Murphy Bed
I'm turning my messy sewing room into an organized craft/guest room, so I made a murphy bed to conserve space. I used corrugated tin on the the face of the bed so that I can use it as a magnet board while not in use as a bed.
My son loved his new Easter basket! This was super cute to make and I just used scrap wood. The paint was CeCe Caldwell's chalk paint in Blue Montana Sky. I used CeCe Caldwell's Clear Wax for the finish. Love these projects!
Great table and easy to follow plans/ directions! First time trying something like this and couldn't be happier. Kept debating if I should by the Kreg pocket hole jig, couldn't have done this project without it. What a difference it make! Can't wait to start the next build.
Followed Ana’s plans, very easy to follow. Chose two different sizes, different woods, and different cushions. Very pleased with outcome.
Tue, 10/05/2021 - 09:46
Very nice, love the different colors of wood! Thank you for sharing~
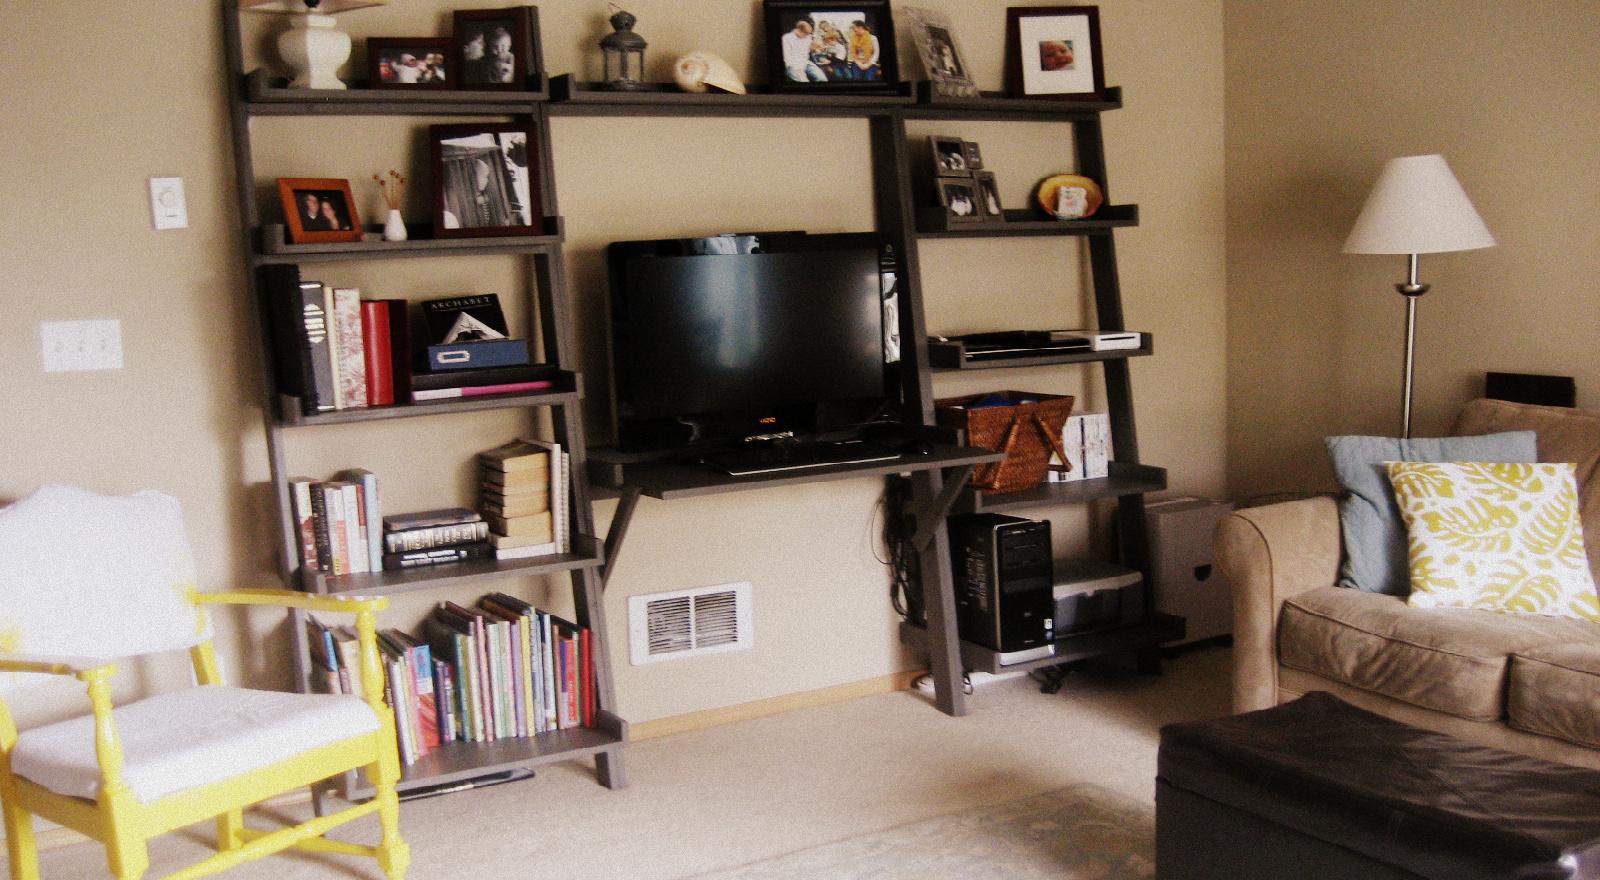
Recently I was a Crate and Barrel and I found the Sloane Leaning Desk and thought that it would be perfect for my media center. (See that wall heater under the desk, I needed that to be open and I was tired of my big wood box of a media center on the, now, couch wall.) So knowing that I had seen the Leaning Wall Shelf on this site I knew I could reconfigure it a bit to work out for my own needs.
First, I cut the dimensions down a bit. Instead of the 31 1/2" length on all of the shelves I cut them at 24". Then then all the back trim at 25 1/2". Then for the middle section, I cut the shelf and desk at 36" and the back trim to 37 1/2". The side trim for the desk is 14 1/4". The desk itself was 22x36" and the top shelf was cut from a 1x8x6. I did this because I could cut all the other shelves and the desk from one piece of 4x8' plywood. For added support I used a 2x4 as the brace under the desk and added 1x2 braces (cut at a 45 degree angle) for extra support on the front/ sides of the desk (see photo). I also left all the edges squared off for a more modern look, like the Sloane.
I hope this helps you and good luck with your project! FYI, this was my first build EVER, and with a little help from my dad cutting the wood and getting it level, I got it done pretty easily. Oh, and get yourself some large clamps or an extra set of hands to help hold things together while you're drilling.
Built three Adirondack Chair, got the dimensions from Ana's Adirondack Chair and modify dimensions for the smaller chair for my daughter. Used ceder and pine. Cost about CDN 40 per chair. Specially I would like to thanks Ana giving information about simple but beautiful furniture designs.
My first attempt at a country farmhouse style dining table, my children managed to also use it as a playhouse within minutes!!
Modifications to Ana's original plan:
I had a friend ask me to build them a sideboard that fit a 7' wall in their dining room. They found the picture and I made to their specifications. First picture is just finished, the second picture is how they painted and placed it.
Mon, 10/04/2021 - 16:49
Beautiful build and wonderful finish, thank you for sharing!
Ok, so no one is going to get really jazzed about this but me, but hey.. I actually had to cut this, which I did on my own with no help from the hubs and nail in the bottom boards. That was a bit tricky cause I used other pallet wood so I didn't have to rob any of the nice stuff from my scrap pile. :-)
I made this from the kitchen island plans, but added a countertop. It's really sturdy and cost about $65 in materials. I love it.
I built this headboard as a birthday gift for my grandmother. She had a rickety, old makeshift headboard composed of a couple of 2x4's and some lattice that was spray painted. I modified the plans to fit her Full size bed and lowered the height down to 62".
This was a custom build for one of my clients. It is a full over queen bunk bed. Scalloped trim on the top, and a balcony/platform from the top bunk. Access to the top via ladder and window! The pic with the messy bed is the FINAL finished product after I added a few more trim pieces to the front.
I tweeked this project because I was making it for a larger person. On the whole, I think it came out pretty good! Thanks Ana! I love your website and plans.
Doll crib with storage bin.
Needed a table for food prep with my grill and found your plans! I used treated lumber for the base and nice cedar planks for the top. The treated lumber had a whiter than usual color which made the base really pop out. I put a nice pecan stain on top and a few coats of poly so the BBQ sauce wouldn't stain it! This was so easy, literally took 2-3 hours to build, stain and poly was done over the next few days. Ready for my next ana-white project. Thanks for posting these plans.
Wed, 07/09/2014 - 16:24
I was looking on Pinterest and found this table. It was exactly what I was looking for. You inspired me to go out and buy a miter saw and some wood and make the table. It turned out wonderful. It now has a permanent place on my patio and gets used when I grill mostly. I was hoping to be able to upload a photo but don't see the option to do so. Anyway, I want to say thanks for the great plans/instructions.
This is only my second build. I love it and am very proud. I made this for my son and daughter in law to put at the foot of their bed. It took a couple of times for me to get drawer glides on right but I did it! I love wood working and want to keep learning!
Wed, 04/15/2015 - 15:49
I really love the two tone colors :) I've got this bench on my todo list too :)
Fri, 04/17/2015 - 07:09
I know, I do too, thanks. Seriously, not that hard really, I say give it a try.
Outdoor pallet bar with sink I found in the garage. Just a dumping sink under cabinet,not hooked up to plumbing.
Easy to make 4x2 Patio Seating with Ikea style cushions.
Added the diagonal designs on the back.
Wed, 10/06/2021 - 10:40
Looks great, love the added back design element! Thanks for sharing!
I love love love these plans! Based on the helpful comments made by other readers, I decided to narrow the bed by leaving one 1x3 out of the head and foot board panels and shortening the other 1x3's and 1x2's as needed. Added mitered trim around the head and foot boards.
The build was super easy and only took a couple of hours. I'm classifying this as a "day project" (6-9 hours) to allow time to paint or stain.
I made this awesome step stool for my daughter to be able to reach things a little bit better. It works perfectly. And the heart adds the perfect touch, don't you think?
Comments
Pam the Goatherd
Wed, 05/15/2013 - 11:05
Great idea!
Great idea!
Julie44256
Fri, 05/17/2013 - 09:54
Hardware Cost?
The estimated cost is $100, but the hardware linked from the original plan was over $300. Do you have an alternate method of mounting this?
arkep
Fri, 05/17/2013 - 11:23
Hardware cost
I think that link was a suggestion if you want an assisted lift/lowering system, and that hardware is part of what makes regular Murphy beds so expensive. I just used door hinges--3 for $8. It's not that heavy to lift and lower the bed, in my opinion.
Julie44256
Fri, 05/17/2013 - 11:40
Hardware Cost :)
Thank you for your reply! If I make this project, I think I'll try the door hinges. It won't be frequently used (a few times a year) and I'm pretty sure we can handle the minimal weight for those few occasions.
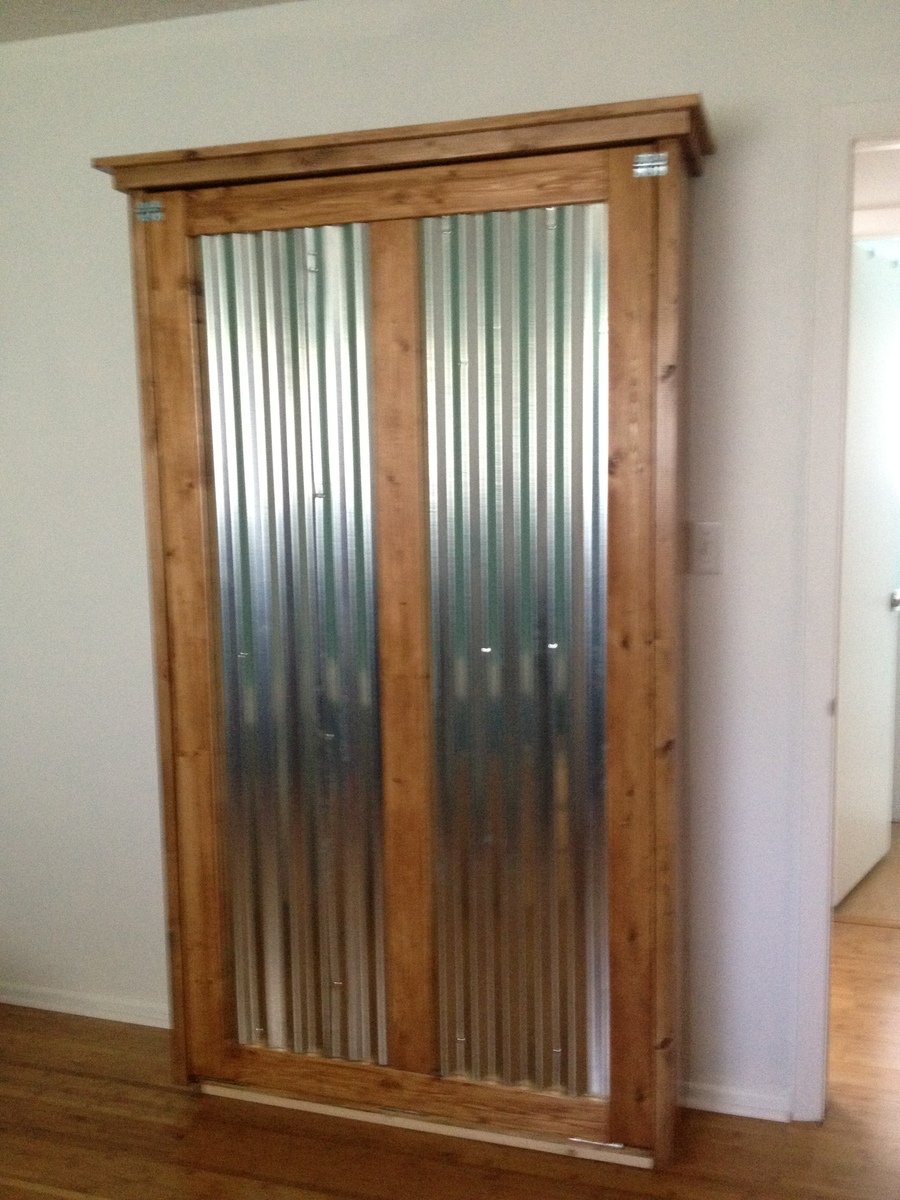
P.S. I really like the styling with the wood and corrugated metal, it looks sharp!
iMark
Fri, 06/28/2013 - 20:02
great muphy bed
thanks for sharing the murphy bed. have been looking for a space solution for my daughter's bedroom. the corrugated tin look sharp in this project--my daughter would like the corrugatged tin as well--except for hot pink stain on the cabinet.
anyone know where to get hot pink stain?
Onaedge428
Sun, 09/08/2013 - 20:58
Does anyone have any
Does anyone have any suggestions on how to bring it up off the floor some?
DorieM
Wed, 02/10/2016 - 04:22
Modify?
I would love this for my room let me save space versus sideways bed. Maybe spray chalkboard or dry erase on one side magnets to one side and daily to do notes on the other?
DorieM
Wed, 02/10/2016 - 04:24
Modify possibility?
Paint tin with dry erase or chalkboard on one side for daily notes?