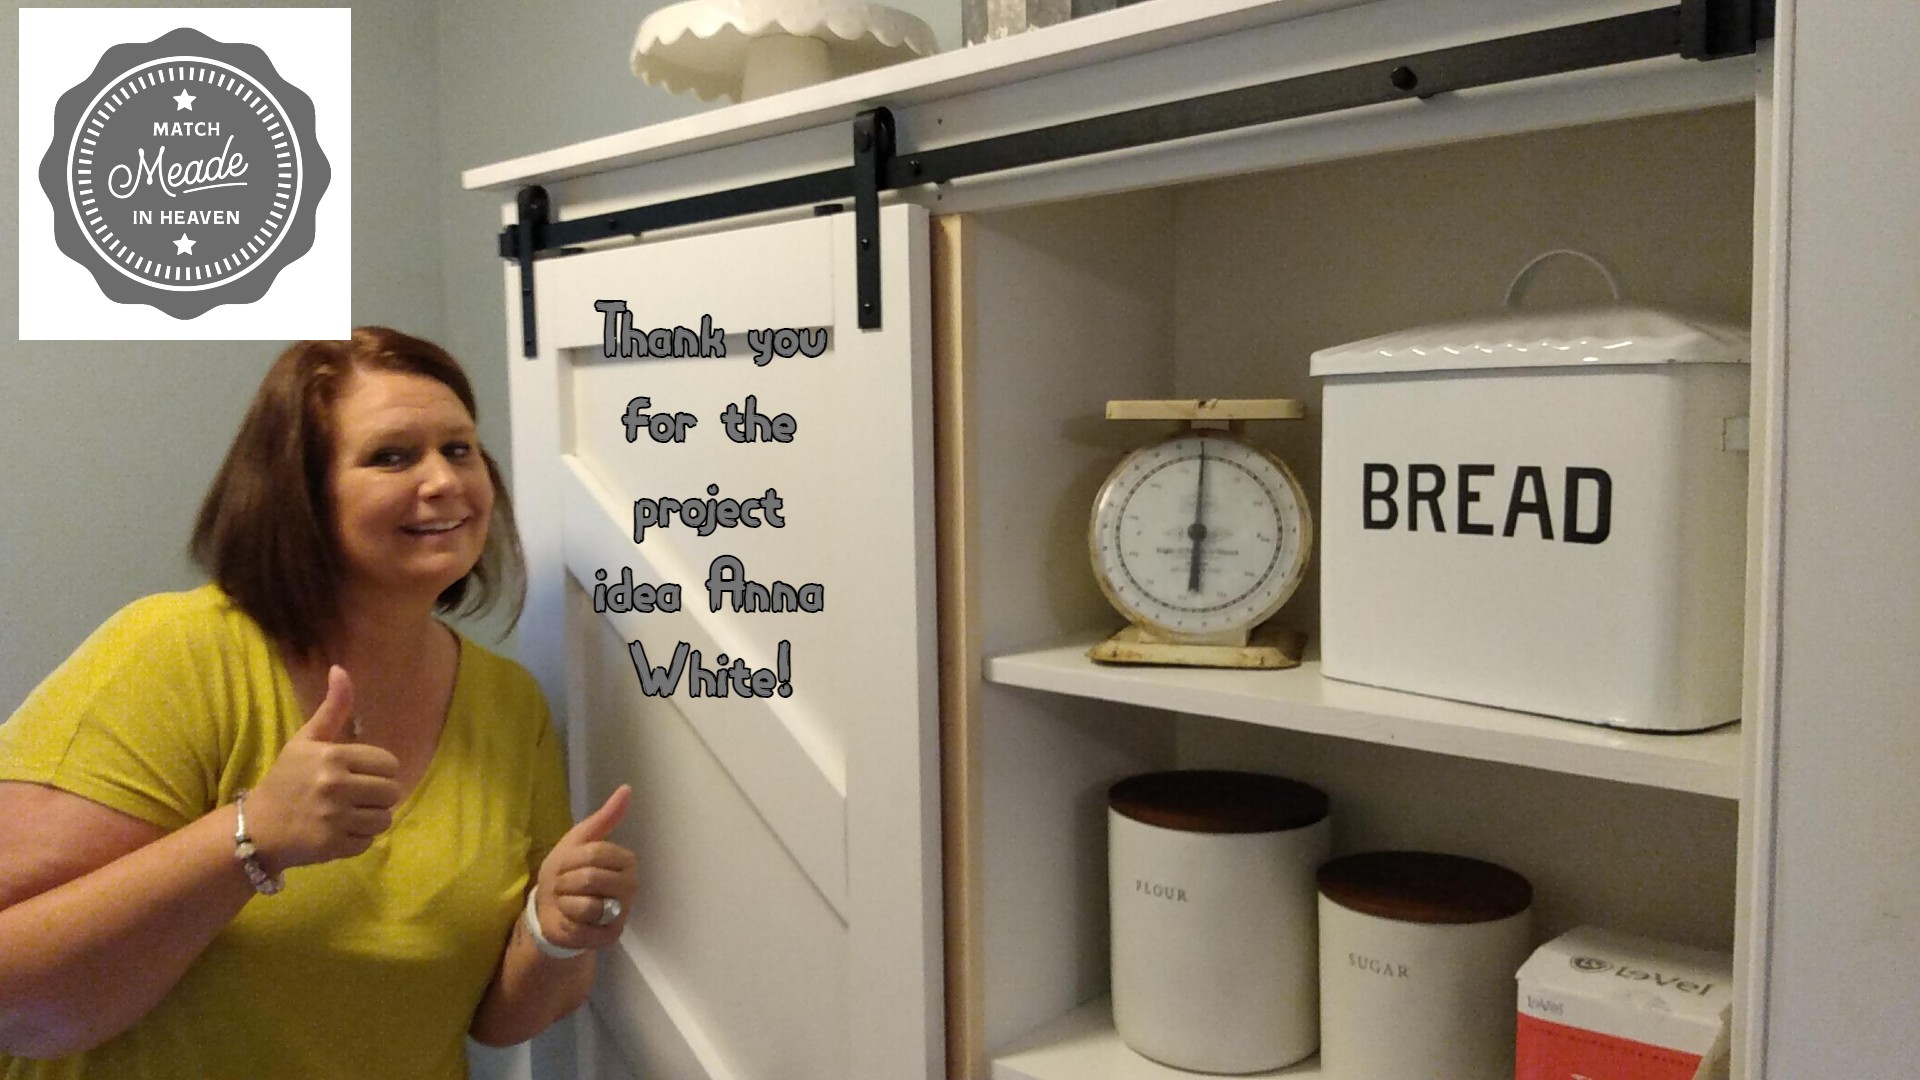
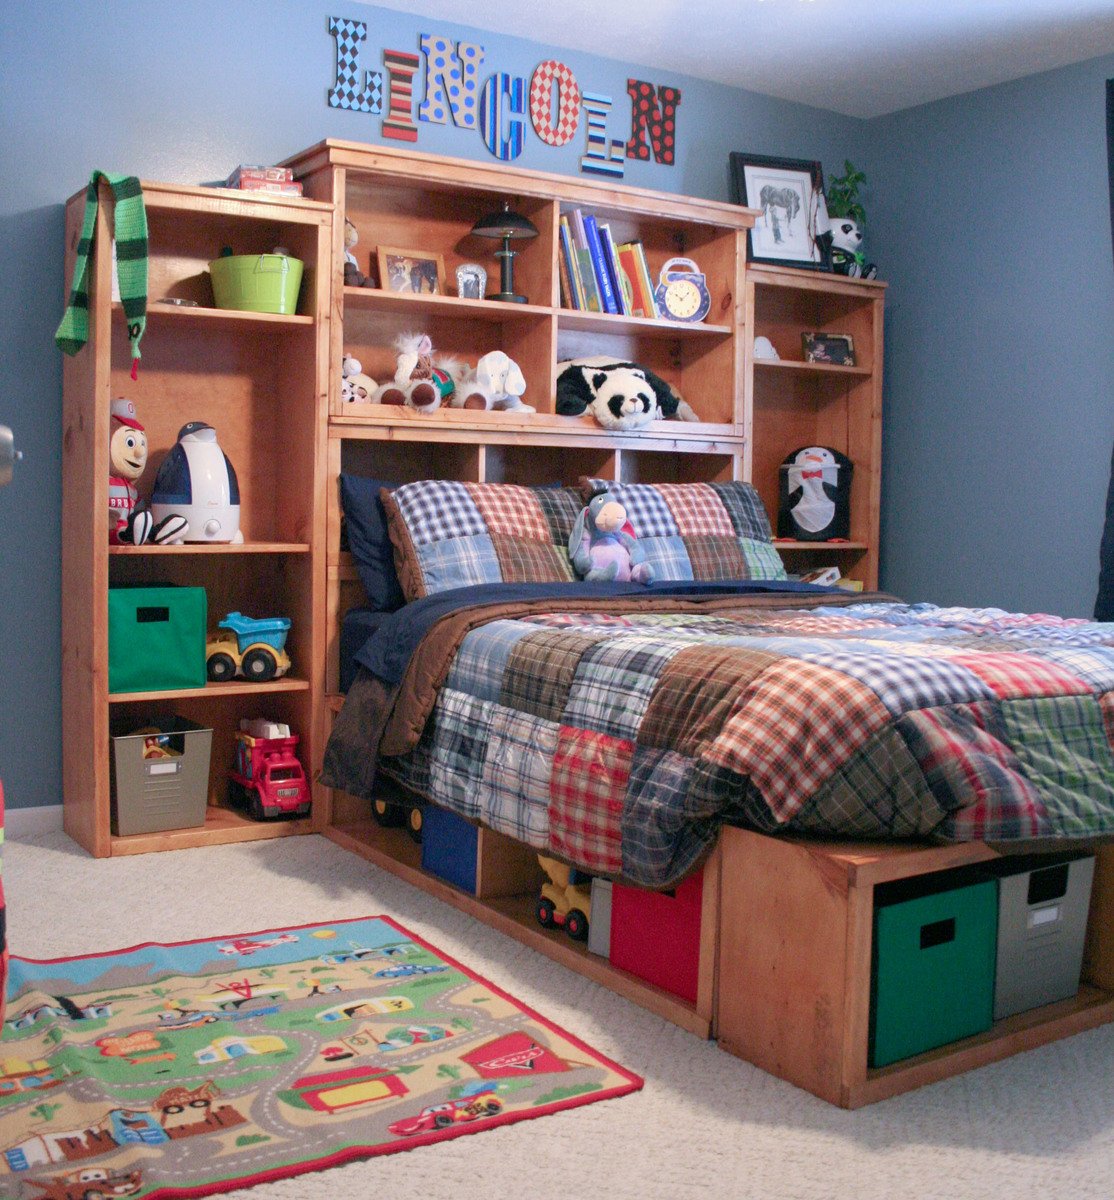
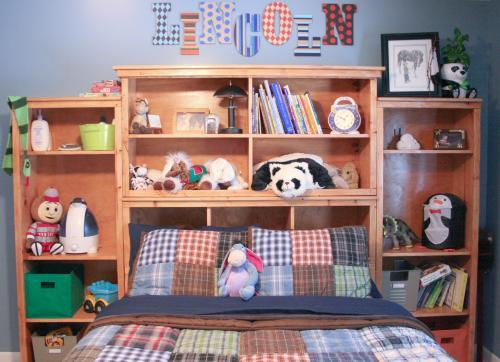
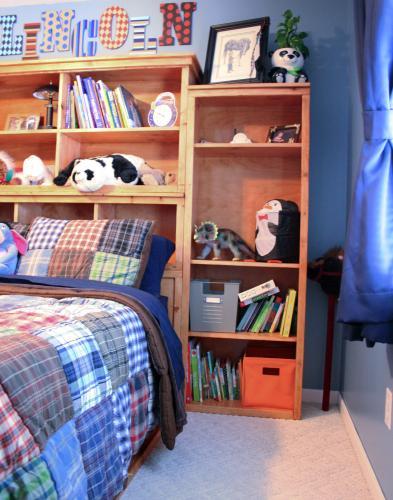
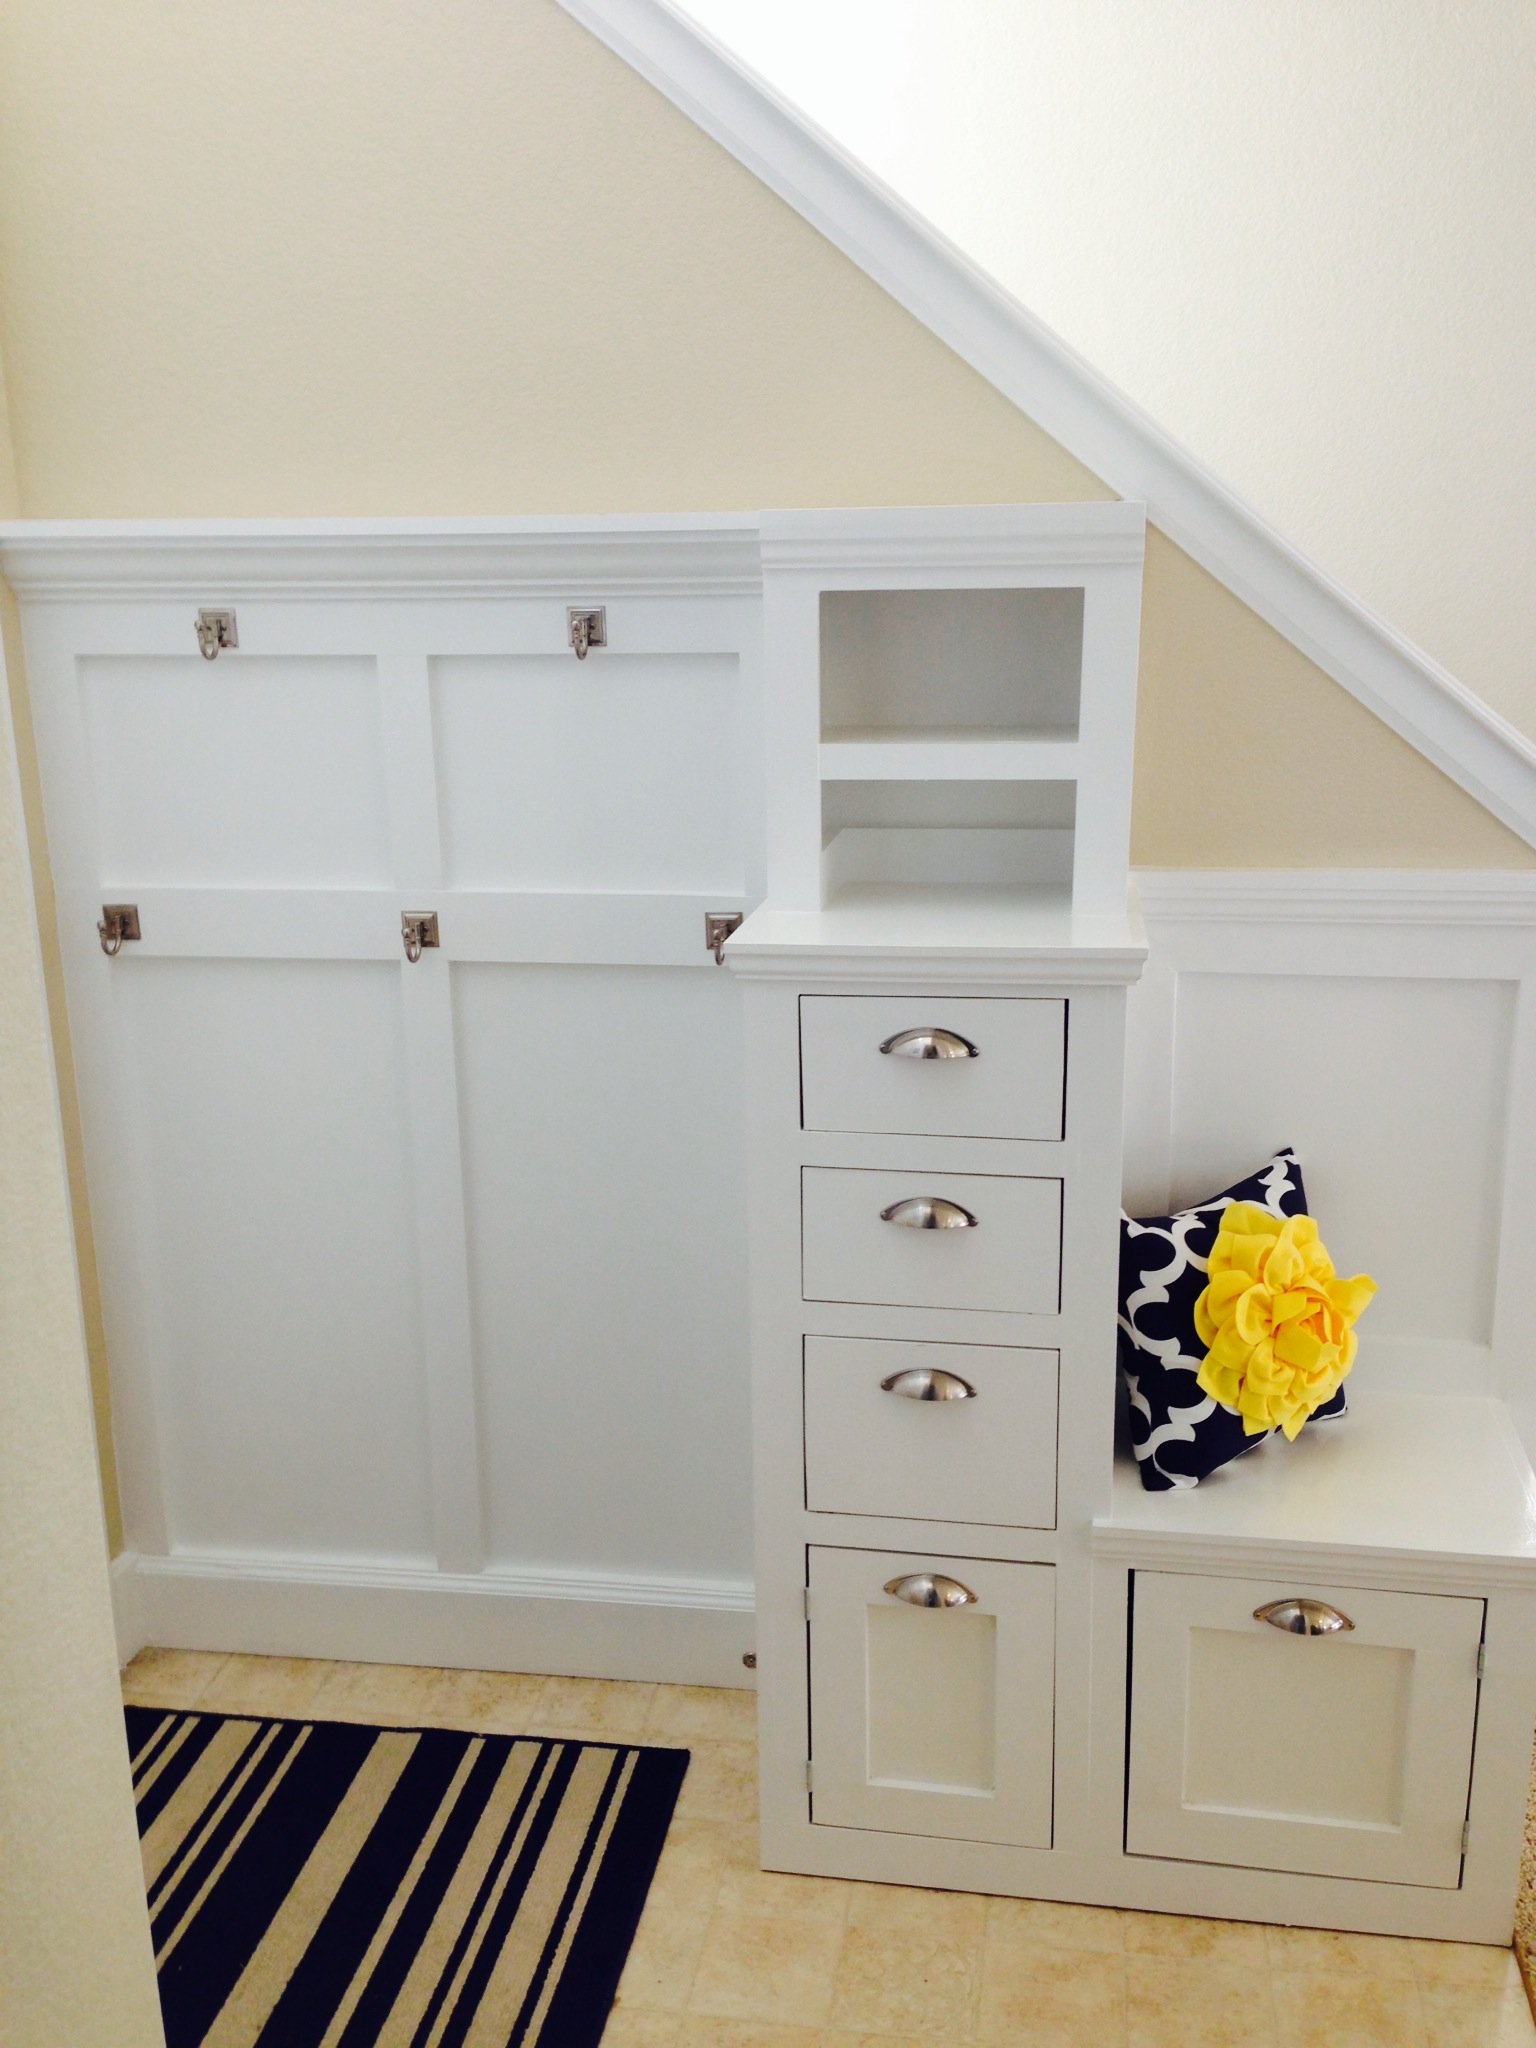
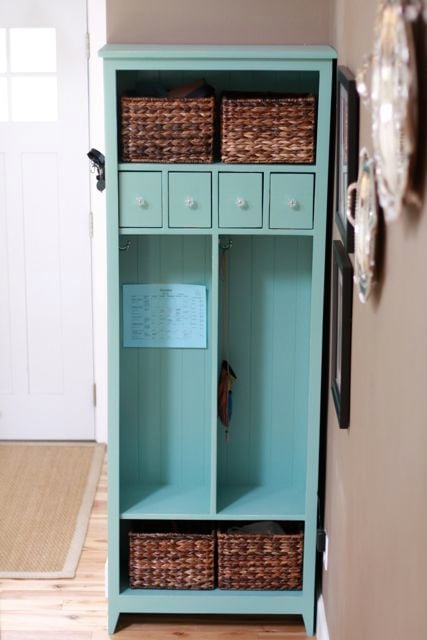
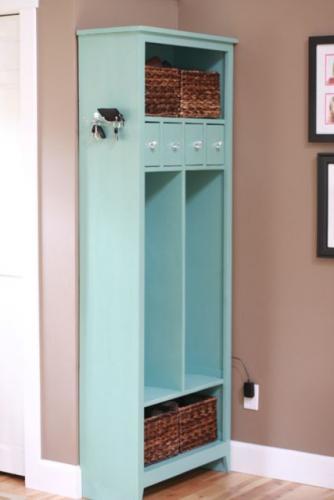
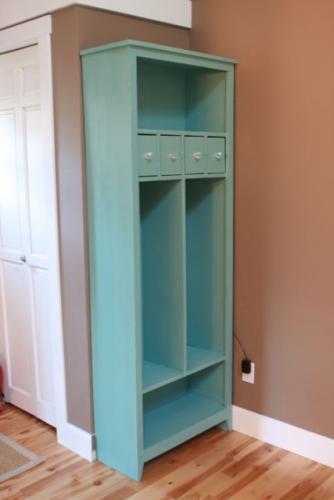
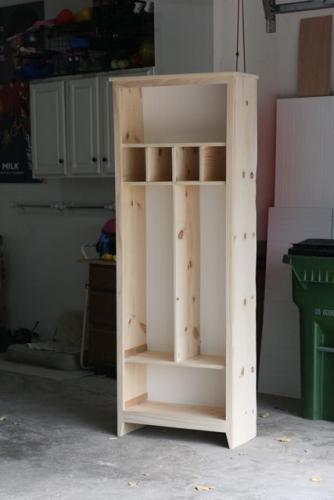
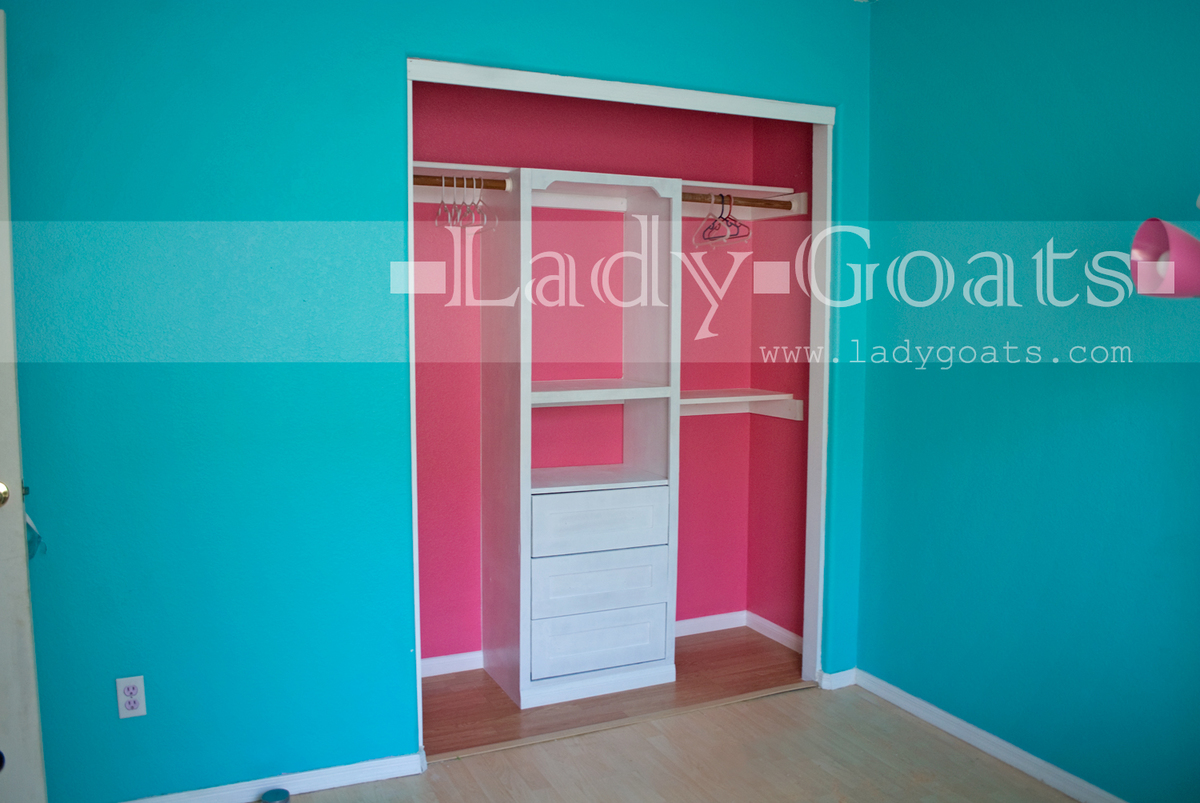
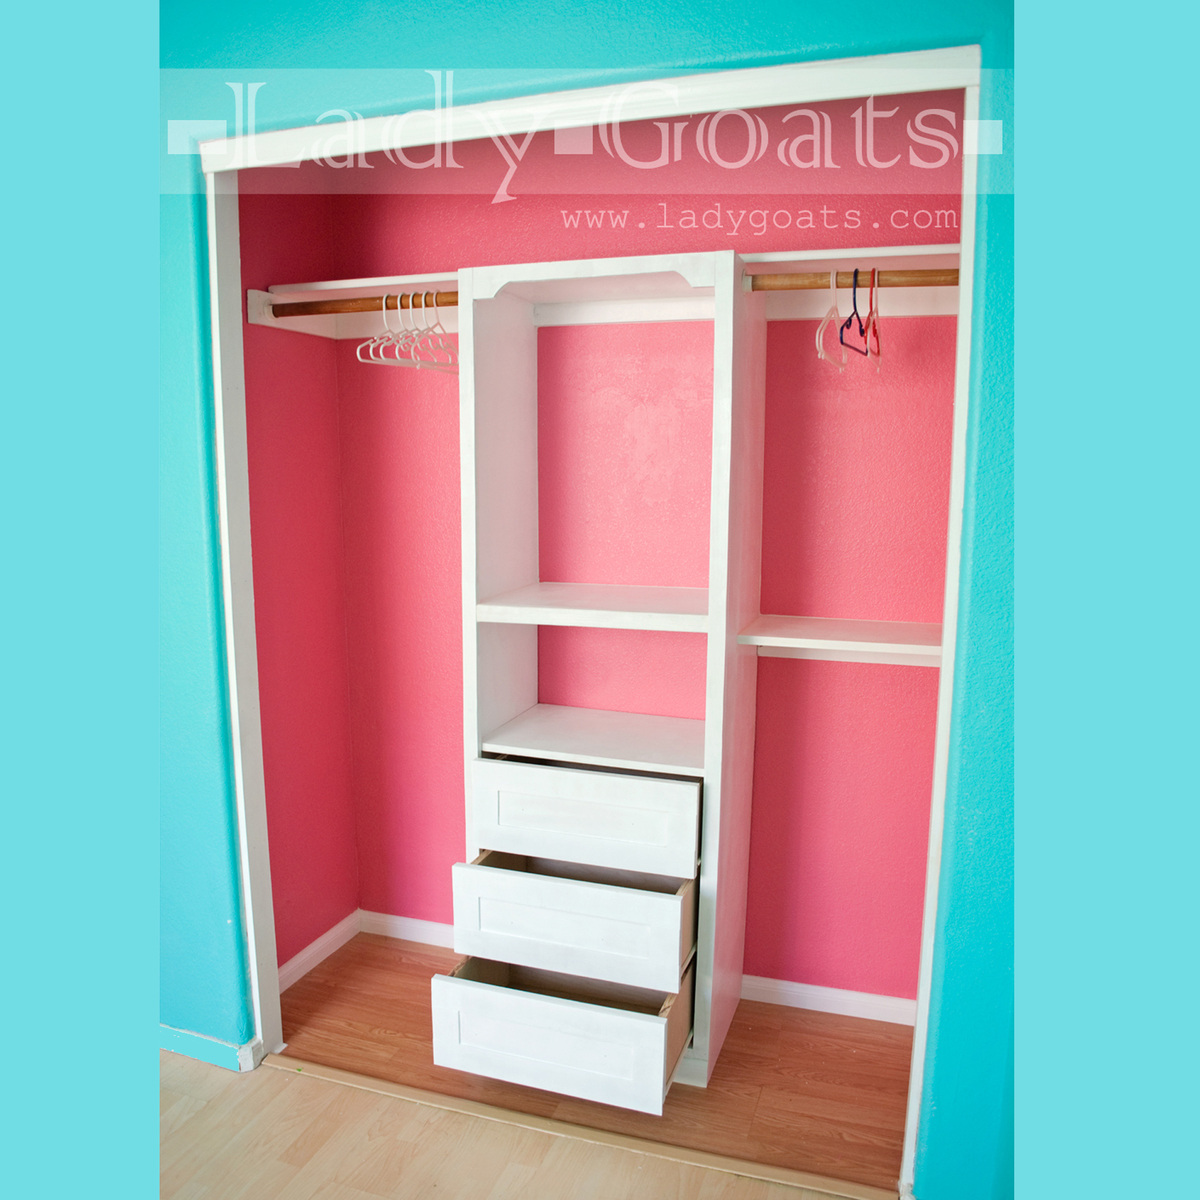
Community Brag Posts

Small X End Table

This was a fun project spread out over 3 weeks to enjoy working on while quarantined at home. It was the first project I worked on featuring mitered corners. It took some practice and many "polishing" cuts to get everything to line up right, but in the end they looked great! I went with a Birch interior plywood instead of you typical (pine?) plywood because it looked a lot more furniture esque. I trick when using a circular saw to cut the plywood is to keep the desired side up when cutting in the direction with the grain and the desired side down when cutting across the grain. When cutting across the grain, the blade can fray the edge of the top ply. I also added braces attached to all 4 legs flush with the top of the legs using 1x2's. This allowed me to glue and screw (1" screws) the table top to the base from underneath so it was hidden rather than nail from the top. I didn't want to have nail holes on the table top because, even with wood filler, they would stand out from the rest of the wood.

I chose to go with the cheap pine that home depot sells instead of the Select Pine because the cheap pine has a lot more character and offers a more rustic look. The pine can be pretty beat up so it takes a while of digging to find the straight boards without any major defects or cracks. I just figure it's part of the experience. Once I have my straight boards I sand everything down so the boards are completely smooth and have softened edges. Clamps are a must and a HUGE help with getting everything lined up during the assembly. I neglected clamps in some of my first builds because I didn't have them and didn't want to invest. I had a real hard time getting things level and straight. Never again.

Other pieces I've build from Ana's plan include (in order of build):
Ana's Adirondack Chair (4x)
Reclaimed-Wood Look Headboard, King Size
Modern Outdoor Chair from 2x4s and 2x6s (2x)
Simple White Outdoor End Table
Rustic X End Table

Estimated Time Investment
Weekend Project (10-20 Hours)
Finish Used
One application of Varathane Early American Premium Wood Stain
Three applications of Varathane Crystal Clear Matte Water Based Ultimate Polyurethane

Benchright Table and Benches

Submitted by mebohn on Mon, 06/11/2012 - 14:14

I wasn't very experienced when I built this table. It was only my second big piece of furniture (farmhouse bed was my first) and it was the first time I had every used a compound mitre saw, which my husband had just bought for my birthday. We had no dining room furniture, so I made the 2 benches to go with, until we could set aside money for the ever so expensive dining chairs. (We'll keep one bench for sure for the kiddos!) My seasoned carpenter husband was so impressed when he came home from out of town to find this table done just in time for the holidays. I love it so much and am very proud of the finish since it was the first time EVER I had used stain or poly. We did order materials for the stretchers, but haven't put them on yet. They were from Fastenal and are pretty pricey - but hopefully, they'll give the industrial touch to finish it off. The whole project took me under 2 weeks - but it would take far less for someone who is more skilled and doesn't have to stop every 5 minutes to tend to 2 very active toddlers.

Estimated Cost
Less than $200 without turnbuckles
Estimated Time Investment
Week Long Project (20 Hours or More)
Finish Used
2 coats of Minwax English Chestnut and 3 coats of Polyeurethane, lightly sanding in between coats
Recommended Skill Level
Beginner

Comments

SawgrassHomeGirl

Tue, 06/12/2012 - 06:01

The table looks gorgeous and I love the stain color. Bravo! Can't wait to see what it looks like with the hardware! :)

givehugsprn

Mon, 07/02/2012 - 01:12

My sister is in need of a new table and I have been thinking of building this table for her. I bought a very nice round table and 4 chairs on CraigsList but the table is too small for her dinning area so I sold the table and kept the chairs. Now I'm working on stripping the wood and recovering the pads on all 4 chairs. Maybe after all the chairs are done I will be able to start the table. I hope mine looks as nice as yours. Great Job!!!

Rebecca H. (not verified)

Mon, 07/30/2012 - 17:52

Hi - what a beautiful job! I'm thinking of making this my first big project and you have really inspired me. One question, did you stay with dimensions found on the original plan? For some reason the table seems bigger. Also, if you did keep to the original dimensions, do you think this would be an easy plan to adjust to making the table wider? Thanks so much and congratulations!

mebohn

Tue, 08/14/2012 - 18:47

Sorry Rebecca - I just saw this question. I ended up adding an extra 1x6 board to widen the table just a few inches but my 1x6's here were not 5 1/2 inches, they were more like 5 1/4 inches. So I had to adjust the whole tabletop anyway. I'm thinking of actually building another one that's longer to fit my dining room better and stain it a little lighter. I don't think this was my first BIG project. I think the farmhouse bed was for me - but I haven't posted yet b/c I just refinished it. This was my first project with a compound mitre saw that my husband eventually bought me for my birthday. I had to learn my way through bevels and angles by myself and I did make a few mistakes, which were frustrating, but a total learning experience. You can do it! Just don't rush and be patient with yourself. I wish you so much success!!! I look forward to seeing your table posted when you finish it! :-)

Simplest Console (first furniture project)

Submitted by Yrkylvr on Sat, 04/05/2014 - 18:50

First furniture project with my Kreg Jig. Went smoothly. Loved the plans and how descriptive they were. This is a great beginner project. It only took me about 2 hours to complete.

Estimated Time Investment
An Hour or Two (0-2 Hours)
Finish Used
Minwax Kona Stain and Valspar paint on bottom (white) then distressed with mouse sander. Actually the more the paint gummed up on the sanding disc the better it distressed!
Recommended Skill Level
Beginner

Comments

JoanneS

Sun, 04/06/2014 - 06:33

Congrats on your first furniture project, great job! Your distressed finish and stained top are awesome. Love the Kona stain color, and I think it is the perfect amount of distressing on the paint. Beautiful!

Modified pottery barn knock off

Submitted by Anonymous (not verified) on Fri, 07/01/2016 - 11:37

Slight modification to the original plans. Used all 2x6's across the top and added capped ends. Used 2x3s instead of 1x3s. Cuts and assembly were not time consuming, sanding was!!

Built from Plan(s)
Estimated Cost
$40
Estimated Time Investment
Weekend Project (10-20 Hours)
Finish Used
Urethane semi-gloss triple thick 2 coats, brush application. Varathane Cognac stain 2 coats. Sanded to 200
Recommended Skill Level
Beginner

Our Porch Swing Bed

I have wanted a swing bed for ages and got hubby on board with this. We built a full size bed (plenty of room for me and all 3 grandkids!) using poplar. I had the turned dowels from a major score at my Habitat Store several years ago. $2 per dowel! I wanted an old fashioned look and so added the corner brackets to all sides and the resin appliques on the back.

I primed with cream colored ceiling paint, an "Oops" paint from my neighborhood home improvement store. The baby blue was another "Oops" paint - another score- only $5 for a gallon of Valspar eggshell. After a very light distressing, I finished it with a paste wax.

I make the design and drawing and Hubby makes all the cuts. I joined all with biscuit joinery for a strong and solid piece.

We hung it from the ceiling joists with 1" manila ropes, added lots of pillows and plants and it is my happy place. A night blooming jasmine adds a heady fragrance that puts me right at peace ... A great refuge from a crazy work day!!!

Estimated Cost
$500 without the bedding
Estimated Time Investment
Week Long Project (20 Hours or More)
Finish Used
Valspar eggshell finish in a baby blue for a matte look, finished off with a little aging wax and final coat of paste wax. (Hard edges were lightly sanded to give a bit of distressing)
Recommended Skill Level
Intermediate

US Flag gun case

I threw some plans together for this.  Going to make another one and tweak it a little but overall I'm happy with the way it turned out. I used dark walnut stain and 4 coats of poly.

Estimated Cost
$150
Estimated Time Investment
Afternoon Project (3-6 Hours)
Finish Used
Dark walnut and polyurethane.
Recommended Skill Level
Intermediate

Comments

Wood King Size Headboard

Submitted by Anonymous (not verified) on Tue, 12/26/2023 - 11:29

We had to build a king-size headboard in our 2nd floor bedroom, because the stairway clearance was too small to fit a headboard up the stairs. We added a couple vertical stabilizer boards.


airbnb.com/h/cozycornercottage-millersburg


coffee table made from a pallet.

Submitted by robin214 on Sun, 06/17/2012 - 22:14

I made this table out of a free pallet. The legs are cut off of an older scraped table and then I used poly with no stain. I used 1x2 furring strips in between slats to make tabletop solid.

Estimated Time Investment
An Hour or Two (0-2 Hours)
Recommended Skill Level
Intermediate

Reclaimed Wood Bench...My First DIY Piece

Submitted by Stacey G on Fri, 04/11/2014 - 09:11

This was my first attempt to use real power tools and make furniture. After being inspired by Ana, I purchased my Kreg Jig and got to work! I needed a coffee table so I tweaked this one to fit my needs. I ended up staining it with Minwax Gray, but it wasn't rich enough for me. So I took white, black and brown pain and dry brushed it to give it that old barn wood look.....OMG I LOVE IT! It came out perfect. So much better than in the photos even! Thank you for the inspiration Ana.....What will I make next???? Hmm......

Estimated Cost
15.00
Estimated Time Investment
An Hour or Two (0-2 Hours)
Recommended Skill Level
Starter Project

I did it! I did it!

Submitted by Anonymous (not verified) on Thu, 07/07/2016 - 13:45

I absolutely loved this project! My first advanced' leveled project! I was afraid it would be to big for my room so I went 10" smaller in the width only. It surprisingly turned out well proportioned! Thanks Ana! I feel like a women with power!!

Built from Plan(s)
Estimated Cost
Plywood is all I had to buy. Roughly $30
Estimated Time Investment
Weekend Project (10-20 Hours)
Finish Used
Basic off white paint, roughed it up then rubbed a walnut stain over the entire thing.. Then a clear polyurethane. The raw wood I just stained the cut edges with a walnut stain and brushed a clear polyurethane over top.
Recommended Skill Level
Advanced

Outdoor Sofa

Submitted by Anonymous (not verified) on Sun, 05/03/2020 - 23:01

Love love love this sofa!

Built from Plan(s)
Estimated Cost
150.00
Estimated Time Investment
Day Project (6-9 Hours)
Finish Used
Polyurethane
Recommended Skill Level
Beginner

Baby Cribs for Christmas Morning

Submitted by Anonymous (not verified) on Wed, 12/27/2023 - 11:35

My wife had the idea for us to give our girls a babydoll bed each this year from Santa. She wanted me to make them so it could be something that they could take with them and hopefully hand down to their girls one day. These were simple and fun to build. I used 3/8” dowels instead of 1/4” just because I felt it would be more durable in the long run. Overall this was a fun little project and the girls absolutely loved the beds that Santa brought them.

Kevin

Built from Plan(s)

Hollister Co. Inspired Farm Table

I wanted to contribute a plan but unfortunately I'm still learning how to use Google Sketchup. However, here's a brag post in the mean time! My husband were asked to replicate a display table from Hollister Co. and this is what we came up with. :)

Estimated Cost
$100-150
Estimated Time Investment
Weekend Project (10-20 Hours)
Finish Used
Kona stain by Rustoleum and Briwax Dark Wood sealant.
Recommended Skill Level
Advanced

Comments

Fillman platform bed full size

Submitted by Mgros483 on Sun, 04/13/2014 - 18:54

Modified the plans for a full size mattress, also used 2x6 lumber for the main frame. Installed LED strip lighting around the perimeter for a night light. Also built my own headboard, modified for the full size. I used laminate flooring for the center inlay.

Fun project, about 6 hours to build, total cost around $200 with the lighting.

Estimated Cost
200
Estimated Time Investment
Weekend Project (10-20 Hours)
Finish Used
Dark walnut stain brushed on, let soak for 5 minutes then wipe off with a rag.
Recommended Skill Level
Intermediate

Channing Bookcase/Desk combo

Submitted by Maremilina on Sun, 07/10/2016 - 23:24

Wife wanted bookcases for all our books and a desk/work area for her calendar.  I decided to modify the Channing Bookcase to suit our needs.  We built 5 of them to fit the wall.  We did not attach the back trim piece on the shelves to give them a recessed look.  Convinced the wife to let me buy the Kreg K4 system, which saved my sanity for the over 500 pocket holes we had to drill in this project. Thanks for the plans!

Built from Plan(s)
Estimated Cost
With paint, about $350 but we live in Guam, so prices are significantly higher!
Estimated Time Investment
Week Long Project (20 Hours or More)
Finish Used
Behr Marquee interior semi-gloss dark navy blue and ultra pure white (top and back).
Recommended Skill Level
Intermediate

Comments

Leaning Wall Shelf

Submitted by King418 on Wed, 06/27/2012 - 19:01

Easy project, I really enjoyed making this and it looks great! I used MDF for the shelves and finger jointed poplar for the rails. I work in a lumber yard so the materials and tools were readily available. I recommend for all levels and again really enjoyed making it! Hope you enjoy my first post!

Finish Used
Black wood paint
Recommended Skill Level
Beginner

Library Book Cart

Submitted by kkllgg on Wed, 04/16/2014 - 09:12

This was one of my first woodworking projects I completed with limited help from my handy husband. And the first time I used a jigsaw (to cut out the handles). I used mostly scrap MDF we had leftover from other projects - only purchasing one additional sheet of MDF for around $12. The MDF worked ok, but I did have some trouble with splitting when screwing it all together and screwing the castors on. Used our Kreg Jig where it made sense.

As a beginner, this project took me somewhere in the neighborhood of 16 hours over the span of a couple weeks. Cost was approximately $50 - including the MDF (but I used mostly scrap we had on hand), spray primer and paint, castors, and "Library" decal.

Built from Plan(s)
Estimated Cost
$50
Estimated Time Investment
Weekend Project (10-20 Hours)
Finish Used
To finish, I primed with Rustoleum spray primer and sprayed several coats (two cans) of Rustoleum spray paint in their bright yellow. (Note that if using MDF, the spray paint did not cover the edges well. I read a tip online that suggested spreading a thin layer of drywall spackle over the edges and that worked for me.) I had someone on Etsy make the chevron "Library" decal for me for about $5.
Recommended Skill Level
Beginner

Frozen Loft Bed

Submitted by ndelanuez on Thu, 07/14/2016 - 10:09

Those angles on the ladder are challenging. This is our first time building any furniture. Thak you Ana W

Built from Plan(s)
Estimated Time Investment
Weekend Project (10-20 Hours)
Finish Used
Sherwin Williams Paint
Recommended Skill Level
Beginner
Back