Community Brag Posts
My laundry basket dresser
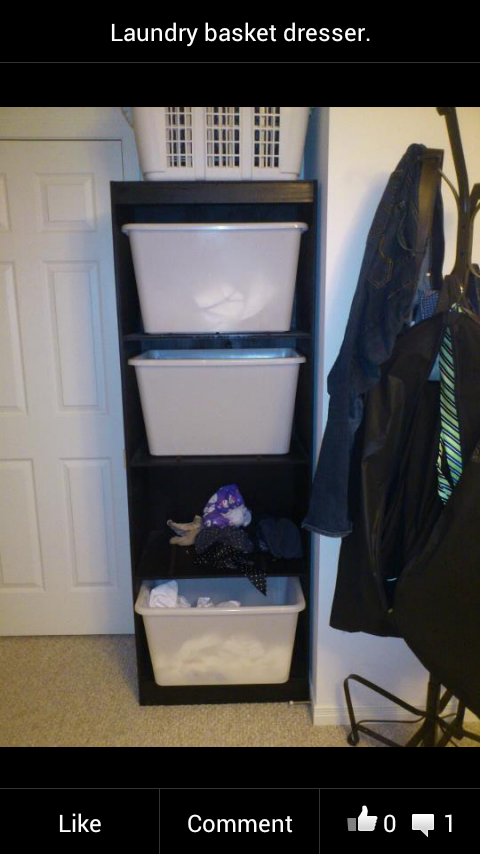
I started with the standard laundry basket dresser but went with shelves. I thought that the baskets would last liner this way. The baskets used are from IKEA and sit on felt runners to keep the noise down.
Built from Plan(s)
Estimated Time Investment
Afternoon Project (3-6 Hours)
Finish Used
Black stain
Recommended Skill Level
Beginner
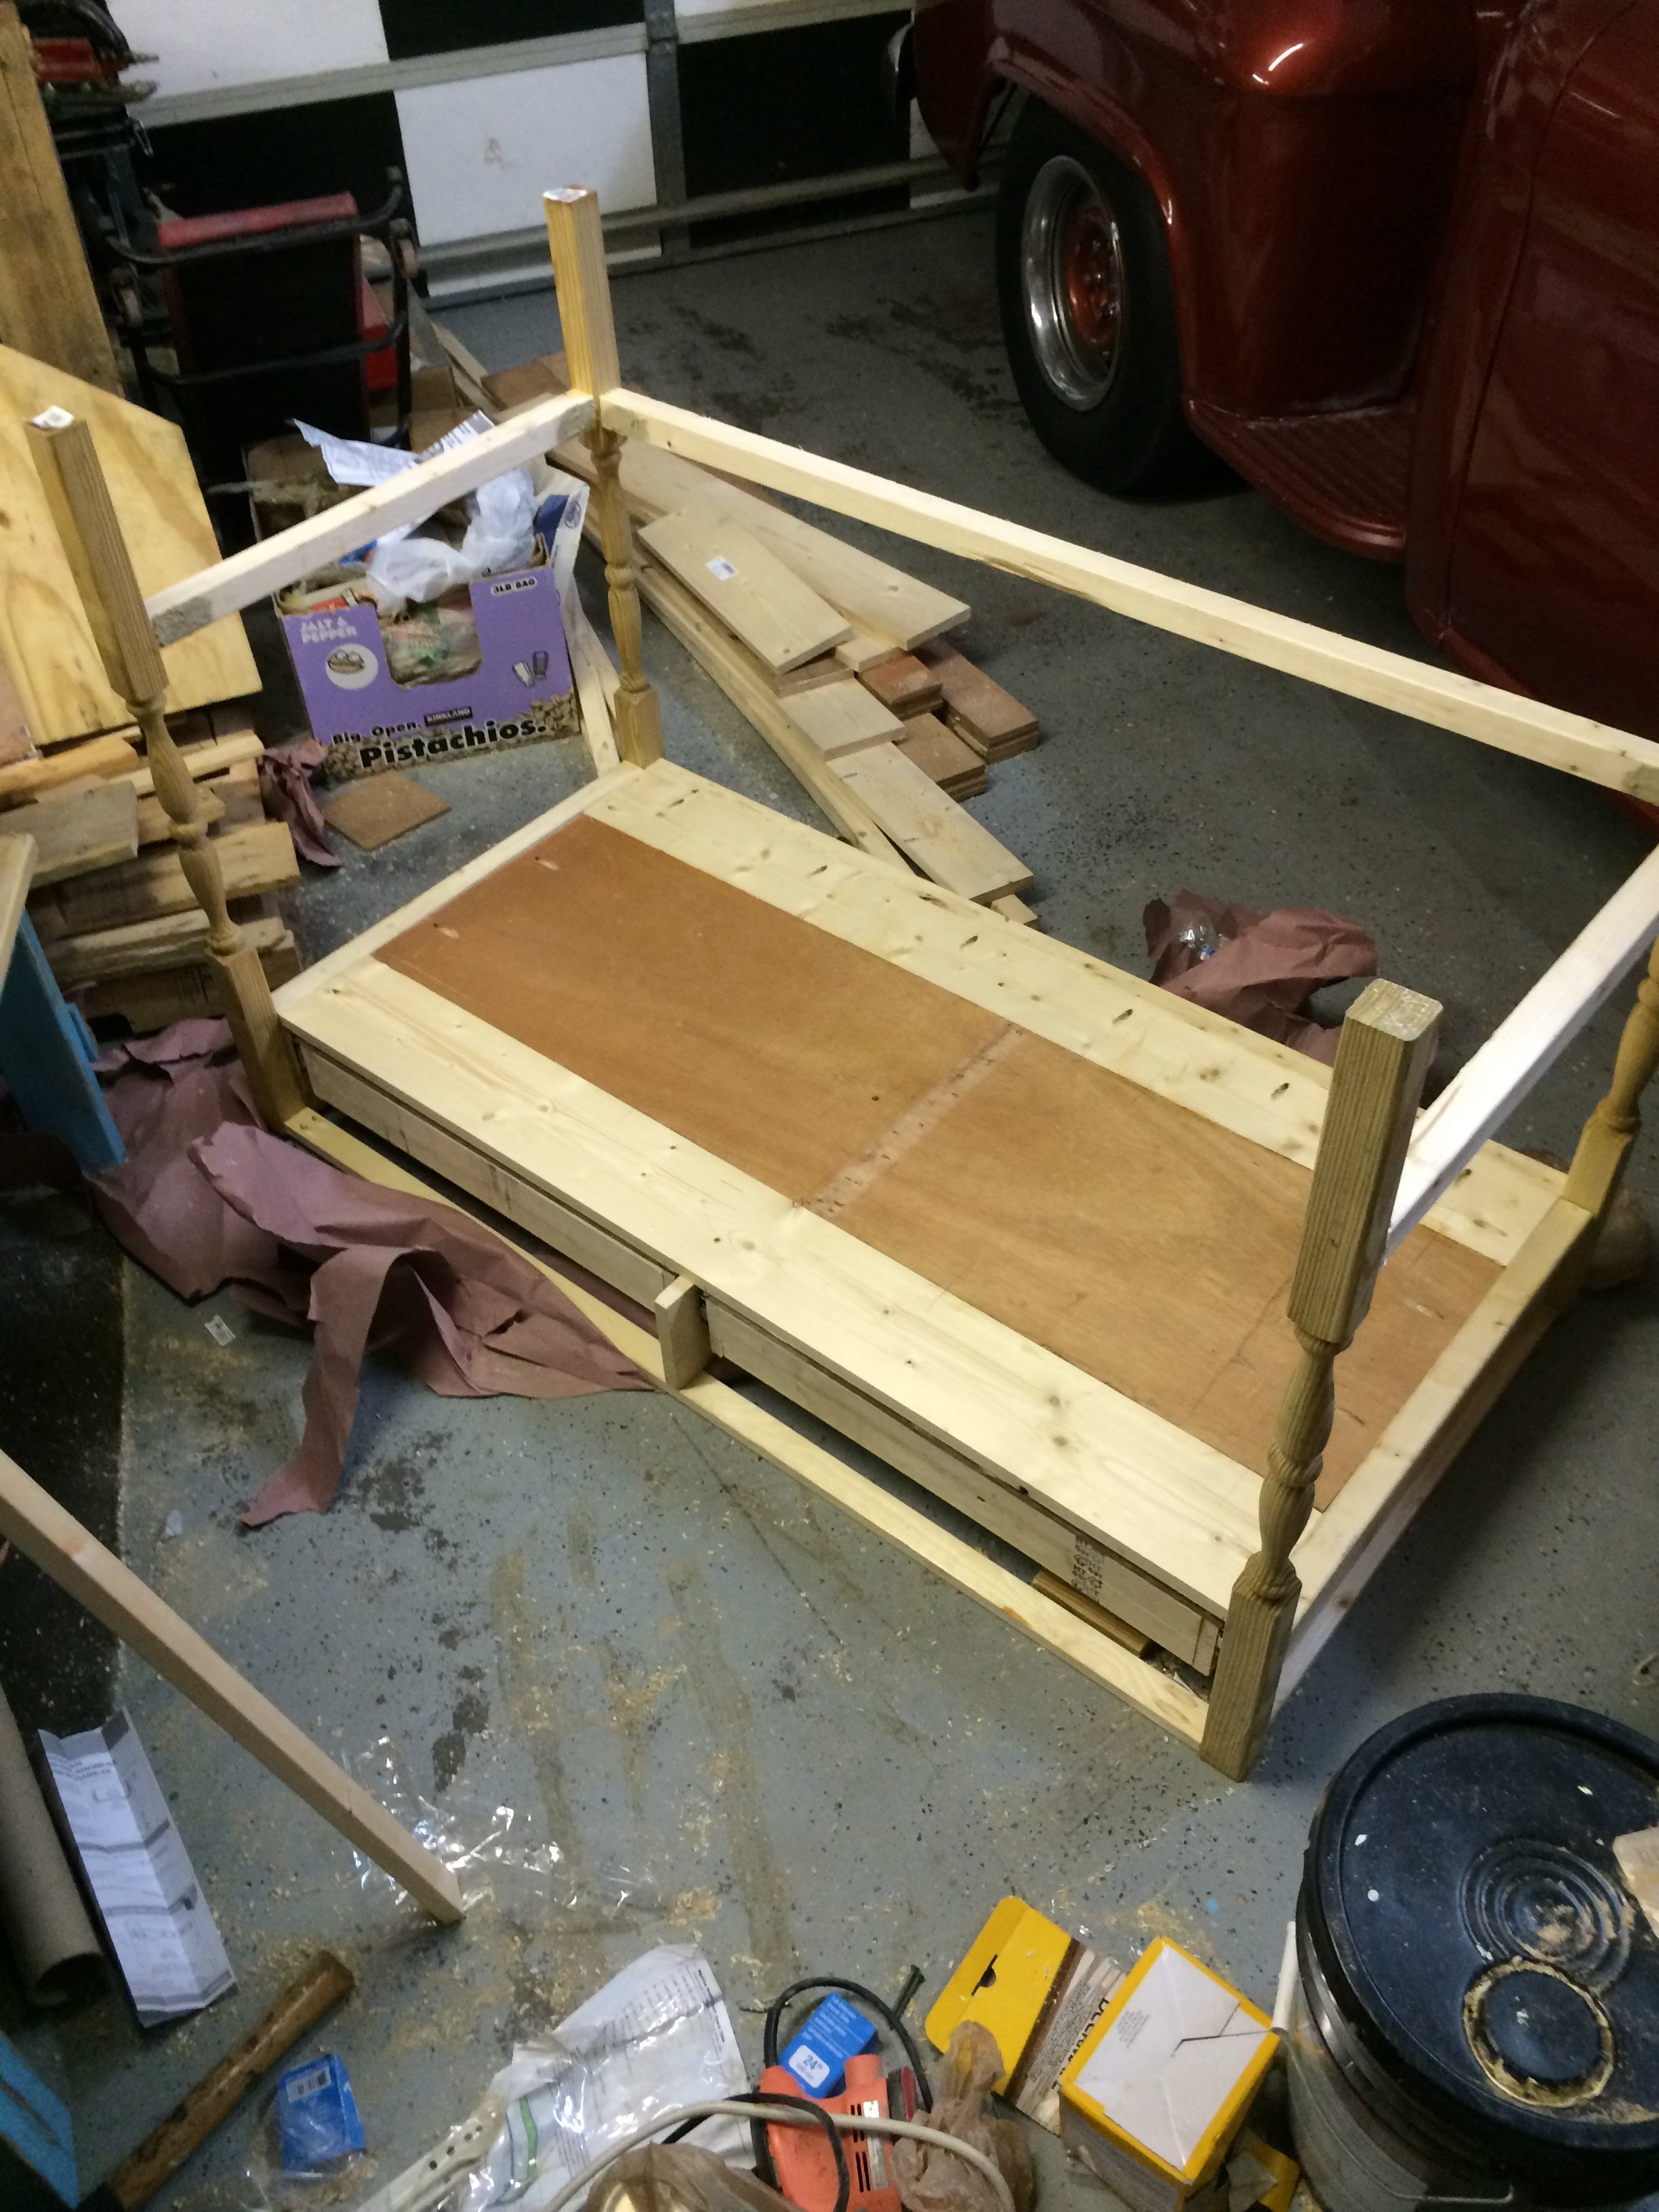
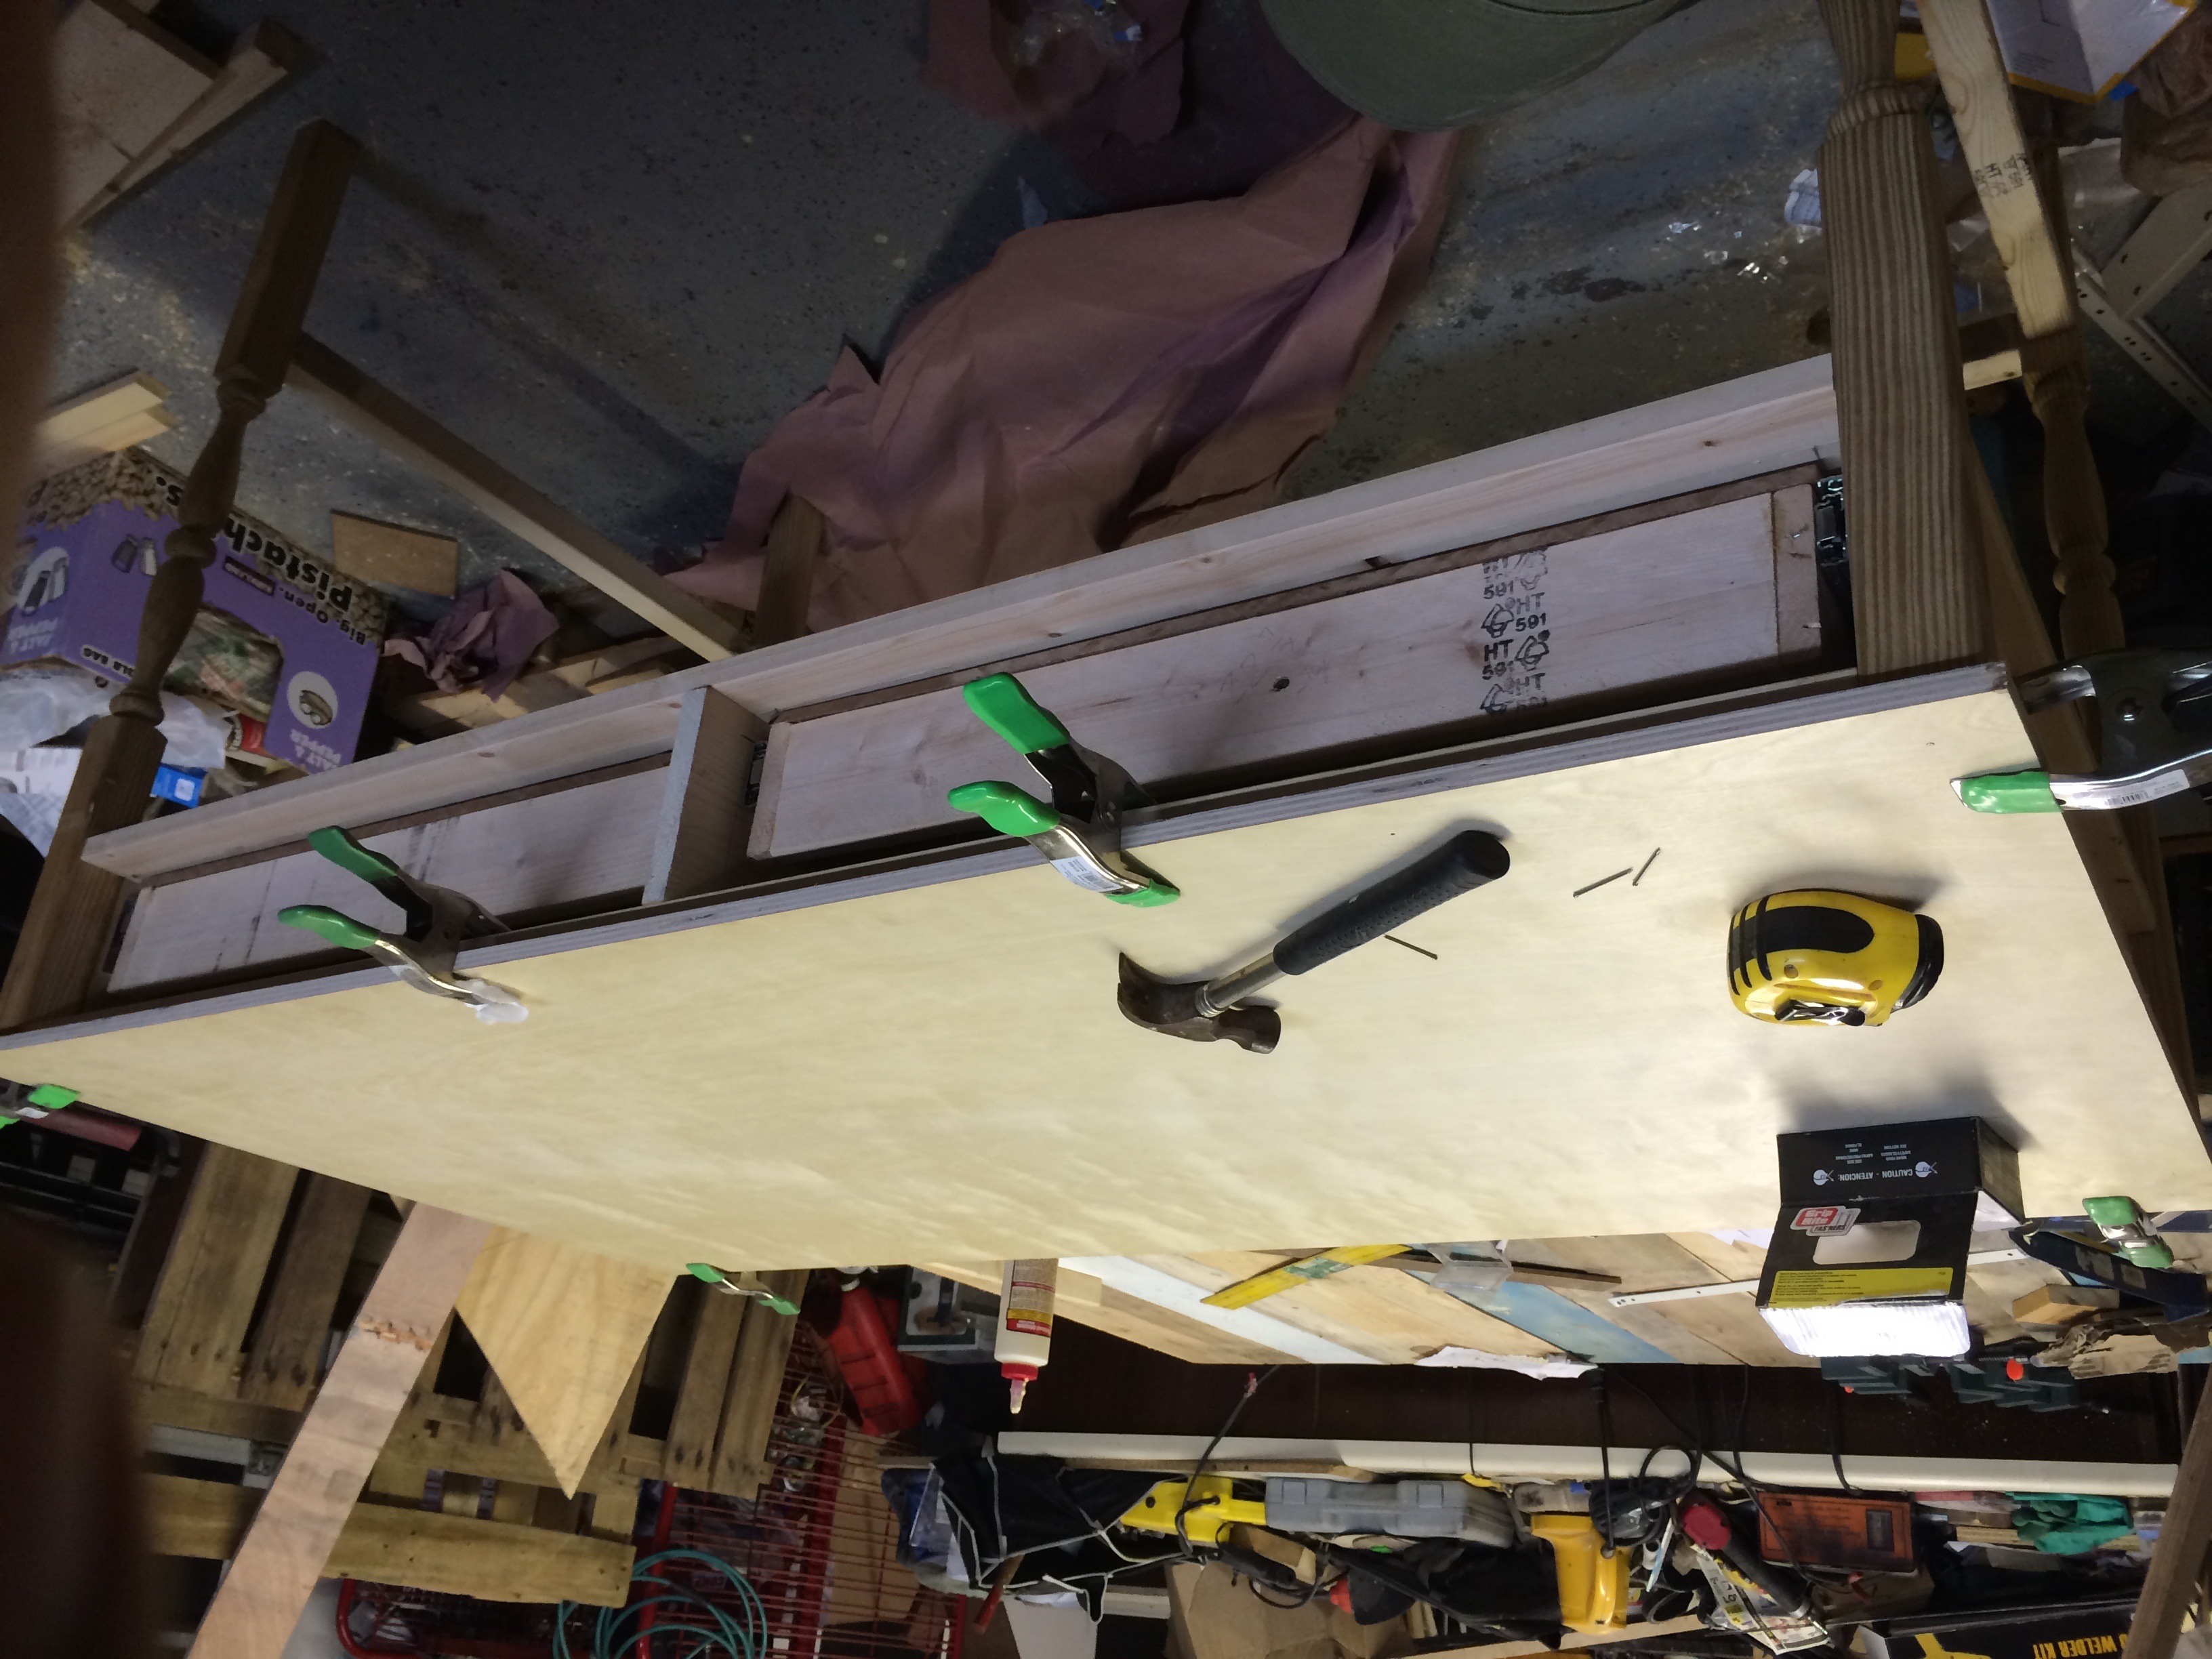
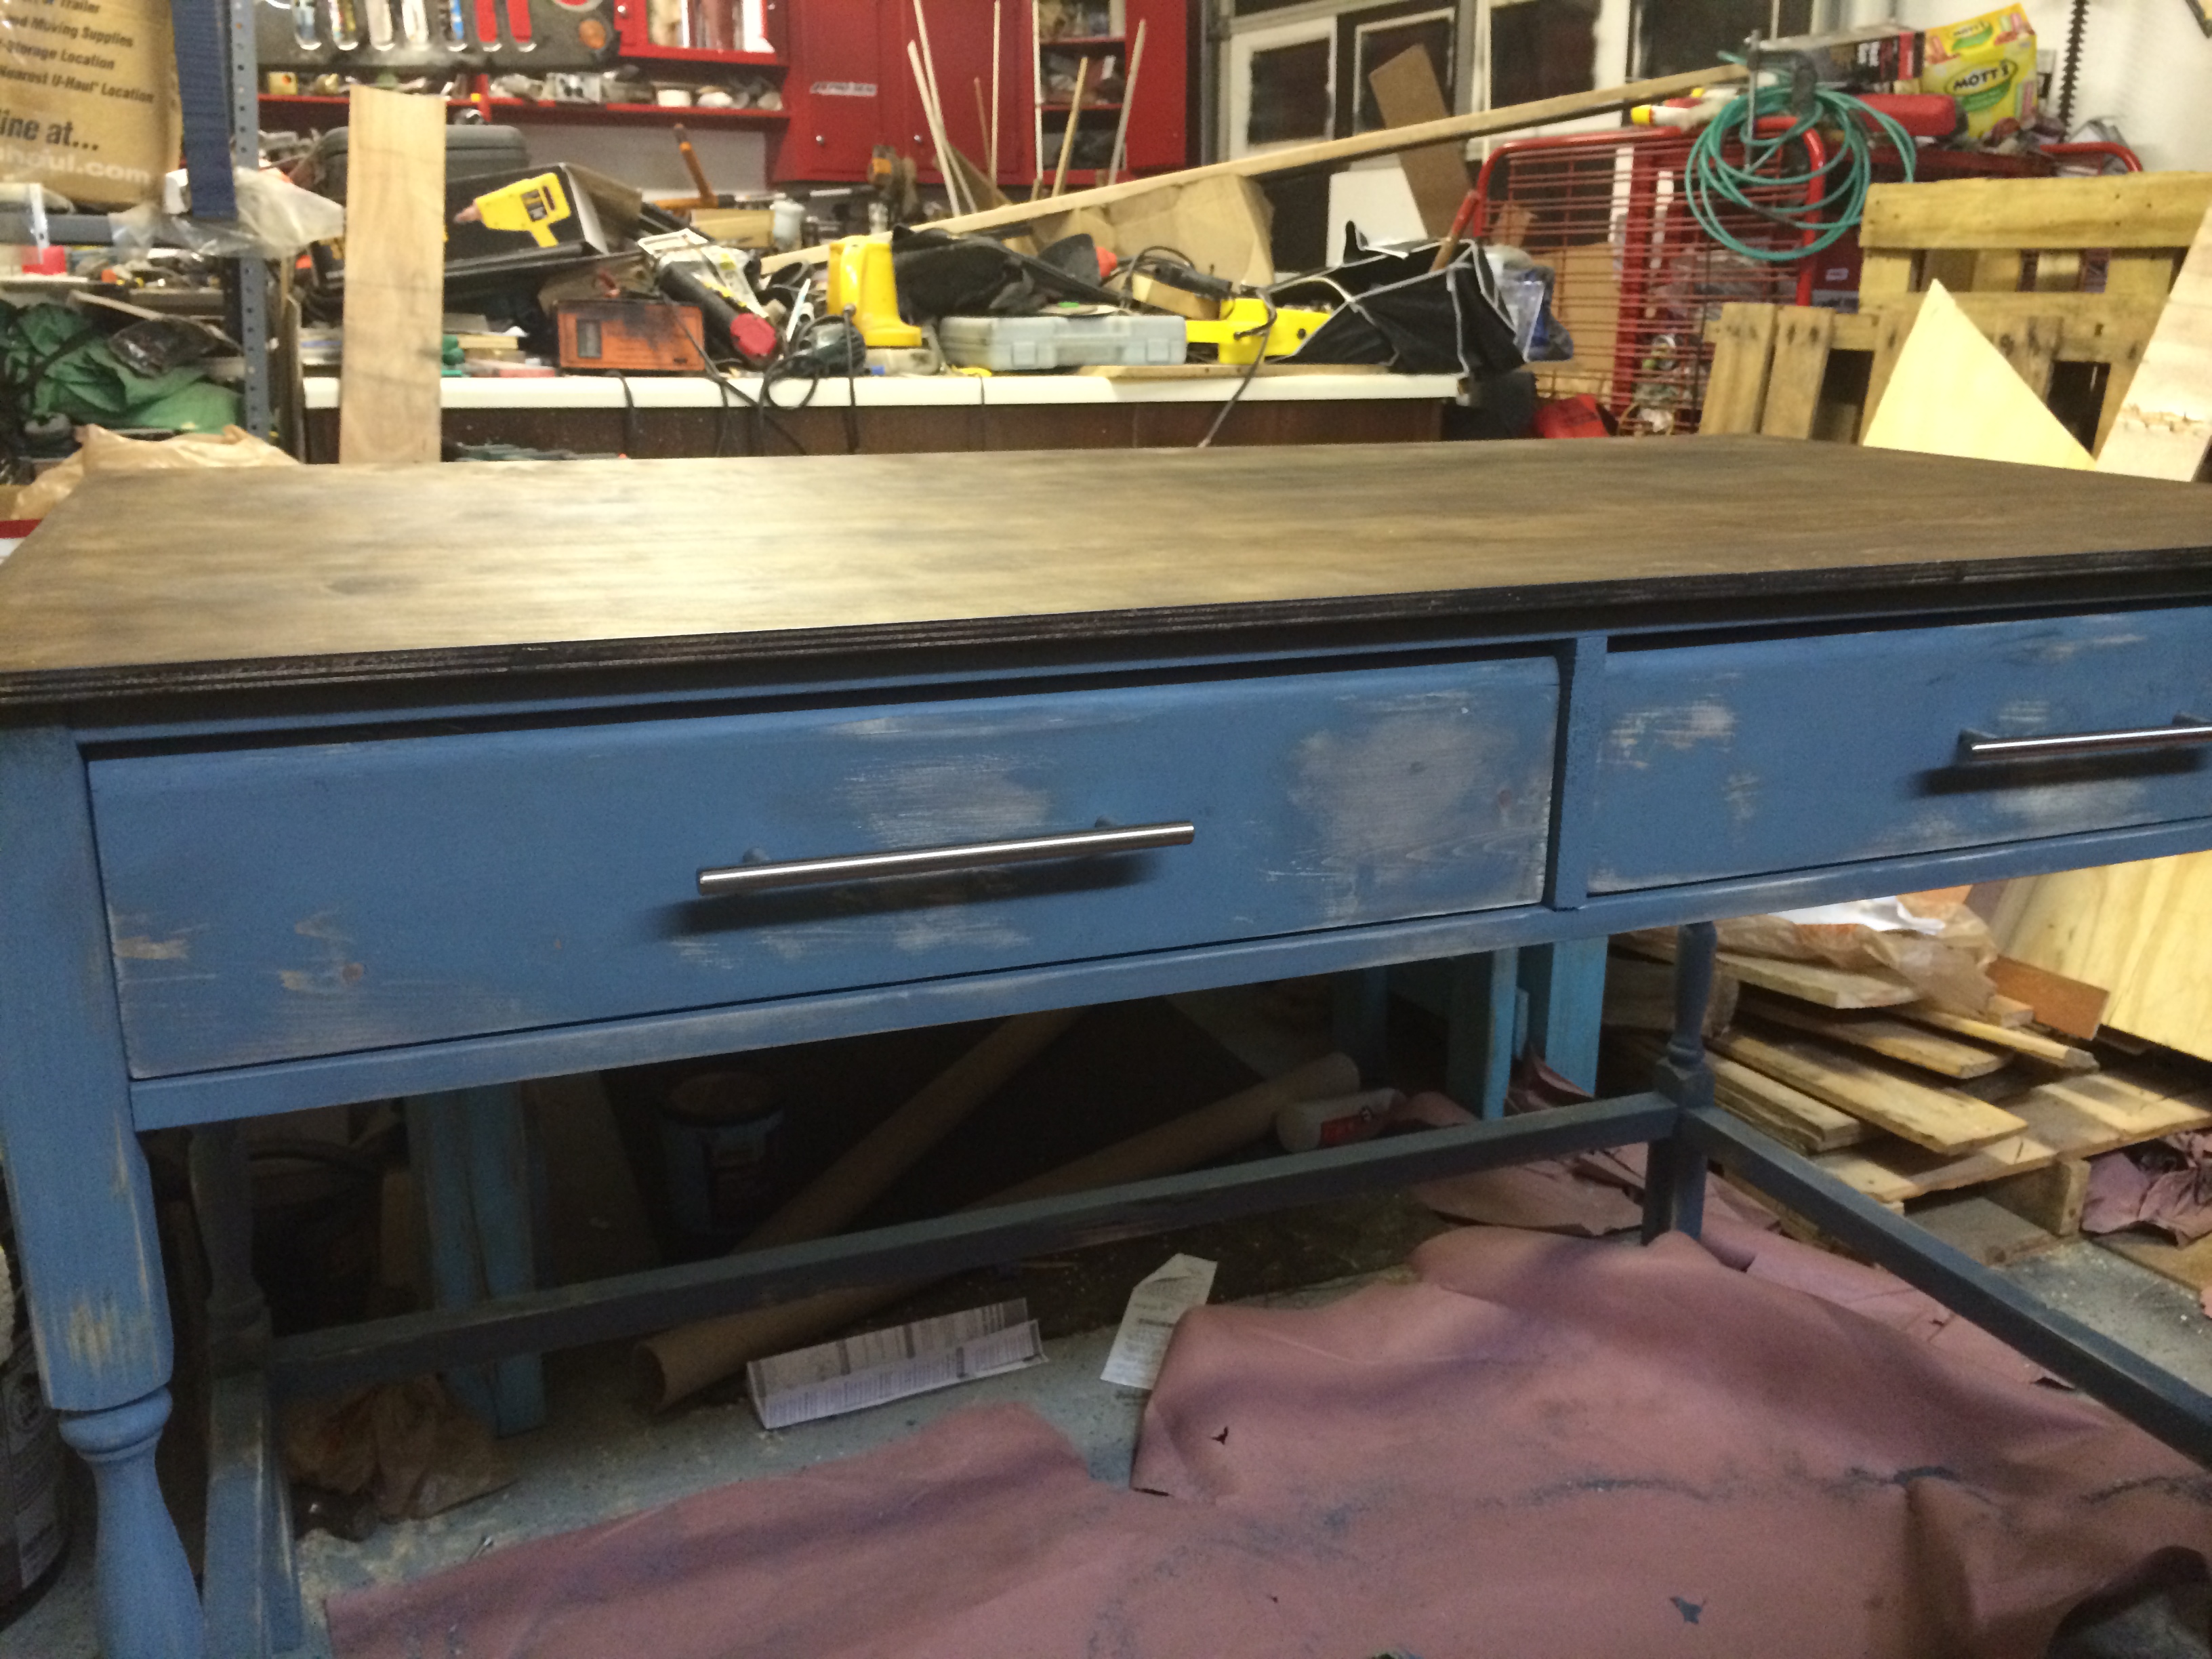
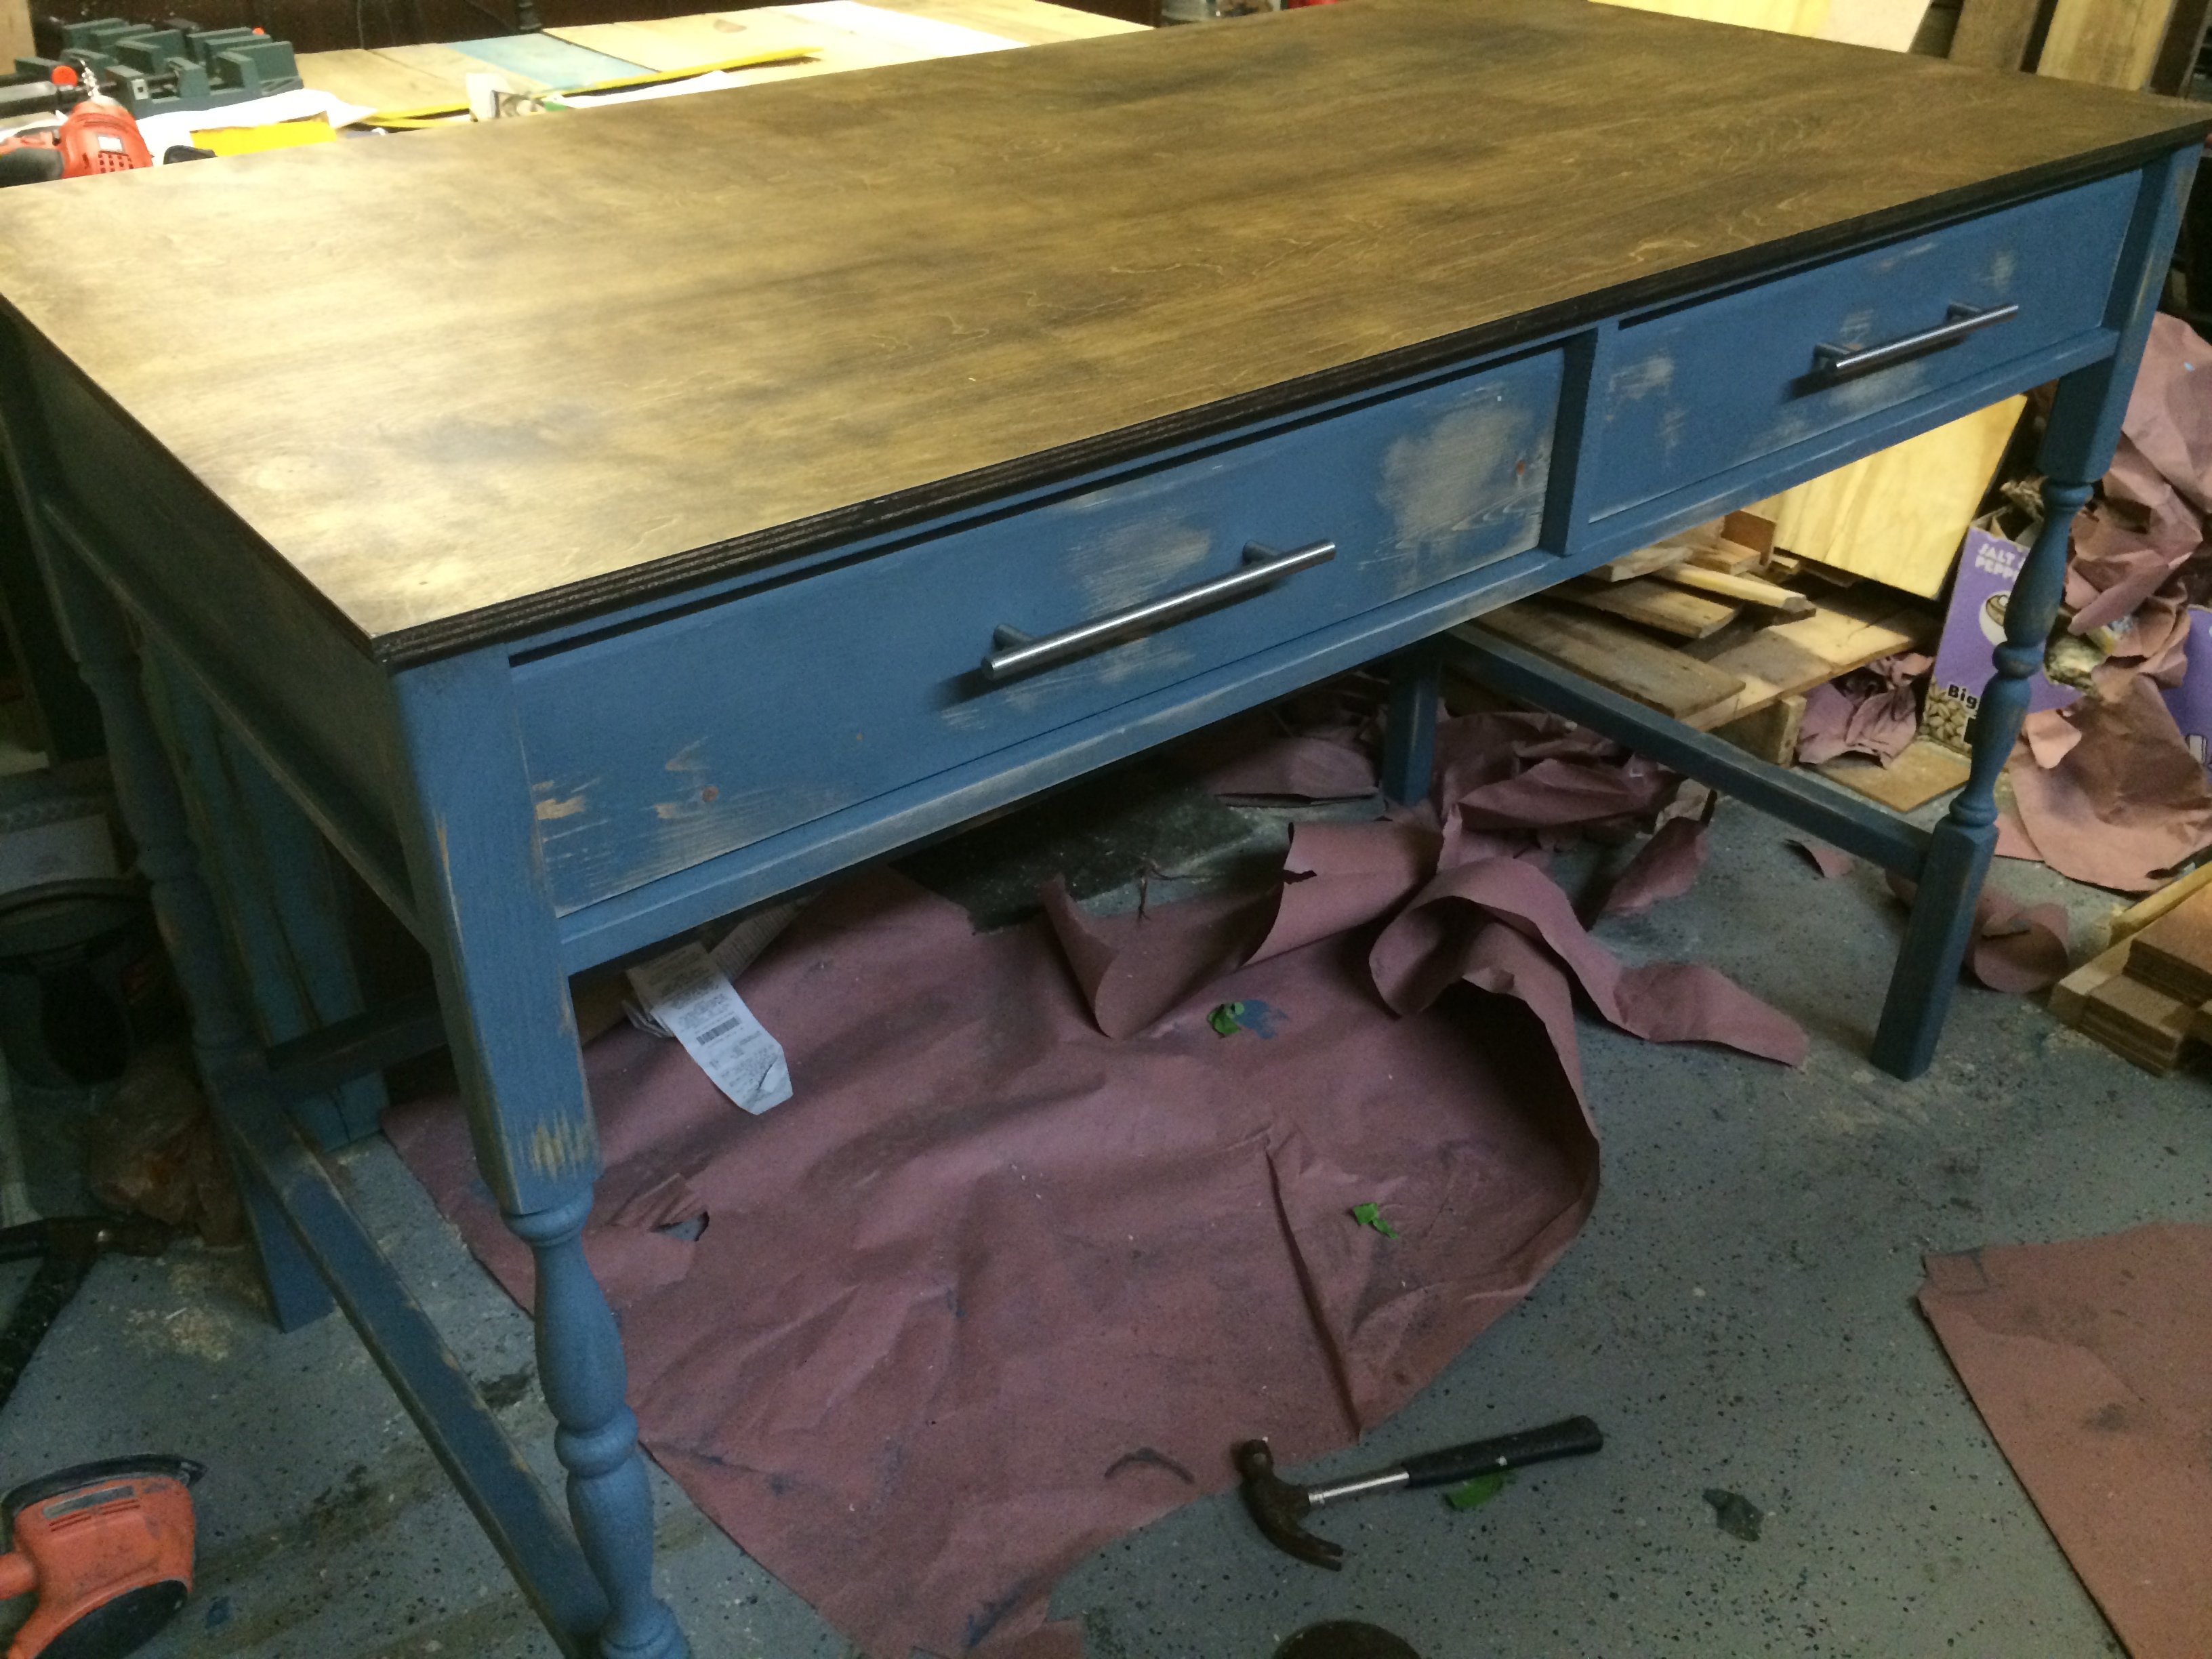
Desk/Craft Space Table
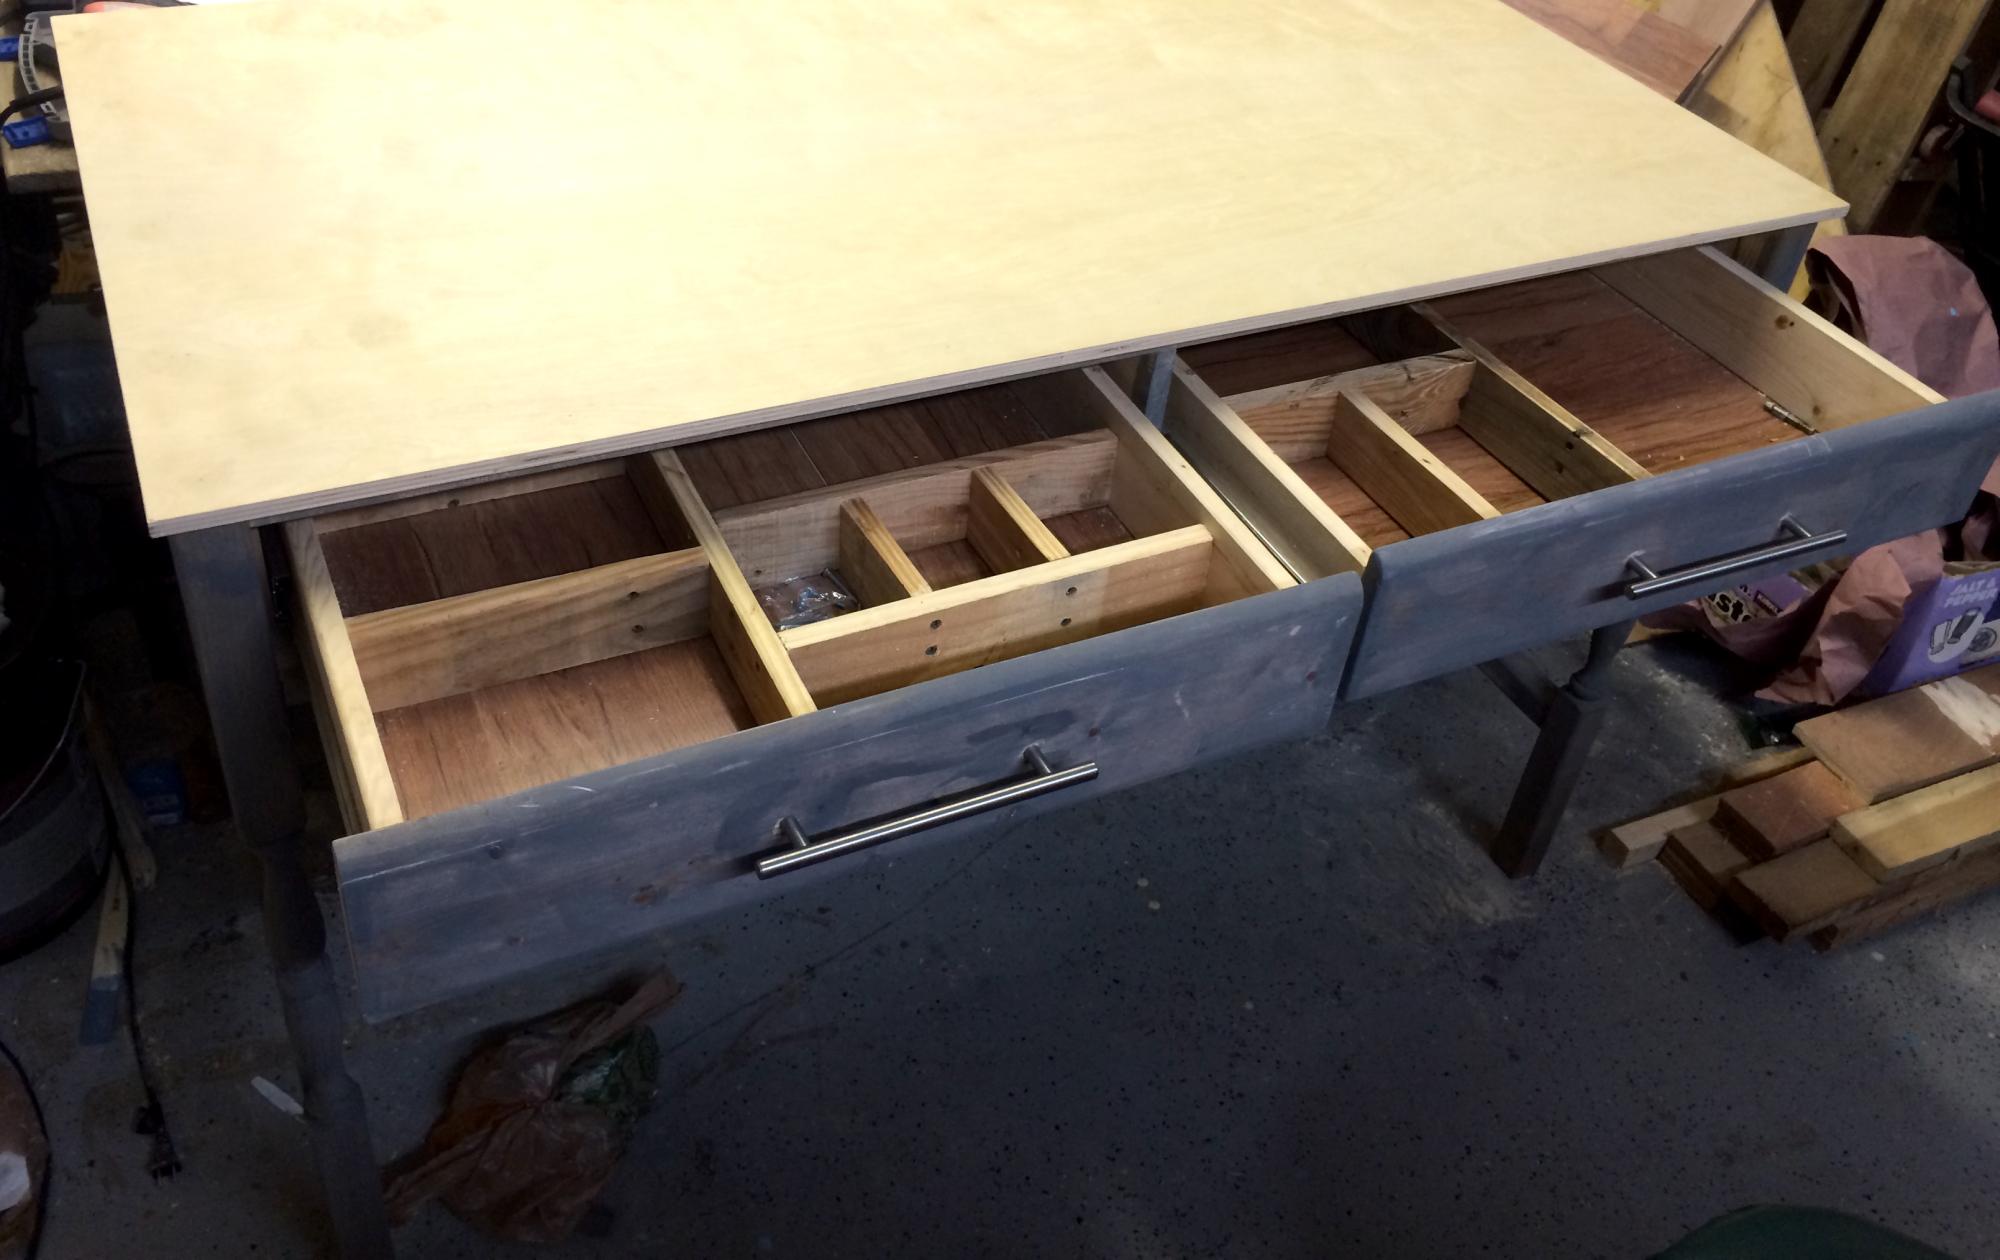
I just started wood-working and found this to be a really nice build. I did, however, adjust the height of the desk legs from 31 inches to 36 inches, because I am 6'6" and felt I needed the leg room. I used 4 Severe Weather 2 1/4in x 2 1/4in x 36in Colonial Treated Deck Spindles from Lowes at $2.88 each for the legs. I also, added the drawer dividers to help organize the storage space. Otherwise, I stuck to the plans.
Severe Weather 2-1/4-in x 2-1/4-in x 36-in Colonial Treated Deck Spindle http://www.lowes.com/pd_7954-432S2236T15N_4294610196__productId=3185415&Ns=p_product_qty_sales_dollar|1&pl=1¤tURL=%3FNs%3Dp_product_qty_sales_dollar%7C1&facetInfo=
Stainless Steel Drawer Pulls http://www.homedepot.com/p/Liberty-8-5-6-in-Steel-Bar-Cabinet-Hardware-Appliance-Pull-117060-0/202023671?MERCH=REC-_-NavPLPHorizontal1-4-_-NA-_-202023671-_-N
Built from Plan(s)
Estimated Time Investment
Day Project (6-9 Hours)
Finish Used
Smokey blue chalk paint (1 cup of paint, 1 teaspoon of plaster of paris, & 1 teaspoon of water)
Minwax classic gray stain (used to give distressed spots more dimension)
Minwax dark walnut stain for desk top
Johnson paste wax
Minwax classic gray stain (used to give distressed spots more dimension)
Minwax dark walnut stain for desk top
Johnson paste wax
Recommended Skill Level
Intermediate
Cama Rustica Moderna
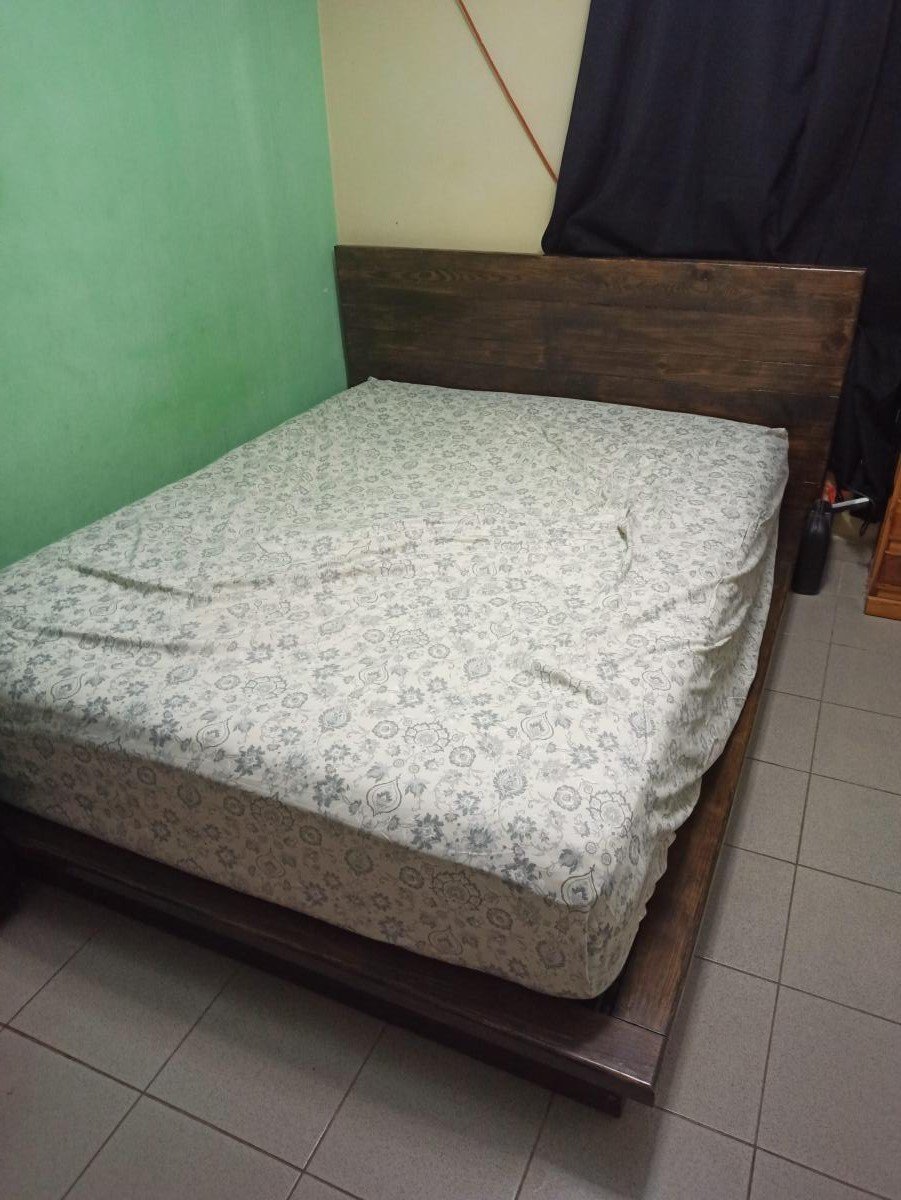
Por ser principiante me tomo 2 fines semanas.
Built from Plan(s)
Estimated Cost
78.00
Estimated Time Investment
Week Long Project (20 Hours or More)
Finish Used
Barniz entintado oscuro
Recommended Skill Level
Beginner
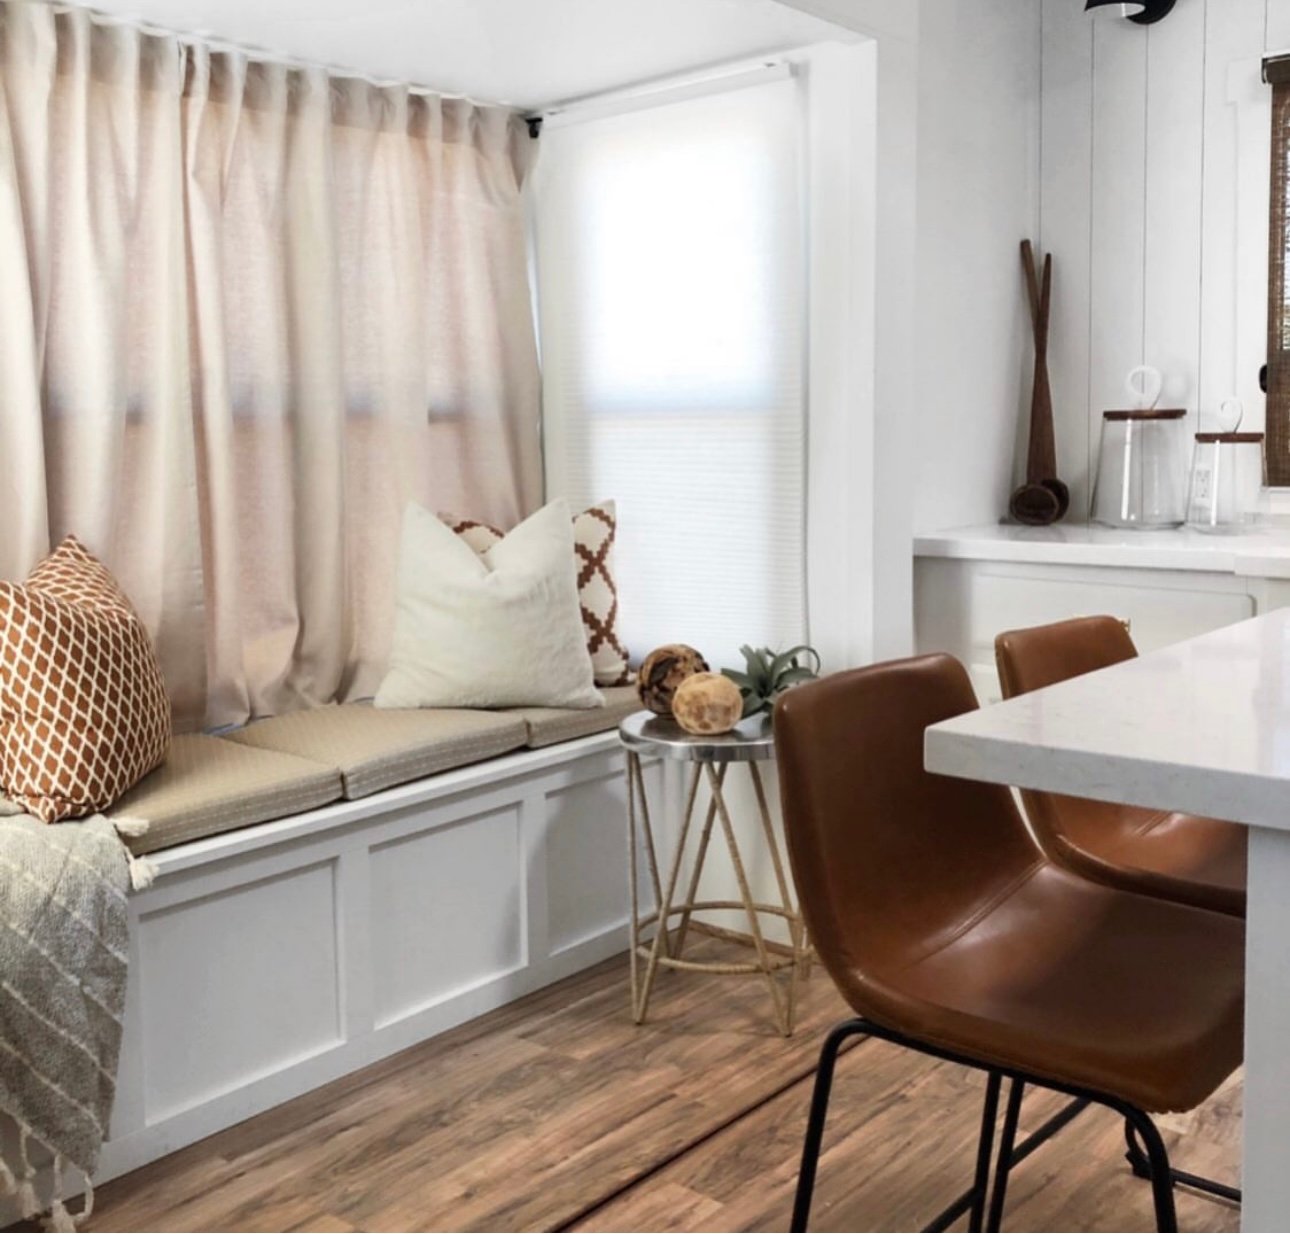
RV Upgrade - Storage Bench
TURNED LEG FARMHOUSE TABLE
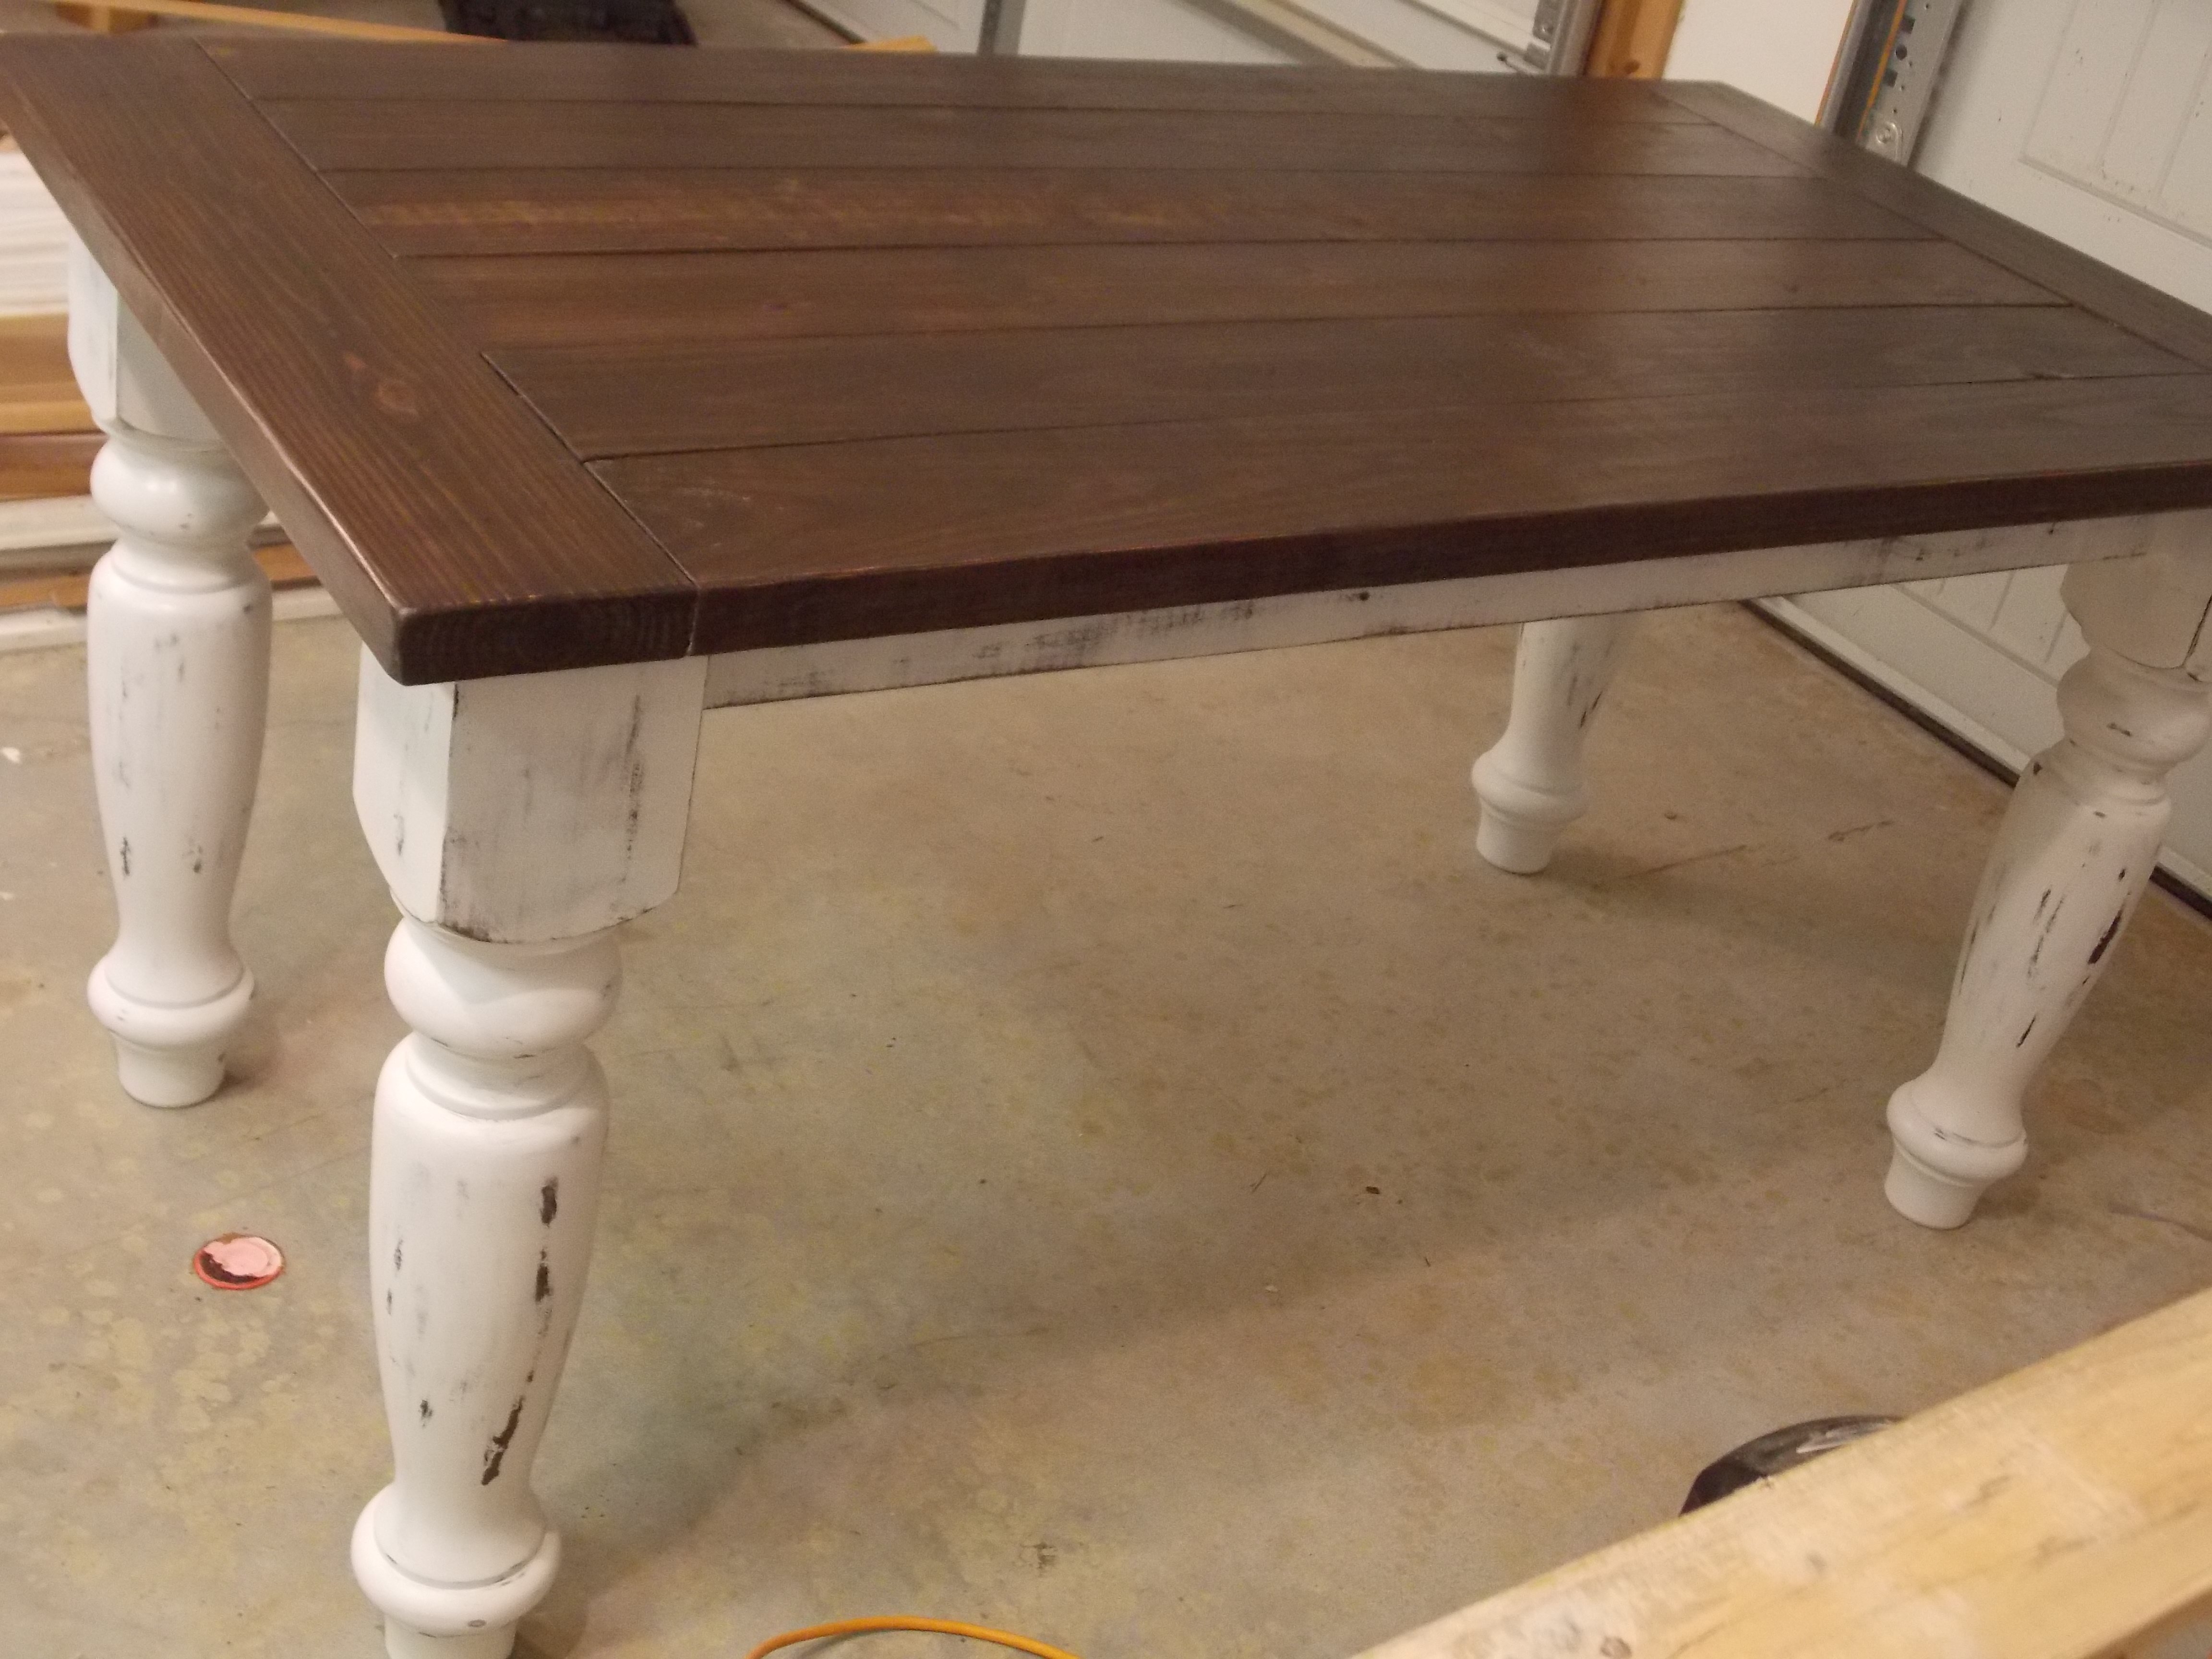
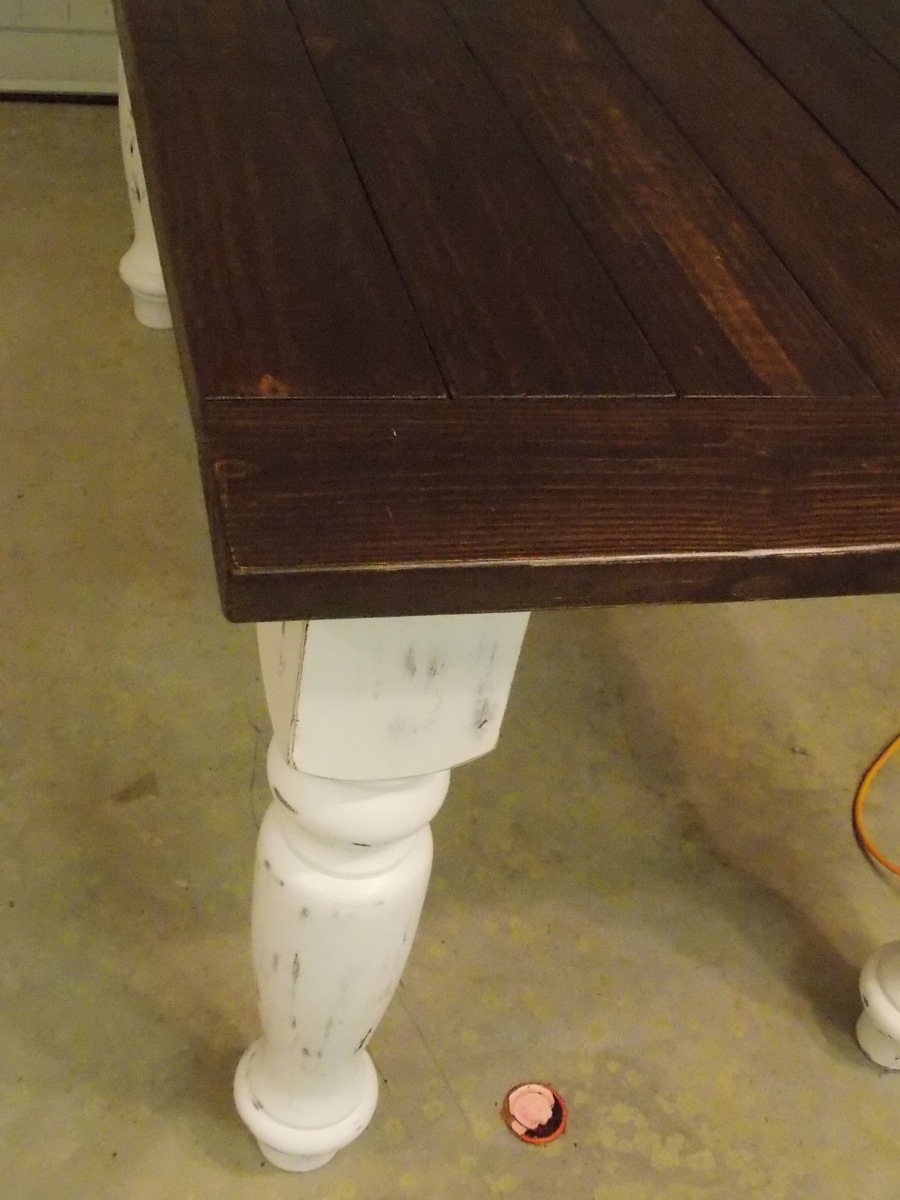
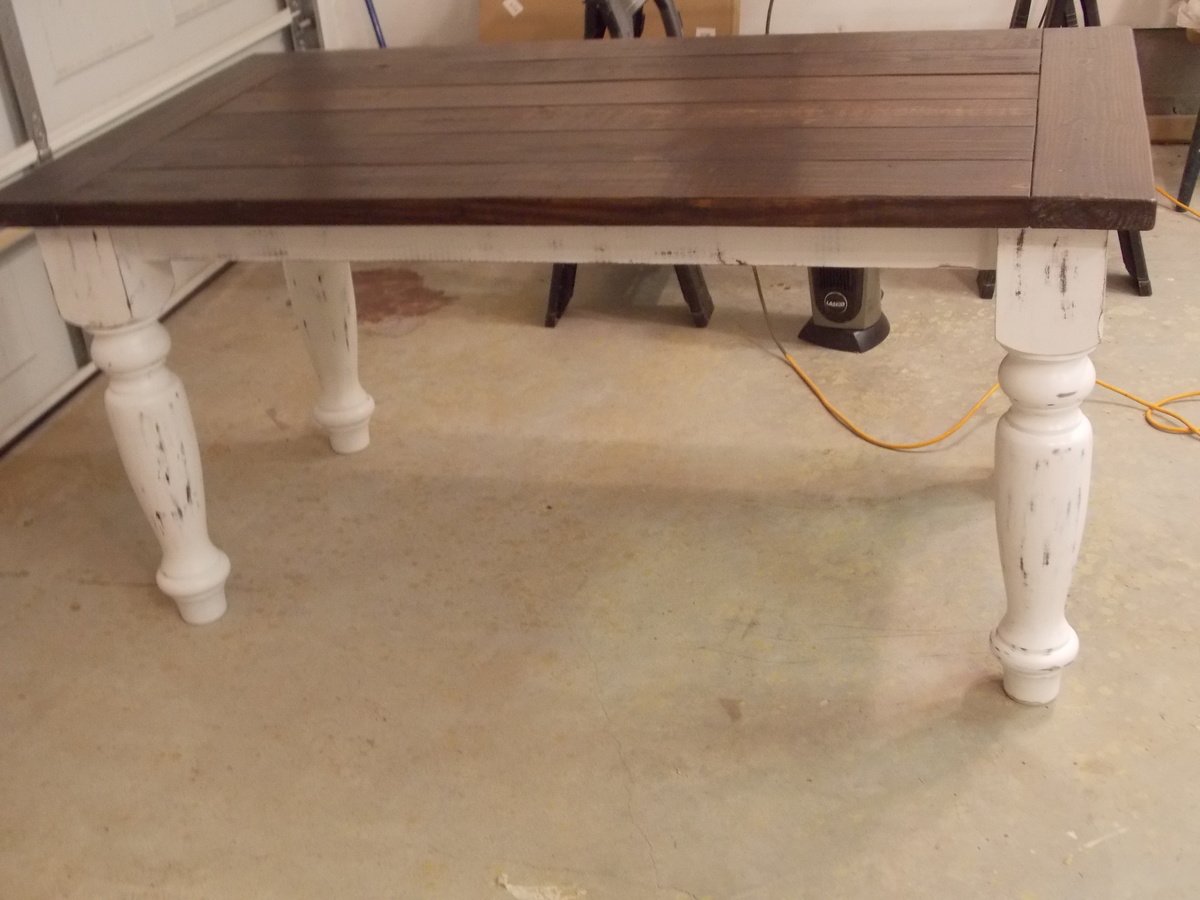
I love how this table turned out! This table was built for a friend of mine who wanted a rustic farmhouse table with "fancy" legs. The legs and apron are painted white and distressed. The table top is stained 2 x 6 pine. We love it! Thank you so much for the plans Ana! The legs are 5" turned maple legs. First, I painted the legs and apron "java brown" and then using Minwax furniture paste wax, I applied wax to the areas that I wanted to distress. After two coats of satin white paint, I distressed the legs using 220 grit sandpaper. Two coats of wax and the legs were silky smooth! The top is 2 x 6 yellow pine. I used two coats of Rustoleum dark walnut, one coat of sanding sealer, a final sanding with 220 grit sandpaper and two coats of wax. Love it!!

Built from Plan(s)
Estimated Cost
200
Estimated Time Investment
Weekend Project (10-20 Hours)
Finish Used
First, I painted the legs and apron "java brown" and then using Minwax furniture paste wax, I applied wax to the areas that I wanted to distress. After two coats of satin white paint, I distressed the legs using 220 grit sandpaper. Two coats of wax and the legs were silky smooth!
The top is 2 x 6 yellow pine. I used two coats of Rustoleum dark walnut, one coat of sanding sealer, a final sanding with 220 grit sandpaper and two coats of wax.
The top is 2 x 6 yellow pine. I used two coats of Rustoleum dark walnut, one coat of sanding sealer, a final sanding with 220 grit sandpaper and two coats of wax.
Recommended Skill Level
Beginner
Comments
Tue, 12/04/2012 - 21:13
That turned out great! I love
That turned out great! I love those legs and the distressed look.
Wed, 01/02/2019 - 10:25
I built this for a friend but
I built this for a friend but as far as I know she is still using it and gets many complements on it.
Distressed Picture Frames From Scraps
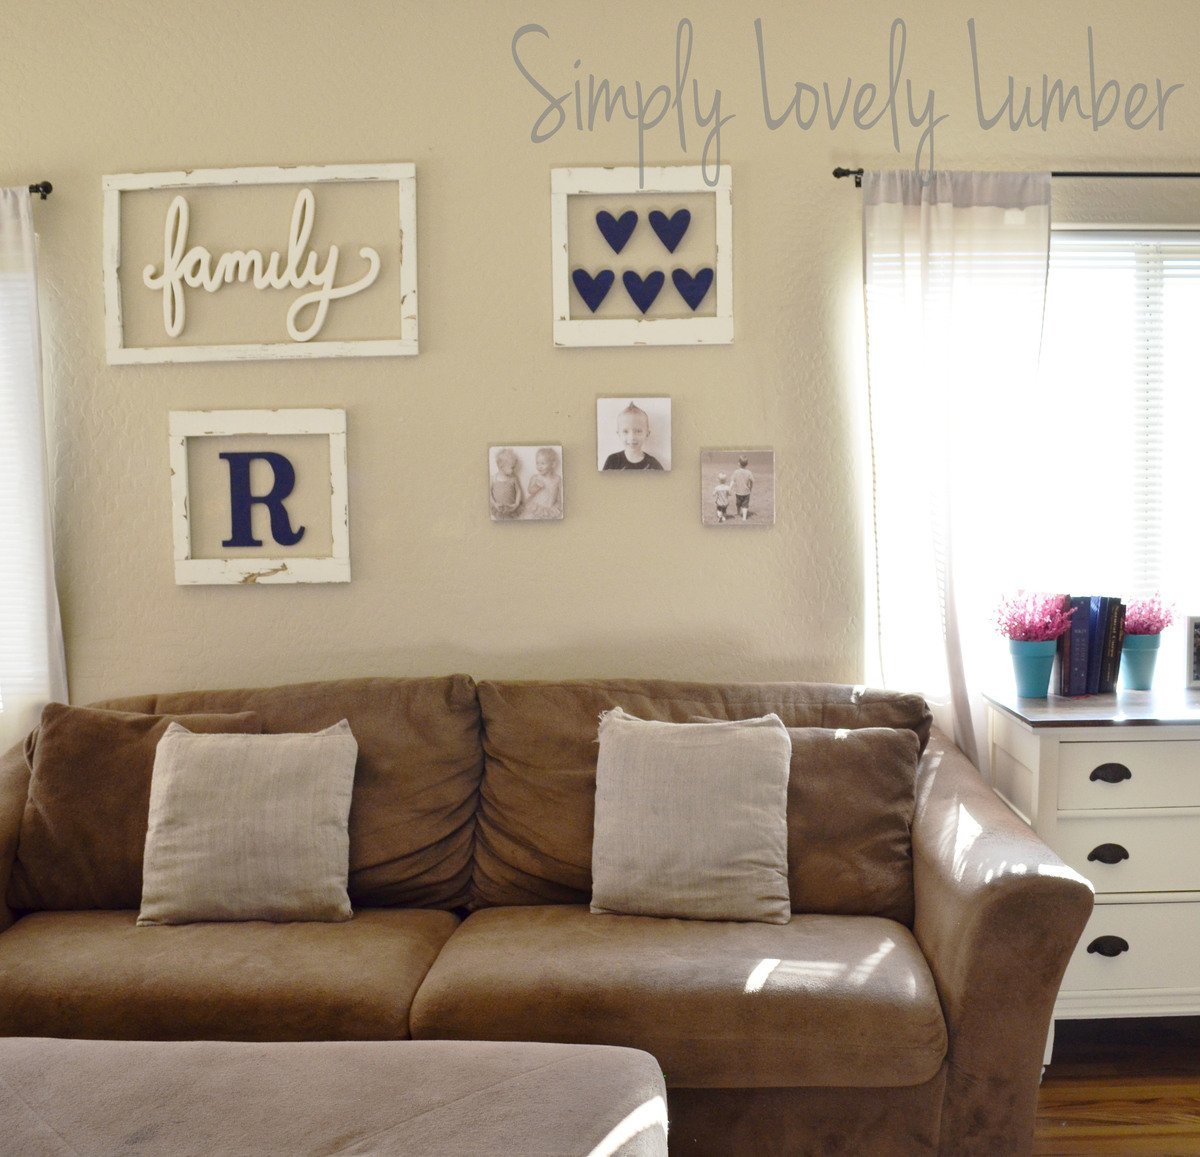
I built everything above my couch using scraps from my garage. The "family" and hearts were cut out of a scrap piece of 1x12. The frames were made using my worst 1x2 and 1x3s. I sprayed them with stain and then paint and finished them by sanding them down.
Estimated Cost
Free
Estimated Time Investment
An Hour or Two (0-2 Hours)
Finish Used
Stain and Paint
Recommended Skill Level
Beginner
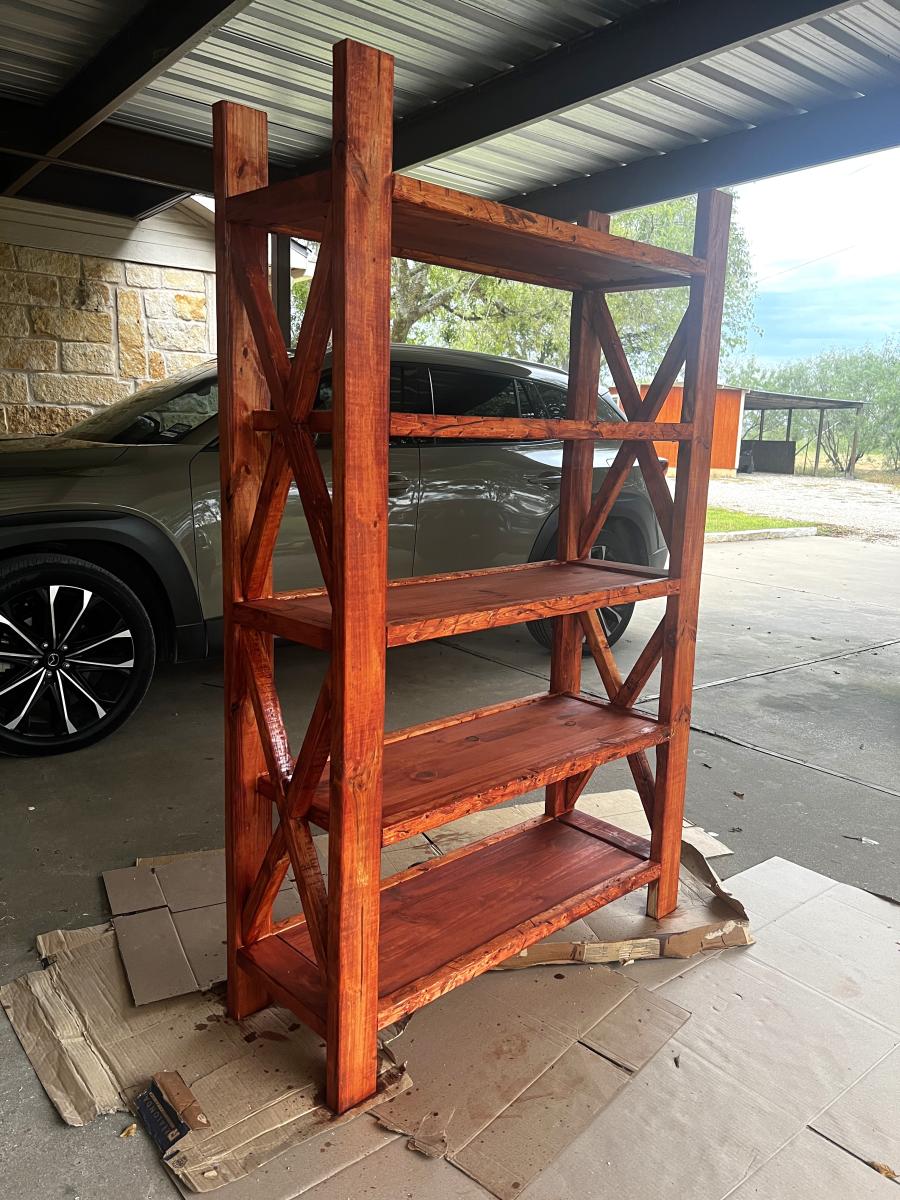
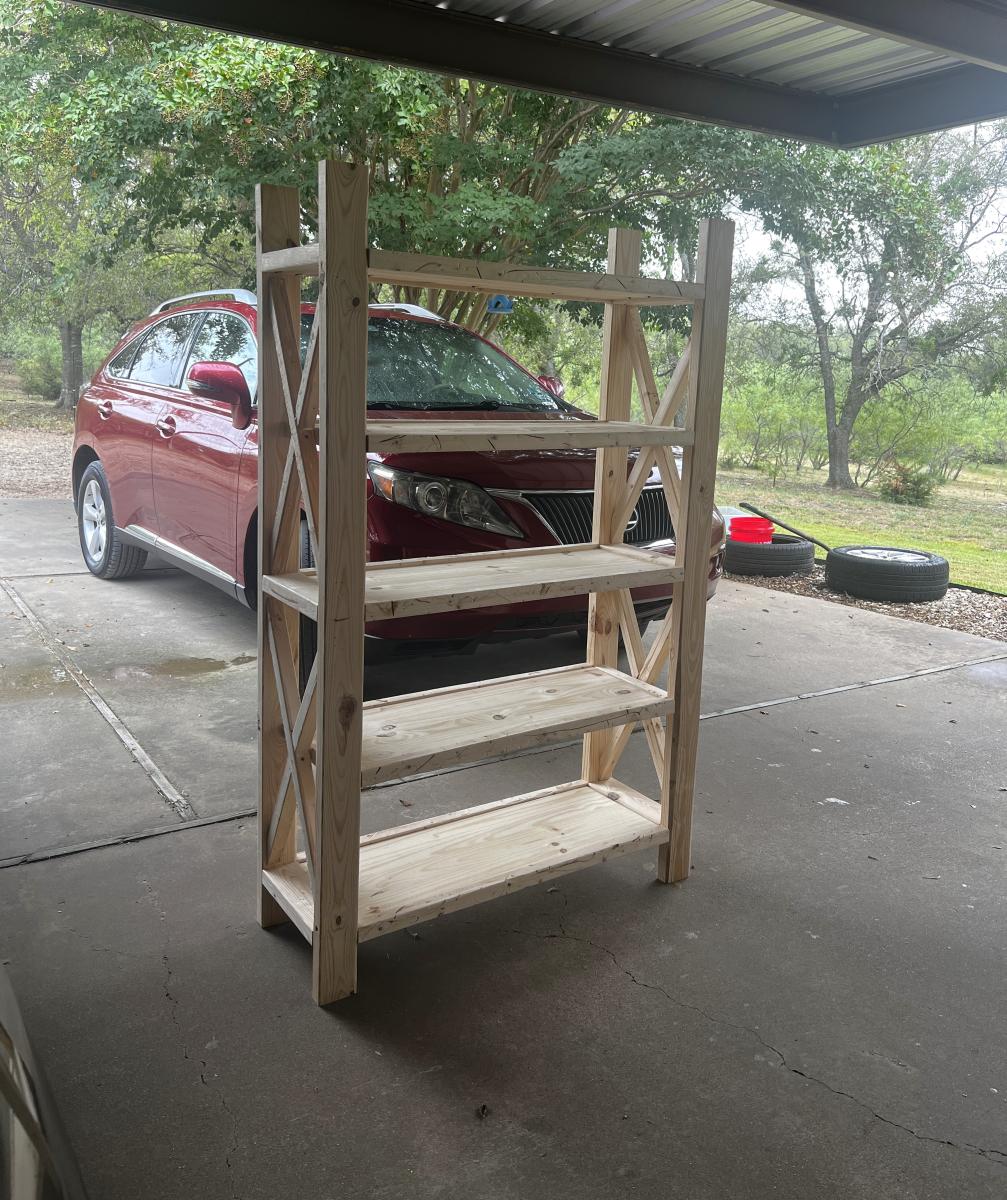
Rustic X Display Shelf
We followed the plans for the Rustic X Tall Bookshelf. This was THE FIRST piece of furniture my husband and I have ever built and we are now hooked! We made a mistake on the measurements for the shelf placements; thus, the extra posts at the top. But we love the way it turned out! Thank you so much for the plans!!
Built from Plan(s)
Seasonal And Holiday
Four cubby bookshelf
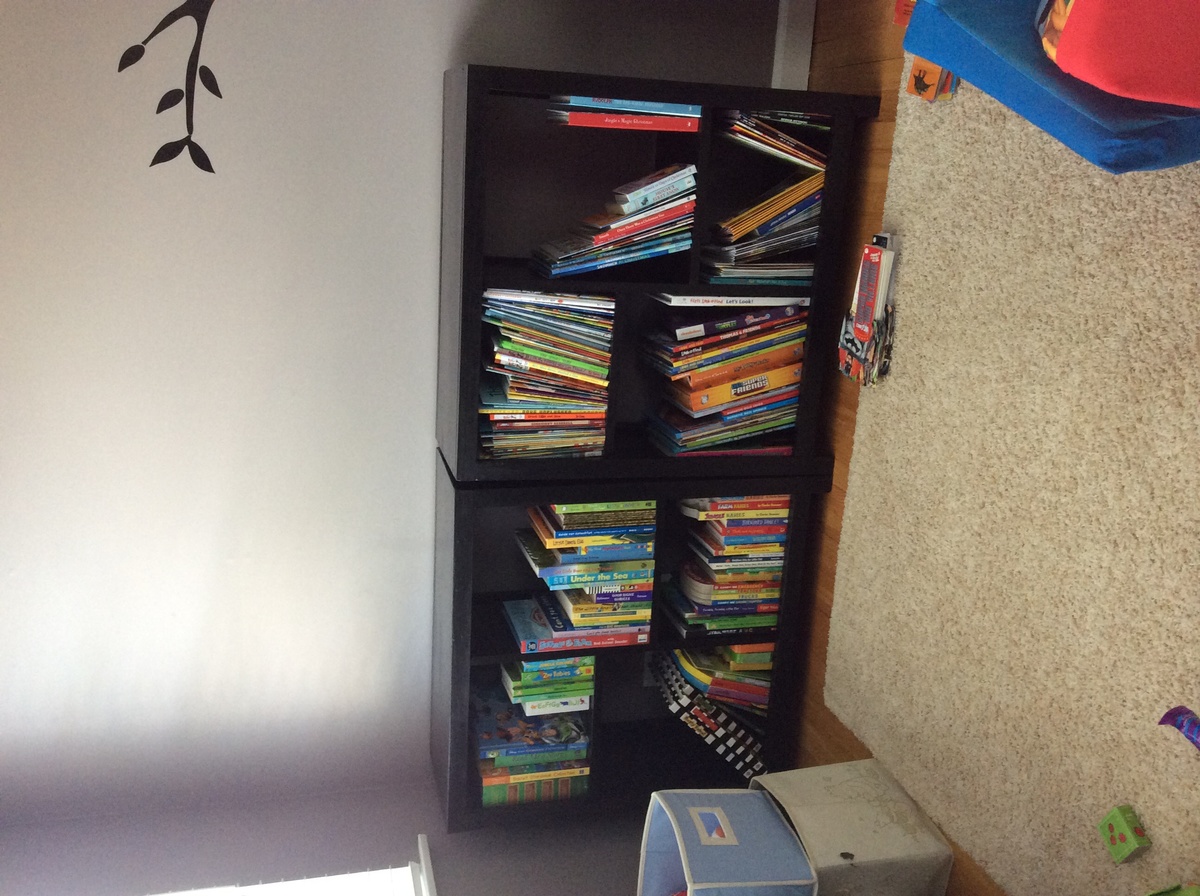
My kids' old bookshelf ran out of room and their books ended up on the floor. I built these using the four cubby bookshelf design and adjusted the shelves for different heights as some of their books are extra large.
Built from Plan(s)
Finish Used
Stained these with miniwax's espresso color. Pre-stained the wood first and did three coats of the stain.
Recommended Skill Level
Beginner
Rustic X Console table
Modified the console table by height (approx 39"), length (approx 40"), and eliminated the middle shelf. I can't put an accurate $ estimate since I bought wood for three projects and this was one of them.
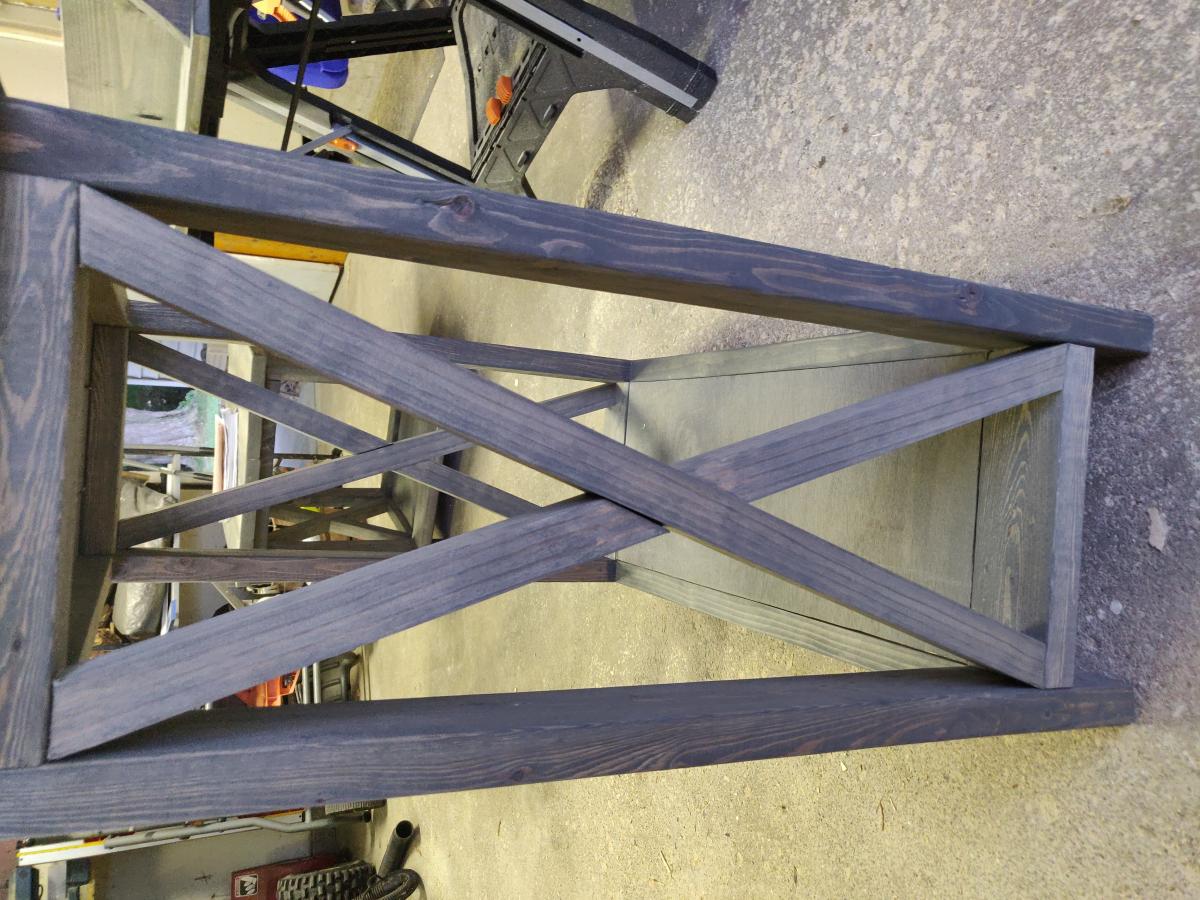
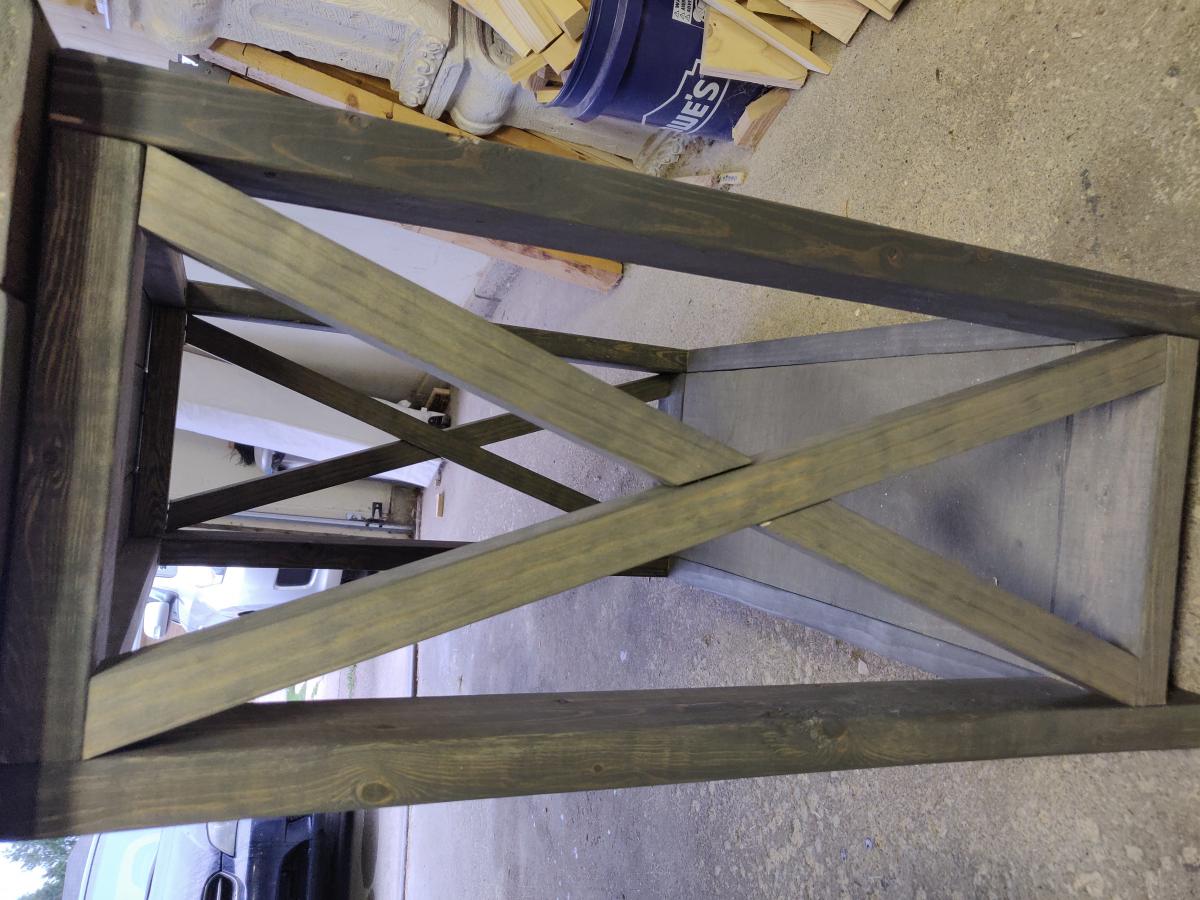
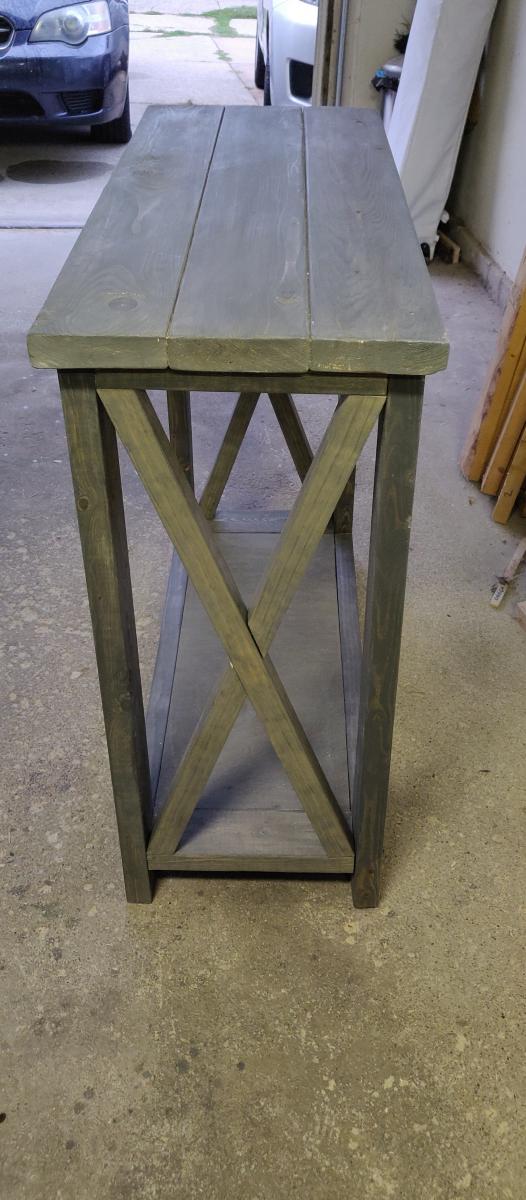
Built from Plan(s)
Estimated Cost
$50
Estimated Time Investment
Afternoon Project (3-6 Hours)
Finish Used
Charcoal grey stain
Recommended Skill Level
Intermediate
2x4 Outdoor Chair and Loveseat Set
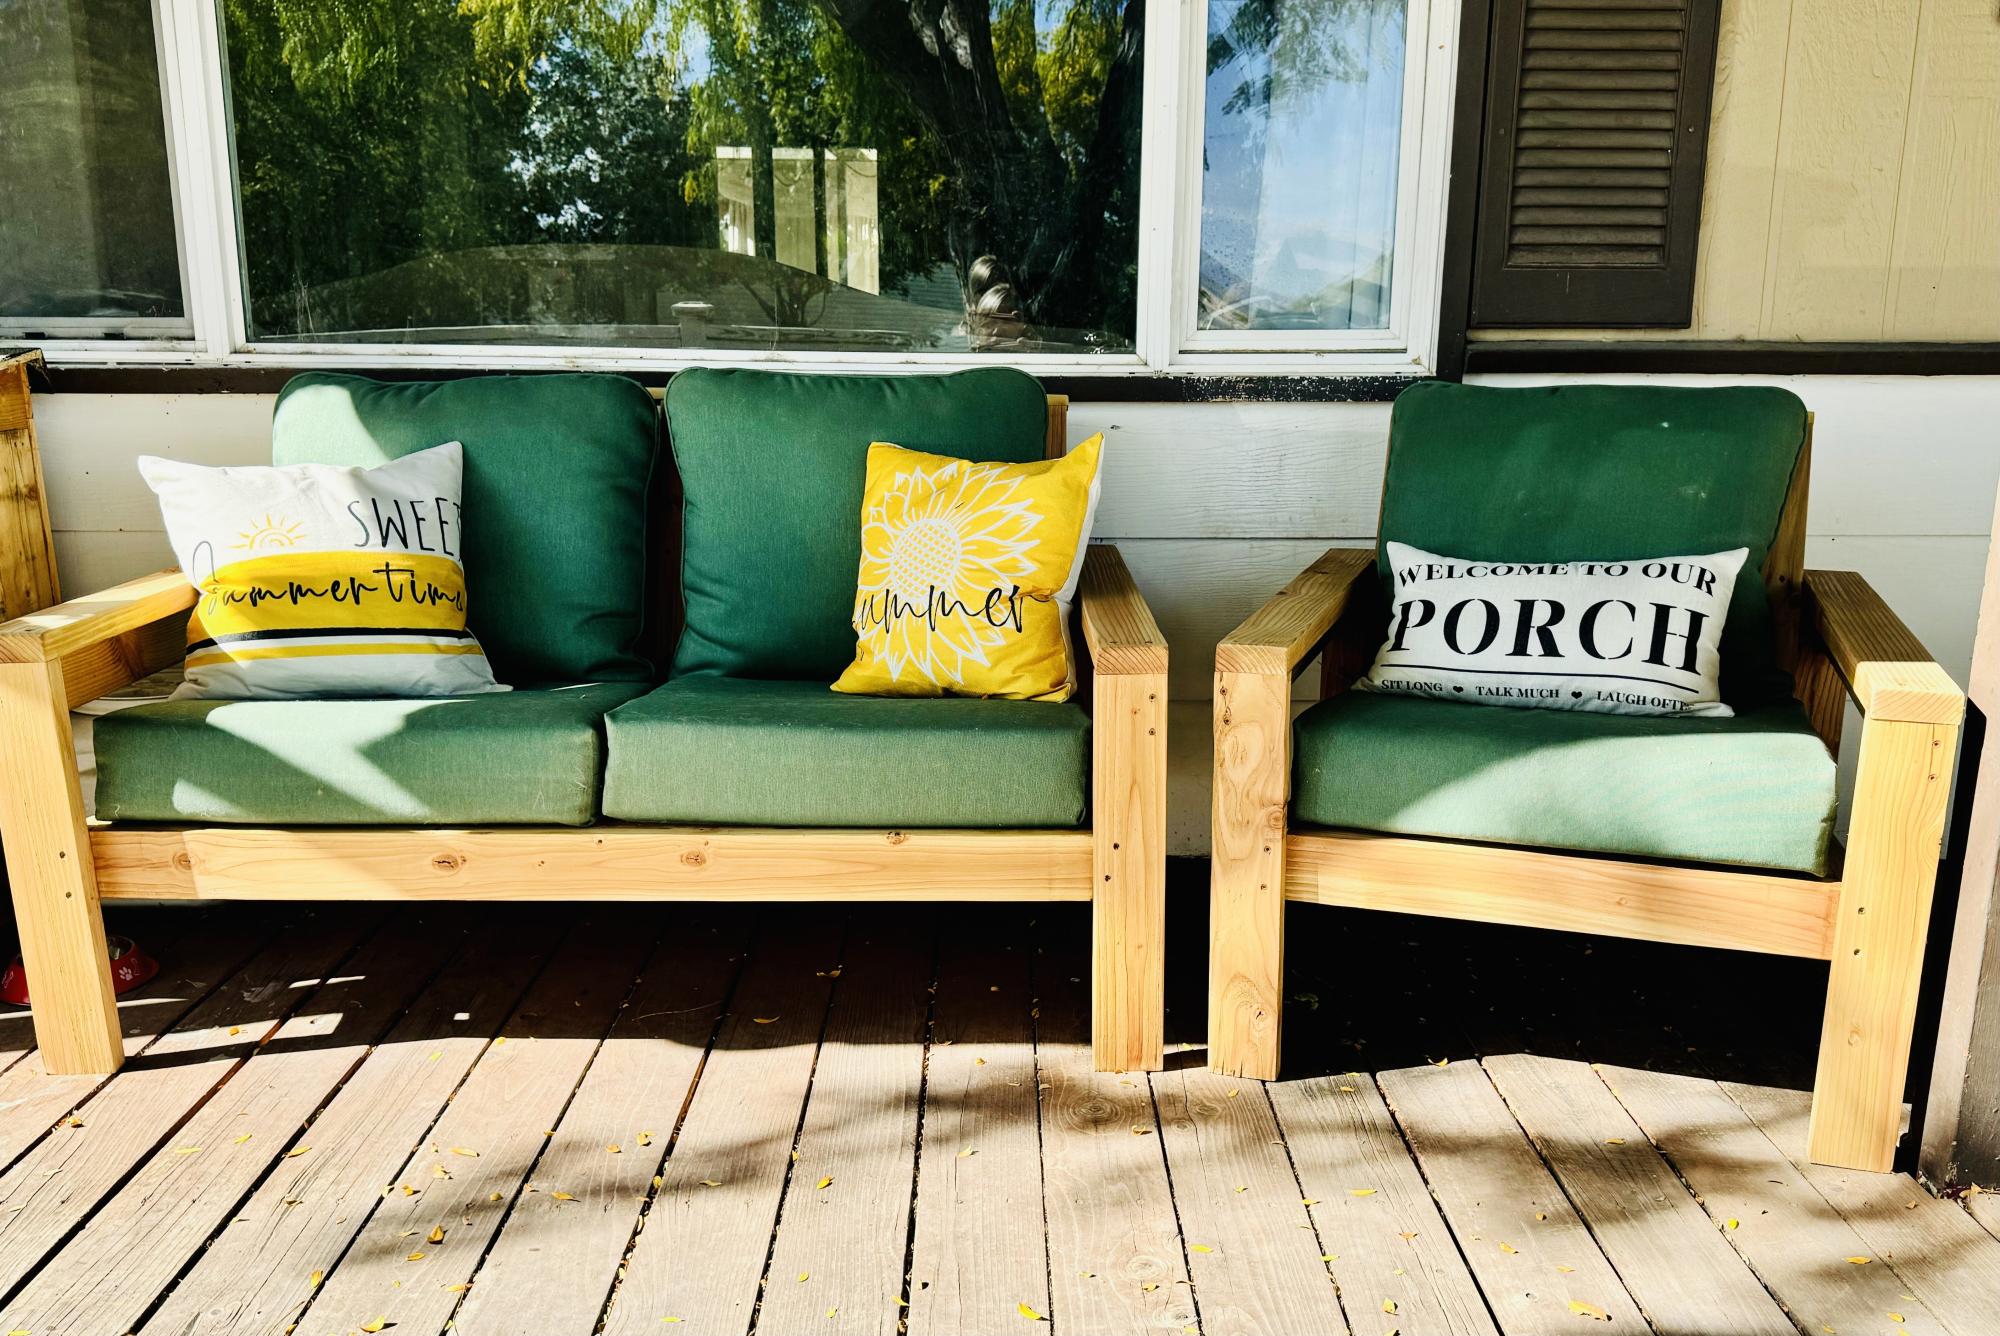
I love the ease with which this set came together! I adapted the plans for a loveseat and a chair for 24x24 deep seat cushions I had picked up on sale in the spring. I spent about $70 on douglas fir 2x4 studs. I spent three partial days on this project: one to cut all the pieces, one to assemble, and the last day for sanding and staining. After assembling the chair, I decided to move the back support of the loveseat forward by 1 1/2 inches and attached the back seat support at 23” because I’m a bit shorter (5’4”) and my feet didn’t touch the ground when fully seated in the chair. It worked out perfectly for me and my husband loves the chair. Now we have beautiful and sturdy seating on the porch. I love how easy Ana’s plans are to follow and the videos are immensely helpful.
Built from Plan(s)
Charlie's Scooter
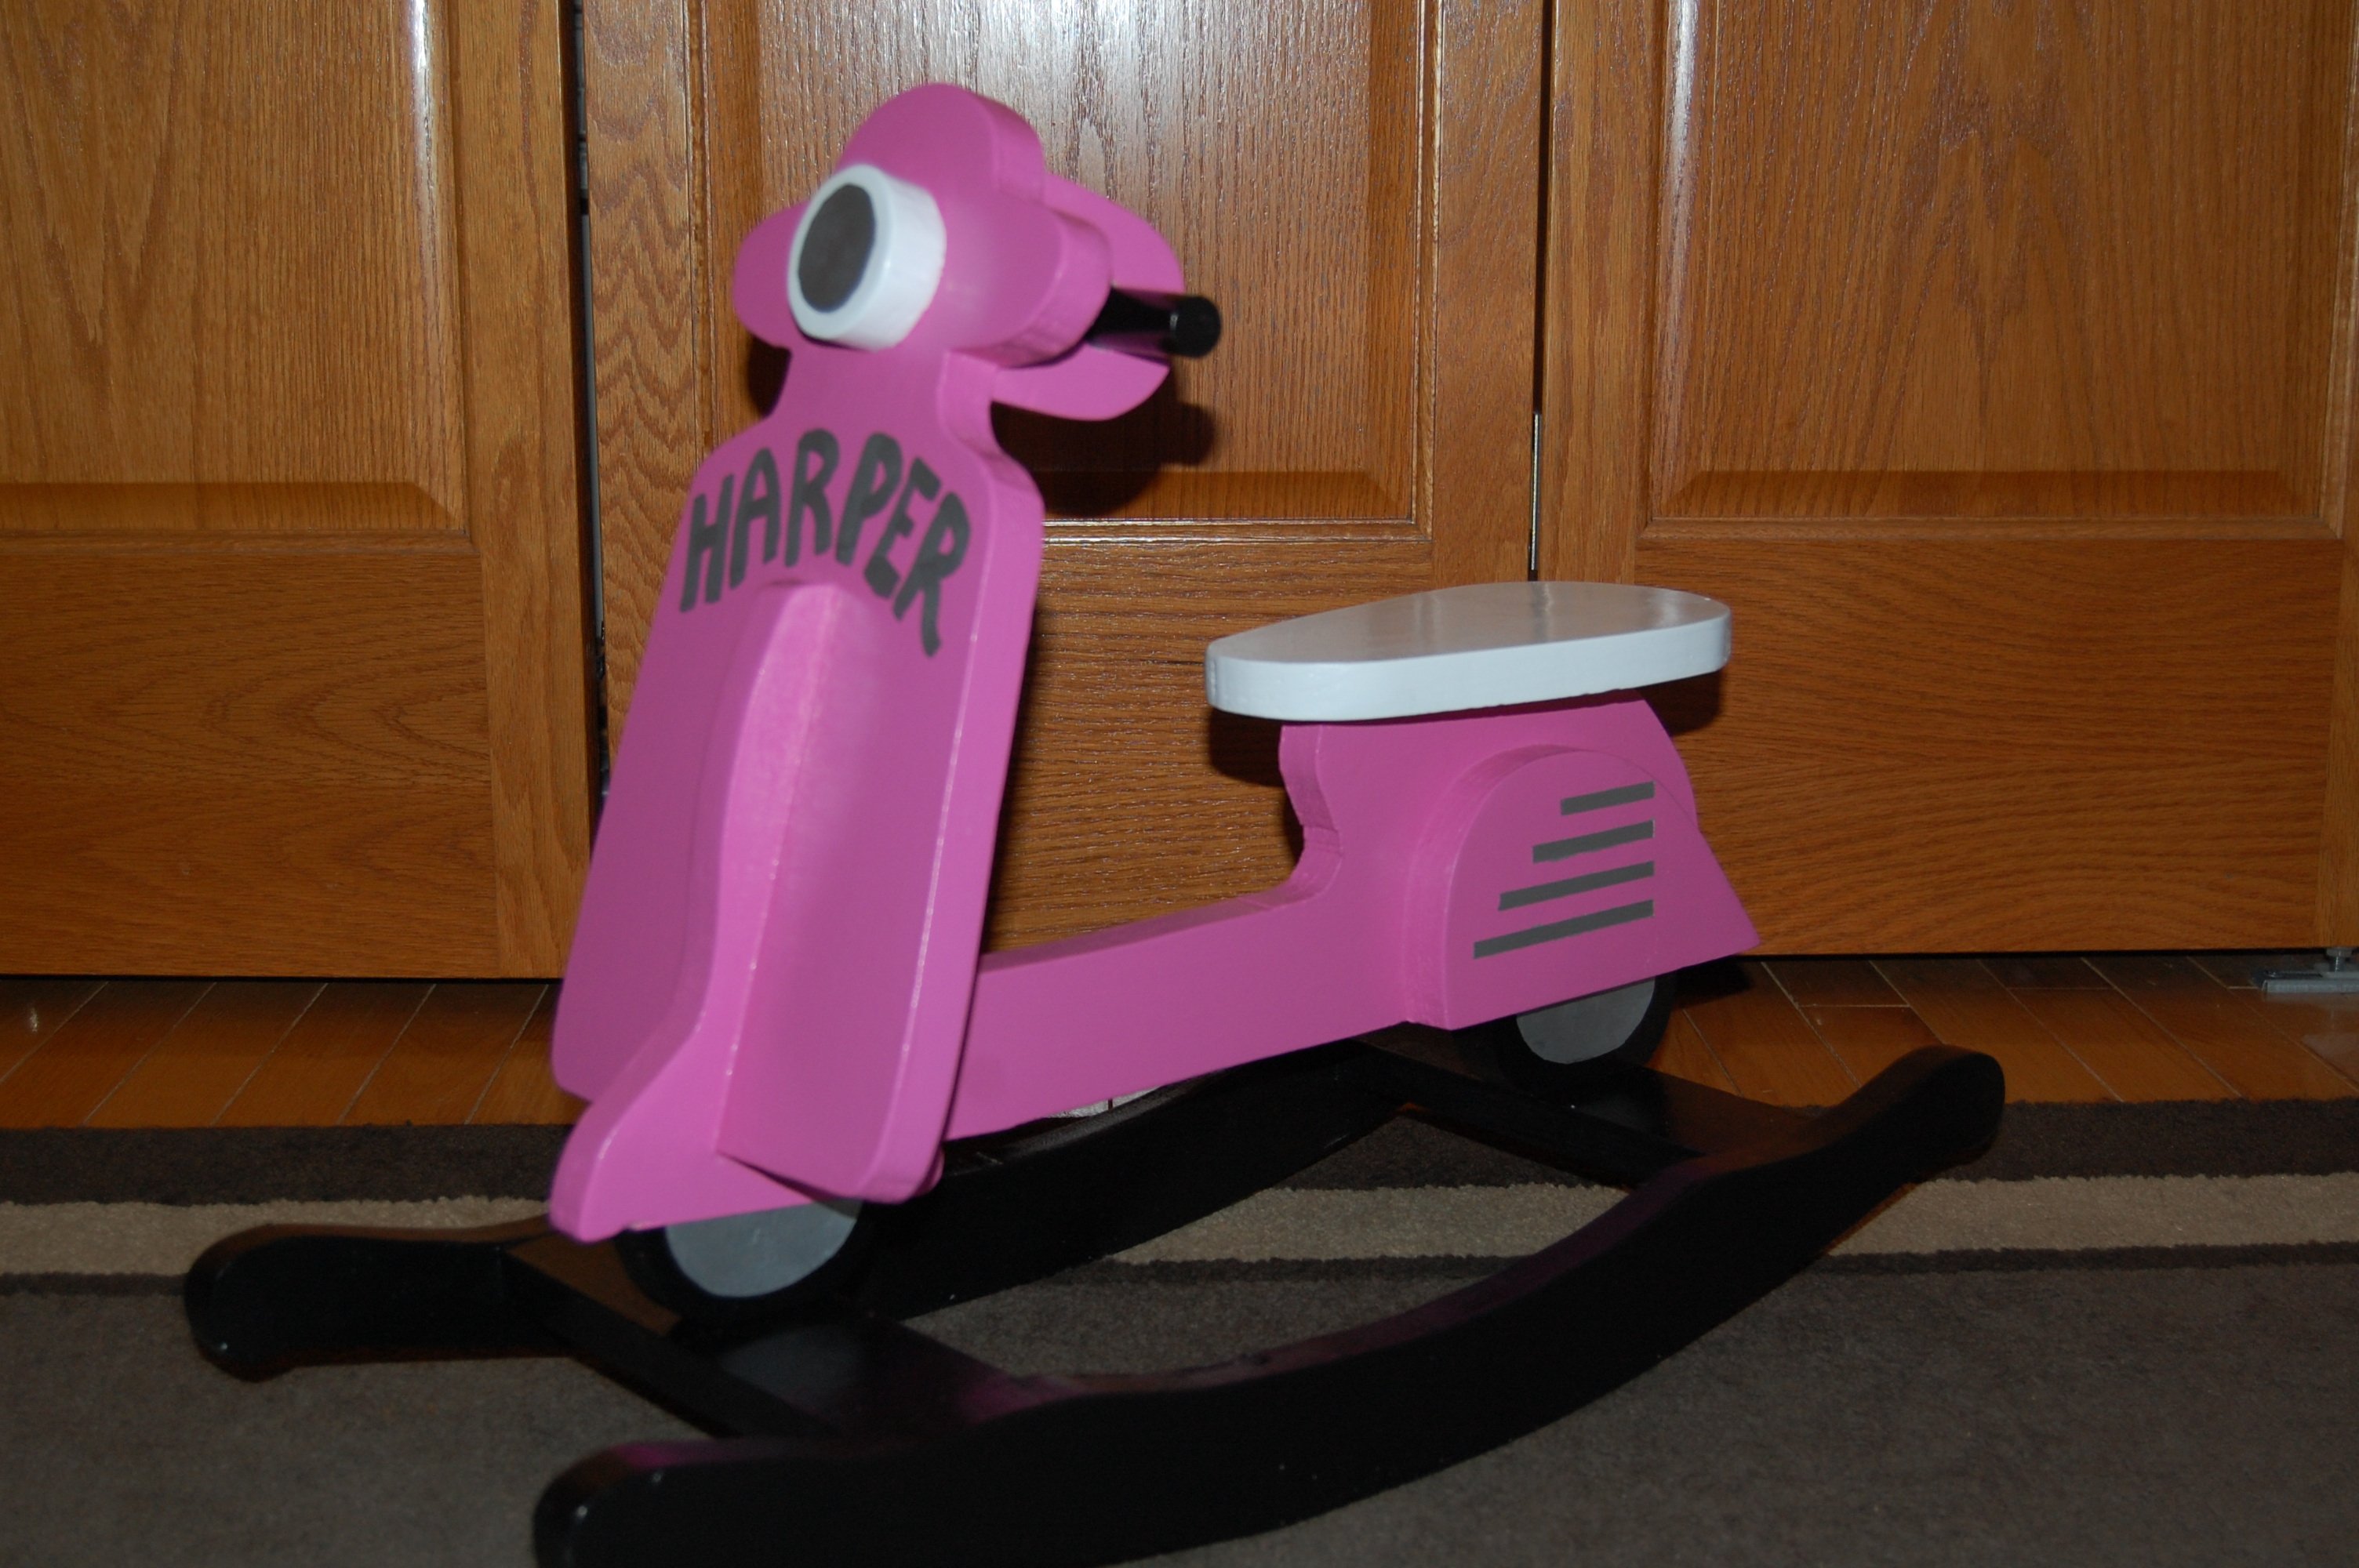
I saw this adorable scooter on Ana's website and thought it would be perfect for my godchild's 1st birthday! (my kids are a little too big for it otherwise I would have made it for them as well). I didn't read the entire post before I started so I didn't read that you should use harder wood to avoid chipping and all that but it still worked out okay, certainly not perfect but a fun gift that I was proud to give.
The multiple paint colors added time as I was always retouching one color up and then going back to another color but that was more me being sloppy than anything.
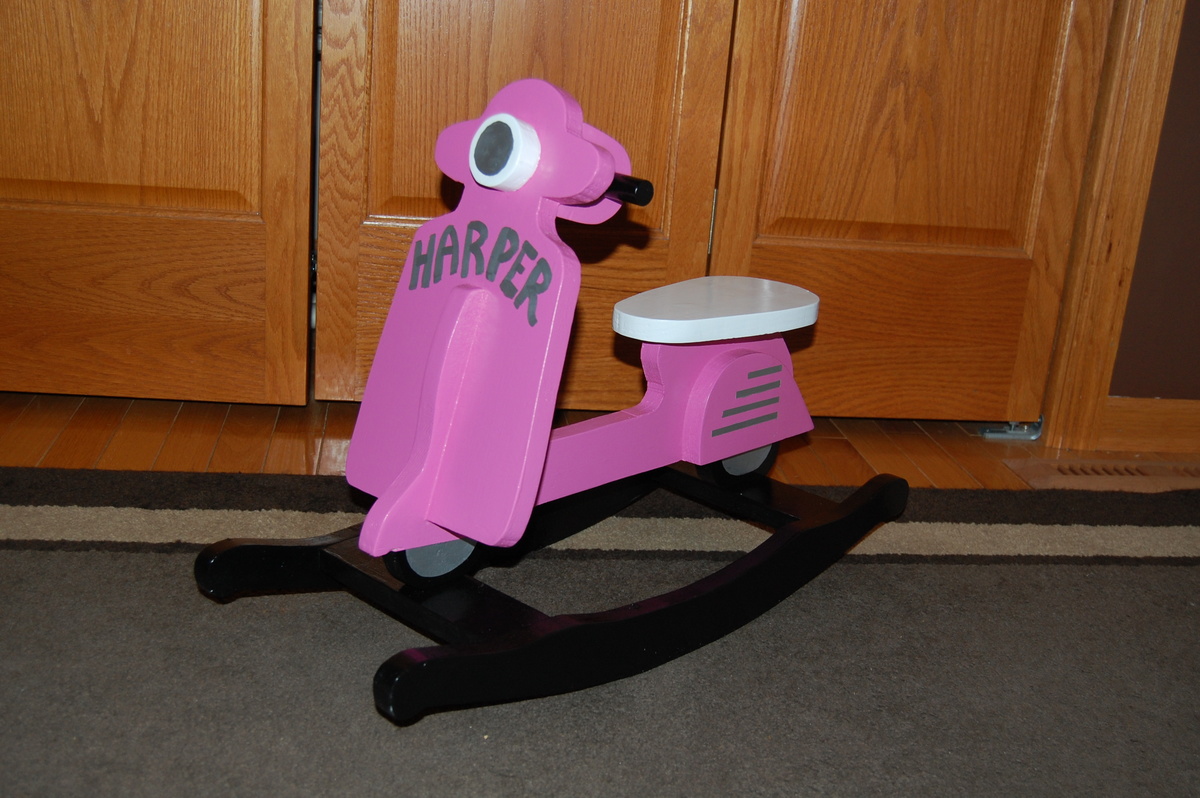
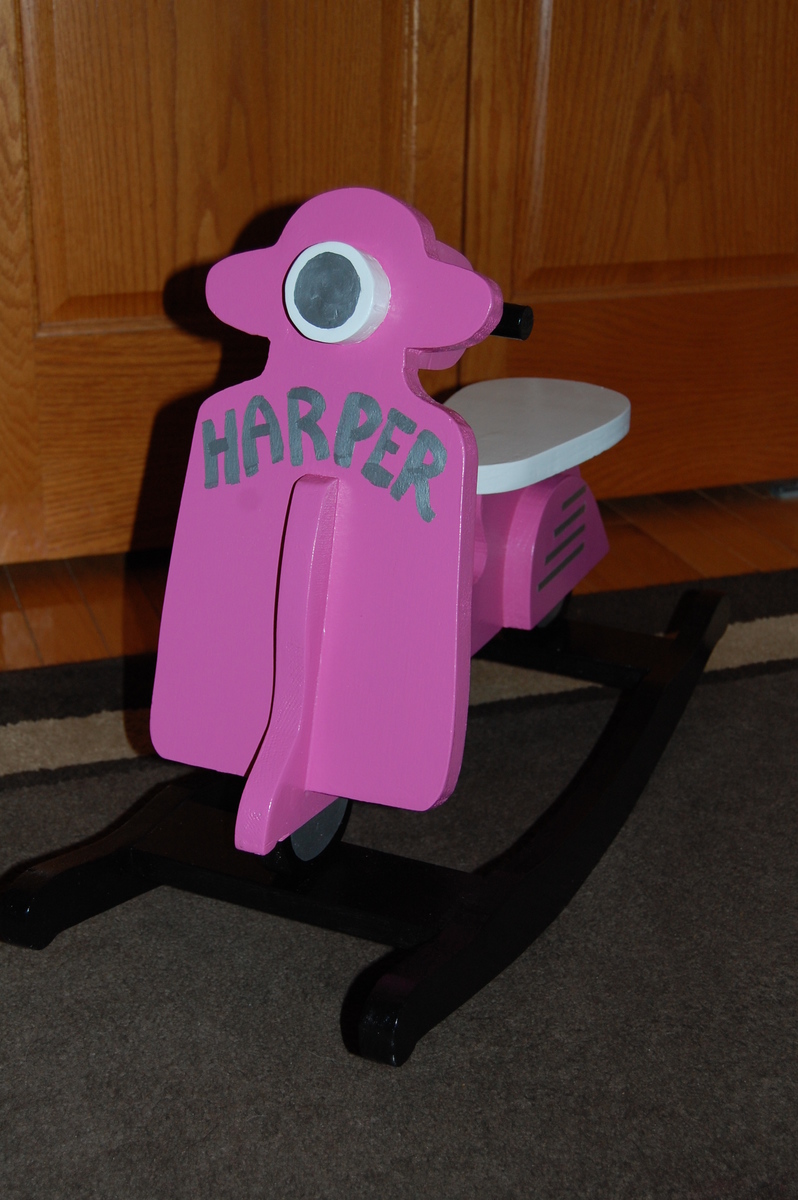
Built from Plan(s)
Estimated Cost
$20
Estimated Time Investment
Weekend Project (10-20 Hours)
Finish Used
Painted finish
Recommended Skill Level
Beginner
Comments
Sat, 01/19/2013 - 20:30
Charlie's skooter
Where can I get the plans for this skooter. I would love to make this for my granchildren
Thu, 02/07/2013 - 11:25
Scooter plans
Here is the link for the plan to make the scooter.
http://ana-white.com/2012/05/plans/charlie039s-scooter
Otherwise you can just search under keyword "scooter" and find the plans that way as well.
Good luck!
Vintage Pew Bench
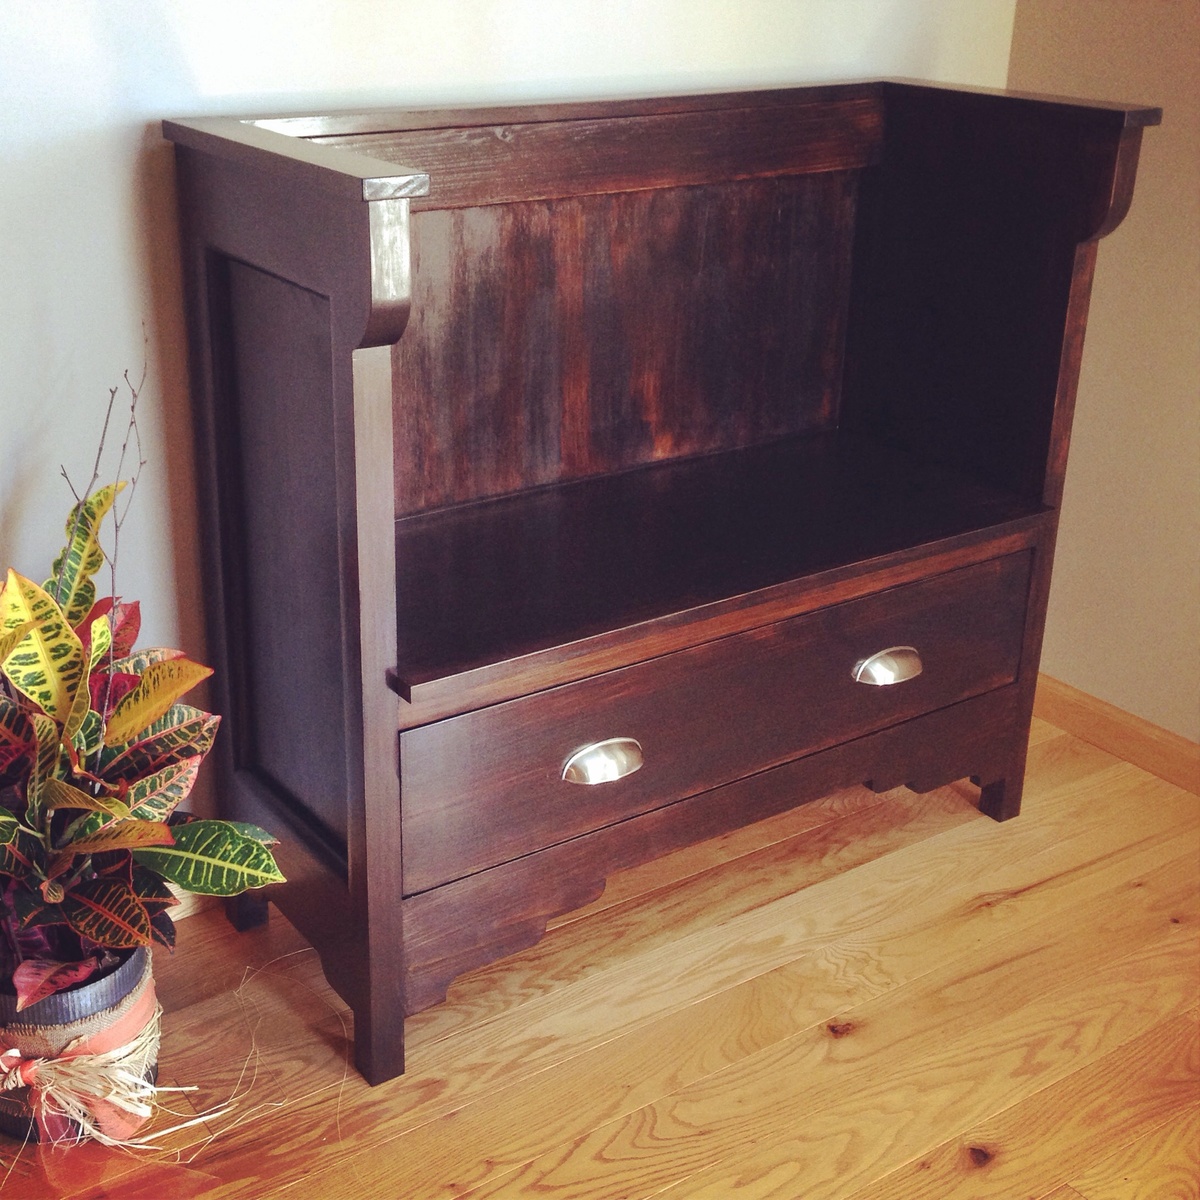
Entryway pew bench
Built from Plan(s)
Estimated Cost
$75
Estimated Time Investment
Day Project (6-9 Hours)
Finish Used
Minwax Polyshades in Espresso
Recommended Skill Level
Intermediate
Comments

Tue, 09/23/2014 - 17:21
Blog Link
I couldn't seem to get the blog link up: some more additional photos on there.

Painters Ladder
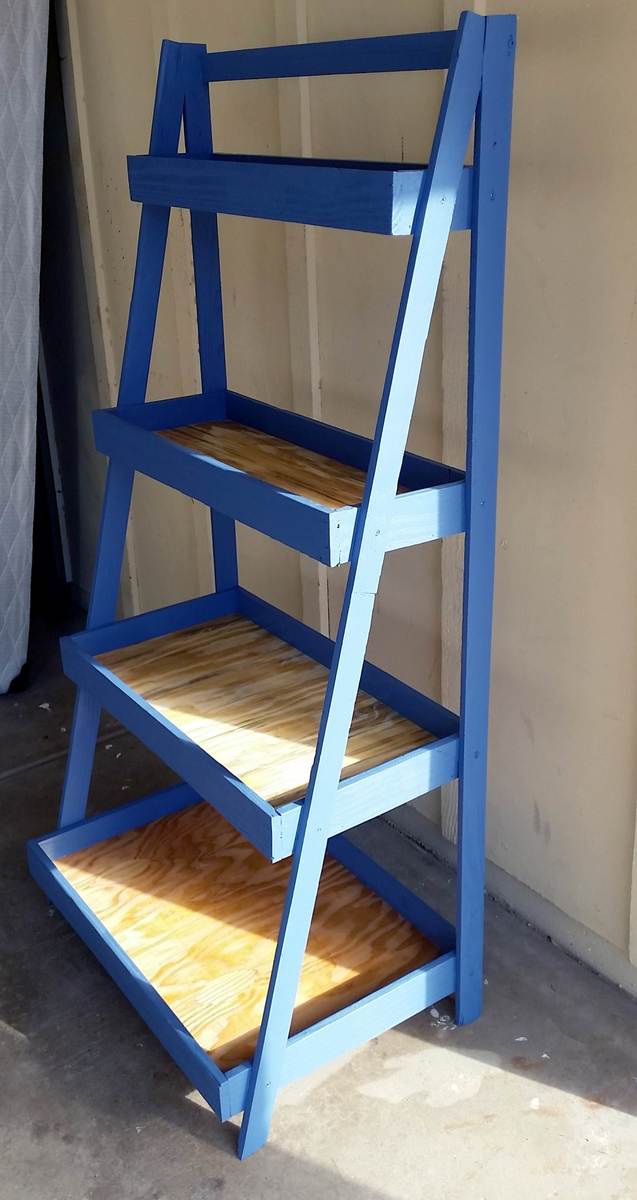
The legs and trim were made from 2x4 that I cut down to size with the table saw. Plywood from a chicken coup I made from Ana''s chicken coup plan was used for the shelf base.
Built from Plan(s)
Estimated Cost
Free, made from scrap wood.
Estimated Time Investment
Afternoon Project (3-6 Hours)
Finish Used
Clear gloss polyurethane and blue paint semi gloss, left over from the chicken coup.
Recommended Skill Level
Intermediate
Clubhouse Bunkbed

This was my first ana white project. I didn't take great photos. I also modified the bunk a bit for small children. I added a bunk right on the floor and made the legs slightly longer so that there was some headroom. After the kids grew a little, we switched it back to just the clubhouse with some room underneath for storage/playing. First time using pocket holes too.
Built from Plan(s)
Finish Used
Polyurethane on body. Paint/clear coat on trim.
Recommended Skill Level
Intermediate
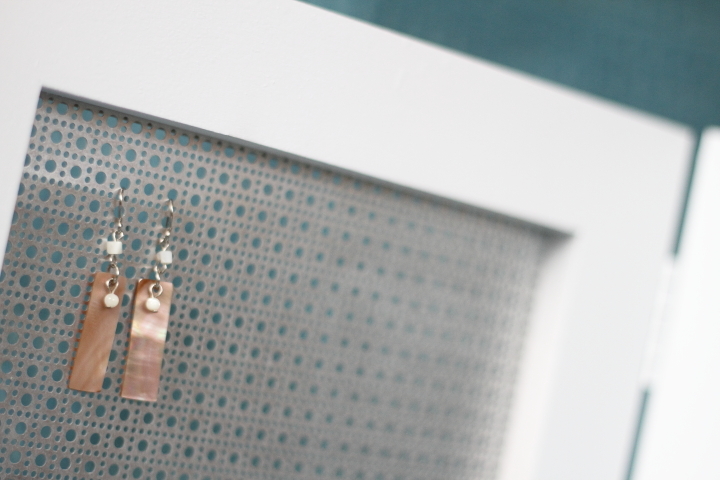
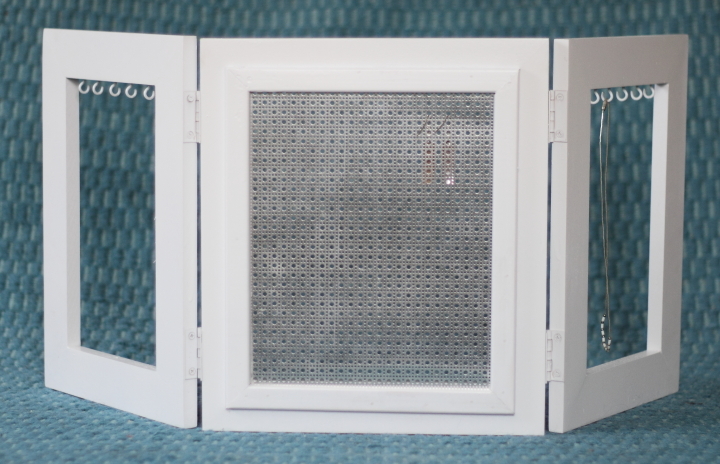
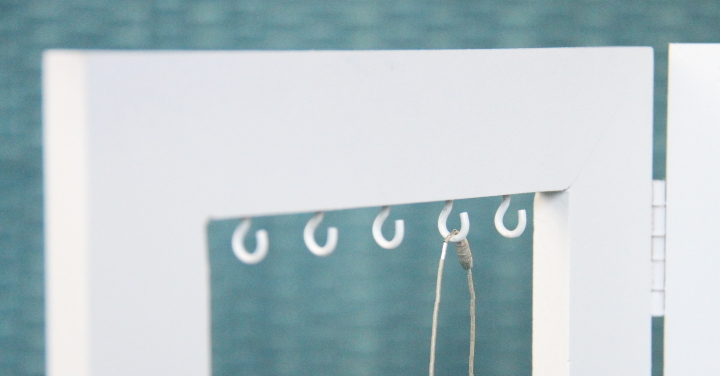
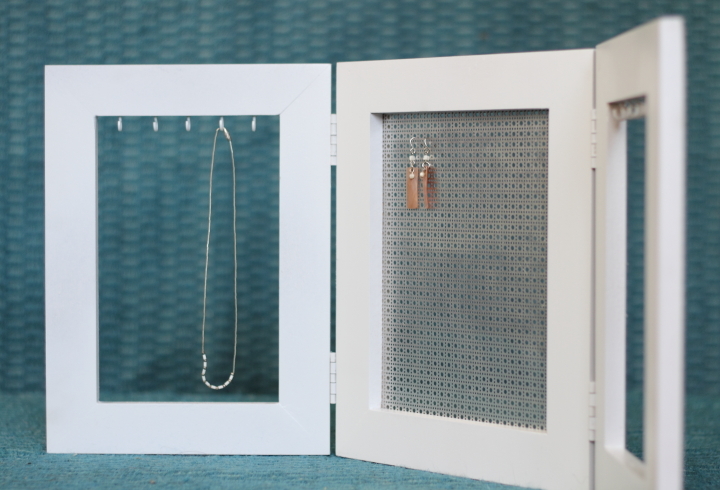
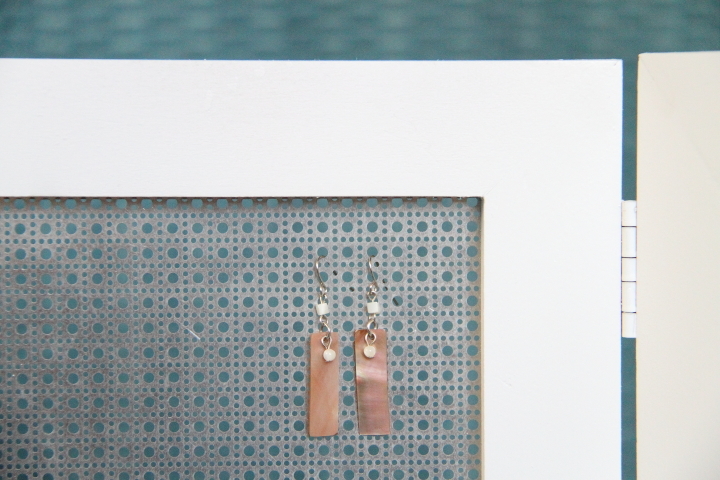
Triptych Jewelry Stand
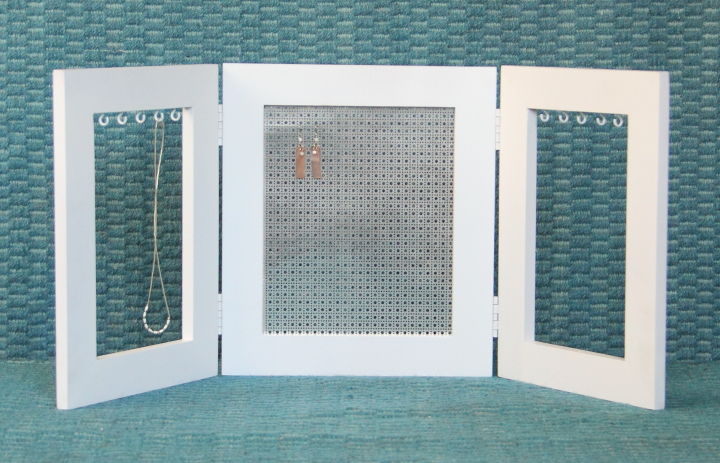
For my boyfriend's oldest niece, who is 13, I decided to make a jewelry stand for Christmas this year. I thought it would be fun to make a triptych with a place for earrings in the middle and necklaces on the sides, sketched out a basic design and got started building.
For the details on how to build it, check out my blog: http://homeandawaywithlisa.com/blog/2012/12/18/triptych-jewelry-stand.h…
Estimated Cost
$10
Estimated Time Investment
Afternoon Project (3-6 Hours)
Finish Used
White Spray Paint
Recommended Skill Level
Intermediate
Camp Loft Bed
I extended the landing and added rails.
Built from Plan(s)
Estimated Cost
$200
Recommended Skill Level
Beginner
Comments
Mon, 06/01/2015 - 12:06
Questions
I love your modifications with extending the landing. Do you have more pictures that show the whole thing? Did you by chance write down any notes with what you did differently? We are building this bed next week and would love to make a "deck" like you did.

In reply to Questions by wrigleysmama
Sun, 01/22/2017 - 10:39
Hi, Ana here! I might
Hi, Ana here! I might suggest something like this -
[[{"type":"media","view_mode":"media_original","fid":"3154931926","attributes":{"alt":"","class":"media-image","height":"834","typeof":"foaf:Image","width":"891"}}]]
Basically just increase the length of the side pieces first to however long you would like the deck to be.
Then, if you need extra support, add legs on the inside of the platform where needed. On the front side if you are doing railing you could even extend the front leg up so it is part of the railing too.
You may need to add additional supports for the deck boards, shown in green above, but this should be easy enough to do.
Hope this helps!
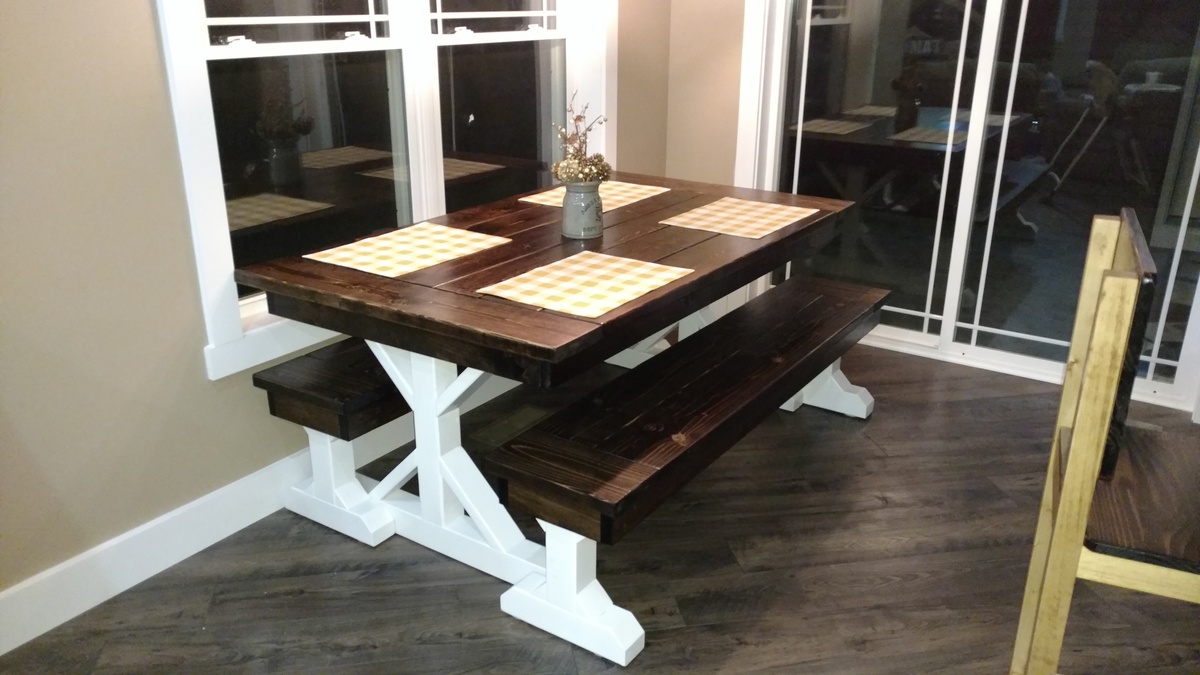
Farmhouse Table
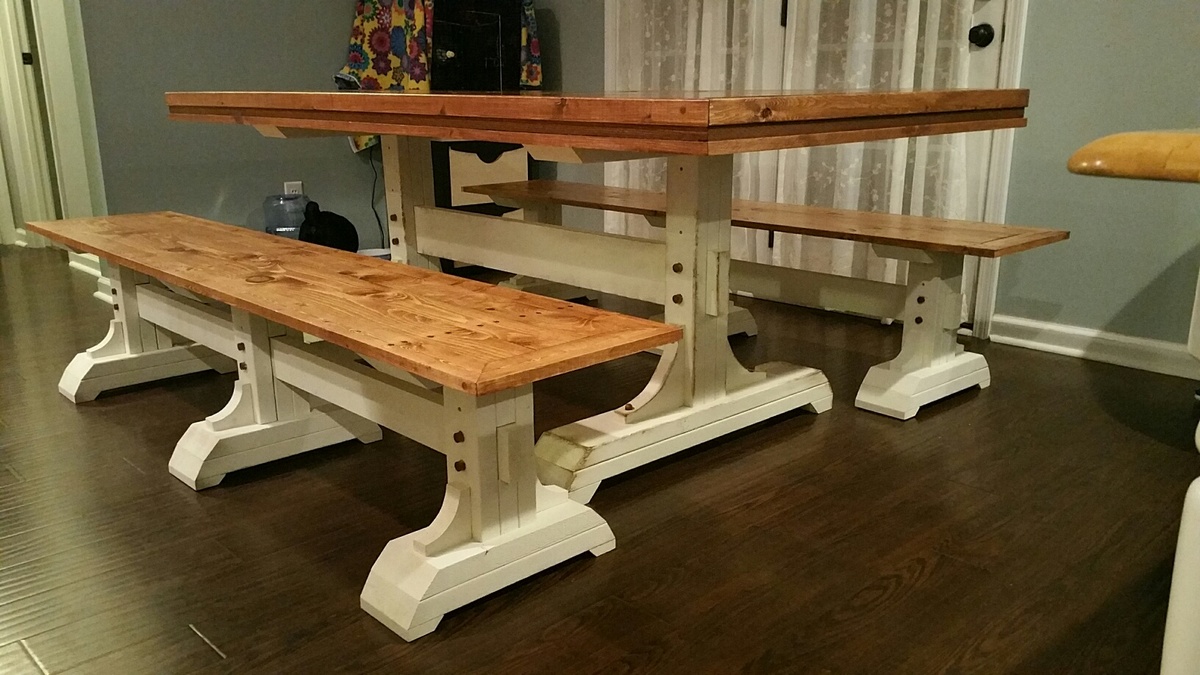
Although I loved the original plans I had a much smaller space to put this in, so 10ft was not an option. So I cut it down to a more managable size and I think it came out great. Let me know what you think. Great plans and I love the site!
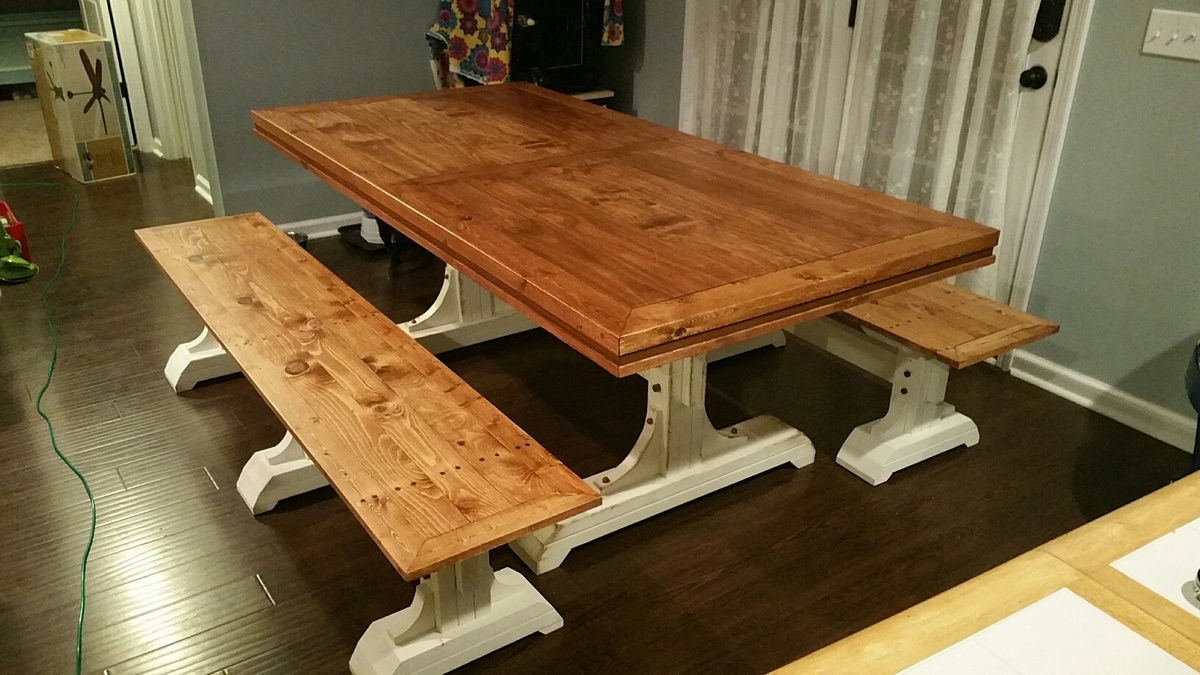
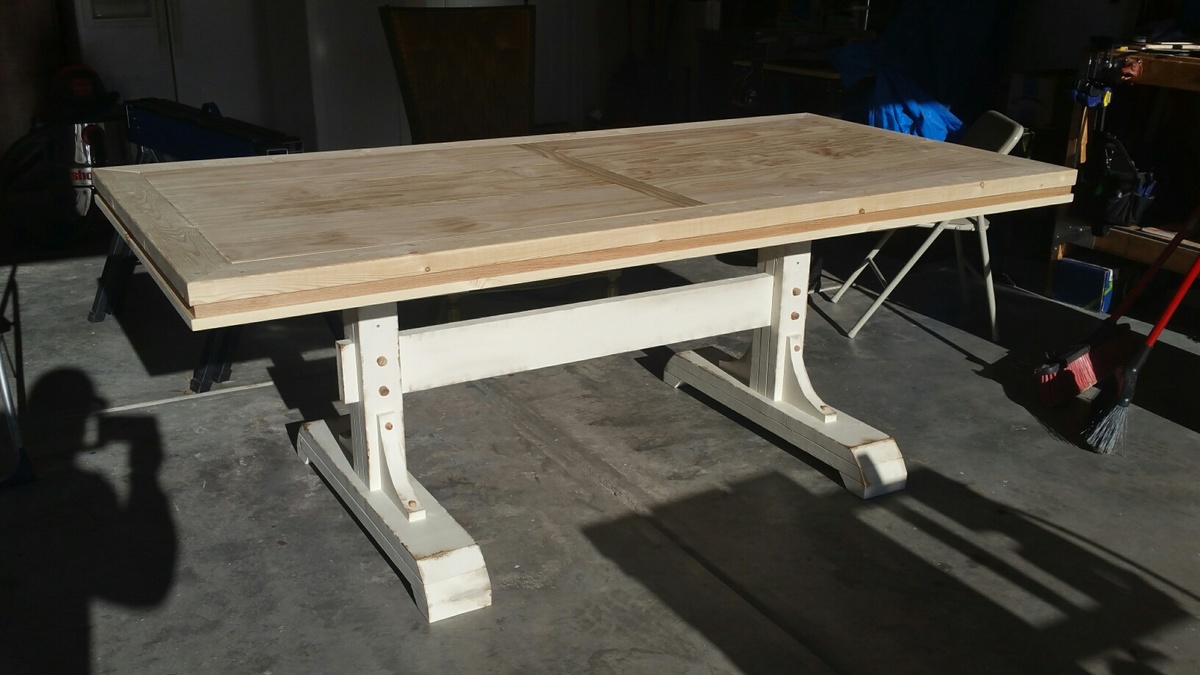
Built from Plan(s)
Estimated Time Investment
Week Long Project (20 Hours or More)
Finish Used
Stain and Lacquer combo.
Recommended Skill Level
Beginner
Farmhouse counter stool - Thanks Ana!
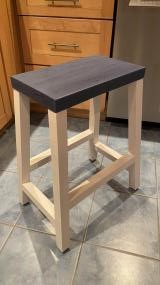
I started learning woodworking several weeks ago and came across your video and plans for the Farmhouse Counter Stool. It was easy to follow, and I love how it turned out! I made one first as a test, and I think I'll make three more. Thanks Ana!
Built from Plan(s)
Estimated Time Investment
Day Project (6-9 Hours)
Finish Used
Chalked paint - linen white and coastal blue, matte clear finish
Recommended Skill Level
Intermediate
Comments
Fri, 09/25/2020 - 14:57
Wonderful!
Welcome to the woodworking community, it looks fantastic! Thank you for sharing:)
Exotic Wood Sofa - Brazil
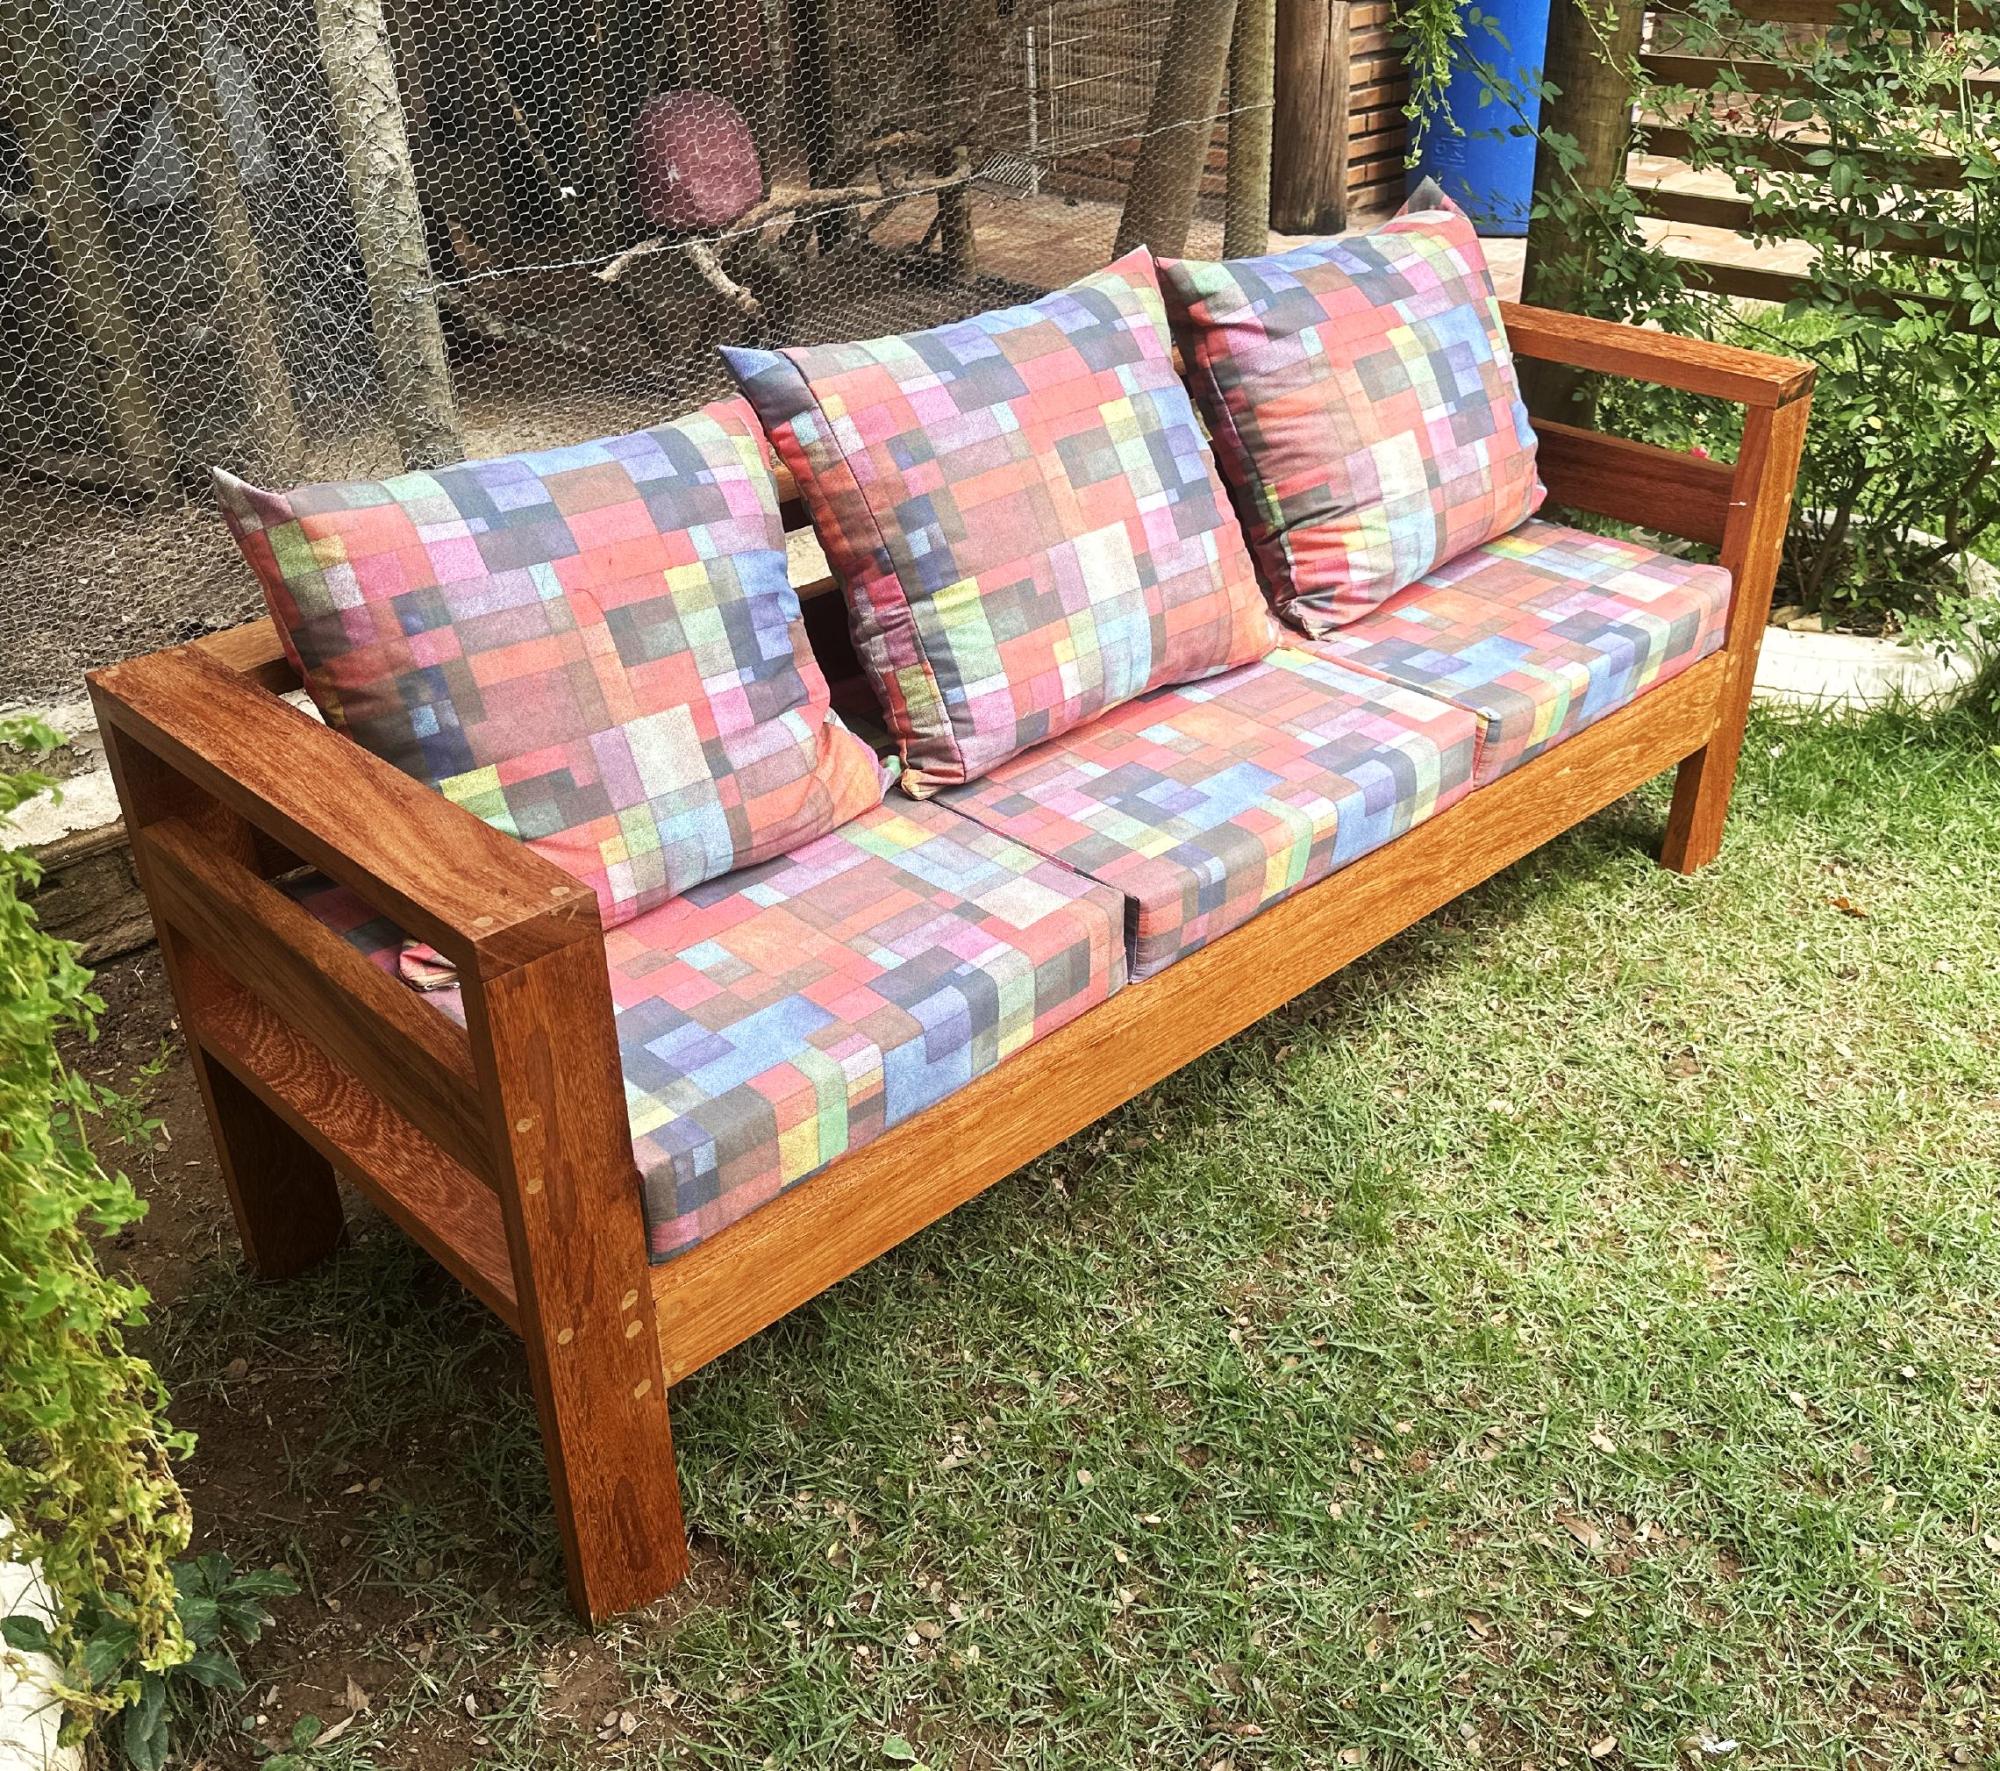
This is my first project following your plans. The wood I've made it is called “Angelim” in Brazil. The finish is a stain called “Sparlack Cetol INCOLOR UV GLASS”.
Built from Plan(s)