Community Brag Posts
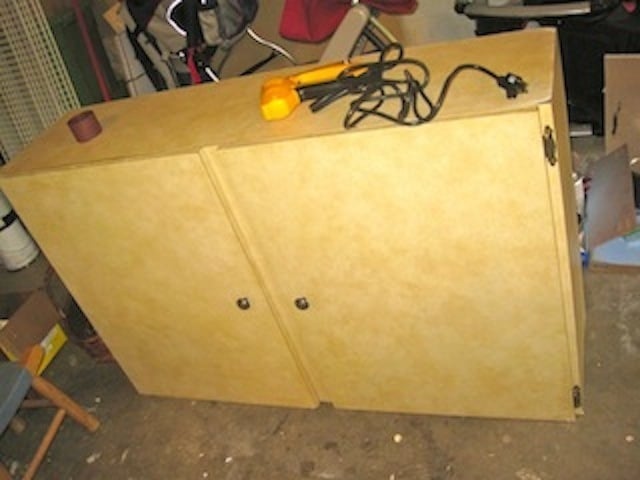
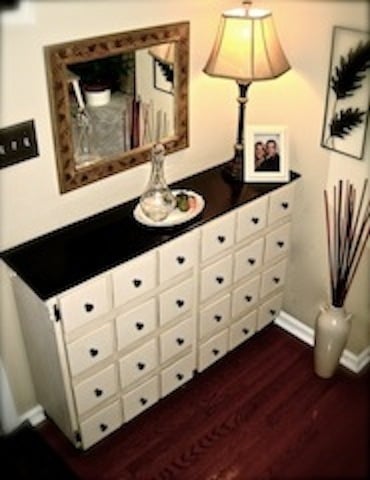
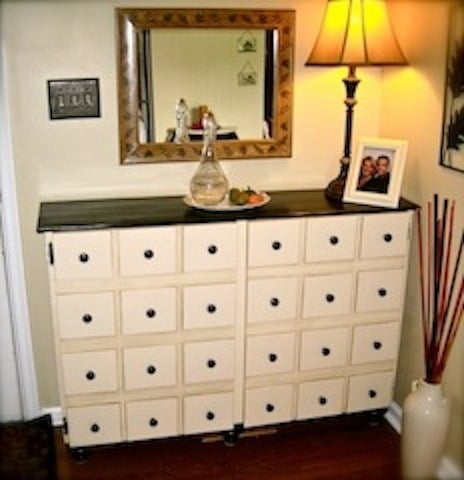
From Cast-off Wall Cabinet to Up-cycled Apothecary Cabinet Conversation Piece!
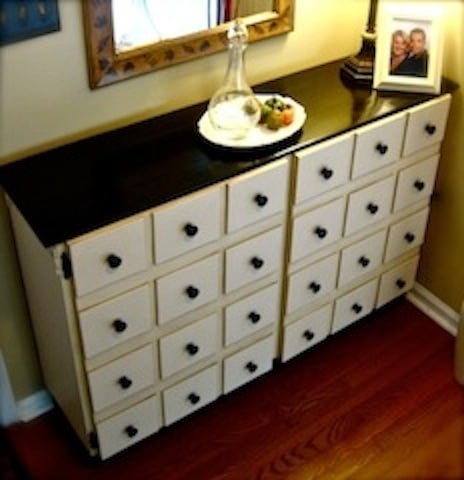
Hello, my name is Natalie Scott & this is my first Ana-White Brag Post! In the beginning, this cabinet was such a silly thing to find. I almost didn't even accept it from a neighbor, who was going to throw it out, when they offered it to me. It ended up becoming my biggest (& longest!) project yet; & the project of which I'm the most proud!
To see the complete process & transformation, go to:
http://TheVintageMagi.blogspot.com/2012/01/from-trash-to-treasure-entry…
Once I had a plan in place,
1. I went to Jo-Ann Fabrics & got a thin, plywood craft boards.They were 1/4" thick, 6" wide, & 36" long.
2. Of course, I already had the base for the cabinet whose dimensions were slightly different than the plans on Ana-white.com, so the math was up to me. After lots & lots & lots & LOTS of equations, I knew that the drawers would have to be 6" long & 7" wide, which is why I went with the 6" wide boards. Less cutting on my part would ensure more uniformity.
3. I started measuring in 7" at a time (& double-checking & measuring again) & cutting with a circular saw.
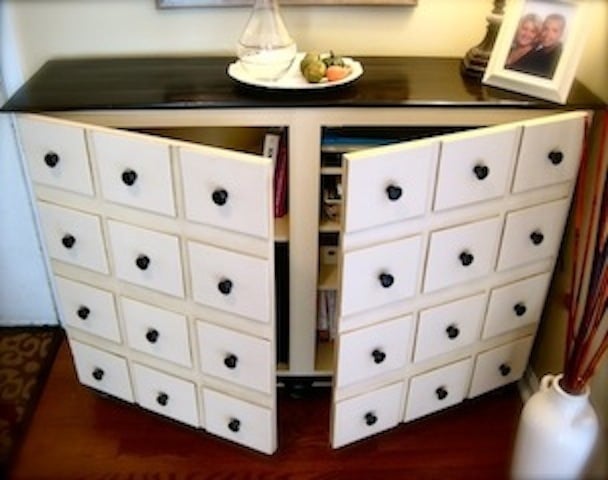
4. I used a blend of construction adhesive & wood glue to seal the plywood "drawers" to the cabinet doors. I didn't even need to clamp!
5. After drying, I filled in any large cracks that may have popped up with wood-filler & let that dry before sanding it down.
While the seal on the "drawers" was drying,
6. I painted the cabinet with Rust-Oleum's Ivory Silk Satin Finish spray-paint.
7. I also picked out wooden knobs at $0.94 a piece as well as 6 traditional-style furniture feet & spray-painted them with Rust-Oleum's Oil-Rubbed Bronze.
8. The feet had screws that allowed them to attach right in to "Heavy Duty Top Plates" that I were attached to the bottom of the cabinet.
All of these items were available at Home Depot.
9. Next, I sanded, primed & painted the doors.
10. After some careful measuring, I drilled pilot holes for each knob.
11. I added the shelves back in to the cabinet, which required more touching-up of the paint.
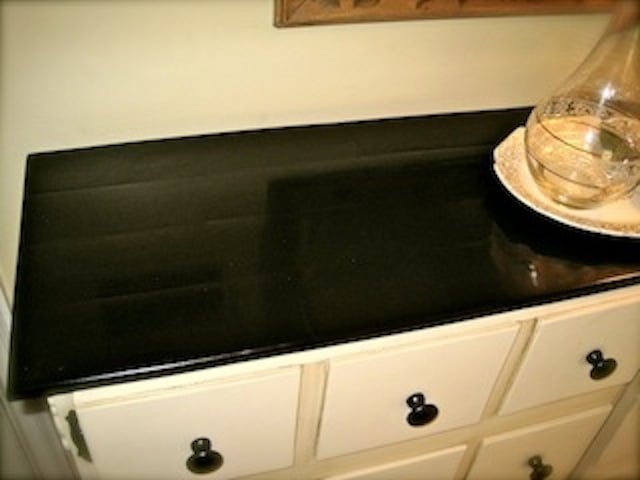
12. I had taken apart a wood pallet, measured the wood, & tried to think of a way to make it into a reclaimed wood top for the cabinet.
13. I cut the boards & made a layout, 4 rows of boards deep, on top of the cabinet, careful to remember the overhang. I added 4 little squares of wood, one in each row of planks, in flattering & uniform positions to complete the desired overhang effect.
14. I sanded the wood, rearranged it, & sanded it some more.
15. I glued the top in place, using the same mix of construction adhesive & wood glue I used before.
16. Next, I used STAINABLE wood-filler to fill in all of the cracks. Then I sanded again from 60-grit up to 200-grit,
17. & made sure by using a LEVEL that the finished surface was FLAT & EVEN.
18. Before it's final sanding, it needed to be extra secure; so I got out the finishing nails & put two nails in each board (except the little squares of wood, which only got one nail), one at each end.
19. I sanded with 220-grit sandpaper.
20. Getting the stain just right for the reclaimed wood top took awhile. Just when I was about to give up, paint & distress it instead, I had an idea. I took what was left (which wasn't much) of the little can of Minwax PolyShades stain in Espresso Brown & added some spoonfuls of Minwax Gel Stain in Hickory (which was MUCH easier to apply) straight into the little can. I shook the can & made a mixture of my own stain that was still a beautiful, dark color - but MUCH easier to apply. I applied 2 coats of stain, following drying-time instructions.
21. I touched up any mistakes on the cabinet with "Goof-Off."
22. I finish covered the stained top with a coat of hardening Minwax Paste Finishing Wax (applied in tiny circles just like waxing a car - "wax on, wax off!").
23. I added the decorative wood trim moldings on the side (using Gorilla brand wood glue mixed with construction adhesive again),
24. attached the finishing touches (like magnets to catch the cabinet doors & keep them shut),
25. & touched up all the ivory-colored paint one last time.
26. I used Rust-Oleum Transformations Decorative Glaze in Java Brown to glaze to the ivory-colored cabinet base (I did not glaze the stained wood top).
27. I coated the whole cabinet with a coat of hardening Minwax Paste Finishing Wax (the same as in step 22).
28. I attached the knobs,
29. & added these "Felt-Gard" self-leveling, heavy-duty felt pads to the bottom of the feet to protect my hardwood floors.
30. It went inside & was decorated, but is still not completely fit with it's final accessories. It looks great!
To see the complete process & transformation, go to:
http://TheVintageMagi.blogspot.com/2012/01/from-trash-to-treasure-entry…
Thank you for the inspiration & all the attention this project has brought my blog & business! Everyone has responded very well & I couldn't be more proud of myself & the accomplishment I feel. I mastered a lot of new tools & products on this project & am ready to start another one! Thank you, Ana-White.com!
"It was more than discovering something that I loved to do -
It was discovering someone I had always been."
~ Natalie ;-*
Built from Plan(s)
Estimated Cost
$50
Estimated Time Investment
Week Long Project (20 Hours or More)
Finish Used
1. Rust-Oleum's Ivory Silk Satin Finish spray-paint
2. Rust-Oleum's Metallic Finish Oil-Rubbed Bronze spray-paint
3. Minwax STAINABLE Wood-filler
4. Minwax PolyShades stain in Espresso Brown
5. Minwax Gel Stain in Hickory
6. Minwax Paste Finishing Wax
7. Goof-off
8. Rust-Oleum Transformations Decorative Glaze in Java Brown
2. Rust-Oleum's Metallic Finish Oil-Rubbed Bronze spray-paint
3. Minwax STAINABLE Wood-filler
4. Minwax PolyShades stain in Espresso Brown
5. Minwax Gel Stain in Hickory
6. Minwax Paste Finishing Wax
7. Goof-off
8. Rust-Oleum Transformations Decorative Glaze in Java Brown
Recommended Skill Level
Intermediate
Comments

Sun, 05/06/2012 - 09:14
Wow! What an amazing
Wow! What an amazing transformation! Your hard work really paid off with such a beautiful piece of furniture.
Barn for Tractor Supply animals
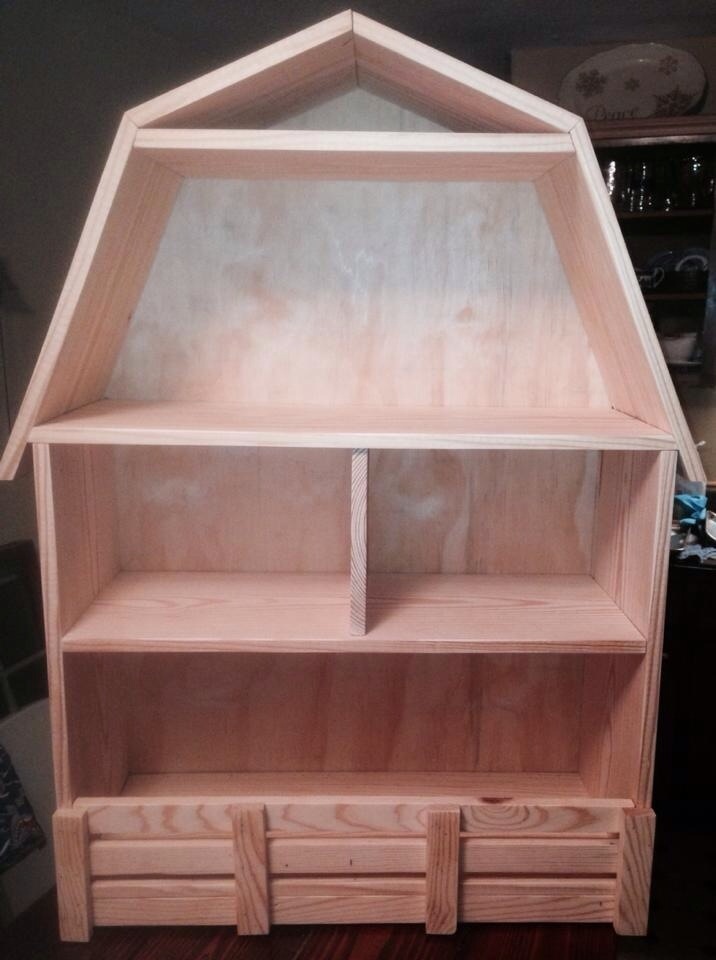
I built this for a friend's daughter who collects the Tractor Supply farm animals. This is the first time I have cut on angles to make the roof. The directions say built it from bottom to top but I found it easier to start for the top and work down. Then attach the whole roof where it marched on the barn... Hope this helps. I did not finish it cause the friend wanted to stain it herself...

Built from Plan(s)
Estimated Cost
$40
Estimated Time Investment
Afternoon Project (3-6 Hours)
Finish Used
None
Recommended Skill Level
Beginner
Farmhouse bed
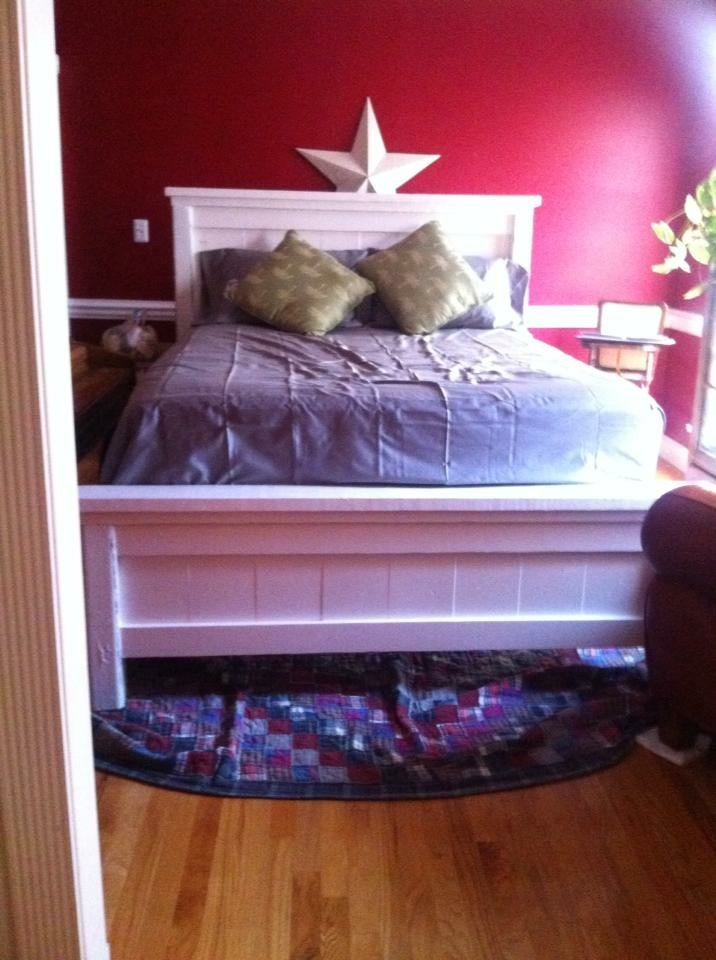
I stumbled across Ana White one day 3 years ago when I was 18 and about to go off to college. My parents weren't home for the weekend, I was bored, and decided a twin bed at my rental just wasn't going to cut it but I was an 18 year old who had champagne taste on a beer budget. I had been helping my dad ever since I was little with wood work all around the house but furniture was something we had never tackled and the idea of building a bed was a little daunting. However, these plans were super easy to follow and I must say, the finished product is absolutely beautiful. After 3 years and many more projects, this bed is still my favorite.
Needless to say my mom asked me for a few years to bring it back to go in my old bedroom at their house - so now I get to build another one!
Built from Plan(s)
Estimated Cost
$100
Estimated Time Investment
Day Project (6-9 Hours)
Recommended Skill Level
Beginner
Workbench
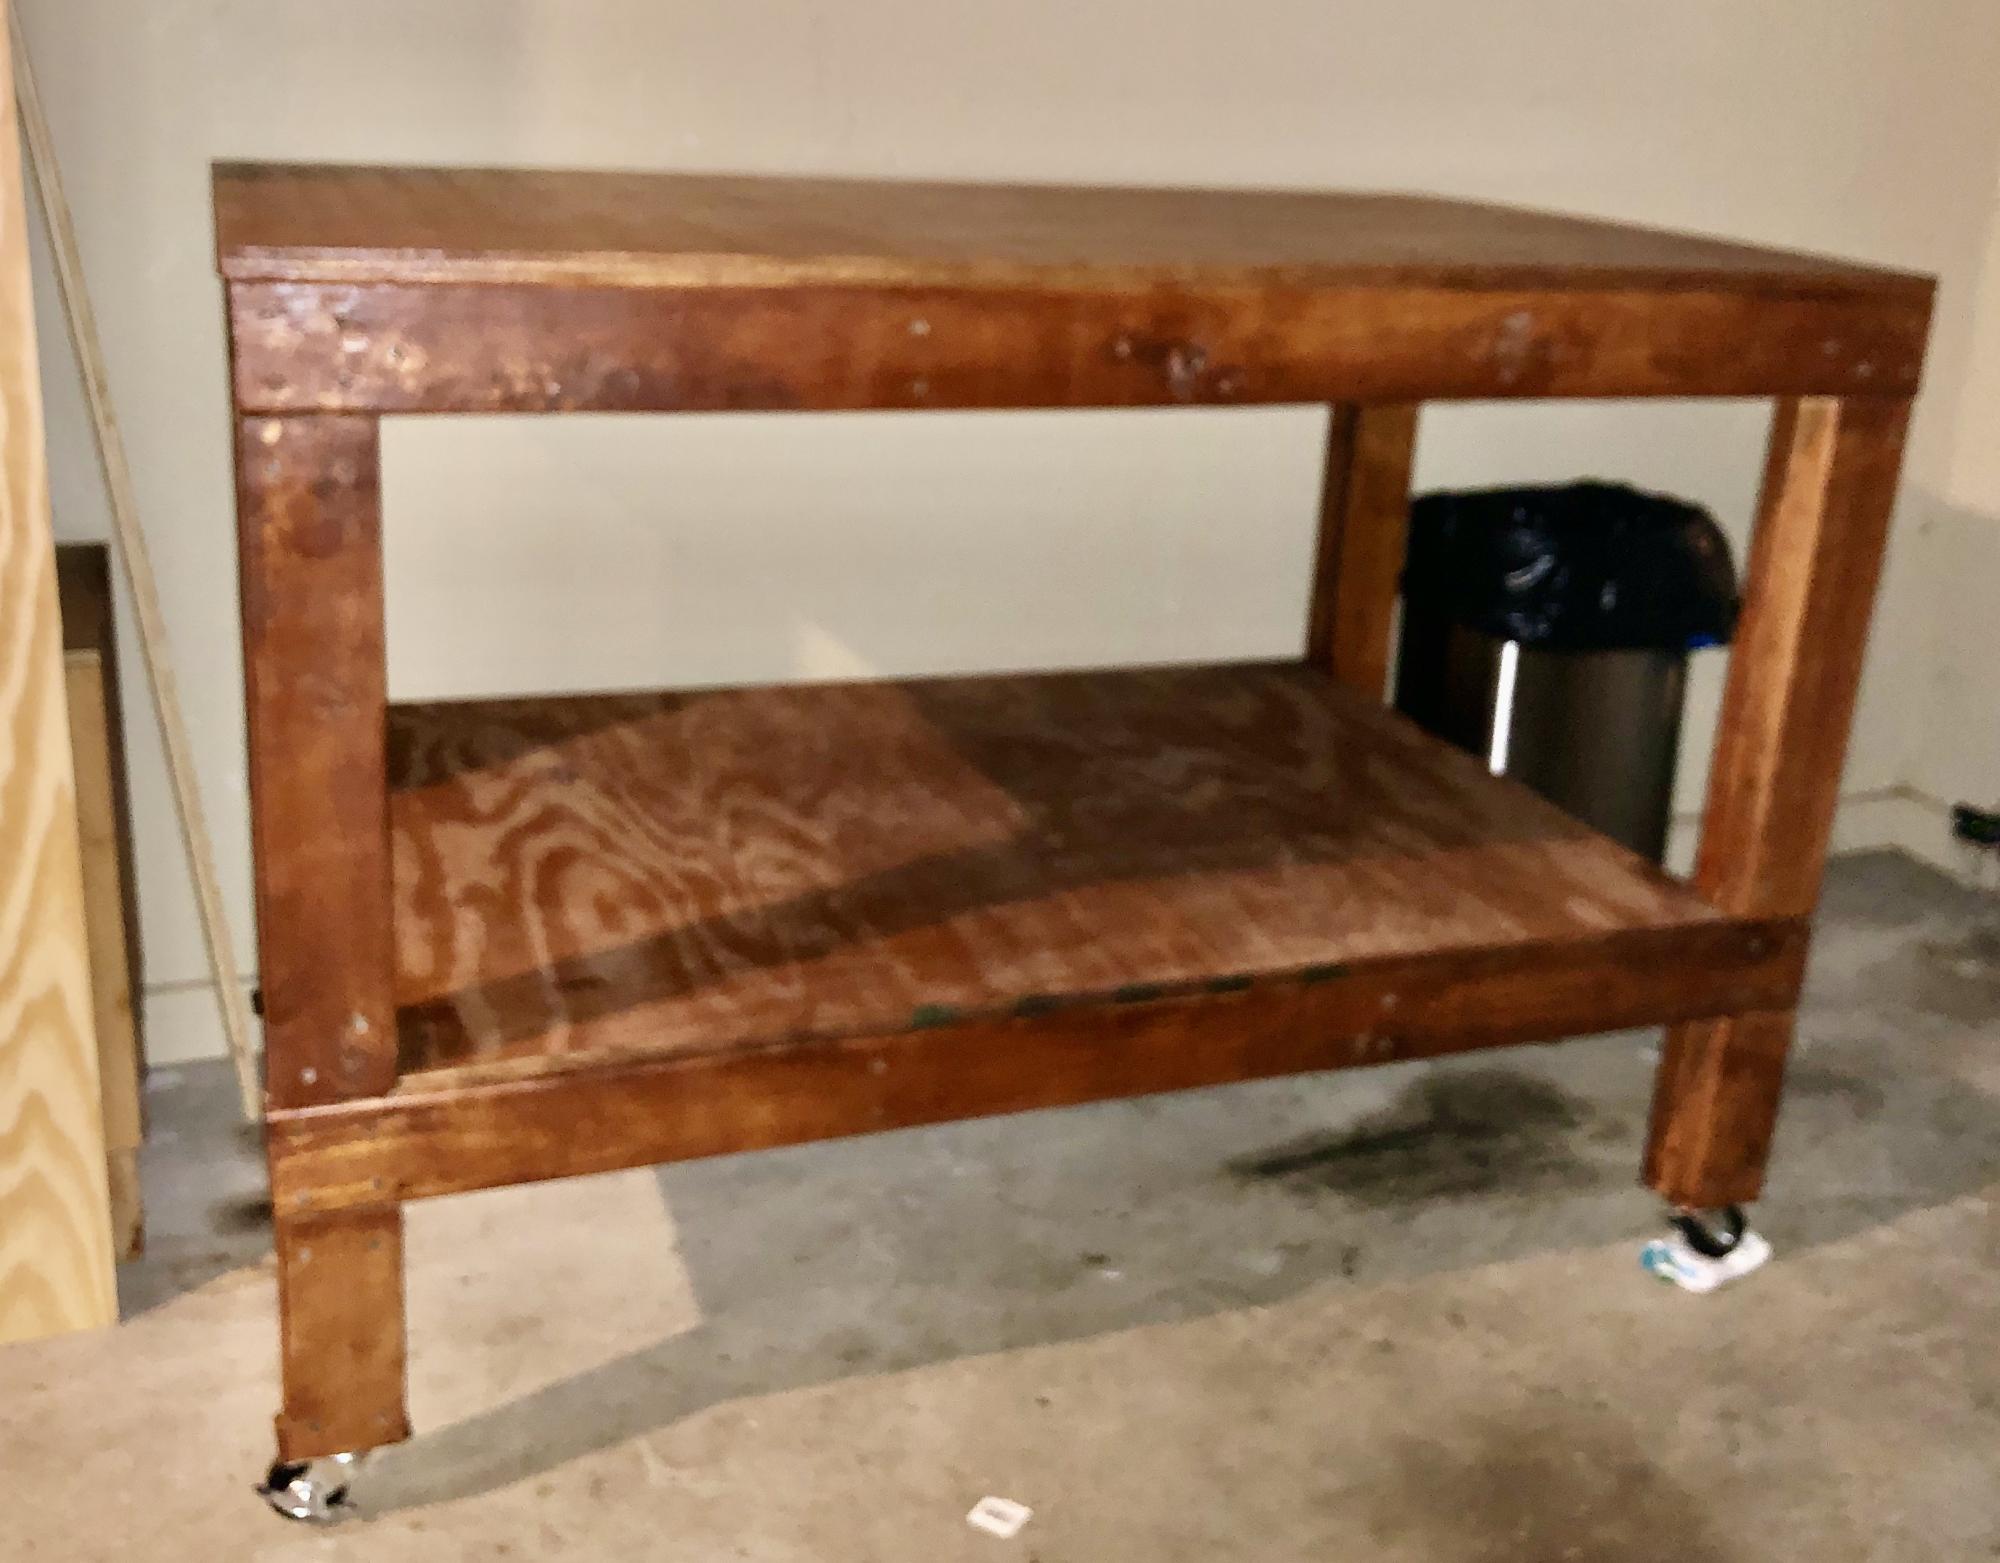
This was my first build and experience with power tools. The size of the workbench table is absolutely the perfect length and height. I ended up adding wheels that lock in place. I’m hooked! Thank you Ana White for providing the plans for a workbench.
Built from Plan(s)
Estimated Cost
$70.00
Estimated Time Investment
Day Project (6-9 Hours)
Finish Used
Walnut stain
Recommended Skill Level
Beginner
Comments

Thu, 02/20/2020 - 11:04
Sturdy wood workbench table
This project is perfect for the beginner. The plans are very simple to follow especially for one that’s never picked up a power tool. I am absolutely hooked.
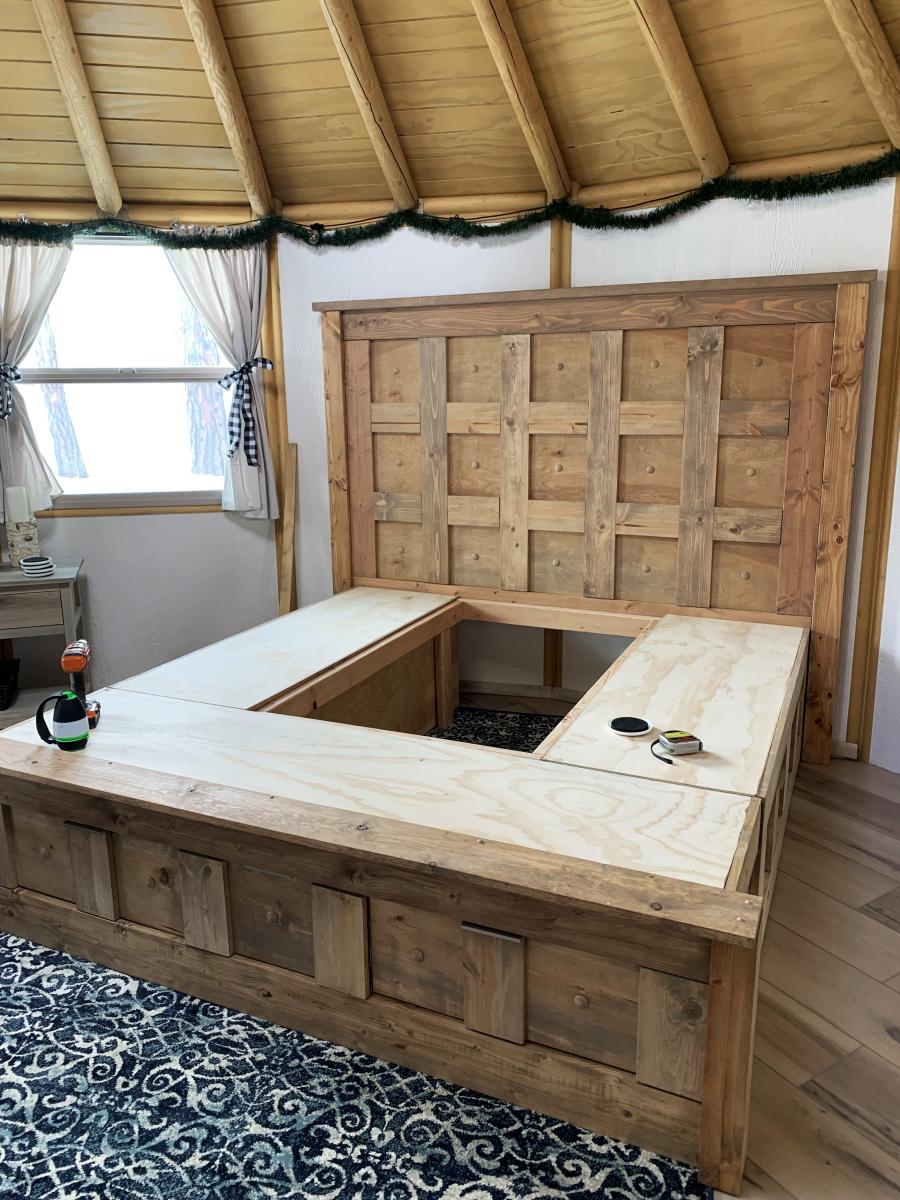
Farmhouse Bed for Yurt Living
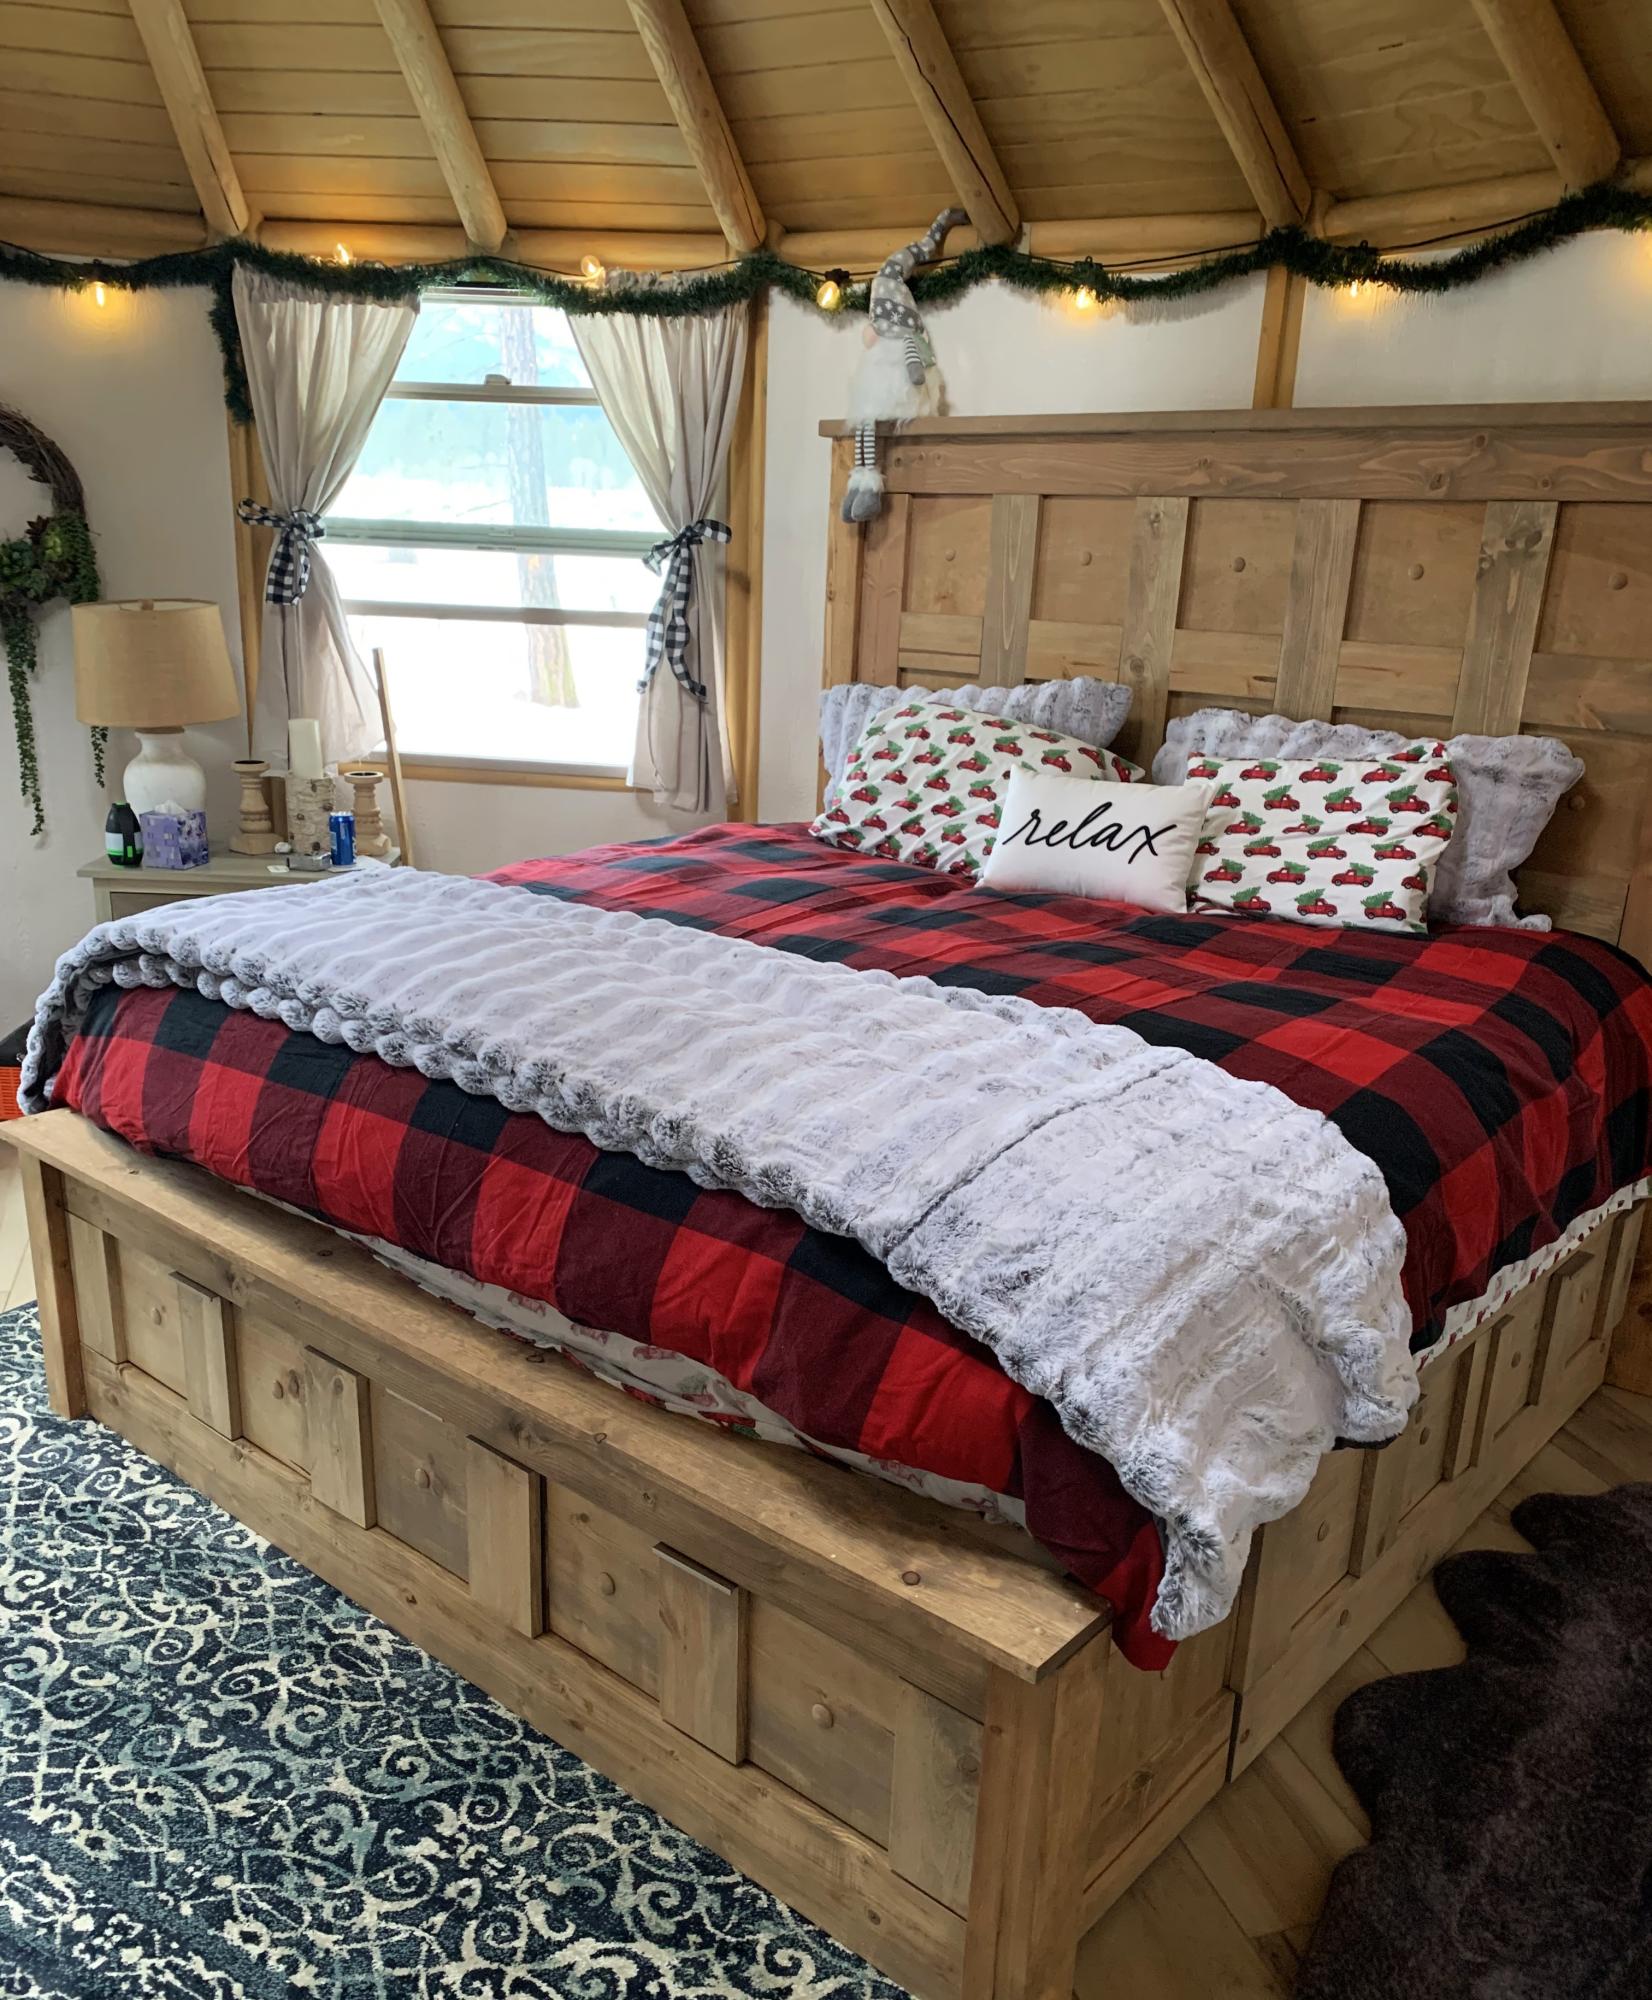
King bed with storage for yurt.
Using instructions from Ana and tweaking them a little.
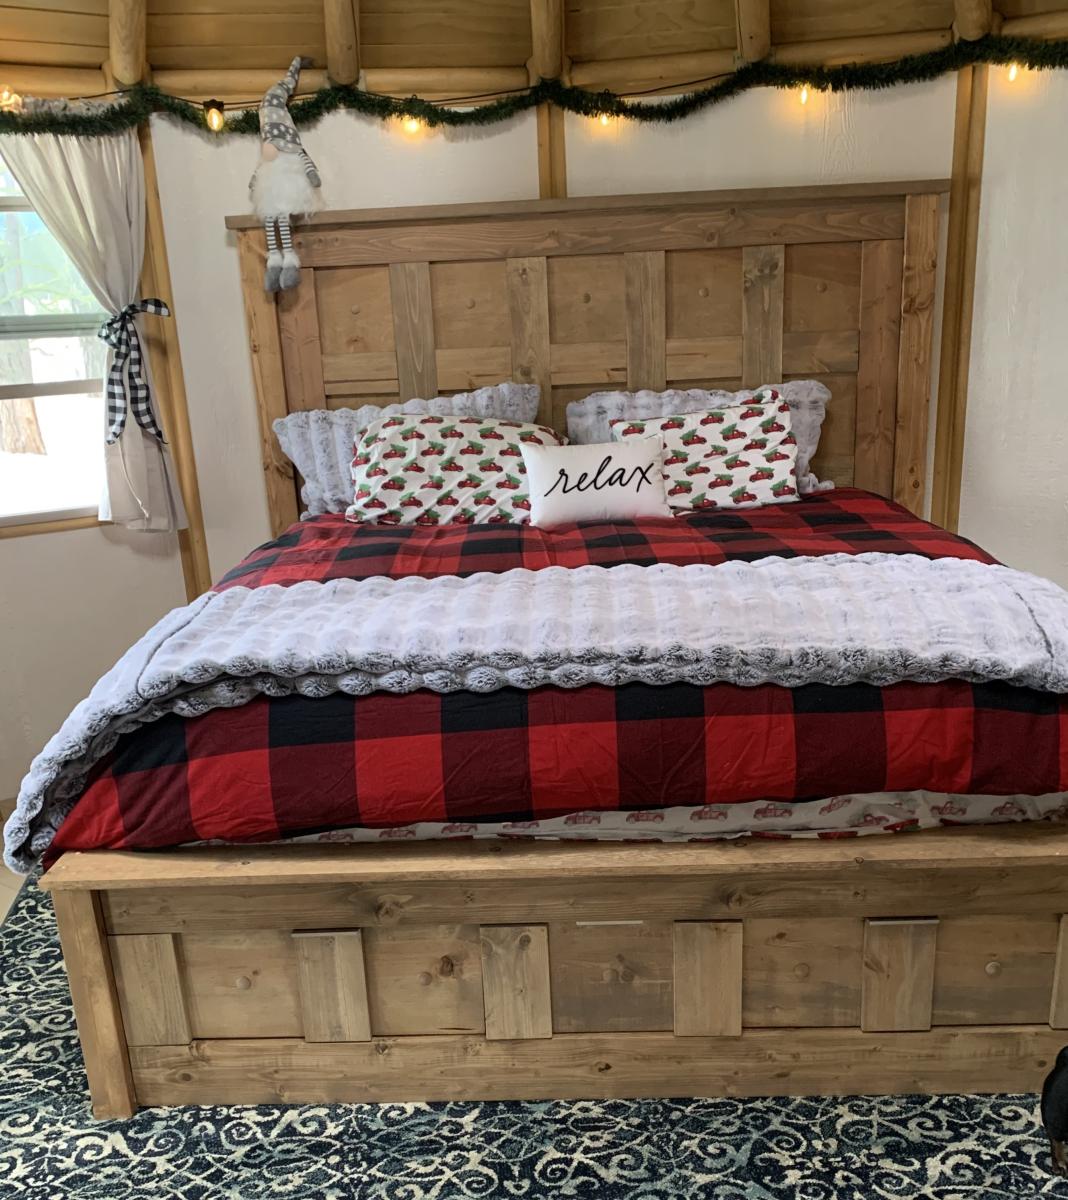
Built from Plan(s)
Seasonal And Holiday
Let's go play on the see-saw!
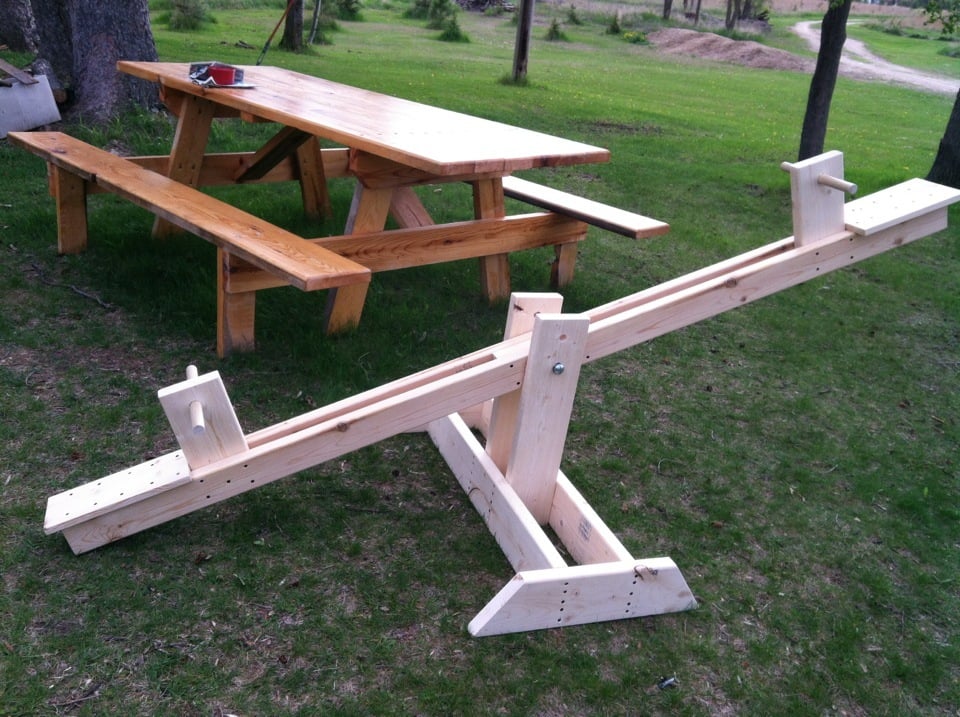
Super easy project....and already, hours of enjoyment by my kiddos!!
Thanks Ana for another awesome plan!
Built from Plan(s)
Estimated Cost
$22
Estimated Time Investment
Afternoon Project (3-6 Hours)
Finish Used
Haven't painted it yet....
Recommended Skill Level
Beginner
Comments

Tue, 05/08/2012 - 16:19
So excited to see this
So excited to see this project!!! Thanks for sharing!
VegTrug

A friend needed a raised garden bed for her husband who is in a wheel chair. I searched and found the VegTrug's. It took a lot of trial and error. I based it off Williams Sonoma's pictures. I wouldn't of attempted this with out a plan if it weren't for Ana's website.

Recommended Skill Level
Intermediate
Comments
Tue, 03/11/2014 - 09:57
Plans for this version of the "veg trug" raised bed?
Dear CaronGirls, Are plans available for this?
Tue, 05/19/2015 - 06:54
Are there plans available for this
This looks great - I would love to try this...are there plans available?
Sun, 04/24/2016 - 06:25
Still can't find this plan. Help
All the responses say to go to the plan catalog. Link does not work. I looked for an hour. Please help, I really want this plan!,
Wed, 05/18/2016 - 21:45
Looks nice
Not sure what the story is here, Maybe she got in trouble for saying Vegtrug? I would like plans for a DIY Raised planter bed like the above.
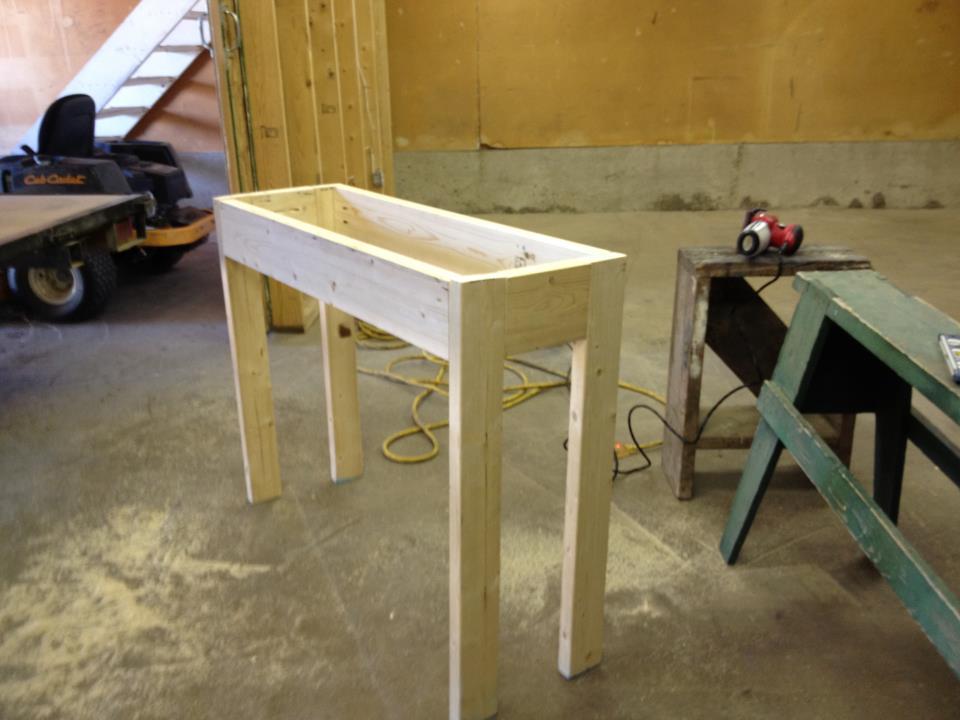
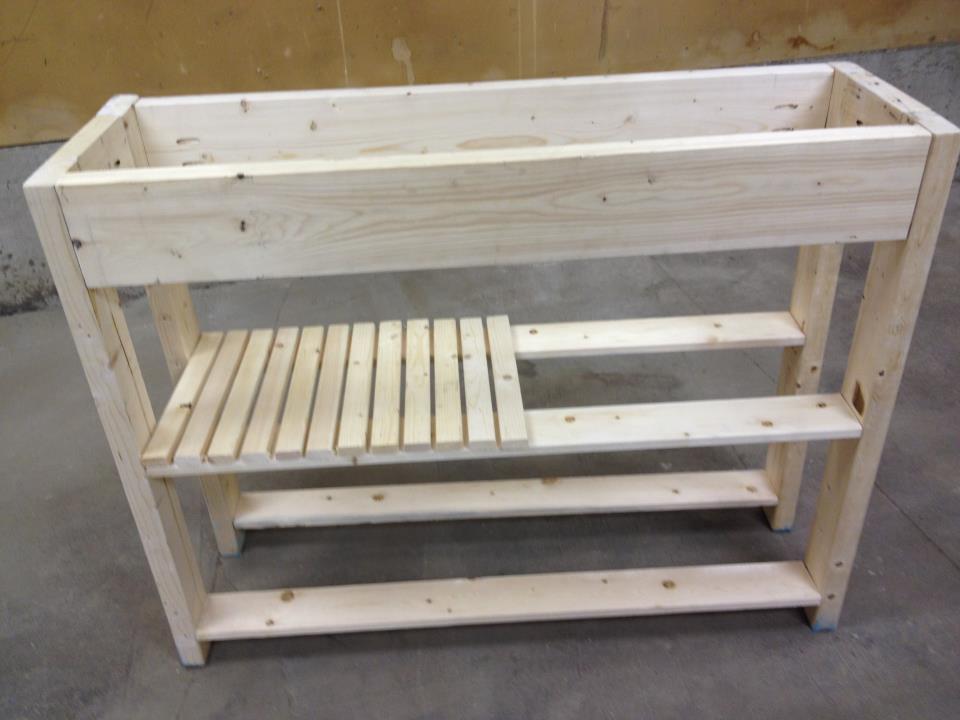
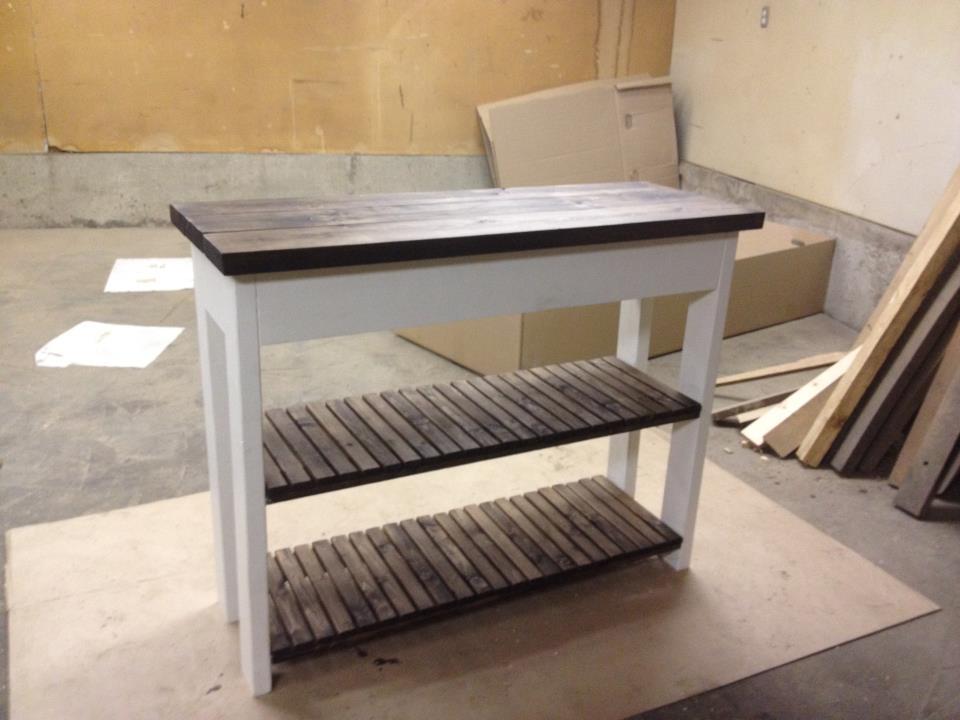
Console Table
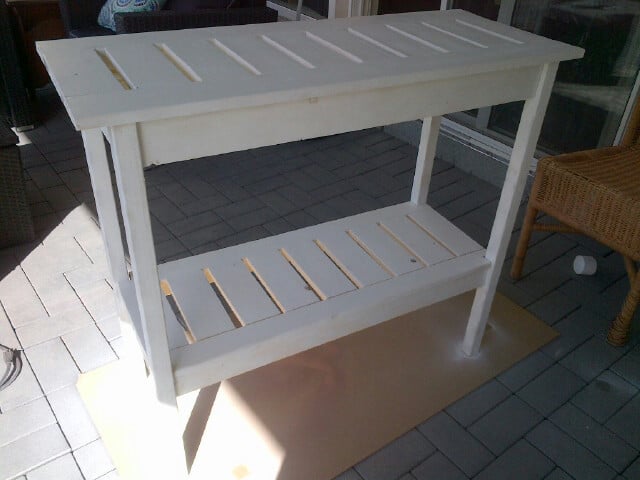
Console table with straight stair legs
Built from Plan(s)
Estimated Cost
$30
Estimated Time Investment
Afternoon Project (3-6 Hours)
Finish Used
White Paint
Recommended Skill Level
Beginner
Love your plans!! Tv show please!!

Your plans are awesome!! Your YouTube videos rock!
Built from Plan(s)
Estimated Time Investment
Weekend Project (10-20 Hours)
Comments
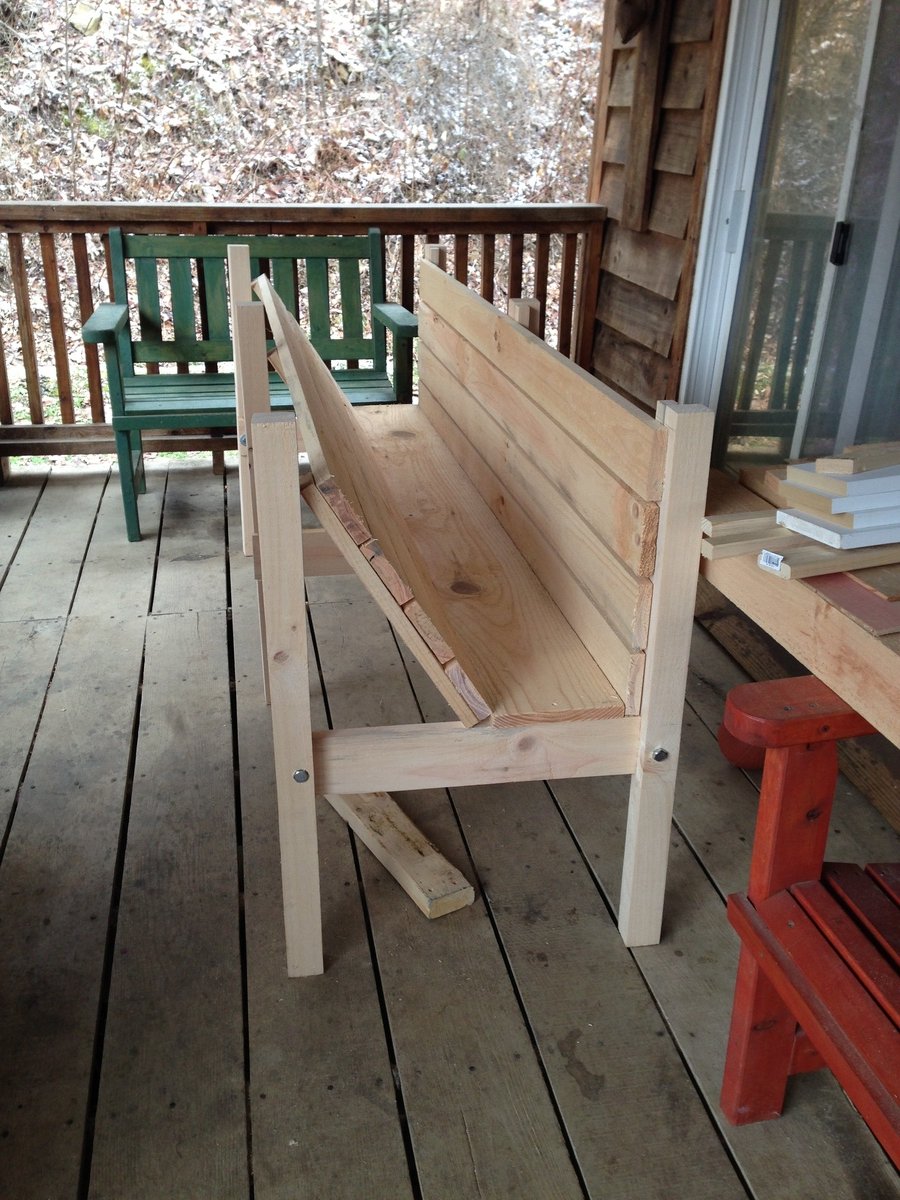
Small Slat Stool or Side Table
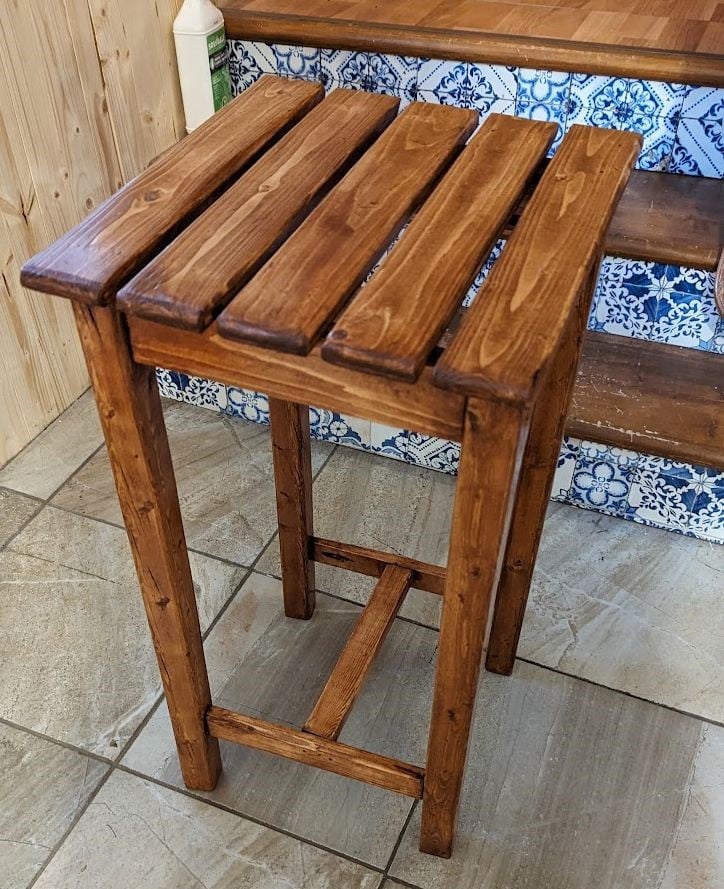
25" height, using it as a lunch table. Did a polyurethane varnish.
Miss Isabelle
Built from Plan(s)
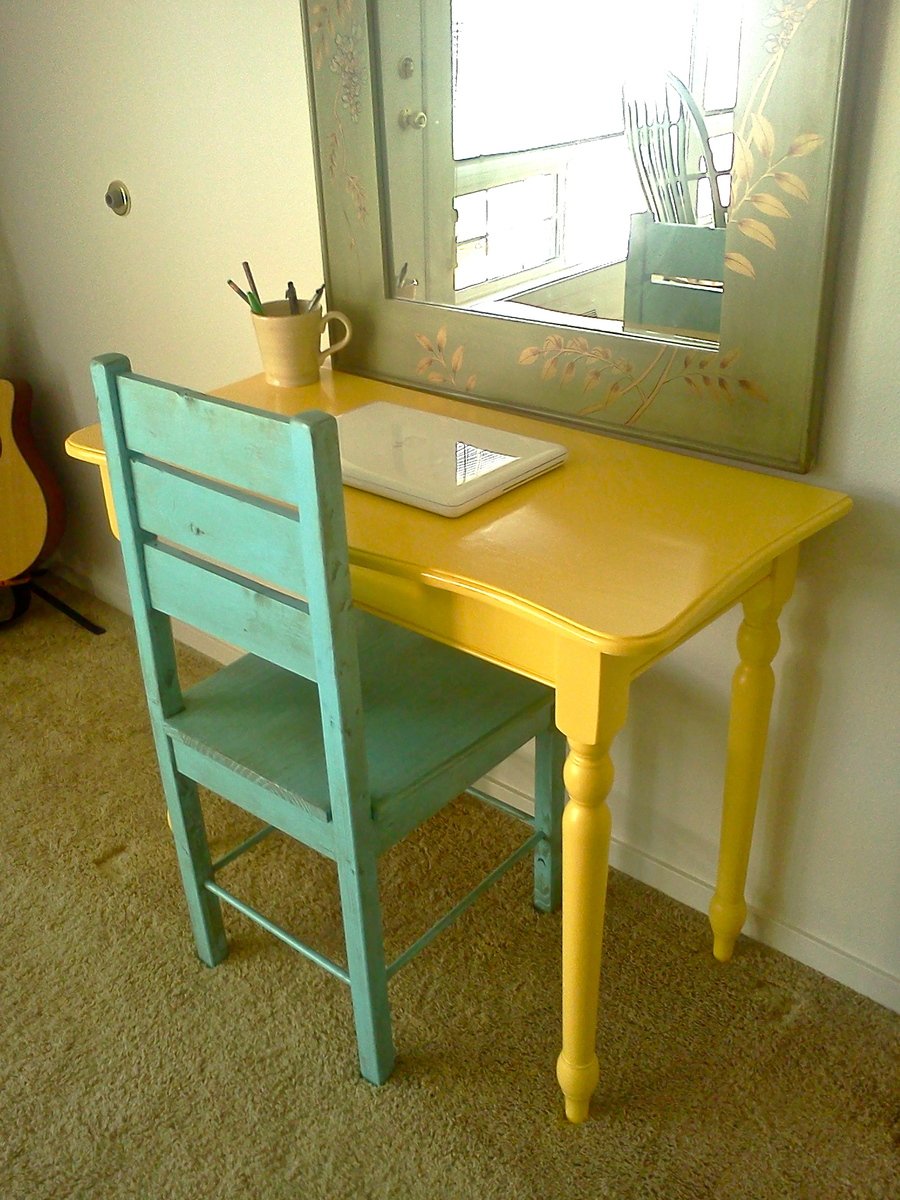
Computer Desk and Chair
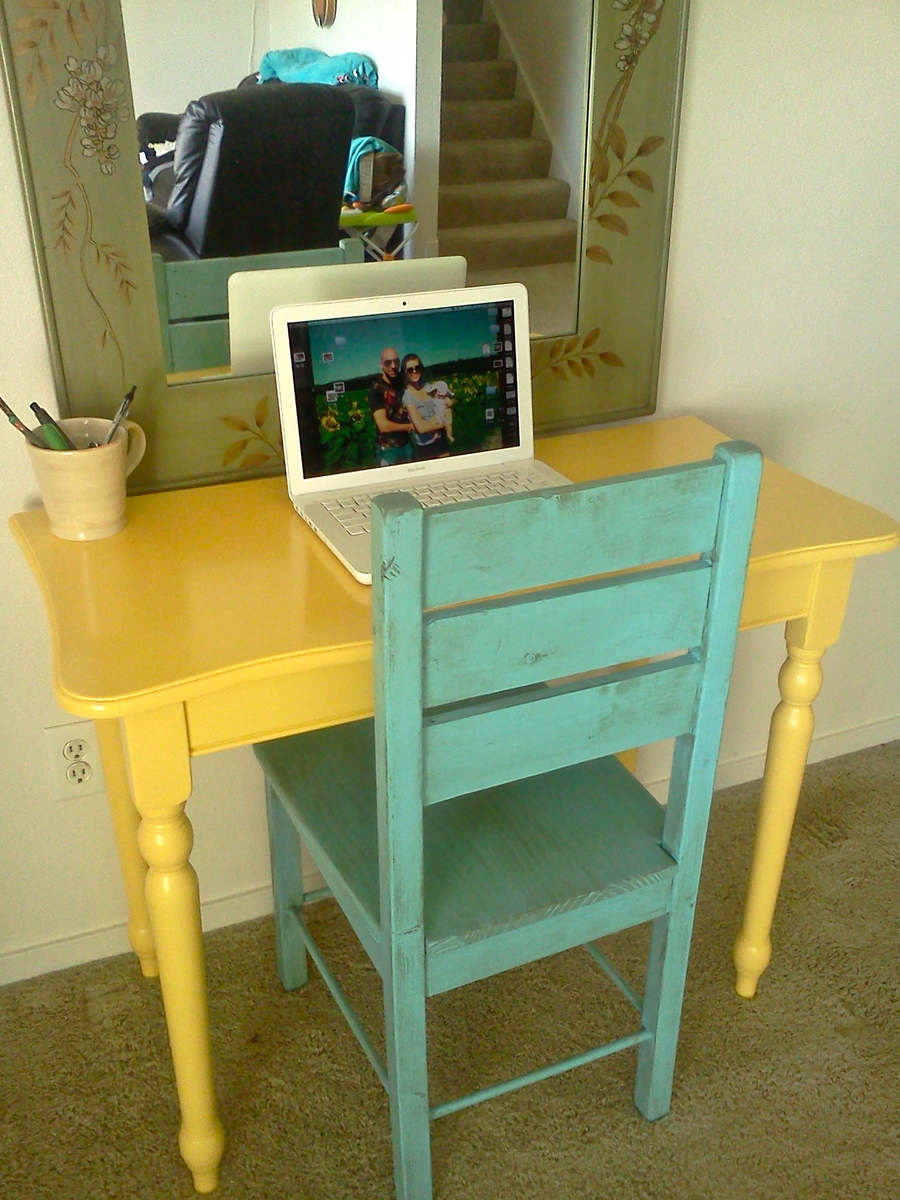
I bought a dining table set just for the chairs a while ago and the table legs have been sitting there ever since. The rest of the materials were scraps from the shop. I never worry about matching wood types if I'm planning on painting it. Everything matches when you paint over top of it.
The chair is something I made a while ago. I realized I didn't want to make 3 more after hours of just making one. That's why I bought that dining set in the first place.


Estimated Cost
Free if you have scraps. $50 if not.
Estimated Time Investment
Afternoon Project (3-6 Hours)
Finish Used
Spray primer and paint
Recommended Skill Level
Starter Project
Comments

Turned Leg Farmhouse Table
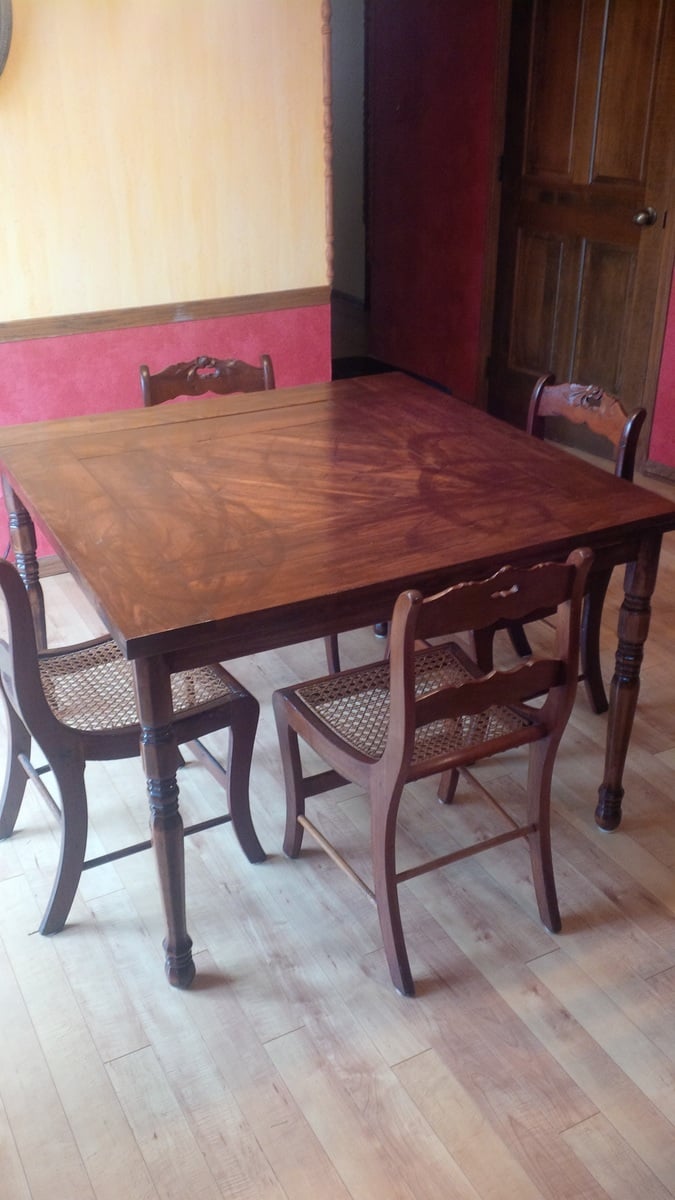
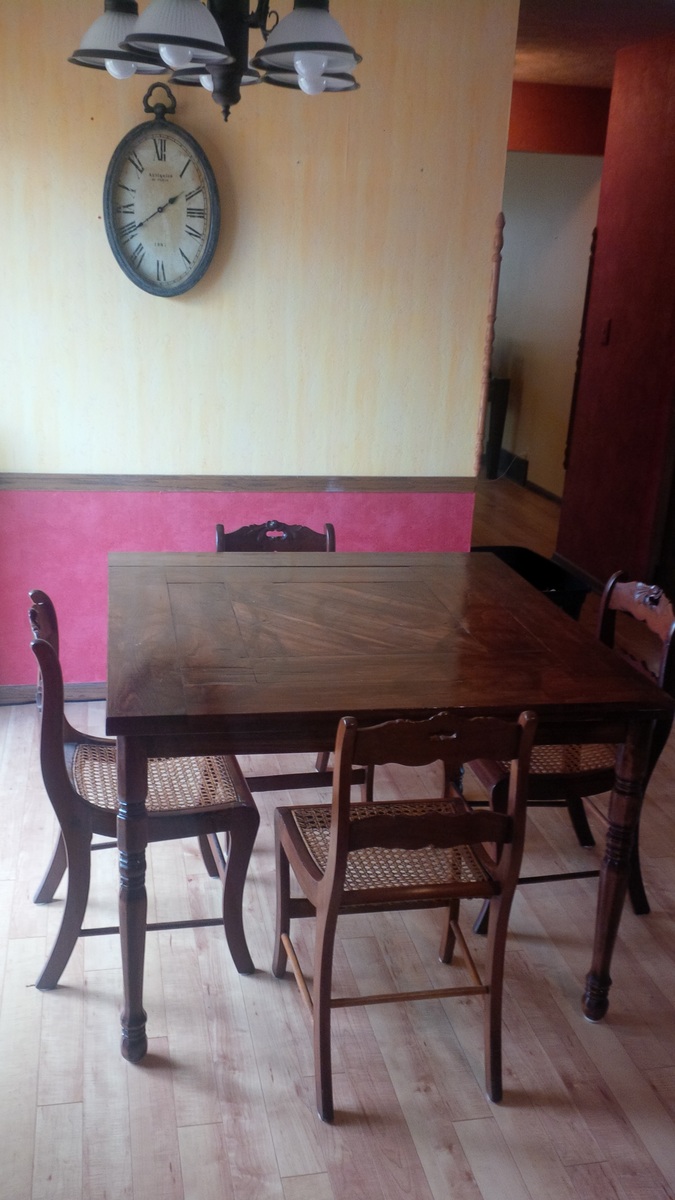
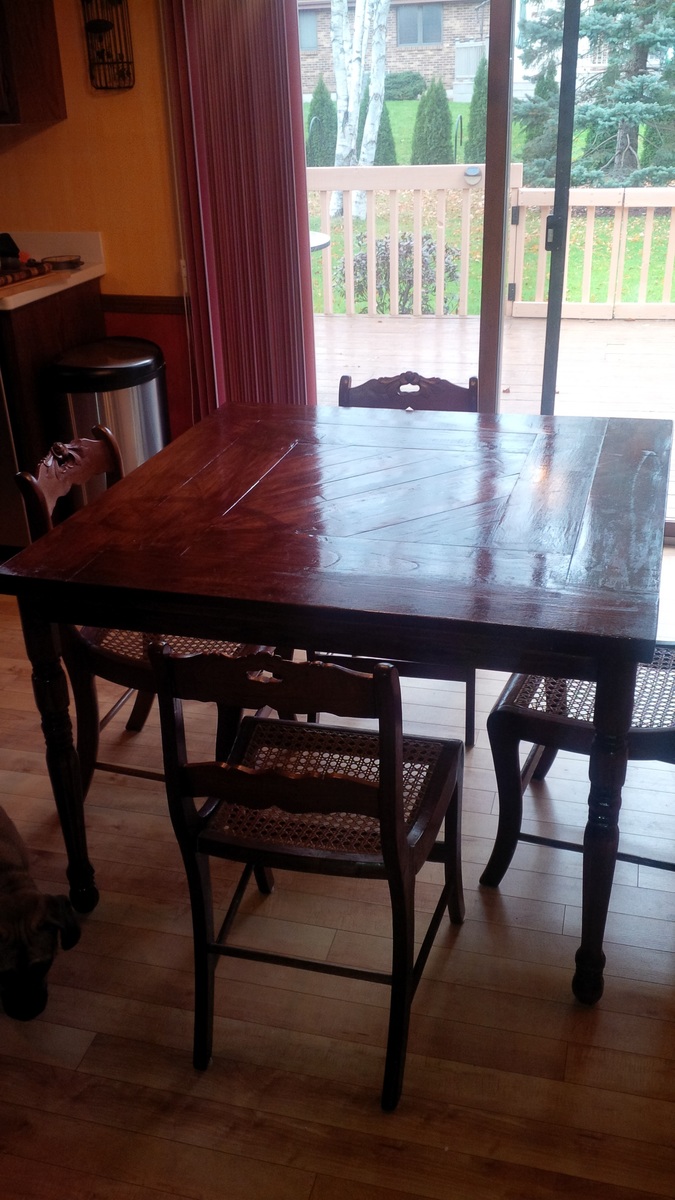
After I found these awesome walnut chairs on craigslist, I did by best to match the stain and build a kitchen table on the cheap for our new house. As you can see, I modified the design into a square to fit the space. I also attempted to create a unique design by making diagonal cuts with the miter saw and connecting everything in the underbelly with my Kreg Jig. My one regret is that after my palm sander broke, instead of buying a replacement, I got a little hyperactive with my belt sander. It ended up making a unique swirl design over the grain. A part of me thinks it looks cool and the other part thinks it looks ridiculous. The moral of the story is never use a belt sander on something you intend to stain.
Built from Plan(s)
Estimated Time Investment
Weekend Project (10-20 Hours)
Finish Used
Old masters American walnut with 3 layers high-gloss polyurethane
Recommended Skill Level
Intermediate
Comments
Sat, 03/08/2014 - 16:33
I've accidentally done the
I've accidentally done the same thing with the sander on pieces of my furniture too. I don't think yours looks ridiculous at all- it is a really beautiful table!!
Simple Side Table

Adjusted a little from the plans to fit better the space available. Also I used some scrap plywood for the bottom.
Built from Plan(s)
A clearance shelf
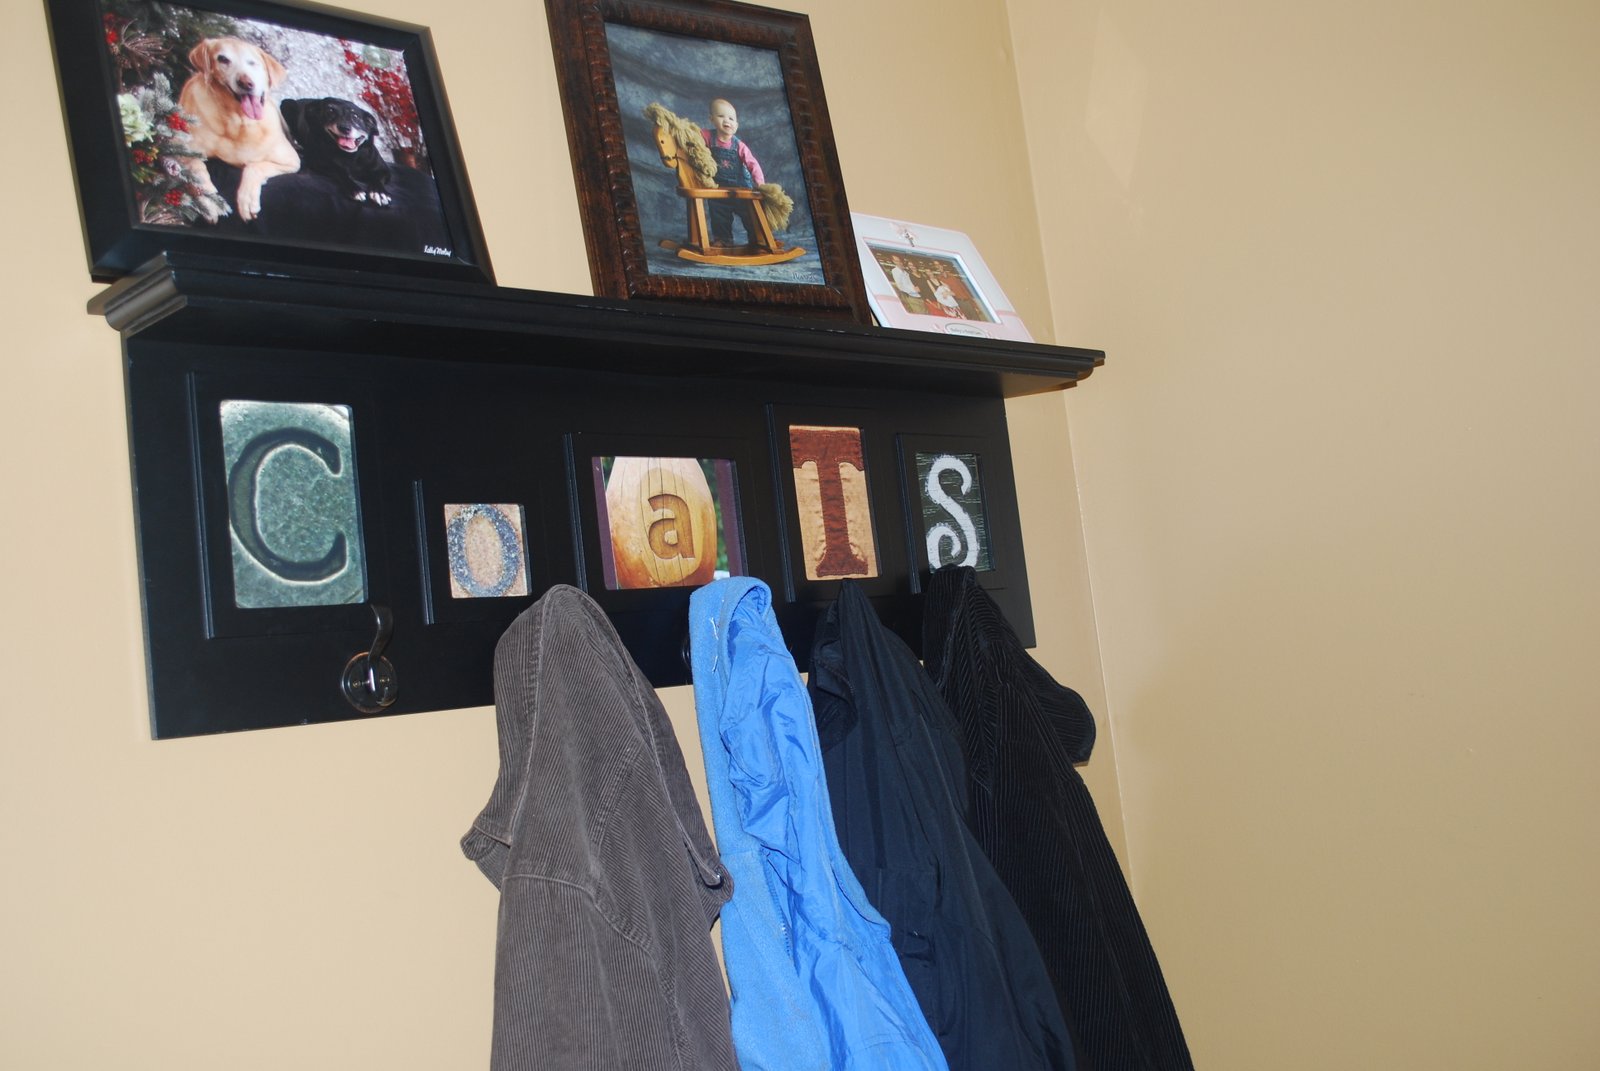
Okay in all fairness to a woodworking site, I did not actually MAKE this shelf. However, I saw the plan for how to decoupage my scraps and thought hey I did something like this a few months back. I think I will take a picture and share what you can do with decoupage and some scraps.... did that make sense? Anyway, this is to give you an idea of something you can do!
So - found this shelf on the damaged section at Hobby Lobby for less than $20 in fact I think it was about $16 or so. It was missing 2 of the glass sections, one of the backs to the picture, and one hook. It also had some small places where the paint was chipped off. So I bought it with a great place to put it but no definitive plan on how to fix it.
Here's my rehab - filled in scratched spots with a black sharpie, it looks pretty good. Instead of trying to find glass/backs, I found some copyright free letters and had prints made of them (there is a whole folder out there on flickr of copyright free letter photos for personal use). Of course, I had to agonize over which ones to use and which had the correct orientation - I ended up with a metal stamped C, a concrete O, a wood carved a, a stitiched T, and a painted s. Then I took thin scrap board, cut them to size, and decoupaged the letters on to each board. For my final decoupage coatings, I used a small brush one way and then the other to give the product a canvas like texture. When that was dry, I sprayed it with a matte clear coat (if you don't do this over mod podge it has a sticky feel to it and dust/dog hair etc will stick to it). I put these little plaques in the holes of my shelf with tape. No glass needed when the decoupage is sealed like this.
Unfortunately, I could not find hooks to match the missing ones so I just bought new ones and will save the other 4 for some other project.
Hung it up and hung coats on it!
Estimated Cost
$20 - including the shelf
Estimated Time Investment
An Hour or Two (0-2 Hours)
Recommended Skill Level
Starter Project
Monster mash activity table
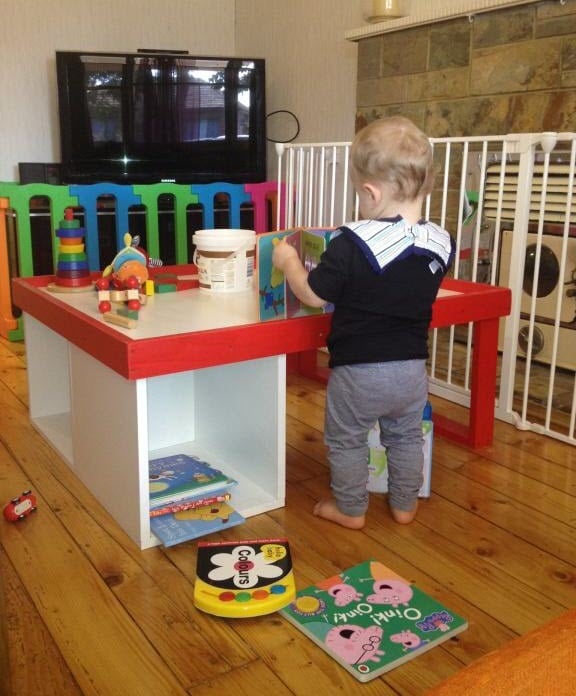
This was a really easy and inexpensive project. As I don't have a table saw and I'm scared to death of my circular saw, I had the laminated MDF cut to size and edged. Assembly and painting was really quick. This little man will road test it for me!
Estimated Time Investment
Afternoon Project (3-6 Hours)
Finish Used
Enamel paint for the red trim
Recommended Skill Level
Beginner
My pallet coop and Ana White run
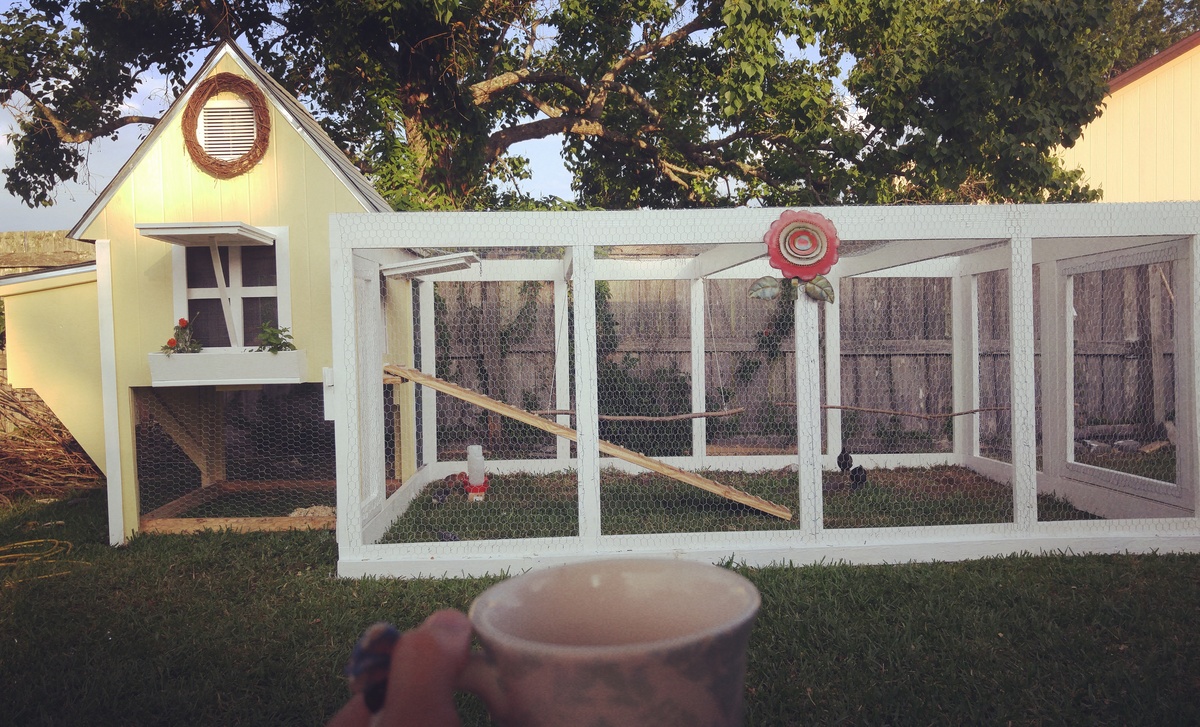
My husband bulky this coop from pallets and used Ana White's chicken run plans. Took us a weekend to build the run.
Built from Plan(s)
Estimated Cost
$200
Estimated Time Investment
Weekend Project (10-20 Hours)
Recommended Skill Level
Intermediate
Modern media console - walnut slab
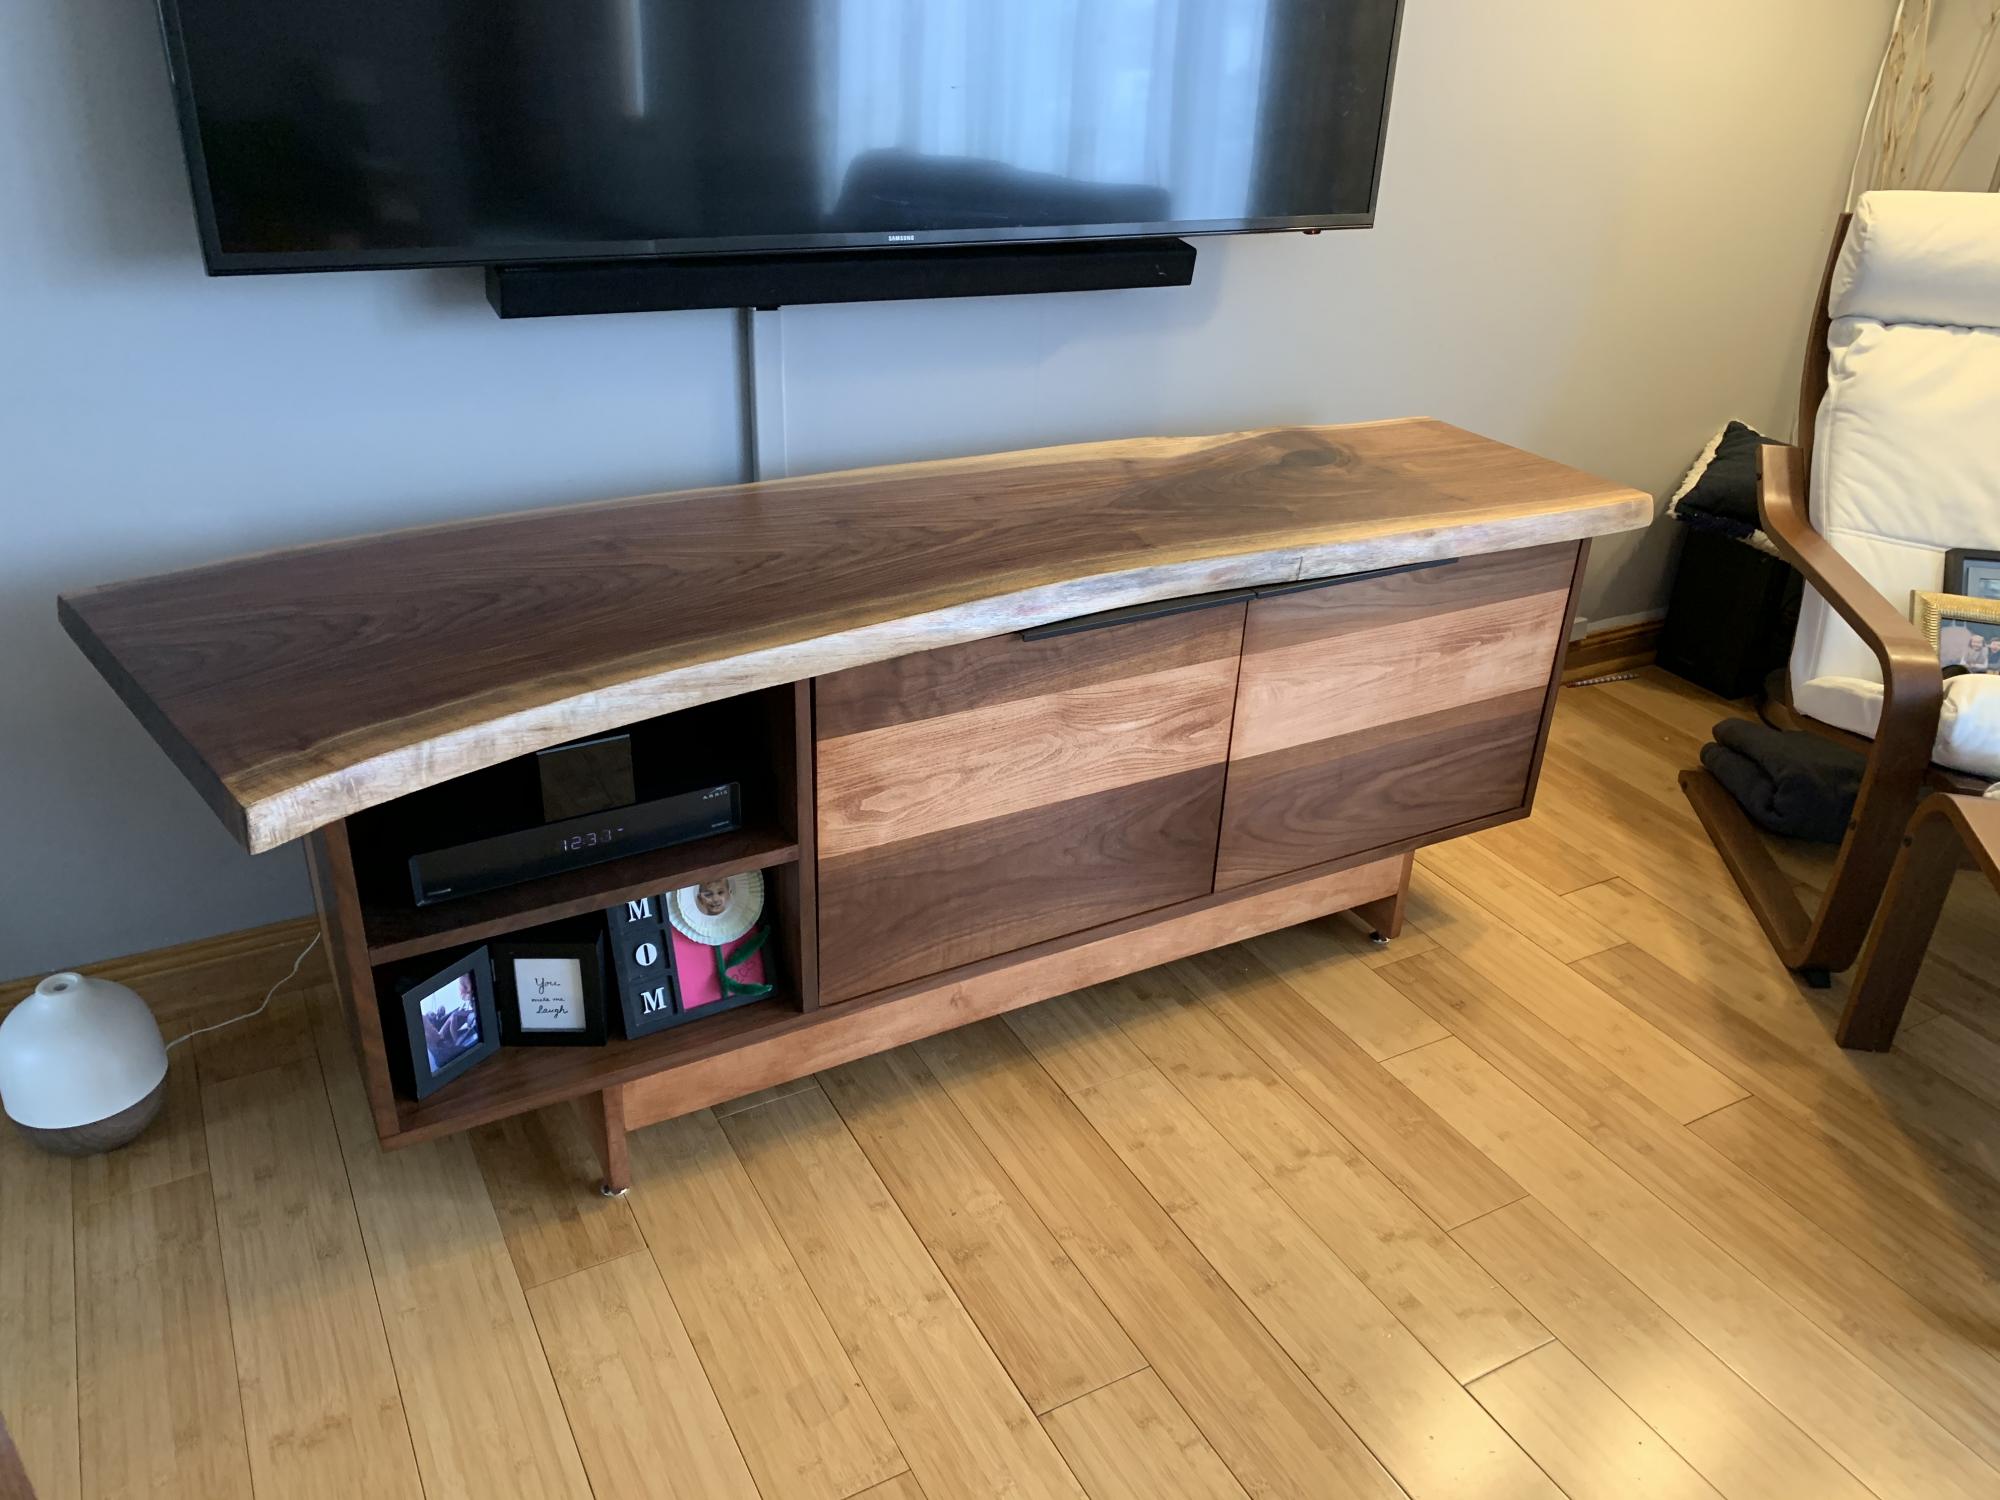
Built mainly from the Modern Media Console plan, modified in a few ways. Aside from the obvious part being the walnut slab on top, I modified the doors to be inset hinges for looks, and it’s slightly longer than the original plans. The other main modification was using the base from the Emersen Console or Buffet plan with the addition of the adjustable height leveling legs.
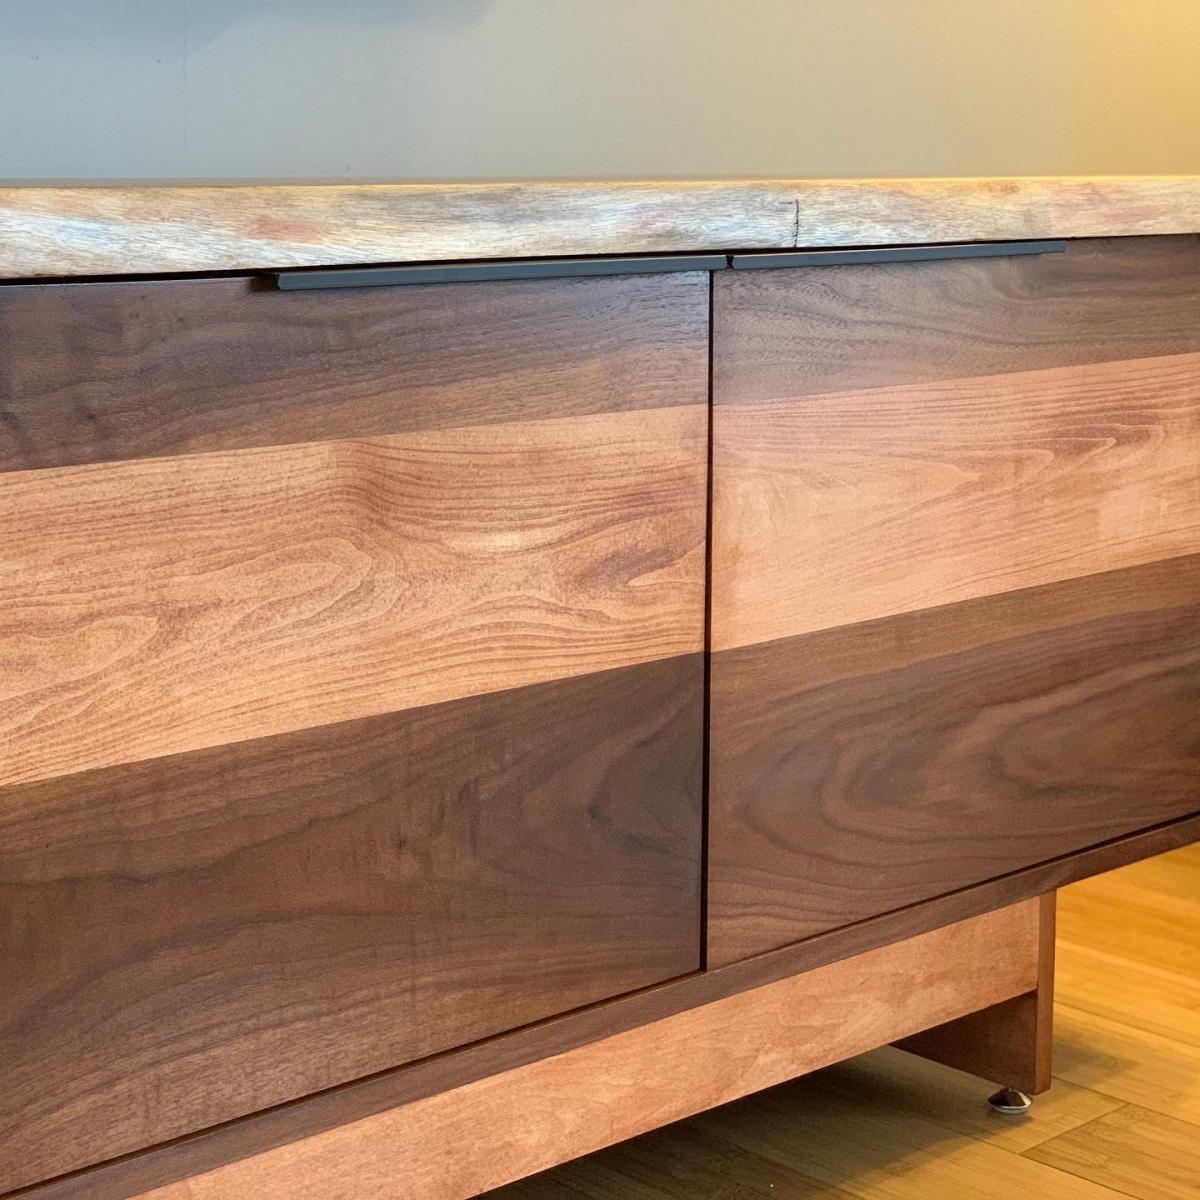
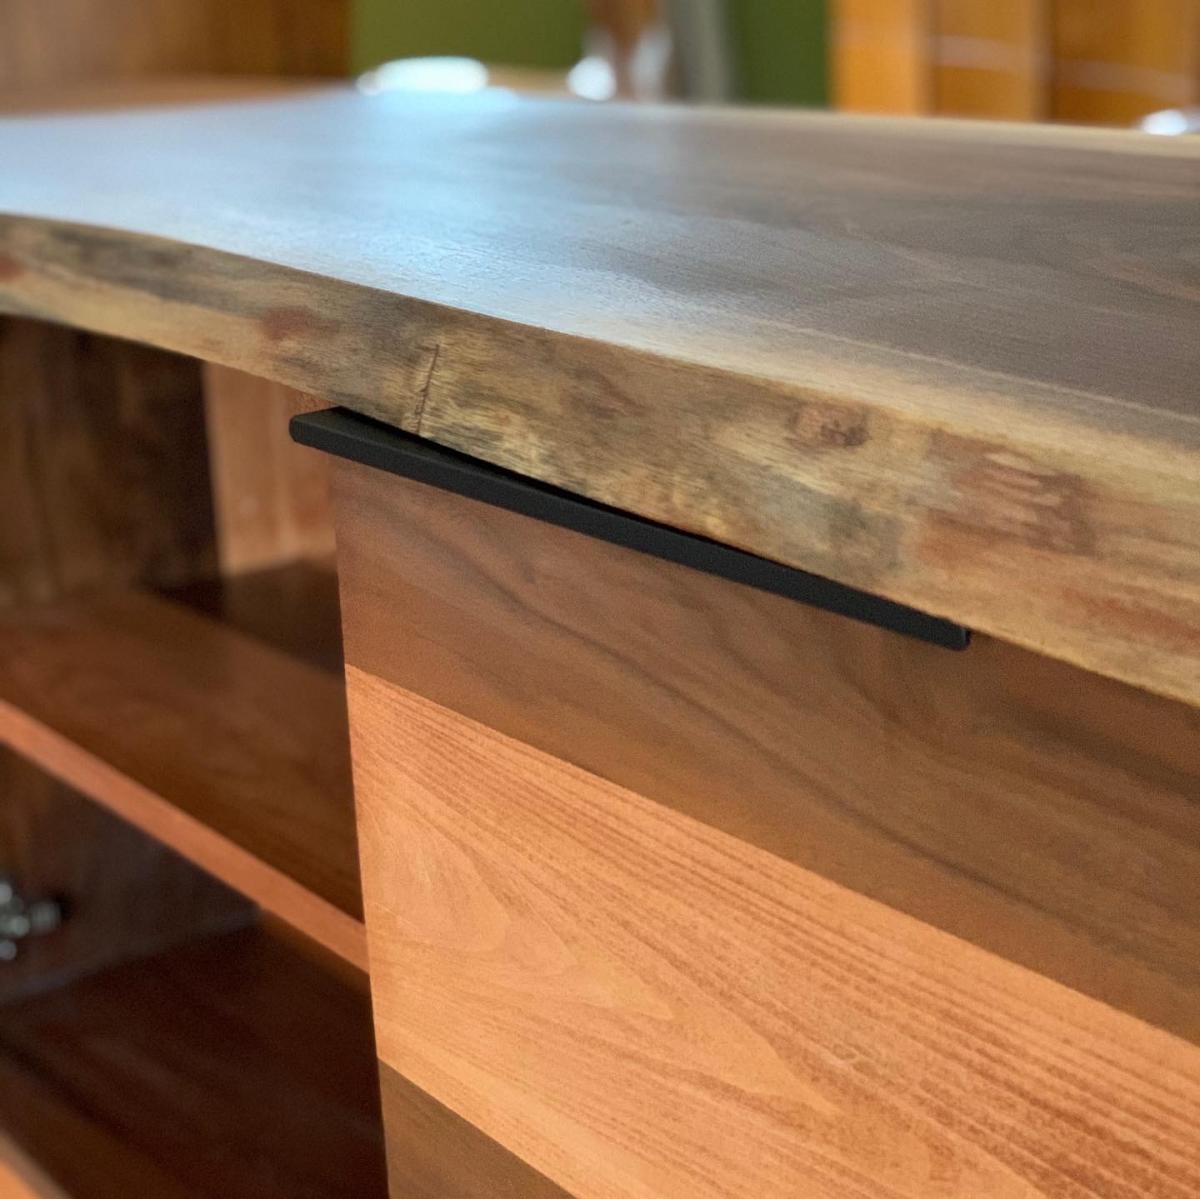
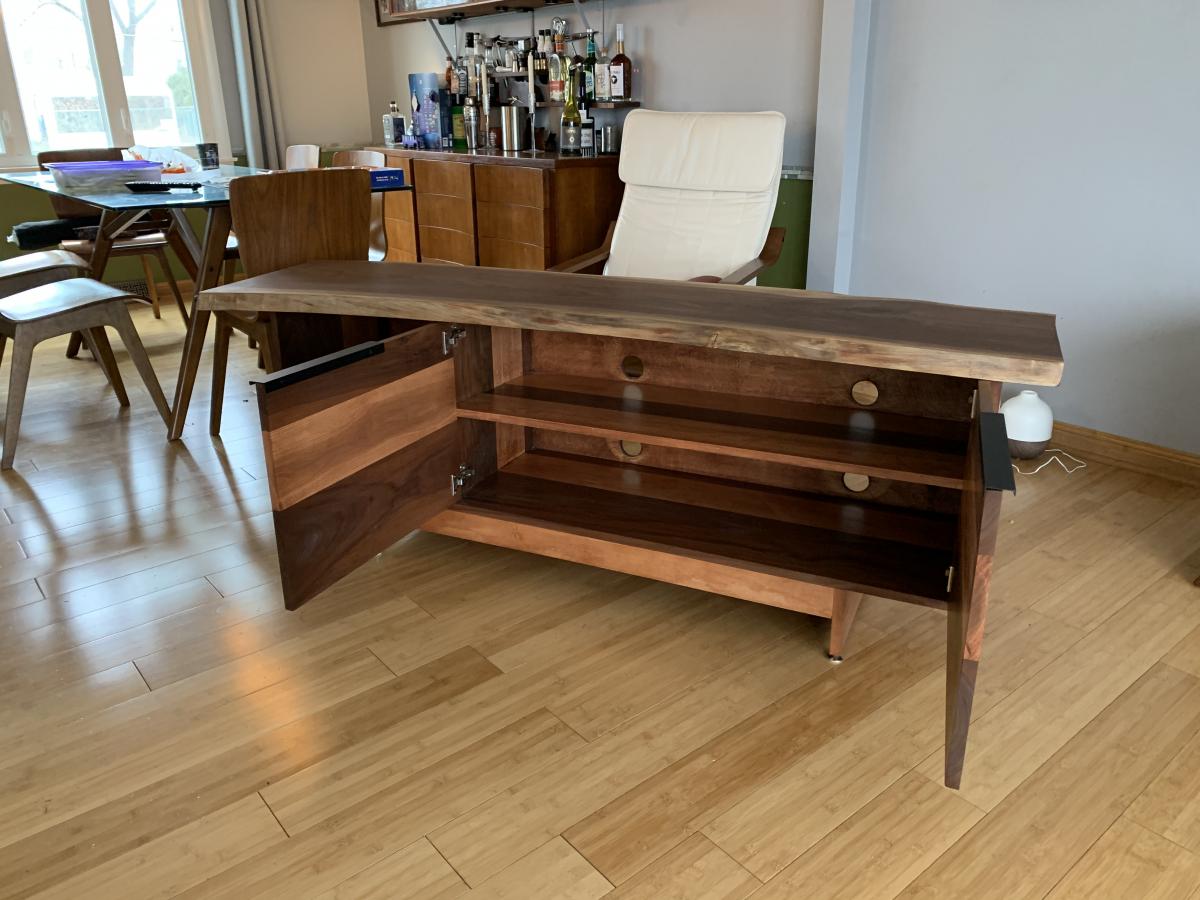


Built from Plan(s)
Estimated Cost
750
Estimated Time Investment
Week Long Project (20 Hours or More)
Finish Used
Stained with American walnut to bring the hue of the walnut and maple to be similar, then finished with a light coating of clear satin polyurethane.
Recommended Skill Level
Intermediate
Outdoor Sofa Seating and Coffee Table
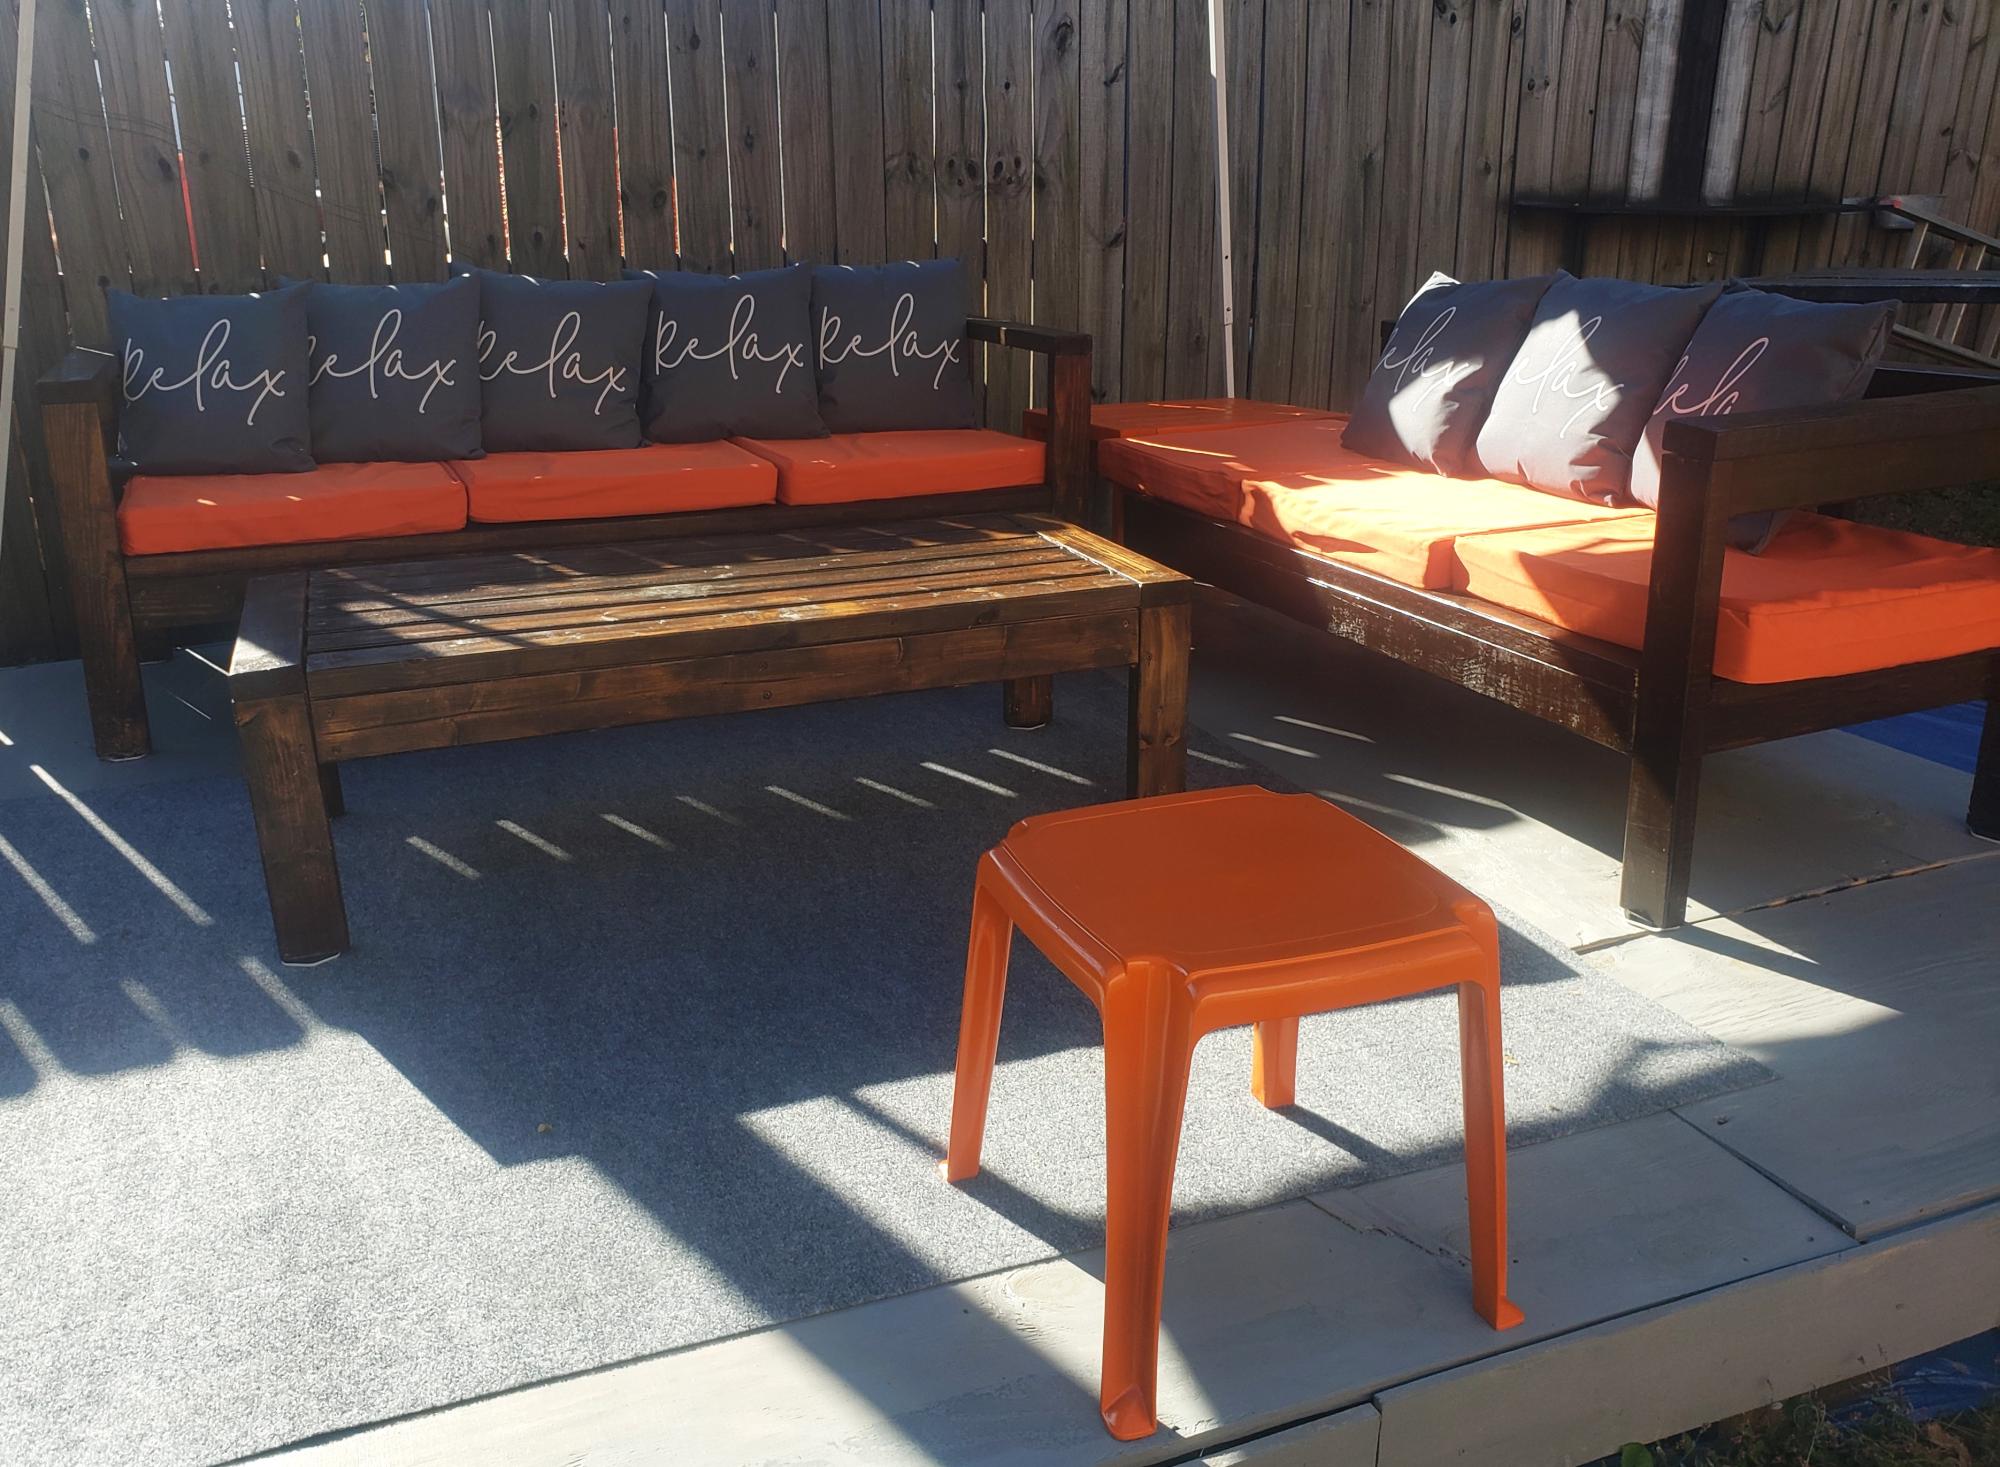
Had fun building this and and putting on the pillows and cushions.
Elite Motionz Buildz
Built from Plan(s)
Entryway Shelf
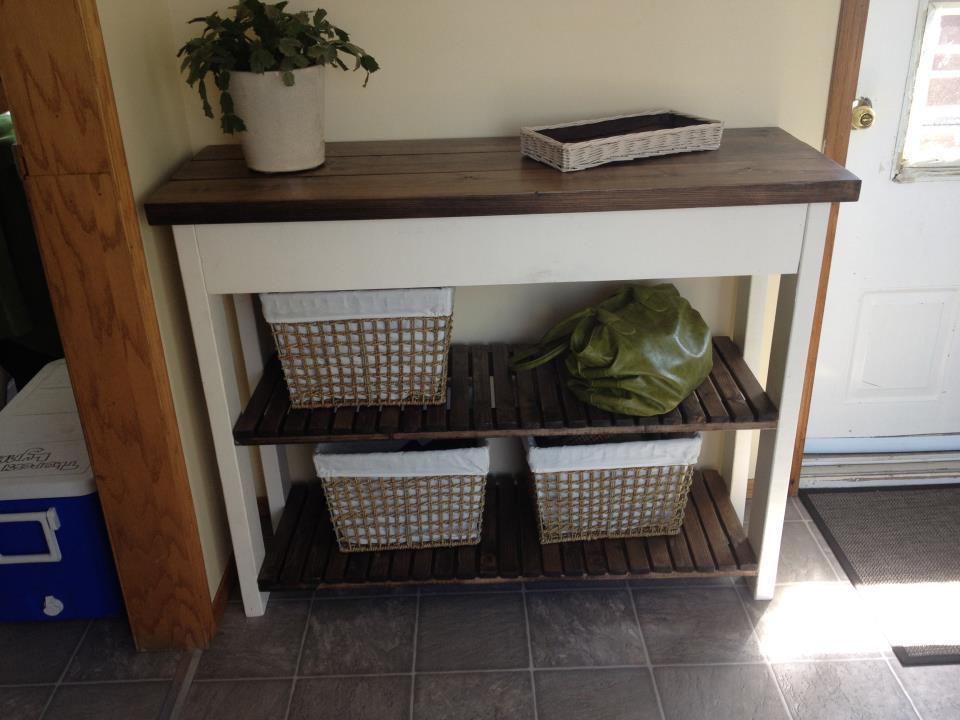
I built this from the Easy Kitchen Shelf Plan, but only used 3 2x6's as the top to make it 16.5" in width and shortened the length to 46" to fit the space.
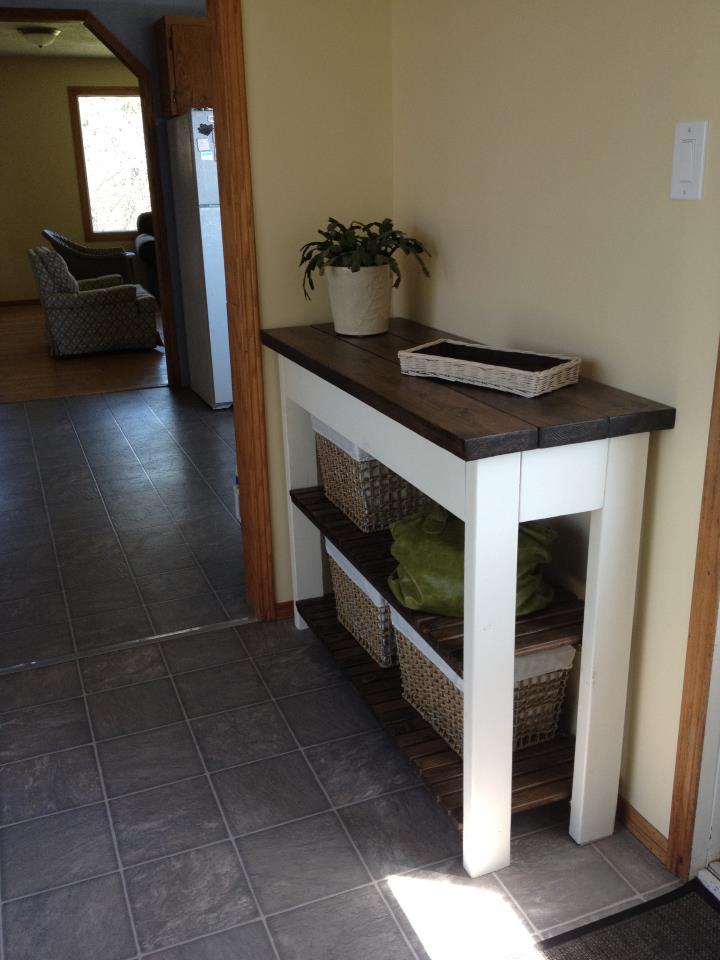
Built from Plan(s)
Estimated Cost
100
Estimated Time Investment
Day Project (6-9 Hours)
Finish Used
I finished it with Minwax Dark Walnut Stain and used some leftover off-white Beautitone paint for the legs. Finished it with 3 coats of Crystal Clear Varathane.
Recommended Skill Level
Beginner
Disney inspired SeeSaw

Our 2 year old granddaughter loves seesaws, so my husband built this one for her. We had just been to Disney World and decided to make the seat Mickey shaped for a little extra fun. He used his bandsaw to cut the seat.
The seesaw is plenty stable enough for us to go on it with her and has been a BIG hit with the neighborhood kids.
More pictures on our blog: http://yearoflivingdisney.wordpress.com/2014/03/03/disney-ride-at-home/
Thank you, Ana, for these plans!

Built from Plan(s)
Estimated Cost
wood was minimal cost, the paint was the expense!
Estimated Time Investment
Afternoon Project (3-6 Hours)
Finish Used
exterior semigloss
Recommended Skill Level
Beginner