Community Brag Posts

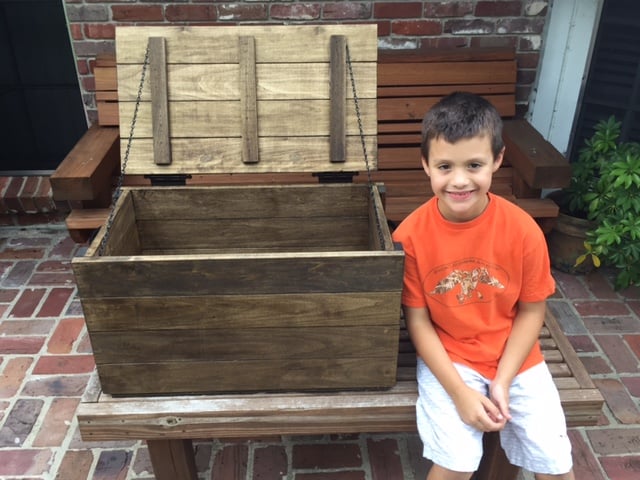
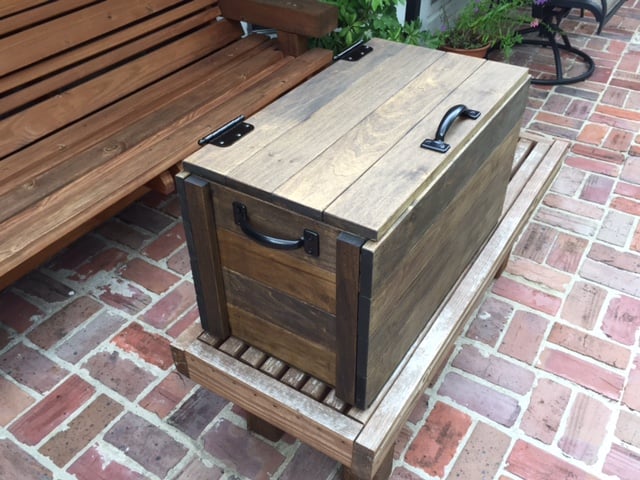
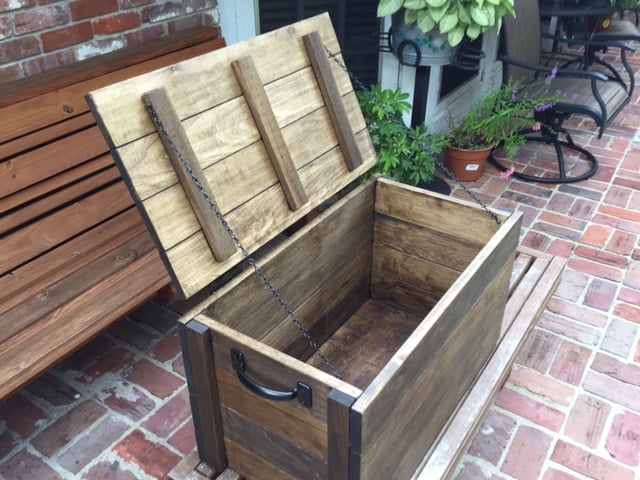
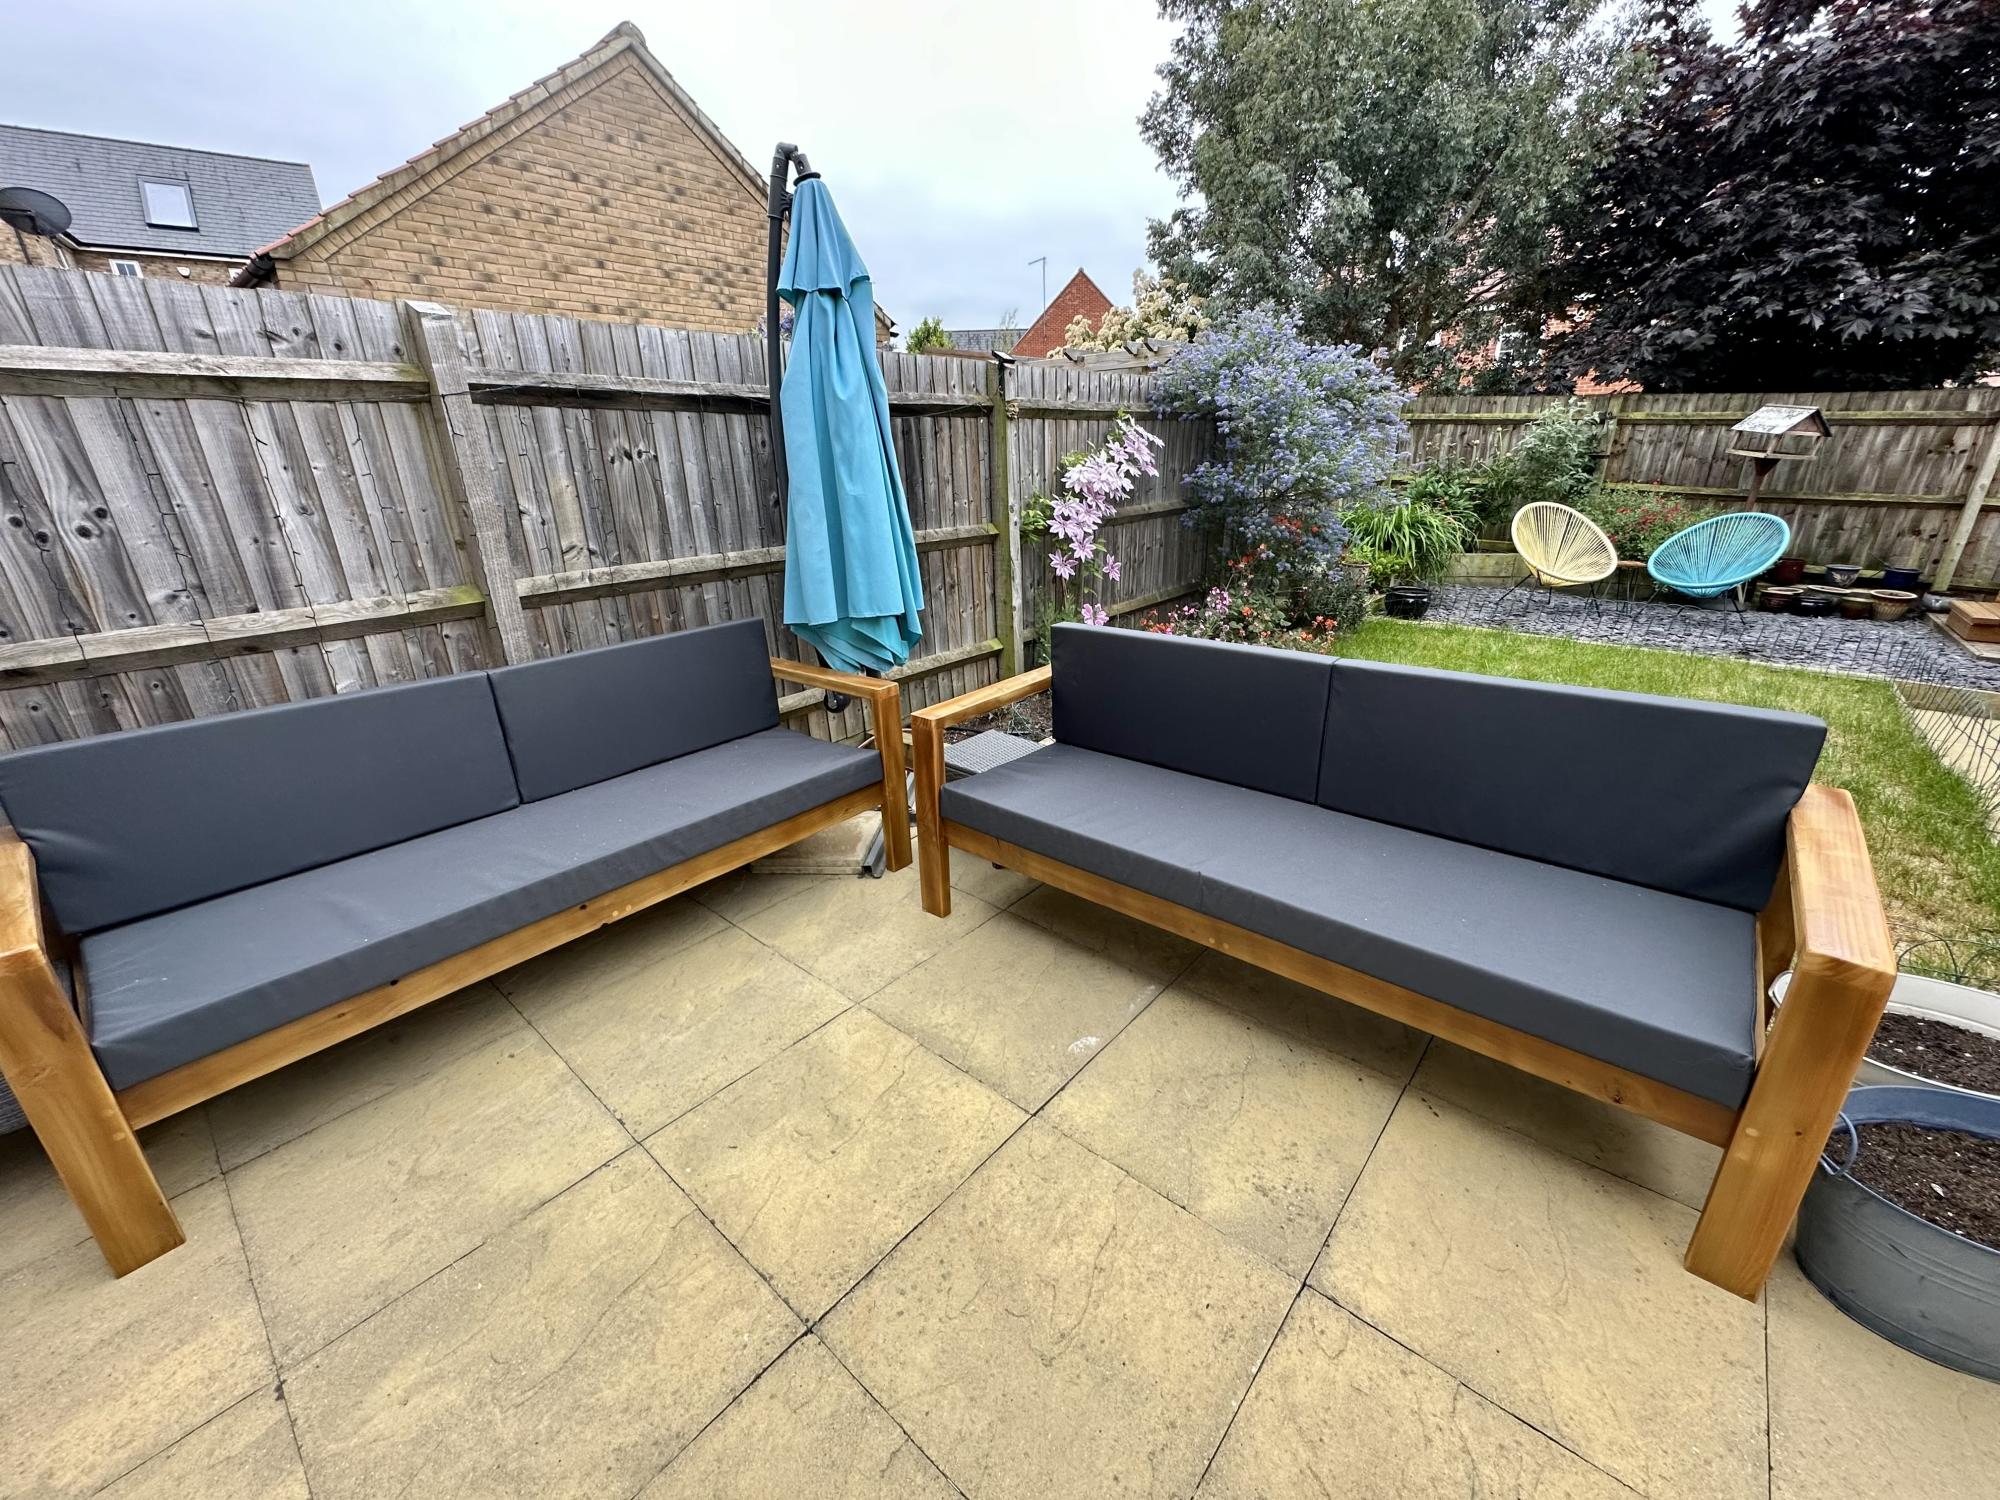
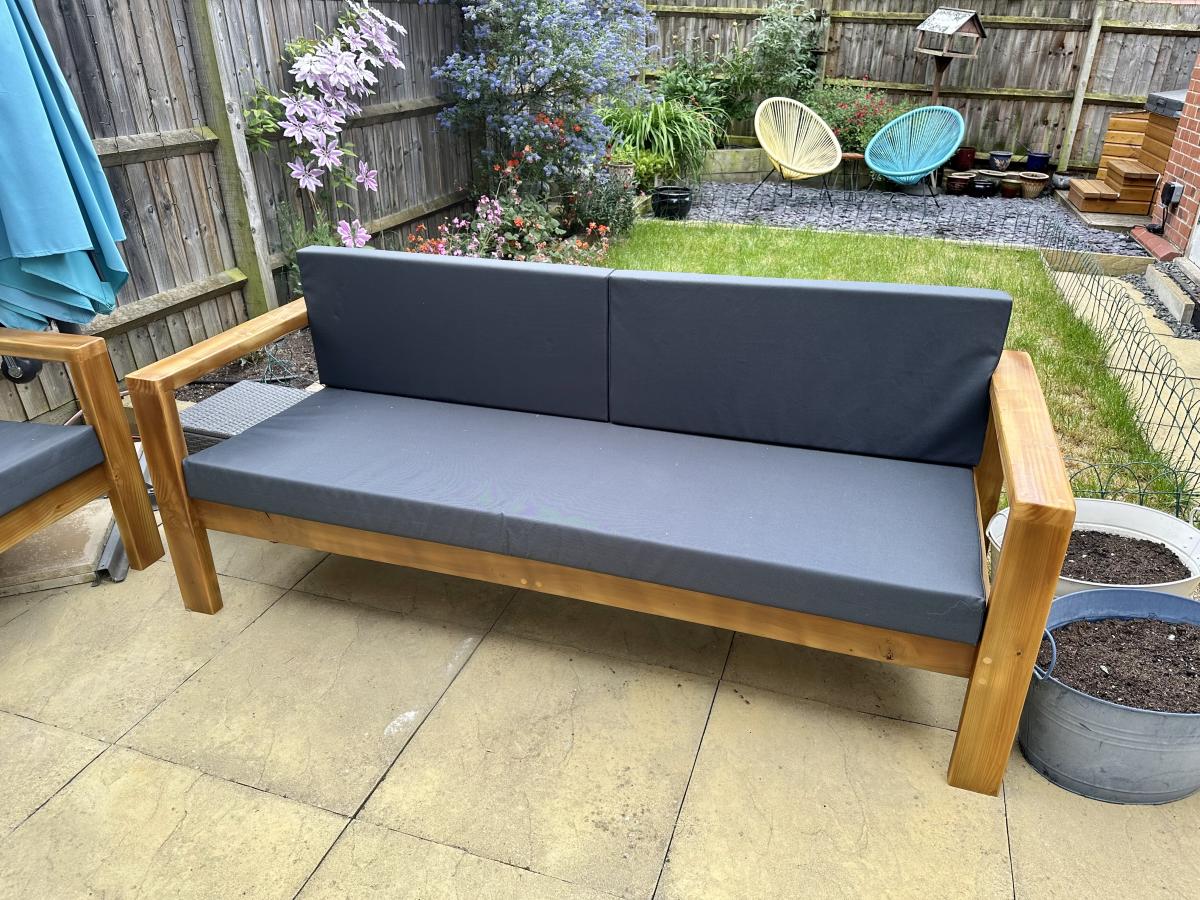
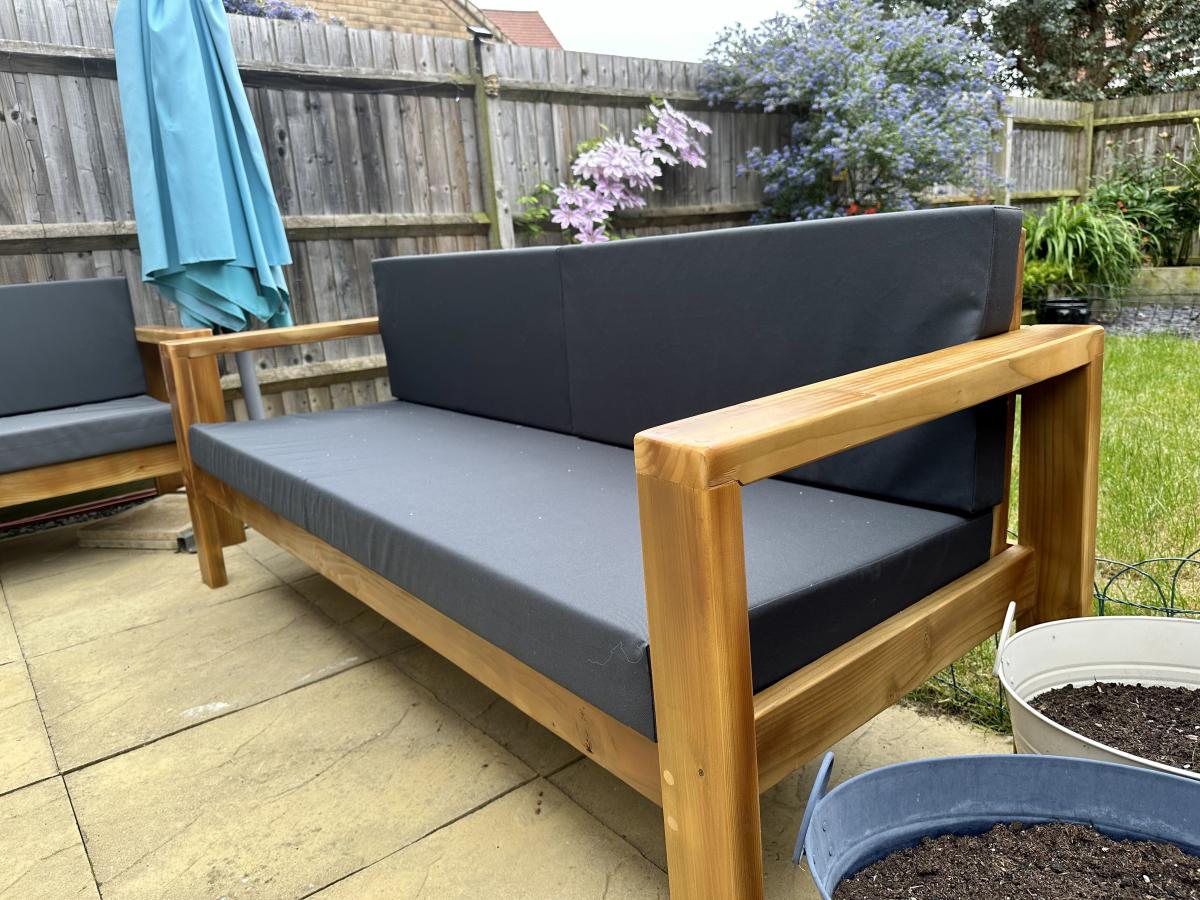
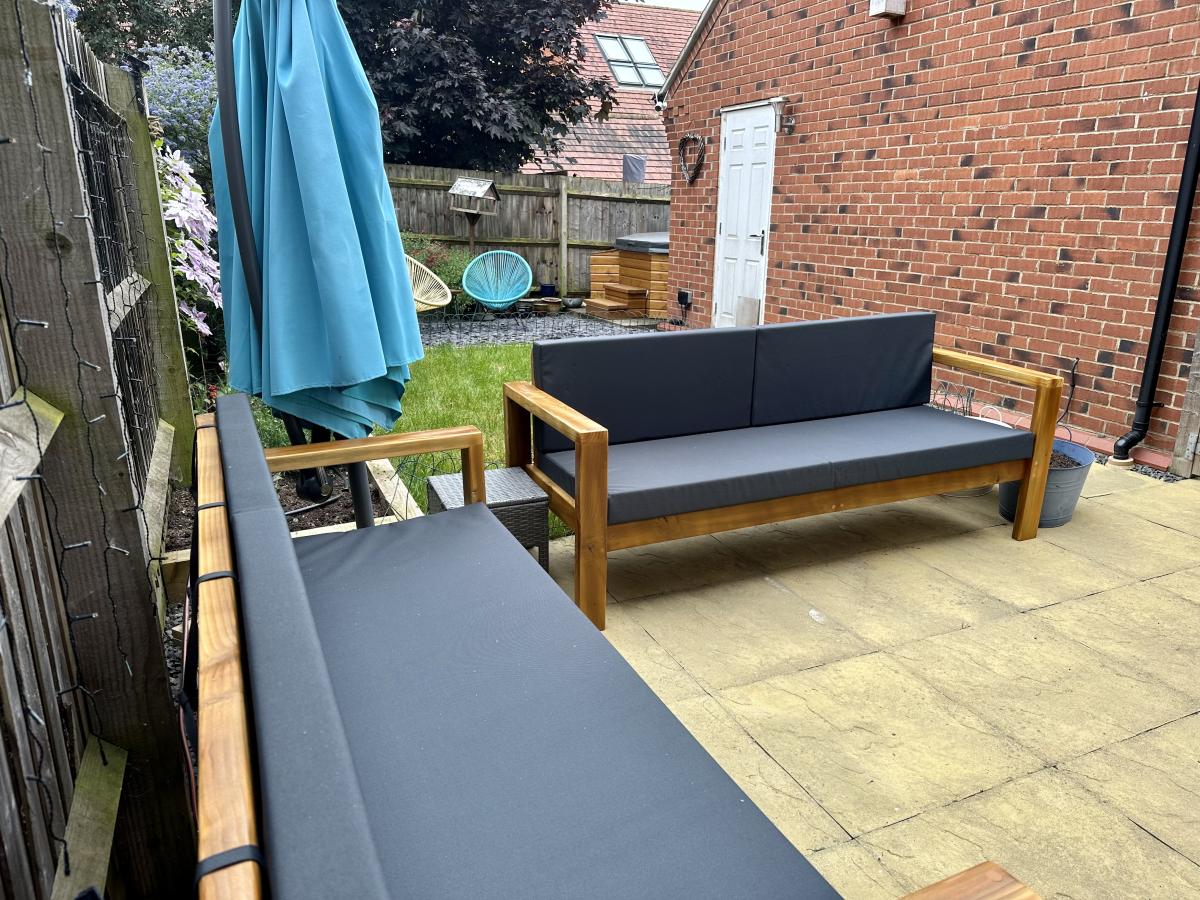
Modern Adirondack Chair Set

Submitted by Anonymous (not verified) on Wed, 06/10/2020 - 17:25

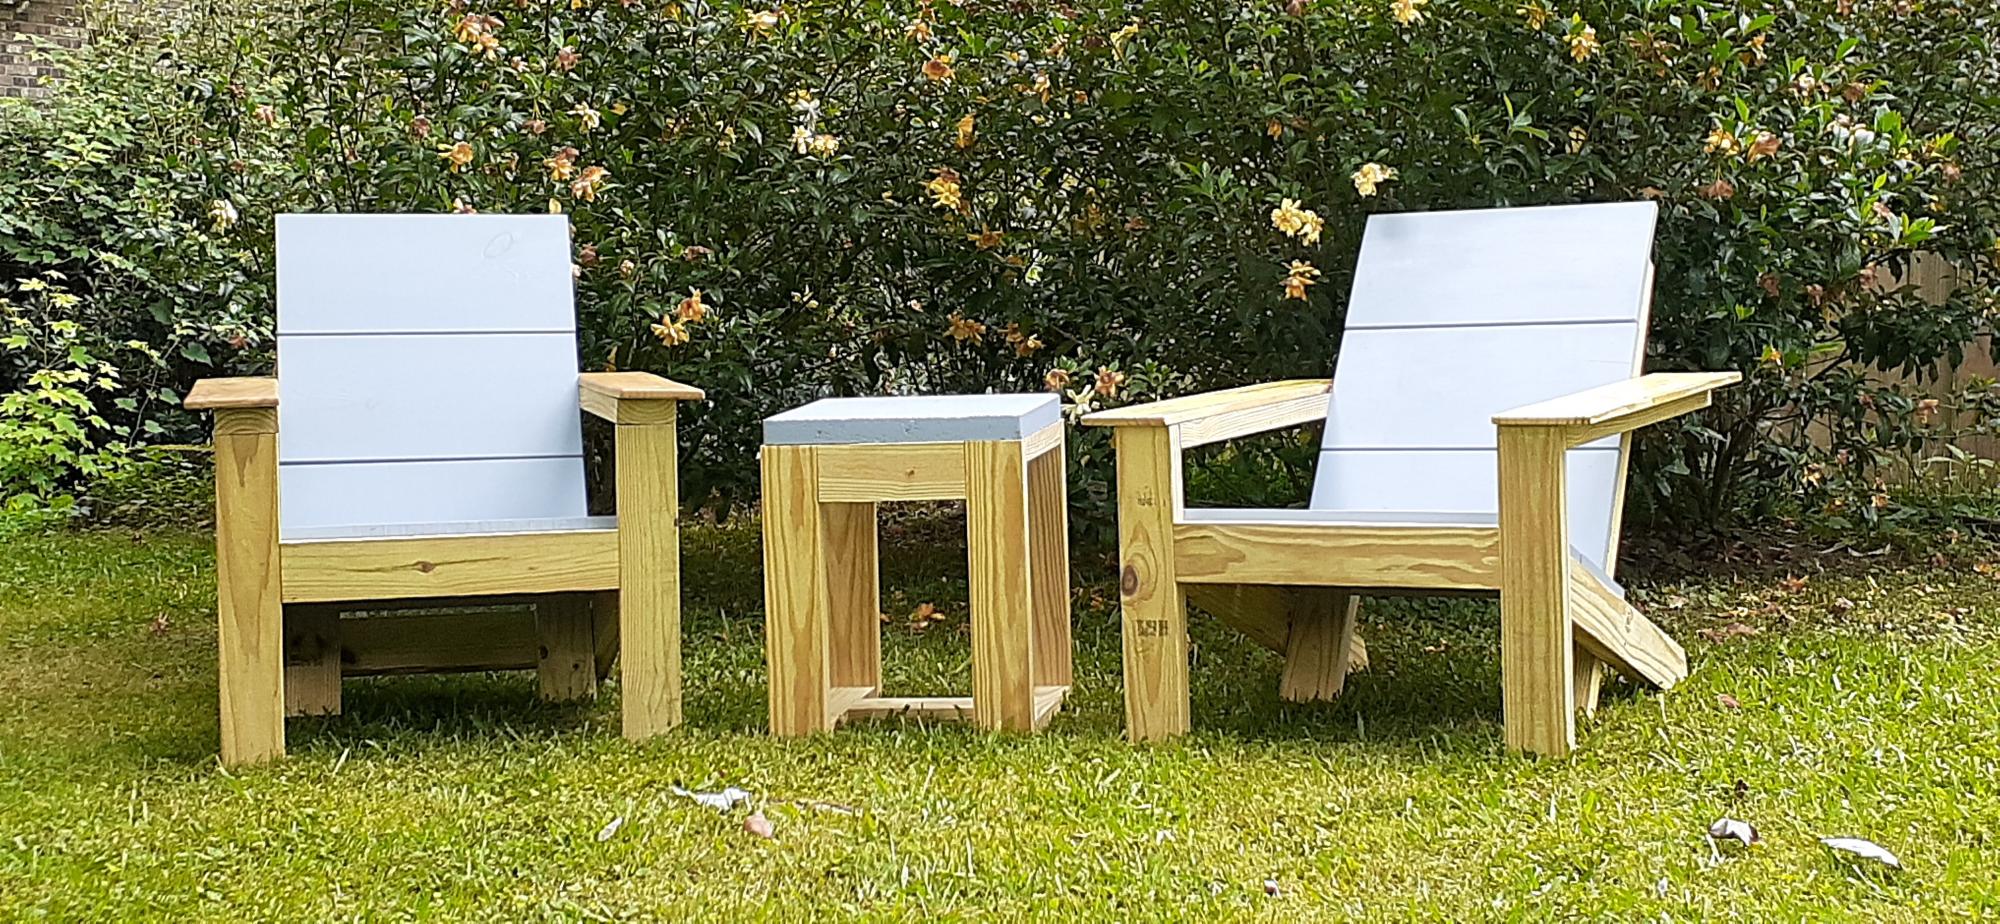
I used 5 5/8 fence pickets I had in the scrap box to give the chairs a wider arm rest. I wanted something wide enough to safely hold a paper plate and drinks.
I planned them, routered the edges and put a coat of oil based polyurethane on them.
The table is just something I put together and the top is a 1.5 inch thick 16x16 concrete paver.
If you like the wide arms, use wood glue and clamps, not nails or screws. Saves you from having to fill them and it looks better too.
Enjoy
And thank you Anna for a great build!

Estimated Cost
$60
Estimated Time Investment
Day Project (6-9 Hours)
Finish Used
Exterior paint and oil based polyurethane
Recommended Skill Level
Intermediate
Seasonal And Holiday

Farmhouse Bench in 1 day

Submitted by vickitee on Wed, 06/25/2014 - 08:27

This was my first build from your site! Farmhouse bench.
I was a little confused with the miter saw instructions "bevel cut at a 10 degree angle off center". I had to google to figure out what you meant. In the end the bench looks awsome and I feel very empowered with my tools.
(still need to stain the finished project, bought all the wood and built in 1 day)
Thank you Ana for sharing your plans!! I love your site and I love my Kreg Jig!
Vicki
(Canada)

Estimated Time Investment
Day Project (6-9 Hours)
Finish Used
going to use walnut stain.
Recommended Skill Level
Beginner

Comments

Farmhouse Table

Submitted by DMax2010 on Wed, 08/27/2014 - 06:30

This was my first attempt at a bigger project. As with most, the finish took the most time. I modified the size of the table because I made it for my sister. It was also the first time I used a belt sander, and I loved it! It made the top nice and even. I did have a huge debacle when trying to fill the gaps of the table with clear silicone...that is definitely something that requires practice! I ended up removing all of the silicone and just allowing the top coat to sink in. Luckily, it just peels right out, although it did leave some clumps that took a little extra care to remove. But overall, I loved how it turned out, and my sister loves it too. I made the bench too.

Estimated Cost
I think the lumber was under $50.00, the stain about $20.00
Estimated Time Investment
Week Long Project (20 Hours or More)
Finish Used
Minwax Express color-Walnut Stain, the final finish was General Finishes Arm-R-Seal, which was a matte finish
Recommended Skill Level
Intermediate

Comments

DMax2010

Wed, 08/27/2014 - 17:34

Thanks Ana! It is one solid table! I can't wait to make one for me next!

Converted TV wall niche

Submitted by Vol4Life1 on Tue, 12/13/2016 - 05:35

We bought this house about a year ago and we finally got around to removing this pointless niche!  The center divider and bottom were removed.  The cabinet and hutch were assembled seperately.  


This is still a work of progress.  I am looking for a nice decorative molding face for the top.  If anyone has any suggestions please let me know!  We will most likely paint it white to match the fireplace mantle.

Estimated Cost
300
Estimated Time Investment
Week Long Project (20 Hours or More)
Finish Used
Paint
Recommended Skill Level
Intermediate

Garage Shelves

Submitted by scoricha on Mon, 01/09/2017 - 11:01

I am loving my new garage shelves.  They were my first woodworking project and very easy to do!  I left the bottom right side open to fit my outdoor table and chairs in the winter (I live in Michigan).  I also used thicker plywood than plan because my shelves are a bit deeper.

Estimated Cost
$130
Estimated Time Investment
Weekend Project (10-20 Hours)
Finish Used
none
Recommended Skill Level
Beginner

Garage Loft Bed

Submitted by GAno1Dad on Tue, 10/21/2014 - 20:24

The garage loft bed was inspired by the plans on your site. I beefed up the framing with 2xs and found siding panels at my local big box. 

Built from Plan(s)
Estimated Cost
$600
Estimated Time Investment
Weekend Project (10-20 Hours)
Recommended Skill Level
Intermediate

Comments

Wolfeman188

Wed, 08/03/2016 - 13:15

Hi, i was just curious if there was plans for this bed anywhere? My son has that exact corvette bed and he is not with me for a little while and i wanted to make it for him to come home to.

Farmhouse Table

Submitted by ssshindler on Fri, 11/07/2014 - 05:39

This is my first project and I am thrilled with how it turned out. Thank you Ana, you have empowered this stay at home mom! 

Finish Used
minwax dark walnut stain, polyvore wax varnish
Recommended Skill Level
Starter Project

Comments

sagey

Sun, 11/09/2014 - 18:41

I  love this table sooooooo much .

please explain exactly how you achieved the finish on it > is the wood reclaimed!!!!

sagey

Sun, 11/09/2014 - 18:42

I  love this table sooooooo much .

please explain exactly how you achieved the finish on it > is the wood reclaimed!!!!

Farm House Table

Submitted by Anonymous (not verified) on Mon, 02/13/2017 - 13:42

I am not a carpenter, I do not even have a tape measure. I got tasked by my leadership dothan class to build a farmhouse table for the academic dream room which is part of the Bright Key Program. Which is being renovated at Honeysuckle Middle School. Found your plans and got inspired. One glitch they wanted this table to be able to sit fourteen chairs. So I had to make a few adjustments like increasing the main boards to twelve foot. Because of your plans, many urban middle schoolers will have a place to get tutored considering cafeteria tables are so expensive. I am a believer of your plans. The positive feedback I received was well worth my time and would not of been a sucess without your plans. I did mine with pocket holes as well. 

Estimated Cost
146.37
Estimated Time Investment
Weekend Project (10-20 Hours)
Finish Used
American 230 and the middle a bluish grey.

Spent an hour picking out lumber. All boards are not the same length. Ran through a planer and I found it eliminates the need to sand. But remember not to plane them to different heights. Pocket holes are great but I found some really nice table joints at Lowes that looked classy with the kreg screws.
Recommended Skill Level
Beginner

Comments

Custom kids closet

Submitted by Jon Moore on Sun, 04/07/2013 - 19:36

I was inspired by the custom closets on this site and decided to have a go at it. My daughter is in high school, so I wanted something functional with a bit of teenage flair.

Of all the designs I researched, I loved Kristen's design (from Pink Toes & Power Tools here: http://ana-white.com/2012/02/closet-organizer) the most, but wanted to add a substantial shoe section and not lose any rod space in the process. I also needed one rod section to be longer than the other two to hang her dresses.

All in all a fun project where I used just about every tool I own:

Circular saw to rough out the plywood shelves and supports.

Table saw with a cross-cut sled (http://wnwoodworkingschool.com/5-cuts-to-a-perfect-cross-cut-sled/) to make the plywood pieces all perfectly square & an extra long rip fence.

Router (with jig) for the dovetail joints, detailing on the drawer fronts and rounding the leading edges of the shelves.

Power drill for mounting the drawers, drawer fronts and handles

Compound Miter saw for the various face framing pieces and the shoe moulding

Pipe cuter to cut the rods (also made a jig to both hold the rods in place while I mounted the supports and set it at the correct height and distance from the wall--used a planer in making this)

Orbital sander

Brad nailer during assembly (also made a jig here to set the plywood pieces on during the tower assembly to keep the back square while I used 90 deg clamps on the fronts).

Airless paint sprayer (I have learned that my wife does not like brush marks!)

Washers for spacing the drawer fronts (found this trick online and it works like a charm!)

Lots of clamps!!!

Estimated Time Investment
Week Long Project (20 Hours or More)
Finish Used
White paint
Recommended Skill Level
Intermediate

Comments

My First Greenhouse

This was my first attempt at building a greenhouse. I wanted my cucumbers to be able t climb high so I made the house higher than the plans showed. It's also a little larger too. Since I am in Europe my dimensions are in meters. The overall size is 3 x 6 meters. I also built it on top of 100mm x 100mm lumber (the equivalent of 4x4's). It took 5 sheets of 6mm thick polycarbonate in 2 x 6 meters.

Built from Plan(s)
Estimated Time Investment
Week Long Project (20 Hours or More)
Recommended Skill Level
Intermediate

Comments

Simple Square Outdoor Table

Submitted by hannant on Mon, 08/07/2017 - 15:10

Inspired by Finn's Dad's table, we decided to copy it since we wanted to build a table that would seat 8 comfortably. The most difficult part of this project was finding clear cedar for the top. It had to be ordered through our local lumber yard and we were not able to match boards. We built the frame out of treated pine and the 4 x 4 legs from average greade cedar found at Lowe's. We finished it with four coats of polyurethane. 

Built from Plan(s)
Estimated Cost
$300-$450
Estimated Time Investment
Week Long Project (20 Hours or More)
Finish Used
Zak Polyruethane marine satin
Recommended Skill Level
Beginner

Man Crate for Grandson

My Grandson Brax is staying with me for a few days this summer and I thought I'd get him invloved with a wood project. We decided on building him a "man crate" to keep toys & other boy stuff in. He was a great help, and got to have a lot of fun while learning to build a DIY project.

Maybe one day Brax will love to build things out of wood like his Paw-Paw.

Estimated Time Investment
Afternoon Project (3-6 Hours)
Finish Used
Minwax Polyshield "Espresso"
Recommended Skill Level
Beginner

Comments

Eco office work space

Submitted by solomonson on Mon, 07/22/2013 - 13:35

We (my husband and I) were in desperate need of a better work space, and this was perfect.

Estimated Cost
$150 (for the whole desk)
Estimated Time Investment
Week Long Project (20 Hours or More)
Finish Used
Bases - Valspar's paint+primer in one in Antique White from the oops bin. Desktop - General Finishes water based stain in Espresso. Top coat - I used Minwax's spray-on polycrylic for the bases and GF's water-based polycrylic in Gloss for the top. Contact paper from Blue for the insides. Paint was rolled and brushed, stain was applied with a rag. Polycrylic was rolled and brushed. Use good brushes (I used Purdy) and you'll never see a brush mark.
Recommended Skill Level
Intermediate

My first project - metric mitre saw stand

Submitted by EmH-C on Sun, 09/13/2015 - 03:30

Adaptation to fit my little mitre saw, small workshop and the metric timber available in B&Q. My first build, this should let me build more while staying comfortable and safe. I'm ridiculously pleased with myself!

It took longer to build than expected because my little boy thinks naps are for wimps.

In case anyone in the UK wants to build similar, here's my adapted sizes.

18mm plywood cutting list:

2   85cm x 50cm (sides)

3    50cm x 50cm (shelves)

2    50cm x 60cm (leaves)

2    45cm x 30cm (leaf supports - replaced fancy brackets that were too expensive over here)

Timber cuts:

6  34mm x 34mm @ 50cm (cleats)

6  18mm x 70mm @ 52cm (supports)

2  18mm x 70mm @ 42cm (spacers) 

Built from Plan(s)
Estimated Cost
£40
Estimated Time Investment
Day Project (6-9 Hours)
Finish Used
Help me use my mitre saw safely and comfortably.
Recommended Skill Level
Beginner

Comments

Wife's Kindergarten Classroom

Been a while since I had time to actually build anything worth posting about! My wife wanted some items for her Kindergarten classroom this year, so built several items, most inspired by the Farmhouse family.

Estimated Time Investment
Day Project (6-9 Hours)
Recommended Skill Level
Beginner

Comments

sido17

Thu, 07/18/2019 - 15:27

I would love the dimensions or plans for this. Would love to make it for my classroom.

dlee69

Tue, 07/30/2019 - 12:07

Hello

Can I please get the plans to the u shape table?

Thanks

Linguine

Mon, 08/19/2019 - 12:09

I am guessing the corner posts are 2 x 4s, the top is 2 x 10s.  It looks like the width is 6’ (looking at the floor carpet tiles being 24” square). So 2 - 2 x 10s side by side for the main part of the desk top and 2 - 2 x10s perpendicular on each side of the chair.  I guess the height is subject to choice and the length of each side would also be subject to choice or to the length of the 2 x 10s to be economical.


an educated guess would be 4 - 8’  2x10s for the top and 6 - 6’ 2 x 4s for the legs?  


Anyone else have any input here?  Open to suggestions.....

Overhead Garage Storage

This project was born out of desperation for some way to organize our garage. It is not difficult to build, and it went pretty quickly with two of us. It probably didn't take more than four hours tops for each section. I've seen the prices for garage storage components and some of them are staggering! We have removed a tall chrome shelf, and moved a ton of stuff onto these shelves, creating a hundred square feet of floor space! And for only $25! Come on over and check it out on my blog! Val

Estimated Cost
$25 per 8 foot section
Estimated Time Investment
Afternoon Project (3-6 Hours)
Finish Used
Whatever white paint we had left over from various projects.
Recommended Skill Level
Beginner

Comments

Outdoor sofas

Submitted by Anonymous (not verified) on Fri, 06/09/2023 - 11:24

These were inspired from a few different projects of Ana’s, great fun to build and have transformed our patio area

Comments

Farmhouse Bench

Submitted by kaytrishjr on Wed, 01/25/2012 - 18:27

I made the large rustic bench to go at the bottom of my bed. I am so happy at the finish product, now I'm going to build the whole table and bench set.

Estimated Time Investment
Afternoon Project (3-6 Hours)
Finish Used
For the top, I used the brown paper bag technique that everyone is using on their floors. I wanted to try it on something small before I put it on my floors. The bottom part is just black paint with satin poly.
Recommended Skill Level
Beginner

Comments

spiceylg

Thu, 01/26/2012 - 08:07

I built this and did the black bottom with wood top and love it. However, that brown bag affect is to die for! Love, love, love!!!

sueslager

Mon, 03/26/2012 - 10:29

thanks for the idea to do it as a table top

i had been planning to use the paper bagging for a stairway, but this gave me a chance to practice on a smaller project .. and i LOVE it!! how is yours holding up? i only did 4 layers of poly but for a seat i think it will be plenty.