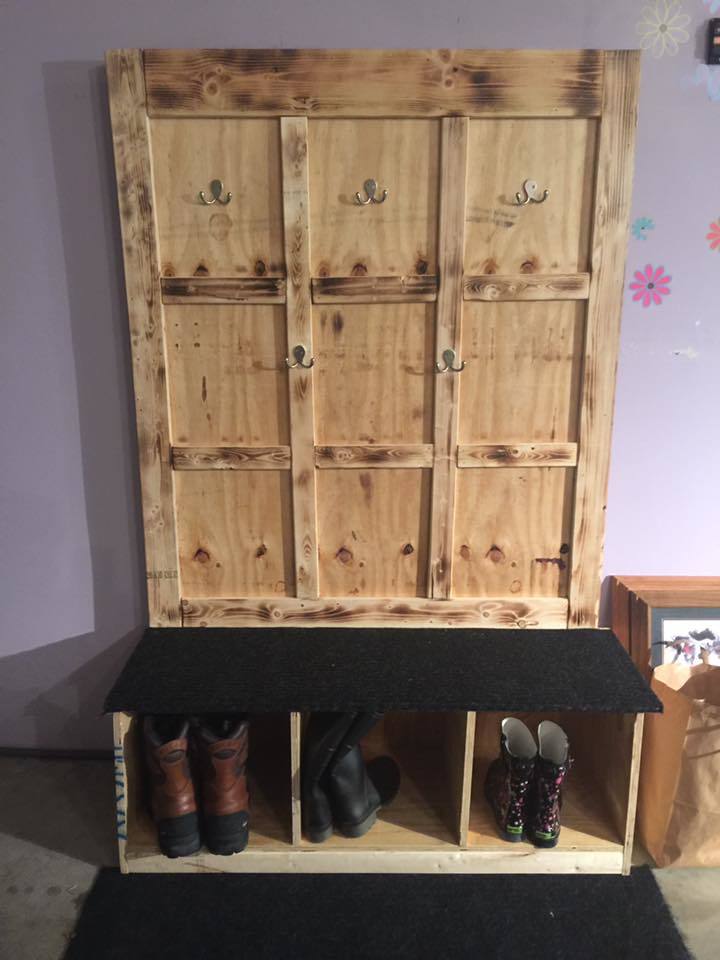
Community Brag Posts
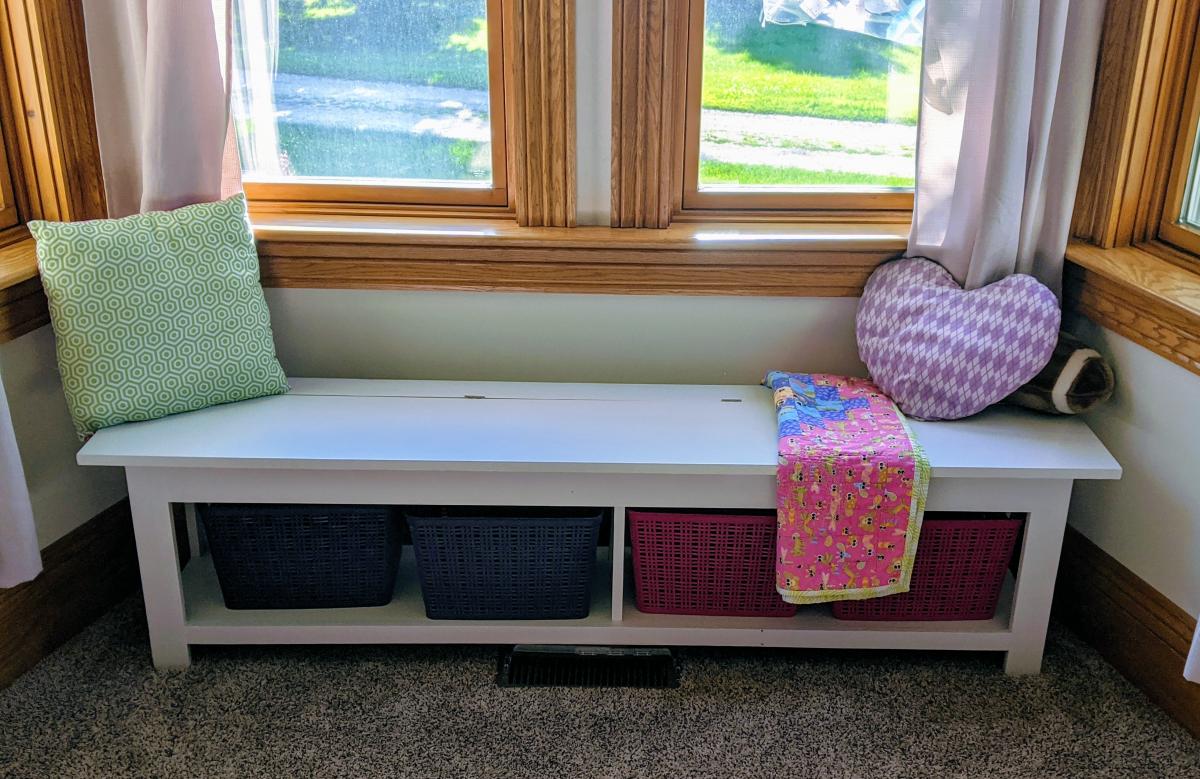
Window Seat
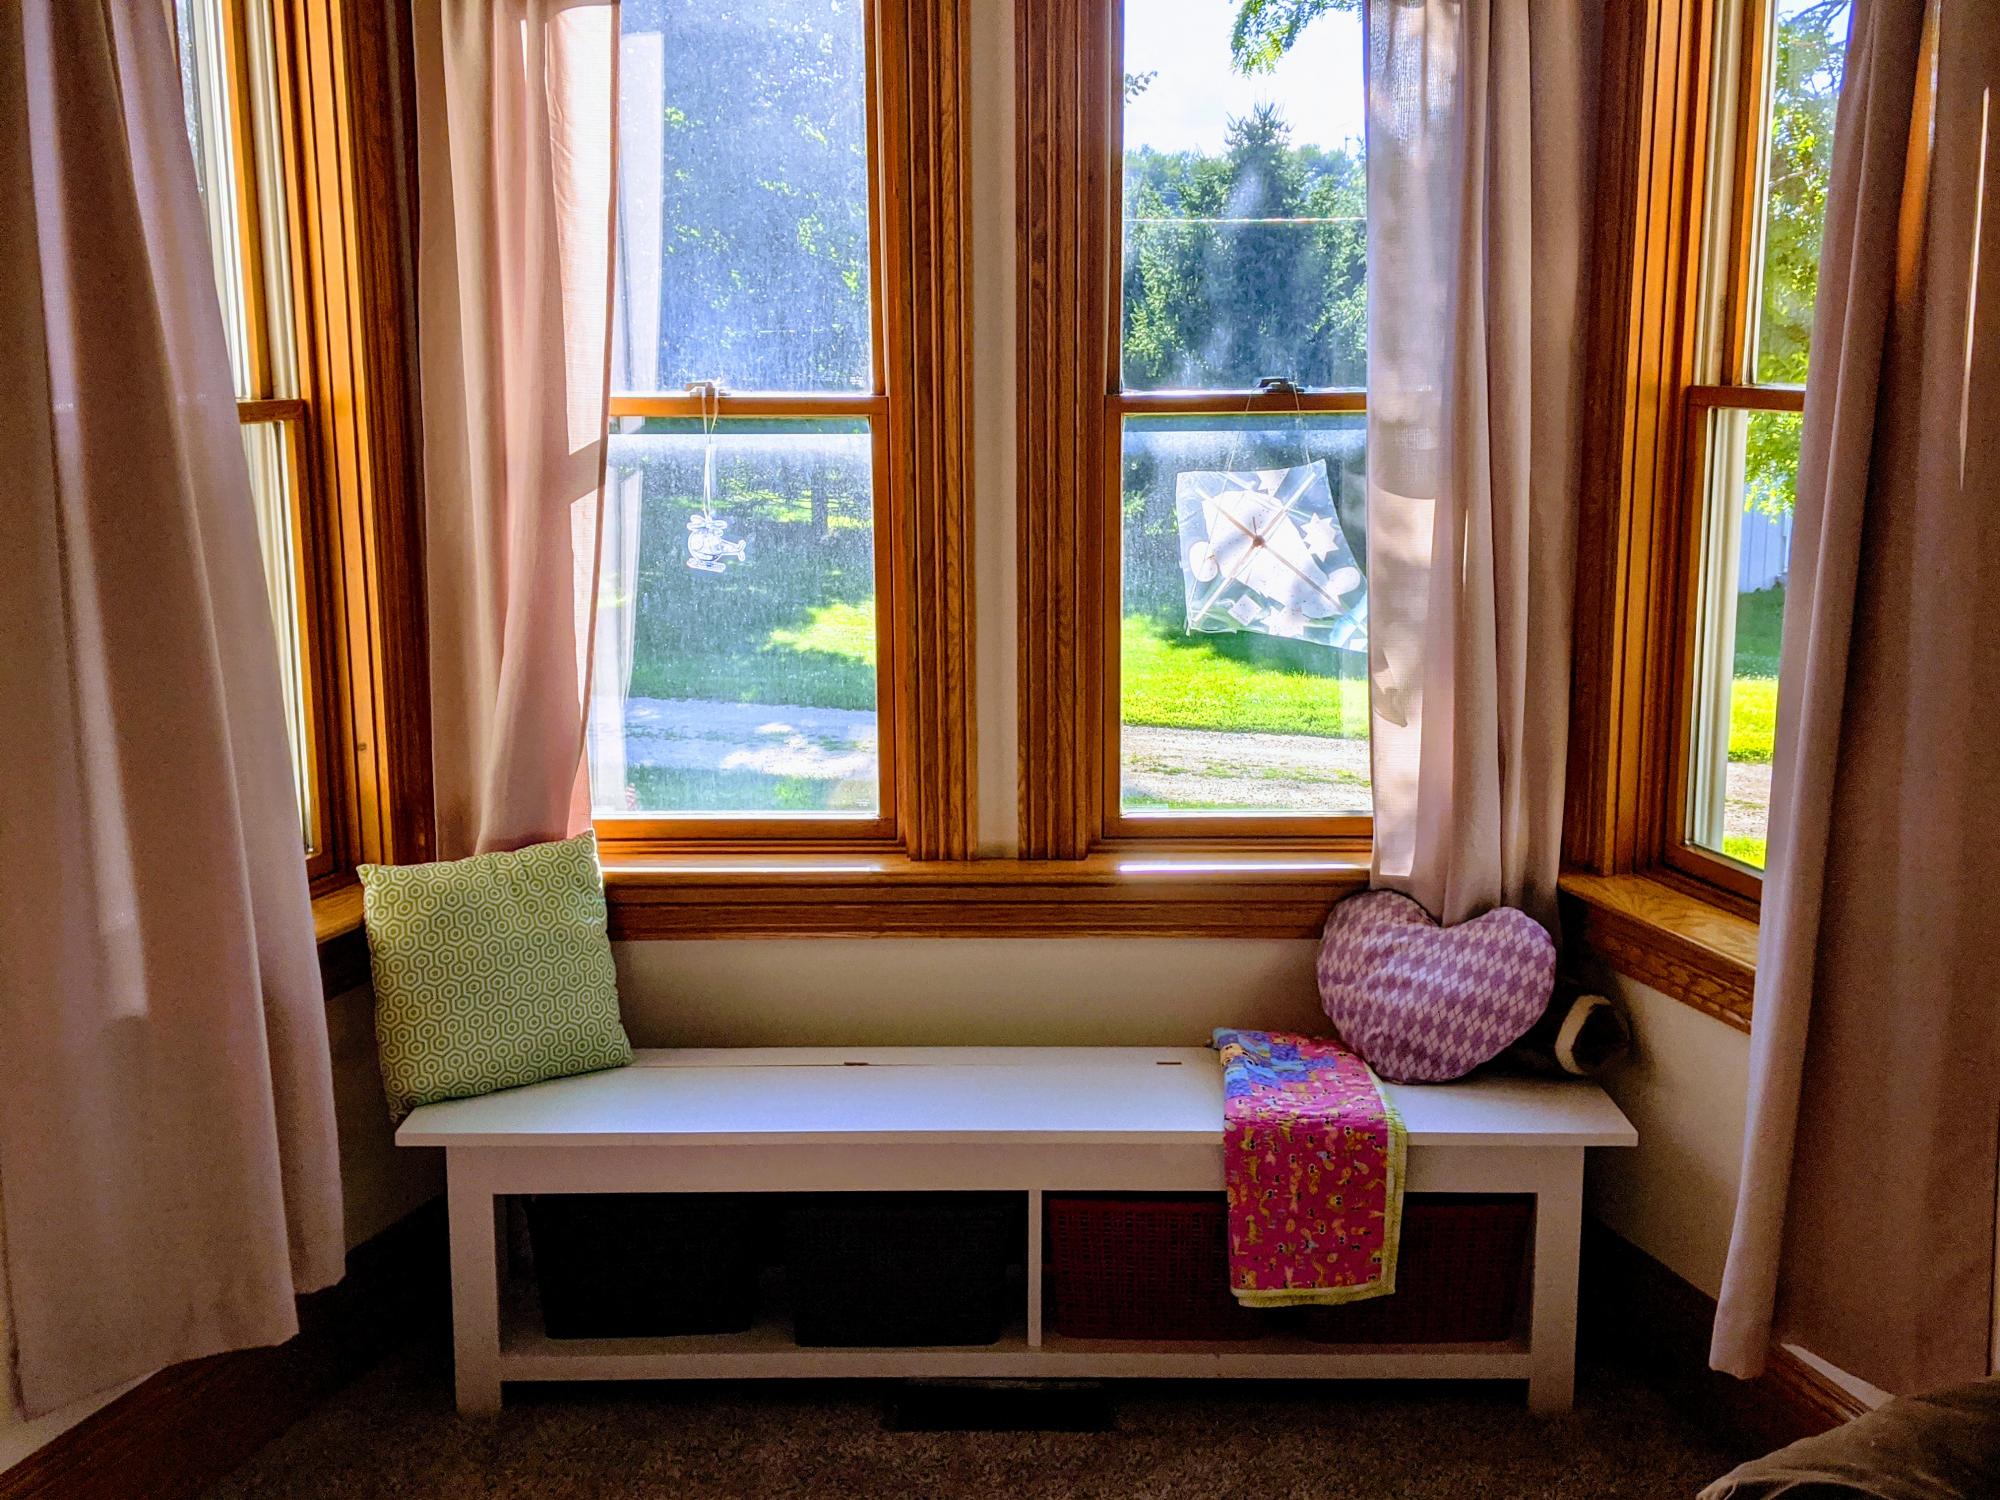
My daughter turned 5 in July. She loves twirly dresses, unicorns, and building. Her current project is a full size airplane made from wood. She is certainly ambitious. For her birthday, she received all kinds of building toys (Legos, knex, etc.) and quickly got to work, creating masterpiece after masterpiece. Like every 5 year old, dismantling a masterpiece is unthinkable. So, she has taken it upon herself to display her projects on every available surface, despite its intended function (i.e., my desk). We needed something that she could use to build, store, and display her projects that wasn't in the way and didn't disrupt our everyday routines (Mama's gotta work!).
Enter, this window seat. I've been wanting to build one for years but never really found a plan I liked. This is exactly what I was looking for, as it has enough building space and storage space to meet our needs. Maybe one day i'll get to use it as a window seat!
I used the flip top storage bench plan and modified the length to fit our windows. The lid is 69" wide and the base is 64.5". I added some supports in the middle, as well. I painted the inside storage space purple to give it a kid friendly touch. I also added lid supports on both sides to prevent pinched fingers.
Estimated Cost
$100?
Estimated Time Investment
Day Project (6-9 Hours)
Finish Used
White paint with purple paint in the storage area. Sealed with mod podge hard coat. 😁
Recommended Skill Level
Intermediate
DIY Wood Event Planning Projects
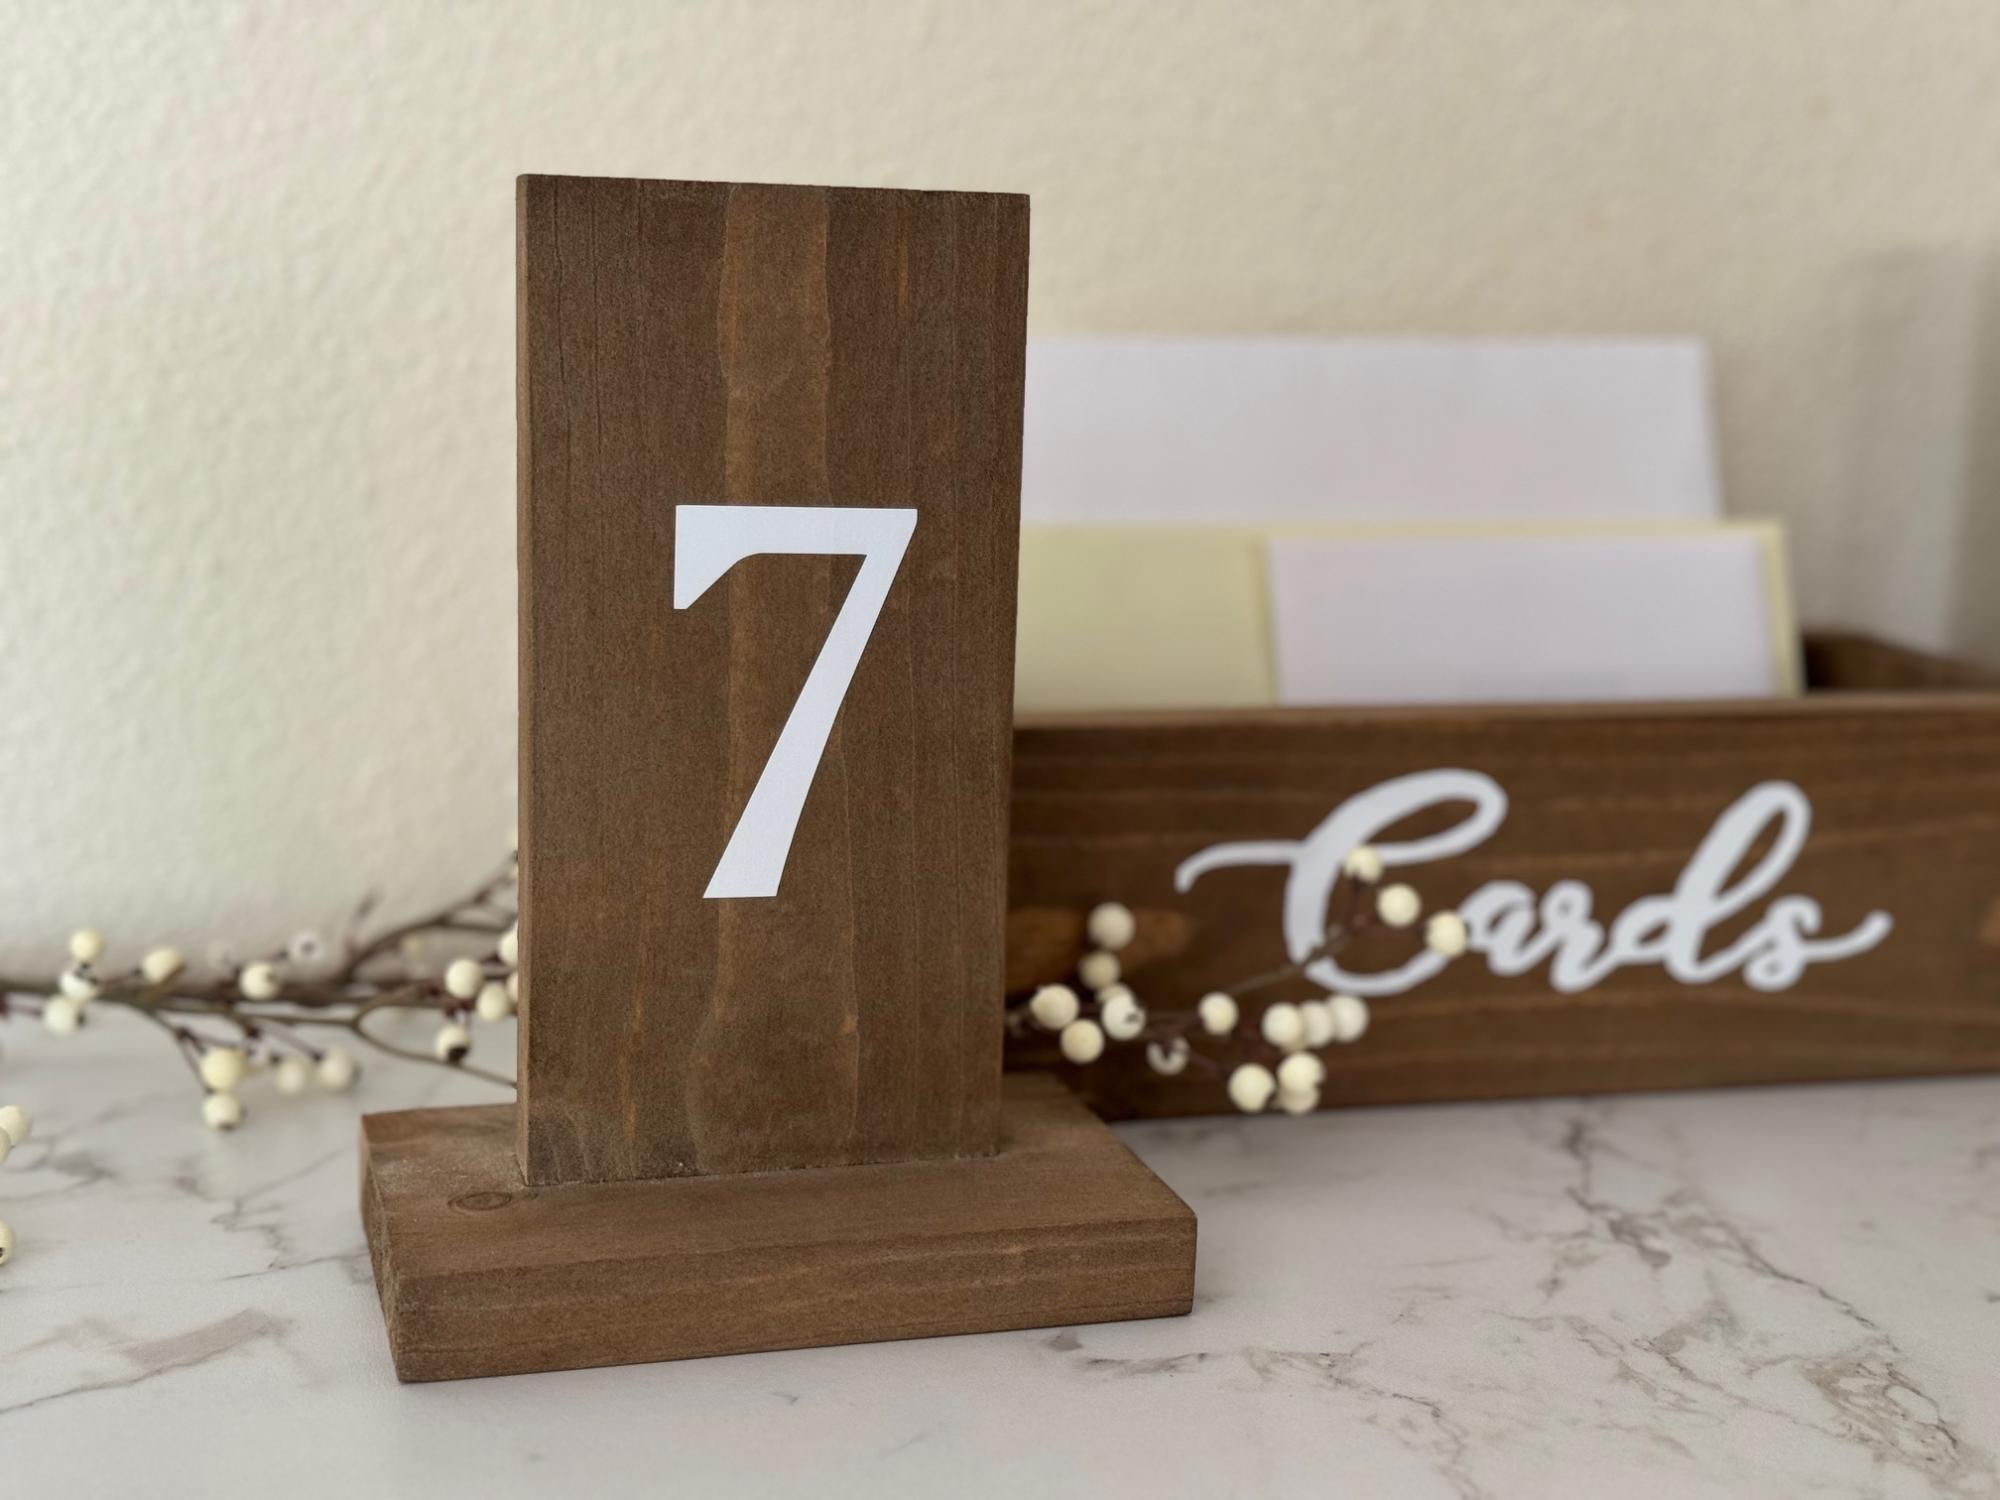
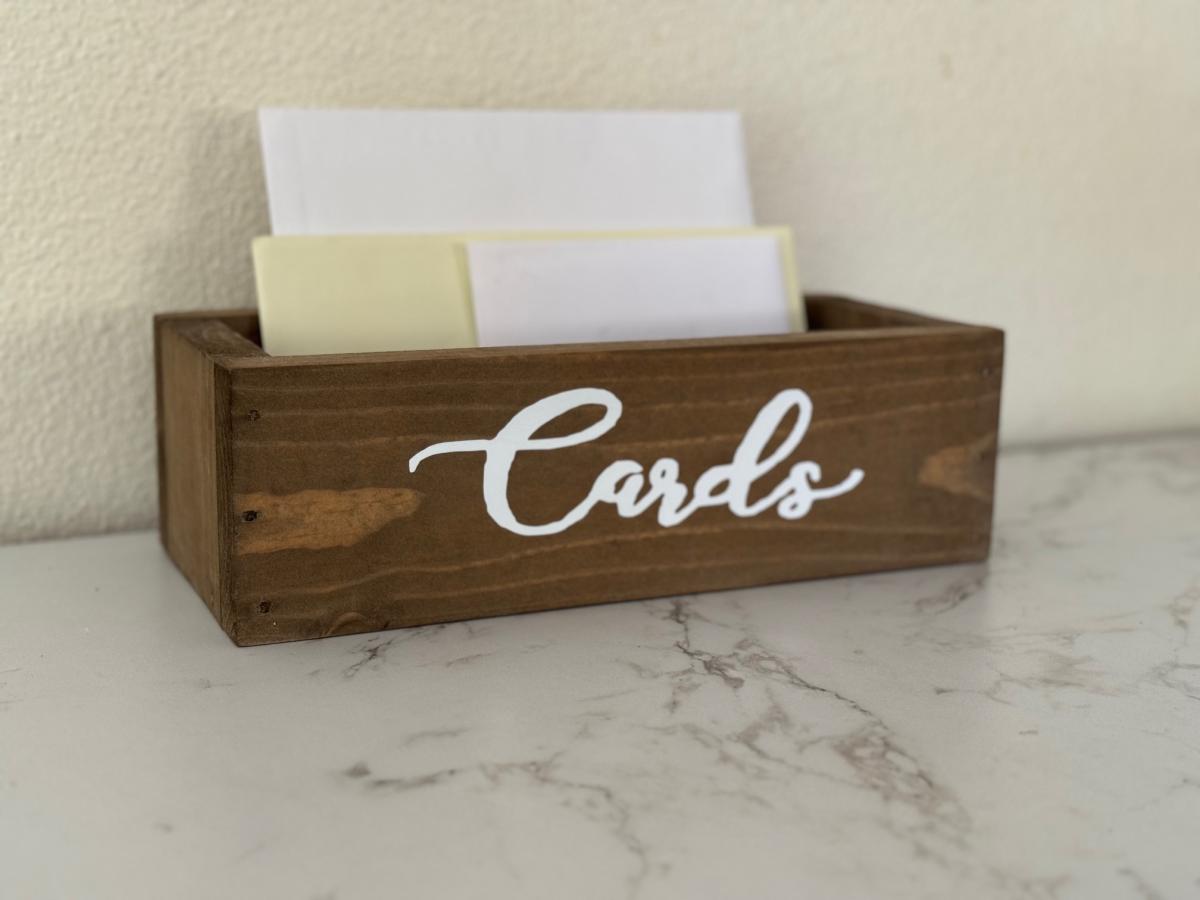
I built these easy diy wood table numbers and card box for a large birthday celebration. I had a friend make the vinyl lettering, very simple projects that were a great additon!

Built from Plan(s)
Simple and Elegant Stool
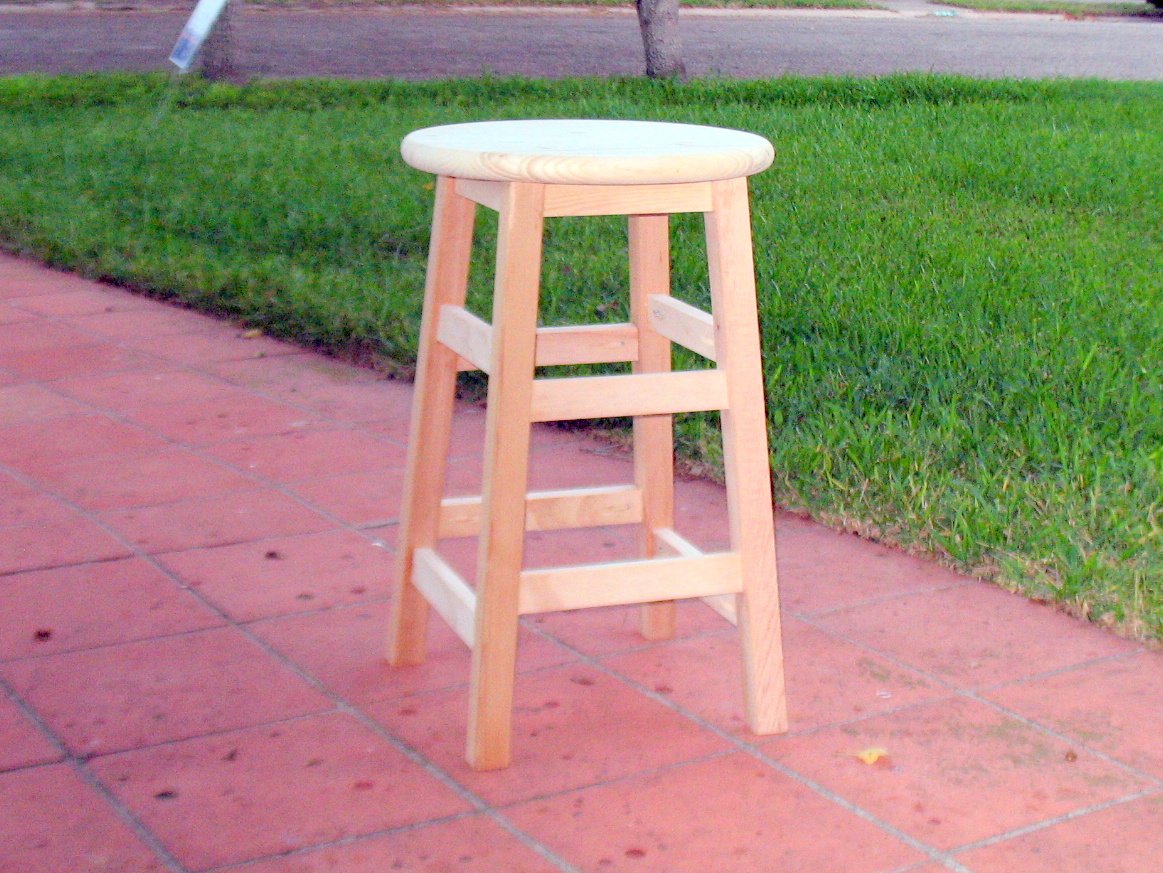
This is the second of the Simplest Stool design I retrieved from Ana's site and built. I love the stool for its ease of construction and beautiful lines. Get your measurements spot on and it goes together in a flash. I did use a 15 inch diameter project round for the seat. I built it upon the request of a friend so they have to finish it. Lots of PHs in this small stool so I wish that Kreg or someone would produce PH inserts that easily fit where you have 11/4 inch ph screws.
Built from Plan(s)
Estimated Cost
Seat $7.50, Legs $4, 1x2 $6 plus misc or about $20 or a little less.
Estimated Time Investment
Afternoon Project (3-6 Hours)
Finish Used
None, but if I were to do it I would paint the support a white satin and stain the seat a semi-dark gunstock or a really nice golden oak. Do them separately and then make the attachment.
Recommended Skill Level
Beginner
Great project!
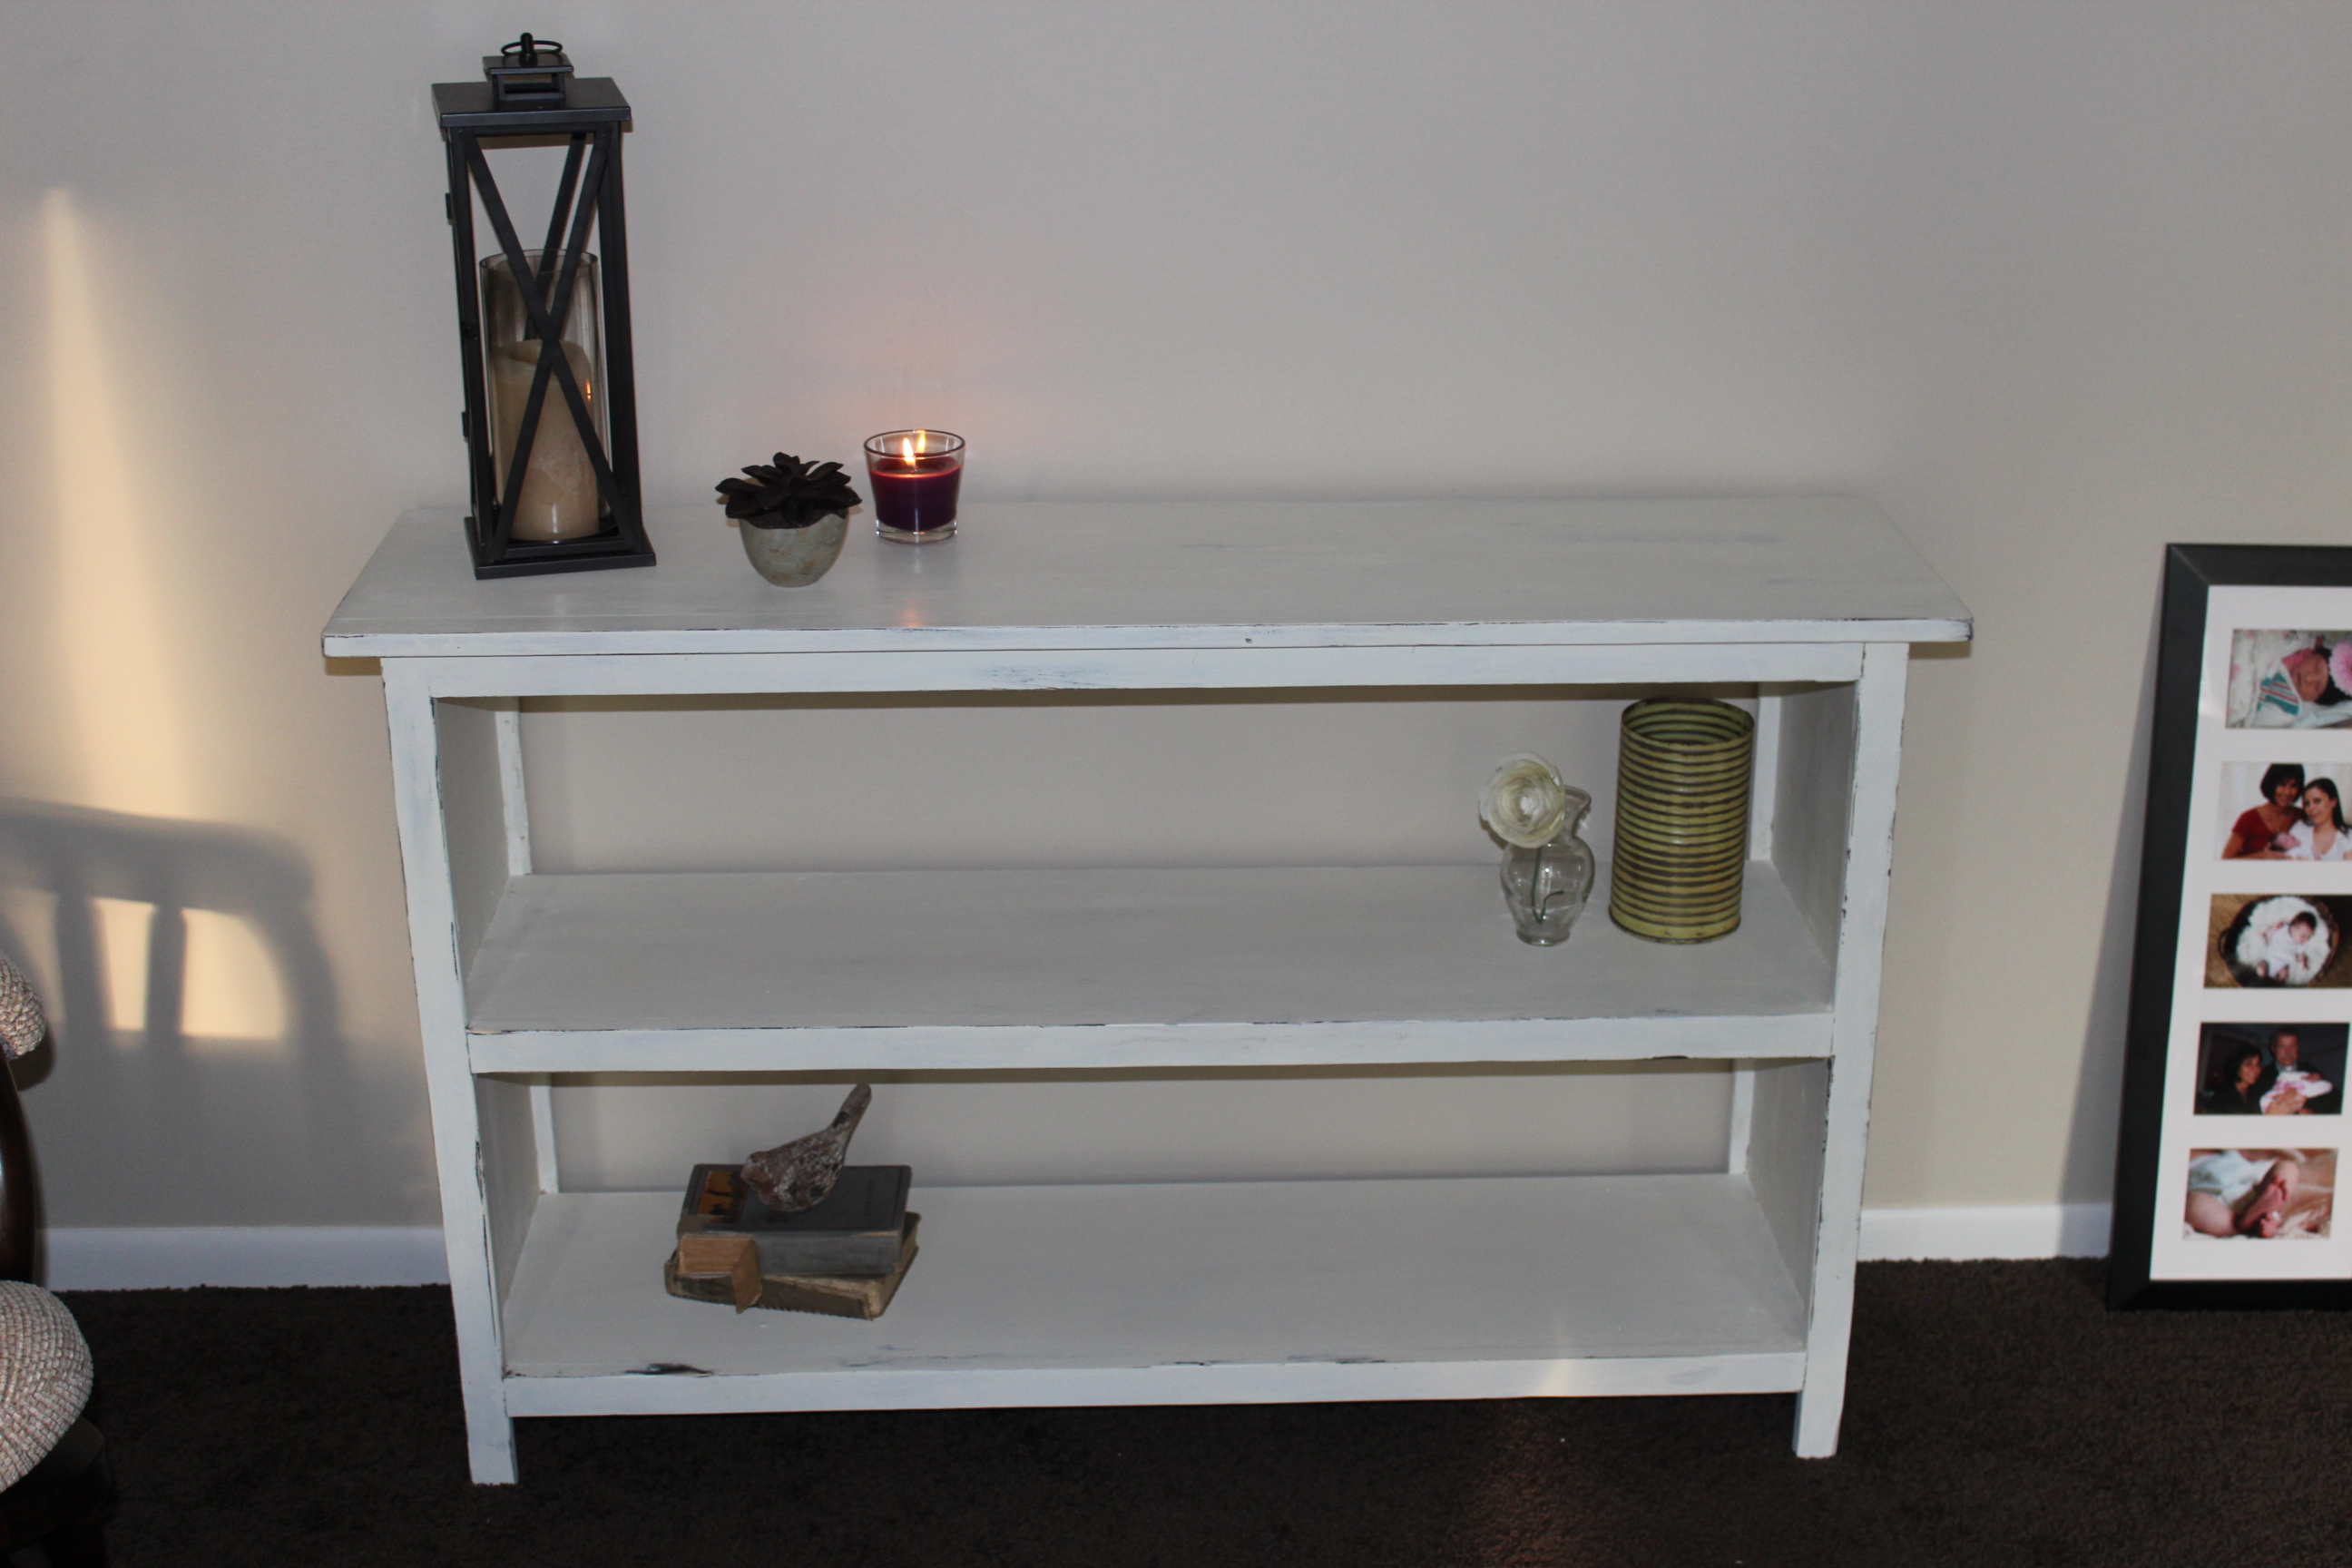
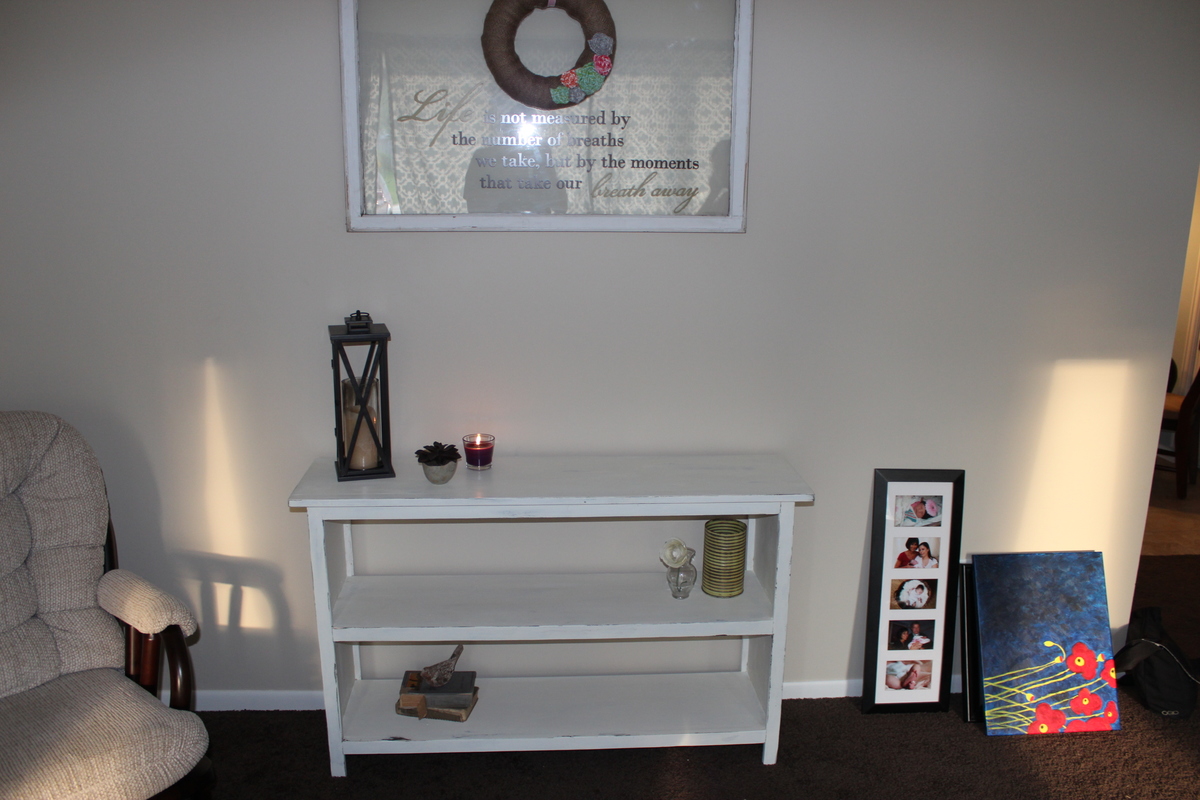
This is an extremely easy project and great for beginners. The step by step guide was spot on. I would only suggest that if you are having your local home goods store do the cutting to make sure they cut according to the guide given or you will end up with only enough "correct cuts" to make one shelf.
I applied a dark brown base coat and then a nice coat of DIY chalk paint (off white). I distressed the edges and a couple of spots on the top shelf and topped it off with clear paste wax. Looks great in the living room.
Thank you for the plans!
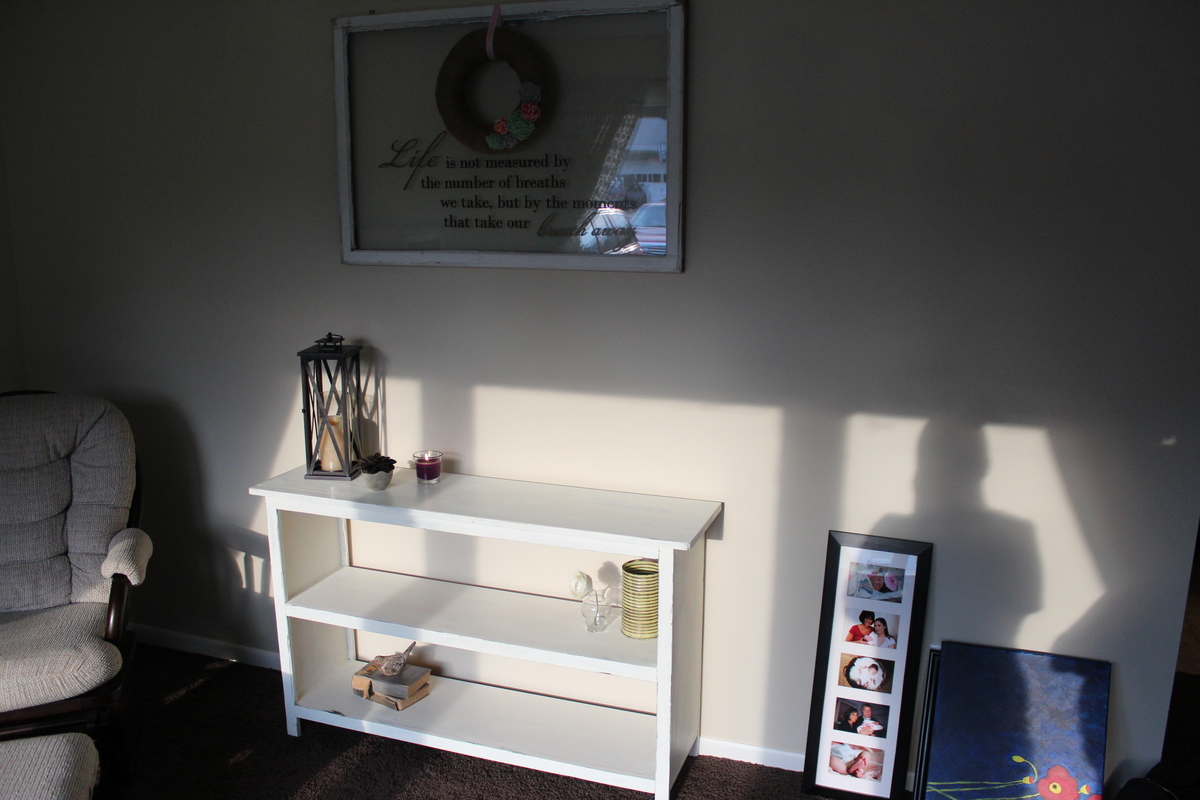
Built from Plan(s)
Estimated Cost
$35
Estimated Time Investment
Afternoon Project (3-6 Hours)
Finish Used
DIY Chalk Paint (Distressed) with clear paste wax
Recommended Skill Level
Beginner
Sweet Pea Bed
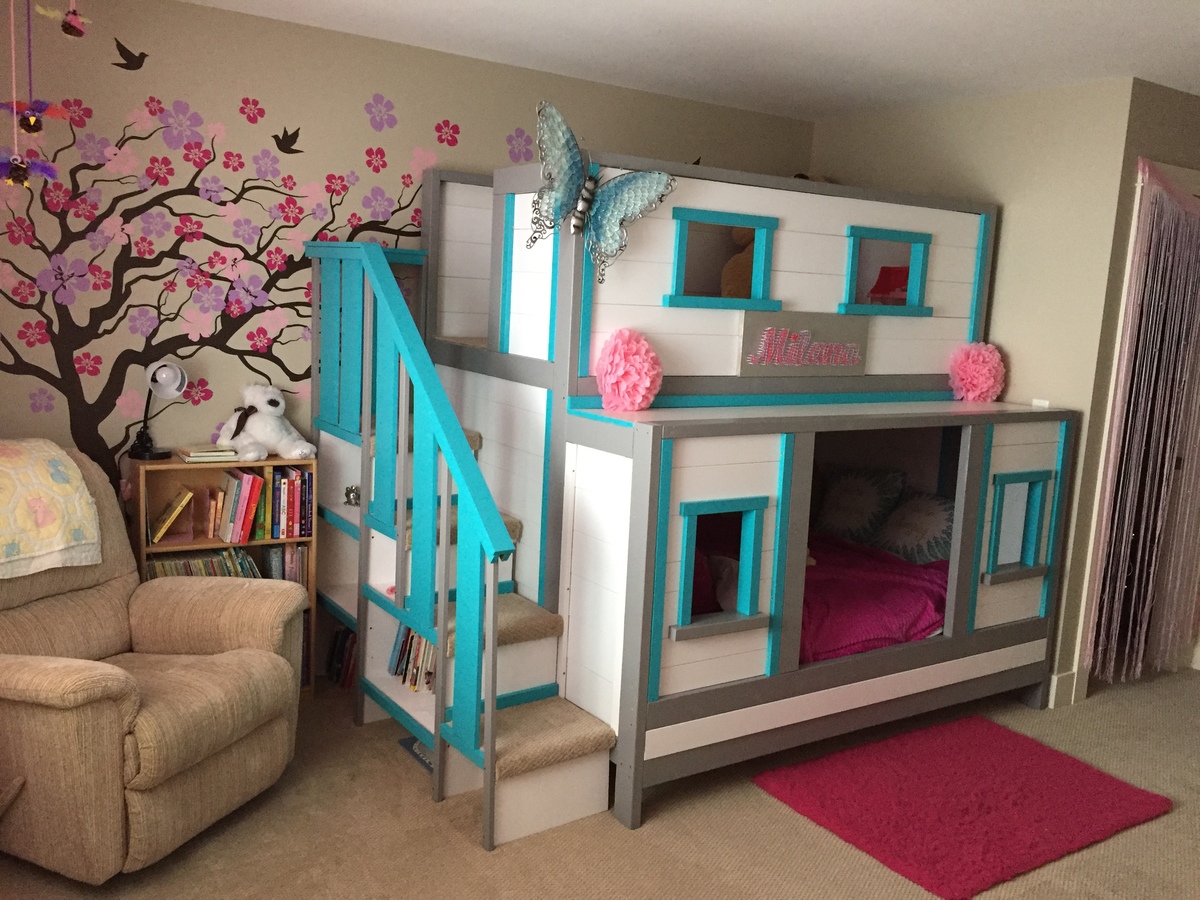
This project cost us about $850CAN and took us around a week (5ish hours a day) to complete. My husband and I are definitely not carpenters so it's not perfect but it's pretty amazing :)
we made several alterations to the plans including making the bottom bunk larger to accommodate a double/full size mattress. We also made the "door" to the bottom bed larger with an opening of 30". Another alteration was we dropped the mattress cleats to 9" off the ground so that the mattress dat down in the bed. The bed is for our 2 year old so we thought she would have trouble getting in if it was much higher. This eliminated the storage area underneath but she has a large closets so we didn't think it would be an issue.
The plans were great and pretty easy to follow. We are over the moon with how it all turned out!

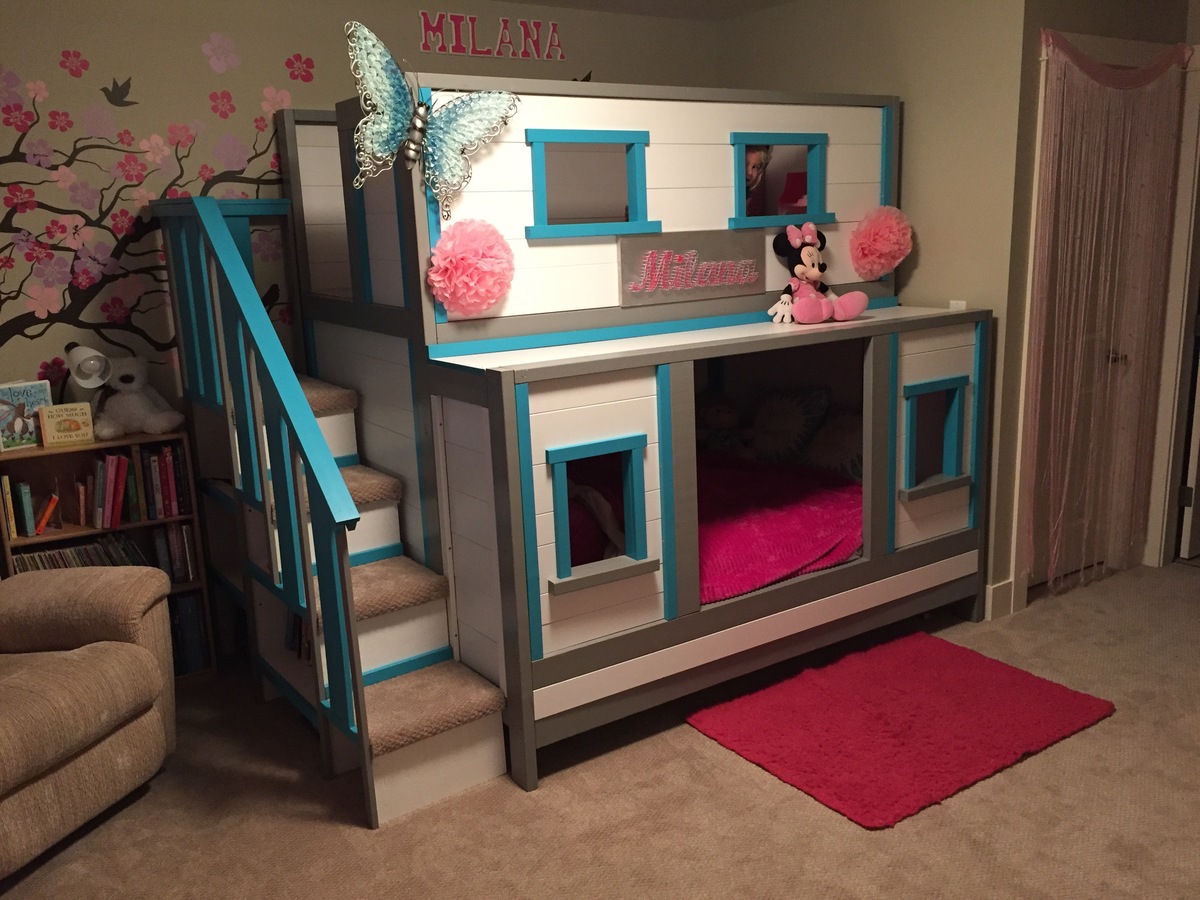
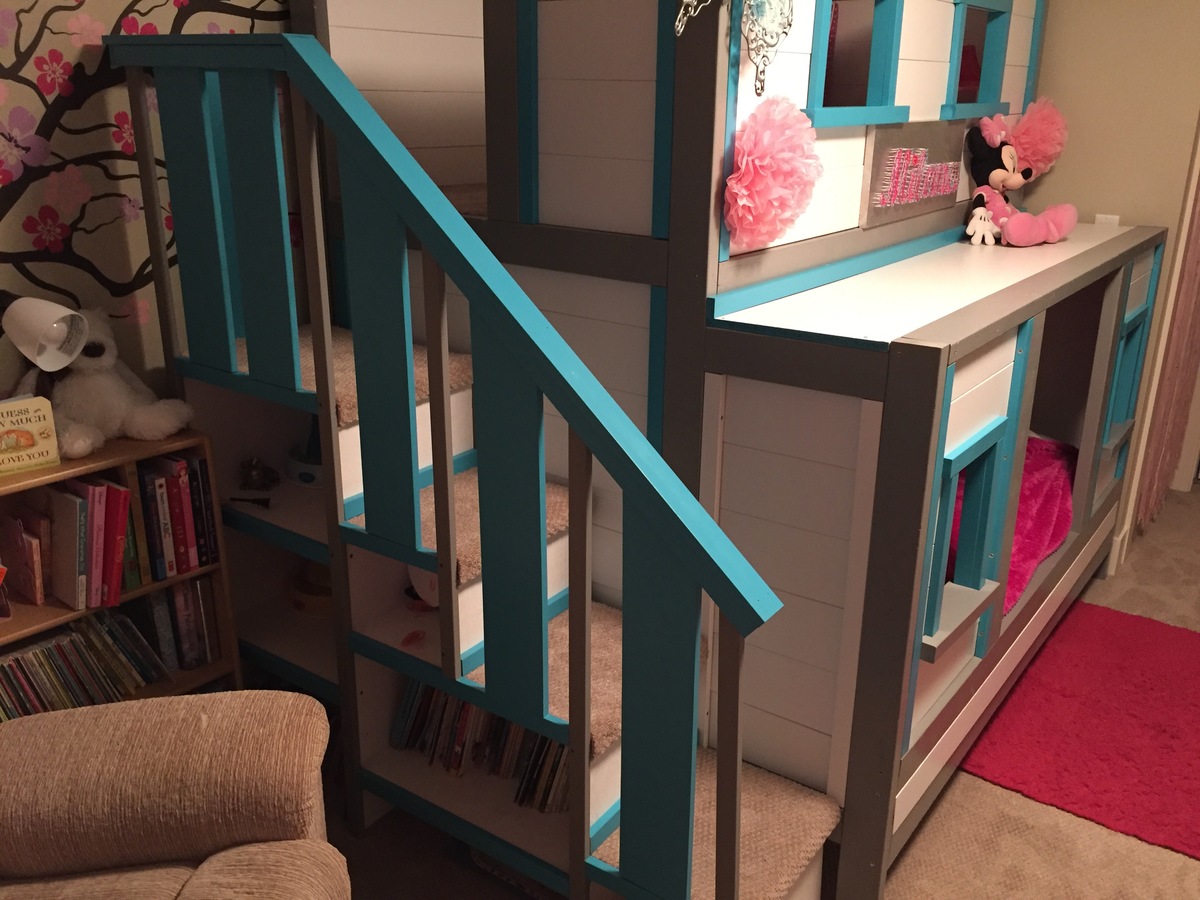

Built from Plan(s)
Estimated Cost
$850
Estimated Time Investment
Week Long Project (20 Hours or More)
Recommended Skill Level
Intermediate
dumpster dresser
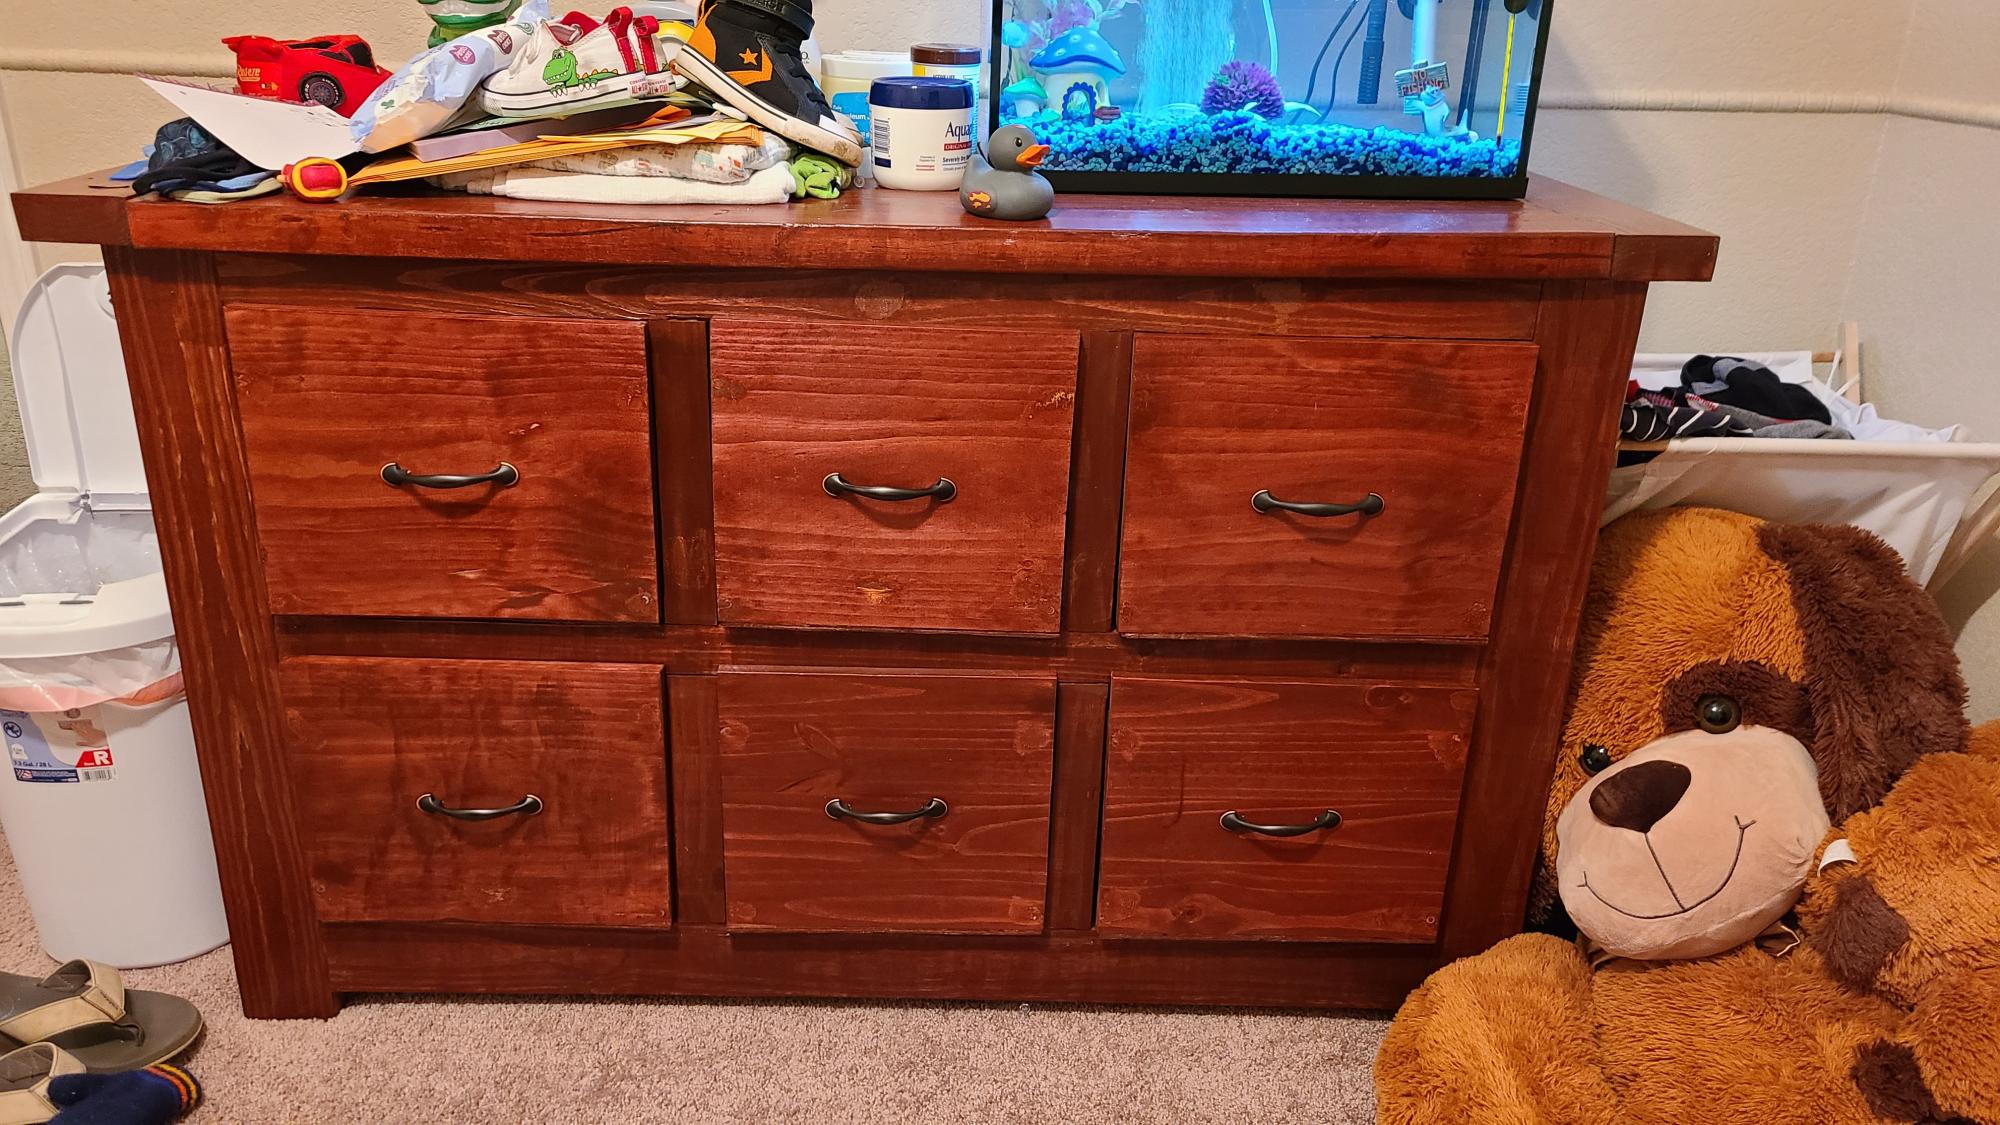
I had left over lumber from a fence that I put up. The kiddo needed to have a big boy dresser. Made this with all treated 2x4s. I cut all of the inside supports to dimension from the 2x4s. Only wood that I needed to buy was for the drawers.
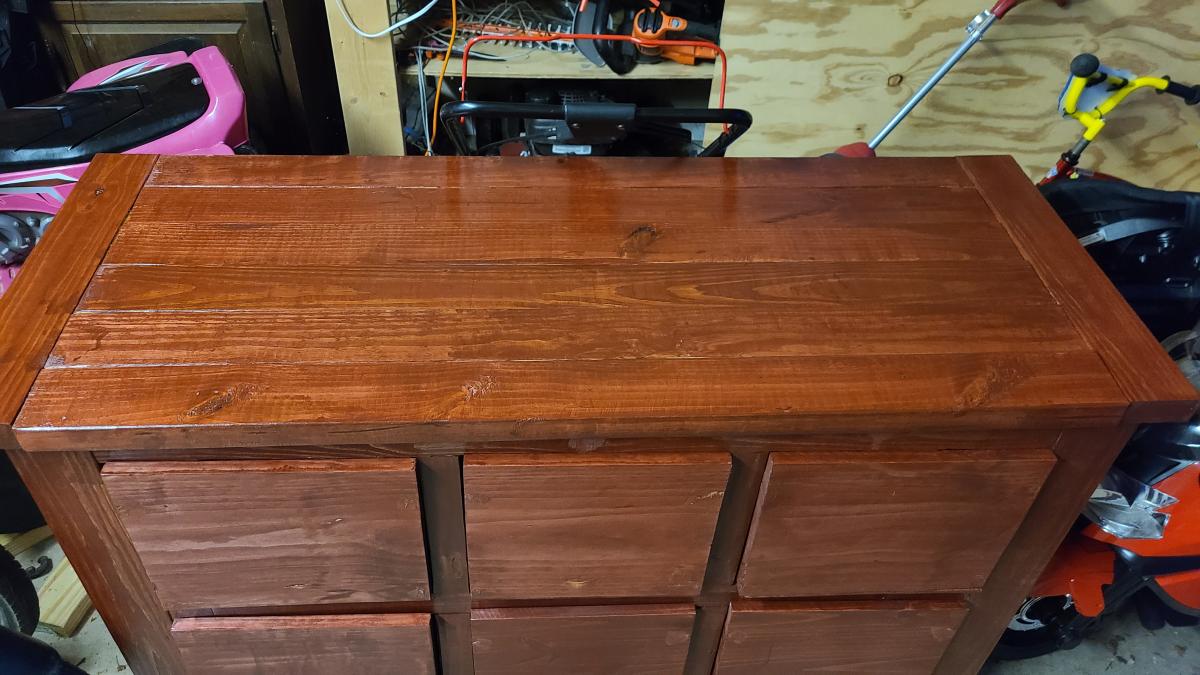
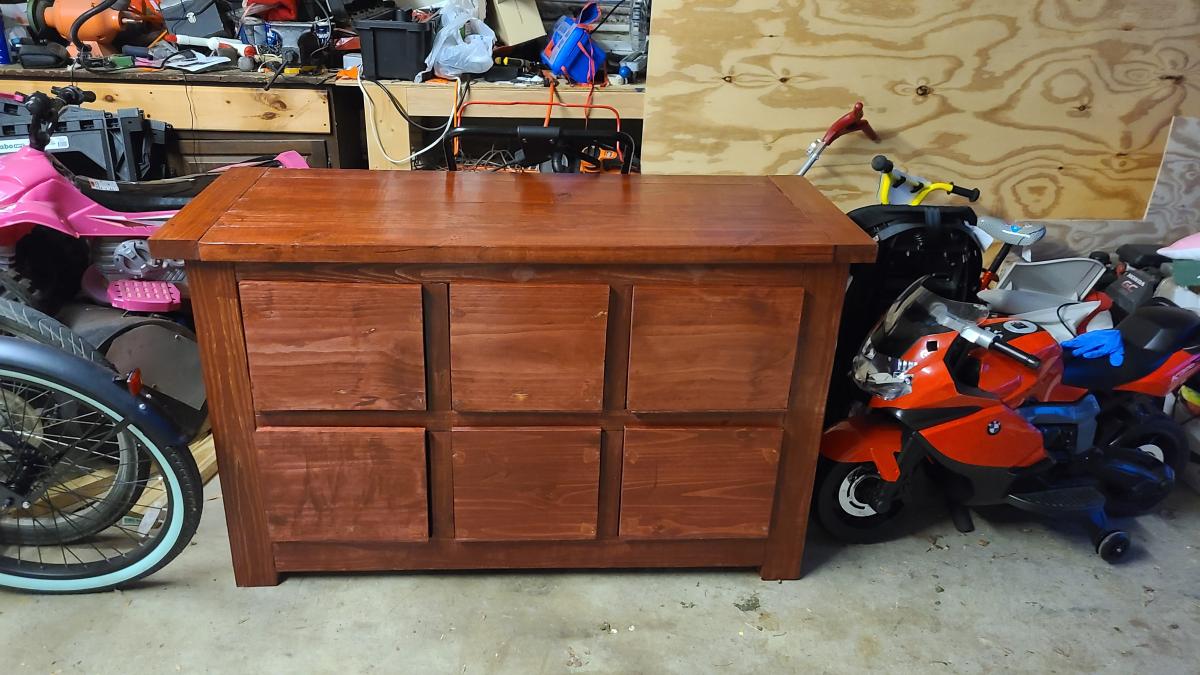
Estimated Cost
150
Estimated Time Investment
Weekend Project (10-20 Hours)
Recommended Skill Level
Intermediate
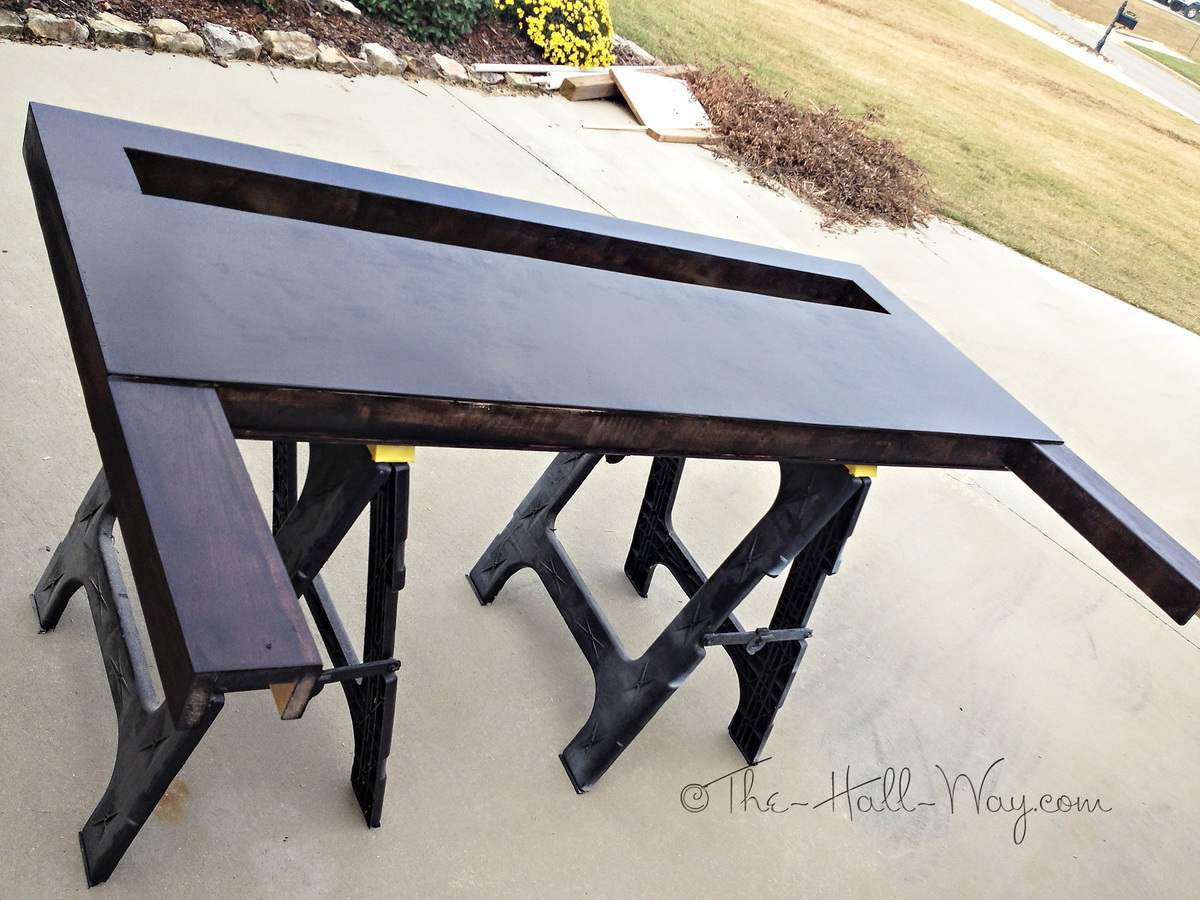
Farmhouse X Desk
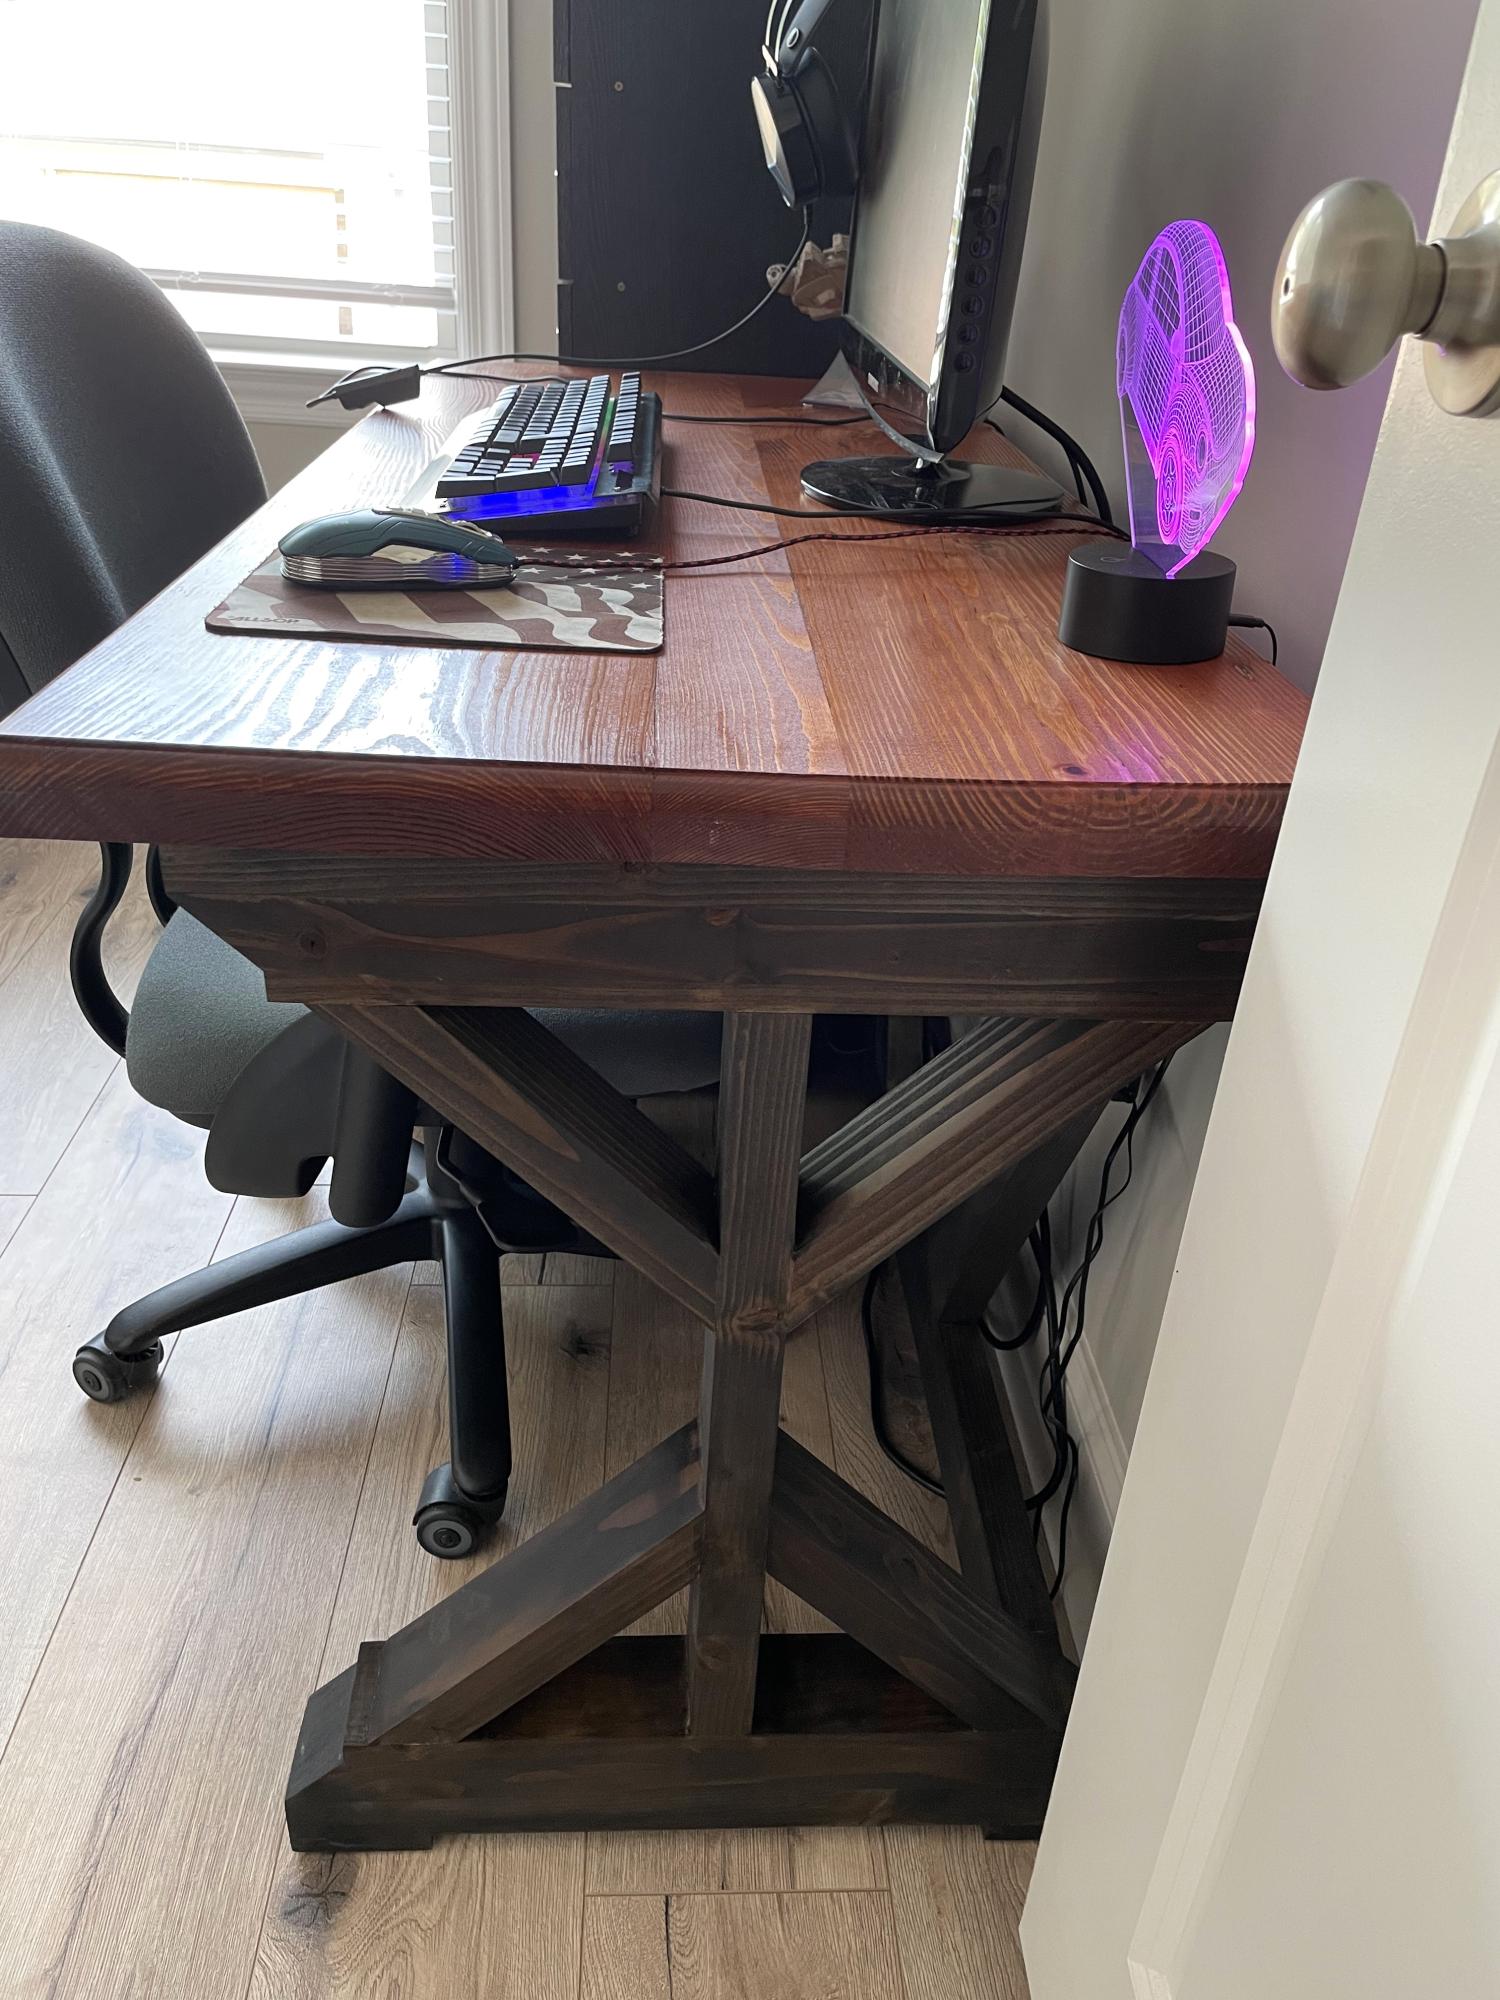
We changed the design a little bit. We used dowels to hold almost all of it together. Then we joined the top and used figure eight fasteners to account for wood movement. My nephew loves it, we think it looks great in his room.
Dave Jacobs and Vaz Franchuk

Built from Plan(s)
Chunky Leg Bed

I built this bed for my sister's new house. I used aspen for the visible boards and furring strips and regular lumber for the rest. The only change from the original plan is that I used 1x6s for the legs so it would sit higher off the floor.
I painted it with Rustoleum Painter's Touch Metallic in Oil Rubbed Bronze and I really like how it turned out. I didn't use any primer, so you can almost see the wood grain which gives it the illusion of being stained. It also has a metallic sheen in the right light, but it's very subtle. The only downside is the metallic gives it a rough texture. I contemplated putting a couple coats of poly over it, which I may do later.
*Picture was taken with her old full size mattress
Built from Plan(s)
Estimated Cost
~$200 including headboard
Estimated Time Investment
Day Project (6-9 Hours)
Finish Used
Rustoleum Painter's Touch Metallic in Oil Rubbed Bronze
Recommended Skill Level
Intermediate
Comments


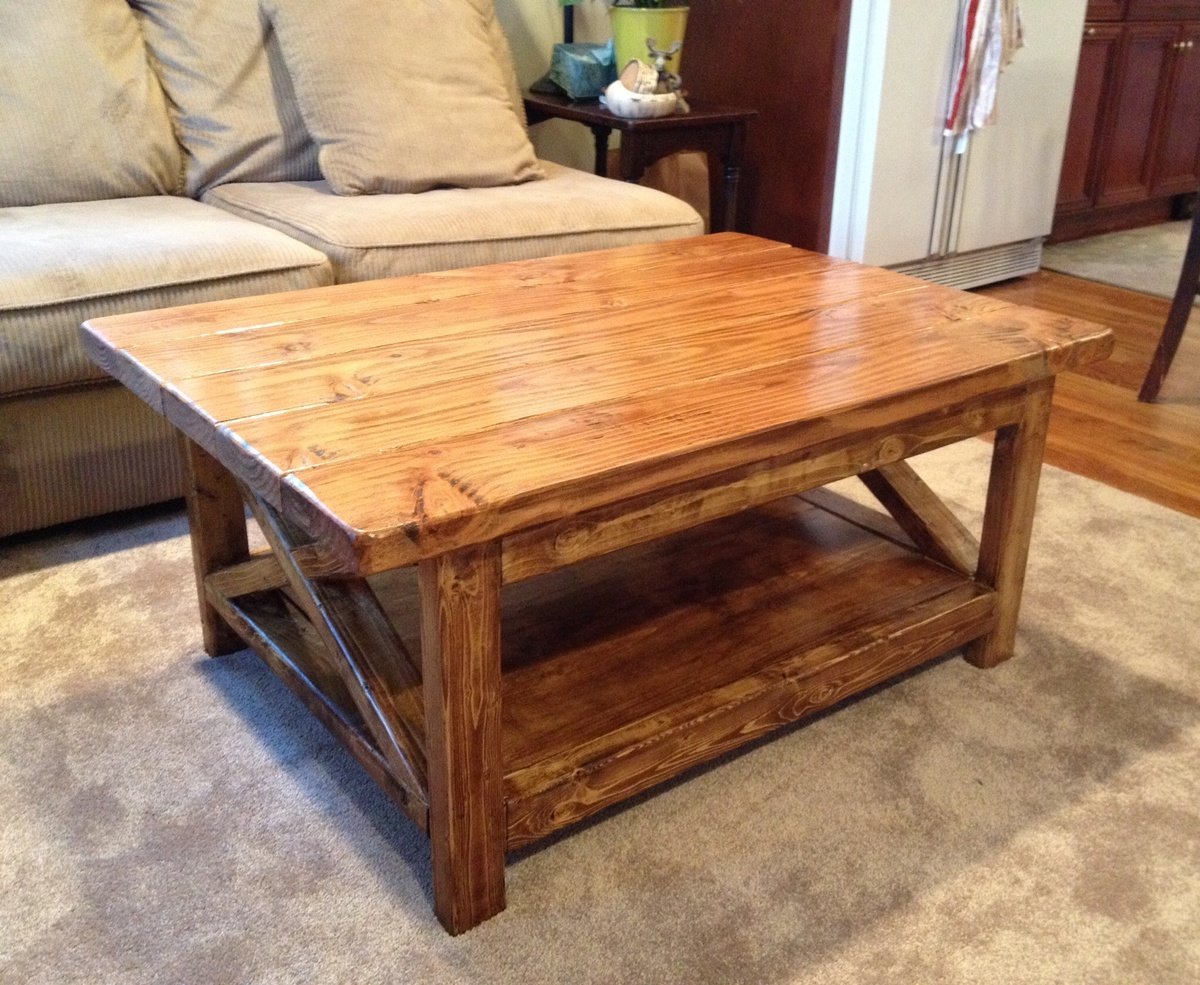
Rustic x coffee table
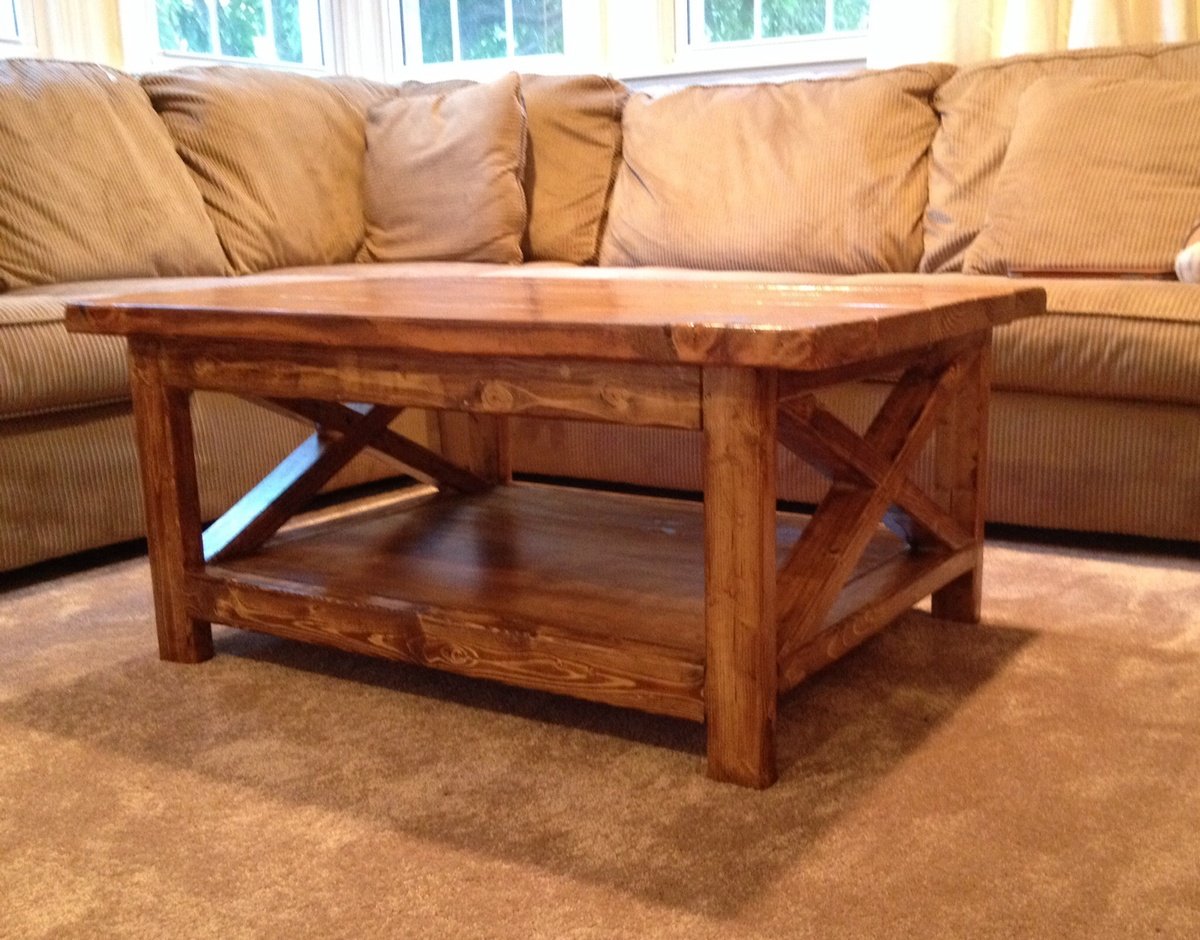
Rustic x coffee table made from plan. Used 3-4 coats of early american stain and two coats of poly.
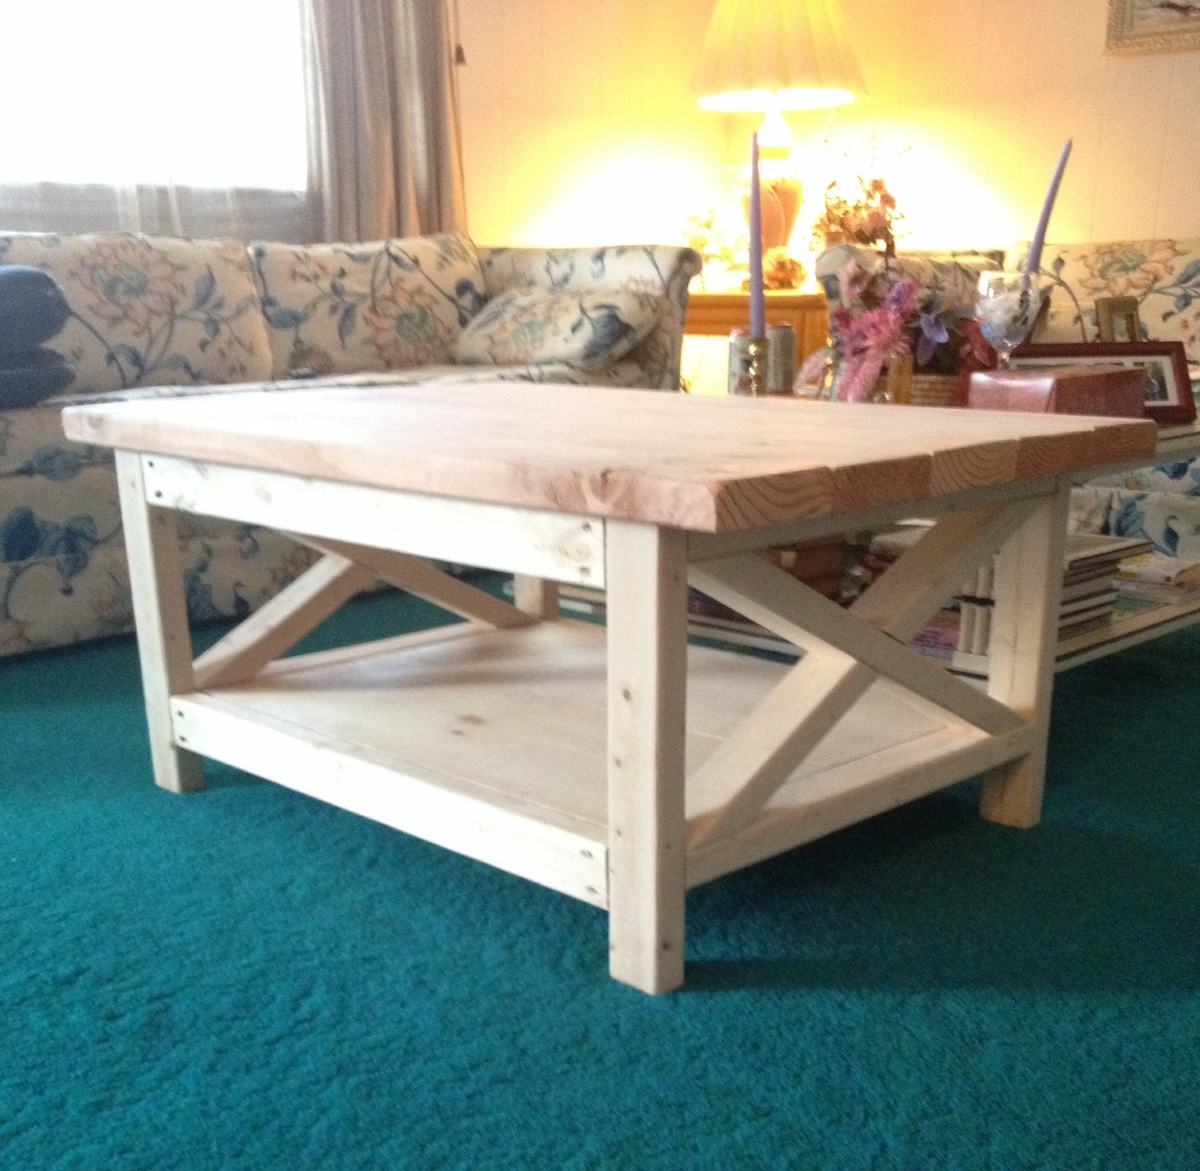
Built from Plan(s)
Estimated Cost
$80
Estimated Time Investment
Weekend Project (10-20 Hours)
Finish Used
Early American (several coats) and poly
Recommended Skill Level
Beginner
DIY Wood Christmas Tree

This project was such a fun challenge for me! I needed a table top version of this great Christmas tree shelf, so I modified the plans just a bit, and created an additional shelf. The little ornament blocks were fun to make too!
Built from Plan(s)
Estimated Cost
$12
Estimated Time Investment
Day Project (6-9 Hours)
Finish Used
MinWax Dark Walnut
Recommended Skill Level
Intermediate
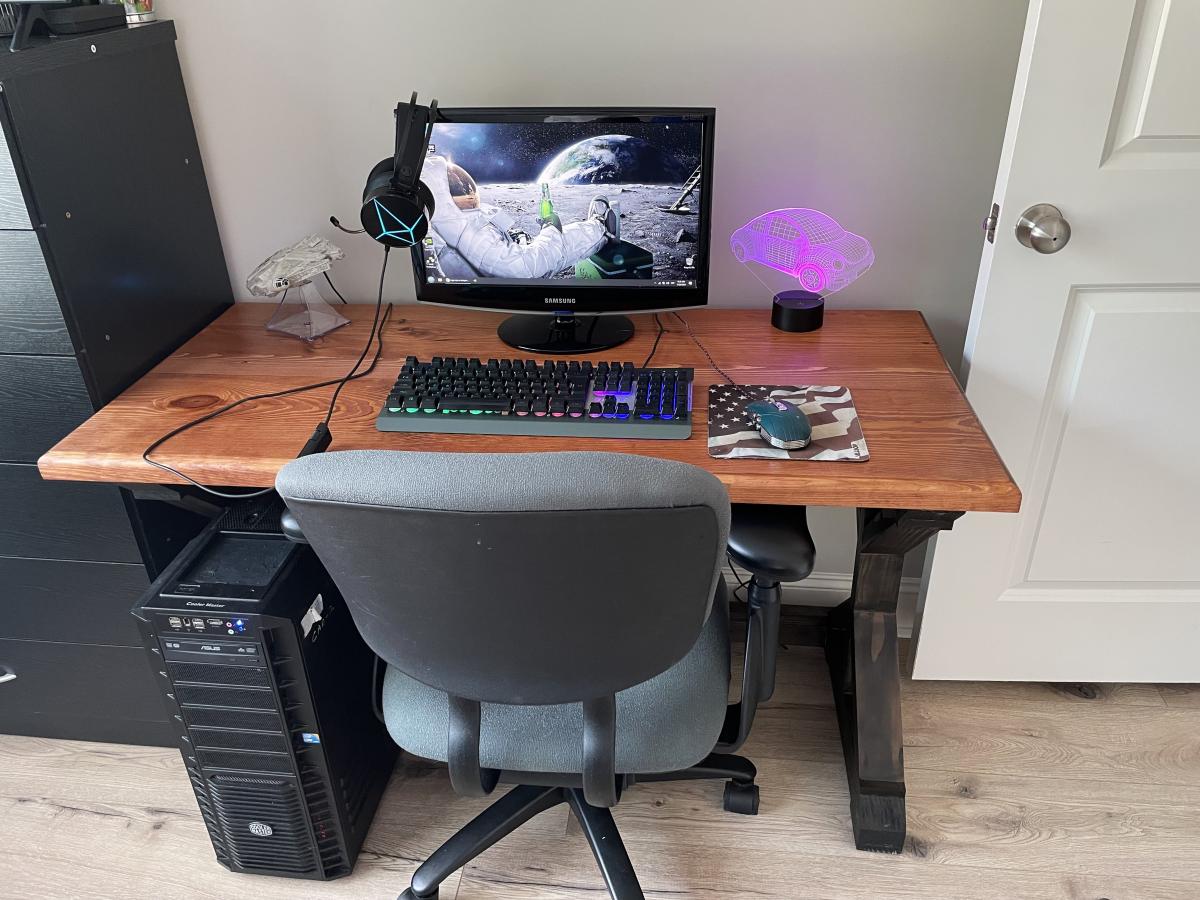
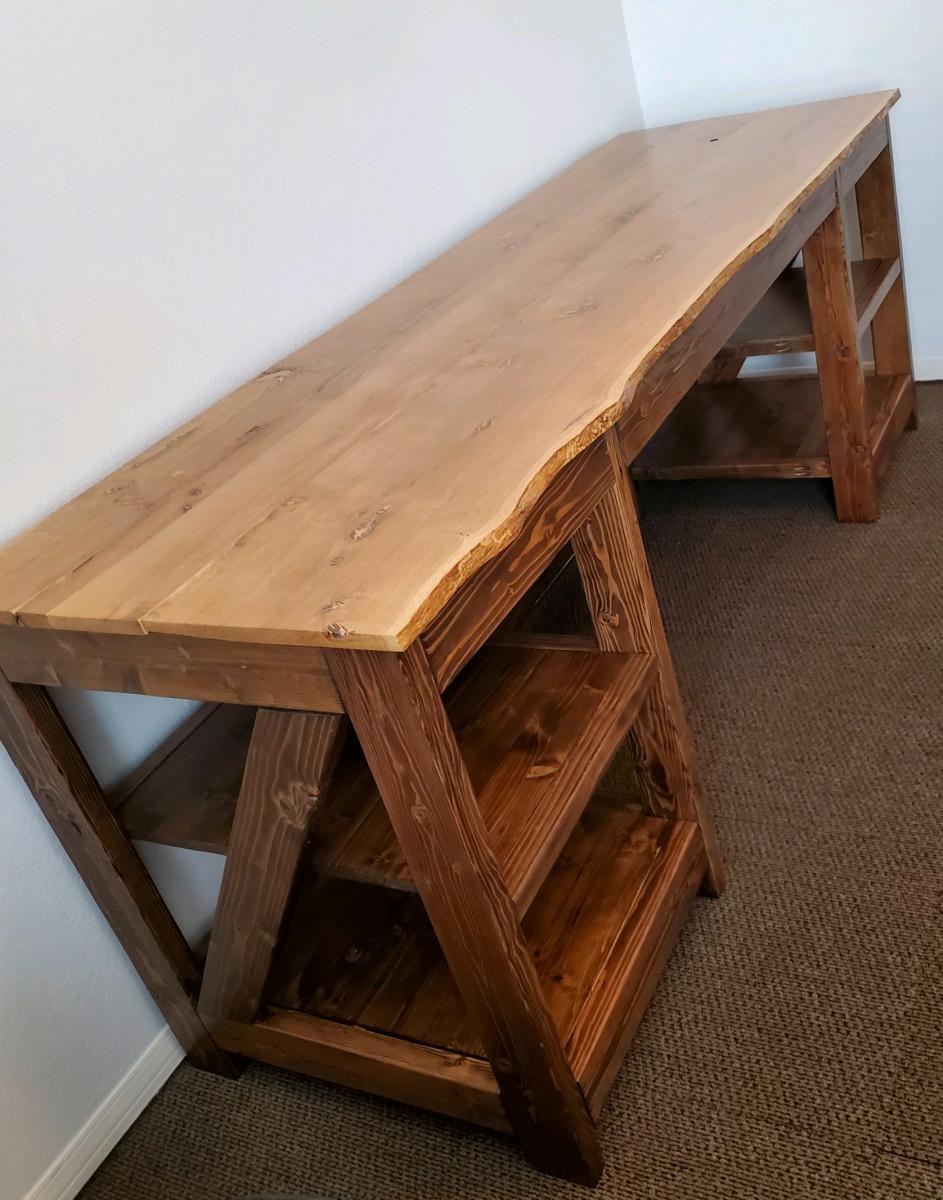
Modified Farmhouse X Desk
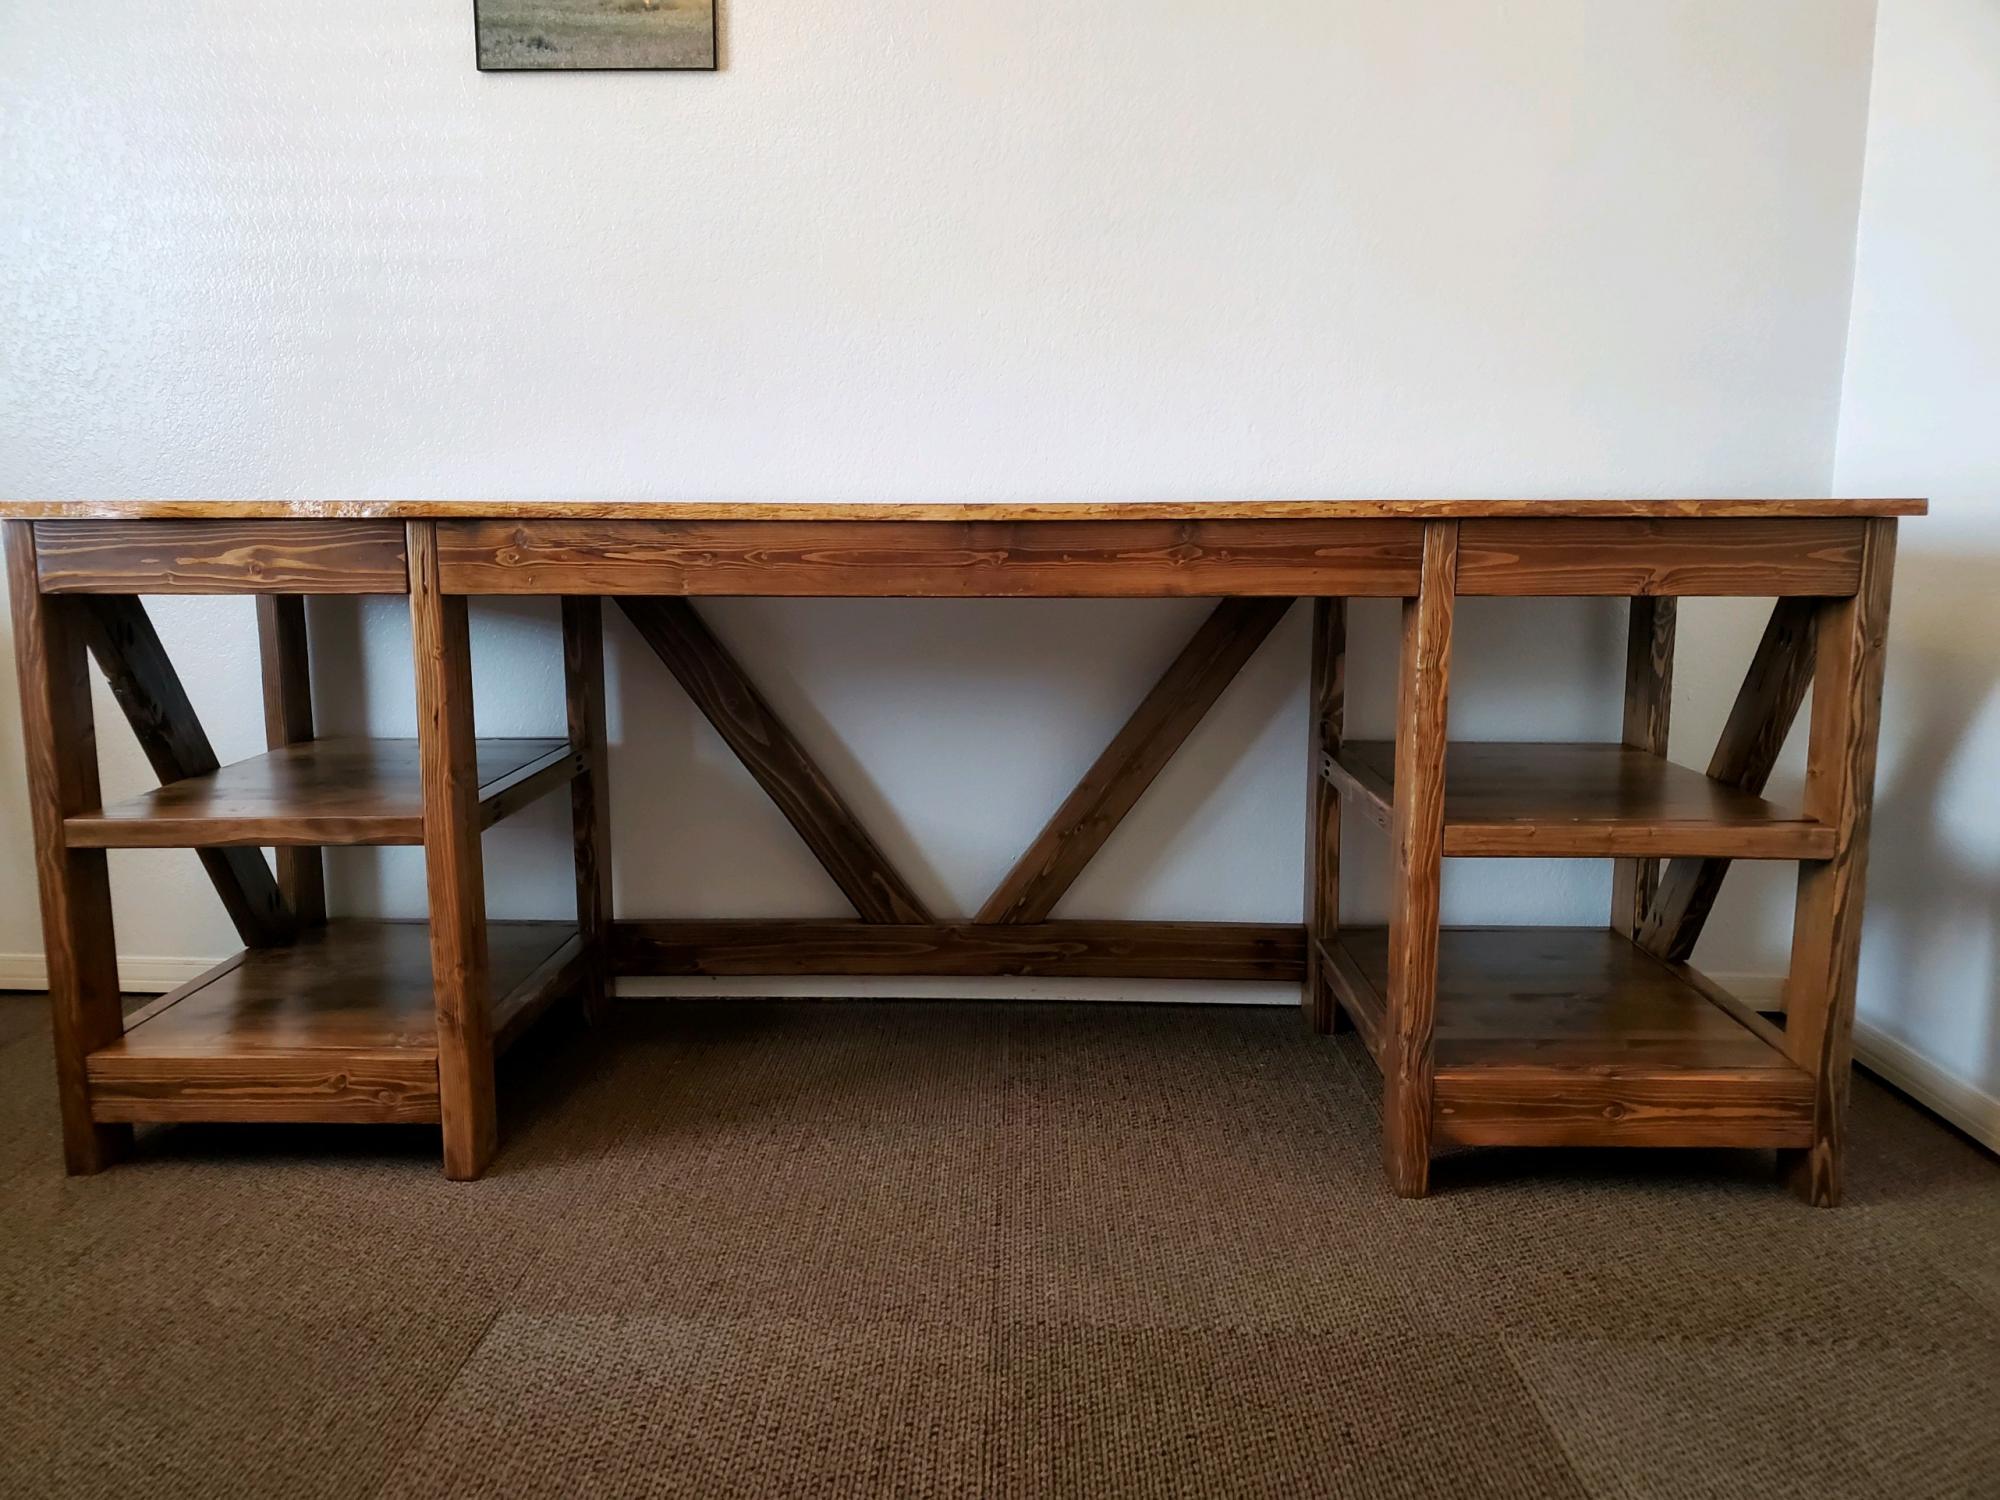
I modified the Farmhouse X Desk plan from Handmade Haven to add the shelving on both ends. I also have a Z on the end instead of the X as that was the way my husband preferred it (it is for him after all). The top is live edge wood which is tricky to work with since the thickness is different from board to board but I still like the way it turned out! The live edge top did add time to the build as well as staining and varnishing as opposed to painting the base.
Built from Plan(s)
Estimated Time Investment
Week Long Project (20 Hours or More)
Finish Used
Minwax Jacobean stain mixed with Special Walnut (had a little of both on hand) for the base and left the top natural. Both coated with Minwax oil modified water based polyurethane.
Recommended Skill Level
Intermediate
Comments
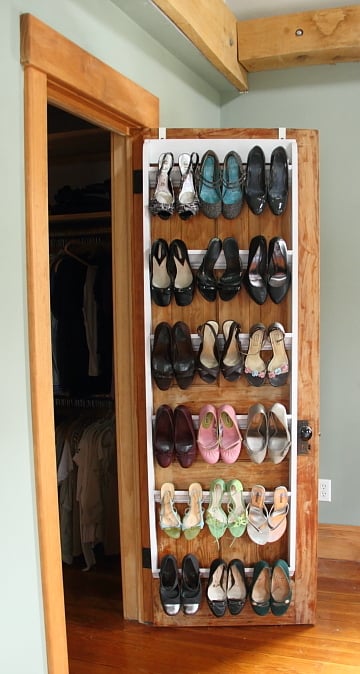
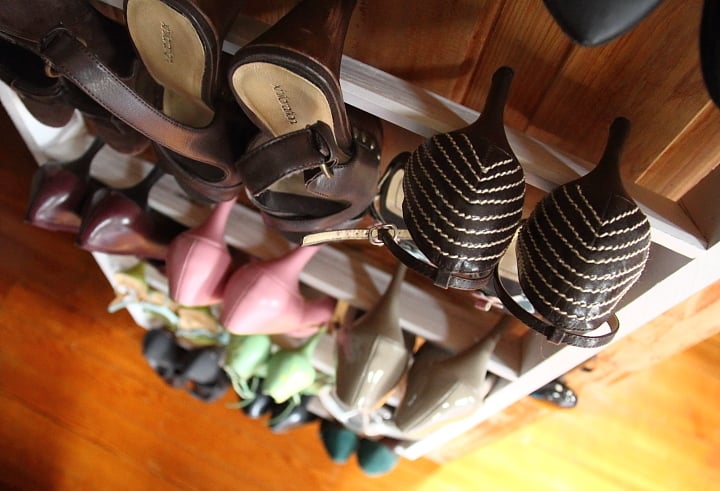
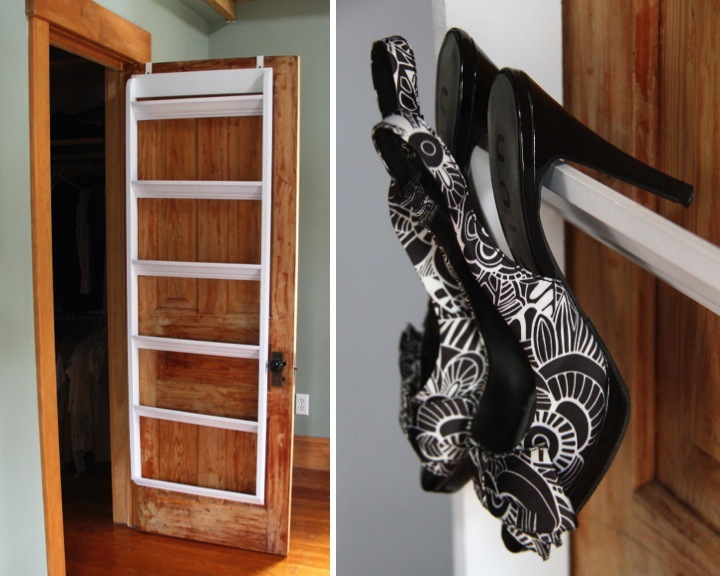
DIY Crown Molding Shoe Organizer for Heels
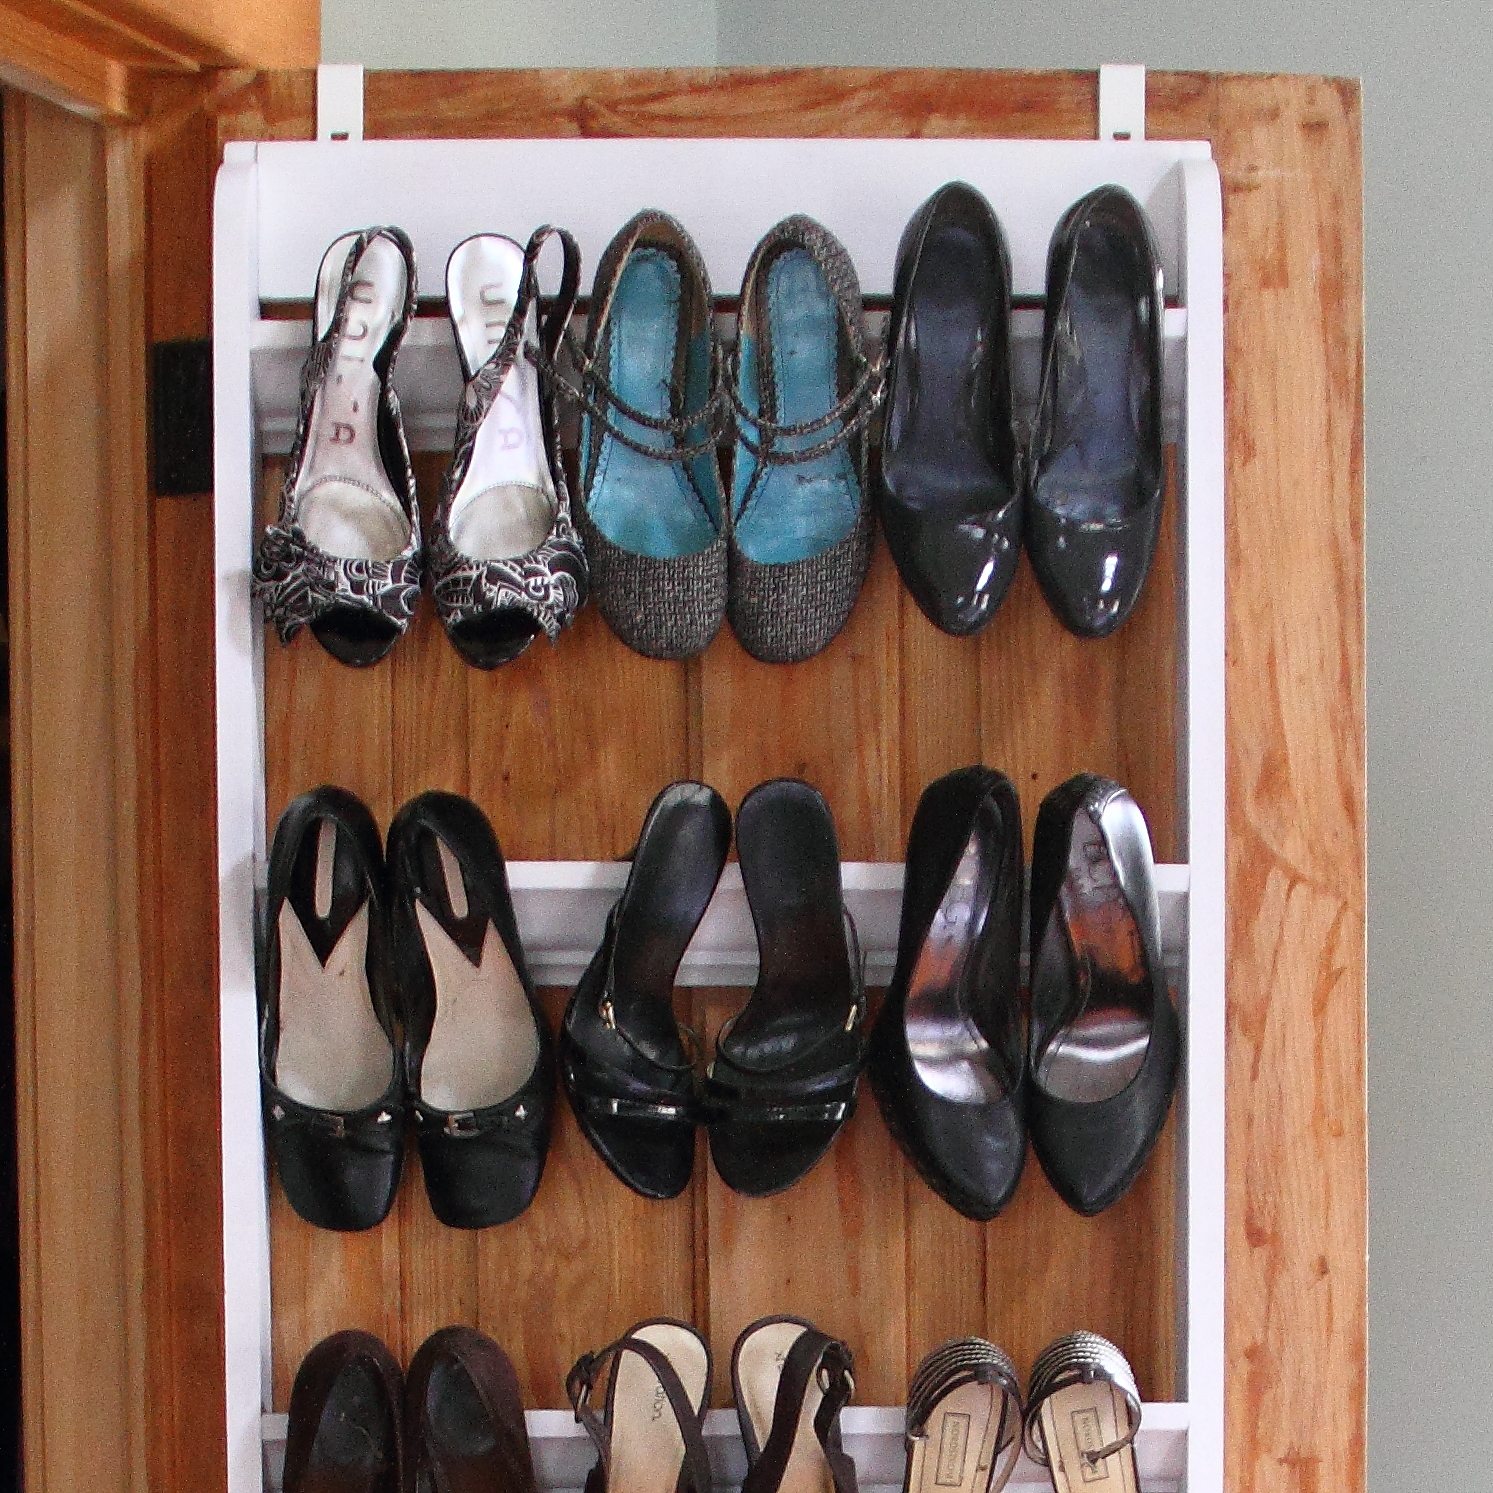
I made this over the door shoe organizer for my heels using a pair of 6' 1x3s, a scrap of 1x4 and some crown molding. It was quite quick to make and I am really happy with how it turned out.
For detailed instructions, check out my blog: http://homeandawaywithlisa.com/blog/2012/10/30/diy-crown-molding-closet…

Estimated Cost
$25
Estimated Time Investment
An Hour or Two (0-2 Hours)
Finish Used
White spray paint
Recommended Skill Level
Beginner
Faux Fireplace
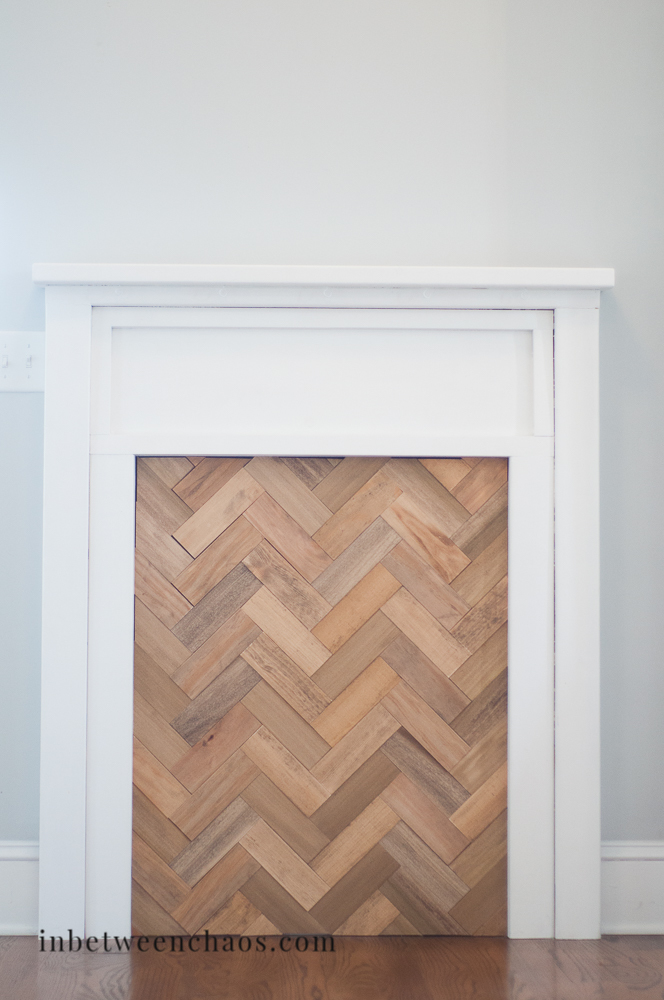
I made this surround to give me a place to hang my stockings for Christmas and give me a mantel to decorate. It also moves easily!
Built from Plan(s)
Estimated Time Investment
Day Project (6-9 Hours)
Finish Used
Sherwin Williams Pure White, insert in Minwax Special Walnut
Recommended Skill Level
Beginner
Comments

Farmhouse Table & Bench
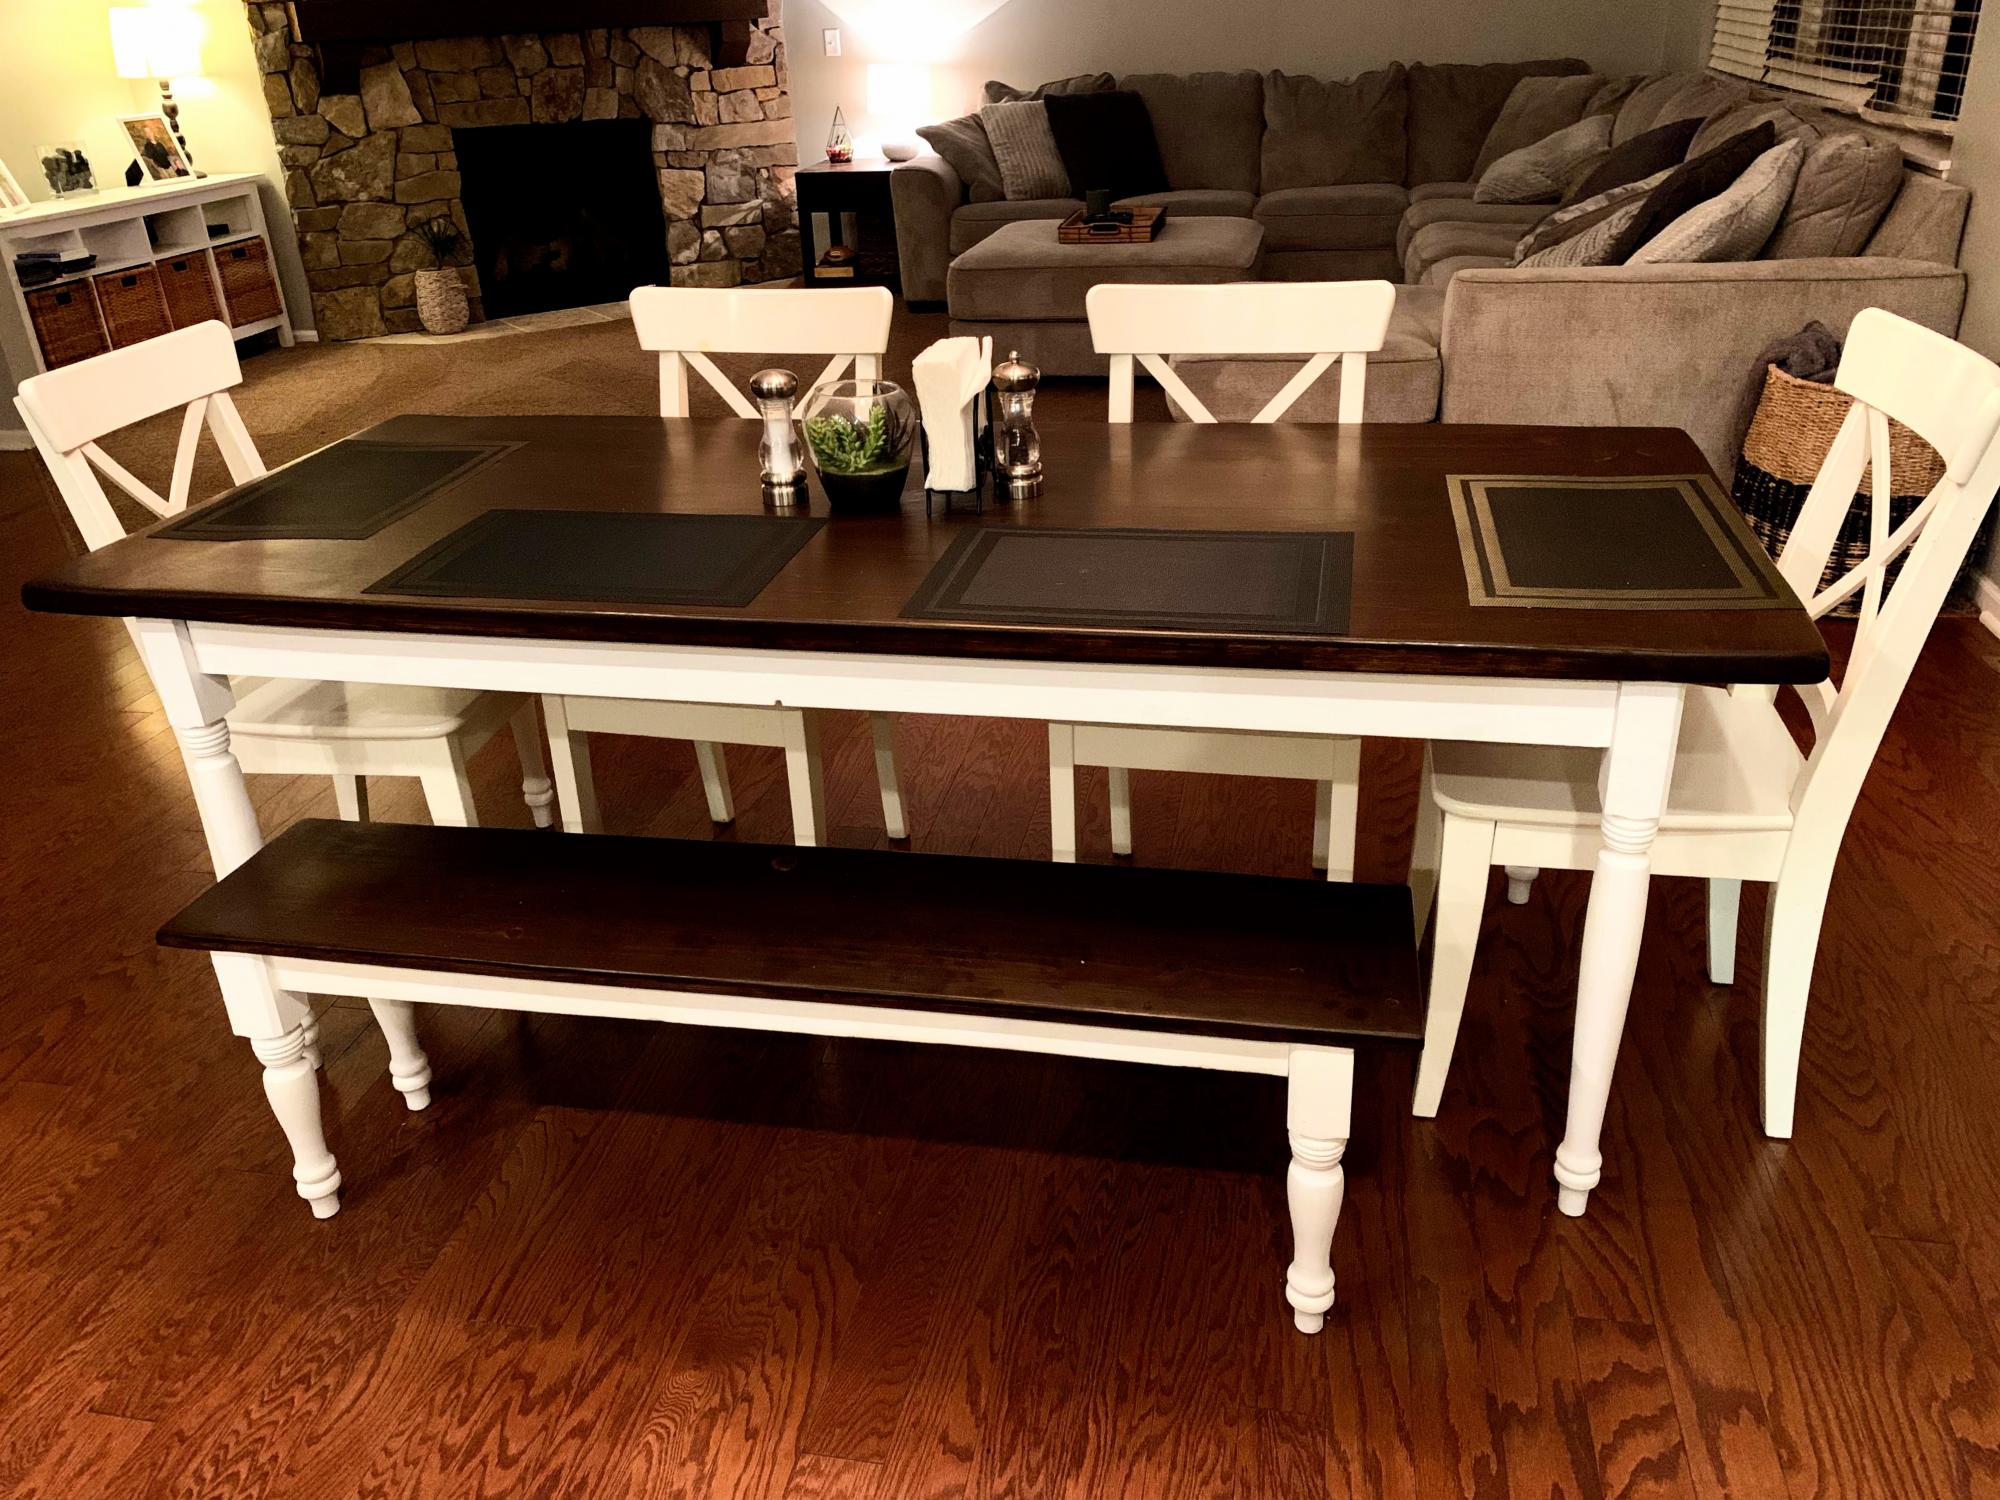
Re-worked plans slightly to include turned legs with matching bench. Been great for family dinners in our kitchen
Built from Plan(s)
Estimated Cost
160
Estimated Time Investment
Weekend Project (10-20 Hours)
Recommended Skill Level
Intermediate
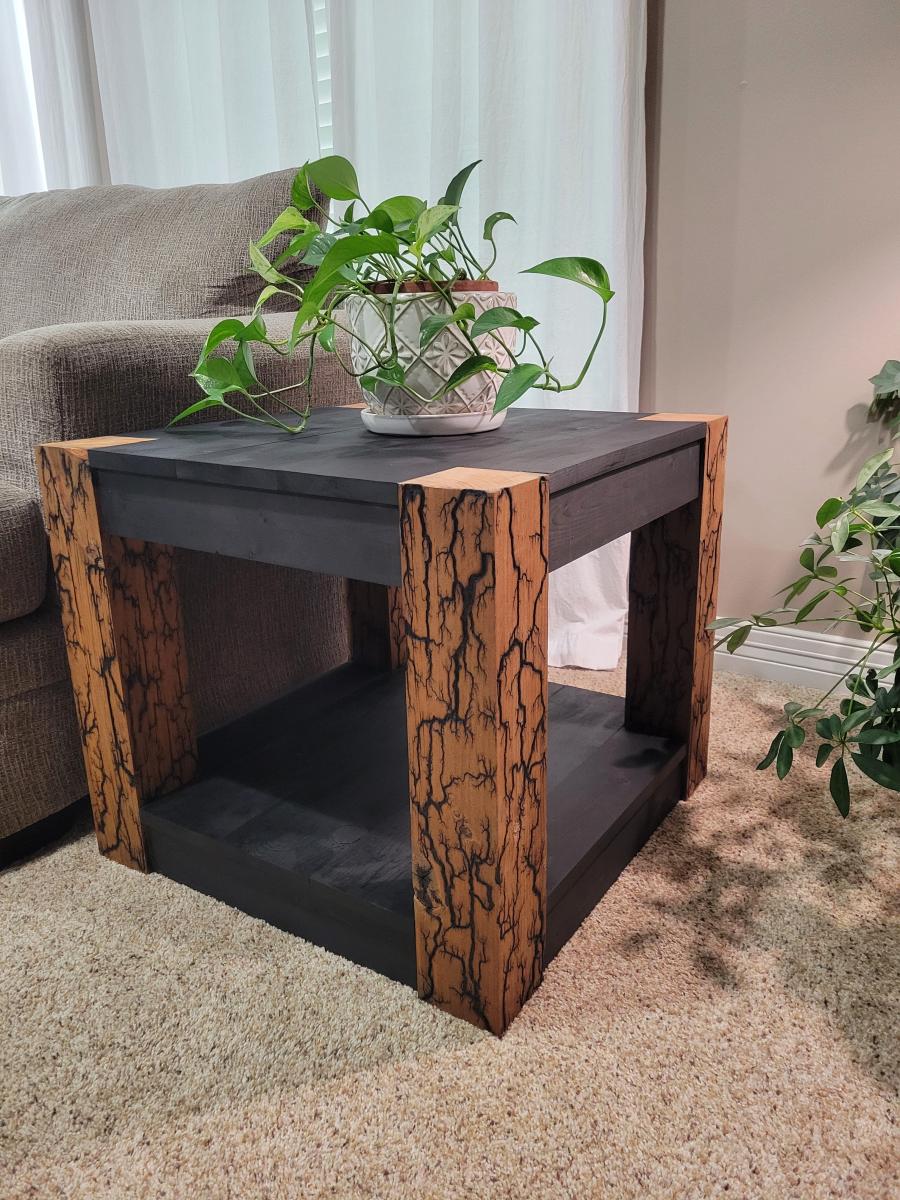
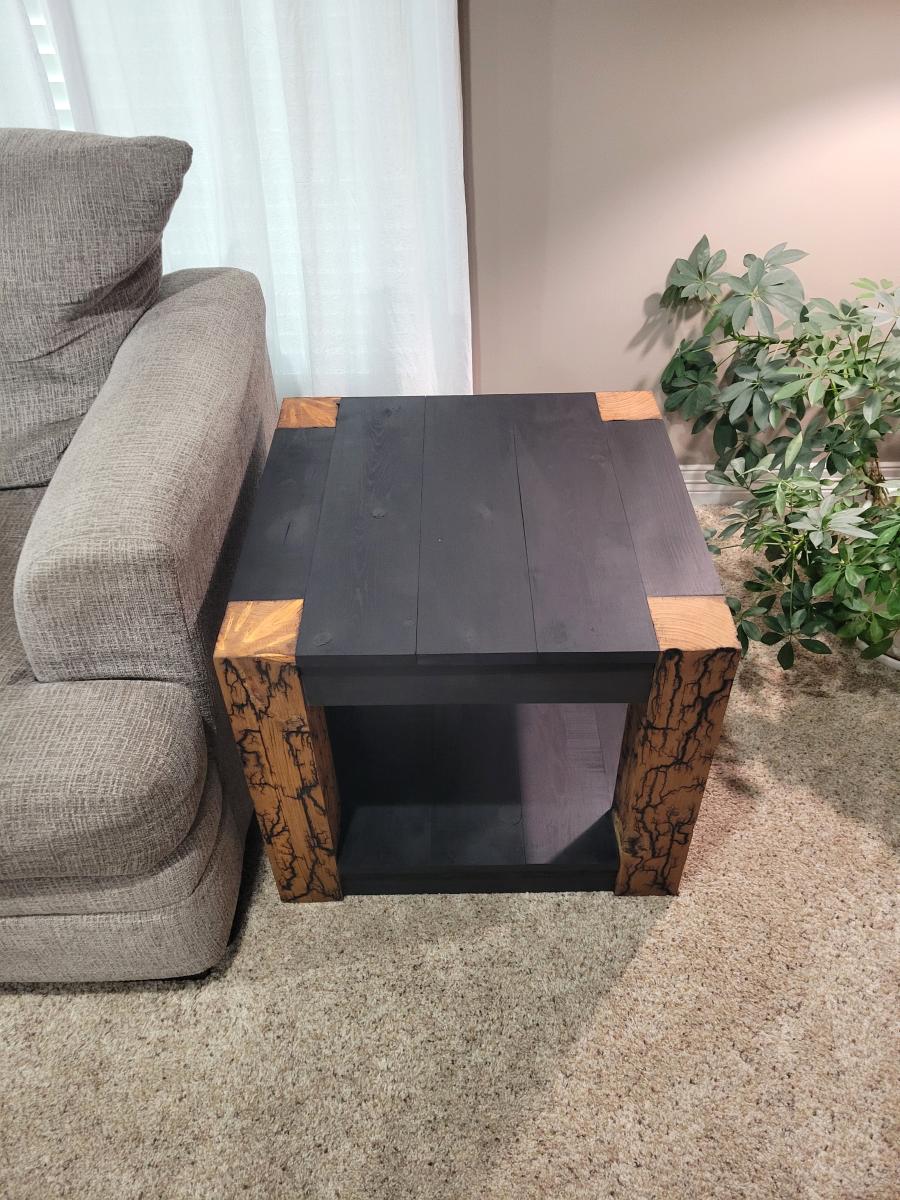
Modern Parsons End Table
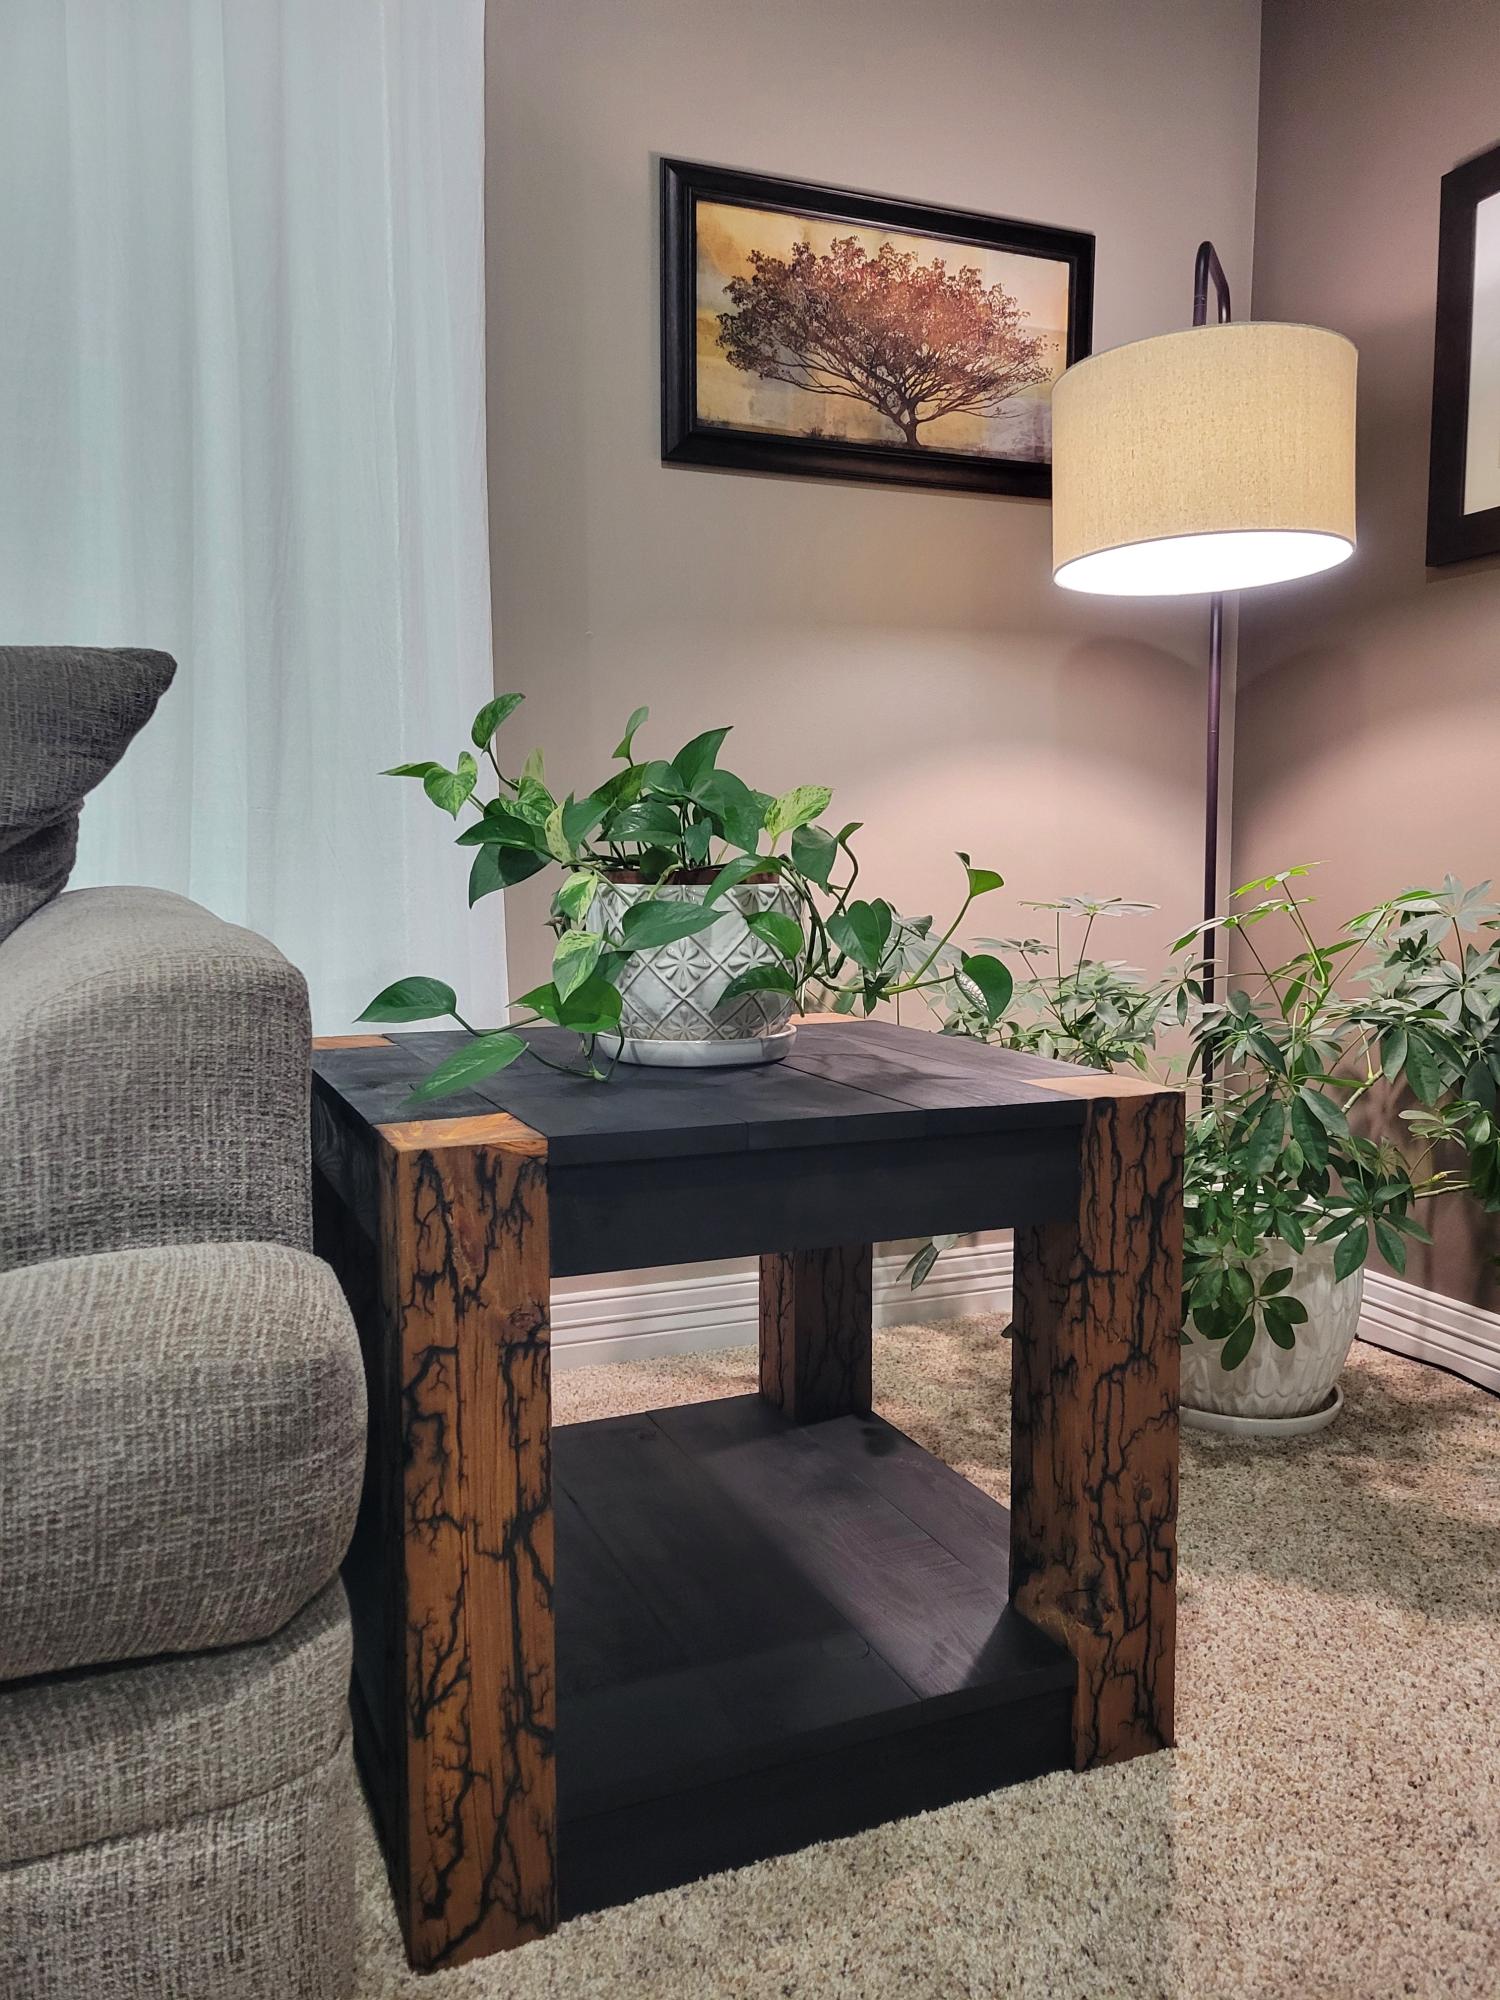
Plans from Wood Parsons End Table with Bottom Shelf.
24Lx24Wx21H
Built from Plan(s)
Small Media Console
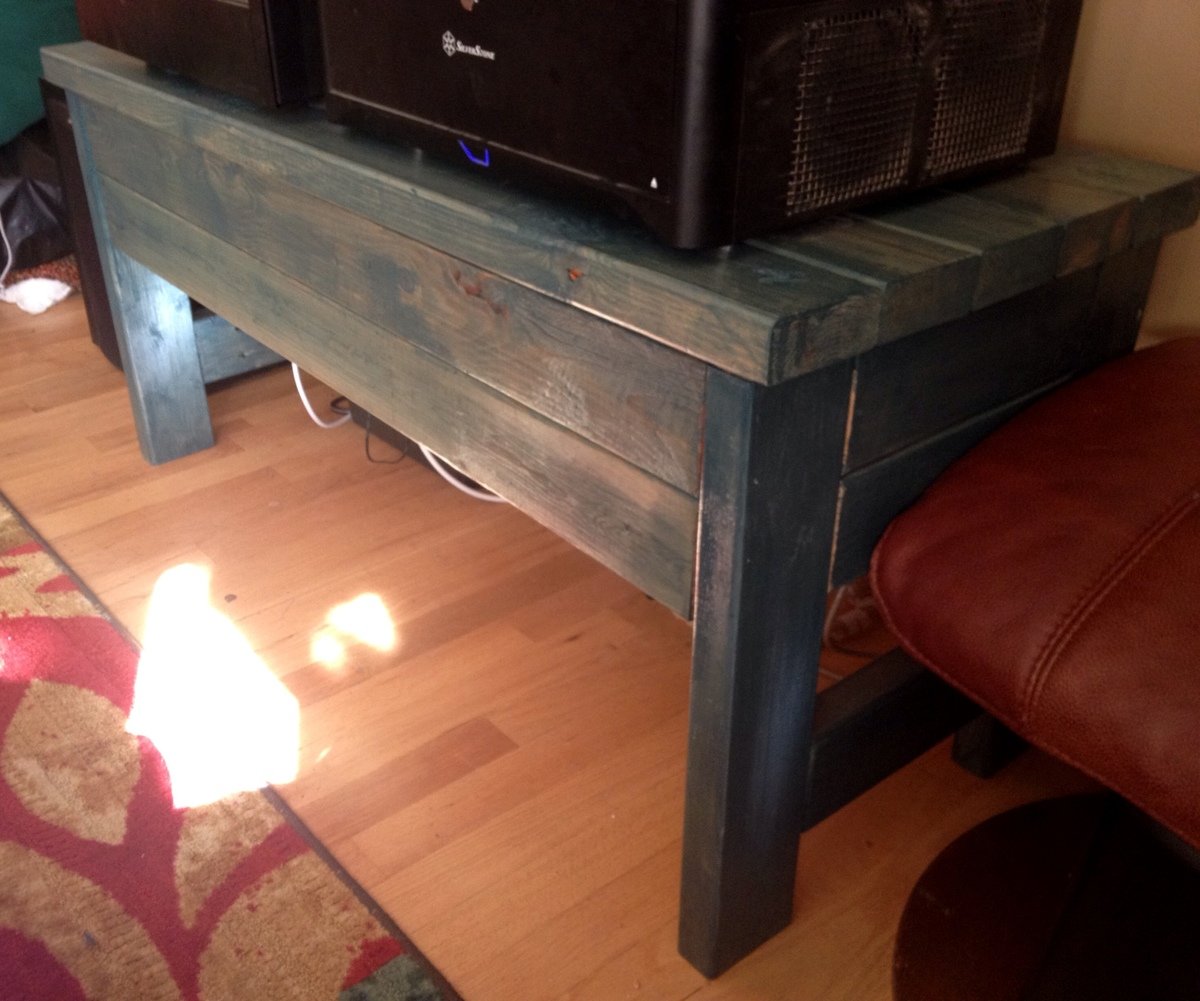
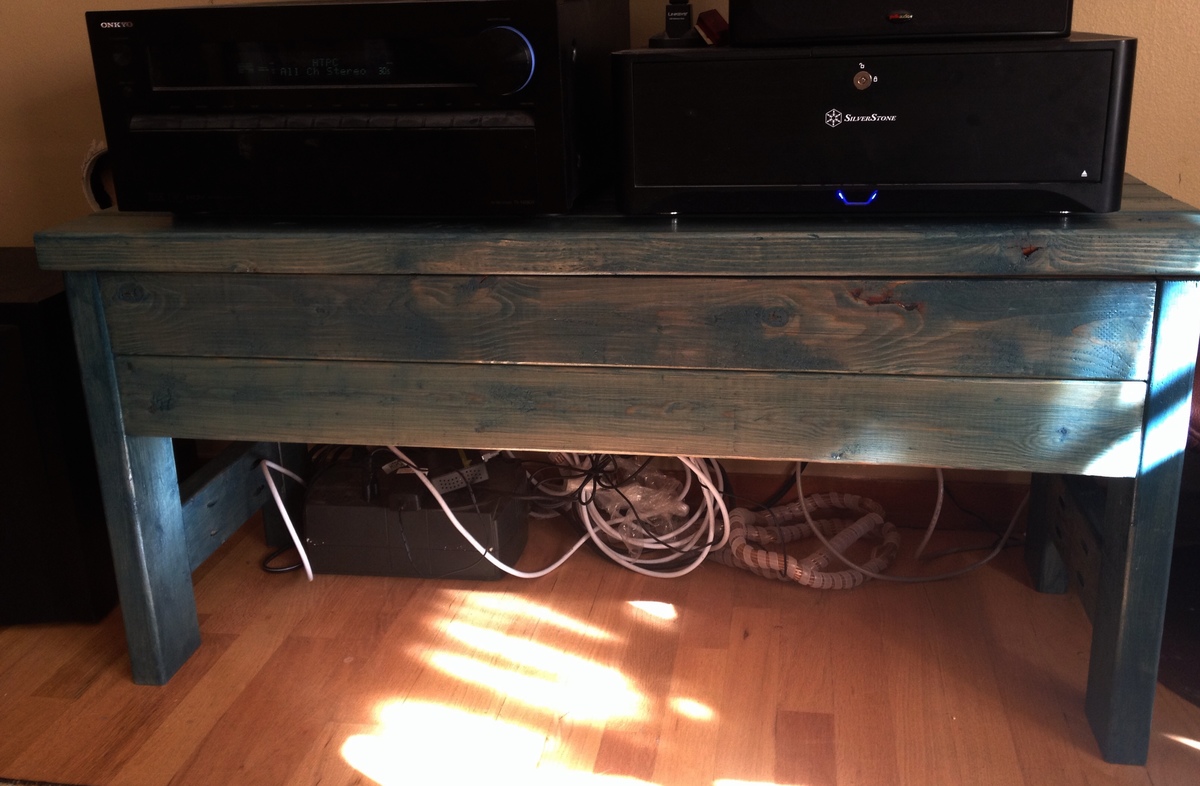
After clearing some doesn't-belong-here furniture out of my living room, my coffee table became the home to our stereo receiver and HTPC. This project was about getting my coffee table back, in a quick, inexpensive way. The photos *still* don't do justice, but since I've added the equipment, I am SO not hauling this back outside for glamour shots.
Size: Adjusted to fit under a wall-mounted flat TV:17.5"D x 21"H x 42"W. The adjustment was simple: use 5 2x4s instead of 4.
The photos also make the stain appear darker than it is -- it's truly a rich teal. I love the color so much, I'm going to strip my built-like-a-tank, 65-year-old wooden front door and stain it, too.
This is my first "real" project. I've built things before. Badly. Now, I have a Kreg, and I'm learning to be a little more patient with clamping and squaring for better results. :)
It appears that my next project will be the taming of the cable spaghetti.
Built from Plan(s)
Estimated Cost
$21
Estimated Time Investment
Afternoon Project (3-6 Hours)
Finish Used
Cabot Premium Wood Finish in Stormy Teal. I'd planned to pick up a quart of paint, but this was so, so very perfect, and allowed for a rustic/distressed look that I love. http://www.cabotstain.com/colors-and-finishes/families/Premium-Wood-Finish-Colors.html
When I stained the sides, I did them pre-assembly and felt they were a tad dark. I stained the rest (front bib, top) after assembly with two very light coats, and I love-love-love the look. Is it blotchy? Why yes, yes it is. The stain sank into the wood more in knots and rougher areas.
A bonus to this product: not only is it water-based, but it SEALS along with staining. I'm lazy. This is good.
Recommended Skill Level
Starter Project
Finally!!

This was such a fun project. Had to figure out how to build the sliding door HW. I didn't want the doors flying off when sliding so I did secure in a way that didn't limit the aesthetics or function. I did add a back to the cabinet since the picture was taken. Strips of plywood to give it that barn flavor. The most time consuming part was painting, staining, protecting and waiting for it to dry.
Built from Plan(s)
Estimated Time Investment
Weekend Project (10-20 Hours)
Finish Used
Antique white and walnut stain
Recommended Skill Level
Beginner
Comments
Ladder Herb Garden
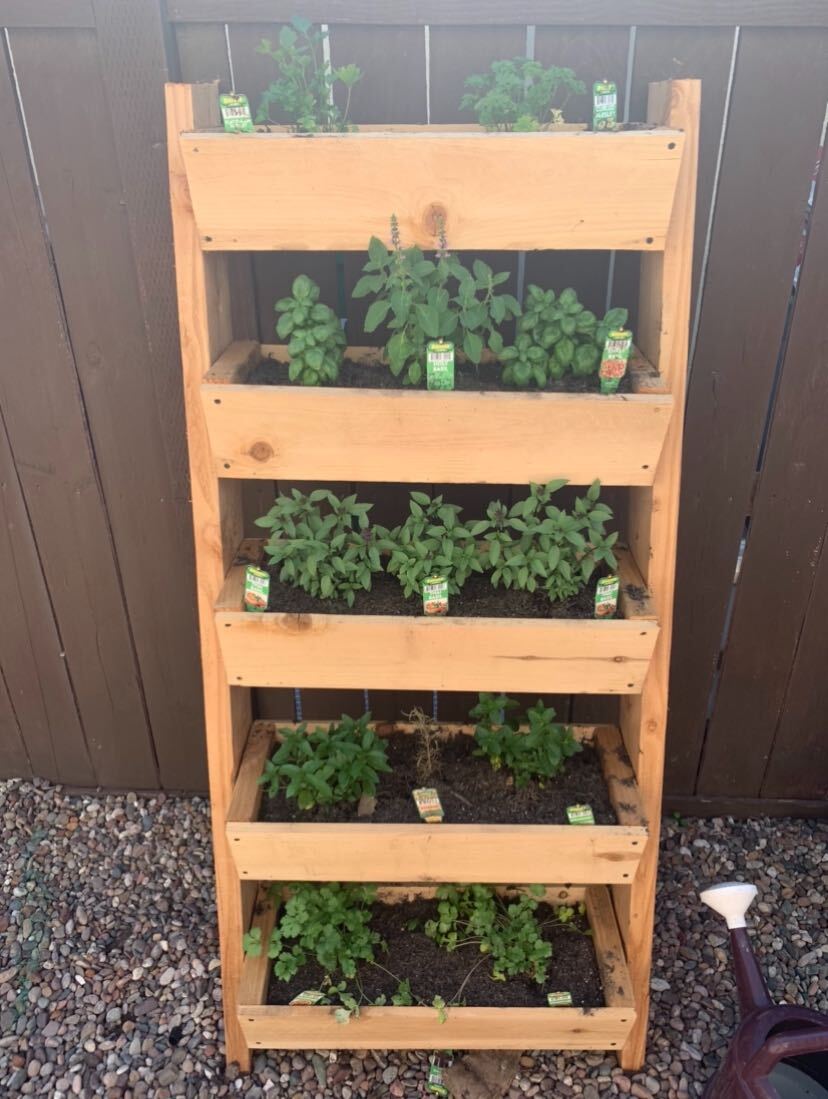
Staying at home during this pandemic pretty much inspired a lot of families to build, discover a new hobby or have their own vegetable garden. Built this ladder garden recently but had to cut it a little short because fences here in California are not as high, at least most I think. We use it to plant different kinds of herbs that we actually use like basil, Thai basil, peppermint, cilantro and parsley and loving it so far.
Estimated Time Investment
An Hour or Two (0-2 Hours)
Finish Used
I didn't use any finish, left it raw.
Recommended Skill Level
Beginner
Comments
Sat, 08/22/2020 - 11:36
Ladder Herb Garden
Hi - This looks very nice!
Are there any plans available?
Best,
Eric
Small Picnic Table - First Project
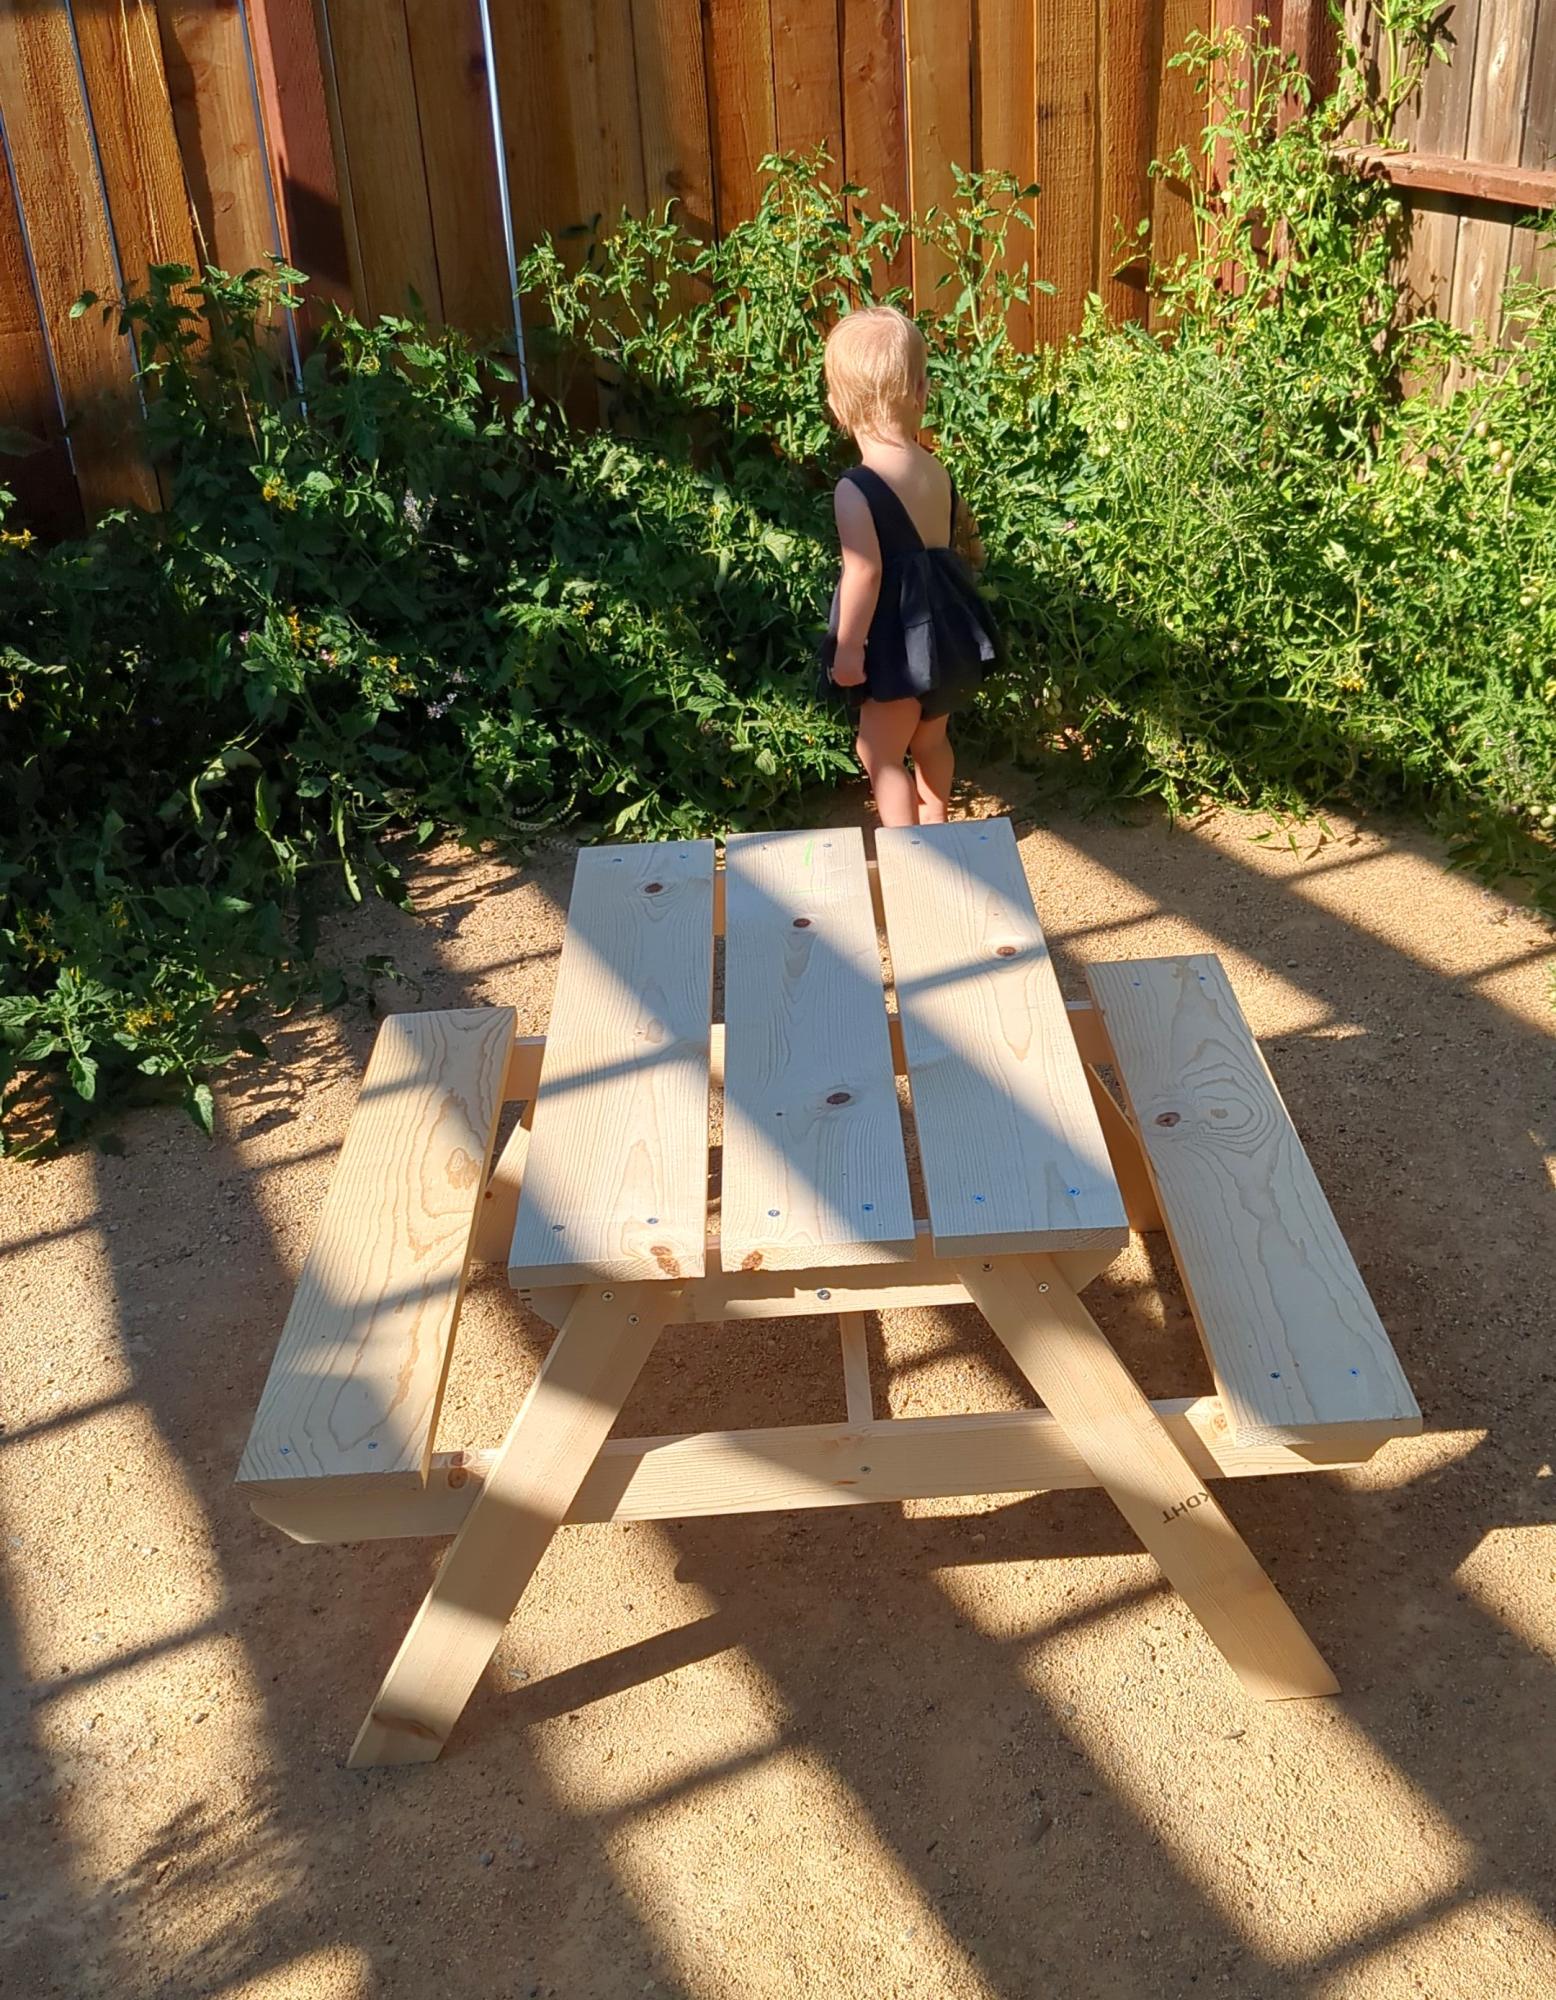
This is my first project for my little girl! We bought the common boards at home Depot where they cut them to length. I spent about $55. I used a small wood saw to cut the required angles and sanded the edges with a sanding block. I'm happy with the result even though I didn't use the wood filler or stain (yet).
Vanessa Zvanut
Built from Plan(s)
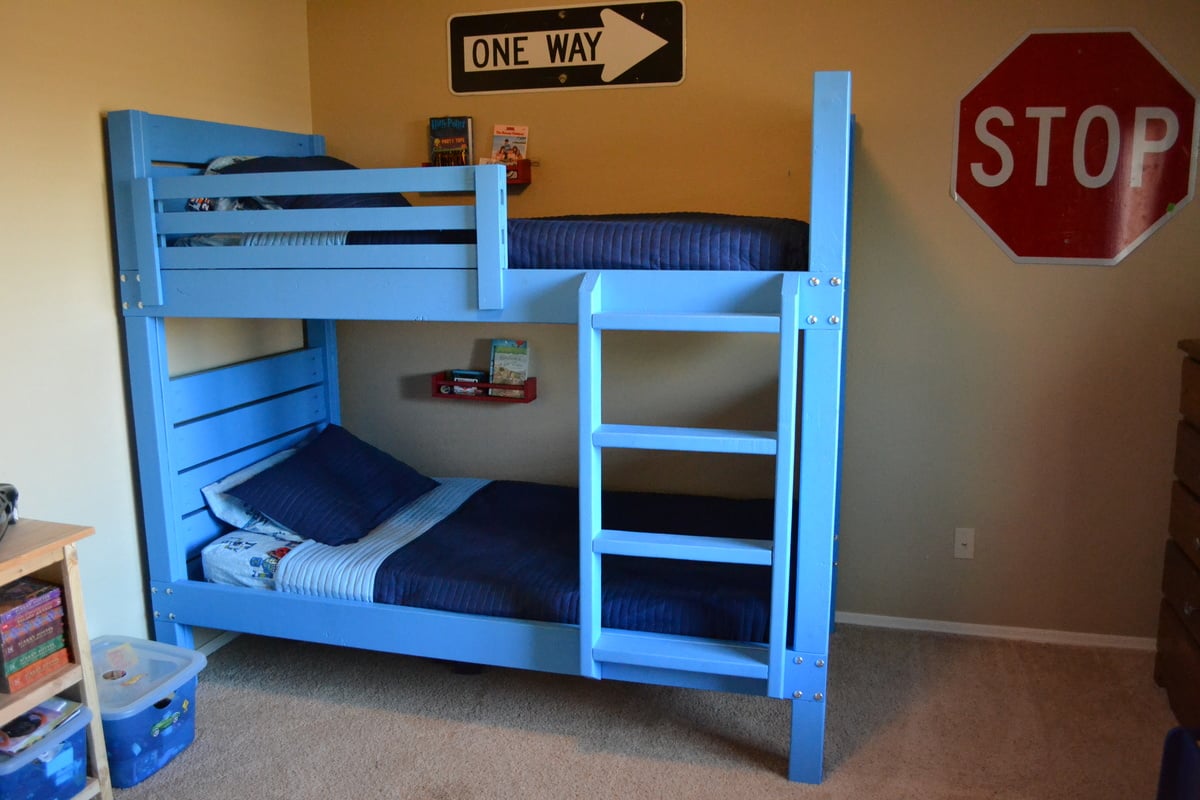
Side Street Bunk Beds (with modified ladder)
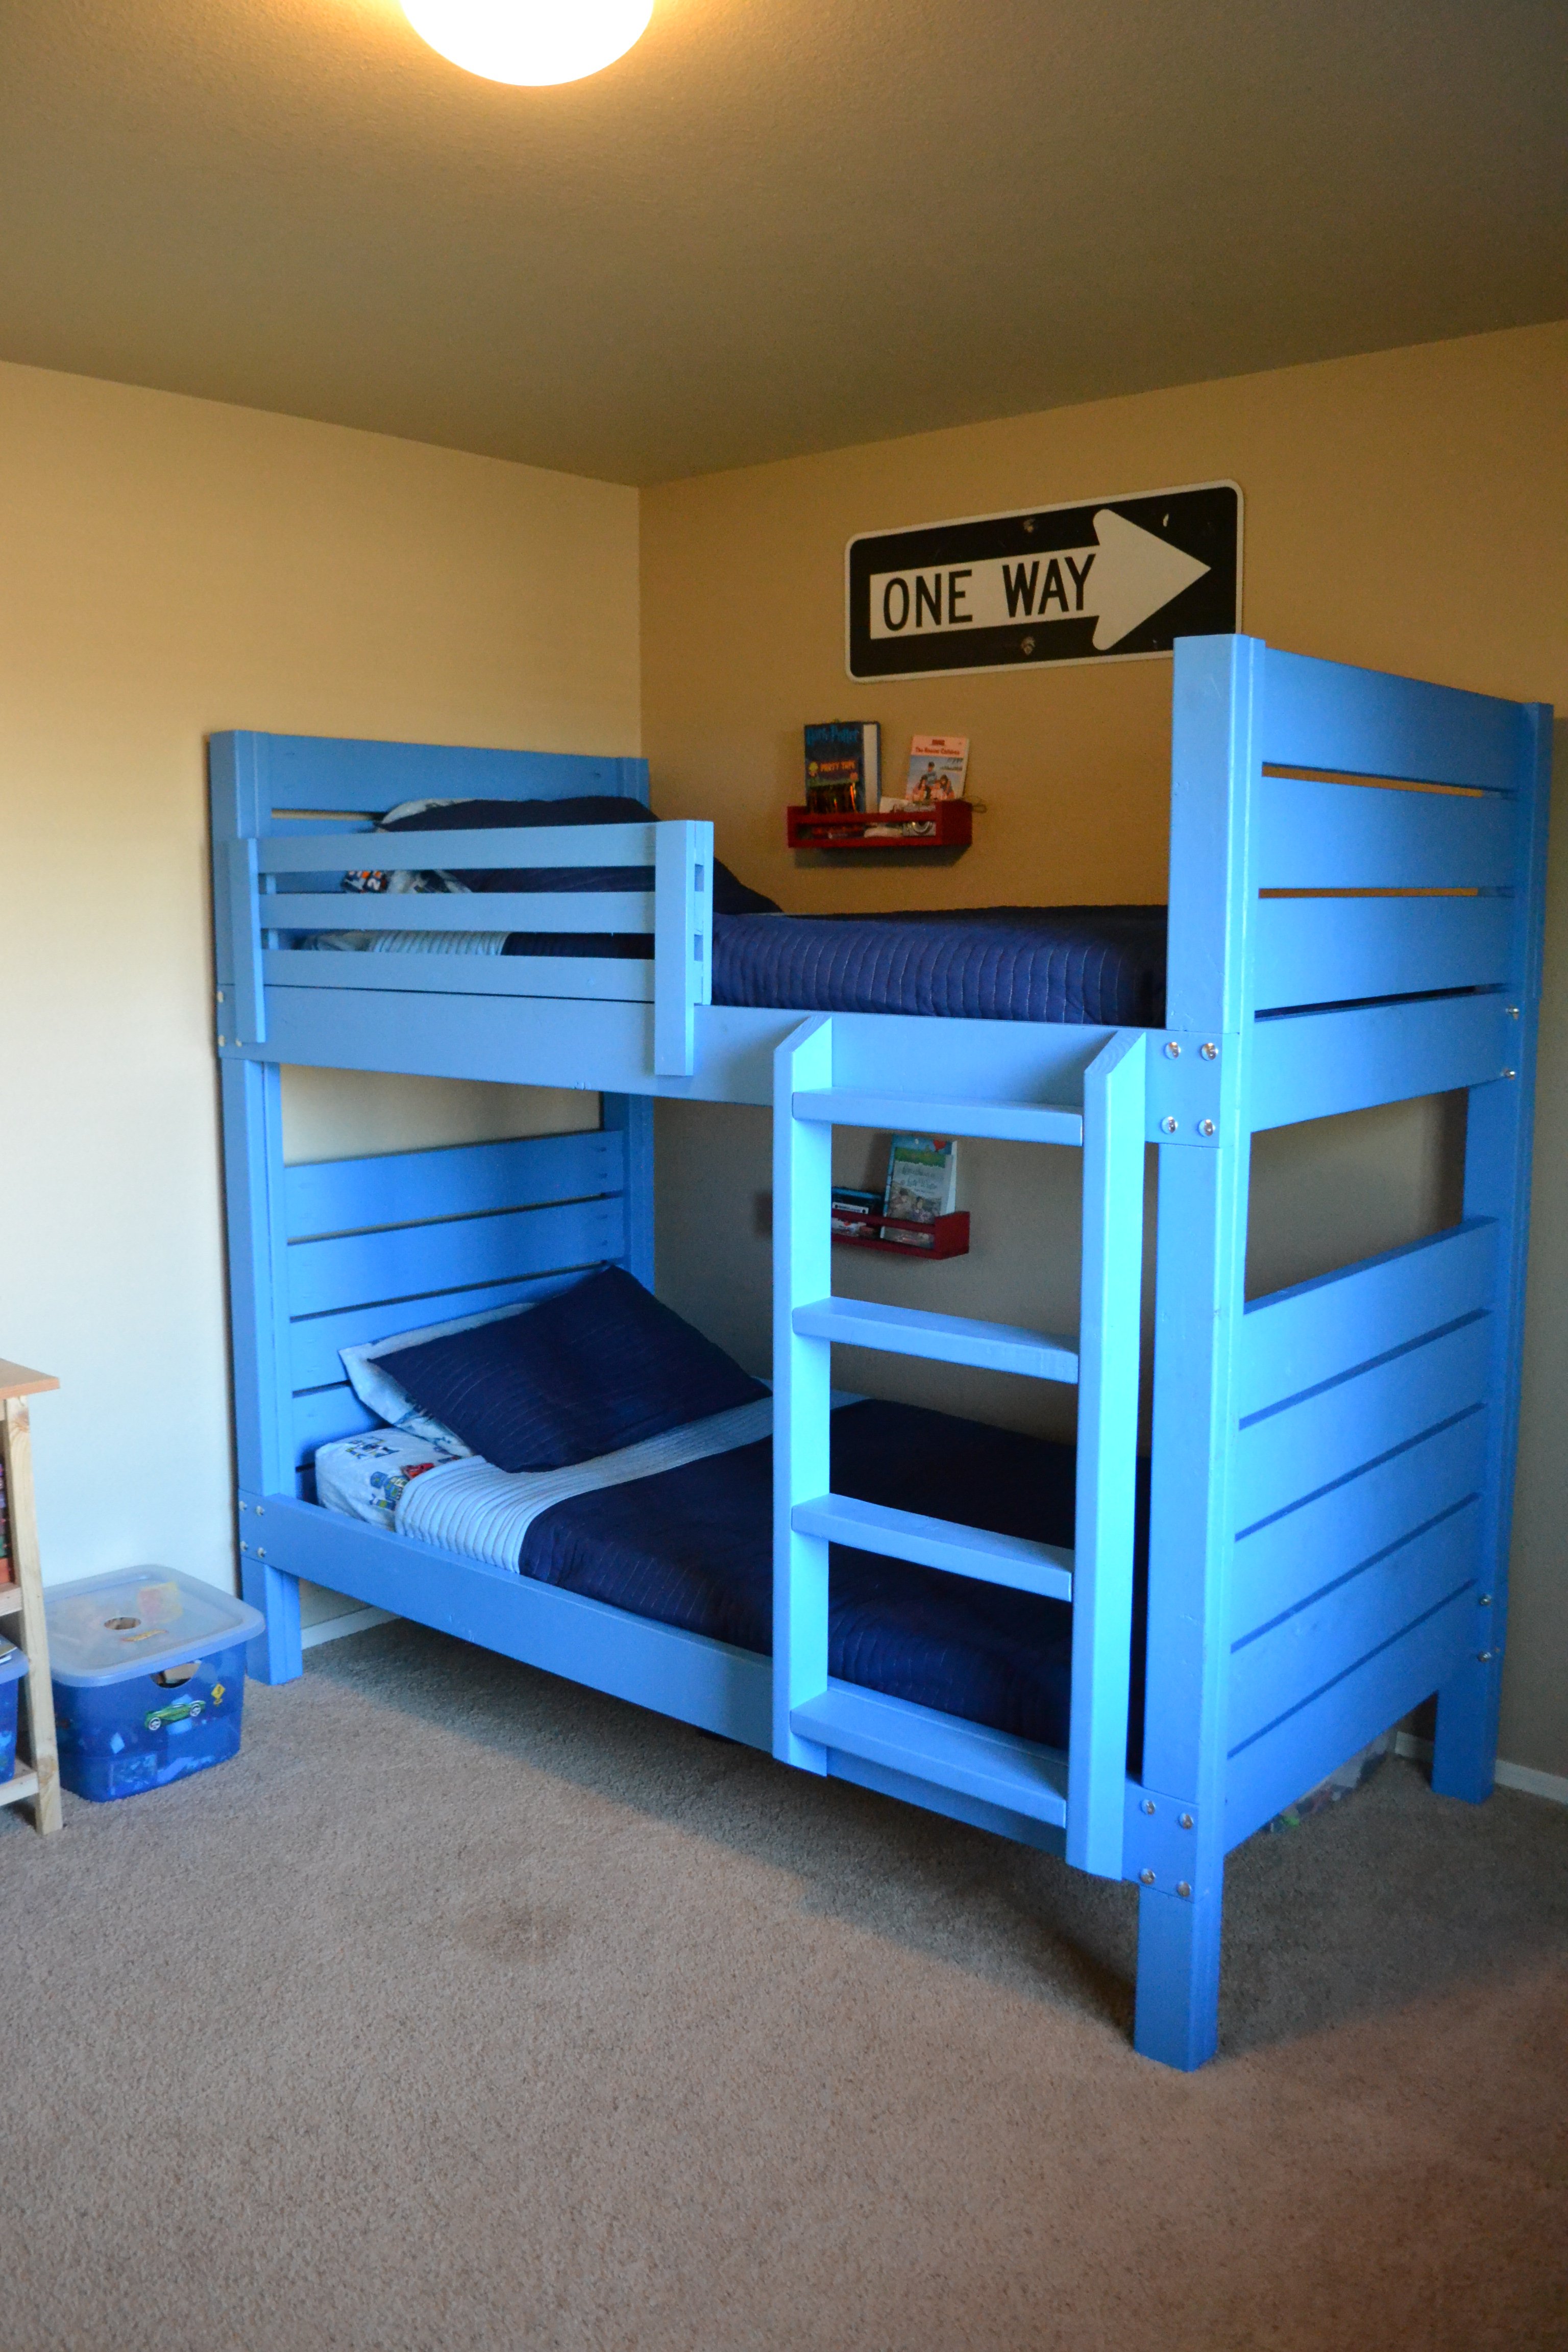
After building the playhouse loft bed, I found this project to be very easy. I built the bunk beds at 37/38 weeks pregnant, so that should tell you how simple it is to construct. The total cost came in under $300 and I was able to use some of the scrap wood I already had in my garage.
I did run into some trouble with the slanted ladder. Even though the pieces were cut to the exact measurements in the plan, the sides of the ladder were too short for the bed. Being very pregnant and impatient, I just modified the ladder so I wouldn't have to waste the pieces I'd already cut.
You may also notice that I didn't fill and sand my pocket holes on the end pieces yet. That was also me being very pregnant and impatient. I'll go back and do that later when I have more time. Despite the little bit of finishing work remaining, this was pretty much a 2-day project. Cutting and construction was fast (one day) and finishing took another full day.
I used Valspar "Blue Burst" paint from Lowe's to finish the bed. I used bolts to attach the side rails because we move frequently so I wanted the bed to be easy to disassemble. Overall, this was a very easy and fun project!
Built from Plan(s)
Estimated Cost
Just under $300
Estimated Time Investment
Weekend Project (10-20 Hours)
Finish Used
Valspar "Blue Burst" interior paint
Recommended Skill Level
Beginner
Comments
Sun, 11/11/2012 - 21:37
Love it! I had same ladder issue...
Love how you whipped this together! I stumbled upon your post as I started working on these bunk bed plans today (I can't read the dimensions on the diagrams from a printout, so i open up the plans on the iPad). I had to finish up the ladder and side rail today. I was stumped yesterday evening with the same ladder issue. Why was it coming up short? It was really annoying considering it took me a while to figure out a 60 degree angle on my miter. I decided to try changing my ladder angles to 22.5 and 67.5, as I still wanted a leaning ladder, but I thought a reduced angle would work better. Didn't have to scrap my boards either, whew. Love how quickly you put this together! Coincidentally, I'm 33 weeks pregnant, but moving terribly slow compared to you.
Mon, 11/19/2012 - 07:25
I'm glad I'm not the only one
I'm glad I'm not the only one with the ladder issue! I couldn't figure out what went wrong. I also tried to adjust the angle but my boards were just a tiny bit too short and I was not wanting to run to the store to get more. I do like the leaning ladder better though. Can I just say that I love that you're building this bed while pregnant too? That's awesome! :)