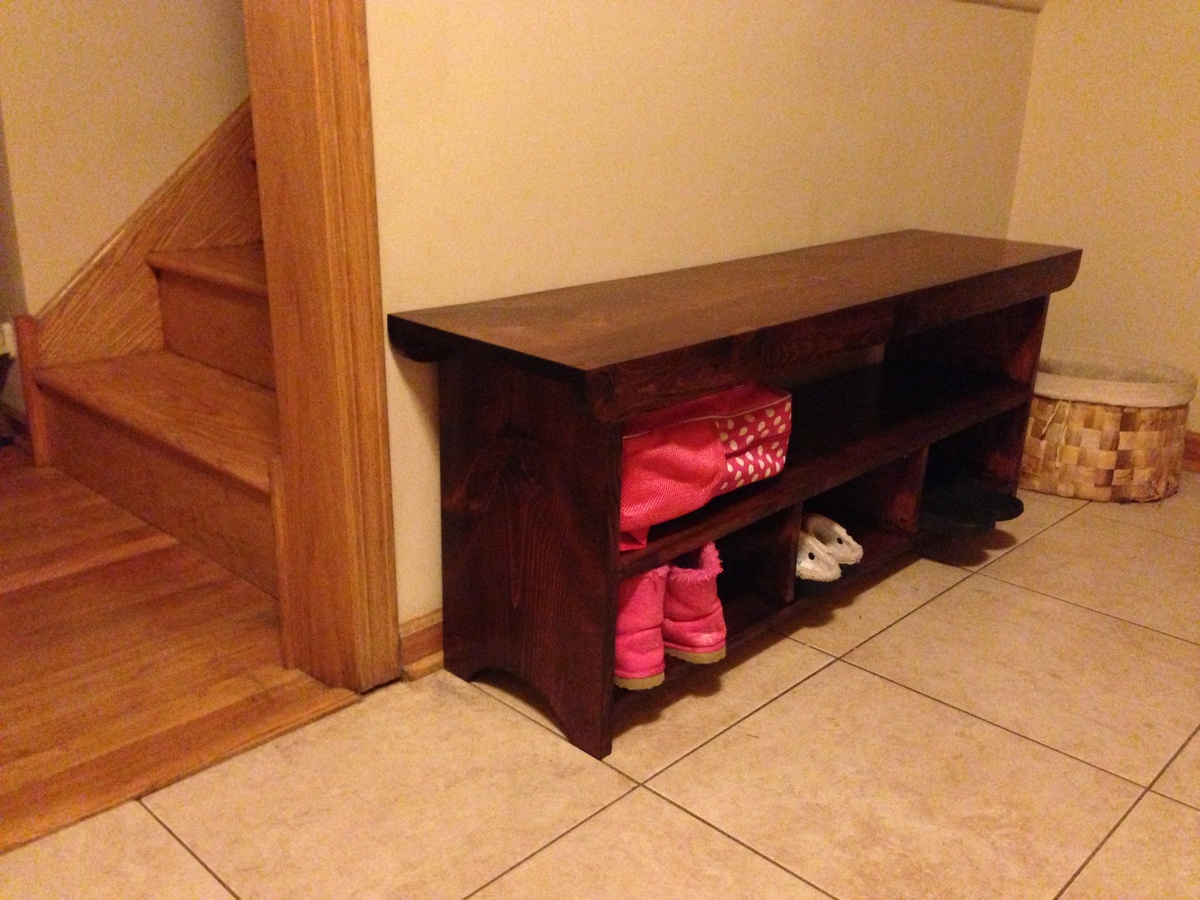
Community Brag Posts

4x4 Truss Beam Table

This is my 2nd table built from plans on the site. I built the pocket hole farm table originally and our family used it for 2 years and then I sold it to another family to enjoy! I built this one a full foot longer and used a 2×10 in the center to widen it. We host large gatherings so I wanted the additional space. The dark walnut came out beautiful if darker than the plan table. We love it!

Built from Plan(s)

Comments

Painter's Ladder Shelf for Back Yard

Submitted by Anonymous (not verified) on Mon, 10/04/2021 - 11:49

I came up with the idea of having something on my back porch to hold all my outdoor stuff.... things I wanted handy, like Pool Towels, Gardening tools and gloves, Sunscreen and Bug Spray. I started looking around for something to buy and finally decided to look for something to build. I was looking on the HGTV website when I found this and thought it was perfect. I'm not sure what exactly made me take it one-step further, but I found a small link embedded in the article and I clicked on it, and a love affair was born. I found the Ana-White website with tons and tons and tons of plans to make all the things I've dreamed about making. So, I signed up, printed the plans and got to work. First time I have built from plans and had to work slowly and not rush to complete it the same day. Snuck away in the evening, after dinner and cleanup, and spent about an hour a night in the garage with the heat and the mosquitos. BTW, tucking dryer sheets in your clothing does really keep the critters at bay. And here is the finished product .... doing exactly what I had planned and fitting perfectly in the location I wanted. On to the next project..... I have several printed out and haven't decided which to start on..... Is it the toy box for my son's toys that scatter around the living room.... or the queen-sized Farmhouse bed for my daughter who has been begging for more sleep room. Or the bookshelves for my room..... So may choices.... and I love that about this webiste.

Built from Plan(s)

Comments

Picnic Table

Submitted by Medickep on Mon, 05/06/2013 - 07:39

My wife started looking at expensive patio sets, which I thought were not worth the price, so I decided to build a picnic table. This is not the cheapest table out there, but it's built to last for years!! I used a high quality cedar as I got a price cut from a friend. I also used deck screws, so there would be no rusty screws!! The table top measures 7' long and looks like one you would see at a state park, notHome Depot!

Estimated Time Investment
Weekend Project (10-20 Hours)
Finish Used
Cabot Australian Timber oil: For this project I went with an oil project so I wouldn't have to sand it every year, like so many in my area with their decks. With this product, you simply clean the table and reapply!!
Recommended Skill Level
Beginner

Comments

Medickep

Thu, 09/05/2013 - 13:04

Thank your hanks for the kind words! This was my first real project and I was pleased with the results!

Gerry Czerniawski

Thu, 08/25/2016 - 09:48

Really like the picnic table - do you have plans for this? (I'm new to this site so apologies if they are here but I just could not see where?).

best wishes

Gerry

Adirondack chair

Easy and fun. Don't worry yourself over the angle on the left side of the stringer. The 15 degree one matters, the other, not so much. Buy an extra 1x4 unless you want to spend a pile of time figuring out how to cut them to maximize the space!

Built from Plan(s)
Estimated Cost
$35
Estimated Time Investment
Afternoon Project (3-6 Hours)
Finish Used
None yet.
Recommended Skill Level
Beginner

Tilt Out Garbage Bin

Submitted by stephie_00 on Thu, 04/23/2015 - 19:16

Modified the plan to use pallet wood and stained it classic grey for a weathered look.

Estimated Cost
$50
Estimated Time Investment
Weekend Project (10-20 Hours)
Finish Used
Min wax Classic Gray oil-based stain
Recommended Skill Level
Intermediate

Comments

Post Office / Bank

I used Ana's Library Base Plan and modified it slightly to include cubby holes on the bottom and an acrylic "window" at the top to create a post office for my daughter. This now also gets used as a "bank" and a "fast food window"! Lots of fun!!

Estimated Time Investment
Weekend Project (10-20 Hours)
Finish Used
Paint, Stain
Recommended Skill Level
Intermediate

Adirondack Chair

Submitted by nateDuncan on Mon, 06/03/2013 - 12:10

I had built a few of these chairs a year and a half ago similar to the red ones that you have on the step by step instructions. That was my first time at customer building and painting anything. Needless to say, my skills have improved over time.

So, I wanted to build this chair for my dad for fathers day. He had an old plastic Adirondack chair sitting in his backyard that was really gross. I wanted to replace it with something nice. So he is obviously a UK fan and I wanted to see if I could paint the logo on correctly while also giving myself the opportunity to build something and see if I can make this chair a lot better than the ones I had previously built.

So I decided to curve the back of the chair and curve the ends of the arms. I recently got a nice dewalt random orbital sander which helped out alot in getting it nice and smooth. I made my own wood putty using the leftover sawdust and glue mixed together. I also fastened the wood together using glue and polymer coated screws. Which are supposed to last alot longer than regular wood screws when using pressure treated pine.

I took my time to make sure the pieces were all square when assembled which was better than previous building projects. Also, as far as finishing the chair, I primed it and then put 3 layers of the Kentucky blue Outdoor paint with a brush (which seems like it took forever). I made the stencil by just printing the logo on a piece of cardstock paper. Then I cut out the logo with a razor, then I wrapped the paper in duct tape to make the stencil it a little stronger and to fix the areas that ripped when cutting the card stock paper. Then I cut out the duct tape where the logo is. I made a couple of test paints using the stencil on some scrap to make sure my technique was good. Then once I felt comfortable, I painted 4 coats of very thin paint on the chair where the logo is. After all was dry, I did a light by hand sanding to make it smooth and then sprayed some clear coat on it for an extra level of protection and to make it shine a little.

It was a fun project and my dad really liked it.

Some things I would have done differently for next time would be to use a router to flush cut the seat slats and also use the router to give a nicer rounded edges for the arms and all of the slats as well. Also, It would be nice to mount a stainless bottle opener to the chair to open your drinks (maybe on the outside of the arm of the chair.

Thanks for the plans. I check your site all the time for ideas.

Built from Plan(s)
Estimated Time Investment
Weekend Project (10-20 Hours)
Finish Used
primer, paint, clear coat
Recommended Skill Level
Beginner

Pipers Farmhouse Bed

Submitted by Plug5 on Tue, 06/04/2013 - 16:25

My wife, and I wanted to upgrade my 5yr old daughters bed. Hopefully this will give her enough encouragement to actually sleep in her room!

The bed turned out great, and my daughter loves it!

This project took a little longer than usual, because with the exception of the couple pieces of plywood all the parts are made from rough maple lumber. The longest part was planing, and gluing all the parts up.

Estimated Time Investment
Week Long Project (20 Hours or More)
Finish Used
Dura Clean Satin Paint with sprayed on white primer.

I used a 4"mini roller with a slight texture for the finish.
Recommended Skill Level
Beginner

Cute Vegetable Cupboard

Submitted by kristyzed on Sun, 10/01/2017 - 15:33

I made this cupboard to hold all of my onions, squash, and potatoes that were previously sitting in piles on the laundry room floor.  This little tower has the perfect amount of storage.


Built from Plan(s)
Estimated Cost
$75 CAD
Estimated Time Investment
Day Project (6-9 Hours)
Finish Used
I finished this off with 2 coats of primer, 2 coats of Trim White by Sherwin Williams, and 2 coats of clear coat. All coats were done with disposable foam brushes.
Recommended Skill Level
Beginner

Modified Easy Bench

Submitted by wkilmer23 on Sat, 04/02/2011 - 08:03

Sorry for the poor photo.  I will take a better one when I find my camera.  We made this bench for our little shih tzu but it soon became a bench for everyone to test out.  If I had to repeat this project, I would probably keep the legs from the original plan.  These store bought legs don't seem sturdy enough.

Built from Plan(s)
Estimated Time Investment
An Hour or Two (0-2 Hours)
Finish Used
My wife bought the fabric at Jo-Jos and the legs are from big blue.
Recommended Skill Level
Beginner

A cottage bench with shoe rack

Only slightly modified cottage bench - I made the storage area bigger and added shelves to put my shoes. Only my second project so it's not perfect (especially the paint job) but I loooove it! Sure, the shoe rack I had was perfectly functional and bigger, but this is waaay prettier.

Found a perfect red oops paint at Lowes and I even added a little birdie stencil. I have a few more pieces I'm working on and hope to finish soon. Thank you Ana for the plans!
Estimated Time Investment
Weekend Project (10-20 Hours)
Finish Used
Primer and two coats of paint, lightly sanded in between. I skipped the top coat because I want the red color to naturally fade with use.
Recommended Skill Level
Starter Project

Small Dresser - Barn Wood Drawer Face

Submitted by CustomPulp on Wed, 05/27/2015 - 06:25

My son needed a dresser that would fit a small space (no more than 40 inches wide). I modified the Cabin Collection plans to fit the small space. Looking at the plan, I wanted to brighten up the wood and opted not to stain. Instead I purchased an airless sprayer and was very pleased with the finish. For the drawer faces, I found old barn wood. The barn wood was a little tricky because some of the boards were warped. I brushed the wood with a stiff nylon brush to bring out the deep grain texture of the wood. Finally, purchased bronze finished drawer handles. Very pleased with the outcome. Thanks for the plans. Can't wait to start my next project.

Estimated Cost
Lumber $90.00. Barn wood drawer fronts were free (driving around in the country looking for barns that have collapsed. Farmer agreed to give me enough lumber for 3 dressers). Promised I would mention his name in the post. Thanks, Jerry Parker!!!
Estimated Time Investment
Weekend Project (10-20 Hours)
Finish Used
Valspar interior - Dove White
Minwax Clear Polyurethane - Drawers
Drawer Fronts were not finished
Recommended Skill Level
Intermediate

Christmas Tree Wall Shelf

Submitted by PhD_Phil on Wed, 12/20/2017 - 10:44

Christmas Tree Wall Shelf

Stockings hung using cabinet/drawer pull knobs that I found on Amazon

Built from Plan(s)
Estimated Cost
<$20
Estimated Time Investment
Day Project (6-9 Hours)
Recommended Skill Level
Beginner

Rustic X Coffee Table, End Table and Console

Submitted by jbayer80 on Thu, 06/20/2013 - 07:07

This was a blast to build. This was all a gift for my wife since the traditional 5th anniversary gift is wood.

The coffee table and console are both awesome! The only thing I would change/modify is the end table, because its kinda big and doesn't really look its part of the set other than the "X". I would maybe take about 2 or 3 inches off all sides or maybe 3 off the sides so its not such a box.

Estimated Cost
$500
Estimated Time Investment
Week Long Project (20 Hours or More)
Finish Used
Kona on top and shelf (s) with 4 coats of polyurethane. Currently there is nothing on all other parts because I wasn't sure what I was going to do. I think I'm just going to put a few coats of poly on the "naked" parts and call it a day. I thought about painting the other pieces but that would hide the beautiful grain in the Douglas Fir. I don't like the idea of the entire thing being Kona because it looks too dark on the others I've seen on here (for my house only), then I thought about a very light stain but think I settled on it being naked with the poly. I would honestly love to hear what you guys think as I have not touched it yet.

Actually I was thinking it would be nice for Anna to have a section with a "poll" for someone like me who is kinda stuck on a finish to post a picture and have other vote on a few options....thoughts??? Anna??
Recommended Skill Level
Beginner

Comments

Val Manchuk

Thu, 06/20/2013 - 07:31

I'll start one! Go for the poly. You're absolutely right, it will bring up the beautiful grain, and show off the "X" accents. Nice work, by the way!

Val Manchuk

Thu, 06/20/2013 - 07:32

I'll start one! Go for the poly. You're absolutely right, it will bring up the beautiful grain, and show off the "X" accents. Nice work, by the way!

spiceylg

Thu, 06/20/2013 - 08:39

Beautiful builds! Wow, they look wonderful. What an amazing gift! From the pics, the end table looks fine, too, as the furniture isn't a small scale. I love the two-tone so I say go for just the poly!

WorkShopWendy

Thu, 06/20/2013 - 12:08

I think you did an amazing job :) love the contrast of the two tones. Using poly for the rest would be beautiful. I cant wait to do this project myself.

JoanneS

Thu, 06/20/2013 - 15:47

What a wonderful gift! These tables are beautiful, great job on this build! I love the two-tone - One more vote for the poly! :)

jbayer80

Fri, 06/21/2013 - 13:04

I'm going to go with only the Poly over the bare wood. Thanks for the comments and advise! It will be a few weeks due to work and travel but I'll send updated pics once its done.

Jbird

Sat, 02/24/2018 - 21:18

I like the naked/poly look too. The other option I think would look good would be painting it white. The contrast between the white frame and darker kona top and shelf would be cool. 

Shou Sugi Ban (Yakisugi) Cornhole Boards

Submitted by Anonymous (not verified) on Sun, 12/26/2021 - 14:48

I'm James Farquhar, designer, and fabricator. This is the second set of cornhole boards I built this year. This set is the regulation size of 48" x 24" according to the American Cornhole Association. It is made from fir 2 x 4 s and pine 1 x 4 s (6 per board). Each board is glued with Titebond II and countersunk Torx top screws (#8 1-1/2 inches). It is coated with Minwax polyacrylic (8 layers sprayed on) and Howard's bee's wax (3 layers). The boards are secured with 3-inch toggle latches in pairs. Kayak carrying handles with four screw ports; I used the same Torx Screws I used to put the boards together, extra for strength. The total weight of the boards is 60 pounds. I used a Texas Flame Thrower to Shou Sugi Ban (Yakisugi), as a finish.

Comments

Northwest Ohio Pergola

Submitted by russell_h on Sat, 06/27/2015 - 17:57

I used flat stone and a masonry circular blade for the base of the corner posts. I also used 2 x 4's for both layers of the top boards. It was a lot of fun to build.

Built from Plan(s)
Estimated Cost
$250.00
Estimated Time Investment
Week Long Project (20 Hours or More)
Finish Used
I will stain and seal in a year
Recommended Skill Level
Intermediate

Basement Storage Shelves

New house equals room for all the junk. Built this off the Garage Storage Shelves plan for our basement storage area. Leveraging the existing exposed studs made it a bit easier. Made these 48" deep to accommodate the big bins with all the holiday decorations. I added another along side, but made it 24" depth...one more yet to go. The wife can't throw anything away!

Comments

Farmhouse Style Bar Table - San Diego

My husband modified these plans by making it a 42" tall bar high table. He built it and I stained it with Dark Walnut Danish oil and it came out better than we imagined. Thank you for these awesomely cool DIY plans.

Estimated Time Investment
Weekend Project (10-20 Hours)
Recommended Skill Level
Beginner

Comments

Fancy X Farmhouse table with built in copper cooler

Submitted by J Dixon on Sun, 08/23/2015 - 01:54

My version of Fancy X Farmhouse table with a built in copper cooler!!

Built from Plan(s)
Estimated Time Investment
Weekend Project (10-20 Hours)
Finish Used
Dark walnut colored danish oil base with satin poly top coat.
Recommended Skill Level
Intermediate

Comments

Codding58

Thu, 05/12/2016 - 12:27

VERY nice build!   How did you make the copper cooler, if you don't mind me asking.    Great Idea and love that you can hide it away!  Cheers