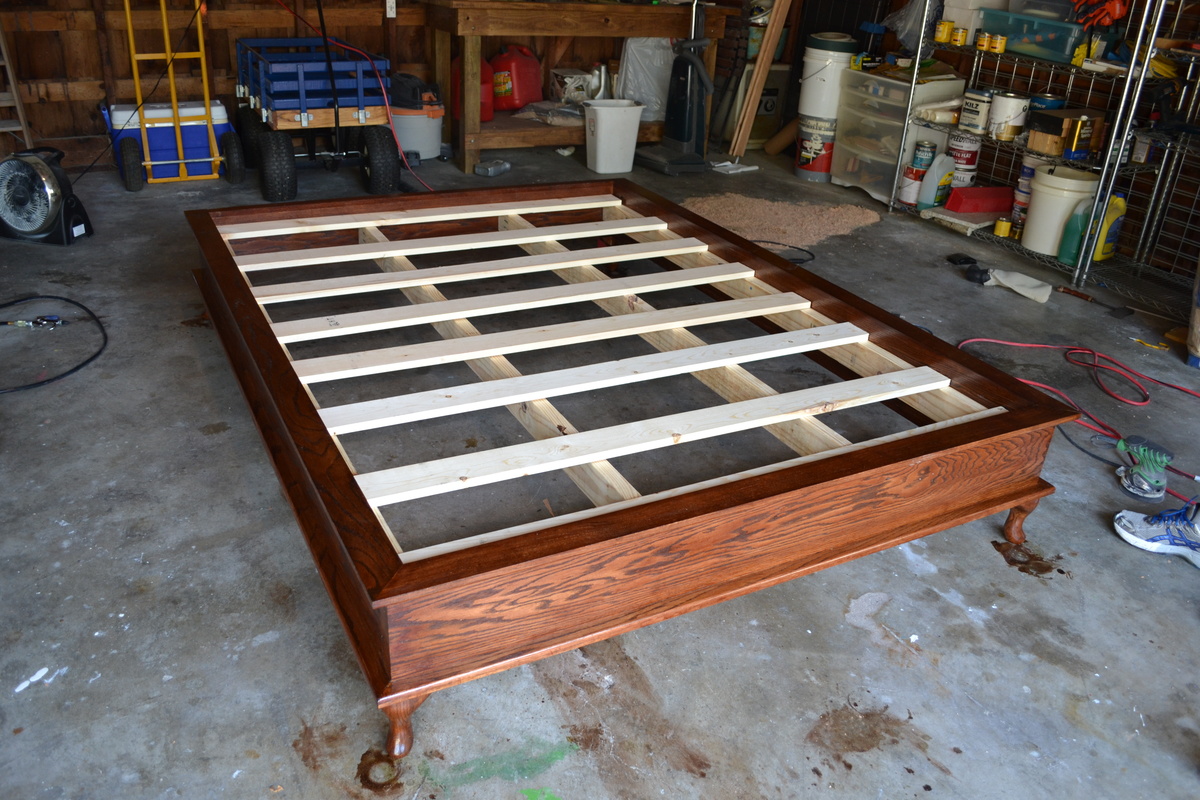
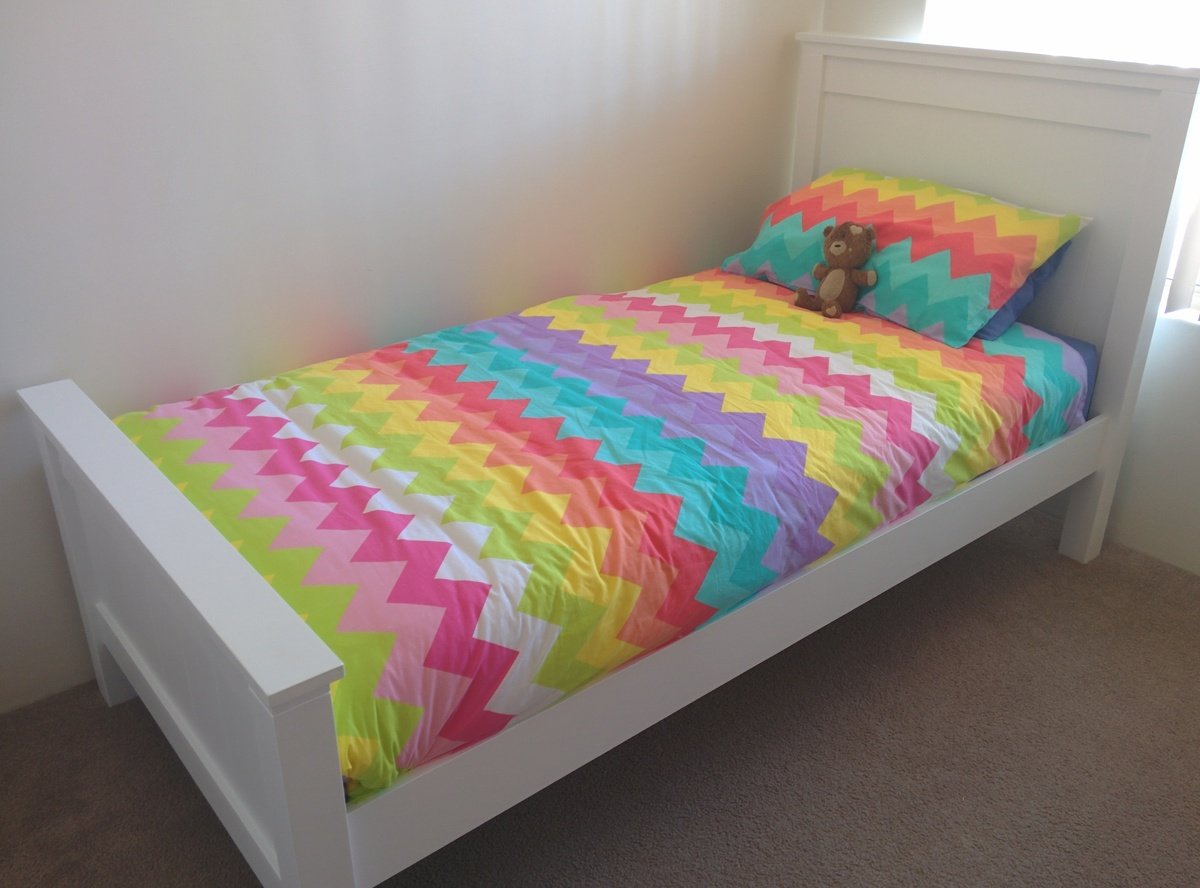
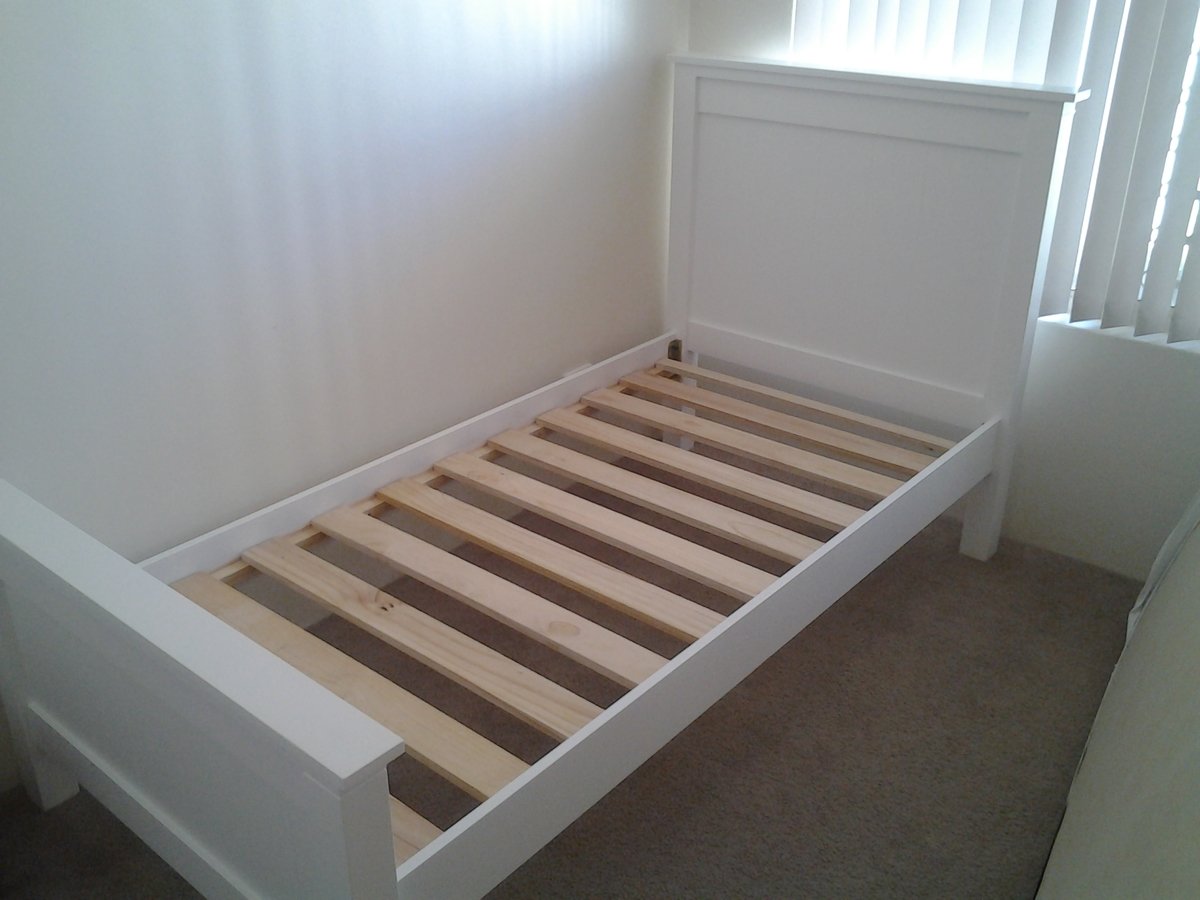
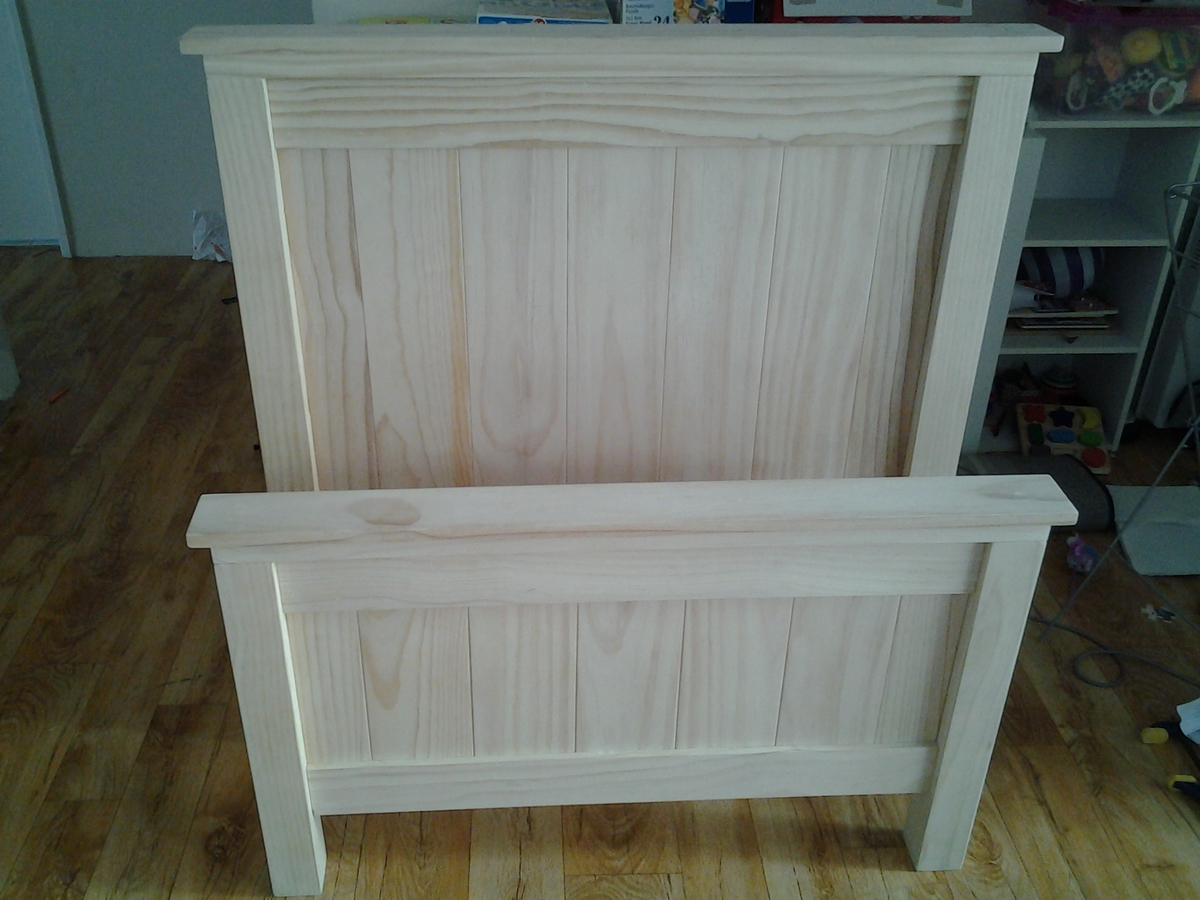
Play Table and Chairs
For my daughter's birthday I made her this table and chairs. Despite being very easy and cheap to make, they are very sturdy. I've sat at that table quite a few times with no issues at all. I love how they turned out.
I had to do a 3ftx3ft square table since our eating area in the apartment isn't big enough for a dining table, but I really like how it turned out :) I also added breadboard ends because I can't stand how the cut ends look. I got the legs from osborne wood
Thu, 05/29/2014 - 23:09
I've been looking everywhere for a small farm table! Can you tell me which legs and lumber you used?
Sun, 01/22/2017 - 13:56
I love this table however i am a beginner. Where can i find the plans to this table and step by step instructions?
Thank you!
Tue, 03/28/2017 - 15:13
This 3x3 farmhouse table is exactly what I want to make with the breadboards. Any chance you can send your plans with the measurements for this 3x3 table. Thank you!
I decided since I was doing a lot of wood working projects I needed to have a work table. I came across the patio table on Ana site and fell in love. I now have a great table in my garage for all my woodworking projects.
This was a 3 weekend project that I hope my son loves.
I used both plans and made adjustments as needed. Read everyone’s post to see what works best for what you are trying to accomplish. I know that my slide is steep and I would of made it more gradual If I did think my kiddos could not handle it. I would say this bed is perfect for my 5 year old and my 7 year old has been in the room playing on it also all day.
This was the first time I ever built anything - before this is hardly used a drill. It was big for a first build, and I did it entirely alone aside from a few text messages with questions. I added a couple little end tables to it for a book and a drink, and it’s now my favourite outside summer spot.
Facebook user @robyn.marie.3572
My wife went shopping one day in a primitive furniture shop and found this saltbox house that she loved. So I decided to get a picture of this house and build it myself. This project was a lot easier than I thought it would be. Hope you enjoy.
Sat, 08/22/2015 - 15:11
First let me say Thank You for your service. I know this is an old post but any chance you could post dimensions/instructions to make the saltbox house? I think it is beautiful.
This table was my 4th build from the site and took my wife and I about 10 hours to build.
Modified so that it could fit 12 people comfortably.
My dad and I built this for my mother in law. Her apartment gives them the option to decorate the area outside the door, so needed a specific size. Love the way it turned out!
M Banks
Well, this was a project that was running concurrently with the Benchright coffee table and I finally got it installed along with the walnut stained 1x4 pine desktop. At first (due to inexperience) I stained it and since I had the wrong plywood, it looked horrible. So it got bondoed and painted and converted into a drawer/rollout printer drawer/hanging file drawer and a support for my single piece 12' + desktop.
By the way, its a pain in the butt to keep the cabinet square and I worked it and worked it, believe me.
Mon, 01/21/2013 - 18:10
I was wondering how you made the desk longer. I have an 11 foot wall and i want the top desk to span the whole wall i was wondering how you supported the whole desk, did you need to add any extra supports?
This was my first build for Katy and she loves it! We used acrylic glass and used the frosted spray pains from krylon.
Thu, 01/09/2014 - 16:32
Sorry guys and gals I couldn't figure out oh to rotate it on my phone! But you get the picture
Absolutely loved making this bed! It became my summer project and I needed it done in a two week time frame. Between working on it after i got off work and on my days off, it came out exactly how I wanted it to.
I only ended up spending a total of $140 dollars by using scrap wood around my garage and new nails and screws and such. This was the absolute way to go before moving into my first apartment with little to no furniture! The storage boxes were the perfect solution to not wanting to buy a dresser. It's completely durable and I'd definitely do it again! Thanks Ana White!
Our daughter outgrew her loft bed and wanted something closer to the ground. We didn't do the side storage towers, because we were concerned if there would be enough room.
Workbench on wheels. I modified the simple workbench to shorten the legs but added Wheels to be easier to move around as I have uneven ground on dirt I had to add pneumatic wheels.
Here are a few of the ten dollar ledges we added around the girls bed. We had no room for tables so we thought we would give this a try. It's working beautifully. We hung the ledges in studs and they are standing up to constant use perfectly. The girls have space for their most cherished nik naks and a drink in case they wake thirsty in the night. We couldn't be more pleased. Now I'm seeing the possibility for ledges in every room.
Thu, 03/22/2012 - 00:34
nice post,thanks for sharing! BTW,check out my new android 4.0 tablet newfreeshipping.
Mon, 04/23/2012 - 22:14
It is nice that you posted something like this [url=http://www.pandawill.com/twilight-turtle-night-star-constellation-p3557… ] Twilight Turtle [/url] and I am quite lucky to read it. Thanks for posting this!
Mon, 10/22/2012 - 03:56
I like all your post. I will keep visiting this blog very often.
Tue, 06/26/2012 - 20:01
Your knowledge of this subject comes through clearly in this article. I love to read this kind of articles, I hope you will update it. Thank you for sharing it with me.
http://www.sbwire.com/press-releases/how-to-get-your-ex-back/magic-of-m…
Thu, 04/19/2012 - 19:01
If converting existing floor space into a half-bathroom, such a renovation can cost as little as a few thousand dollars, making the addition of a powder room one of the few home improvement projects where the value added to the home exceeds the cost of the renovation.water damage Pearland tx
Fri, 04/20/2012 - 02:14
You can also use vinegar to remove heat stains on stainless steel cutlery and pans, or remove streaks and heat stains by rubbing with club soda or olive oil.Basement water Atlanta GA
Sat, 04/21/2012 - 00:28
Before you go to use it...if it's been sitting for awhile...give it a good shake. As you can see in this picture...it does tend to separate a bit. But after a quick shake it's good to go. To use: spray on stains as you normally would. I usually let mine "soak in" for a few minutes at least. Then launder as usual.water damage Temecula CA
Mon, 04/23/2012 - 22:11
It is nice that you posted something like this [url=http://www.pandawill.com/mini-led-lcd-projection-clock-digital-keyring-…] Projection clock [/url] and I am quite lucky to read it. Thanks for posting this!
Fri, 04/27/2012 - 10:11
I have no experience to build a site like you said on this page. I need to learn to create a site and develop it, perhaps using new versions of Drupal could improve and make my blog more often visited by Internet users.water damage restoration Raleigh Durham NC
Fri, 04/27/2012 - 10:13
It is very fascinating, You’re a very professional blogger. I’ve joined your feed and look ahead to in search of more of your excellent post.water damage restoration Raleigh Durham NC
Fri, 05/11/2012 - 07:40
This blog is really very interesting and easy to understand the information provided in it. It is very nice to view this blog and it's nice to see the best information cited here.Water damage Lafayette LA
Fri, 05/18/2012 - 19:54
I used to be more than happy to seek out this internet-site.I wanted to thanks in your time for this glorious read!! I positively enjoying each little bit of it and I have you bookmarked to check out new stuff you weblog post. Water Damage Anaheim CA
Fri, 06/01/2012 - 04:59
Quite insightful submit. Never believed that it was this simple after all. I had spent a very good deal of my time looking for someone to explain this subject clearly and you're the only one that ever did that. Kudos to you! Keep it up. Water extraction Lakeline OH
Sun, 06/17/2012 - 20:37
I'm so excited that I have found this your post because I have been searching for some information about it almost three hours. You helped me a lot indeed and reading this your article I have found many new and useful information about this subject. Paint Contractor Glendale AZ
Mon, 06/25/2012 - 03:45
Your knowledge of this subject comes through clearly in this article. I love to read this kind of articles, I hope you will update it. Thank you for sharing it with me.
http://www.hcgrevival.com/
Wed, 06/27/2012 - 04:10
Sometimes it is so hard to find good and useful posts out there when doing research. Now I will send it to my colleagues as well. Thank you for being one of them.
http://www.reklama-internete.com/
Fri, 06/29/2012 - 01:15
Thanks for this exciting post. It is well written and has some great content. Do you have any others that I can go to about this subject?
http://www.californiahealthinsurancenow.com/Kaiser_Permanente.html
Tue, 07/03/2012 - 05:21
This information very useful! I've been looking for books of this nature for a way too long. I'm just glad that I found yours. Looking forward for your next post. water damage restoration Raleigh Durham NC
Tue, 07/10/2012 - 15:35
This is great stuff. Very handy these ledges are. lets see how many more can be added.
Nice, Thanks
Mon, 07/16/2012 - 22:55
The program is designed under the same model as new homes built for Habitat families where the veteran will repay the zero interest loan necessary for these repairs, which is then deposited into a revolving fund to assist additional families in need of decent housing. Mold Inspection Covington LA
Thu, 07/19/2012 - 04:32
I hope people listen, too, but I'll be surprised if they do. In all the years I've been in the business, we're still fighting the same battle we were when I first started - most folks want the lowest ... Water Damage Restoration Colorado Springs CO
Wed, 08/01/2012 - 22:13
If you're involved in a head-on crash, the windshield must stay in place to keep you inside the car and to keep flying debris out. If the windshield flies out, so too may you or your kids. Improperly installed windshields can easily be dislodged during a crash. Architectural Engineer NYC
Thu, 08/02/2012 - 03:41
This blog is really amazing due to its unique and outstanding post.
Fri, 08/17/2012 - 06:48
You have to put efforts in home maintenance to make sure everything is in right condition. If any part of your house needs repairing then have it repaired immediately. If you neglect the problem for too long then it might become even more complicated. Masonry contractor West Hartford CT
Mon, 09/03/2012 - 02:11
The girls have space for their most cherished nik naks and a drink in case they wake thirsty in the night. We couldn't be more pleased. Now I'm seeing the possibility for ledges in every room. http://www.genericviagratab.com/
Sat, 09/29/2012 - 09:29
I am very enjoyed for this site. Its year informative topic. It help me very much to solve Some Problems. Its so fantastic and Opportunity are working style so speedy.
Outdoor Lighting Batavia IL
Tue, 11/20/2012 - 00:17
This is represented partly in the significantly higher frequency and register neutrality of connectives such as tak or totiž when compared with the English so and therefore but primarily by the nature of the mental spaces set up by the Czech lexemes. water damage Anaheim CA
Fri, 11/30/2012 - 03:19
The contemporary strategy is often focused on the development of specific skills and abilities. As a result, it fails to provide with the broader education and, instead of the formation harmonious, balanced personalities, it breeds specialists trained to work in a specific field. This is a good example like the ones http://bestsamplepapers.com does. People prefer more broad basis.
Thu, 02/07/2013 - 02:08
Pretty good post...
I just stumbled upon your website and wanted to say that I have really enjoyed reading your blog posts. Any way I'll be subscribing to your feed and I hope you post again soon.
Thu, 02/14/2013 - 23:45
A lot of interesting things found on your blogs, like the topic! The author thanks and success in the blog. http://bbrencontresexe.com
Fri, 04/12/2013 - 05:55
As a Newbie, I am permanently exploring online for articles that can be of assistance to me. Thank you
http://healthpharma.blogsome.com/
Built the Hailey Platform bed with planked headboard, and two Kentwood bookshelves, for a guest room in our new house! The dimensions of the bookshelves were changed a bit to fit the space, but the bed (should be) built to dimensions in the plan for a full size bed.
This was my second project from Ana White's plans. I felt confident in my new woodworking skills once I learned how to use the kreg jig for pocket holes. The child's table and chair I made came out so good, I decided why not try a toddler bed for my 4 yr old granddaughter. She loves her new bed. And I love how easy and fun it was to make.
I only had to make minor adjustments to the size to accomodate her mattress. I brought the footboard out to the edge of the legs because I needed to add an inch to the length, but the sides are set in like the plans. I also added a couple inches to the rail height since her mattress is 6 inches deep and I wanted it to be above the mattress.
I was afraid I couldn't get the rounded headboard neat, so I used the whole 6 inch board, adding to the height of the headboard a few inches. I also added the top board on the headboard because it just made it look cleaner on top. You might not be able to tell from the photo, but I did use the beadboard - I had a scrap the perfect size.
We usually place our stockings on the mantle. Last year, a full stocking fell down and toppled some of our nativity.
This year we used up some of our scrap pieces to build the stocking holder. We also made the stockings.
Absolutely love it! Super easy to scale down to our family of three (+one on the end for our dog 😂). It’ll be nice to double as a winter coat drying rack.
Great outdoor seating built with 2x4's
The can good organizers I found on line were metal and didn't fit the exact opening I needed. I built my own for much less than the metal ones (which were $36 each!). With this plan, you can build up to four of the size I made for under $36. See how they just blend into the cabinet and look like they are built in it? Here is the process. Step one: Cut the sides and the ledges. Step two: Attach pieces to the walls of the unit. Step three: Set the lauan onto the ledgers. See? I told you it was easy! I drew up a sketch of the size I used for my 12" opening with a cabinet depth of 11.5" (if you have doors, it will be a depth of 10.5-10.75"). The height of my can good holders are 11". Again, the plan can be adjusted to any size space, but I think if you go past three cans wide, you may want to use something more sturdy than the lauan. Additionally, if you make the unit taller and add shelves, make certain the cans will fit thru the opening, don't just measure with the can in place on the shelf. Cut list for 1 can good holder: 2 - 11"tall x 11.5"deep walls (the melamine is 11.75" deep, I had to trim mine down) If your doors are on your cabinets, your cuts will probably be between 10.5" and 10.75" 6 - 1x2" 10.5" strips 2 - 10.5x10.75" lauan cut for the shelf If your doors are on your cabinets, your cuts will probably by between 9.75" and 10" I used 1.25" finish nails, but you can use screws if you prefer. Wood glue, wood filler, etc. Cut 6 equal size 1x2 strips. 2 per ledge, one for the back support. The size of the opening subtract the width of the melamine walls (.75x2=1.5"). My opening was 12" and then I subtracted the 1.5" (for walls). Nail the bottom 1x2 to the end of the upright 1x2 as shown above to create the front ledge. Flip the ledge over and attach the ledge to the front (finished) edge of the melamine. Make sure the bottom ledge is flush with the front and the bottom of the wall. Measure down 5.5" (halfway point) from the top and mark the edge of the wall. Attach the top ledge to the wall keeping the front of the ledge flush with the side wall front edge. Find your center point again (5.5") and measure up toward the top .75" to create a bit of a roll for the cans to come forward when you remove one. Do the same for the bottom. Measure .75 up from the bottom and mark. Attach the back supports at the marks you made in the last step. Attach second wall and screw or nail supports and ledges. Once all the 1x2s are in place and secure, the lauan pieces will fit in place and stay with the weight of the cans. You can add glue to secure them, your preference. Then touch up the nail holes and slide into place. I hope this gave you a helpful way to store your can goods. Let me know if you have any questions. Happy building! Karen :)
Comments
nancy
Tue, 03/13/2012 - 21:02
Wow
Simply gorgeous! Did you use any poly on the table top? The finish is amazing. Thanks for sharing. Now I want to make one too!!
kristilmay
Tue, 03/13/2012 - 21:32
Yes
Sorry! I just realized I didn't put that. I used Minwax Polycrylic. Thank you for your compliments!
Cindy from Indiana (not verified)
Wed, 03/14/2012 - 10:00
Gorgeous! Gorgeous! Gorgeous!
I think the title of my response says it all. ;-)
They really turned out beautifully. Great job!