Community Brag Posts
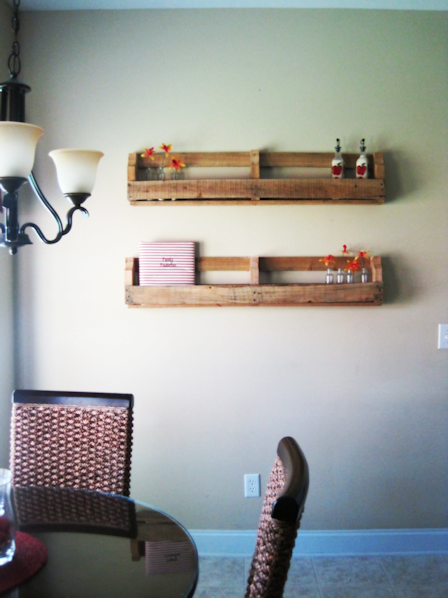
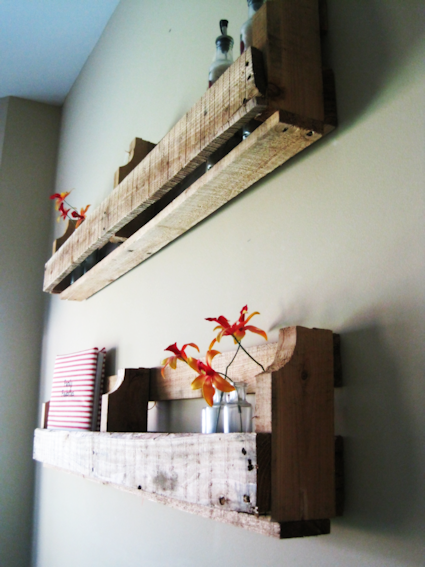
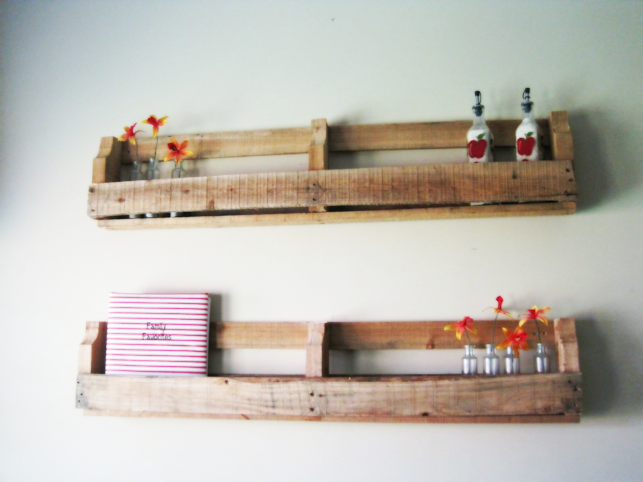
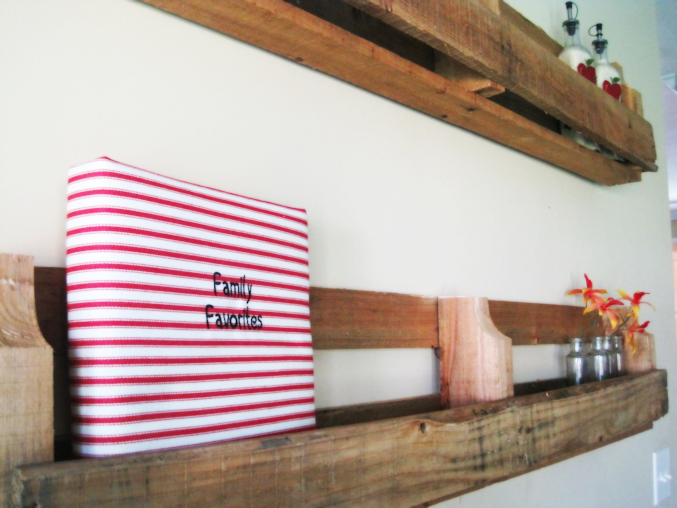
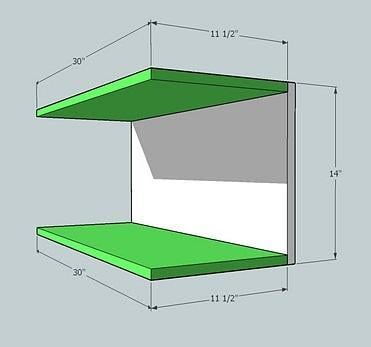
Country Pallet Shelves
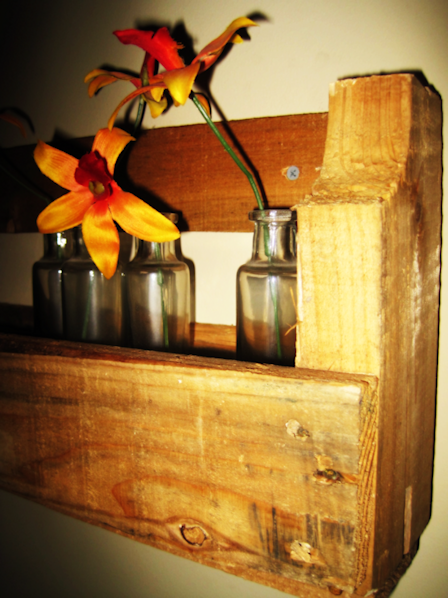
Love these shelves.... Best part about them is they were completely free but add such a great country feel to my country style kitchen...
Built from Plan(s)
Estimated Cost
$0.00
Estimated Time Investment
An Hour or Two (0-2 Hours)
Finish Used
None... best part about the character.
Recommended Skill Level
Starter Project
Comments
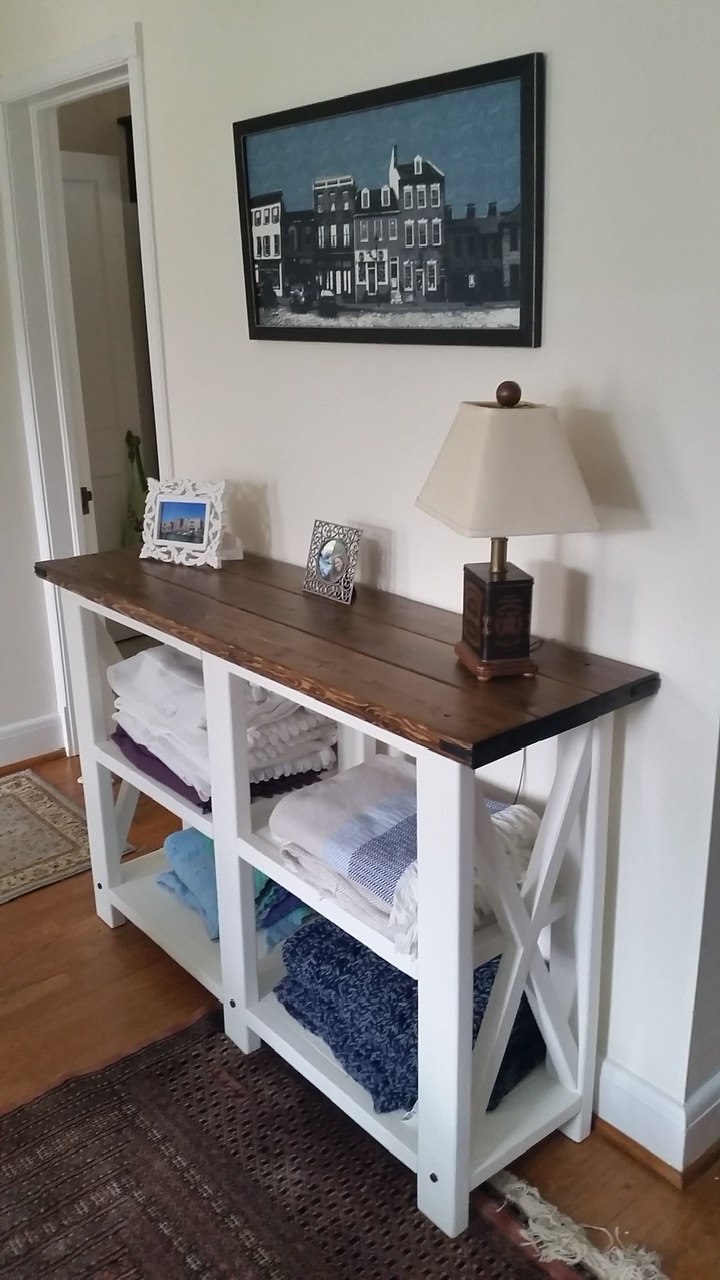
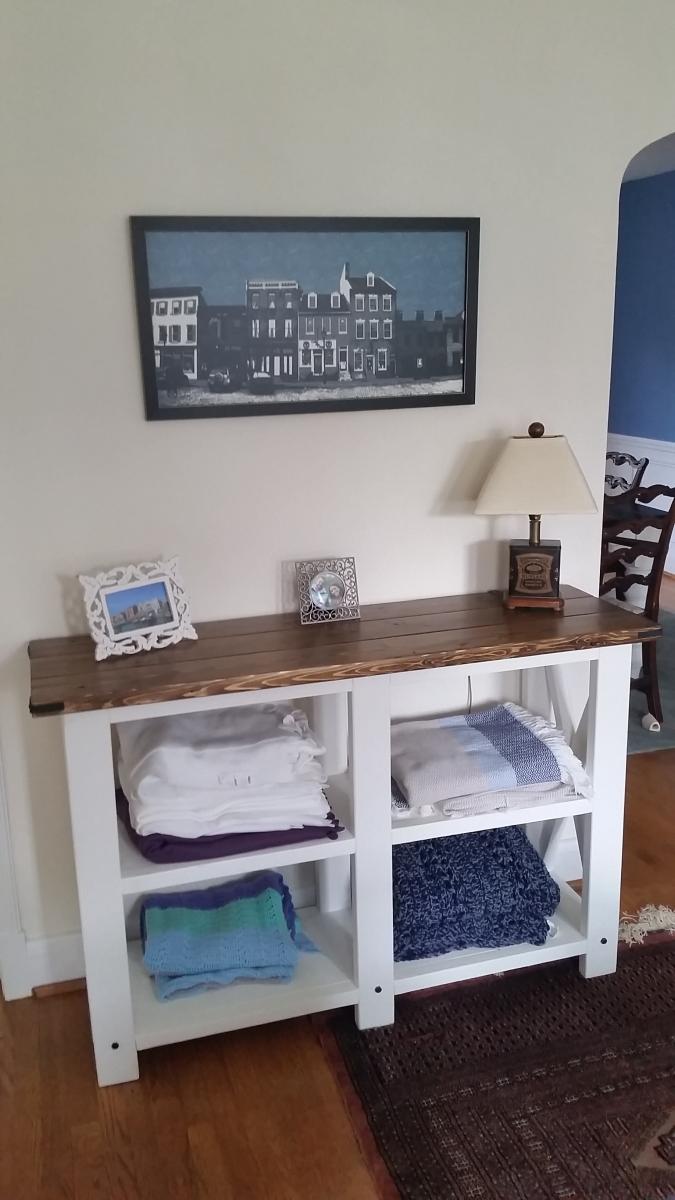
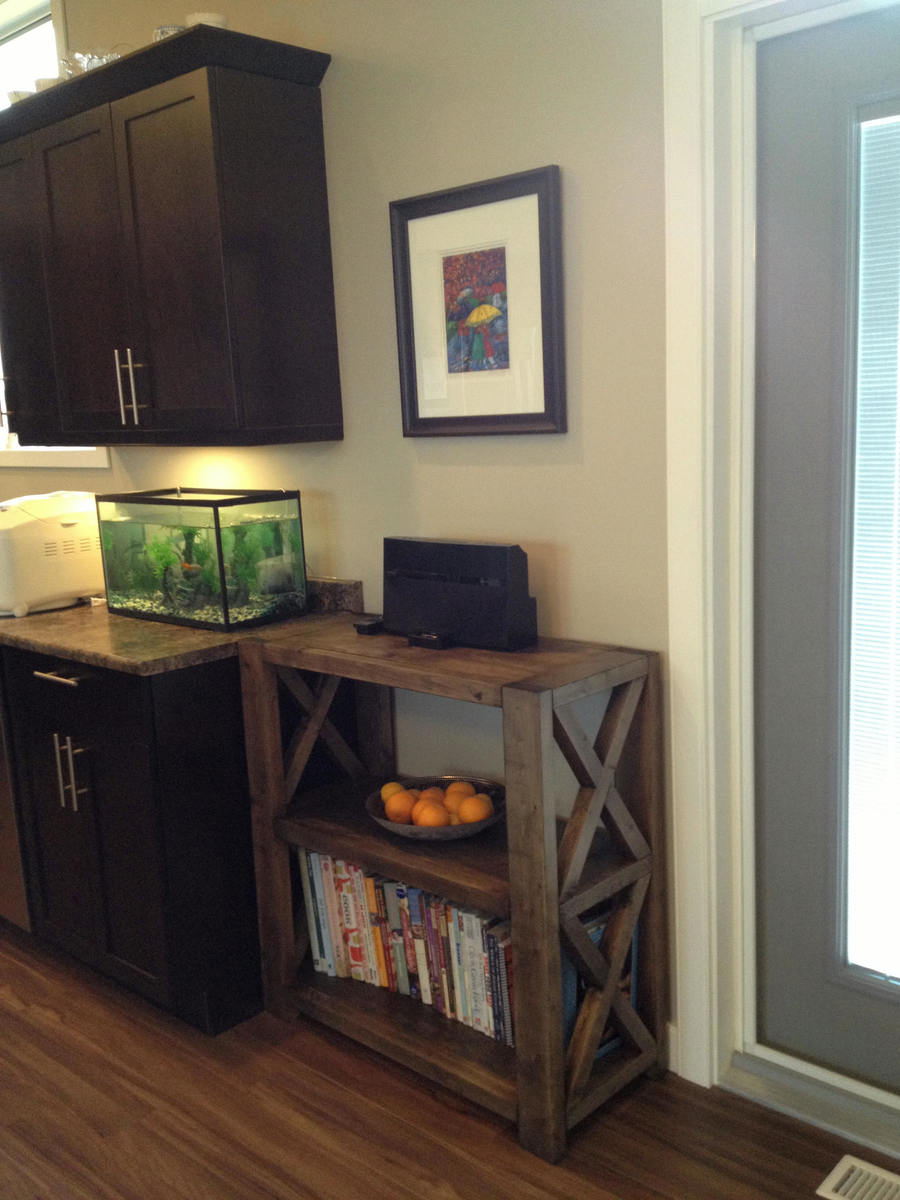
Rustic X Bookshelf--Short
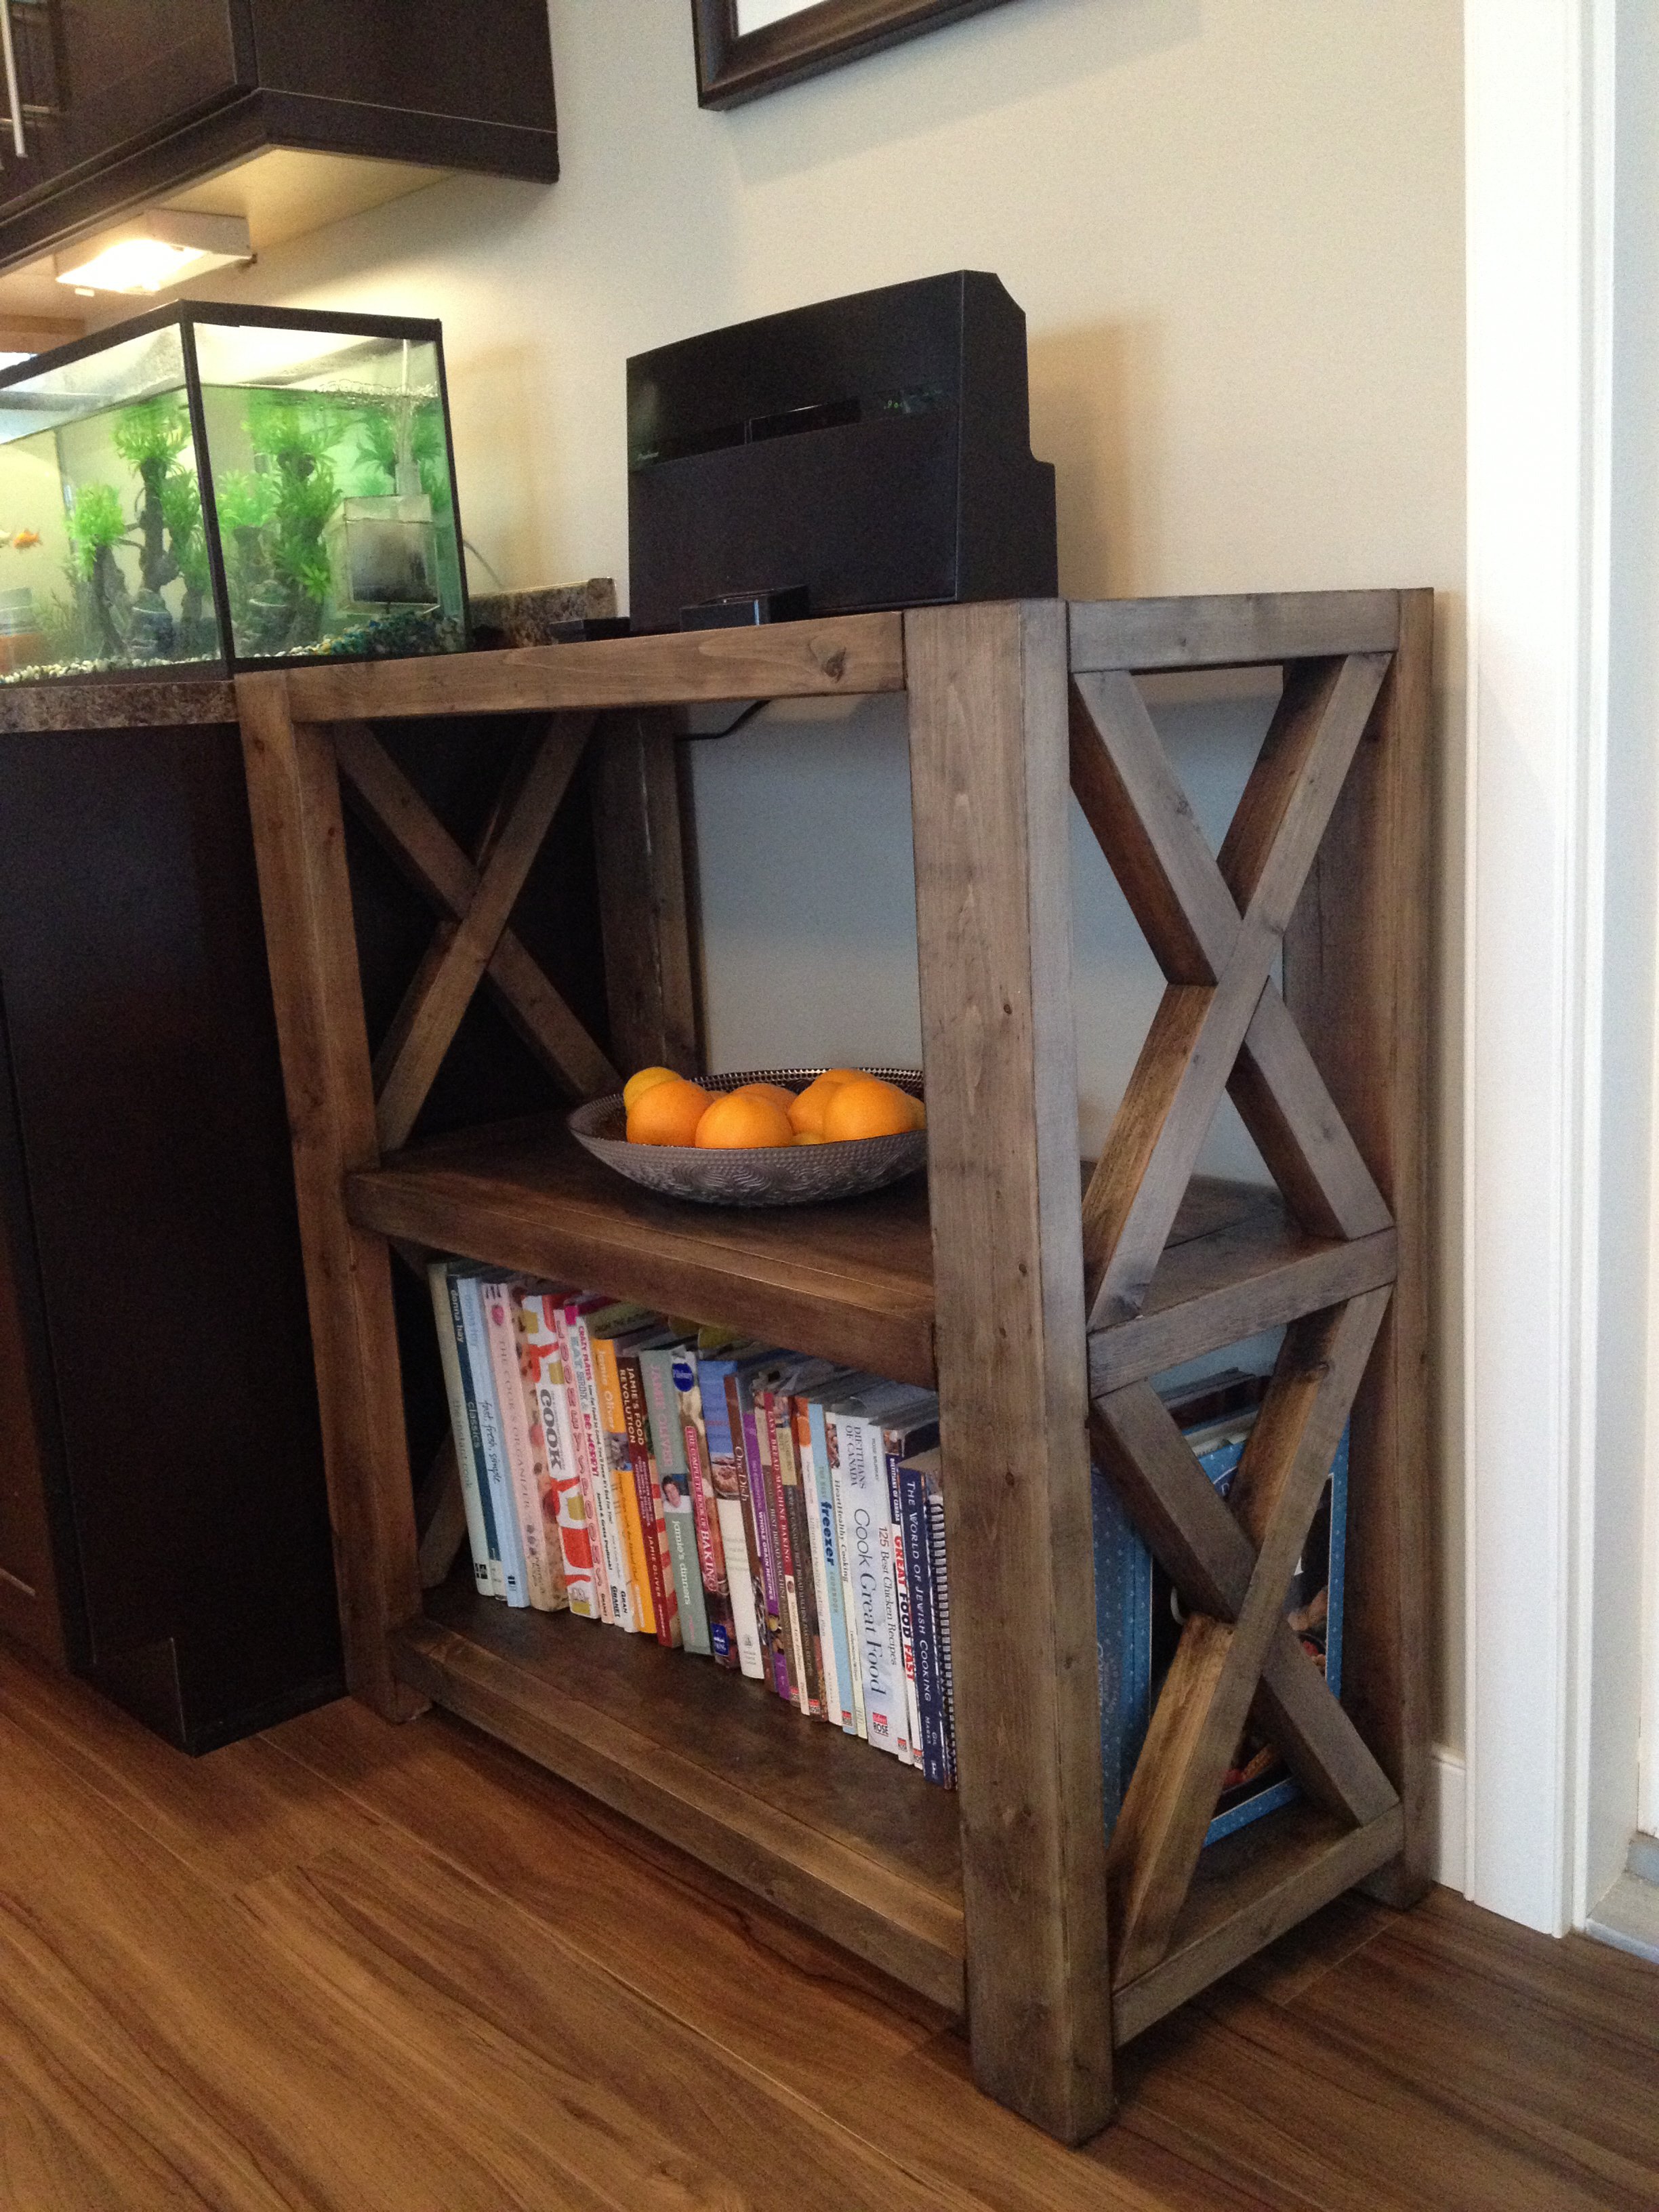
I've loved the Rustic X series from the first plan (the console table) but none of them were things I needed for my home. So when I saw the Rustic X Tall Bookshelf I was thrilled since I have been needing a cookbook shelf in my kitchen, and had been trying to design my own using some form of the X construction. I still needed to customize it, but it was much easier to do from the existing plan. I made it half the height since I wanted it to be flush with my counter, and also wanted it narrower. I had leftover 1 x 12s from another project so I used those, and decided to make two Xs instead of one because of the narrower width. I cut the X's to fit, and used wood glue and 2" nails to secure them from the bottom. Perfect fit for my space!
Built from Plan(s)
Estimated Cost
$25 in new wood, plus leftovers for shelves
Estimated Time Investment
Weekend Project (10-20 Hours)
Finish Used
I used a technique for oxidizing wood which I read about at The Friendly Home. Hillary does a great detailed tutorial (http://thefriendlyhome.blogspot.ca/2012/07/how-to-oxidize-wood.html) on how to use tea, vinegar and steel wool to give new wood an aged weathered look. Cheap and beautiful! I will absolutely do it again! But it was a bit lighter than I wanted, so I used Minwax Polyshades in Tudor to darken them up and seal the wood.
Recommended Skill Level
Beginner
Comments
Sun, 12/22/2019 - 18:07
What is the cut list for…
What is the cut list for this modified, shorter version?
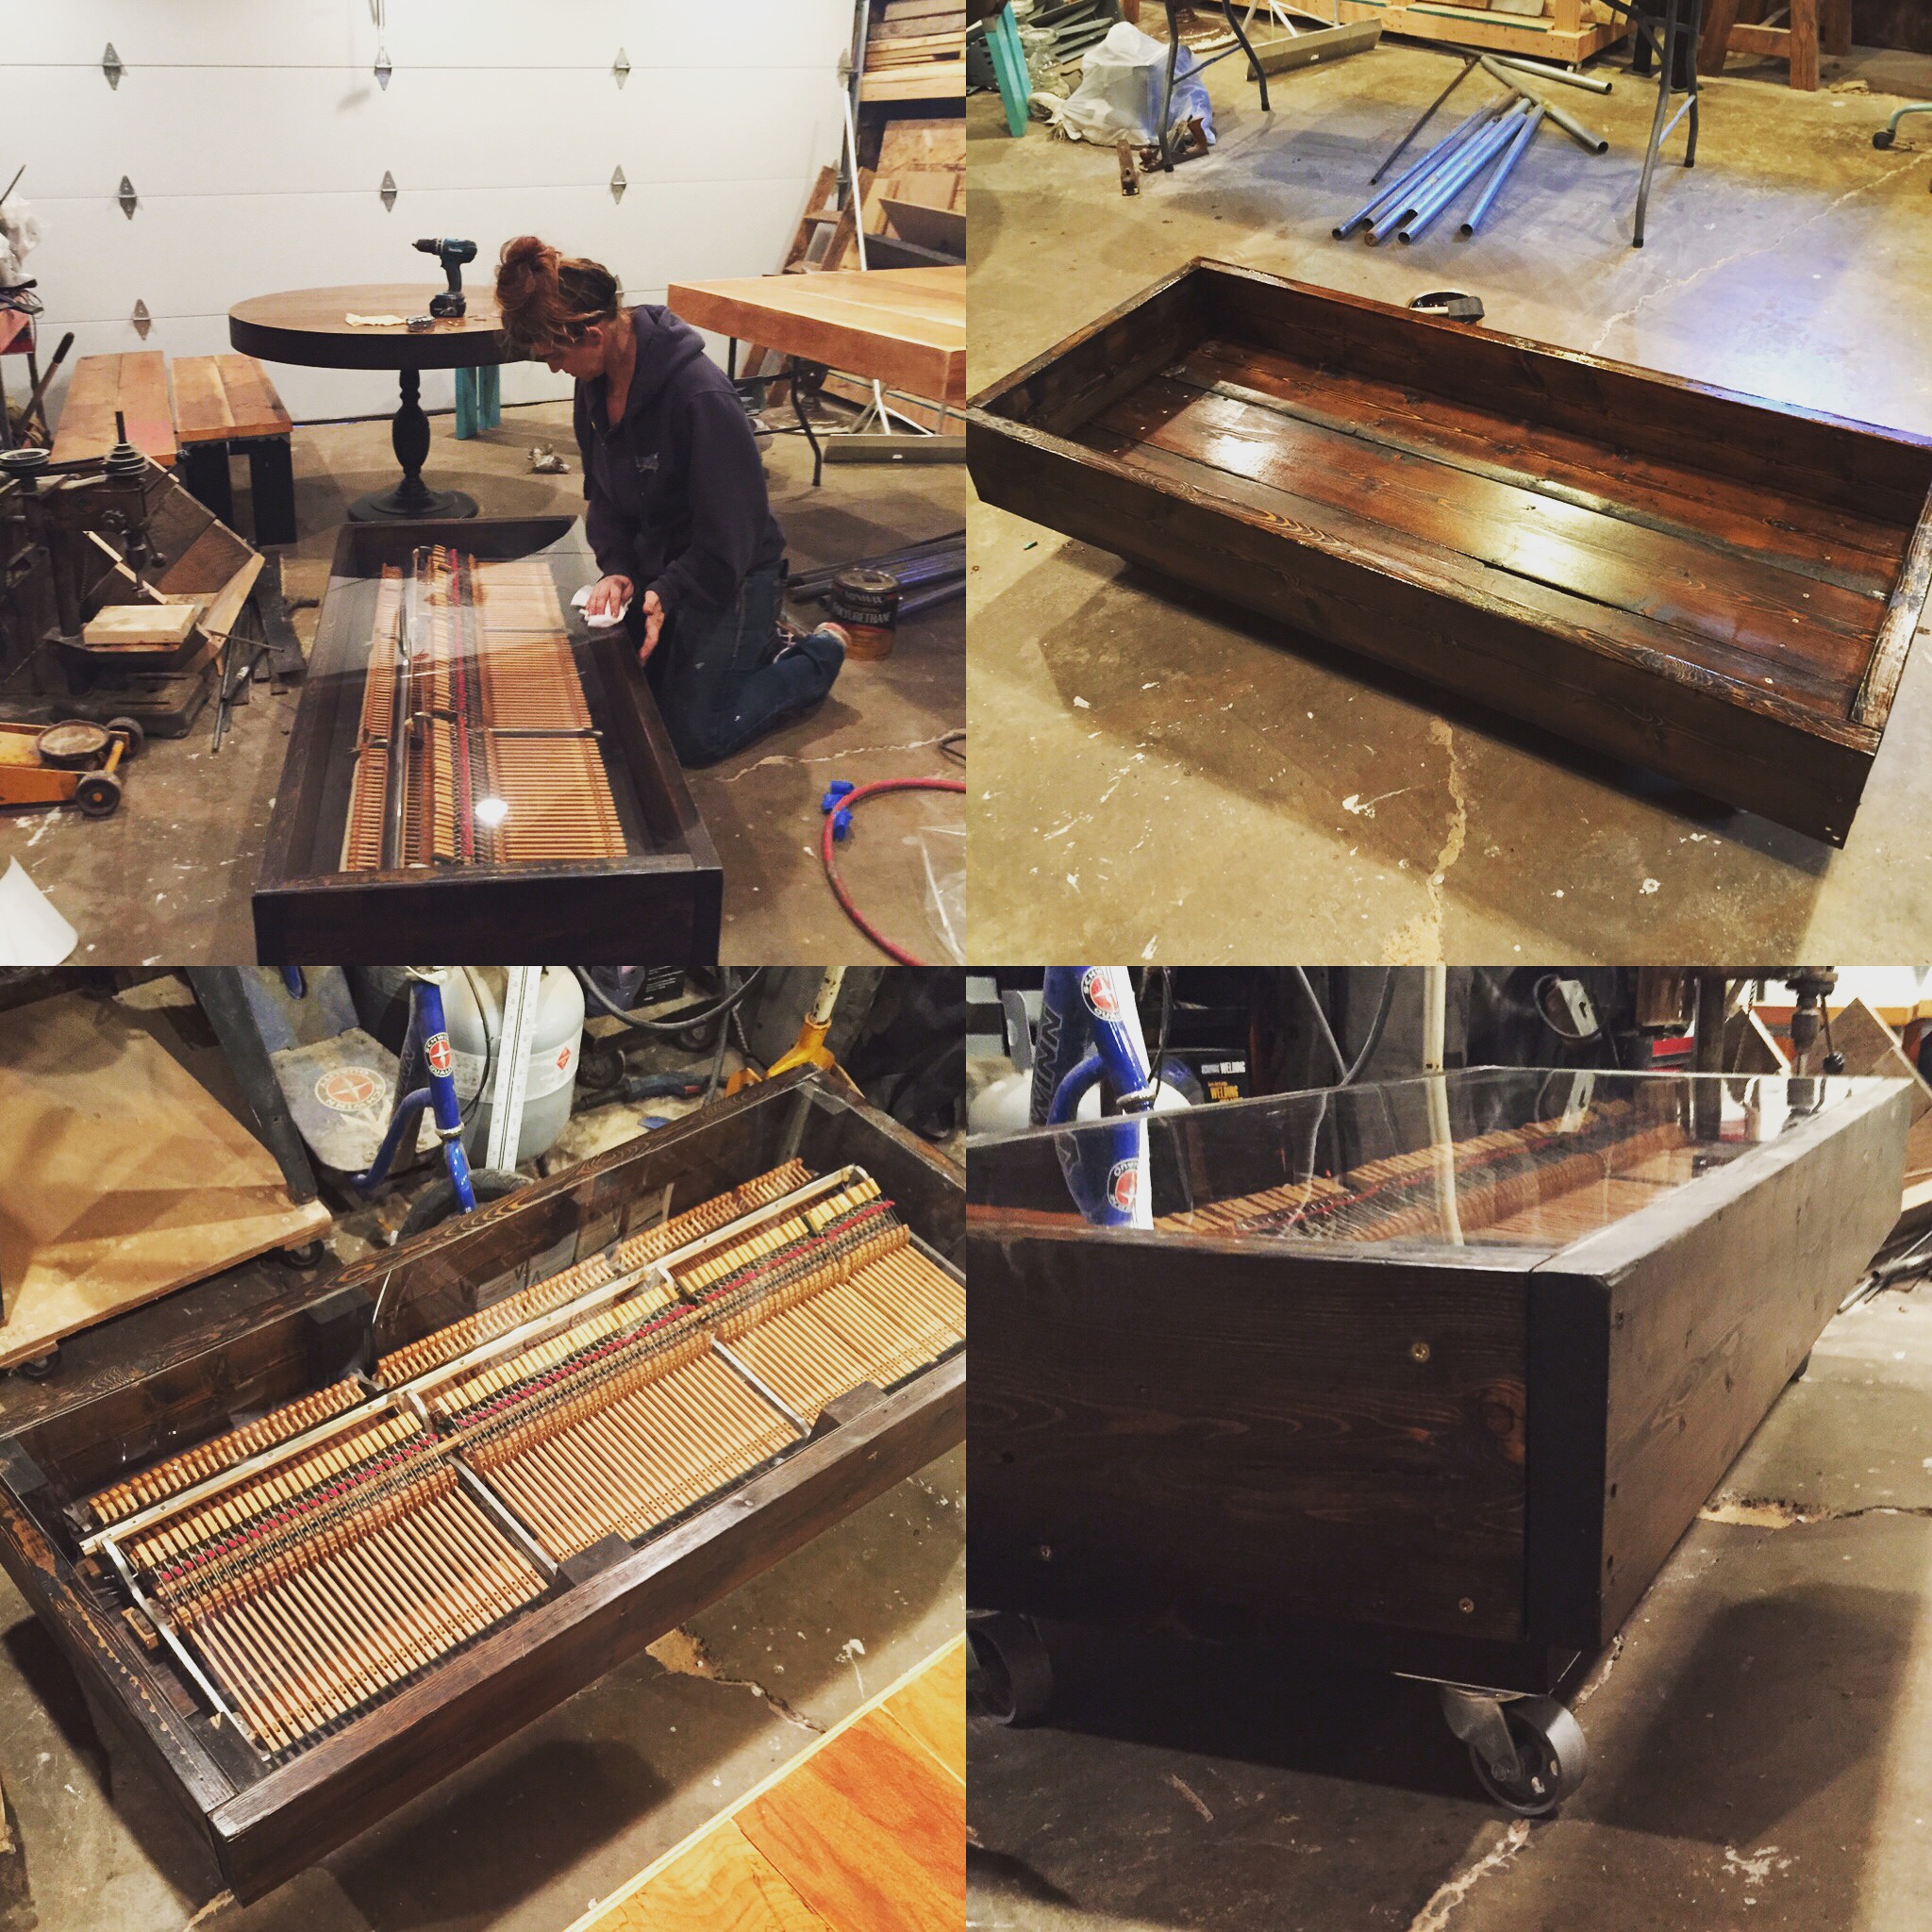
Re-purposed Piano Coffee Table
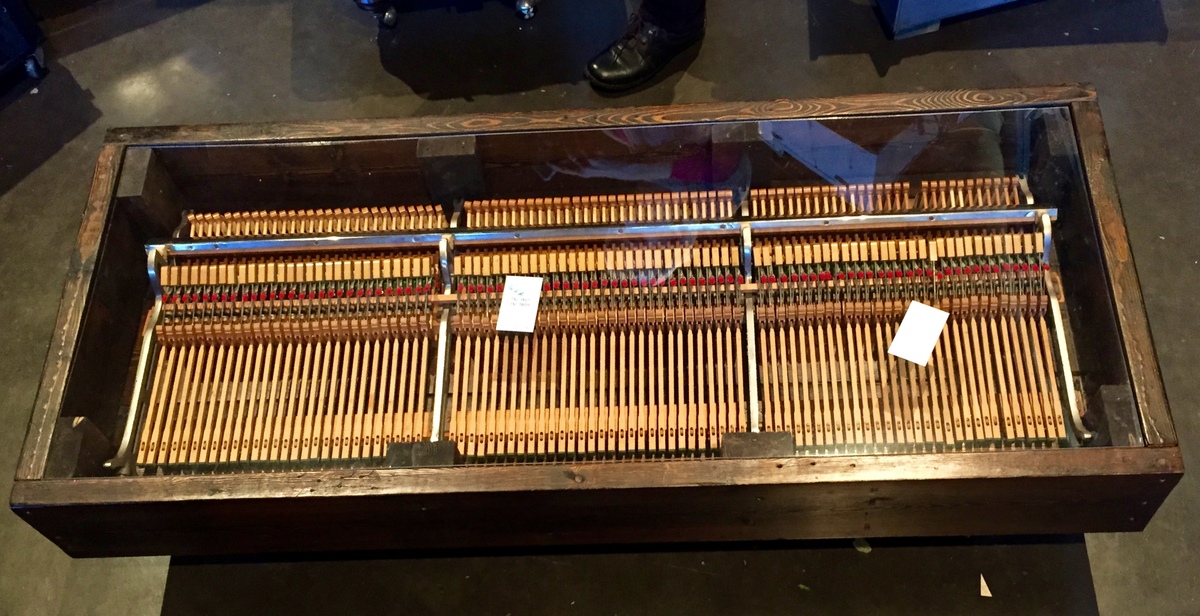
I inherited the guts of a piano, and just had to make them into something funtional. I am a musician, and these piano hammers were great inspiration for my next build. I made a box out of 2x8s, braced them with 4x4's (which also added height) and attached some metal 2 1/2 in casters. I set the hammers inside the box, and topped it off with plexiglass. A functional work of art to be enjoyed for generations!
Built from Plan(s)
Estimated Cost
$150
Estimated Time Investment
Day Project (6-9 Hours)
Finish Used
Stain and Poly
Recommended Skill Level
Intermediate
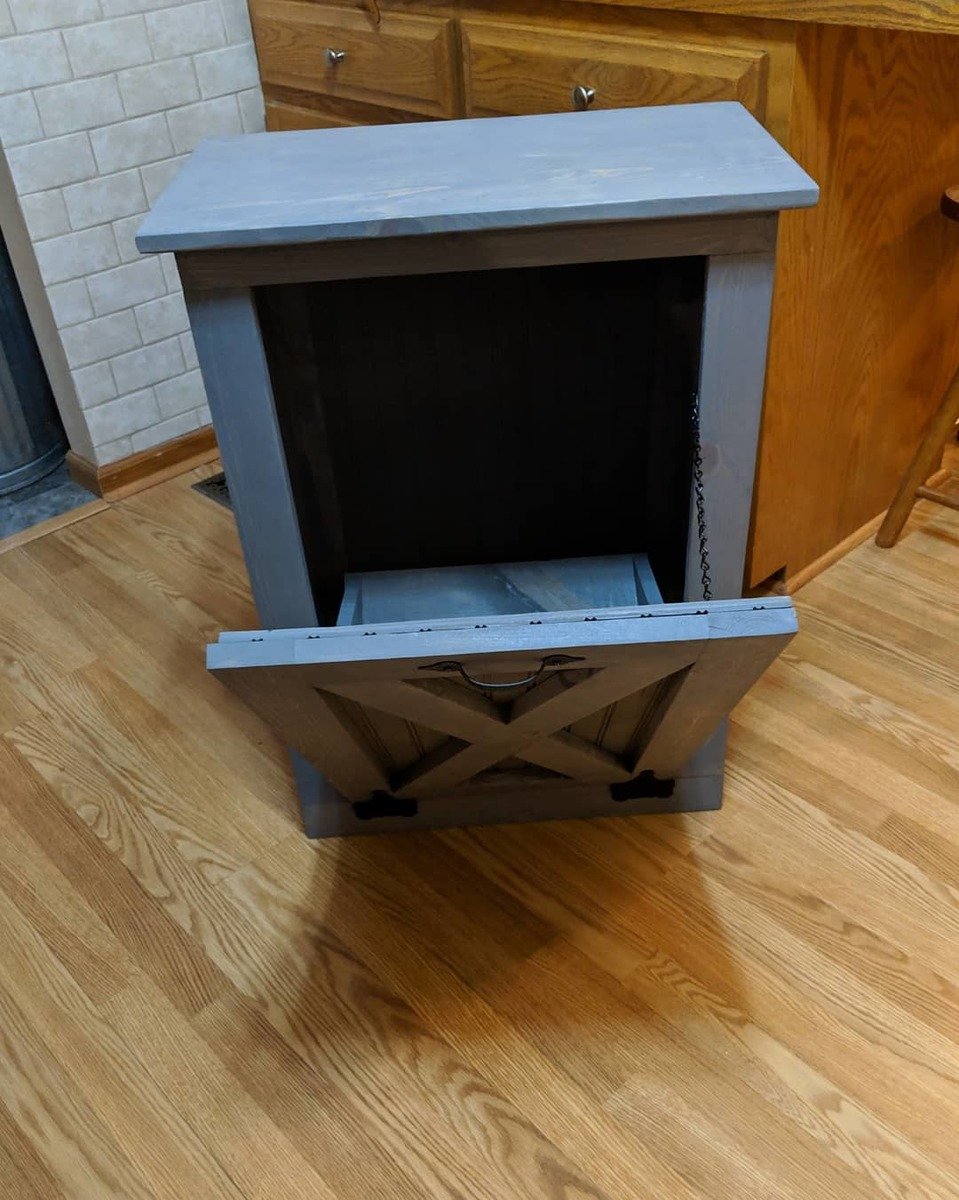
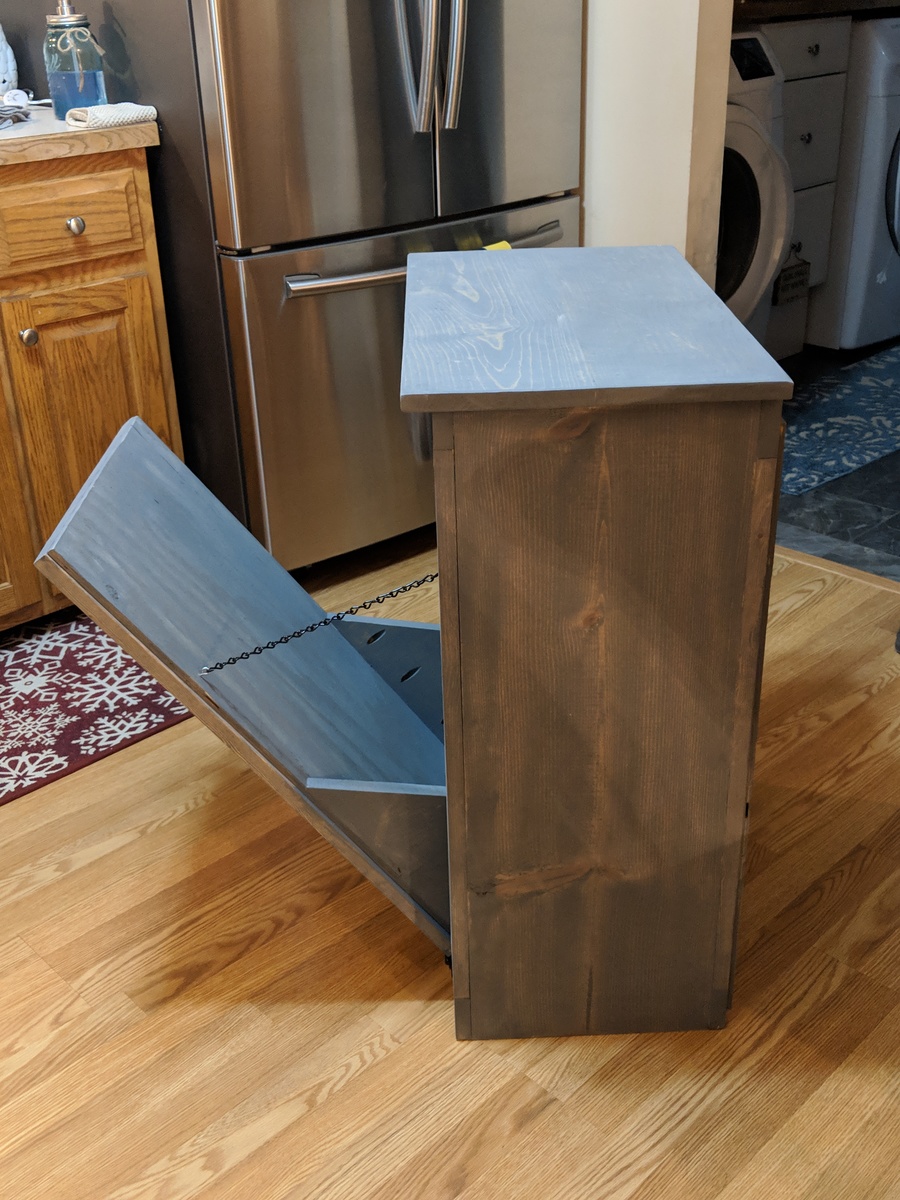
Tilt out trashcan, slight modification.
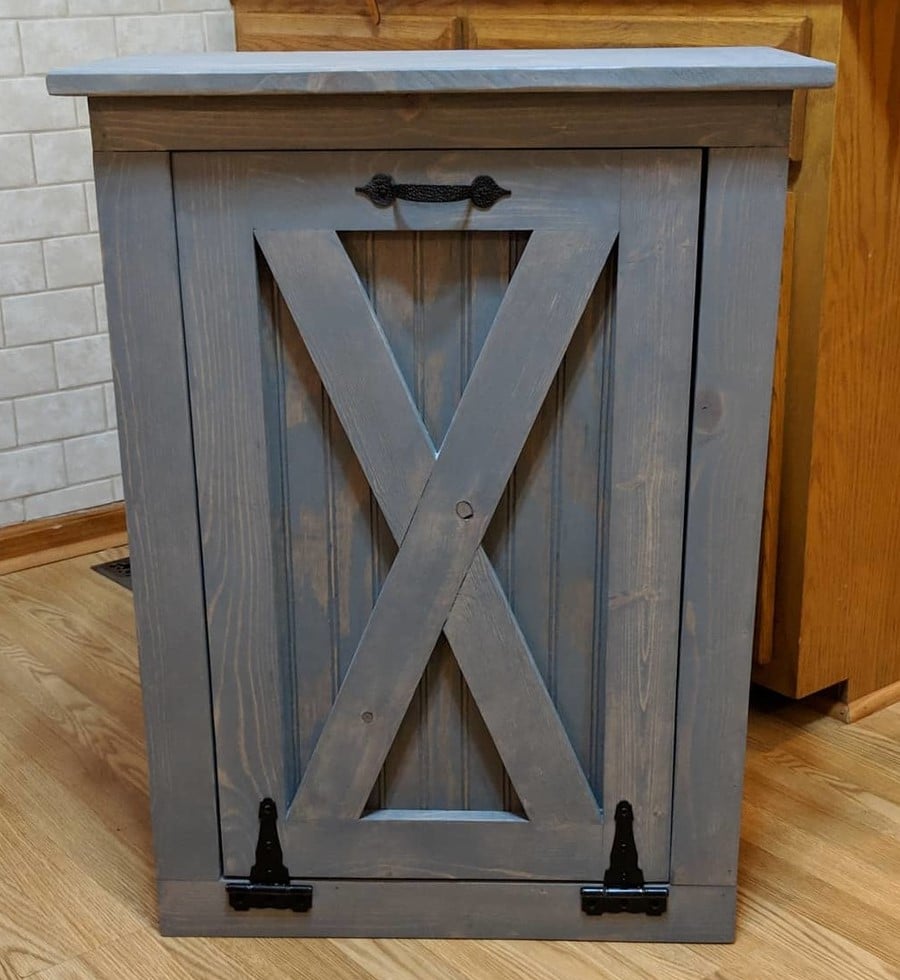
Made it a little taller and a little deeper.
Built from Plan(s)
Estimated Cost
$75.00
Estimated Time Investment
Afternoon Project (3-6 Hours)
Finish Used
Varathane worn grey.
Recommended Skill Level
Intermediate
All treated wood
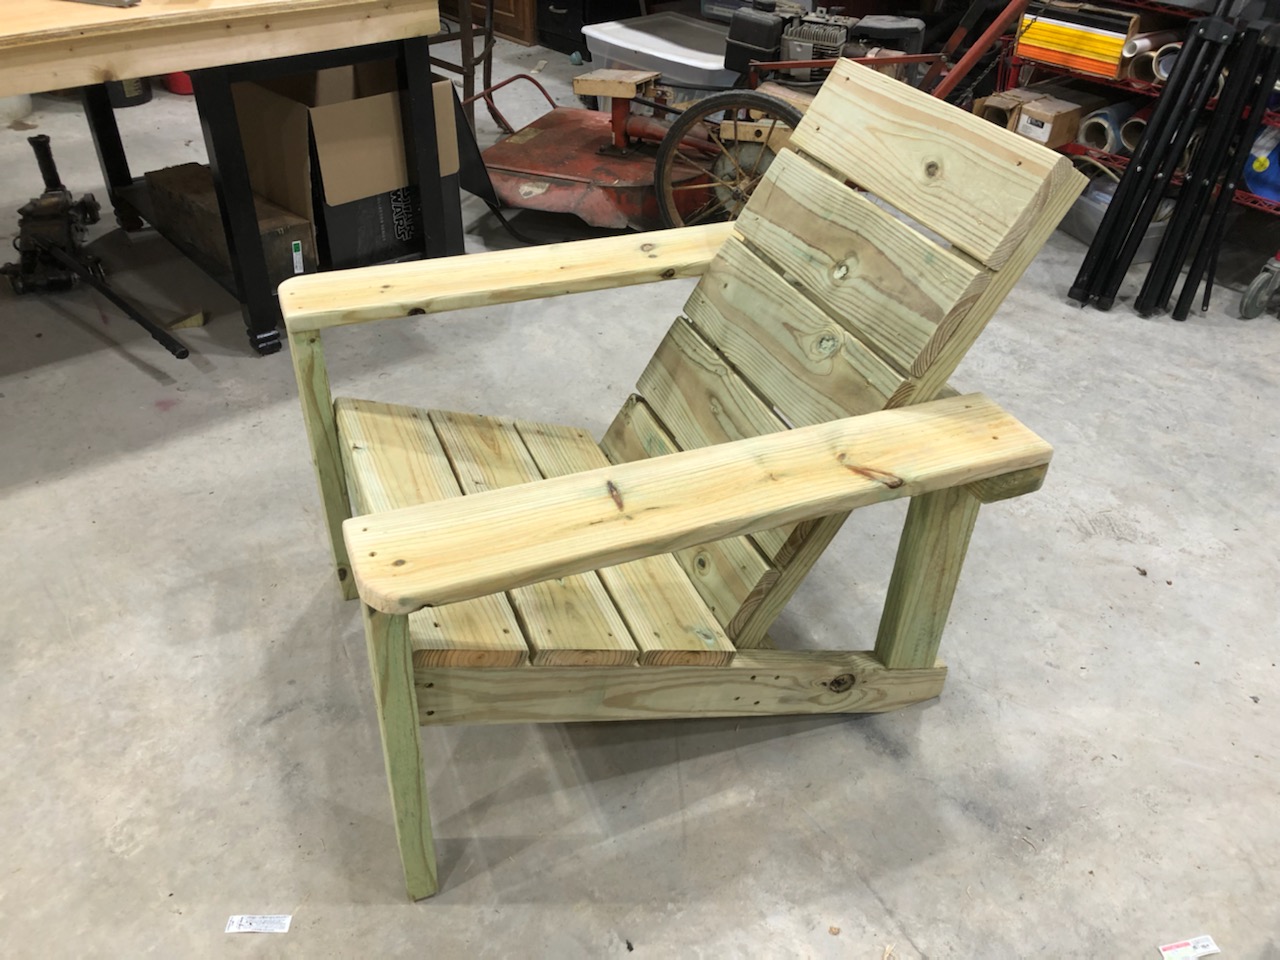
I made a slight modification using 5/4 x 6 deck boards instead of 1x10's. I also added some additional bracing to the backs of the arms. Love these chairs!
Comments
Elementary Upgrade
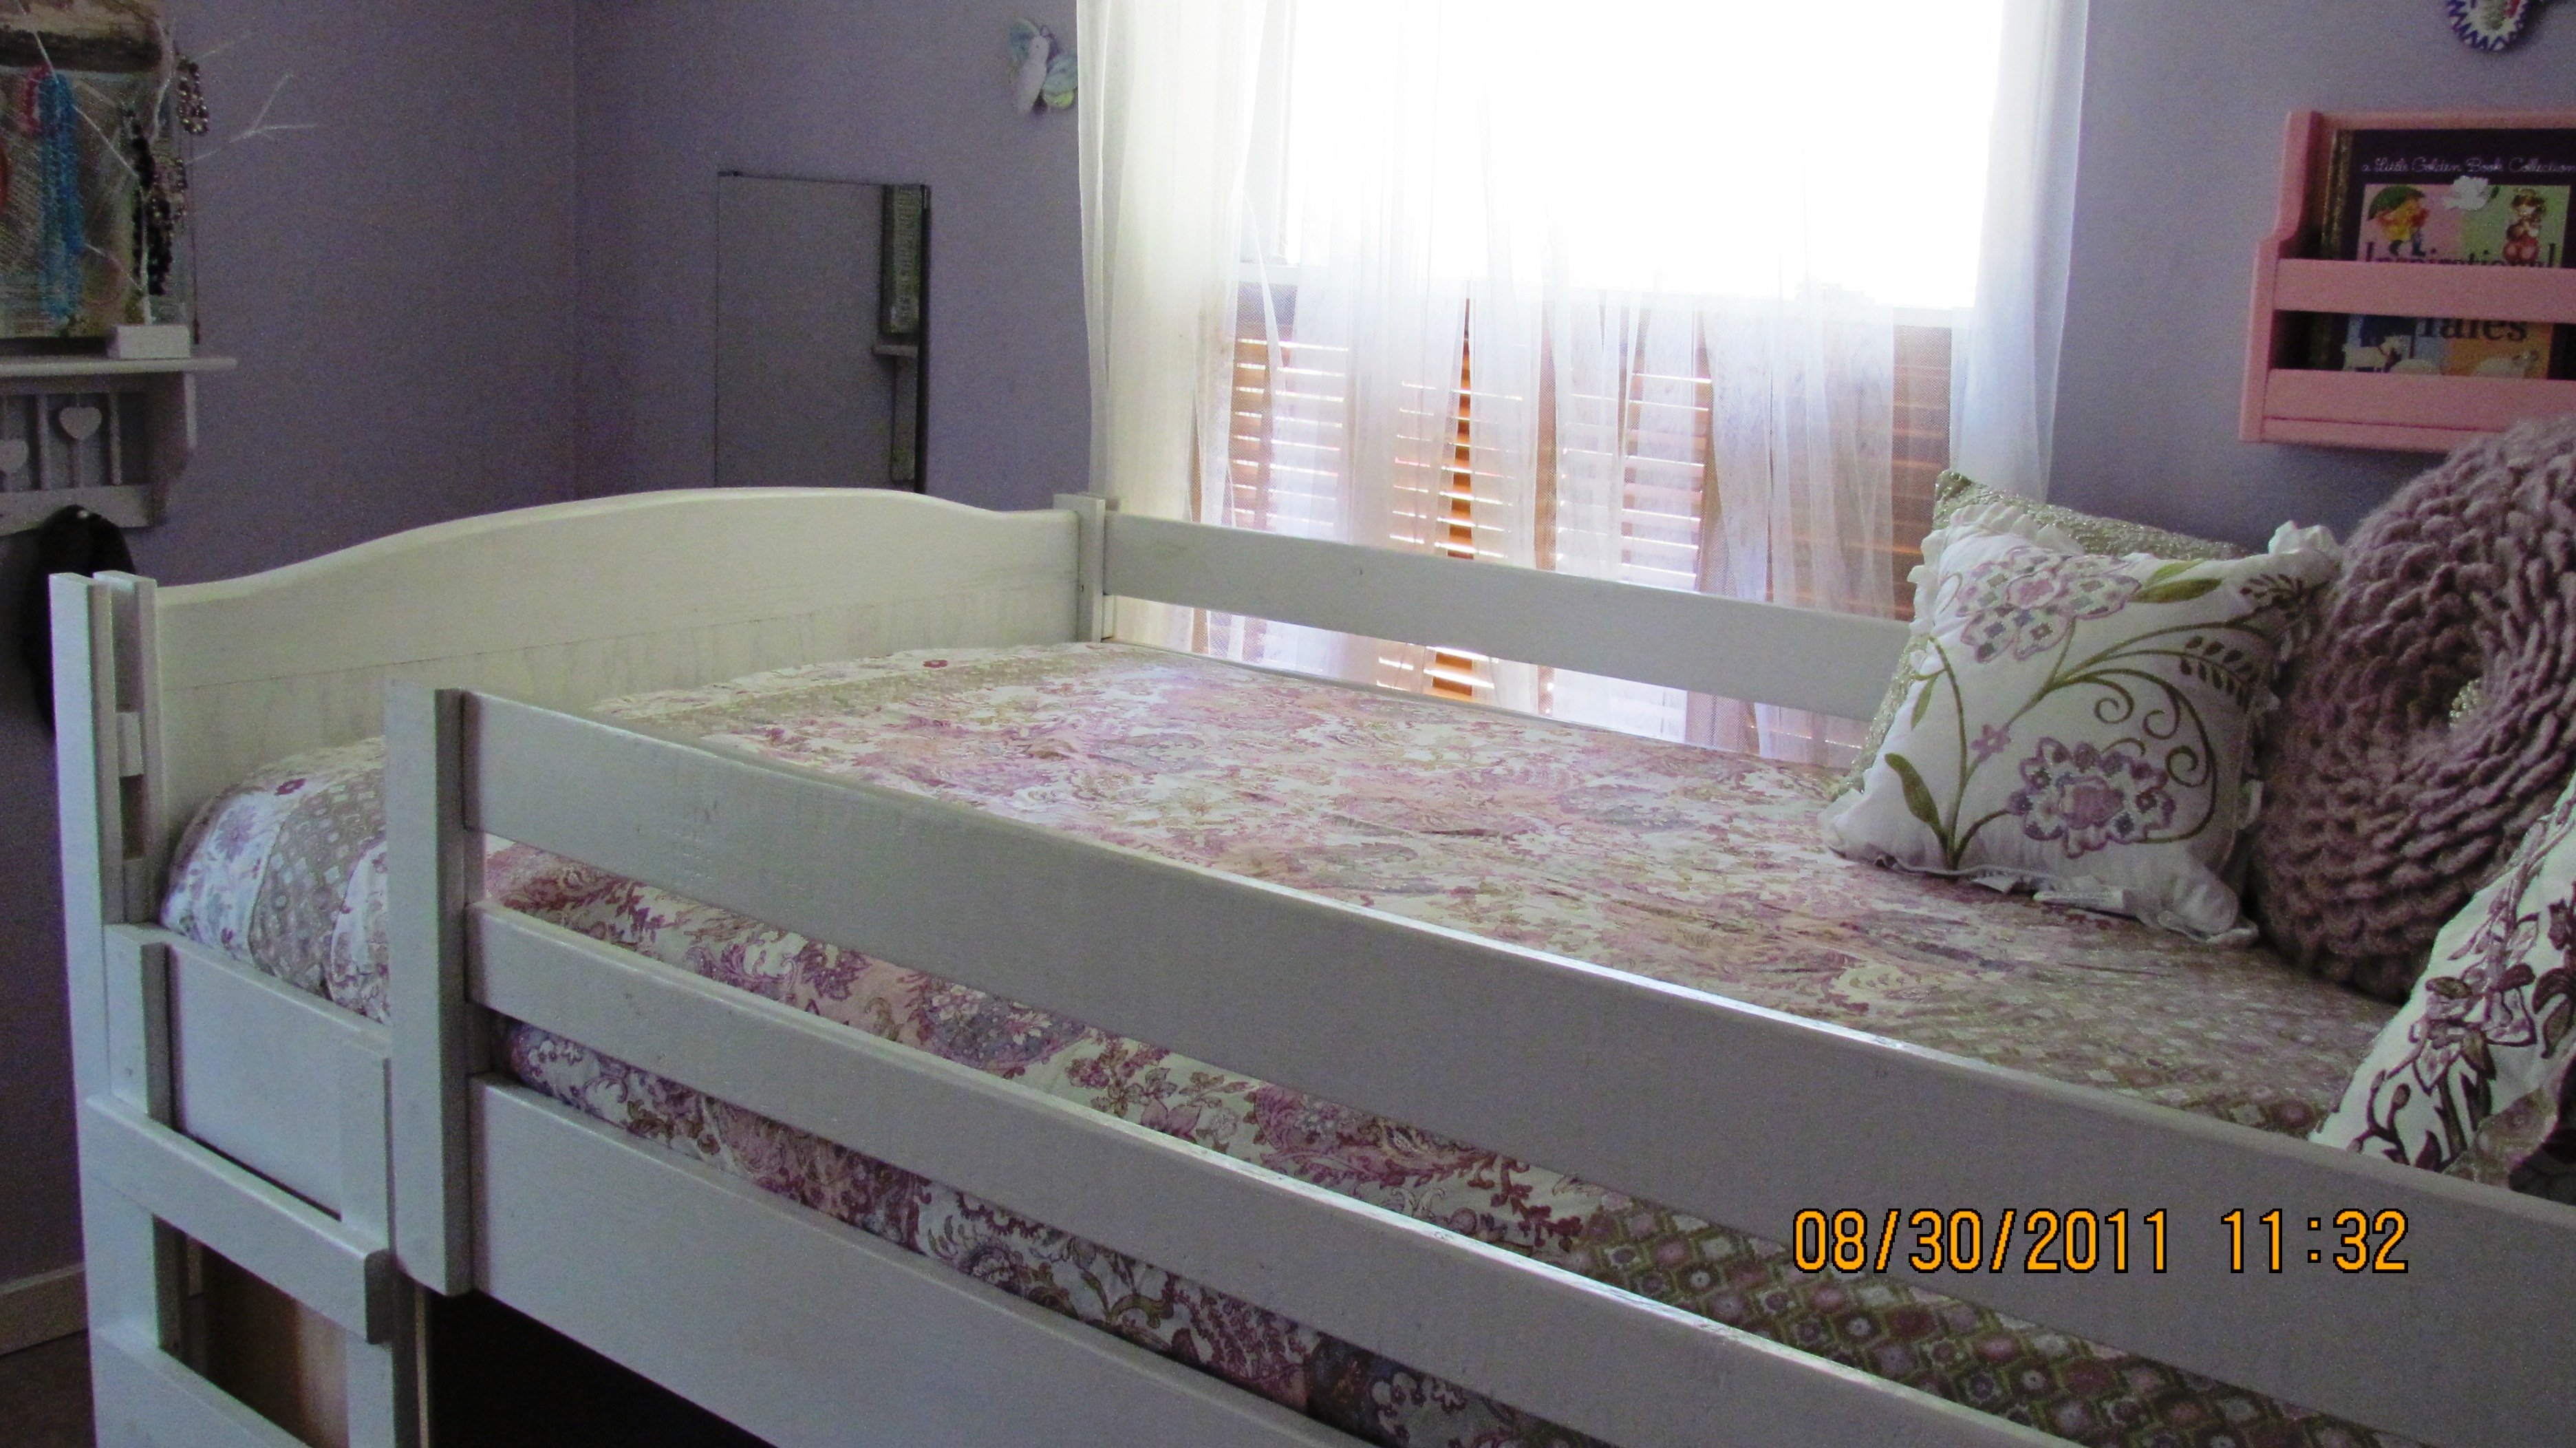
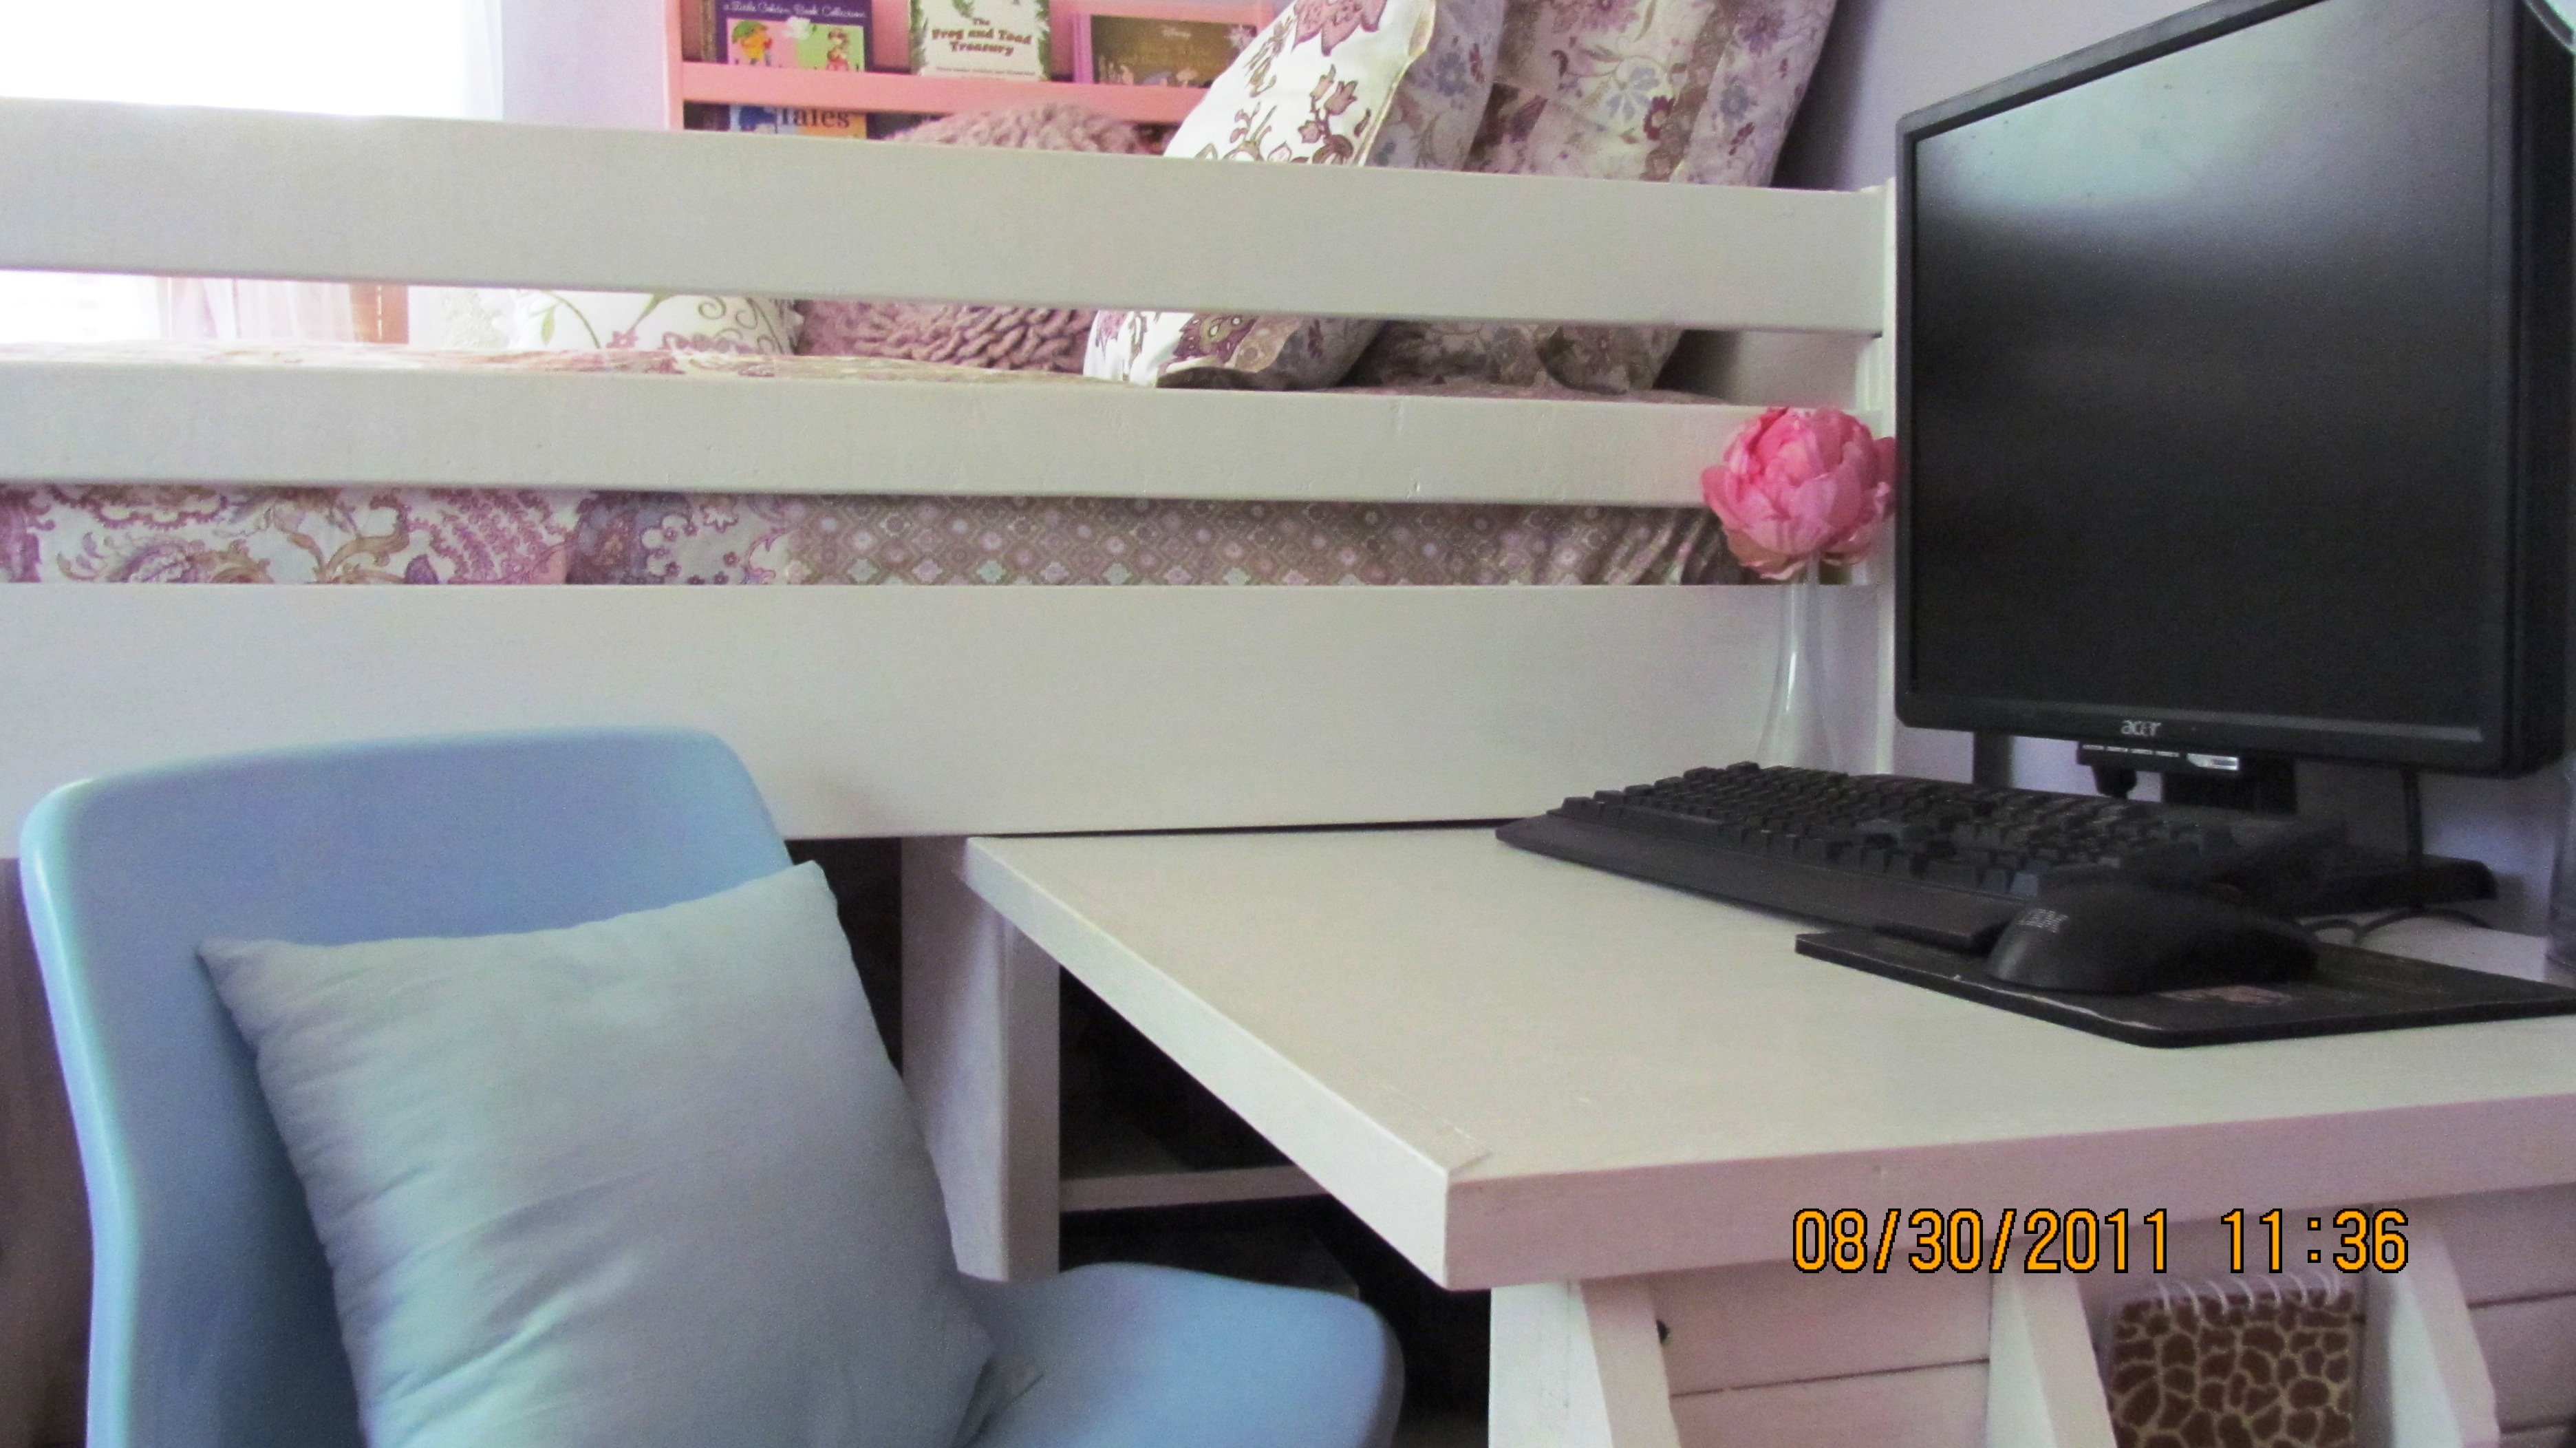
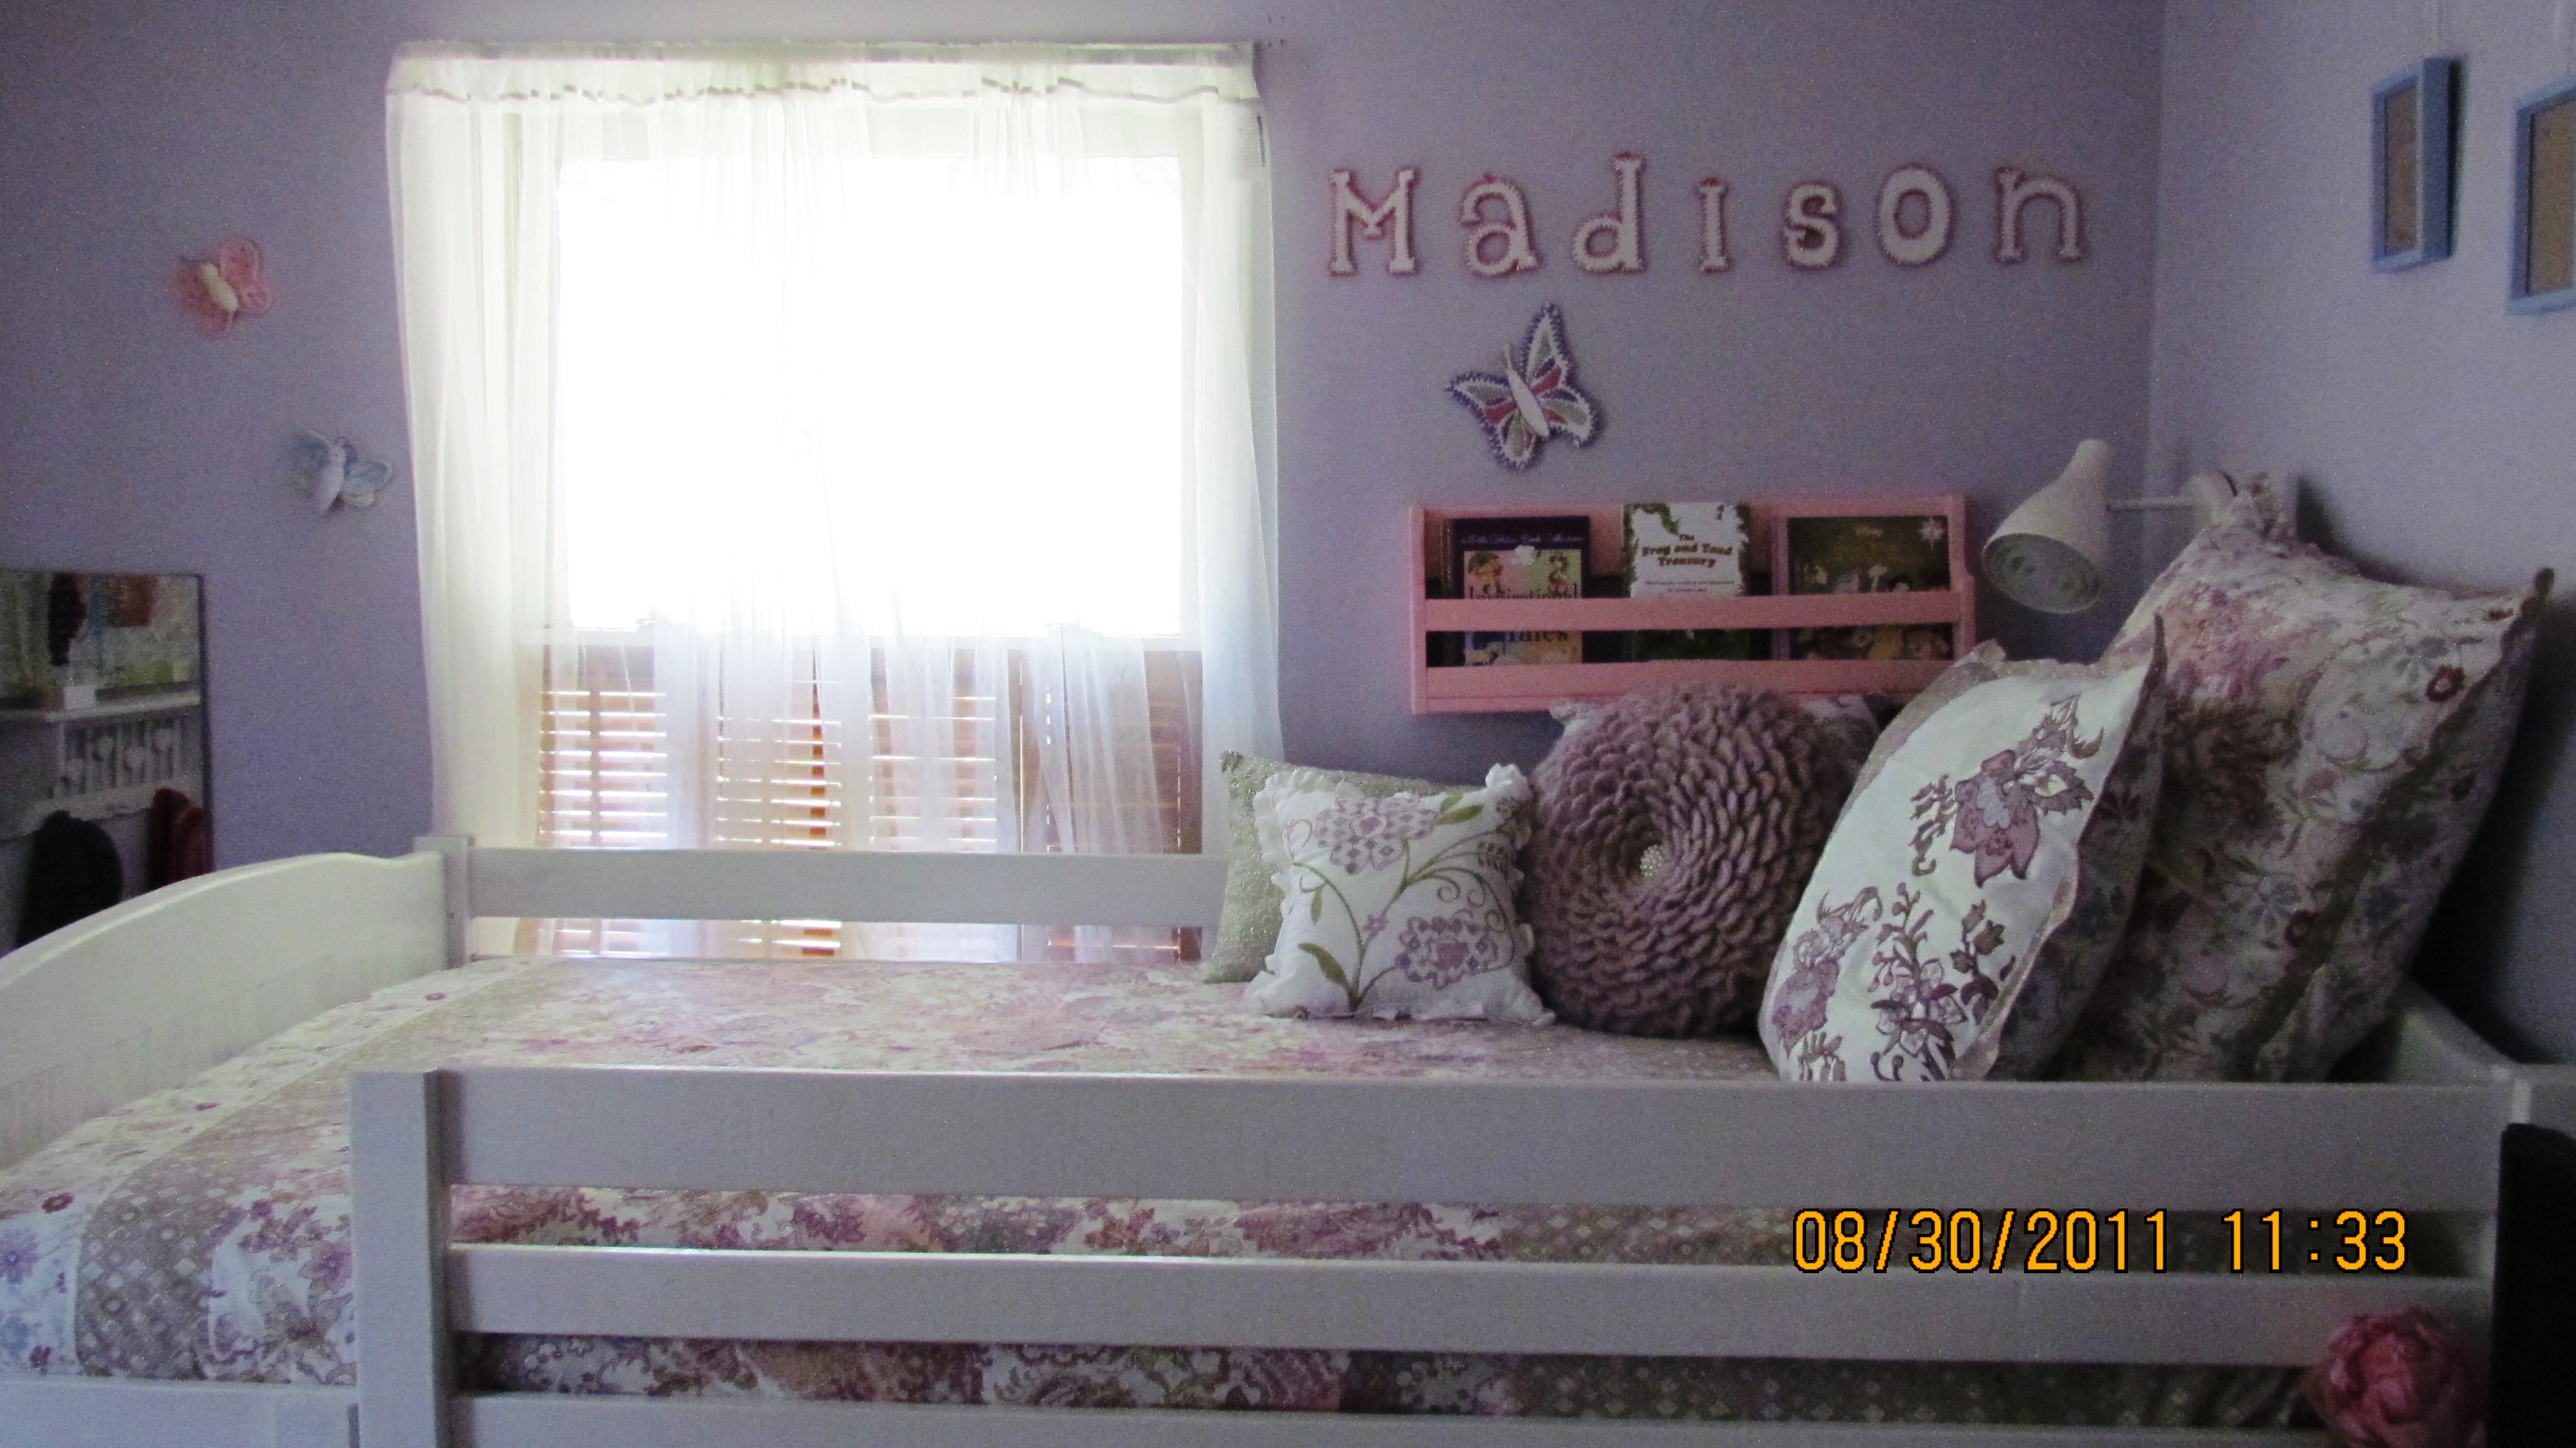
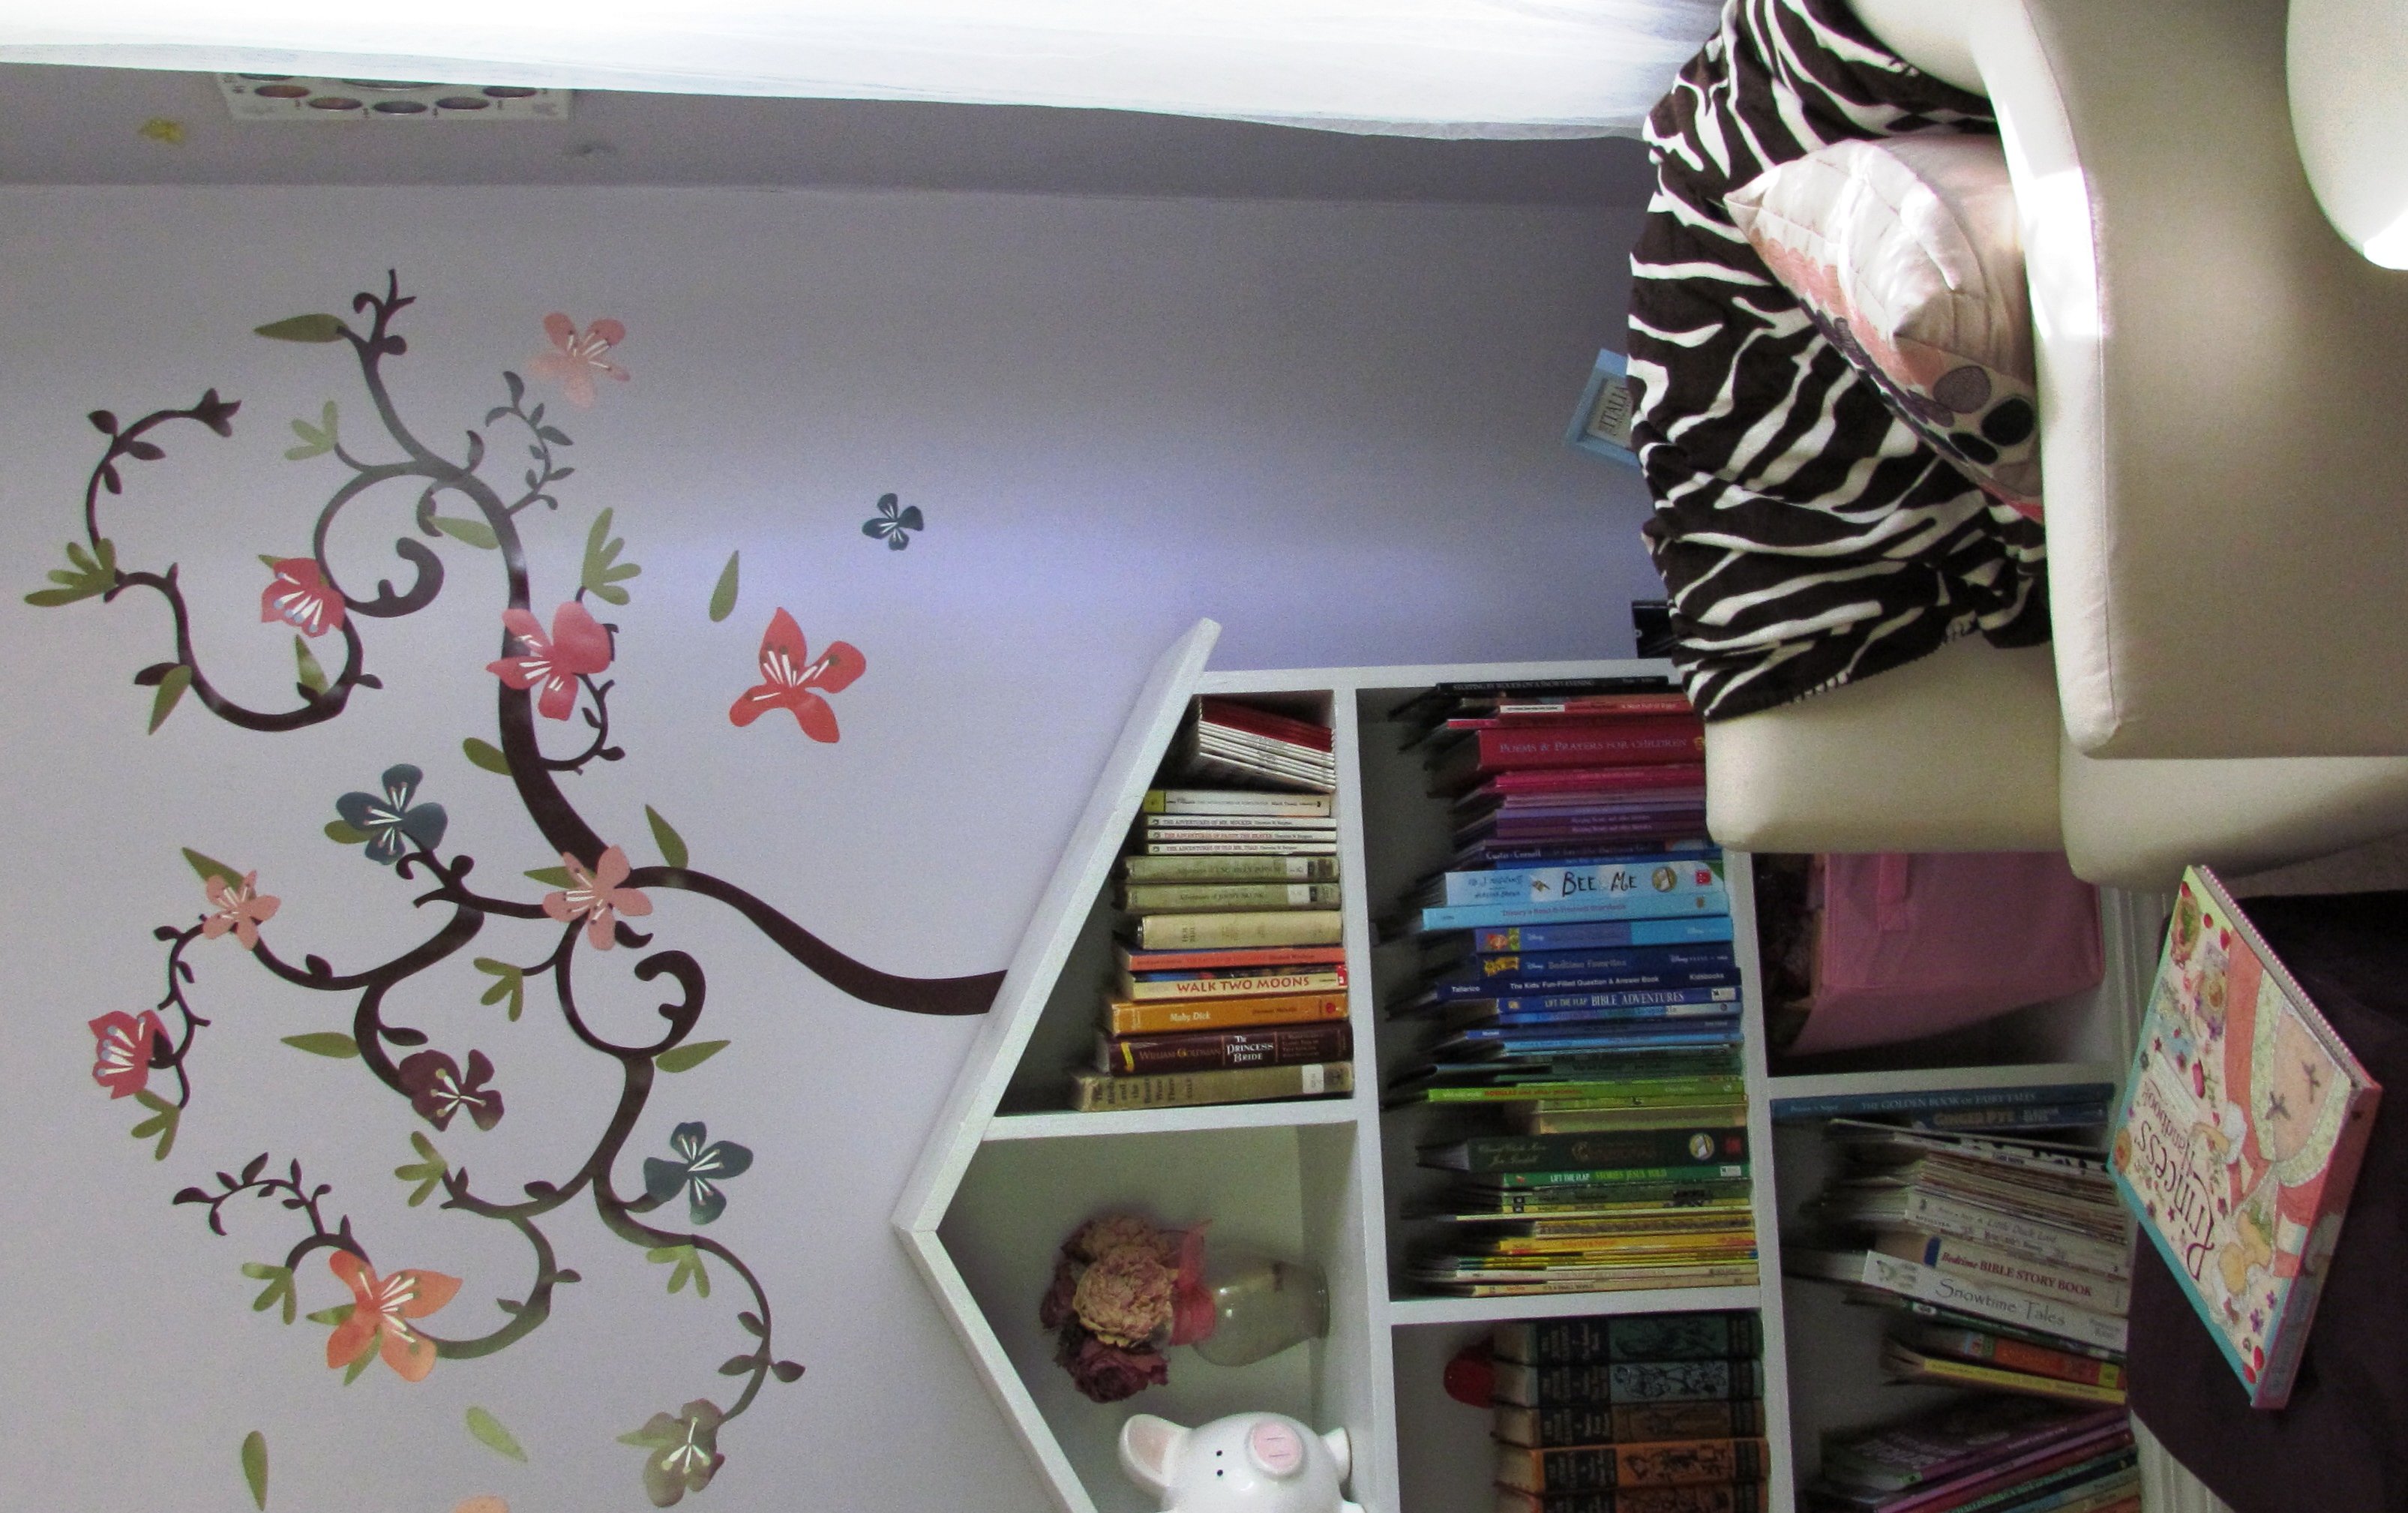
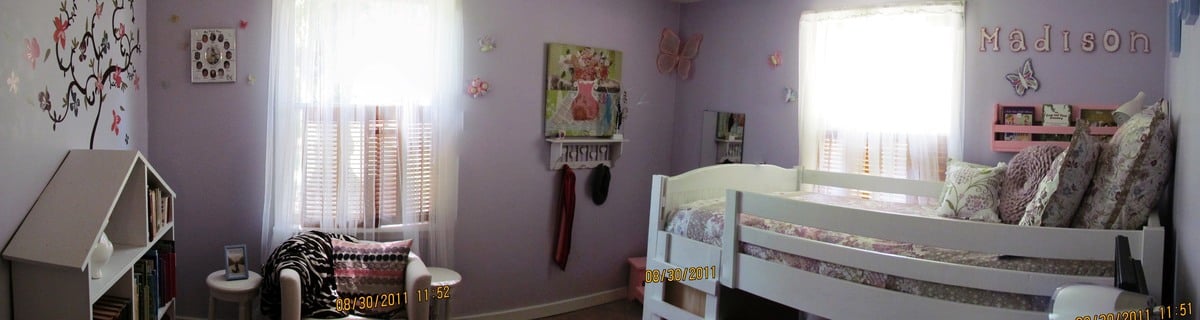
To celebrate my daughter beginning Kindergarten, I built her a school-appropriate bedroom. Inspired by the Junior Loft Bed on the Walmart.com website, I modified Ana's Chelsea Bunk plan by changing the height and adding a built-in desk unit. The bed is 27.5" from the floor to the bottom of the siderail and has an overall height of 43". The desk section has a custom-built cabinet designed to fit her oddly shaped computer unit.
The room is divided into separate "nooks" with an overall emphasis on reading (she LOVES to read). There is the reading nook with her bookcase and comfy chair, a dressing nook with her stool and mirror, her study nook with her computer and school supply cubbies, and her sleeping nook.
Other modified Ana features in this room include the dollhouse bookcase, flat-wall book holder, numbered cubbies on the wall, and the vintage step stool.
Built from Plan(s)
Estimated Cost
Bed/desk combination: $110
Estimated Time Investment
Day Project (6-9 Hours)
Finish Used
Plain Jane white paint.
Recommended Skill Level
Intermediate
Comments


Wed, 08/31/2011 - 13:17
Really nice!
What a nice bedroom!
How did you make use of the space under the bed?
Wed, 08/31/2011 - 19:13
Space under the bed
Right now I have the cabinet base for the desk, a large container full of accessories for her dollhouse, a large dollhouse, and a 3-drawer chest (Rast from Ikea) all under the bed with plenty of room to crawl around and play/sit/hide/etc.
Lifting the bed up off the ground really doubled the storage space in this small room (10x10 feet!)
Full Sized Canopy Farmhouse Bed

My wife and I were expecting our first so we had to downsize from a queen to a full. While my wife was away for a week on a trip, I put this together. She always talked about a canopy bed and I think it turned out nice. I made a few modifications to Anna's design. The canopy is higher, I used edge support for the bed and I used dowels for everything with the exception of the lag bolts connecting the canopy to the bed. This was my first furniture project (other than shelves).


Estimated Cost
326.54
Estimated Time Investment
Week Long Project (20 Hours or More)
Finish Used
Poly Clear Coat
Recommended Skill Level
Beginner
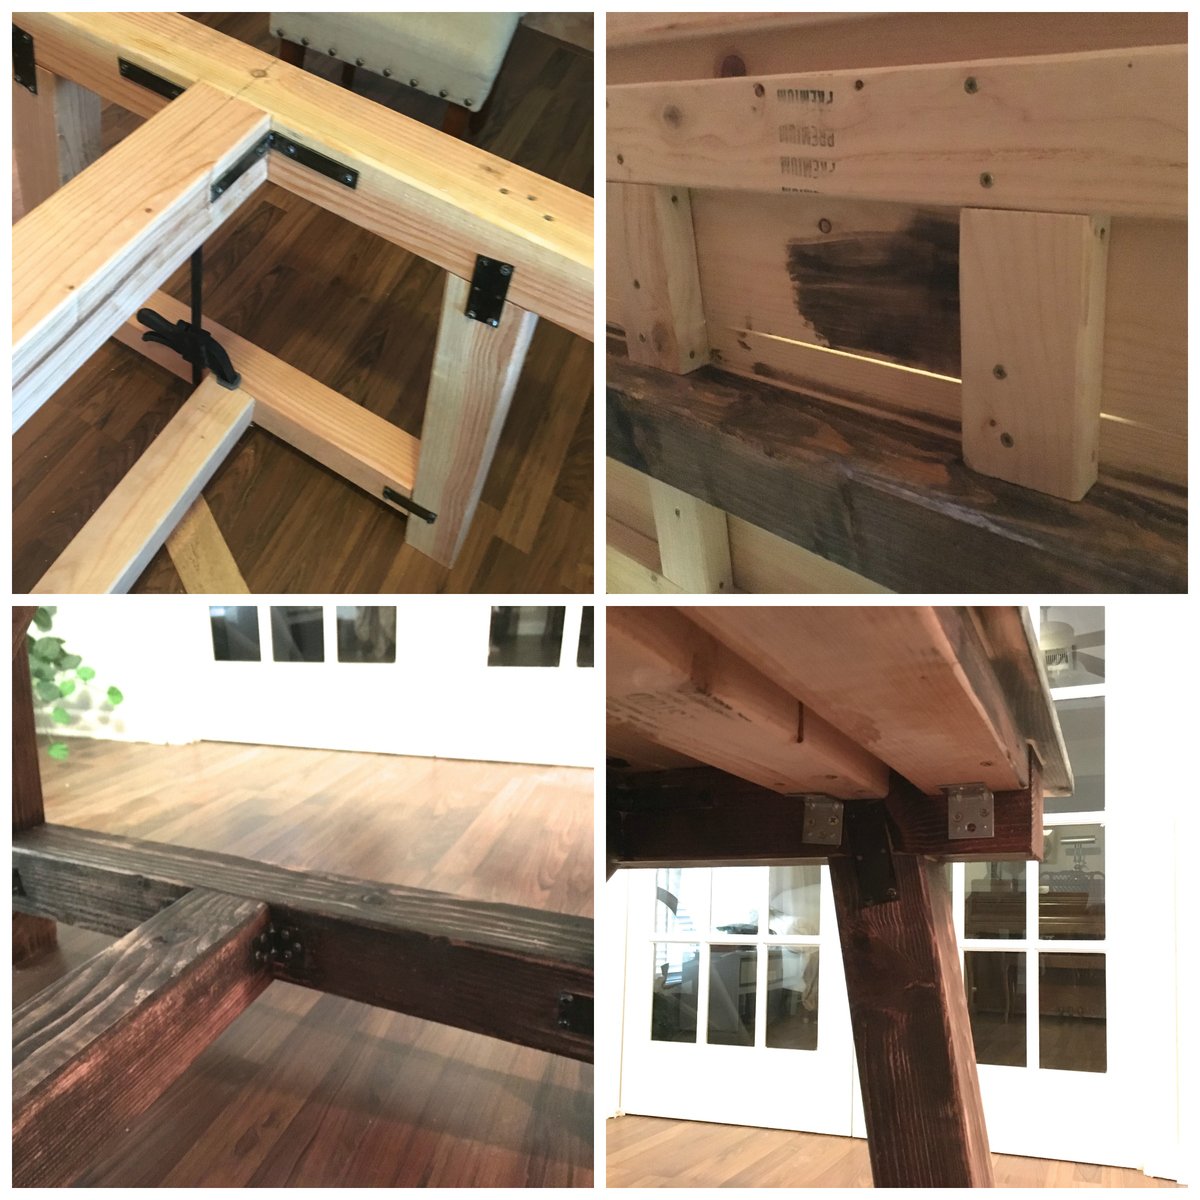
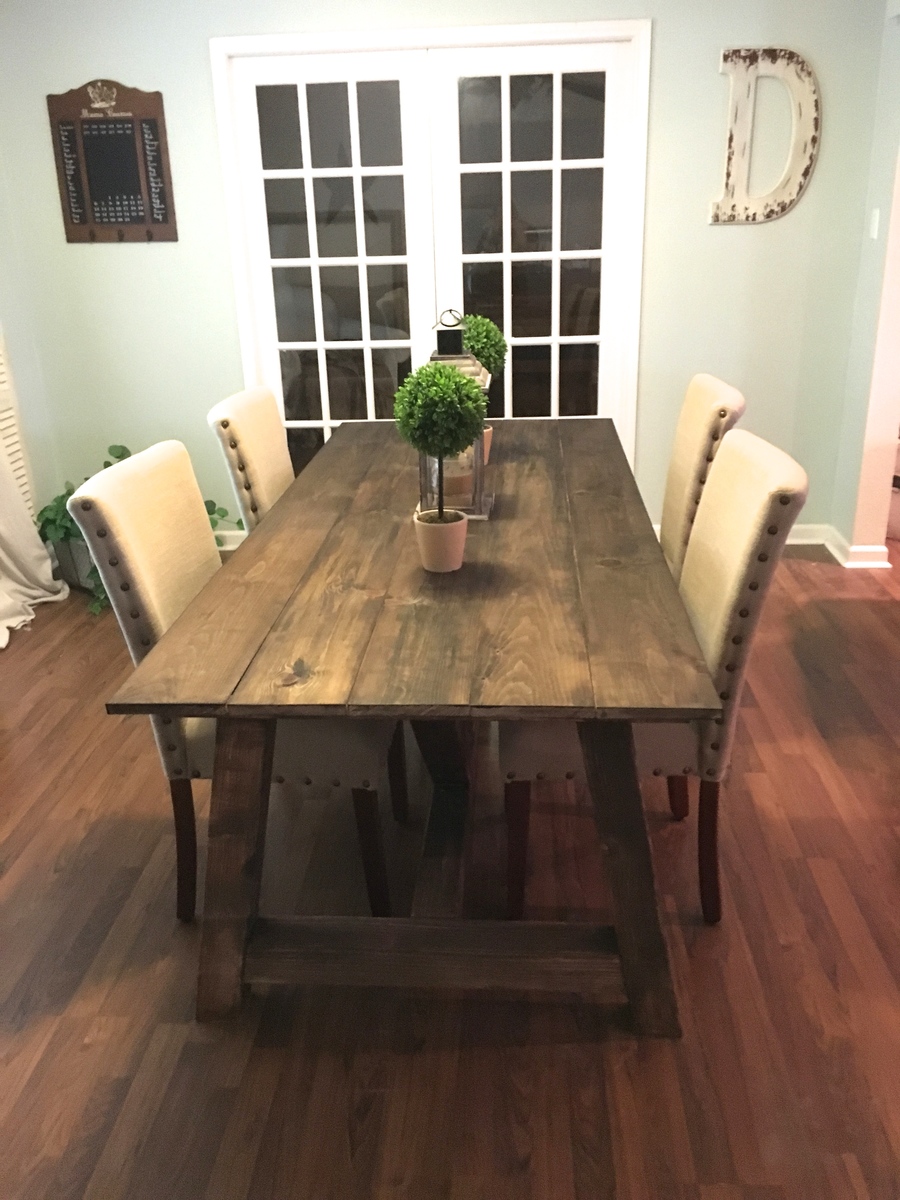
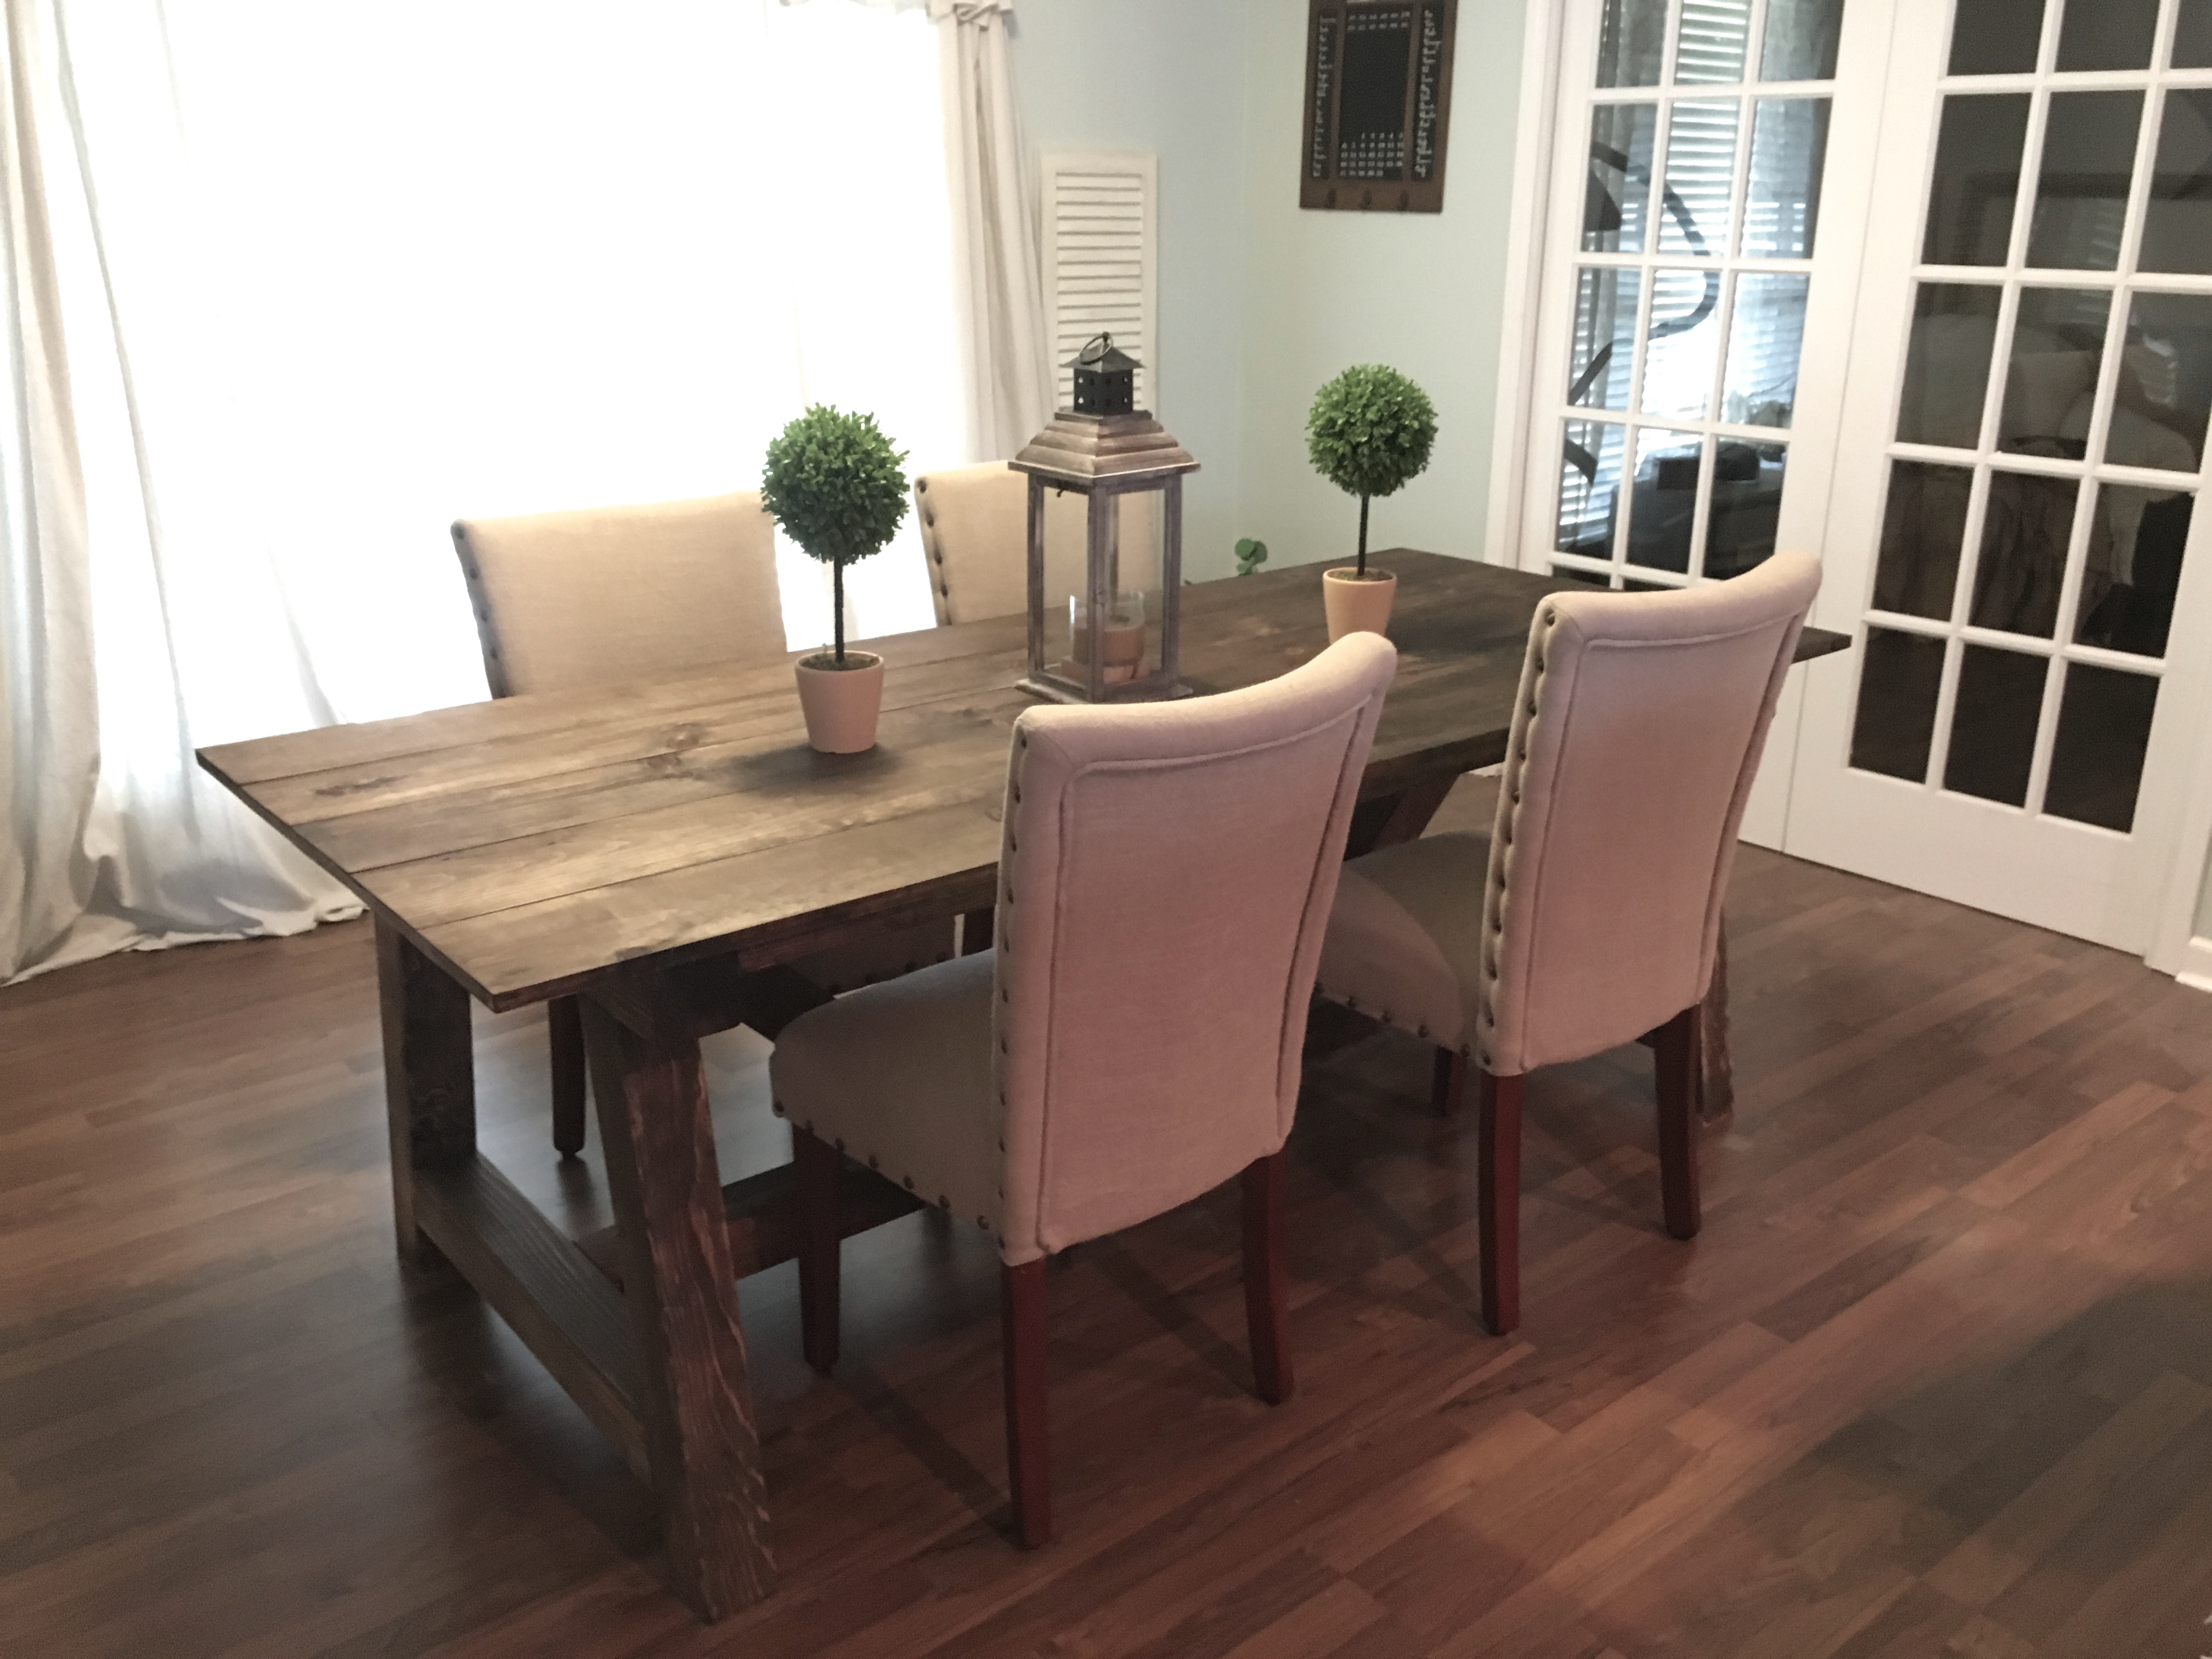
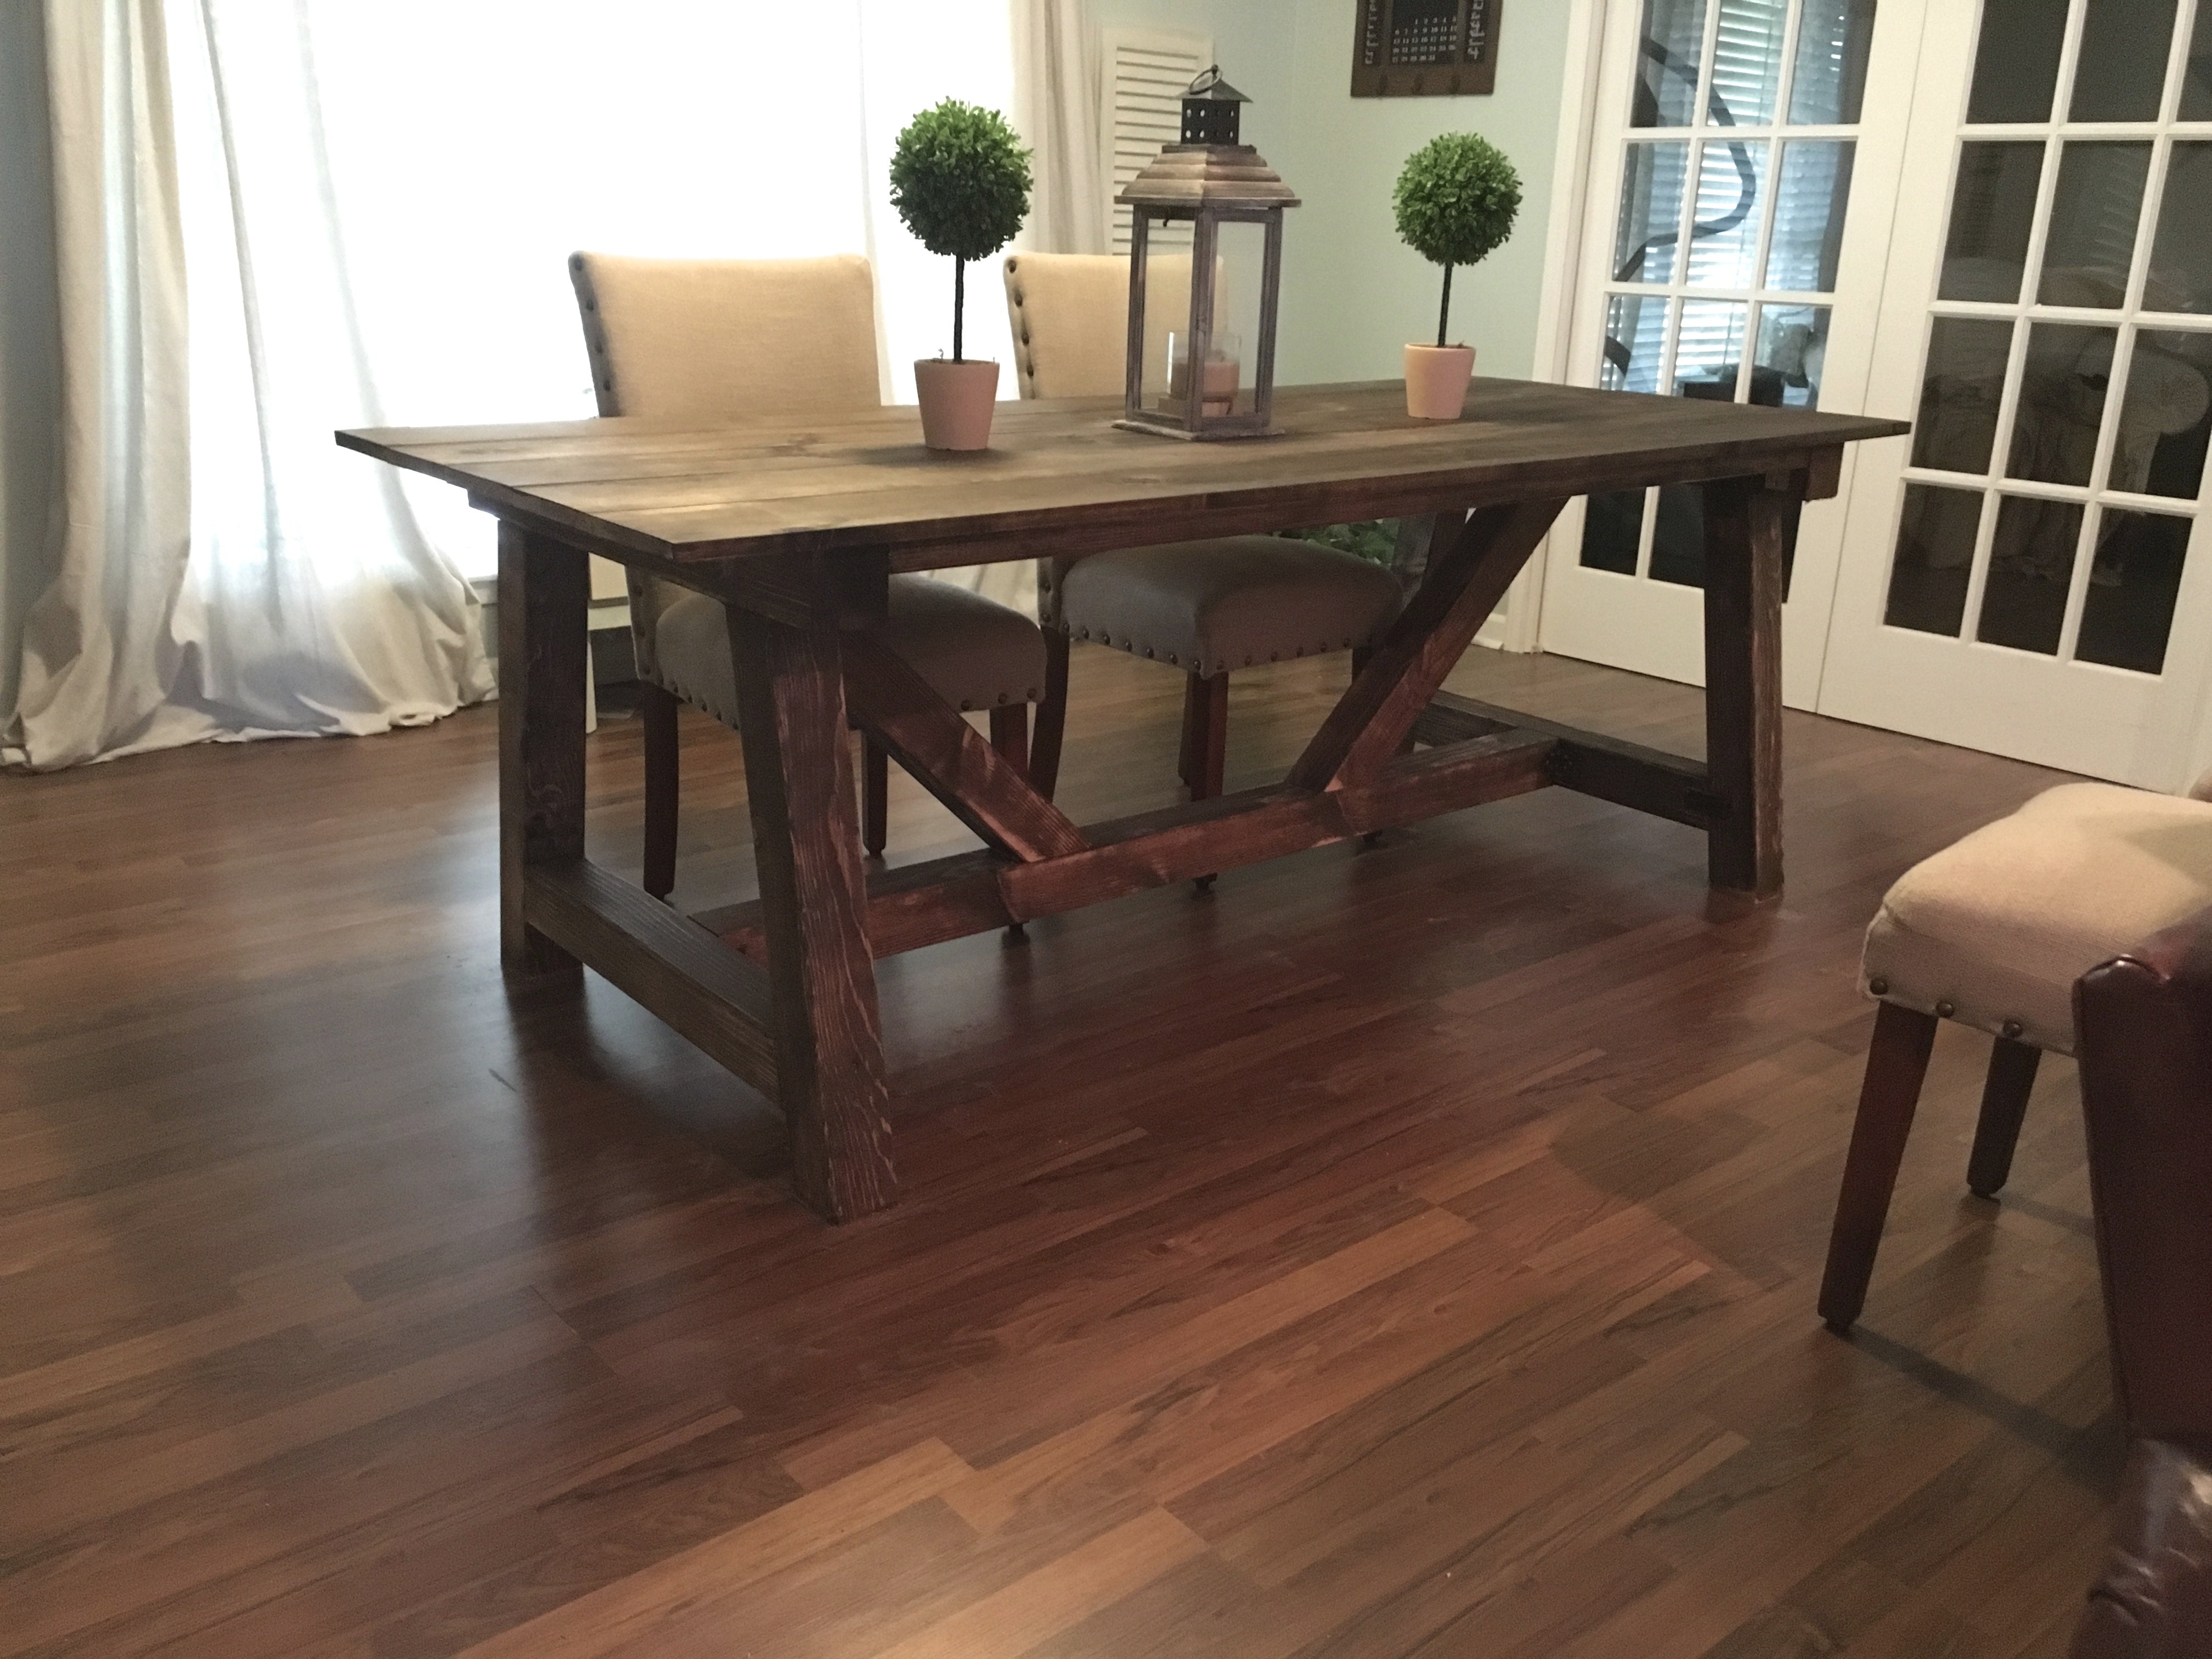
Truss 4x4 Dining Table
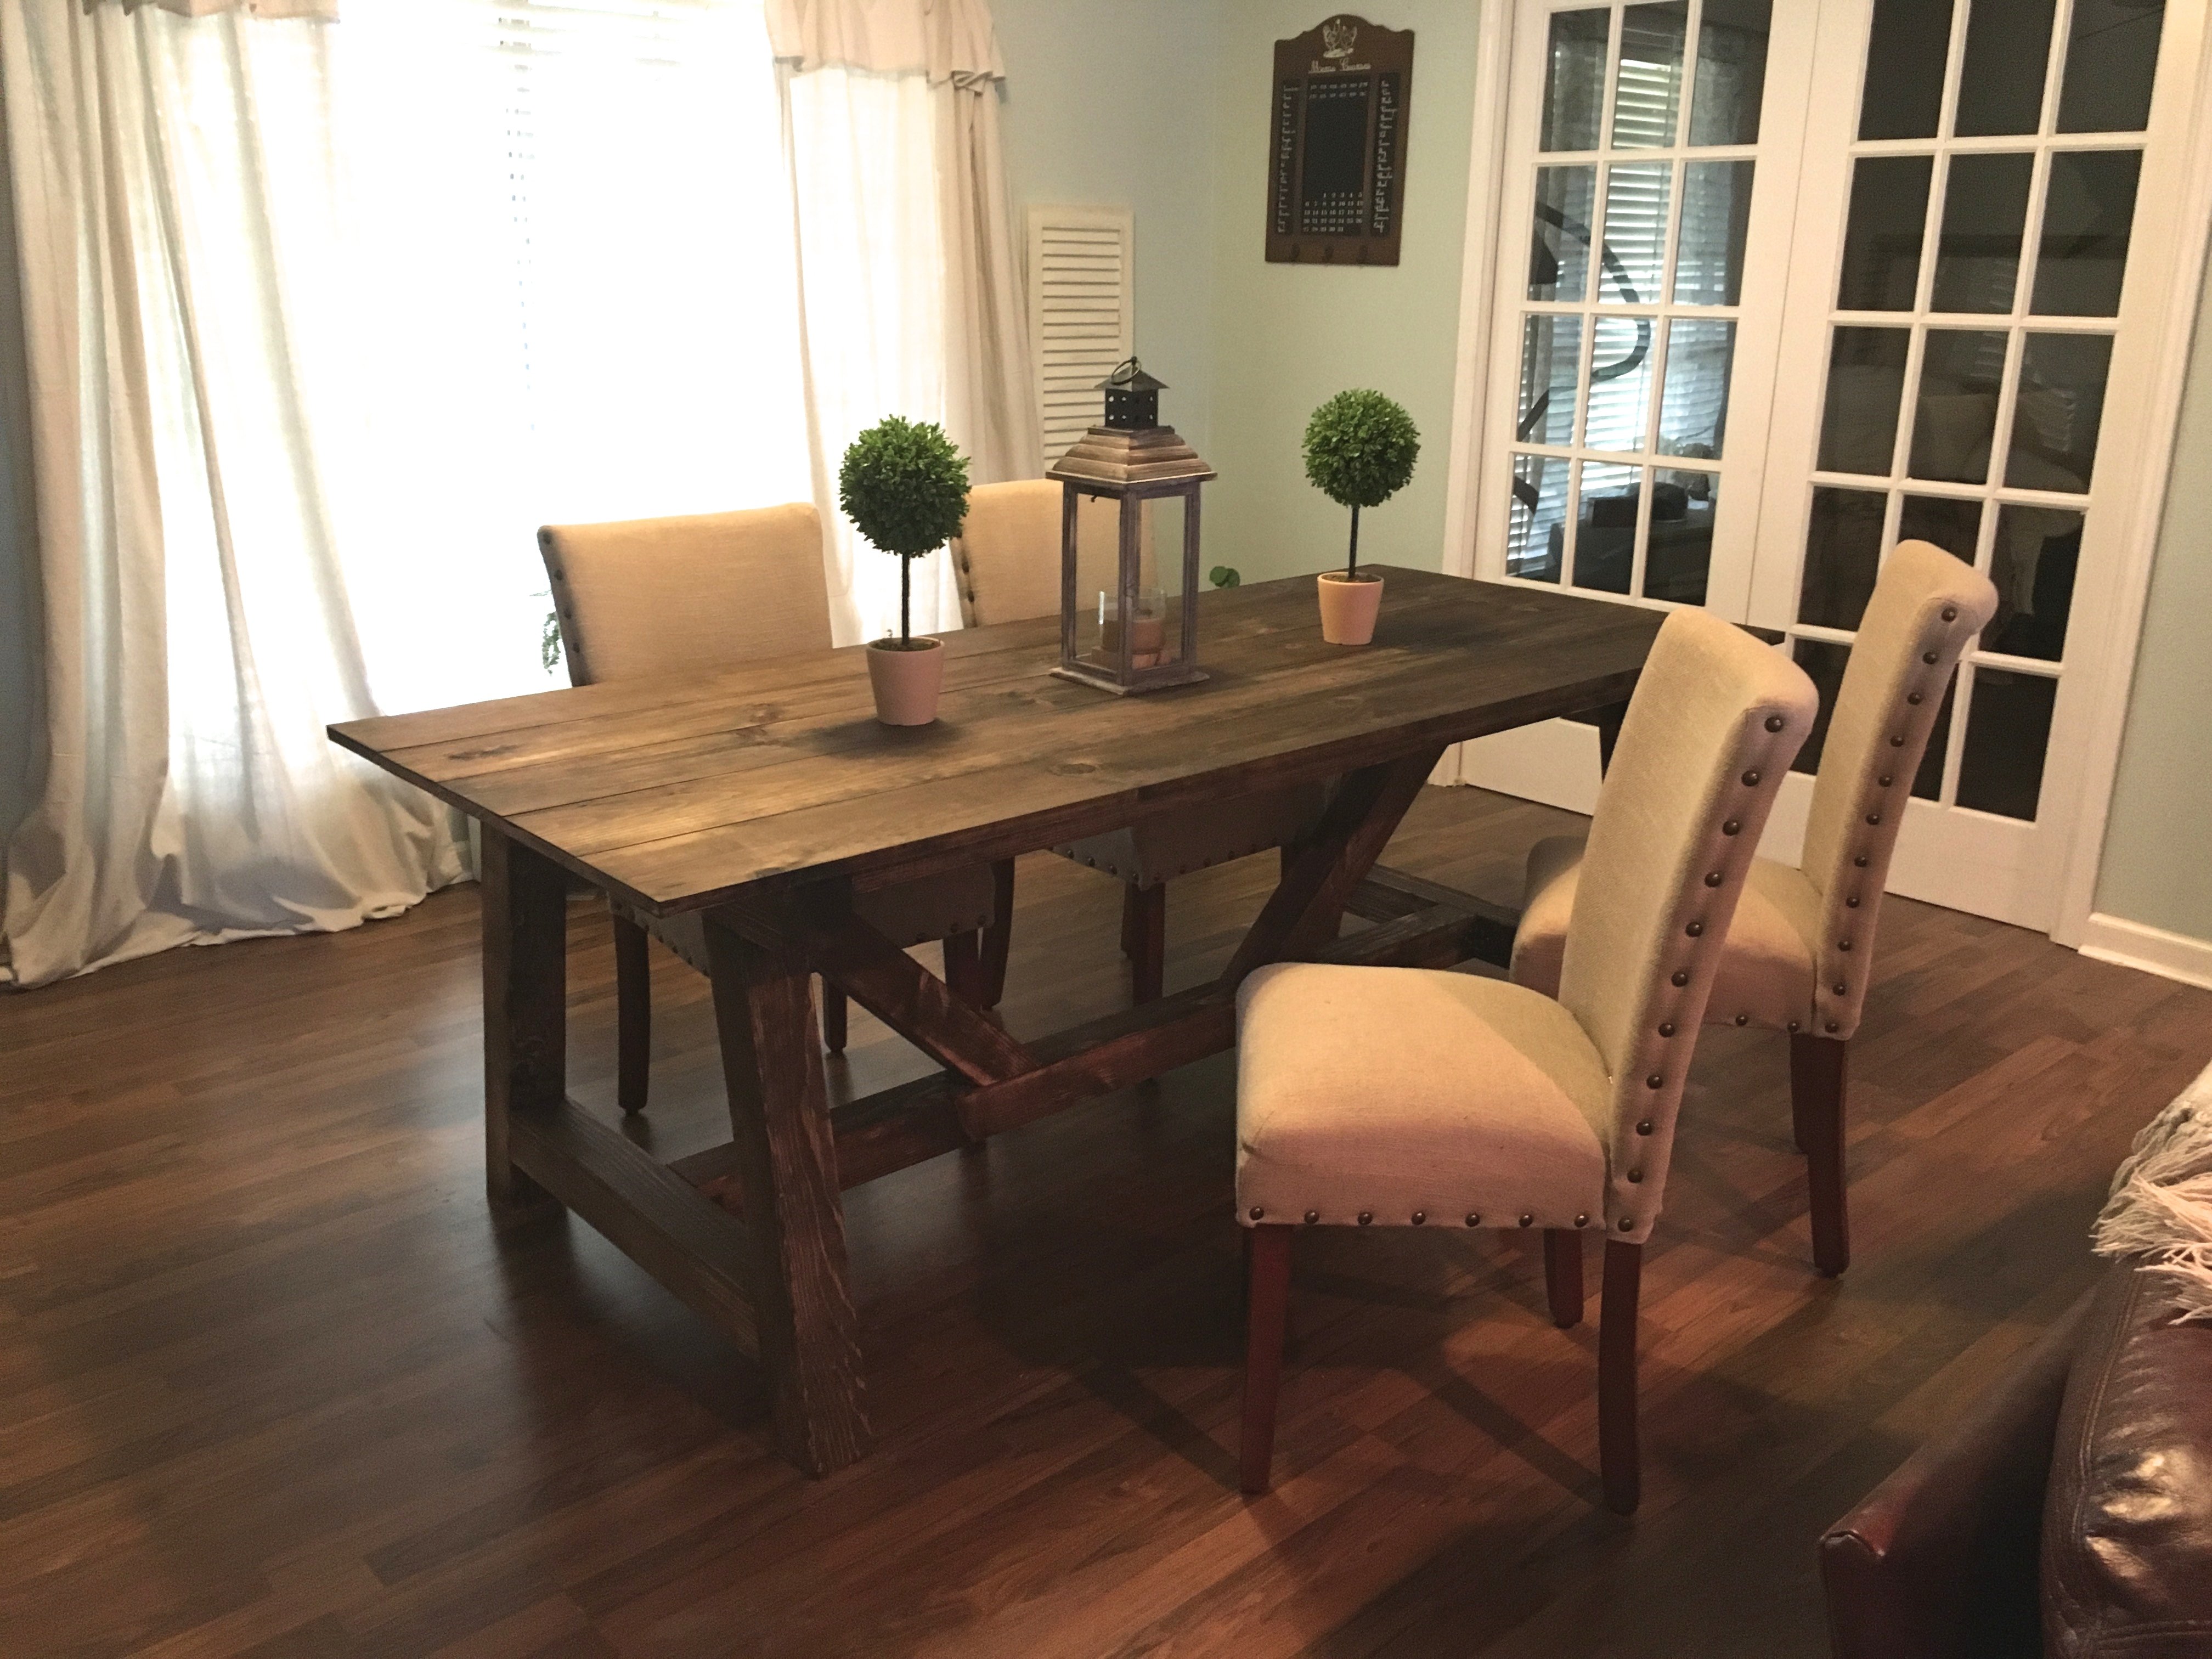
I somewhat followed the general context of the plans for the bottom, but I added bracing and general durability changes to the plans. As the original builder did not take thought into the event of moving/ un- assembling, warping, expansion or durability. I used kiln douglas fir (4x4, and 2x4) and kiln dried pine bread board tops. All bracing joints were predrilled and then screwed in with 4.5 or 2 inch screws, as a kreg jig joint should not have stress- I want this table to withstand someone leaning or in the instance sitting on the tabe to be safe- a 1/2-1.5 kreg screw would not work. I also changed the bread board to a 1x10- as most of the 2x10 at the stores were warped or chemically treated. Underneath we added bracing with an additional 2 2x4 beams, with cross beams in the middle to prevent sress. We opted not to have breadboards, as I did not want to mortise or tenon joint the ends. We followed close to the plans- but inforced stronger bracing to withstand weight applied to the table and easy dissasembly. :)
My cost was a little higher - but I did not want chemically treated pieces or warping. There was additional cost in 4.5 inch screws, and brackets but under 50 dollars.
Built from Plan(s)
Estimated Cost
Wood: 197
Brackets: 32
Screws: 12 (Already has 2inch)
Bluing Agent: 5 (already had)
Brackets: 32
Screws: 12 (Already has 2inch)
Bluing Agent: 5 (already had)
Estimated Time Investment
Day Project (6-9 Hours)
Finish Used
Sand 120 grit, then 260. Vinegar wash to 'condition' the wood for absorption to prevent spotting/bleeding. 50/50 Mixture of Dark Walnut and Special Walnut. Hardware was Zinc Coated- sanded and vinegar washed- final coat was bluing.
Recommended Skill Level
Intermediate
Comments
Gunstock Stained Farmhouse/craftsman bed
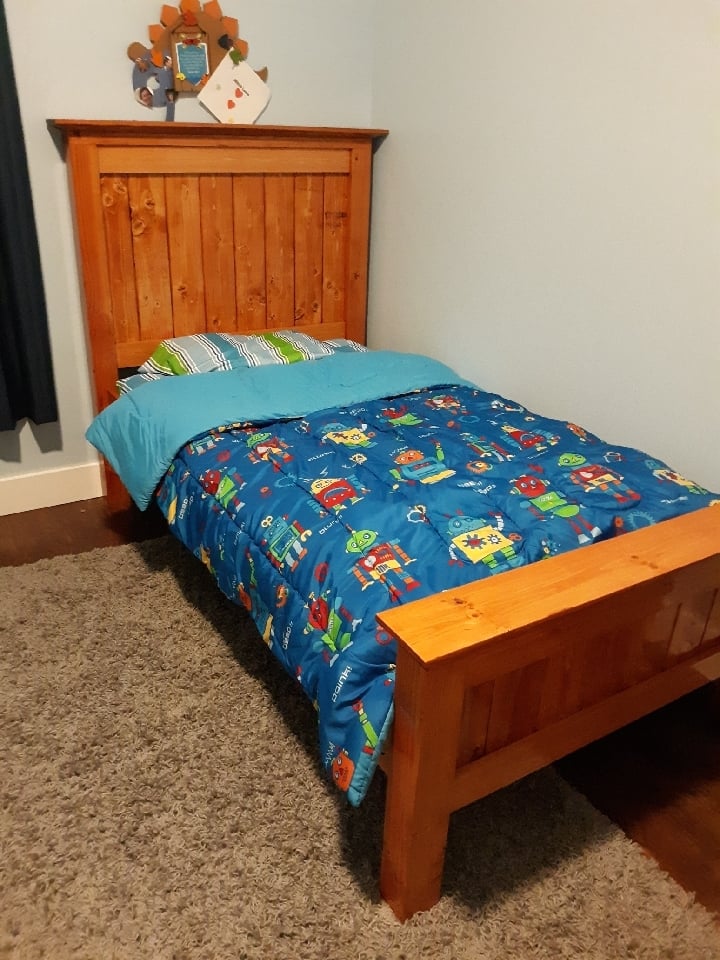
Followed the plan, adjusted the height to accomadate a trundle bed in the future. Tapered the edges of the 2x6 material for a shaker/craftsman look. If you cut the board at a 25 degree angle the 2x6 material will rest right in line with the 2 x 4 material below. Be sure and add 2 to 2 1/2 inches to accommodate the taper edging.
Used Minwax gunstock stain to match the furniture and three coats of fast drying gloss poly.

Estimated Cost
220.00
Estimated Time Investment
Weekend Project (10-20 Hours)
Finish Used
Used Minwax gunstock stain to match the furniture and three coats of fast drying gloss poly.
Recommended Skill Level
Intermediate
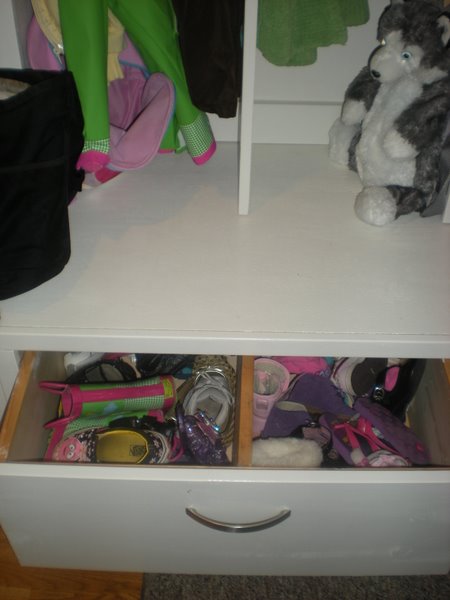
Braden Entryway Mail Sorter/Locker/Shoe drawer
This is the greatest website ever! Thank you so much Ana White! Anyway, this was my first project. Our family room was a mess - shoes everywhere, coats strewn, you name it. We don't have a mud room - you just walk in from the garage to BAM, the family room. So the mess needs to be contained and organized and the Braden Shoe Drawer, Locker and Mail Sorter/Phone Charger was our answer! I would have loved to have done the locker-mail sorter-locker layout but space is limited in the room so I was only able to make one locker. I did make a 3rd drawer, per Ana's awesome wood cutting instructions and that drawer is in a storage closet. So, pay attention to her cutting instructions - she knows what she's talking about! I had some left over wood (1x10) and used that as a divider in the shoe drawer to keep each kids' shoes separate.
Built from Plan(s)
Estimated Cost
$250 (for hutch/locker, mail sorter, three drawers)
Estimated Time Investment
Weekend Project (10-20 Hours)
Finish Used
Kilz Primer, Olympic High-Gloss Antique White paint. Two coats put on very sparingly (dryly). I painted the small mail slots and inner side panels of the mail sorter prior to building after reading previous posters' tips - totally worth it.
Recommended Skill Level
Beginner
Comments

Sat, 09/03/2011 - 10:04
Just love the divided drawer
Just love the divided drawer and this whole set! What am amazing project! So proud of you! The finish is just perfect too!

Sat, 09/03/2011 - 12:59
Looks great!
This looks great for a first build! The drawers are great for hiding the shoes and I love the mail sorter. Awesome job!
Thu, 12/01/2011 - 13:26
GREAT JOB
I'm new to Ana's site & I desperately need to find a Mud Room Locker System & since I don't have an office downstairs I either need a desk put in my kitchen or a mail sorter system of some kind! You did a fabulous job but I have to admit that I'm terrified to even start this project!!!!! I'm afraid that I'll make a huge mess of it!!!! Any suggestions for a newbie???? Thanks a million!
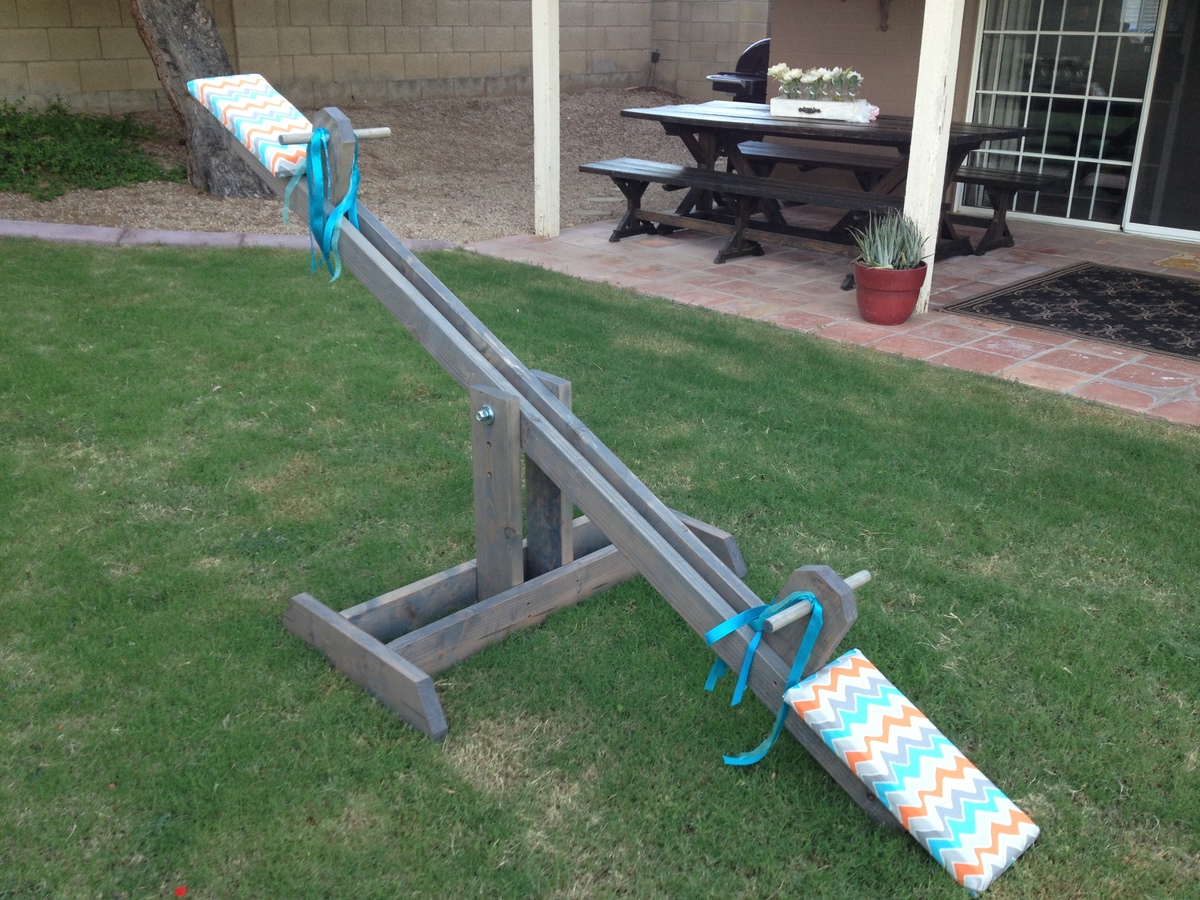
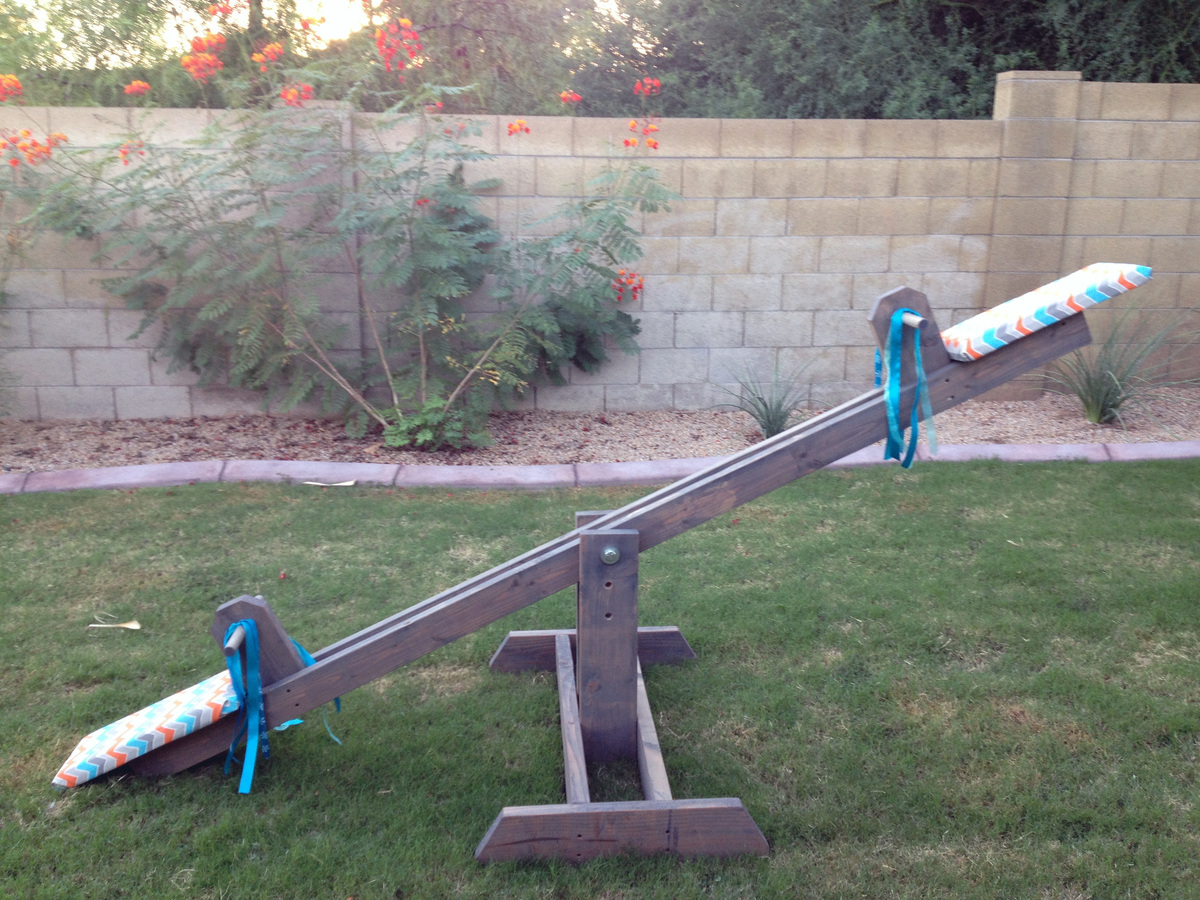
Cwen's Birthday Party Seesaw!
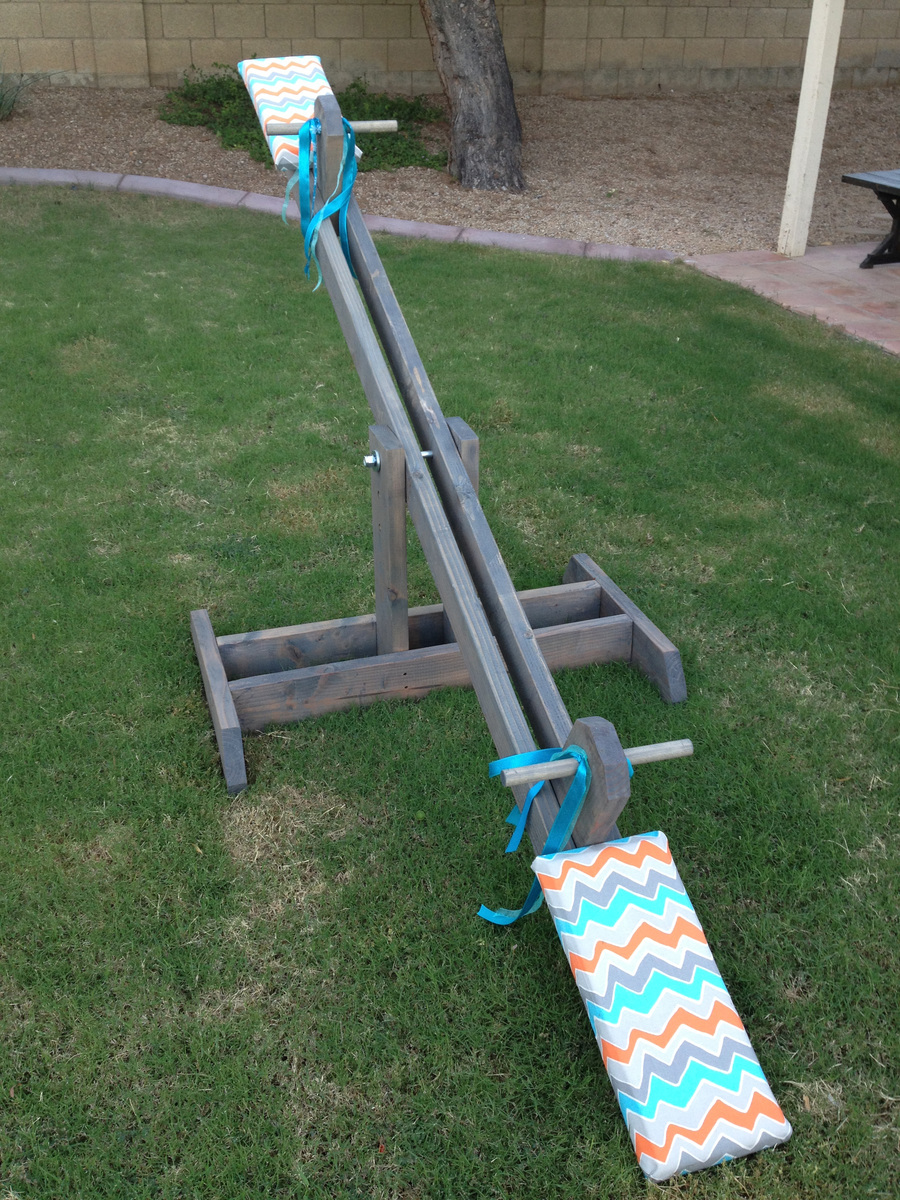
My husband built the seesaw and I applied the finish and covered the seats. This project was very easy and built in one weekend, including drying time for the stain. I used Minwax stain in Classic Grey and did not use a clear coat over the stain. I bought the canvas seat fabric at Hobby Lobby for $5.00 and used 2 inch foam cushion, which was about $3.00. I had some left over ribbons from another project that I tied to both sides of the handles to make the seesaw look festive for the birthday party! The project ended up costing about $50.00 in materials. My daughter Cwen loves it!
Built from Plan(s)
Estimated Time Investment
Day Project (6-9 Hours)
Finish Used
Minwax - Classic Gray
Recommended Skill Level
Beginner
Toy Box / Blanket Chest
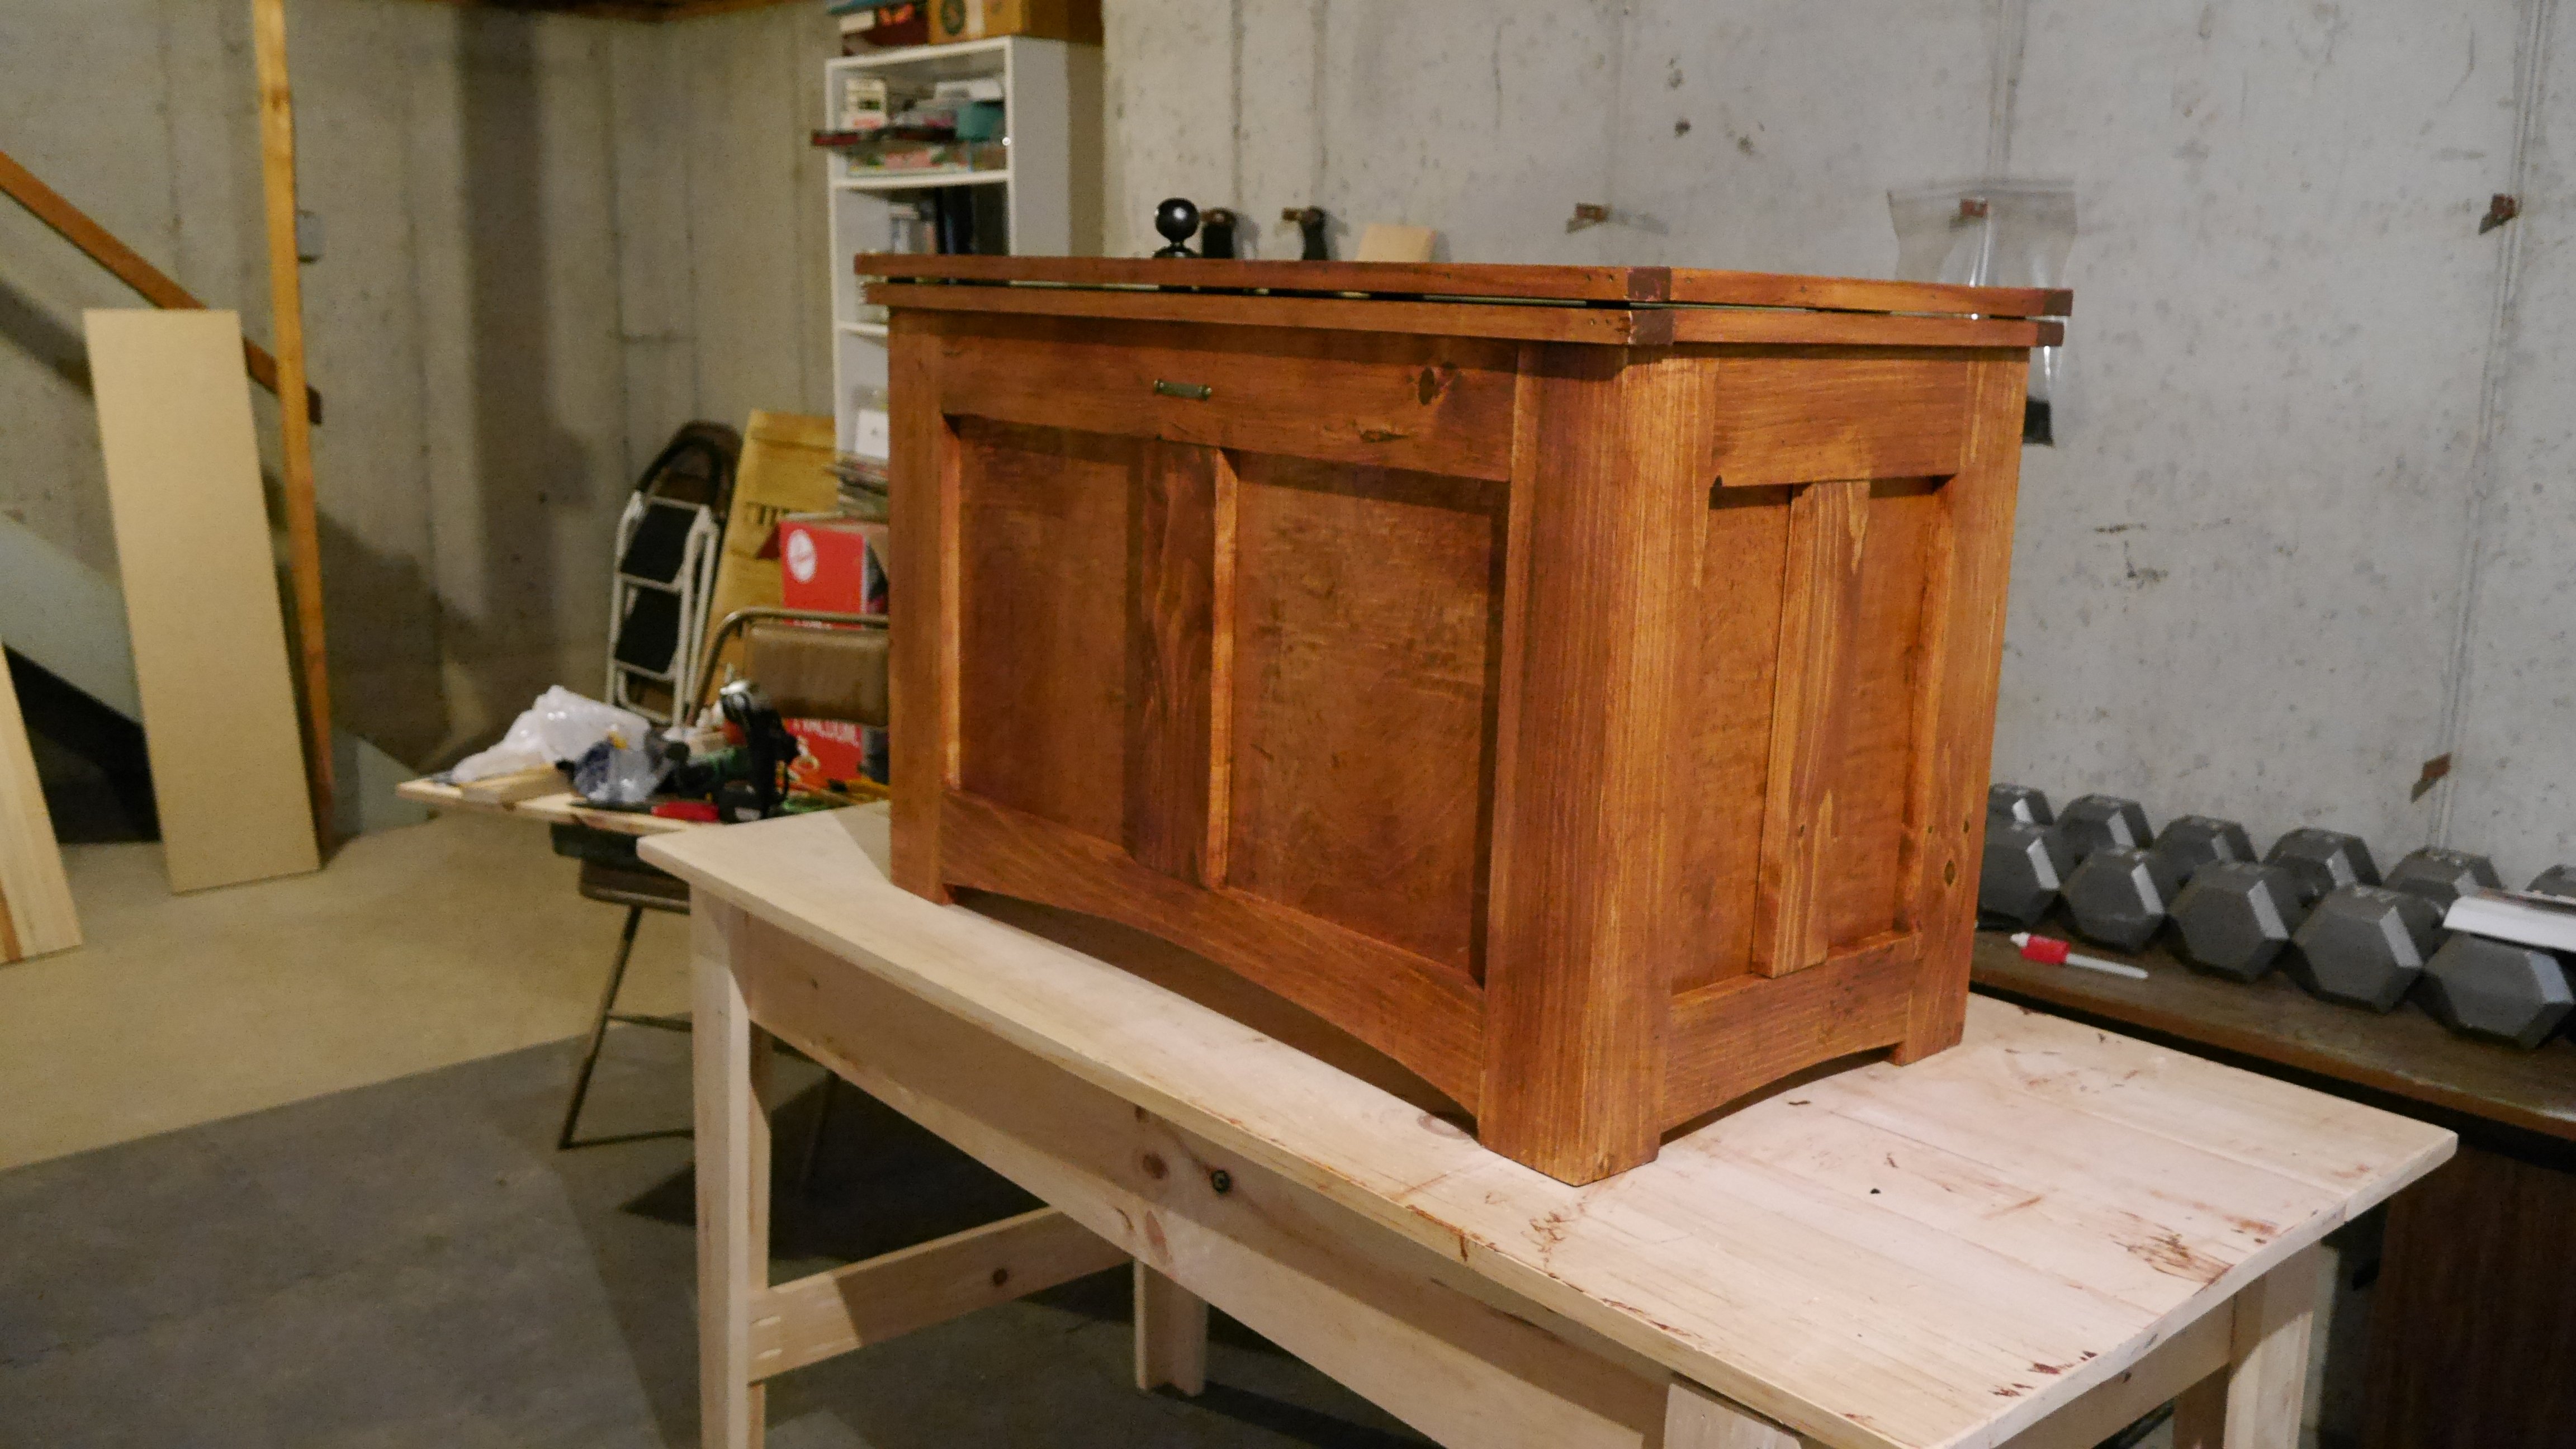
A few weeks back, my niece asked it I wouldn't mind building a Toy Box to auction off at a benefit she's holding this Saturday (December 5th - 2015). She and her husband are adopting 4, count 'em FOUR orphans from Latvia, so naturally I was more than happy to oblige. I didn't use any specific plans per se... I just used some pocket hole cabinetry I've seen on this site and others, as well as some pictures I found on the internet of different toy boxes and blanket chests for inspiration. The final project cost about $55 all in, including lumber and hardware. I used 1x3s and 1x2s for the frame, one 4x4 sheet of 1/4" plywood for the panels, and one 3/4" x 16" x 8 foot project board (which I got for $11 and change!) to use as the bottom and lid of the chest. For hardware, I used a couple of box hinges, a lid stay so that the lid both stays open on it's own and closes softly (gotta save those little fingers, y'know ;) ), and a cool wrought iron knob I found at Hobby Lobby for about $2 (gotta love the 40% off Black Friday Deals!). Oh... I also picked up a little quote plate from Hobby Lobby too, just too add that extra touch. ヅ Stain is Rustoleum American Walnut with 3 coats of satin poly.
UPDATE: The auction was yesterday and the chest sold for $330! ヅ


Estimated Cost
$55
Estimated Time Investment
Weekend Project (10-20 Hours)
Finish Used
Rustoleum American Walnut stain with 3 coats of Satin Polyurethane
Recommended Skill Level
Intermediate
Comments
King Farmhouse Bed
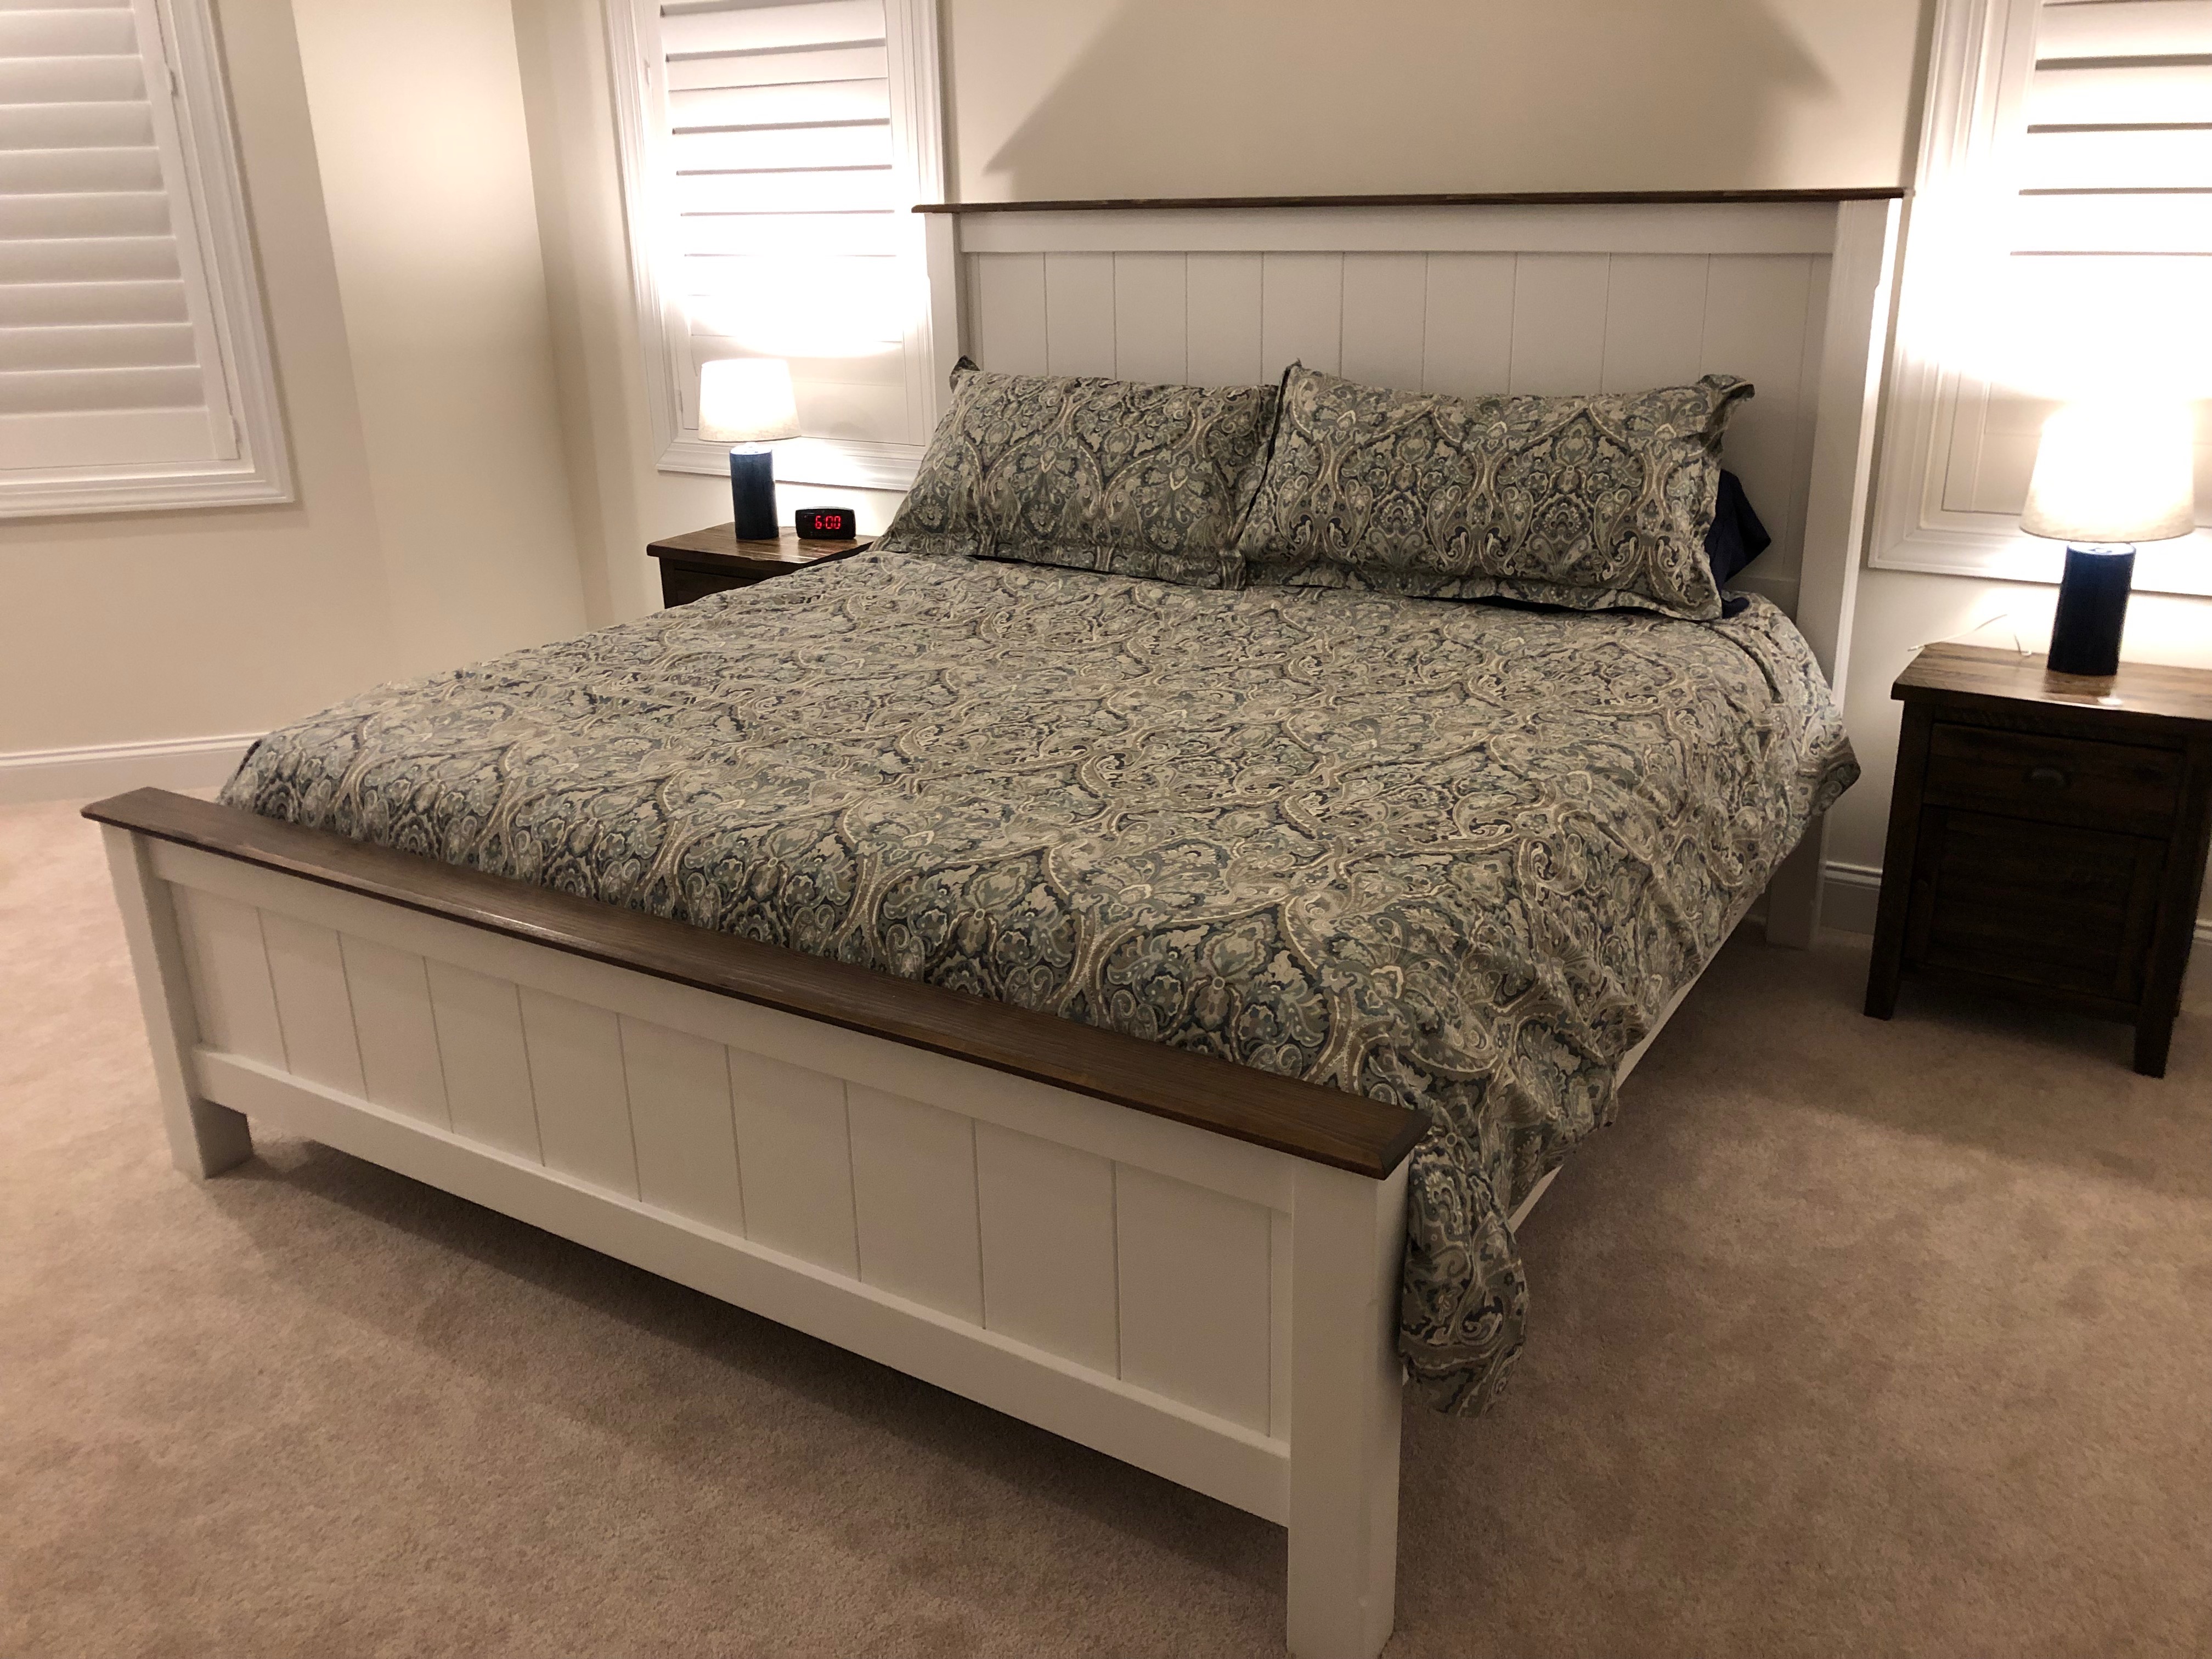
I pretty much followed the original plans. I added a chamfer on the outside corners of the posts and on the top boards on the head and foot boards. I also stained these to match the nightstands. Since I used a foam mattress, i built a platform by gluing/screwing a 2x4 inside the side rails. Then I set 1x6s on the 2x4 to support the mattress.
I use the free version of Sketchup to design the bed and estimate materials needed.
Lessons learned
- Take extra time to figure out how to connect the side rails to the head and foot boards. I thought i could use a sliding lock but this wouldn't work for my design. I improvised using 3x7 tie plates and screwed the two components together. For the headboard, I lined the 2x4 with the inside headboard post. For the footboard, I bent the tie plate 90 degrees and screwed the 2x4 to the footboard. It worked very well.
- I would recommend chamfering the outside top of the side rails. I didn't and my wife complains that she bumps her shins on it.
- Top boards are 1x5s, which in my are are only sold at home depot. The other wood is readily available.
It's not that difficult of a project. It is time consuming, though.
Estimated Cost
About $150
Estimated Time Investment
Week Long Project (20 Hours or More)
Finish Used
Latex semi-gloss enamel for everything except the top boards which were stained and polyurethaned.
Recommended Skill Level
Beginner
Comments
Fri, 10/16/2020 - 13:48
Love this look.
I love the look of your version. Do you have the SketchUp file anywhere that I can download? I would really like to make this version as I love your proportions and the color scheme.
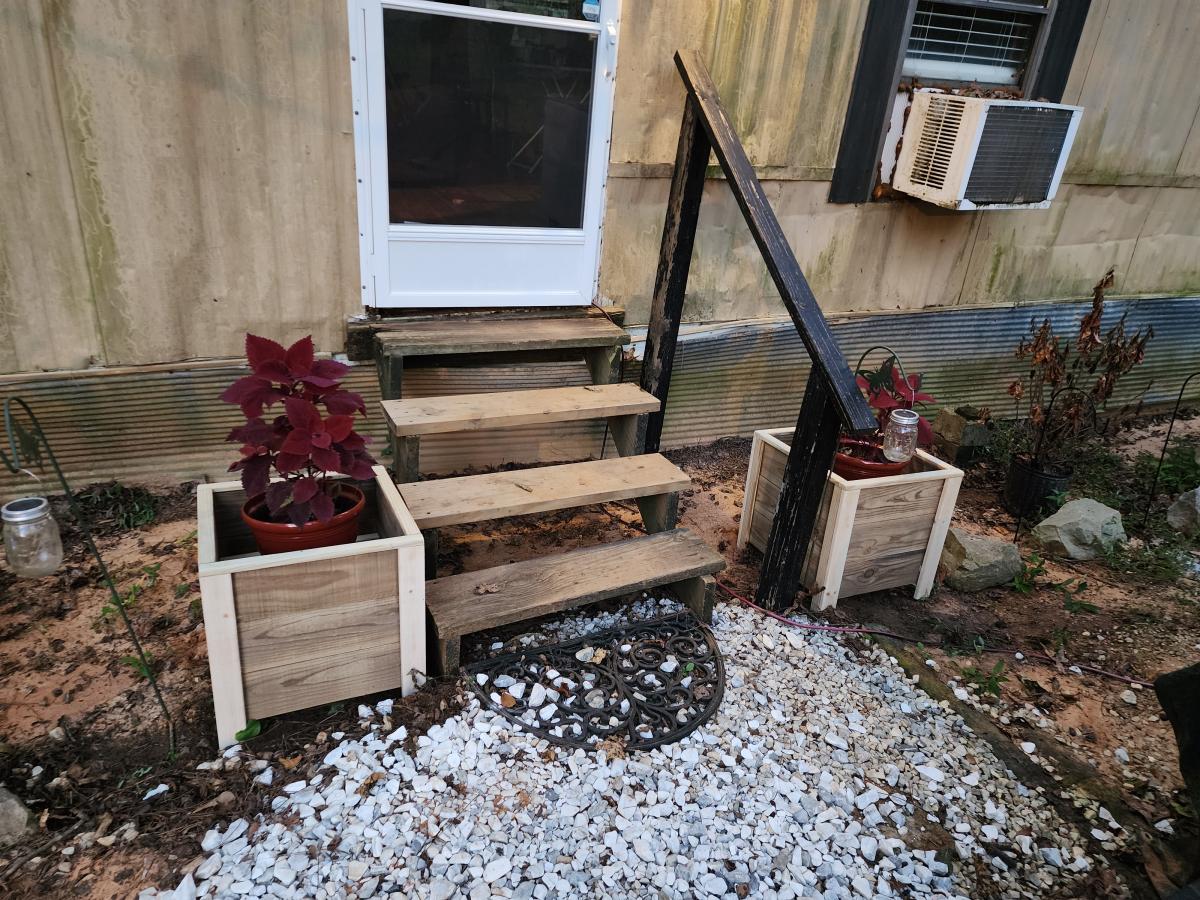
Planters
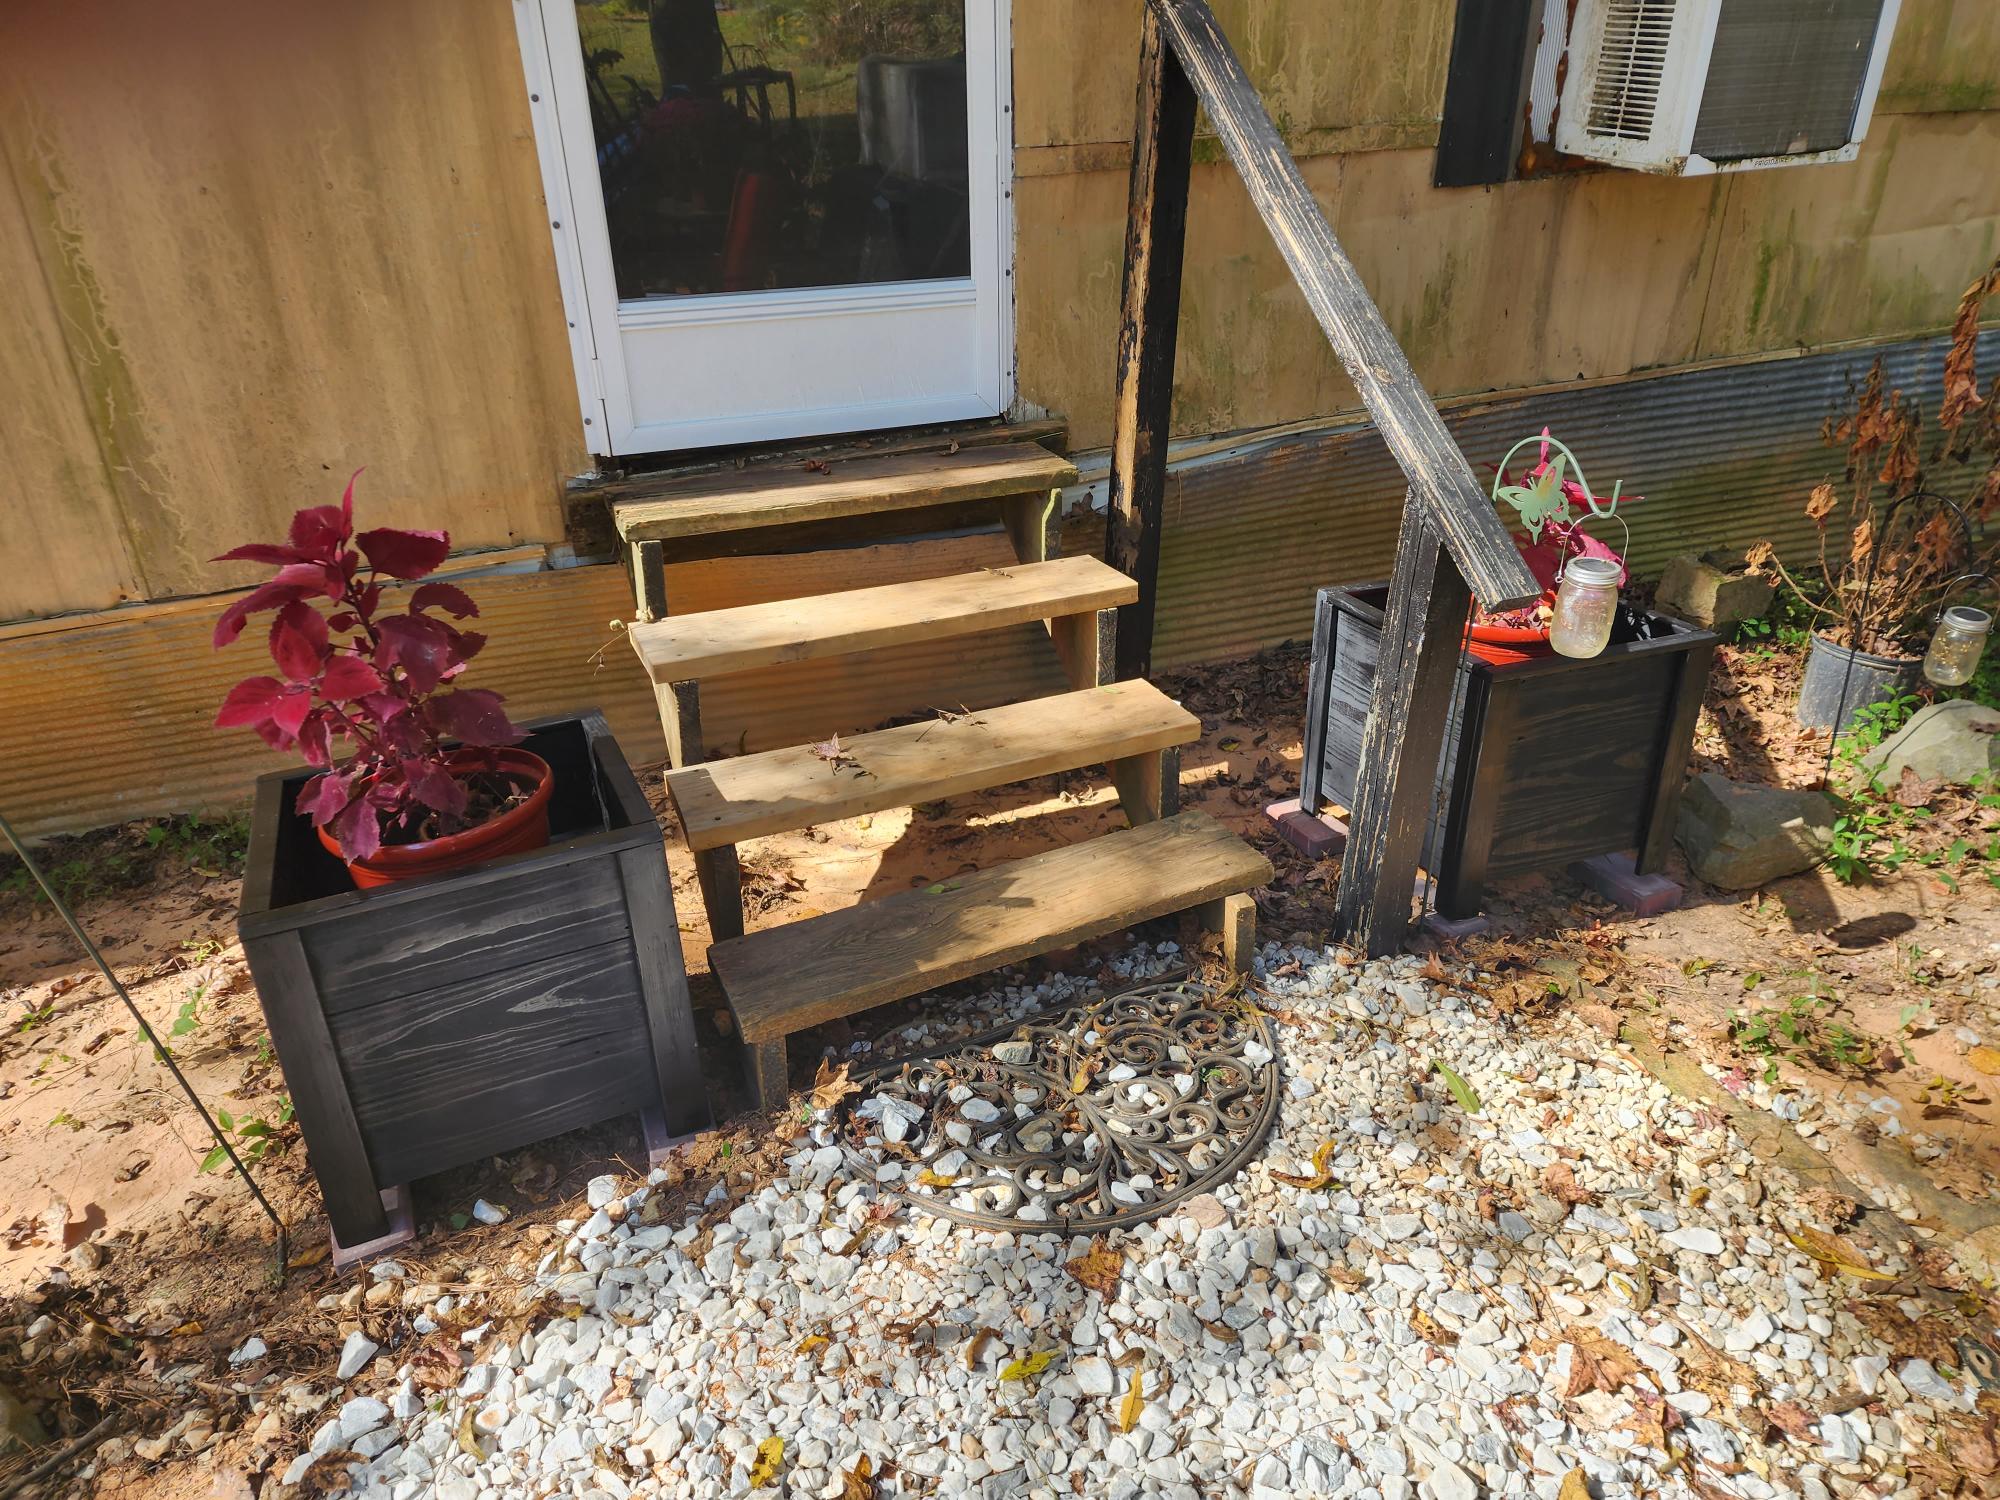
First time building planters. They came out perfectly.
Comments
Plane Old Shelf
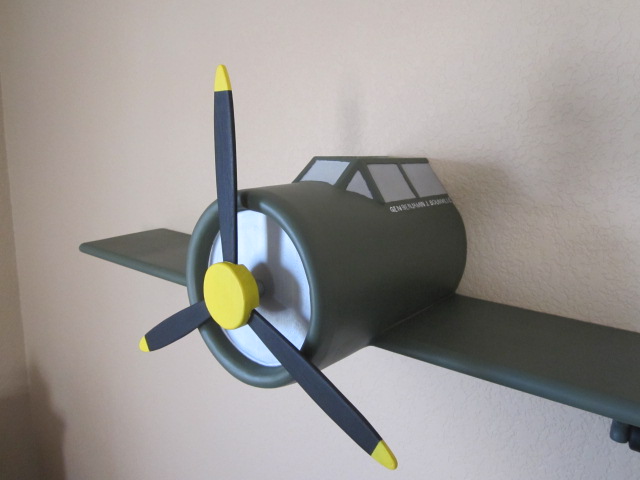
This is a shelf based on the fighter planes from the pre-WWII era. I built it for my son's nursery. I stumbled onto Ana White's plan "Plane Old Shelf", got inspired, and it evolved into what it is. If you have any questions, feel free to contact me.
Built from Plan(s)
Estimated Time Investment
Week Long Project (20 Hours or More)
Recommended Skill Level
Beginner
Comments
Mon, 09/05/2011 - 22:38
What did you make the fuselage out of?
I love this! I would love to make a version of this. Can you please post what you used to make the fuselage and landing gear out of? Also, how did you attach it to the wings?
Thu, 09/08/2011 - 13:46
Fuselage
Thanks! The fuselage is made out of bender board. I don't remember the exact thickness but it was the thinnest they had at Michael's. You would think I would remember. I had to do the fuselage twice. My daughter stepped on it and put a hole through it.
The wings were actually one long wing. I build a frame around the wing and then wrapped the bender board around it. It may not be the best way, but it is all I could think of.
Thu, 09/08/2011 - 17:14
Landing Gear
The Landing gear was made out of a 1x6 I had. The struts were two sizes of oak dowels.

Thu, 10/30/2014 - 17:07
More information
I undersand the shelf and the landing gear. I can make the canopy and propeller, no problem. I don't understand how the main fusulage was made with the curved edge. I tried searching for the bender board that was mentioned above with no luck. Could you point me in the right direction?
Thanks,
Jordan
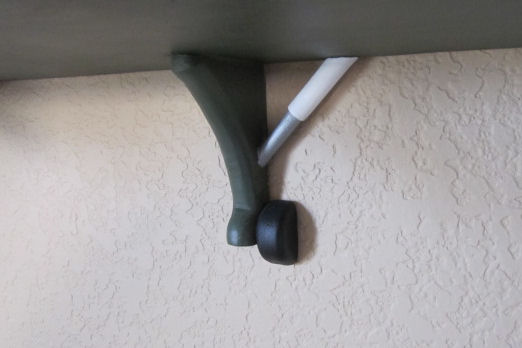
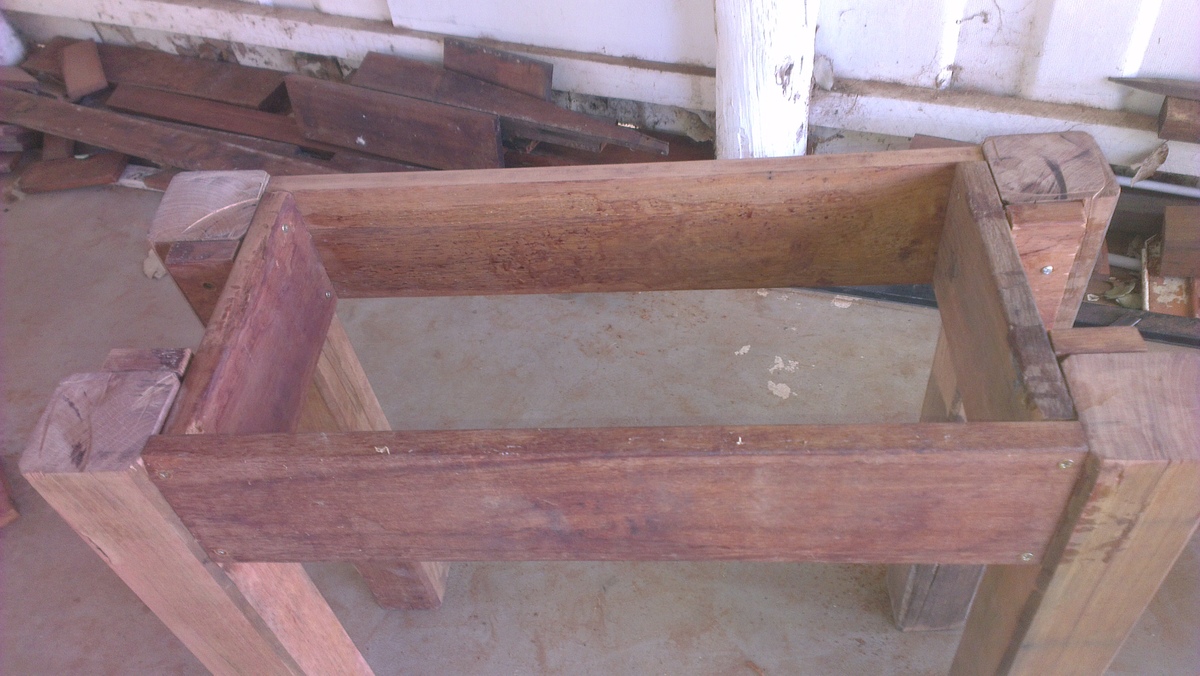
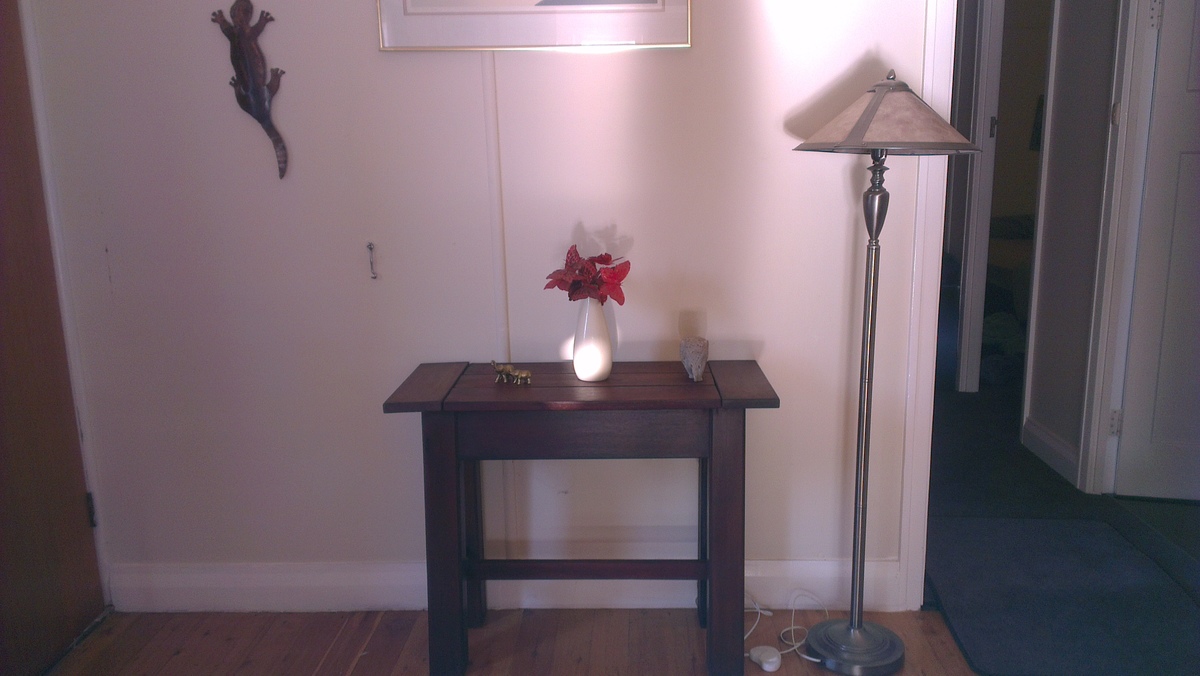
Wooden side table
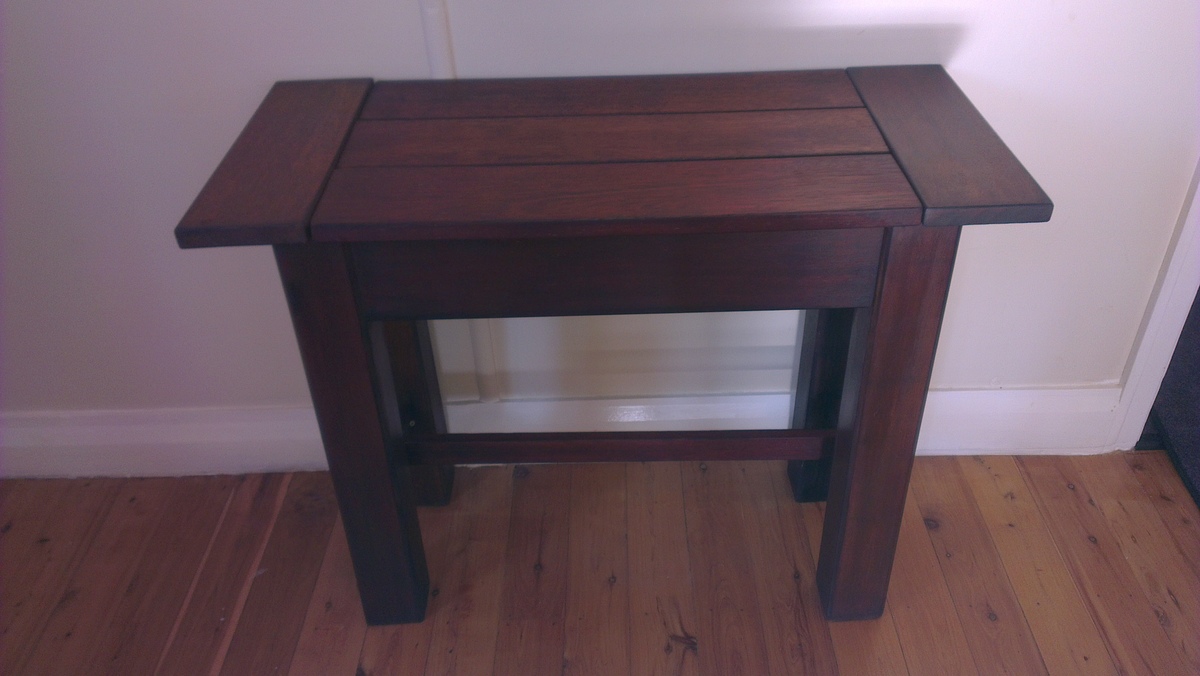
Created from recycled decking timber
Built from Plan(s)
Estimated Cost
$40
Estimated Time Investment
Weekend Project (10-20 Hours)
Finish Used
Tung oil and wax
Edges darkened with ebony stain
Edges darkened with ebony stain
Recommended Skill Level
Intermediate
Comments
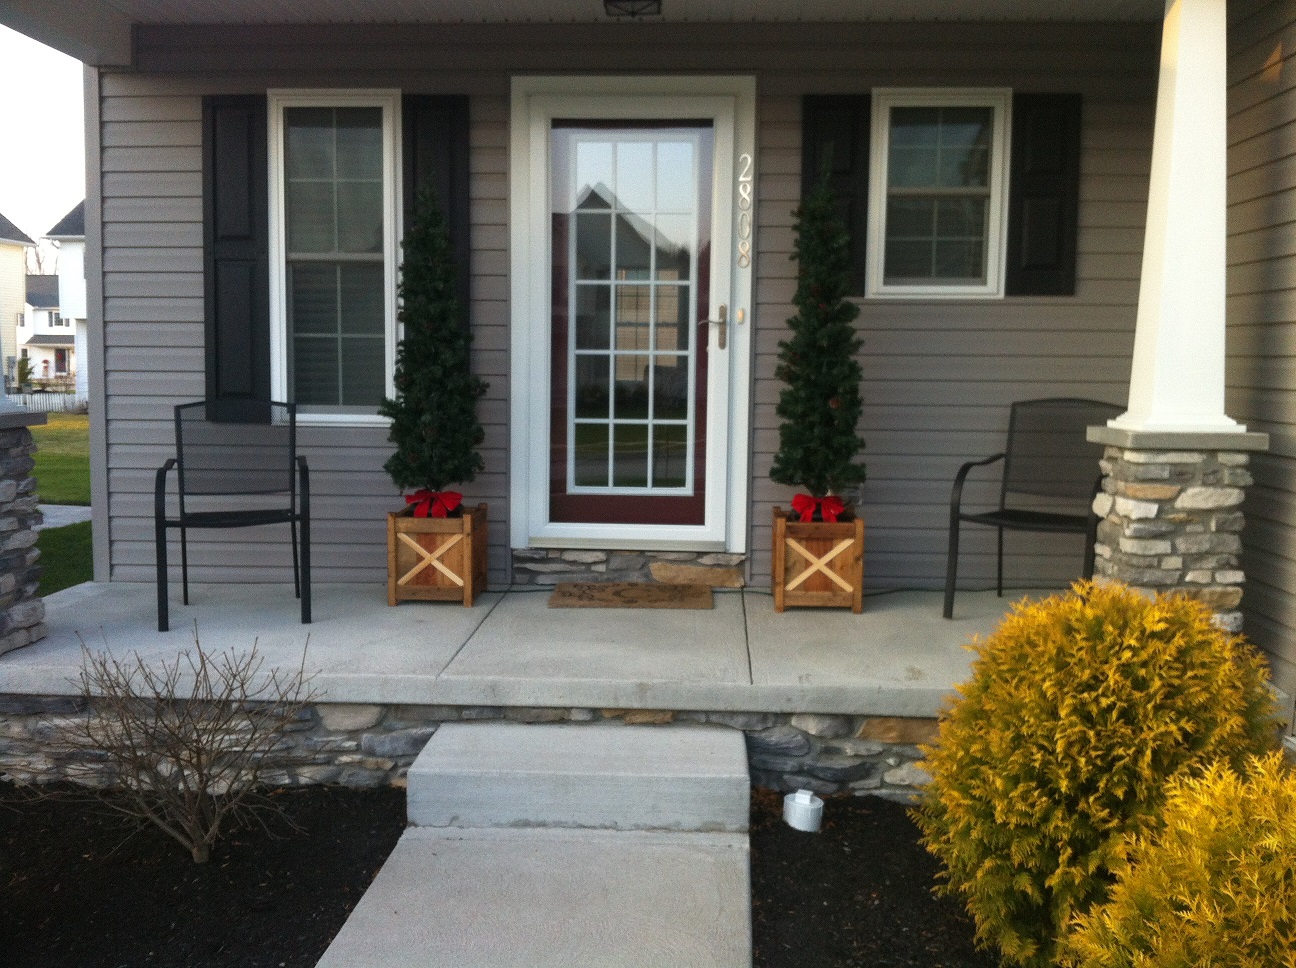
Cedar Planter
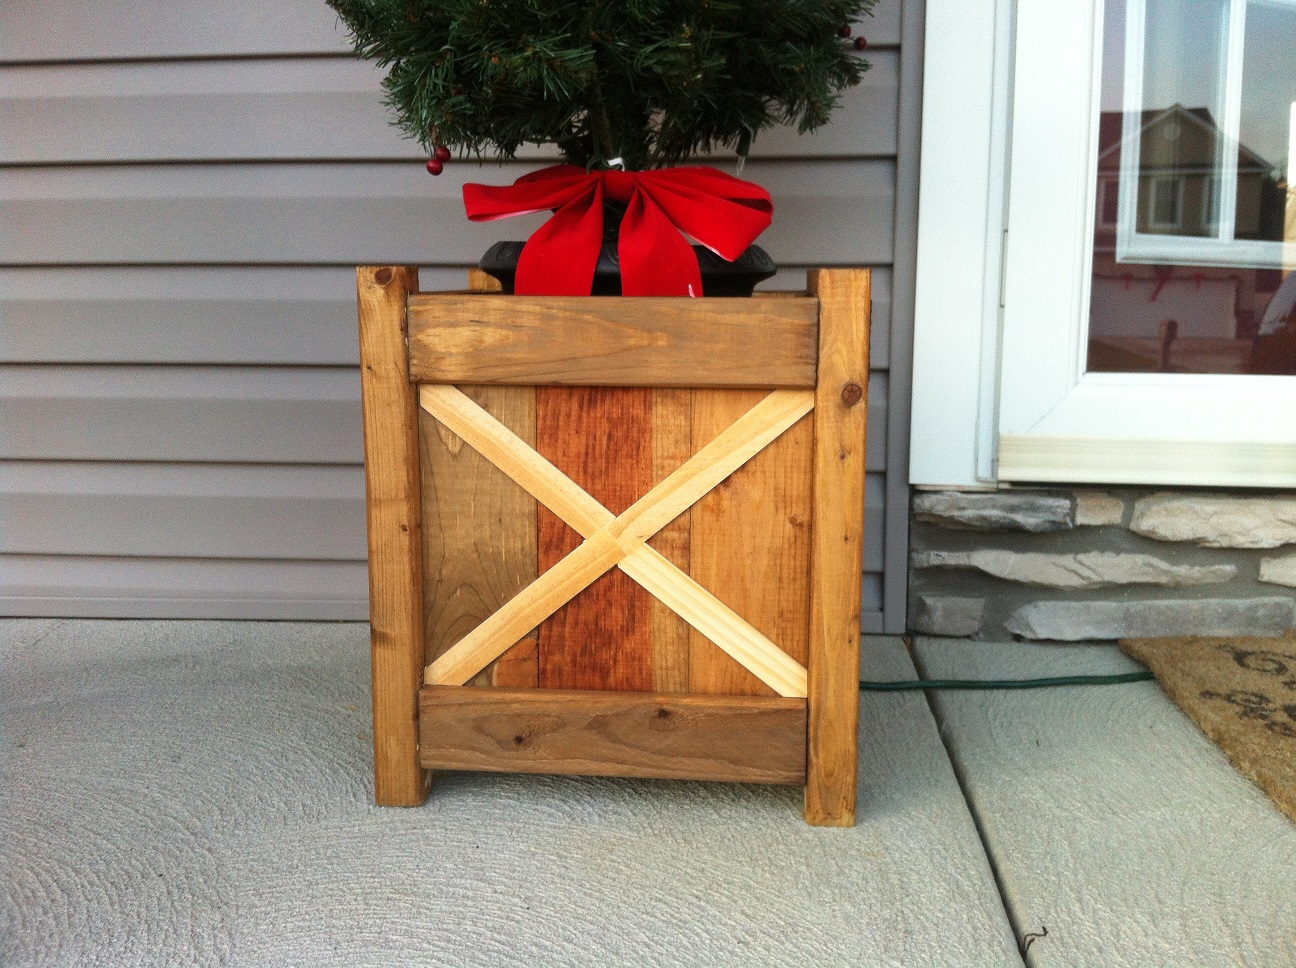
I built these out of necessity to keep my tipsy Christmas decorations from blowing over. The last couple years I spent a lot of time picking these trees up off the ground. I like how they turned out and were relatively easy to build.
I was excited I got to use my Kreg Jig for the first time, which looked more difficult to use than it actually was. Although these are cedar planters I used all pine from big box orange. Some leftover from the farmhouse queen bed I built and the rest I purchased.
The finish didn't turn out as grey as I would have hoped using the steel wool and vinegar, but I still like the aged look. I added the "x" detail in the front afterward and instead of staining my wife thought it looked better natural. Either way I would have been happy. I will be able to use these year round in some capacity.
Built from Plan(s)
Estimated Cost
I used some scrap and some new, but these cost me about $15 each
Estimated Time Investment
Afternoon Project (3-6 Hours)
Finish Used
Steel Wool and Vinegar followed by Thompsons Water Seal
Recommended Skill Level
Beginner
Entry Level Workbench

Building a workbench seems to be a rite of passage for most serious woodworkers. The Entry Level Workbench shown here is a collaboration between myself and Kevin at Kev's Woodworks. I've detailed the design while Kevin and his son built the workbench as a father/son project.
All details including dimensions, parts list, tool list, and a full cost breakdown are included in the link if you would like to build your own bench.


Estimated Cost
$1400
Estimated Time Investment
Week Long Project (20 Hours or More)
Finish Used
Paint for base
Recommended Skill Level
Intermediate
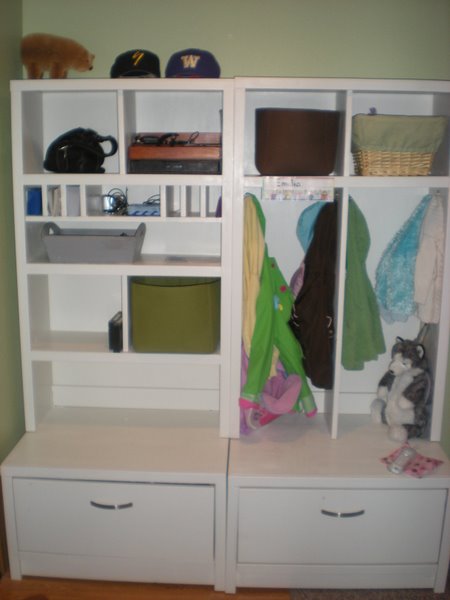
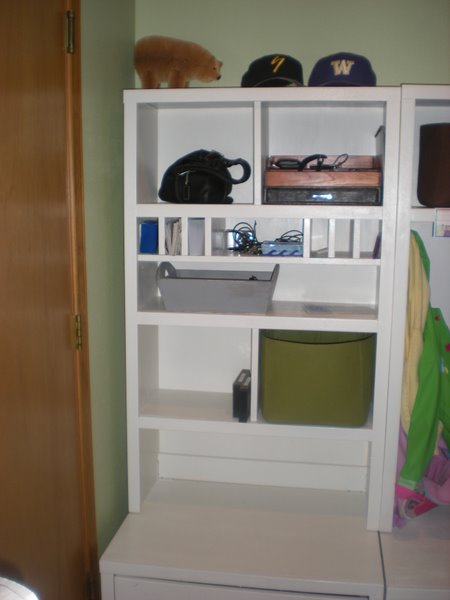
Entry Bench

I search many DIY entry benches and ultimately chose Ana White's, it was perfect what what we needed. Thanks for the vid, plans, post and tips that helped me build it. I'm currently browsing your other projects for the next one. Thanks so much
Built from Plan(s)
Comments
Fri, 12/16/2022 - 13:11
Wonderful bench!
This looks fantastic, thank you so much for sharing, can't wait to see your next project!
Teal Dresser
This was our last furniture build to complete our DIY bedroom makeover. We have a small space, so the dimensions of the Beach Cottage Dresser were perfect. We used mostly spruce, because we were going to paint the project. We used leftover accent paint from the walls and stained the top to match to rest of the furniture we've built. This was our third project.
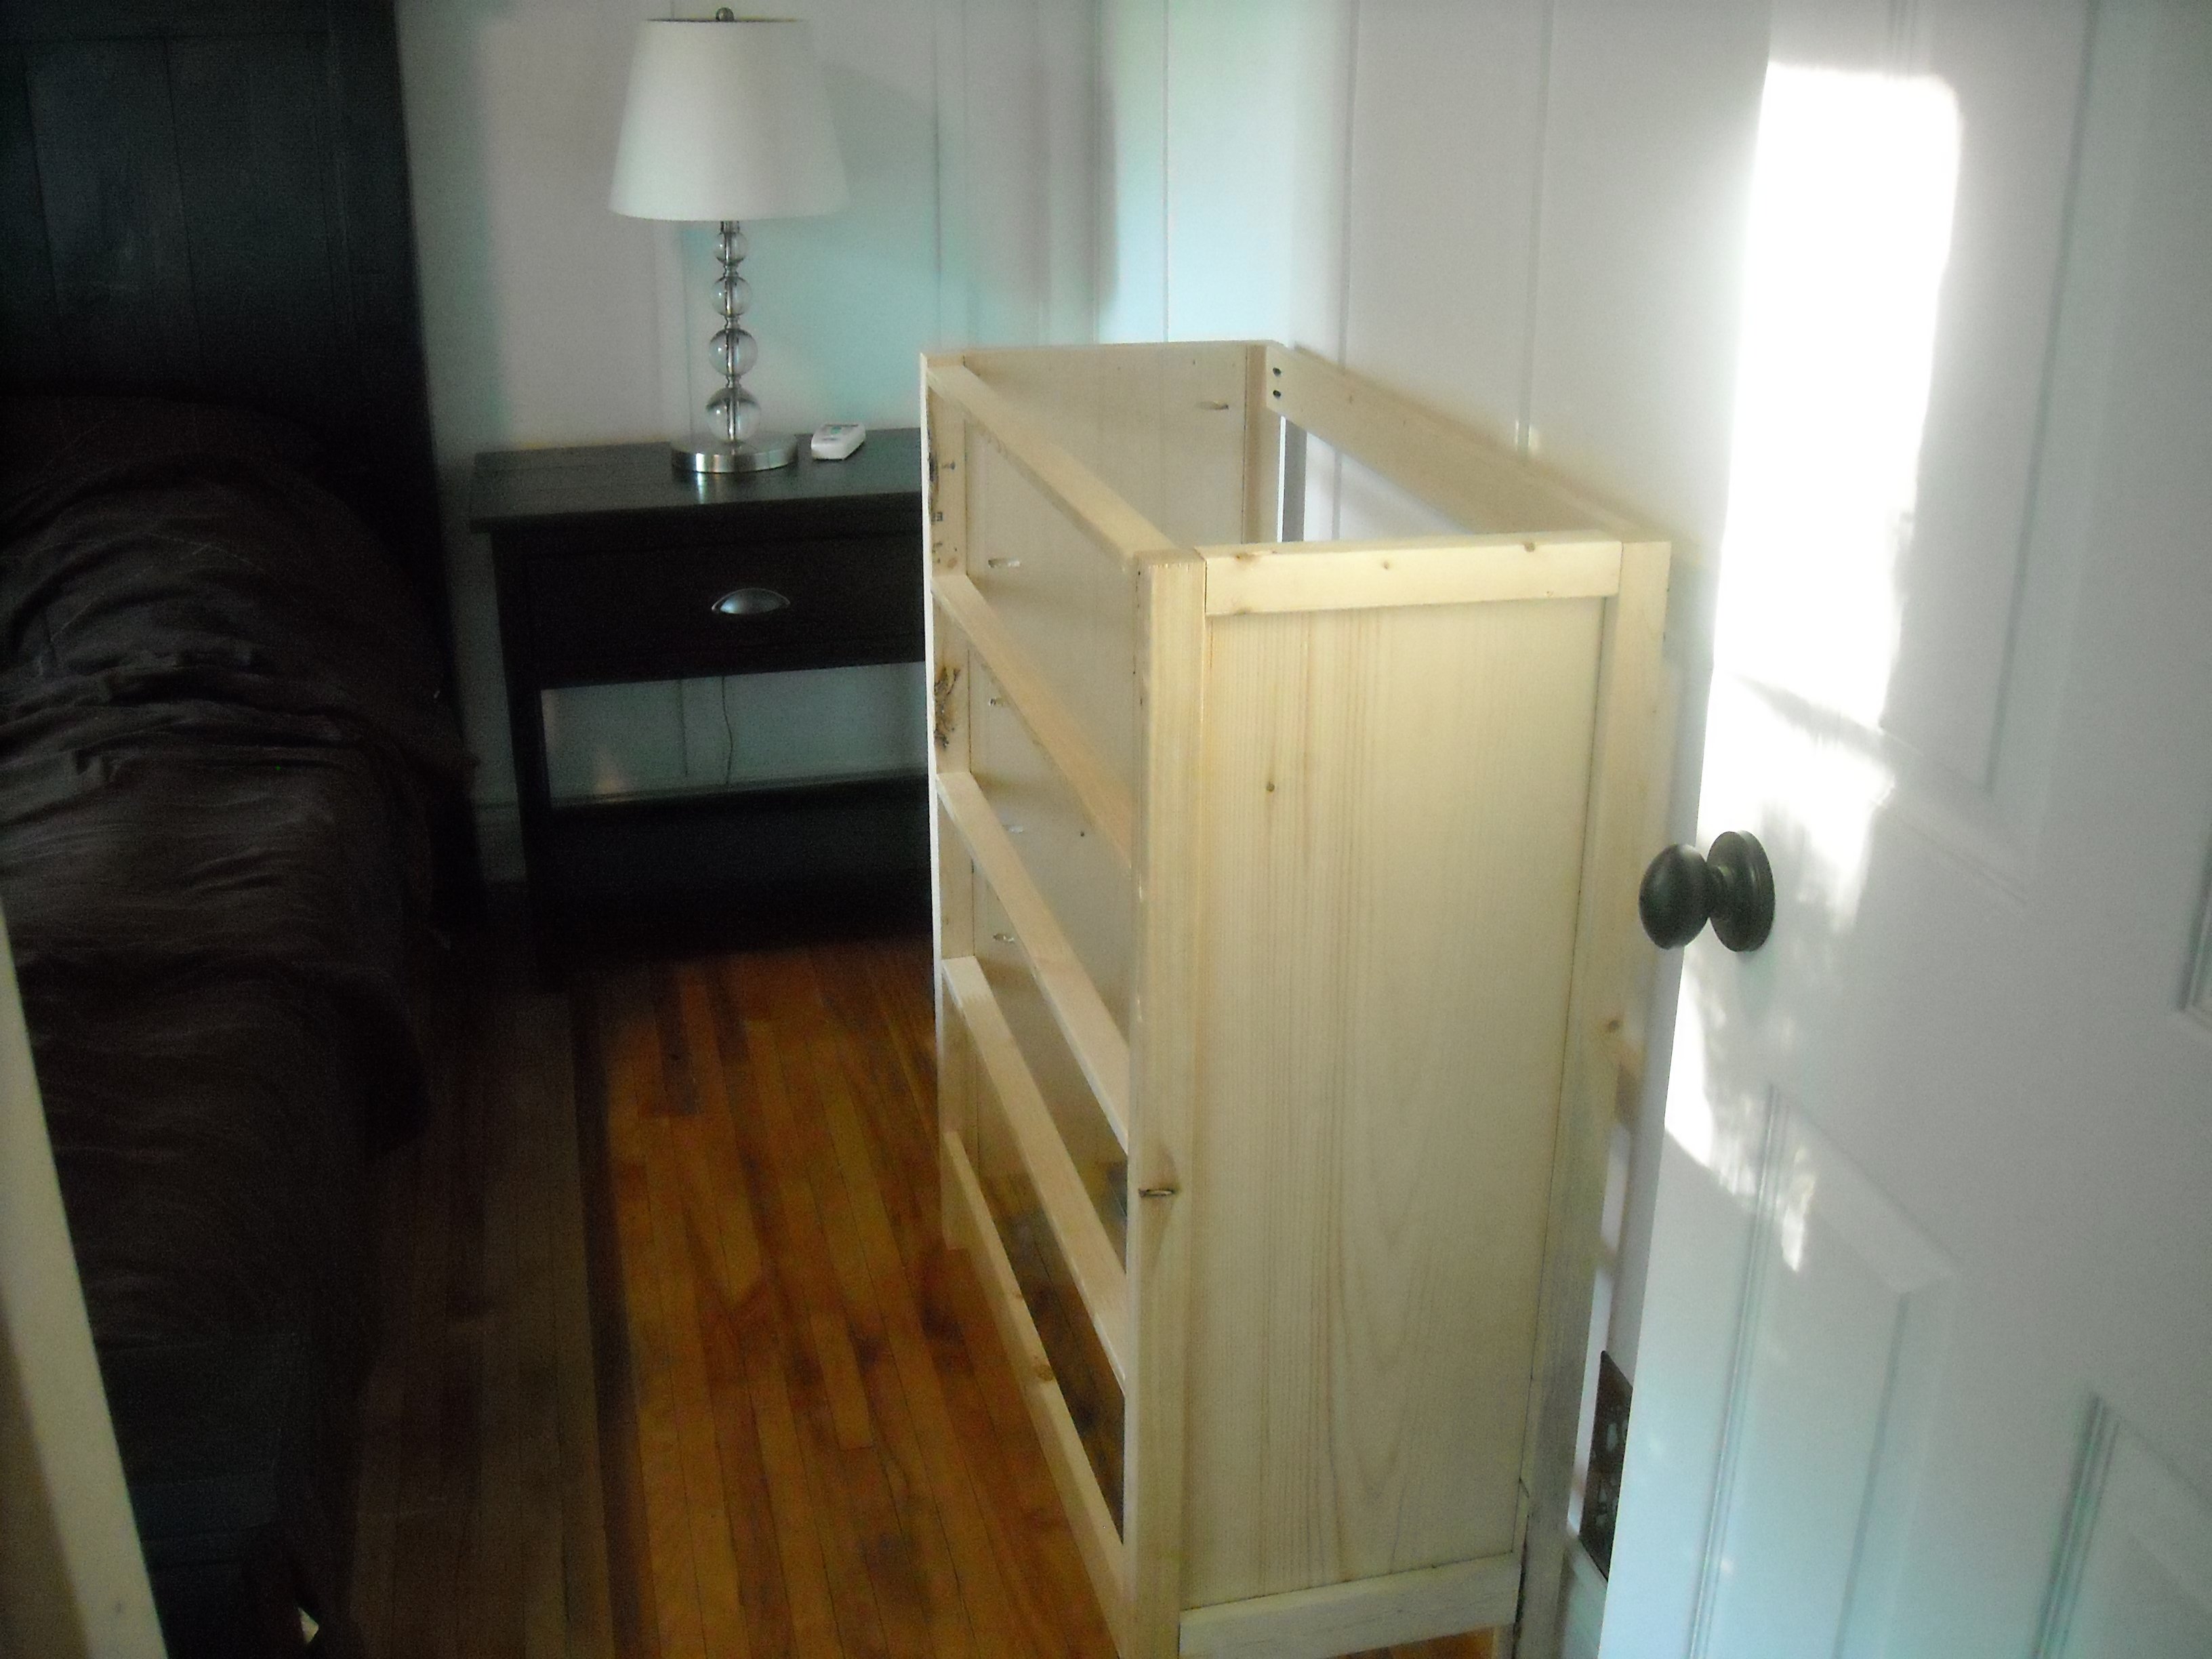
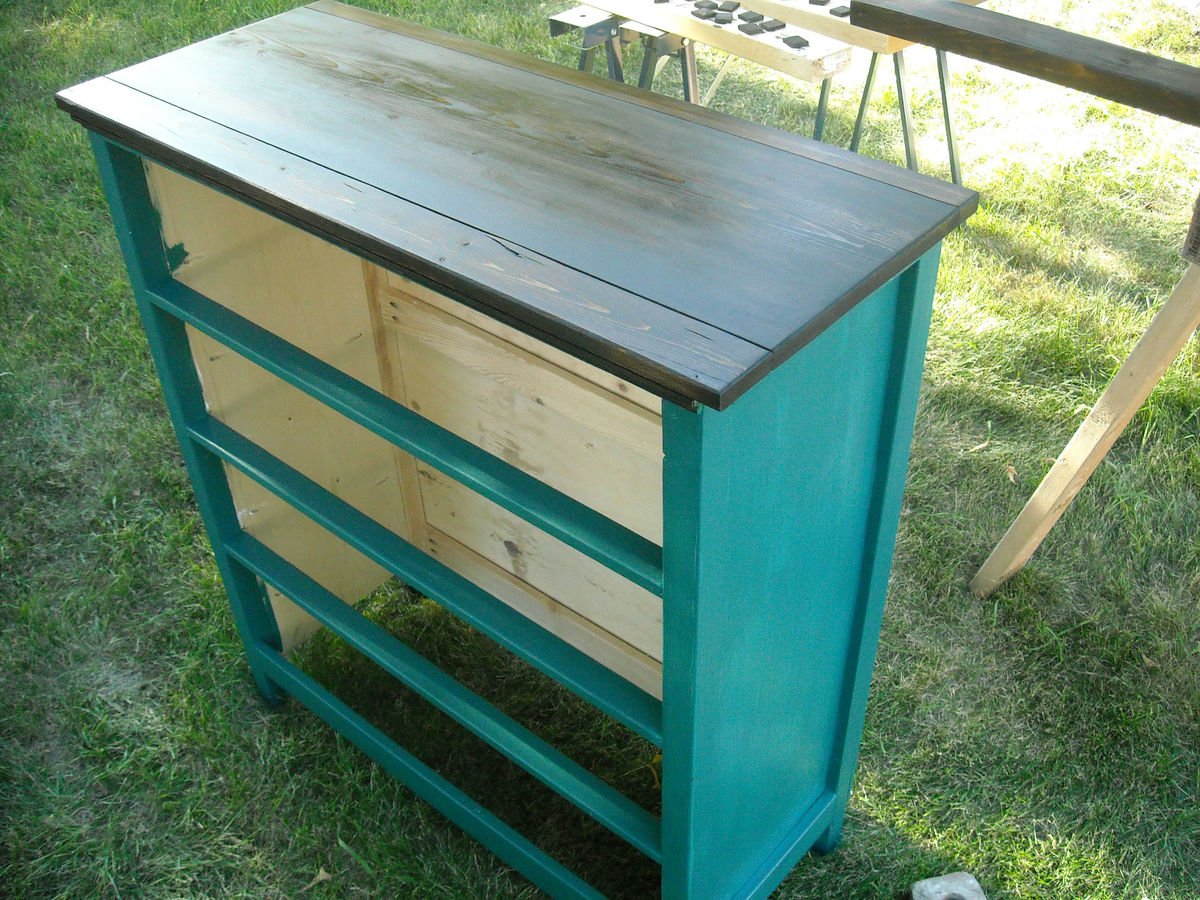
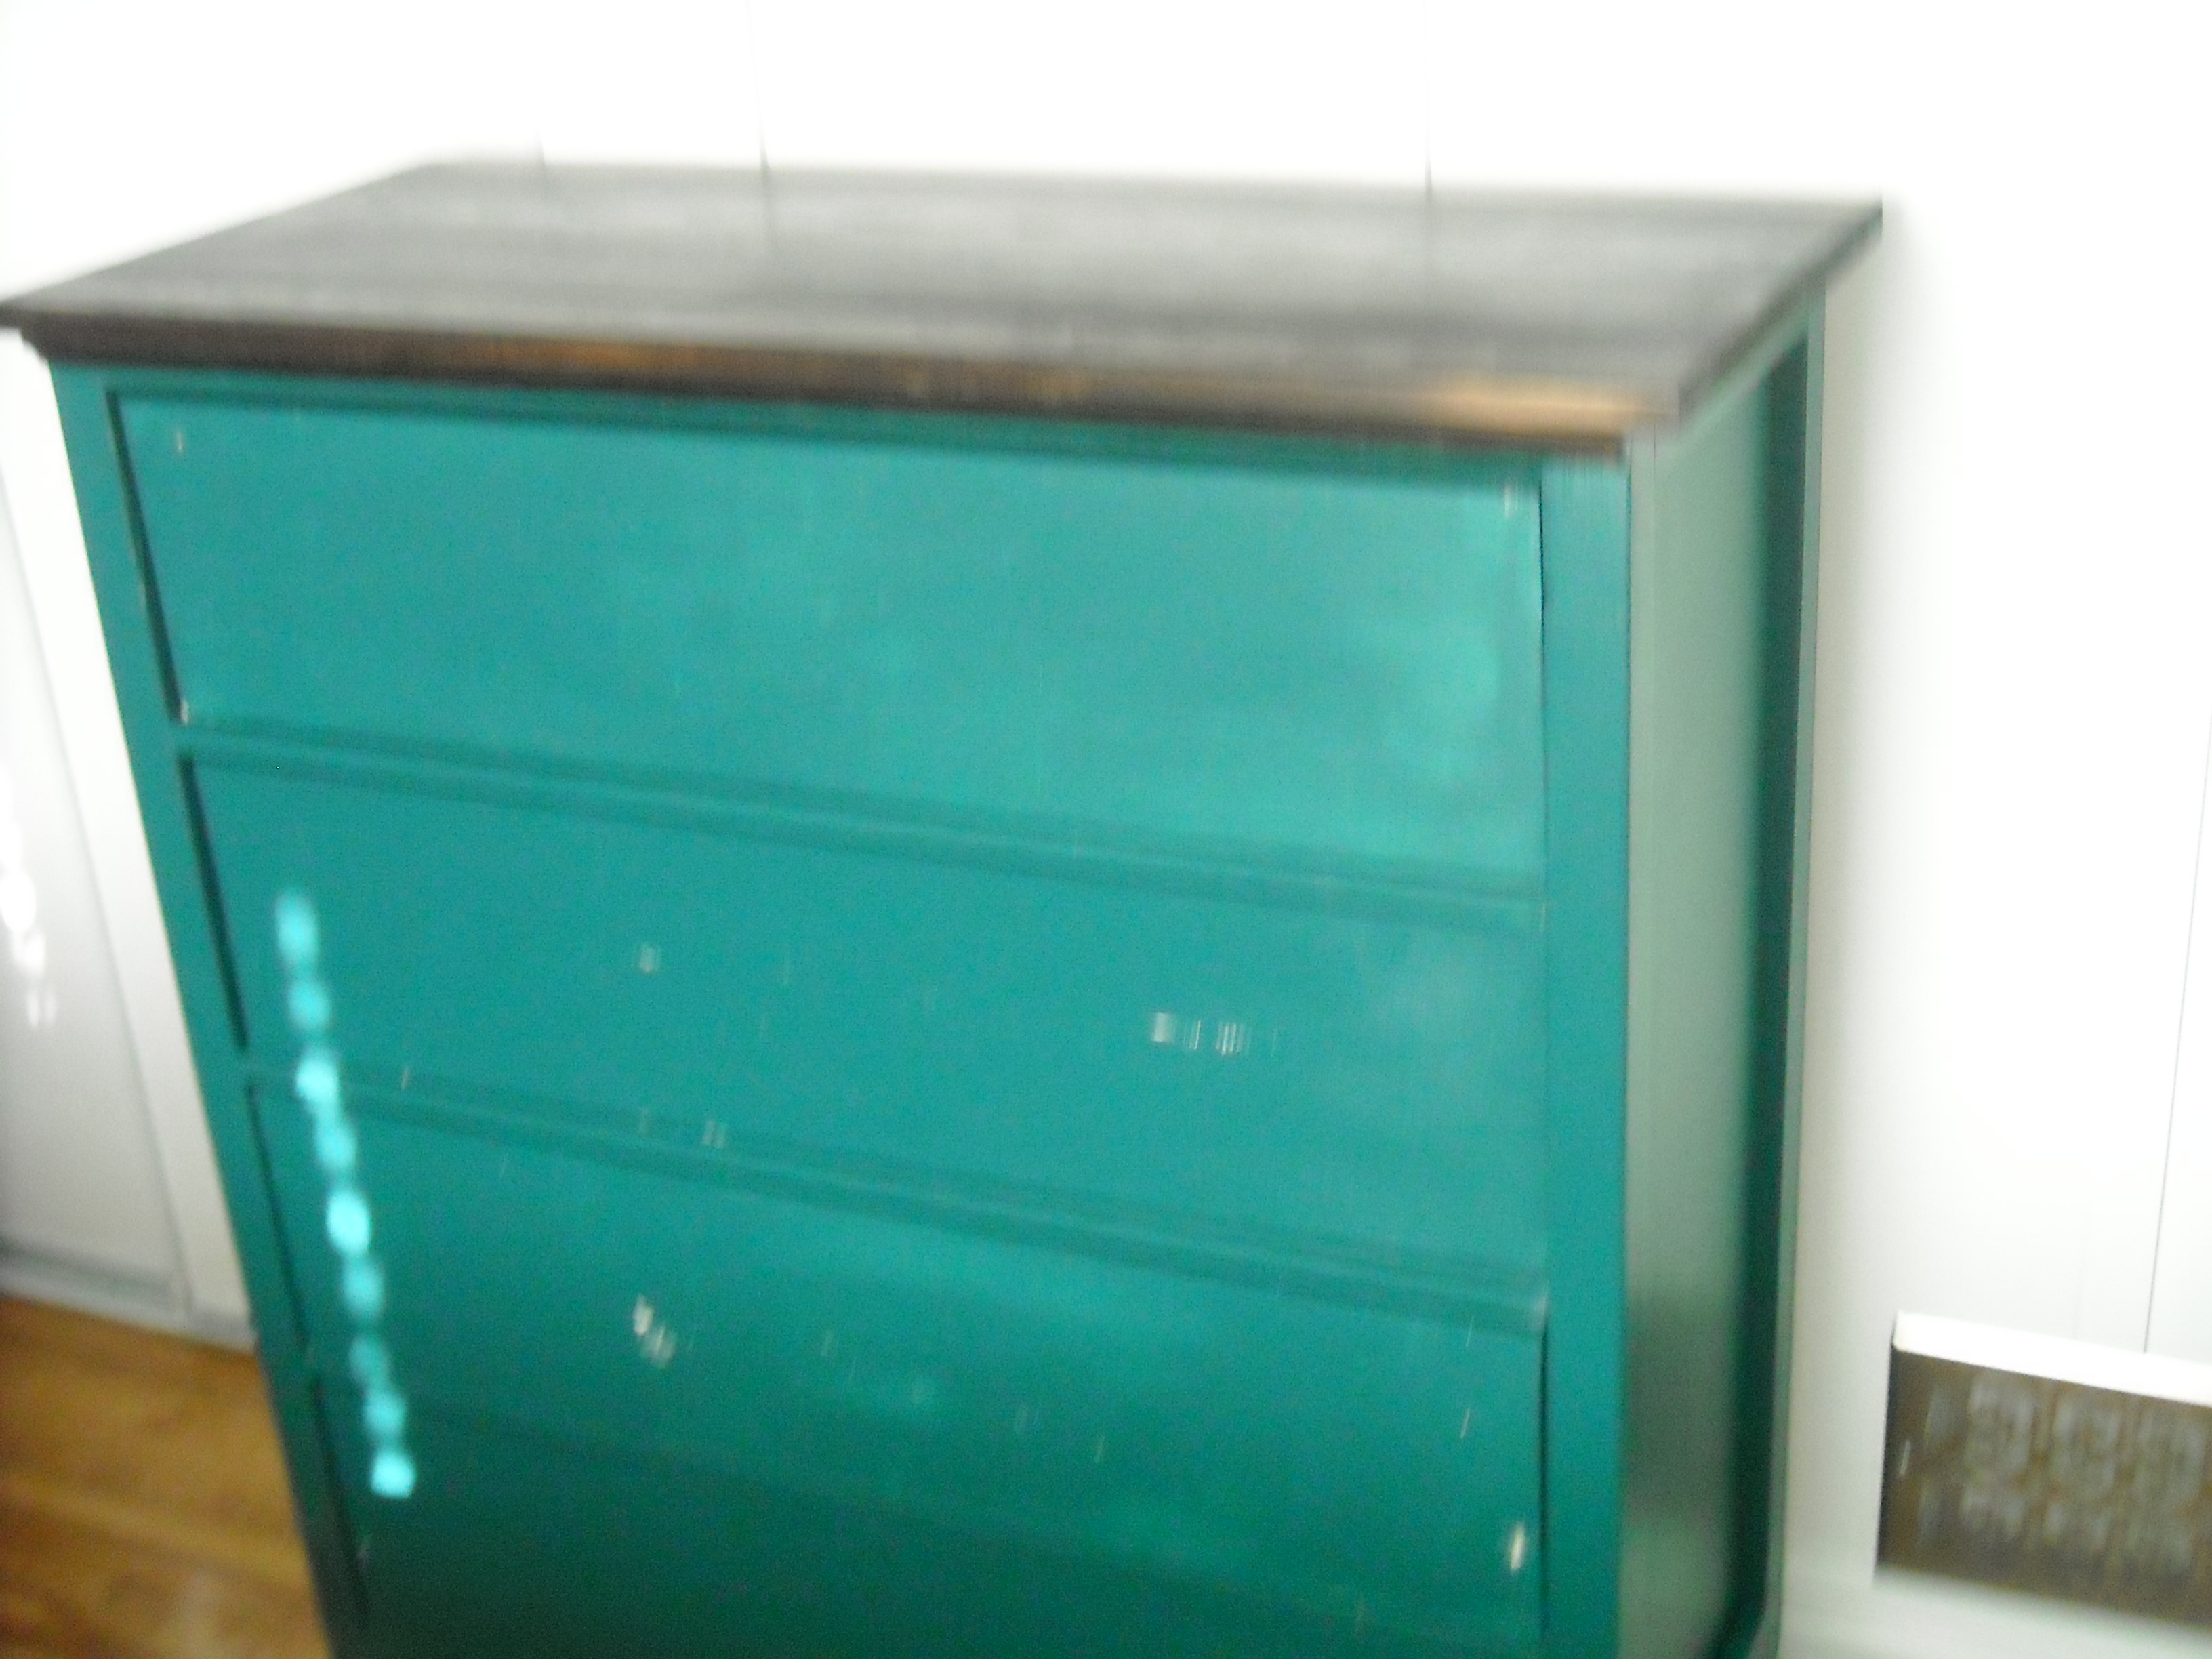
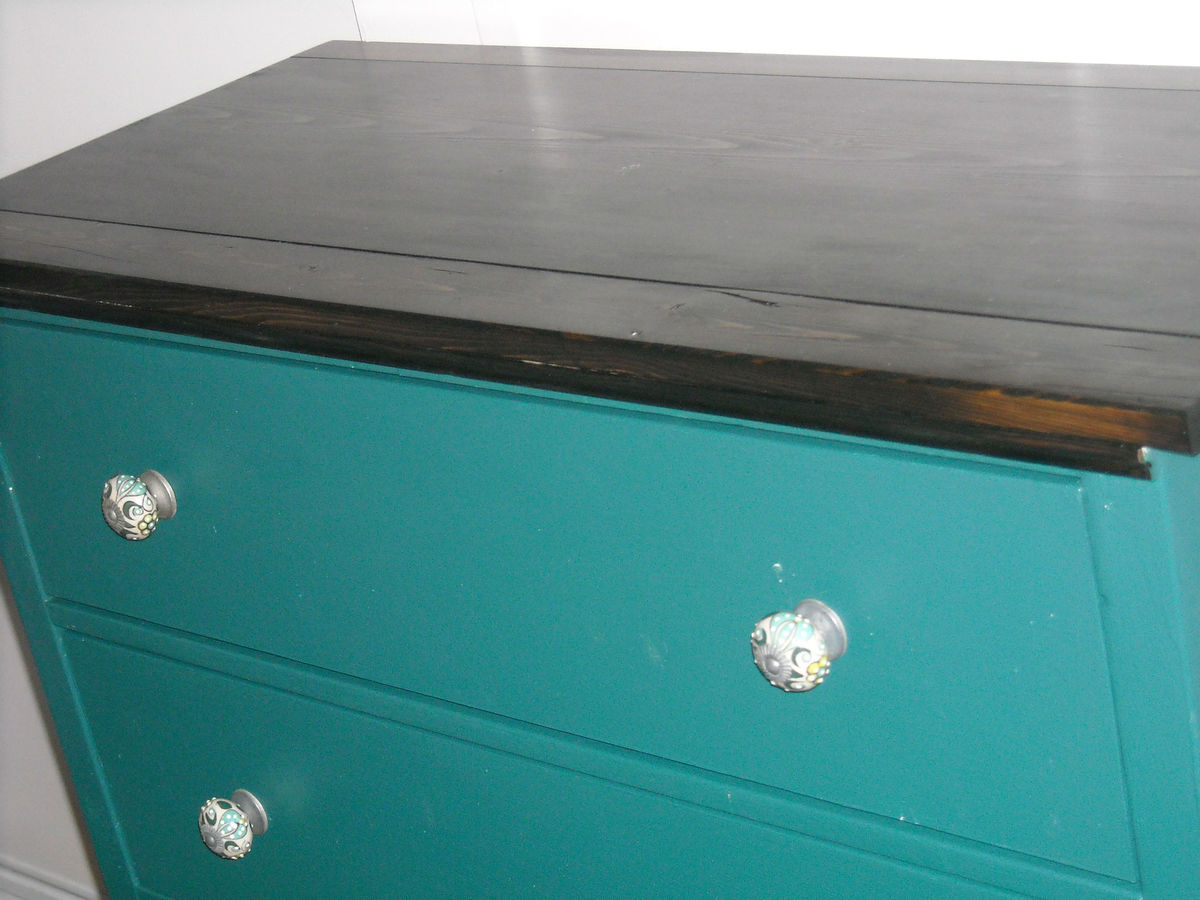

Built from Plan(s)
Estimated Cost
$160.00
Estimated Time Investment
Weekend Project (10-20 Hours)
Finish Used
We stained the top with Dark Walnut, and painted the rest with two coats of Benjamin Moore Blue Oasis.
Recommended Skill Level
Beginner
Comments
Ana White Admin
Wed, 10/19/2022 - 08:30
Perfection!
Love this as blanket storage!