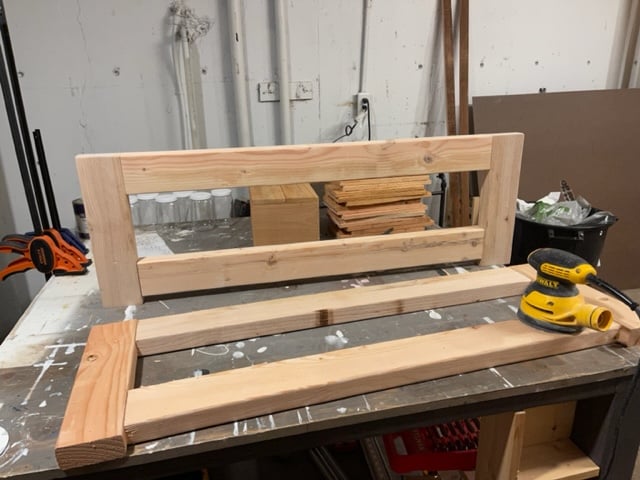
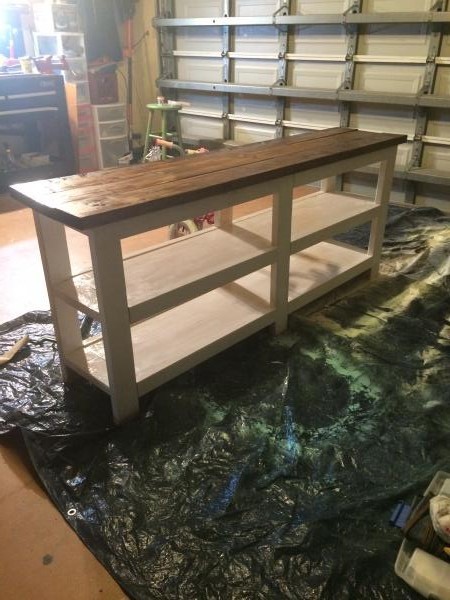
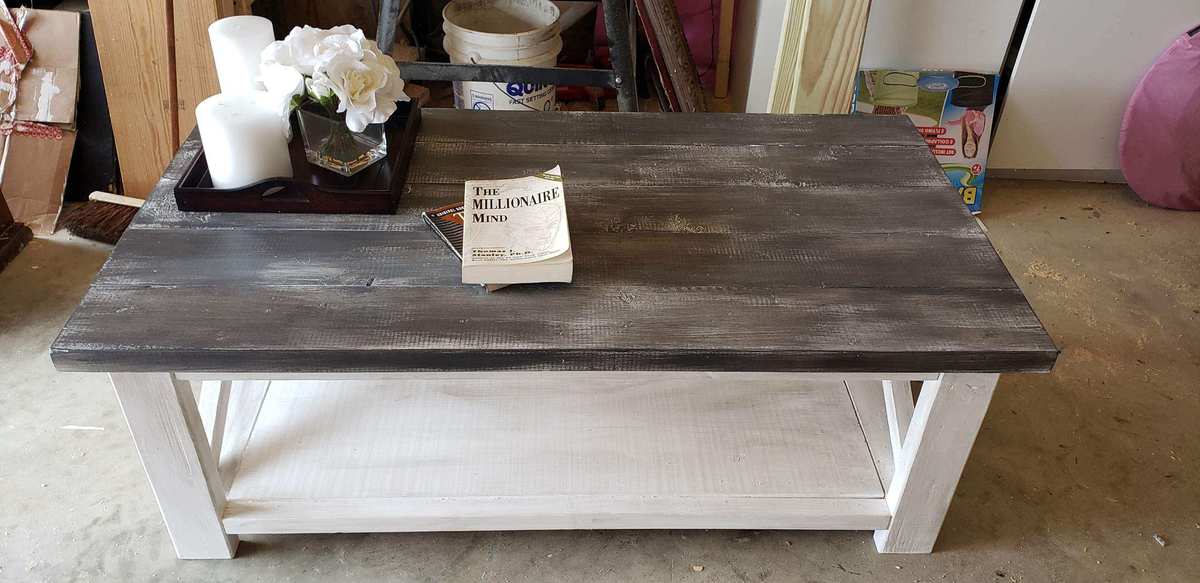
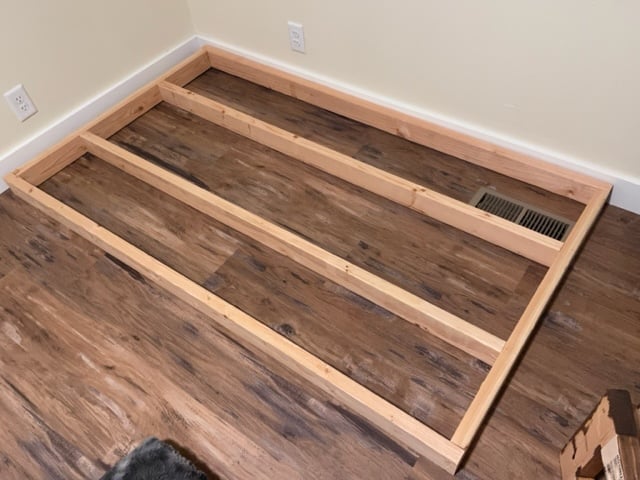
Community Brag Posts

Shoe Dresser (smaller to fit our hall)

Submitted by Anonymous (not verified) on Sun, 08/07/2016 - 13:02

Loved a shoe cabinet at Mobler Furniture, but hated the 300 dollar price.

Figured Ana would have a plan: She Did. We used the Shoe Dresser plans but I built the gables in one piece to eliminate the need for separate feet. The overall length is only 38 inches. I built it counter height.

Because we used wood that we had laying around from previous projects, the drawers, and the unit are made of pine, while the top is made of oak. Total cost for the wood was 30 canadian dollars.

Rather than buy catches, I ran an extra support rail under the top, which made attaching the top easy, but also served as a "bump" for the closing door - it adds a satisfying clunk when closing the doors. I did the same for the second door too.

The handles were purchased for a project in our previous house and used here instead.

We used paintbrushable Tremclad matte black for the interior (23 bucks - used less than half the tin.)

We used 1.5 cans of spray Tremclad red enamel for the exterior (8 bucks a tin)

We hit it all with two coats of Zinsser sealer first  - 14 bucks, used half. 

Total hit was well under a hundred bucks.

Took me a couple days to work out the details, a day to construct, and about three days to paint, one for the undercoat, one for the black, one for the red.


Built from Plan(s)
Estimated Cost
Under a 100 canadian dollars - hard to be precise because we used stuff from other projects.
Estimated Time Investment
Week Long Project (20 Hours or More)
Finish Used
I always hand sand my stuff. I use 80 grit wrapped around a block of oak and sand til i'm happy. then i go to 120, then jump to 220. i hit it with zinnser sealer, sanded with 220, and did another coat of sealer. more 220 sanding. the inside was brush painted, two coats of Tremclad Matte Black rust enamel. The outside was sprayed with two cans of Tremclad Red Rust enamel.
Recommended Skill Level
Beginner

Modern adirondack chair

Submitted by ksymon77 on Mon, 05/25/2020 - 08:16

Ana thank you for these plans! My second ever woodworking project and love adirondack chairs.
Perfect for my small Brooklyn backyard :)

Estimated Time Investment
Afternoon Project (3-6 Hours)
Recommended Skill Level
Beginner

Comments

Farmhouse Hall Tree

Submitted by Anonymous (not verified) on Mon, 02/12/2024 - 09:04

Modified the top of Ana’s plan for a Hall Tree and very happy with how it turned out.

Steve Nadler, High Springs Florida

Built from Plan(s)

FREE workbench

When I bought our house the previous owner had asked me if I wanted him to leave all of the scrap wood he had beside the house I said "Sure"

Looking at the pile I was amazed at how much was actually there.

This workbench is from the Mastercraft Essential Workshop book. I built one of these when I was younger with two sheets of plywood for a top and a back on the shelf so nothing falls out. My lack of sheet good scraps forced me to modify the design. Fits nicely into my mini shed workshop.

Note that the picture doesn't show the front 2x4 under the plywood top.

UPDATE:
My office cleaned out some old junk and gave me these modular drawers. I new they would make an excellent storage system for my workbench. Overkill...yes...but they were free so I couldn't resist.

Estimated Time Investment
Afternoon Project (3-6 Hours)
Finish Used
None. Other than the weathering the wood took outside.
Recommended Skill Level
Starter Project

Farmhouse Table

Submitted by crozette on Sat, 05/10/2014 - 10:15

Modified to remove the end braces so that chairs can be pushed in on the ends of the table. Full report on my blog!

Estimated Cost
$175
Estimated Time Investment
Weekend Project (10-20 Hours)
Finish Used
Used ZAR Modern Walnut stain and Clear Satin poly.
Recommended Skill Level
Beginner

Workbench console turned desk

I modified the work bench console to make a standing desk.  I have a lot of textbooks so I made the desk 63 inches by 29 inches, using 1×6s instead of 2×4s.  I also added a drawer to the front, and eventually I'll finish a back lift up compartment for storage of firearms.  Since the desk is bigger I added a cross board in the legs for extra stability.  I also made the shelf a lot higher to store textbooks I wasn't using in the moment.  The way it's built I could use it as a console or bar table in the future.  The stain is miniwax dark walnut with a polyethlyene sealant.  Hope you like it!


The website keeps rotating the pictures, sorry. 

Built from Plan(s)
Estimated Cost
$150
Estimated Time Investment
Weekend Project (10-20 Hours)
Recommended Skill Level
Intermediate

Comments

CaleanWsh

Mon, 05/18/2020 - 10:07

How did you do this? Plans would be nice :) (Not going to comment on having to stand on my head to see some of the pics.... Oops...)

Haley Platform Bed and Headboard

Submitted by nelson6889 on Tue, 05/26/2020 - 07:50

First time building a bed. The plans were spot on and easy to follow. Used my left over flooring to make the headboard planks.

Estimated Cost
200
Estimated Time Investment
Weekend Project (10-20 Hours)
Finish Used
Painted with semi gloss White
Recommended Skill Level
Intermediate

Channing Desk

Awesome desk made from the Channing Desk plans on Ana-White.com! I had such a great time building this desk with my girlfriend. It was our first of many builds together.

thanks again ana-white.com

Estimated Cost
$110-$125
Estimated Time Investment
Weekend Project (10-20 Hours)
Finish Used
Minwax Jacobean (2 Coats) with Minwax High Gloss Super Polyurethane (2 coats). I sanded the polyurethane with a 180 grit block between coats and let dry overnight.
Recommended Skill Level
Beginner

Potting Bench

Submitted by fifi_momo on Mon, 05/12/2014 - 19:45

I adjusted the depth of the bench to accomodate a bath vanity top with sink (from the Habitat reStore). The width was adjusted to allow for 2 feet of workspace to the left of the sink. The overall height was adjusted to my wife's height. The front legs were made longer than the rear to account for the slope of the yard location.

Built from Plan(s)
Estimated Cost
$200
Estimated Time Investment
Weekend Project (10-20 Hours)
Finish Used
Deck oil
Recommended Skill Level
Beginner

Stained red oak toybox

Submitted by Anonymous (not verified) on Sun, 08/14/2016 - 11:29

Thank you very much for this marvelous plan and idea. I built one for each family of grandchildren and love the finger-saving torsion hinges and front lid relief. I did end up trying biscuit joints (except for where the 1x2 boards join to the legs) as it left the inside of the box looking cleaner, especially if stained instead of painted.

Built from Plan(s)
Estimated Time Investment
Week Long Project (20 Hours or More)
Finish Used
Minwax Polyshades Pecan combination stain/polyurethane after a pre-stain treatment.
Recommended Skill Level
Beginner

Benchright Table and Farmhouse Bench

Great plans and a great build. I used 4x4’s for the legs and decided to go with the Farmhouse Bench instead. The color I went with is Weathered Grey. I applied it with a brush and immediately wipes it off with a clean rag, then 2 coats of poly to finish it off.

Estimated Cost
$200
Estimated Time Investment
Weekend Project (10-20 Hours)
Finish Used
Weathered Grey Oil Based Stain with Semi-gloss Poly
Recommended Skill Level
Intermediate

Comments

Shoe Shrine Cabinet

Submitted by Anonymous (not verified) on Sat, 02/17/2024 - 09:58

I made 2 shoe shrines then decided to add a cabinet between them for long dresses . Was going to put cabinet doors on the shoe shrines but decided it looked good displaying her shoes. I followed the shoe shrine plans from Ana's web site I found the plans easy to follow although once I was finished I realized it would have been much easy to make the outside frames first and then square them rather then build the insides and then put the outsides on last. It's challenging to keep them square when following the plans . The whole project was allot more work then I anticipated I used my sprayer to paint it I filled all the pocket holes and used wood filler to make the cubbies all one seamless look. Then added crown molding to the top. The doors are the faker shaker doors . I have made real shaker doors on other projects I cant tell the difference between the fakers and the real shakers . Happy with how it came out.


Mark DePonzi

Built from Plan(s)

12 foot long cedar Providence Buffet

My mom asked me to build her a buffet to match the Provence style dining table I built her a few months ago. I used the Providence Table plan as a jumping off point. Here’s a quick breakdown of the changes I made to the plan:
• Supply list – 3 2x6x12′ boards for the top
2 2x6x10′ boards for the shelf
5 2x4x8 boards for the legs and supports
• Design – I cut the legs to the same dimension, but flipped the legs 90 degrees so the profile matched the table’s. I placed the leg support 4″ from the ground, again to match the dining table. I added a shelf by drilling the 10′ 2×6′s down onto the leg supports, and used scrap 2×4′s under the center to keep it from dipping. I nixed the center top support, and decided to keep the cross supports at the same angles and length, but doubled them and used scrap 2×4 cut at 18″ wide (the width of the buffet) to span the three boards so the center wouldn’t dip or warp over time.

We chose cedar to match the table and cut down on chemicals, but it could cost a lot less if you used untreated pine for indoor use. Either way, $120 for a twelve foot long buffet isn't too shabby!

Built from Plan(s)
Estimated Cost
$120
Estimated Time Investment
An Hour or Two (0-2 Hours)
Finish Used
left unfinished, my mom will probably sand and use deck stain on it.
Recommended Skill Level
Intermediate

Comments

Patriotic Picnic Table for Kids

I built this for a silent auction at my school. My students chose the theme. Each of the kids in my class signed the white legs. Super easy to put together after following the plans to cut each piece of lumber. The painting was another story thanks to those stars!

Built from Plan(s)
Estimated Time Investment
Afternoon Project (3-6 Hours)
Finish Used
leftover paint and varnish
Recommended Skill Level
Beginner

Comments

AP - Play Kitchen

Submitted by Anonymous (not verified) on Sun, 05/31/2020 - 19:20

Loved the plans from the site Ana! I got inspired seeing all the lovely play kitchens that everyone had created! Thought I'd share the one I've made for my little one as well, she loves it!

Farm Table Sewing Base

Submitted by fallon on Wed, 07/25/2012 - 18:52

We just slightly modified the plan to accommodate our really great industrial sewing table base.

Estimated Time Investment
Afternoon Project (3-6 Hours)
Finish Used
First coat - Glidden Natural Linen
Stain - MinWax Classic Gray 270 (one person brushes while the other wipes it right off)
A little sanding for some aging
Several Coats of MinWax - Polycrylic, satin finish (sand between each coat)
Recommended Skill Level
Beginner

Comments

Great weekend project...the "love swing"

Submitted by Don Ellery on Mon, 05/19/2014 - 15:49

A great weekend project...the "love swing"! I used the plan from Ana for the swing seat and added two arm rests from left over 1x6, rounded them off and sanded.

I cobbled together an A-frame to hang everything, made from five 8 foot 4x4s and two 8 foot 2x6s laminated together for the stretcher. Assembled with 1/2" galvanized carriage bolts and hung with 1/4" chain.

Definitely going to want a good miter saw for the A-Frame angles (the top ones are a bit tricky to get everything lined up)

Love it! Thanks for another great plan Ana..and of course..Shanty2Chic!

Built from Plan(s)
Estimated Cost
$200 ish..including the A-Frame... the hardware and chain can be pricey!
Estimated Time Investment
Day Project (6-9 Hours)
Finish Used
Behr exterior weatherproofing stain - Chocolate.

Just 2 thin coats, dries fast...second coat can be applied later the same day.
Recommended Skill Level
Beginner

Comments

Carpenters Daughter

Mon, 12/12/2016 - 17:09

Could you please post the plans to build the a frame as well? I really love what you did and would like to copy it! Great Job!

Don Ellery

Wed, 07/19/2017 - 11:31

Hi! I wish I could, but I didn't take any notes on the angles or lengths when I made this and I left it with the house when we moved. 

Sittin', thinkin' and dreamin' bench for my Mermaid Mansion

Submitted by Anonymous (not verified) on Sat, 08/20/2016 - 15:55

I made this bench to replace a sidewalk planter box outside my front door.  The only modifications I made were adding 4- 2x4 supporting legs - you can see them in the first photo.  This just makes the legs a little sturdier and I also added some carriage bolts to give a slight decorative touch as well as to anchor the legs to the frame.  I use a nail gun and some wood glue to secure the 2x4 to the side of the existing leg, and voila!  Thank you for a very easy to understand and follow project, Ana!

Built from Plan(s)
Estimated Cost
$60, wood, screws and stain
Estimated Time Investment
Afternoon Project (3-6 Hours)
Finish Used
Behrs outdoor stain and sealer, semi-transparent colors.
Recommended Skill Level
Beginner
Back