Community Brag Posts
Outdoor Sectional
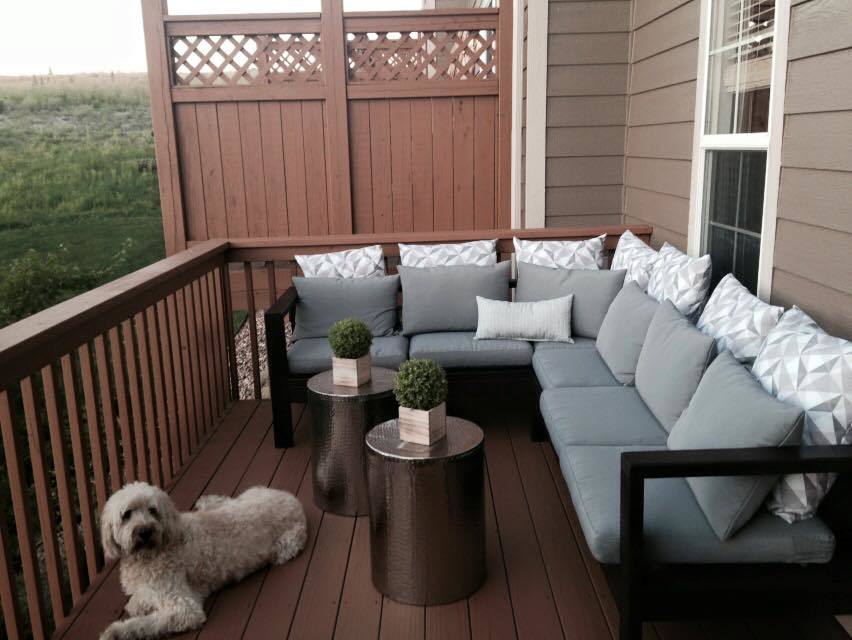
This project took a day to build and about four days to stain with a day of drying in between each coat. Great plans! I love my new couches!
Built from Plan(s)
Estimated Cost
$110- Wood, Douglas Fir studs at Home Depot
$30- Deck Stain, Merlot, Home Depot
$250- Cushions, Hallo, Ikea
$100- Fabric and pillow forms for extra pillows
$30- Deck Stain, Merlot, Home Depot
$250- Cushions, Hallo, Ikea
$100- Fabric and pillow forms for extra pillows
Estimated Time Investment
Day Project (6-9 Hours)
Finish Used
Deck Stain in Merlot Color
Recommended Skill Level
Beginner
Comments
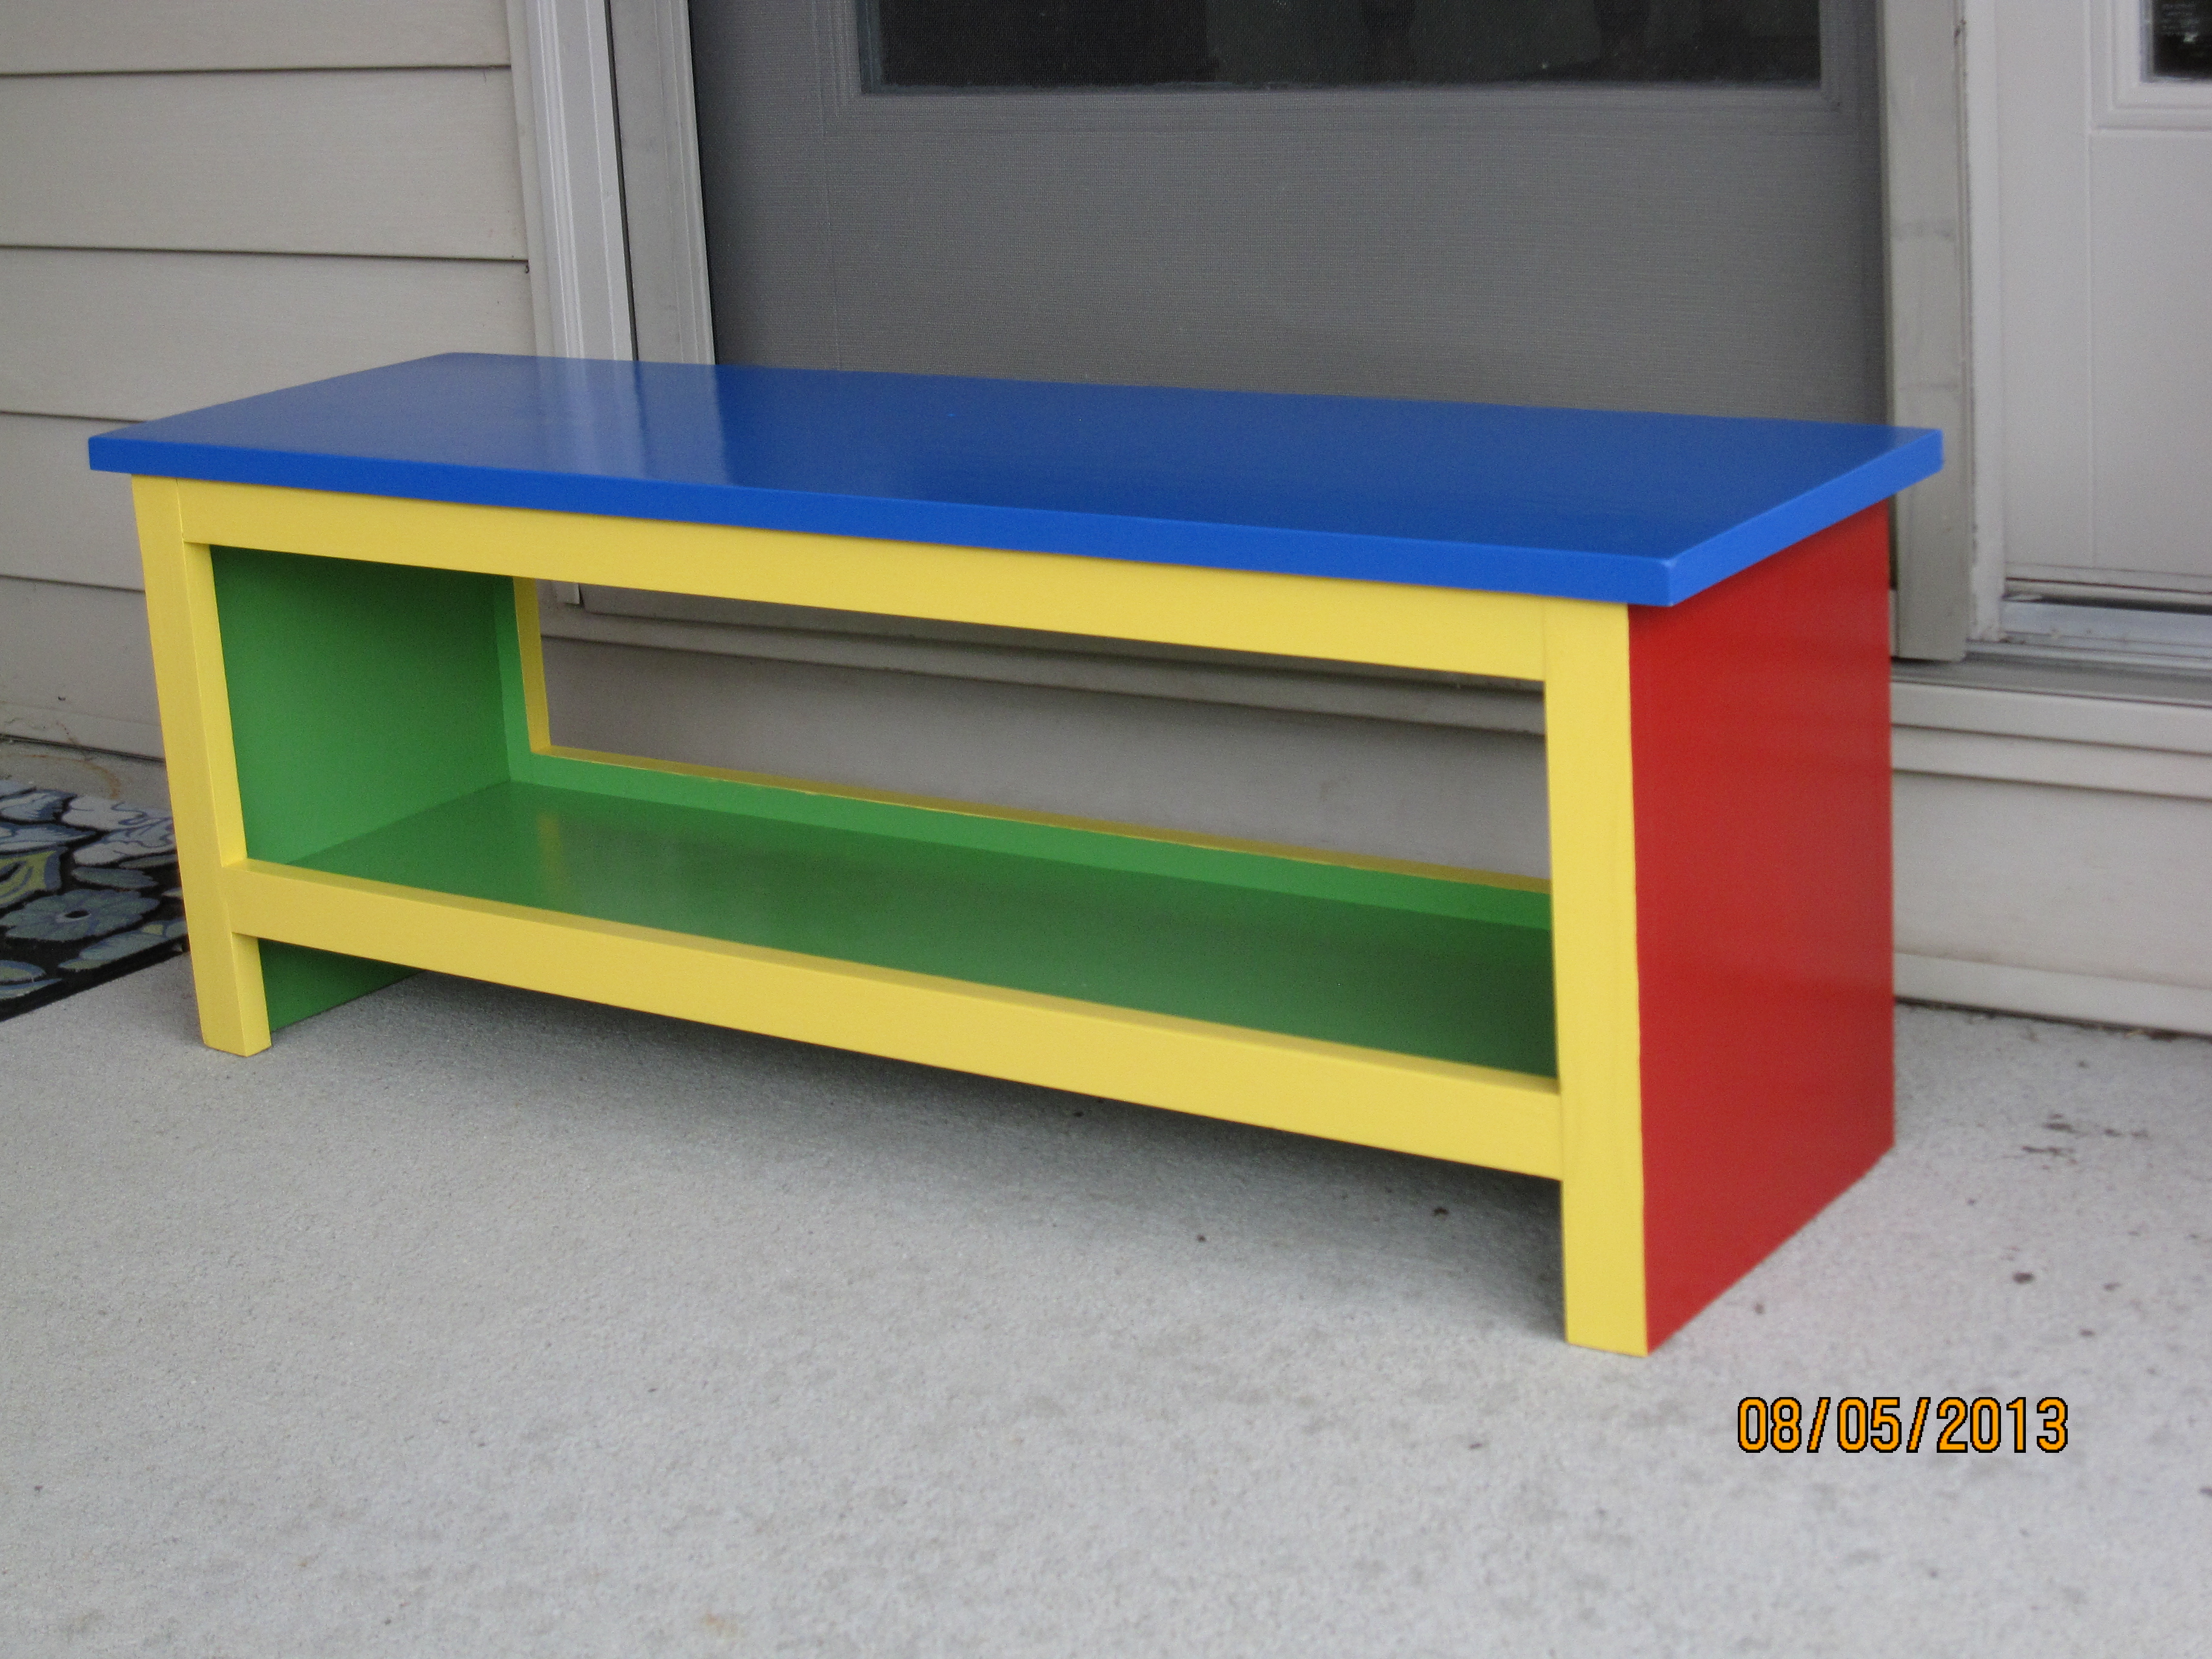
Mudroom Locker & Bench Completed Version
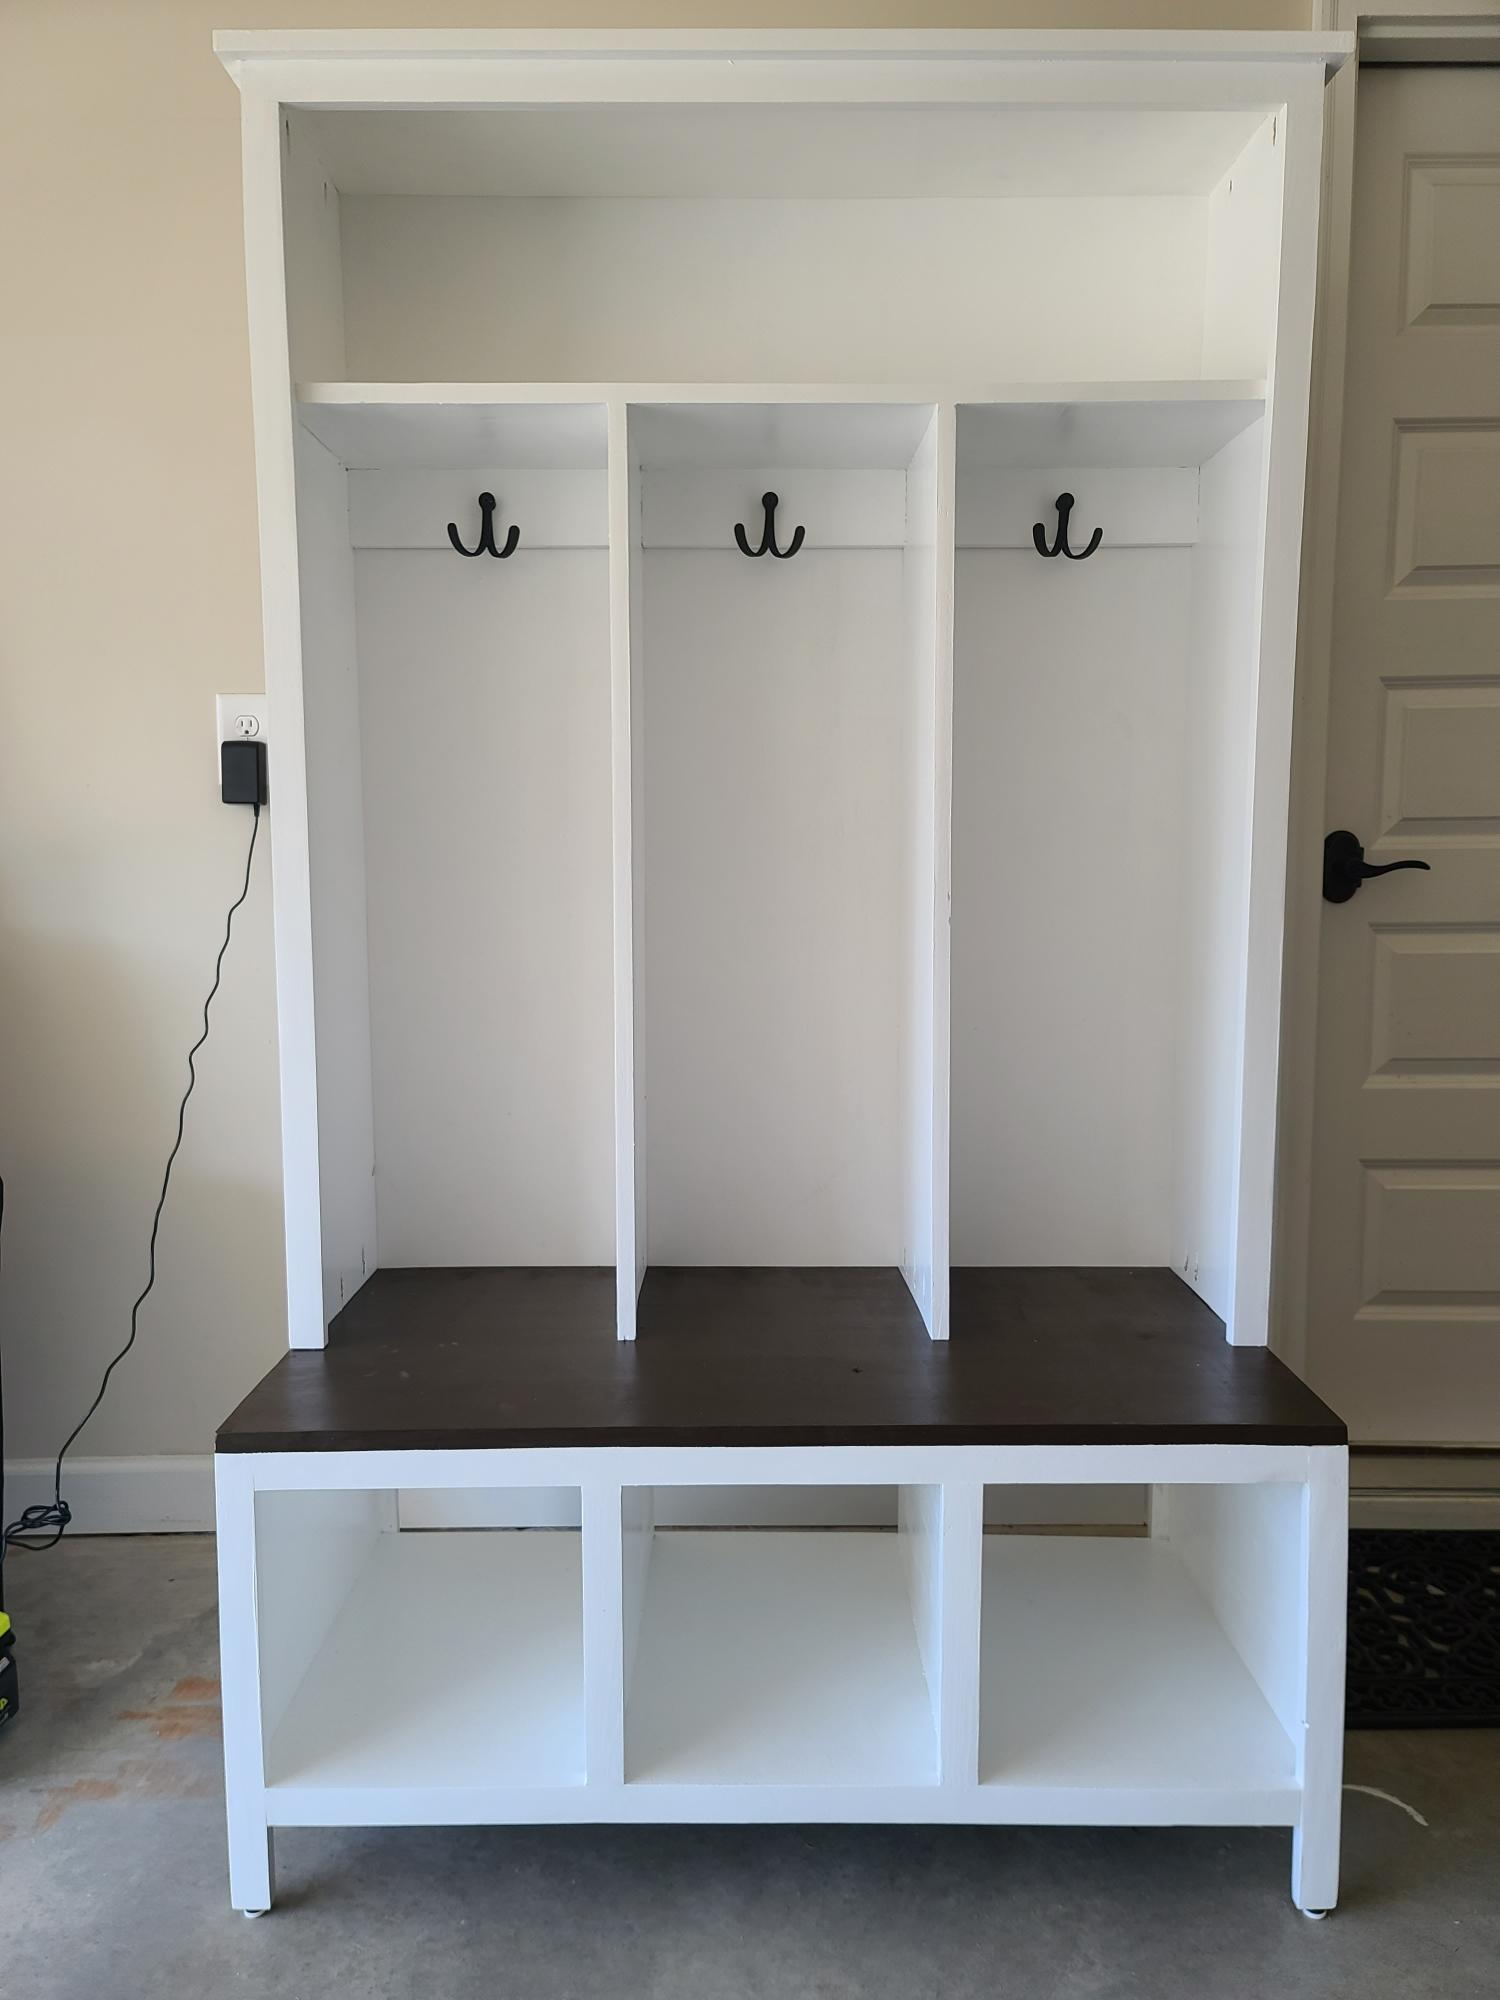
I had previously posted a work in process version, this is the completed project. Very happy with the results of combining the Easy Three Cube Bench and Small Locker Cabinet plans. If I had to change anything, I might widen the dividers to get a little more width, but this suits what we were trying to accomplish.
Learned something on this project, I hate painting! In the future when I know I am going to paint the completed project, I'm going to paint as much as I can before assembling.
Built from Plan(s)
Comments
Super Easy Bench (modified)
We built this bench for the same women's shelter for whom we built the storage table and benches at their request. They wanted a place for the children to come in and remove their shoes. Since it was for children, we modified the height to be the same as the other small benches, 14". Leftover gray primer was used and they requested the same color scheme as the previous build. Therefore the leftover paint from the other project was used plus three coats of semi-gloss Polycrylic. I think the paint brand is Olympic. It was a joint effort between a friend, my husband and I. It was built in an evening, but I put a week long project because of the coats of primer, paint, and top coat with all of the drying time.
Estimated Time Investment
Week Long Project (20 Hours or More)
Recommended Skill Level
Beginner
Comments

Fri, 08/30/2013 - 09:06
Bless your heart. :)
This is great! I love that you are still building things for the shelter! Your bench looks well-built and I am sure it will last them a lifetime.

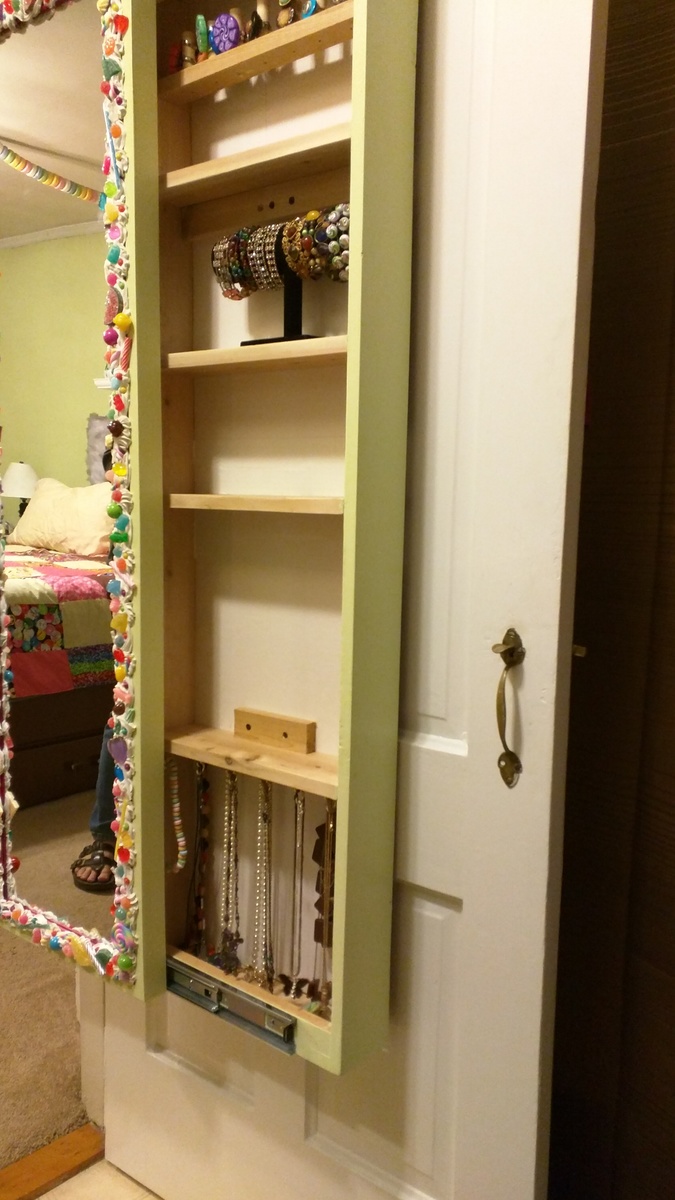
Our Flare!
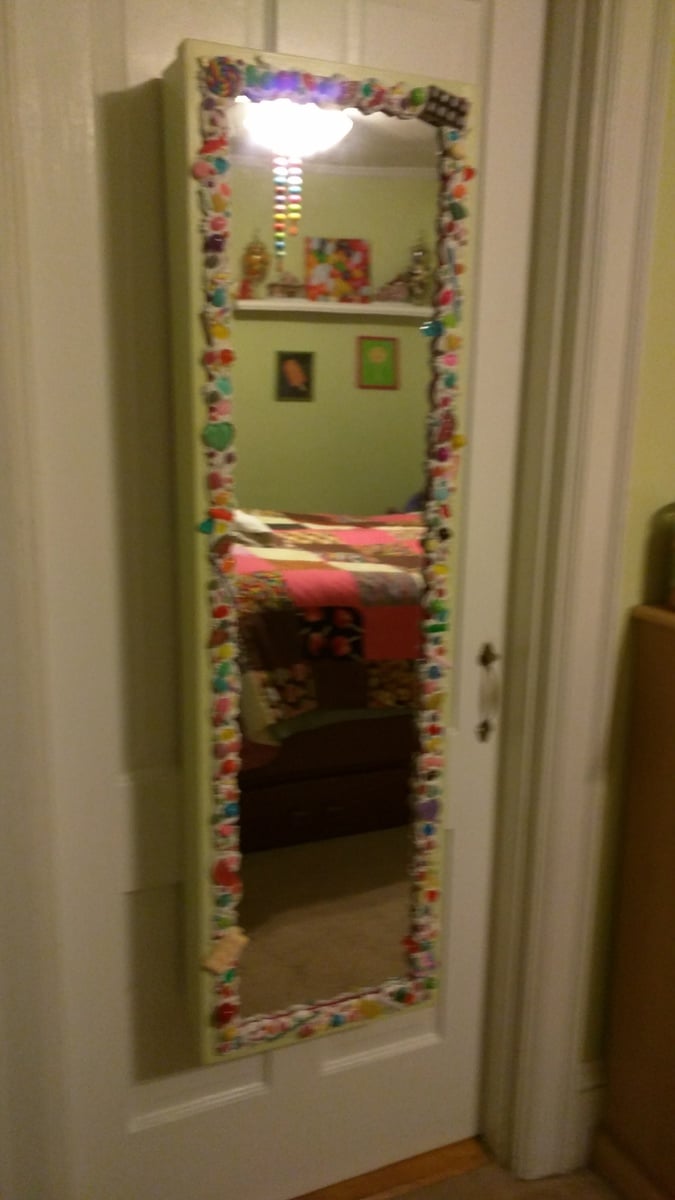
Hi Anna, I really had fun making our version of your sliding mirror project! Thought you might enjoy the photos! I made it into a jewelry cabinet.
Built from Plan(s)
Recommended Skill Level
Intermediate
Comments

Sun, 09/17/2017 - 20:48
attaching rails
How did you attach rails? I still cannot figure out the best way to do it...
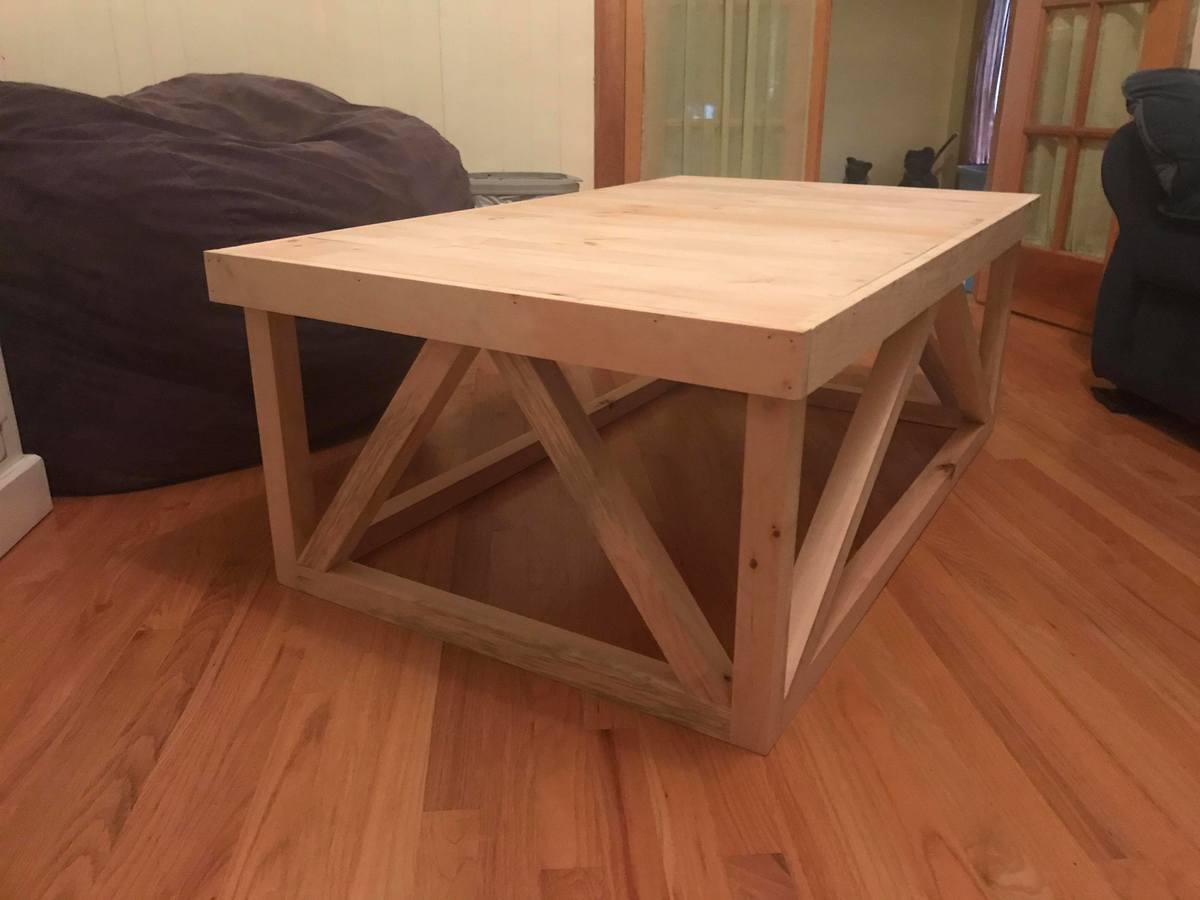
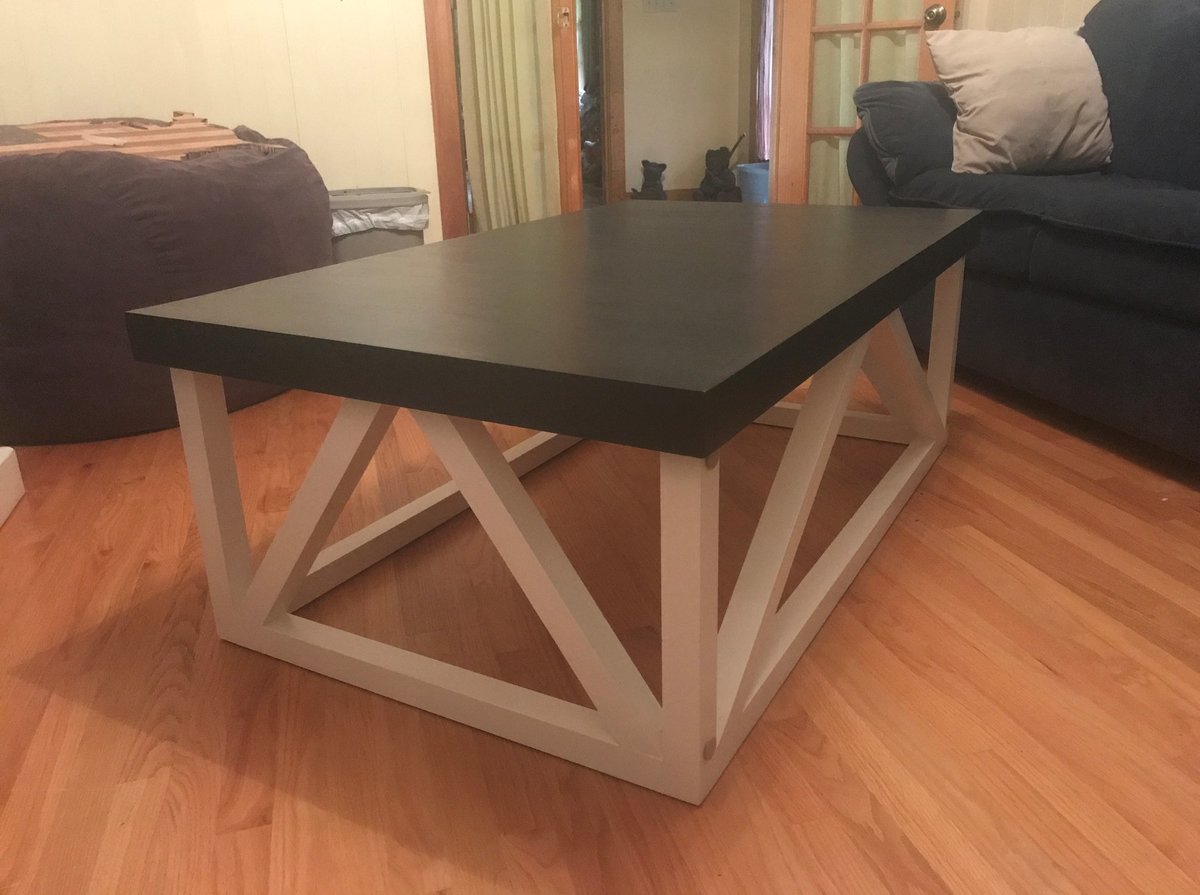
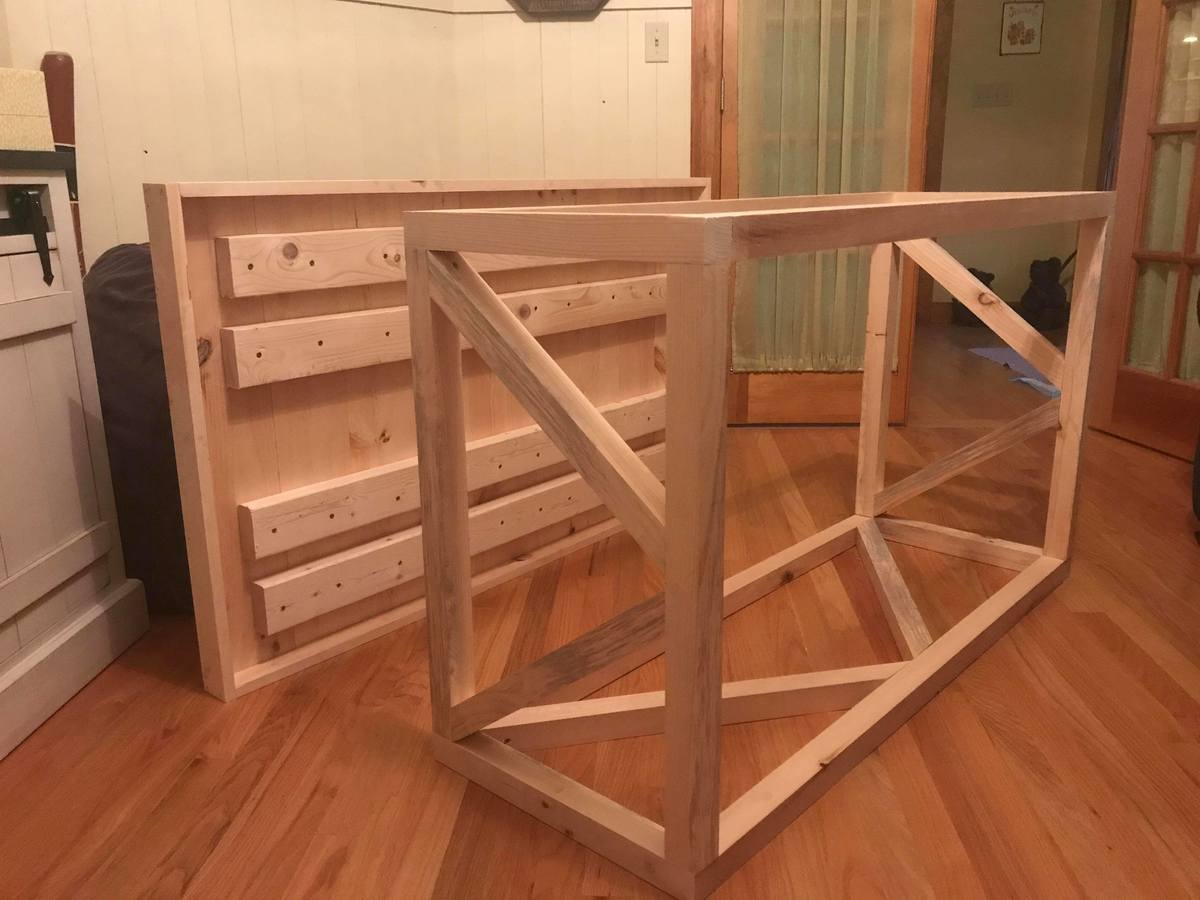
Coffee Table - Gaming/Dining Table Combo
My wife was interested in a coffee table that we could also use for playing games or company for meals, and naturally we found just the thing on Ana White's website. I got some 2x2 pine from a lumberyard after not being happy with box store lumber. The table top is made of pine glued together. I decided to put the 2x4s underneath which gave some heft to the top so it does not wobble. It fits tighter than I would want, so lesson learned for me I should have paid more attention there. Since we wanted to paint the piece I went with the pine top. If it were going to be displayed somewhere else in the house, or stained, I would have chosen a harder wood for the top. The nice part of this plan, I could easily build another nicer top to go with the base if I wanted too.
Built from Plan(s)
Estimated Cost
$100
Estimated Time Investment
Weekend Project (10-20 Hours)
Finish Used
Zinsser Bulls Eye 1-2-3 Primer; Valspar Signature interior paint and Minwax Polycrylic. I also tried Minwax One Coat Polyurethane with horrible results. Don't bother with the One Coat. I ended up sanding it off, repainting two coats, and using the polycrylic I usually use with much better results. Light sanding between each coat. Be patient, don't rush.
Recommended Skill Level
Intermediate
Comments
Sun, 10/14/2018 - 15:15
Thank you Ana!
Thanks Ana! What a great surprise hearing from you directly. I appreciate it. :-)
Wide Platform bed

This bed is my first "for profit" bed. Took some design changes so it could be taken apart and put together easily with metal bed brackets.

Built from Plan(s)
Estimated Time Investment
Week Long Project (20 Hours or More)
Finish Used
This finish was MInwax Expresso with several coats of satin polyacrylic lightly sanding between each.
Recommended Skill Level
Intermediate
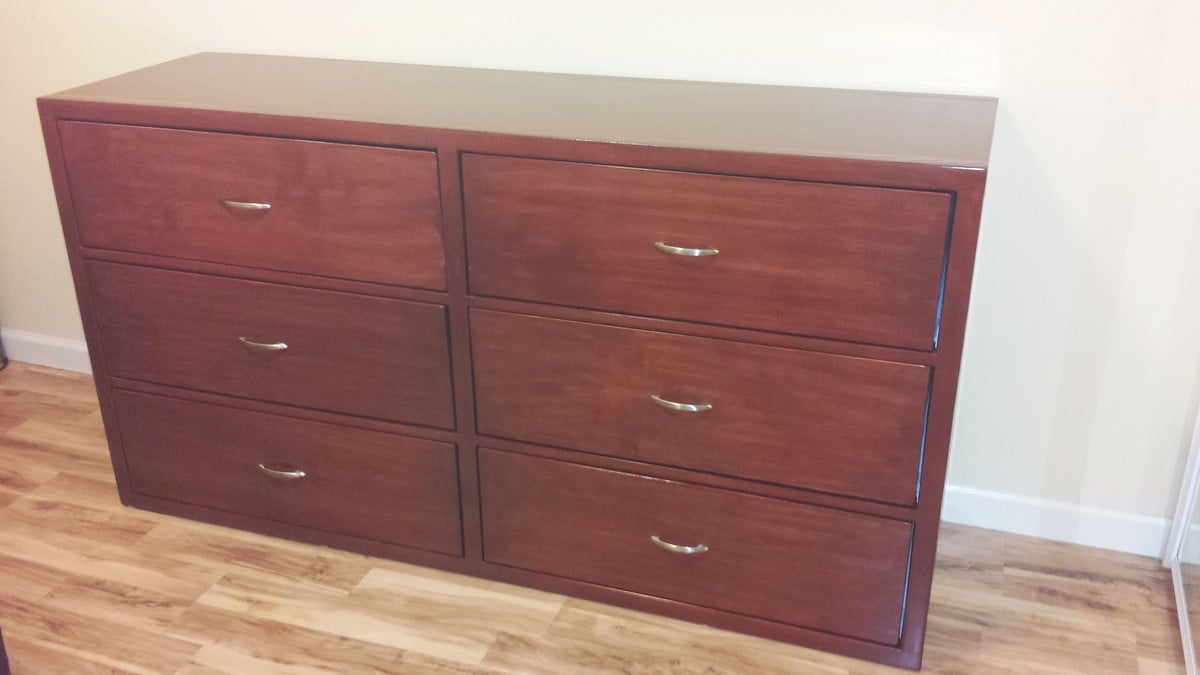
ROLLING RUSTIC WOOD DRESSER
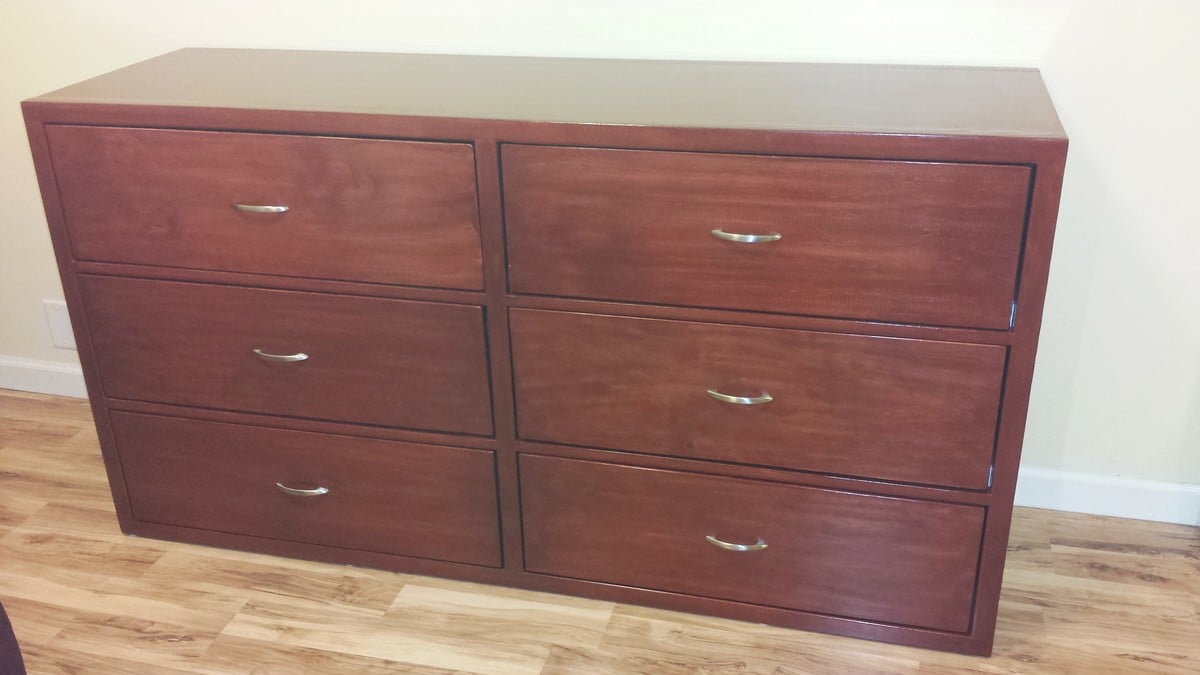
First big project, big for me anyway. Dresser came out better than I had imagined. I followed the plan exactly step by step except for the wheels part. Thank you Ana for the plans.
Built from Plan(s)
Estimated Cost
300
Estimated Time Investment
Weekend Project (10-20 Hours)
Finish Used
Rust-Oleum Traditional Cherry Wood Stain
Recommended Skill Level
Beginner
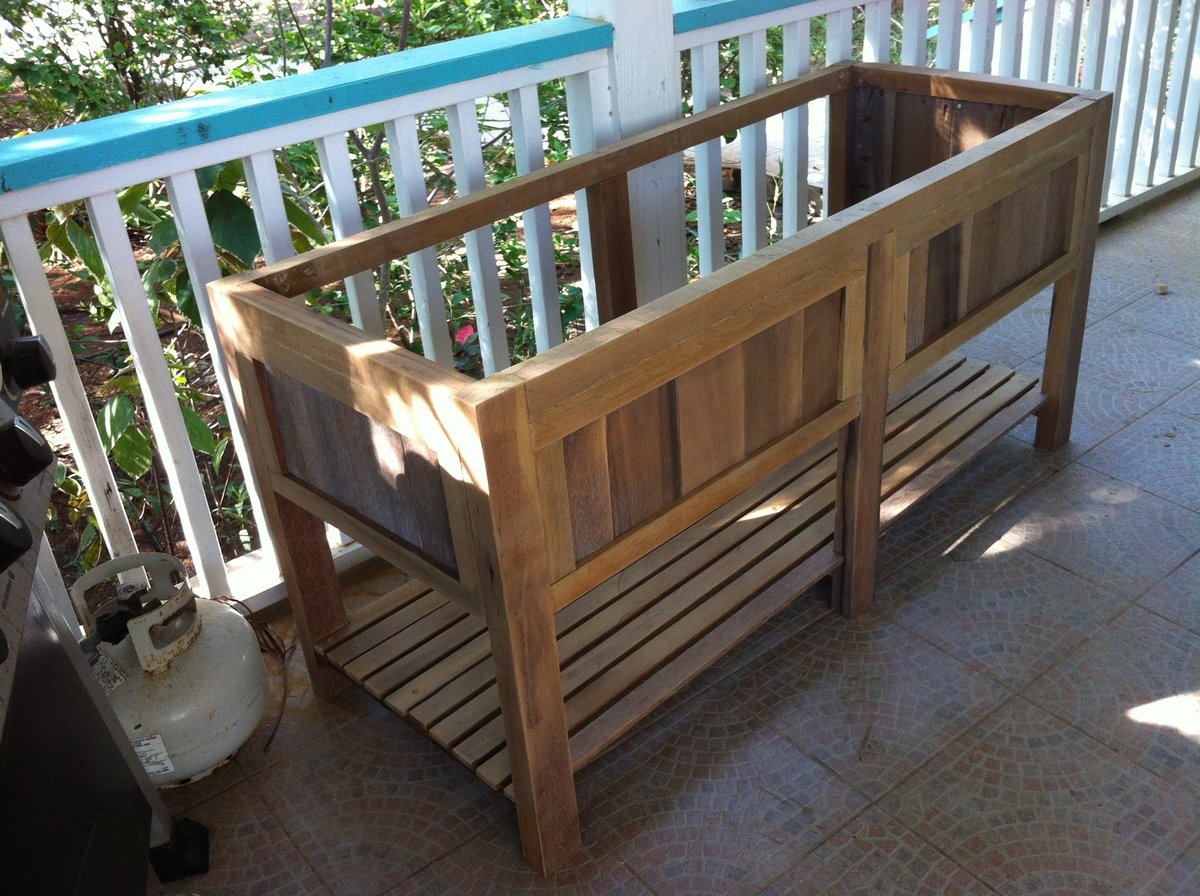
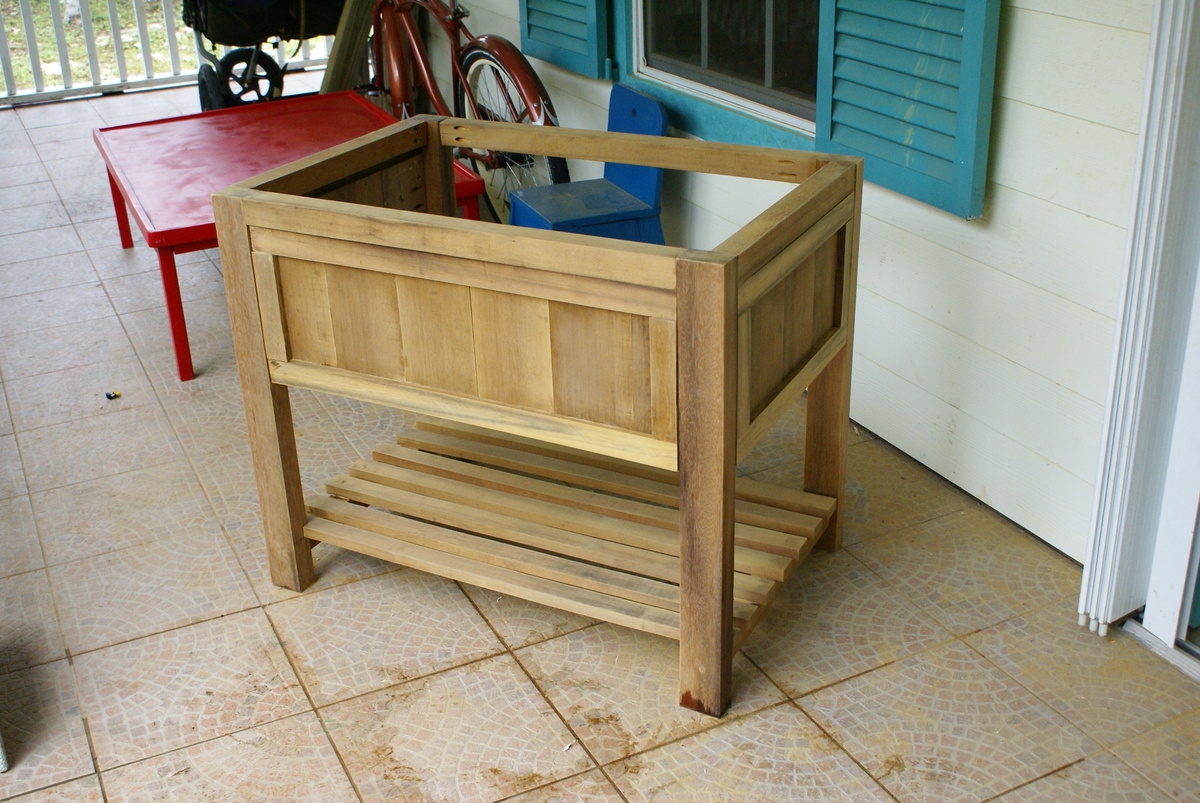
Greenheart Bathroom Vanities
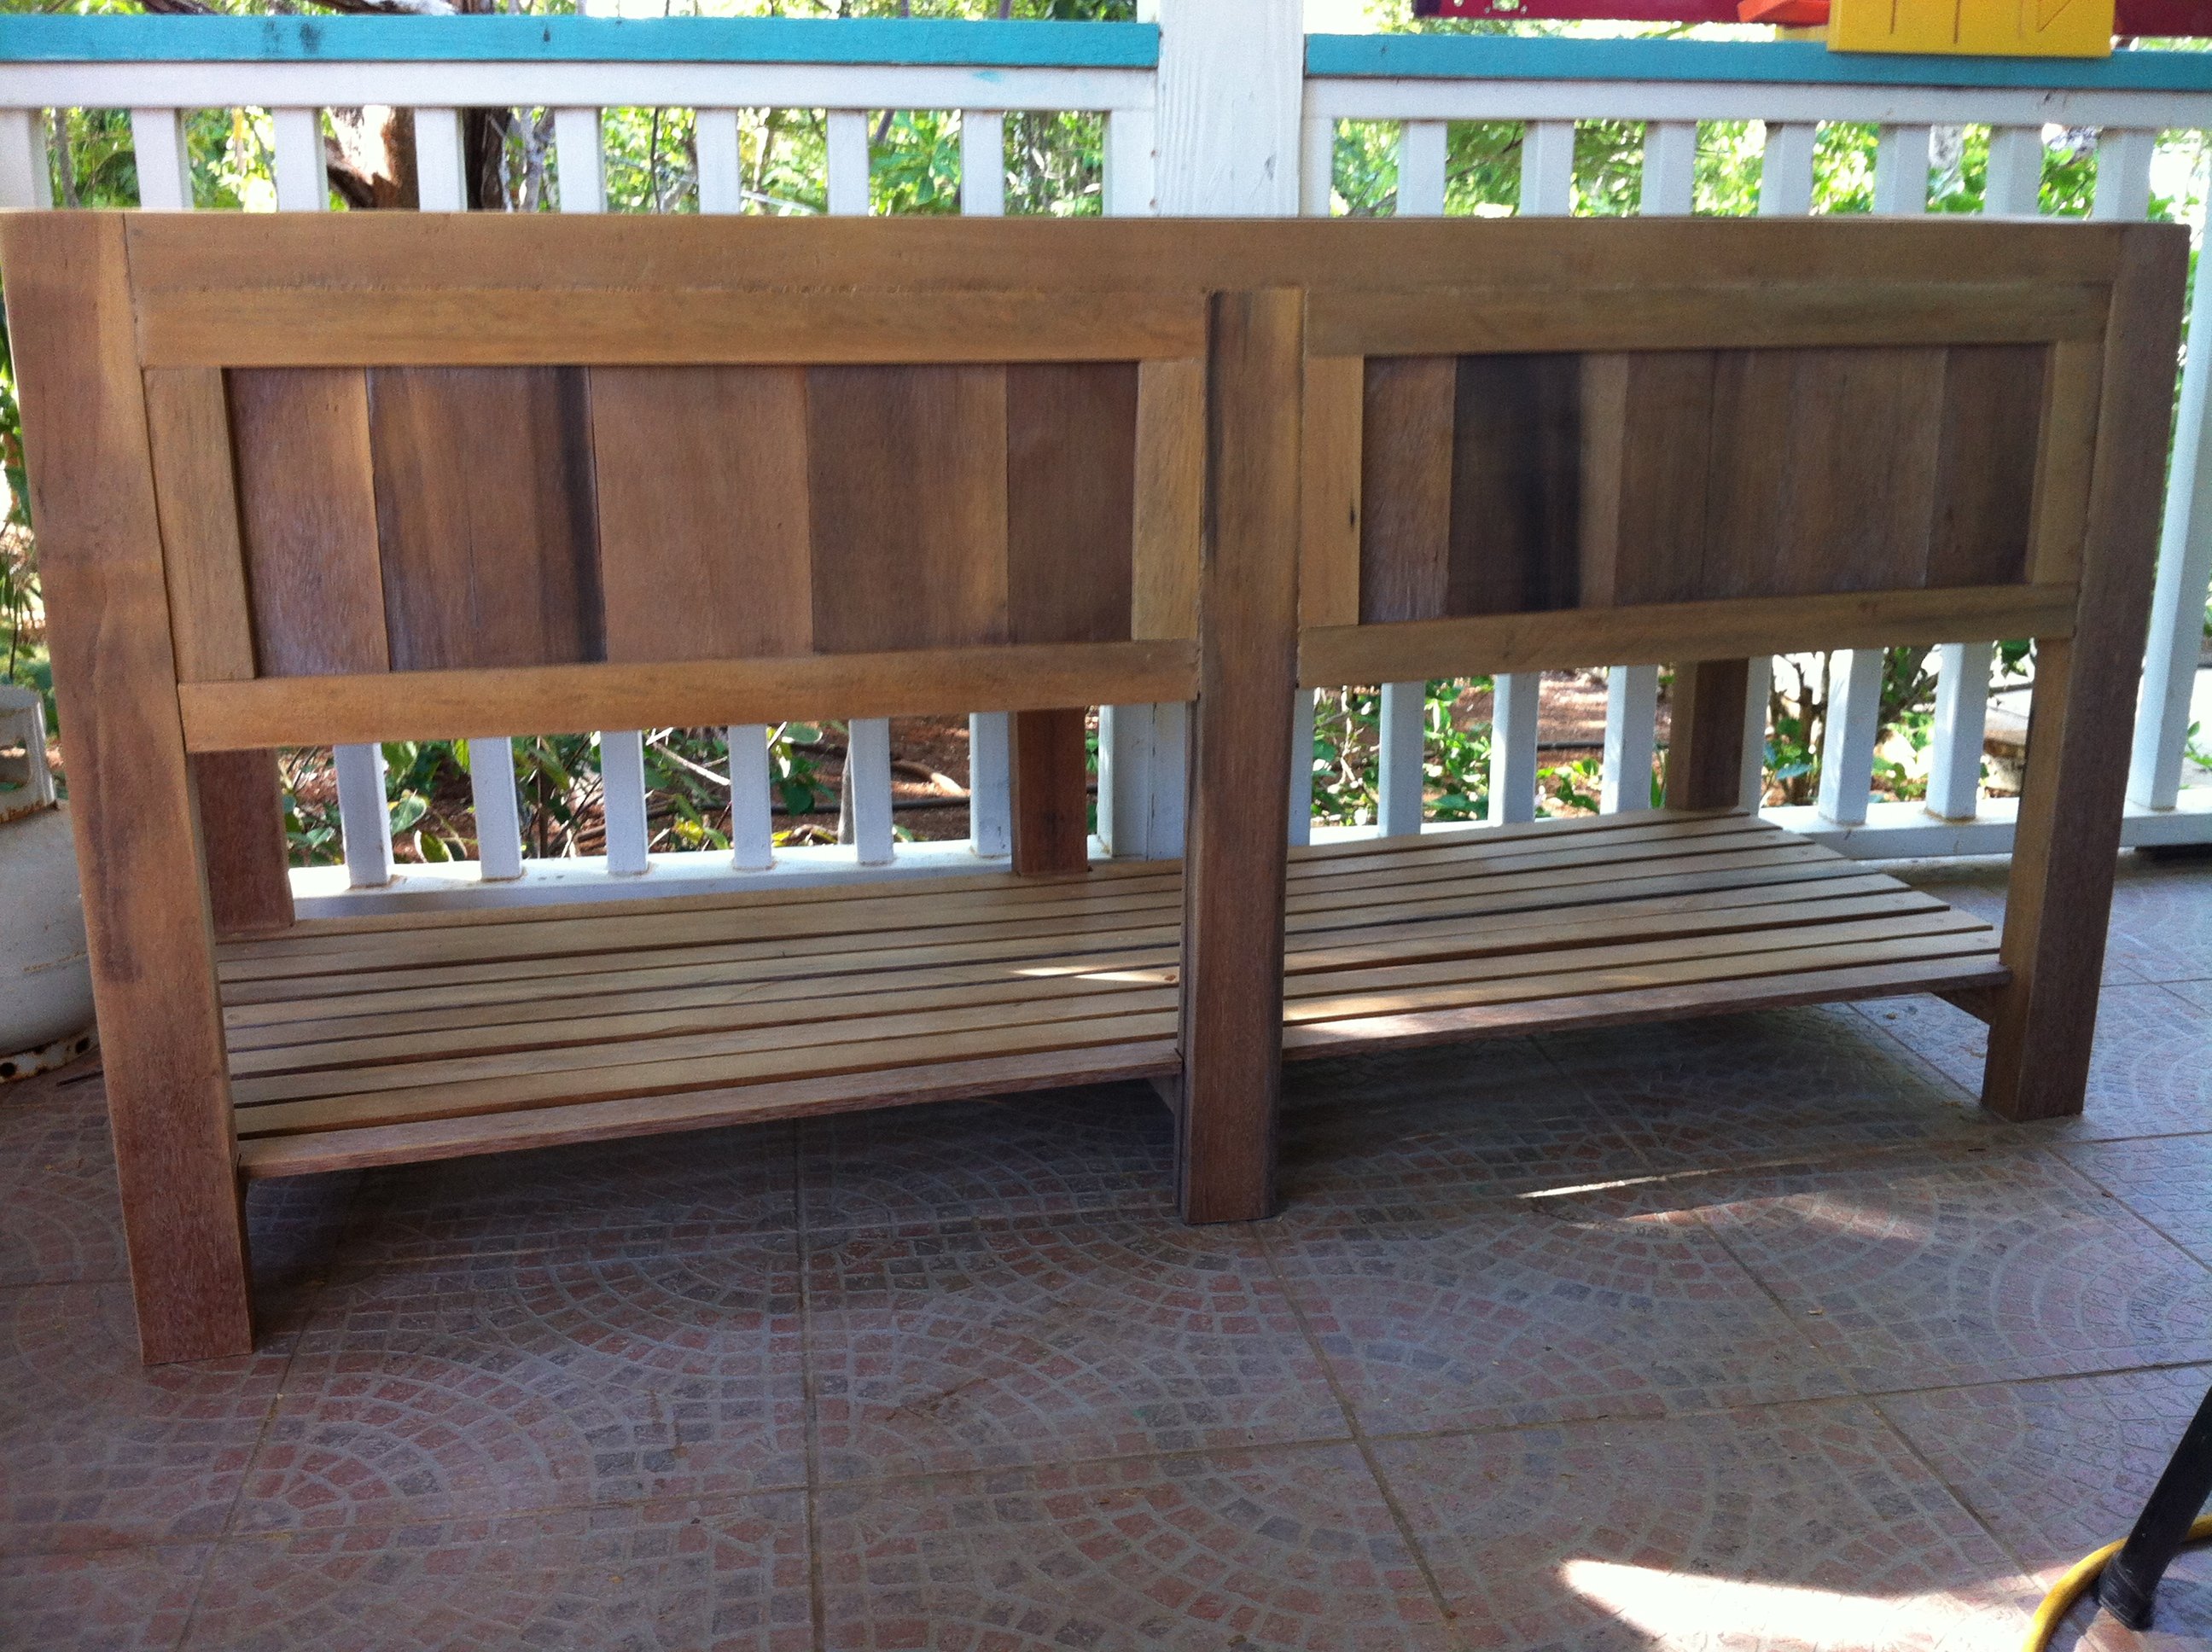
I've been working on these bathroom vanities for a family building a home. These are made of gorgeous Greenheart lumber. I have only worked with pine and spruce up to this point, but this wood is truly stunning. It has been quite the adjustment to work with, and I've broken my share of bits and screws :)
All of these together took me about a week to complete. Had I been working with a softer wood it would have taken no time hardly, but the hardwood....that's a whole other ballgame to me!
They will be adding 2'' thick concrete counter-tops on these when they get installed. I love the simplicity of their look!

Built from Plan(s)
Estimated Cost
No idea on what this wood costs (and the costs to get it to where I live)
Estimated Time Investment
Week Long Project (20 Hours or More)
Finish Used
Unfinished in these photos. They are still trying to decide the final finish.
Recommended Skill Level
Intermediate
Comments
Tue, 10/01/2013 - 07:35
They are beautiful!
These vanities are beautiful. It would be really neat if you could add pictures when they are installed with the counter tops! I am contemplating replacing a vanity with a DIY one, and I love seeing how other people have made things beautiful with their own 2 hands.
In reply to They are beautiful! by NimbleShopper
Tue, 10/01/2013 - 14:35
Pictures
I will most definitely add the pics with the counters. I can't wait to see them myself :)
Twisty Table
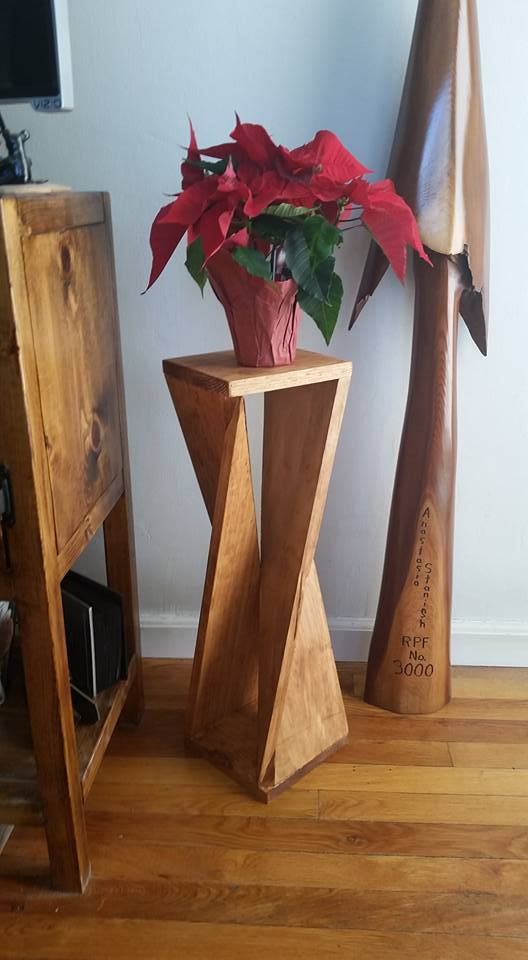
Saw this clever side table on Pinterest. It's made out of 1 1x8x8. I was able to figure out how to build a jig for the table saw to suit the project and then it was easy peasy lemon squeezy from there.
Estimated Cost
$20
Estimated Time Investment
An Hour or Two (0-2 Hours)
Finish Used
Minwax Light Walnut
Recommended Skill Level
Intermediate
Comments
Mon, 12/21/2015 - 09:41
This is so clever and would
This is so clever and would make an inexpensive yet first-rate gift! I love it...thanks for sharing.
Fri, 10/28/2016 - 08:40
twisty-table
I would love to build this unique table, but can't seem to find some actual plans with dimensions and jigs
Fri, 10/28/2016 - 08:45
twistytable
Would you please email me the plans for this table. Thanks so much
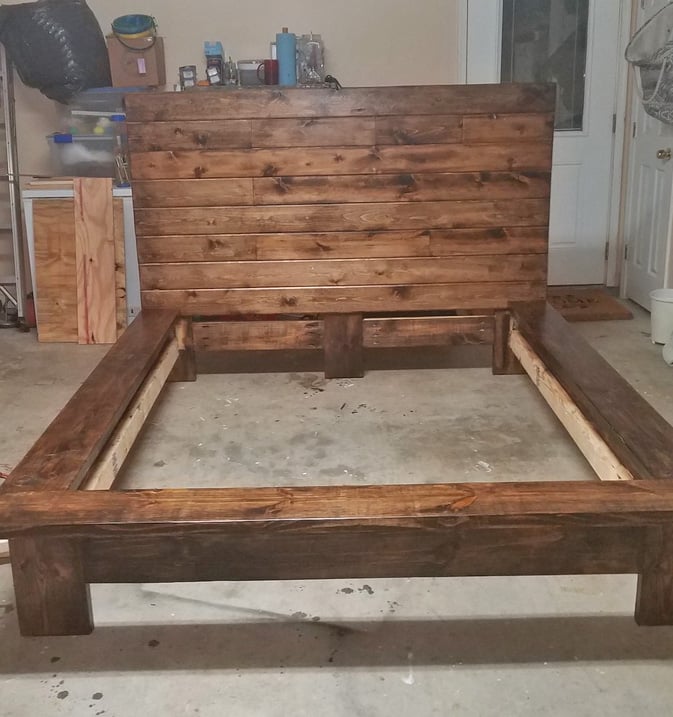
Modern Farmhouse Bed
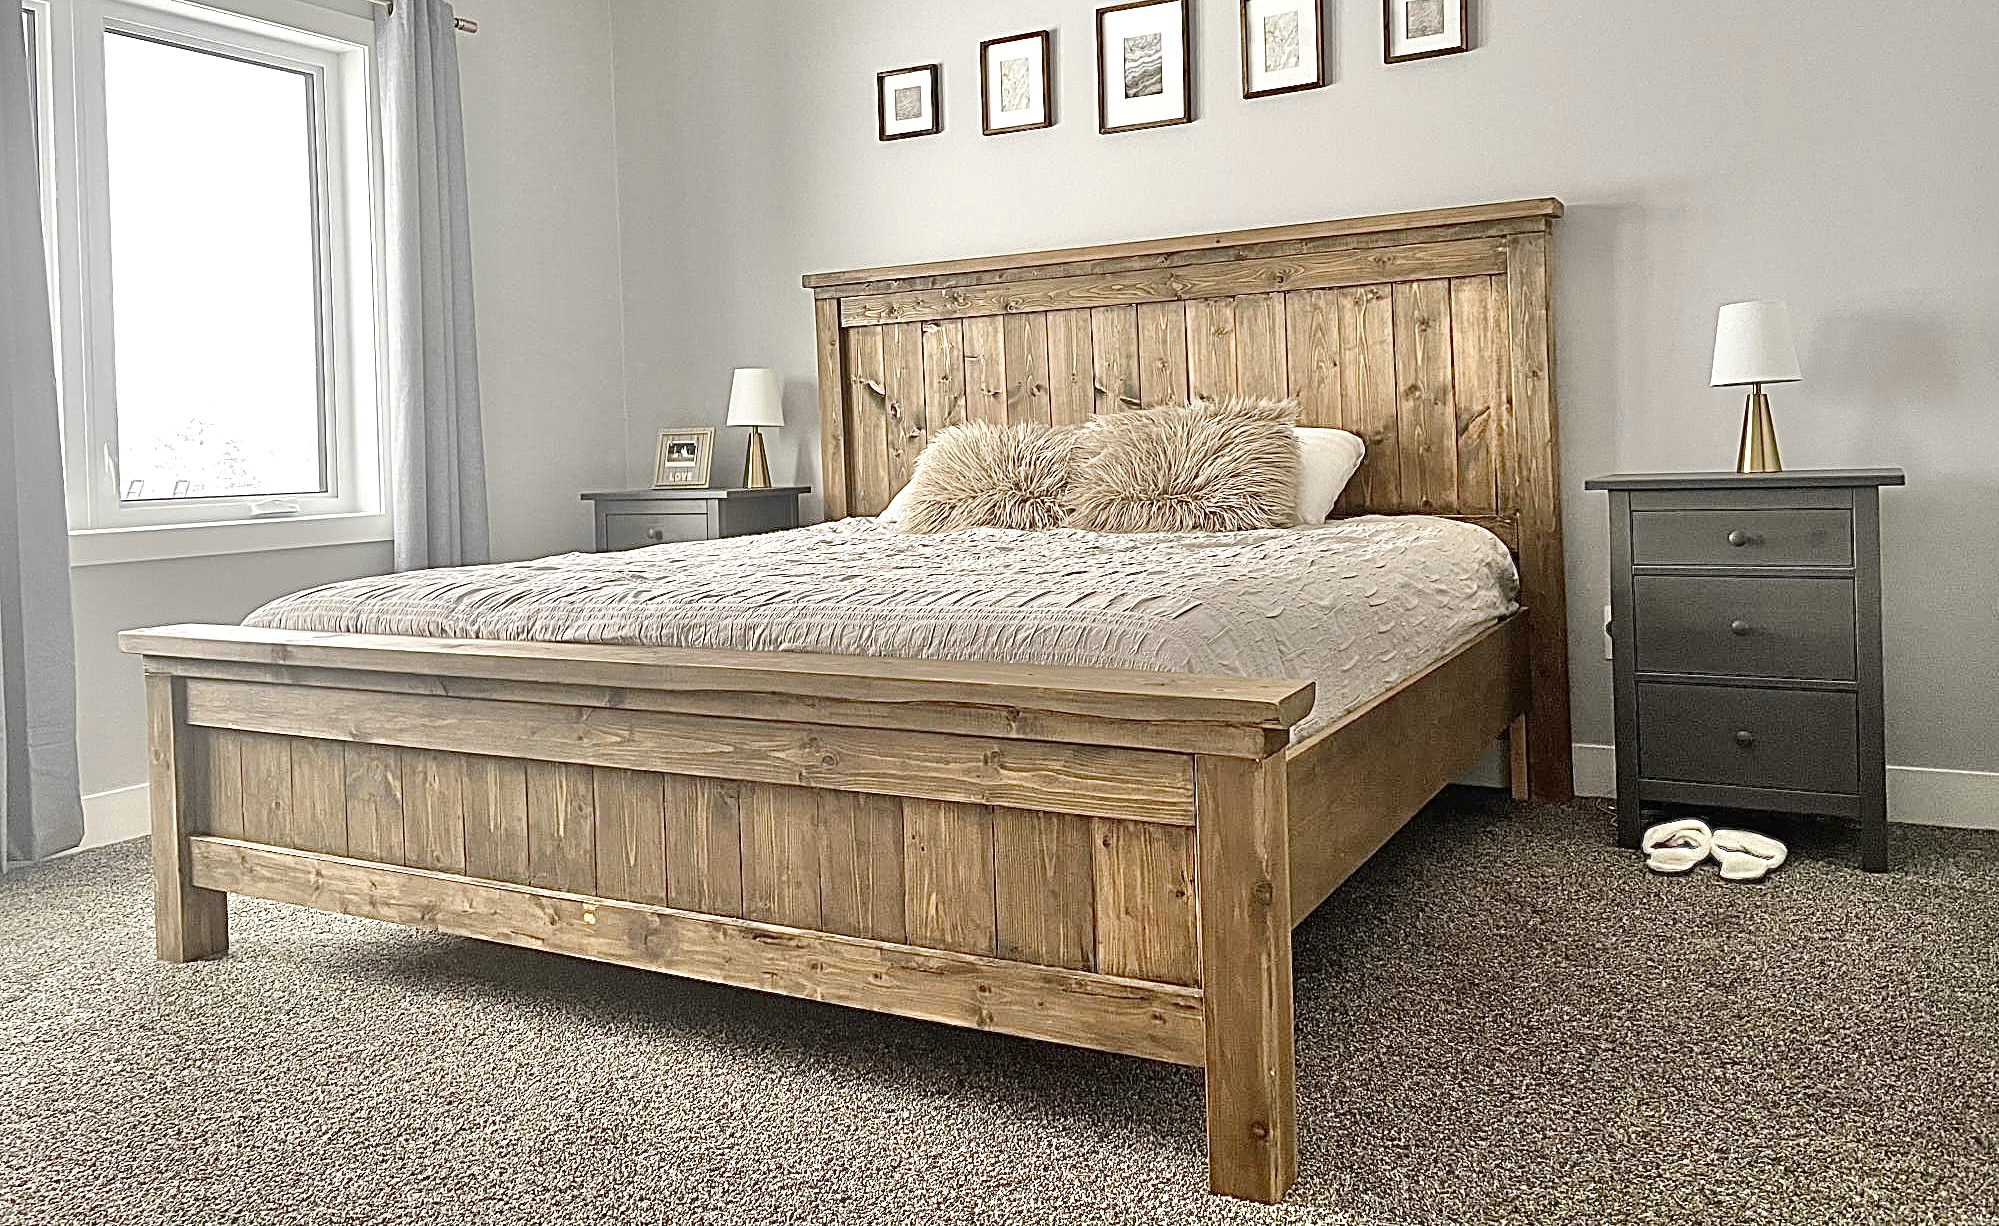
My husband and I had worked on this bed together, and we are so happy with it! We went with taller side tables that we purchased, and just stained the wood instead of painting it.
Built from Plan(s)
Comments
Farmhouse storage bed

I slightly modified the plans on your site and built this bed for my daughter last year and it is holding up great.
Built from Plan(s)
Estimated Time Investment
Week Long Project (20 Hours or More)
Finish Used
White paint
Recommended Skill Level
Beginner
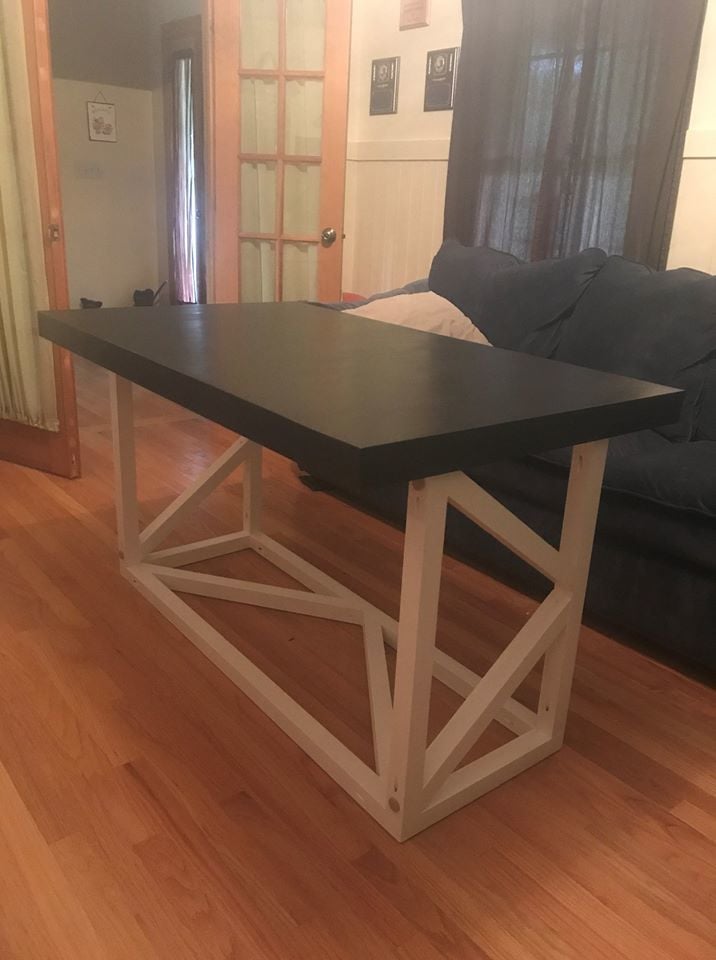
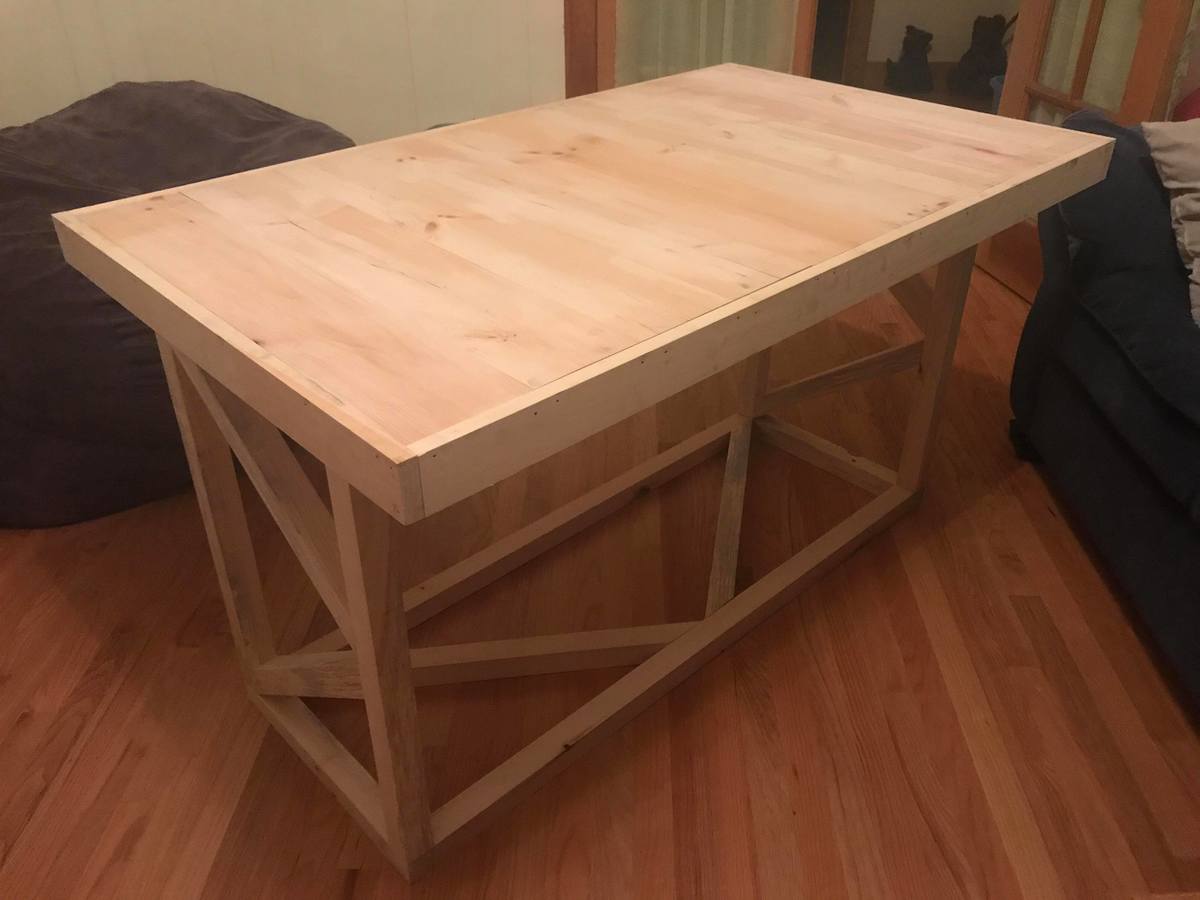
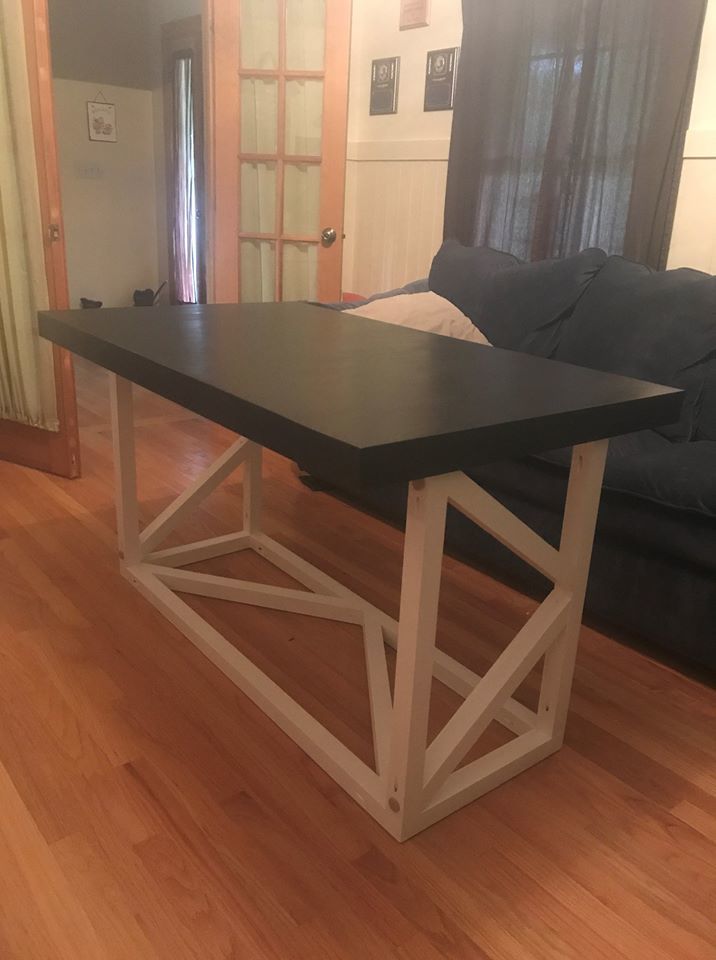
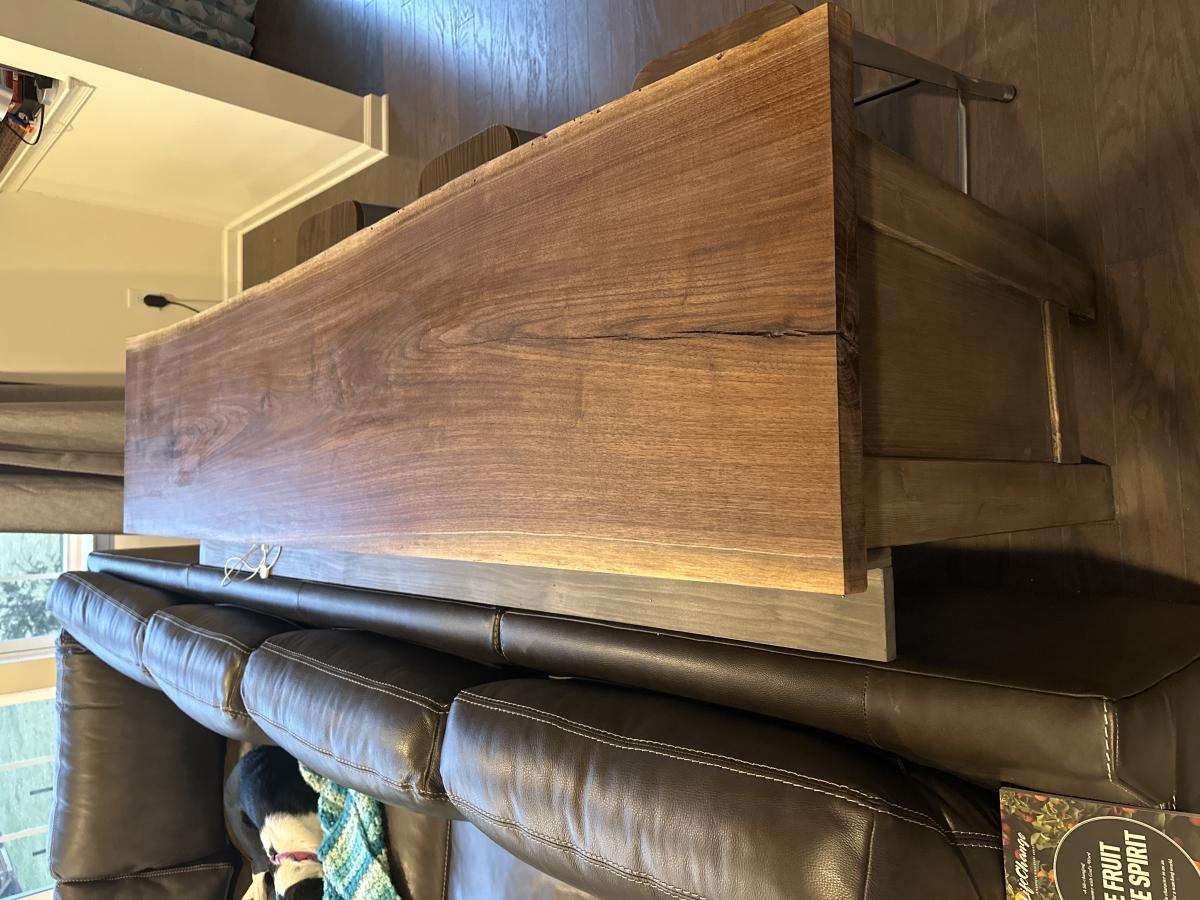
Sofa Console Table Bar Height for Dining
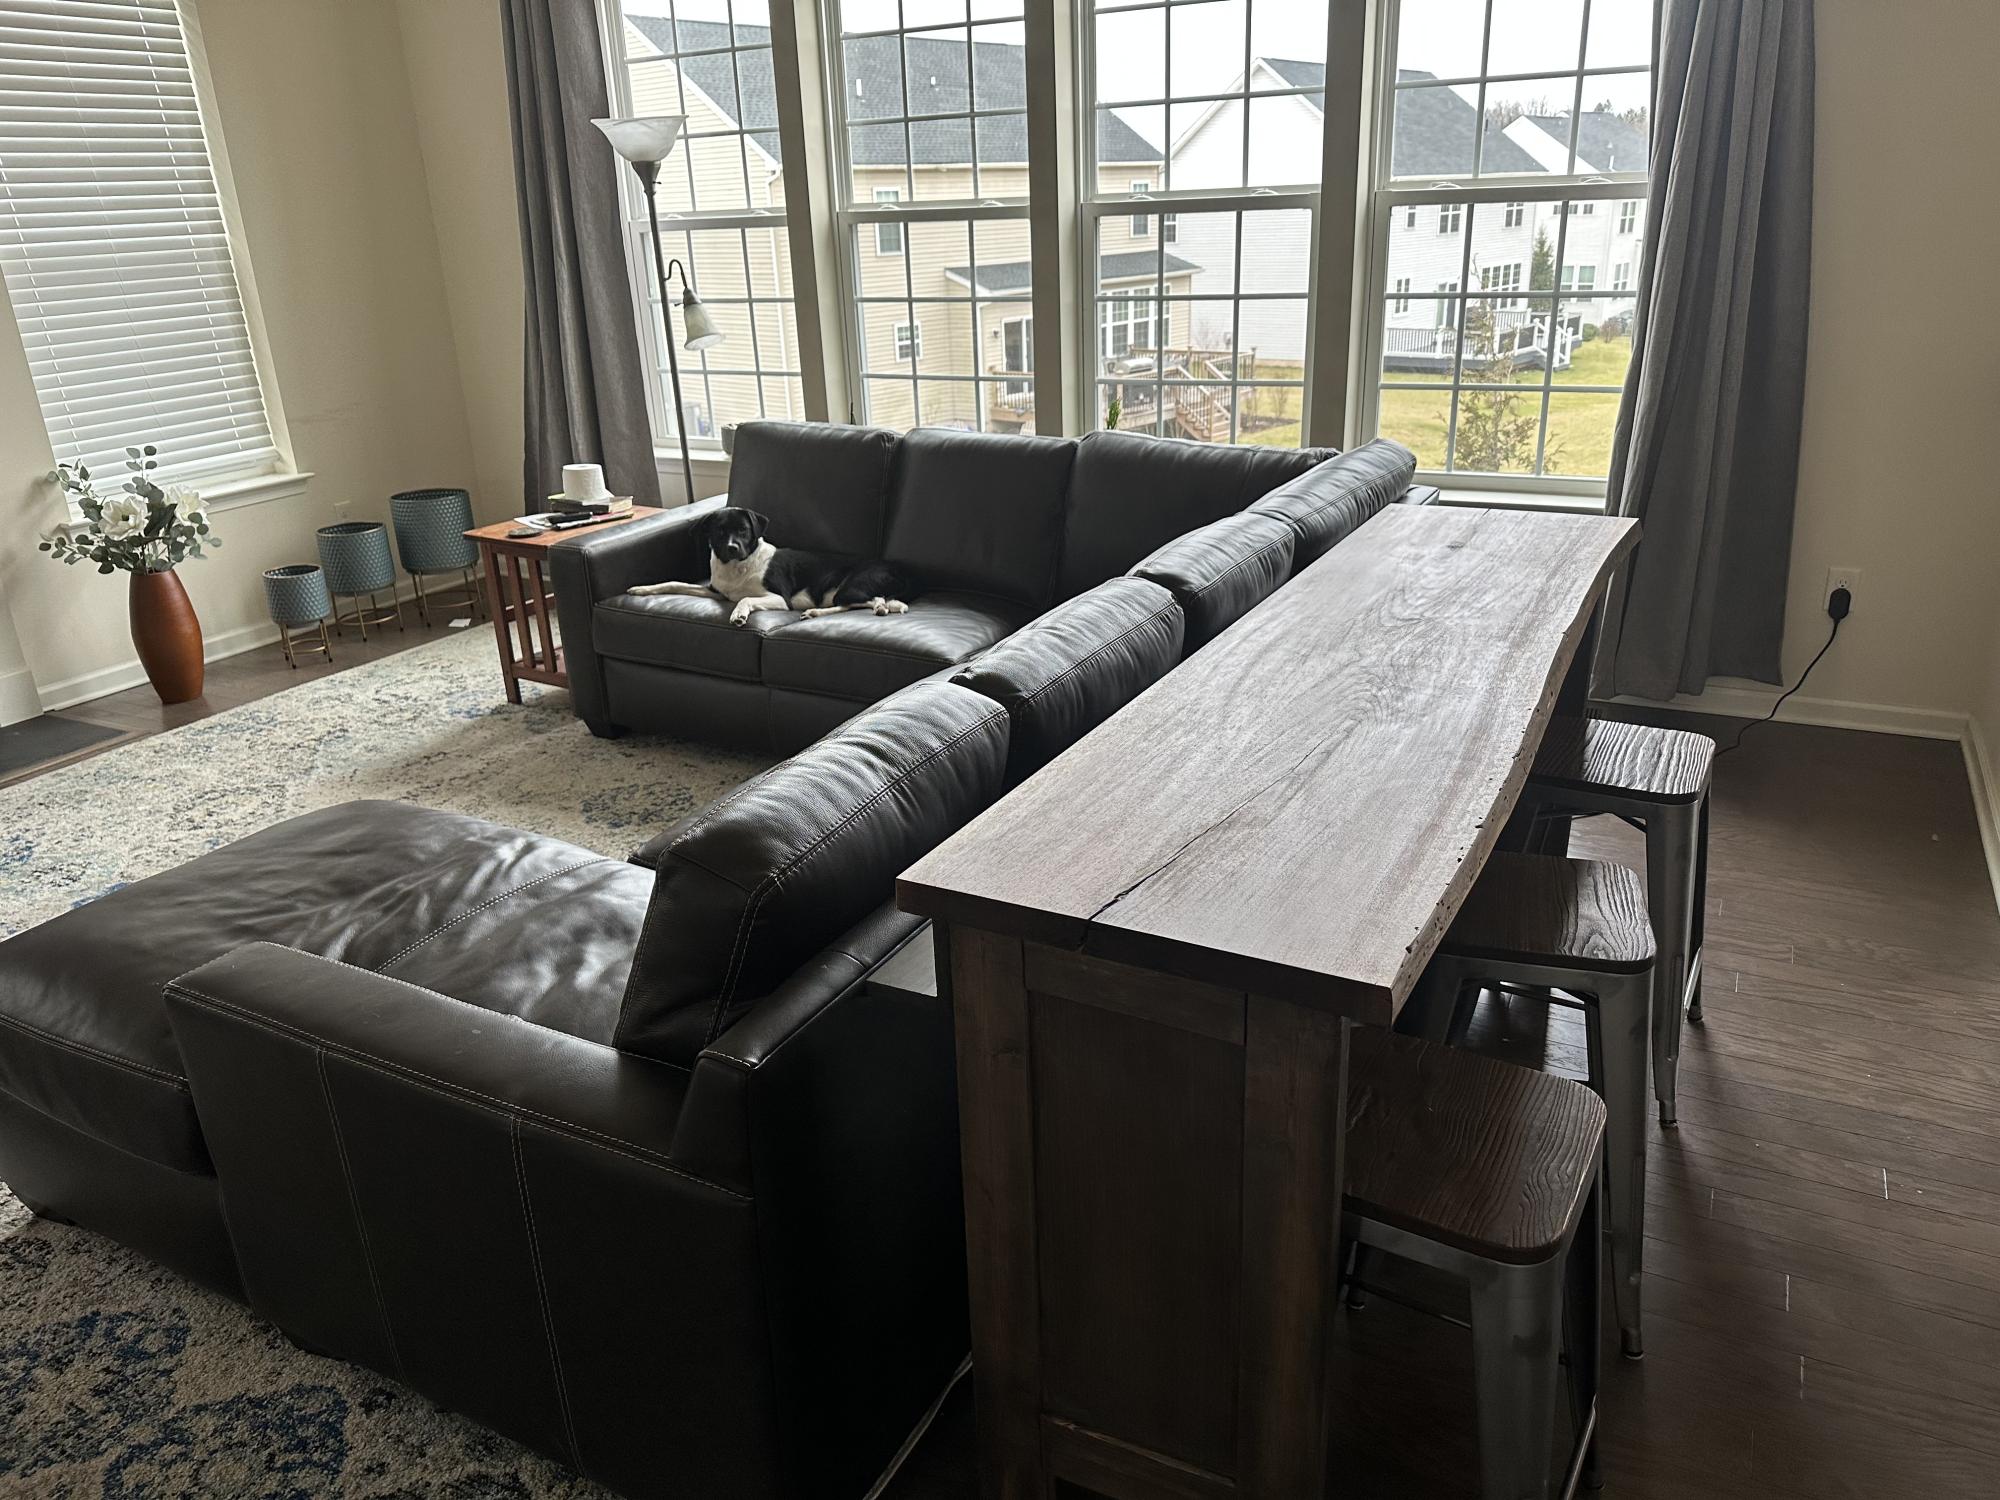
I took the basic idea of the Rustic X Console. Raised it to countertop height so I could use it for three stools. I also added a shelf so people sitting on the sectional could put drinks right behind them. Added a charging station to that shelf as well. Topped it with a live edge black walnut slab. Finally, I didn't use the X because the table was too high and the base was too narrow to make the X work. I used a tablesaw to cut a grove in the legs and then put a 1/4 plywood panel.
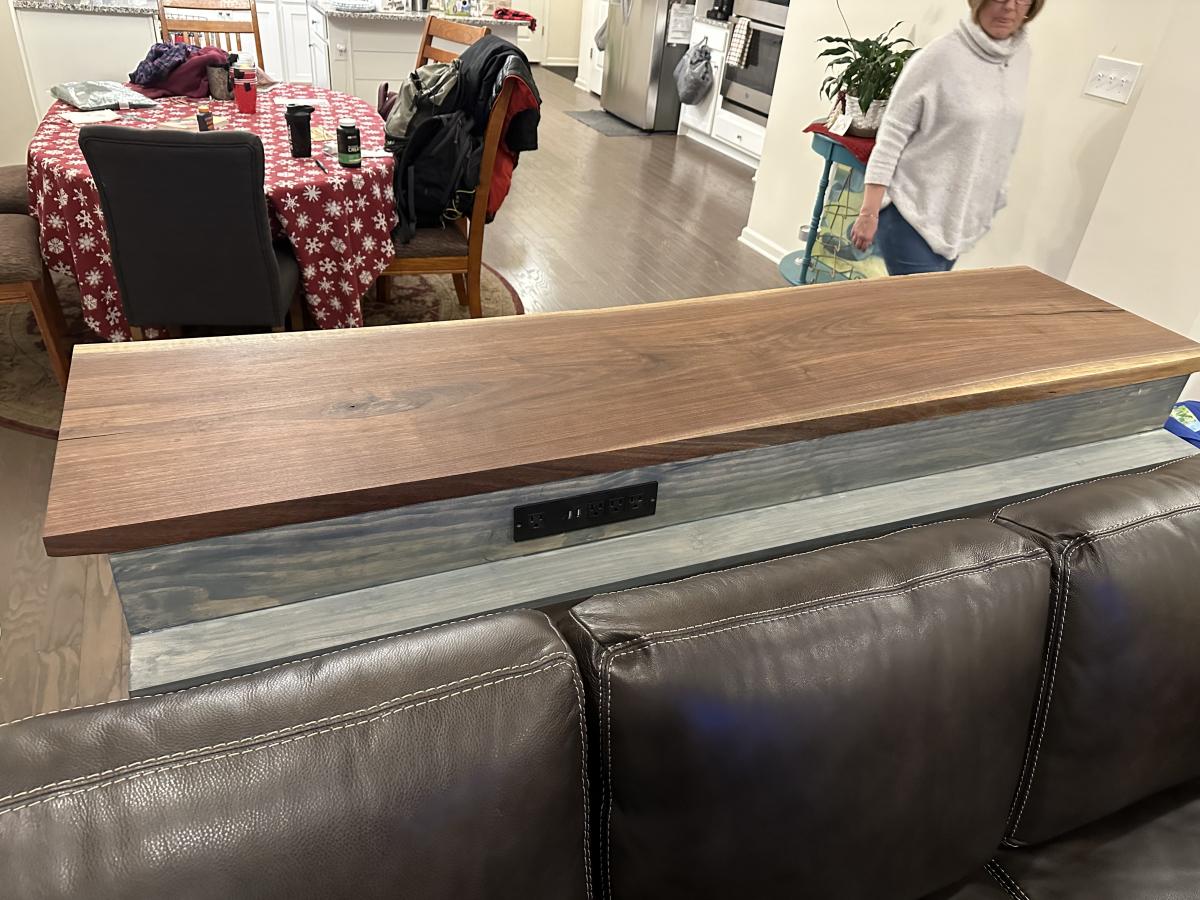
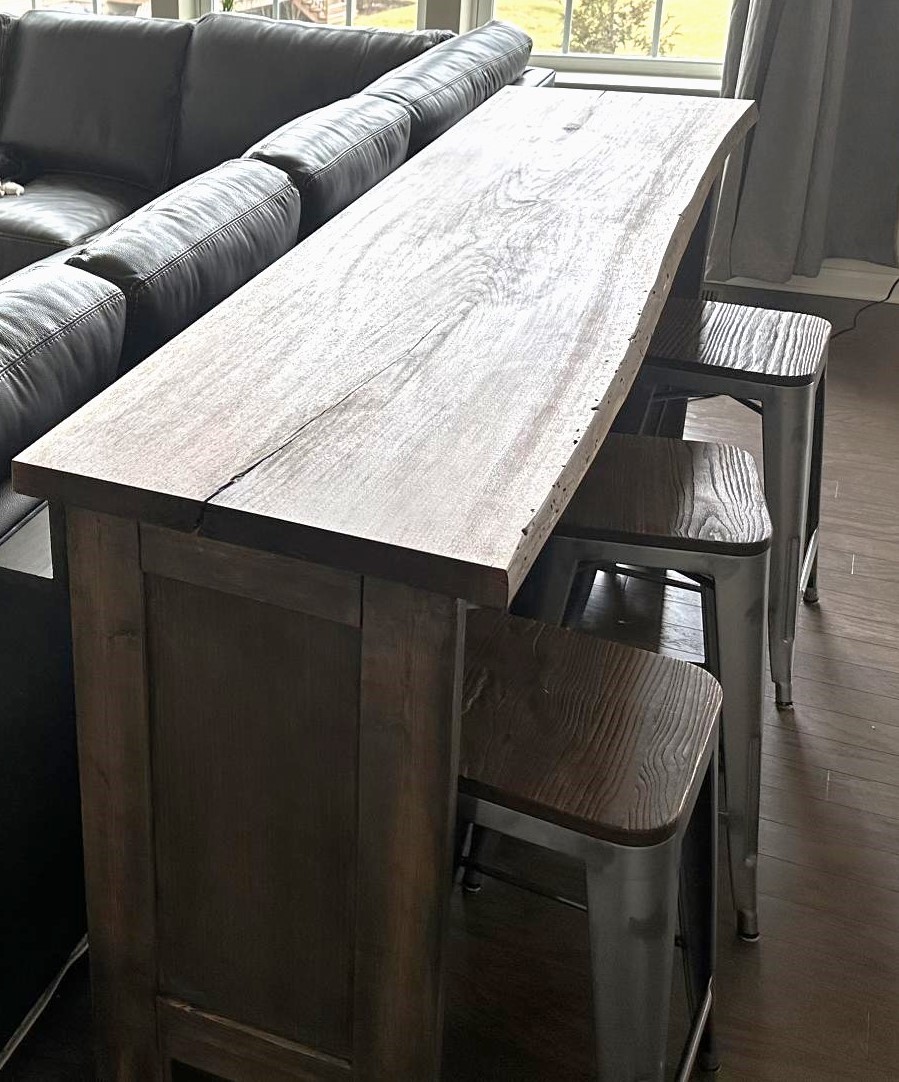
Built from Plan(s)
Comments
DIY Modern Farmhouse Dropzone


Corner Banquette Bench with Storage
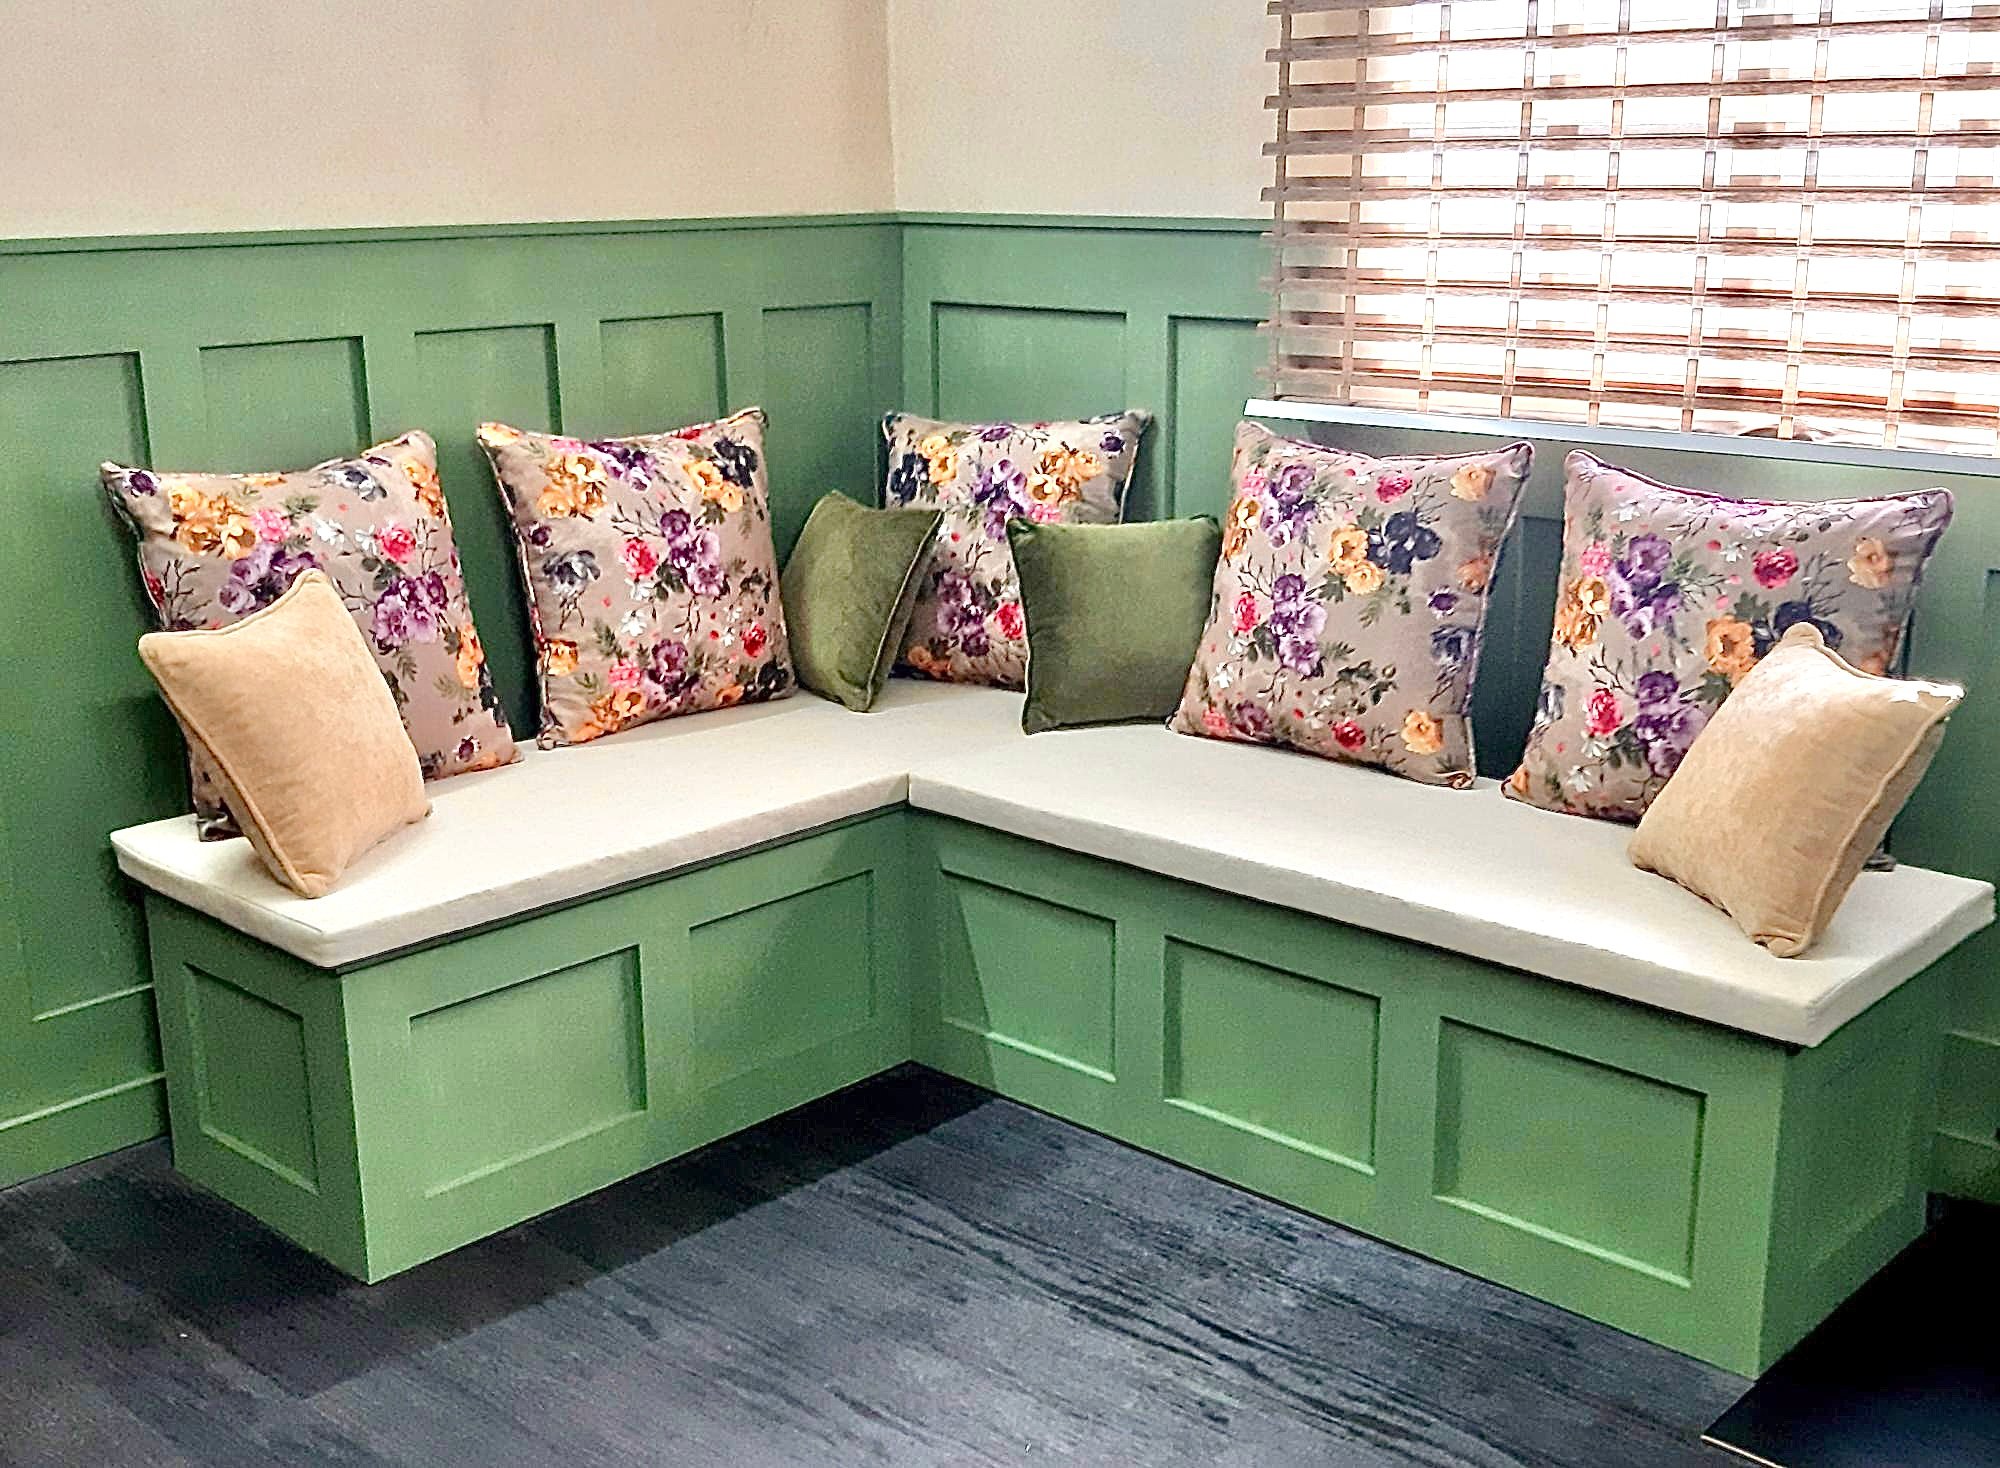
Beautiful banquette bench by Khalid Al-Bahi
Built from Plan(s)
Adirondack chairs
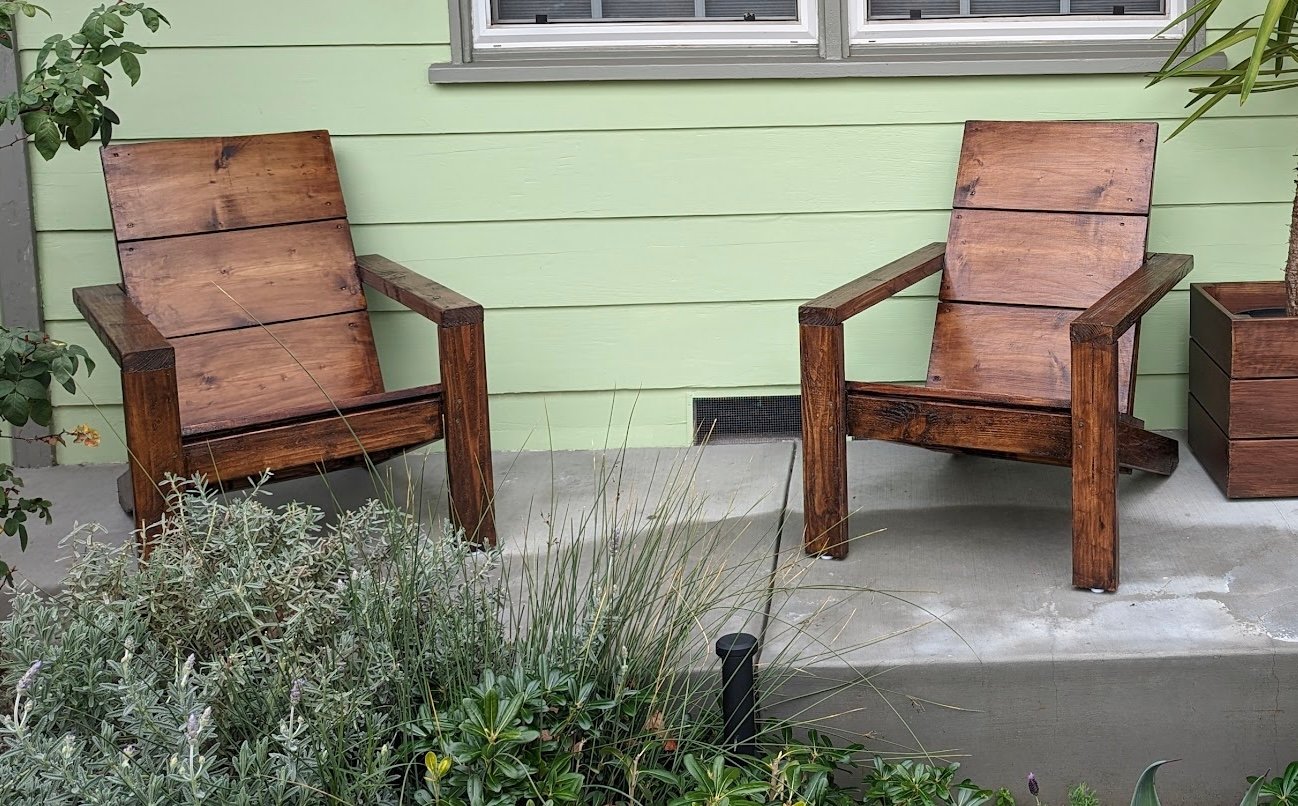
This was such a fun project. Your plans were spot-on and easy to follow. I am not a total beginner woodworker but not experienced either and I am so proud that I created these beauties with your help. They are adding so much to our curb appeal. I learned a lot and I got an education on pocket screws and the Kreg jig; I ended up buying the 520PRO. I am so grateful!! Thank you so much!
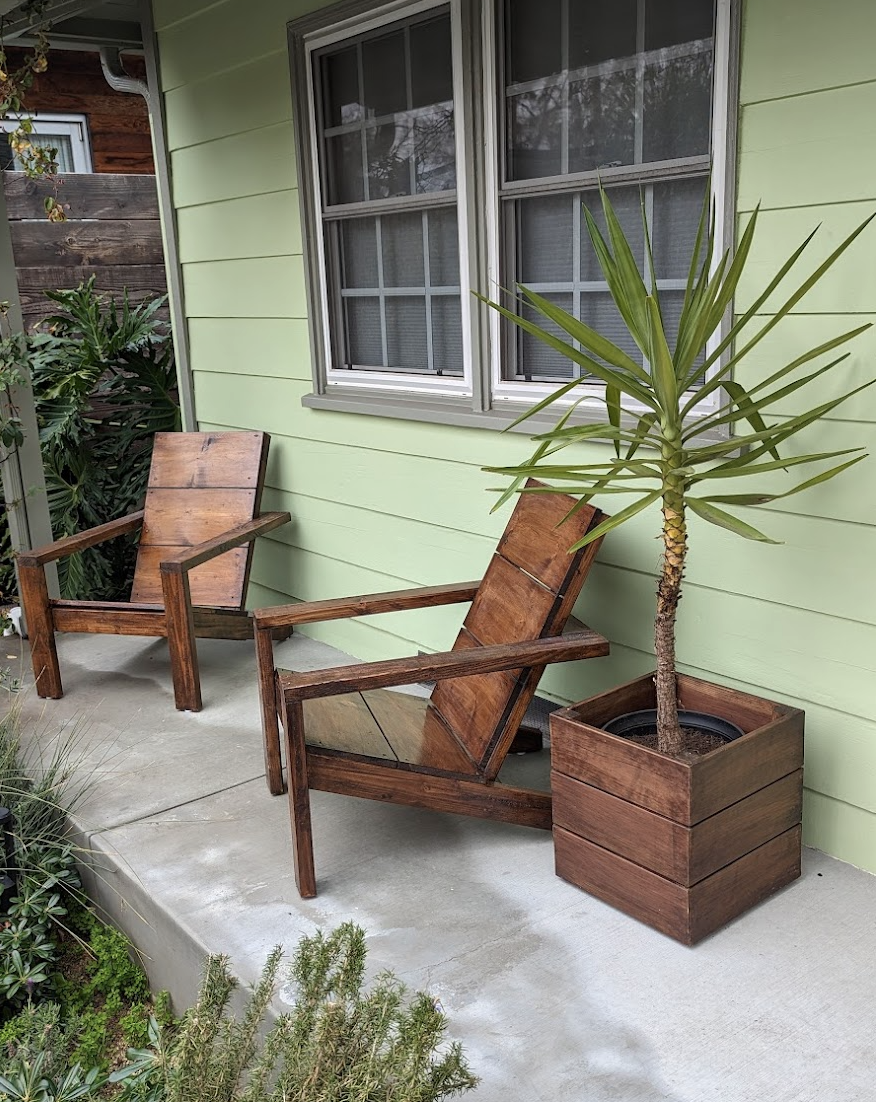
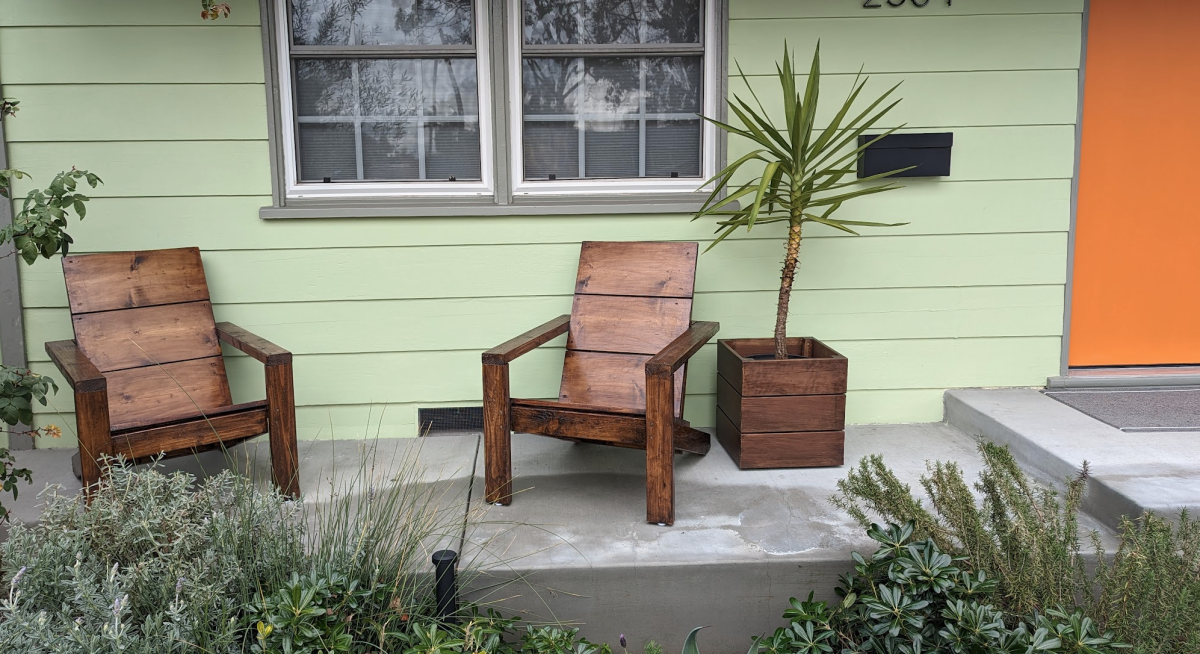
Built from Plan(s)
Comments
Sat, 03/18/2023 - 09:13
Love the curb appeal!
Great stain choice, it looks so inviting! Thank you for sharing.
Wall Clock
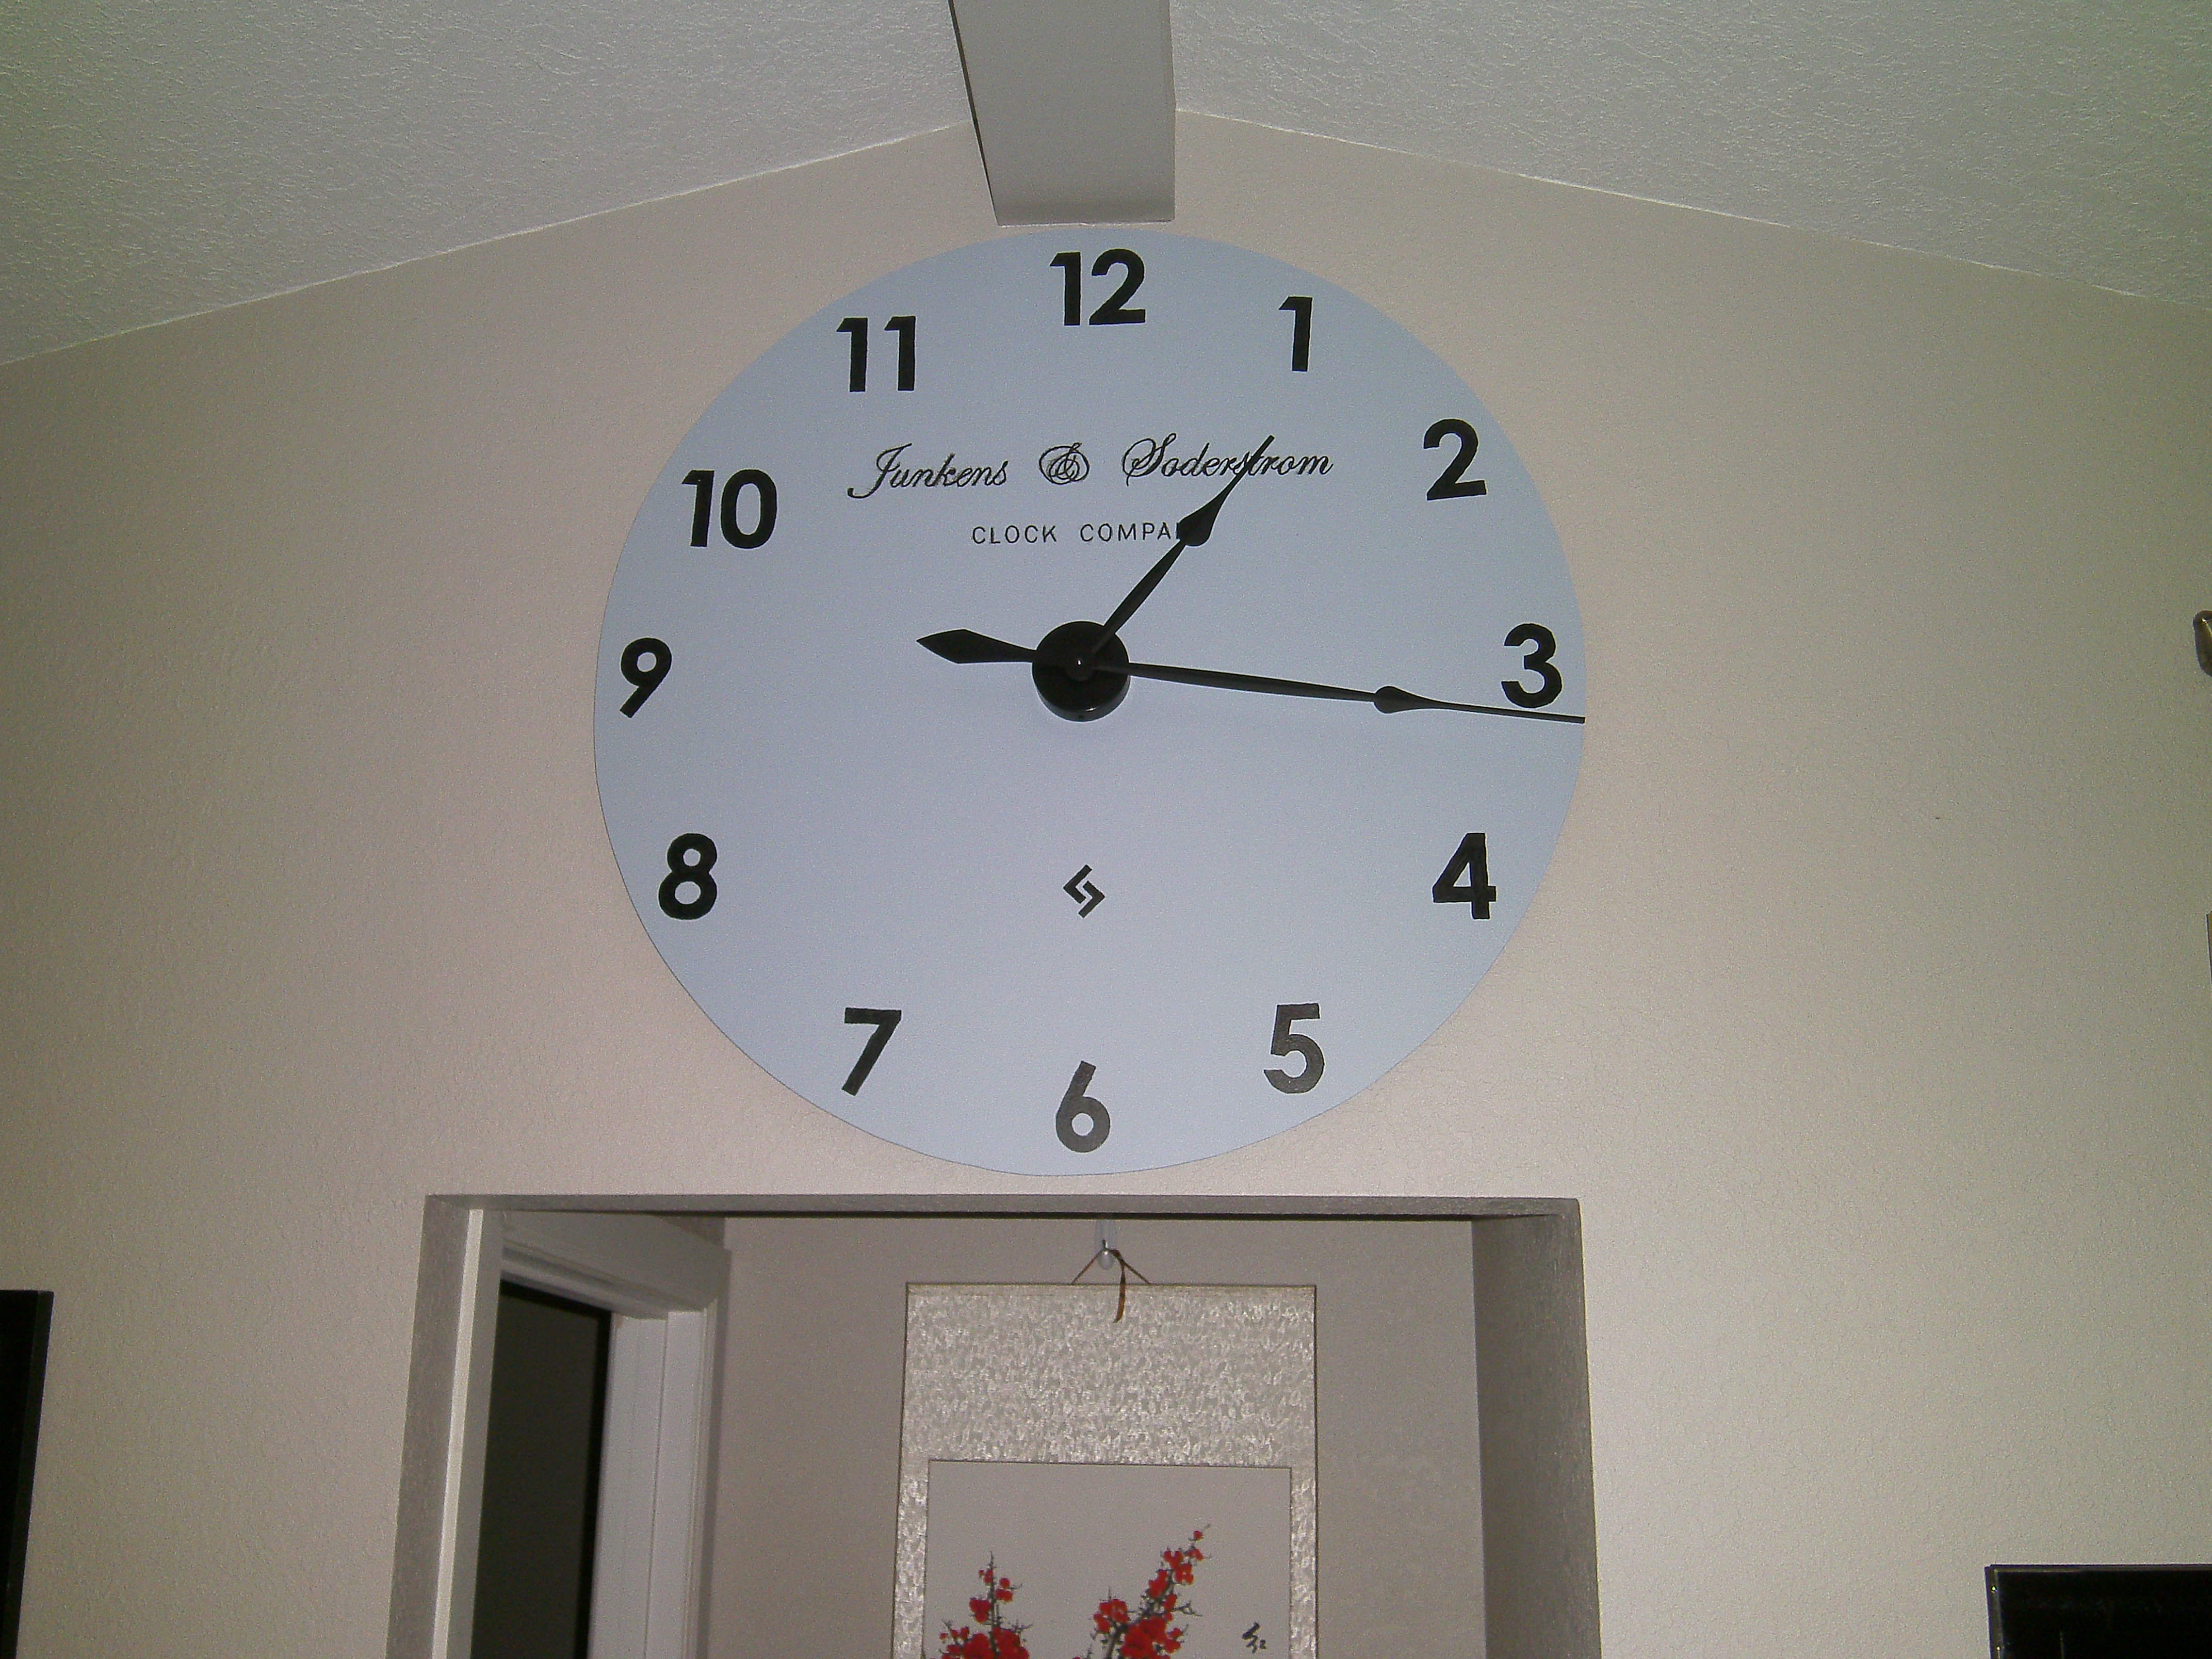
My wife wanted something to replace the wreath on our wall after Christmas and I was thinking of making her a large wall clock as a gift. Plan meets opportunity and we just happen to be at Hobby Lobby at the time and so it began. I used a piece of paneling for the face of the clock (same material as peg board without the holes about $8, enough to make two if I wanted) and built a wooden frame out of 1' X 2' s on the back that resembles a four pane window frame. Painted the face and numbers, then printed our names and transferred them on to the face and followed up tracing them with a sharpie. Affixed clocked to face and hung.
Built from Plan(s)
Estimated Cost
$50
Estimated Time Investment
Afternoon Project (3-6 Hours)
Recommended Skill Level
Beginner
Nightstands
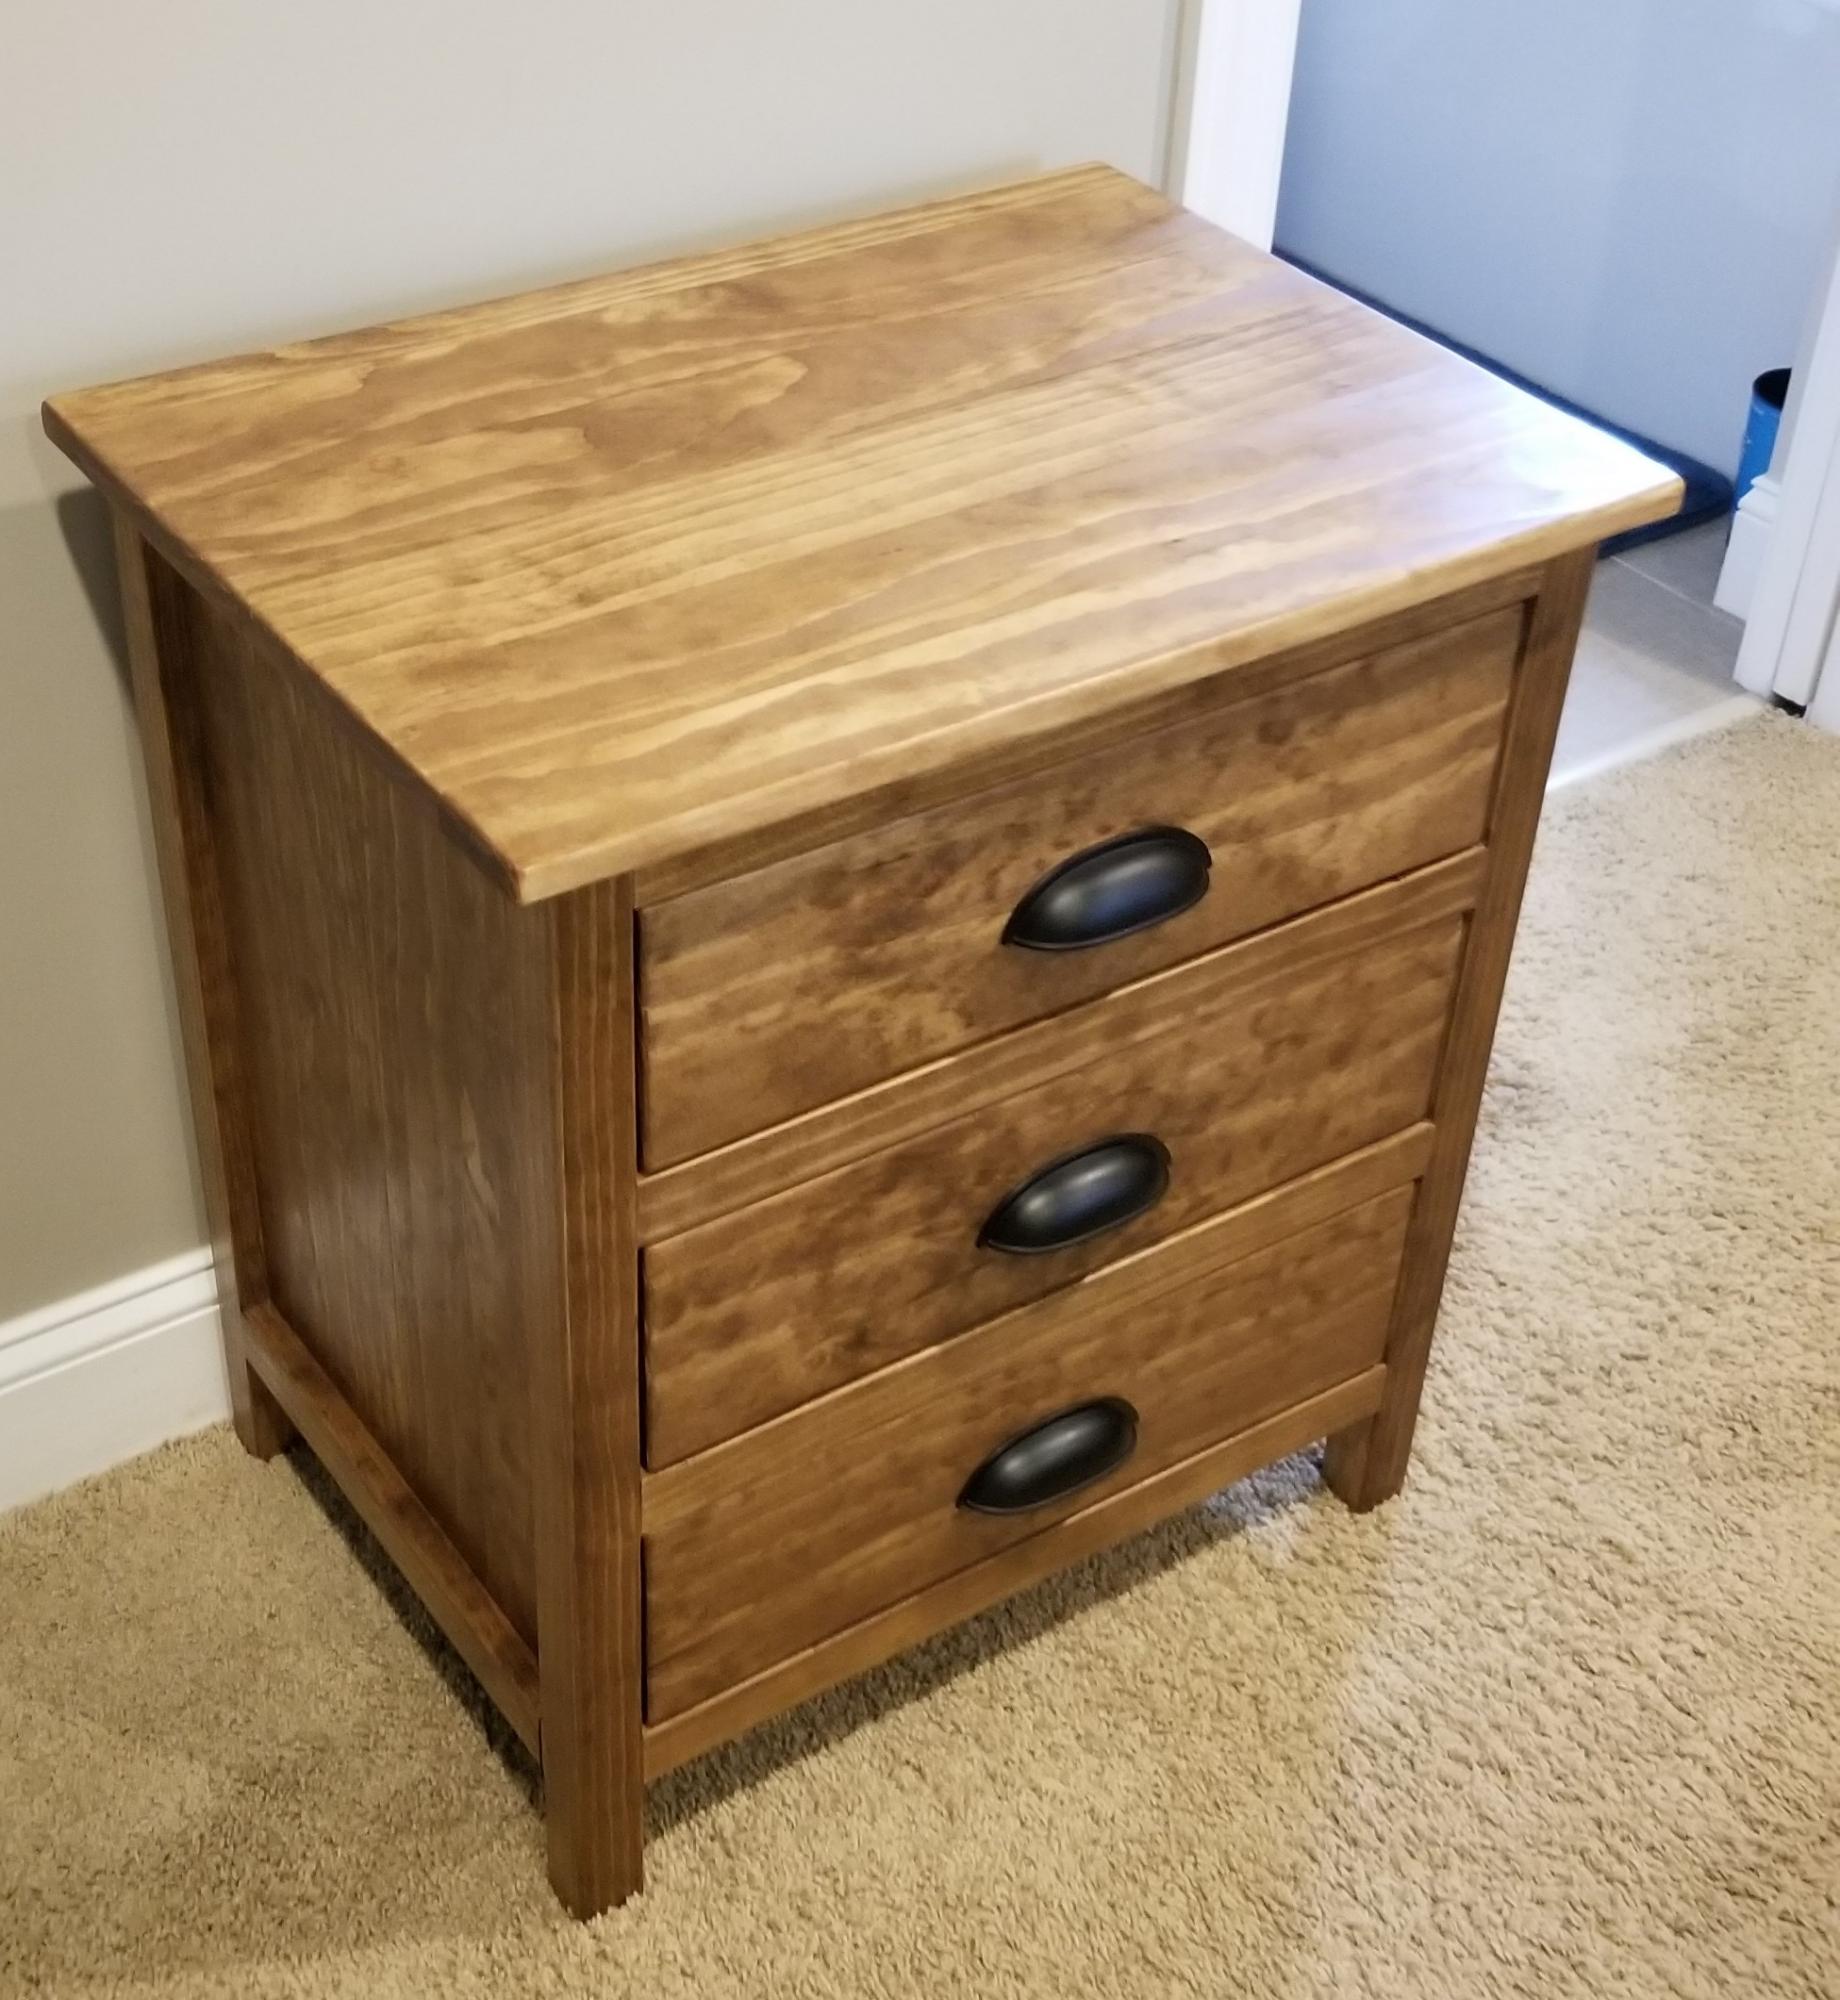
I used one of the plans found on the site but modified it by making mine 8 inches wider. They are slightly higher as well to match what I replaced in our master bedroom. This was actually the first project that I took on after looking at bedroom furniture for over a month and realizing how expensive cheap furniture is.
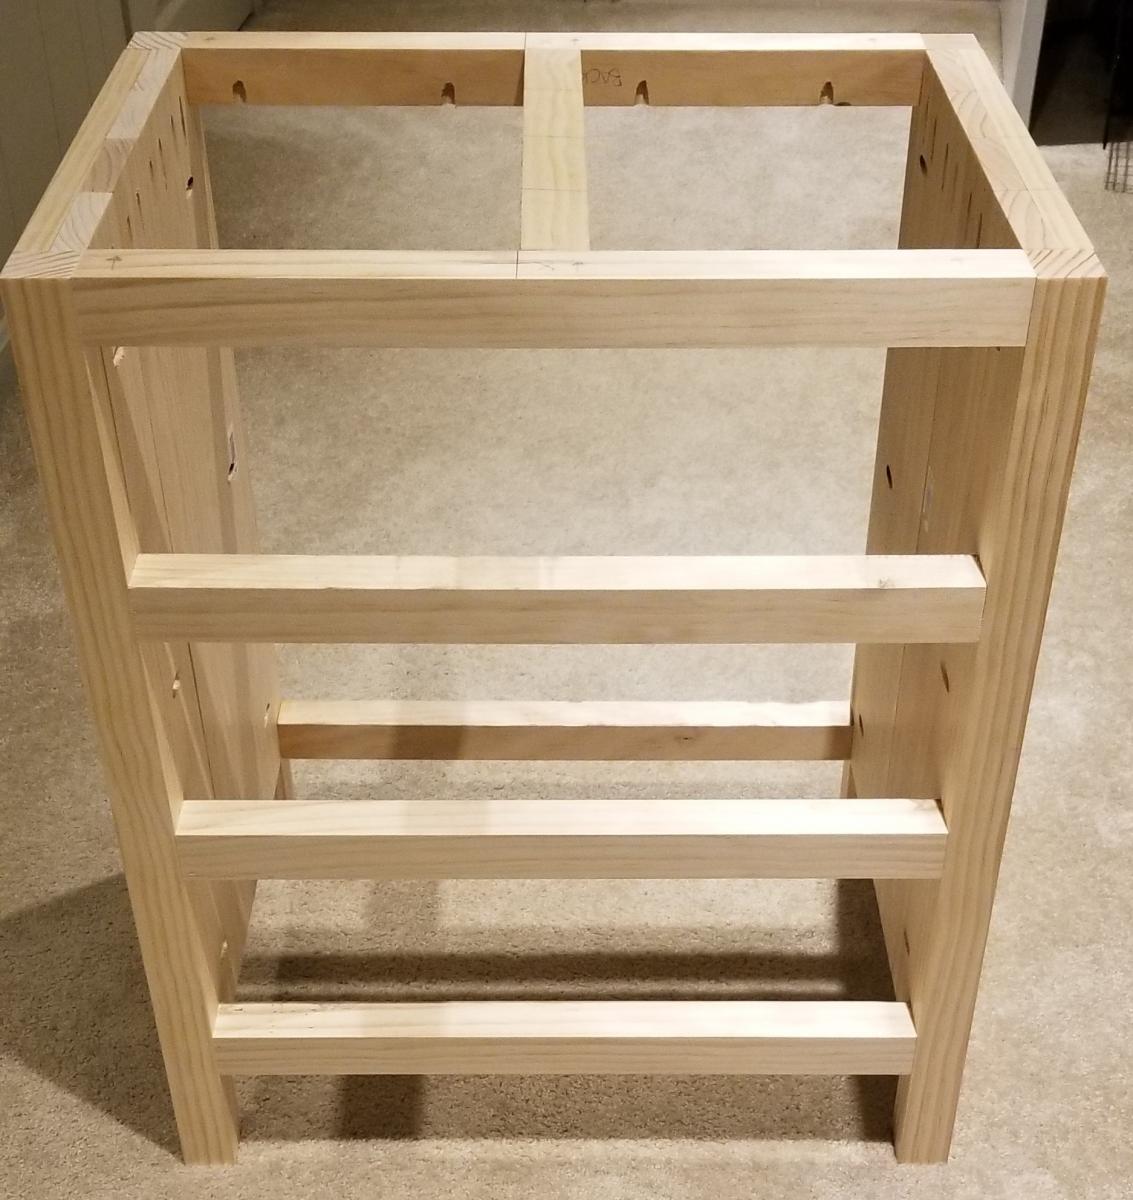
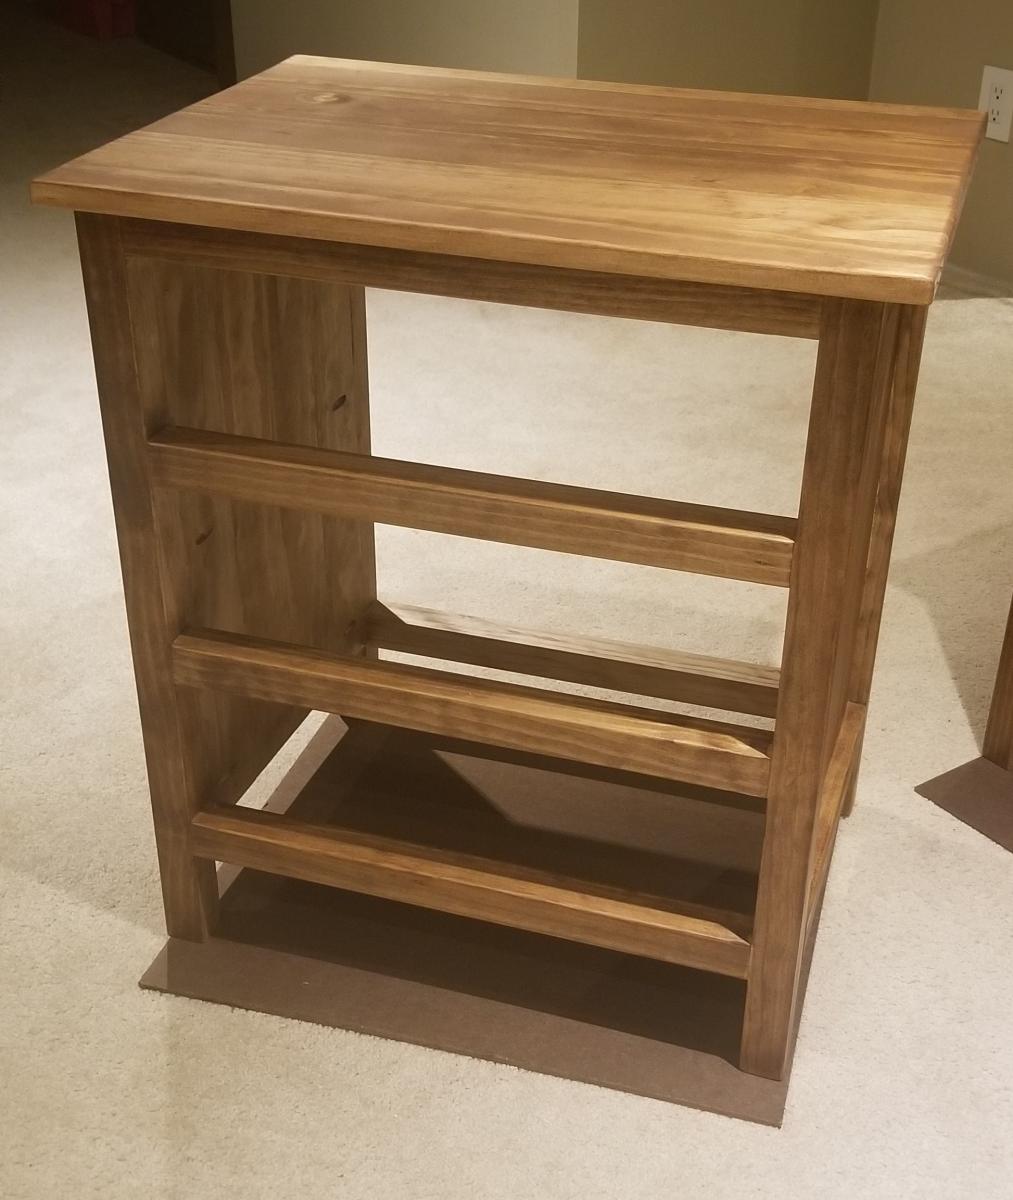
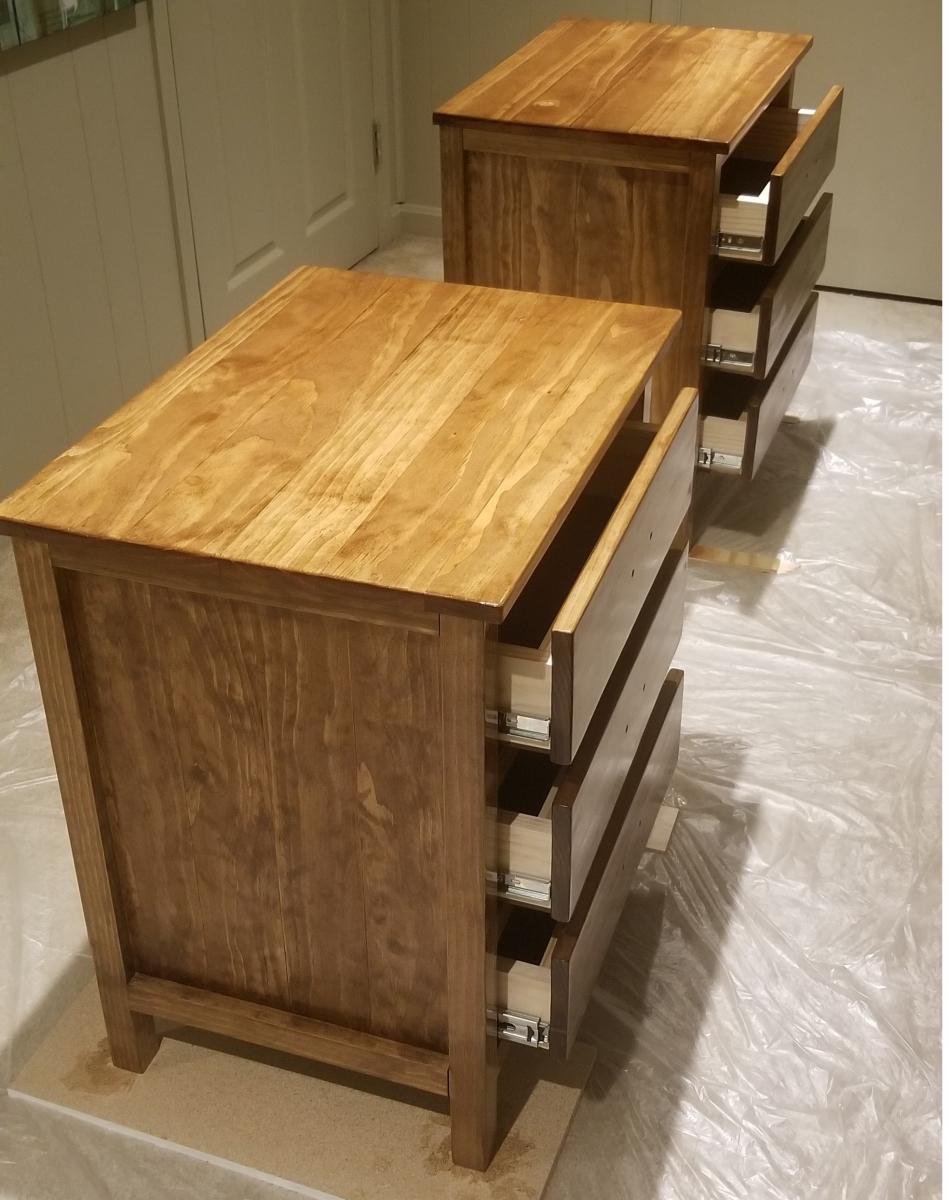
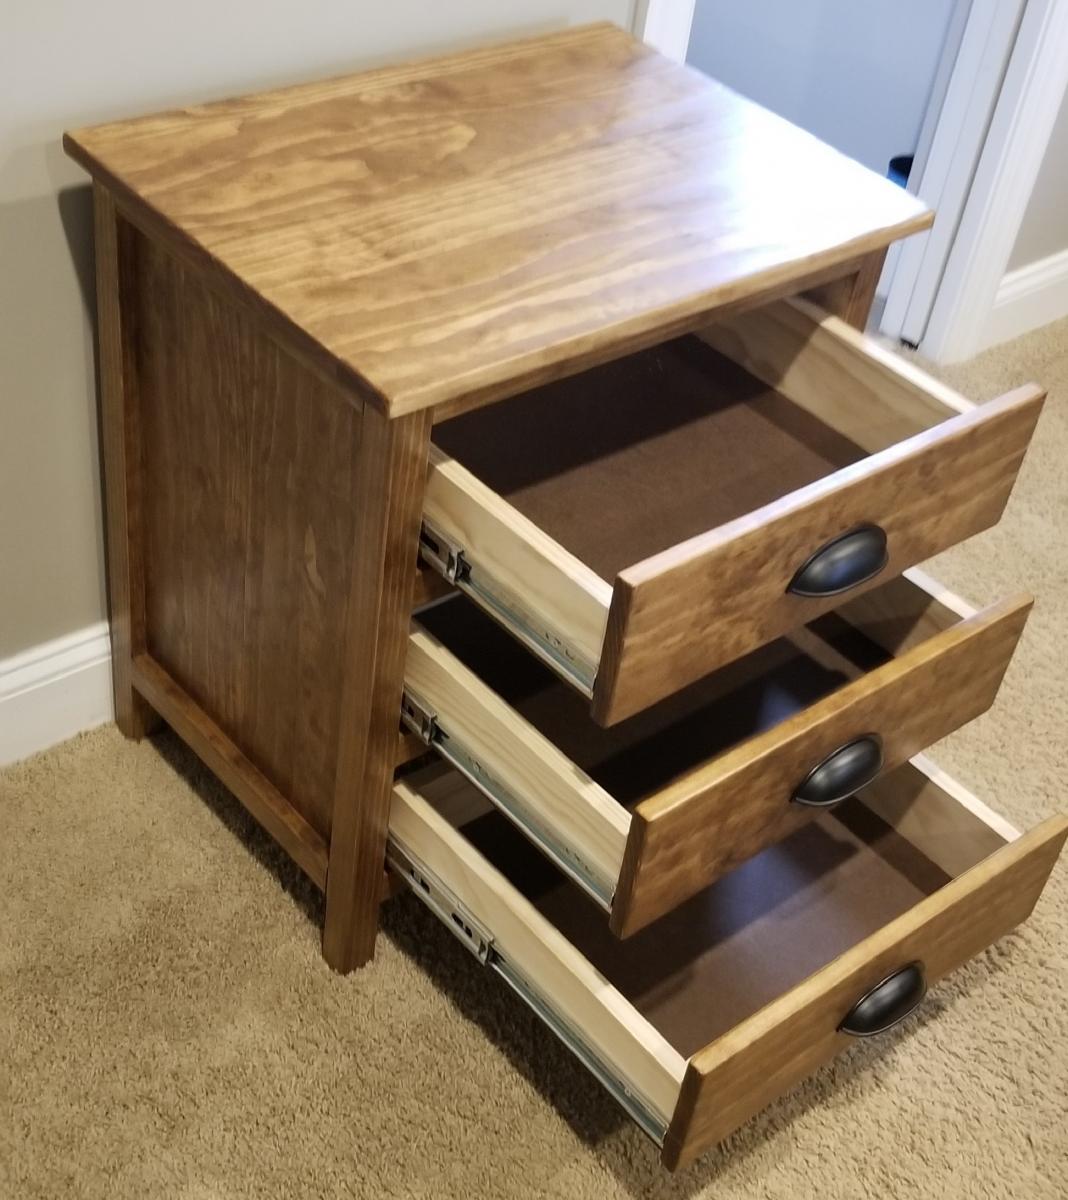
Built from Plan(s)
Estimated Cost
$300
Estimated Time Investment
Weekend Project (10-20 Hours)
Finish Used
Minwax Early American Stain and Minwax Satin Polyurethane
Recommended Skill Level
Intermediate
Mini Dresser for Jewelry and keepsakes
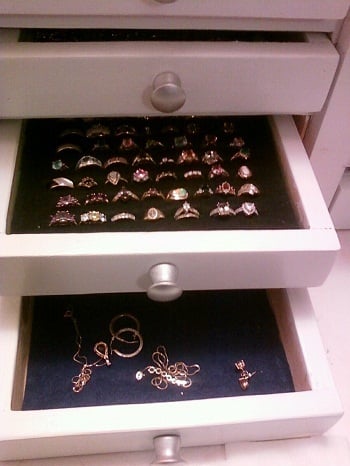
These little dressers are inspired by Ana's Master Closet System drawers, and the Willy Bookshelf. These were made entirely from scrap wood, so it only cost me for the knobs and the felt for the drawers/bottom. These drawers were sized to fit inside the cubes in my vanity/desk, and to fit the left over wood available from my scrap bin. This took a while to cut everything, but it was fun and didn’t cost me anything but my time. On the top dresser I used some ‘slices’ of lauan for trim, to hide the cut edges and the bit of ‘cup’ on my side pieces (these were re-purposed old shelf boards from the garage). I used my finish nailer and glue for these.
Here’s a shopping and cut list (and a few tips) to make the 4-drawer equivalent (similar to the top one) with standard sized 1x12 lumber, and using 1x2 for drawer front/back/sides and applying 3/16” lauan ply for the bottoms. Haven't figured out how to use sketch up yet, so I can only provide a shopping list, cut list, and finished dimensions, so here goes:
Shopping list: (my 1x12’s are 11.25” wide and .75” thick, and 1x2’s were 1.5” wide, and .75” thick, and lauan is 3/16” thick)
1 pc 1x12x8
2 pc 1x2x8
2 pc 24” x 24” lauan (3/16’ plywood) (you’ll have some left over from the 2nd piece)
Felt - 4 pc 8.5” x 9.75” for insides of drawers, 4 pc 10” x 11.25” for drawer bottoms, and 1 pc 11.75" x 11.25" for dresser bottom. You can use 9 sheets craft felt (9” x 12”) for this – the 11.25” front – back measurement on the drawer bottoms is what’s most important –craft felt is 9” wide, and it’s OK if the felt doesn’t go all the way to the edges on the side-to-side measurement
(Sticky-back felt works and looks great, but costs a lot more than regular. I use sticky back on something I’m making as a gift, but these were for me so I just used regular felt and glued it in place with wood glue)
4 mini-knobs (Mine are unfinished ones from Ace, got for 2/$1.29 and spray-painted them)
Finish nails (I had 1 ¼” on hand) and plenty of glue
Finishing materials - filler, sand paper, plus paint/stain to suit your tastes
Cut list:
2 pc 1x12, cut at 2” (spacers - use these 'slices' for spacers while assembling, so the shelves are all spaced the same distance apart – this idea is from the Kreg jig demo video where they built the bookshelf). I like to cut these first, making sure they are nice and square. To me it’s easier and safer to cut these thin pieces from a larger piece with my miter saw.
2 pc 1x12 @ 11.75” (dresser top/bottom)
5 pc 1x12 @ 10.25” (2 for sides, 3 for shelves)
8 pc 1x2 @ 10” (drawer front/back)
8 pc 1x2 @ 9.75” (drawer sides)
4 pc 10” x 11.25” lauan plywood (drawer bottoms)
1 pc 11.75" x 11.75” lauan plywood (back)
Finished dimensions:
Dresser: 11.75” H x 11.75” W x 11 7/16” deep (includes back)
Drawer opening size: 10.25” wide x 2” tall x 11.25” deep
Drawer dimensions: 10”wide x 11.25” long x 1 11/16” tall (felt on the bottom of the drawer will make this height just a little taller)
Finished inside depth of drawer 1.5”, drawer inside dimensions 8.5” wide x 9.75” long
Finish: sanded, filled, sanded some more, and painted with some left over white paint, and used silver spray paint for the knobs
Assembly tips: Dresser part is constructed very much like the Willy bookshelf. The top and bottom are the same size on this one and the dresser bottom is applied the same way as the top of the Willy bookshelf. Once the bottom is on, use the ‘spacers’ to make sure the shelves are the same distance apart all the way up, then the top goes on last. 3/16” plywood goes on the back. Drawers are constructed like the master closet system drawers. Drawers slide directly on the shelves (and bottoms of drawers covered with felt) so no drawer glides are used. Applied the felt and knobs after sanding and finishing. Make sure the felt goes all the way from the front to the back of the drawer bottom, and is glued on thoroughly.
Built from Plan(s)
Estimated Cost
$10 (would be about $30 for materials for a 4 drawer cube done in whitewood)
Estimated Time Investment
Afternoon Project (3-6 Hours)
Finish Used
White paint (left over)
Recommended Skill Level
Beginner
Comments
Thu, 12/22/2011 - 23:15
So clever. You did a great job.
How did you do the insides? Did you line it with some type of foam? Great work. Thank you for posting.

Fri, 12/23/2011 - 11:56
Insides of drawers
Thanks very much! For the ring drawer, I used a piece of 1" thick high density foam (I cut up a kitchen chair pad) and on top of this is a piece of sticky-back felt. I drew lines on the paper side and cut slits into the felt first, then stuck it on top of the foam, and cut into the foam following the slits, using a utility knife. I didn't cut all the way through the foam, but almost to the bottom. The slits go all the way across the foam (to about 3/4" from edge) to fit more rings in there, but you can also do individual slits for each ring (if you have more patience than me - haha). The other drawers have regular felt cut to size and attached with wood glue. (Sticky back felt inside the drawers would have worked fine too, it just costs more).

Fri, 12/23/2011 - 16:55
That's pretty slick
I just built a gentleman's valet for my sister in law's boyfriend, partly to test out some joinery ideas, and partly because I found a beautiful piece of white oak in the discount bin while I was looking for something else at the lumber dealer. I was pretty impressed with myself, but it's got nothing on the ambition of this project.
Excellent work. I absolutely wouldn't have guessed it as a beginner project.
I'm almost certainly going to have to build a jewelry chest like this for my wife pretty soon. My dad just built my mom a nice one, and my wife will be wanting her own.
Sat, 12/24/2011 - 13:54
Thank you
Clay, thanks very much for the nice compliment. I've seen your projects here and on your blog and they are beautiful, so I'm very flattered! I've edited my original post to include measurements and cut list for a 'regular lumber' equivalent to the top chest. Lots easier than cutting all those drawer sides out of plywood and 1x12 like I did with my 'prototypes'. :) The next one I do will be with regular size lumber. Thinking of building one for my Mom. Happy holidays!
Thu, 02/02/2012 - 00:26
do you sell these? Its
do you sell these? Its awesome. I've been looking for a tabletop drawer to store my makeup but everything is made of plastic! I was actually googling to see if there was someplace I can do woodshop to make my own jewelry drawer but alas I dont have the skills nor do I have any tools. I really admire this drawer!
Thu, 02/02/2012 - 04:56
Rentable Shop Space
Lucy, try looking for something like a Makerworks. These are communal workshops with space and tools that you can use for a fee or a subscription. I don't know how prevalent they are in most of the country. I live in a suburb of Detroit, and because of the large manufacturing base there are a lot of them around.
The more expensive ones offer classes where you can pick up basic skills on unfamiliar equipment, but even those "expensive" ones don't cost a lot of money. The inexpensive ones still offer training on their equipment, but less formally than a scheduled class.
One of the more interesting features of these places, at least around here, is that they have CNC machines available. A CNC machine would let you transfer sketchup drawings directly to cut parts. For a one-off item it's not worth the trouble, but if you wanted to duplicate an item it would be great.
Redwood Farmhouse Table and Bench
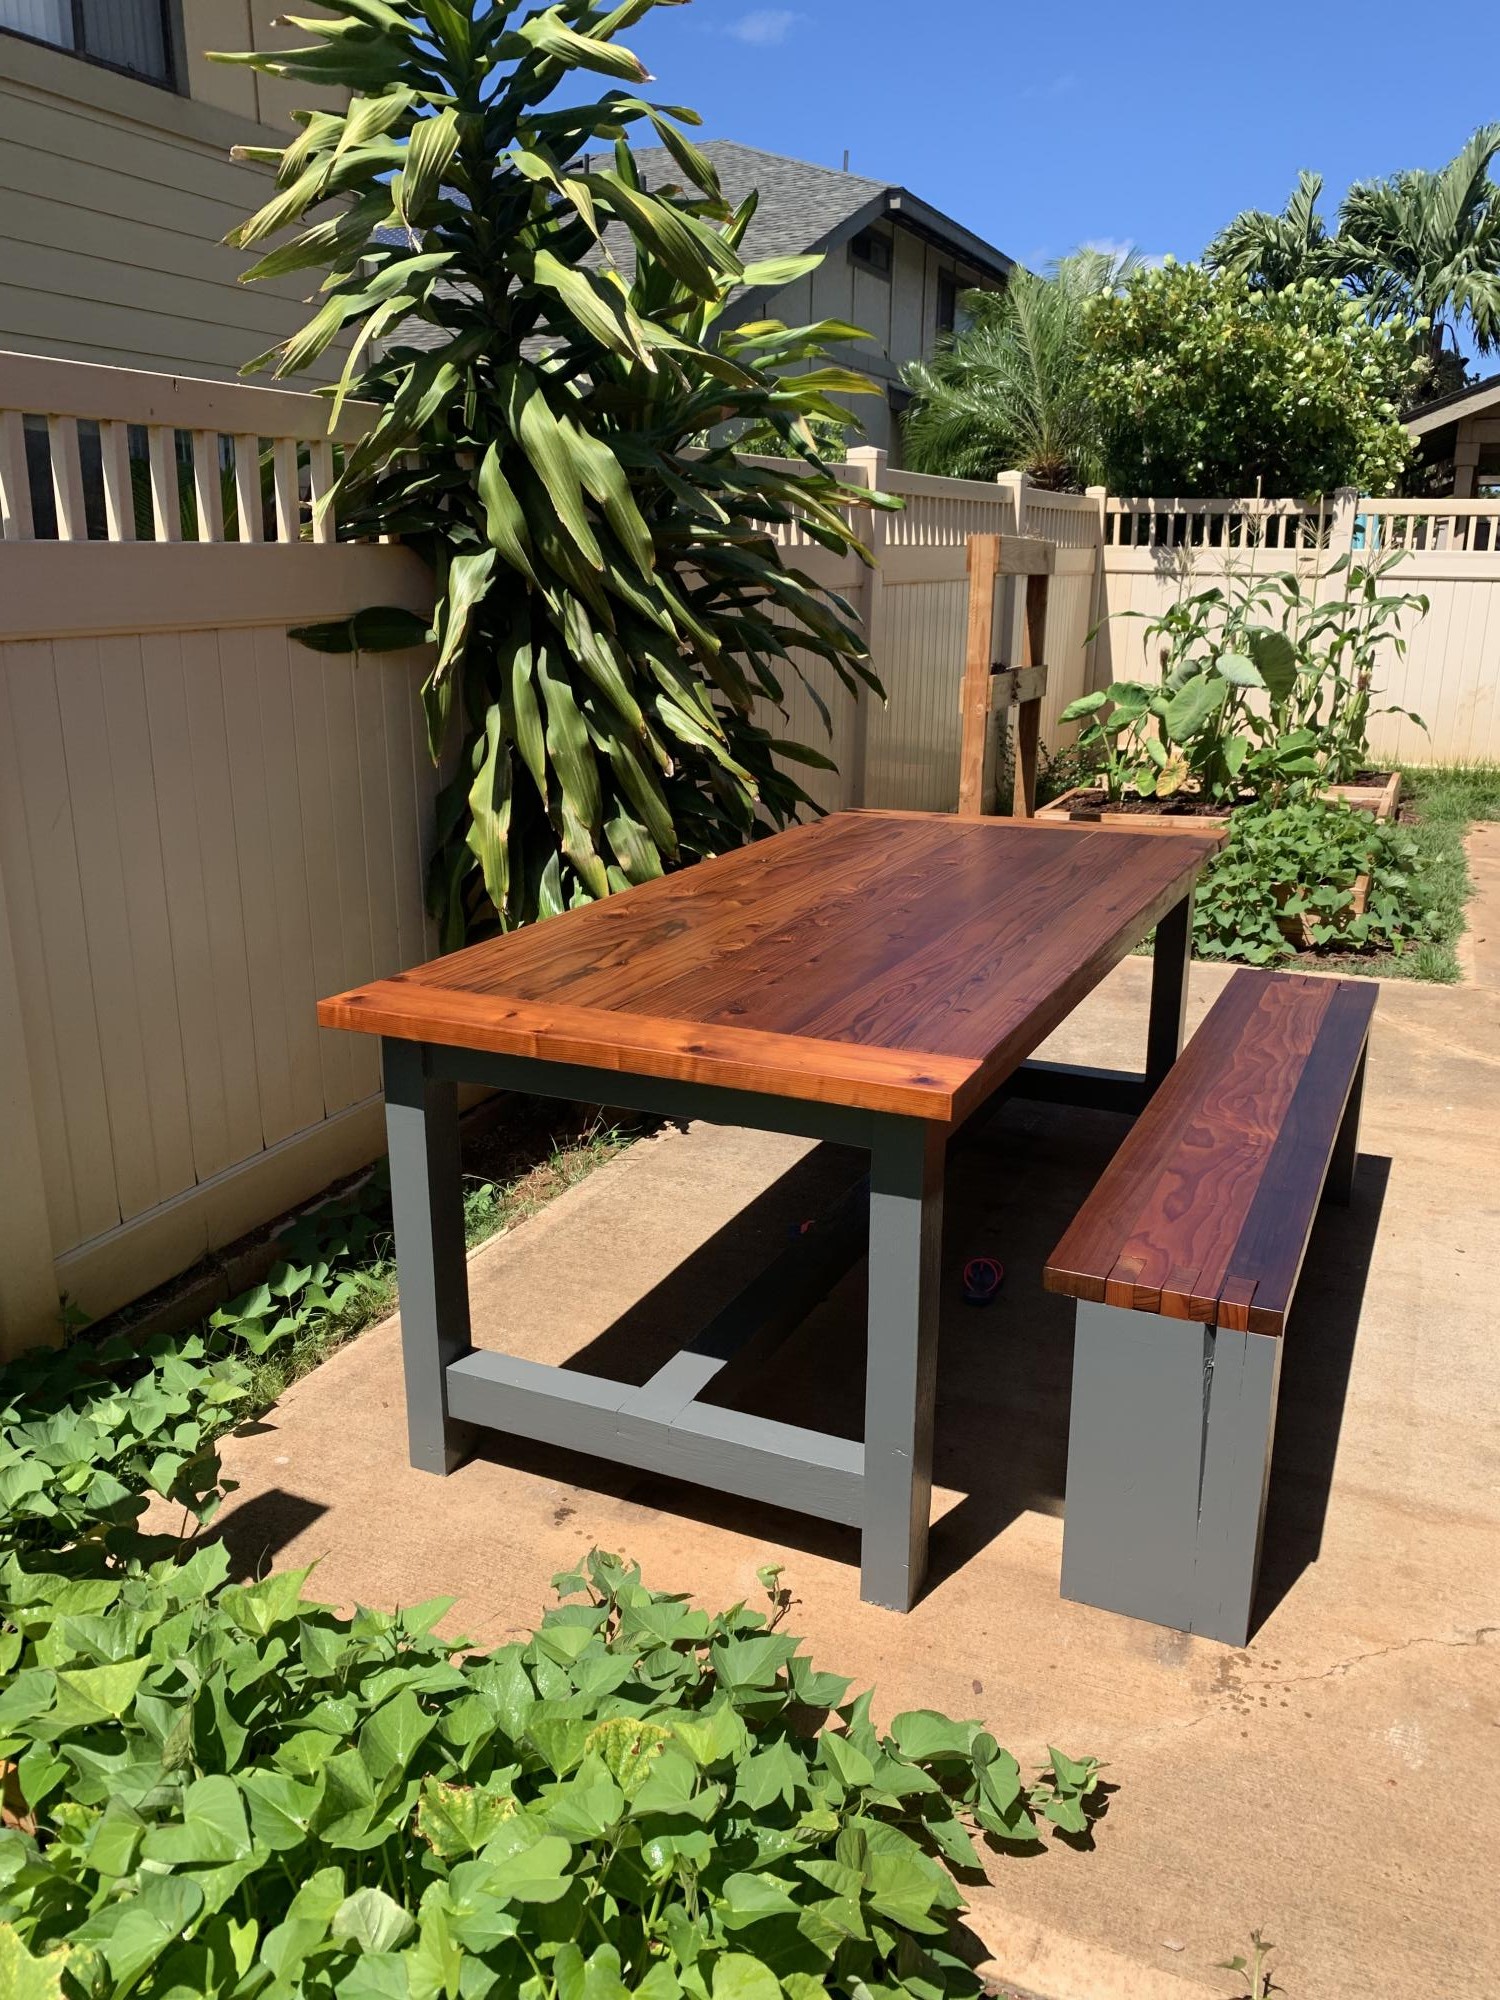
Farmhouse Table and Bench. Made from all redwood. Table is all new wood, and half the bench was from reclaimed redwood. Used Danish Oil and Spar Urethane to finish the tops, and paint to finish the legs.
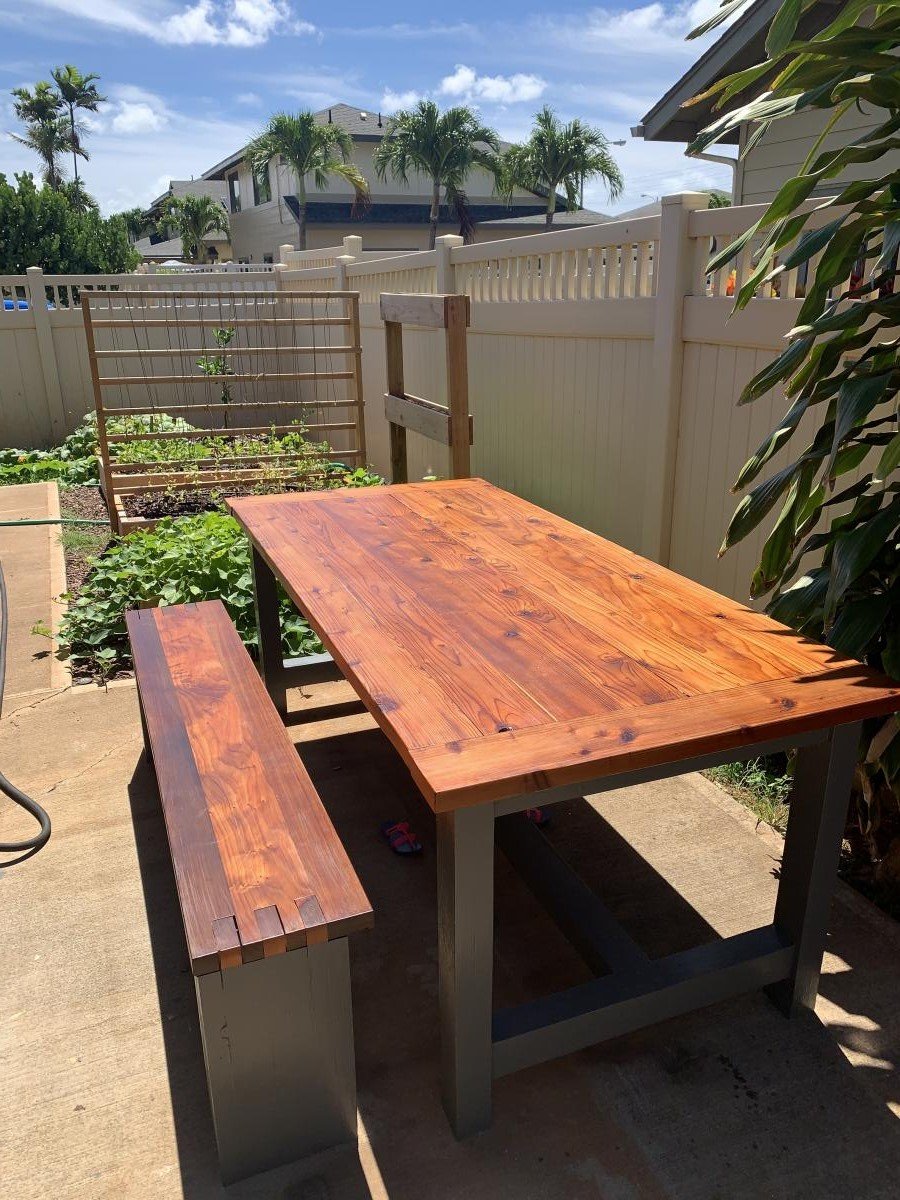
Built from Plan(s)
Estimated Cost
Not sure, but redwood cost a lot more than pine. Maybe $400 or so.
Estimated Time Investment
Week Long Project (20 Hours or More)
Recommended Skill Level
Beginner
Comments

Mon, 07/22/2019 - 11:14
What a gorgeous table and…
What a gorgeous table and chairs. the top is done very nicely! Love it!