Community Brag Posts
American Girl Dream Dollhouse

Finished it in one weekend, but worked all days, both days. My little clients are beyond happy with the results.


Built from Plan(s)
Recommended Skill Level
Intermediate
Modified Indoor Clubhouse and Bed

This is my first build and I had so much fun! I am now officially addicted to DIY and woodworking!
I started off with a couple of problems right out of the gate but, I really wanted to make this for my Grandaughter for Christmas. The first problem was the ceiling in her room is 7 feet 6 inches high. So, if I lowered the height then the loft platform became too low to install over a twin bed. It didn’t allow for enough headroom over the mattress. Plus, I didn’t want her to sleep on a mattress that was on the floor. So, I raised the platform to 48 inches and modified the roof so that I would be able to fit the Alaska Cabin Twin storage bed underneath.
I also modified the size by increasing the platform dimensions to 40”x48”. Doing that allowed me to comfortably fit the bed underneath.
I was lucky to find laminate flooring on clearance at Lowe’s. I paid five dollars for an open box. I used it to cover the plywood floor. I also used it for the roof by just nailing it to the 2x4s.
I wanted my granddaughter to be able to paint, use her markers, and be as messy as she wanted without restrictions. One wall is made from dry erase board with 1x4s as shelving to frame it out. (I used Ana’s flip down desk plans as a guide for the shelving.) The back wall is slat wall from Menards. I just spray painted it hot pink. The third wall is a 12 inch shelf framed out by 2x4s. The last wall is leftover 1x3 and 1x4 boards that I stained and painted.
My daughter didn’t like the first ladder so I moved it to one side. I stained the ladder with Minwax classic gray. I also used the classic gray stain for the cabin bed frame. The pink on the cabin bed is Sherwin Williams “hibiscus.”
My granddaughter and I finished the bed this evening. She loves helping me “work “in the garage. We ended our build by adding a monster free zone. Monsters will be zapped if they try to enter the clubhouse or the bed! Thank you Ana!
Mary


Built from Plan(s)
Estimated Cost
$150
Estimated Time Investment
Week Long Project (20 Hours or More)
Finish Used
Minwax Classic Gray
Sherwin Williams “Hibiscus”
Kilz white primer
Sherwin Williams “Hibiscus”
Kilz white primer
Recommended Skill Level
Beginner
Comments

Sat, 01/12/2019 - 09:20
What a special project. I
What a special project. I love all the details and customizing. Memories and a project to be treasured for years!
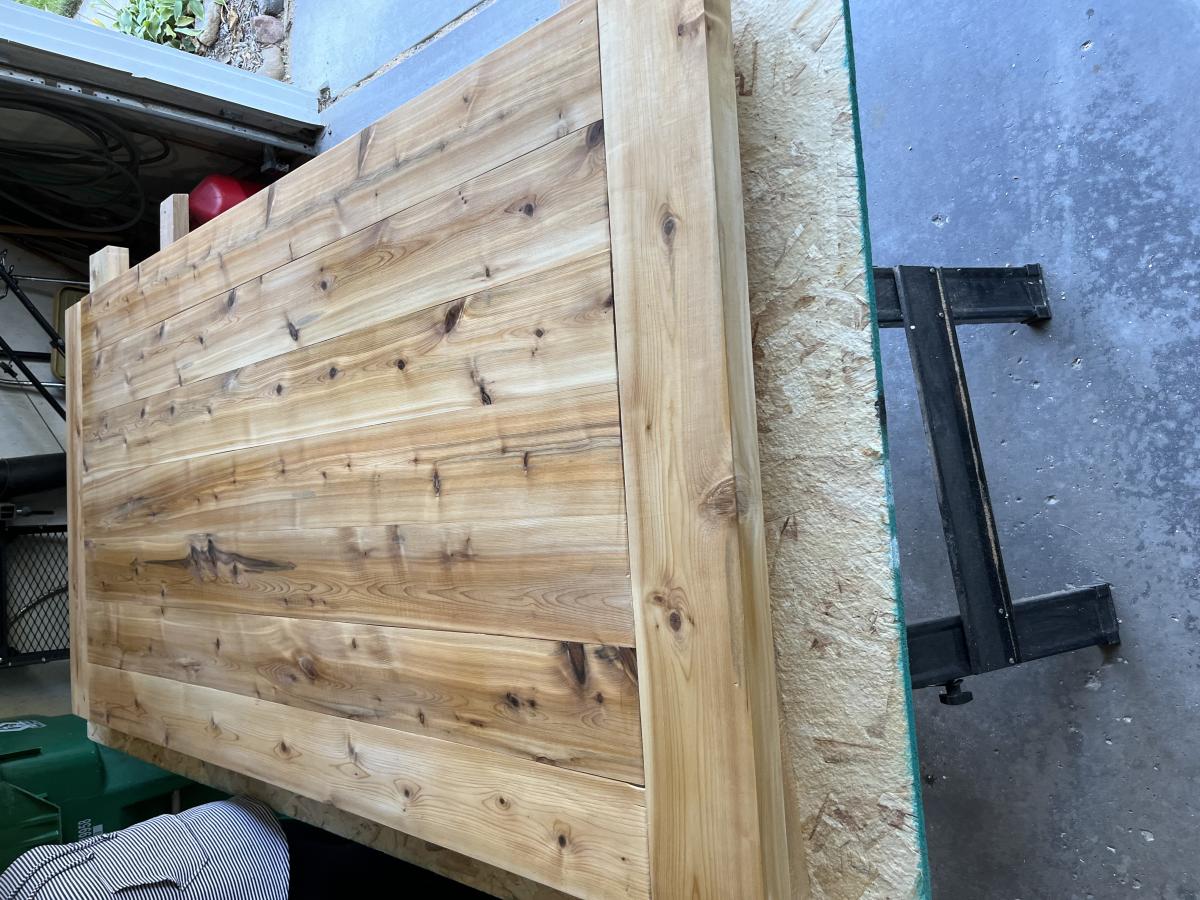
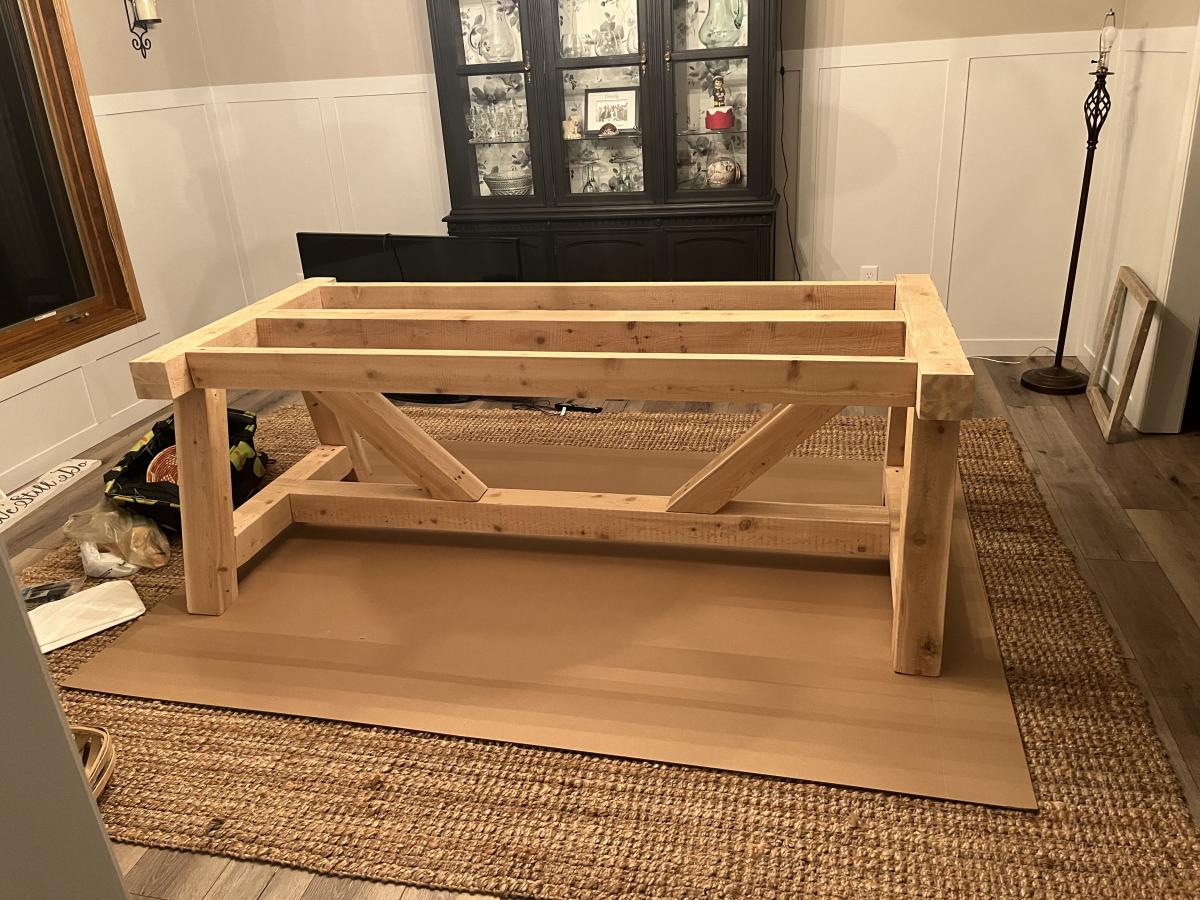
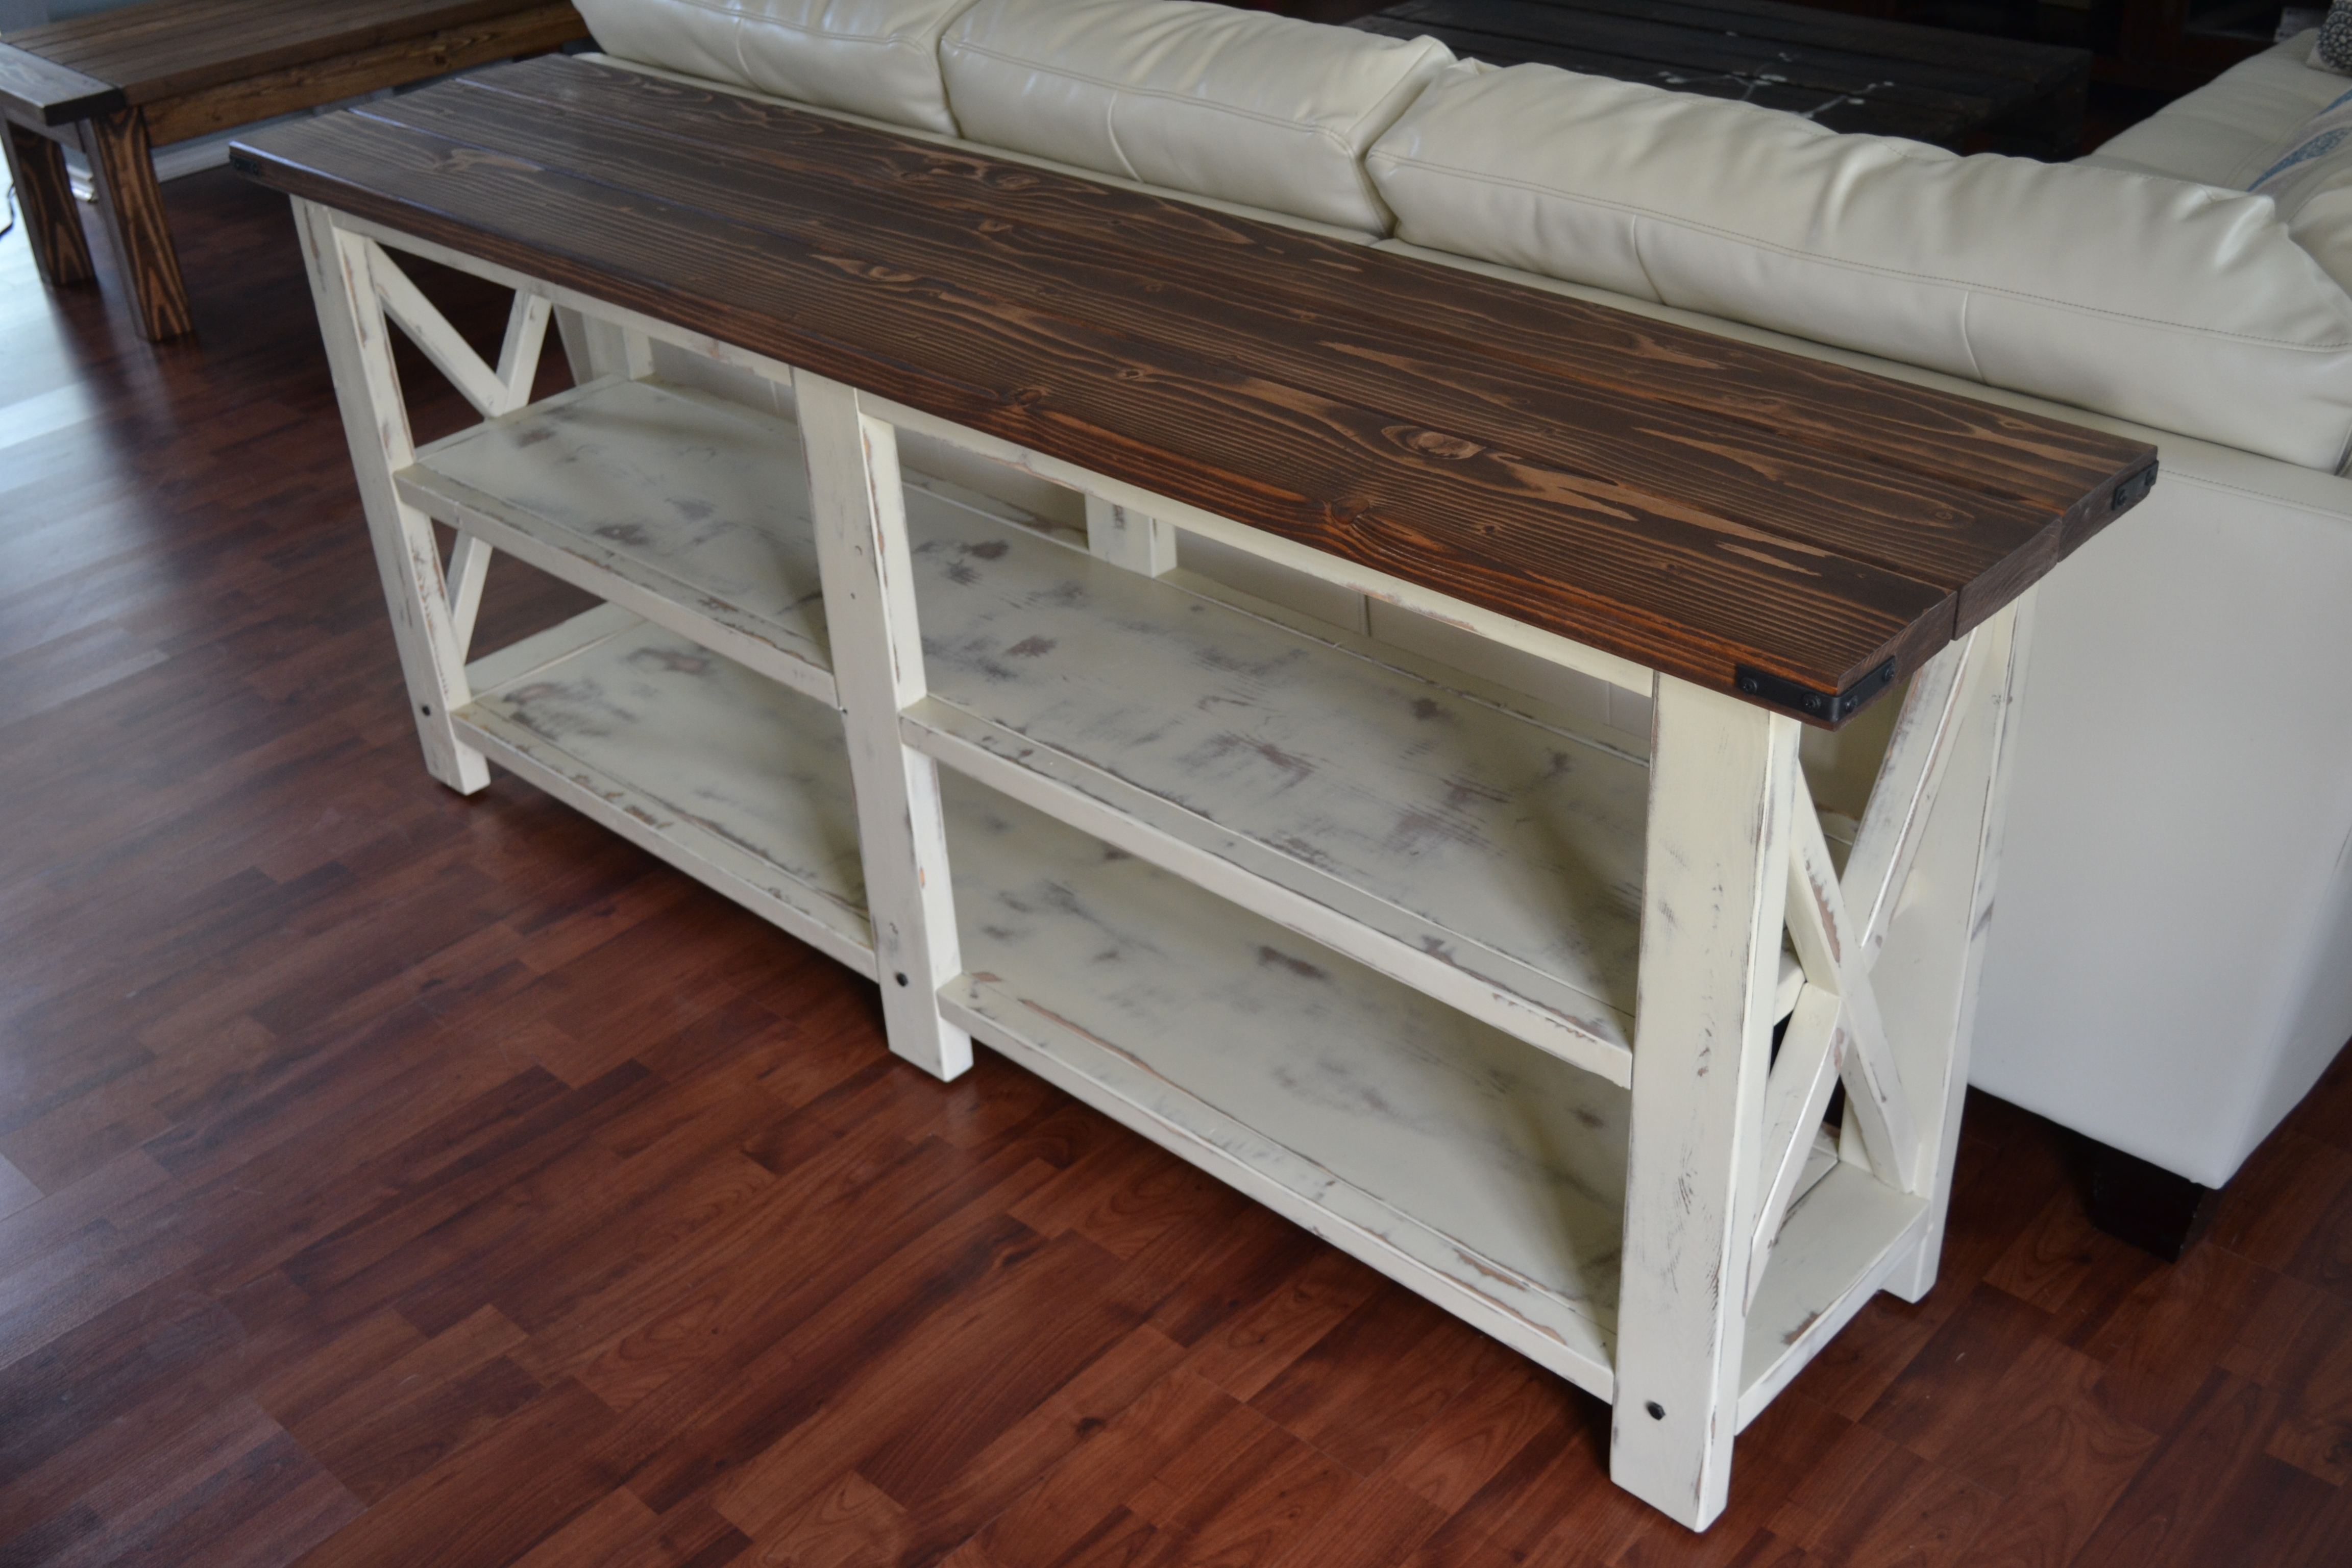
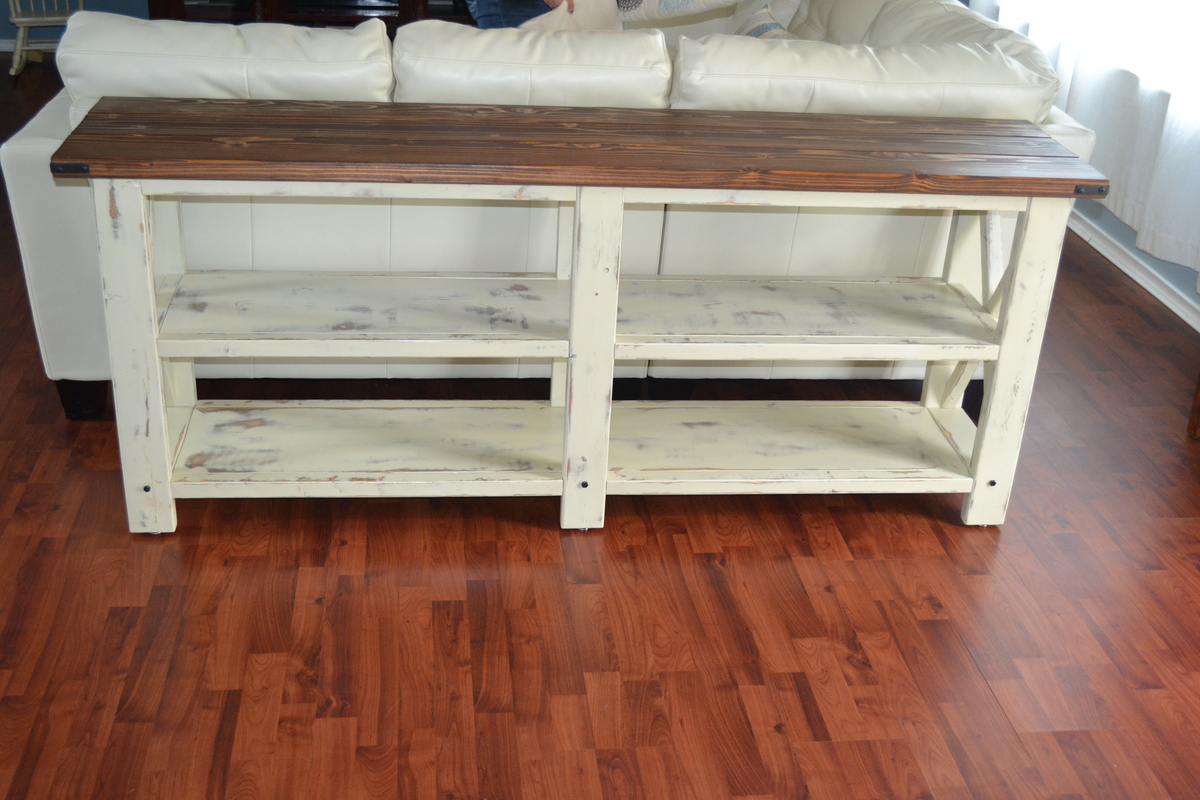
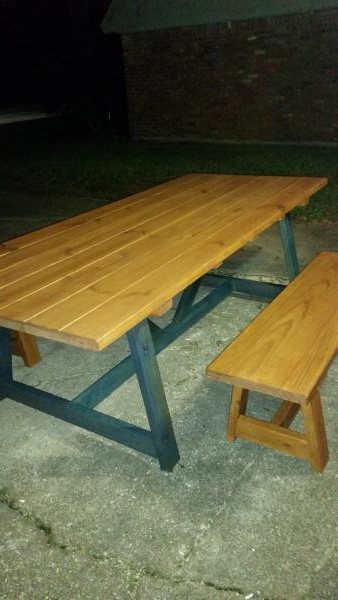
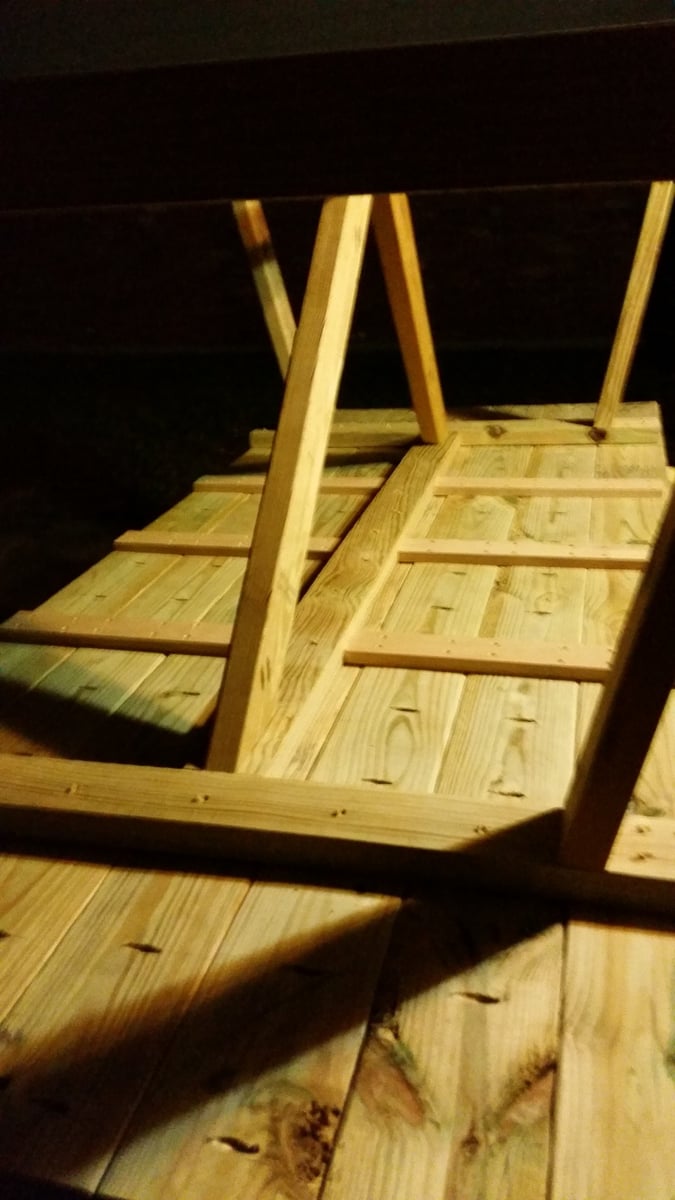
4x4 Truss Beam Table

This is our new dinning room table. We used the 4x4 truss beam table and refer to it as our farm to table table. It's made from red cedar that we harvested off of our land and milled into lumber. A natural stain with some clear coats and it turned out to be gorgeous. I wasn't a fan of the black base, at first, but think the finished table looks good. Pretty happy with my first table attempt.
Built from Plan(s)
Comments
Sun, 10/23/2022 - 10:40
Pretty first table!
You did an outstanding job, love the finish choice! Thanks for sharing.
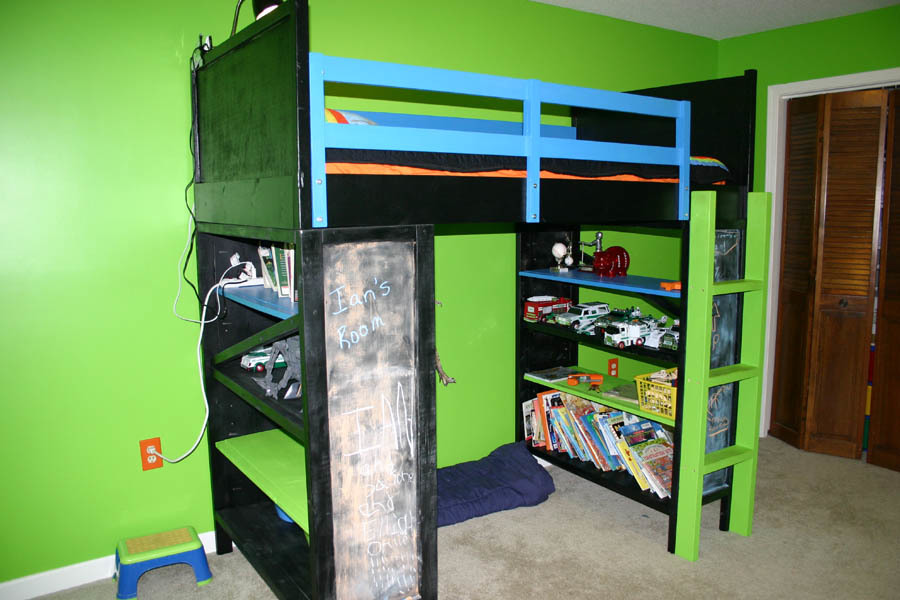
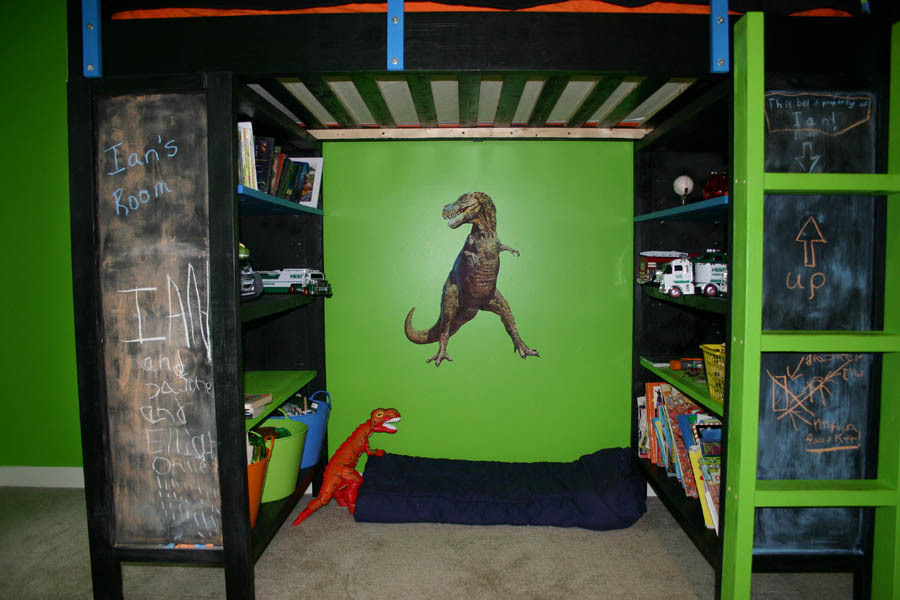
Modified Loft Bed
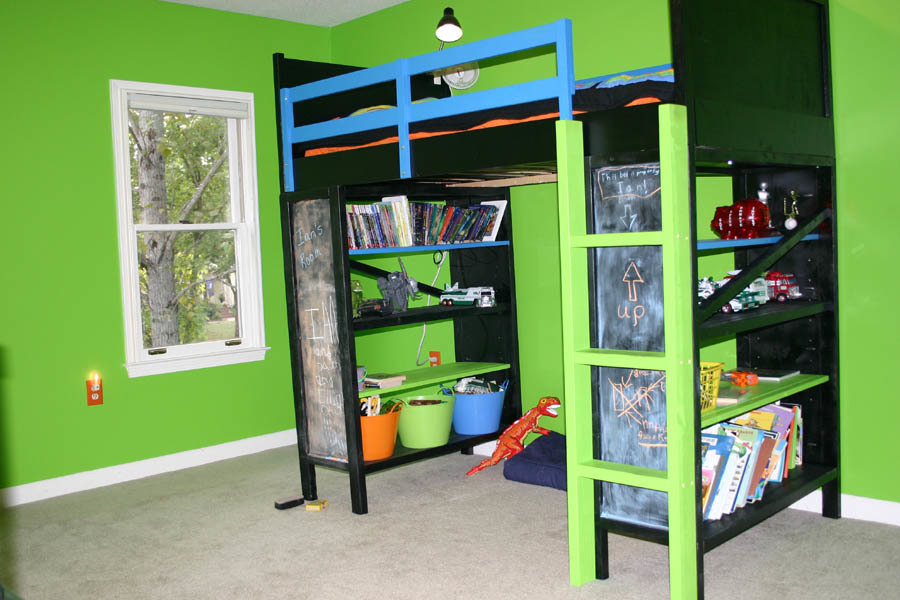
It was time for my younger son's bedroom re-do. He had waited patiently, and was pretty clear in his requests. He wanted color, and dinosaurs. Not just any dinos, but "real" ones--no babyish dinos allowed, said my future paleontologist. Once he saw the loft bed that I was considering for his older brother--he was hooked. We negotiated the paint colors and we were off.
I used the cabin loft bed and the chelsea designs for this bed.
I used the Chelsea bookcases with 2x3s as legs instead of 2x2s (due to quality). This altered the shelf measurements some, but I simply made my adjustable shelves to plan.
The biggest thing to note about the Chelsea bookcase supports is that you need some sort of bracing to eliminate side-to-side wobble. I used a 2x2 and eliminated most all of it, but you need to take this into account!
As for the cabin loft plan part--this was used in the bed portion of the plan. I did used the non-mortising bed rail brackets to attach the side rails for ease of use.
Ladder-Oh the ladder and the angles gave me fits! LOL. I ended up doing a straight ladder and attaching it to the bookcase support. It's fine. Just FYI-don't paint your ladder a light color if dirt bothers you. The rungs are already showing the dirt from little boy feet, so it may get painted again!
I painted the side panels of the bookcases with chalkboard paint. If I did it again I think I would have attached a smooth piece of thin board(the name escapes me right now) and painted that, as the wood tends to catch the eraser some.
Built from Plan(s)
Estimated Cost
~$200-$250
Estimated Time Investment
Week Long Project (20 Hours or More)
Finish Used
I used a rustoleum satin black, a behr cobalt blue paint and primer in one (from the oops bin at orange for $1!) and the green was a Sherwin Williams eggshell (same as the walls).
Recommended Skill Level
Intermediate
Comments
Fri, 12/30/2011 - 18:19
I like the idea of using the
I like the idea of using the straight ladder. I built the loft bed for my daughter. I went crazy trying to make the legs match. After a lot of filing I was able to get them relatively close. BTW, nice dinosaurs!
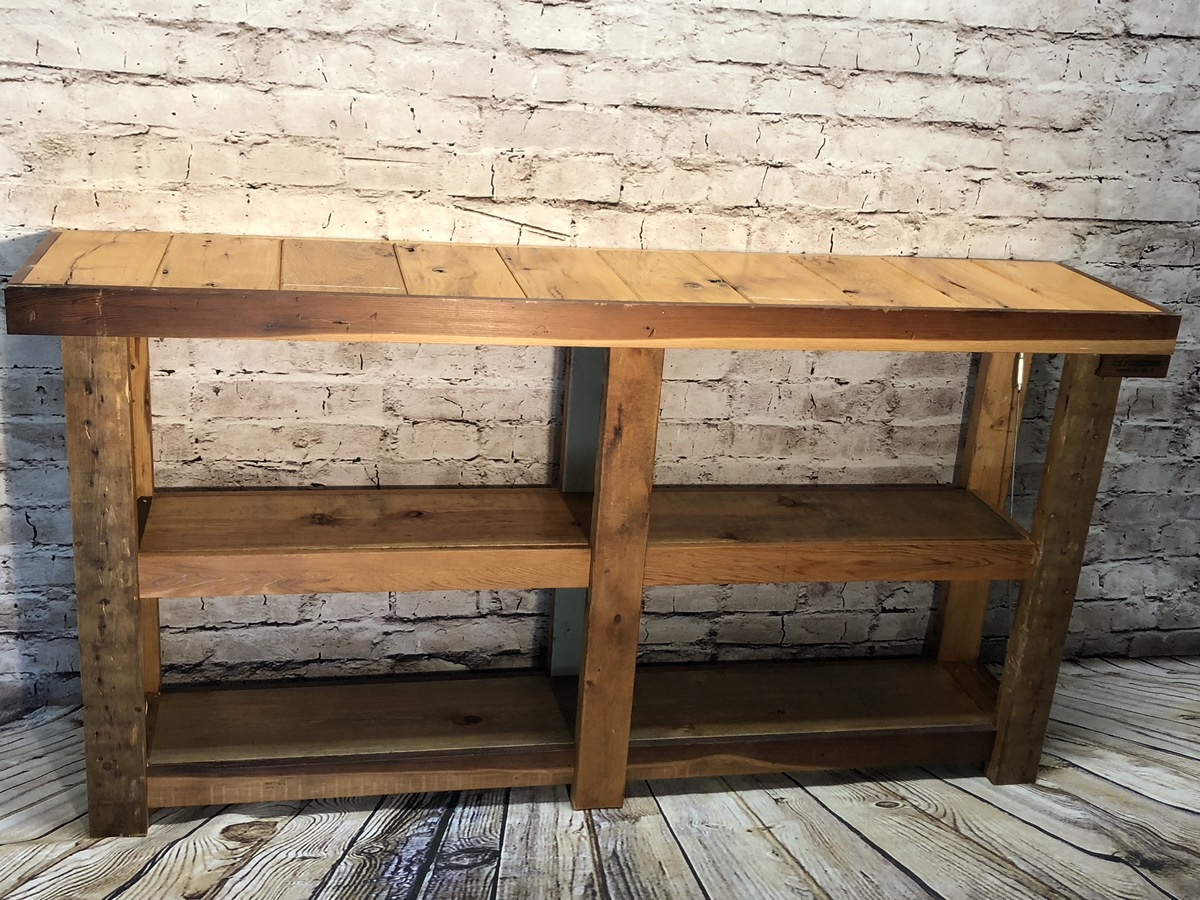
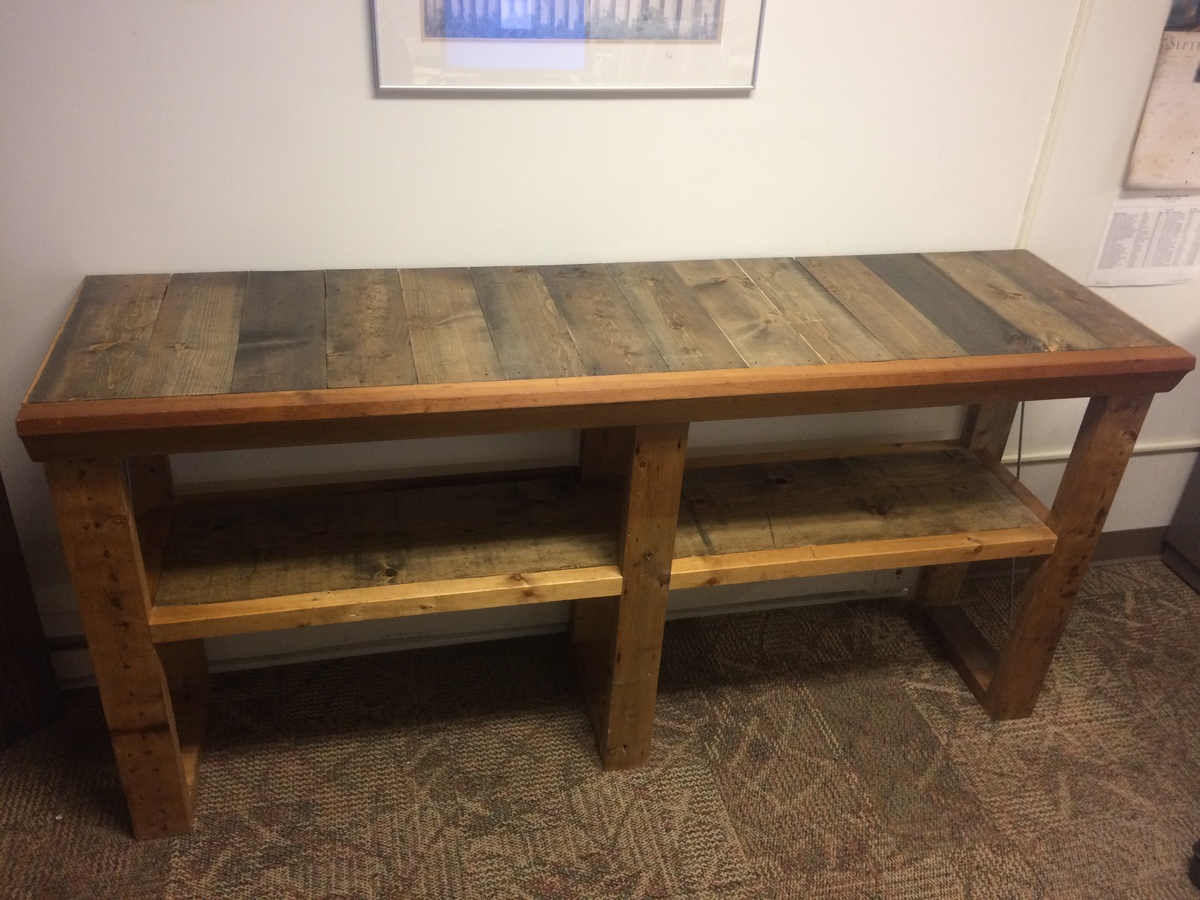
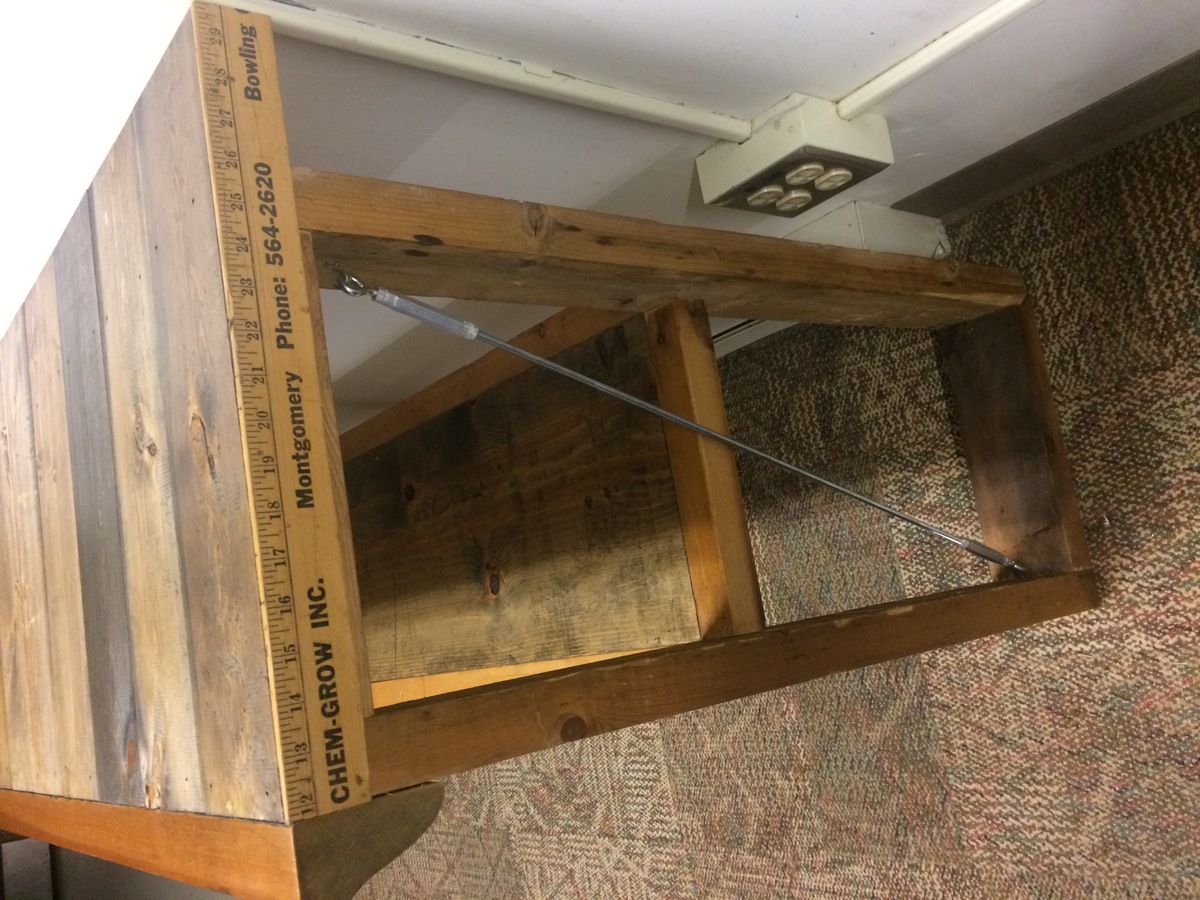
Console Table
A customer of ours emailed the plans for this console table to me from Ana's site and asked if I could build it for her. I must say, the plans were laid out so well I believe my 8 year old could have built it. Well done Ana!
I made the color scheme what the customer asked for and I think it turned out pretty decent. I also have to say that I would typically wing it when it came to building stuff, but after seeing how the plans on this site are laid out so well, I will definitely be changing my practices. I have read a lot of great helpful tips, tricks, and hints on this site. I've only been doing this for about 6 months, so I need all the help I can get!
Thanks again, Ana, for being such a great source of information and inspiration!
Estimated Cost
125
Estimated Time Investment
Weekend Project (10-20 Hours)
Finish Used
ON the table base I used a minwax Walnut stain on the bare wood, then applied a coat of Krylon Almond paint. I distressed the paint with a 5" orbital sander and 120 grit sand paper. I then applied two coats of Minwax wipe-on Polyurethane Satin finish. I did the same on the top, minus the almond paint. After the poly coats were applied I wiped the entire piece down with an orange oil/bee's wax mixture, let it dry, then buffed it with a soft clean cloth.
Recommended Skill Level
Beginner
Providence Table and Benches
very easy high quality build. I feel this piece will stand the test of time, and for so little in cost.
Built from Plan(s)
Estimated Cost
$300.00
Estimated Time Investment
Weekend Project (10-20 Hours)
Finish Used
BEHR Stain
Recommended Skill Level
Beginner
Necklace and Earring Shelf

I built this super easy shelf for my earrings, necklaces and bracelets. I love that I can see what I have, before they were stored away in a drawer and not easily accessible for daily wear. I also enjoy that this was super inexpensive and easy to build! Planning to build another one for my daughters.
Kiddo table and chair(s)
A nice and easy project for little people to enjoy getting in and out of chairs without worrying parents!
Used a router first time to soften the edges of the chairs and table. Also used a plug maker to fill up the counter sink holes. Love that stuff.
Didn't want to make all the chairs at once to figure out how I can improve on my process, and now I know that I should
1. Paint the slats prior to installing
2. Use router on the slats prior to installing
3. Use kreg jig to install the slats
Planning on making more chairs, or one more chair and 2 stools. Not sure yet.
As always, painting took the longest and I am not done yet. Will give a Minvax polycrylic gloss finish before putting into use.
Built from Plan(s)
Estimated Cost
$15
Estimated Time Investment
Day Project (6-9 Hours)
Finish Used
Oops paint from Home Depot :) Love those surprises and prices!
Recommended Skill Level
Starter Project
garden bench
First project. Modified so that the seat is more narrow.
Built from Plan(s)
Estimated Cost
$37 for lumber
Estimated Time Investment
Afternoon Project (3-6 Hours)
Finish Used
brown paint
Recommended Skill Level
Starter Project
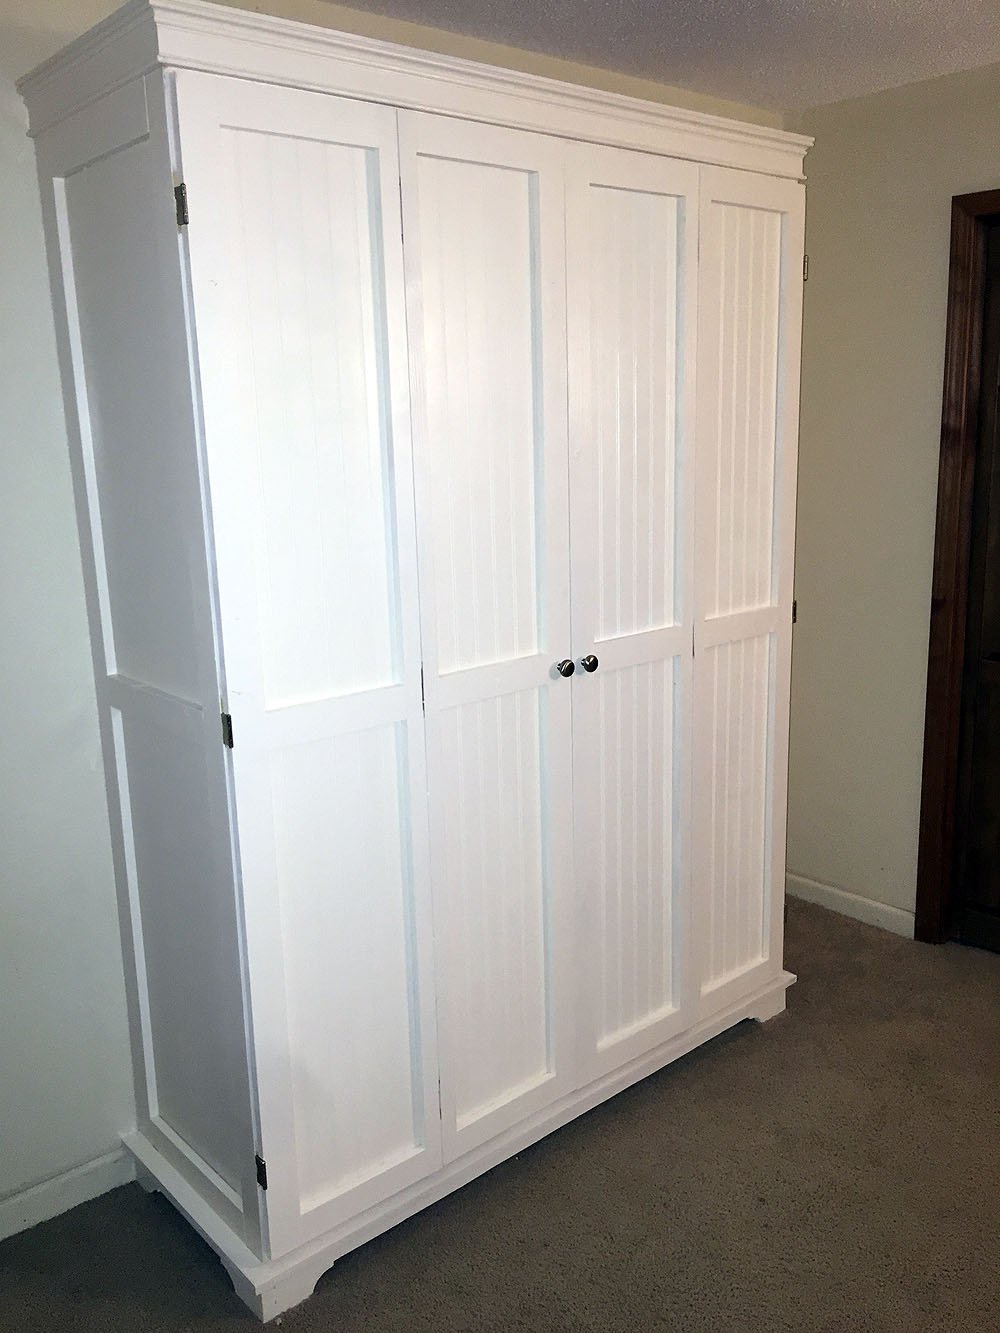
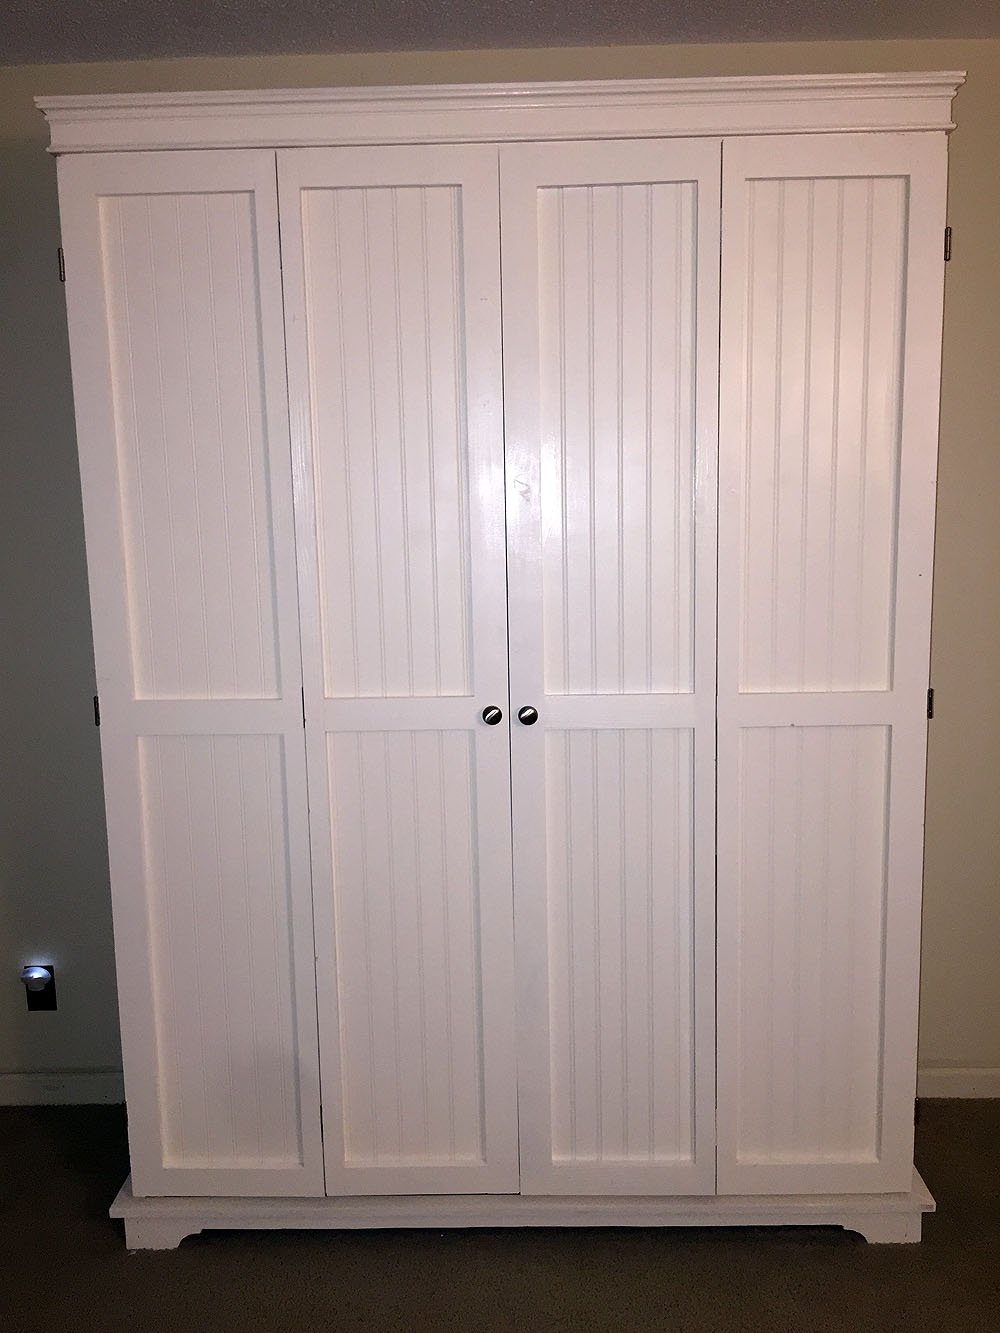
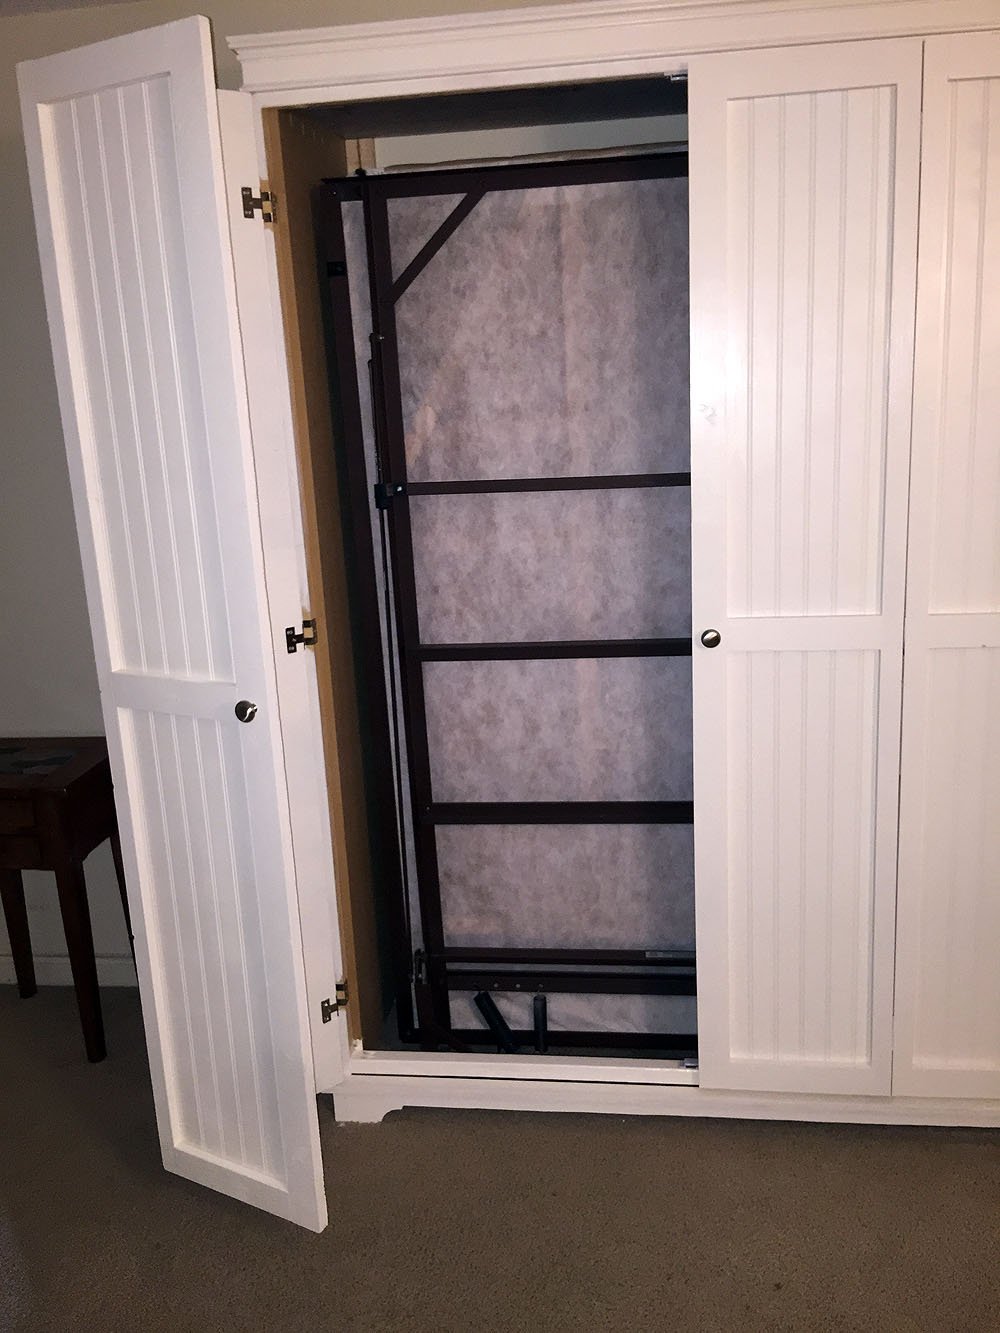
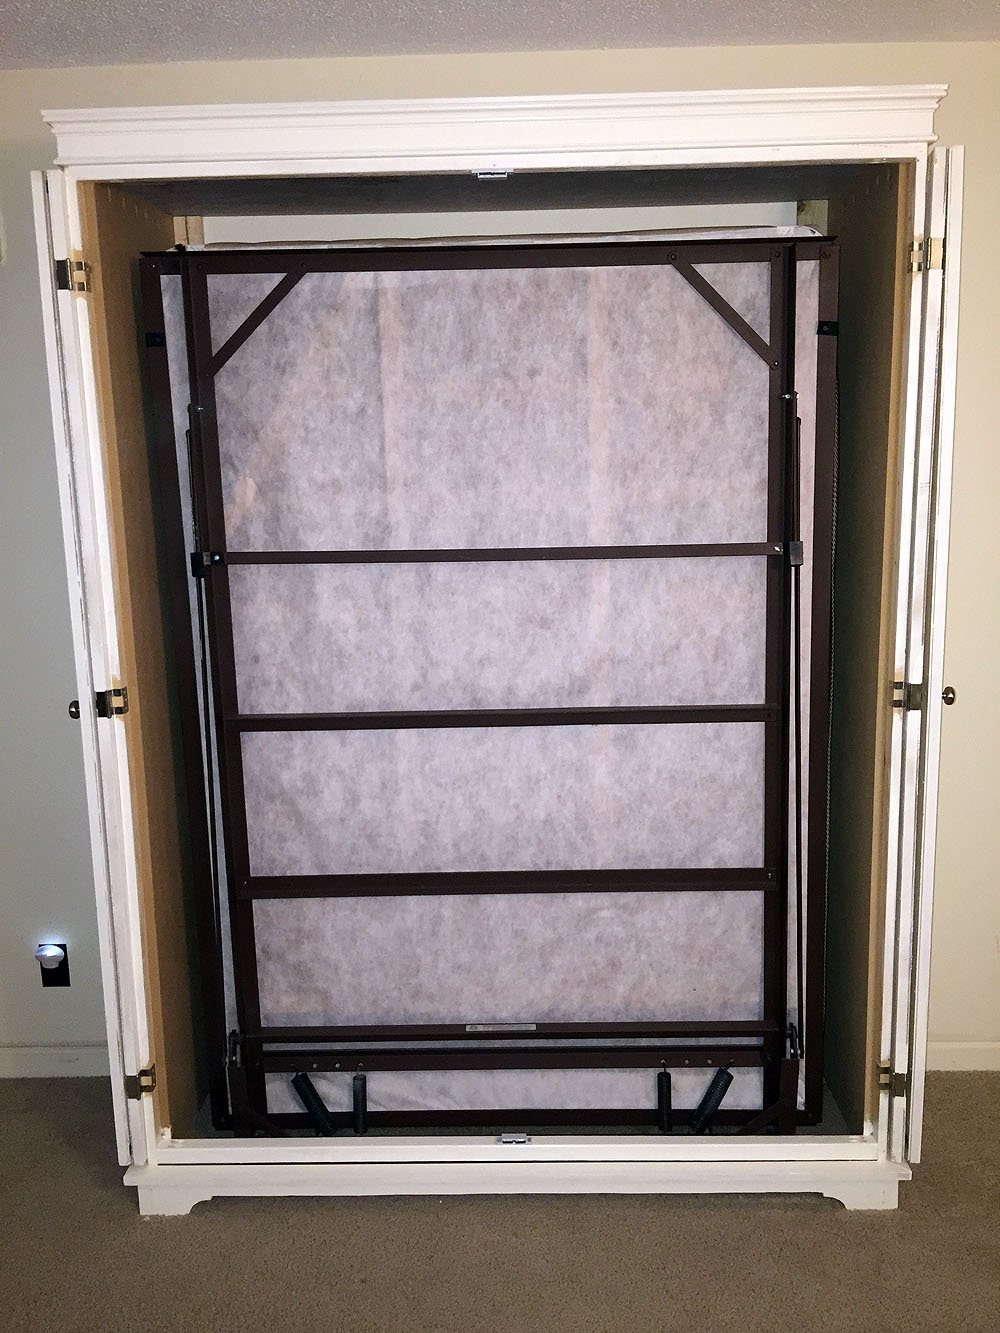
Murphy Bed Cabinet
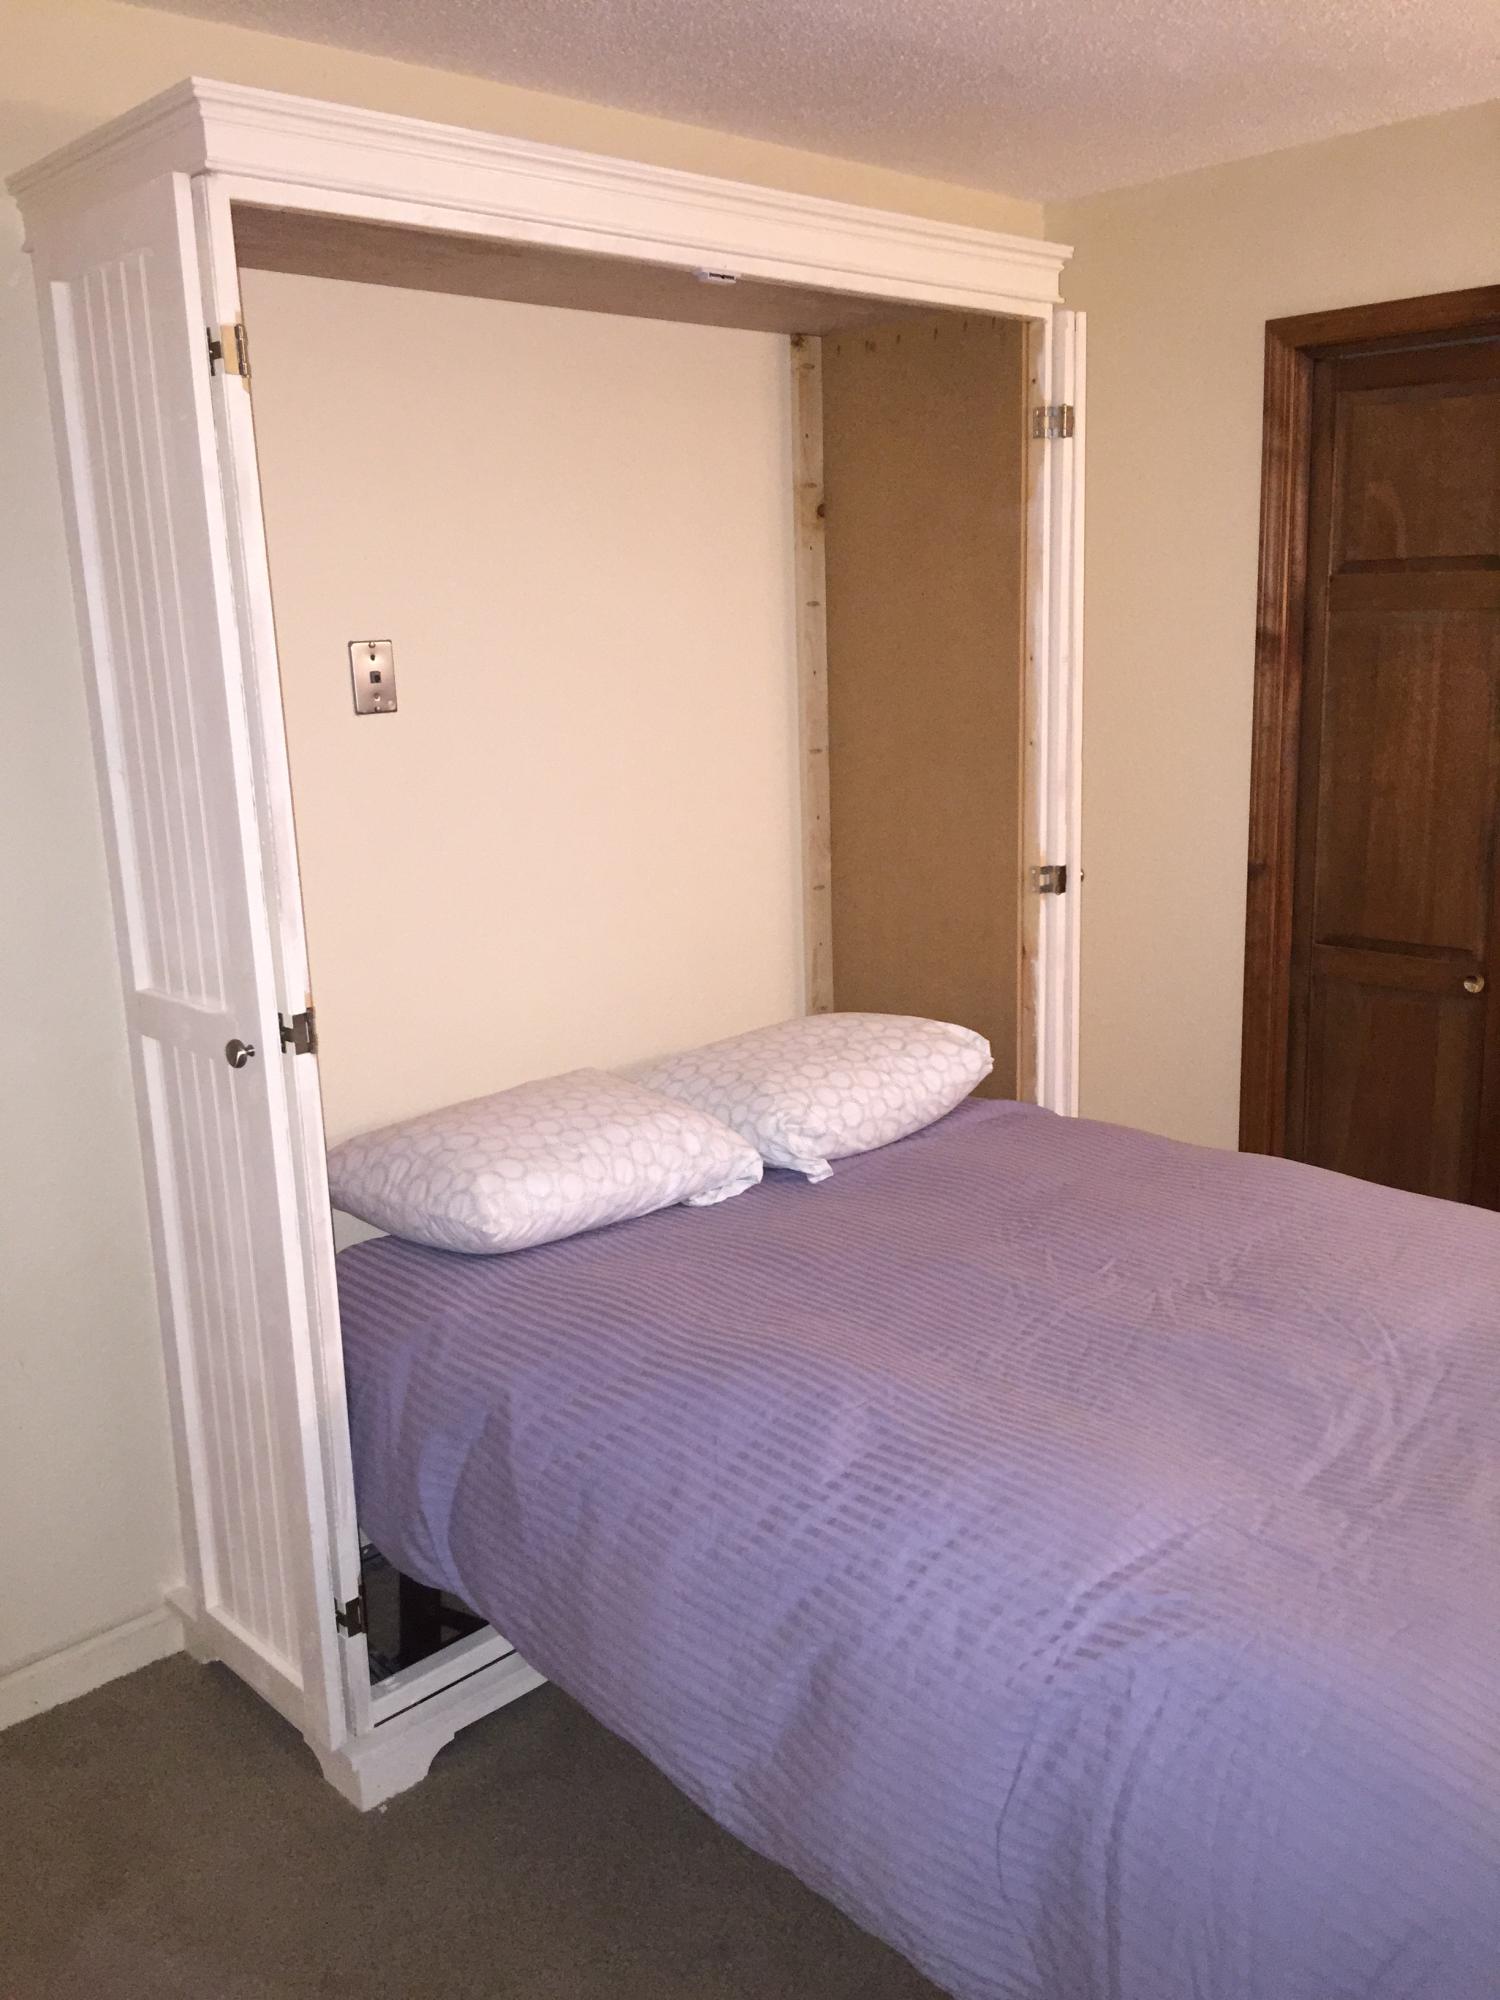
I made this cabinet to house my murphy bed. I used the Toy or TV Armoire plans as a start and adjusted the measurements as needed.

Built from Plan(s)
Estimated Cost
$250
Estimated Time Investment
Weekend Project (10-20 Hours)
Finish Used
Painted White
Recommended Skill Level
Beginner
Comments
Tue, 06/02/2020 - 16:22
Door question
Do you have plans or details about the door materials/ hinges?
Thu, 12/03/2015 - 07:30
Murphy Hardware
This was an actual "original murphy bed" that i found on craigslist for $100
Wed, 02/02/2022 - 02:55
Awesome! What style hinges…
Awesome! What style hinges did you use to make the doors fold back flush with the sides?
Reclaimed wood rustic X console
Modified to fit dimensions of some reclaimed lumber. Substituted some threaded steel rods instead of the wooden X.

Built from Plan(s)
Estimated Time Investment
Weekend Project (10-20 Hours)
Recommended Skill Level
Intermediate
Built-in bench with drawers, side cabinets and floating shelves
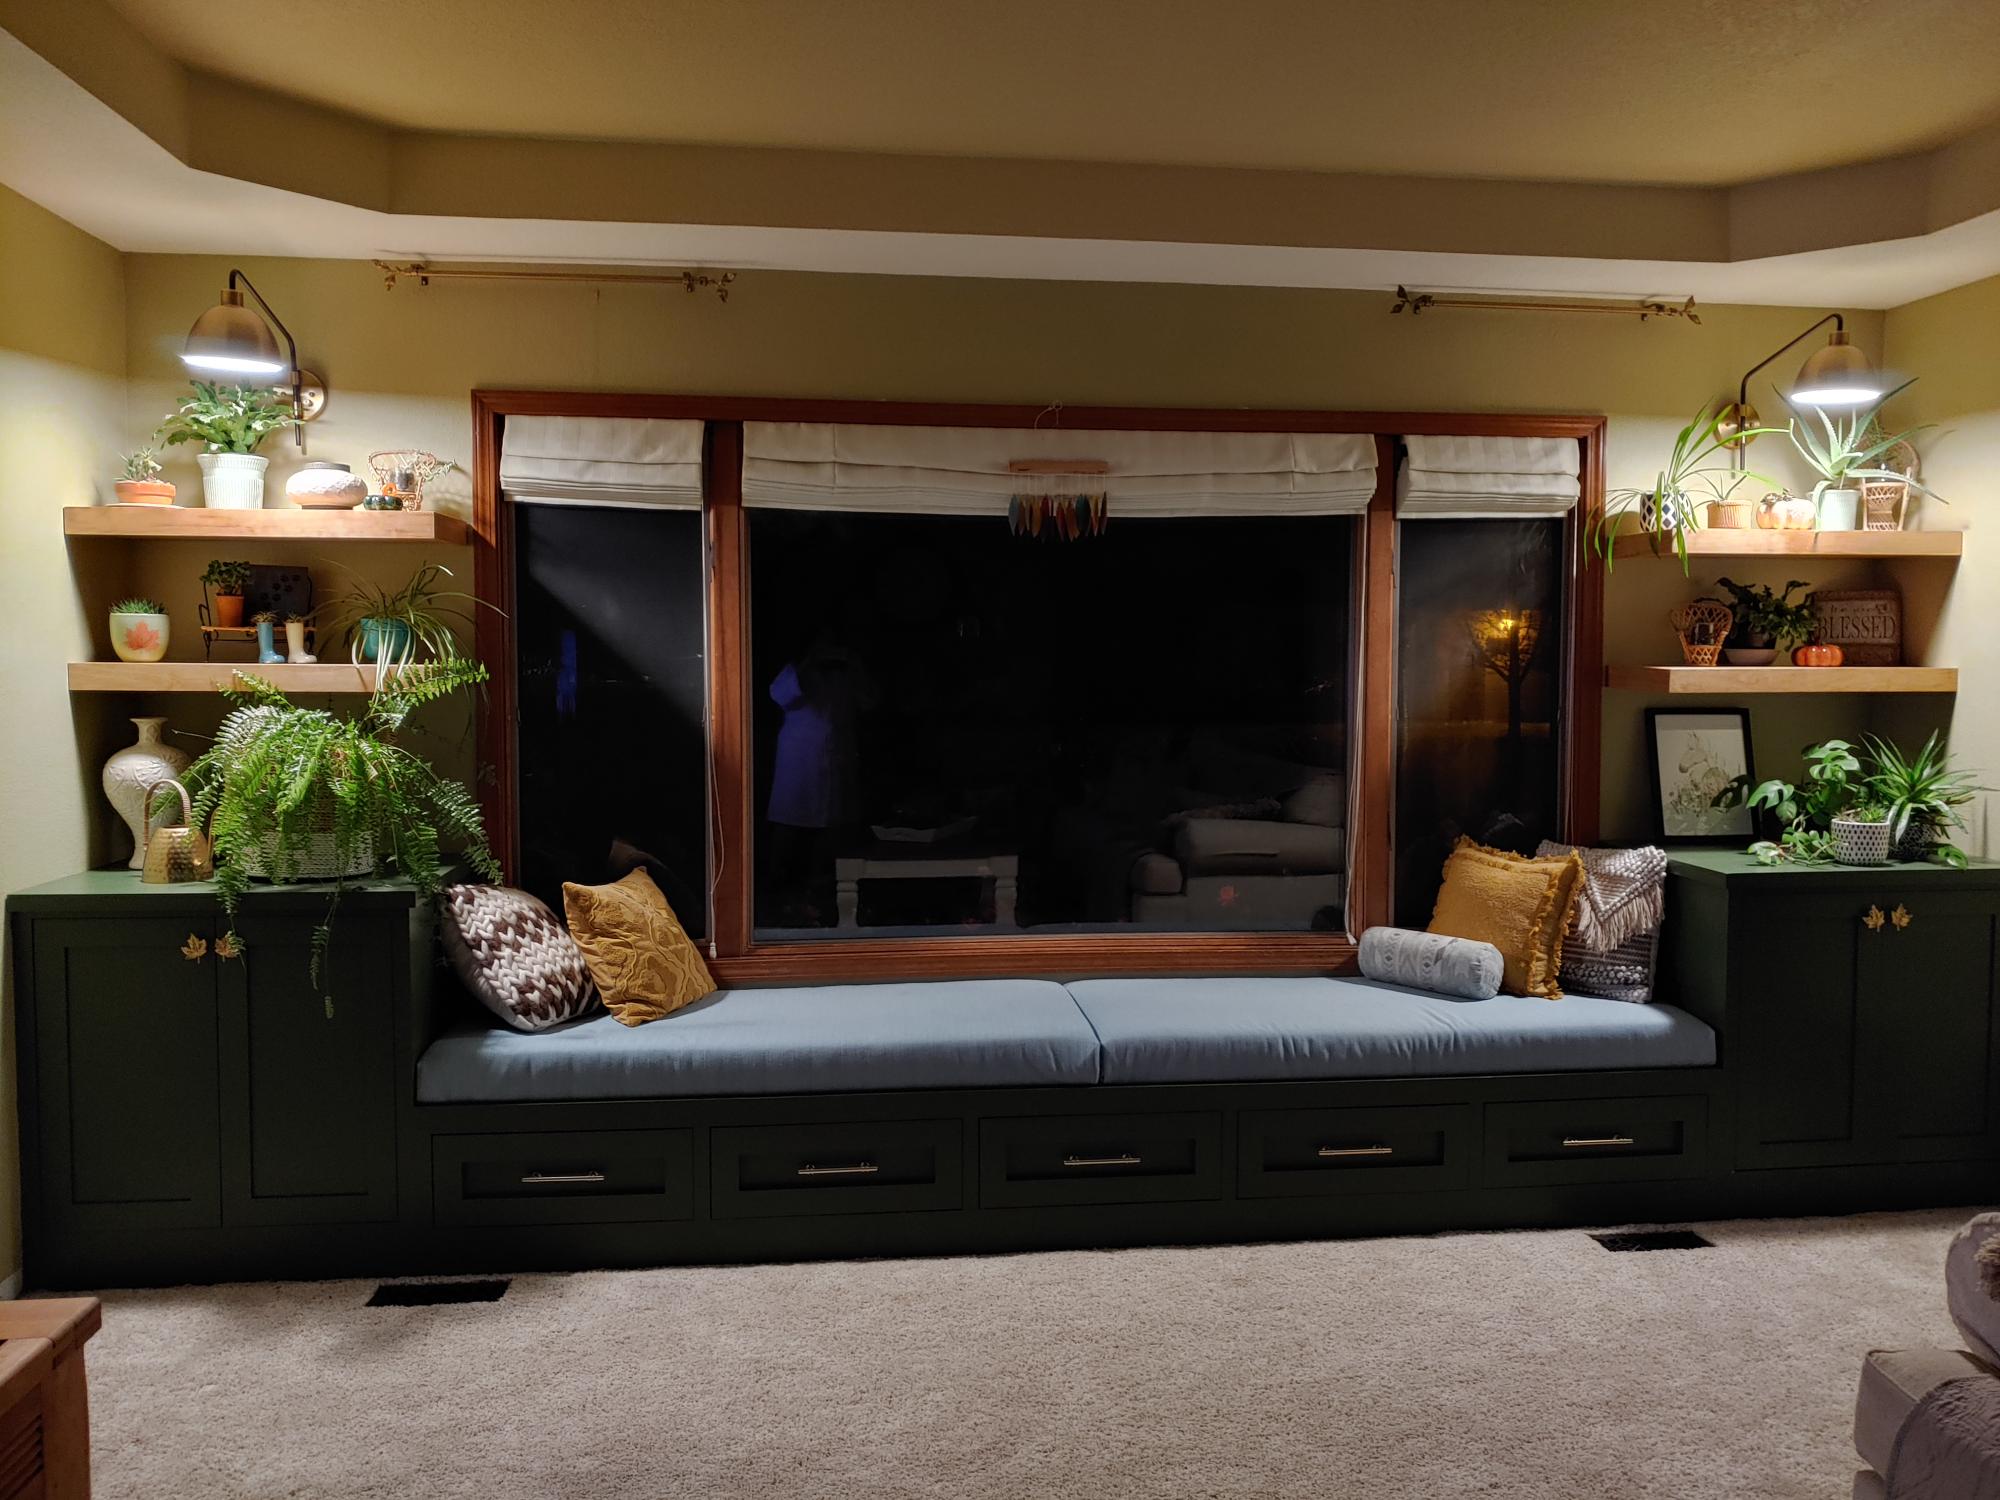
I have wanted a built-in window seat on this wall for a very long time. My hubby and I finally tackled this project. Definitely not perfect and lotsa challenges and mistakes made but we are happy with outcome.
Built from Plan(s)
Comments
Sat, 11/26/2022 - 14:47
Amazing built ins!
This looks fantastic, great solution for the space! Thank you so much for sharing.
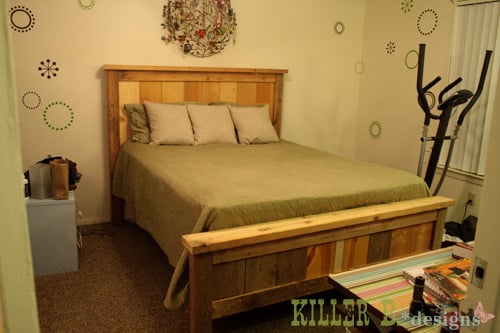
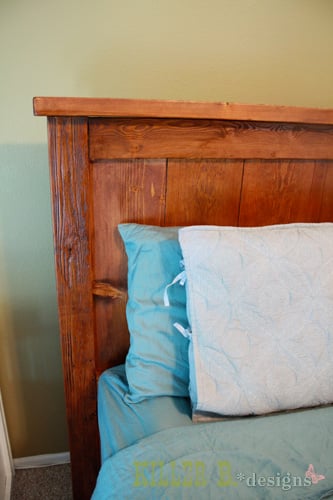
Reclaimed Wood Farmhouse Bed
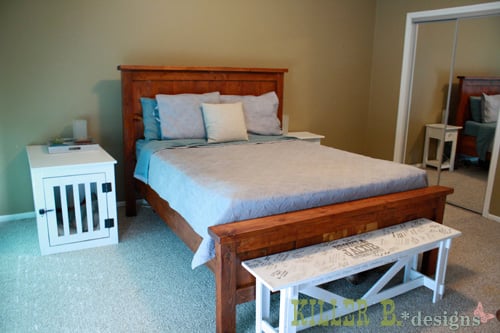
I was living in an apartment in Waco with my newly minted husband, and was gearing up for a move to Lake Jackson after his graduation from school. I had this horribly flimsy Walmart platform bed that was at the end of its life. After I read a post on a favorite blog mentioning my now hero, I checked out the projects on Knock Off Wood. “Hmmm,” I thought, “I think I can do that!” So, I found the perfect plans for the queen-sized Farmhouse Bed, and went to visit my parents. Print-out in hand, I showed my dad what I had in mind. He was totally on board, and said he even thought he had all the lumber we needed in his barn. And he did! We spent a Sunday afternoon shopping his barn, and then loaded it all up to drive over to his shop to do all the cutting.
Here’s the best part. I then loaded every single cut piece of lumber into my Honda Civic and drove it back to Waco. Yes, people. I didn’t even have an SUV, I had an economy size 4-door sedan. And I fit all that lumber in it! As soon as I got home, I was raring to go. Unfortunately, the Husbane was not. He was grumpy, and moaning about trying to put a bed together in an apartment. So I huffily said “Screw You!” and went on my merry way. Okay, that’s a total lie. I actually cried and shamed him with my words into helping me, because he was ruining this exciting new prospect with his bad attitude. Feeling like a horrible person, he apologized and took me to McCoy’s to get all the screws and hardware we needed to put this behemoth together. We put the headboard together as a team, and once I learned just how to use a power drill (it really was my first time ever!) I put the footboard together all by myself. I was so proud! Then we put on the side boards, figured out the rails and slats, and pushed the last screw in the next day. For just $16, a lot of free barnwood, and gallons of sweat and tears, we had our very first hand made bed. And I couldn’t be prouder.
Built from Plan(s)
Estimated Cost
$16
Estimated Time Investment
Weekend Project (10-20 Hours)
Finish Used
Minwax gunstock, Minwax Polyshades Walnut
Recommended Skill Level
Beginner
Comments

Mon, 09/05/2011 - 10:46
Beautiful! You have every
Beautiful! You have every right to be proud of your lovely work.
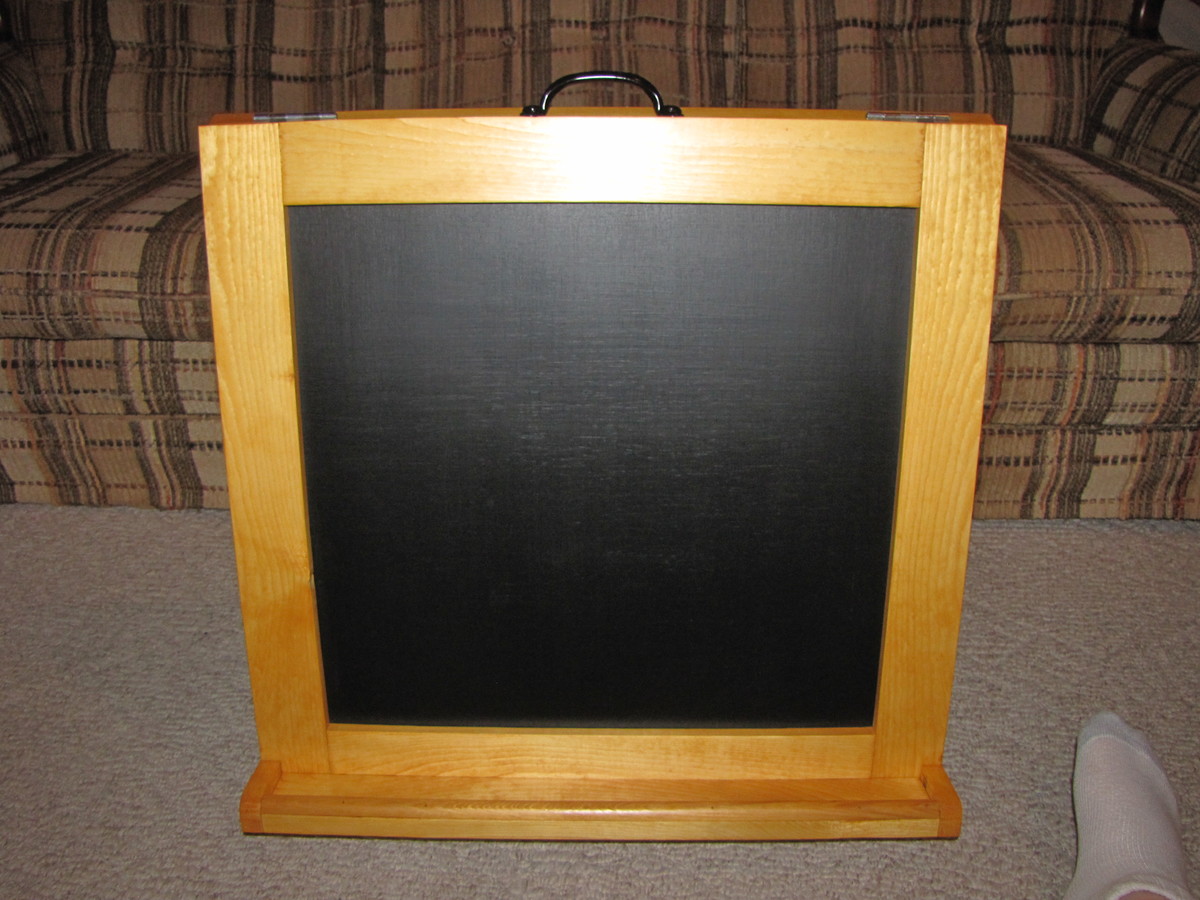
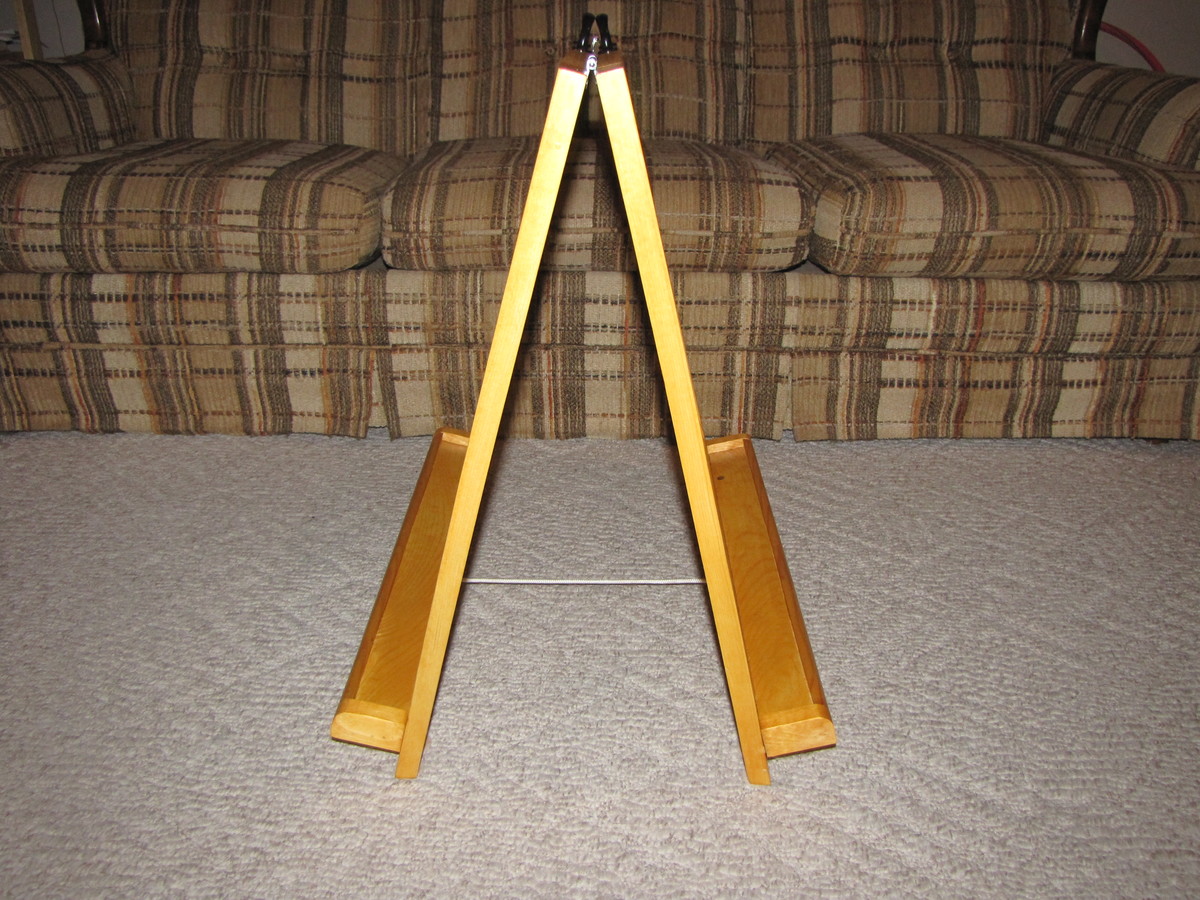
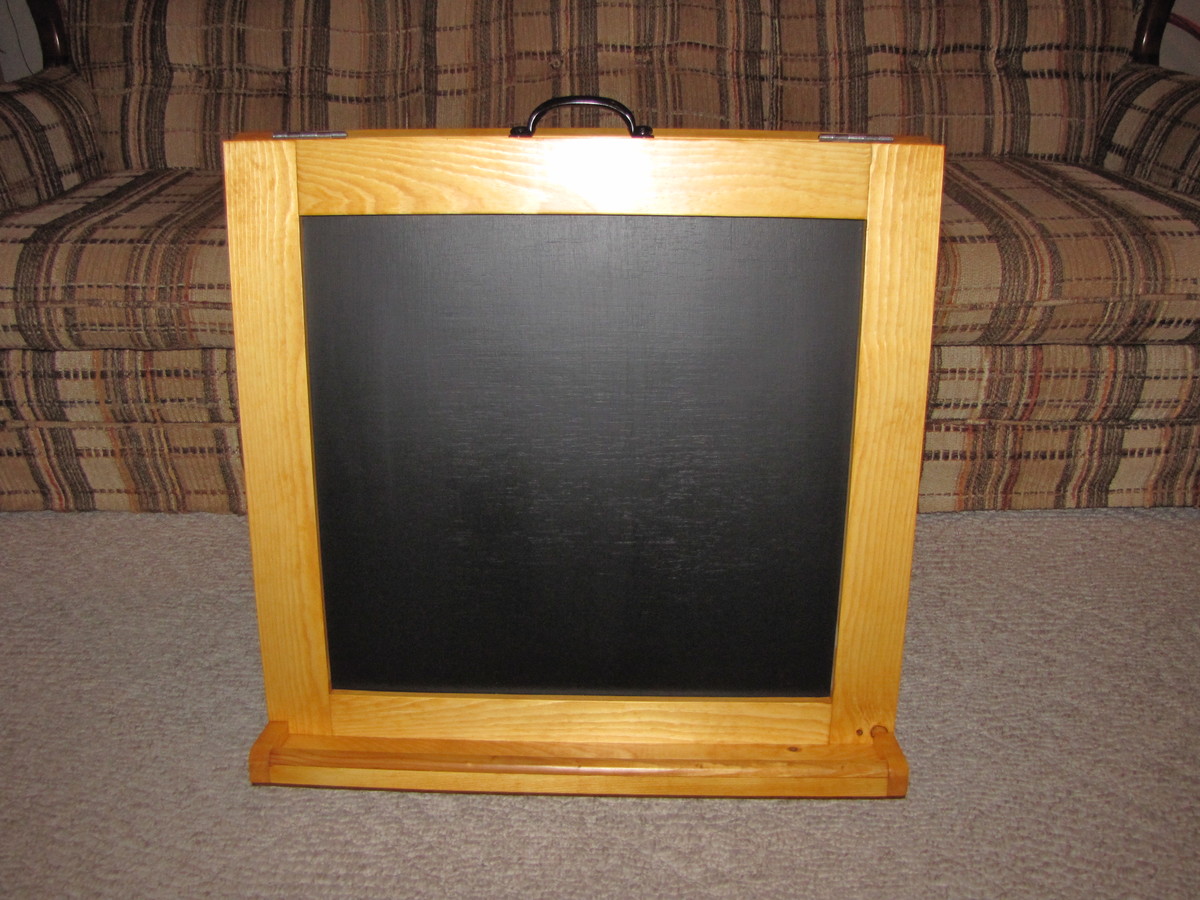
Folding Double sided Chalkboard.
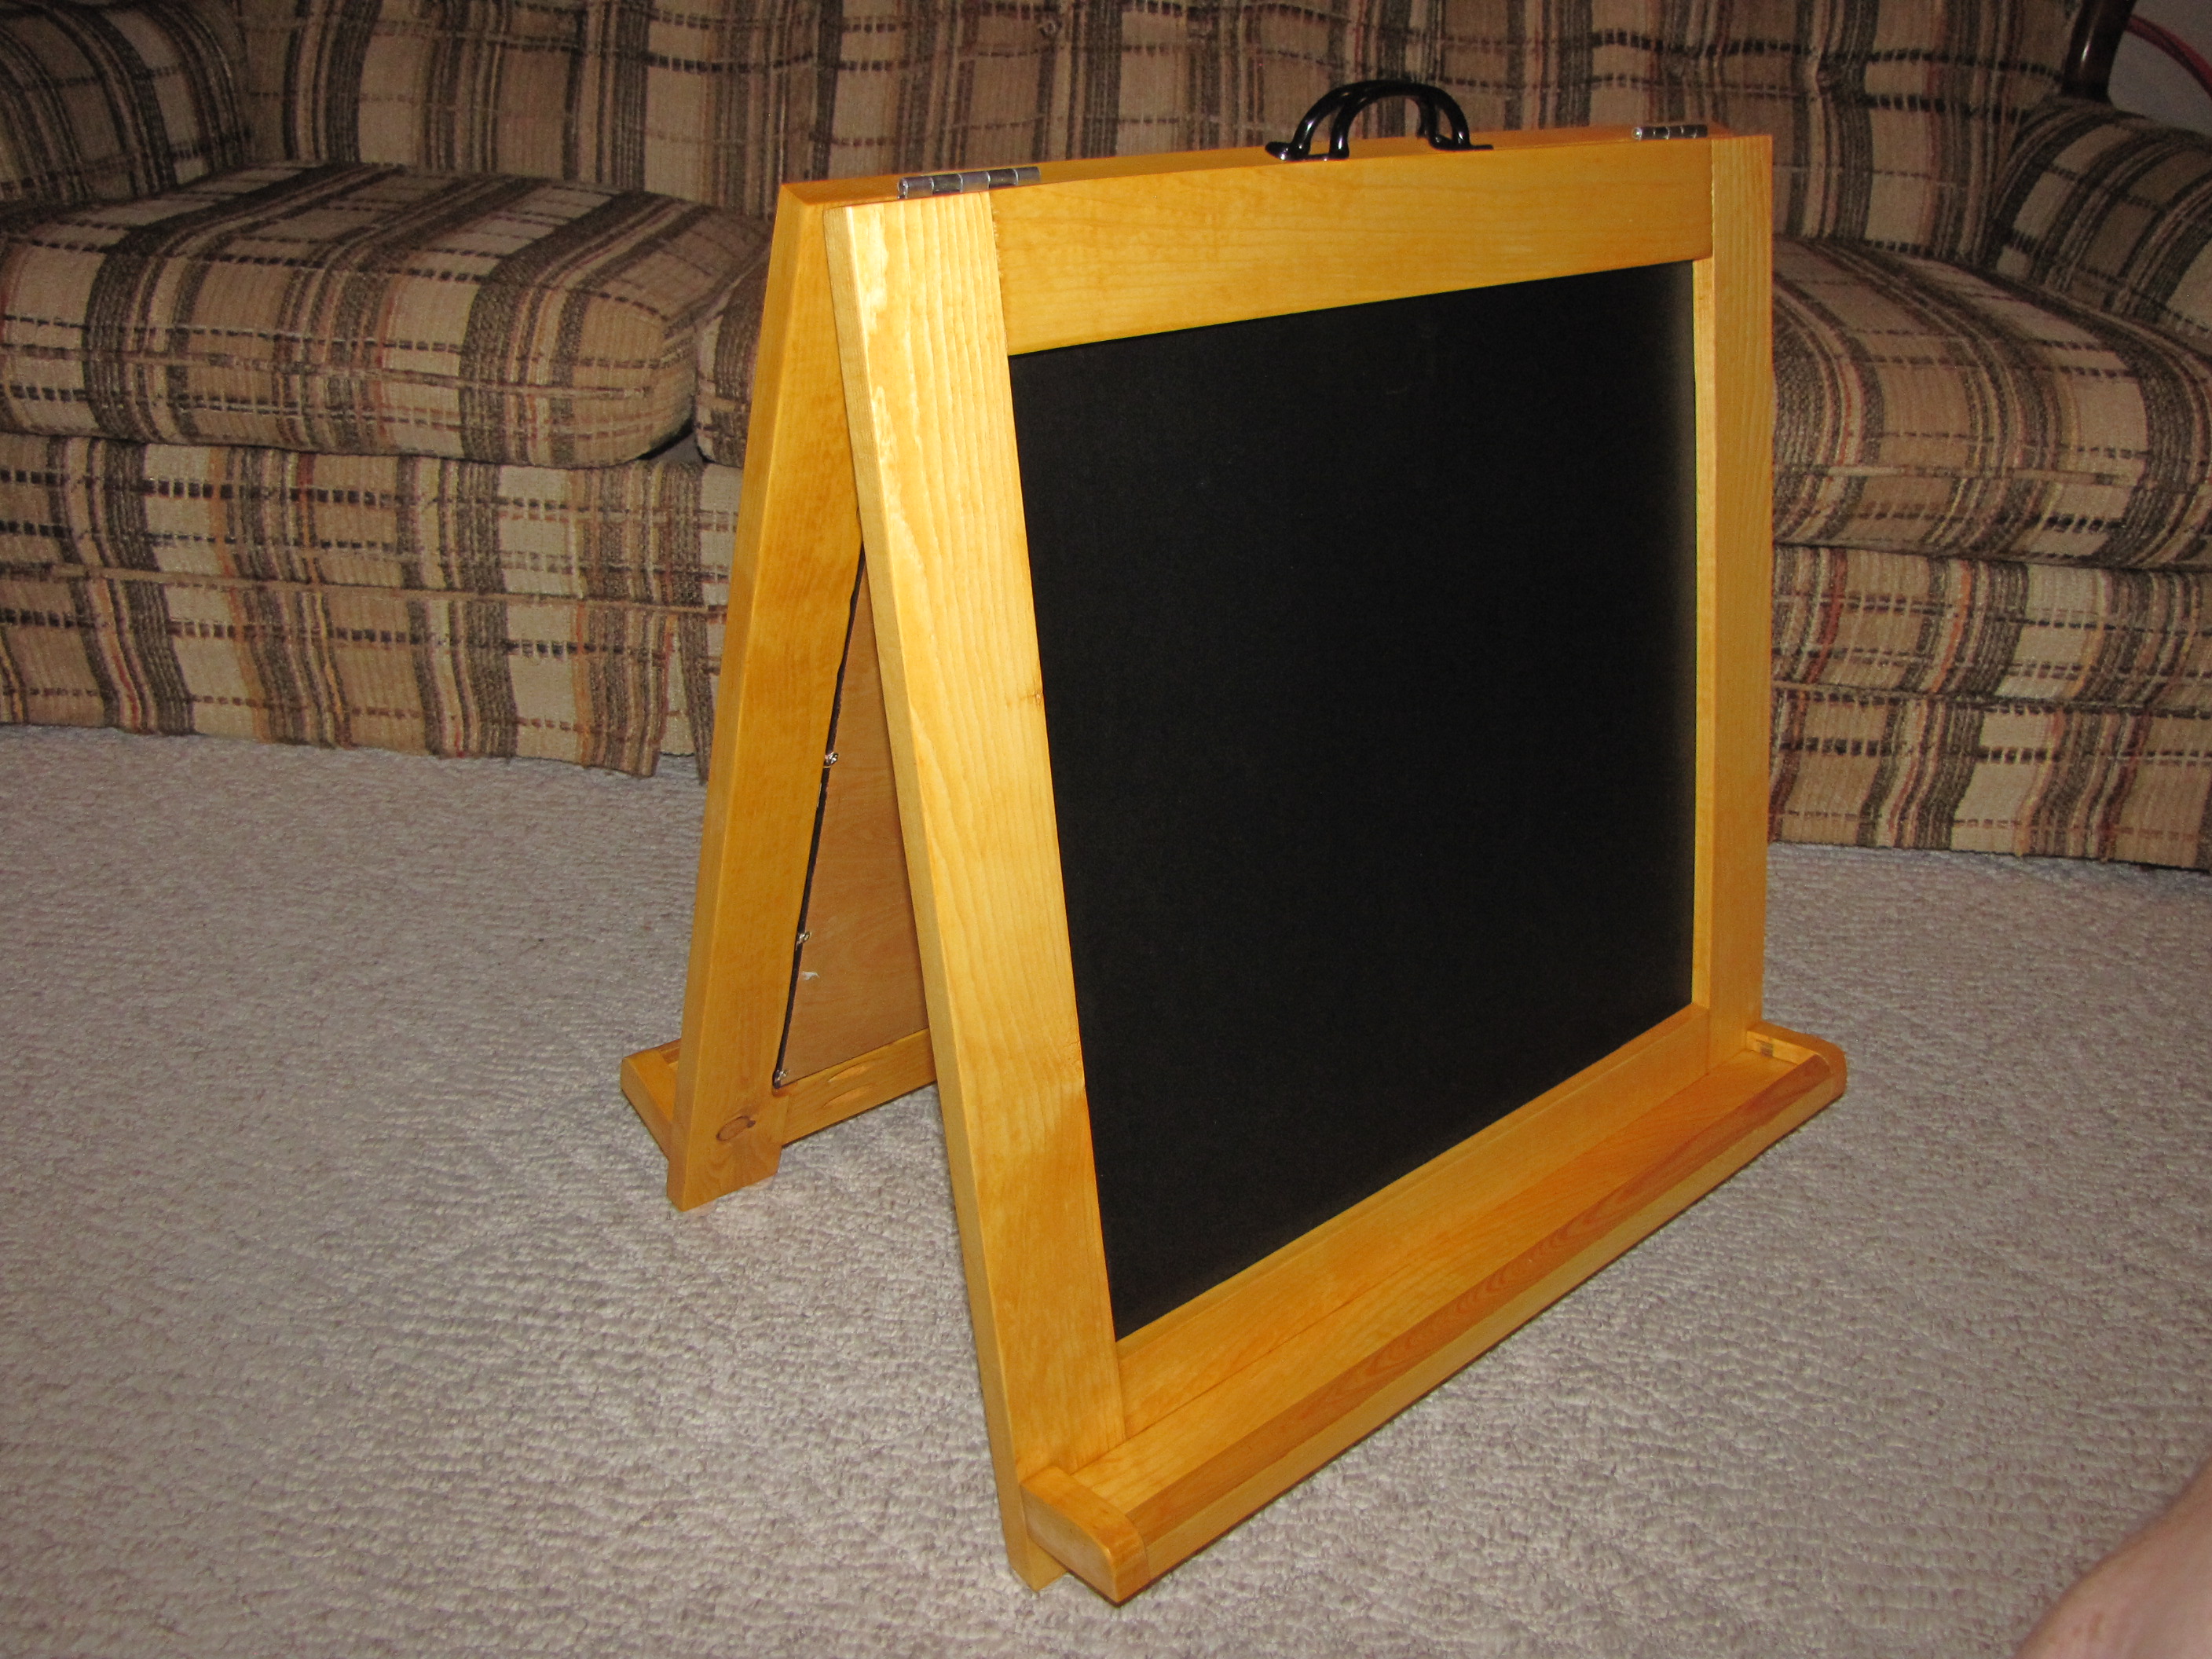
This a Anna White.com Inspired Folding Chalkboard design. I just made a couple slight modification. Slightly larger, and tray to hold chalk and eraser.
This one was build for my two year old nephew as his birthday gift! I think Wyatt and his brother Marshall will get a lot of good use out of the gift.
Anna and John thank you for providing such a fantastic site!
Best Regards,
Bob C
"Remember Working SAFELY IS the most important thing you can do!"
Estimated Cost
$25.00
Estimated Time Investment
Weekend Project (10-20 Hours)
Finish Used
Golden Oak Stain and Polyurethane, Valspar Chalkboard Paint
Recommended Skill Level
Starter Project
Comments
Thu, 09/26/2013 - 11:06
Ok now I want to make one for
Ok now I want to make one for my two year old! Cleaning up chalk is so much easier then crayons and markers.
Cedar Yard Tool Shed
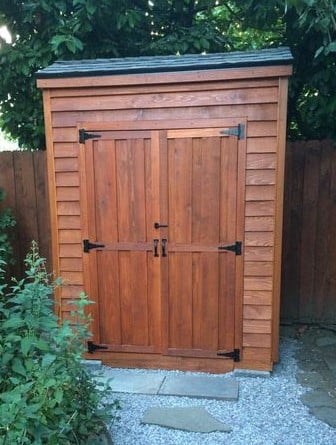
I changed the plans just slightly. I used 2x4's for framing and enlaged the shed somewhat and added a floor. I also used a different type of roof to handle the amount of rain in my area.
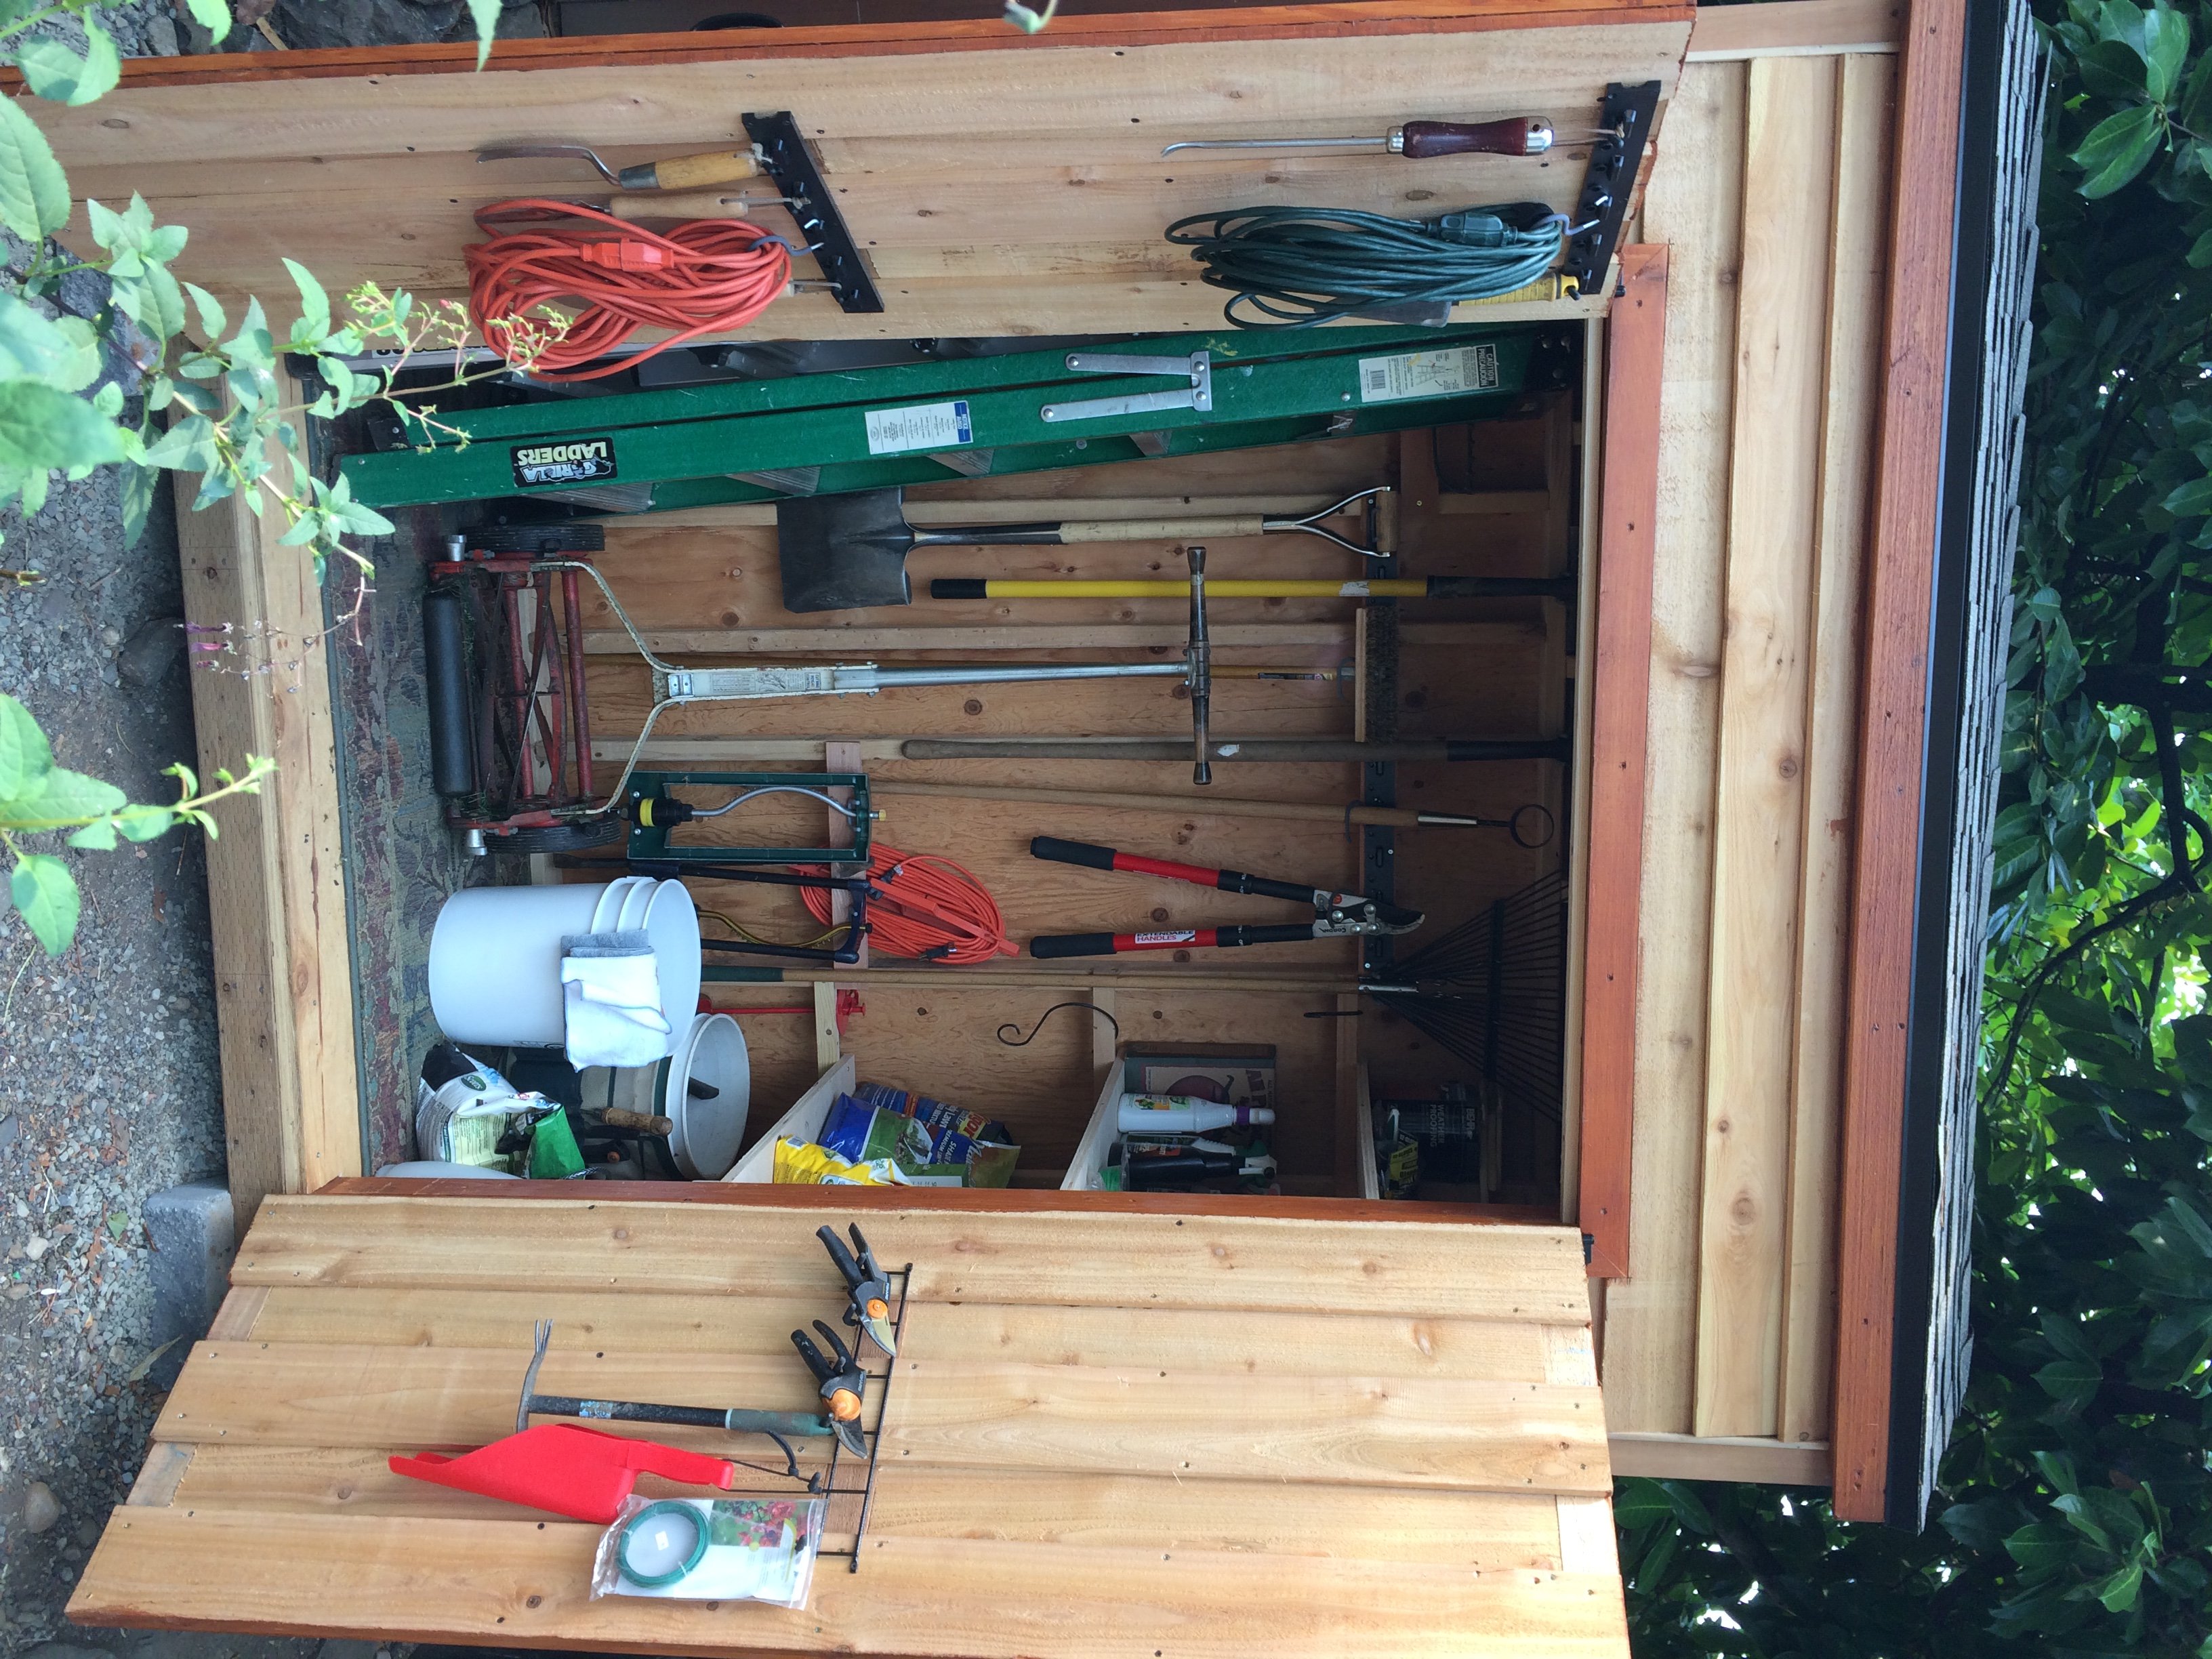
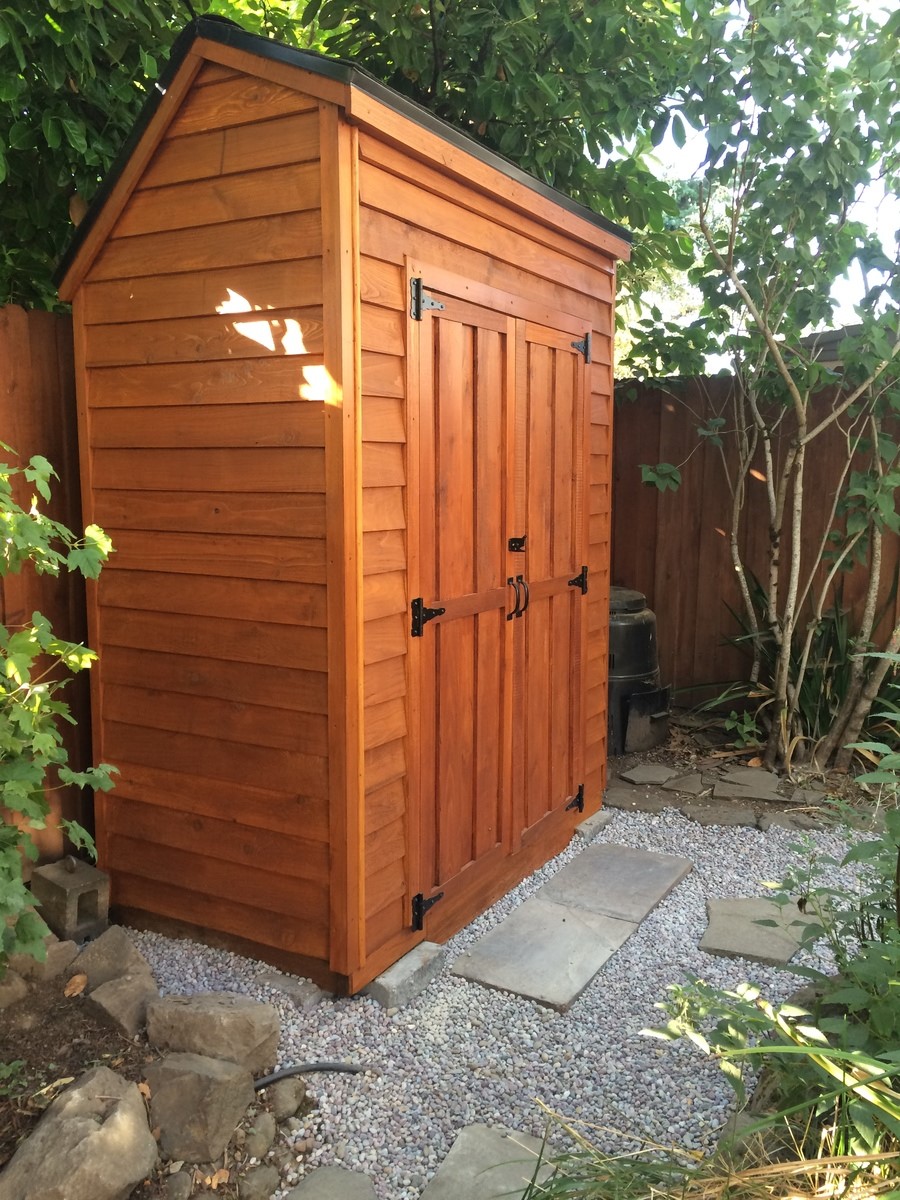
Built from Plan(s)
Estimated Cost
$450.00
Estimated Time Investment
Week Long Project (20 Hours or More)
Finish Used
Natural Cedar stain
Recommended Skill Level
Beginner
Comments
Corner cabinet
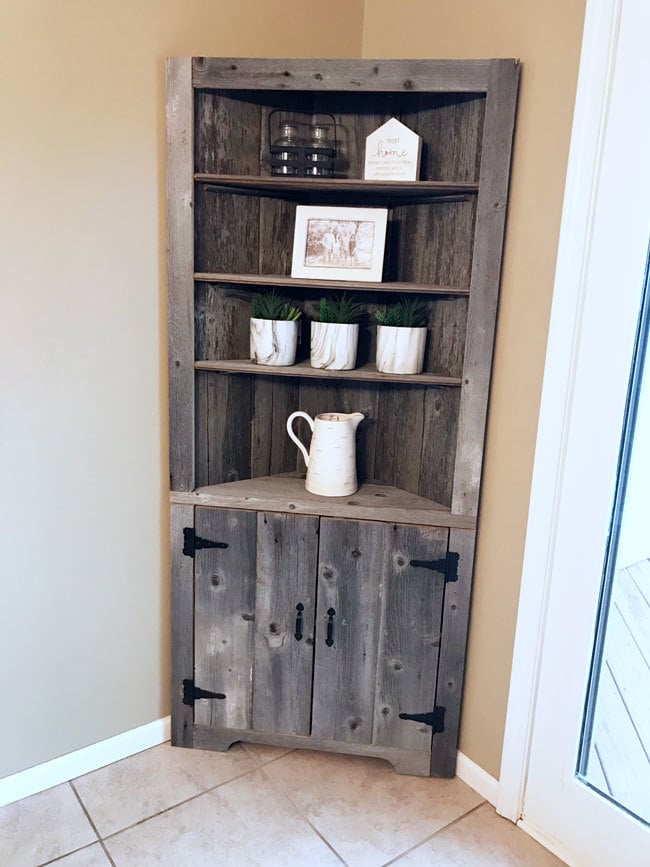
Went to a local farmer, who had a barn falling down and asked if I could get some wood. He allowed me to take a few pieces and turned it into a corner cabinet for my wifeWent to a local farmer, who had a barn falling down and asked if I could get some wood. He allowed me to take a few pieces and turned it into a corner cabinet for my wife
Built from Plan(s)
Estimated Time Investment
Day Project (6-9 Hours)
Recommended Skill Level
Beginner
Farmhouse Bed (hybrid)
This is my first time building anything! I had so much fun and it was actually easier than I anticipated. I used the Farmhouse Bed (queen) plan as the basis for my design, but made a couple of tweaks. I wanted the planks in the headboard and footboard to be horizontally oriented instead of vertical. In addition, I bought some hardware for the side rails to hook into my bed posts so that I could easily assemble and disassemble the bed. I went to a lumber mill to select my wood and the worker convinced me to use red oak to build the project, due to the cost and the durability. I stained it with a white wash which I added a sage green tint to so that I could mute the red in the oak a bit. I wasn't able to buy the exact dimensions of lumber noted in the plans so I had to improvise. For example, they didn't have 4x4s so I glued 3 boards together to make my posts. By the time I sanded, the pieces blended beautifully and you can't even tell that it is 3 separate pieces of lumber. I built this bed for our guest room and I can't wait to have guests over!
Built from Plan(s)
Comments
Thu, 12/08/2022 - 11:28
A first project!
This bed is stunning, you knocked it out of the park for your first project! Can't wait to see what you build next.
Doll farmhouse bed as a present
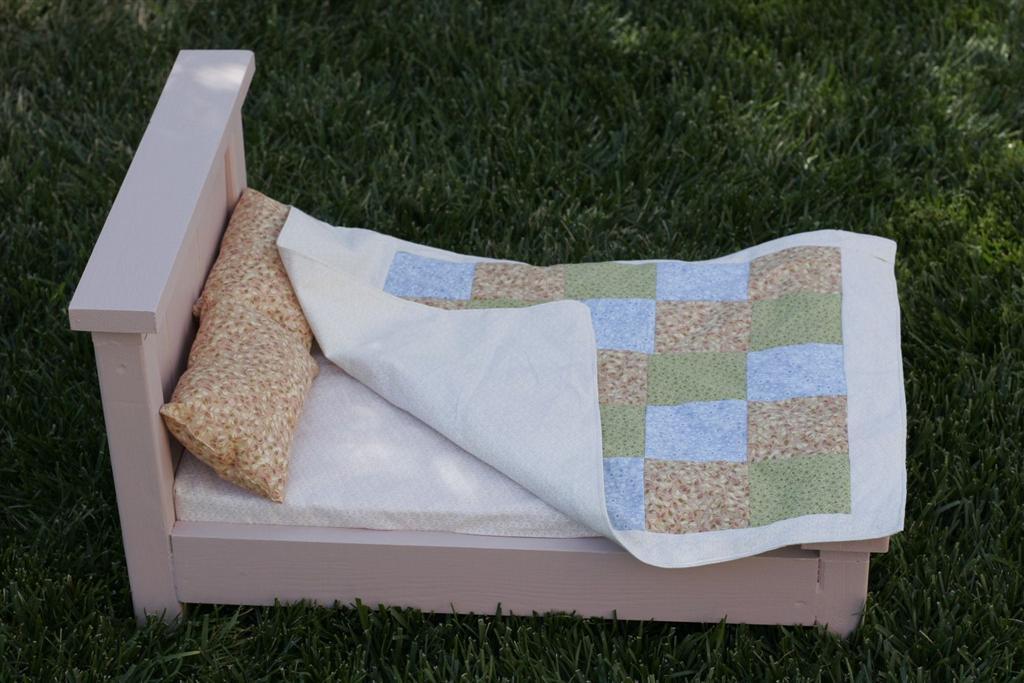
Built this cute doll bed for a friend's daughter's 3rd bday. I hear she loves it :)
The bedding (which took the longest) was made from my stash, followed loosely the plans at
http://fromanigloo.blogspot.com/2010/11/dolly-bed-fitted-sheet.html
and http://fromanigloo.blogspot.com/2010/11/dolly-pillows-and-pillowcases.h…
I wish I had a nailer; this project would have been faster with that. Predrilling etc took more than I care.
Mostly used left over 1x3s, and the rest was brand new pine.
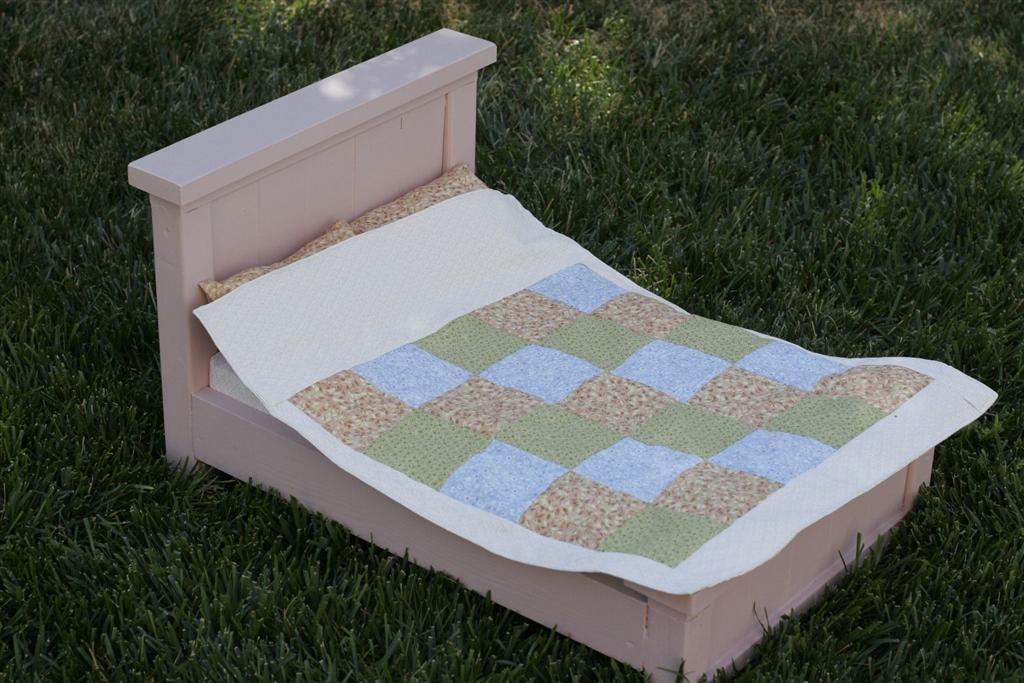
Built from Plan(s)
Estimated Cost
$10
Estimated Time Investment
Day Project (6-9 Hours)
Finish Used
Oops beige paint, tinted with some crazy pink I had to make my own pink mix.
Recommended Skill Level
Starter Project
Folding Sling Chair
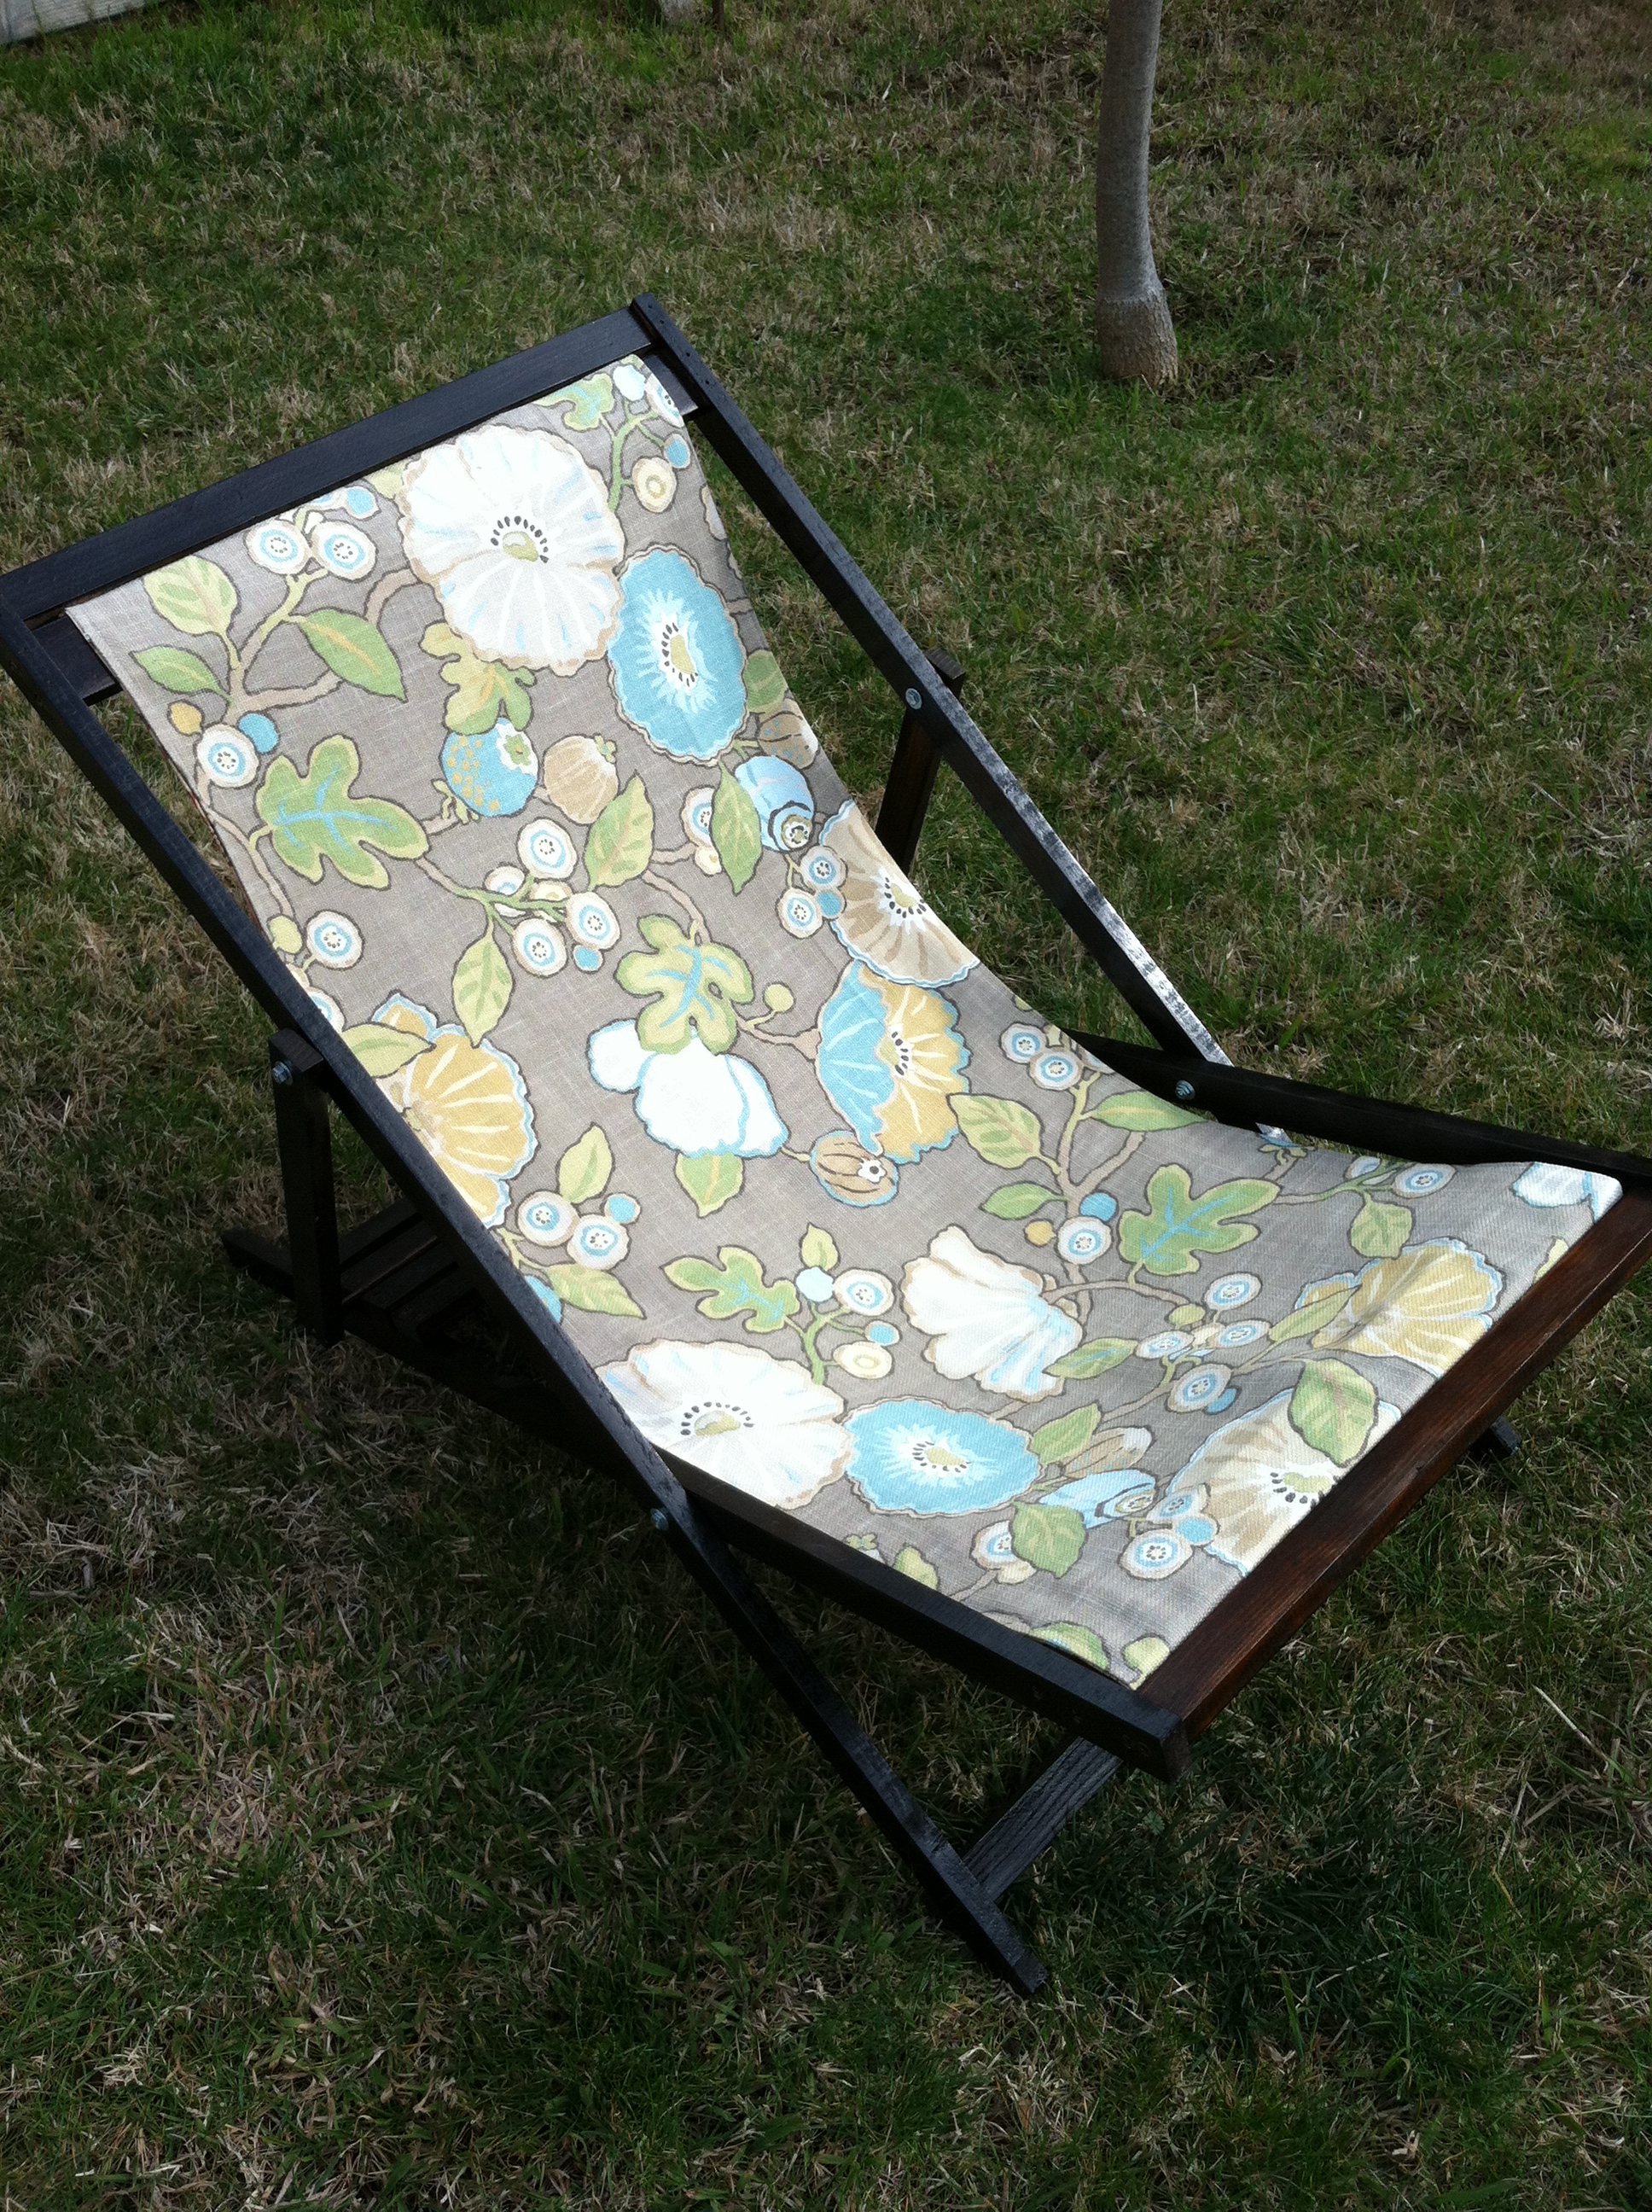
Note to self: don't sit in chair out back when you have a dog that likes to lick. This chair puts you right at licking height....
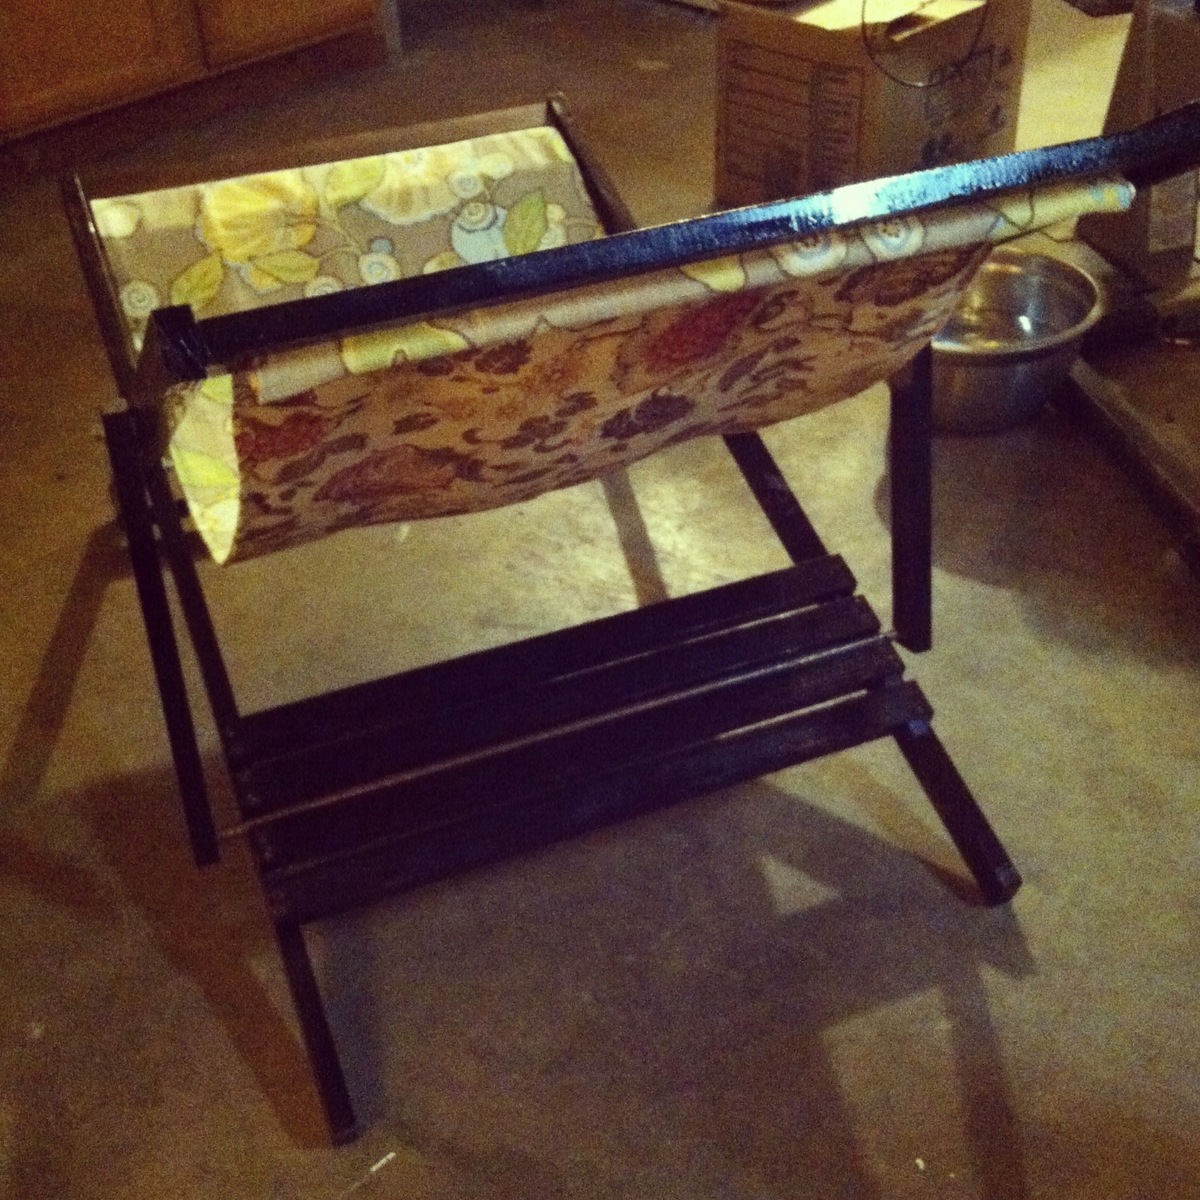
Built from Plan(s)
Estimated Time Investment
Weekend Project (10-20 Hours)
Finish Used
Espresso polyshade
Recommended Skill Level
Beginner
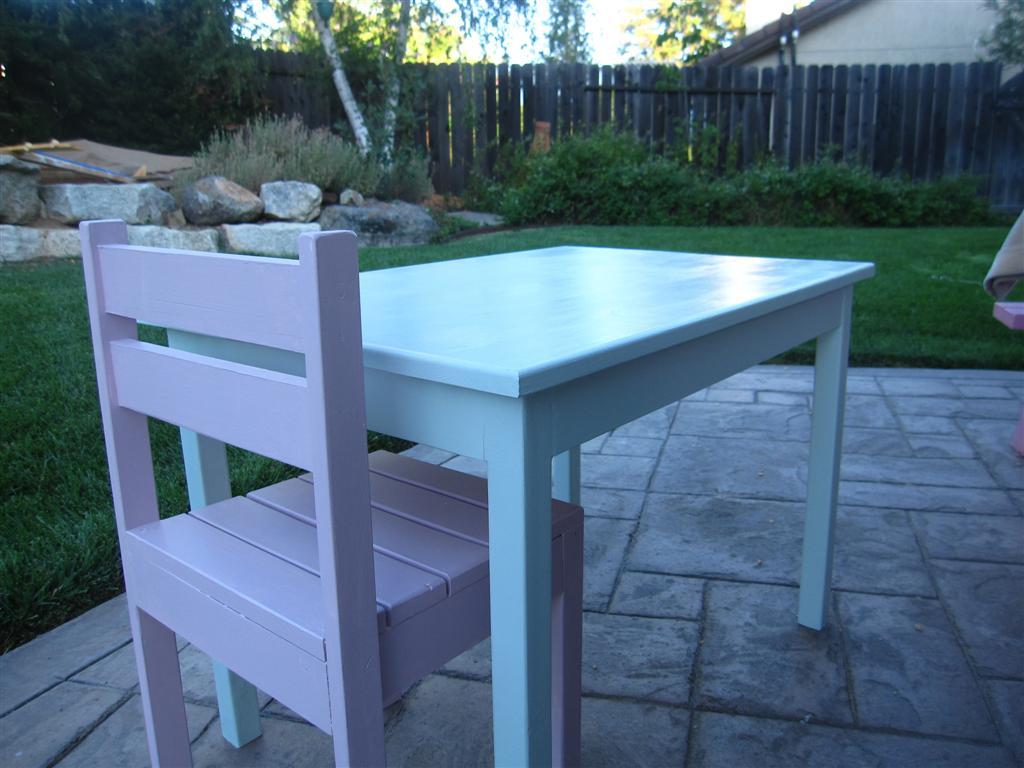
Table and chairs for my grand daughter
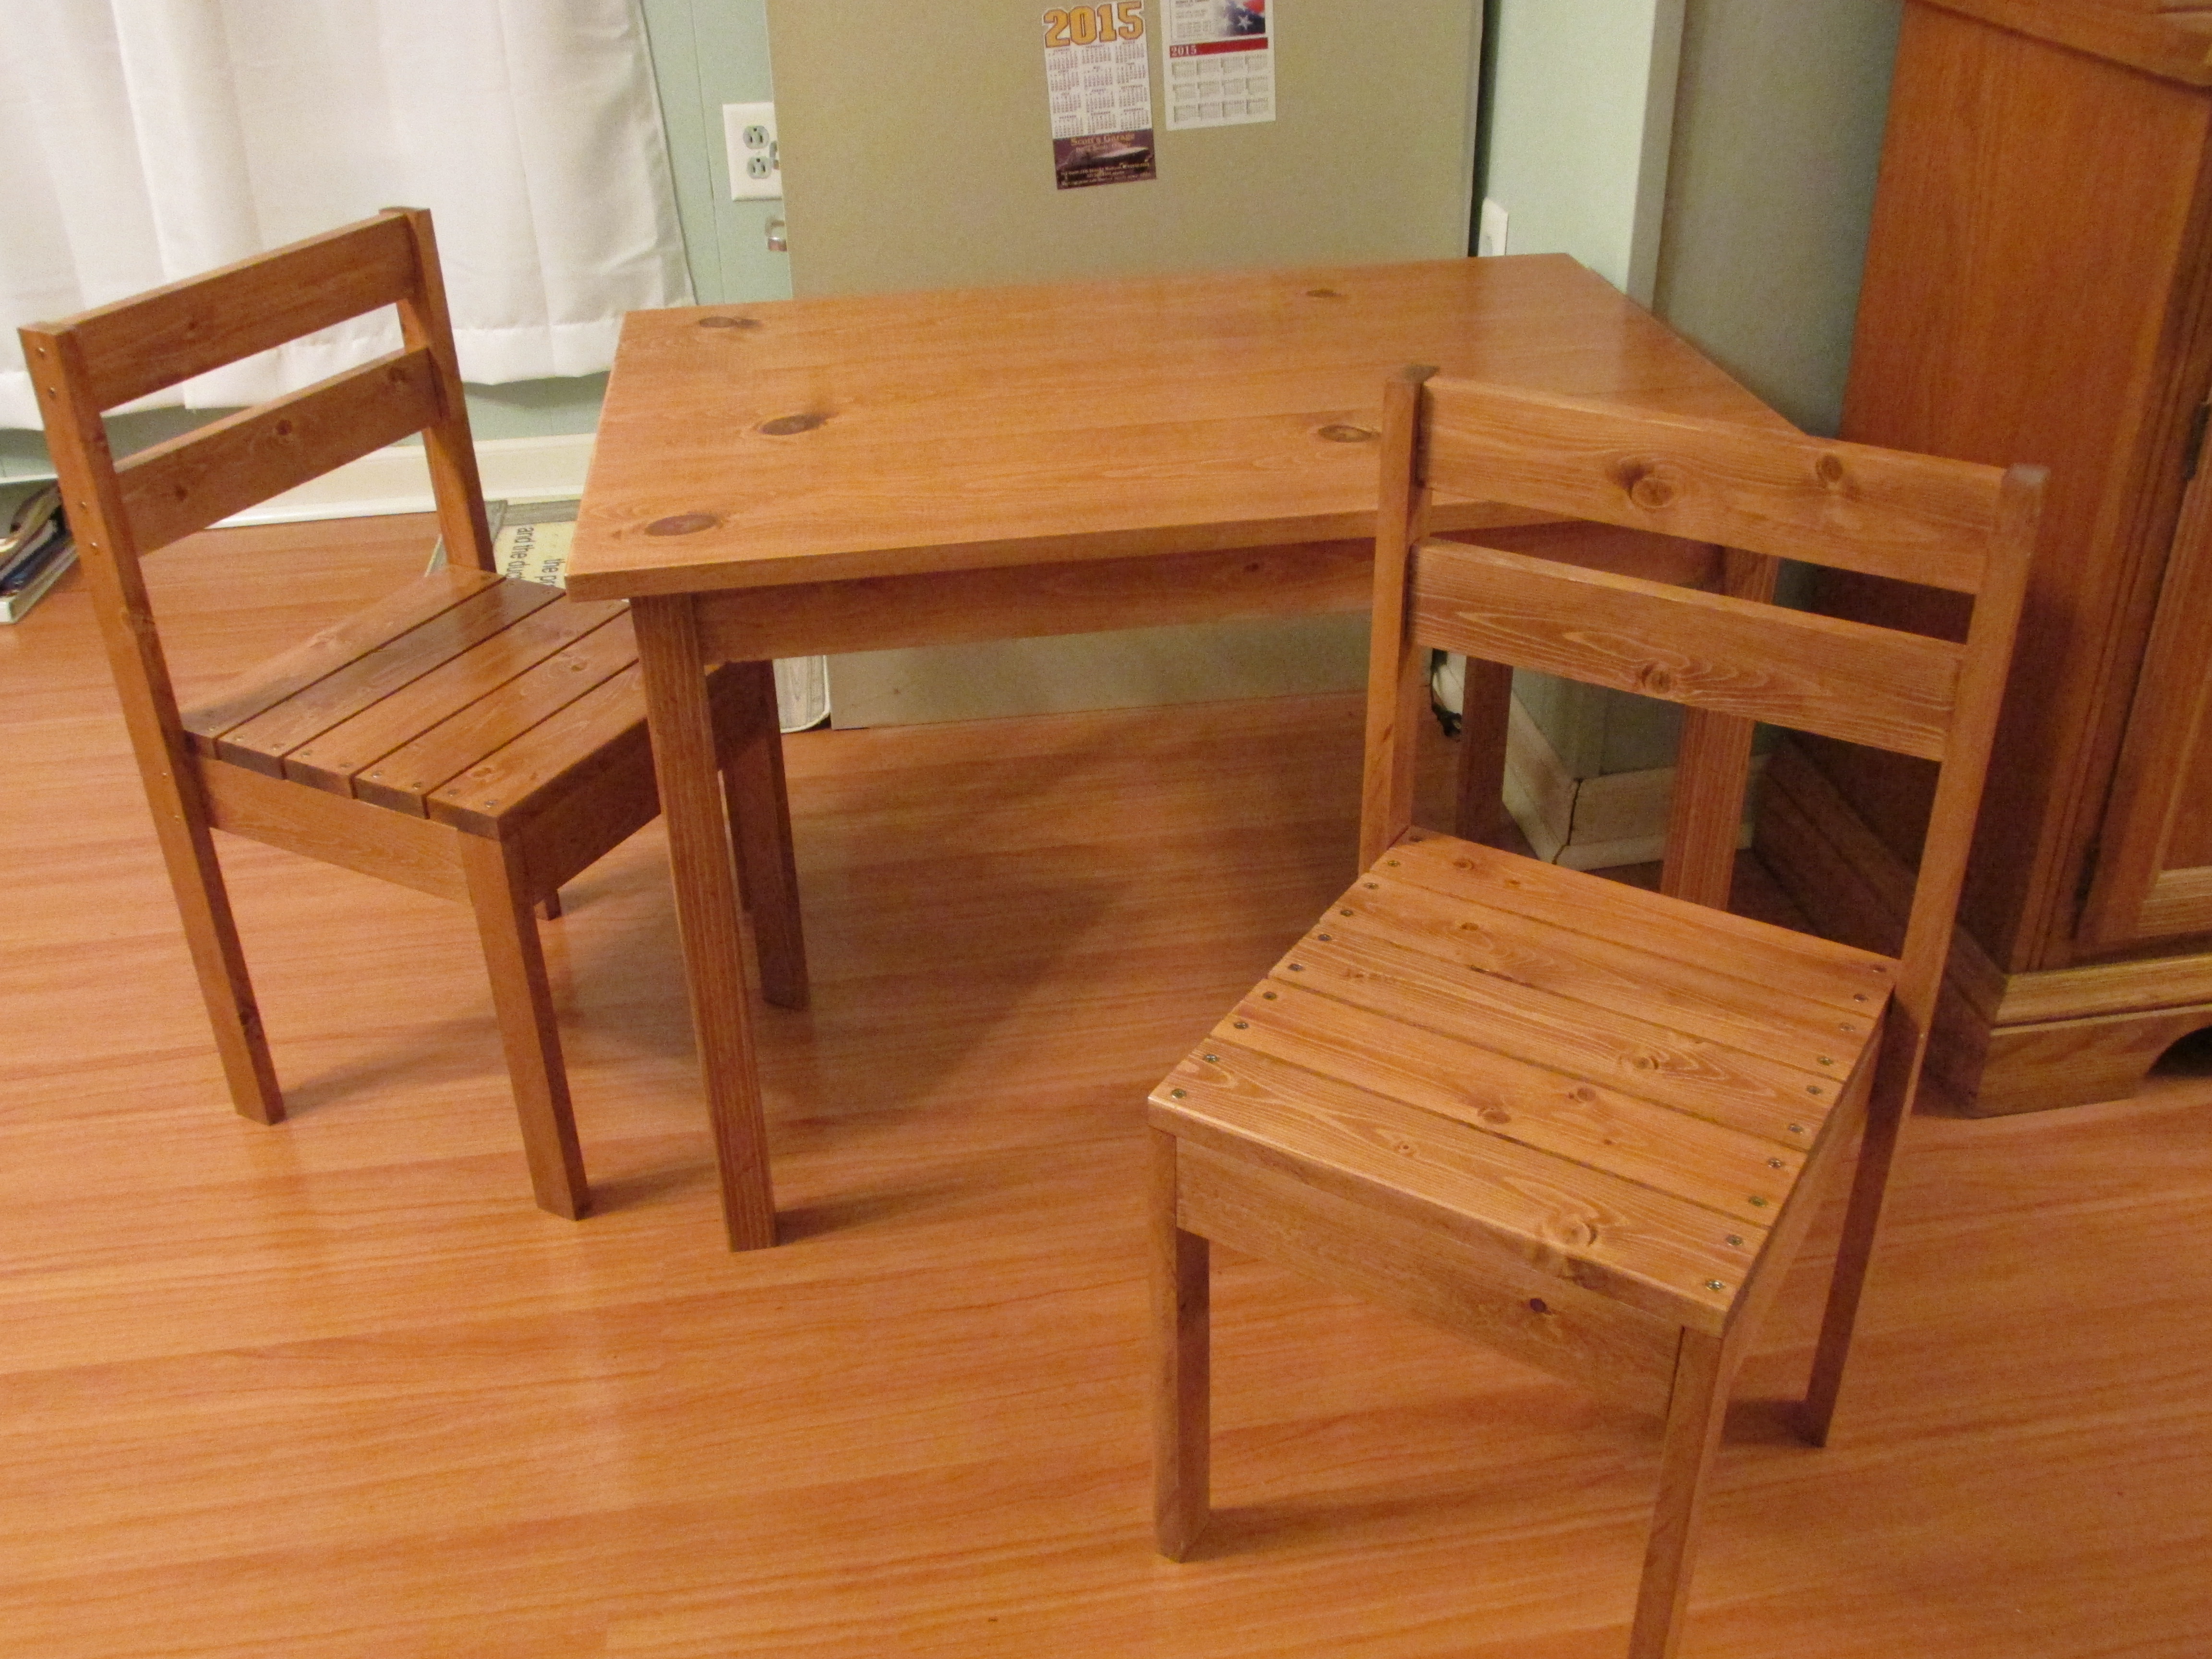
This was a fun project to build! The plans were very easy to follow and the table and chairs turned out just like they were supposed to. I ended up buying a Kreg jig to put the furniture together. The jig cost $40.00 at Home Depot and it was well worth it because I'll be able to use it on other projects. The plans showed the furniture being prepped and painted but my daughter wanted the pieces to look close to their dining room table so I took the time to stain and varnish them. I built the table and chairs out of pine and I used average dimensional lumber so the whole project only cost around $35.00. If you're looking for good children's furniture these would be good to build.
Built from Plan(s)
Estimated Cost
$35.00
Estimated Time Investment
Weekend Project (10-20 Hours)
Finish Used
Minwax Cherry #235 Stain - 3 coats
Minwax Helmsman spar urethane Clear Semi Gloss - 2 coats
Minwax Helmsman spar urethane Clear Semi Gloss - 2 coats
Recommended Skill Level
Beginner
Comments
Aveach8730
Wed, 10/24/2018 - 11:36
are there plans for this bed
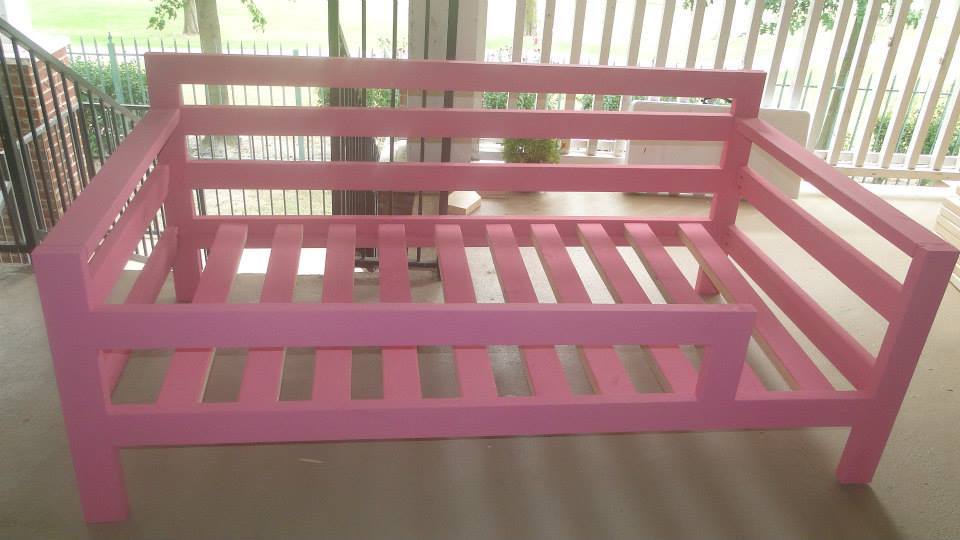
http://www.ana-white.com/2013/09/pink-twin-day-bed-made-toddler