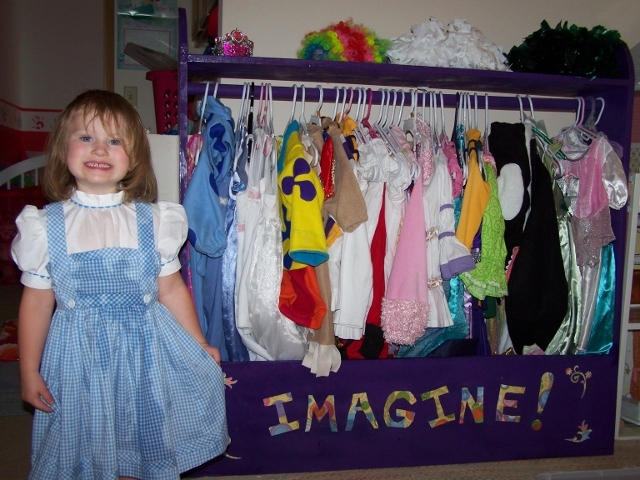
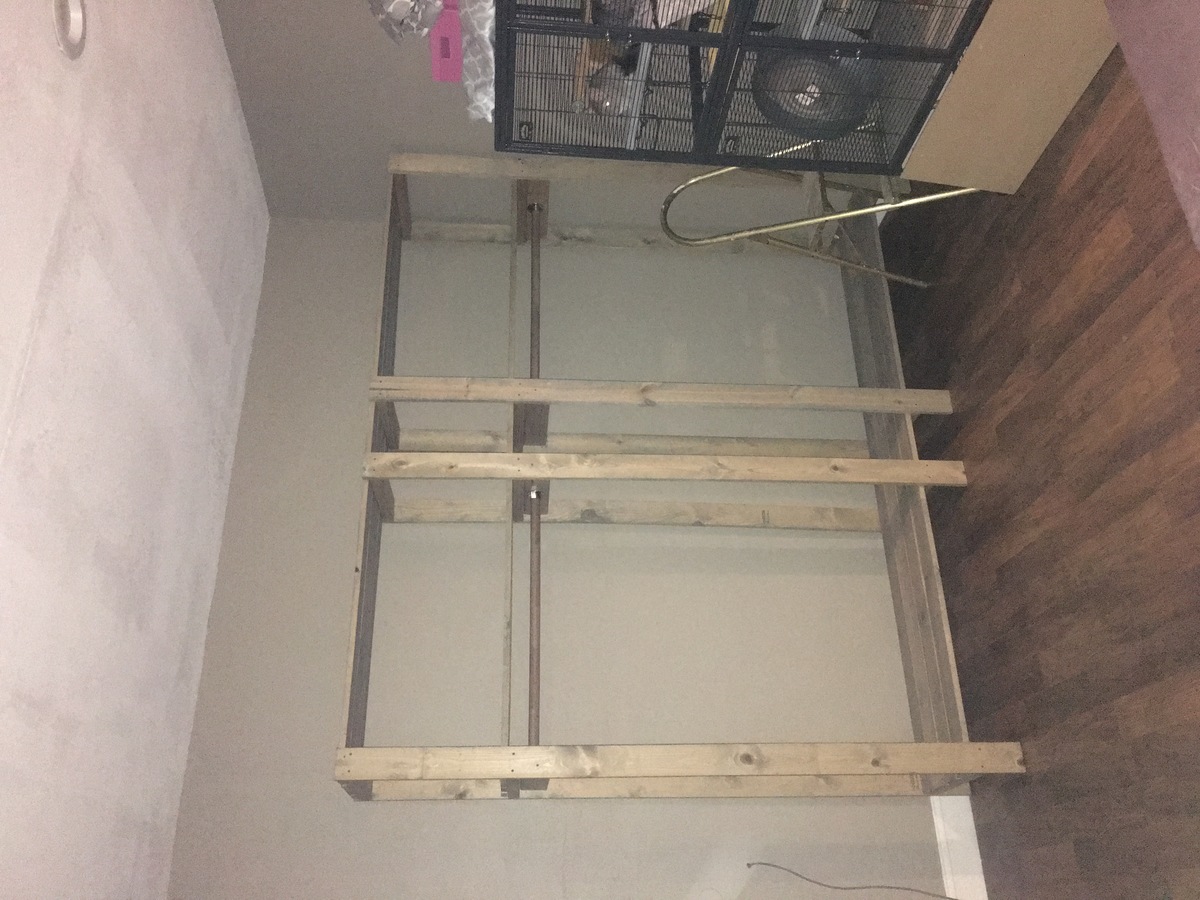
Community Brag Posts

Great headboard

Submitted by kezsub on Sat, 01/04/2014 - 19:03

I took this and modified slightly. My wife wanted it a little lower since our room is smaller. I took the original plan then just drew out a rough sketch with the dimensions I wanted. I modified the cut list accordingly. I prepped all the wood for cutting and had all wood cut and headboard assembled in just over 4 hours. The finishing of puttying and sanding, puttying and sanding, puttying and sanding, then painting and painting and painting took about 2 weeks due to weather and other time constraints. But the patience paid off and we have a nice looking headboard. We had no scraps so the cost for us was about $150. Already have had friends ask how much to make one for them.

Built from Plan(s)
Estimated Cost
150-170
Estimated Time Investment
Week Long Project (20 Hours or More)
Finish Used
cream flat paint
Recommended Skill Level
Beginner

Pentagon Cooler table

Submitted by Anonymous (not verified) on Fri, 03/25/2016 - 09:05

This table was made with already turned legs purchased at HD, one 4 x 8 sheet of oak plywood cut into two 4 x 4 sheets, pine for the cooler supports and edged with 1 x 3 oak routed with an ogee detail. Table supports were attached to the legs using pocket holes. Legs and supports were attached to the table bottom using pocket holes. The opening for the cooler was cut by plunging a circular saw from the top.

Estimated Cost
cost ~ 175
Estimated Time Investment
Day Project (6-9 Hours)
Finish Used
Minwax Early American stain
Minwax Polycrylic Polyurethane
Recommended Skill Level
Intermediate

Doll Bunk Bed

Submitted by DIYMomof4 on Sun, 11/10/2019 - 19:53

I built this doll bed to be raffled at a fundraiser.  It came together pretty easily, and I really appreciated the mattress tutorial!  Thank you!

Estimated Cost
$50
Estimated Time Investment
Weekend Project (10-20 Hours)
Finish Used
Behr Ultra Satin - Ceylon Cream
Recommended Skill Level
Beginner

Small Dresser (cabin collection) turned changing table

Saw this on Ana's site just in time to make it for a changing table for baby number 4. This was our most difficult plan to take on so far, but it turned out to be pretty straight forward. The details on the plan were a great help - using the spacers to make the drawer openings perfectly spaced, and attaching the drawer fronts on after attaching the rails were great tips. We also used dowel drawer slides for the top 2 drawers, which we really ended up liking.

Estimated Cost
165
Estimated Time Investment
Week Long Project (20 Hours or More)
Finish Used
white spray paint - Krylon primer, rustoleum paint in semi-gloss, krylon clear coat in satin.
Recommended Skill Level
Intermediate

Comments

Kathy B. (not verified)

Sat, 03/17/2012 - 01:15

Did you just use a router for the channels in the top drawers? If yes, what bit? If no, how did you do them?

Beautiful work! Your baby is very lucky! :)

claydowling

Sat, 03/17/2012 - 03:04

Those grooves are probably made with a dado stack on a table saw, but your could easily do it with a router and a guide. Table saw is easier though.

If you don't own a dado set already, don't buy the cheapest one you can find. I made that mistake, and wasn't overly happy with the results of the cut. When I bought a better dado blade set, I was a lot happier with the quality of my cuts.

That turns out to be generally true: I'm always more happy with the result of a better blade. I also needed to tune up my saw to make sure the blade was properly aligned with the guide slots, and that my fence was parallel to the blade. If you don't do that then the best blade in the world won't help. Also, buy full-kerf blades, not the thin kerf blades they sell at the home improvement store. The full kerf blades wobble less and give you cleaner cuts.

In reply to by rob (not verified)

brookifer86

Sat, 03/17/2012 - 06:33

This is a community, there's no need to be rude. Sometimes the authors don't know there are comments, and it's nice to hear more than one solution to a problem. So let's please just appreciate the contribution from all the members, yes?

Guest (not verified)

Sat, 03/17/2012 - 14:56

Brookifer86,

I can appreciate where you are coming from, and I appreciate your kind suggestions.

I can also identify with Rob's comment directed at Clay. Which I did not find rude.

Clay tends to comment on nearly almost every post on Ana's site with a dismissive and know-it-all attitude, giving outdated advice and rude corrections. It has gotten pretty old. Obviously I am not the only one who sees this.

Remember, one person's authoritarian advice on how to do things isn't the only way or even the best way to approach a project. It is simply their experience and their own personal way of doing things.

birdsandsoap

Sun, 03/18/2012 - 12:16

I'm grateful for all the help on this blog! When it comes to woodworking, there always seems to be more than one way to do things, and I want to hear EVERYBODY'S ideas; it makes me a more knowledgeable woodworker and helps me overcome planning obstacles I would otherwise not get passed.
Clay, I've read many of you posts and appreciate the wisdom you share. And to the complainers: sometimes our thoughts are not always conveyed on Internet discussions. Some personalities can come across as abrasive/arrogant unbeknownst to the author simply because of their writing style. I've seen it time and again on blogs and forums. I know what I want to say, but it doesn't always come across *quite right* when I'm typing it out.
Either way, I want to hear more about these drawer glides! Clay, you posted a great link on the original plan that suggest always using hardwood for drawer glides or at least a hard/softwood combo. Makes sense, any other want to chime in?

rob (not verified)

Sun, 03/18/2012 - 12:39

Just because I asked him to let Mollie answer the question doesn't mean I was calling him rude. I just think it's common courtesy to let someone who is asked a question to speak first. I definitely appreciate Clay's wisdom and I agree that there are many ways to do something.

What if it were in person though? What if someone kept asking you a question but someone standing off to the side kept answering it before you? Sure they answer correctly every time and give credible insight but after getting cut off over and over, don't you think it might get annoying?

Don't you think the teacher gets a little piffed when that one kid in the back raises his hand and belts out the answer every time and doesn't let any of the other kids answer the question? Sorry for the rant...

anyway the issue isn't about good or bad insight. The issue is just manners. I'm sorry if that comes off brash, but let the person who actually built it answer first.

birdsandsoap

Sun, 03/18/2012 - 13:18

Lucky for us, we're not in person and we can just "scroll down," lol. I remember recently, one of the blogs I regularly read posted about just this. Her article was spot-on and amusing at the same time...partly because she describes these notorious commenters, and because I know I've been guilty of "thread dumping " myself. There are personalities that clash online and in the real world too. It's worth a glance for a little perspective-and a laugh. http://www.homestoriesatoz.com/2012/02/how-deal-negative-comments.html

claydowling

Sun, 03/18/2012 - 16:30

I seem to have stepped on some toes, and for that I'm sorry. I'll certainly take your points in mind in the future. I'm afraid that's distracted from the main point: this is a really amazing piece of furniture. Molly, your house must be pretty amazing if you're building furniture like this. I'll bet your children grow up to be pretty amazing if they've got a mom who builds their furniture.

bhoppy

Mon, 03/19/2012 - 12:44

Beautiful changing table! I have only been building a little over a year and I always appreciate the advice on this site. Thanks for sharing so much Clay:-)

Mollie (not verified)

Sun, 07/29/2012 - 21:13

I just saw there were comments here on my brag post. So, Clay, thanks for answering for me.

We used our table saw - although we don't have a fancy blade. We should probably get one. My husband just ran it through the table saw several times to get it the exact right width. The blade was lowered so that it would only cut 1/4 inch into the wood. And the slides were hardwood - square dowels you get get at a home improvement store.

little stuf

Wed, 08/08/2012 - 08:08

I love the plans for this piece, to begin with. Great job on your build. I LOVE this in white! Especially for a baby room or a little girl's room. Thank you so much for sharing your pics and ideas!

Green Granny (not verified)

Mon, 01/21/2013 - 20:45

Fantastic job on this piece! I think this would be perfect in an adult's bedroom also, with the bottom shelf for a blanket or quilt. I would love to make this.

DoryEllen

Sun, 03/31/2013 - 16:01

Hi,
I was wanting to do the same thing...make this for using as a changing table. What are the dimensions of your dresser? Did you change the size of the drawers (did you use something different than a 1x8)? At what measurement did you place the lower shelf relative to the ground and how much space is there between the top of that lower shelf and the bottom of the 1x2 that frames the bottom drawer?

Any help / details that you can give would be so appreciated!

Thanks!

Farmhouse table - Grey legs

Submitted by Anonymous (not verified) on Mon, 03/28/2016 - 13:06

Made exactly to the plans with the exception of the middle 2x4 between the legs. I used 1/2" threaded rod, some steel rings welded to the rod, and a double sided clevis to make the connection in the middle. 

Estimated Cost
~$100
Estimated Time Investment
Day Project (6-9 Hours)
Recommended Skill Level
Beginner

Dollhouse Bookshelf with Arched Doorways

Submitted by mary tuper on Mon, 11/18/2019 - 11:58

My first project using plans on this site - made for my grand daughter - her MOM loved it and she will too - she is only one and a half.... I used the plans on this site and decided to make some arch doorways in the room dividers. Came out so cute!

This was a relatively simple plan to do but it took me a while to get everything squared and right the first time around. I shortened the width of house to accommodate space in bedroom and also added arched doorways in the room dividers. They came out so good. Daughter-in-law loved this and we know my grand daughter will too. She is only one and half now! It was a fun project and gave me a great sense of accomplishment once it was finished!

Built from Plan(s)

Brookstone Storage Bed

Submitted by etbuogie on Sun, 03/18/2012 - 19:41

I made modified the plans to make the bed a full instead of a twin. This was a little tricky, because the full bed is bigger then a 4x8 sheet of plywood. If you are interested I can get pics of the extra support I had to build to suport the plywood seem. I also used redoak, which is why it cost so much. The extra money was well worth the cost when you use the finish. The headboard I used is from my wifes great grandmas' house in Southern Louisiana. It is 125 year old cypres storm shutter.

Built from Plan(s)
Estimated Cost
400.00
Estimated Time Investment
Weekend Project (10-20 Hours)
Finish Used
General Finishes Oil Based Gel Stain in Java. With three coats of General Finishes Arm-R-Seal Oil and Urithane Topcoat Satin. I was worried about staining, because I have not had good luck in the past with getting an even stain. This stuff was very easy to use. In the photo the stain looks a little uneven, but that was from the flash. I have tried using Minwax before, and had a horrible experiance with it. This stuff though I would recomend to anyone. Only downside is that it is more expensive, about 20 bucks for a quart of stain, and 15 for a quart of topcoat. Well worth the money for the finish. On the Headboard I used Watco Teak Oil. They just happened to be almost the same color.
Recommended Skill Level
Intermediate

Comments

Raised bed garden planters

Submitted by 4peas on Thu, 01/09/2014 - 07:55

I really wanted to have a raised bed garden to grow organic veggies for my family but was so discouraged by the cost of ready-made planters that I almost gave up. While searching for options on Pinterest I came across these fabulous, affordable and untreated wood planters and after a trip to the home store, we built 10 according to the plans. I couldn't be happier with the results; thank you Ana!

Estimated Time Investment
Weekend Project (10-20 Hours)
Finish Used
none
Recommended Skill Level
Beginner

Comments

4peas

Thu, 01/09/2014 - 08:00

I really wanted a raised bed veggie garden but was discouraged by the high cost of ready made planters - especially since my dream garden required 10! I was about to give up when I discovered Ana's amazing plans while browsing Pinterest!

Mark555

Tue, 07/08/2014 - 00:24

Thank you Ana, I used your plans and ideas for a raised bed vegetable garden. I did change things a bit and it has worked out real well for me. I hate weeding and well I am a bit lazy. So mine are 6’x3’, I had a problem with the pickets splitting when I used screws to fasten them down. I ended up using a pneumatic brad/nail gun to fasten things together. I also used weed block under the bed and over the dirt and mulched over that. I have almost no weeding to do, about 10 minutes every three days or so. I also put in an irrigation system using ½ inch pvc pipe and 2 liter soda pop bottles. That way I water the roots and not the whole area, it cuts down on my water bill and it goes directly to the roots. The other thing I ended up doing is putting down 6 mil black plastic between the rows of raised beds and putting straw over that( I have 3’ walking/working paths between each bed). I have built 20 of them and plan to add another 20.

First Father-Daughter Woodworking Project

Finally having a house meant that we could finally have family over for holidays, parties, etc. The problem was that we didn't have a table large enough to accommodate more than 4 people comfortably. When I saw the plans on here, I knew it would be the perfect fit for our home which is turning out to be a little bit rustic, a little industrial and very eclectic. While my dad has done some woodworking projects, they have mostly been easy shelves or home construction, nothing like this project. We built the table and built the matching 8ft bench out of approx. $95 of construction pine lumber. We changed the table lumbar from 4-2x10s to 8-2x6s (cut down to 5" width for cleaner edges). My dad did most the construction and I completed the finish. I sanded to 220 grit. We used SamaN Water-based stain in Black (I love that stuff, so easy to use and re-wets so I didn't have any lap marks, although it did wipe off some when I applied the poly) and ZAR Ultra Max waterborne oil-modified polyurethane. The grain raised even more after I laid on the poly. I love how the pine created a reverse grain and has such great texture. We made some modifications, one being that we did not attach the table top to the base. Instead, we added some wood to the bottom of the table to brace against the brace and legs. The table top is so heavy that is never moves and will make it easy to move since together, the table and brace are too heavy for 2 people to lift. Some of the things we learned: always double check the measurements (the base braces were about 1.5" to tall), if at all possible, create a jig to keep the leg pieces square, be careful assembling the base (we cracked one of the braces), and let poly cure for at least 24 hrs even if none of the literature mentions it. If we had the equipment, we would have loved to use a planer and a joiner, but even so, I think it came out awesome. It only took 40 years, but I think that our first father-daughter woodworking project has been a great success. Can't wait to work on our next project!! Thanks Ana-White & Shanty 2 Chic for some great plans!

Estimated Cost
$95 for lumber + $55 for materials (screws, stain, poly, etc) = $150
Estimated Time Investment
Week Long Project (20 Hours or More)
Finish Used
Sand with 220 grit (for table and bench tops, I raised the grain before knocking it down with the 220 grit), stained with SamaN water-based stain in Black (my lumber came from 2 different stores, the 2x6s came from a local lumber yard which took the stain better than the other lumber picked up from Home Depot, so the Home Depot lumbar all got 2 coats of stain. Poly'd with ZAR Ultra Max Waterbourne oil-modified polyurethane with 2 coats (although I will probably add more coats in the future). I sanded with 400 grit between coats although I don't think I needed to. I used the brush-on instead of wipe-on and so it was not the easiest to use, but I've heard it could have been a lot worse. Definitely let the poly cure for 24 hrs at least even when your literature does not indicate anything.
Recommended Skill Level
Intermediate

Mud Room Bench

This plan started with Ana's "Mudroom Bench with Easy Drawers" project as a base. I painted 1/4" strips of plywood to give the look of distressed wood on the wall. The shelves above was a simple box with dividers. I made extra deep drawers for ALL my kids' shoes and it is so nice to just grab all the errant shoes and toss them in there out of sight! I also outfitted it with motion-detection lighting so no more fumbling for the light switch in this dark passageway.

Built from Plan(s)
Estimated Cost
$400
Estimated Time Investment
Weekend Project (10-20 Hours)
Finish Used
white enamel, black is chalk paint with wax finish
Recommended Skill Level
Intermediate

Simple Outdoor Loveseat

Submitted by Anonymous (not verified) on Tue, 08/01/2023 - 15:02

Modified the simple outdoor chair plans and made it into a loveseat.

Mike T.

Built from Plan(s)

Comments

Easy Upholstered Bench

Submitted by saracrow on Wed, 03/21/2012 - 11:21

After discovering Ana White, my husband and I have been slowly creating our dream guest room. I had the vision of a modern striped bench at the end of the bed and using the Easiest Upholstered Bench plans, Ana made it easy! I love how this turned out. It was actually my first sewing project ever and I love how it turned out.

The foam is what spiked the price in this project.

Built from Plan(s)
Estimated Cost
$70
Estimated Time Investment
Afternoon Project (3-6 Hours)
Finish Used
Mixwax wood conditioner, Minwax Dark Walnut, Minwax Polyacrylic
Recommended Skill Level
Beginner

Comments

saracrow

Wed, 03/21/2012 - 14:48

Thank you very much! Although building this piece was easy, the small touches definitely took some time. But it was worth it!

Farm house queen bed modified for box spring

This bed was built completely out of necessity. Our old 30 year old bed (including mattress) had given me my last backache. A new bed and mattress set was too expensive so I decided to build the bed and spend the saved money on a mid class mattress. So glad I did! What I built seems waaaay better than what we could have afforded. And it only took me a long weekend plus a few days waiting for stain and polyurethane to dry. Plus the return trips to HD to purchase new lumber after making wrong cuts and the cheap furring strip I bought at first continuously split on me.o t

I wanted the box spring to fit inside of the frame as much as possible. I realized the farm house queen bed plan plus the platform bed plan that I was using did not do that a bit late. By then I had already glued and screwed on the side rails. So I just flipped the frame around and decided to go with that side. Later I realized that the inside width of the bed was 57!! (60 - 3 for the frame) so I needed to return to the store to get new wood for the frame since what I cut already was 3 inches too short. My already built headboard and foot board also would not fit like the plan suggested so I needed to improvise. What you see is mainly my improvisations as a result of many, many mistakes.

My bed has two sets of legs. I did not trust the headboard and footboard legs as I could not attach them as described so I added a set to the frame itself. I also made the upholstery so that I could easily change it by unscrewing it from the head and footboards.

Estimated Cost
$90. Less than $70 initially but went up with the addition of trims and mistakes. Already had fabric and foam.
Estimated Time Investment
Week Long Project (20 Hours or More)
Finish Used
3 coats of Minwax polyshades in satin followed by Minwax gloss polyurethane. I applied it using foam brushes.
I would have liked it to be lighter. Just as I thought the color was good - after 2 coats - I spilled half the can of stain onto the foot board. Was forced to brush that in and add another coat to the headboard.
Recommended Skill Level
Beginner

Comments

moosmani

Fri, 01/10/2014 - 20:10

Oh my! I had to giggle about your experience, especially the last part when you were forced to put on another coat after spilling half the can! Been there, done that. You did a great job at improvising and I'm impressed you could keep the cost so low. I really like the dark color. Great job!

moosmani

Fri, 01/10/2014 - 20:09

Oh my! I had to giggle about your experience, especially the last part when you were forced to put on another coat after spilling half the can! Been there, done that. You did a great job at improvising and I'm impressed you could keep the cost so low. I really like the dark color. Great job!

Cabin Bed

Submitted by Anonymous (not verified) on Sat, 04/02/2016 - 07:53

Changed the scale of the front panel and the window trim slightly.  Added window boxes for a drink, toys and book storage.


Built from Plan(s)
Estimated Cost
~$200
Estimated Time Investment
Weekend Project (10-20 Hours)
Finish Used
Interior paint and primer
Recommended Skill Level
Beginner

Easy Kitchen Island

Submitted by khewatt on Fri, 03/23/2012 - 19:35

An easy to build and very sturdy kitchen island. My father and son constructed the island itself. I stained and painted the island. The construction was relatively easy. Painting and staining were easy, but time consuming because of dry times.

Built from Plan(s)
Estimated Cost
$125
Estimated Time Investment
Weekend Project (10-20 Hours)
Finish Used
Stain- Minwax Wood Finish- color: special walnut
Paint- Behr Premium Plus Flat Enamel- color: Beluga
Polyurethane- Minwax
Recommended Skill Level
Beginner

Comments

Barn Beam Ledge - First Project!

Submitted by divertete on Sun, 01/12/2014 - 13:00

This was my first project since shop class in 7th grade (20 years ago)! Picked this beautiful shelf as a Christmas present to my husband to show off his hard-earned trophies from his ultramarathons (100+ miles of running). Next time I would make it a bit longer, and use end grain on the sides for a more even color. Came together easily, and can't wait for my next project! Picture is from Jay Dash Photography, of the Wasatch Mountains in Utah.

Built from Plan(s)
Estimated Cost
$30 (including supplies)
Estimated Time Investment
Afternoon Project (3-6 Hours)
Finish Used
Minwax conditioner followed by Minwax dark walnut stain (one coat), and semi-gloss poly
Recommended Skill Level
Starter Project

Comments

Farmhouse Xcoffee table

Submitted by GingerRae on Mon, 04/04/2016 - 16:12

My husbands second build and it turned out AMAZING! The plans were great!

Built from Plan(s)
Estimated Time Investment
Day Project (6-9 Hours)
Finish Used
Stain, off white semi gloss by glidden and poly
Recommended Skill Level
Beginner

Rolling workbench carts

Submitted by LampAtFeet on Tue, 12/10/2019 - 08:04

A few years ago I ran across Ana's plans for the Ryobi Dream Workshop with the rolling carts. They have been the most useful item in the garage. I customized them by using some scrap lumber to build some simple slide out shelves, attached a power strip to the inside of the cart, added hooks to hold various tools and added a removable container to the outside edge to hold items (safety glasses, pencils, scissors, glue, etc) that I want to keep close by but not on the work area. Thanks for the plans, Ana!

Estimated Cost
$60
Estimated Time Investment
Afternoon Project (3-6 Hours)
Finish Used
No finish added
Recommended Skill Level
Beginner

Planked wood sideboard

Submitted by Anonymous (not verified) on Thu, 04/07/2016 - 10:45

This sideboard buffet took me several months to complete mostly because I have little kids and had to have my husband home to give me the time I needed! The hardware and paint was the most expensive piece. I first stained it with kona stain then painted it with ASCP in Provence. I still need to put the wire mesh in doors but I'm still searching for options:-) This was my first project with drawers and it was not easy!

Built from Plan(s)
Estimated Cost
$350
Estimated Time Investment
Week Long Project (20 Hours or More)
Finish Used
Kona stain
Annie Sloan chalk paint in Provence
Clear wax to bottom
Polyacryllic to top
Recommended Skill Level
Advanced