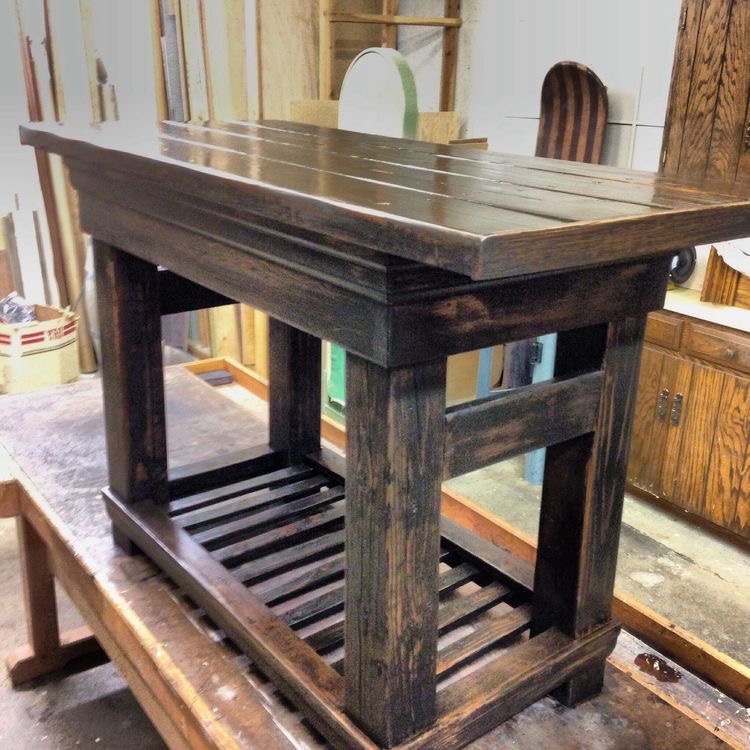
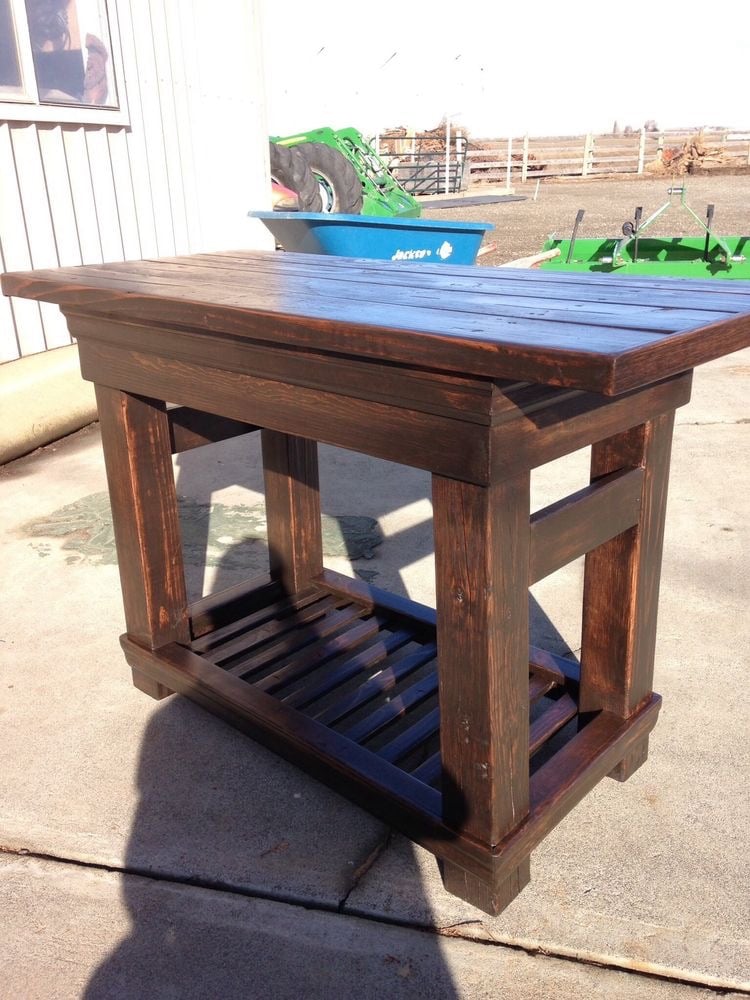
Community Brag Posts
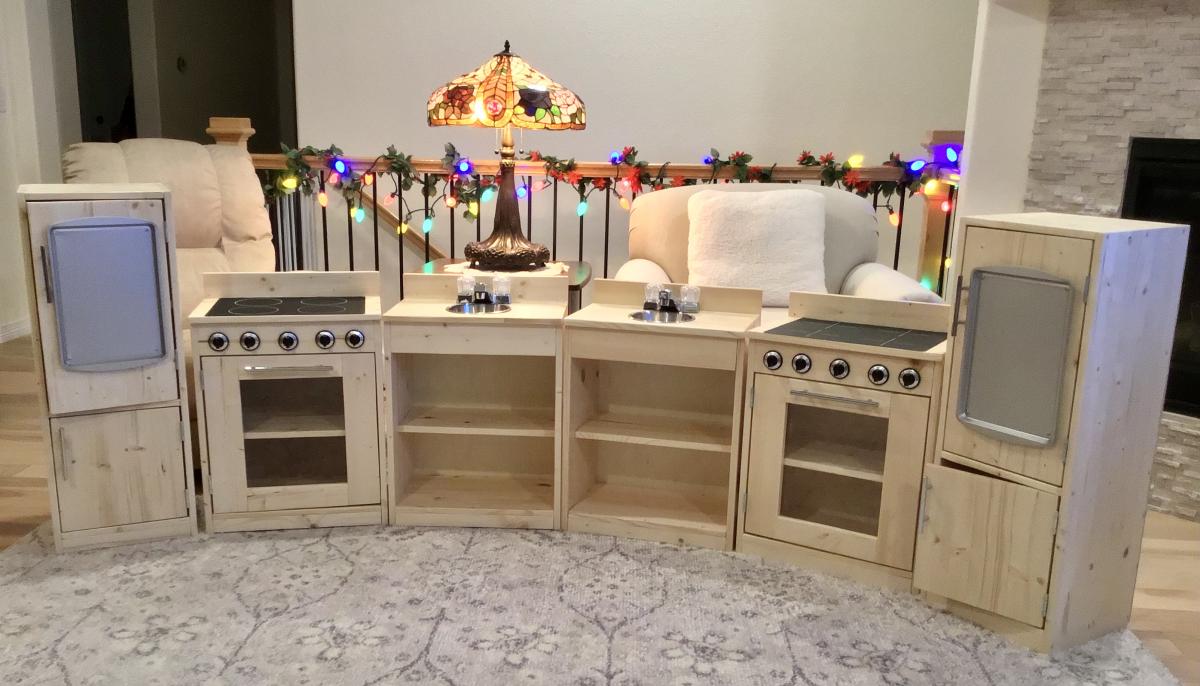
Two Play Kitchens
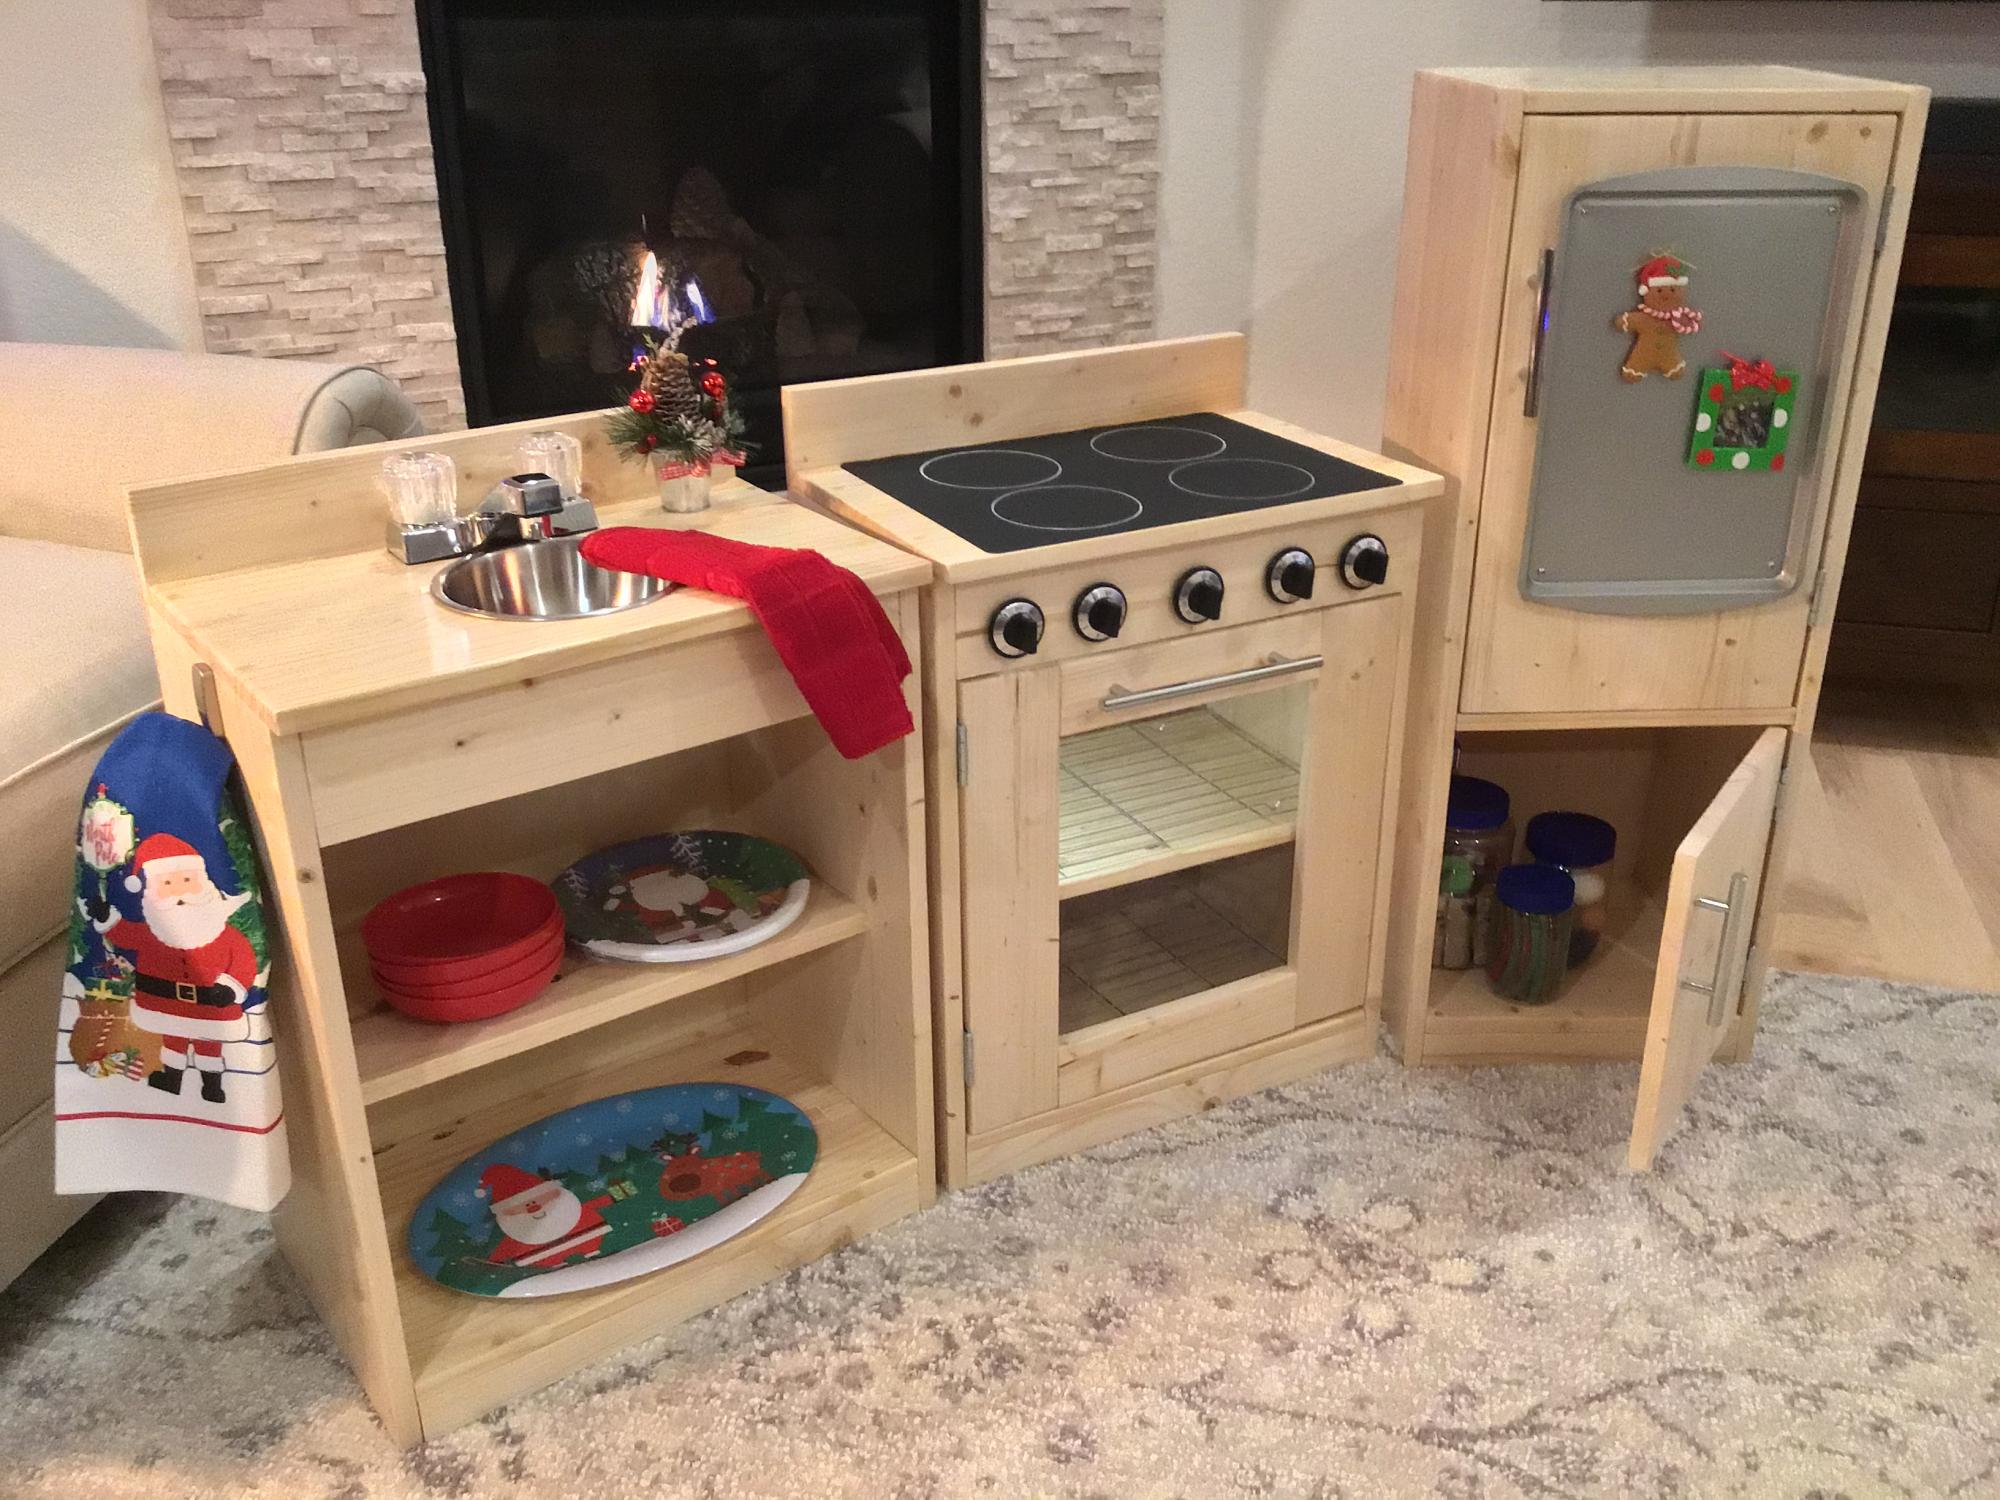
Two one-year-old cousins. What can I tell you; they BOTH needed a kitchen set for Christmas!
We were glad to stumble upon these plans for heirloom toys and greatly appreciate that they are free for all to access. Directions are easy to follow and the user-comments offer lots of good ideas which I incorporated into the units I built. I added three inches in width and height to the sink and stove units. Sanded pieces before assembly. Used screws instead of nails; screws were set using a counter-sink bit. Rounded all edges; this was very appreciated by the mothers! Both mothers also requested a clear polyurethane finish instead of paint. Magnetic closures on all doors.
Touches of realism for the ovens: cookie-cooling racks on the oven shelves to simulate the oven racks, a motion-sensor-light in each oven triggers when the door is opened, cooktops created with a black silicone placemat and a white permanent marker worked well to draw/simulate the burners. Despite the families’ actual home ovens having digital controls, both moms requested knobs for the children to manipulate ... screws through the back of the faceplate allow the knobs to rotate. Oven doors have side hinges for ease of child access to ‘baking food’ and to prevent anyone from stepping onto an opened door hinged on the bottom. Touches of realism for the sinks: aluminum mixing bowls for sinks, box-store bathroom faucets, hook at the side for hand towel. Touches of realism for the Narrow Fridge: hinges on the right and freezers on the bottom to match the children’s home refrigerators. We considered coating the top door with magnetic paint, but per request to stay away from paint, cookie sheets were screwed to fronts so that children can display drawings or anything magnetic.
Several Christmasy additions such as linens, dinnerware, magnets and mini floral buckets really added to the “wow factor” under the Christmas tree!
Built from Plan(s)
Estimated Time Investment
Week Long Project (20 Hours or More)
Finish Used
Polyurethane
Recommended Skill Level
Intermediate
Comments
Wed, 12/23/2020 - 09:57
Oh my, just adorable!
Absolutely love the extra thought and details put into this! It will be loved and cherished by all:) Merry Christmas
Tilt Out Trash Bins
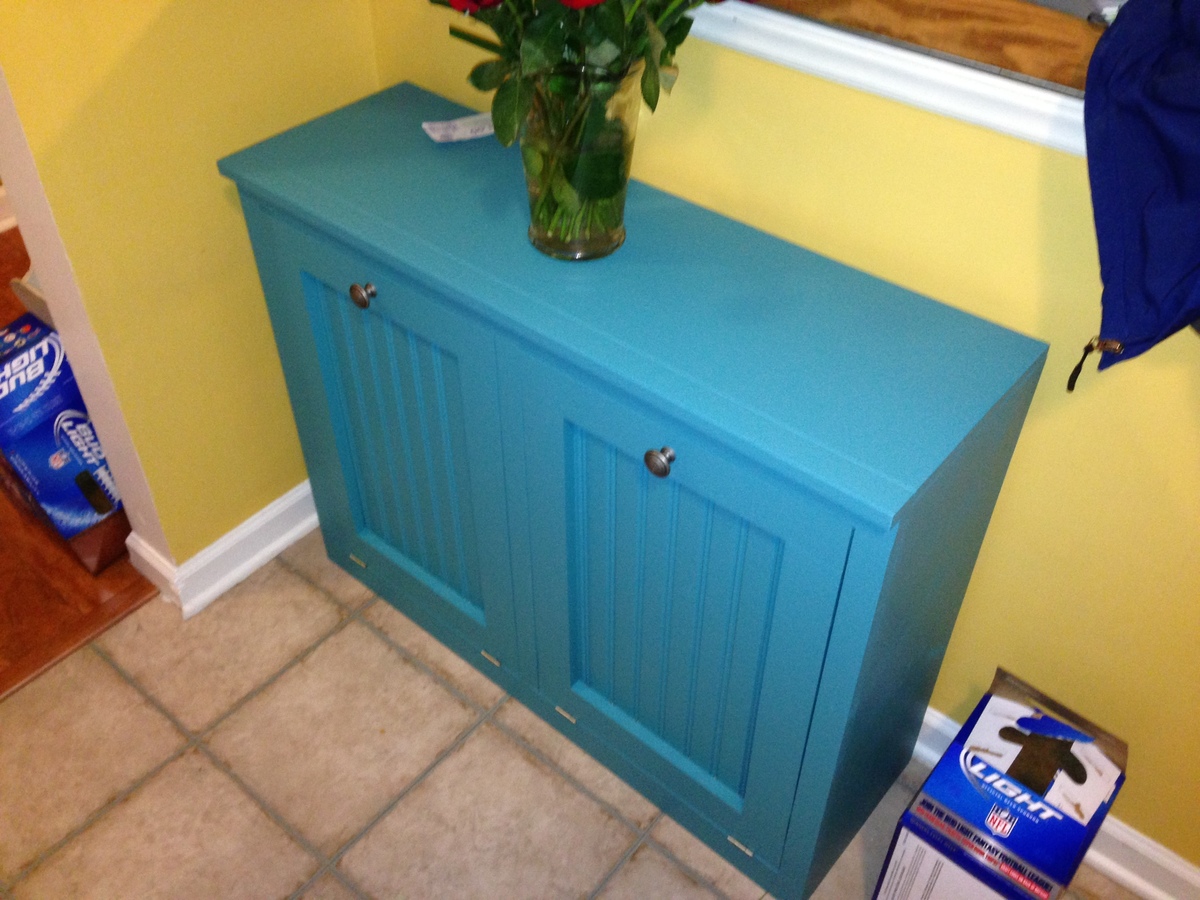
I loved this project. Great way to clean up the kitchen and creates a nice usable shelf.
Estimated Time Investment
Weekend Project (10-20 Hours)
Finish Used
Kilz primer/paint in 1.
Recommended Skill Level
Intermediate
Comments

Thu, 01/31/2013 - 22:22
What color is that? I love
What color is that? I love it!
Good job on the build, too!
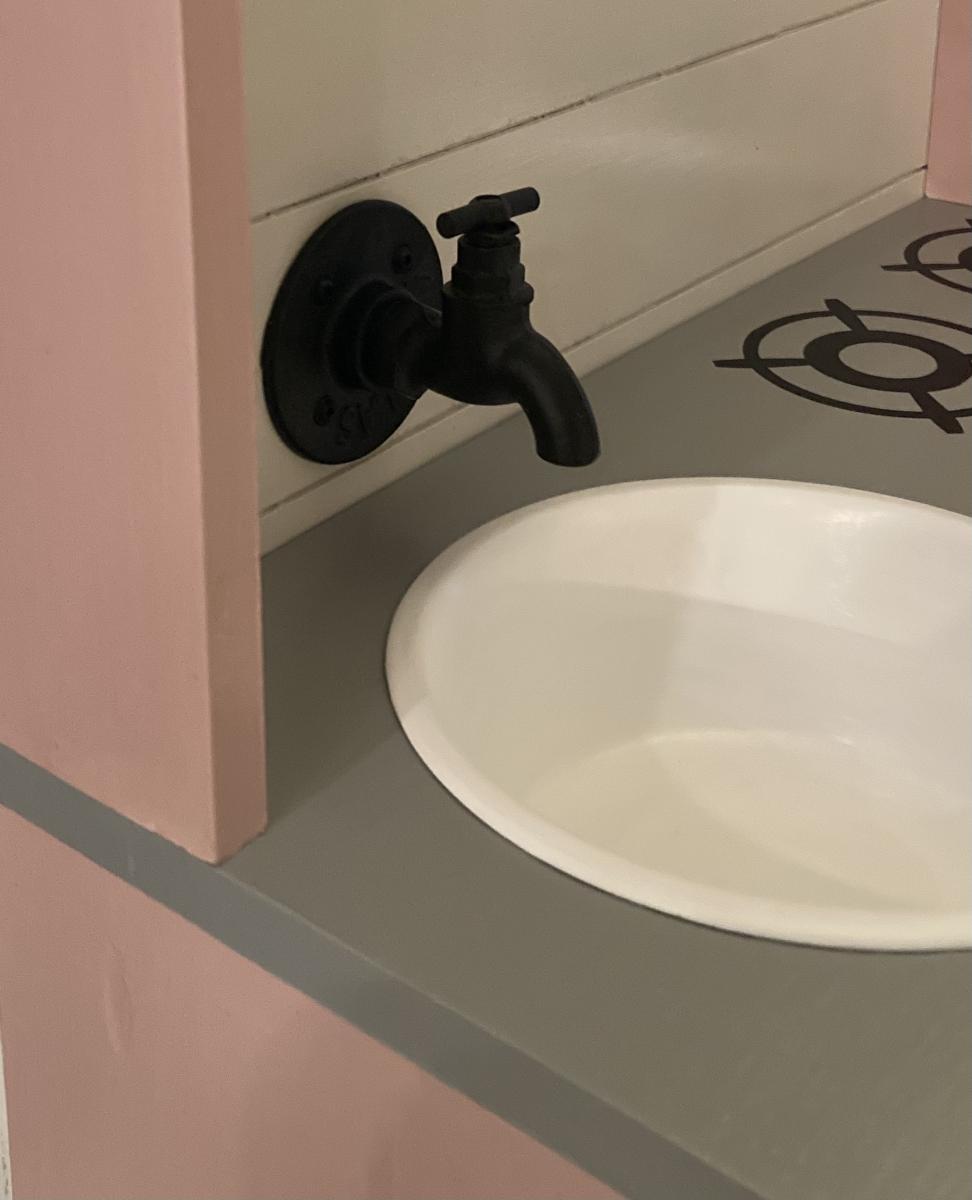
Play kitchen
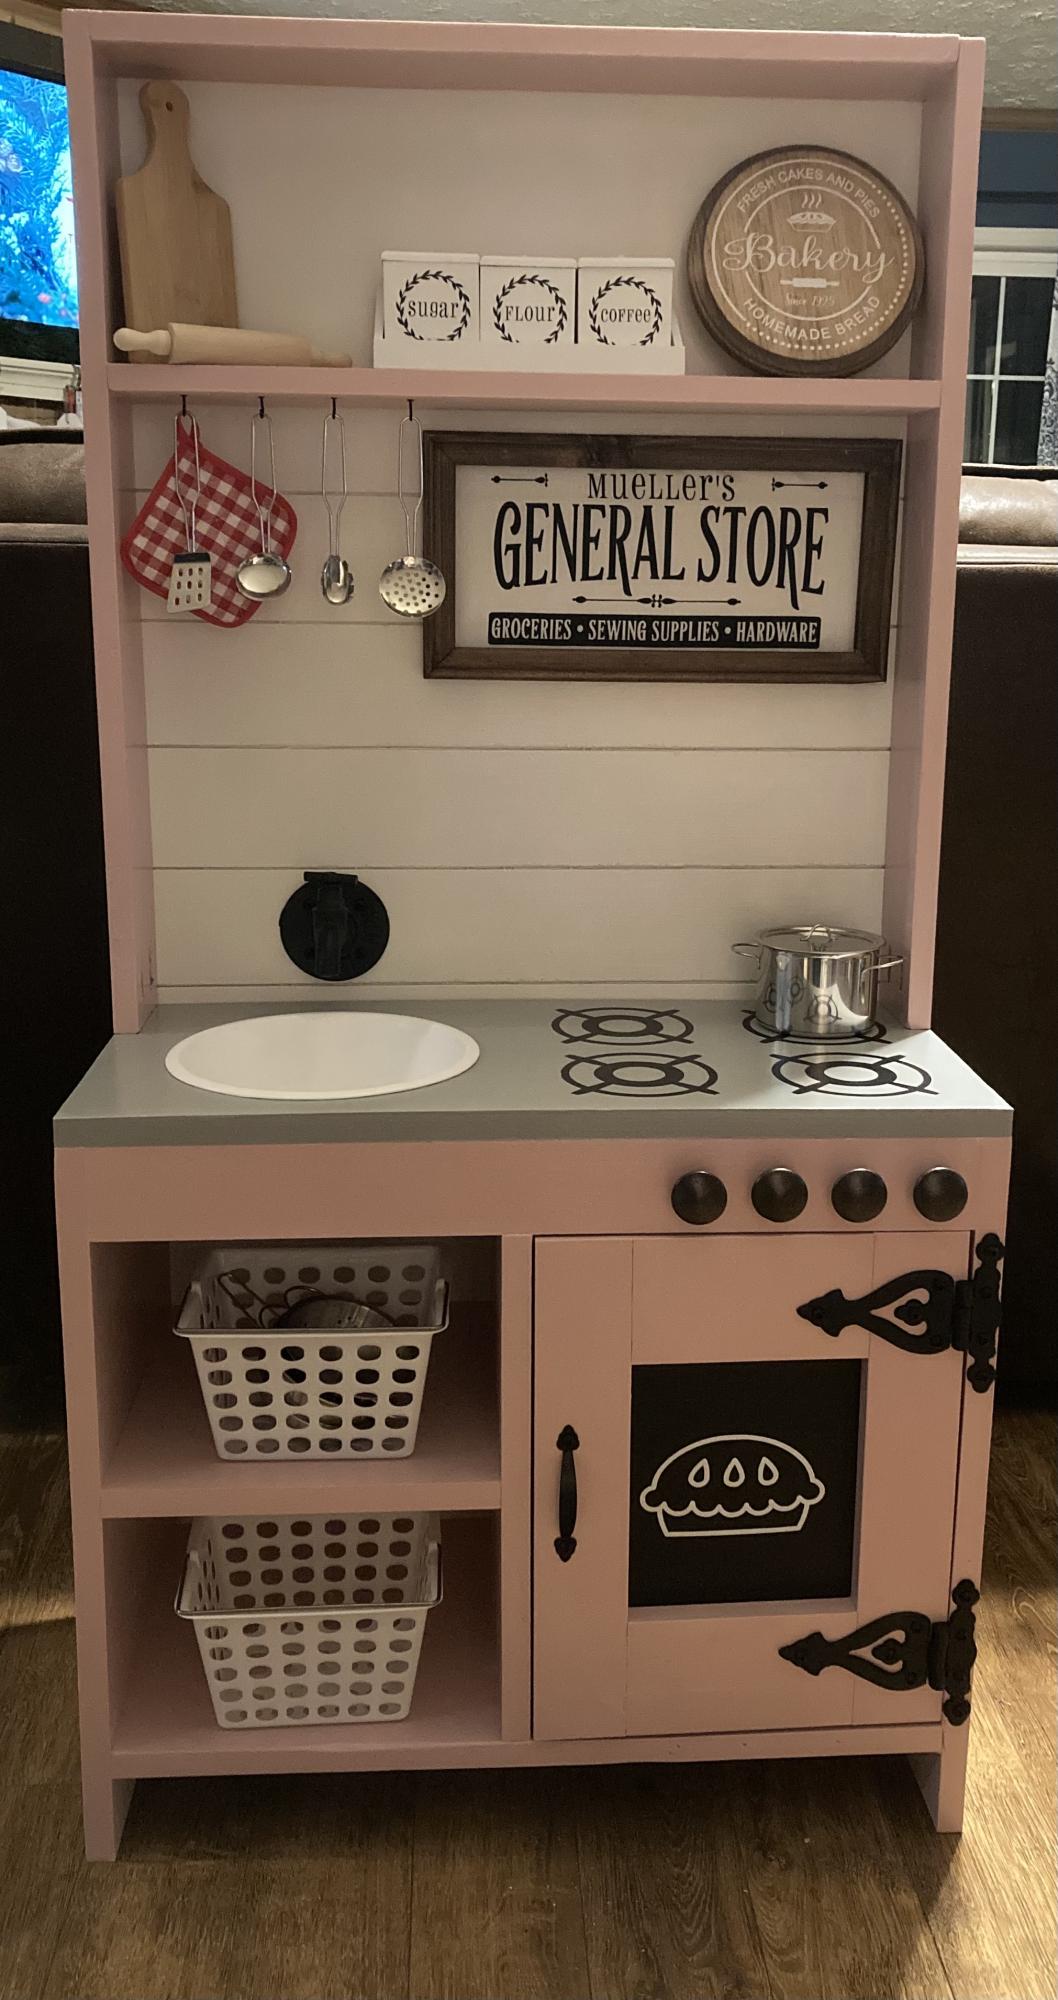
Made this for my grand-daughter’s birthday!
I used the play kitchen with back wall plans. I used my circular saw to make 1/8 grooves for the shiplap, a dog bowl for the sink painted with enamel paint, the faucet is actually a coat hook I purchased from Amazon. The hutch is made from basic 1x4’s. The burners were made from an svg from Etsy as was the pie in the oven and the sign above the stove. Super cute, fun project!
Built from Plan(s)
Finish Used
Waverly paint in Ballet Slipper pink, gray chalk paint and white paint. Sealed with polycrylic.
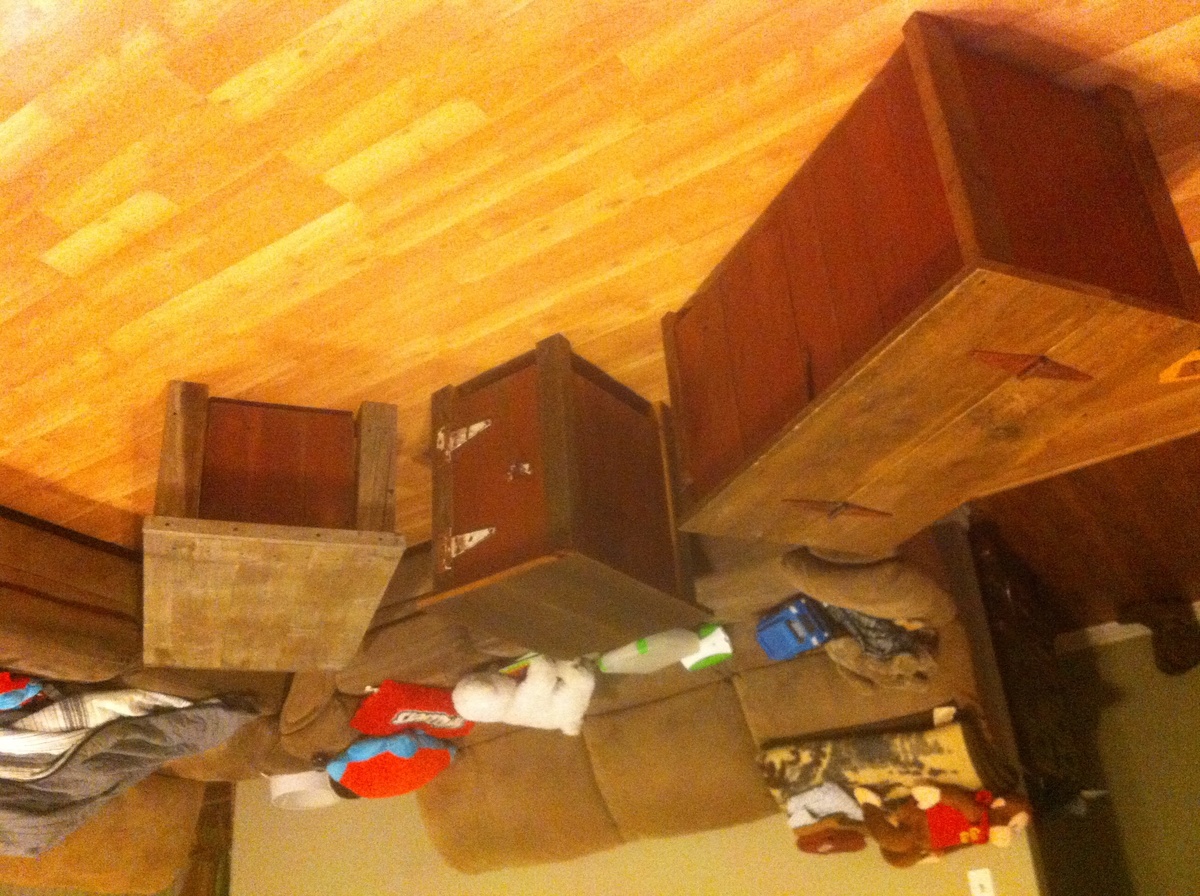
Barnwood furniture
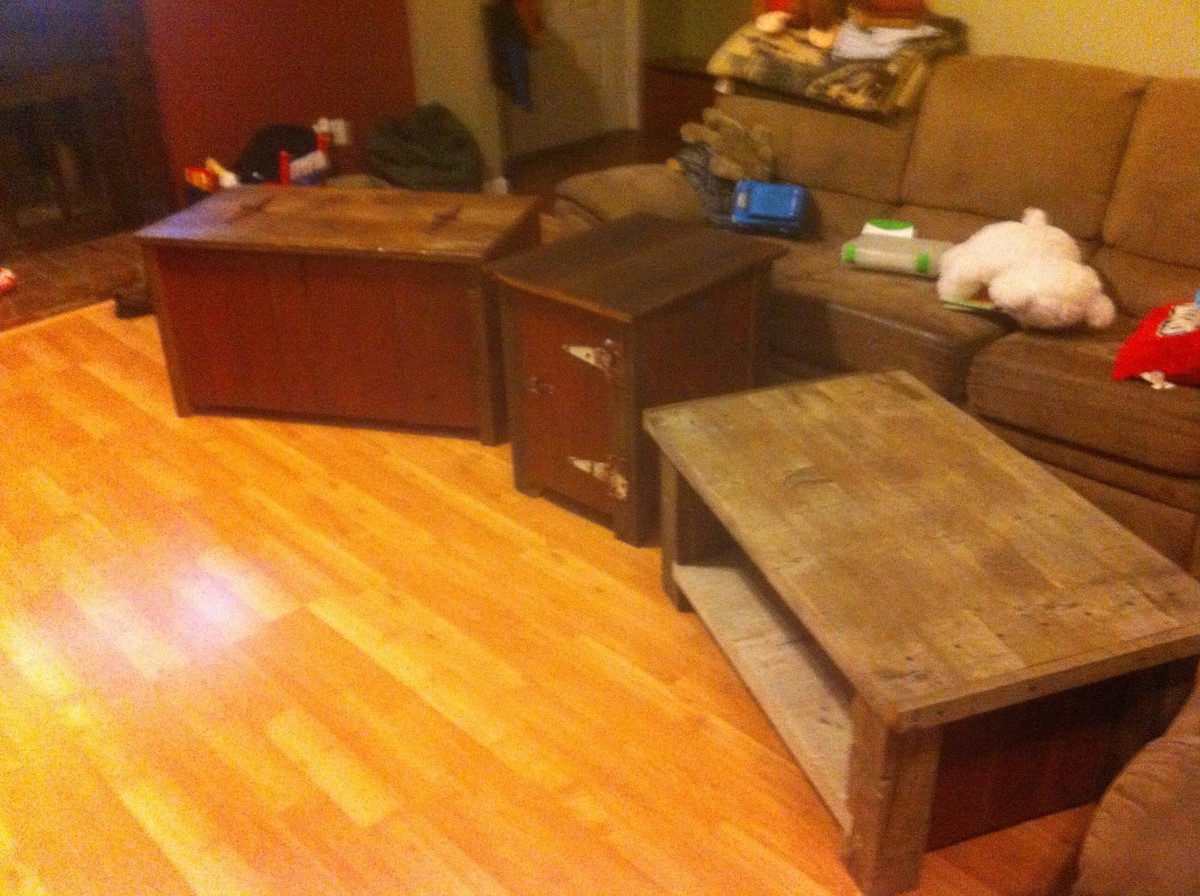
I know that these aren't the best pictures. I'll load individual ones later. I built the coffee table, end table and toy chest out off all my grandparents barn. It collapsed a few years ago in be harsh Iowa winters. Everything on these is from the barn from the wood, hinges, and nails. It even makes the old barn door noises when opening them! Curious of what people think and ideas.
Estimated Time Investment
Weekend Project (10-20 Hours)
Finish Used
Oil based poly finish.
Recommended Skill Level
Intermediate
Comments
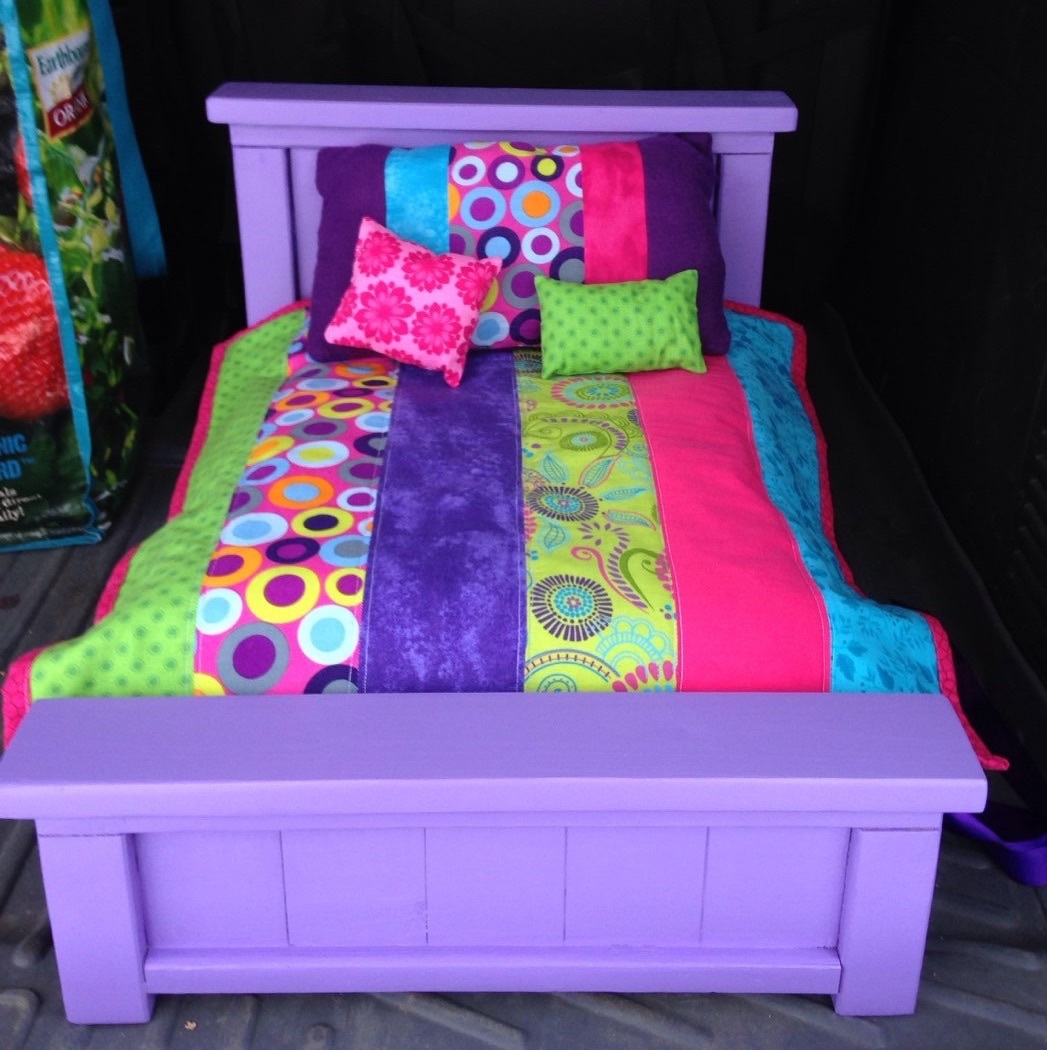
Farmhouse Doll Bed
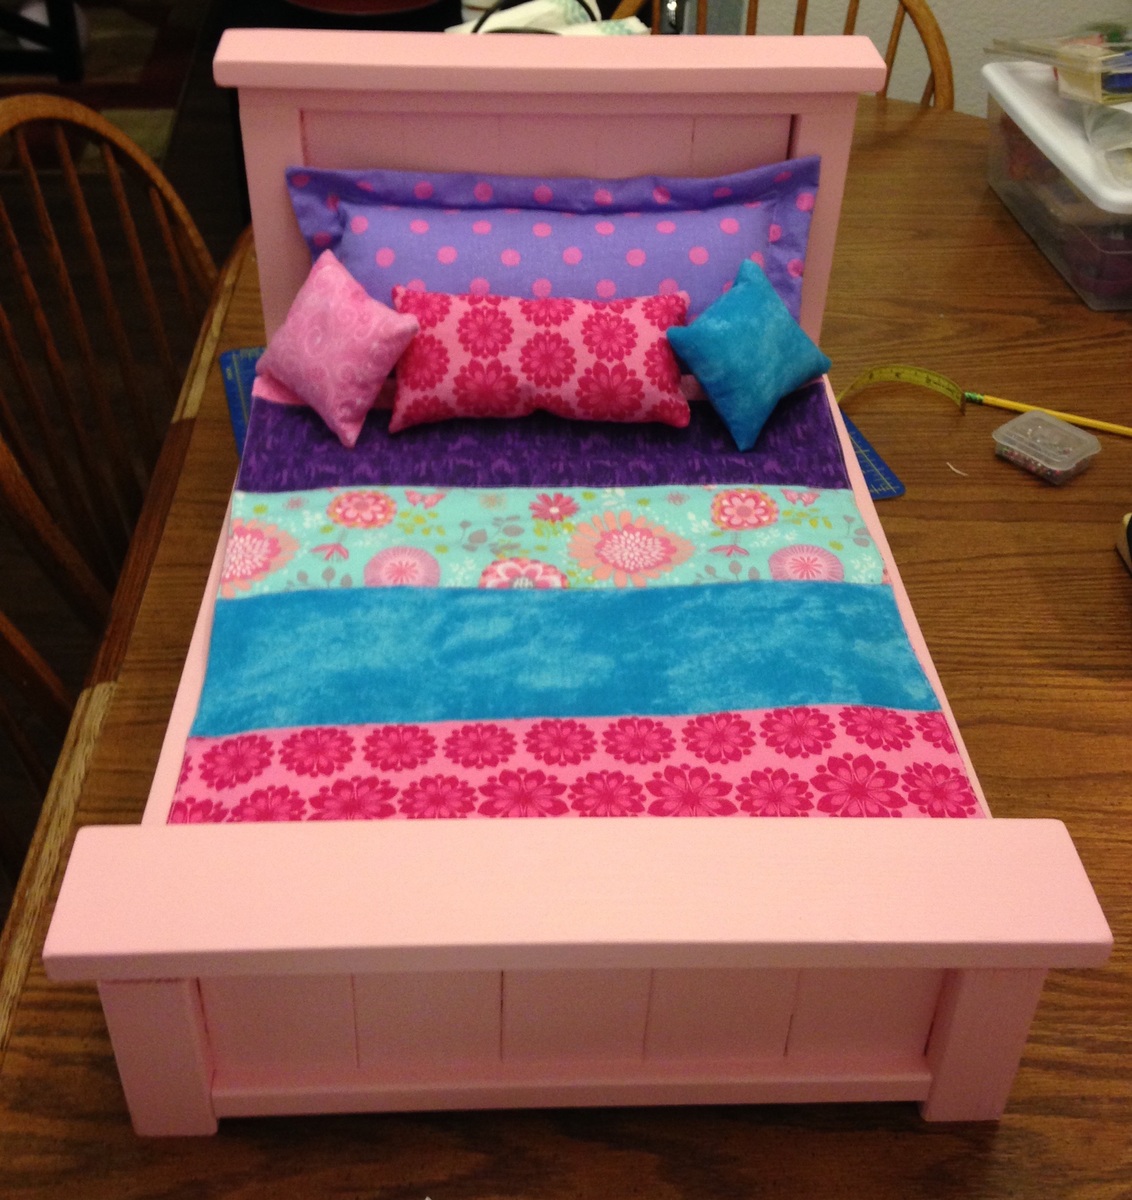
These are my first two farmhouse beds. The pink bed was my very first woodworking project since high school. We're not gonna say how long ago that was. Haha!
Thank you for sharing your plans. My daughter and my cousin's daughter love their new little beds.
Built from Plan(s)
Recommended Skill Level
Beginner
Hudson's Rustic Changing Table
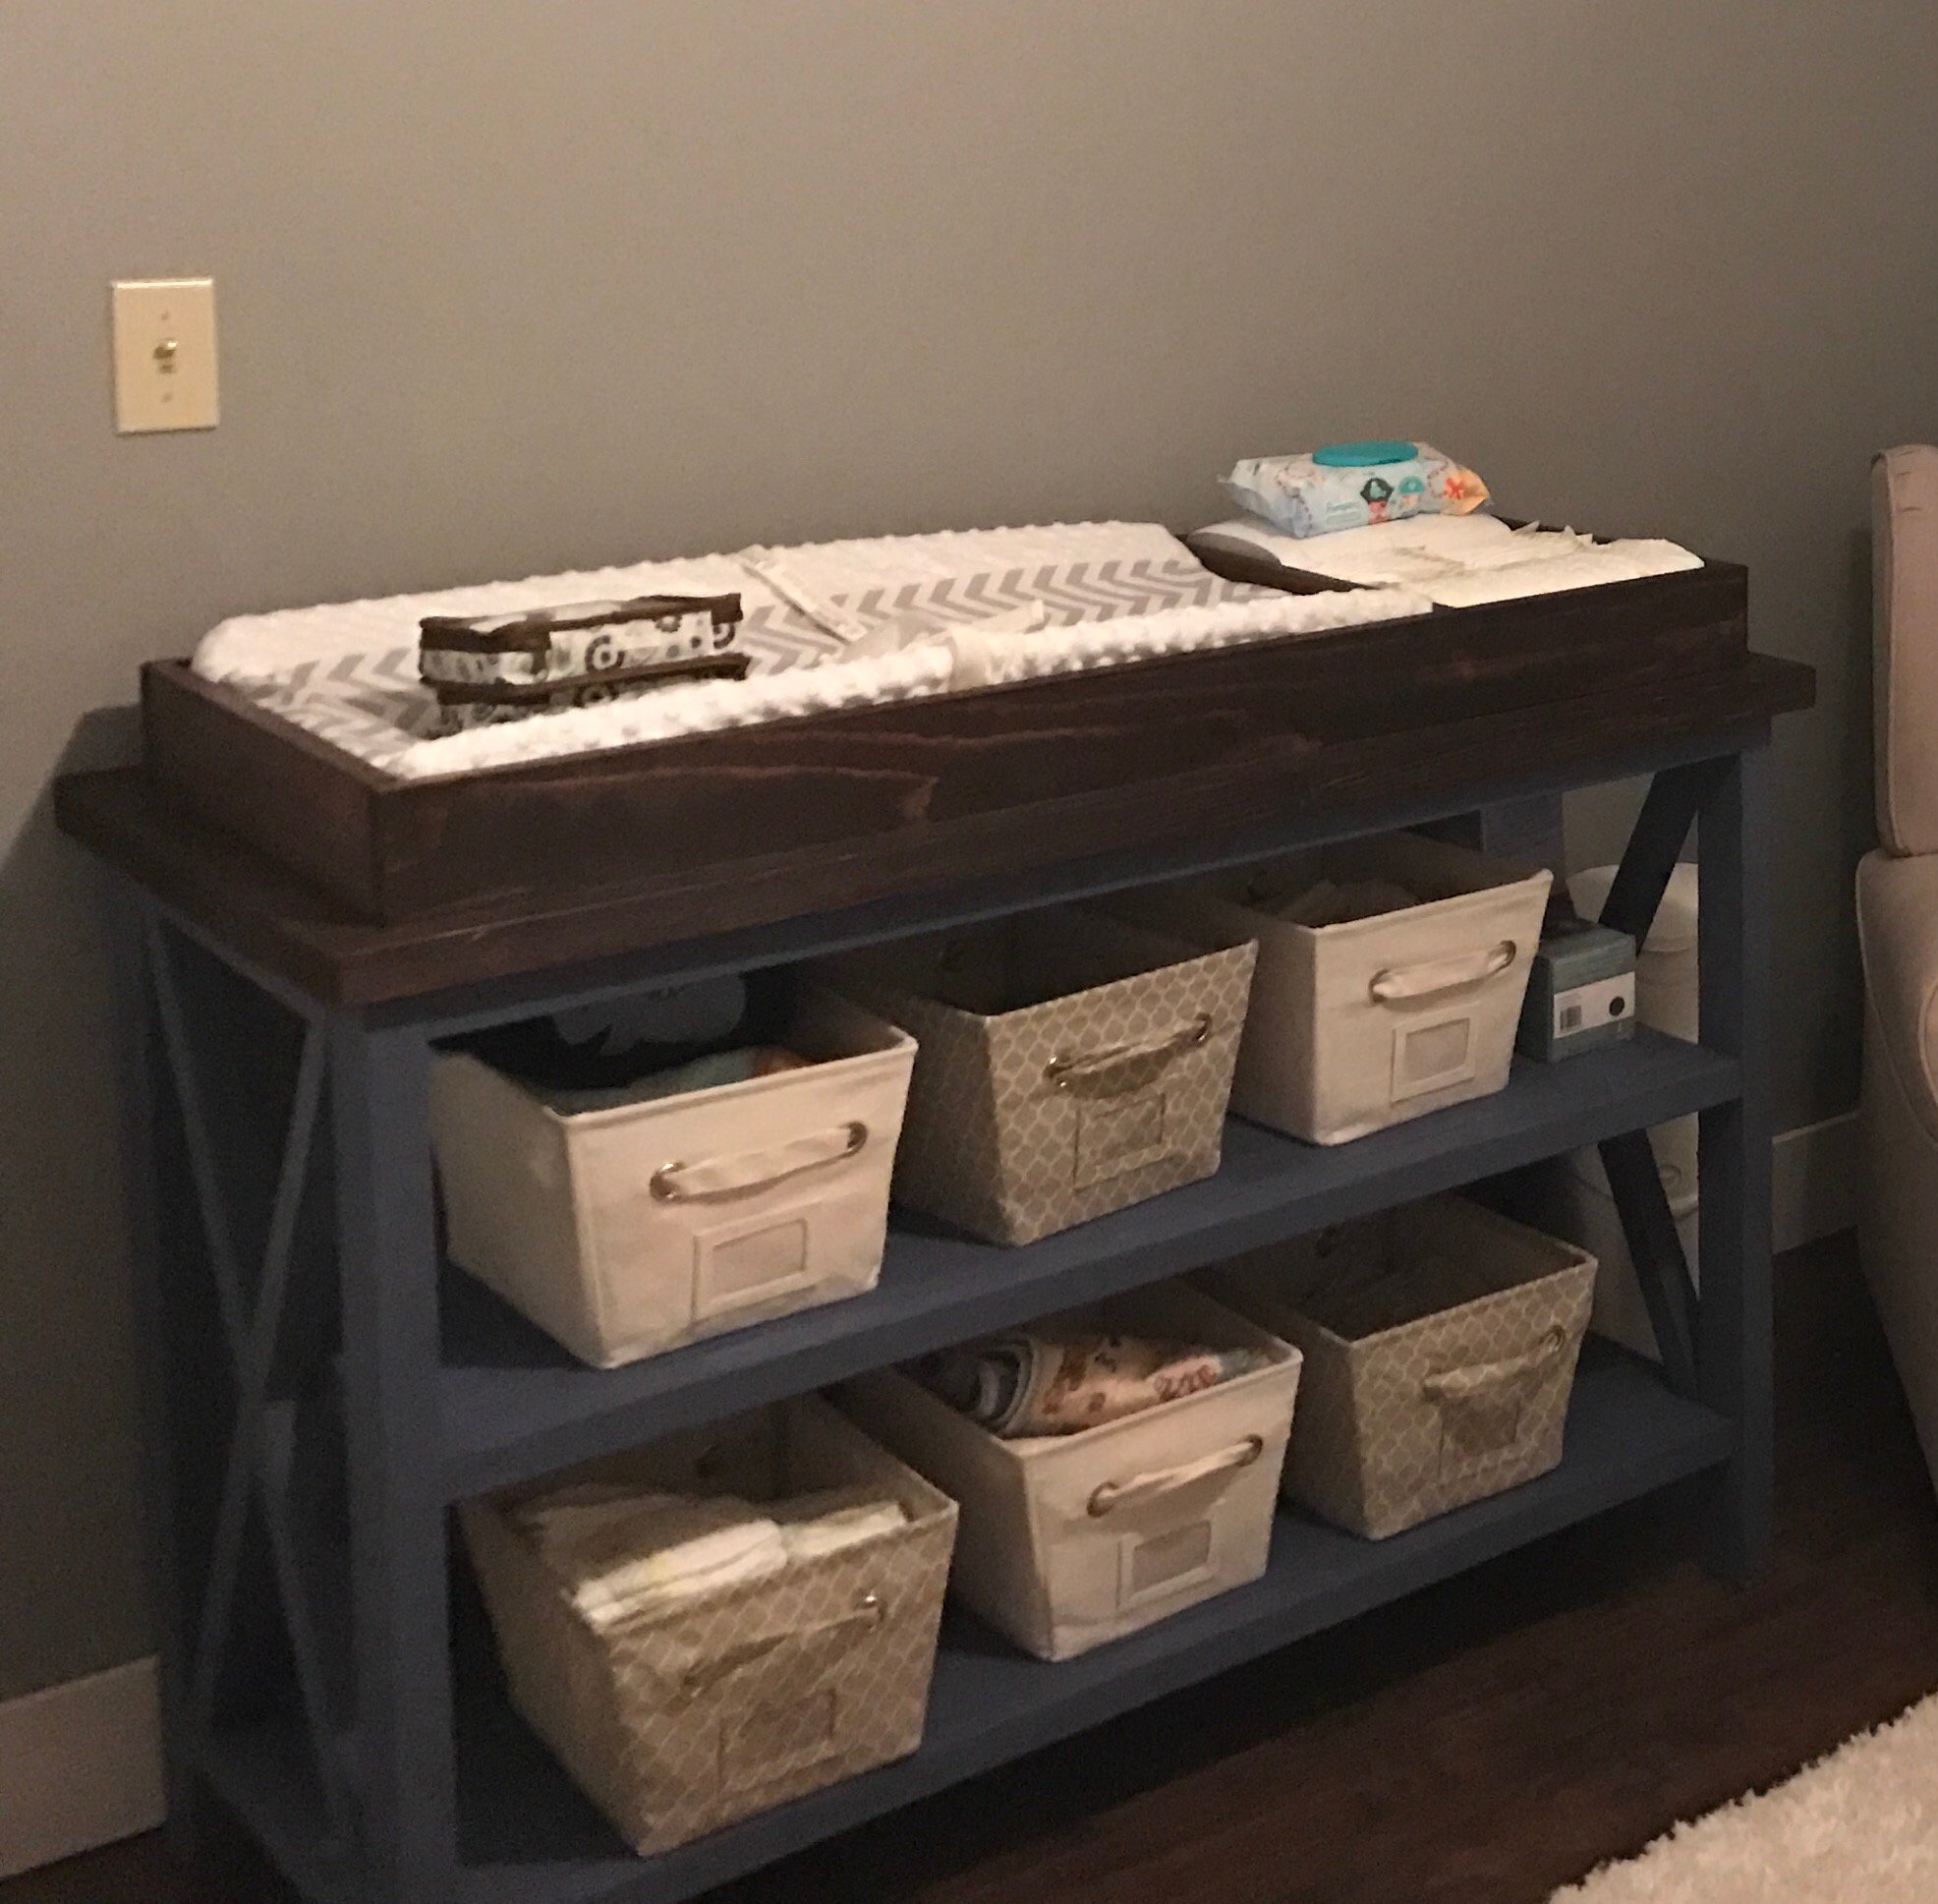
Used Minwax stain in Dark Walnut and Coastal Gray chalk paint from Rustoleum
Built from Plan(s)
Estimated Cost
$125
Estimated Time Investment
Day Project (6-9 Hours)
Recommended Skill Level
Intermediate
Kentwood Bookshelf
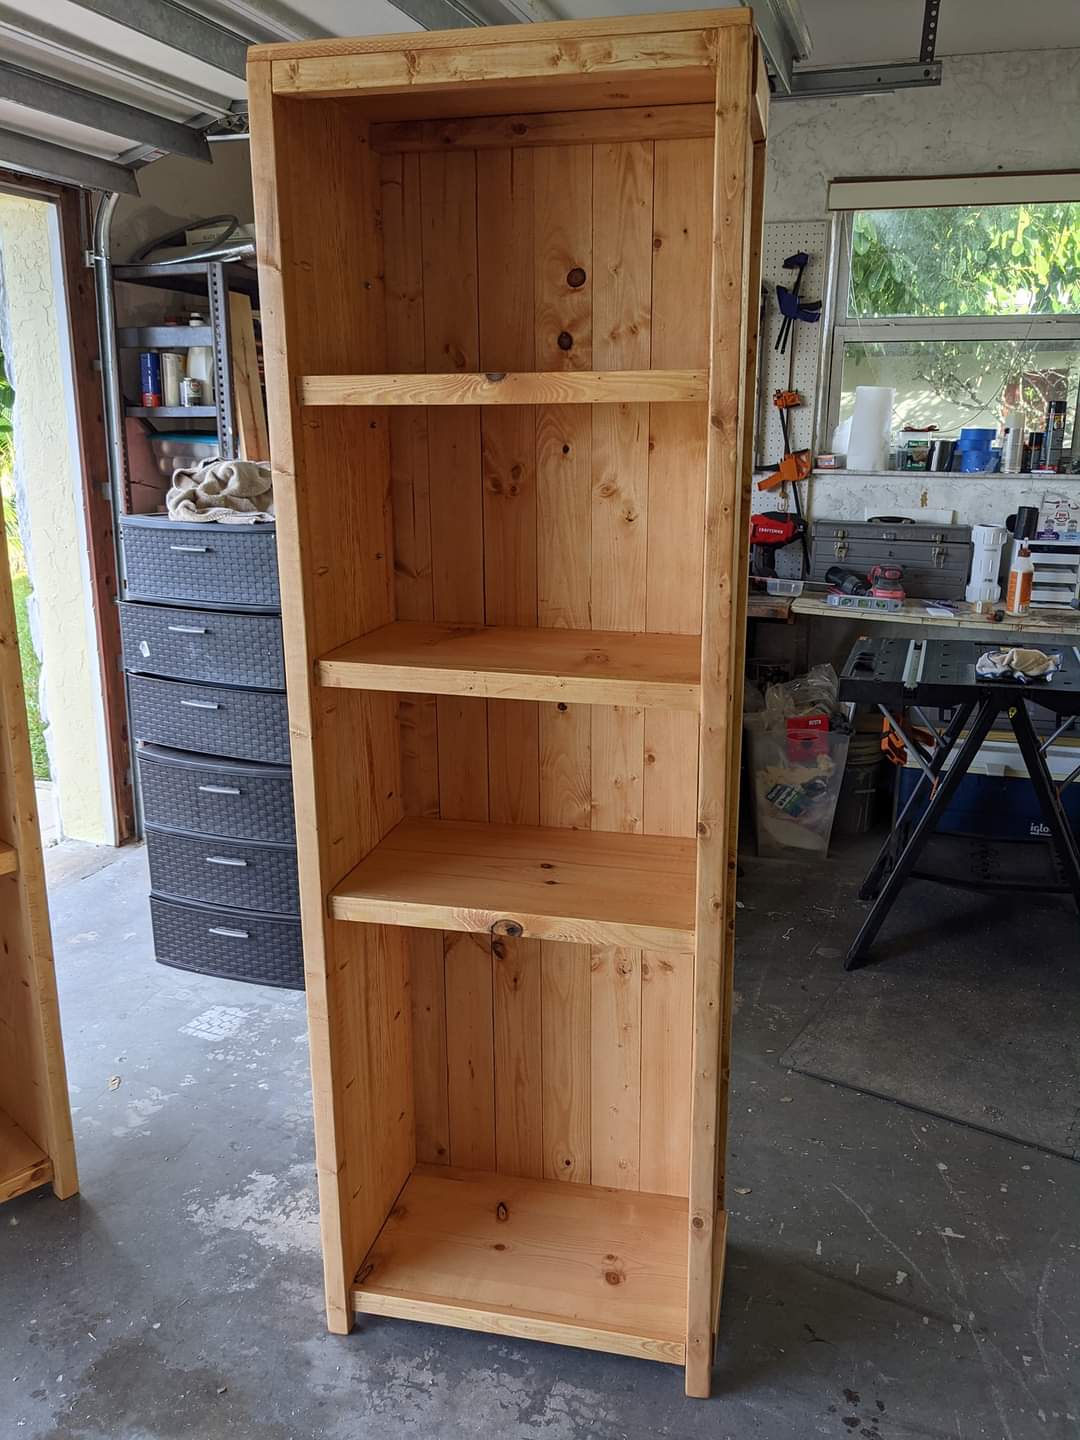
Built the Kentwood Bookshelves for our living room. Bookcases are 6ft. Made of Pine and Whitewood. This is my 2nd build and looking forward to more.
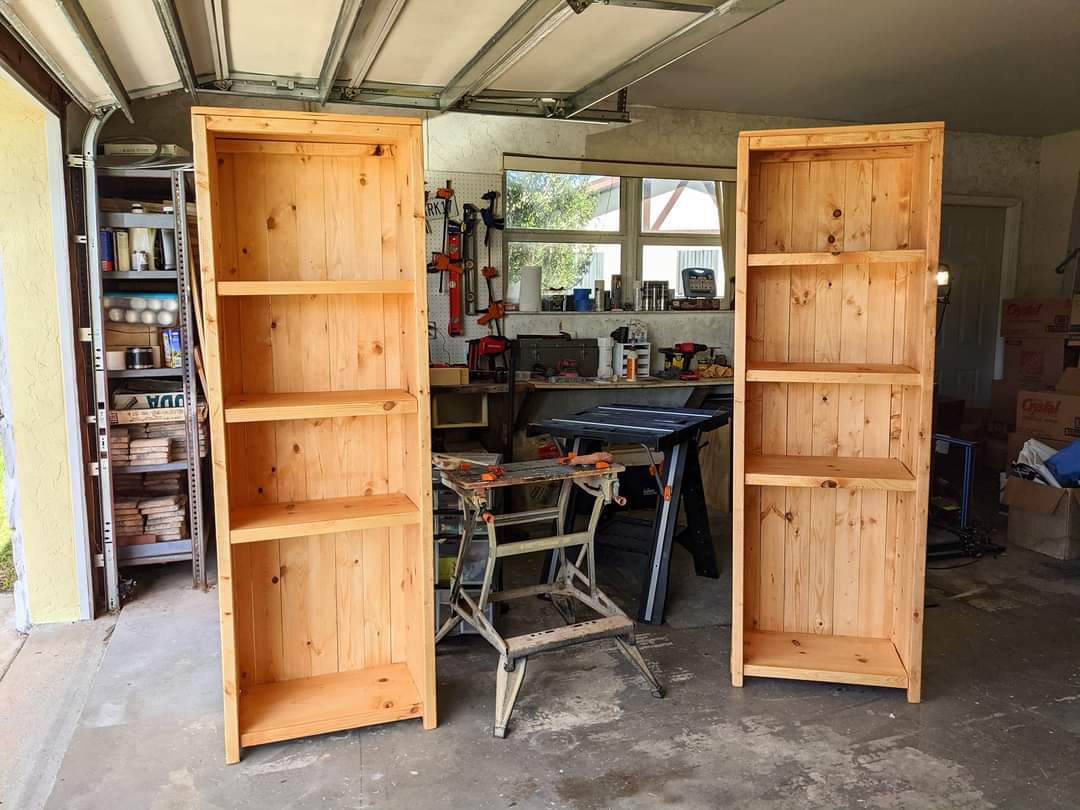
Built from Plan(s)
Estimated Cost
325
Estimated Time Investment
Weekend Project (10-20 Hours)
Finish Used
Minwax Colonial Maple
Recommended Skill Level
Intermediate
Naked wall no more!!
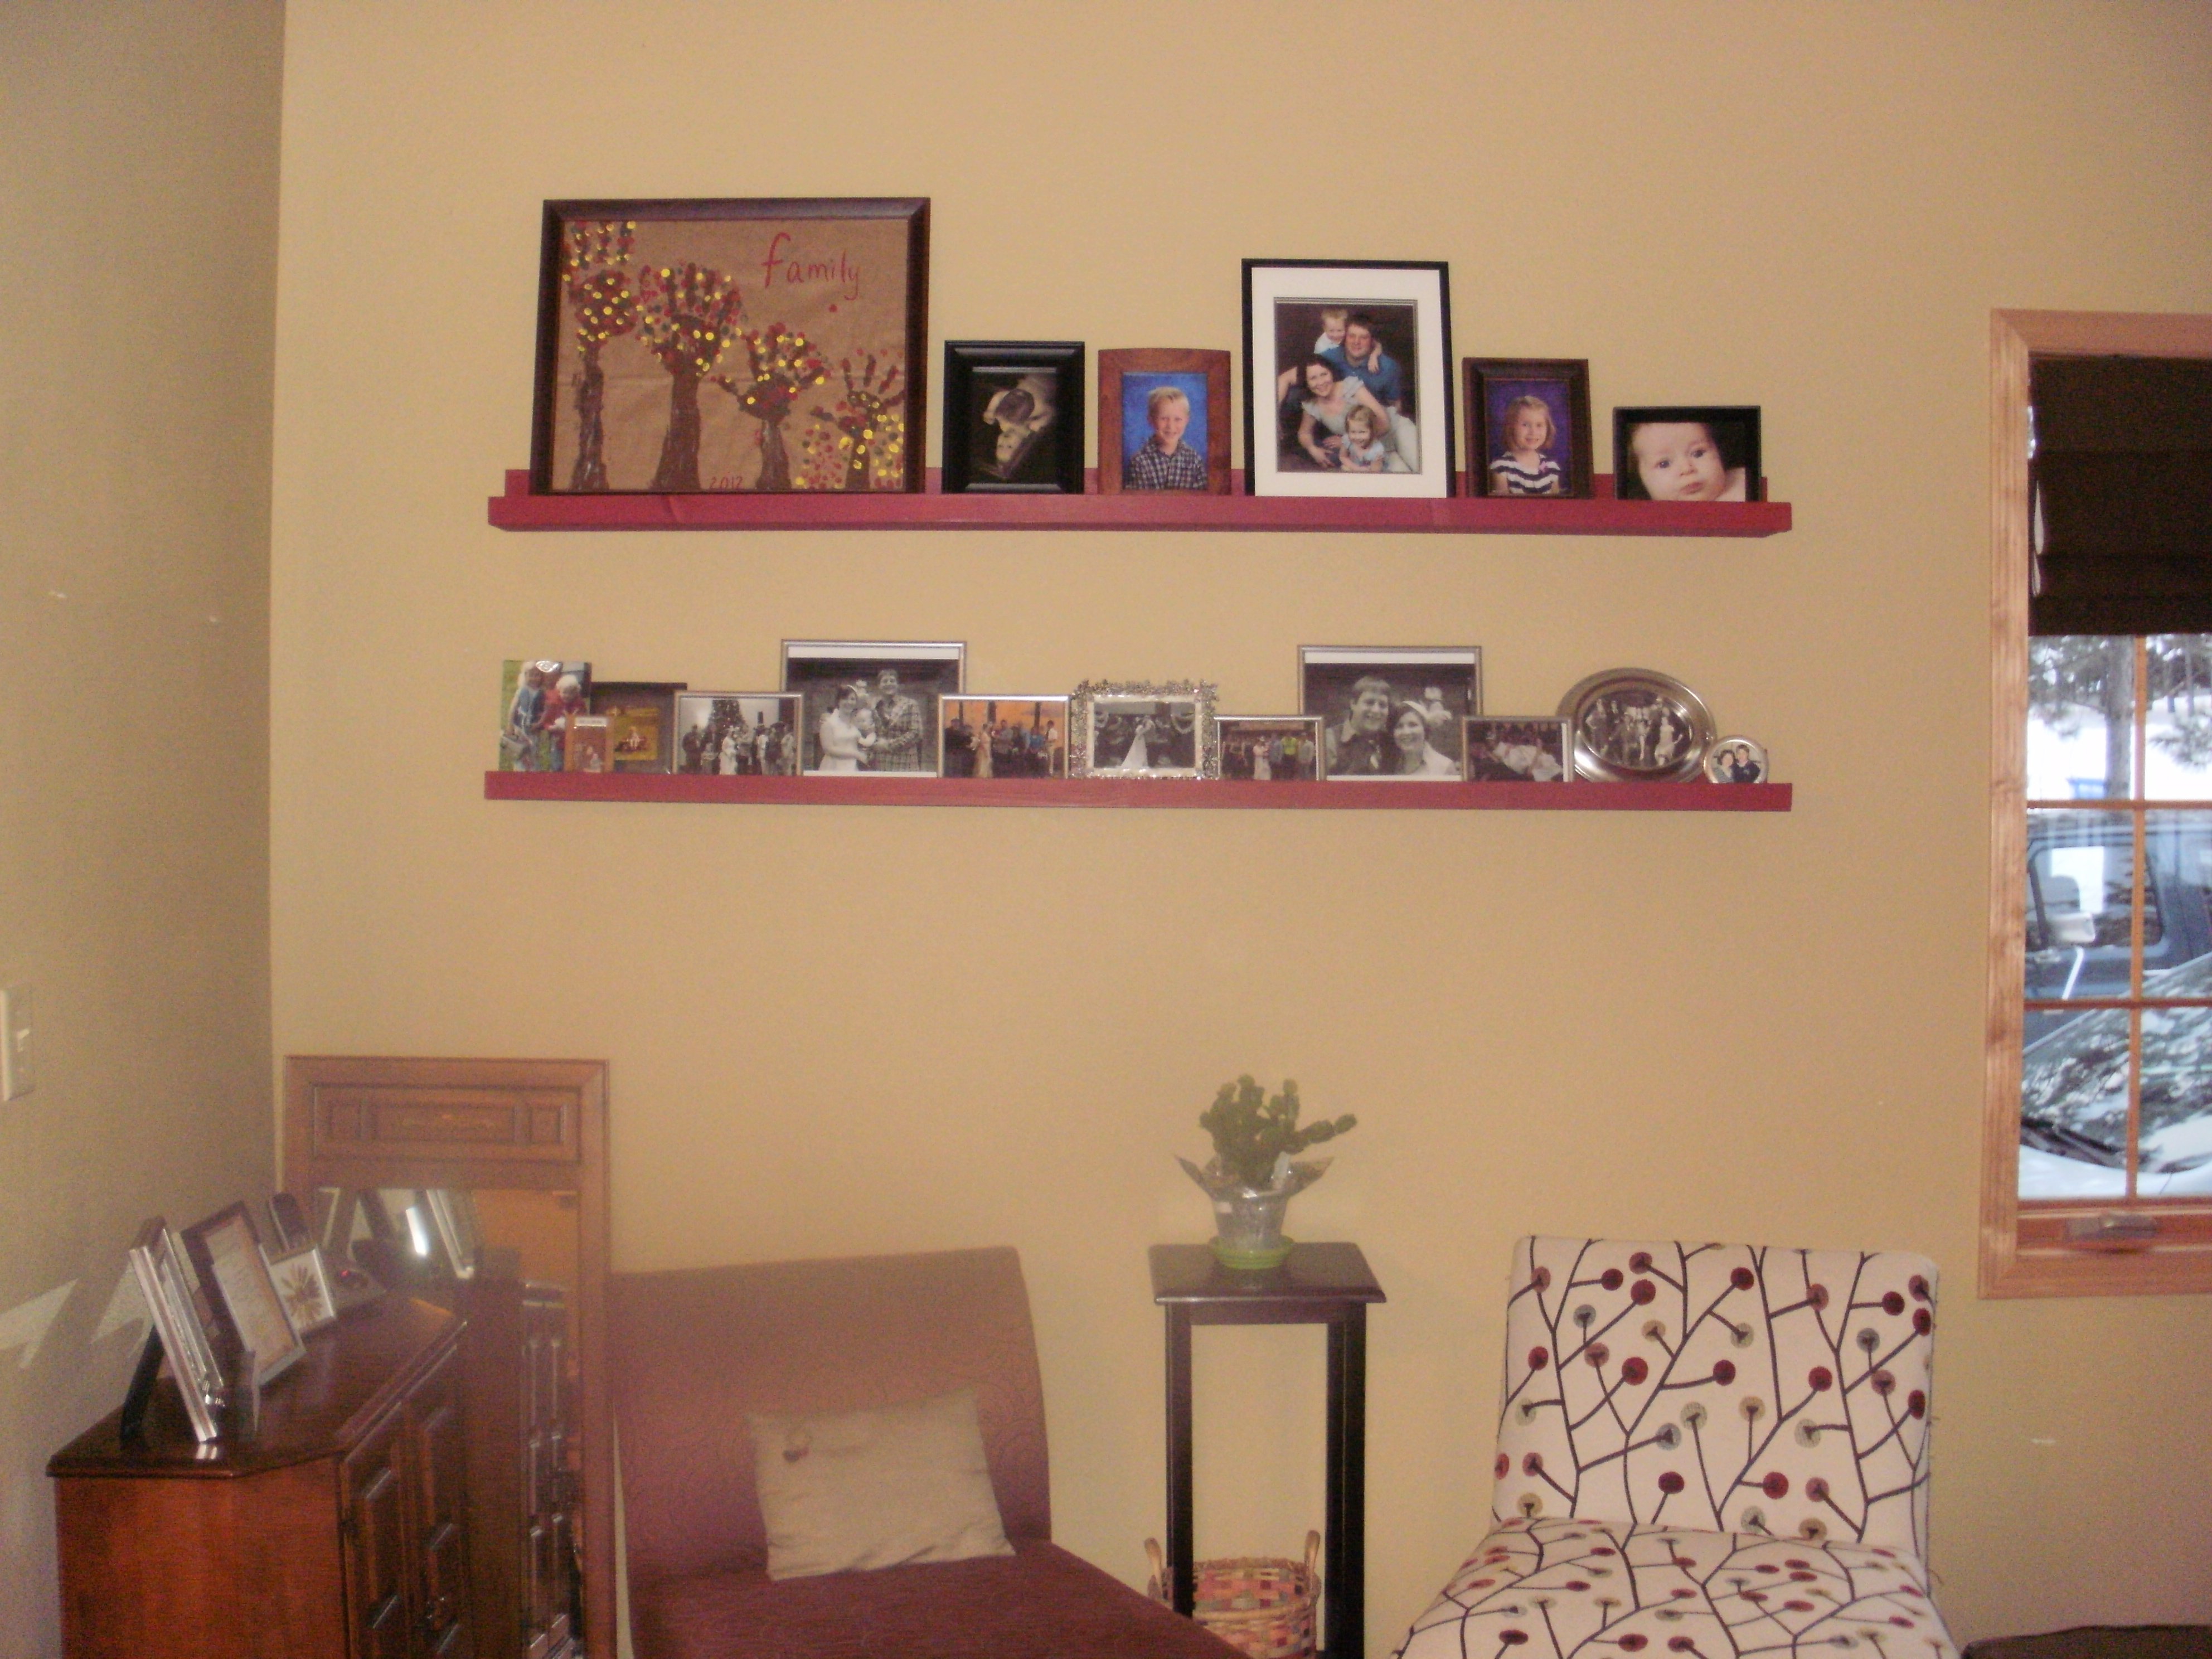
I had a wall in our living room that was bare for almost 4 years. SO happy with the results of my "Ten Dollar Ledges"!!
Estimated Cost
$20
Estimated Time Investment
An Hour or Two (0-2 Hours)
Finish Used
RUST-OLEUM, AMERICAN ACCENTS; Colonial Red Smooth Satin Finish.
I'm a lazy painter, I didn't sand or prime my ledges and only applied one coat as I loved that I could still see the wood grain through the paint. (8oz can covered both ledges with one coat, still have half the can left!)
I'm a lazy painter, I didn't sand or prime my ledges and only applied one coat as I loved that I could still see the wood grain through the paint. (8oz can covered both ledges with one coat, still have half the can left!)
Recommended Skill Level
Starter Project
Comments

Mon, 02/04/2013 - 10:59
very nice...
I was wanting to make a small one under my bathroom mirror, but wondered if it would be too bulky. Seeing yours, I can see they look pretty sleek and I am probably going to go for it. (if I don't like it, I am sure it will get use somewhere)
I love how you admit you are a lazy painter, I am getting more patient the more I am building...hehe

Mon, 02/04/2013 - 13:22
love the colour
The colour you chose is really nice. They shelves look great on that wall, I am making some for a hallway with 1 x 3 instead to make them stick out less.
Adirondack Chair with a Bahamian Accent
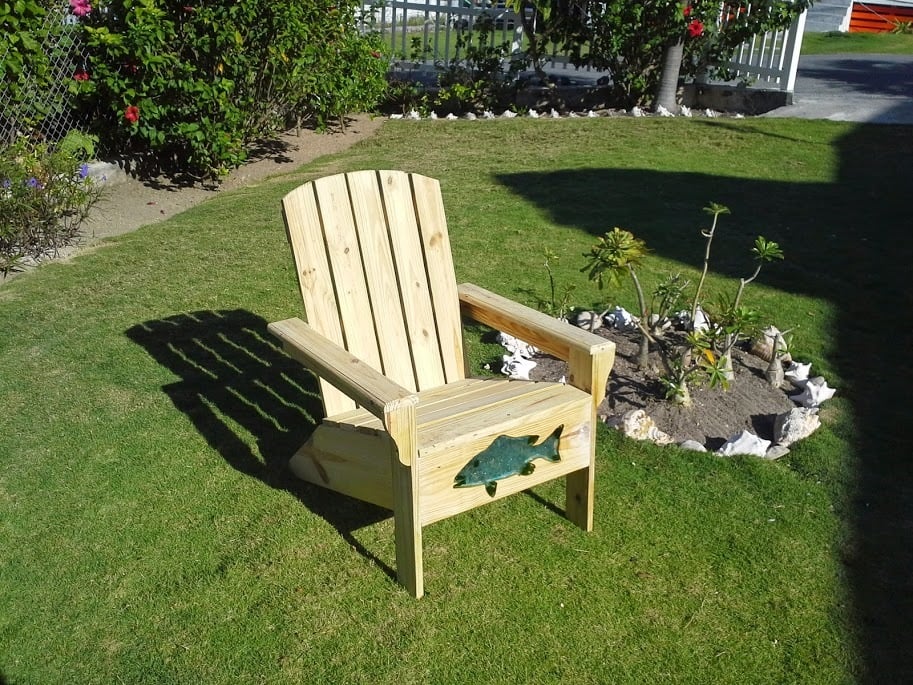
Hey Ana -
You're plans have been such a great help to me here in the Bahamas. You've saved us thousands of dollars. Really! Here's one of my many adirondack chairs under construction. I added a Bahamian accent.
Built from Plan(s)
Estimated Cost
$50 (Bahamian)
Estimated Time Investment
Afternoon Project (3-6 Hours)
Finish Used
Unfinished (waiting for PT to dry)
Recommended Skill Level
Intermediate
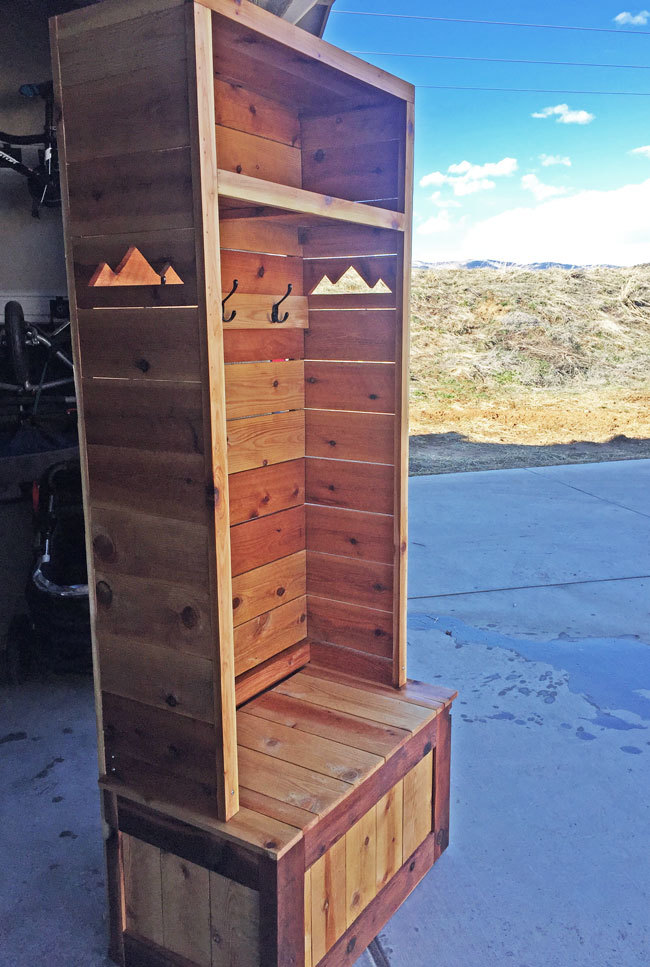
Hall Tree -cedar picket
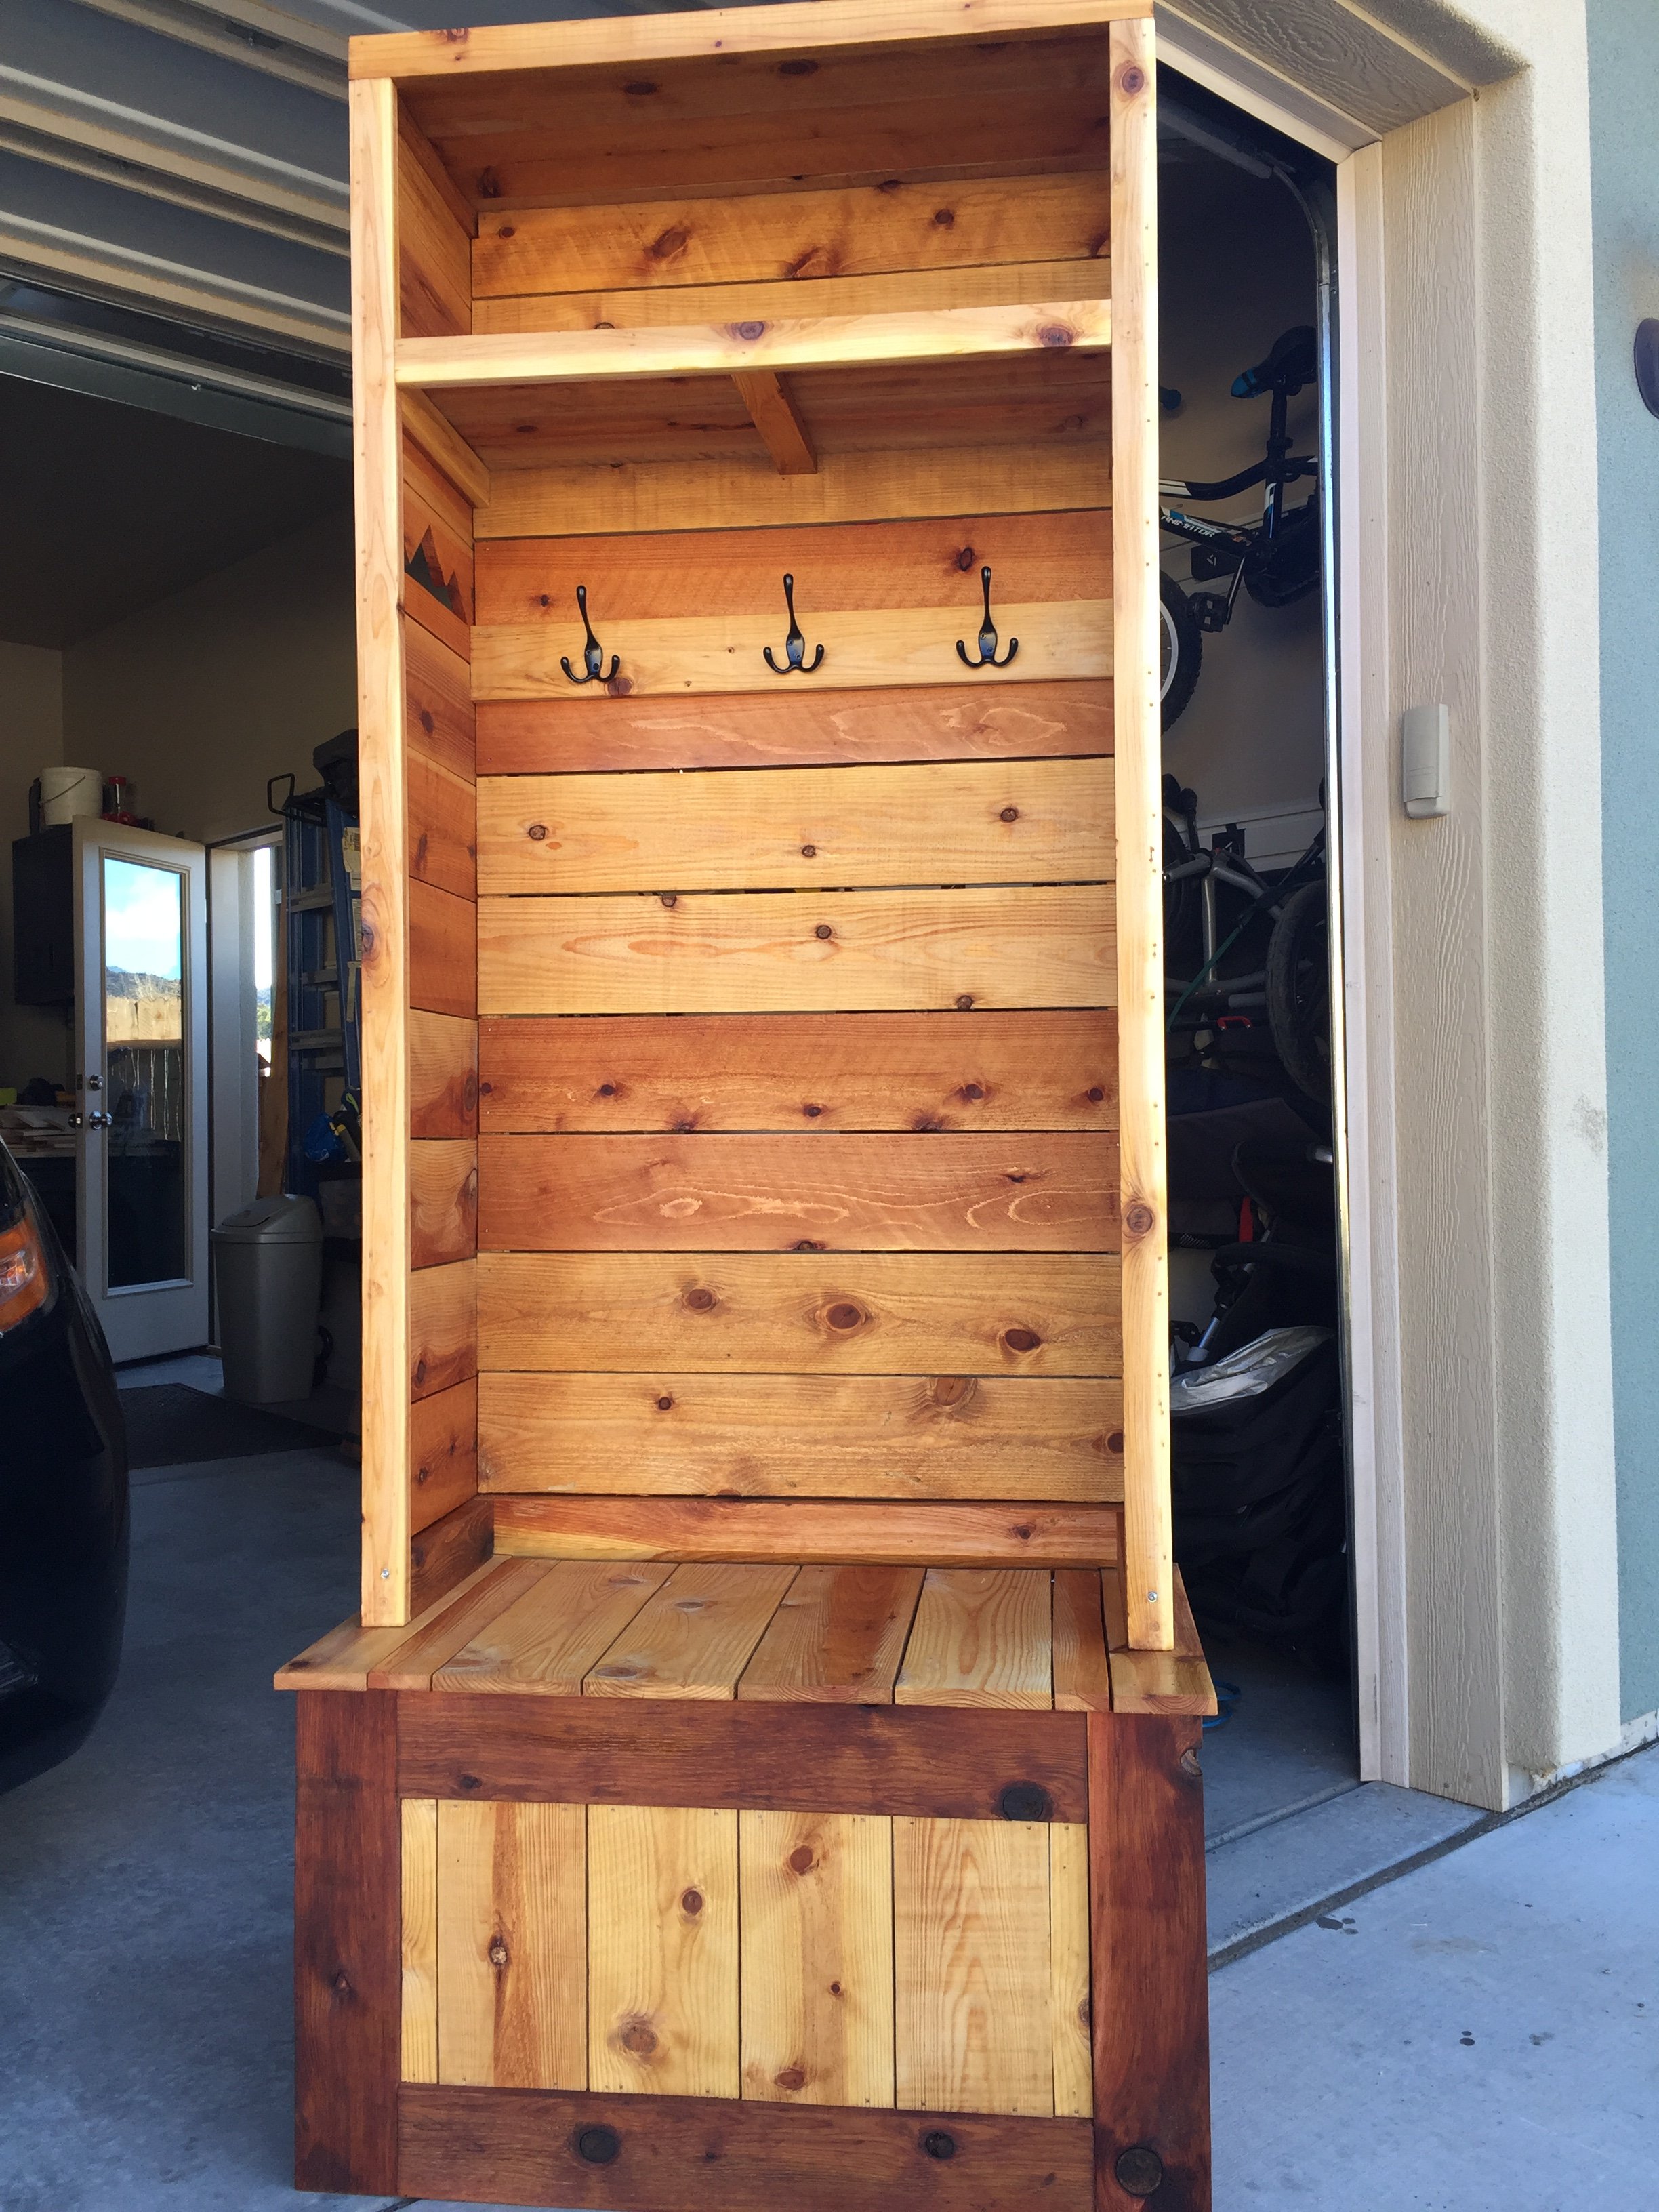
I built this based on the idea of the mimi storage bench and hutch. We will use this in our garage next to or shoe rack. I built this primarily from 1x6 cedar fence pickets, a few cedar 1x2's and a couple cedar 2x4's.
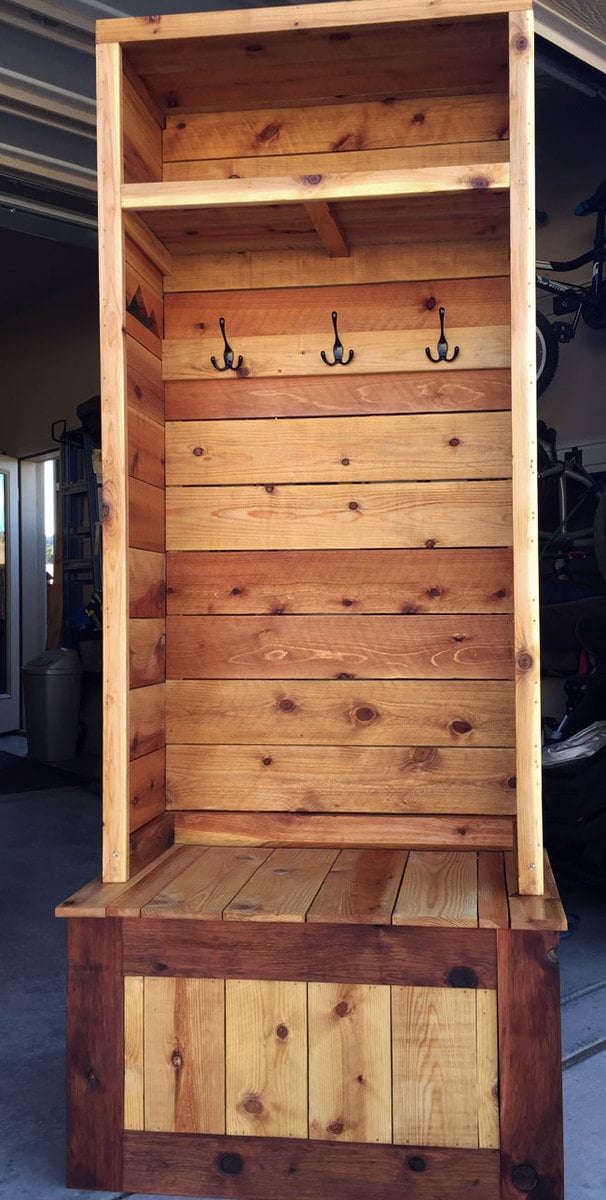
The lid lifts for off season shoe storage. All bench joinery is with pocket holes and the cedars pickets are attached with pneumatic 1 or 2-1/2" nails.

I used my speedy square's 45 degree angles to trace out the mountain silloutes and then cut them out with my jigsaw. I paced myself on the project and my four year old helped quite a bit with measuring and handing me the next board. We're excited to have a little spot to change shoes and grab the jackets. Feel free to check out my Instagram for other random projects or are family fun instagram.com/fotosnapper

Built from Plan(s)
Estimated Cost
$80 in wood, $15 in sealant.
Estimated Time Investment
Week Long Project (20 Hours or More)
Finish Used
Light sanding with a poly sealant for deck furniture from Orange. Single coat
Recommended Skill Level
Beginner
Altered apothecary console
I built this based on the apothecary console plans but with the modifications that VLilly made for the Altered Apothecary Media Console. Very happy with how it turned out! Thank you Ana for sharing the plans!
Built from Plan(s)
Estimated Time Investment
Week Long Project (20 Hours or More)
Finish Used
Whitewash, stain, distress, polycrylic
Recommended Skill Level
Intermediate
Comments
Cubby Bookshelf -- Large
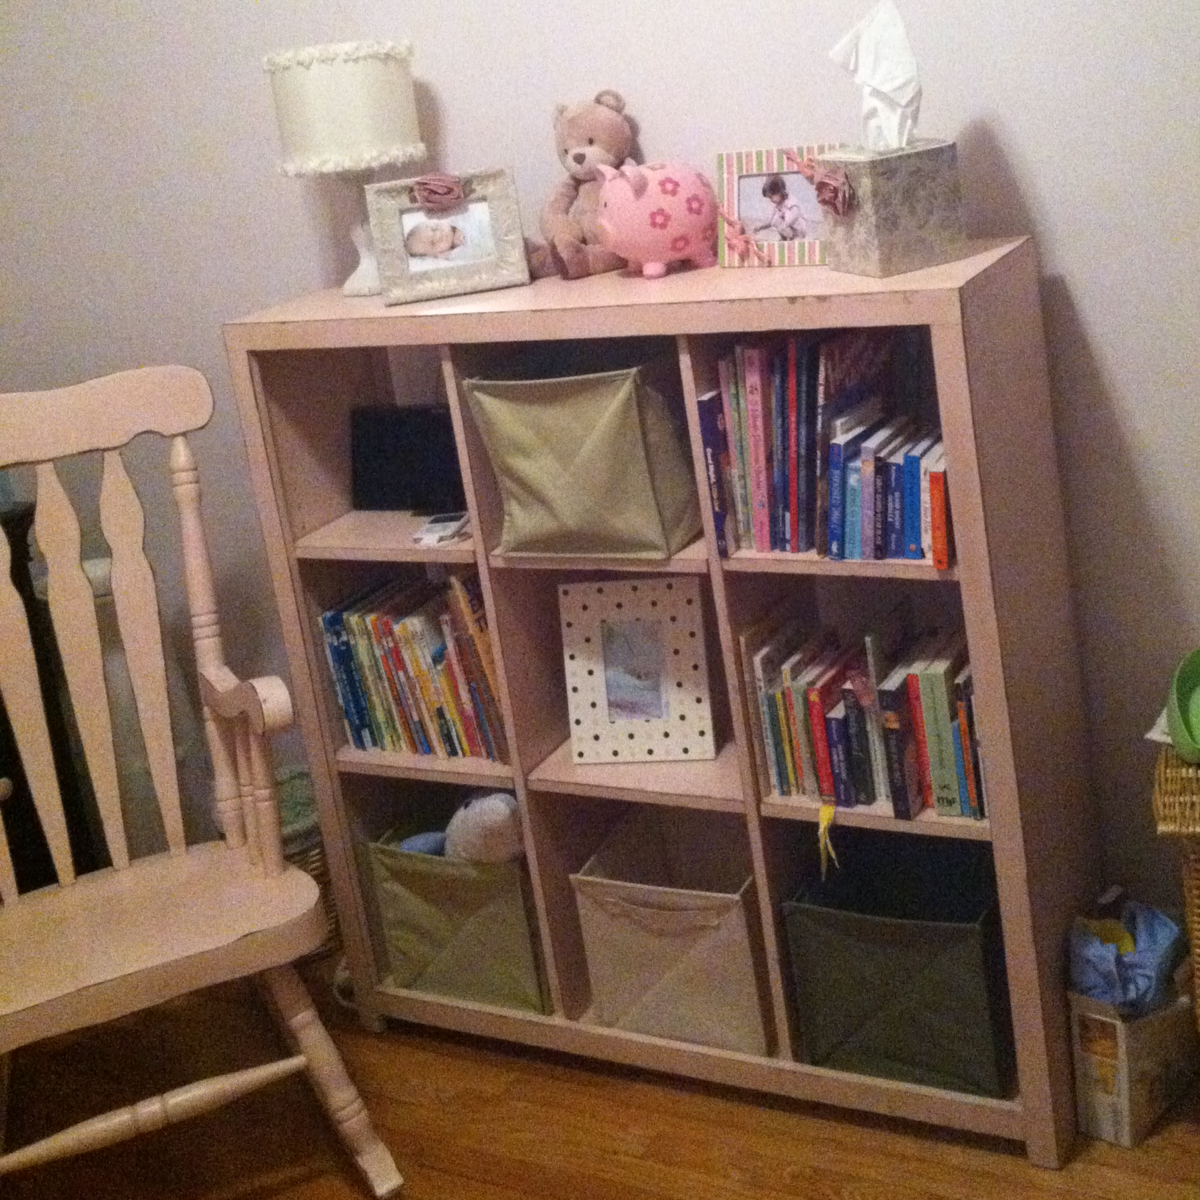
First Project...
Different aspects of the project took a lot longer than they should since I was trying to figure out how to use all of my new toys, e.g. circular saw, kreg jig, adjustable shelf jig, sander, etc., but I think it ended up turning out pretty good.
I ended up buying an unfinished rocking chair on Craigslist for $20, which I finished the same way.
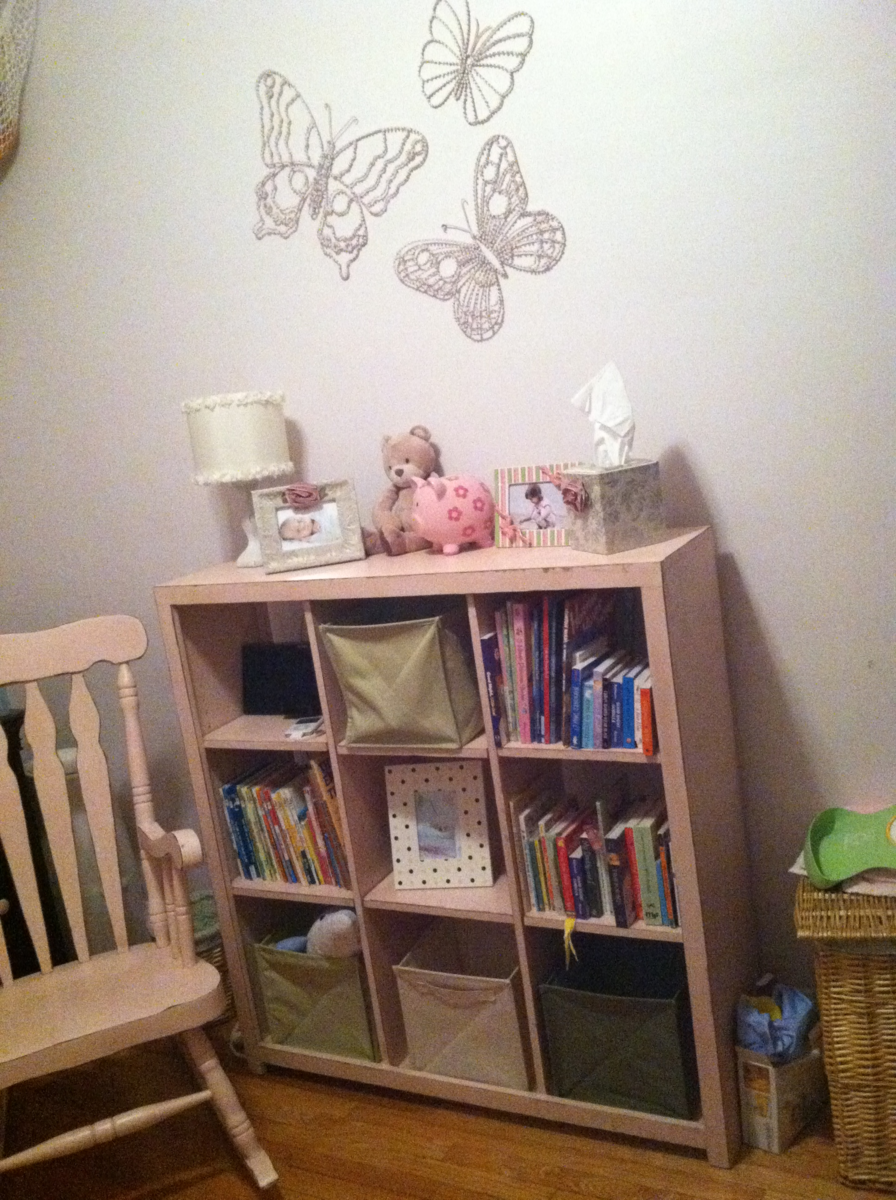
Built from Plan(s)
Estimated Cost
$100
Estimated Time Investment
Weekend Project (10-20 Hours)
Finish Used
Behr Kashmir Pink with Minwax Early American Finish on the Distressed Edges...followed the Vintage Distressed Pink using Minwax Stain Tutorial
Recommended Skill Level
Beginner
Pallet Christmas Trees
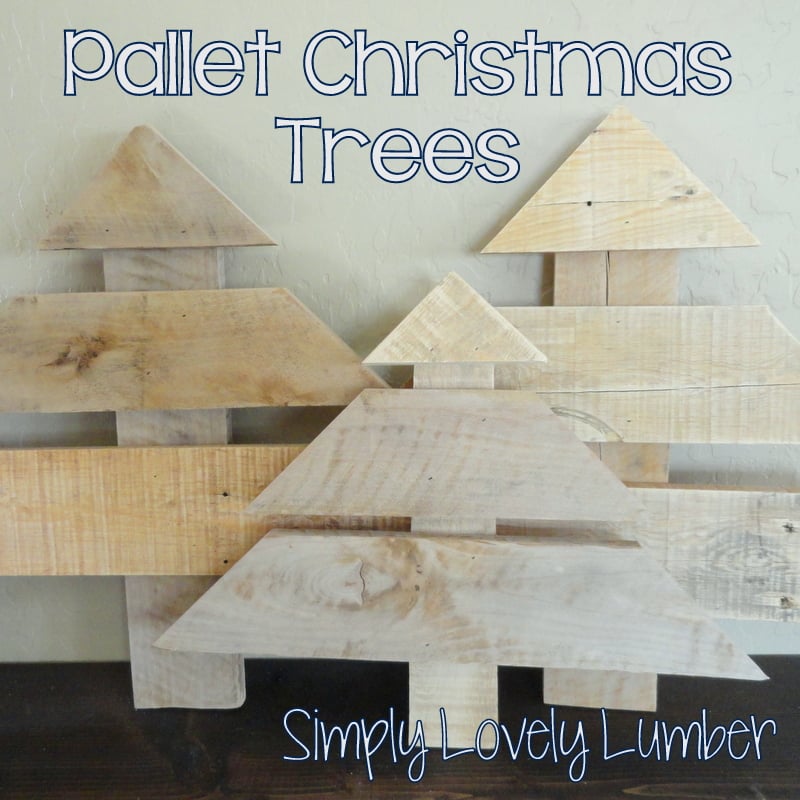
I have some pallet wood and decided to make some Christmas trees. They were really fast and easy. I cut them at a 45° and just glued and nailed them together.
Estimated Cost
Free
Estimated Time Investment
An Hour or Two (0-2 Hours)
Finish Used
None
Recommended Skill Level
Starter Project
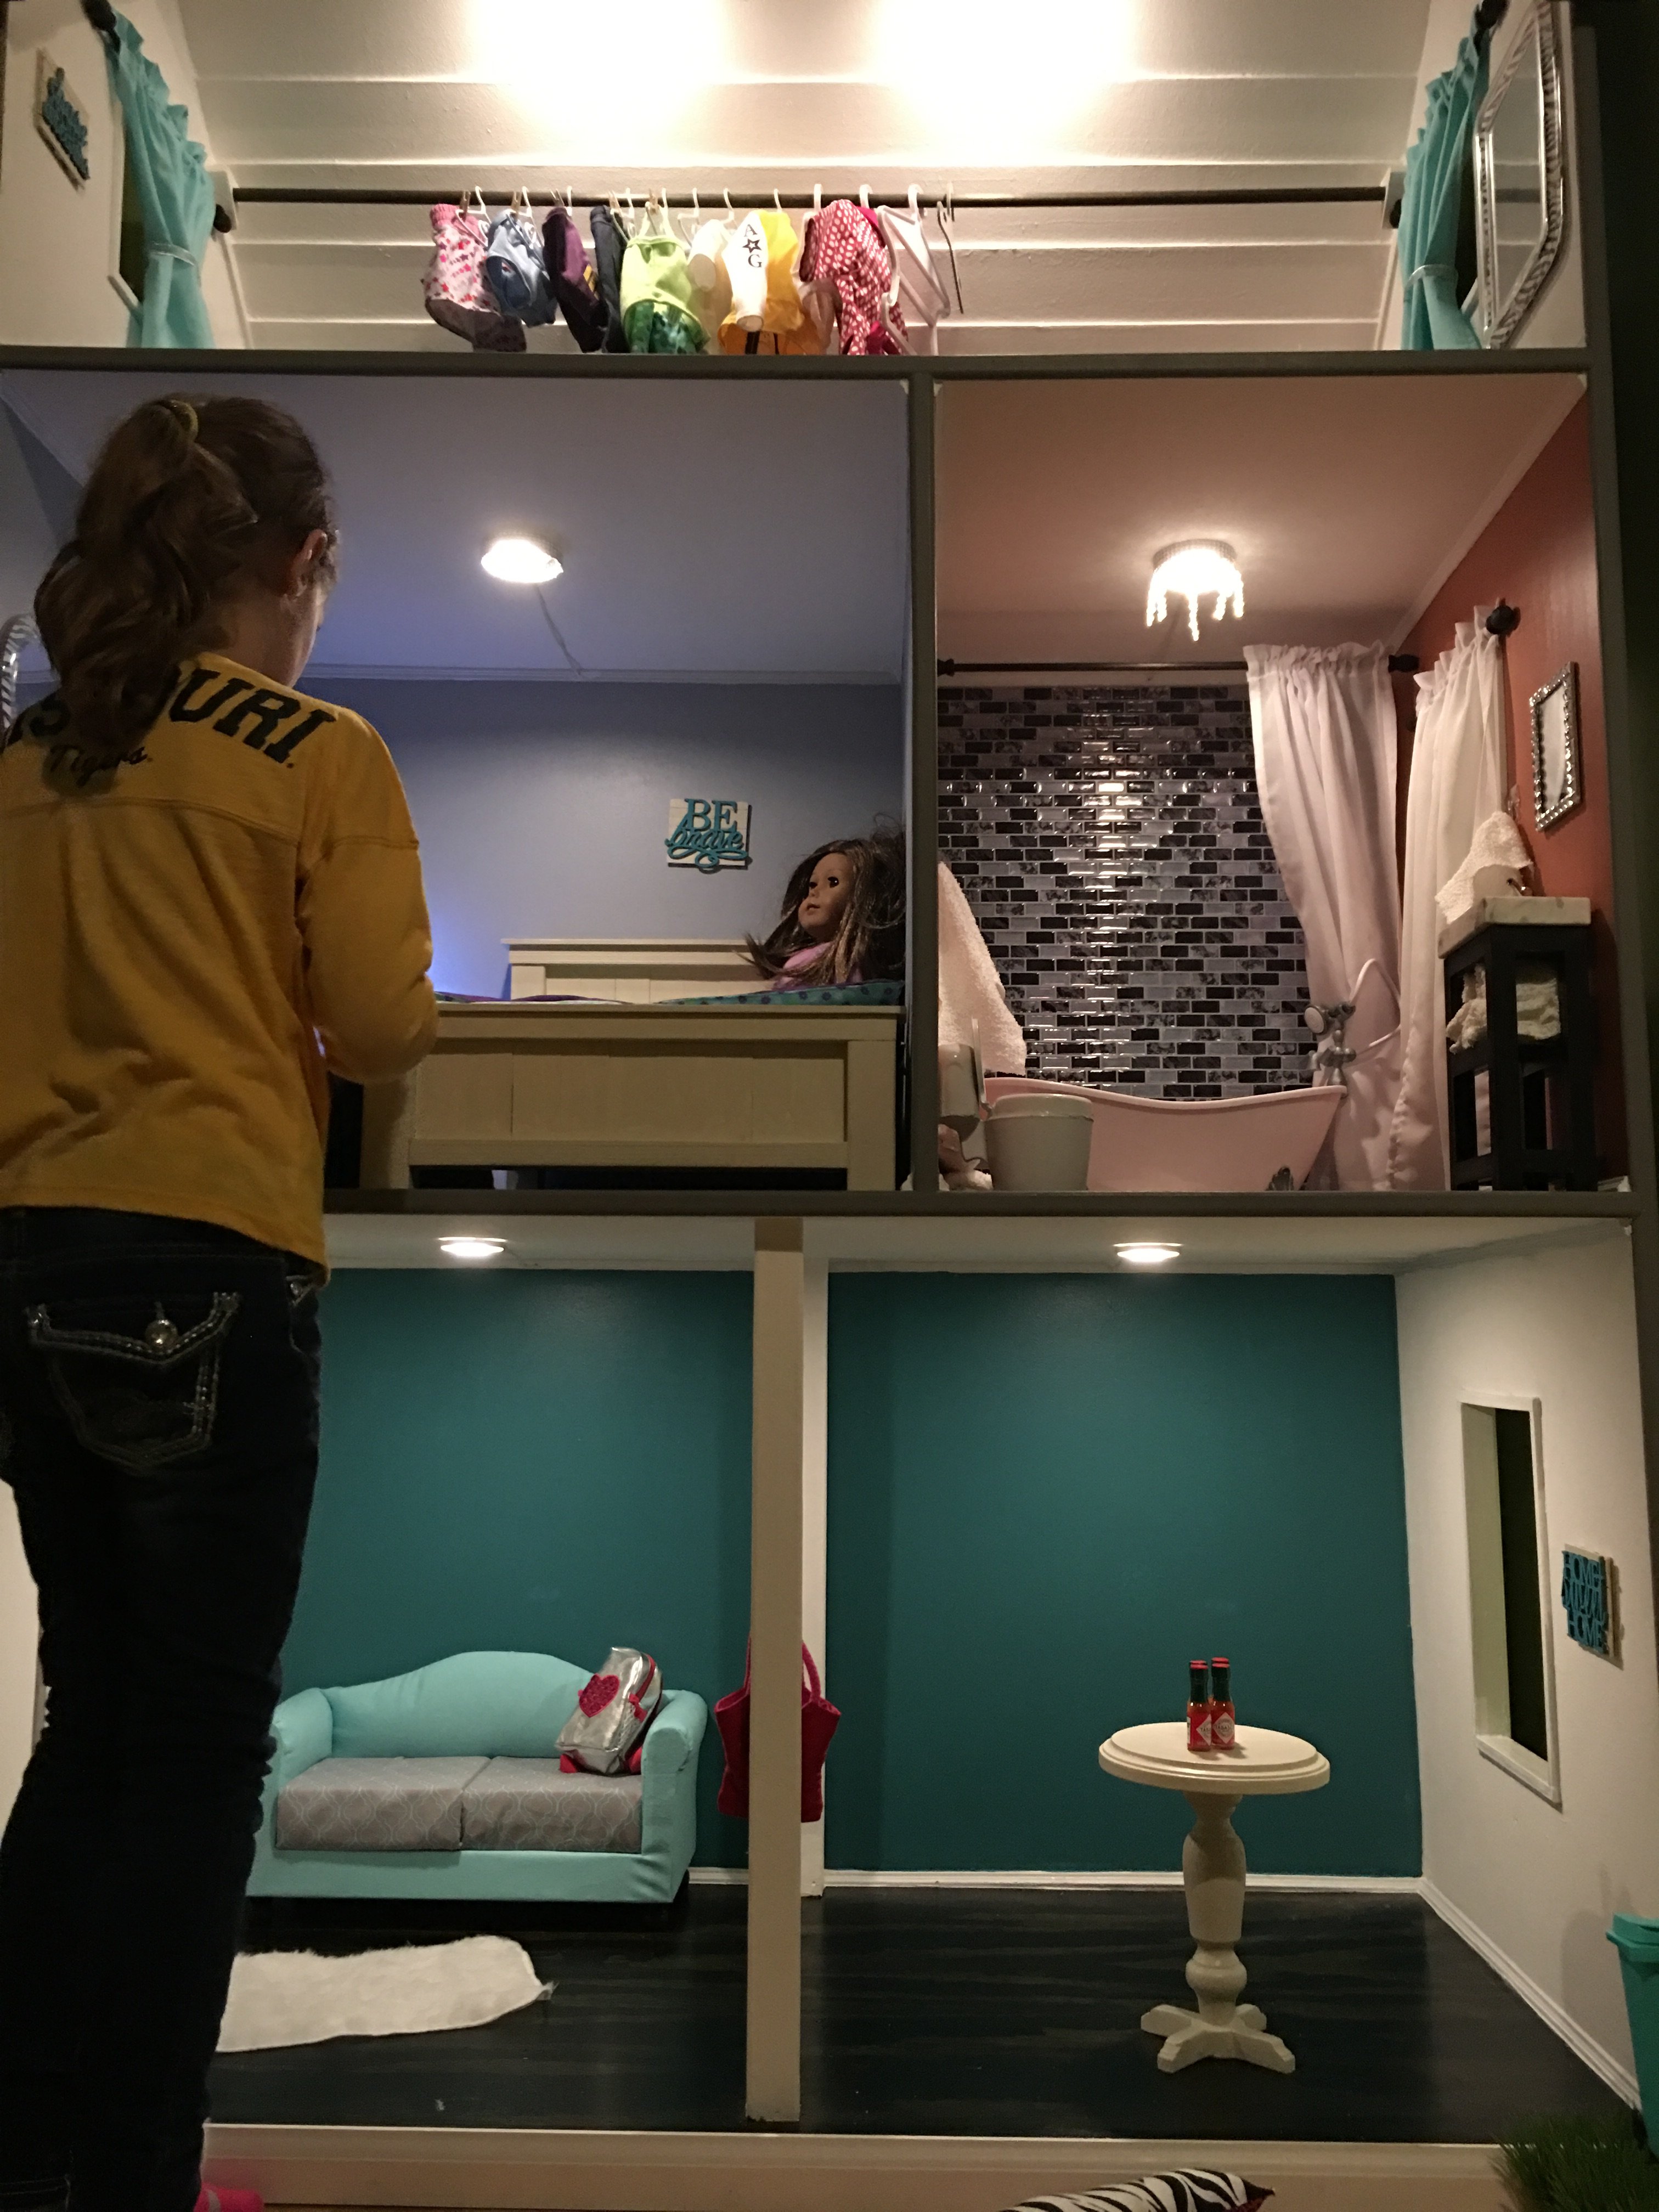
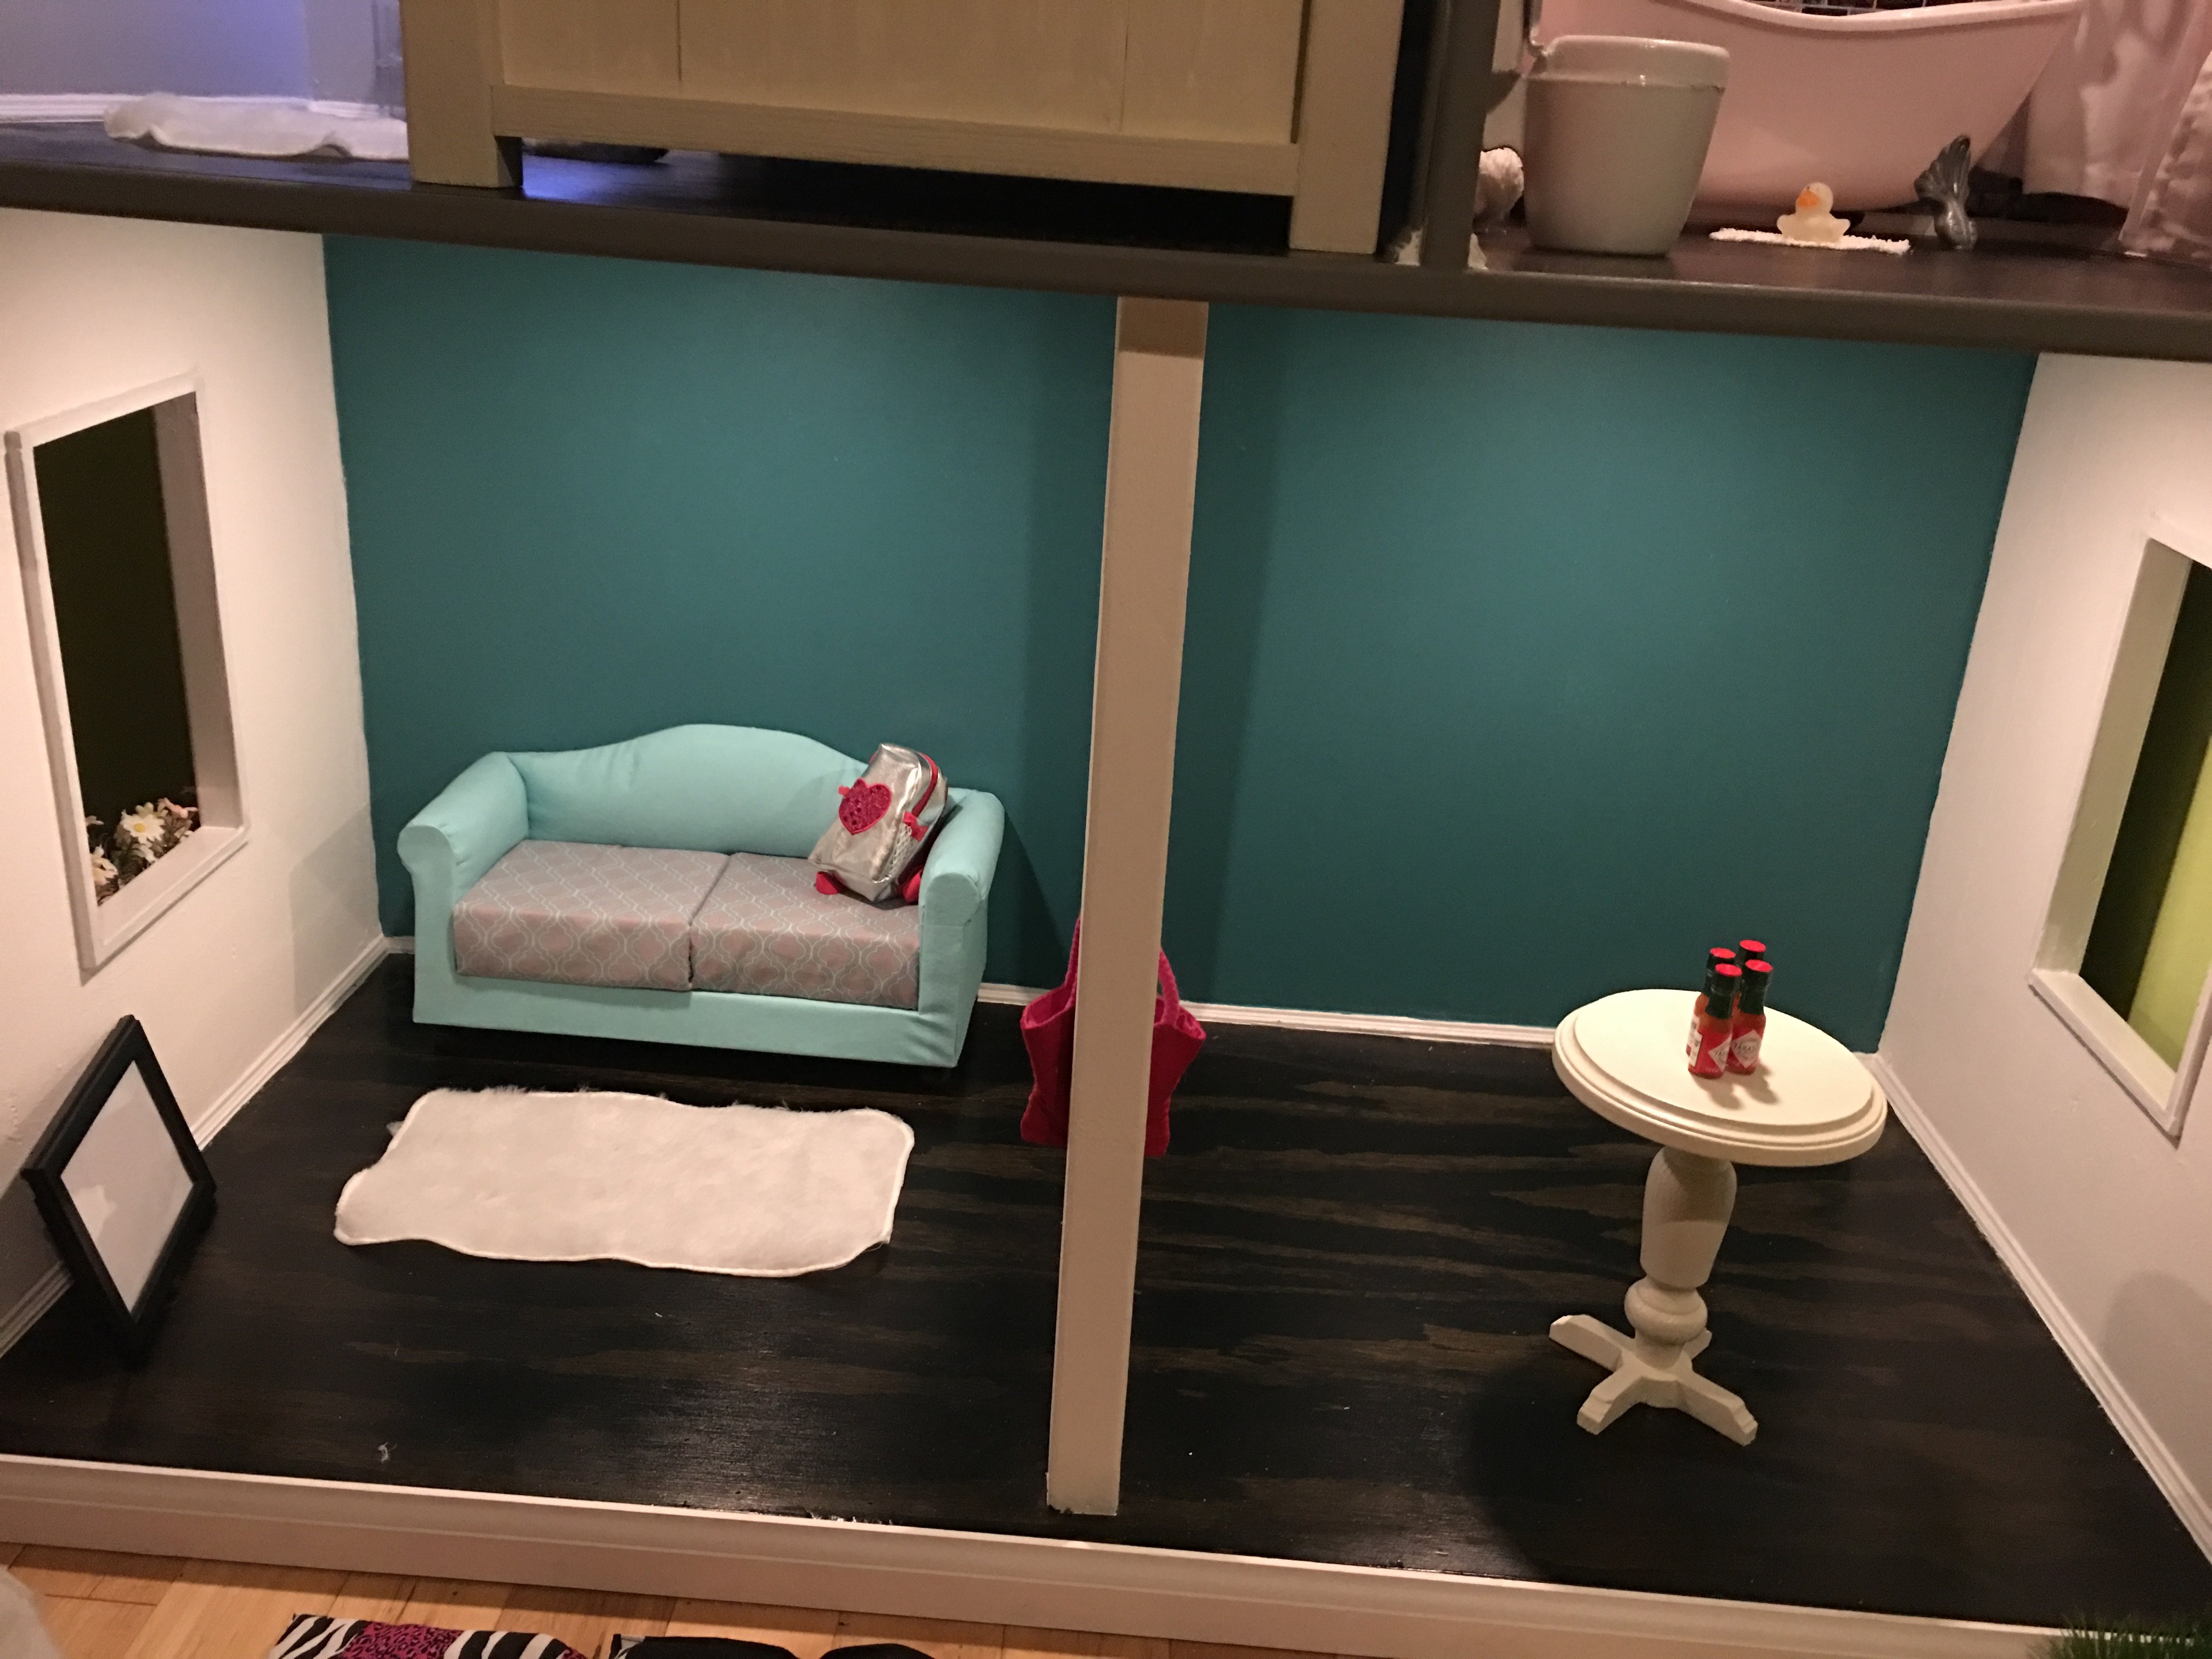
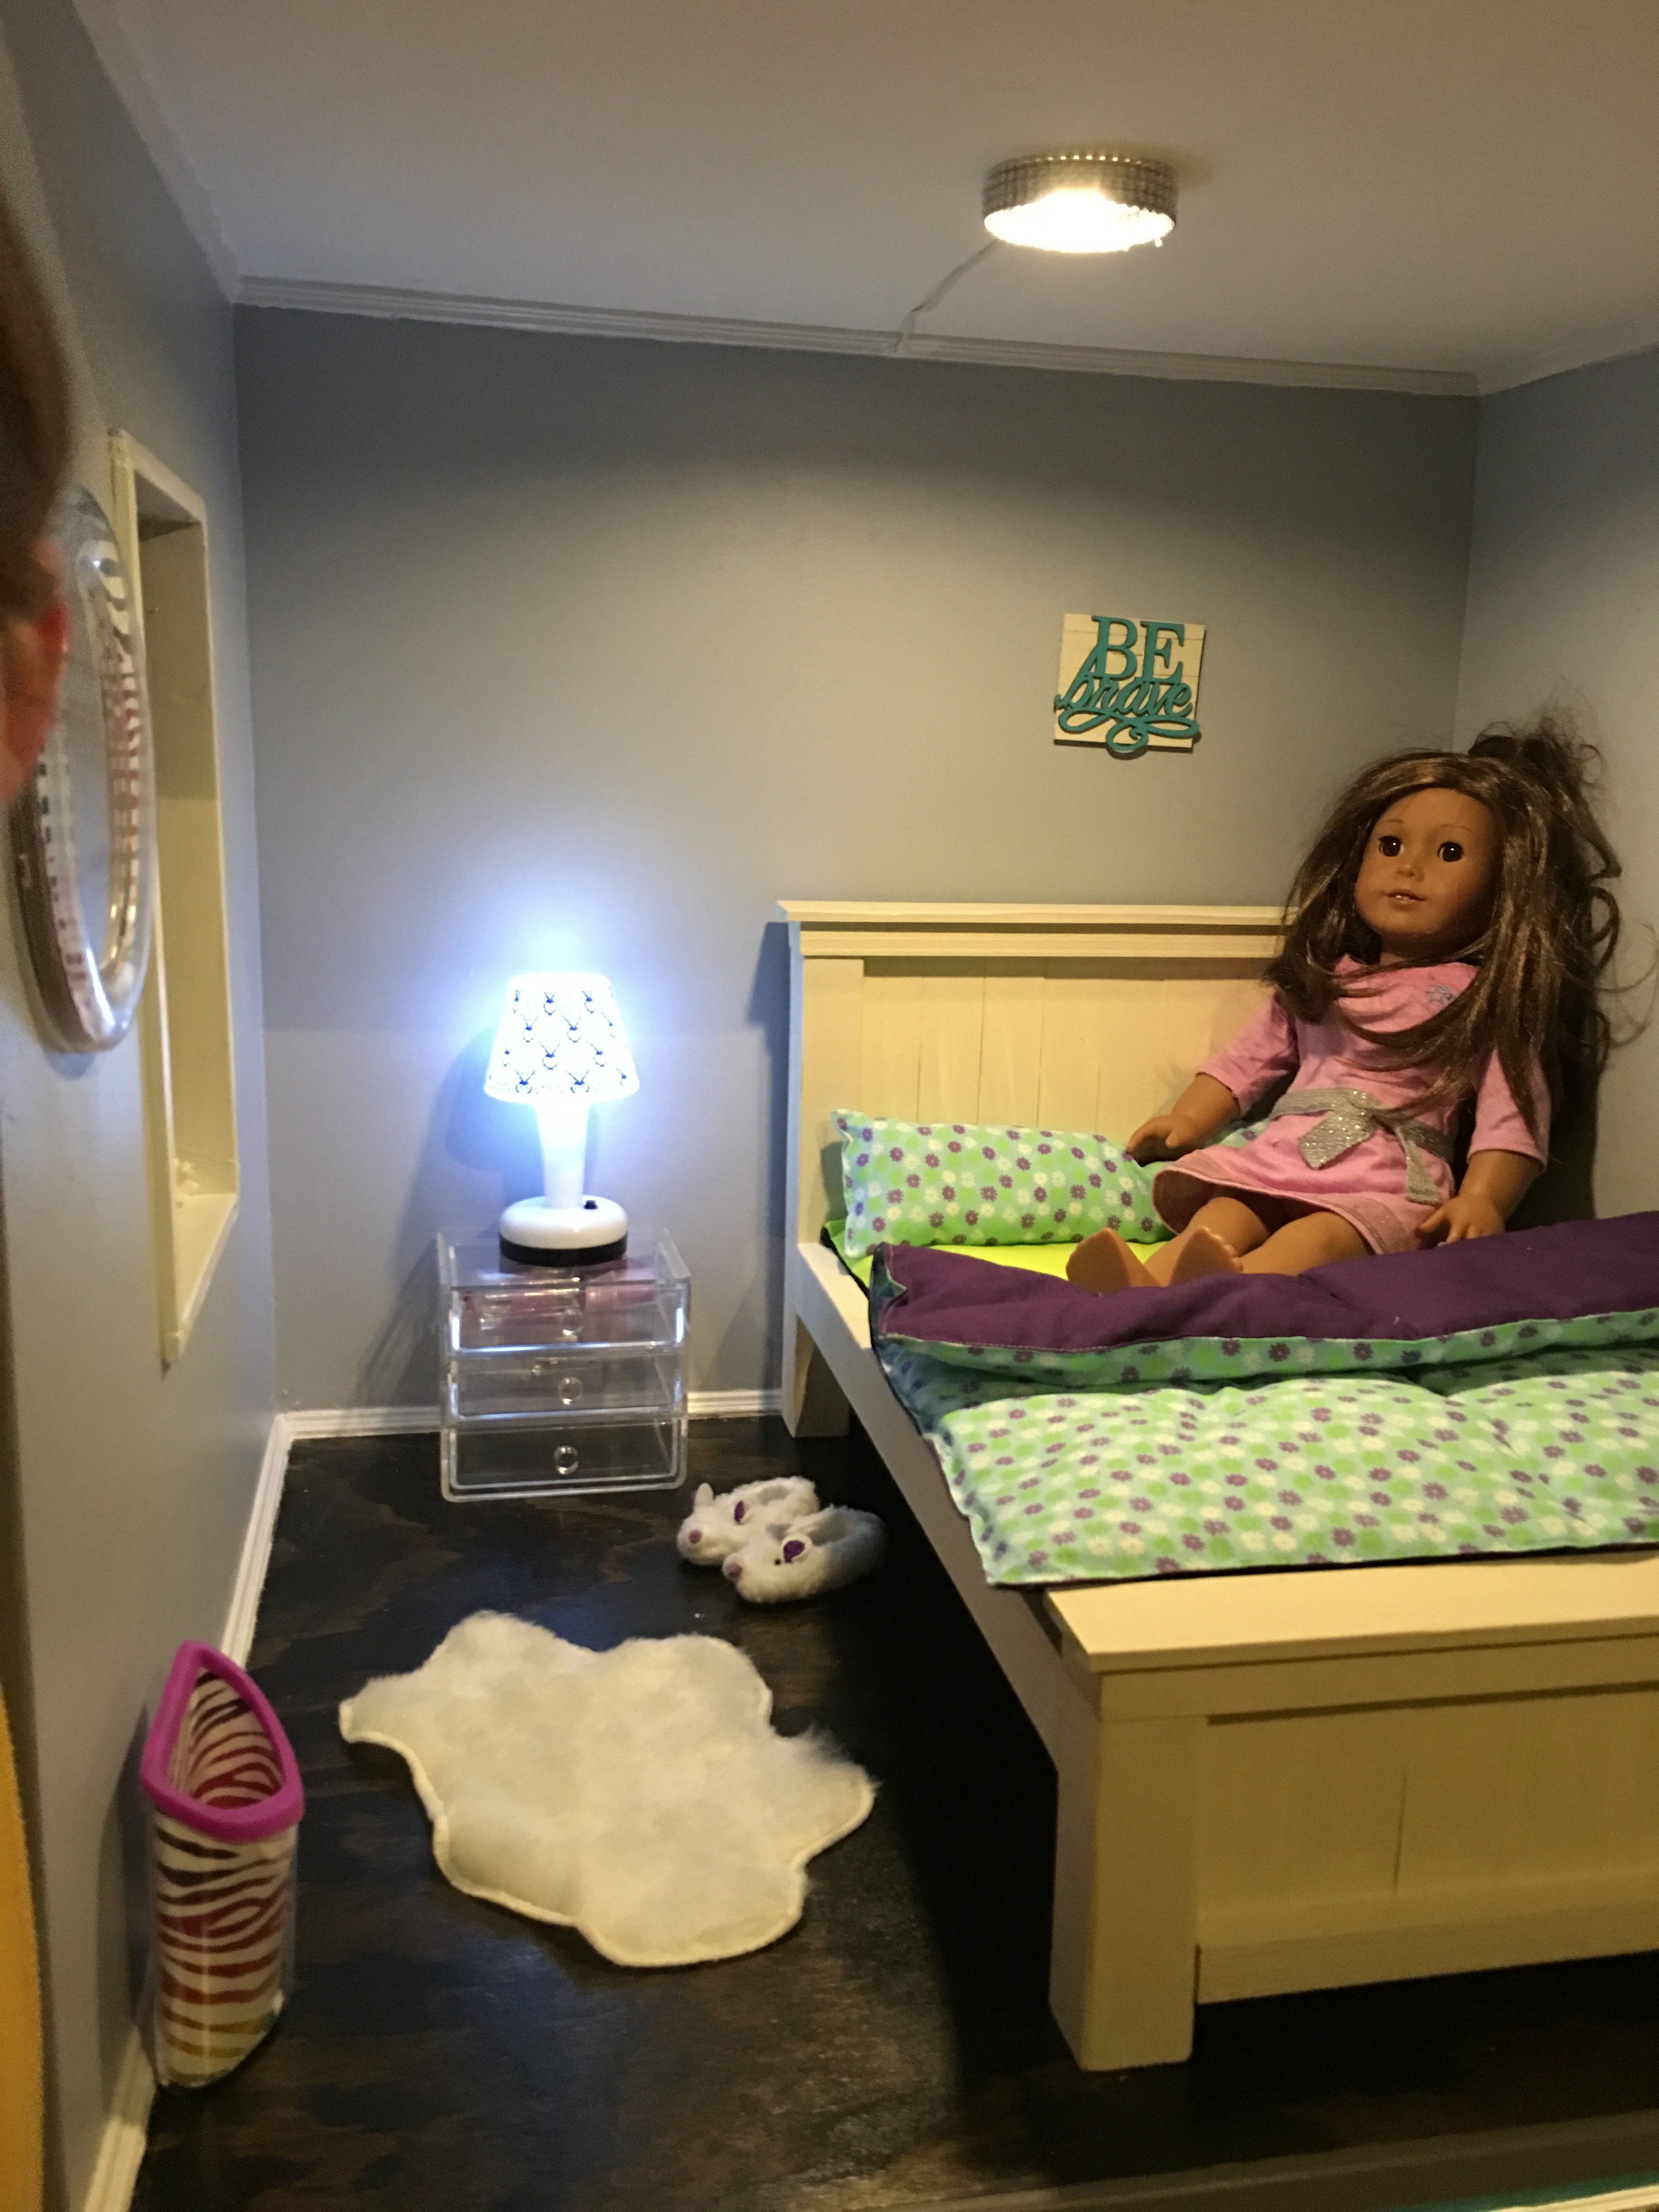
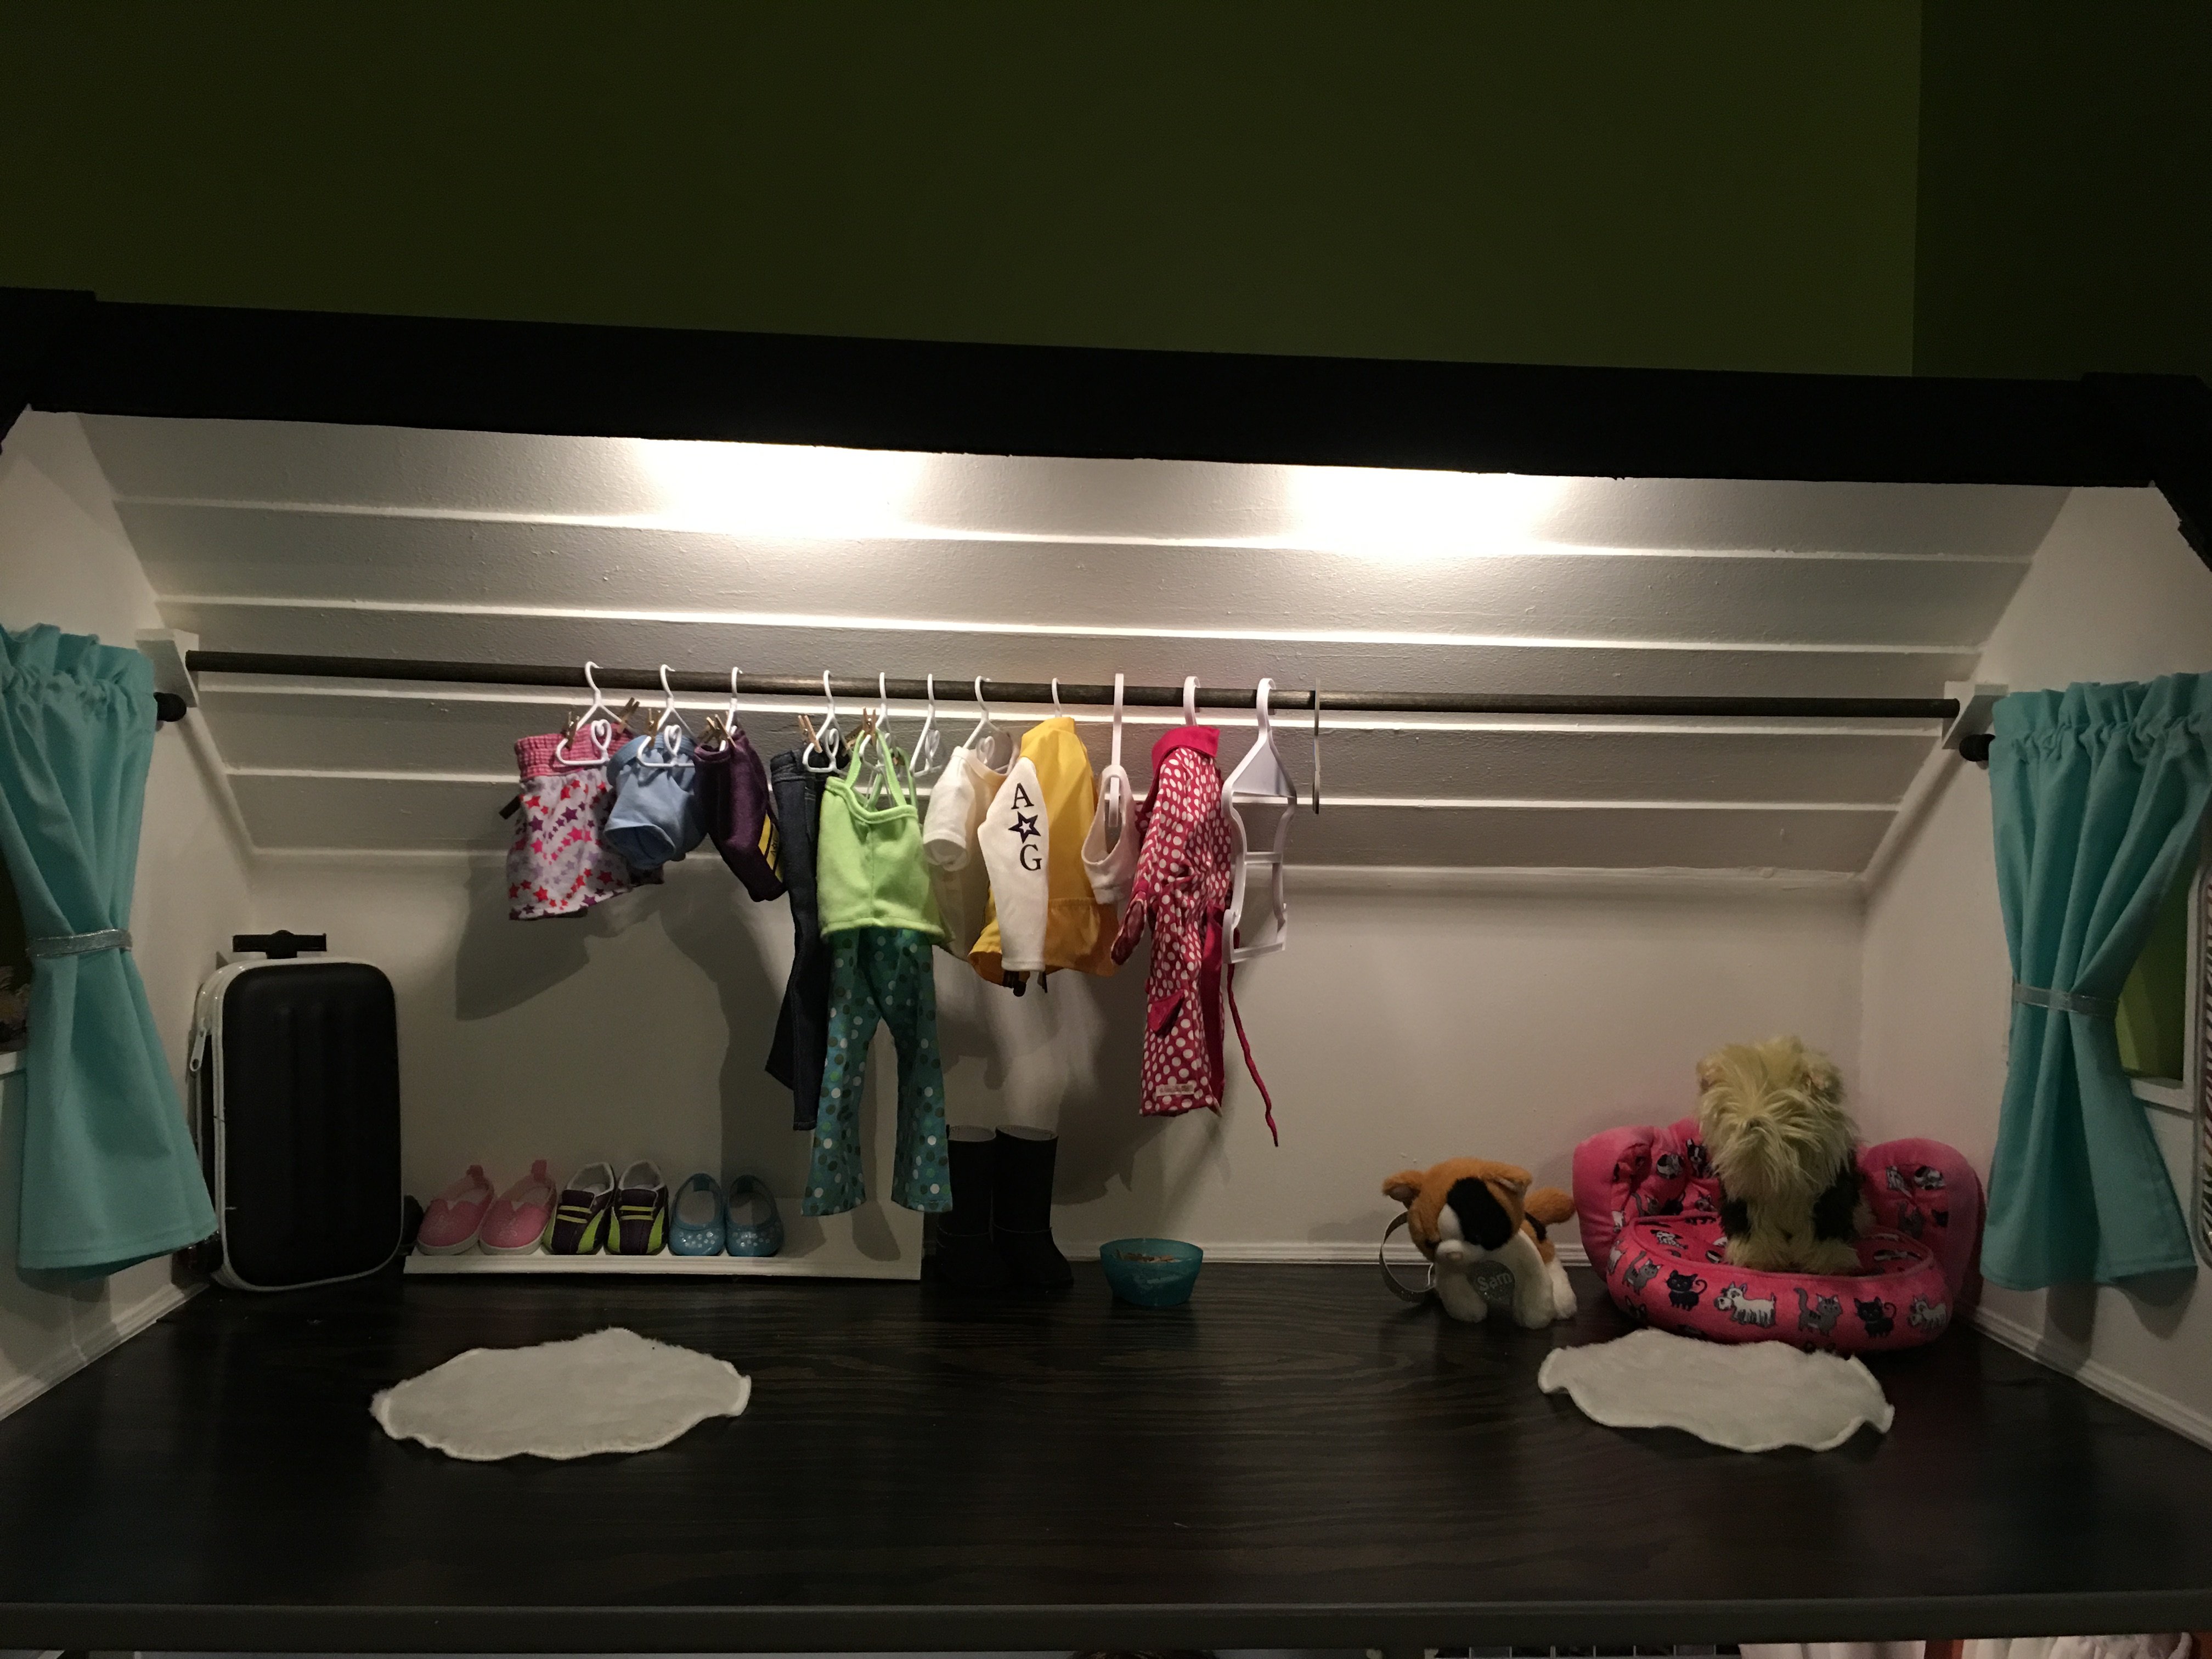
American Girl Dollhouse Masterpiece!
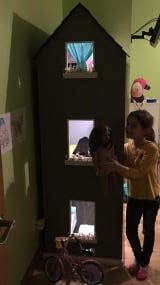
This dollhouse was super easy to make! Harper (the doll) wanted an open concept living/kitchen, and that is the first floor. Second floor are the bedroom and bathroom. Top floor is the closet. The roof is made from 3.5" slats of luan glued together and painted with black sanded paint. Notice the baseboards and crown molding? My granddaughter helped cut windows out with a jig saw. I still owe my granddaughter a garage and patio with pergola, and kitchen appliances and chairs, but that will wait until summer when she can help craft/build them.
Harper's bed is modeled after the farmhouse bed plans available on this site, but I used smaller scrap lumber. I wanted milk paint but was unwilling to pay the high price, so I bought a sample jar of antique ivory paint and watered it down. It turned out great!

Built from Plan(s)
Estimated Time Investment
Week Long Project (20 Hours or More)
Finish Used
Kilz primer, Behr satin indoor paint (leftovers from our house)
Recommended Skill Level
Intermediate
X Frame country coffee table
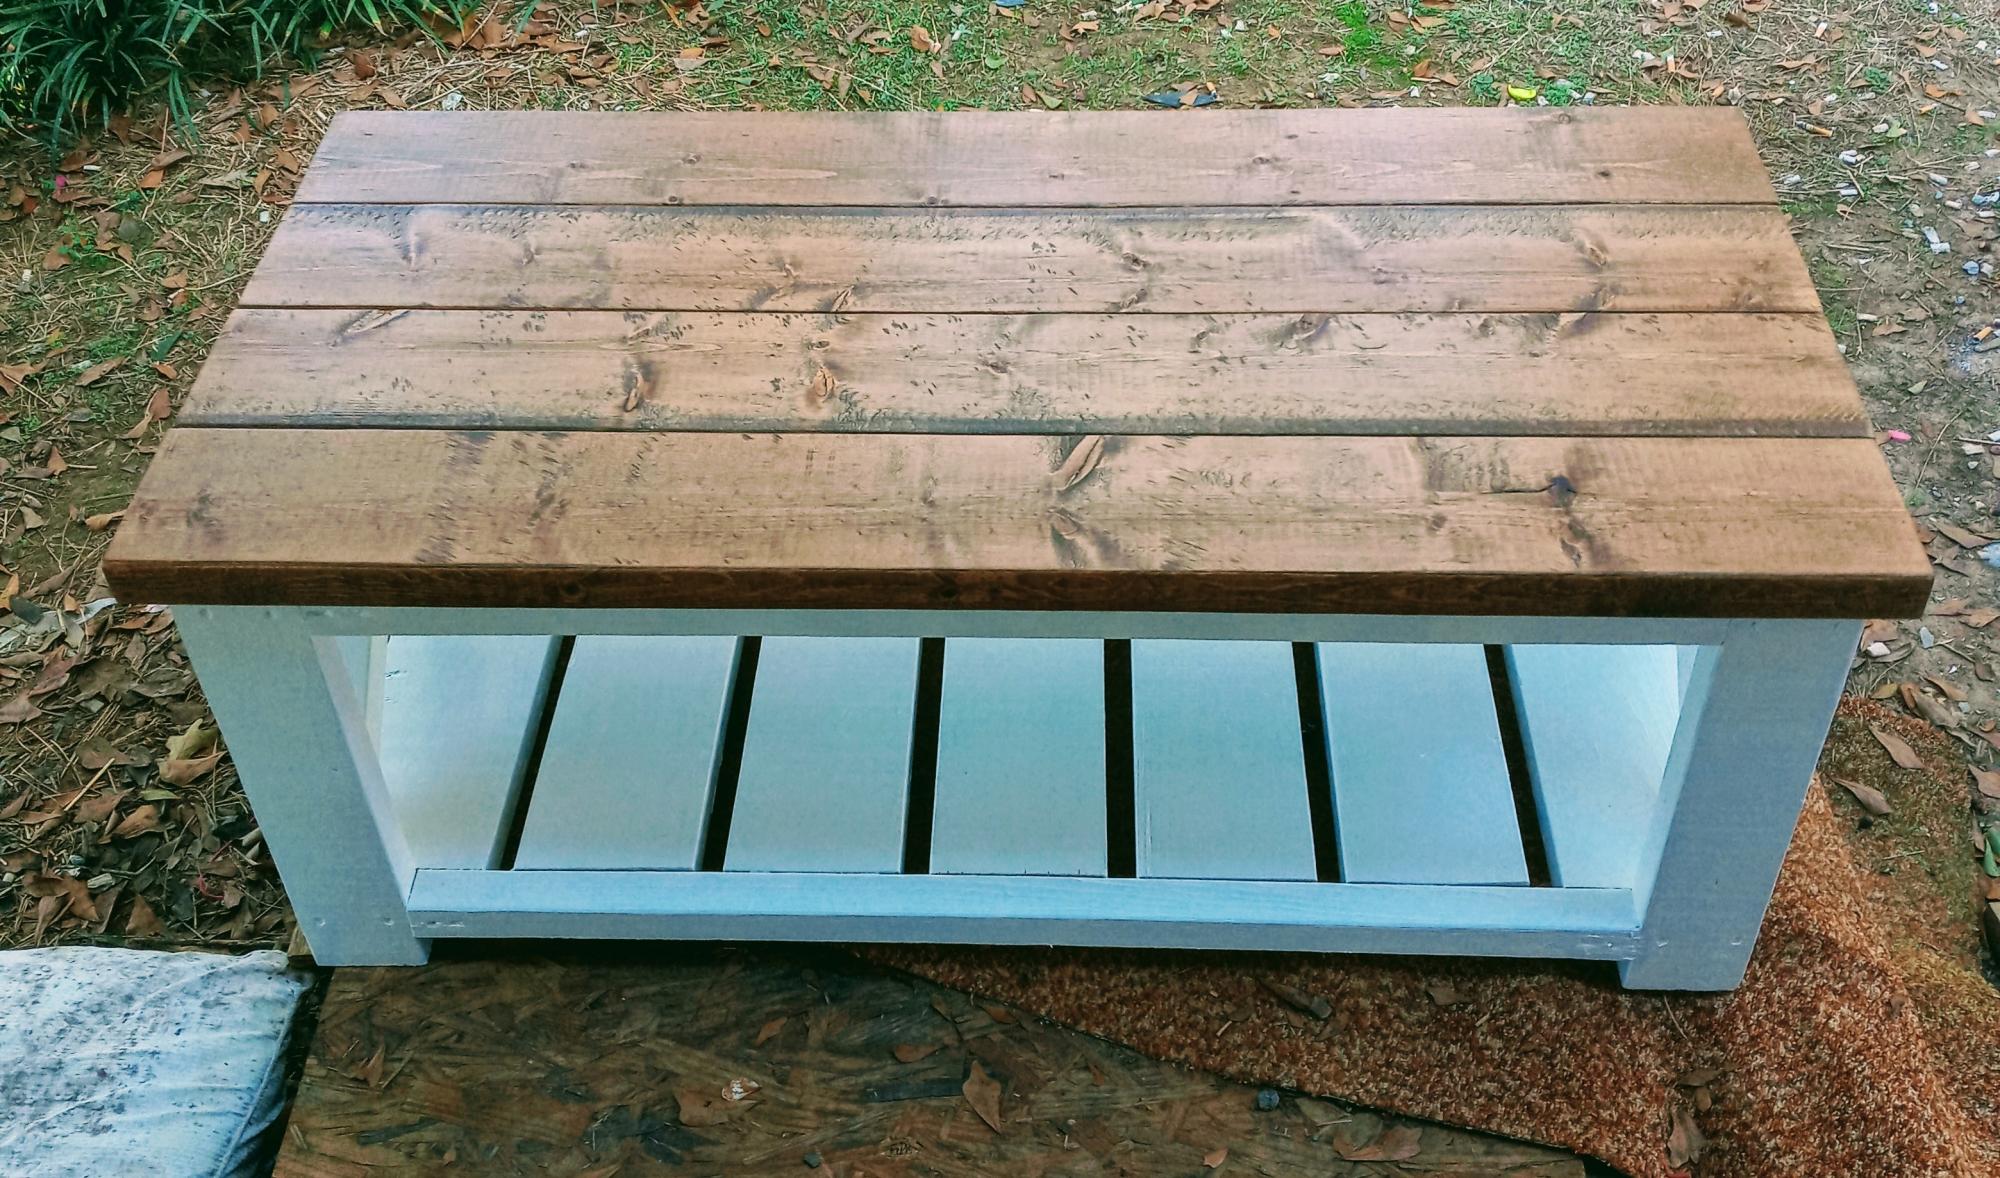
Wanted something sturdy because of my kids. Found the project on here and was fairly simple to build. The step by step instructions really helped.
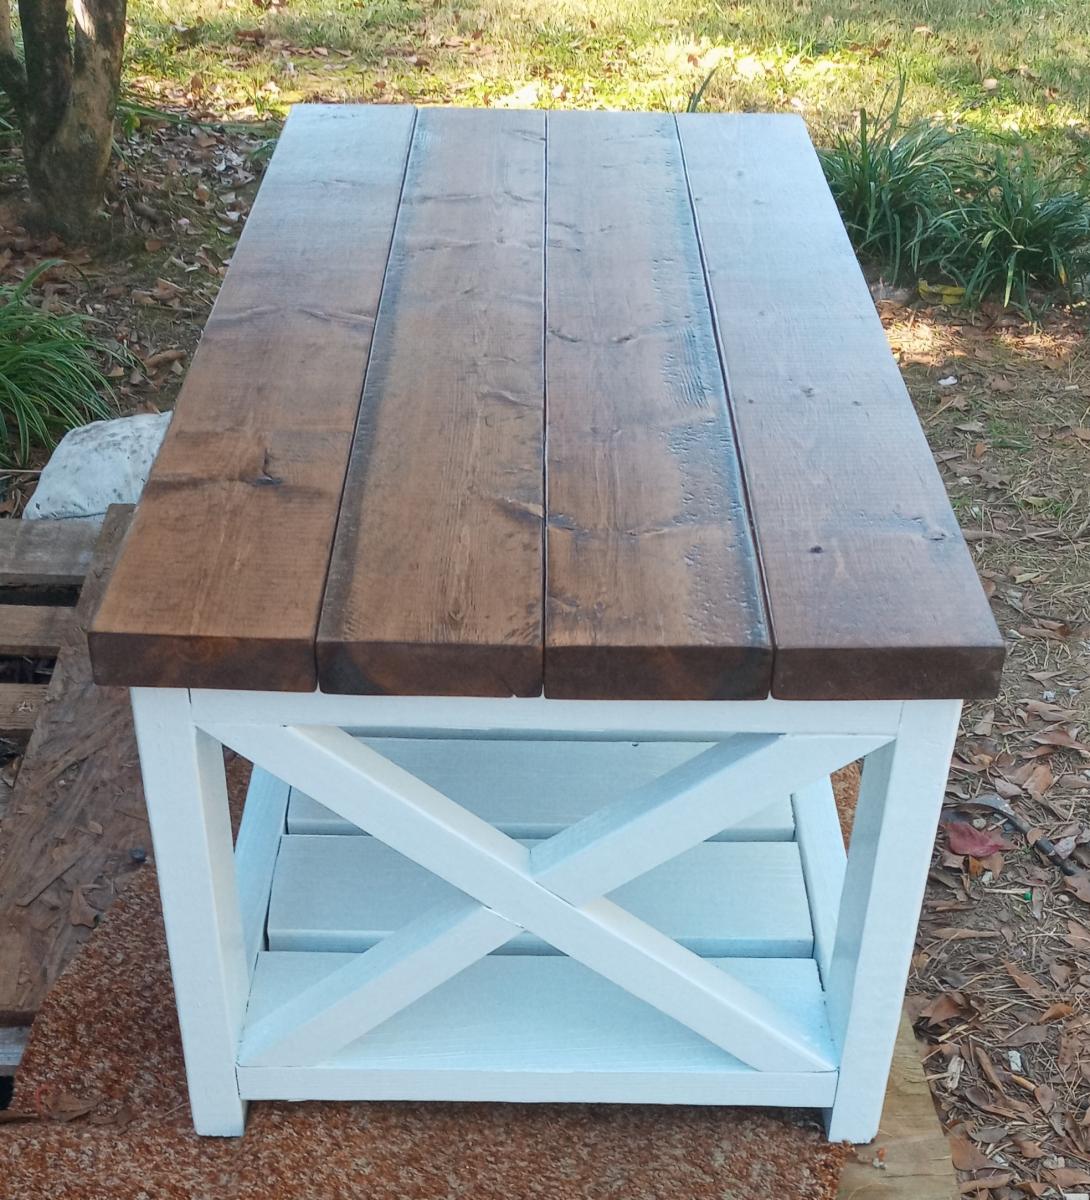
Estimated Cost
$65
Estimated Time Investment
Weekend Project (10-20 Hours)
Finish Used
Special walnut stain with gloss white paint. 3 coats polyurethane on the top. Sanded between each coat with 320 grit.
Recommended Skill Level
Intermediate
Comments
Shabby Chic Farmhouse Bed
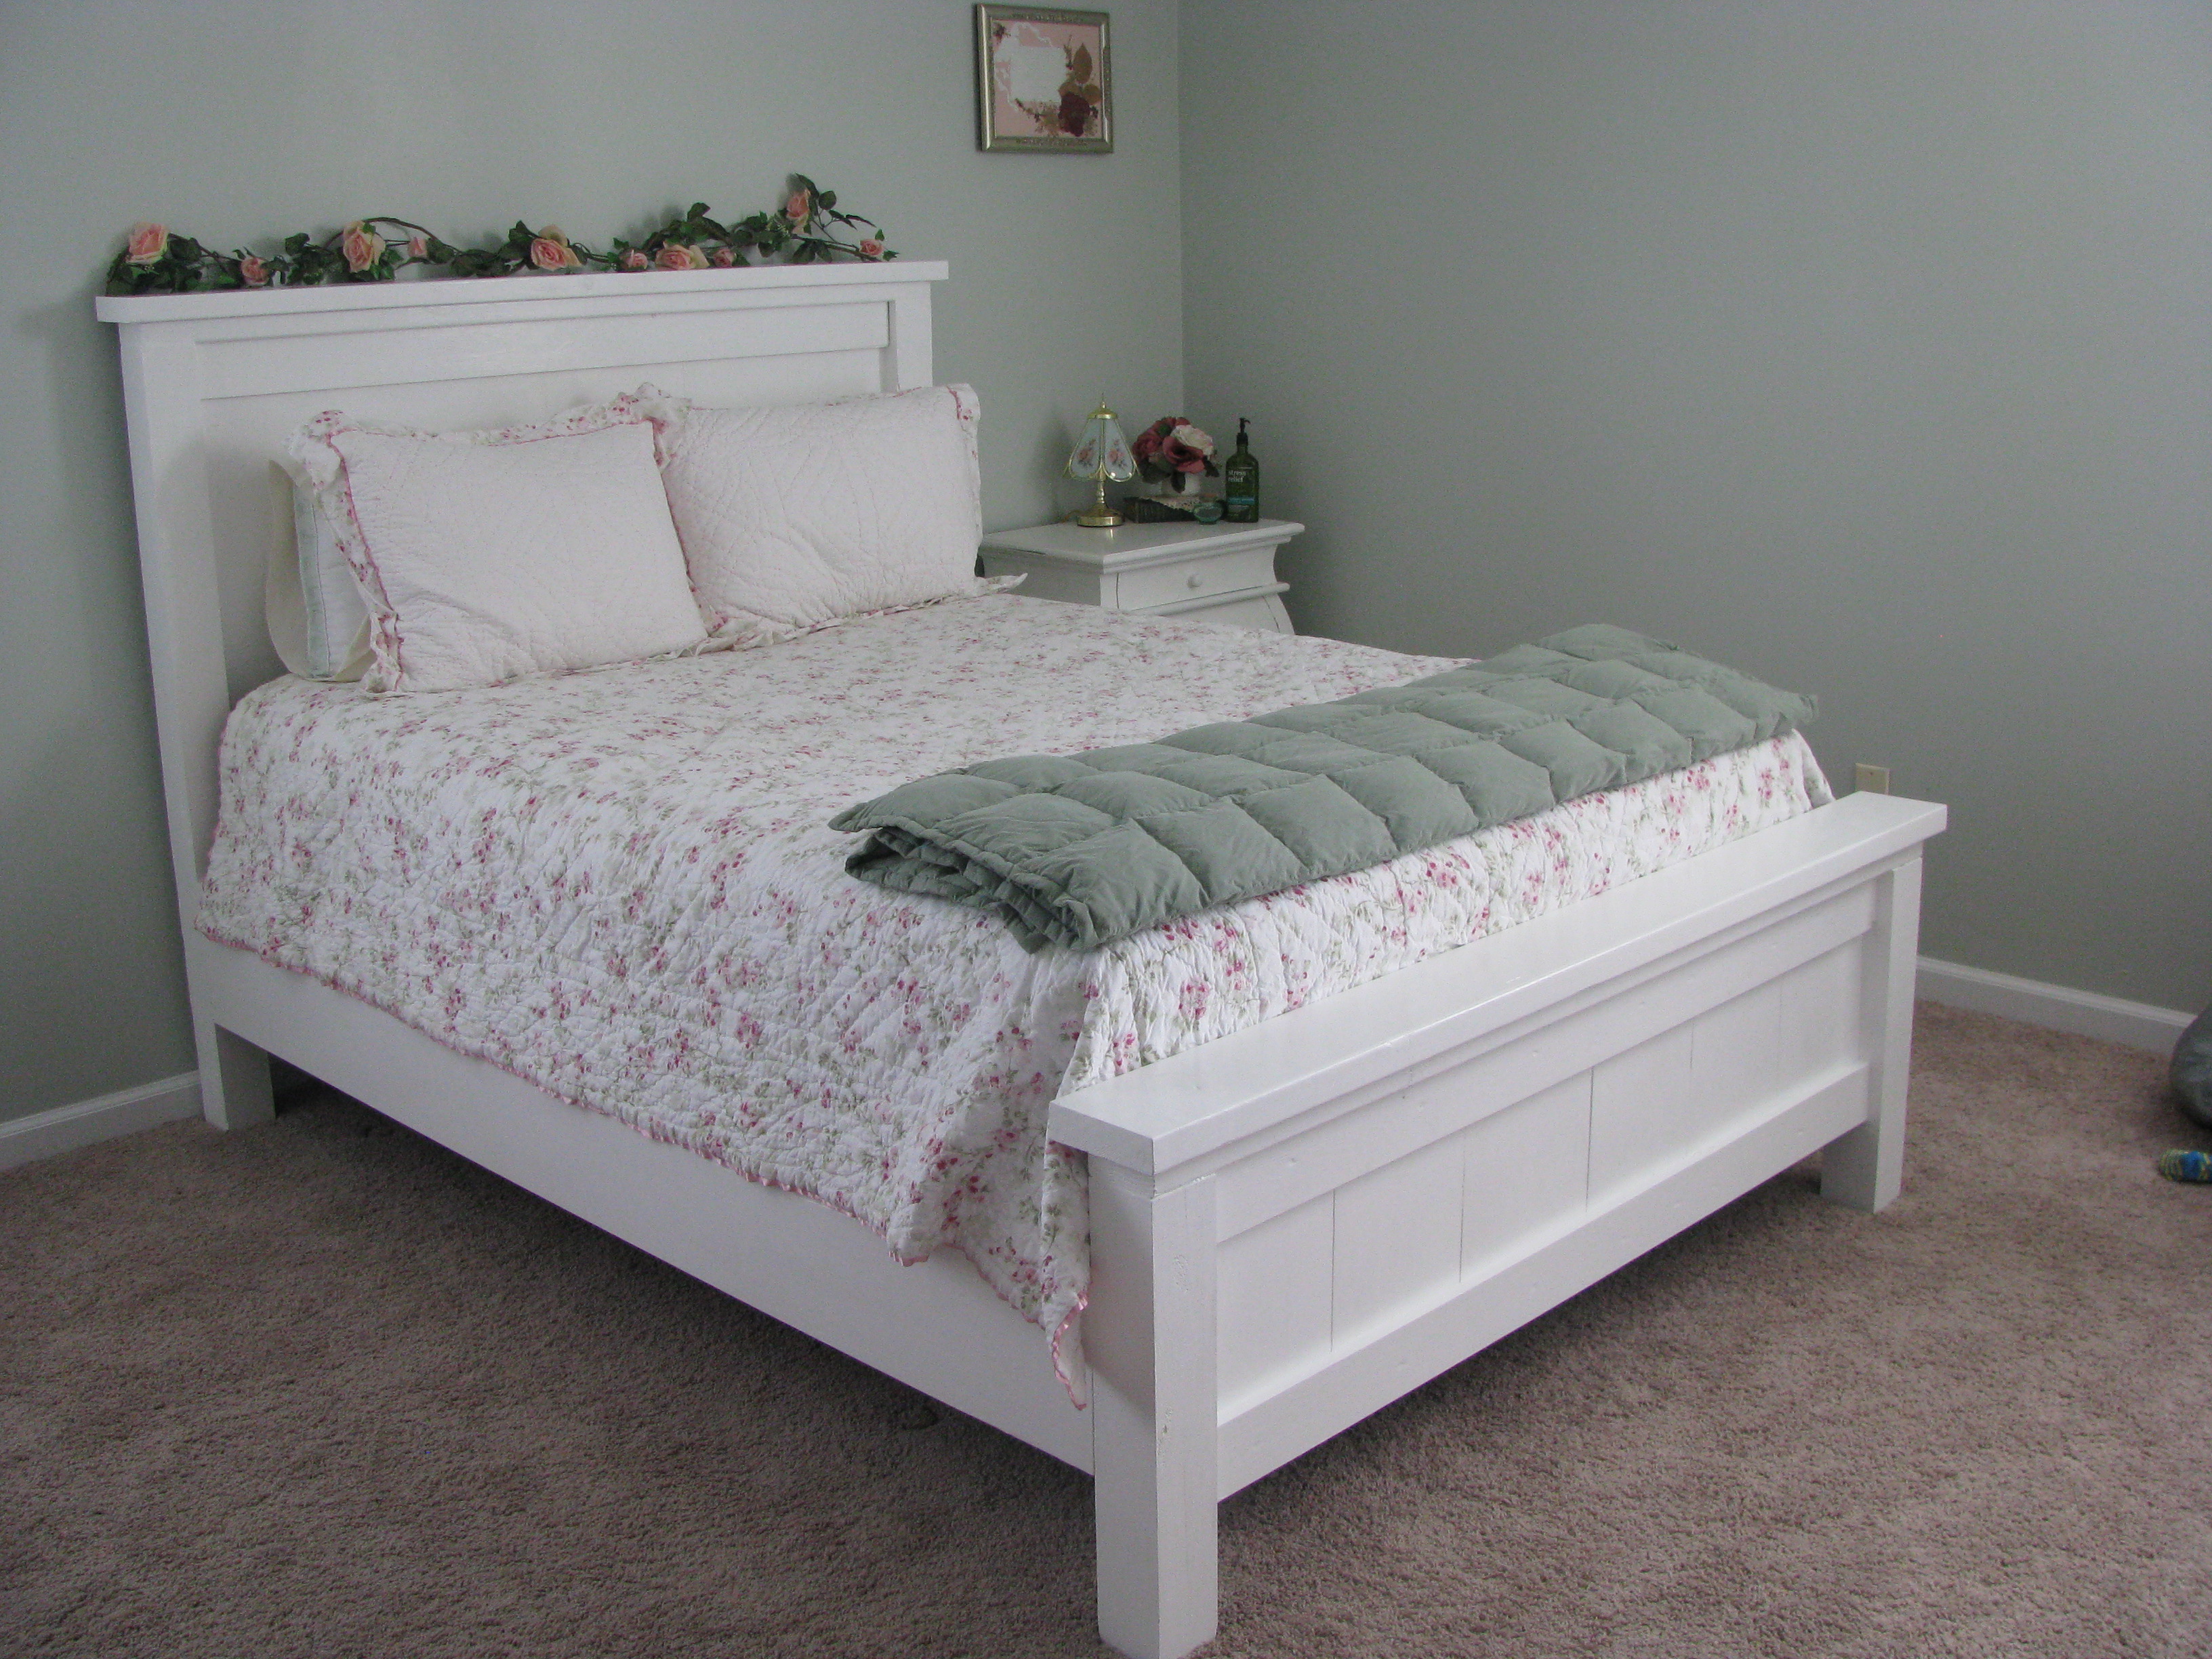
This was our first major project, so we learned a lot while we were doing it. We painted our bed white, and rather than using metal bed rails (which no one seemed to sell), we improvised and fastened 2x4s to the inside of our side rails. Then we cut slats to rest on the 2x4s and run the width of the bed. The 2x4s lend great stability to the side rails, and are much less costly, not to mention easier to obtain. ($10 vs. $75) This bed is sturdy and solid. I think we will be handing it down to our grandchildren in fifty years!
Recommended Skill Level
Beginner
Study Room Cabinet
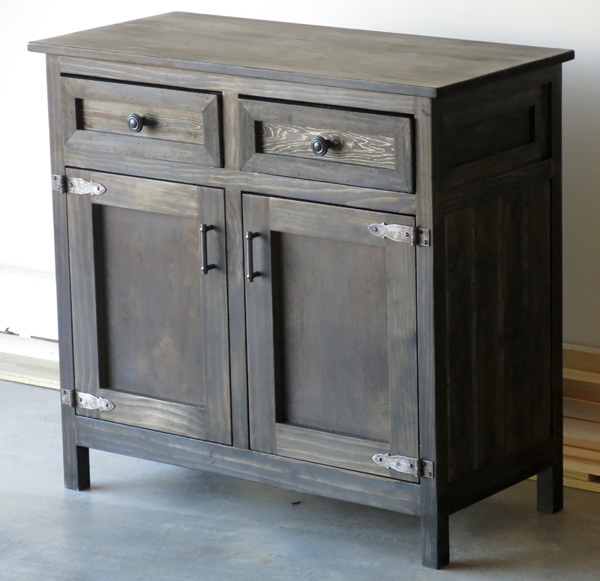
Cabinet from my own design. I built one for us and a relative saw it and liked it so much asked me to build them one the same.
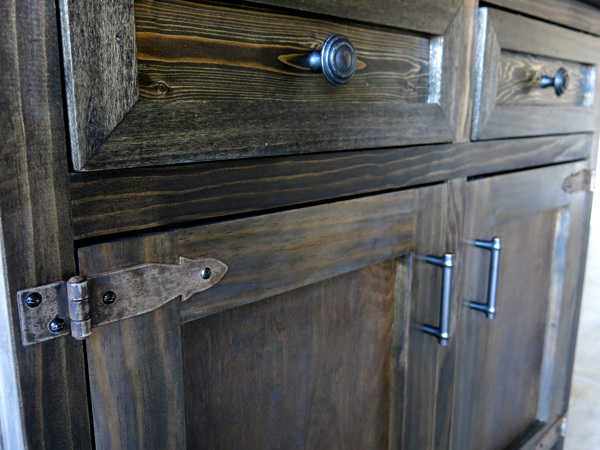
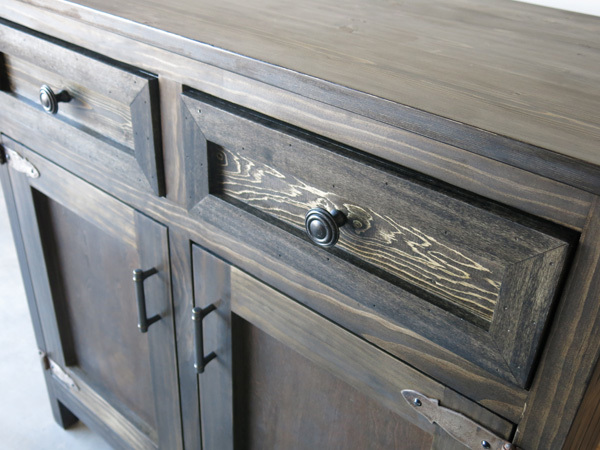
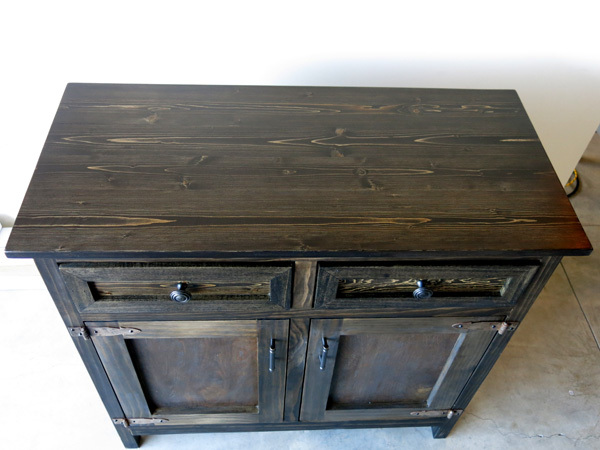
Estimated Cost
$200
Estimated Time Investment
Weekend Project (10-20 Hours)
Finish Used
Minwax Ebony, Satin Poly and Wax finish.
Recommended Skill Level
Beginner
Comments

In reply to Love it! by Ana White Admin
Mon, 12/15/2014 - 12:57
Happy to share the plan...
Hi Ana. I'm happy to share the plans for this but all I have is the main sketchup drawing and my cut list in excel. Not sure if there is an easy way to create the exploded diagrams you normally have? Happy to give something back to you and the rest of your fans.

Thu, 12/18/2014 - 07:57
Awesome!
I love everything about this....the design, the different wood grain on the drawers, the color, the finish, and especially the hardware. Can I ask you to share where you got the hinges and how you got that finish? I hope you're able to post the plans because it's awesome.
Workbench
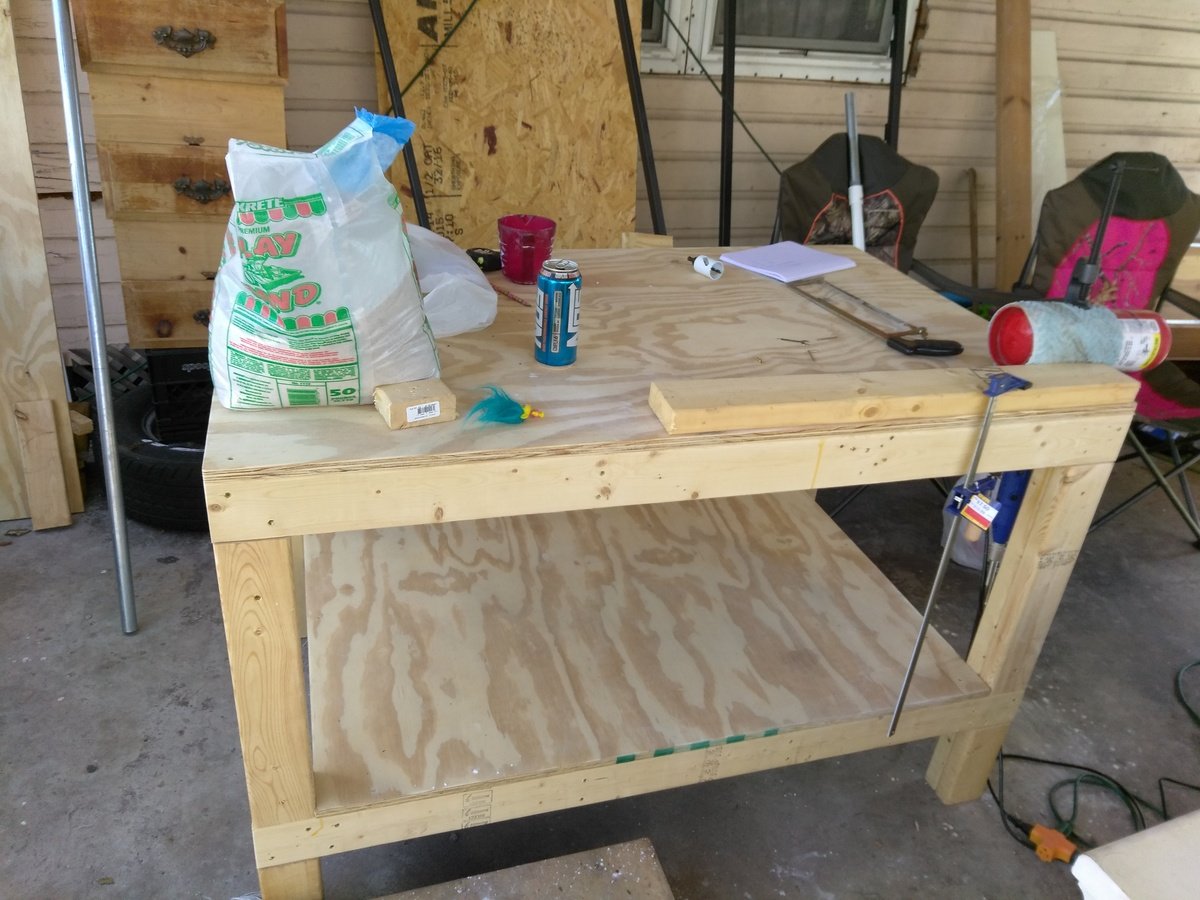
I have added a few things to make this workbench comprehensive. I added a paper towel holder, go Jo holder, cord hooks, electric bar, and I enclosed the sides and put a door on the front and a hinged pegboard on the back which makes it able for me to store all of my tools and lock them up.
Built from Plan(s)
Estimated Cost
100.00
Estimated Time Investment
Day Project (6-9 Hours)
Finish Used
No finish
Recommended Skill Level
Beginner
Potting bench
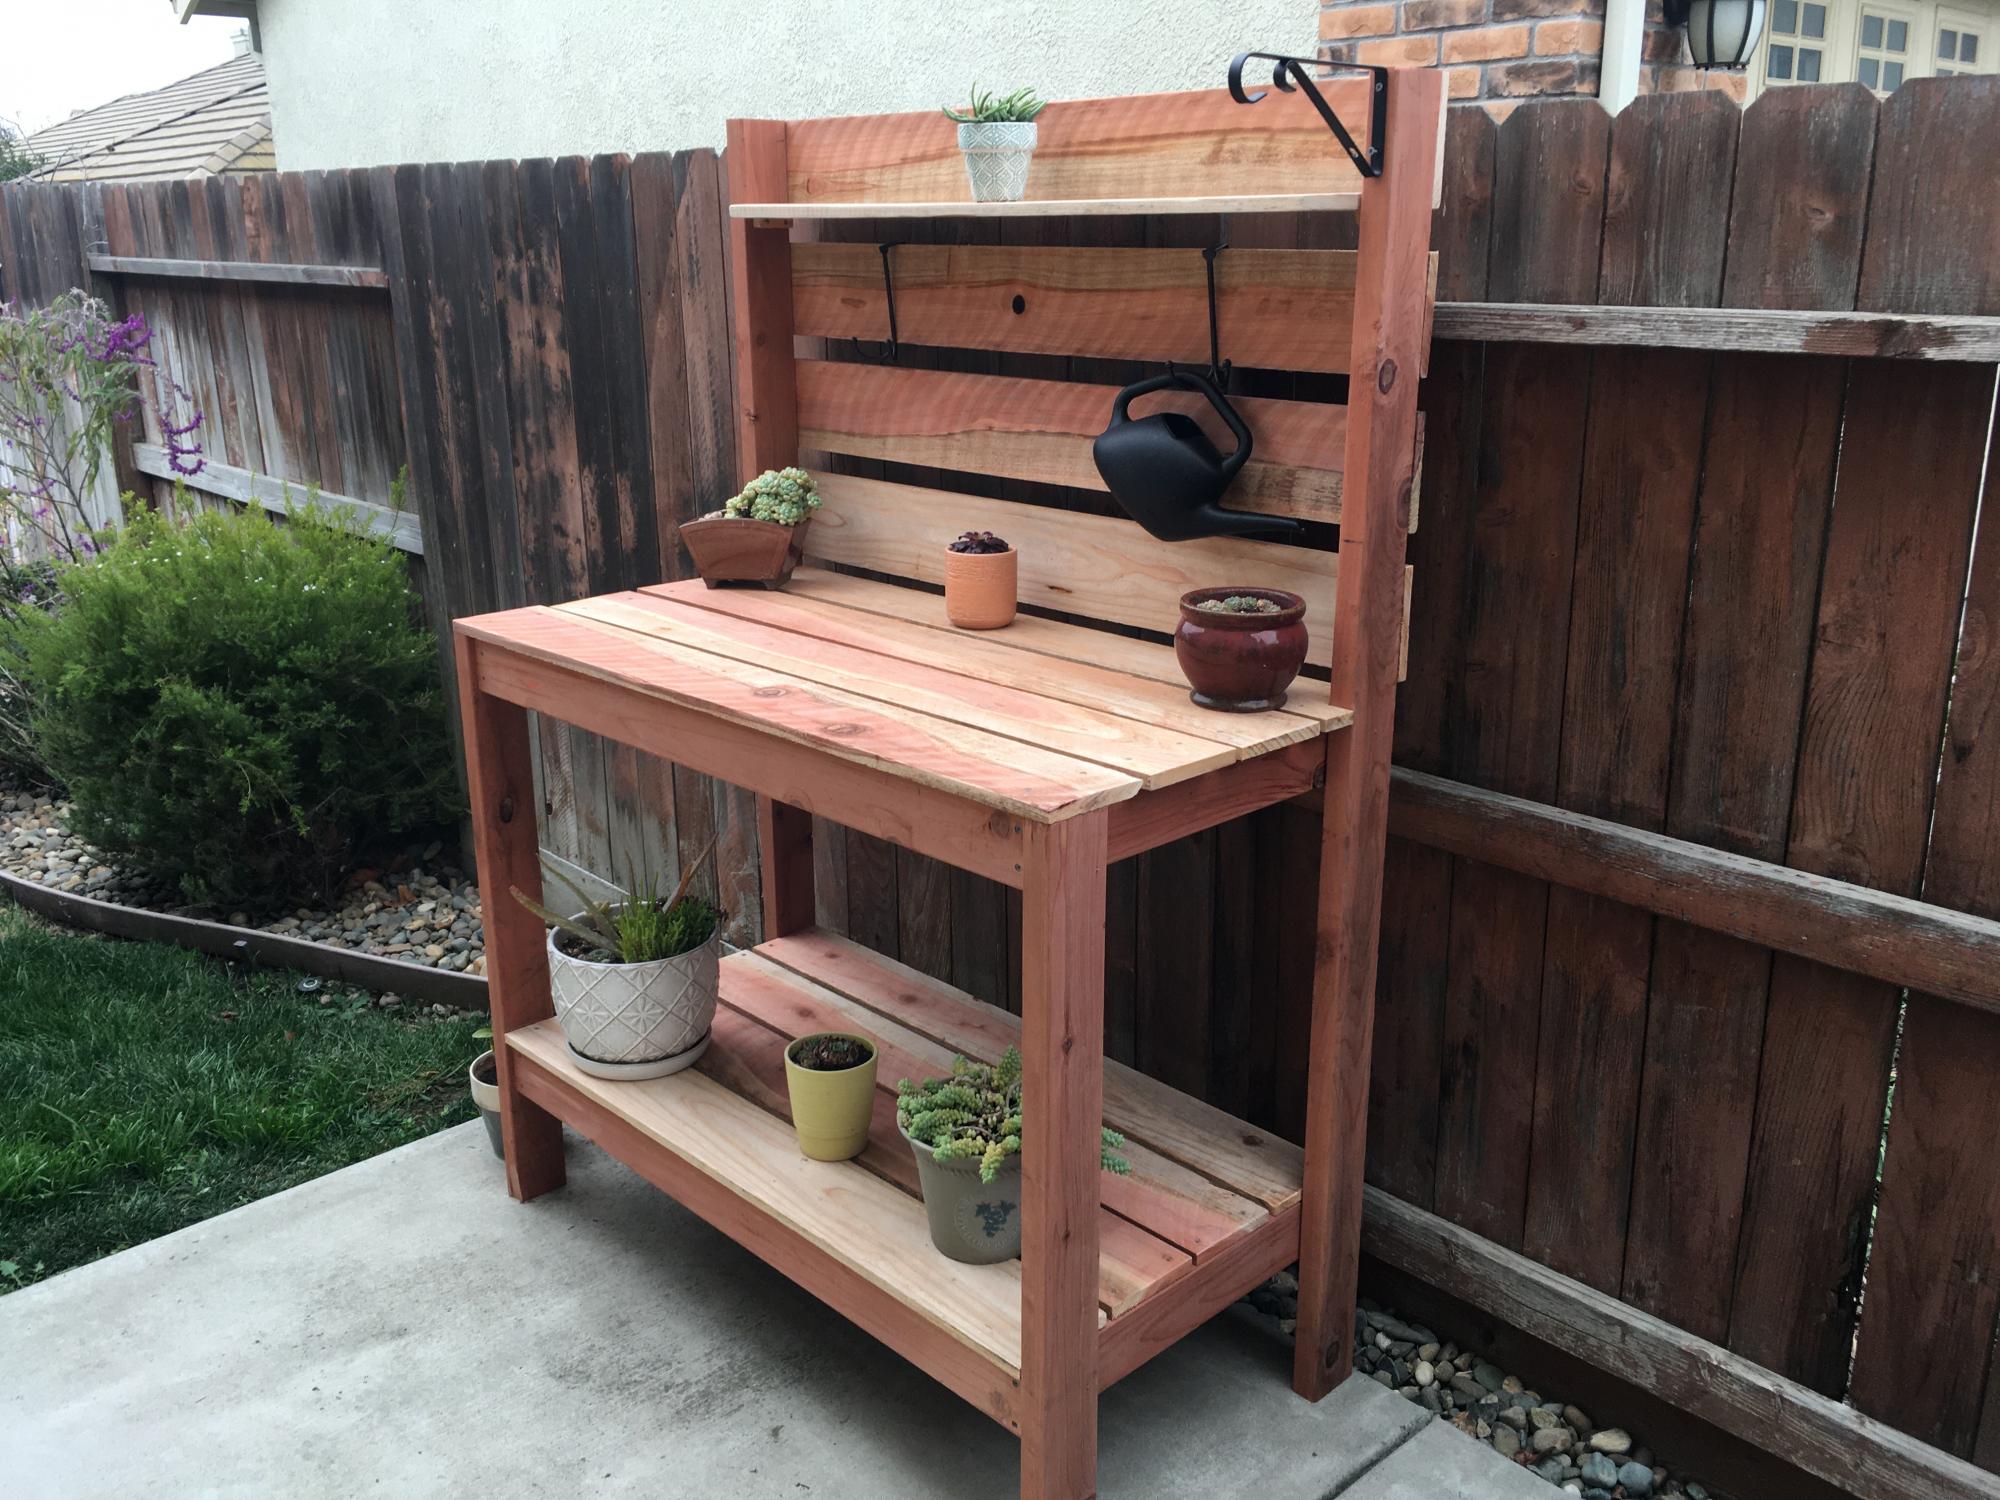
I used redwood lumber, 2x4s and 1x6s only. I wanted the bench to be a little taller so I used 2x4x10s for the legs to make work surface 38” high and total height 66”. To get the most out of the 8’ 1x6s I made the bench 48” wide. I also had to adjust the depth since I did not use 1x4s. And finally, I sanded the 1x6s because they were rough sawn.
Very fun project! Once I figured out the adjusted cut list the whole project came together in a matter of a few hours.
Built from Plan(s)
Estimated Cost
$100
Estimated Time Investment
Afternoon Project (3-6 Hours)
Finish Used
Light sanding, No finish.
Recommended Skill Level
Beginner
Farmhouse bed Queen
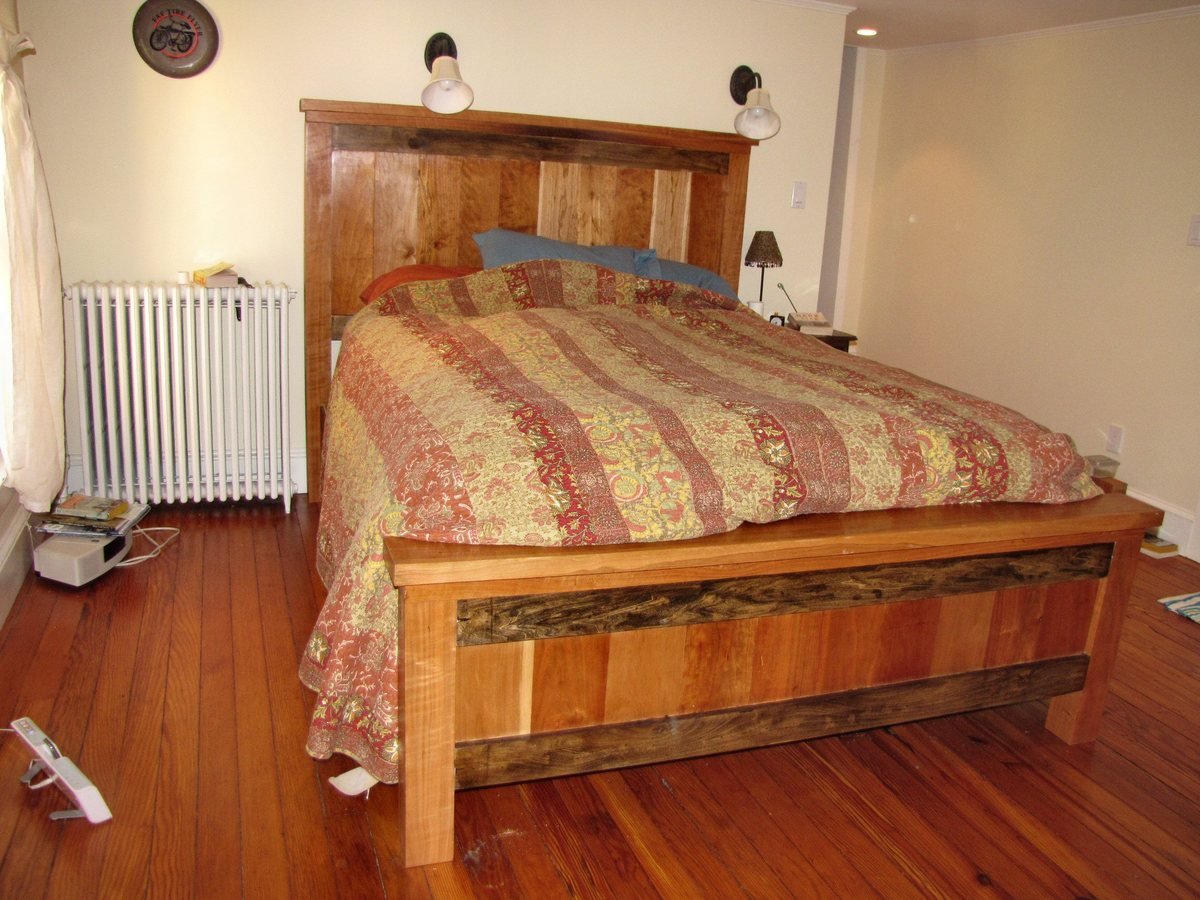
I followed Anna's incredibly easy to follow plans pretty darn closely. I used Cherry for 90% of the bed and the cross-boards on the headboard and footboard are poplar. I used lumber that I had been holding on to for some time and purchased construction-grade lumber for the frame. Anna's plans allowed me to bring to fruition my dream to build my own bed. This was the largest project I'd built to date, and I was incredibly happy with the outcome. For a mattress I ordered foam from http://www.mattressbymail.com/ I ordered 5" of high quality foam and 4" of the 5lb viscomax memory foam and it is the most comfortable bed I've ever slept in for
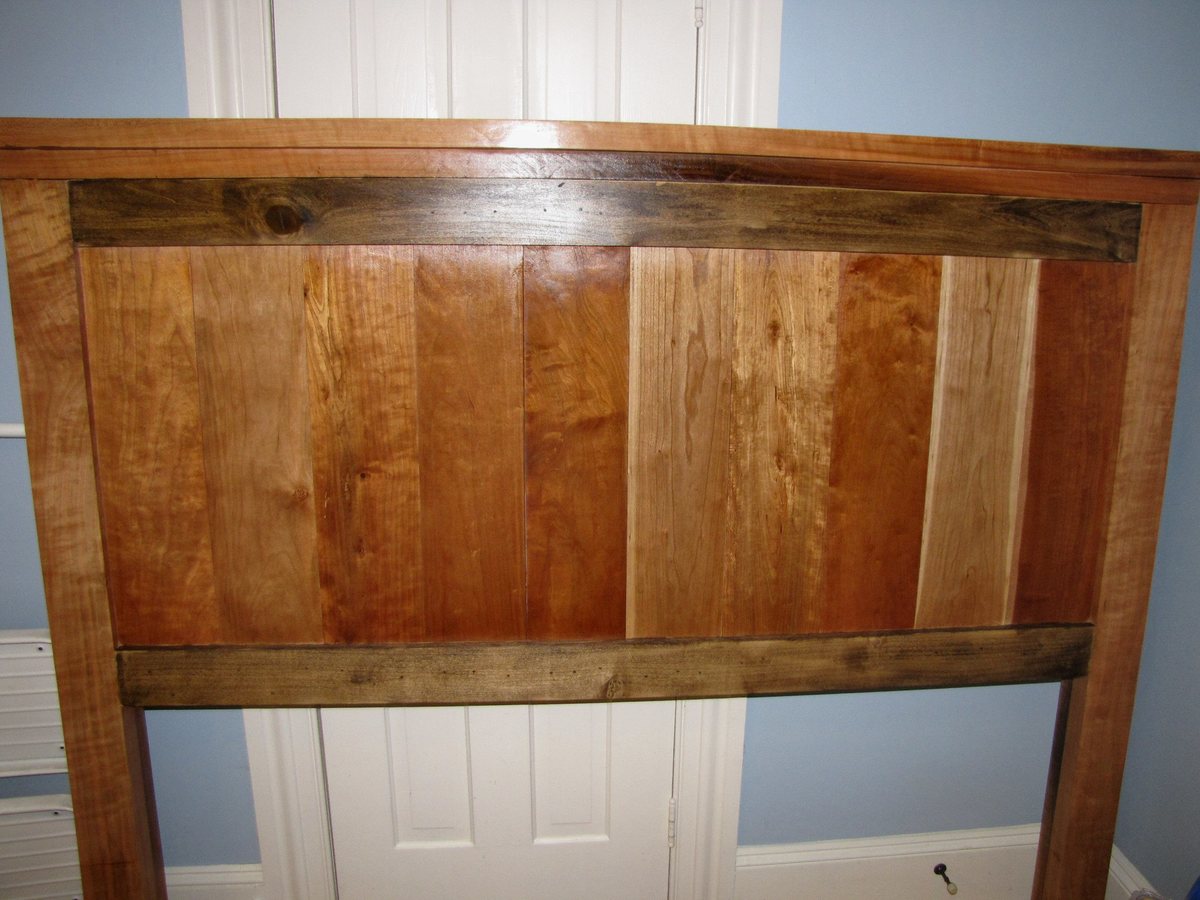
Built from Plan(s)
Estimated Time Investment
Week Long Project (20 Hours or More)
Finish Used
minwax antique oil finish
Recommended Skill Level
Beginner