Community Brag Posts

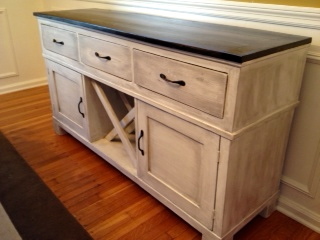
Recycling Bin Cabinet

Submitted by Anonymous (not verified) on Thu, 03/07/2019 - 15:14

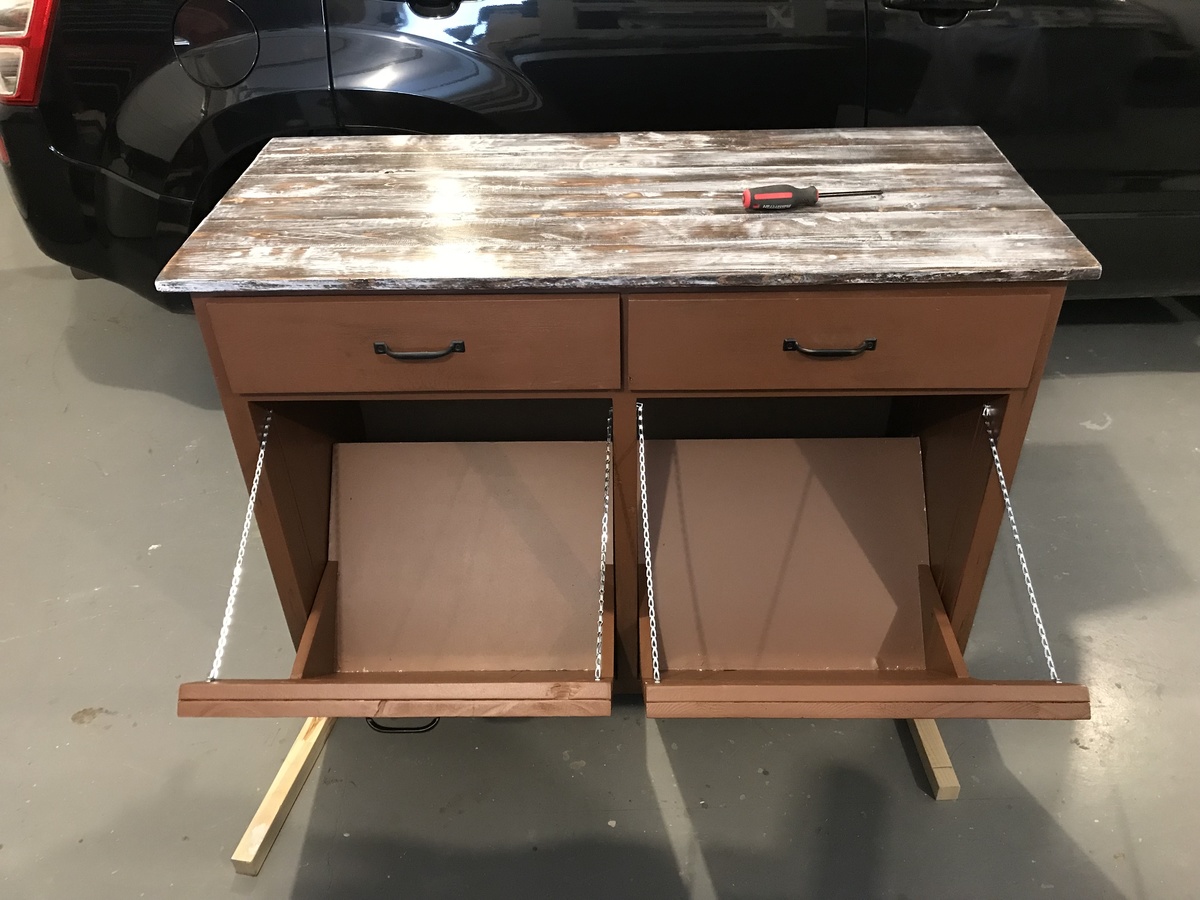
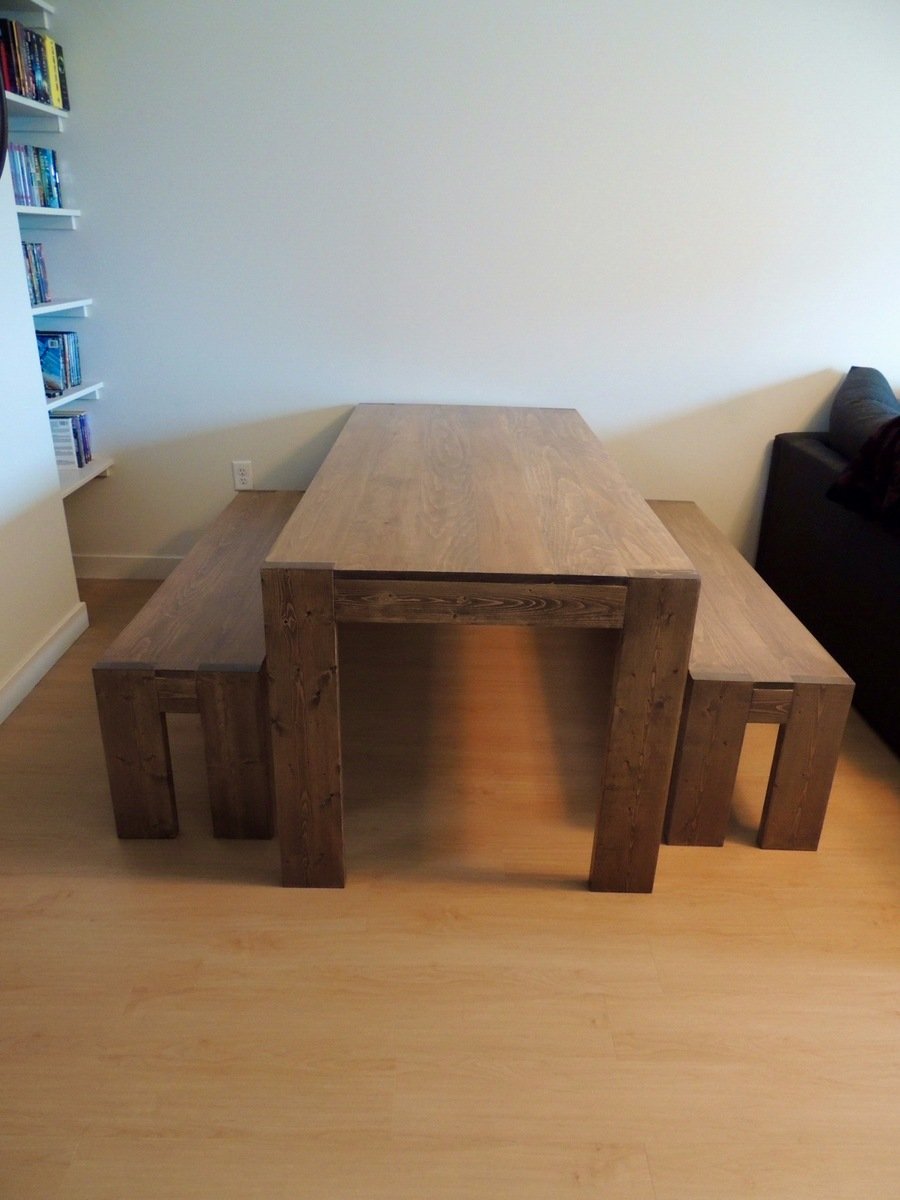
I just started building "stuff" a few years ago and love Ann's plans. I have built several of your dining and coffee tables. This cabinet was a bit challenging and took me a while. I have had built drawers before but they turned out OK. I really like the top I create from some scrap 1 x 4's. Thanks for the great projects.
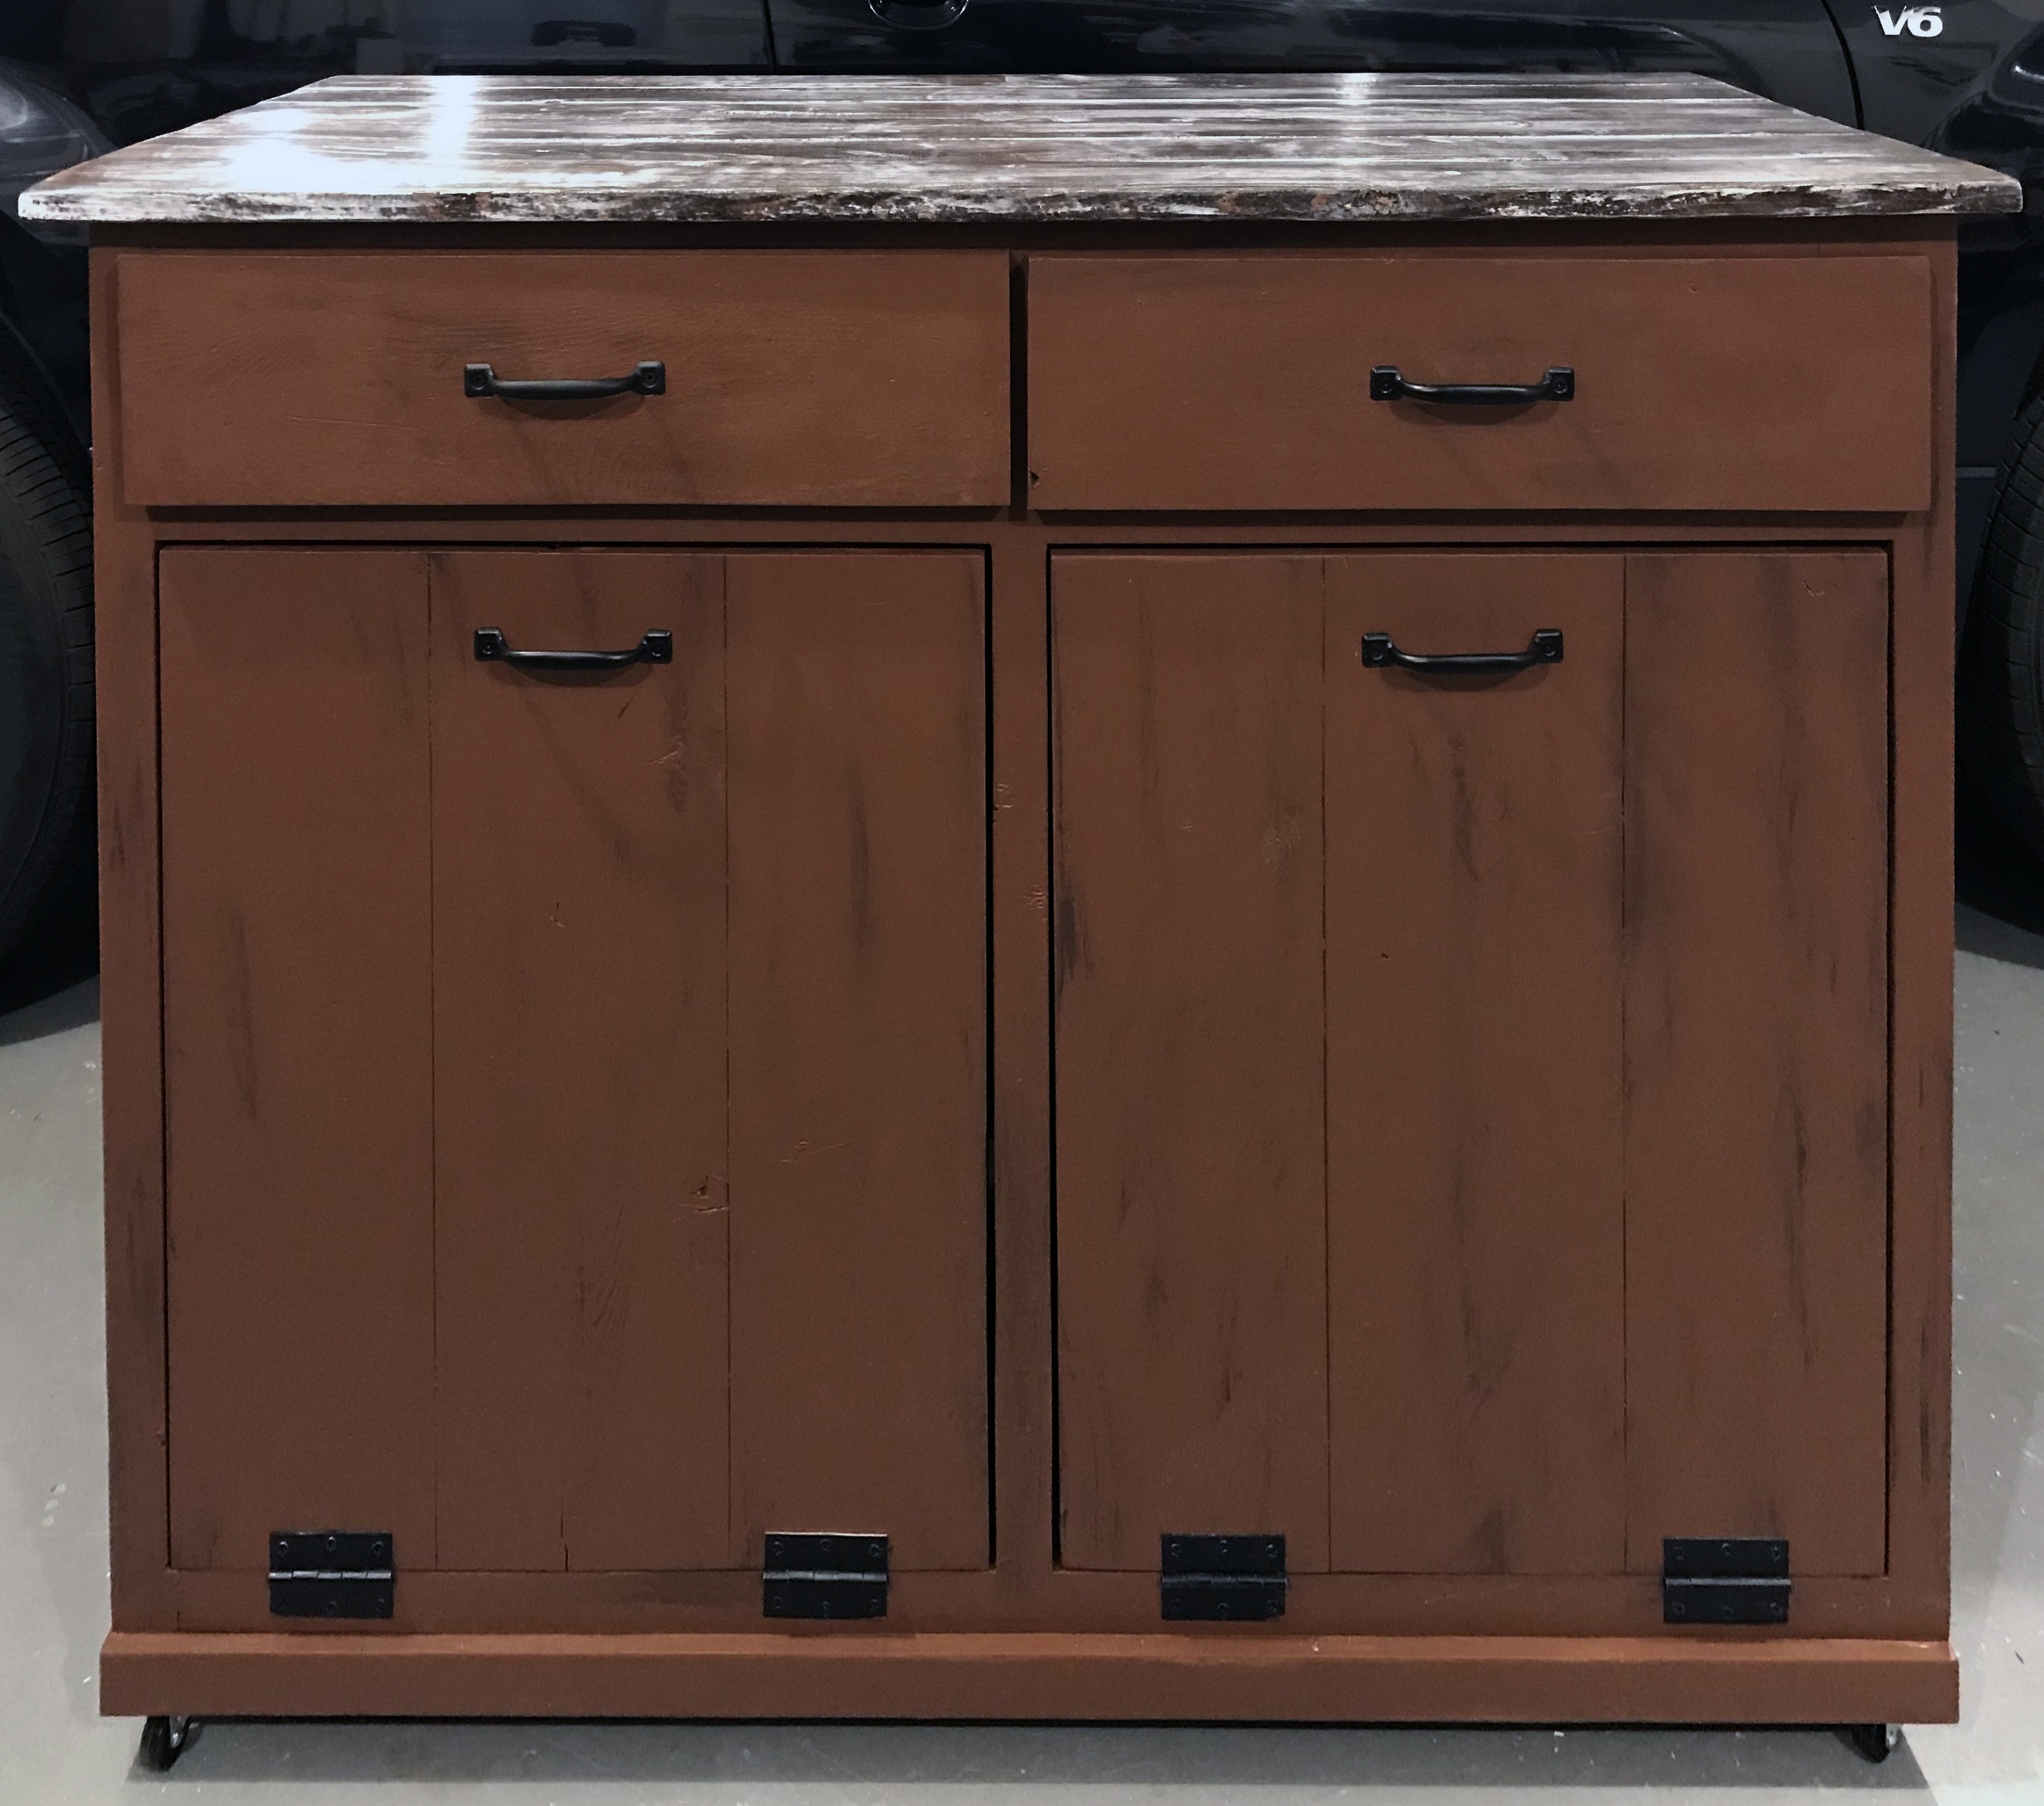
Estimated Cost
$100
Estimated Time Investment
Weekend Project (10-20 Hours)
Finish Used
white paint, walnut stain, red oak paint.
Recommended Skill Level
Intermediate

Simple Drawer Dividers by Hannah McCormick

Simple and great way to get drawers organized, by Hannah

Comments

OceanCactus

Tue, 01/31/2023 - 05:40

Hi Ana! Your work and dedication to your art are amazing! I had a quick question regarding the channels. I looked up "C channel" to order at my hardware store but there seems to be a curve at the bottom where the wood panel would sit. I also saw a "U channel" that's square and looks more like the one you posted in your video. Could you guide me as to which one would be best? Thanks!

Lap desk

This project was fun and easy to do. I made two of them so my husband and I could each work, watch movies or whatever while sitting in bed. The kids also use them sometimes during the day for playing on the computer or for having a snack. These little lap desks are super sturdy and very useful. They only cost me about $5 each to make.

Estimated Cost
$5 for the wood
Estimated Time Investment
An Hour or Two (0-2 Hours)
Finish Used
minwax wood conditioner, minwax red mohogany, minwax polyurethane.
Recommended Skill Level
Starter Project

Rustic x console

Submitted by Anonymous (not verified) on Mon, 03/11/2019 - 23:02

This is my first ana white project and my first woodworking project. I think i like this new hobby i just picked up. 

Built from Plan(s)
Estimated Time Investment
Weekend Project (10-20 Hours)
Finish Used
Black tea, vinegar/ steel wool stain, wax finish
Recommended Skill Level
Beginner

These Adirondack Chairs are super comfortable

Submitted by Anonymous (not verified) on Fri, 02/03/2023 - 05:45

I built a couple of these for the garden area and they are wonderful to sit in. As an experiment I painted these with chalk paint then finished them with several thin coats of spar urethane. After a couple of years in the sun, they seem to be holding up pretty good. I may sand and apply more spar urethane this summer just to keep them looking good.

Comments

Modified Sand Box with Lid

Submitted by Lady Goats on Tue, 10/18/2011 - 10:24

When I saw someone post this sand box request on Ana's facebook page, it was like the sand box of my dreams! Our backyard is a work-in-progress, and we're constantly in different areas, so I knew that I would need a much smaller, transportable size. When the back yard is finished, I'll definitely build the full-sized sand box... But until then, I've got this 2' x 2' box, some sand in an IKEA bag, and a happy little toddler, who cries every time I try to close this to get photos. :-)

Estimated Cost
$15
Estimated Time Investment
An Hour or Two (0-2 Hours)
Finish Used
I haven't finished this yet. I'll probably put a coat of wipe-on poly on it until I figure out what I want to do with it.
Recommended Skill Level
Beginner

Comments

Andy O (not verified)

Wed, 10/19/2011 - 08:45

Awesome sandbox, may have to try this in the spring. I am home on maternity leave (in Canada where we get a year) and luckily managed to score one of those happy, content babies who don't need a lot of my time... so I am bored to tears and looking for projects. I found Ana's site which lead me to your sandbox and the picture of your gorgeous little girl crying when the sand box was closed; that made me laugh so much I had to comment; too cute!!
You and Ana look like the Charlie's Angels of DIY! Thanks for the pictures, inspiring.

In reply to by Andy O (not verified)

Lady Goats

Thu, 10/20/2011 - 14:08

Your comment about the Charlie's Angels of DIY TOTALLY cracked me up! I LOVE THAT! Wouldn't really say that I'd make the cut, though... But thanks!!! :-)

I'm SO jealous of a year maternity leave. My baby was also VERY undemanding, and I built my first project when she was 5 weeks old. Yay, go us!!! :-) I'd love to see this if you do build it! What other projects are you planning?

Storage Bed

Submitted by kbadd on Sun, 10/13/2013 - 22:15

Sorry there aren't more pictures of the building of it. We ended up rushing through it because a storm was moving in. In total it took about 4 hours to build the boxes and headboard. We already had the upholstered portion of the headboard that I made from scrap a few months ago so we made the bed to fit around it. We decided to leave it without a footboard so that we could slide things underneath easier. This has made storing things underneath very easy, we even keep our laundry baskets tucked underneath and we can have easy access. By making the cubbies slightly smaller we were able to make a total of 4 cubbies on each side and we can store all of our clothes and were able to get rid of our dresser.

Estimated Time Investment
Afternoon Project (3-6 Hours)
Finish Used
Valspar paint and primer in one. I'm sorry, I don't know the exact color.
Recommended Skill Level
Intermediate

Rustic X Coffee Table

Submitted by Anonymous (not verified) on Sat, 01/02/2016 - 13:06

This is my first attempt at a rustic coffee table build based on Ana's designs. I used redwood (mostly) and pine for the bottom shelf. The solution was created using white vinegar and 00 grade steel wool. The solution was not diluted (should have done 50/50 with water) and sat for about 15 days (only needed 5-7 to dissolve all wool).  

Hope you enjoy!


Built from Plan(s)
Estimated Cost
$115
Estimated Time Investment
Weekend Project (10-20 Hours)
Finish Used
Vinegar/Steel Wool oxidized solution - two coats, not diluted + Satin Clear Minwax Polyurethane finish (three coats, sanded w/220 grit sand paper in between).
Recommended Skill Level
Beginner

Bunkbeds for the Grandkids using the Clubhouse Bed plans.

Submitted by Anonymous (not verified) on Mon, 03/18/2019 - 14:02

Used the Clubhouse Plans as the base. Added length to the 2x4's for the second bunk. Made upper and lower railings. Used 2x4's between the legs with 2x2's screwed in for the lower bunk. Hobby Lobby for the nautical swag. So now me and the grandkids have a place to hide!

Estimated Time Investment
Weekend Project (10-20 Hours)
Finish Used
Min wax pickled white wash water base
Recommended Skill Level
Beginner

Cornhole Boards

Submitted by Anonymous (not verified) on Wed, 02/08/2023 - 18:09

I made one set for my son, the one with the stained top. His friends liked it so much and kept borrowing his set, that he wanted to surprise them with their own and asked me to build them one with the LSU colors. Thought they turned out great! Thank you for the plans!

Comments

One happy little girl! And one happy Mommy!

One of the first projects from my new "workshop". I added a mirror to one end and hooks to the front and other end. My 3 year old was ecstatic about helping build it and I enjoyed every minute of it! What a fantastic way to bond and teach and grow, for both of us! Thanks for the site and the plans Ana!!!

Estimated Time Investment
Weekend Project (10-20 Hours)
Finish Used
Latex paint
Recommended Skill Level
Beginner

Comments

hammertime

Sun, 10/23/2011 - 08:13

Love the mirror, what a great addition. Nice job...the bonding memories will outlast the costumes by far. Way to go.

Rustic X Tall Bookshelf

Submitted by Anonymous (not verified) on Sun, 01/03/2016 - 18:26

easy to follow steps. Good weekend project for a beginner. I just got tools for Christmas and I tackled this without prior building experience. Excited for more projects

Built from Plan(s)
Estimated Cost
$75
Estimated Time Investment
Weekend Project (10-20 Hours)
Finish Used
Dark Walnut stain and Sage page with rustic finishing
Recommended Skill Level
Beginner

Pinkpinkpink sandbox

Submitted by Anonymous (not verified) on Sat, 03/23/2019 - 11:26

I let my kindergartener  choose the color, so we have a pink sandbox! I live that this has a full lid, as the sand generated a lot of interest from our chickens! Plan egg followed as written, with a few minor detail changes, love it! Note, 320 pounds of sand was a just right amount for this sandbox!

Built from Plan(s)
Estimated Cost
50, but I used heavy gate fixtures and expensive exterior paint and an additional finish, it could be made for less.
Estimated Time Investment
Day Project (6-9 Hours)
Finish Used
Behr satin finish exterior in high maintenance pink
Recommended Skill Level
Beginner

The littlest Helper Tower

Submitted by Anonymous (not verified) on Fri, 02/17/2023 - 04:54

I built this Tower from plans found on Ana's site.
Decided to do with a two tone colour.
I'm very happy how it turned out.
All three Grand Kids fit in there and love it.

Thanks Ana

Built from Plan(s)

Salsa Console

We recently built our version of the Salsa console to use as a buffet/sideboard in our dining room. It turned out beautifully and we couldn't be happier with it! Check out our blog for more details :)

http://strawbridgestuff.com

Built from Plan(s)
Estimated Cost
$100 (using paint and supplies on hand)
Estimated Time Investment
Week Long Project (20 Hours or More)
Finish Used
Valspar "Snowcap White" in Semi Gloss; Minwax Ebony Stain, Satin Poly finish. Details on "glaze" technique can be found on our blog post!
Recommended Skill Level
Intermediate

Comments

Jamie's Little Car

This was my second build (easier than my first project...the Adirondack chair). Its a heavy piece and plenty sturdy as a birthday present for my one year old nephew and his sister and cousins to play on. Bought a plastic steering wheel from amazon.com. the textured paint (Anchor Gray - textured metallic by Martha Stewart was perfect for the wheels). Couldn't find the plans on ana-white but did get them from http://www.morelikehome.net/2012/10/day-26-build-little-car.html?m=1

Estimated Time Investment
Weekend Project (10-20 Hours)
Recommended Skill Level
Beginner

Modern Farm Table

I built this table back in May so a little late posting. It is the second Modern Farm Table that I've built. The first was built for my sister and this one for my nephew and his partner. I am very happy and so are they with how it turned out. Thanks again Ana for your plans.

Estimated Cost
The estimated cost was approx. $300
Estimated Time Investment
Week Long Project (20 Hours or More)
Finish Used
Before staining I did a whole lot of sanding. I first used minwax wood conditioner-one coat. Second Step was to apply one coat of minwax weathered oak and then two coats of minwax special walnut. For the protective coat I used minwax polycrylic. I applied two coats all over and a third to the top of the table and benches.
Recommended Skill Level
Beginner

Apartment Perfect Dinng set

Submitted by Tbacks on Sat, 03/30/2019 - 19:17

We modified the farmhouse table and bench to make a table for our daughters apartment. We made the table 54” long which turned out to be the perfect size for the apartments dining room space.  You may also notice we built a dog bowl table to match the farmhouse table style.  Love the design!

Estimated Cost
$200
Estimated Time Investment
Weekend Project (10-20 Hours)
Finish Used
Off-white paint wash bases with a weathered wood treatment for table, bench and chair tops
Recommended Skill Level
Intermediate