Community Brag Posts
Hanging Beds
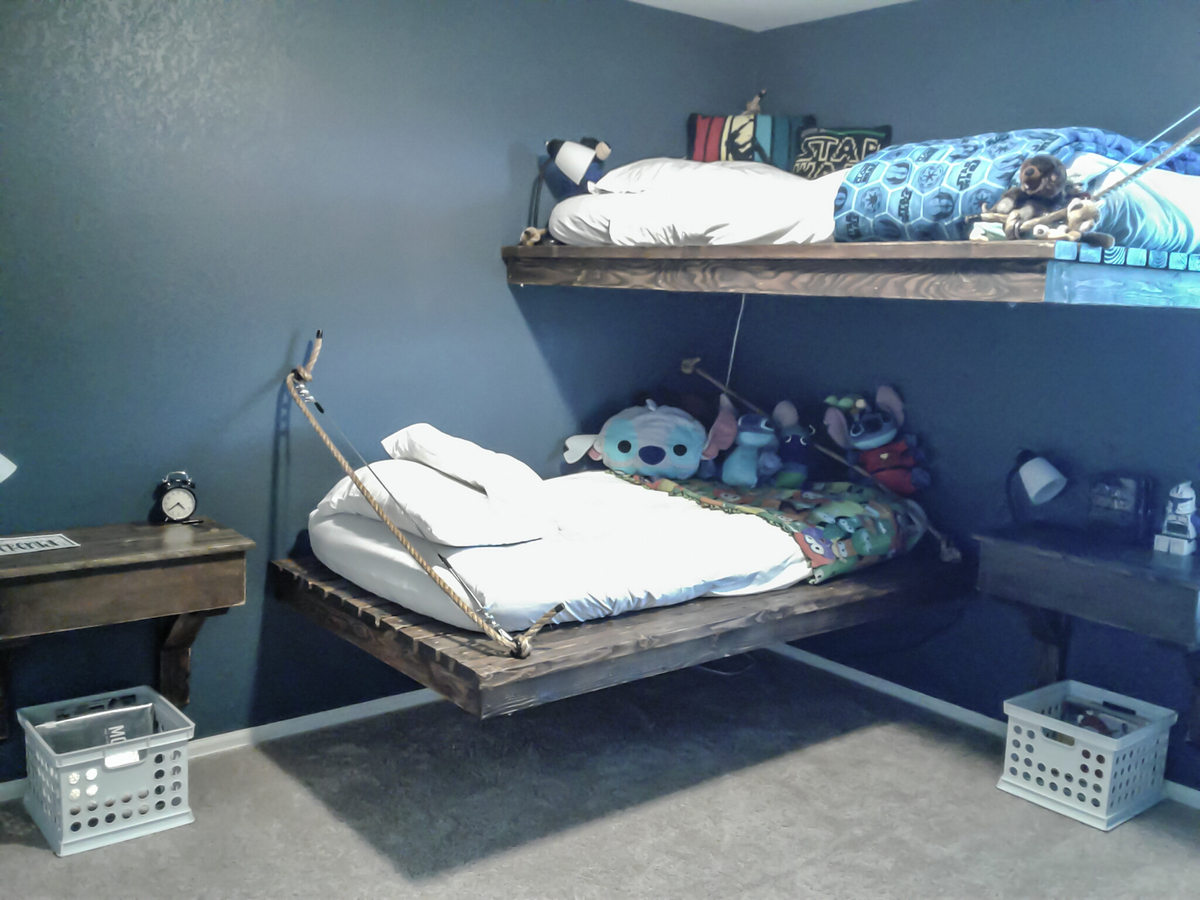
Using the daybed plan I modified the beds to hang supported by two walls. I mounted the bed to the wall into the studs using 5/16 GRK Rugged Structural Screws, and also used structural screws to attach all the framing supports. I originally tried to hang the unsupported side with rope from a lag thread screw eye in the wall stud and a lag eye bolt in the bed frame, but the rope had too much stretch and would not adequately hold the corner (as the rope stretched the weight on the corner pulled on the 2x4 wall support at an odd angle that would probably eventually break the frame). So, I found stainless steel uncoated wire rope, with the appropriate fasteners, and that seemed to hold well with less give on the corner. I was still a little uncomfortable with the amount of force pulling on the 2x4 center supports at the 2x4 wall brace so I also added 2x4 joist hangers on the center supports. The corner still moves slightly when I hang on it (I'm about 110lbs), but I have no doubt the bed will support the weight of my kids without issue. My 200lb husband got on it without any problems. The beds are straight forward and cost-effective to make, you just have to be sure you mount them safely. Also, a tip for those of you planning on mounting the beds to a wall, mount the frame first and then screw on the decking boards...so much lighter and easier to work with that way!!
Built from Plan(s)
Estimated Cost
180.00 for 2 beds and all the hardware to hang them from the wall.
Estimated Time Investment
Week Long Project (20 Hours or More)
Finish Used
jacobean stain, sanded to distress, and one coat of triple thick poly in satin
Recommended Skill Level
Intermediate
Modern Adirondack Chair

Love this chair. I used old fence planks for the seat. Super easy. Clamps are a girls best friend.
Built from Plan(s)
Estimated Cost
$25
Estimated Time Investment
An Hour or Two (0-2 Hours)
Recommended Skill Level
Beginner
All Dolled Up
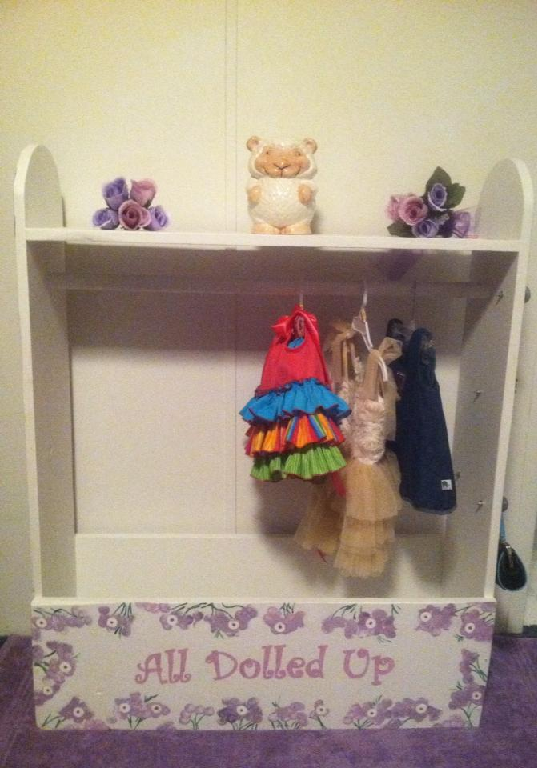
This is my first project. My husband was out one morning so i decided to try to figure out how to work his tools and create this dress up cabinet. I love the way it turned out and it was so easy! I am praying God will bless me with a little girl, so I made this for her--for I WALK BY FAITH not by SIGHT! Thanks Ana, your plans are amazing!
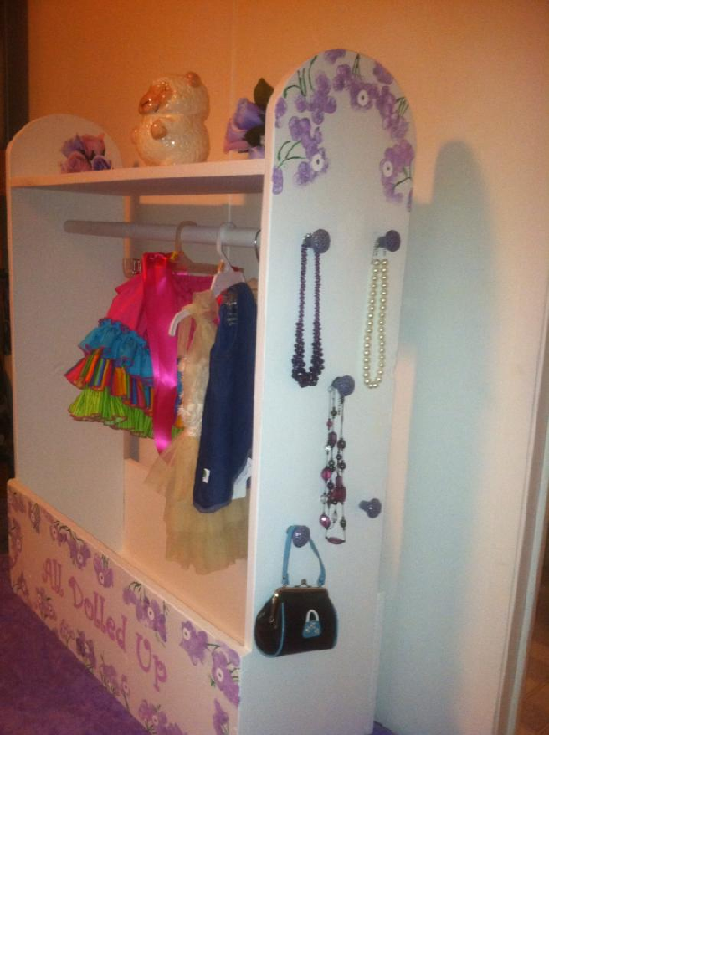
Built from Plan(s)
Estimated Cost
$35
Finish Used
White, lavendar, and Pink paint.
Recommended Skill Level
Starter Project
Comments
Desk & Hutch
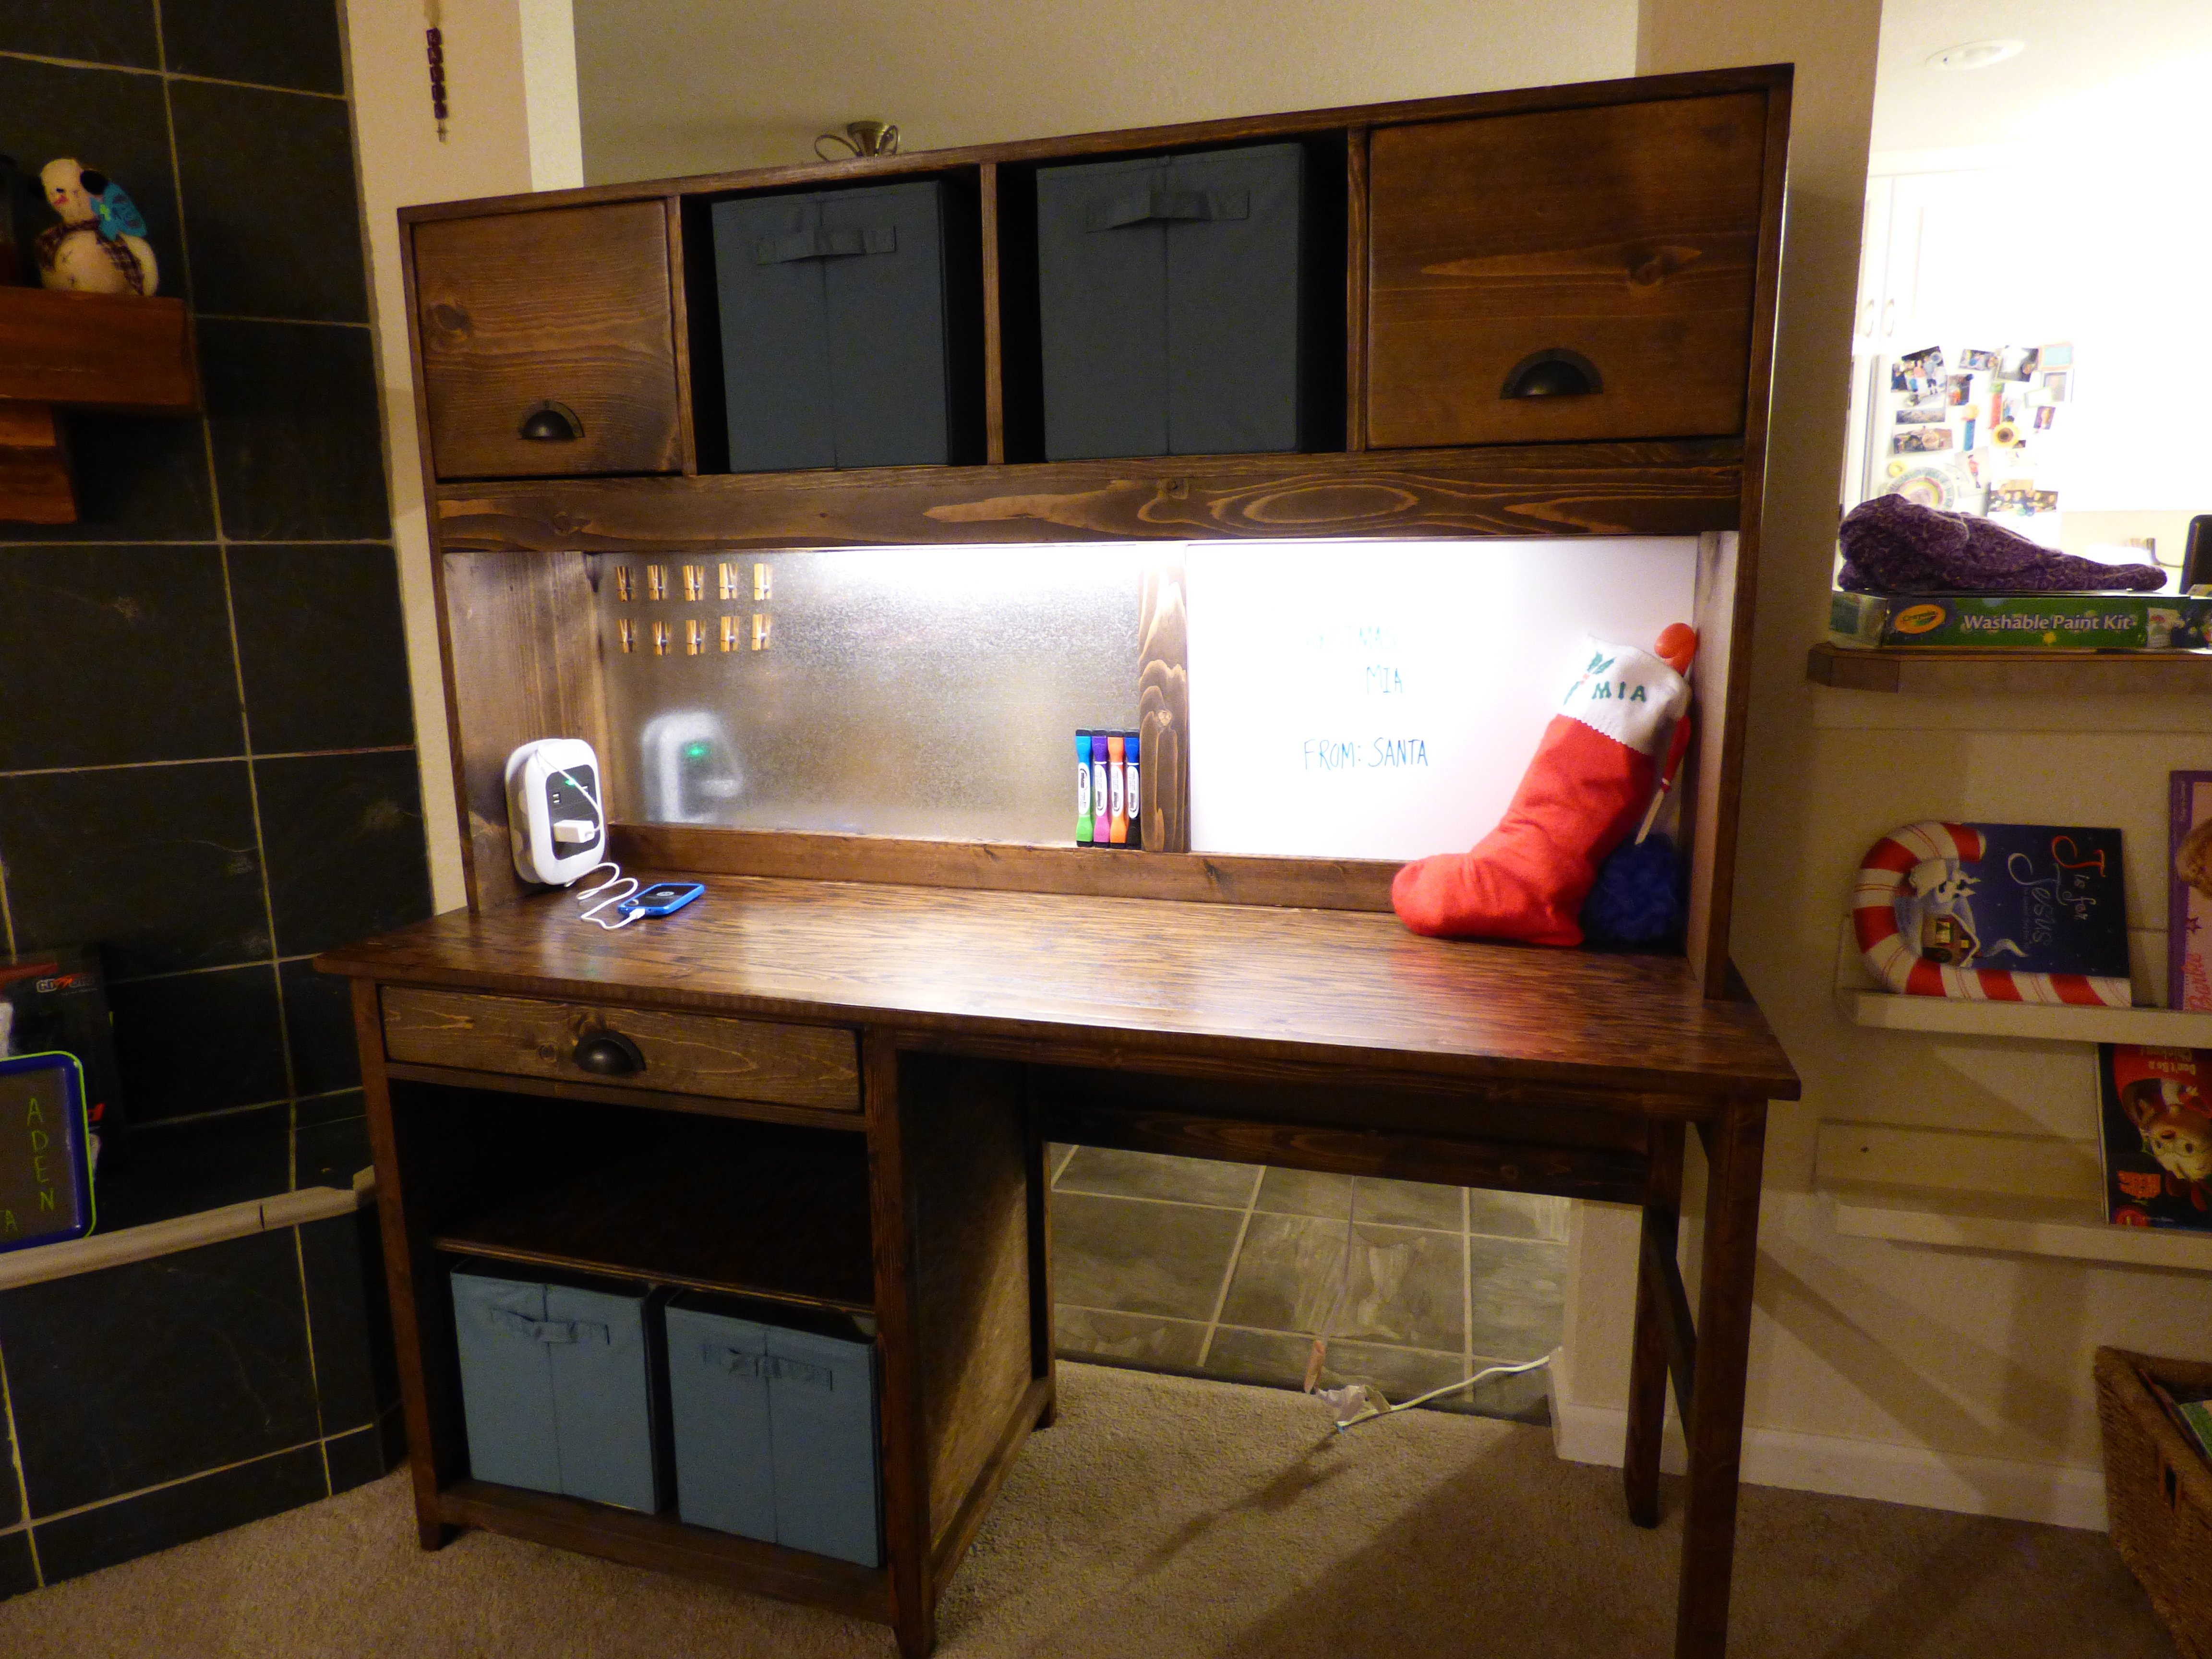
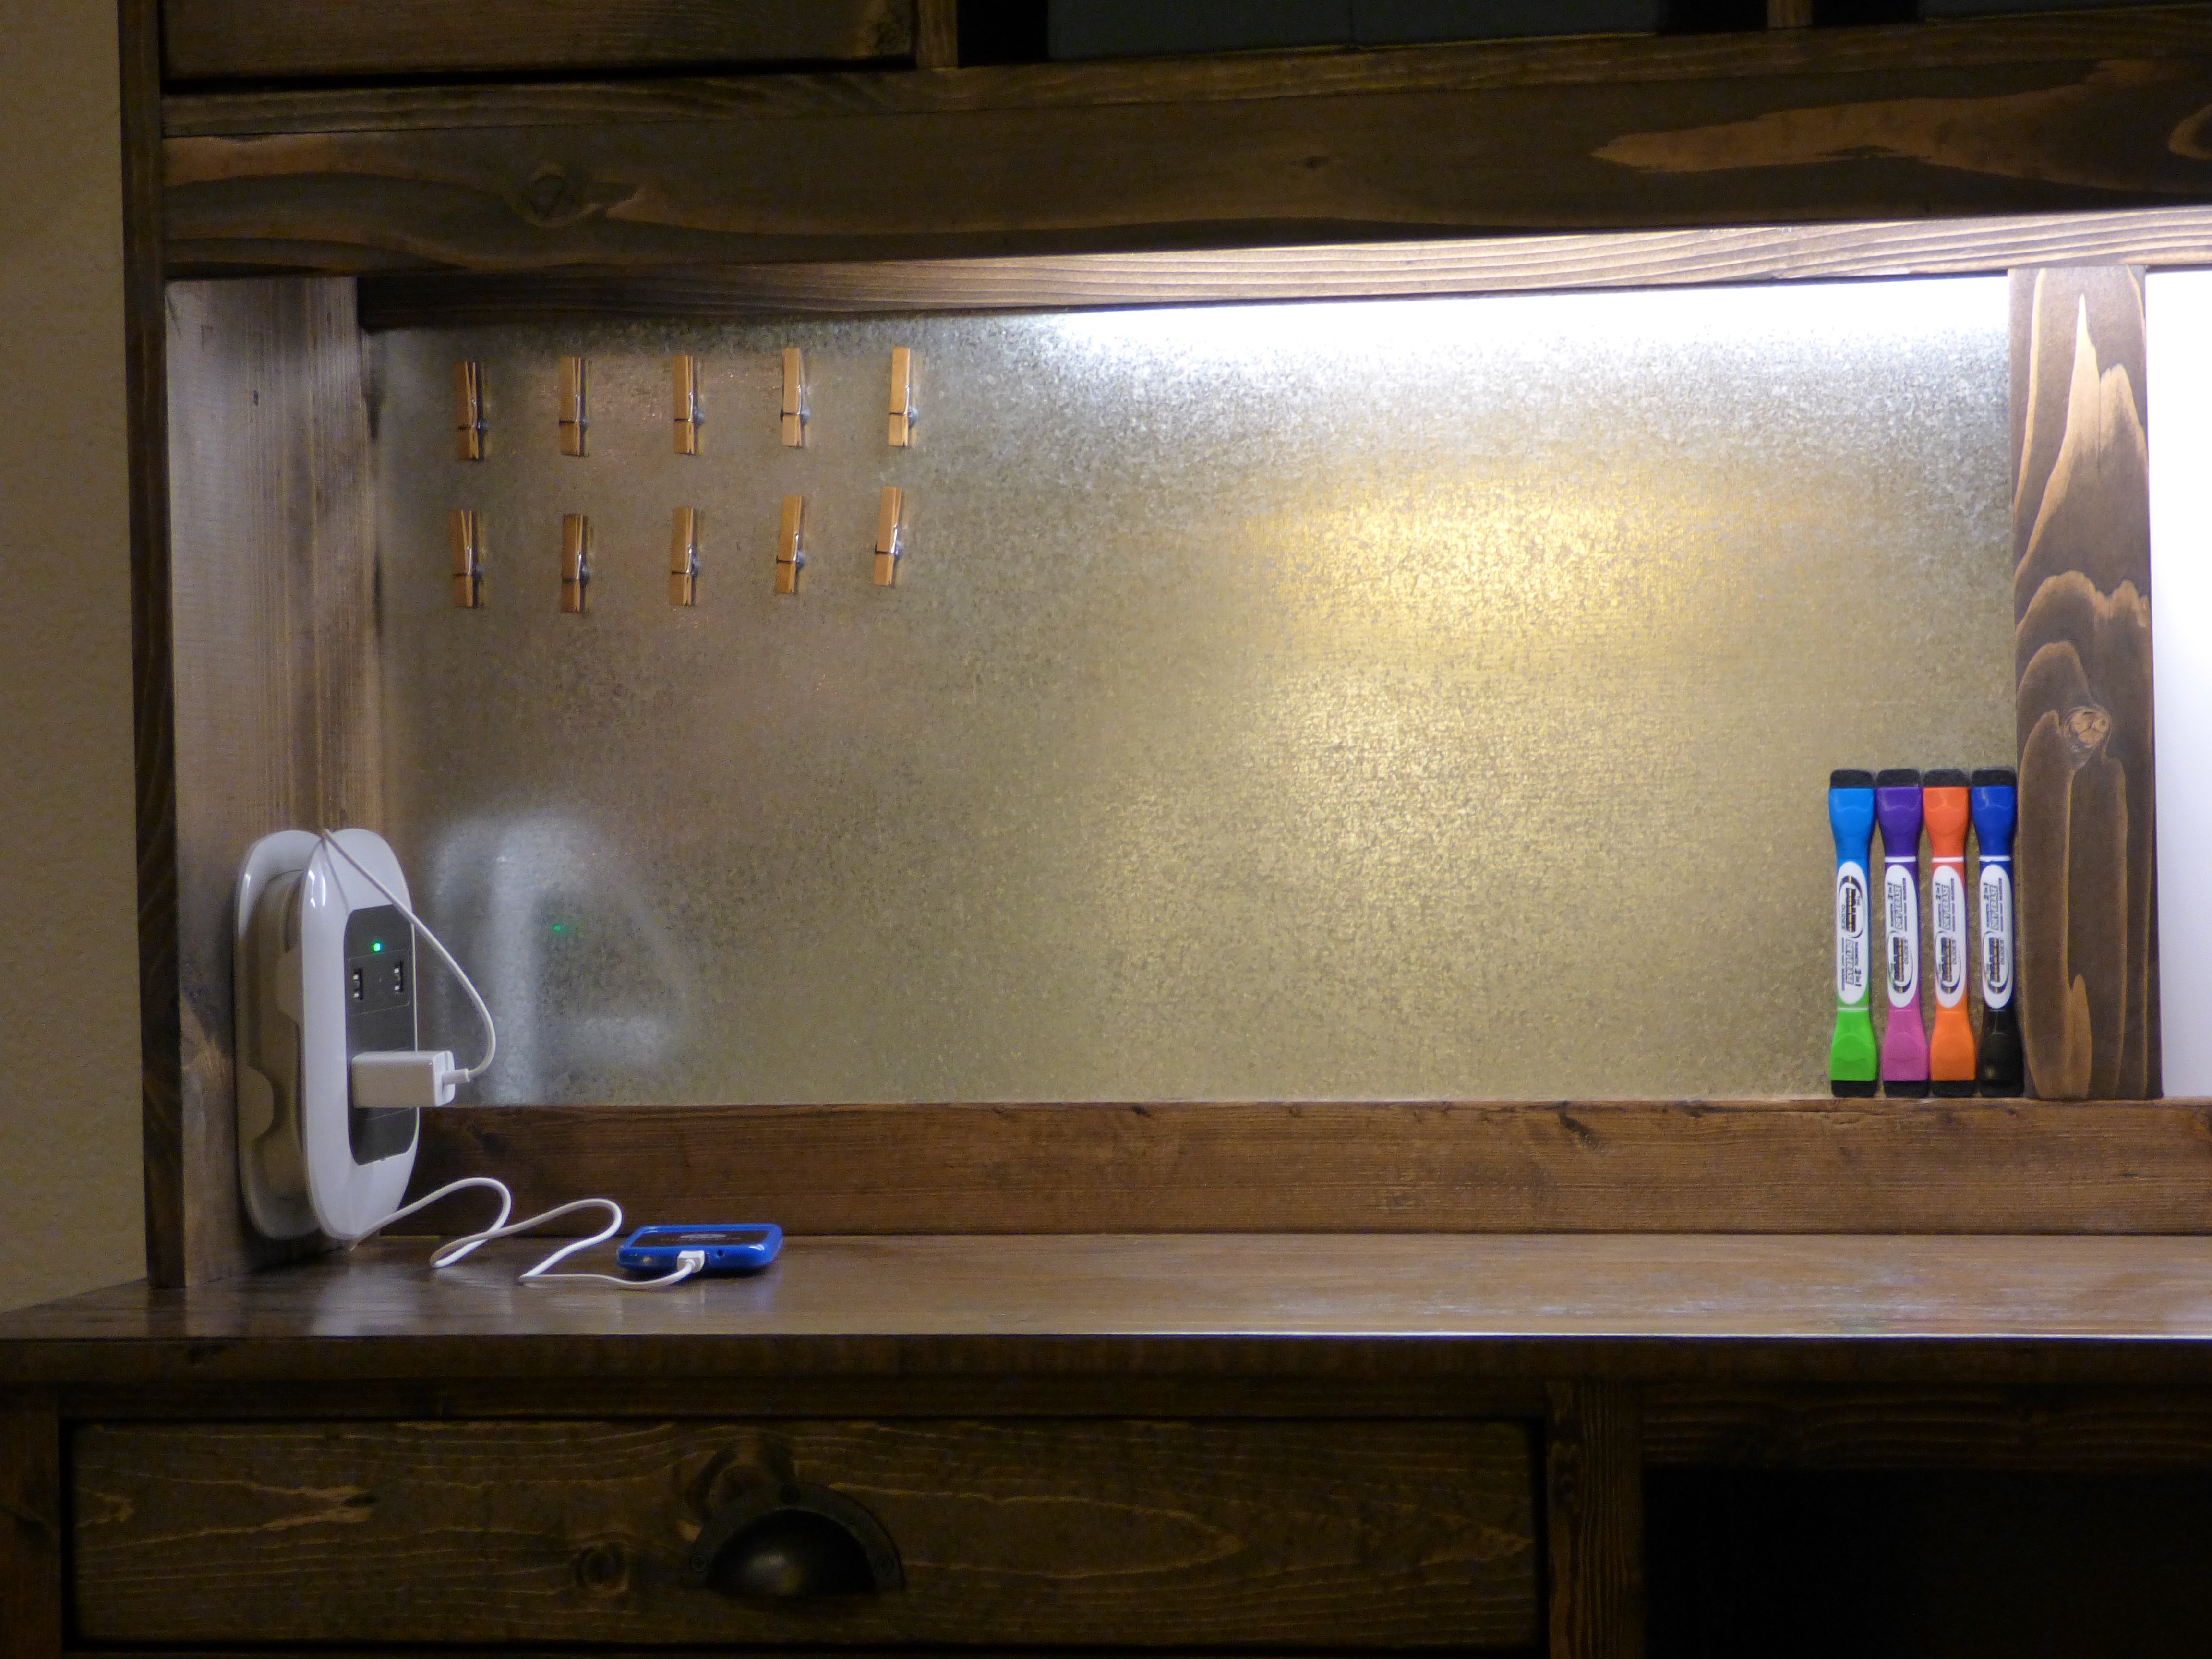
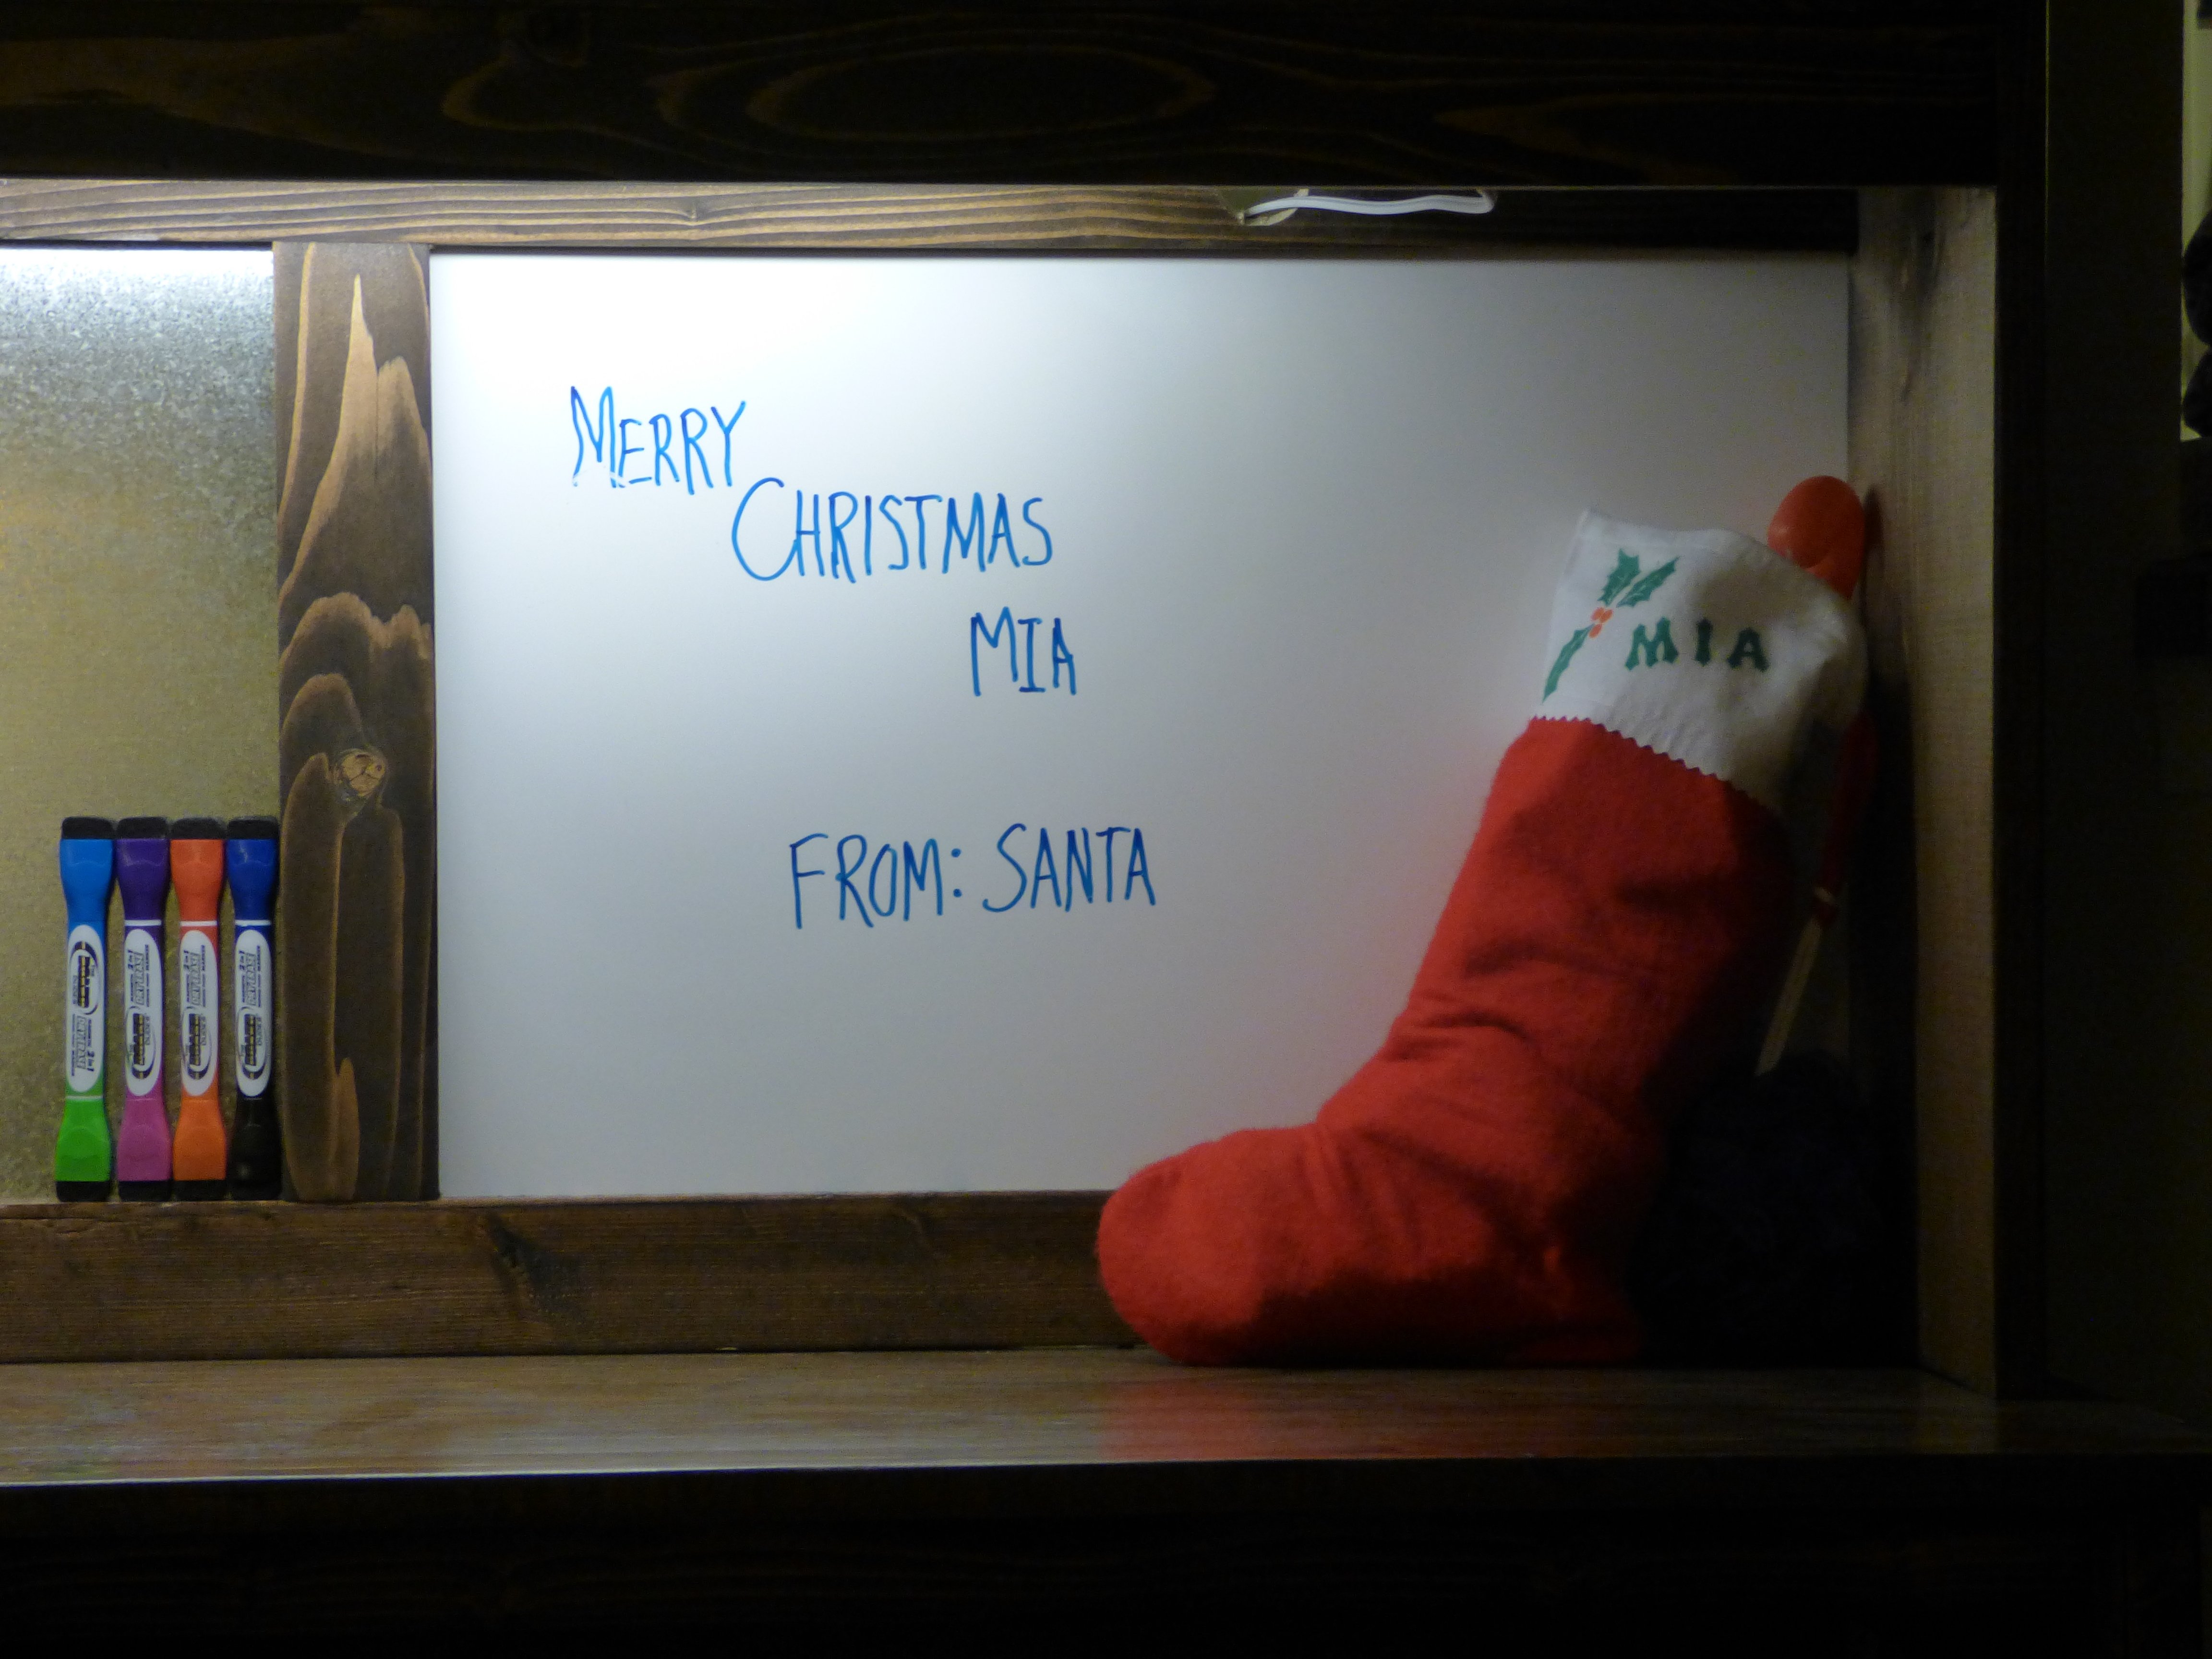
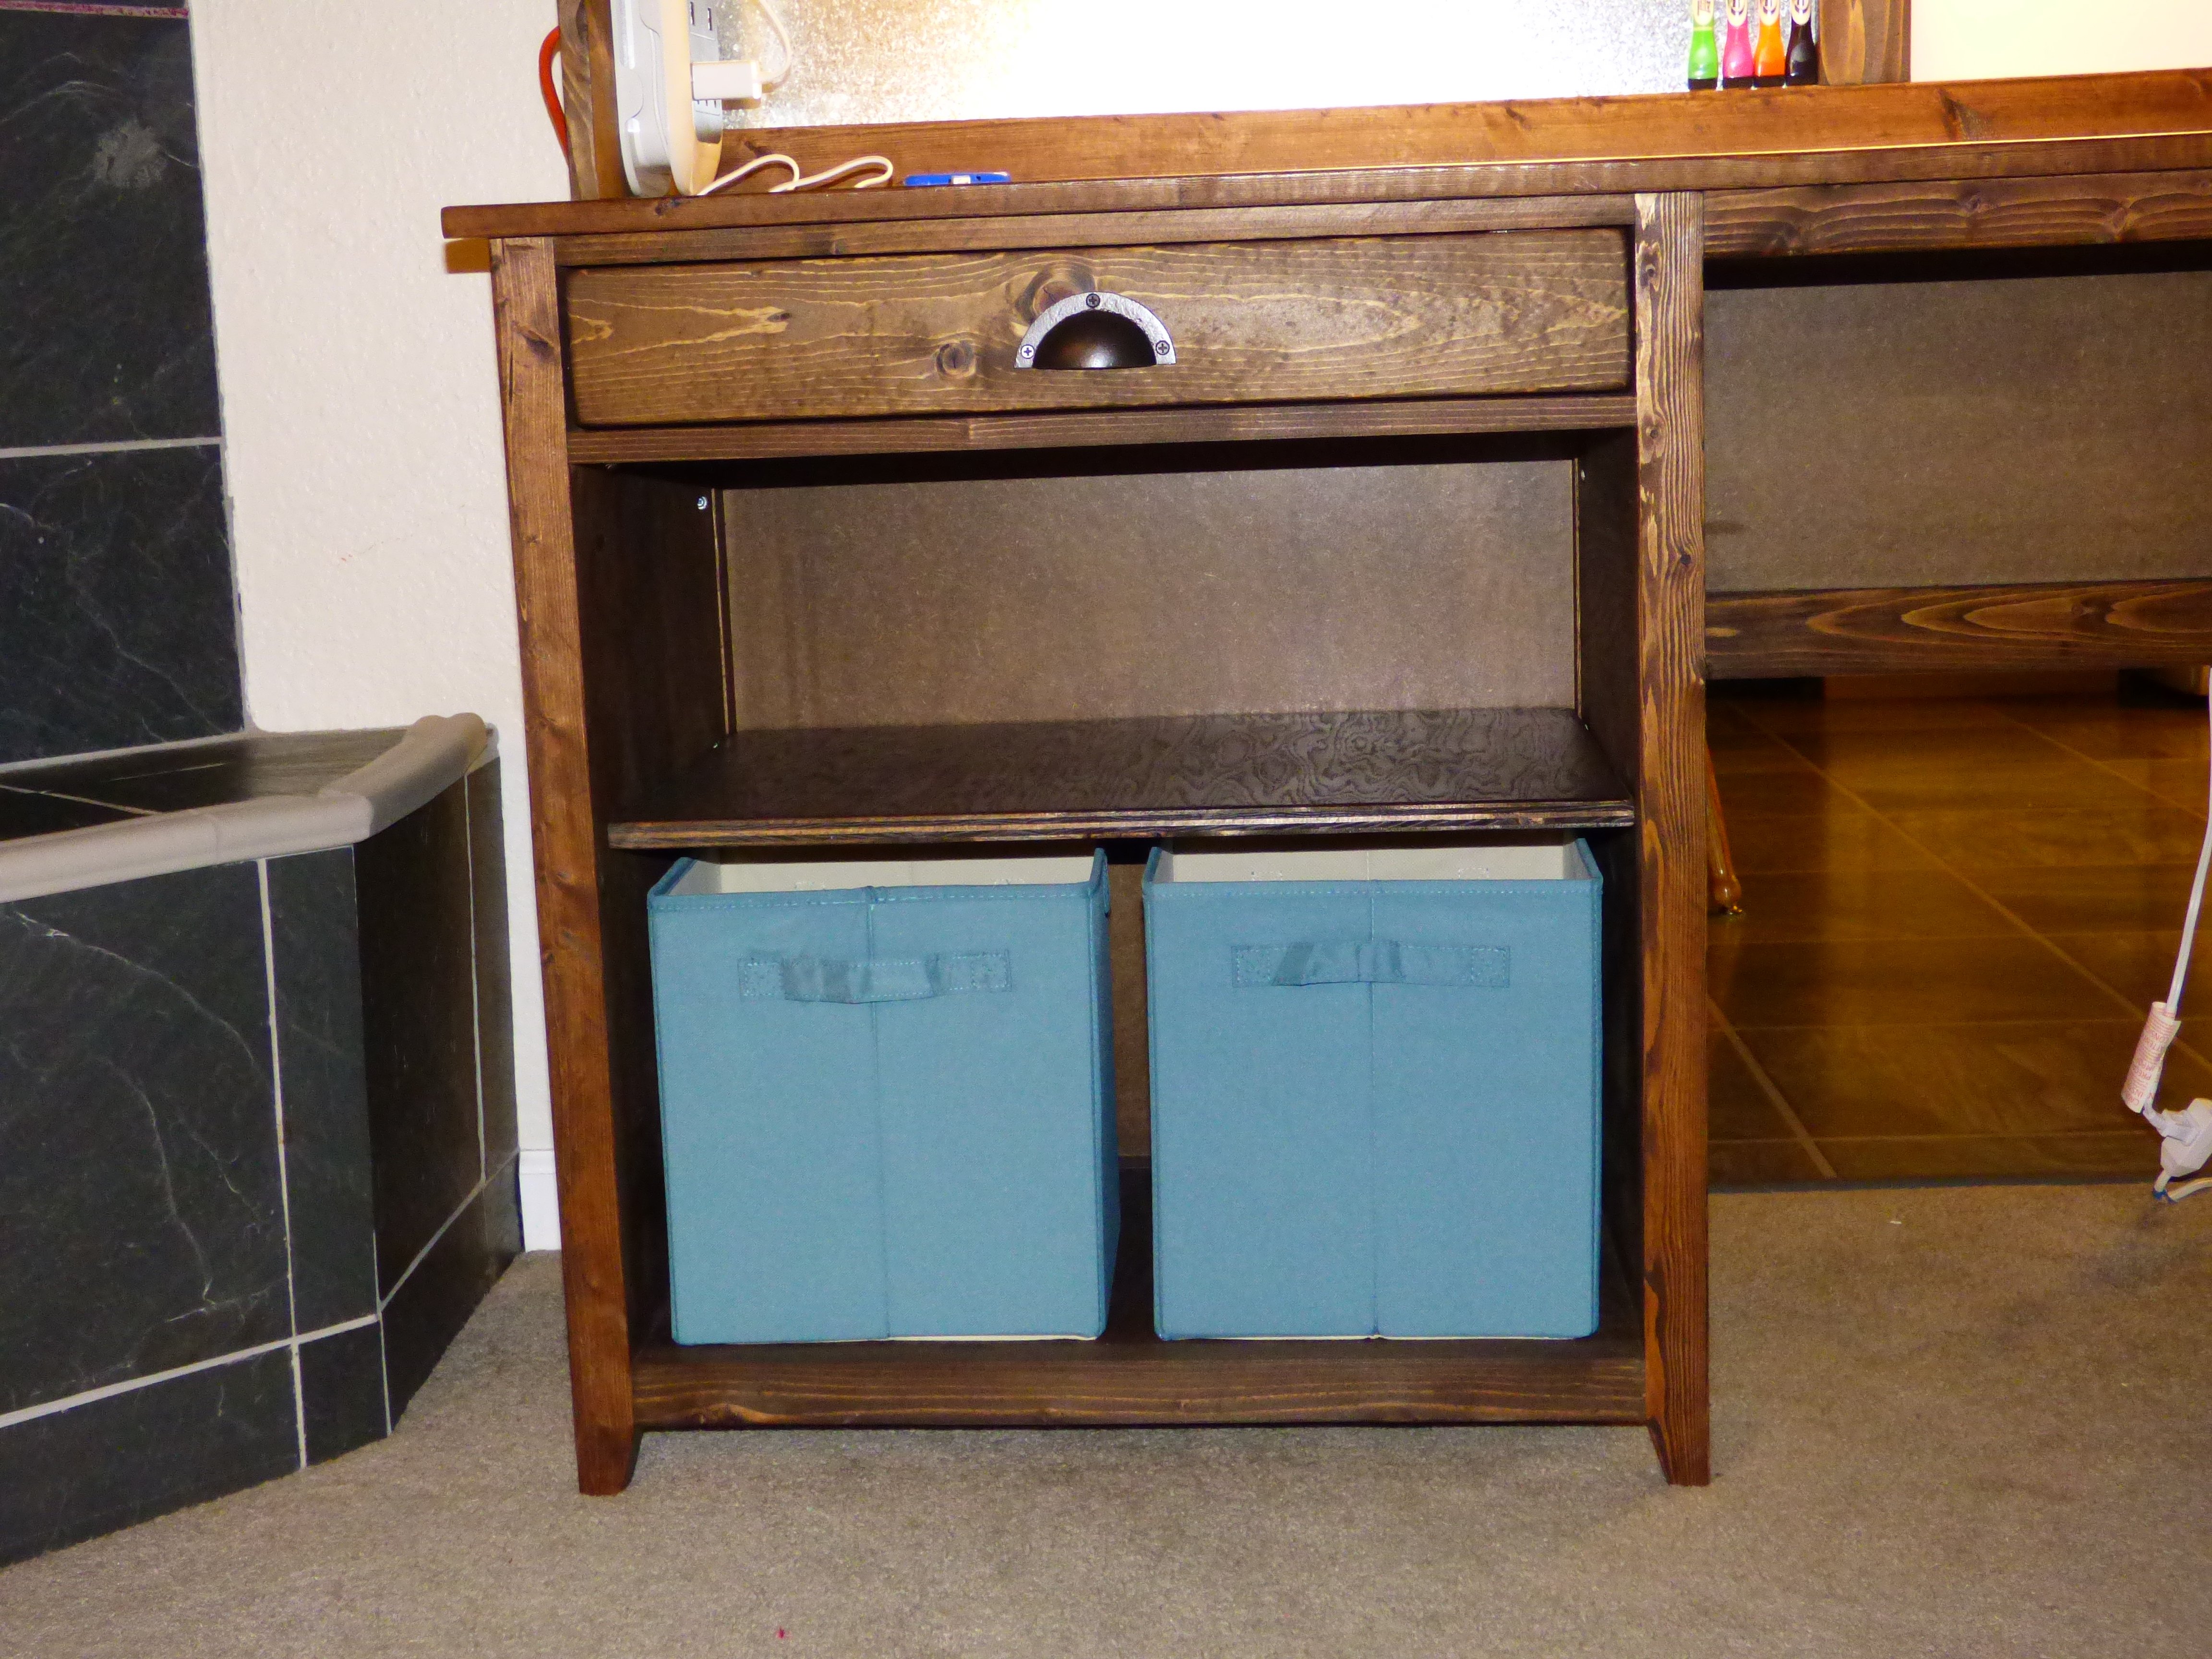
I was not able to get to this desk last year and thought my 15 year old teenage daughter had forgotten about it and was getting too old. Around Thanksgiving she made a comment with a sigh that it would never happen and she understood. I immediately went to work in the garage to have this ready on Christmas morning. She had no idea and was very surprised to find it near the Christmas tree!
Desk included a power strip with USB ports, an under the hutch light, magnet board & dry erase board w/ magnet markers to stick on the magnet board.
Thank you so much for putting these plans on-line.
Built from Plan(s)
Estimated Time Investment
Weekend Project (10-20 Hours)
Recommended Skill Level
Intermediate
Comments
Nitzan
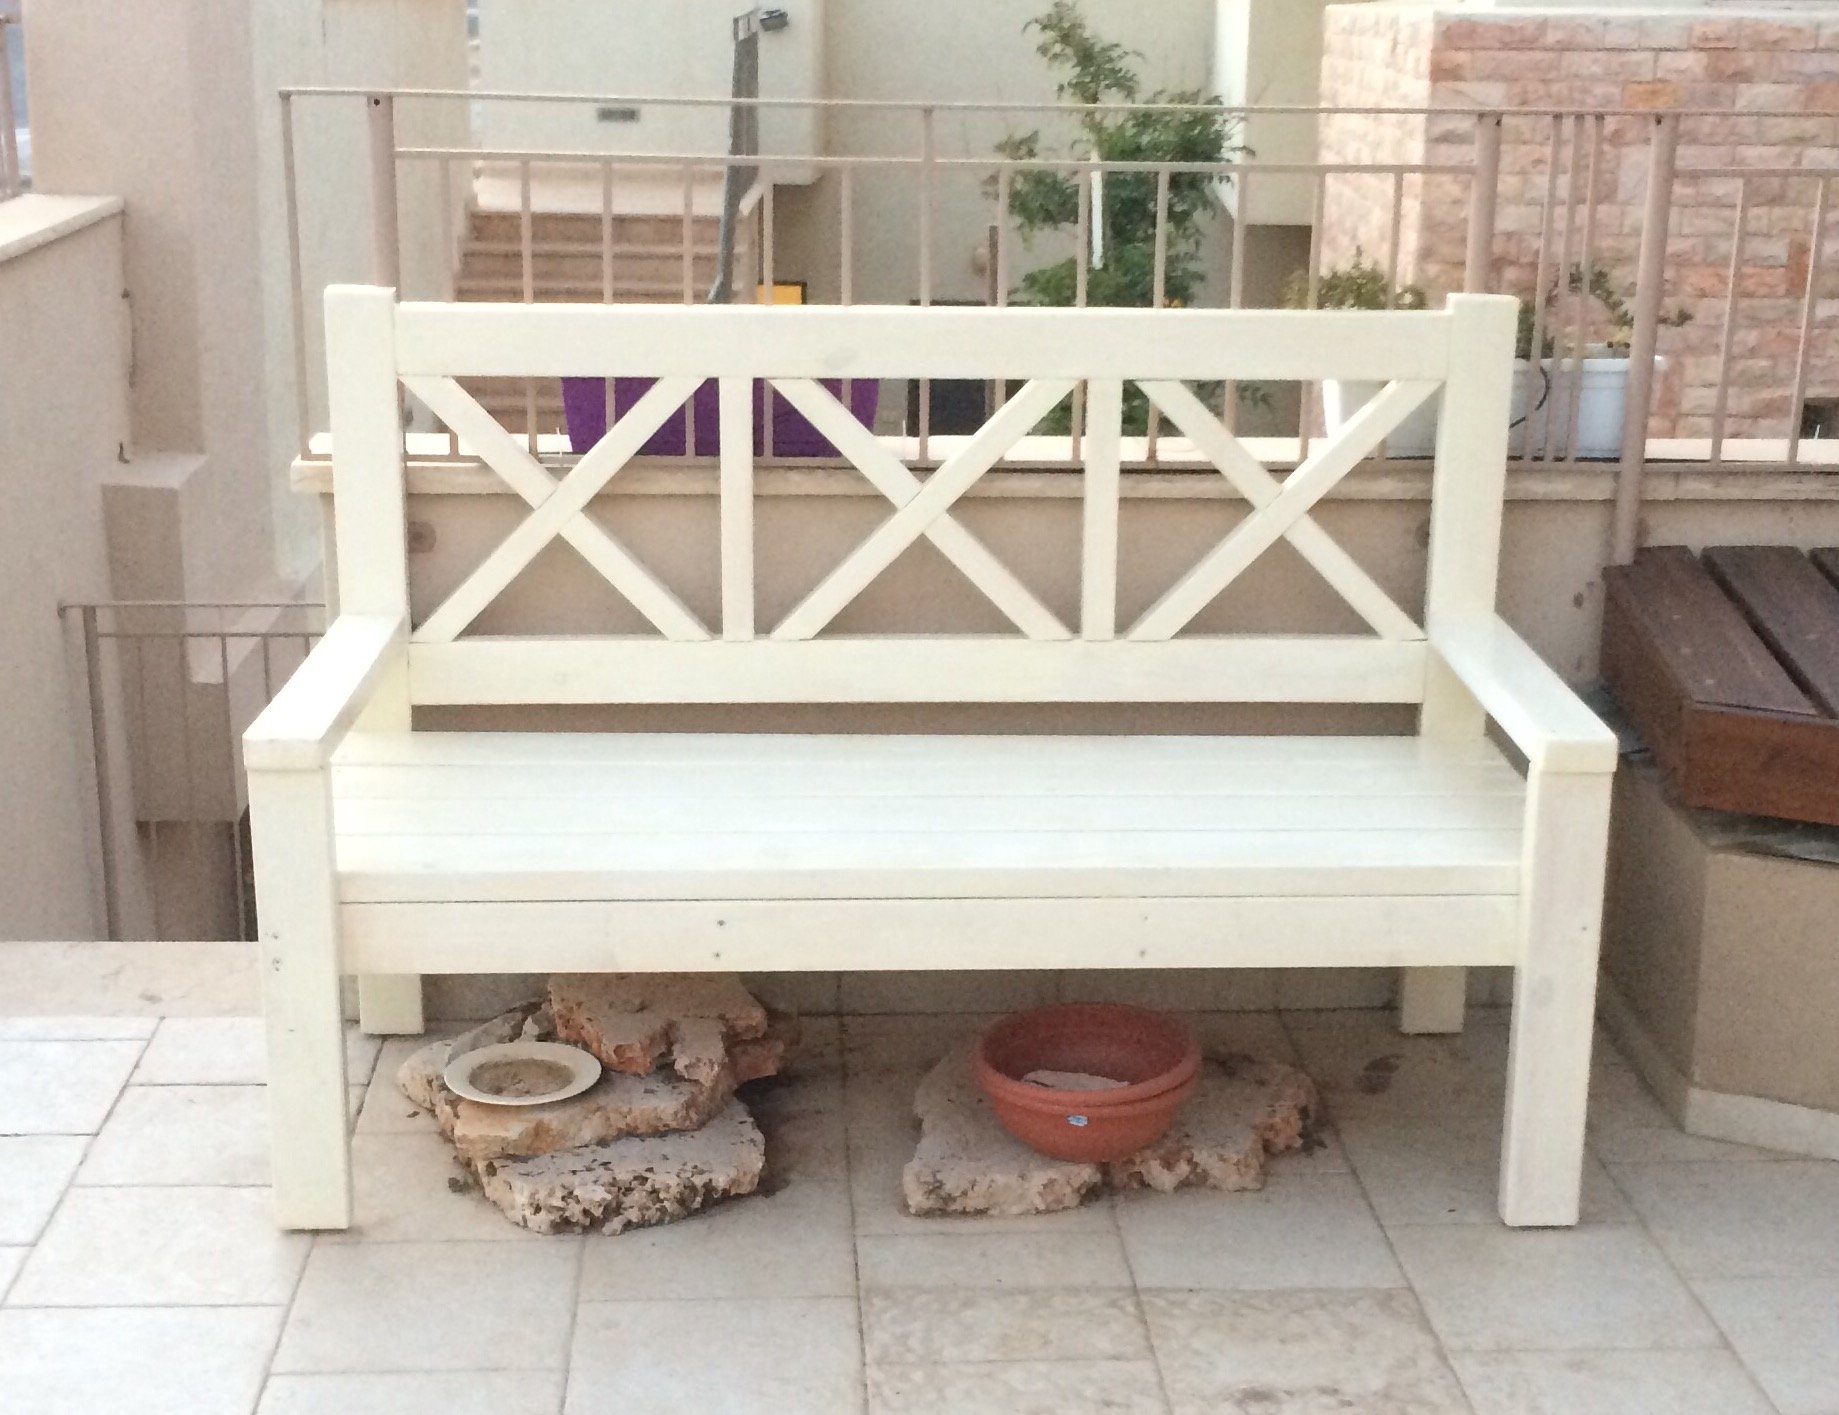
I love this plan, it was easy to follow.
I live in Israel, so had to translate to centimeters.
I made the X from 2 full pieces, cutting a half width dado. Found it easier to assemble.
Few minutes after placing it in the house front, a friend suggested buying it....
Thanks
Built from Plan(s)
Estimated Cost
300 NIS, it's about 83$
Estimated Time Investment
Week Long Project (20 Hours or More)
Finish Used
Chalked rustoleum,
With Yacht Varnish Matt top.
It made the bench a bit too yellow, but the result is still nice
With Yacht Varnish Matt top.
It made the bench a bit too yellow, but the result is still nice
Recommended Skill Level
Advanced
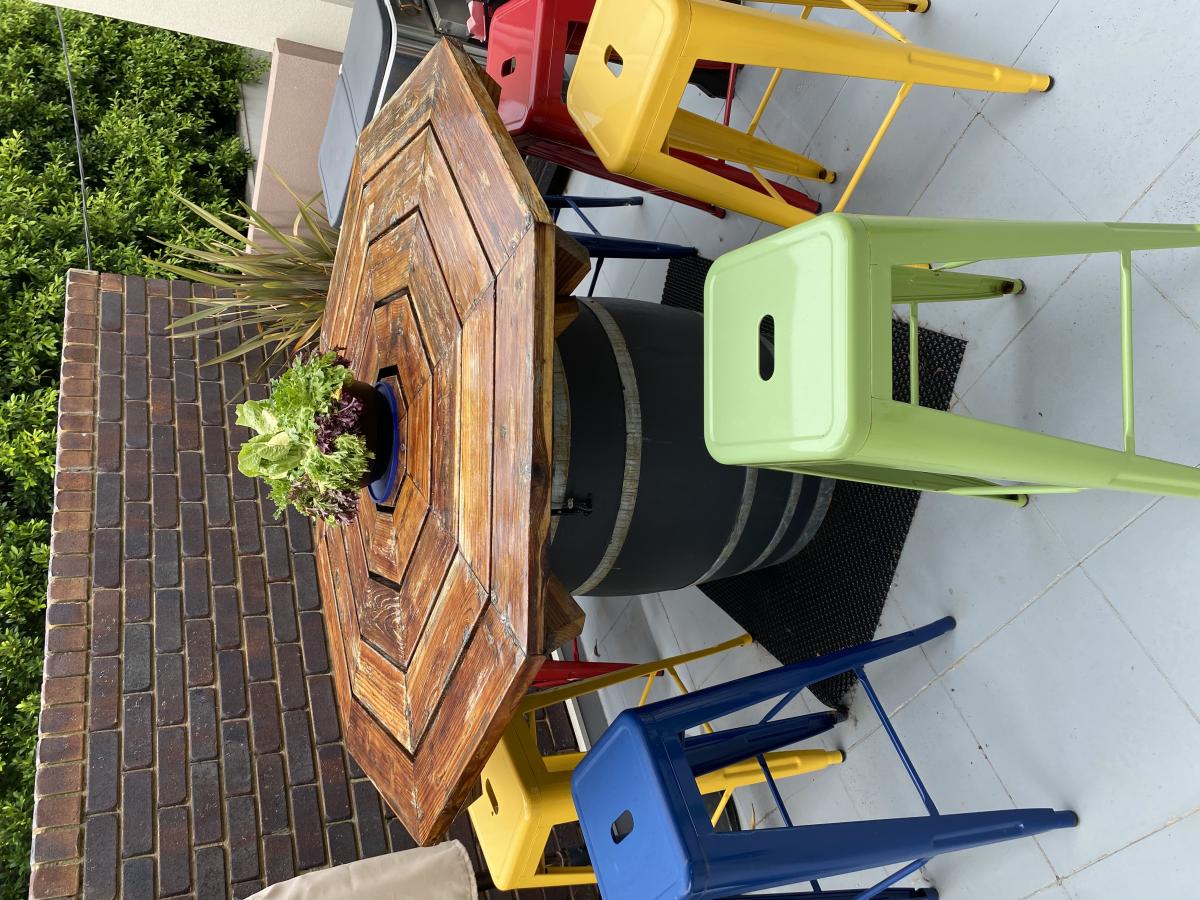
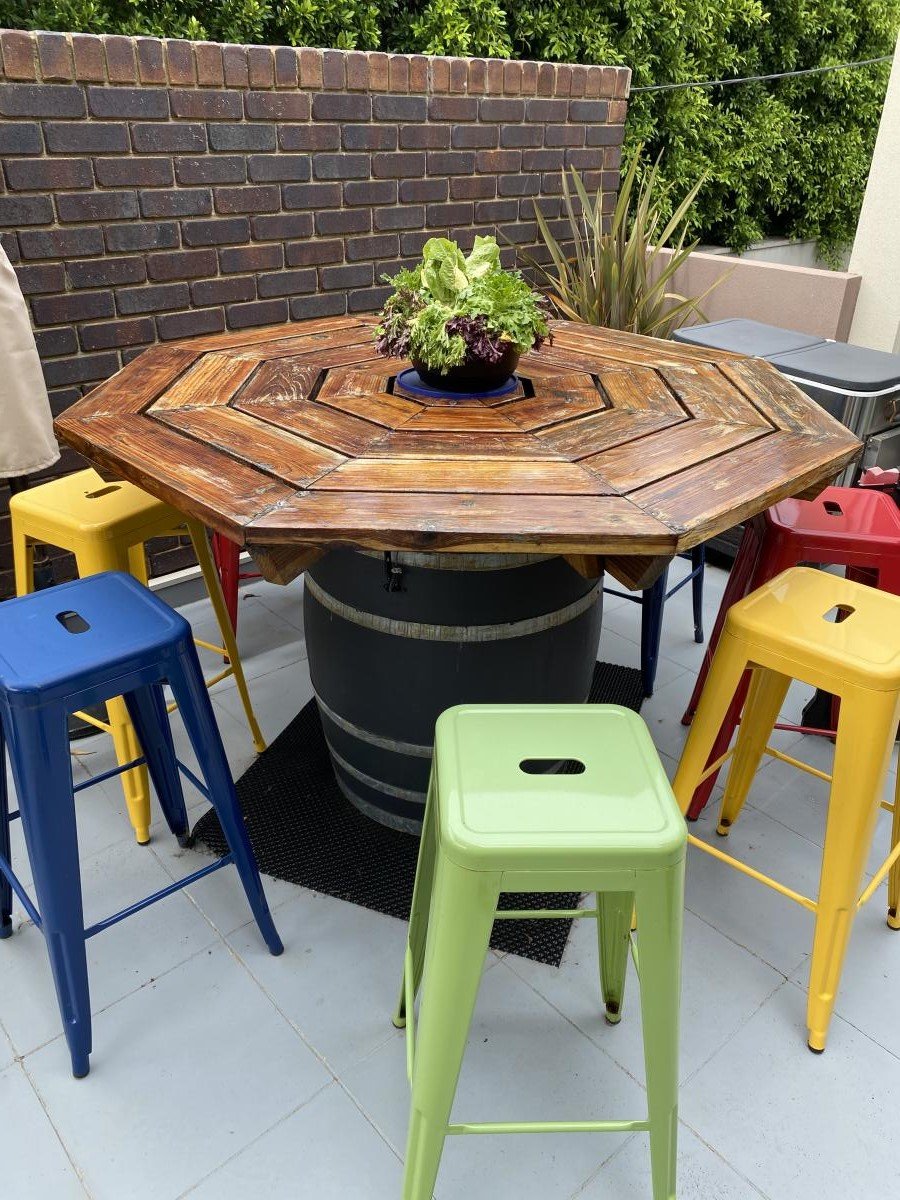
Octagon picnic table, made from redwood. Modified after eight years.
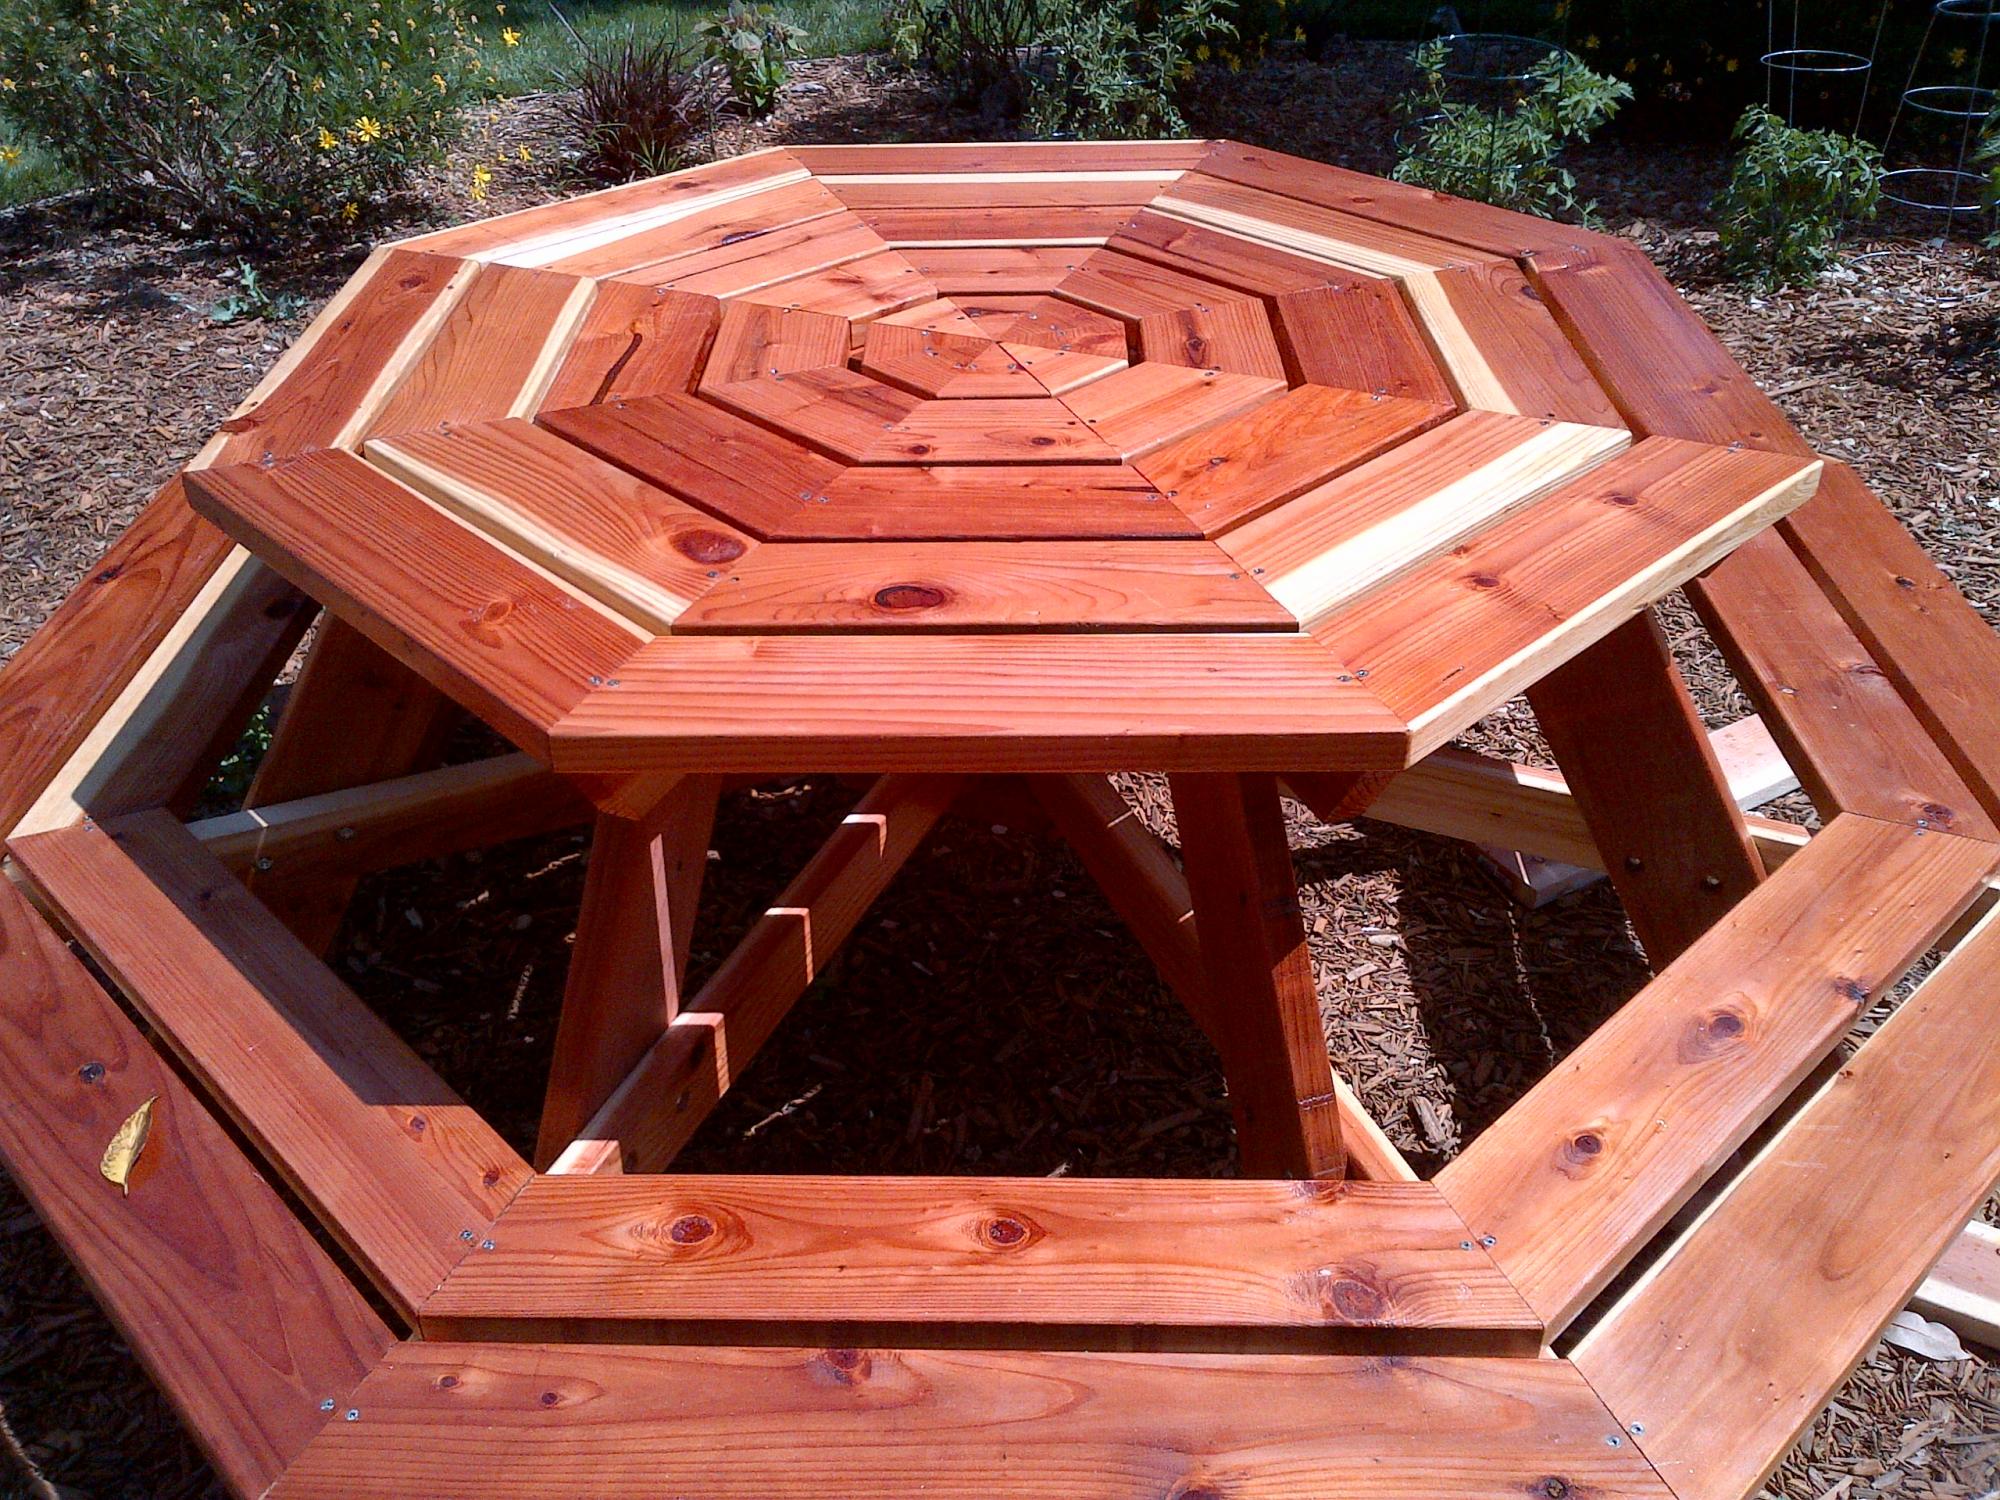
I made the octagon picnic table in 2012, using redwood. We lived in California, then in Asia, and now in Australia. In 2020 I modified the table using a wine barrel, because the original legs had rotted.
Built from Plan(s)
Estimated Time Investment
Week Long Project (20 Hours or More)
Comments
Modified Wide Cabin Dresser
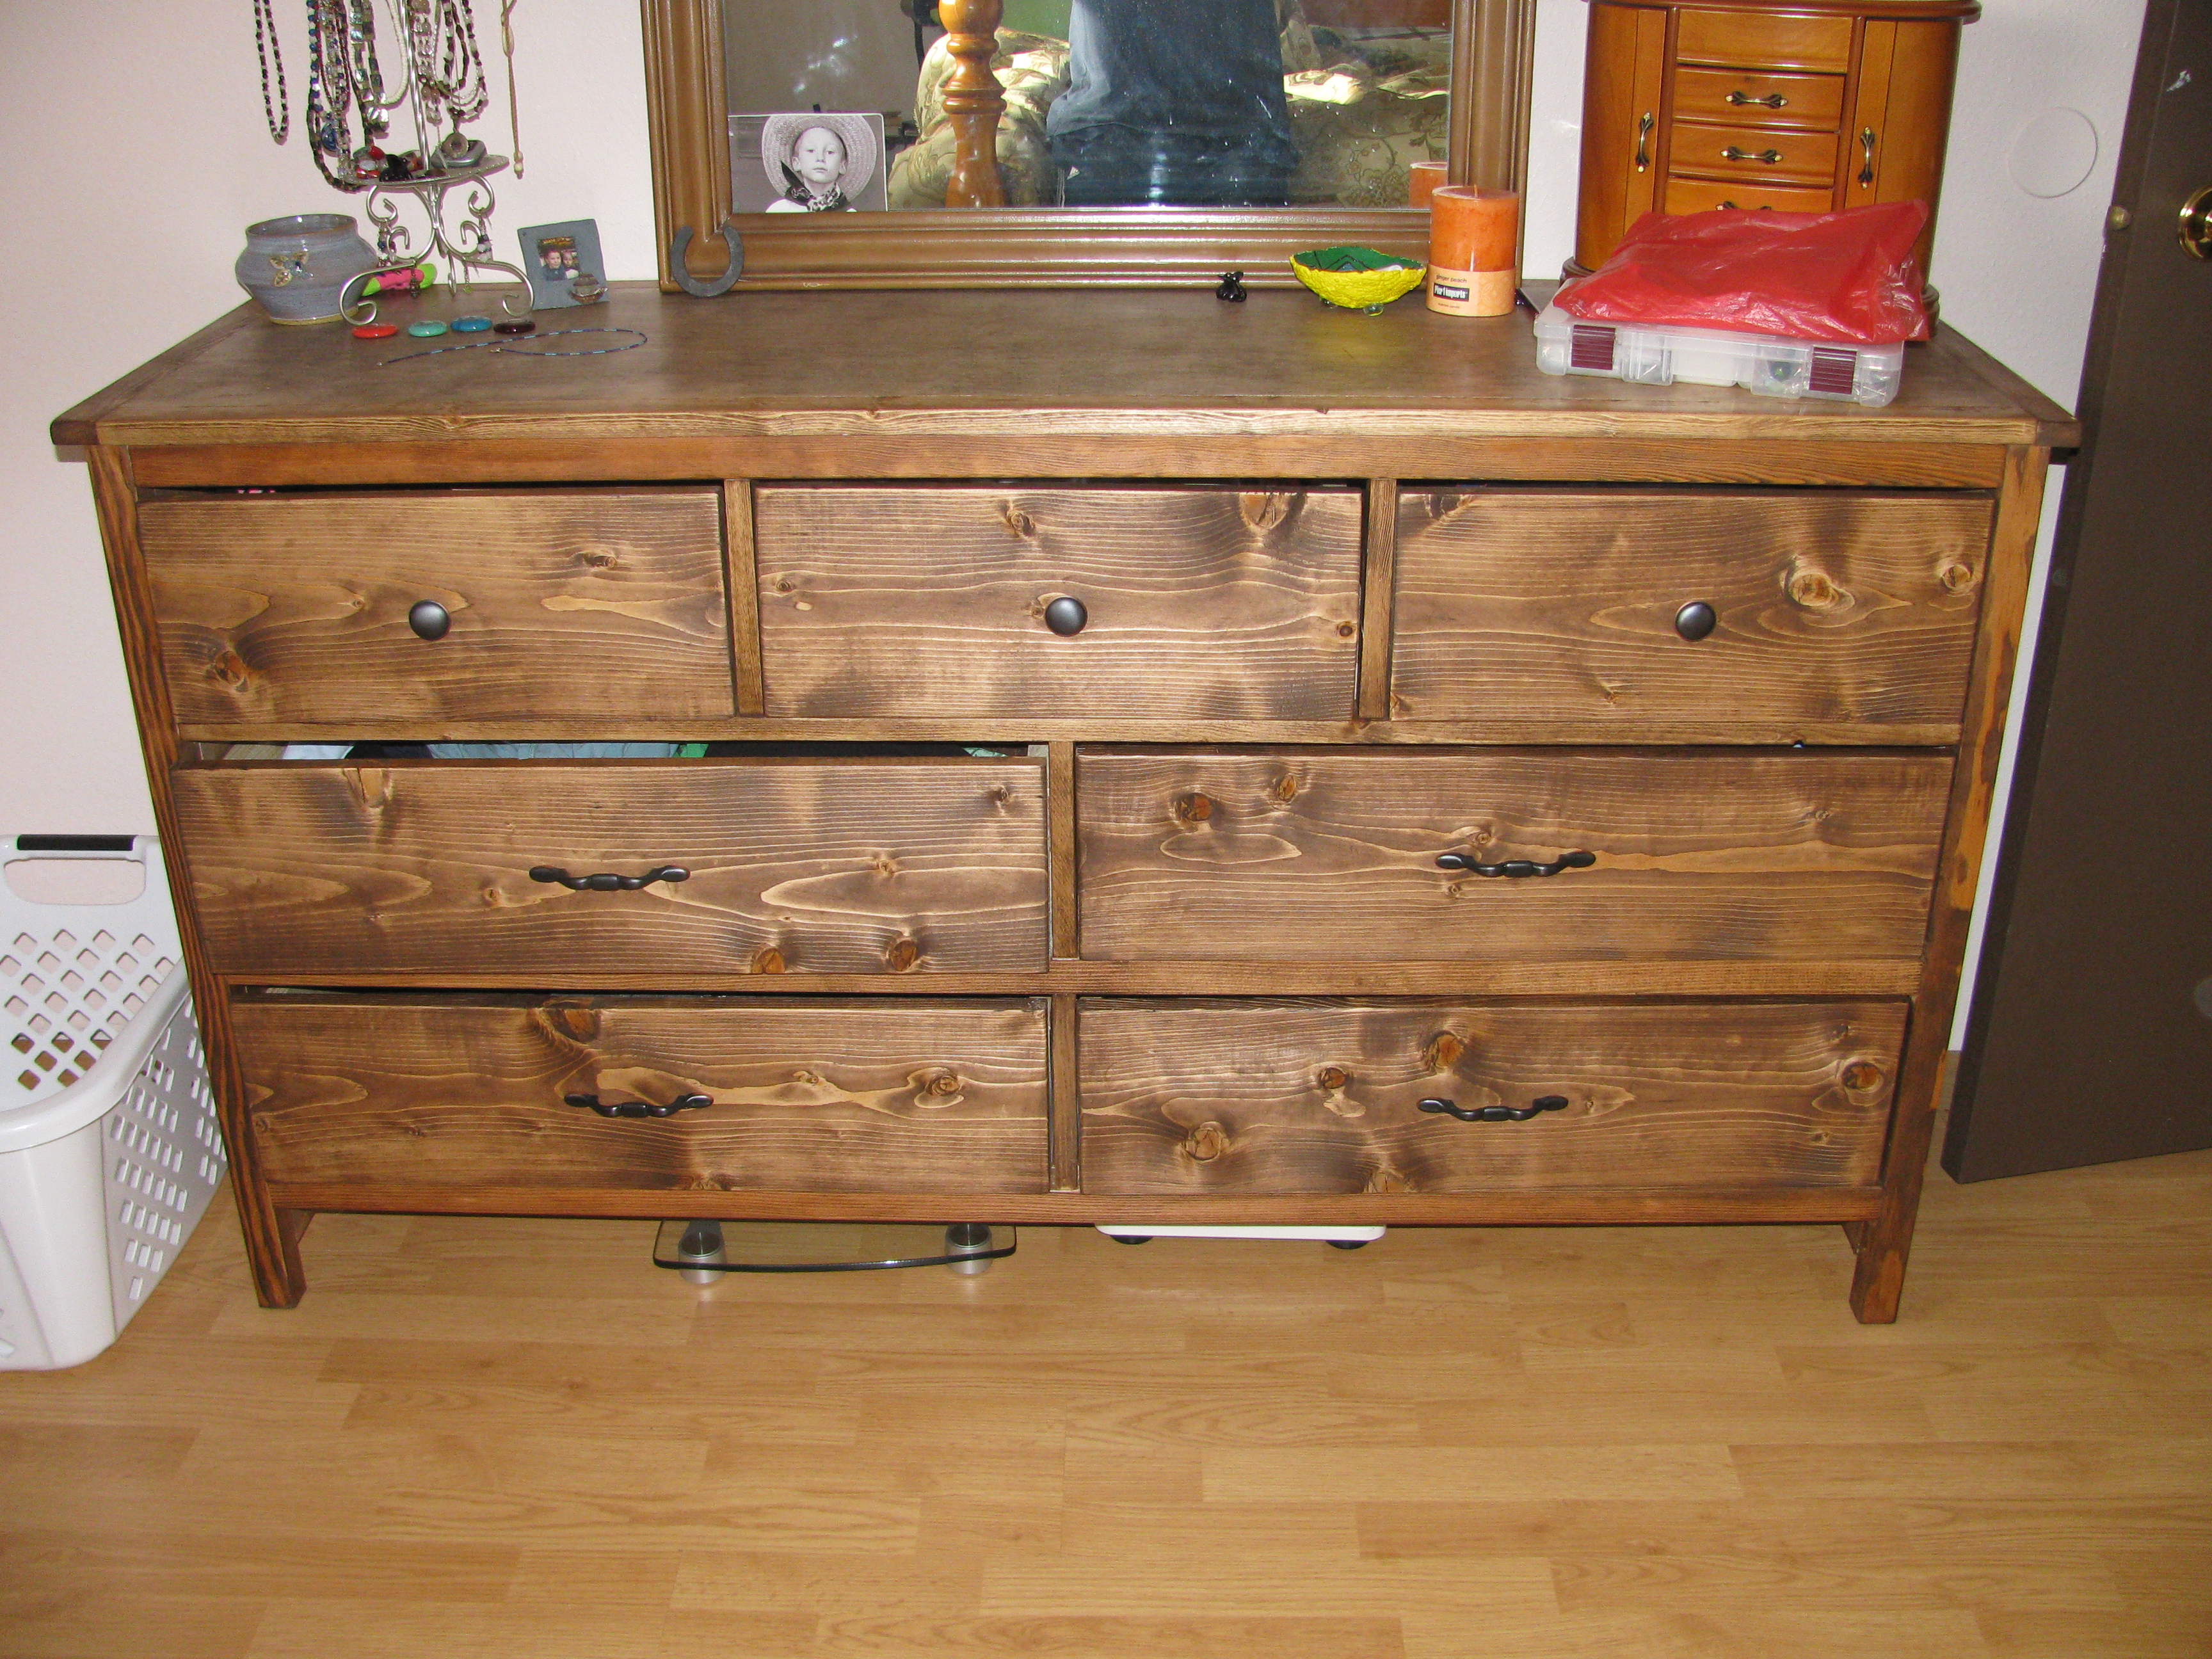
My wife's Christmas present. I modified the Cabin Wide Dresser plan to include two extra bottom drawers. I also built the drawers without metal slides which made the drawers a little bigger. Technically, I need to finish this with some nylo-tape to make the drawers slide more smoothly. A similar style/size dresser made of solid wood was easily over $500, this cost less than $200 in materials and my boys were able to help out.
Built from Plan(s)
Estimated Cost
$170
Estimated Time Investment
Weekend Project (10-20 Hours)
Finish Used
Minwax Early American 230 stain, then several coats of natural Danish oil. Brushed the stain on and allowed to dry for 24+ hours. Then put on several hand rubbed coats of Danish oil (I love this stuff).
Recommended Skill Level
Intermediate
RH Inspired Shanty Sideboard & Hutch
Have been wanting to build this for 6 months now and just havnt had the time. Finally completed it!
I made some small changes to the design, different trim layouts, different dimensions, and went with a plank look for the back of the hutch instead of a solid peice of 1/4" plywood.
Built from Plan(s)
Estimated Cost
$500.00. This price includes wood, stain, and hardware.
Estimated Time Investment
Weekend Project (10-20 Hours)
Finish Used
1 coat of Minwax Weathered Oak, then 1 coat of Minwax Special Walnut.
Recommended Skill Level
Beginner
Comments

In reply to This looks great. I love the by handmadewithash
Wed, 12/31/2014 - 17:00
To handmadewithash..
Thank you very much for the comment! =).
Happy New Years as well!
Cheers,
Justin

Thu, 01/01/2015 - 22:48
To ehays216
Thank you ehays216! Ive looked at your Farmhouse Storage Bed a few times.. Have always wanted to try the Steel wool/Vinegar trick.
Cheers,
Justin
In reply to Stunning! by Ana White Admin
Thu, 01/01/2015 - 22:49
Thank you very much Ana White
Thank you very much Ana White Admin!
Cheers,
Justin
In reply to Beautiful!!! by Smjackson82
Sun, 01/04/2015 - 16:07
Of coarse! I used the same
Of coarse! I used the same height and depth dimensions, just shortened the width by 9 inches.
Cheers,
Justin
In reply to backdrop by timberandsoul
Sun, 01/04/2015 - 16:09
Thanks a lot timberandsoul!
Thanks a lot timberandsoul!
Photo was taken on an empty wall in my living room, Which is currently a light gray wall. thought it looked boring so I did a quick switch of backdrops in PS. I just typed in brick wall in google.
Cheers,
Justin

Sun, 01/04/2015 - 11:30
How to achieve that finish?
Hi Justin. Did you use any special technique between the two coats of stain to achieve that effect. Thanks. Andy
In reply to How to achieve that finish? by AndyH
Sun, 01/04/2015 - 16:10
Got your email Andy,
Got your email Andy, hopefully you got mine!
Cheers,
Justin
Sun, 01/04/2015 - 18:36
Hey Singhs, I went with Home
Hey Singhs, I went with Home Depot Regular Knotty Pine. Cheap and easy to work with.
Cheers,
Justin
Mon, 01/19/2015 - 13:03
Stain color and plank backing
I love this! Can you give me information on how you modified the plan to achieve the plank backing and the stain color?
In reply to Stain color and plank backing by juddgirl2
Sat, 01/24/2015 - 13:08
Sure! the plans call for 2
Sure! the plans call for 2 solid sheets of 1/4 plywood for the backing.. I simply just ran the plywood through a table saw at 5.5" wide and brad nailed it the back. =)
The stain is weathered oak and let sit for 15min. Then right away special walnut and let sit for 15 min.
repeat until desired colour. let me know if you have any more questions!
Cheers,
Justin
Sun, 01/08/2017 - 07:33
Stain question
How many coats did you have to do to achieve this look? The weathered oak looks so light...and gray.
Thanks!

Sun, 05/17/2015 - 19:40
Attaching Sideboard to Hutch
What was your strategy on attaching the sideboard to the Hutch. I haven't seen where there is any instructions or conversation around this. What and how did you accomplish this and/or is there anywhere to go that discussed this that helped you.
Thanks,
Tue, 07/05/2016 - 00:19
Truly gorgeous!
This inspired hutch/sideboard is absolutely divine! What an awesome job!
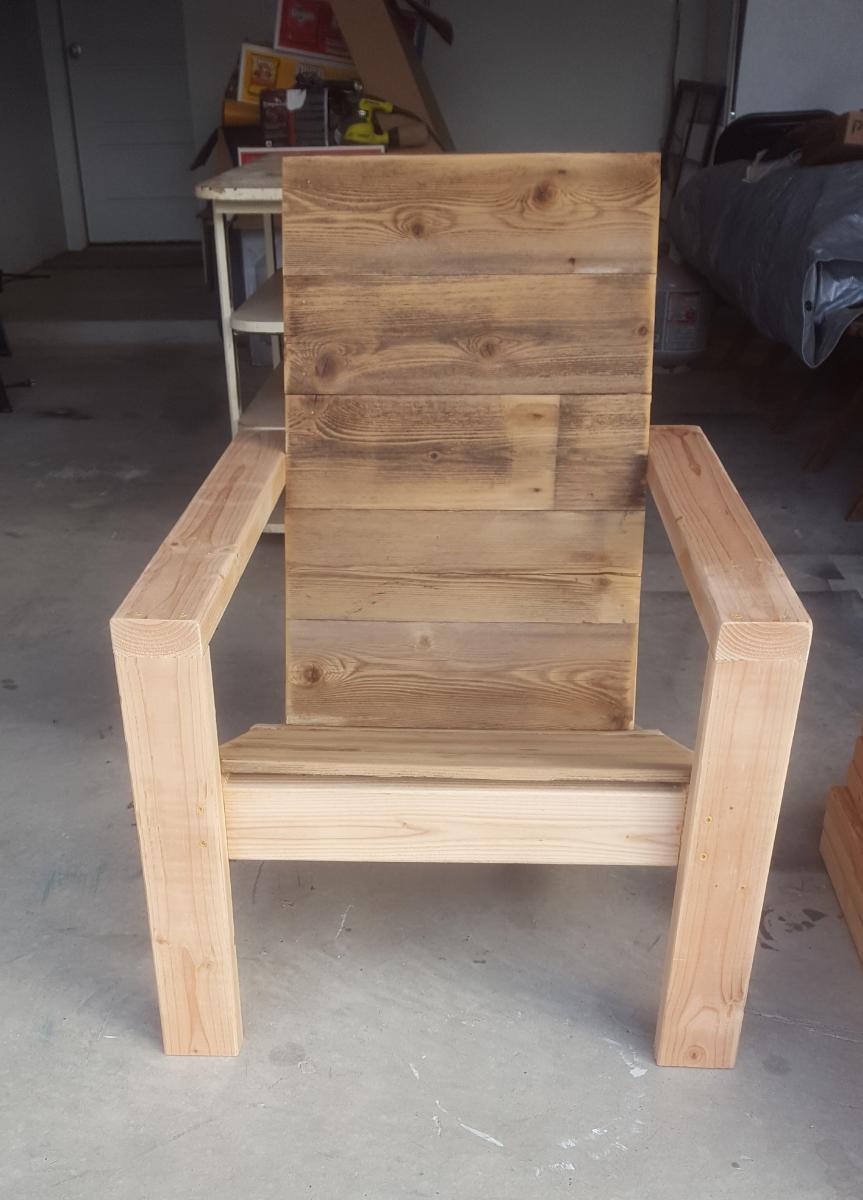
Ana's Adirondack Chair and side table
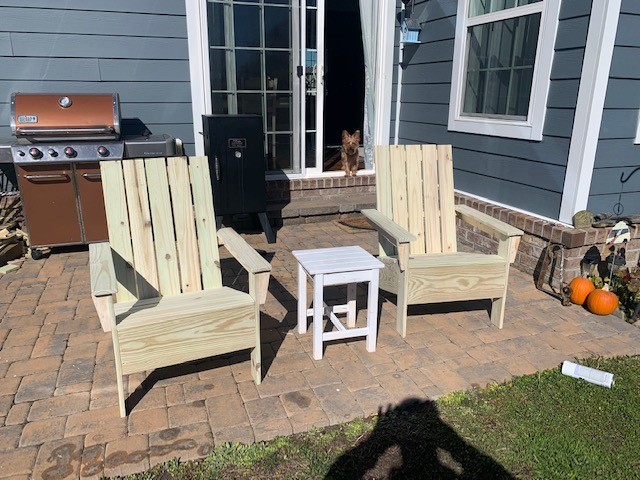
Been looking for a while for some simple looking Adirondack chairs. I found these and they turned out great. Will be finishing them with a white paint. Thanks for the plans Ana!
Estimated Cost
65 dollars for 2
Estimated Time Investment
Afternoon Project (3-6 Hours)
Recommended Skill Level
Beginner
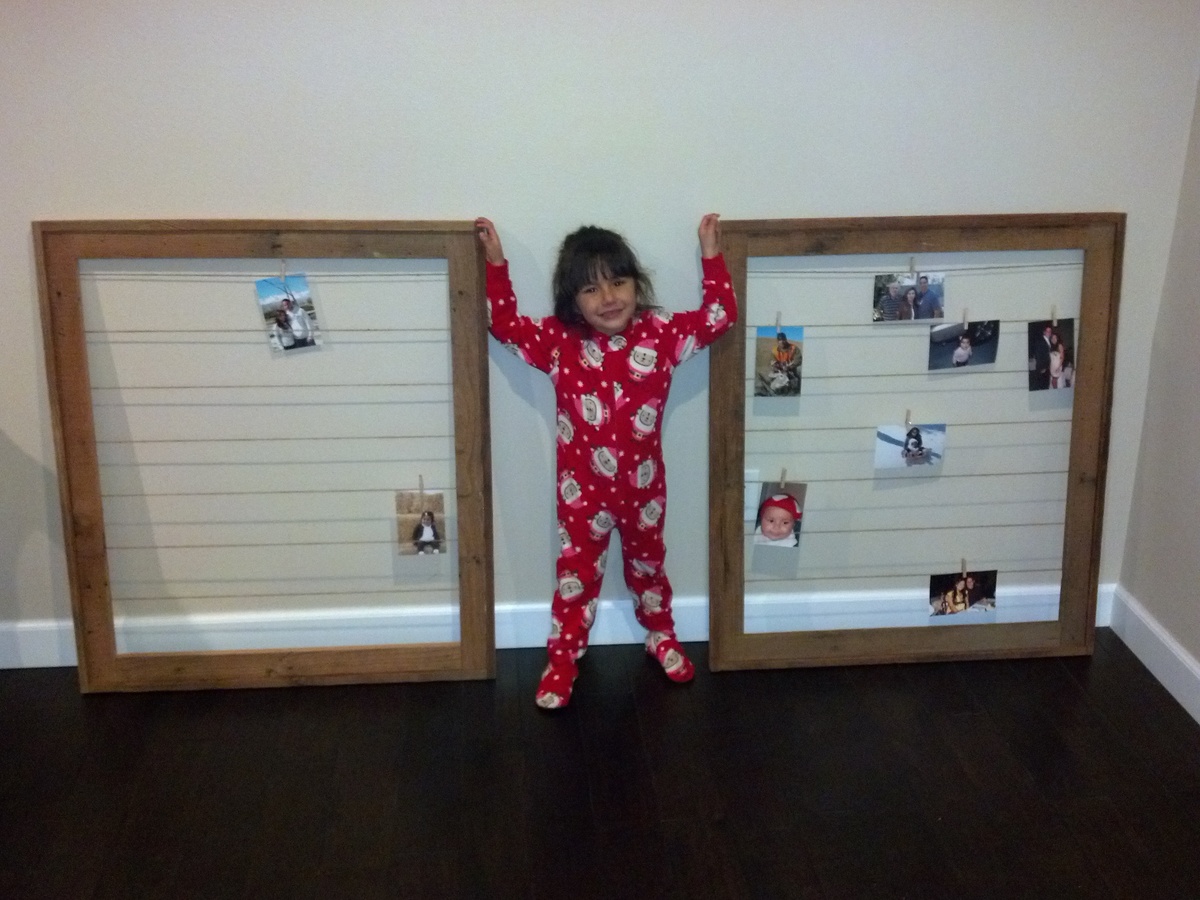
Clothesline Frame

When I saw this, I knew it would be perfect for our mantle. I need to add photos to it, but I love it! I plan on changing things out for each season... I can see autumn photos of the kids hanging beside pressed leaves in the fall, christmas cards hanging here during the holidays, etc. So many possibilities. Very simple to make. Love it!
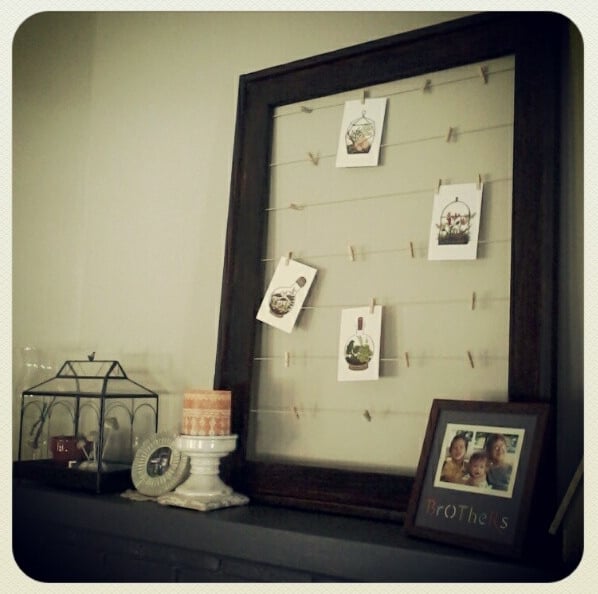
Estimated Cost
$8
Estimated Time Investment
An Hour or Two (0-2 Hours)
Recommended Skill Level
Starter Project
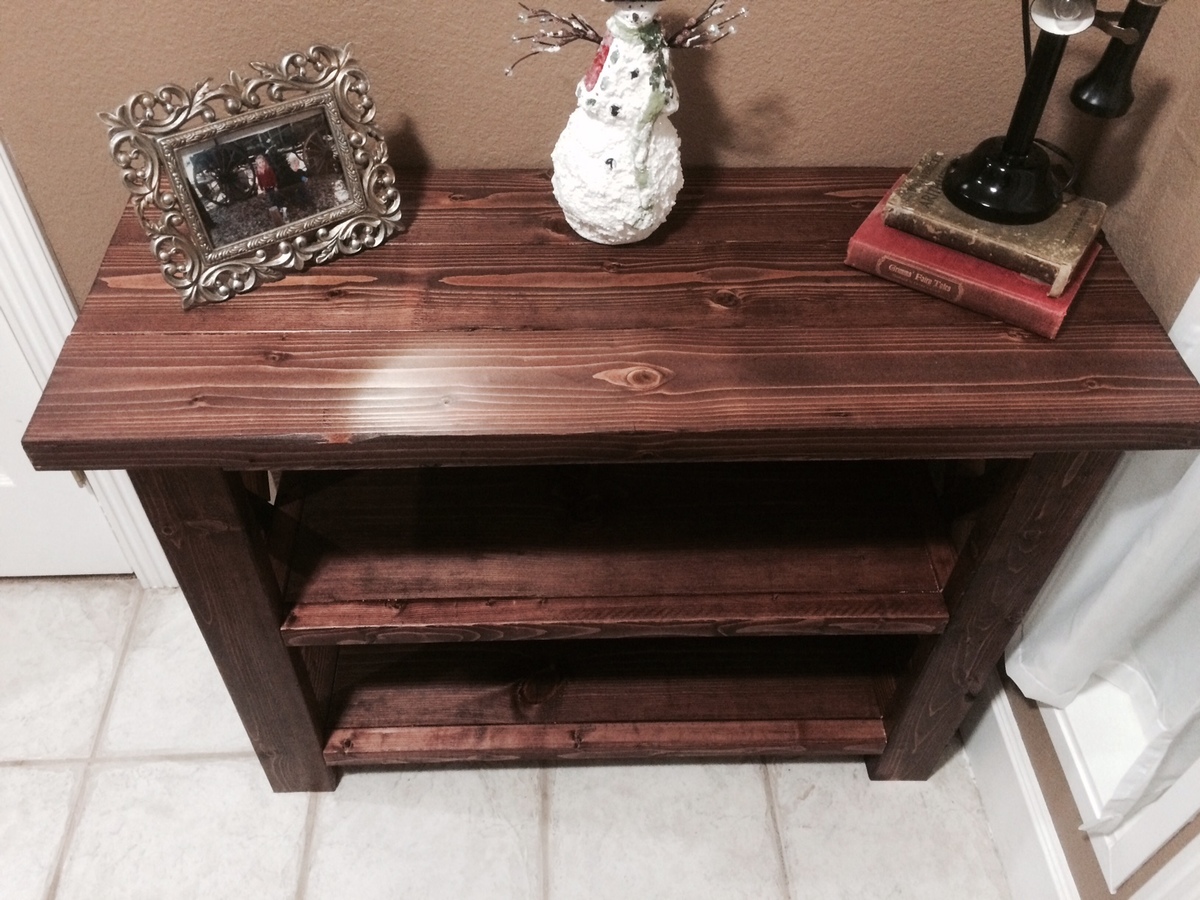
Entry Table
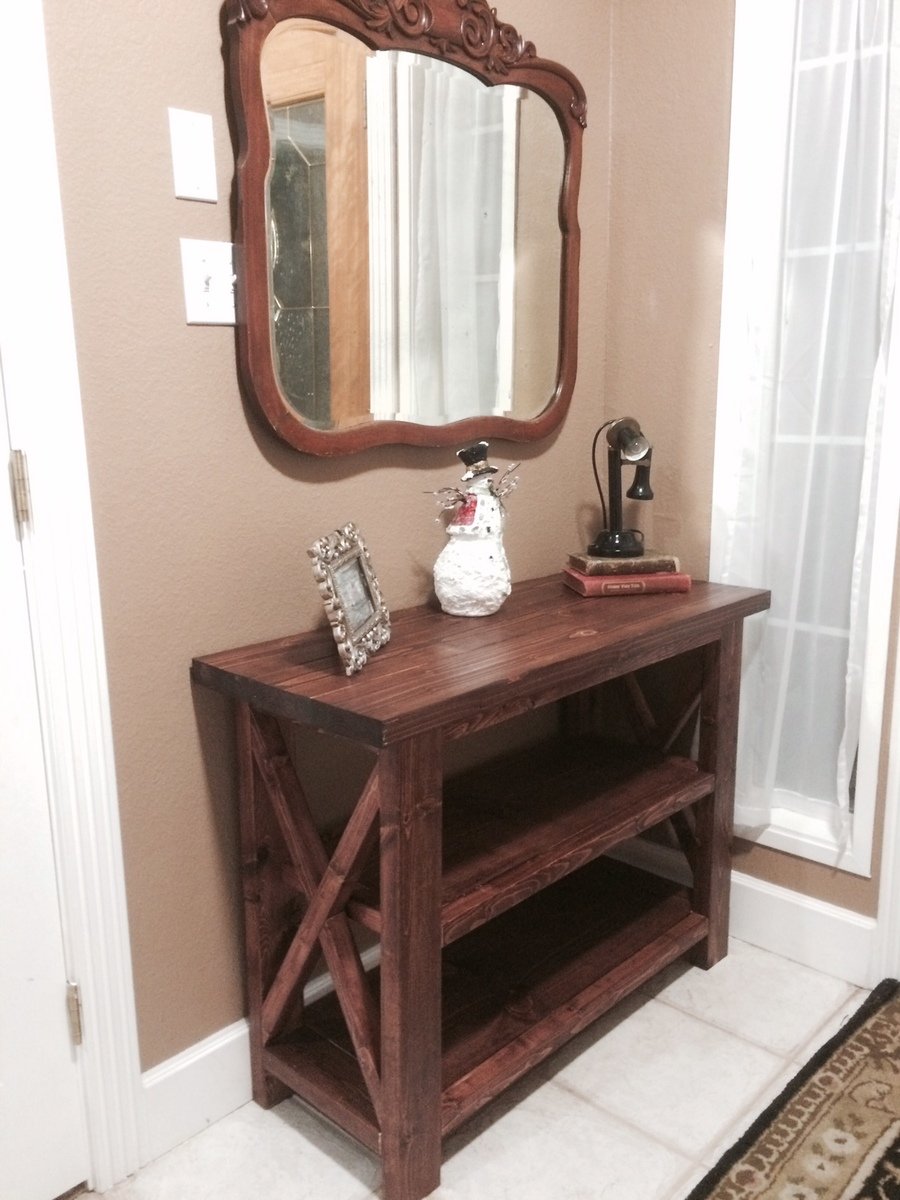
Well after completing the console table I decided to change the sizes a little and create an entry table and stain it to match my great great grandmothers mirror that we have. That mirror has to weigh 50lbs. It turned out great and I did sanding and staining before putting it together which saved a lot of time trying to get into all of the corners. Then just had to ploy and stain the edges of the top once finished.
This is approximately half the width of the console table so calculations were fairly easy to figure out.
Built from Plan(s)
Estimated Cost
$50
Finish Used
Used dark Walnut with a satin polyurethane
Recommended Skill Level
Beginner
Comments
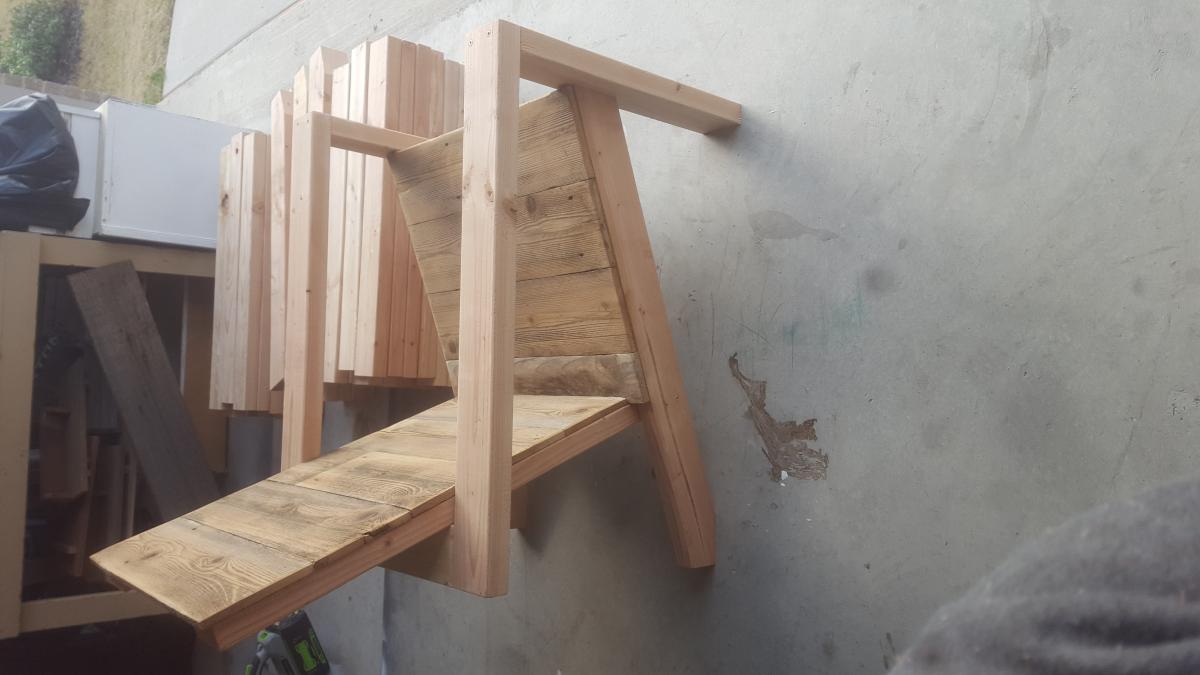
Heavy duty log peeling stations
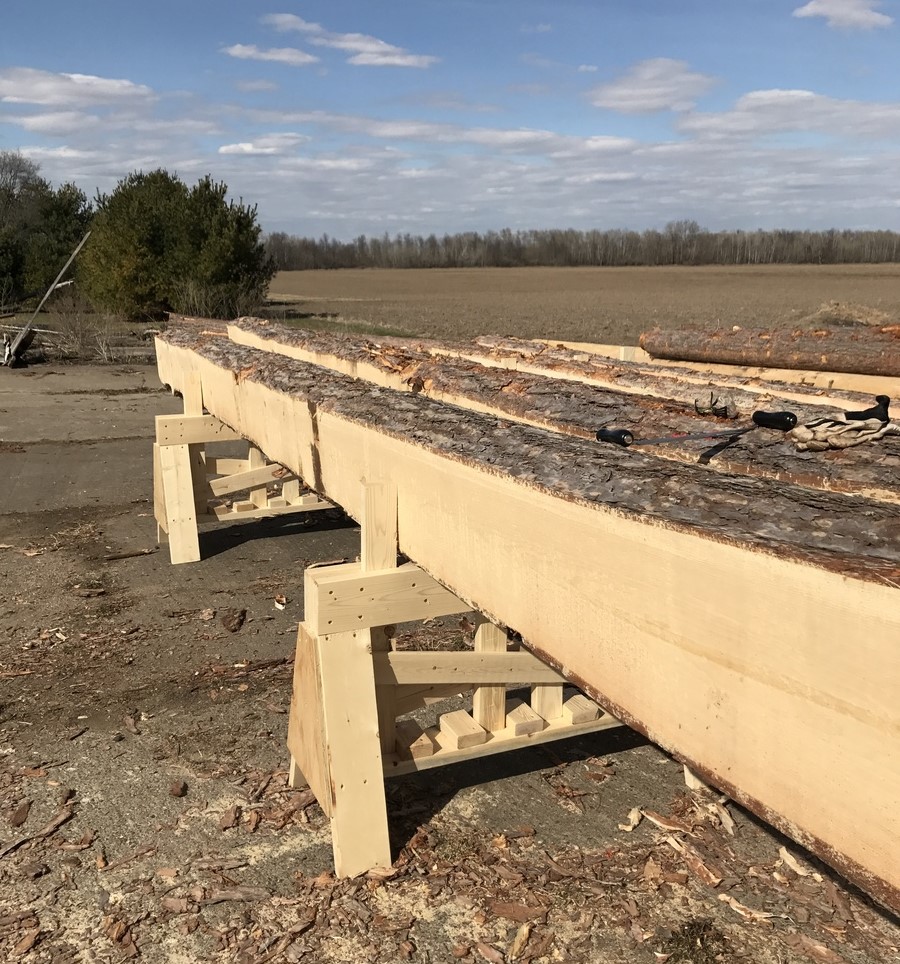
I modified Anna's plans to make these heavy duty saw horses.
Estimated Cost
$120
Estimated Time Investment
Day Project (6-9 Hours)
Finish Used
2 of these sawhorses can support 2 1500lb logs, I can peel the bark off then rotate the logs. I added vertical removable supports to support the logs when they are on the sawhorses. Thanks for the ideas.
Recommended Skill Level
Beginner
Hall Tree for Mudroom

I made this to fit the room and to help organize and cleanup the laundry / mud room. After searching for plans online I just sat down with pencil and paper and drew up my own plans, cut sheets and design from a combo of numerous projects I found in Pinterest.

Estimated Cost
500.00
Estimated Time Investment
Week Long Project (20 Hours or More)
Finish Used
All wood primed with Sherwin Williams Preprite Problock Primer and finish painting with SW ProClassic Waterbased Acrylic-Alkyd Satin finish in Dover White
Recommended Skill Level
Intermediate
Comments
Thu, 02/18/2021 - 15:43
Very cool design and build!
Love the option of open and closed storage, it looks amazing!

In reply to Very cool design and build! by Ana White Admin
Fri, 02/19/2021 - 08:44
Thanks! We have some items…
Thanks! We have some items like a steam mop and electric broom that go in one of the enclosed storage areas. I can post plans, construction pics and cut sheet if there is a place to do that.
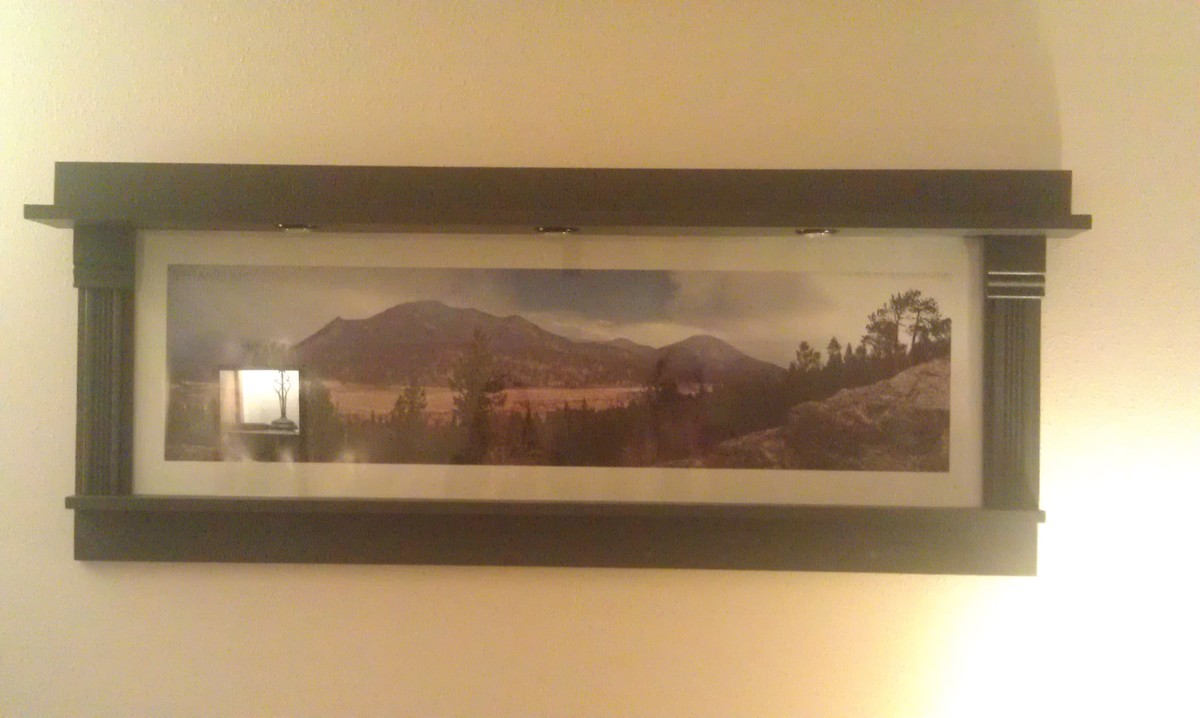
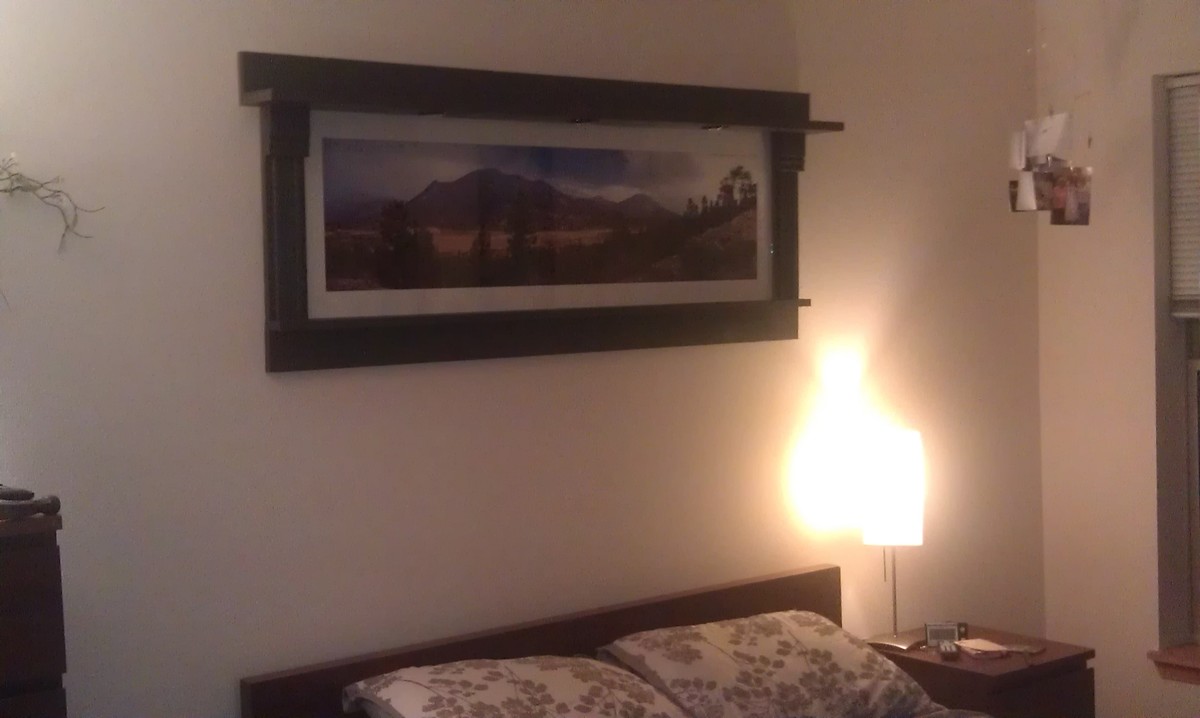
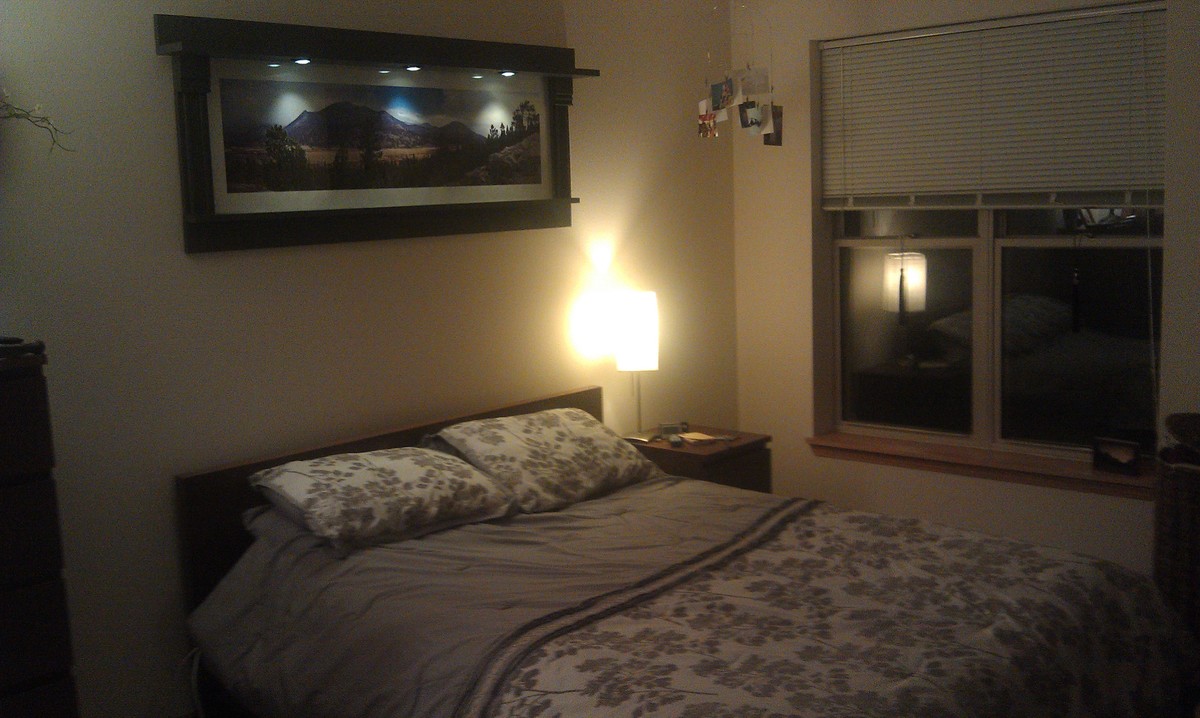
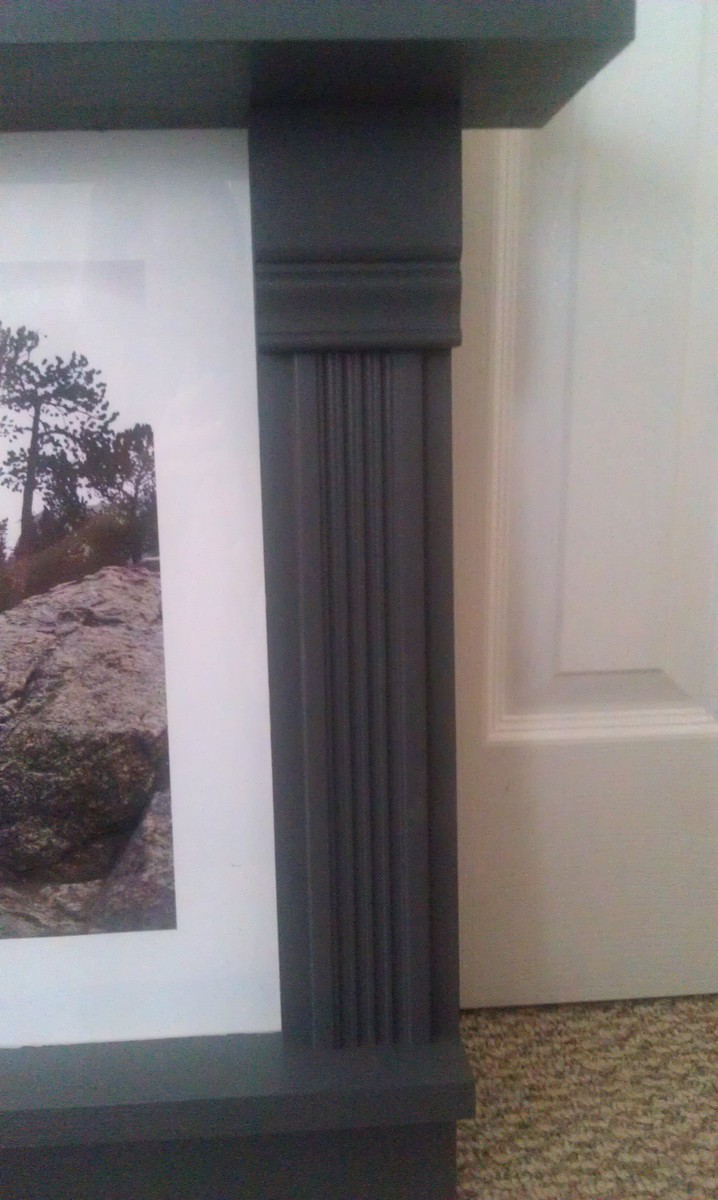
Lighted Panoramic Craftsman Frame
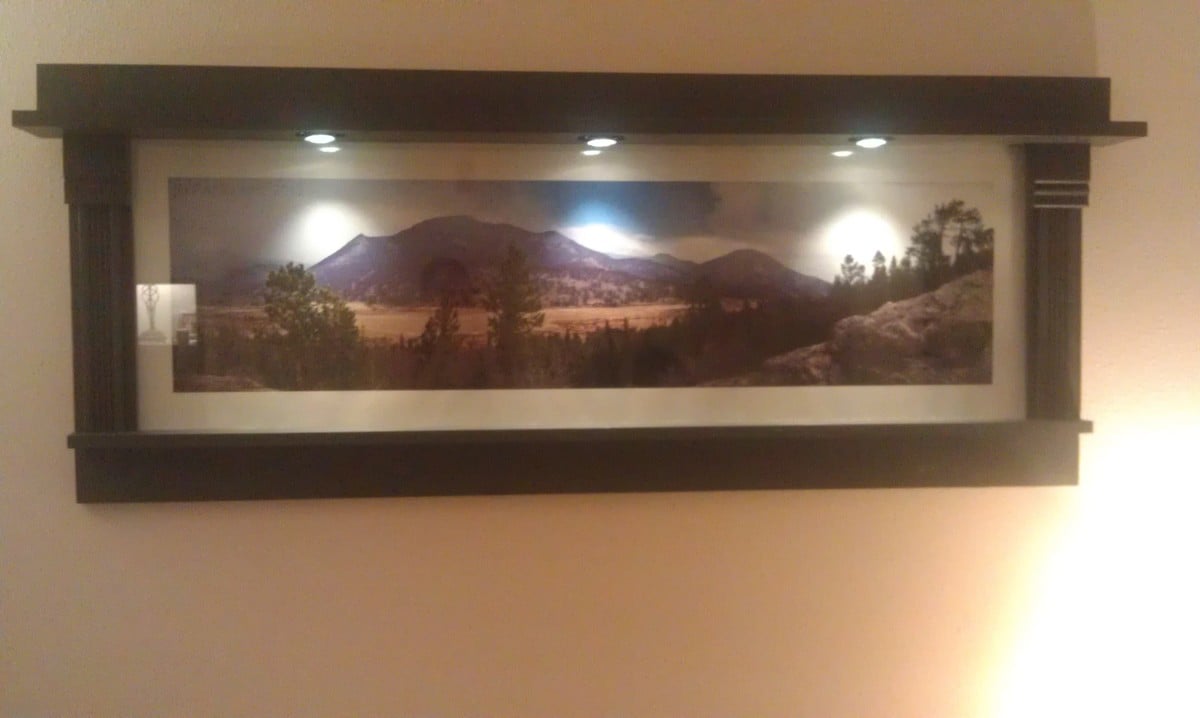
Let me first preface this by saying that the only similarity between my little creation here and the Craftsman Frame is the actual structure of the frame. I altered just about everything else about it, but since the idea was born with this plan I figured I would post it here! :)
A friend of mine just moved into her first apartment after graduating college and is quickly realizing she is in need of décor. For Valentine's Day, her boyfriend (a photographer) gave her a photo he had taken of the mountains in Colorado, a trip they had taken together earlier that year. The picture is absolutely stunning; the only problem is that it is a panoramic photo, measuring a whopping 18"x55". A quick Google search revealed that even a cheap poster frame with these dimensions would cost $110 at minimum; not to mention that it would have zero character. And a custom frame? psssh, don't even go there...this girl wants to decorate her apartment, but come on she still has to be able to afford groceries! :)
Anyway, as the new owner of a miter saw I saw an opportunity and I'm so glad she let me give it a go. We discussed the plans I had and ventured off to our local Lowe's. About 2 hours--and lots of laughs--later we walked out with all supplies in hand (who knew two girls in their young 20's could spend so much time at Lowe's?! We had a blast).
I loved the base idea of the Craftsman Frame, but since she doesn't have a lot of other décor yet (and isn't allowed to paint the walls of her rental), I really wanted this piece to be a focal point. She listened to my ideas like a trooper and, to my surprise loved every one of them. We thought about making a collage frame so she can display additional photos from this trip, but instead decided to frame only this photo and to use a 1x6" board (rather than a 1x2" as in the original plans) so she can use it as a shelf to for her other photos. Since this piece will be a focal point above her bed, I wanted it to look almost like the mantel of a fireplace, so we picked out some accent pieces to achieve this look on the sides (we really had no method to this; my only suggestion is to go wild and try things in the store that you normally wouldn't). We also purchased some LED lights (battery operated, since she doesn't have an outlet nearby) for ambient lighting. I wanted these to be as invisible as possible, so I fashioned holes in the top shelf for them to fit into!
Honestly, the toughest part of this project was finding glass large enough for my frame and making it fit. I had to call several local custom shops and was very pleased with the final result. (my sliced-up fingertips however, do have one suggestion to offer: if you get glass custom-cut...PLEASE make sure you are wearing gloves when inserting it into the frame--OUCH!) The original plans for this frame include just finding a way to attach the picture to the back side of the frame. Since I was using glass in this frame, I simply used a router to create a groove on the back side for the glass and photo to sit inside.
Overall, we are both thrilled with how this turned out! Time for my next challenge...

Built from Plan(s)
Estimated Time Investment
Weekend Project (10-20 Hours)
Finish Used
Since the décor in this room is mostly light gray and khaki, she wanted something that wouldn't match those muted tones exactly. We ended up purchasing two sample-sized (7.12 fl oz) cans of Olympic paint in Knight's Armor (D58-5). They were running a 2-for-1 deal that day so we got both but only needed one in the end. Overall, I think I applied 3-4 coats to ensure an even coverage.
Recommended Skill Level
Beginner
Comments

Wed, 02/27/2013 - 14:46
Thank you! I had a blast
Thank you! I had a blast doing it! (It helps to have such a beautiful photo to work with!)
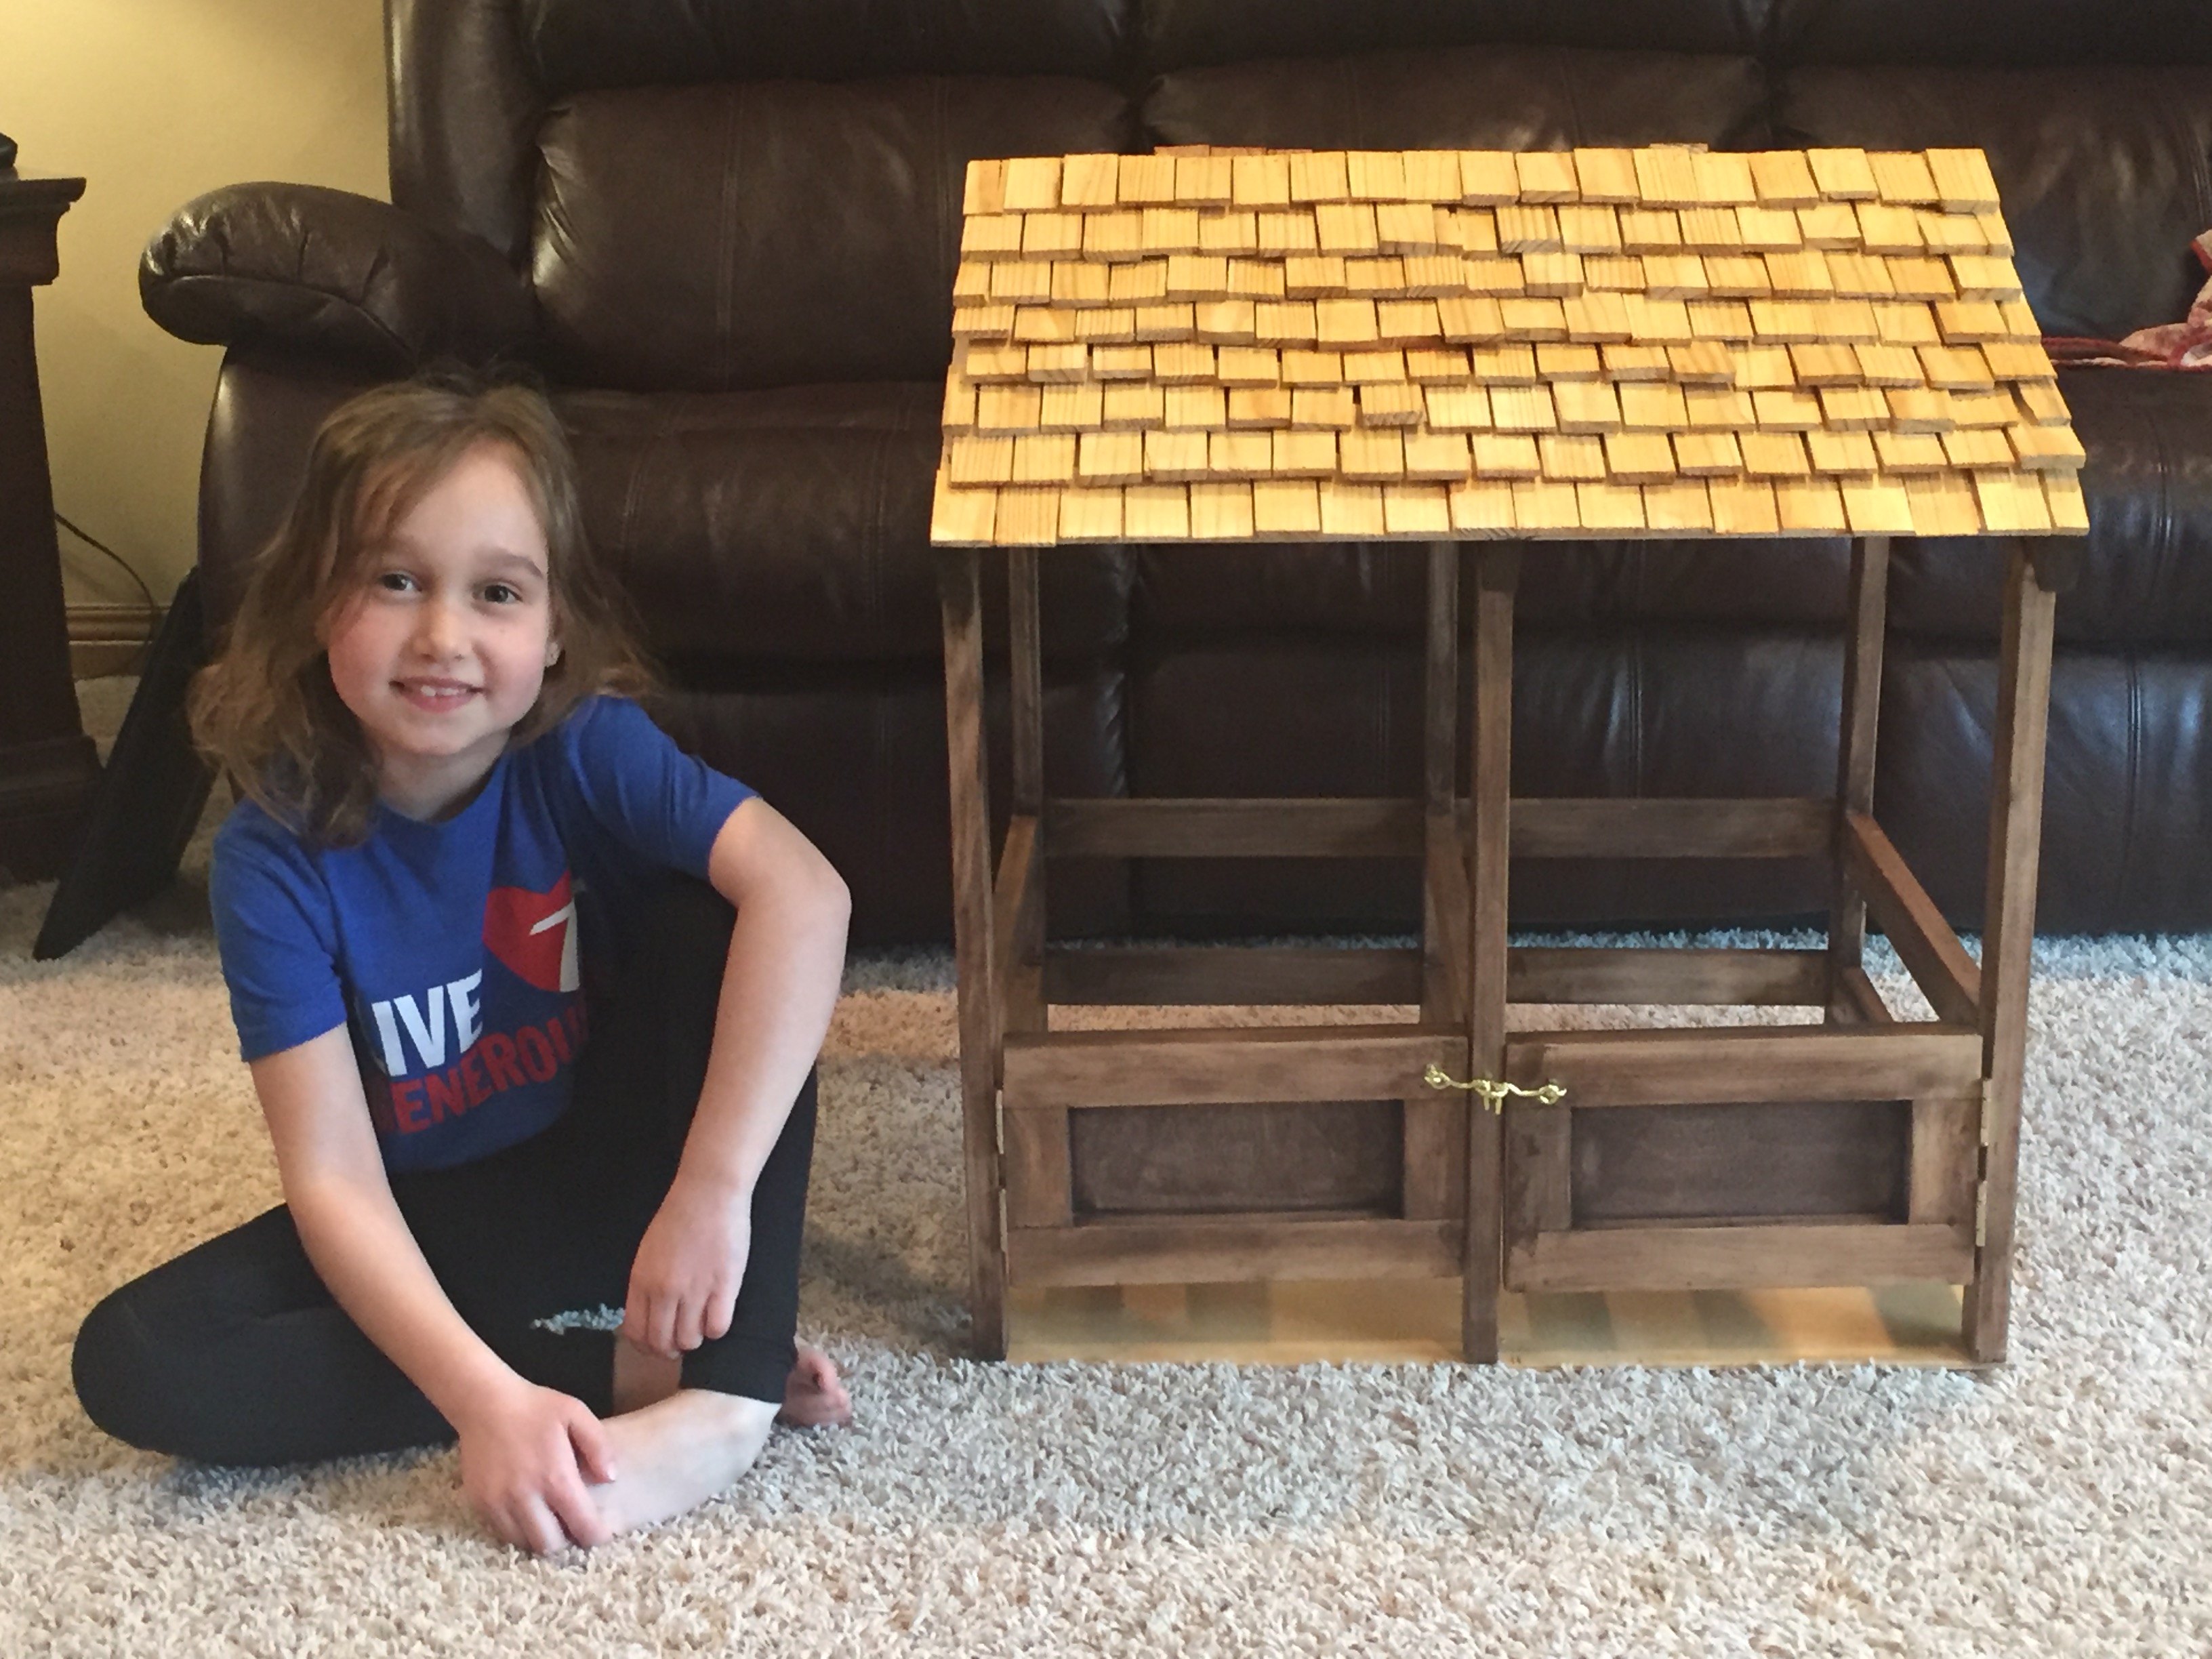
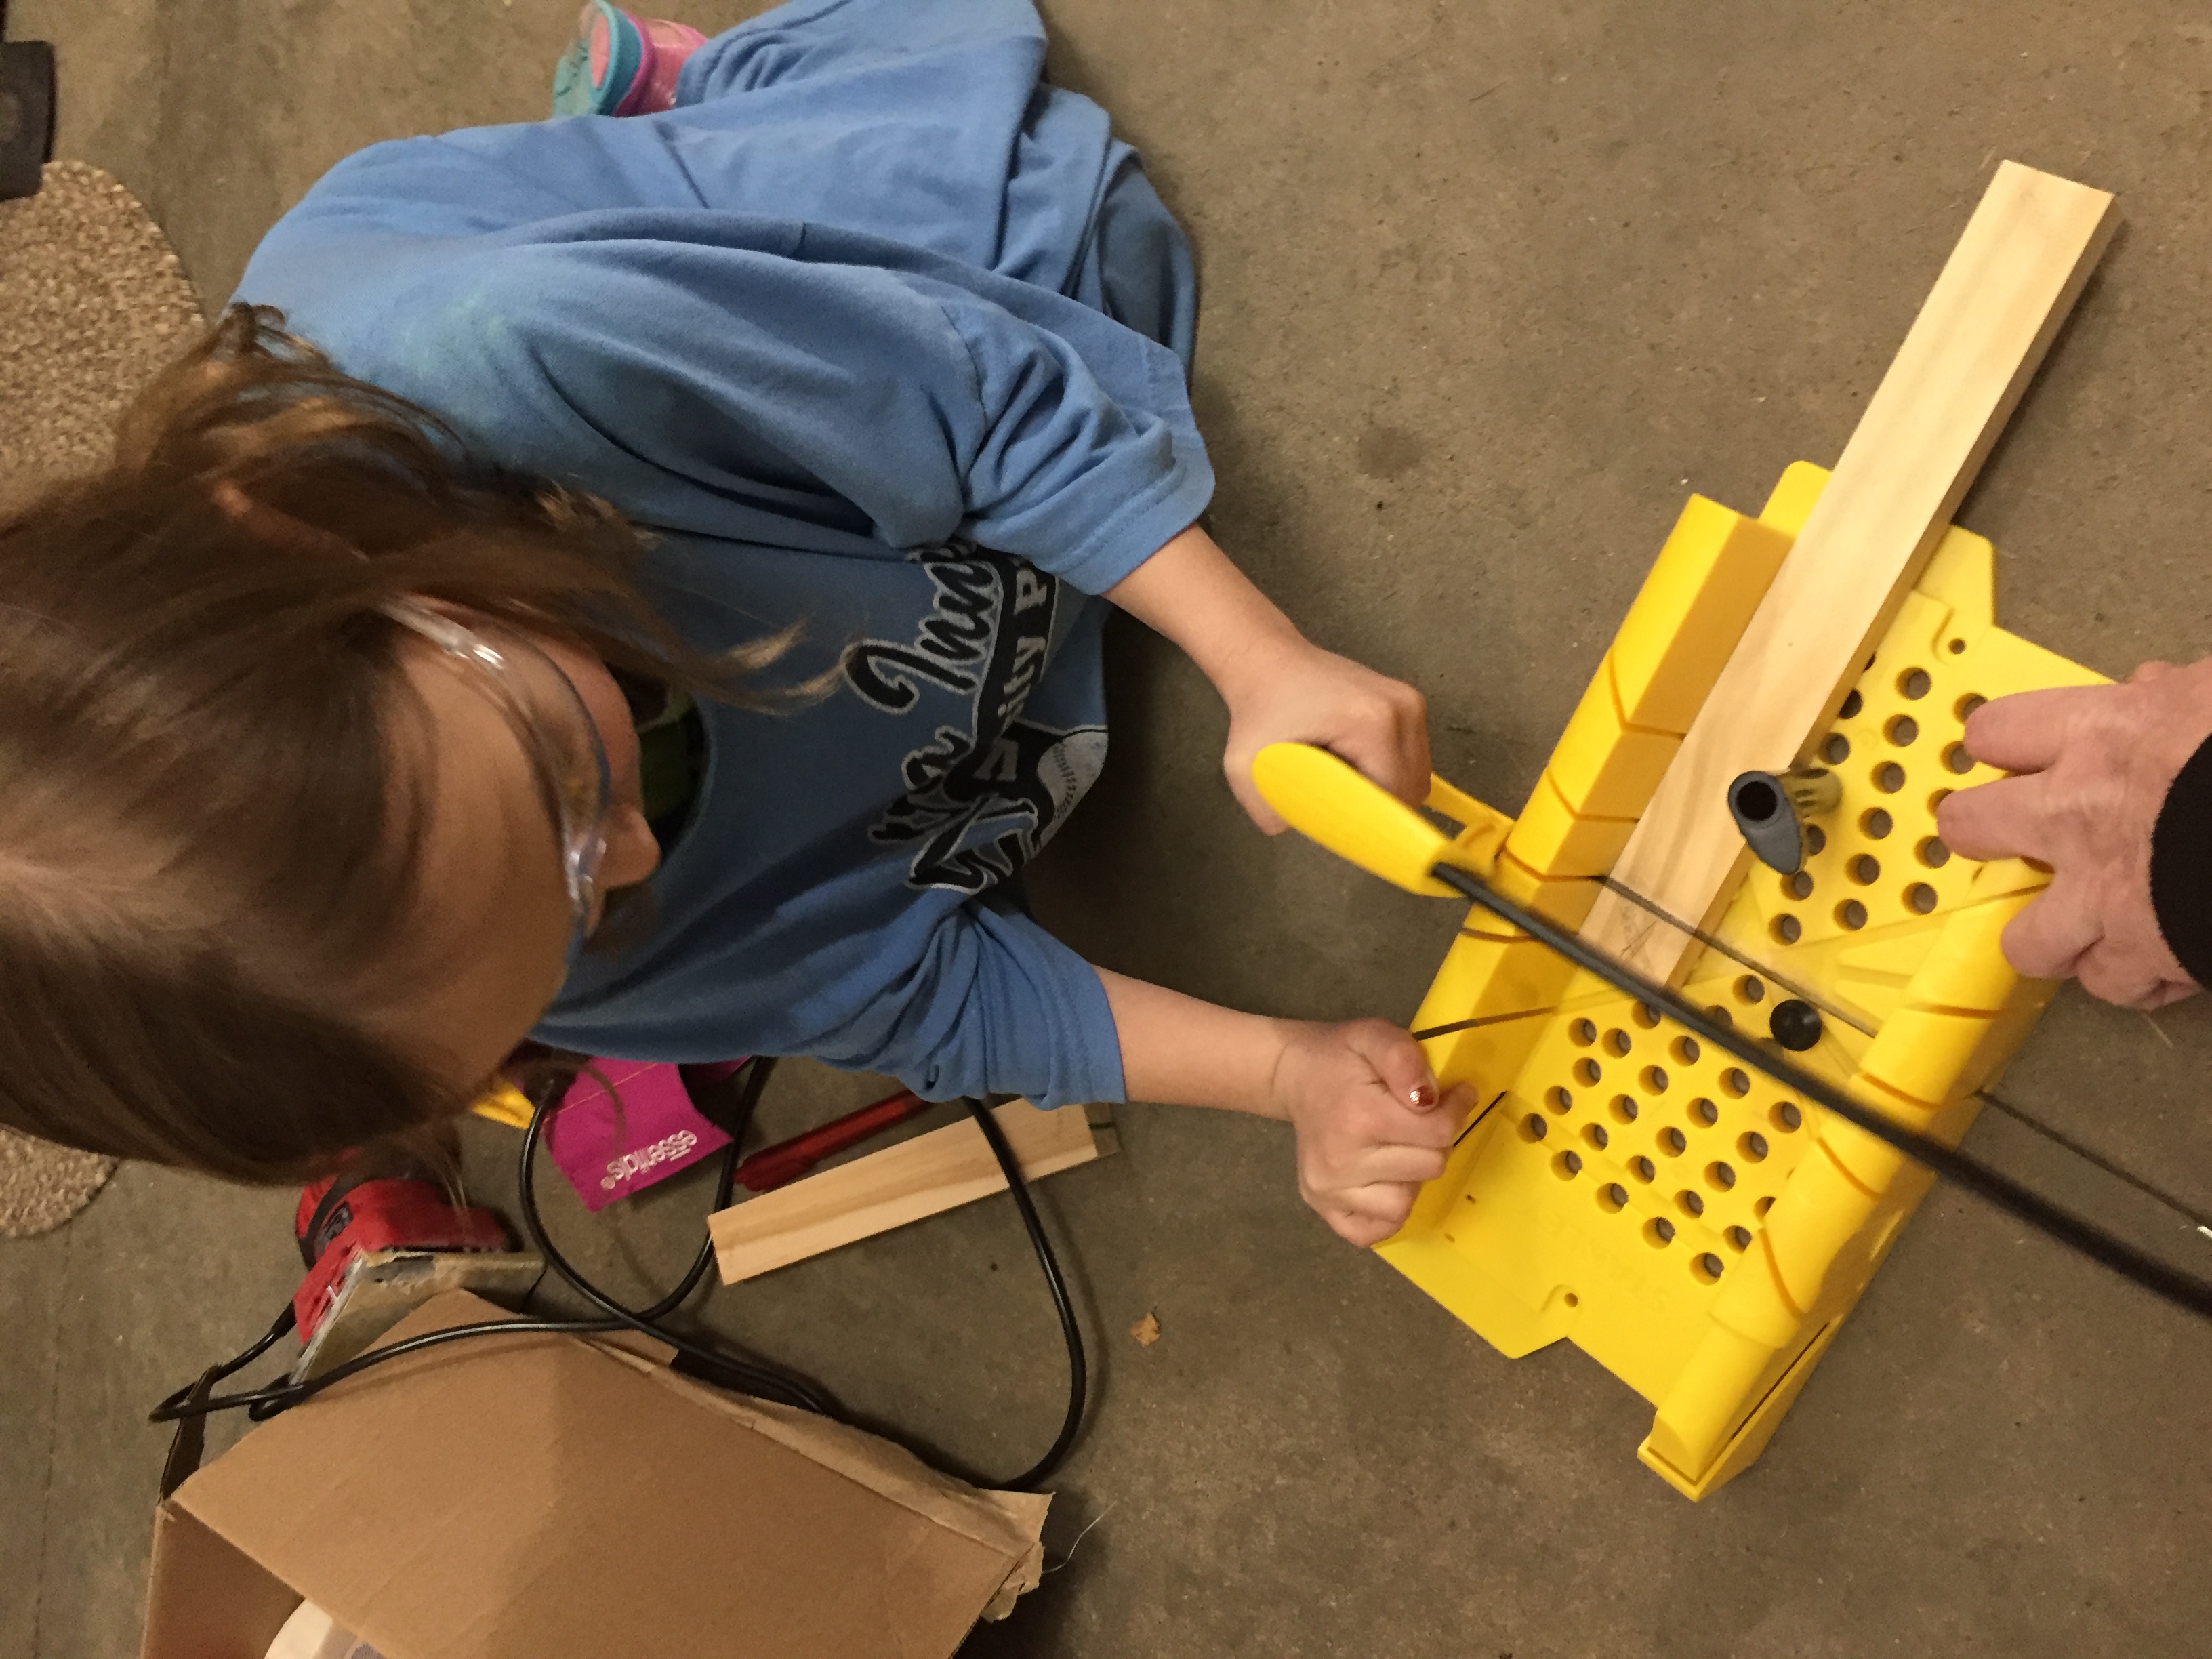
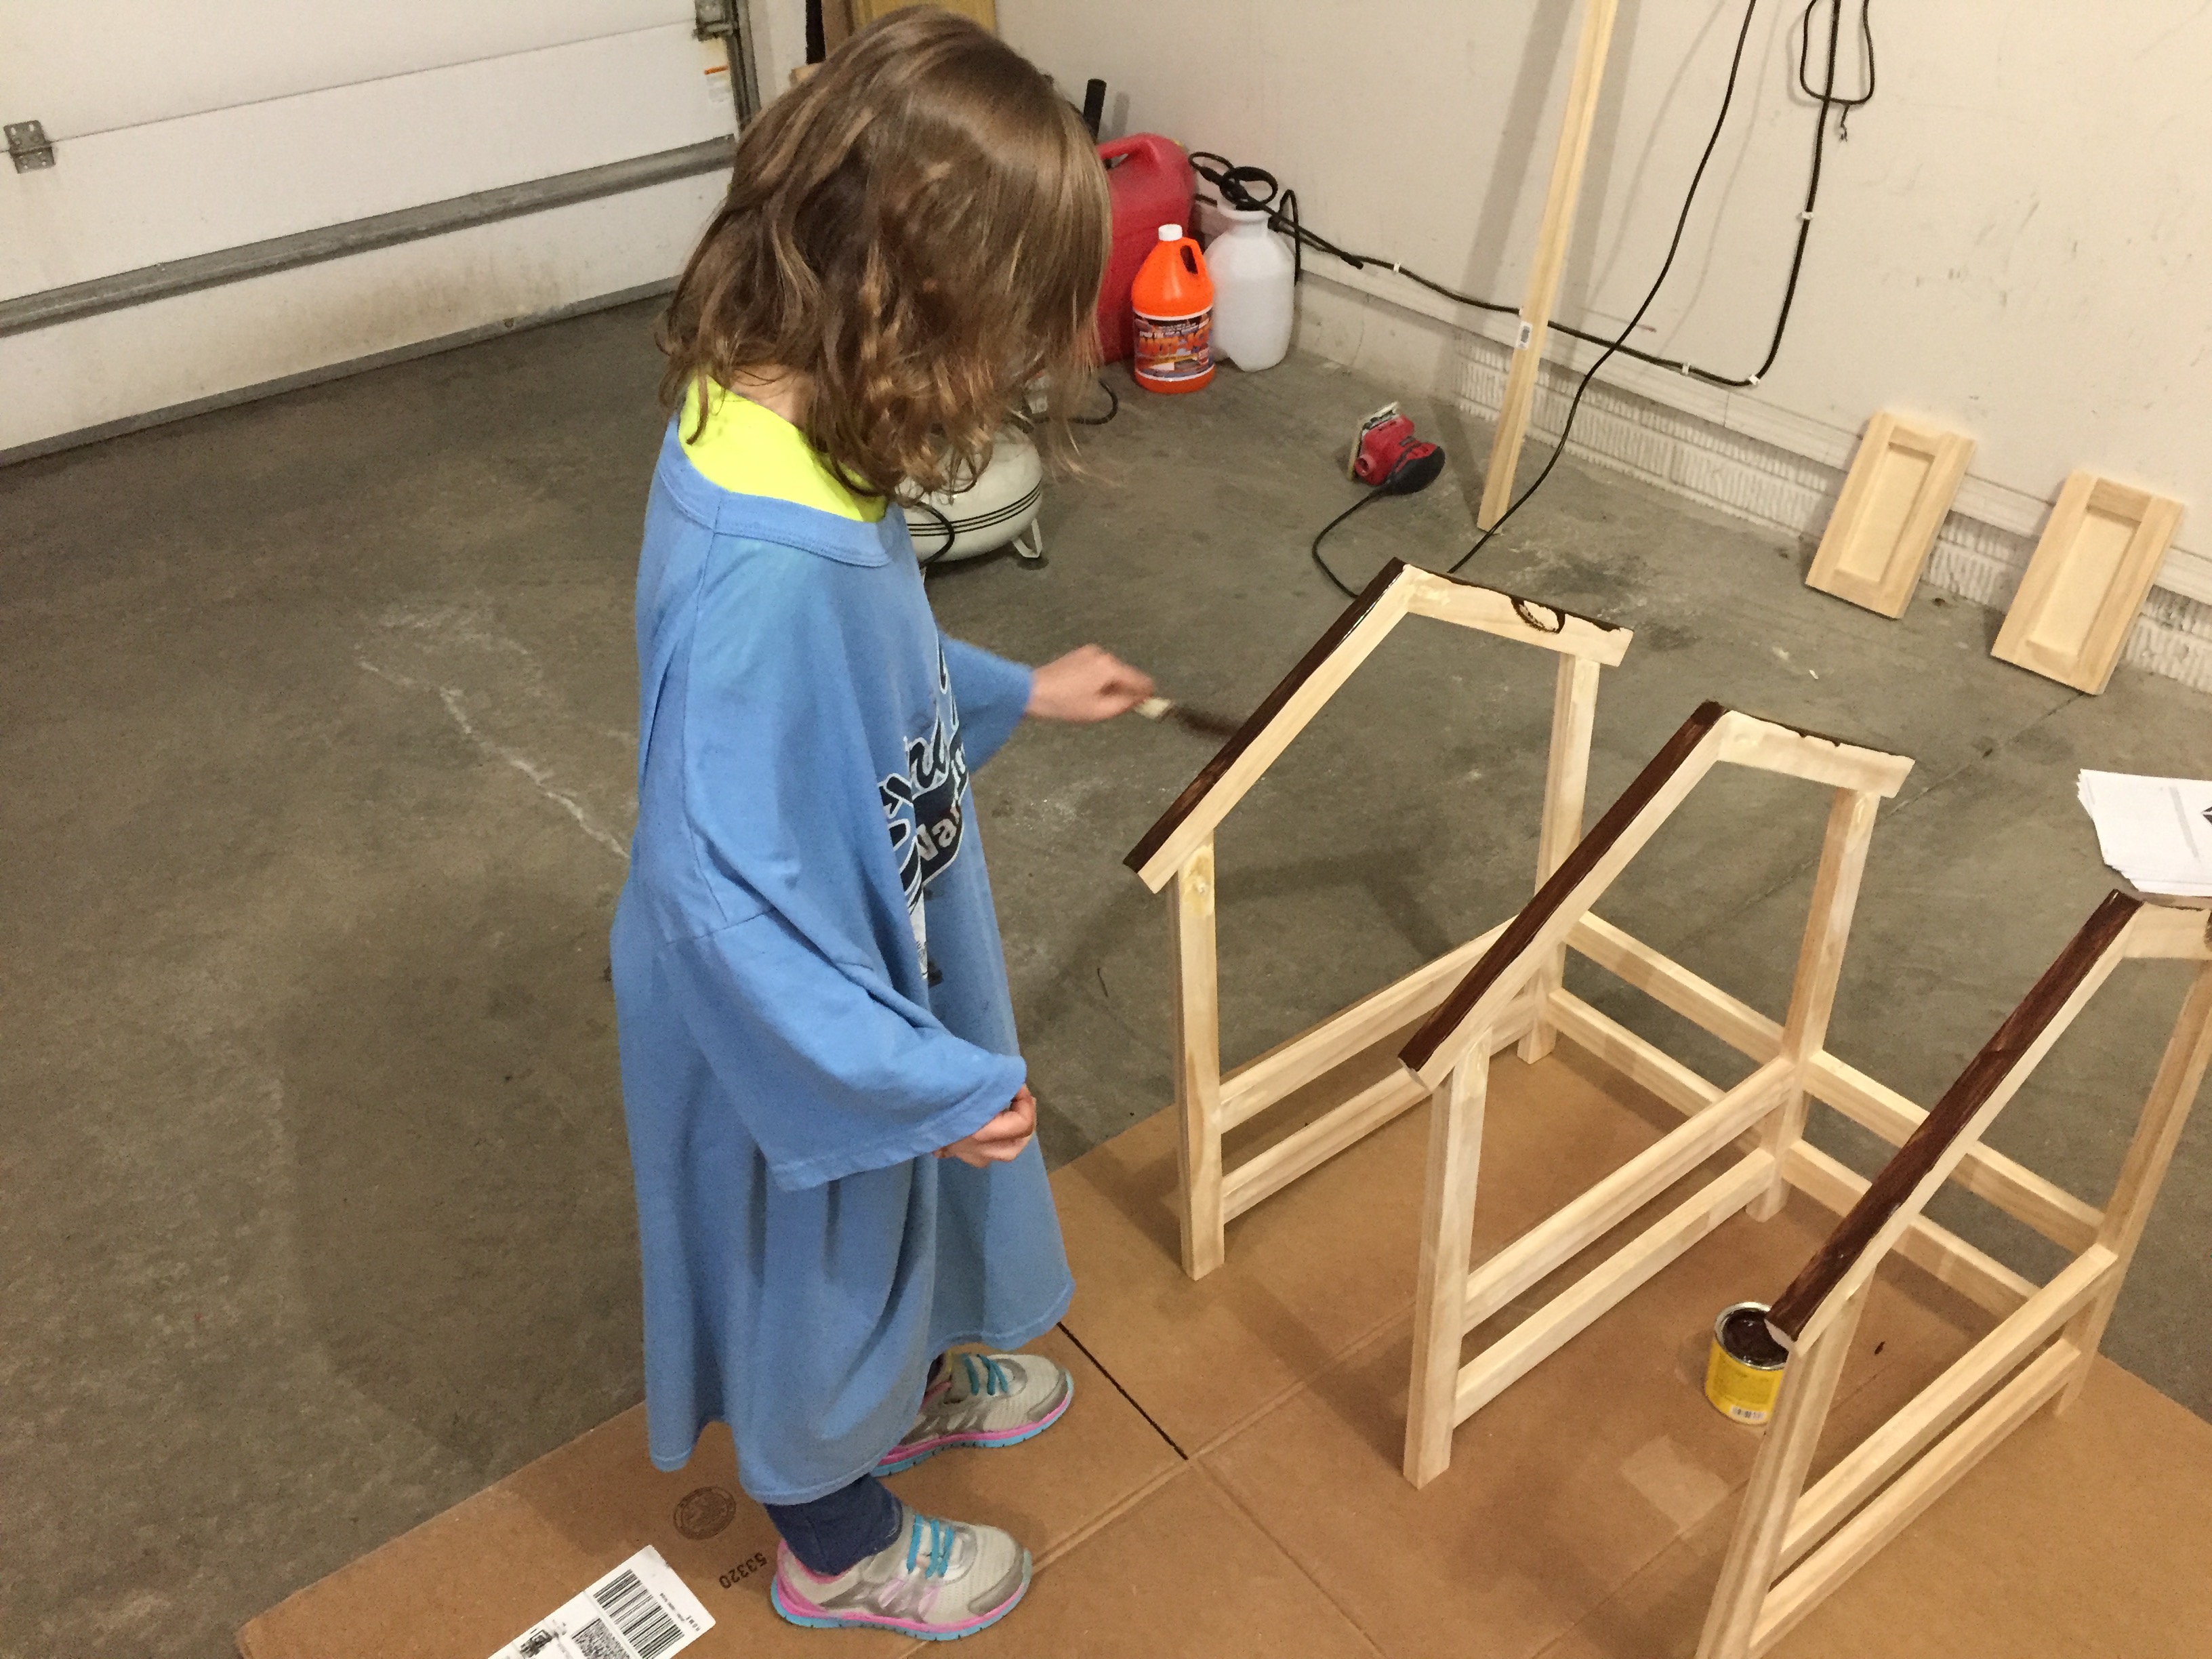
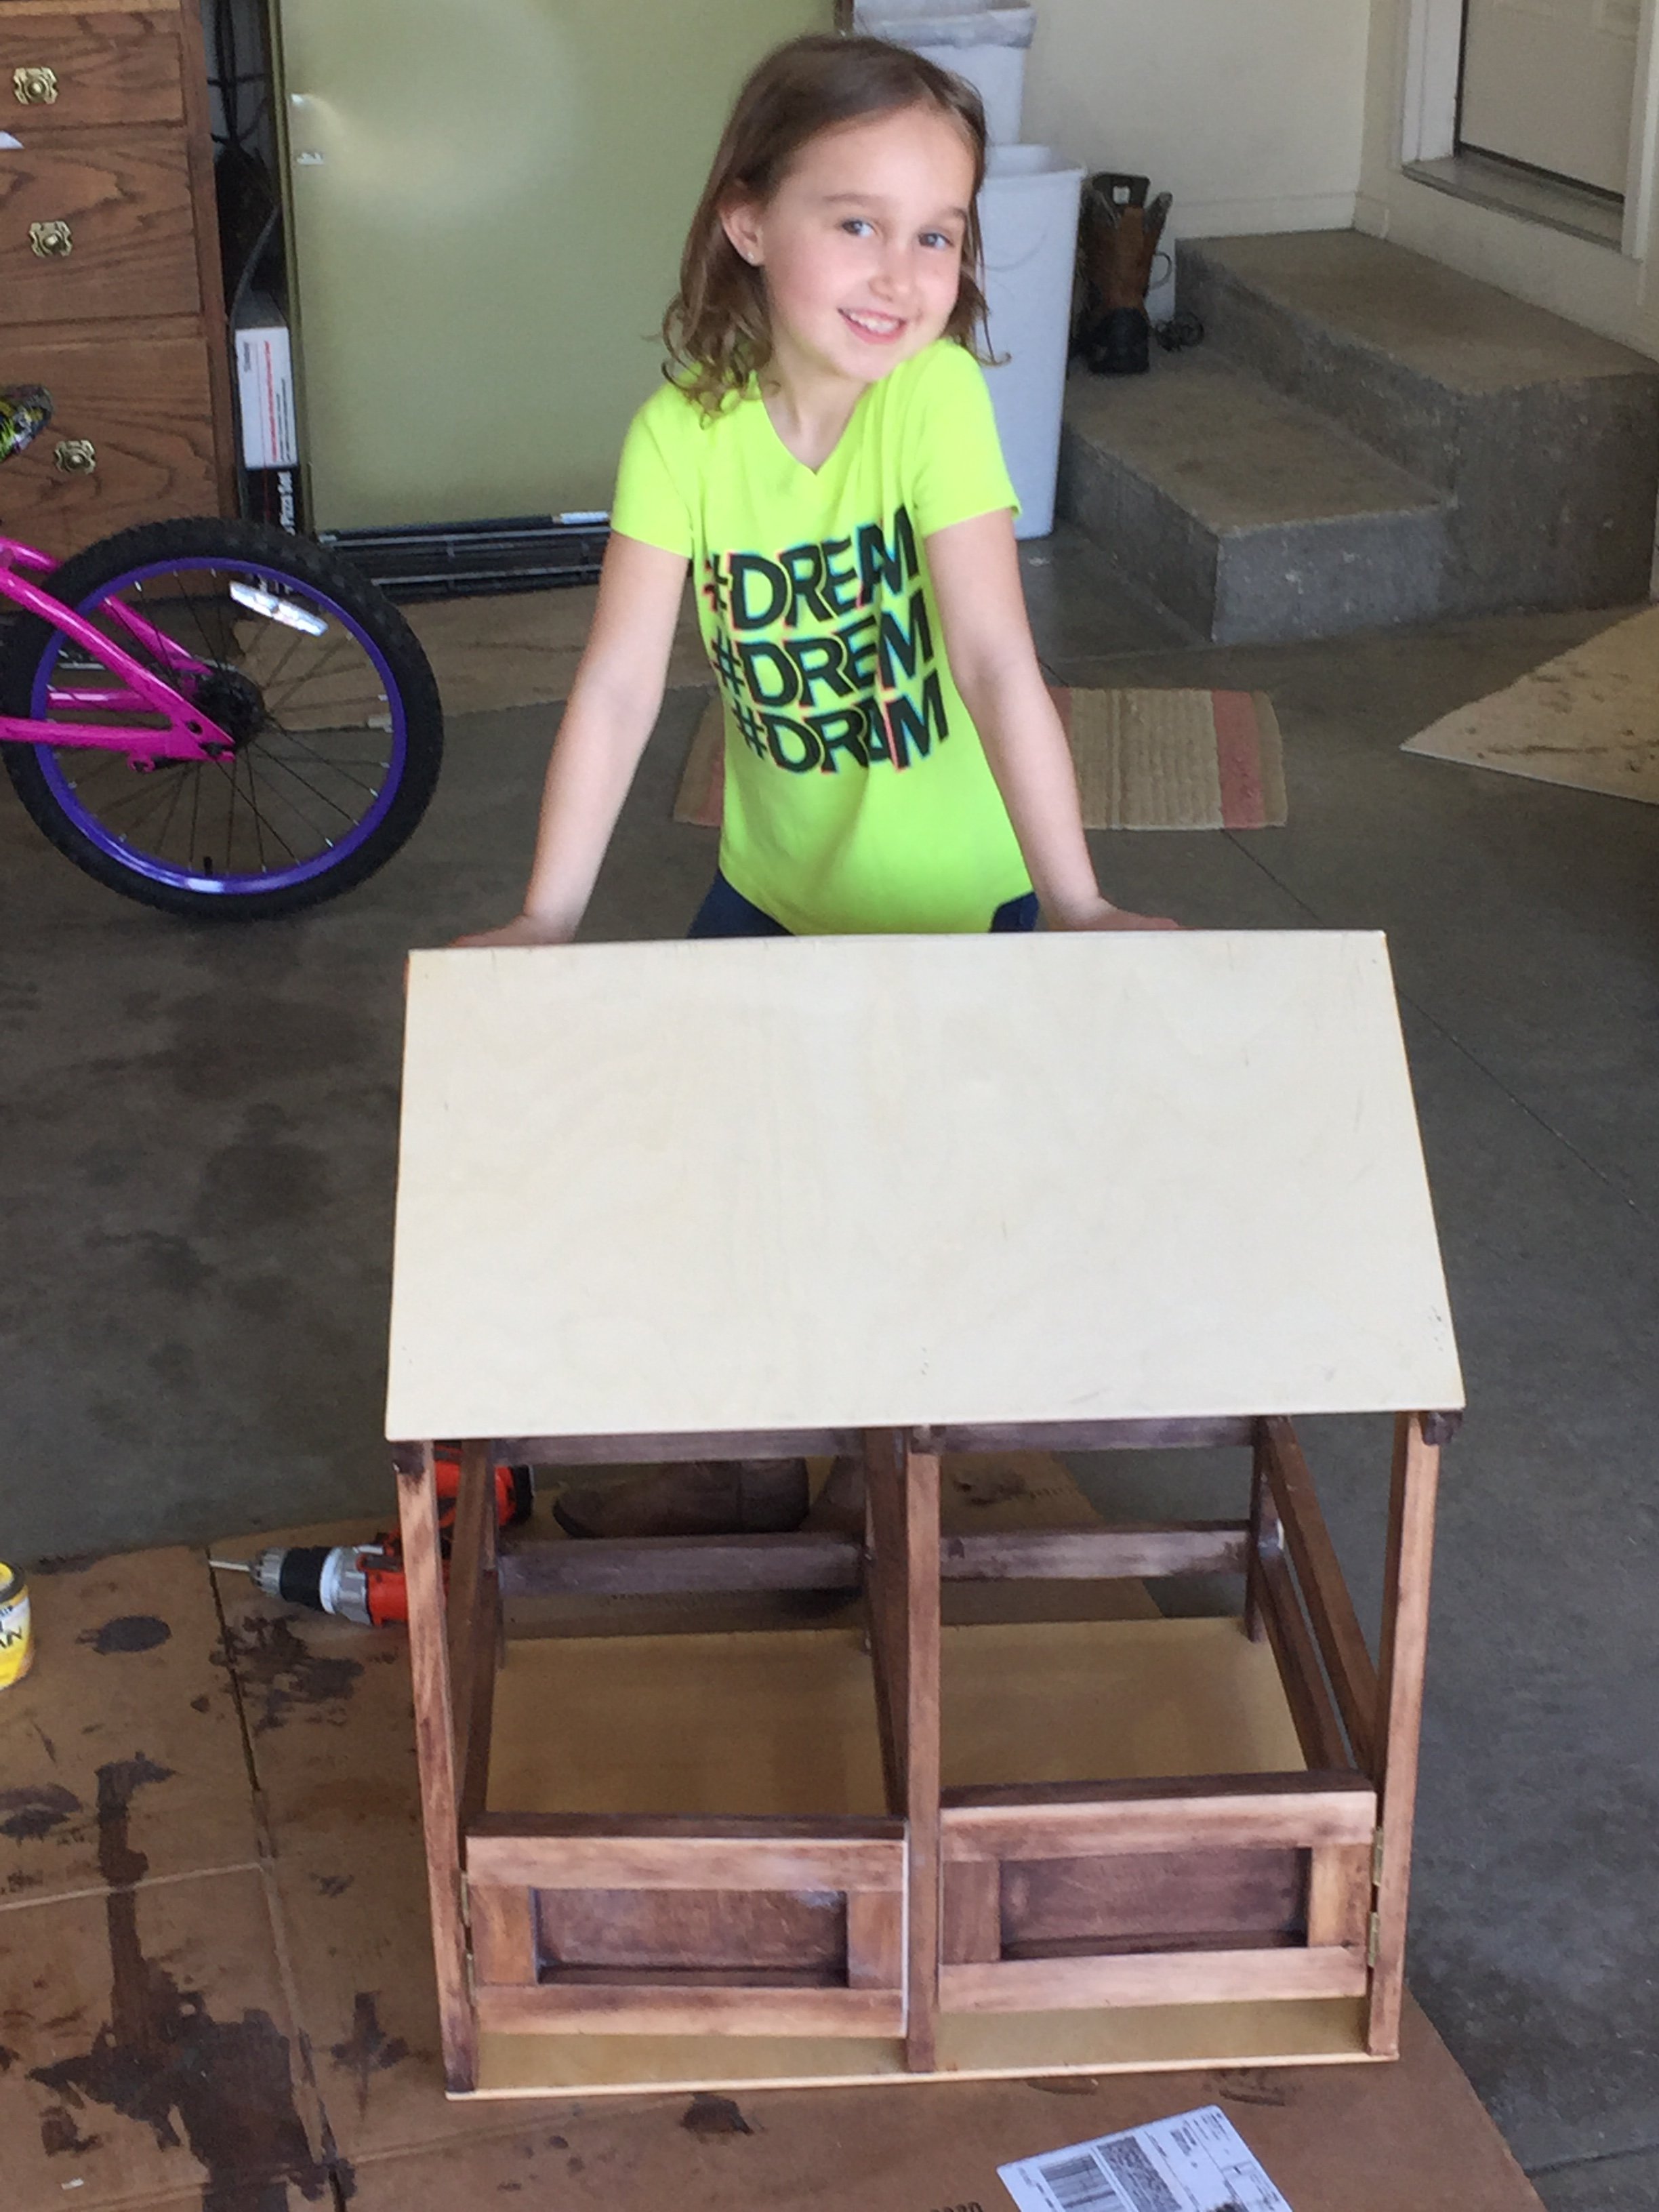
American Girl Doll Horse Stable
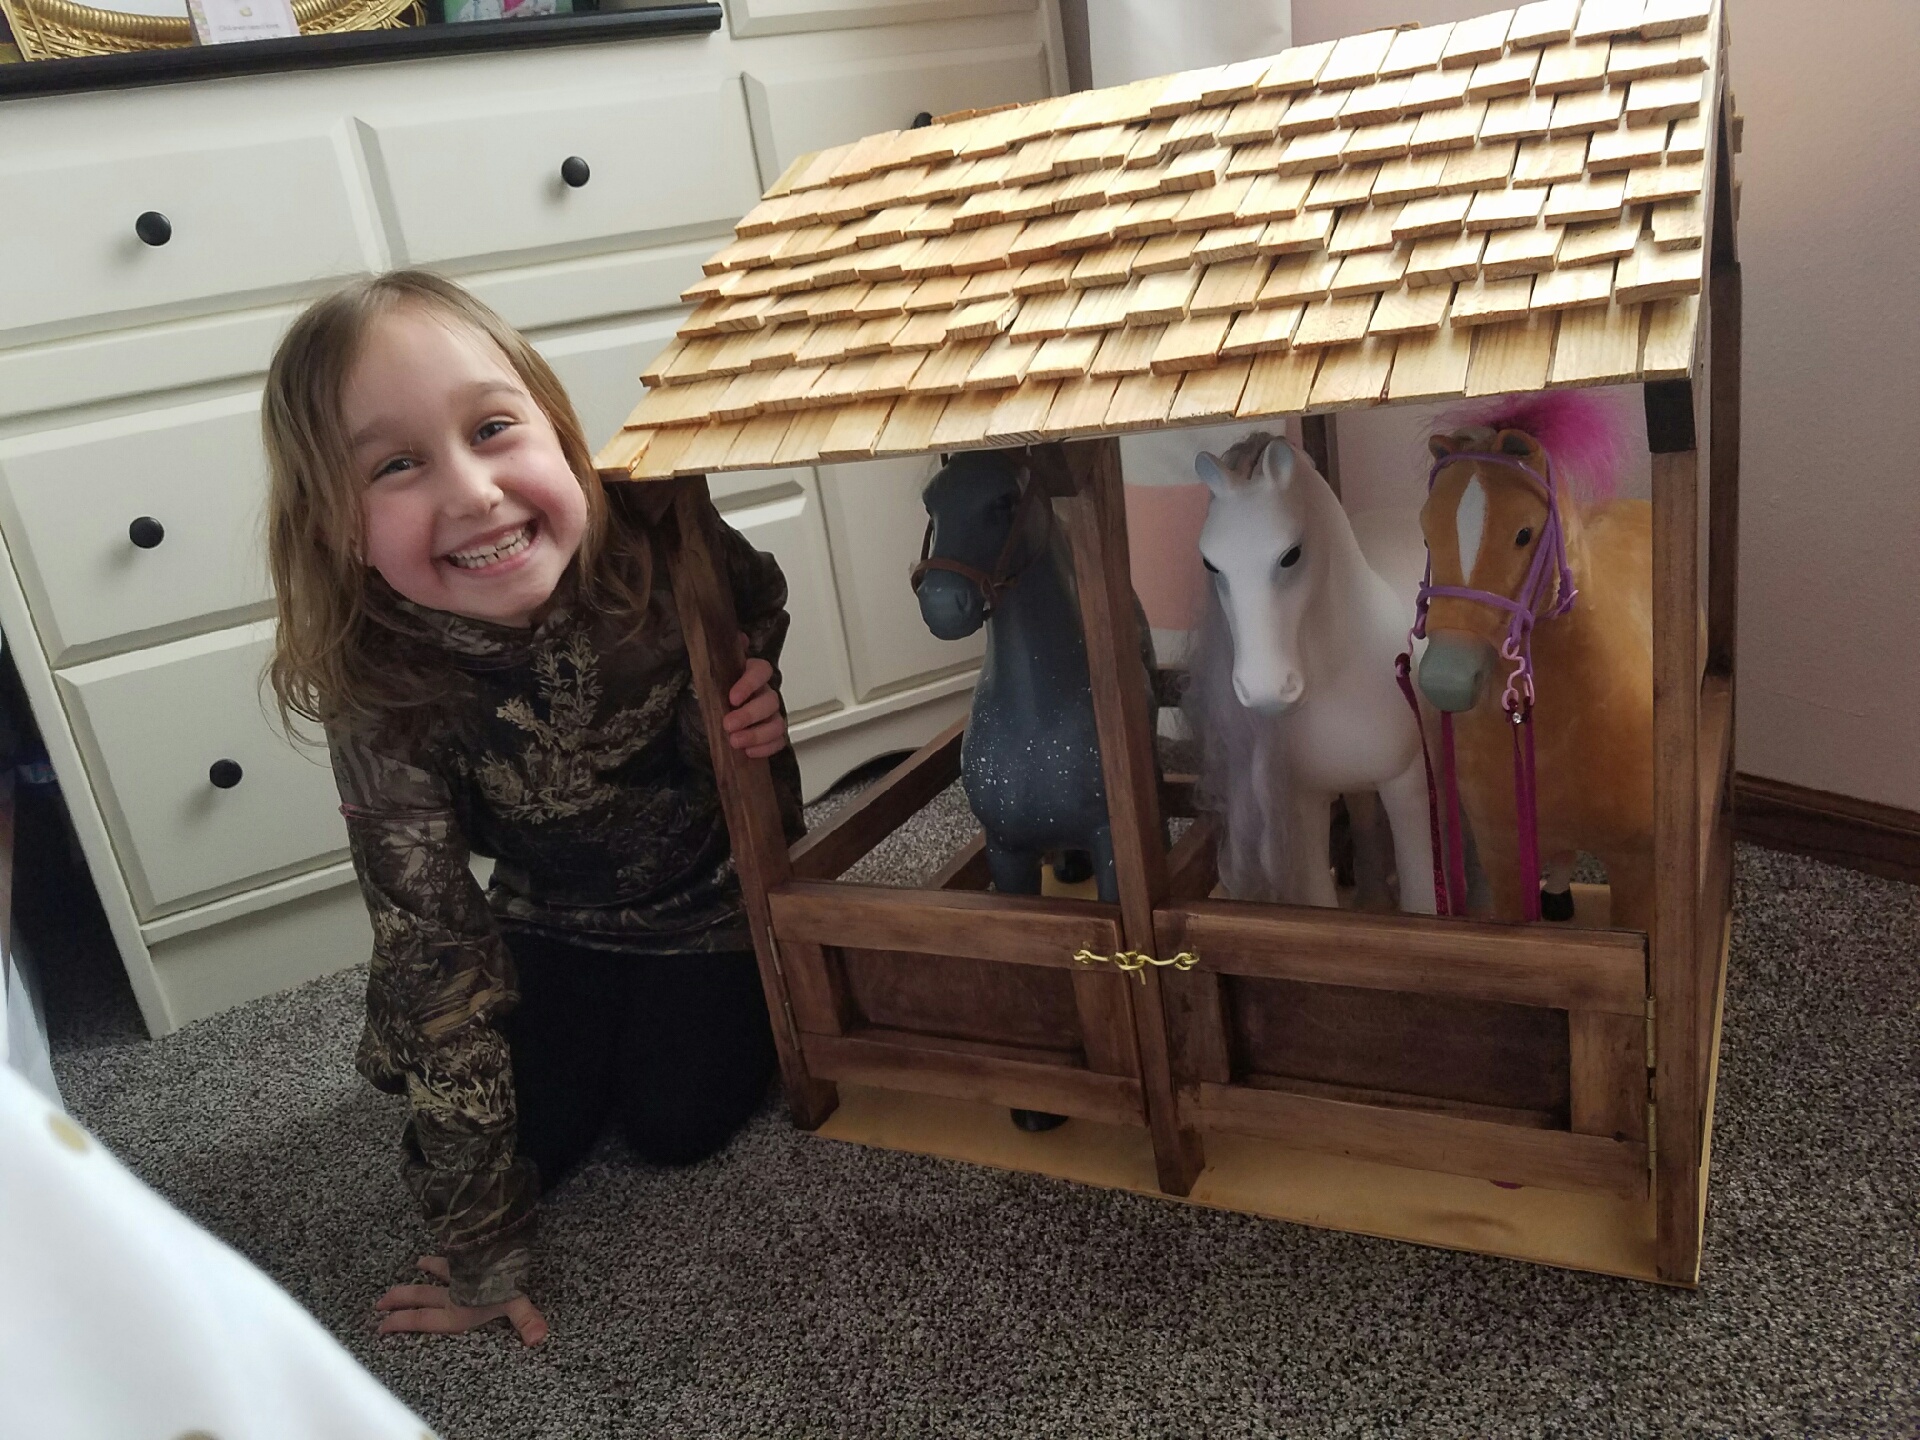
This was my first project with my daughter. After a divorce, I wanted something fun to do with my daughter-something where she would learn, have fun, and see a project from start to finish.
I did a lot of pre-cutting and prepping, but she did some cutting with a handsaw and mitre box, drilled holes with the Kreg jig, stained, used the nail gun, and glued. I installed the shingles, and touch up staining, but she did a lot of work for this project!
Since then, we have built a collapsible corral (fence) for her three horses, and next is the farmhouse bed for her doll!
Thank you for the great instructions, my daughter thinks I'm the greatest person on earth because of these projects!
Built from Plan(s)
Estimated Cost
I bought the Kreg jig, so my cost was a lot higher, but less than $75 prior to the purchase of Kreg jig (additional $40 with clamp).
Estimated Time Investment
Weekend Project (10-20 Hours)
Finish Used
Honey maple and dark maple
Recommended Skill Level
Beginner
My first ever project!
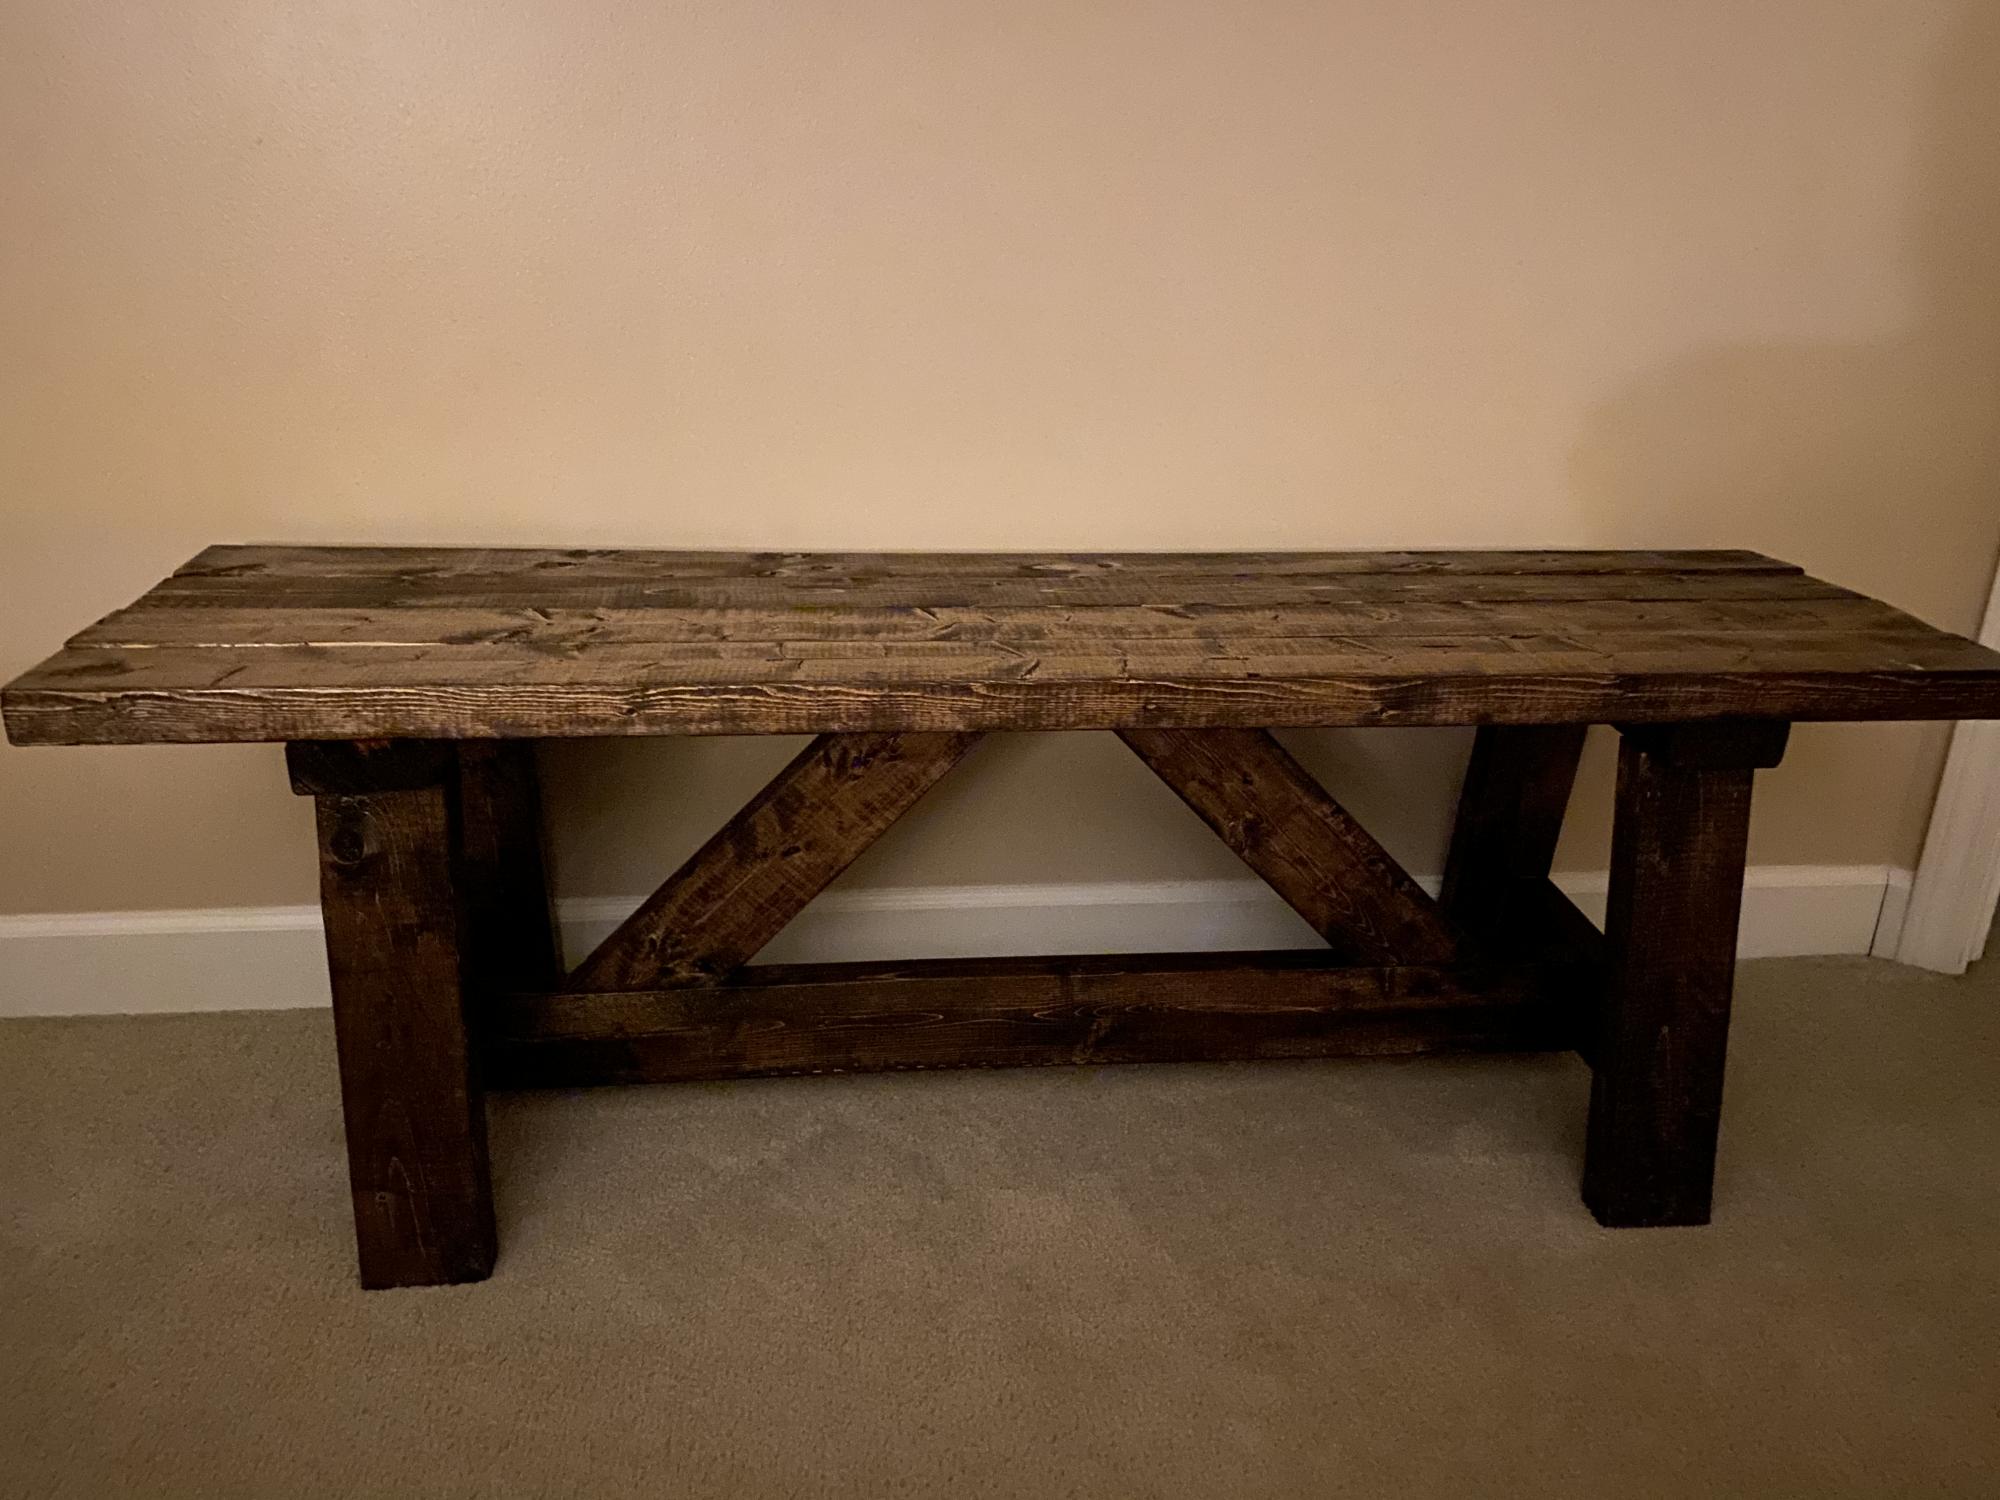
This was my very first experience ever building anything. I’d barely used a saw before this! I probably did a few things wonky, and it has some flaws. BUT it’s level and doesn’t wobble!!
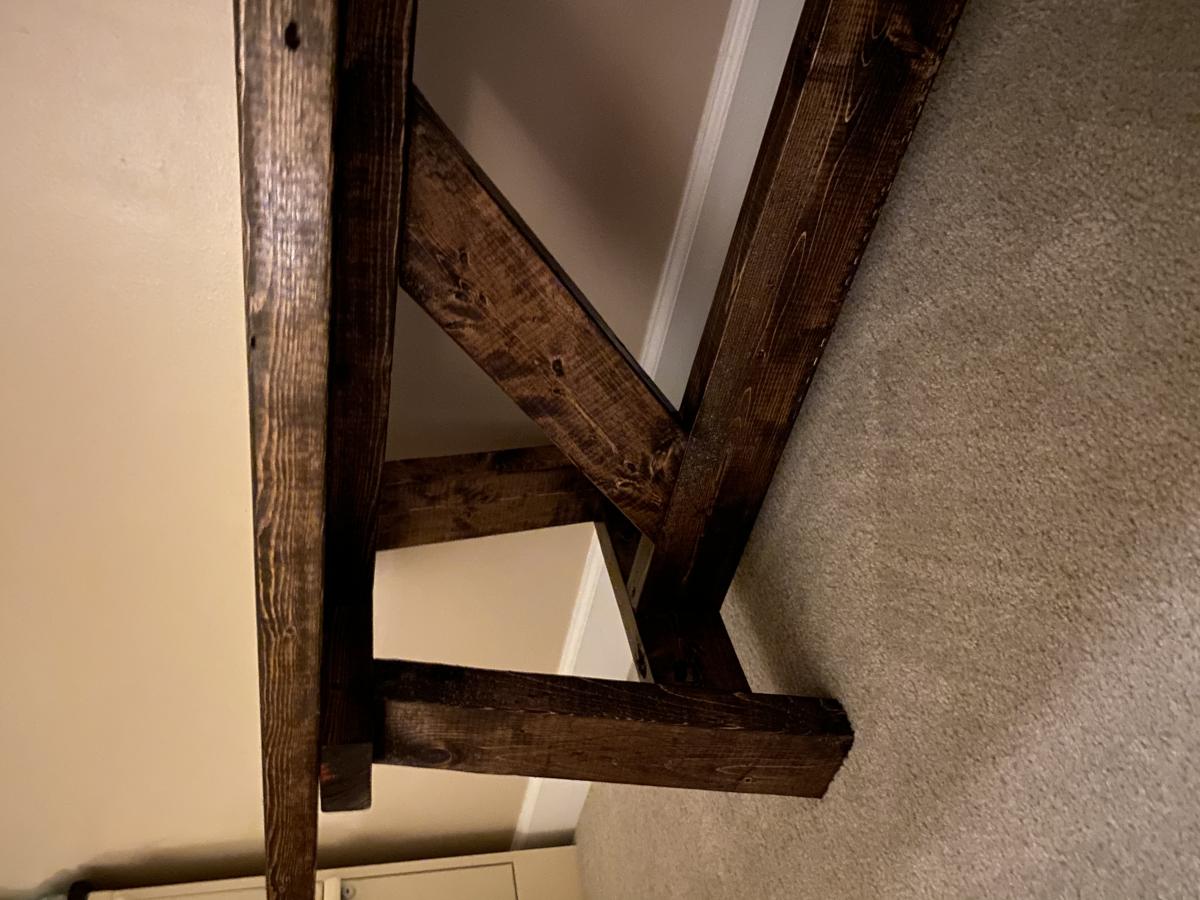
Estimated Cost
$50 (for wood and screws)
Estimated Time Investment
Day Project (6-9 Hours)
Finish Used
Minwax Dark Walnut with a glossy clear coat.
Recommended Skill Level
Beginner
Comments
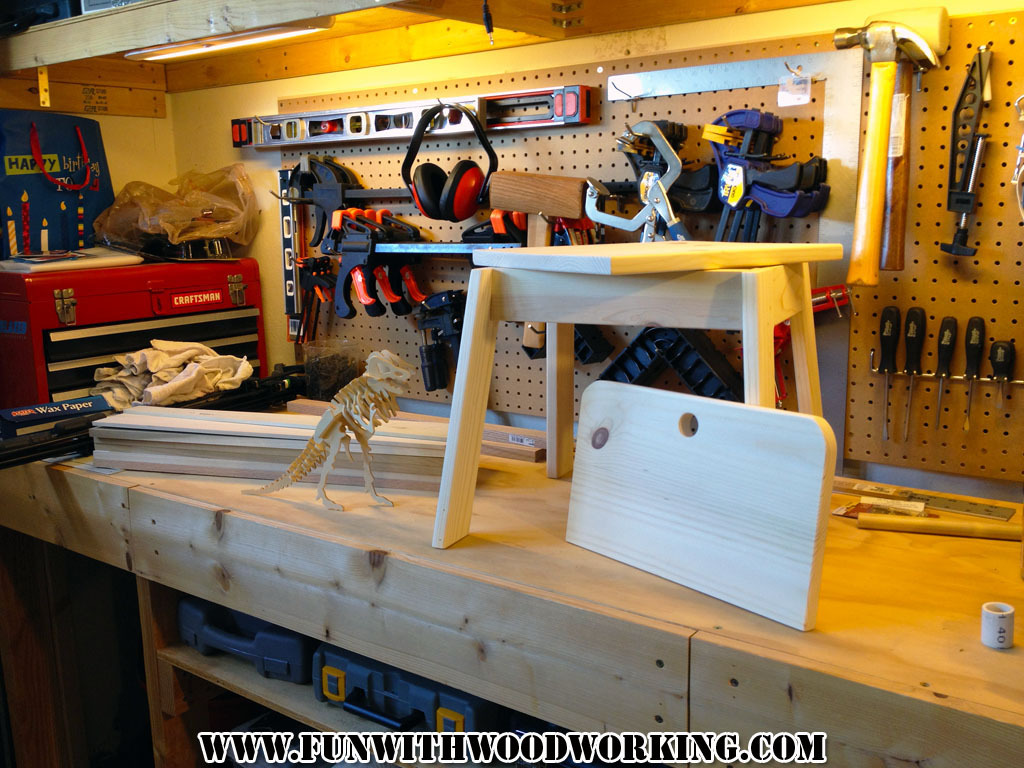
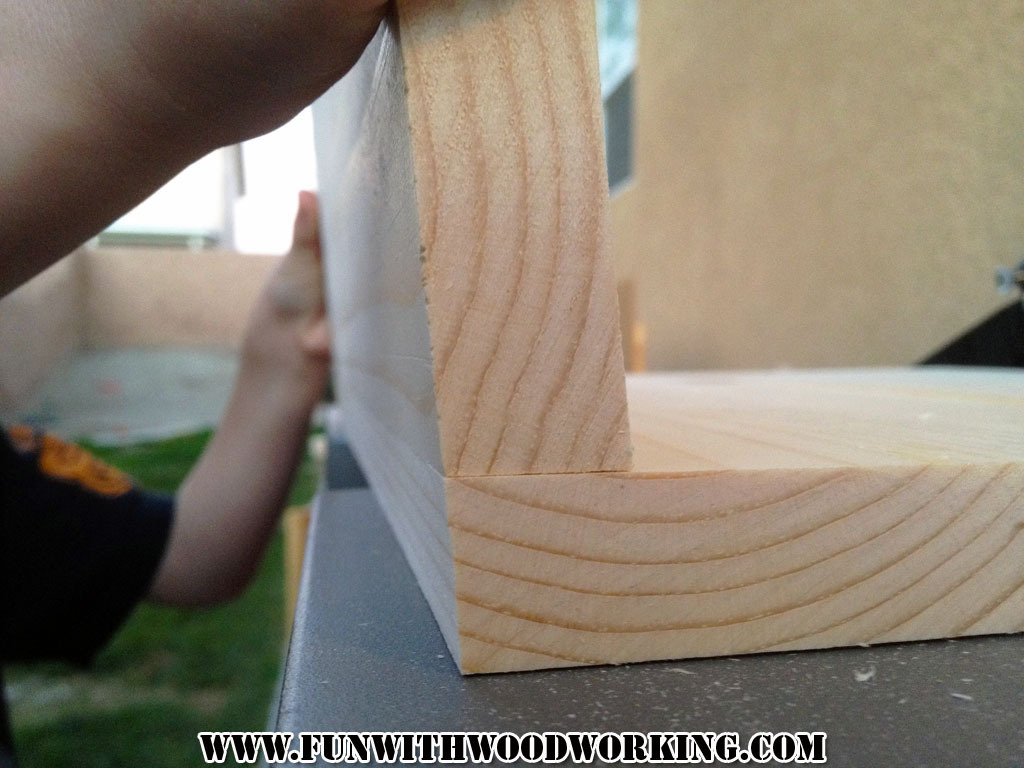
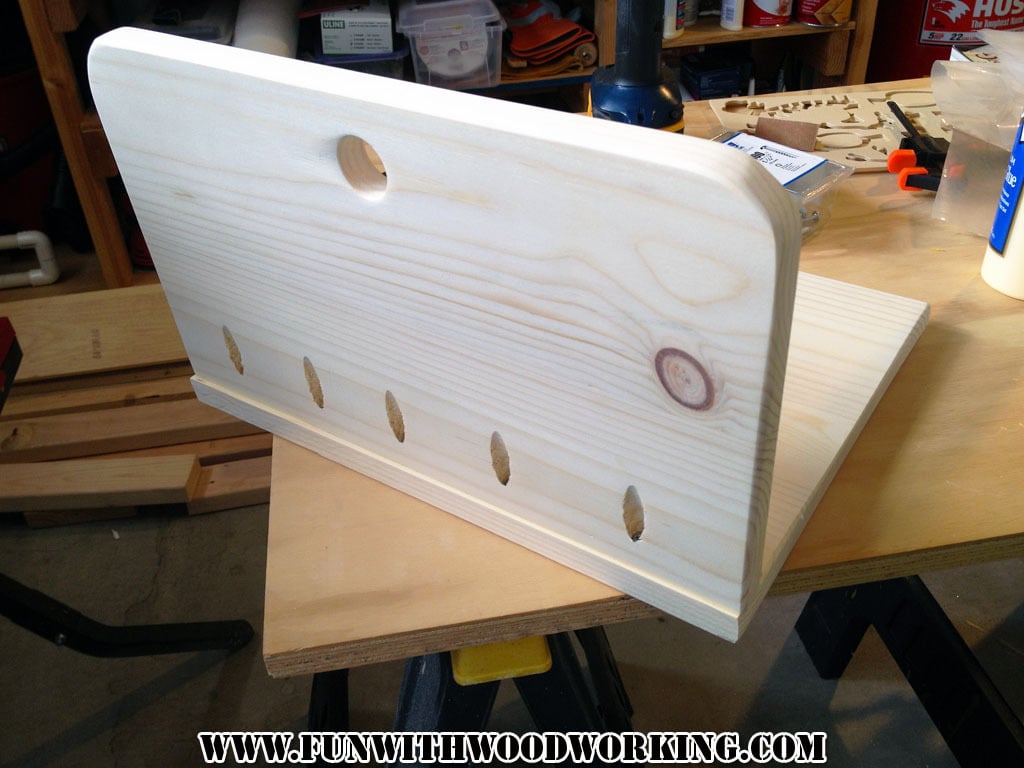
Thumb Chair
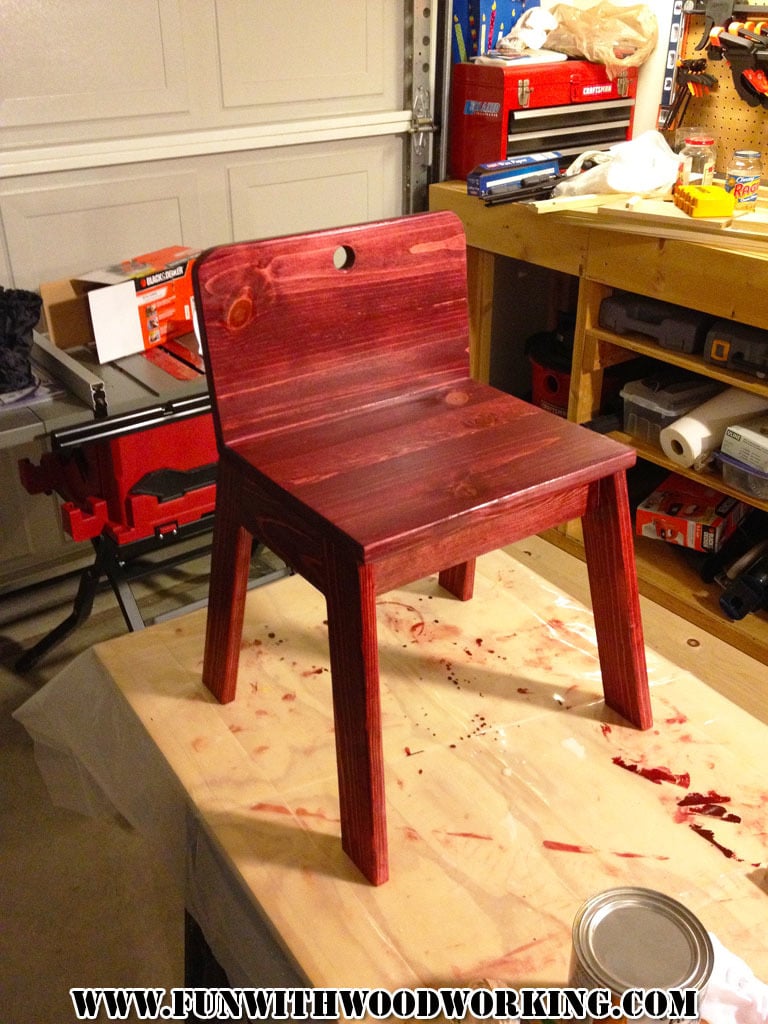
I found this plan on your site and fell in love with it. I followed all the directions but added a bevel to the rear of the seat match the the seat back and I rounded over all the edges on my router table. I also stained it and gave it 3 coats of polyurethane. My 6 year old son loves his chair and he is going to help me make one for his 3 year old brother.
You can follow the build on my blog at :
http://funwithwoodworkingtoo.blogspot.com/2013/01/lets-make-thumb-chair…
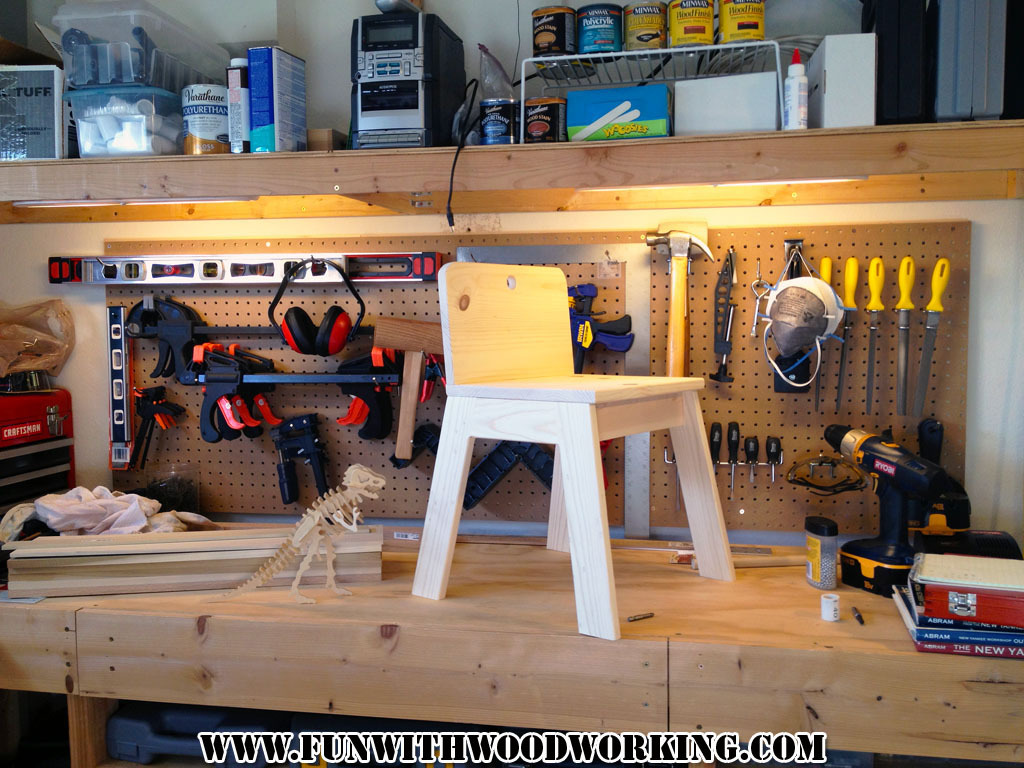
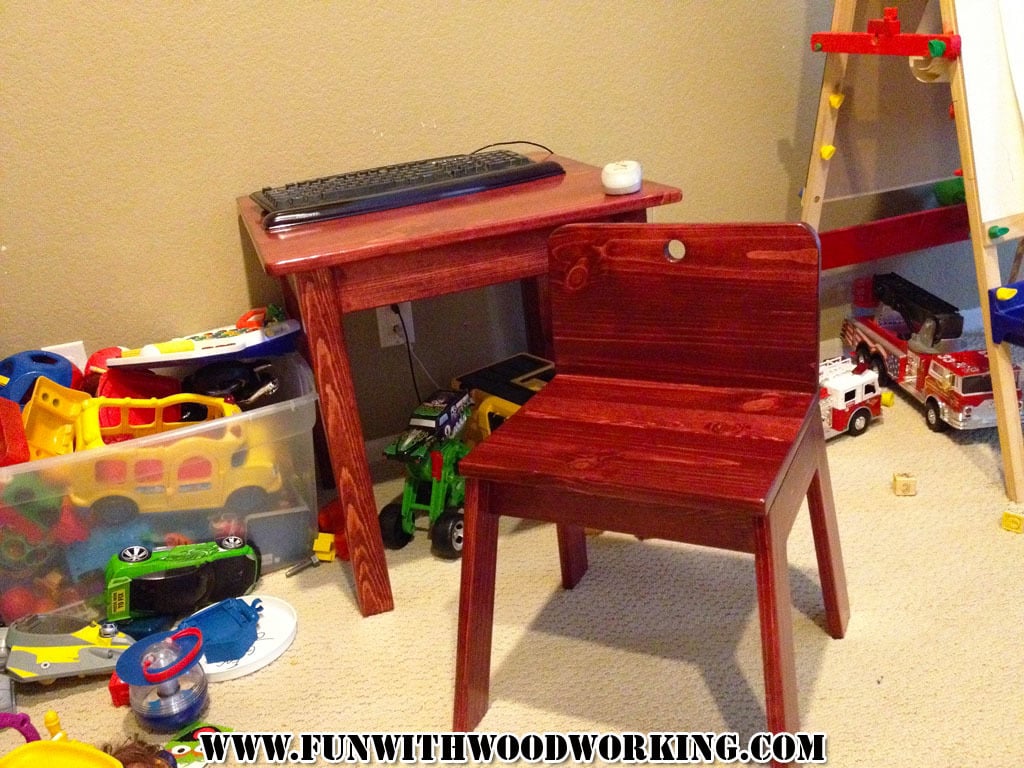
Built from Plan(s)
Estimated Cost
$10
Estimated Time Investment
Afternoon Project (3-6 Hours)
Finish Used
1 coat of Varathane stain applied with a rag and allowed to dry over night. 3 coats of Varathane water based polyurethane applied to entire project top and bottom with a light sanding between each coat with 220 grit sandpaper.
Recommended Skill Level
Beginner
Pet Kennel
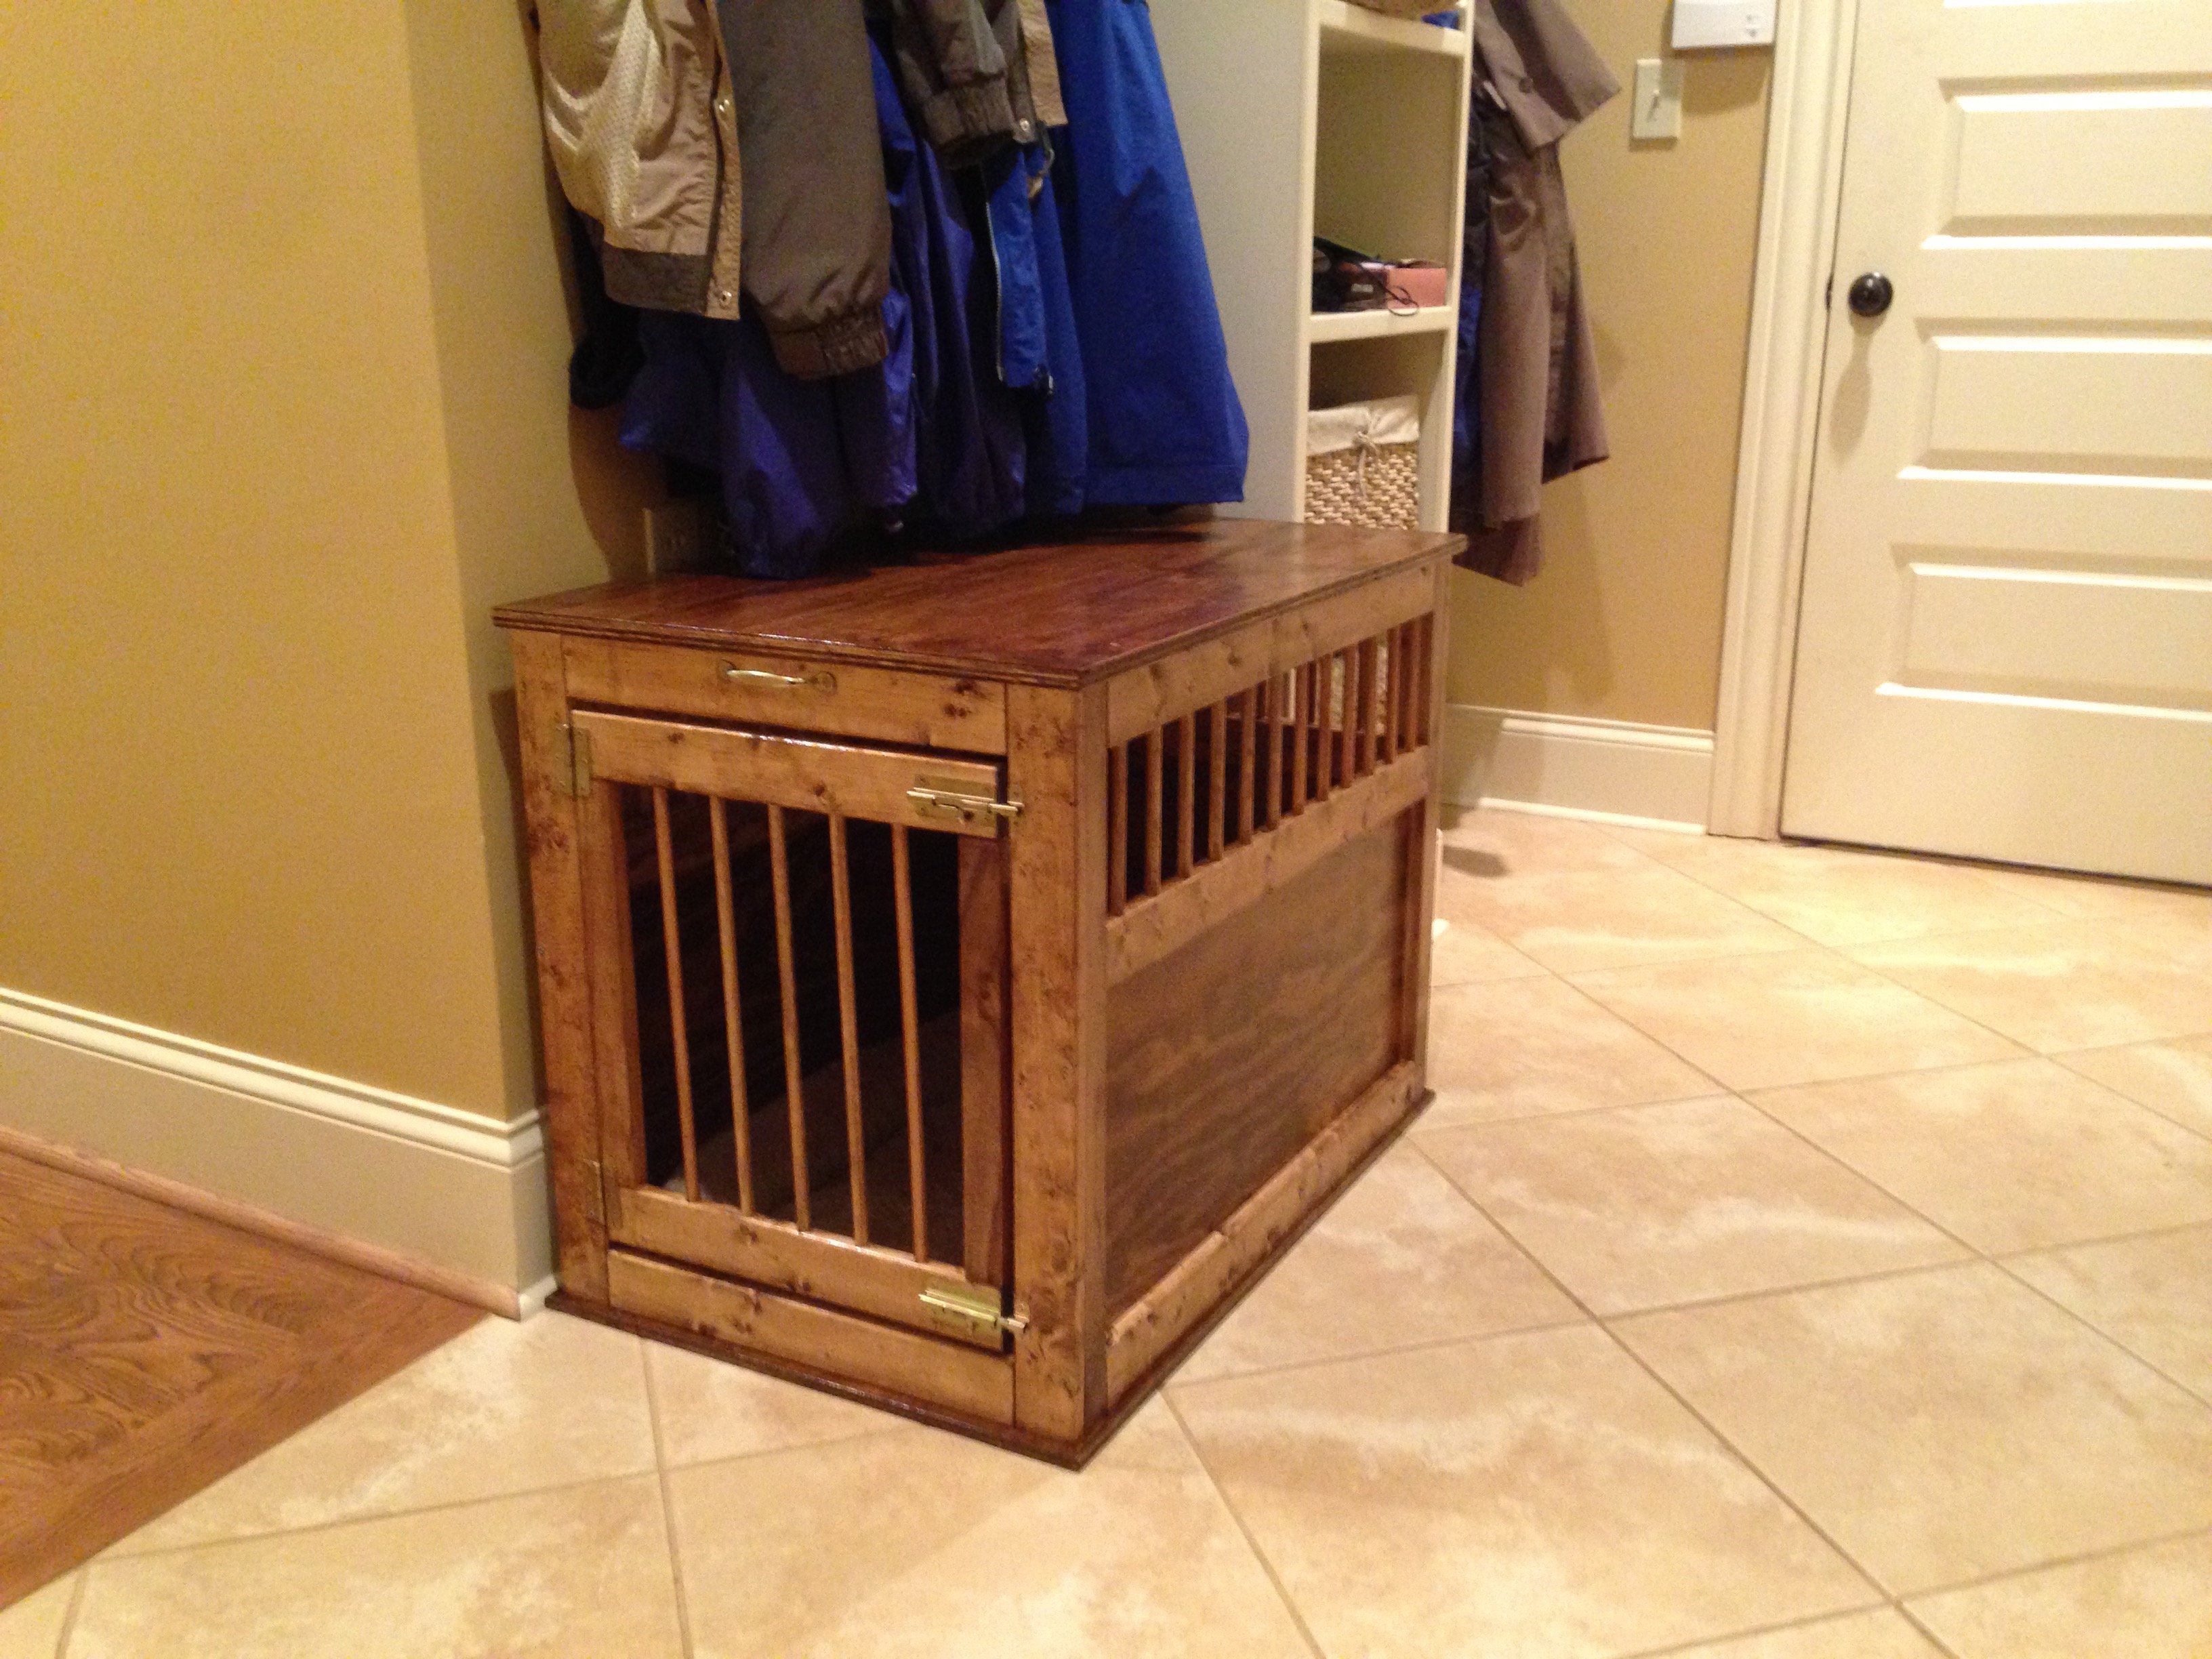
This is my first post. I have used a few of the plans off of here before but I thought this one turned out really well and wanted to share. I used dowel rods to give it a more open feel and think it looks good. My dog loves it! Thanks.
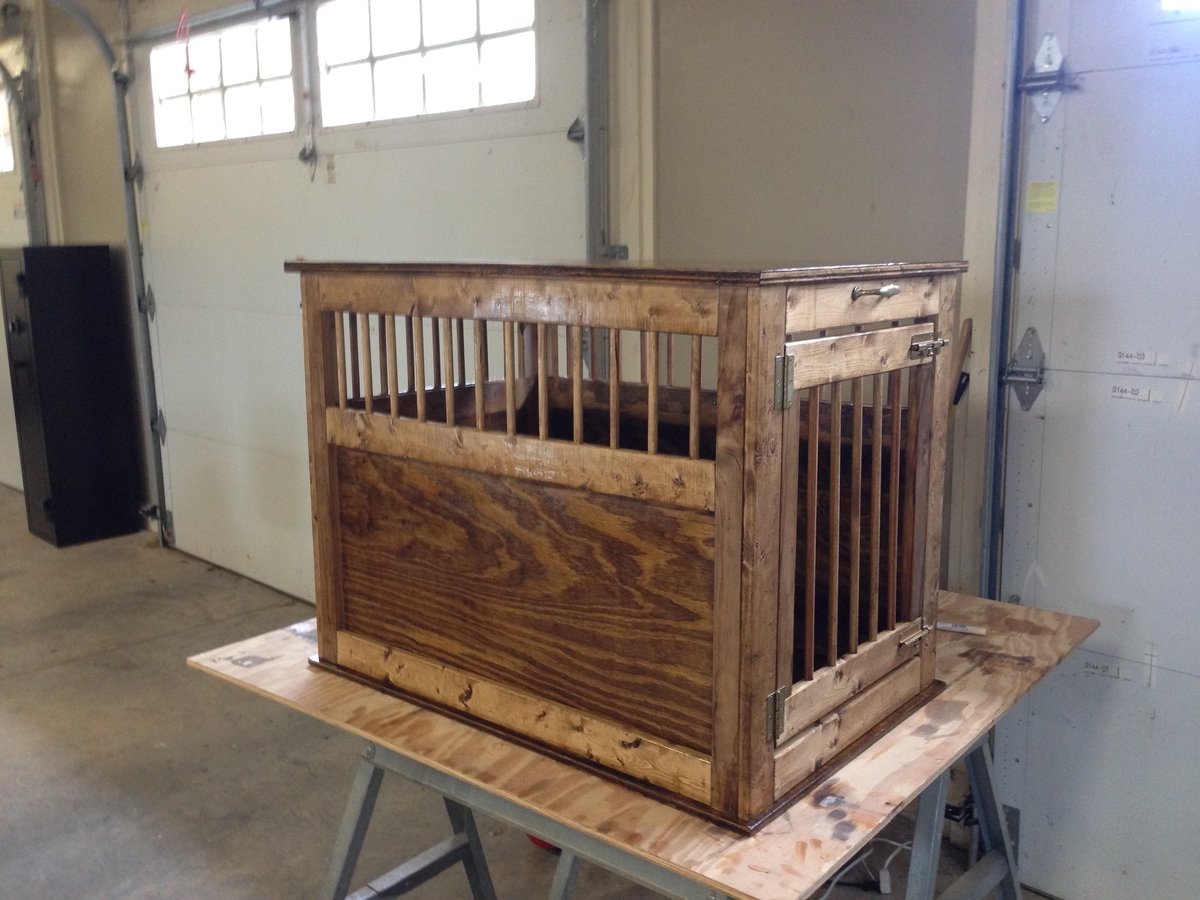
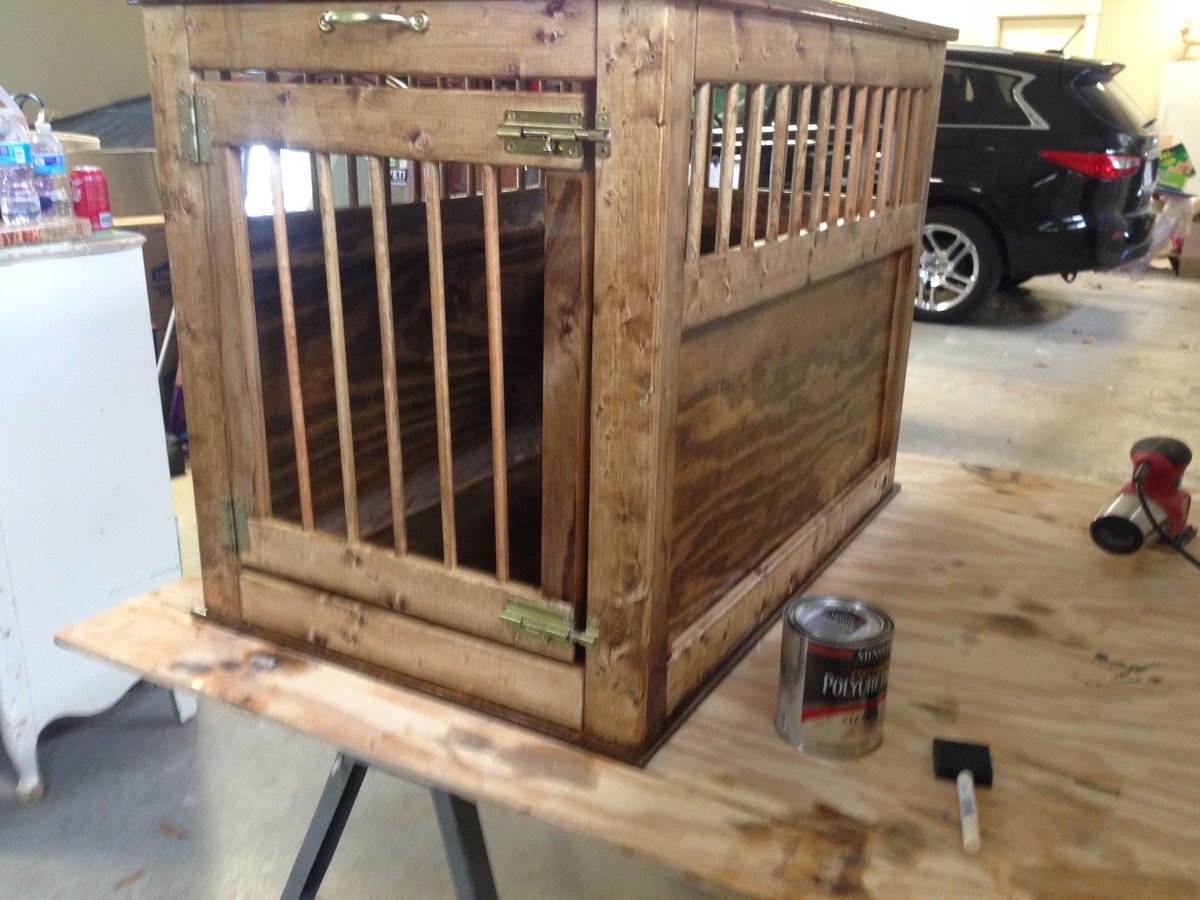
Built from Plan(s)
Estimated Time Investment
Day Project (6-9 Hours)
Finish Used
Minwax special walnut stain and polyurethane
Recommended Skill Level
Beginner