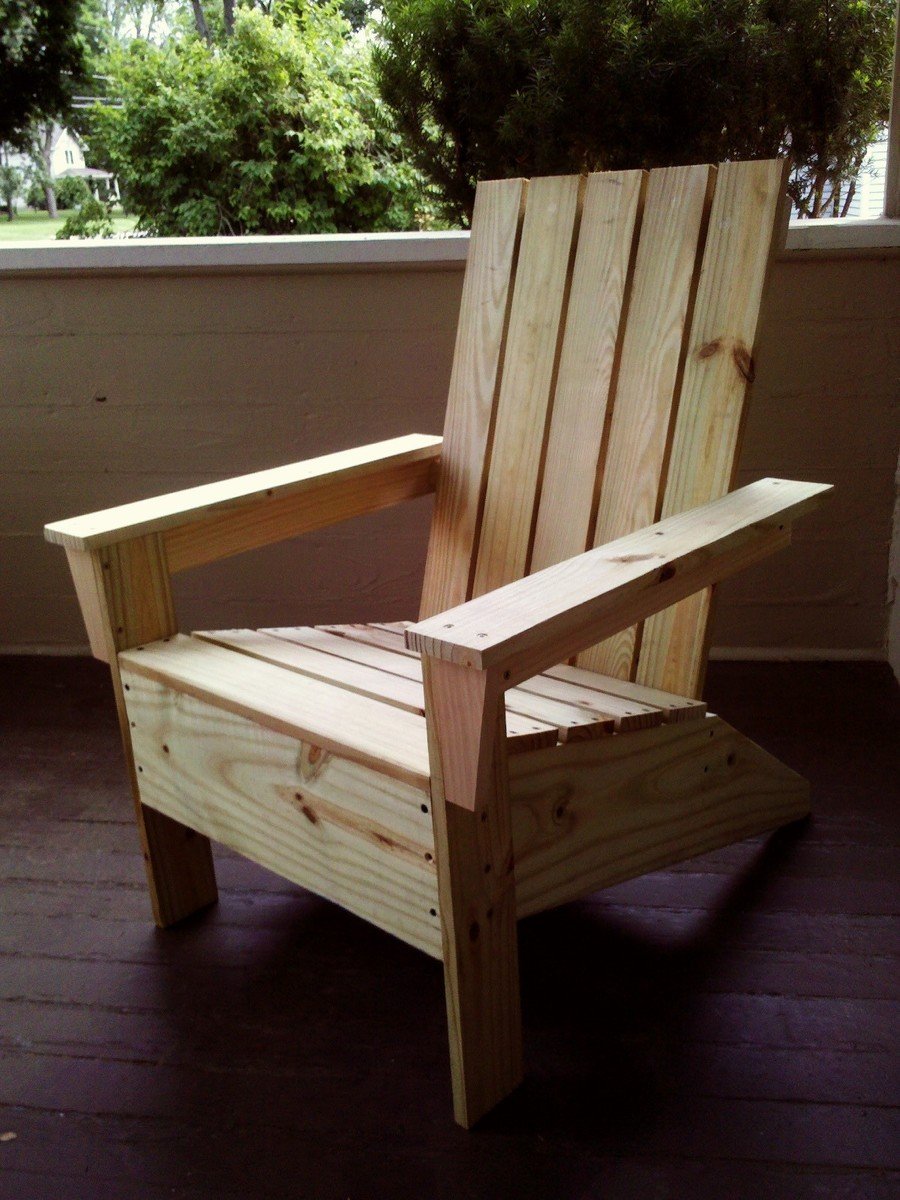
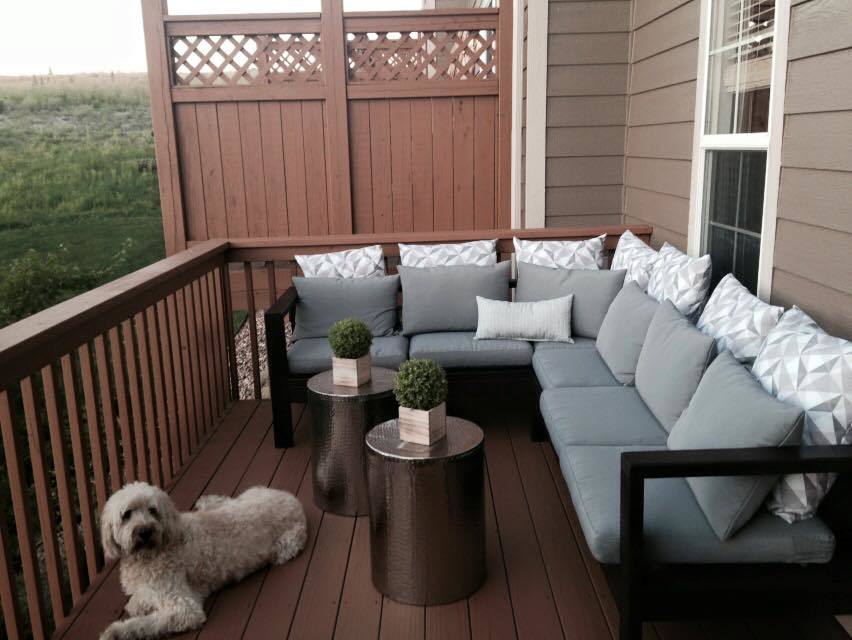
Community Brag Posts

Happy Mother's day

Submitted by Anonymous (not verified) on Sun, 05/08/2022 - 08:21

My sons and I decided to tackle a project for mom this year, and the farmhouse coffee table was a great project. Tweaked the design slightly with offset full length cross pieces and a distressed paint finish on the base. Great plans, fun project with the kids, and mom loved it!

Comments

Cubby Storage for the Playroom!

I used Ana's plans for the open cubby base and hutch with doors to create my storage system for the playroom. I had Lowe's rip my 2 sheets of 3/4" MDF and I made the smaller cuts with my miter saw. I used 1/4" white bead board panel for the doors and cubby backs. I built the pieces in 1 day and painted the next. It was simple and fun! You can see more details at http://www.shanty-2-chic.com/2011/07/storage-for-the-playroom.html!

Estimated Cost
$130
Estimated Time Investment
Weekend Project (10-20 Hours)
Finish Used
I coat of primer and 2 coats of Valspar Antique Homestead Lace in Satin
Recommended Skill Level
Beginner
Seasonal And Holiday

Narrow end table

My kids (11 & 12) made these in about 3 days. We have to work during my 2 yr olds nap time so I would say 6-8 hrs total. We always have a lot of scrap wood lying around so this was a great way to use it up. Unfortunately, sometimes when using scrap wood, it is not always the exact measurements that you need but some plan reworking and measuring as you go can fix that. On this particular plan, the only thing we changed was the thickness of the top and a little fudging on the drawer box. We also used our router to round over some or the edges and we made our own drawer tracks along the bottom w/ scrap furring strips. Honestly, those studs you see in the picture, did most of the work and since their skill set usually involves a reference to the newest video game out, I would say this was defiantly a simple project! ;-)

Built from Plan(s)
Estimated Cost
$20 each If you had to buy all new wood
Estimated Time Investment
Afternoon Project (3-6 Hours)
Finish Used
Valspar paint in emerald and varathane brand stain in early American
Recommended Skill Level
Beginner

Comments

spiceylg

Wed, 08/14/2013 - 04:46

I love that your kids built these, what a sense of accomplishment! Tell them they did a great job!

Kitchen Island

The plans were easy to follow. I modified my island to fit my space and cut it down to 44 inches in length.

Built from Plan(s)
Estimated Cost
The entire project cost $47.00.
Estimated Time Investment
Day Project (6-9 Hours)
Finish Used
I stained the top and shelves with Watco Danish Oil in dark walnut and then used a satin finish varathane for only the top to protect it from spills, etc. The sides and legs were painted with an interior latex paint called "Sandbar" from Home Hardware.
Recommended Skill Level
Beginner

Comments

Emily Jo (not verified)

Mon, 10/31/2011 - 15:33

Your island is gorgeous, and I love the modification you made to the original plans on the shelving support! I would like to know what size the boards are that you used so that I can duplicate. Thank you!

Lisa Tamaye (not verified)

Sun, 02/05/2012 - 18:10

This is great! ANyone know how I could extend one side in order to put stools for an eating area?
Would love to do that!

Alice (not verified)

Tue, 02/07/2012 - 19:43

I would think it would be basically the same build, just add brackets to support the extra wood.

Guest (not verified)

Mon, 03/05/2012 - 15:20

I want to make this Kitchen Island but if can't find the Supply List. Would you mind posting it or emailing me please! This will work perfect in my Kitchen

Katia57

Mon, 03/05/2012 - 17:46

Wow! Just a wonderfully simple project! I can figure it out by looking at it. I have a piece of Rock Maple Counter Top 24"x6'that needs legs. I'll probably use 4x4' for legs, six of them. But the shelves will be just like this. Thank you!

Katia57

Mon, 03/05/2012 - 17:50

Wow! Just a wonderfully simple project! I can figure it out by looking at it. I have a piece of Rock Maple Counter Top, 24in.x6ft., that needs legs. I'll probably use 4x4s for legs, six of them. But the shelves will be just like this. Thank you!

Guest (not verified)

Wed, 04/04/2012 - 11:58

Just click on the link for the instructions. It's under the heading 'About This Project' titled as 'From Plan: Easy Kitchen Island Plans'.

Click where it says 'Easy Kitchen Island Plans'. When you hover your cursor over the words, you will see that is a hyperlink.

Lindsey Adams (not verified)

Sun, 05/20/2012 - 06:48

I love your island and I also have a small kitchen...would you happen to know the sizes of the boards you used? Thanks

??? (not verified)

Wed, 07/25/2012 - 14:31

Yours looks so different and so much better then the one that show how to make it, how did you do it? I really would love to build it but have no idea how...
Thanks so much!

CBsMama (not verified)

Wed, 08/15/2012 - 13:08

This island is perfect. I love the shelves and the size. Any chance you could send me the dimensions of this island and details on how you did the shelves? Great job!

lizzy1299

Mon, 02/04/2013 - 15:03

I'm SO glad I stumbled acrossed your website! I LOVE that island and getting ready to get all the stuff to make it. Did you use the Kreg Jig thing the original person used...? If not, how did you cover the screw heads?

Thanks!

ameliam

Wed, 12/31/2014 - 07:37

Hi, this is my first time building anything. I really like the modification made to the original plans. I like the legs facing the other way. I can't figure out how to modify the cuts on the sides and front and back supports for the top to adjust for turning the legs the other way. Are there modified plans. LOL I need instructions, I’m not quite there yet on doing it myself. Thank you

djbeenie

Wed, 02/04/2015 - 15:03

How did you mount the 1 x2s since its on the side of the 1 x 4s. Did you tac them in. I really like the way that looks. Thanks!

MBuckson

Mon, 03/16/2015 - 08:00

Amazing island! I am in the middle of building this and looking ahead to the finishing aspect of it and I have a question: What tool did you use to apply the oil on the counter top? A cloth or a certain type of brush?

wiri0302

Sat, 06/06/2015 - 18:33

Hello, i love this island but maybe i missed it. What kind of wood is everyone using? Frosting said $47 but that could only be for pine right? Are people using pine to build this? I would like it to look just like the picture. Any help would be appreciated! thanks!

X Book Caddy

Submitted by carongirls on Fri, 08/16/2013 - 06:30

SImple and easy to make. I had leftover wood so all I had to buy was 1x2"s. I'd say the total cost was $15. It's sturdy and holds a lot of books.

Built from Plan(s)
Estimated Time Investment
Day Project (6-9 Hours)
Recommended Skill Level
Beginner

Twin Farmhouse Bed with Jeremiah 29:13 carved into headboard

This is the second farmhouse bed that i've built from these plans.  I made a slight modification to shorten the headboard for this bed. Overall, it was a fun and enjoyable project. 


Built from Plan(s)
Estimated Cost
$160
Estimated Time Investment
Day Project (6-9 Hours)
Finish Used
Walnut, and spray lacquer
Recommended Skill Level
Beginner

Modern Farmhouse Bed with changes

Submitted by alleysrats on Tue, 08/21/2018 - 19:25

I needed a bed frame to go around my adjustable mattress and cheapest I found for pre-fabricated was greater than $200 and I thought why not go on Ana’s site and see if I could build one cheaper and I found this design.  I did everything in the instructions but build the platform as I was only getting it as a frame around the base that I already had.   I ended up using carsiding as it was cheaper than 1x6’s I also did not use pocket holes I just used regular screws that I countersunk and it gives it a bit of a more rustic look   I did have to adjust a few things as the side rails the 2x4 toppers went over too much on the adjustable portion of the bed and I didn’t allot for additional width on the head and footboard so I had to remove them -  to me it presents a little bit of a cleaner line I figure I can always go back with a 2 x 2 if I want a capped look.  The weathered recommended product turned it to a grayish purple hue no matter how much I sanded it -  it grew on me but definitely not the same color probably different tannins in the wood I was able to find not sure.  


The build took about two days total I built it all on my own the bed hardware was tricky though after failing to find anything local I ordered bed rail hardware off of Amazon for 12 bucks it’s a lot easier and your able to connect the side rails to the head and footboard on your own.


Total cost with the bed hardware probably about $130 if I took off the stuff I wasted it may be closer to $115.

Built from Plan(s)
Estimated Cost
$120
Estimated Time Investment
Weekend Project (10-20 Hours)
Finish Used
Varathane Weathered
Recommended Skill Level
Beginner

School Table

Submitted by jazberg on Fri, 07/15/2011 - 12:46

My husband and I took the Narrow Farmhouse Table and modified it for a school table for our children. We used two old doors we had left over from remodeling our 1925 craftsman home. One door is the top, and the rest is lumber culled from the other door. A fun, free, one-day project.

Built from Plan(s)
Estimated Cost
Free (glass top - $75)
Estimated Time Investment
Afternoon Project (3-6 Hours)
Finish Used
Paint. We sanded the paint already on the door and stained the bare wood to add contrast.
Recommended Skill Level
Intermediate

Comments

Desk Accessory Sets from Scrap Wood

Submitted by JoanneS on Mon, 08/19/2013 - 18:06

These were the inspiration pieces for the 1-Board cedar desk accessory set plan. These were made entirely of scrap wood. These sets are all painted, they will be gifts for the girls at work.

The wood for these is some 3/8" plywood (crate and pencil cup sides), 1x2 (bottom of business card holder and ends of pencil cup), some 1/2" x 1 1/2" craft board (sides of paper clip trays, business card holder), 3/4" plywood (bottoms of paper clip trays), some small squares of Wainscoat paneling (sides of gray pencil cup), some 1/4" plywood (bottom of pencil cup), some 1" strips of some old painted lauan (old project, pulled apart and the wood is being repurposed) and a couple of little pieces of 1/2" x 3/4" S4S (fronts of business card holders).

You can see the mishmash of different materials in the shot of an unfinished set, and also the stack of them waiting in the wings on my work table (it's starting to look like a Jackson Pollock painting :) heehee)

All the paints and materials were left overs from other projects. I hadn't decided on the finishes yet while I was building. These would be even easier to make if I had finished all the pieces first!

It was fun building these, it's great to be able to take something that may have gone in the bin, and make it into something lovely. I'm hoping the girls like these!

I've got a cube drawer plan in the works (a 1-board cedar with 2 drawers, and also have measurements for a 3-drawer from 3/8" thick craft board and 1/4" plywood, like the one on the table). I'll get to those soon.

Estimated Cost
0 - all scrap and left over finishes
Estimated Time Investment
Afternoon Project (3-6 Hours)
Finish Used
The gray set received 1 coat of white primer, 1 coat of gray (Ace Royal in Greek Column), then was distressed with 100-grit sandpaper, and given a coat of Minwax's crystal clear polycrylic in satin.

The blue set received 2 coats of Clark & Kensington paint tinted to Benjamin Moore's Blue Echo, and glazed with Minwax Express Color in Walnut. This set received a top coat of Minwax Oil Modified water based poly (I have lots of that left over from last year's island build).

The one on the table is receiving 3 coats of Benjamin Moore Aura in Wenge.
Recommended Skill Level
Beginner

Comments

Linda7

Mon, 08/19/2013 - 20:40

Thanks for sharing your pictures and plans for the desk accessories and trinket box. What great ideas for inexpensive gifts for people on you list!

JoanneS

Tue, 08/20/2013 - 15:09

Thanks Linda! I've absolutely had a ball planning and working on these! I'm so glad you like them! :)

yurra-bazain

Fri, 08/30/2013 - 17:57

I love when something is functional and adorable (and affordable to boot)! This is great; I am sure you'll have very many happy recipients of these cute desk accessories!

JoanneS

Thu, 08/22/2013 - 13:25

Yvonne, thank you for the nice comment! :) I'm working toward my goal of finding things to make from all the left-over wood in my garage. I didn't realize how much had accumulated. Really I am having a ball doing this! I did go buy some more cedar pickets though, I'm going to work on the 1-board cube plan this weekend. :)

Rustic X Console Table With Twigging

Submitted by markman57 on Mon, 09/21/2015 - 08:44

Followed the original plan but substituted branches from an oak tree for the X brace to give it a more "Adirondack" look.  Geneously sprayed the branches with a clear polyurethane coating to seal the bark.

Built from Plan(s)
Estimated Time Investment
Week Long Project (20 Hours or More)
Finish Used
Zar Golden Oak oil based finish
Recommended Skill Level
Intermediate

Wooden Play Toy Grill

Submitted by zeuss0101 on Sat, 09/15/2018 - 17:35

Enjoyed building this with my son.  Thank you Ana.

Estimated Cost
About $25
Estimated Time Investment
Afternoon Project (3-6 Hours)
Recommended Skill Level
Intermediate

Camp Loft Bed with Stair, Junior Height

Submitted by Anonymous (not verified) on Wed, 06/08/2022 - 15:46

Pretty straightforward project. I didn't end up making the base due to lack of space and time. The hardest part for me was staining as depending on the medium semi-transparent etc... and how you apply it brush or gun etc... can change how it turns out. I used dark walnut i believe and only 1 coat and to me it was plenty rich. pretty sure it was semi transparent. I like how it's a loft bed and gives kid more sqft for their room. it is somewhat shaky but not horrible probably due to lack of base. I will probably add some cross members for support.

Comments

Simple Modern Desk

Submitted by lilred02 on Sun, 07/17/2011 - 18:01

Built this a little smaller - only 15" deep and 42" wide for use behind the couch with multiple functions - laptop desk, dining room buffet table, and behind-the-couch-set-things-on table. Love it!

Tricky parts - the drawers. Because I changed the dimensions, I built the drawer box to fit my new dimensions and installed it. Then, I cut the sides of my drawers 10" deep (the smallest drawer slides I could find and a perfect fit). I laid the Hettich ball bearing drawer slides (from my local lumber and cabinet supplier, not big box) in the drawer box and trimmed down my drawer front/back until they fit nicely. If you're interested, it was 15 1/8" wide.

Nail gun is a must on this project!!! And remember to glue and use 2" nails.

I used the Kreg jig to build my drawers because I'm familiar with building drawers that way and feel comfortable getting them squared. I highly recommend the Kreg jig!

Then, I attacked it with my orbital sander until it was nice and smooth.

Love Ana's great patterns!

Built from Plan(s)
Estimated Cost
$85
Estimated Time Investment
Day Project (6-9 Hours)
Finish Used
lots of sanding, vacuum, wipe with microfiber cloth, spray primer, sand, vacuum, wipe, paint, sand, wipe, poly to finish. Use sponge brush to avoid brush strokes.
Recommended Skill Level
Beginner

Comments

simplyelle

Sat, 06/22/2013 - 13:34

I've been looking for a post with dimensions more similar to my sketch and found yours. Thanks! I must say that I'm a bit puzzled with how to attack my drawers. My table's dimensions being 44Lx16D. I am in desperate need of a comp table to fit along a short wall, but need it to be functional, hence the need for drawers. Were your drawer dimensions limited to the length of the drawer slides you found? If possible, I'd like my drawers deeper. However, I'm open to one longer, less complicated, drawer as well, lol. I'm curious. Help!

Play Kitchen

Submitted by carlynoel on Tue, 08/20/2013 - 16:50

This was so fun. My little girl loves it and we have another on the way, so I am thrilled with how it turned out. The assembly wasn't hard, but it took FOUR coats of paint and three coats of finish. That was the most tedious part. I made a box for the apron sink, rounded off the edges, sprayed it with a white lacquer, and modified the countertop so it fit in nice and snug. It's my favorite part. I love that it tied in the white fridge. It ended up costing me 130 bucks. 50 in wood, 35 in paint/supplies, 45 in handles, knobs, faucet, hinges, stovetop etc.

COUNTERTOP AND SINK MODIFICATION:
I hope this isn't too confusing. It's hard when you can't see it, so don't hesitate to email for clarifications.

Countertop
(2) 1x3 @ 10 ½” (these boards go on either side of the sink when looking from above)

(1) 1x4 @ 11“ (this is the board the faucet sits on)

Put the backsplash on the same way the original plans say.

Sink box
11” wide, 8” deep, 5.5“ high (Using all 1x6 boards)

(2) 1x6 @ 11” (front and back)

(2) 1x6 @ 6.5” (left and right sides, on the inside of the 11" boards)

6.5x9.5 inside bottom (cut down whatever board you need to to get this size. This should fit snuggly inside the walls of the box)

Because a 1x6 is really 5.5 inches wide, and the countertop is 3/4" thick, and 3/4" of the sink sits above the countertop, that means 4” of the sink will be under the countertop. So looking at the sink from the front, you need (2) 1 ¾” wide x 4” long blocks of wood on either side of the front part of the sink. Then I just put a 1x12x14 1/2" shelf under the whole thing to hold it up. I built the sink box first and spray-painted it with a white lacquer, then I built the entire sink countertop and base, and then shoved the sink in last. It was a very tight squeeze so I didn't have to nail or glue it in or anything. About an inch of the sink should be sticking out of the front, and 3/4" should be sticking out the top.

Good luck!
Email me for questions!
[email protected]

Or visit my blog for details where I got all the accessories
carlyandjordan.blogspot.com/2013/08/play-kitchen.html

Estimated Time Investment
Week Long Project (20 Hours or More)
Finish Used
Behr Paint/Primer (color: Dreamy Cloud by Valspar) Minwax Satin Finish
Recommended Skill Level
Beginner

Our Flare!

Submitted by bfinnemore on Mon, 09/28/2015 - 11:56

Hi Anna, I really had fun making our version of your sliding mirror project! Thought you might enjoy the photos!  I made it into a jewelry cabinet.

Recommended Skill Level
Intermediate

Comments

Kitchen helper

Submitted by itzdonna on Sat, 10/13/2018 - 09:36

Thanks so much for the plans Ana.  Made this for our grandaughter.  Right now all colors are yellow and all bugs are bees so I decorated it as such.  Chose  not to use pocket screws as I figured if you had issues with the wood splitting I wasn't going to push my luck.  Plans were very easy to follow and took us about 4 hours in total.  Can't wait for her to start using it.  

Built from Plan(s)
Estimated Cost
$25
Estimated Time Investment
Afternoon Project (3-6 Hours)
Finish Used
Semi gloss paint
Recommended Skill Level
Beginner

Another successful Classic Bunk beds build

Submitted by Anonymous (not verified) on Thu, 06/23/2022 - 10:06

I followed Classic Bunk Beds instructions with the ladder to the left end instead of the right. I think this by accident though it works out fine in the room either way. It's finished with Danish Oil rubbed on.

Comments

Corner Cabinet Storage Shelf

Submitted by sssmile14 on Sun, 07/24/2011 - 19:32

We built this corner cabinet shelf in three days (only because it is over 100 degrees here, so we had to wait until 9:00 at night to work on it) for our office space. We love, love, love it and can't believe how nice my corner cabinet turned out. Only our second building project ever. :)


Built from Plan(s)
Estimated Cost
80.00
Estimated Time Investment
Afternoon Project (3-6 Hours)
Finish Used
Kilz Satin Paint- Black
Recommended Skill Level
Starter Project

Comments

kellerkb

Mon, 06/03/2013 - 21:20

Hello, I would appreciate help finding the plans for this project! Thanks!

cerberus456

Tue, 08/02/2016 - 14:54

I do cedar. Thank you very much for the drawings. This site is to become one of my favorites.

Greetings from Xalapa Veracruz Mexico