Corner Cupboard in Cottage White
We made this piece 7' tall rather than 6' tall so that it would go well in our dining room, leaving the cabinet doors the same height but adjusting the upper shelves to fit.
This was a project I had been dying to try out as a way to challenge myself. I wanted to make a herringbone pattern on a table top. I built the legs around the Bois Rouge Saint Paul Table plans. The hardest part was milling on the wood and making it the same width and size but once I had all my pieces the process went pretty smoothly. The funy thing is I did not build this piece for anyone specific and now I have this beautiful table that is sitting unused in my garage. The next step is to sell it!!
I modified the plans from the favorite Bookshelf to fit my laundry baskets. Once I'm done painting, this will be installed in my master closet. (Finally all the dirty laundry off the floor!)
Awesome shed storage and organization shared by Kelly Campbell
I spent lots of time looking at all the photos posted on this site of people's amazing renditions of "Grace's Play Kitchen." I was so inspired by everyone's creativity! I found an old wooden play stove at a flea market and decided to make a matching sink. I took Ana's plans to the carpenter at the wood shop on the military base where I am stationed and asked if he could help me build a matching piece. We spent about 4 hours one Saturday building the sink. The carpenter had so much fun helping me, he suggested I build a matching refrigerator. So that was created in another couple hours the following Saturday. I did as much of the building as I could, but definitely had some help from the carpenter as I'm a novice. (Thanks, John!) I made the curtain and matching towels, but found the apron and chef's hat on Etsy. (Thanks, "SweetApronzNCupcakes"!). The play kitchen is in my kitchen, so my two year old daughter can pretend play while I'm working on meal preparation. Thanks again, Ana and all the creative folks who contributed ideas! I foresee many hours of play enjoyed by this play kitchen, and hope it can be passed on to future generations!
Sat, 09/24/2011 - 15:49
I really like the fridge and the knobs on the stove. They look great!
Made this for my lovely friends Melissa and Lance and their adorable little boy Rylin.
Saw this clever side table on Pinterest. It's made out of 1 1x8x8. I was able to figure out how to build a jig for the table saw to suit the project and then it was easy peasy lemon squeezy from there.
Mon, 12/21/2015 - 09:41
This is so clever and would make an inexpensive yet first-rate gift! I love it...thanks for sharing.
Fri, 10/28/2016 - 08:40
I would love to build this unique table, but can't seem to find some actual plans with dimensions and jigs
Fri, 10/28/2016 - 08:45
Would you please email me the plans for this table. Thanks so much
Super easy weekend project!
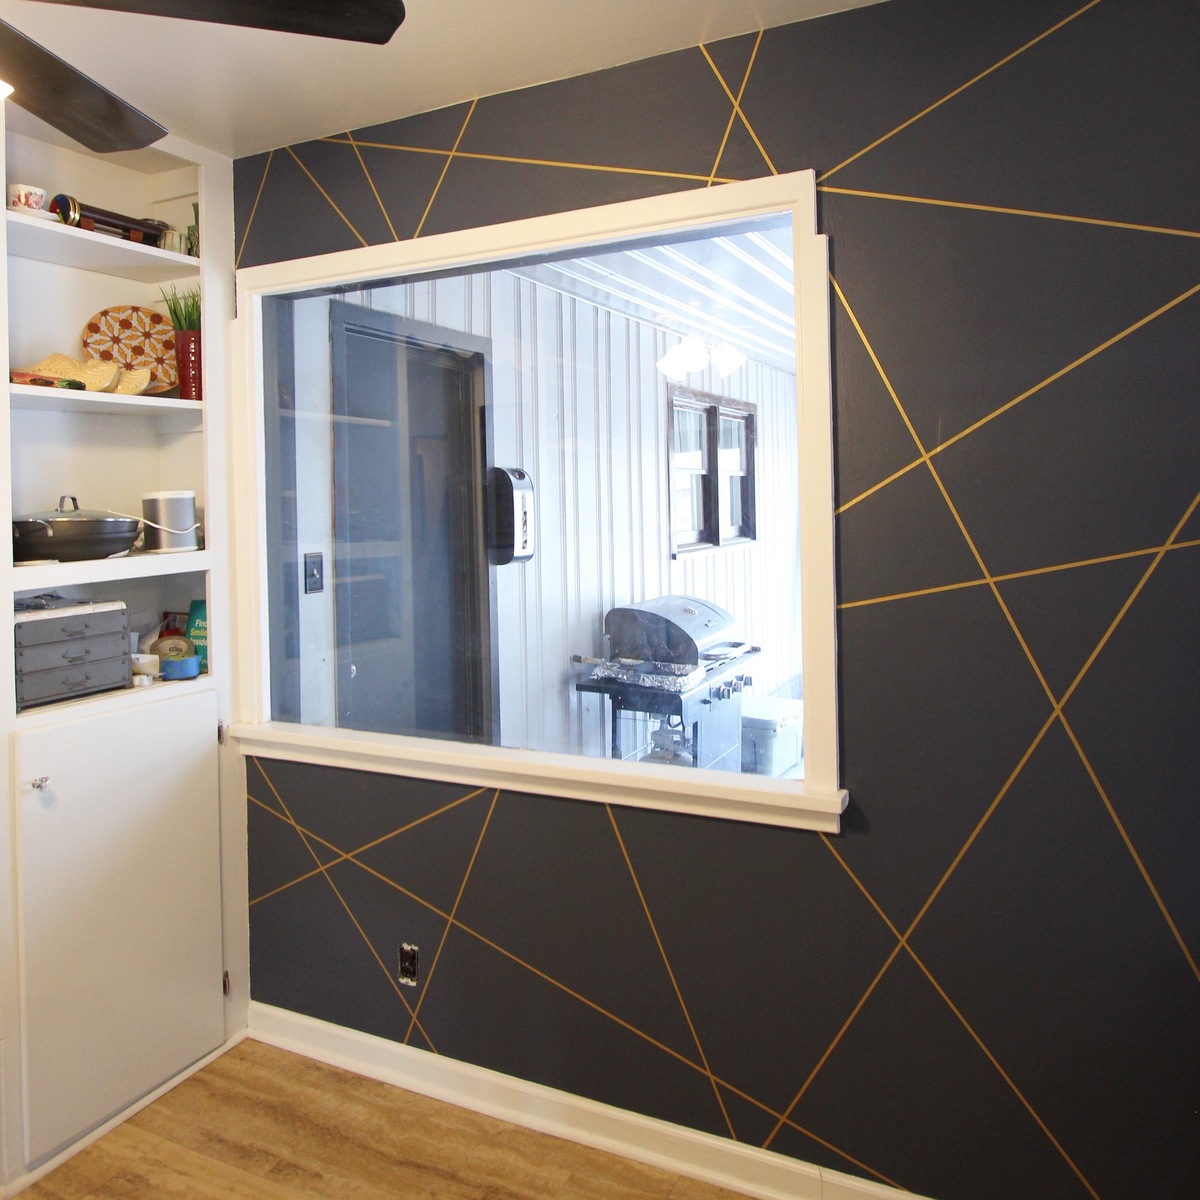
I Decided to paint a feature wall in my kitchen! I’m really into geometric shapes right now and the next few projects I have planned will reflect this.
I used some skinny tape to mark my lines and then put yellow frog tape on each side of the skinny tape and then removed the thin tape in the middle that was marking my straight line, this way my lines were all the same thickness and it was a really easy way to make sure I liked my line placement. I tried to make sure i had no two lines parallel with each other so that my pattern looked random and abstract. To limit the gold paint from bleeding and make certain my lines would be as crisp as possible I did a first coat with navy (same as wall color) over the taped lines- this kinda seals up the edges of the tape with the wall. Taping my lines was the most tedious part of this project but once they were on, it was as easy as waiting for coats of paint to dry. And I love the finished product! Really adds a POP to our kitchen!
Check out the project on my Instagram, I will be posting some process photos and videos soon. @halfwayhandy
This was one first project and I am very proud of it. It was challenging but I think it turned out beautiful and everyone who visits loves it. I built it out of cedar wood for better durability and protection against rain and the elements.
In reply to Beautiful Bench! by Ana White Admin
Wed, 02/01/2023 - 10:39
OMG! Ana liked it. You made my day. Thank you for responding.
8 foot long photo ledge inspired by $10 ledges project plan, http://ana-white.com/2010/10/ten-dollar-ledges.html
I used a 1x4, 1x3, and a 1x2 and added some crown molding to the bottom for a little something extra.
My friend saw the Gaby Kitchen Island that I posted on FB and asked me to make a wine display for him. I immediately went to Anna's site to look for a design. Added LED lights from IKEA.
Cabinet with adjustable shelf. Finished in an antique white effect. Gave it a coat of Grey stain first then painted with two coats of white sanding back after each coat. Top was stained Walnut and then painted grey and sanded back to show some of the walnut stain and the grain through. I left the inside natural color for contrast rather than having it all white .
This was a fun little project to make. The golf ball is trapped inside the 12 piece burr puzzle. As with all burr puzzles, there is a trick to solving it.
Build Instructions/Dimensions: https://www.instructables.com/id/Caged-Golf-Ball-Puzzle/
Video of Build: https://youtu.be/gcdd7ZAYNTo
Solution: https://youtu.be/IjHByz2_xMk
I made this for my daughter for Christmas last year. Well, actually Santa did, or at least that's what she tells people. I had one of the big companies cut the lumber for me, but a few boards were cut incorrectly. I live about 25 minutes from a local hardware store and needed to have them re-cut. Luckily for me, my father-in-law is handy and he brought out his circular saw and helped me even out my boards. Then, for Christmas I got a gift too - a table saw.
I've been eyeing the Land of Nod library cart for months!
...However, I wasn't sure about the price tag, so I started researching how to make it myself.
This is our first of many projects!
I loved the simplicity and shelving of the Parson Tower desk plans but I really wanted a standing work station. I made it taller (approx. 40 in tall) and I made the desktop longer and wider (approx. 72 x 24in) and I LOVE it!
Farmhouse bed. Makes a pretty universal styled bed
My mom and o completed this weekend project together! It was so fun to complete! The table is customized to 7ft and the benches made smaller than the original plans so they slide under the table when we’re not using it. We made it for our homeschool room. The kids are excited for this space already and we all have the room we need to get our work done! Under $200 start to finish! I used a prestain to prep the wood and then stained with watco danish oil in a natural finish.
I tackled the Farmhouse Table over a long weekend while my boyfriend was away - he was surprised needless to say!
I have not attempted any woodwork projects since grade 8, but this was alot of fun - I did not find it very difficult and loove using power tools :)
I made the matching bench, however I guess I did not stir the bottom of the can well enough and my bench is now red :/ soo I am going to either stain it dark or paint it white and use it as a mudroom seat!
*I also made mine shorter - 7ft long to fit in our dining room and adjusted the bench to fit.
Fri, 10/07/2011 - 17:15
Thank you so much Ana! We are in the process of renovating our house and your website has inspired me to take on so many more projects now!! :)
Wed, 11/02/2011 - 04:52
I built a similar table and I am having problems with my kids getting food in between the pieces of wood. Do you have this same problem, is anyone having this same problem? Does anyone have any suggestion as to how to fix it, how to keep food and other particles from getting trapped between the cracks? Thanks! You did a great job!!
Wed, 11/23/2011 - 15:00
I am building this table as we speak. The thought occurred to me as well concerning the cracks attracting crumbs. I believe using clamps to make the fit as tight as possible will help. Also some poly finishes may be appropriate with children which may even seal the cracks... if sanded and clamped well.
Wed, 11/23/2011 - 15:11
I did try my best to clamp the wood together as tight as possible - due to the pieces of wood not being completely straight, they are there.
I haven't had this problem yet. I do use place mats when eating at the table, that generally stops any crumbs etc.That's probably the easiest way to avoid it :)
Thank you for your comments!
More images and details can be found at http://ohbygollyblog.com/?p=4029 Come visit me!
Tue, 10/08/2013 - 09:58
Very creative! I went to your blog and looked at your own headboard, too. You do good work!
Comments
chanjen25
Sun, 12/15/2013 - 23:30
question
i would love to build this how do i get the plans?