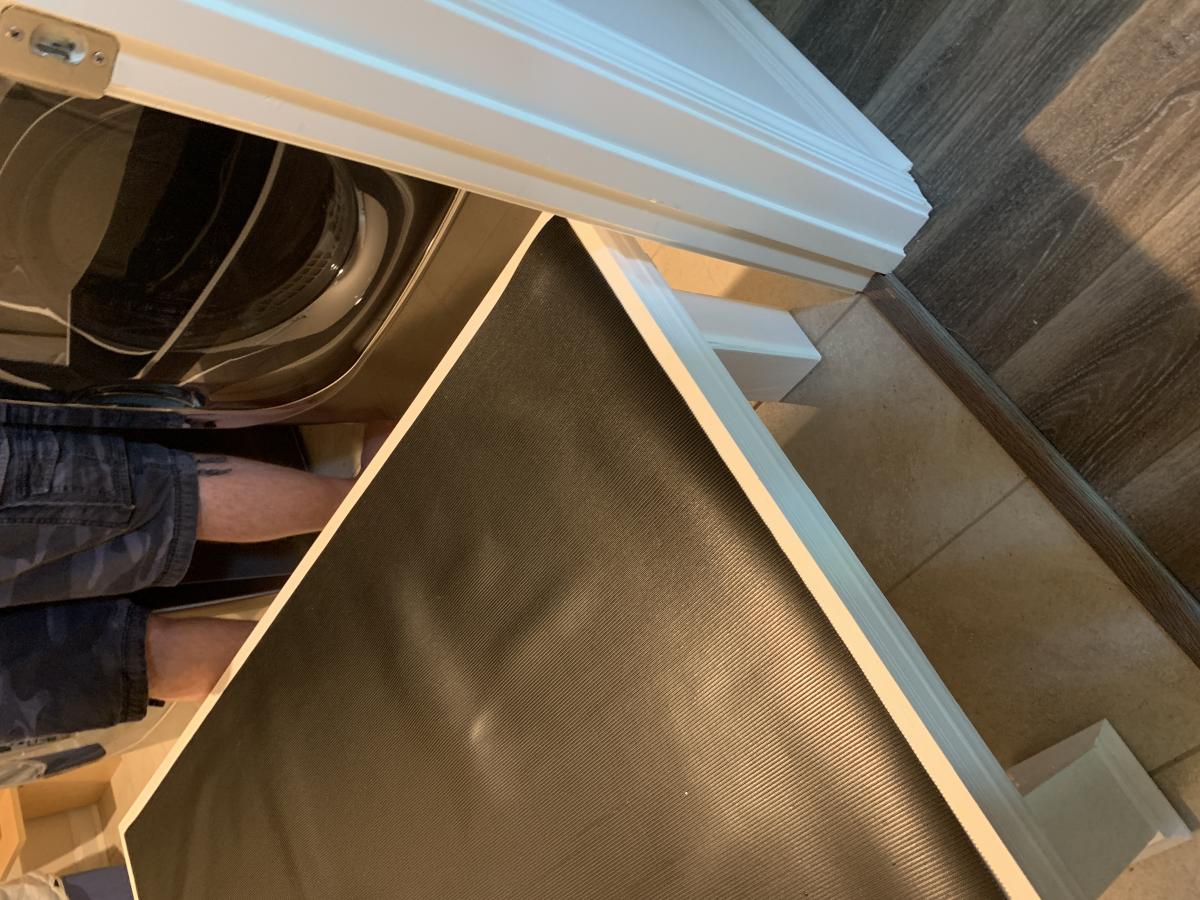
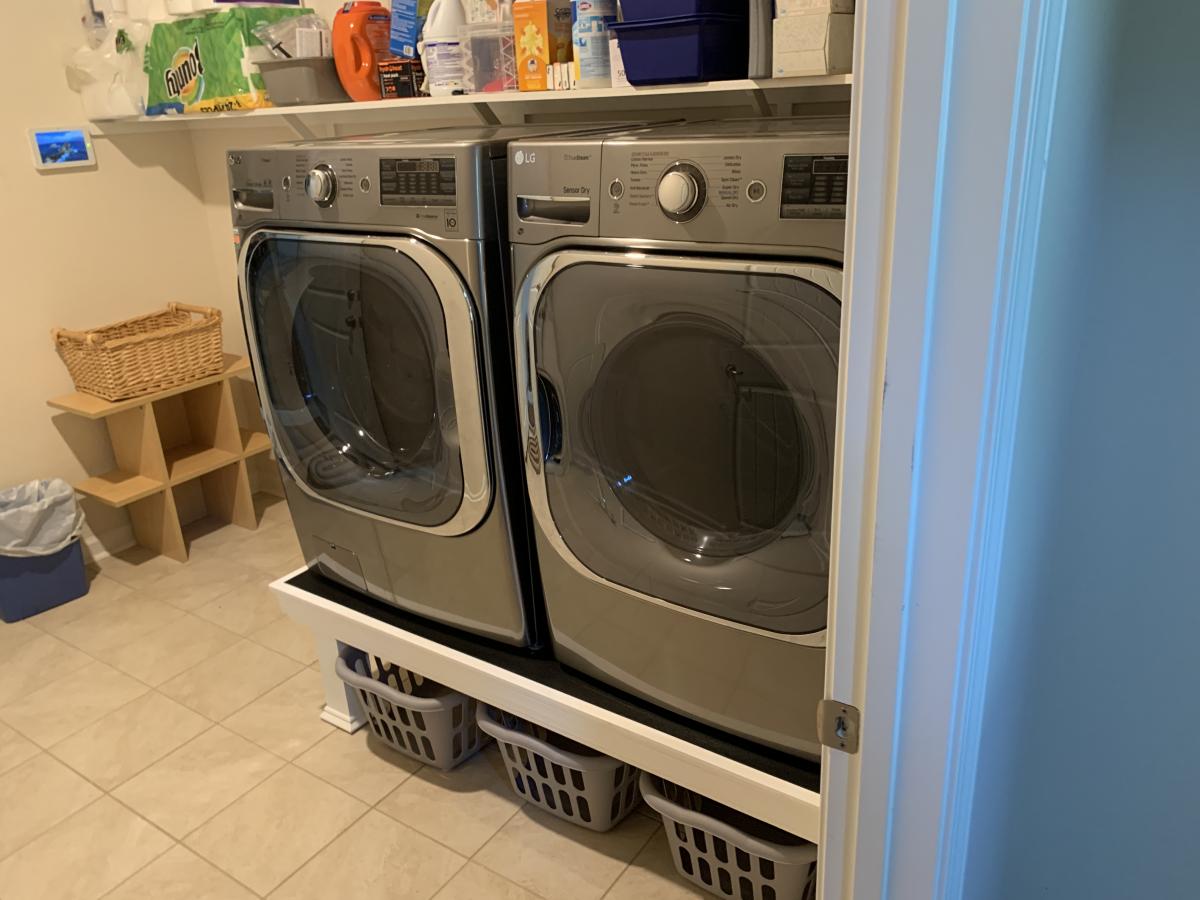
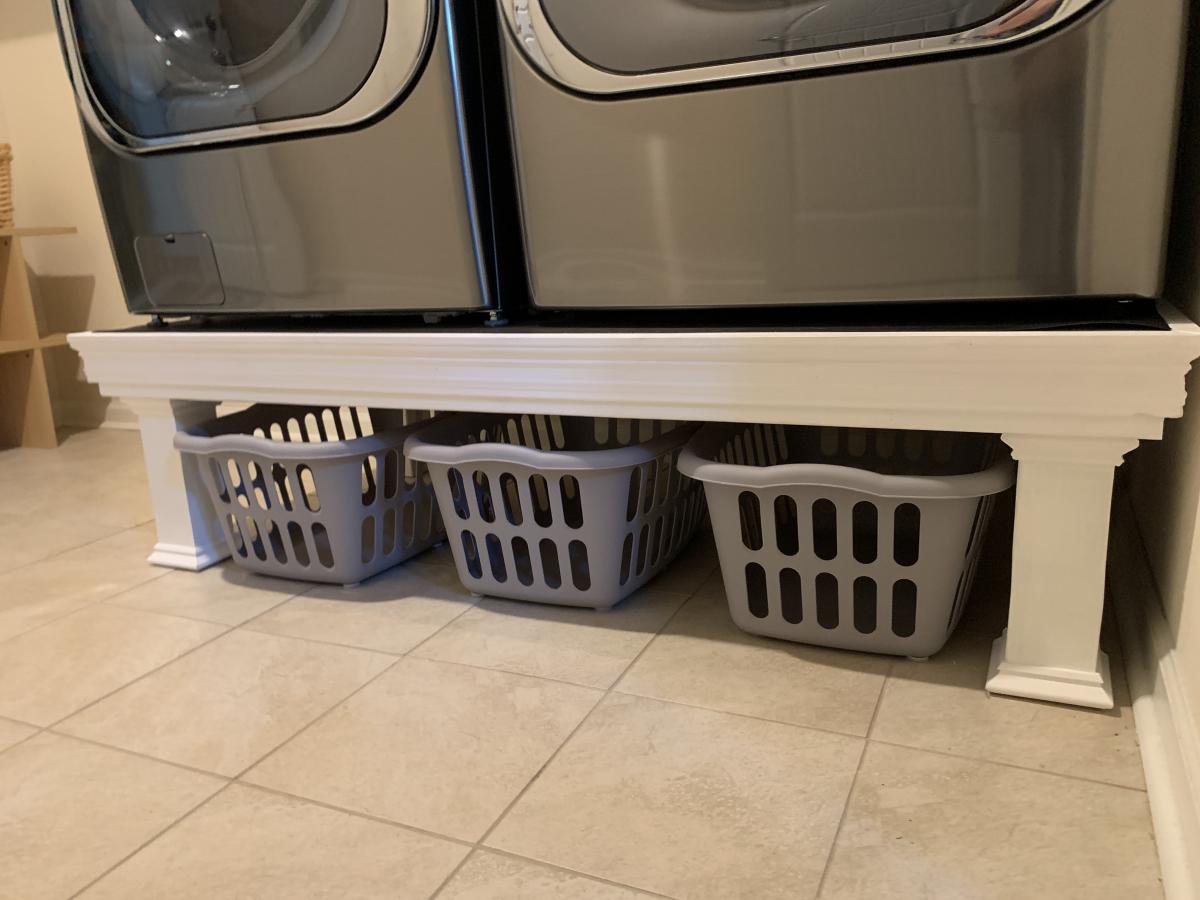
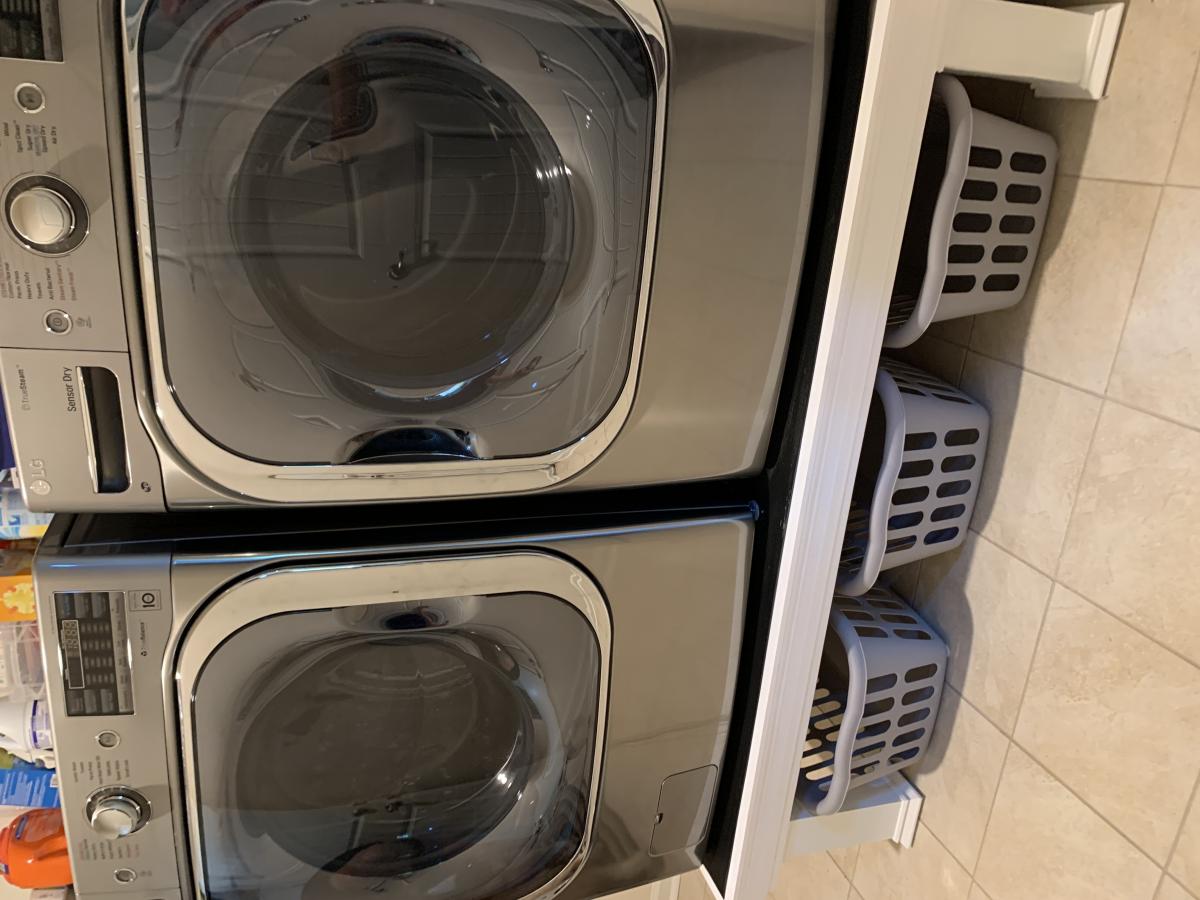
Community Brag Posts

Laundry Pedestal

Submitted by Kamoanui on Tue, 06/30/2020 - 09:42

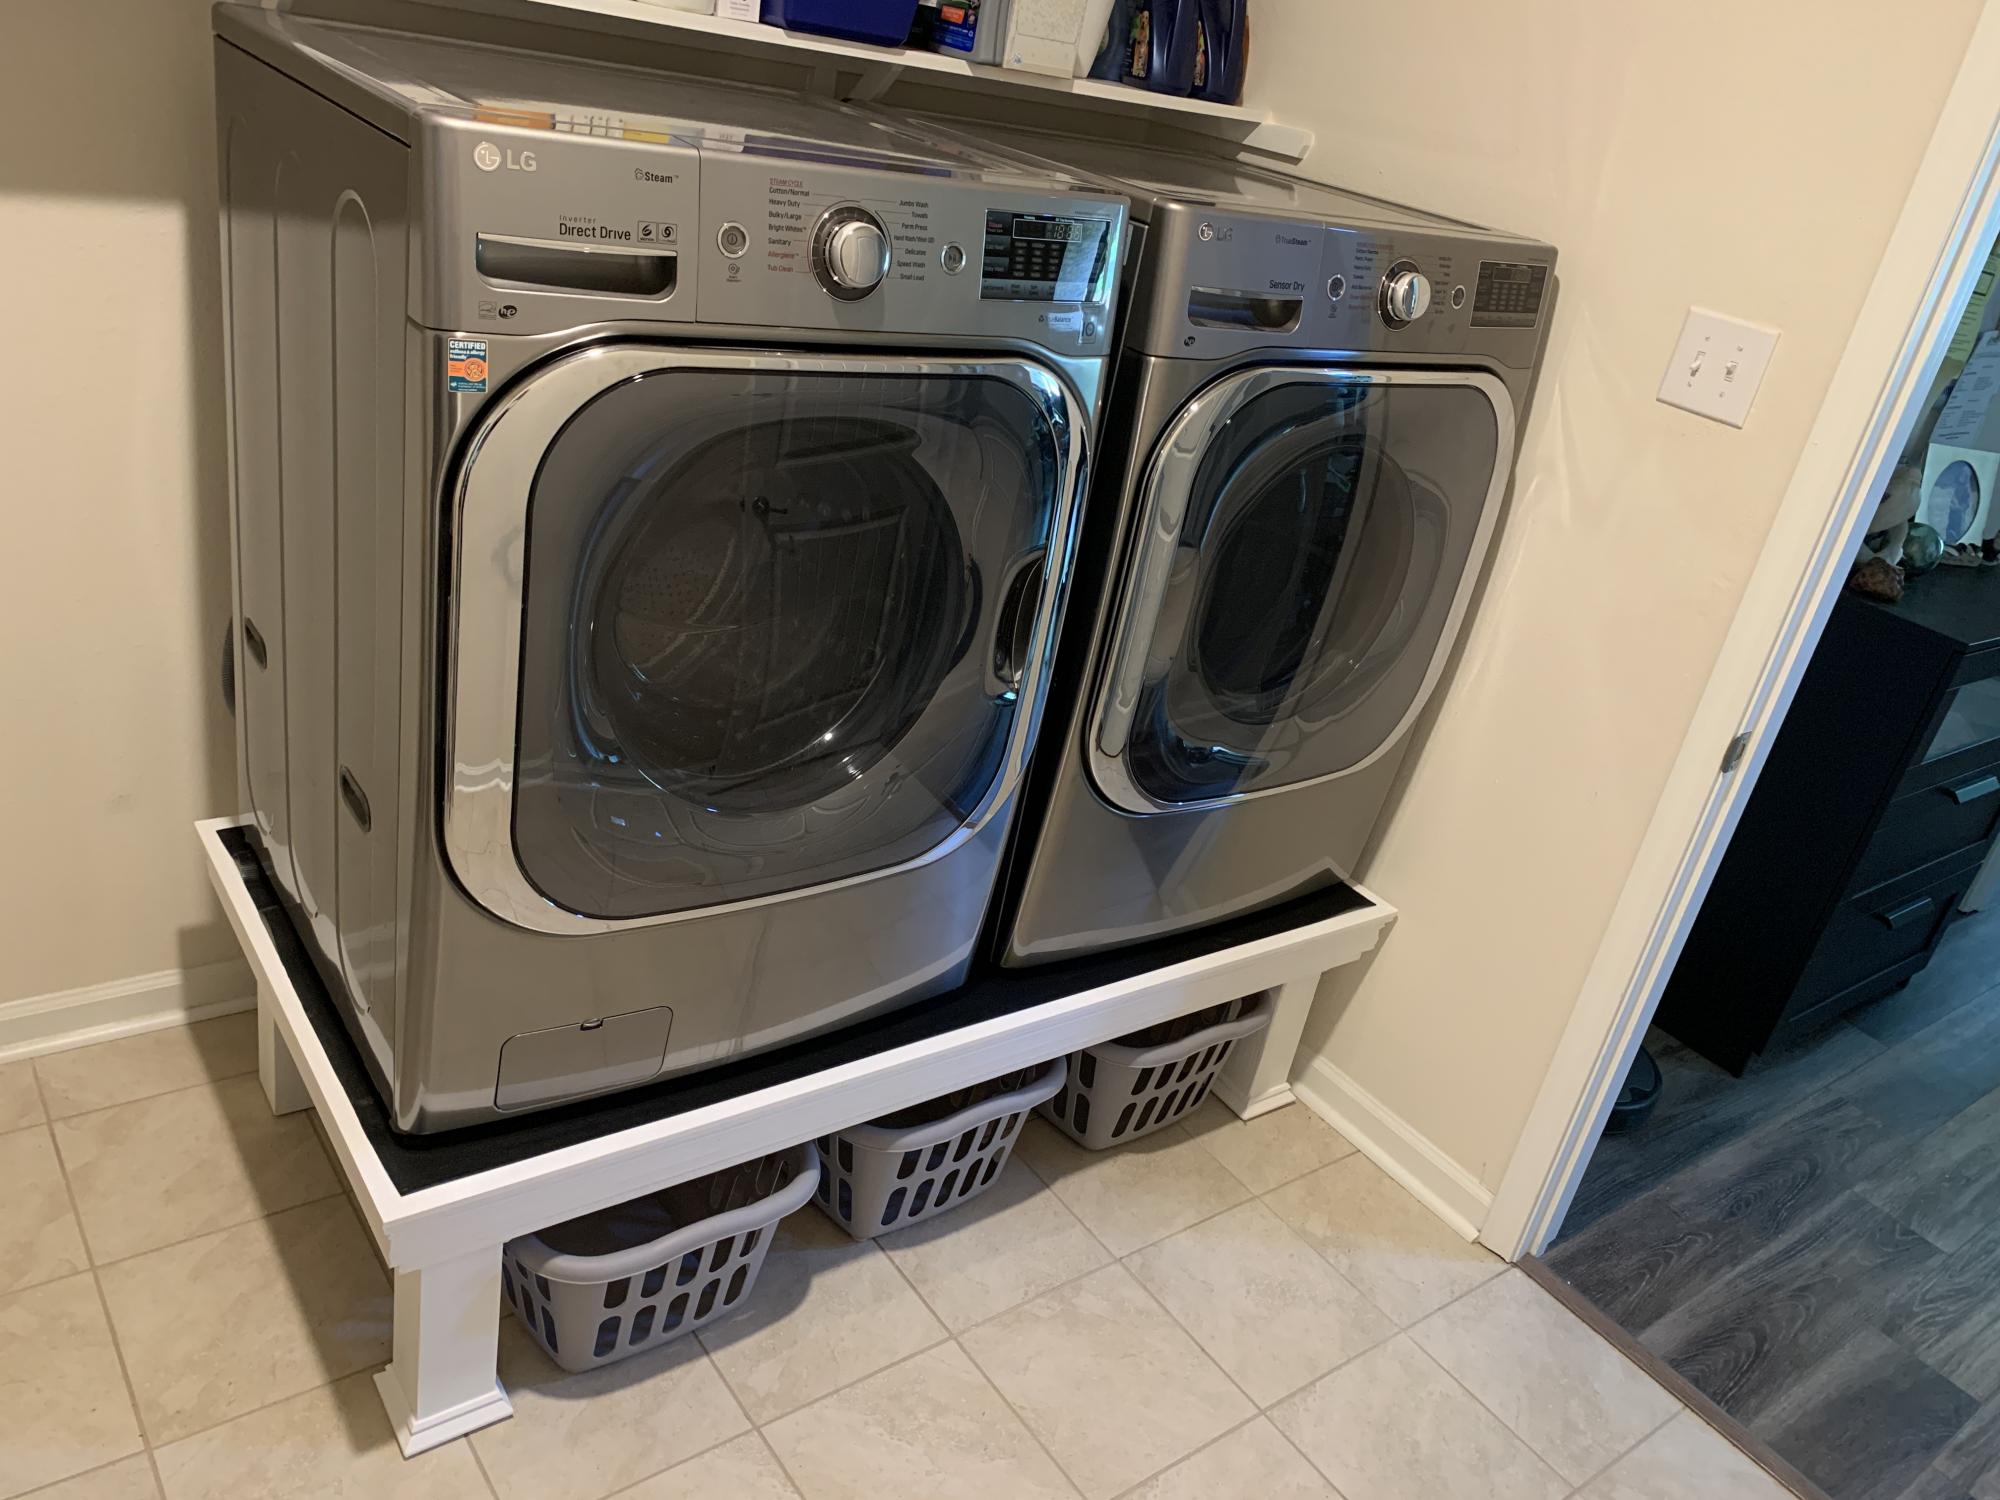
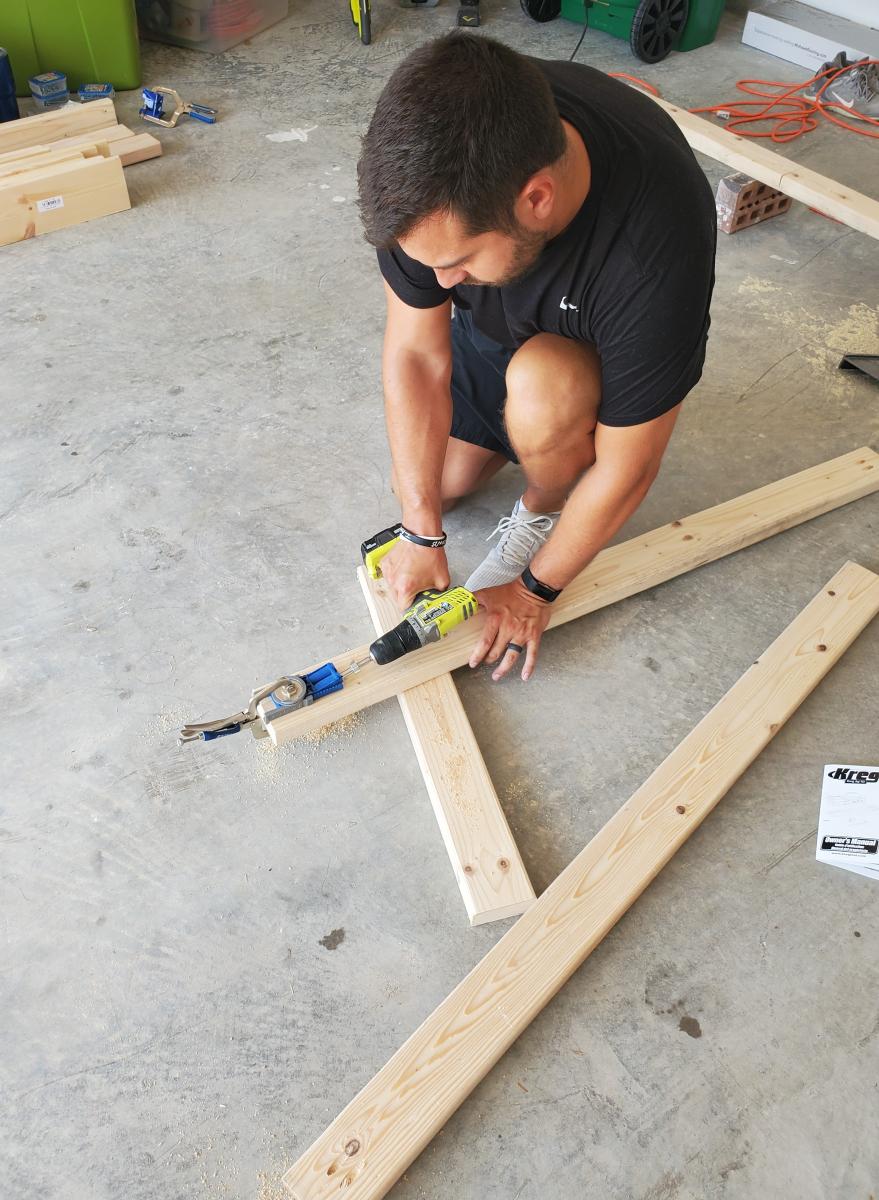
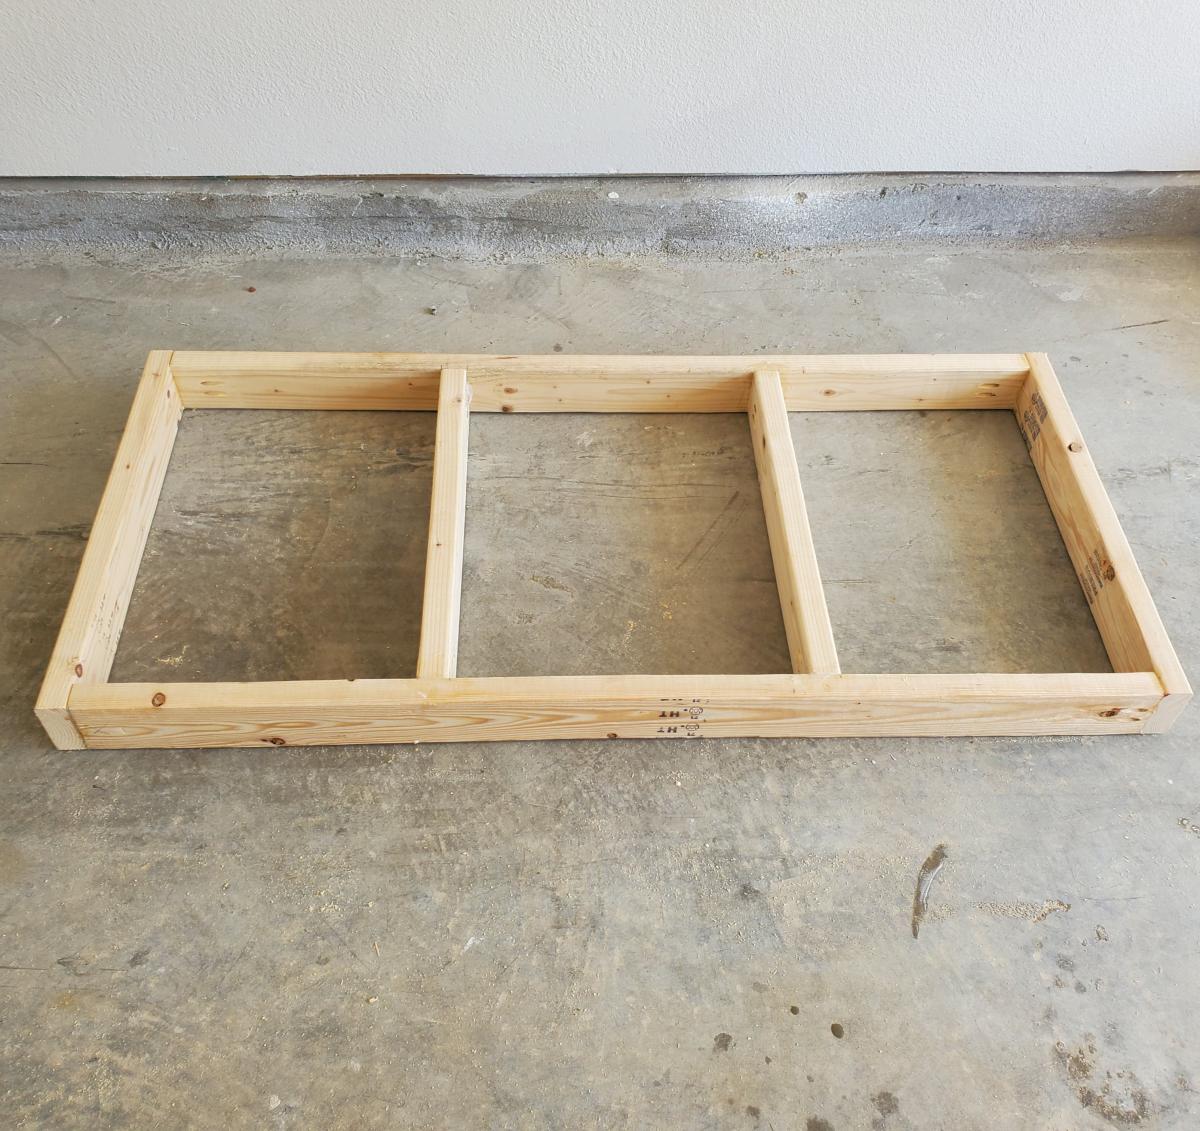
This was quick build. First time for us using trim, so we wasted a few feet getting the angles right. We attached the legs directly to the frame, and did not use the metal brackets. We also did not build the floor frame. We measured how high/wide the laundry baskets ($3/piece at Target!) were, and made it to fit them. We added a piece of rubber mat to the top (bought at Lowe's). A few weeks later we helped our daughter and son in law build one for their new house!

Estimated Cost
$40
Estimated Time Investment
Afternoon Project (3-6 Hours)
Finish Used
White satin paint
Recommended Skill Level
Beginner

Open Shelf Nightstands

Submitted by Anonymous (not verified) on Tue, 04/30/2024 - 11:29

I built these for my daughter's birthday, after she showed me a set of night stands that resembled these from the site. I used cedar with a steel wool and viniger stain to give them a aged look. With 4 coats of a water based urathane as a finish. Your plans were accurate and simple to follow. Thanks

Outdoor Patio Set (Tall People Approved)

I was so excited to build this outdoor patio set! My husband and I looked high and low to find an affordable,“tall and sturdy people” outdoor patio set. The sturdy pieces we found were in the $600-$1000s... and I’m sorry.... we’re not paying that. Especially, since most of those sets were not built to hold up in the Florida rain and humidity. So my husband suggested... “ just build it!” I modified the leg length to 28 1/4”, since I have tall family. The cushions were found at Pier1 for a steal since they’re going out of business, so the chairs were modified to fit the cushion size 22”x 22”.

Estimated Cost
$250 with Cushions
Estimated Time Investment
Weekend Project (10-20 Hours)
Finish Used
Thompson Waterseal- transparent- Autumn Brown
Recommended Skill Level
Beginner

Dining Room Table - Dual Trestle and Extension Slides

My 40”x80” dining room table with equalizer extension slides that bring it to 110” when both leaves are installed. This was initially inspired by the Farm Hose trestle table. I've got details in some blog posts on my build. It’s not exactly the most complete blog with every detail, but it has a bunch of pictures along the way.

Estimated Cost
$1,200 for wood. Probably around $1,500 total if you add in some tools / supplies I didn't have.
Estimated Time Investment
Week Long Project (20 Hours or More)
Finish Used
Aqua Coat grain sealer. General Finishes Prairie Wheat Gel Stain, General Finishes Arm-R-Seal poly seal coat.
Recommended Skill Level
Intermediate

Comments

Can’t Believe We actually built this

Submitted by Anonymous (not verified) on Mon, 09/14/2020 - 13:48

5 1/2W x 5 1/2L x 8H.
Ana made this project very easy for me. I did the main building while hubby cut the wood & helped drill in hard to reach areas. Thank you Ana for boosting my confidence. I’ve never done anything trike this.

Built from Plan(s)
Estimated Cost
500.00
Estimated Time Investment
Weekend Project (10-20 Hours)
Finish Used
Did not have time to paint. Will have to be another long weekend. When I do, it’ll be white.
Recommended Skill Level
Beginner

Comments

Square Farmhouse Table

Submitted by eddingsr on Sun, 01/08/2017 - 13:17

I built this table for a friend who wanted a rustic, plank-top kitchen table. She wanted a square table with 4x4 legs. Since I don't have clamps, I used pocket holes and wood glue for the table top. Also, I only have a 7&1/4" miter saw, which means the 4x4s were too thick to cut. So I made one cut in the legs, then flipped them and made another. It worked! :) I sanded down the sides of the table top with 80 grit. They needed to be evened up since some of the planks were a little longer than others. I back braced underneathe the top with (3) 1x3s. Then, I sanded all over with 120, vacuumed, then wiped it down with a damp towel. Fun build!! 

Estimated Cost
~$100 for lumber, screws, wood glue, sandpaper, and finishing products.
Estimated Time Investment
Week Long Project (20 Hours or More)
Finish Used
For the finish I used Minwax wood conditioner, then a coat of Minwax stain in Provincial. I went back and put a second coat of stain on a few of the premium pine pieces, because they soaked up the first coat really well, and I wanted some darker pieces on top. I let those soak for about 15 minutes. Afterwards I did 2 coats of Polycrylic all over, then a third coat for the top only. I dry sanded between coats with 600 grit sandpaper.
Recommended Skill Level
Intermediate

pipe/wood bookcase

Submitted by ltodd on Thu, 04/11/2013 - 18:26

1/2 ' x 18" black pipe was used along with 1/2 ' flanges. The wood was re-purposed 2x6' pine lumber that had been used for pallets, that would have been thrown away. The boards were joined with a Kreg Jig, It will house my stereo components.

Estimated Cost
$150 pipe/flange costs
Estimated Time Investment
Weekend Project (10-20 Hours)
Recommended Skill Level
Beginner

French County Wardrobe

This is probably one of my favorite pieces I have built.  Challenging but fun.  I built it as two separate sections, an upper and lower cabinet to make it easier to carry indoors.  I added a full-extension drawer below for storage. The two-toned paint combination did take a lot of extra time. Because I used an airless spraying to paint I had to tape and cover each section separately. 


Built from Plan(s)
Estimated Cost
$300.00
Estimated Time Investment
Week Long Project (20 Hours or More)
Finish Used
Venus teal and creme brulee by Behr. Dark walnut stain for the top.
Recommended Skill Level
Intermediate

Comments

Wood Chuck

Fri, 03/06/2015 - 10:43

WOW it looks awesome the extra time spent on the painting was more than worth it looks spectacular. I bet you also could make a great profit selling this Wardrobe either on line or in a consignment shop, if I had the need for one and the money I would defiantly buy one!!

MrCoffee

Fri, 03/06/2015 - 13:54

I love the way the paint job came out on this and I really dig the having the molding on the top stained.

Calmly

Sun, 03/08/2015 - 07:36

This looks awesome! I love the the paint finish and it your profession work

TwoCuteKids

Mon, 03/09/2015 - 17:30

I agree this is your best so far...which is hard to say b/c all your projects are amazing! I love the style, the paint colors, the stained top, and the hardware!

whopua

Tue, 11/10/2015 - 11:13

Are there any available plans? I'd love to make this for my wife!

Anela

Sat, 03/19/2016 - 15:06

It looks really great! 

I have fallen in love with it the second I saw it and somehow I am now convinced that I need a new wardrobe ;) 

I guess you don't have plans for the wardrobe laying around - but would you mind doing a fast sketch (just a simple one on paper) with all the measurements noted? I would be thrilled to try building it myself in the summer. 

Greetings from Germany!

Anela

Sat, 03/19/2016 - 15:07

It looks really great! 

I have fallen in love with it the second I saw it and somehow I am now convinced that I need a new wardrobe ;) 

I guess you don't have plans for the wardrobe laying around - but would you mind doing a fast sketch (just a simple one on paper) with all the measurements noted? I would be thrilled to try building it myself in the summer. 

Greetings from Germany!

petemoore

Mon, 08/22/2016 - 07:32

its very nice but there are no plans

can you put up the plans or email me them please

many thanks

leftysgirl

Tue, 07/18/2017 - 05:43

Are there plans used for this beautiful piece? I do not see any links. Help please!! I absolutely need to make this armoire :) :) 

Fenced-In Walkthrough Garden

Submitted by jmholzma on Fri, 04/29/2022 - 17:08

Used the Garden Enclosure plan as a reference, but wanted a much bigger area to walk through and relax in. Dimensions are about 30'x20'. Took a few months with a break for winter because it was just me working in spare time on weekends, would have gone a lot faster with an extra set of hands. Towards the end realized that drainage in the walk path was going to be an issue so I put in a very basic french drain before I weed fabric and mulched.

Really happy with how it turned out. Cost was pretty high, probably about $1500 all told, between wood, garden soil, etc. But we'll be able to enjoy it for many years.

Built from Plan(s)

Comments

Simple Modern Desk

Submitted by lilred02 on Sun, 07/17/2011 - 18:01

Built this a little smaller - only 15" deep and 42" wide for use behind the couch with multiple functions - laptop desk, dining room buffet table, and behind-the-couch-set-things-on table. Love it!

Tricky parts - the drawers. Because I changed the dimensions, I built the drawer box to fit my new dimensions and installed it. Then, I cut the sides of my drawers 10" deep (the smallest drawer slides I could find and a perfect fit). I laid the Hettich ball bearing drawer slides (from my local lumber and cabinet supplier, not big box) in the drawer box and trimmed down my drawer front/back until they fit nicely. If you're interested, it was 15 1/8" wide.

Nail gun is a must on this project!!! And remember to glue and use 2" nails.

I used the Kreg jig to build my drawers because I'm familiar with building drawers that way and feel comfortable getting them squared. I highly recommend the Kreg jig!

Then, I attacked it with my orbital sander until it was nice and smooth.

Love Ana's great patterns!

Built from Plan(s)
Estimated Cost
$85
Estimated Time Investment
Day Project (6-9 Hours)
Finish Used
lots of sanding, vacuum, wipe with microfiber cloth, spray primer, sand, vacuum, wipe, paint, sand, wipe, poly to finish. Use sponge brush to avoid brush strokes.
Recommended Skill Level
Beginner

Comments

simplyelle

Sat, 06/22/2013 - 13:34

I've been looking for a post with dimensions more similar to my sketch and found yours. Thanks! I must say that I'm a bit puzzled with how to attack my drawers. My table's dimensions being 44Lx16D. I am in desperate need of a comp table to fit along a short wall, but need it to be functional, hence the need for drawers. Were your drawer dimensions limited to the length of the drawer slides you found? If possible, I'd like my drawers deeper. However, I'm open to one longer, less complicated, drawer as well, lol. I'm curious. Help!

Photo Gallery Made Easy!

Submitted by mdean on Mon, 10/21/2013 - 12:50

I love my new photo ledges. I had a huge space on my wall and these ledges are perfect. The ledges were so easy to make. I got a kreg jig for my birthday (I never thought I would ask for a tool for a birthday present) and I have gotten so much use out of it. I saw similar ledges at pottery barn for 10 times the cost of this DIY project. I saved so much with these ledges. The kreg jig has already paid for itself. The ledges make it super easy to switch out photos and I love being able to display so many fun photos. Everyone who sees these ledges loves them!! This was my first project. Thanks Ana for the great plans!

Estimated Cost
$50
Estimated Time Investment
Afternoon Project (3-6 Hours)
Finish Used
White gloss spray praint
Recommended Skill Level
Starter Project

Comments

mdean

Mon, 10/21/2013 - 12:51

I might spray paint all the picture frames white or an oil rubbed bronze in the future...I'm not sure yet. Opinions?

JoanneS

Mon, 10/21/2013 - 18:27

Your gallery looks beautiful! Great job on your first project, congratulations!

(ps- I think the oil rubbed bronze would look super on the picture frames.)

Easy Build Fence Picket Planters

Submitted by vendo on Thu, 05/11/2023 - 12:14

I've been wanting to build this plan for quite some time! Took me about 2 hours to build and 1 hour to finish. Giving these as gifts for Mother's Day! Total cost was about $15 per planter. I scaled down the design after I found the plants I wanted to put in them. Ana has the best and easiest plans!


Seasonal And Holiday

Wood Porch Swing

Submitted by ccobb1612 on Thu, 11/16/2023 - 08:59

Made the large porch swing and changed length to fit into porch space. Used rope to hang for more rustic look.
Note - next time will possibly used 2x6 for arm rest to allow for drink holder hole and possibly on framing instead of 2x4s. DIL and new grandson love it.

Built from Plan(s)

My Big Ur Farm Table

Submitted by Jake on Sun, 06/24/2012 - 16:12

I built the table to use in my garage but it came out so beautiful that I now find myself wondering who to give it to. I followed the plans except I used 1x3s instead of 2x6s or 2x2s for the trim between the legs. I built the top first using pocket holes and then added the legs. I then added the side trim before adding the joists. That process had every board fitting perfectly. No attachments are visible from the outside. I attached the legs using pocket holes and three inch screws and glue , of course.

I will build two benches which should be a snap.

I had no luck finding a 10 foot 4x4 so I bought two 8 foot. Got a good deal at HD with each less than $8 each

Built from Plan(s)
Estimated Cost
$61 which includes screws and glue but not stain.
Estimated Time Investment
Day Project (6-9 Hours)
Finish Used
I use Minwax Golden Oak for the pine components and Minwax Red Oak for the fir legs. I like the contrast.
Recommended Skill Level
Beginner

Outdoor Patio Table

Submitted by stephanief on Wed, 07/18/2012 - 18:29

I built this outdoor patio table in about a weeks time working on and off. There are mistakes, it's uneven in places and it is not perfect! That being said, the plans for this are very forgiving and nobody would ever know without looking for these things.

You can get the breakdown on the build, the finish I used, chair solutions and other suggestions here:

http://legosecretagent.blogspot.com/2012/07/outdoor-patio-table.html

This beautiful table only cost around $60 total to build!

Built from Plan(s)
Estimated Cost
$60
Estimated Time Investment
Weekend Project (10-20 Hours)
Finish Used
Minwax, specifics at http://legosecretagent.blogspot.com/2012/07/outdoor-patio-table.html
Recommended Skill Level
Beginner

Rolling Cart - pallet recovered wood

Submitted by jgrunwaldt on Thu, 08/25/2016 - 19:36

Rolling bar cart made entirely from recovered pallet wood.

Based on original Ana White's plan, I've just added a side pocket and rails on the lower shelf to prevent sliding of items placed on it. 

Later on I made another one for a friend who attached a hanger plate and a magnetic knife holder.

Built from Plan(s)
Estimated Time Investment
Weekend Project (10-20 Hours)
Finish Used
wax
Recommended Skill Level
Intermediate

Craft Table/Sewing Desk

Estimated Cost
$250
Estimated Time Investment
Week Long Project (20 Hours or More)
Finish Used
Paint (sigh)
Recommended Skill Level
Beginner

Comments

Easy small space side table

Submitted by Dedavies3 on Mon, 07/07/2014 - 17:57

This was my first project. It was relatively easy but I did make some mistakes that are now design features

Estimated Cost
Reclaimed wood
Estimated Time Investment
Afternoon Project (3-6 Hours)
Finish Used
Minwax English chestnut
Recommended Skill Level
Beginner