Community Brag Posts

Corner cabinet

Submitted by Anonymous (not verified) on Thu, 01/24/2019 - 13:58

Went to a local farmer, who had a barn falling down and asked if I could get some wood. He allowed me to take a few pieces and turned it into a corner cabinet for my wifeWent to a local farmer, who had a barn falling down and asked if I could get some wood. He allowed me to take a few pieces and turned it into a corner cabinet for my wife

Built from Plan(s)
Estimated Time Investment
Day Project (6-9 Hours)
Recommended Skill Level
Beginner

Freestanding Garage Shelves

Submitted by Jeanna on Mon, 04/27/2020 - 08:07

This was our first real DIY from scratch project. We somehow made it a bit too tall and so have not put the top shelf planks on. Over all we are pretty happy with it. This was in a rental storage unit. We plan to give it another go in our garage too.

Estimated Time Investment
An Hour or Two (0-2 Hours)
Finish Used
None
Recommended Skill Level
Beginner

King Size Platform Bed

Submitted by Anonymous (not verified) on Fri, 03/01/2024 - 07:33

followed your instructions for the "Essential Platform Bed Frame" -- made this as a king. 2x6's for all legs/center supports with mitered corners for a simple added style. only suggestion/modification is the the #of slats you suggested (10) is way too few, I ended up using 15 or more

Also, used the circle-corners instead of mitering because all our doorframes in the house have that type of corner, and then I wouldn't have to "match" the leaf design where the mitered corners meet

Thanks for your guide!

Jake in Spokane

Built from Plan(s)

Trash bin

We really needed something to put our recycling in. A paper bag on the floor just wasn't cutting it anymore! I saw this plan and knew it would be perfect, especially because it fits your normal grocery store paper bags. It was also my first project using a Kreg-Jig and I love it. A lot. Just fyi for anyone on the fence like I was for a while.

Estimated Cost
$15-$20
Estimated Time Investment
Afternoon Project (3-6 Hours)
Finish Used
Valspar Spring Sprout Satin spray paint
Recommended Skill Level
Beginner

Cedar Outdoor Dining Table and Benches

My wife and I loved the version that Finns-Dad made but we wanted it to be rectangular. The top is 1x6s around the edges with 1x4s in between. The frame is 1x4s. The bench tops are all 1x4s with 4x4 legs. There are 3/8 inch lag bolts in the legs. We did 4 coats of the urethane.

This was my first major project, and while there are many things that I would do differently if given the opportunity, we're still very pleased with it.

Built from Plan(s)
Estimated Cost
$350
Estimated Time Investment
Weekend Project (10-20 Hours)
Finish Used
Rust-Oleum Varathane Classic Clear Water Based Outdoor Spar Urethane Semi Gloss
Recommended Skill Level
Beginner

Comments

Beautiful Table

Submitted by Anonymous (not verified) on Mon, 11/07/2016 - 05:27

We have been eyeing this table for years now...finally the military has brought us to the east coast where we have room to do some wood work hobbying! This table is sturdy and beautiful. Love that we can break it down into so many pieces for our moves. Thank you Ana White!!

Built from Plan(s)
Estimated Cost
140 for wood, hardware, stain and sealer
Estimated Time Investment
Weekend Project (10-20 Hours)
Finish Used
Minwax Early American, Varthane semi gloss poly
Recommended Skill Level
Intermediate

Comments

Pony Wall Workbench

I picked up wood working as an indoor hobby during the Coronavirus and working from home. I was doing everything on the floor in my garage until I saw these plans for the Pony Wall Workbench. I'm 6'4 so having a bench to work at is such a savor for my back. I didn't have as much room, so I just used the 8 foot section and dropped the miter saw into the middle, two drawers on either side. I'm a big golf fan as well, so I spiced it up with some old golf balls I had laying around for drawer knobs!

I really appreciate this site and all the plans. I'm looking forward to many new builds, not on the ground haha!

Built from Plan(s)
Estimated Cost
$150-$200
Estimated Time Investment
Day Project (6-9 Hours)
Recommended Skill Level
Intermediate

My version of the Small Chicken Coop with Planter, Clean Out Tray and Nesting Box -with the addition of a chicken run

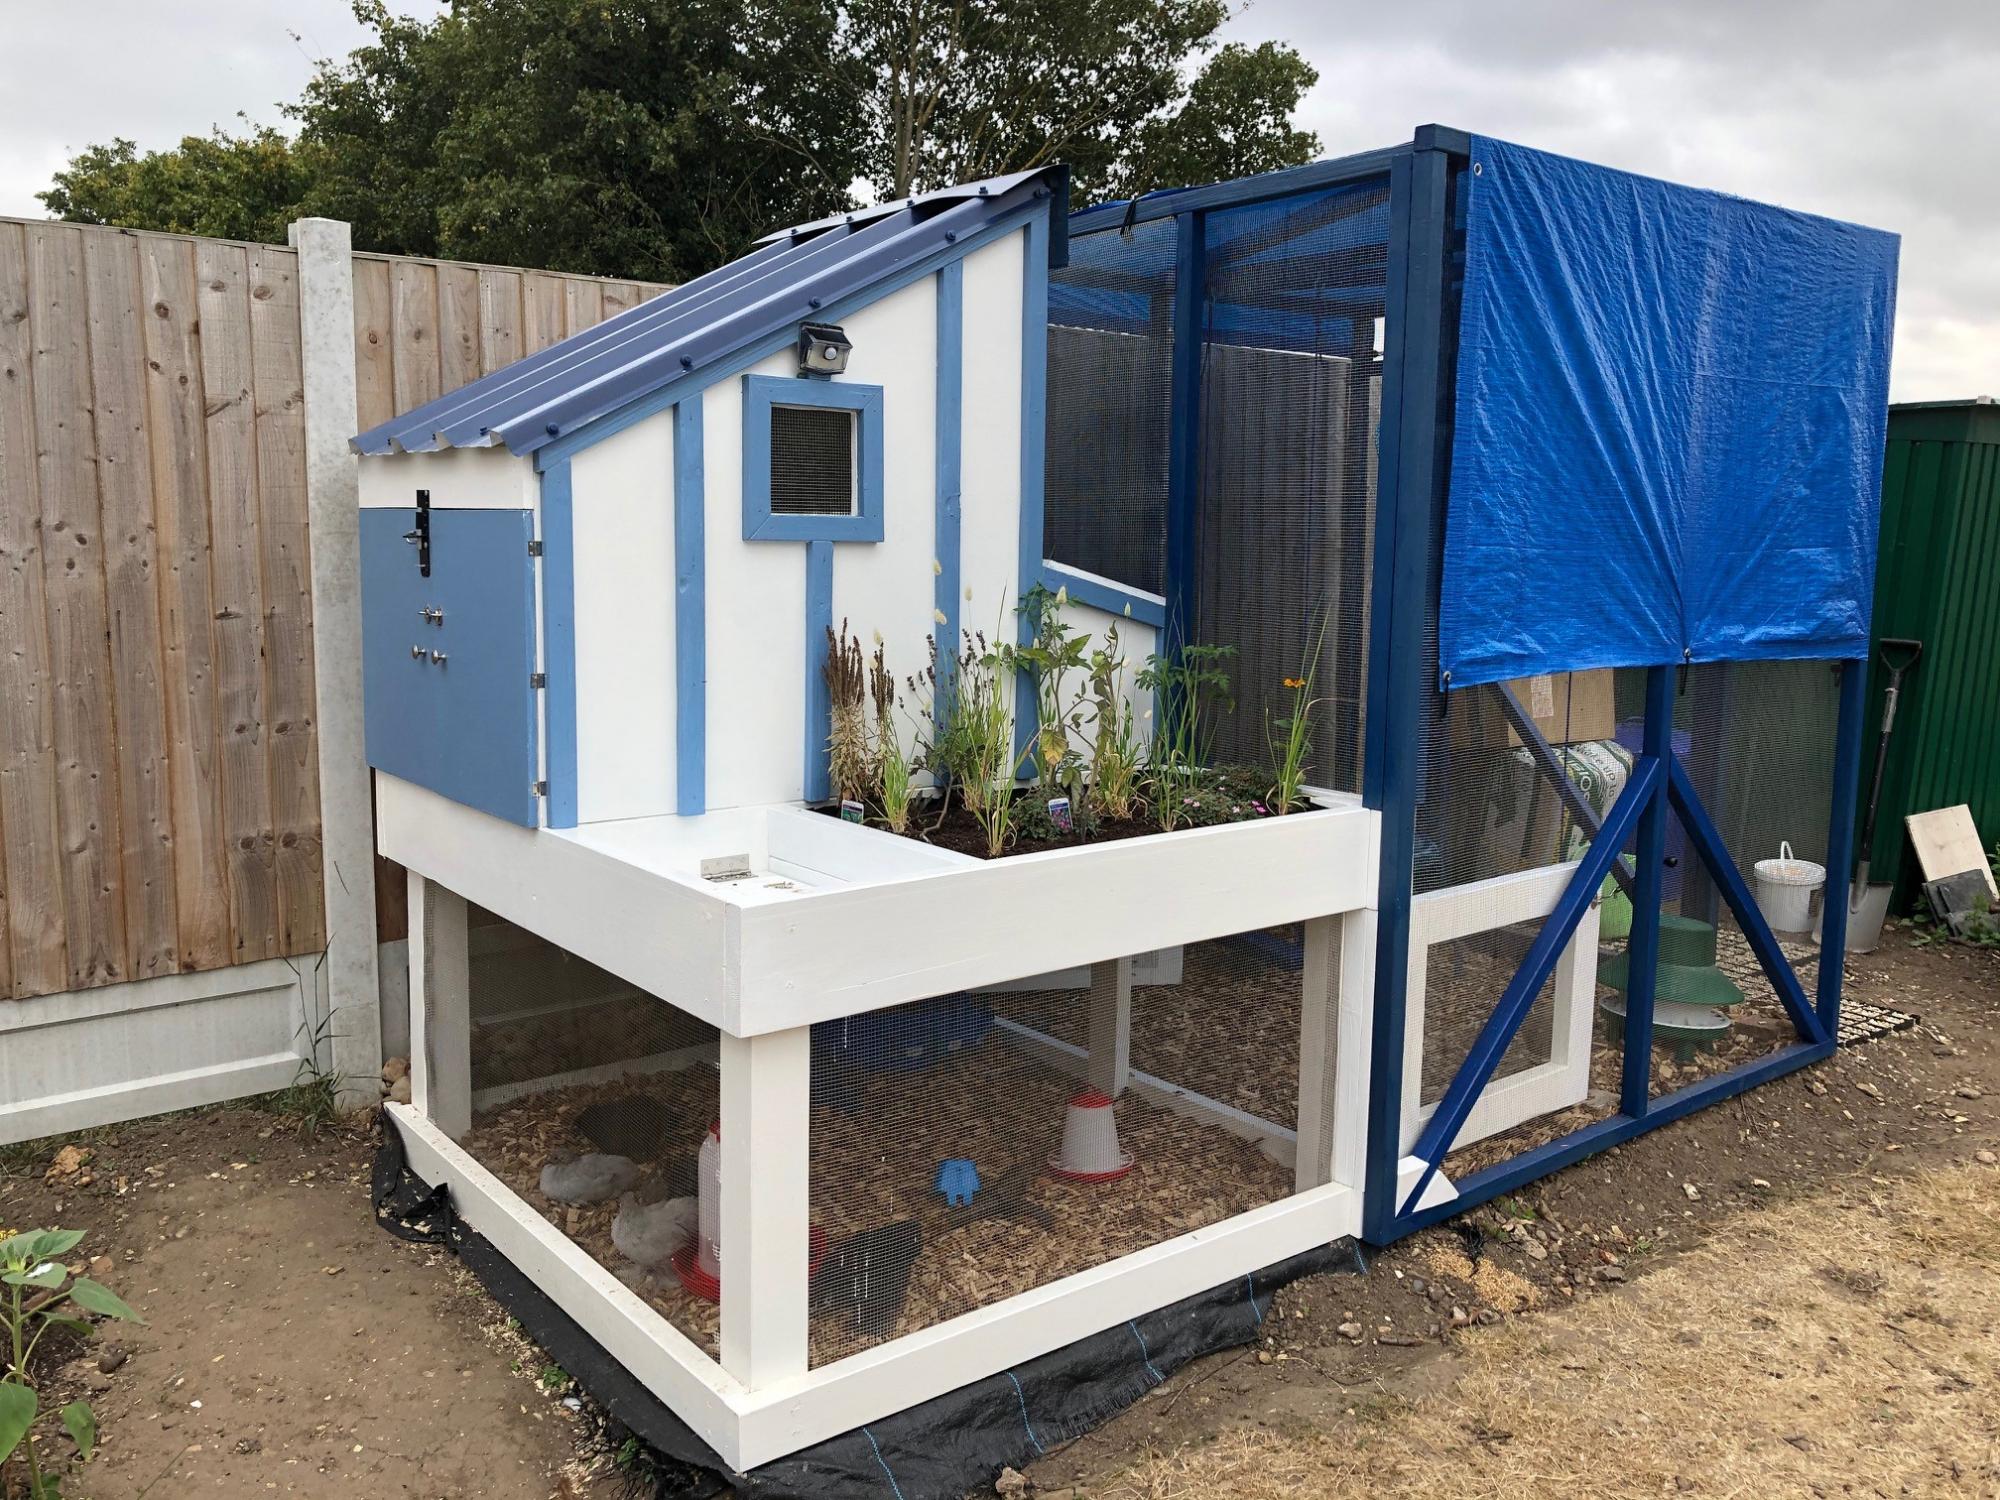
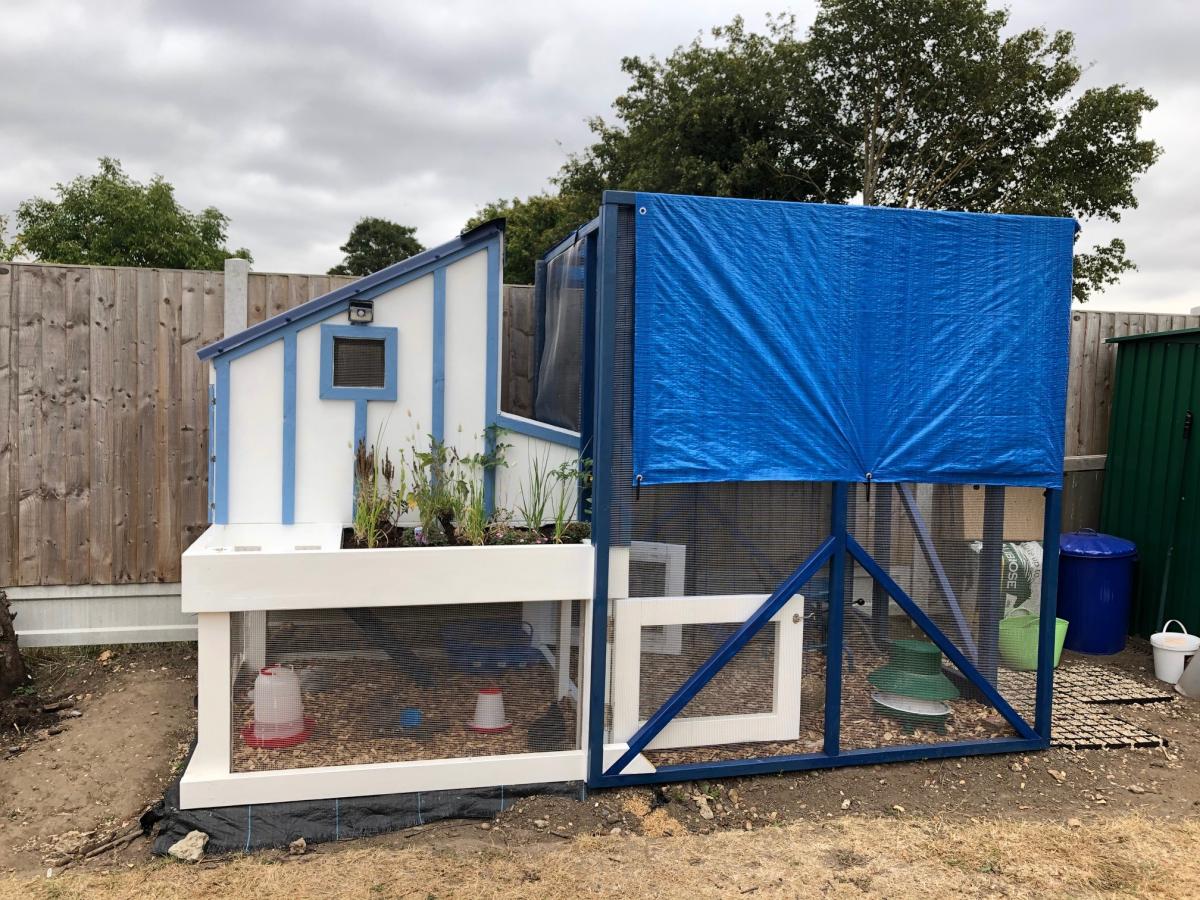
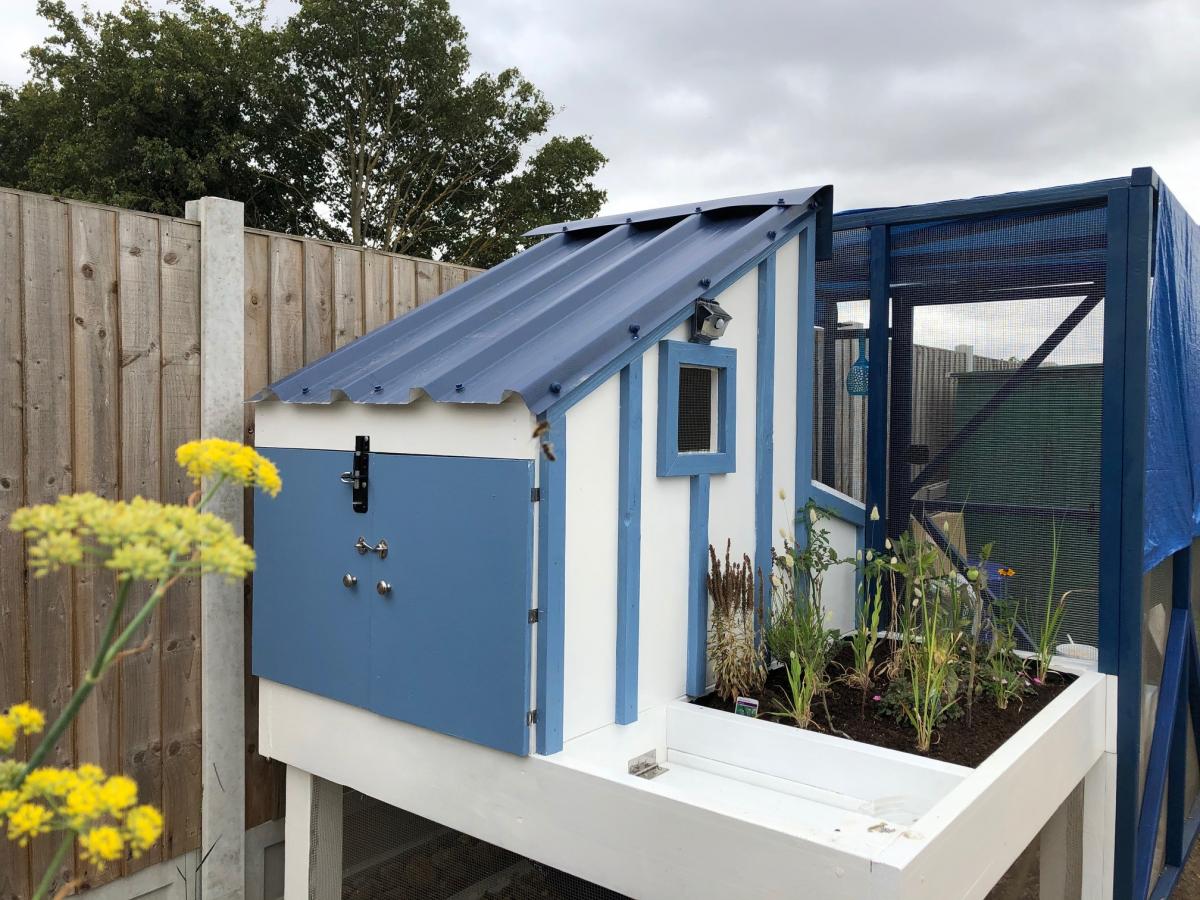
I loved the design that Lady Goats and Ana had created but it wasn't quite right for me, so I used the 'essence' of the coop and tweaked it.

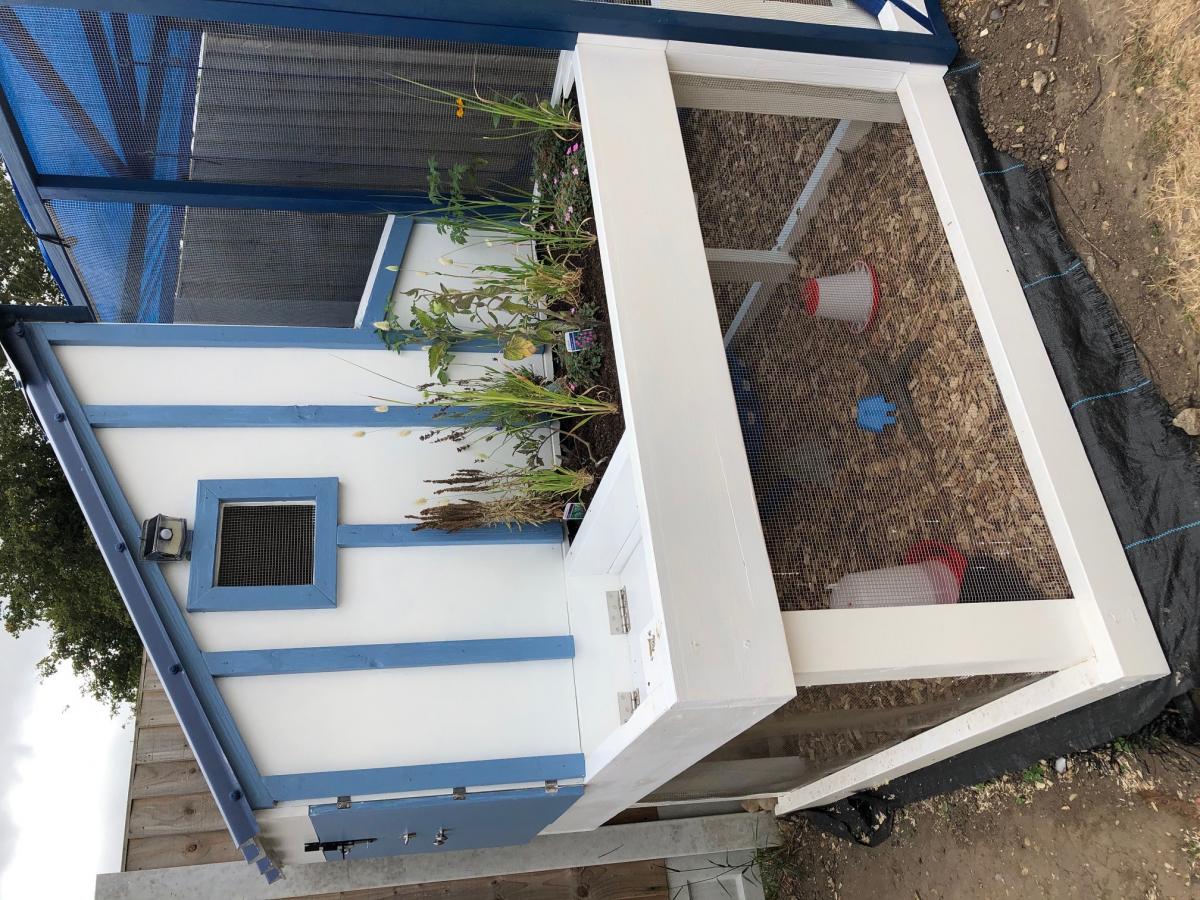
I had some leftover metal roofing sheets from a tool storage area I'd made so used this on the roof, and also made the roof a pent shape. I moved the doors to the side, and also reduced the size of the planter. Next to the planter I've made a lift up hatch so that I can more easily replace the water and feeders.
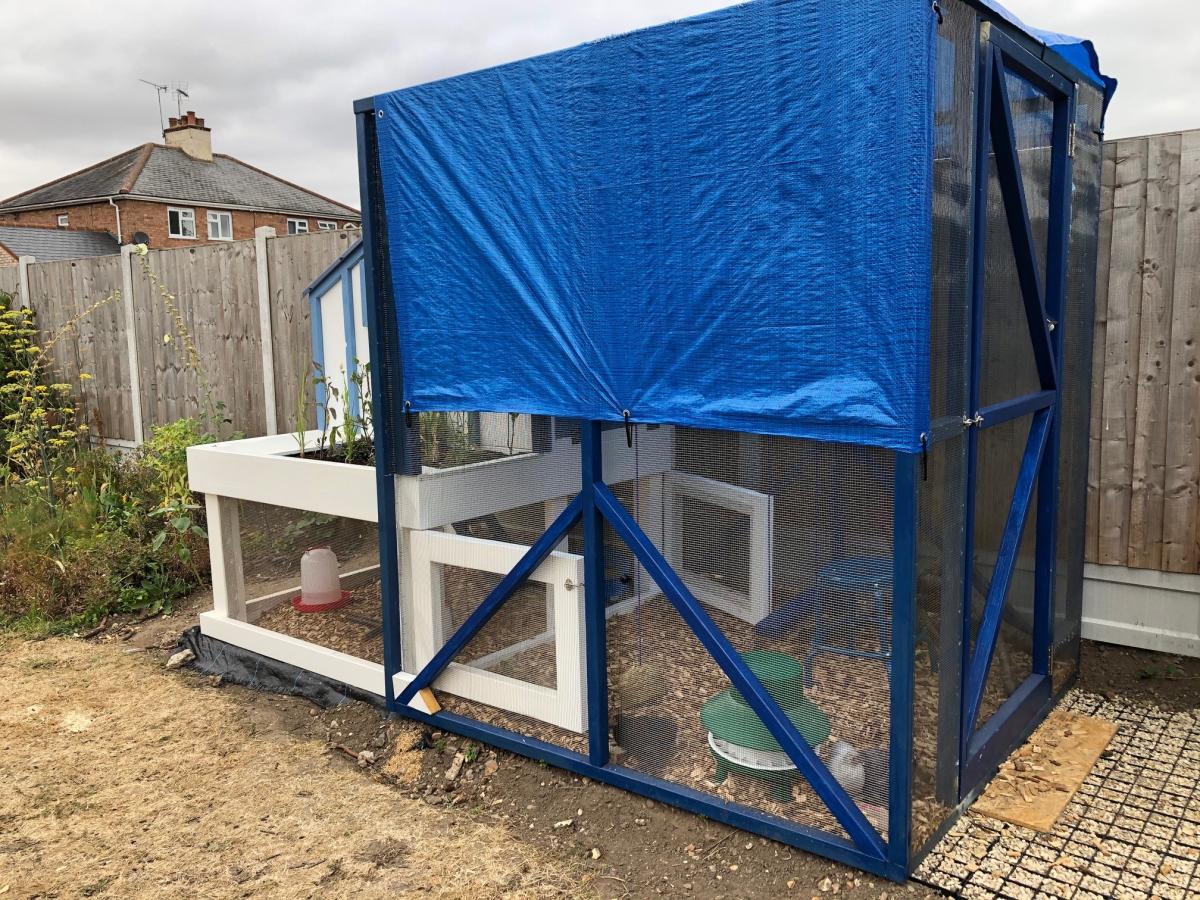
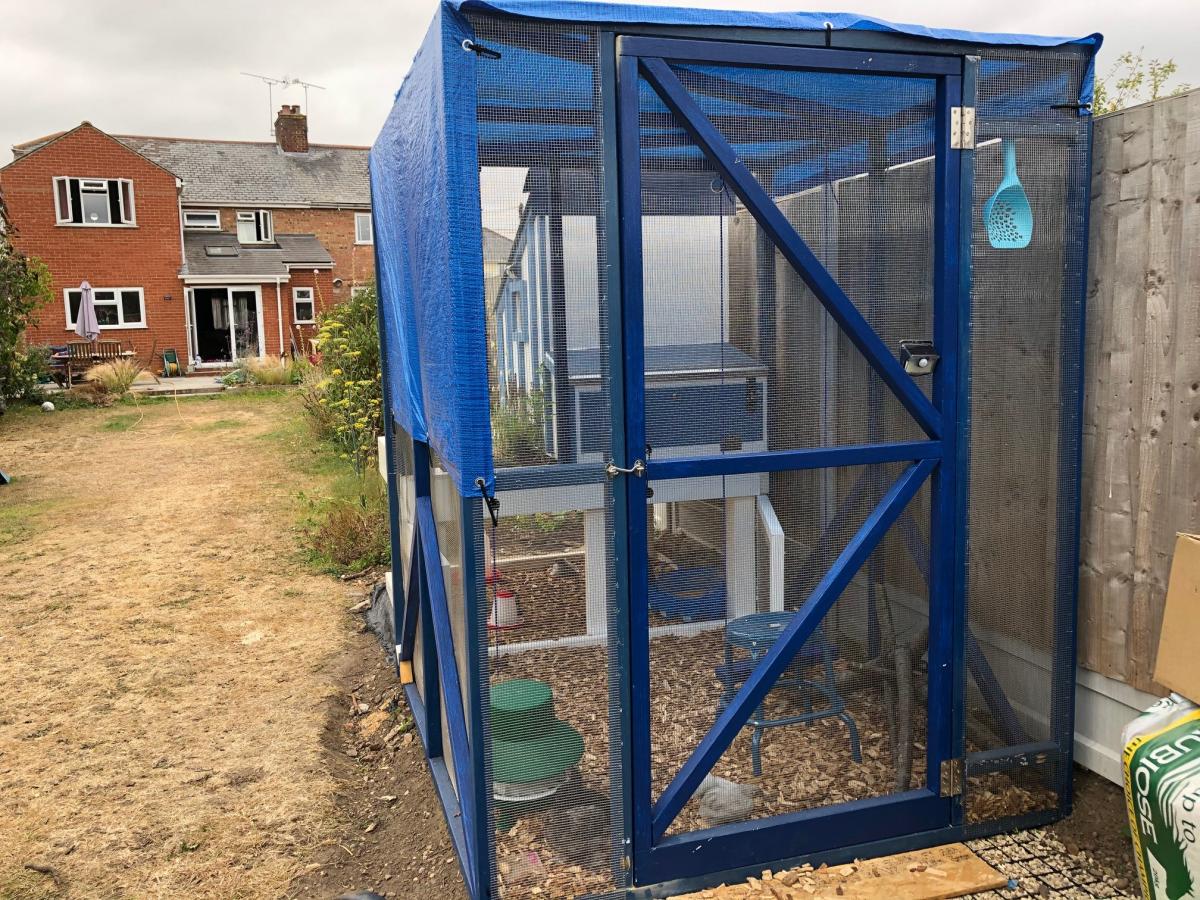
I've added in a 2m x 1.8m (approx. 6.5ft by 6 ft) run so that the little chicks are safe and can run about from their coop.

The whole coop is covered in stainless steel rodent mesh so not only can foxes not get in (our main predator in the UK) but also rats and mice won't be able to get in to take their food and bring their disease.

I undercoated all the wood and then double-coated in exterior weather-proof gloss. Inside the coop I triple coated (I wanted to be thorough!) and also sealed every single joint in the whole build to avoid water penetration as well as mites setting up camp. It's already very easy to clean and hopefully should last a long time.

Hope that you like what I've done here. I'm so pleased with the results but pretty tricky to do by myself.
I'm learning, learning, learning though :-)

P.S. Sorry that the pics below aren't the correct way up -I don't know how to make them appear in the right direction.....

Estimated Cost
£500
Estimated Time Investment
Week Long Project (20 Hours or More)
Finish Used
I sanded all the wood to within an inch of it's life (!) then undercoated all the wood with an exterior weathertight product (Zinnser BIN primer sealer) and then double coated all the non-inside areas with Sandtex Exterior white gloss.
The areas inside the coop were tripled coated and every joint was sealed with exterior caulk and then repainted.

It should hopefully be washable, mite-proof and last a long time now!
Recommended Skill Level
Advanced

Comments

Drop down murphy bar

Submitted by nick_h on Tue, 12/06/2016 - 10:54

My attempt at the murphy bar featured on this site. Still have to add the sash locks. Added pallet crossmembers at the back, an x in the leg, and a french cleat to mount to the wall. 

Estimated Cost
$45
Estimated Time Investment
Day Project (6-9 Hours)
Finish Used
Special Walnut Minwax on the bar top and shelves, crisp linen matte latex and dry brushed casual gray for accents/aging. 2 coats of polycrylic for protection. If built again would pre stain and base coat all the wood before build time, then assemble, add accent brushing and spray the polycrylic.
Recommended Skill Level
Beginner

Comments

zannej

Tue, 12/31/2019 - 11:49

This looks awesome! I want to help my friend build this for his kitchen. I've looked at the plans in the link & I'm wondering what modifications you made for the X pattern-- how much did it alter the material & cut list?

Would you please share your material & cut list for this?

Entryway Bench and Storage Shelf with Hooks

Submitted by DC_Idaho on Fri, 10/23/2020 - 10:37

I took your entry way plans, went to my local saw mill and bought some rough cut poplar, and got to work. I started this project for my wife and was able to get the entry way shelf built. When I showed a co-worker what I was doing she asked if I would build her a bench with a few customizations. I took a break from doing the bench for my wife and made the bench for a co-worker, btw, I totally under sold the bench($200). The pictures show what I came up with, smaller shoes on the inside and boots on the outside. I still have to build another bench to match my wife's entry way shelf with coat hooks :)

Estimated Cost
$600
Estimated Time Investment
Week Long Project (20 Hours or More)
Finish Used
Stain and diluted off-white paint
Recommended Skill Level
Intermediate

Comments

Headboard based on PB Oxford Storage Bed

Although I didn't build this from a plan I wanted to be sure and share it as it is because of my experience building from Ana's plans that I felt comfortable giving this a shot.

My in-laws were just updated their lake cabin and wanted a storage headboard as space is a premium and it will be the only furniture in the guest rooms. It is unique as it has shelves on either side which can pull out to function as a small night stand, perfect for cell phones, books etc. The back of the piece is tongue and groove knotty pine which for the more rustic look they wanted.

I will probably do things a little different when I build the next headboard but overall I am satisfied with the end result. I chose not to do a lower storage area, mainly to keep the cost down. It could be done very easily but this piece is already very heavy and that there is plenty of storage.

Estimated Time Investment
Weekend Project (10-20 Hours)
Finish Used
Special Walnut stain with semi-gloss Polycrylic. All of the wood was sanded and then I applied wood conditioner. One coat of the stain and three coats of the semi-gloss. I live in Minnesota and build it in my garage so I had to wait until this week when temperatures finally were warm enough to apply the finish.
Recommended Skill Level
Beginner

Comments

Easter Bunny Wood Decor Piece

Submitted by Nor7 on Thu, 03/19/2015 - 07:25

This was a simple build. You can probably tell from the pictures how it was cut, painted and decorated. The whiskers are just picture hanging wire. The wood was scrap from around my shop and all the other materials we had on hand.

Estimated Cost
$0. Made from scrap and hobby materials from around the house/garage.
Estimated Time Investment
An Hour or Two (0-2 Hours)
Finish Used
Acryllic Paint
Recommended Skill Level
Starter Project
Seasonal And Holiday

Tilt Out Garbage Bin

Submitted by stephie_00 on Thu, 04/23/2015 - 19:16

Modified the plan to use pallet wood and stained it classic grey for a weathered look.

Estimated Cost
$50
Estimated Time Investment
Weekend Project (10-20 Hours)
Finish Used
Min wax Classic Gray oil-based stain
Recommended Skill Level
Intermediate

Comments

Shou Sugi Ban (Yakisugi) Cornhole Boards

Submitted by Anonymous (not verified) on Sun, 12/26/2021 - 14:48

I'm James Farquhar, designer, and fabricator. This is the second set of cornhole boards I built this year. This set is the regulation size of 48" x 24" according to the American Cornhole Association. It is made from fir 2 x 4 s and pine 1 x 4 s (6 per board). Each board is glued with Titebond II and countersunk Torx top screws (#8 1-1/2 inches). It is coated with Minwax polyacrylic (8 layers sprayed on) and Howard's bee's wax (3 layers). The boards are secured with 3-inch toggle latches in pairs. Kayak carrying handles with four screw ports; I used the same Torx Screws I used to put the boards together, extra for strength. The total weight of the boards is 60 pounds. I used a Texas Flame Thrower to Shou Sugi Ban (Yakisugi), as a finish.

Comments

Modular office small desktop/Narrow file drawer base unit

Submitted by gmamurphy on Sun, 06/12/2011 - 14:00

Combined the modular office small desktop with the Narrow file drawer base unit to suit my needs/space requirements. Used the legs from the narrow farmhouse table because I just loved them! Added beadboard for the drawer faces because it matches the rest of our house.

Estimated Time Investment
Week Long Project (20 Hours or More)
Finish Used
painters touch and minwax polycrylic
Recommended Skill Level
Intermediate

Comments

bundaboy

Mon, 04/28/2014 - 22:18

I am about to start on a very similar 4 draw version of this, do you have any more information? In particular I was wondering how the drawer slides were fitted - are the side or bottom fitting? Cheers and well done!

Farmhouse Doggie Daybed

Submitted by jkjackson on Sun, 04/24/2022 - 18:42

This was adapted from the Farmhouse bed plans to match our king size farmhouse bed.

Comments

L shaped triple x desk

Submitted by Anonymous (not verified) on Sun, 01/01/2023 - 13:24

We built this desk over Christmas break with my son for his bedroom.
Ran all wood through a planer and used pocket hole screws and Tite bond 3 glue. Black stain and satin polyurethane (3 coats) for the frame and my own stain concoction for the shelves and top treated with 2 coats of Odies oil.
He was very pleased and we enjoyed our time working on this project

Comments

Large 6 X 8 Sandbox

We wanted to make a large sandbox for lots of kids. We love that it has an easy cover and two large benches to sit.

Supplies and Steps are shared at http://myhomedonemyway.blogspot.com/2013/07/building-6-x-8-sandbox.html

Built from Plan(s)
Estimated Cost
$250
Estimated Time Investment
Day Project (6-9 Hours)
Recommended Skill Level
Beginner

Comments