Community Brag Posts

Farmhouse table

Submitted by Anonymous (not verified) on Thu, 06/18/2020 - 19:25

First table build! We modified the plans with no breadboard ends since we live with lots of humidity and wanted to allow the wood movement. We also used 4x4s for the legs. White chalk spray paint legs and custom mix of special walnut and weathered oak stains. We LOVE it!!

Estimated Cost
200
Estimated Time Investment
Weekend Project (10-20 Hours)

Outdoor seating made with thrown away cushions

Submitted by Anonymous (not verified) on Mon, 06/22/2020 - 18:01

Someone on my street had thrown out 2 couches. The cushions were in perfect condition. So I built chairs and fit the cushions! I built a matching coffee table to fit a glass I had. To finish the space, I added a table to have my morning breakfast.

Estimated Time Investment
Weekend Project (10-20 Hours)
Finish Used
Paint and stain
Recommended Skill Level
Intermediate

Comments

New counter height planters in use

Submitted by jrbdmb on Fri, 06/20/2014 - 05:05

Using the counter height planter plans from Janettx. Thanks!

Estimated Time Investment
An Hour or Two (0-2 Hours)
Recommended Skill Level
Beginner

Comments

Janettx

Mon, 09/20/2021 - 13:24

Nice job!!! I'm still using mine. I ended up putting 12"x12" pavers under each leg to extend their life. After the 2nd year now we get bumper crop out of ours each season.

6' Square Sandbox

I've been wanting to buy or make a sandbox for my son for a couple of years now. Since seeing this on Ana White I knew I had to make it. My son is 4 yo and I didn't think the 4' square sandbox would be big enough for him, so I made it bigger. Ours is 6' square.

Materials:
4@1x8x6'
12@1x6x6'
2x4 - used leftovers from another project
8 hinges
4 handles
decking screws

Cut lengths:
2@1x8 cut to 71.5 (long sides of the box)
2@1x8 cut to 70.5 (short sides of the box)
did not cut the 1x6 boards (top planks) - actually designed the other boards to fit their length to prevent cutting (saving time) (note that original plan uses 1x4 planks - I used 1x6s so I could use the same number of planks but cover a larger area)
4@2x4 cut to 11.5 (arm rests)
4@2x4 cut to 18.5 (back supports)

followed instructions for assembly otherwise. At my husbands suggestion we put the handles on the sides and can easily open from either side - prevents having to lean over to the middle to open (back saver)

I finished the project in 4 hours including clean up and a couple of small breaks. This is my first Ana White project. It was a lot of fun to build and I hope my son will enjoy it for years to come!

Built from Plan(s)
Estimated Cost
$190
Estimated Time Investment
Day Project (6-9 Hours)
Finish Used
Sand and stain with sealer included
Recommended Skill Level
Beginner

Comments

Mrs. Chellebelle

Sat, 09/01/2012 - 20:59

Wow, this is just what I need! I've been wanting to make a sandbox for under the playhouse but the other plan was too small. This would be great for the little guys. Thanks!

Modern Outdoor Sofa and Loveseat

Modified the loveseat plans and created a sofa as well. No one that sees these thinks I built them. They look so much nicer than anything you can buy!

Estimated Cost
$350
Estimated Time Investment
Week Long Project (20 Hours or More)
Finish Used
First coat SW New Ebony Stain
second coat Varathane Briarsmoke
Recommended Skill Level
Beginner

Comments

8 foot picnic table

Submitted by Abby721 on Sat, 07/18/2020 - 08:40

This picnic table was a quick build and turned out amazing. I modified the center base support by adding an extra table top support and seat support board to the opposite side of the center legs to give the table symmetry to accommodate an umbrella hole. I also shortened both cross supports by an inch to make sure the base wouldn’t be longer than the top boards. The space between the center table support boards and seat support boards is the perfect size to fit a standard umbrella. I used a 1 3/4” hole saw to make the umbrella hole. The build and stain/paint took me about 5 hours but additional time is needed to properly seal the table. I used untreated pine. Treated pine may give the table longevity but it would also add a lot of weight to an already heavy table. This was a relatively easy and quick build and is a great size to fit my whole family plus a couple guests! I’m happy with how it turned out and would recommend this build to anyone looking for a budget friendly and simple patio table.

Built from Plan(s)
Estimated Cost
$75
Estimated Time Investment
Day Project (6-9 Hours)
Finish Used
Varathane Briarsmoke for the top and Rustoleum Canyon Black Satin for the base. Sealed with 2 coats of Varathane Helmsman Spar Urethane
Recommended Skill Level
Beginner

Comments

Seasonal And Holiday

Cedar Planter with Mitered Top

This was by far the easiest project. This planter is HUGE as well and makes a great focal point for your curb appeal. I didn't extend the sides but rather created a mitered edge for the top creating a nice clean finish.

Built from Plan(s)
Estimated Cost
$20
Estimated Time Investment
An Hour or Two (0-2 Hours)
Finish Used
Minwax English Chestnut with a Spar Varathane protective coat
Recommended Skill Level
Beginner

Comments

adkgirl

Sun, 09/22/2013 - 20:25

how exactly did you attach the mitered top?? Finish nails or is there a way to use the kreg jig to hide joinery? These are beautiful, BTW. Thanks :)

Playhouse for Christmas...almost done!

Submitted by lprollins on Sun, 11/25/2012 - 14:57

My husband and I used our Thanksgiving break to build this playhouse and deck, using Ana's plans. We are NOT builders...this is very doable for beginners with the right tools. Read the plans thoroughly before starting. Total cost (including all lumber, hardware, and paint) was under $600.

We still have door and house trim to complete, a little painting, and a handrail/ladder.

Santa may bring a slide and some other fun accessories!

Thanks Ana!!!!!

Estimated Cost
$600
Estimated Time Investment
Week Long Project (20 Hours or More)
Recommended Skill Level
Beginner

Child's Bench with Arbor

Submitted by jennibee on Sun, 09/14/2014 - 08:57

This was a weekend build made from plans right here on Ana-White's site. There were a few changes made to make it sturdier since several (older) rambunctious toddlers were going to be using it. If anyone is interested in how much weight it can hold, two adults sat on this and it held up great. We have had this in the back yard for over a year now and it looks just as it did when it was first built.

Built from Plan(s)
Estimated Cost
Under $100. Not sure about actual cost since we had wood, primer, and paint on hand.
Estimated Time Investment
Weekend Project (10-20 Hours)
Finish Used
Primed and painted with exterior paint.
Recommended Skill Level
Intermediate

Garage Shelves - Freestanding (Modified)

Submitted by Anonymous (not verified) on Tue, 09/15/2020 - 20:45

First project ever! I have been planning to build this for at least a year, and I finally did it! I had to modify the plan to fit my space, but it worked out well. They cut the wood for me at the store, so I did not make any cuts myself, just assembled all of the pieces together. I used all 2x4s, 8' and 10', cut down to my measurements. I did not finish the shelves since it is just for the garage, but I did sand rough board edges and some of the faces. I just used an palm sander and coarse sandpaper (80 grit). Please double check all measurements and lists because I forgot to add my shorter shelf supports to the list and had to go back to the store. I also forgot to add the width of the top shelf to those two shorter supports, so the shelf boards are resting on the top instead of nestled into the supports. It turned out not to be a functional problem, but a good lesson to learn. I also learned to make sure my driver battery is charged fully before starting - that took a large chunk out of my first day building and I had to finish the next day. My husband helped with some lifting and holding, but I mostly did this on my own in one weekend, so you CAN do it! Don't wait like I did - it is soooooooo useful and it looks great! All of my friends are really impressed and it feels so good to have made something like this! Thank you Ana!!

Estimated Cost
$180
Estimated Time Investment
Weekend Project (10-20 Hours)
Finish Used
N/A
Recommended Skill Level
Beginner

Comments

Three story doll house for my granddaughter

Here's my version of the Dream Doll House. Three stories, made with birch plywood and pine, featuring realistic stairs, baseboards, crown molding, exterior corner battens, and left in the natural state with just a few coats of water-based poly. Put the whole thing on casters for ease of rolling around the playroom. Fun project and the hugs were all the reward I needed!

Estimated Cost
Maybe around $100.
Estimated Time Investment
Weekend Project (10-20 Hours)
Finish Used
Water-based polyurethane
Recommended Skill Level
Beginner

Comments

Castle Loft Bed "Frozen" Themed

Submitted by Anonymous (not verified) on Wed, 02/15/2017 - 14:19

I present the "Castle Loft Bed" with minor modifications. Finished in a "Frozen" theme.

It was time to upgrade my youngest to a "big kid bed" and she was insistent on a frozen bed. After searching for various options we settled on the "Castle Loft Bed" from the Ana White catalog of plans.

We left the slide off, due to available space. Also we changed the steps to be more of a usable toy box/storage and hamper area. I also modified the internal bookcase to have a small "secret" cubby for her "valuables". We also added color changing LEDs to fit the little princess's mood.


I hope you like my rendition and keeps in spirit the DIYers quality.


Estimated Cost
425.00
Estimated Time Investment
Week Long Project (20 Hours or More)
Finish Used
Various paints
Recommended Skill Level
Intermediate

Modified Grandy Console with inset doors

I wanted to switch things up. I have made and sold many of the Grandy consoles with barn doors but my current new (to us) home was more modern traditional, definitely not very farm house. The Grandy plan makes a solid piece of furniture which is exactly what I need for it to survive amongst the giant teenagers that we are raising BUT I wanted to switch up the doors and add some traditional elements with a pop of modernish hardware. Make sure that your face frame openings are square. Add some non-mortise hinges, latch bolts and L brackets and this plan appears transformed!

Built from Plan(s)
Estimated Time Investment
Weekend Project (10-20 Hours)
Finish Used
Kilz primer, sw Dover white with a poly clear coat for added durability. Sand between all coats (time consuming but it adds a professional edge to your finishes).I use a critter sprayer from Amazon for the exterior and for poly. Foam rollers for the inside. Stain color for X doors was kona and lighter toned doors was a process (see Instagram post) but involved white wax.
Recommended Skill Level
Intermediate

Comments

Guitar Stand

Submitted by Eddie K on Thu, 03/02/2017 - 13:49

Built this guitar stand basically by using on-hand materials left over from another project.  Used 1x12's; 18" tall fir for sides and back braces (cut at 5 degrees on each side).  Added felt strips to protect the instrument.

Estimated Cost
Probably around $20-25. Need about 4' of 1x12 fir and Minwax Polyshades in Classic Oak. All materials were on hand except the roll felt, so hard to pinpoint.
Estimated Time Investment
Afternoon Project (3-6 Hours)
Finish Used
Minwax Polyshades in Classic Oak.
Recommended Skill Level
Beginner

Comments

Industrial coffee table

Submitted by mandi10uga on Wed, 03/08/2017 - 05:43

I used 2x2s for the base and stained them ebony. The top is made of 2x6s stained weathered oak & dark walnut. Caution: no matter how perfectly square your base is, if your top is even remotely warped/twisted, it will pull the whole thing out of whack. The base is not strong enough to fight the 2x6s. 

Estimated Cost
$50
Estimated Time Investment
Afternoon Project (3-6 Hours)
Recommended Skill Level
Beginner

Christmas 3-tier cookie stand

Submitted by calcowoods on Thu, 12/31/2020 - 12:51

Inspired by Shara of Woodshop Diaries, created this 3 tier tray for displaying cookies for Santa. Added a 3 dimensional star as the topper and simply followed the excellent photos and schematics on Shara's website.

Estimated Cost
$5
Estimated Time Investment
Afternoon Project (3-6 Hours)
Finish Used
Minwax paste wax
Recommended Skill Level
Beginner

Comments

Custom Industrial Style Closet

Submitted by slug on Tue, 12/09/2014 - 09:03

We remodeled our house and now had a new 9x6 master closet to fill. During construction I saw this design on ana-white.com and liked the style, but wanted to customize the layout. I found an online closet designer and played around until I found something my wife and I liked. We ended up with a 9 foot long his/hers double hanging on the ends and a long hanging section in the middle. And on the other side 8 feet of shelving (leaving about a foot for other storage).

I bought the pipe as a 10 foot pipe to be cut and threaded (for free by the store). I did have to change the design a little because the store cannot thread pipe less than 14 inches. So I ended up replacing the short pipes and T's with 2x4s. That made it a little cheaper and I still like the end result.

We stained all the wood using Minwax "Early American". This probably accounts for most of the build time.

Then I put together the supports and brought them into the closet to add all the pipes and slats. I started with the wall for hanging. And later did the shelving.


Here's another forum with more pictures of this project:

http://woodworking.formeremortals.net/me-mo-community/#/discussion/866/…

Built from Plan(s)
Estimated Cost
<$400 for whole closet.
Estimated Time Investment
Weekend Project (10-20 Hours)
Finish Used
Minwax "Early American"
Recommended Skill Level
Beginner

Comments

Wood dog crate end table

Submitted by Anonymous (not verified) on Sun, 03/12/2017 - 17:11

Really fun build! I changed the plans a bit and made the spindles go all the way to the bottom. Made it more open for the dog. Took a while to finish since I would tinker when I had the extra time! Turned out great with the two tone, stained from and top with white spindles and door. Thanks for the plans!

Built from Plan(s)
Estimated Cost
$50-$80
Estimated Time Investment
Week Long Project (20 Hours or More)
Recommended Skill Level
Intermediate

Loft bed

Submitted by scooper812 on Fri, 01/08/2021 - 23:52

My daughter had been asking for a loft bed that she could place a futon under. This plan was exactly what I needed! I made the bed taller so she would be able to stand under it (we have 10’ ceilings - old house). And, I replaced the ladder with a staircase with built-in cubbies.

This was our first project of 2020 and we started it during the first part of the quarantine, so it got named “Project COVID-19.”

Built from Plan(s)
Estimated Cost
$200
Estimated Time Investment
Week Long Project (20 Hours or More)
Finish Used
White latex paint
Recommended Skill Level
Intermediate

Comments

Rustic X Console

Made a bit shorter to fit our decorative arch and opted for more different hardware.

Built from Plan(s)
Estimated Cost
$100
Estimated Time Investment
Day Project (6-9 Hours)
Finish Used
Rustic Oak Stain with a wax finish.
Recommended Skill Level
Intermediate

Comments

mitered corner farmhouse table - shiplap top.

Submitted by Anonymous (not verified) on Tue, 04/25/2017 - 13:07

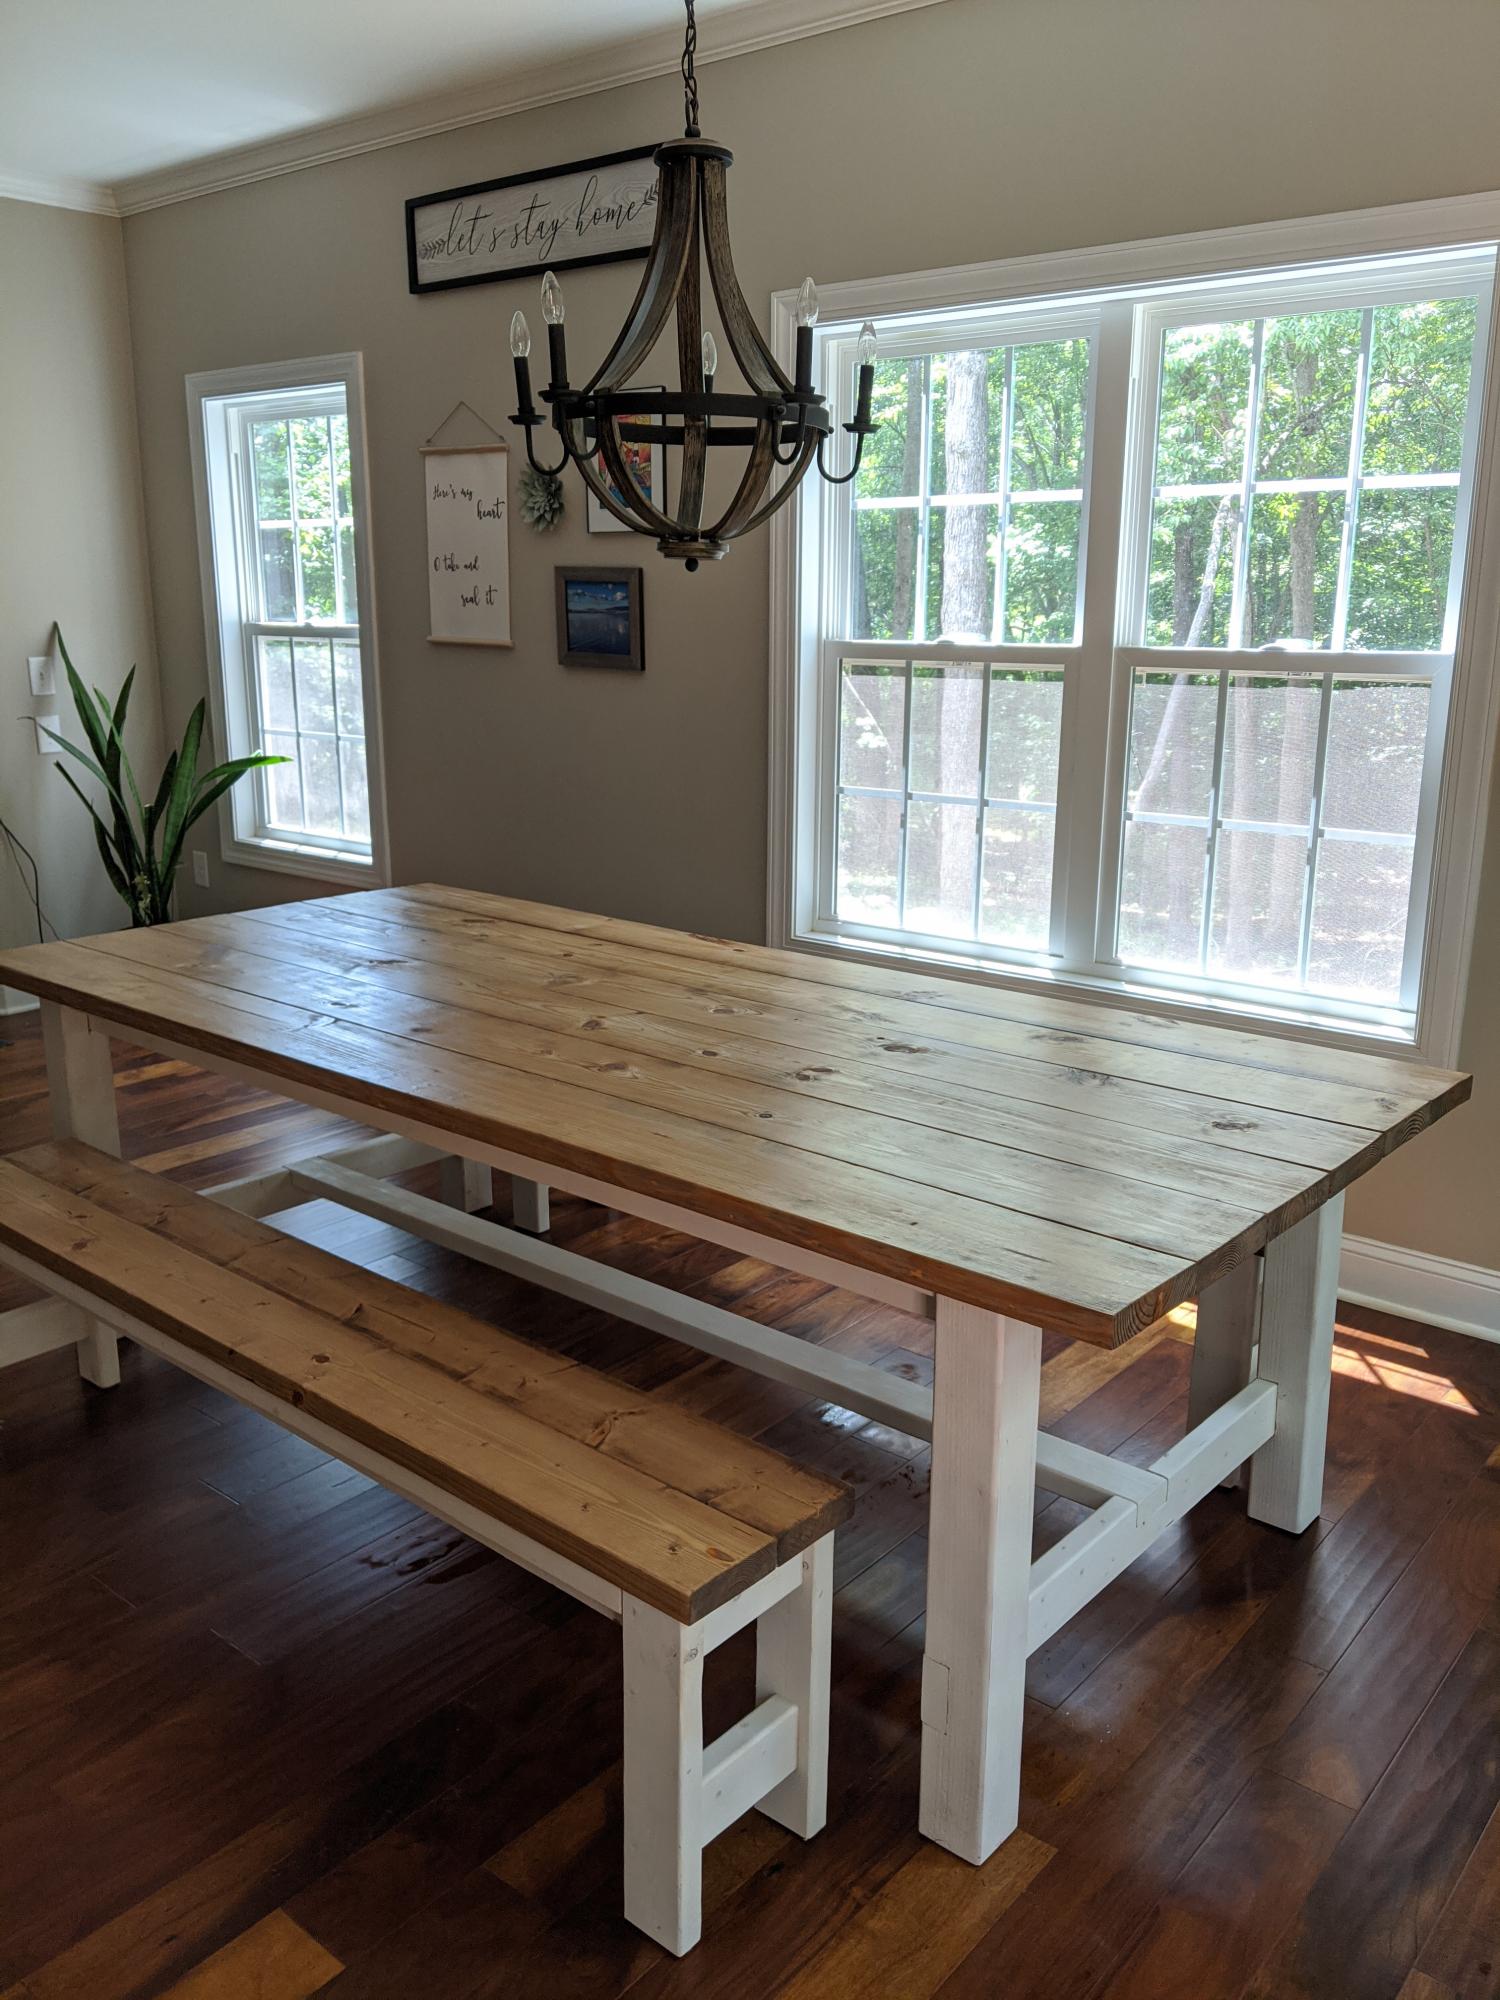
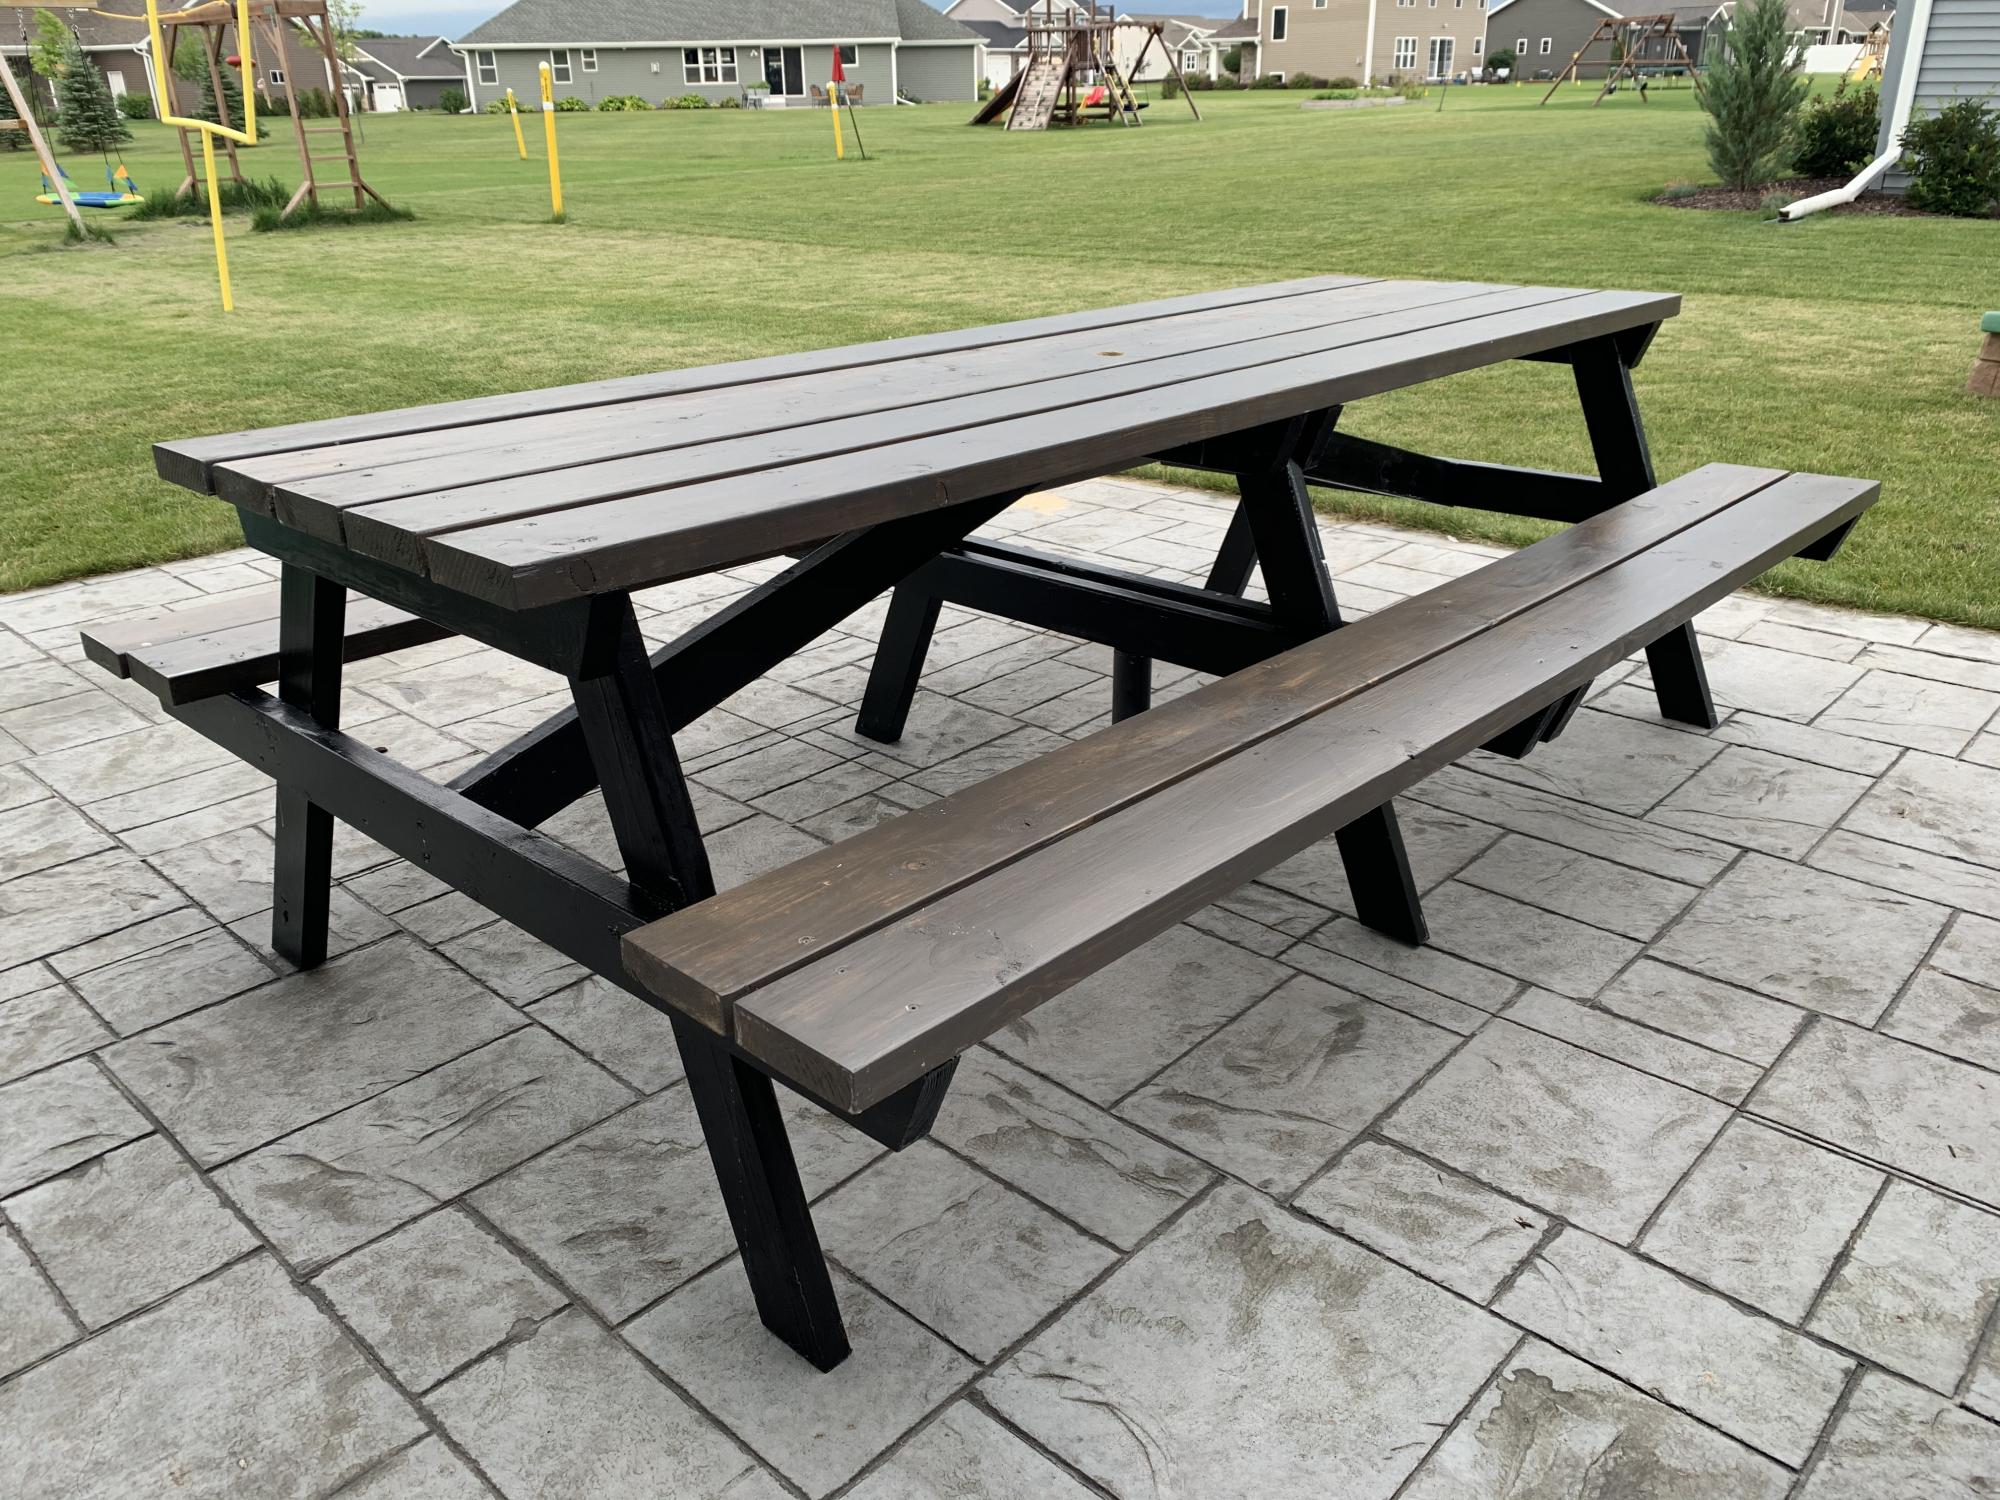
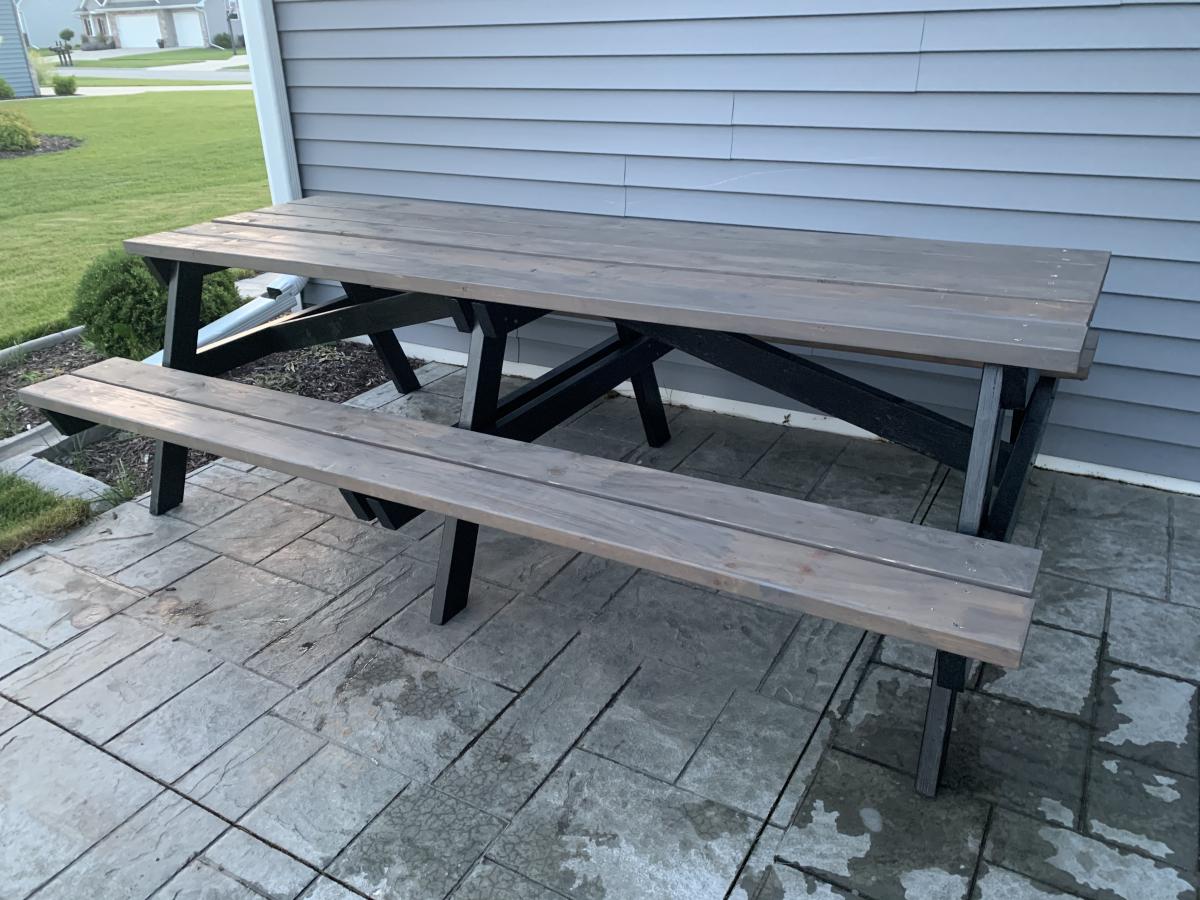
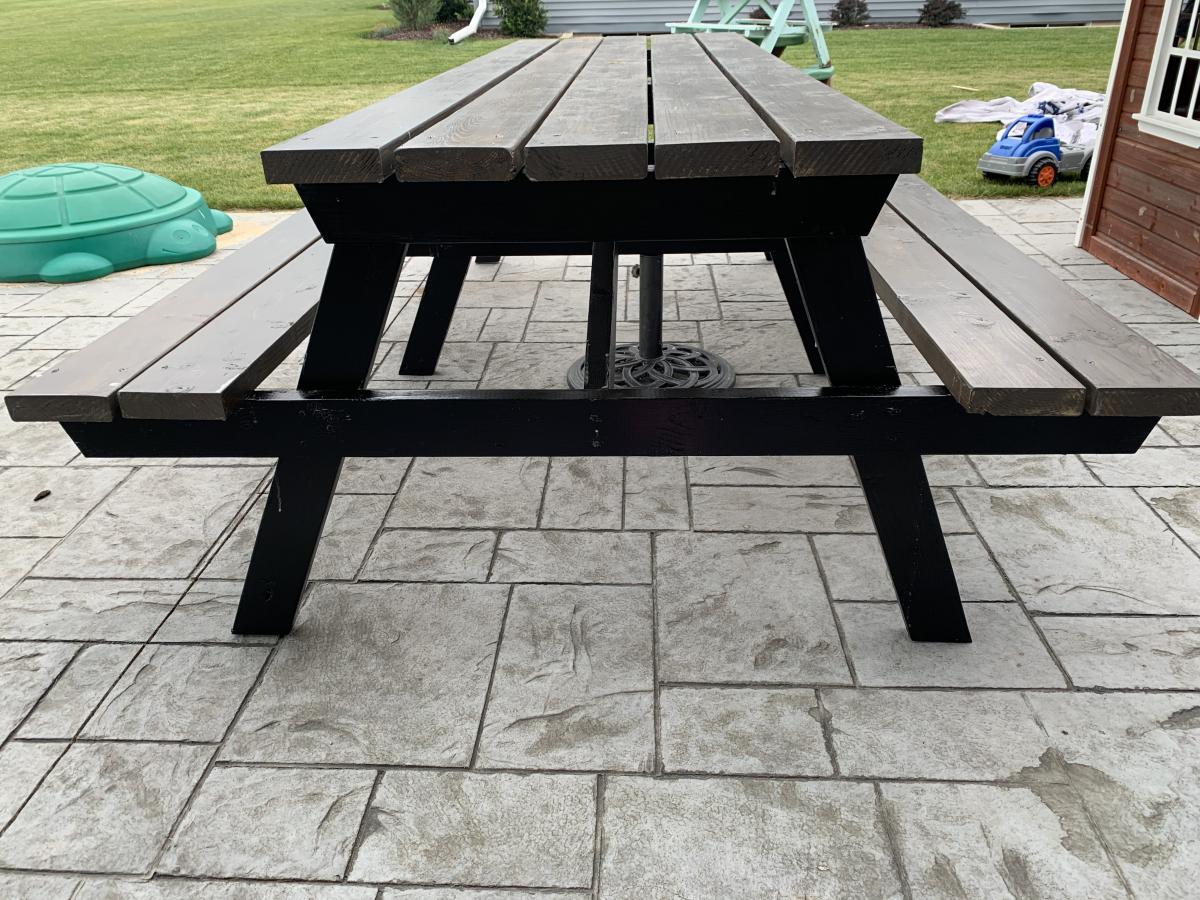
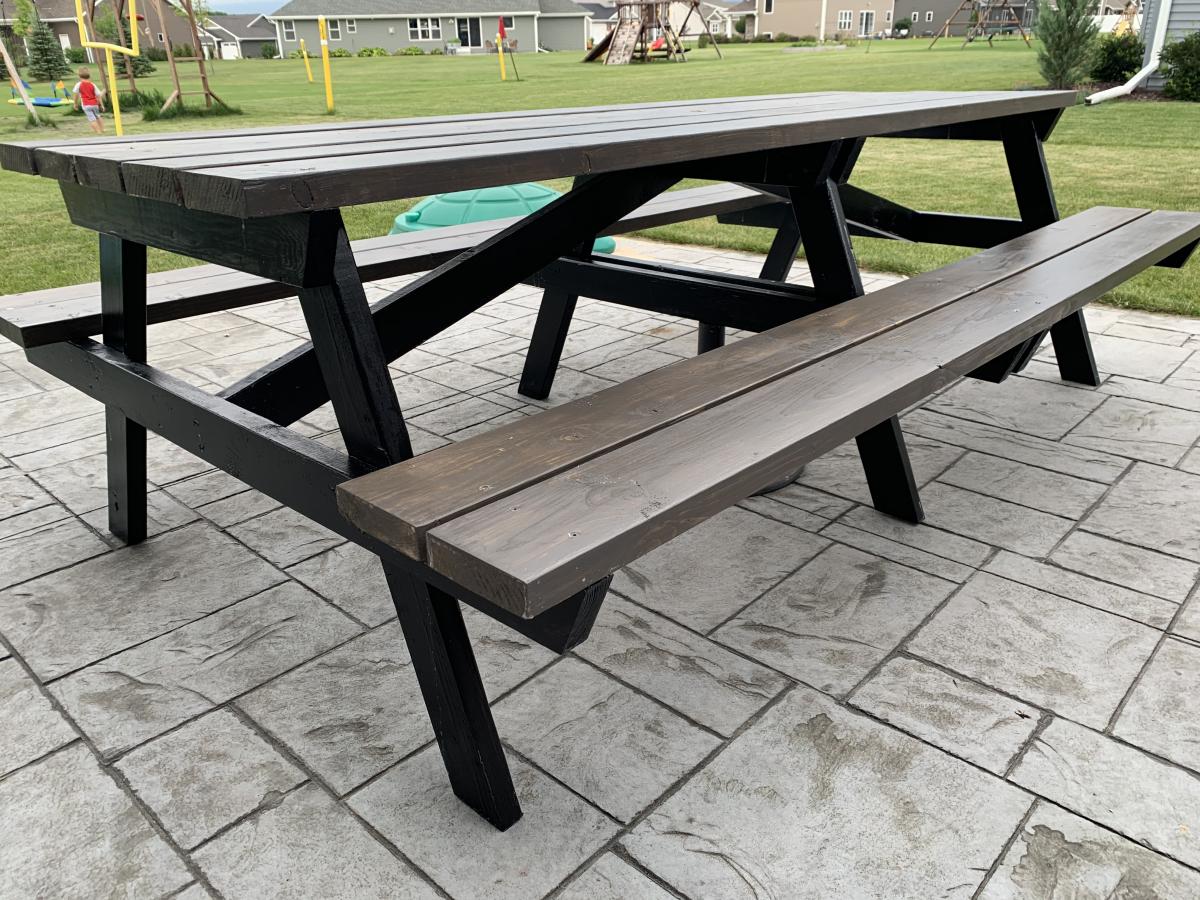
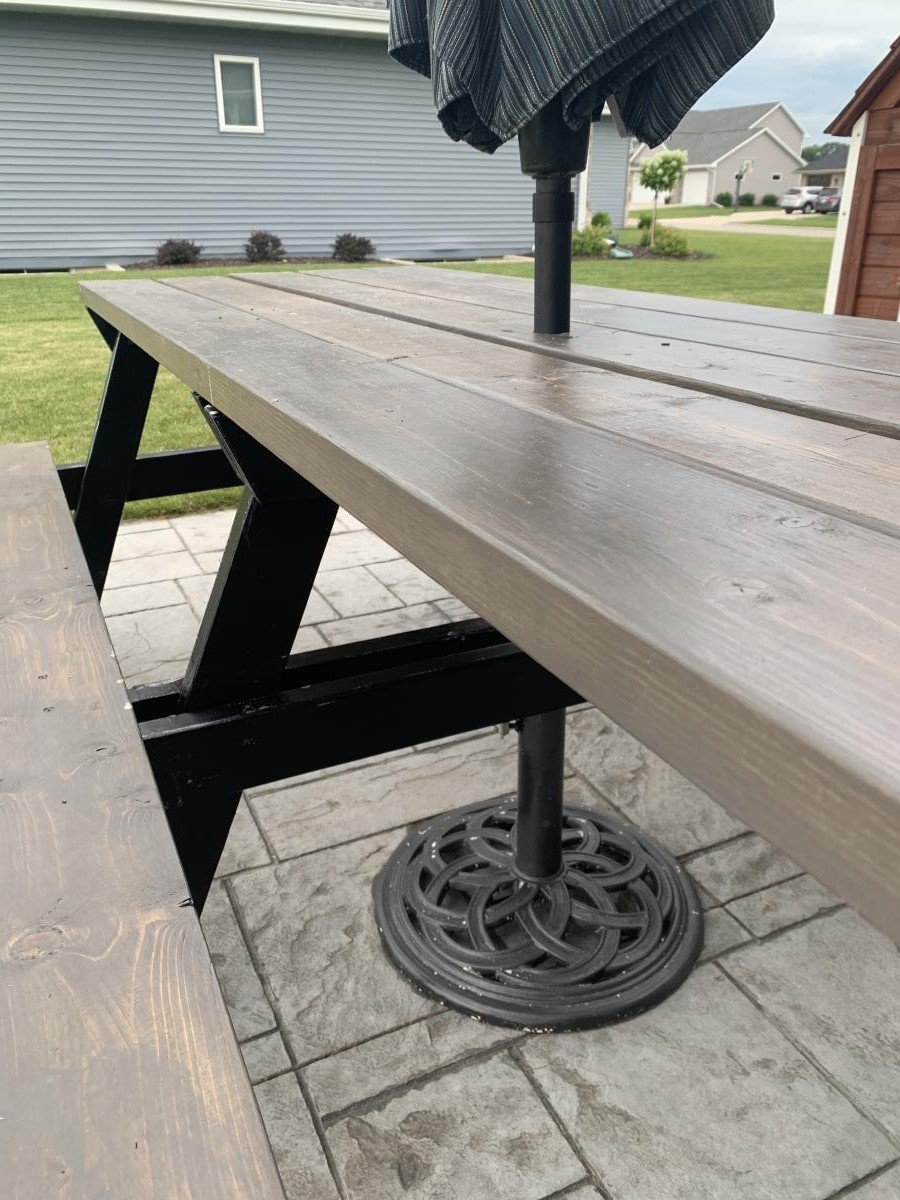
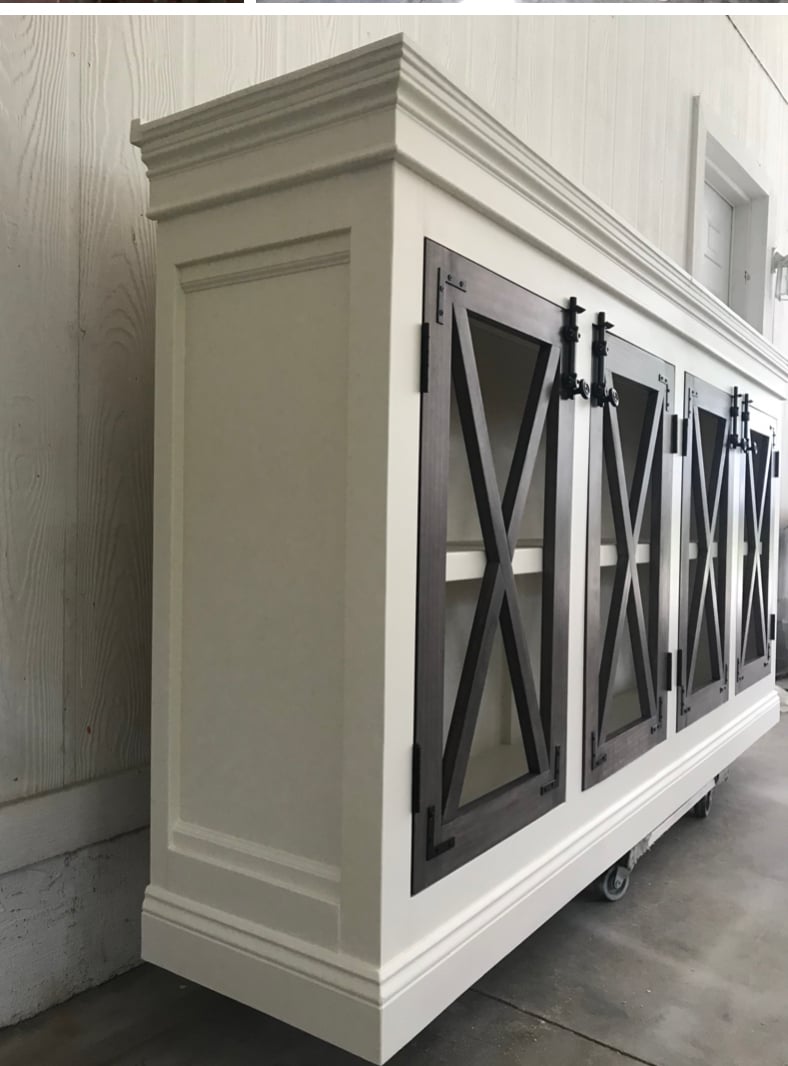
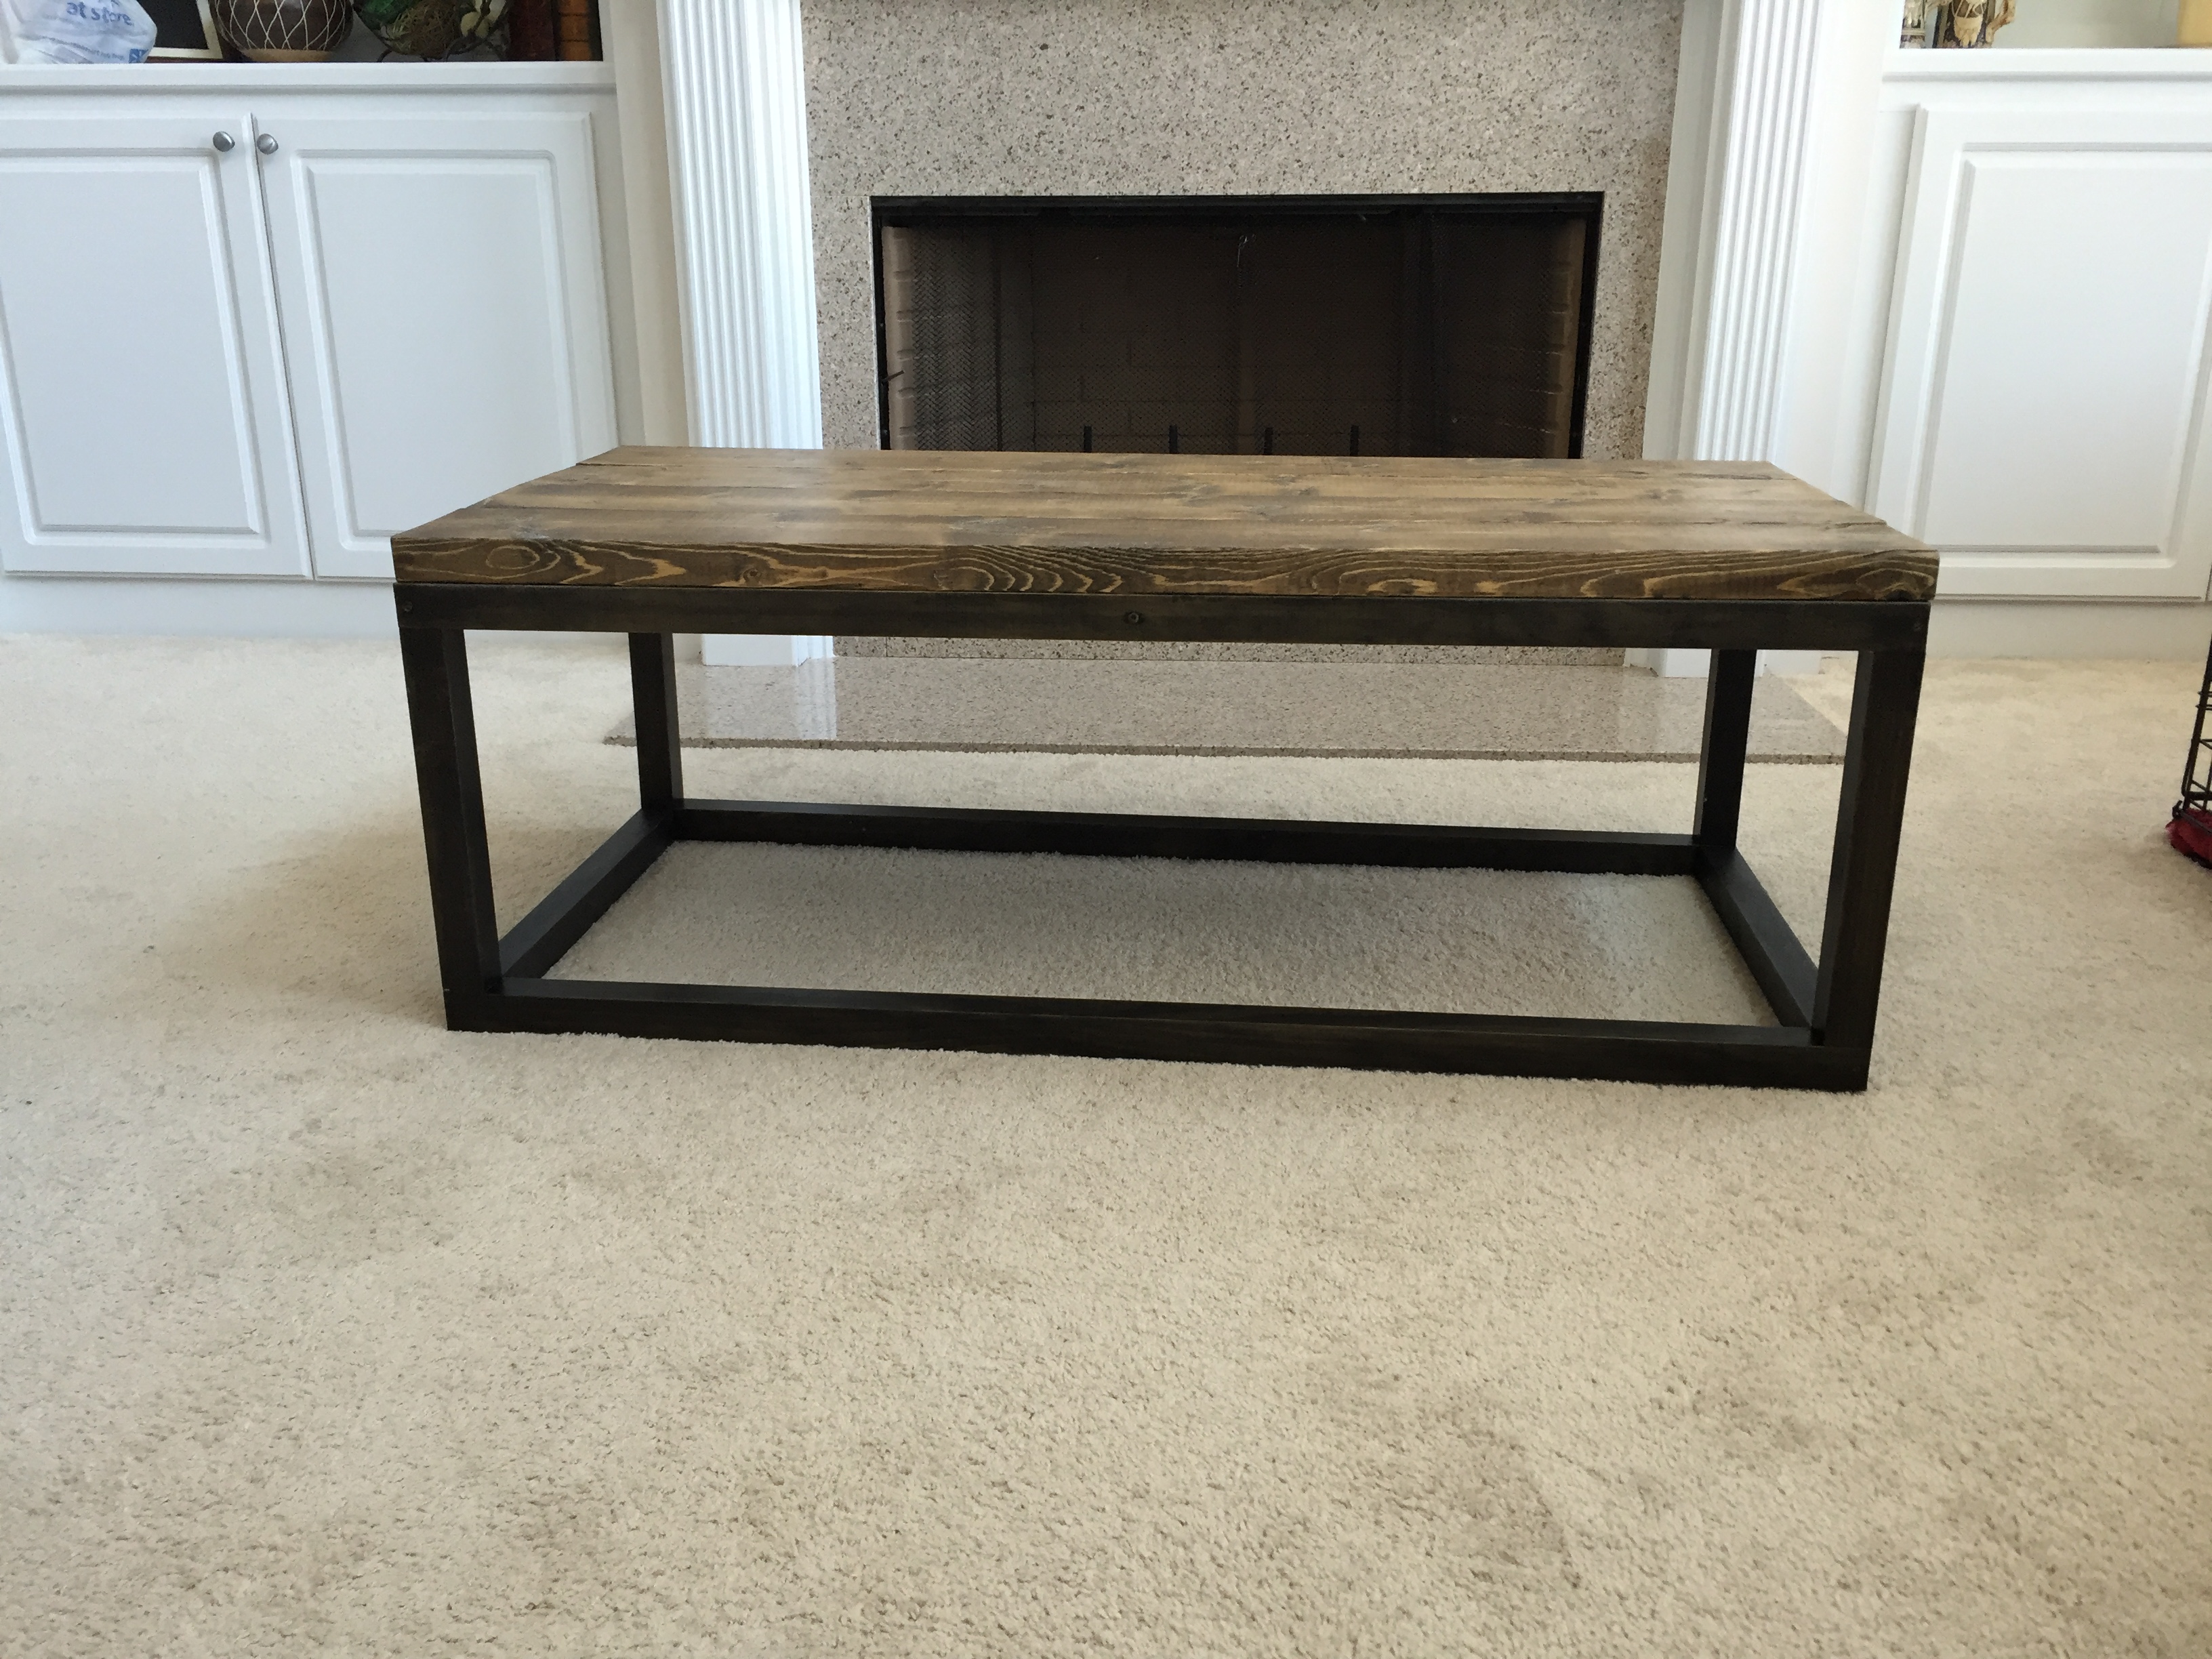
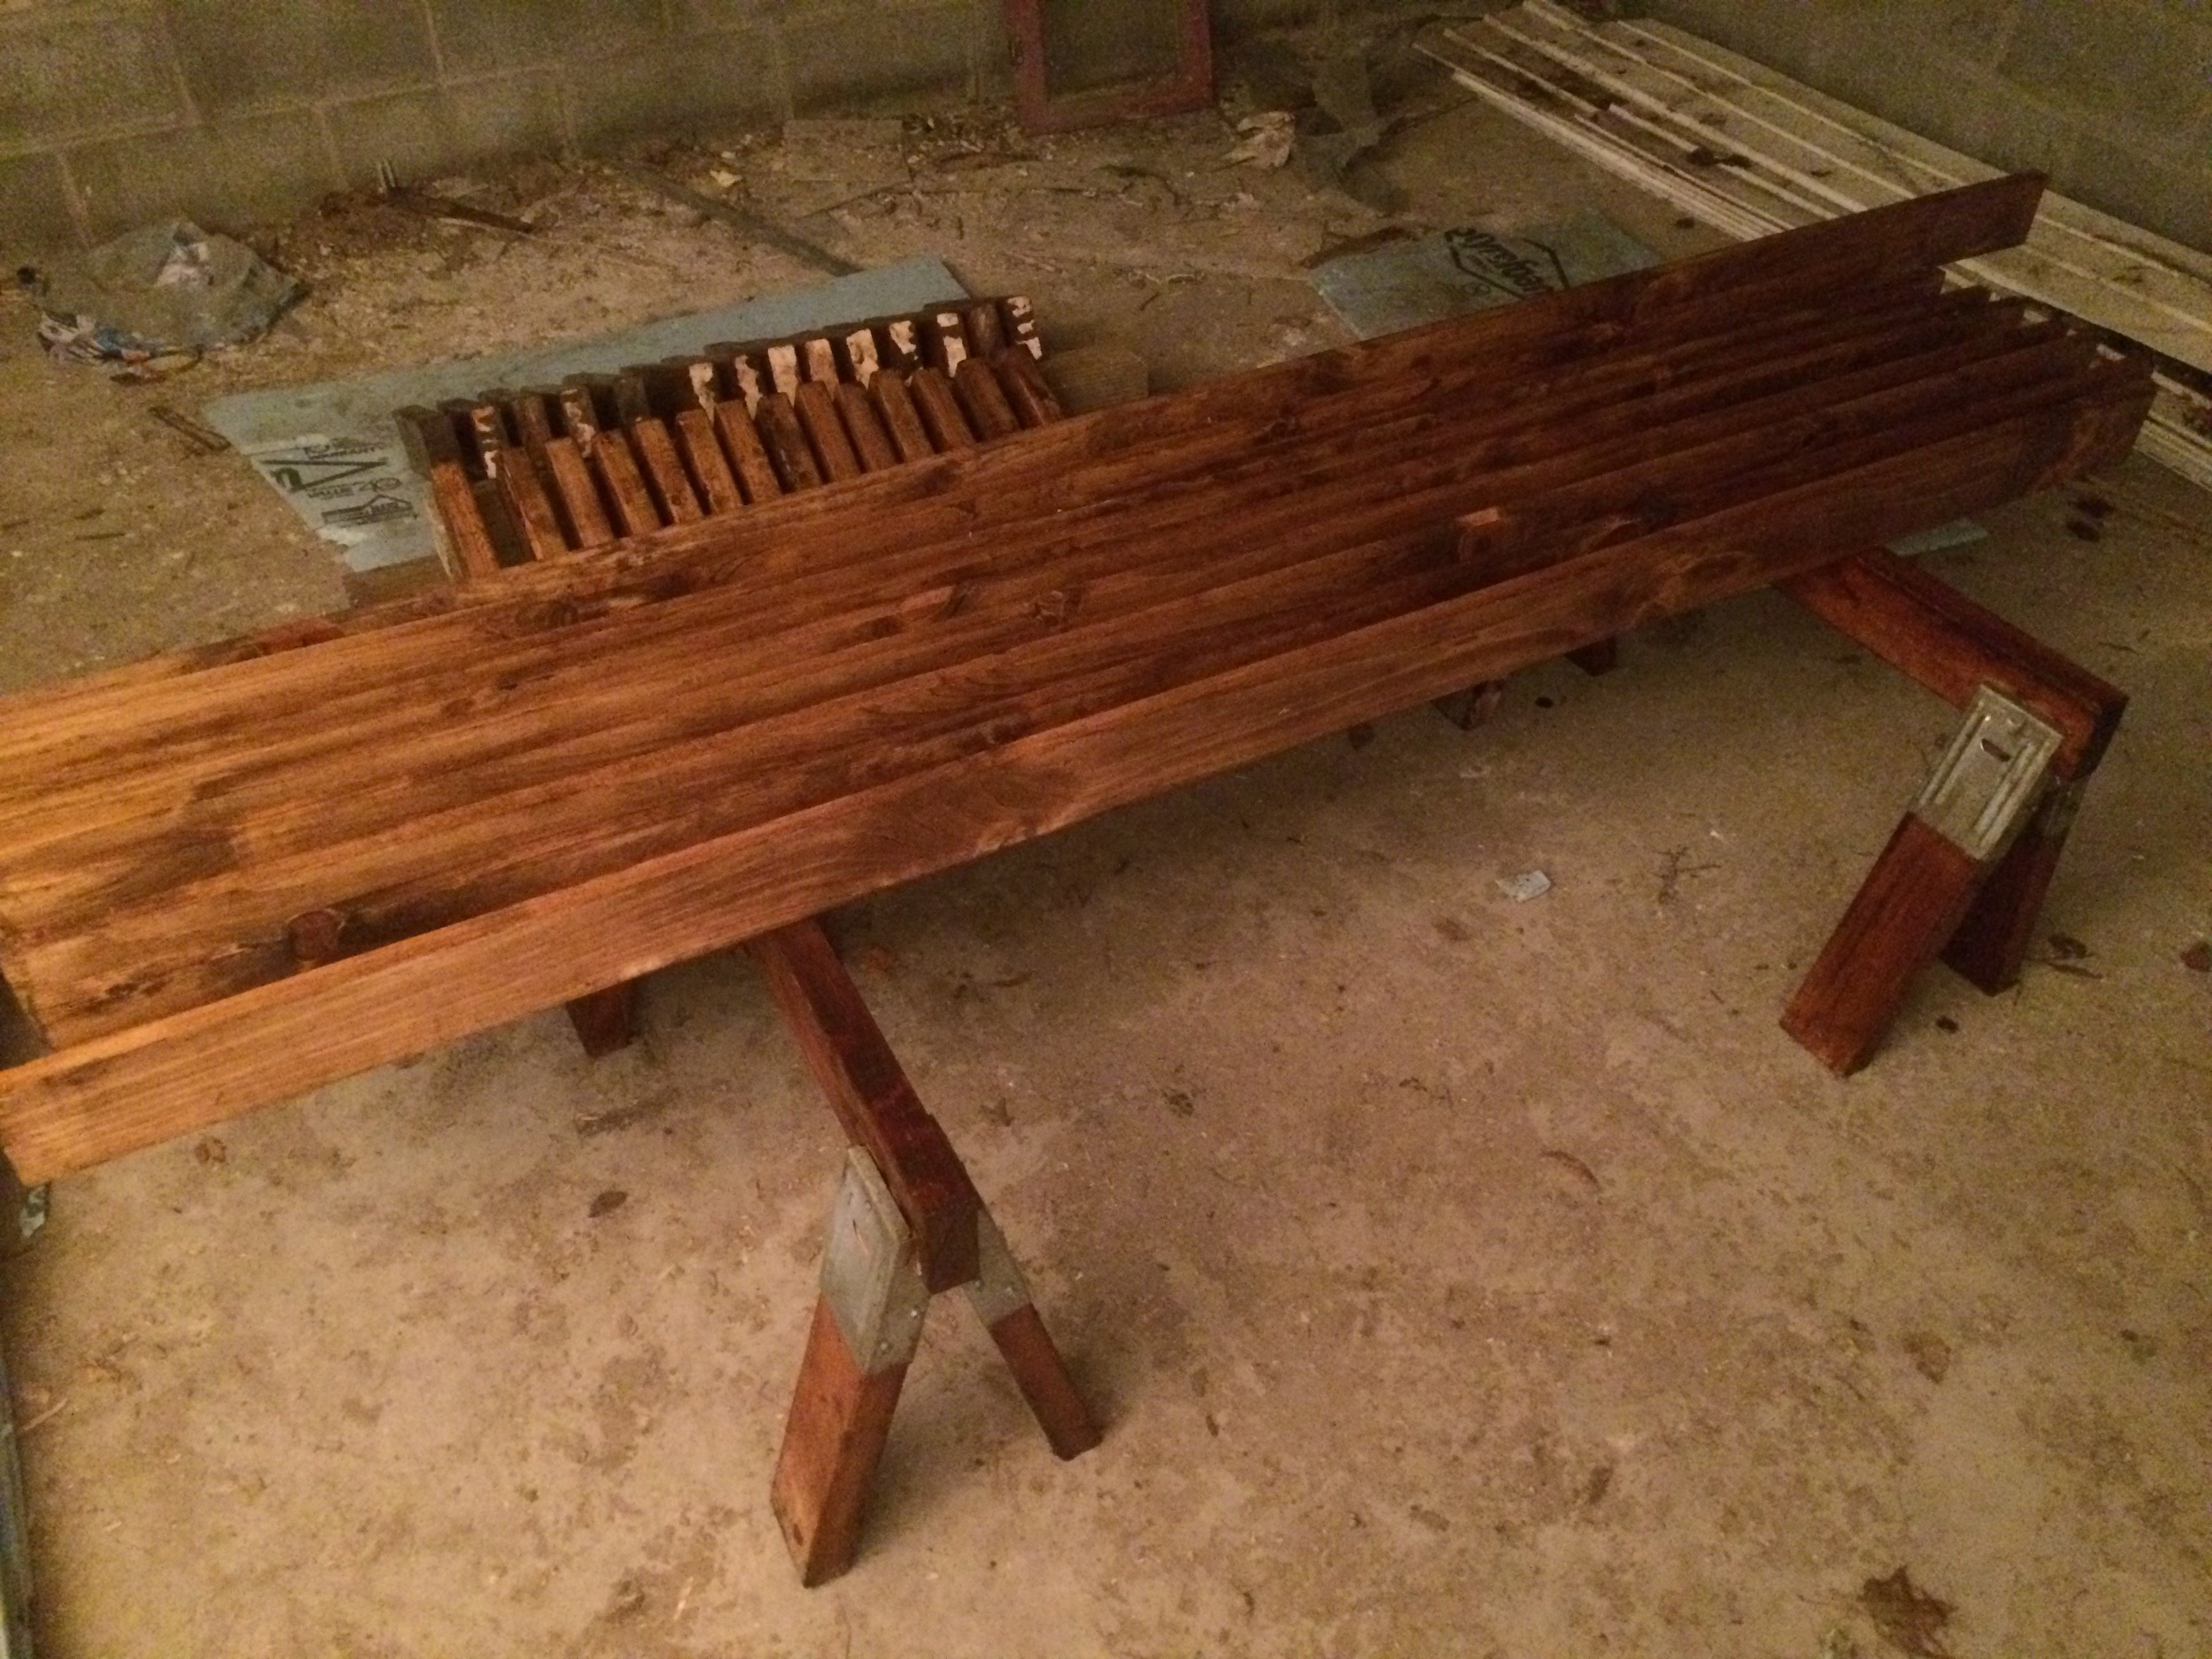
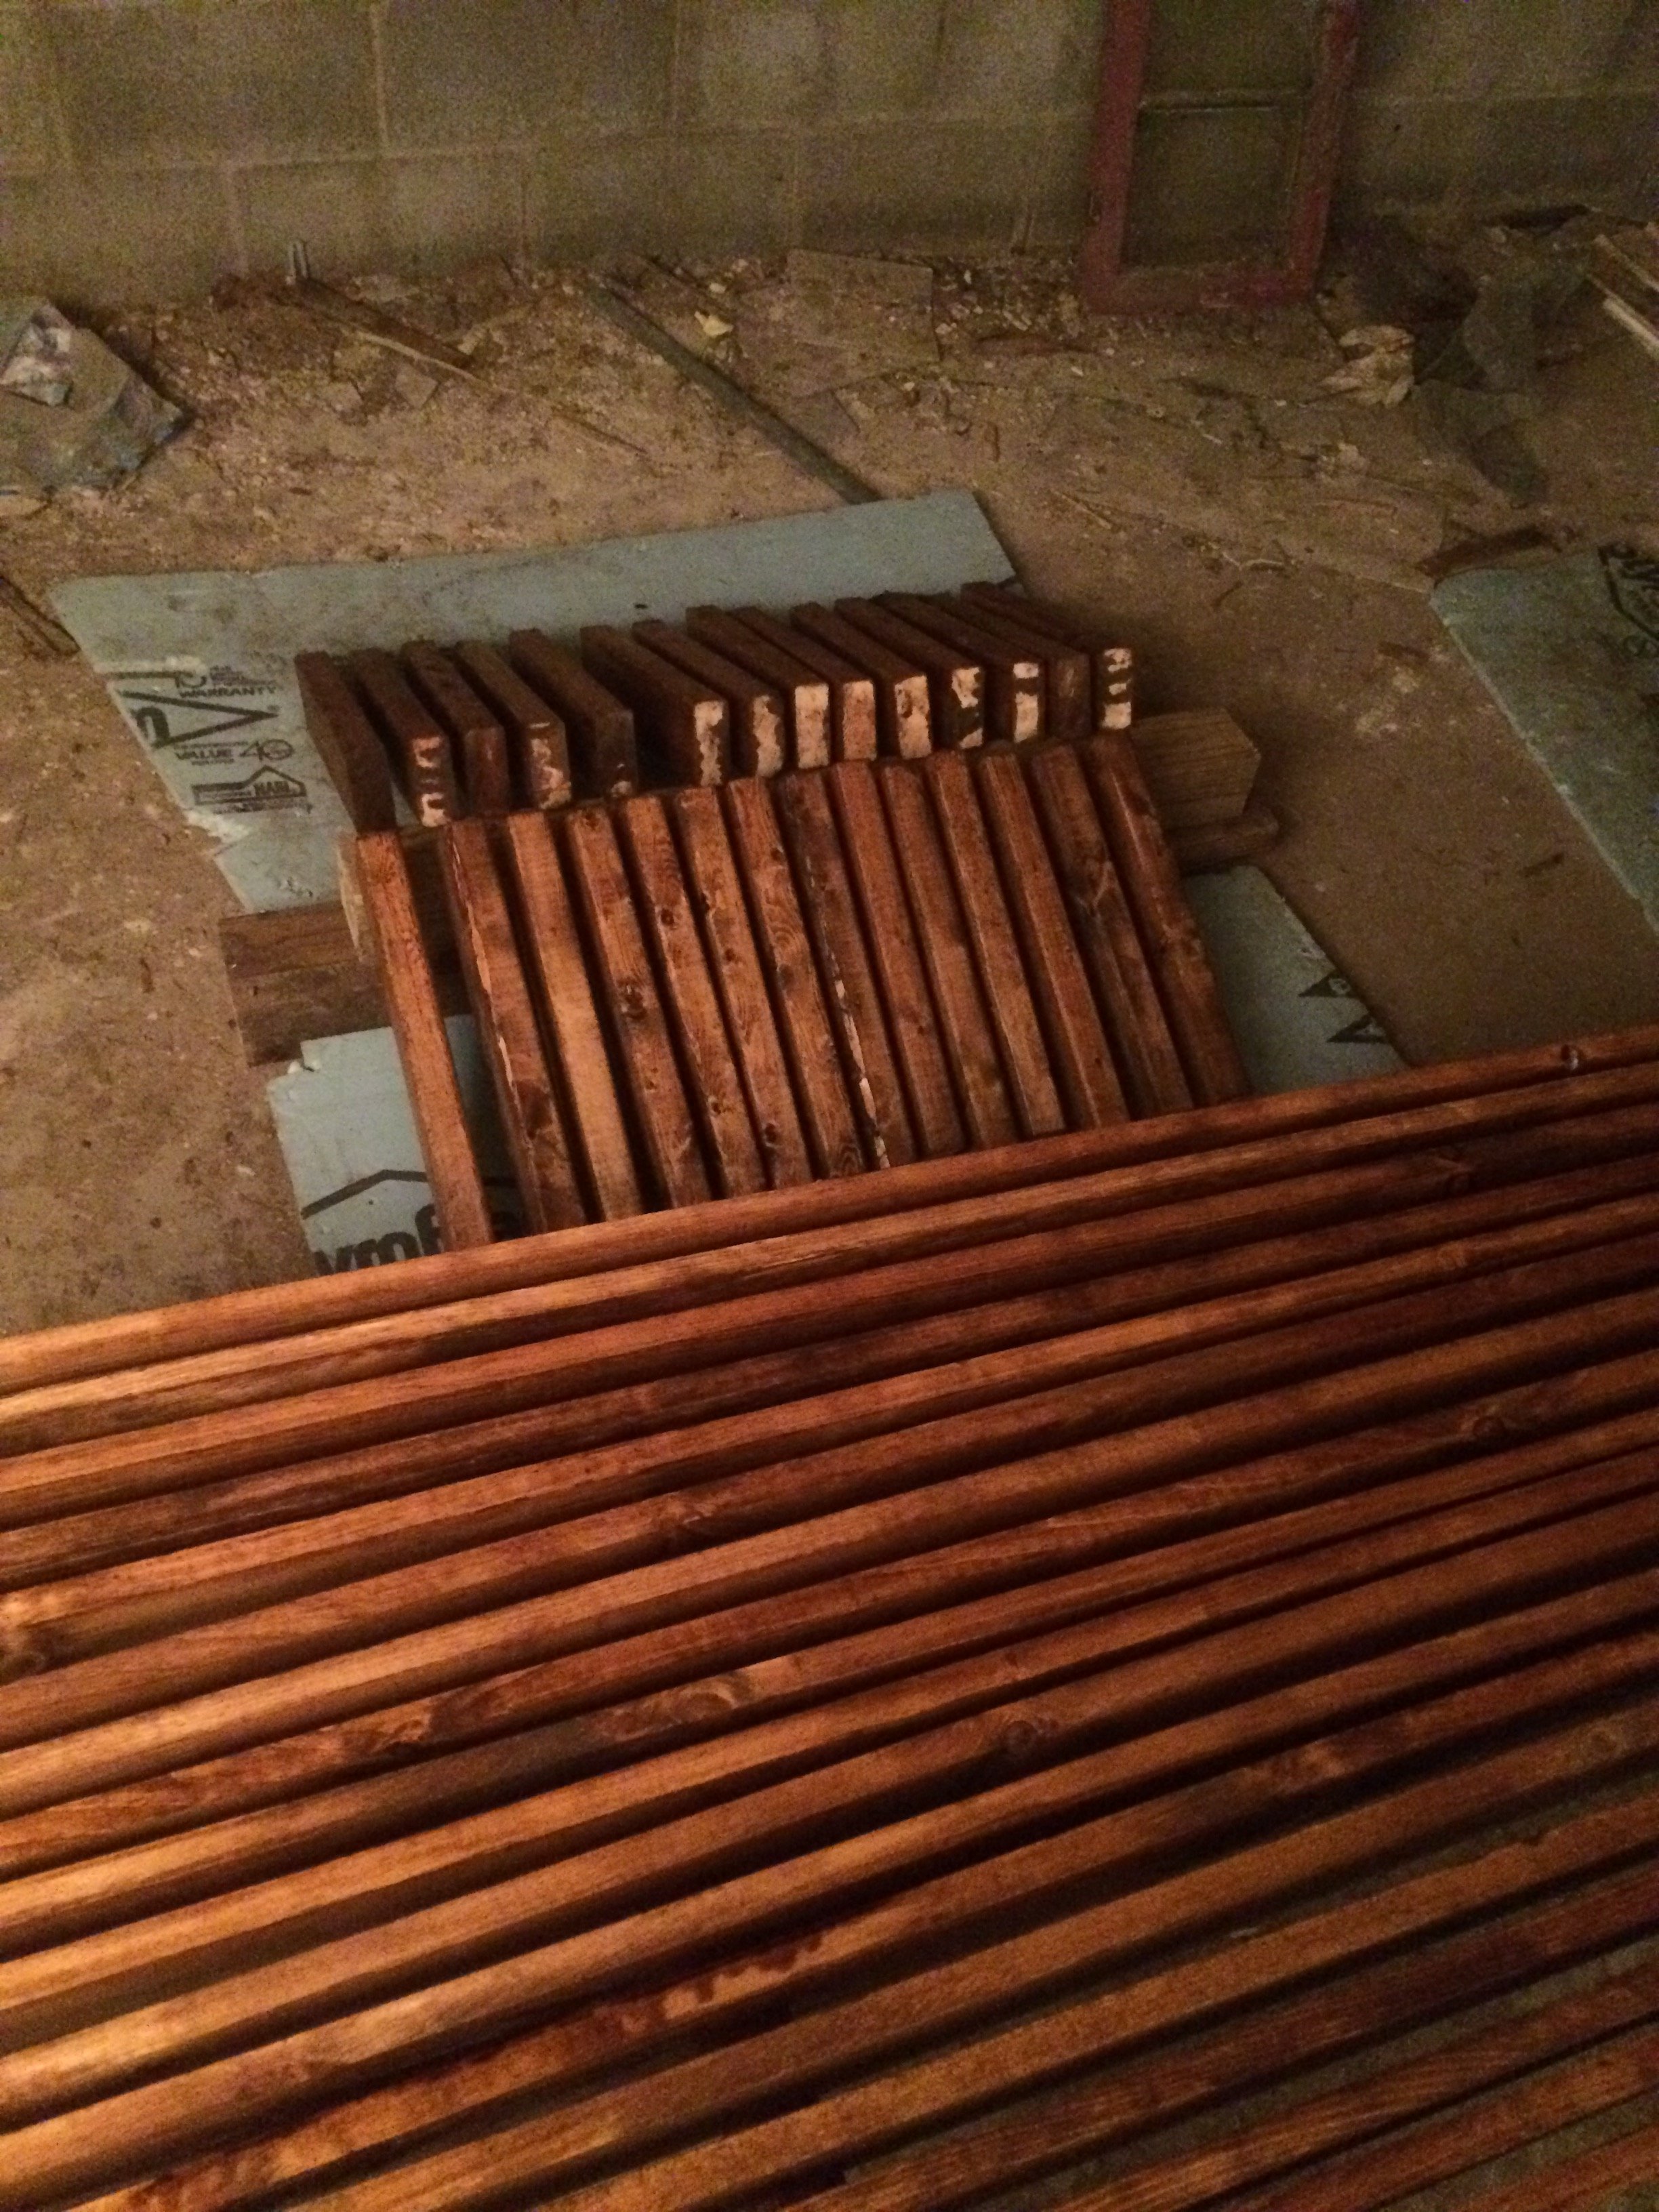
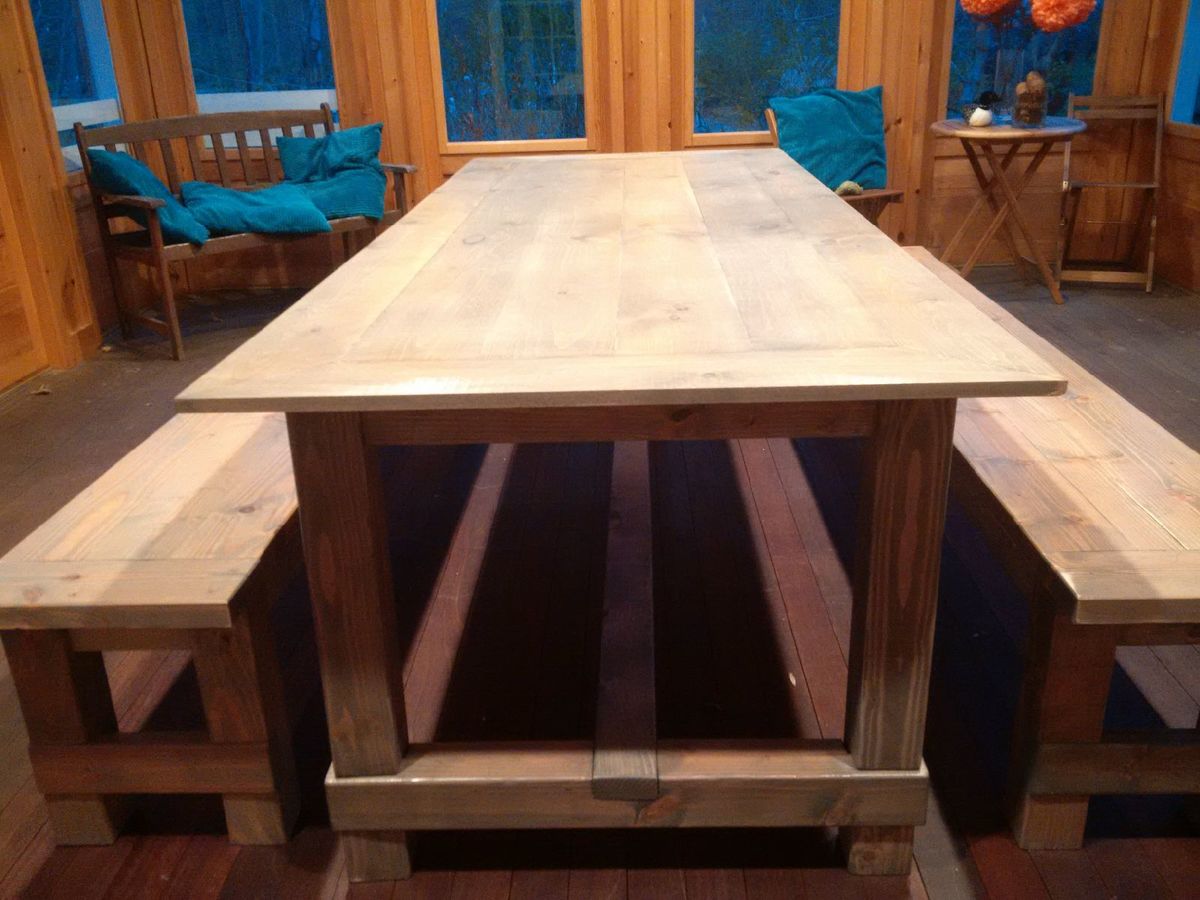
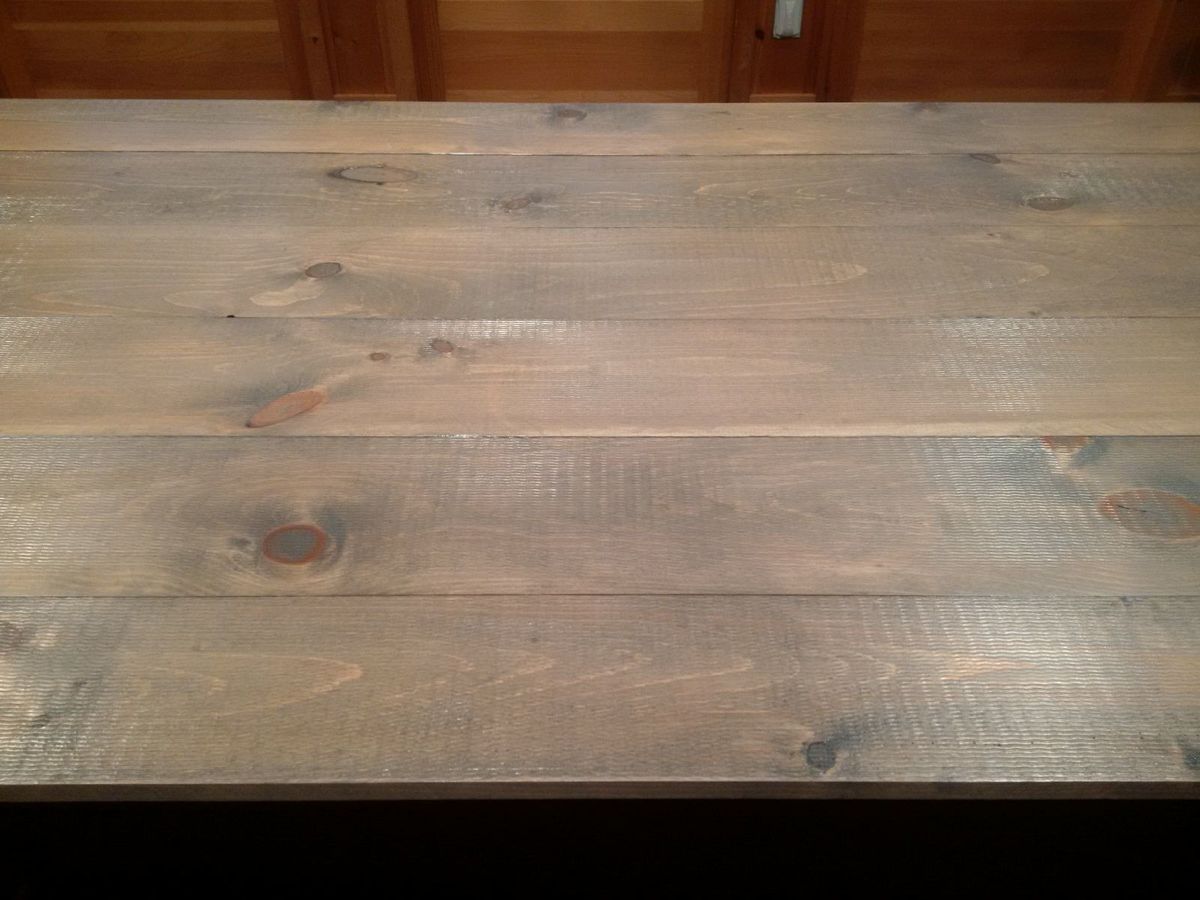
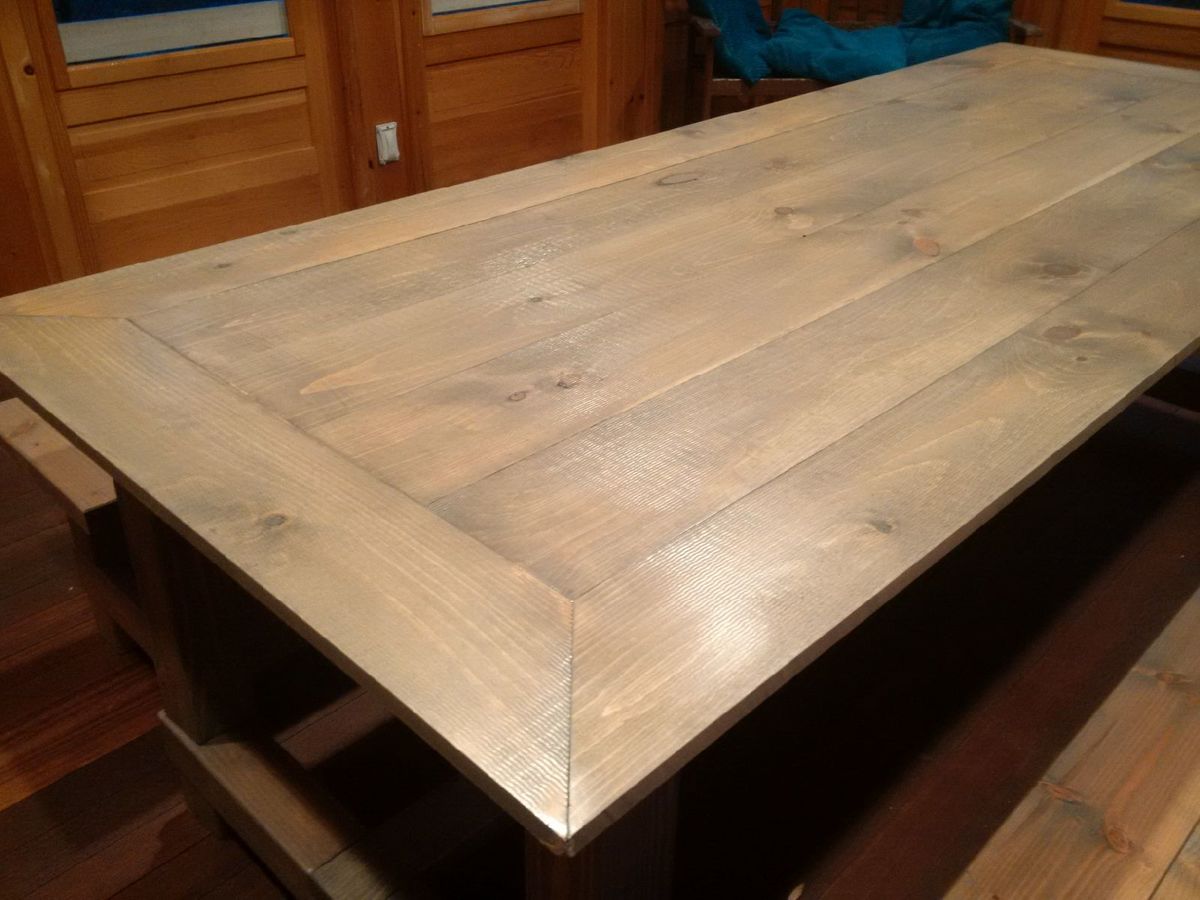
Slightly modified the farmhouse table plans to build the top out of 6 inch pine shiplap, its thinner than the farmhouse plans (its 3/4inch), but I liked the rough cut on the top surface, and overlapping edges made for a great fit. 

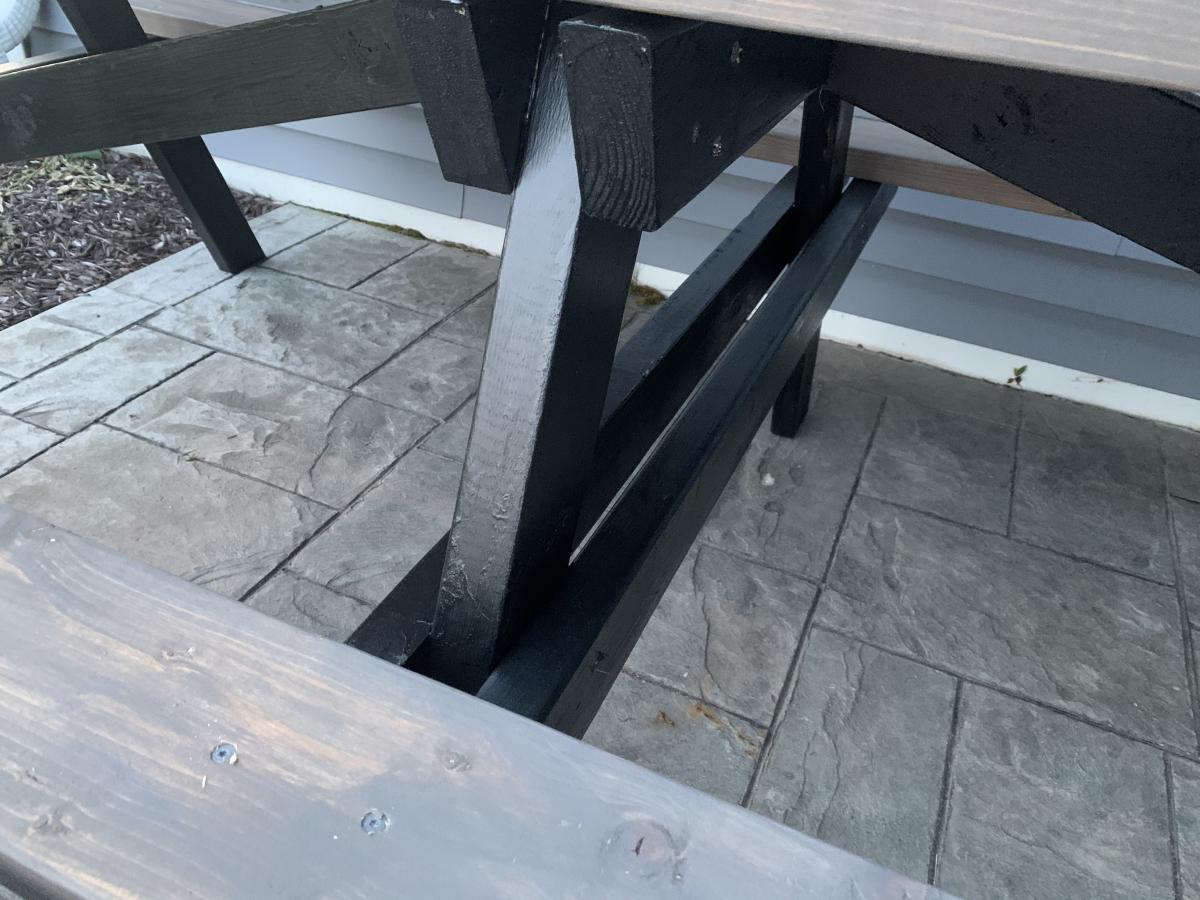
I cut the outside edge boards down to 4inch wide, and then mitred the corners to act as a frame for the 6 inch boards. I will build copper corner protectors. 

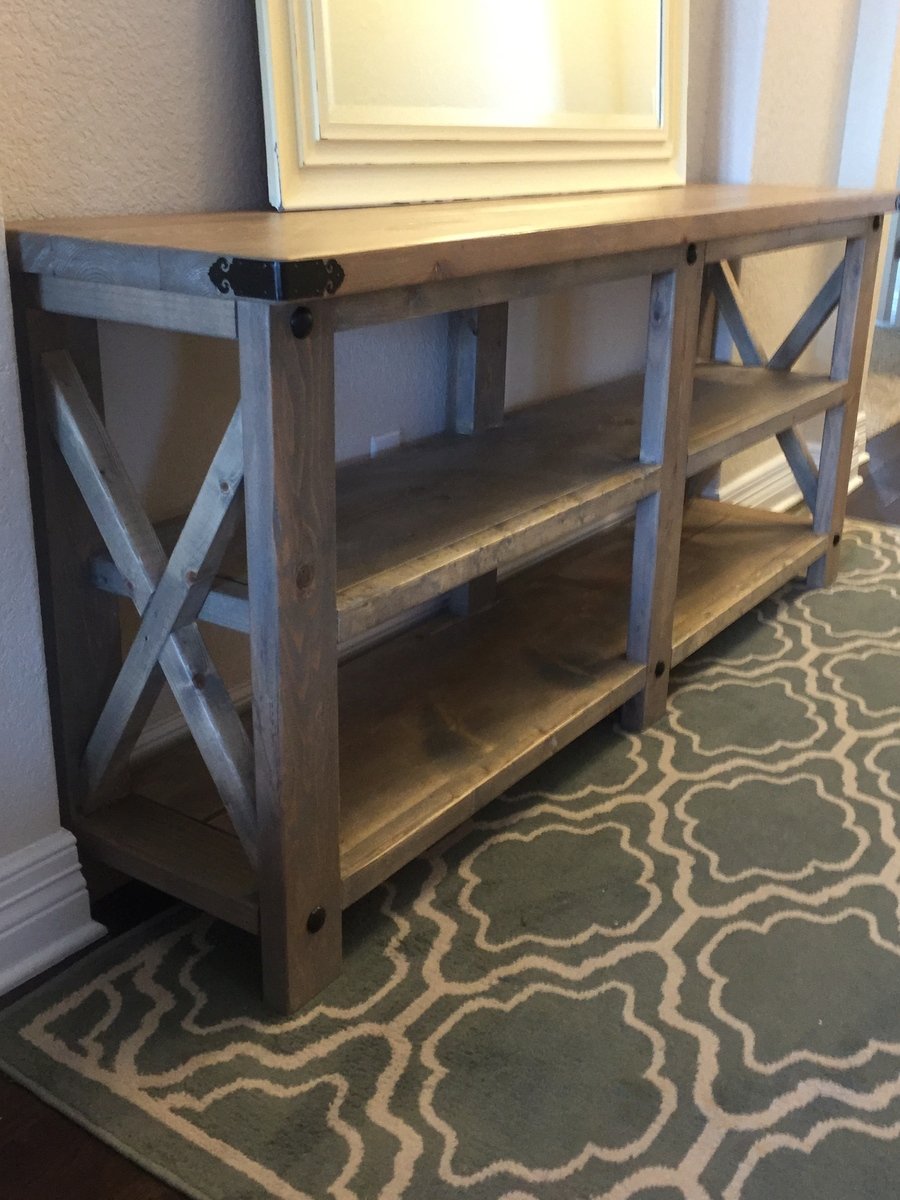
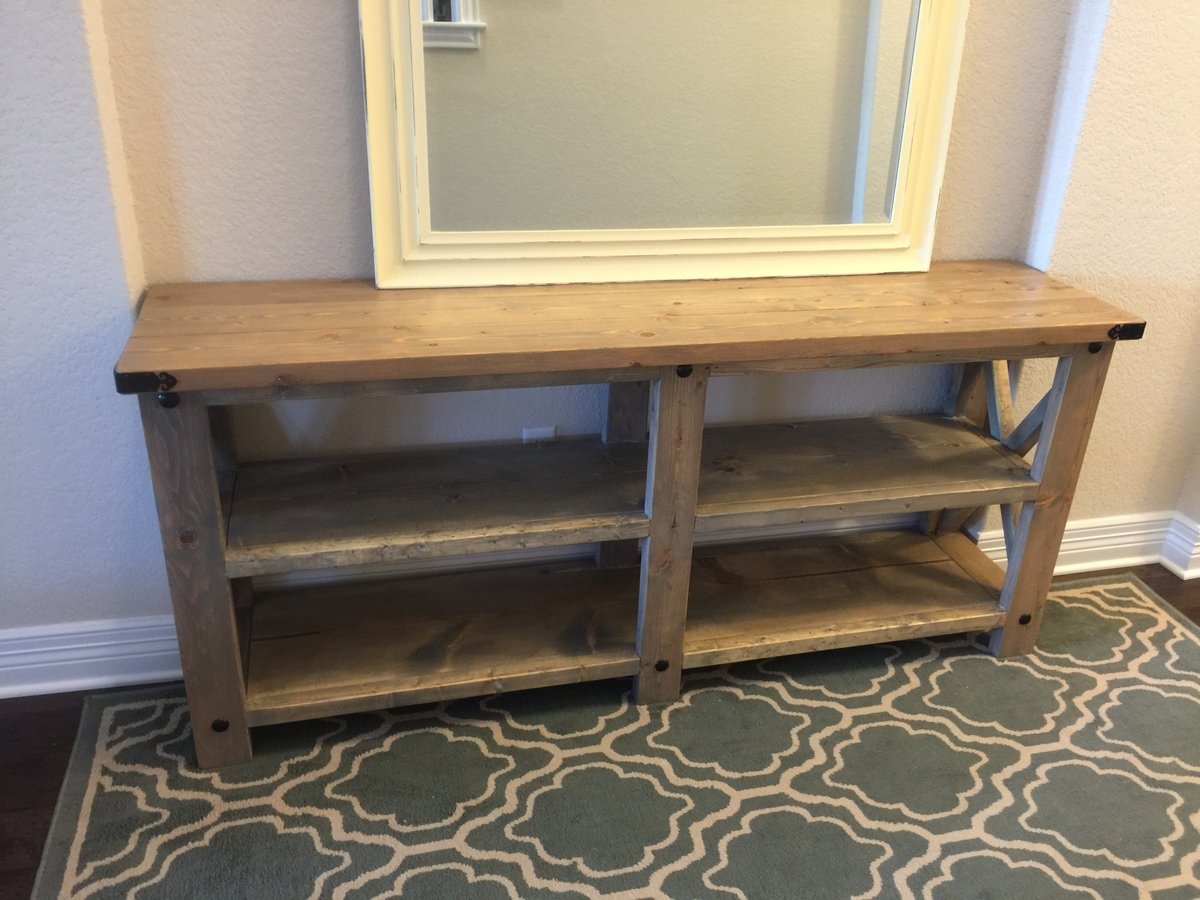
Finish was: pre-conditioner on the wood, 3 coats of minwax weathered oak stain, 3 coats of polyurethane. Sanded the benches between coats, but not the table, as the table has a rough surface. 

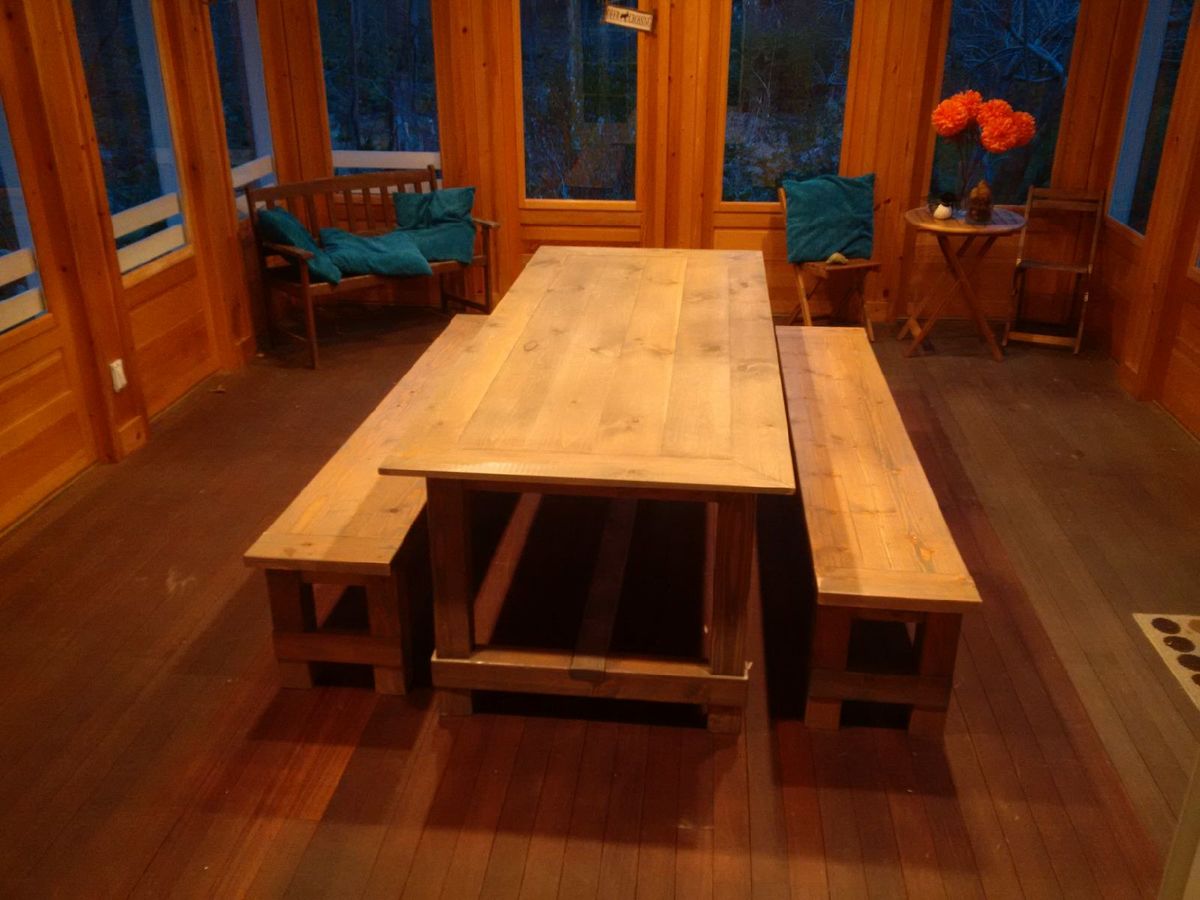
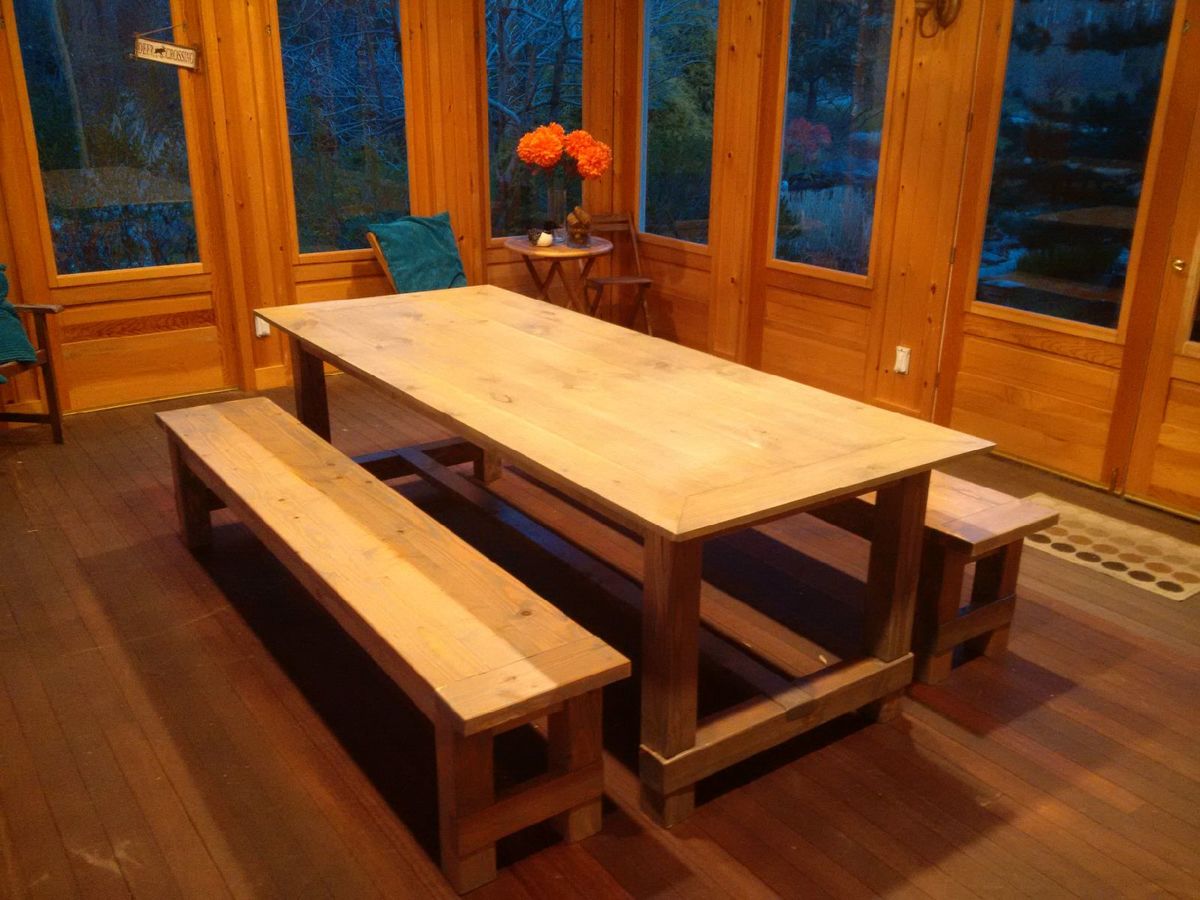
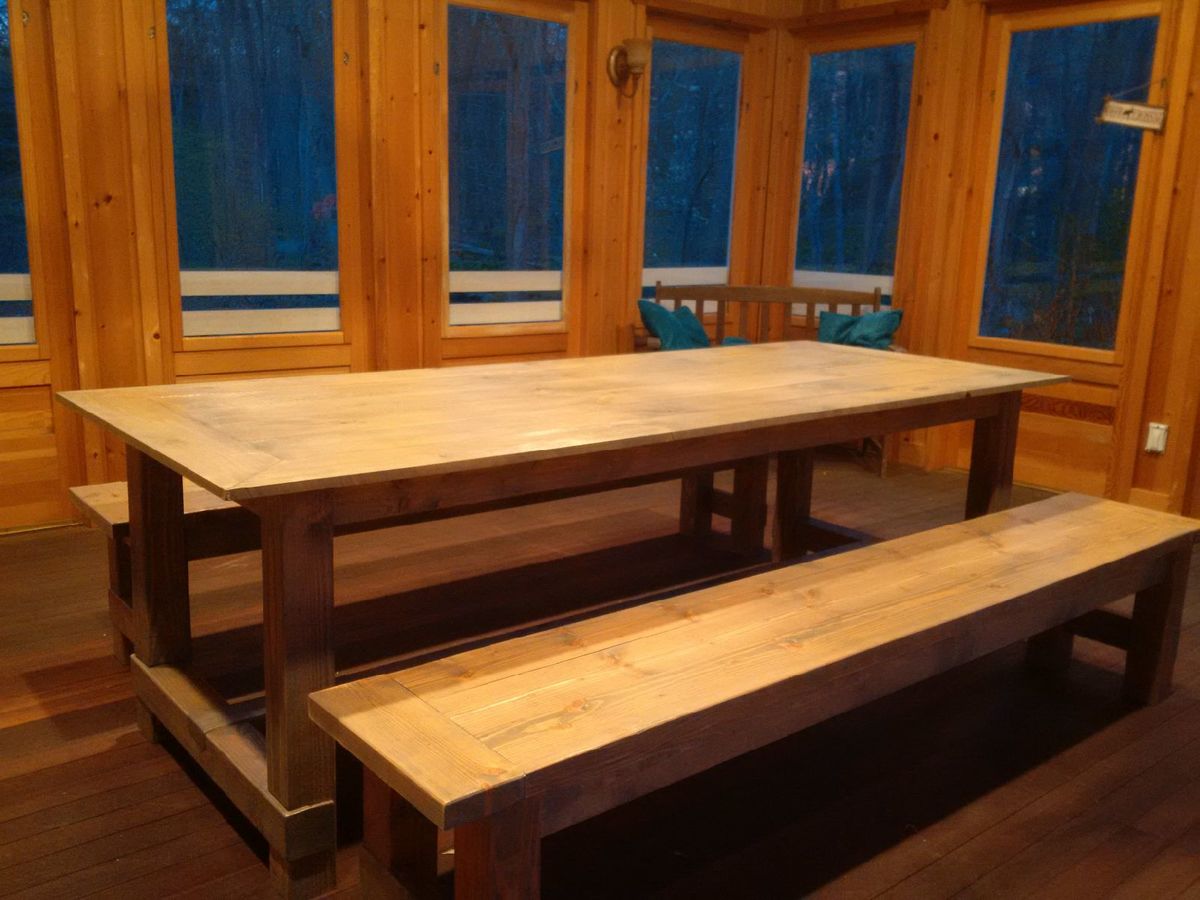
benches are 2x6 fir boards, cut the long edges off on a table saw to make them join better, as I dont have a jointer.  Same finish applied as the table. 

Table is 8 feet long, 38 inches wide.  seats 10 comfortably.

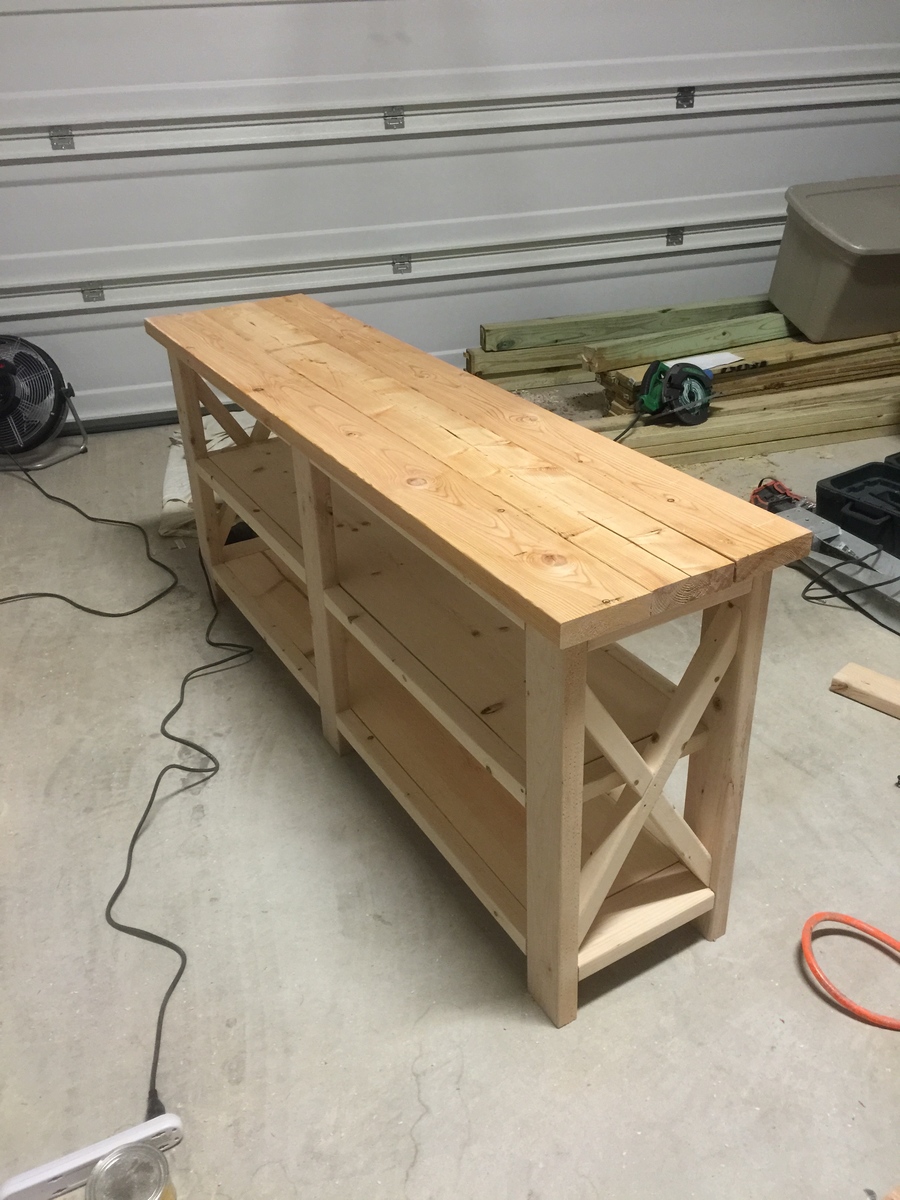
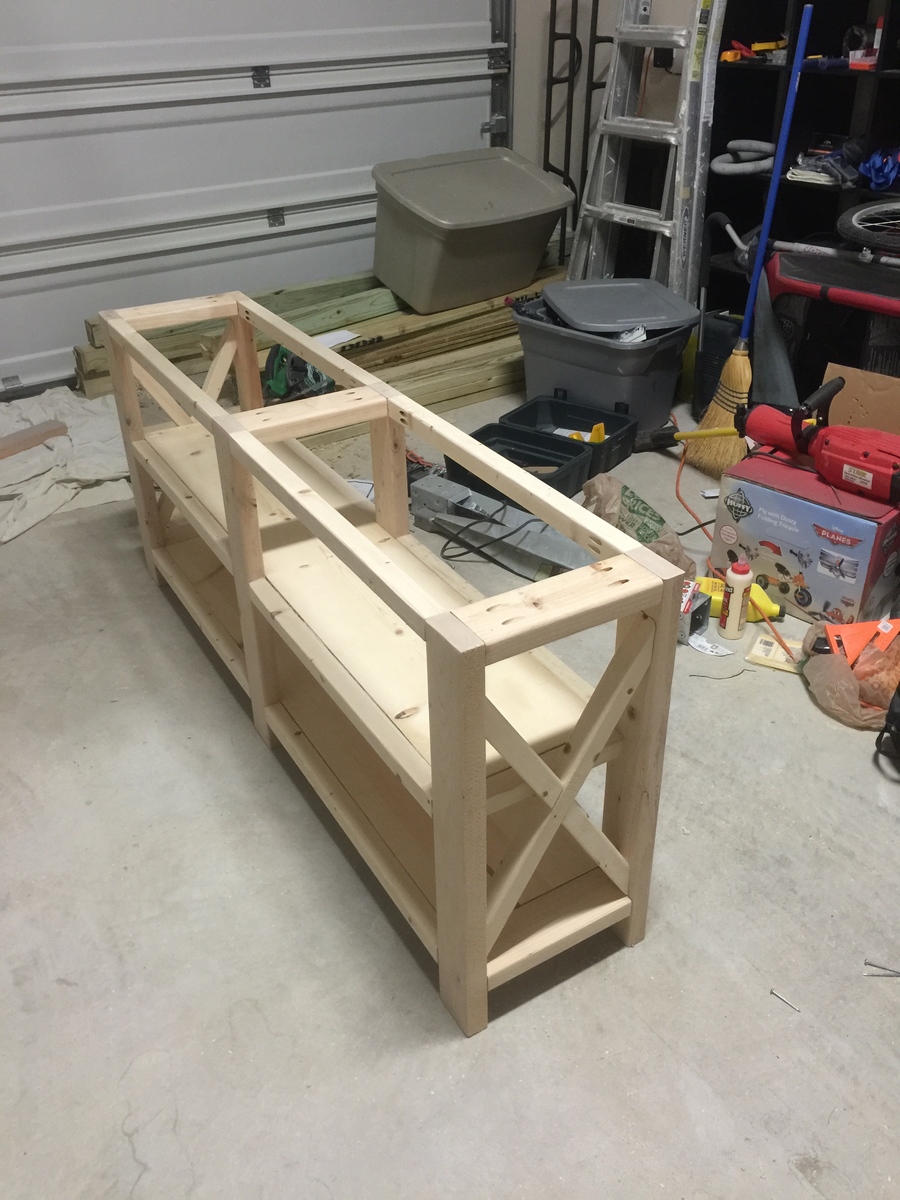
It was half finished in my garage for several months, in which time I used it as a workbench - so it has plenty of authentic weathering dings and dents. 

It was my first project, as I have only recently moved into a house with a garage. 

Loved the construction part, hated the finishing steps. 

thanks!

oz


Estimated Cost
200 in wood, fasteners, stains, etc
Estimated Time Investment
Week Long Project (20 Hours or More)
Finish Used
minwax pre-conditioner, weathered oak and polyurethane
Recommended Skill Level
Intermediate