Community Brag Posts
DIY Attached Garage Shelves
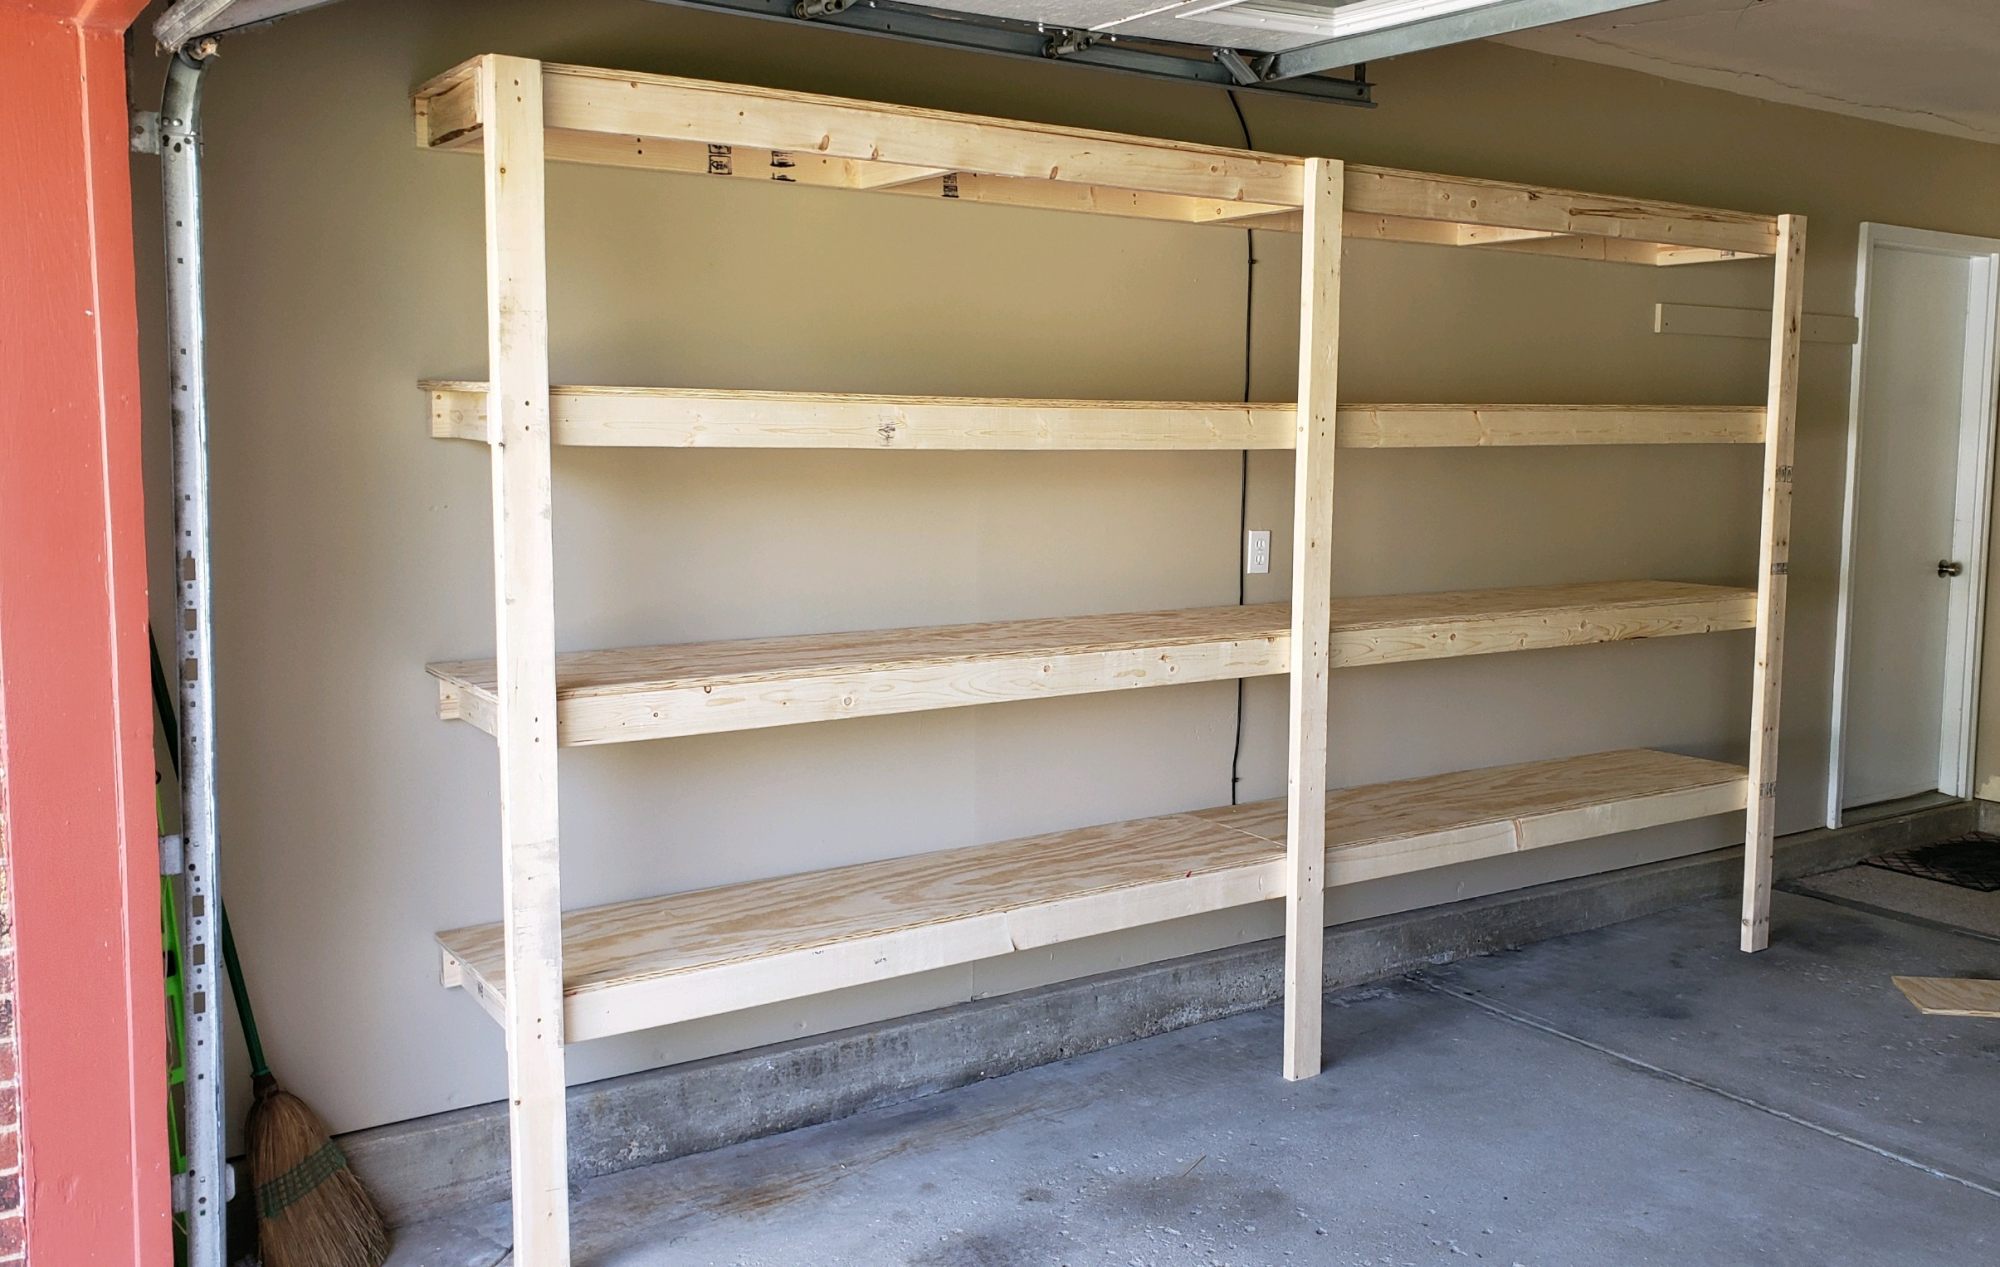
Thanks to Ana's plans for the attached garage shelves, we've managed to change 12' of garage space into 60! A quick trip to the local Home Depot and following the included instructions, these SUPER easy shelves were perfect for our needs. Thanks, Ana!
Built from Plan(s)
Estimated Cost
$160
Estimated Time Investment
Day Project (6-9 Hours)
Recommended Skill Level
Beginner
DIY Media Wall
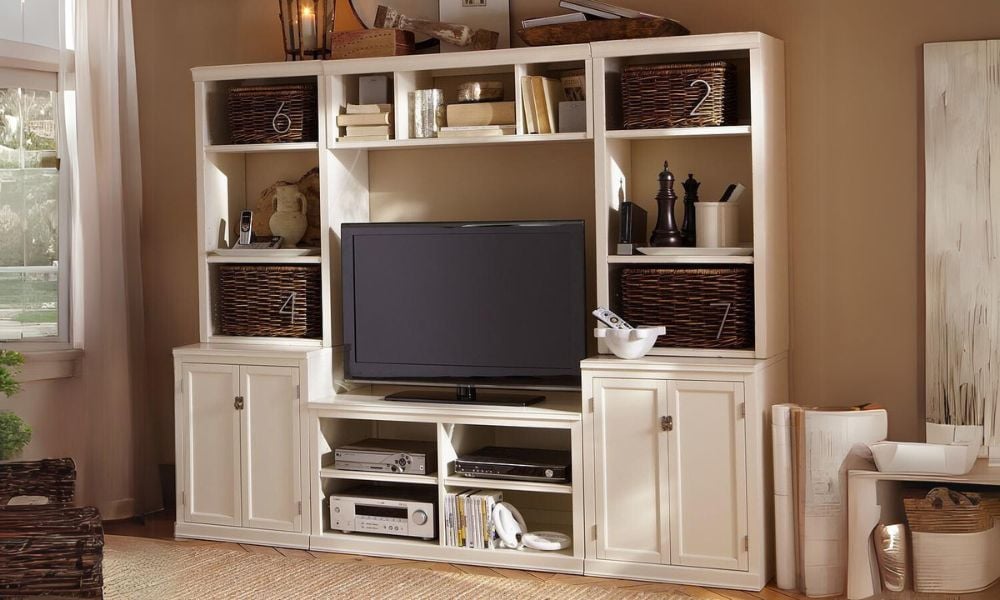
My husband and I have started our first DIY project! I was on PB website and found the Logan Media suite and fell in love their was just one problem I can't afford to pay 2,000 or more for an entertainment center. So I drew out the plans for it and went to my husband with the idea and he was all for it!! He really likes to build outside of work he enjoys it and we have a lot of fun together as couple. Were not completely finished yet and I will update this blog once were done but for now this is what we got.
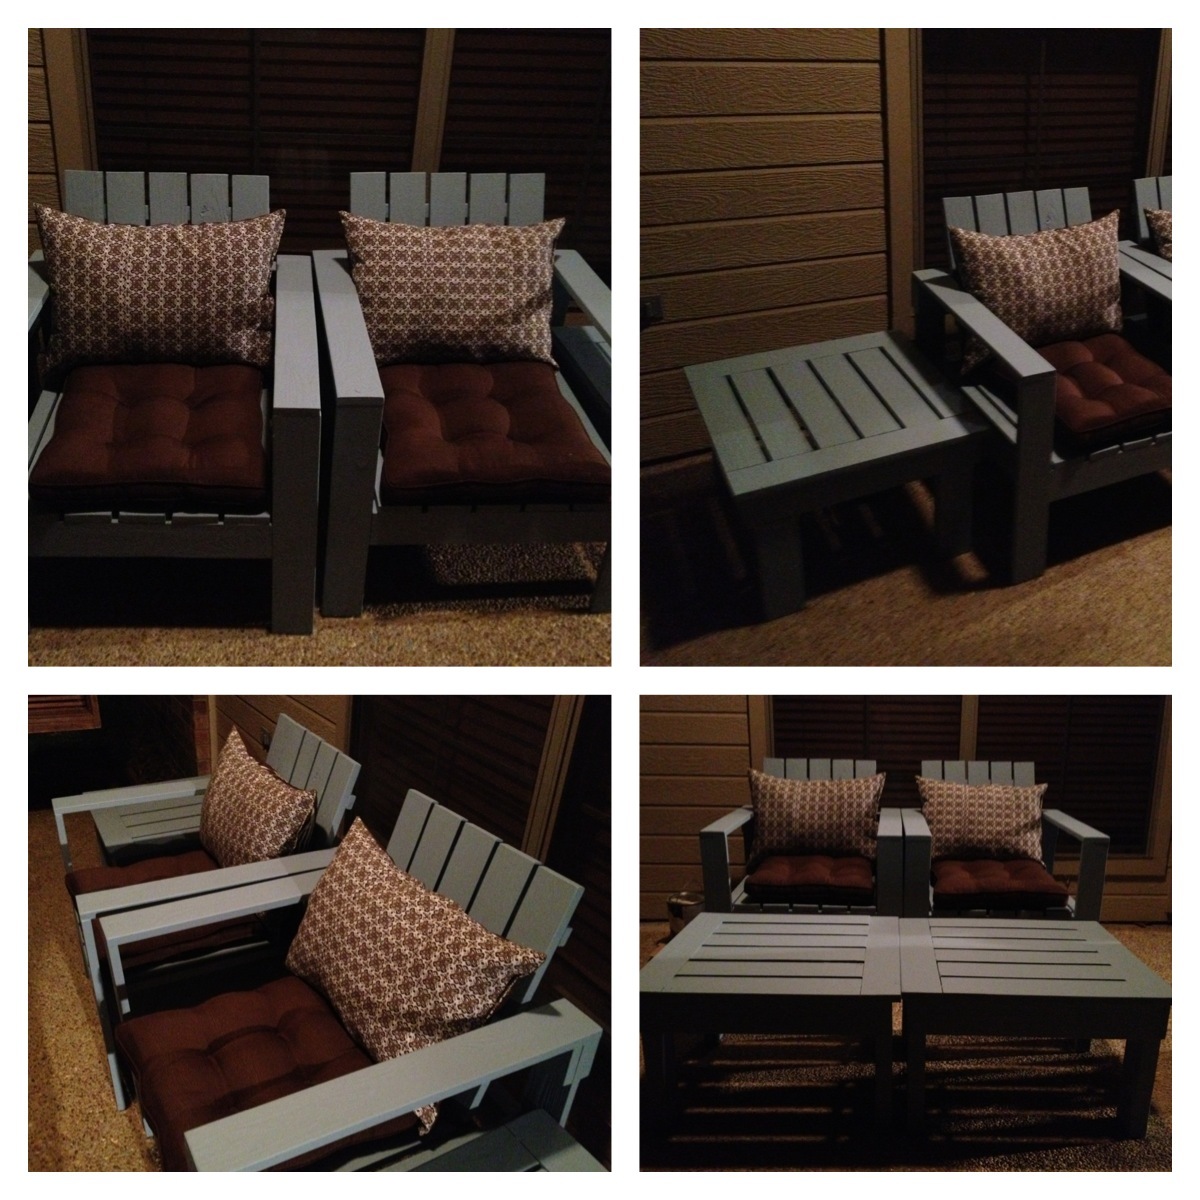
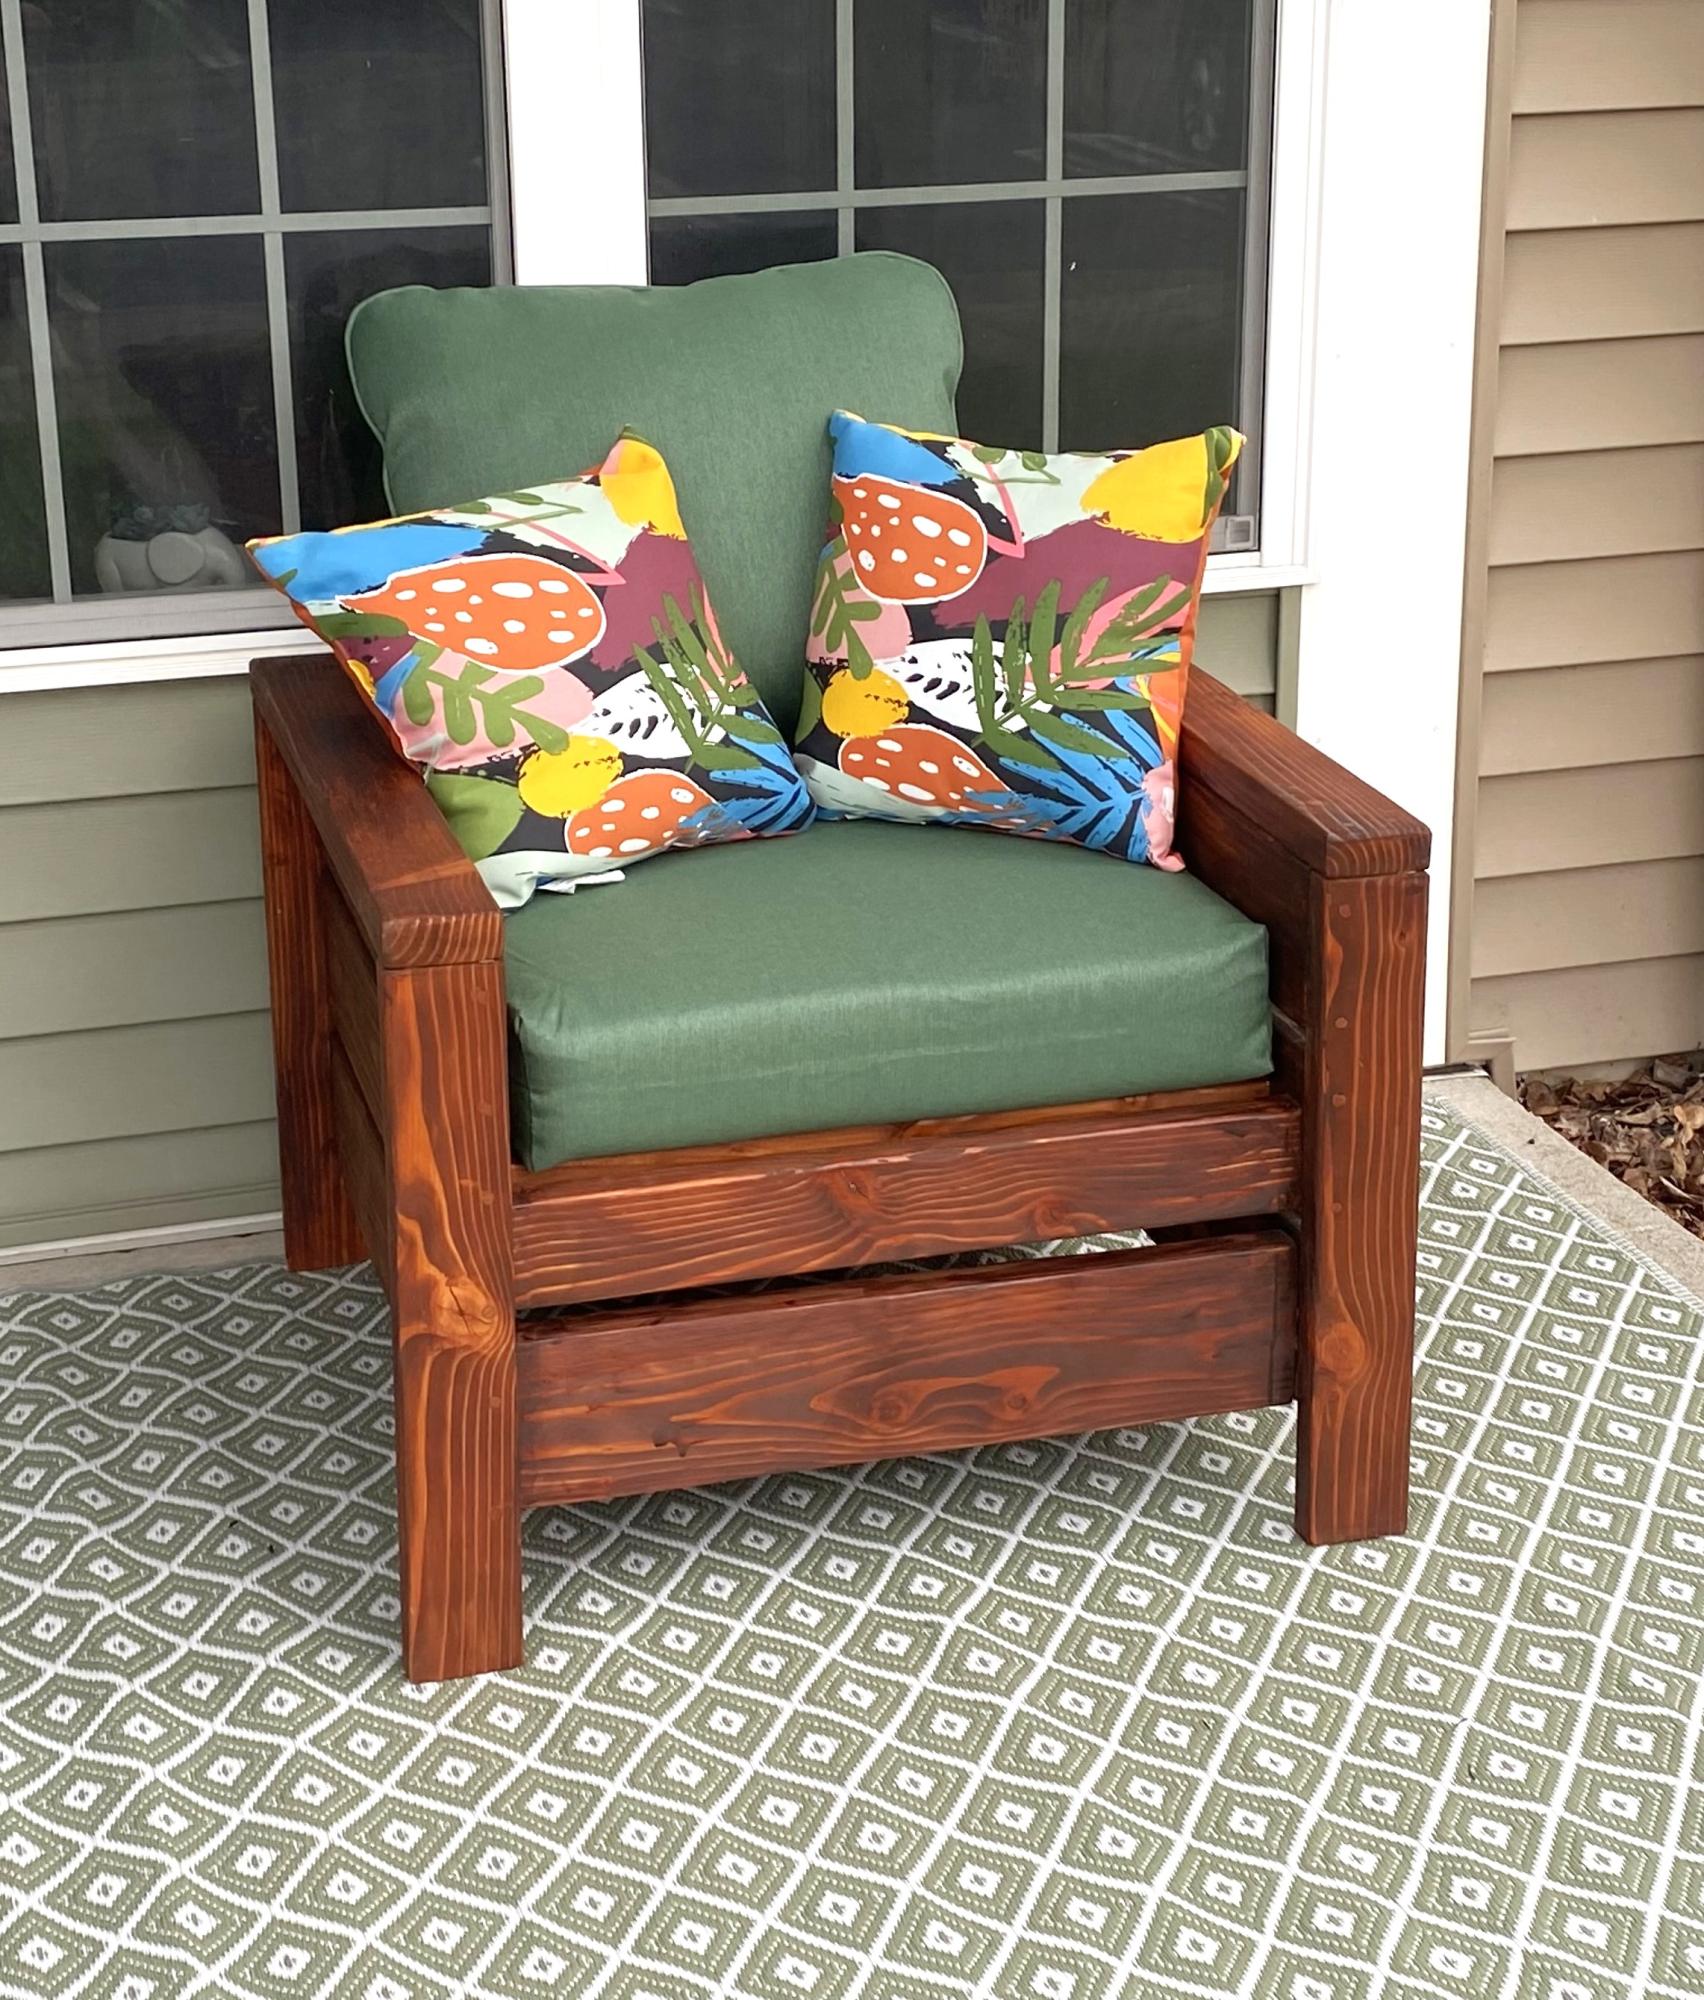
Simple Outdoor Lounge Chair and Ottoman
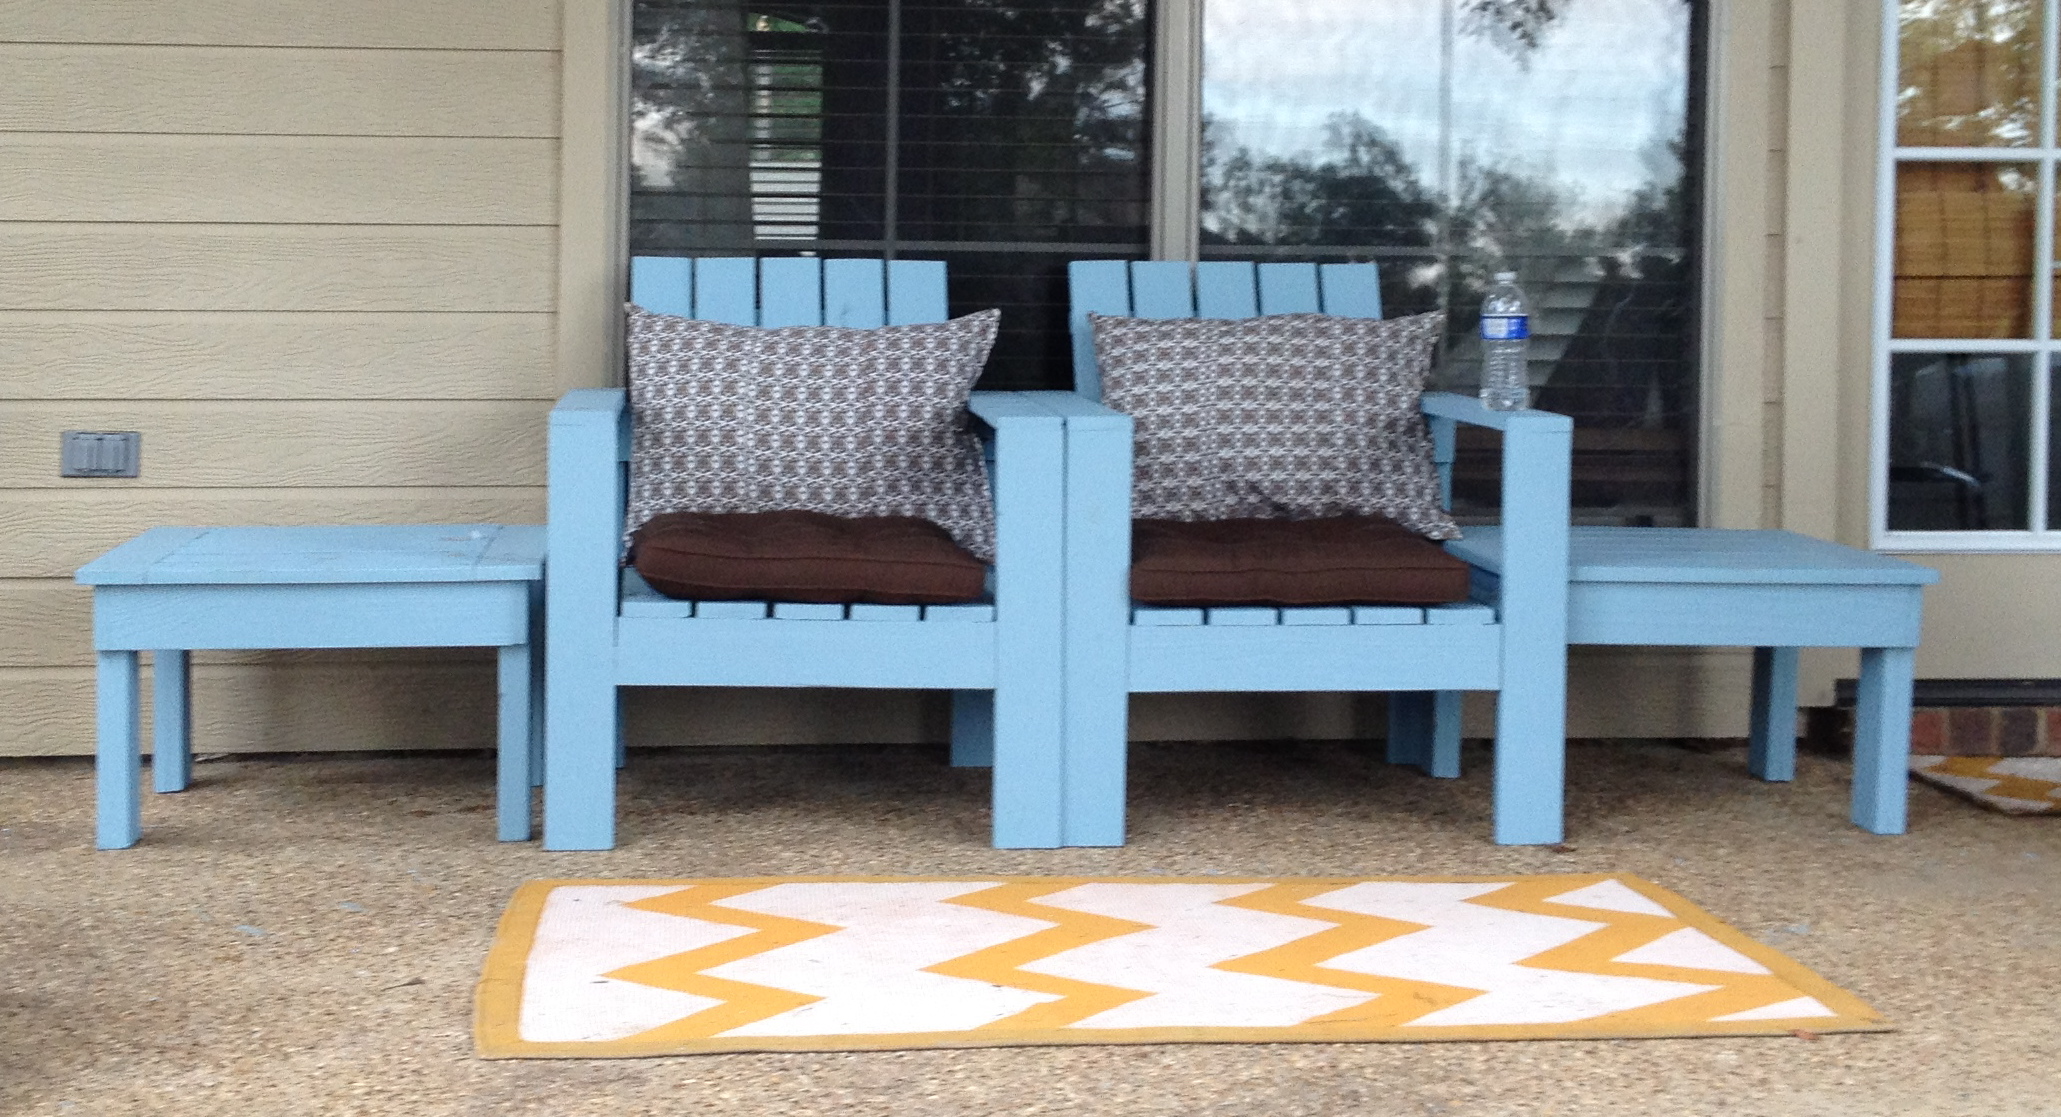
We wanted outdoor furniture but did not want to pay over $500. Very sturdy and will last forever!
Built from Plan(s)
Estimated Cost
$80 for all wood and screws
Estimated Time Investment
Weekend Project (10-20 Hours)
Finish Used
Cabot Solid Stain
Recommended Skill Level
Intermediate
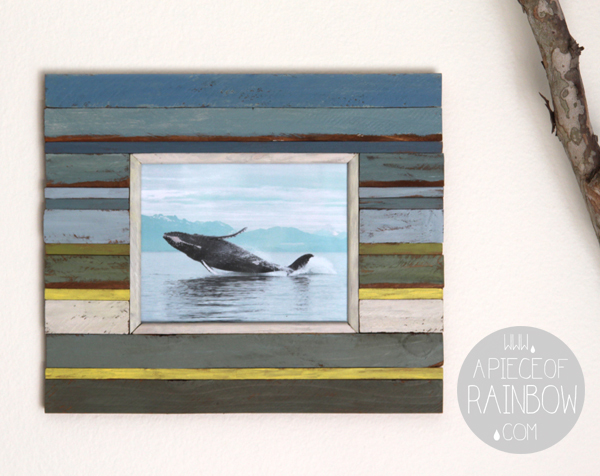
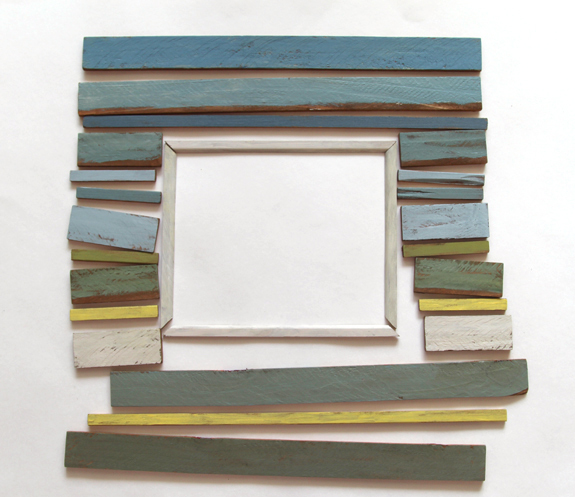
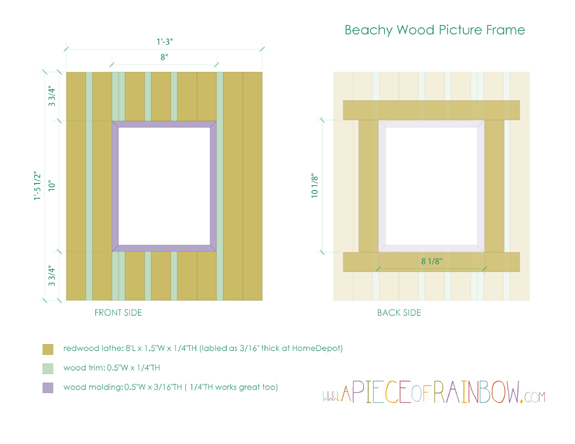
Make Beachy Style Picture Frames From Fence Wood
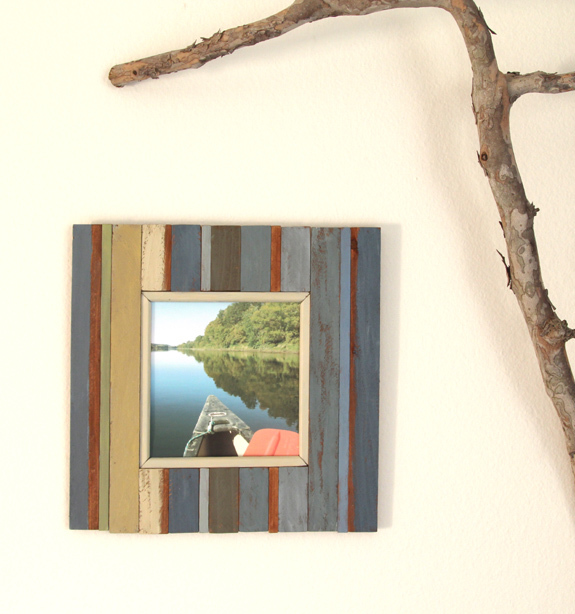
These picture frames are inspired by furniture and frames made from
reclaimed boat wood which came from fishing villages in many parts of
the world. The frames here are made from readily available materials – the humble fence wood boards, some stores call it lathe. An 8' long piece only cost $1-$2. The complete detailed tutorial is here- http://www.apieceofrainbow.com/diy-make-beachy-style-picture-frames-from-fence-wood/
Estimated Cost
$5
Estimated Time Investment
Day Project (6-9 Hours)
Finish Used
paint
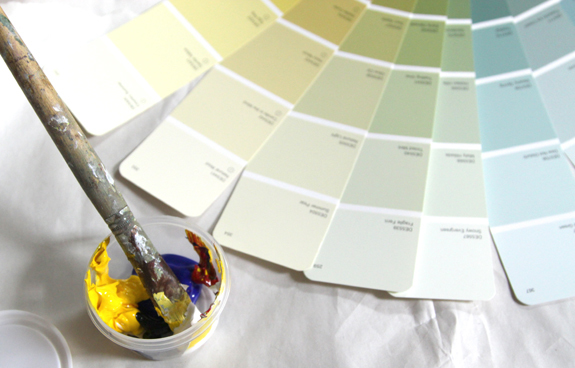
I chose a palette of subdued blues, greens, a little yellow and white. I like acrylic paints because they are non-toxic. Mixing colors becomes a lot easier with the guidance of the fan deck.
I chose a palette of subdued blues, greens, a little yellow and white. I like acrylic paints because they are non-toxic. Mixing colors becomes a lot easier with the guidance of the fan deck.
Recommended Skill Level
Beginner
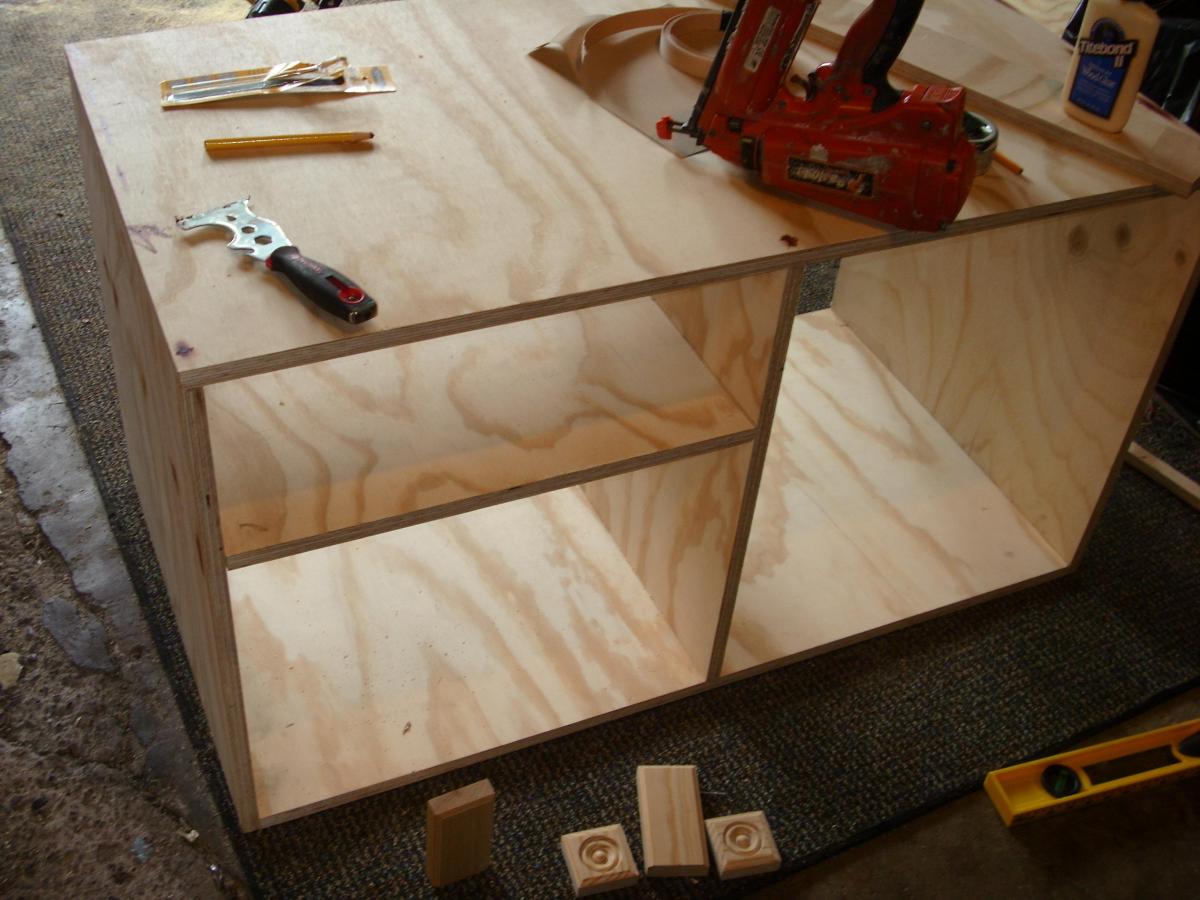
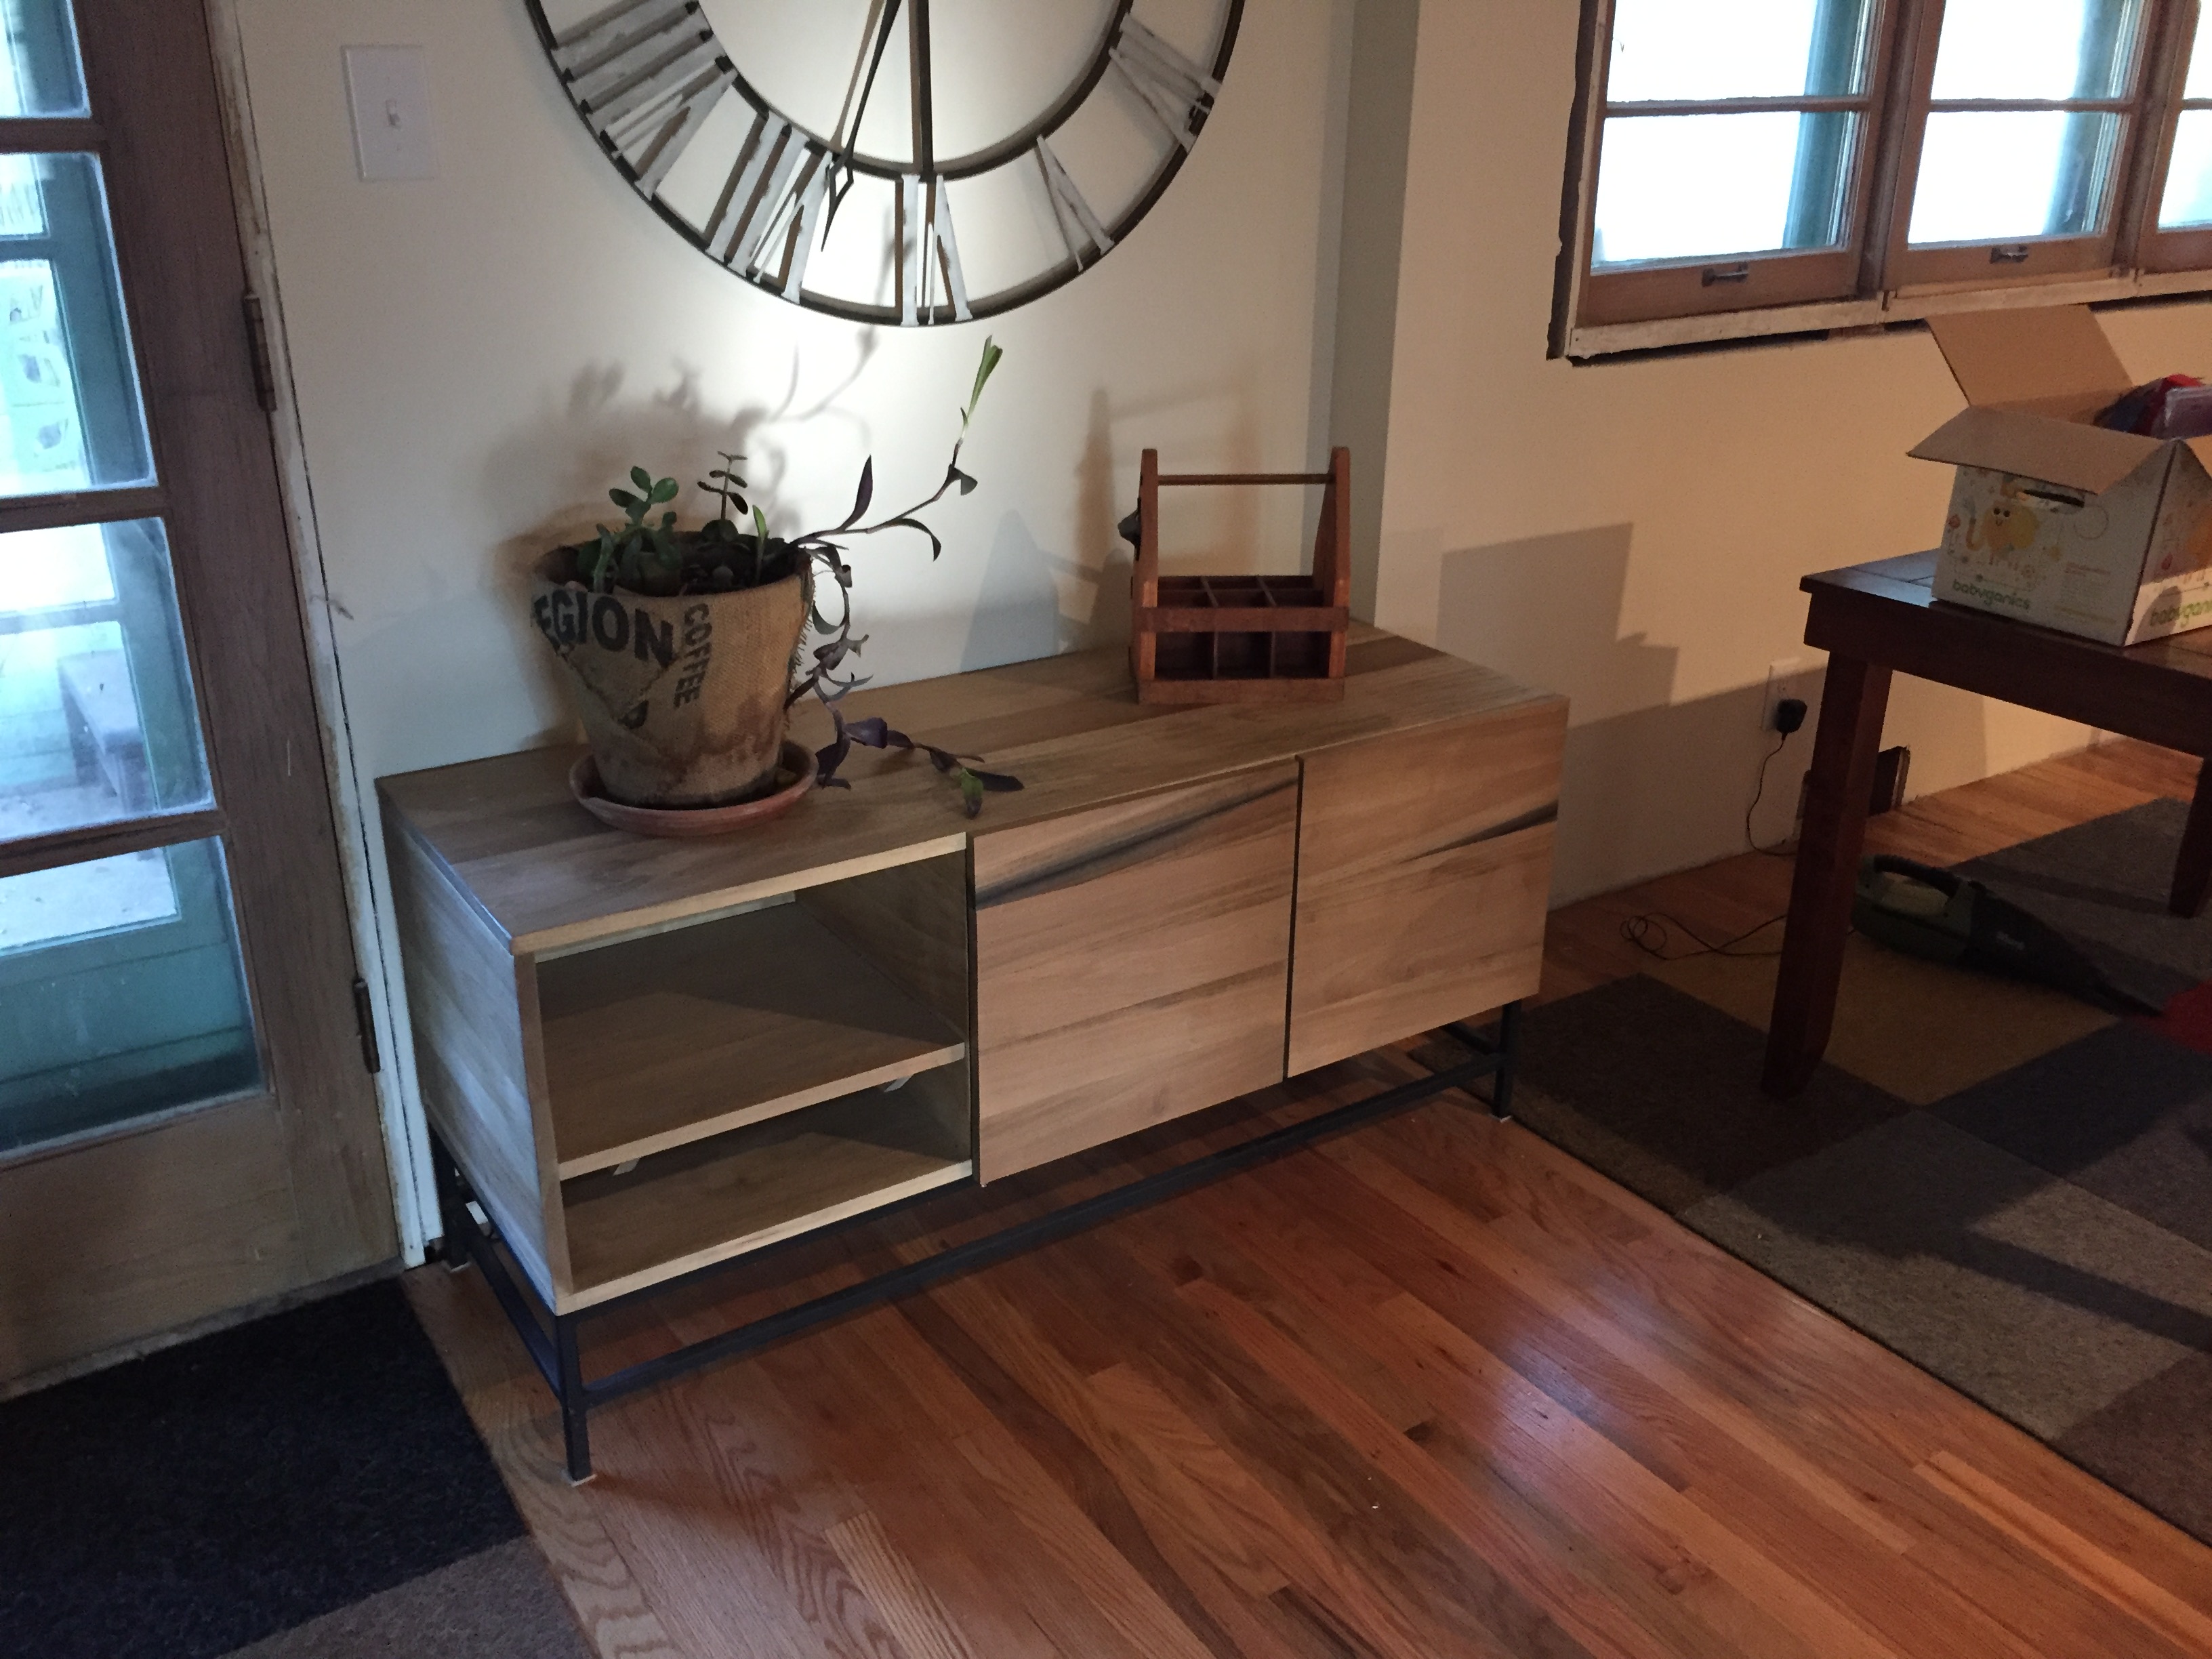
West Elm Knock Off TV Stand
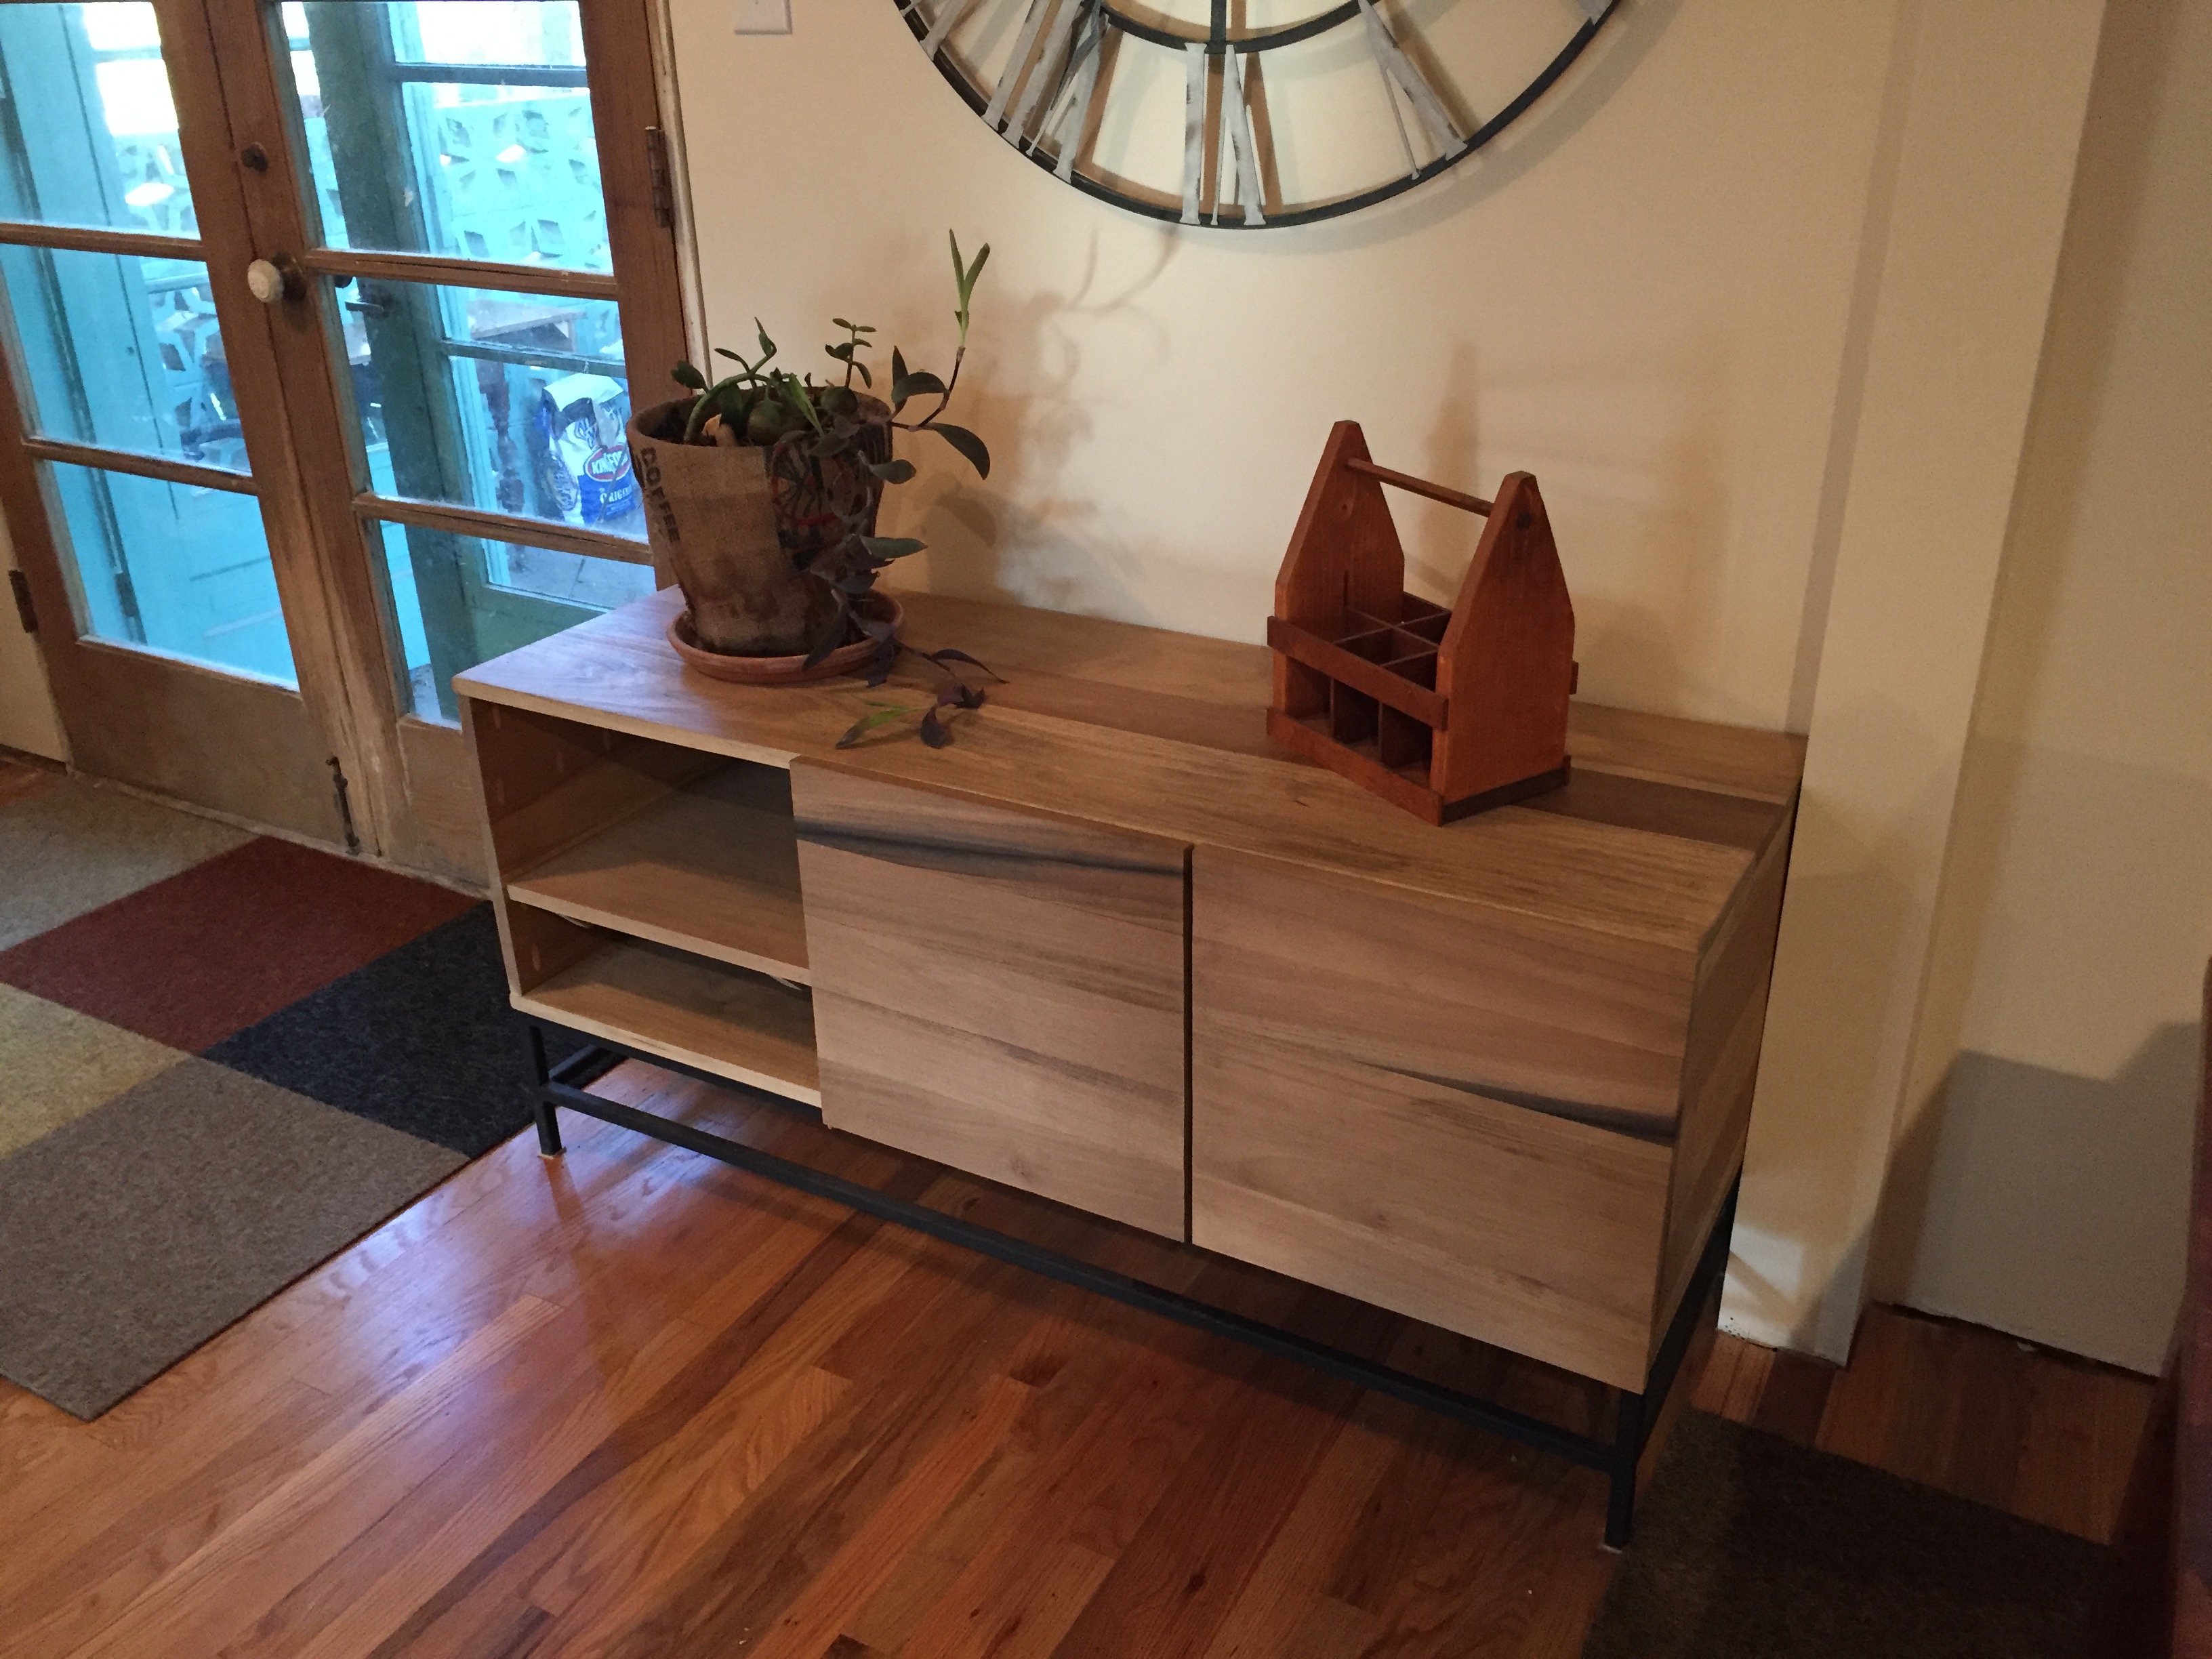
I did not have any plans for this. I had the dimensions from the West Elm Website so I did my best to match that. My sister asked me if I could build this for her and I saw it as an awesome challange. I used euro style hinges for the doors and the left side shelf is sitting on wood strips nailed in the sides. There is also a shelf inside the cabinet. I built the stand and she stained it.
This was my second time welding. I used a Mig Welder that my buddy had. It was a little intimidating at the very beginning but Mig welding is super easy. You can grind the welds down fairly easy too. I sray painted it all with a flat black spray paint. I think it turned out really well. I had a steel shop her in town cut all the steel to the sizes I needed. All I had to do was weld and paint.
Built from Plan(s)
Estimated Cost
$150-$200
Estimated Time Investment
Week Long Project (20 Hours or More)
Finish Used
She used a mixture of a few stains.
Recommended Skill Level
Advanced
Nightstand shelves
Wanted new nightstand but also wanted so shelving for pictures and stuff. Saw a picture on here and google images and decided to make it my own.

Built from Plan(s)
Estimated Cost
$80
Estimated Time Investment
Weekend Project (10-20 Hours)
Finish Used
paint is Rust-oleum Chalked (linen white). Had this from pervious project.
Stain is Minwax semi-transparent Dark Walnut
Stain is Minwax semi-transparent Dark Walnut
Recommended Skill Level
Intermediate
Wood Outdoor Chair
I used dowels in the screw holes.
Mike Kimble
Built from Plan(s)
Camp loft with side stair
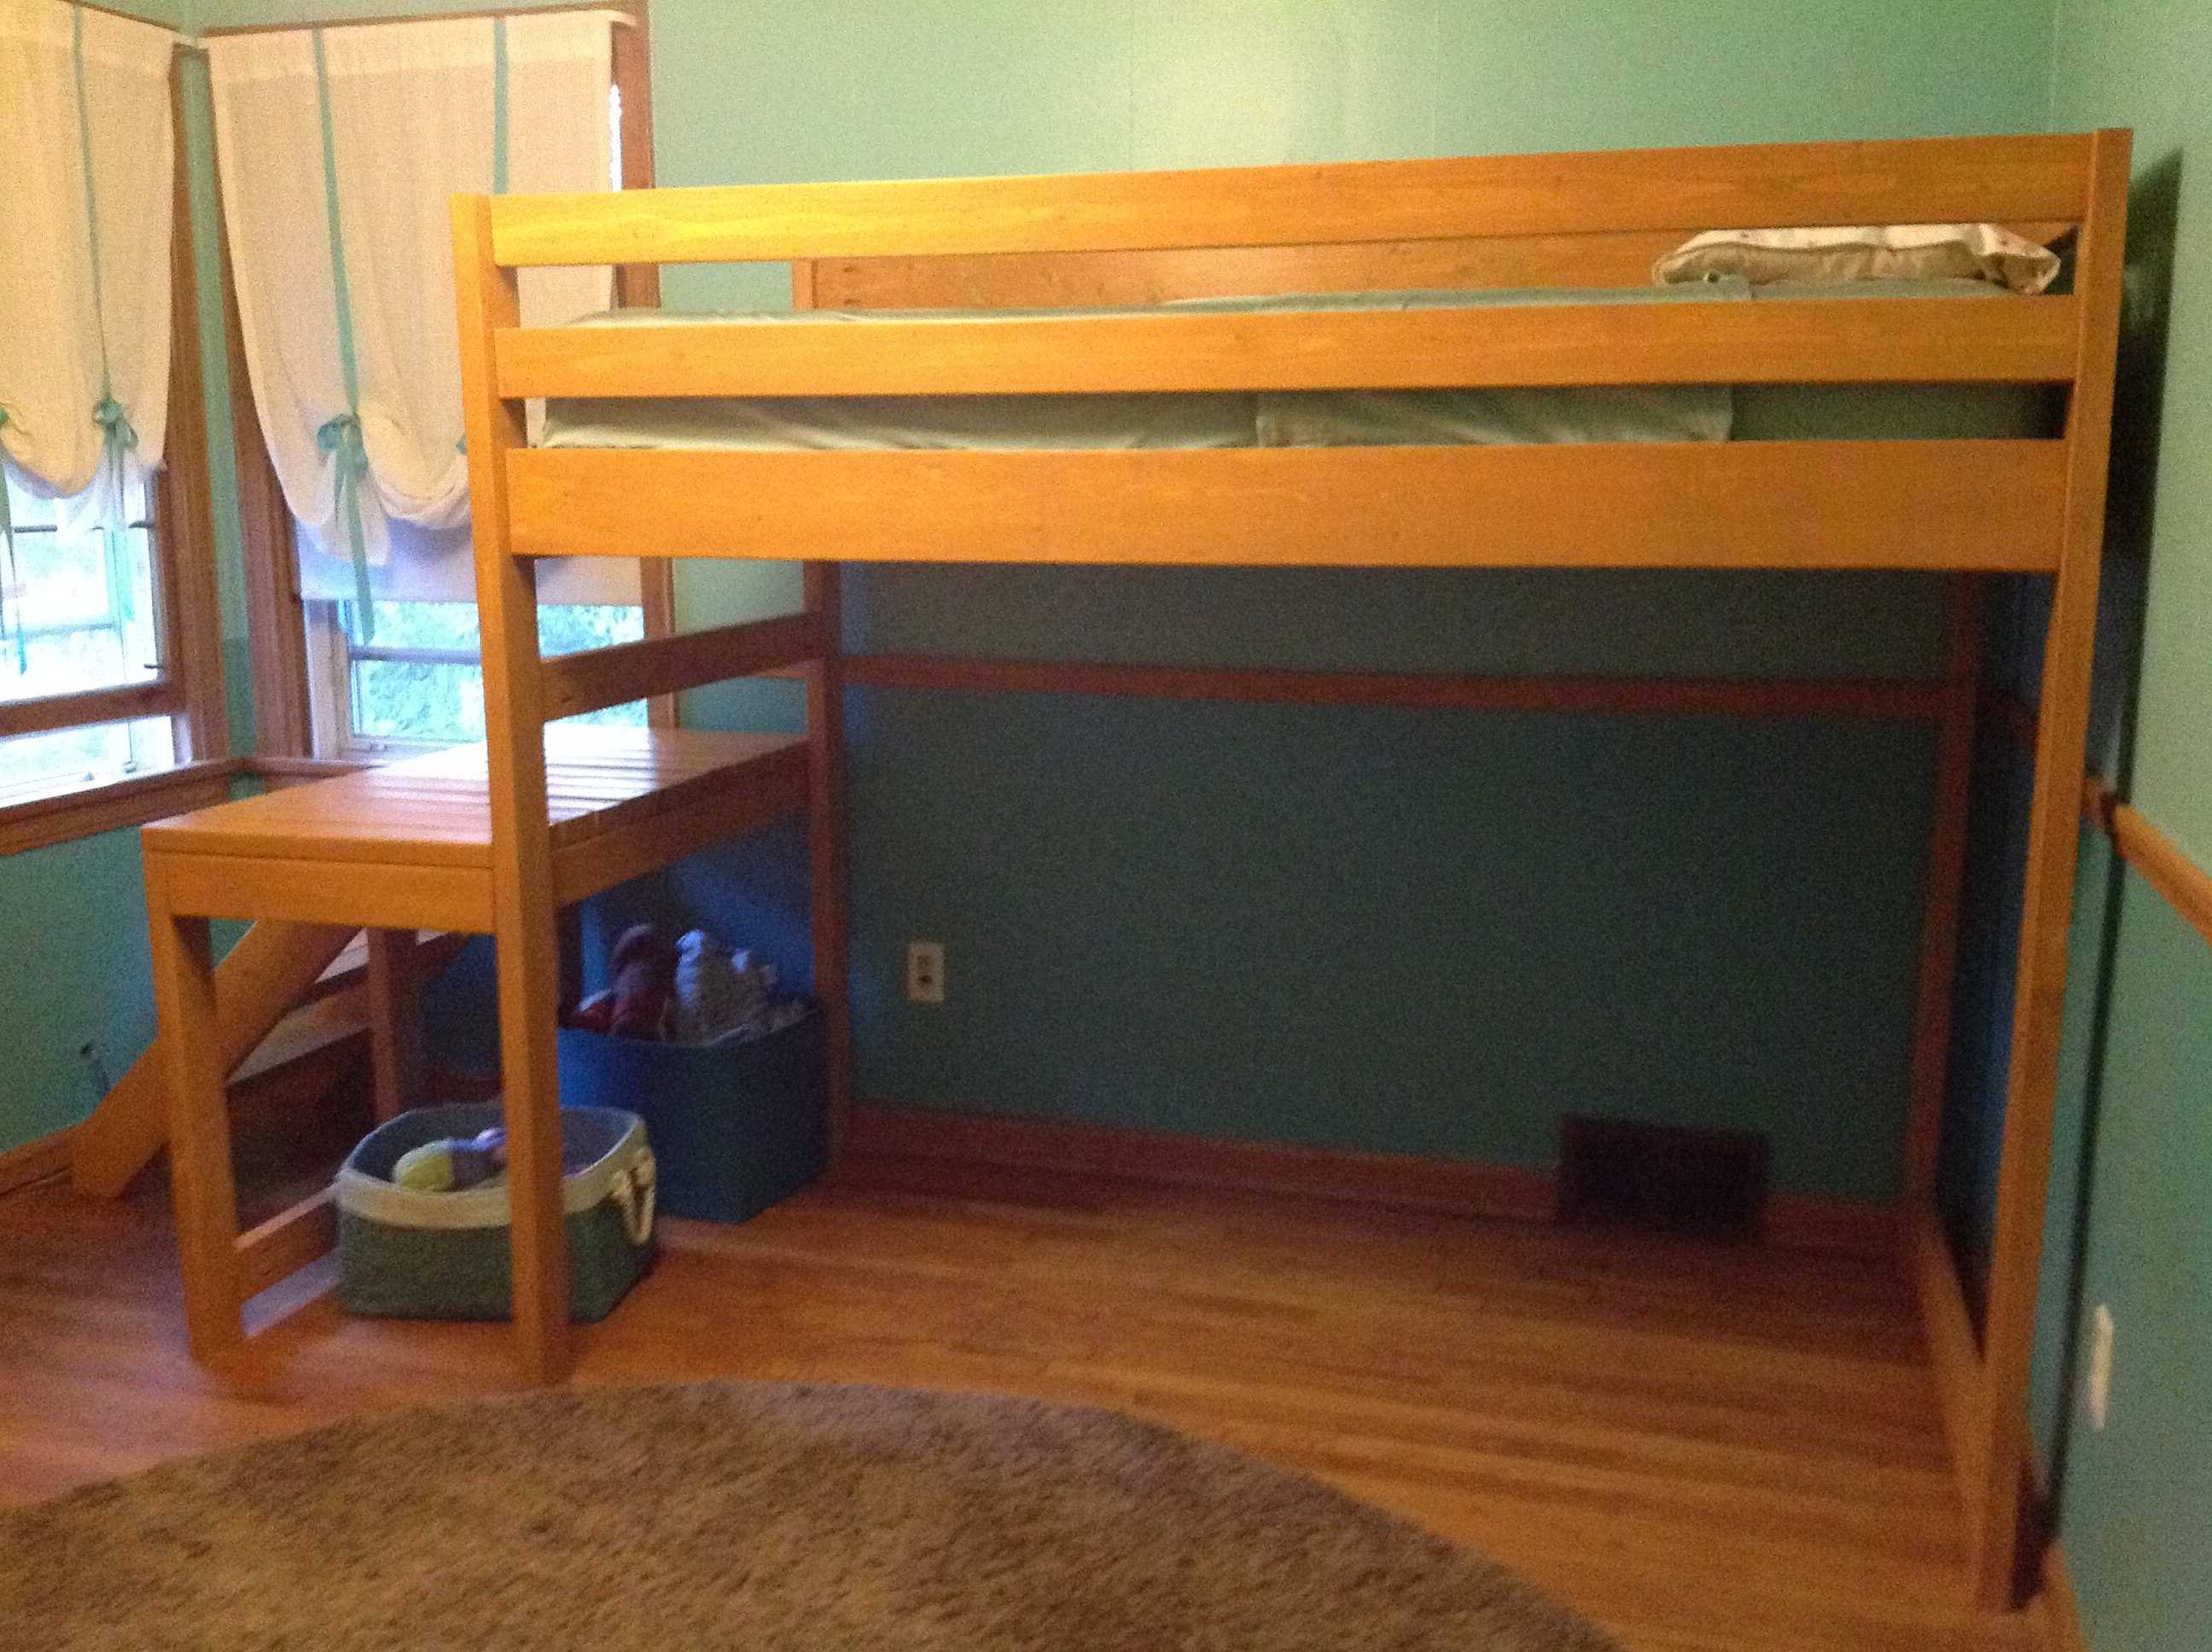
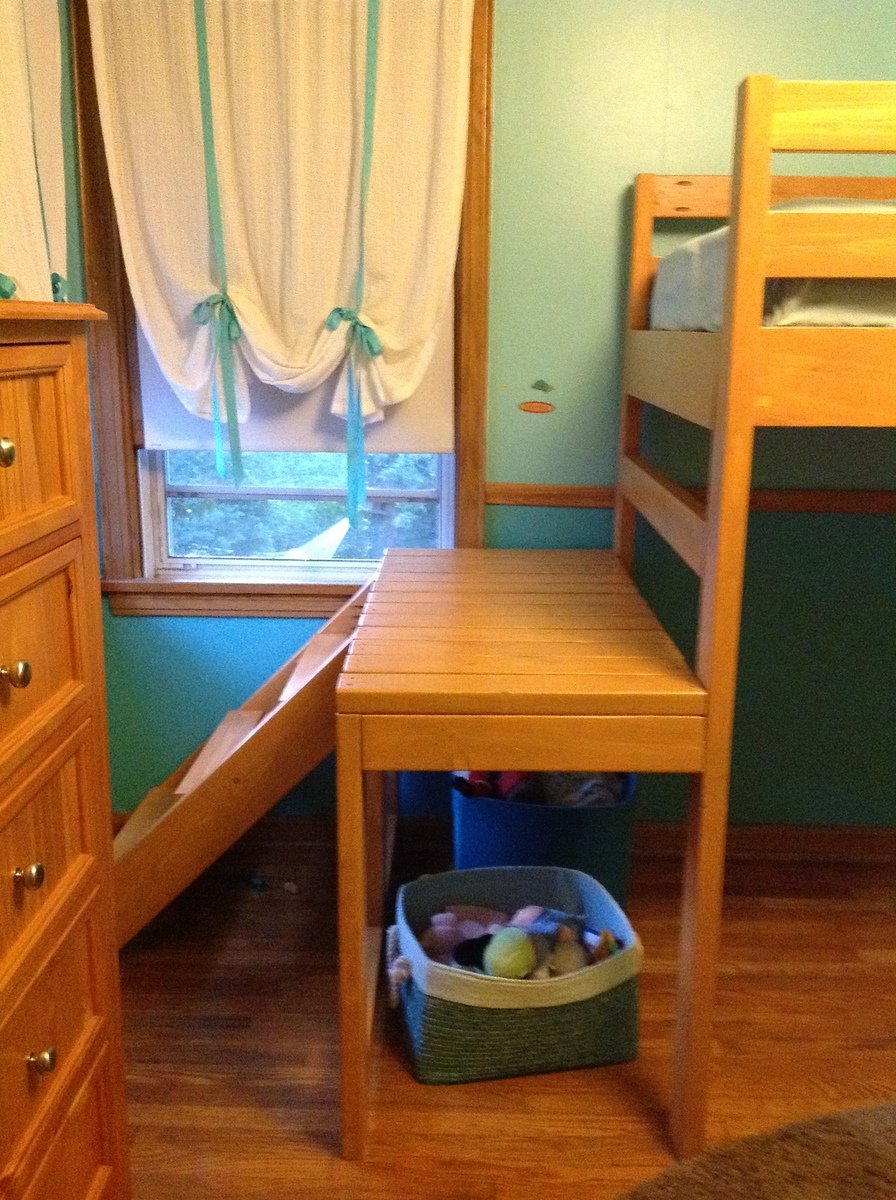
I finally decided I was going to make the fort bed for my daughter and was about to print off the materials list to take to the lumber yard and the junior height camp loft was front and center on the webpage. Though significantly more bed, it looked perfect my little girl. We really wanted her bed high enough to avoid the only heating vent in the room and didn't want to lose the floor space for play, this seemed to be an ideal fit. When I finally put the bed together I realized that keeping the staircase as in the original plans resulted in a bowling alley sort of space left over. It was awkward and really shrunk the room as the 'alley' wasn't usable for much of anything. I played around a little bit and my husband and I decided that we would put it on the side. It fit perfectly to the wall and was much more space efficient for the room. I am a little nervous about the new openness of the deck portion, but both kids have found it a fun place to read and pretend fish. It was my first project of this size and I did everything until the final assembly by myself and I am so glad to have done it. It took more time than I imagined, but again I am a true novice.
I really wanted it stained so that it would camouflage the wear a little better, but I had a great deal of trouble finding a low VOC stain in my town. I used the lowest I could find and a low VOC water based poly. It matches her dressers and trim nearly perfectly. Her older brother likes the bed so much that nearly everyday he tries to convince her that she wants to switch beds with him.
Built from Plan(s)
Estimated Cost
$100-$120
Estimated Time Investment
Week Long Project (20 Hours or More)
Finish Used
Zar UltraMax low VOC stain in Golden Oak
Recommended Skill Level
Beginner
Comments
Tue, 08/28/2012 - 11:28
I love your bed so much! And
I love your bed so much! And I love the idea of having the stairs on the side like that. :)
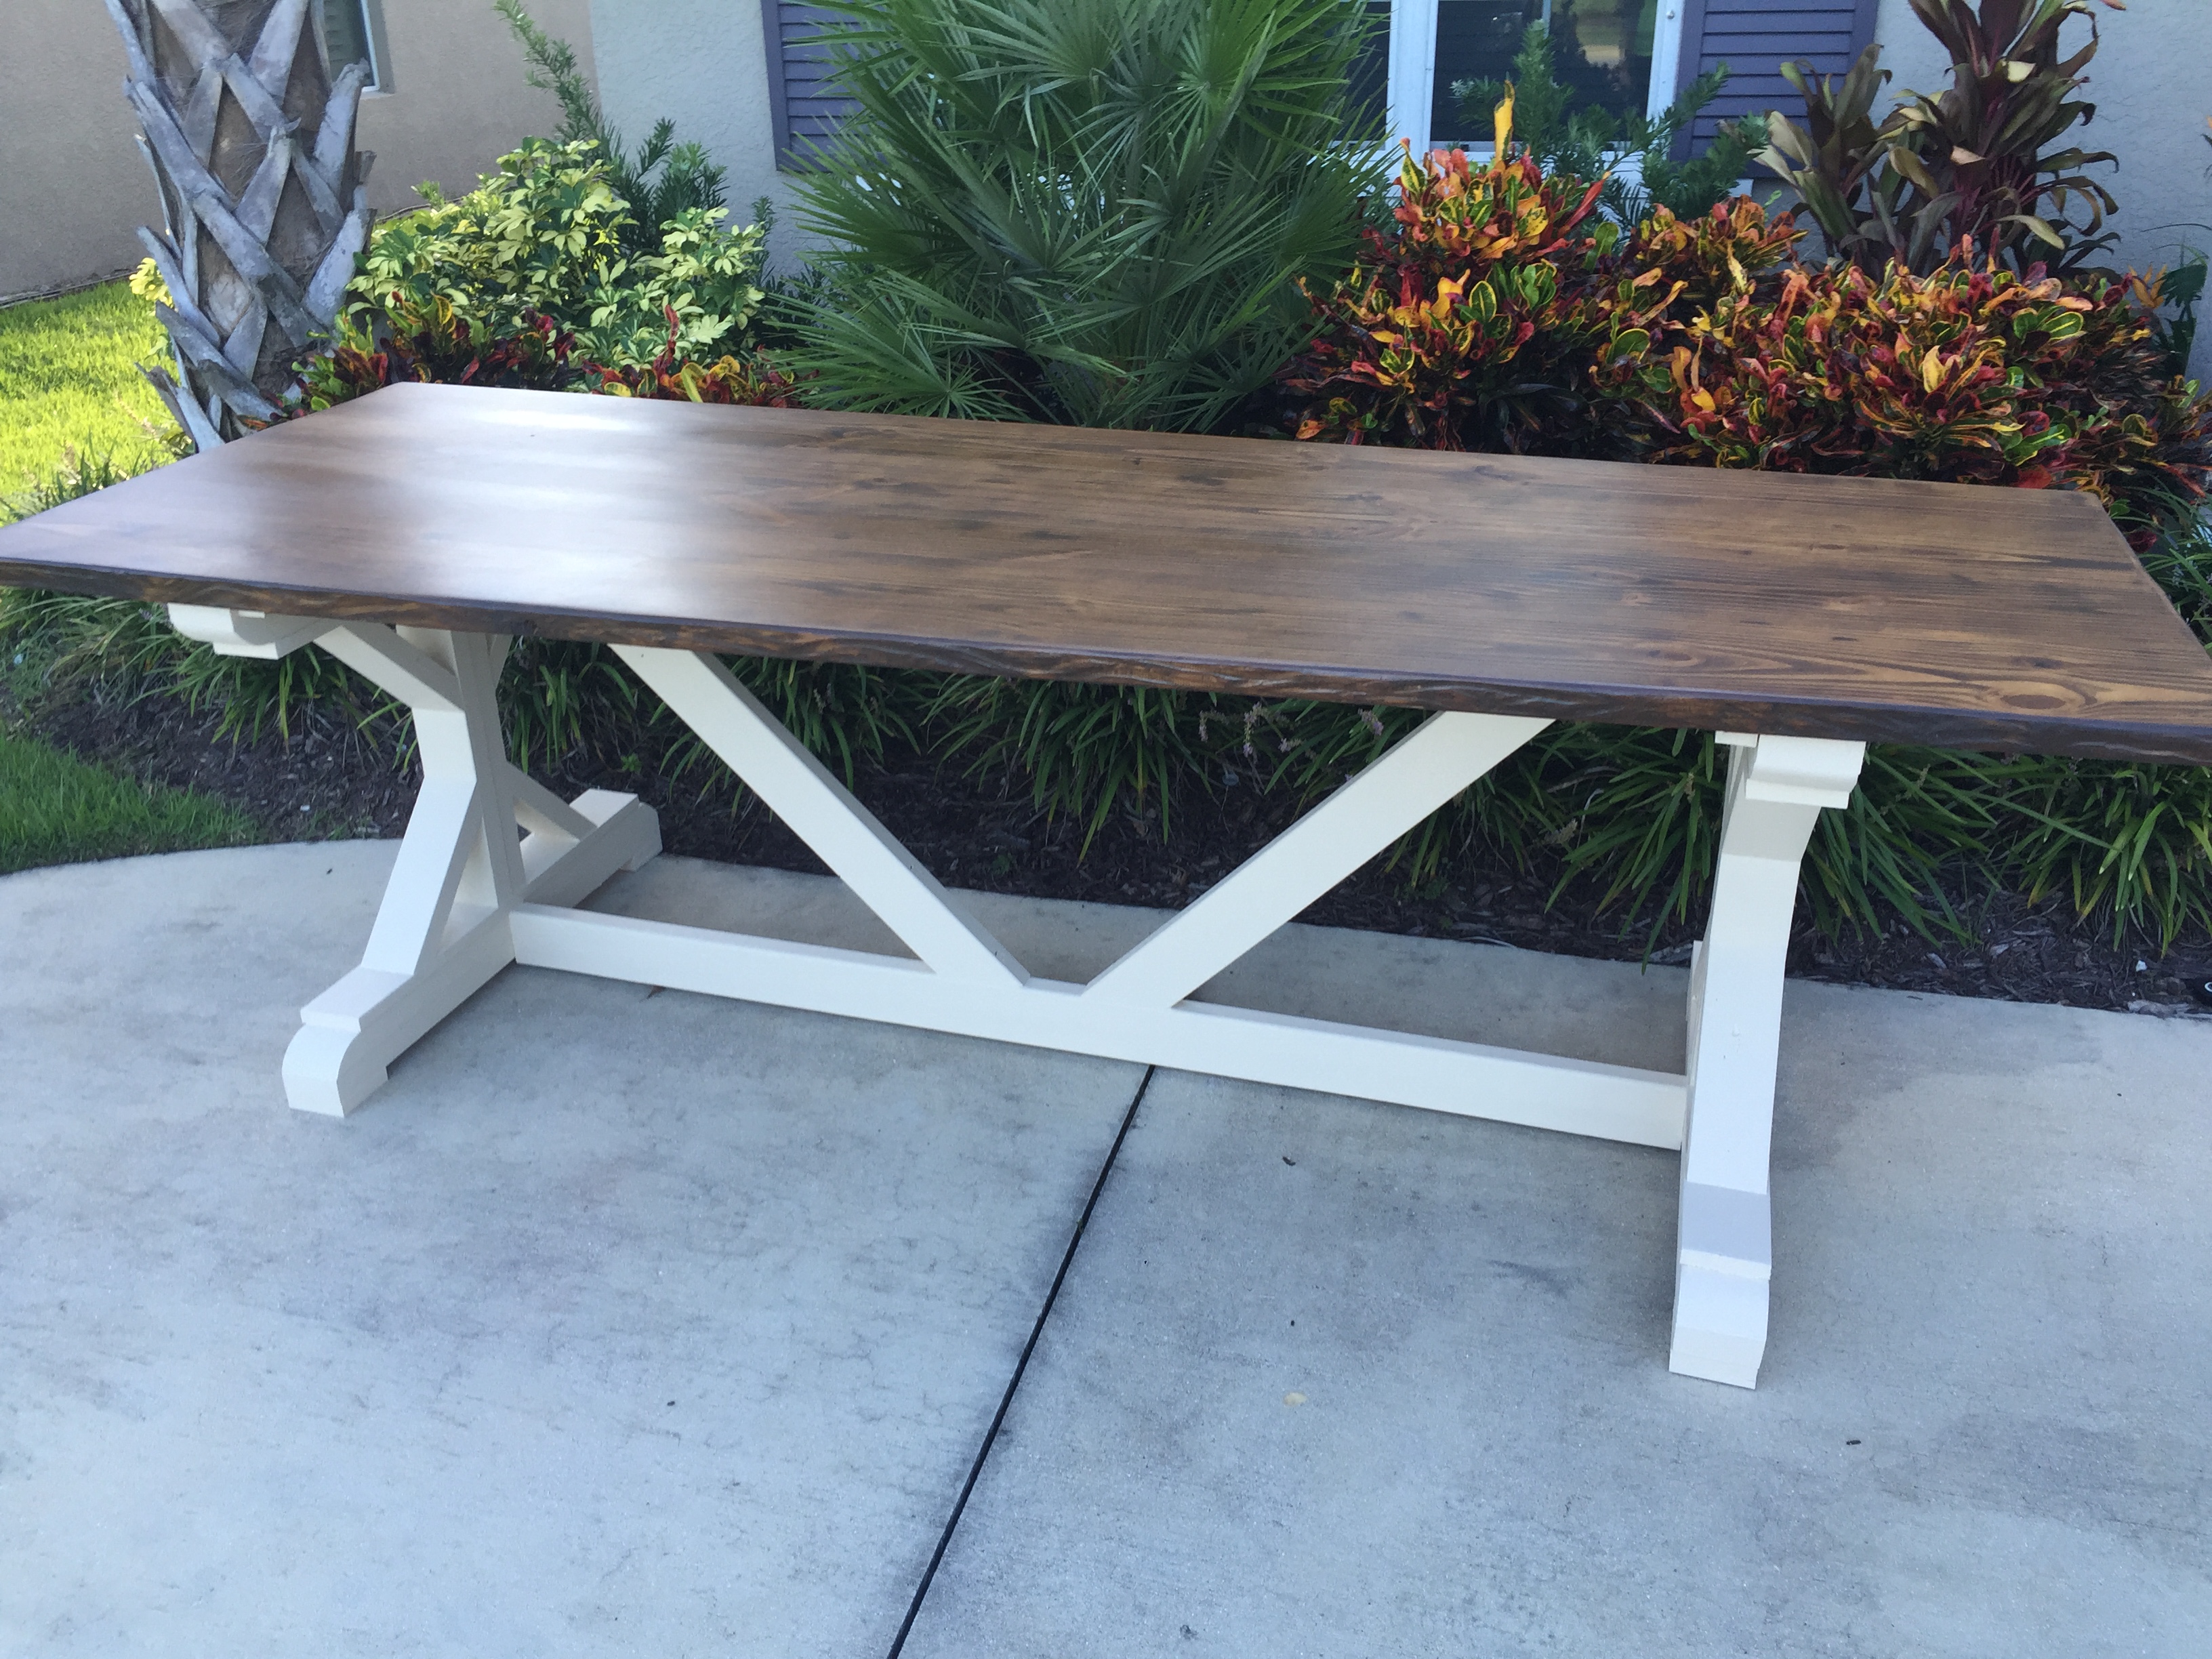
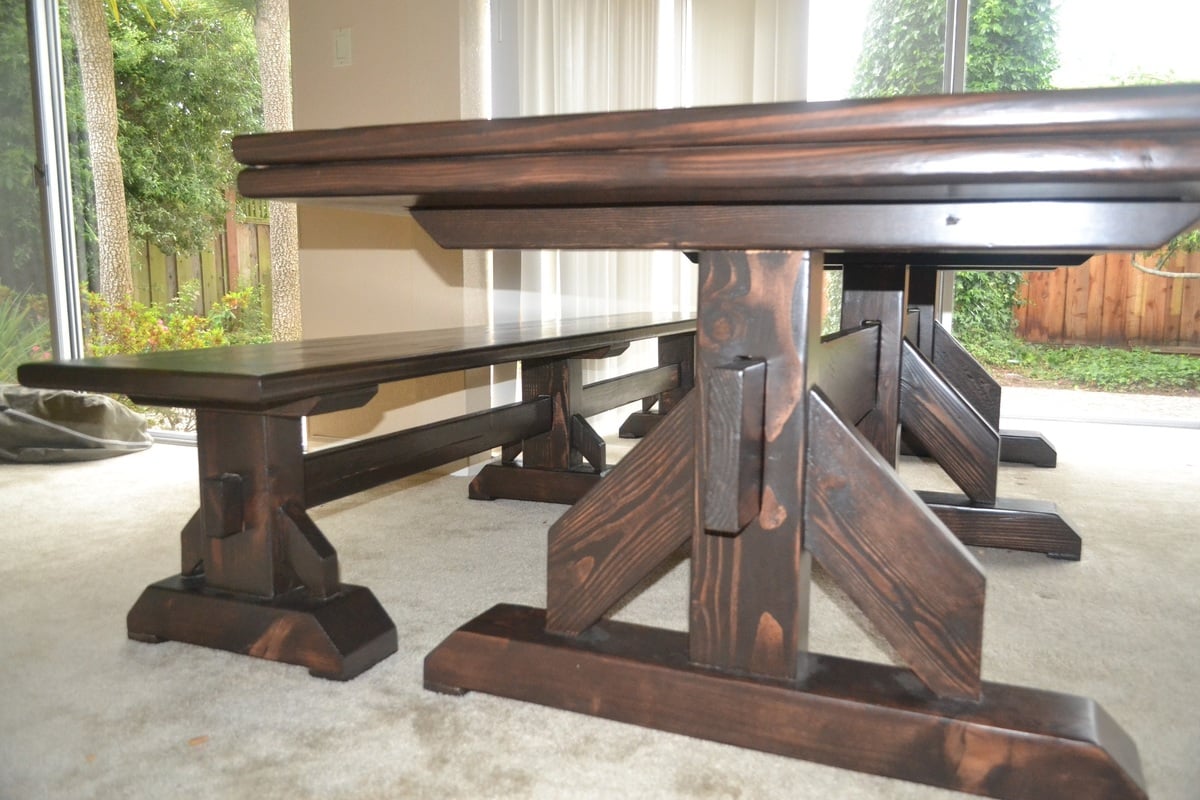
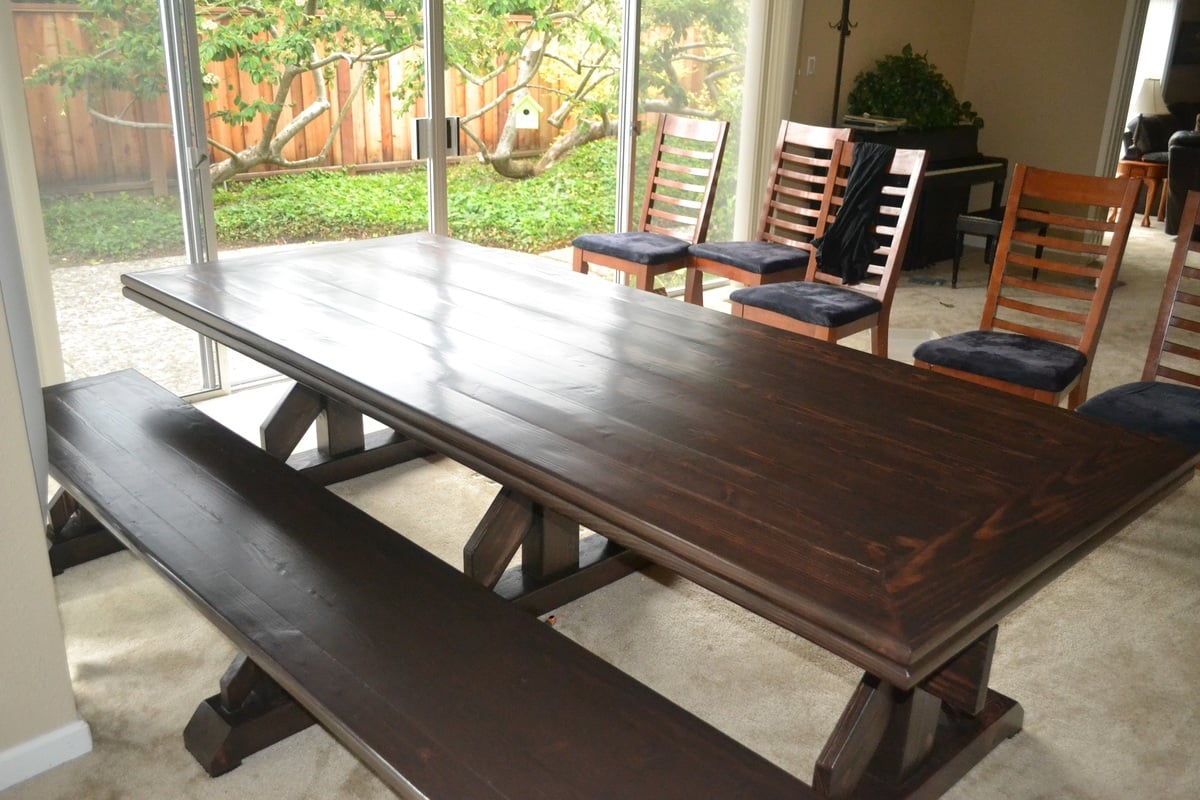
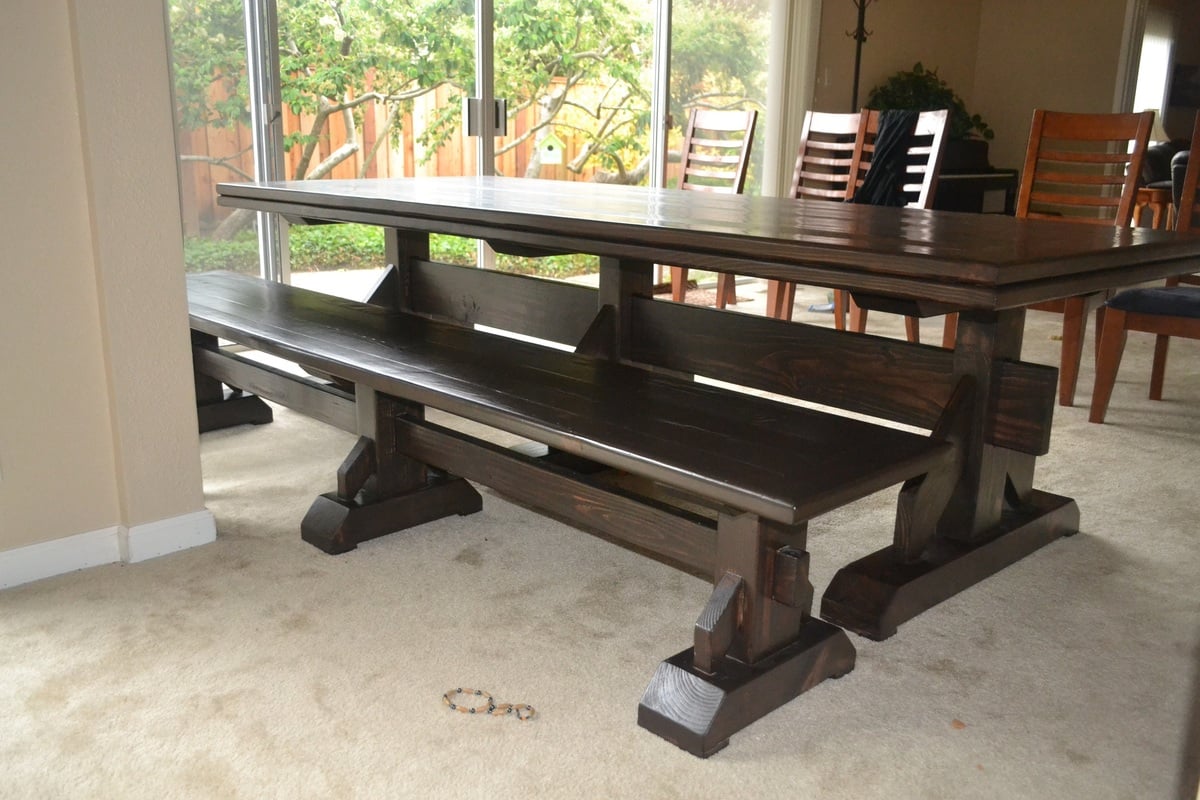
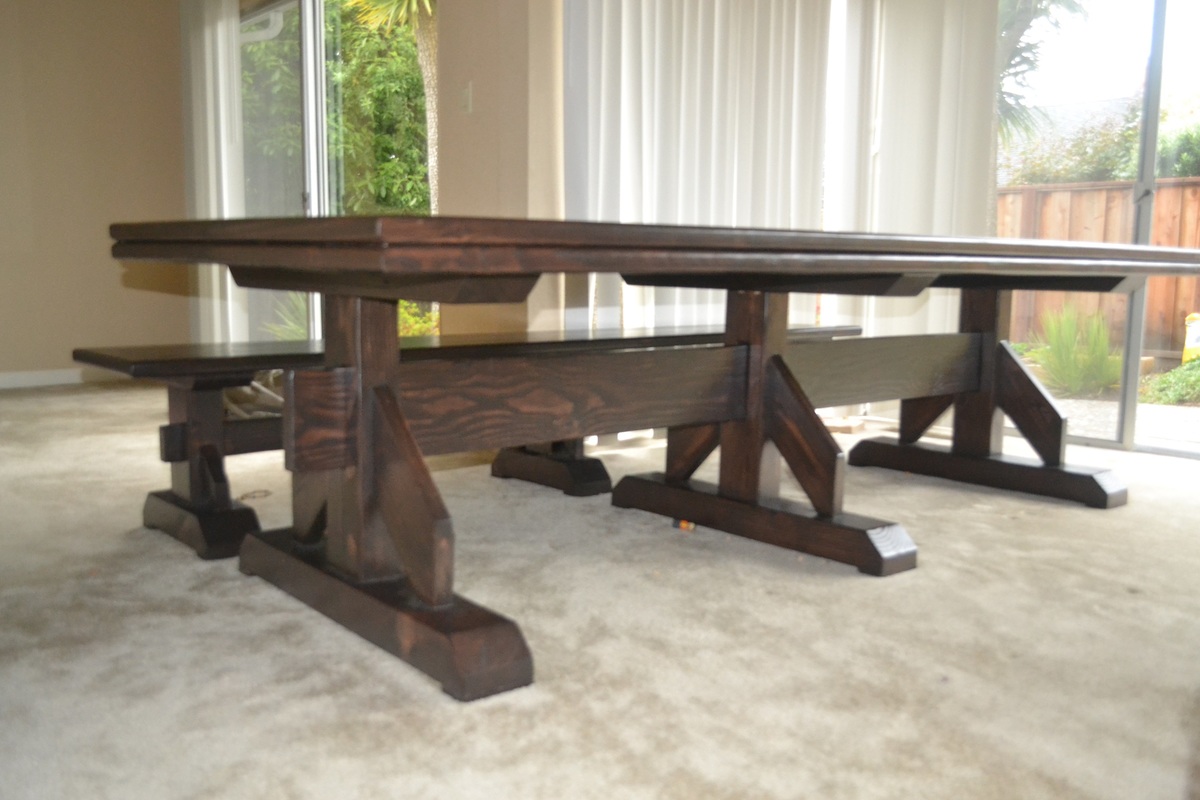
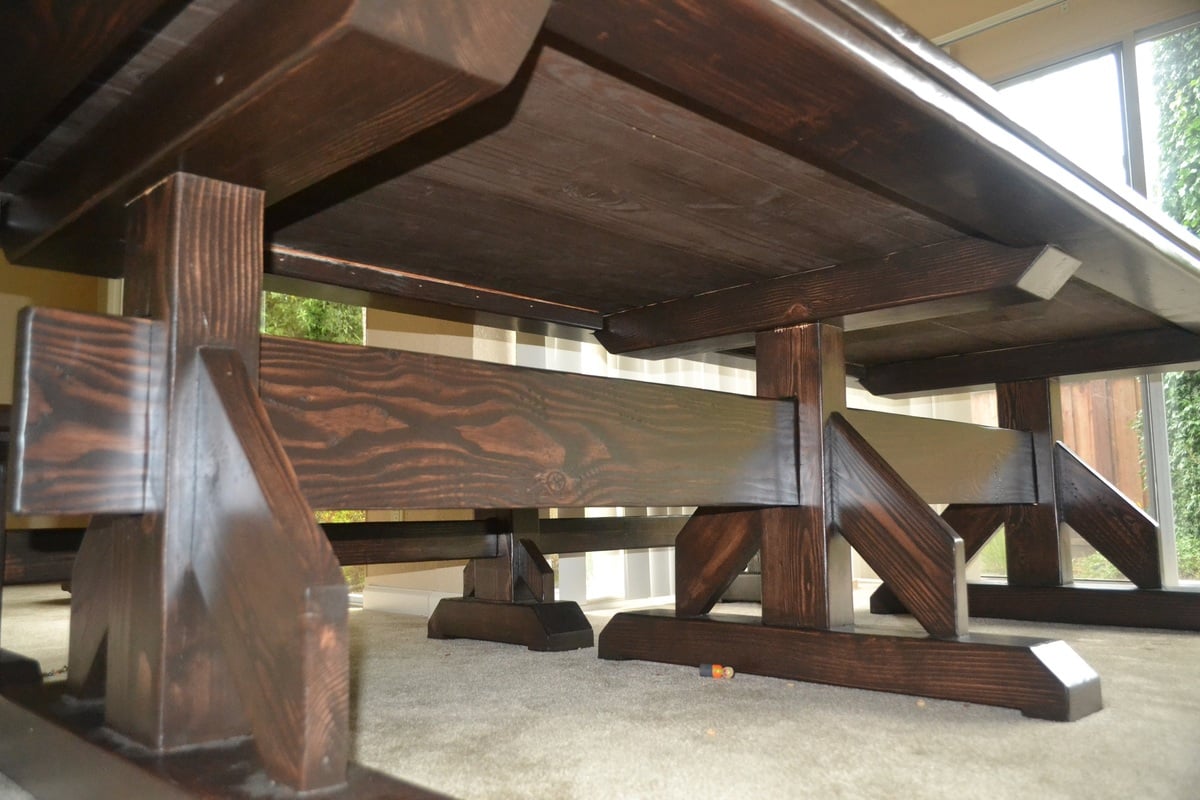
Triple Pedestal Farm House with Bench
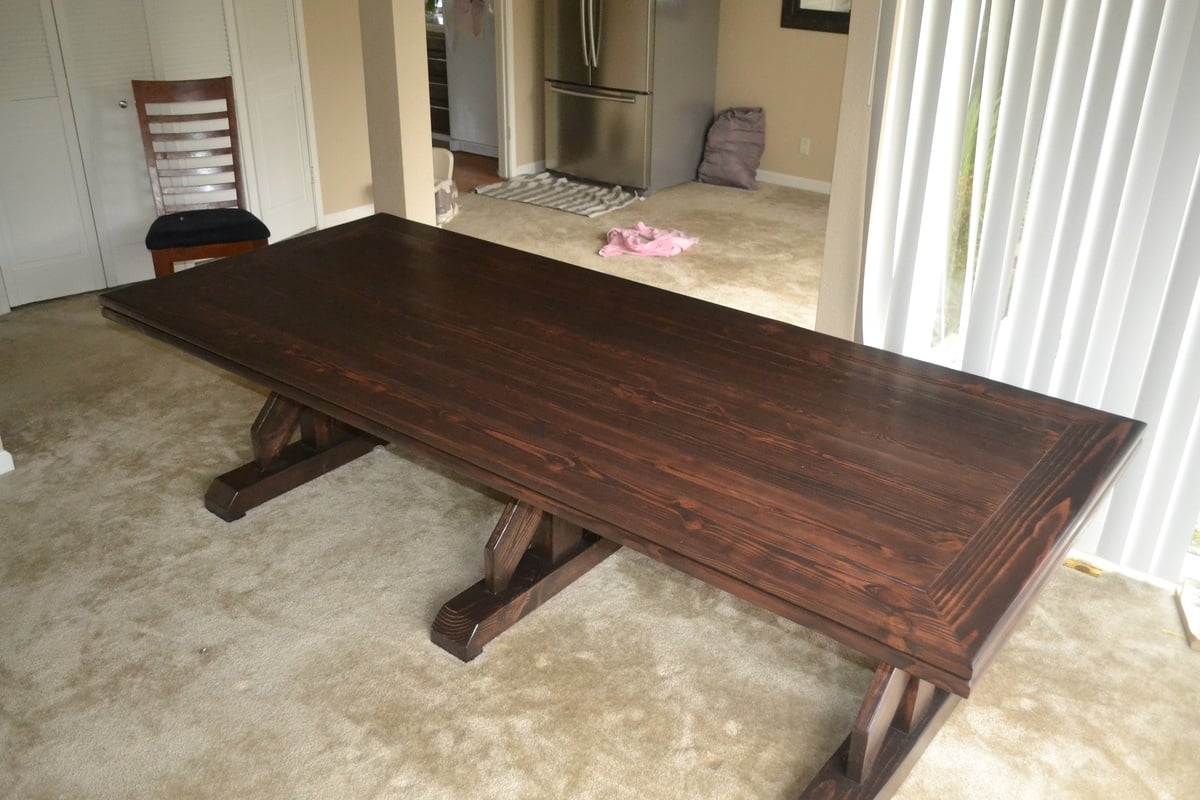
So I finally broke down and decided to make the table that my wife had been asking for sometime. This after our last table was damaged by mold in our last move. I have completed a few woodworking projects before this so from a skill level on this project it was not too hard. The problem was that I wanted the table to be perfect but my wife wanted the dings and dents that came along with a farm table, so we compromised somewhat.
I did run into one significant issue that will be a life long lesson. The Douglas Fir wood that I bought had a very high moisture content and during the course of the project most of the wood began to shrink up to a half an inch in some parts as the wood dried out. I was talking to a construction friend in the area when I was finishing up the table and he confirmed that he had the same issue with this wood locally. Would have been nice to know this from the beginning.
Anyways, we followed the Triple Pedestal Table and Bench with the following adjustments. We used all 2x6 boards for the table top in order to provide additional thickness for durability, we also removed the center divider and just opted to use the full length of the 8 foot boards. We then framed the table with 2x6 and then added another lip of 2x6 below the table top. The purpose of this was to create a large enough area to notch the boards for a resting areas of the leg tops. We also rounded all of the 2x6 edges on the top with a router as we didn't want to have any sharp corners for the kids to run into.
On the legs, we opted to use 4x6 posts for the leg bases and tops, as well as the leg post. We (meaning me) wanted to have a nice clean look rather than the layers of 2x6 and 2x4's in the original design. I used the router to create the hole in the post for the runner beam, and used a 2x8 beam rather than the 2x6 beam. Finally I did not have the patience to cut out all of the arches for both the table and the bench and my jig-saw was not working properly, so we just decided to improvise with the design as shown in the pictures.
Built from Plan(s)
Estimated Time Investment
Week Long Project (20 Hours or More)
Finish Used
Rustoleum Kona Stain, one coat and wiped dry with towel after 5 minutes. Rustoleum Satin water based polyurethene, 3 coats on legs and 4 coats on bench and table top, sanded after each coat.
Recommended Skill Level
Beginner
Comments

Made by mj
First ever project. Just testing my skills and all materials were low grade. Next project will be better grade wood
Estimated Time Investment
Weekend Project (10-20 Hours)
Finish Used
First project will use better quality wood on next one
Recommended Skill Level
Starter Project
Comments

Thu, 09/22/2016 - 09:04
Fabulous Smart First Project
You are smart to start small! Great job, can't wait to see what's next!!!!
Farmhouse console tv stand

Love these plans for the farmhouse table comsole
Built from Plan(s)
Estimated Cost
$60+
Estimated Time Investment
Day Project (6-9 Hours)
Finish Used
N/a
Recommended Skill Level
Intermediate
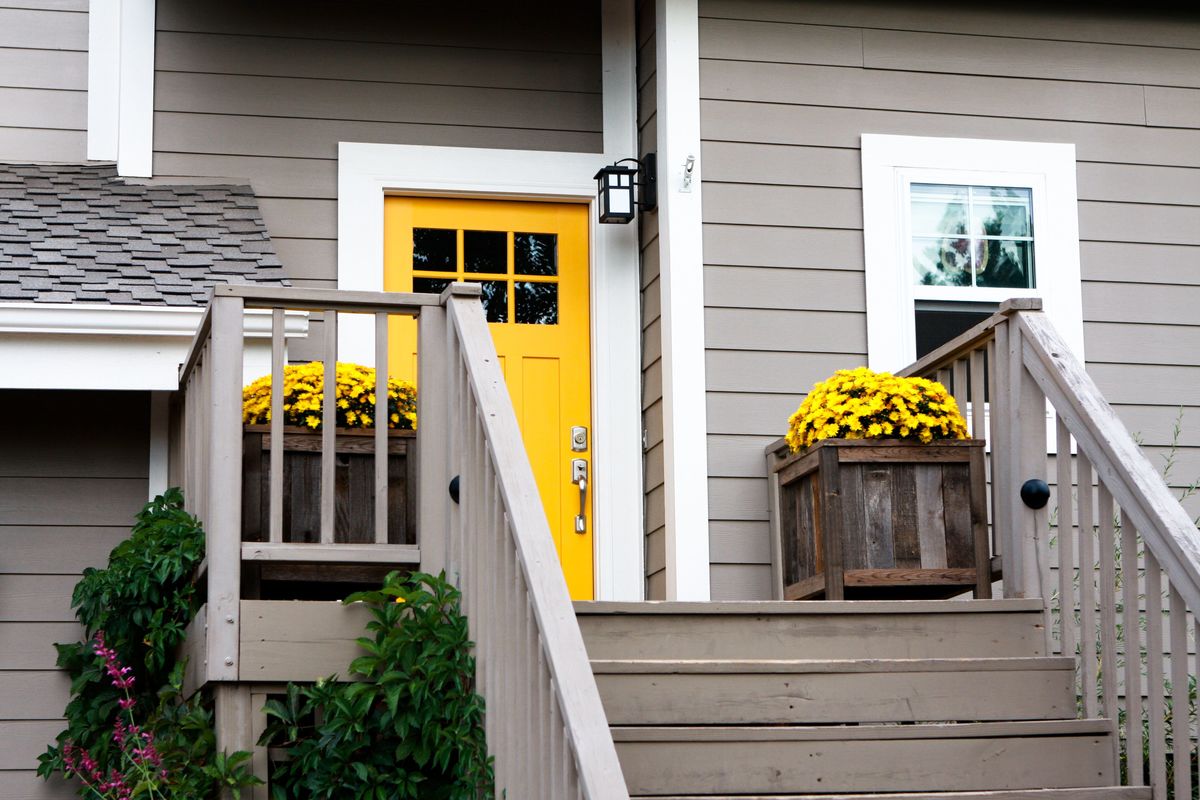
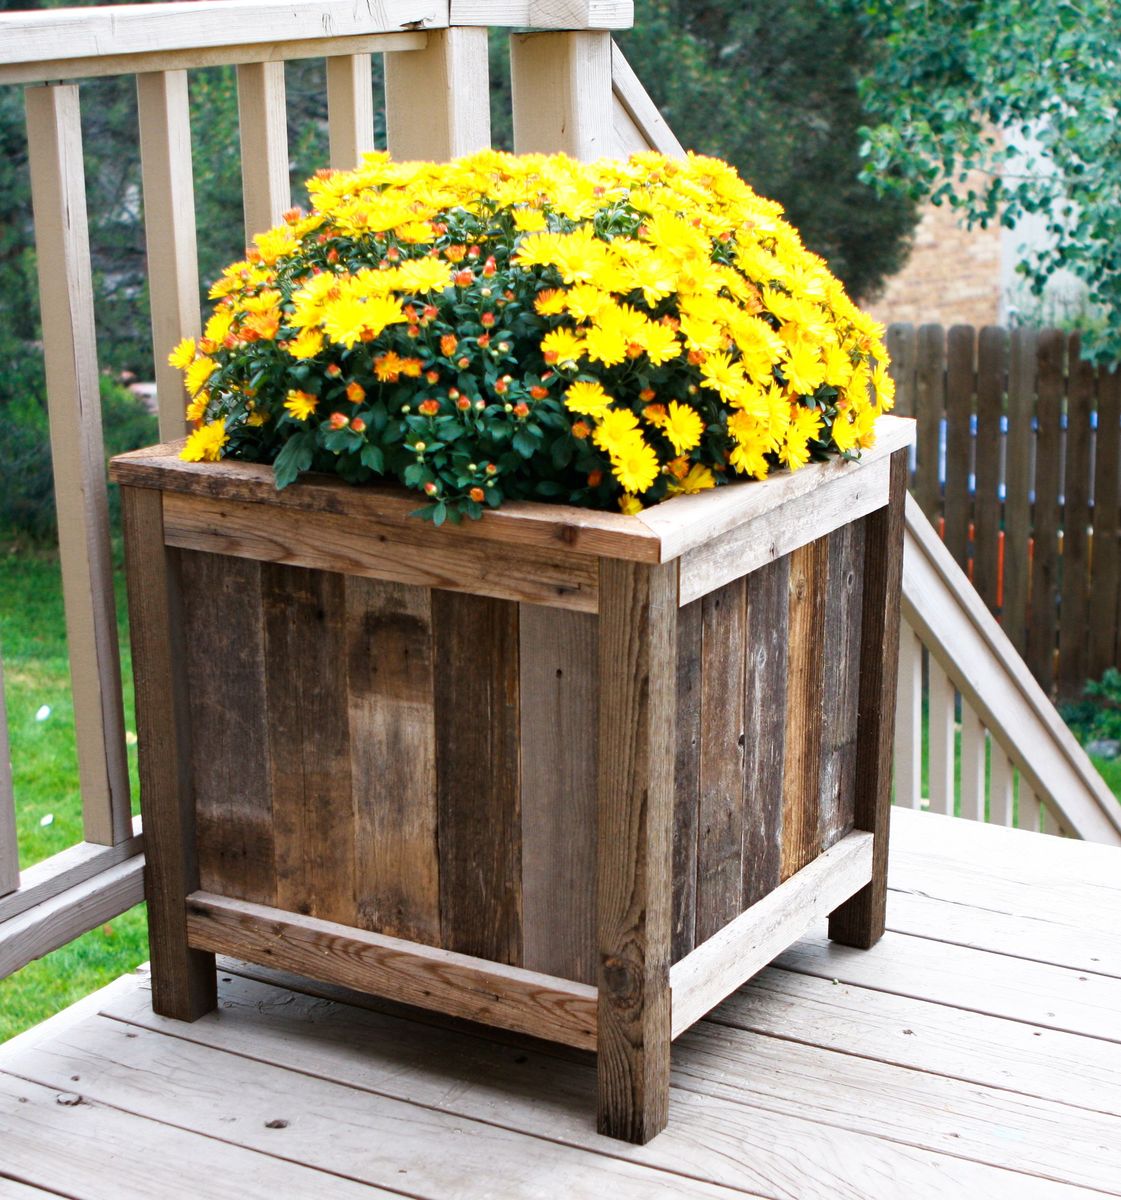
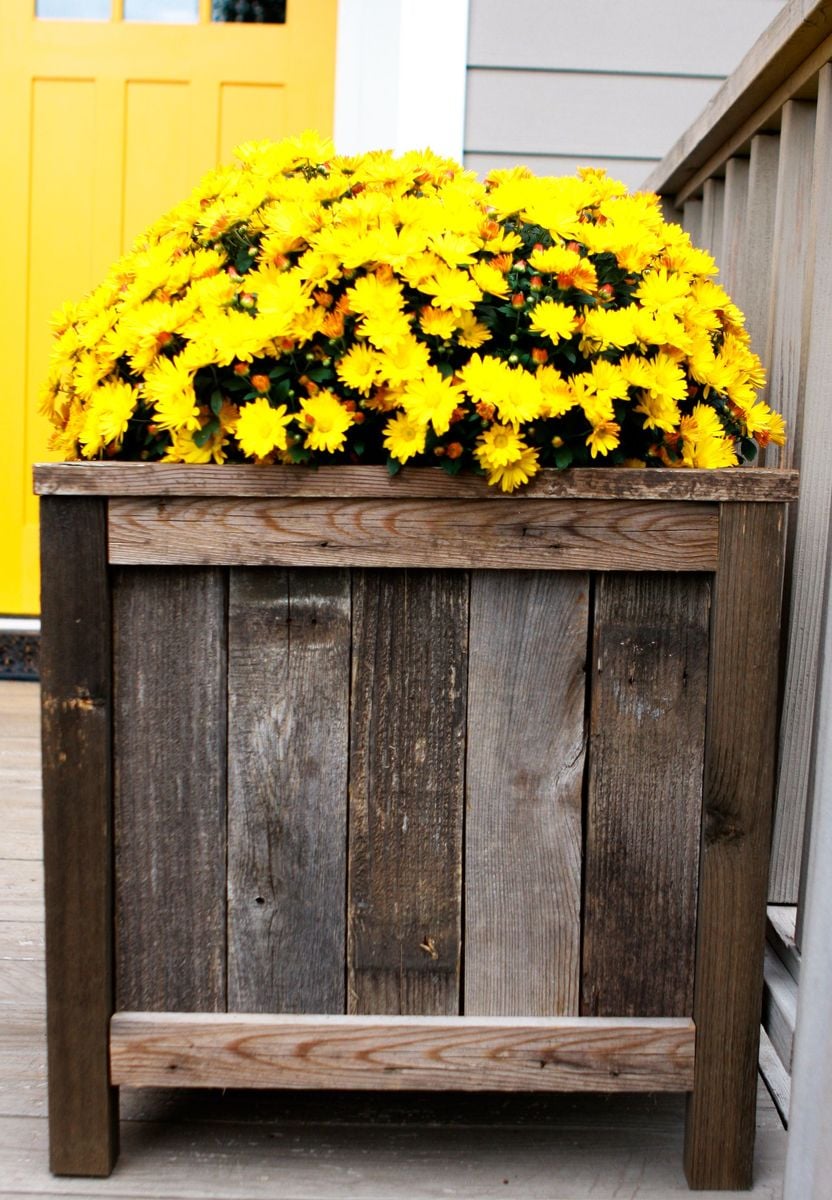
Cedar Planters made from Reclaimed Fence Pickets
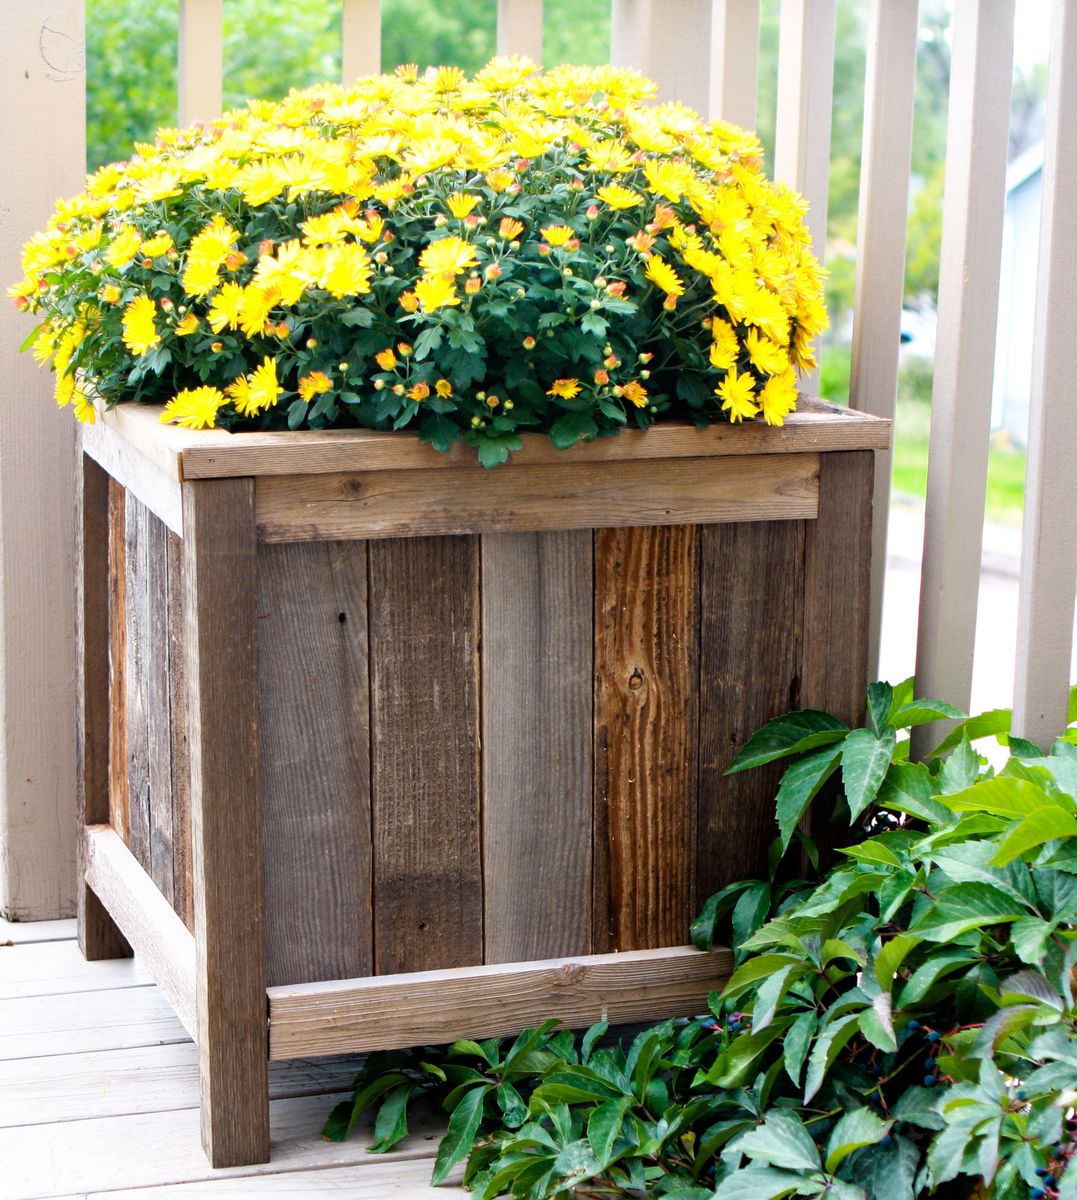
I built Ana's under $20 cedar planters for free. Or, almost free! I had to buy some more wood glue, but I had some of the wood on hand and took some from a friend's pile of old fence wood. It took me about five hours to build both planters from start to finish. See the blog link below for more info.
Pin For Later!

Built from Plan(s)
Estimated Cost
Free
Estimated Time Investment
Afternoon Project (3-6 Hours)
Finish Used
Oxidized the new cedar 2x4s with steel wool/vinegar (http://thefriendlyhome.blogspot.com/2012/07/how-to-oxidize-wood.html). Other than that, no finish.
Recommended Skill Level
Beginner
Comments

Tue, 09/08/2020 - 16:12
This is great. I just tore…
This is great. I just tore down my old fence and have tons of old cedar pickets. I want to make some planters for my new patio.
my planter box
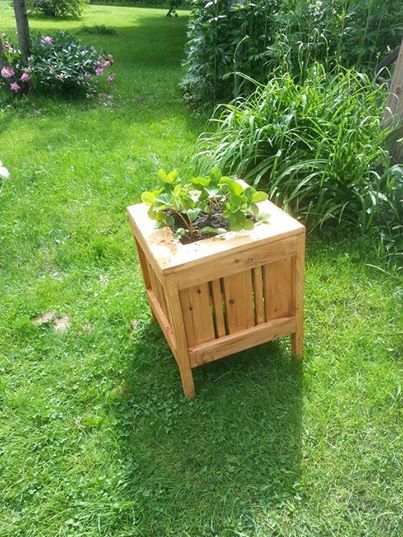
used the plan on this site then modified it.
Built from Plan(s)
Estimated Time Investment
Afternoon Project (3-6 Hours)
Finish Used
woods ceder finish
Recommended Skill Level
Beginner
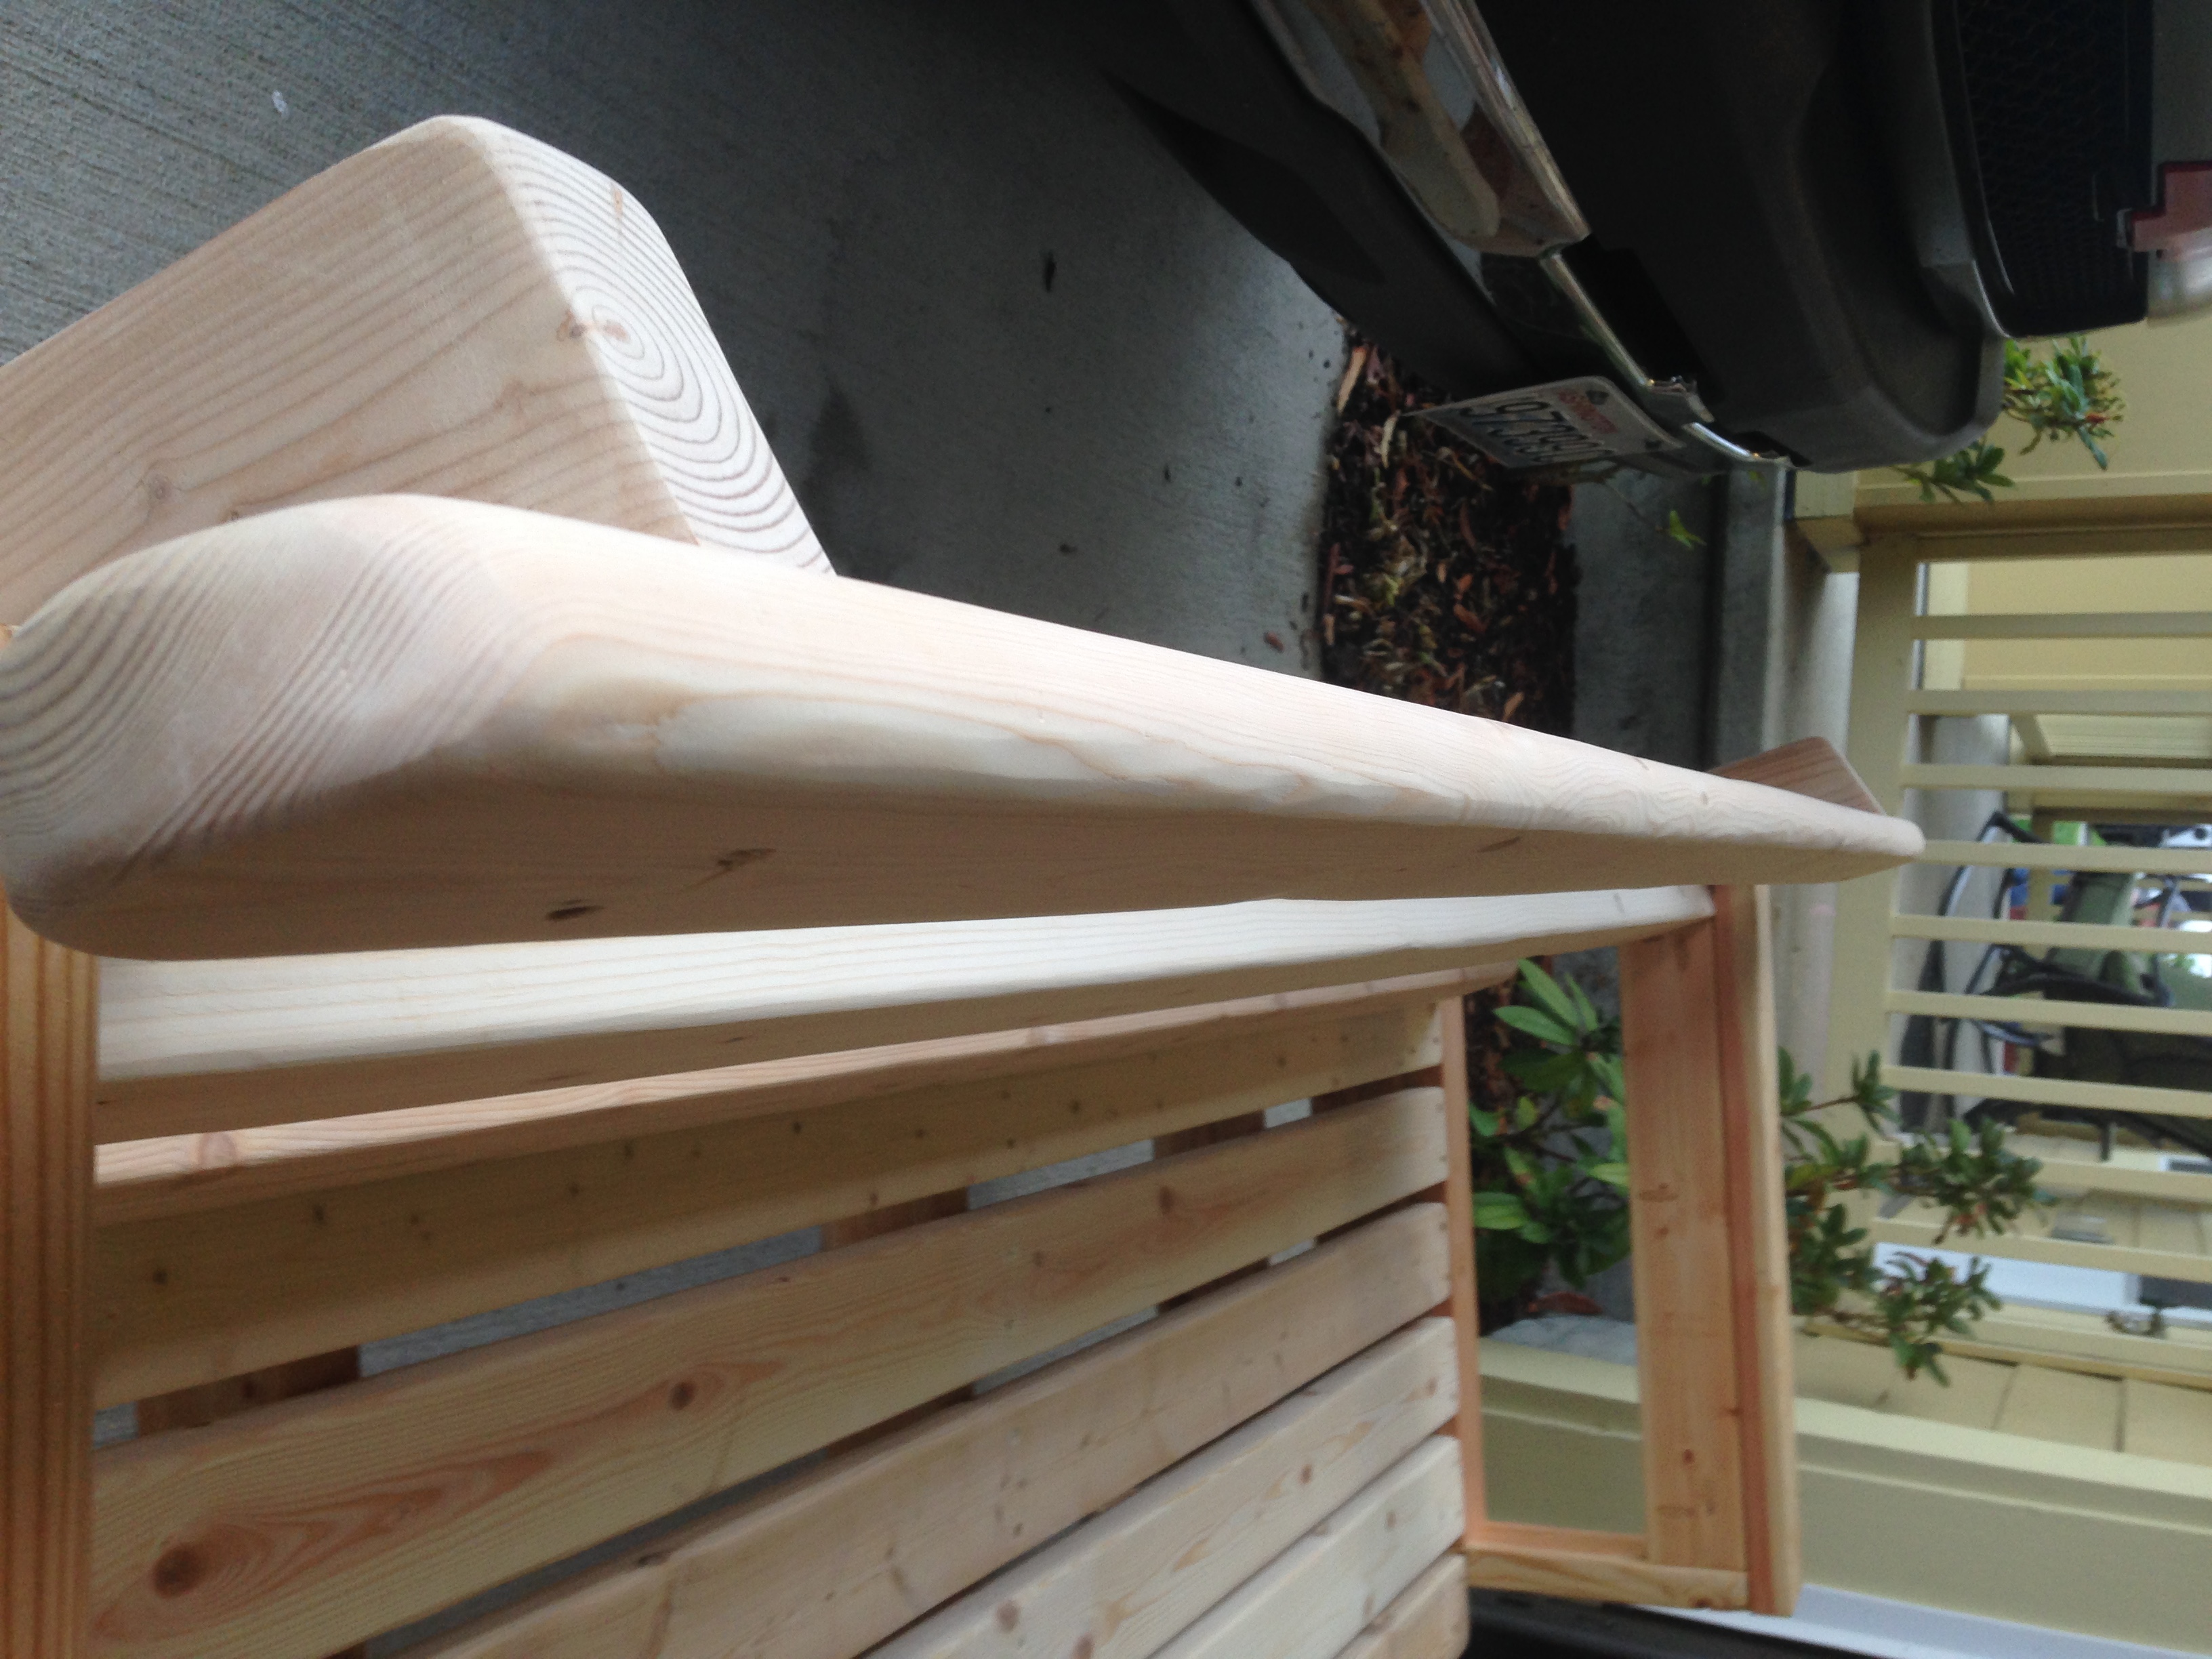
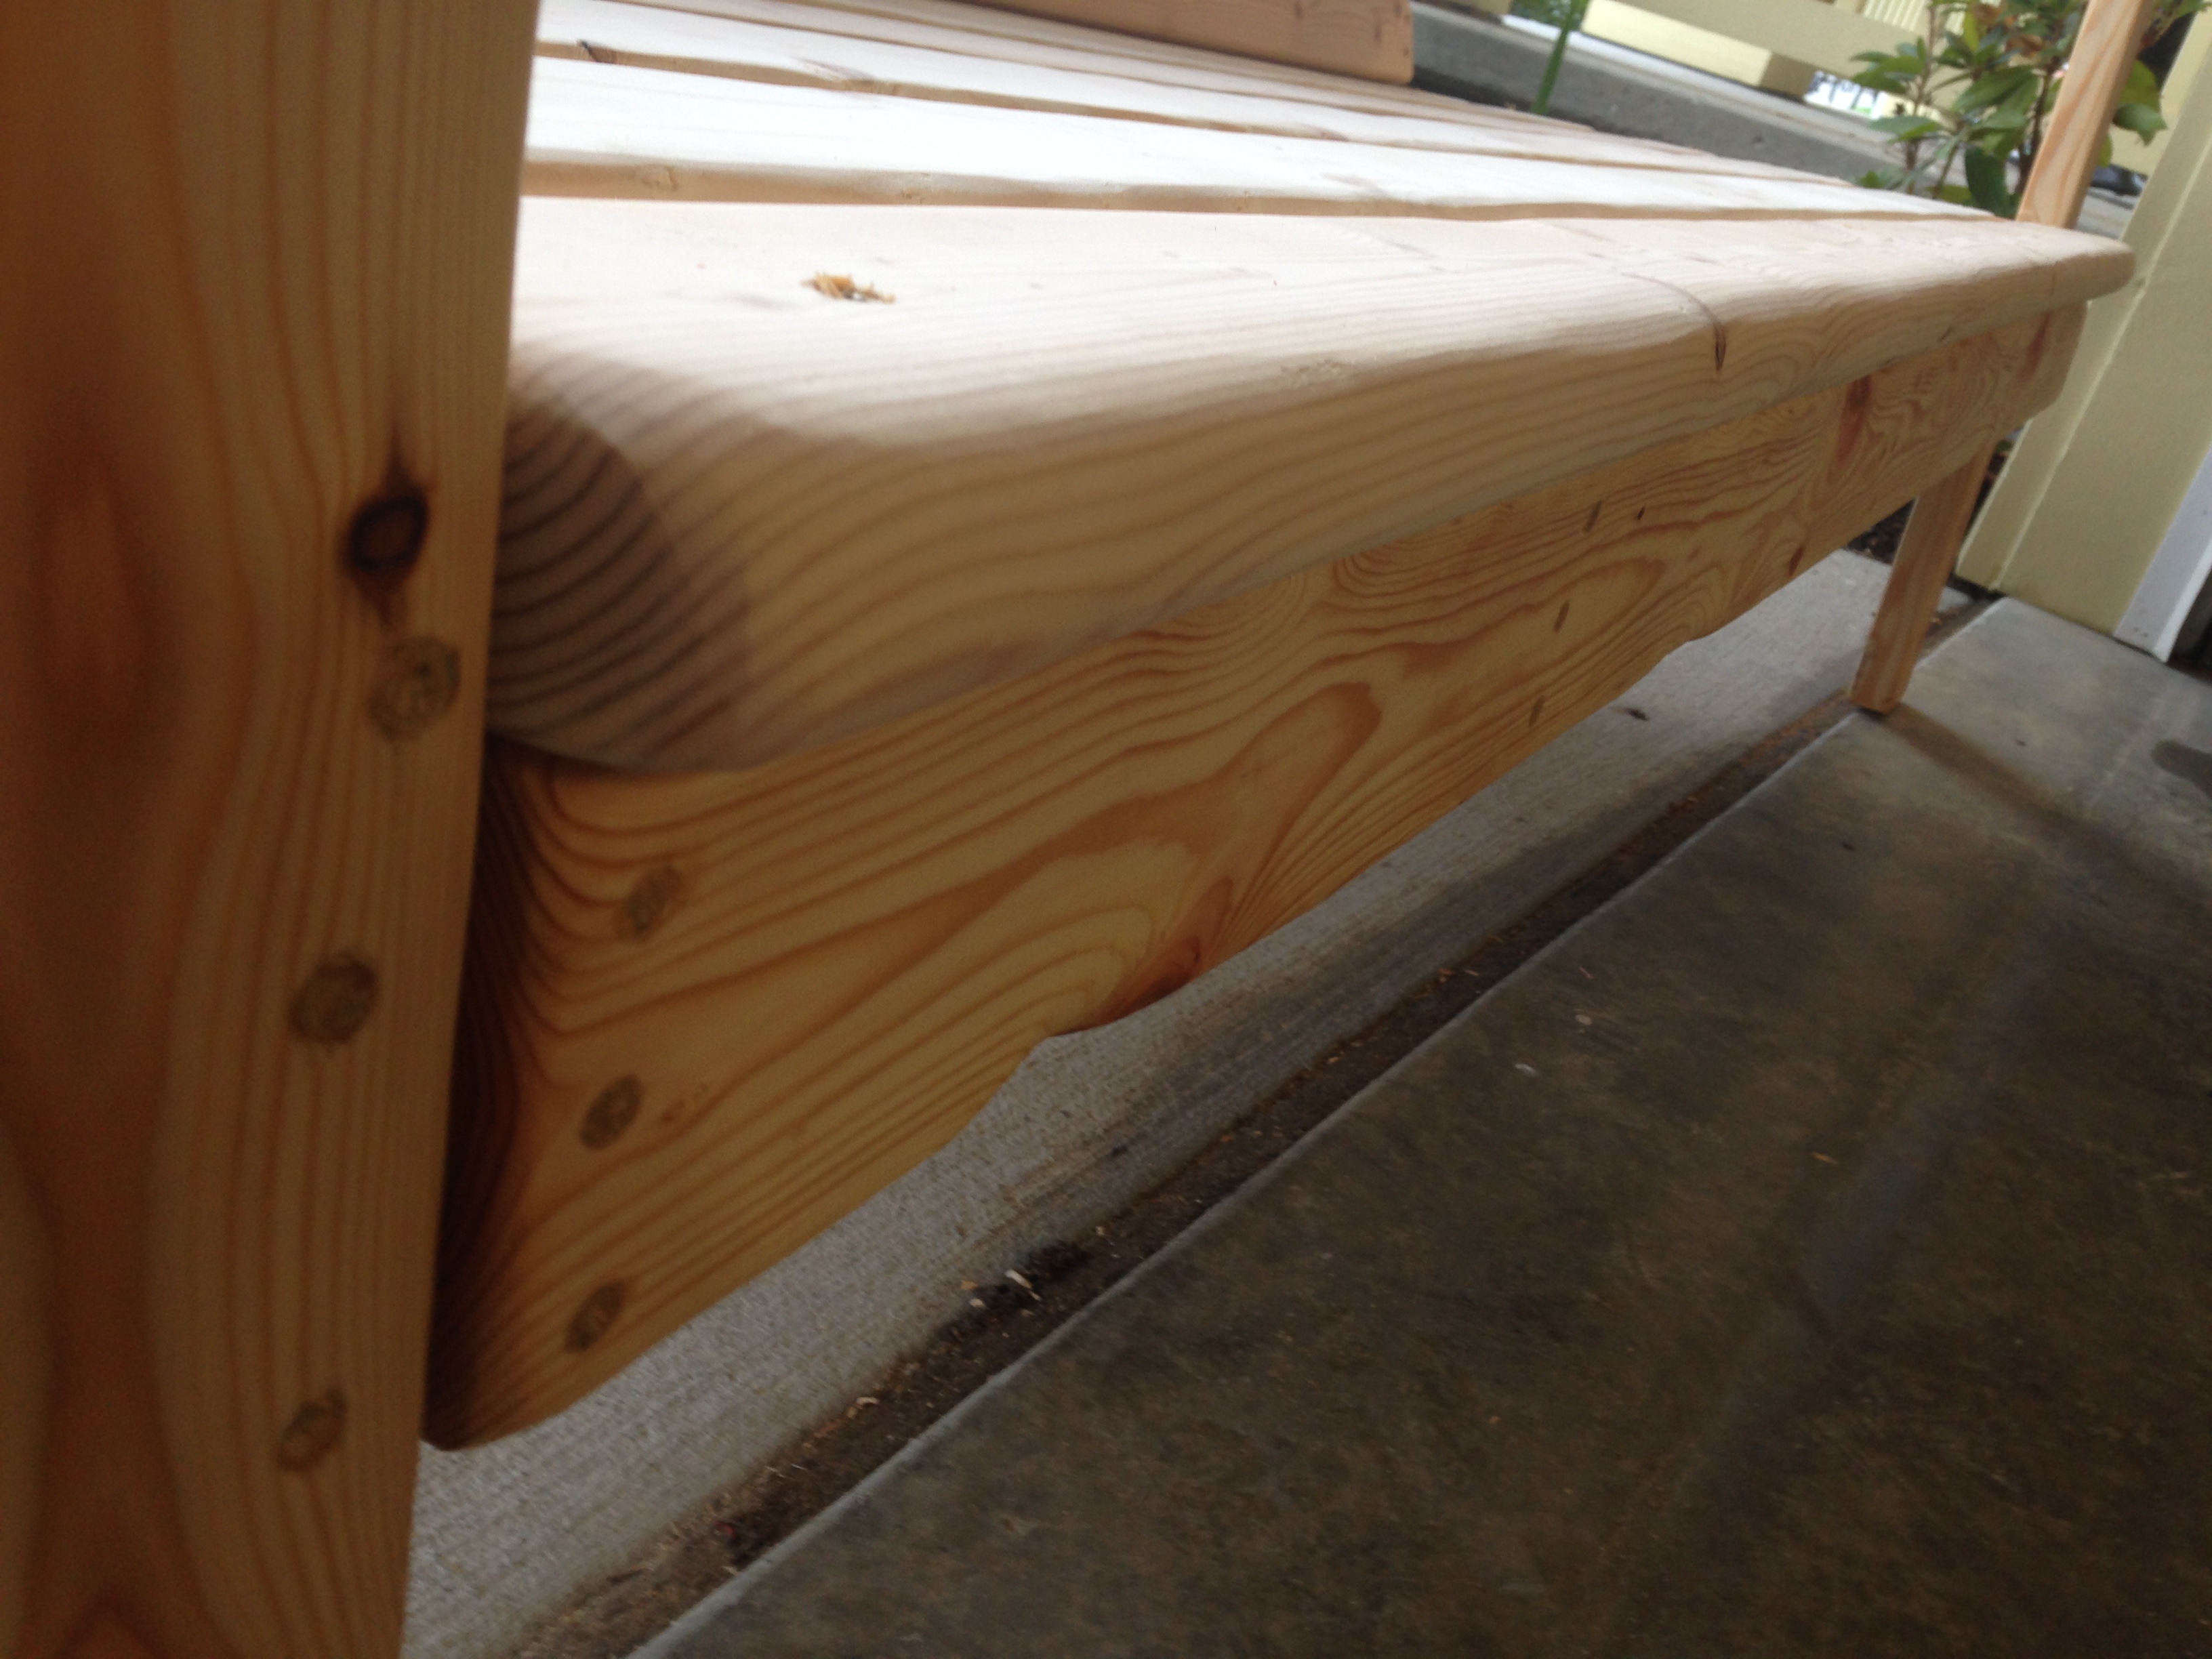
Sectional
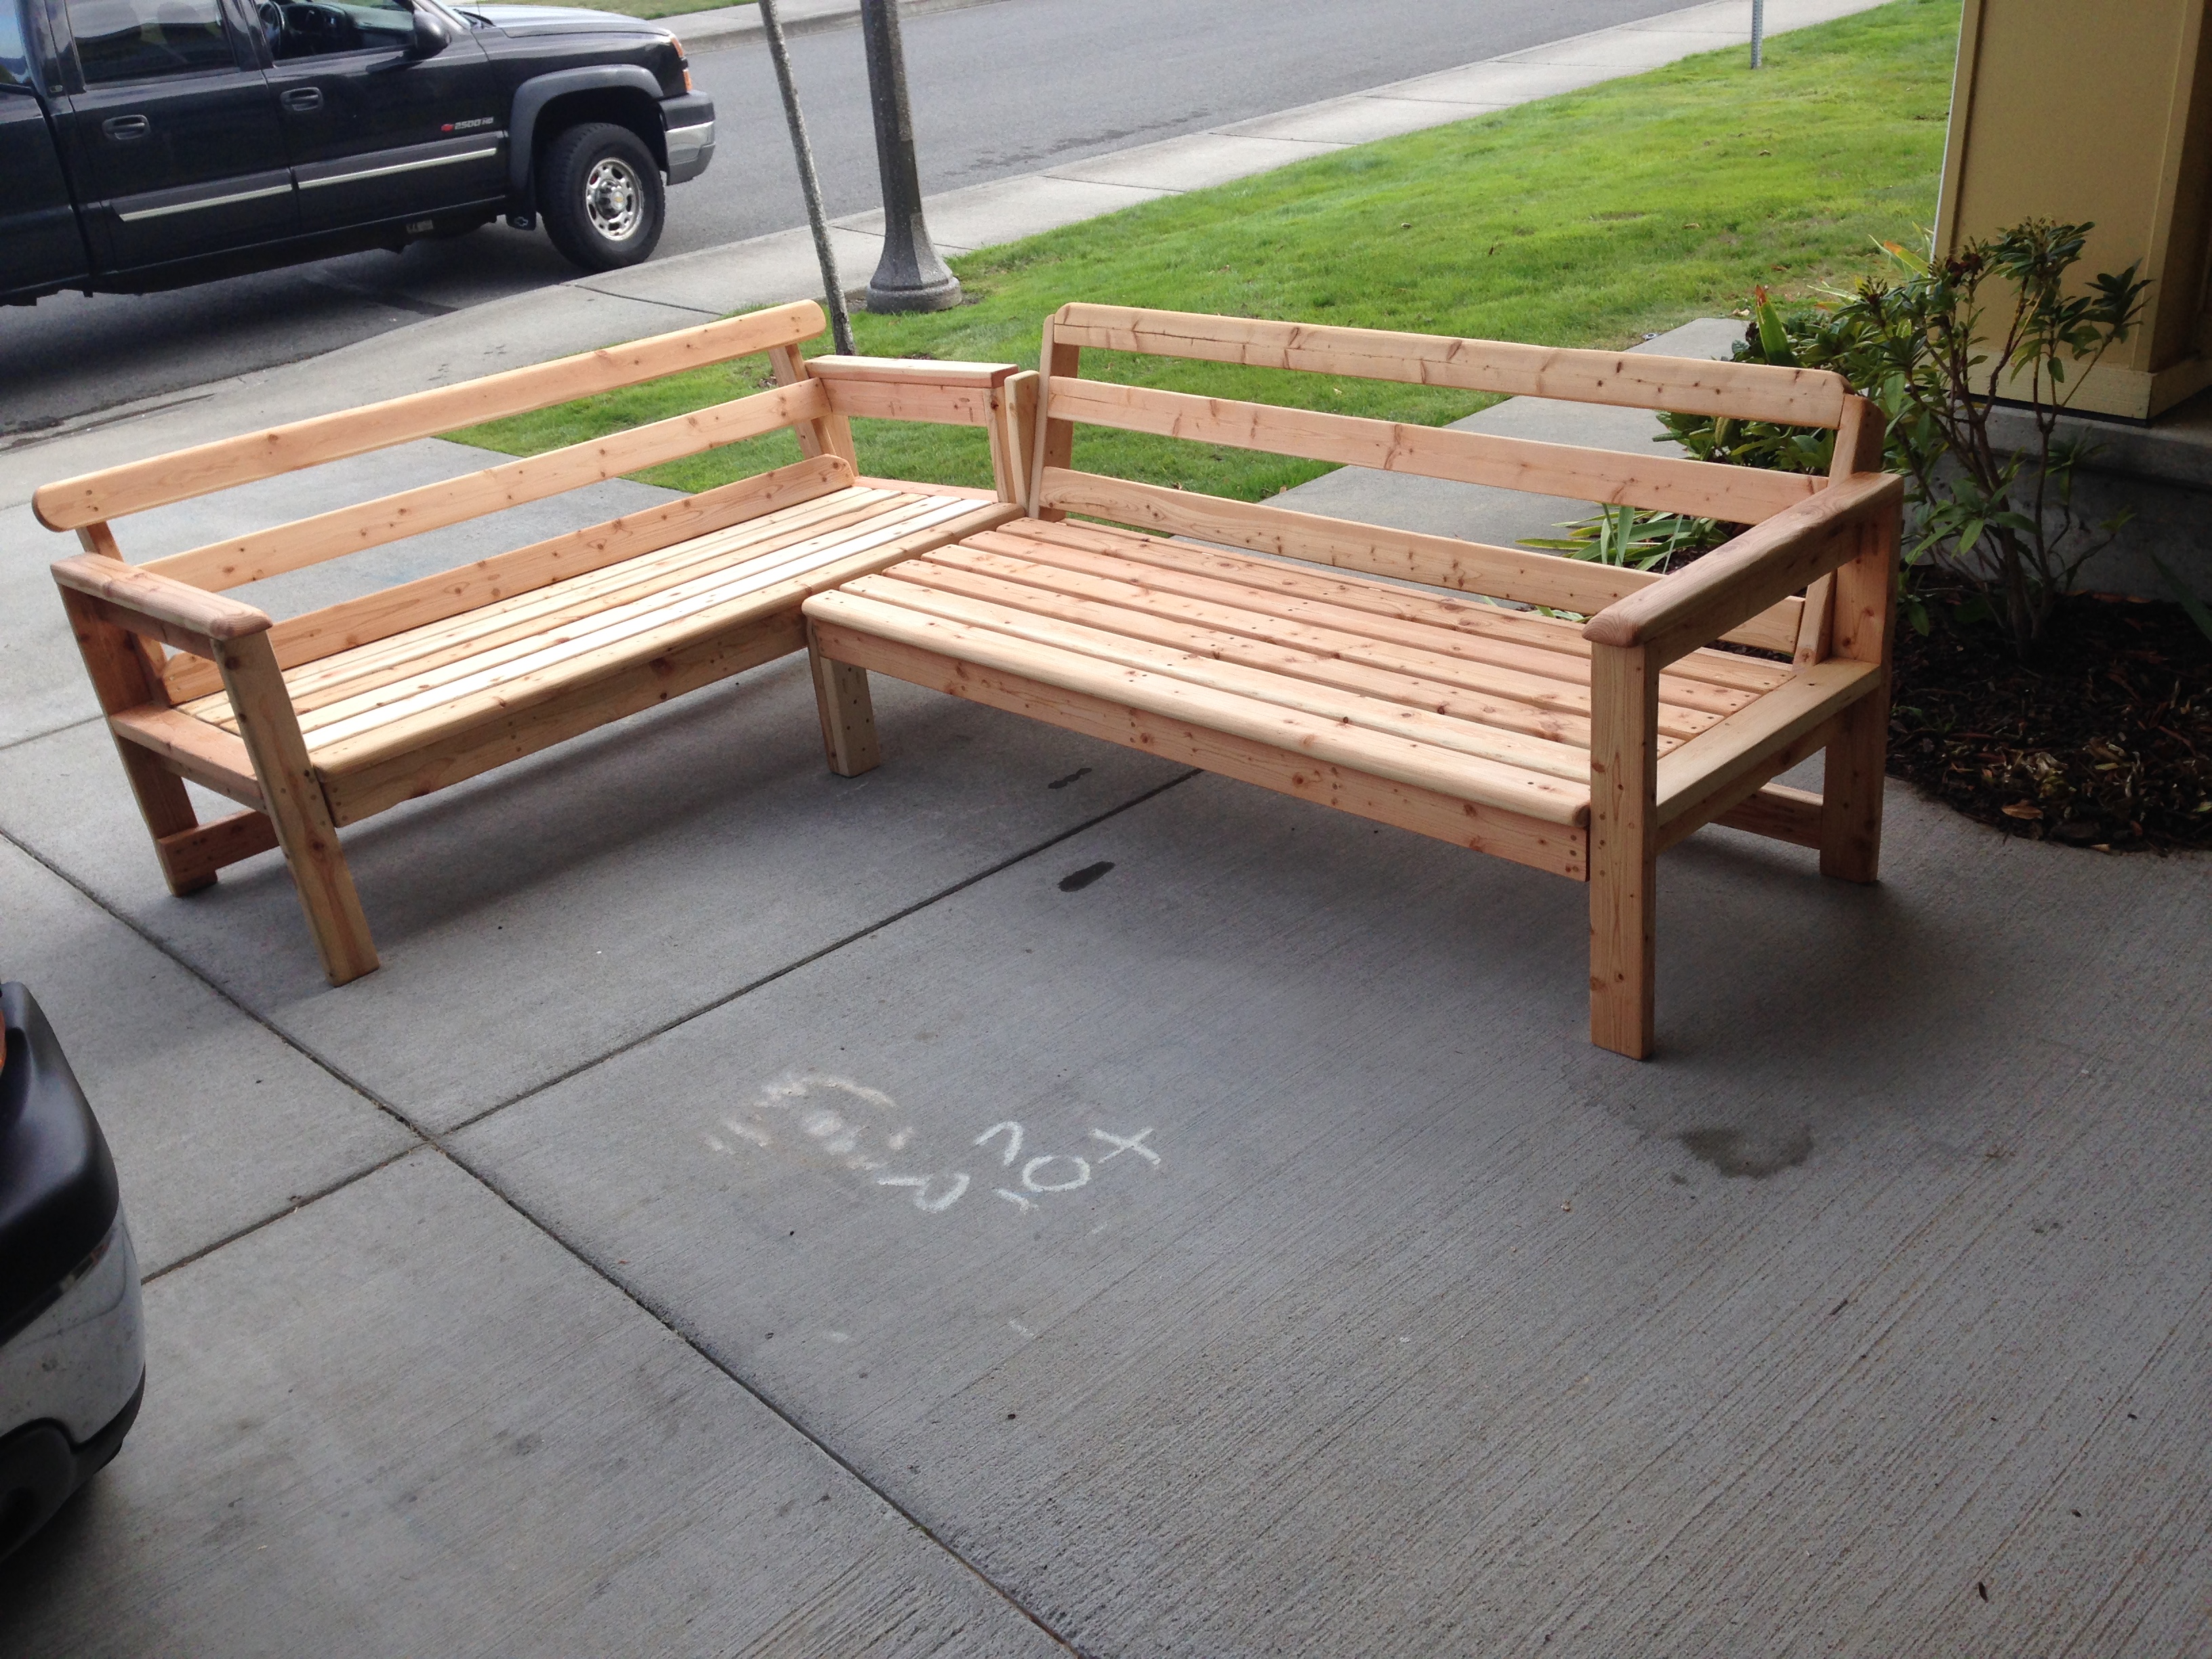
Mostly the same. Made smaller spacing for the seat (used 1x4 for spacing) and gave it a back (18" 15% miter) hand formed the front seat board and a bit of an overhang also hand formed the tops of the seat backs and armrest idea was it would be comfy with or without cushions. Ow and it's all construction grade lumber that I water sealed. Thanks for the idea!

Estimated Cost
$126.00
Estimated Time Investment
Weekend Project (10-20 Hours)
Finish Used
Thompsons clear water seal applied as I was assembled
Recommended Skill Level
Intermediate
Comments
Sun, 09/25/2016 - 09:33
I bet it's super comfy with
I bet it's super comfy with the leaning back! Great job thanks for bragging!
hidden powder station dresser
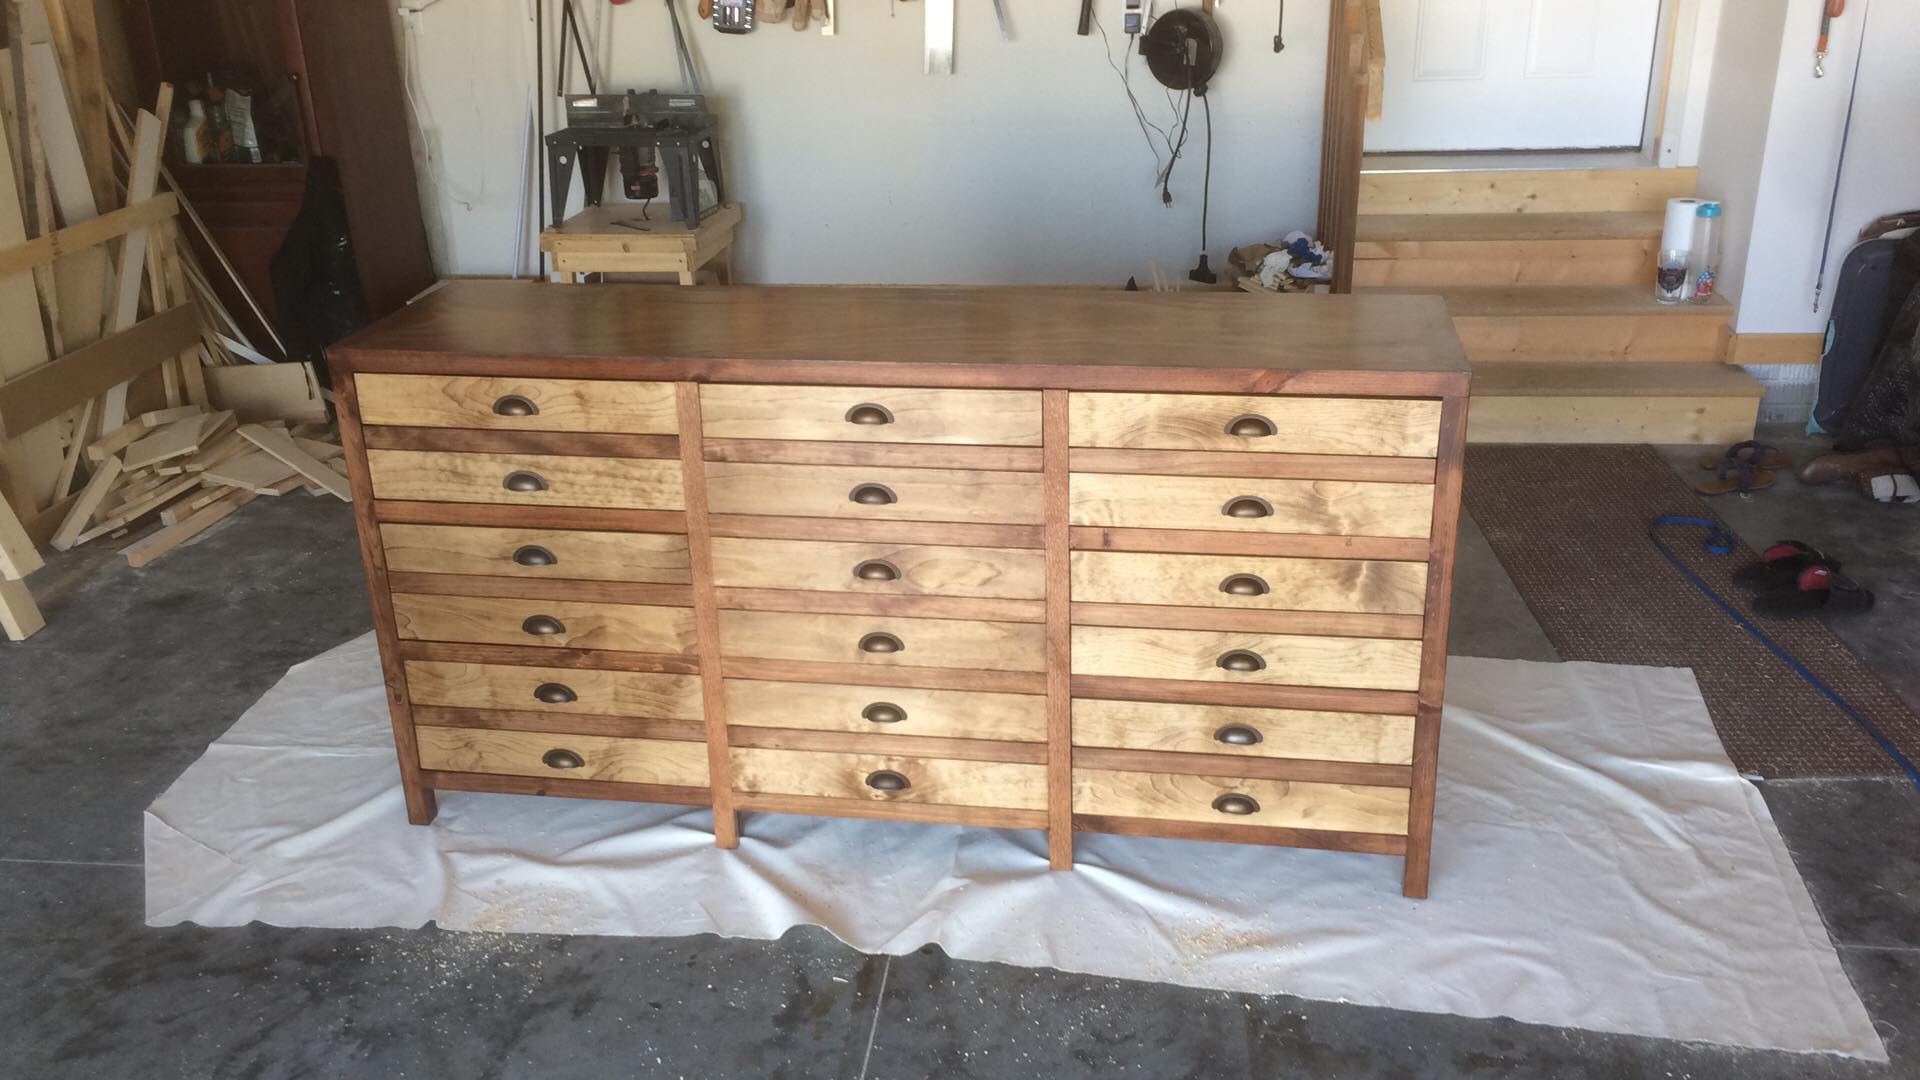
We did some small edit to the original plan. Putting six large drawers and only one chair which was moved to the center. We also extended the chair legs the full length of the cabinet. The outer legs are 2x2s instead of 2 1x2s since no chairs were placed there.
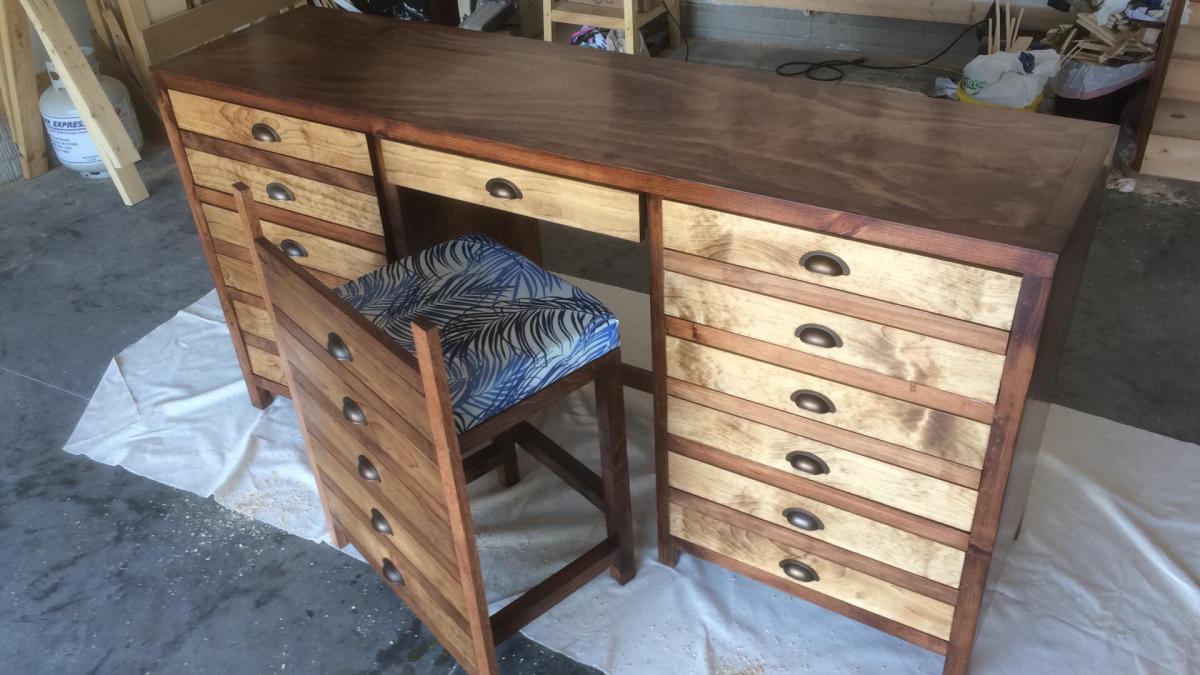
Built from Plan(s)
Estimated Cost
400
Estimated Time Investment
Week Long Project (20 Hours or More)
Finish Used
minwax early american on everything and then red oak stain on all except the drawer fronts and the red oak chair legs. Finished with an oil-based satin polyurethane.
Recommended Skill Level
Intermediate
Double Laundry Basket Organizer
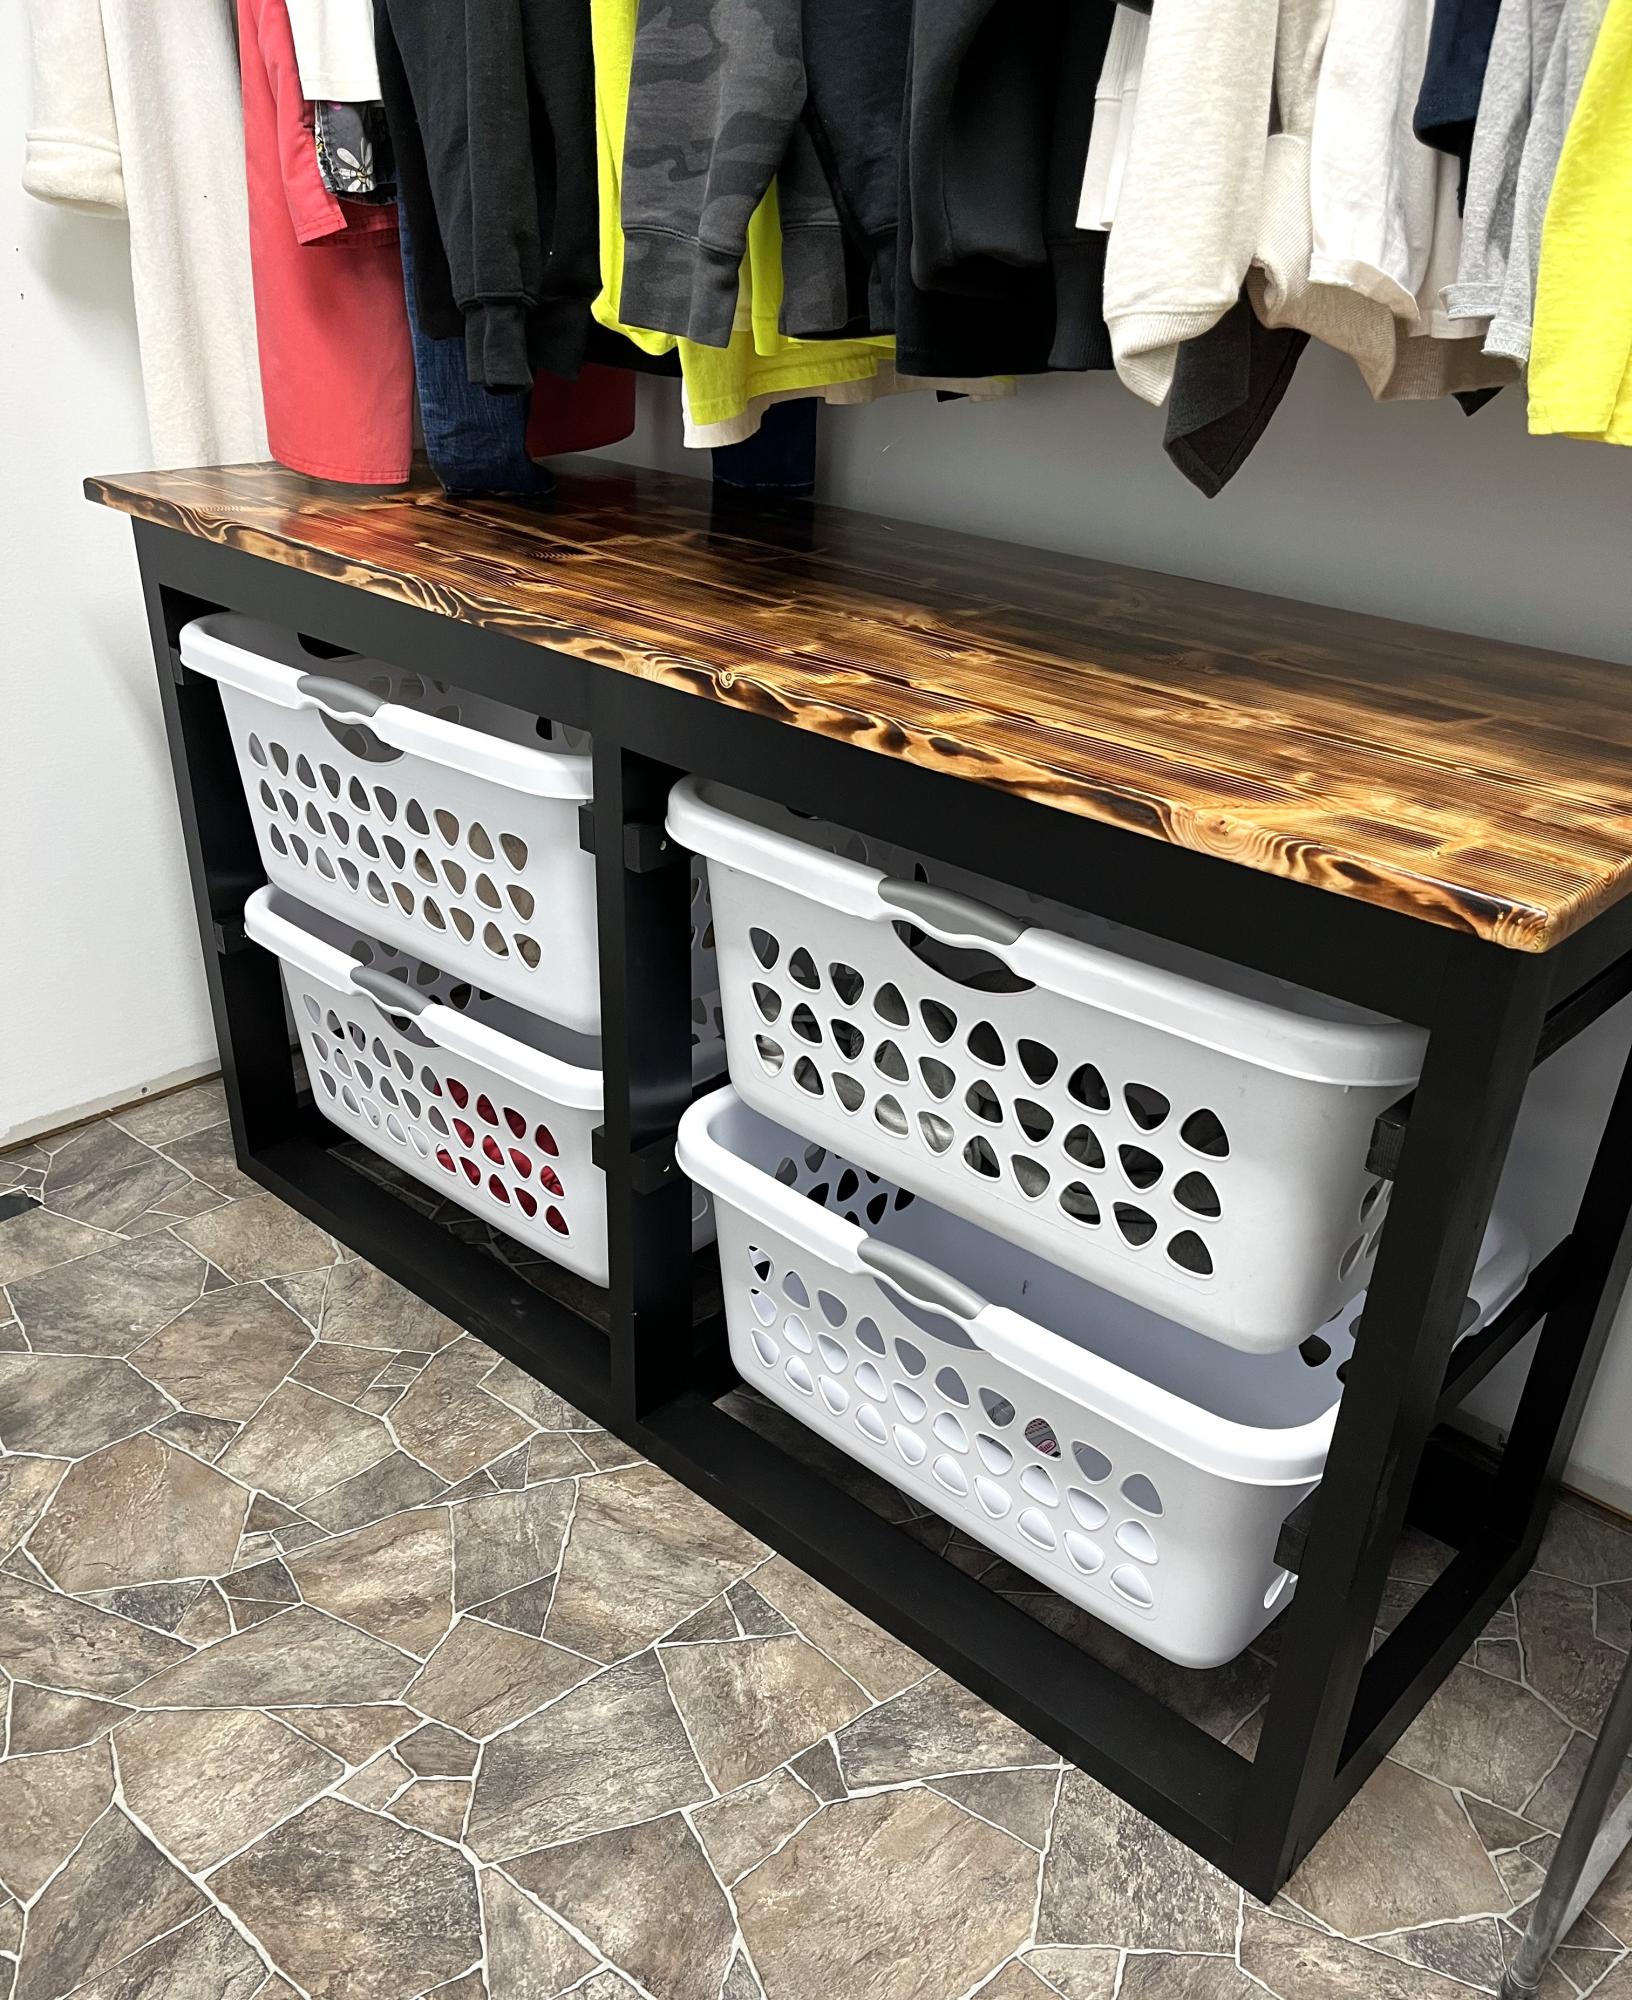
Ana your plans are amazing- here’s how mine turned out, I love it
Arlene
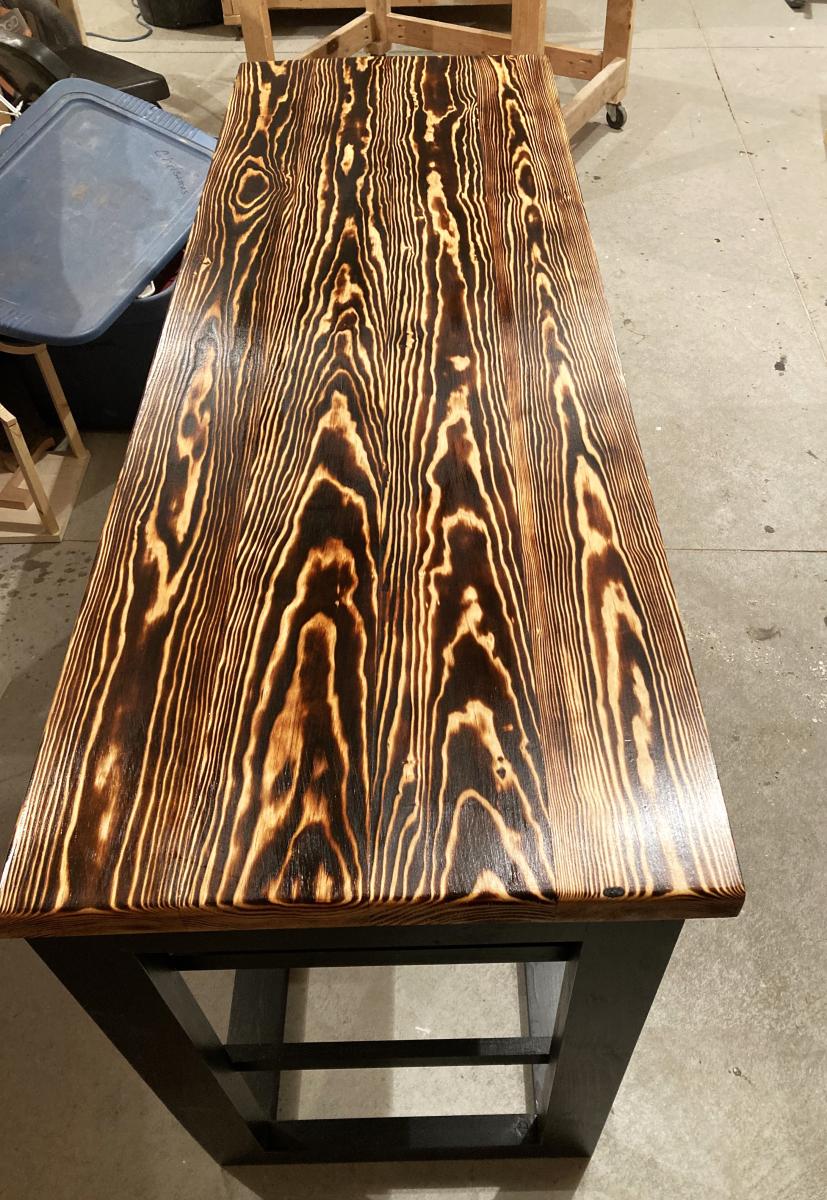
Built from Plan(s)
Simple Wine Hutch
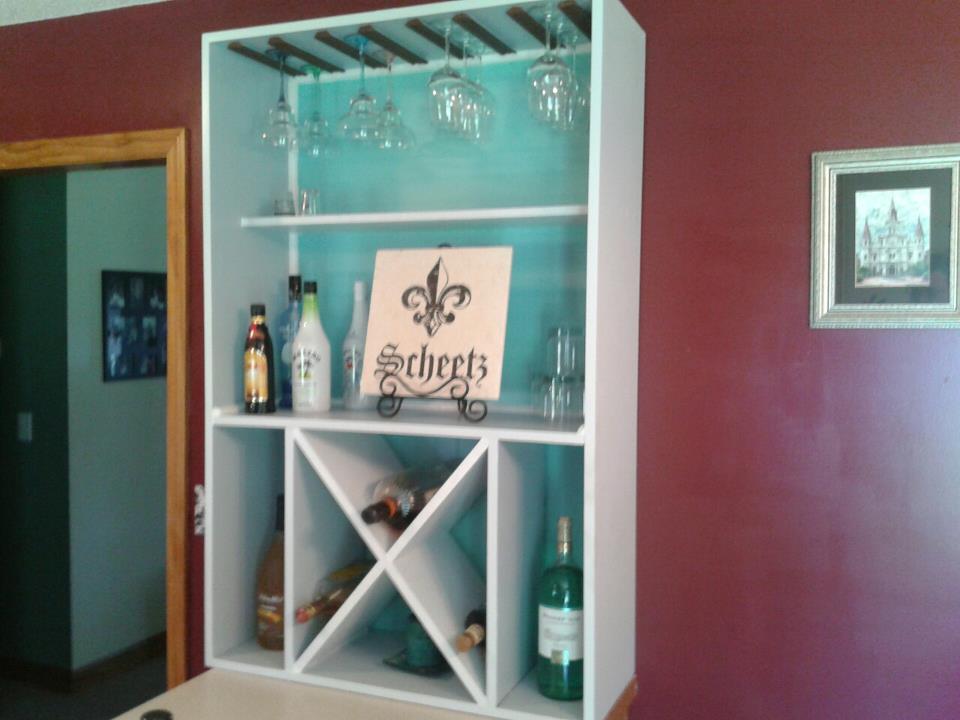
Made from Pine and great for Wine! A couple lengths of pine, some bead board, and coastal accent paint and ...Boooom! Show it off to all your friends and family.
Estimated Time Investment
Day Project (6-9 Hours)
Finish Used
Coastal Paint
Recommended Skill Level
Beginner
Comments
Princess canopy bed
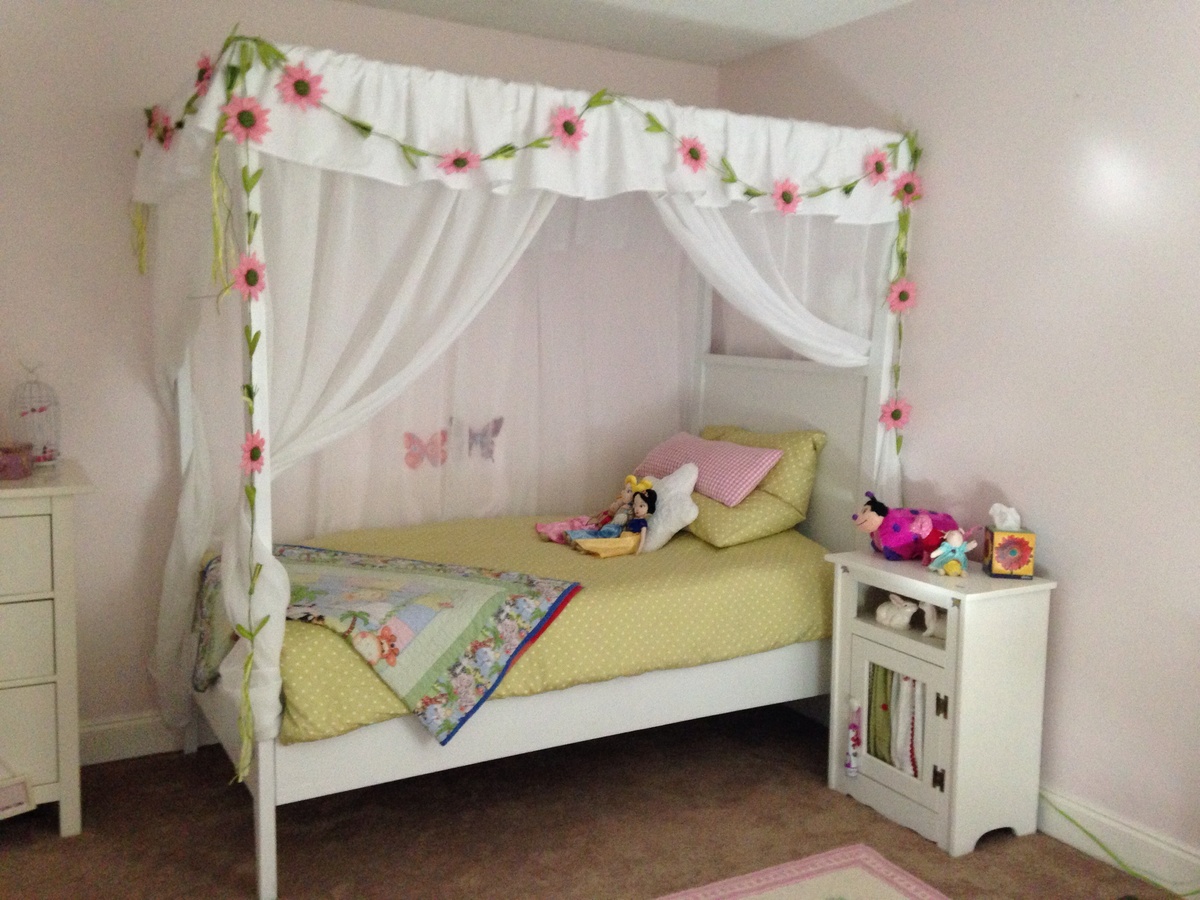
My first ever furniture making attempt . My 5 year old daughter Delilah really wanted a princess canopy bed and we found the perfect one on this site , thank
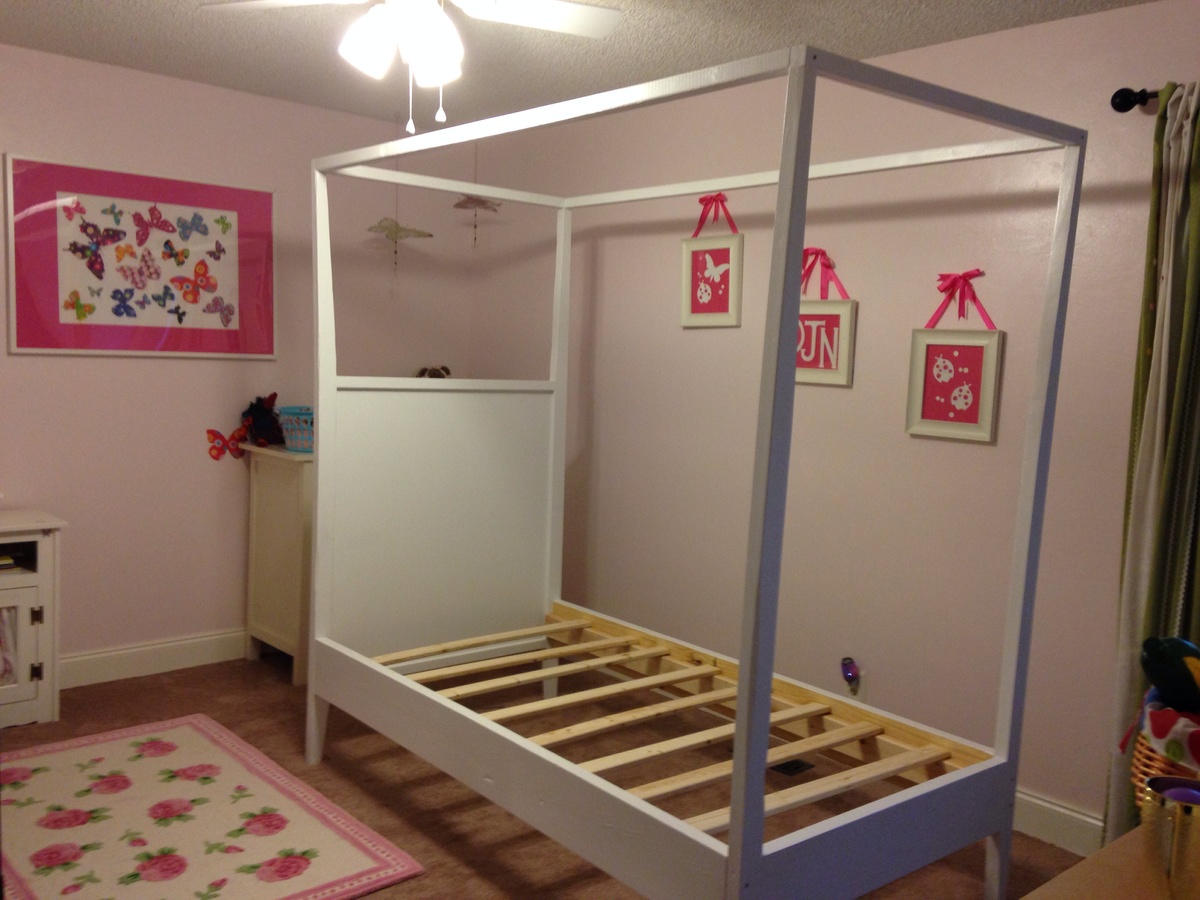

Built from Plan(s)
Estimated Cost
$70
Estimated Time Investment
Weekend Project (10-20 Hours)
Finish Used
Paint
Recommended Skill Level
Beginner
Comments

Loft Bed

This project was for our 4 year old daughter. We wanted to get her a loft bed, but I wanted to make sure the rails were really tall so she didn't fall out. So, I took some inspirtation from loft beds on this website as well as looking at pictures of beds you can buy. I also added the drawers within the stairs because I wanted to utilize the storage potential. That was the most difficult part as I'm not particularly experienced in making and installing drawers. Off to YouTube tutorials I went and it turned out quite nice. I had to build it in three different parts to get it in her room. It's the actual bed portion, the stairs, and the side wall. Once I got it together, I left the screws showing that I connected it with, which I hate, but when we have to move it out of there, I didn't want to go through a ton of trouble. I used Kreg pocket holes for all of the vertical bed slats which caused a ton of work plugging the holes, cutting off the excess, sanding, and then sanding again and again. But, it was well worth it. We have made her a cozy little nook underneath the bed and added a light since these pictures. Overall, it was a fun project


Estimated Cost
$500-$700
I used maple plywood for the walls which shot the price up a LOT
I used maple plywood for the walls which shot the price up a LOT
Estimated Time Investment
Week Long Project (20 Hours or More)
Finish Used
White paint
Recommended Skill Level
Intermediate