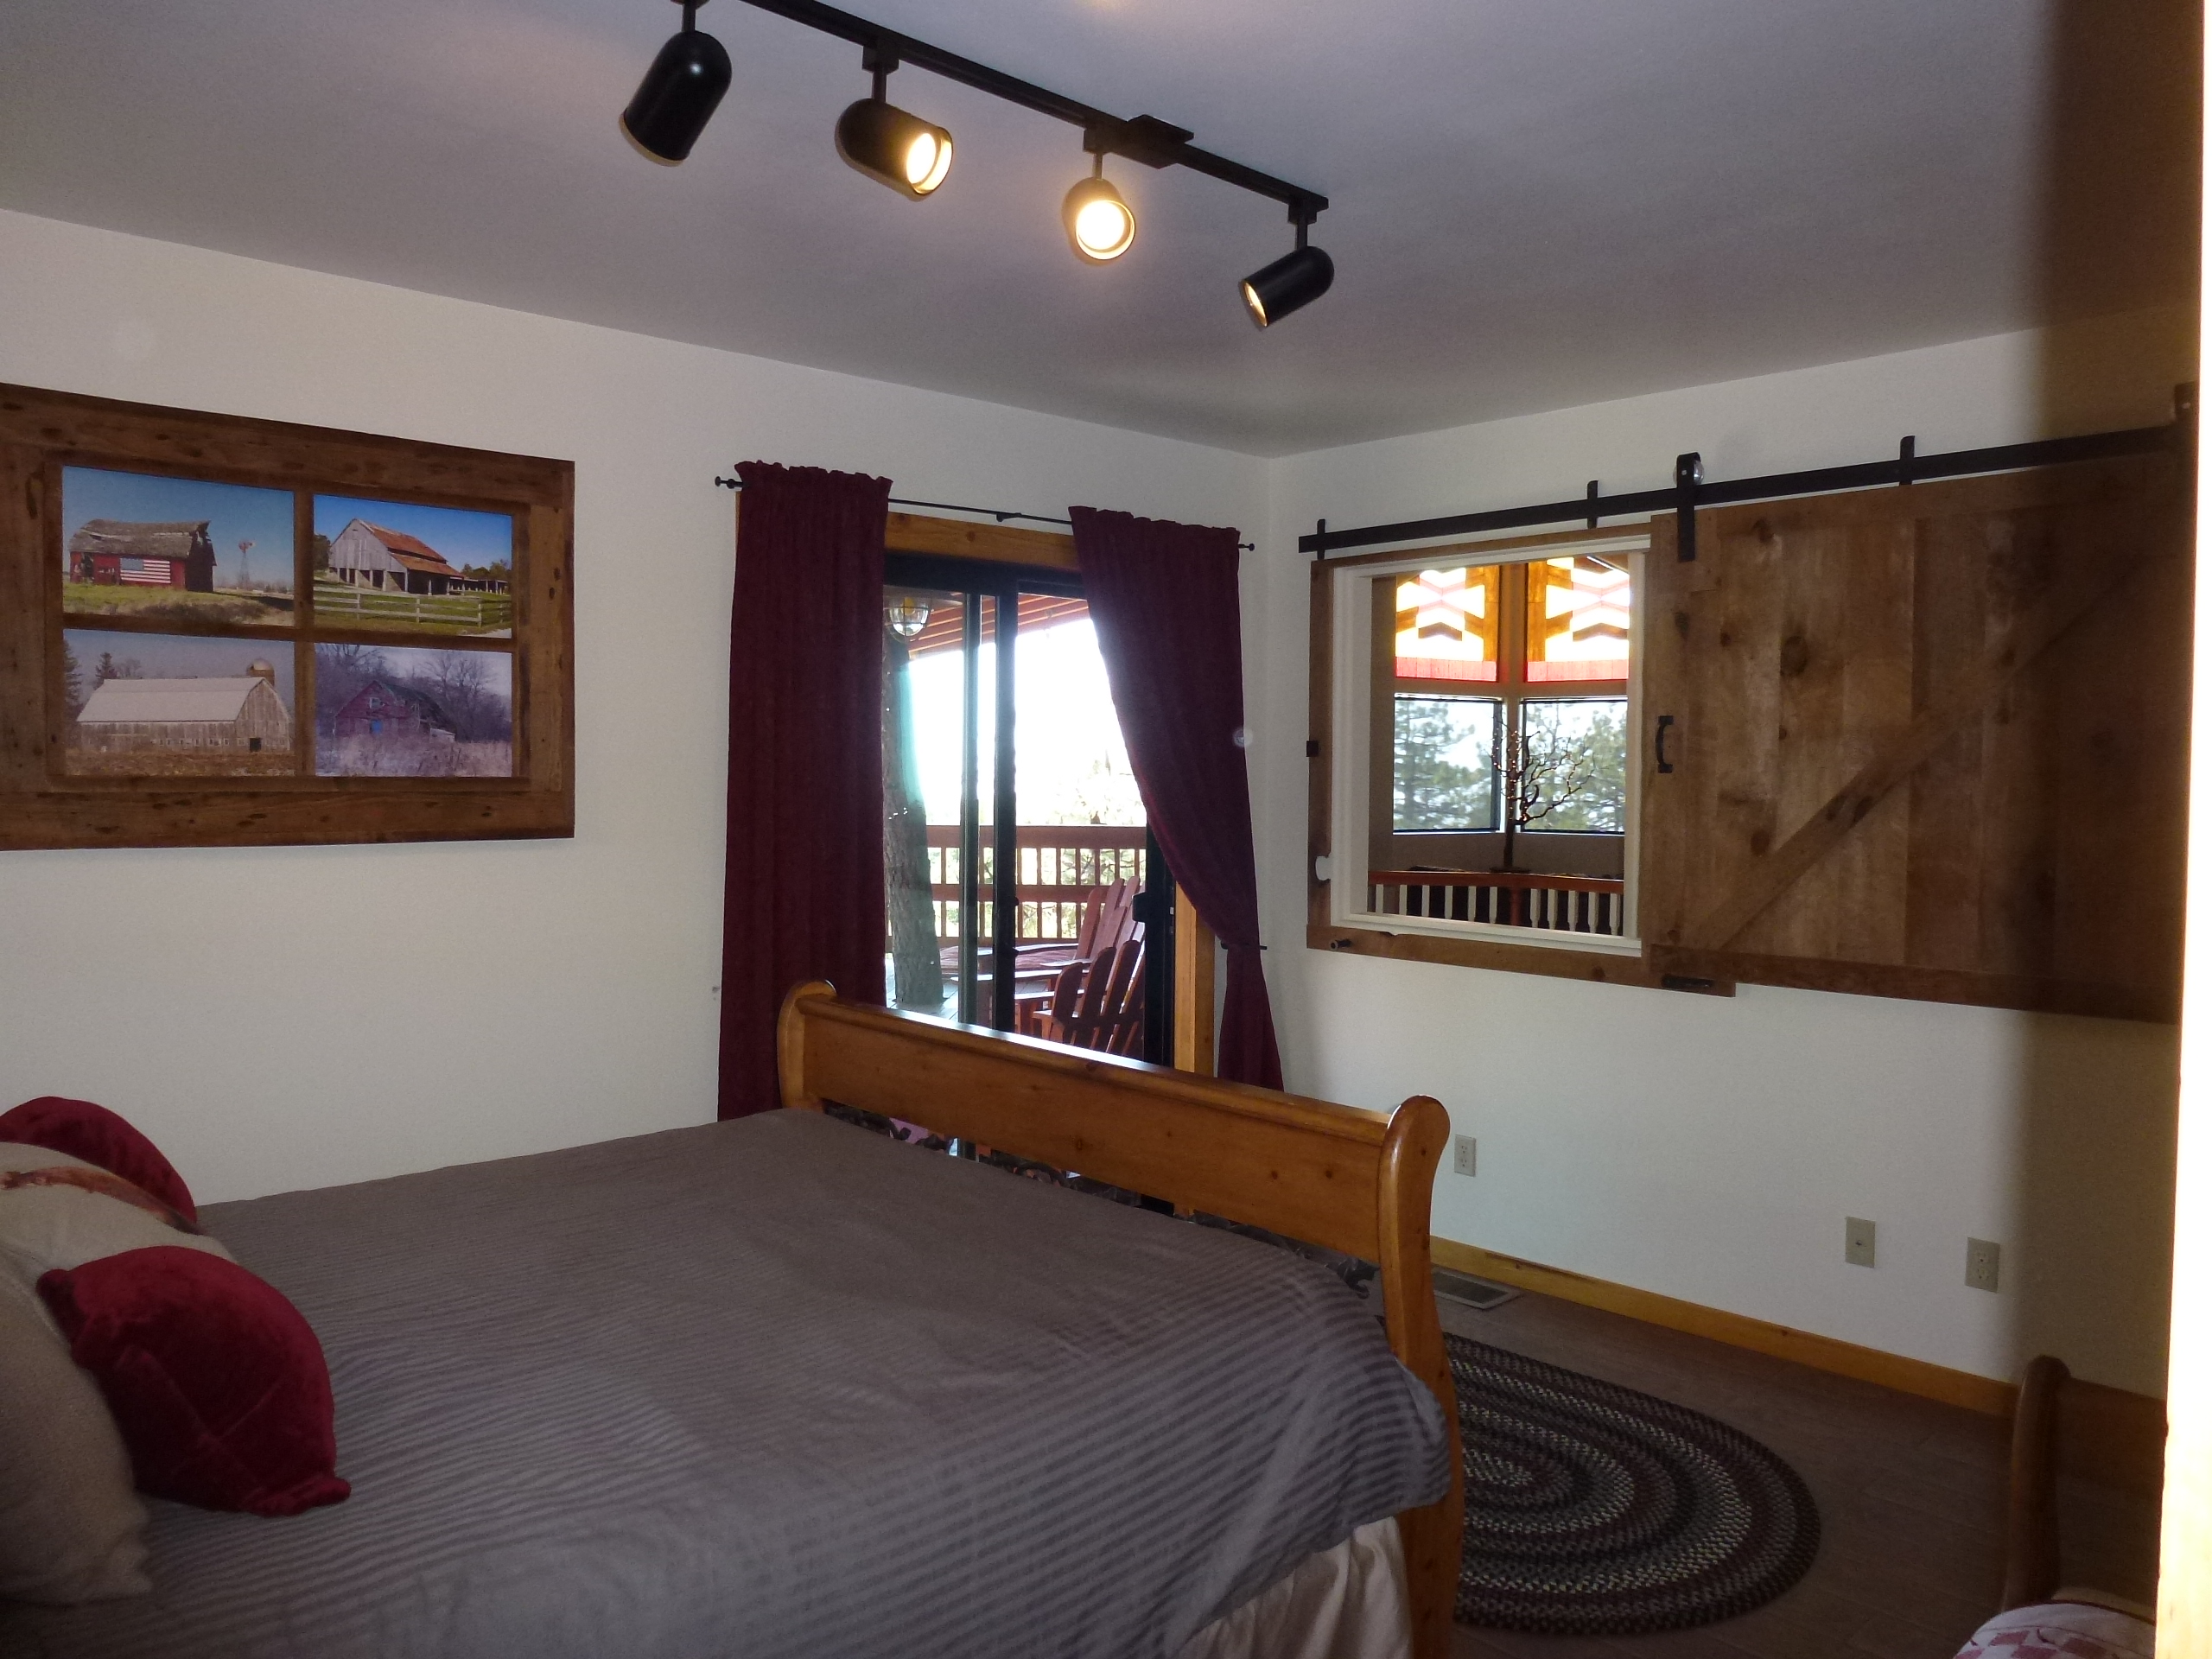
Community Brag Posts

Barnwood Frame

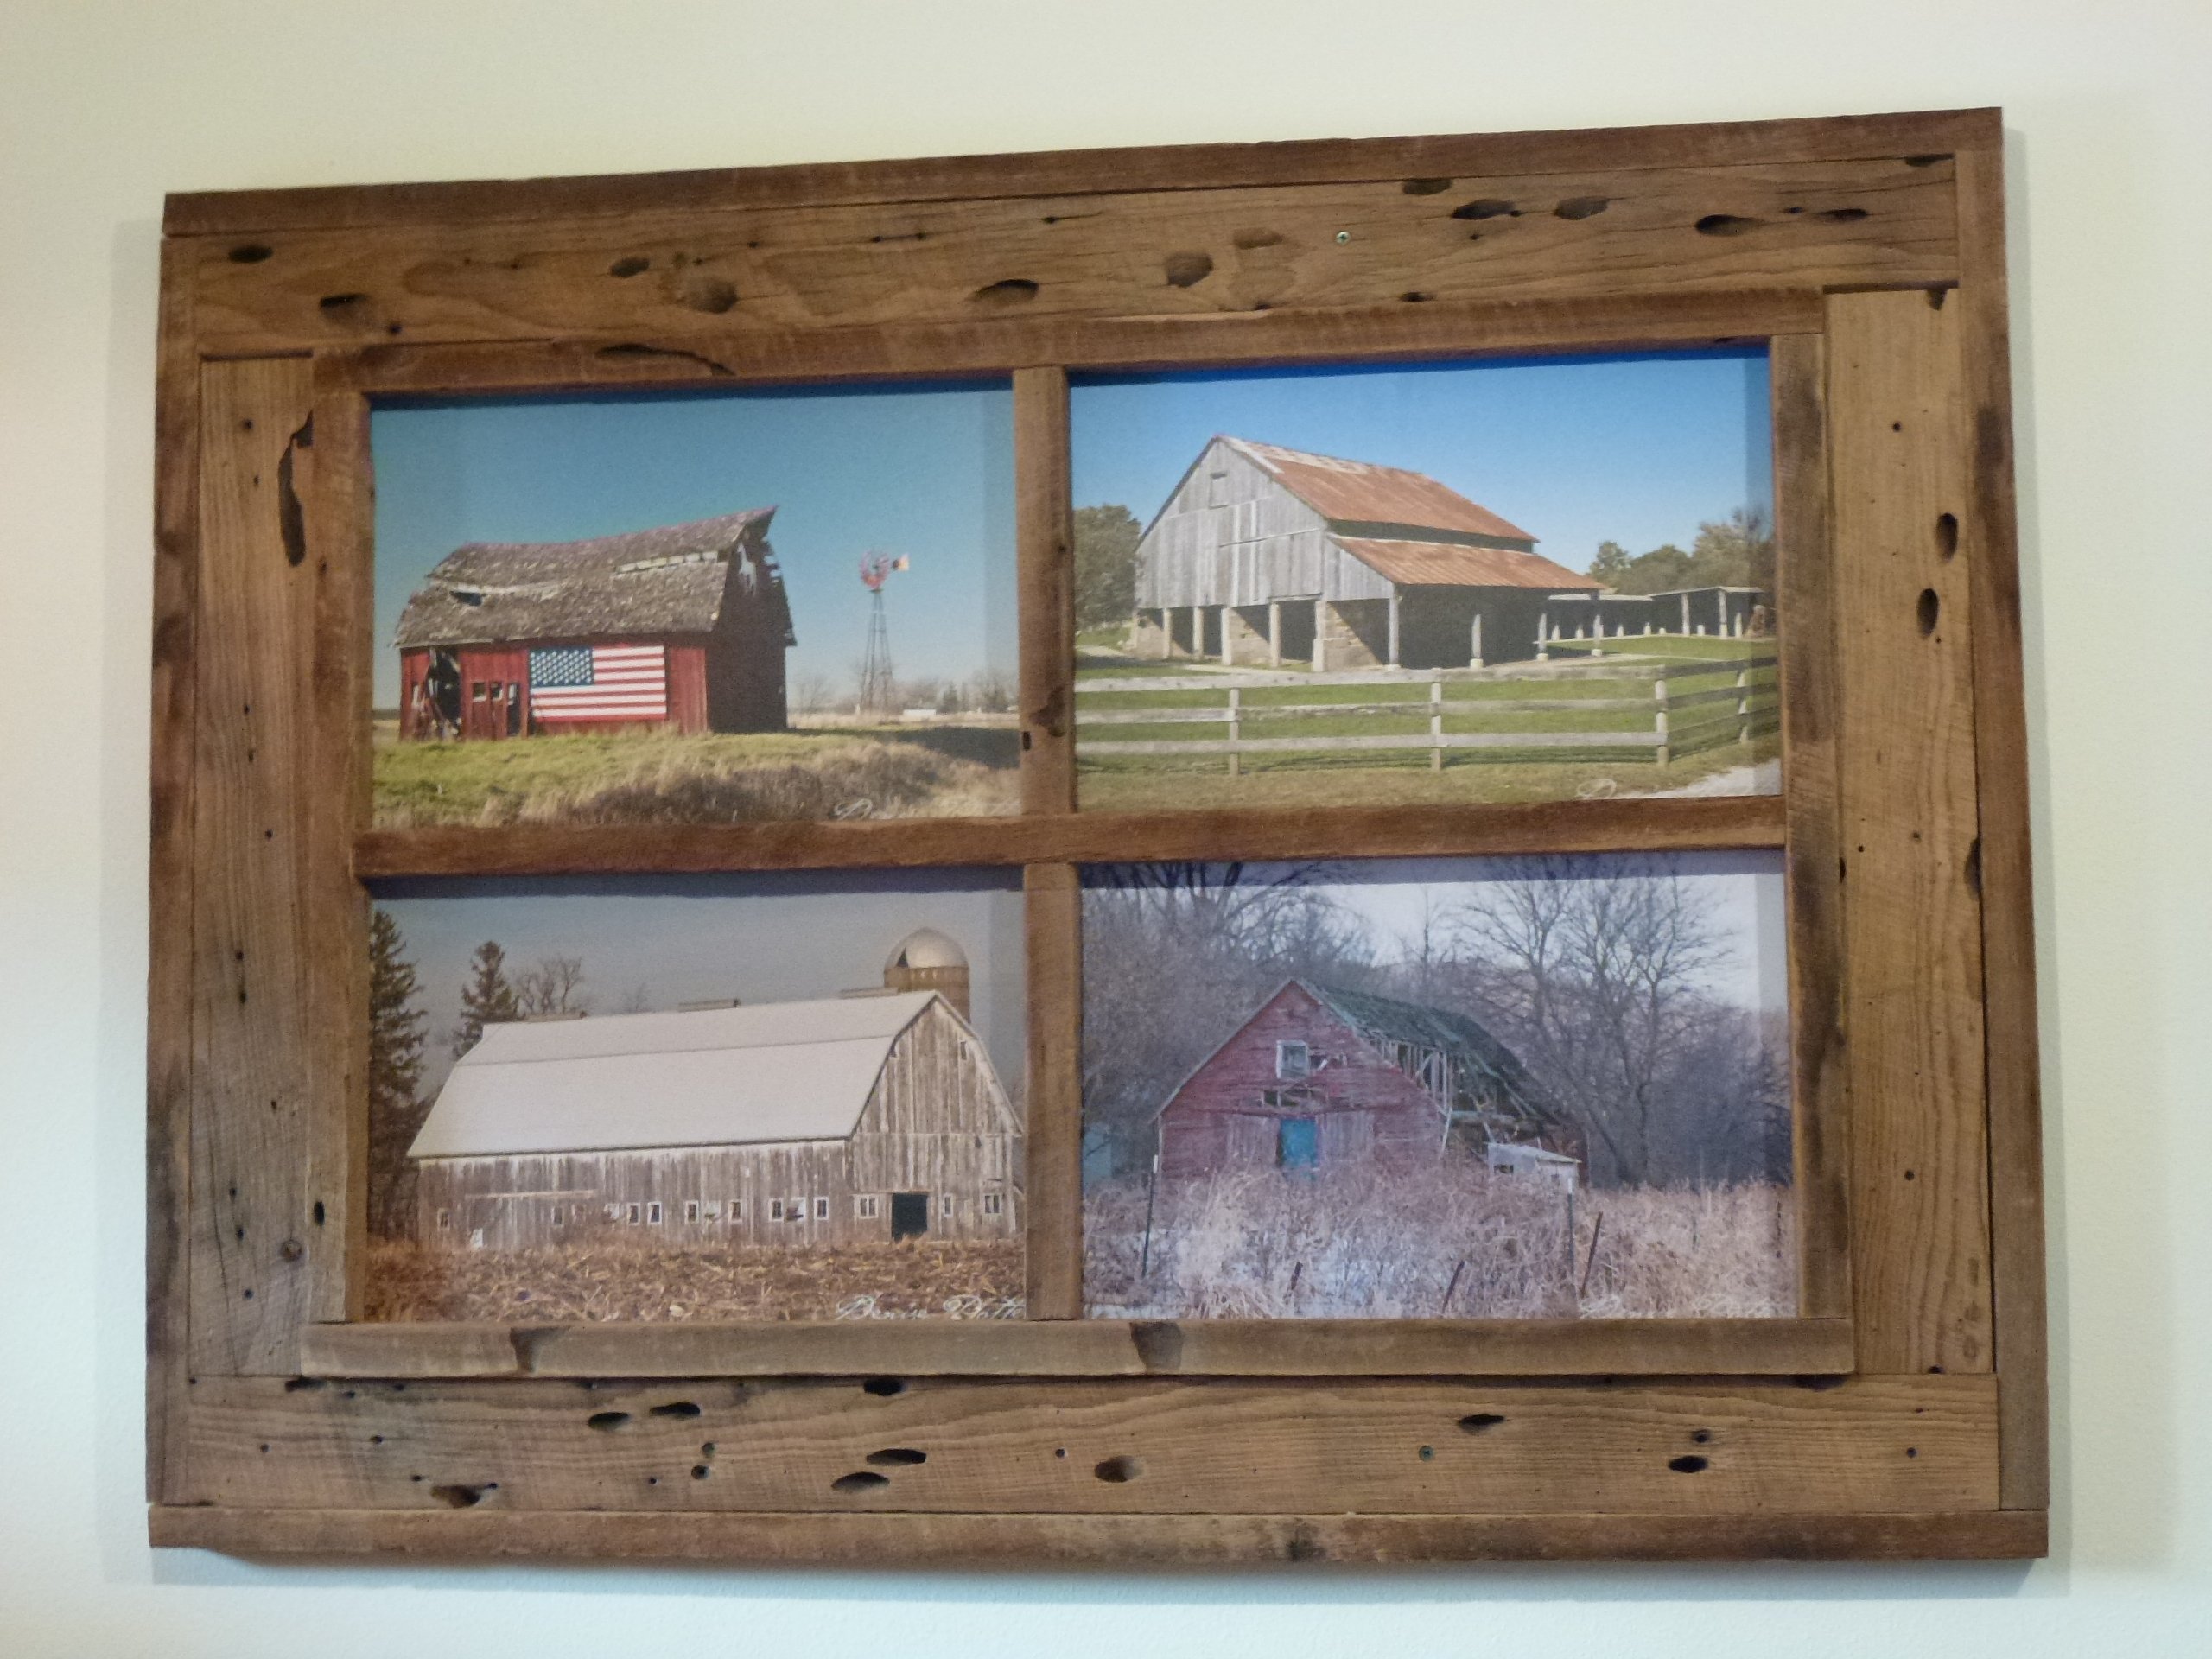
As part of a redecorating project using reclaimed barn wood for our guest bedroom, we constructed this window frame to display some photos from one of our siblings of barns found in Iowa.

The dimensions are 44” X 33” with each photographic image being 11” x 16.5”.
Since the wood had so many bore holes, we used ¾” redwood under the visible fascia for added strength.

Cost - $75 / 4.5 hours to build.

http://ana-white.com/2009/12/plans-barnwood-frames-1-and-10-minutes.html

Estimated Cost
$75.00
Estimated Time Investment
Afternoon Project (3-6 Hours)
Finish Used
None
Recommended Skill Level
Intermediate

triple pedestal dining table

This table is enormous at 106" long made from pine boards and fir studs. A very easy build considering the final outcome, totally doable by any DIYer.

Built from Plan(s)
Estimated Cost
$200
Estimated Time Investment
Weekend Project (10-20 Hours)
Finish Used
1. Minwax provincial stain
2. Two coats Minwax polycrylic clear satin
Recommended Skill Level
Intermediate

Playhouse in-progress

Submitted by DoctorEw on Mon, 05/02/2011 - 06:49

Due to rain (and horrible ability) this project has been taking a LONG time it seems. =) We had one of those "cheap" playsets from one of the warehouse clubs that would scare me to death anytime my girls got to swinging on it. So... we knocked it down and I took some liberty with the details from Ana's playset plans.

Estimated Cost
~$600 so far (concrete, wood, fasteners, shingles, etc..)
Finish Used
Will paint
Recommended Skill Level
Intermediate

My first coffee table and desk!

Submitted by Anonymous (not verified) on Mon, 12/27/2021 - 03:59

Ana, thanks for the online lessons! I’ve built four desks and the coffee table. Having fun too great retirement gig!
Ron from Ohio

Comments

Shoe dresser

Submitted by RoseOfShaz on Thu, 07/04/2013 - 15:26

I didn't build this shoe dresser because I particularly needed one, but it looked so lovely that I couldn't resist.

- I modified the plans by building 3 bins instead of 2 so it could hold more shoes.
- I decided against the dowel stick and opted for hinges instead, which were surprisingly not too difficult to assemble. I found that I didn't even need the magnets after installing the hinges as the doors stay closed.
- I used 7" chains on both sides of each bin instead of a belt to make it extra sturdy.
- I added two back legs.

Et voila! This is the end result. I'm very pleased.

PS. Those flopping bins are a pain when you're trying to build!! An extra pair of hands is definitely recommended.

Built from Plan(s)
Estimated Cost
$150 (with extra bin)
Estimated Time Investment
Weekend Project (10-20 Hours)
Finish Used
Walnut (can't remember the exact name of the stain, but it's the one Shanty 2 Chic always uses!)
Recommended Skill Level
Intermediate

Comments

SoCaliforniaMel

Fri, 07/05/2013 - 22:49

Pretty :) Good Job. Now if I only had the space for one thats 10 rows high :P I like the stain color too. Shanty 2 Chic always uses Rust-o-leum. I think its called dark walnut. Dont quote me though. I love the stain and spray paint combo colors they use.
~Melody

Nursery Room Book Shelves from $10 Ledge Plan

Submitted by karahart on Wed, 05/11/2011 - 08:42

I built these bookshelves with the help of my husband for our daughter's nursery. They were so simple to build, the finishing work is what took the most amount of time. They're very sturdy, and we get tons and tons of compliments on the 'feel' that they add to the nursery!

Built from Plan(s)
Estimated Cost
$35
Estimated Time Investment
Afternoon Project (3-6 Hours)
Finish Used
I put on a coat of white primer, and then painted quite a few coats of ultra-white paint on each shelf. I sanded between each coat of paint, and finished it off with a top coat of polycrylic. I also filled in the screw holes with white caulk and painted over that once they were all mounted.
Recommended Skill Level
Starter Project

Inspo + Direction

Submitted by CarrieLJP on Tue, 01/16/2018 - 15:36

I fell in love with a headboard I found on Houzz that was priced over $1,500. I knew I wanted to build it myself but I had never built a headboard to this scale before. Several headboards from Ana's site helped give me direction and this is what I ended up with. My husband and I build furniture for a living, so we had plenty of lumber around to put most of the body together, but we don't often work with trim in such fine detail, so that added significantly to the cost (and time) invested. If I had to guess though, the headboard as we built it was probably around $125.

Built from Plan(s)
Estimated Cost
$100-$125
Estimated Time Investment
Day Project (6-9 Hours)
Finish Used
Special Walnut stain (let sit for 20+ minutes before wiping off), dry-brush white wash, finished with Johnson hard wax.
Recommended Skill Level
Intermediate

12 ft farmhouse table with extensions - reclaimed wood

I had no experience building furniture prior to this project but I wanted a 12 ft outdoor table and could not find one.  This tables center section is 8 ft and was built roughly following the plans for the farmhouse table.  I added two 2 ft extensions at each end making the overall table 12 ft.  The extensions included aprons so when installed they look to be part of the table.  The extensions just plug into the end apron of the center section with 2x4 oak braces which engage in the apron and under the table approximately 2 ft from end.  There is no visual sagging of the extensions. I finished the table with Sikkens DEK finish.


Estimated Cost
The lumber was reclaimed and cost approximately $400 for this project.
Estimated Time Investment
Week Long Project (20 Hours or More)
Finish Used
Sikkens DEK transparent
Recommended Skill Level
Beginner

6 Cube Bookshelf - Poplar

Submitted by kev117s on Tue, 07/28/2015 - 18:29

I built this set of cube shelves for my 3 yr old son's room. THANK YOU, ANA! I used poplar as I did not want to paint the wood and I love the irregular pattern of the wood grain. To save money, I used pine for the inner shelves and dividers. I stained it using the oxidized solution (http://www.friendly-home.net/2012/05/oxidized-x-console.html) that Ana recommended from the instructions of the Rustic Console. I added a cup of coffee to the solution to get a darker browner shade and unevenly sanded the wood for the distressed look. It matches the poplar wood more so than keeping the pine wood as is.

I also created a 5-tier version to match the 6 cube shelves but did not include the legs. I thought it would be more stable to keep the lower frame on the ground.

I purchased the storage boxes from Amazon It was around $20 for 6 boxes!


I am ready for the next project!

Built from Plan(s)
Estimated Time Investment
Week Long Project (20 Hours or More)
Finish Used
Oxidized solution for the shelves and dividers.
Recommended Skill Level
Beginner

Recycle/garbage center

Submitted by YeenYus on Wed, 07/24/2013 - 08:50

We just moved in to a newly built house, so it was important for everything to have a place. I don't like the garbage can to be under the sink, and my wife doesn't like the can just out on the floor...too many missed hook shots with the coffee filters I guess! This cabinet solves many kitchen problems all at once. An attractive cabinet that hides garbage and recycle, yet is easy to get in and out of. The railroad spike handles are something we sell on Etsy, as well as knobs and shelves. The shop name is YeenYus.

Estimated Time Investment
Weekend Project (10-20 Hours)
Finish Used
Stain, paint
Recommended Skill Level
Intermediate

Comments

Ecspronk

Wed, 07/24/2013 - 20:44

I was wondering if you had a price estimate on how much the supplies cost you along with some measurements. I am looking to build a double one like this. More details would be awesome. Thank you

In reply to by Ecspronk

YeenYus

Wed, 07/24/2013 - 21:15

Yeah, I kind of built this on the run with nothing but the space it had to fit into. But it is 34" wide 32" deep and 24" high. I needed it to fit under the window and used the Home Depot garbage bins as the starting point.

I build a lot of stuff...and this was a tough one. The frame is 2x4's with pine facing and bead board. 4 hinges, stain and paint...less than $100.

I'd love to work with you on this if you want. The hard part was engineering the bins falling forward equally and not binding up. The back of the bin actually hits the counter top perfectly now. But you can see that I had to put an extra 1" under the top for it to hit something.

It' gonna take some work but this thing looks and works so smoothly. You can do it...I can help!

momaimp

Thu, 05/08/2014 - 06:07

Would you be able to post a sketch of this project? I assume there are three boxes - the main cabinet and the two tilt-out boxes, but I would appreciate seeing a breakdown of the parts. Thanks!

momaimp

Thu, 05/08/2014 - 06:07

Would you be able to post a sketch of this project? I assume there are three boxes - the main cabinet and the two tilt-out boxes, but I would appreciate seeing a breakdown of the parts. Thanks!

Jsanderson

Wed, 09/23/2015 - 06:32

Is there a way I can get plans for this? I tried to sign up on site but can't locate

Simple outdoor sofa and chairs

Submitted by Bamafan50 on Sun, 08/02/2015 - 17:50

The sofa was my first large DIY project that required a fair amount of construction. It took me about a week working a few hours a day. I followed the plans as they were listed but made a few adjustments to accommodate for the size of the cushions. I used regular pine and then cheap lumber for the slats, lesson learned. Way too much sanding and it still didn't have the finish I was hoping for.  

For the chairs: I used a mix of plans from the Bristol outdoor lounge chair (Ana's) and the simple outdoor sofa. I chose to use all sect pine for the chairs, after the hard time I had with the cheaper wood I chose to use on the sofa.  I was much happier with the end result.  I used 1x3's mostly and then added 1x1 composite molding as an accent around the base.

I looked long and hard for cushions before I started the project based on the recommendations from others. I took me a while but I finally found Somewhat affordable outdoor sunbrella cushions at Lowes. These are the Allen + Roth deep seating sunbrella cushions, which I highly recommend. They are very comfortable and dry quickly after it rains.

Estimated Cost
The cost for both the sofa and chairs was close to $800 dollars. However, the majority of the money was spent on the cushions. At about $98 dollars a set, the sunbrella cushions cost me about $530
Estimated Time Investment
Week Long Project (20 Hours or More)
Finish Used
Rustoliium oil based glossy white with two heavy coats. If I had it to do over again, it would be latex followed by poly
Recommended Skill Level
Beginner

Modern Farm Table - Dark Stain

Submitted by nittle on Thu, 07/25/2013 - 22:27

This was my first project. I learned a ton through the process. Ana's directions were very easy and straightforward.

I purchased the wood (Doug-Fir) from Lowe's and cut it at home with a circular saw. I filled the gaps in the table/benches with a crystal clear silicon caulk - I have mixed feelings about this, since it dried kind of shiny. The coats of polyurethane helped to dull the finish a bit. For the stain, I used Rustoleum Kona, and Minwax Helmsman Spar Urethane Semi-Gloss for the finish.

Like others have suggested, I built the benches first, then the table. This was a great tip, since you can learn the design on a smaller model before tackling the beast of table (it's heavy). I also added some horizontal supports on the ends of the tables/benches, not in the original plans. I just duplicated the end aprons of the table and countersinked/screwed them in at an angle.

Cutting and building the project didn't take nearly as much time as the sanding, staining and finishing. The back-end part of the project was very detail-oriented and stretched out over several days.

Overall, very pleased with the finished project. It was very empowering to know that I can build something like this. Thanks Ana and all of the others with their tips and suggestions! My wife and I know have a long list of other projects to tackle :)

Built from Plan(s)
Estimated Time Investment
Weekend Project (10-20 Hours)
Finish Used
Rustoleum Kona Wood Stain and Minwax Helmsman Spar Urethane Semi-Gloss for the finish
Recommended Skill Level
Beginner

Simplest Stool : Saddle Back Style

Submitted by tsibiga on Mon, 06/20/2011 - 09:52

We've been looking for some saddle back stools for quite a while that would fit snug under our kitchen island. I couldn't find any, so I checked Ana-White and found the perfect building plan. I used scraps to build two matching stools and so I altered the plans to fit what I had. Other then the dimensions being different, I also used a 2x12" piece of wood cut down to 9x15" for the stool top.

I've documented the process as best as I could at; http://www.tommyandellie.com/Site/Home/Entries/2011/6/13_More_Seating_f…

Built from Plan(s)
Estimated Cost
$0 I used all scrap wood from a previous project
Estimated Time Investment
An Hour or Two (0-2 Hours)
Finish Used
"Rainwater" Martha Stewart Paint
Recommended Skill Level
Beginner

Comments

tsibiga

Thu, 06/30/2011 - 04:50

I skipped a step that I might redo. I'd recommend taking some wood filler and spreading over the knots and imperfections before painting it. Sand it down, smooth it out, and it'll be Looking flawless.

Stef (not verified)

Thu, 07/07/2011 - 15:02

I've been looking for some stools like this, so I followed your lead and just finished making some. Thanks so much for sharing!

tsibiga

Fri, 07/08/2011 - 17:53

Awesome! I'm so glad you made some. Thanks for sharing. We love our stools and hope you enjoy them as well.

Reclaimed Cedar Board 10x 10 Barn Greenhouse

Submitted by bailie on Sun, 04/24/2022 - 13:02

Thank you for sharing your plan!

10×10 greenhouse made with re-claimed cedar boards from old barn on Menlo, WA

Built from Plan(s)

Comments

rick1956

Wed, 06/08/2022 - 05:52

Beautiful! I like the fact that you bucked the trend and turned your clear panels for Washington rainwater runoff. There are good and bad with both directions, vertical makes the most sense. I can see myself re-doing ours at some point to change the panel direction. At least they're pointing the right direction on my skylights.
Great design, and of course, I love the 'live edge' details you added throughout!

4x4 Truss Beam Table -Modified Size

My husband and I moved in to our new house last fall and we needed a dining table that would seat at least 8. We picked this plan from Ana's site because I love the look of the 4x4 beams. I used Adobe Illustrator and my math skills to modify the size and scale to fit our dining room with exact spacing all the way around. We had difficulty finding untreated 4x4 beams but were able to special order some for a reasonable price from a local lumber company. It is more expensive than combing 2x4s but I did not like the pieced together look of the 2x4s. We stained with Rustoleum Dark Walnut and Matte Poly just like the blog post from Ana's site. We also used the Kreg Jig HD which is SO AWESOME! We love the table. Now we just need to decide: chairs vs. benches. I hate to block the beautiful truss design of the base. Its so gorgeous!

Built from Plan(s)
Estimated Cost
Around $200 including the Kreg Jig HD, screws, sandpaper, and glue.
Estimated Time Investment
Weekend Project (10-20 Hours)
Finish Used
Rustoleum Dark Walnut
Rustoleum Matte Polyurethane
Recommended Skill Level
Beginner

Comments

MrCoffee

Mon, 08/31/2015 - 14:18

I love this table.  The finish came out great by the looks.  My wife and I are moving into a house soon and I think this is going to be the design for our table as well.

jlandttc

Mon, 09/07/2015 - 06:21

What a beautiful table!  Is this table square?  We are also looking to build a table to sit 8 and love the look of yours.  Could you share your cut list or dimensions?  

Spayton821

Thu, 12/10/2015 - 06:59

I am so in love with his table. We have a family

of 7 and are looking to replace our current dining room table and this would be perfect.  Is there any way you could share your measurements. 

Jake'n'Leelo

Mon, 08/29/2016 - 06:08

Thank you for all the kind comments! I did not know that I had gotten any and had not checked back over the past year. The jump drive with my dimensions on it got damaged last year shortly after the build and I lost all of my home decor files including the AI with my cut list and dimensions. I know it had been a while since several of your comments but I will see if my husband can help me measure the table and figure out what the dimensions are and post them on here for you. Happy Woodworking!

topdowndoorsoff

Tue, 11/15/2016 - 18:01

This table really looks great!  I'm about to start making one and would love to know the dimensions you used. I also noticed that you didnt use the bread boards on either end.  How many people does this table fit?

Thanks!


Factory Cart Coffee Table

I used Ana's plans for her factory cart coffee table to create my new coffee table. It was super easy and cheap! I used 1x10's for the sides to make it a bit taller. I found my casters at Northern Tool for $12 a piece. That was the main cost of the table. I used Gorilla Glue and 2" nails to hold everything together. I had it done in a couple hours and I love it! You can see more details at http://www.shanty-2-chic.com/2011/06/crate-coffee-table-reveal.html !

Built from Plan(s)
Estimated Cost
$85
Estimated Time Investment
Afternoon Project (3-6 Hours)
Finish Used
Minwax Dark Walnut stain and 1 coat of Polycrylic Semi-Gloss
Recommended Skill Level
Beginner

Modern Outdoor Table & Benches

Submitted by Anonymous (not verified) on Thu, 05/19/2022 - 13:59

I made the table 6’ long and 30” wide to fit my narrow deck. I used some heavy duty shelf brackets under the legs to reinforce the table, mostly because I don't trust my beginner abilities. Took me about a week to cut, sand, stain and put it together (and then i stained and sealed again). Actually assembling it took only a few hours. I see a combo of pocket holes and regular exterior wood screws. Loved building this, love Ana’s plans. Thanks Ana!

Comments

Outdoor Bar Table and Stool

Submitted by Titus2000 on Thu, 06/09/2022 - 14:38

I love this bar table! I needed something long and narrow for our small patio - just deep enough to fit a plate and a drink, or a laptop, and long enough to fit three stools, so I modified Ana's dimensions. Also, living in Florida, we occasionally need to bring our furniture inside for hurricanes, so I made it a lighter by using 1x3s and 1x4s instead of 2x or 4x4s. I still need to paint the bottoms a cream color and build two more stools, but I already use it a lot. Thanks Ana! (The photo was upright on my computer, but I didn't see how to rotate it once it was uploaded)

Comments

Loft Bed for Renee's Room

This is the 2nd of two loft beds I have built using Ana's plans - they came out great and my girls love them! I did make some modifications to each, as the girls have different needs. It was a great project and I would like to thank Ana for the concise plans, cut lists, ideas, etc. You made it so easy!

If you are interested in seeing more about this project feel free to visit my blog at www.mothersmusings.net. See you there!

Estimated Cost
$150.00
Estimated Time Investment
Week Long Project (20 Hours or More)
Finish Used
I must say, if I had it to do again I might have upgraded on the wood, but I got the cheapest pine I could find. This led to using A LOT of wood filler and sand paper - and probably took me about twice the time it would have taken had I used prime wood. I used an oil based primer to make sure the knots stayed covered, and 2 coats of Behr high gloss white paint for the finish. Extra work...yes - but ultimately I think I cut my cost in half.
Recommended Skill Level
Beginner

Twin Farmhouse Beds

Submitted by lmshaffer on Thu, 10/08/2015 - 09:05

We made the headboards 7" shorter because the collage wall was already on the wall. Also, we used plywood instead of slats for support for the mattresses. Oh, and we had to trim the side rails to 75". Overall, it was a quick and simple project!

Built from Plan(s)
Estimated Cost
$150 each
Estimated Time Investment
Weekend Project (10-20 Hours)
Finish Used
white acrylic paint applied with a cantankerous paint sprayer
Recommended Skill Level
Intermediate