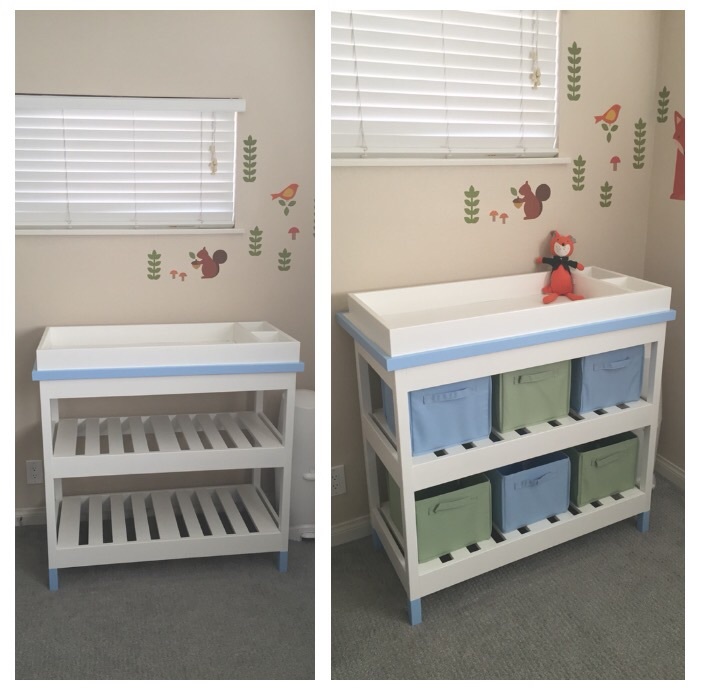
Northwest Ohio Pergola
I used flat stone and a masonry circular blade for the base of the corner posts. I also used 2 x 4's for both layers of the top boards. It was a lot of fun to build.
This is my first Ana-White project (first furniture project, for that matter). I used the Farmhouse Bed as inspiration and modified the headboard / footboard to be a little taller. Other differences are that I used larger side railings (2x10) and left off the decorative tops of the headboard / footboard. Pocket holes hide all of the attachments, and I found some amaing bed rail hangers so the bed can easily be disassembled in case we move. It's super sturdy and my wife is happy (the most important part)!
We just moved into our newly built home, I love to cook, and realized really didn't have a good spot in the pantry for all the spices. This was my first project and in doing internet search for ideas came across Ana White's website, not only did I find the spice cabinet plan I was looking for, but a treasure trove of other projects and ideas. New to this so I have found Ana's site to be such a blessing. Yes, this made me a hero to my wife!
Built this over a relatively warm Saturday in January. Like most projects, the building wasn't bad but the finishing took forever :)
My husband modified these plans by making it a 42" tall bar high table. He built it and I stained it with Dark Walnut Danish oil and it came out better than we imagined. Thank you for these awesomely cool DIY plans.
I spent a couple of weekends making the knockoff West Elm Doll Houses using these free plans, as Christmas gifts for my 3 year old honorary nieces. The plans made building the doll houses quite easy! I opted to add trim pieces on the door and window openings, which saved me some headache, since they didn't need to be cut perfectly straight, and I also decided to cut the door and window openings out before attaching the front side to the rest of the house, just in case I messed up. The furniture was a bit harder without any plans (it's noted that the plans will be available soon, but they weren't when I did this build), but I just looked at the photos and made things up as I went along, using scrap wood and wood glue, which was pretty fun. Total cost was about $75 for both of these doll houses, the furniture and spray paint. For the finishing, I used Minwax Wood Finish Oil-Based in Ebony for the roofs and exterior window and door trim, which I stained before attaching. The rest of the house is Benjamin Moore Advance in Chantilly Lace, since that's what I had on hand, followed by two coats of Rust-Oleum spray paint in Satin Clear Enamel. For the furniture I opted to spray paint it all in satin white or black, also followed by two coats of the enamel spray. I used acrylic craft paint on the faucets, to give them a pop of silver. And I added some scrapbook paper for wallpaper and some cut up rug samples, for a little color! Both of my friends' 3 year olds are a little on the young side for these, but they've been enjoying learning how to play with them!
Tue, 01/04/2022 - 14:07
These are darling and all the detail and work is stunning, bravo!
Again I'm sorry I have no plans, but what I do have is a great instructional video. Drawer slides are such a pain to install without the right tools. I'm sure you can find great dresser plans but the kicker is how you install the drawers. These inexpensive drawer slide mounting tools might save you from going insane. Check them out. http://youtu.be/vI3jgkhxxPE
I off set the shelves because my wife wanted to be able to fit some of my sons bigger toys. I also add trim pieces to make it more decorative and painted it white. Enjoy...
Sun, 07/14/2013 - 08:25
My next project! I love the way this came out. Great job.
I built this 10.5' farmhouse table for my aunt and uncle's dining room. I modified the plans slightly to try and look more like the Restoration Hardware version, using 4x4's for the beams and side supports and rounding the sides of the side supports. I also modified the top by adding an extra sideways board in the middle. The rationale for this was that I was worried about finding boards at the length I wanted that were perfectly straight from end to end, so by adding the center sideways board I only had to find boards that were perfectly straight for about half the full length. Also, we liked the look of the extra board in the middle. My little cousins had fun helping me distress the wood with hammers and other tools laying around. We love the way it came out, thank you Ana!
With a third baby on the way, they may not be enough room in this one for much longer, never realized how many they had till be put them all together.
Plans were easy to follow and we were able to build it using scrap and salvaged wood, and leftover paint. Only had to buy screws and the chalkboard sign materials, so very affordable to make. Birthday boy LOVES it! We set it up with some bakery toys, but the dramatic play options are virtually endless. This is one of those type of toys that will be part of all kinds of play with kids of all ages. The size is great for him at 3 years old but I expect it will be usable for many years before he outgrows it. Well worth making.
My husband and I were inspired by Ana's plans, but needed to use up some wood we had laying around the garage because it was starting to bend and warp. We made the large box 2x6 ft and the smaller one is made from scrap and is about 15in x 2.5 ft.
This is the second project I've completed and I'm very proud of it. The design was changed just by adding four legs instead of three. It took me awhile to get the color even. Sanding between coats of the clear coat semi-gloss finish would leave white marks/residue that was difficult to clean away. I would have to restain those sections with a swift wipe on/wipe off action. This made the color deeper but also richer. During the summer months, the bench will be outside but will serve as indoor seating in the winter.
Rustic X end table
The original plans make a pretty big coffee table (52" wide). I made this one (32") with the left over pieces of 2x6 from the bigger one. It was fun to make and is great for someone with a smaller living room
This is the 1st Ana White project I ever built. I now have several items of hers under my belt. I built this the summer of 2017 for the solar eclipse. We live directly in the path with longest viewing times. I placed an ad and got responses from all over the country of people wanting to stay on our property. This outhouse like all of Ana's other plans were easy to adapt to fit my needs. I extended the roof to include the covered porch and only used tin. I also added a couple of shelves a 2 mirrors. Almost everything I used to build this were things we already had. It's mainly built used our old swimming pool deck that we had torn down. The versatility and the clarity of Ana's project plans make this my go to building site!!
My dear husband built the bed and I painted it. He found that it was easy to make. Thank you Ana, we love it. We are waiting for our new mattress!
I was looking for inspiration for the grandchildren when
I came across the full size version. I have now made 3 of the 1\3 sized as pictured, in different colours. It takes longer to paint them than make them.
First table I've built. The Rustic X Console Table was fun and fairly simple. A little complicated since we live in Hawaii and decent cheap wood is difficult to come by. Makes my entrance way very inviting.