Community Brag Posts

Sand box with benches

Submitted by Big Grizz on Sat, 04/28/2012 - 19:51

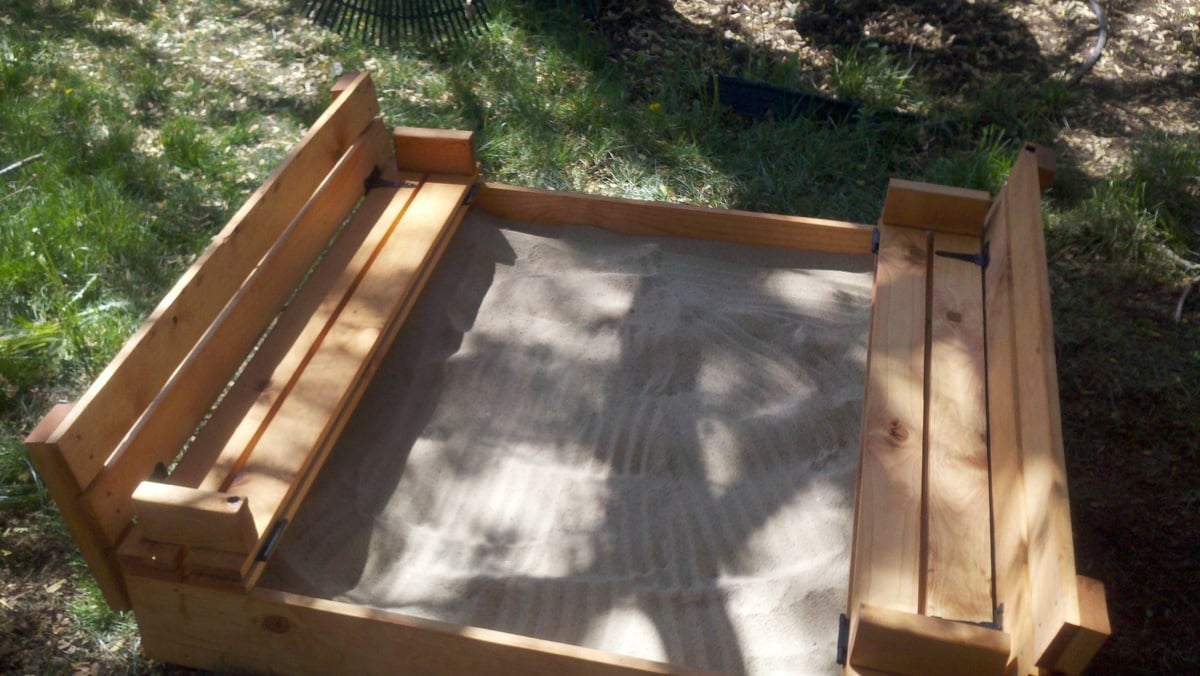
This sand box was very easy to build and it works great. The only thing I would change is cutting the "arm rests" at 7 1/2" instead of 6 1/2". I did that for the second set of arm rests (when I downloaded the plans many weeks ago the cut list was wrong). It made putting that section together a lot easier.

I easily spent more on the hinges (at $5 per hinge x 8 hinges) than I did on the wood itself.

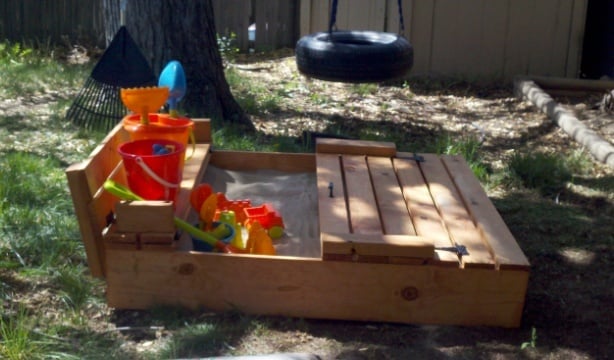
My 1 and 1/2 year old loves playing in it and now I need to build a toy box for him to put all of his sand toys in!

Built from Plan(s)
Estimated Cost
$115
Estimated Time Investment
Afternoon Project (3-6 Hours)
Finish Used
Redwood colored stain
Recommended Skill Level
Starter Project

Comments

T. Holloway (not verified)

Mon, 09/17/2012 - 10:29

I just want to say that I asked for my husbands help, and his advice increased the price significantly.
He does not like to paint, and will spend the extra dollar to purchase pressure treated wood. So I sent him with my materials list and the wood he purchsed was $60.00, plus $22.00 for hinges and $10 for a box of deck screws. Actually, I am a artist and had wanted to paint the project to look like a big frog.

Garden Shed

Submitted by Deborah on Sat, 08/18/2012 - 23:01

I have been dreaming about building so many things featured on this website, and I finally buckled down and built something. I figured that an outside garden shed would be a bit more forgiving than a project requiring a bit more precision, and from the picture, you can see that it's not perfect! I'm still working on trimming the shingles and I still have to stain/seal it. I've got to admit, when I first picked up the wood for the project at the store, I wondered what I had gotten myself into. But I just jumped in, and here it is.

Built from Plan(s)
Estimated Cost
$300
Estimated Time Investment
Weekend Project (10-20 Hours)
Finish Used
Plan to stain it with some sort of deck stain.
Recommended Skill Level
Beginner

Comments

Nesting Grill Station

I was tired of seeing my propane bottle on the porch and this project was a perfect blending of camouflaged storage with lots of potential countertop workspace. My grill station is smaller and shorter than the original plans to better fit our family size and the porch space we have available. My husband has a bandsaw mill. When he was milling boards this fall, I asked for some 1/2" thick planks just for this project. I also had the knobs and wheels leftover from past salvaging work. I have been trying my best to use up "stock on hand" during this pandemic. Though I spent some time sanding the rough cut lumber, it still absorbed lots of stain. I wanted two tones of color, so that's good, but I still had to mix two stains together to have enough for the lighter parts.

Now we are looking forward to some cold weather BBQ meals!

Estimated Cost
$10 for screws, all else salvaged.
Estimated Time Investment
Weekend Project (10-20 Hours)
Finish Used
I stained the wood before joining it together so the two shades of stain wouldn't run together. For the darker parts I used Minwax Red Mahogany. On the lighter parts I mixed Minwax Early American with Natural (because I was running out). After staining I put the table together and finished it with Minwax Polycrylic, until that ran out, then Bona Mega satin floor finish. I put three coats of finish, sanding between coats.
Recommended Skill Level
Intermediate

Comments

mamasue72

Tue, 07/04/2023 - 08:38

Love this size. My deck is small so this is perfect. Thank you for posting the brag😊👌

Farmhouse table, bench, and 2x4 chairs

Submitted by palgier15 on Sat, 02/20/2021 - 08:51

Started with building the table for our ever expanding family. We priced out a new table and chairs at the price of $3700 and was able to build the table, bench and 5 chairs for $400. The table is perfect for our big family and very solid. The bench and chairs went together fairly easily. I adapted 1 of the chairs for my son who has to have arms to keep him safe. Great for any family.
2x4 chairs are from morelikehome.net day 4 build

Estimated Cost
$400
Estimated Time Investment
Week Long Project (20 Hours or More)
Finish Used
Varathane Gel Stain Provincial
Varathane Polyurethane Semi-Gloss
Recommended Skill Level
Beginner

Backyard Bliss!

Submitted by kdins31 on Mon, 01/12/2015 - 09:26

I built this outdoor play area for my kids this past summer.  The area under that portion of the deck was always messy and muddy and so I wanted to make use of it.  I built the deck and anchored it with lag bolts to the deck supports.  On the one side I used rubber mulch and on the other there is play sand.  I dug holes in various locations and filled with gravel to allow for drainage under the sand and mulch.  For the awning I used plain cedar shingles.  I added a shower that is just regular 1/2" metal pipe with a hose adaptor.  The shower wall and fence are just old pallets that I had for a while, cut to size, which was pretty much random but they came out great.  I added a misting system under the awning that works great, the kids love the cool mist on the hot days. Overall, a heavy job ripping up the grass, moving the wood, gravel, stones, sand and mulch, but a fun deck build and even better experience doing this with my kids by my side!  

Estimated Time Investment
Week Long Project (20 Hours or More)
Recommended Skill Level
Intermediate

Comments

Einman10

Tue, 12/29/2015 - 17:10

I'm extremely interested in the plans for the bathroom vanity with the step stool that pulls out for kids to be able to reach the sink.  Is there a way I can get those plans?

Faux Fireplace with Hearth

We made some modifications by adding a hearth for additional height (the room we have it in is very large and open) and joining 2x4s for the mantel and base which I stained grey for contrast. We decided to use thin brick for in the "firebox" to make it look more realistic. We also have a newborn and spent over two months putting it together a little at a time in our free moments so I'm not sure how long it would actually take to do at once, but cutting and putting up the brick was very time consuming. 

Estimated Cost
$250
Estimated Time Investment
Week Long Project (20 Hours or More)
Finish Used
White paint, Minwax "Classic Grey" stain
Recommended Skill Level
Beginner

Comments

westmoundstar

Thu, 08/27/2020 - 11:16

This looks great! I'm actually in the middle of this build with the hearth as well. Couple questions....
How did you connect the two pieces? Also, did you connect to the wall? I'm assuming you didn't leave the 5 1/2 inch gap on the bottom of the fireplace and connected direct to the hearth. Let me know, thanks!

Seasonal And Holiday

My simple Outhouse

Submitted by Anonymous (not verified) on Wed, 07/31/2019 - 17:14

<p>I worked on this for about 2 weeks in my free time. I modified the original plans from this site to accommodate my needs. I just wanted a “#1” only place near my pool so I didn’t have to dry off and walk all the way up to the house. The trash can is for the TP and I will just toss it when I need to. I used a traffic cone as a pee funnel and attached&nbsp;tubing to the end of the funnel&nbsp;that I buried down along the slope of my yard against the fence line.&nbsp;I ended up adding an area for boys since I didn’t want the inside all gross. I added solar deck lights to the outside and a light inside too.&nbsp; It turned out amazing!!!</p>

Built from Plan(s)
Estimated Cost
$300
Estimated Time Investment
Week Long Project (20 Hours or More)
Finish Used
Varathane Premium fast dry oil based stain in the color “Ipswich Pine” and Varathane Ultimate Spar Urethane oil based in clear satin. One coat of each.
Recommended Skill Level
Intermediate

Comments

Restoration Hardware inspired Maison bed tutorial and finish. Starting with Ana's platform base.

I have wanted a Restoration Hardware bed for so long. Now I have "one" but for way less and we did it all ourselves. starting with Ana's platform bed plans we build on it and walk through the process and even the custom 3 part finish. for a full tutorial please see my blog. http://imperfectlyimaginable.blogspot.com/2013/11/restoration-hardware-…

would love to hear from you and see any projects that are completed.

Estimated Cost
under 400 I think the lumber cost me 175 or so
Finish Used
custom 3 step finish please see blog for tutorial
Recommended Skill Level
Beginner

dresser for my daughter

Submitted by jerfer on Wed, 01/18/2012 - 18:58

I designed this off of the laundry basket holder.

Built from Plan(s)
Estimated Time Investment
Day Project (6-9 Hours)
Finish Used
home depot pink paint 2 coats...
Recommended Skill Level
Beginner

Comments

Liana (not verified)

Thu, 05/03/2012 - 06:38

Great option & smart. Now, after seeing your changes to the original, I am thinking of making one similar to yours but build it to hold all my craft storage bins.

Nicole Carlson (not verified)

Sun, 05/20/2012 - 11:44

I was wondering if you had the plans for the project. I would like to make one of those. So what are the project plans? ( Wood used and the cutting measurements. )

Round Side Tables

Submitted by Anonymous (not verified) on Fri, 06/16/2023 - 18:39

I first made a set of these for my wife to use on the deck. She liked them so much that she's using them in the living room! (Second photo.) These were made from rough lumber left over from a building project so took a fair amount of time to cut and prep. I don't have a planer so the belt sander outside was put to good use. Then, to make them them fit well, I recut the sides, and rather than pocket holes I glued them into a plank before cutting the rounds with my table saw. That also gave me a tight flat top.

Her friend saw them and wanted a set, so here they are. Again I recut the sides and glued them to create a smooth plank. This time I used the router and a circle jig to cut the tops, giving me a much nicer finish. They will be stained mahogany and finished with multiple coats of polyurethane.

The large one I simply upsized from the original plan, roughly scaled. It is 22" tall, made with 2x8 lumber selected and purchased at the box store. My wife's friend is totally delighted with them! Thanks Ana for the inspiration.

Built from Plan(s)

Comments

Outdoor Grill Station

Submitted by Anonymous (not verified) on Tue, 09/05/2023 - 09:21


This rolling bar was inspired by Ana White's plan.  It is used as a bar and conceals an electric smoker and a grill.  I added handles for moving and some hooks on the sides.  I stained the salvaged 2 X 6 's and brushed on clear oil based poly on the new Cedar fence boards.

Billie

The Gíaffe TV Stand

Submitted by Anonymous (not verified) on Thu, 02/06/2020 - 09:55

The Gíaffe Free Standing TV Mount. Handcrafted and engineered to use its center mass to deliver strength and balance for tv sizes 30-60". Display your television without detracting from your home's decor. The Gíaffe Free Standing TV Mount is the perfect solution and its rich finish will be perfect for any house/office room.

Estimated Cost
$109
Estimated Time Investment
Day Project (6-9 Hours)
Finish Used
Stain - Dark Walnut - Varathane - 2 Coats
Finish - Water Based Polyurethane - Varathane - 3 Coats
Recommended Skill Level
Intermediate

Comments

Modified L Shaped Desk

This was my first woodworking project in a couple years. I modified the size to make it about 60" on each side. Now that  I am working from home now due to COVID-19 for the foreseeable future this has been perfect to use in order to have two monitors and enough room on the sides for other work. 

Estimated Cost
70
Recommended Skill Level
Beginner

Comments

2x4 Outdoor Sectional Sofa

Submitted by lknolan2 on Sat, 04/18/2020 - 20:19

Great Plan! Loved how easy it was to build and how little the cost was.

Estimated Cost
$200
Estimated Time Investment
Afternoon Project (3-6 Hours)
Finish Used
Outdoor deck stain by Valspar in Canyon Brown
Recommended Skill Level
Beginner

Comments

jwood4

Sun, 08/01/2021 - 18:40

Looks amazing! What method did you use (pocket holes, dowels, deck screws, etc) to join the visible portions like the arms?

Seasonal And Holiday

Vintage Doll Cradle

Submitted by Anonymous (not verified) on Wed, 07/27/2016 - 09:59

I used leftover plywood (1/4 inch) instead, but would only recommend it, if you plan to paint the cradle (due to splintering when you make your cuts). I also used my nail gun instead of screws, which worked fine since the wood is a lot thinner and lighter. The cradle is very sturdy and my 4-year-old loves it. Thanks for the awesome plans!!

Built from Plan(s)
Estimated Time Investment
An Hour or Two (0-2 Hours)
Recommended Skill Level
Beginner
Back