Community Brag Posts

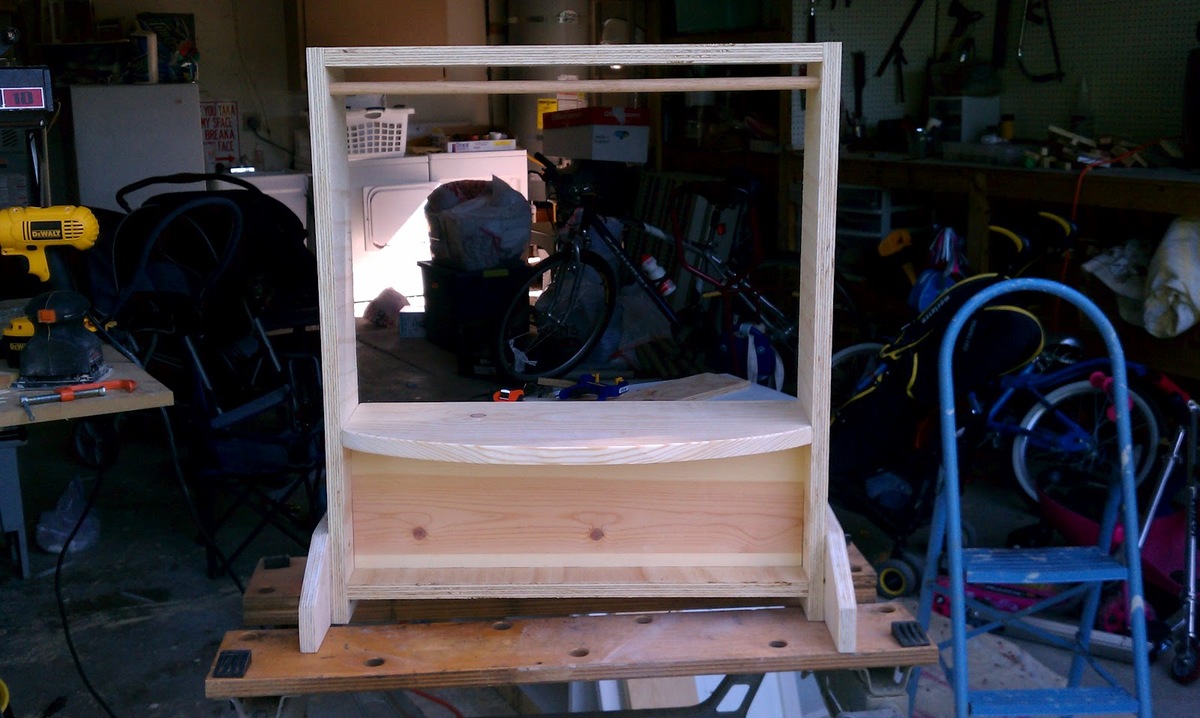
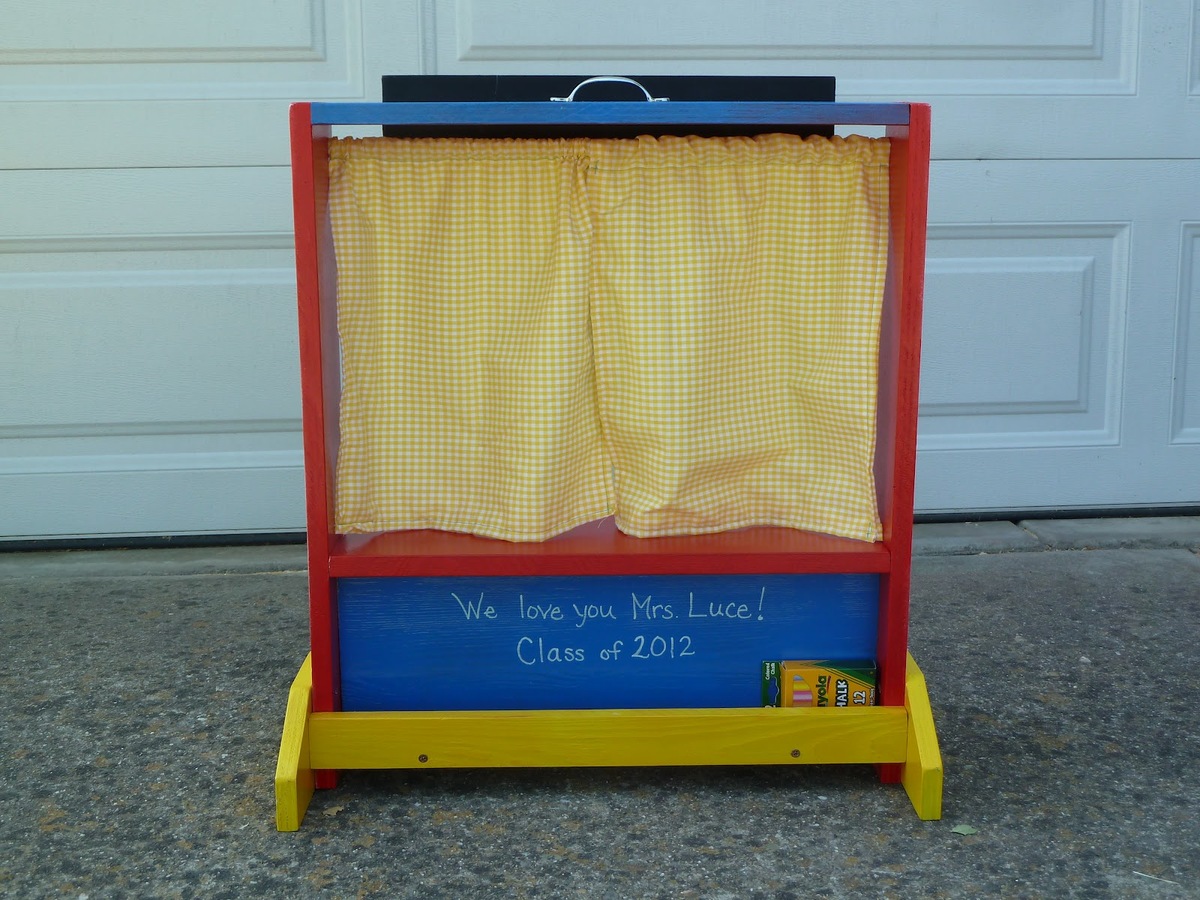
Table Top Puppet Theater

Submitted by melfosson on Tue, 05/22/2012 - 14:26

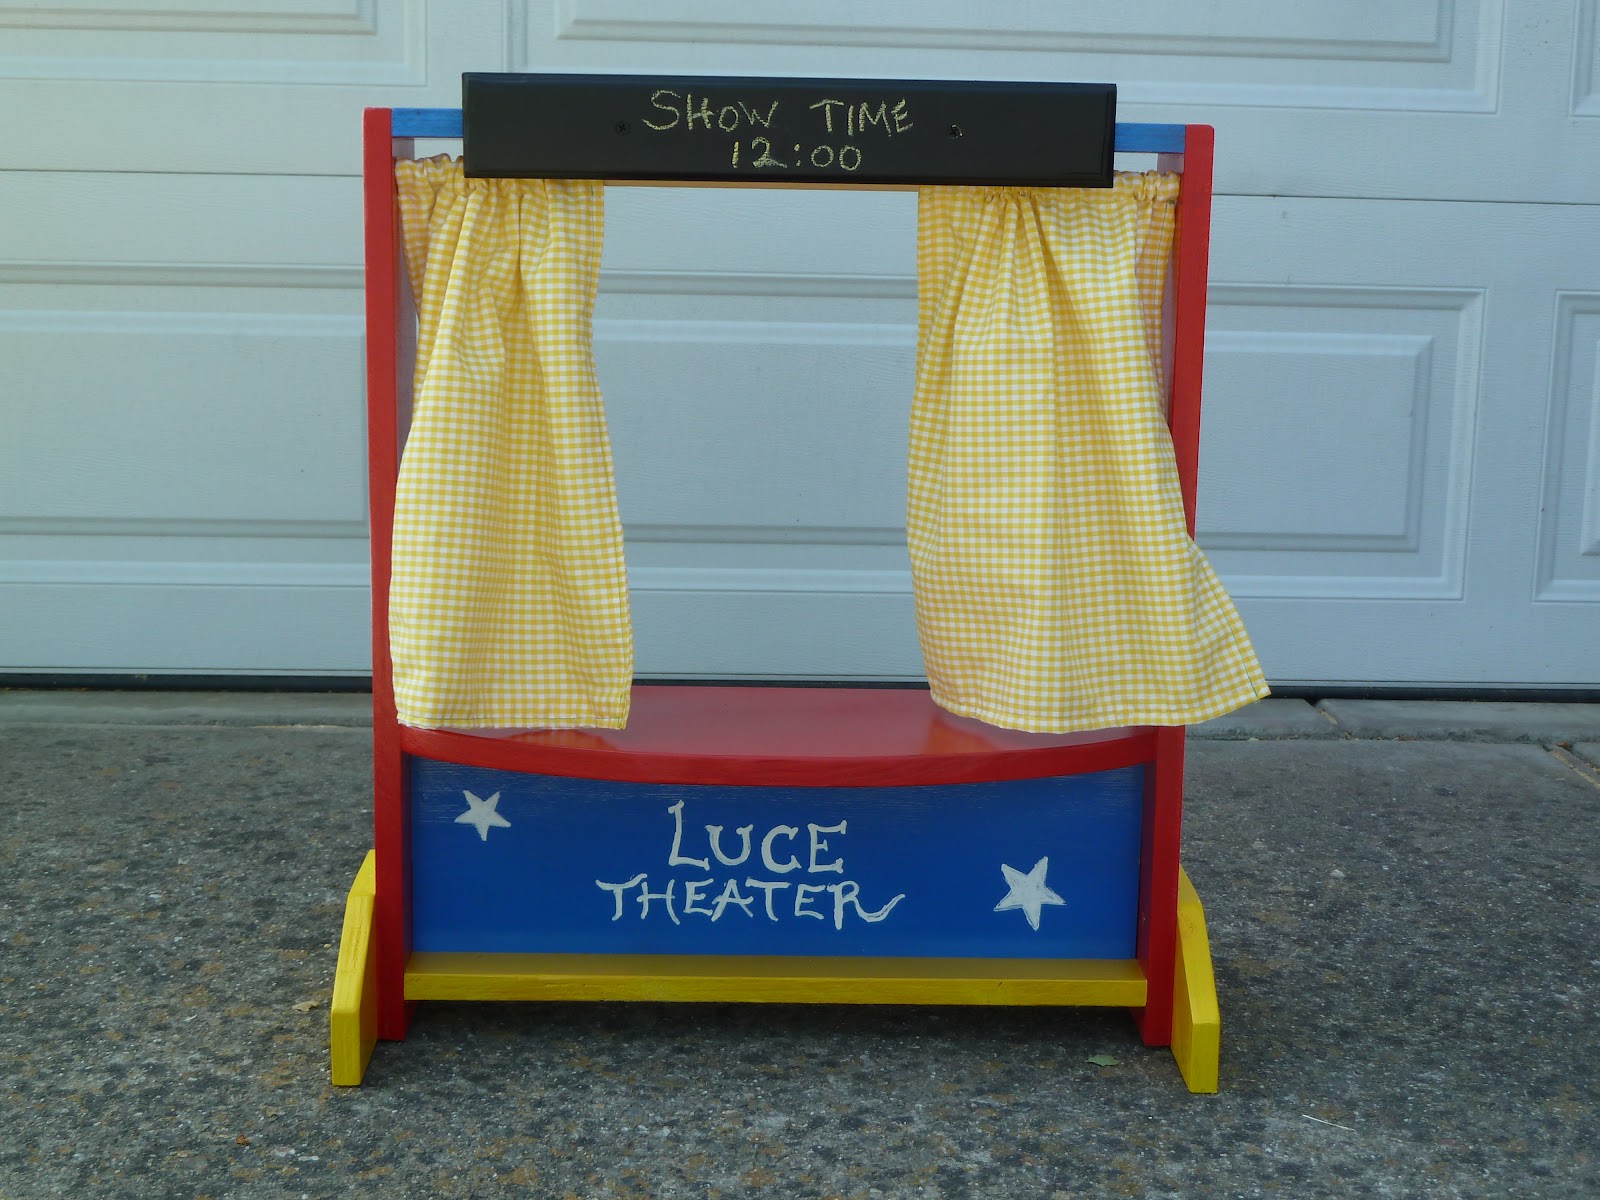
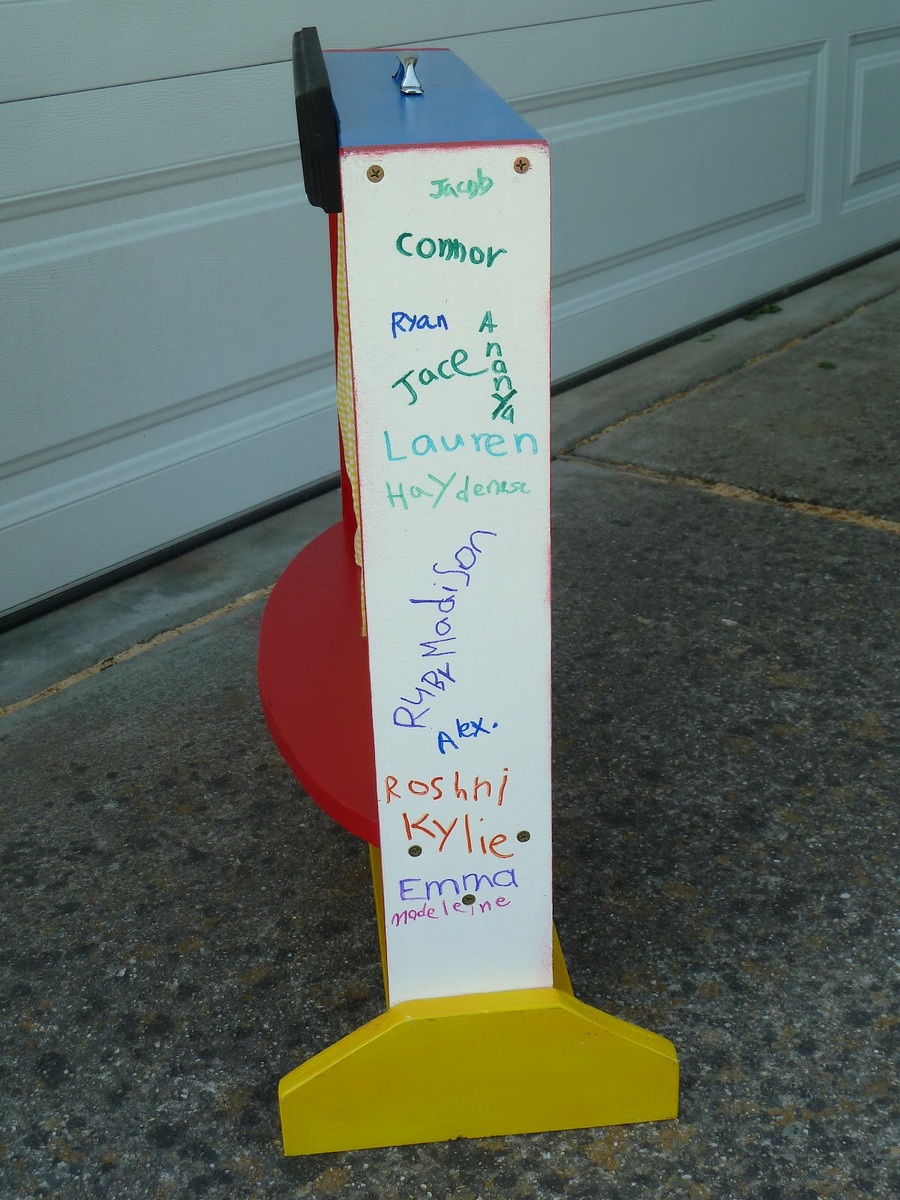
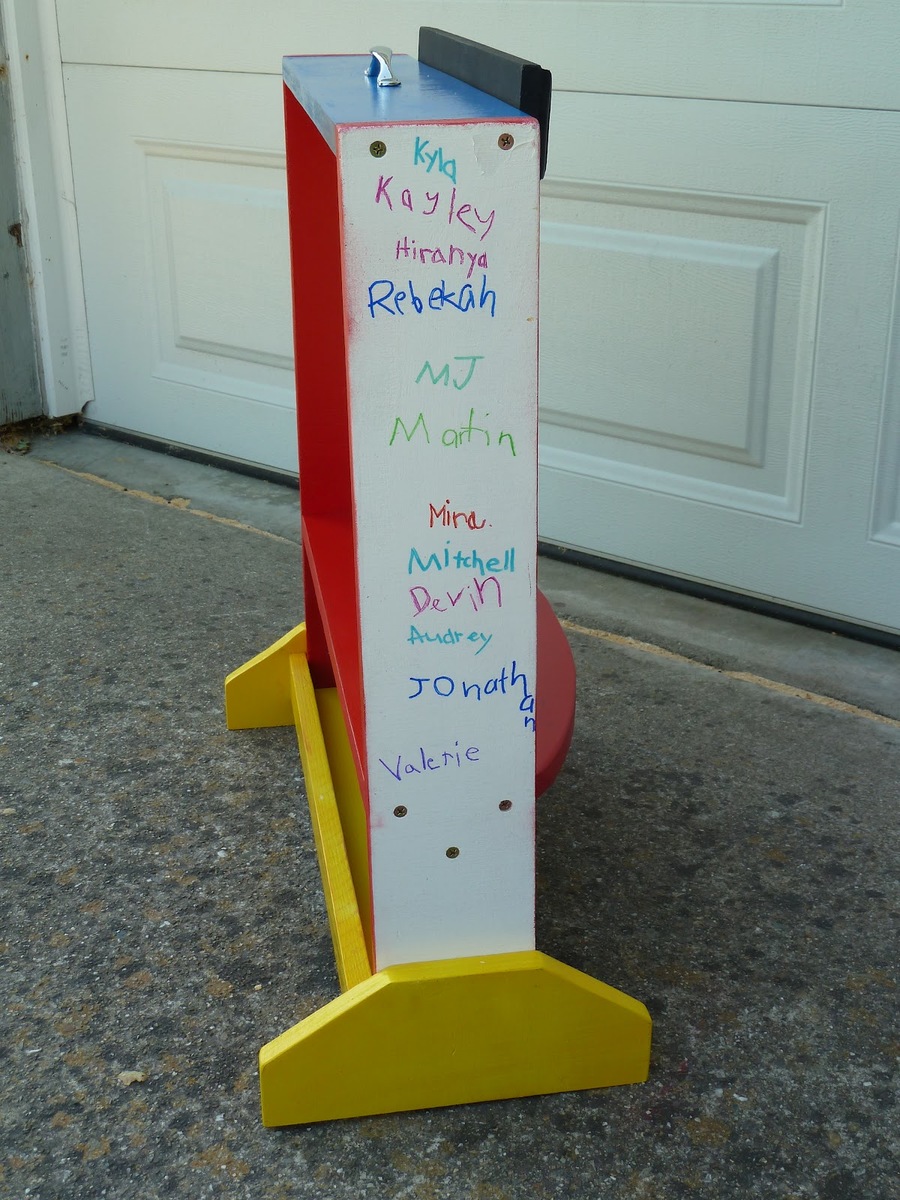
My son's kindergarten teacher had a table top puppet theater on her "wish list" from an online store - but it cost $70 and I knew there's no way i could buy that. But just one look at it made me realize I could build my own. My son and I built it in just a couple hours and then took some extra time for sanding and spray painting. I had all the kids in the class sign their names on the sides and I used chalk board paint on the top sign so the kids can write their own show title or time, etc. There's a place to keep the chalk in the back. We presented this gift to my son's teacher at the end of Teacher Appreciation week, and it was a huge hit!

PLANS: http://www.tools4moms.com/2012_05_01_archive.html

Estimated Cost
$0-$15 (I only paid for spray paint because I had the wood scraps)
Estimated Time Investment
An Hour or Two (0-2 Hours)
Finish Used
Spray painted all the boards separately before assembling. Use different colors to give it a fun look.
Recommended Skill Level
Starter Project

Rugged Outdoor Table

Submitted by cdrum89 on Thu, 03/06/2014 - 06:05

Ok I decided to construct my very first project - a small outdoor table that would look a bit ancient mostly because the need for it in my house has been screaming since I could remember. I would selfish to say that I did it alone but I got a bit of help from my hussy. I'm happy that the kids love it and all struggle to have lunch on it.

Built from Plan(s)
Estimated Cost
$50.00
Estimated Time Investment
Day Project (6-9 Hours)
Finish Used
Coated with a transparent paint/thinner as I wanted to keep it a bit raw.
Recommended Skill Level
Beginner

LV wine case

Submitted by Anonymous (not verified) on Sun, 06/05/2016 - 13:09

I built this wine case for my for my daughter and her husband. I couldn't done it with Ana"s great plans.

Built from Plan(s)
Estimated Cost
$200
Estimated Time Investment
Week Long Project (20 Hours or More)
Finish Used
Daughter and son-in-law will use it to store the many wine bottles they receive as gifts.I think natural Oak is beautiful and just use a poly finish.
Recommended Skill Level
Intermediate

Our First Wood Working Gift!

Submitted by JD_2030 on Thu, 03/26/2020 - 16:41

This cup tree was so easy to put together and made a wonderful birthday gift for my dad! For the bottom and top, we used scrap plywood that we had lying around. We used one light coat of stain to give it a warm hue. What an enjoyable project!

Built from Plan(s)
Estimated Cost
$6
Estimated Time Investment
Afternoon Project (3-6 Hours)
Finish Used
Stain
Recommended Skill Level
Starter Project

Providence Table

Here is my Providence Table made from scrap wood we had left from building our deck. I am not thrilled that it is made out of pressure treated wood but it is what it is. I used 2x6 mixed in with 2x10's for the top, 4x4's for the legs and used a 1/4 router bit for all the edges.

Built from Plan(s)
Estimated Cost
free from scrap
Estimated Time Investment
Afternoon Project (3-6 Hours)
Finish Used
It is still drying out but the plan is to paint the legs white and the top a stain color.
Recommended Skill Level
Intermediate

Comments

Kids Bunk Bed with Storage Stairs

My husband and I searched at least a hundred plans to find a simple bunk bed for our girls and Ana's Loft bed was a perfect base plan with a few changes. We wanted a lower bunk, top and bottom, since our girls are young (ages 5 and 2.5). The youngest just moved from the crib so by putting the bed lower we are able to skip the side rails. Overall we cut 10 inches off the height of the original loft bed plan and still have plenty of room in the lower bunk. I can sit up comfortably on the lower bunk and the youngest can even stand. We went with another 8 inch board for the top bunk rail, it was simpler then the rail with cap but achieved the same overall rail height. We knew we didn't want a ladder in their room because our 2 yr old is fearless. So for the stairs my husband just ended up winging it, loosely basing them on the Storage Stairs plan, creating basic cubes so we can still let light in and have storage. We also didn't want the steps to be high up in case the girls fall from them, which is more common then them falling off the top bunk. At 32 in. high (the bunk is 61 in) both of them can still climb in the top bunk without issue. At first the steps didn't have the tall "cube" at the back but the platform just wasn't that big so the long cube was an add on and gave it the perfect size and heft. We couldn't be happier with how it turned out. Thanks Ana for your awesome blog and the great plans that you post. My husband also built the original play kitchen and it is amazing! I'll have to do another post with pics of that.

Estimated Cost
$300
Estimated Time Investment
Weekend Project (10-20 Hours)
Finish Used
Valspar white primer and top coat in one in satin finish. Decorative paint is Martha Stewart craft paint, our 5 year old chose stencils, the 2.5 year preferred to free hand her art ;)
Recommended Skill Level
Beginner

Comments

Octagon Picnic Table

Submitted by Anonymous (not verified) on Thu, 06/09/2016 - 04:59

Was a good project that I built for my son's new home.

I found a few errors in the instructions such as:

A) 2 - 2x4 @ 30 1/2 should be 30 1/4

B) 8 - 2x6 @ 32 15/16 both ends at 30 degrees off square, parallel to each other) should be cut at 34 15/16 blank sizes then cut the angles to acheive the finish size of 32 15/16

C) 8 - 2x6 @ 36 3/4 (both ends at 90 degrees off square, parrallel to each other) should be (both ends at 22 1/2 degrees off square, NOT parrrallel to each other)

Built from Plan(s)
Estimated Cost
$120
Estimated Time Investment
Week Long Project (20 Hours or More)
Finish Used
Dark Walnut Stain, Urethane Top Coat
Recommended Skill Level
Intermediate

Martina Bath Storage

Submitted by wahome on Mon, 05/28/2012 - 13:14

So happy to finally get around to this build. Super easy, though I found I am not that skilled with cove moulding...nothing a little wood putty couldn't hide.

Estimated Cost
$20
Estimated Time Investment
Afternoon Project (3-6 Hours)
Finish Used
Behr primer and paint in one, color was custom mixed based on Martha Stewart craft paint in Pool. Topped with Minwax waterbased poly.
Recommended Skill Level
Beginner

Media Console

Submitted by KWTookey on Fri, 03/14/2014 - 14:37

My first furniture Build. My wife wanted rid of our old bookshelf turned TV console. I saw this online and went for it. Finished it with a serious splash of color. We love it so much we decided to go with teal as our primary livingroom accent color. Pretty proud of this little guy. Thanks for the great design!

Built from Plan(s)
Estimated Cost
$100
Estimated Time Investment
Week Long Project (20 Hours or More)
Finish Used
2 coats of Behr Eggshell latex in "Lagoon"
Sanded down corners, edges,
Then Minwax "English Chestnut" for highlights.
Finished with 2 coats of Polycrylic topcoat.
Recommended Skill Level
Beginner

Comments

DIY Rustic Console

I had a friend make a request for a console table.  We came up with this design to fit her space and needs.  It was a pretty easy build.

Estimated Cost
$150-200
Estimated Time Investment
Weekend Project (10-20 Hours)
Finish Used
ECOS Paints Woodshield - Pine Needles
ECOS Paints Woodshield - Satin Varnish
Recommended Skill Level
Beginner

Custom Electric Fireplace Built-in

Submitted by Anonymous (not verified) on Sat, 11/18/2023 - 12:49

Came across your shiplap fireplace and tweaked it a little, not bad for a 64 year old female right? Didn't take a weekend though more like a month but worth it. Thanks for the inspiration.

Comments

Rustic Kitchen Table

Submitted by sonji98 on Thu, 05/31/2012 - 07:54

Table mad using the Rustic Table plans.

Built from Plan(s)
Estimated Cost
$250 for all materials & finishes
Estimated Time Investment
Weekend Project (10-20 Hours)
Finish Used
Minwax Wood COnditioner, Minwax Stain in English Chestnut & Provincial, flat house paint and wax for apron and legs.
Recommended Skill Level
Beginner

Comments

Britt (not verified)

Wed, 10/10/2012 - 20:39

I love your tabletop! How did you finish your top to reduce the gaps between the boards?

Thanks for your picture!

Little e's Garden Bench

Submitted by jaime19861 on Mon, 03/17/2014 - 09:28

I made this garden bench for my niece's 3rd Birthday. She loved it!

I was able to use wood that had been leftover from past projects. I only had to buy a few boards. The paint was largest expense.

The most difficult part was the arch. I did that by bending my ruler along some finishing nails.

Built from Plan(s)
Estimated Cost
$30
Estimated Time Investment
Day Project (6-9 Hours)
Finish Used
I used DutchBoy MaxBond semi-gloss exterior paint.
Recommended Skill Level
Intermediate

Shelves for a Shed

Submitted by mtairymd on Sat, 06/18/2016 - 13:30

Build Instructions:
http://www.instructables.com/id/Shelves-for-a-Shed/

I looked at purchasing brackets but I couldn’t get the exact size and the price seemed high for something so simple – plus I had a few excess 2×4s from the last job. Mainly, I wanted to utilize the area in the upper portion of the shed while keeping the floor clear for yard/garden equipment. There are multiple variations of this style bracket online. I took a little different approach by utilizing the existing part of the shed (top plate) for support. I don’t know the load capacity but I’m quite sure it will handle any of the items (tarps, paint cans, etc.) I plan to place on the shelf.

Estimated Cost
$20
Estimated Time Investment
Afternoon Project (3-6 Hours)
Finish Used
None
Recommended Skill Level
Beginner

Penny the Chicken's new house

We needed a coop for our son's chicken Penny as she was big enough to move outside. We wanted one that would hold at least 2 chickens as we plan on getting a second soon. We found the plans for the a frame chicken coop here and the next day my husband and 5 yr old son got to work. Took them about 3 hours from start to finish and it turned out great. He plans on spraying the whole thing with outside deck sealer to protect the wood and had some trim on the edges to protect the kids from getting scratched by the chicken wire.

Built from Plan(s)
Estimated Cost
$169
Estimated Time Investment
Afternoon Project (3-6 Hours)
Recommended Skill Level
Intermediate

Comments

My Rustic X-Side Kitchen Island

Submitted by cassiet717 on Sat, 03/22/2014 - 05:53

I’ve been hoarding my scraps for the past six months or so hoping to build this as soon as possible. I paid roughly $34 for it!
Everything but the 1”x8” drawer face and the project panel top came from my scrap pile. My aunt and uncle’s renovation dumpster provided the missing 2”x4”s. There are nail holes, dings, and some general bruising, but who says that’s a bad thing?
I omitted the piece of trim beneath the drawer to allow more room for storage on my shelf. I absolutely love my island, and as usual Ana's plans were flawless!
You can see details on how I built and finished on my blog here: http://lovelyweeds.blogspot.com/2014/02/island-paradise.htmlit
Thanks for taking a look!

Estimated Time Investment
Day Project (6-9 Hours)
Finish Used
Olympia latex paint, Minwax Special Walnut stain, Minwax Finish Wax (body), Polyurethane (project panel top)
You can see tips for recreating my finish here: http://www.lovelyweeds.com/2014/03/island-paradise-part-2.html
Recommended Skill Level
Intermediate

Thank you for making my first furniture DIY project so easy!

Submitted by Anonymous (not verified) on Wed, 06/22/2016 - 10:07

I've been looking for a way to hide my ugly garbage can in my kitchen for a while now.  I figured it would cost way too much to buy something like this and was so excited to find Ana's plans online.  This was my first furniture attempt ever.  The plans provided made the entire process so easy.  I used some leftover beadboard for the door and some odds and ends we had laying around for the hardware to keep the costs down.  

Estimated Cost
about $30
Estimated Time Investment
Day Project (6-9 Hours)
Finish Used
The cabinet was first painted with Americana Decor chalk paint in Vintage then topped with Americana Decor chalk paint in Everlasting and distressed with my random orbit sander. The bead board in the door was painted with some leftover Annie Sloan Chateau Grey. To protect the finish I topped it with Annie Sloan clear wax (3 coats on the top).
Recommended Skill Level
Starter Project
Back