Community Brag Posts

1x12 Wood Bulk Bins

Submitted by carongirls on Mon, 01/26/2015 - 05:42

I made my bins 36 incheg to fit my space.  My big box blue store has 1x12x8 utulity shelving boards for $13 compared to $27 for the 12 footers. 

Built from Plan(s)
Estimated Time Investment
Day Project (6-9 Hours)
Recommended Skill Level
Beginner

Comments

My floral chicken coop

Submitted by Anonymous (not verified) on Mon, 04/26/2021 - 19:25

I’m so thankful I found Ana White’s site, like, 10 years ago. She’s inspired me so much and helped me to know I could build stuff! This is far from the first thing I’ve built but it’s absolutely the most complex! I was able to find a bunch of wood free locally from a construction site (they posted it online) and some friends had some old plywood they were kind enough to give us. Even with most of the wood covered, the cost of hardware and other supplies still took us over $200. I worked on it during the day for the last few weeks around our homeschooling schedule, so it did take quite a bit of time. I also had to modify it to work with the wood I had and I wanted to make it bigger inside. But it’s finally finished and our little chickies seem quite happy so far!

Estimated Cost
$250
Estimated Time Investment
Week Long Project (20 Hours or More)
Finish Used
Exterior white paint, honey colored sack stain
Recommended Skill Level
Intermediate

Comments

Do not test the seating until all table is comlete (humor at my expense)

Fun build. Thanks Ana. I made the mistake of installing one set of seat boards and testing the strength. I weigh over 300lbs. No harm no foul but you can probably figure out the rest. On my backside soon after.

Looking forward to building my next 2 without this mishap.

Jim

Built from Plan(s)
Estimated Cost
200
Estimated Time Investment
Weekend Project (10-20 Hours)
Finish Used
behr stain mentioned in plans and spar urethane poly exterior by minwax

Comments

Slatted double vanity - FINALLY finished!

I was a bit over my head with this one but I am so far very happy with the project. It is not quite finished. The marble was installed last week and we are awating the plumber to come back to hook up the sinks. I will install the second slatted shelf once the plumbing is in. Will post finished pictures soon. The mirror is made from 6x6 posts from the lumber yard. We had a friend cut them to size using a band saw. We made the mirror frame based on a picture I found on Houzz.com. The mirror glass was something I picked up off of craigslist for next to nothing and removed from the original frame. It is HEAVY (~200lbs) and attached to the wall with metal brackets. We purchased the sinks/faucets on ebay. 


Estimated Cost
For the vanity alone: $200-250
Estimated Time Investment
Weekend Project (10-20 Hours)
Finish Used
I used Hilary's vinegar/steel wool solution to age the wood, then sanded and finished with the vermont natural coatings polywhey in satin.
Recommended Skill Level
Intermediate

Comments

Outdoor Entertaining Space

Submitted by ikeymedesu on Sun, 05/30/2021 - 06:09

A 2-month long project to create an entertaining space in our small backyard. I started with a dining set for 6, then went on to seating around our firepit. I actually doubled the size of the Modern Outdoor Loveseat and built a 4-seat couch (added a center section for support. I also built 2 loveseats, 2 small side tables, and took some creative liberties to design a coffee table/foot rest combo. The major modification I made to the couch and loveseats was adding a back for some additional height. This really improved the comfort when leaning back. Had a great time completing this project! When lumber prices come down I'll continue the build. (2 pictures keep uploading and converting to an upside down image - no idea why, but sorry for the weird view)

Estimated Time Investment
Week Long Project (20 Hours or More)
Finish Used
Behr Premium Transparent Natural Cedartone Weatherproof
Recommended Skill Level
Intermediate

Comments

Ana White Admin

Sun, 05/30/2021 - 09:58

Love the coffee table foot rest, would love to see more of the outdoor table as well! It all looks amazing and came together perfectly! Thank you for sharing, check out our Facebook page, just shared!

Seasonal And Holiday

Over Toilet storage shelf

Submitted by Anonymous (not verified) on Mon, 10/04/2021 - 14:30

I made this less wide then the plans to fit in my small bathroom. Thank you for these wonderful
Plans!

Comments

Kitchen Lazy Susan

Submitted by bsbdays on Mon, 04/06/2015 - 06:29

This is a sample of what I have done using Ana's plans. Thanks Ana!!! I will be posting my entire kitchen Reno in the near future.

Estimated Cost
Cabinet was $98.00, Lazy Susan was $145.00
Estimated Time Investment
Afternoon Project (3-6 Hours)
Recommended Skill Level
Intermediate

Comments

Simple Outhouse

I built this outhouse to go with a dry cabin I'm working on, and also as an emergency backup for my house. I used treated lumber on the base/deck and splurged on T-111 for the siding. I wanted to use greenhouse polycarbonate for the roof, but found a piece of metal roofing in my shed that was exactly the right size so I used that instead. I thought about doing a fancy cutout on the door but ended up going with a half moon because it was easy. I'm thinking about cutting out stars of different sizes all over the rest of the door to let in more light. I'll trim and stain it next summer.

Built from Plan(s)
Estimated Cost
$450 - I used T-111 which is $40/sheet here in Alaska. I also used treated lumber where recommended and stainless steel screws.
Estimated Time Investment
Weekend Project (10-20 Hours)
Recommended Skill Level
Beginner

Comments

CH

Mon, 01/13/2020 - 15:25

WHAT HAPPENS TO THE 'STUFF' THAT YOU DEPOSIT IN THE TOILET?  I DIDN'T READ ANYTHING ABOUT DIGGING A PIT/TREATMENTS, ETC.  PLEASE LET ME KNOW.  THANK YOU!  CH.

Modified Ten Dollar Floating Ledges

Submitted by Radcrafter on Thu, 04/16/2015 - 22:33

I love these shelves.  So simple to build and still make a big impact.  I built mine just a little different from the plan.  I used 1x3 furring strips for the bottom and back pieces instead of 1x4's and then ripped a 1" strip from another 1x3 for each shelf to create the front trim piece instead of a 1x2.  The shorter front trim piece gives me just enough ledge to keep the frames from slipping off the ledge, but provides maxium display area for the art work.  

For three shelves just like these you need:

  • 7 -  1 x 3 x 8' furring strips 
  • Special Walnut Stain from Minwax
  • Satin Poly for finish (I also used Minwax for this too)

They were assembled using 2" fiinishing nails and lots of wood glue.

Built from Plan(s)
Estimated Cost
$20-30 approx for 3 shelves
Estimated Time Investment
Afternoon Project (3-6 Hours)
Finish Used
Minwax Special Walnut Stain, Satin Poly
Recommended Skill Level
Starter Project

Kids Country Bench Modified: First Build

Submitted by EllenFitz on Sun, 03/13/2011 - 19:20

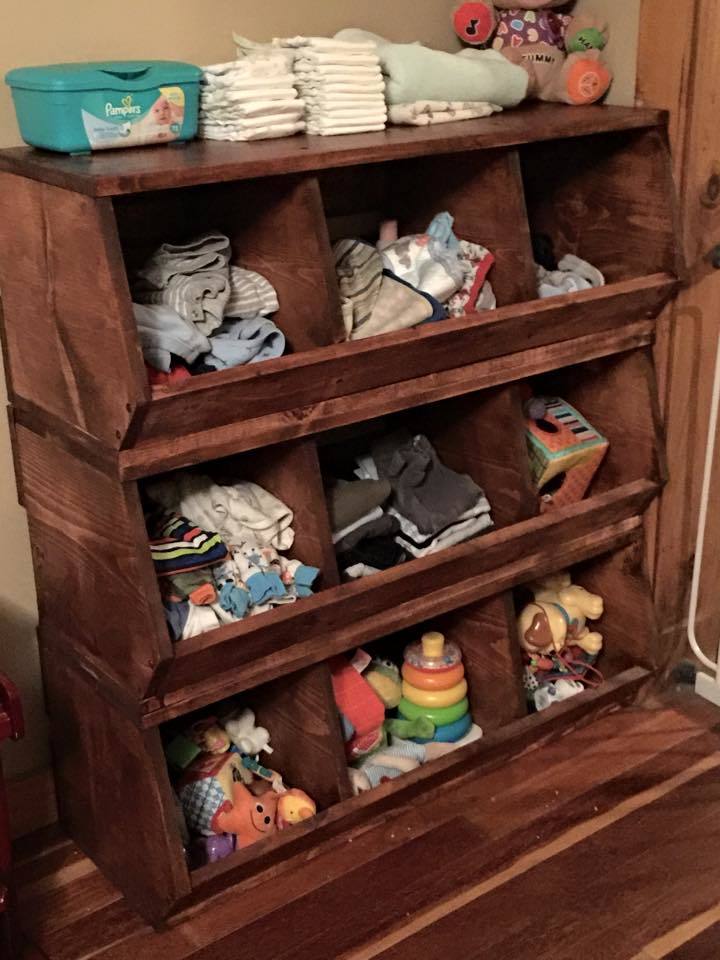
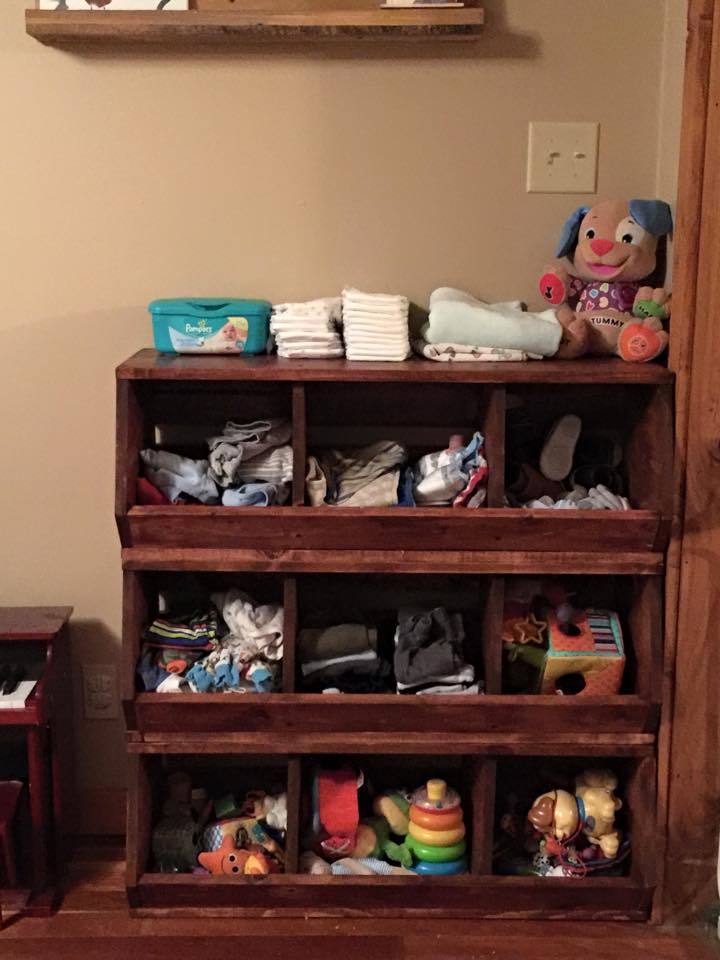
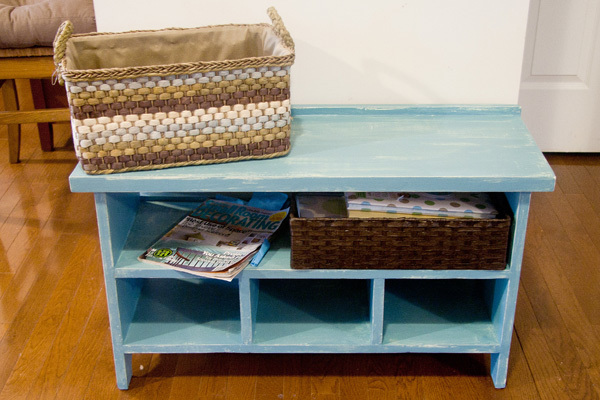
My husband and I put this together to fit a spot that was just slightly off of what standard furniture would accomodate. Looking for something simple as a first build, we went with the Kids Country Bench and made some changes along the way.
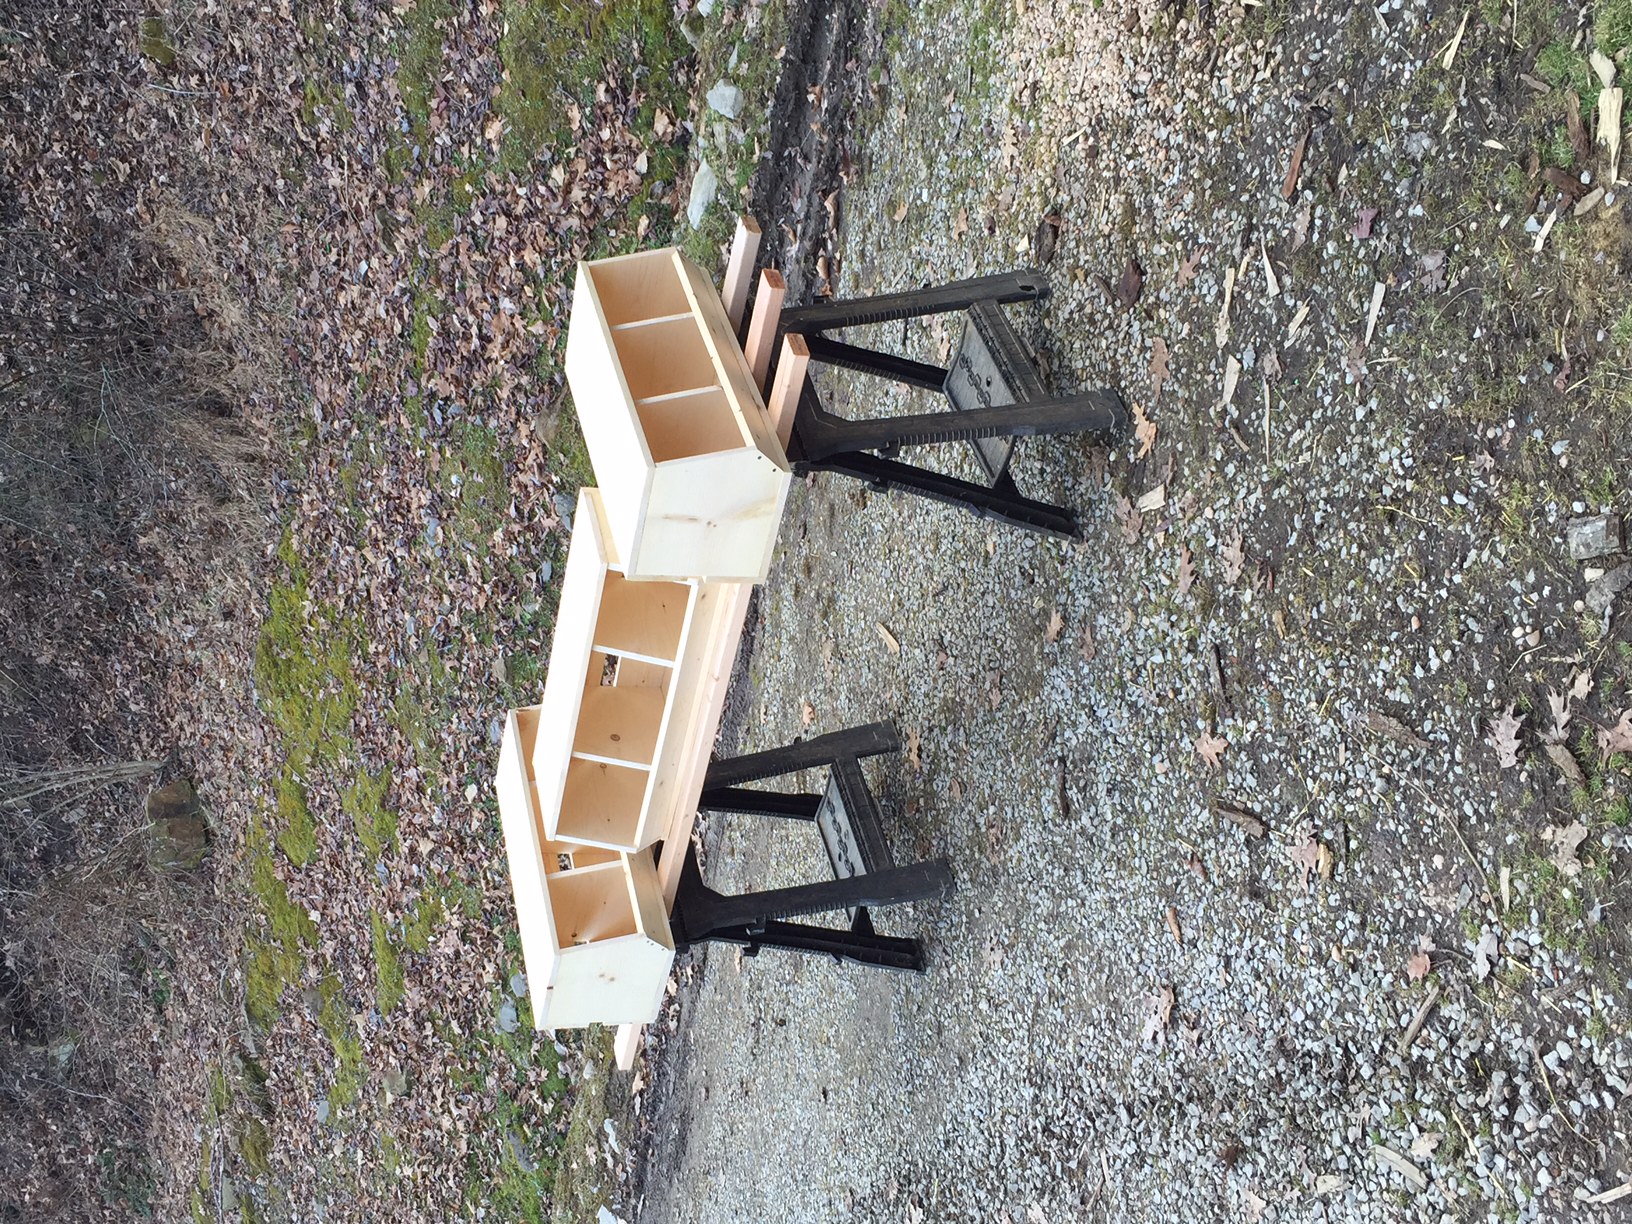
We made 3 cubbies on the bottom shelf for extra storage and a little extra stability, since our boards were more bowed than we preferred. We also removed the front and back aprons. In the front we just attached a 1x2 that we ripped into a 1x1 as a trim piece. In the back, we centered a 1x2 to give a slight lip in the back.
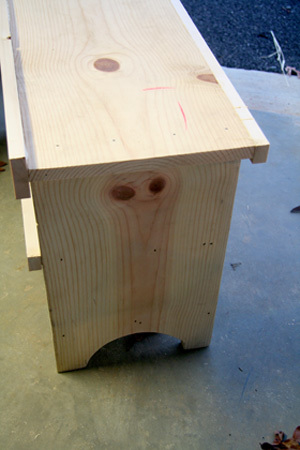
I don't have a jigsaw, so we used my FIL's Scroll Saw. That was interesting ... but the sides turned out ok. Not perfect, but ok.
I was hoping to finish this with a high gloss product, but since the boards we ended up with more 'rustic' than I anticipated, I decided to embrace that and go with a distressed finish. I used a spray primer, and then one coat of Sherwin Williams yellow, covered with a dry brush of Sherwin Williams blue. I then sanded the corners and edges and finished with a spray top coat.
We had lots of fun, although it took us a long time. We were only working in small shifts, in between naps. If we had managed to get, say, 3 straight hours to build, I think we could have finished in in that time period.
This was a great starter project, and it's nice to know that we can make MINOR modifications to a plan and not have it fall apart on us :)
Thanks for the inspiration Ana!

Built from Plan(s)
Estimated Cost
$50
Estimated Time Investment
Afternoon Project (3-6 Hours)
Finish Used
Distressed/Dry Brush paint
Recommended Skill Level
Starter Project

My entry way bench in Hickory

Submitted by Anonymous (not verified) on Sat, 10/23/2021 - 15:07

The Shelf Help app helped me customize this to my space, the plans were excellent. Thank you!

Built from Plan(s)

Comments

Kitchen Island, Trash Can Storage

Submitted by Anonymous (not verified) on Thu, 11/11/2021 - 21:46

I absolutely love this kitchen island/trash storage/prep station. I had so much fun building this with my father in law who is a professional carpenter. I had built several other projects, but with this project and his help, I feel that I can finally say I am an "advanced" builder :)

I had so much fun with this, and I can't believe how it turned out.

Comments

Christmas Tree Shelf

After watching Ana's video I decided to try to build the Christmas tree shelf this year in time for the season. It worked out alright. The build is straight forward. Doesn't take long and it's a fun seasonal project. Now I just have to figure out what to put on it.

Built from Plan(s)

Comments

Faux Fireplace with Hearth

We made some modifications by adding a hearth for additional height (the room we have it in is very large and open) and joining 2x4s for the mantel and base which I stained grey for contrast. We decided to use thin brick for in the "firebox" to make it look more realistic. We also have a newborn and spent over two months putting it together a little at a time in our free moments so I'm not sure how long it would actually take to do at once, but cutting and putting up the brick was very time consuming. 

Estimated Cost
$250
Estimated Time Investment
Week Long Project (20 Hours or More)
Finish Used
White paint, Minwax "Classic Grey" stain
Recommended Skill Level
Beginner

Comments

westmoundstar

Thu, 08/27/2020 - 11:16

This looks great! I'm actually in the middle of this build with the hearth as well. Couple questions....
How did you connect the two pieces? Also, did you connect to the wall? I'm assuming you didn't leave the 5 1/2 inch gap on the bottom of the fireplace and connected direct to the hearth. Let me know, thanks!

Seasonal And Holiday

Wood pullout Cabinet drawer pulls

Submitted by 3kidsilove on Sat, 04/16/2011 - 20:03

When I saw these on this sight I had to have them! We just bought a house and it has old cabinets and a remodel is not in the budget so these were perfect ! I did the top one then my husband did the other 4. This was a fun project can't wait to do more.

Estimated Cost
100.00
Estimated Time Investment
Weekend Project (10-20 Hours)
Recommended Skill Level
Beginner

Low loft bed...

Submitted by Anonymous (not verified) on Sun, 12/26/2021 - 17:43

My son's bed fell apart like a day before this plan came out. Being able to create things with just my chop saw makes it so simple and fun to do with my young son.

Thank you very much Ana.

Kim and Levi

Comments

Tall trellis from coat tree plans

Submitted by bar1812 on Thu, 06/25/2015 - 18:38

I could not find a big enough, awesome enough trellis in stores, so I built my own out of cull lumber [the stuff on super-clearance no one else wants] for about $12 and a left-over post pocket. Thanks for the inspiration!!

Estimated Time Investment
Afternoon Project (3-6 Hours)
Finish Used
ebony stain and spar varnish to hold up to the elements
Recommended Skill Level
Beginner

Comments

My take on the chicken coop design

Submitted by Anonymous (not verified) on Thu, 12/30/2021 - 13:01

When we became accidental chicken owners, we had to build a coop fast. I found the plans for Ana’s replica of the Williams Sonoma chicken coop and got to work. They were very easy to follow and easy to modify to fit our own needs and aesthetic. We decided to enlarge the coop and remove the planter in the original plans do we could accommodate more chickens while keeping the original footprint. Instead of plywood, we used cedar reclaimed from an old fence we had recently replaced. We also enlarged the rear door to make clean out as easy as possible. I cut pieces of corrugated plastic that fit inside the door and windows to winterize the coop when temps drop below freezing. The run is designed to follow the shape of the coop and is large enough to give our 5 chickens plenty of space. The planter box runs the length of the chicken run, providing some plants to munch on inside and shady vines that will eventually cover the outside. Thanks for the awesome plans!

Comments