Community Brag Posts

Loft Bed for Renee's Room

This is the 2nd of two loft beds I have built using Ana's plans - they came out great and my girls love them! I did make some modifications to each, as the girls have different needs. It was a great project and I would like to thank Ana for the concise plans, cut lists, ideas, etc. You made it so easy!

If you are interested in seeing more about this project feel free to visit my blog at www.mothersmusings.net. See you there!

Estimated Cost
$150.00
Estimated Time Investment
Week Long Project (20 Hours or More)
Finish Used
I must say, if I had it to do again I might have upgraded on the wood, but I got the cheapest pine I could find. This led to using A LOT of wood filler and sand paper - and probably took me about twice the time it would have taken had I used prime wood. I used an oil based primer to make sure the knots stayed covered, and 2 coats of Behr high gloss white paint for the finish. Extra work...yes - but ultimately I think I cut my cost in half.
Recommended Skill Level
Beginner

Cutest Baby Doll High Chair

Submitted by tracysmith on Sun, 03/27/2011 - 15:29

My neighbors grand-daughter is about to turn 3 and I thought this would make a great present for her.. plus, when she saw it online while visiting me (I was checking the website as usual), she said "Oh, I NEED one of those!".  I laughed and then that night went out and checked my scrap pile to see if I had everything I needed to build it.

I only needed one 8' piece of 1x2 to complete it.. .everything else I had, so great!
Estimated Cost
About $10 with paint.
Estimated Time Investment
An Hour or Two (0-2 Hours)
Finish Used
I have yet to paint this little project, but it will be painted in a gloss lavender purple so it's easy to clean.
Recommended Skill Level
Starter Project

Comments

Ultimate work bench

Submitted by markmart74 on Fri, 06/16/2017 - 18:44

Tablesaw, router, fliptop mitersaw, and dust collection workbench. 

Recommended Skill Level
Intermediate

Comments

My Simple Outdoor Lounge Chair with 2x4 modification

I modified this chair with 2x4's as the base and 2x2 for decoration on arms, this is prior to sanding and finishing

Built from Plan(s)
Estimated Cost
$15-$20 dollars, depending on local lumber prices and finishing options.
Estimated Time Investment
An Hour or Two (0-2 Hours)
Finish Used
Unfinished
Recommended Skill Level
Beginner

Comments

RandyW

Sat, 06/13/2020 - 16:33

I always take my sander to the sharp edges and round them off

DIY Outdoor Sectional

Submitted by Anonymous (not verified) on Mon, 05/06/2024 - 13:25

I used the armless chair plan, and altered the one armed plans to make two chaises. Then I increased the size slightly to accommodate the 25x25 pillows I bought. This took about 12 hours with one person working. I am super proud of it! Finished today, and will eventually stain after the wood has dried out a little. Thank you, Ana, for making straightforward plans that gave me the confidence to do my first woodworking project!

Andrea in Michigan

Ladder Back Chair

Submitted by Dlwj27 on Tue, 07/04/2017 - 11:44

I adjusted the plans to make this a chair that would fit under a regular table. The front legs are 19" and the back legs are 40". Then I followed the plans as written.

Built from Plan(s)
Estimated Time Investment
Weekend Project (10-20 Hours)
Finish Used
Stained chair with Mini Wax Wood Finish Stain in Provincial #211. Then dry painted Americana Decor Chalky Finish in Timeless. After paint dried I rubbed Steel Wool over the whole chair to give a distressed look. I applied a coat of Mini Wax Polyurethane Clear Satin to finish.
Recommended Skill Level
Intermediate

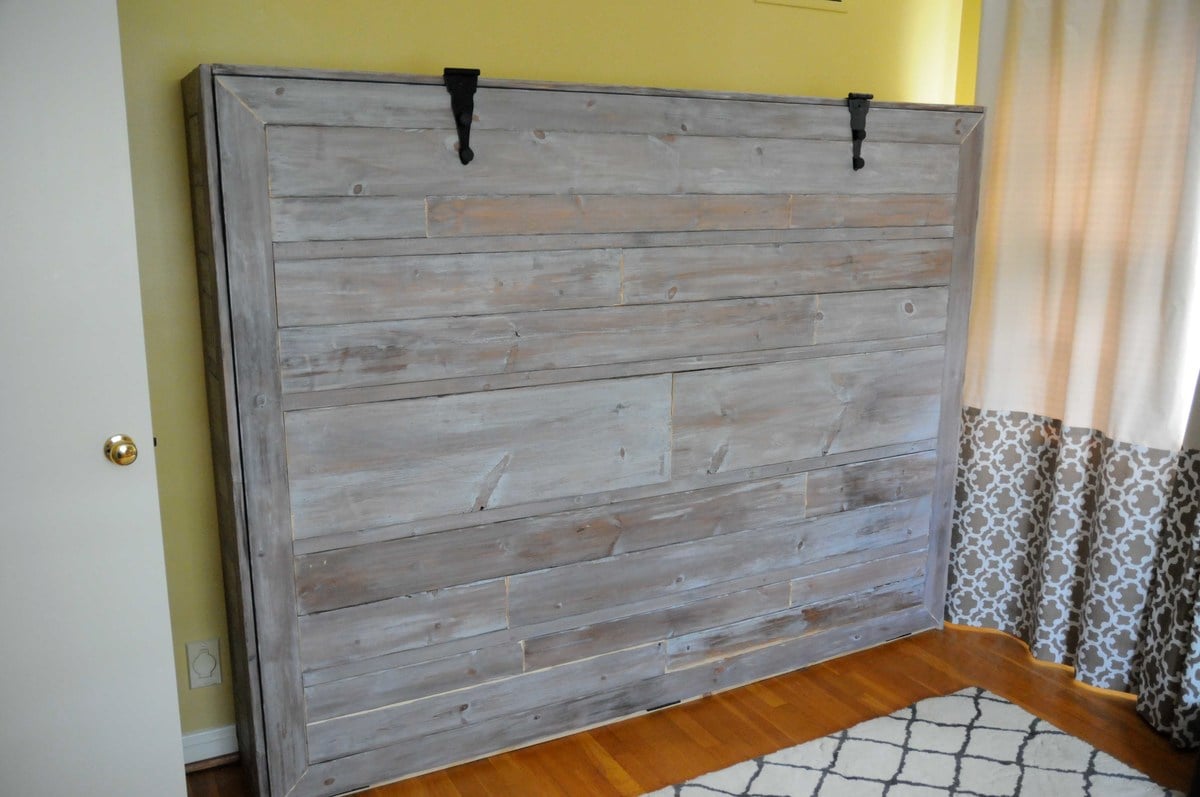
Rustic Queen Sized Wall Bed

Submitted by ldo2626 on Wed, 06/25/2014 - 09:09

Expecting our second child, my wife and I decided to do away with our guest bedroom and combine it with our office. The only problem was our queen bed took up way too much space and it didn't get enough use to justify the sacrifice. We looked at the wall bed options available for purchase and decided they were way too blah and very expensive. I then found the "A MURPHY BED YOU CAN BUILD, AND AFFORD TO BUILD" post on Ana's website (thanks for the inspiration)! 

 Using cheap pine boards, plywood, door hinges, vinyl upholstery and stain I constructed the wall bed you see here. It really wasn't that difficult but facing it took the most time. To give the boards a more rustic look I used a utility knife to shave off the edges/corners and stained them with the Minwax American Walnut water based stain and the Minwax White Wash Pickling. When this started we thought we were going to have to settle for something unattractive and less than desirable. Seeing it in our office now, we love our new bed and actually think it makes the room look much better!  I didn't keep track of costs, but it couldn't have been more than $150.


Estimated Cost
I didn't keep track of costs, but it couldn't have been more than $150.
Estimated Time Investment
Weekend Project (10-20 Hours)
Finish Used
Minwax American Walnut water based stain and Minwax White Wash Pickling
Recommended Skill Level
Beginner

Comments

jwm816

Tue, 07/08/2014 - 08:08

Looks great! May I ask what the final outside dimensions were? Curious to see if this would work for me.

Thanks!

ldo2626

Wed, 08/06/2014 - 09:23

I would have to measure it when I get home... at work currently. Looking back, I think the best approach is to take the measurements from the plan, find the difference between standard mattress and queen mattress dimensions (check wikipedia for standard sizes), then add that difference back to the plan. I cut it real close on mine and could use a little more space. It would be nice to make it a bit deeper and with some head room to store comforters and pillows.

lopixy

Sun, 11/30/2014 - 18:10

I love this!  Could you give more details about how you did the facing?  Are the pine boards just nailed onto the plywood? 

chefrgk

Sun, 12/28/2014 - 12:59

I am dying to get started on this wall bed project. I keep getting this message when trying to open the Plans.

The page you are looking for is temporarily unavailable.
Please try again later.
can someone help me find them.

chefrgk

Sun, 12/28/2014 - 12:59

I am dying to get started on this wall bed project. I keep getting this message when trying to open the Plans.

The page you are looking for is temporarily unavailable.
Please try again later.
can someone help me find them.

nicolanala

Tue, 08/09/2016 - 15:24

Hi. I would love to try this. Looking to build in the next month before parents in law come over. Is there any working links to the plans??

josheli

Thu, 01/25/2018 - 13:06

click on the bed picture above and it will take you to the plans


Laundry Basket Dresser

This took me about an hour to build. I used two coats of paint and bought the cheapest laundry baskets that Walmart sells here in Alaska ($3.77 each). I added some felt to the bottom corners as it'll be sitting on a hardwood floor. Very happy with the finished product!

Estimated Time Investment
Afternoon Project (3-6 Hours)
Recommended Skill Level
Starter Project

Outdoor Sofa and Chair with Slanted Back

Submitted by Anonymous (not verified) on Sun, 07/16/2023 - 10:22

OK, I think this build may be my biggest project yet! It is definitely the heaviest. With the strong winds we can get here in Florida we needed substantial outdoor furniture.
I did make some modifications along the way measurement-wise so the sofa would fit my front porch better. All in all, this took 2 full days. I built the sofa first, stained it the next day and then decided (due to trying to get stain in all the nooks and crannies) to stain the chair pieces first before putting it together.
I am so happy with the results and so far, almost a year later, this furniture looks great and hasn't moved an inch in any of the thunderstorms we've had! Thank you Ana!!

6'x6' Box

Submitted by Anonymous (not verified) on Wed, 04/20/2016 - 19:22

I found these plans online and was just waiting for the kids' grandpa to come out and build it. Could be built in one afternoon (depending on how many trips to your local Home Depot, and availability of the correct tools)
Modifications from original plan:
6x6 instead of 4x4
Brackets to hold patio umbrella for shade
Added seat gussets for additional support
Added "wooden flange" around bottom of box to run lawnmower on
One additional center back support on each bench
One centered handle (instead of a handle on each end)
Stapled landscape weed barrier fabric onto the bottom
Sanded all exposed edges

Materials:
4@2x10x8'
12@1x6x6'
2@2x6x12'
8 hinges
2 handles
3 1/2" decking screws (for attaching 2"x boards)
1 5/8" decking screws (for attaching 1"x boards)
2+ 1 1/4" 2-hole straps for metal conduit (for attaching patio umbrella*)
*Our patio umbrella pole was 1 1/2" diameter, but 1 1/2" straps had too much play, so we used 1 1/4" straps and misc flat washers to adjust the snugness to the pole
Cut lengths:
2@2x10 cut to 72" (long sides of the box)
2@2x10 cut to 69" (short sides of the box)
Cut one each of the following out of a 12 footer:
2@2x6 cut to 75" (long side "flange")
2@2x6 cut to 64" (short side "flange")
No cuts were made to the 12 1x6's
Used one leftover 2' from the 2x8x10's ripped in half cut to 11.5" for arm rests
Used two leftover 2' sections from the 2x8x10's ripped in half cut to 21" for back supports
Used the last 2' cutoff to make two seat gussets (cut about 9 1/2" off and then ripped it at 45 degrees)
Used the remaining piece (ripped in half length-ways) to attach to the center of the backrest for additional support and as the attachment point for our handles
We decided to do one handle in the center of the backrest so one reasonably strong adult could open the lid
The bottom "flange" was assembled with the box upside down. Basically a 2x6 screwed to the bottom edge of the box allowing 1 1/2" overhang all the way around
After making cuts, but before assembly, we recommend using a quarter-sheet pad sander (or similar) with 60 grit paper to break all of the edges and round over any ends or corners that will be in contact with sandbox users
Followed other general assembly instructions

Built from Plan(s)
Estimated Cost
$300 with umbrella and sand
Estimated Time Investment
Day Project (6-9 Hours)
Finish Used
We live in a very arid climate (Utah) so we chose not to varnish or paint this project
Recommended Skill Level
Beginner

Essential Adirondack chair

Submitted by str1523 on Mon, 05/25/2020 - 10:23

Like this chair! Changed the 3 1x10's on the back to 4 1x8's ripped down to 6 ¹⁵/¹⁶

Estimated Cost
40
Estimated Time Investment
An Hour or Two (0-2 Hours)

Comments

Garden Tool Shed (based on plans for Small Outdoor Shed)

Submitted by aceecee on Tue, 09/22/2020 - 14:07

My husband and I built a garden tool shed using your plans for a "Small Outdoor Shed or Closet." We needed exactly this size for our available space. (THANK YOU! The video was really helpful and the plans were very detailed.) We are not handy at ALL, and are definitely beginners when it comes to woodworking. But, when the person who was supposed to build it for us was delayed, we thought we could try it, or at least START.

We bought a lower-end Kreg pocket jig and a secondhand mitre saw, and set to work, using T1-11 siding. We ended up building the entire shed ourselves, and were very surprised at the end result (and proud too!). The hardest part was building the doors, since we weren't really sure how to construct them to keep them from bowing. We ended up putting trim all around the edges of the T1-11 plywood doors, inside and out. (We were too far into building them when we realized we probably should have done it differently.) We also couldn't figure out how to get the double doors to stay tightly shut, but ended up using a rotating block (see picture) at the bottom and it works great, especially given that one of the doors had a slight bow at the bottom.

I think the only ways in which we deviated from the plan were that we added trim, an additional 2x4 up high across the back of the shed (for hanging long-handled tools), and two interior shelves on the left (from leftover siding). We used colored corrugated polycarbonate sheeting over the roof instead of asphalt shingles. (Unfortunately you have to use specific screws for the sheeting and one length was too short and the other too long and protrudes through the roofing slightly, into the interior. But we like the pop of color the sheeting adds, and REALLY didn't want to do shingles for such a small area, nor did we know how to do shingles.)

My final suggestions would be that a mitre saw and pocket jig are REALLY helpful and using star head screws is easier. I would also suggest that you paint everything (prime and color coat) before assembly and just touch up afterwards, especially if you use a lot of trim as we did. We primed and painted the siding but just primed the trim, and it was a real pain to put the color coat on all that 1x3 trim after construction.

This plan is listed as an "intermediate" project and I think that's probably a correct designation. As beginners, it just took BOTH of us to figure it all out (we work really well together) and to build it, and it took a much longer time than it would for someone with more experience.

Estimated Cost
I think we probably spent between $300 and $400 on lumber, hardware and paint, not counting buying the secondhand mitre saw and the Kreg jig.
Estimated Time Investment
Week Long Project (20 Hours or More)
Finish Used
Primed and painted, green and tan. (We bought the green and had the tan on hand.)
Recommended Skill Level
Intermediate

Comments

laurawelsh

Tue, 10/06/2020 - 15:56

Well done! I love this! Can I ask what dimension your garden tool shed is? And how did you decide on the new roof size/angle? I have a similar space and am contemplating something similar. Thanks!!

laurawelsh

Tue, 10/06/2020 - 15:56

Well done! I love this! Can I ask what dimension your garden tool shed is? And how did you decide on the new roof size/angle? I have a similar space and am contemplating something similar. Thanks!!

Fire Pit Swings

My wife saw something like this on Pinterest and desperately wanted one. The one she saw was hexagonal in shape. We didn't need as many swings so we went with just a plain square shape. We used 6x6s for the legs and posts across the top and used 4x4s for the angled support pieces. We built the swings using the plan from this website. All the materials can be picked up at the blue and orange stores. However when it came to the springs for the swings, the blue store was 1/3 of the price of HD. The legs are 12' long and buried 4' under the ground and cemented in for strength. Luckily I am retired military and was able to rent an auger for 1/2 the price of HD or the blue store. You could do it by hand but it saved us hours and lots of back pain. We found our dimensions for the size we wanted and spray painted dots on the ground where the posts were going to go. We dug the holes and stuffed the 6x6s in them. Using a post level we made sure they were plum. We braced them and added the quickrete and left them to setup over night. The next day we had to make sure all the tops were level with each other. This is where having some knowledge of physics paid off. I took clear tubing and screwed it above the height that I wanted on one post and then screwed the other end to another post. Fill it with water until the water level on the first post is where I wanted it (8 feet high) and it will automatically fill it level on the other end. There is a picture of this above. Water will always level itself out. I had to do this because my yard is at a slight down hill grade. We marked it and cut the tops off to make it level. After attaching the 6x6s on the top with 8" lag bolts it was time to paint. After painting was done we built 3 swings from Ana's plans. We shortened them by 6" to give room to walk between the legs and the swings. All in all it was a great project that only took two dedicated weekends. My wife still has to paint the swings though.

Built from Plan(s)
Estimated Cost
$600ish
Estimated Time Investment
Week Long Project (20 Hours or More)
Finish Used
We used an oil base Black Barn Paint from the blue store.
Recommended Skill Level
Intermediate

Comments

jkread

Wed, 05/27/2015 - 22:38

It sounds and looks like the top 6x6s are mitered and sit on top of the end of the vertical posts. I'd say at least one lag bolt each way to hold the mitered corner together and then at least one in each piece down into the vertical to hold it in place.

carewarner

Mon, 04/27/2020 - 10:24

WOW, LOVE!!! This is simply gorgeous! What a warm and welcoming addition to your yard. And thanks for sharing your method of finding level for your posts on your sloped yard. I absolutely love it!

Seasonal And Holiday

Loft bed

Submitted by Ball on Tue, 06/28/2016 - 08:26

The bed is a mixutre of the loft bed plan and the farmhouse loft bed plan with some modifications of my own thrown in.  I liked the headboard look of the farmhouse loft bed and incorporated it into the plan.  I also made the side rails out of 1x10's to make it more beefy looking and I think it works better.  The supports for the mattress are made out of 3/4" bookshelves, cut down to fit as it added more support than 1/2's.  The desk is based off the loft bed desk plan, but I made the top piece out of 3/4" MDF. I think it makes a nicer look.  I added 1x2's to the face of the bookcases and desk top to finish it off and make everything look more finished.

I also added a programmable, remote controlled, RBG LED lighting system under the bed.  My daughter can go from dance party to mood lighting depending on the situation.  This bed will deliver.

I also modeled everything in 3D CAD using Solid Edge.  This was a very helpful tool to get all the measurements correct as well as incorporating 3 different deisigns blended with my own.


Estimated Cost
$300
Estimated Time Investment
Week Long Project (20 Hours or More)
Finish Used
Sherwin Williams Pro-Classic acrylic latex enamel.
Recommended Skill Level
Intermediate

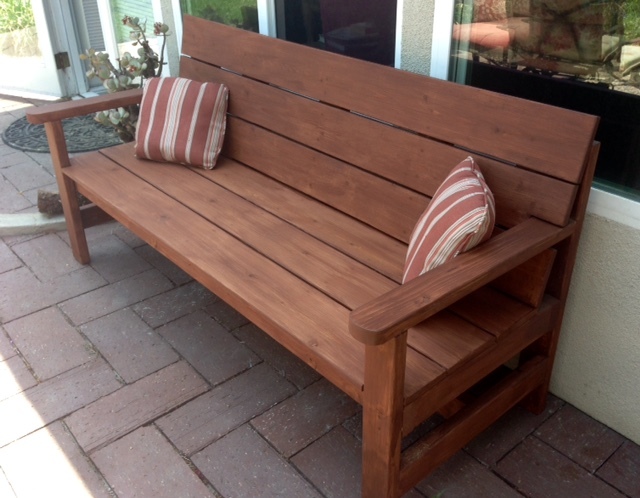
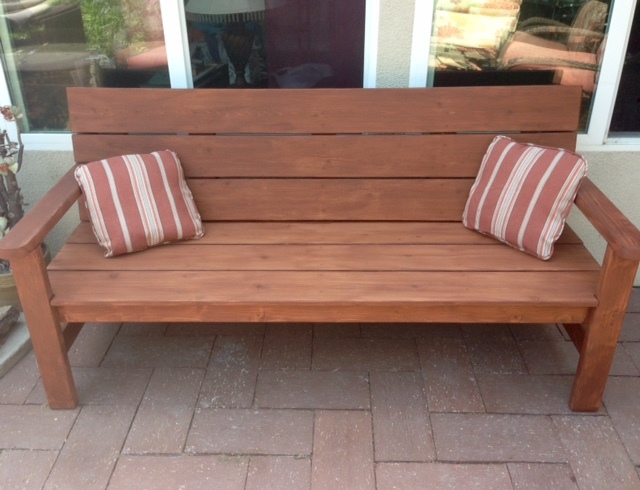
Modern Outdoor Bench

Submitted by Anonymous (not verified) on Tue, 08/09/2016 - 16:29

Great plans!  I modified the bench by adding a slanted back (which enabled me to put the slats closer together), extending and curving the front of the arms and extended the seat to the outside of the legs.


Recommended Skill Level
Intermediate

Comments

Back