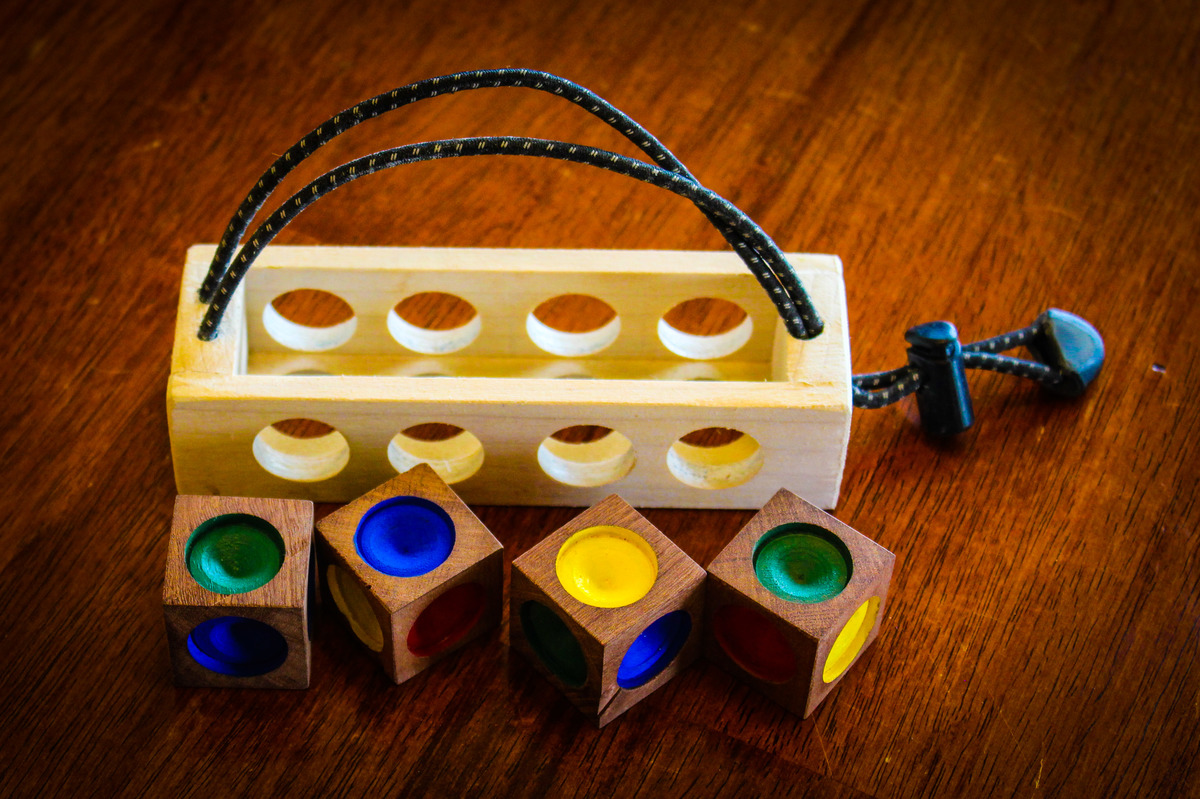
Community Brag Posts

Faux Mantle

1st of all I want to apologize for posting several of my builds at once. I am not trying to steal the show, but I'm just deciding I would like to share my builds.

Ok, now to this build. I didn't get this mantle from this site but still wanted to share. I used the one from "blue roof cabin" site and adjusted it to my desire. I wanted my depth to be bigger so I used 1x8's to bring it out from the wall more. I got the backing idea from "Netties Expressions" by using Whitewood V-Groove Wainscot wall panels.

I plan on building one from Ana's site to do one for my dining room. I check this site daily just to see what you all have built so I can get more ideas. Thanks Ana for sharing your builds.

Finish Used
Rustoleum black cherry and dark walnut.
Recommended Skill Level
Beginner

Grand Waterfall Console Table

Submitted by Anonymous (not verified) on Tue, 06/27/2023 - 08:48

I used the Grand Waterfall Console plans, but modified them to be 72 inches long instead of 84 inches. Overall, I learned a lot during the process, but wood filler, sanding, stain, and finishing with polycrylic made all the difference in the end. The hardest parts for me were the mitered cuts. I think if I did it again, it would look even better!

Deb

HGTV'd myself

Submitted by angiemicn on Fri, 02/10/2012 - 04:21

This was one of my first big projects, this site motivates you to get better. No, at first I couldn't build a box, now, I'm building outdoor bars! All of my skills, I learned from this site. The boxes are heavy, sturdy, they've had 5 golden retrievers on it, 4 adults at once, and the storage is incredible. The pics below show what an improvement a piece of furniture can do. This piece went into a dead space corner, a catchall. I'm not proud of the mess, :), but I am proud of the after. Extra room, light, airy, yeah!

Built from Plan(s)
Estimated Cost
80 to 100
Estimated Time Investment
Week Long Project (20 Hours or More)
Finish Used
primered x2 coats, Kilz2, stained n between. Semi gloss Pure White 2 coats
Recommended Skill Level
Beginner

Modified fancy x

Beetle kill table. I chose to mortise the support and use pegs for effect. As such used 4x4 for leg uprights. Made the top removable because it's heavy!

Built from Plan(s)
Estimated Time Investment
Weekend Project (10-20 Hours)
Finish Used
Oil based gloss plolyurathane
Recommended Skill Level
Intermediate

Comments

Josh-Adam

Wed, 08/03/2016 - 09:59

That table looks awesome ! I am in the process of making one similar i went to a local mill and they had ambrosia maple to make the table topper and i am making the base. I was wondering how you went about making the table top removable did you use threaded inserts ? also how did you get the cross support cut out done? Last question i have is where did you find the 4x4 material i am in eastern north carolina and it seems it doesnt exist around here. thank you for sharing

Coen's Cabin Bed

Submitted by Anonymous (not verified) on Mon, 02/29/2016 - 15:28

This is a fairly easy build. It did take some time with three little ones running around, but the finished product is well worth it! My three-year-old doesn't want to get out of bed in the morning (win!).

Built from Plan(s)
Estimated Cost
$250-$300
Estimated Time Investment
Week Long Project (20 Hours or More)
Finish Used
Minwax weathered oak stain
Recommended Skill Level
Intermediate

Comments

Ana White Admin

Tue, 03/01/2016 - 12:19

You did an amazing job on this, I wouldn't want to get out of bed either! Thanks for sharing:)

Rustic Farmhouse Vanity

Submitted by jameslee on Thu, 10/10/2019 - 16:23

My master bathroom was my first DIY remodel. I took this room down to the studs and built it back up. I struggled to find the perfect vanity that felt strong and sturdy and could not find one. I needed a wide vanity to accommodate this 3 foot wide vessel sink. I found Ana White and this plan online and fell in love! This was my first build and I’ve become addicted to wood working since. As my first build, this took me most of a day to build and assemble drawers. Sanded and painted with a flat finish! I love it! Thank you Ana!

Estimated Cost
$200
Estimated Time Investment
Day Project (6-9 Hours)
Finish Used
General Finishes milk paint in Seagull Gray with a high performance flat finish. Hardware and sink found on Amazon.
Recommended Skill Level
Beginner

Comments

x bench

Submitted by sidman on Tue, 02/14/2012 - 02:41

I loved this bench when I saw the plan and had to try it. Thanks Ana!

Estimated Cost
20.00
Estimated Time Investment
Afternoon Project (3-6 Hours)
Finish Used
Red oak stain on top and painted the botton black.
Recommended Skill Level
Starter Project

Comments

Tiny House Ontario

Submitted by Anonymous (not verified) on Fri, 03/04/2016 - 12:43

I looked at all the sofas that people built and took bits out of a lot of them to decide what I needed to fit my needs. I am in a tiny house and I wanted the sofa to be super versatile as well as being good for storage. I decided to build it the size of a double bed, but to divide this into three sections so that it can be used as a sectional, a seating area for meals and a bed for overnight guests. It was a lot easier than I thought it would be.

Thank you for this, I would not have known where to begin.

I decided on brightly printed outdoor fabric because the interior of my tiny house is all wood and I though the bright colours would be a nice addition. The outdoor fabric was chosen so that it would resist water and stains as well as pet hair.

Estimated Cost
$487.
Estimated Time Investment
Day Project (6-9 Hours)
Finish Used
water proof outdoor fabric
Recommended Skill Level
Intermediate

Built in dining bench

Submitted by aahmad79 on Sun, 10/13/2019 - 09:14

I used the mudroom bench plans and modified them slightly to account for the wider space and air registers underneath. Thanks Ana!

Built from Plan(s)
Estimated Cost
$450
Estimated Time Investment
Week Long Project (20 Hours or More)
Recommended Skill Level
Intermediate

Comments

Daybed Mash-up of Plans

Submitted by Anonymous (not verified) on Mon, 07/03/2023 - 12:35

I mashed together several twin bed plans - farmhouse bed, simple twin bed and Hailey Storage bed to create this farmhouse style daybed. It's a very sturdy and heavy piece of furniture.

Built from Plan(s)

Cedar Garden Bed

I made this garden bed in one evening. I love it! I bought 6 6' cedar fence pickets and two cedar 1x2s. I don't have a table saw, and they wouldn't rip a fence picket for me at the store, so I had to buy the cedar 1x2's but the project was still very affordable. I wanted it a little wider than the original plan, so I just cut the 6' pickets in half for the sides.
It is 6' x 3' and I didn't bother to cut the dogears off. You probably wouldn't even be able to tell they are there. I didn't trim the top out because that would add on about $6, and I like it just the way it is.
Now, lets see if I can actually grow some plants in it!!
I'm a beginner, and this project was really easy.

Estimated Cost
$20
Estimated Time Investment
Afternoon Project (3-6 Hours)
Recommended Skill Level
Starter Project

Comments

Lisa P (not verified)

Tue, 04/03/2012 - 08:08

This is exactly how I was going to modify Ana's plans as well. Have you started growing anything yet? Looks great!

Tara Kirkland

Tue, 04/17/2012 - 20:55

Yes, I've started "trying" to grow a few things. I don't usually have much luck, but maybe.... just MAYBE this will be the year!! :)

Lindyer0523 (not verified)

Mon, 04/23/2012 - 07:13

What would you have used for the top trim?

counter raised beds

2 - 2x12x8

2 - 2x3x8

2 - 4x4x8 (cedar, fur is cheaper and will work fine also)

16 - 5/16x4 lag screws 

16 - 5/16 washers

3x10 feet 1/4 hardware wire

20 - 3inch wood screws (outdoor rated, deck screws or the like) 

you will have left overs if you buy extra lags you can make some other boxes depending on how high you want these, or set them on ground without legs. and use the wood screws 

Estimated Cost
$75
Estimated Time Investment
An Hour or Two (0-2 Hours)
Finish Used
no finish
Recommended Skill Level
Beginner

Farmhouse Nesting Tables

Submitted by Anonymous (not verified) on Fri, 10/18/2019 - 08:34

First real furniture project. Used pocket screws for just about everything and added some decorative 2" bread boards.

Built from Plan(s)
Estimated Cost
Under $100
Estimated Time Investment
Day Project (6-9 Hours)
Finish Used
Early American Stain with Polyurethane finish
Recommended Skill Level
Beginner

Square Picnic Table with Umbrella

Submitted by Anonymous (not verified) on Fri, 07/07/2023 - 11:06

Used your plans to make a sturdy, durable hardwood picnic table for a friend. Top is black cherry (1 1/4") and base/seats are white oak (1 1/4"). The seats are one piece, 11" wide from a white oakoy cut and sawed on our property! Sealed with two coats of Spar Urethane.

Chip McCoy

Built from Plan(s)

Mimi's Hall Tree

Submitted by Erik on Fri, 02/24/2012 - 06:33

This is my first ever build (so be gentle). My fiance has always wanted a Hall Tree and her birthday was comming up so I posted a request for a Hall Tree and that afternoon there was a post from Ana with Mimi's Hall Tree, so I figured that was a sign I HAD TO BUILD IT! So I took the lists went to the local Home Depot and bought all the wood, plus a Jig Saw, Kreg Jig, Sliding Compound Miter Saw, Circular Saw, Clamps.... a few weeks later just in time for her birthday this is what I had. I have to admit its flawed but we love it!

I can't thank Ana and company for turning me on to my new hobby and I am looking forward to my next build!

PS I will be putting the hooks on tonight, I will post more photos when the hooks are on and there is stuff on the Hall Tree

Estimated Time Investment
Weekend Project (10-20 Hours)
Recommended Skill Level
Beginner

Comments

Guest (not verified)

Fri, 02/24/2012 - 06:38

The stain is minwax mahogany.

Guest (not verified)

Fri, 02/24/2012 - 09:18

I BET YOUR FIANCE LOVED IT...GOOD JOB KEEP BUILDING!

Caroline's double loft bed

Submitted by Anonymous (not verified) on Thu, 03/10/2016 - 19:18

We made this a double bed and lowered the height by 3 1/4 inches because we have low ceilings. We added an extra support under the mattress since it's a double. Plan to add the desk and low shelves later. Followed the plans very closely, worked out great. One thing I would suggest is to do the slats after the guardrail. Otherwise you can't stand under the bed and it's hard to get a good angle when screwing it on. Many happy hours of reading Harry Potter up there in the first week :).

Built from Plan(s)
Estimated Cost
$500
Estimated Time Investment
Week Long Project (20 Hours or More)
Finish Used
Gel stain
Recommended Skill Level
Intermediate

Modern Chaise Lounge

Submitted by Anonymous (not verified) on Sat, 07/08/2023 - 10:13

Modified lounger, made from 75mm x 38mm (cls) timber, sealed with 3 coats of exterior varnish.

Had great fun making this one, already on with making my second lounger.

A bit of wood

Rustic Planked Wood Sideboard

Check out my blog post for more on building this giant, hardworking piece! It took me about 45 hours to build it from start to finish (I work slowly) and cost about $400 in materials.

Estimated Cost
$400
Estimated Time Investment
Week Long Project (20 Hours or More)
Finish Used
General Finishes water-based stain, milk paint, glaze, and Staples Crystal Clear bowling alley wax. More details on my blog post.
Recommended Skill Level
Intermediate

Comments

Icepickman

Mon, 02/02/2015 - 07:21

hey, great build, i'm going to attempt a similar project. i could not get to your blog post?

Back