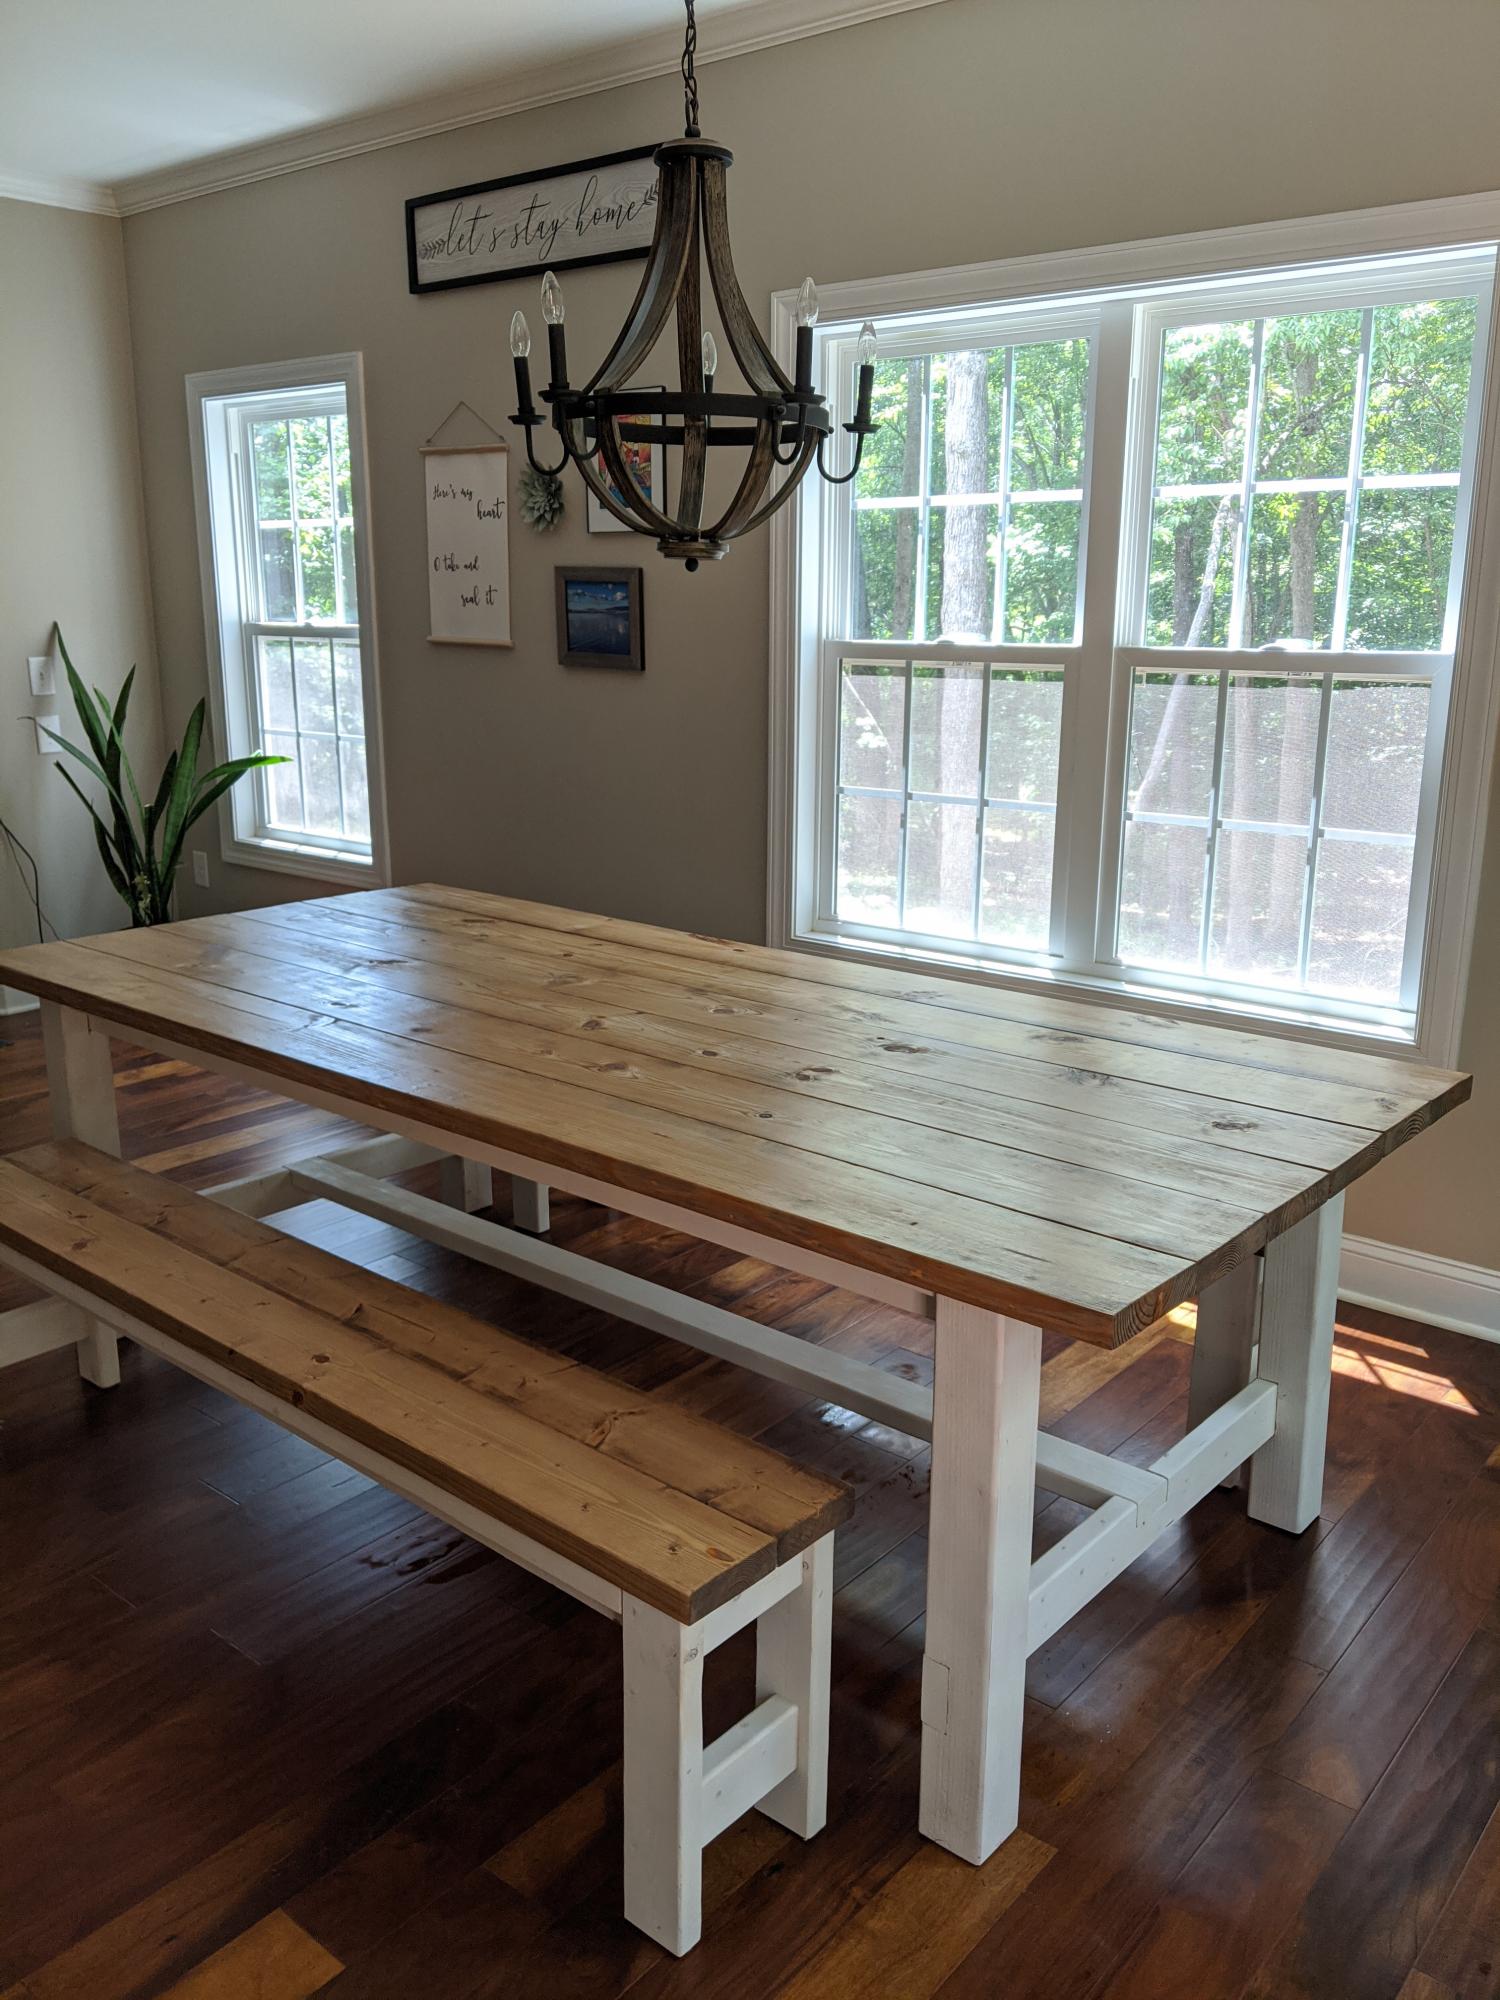
Shiplap Fireplace with Live Edge Mantel

I decided to go with a live edge mantel. I feel it really compliments my new hardwood floors.
thomasamayberry.com
Built from Plan(s)
I decided to go with a live edge mantel. I feel it really compliments my new hardwood floors.
thomasamayberry.com
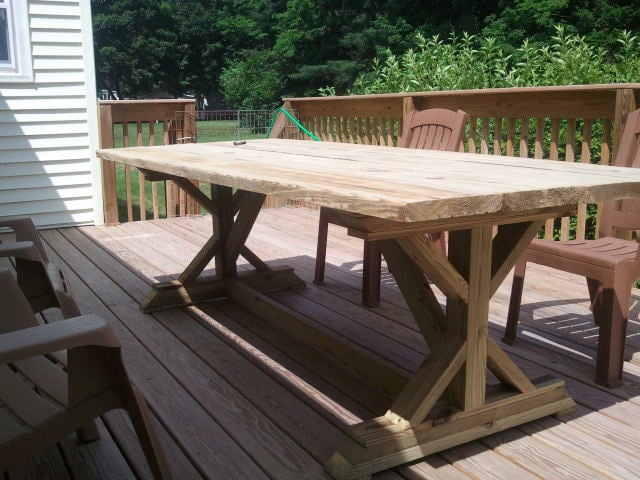
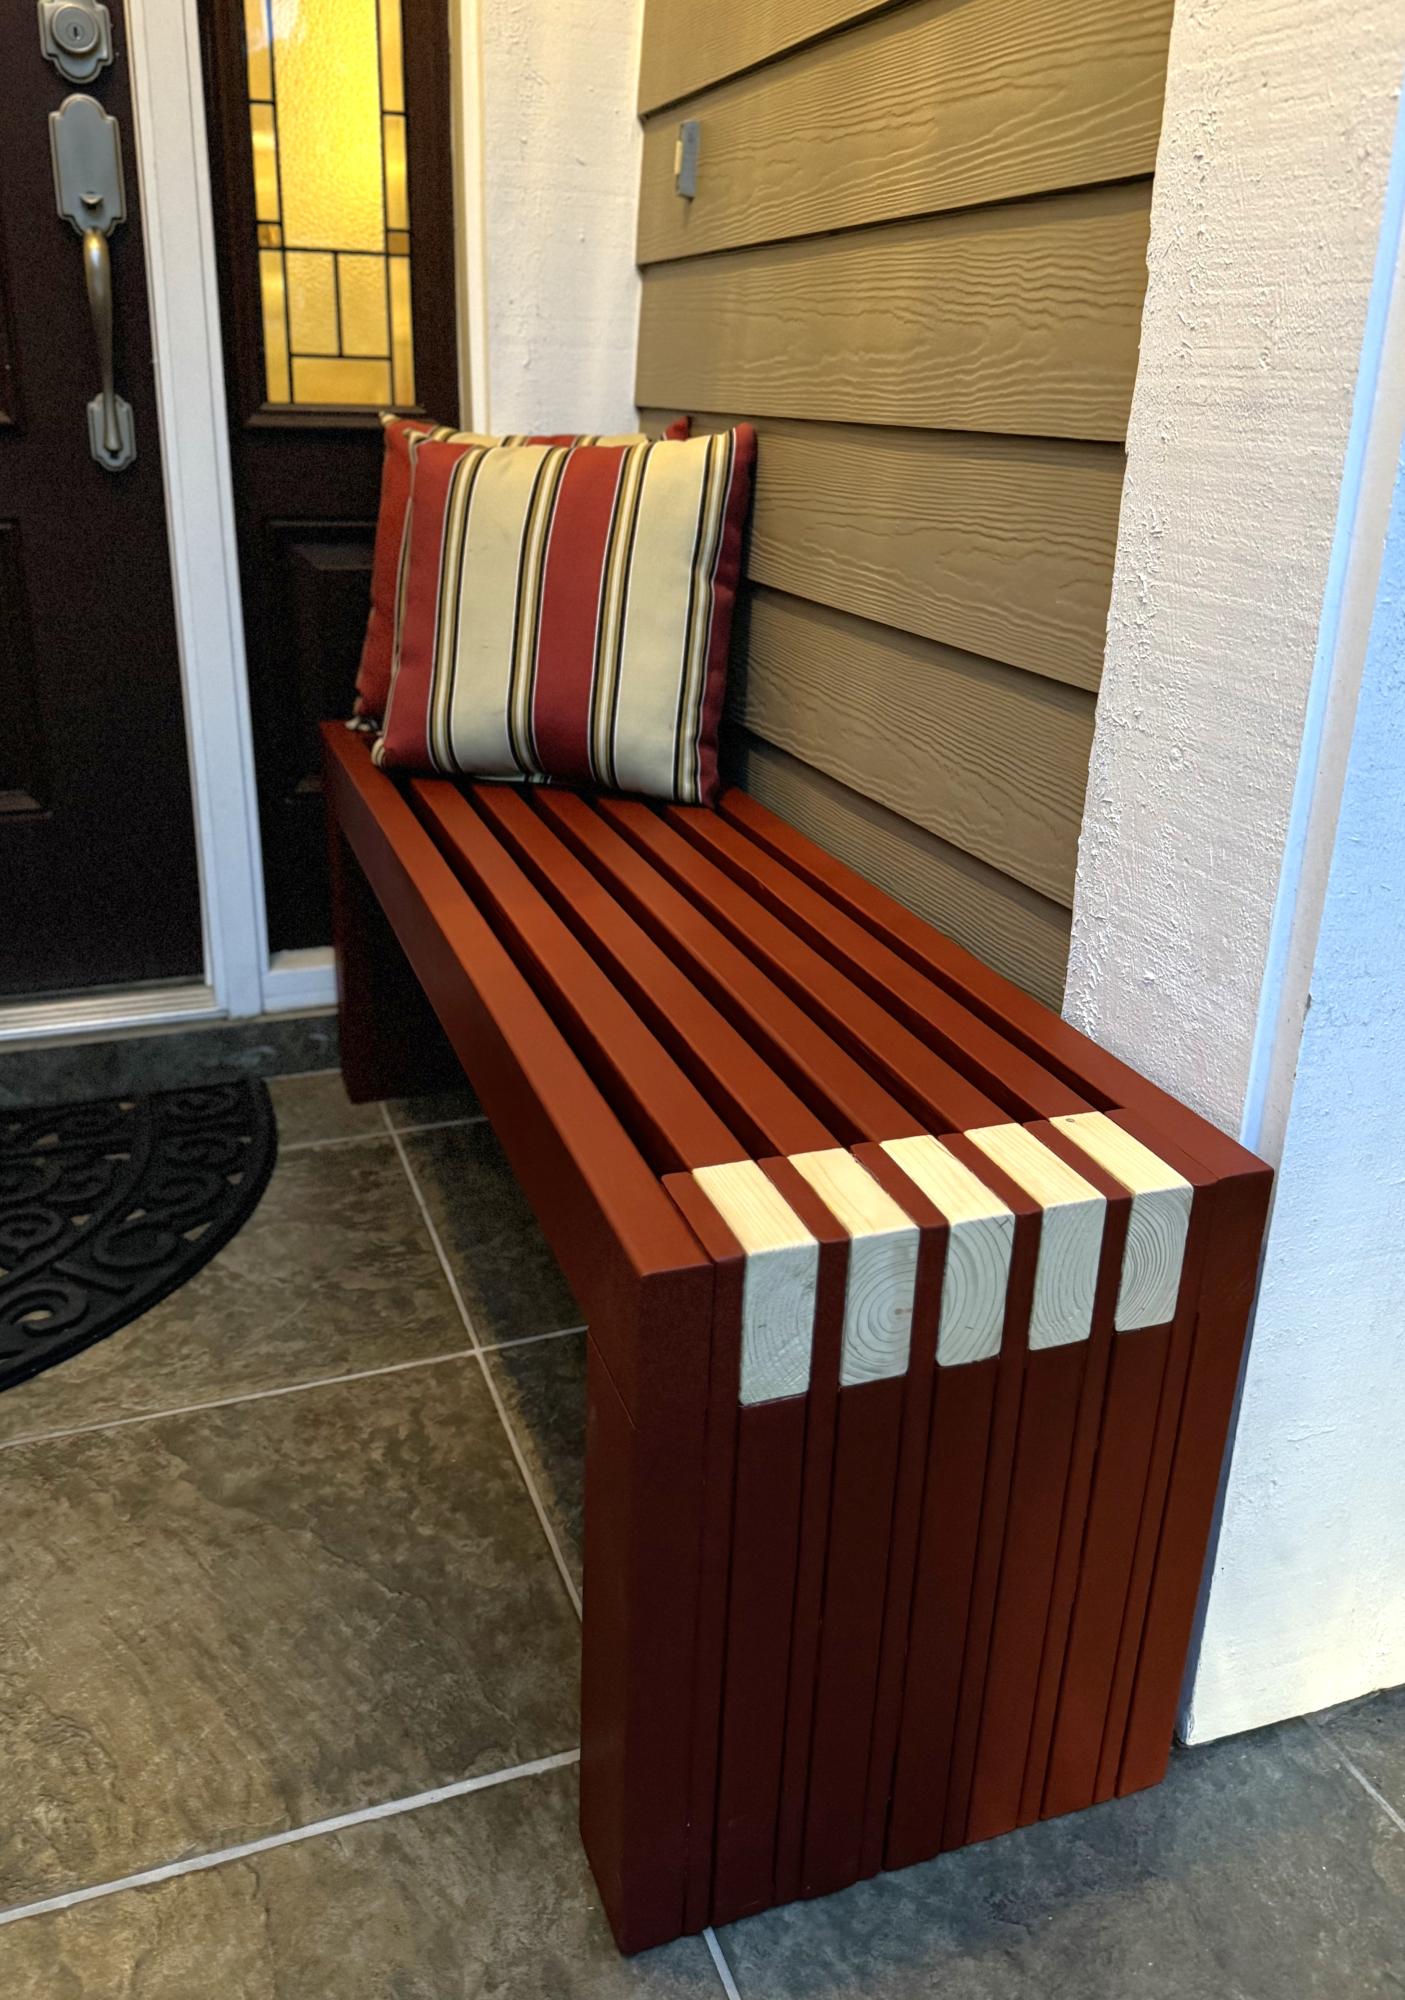
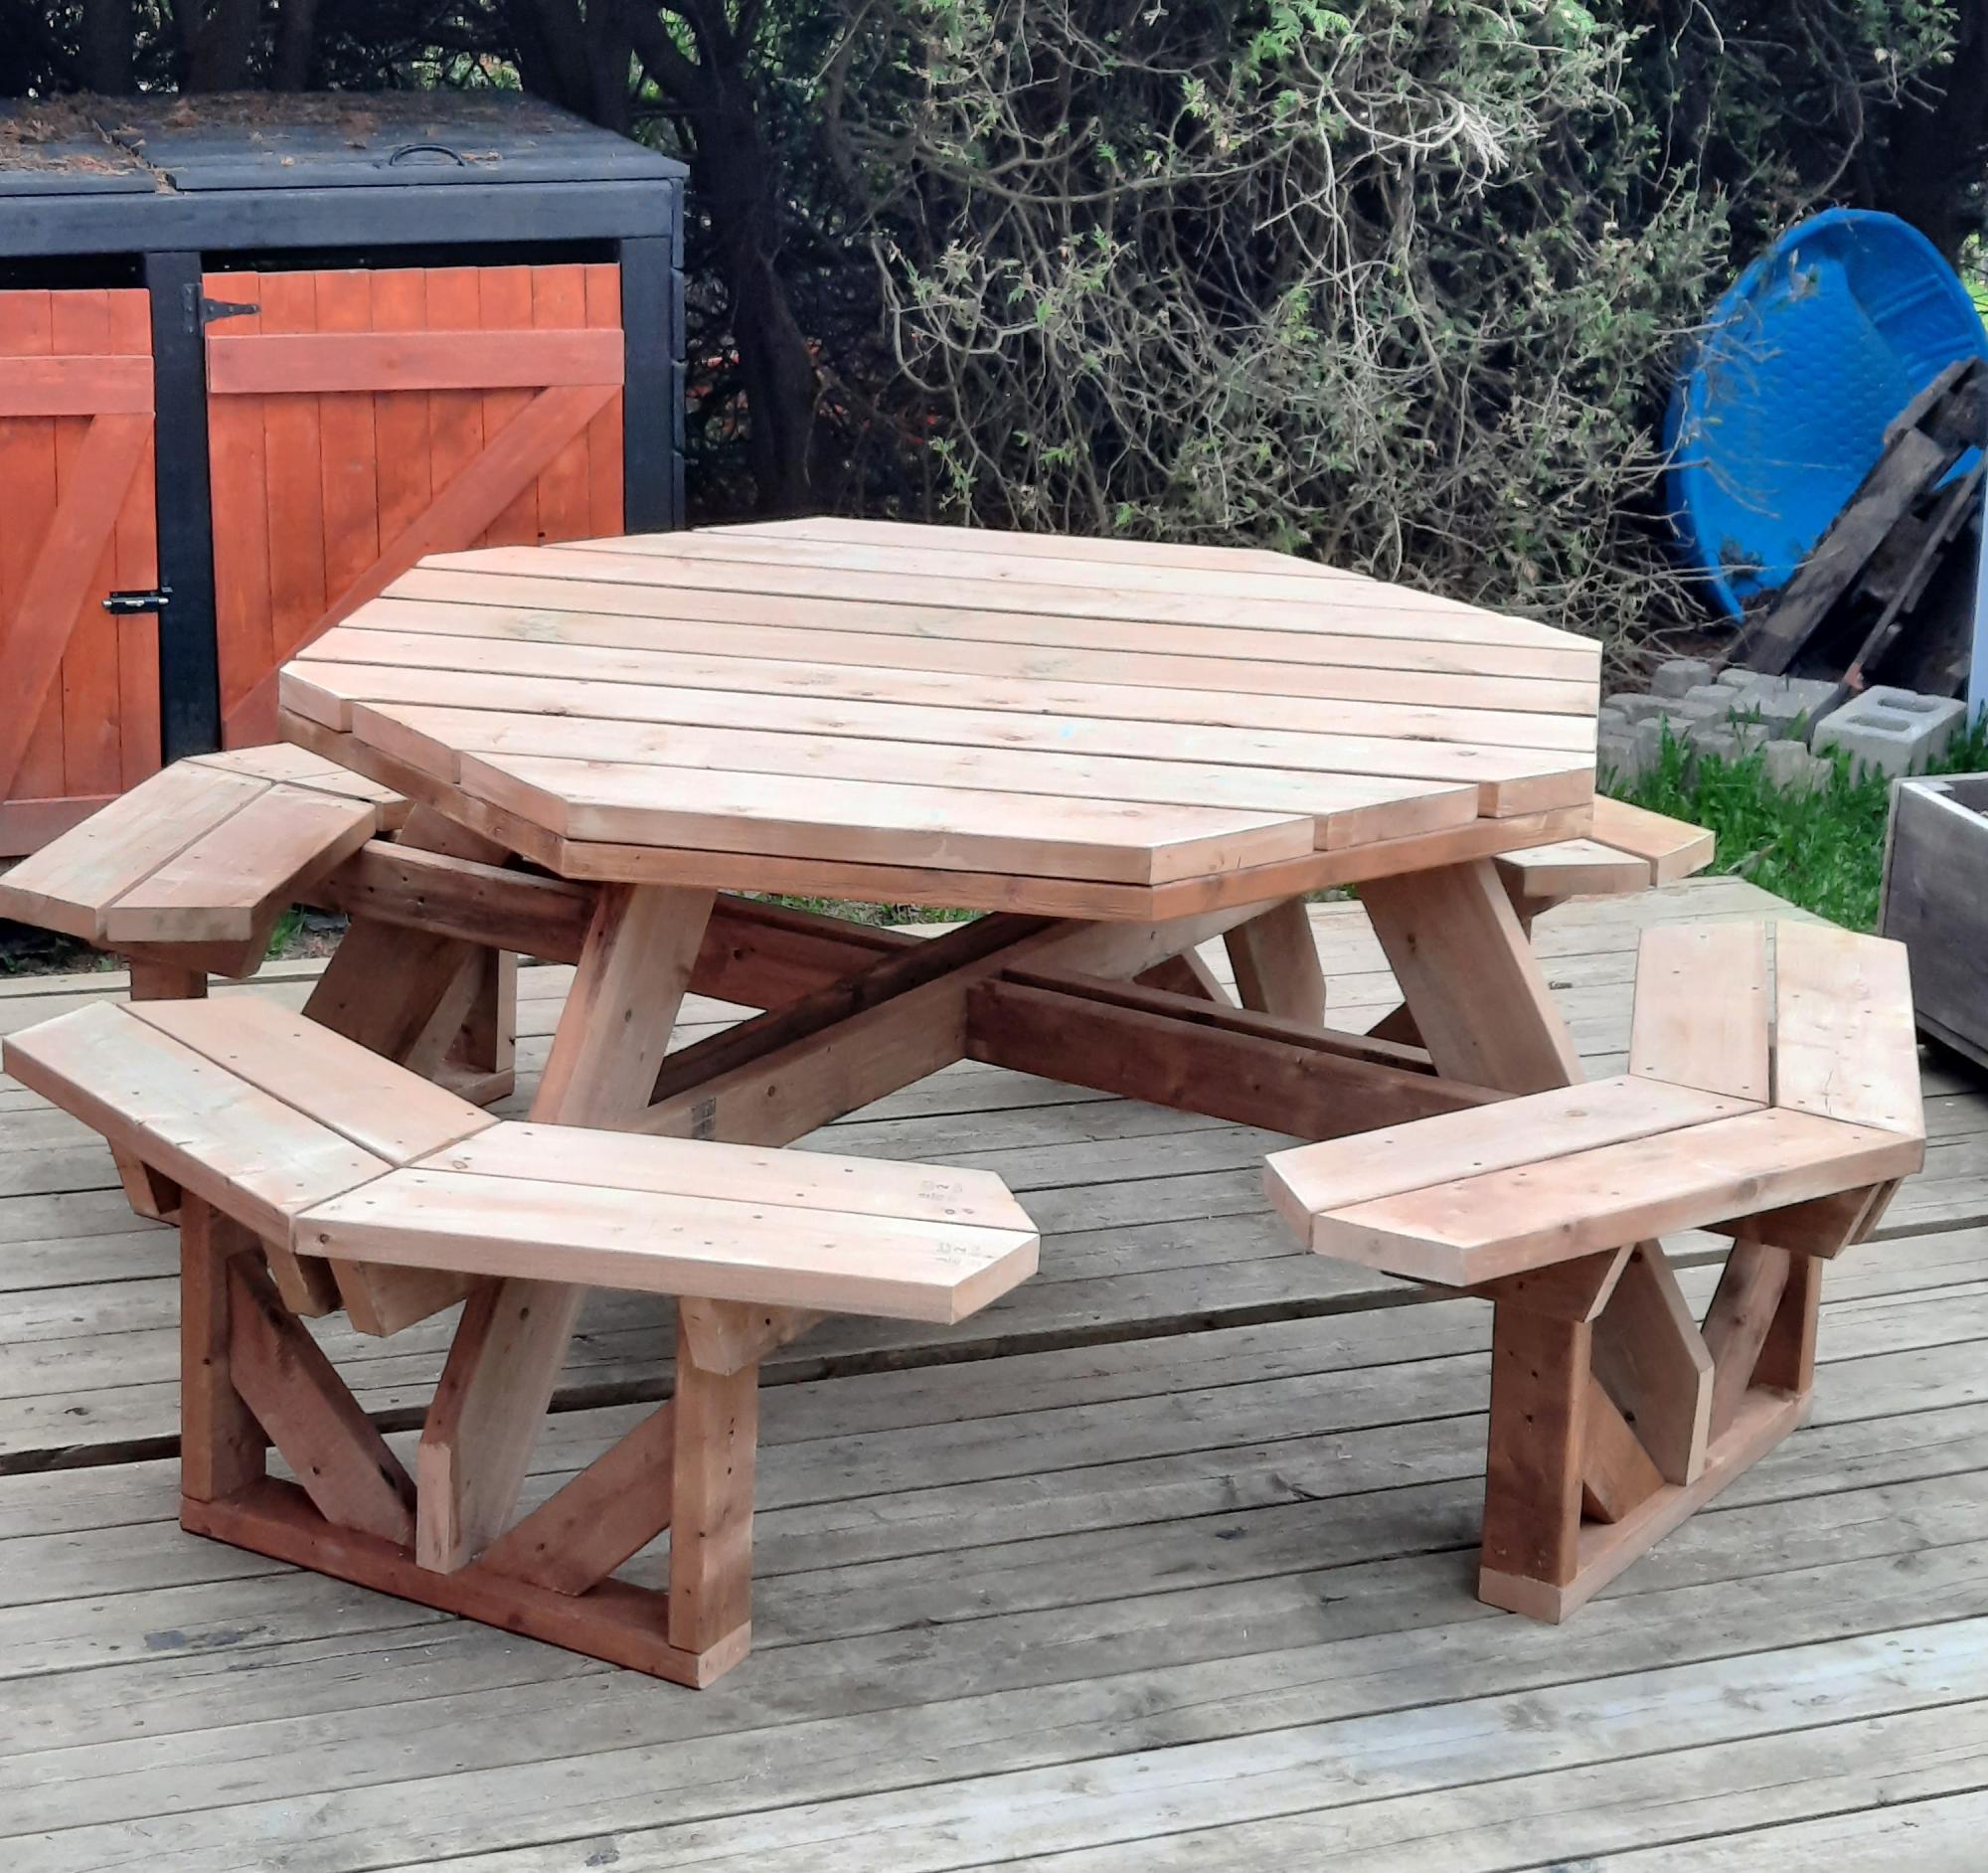
Needed a table for our deck, but didn't want to spend the $400-500 on sets at the store. Followed the plan for the most part and it was fairly easy to build. The only thing I did differently was in building the ends was put the "X" supports in after making the "I" shape in case I was off with my cuts.
Spent an hour cutting all the pieces on a Friday night and about 3 hours assembling Saturday morning. Table was ready to eat lunch on!
Wed, 06/20/2012 - 12:12
This is amazing! I really want to build this, but the plans seemed really confusing to me. Did you use a kreg jig for this?
In reply to This is amazing! I really by benfoldsfivealive
Thu, 07/05/2012 - 12:05
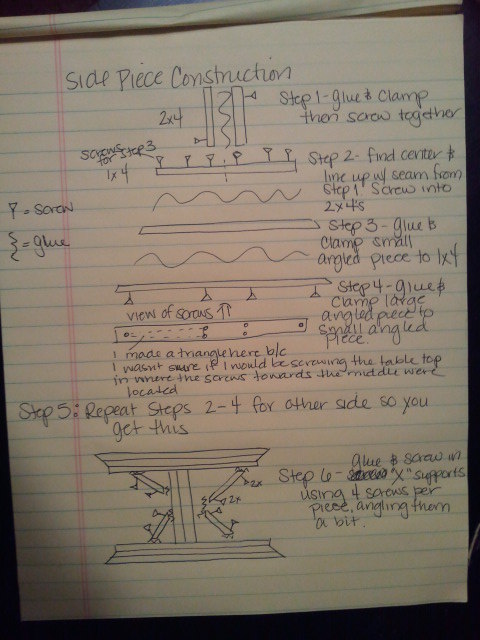
I did not use a Kreg jig because i dont havd one and I didn't try to hide my screws. I did pre-drill all my holes so that I didn't split any boards... and my dad is a carpenter so he helped me attach the 2 cross pieces (which is the only part I had trouble with) to the ends, which we did by just angling the screws in. I will try to take a few more detailed pics in the next few days so you can get a better idea of how I did it.
In reply to This is amazing! I really by benfoldsfivealive
Wed, 06/20/2012 - 19:15
Posted an explanation of how I made the side pieces. Hope it helps!
Mon, 07/02/2012 - 03:37
Hi, great build !
Could you please explain how and from where did you screw the curved pieces at the bases ?
same question for the table top boards ?
Thank you!
In reply to Quick question by I Rub (not verified)
Thu, 07/05/2012 - 12:03
If you look at the first drawing I have attached it will show you where to screw the curved pieces in. I screwed through the 1 x 4 to attach the smaller curved piece. Then I would screw through the larger curved piece into the smaller curved piece to attach it.
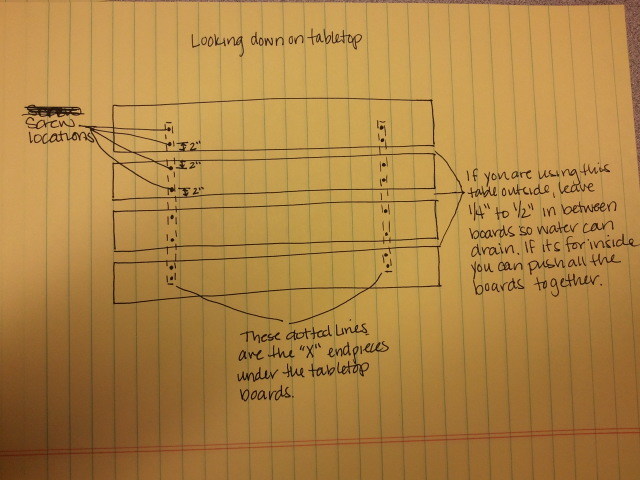
The table top pieces I screwed in from the top into the side pieces that you build first. I used 2 screws per board per side. The 2 boards in the middle should have screws at least 2 inches in from each side. The 2 boards on the end will have one set of screws 2 inches from the side that is next to the boards in the middle. The second set of screws will end up in about the middle of the outside boards. I'm going to attach another drawing to explain. Let me know if this helps.
Mon, 07/09/2012 - 11:22
I plan on building the table this week, will use your advice. Much appreciated.
Sun, 07/15/2012 - 16:20
Thank you for posting this. I started the project yesterday and I started with putting the cross braces on first and it did not turn out leveled. I thought that I would try to put it together first and then add the cross braces but was scared if it would hold. Thanks to your post I feel more confidant about it. I am going to make a run to the big box store and start over. Its okay because this is my very first build and I am just happy with my first 45 degree cut with my new circular saw ;) I guess its a learning process.
Thanks again for your post,
Gus
In reply to Thank you for posting this. I by Gus (not verified)
Thu, 07/19/2012 - 07:58
Glad I could help! Good luck with your build!!!
Was a quick and simple project, i mainly worked off the pictures rather then the instructions. The best part was that the project required me to go out and buy a Kreg Jig to get the nice pocket hole finish, which i now wish I had done years ago.
I loved making this! I had to travel about 2 hours to get the DF 4x4s which was the only pain in making it. This was my third big project and it wasn't hard at all! It's super heavy so it was a litte tough to turn it over. It only took me about 3 days to make it once I had all the wood.
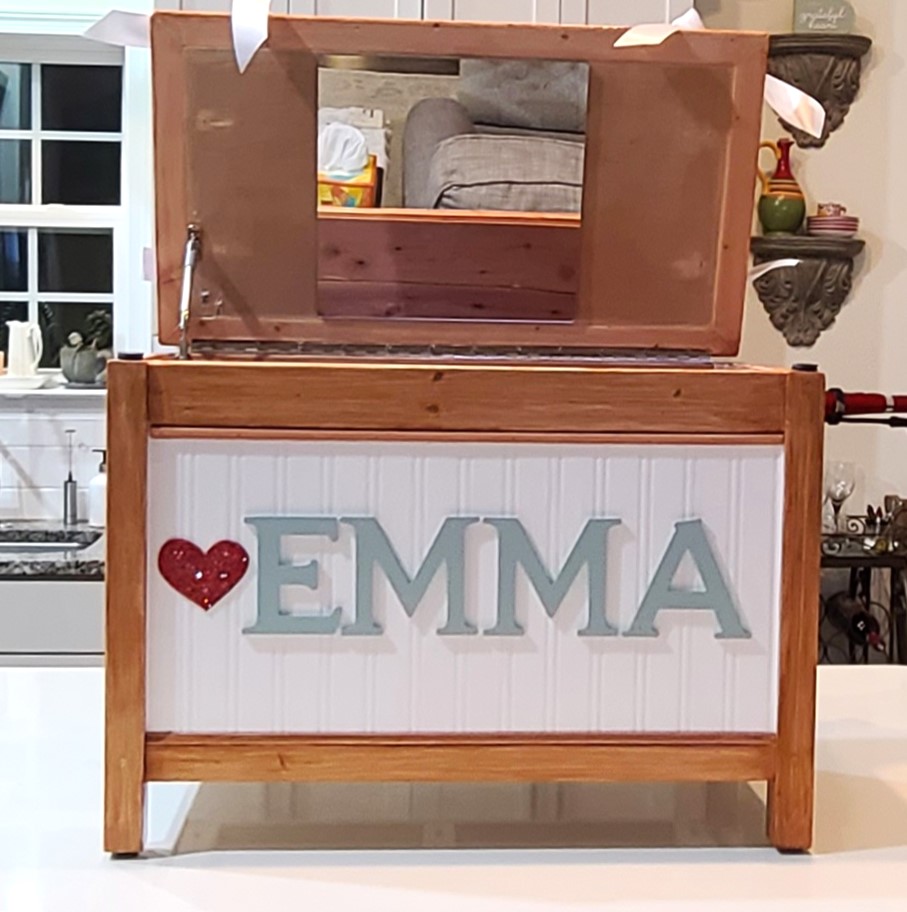
I made this "dress up box" for my granddaughter. She loves dress up and also likes to sit in boxes - lol... I lined it with cedar planks and added a cushion on top. I put a few coats of polyurethane over the glitter paint to reduce the chance of getting glitter everywhere. I made it a little smaller (24 inches wide instead of 37 because of space concerns). She loves sitting in it and looking at herself. (the mirror is unbreakable plastic of some sort). There is also a faux fur blanket (removable) in the bottom of it so she's comfortable sitting in there. Thank you so much Ana for all of your plans! It's so very kind of you to share them.
Kathy Taylor
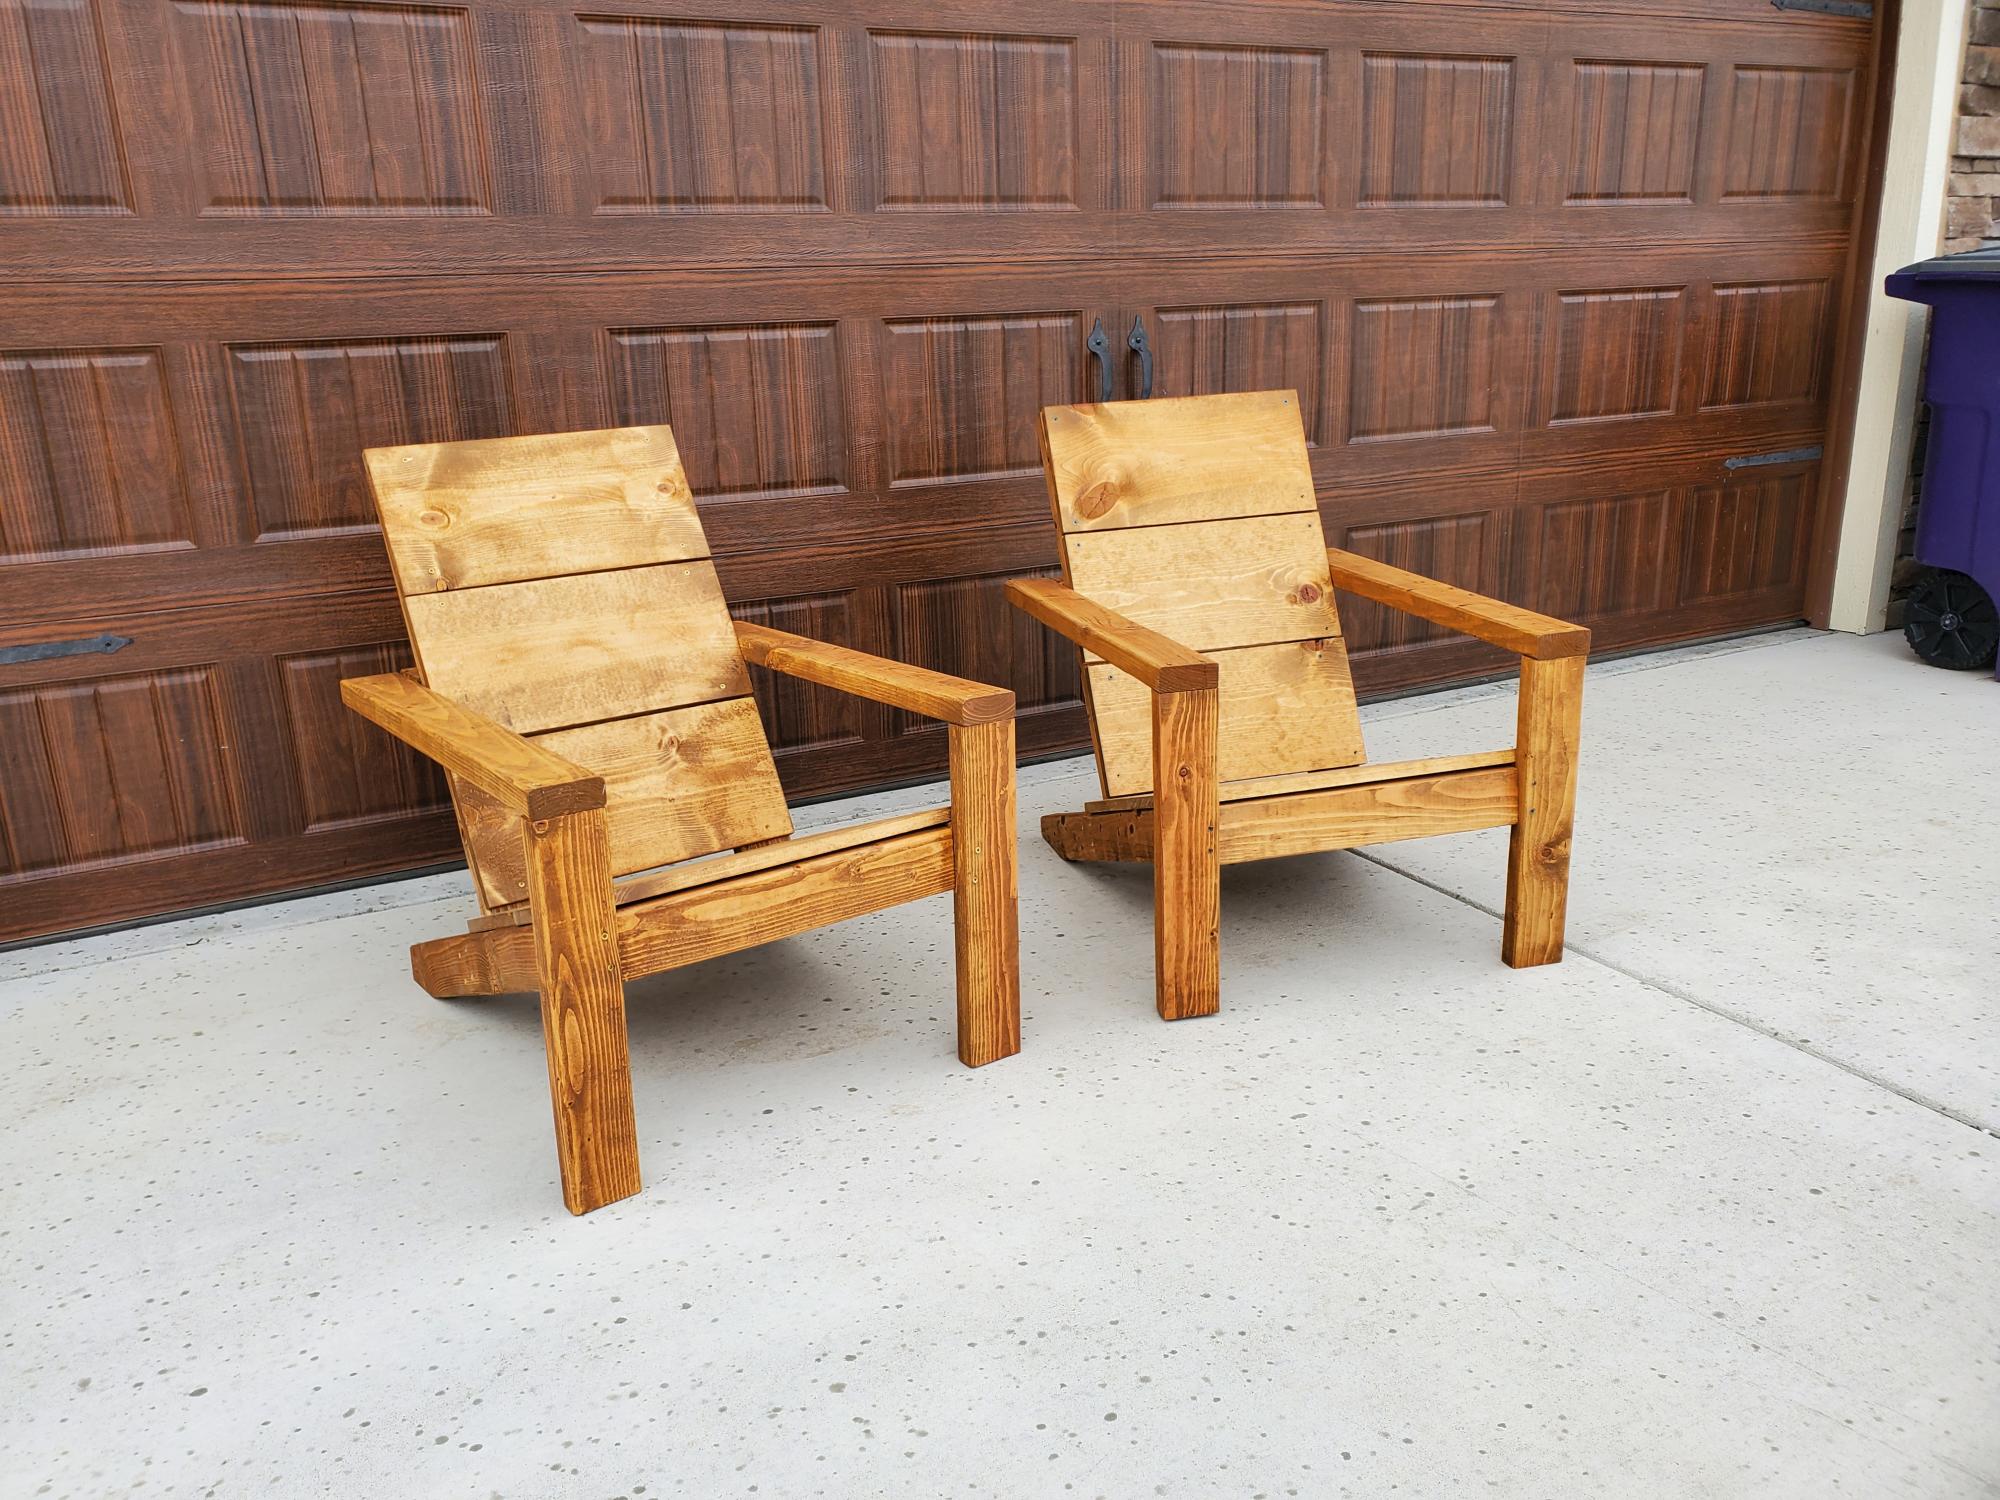
2 simple chairs that look great
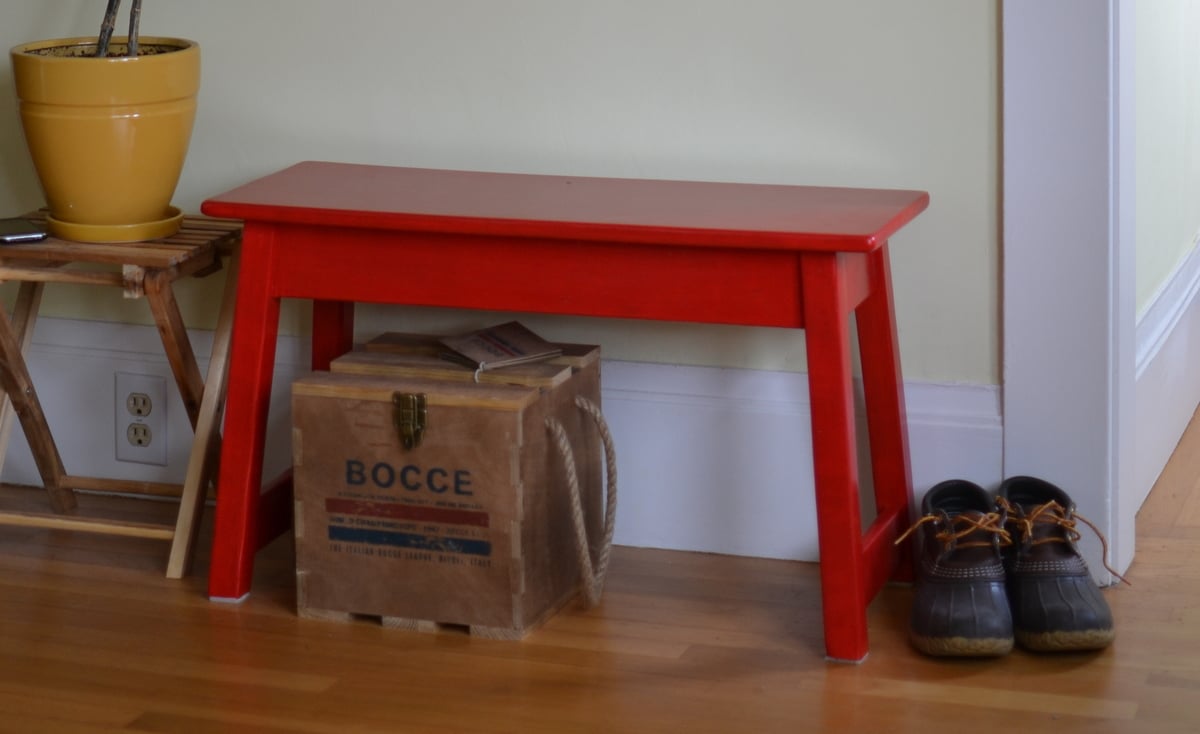
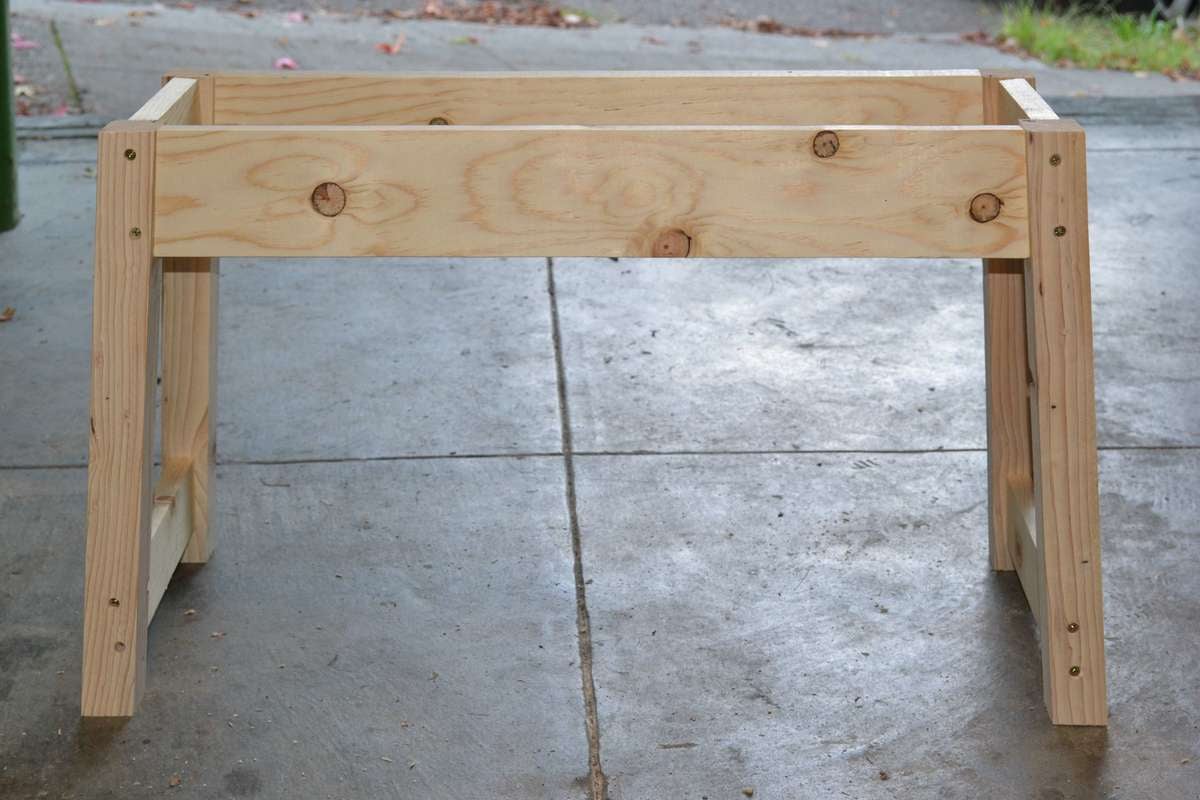
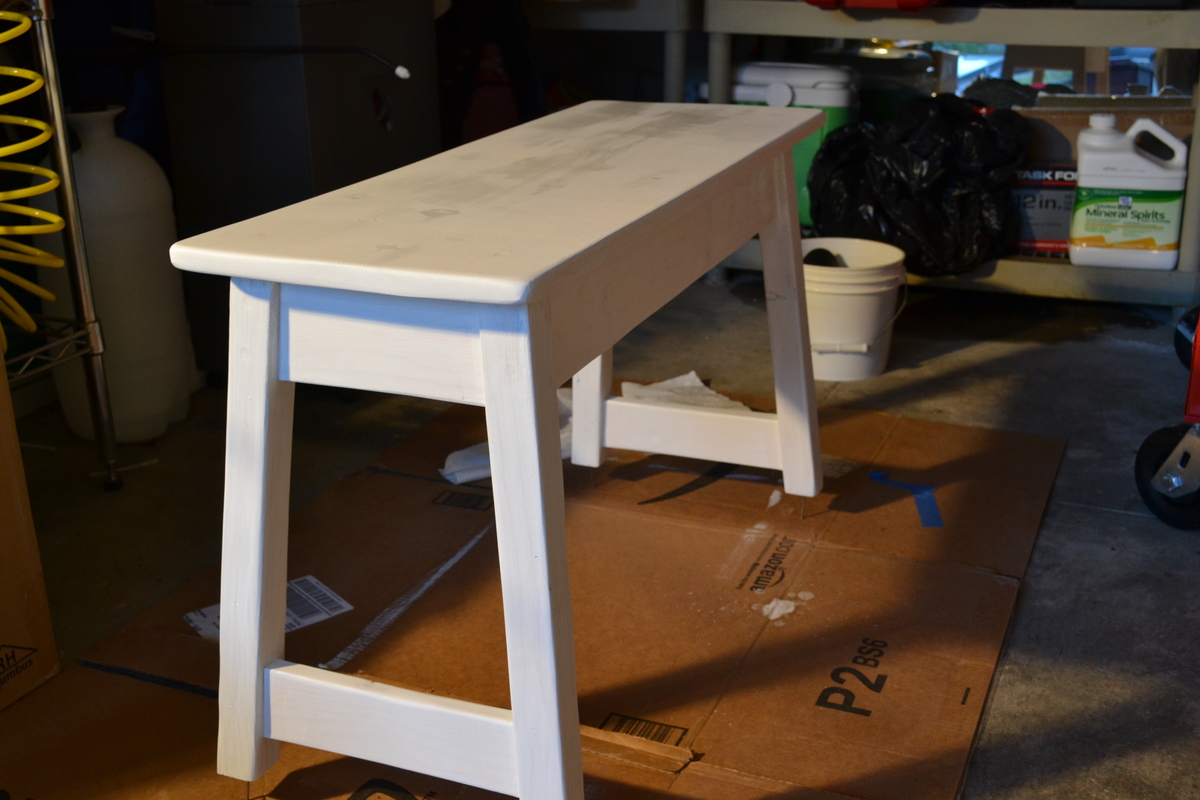
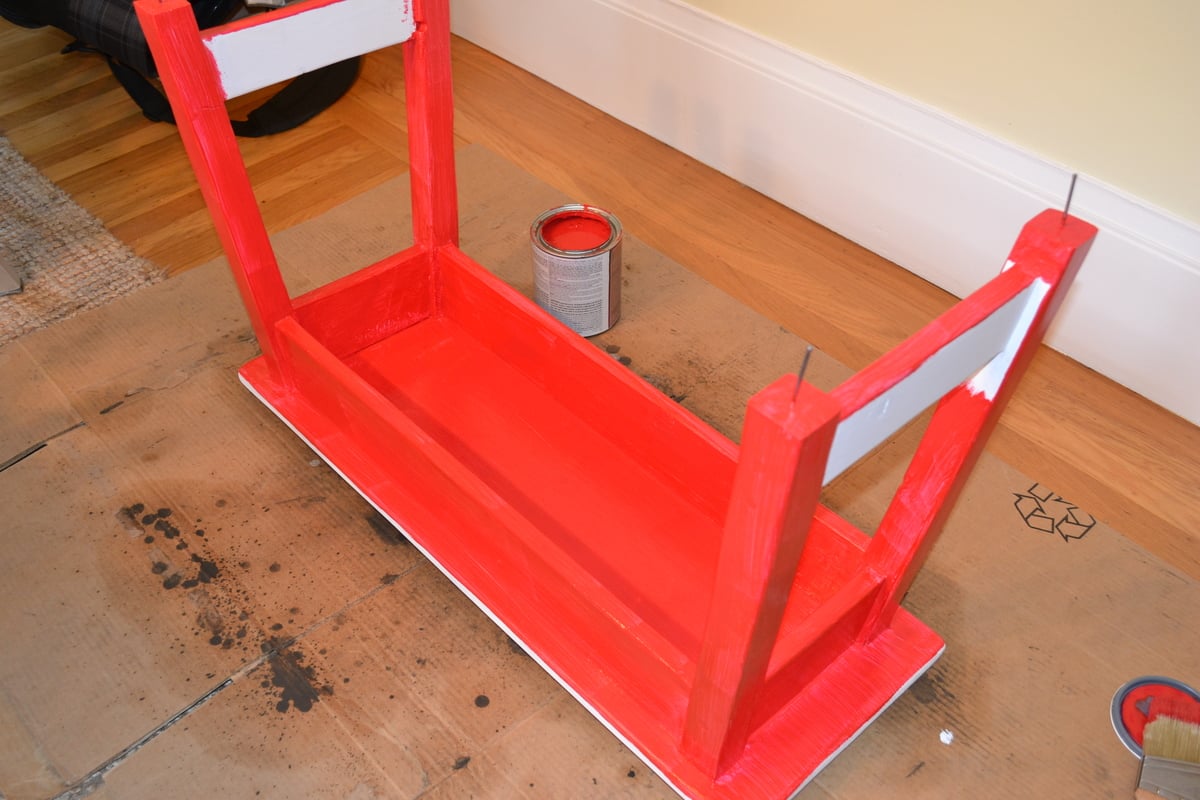
I loved this project as soon as I saw it on Ana's site. I made a few changes to the plans in order to suit my needs and also as an excuse to use my new tools. I left out the cross supports in order to accomodate storage underneath the stool and it still retains exceptional strength without the supports. I also used my new router to round the edges on the top peice to give it a more finished feel. I'm really happy with the results and have made multiple for friends and family, both painted and stained.

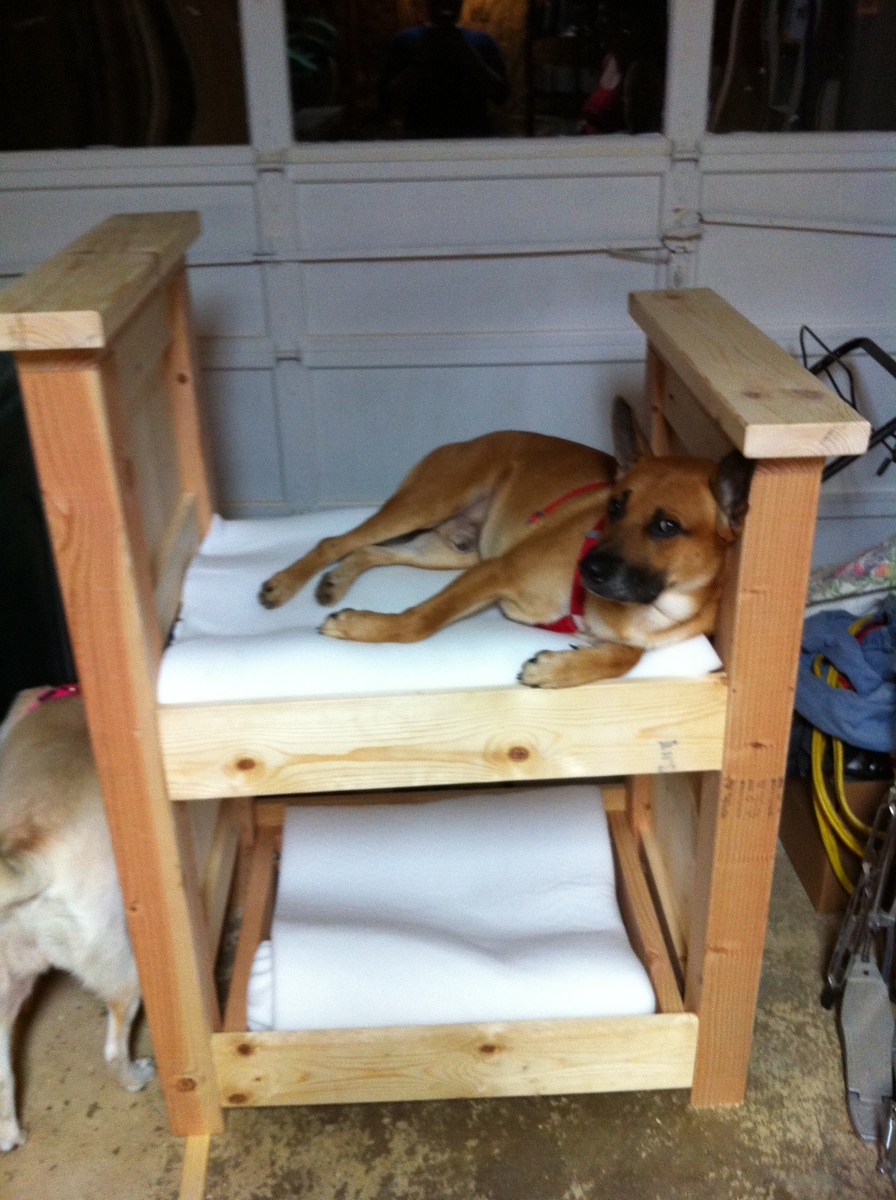
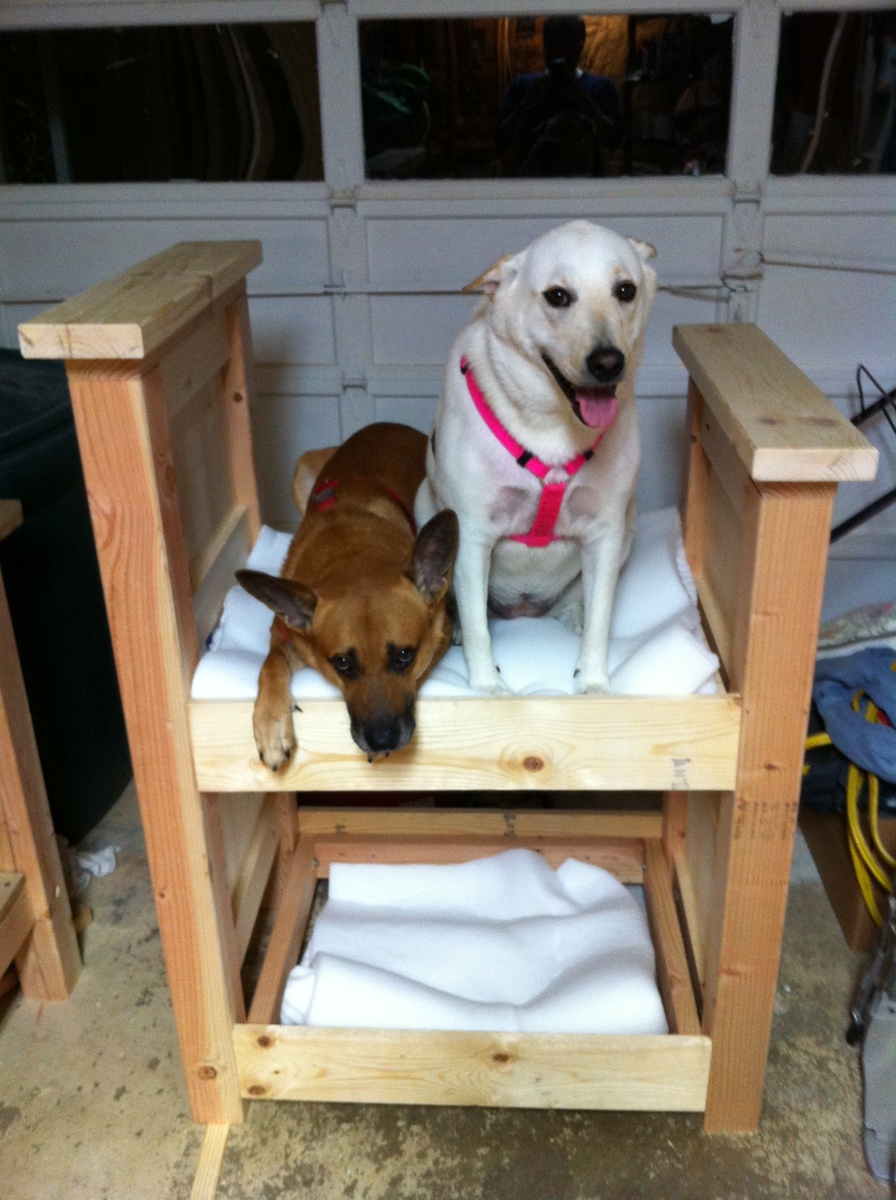
I built this dog bunk bed based on the queen farmhouse bed. As you can see the dogs are already fighting over the top bunk. This bed is very very sturdy and should give many years of use. Yes I spoil my dogs.
Tue, 08/14/2012 - 17:23
Can you tell they're already fighting over the top bunk! I'm debating on painting it white. I like the natural look though. Thanks for the comment! :)
First table build! We modified the plans with no breadboard ends since we live with lots of humidity and wanted to allow the wood movement. We also used 4x4s for the legs. White chalk spray paint legs and custom mix of special walnut and weathered oak stains. We LOVE it!!
Recently identified this wonderful website. Thank you for the plan and really enjoying the process of building the furniture from scratch.
Using the counter height planter plans from Janettx. Thanks!

Mon, 09/20/2021 - 13:24
Nice job!!! I'm still using mine. I ended up putting 12"x12" pavers under each leg to extend their life. After the 2nd year now we get bumper crop out of ours each season.
I had a lot of fun building this table! Ana's plan was easy to follow, even for a beginner like myself! The only thing it needs is exterior paint. I will definitely try another project from this site! Thank you Ana!
Vicky Shank
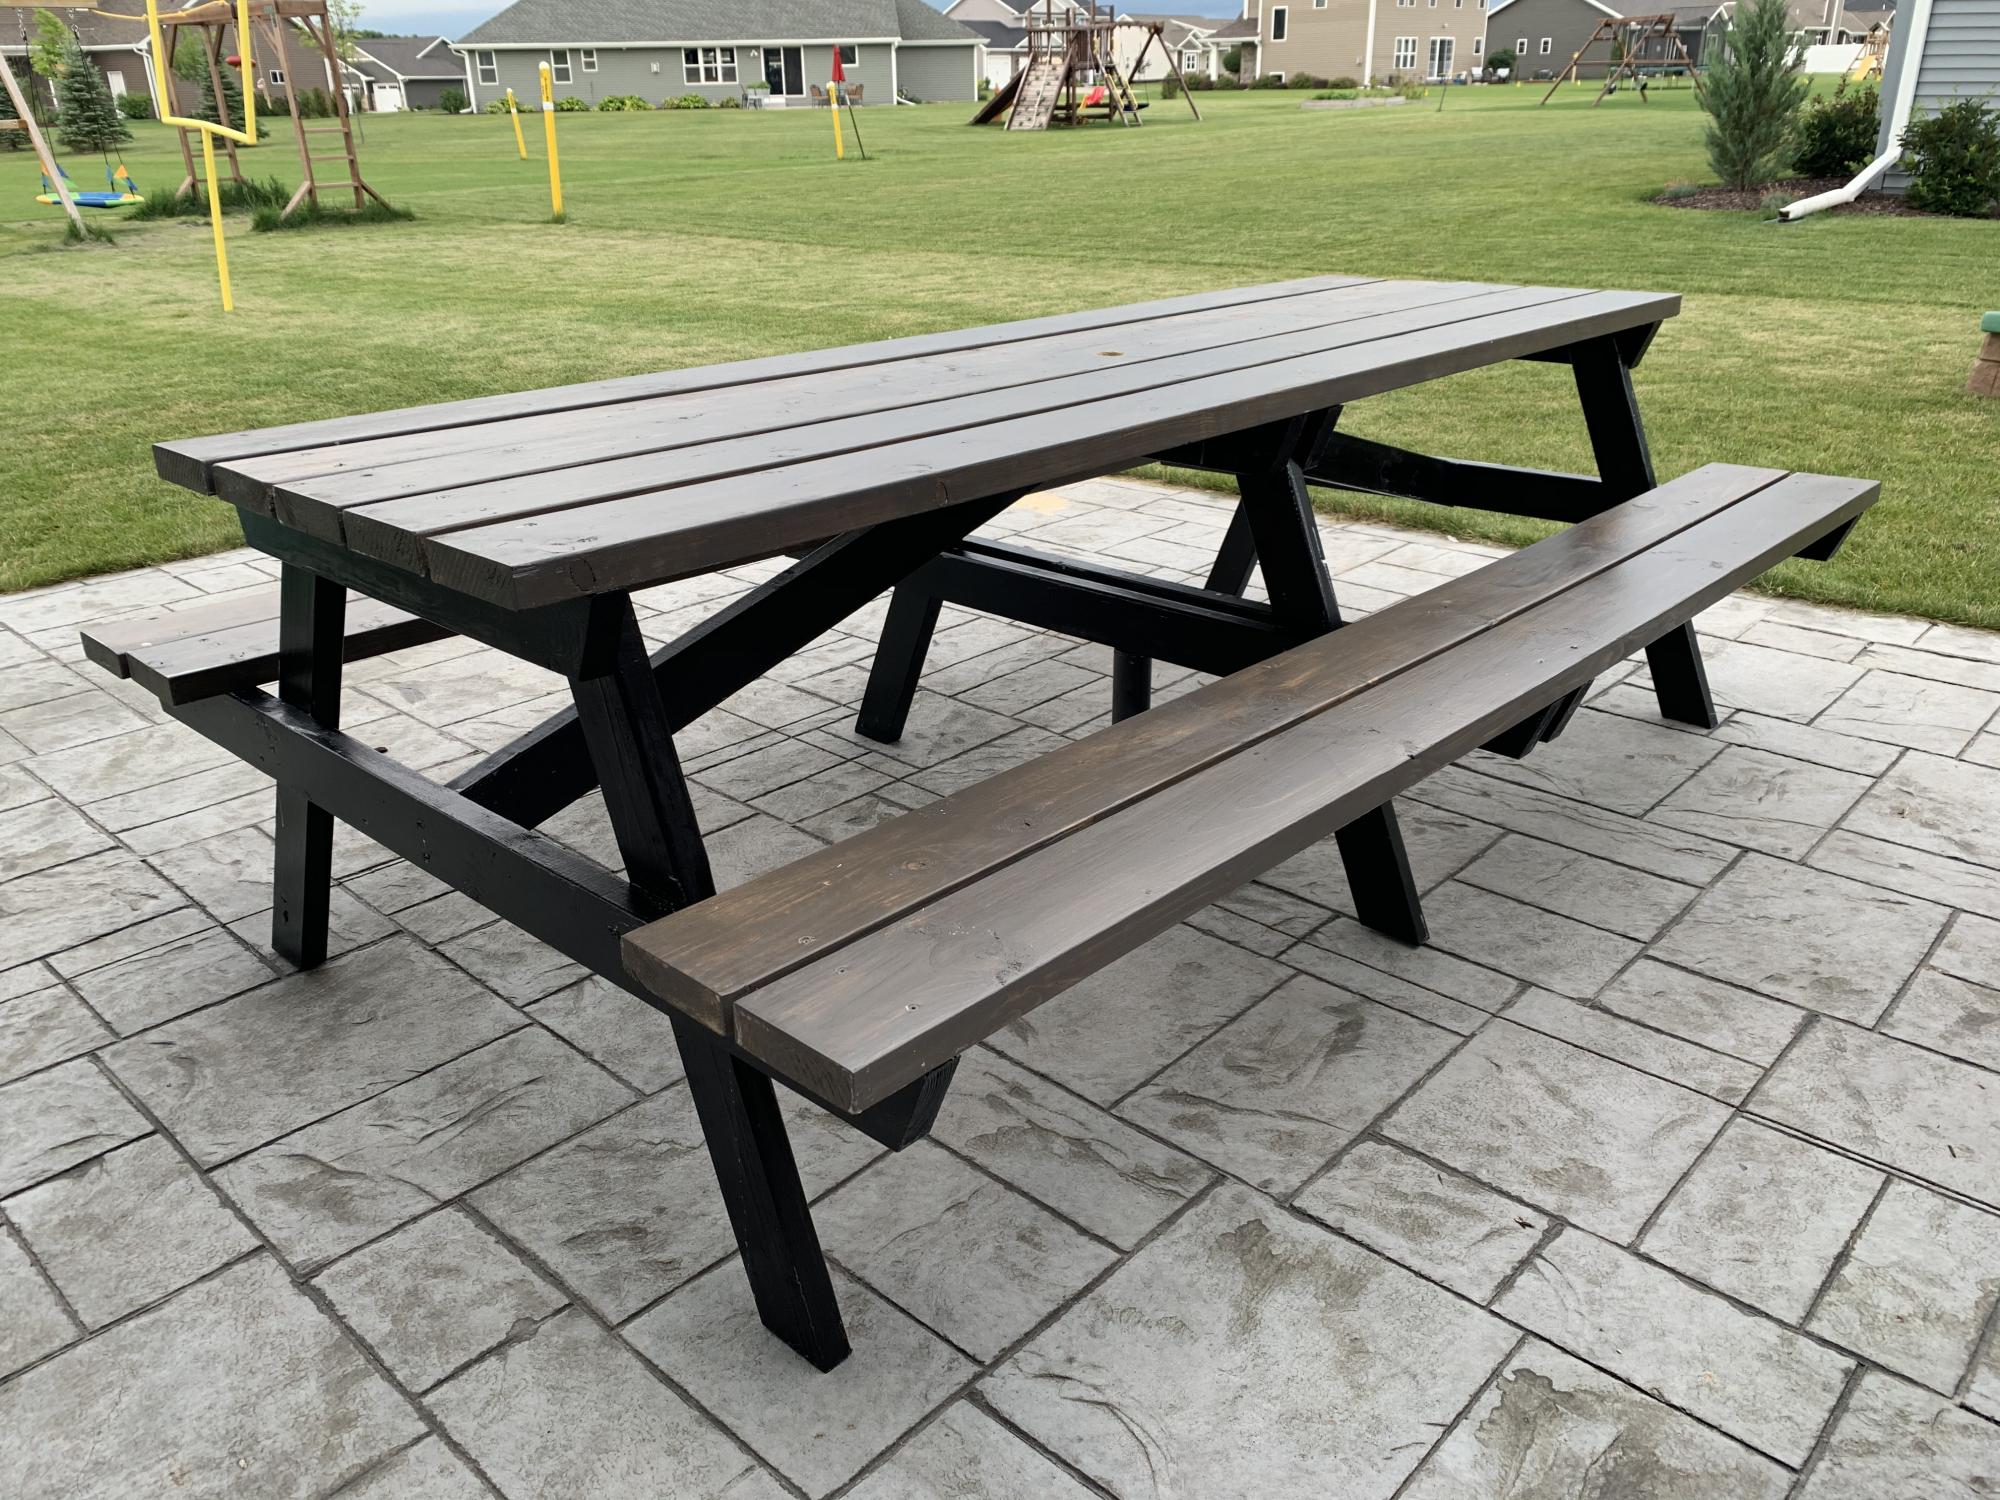
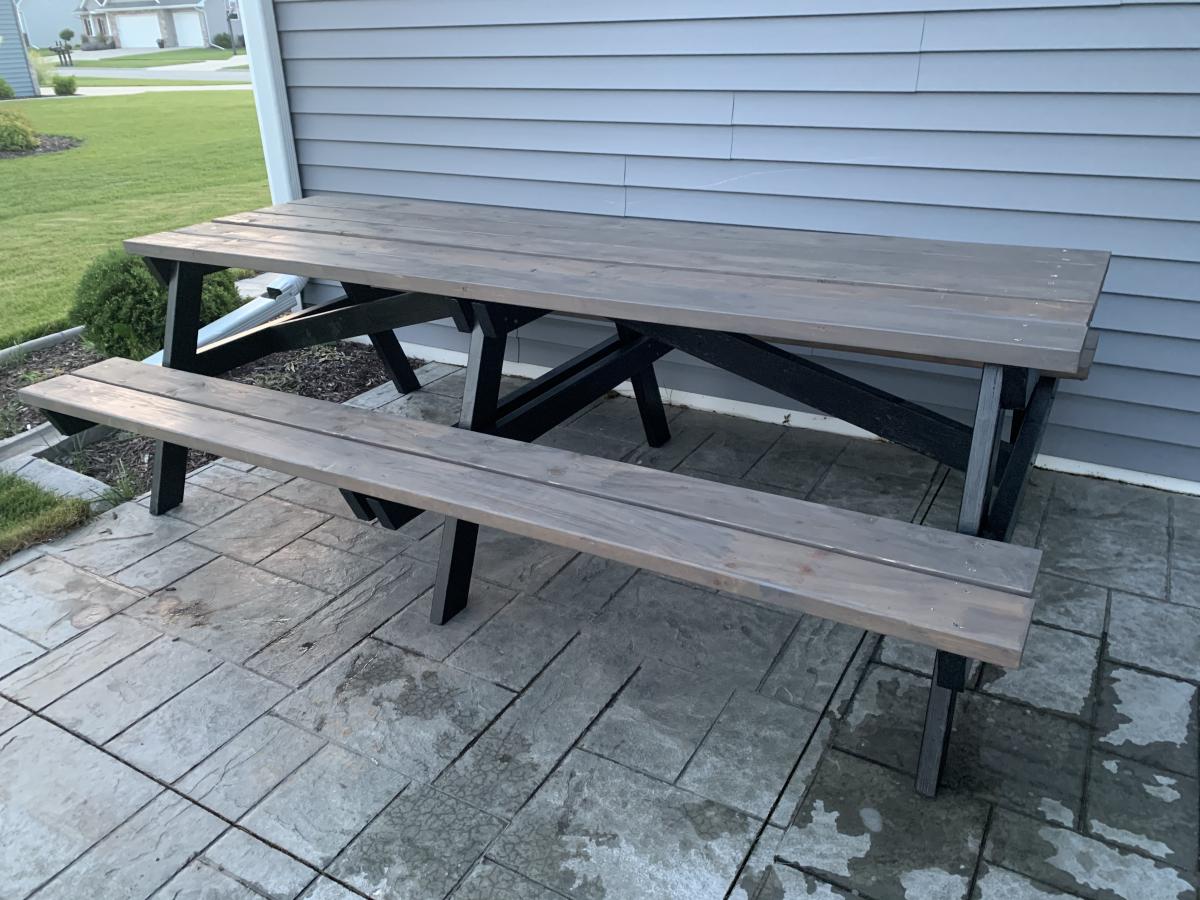
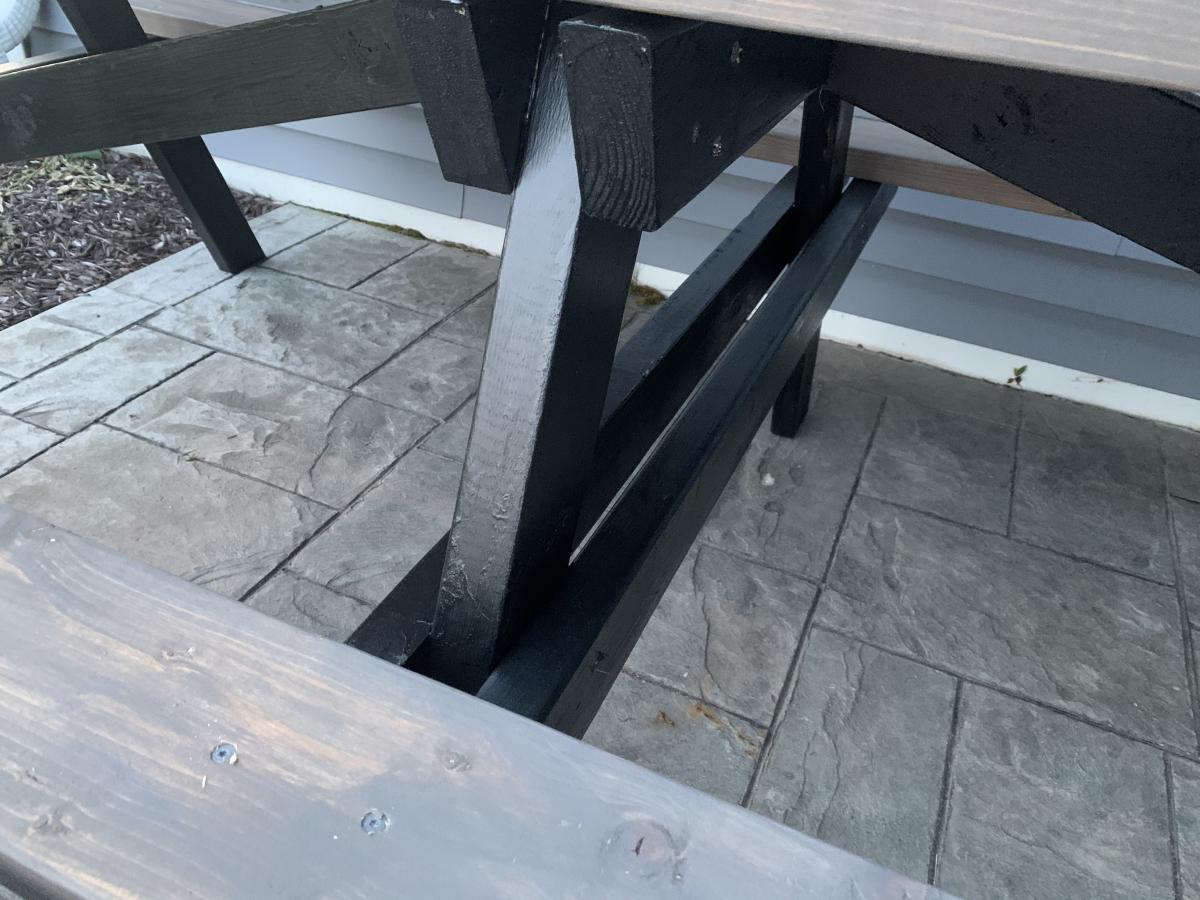
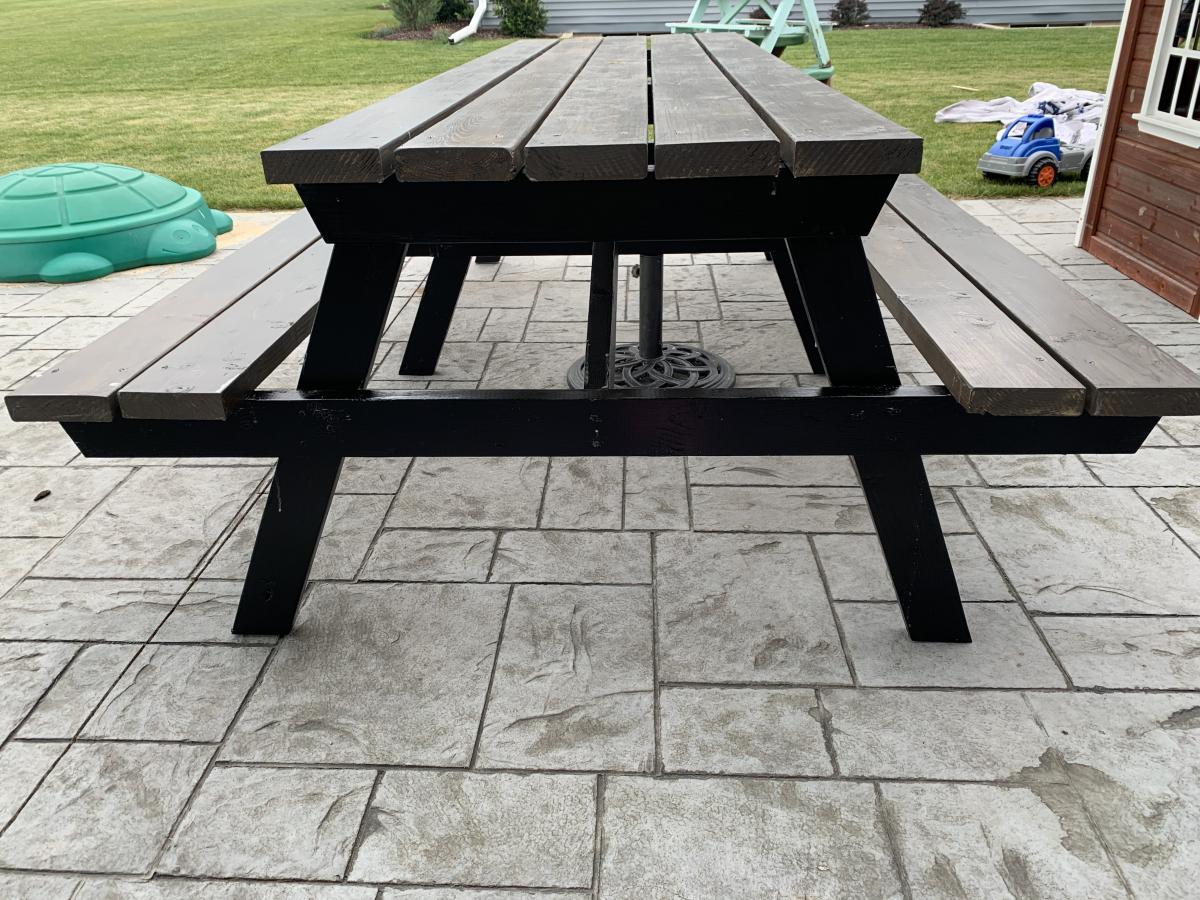
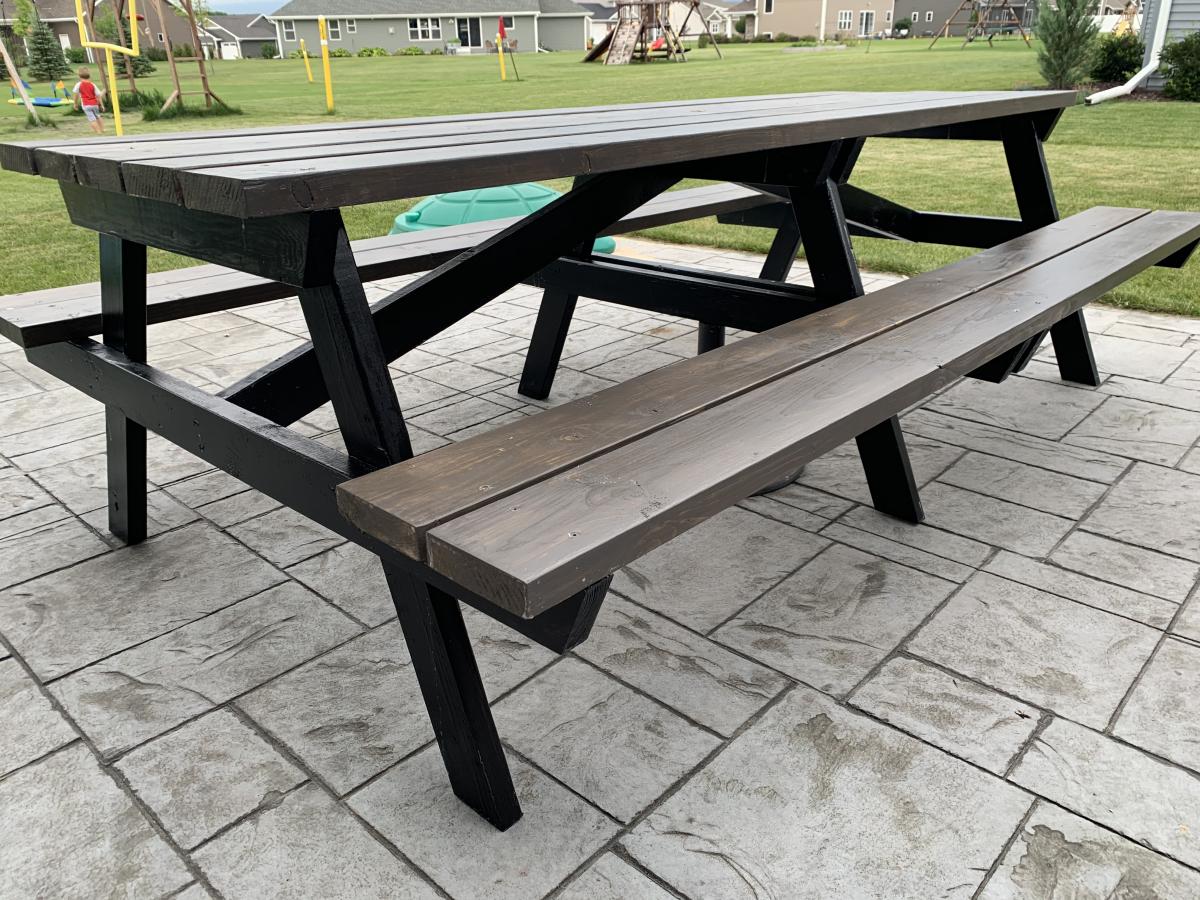
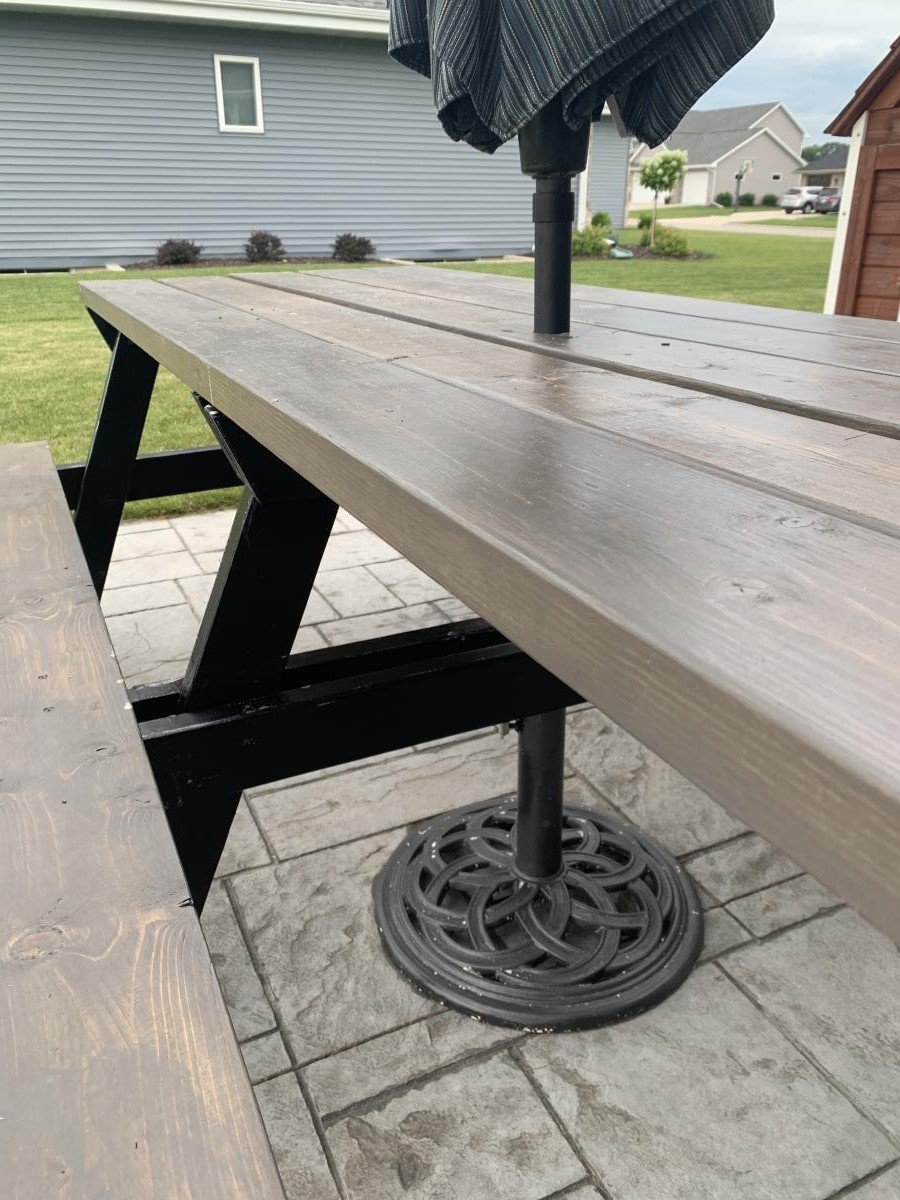
This picnic table was a quick build and turned out amazing. I modified the center base support by adding an extra table top support and seat support board to the opposite side of the center legs to give the table symmetry to accommodate an umbrella hole. I also shortened both cross supports by an inch to make sure the base wouldn’t be longer than the top boards. The space between the center table support boards and seat support boards is the perfect size to fit a standard umbrella. I used a 1 3/4” hole saw to make the umbrella hole. The build and stain/paint took me about 5 hours but additional time is needed to properly seal the table. I used untreated pine. Treated pine may give the table longevity but it would also add a lot of weight to an already heavy table. This was a relatively easy and quick build and is a great size to fit my whole family plus a couple guests! I’m happy with how it turned out and would recommend this build to anyone looking for a budget friendly and simple patio table.

Sat, 07/18/2020 - 13:17
Thank you Abby!!! Your picnic table turned out amazing, I love the added umbrella modification!
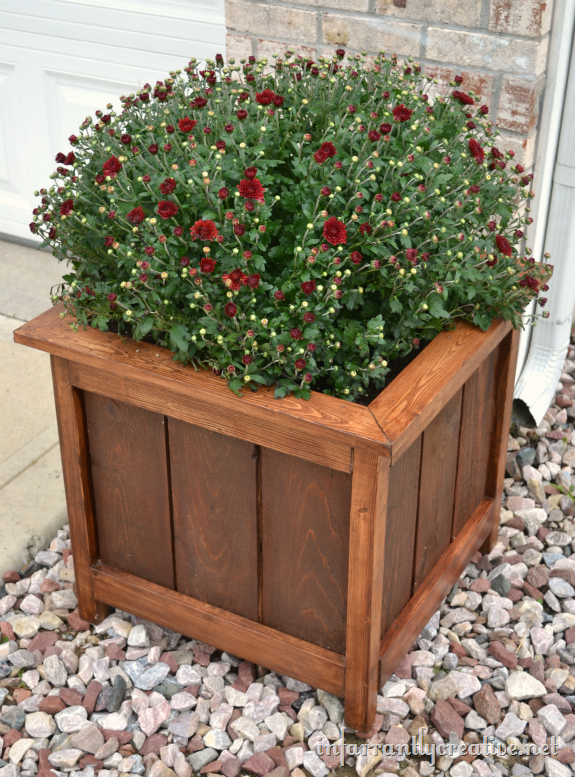
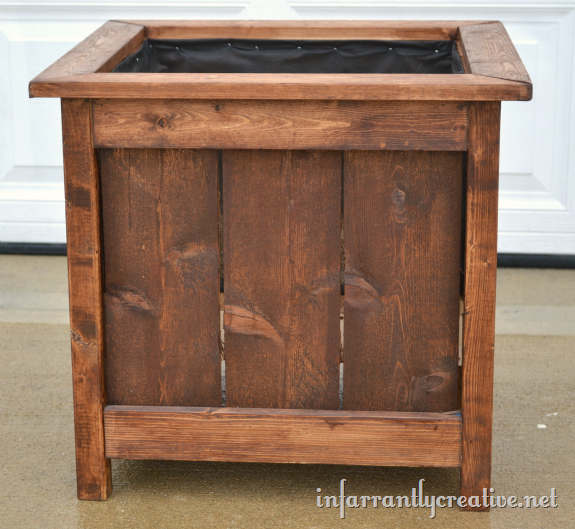
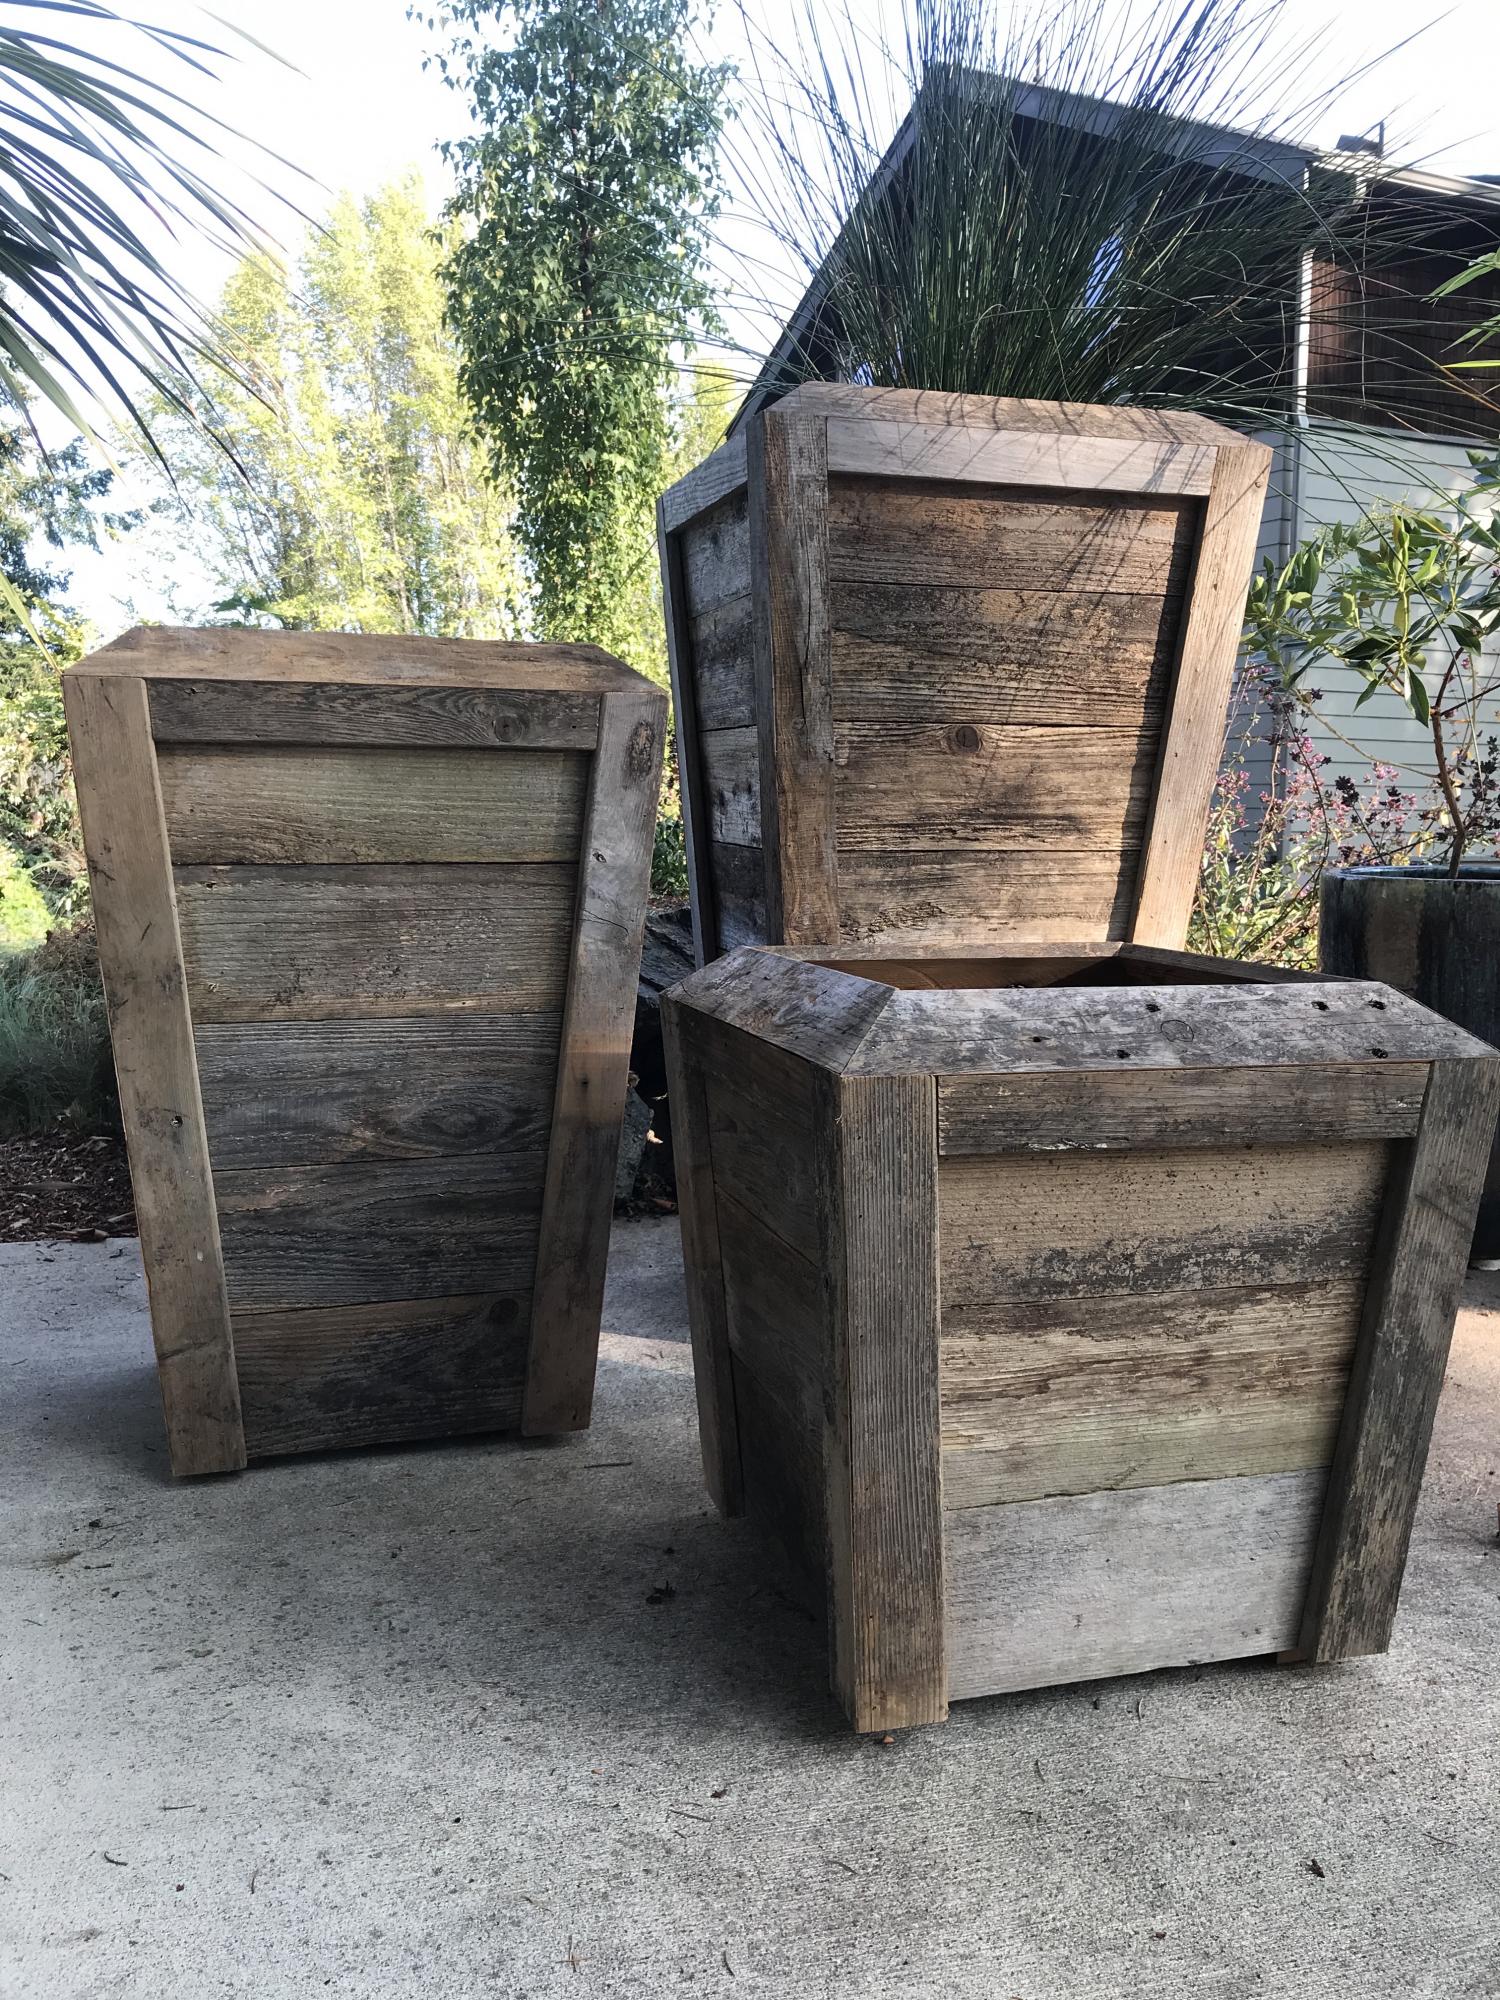
This was by far the easiest project. This planter is HUGE as well and makes a great focal point for your curb appeal. I didn't extend the sides but rather created a mitered edge for the top creating a nice clean finish.
Mon, 10/29/2012 - 23:02
This looks beautiful! I just made one too, I will have to do the top like yours it's pretty that way. I love how the stain too!
:) Valerie
Sun, 09/22/2013 - 20:25
how exactly did you attach the mitered top?? Finish nails or is there a way to use the kreg jig to hide joinery? These are beautiful, BTW. Thanks :)
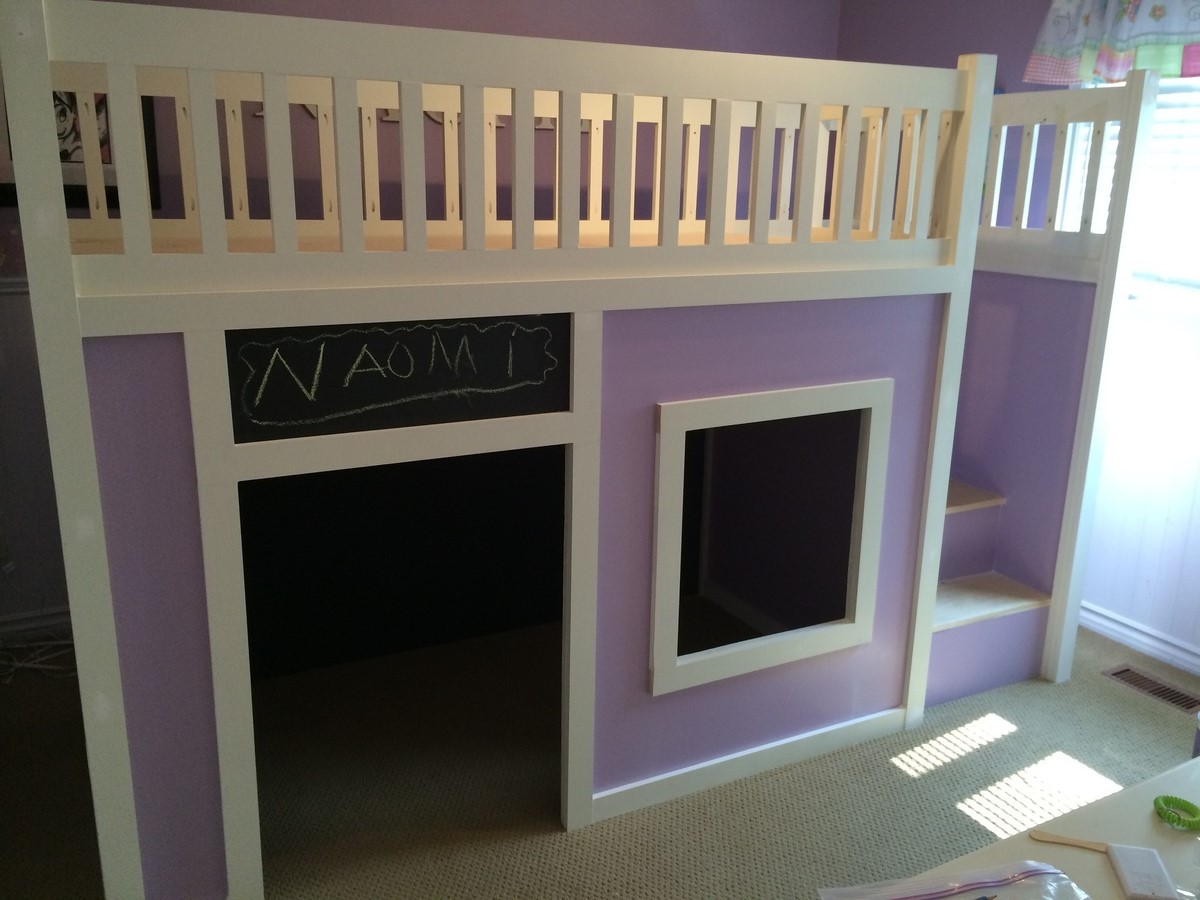
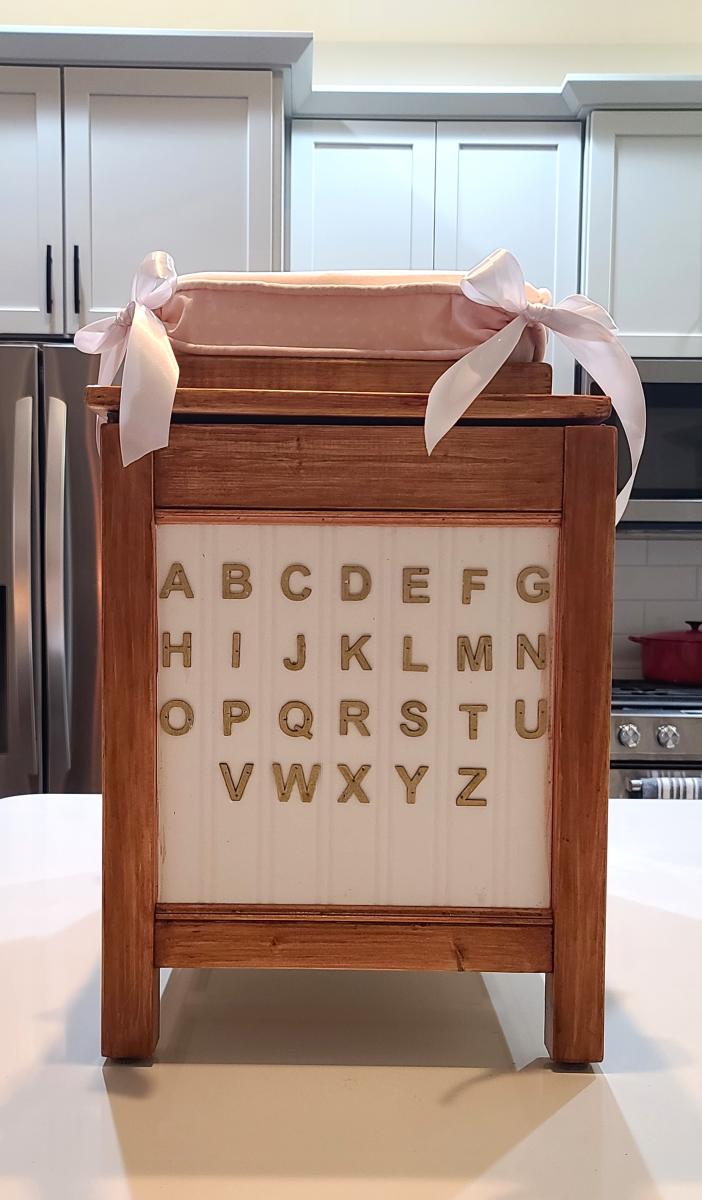
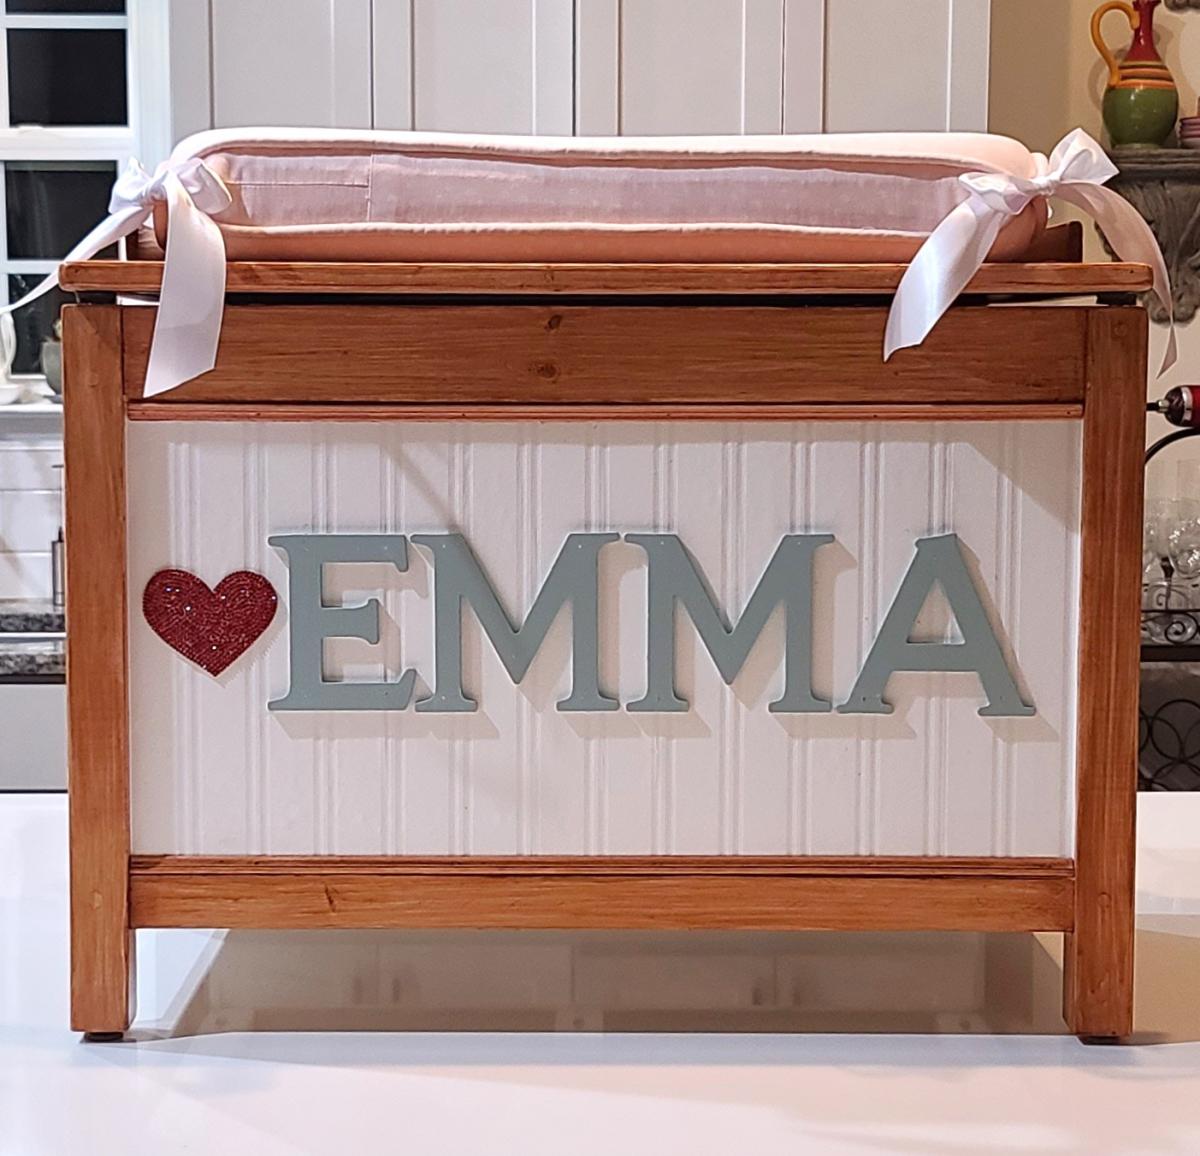
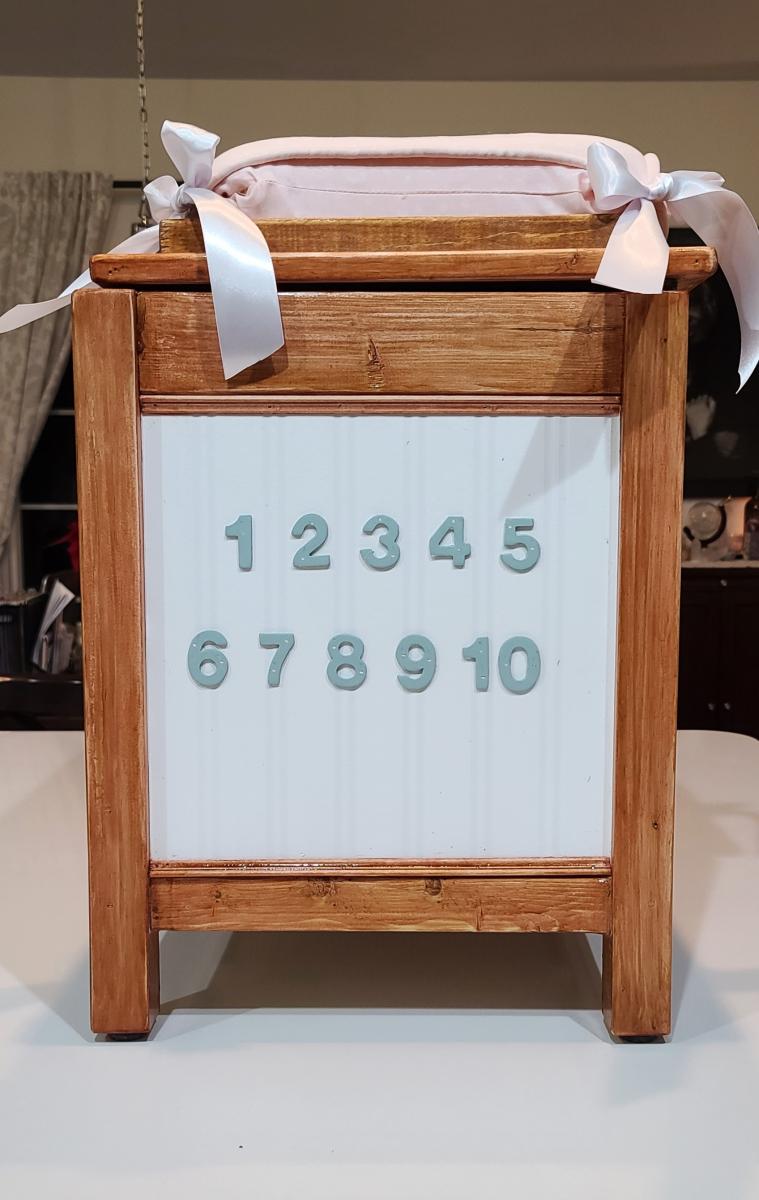
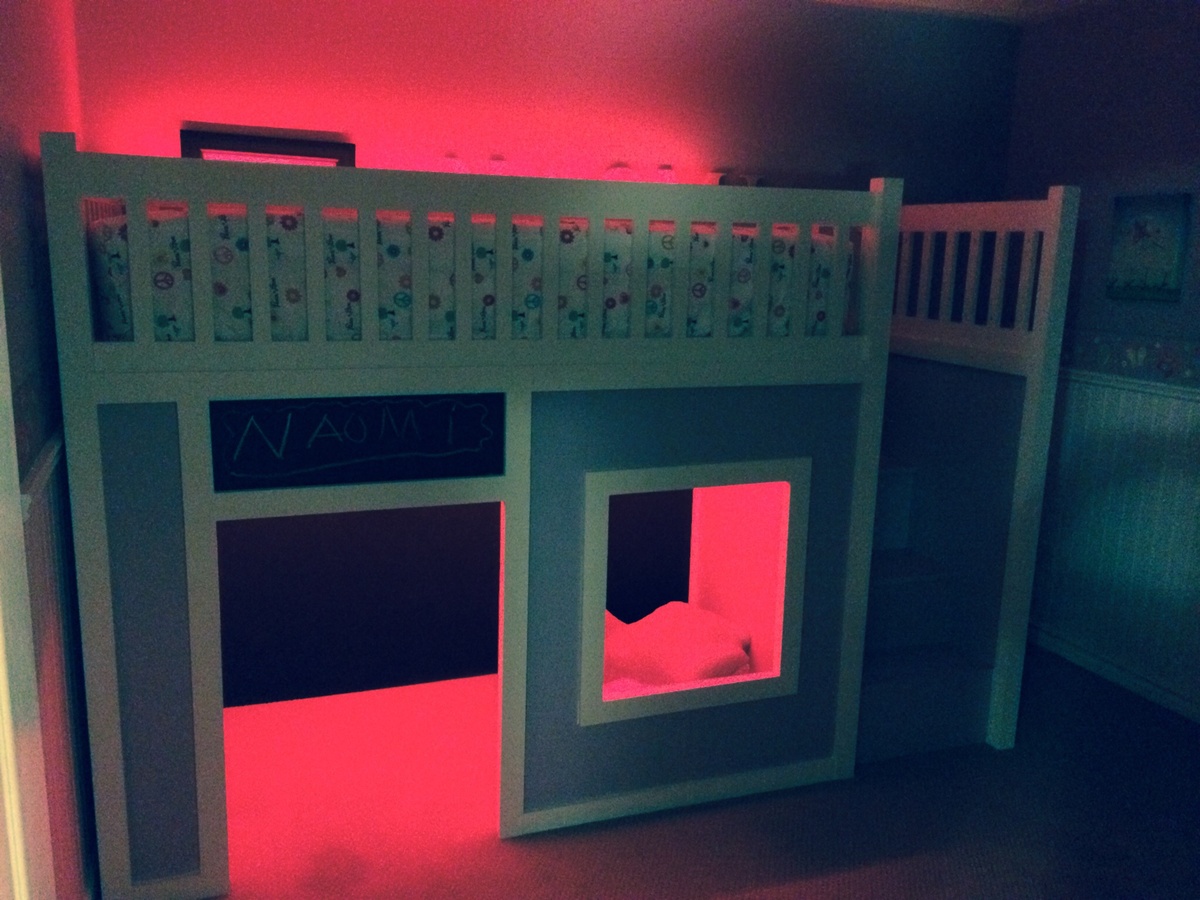
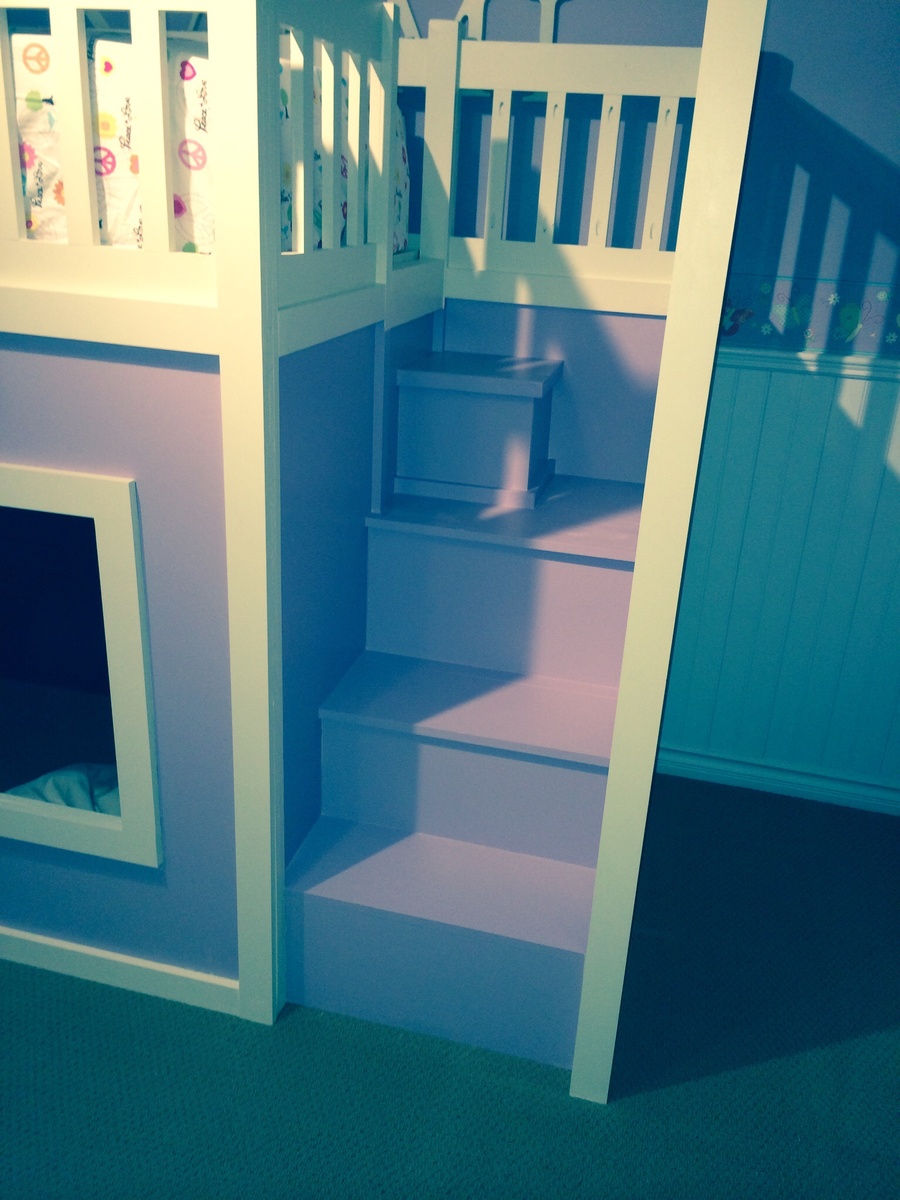
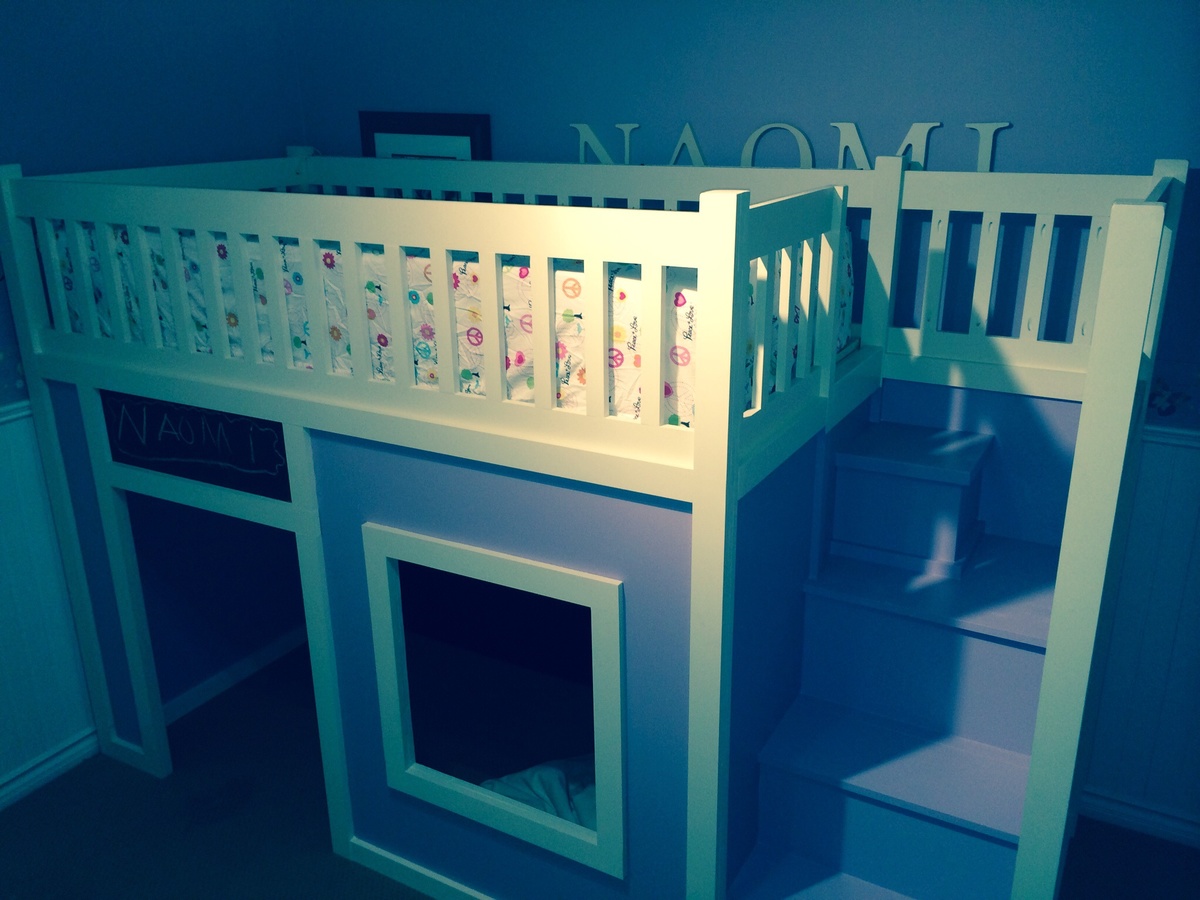
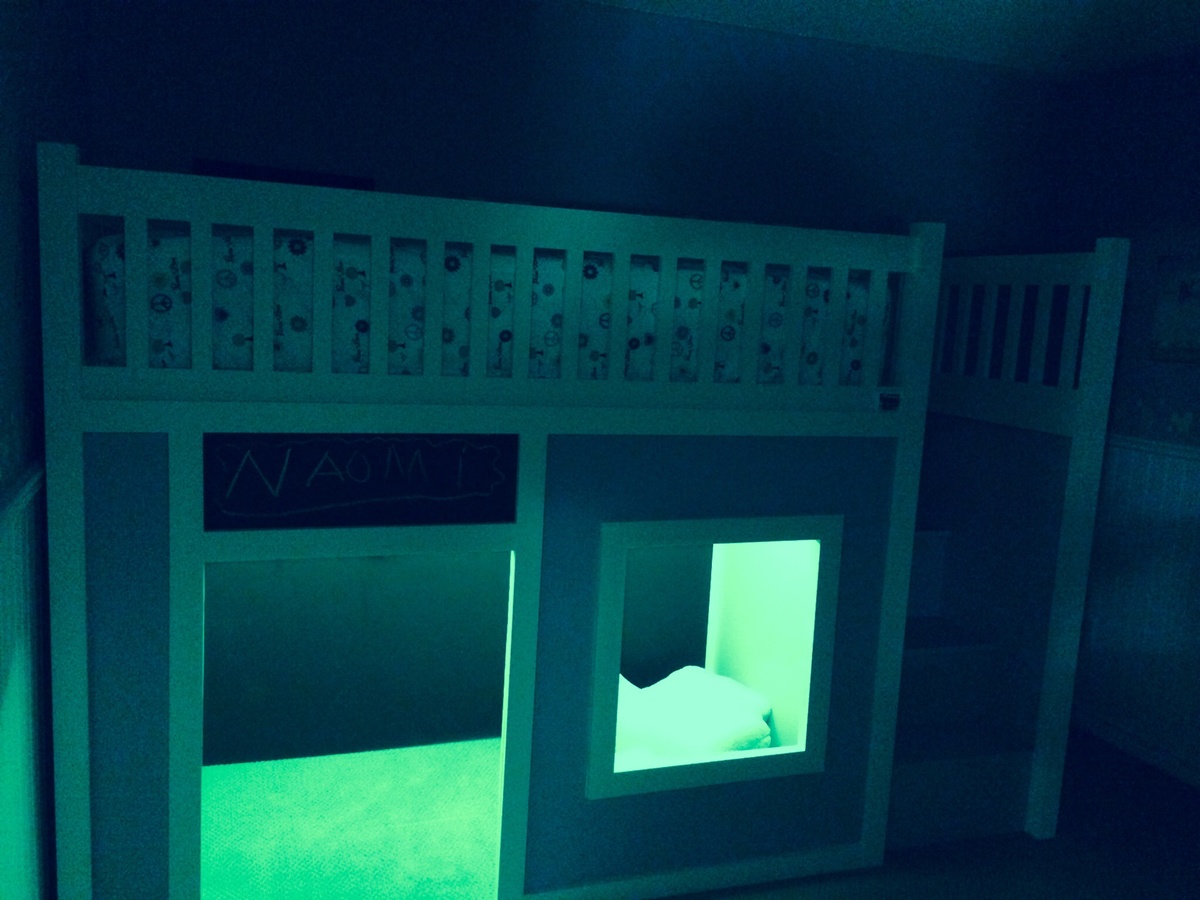
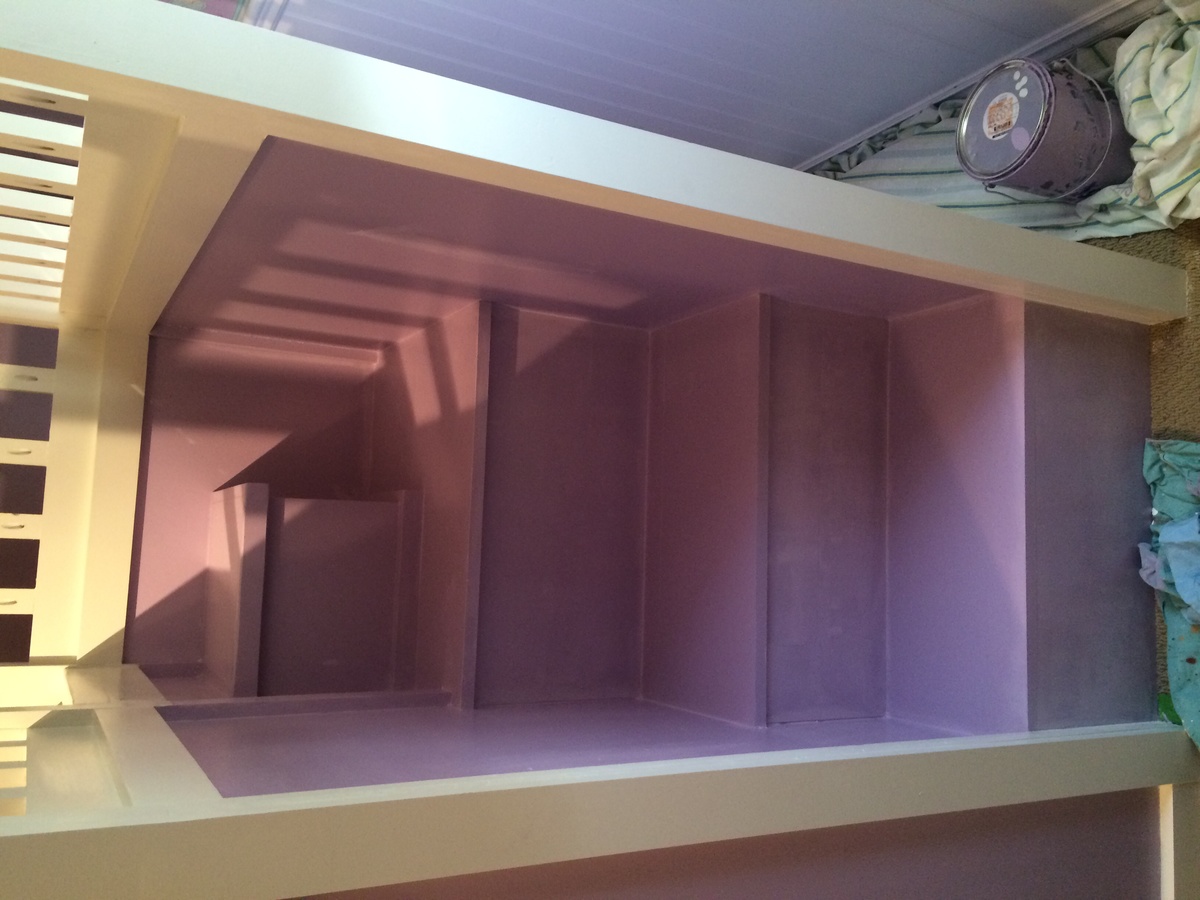
This was a great plan to follow. I made a few modifications such as adding a back wall that I painted with chalk paint so my daughter can draw to her hearts content. I also added a bit above the door so we can post messages such as her name or "girls only". I decided to skip the stairs being storage thinking it would simply be a junk collector and added a small step at the top as she found it a bit too high to get into her bed. Finally the painting took sometime as I used cabinet quality paint for durability but it's a bit tricky to work with. As a final touch I installed LEDs from Costco on the interior ceiling and back top rail all controlled by a remote with over 20 colors to choose from and adjusting brightness. Can't wait for my next project.
Very good plans to work from, and very adaptable! I modified the plan to add a sloping lip, which I think finishes the look. I was using old weathered cedar, so I contrasted that with cabinet style joinery (all mitered joints). I like the difference between the old distressed wood and the more refined joints. I set the skill level at "advanced" due to the compound mitered cuts required. I would be happy to supply the miter and bevel angles if anyone is interested.
One small suggestion: I found the diagram of the cuts for the sides to be confusing because the diagram of the piece of wood, which is rectangular, looks slanted in the perspective view. I would project the rectangle flat (all right angles) so that the angled cuts are clearer, and not confused with the "angles" of the sheet itself.
Thanks for a great idea!

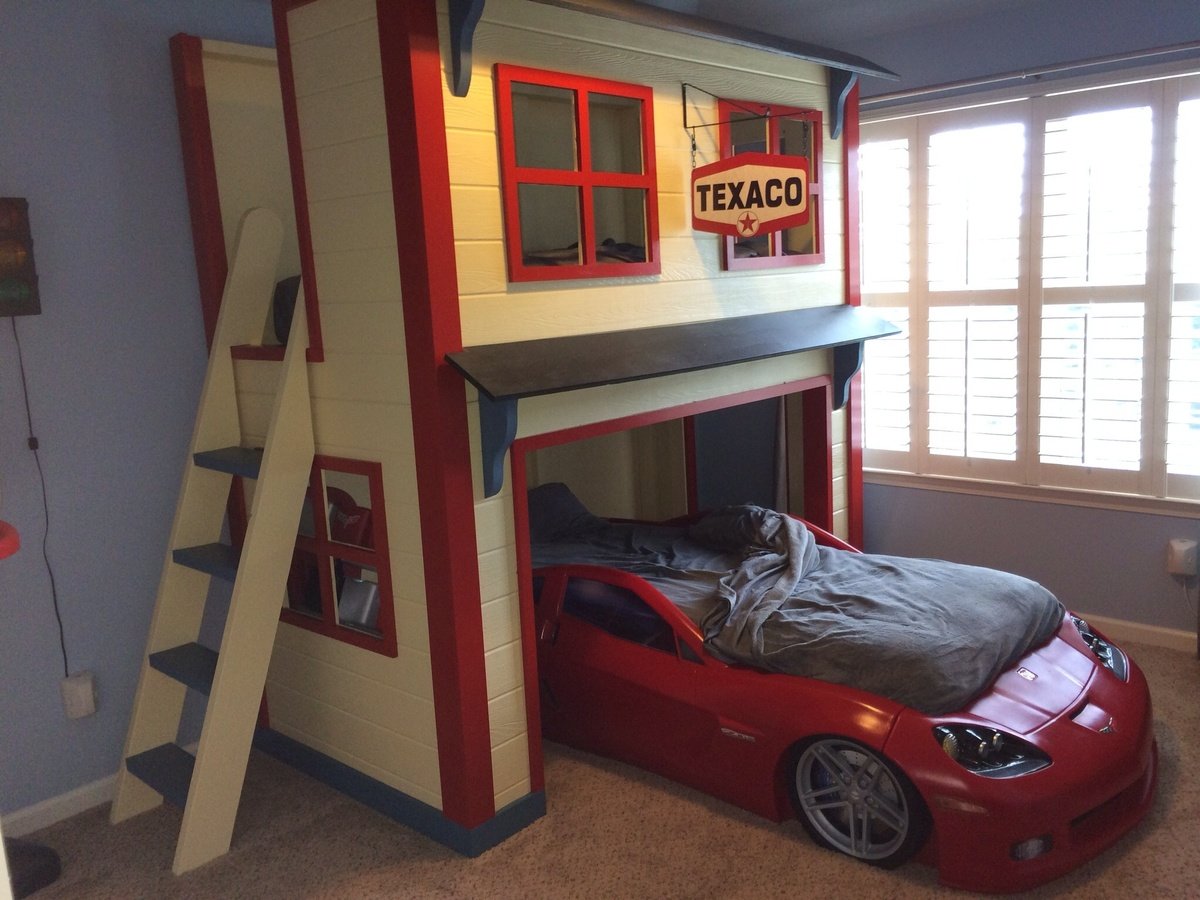
The garage loft bed was inspired by the plans on your site. I beefed up the framing with 2xs and found siding panels at my local big box.

Tue, 04/21/2020 - 13:23
Wondering if anyone has the plan to this my boys are wanting a garage themed room and this is perfect!!

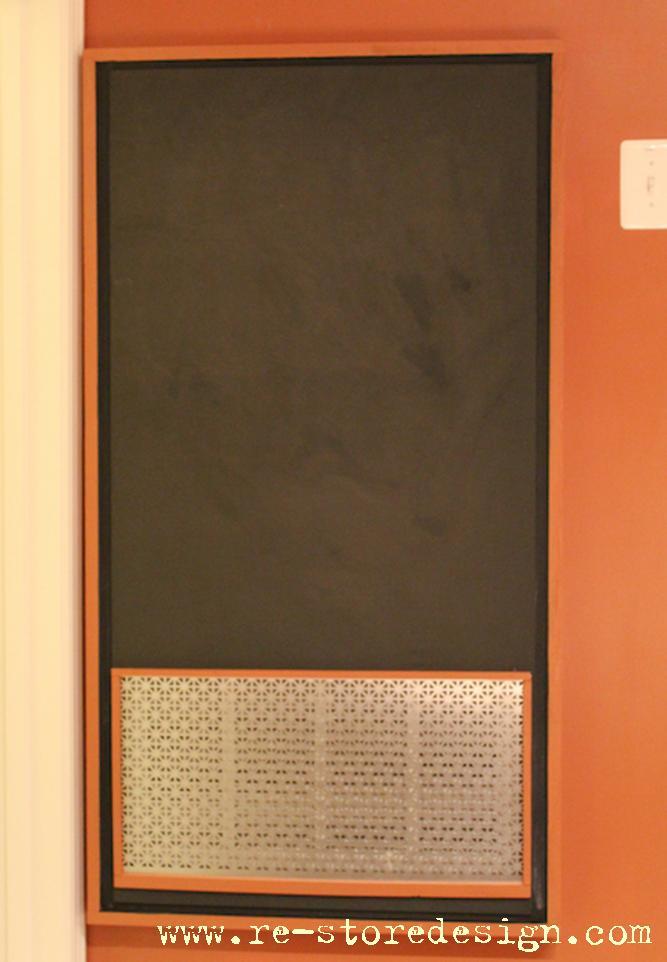
We have a 2′x4′ metal furnace cover that takes up a big portion of our dining room wall. To say it is an eye sore would be an understatement! We both love chalkboards, so I decided to make a cover out of chalkboard. Since it still needs to function as a furnace I made a cutout where the vent is. I covered that portion with a tin sheet. It looks so much better!
Learn how to make your own chalkboard paint in any color!
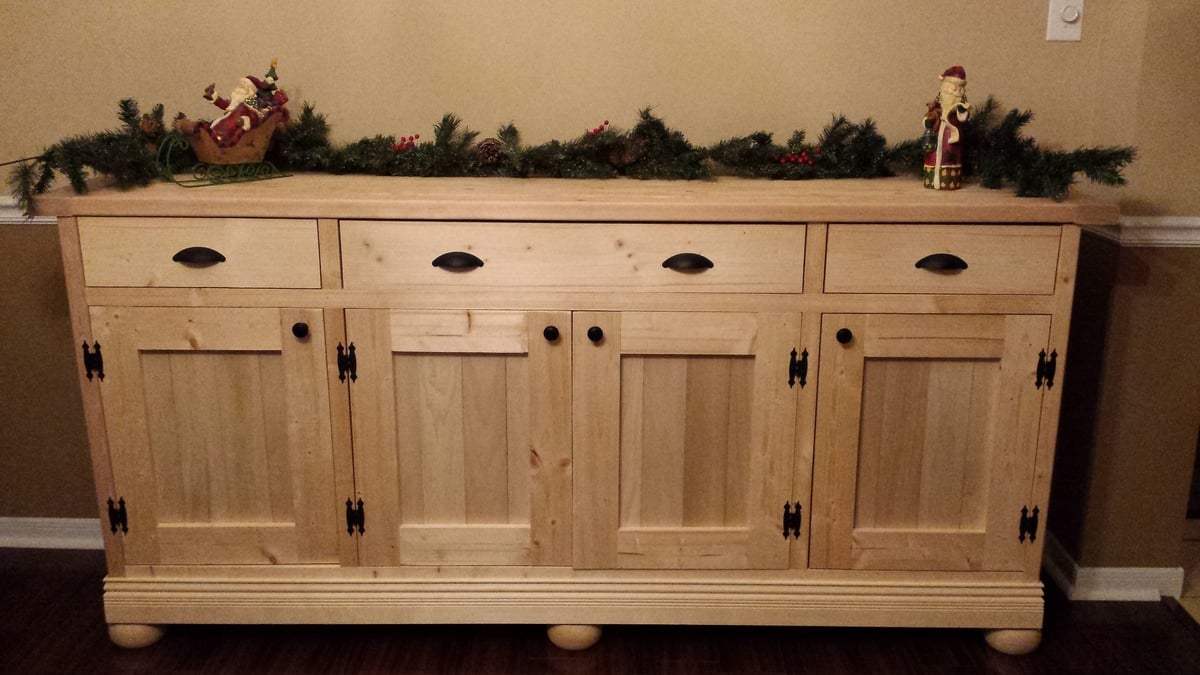
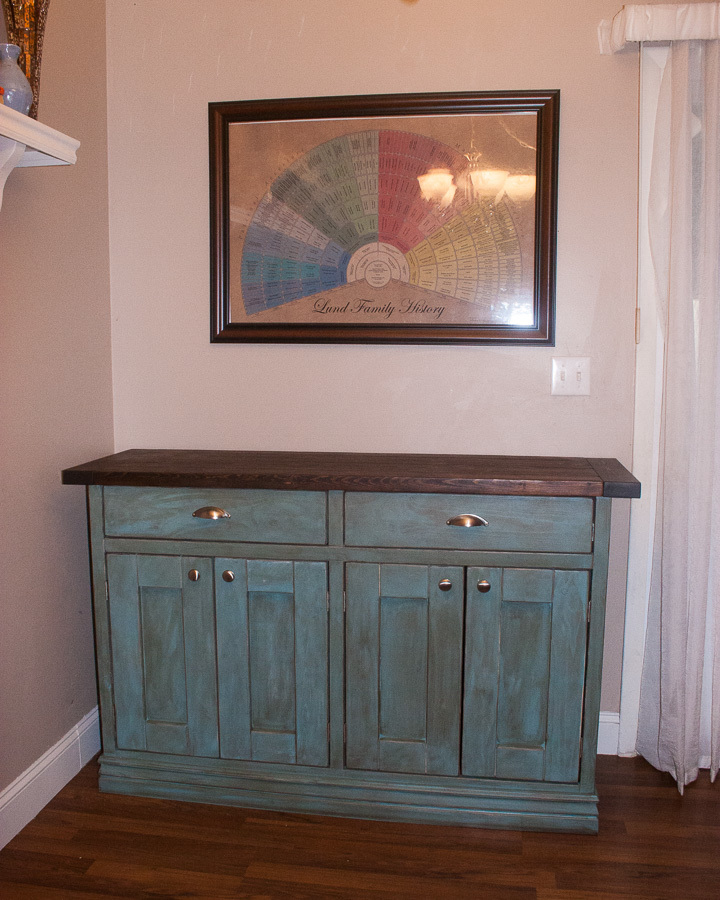
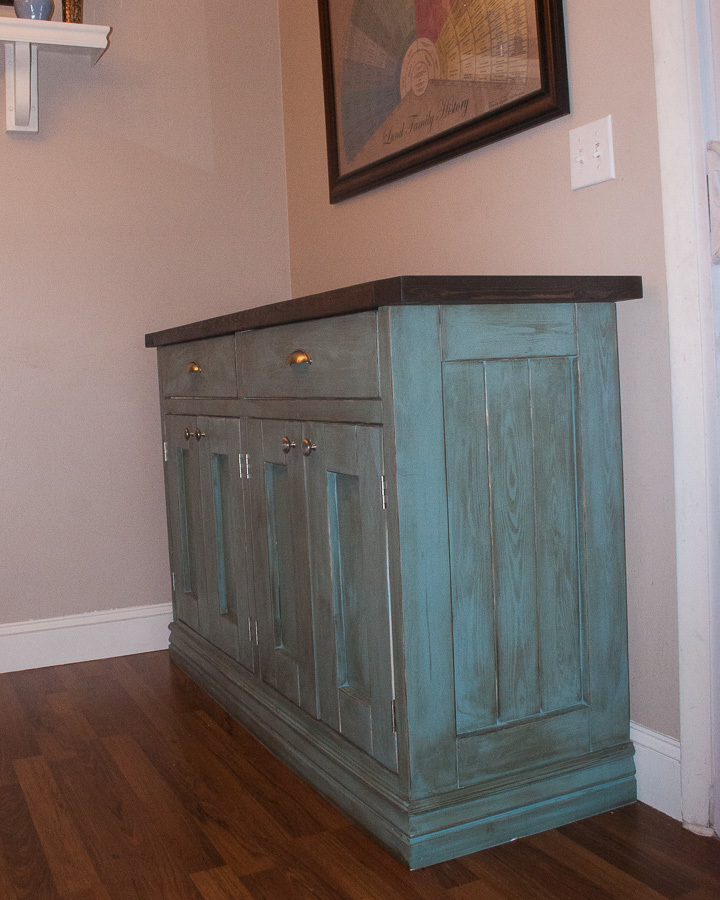
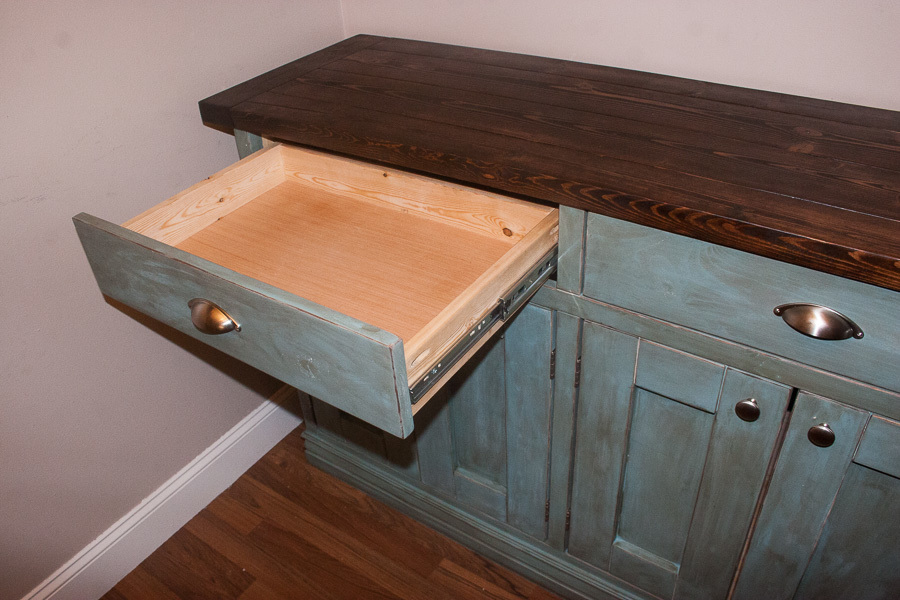
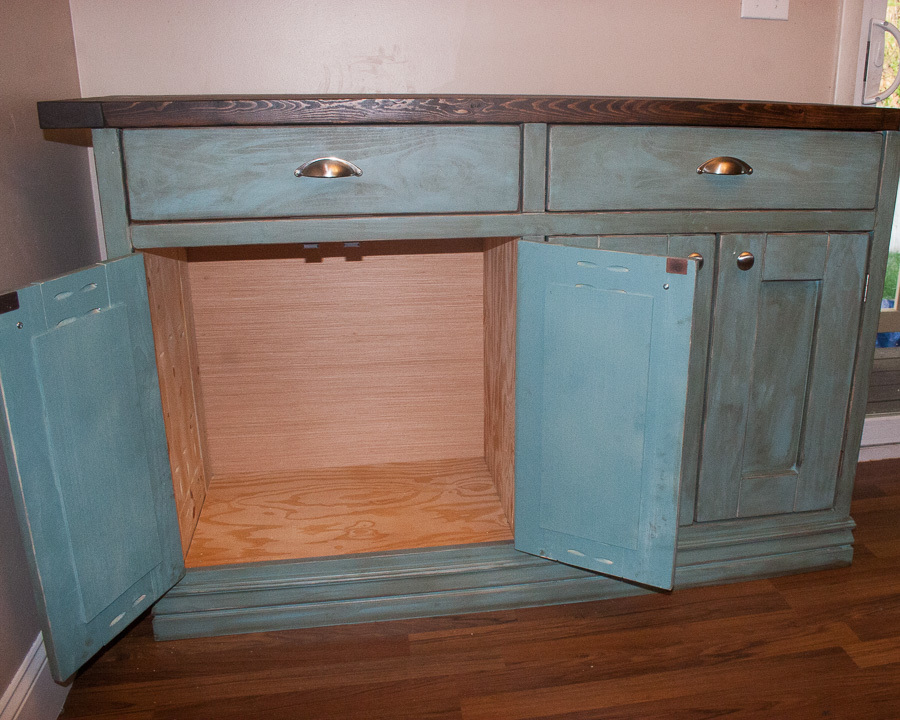
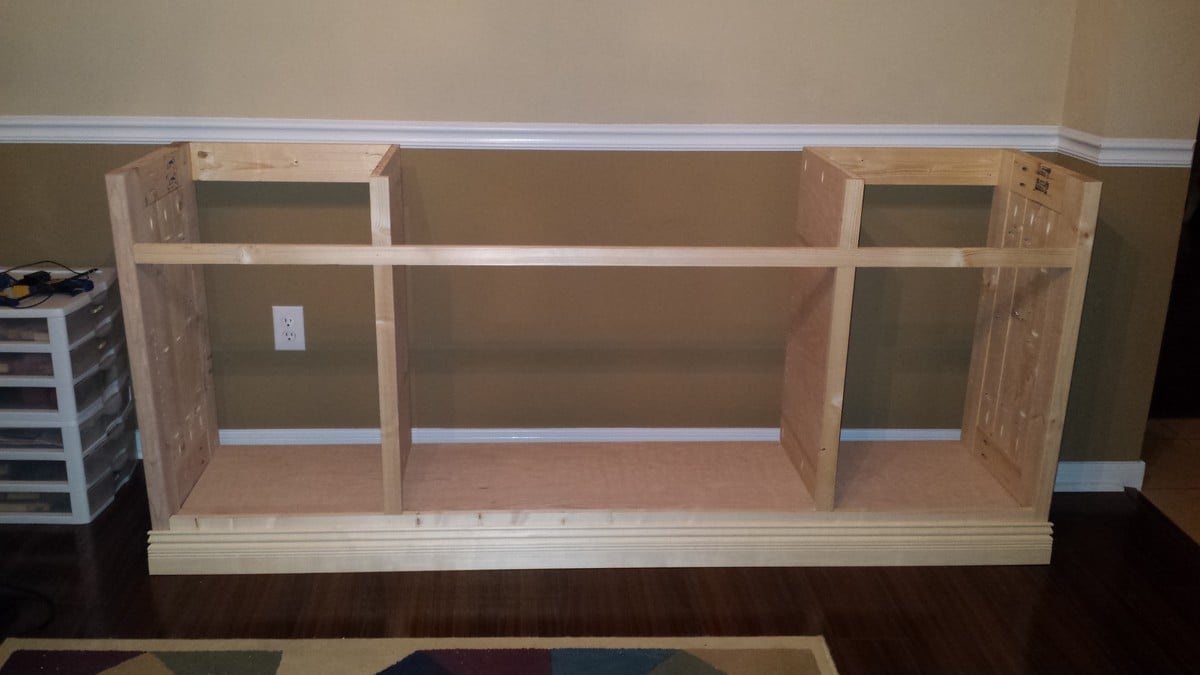
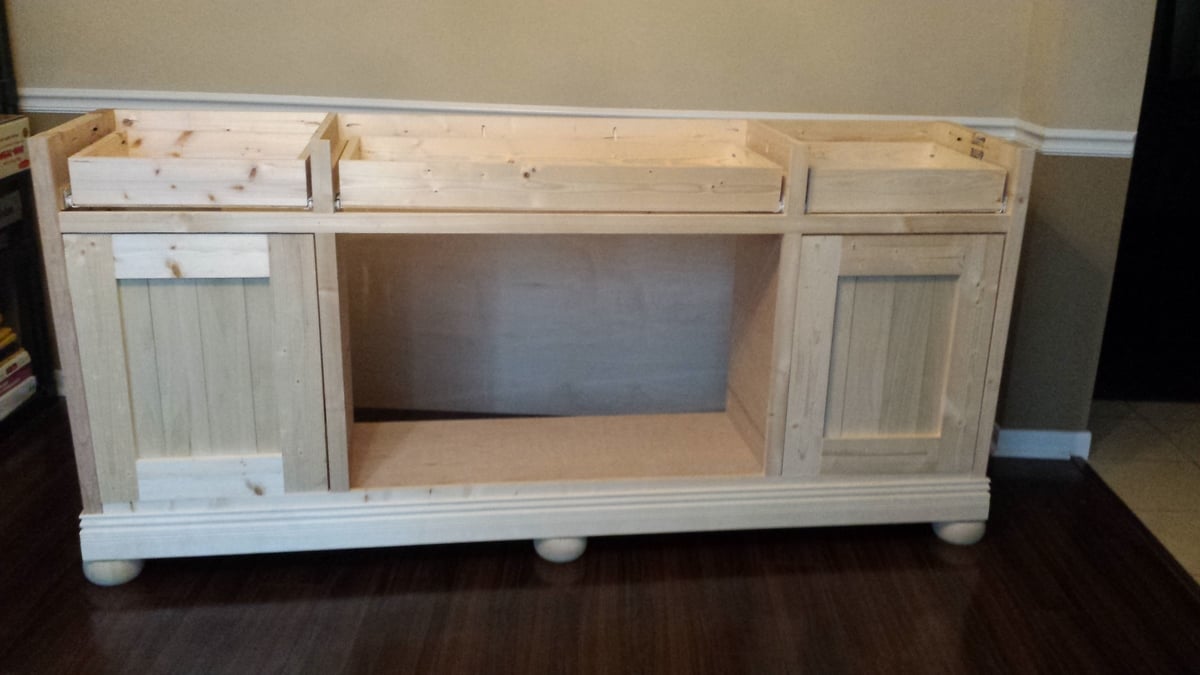
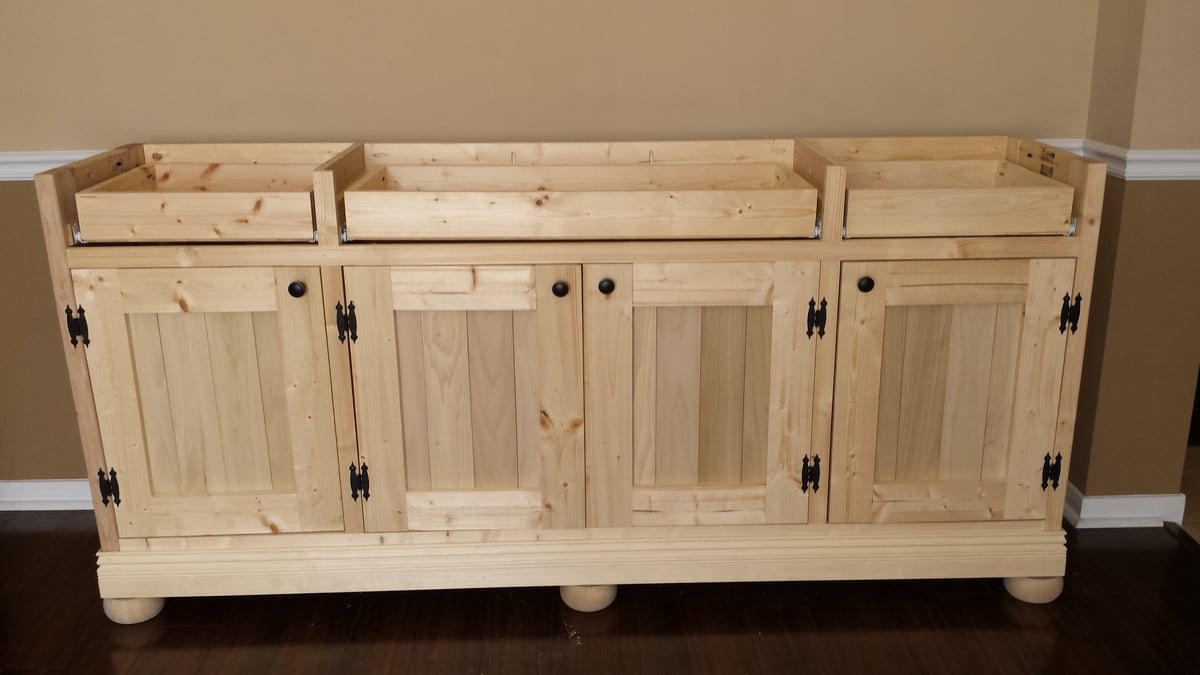
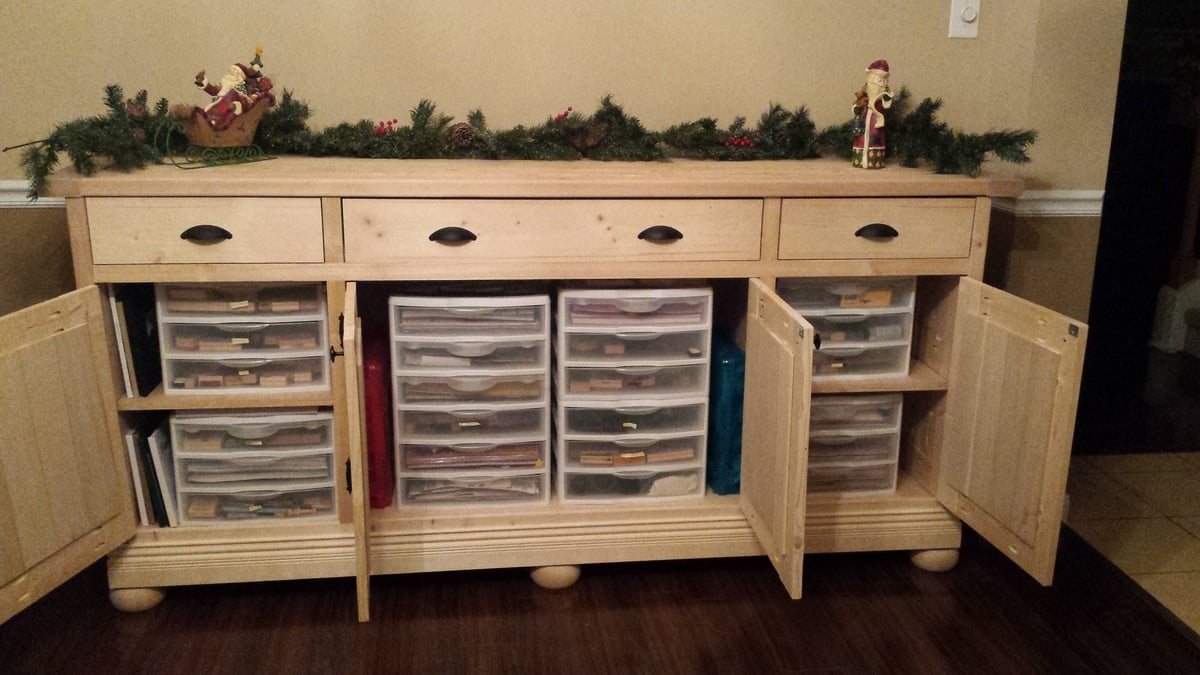
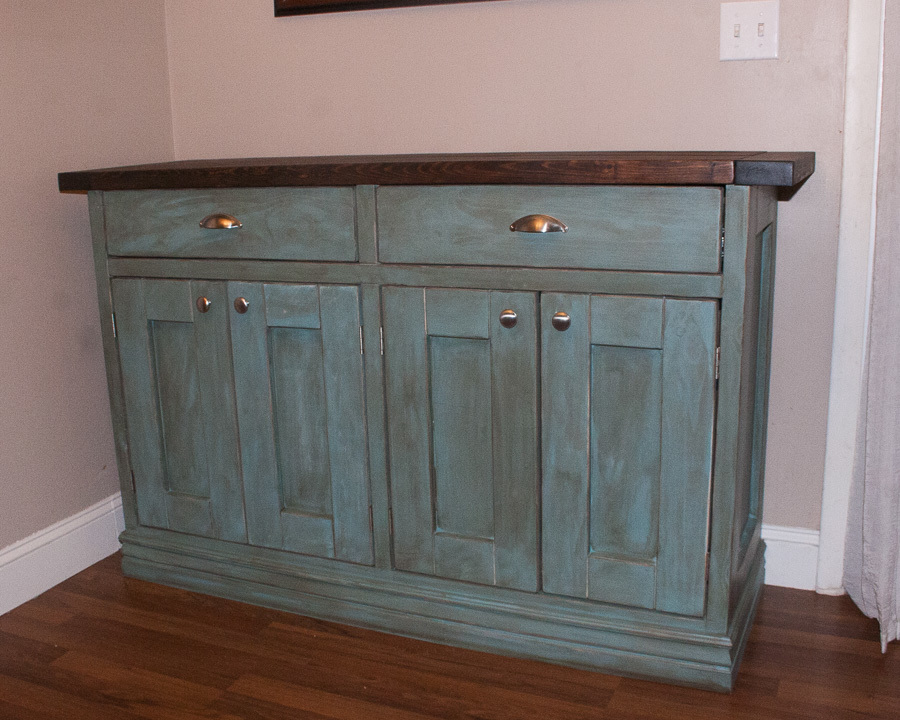
I was looking for something to hold my scrapbooking supplies. I want to use my formal dining room as my craft room but have the illusion it's still a dining room. This plan was perfect. This was my first time building anything from Ana's site. I added feet to the bottom to change up the look just a little. I also used a more detailed base molding. I also added some support to the bottom to have somewhere to attach the feet and distribute the weight of all my scrapbooking supplies. The best advice was to leave the top off until the end. I also waited to attach the back till the very end also. I thought I'd have the most trouble with the drawers but the doors ended up being the hardest part for me. Overall I'm very happy with the buffet! I haven't decided how I'd like to satin it yet. I'll eventually get that done! On to the next project. :)

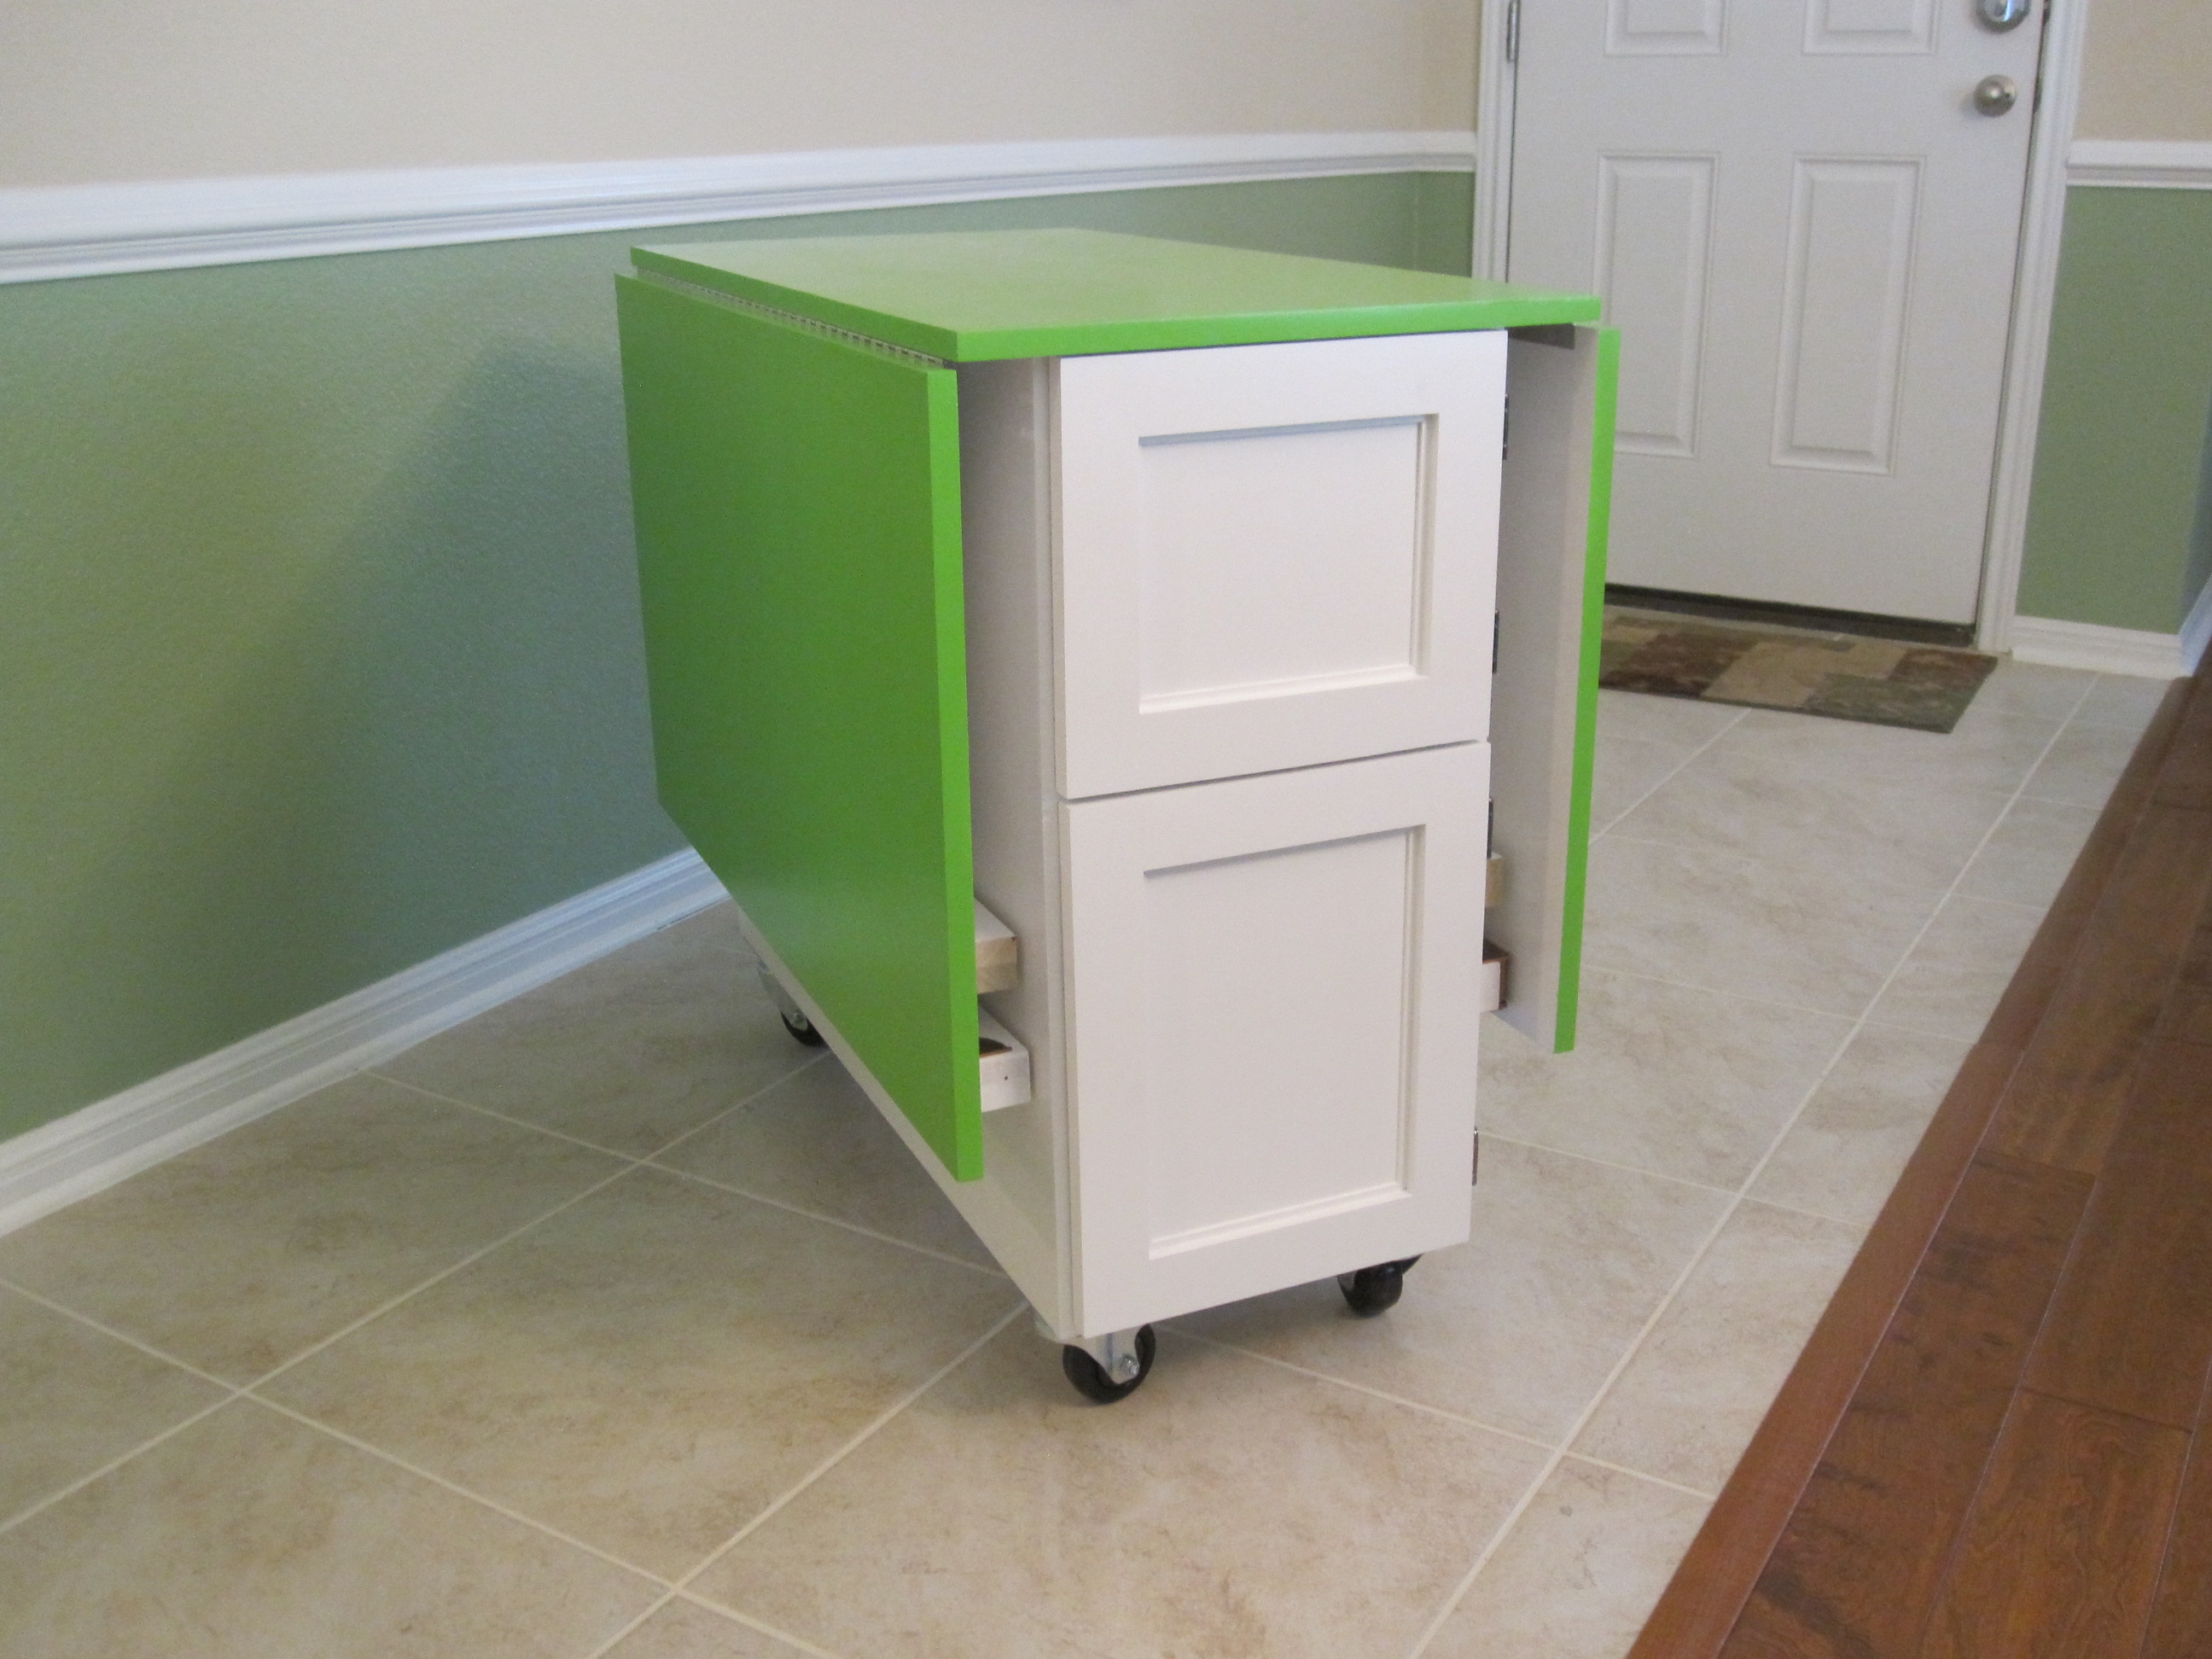
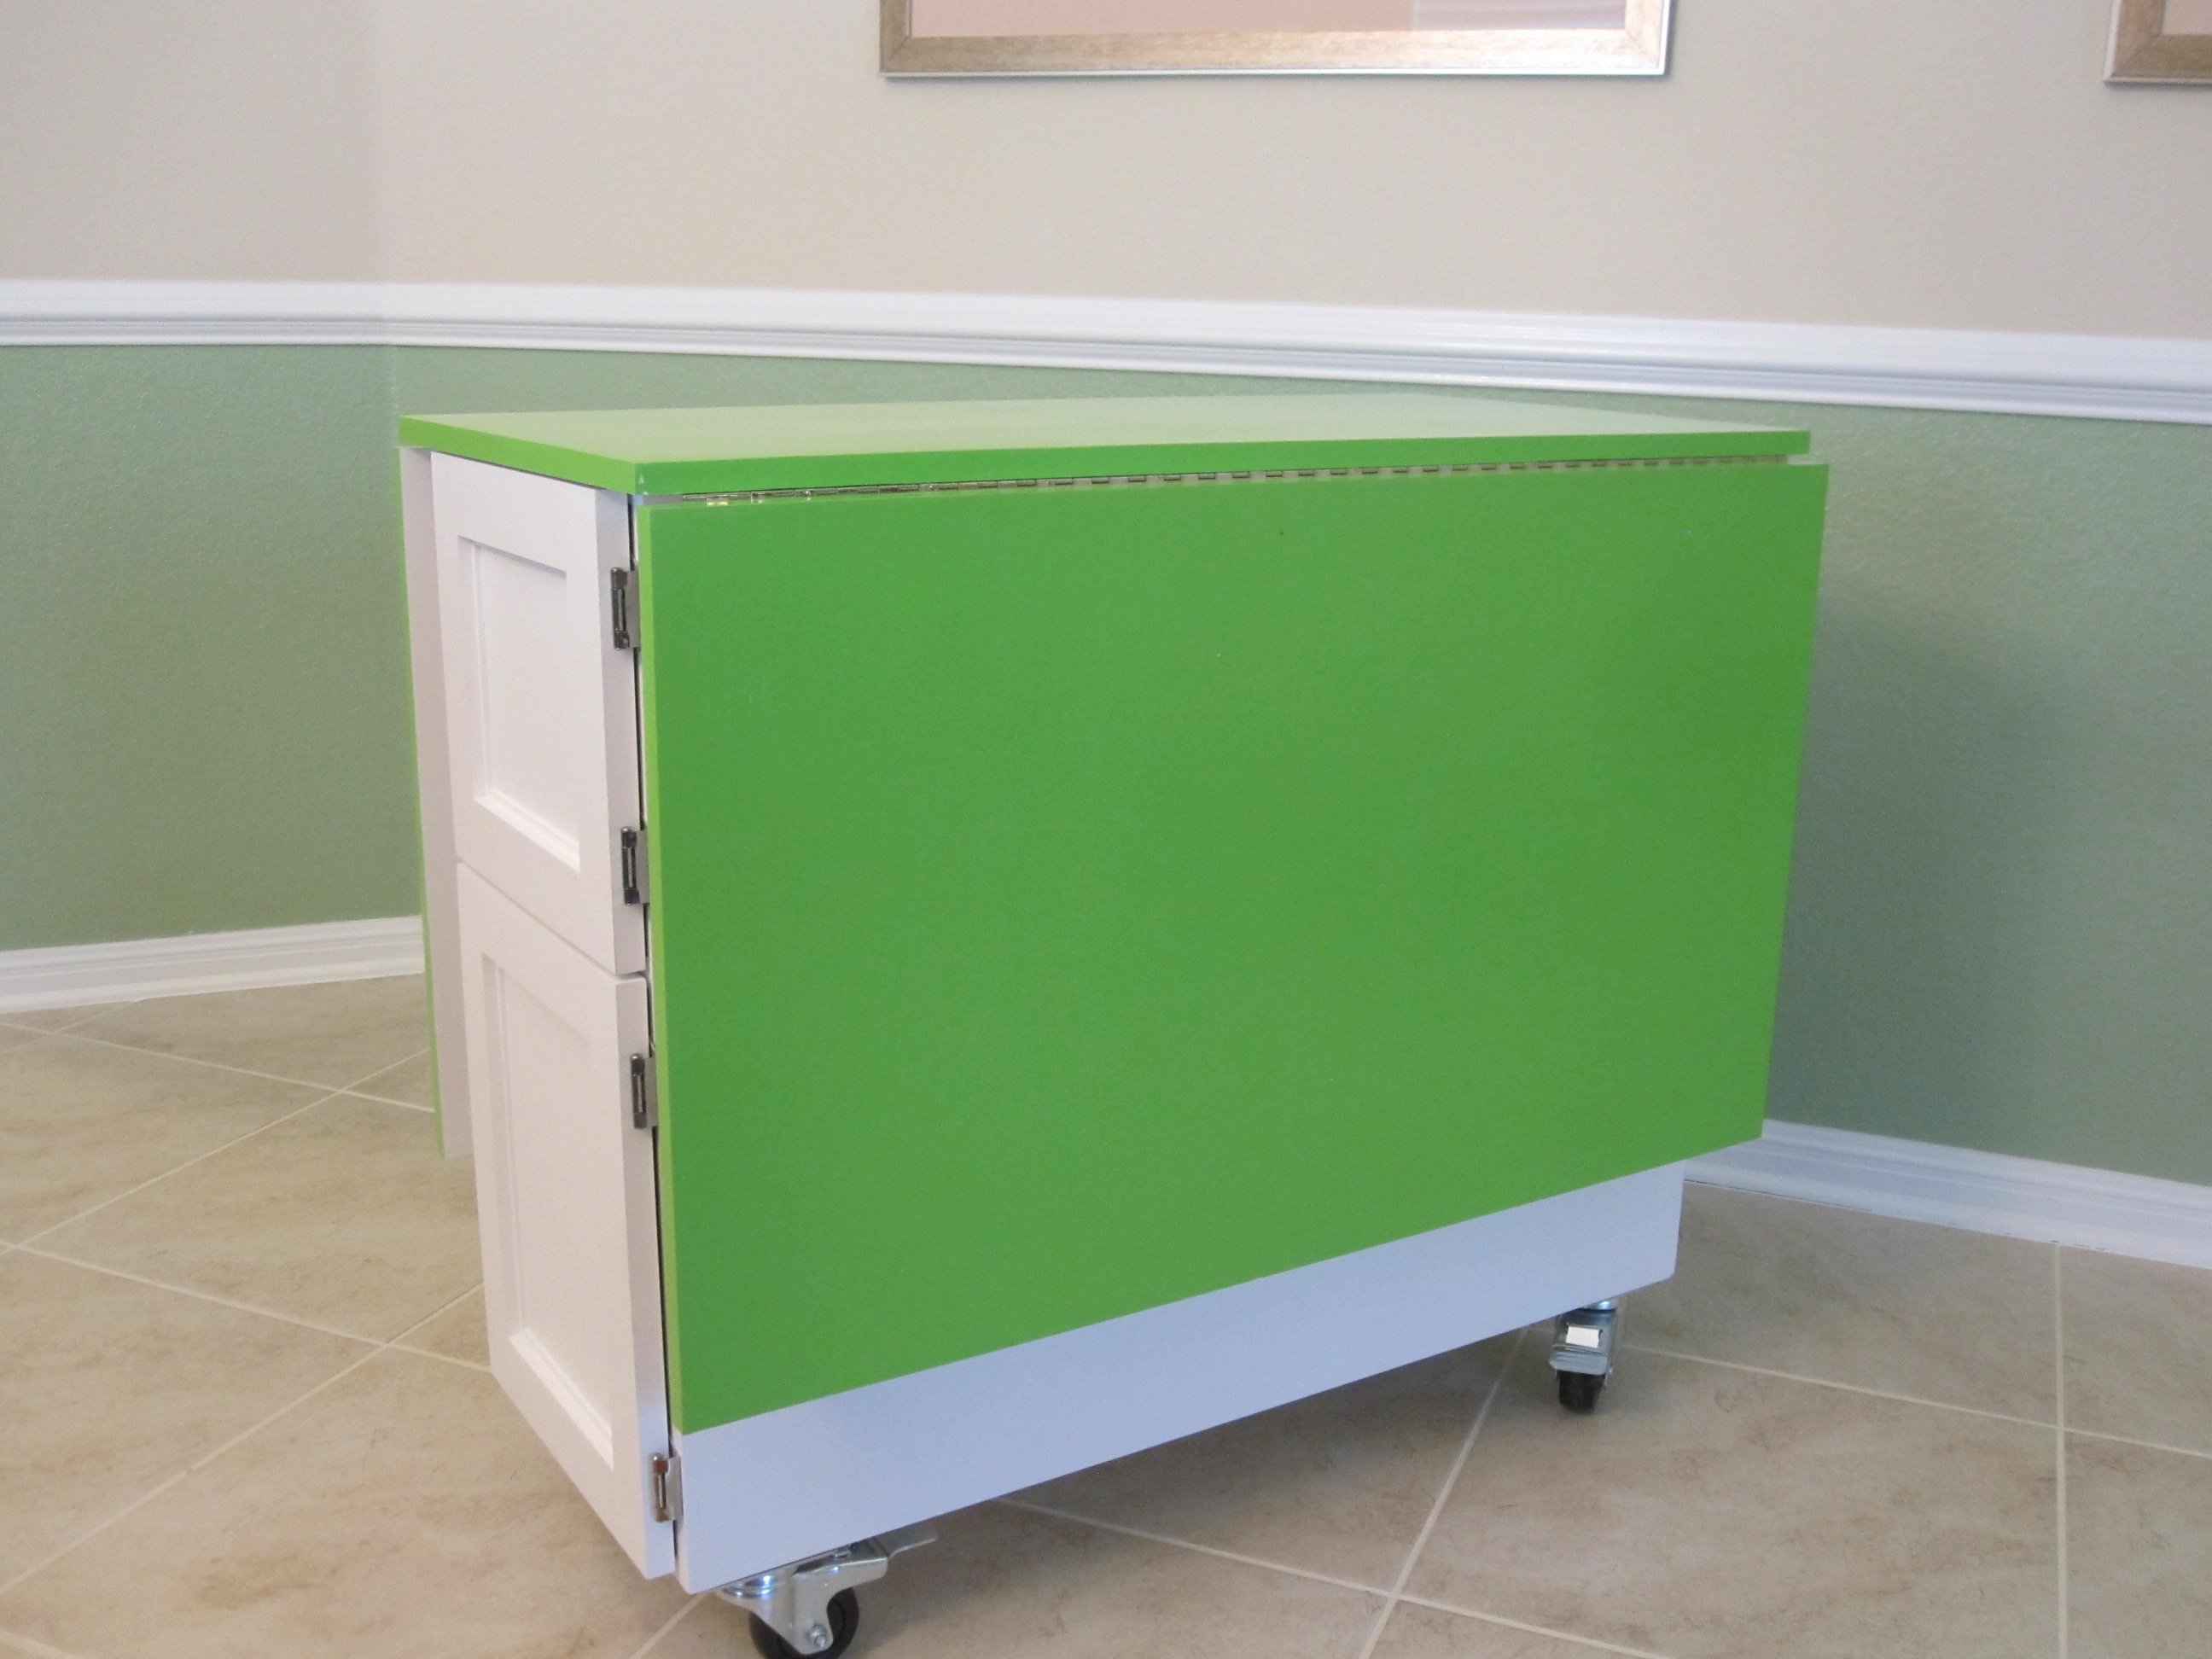
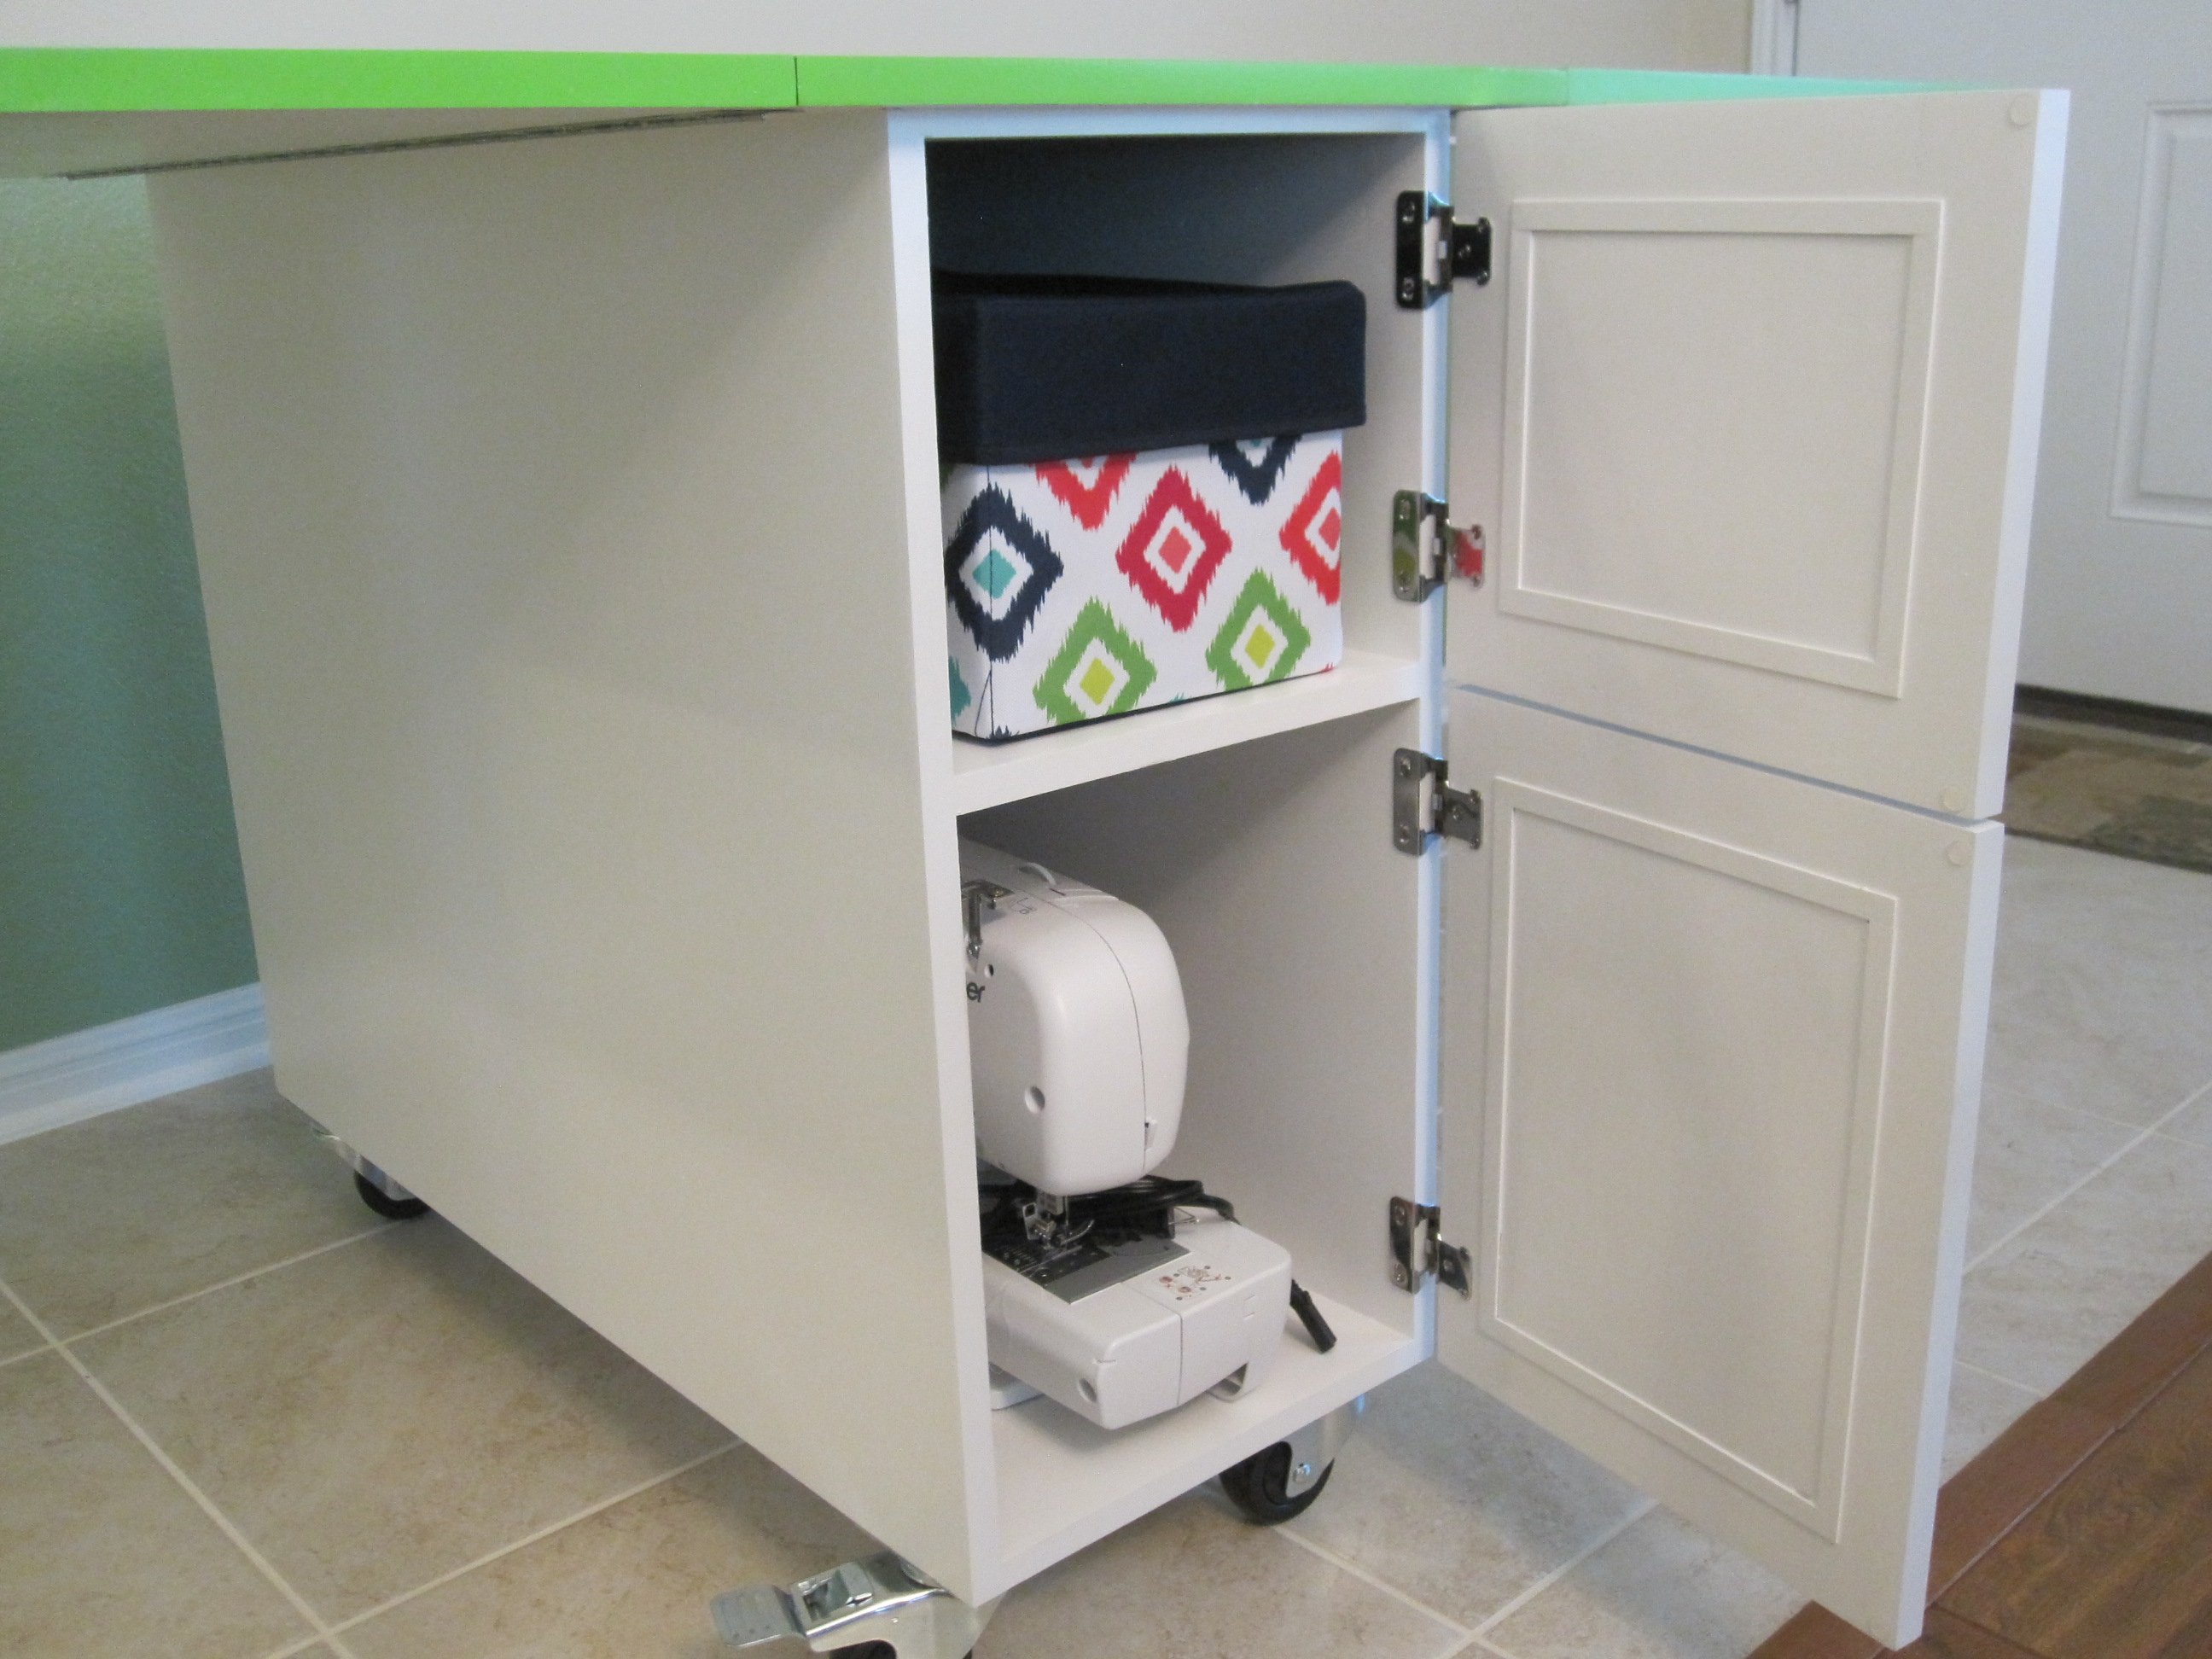
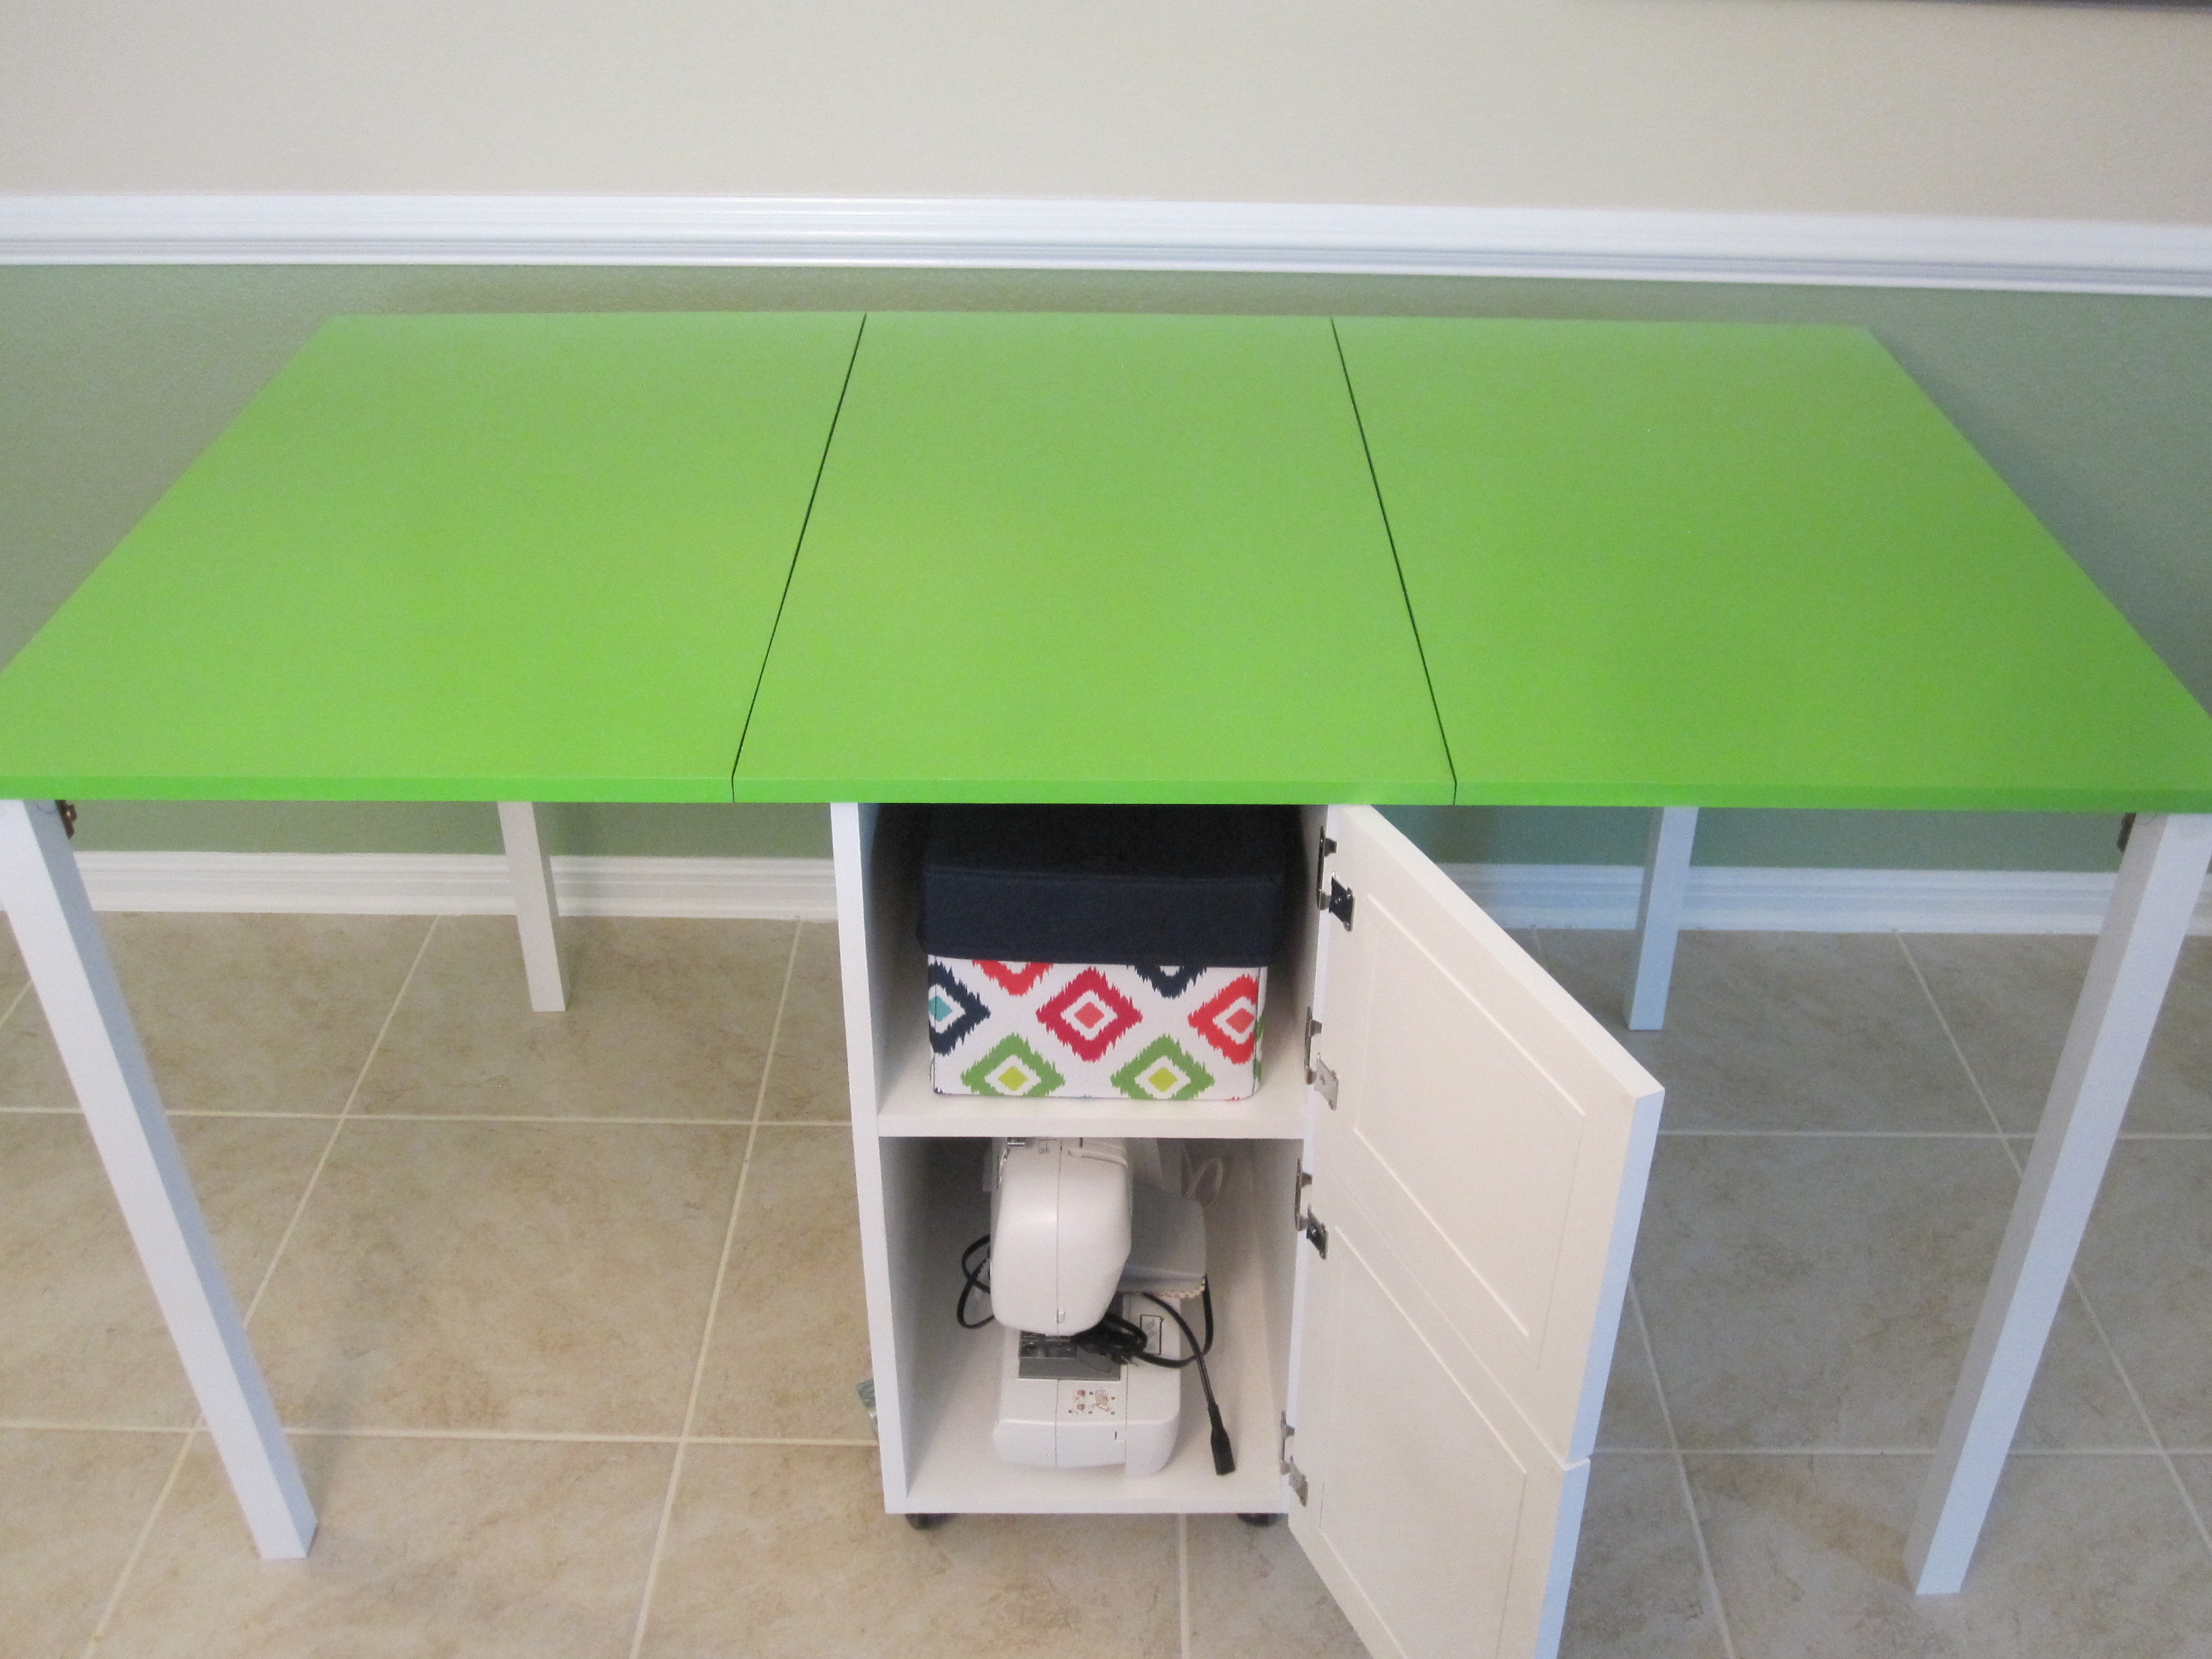
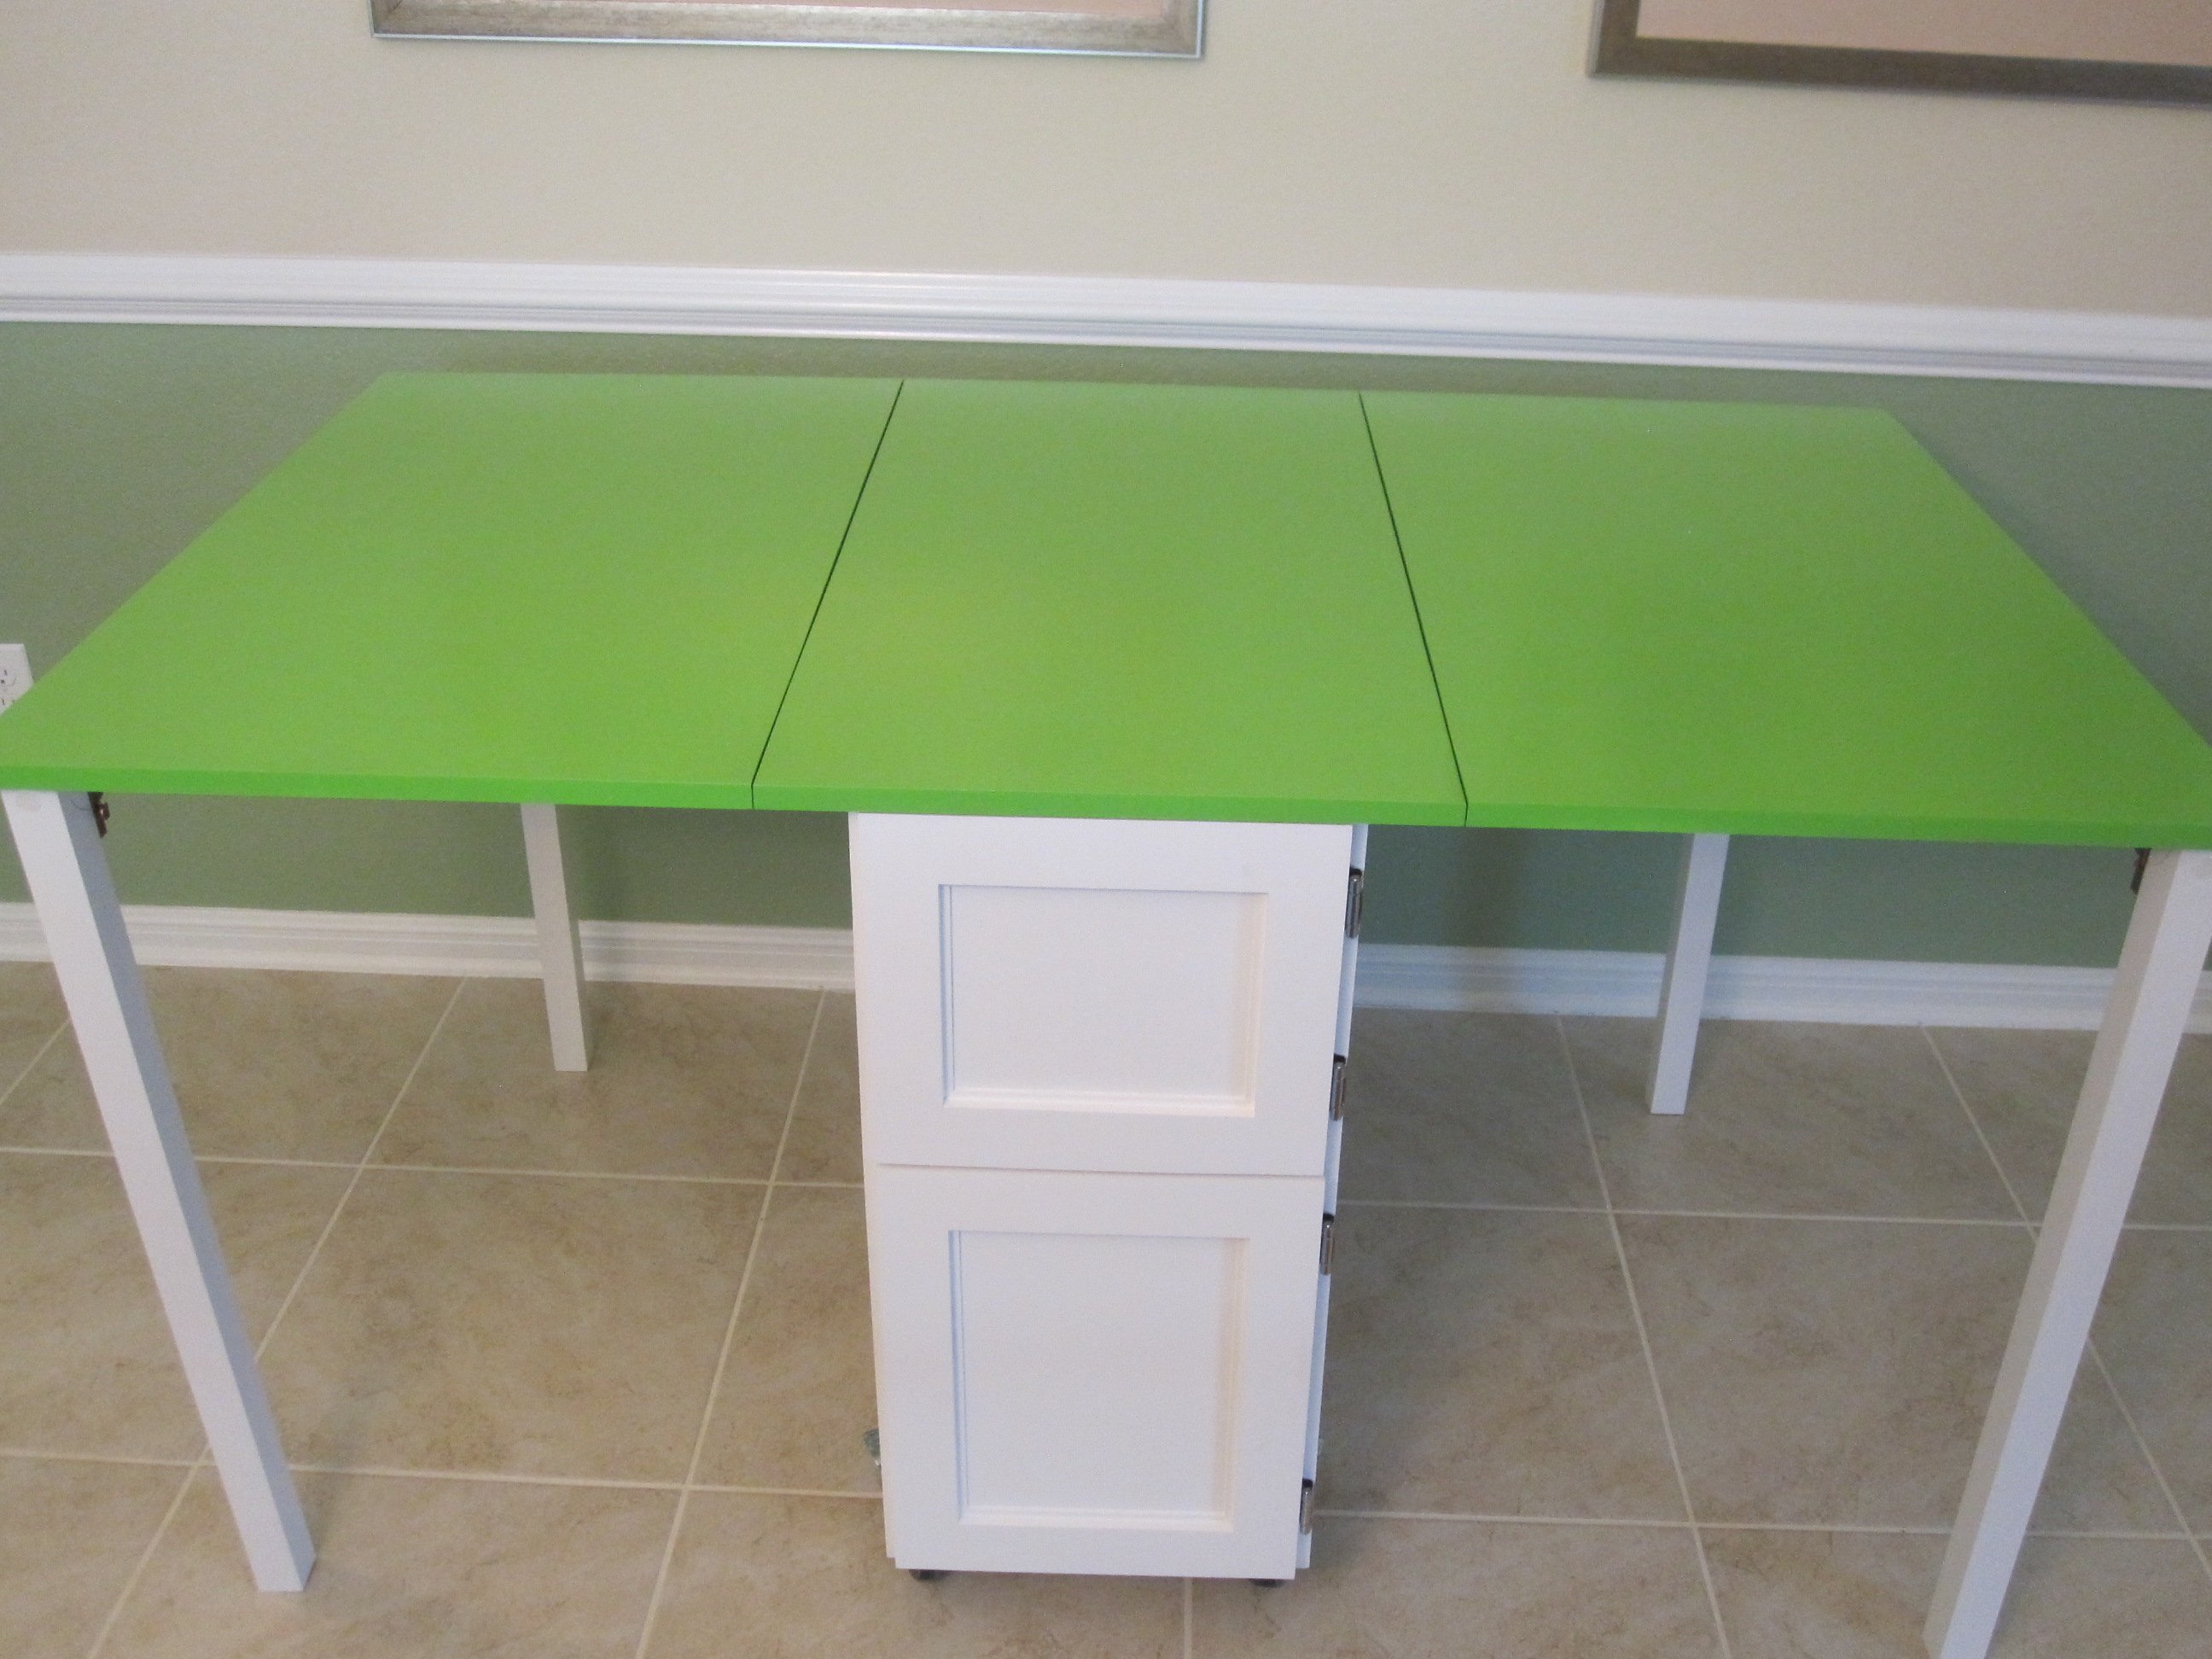
Built the sewing table for my wife Penney. It has a work surface that is 36" x 60" and is 32" high.
Used 3/4" Baltic Birch and used premium pine to add edge banding. Used 1/4" plywood for a back to the sewing table to add strength and I think helps the look of the table. My Kreg Jig was used everywhere possible when assembling the case. Used full length piano hinges with #6 x 5/8" screws to attach the leaves to the table. Made the doors using premium pine with a plywood panel. For the legs, I used folding, locking leg brackets from Lee Valley to attach the 1-1/2" square poplar legs. The casters are 3" double-locking from Woodcraft.
Went a little over budget, but it turned out very nice and she loves it.
Thank you for the easy to follow plans.
My husband did the build and I did the finishing. This would have been much easier with the correct tools such as clamps and squares but he got by. We did have a Kreg jig that made the assembly much easier. This took about 15-20 hours over the course of a week long spring break.