Community Brag Posts
8 foot Farm Table
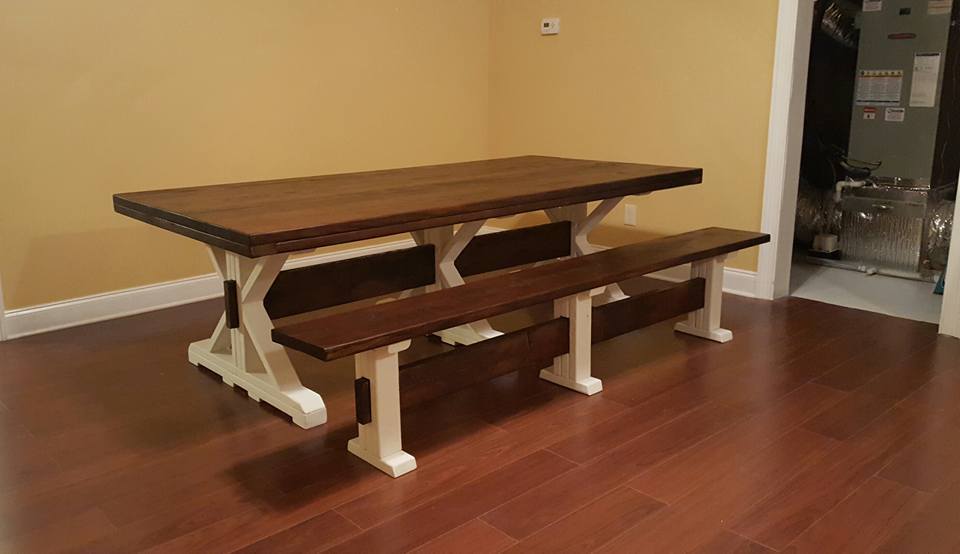
Inspired by the Fancy X farmtable plans. Added a crossbeam mid legs. Stained top and center beam chalk painted legs. Bench inspired by the table just minus the diagonal pieces.
Built from Plan(s)
Estimated Time Investment
Week Long Project (20 Hours or More)
Recommended Skill Level
Beginner
Ultimate Work Bench with Drawers

Ana White's plans came through again, easy to understand, I made drawers in one side for more storage, thank you!
Cathy B
Built from Plan(s)
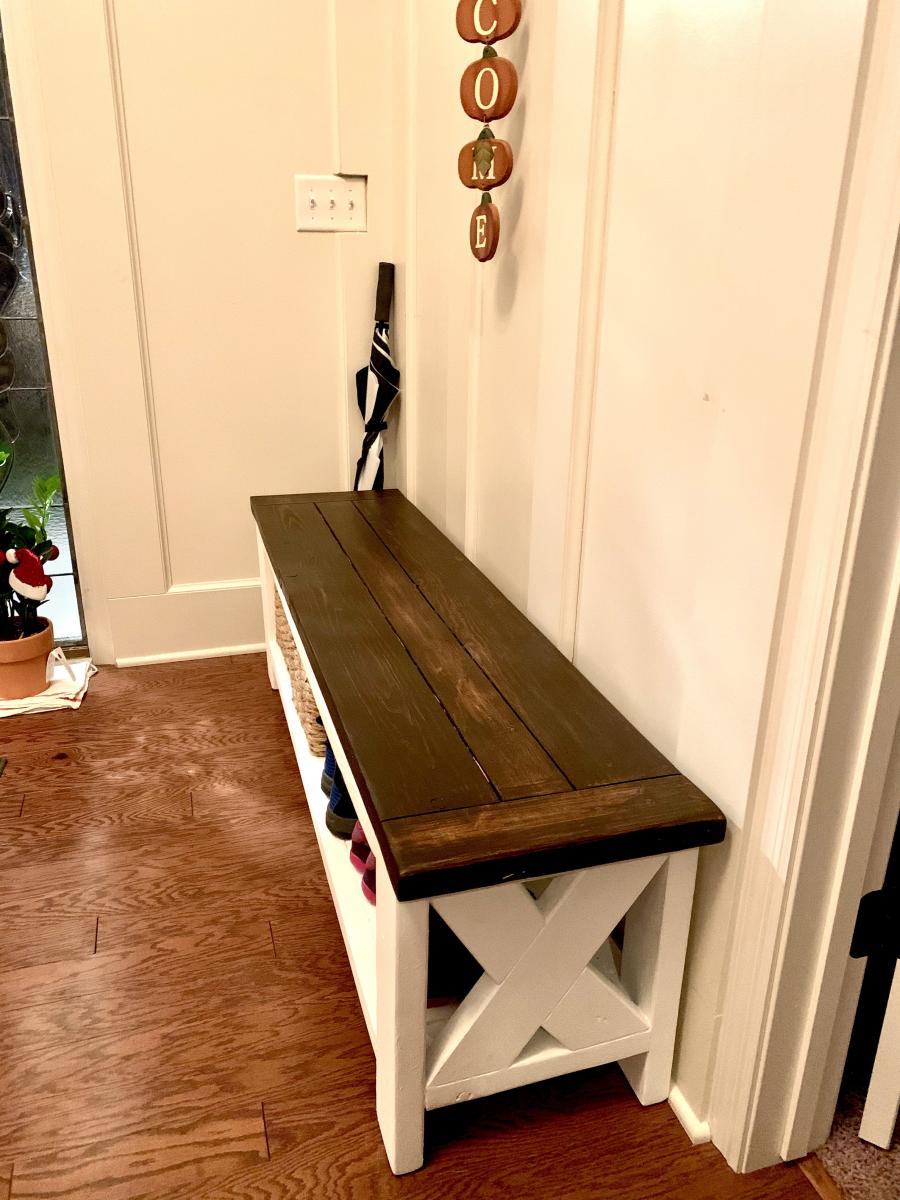
Rustic X Bench for Entry
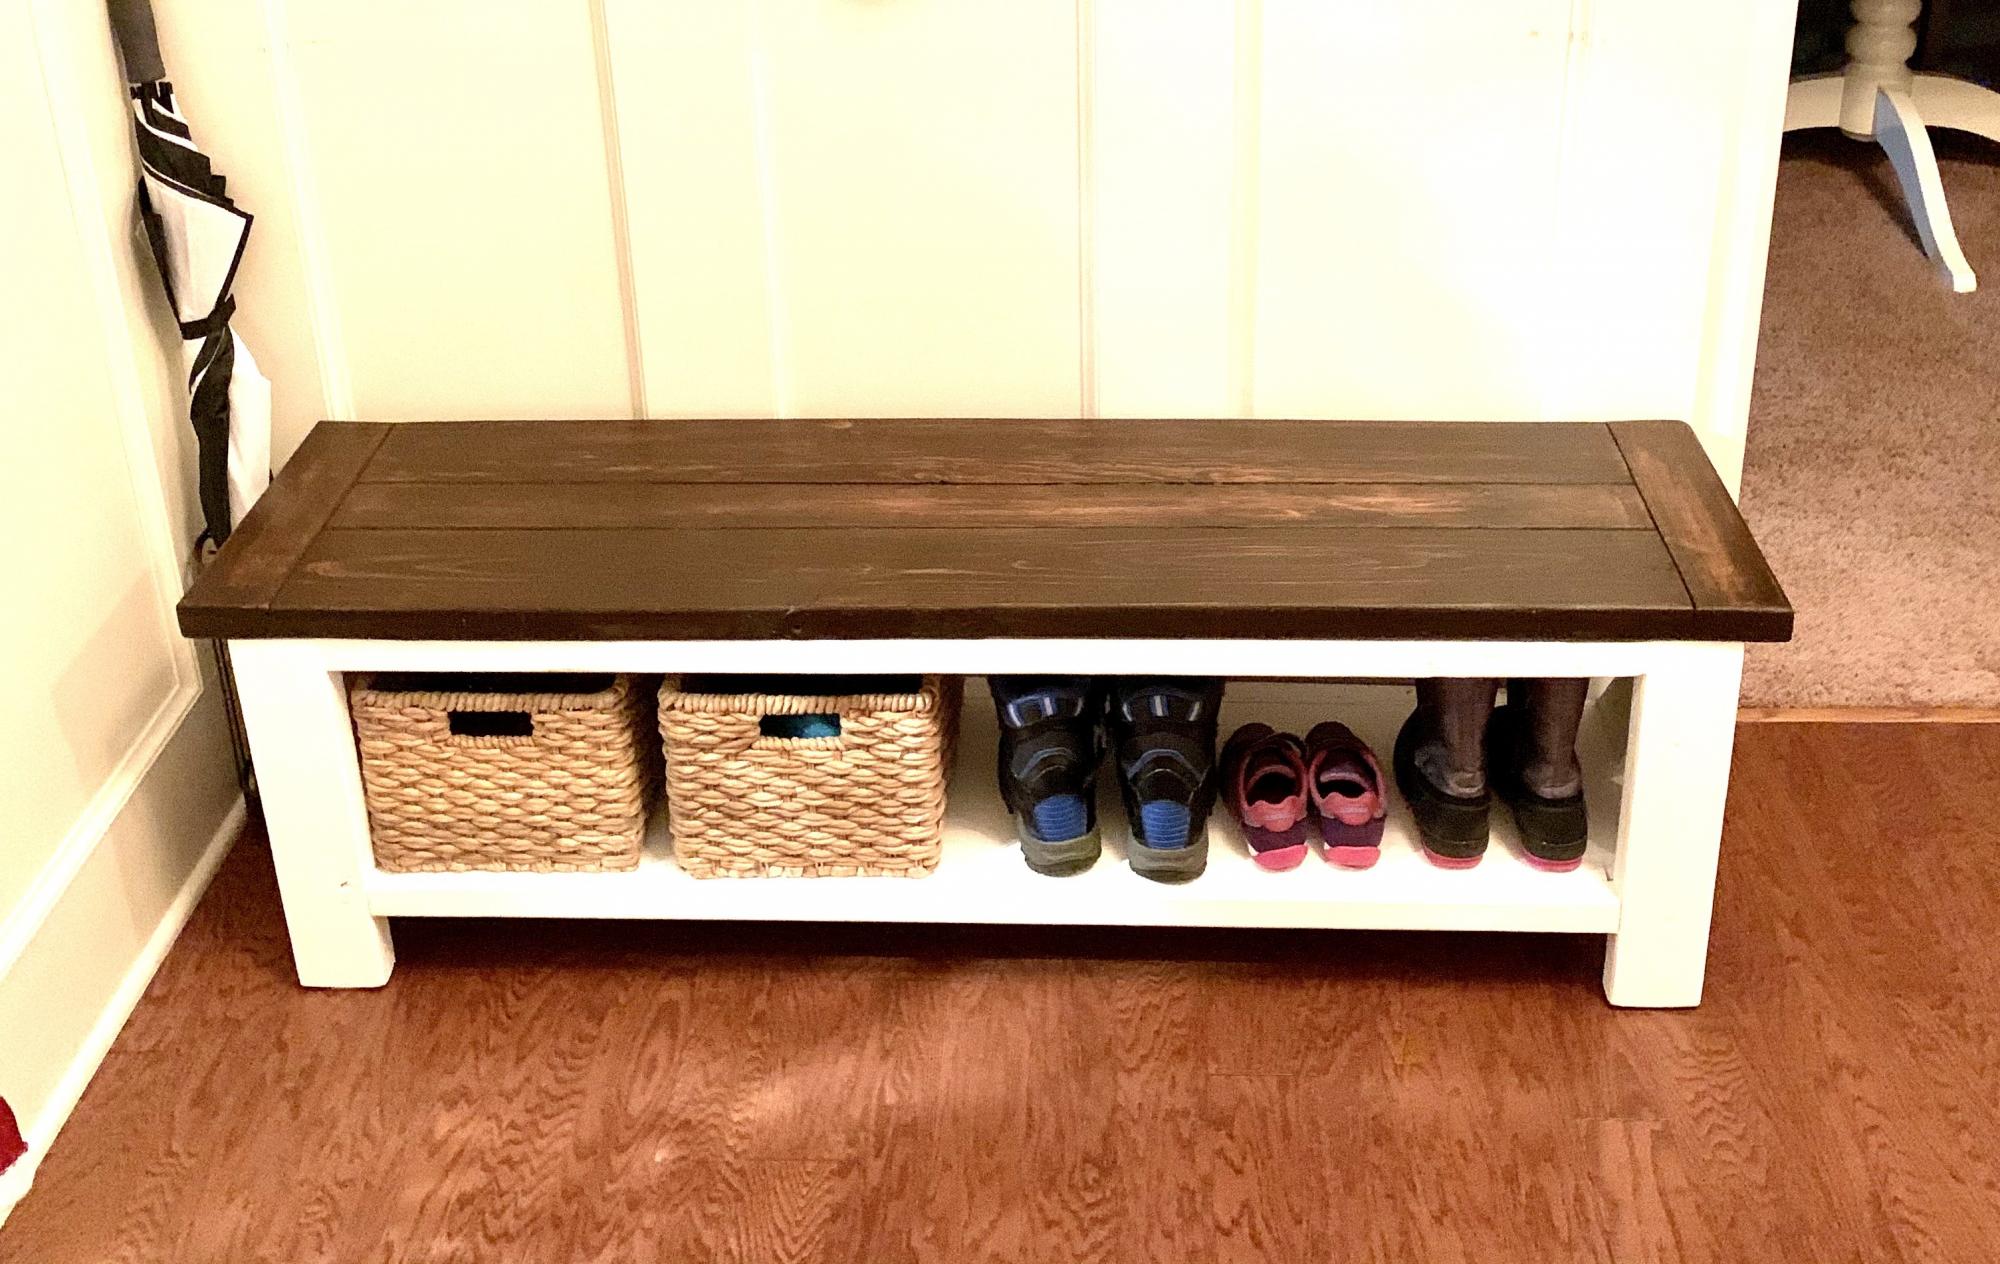
Made 2 changes to the plans which was using a 2 x 4 as a center top board to add some variety to the board width and also decided to go with breadboard ends which also used 2x4
Thanks for the plans!
Built from Plan(s)
Estimated Cost
$50
Estimated Time Investment
Afternoon Project (3-6 Hours)
Outdoor Sectional
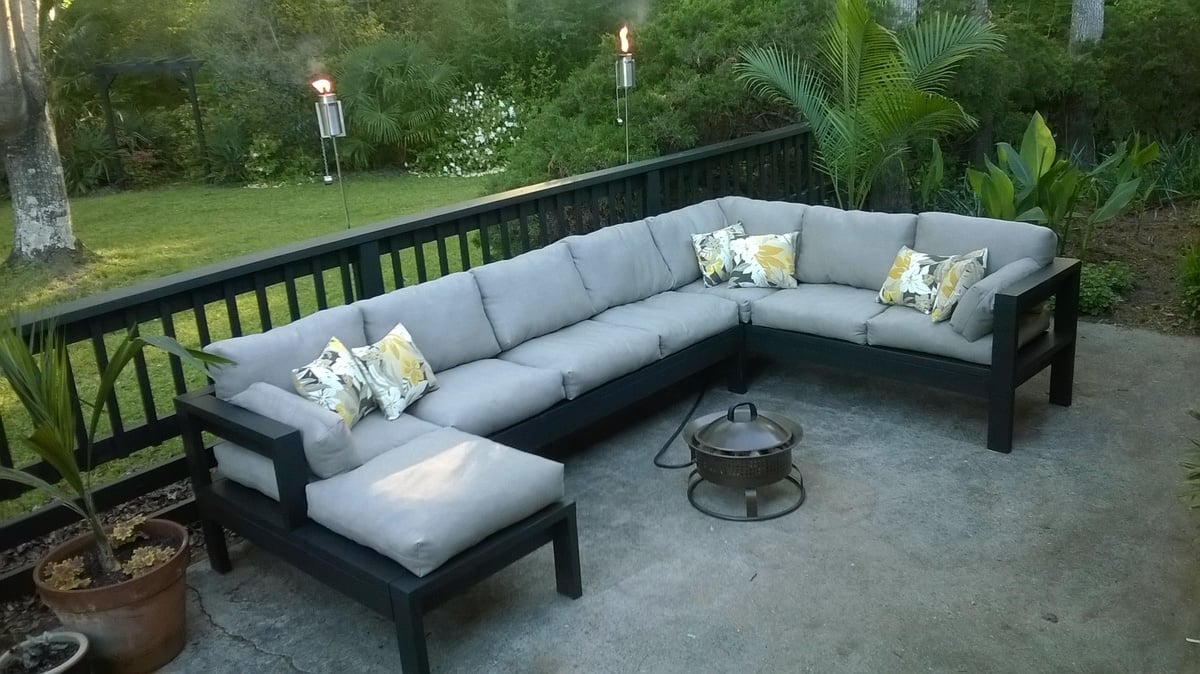
I modified the plans slightly, reducing the overall seating depth by 1.5" so I could use 8' lumber with minimal waste, and make 2 cushions out of one 54" width of fabric. I also tweaked the design to make a chaise lounge on one side. I used bargain priced sunbrella fabric (has a few imperfections) and recycled soda bottle fill for the cushions to keep cost lower. Building the wooden part was quick and easy (took an afternoon including two trips to the store), but this was my first sewing project so the total project time reflects my learning curve making and stuffing cushions.
Built from Plan(s)
Estimated Cost
Just under $300 total.
The lumber cost was less than $100. It was my first sewing project, so I was surprised that the cushion stuffing was the most expensive element of the whole project. If you can find cheap pillows, the plans are easily modified to fit their dimensions.
The lumber cost was less than $100. It was my first sewing project, so I was surprised that the cushion stuffing was the most expensive element of the whole project. If you can find cheap pillows, the plans are easily modified to fit their dimensions.
Estimated Time Investment
Week Long Project (20 Hours or More)
Finish Used
behr weatherproofing solid color, slate.
A narrow roller was a life saver in getting between all of the boards on the seat.
A narrow roller was a life saver in getting between all of the boards on the seat.
Recommended Skill Level
Beginner
Comments
Tue, 04/05/2016 - 06:45
You are amazing!
This looks like a very lovely place to relax, can't believe that was your first sewing project!
Wed, 04/06/2016 - 06:34
This looks really great! You
This looks really great! You have inspired me to stop procrastinating and get started on our outdoor sectional. Every time I think about doing it the building part seems fun but, I'm overwhelmed by the task/cost of the cushions. I'm interested in learning more about the fill you used. Where did you find it and what was the approximate cost? Thanks and great work!
Wed, 06/29/2016 - 20:25
Whoops - sorry about that.
Whoops - sorry about that. This looks amazing, and the detail on the fabric is quite fantastic. I have been wanting to replace some old furniture that is falling apart, and this would really be a wonderful addition to the outdoor space. Kudos on the great work.
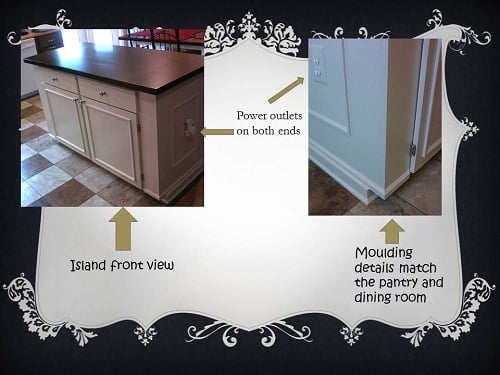
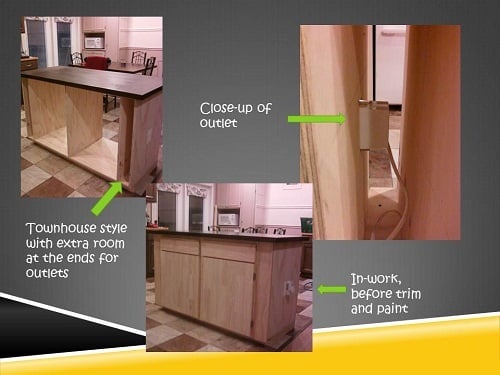
Kitchen Island with Farmhouse Table Top
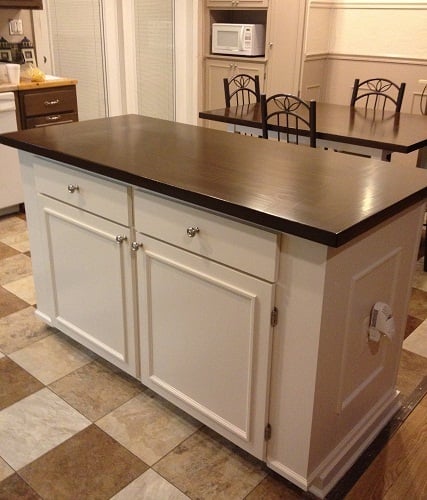
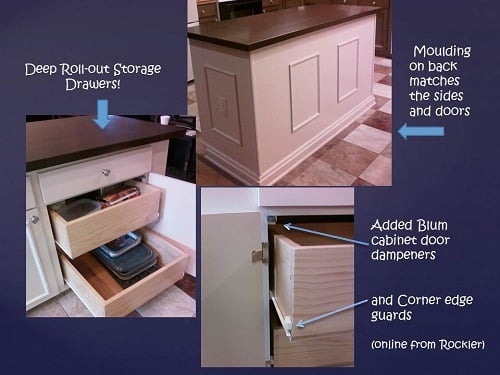
I’ve wanted a new island for awhile but wasn’t quite sure what I wanted it to look like, until I saw Ana’s cabinet plans for the Momplex kitchen! We wanted a fairly large island, so we did two 24” base cabinets “townhouse style” (from Ana’s Kitchen Cabinet Base 101 post) plus we added a little extra space at both ends, so Hubby could install some electrical outlets and we’d still have plenty of room for the drawers. The old island had power already, so he got the outlets wired pretty fast. Behind the doors are some deep pull-out drawers to hold all the stuff you’d usually have to bend down and reach for. Now it’s so convenient! I built a Farmhouse Table top for it and love it! We built flat doors and trimmed them up to match the island sides and back (also matches our pantry and dining room). This project took us about 40 hours to build and finish, and it was so worth it! Ana, you are a rockstar in our house! We now have a real showpiece for our kitchen, thanks to Ana White!

Built from Plan(s)
Estimated Cost
$550
Estimated Time Investment
Week Long Project (20 Hours or More)
Finish Used
Cabinet: 3 coats of Ace Royal semi gloss in Crushed Peanut, sanded between coats. Top: 2 coats Minwax Color Express in Walnut (1st coat brushed on, 2nd coat rubbed on), plus 3 coats of Minwax Oil Modified Water Based Polyurethane in Satin (sanded between coats); and on the drawer boxes, 2 coats of Minwax Polycrylic in clear satin (the clear water base poly doesn’t add any color to the natural pine)
Recommended Skill Level
Intermediate
Comments
Fri, 03/30/2012 - 21:14
Absolutely stunning! I'm in
Absolutely stunning! I'm in the process (sooo sooo close to being done) of making a banquette seating area with the creamy colored drawer base and the top stained in walnut. I put the same half round trim on my drawer fronts too. I saw a vanity on display at Lowes with this detail and had to copy it. I love the look! I am also building a trestle table from plans from www.thisoldhouse.com to match. I bought some beautiful matching chairs from Target.com. I can't wait to get it finished. I'm about to go paint the drawers right now. The table components were just primed 15 minutes ago. :-)


Sat, 03/31/2012 - 08:04
Thank you!
Brigitte and Pam, thank you very much for the nice comments! :) I'm having a ball building projects from this site. This is our favorite one so far (we say that every time haha). I have to smile and run my hand across the top whenever I walk past it - I guess when the novelty wears off I'll stop doing that :) Now I'm ready to add those door dampeners to all the cabinet doors in my house (so cool not hearing a slam when you shut them). Brigitte, your project sounds beautiful, can't wait to see the pictures of it!
Sat, 03/31/2012 - 18:57
This is beautiful!
Absolutely gorgeous! I really love the colors. I've never tried the color express stain - and I have to try it now! The top is so seamless. Love it!
Sun, 04/01/2012 - 05:33
Thank you!
Mebohn, thanks very much for the nice comment! You'll love the color express when you try it. Walnut is my favorite and I've used it for lots of projects. I like brushing it on to get a nice dark first coat, and then on this one, rubbed on a 2nd coat (needed to wait an extra hour for the first coat to dry). I used lots of wood glue and Kreg screws to assemble this top (it's 5 pieces of 1x10, 3 across and 1 at each end) and then added 1x4 underneath (around the edges and across the center for attaching) to make it 1 1/2 inches thick. Then a whole lot of sanding :)

Sat, 05/26/2012 - 06:46
Thank you!
Mariah, Thanks very much for the nice comment! I'm really happy with how this turned out. Now I want to re-do all my kitchen cabinets with Ana's plans. :) PS -- I saw your jugsaw puzzle table this morning on the brag board -- super creative!!
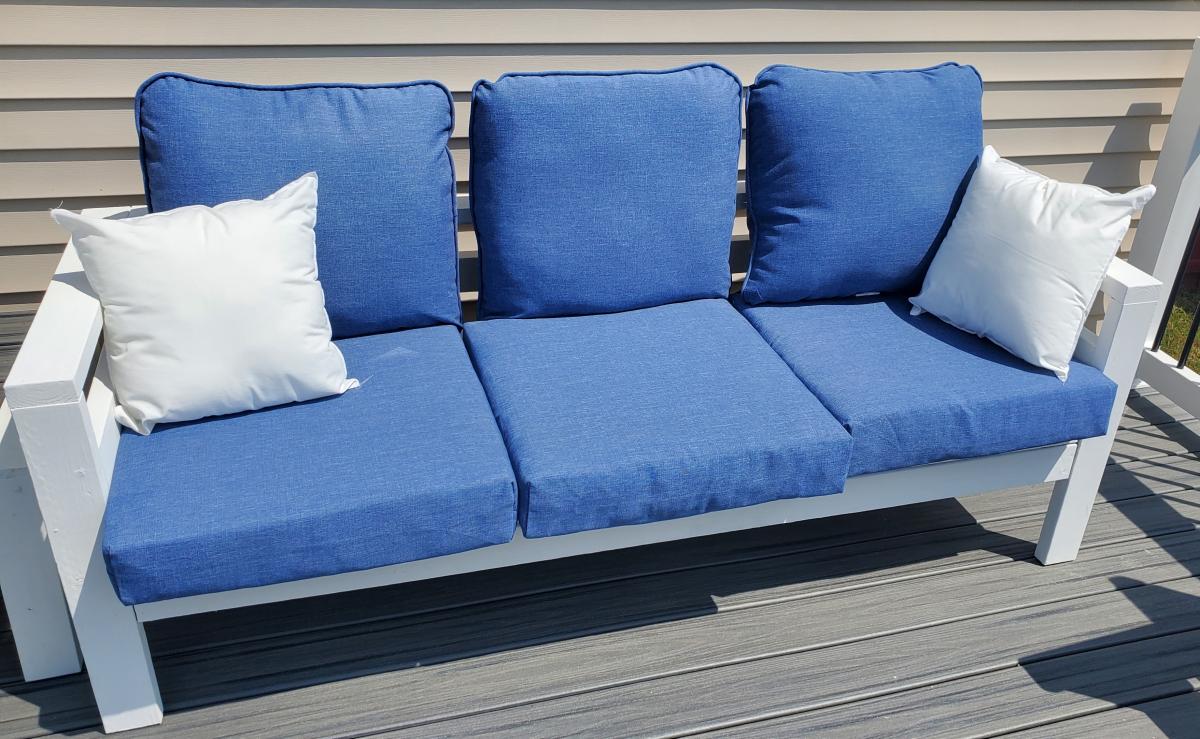
Outdoor Sofa and Table
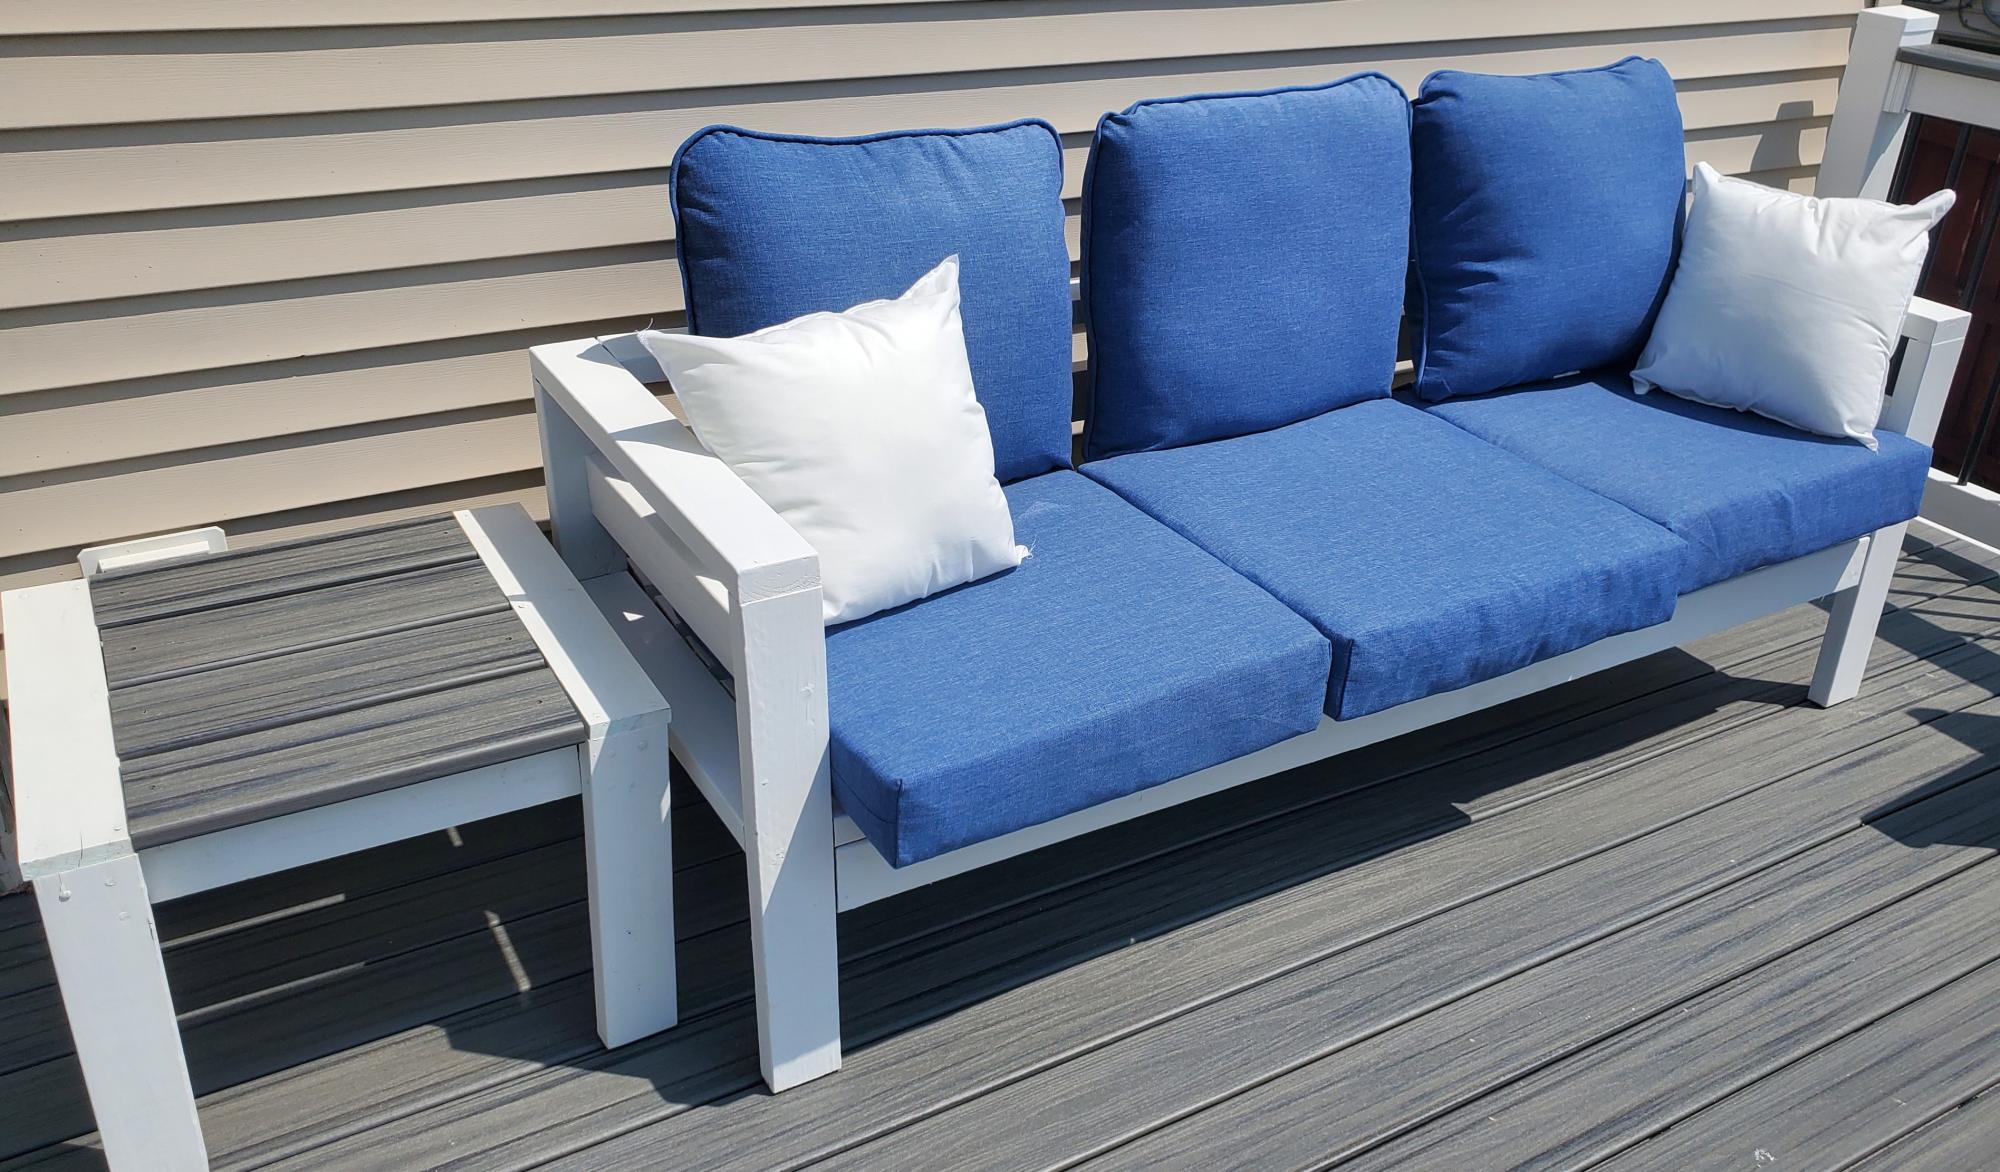
Deck sofa from a Ryobi/Ana video a few years ago. End table is also from Ana's plan using leftover Trex decking. Special thanks to Jen for her assistance.
Built from Plan(s)
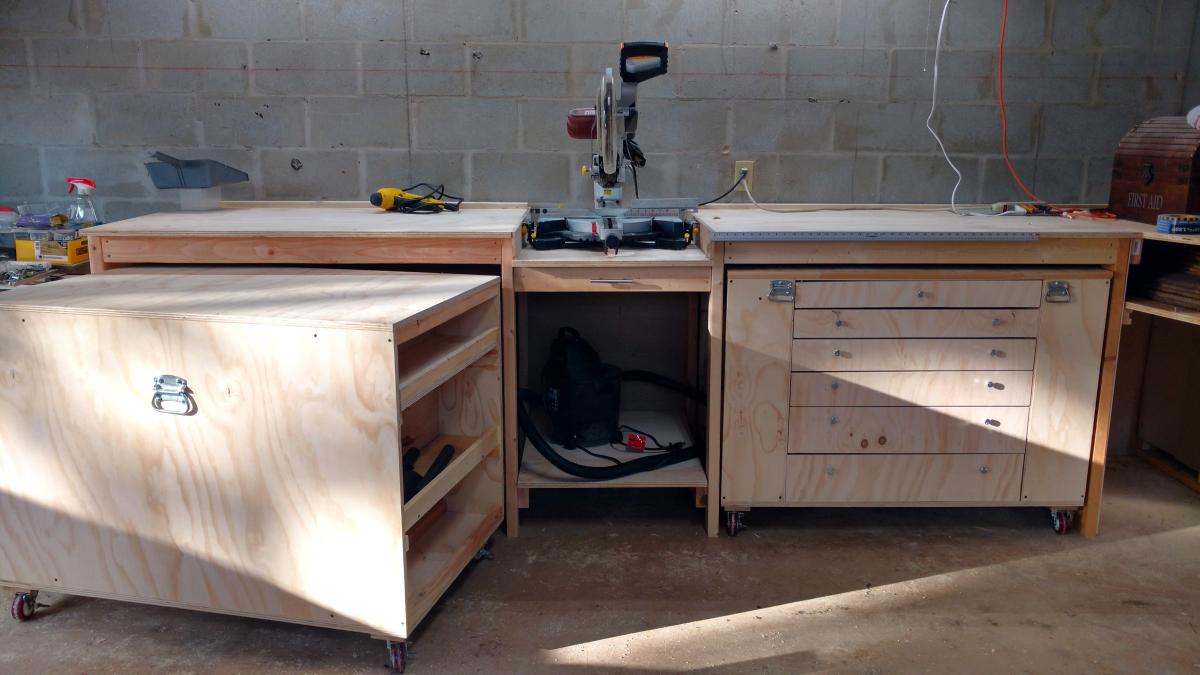
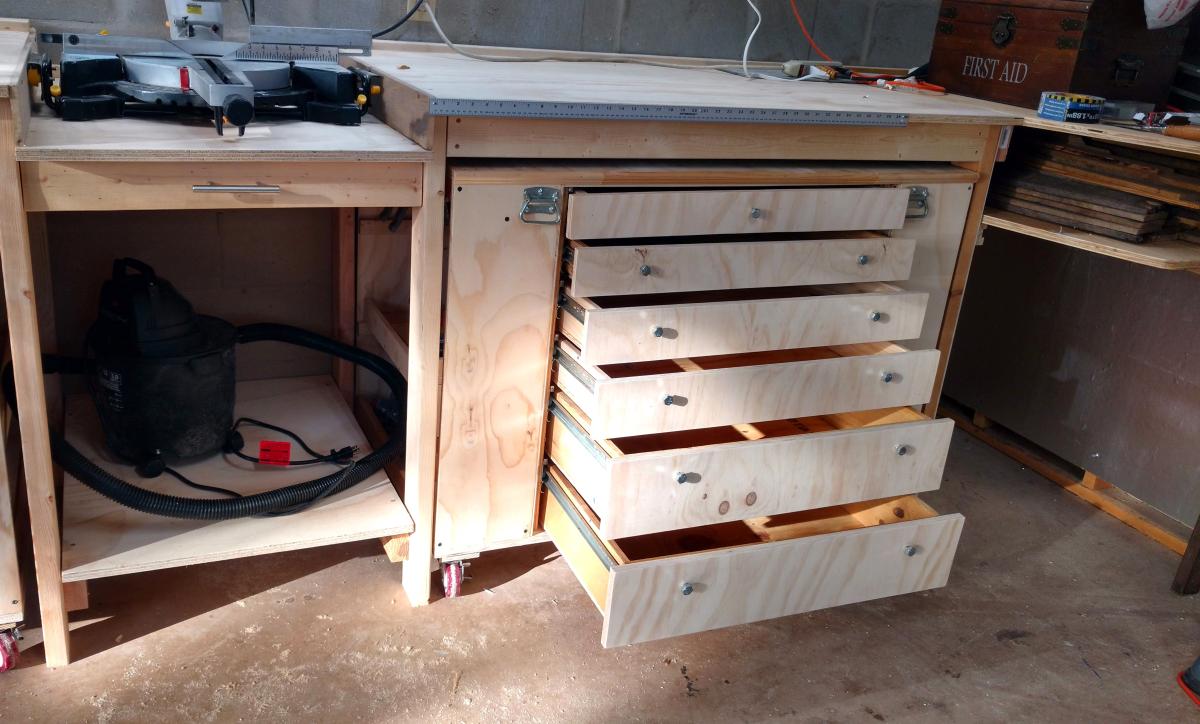
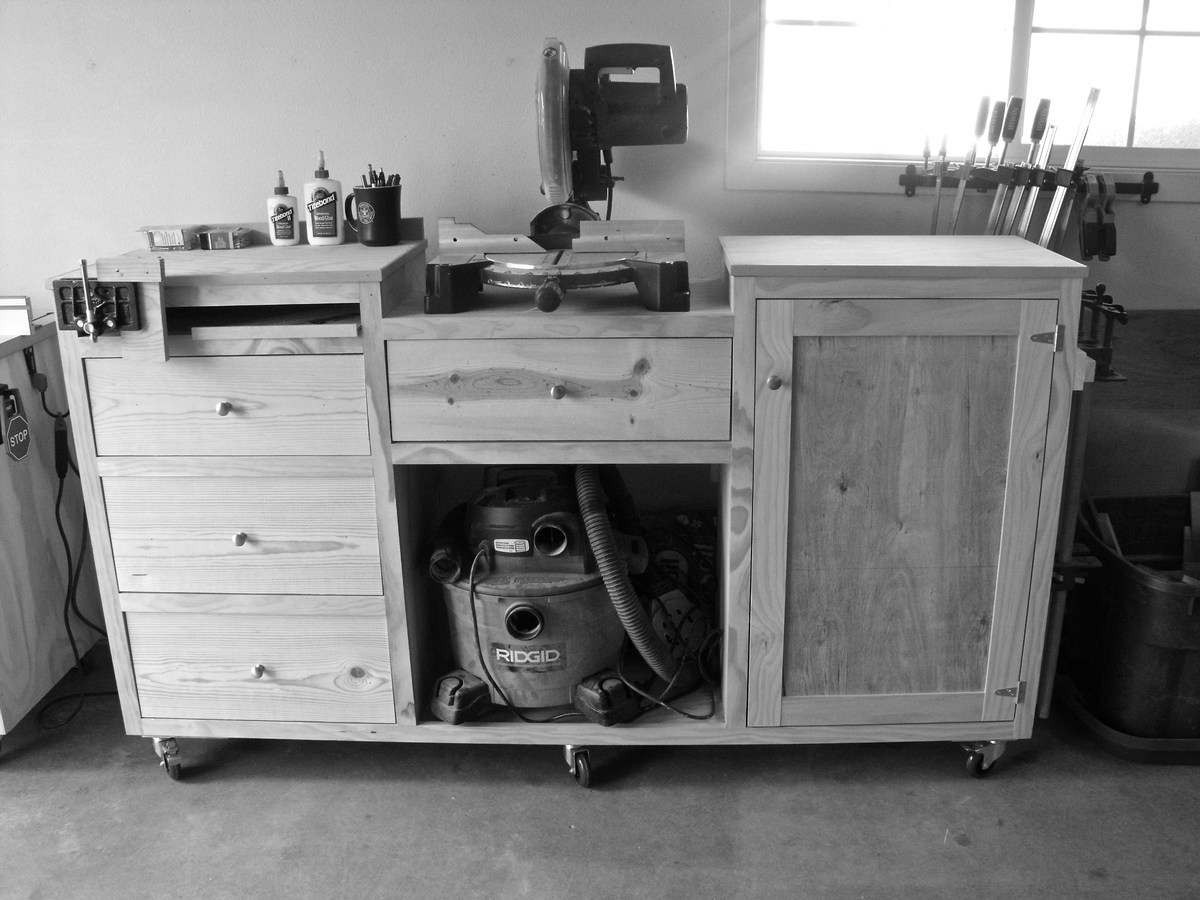
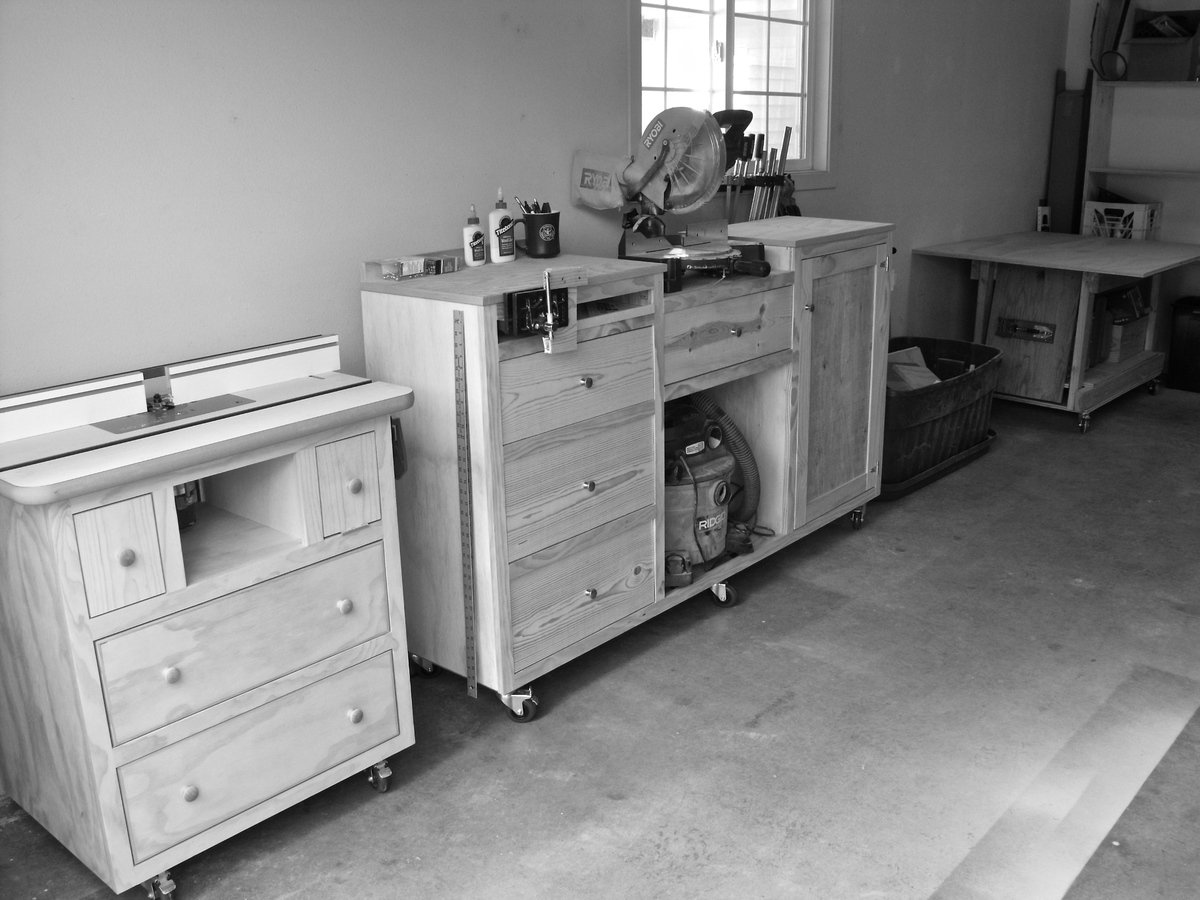
Wood Shop Storage Solutions...
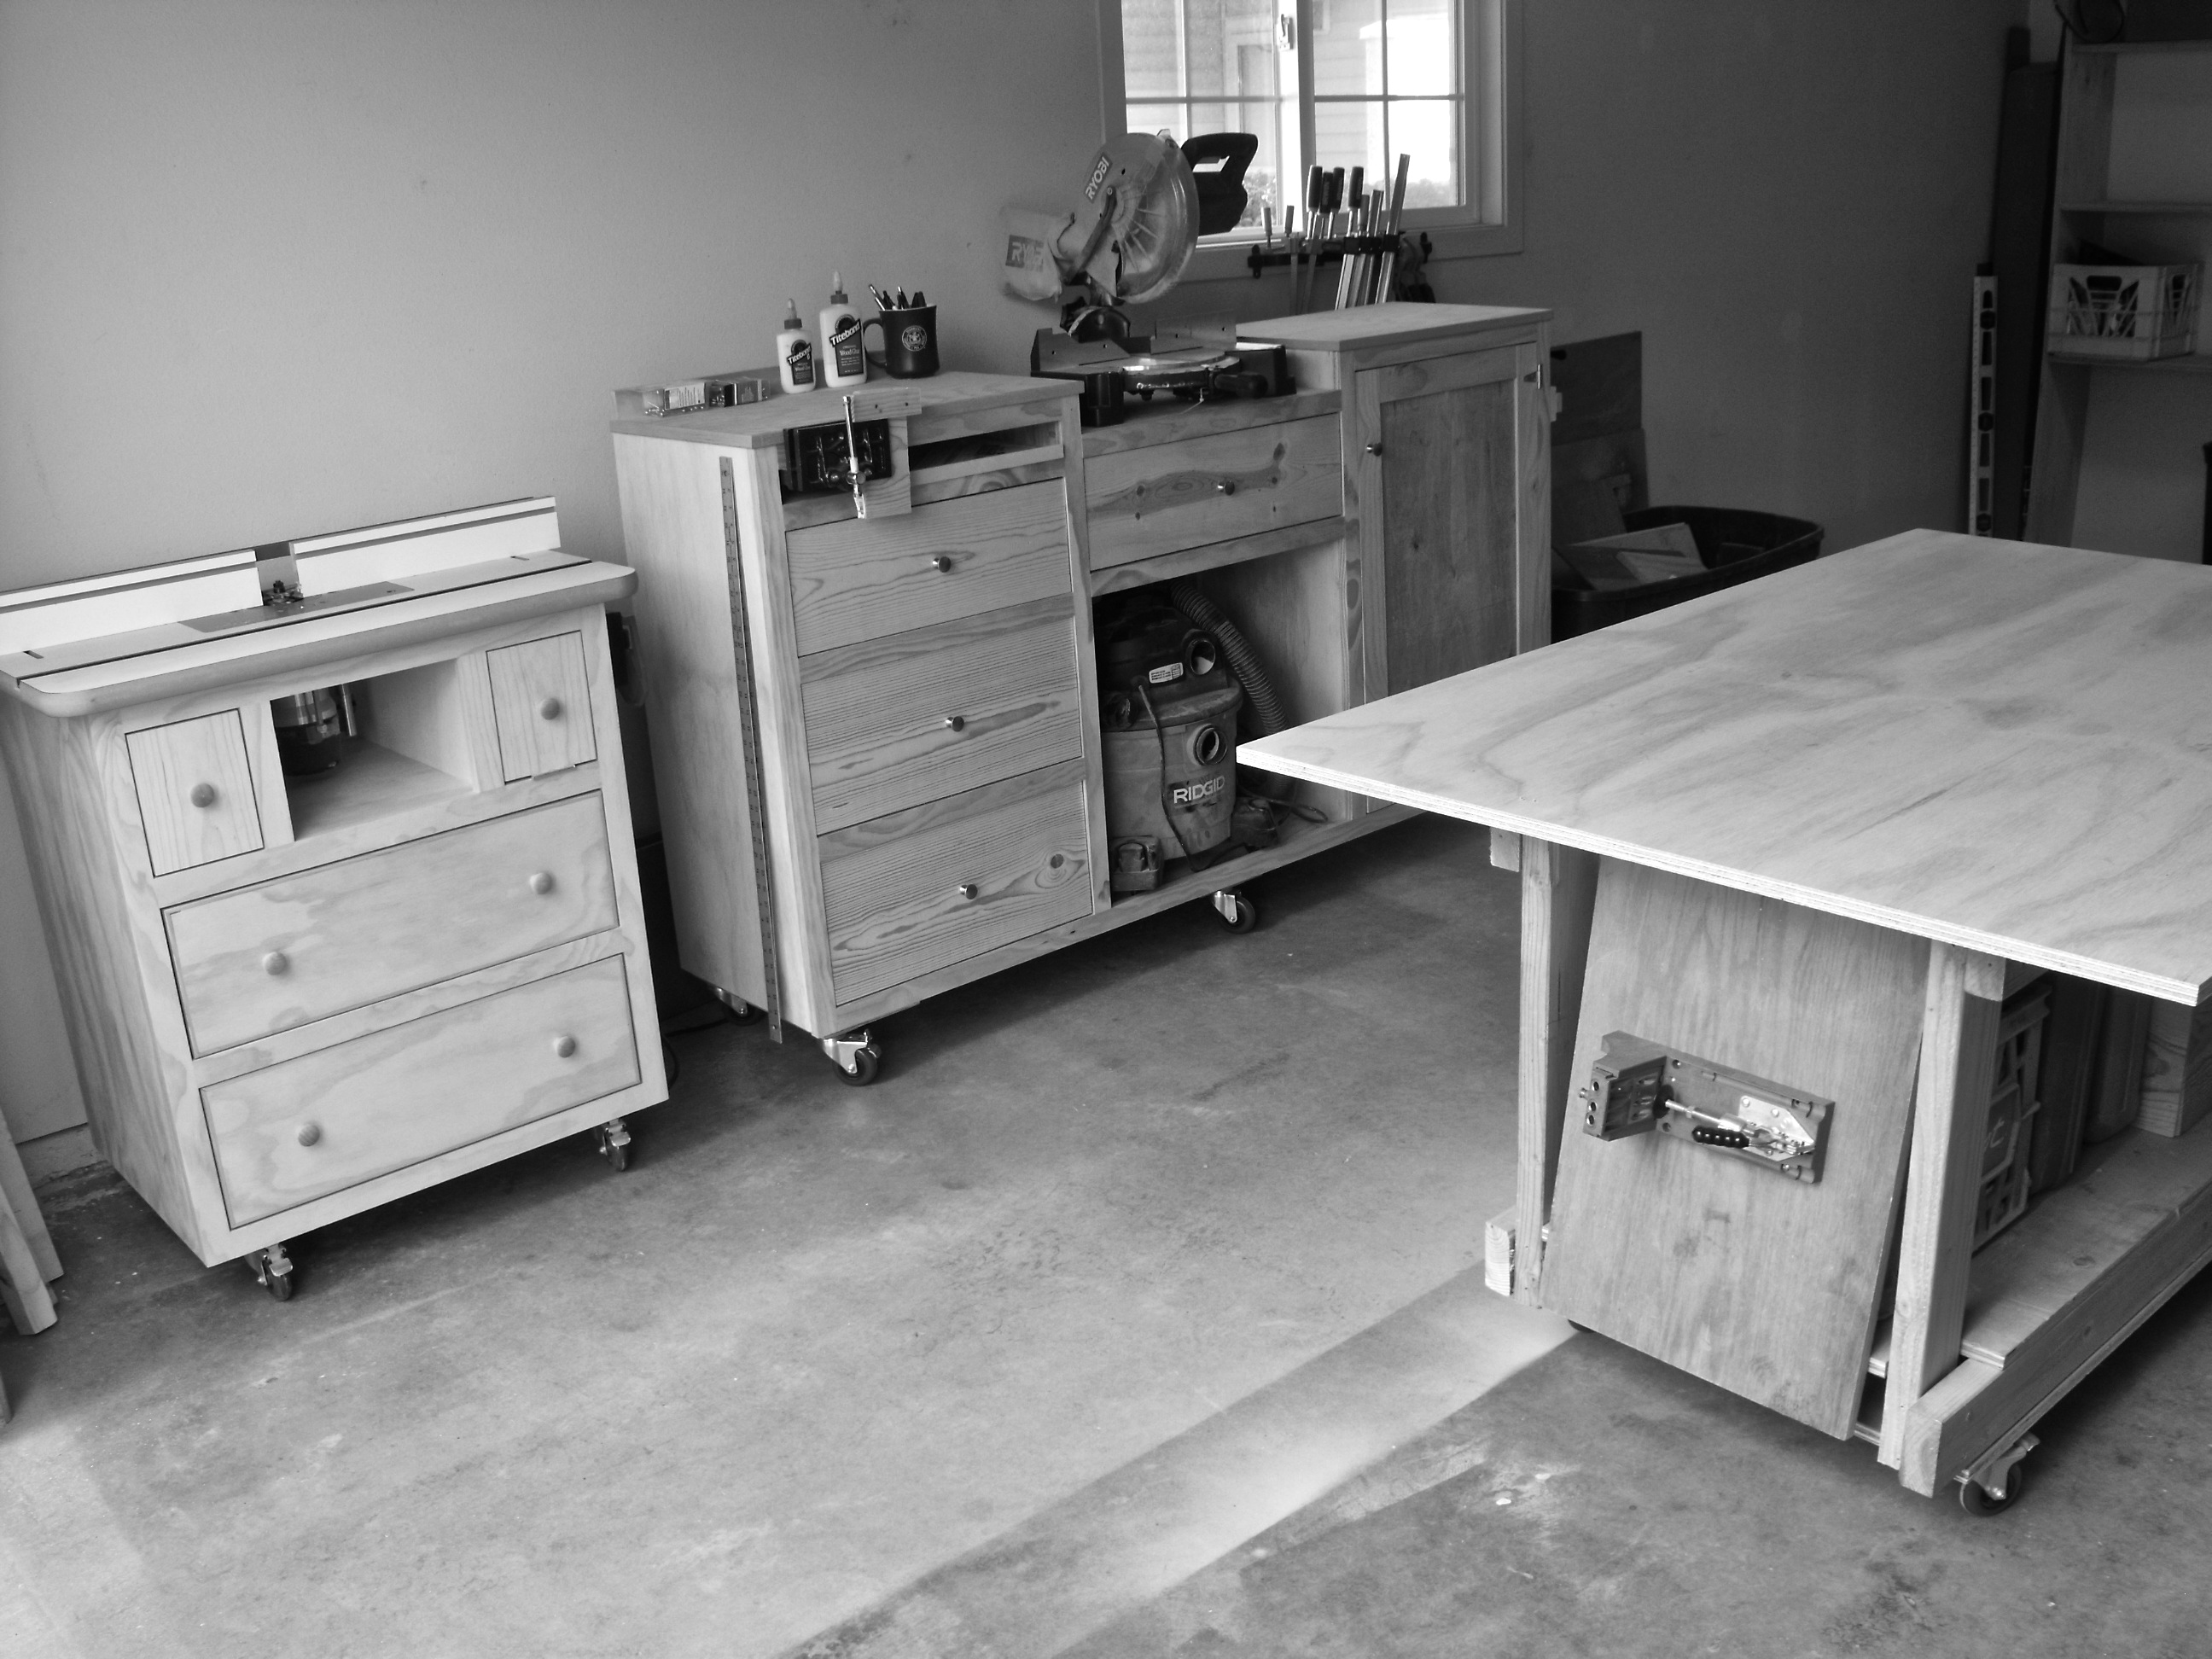
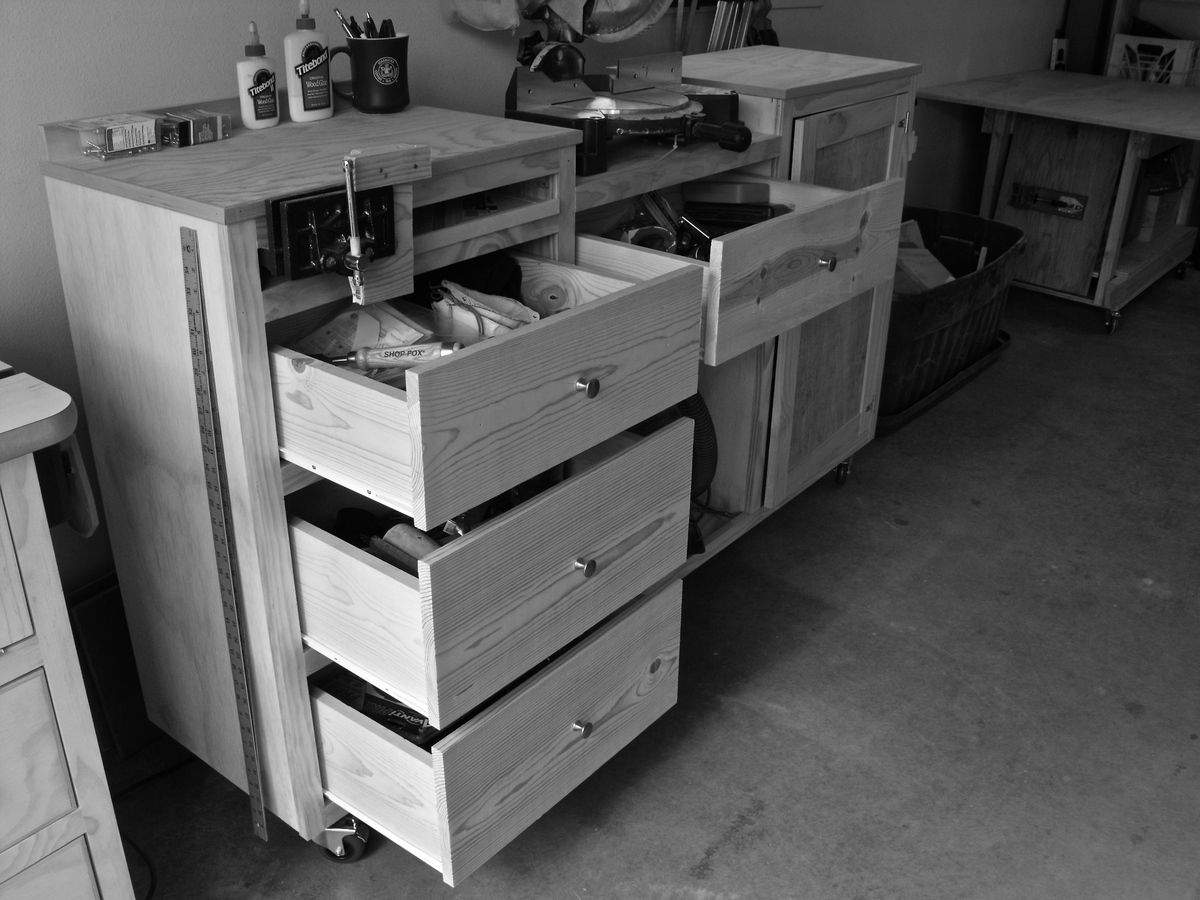
It seems like organization is always a work in progress especially in my one car garage shop. Honestly it took years to realize what I needed to customize my space in order to organize things. I've built bulky work benches out of 2x4s and plywood. I've rearranged the work space over and over again over the last few years and finally came up with my own system
The miter station is a life saver. I had one of the fancy ones with the foldable wings but didn't like it. The object of it was to be able to fold the wings down for storage but I never did and it caused other space saving problems. Now I can easily store all of my small tools and woodworking knick knacks all in one spot. You can find plans for these if you google miter station, but take my advice and custom make one that fits all of your needs. There's a spot for my vice and speed square too. Things like that make it count.
The router table is probably my favorite tool in the shop. You can do so many things with the router table. I started out with just a top and a base and worked from there. Now everything router is in the cabinet ready to go.
Everything is on wheels. Us military guys and gals have to move around a lot so we have to plan for that. Now everything can just roll up the ramp and in to the truck.
Take some time and think about the efficiency of your shop space. How does everything flow? Or do you even flow at all? I used to woodwork myself in to a bunch of brick walls and now I don't.
Thanks for checking it out
Patrick


Estimated Cost
a lot hah
Recommended Skill Level
Intermediate
Comments

Fri, 04/06/2012 - 22:05
wow. This is very impressive.
wow. This is very impressive. I love how tall the pieces are so you don't have to bend down, I'm always working with my tools on the ground and it is a pain.
I covet your router table.
And the miter station is awesome. I just may copy that! I love how it houses all of your other tools as well. OMG! It even holds your shop vac, and has a handy ledge for pipe clamps?! I would love a simple plan.
I'm really curious about your kreg jig setup on that work table too.... details please.
Well Done!
Sat, 04/07/2012 - 09:20
Ahh The Ground
You've got to get up off the ground. I did that for a looooong time and my back suffered big time.
The kreg jig is mounted to a piece of plywood. Then I drilled 2 holes in the top corners and hung them on the side of the work table.
The miter station has to be custom made for your shop needs but planning it out is very important. I needed a spot for my vice and a quick spot for my speed square. So I calculated all the space needed for 3 drawers and then just added a few inches. Also measure how high your saw sits and recess your work surface exactly that amount.
Grizzly tools has a good deal on simple router table set ups right now. I'd check that out. Eventually the miter saw will be hooked up to the shop vac. I bought an outlet that automatically turns the vacuum on when I use the saw.
It's just like the other stuff. Start with the face frame and the rest will come to you.
Patrick

Sat, 04/07/2012 - 11:49
Alternate plans
If working without plans makes you twitch, Startwoodworking.com, Fine Woodworking and Popular Woodworking usually all have plans for shop furniture like this. There are enough variations over the years that you can usually find the features you're looking for if you do some mixing and matching. I know there was a very nice router table plan last year.
For the record, I work more like Patrick unless what I'm building gets complex.
Sun, 04/08/2012 - 00:25
Me too! i always seem to get
Me too! i always seem to get inspired by a plan, and by the end of the project, it's totally different than the original because of all of the adjustments I make. I have never even considered building shop furniture before, these photos are inspiring!
Thanks Clay for the link, I will have to go burn some time on that site as well. Someday (when I don't have a leaky garage) I will have a shop worthy of such beautiful equipment.
Great Job again, Patrick!

Sun, 04/08/2012 - 04:06
Impressive
Really nice job on these and oh so practical! And Patrick, thanx for serving!

Sun, 04/15/2012 - 14:24
AMAZING
Uh, this is amazing. Good thing I can tell your shop vac and scraps bin have DUST on them, or I think you might be lying about this somewhere you actually work :) ! I just got around to finishing my work space table. I am planning on doing some major organizing before the heat of the summer hits, and then maybe a router table like this might make it to the top of my list.
Mon, 06/11/2012 - 19:56
Sheer inspiration!
Patrick, with the recent release of your Farmhouse Table, I find myself watching it over and over and my jaw is always on the floor by the end. In a way, the flow and the craftsmanship is intoxicating. My family is in the process of moving to a new home and I am mostly looking forward to organizing the garage space. I need a man cave and it needs a miter saw station and a router table.
Did you construct it all with pocket holes? What material is the majority of the carcasses, face frames and drawer fronts?
Thanks for the excellent pictures and marvelous video!
Scott
In reply to Sheer inspiration! by Scott Kershaw (not verified)
Mon, 06/11/2012 - 22:54
Thanks Scott
The materials are just standard pine boards from Home Depot. White pine for the face frames and drawers and 3/4 pine plywood for the cabinets. I'm glad you like the video and I really appreciate the nice words. We have some new stuff coming up, so be checking back for the router table plan.
Patrick
Tue, 06/12/2012 - 18:36
Thank you, Patrick!
Do you use a table saw for any of your projects? What would you estimate the cost of the miter saw station, alone, to be? For some odd reason, nice 3/4" birch plywood is the same cost as 3/4" pine/fir plywood here is Missoula, MT. An 8' x 4' sheet goes for ~$45. Is your switch for the vacuum the Rockler product like in this video: http://www.youtube.com/watch?v=7LmSVvOnxsI ? Sorry for all the questions. Your station is by far the closest to the what my mind has been imagining and what my garage could handle. Thanks!
In reply to Thank you, Patrick! by Scott Kershaw
Tue, 06/12/2012 - 20:18
Scott
I just bought a used Grizzly table saw. It's pretty new to me so I'm all excited about learning on it. For the most part I used a circular saw with a straight edge. Now that I have a table saw, all that should go a lot faster. The switch is very similar to that one, but I bought it from sears a few years back. The miter station is hard to make plans for. Every miter saw is different so the platforms need to be different sizes to match whatever saw you're using. Then you have to keep in mind the size of your shop vac and design it around that as well.
Wed, 06/13/2012 - 05:31
Used Table Saws
Table saws are something that can last fifty years or more without any trouble, so you can get them used pretty readily. You want to buy a good sturdy saw. Locally the used market is dominated by Craftsman/Sears saws. The saws made before 1962 were made by King-Seeley, a company local to me, and those are pretty good saws (I own one and really like it). The ones made after that were made by Emerson Electric, and the owners of those saws have not had such kind things to say about them.
In reply to Patrick what router table top by jlouki01
Tue, 03/12/2013 - 12:47
router table top
I got that table top at Rockler. It's been great so far.
Tue, 09/16/2014 - 06:30
Length of Miter Station?
Hi Patrick,
I am in the process of desinging a similar miter station, but am curious as to how long your's is? Some of the recommendations call for a full 8 ft long base, but not sure I have the space in my garage for something like that. What is the length of yours?
Thanks!
Thu, 06/02/2016 - 13:55
Miter Station
Hey Patrick. Thank you for providing so many plans to such beautiful pieces. I am about to start working on the router station this weekend. I can't wait to get started. The reason for the message, could you possibly provide the plans for the miter station you created. I am a new woodworker and I need plans to be able to create some of these pieces. I would love to have a garage of similar pieces. Is that something you could provide? I would be happy to purchase it from you. Thank you again for your hard work. - Justin
Tue, 12/12/2017 - 10:25
Mitre saw table
I would also be very interested in the plans for your saw table.
Corner TV stand
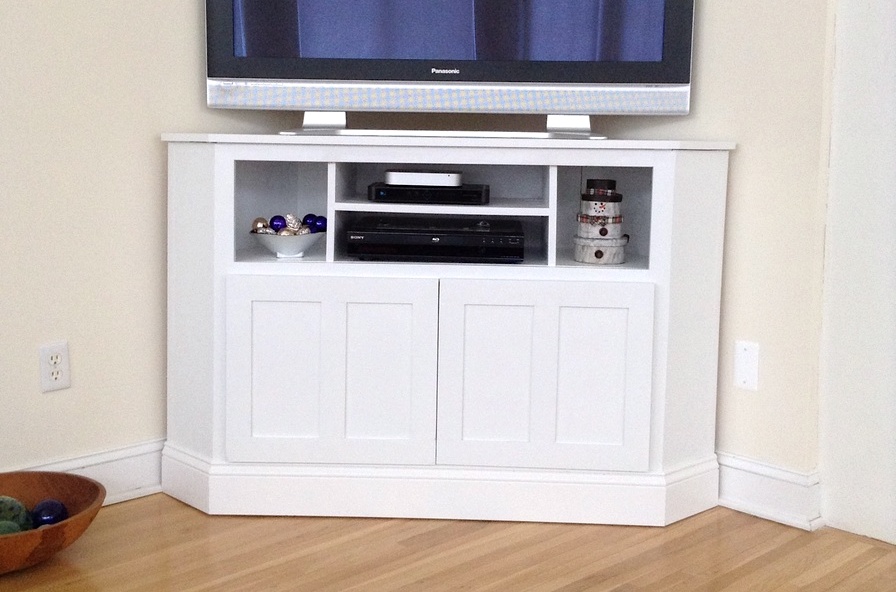
After a promise to get a new carpet and TV stand as an anniversary gift, I began a search for a corner stand that would fit a 50" flat screen and hid all of those ugly wires. Craig's List had nothing and the retail options were either cheaply made, ugly or crazy expensive. I stumbled upon Ann's page, and since my son has a wood shop in the basement, I figured why not try to build something. I used the original plan, but borrowed ideas from other brag posts to create a 36" tall model with overlay doors that we think looks great. Next project: bar stools for the kitchen island.
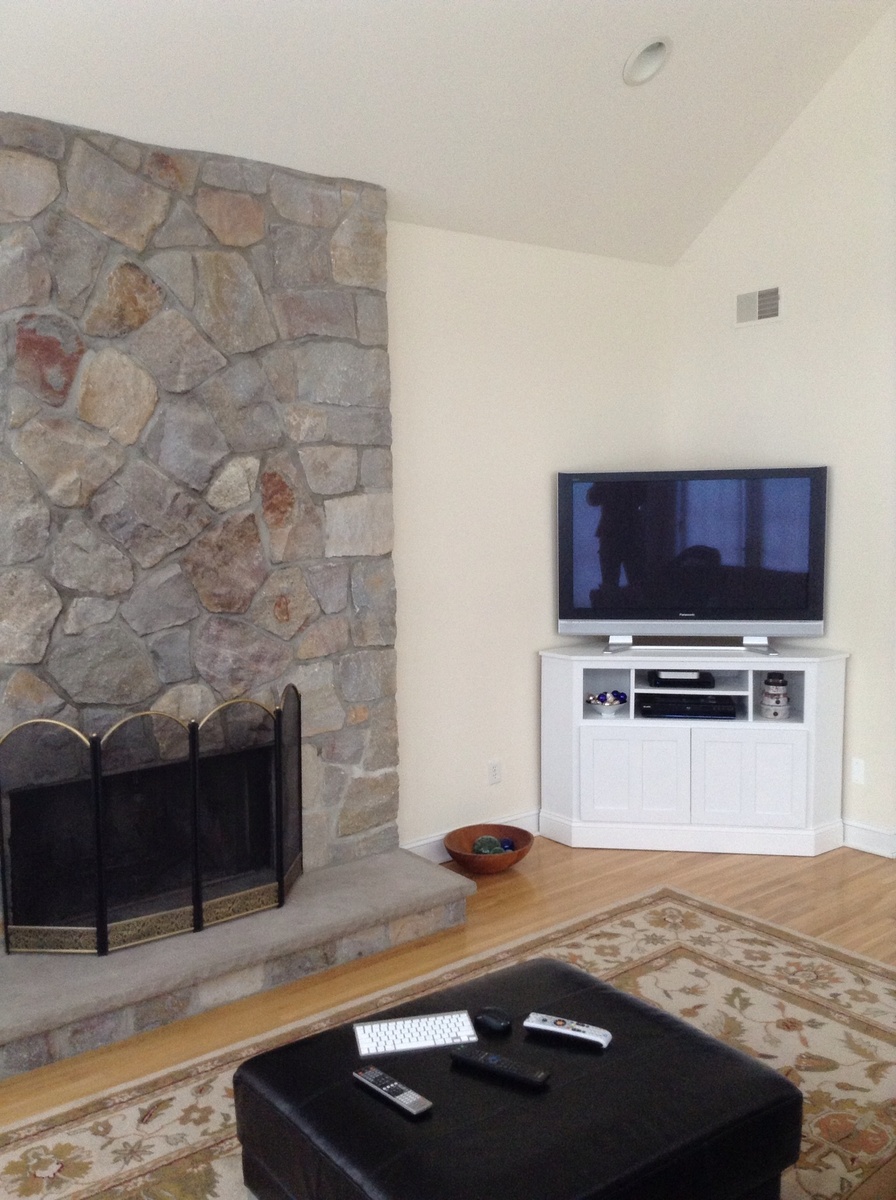
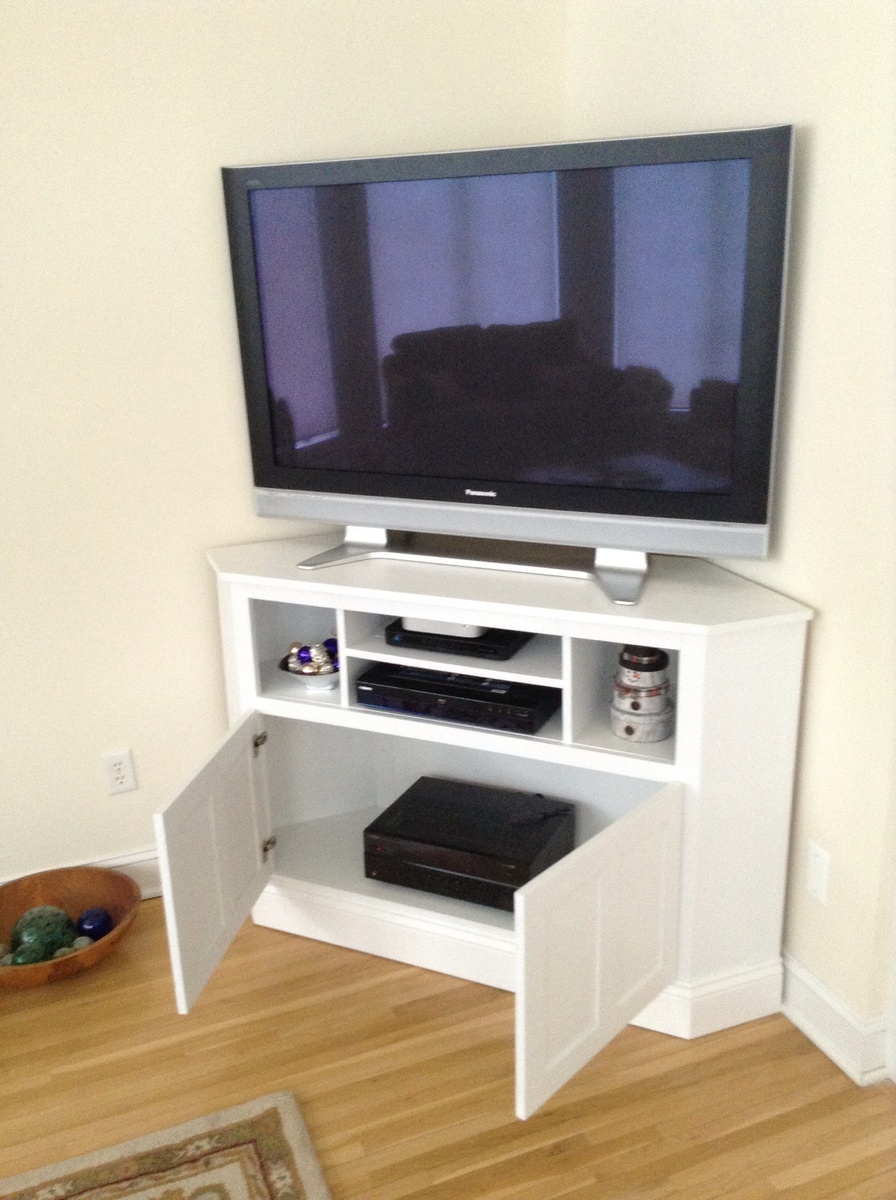
Built from Plan(s)
Estimated Cost
$200
Estimated Time Investment
Weekend Project (10-20 Hours)
Finish Used
Zinder Primer and Gidden (America's Finest) Semi Gloss
Recommended Skill Level
Intermediate
Washer Dryer Pedestals
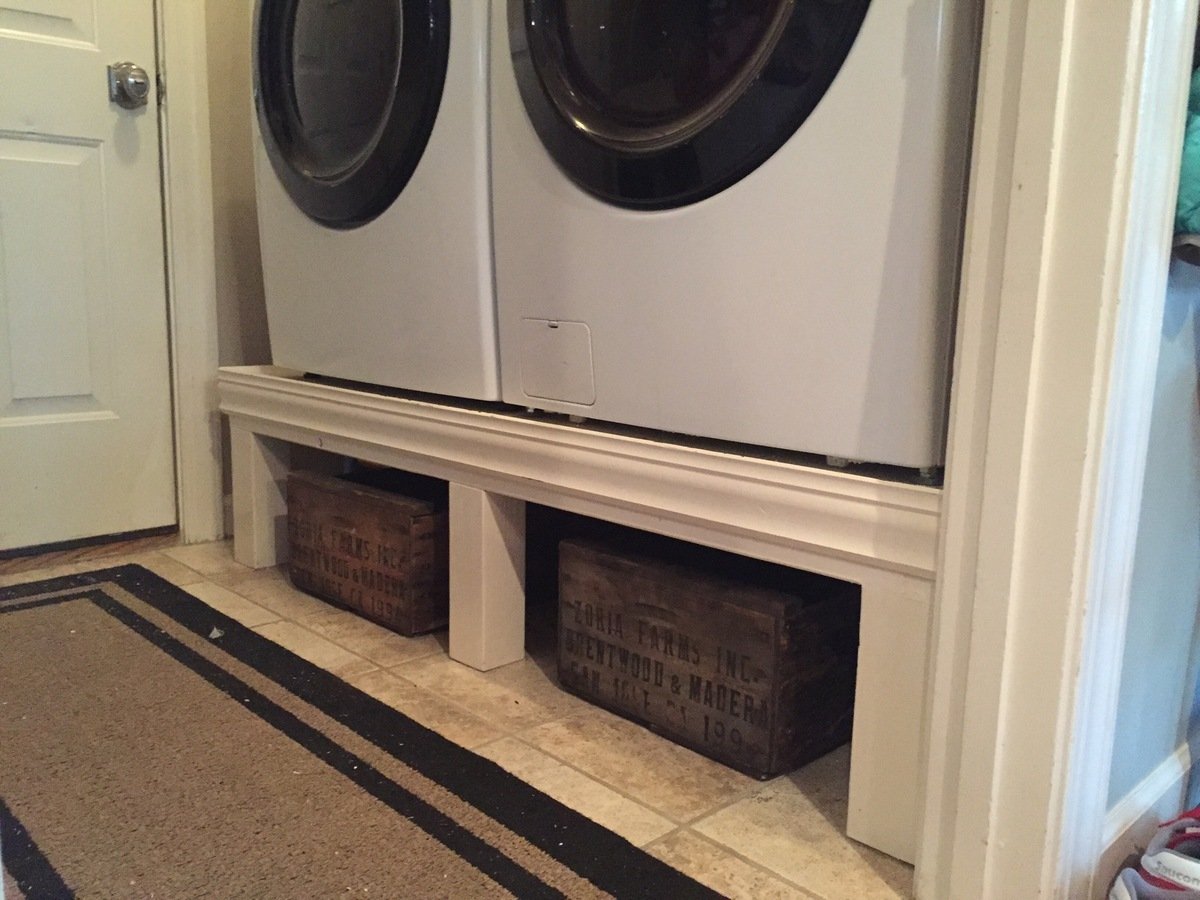
We have a very small laundry room and we wanted some additional room to put shoes when we walk in. We also couldn't have the pedestal be too tall or our washer and dryer would hit the shelves we put in over the laundry room. For this reason I modified the plans to remove the bottom and adjusted the height of the plans to just fit. I was worried about the stability, but made this super strong.
Built from Plan(s)
Estimated Time Investment
Weekend Project (10-20 Hours)
Recommended Skill Level
Intermediate
DIY Outdoor Table
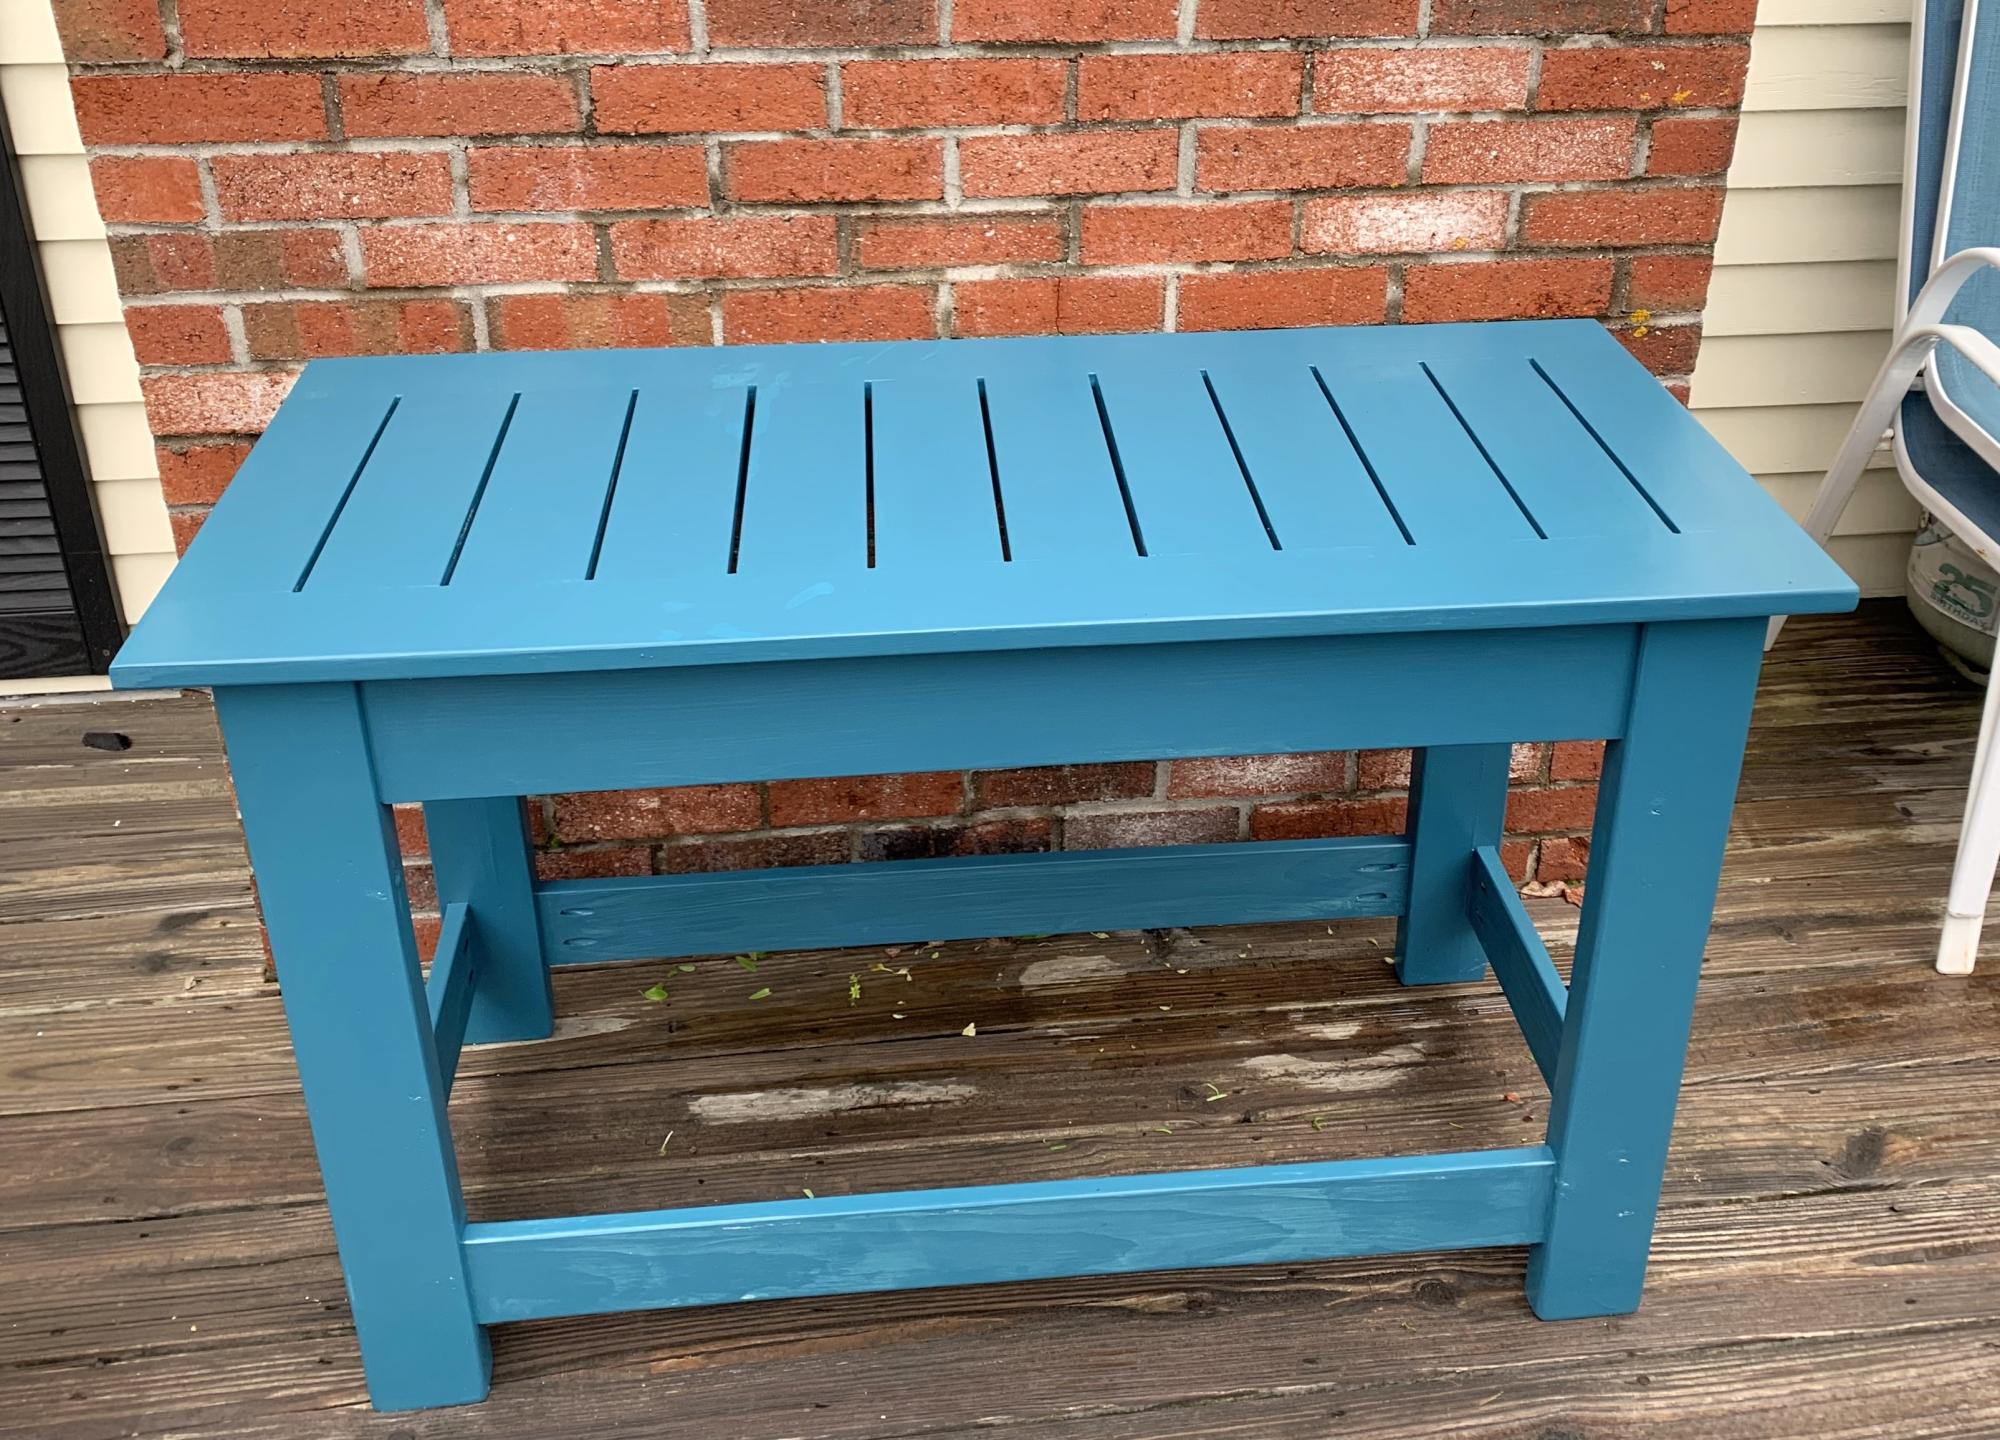
Parents wanted an outdoor table on the deck. They had scrap wood in the basement from when the house was built. Found the design from Ana White, inspired, and adapted it. It was a small project, but the success of this inspired me to get back into building furniture. It doesn't have to be complicated and the satisfaction of building something from materials that exist and working with what one has in terms of tools and skills is very satisfying.
new photo ledges - only a few months late!
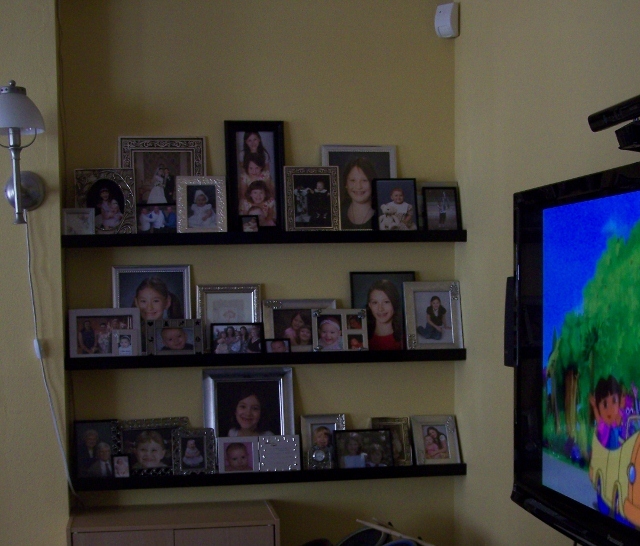
I know there are a hundred brag posts of the $10 ledges, and I have used them before (and posted them) but I am so happy with how these turned out!
Its too bad I don't have a good before picture, because the things I love most about these are the colors and the interchangability and it would be easier to explain with the before picture!
I have had pictures in cute matching frames on the one wall for years, but the frames were too light for the wall color, and the floor and furniture, so I needed to darken them up. Additionally, we got a black tv stand even though the floor and couches are dark brown. (TV is black, so it works) So I made the shelves black to pull that in. Then on the shelves closer to the tv, I used black and silver frames, and on the ones above the brown couch I painted all my light wood frames darker.
As for the interchangability, its a lot easier to pull the frames down and change the picture when you don't have to worry about how they look together - I can just move them around on the shelf. I've always had a hard time getting a "gallery" look just right - something will always hang lower than I want or whatever. So I finally got it perfect with one 10x13 of the kids together in the middle of 4 8x10s (one of each) and a few little ones to mix in. Then we had to go and have #5 and mess my whole system up! :)
So he's 16 months now and his picture is finally on the wall, and was taken last May - so sad..
But my other set of shelves has pictures of everybody - even me, yikes! I decided they look better full so I used all the frames I had, and got some cheap ones and thrift store frames and put them all together. "controlled chaos" just like the rest of the house/life!
Thanks Ana for giving me the confidence to know that I can make it myself, I never would have gone out and spent the money to buy matching frames, but knowing I could just do it myself I was able to get it done for cheap!
Built from Plan(s)
Estimated Cost
$50 including some new frames and paint
Estimated Time Investment
Afternoon Project (3-6 Hours)
Finish Used
black spray paint, brown spray paint on the frames, some silver too
Recommended Skill Level
Starter Project
Vanity Table
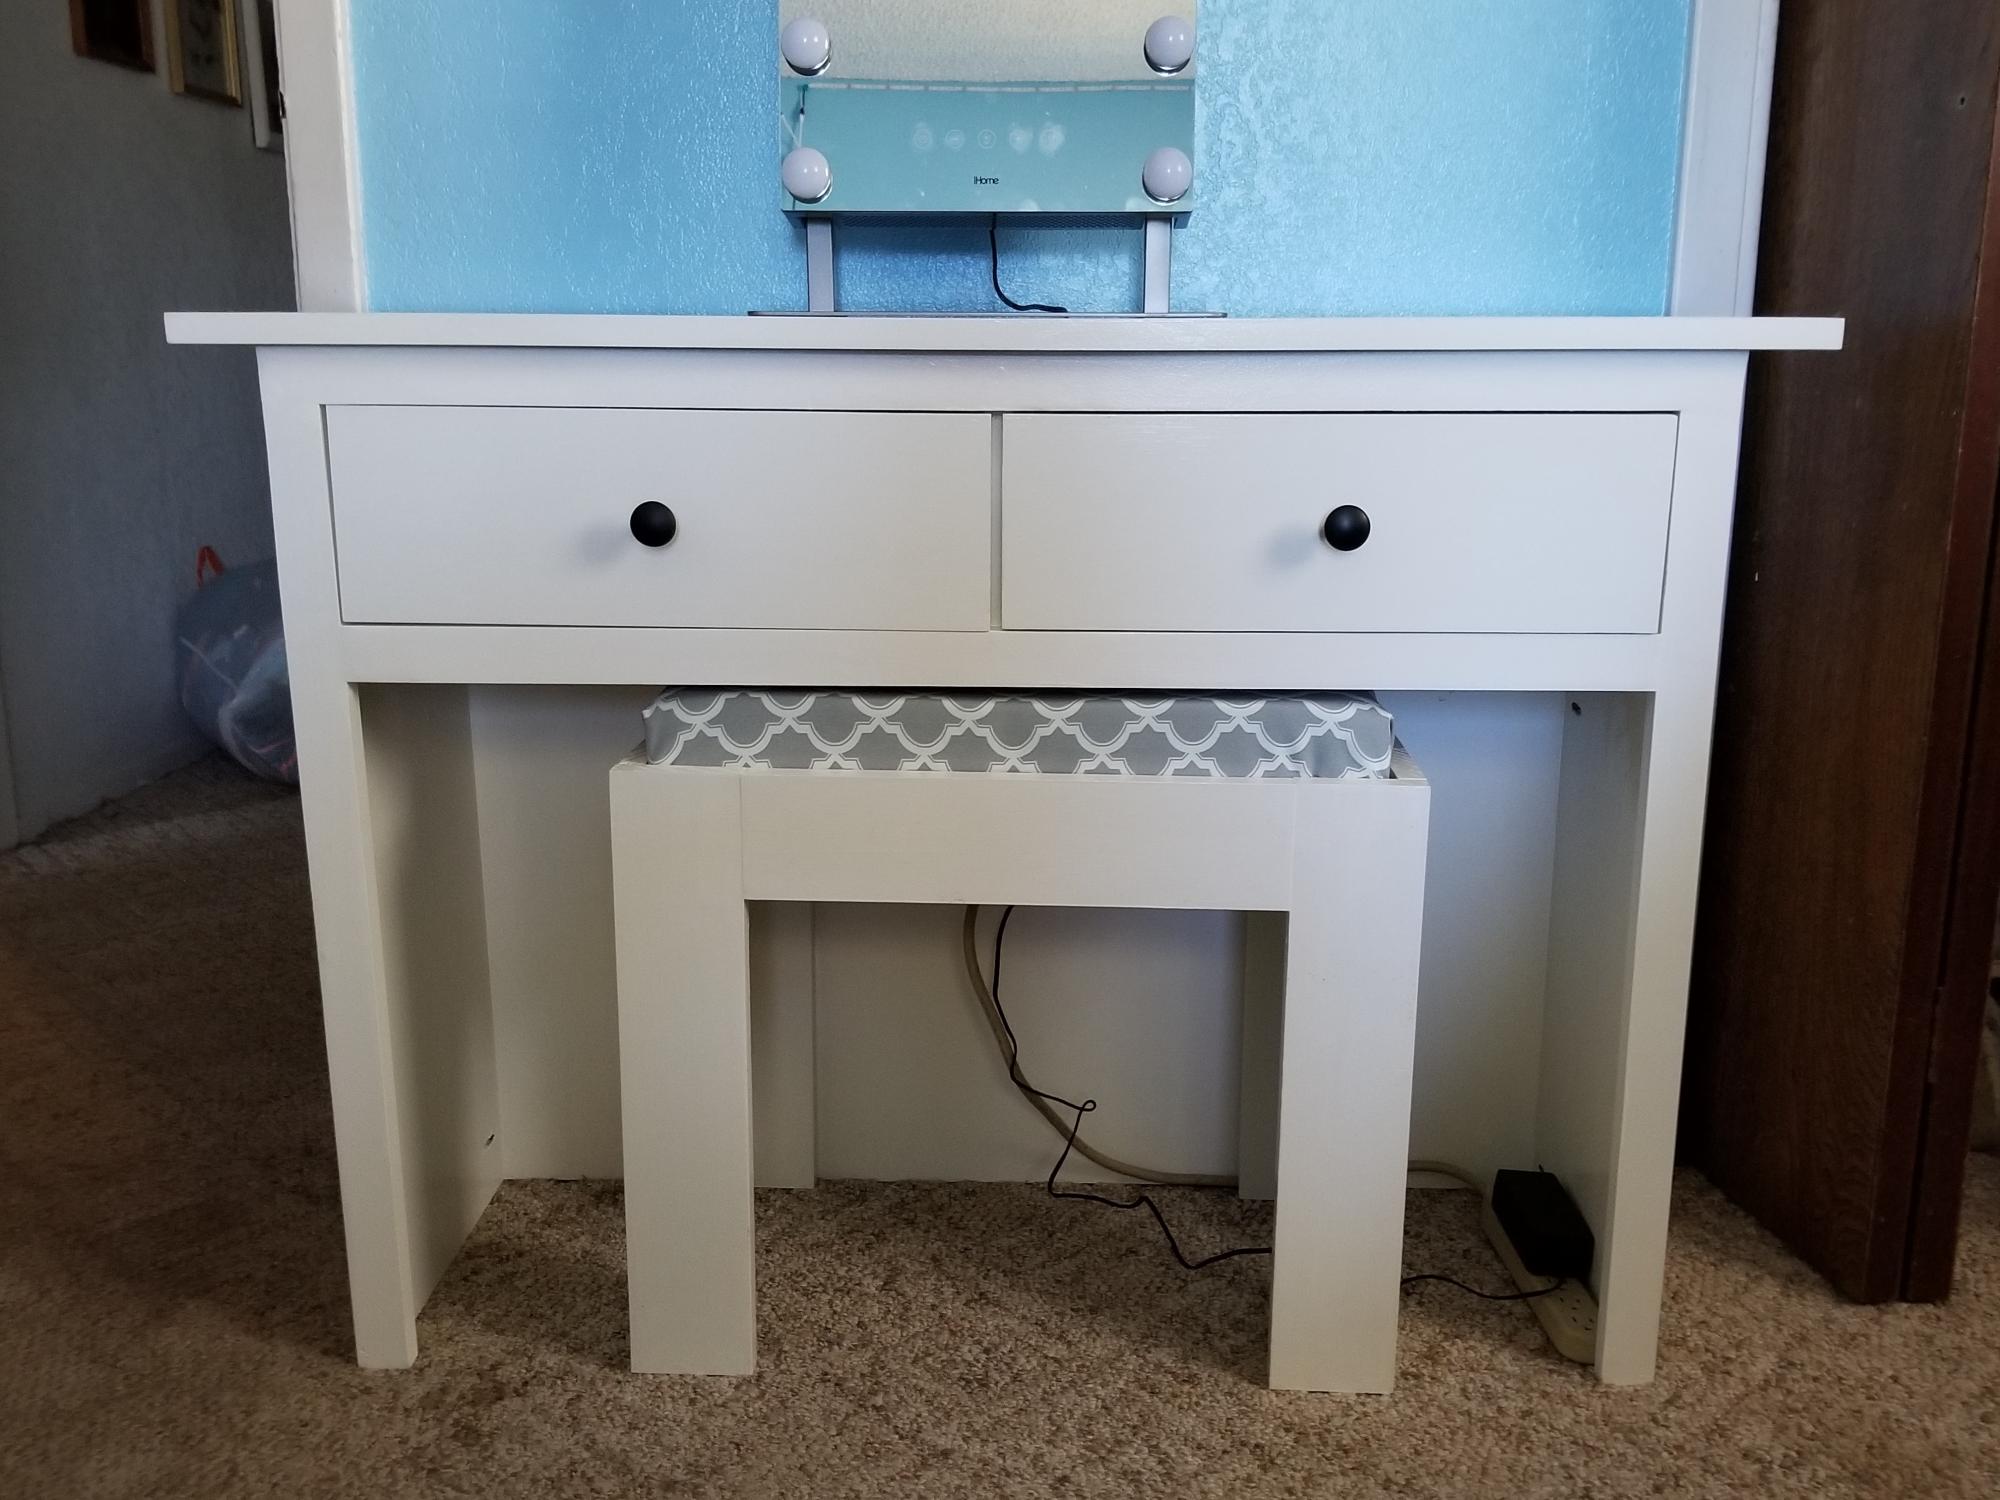
I started with the Cindy Wood Console Table but modified it. I wanted the center to be open so it could be used as a vanity table. I omitted steps 2 and 4 and altered step 3 so that the length of the centerpiece is only 8 3/4 long. I also omitted step 7. In step 8, I made the front-facing go all the way to the bottom, my cut was 27 5/8. All other steps were the same.
Since it is a vanity table, I also made a bench to go with it. I used 1X4 for the legs and side pieces. The total dimensions of the bench are 22 inches long, 12 1/2 inches wide and 18 inches tall. I had to buy an additional 10 feet of 1X4 to add this to my project. The cuts for the front and back of the bench are 14 7/8, the sides are 3 7/8 of 1X4. I used pocket holes to put the legs, font, back, and sides together. Because of using pocket screws, make sure to put the sides together first, then the front and back. I used leftover 1X2 pieces to create a railing on the inside of the bench for the seat base to rest on. I put the railings 5/8 inch from the top of the bench and secured them using wood glue and 1 1/4 inch screws. I used leftover plywood as the seat base. I cut the plywood to be 10 1/2 by 20 inches.
Built from Plan(s)
Estimated Cost
150 - 200
Estimated Time Investment
Weekend Project (10-20 Hours)
Finish Used
I painted it white so that it would go with my daughter's dresser and side table she already had.
Recommended Skill Level
Advanced
Plate Rack adds much needed storage
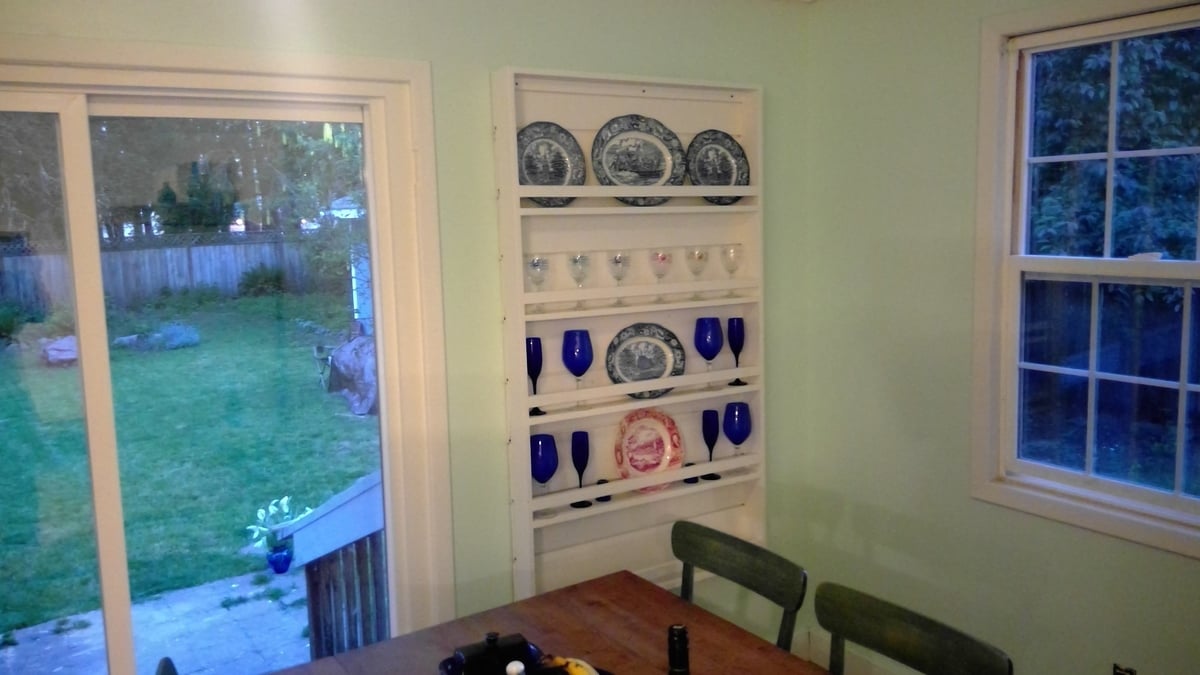
I came across the plans for the pate rack and realized it would be a perfect fit in my dining room. My house is just shy of its 100th birthday and I have been tackling renovation one room at a time. I have been trying to find new ways to use all of the materials that have been removed or replaced during my renovation. I was able to use the damaged shiplap and warped baseboards from my first room's renovation and create a plate rack shown.
Thank you for the plans!
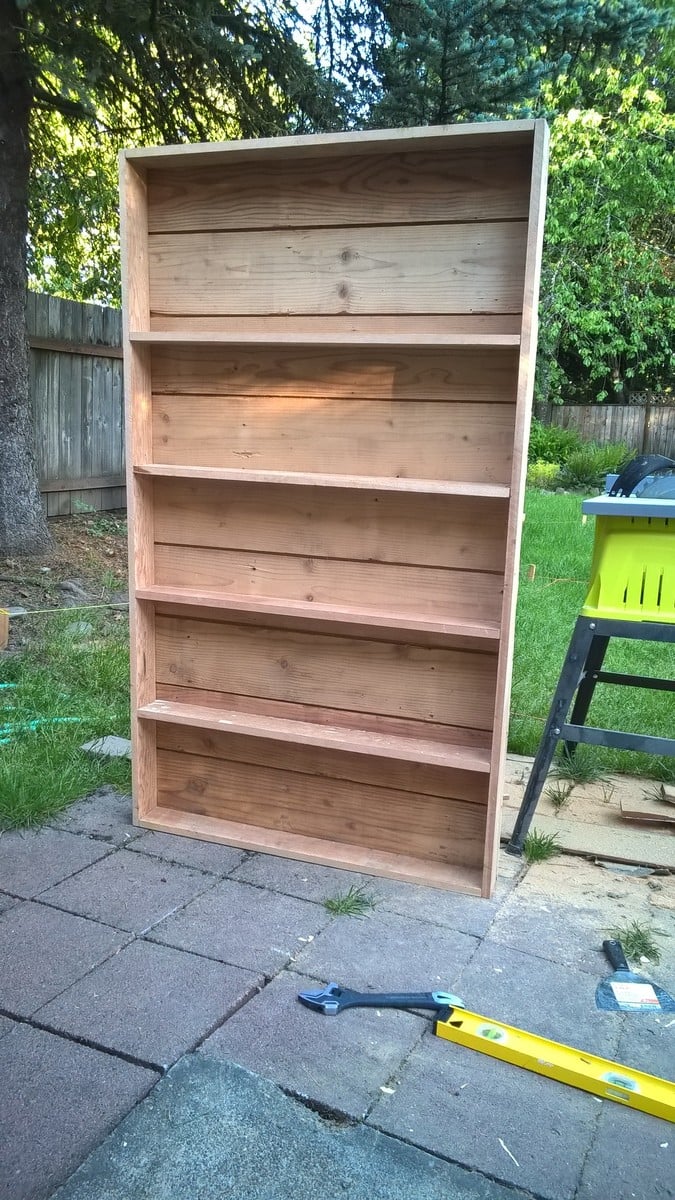
Built from Plan(s)
Finish Used
Used primer and "Swiss Coffee" white paint
Recommended Skill Level
Beginner
Barn Door Console with Shelf and Drawers
Built by Christ Rutledge
Built from Plan(s)
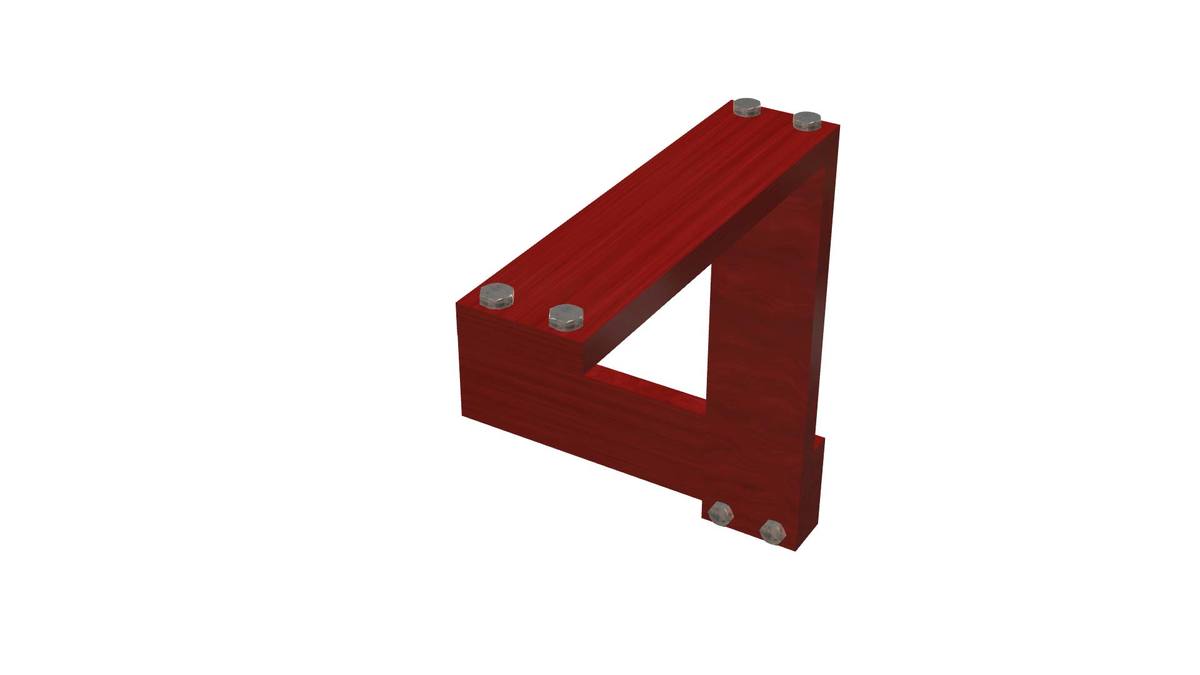
Impossible Triangle
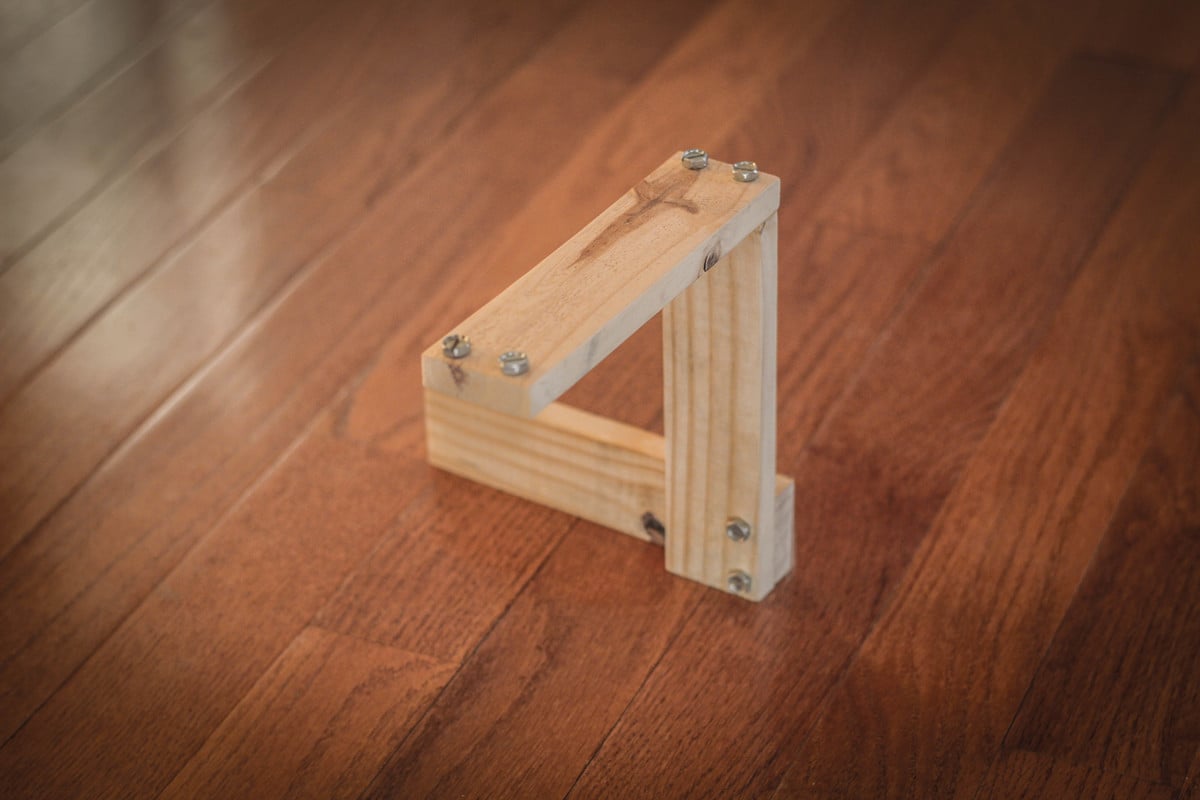
This is a modified version of the Penrose “Impossible” Triangle which is an interesting example of how the brain can be fooled. The main difference in this version is the use of hardware to simulate the triangle side connections. Watching the video is the easiest way to see how it works.
https://www.youtube.com/watch?v=_B2D5h74mMA
Please check out my other woodworking videos as well. Each video has a PDF drawing of the plans in the description.
https://www.youtube.com/playlist?list=PLcLIJdluqiyiI7J9qp5VAXrALMOftr0RT
Estimated Cost
Free - pallet wood and recycled hardware
Estimated Time Investment
An Hour or Two (0-2 Hours)
Finish Used
None
Recommended Skill Level
Starter Project
Big Kids Picnic Table- My First Wood Project!

My first woodworking project. The plans were easy to understand and my four kids love it!
Built from Plan(s)
Estimated Cost
$60
Estimated Time Investment
Afternoon Project (3-6 Hours)
Recommended Skill Level
Beginner
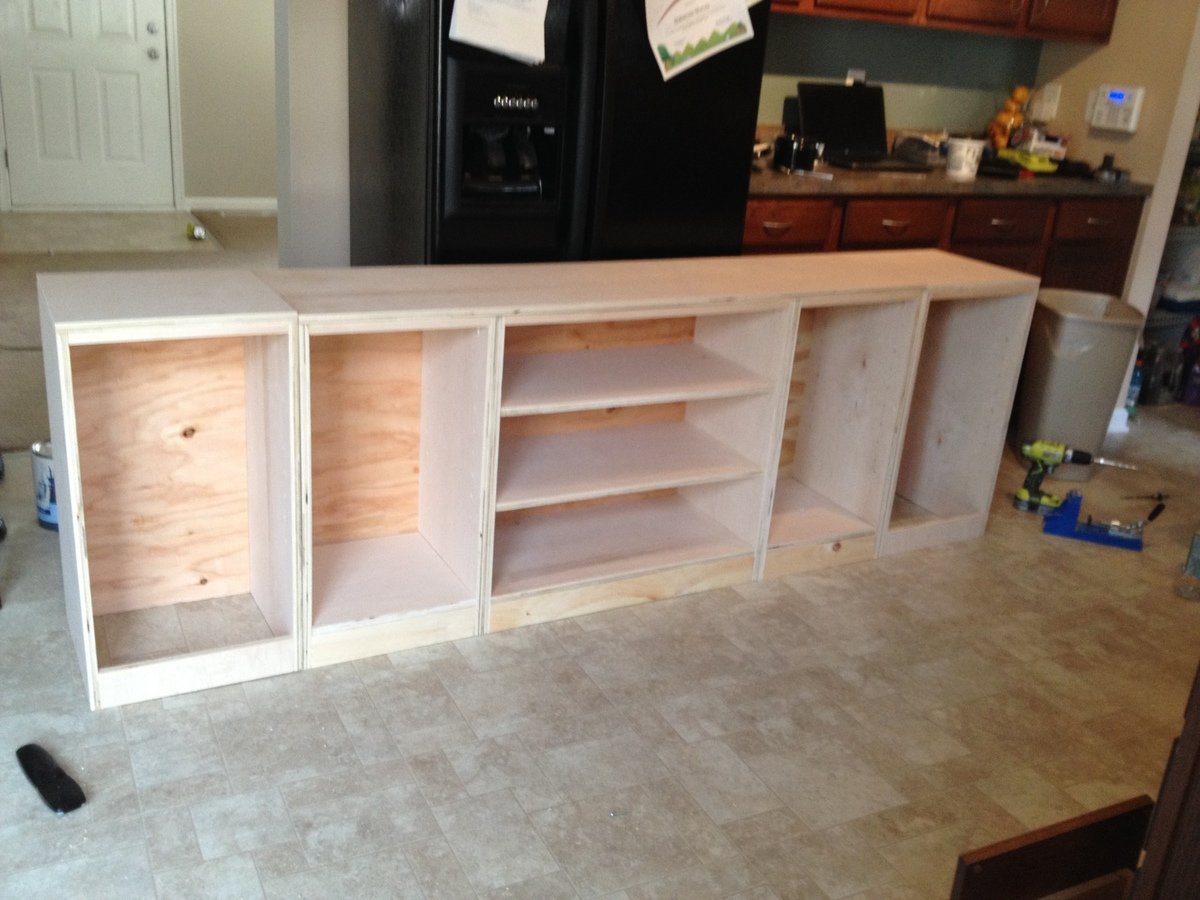
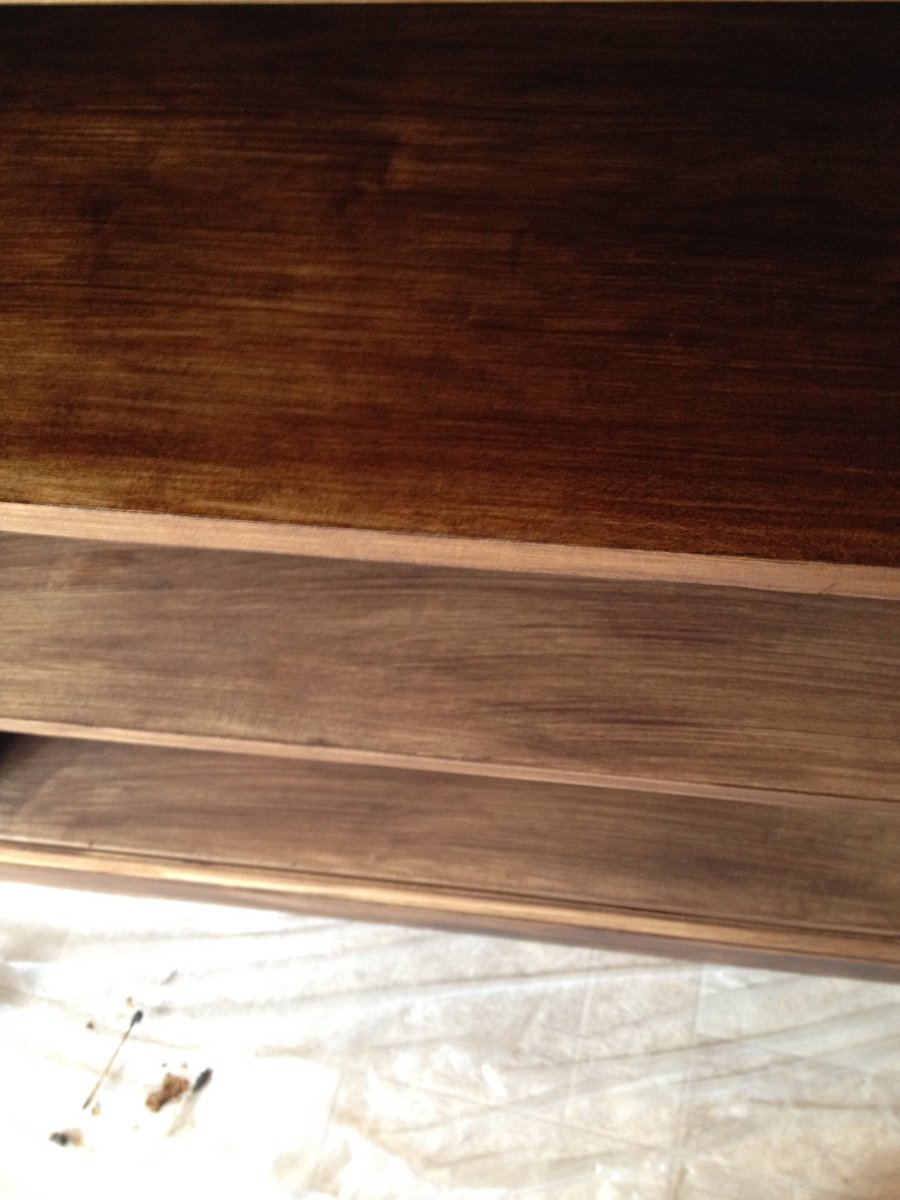
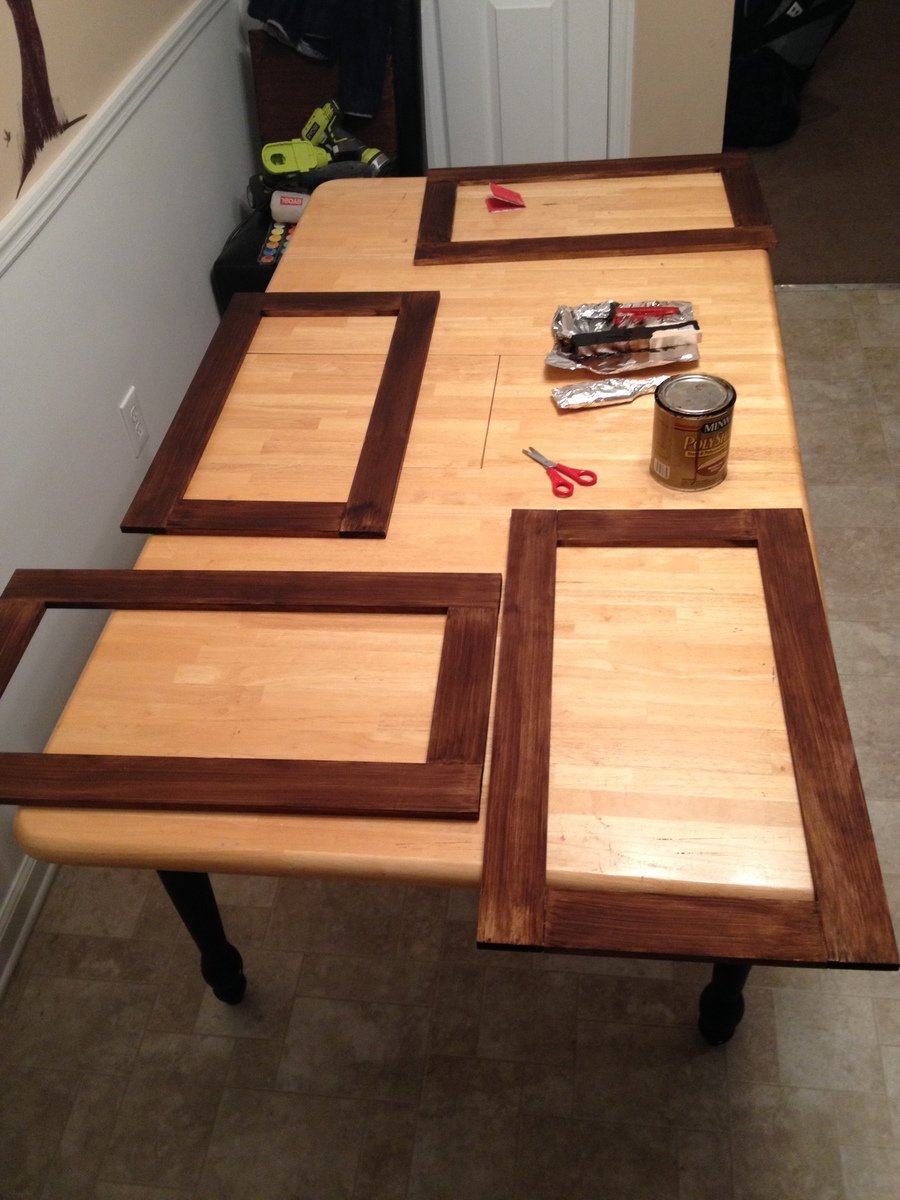
Pottery Barn Printer's Long Low Media Suite
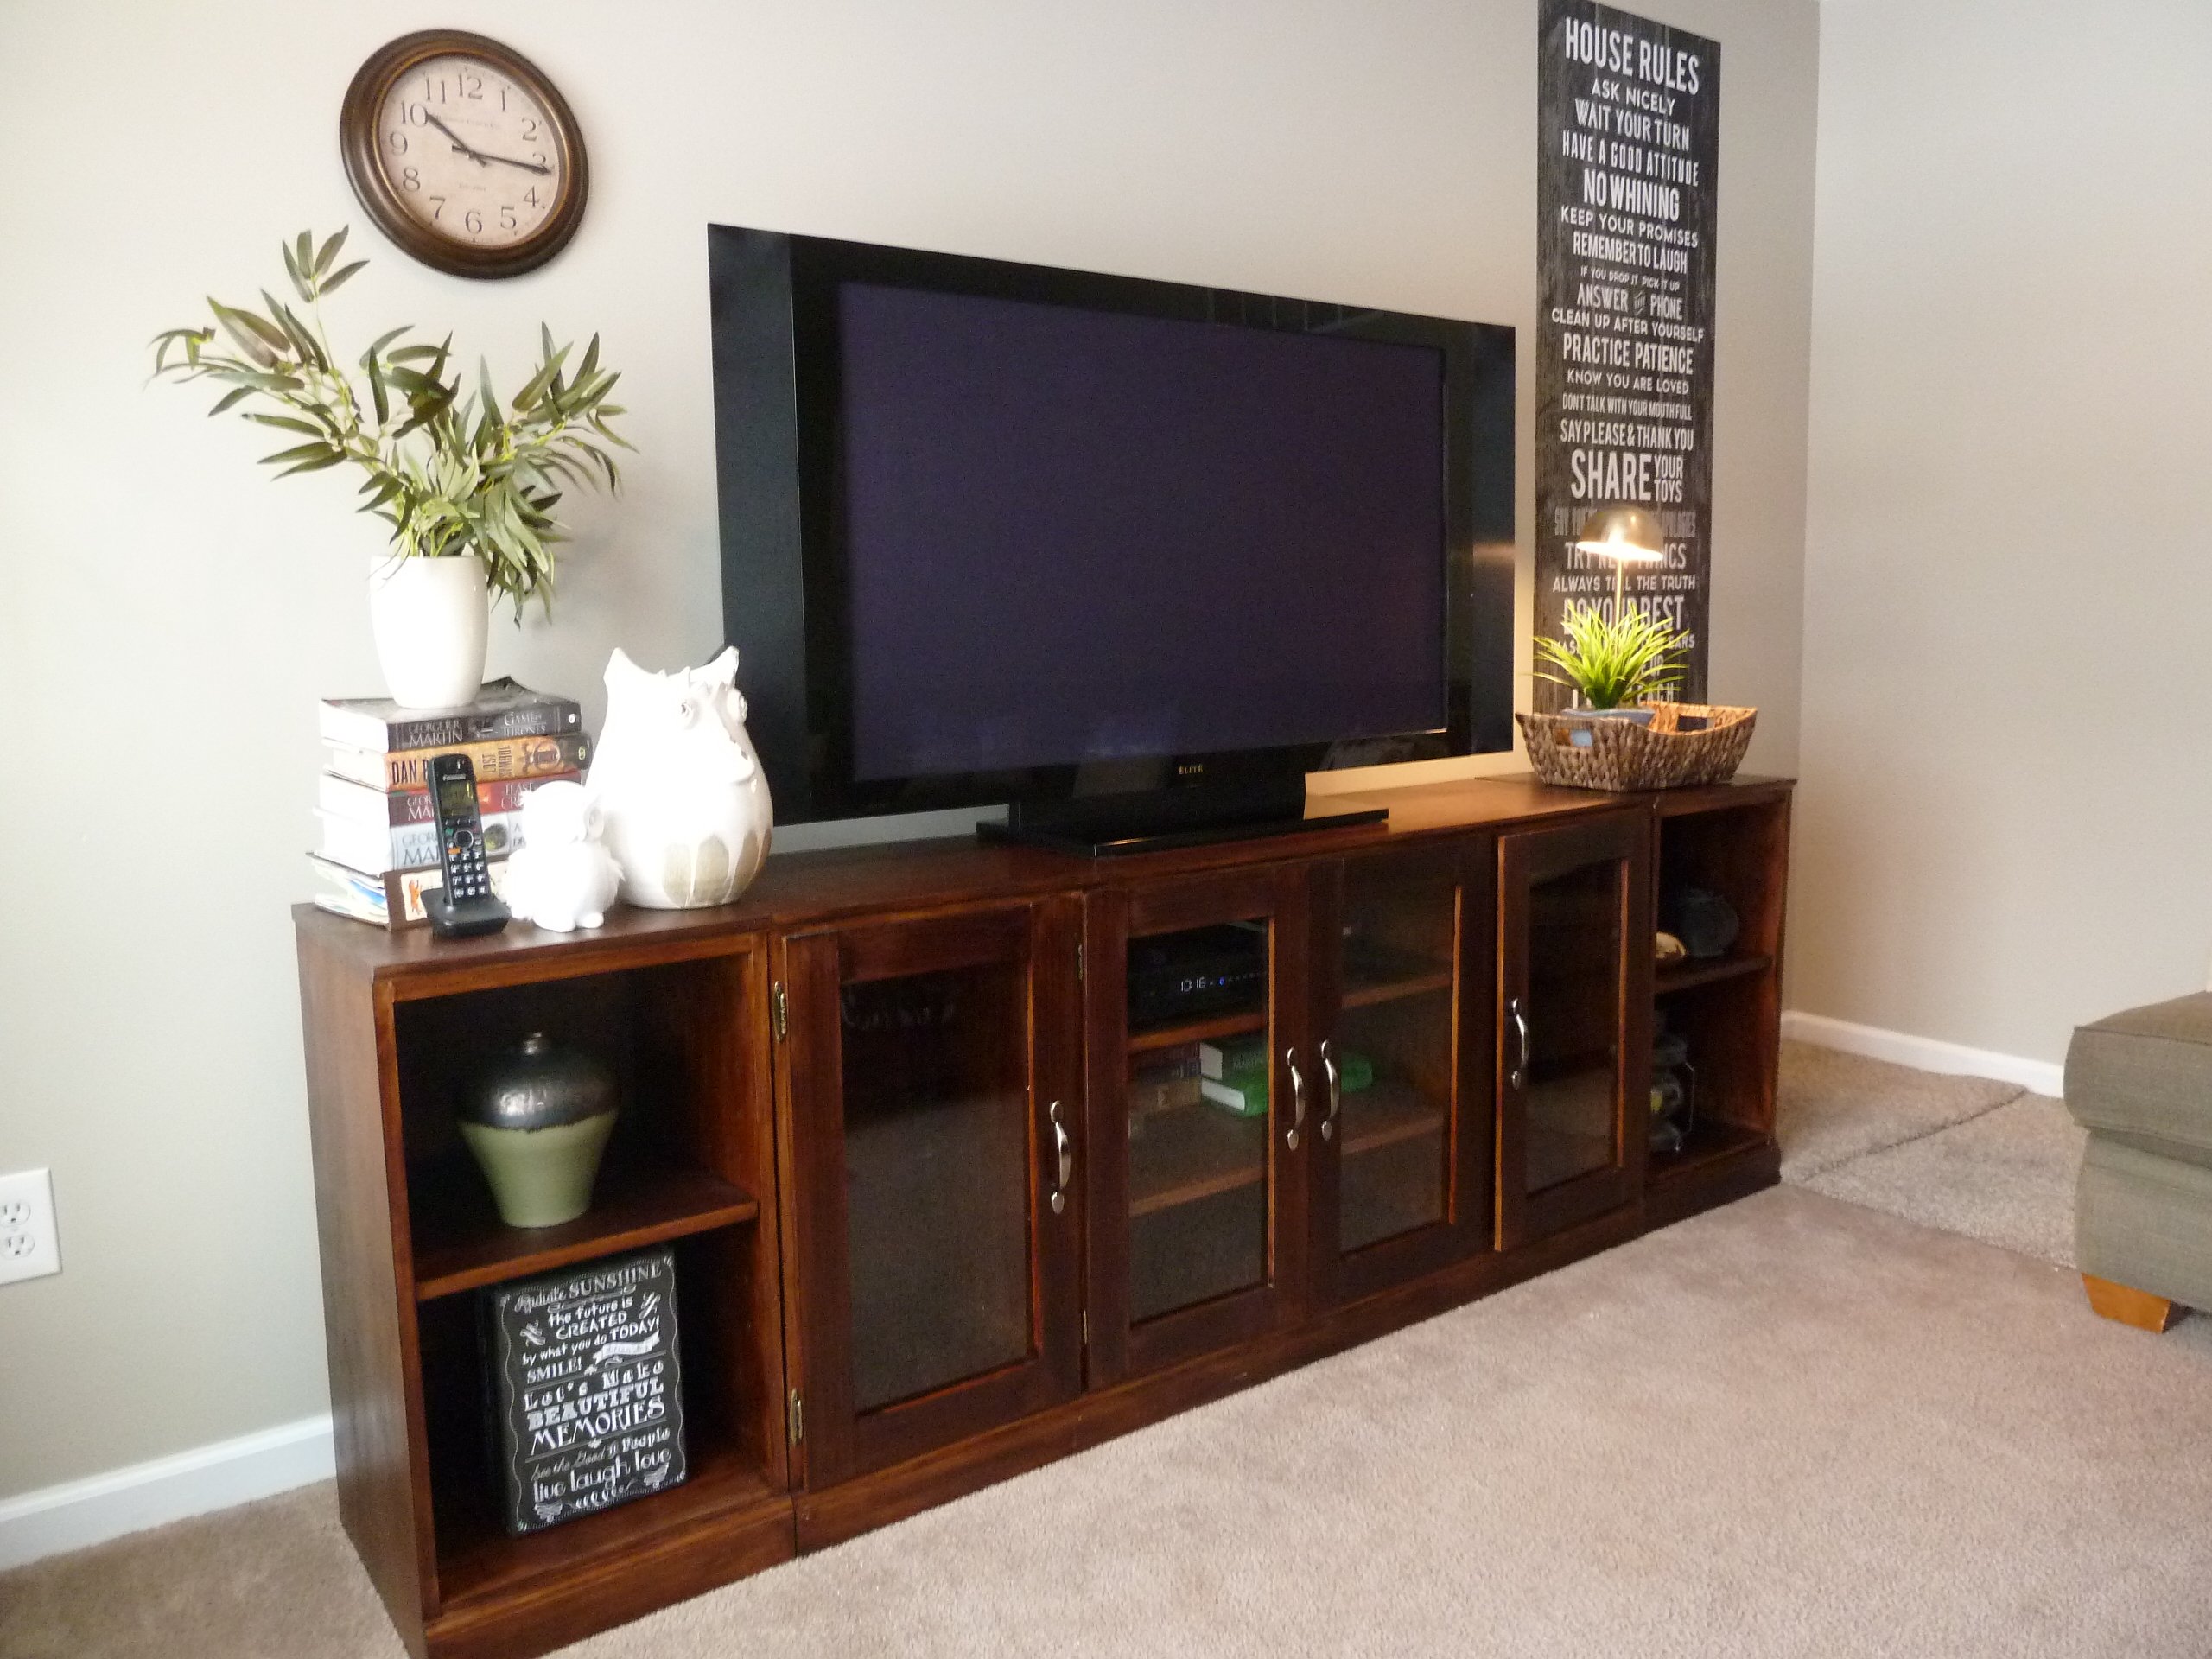
I feel in love with the Pottery Barn Media Suite and new immediately I wanted to build it. I couldn't justify paying close to $2,000 on an entertainment center. I knew Ana would have the plans to help me out. I modified the plans a little bit and instead of building 6 cabinets, I decided to make the inner 4 cabinets one piece, and the 2 outer cabinets removable. This will give me options for when I have to place the Christmas Tree or if we move and cannot fit this huge piece. I also wanted to have as much strength in the middle for our plasma TV. It's about 4 years old and isn't as light at the new TV's are. I loved every minute of building this project and couldn't be more happier! Feel free to search PB website to compare their media suite to my version (savings of $1,700). Feel free to ask any questions!
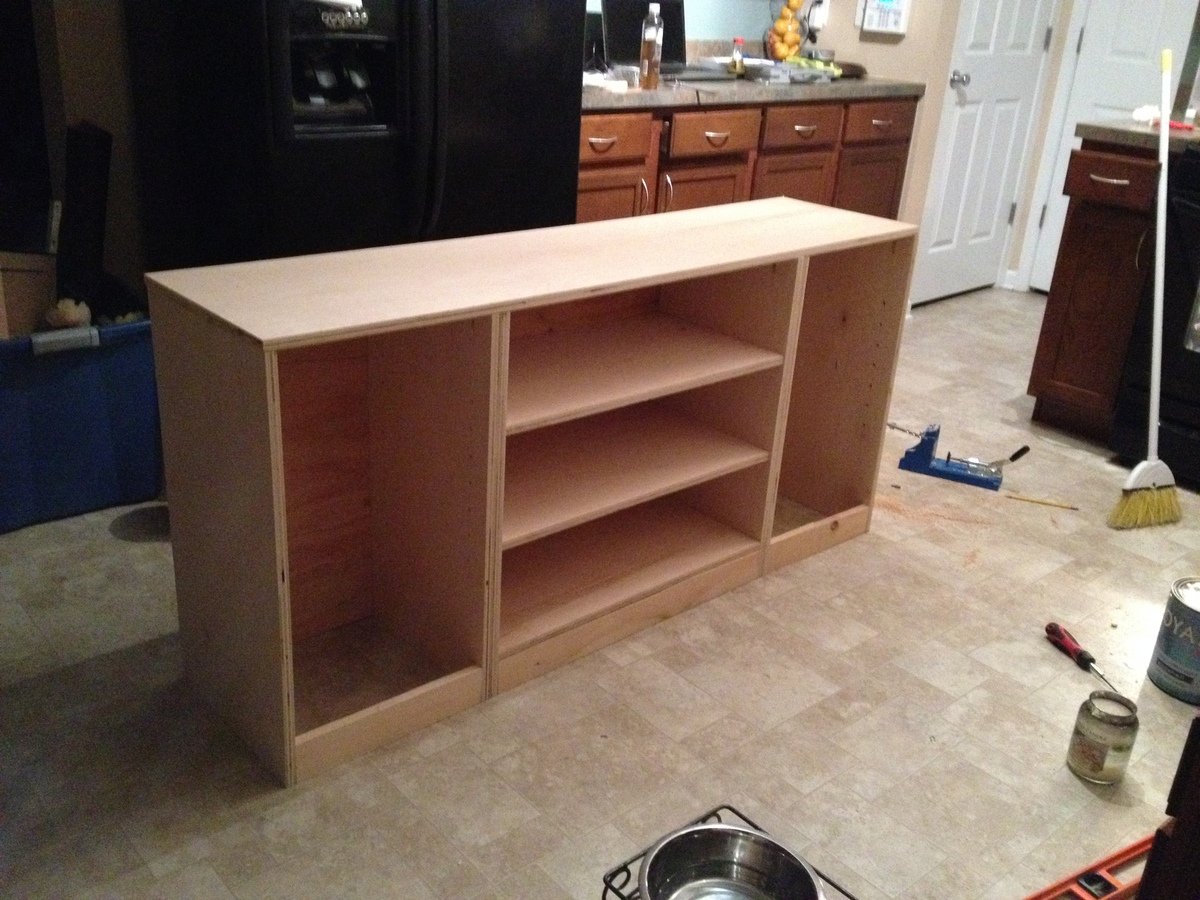
Built from Plan(s)
Estimated Cost
$325
Estimated Time Investment
Week Long Project (20 Hours or More)
Recommended Skill Level
Intermediate
Comments
Wed, 07/08/2015 - 08:35
Few questions
Love how you did yours Christina
I too would like to make one larger unit rather than say 6 of the individual cabinets. Looking at your pictures, it looks like you still made them individually but I'm assuming you attached them (screwed) together? Is that the case? Did you have any issues with the main piece and two ends being different heights when finished?
Am wanting to make a total length of around 104". Means I'll have to tweak some measurements.. In addition, I would like to have one side be a lift top so we can put in a record player and simply lift the top face to access. That wont be too big of a deal.
How did you find the doors were to make? No big deal? i've been curious how the dimensions all play out with the hinges and doors opening etc.
Sat, 01/30/2016 - 13:58
Instructions
I cannot find these instructions anywhere! The PDF does not include the instructions :(

In reply to Instructions by LBlakesley87
Sat, 01/30/2016 - 14:42
This is a brag post (a
This is a brag post (a beautiful one, might I add!!). The links to the instructions are included above. Here's to the main base http://www.ana-white.com/2010/08/plans/open-base-basic-collection
Simple Bed Twin
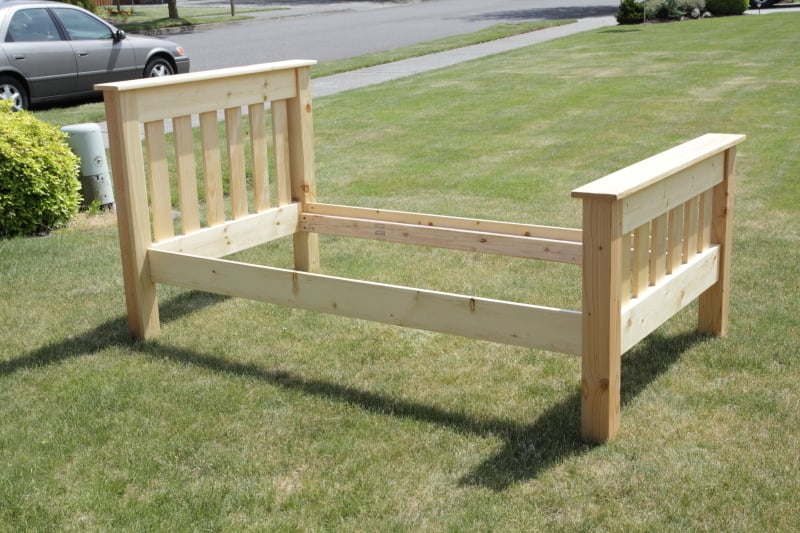
Total cost was under $200. The wood was a combination of select pine, Douglas fir. I used Minwax clear finish. Instead of slats I used plywood. This is going into the spare bedroom. We are quite pleased.
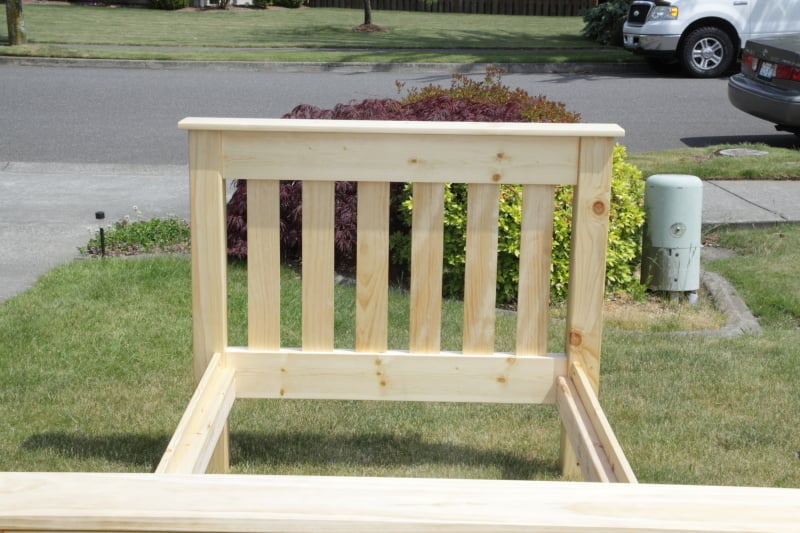
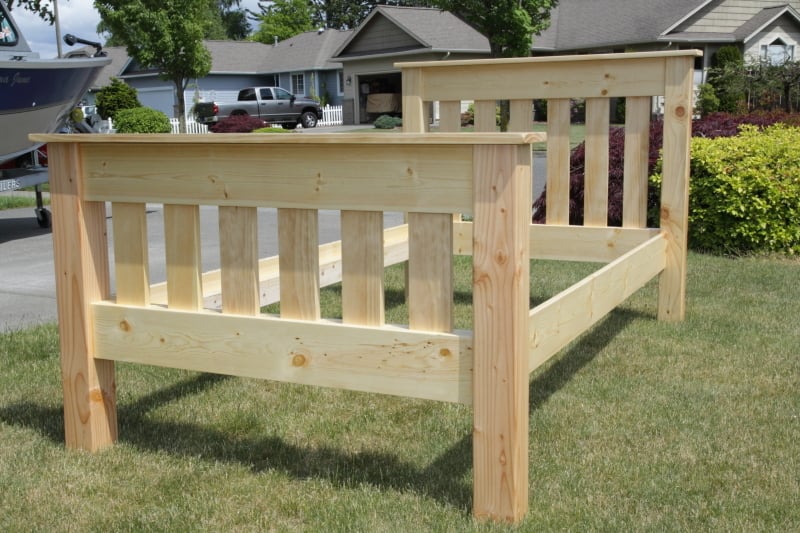
Built from Plan(s)
Estimated Cost
$200.
Estimated Time Investment
Weekend Project (10-20 Hours)
Finish Used
Minwax wood conditioner and Minwax clear Polyurethane fast drying.
Recommended Skill Level
Intermediate
Comments
Mon, 05/28/2012 - 19:51
We chose to go with a 1 x 6
We chose to go with a 1 x 6 instead of a 2 x 4 for the top of the head and foot boards.
Tue, 05/29/2012 - 16:29
Take it Apart?
Can you take the bed apart in case you move? You did a great job.
Fri, 06/01/2012 - 20:45
Yes it comes apart. A total
Yes it comes apart. A total of four pieces. Headboard, footboard, and the two sides. Also a fith piece if you count the plywood base for the mattress. The sides are screwed in at each of the corners of the head and footboards.
Mon, 05/12/2014 - 19:01
Nice!
Thinking of building this for my son as we move from crib to bed. Just curious how sturdy and strong the bed is? From the pictures it doesn't look like there's much wood where the rails attach to the head and footboard. Did you use pocket holes and screws? Any comments on how it's held up, what you might do differently? Also any idea if it'll hold a kid and parent for nightly story time?
Thanks...nice work!
Wed, 05/14/2014 - 15:22
It is in our guest room and
It is in our guest room and does not get much use. However, it is screwed in at the corners not with pocket screws because the rails were too close to the edges. I chose to screw them in starting farther back and at a 45 degree angle to send the screw deeper towards the center of the four posts. It is very strong. Another suggestion would to purchase bed hardware. Hardware can be found online or in a hardware stores for attaching rails to bed posts. I've used such hardware for fixing commercial beds I've purchased.
Hope this helps.

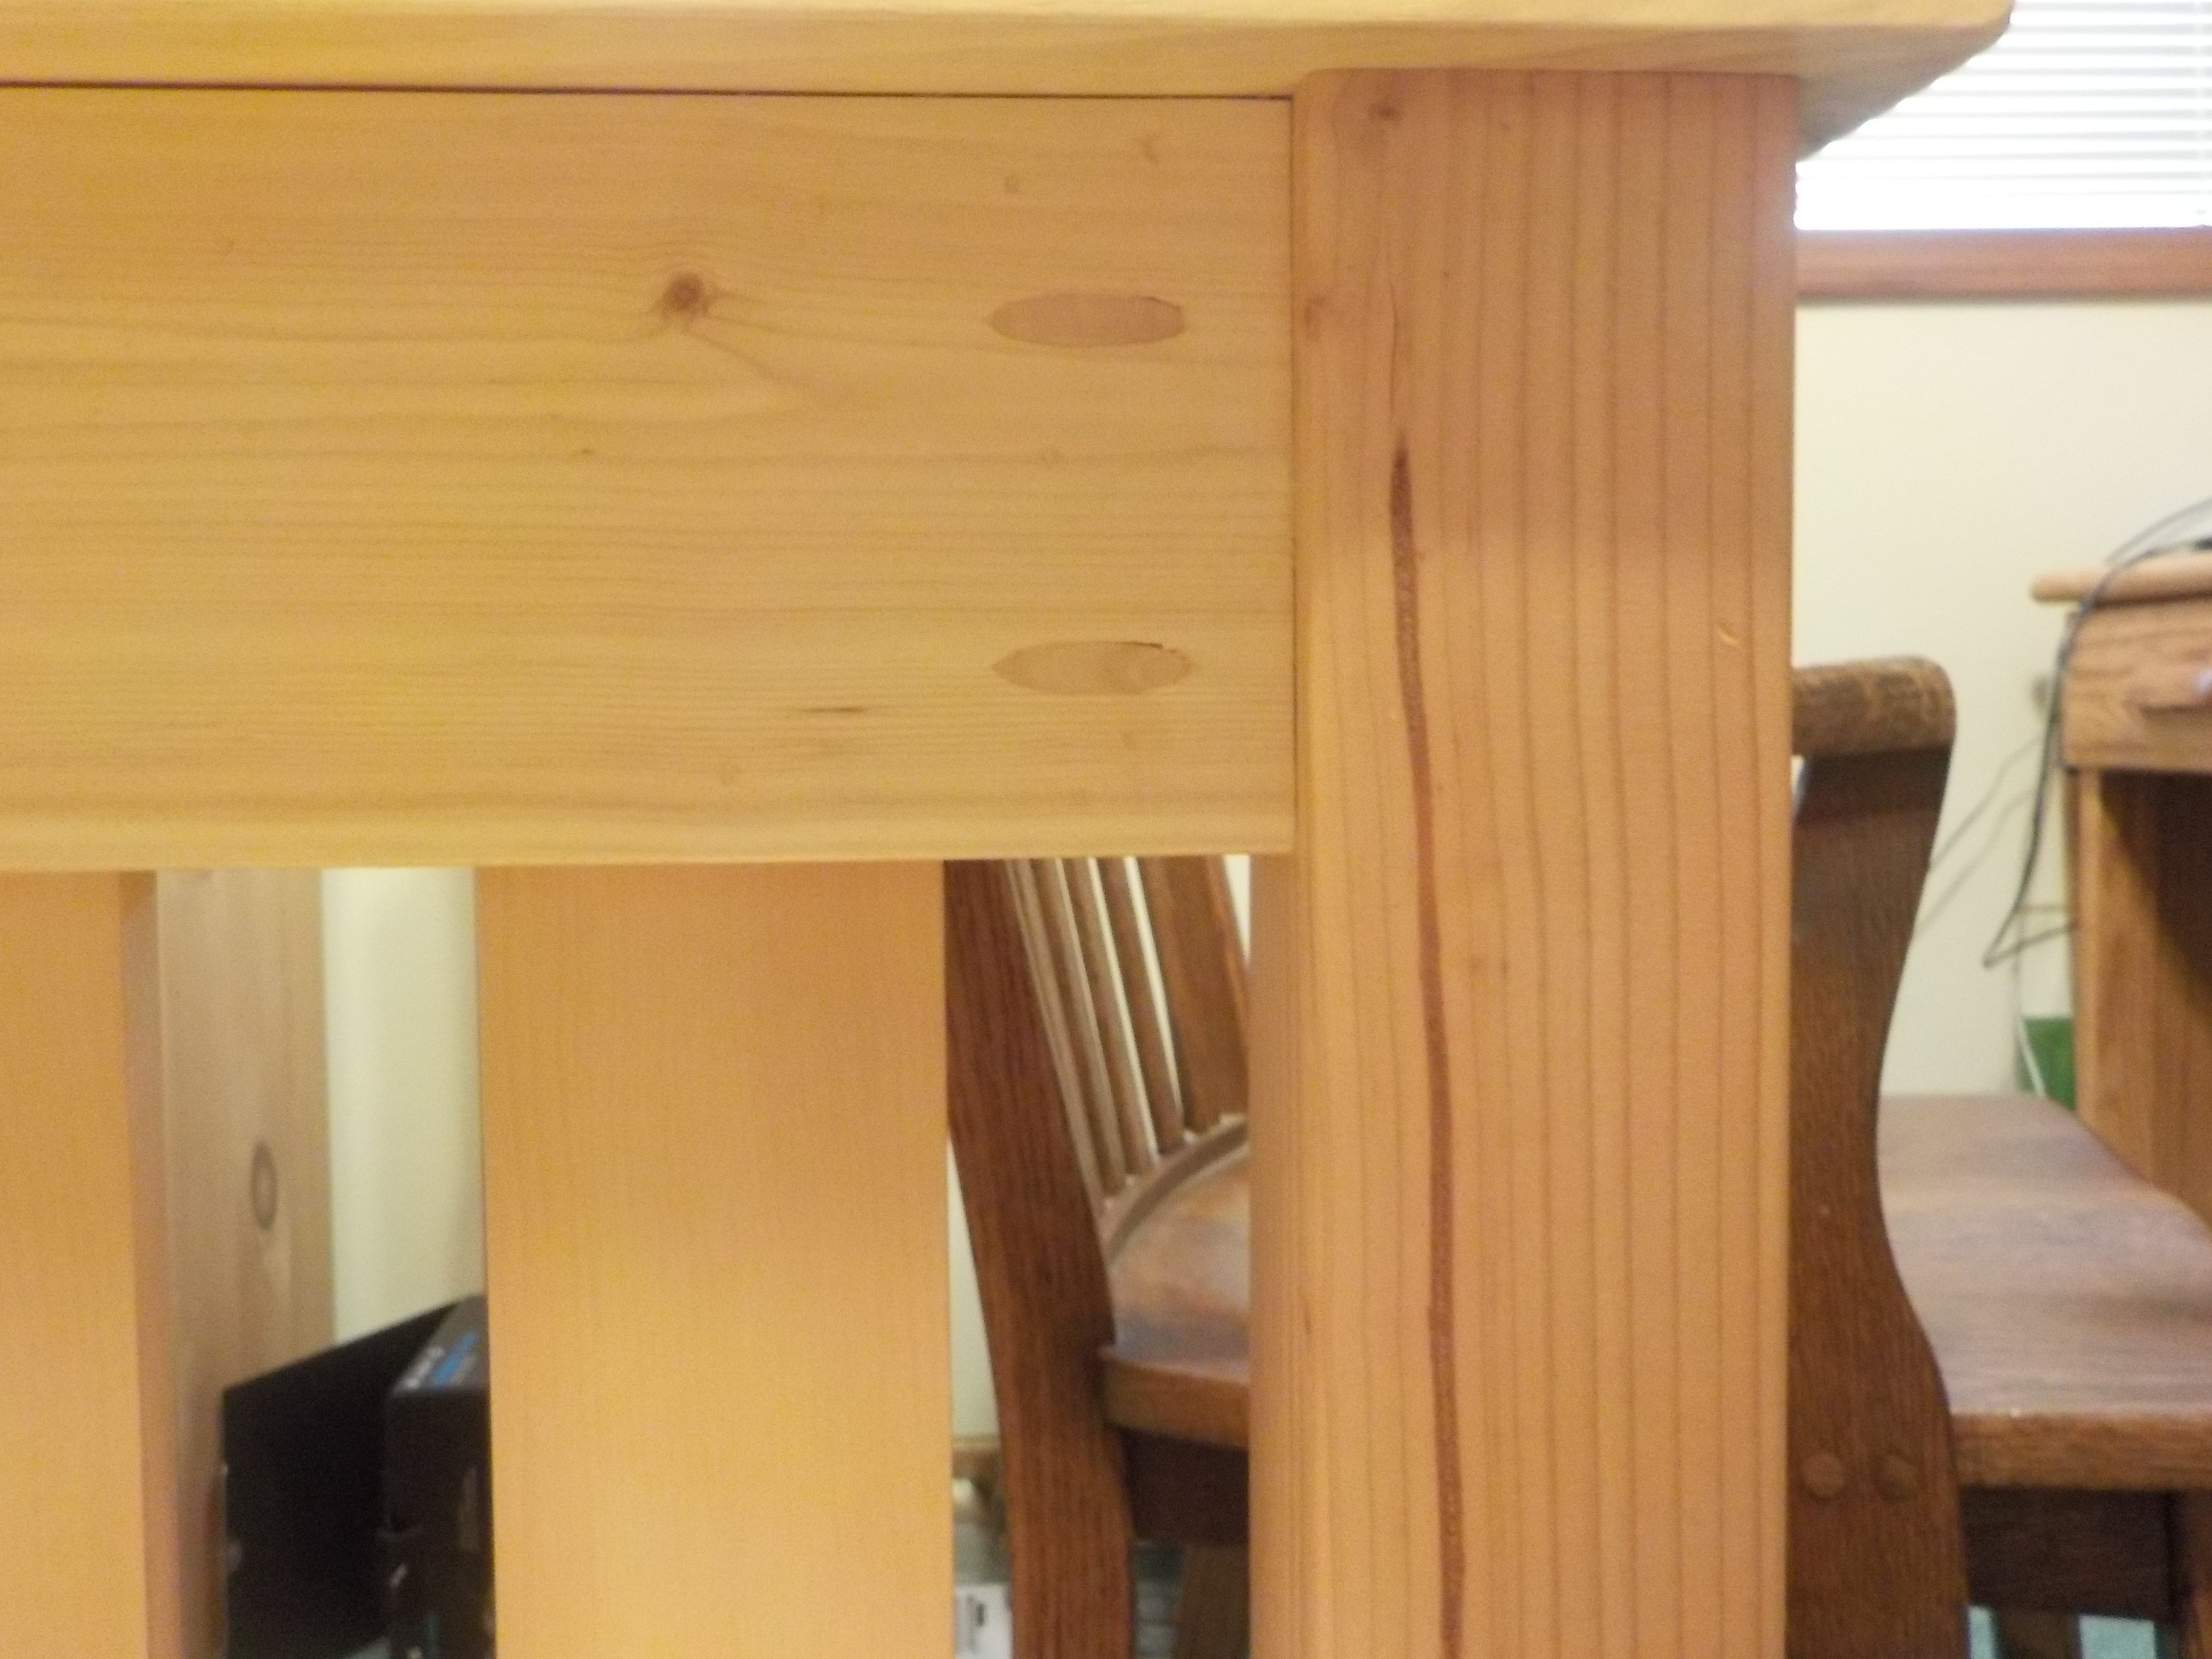
Tue, 01/20/2015 - 15:25
Sorry it took so long to
Sorry it took so long to answer. Where I put the screws depended on how the bed was going to be placed in the room. In our case, the headboard was going to up against a wall. Therefore the screws were on the wall side of the headboard. The footboard of the bed had the screws on the mattress side. Kreg sells pocket hole plugs that work very well. Glue them in after you screw the head and foot boards together and sand them before finishing.
The sides of the bed that are attached to the head and foot boards and screwed in too. I had to screw them in at a sharper angle to get enough sideboard material but deep enough into the head and foot boards in. Use the longest screws possible for strength without going all the way through the four corner posts.
Tue, 01/20/2015 - 15:50
Either way described above
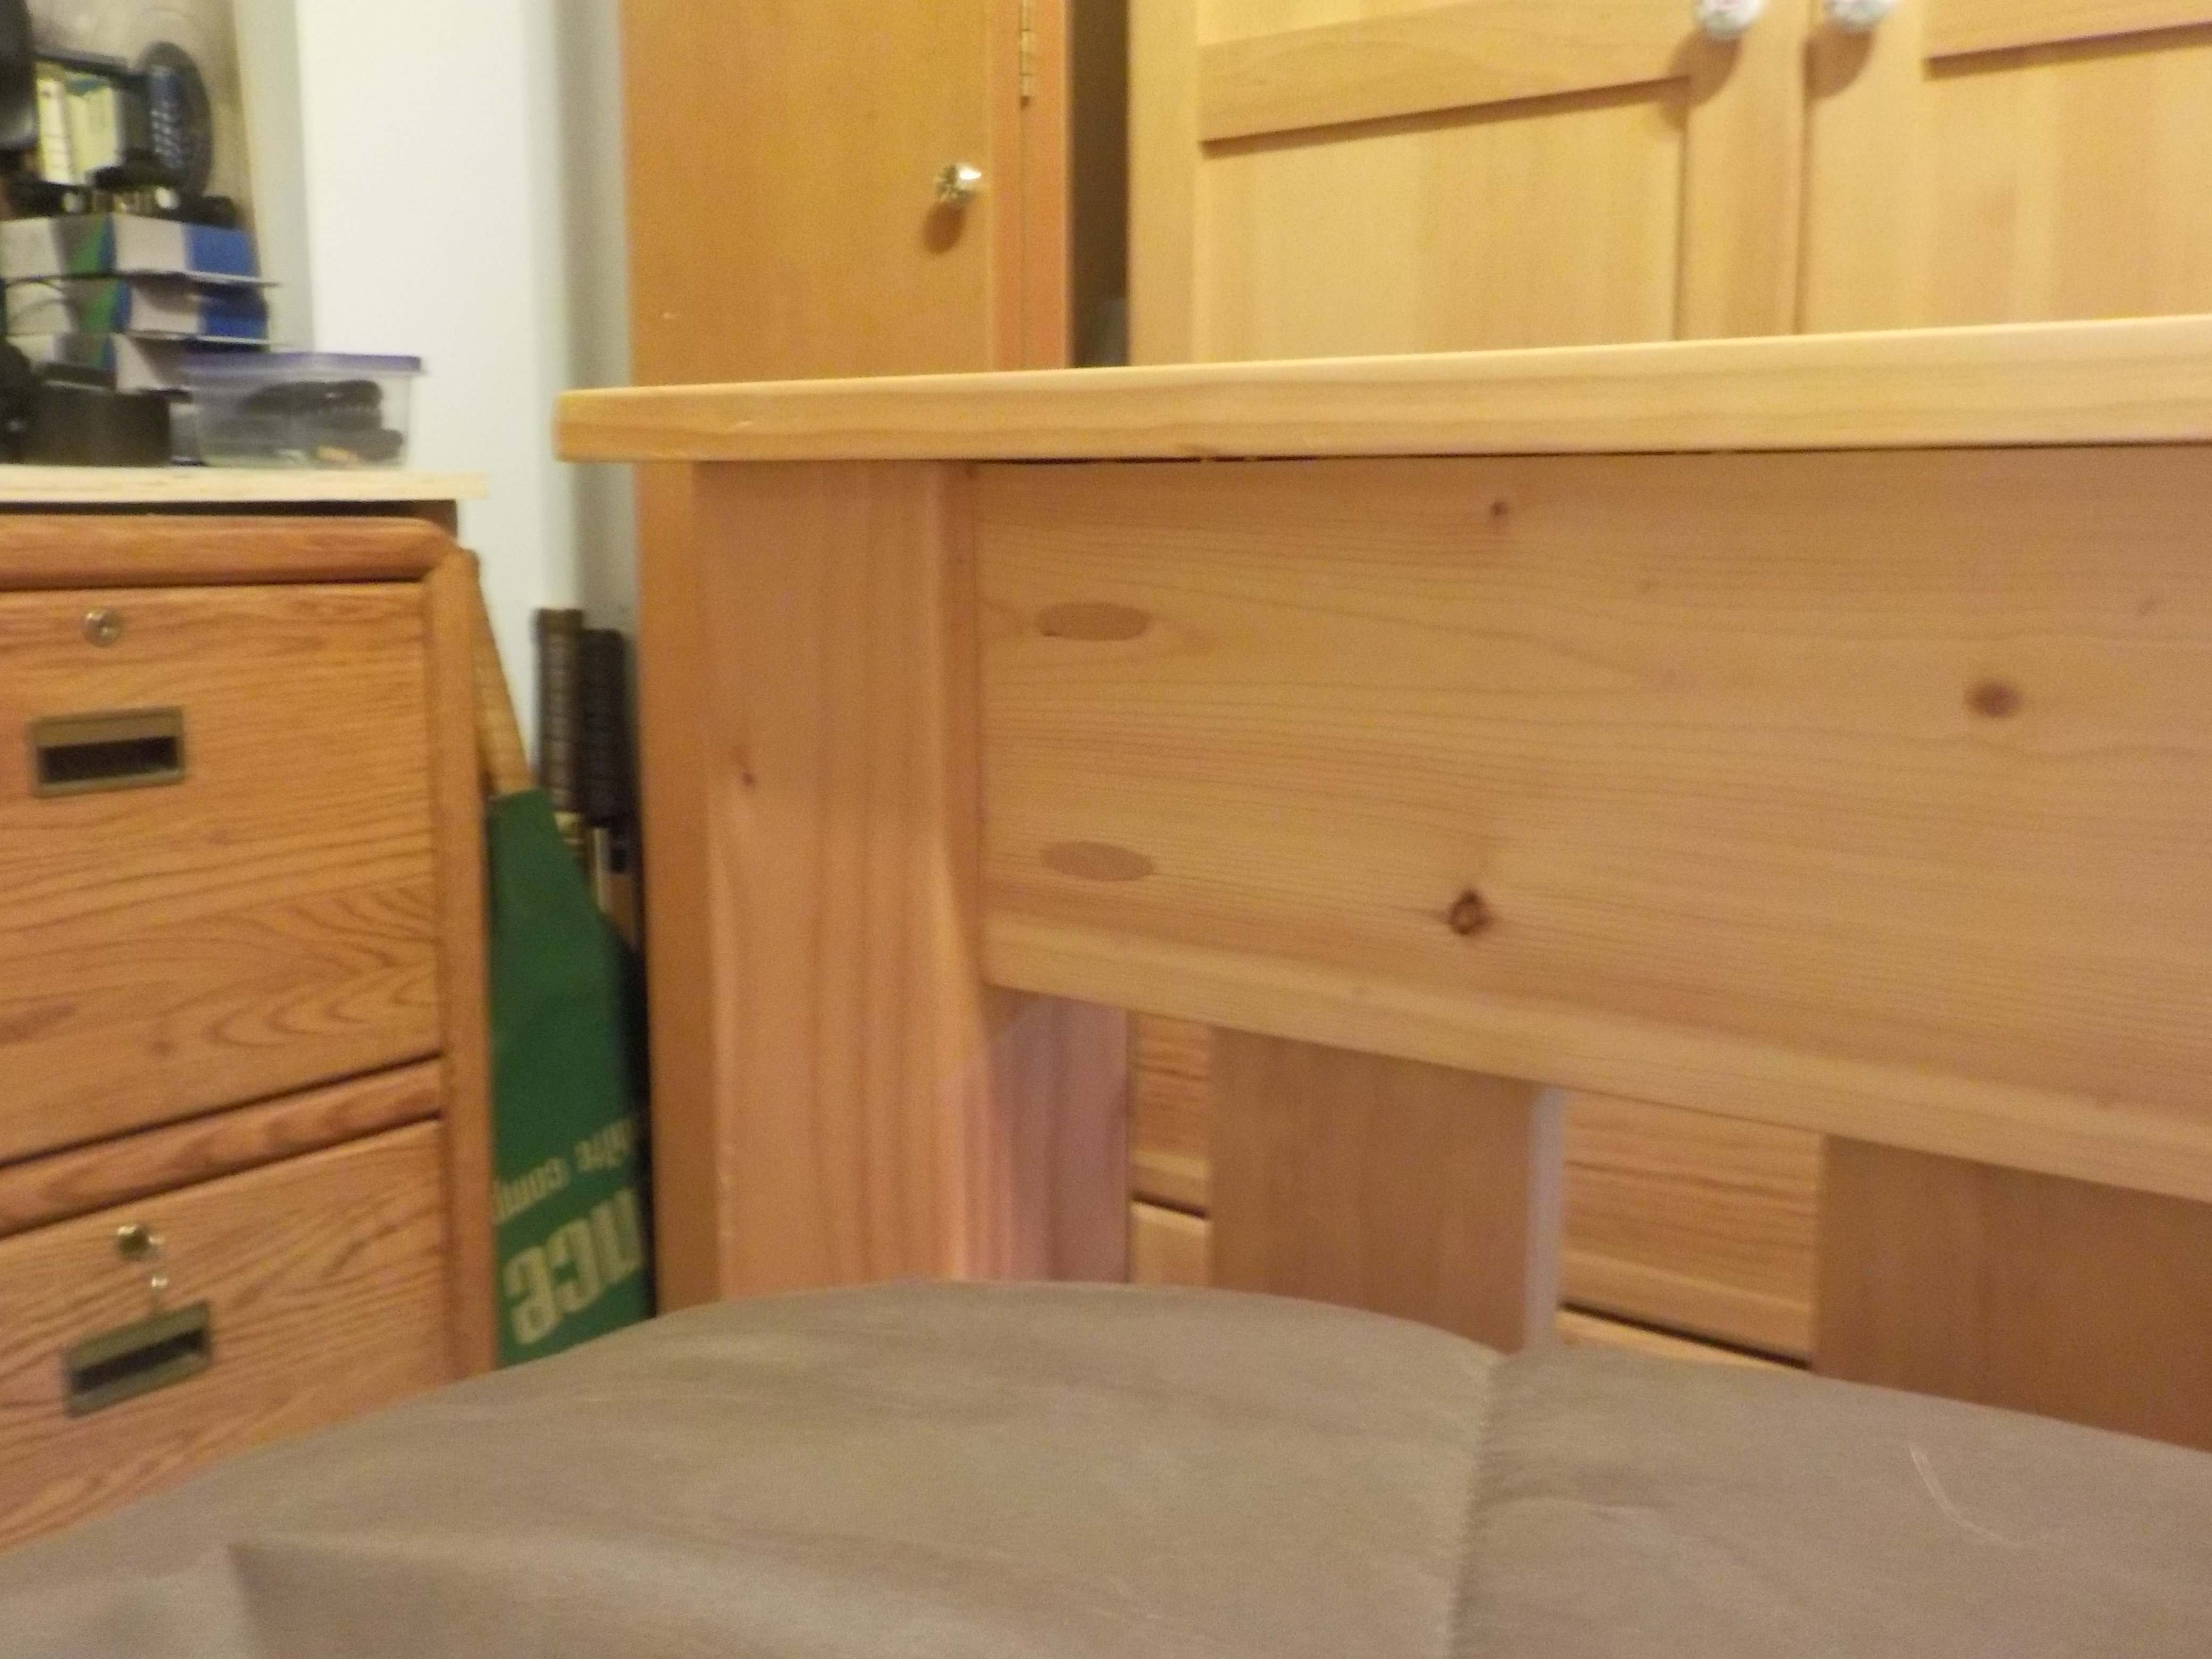
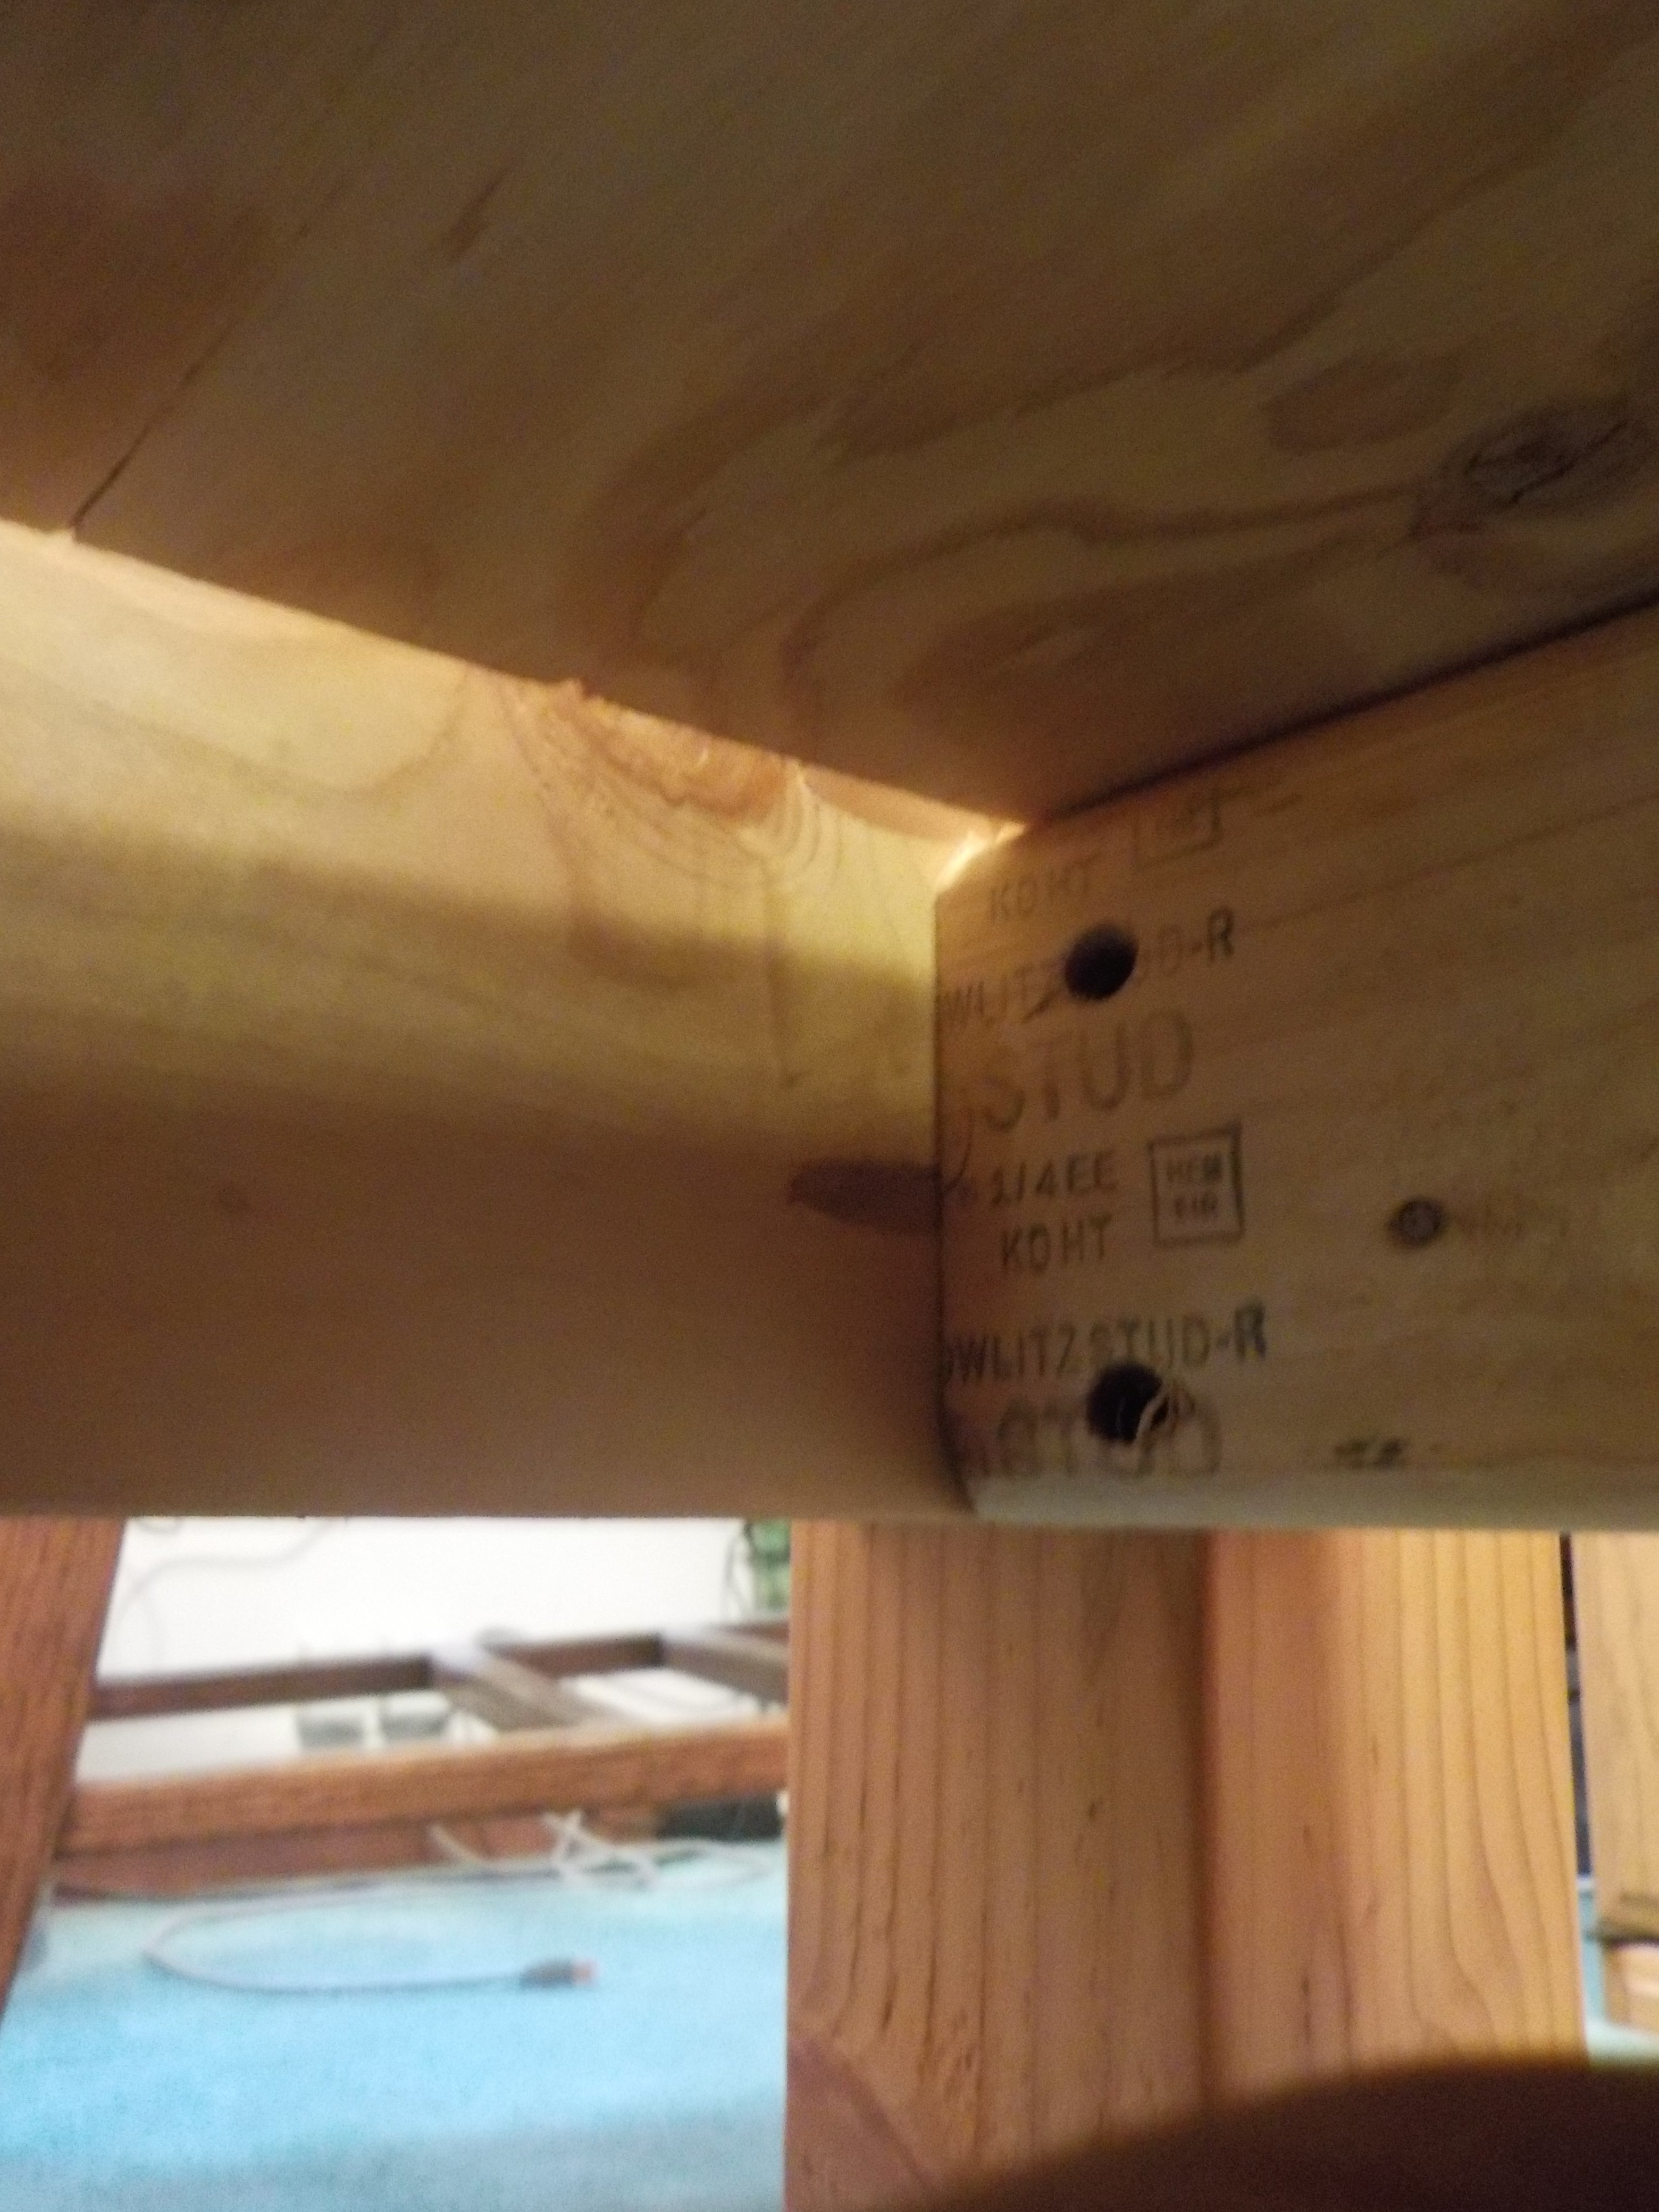
Either way described above will work. See added photos of plugged finished pocket holes and underside attachment to foot-board.
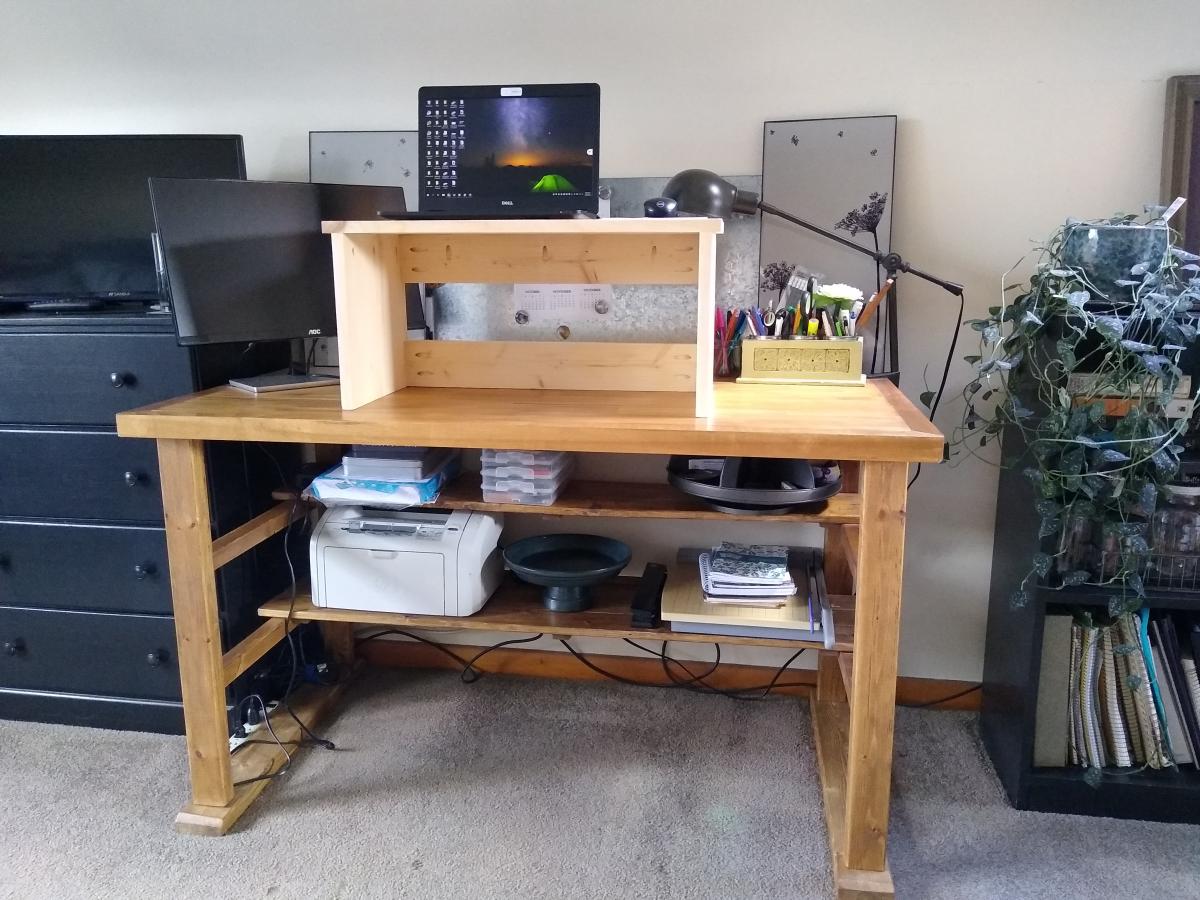
Lap desk/Standing desk
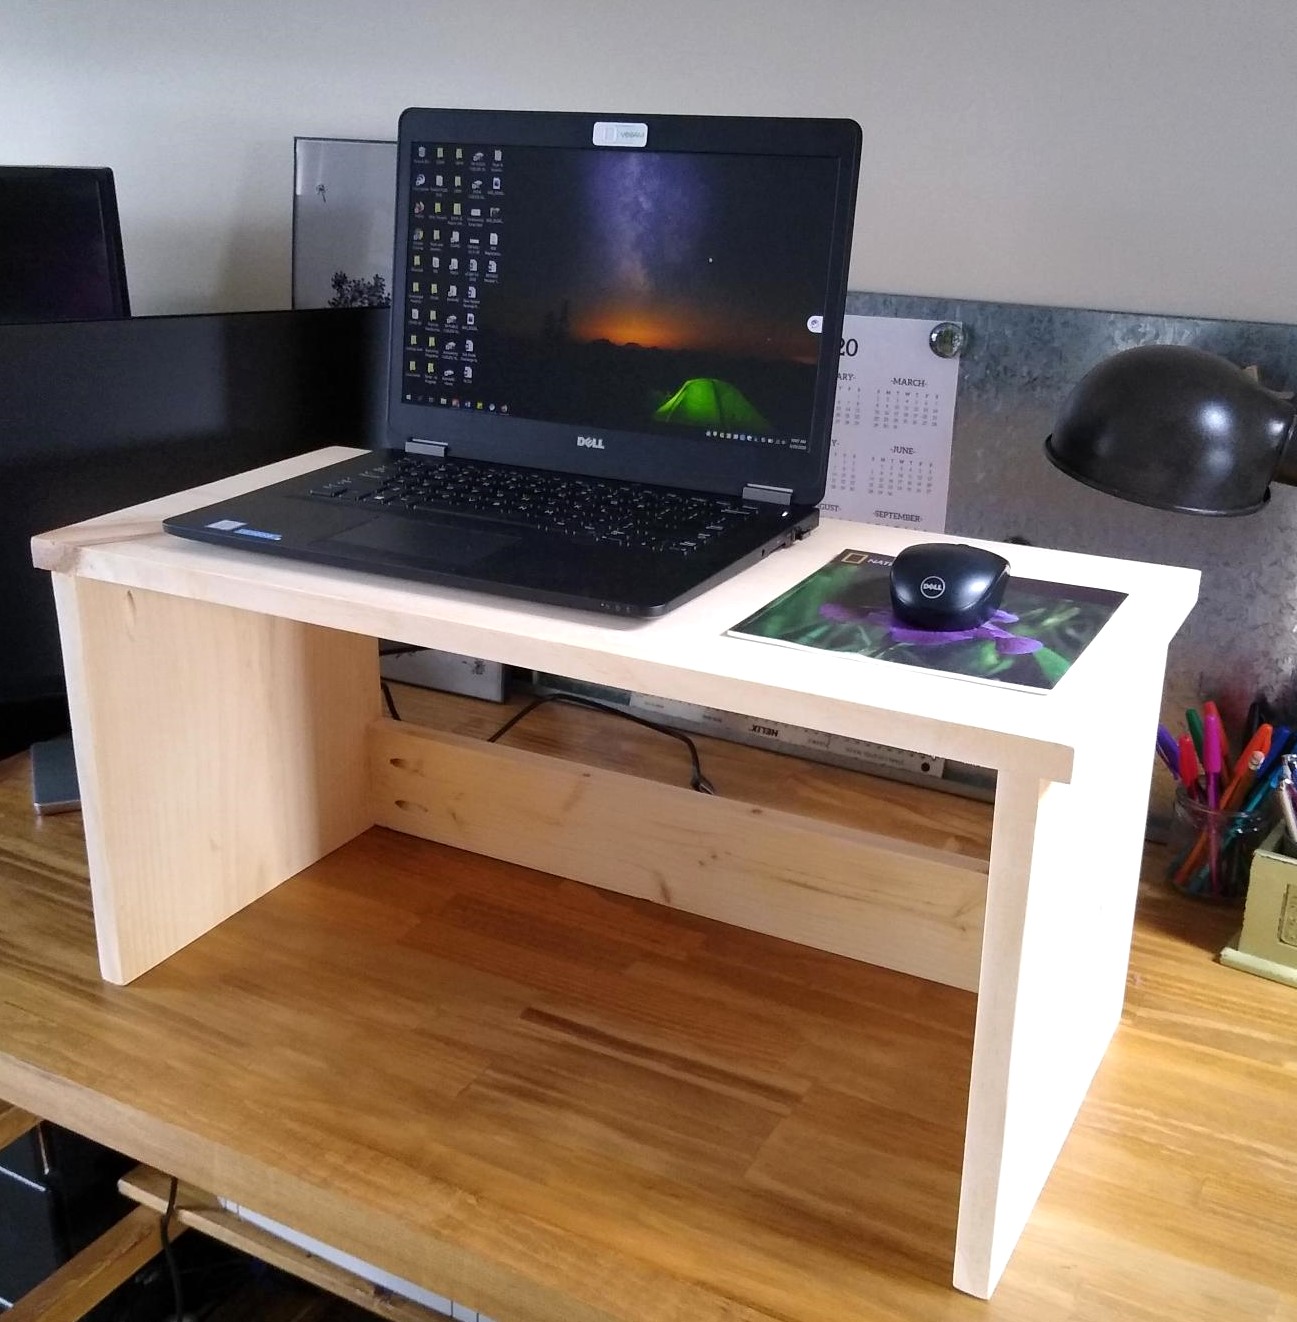
Built this last weekend so I would have the option of standing at my desk - these plans work perfectly for that purpose! Quick and easy build that I was able to do with scraps on hand. Highly recommend for anyone who has suddenly found themselves working from home and is finding their desk chair just isn't comfortable enough for a full day of work. Easy to move out of the way when not needed and provides a nice way to quickly move work things off to the side but keep them handy for the next day. Thank you for the very timely plans!
Built from Plan(s)
Estimated Time Investment
An Hour or Two (0-2 Hours)
Finish Used
None yet. Will have to wait for some nice weather to stain/seal outdoors.
Recommended Skill Level
Starter Project