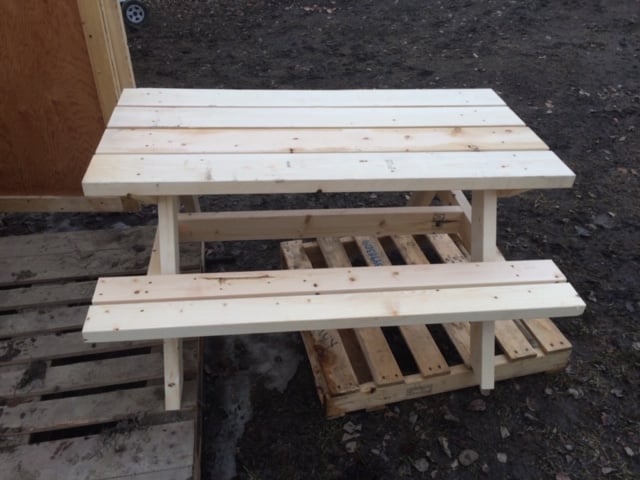
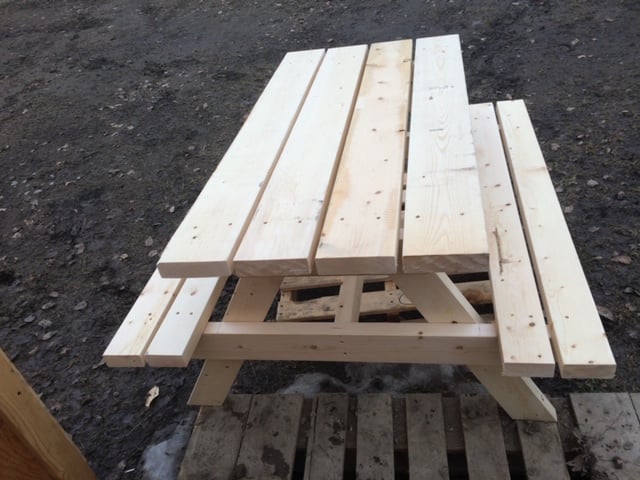
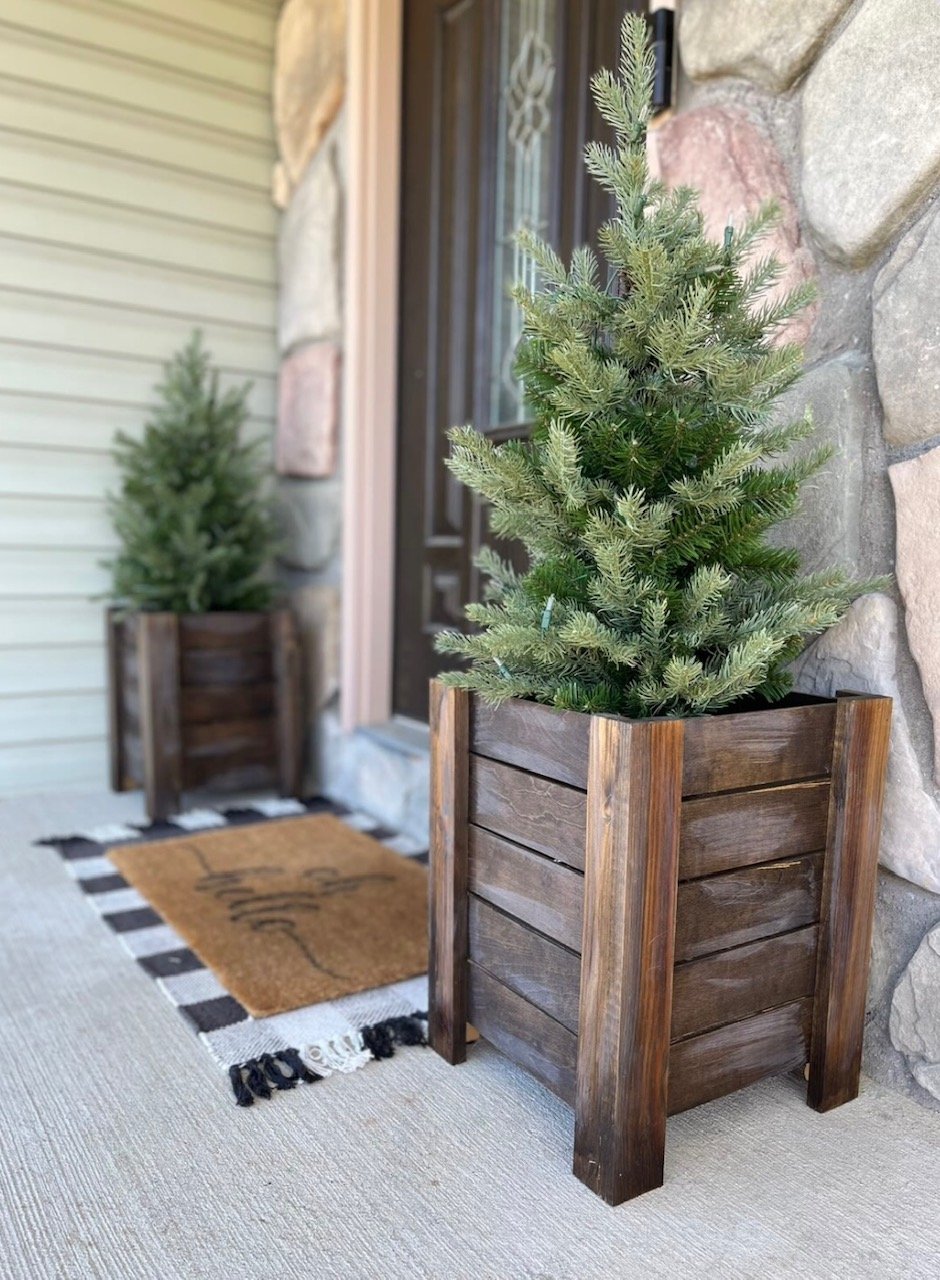
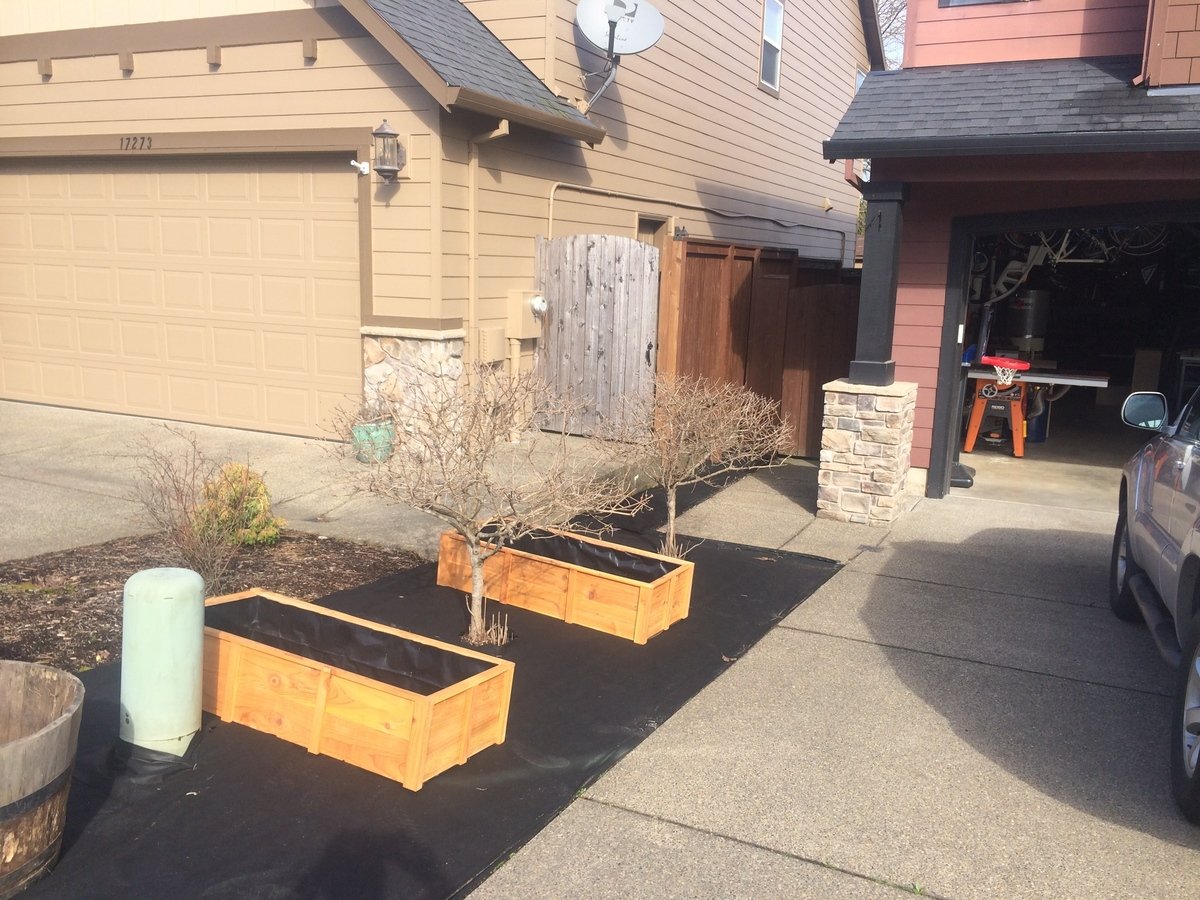
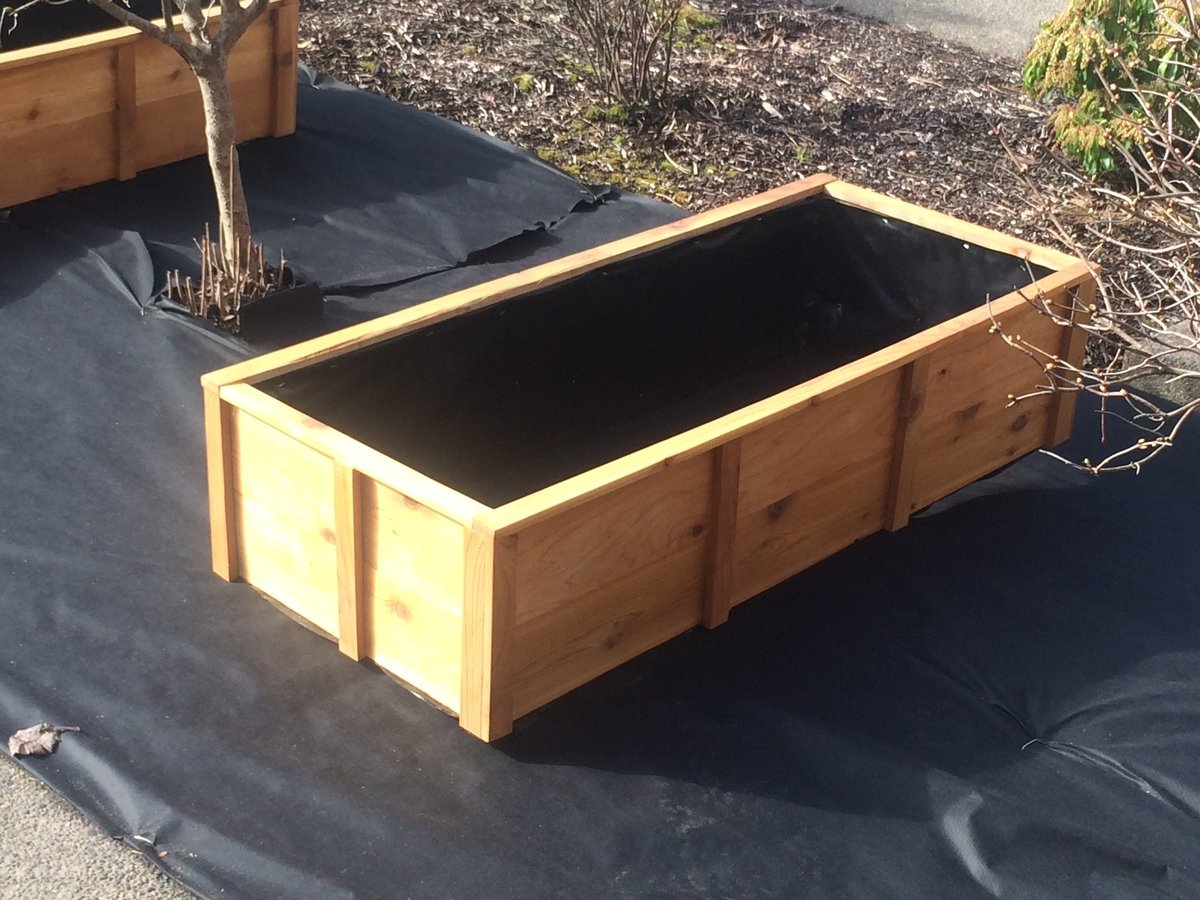
Community Brag Posts

Board & Batten Banquette

My family needed a seating area for our tiny kitchen and a built-in banquette solved our spatial design problem perfectly! I basically built it like a short and wide freestanding wall with a board & batten design and plywood top for seating. More details on my website post...

Estimated Time Investment
Weekend Project (10-20 Hours)
Finish Used
board & batten with latex paint
Recommended Skill Level
Intermediate

Comments

Bench, storage shelf

Submitted by Anonymous (not verified) on Mon, 02/01/2016 - 20:18

I made this taller and added and extra shelf. I also didn't add the angle cuts and for the front pieces. It was so easy and I built it within three hours with my 8 yr. old son.

Estimated Cost
$25
Estimated Time Investment
Afternoon Project (3-6 Hours)
Finish Used
I finished the shelving part with 2 coats of white leftover ceiling paint and varnished the top with 2 coats of a pecan polyurethane blend.
Recommended Skill Level
Beginner

DIY Farmhouse King Size Bed

Ever since we moved into our current home, our master bedroom headboard has been at the top of our my project list. I knew I wanted a beautiful farmhouse style headboard. What I didn’t want was the heavy retail price tag. I searched high and low at places like Target, Wayfair, Amazon and even Walmart without finding an affordable option for us.

There is this perfect vantage point of our bedroom from the glider in my son’s room. I remember staring at that empty wall space above our bed for years, it felt like, while rocking our son to sleep. Just willing a headboard to appear. I wanted it so bad I could taste it. Something about looking at that same view, night after night, and waiting, waiting, waiting for it to happen just makes me appreciate it so much more now that it’s here, as so often happens in life.

This project inevitably got put on hold over the years after one thing or another got in the way. Either we didn’t have the time to devote to it, or we always had something else to put our money into. Untilllll I stumbled across Ana White’s Farmhouse Headboard Plans.

Built from Plan(s)
Estimated Cost
~ $200
Estimated Time Investment
Weekend Project (10-20 Hours)
Finish Used
Valspar off the shelf white in semi gloss applied with paint sprayer in several, thin coats with sanding in between.
Recommended Skill Level
Intermediate

Stick on organizers for dresser drawer

Submitted by Ana White on Thu, 04/27/2023 - 12:58

I used the stick on drawer organizer tutorial to divide a giant dresser drawer

With the divider, the drawer can hold more and is so much neater and easier to use

i love there is ZERO planning or sourcing of dividers with this method  just have the basic materials on hand, open up a drawer and get it done  


Toy Work Bench

Submitted by cdswhite on Fri, 12/30/2011 - 18:09

I made this work bench for the Make Two Challenge but haven't found someone to give it away to yet. We did have fun building it though. Check out my blog for more details!

Built from Plan(s)
Estimated Cost
$5 - I had everything but the 1x4s on hand and even those I got for a steal
Estimated Time Investment
An Hour or Two (0-2 Hours)
Finish Used
The stained parts were Old English stain, the rest has one coat of primer, a couple coats of Mystic Forest (more green than the pics show) and a couple coats of spray poly in satin.
Recommended Skill Level
Starter Project

Queen-size Slat Bed

Submitted by MikeT on Mon, 11/18/2013 - 15:45

I needed a new double bed for one of our spare rooms (that had been used for storing suitcases, etc.) and looking at what was available, decided to make my own. 

I settled on standard timber sizes - 4x4, 6x4, 8x1, 4x2, 1x1, etc. and used pocket-hole joinery to tie it all together. 

As far as tools, a drop saw, battery drill and hand router/trimmer, along with measuring/marking/squaring tools.

The bed rails and stretchers are 6x2 Meranti (a local timber in SE Asia where I live), the posts are 4x4s, the support rail in the centre is a 4x2, the head and footboards are finished with 8x1s.

The slat support cleats and centre support rail were rough-sawn, the rest of the timber was planed - my thinking being that no-one would see either of those and I had a bunch of 4x2s lying around.

Very little measuring was done, other than for cutting the lengths of timber - I just cut a piece of timber to act as a spacer to ensure I had the rails and stretchers at an even height and set back from the edge of the 4x4s.

All measuring was done in metric, as that's what I am used to - so the 4x4s are really 100x100 - and after planing, 90x90, but my router bits are imperial, so I decided to use inch measurements in descriptions. The plans are in metric, but if you want them in inch, just change the 'model' to inch.

The 4x4s had a 1/4" groove 7/8" deep routed in to take a matching 'tongue' routed into the boards, which were glued in place. one 8x1 board in the foot and three in the headboard gave it a nice balance and reduced the need to rip any planks. The 4x4s were cut to accommodate those plank dimensions. The tops of the head/footboards were a ripped and shaped 8x1 board.

I routed a v-groove in the sides and foot to break up the expanse of timber, sanded it all down and used a dark stain - local meranti varies so much in colour, from golden blonde to ashy dark, that staining is pretty much compulsory.

As to method:

Cut rails, cut posts, cut stretchers - test fit.

Make 'spacer'

Drill pocket-holes in rails and stretchers

Route groove in posts, route v-groove in rails and foot stretcher.

Support end of rail, use spacer to get correct height against post and seat pocket-hole screws - same at the other end and for stretchers. This almost completed construction :)

Measure and cut slat - fit support cleats and centre support rail using slat as template/guide.

Use slat as template for cutting the rest of the slats - test layout/fit slats.

Glue boards in footboard and headboard.

Cap footboard and headboard with ripped board - panel pins and glued.

Finish sand, wipe down, varnish.

All in all, it is very sturdy - Meranti is heavy stuff. I could have used much lighter gauges of timber, but apart from the 6x2s, it was what I had lying around, so the dimensions almost dictated themselves.

I did do some further 'trim', by shaping the capping planks on my table saw - a quick and effective way of 'raising' a panel.

You can find the plans here: https://www.dropbox.com/sh/k99w5pik5pezmxa/pUU2TUwlKM

Estimated Cost
$100
Estimated Time Investment
Weekend Project (10-20 Hours)
Finish Used
Polyurethane stain varnish - dark smoke.
Recommended Skill Level
Beginner

Rustic X Console

Needed to add a buffet console to the empty wall in our formal dining room.

Built from Plan(s)
Estimated Cost
$65
Estimated Time Investment
Afternoon Project (3-6 Hours)
Recommended Skill Level
Beginner

Modified Modern Park Bench

Submitted by Anonymous (not verified) on Sat, 08/03/2019 - 16:06

I used the Modern Park Bench plans and modified the size for our patio space. I also modified the bottom and used 2x2’s to give it a different look.

Built from Plan(s)

My son's first woodworking project!

Submitted by Andef on Tue, 01/03/2012 - 10:20

My 12 year old son expressed some interest in learning how to build things. We looked for several "kit" projects but they all seemed too juvenile to him. In the meantime his "Grandma" (an old family friend) asked me to find her a tray that she could use to carry her cup of tea on so when it sloshed it wasn't running down her arm. I looked and looked but couldn't find one in the stores that had a handle that she could grip. I was very surprised and relieved to find the pefect project: this wonderful serving tray!
We printed the PDF, drove to the store and a few hours later- her tray was finished and my son was hooked on wood working.
Overall it was a very simple project- the thing that caused the some difficulty was figuring out the process for shaping the handle- that grid diagram was very confusing to us, but it may be because we are novices.
Aside from that- we could not be happier and we are looking forward to completing some other projects together.

Built from Plan(s)
Estimated Cost
$12
Estimated Time Investment
Day Project (6-9 Hours)
Finish Used
Minwax espresso stain and acrylic paint to cover the areas where the glue wouldn't take the stain
Recommended Skill Level
Beginner

Comments

spiceylg

Tue, 01/03/2012 - 11:29

You must be so proud! Tell him for me that he did a fantastic job and welcome to the group!

Guest (not verified)

Wed, 01/04/2012 - 05:30

Absolutely fantastic job! Welcome to the world of woodworkers, and keep up the good work! And please post your next project for us all to see!

Jake

Sun, 03/10/2013 - 11:55

Just let him know that he did a fabulous job for his first project. When all of us started we made many many mistakes but learned valuable lessons. Woodworking requires math, geometry, patience, planning, preciseness, and a lot of other things. You do not need a bunch of expensive tools. Some of the best projects I have seen were all built with hand tools. Clamps are a must however. Folks on this site will gladly share ideas and direction anytime your son needs it. By the way I still make a lot of mistakes, but only me and my shadow know.

Lounge Chair and Table

Submitted by wunkie on Tue, 11/19/2013 - 20:07

2nd project. Made this for me! Love it. I bought 5 towels at Walmart for $2.86 each, extra firm pillows for $3.50 each and made the cushions. It is like sinking into Heaven. Glass of wine and a good book. Set for the day. I added another support half way through since people used it as a seat during parties and I was afraid it would sag in the middle.

The table was an after thought. I had leftover wood and and just gestimated measurements.

FYI, I'm a slow project person, so most could probably finish faster than I did.

Estimated Time Investment
Day Project (6-9 Hours)
Finish Used
I followed the directions on Ana's site, which were very easy to follow. Great beginner's project. It's all straight cuts.
Recommended Skill Level
Beginner

Daughter loves it!

Submitted by Anonymous (not verified) on Sat, 02/06/2016 - 09:47

Thank you so much for these plans! 2 weeks worth of nap time building and my daughter has an awesome new bed! 

Built from Plan(s)
Estimated Cost
$300
Estimated Time Investment
Week Long Project (20 Hours or More)
Recommended Skill Level
Intermediate

Comments

My Farmhouse Table

Submitted by Anonymous (not verified) on Sat, 08/24/2019 - 17:41

Made using knotty pine.


I used HD pocket screws and glued all top pieces except for the breadboard ends, to allow for wood swelling/contracting.


Estimated Cost
$200
Estimated Time Investment
Week Long Project (20 Hours or More)
Finish Used
The wood was sanded to 180 grit, and stained with a dark walnut stain after applying a wood conditioner. The high grit sanding and wood conditioner lightened the stain considerably, and I'm very happy with the resulting color. I initially tried staining after doing 120 grit sanding with no conditioner and found the stain far too dark.

The top was finished using water based polyurethane. I did three coats and wet sanded between coats. A smooth finish was achieved by using a synthetic steel wood on an orbital sander to buff it to a smooth shine.
Recommended Skill Level
Intermediate

Vertical Shoe Rack

Submitted by Anonymous (not verified) on Sat, 05/06/2023 - 14:12

I needed a shoe rack that would work for our limited space and the Laundry Tower that was on the brag post caught my eye. It was modified from the Open Frame Laundry Basket Organizer. This shoe rack is working great for our family now! Thanks for this community!

Comments

Farmhouse bench

I took Anna's Narrow Farmhouse table and downsized it to make a bench for my kitchen table. For the bench top, I used what I had on hand to make a comfortable seat.

Built from Plan(s)
Estimated Cost
$10 plus scraps
Estimated Time Investment
Afternoon Project (3-6 Hours)
Finish Used
I bought rough looking 1x3 furring strips - the cheap ones! I wanted a primitive well worn look. After putting the bench together, I beat up the boards with nails, a hammer, my drill - whatever was handy. I then painted it solid black, let dry, sanded lots of bare spots, wiped clean of dust, stained sanded spots lightly with some stain I had on hand (no name left on the label), then poly'd the whole thing (since it will need lots of cleaning.
Recommended Skill Level
Starter Project

Volcano Loft Bed

When it was time to re-do my son's bedroom (past time, really), I decided to build him a loft bed to help maximize space in his small room. A quick search to the internet brought me to Ana's site, saving me lots of hassle on trying to design my own loft bed for him from scratch. My son, who loves everything science and is especially fond of volcanoes, wanted a volcano themed room, and I had the bright idea to make the bed itself into a volcano.

I modified the loft plans slightly to create a bookcase headboard - because I always wonder when looking at loft/bunk beds where the kids put all their STUFF (books, reading lights, glasses, special treasures, etc) - but other than that its just the plans from this site minus the rails and with plywood tacked on to the exterior (the plywood takes the place of the rails). The plywood was cut with a jigsaw after it was put up so I could get all the ridges and holes in just the right spot and height.

Honestly, the painting took much MUCH longer than cutting and assembling the bed did, but I think it really turned out well. The inside of the volcano on the cave's back wall is my favorite part. There's still a few things left to do, but no project of mine is ever really completely finished anyway! On on end inside the "cave" under the loft I built a cushioned reading bench and bookshelf, but the other end of the cave is still empty. Eventually it will house a built-in desk that looks out of the lava holes in the walls.

The cave under the bed is so cozy, I've found myself sitting on the reading bench more than once while working on the project, enjoying some me-time when the kids are at school!

Built from Plan(s)
Estimated Time Investment
Weekend Project (10-20 Hours)
Finish Used
paint
Recommended Skill Level
Intermediate

Comments

Ccpie77

Sat, 03/22/2014 - 10:49

Hi -

Great job!! I'm planning on adding a slide too for my son. Did you do anything extra to support the slide?

Thanks!

Ccpie77

Sat, 03/22/2014 - 10:49

Hi -

Great job!! I'm planning on adding a slide too for my son. Did you do anything extra to support the slide?

Thanks!

The Kids are off the floor

Submitted by derwood294 on Mon, 02/08/2016 - 09:11

We Recently moved into a new house and this project was a great break from the regular work on the house. The instructions were great and easy to follow. The 2 x 6s on the sides makes it hard to use carriage bolts though I settled for lag screws. Can't wait to do my next project.

Built from Plan(s)
Estimated Cost
around $120
Estimated Time Investment
Weekend Project (10-20 Hours)
Finish Used
Semi-gloss paint of Behr Paint and primer in one with the color Cupcake Pink. I stated with Killz Primer and 2 coats of the Beher.
Recommended Skill Level
Beginner

Redwood Adirondacks

Submitted by Anonymous (not verified) on Sun, 09/08/2019 - 16:46

Ana's favorite Adirondack chairs made from redwood.

Estimated Cost
150
Estimated Time Investment
Weekend Project (10-20 Hours)
Finish Used
None
Recommended Skill Level
Beginner

Comments

$15 Cedar Lemonade Stand!

My kid-o's love to sell lemonade. So, we made a trip to the local hardware store. Because I am terrified to use my husbands electric saw, any wood we purchased would have to be cut with a hack saw and a miter box. And since the stand is to be stored in the backyard, we opted to build it from cedar. We ended up purchasing 8 fence pickets for about $15 total. This was also to be a great way for my kids to apply the some of the knowledge they have picked up this year, our first year of homeschooling. My children, ages 7 and 9, measured all of the boards that needed to be cut. It turned out GREAT! We already had some extra boards, spray paint and screws on hand; so, the grand total was $15.00 for the entire project!

Built from Plan(s)

stools turned nightstand

Submitted by hoffer5353 on Sat, 01/07/2012 - 19:42

I started this project so my children could use them at the x-desk art table. But as they came together I decided that I would use them for nightstands in our new bedroom.
They are fabulous as a stool or a table I love them.

Estimated Cost
free-scraps
Estimated Time Investment
An Hour or Two (0-2 Hours)
Finish Used
natural
Recommended Skill Level
Beginner

Entry Table from the Providence Bench

I used the providence bench instructions as my base, but made the legs longer and the top 1 board wider. It took a total of 7 2x4's. Cheap, easy, and fun addition to my entry way! Thanks Ana White!

Built from Plan(s)
Estimated Time Investment
Afternoon Project (3-6 Hours)
Finish Used
Entry table or Sofa table.

Used Poly Shades Bombay Mahogany Stain for the finish. I did 3 coats of it.
Recommended Skill Level
Starter Project