Community Brag Posts
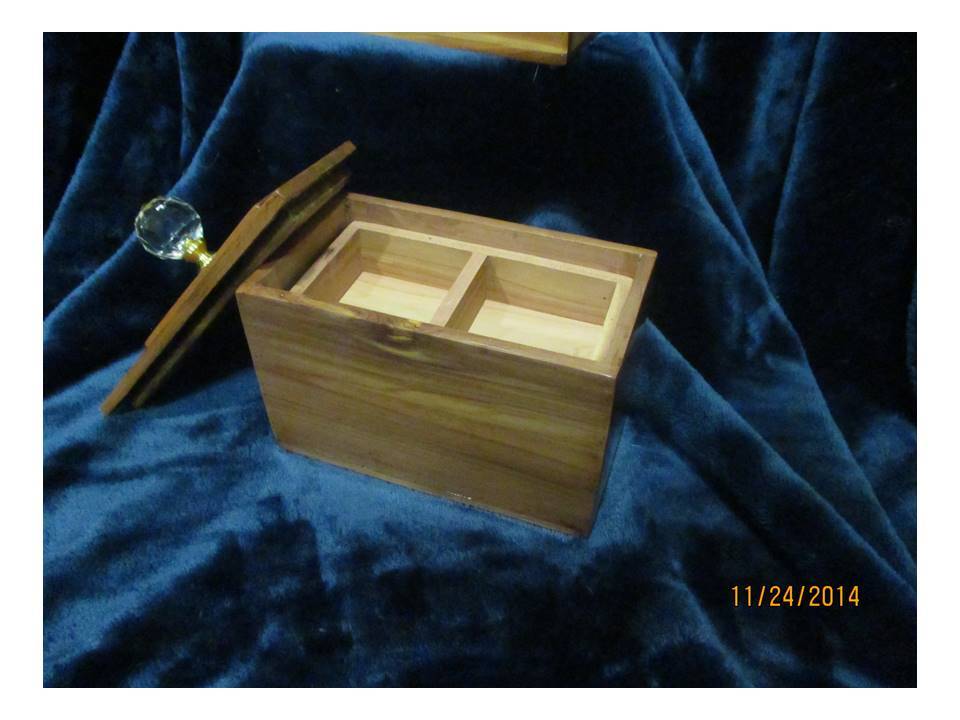
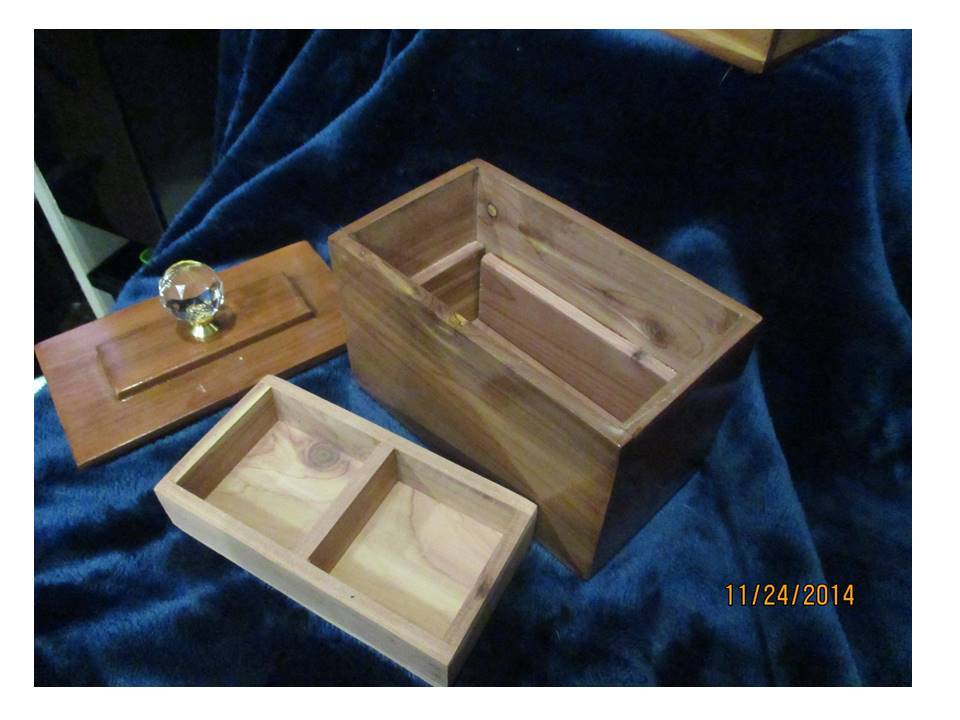
Aromatic Cedar trinket box

This was a project to use some pieces of left over ¼” thick aromatic cedar closet lining board. I cut off the tongues and grooves with the sliding miter saw, and calculated the measurements for the box to fit the size of the wood. For this build I used the micro-pin nailer with compressor, and ½” headless pin nails. The finished box measures 4 1/8” tall, 6” long, and 3 3/8” wide.
Inside, a divided lift-out tray sits on rails made from small pieces of the cedar board glued to the inside. The addition of an extra decorative board to the top made it ¾” thick, to work with a regular knob. The inside of the box stayed unfinished to preserve the cedar fragrance. This was an afternoon project.

Built from Plan(s)
Estimated Cost
The cost of this build is just for the knob, since the wood and finishing materials were already on hand.
Estimated Time Investment
Afternoon Project (3-6 Hours)
Finish Used
On this build I ended up with some discoloration from the glue. I re-sanded and touched it up with some Minwax express color in Mahogany on those areas to even up the color and make it all look natural again. Then everything received 3 coats of gloss polycrylic, topped off with an acrylic crystal knob from Lowes.
Recommended Skill Level
Beginner
Comments
Fri, 12/05/2014 - 17:56
Trinket/jewelry boxes
Joanne, you are the queen of trinket/jewelry boxes! I love all of your posts which show how something simple can be so different and special. These would make wonderful Christmas presents for loved ones, friends, or co-workers. Thanks for sharing.

Sat, 12/06/2014 - 04:58
Thank you!
Linda, thanks so much for the nice comment! I have such fun doing hand built gifts for Christmas! Thinking up how to decorate them and what to make them from is a big part of the fun! 
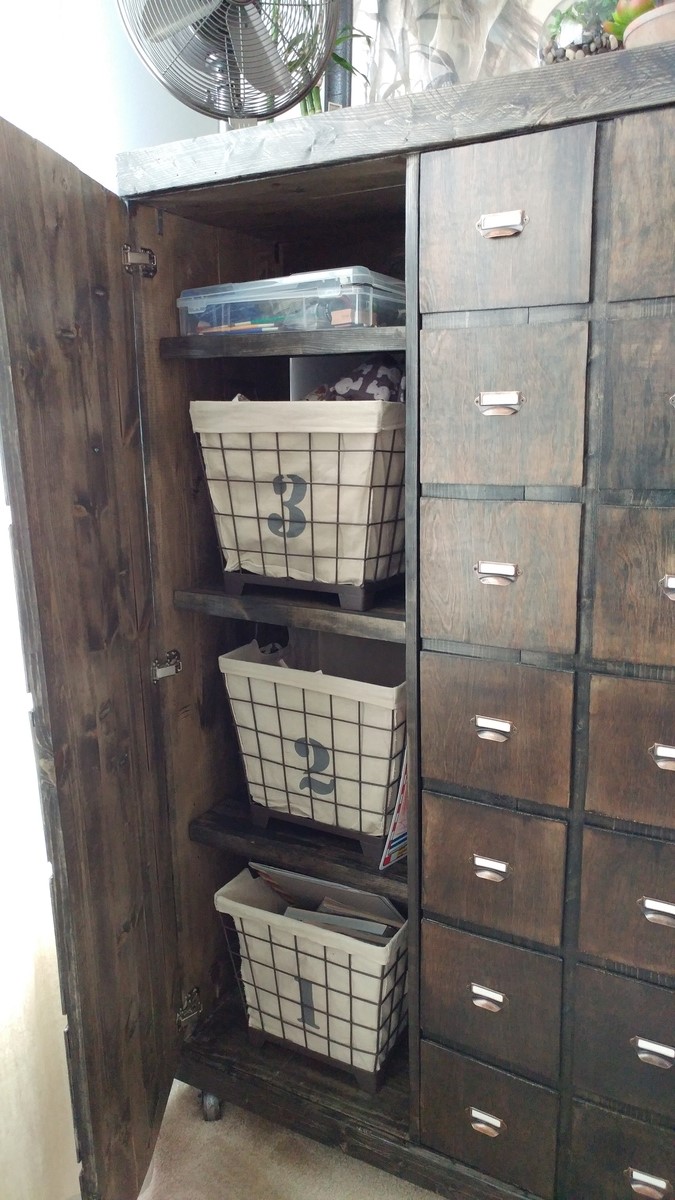
Apothecary cabinet
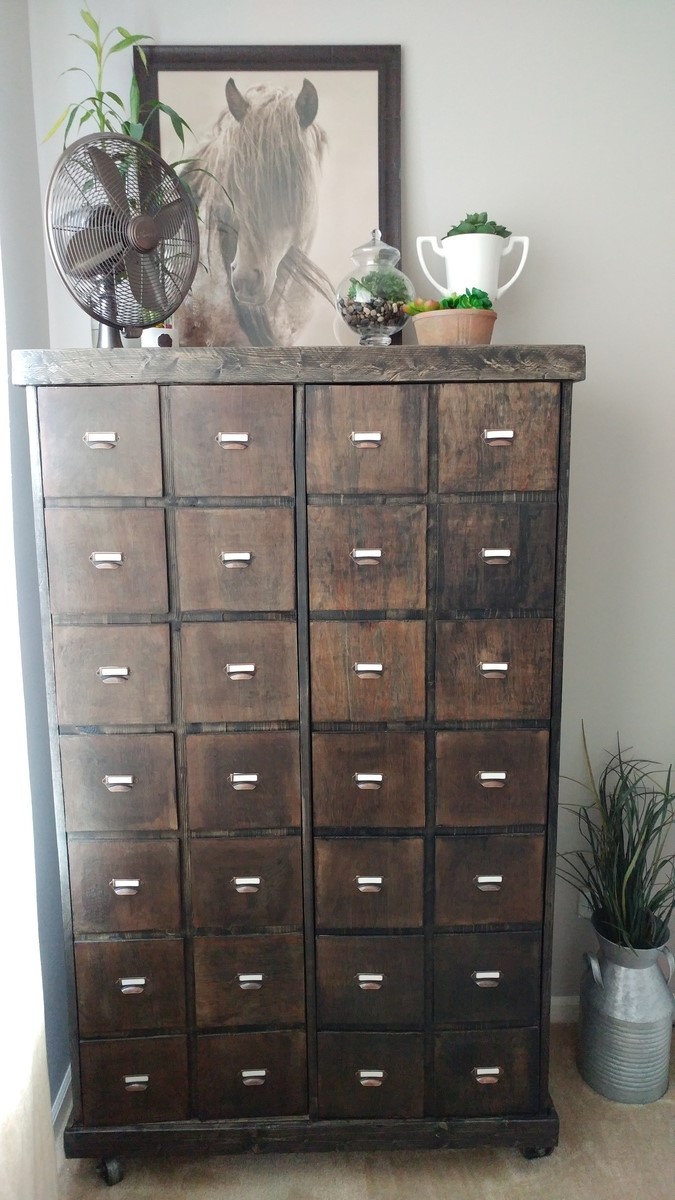
I've wanted to build one of these forever! I changed the plans a lot to accommodate my needs, but I loved the idea of faux drawers on the doors to have an authentic look. It fools most people! Took 2 weeks for me to complete, working on and off. It has great storage inside for all the kids' stuff I didn't have a place for previously. The stain is ebony by minwax and the hardware pulls I purchased for under $10 for 30.
Built from Plan(s)
Estimated Time Investment
Weekend Project (10-20 Hours)
Finish Used
Minwax ebony stain with varathane poly in satin
Recommended Skill Level
Intermediate
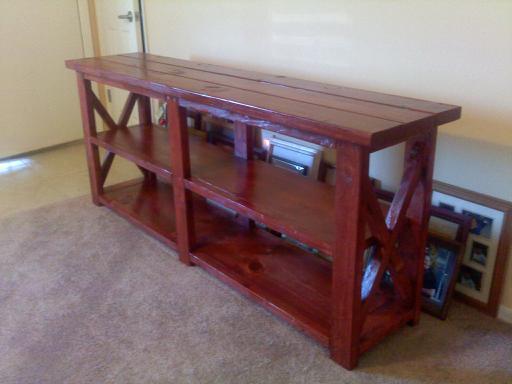
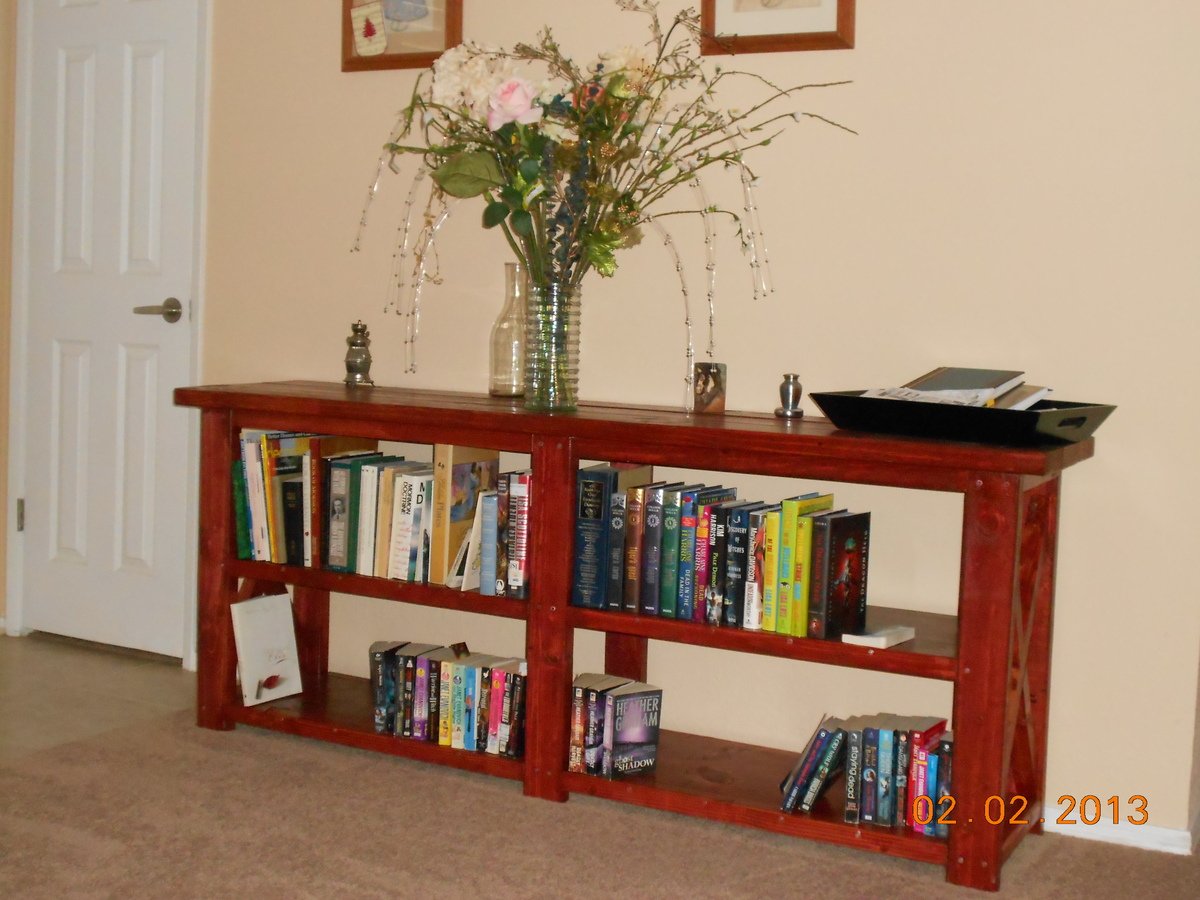
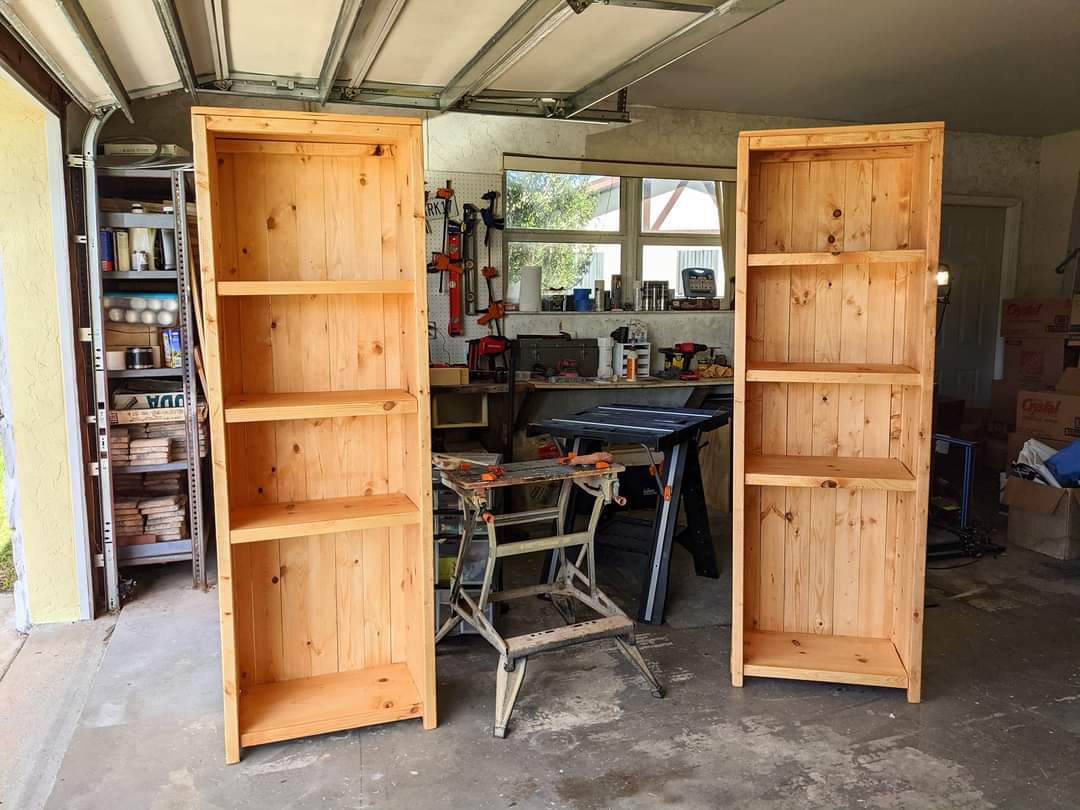
Kentwood Bookshelf
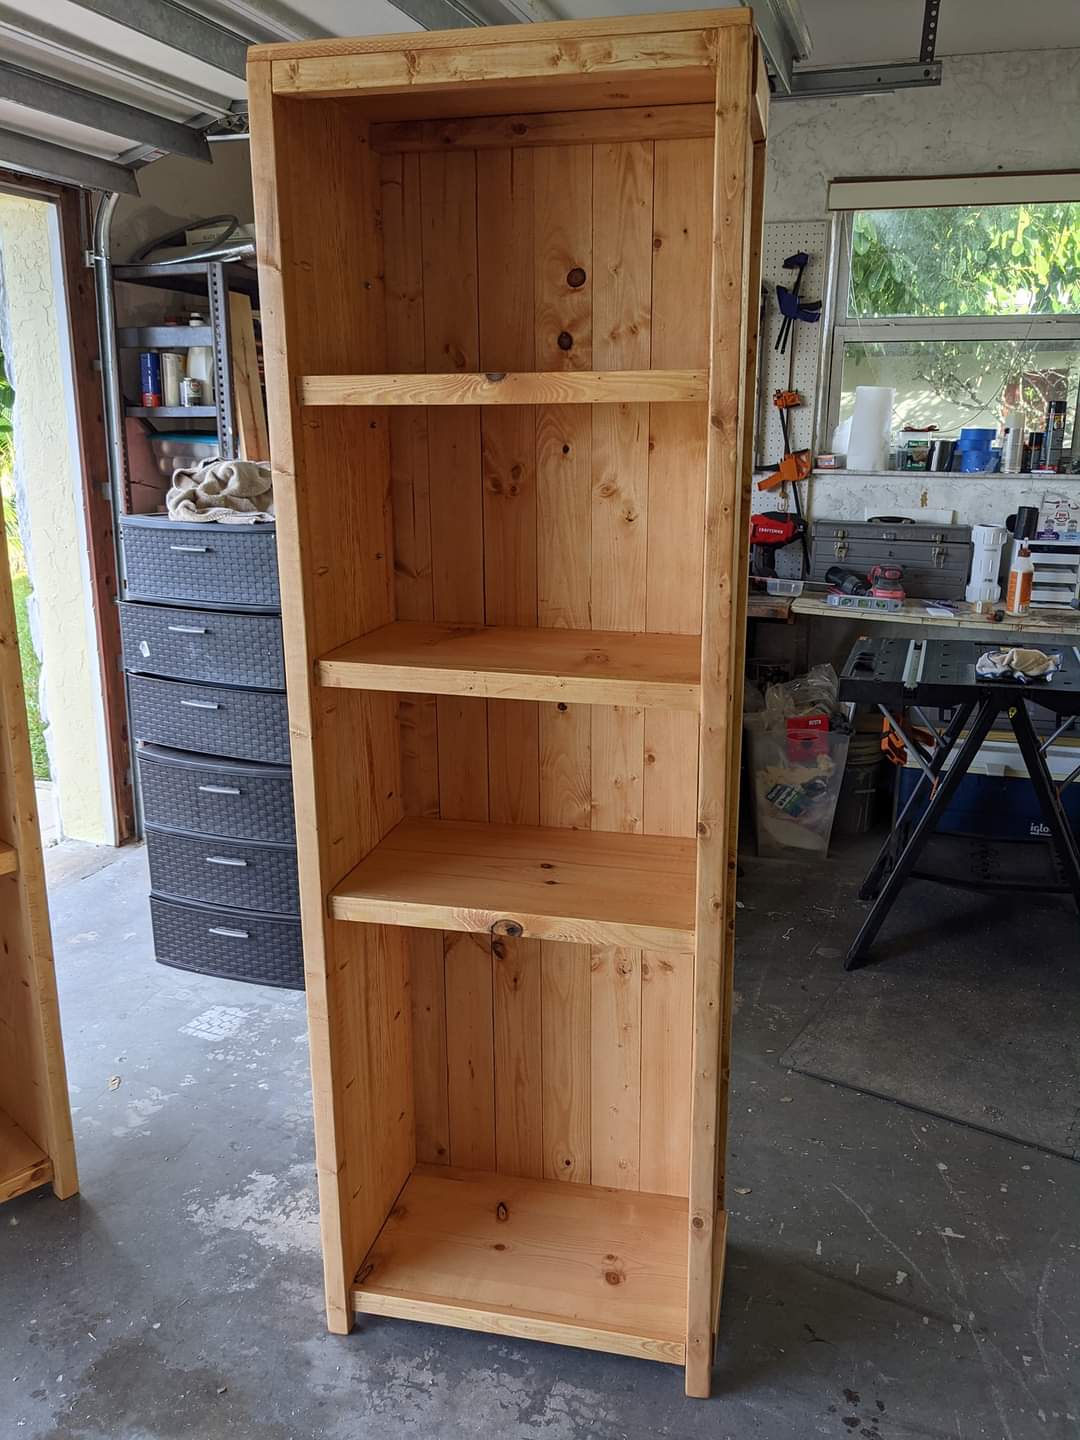
Built the Kentwood Bookshelves for our living room. Bookcases are 6ft. Made of Pine and Whitewood. This is my 2nd build and looking forward to more.
Built from Plan(s)
Estimated Cost
325
Estimated Time Investment
Weekend Project (10-20 Hours)
Finish Used
Minwax Colonial Maple
Recommended Skill Level
Intermediate
Hanging Wall File
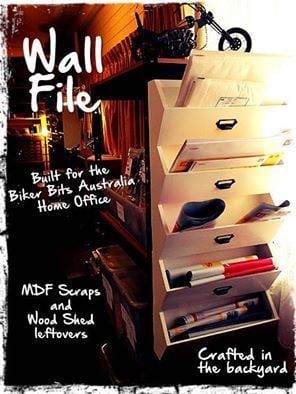
This was just a quick little project as we decided we needed a bit of organisation in the office.
I just used scrap mdf and leftover bits and pieces from other projects for this wall file. We now have somewhere to put all the postage stuff for our online sales site.
Cheers... Nay
Built from Plan(s)
Estimated Time Investment
Afternoon Project (3-6 Hours)
Finish Used
White enamel paint
Recommended Skill Level
Starter Project
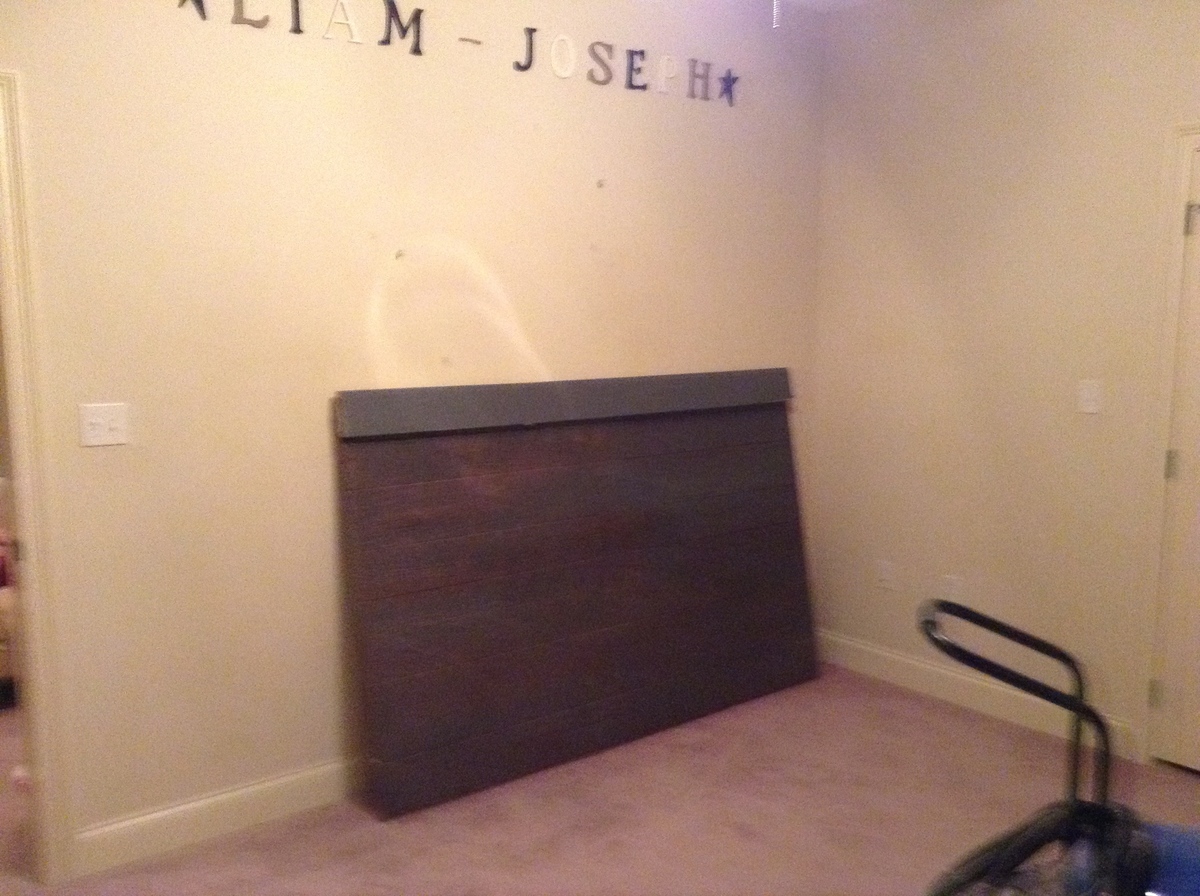
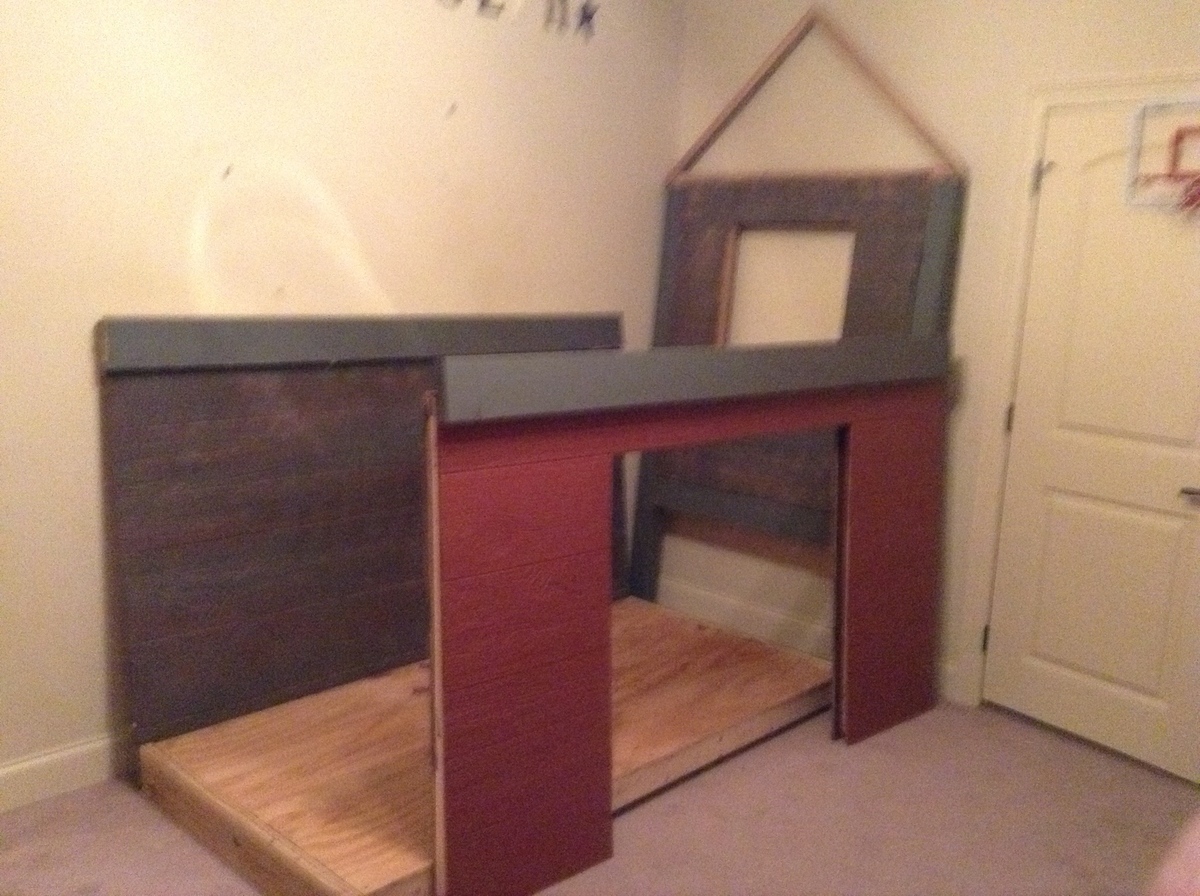
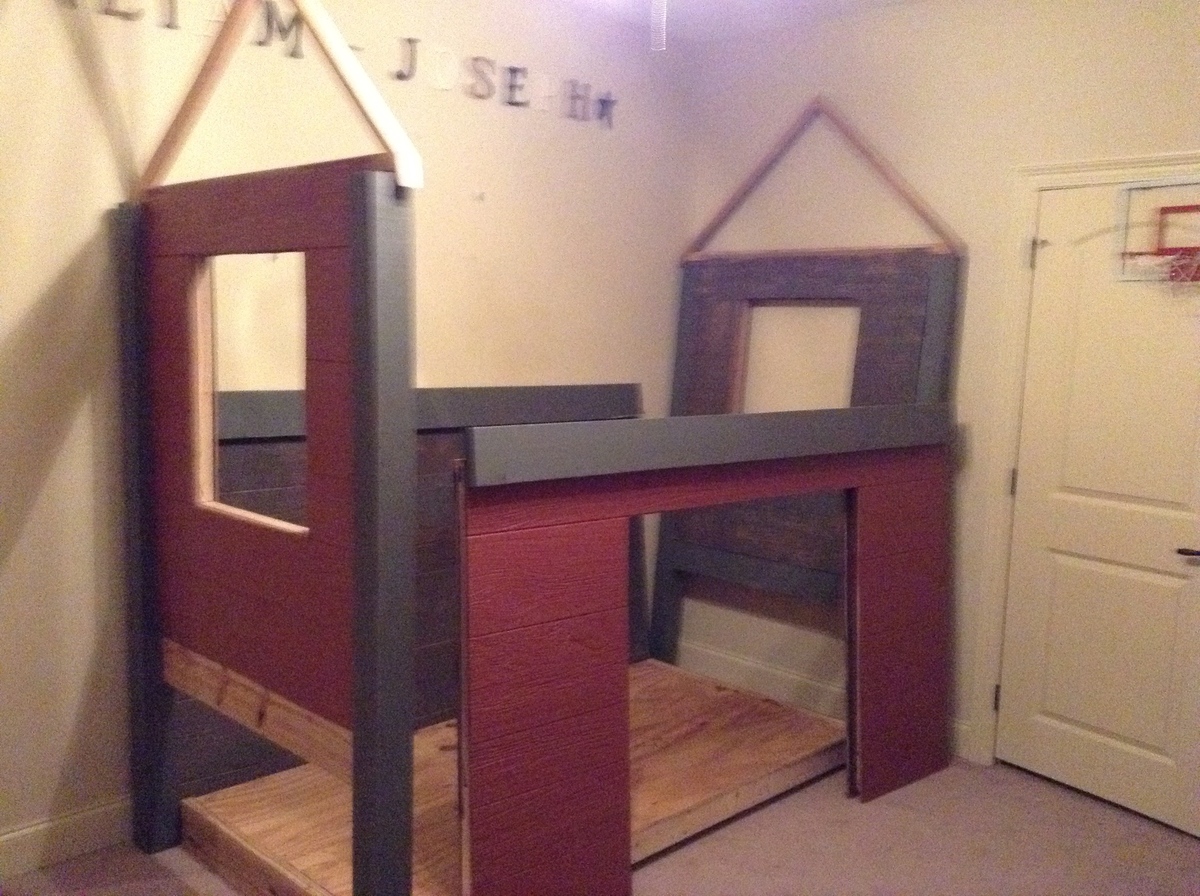
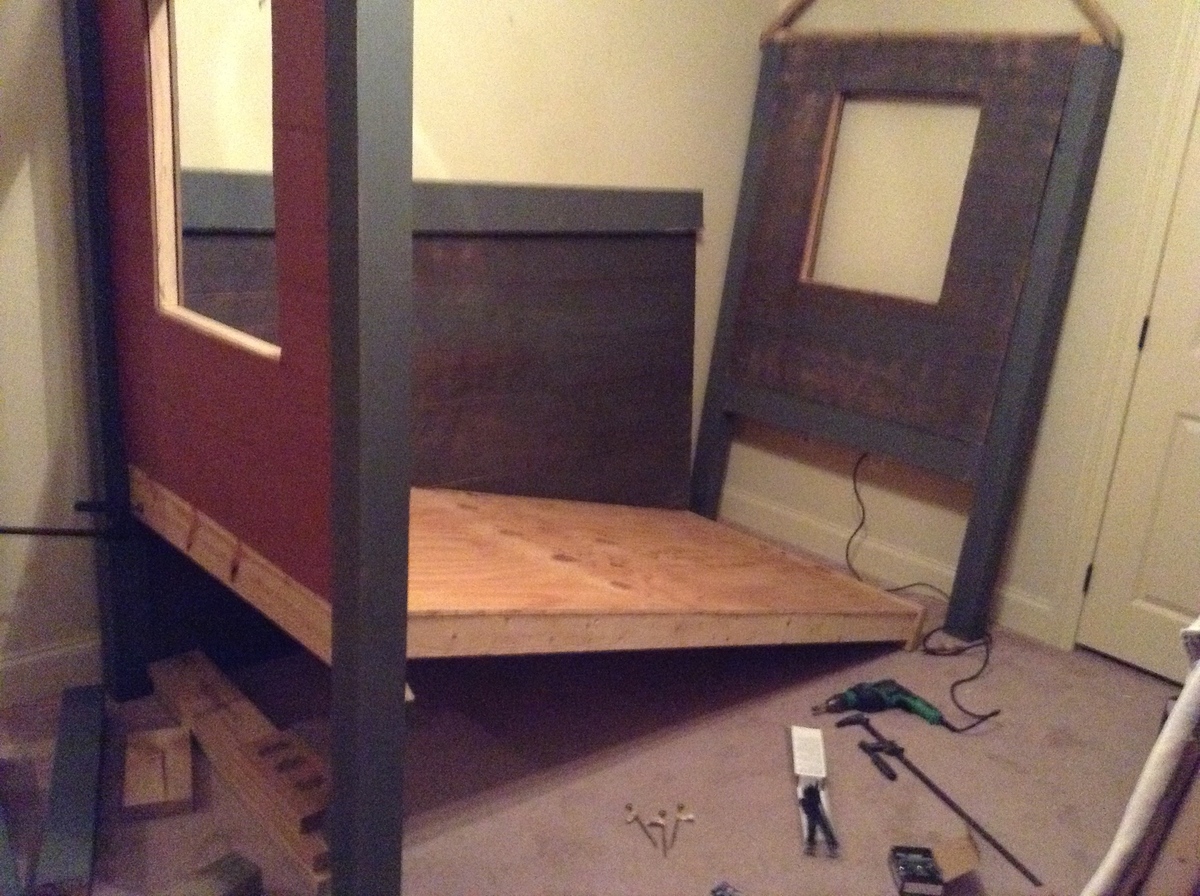
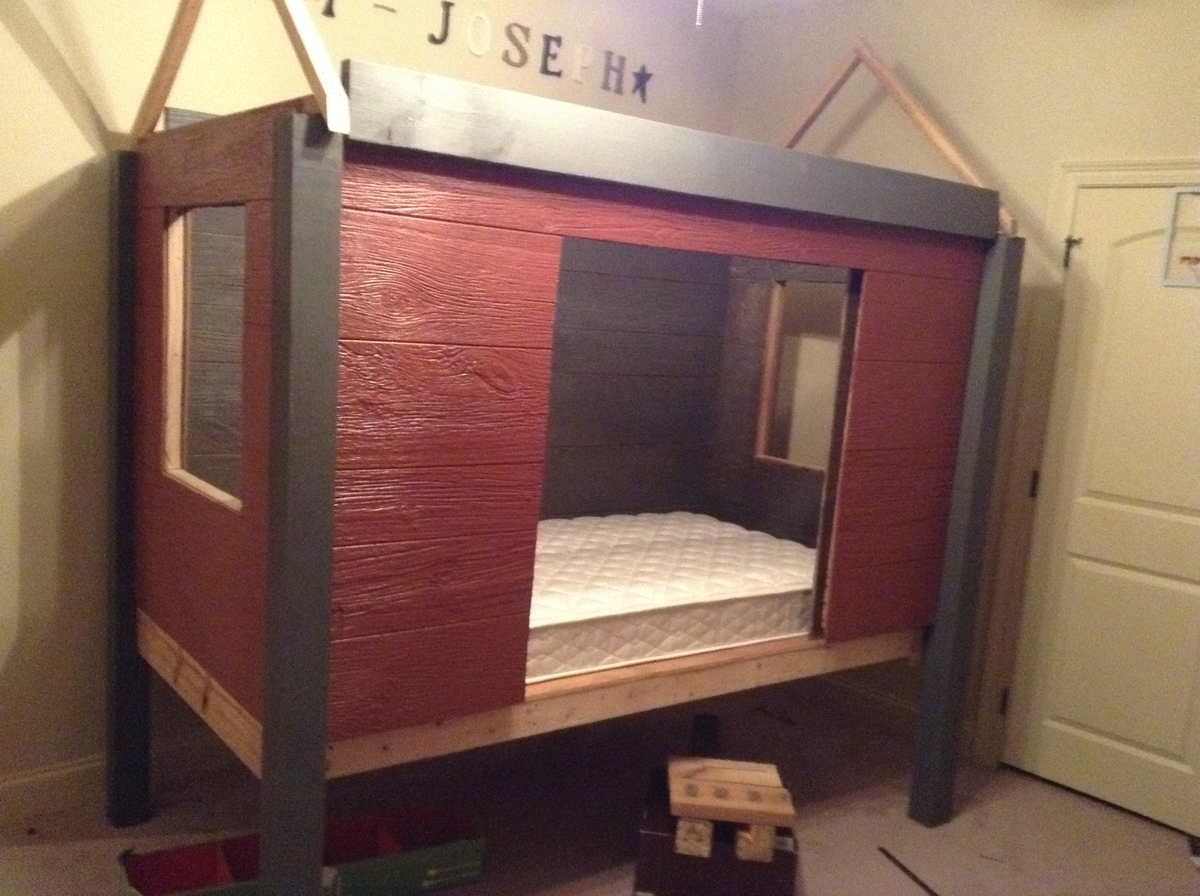
Liam's Christmas Day Barn Bed
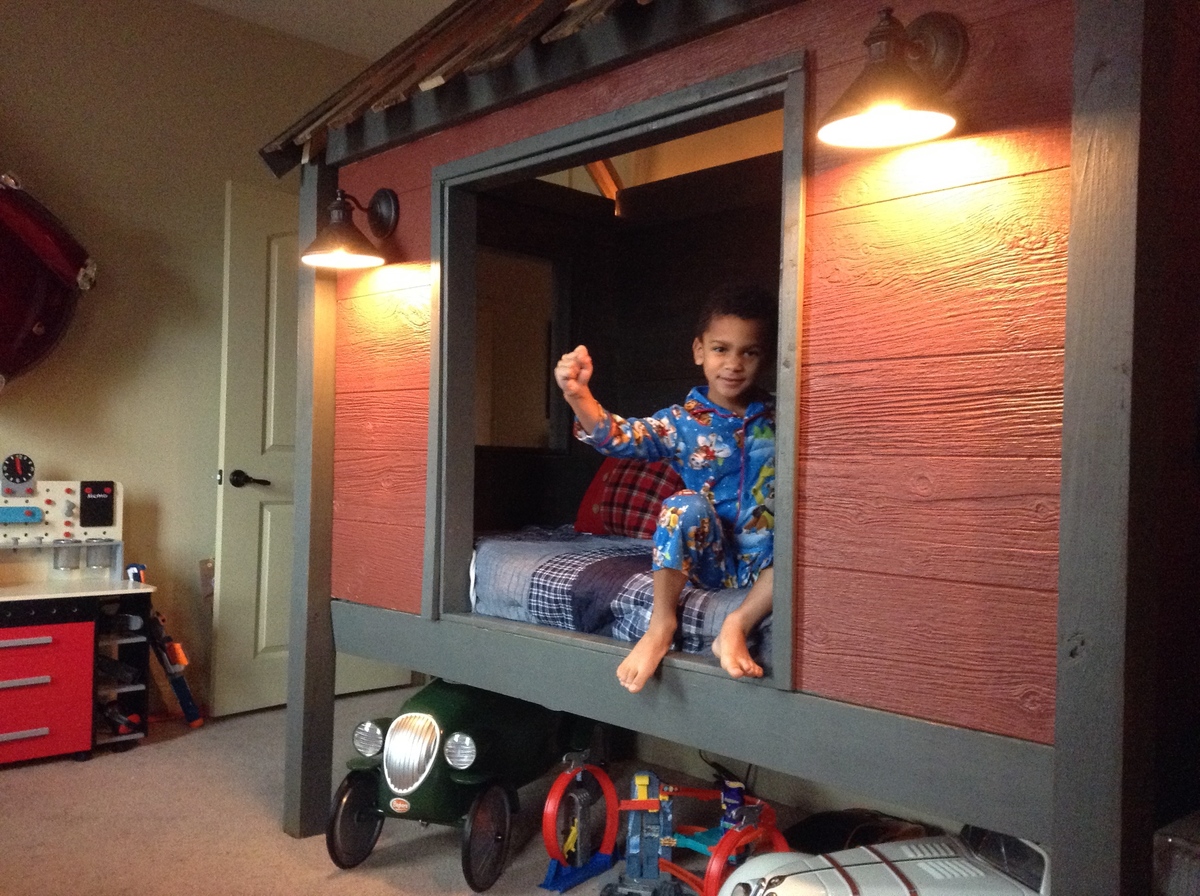
Our son Liam-Joseph wanted a "Big-Boy Bed" and then he added "I want Daddy and Santa to make it". Well "Santa" and my wife Jacques looked all over the internet and finally found your Cabin Bed via jennwoodhouse.com. Jacques altered the plans demensions and she realized the bed could be barn-like so she came up with the red and gray paint job. She actually wanted a cupola but I thankfully talked her out of that. Well somehow we keep the construction from Liam 2 weeks before Christmas. On Christmas Eve Liam's Grandparents keep him at their house while "Santa" and I put the bed together (I never did a trial run so I was relieved when everything fit right together). The next day after opening his presents he ran up to his room and saw his bed for the first time.
The project isn't completed. I recently finished the roof with wood pallets but I need to finish the trimming of the interior of the bed walls.
Estimated Time Investment
Week Long Project (20 Hours or More)
Recommended Skill Level
Intermediate
Altered apothecary console
I built this based on the apothecary console plans but with the modifications that VLilly made for the Altered Apothecary Media Console. Very happy with how it turned out! Thank you Ana for sharing the plans!
Built from Plan(s)
Estimated Time Investment
Week Long Project (20 Hours or More)
Finish Used
Whitewash, stain, distress, polycrylic
Recommended Skill Level
Intermediate
Comments
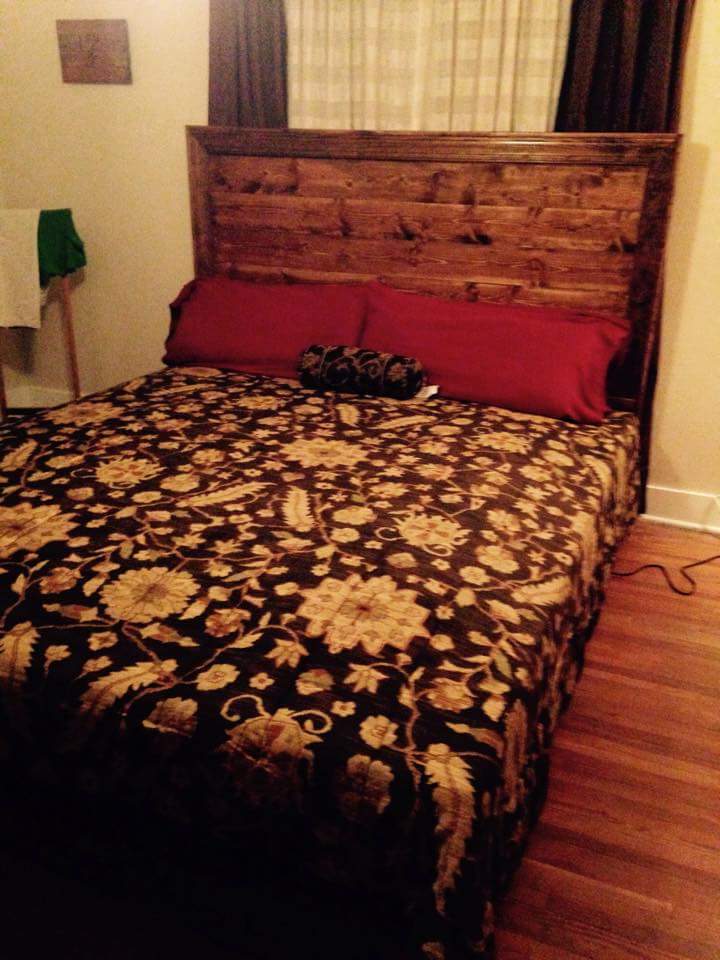
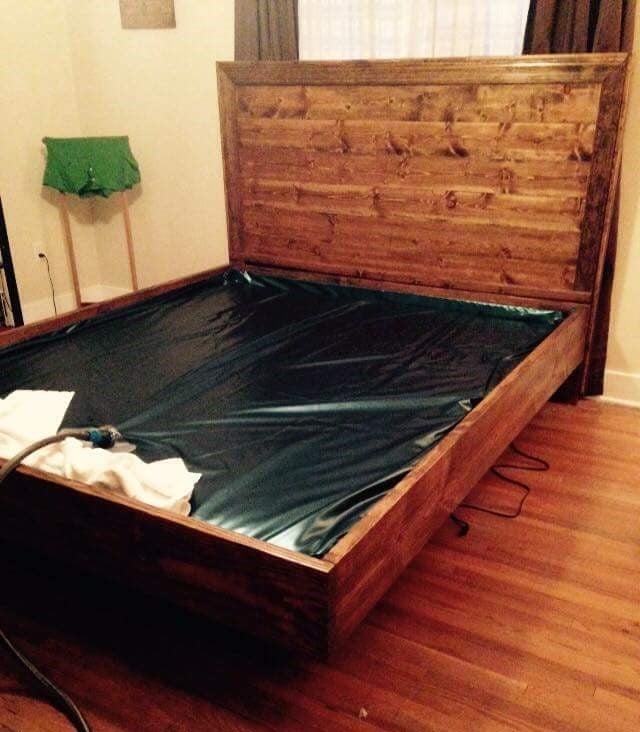
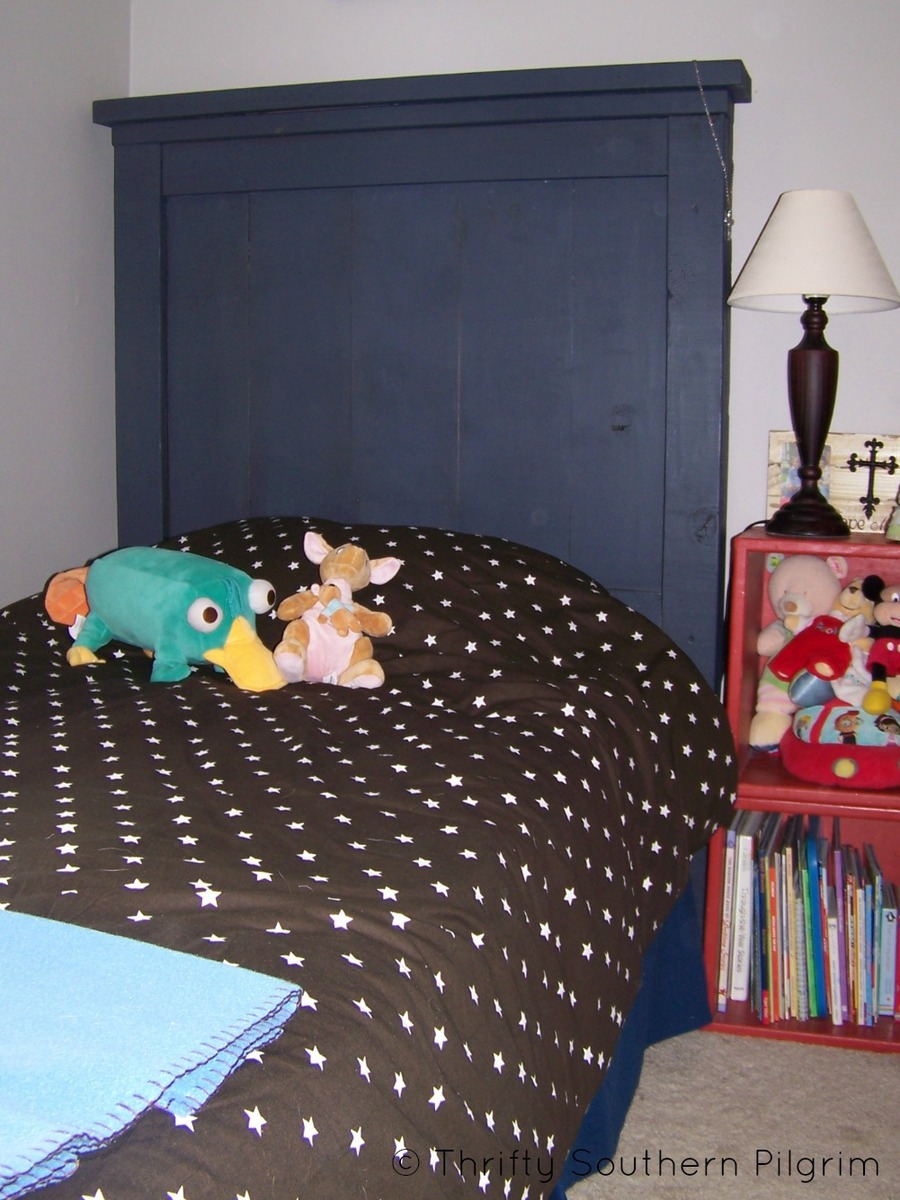
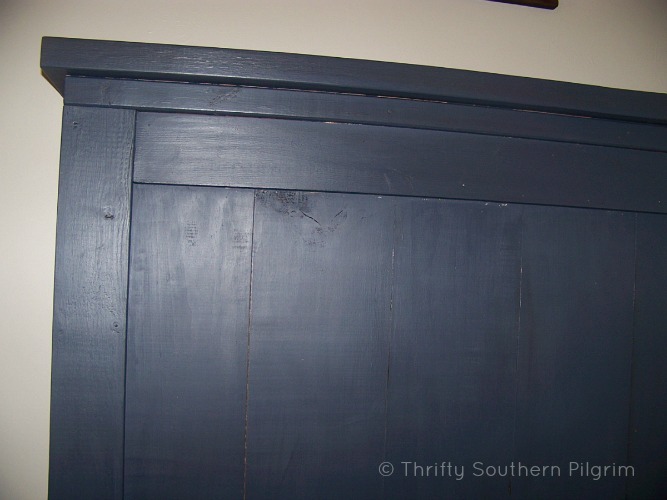
Planked Headboard / Waterbed Build
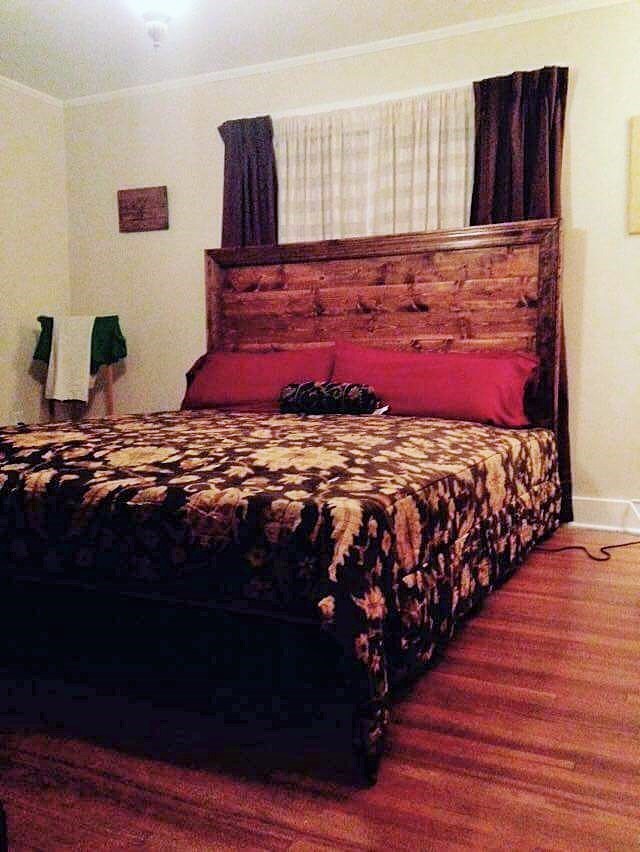
I don't have photos of the build but I did acquire some pictures of the assembly.
What we added to the shopping list for a king was 3 1x6x8's (he bought 6 total instead of 1x6x10's) and 1 1x4x8. To build it in a king or California king just take a measurement of the top or bottom of the bed frame to find the length to all of the horizontal boards. This takes care of the headboard. For the frame we simply built it to fit out of four 2x10x10's.
I also used my Kreg Jig to attach all of the center horizontal boards together with pocket holes instead of adding supports to the back.
Built from Plan(s)
Estimated Cost
$150.00 for the entire bed.
Estimated Time Investment
Weekend Project (10-20 Hours)
Finish Used
Rust-Oleum English Chestnut
Recommended Skill Level
Beginner
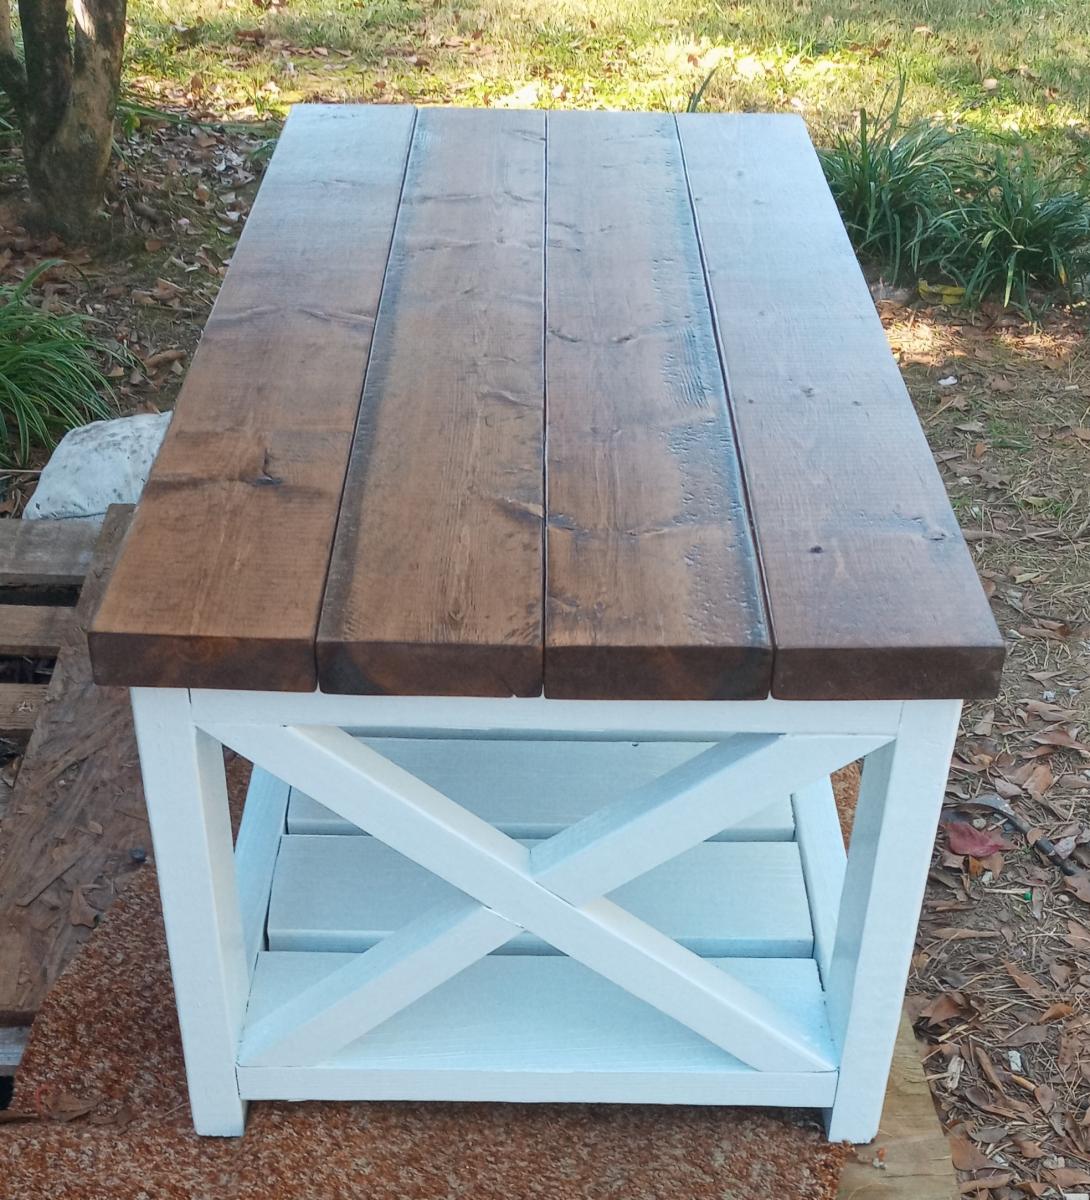
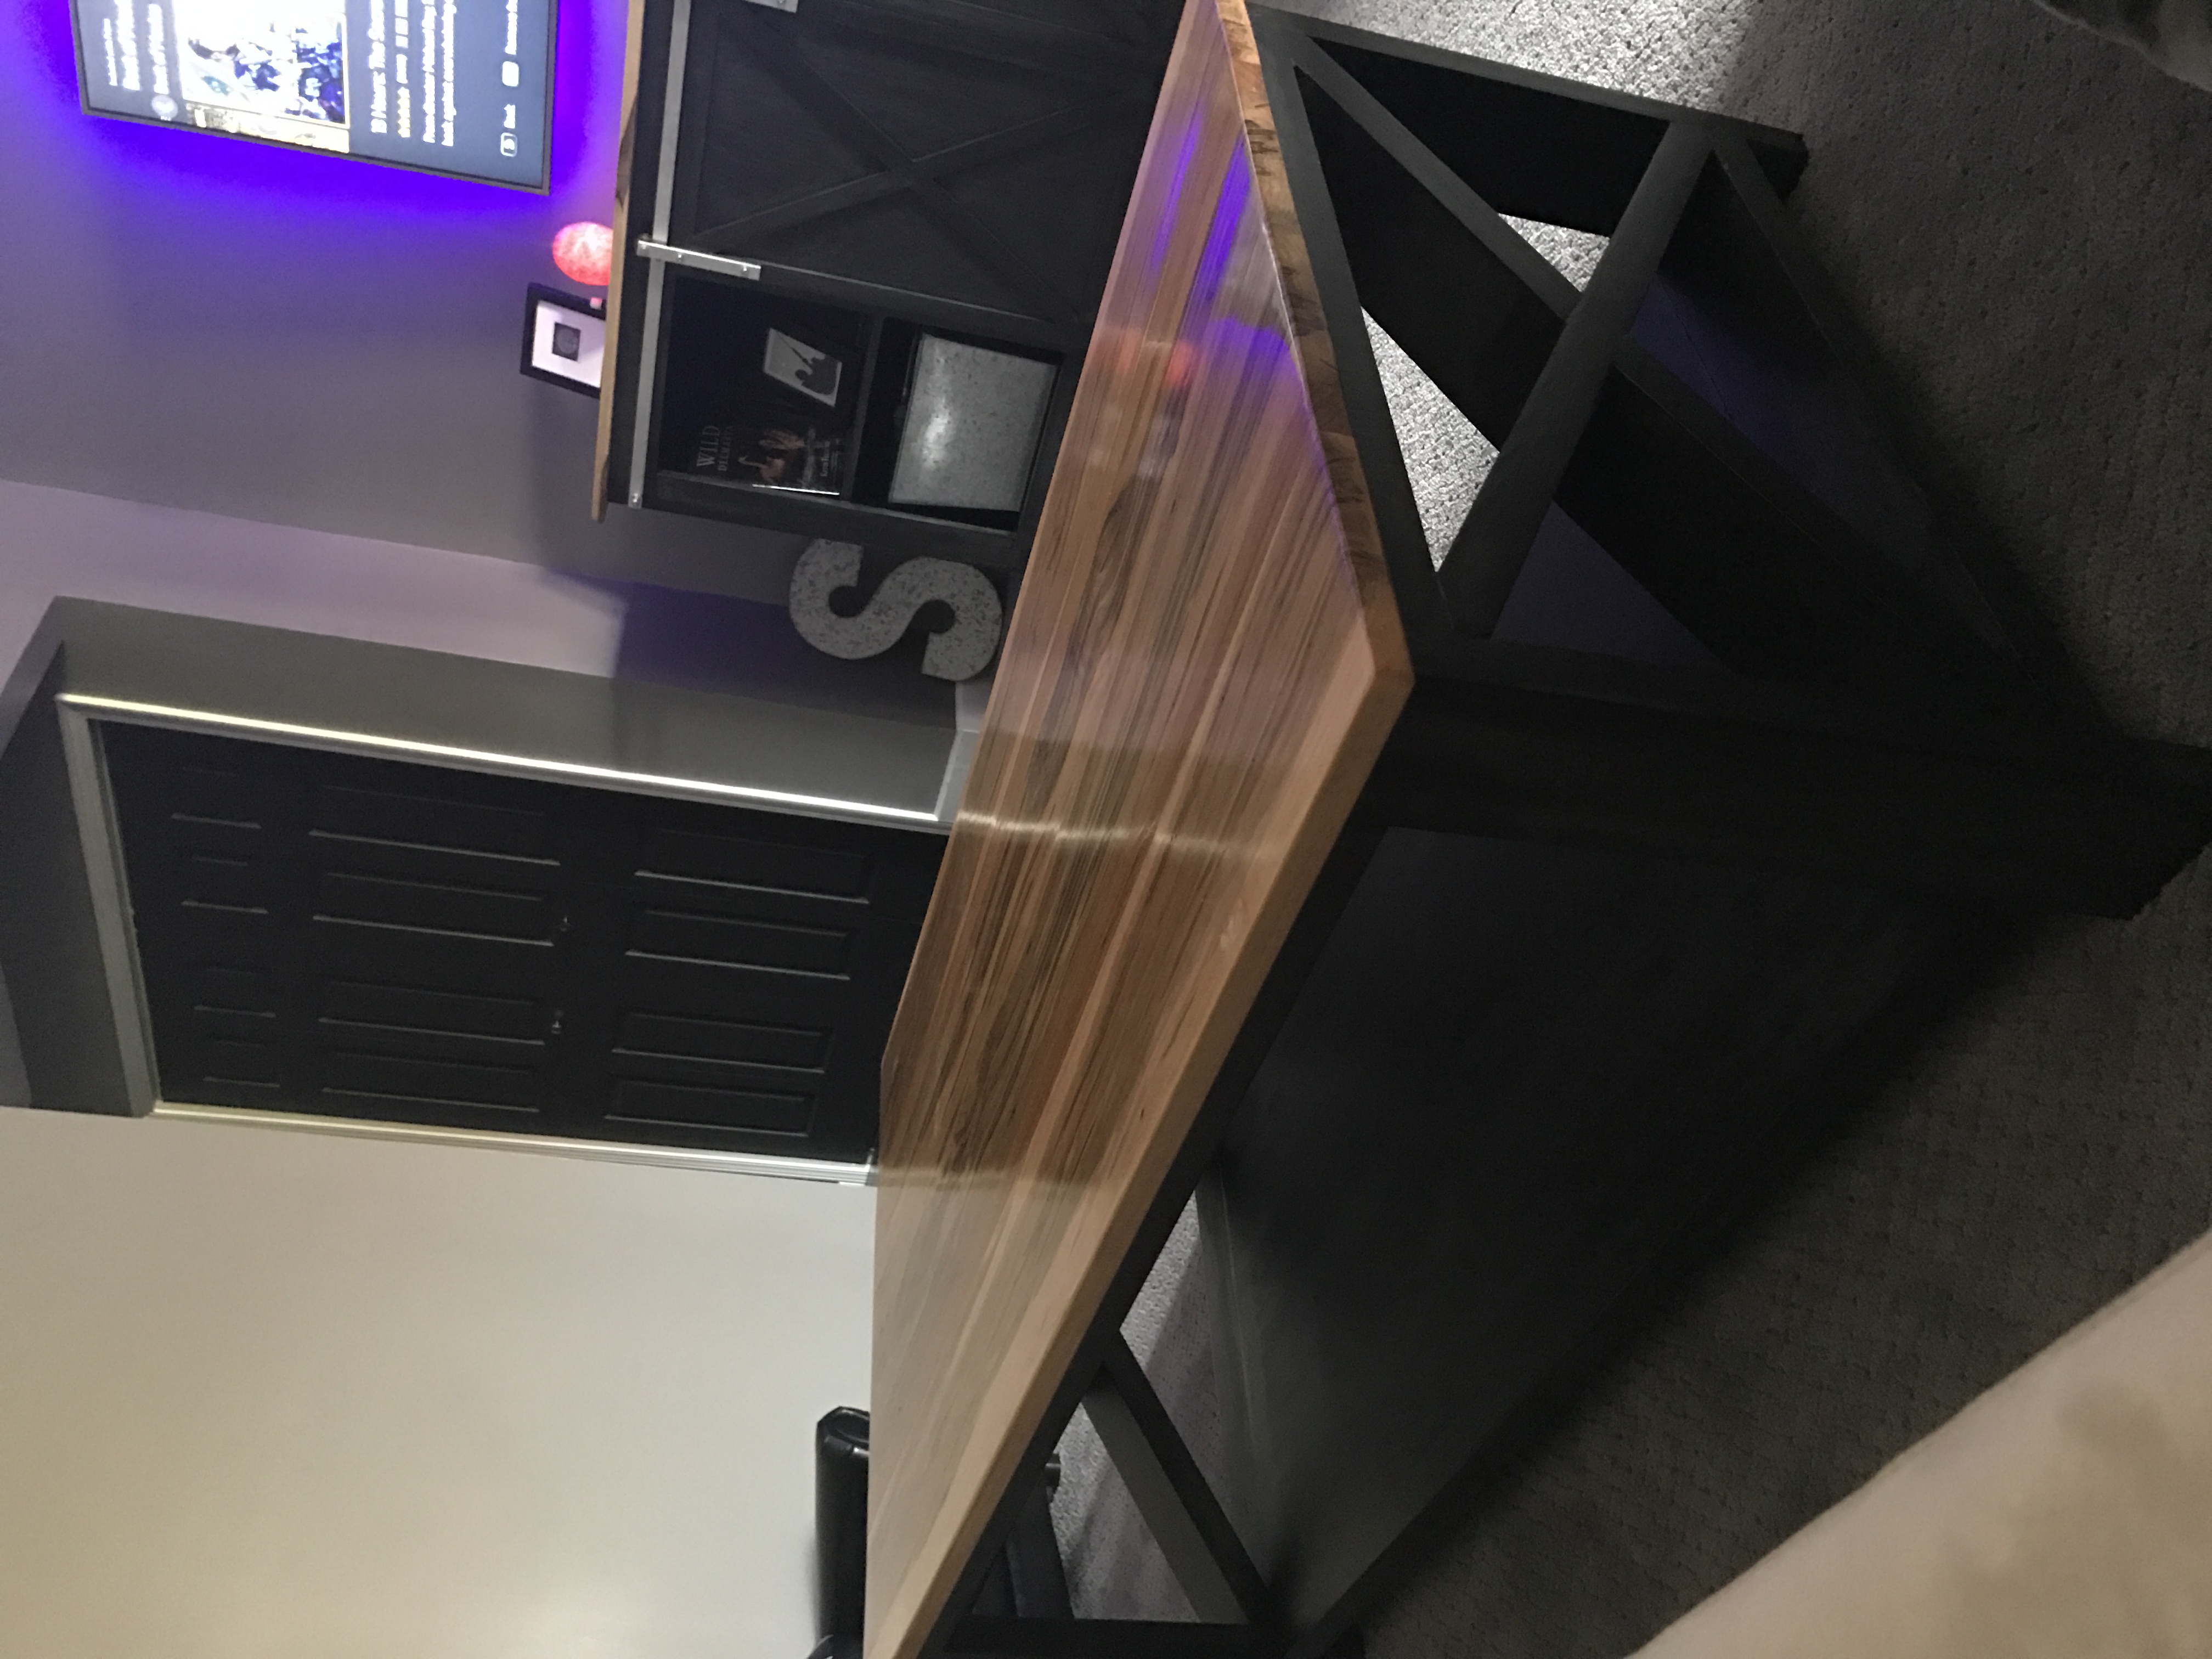
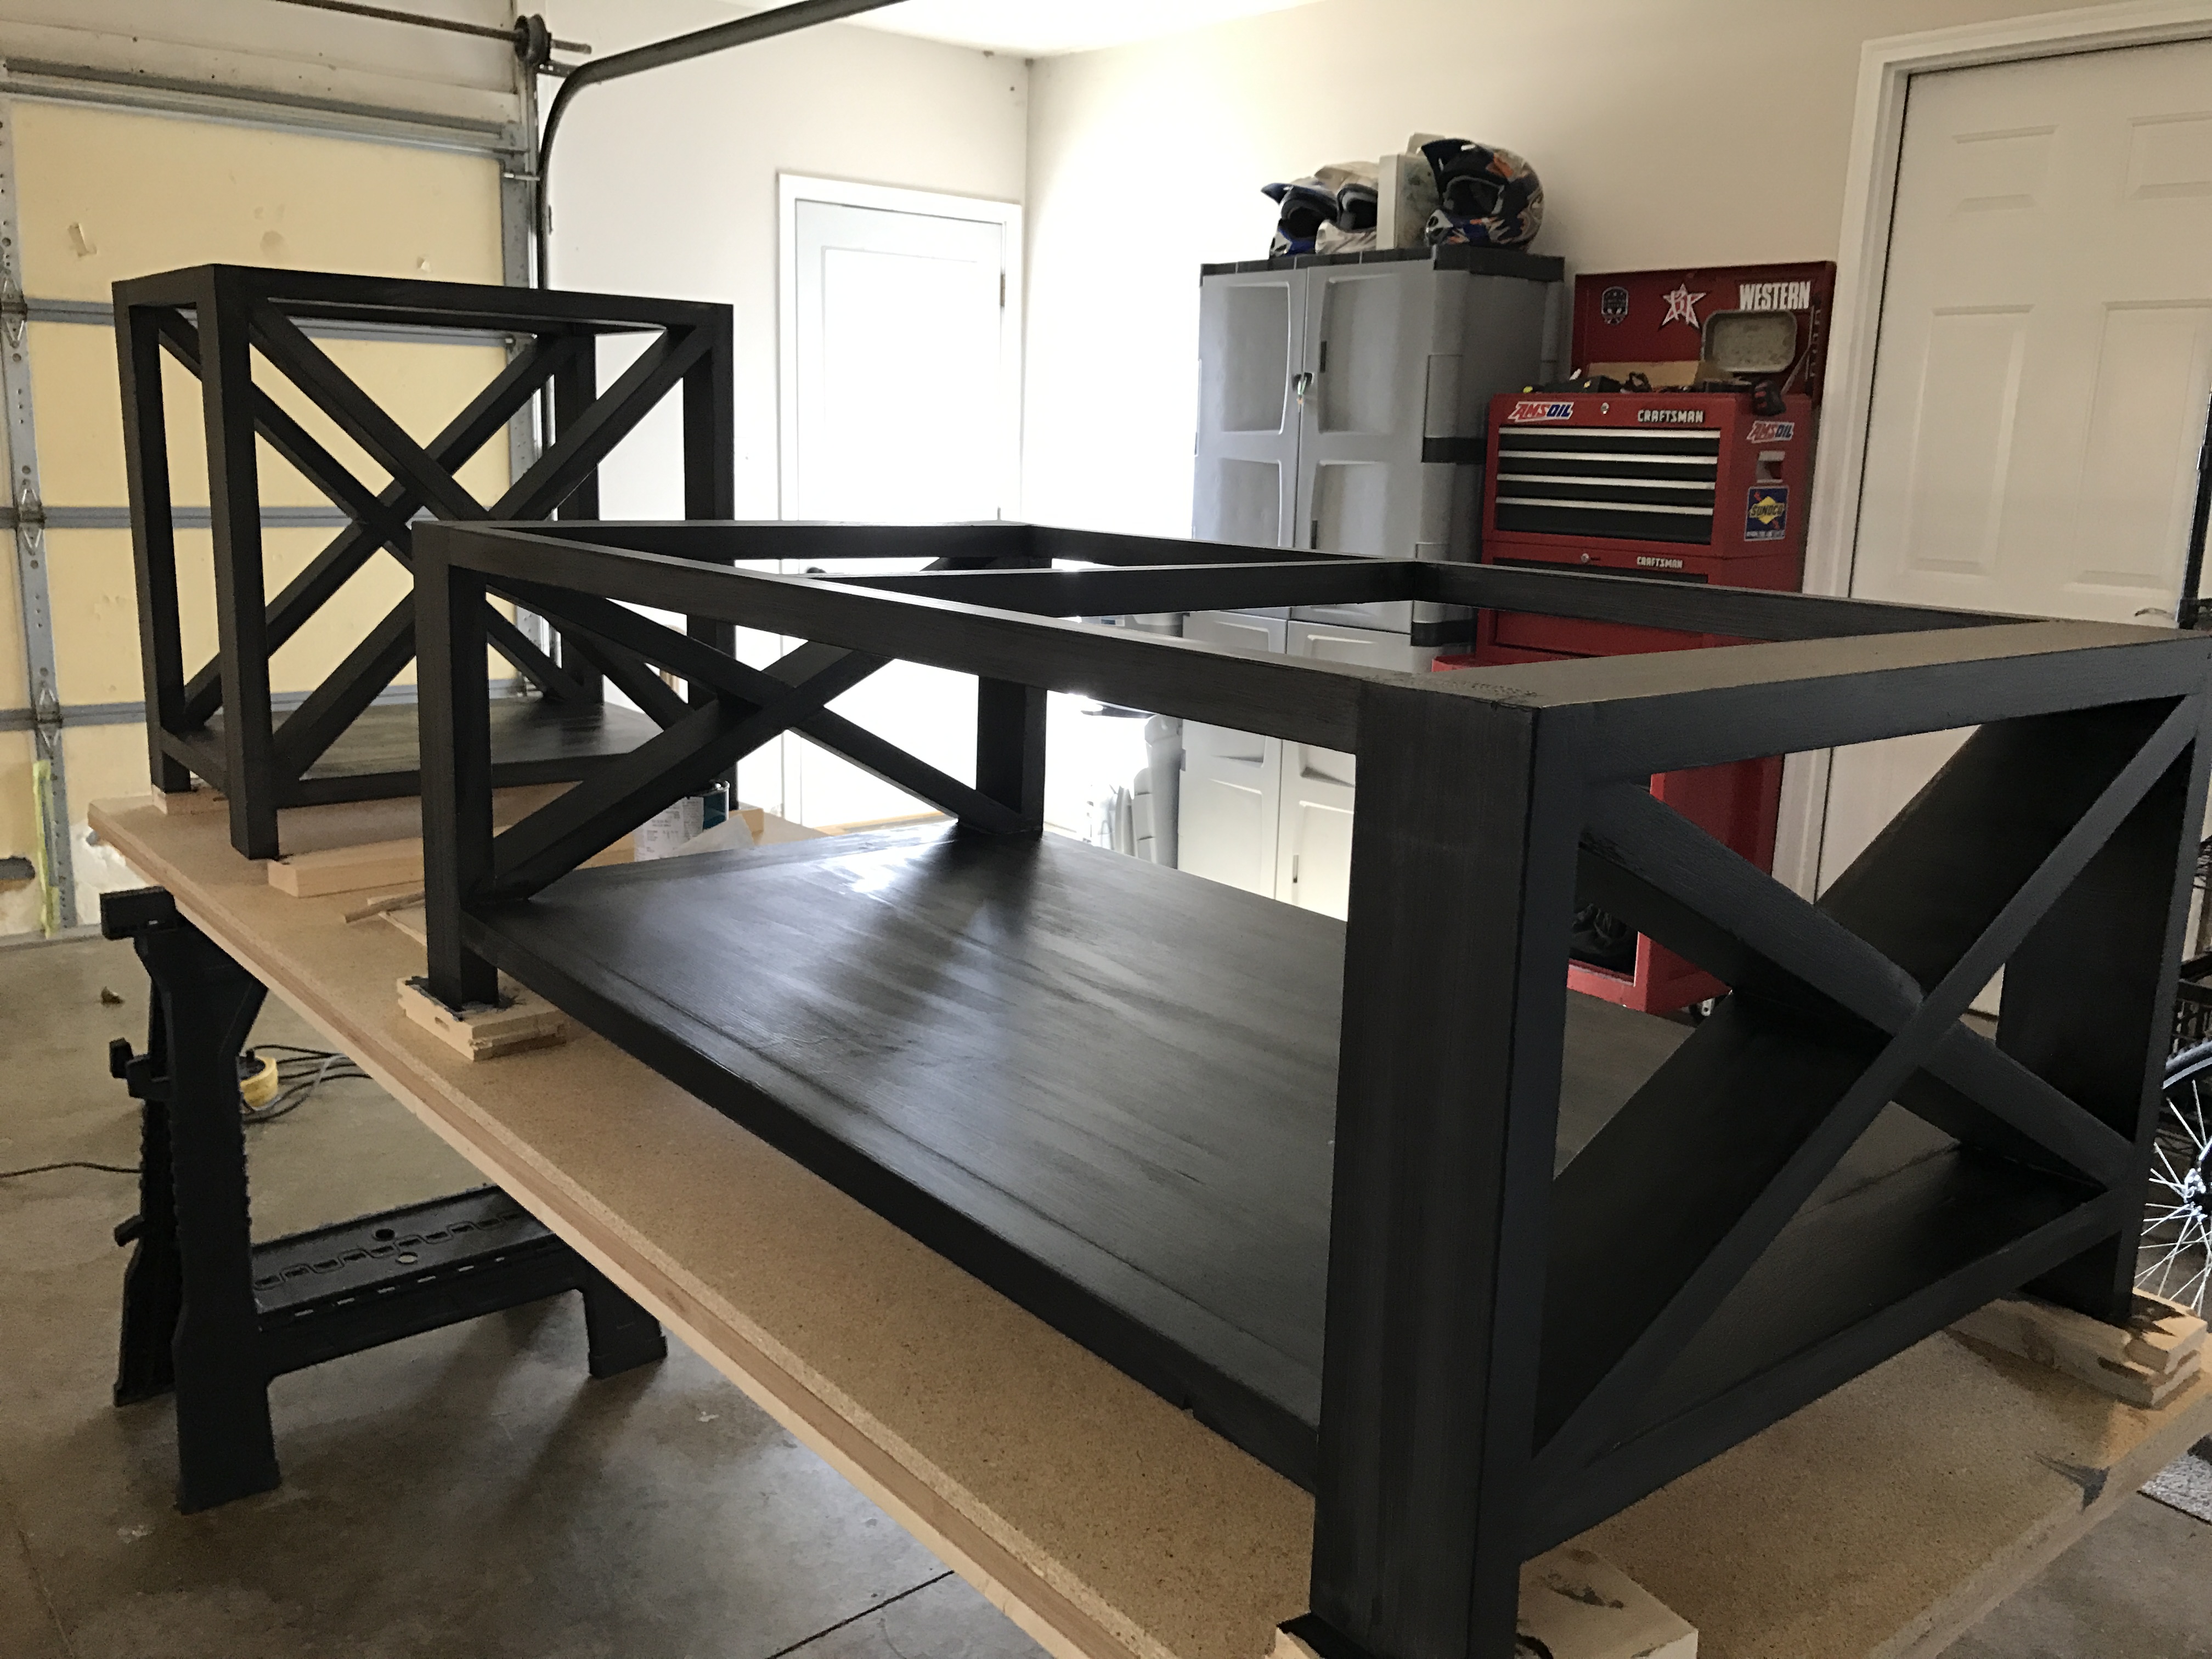
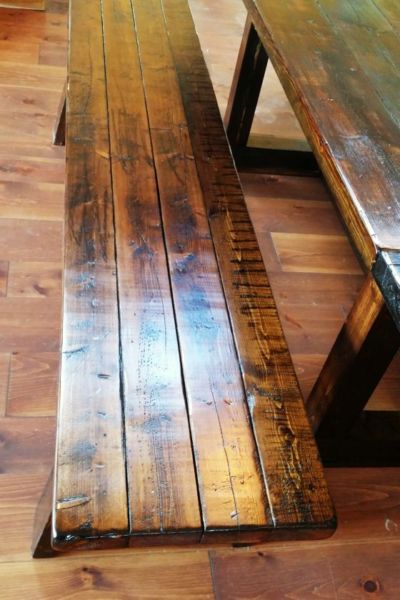
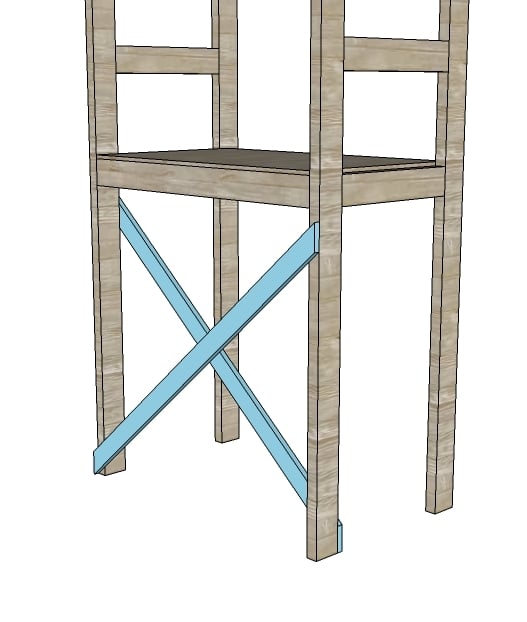
X Frame country coffee table
Wanted something sturdy because of my kids. Found the project on here and was fairly simple to build. The step by step instructions really helped.
Estimated Cost
$65
Estimated Time Investment
Weekend Project (10-20 Hours)
Finish Used
Special walnut stain with gloss white paint. 3 coats polyurethane on the top. Sanded between each coat with 320 grit.
Recommended Skill Level
Intermediate
Comments
Simple Side Table
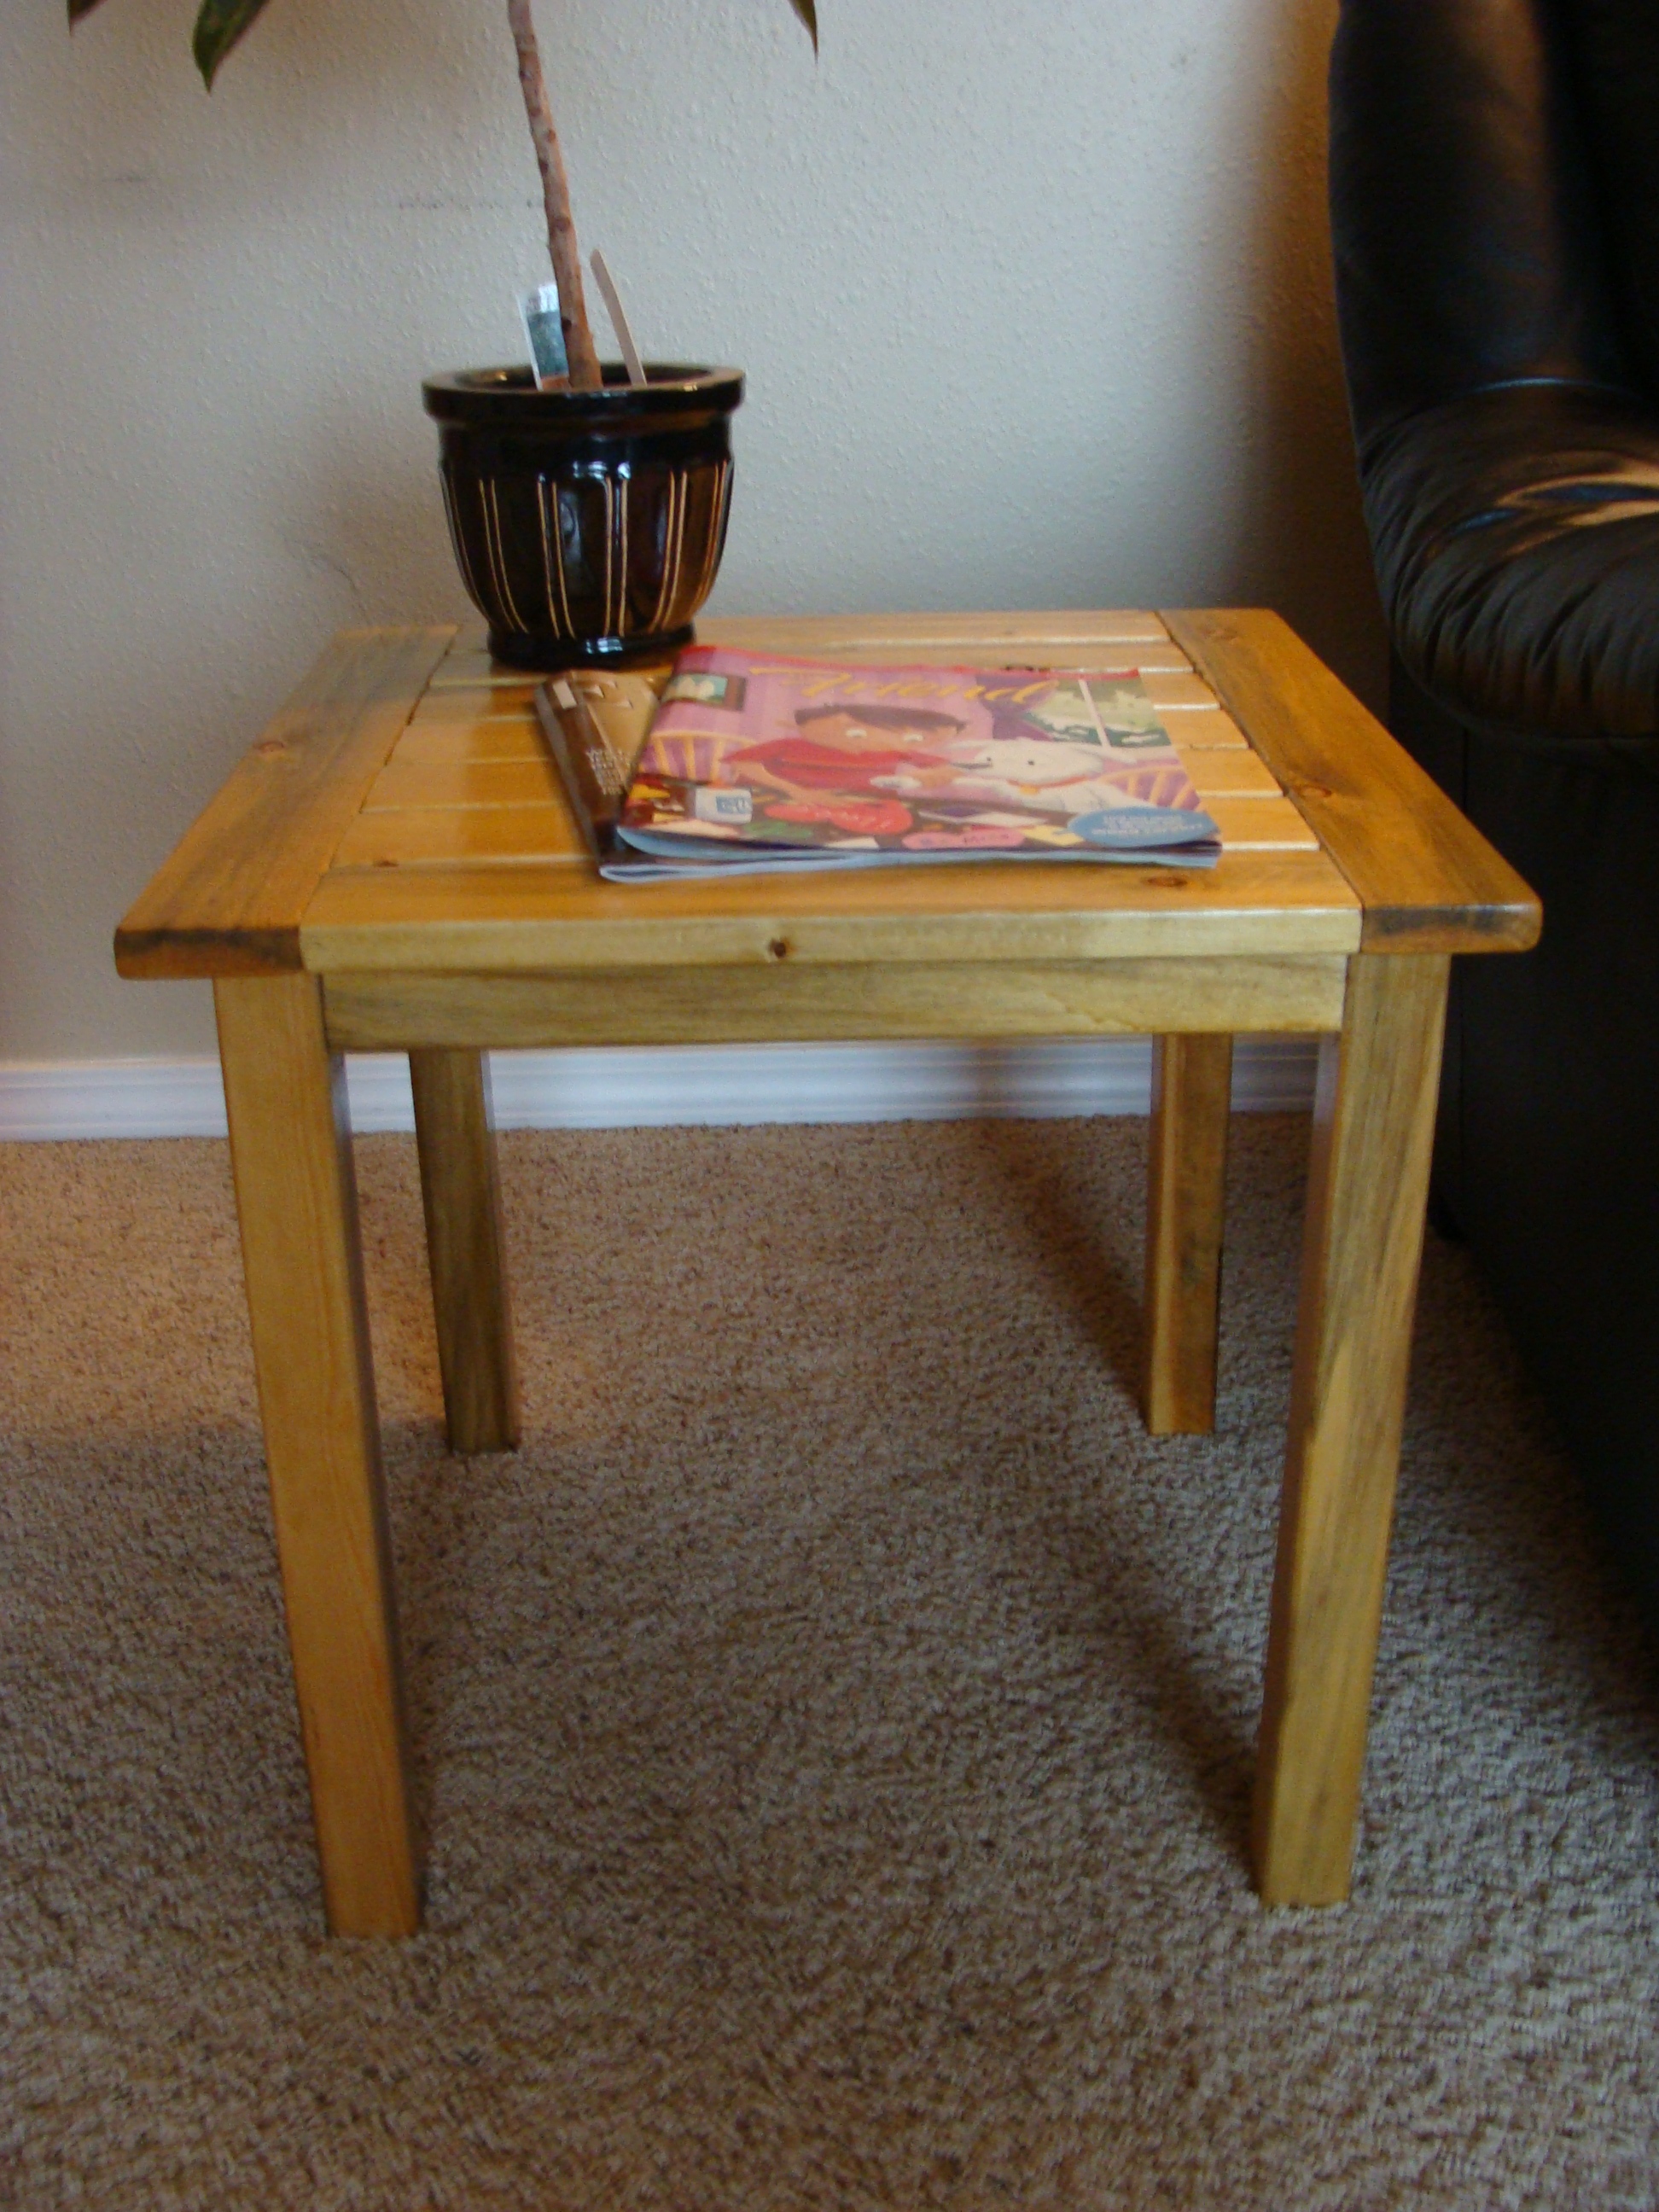
I built this for a friend who needed a small side table. All the cuts were made with a chop saw. I used 1X3 furring strips and 2X2's. It was a little tricky to get all the table slats to match up. I used the Kreg jig to conceal all the screws and get stronger joints. I love that thing!
Built from Plan(s)
Estimated Cost
$10
Estimated Time Investment
Afternoon Project (3-6 Hours)
Finish Used
I brushed on two coats of Minwax Polyshades in Honey Pine Gloss, then rubbed in a coat of Howard Feed-N-Wax.
Recommended Skill Level
Beginner
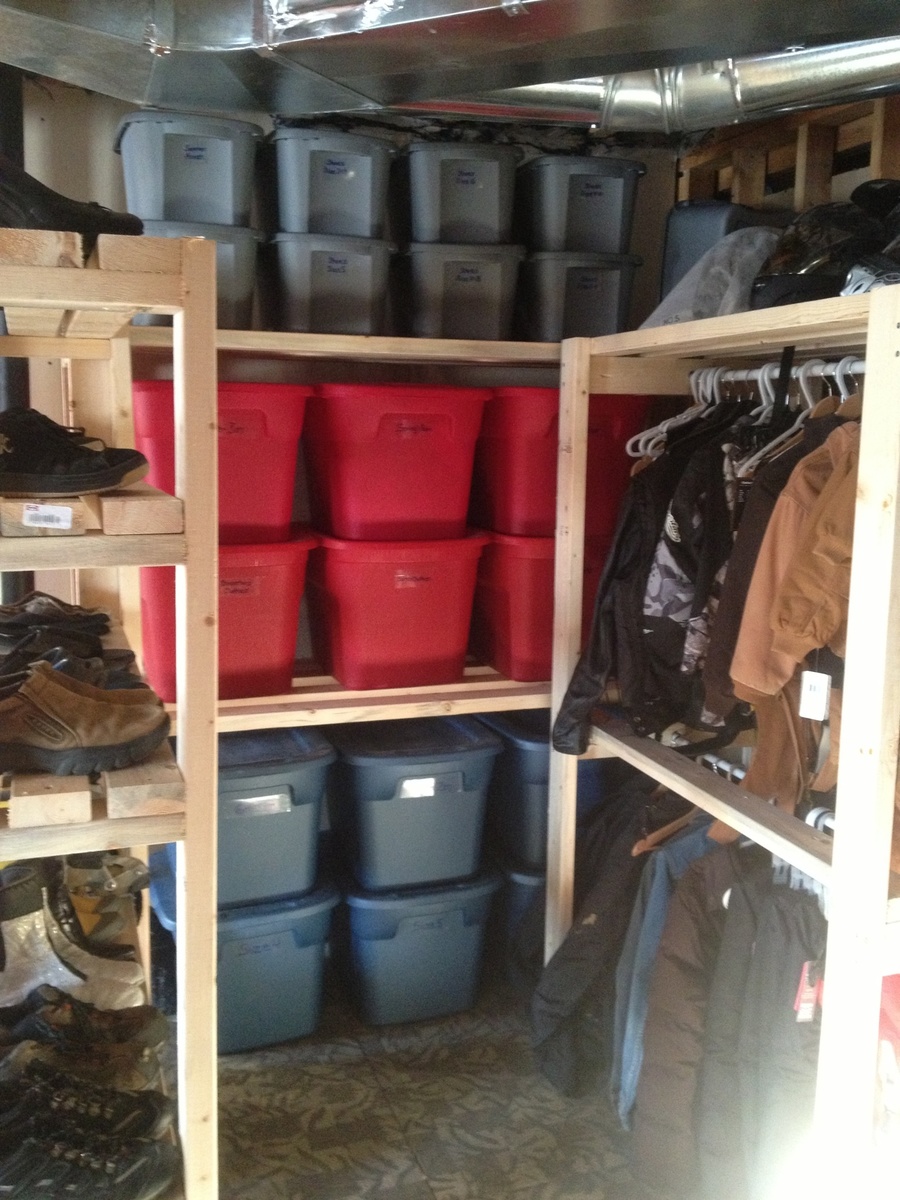
Economical Basement Shelving 2
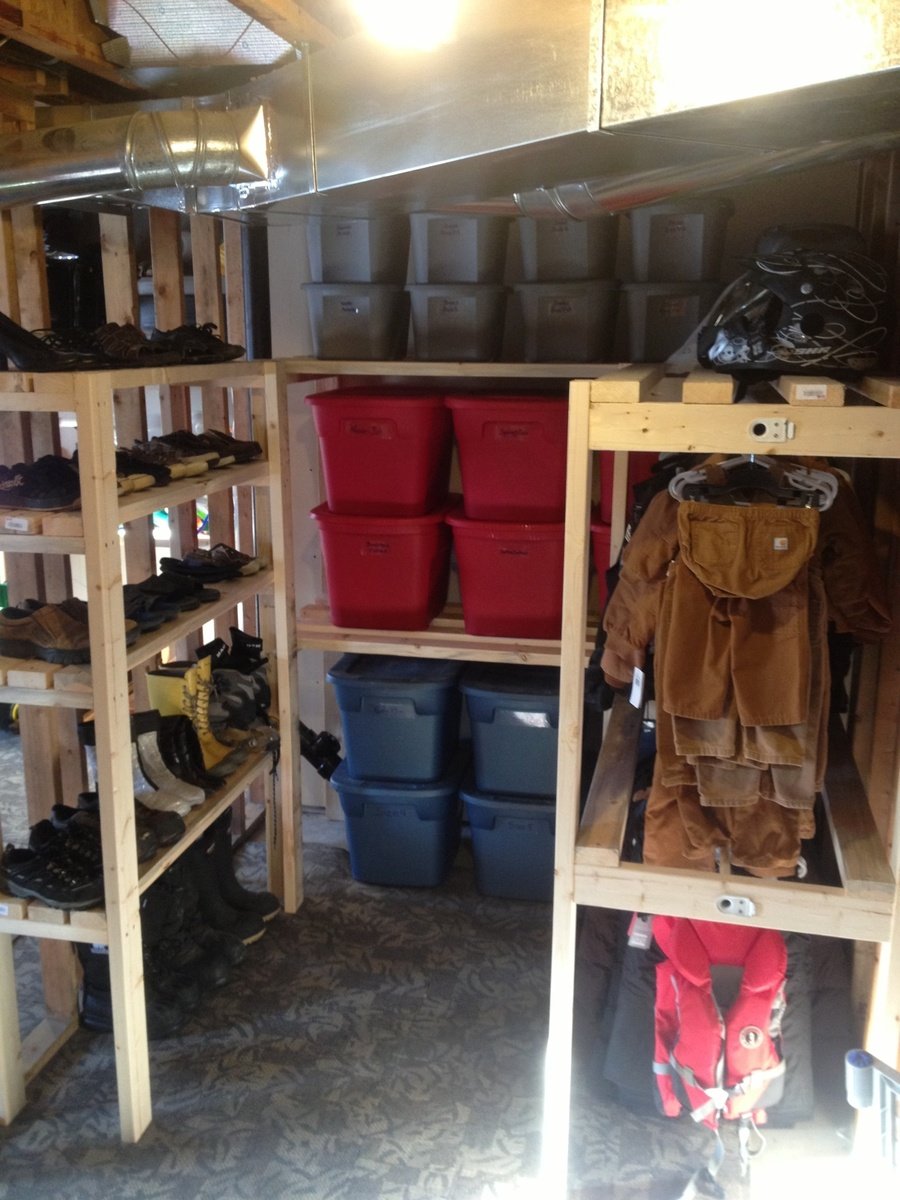
I've been organizing our unfinished basement so that my boys have more space to run and ride their bikes over the winter. I needed something to organize our off season clothes and bins of clothes that my boys are growing in/out of. This plan was perfect. It's not my prettiest build but it's soooo functional!
Built from Plan(s)
Estimated Cost
$100
Estimated Time Investment
Afternoon Project (3-6 Hours)
Finish Used
None
Recommended Skill Level
Starter Project
Comments

Joe Shape
Fun and easy project. I couldn't be happier with the end results. Great plan from Ana White.
Estimated Cost
$83 for coffee and end table.
Estimated Time Investment
Weekend Project (10-20 Hours)
Finish Used
Waterlox on top and Sherwin Williams furniture paint on frame.
Recommended Skill Level
Intermediate
Potting bench
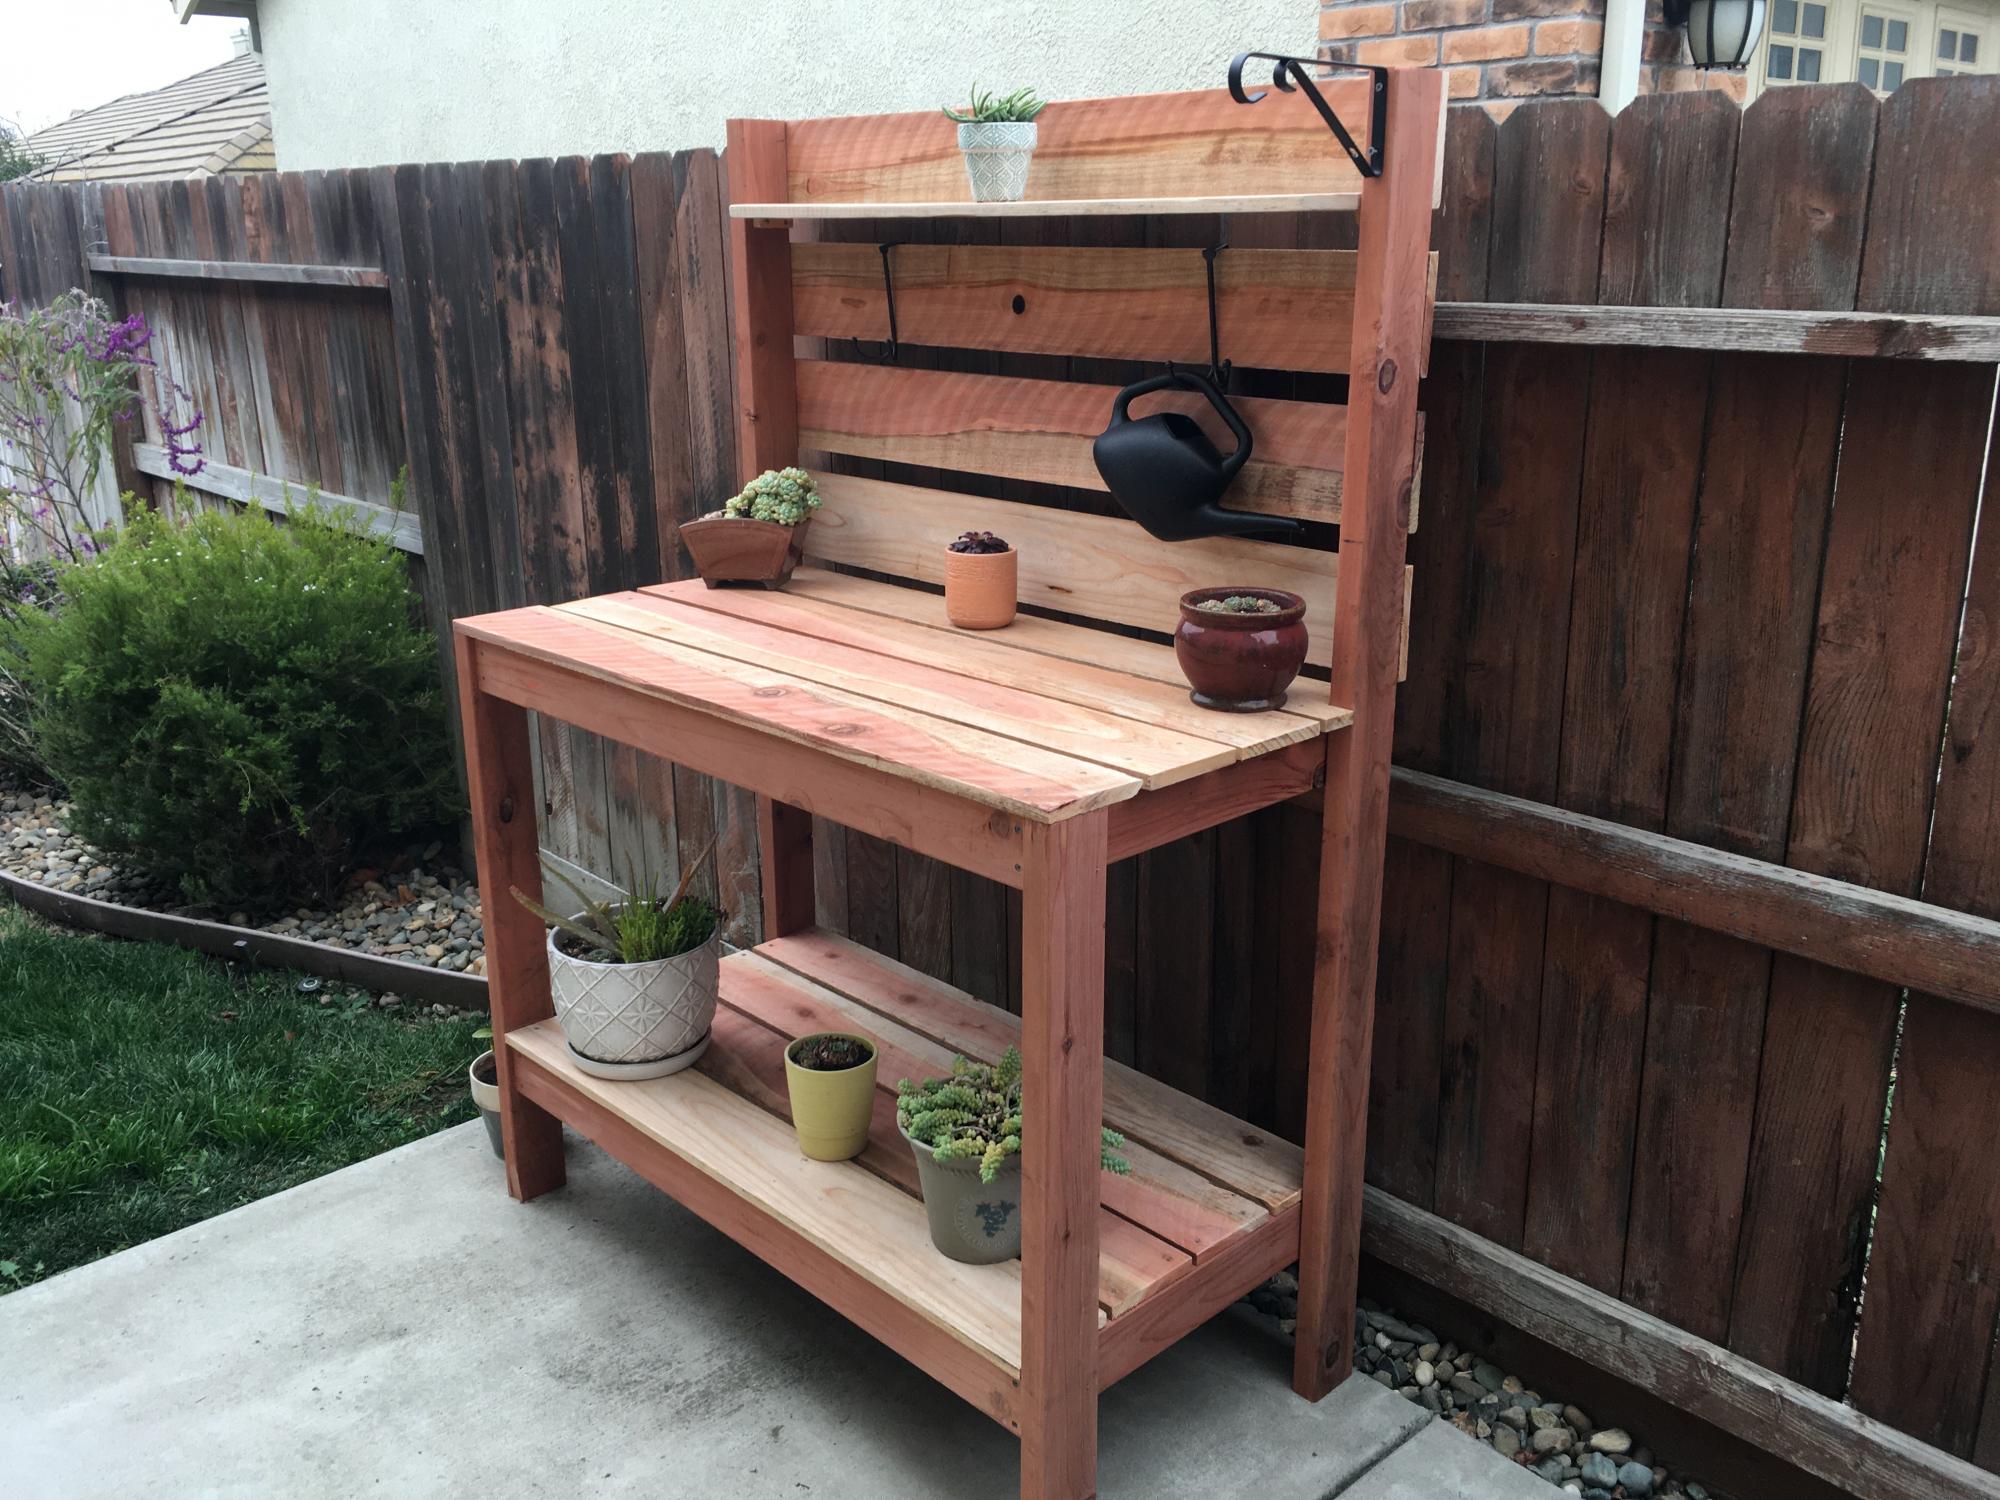
I used redwood lumber, 2x4s and 1x6s only. I wanted the bench to be a little taller so I used 2x4x10s for the legs to make work surface 38” high and total height 66”. To get the most out of the 8’ 1x6s I made the bench 48” wide. I also had to adjust the depth since I did not use 1x4s. And finally, I sanded the 1x6s because they were rough sawn.
Very fun project! Once I figured out the adjusted cut list the whole project came together in a matter of a few hours.
Built from Plan(s)
Estimated Cost
$100
Estimated Time Investment
Afternoon Project (3-6 Hours)
Finish Used
Light sanding, No finish.
Recommended Skill Level
Beginner
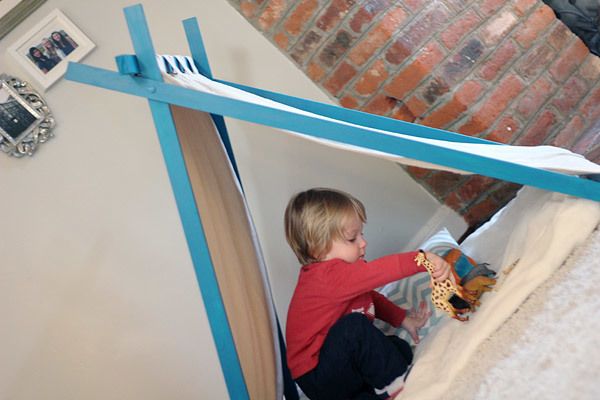
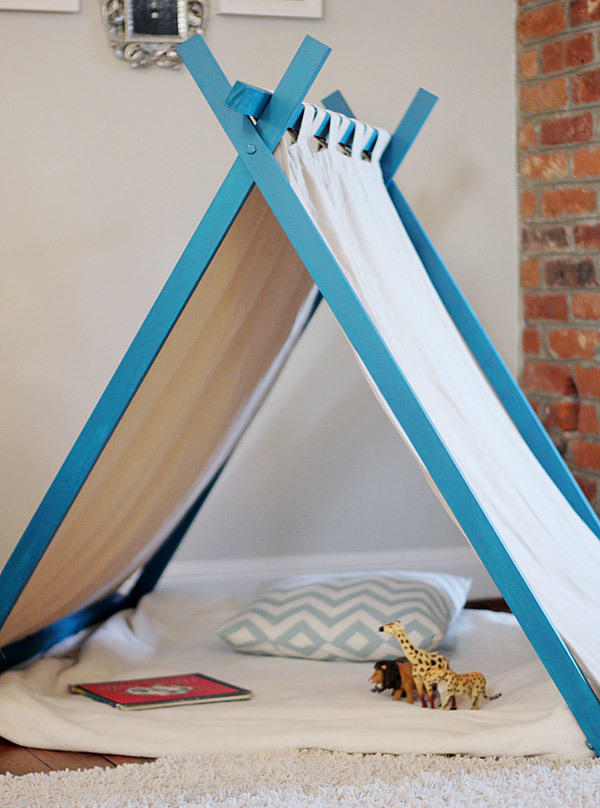
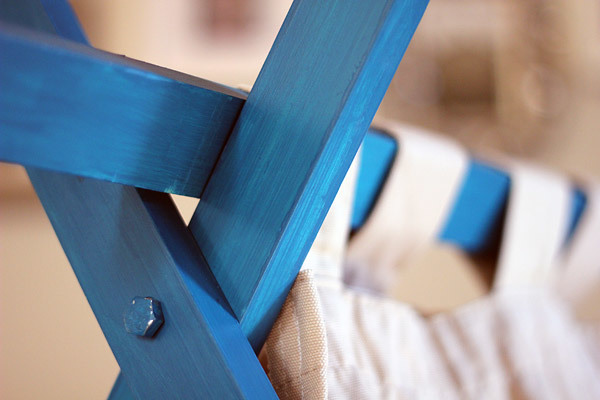
Foolproof Fort

Ethan and I did a little project last week.
It’s been windy and cold outside and we’ve been running out of indoor activities. We made Valentine decor, heart-shaped food, colored, met friends at museums and toddler-rock’n-roll-playing coffee joints, played trains and kitchen and dinosaurs, read a hundred books.
One super fun source of indoor entertainment we’ve never successfully completed is building a fort.
When I was young, I was the fort-making queen. My parents had this incredible 80′s-style glass-and-metal table with huge leather and wood chairs (it was insane), each piece weighing what seemed like a million pounds—PERFECT fort building materials. Blankets, pillows, books, and toys made a wonderland of imagination for me and my friends. I remember supporting corners of blankets with this heavy old clay jug and other skull-crushing items that could have crashed down at any wrong movement. How we make it through childhood is beyond me.
I guess our furniture selection is just not fort-worthy. At least, not in the sense that doesn’t pose the risk of a chair toppling on him, undoubtedly leading to suffocation and/or a concussion.
So a few minutes spent reading Ana White’s website, a little trip to the hardware store (where a visit to the “big saw” was requested only to end in wimpers of “no saw, I’m scared!”), about $25, and a little sweat later, we had a perfect little “fort” with no chance of injury, one that doesn’t need to be disassembled…ever.
We had everything cut down at the hardware store. Paint was leftover from Ethan’s train board, side panels made from Target tab-top curtains I’ve had since college. Really.
It was Ethan’s first construction project so I started him off right—with sanding.
When everything was nice and smooth, we had lunch and the Peanut hit the hay while I took out the “big mama bit collection” and started drilling. As usual, Ana’s plans were very well illustrated and straightforward…we used her oven door plan for Ethan’s kitchen and it worked perfectly.
By the time Little Man woke, we were ready for paint. I wondered if painting with a toddler was the smartest idea…but we just went for it.
He did GREAT. Thank you Ikea for the $2 smock.
As I’d feared, the (almost) finished product was about four feet too tall. It was massive in our living room!
So a few days later the Hubs helped me cut it down with our chop saw. So much for making things easy by having all the wood pre-cut. I guess Ana’s house is much bigger than ours.
My next task was hemming, narrowing, and velcro-izing the panels. With a much shorter tent, my trusty old curtains were way too long. Plus, I wasn’t so sure about Ana’s suggestion to staple curtain to tent…it seemed much too permanent What if we want to add a stamped pattern? Or a window? Or change up the fabric? Velcro seemed safer.
Sure, it’s not the fastest way, but I think it was worth the time. And my $20 craigslist sewing machine handled it like a champ.
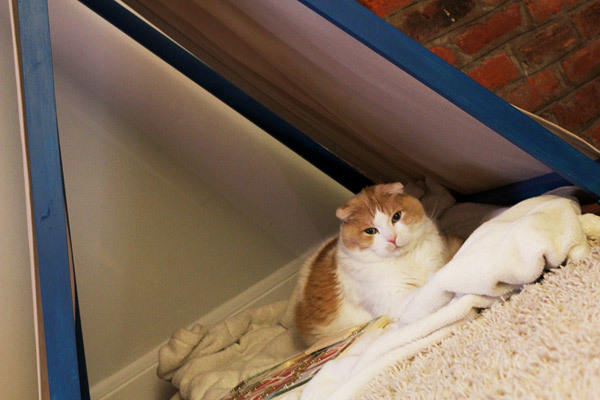
We’ve already done some good lazin’ around in the new fort. Or nook. Or tent. Whatever, Ethan seems to think it is pretty cool.
It’s also pretty popular with our furry friends.

Built from Plan(s)
Estimated Cost
$25
Estimated Time Investment
Afternoon Project (3-6 Hours)
Finish Used
Valspar sample paint
Recommended Skill Level
Beginner
Comments
Mon, 06/10/2013 - 12:19
Final dimensions?
So, I'm curious how long and tall everything ended up. I'm thinking I need a smaller version of the original also, and yours looks just perfect. How long are the boards now? And how tall is it?
Rekourt Dining Table in Distressed Dark Walnut
Hey all my DIY friends!
This is my first build of the Rekourt Dining Table. Big thanks goes out to Ana and Jen for providing these awesome plans.
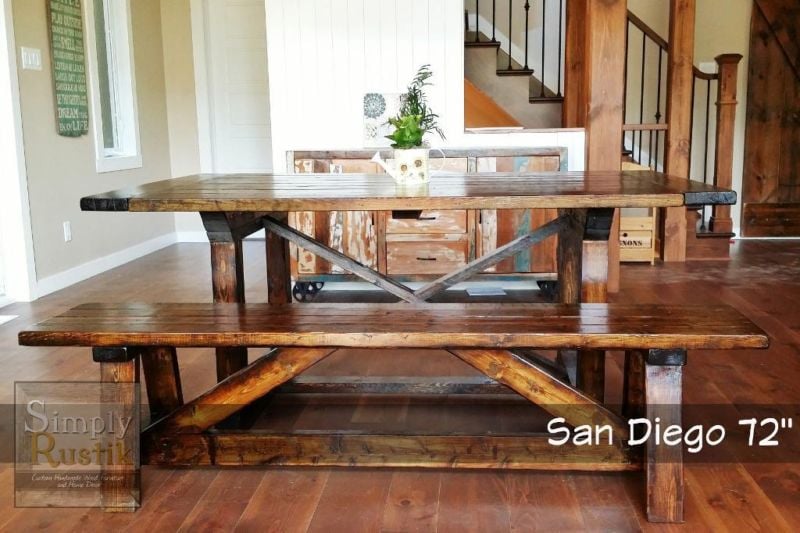
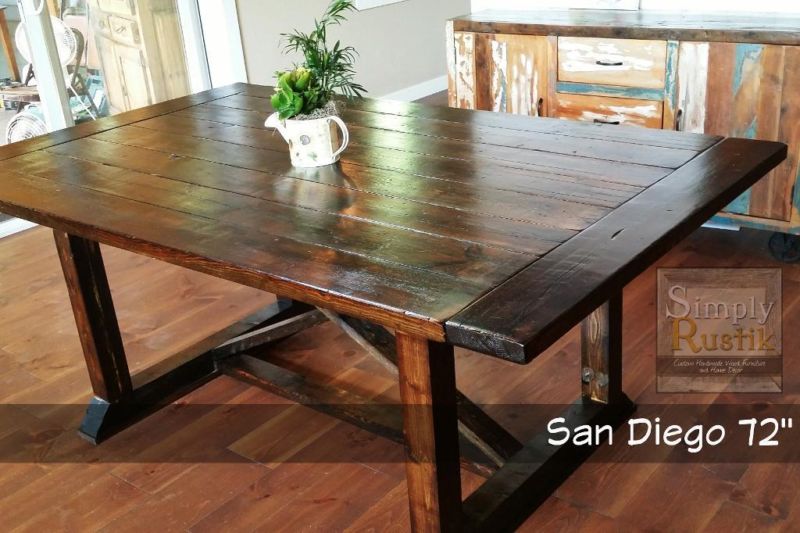
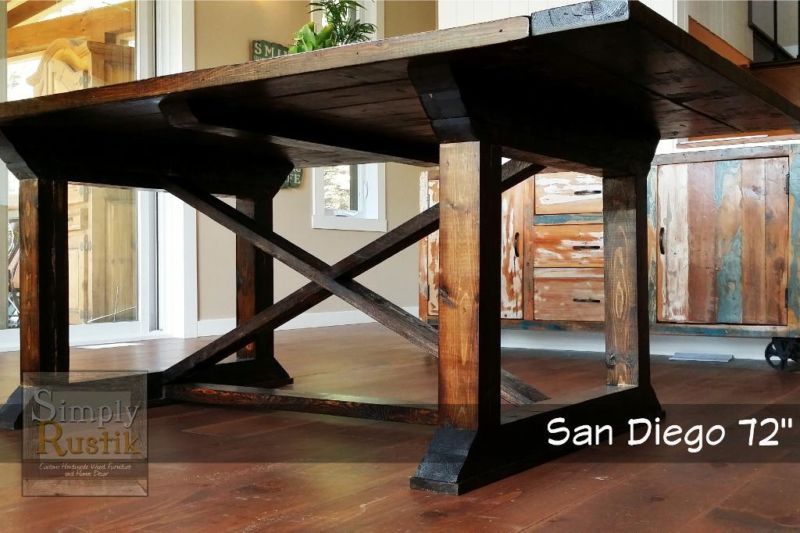
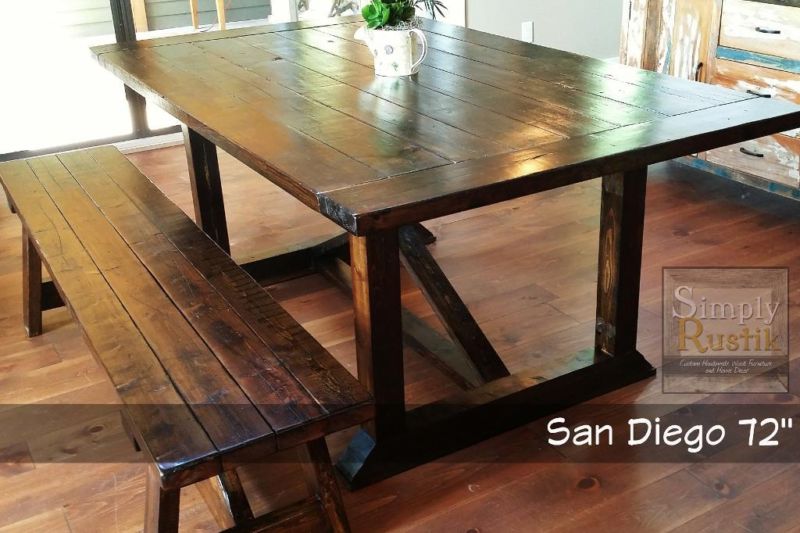
I think I achieved this table quite well, except for a minor detail where I forgot to sand two pot holes. It actually created a very rustik look to this table. I decided to try the steel wool and vinegar solution combined with the black tea for the finish of this table. I realized it adds so much richness to the wood, it's incredible. The stain is Minwax's Dark Walnut and I topped it off with a Satin Oil-based Polyurethane. The top and legs were also physically distressed using a variety of tools I found in my tool chest. Those included screw drivers, lag bolts, worm hole puch I created out of a leftover 2x4, chains, sanding disc, knife, hammer and much more! That part, although tedious, was fun as it gave me the permission to bang stuff up intentionally :)
For the finish, I first started off by sanding very well, talking hours for the entire table. I then went out and distressed the tops in a very random fashion, trying to not repeat any patterns. As I was doing this, I was waiting for my black tea to seep and be ready for application. I poured boiling water in a large Mason jar and added 4-5 bags of black orange pekoe tea bags. I waited about 2 hours before applying it with a foam brush, very liberally. I allowed the tea to dry overnight and the following day, I applied the steel wool and white vinegar solution. My solution had been sitting for about 5 days, enough to start seeing a bit of rust in the Mason jar. The rusty solution ended up giving the wood an orangy/redish tone, which when seen under the dark walnut, added lots of depth and richness to the color. Once dry and the wood had turned greyish/orangy/redish, I stained it using Minwax's Dark Walnut stain. I did section by section, leaving the stain no more than 3 minutes before wiping dry. I followed this (once the stain was dry) with two coats of oil-based polyurethane in satin (Varathane (Canada's version of the Rust-Oleum poly). I sanded the poly in between coats with 220-grit sandpaper using my orbital sander.
Since then, I have gone out to build about five of these, all in different lengths and sizes, including some with removable bases. The angles in the X's are a little tricky when you don't have plans for a specific size, but I have noted these down based on spacing between legs. If any of you need andgles for specific table lengths, let me know and I may be able to help :)
Let me know what you think and happy building!
Built from Plan(s)
Estimated Cost
Table ($100) and bench ($30) in lumber.
Estimated Time Investment
Weekend Project (10-20 Hours)
Finish Used
Orange Pekoe Tea
Steel Wool (#0000) and White Vinegar
Minwax Dark Walnut Oil-based Stain
Varathane Pro Satin Oil-Based Polyurethane
Steel Wool (#0000) and White Vinegar
Minwax Dark Walnut Oil-based Stain
Varathane Pro Satin Oil-Based Polyurethane
Recommended Skill Level
Intermediate
Comments
Tue, 12/16/2014 - 12:22
One more thing!
I just clicked on your other images, boy would we love to see the turquoise island and that amazing rolling console up close:)!!!!

In reply to One more thing! by Ana White Admin
Tue, 12/16/2014 - 12:31
Island
Thanks Ana! Can I post pictures in these replies?
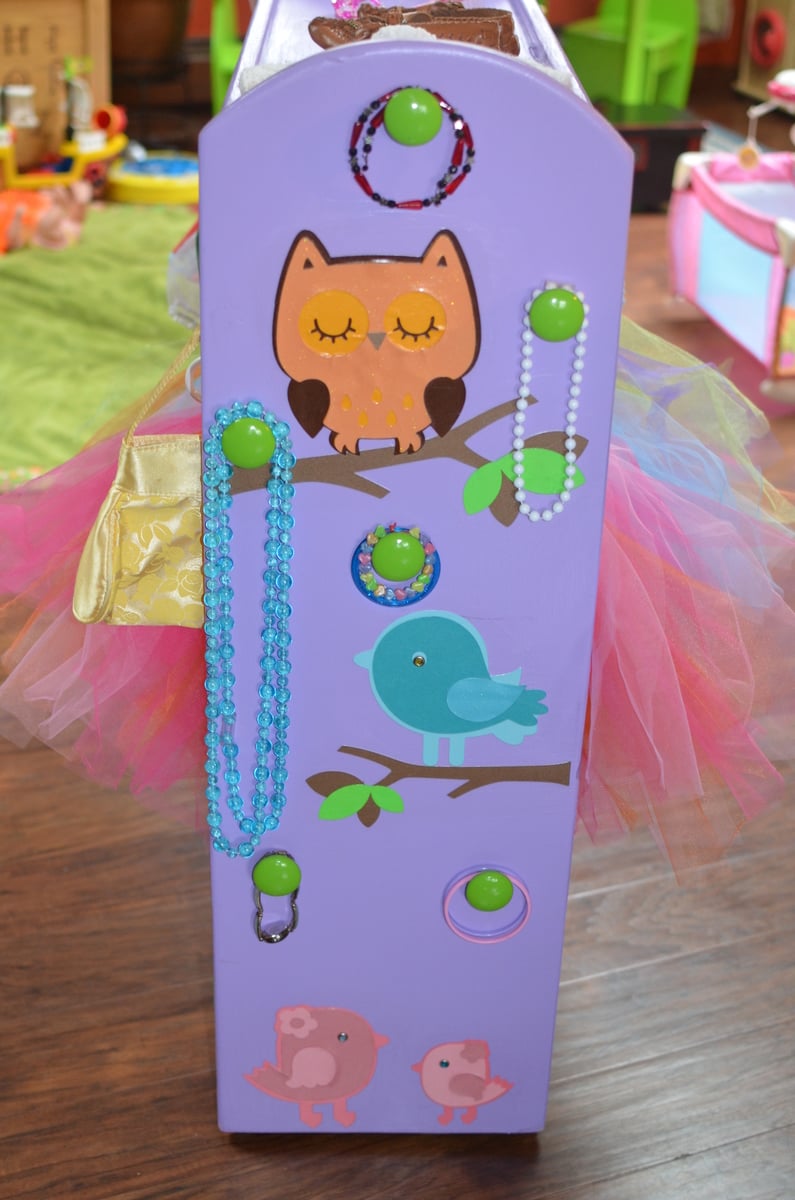
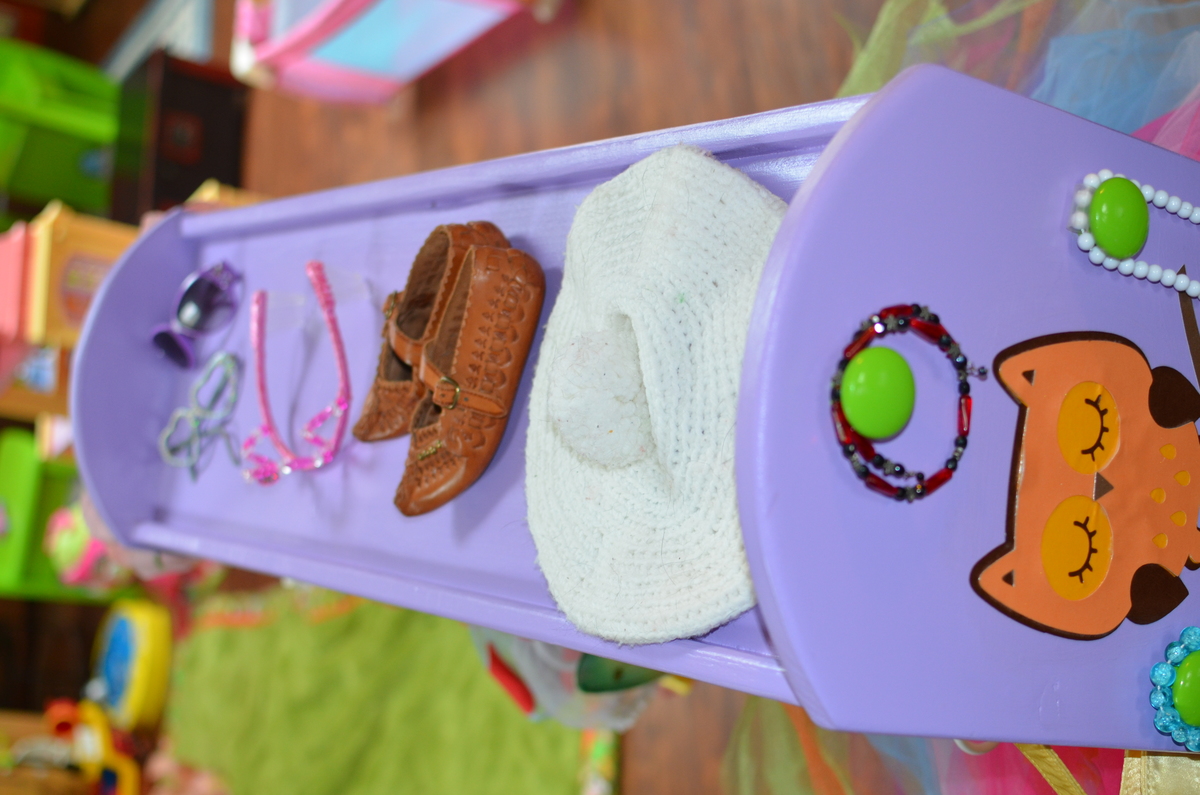
Dress Up consoles
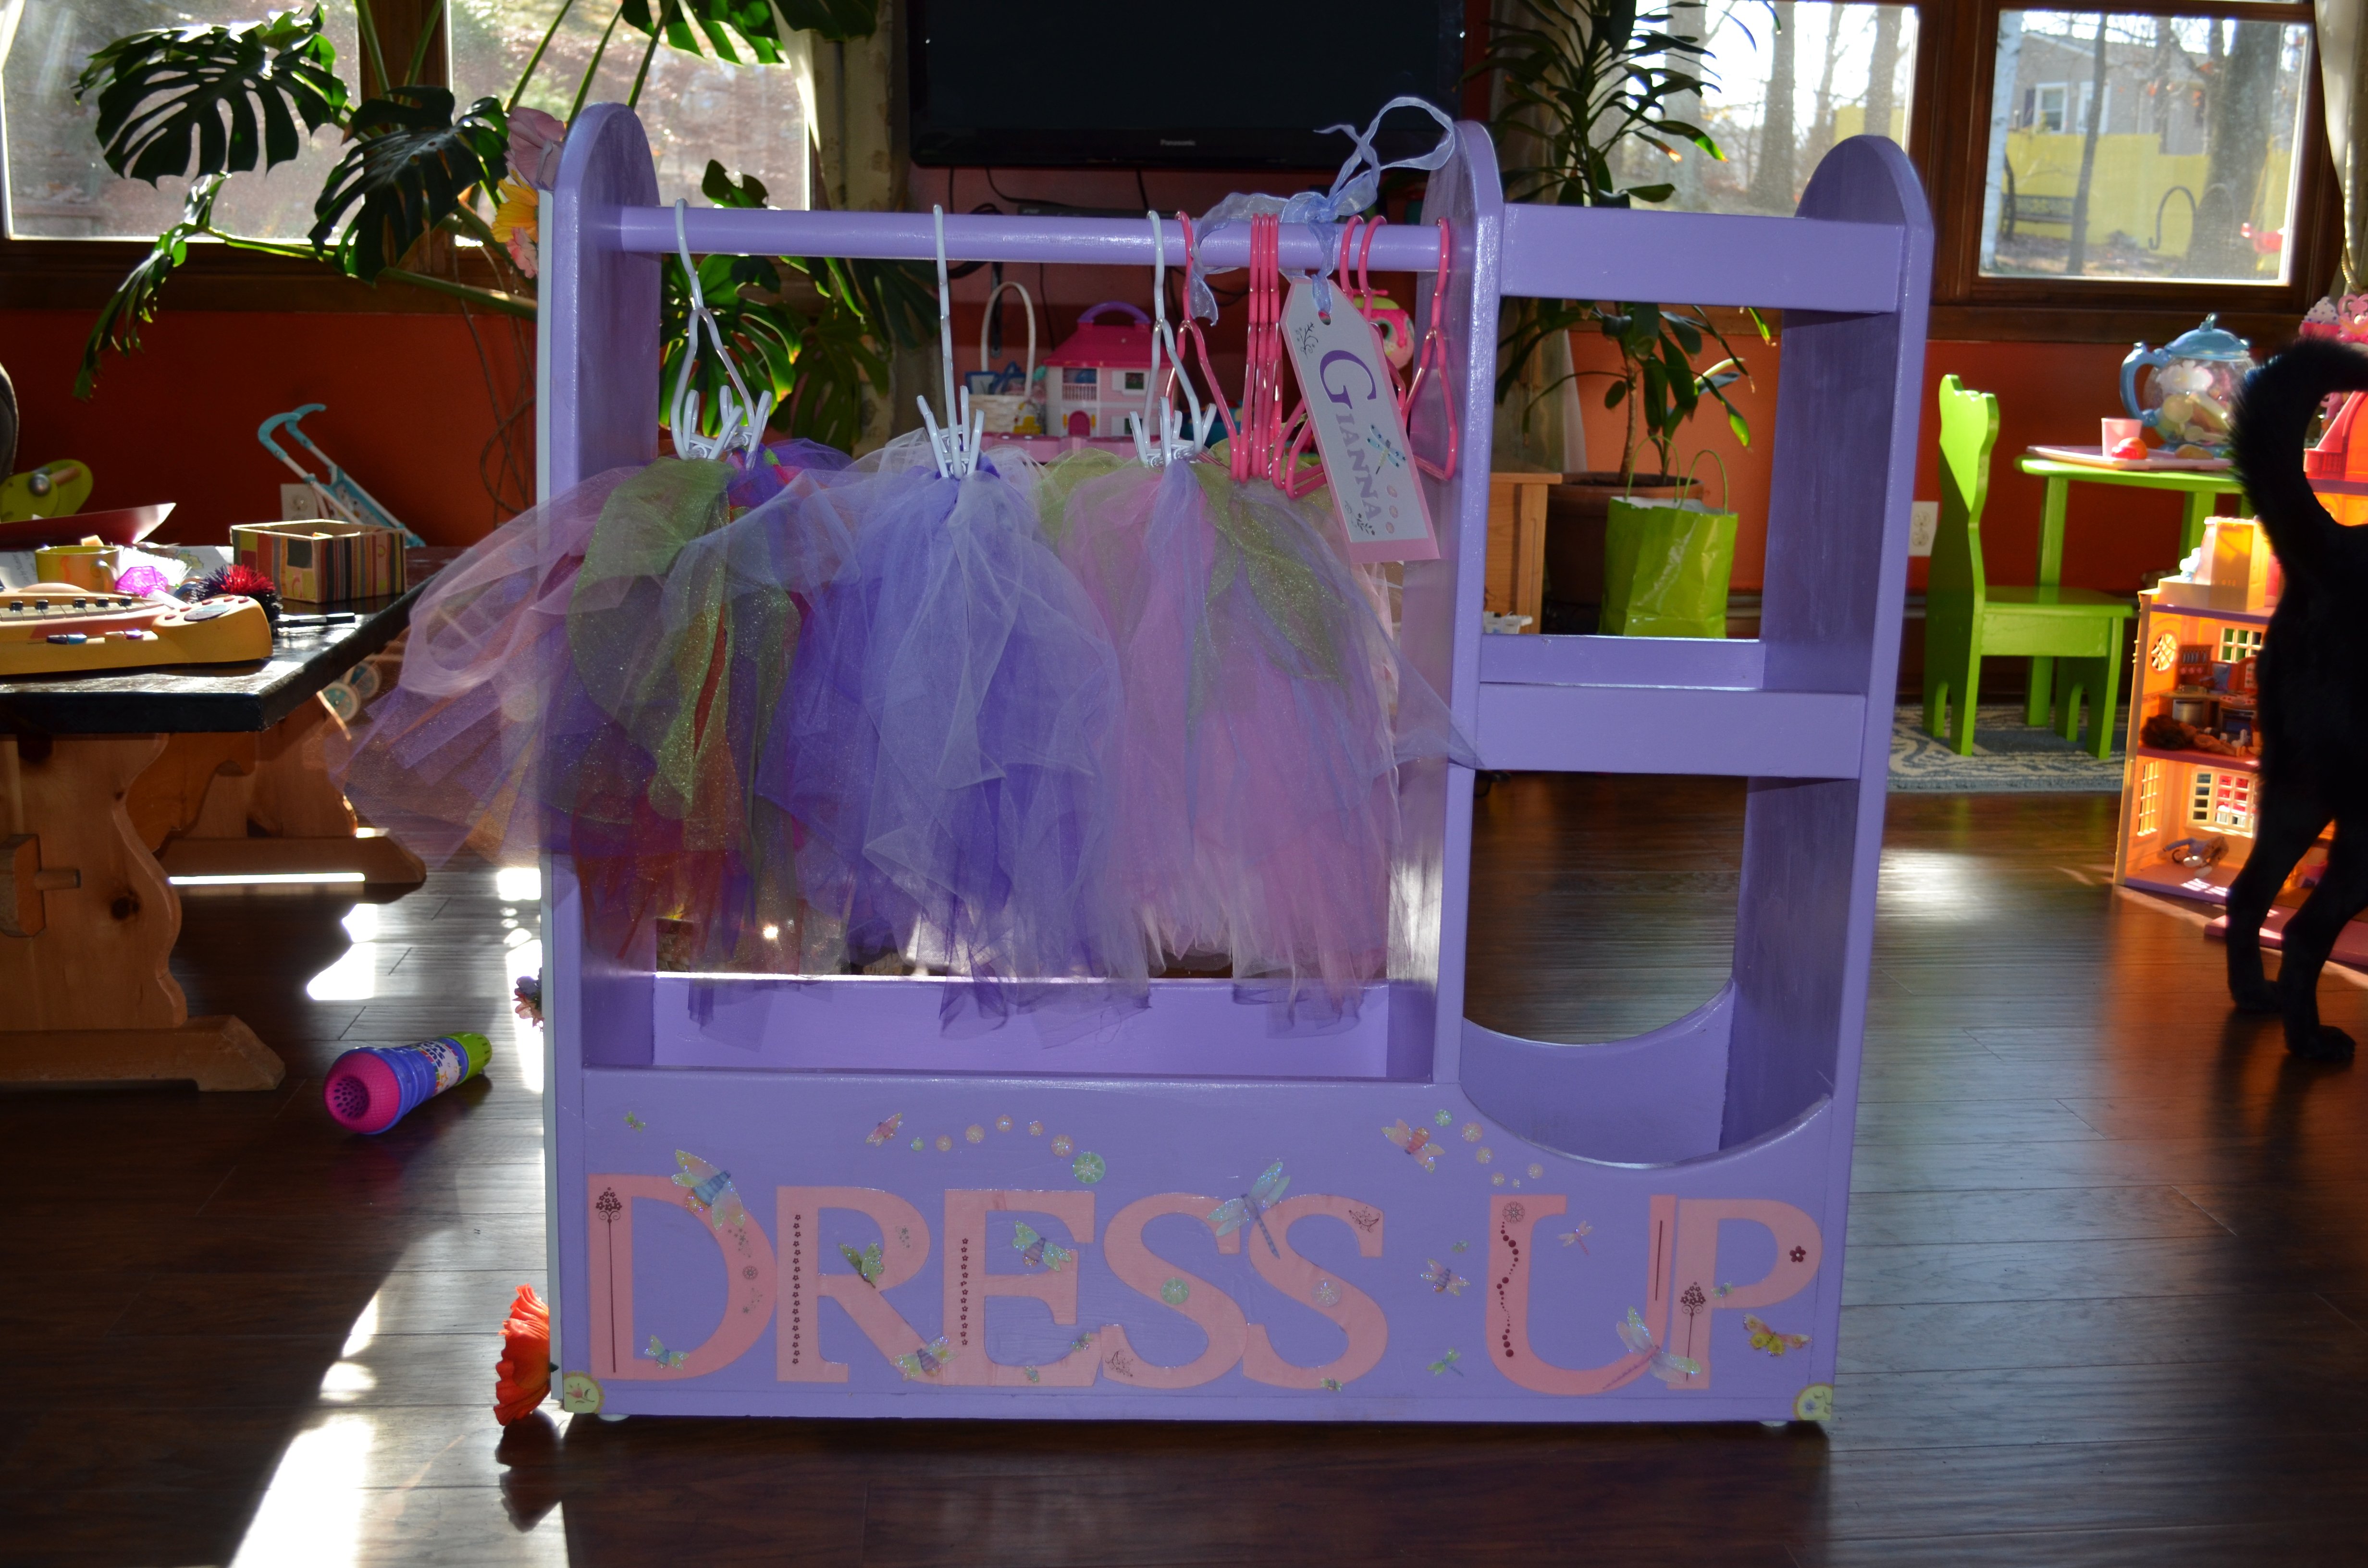
I have a 2 1/2 yo daughter and a 2 yo niece, so I make most of Ana's awesome plans in duplicate! These are two versions of her Dress Up console, one was for my niece's 2nd Bday, the other I just had to make for my own little Princess!
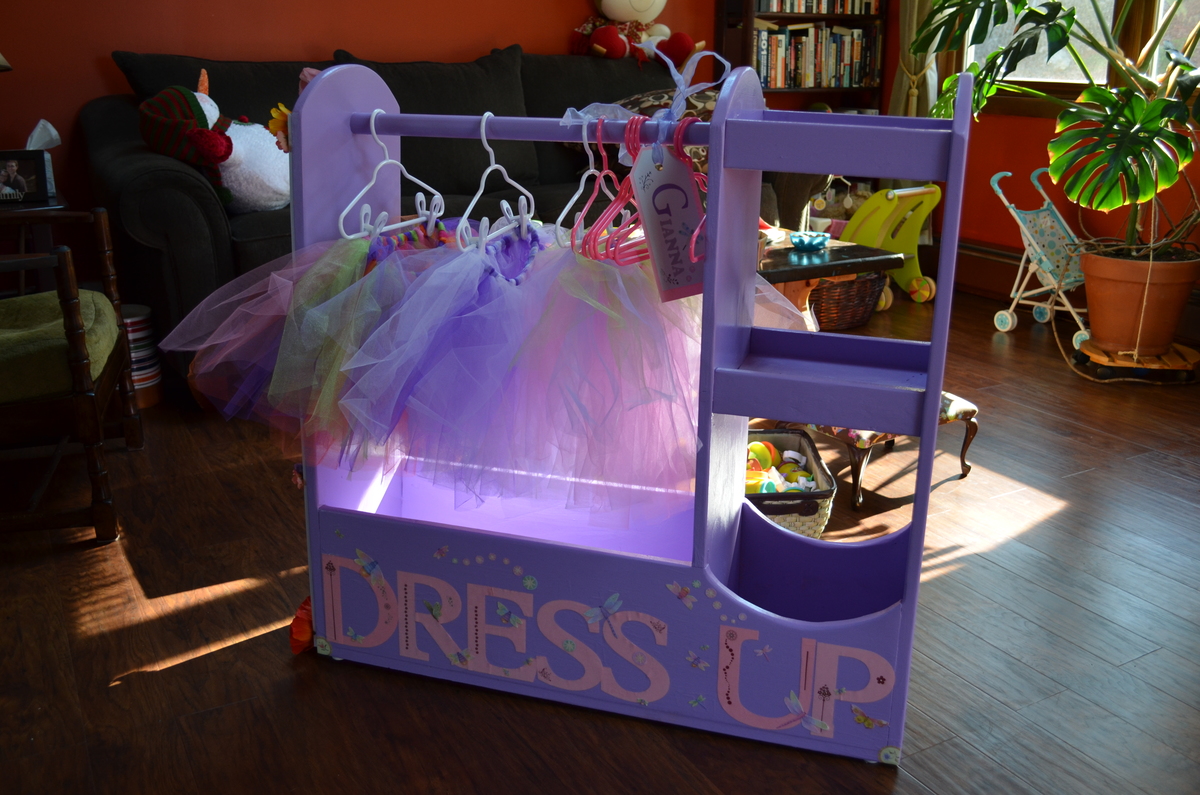
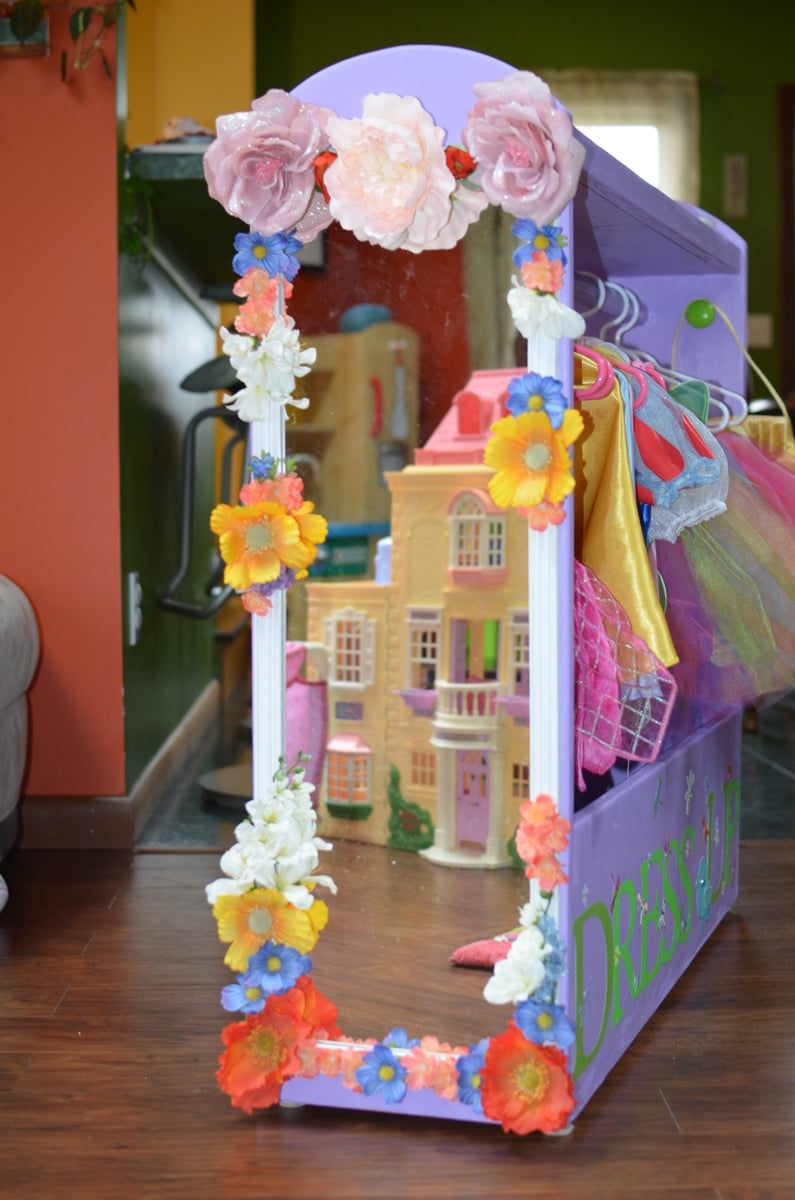

Built from Plan(s)
Estimated Time Investment
Afternoon Project (3-6 Hours)
Recommended Skill Level
Beginner
Comments
Tue, 06/18/2013 - 15:18
Since you've had experience
Since you've had experience with both, do you like having the cubby's or do you think it is sufficient without? Trying to decide which route to take. Thanks!
Fri, 09/26/2014 - 13:46
Hi! Where can I find the
Hi! Where can I find the plans for this exact dress up storage?
Fri, 09/26/2014 - 14:00
Dress Up Storage plans
Hi Rinabeens,
Link to the plans:
http://ana-white.com/2010/11/craftiness-not-optional%E2%80%99s-dress-st…
This is super cute, I hope you post a picture when you build this!
Rustic X Square Oversized Coffee Table
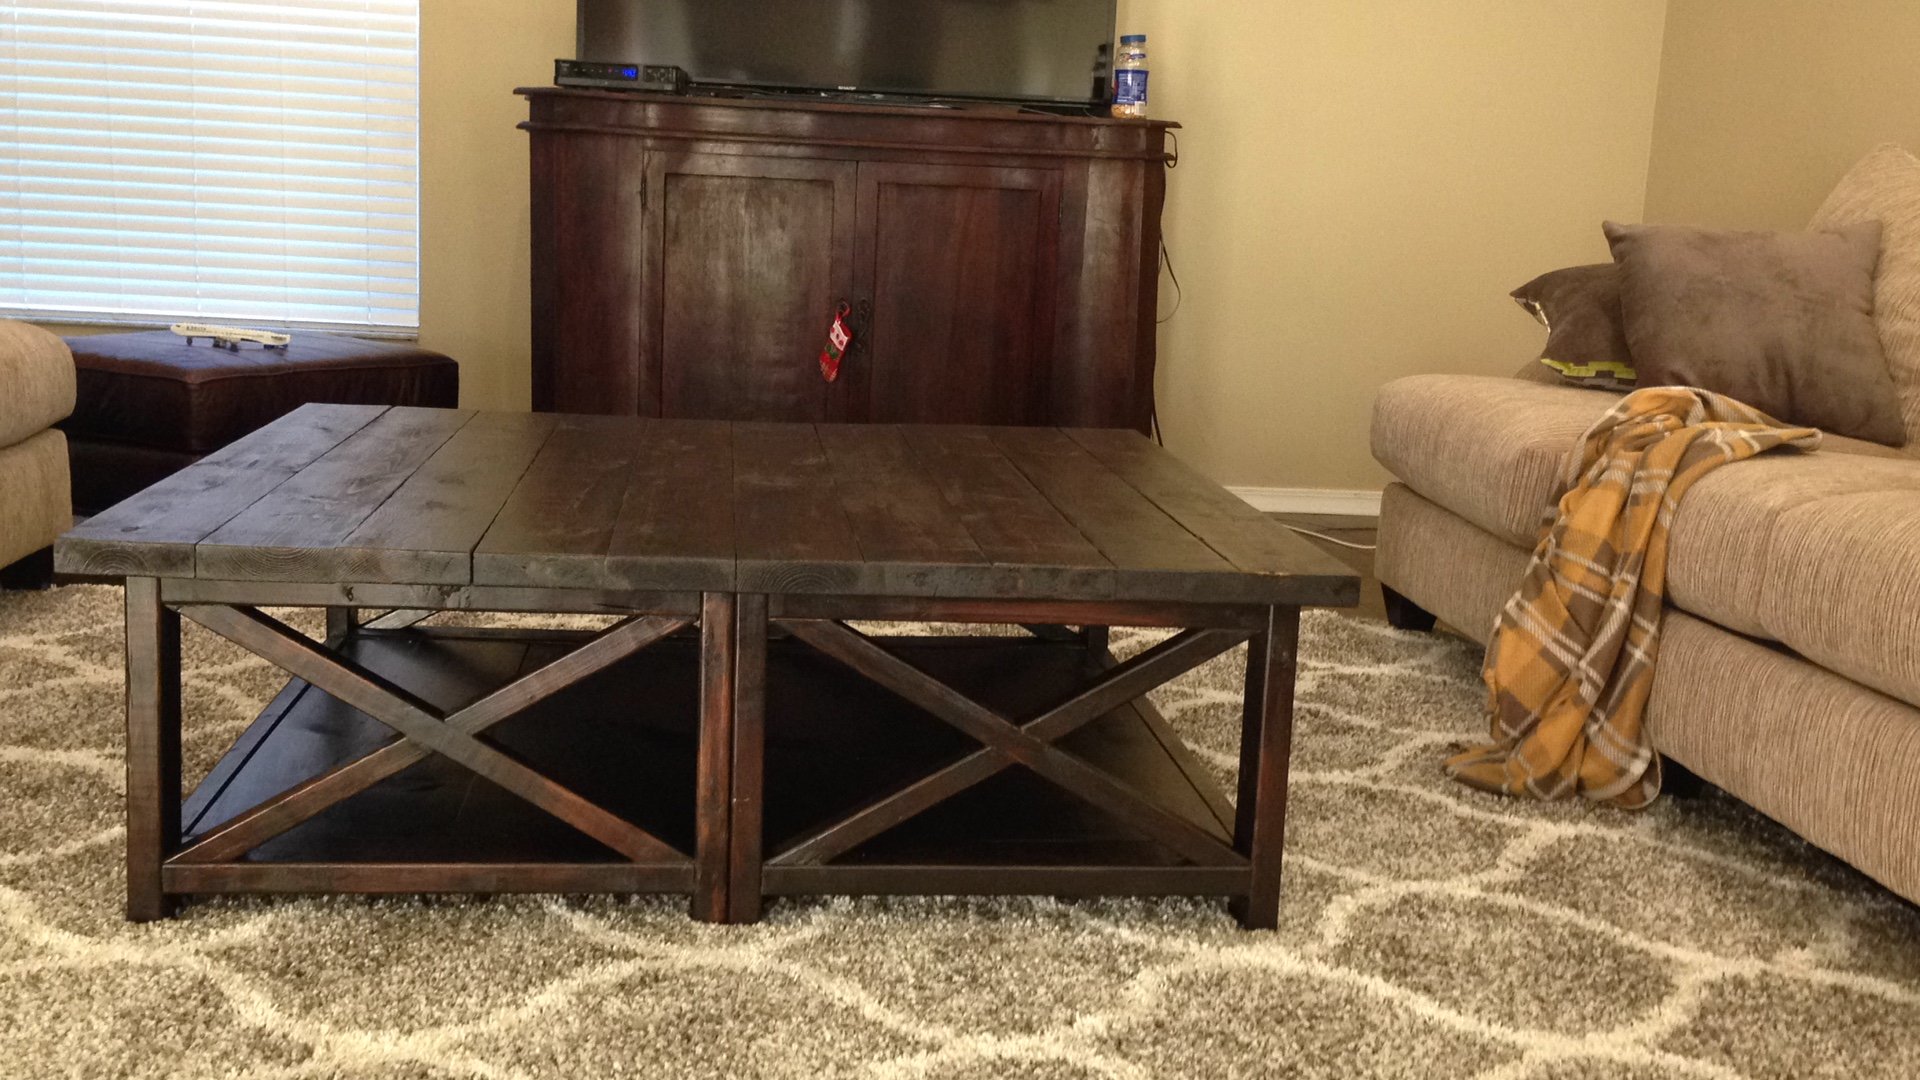
We could not find a large enough coffee table that we wanted so we decided to make our own. We loved the Rustic X plan and thought if we put two tables toghether we could get the pefect table size for our living room. Project cost us around $120 and it took us a week to complete, but we are happy with the results. The color is a dark expresso.
Built from Plan(s)
Estimated Cost
$120
Estimated Time Investment
Week Long Project (20 Hours or More)
Finish Used
The stain is called Kona
Recommended Skill Level
Intermediate
Comments
Farmhouse Table
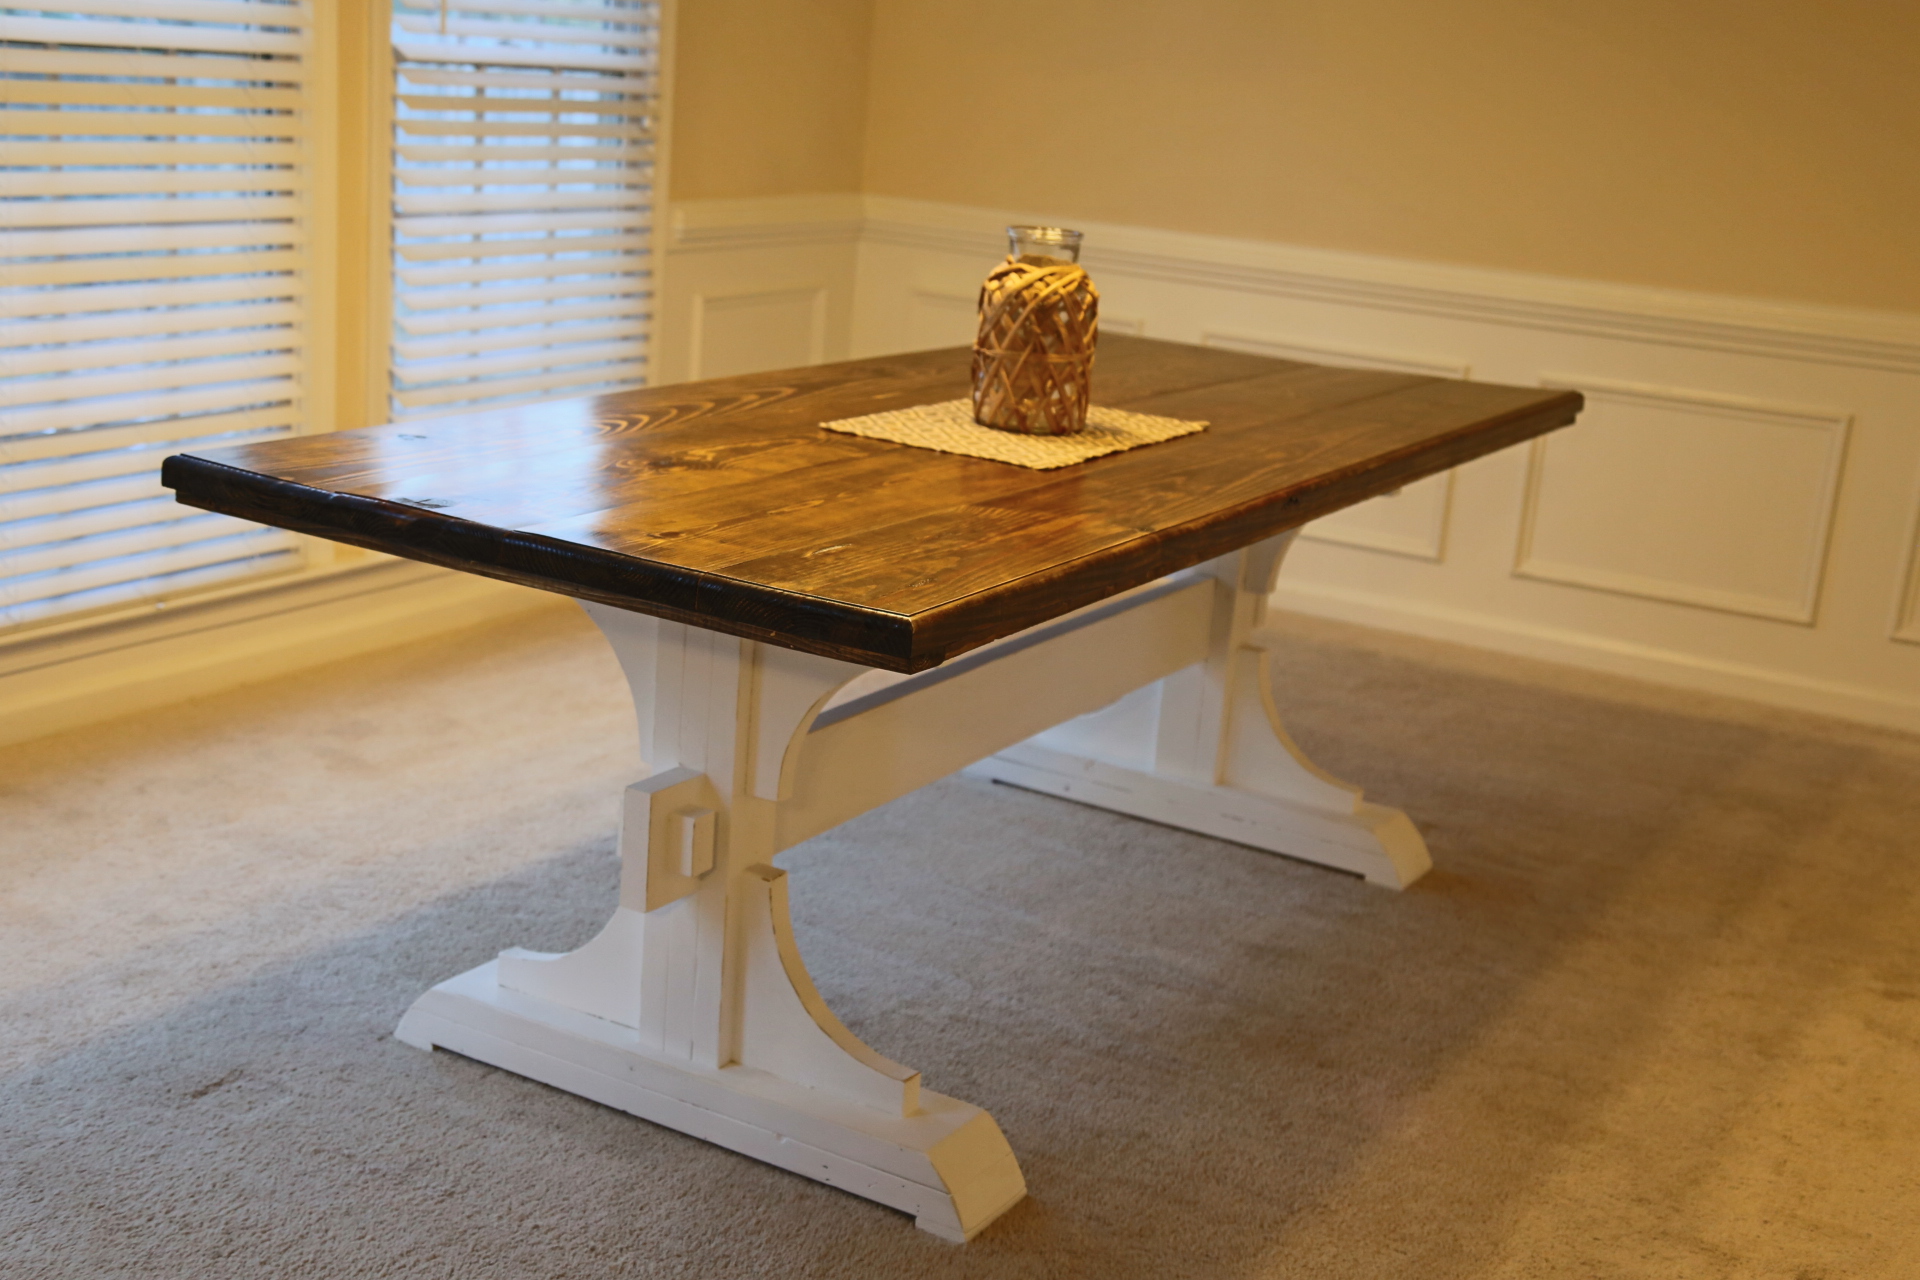
I love this farmhouse style. It's 7'x3' and 30" high. I got the plans from Ana white. I just made a few changes.
Estimated Cost
$85
Estimated Time Investment
Weekend Project (10-20 Hours)
Finish Used
Minwax dark walnut/ minwax polyurethane
Recommended Skill Level
Intermediate
My First Bed
This was my first bed since we can not find any in stock due to the pandemic. I switched up the headboard legs to 2x6s for a slightly wider base. This helped with the mattress in a box we ordered. I built a simple frame using 2x8s, all basic lumber from the big box store, and used 2x6s for the footboard legs. I built the bed frame just about two inches shorter in width to give it some variation in sight lines. I finished it with basic white enamel paint and put 1x4 slats under the mattress. My wife loved it and it turned out well.
Built from Plan(s)
Estimated Cost
$380
Estimated Time Investment
Weekend Project (10-20 Hours)
Finish Used
White Paint
Recommended Skill Level
Intermediate
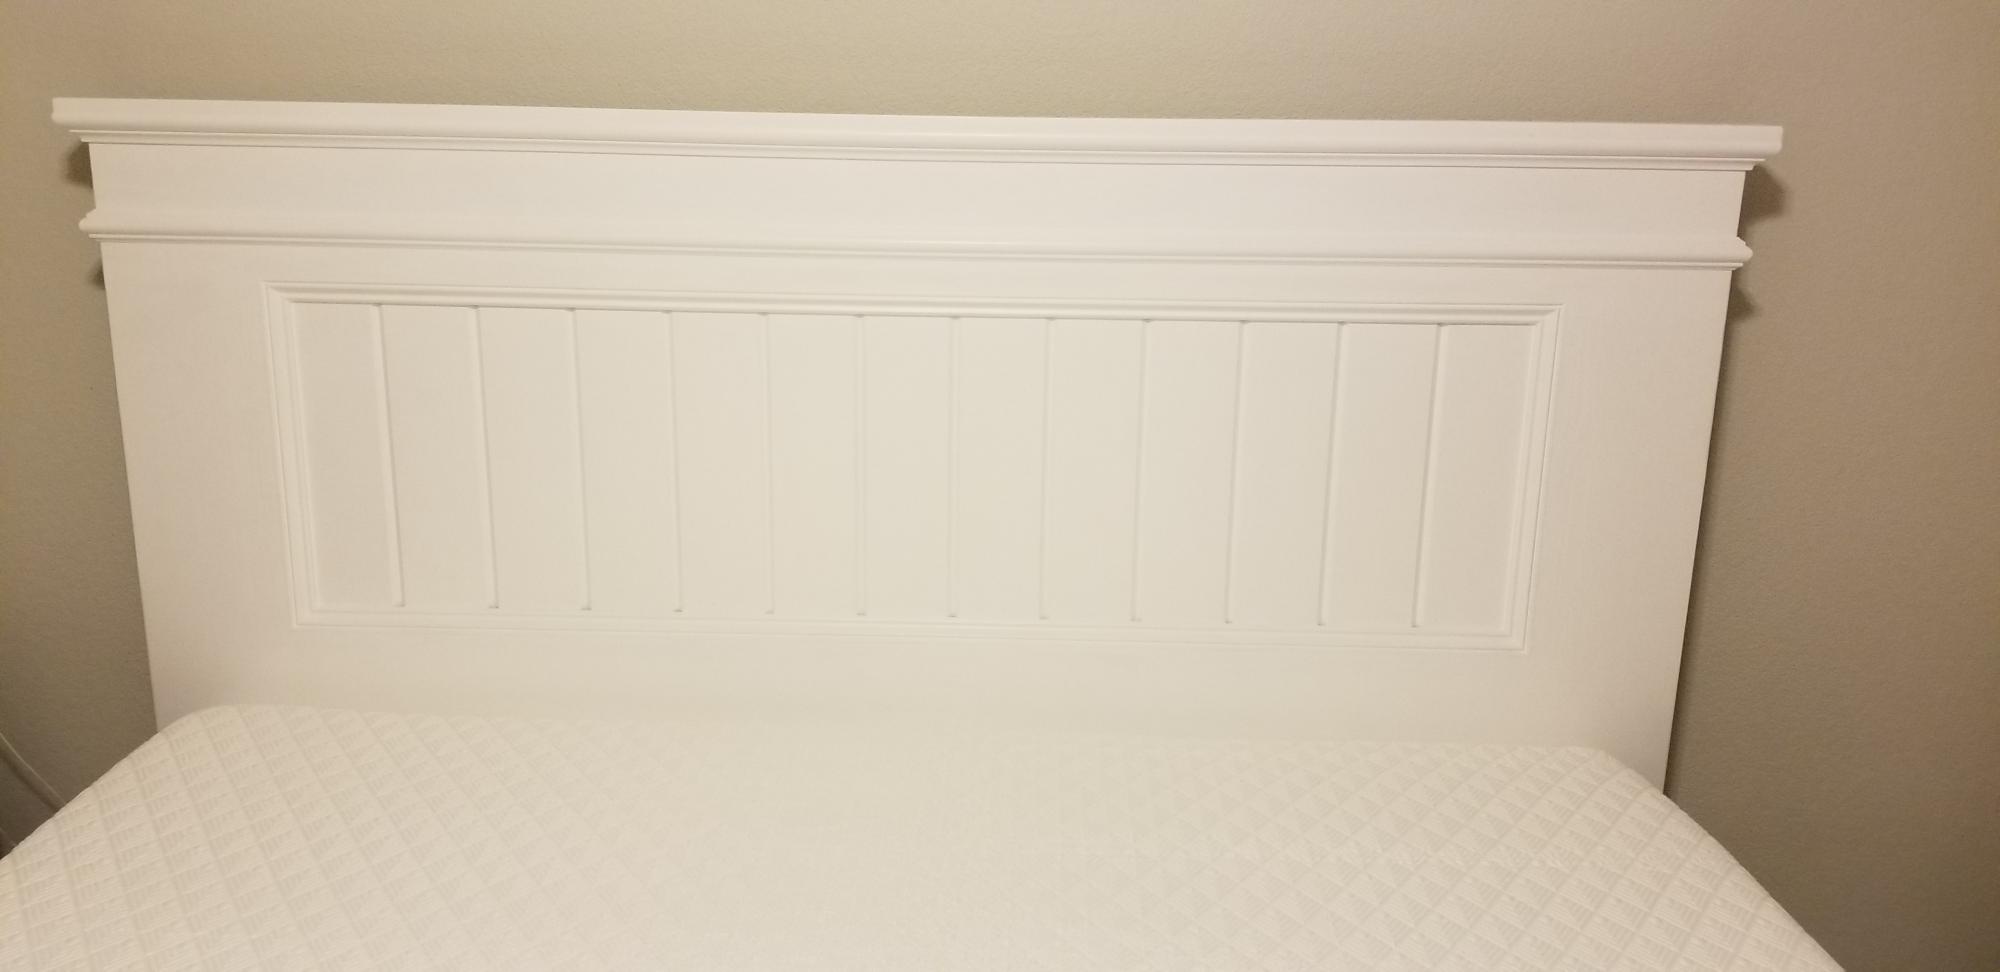
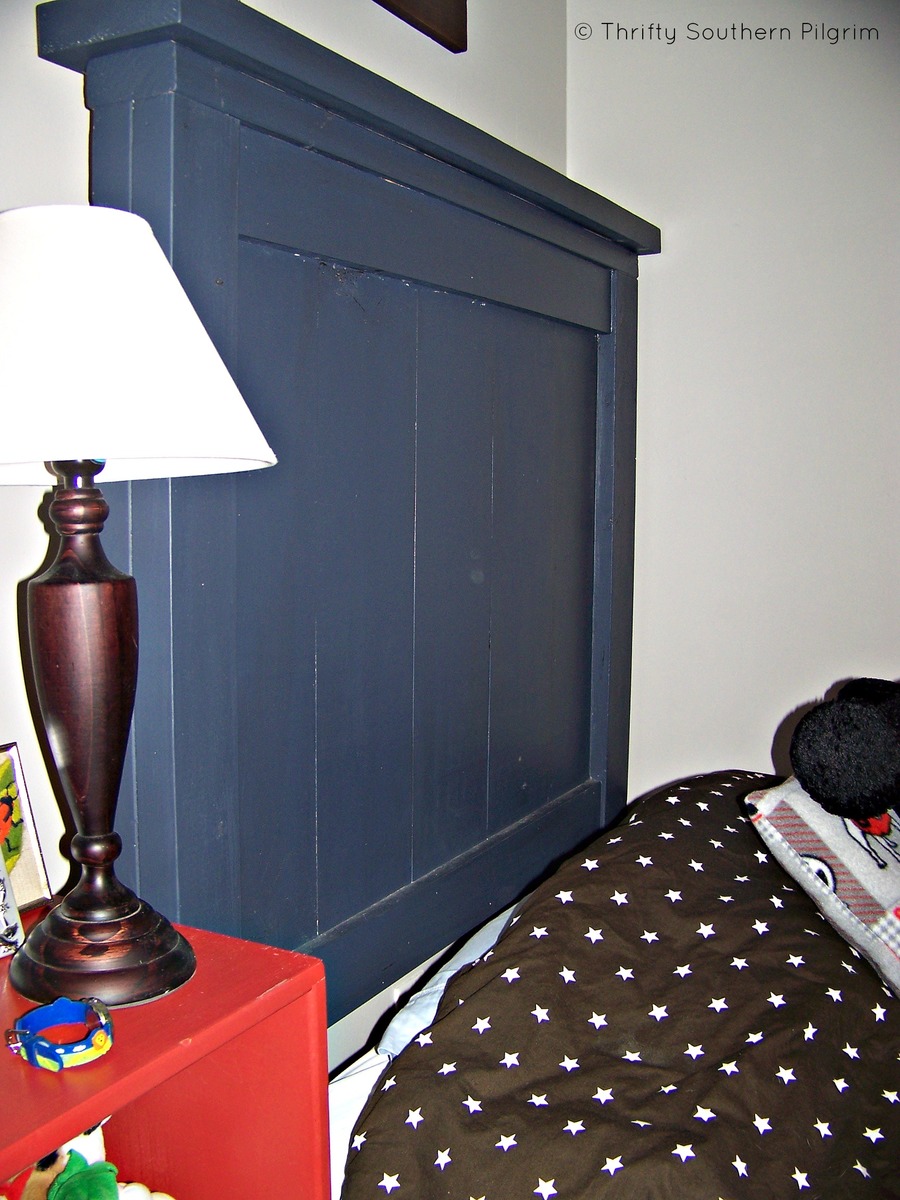
Twin Headboard (2) from Farmhouse Plans

I used a combination of Ana White's book, The Handbuilt Home, and her website plans to build TWO twin sized headboards. I did not build the rails and/or footboard, because the room is too small. I simply attached the metal bed frame to the posts of the headboard. My boys love their new beds!
Estimated Cost
$100 (for both)
Estimated Time Investment
Day Project (6-9 Hours)
Finish Used
Paint
Recommended Skill Level
Intermediate
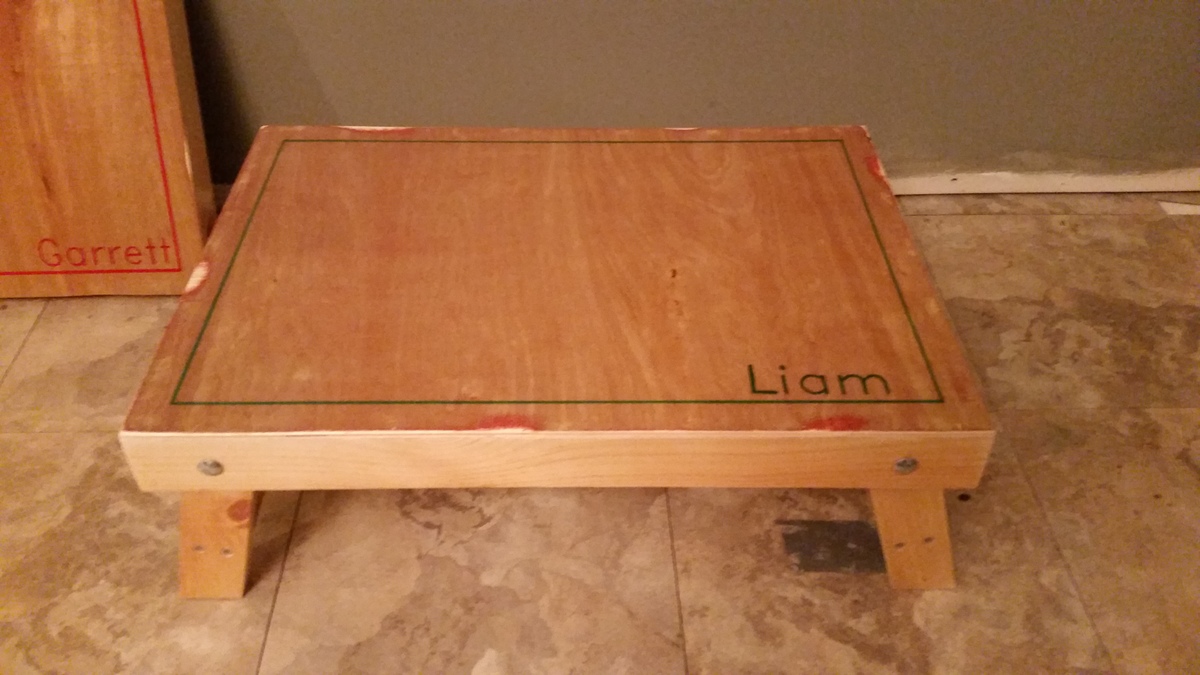
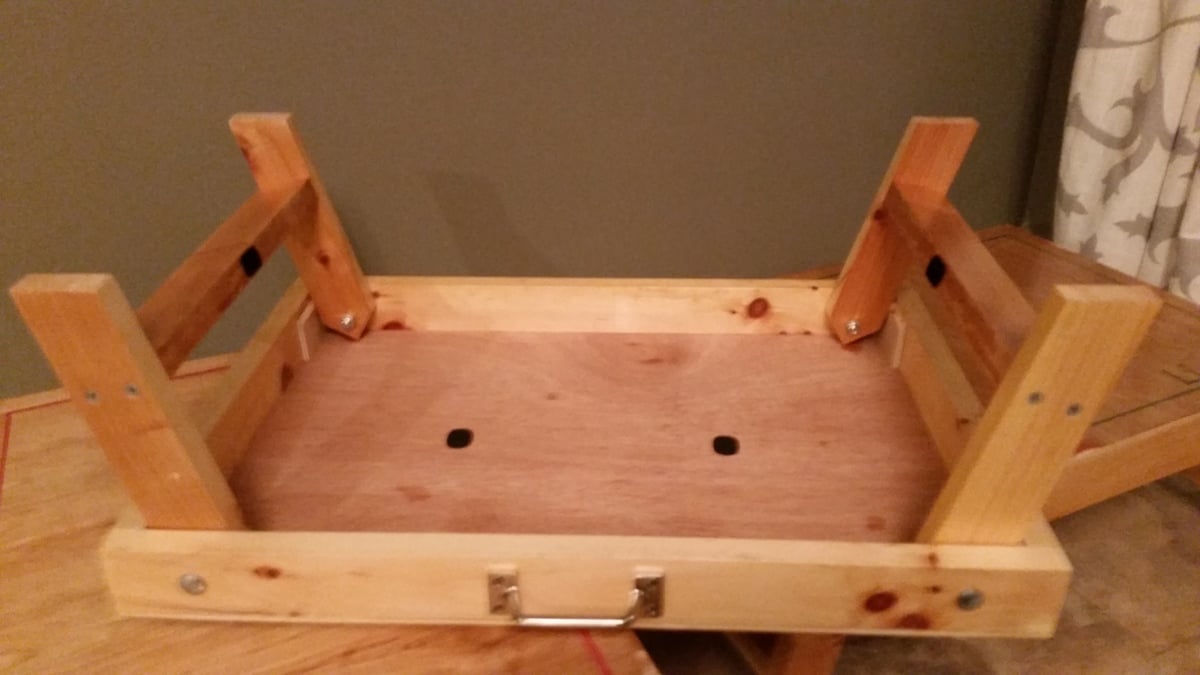
Folding Lap Desk Christmas Presents
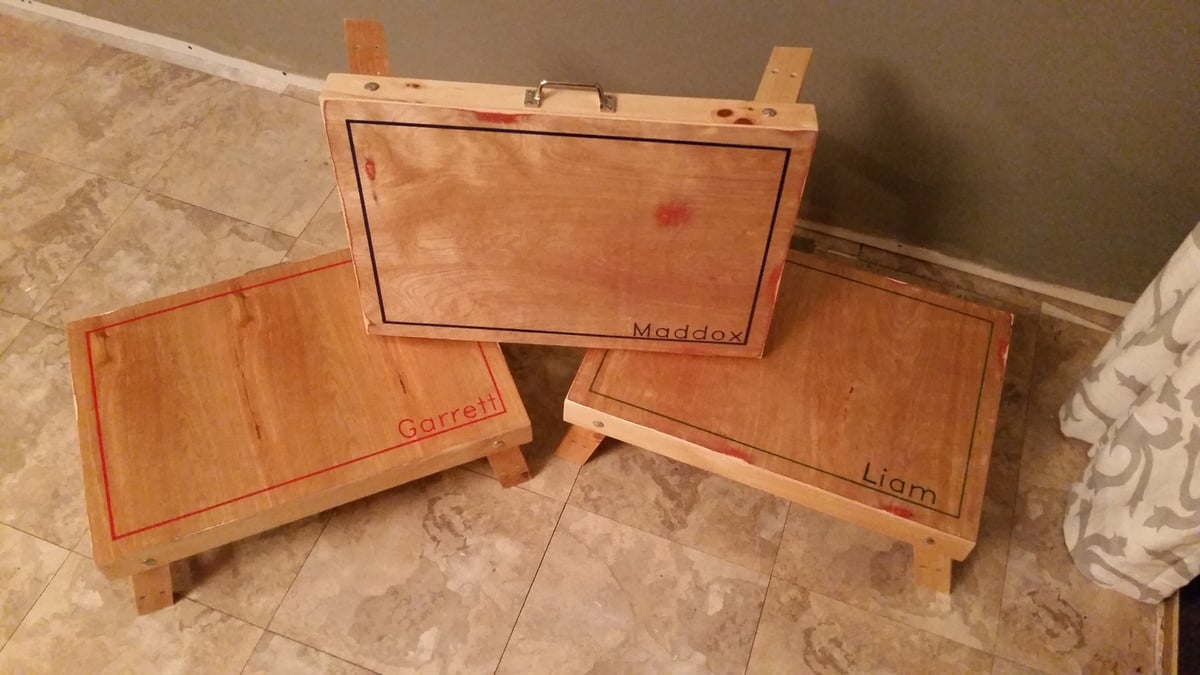
This was a fun project for my three nephews for Christmas (ages 3, 2 and 2). I thought they'd each like their own little personalized desk for coloring, blocks, snacks, etc.
This was a relatively simple build with the only tricky part being the leg holes (and getting the legs to open at the exact angle I wanted). I had to fudge a couple of them with some patches that you can see in one of the photos.
I would suggest using lock nuts on the bolts. The original nuts I used were turning as the legs opened and closed. I thought that eventually the nuts might work themselves off the bolt.
The frame was built completely out of 1x6 scrap wood I had lying around my garage that had been used for shelves. I cut the 1x6s down to 1x2 and 1x3 with my table saw. I did buy a small sheet of plywood underlayment for the top.
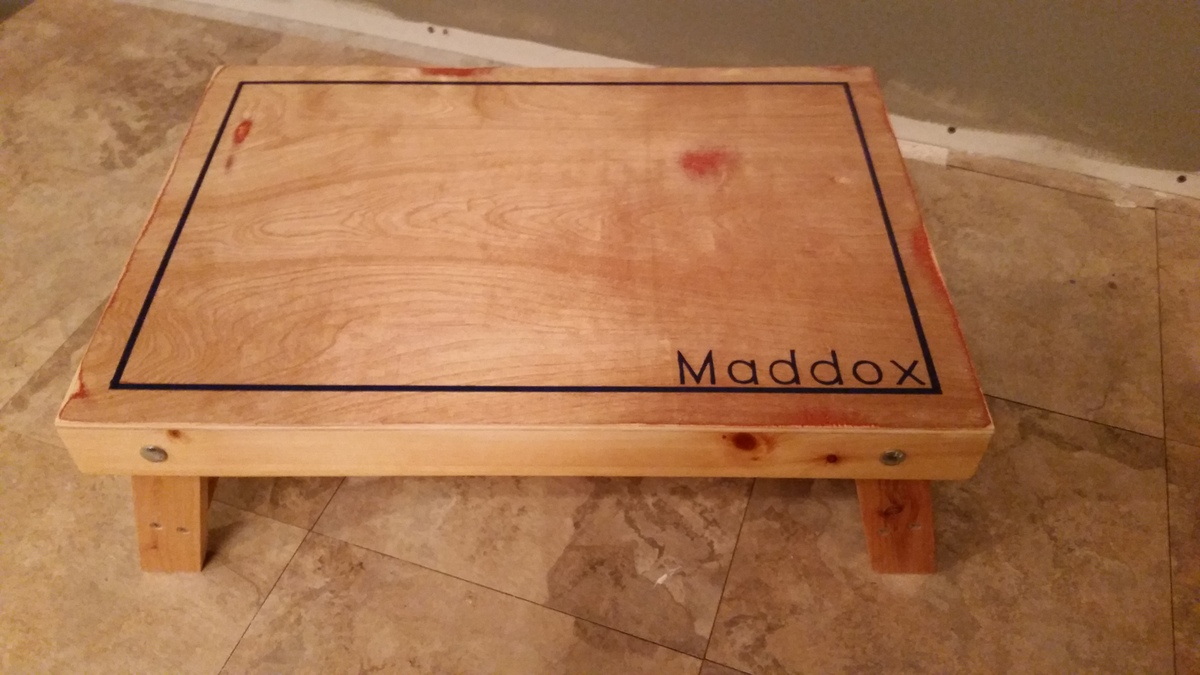
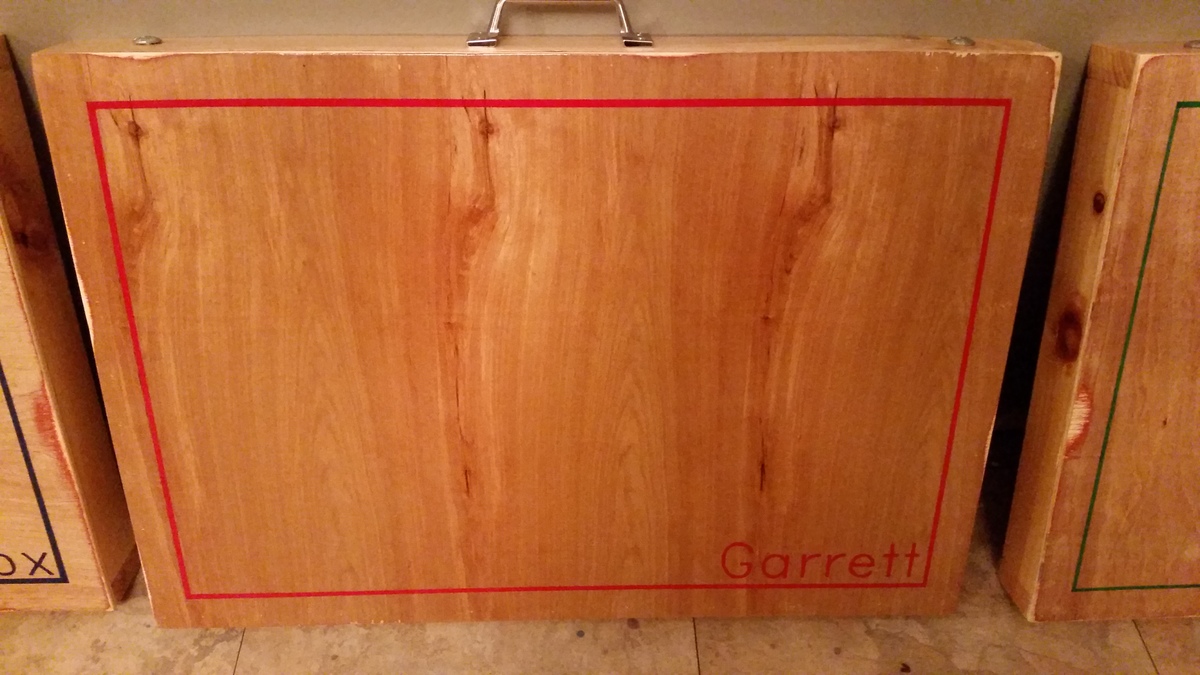
Built from Plan(s)
Estimated Cost
Aprox $10/ea for my three. If you buy all the wood, it would probably be closer to $15-20/ea.
Estimated Time Investment
Afternoon Project (3-6 Hours)
Finish Used
Acrylic paint for the names and border. Poly clear coat all over.
Recommended Skill Level
Beginner