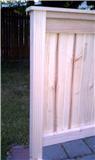
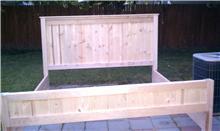
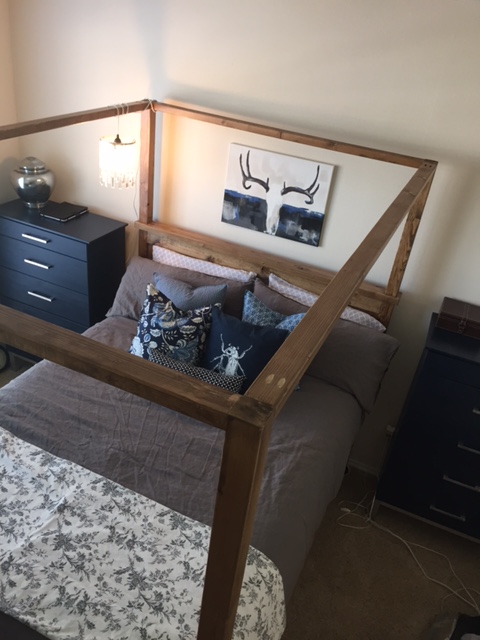
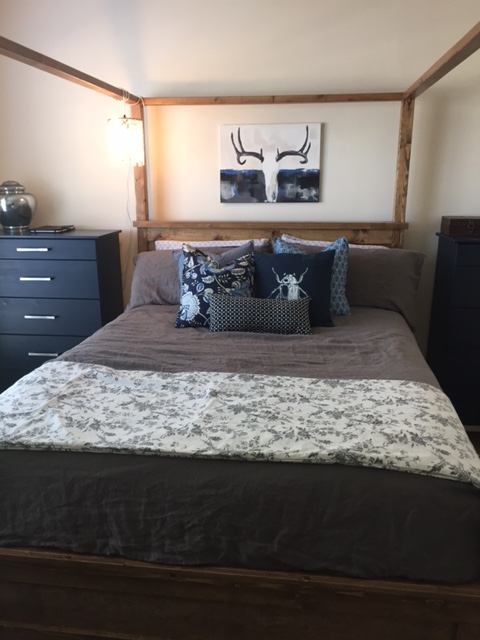
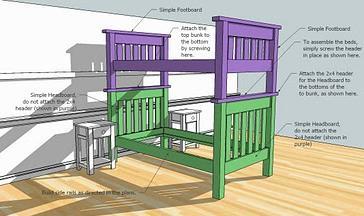
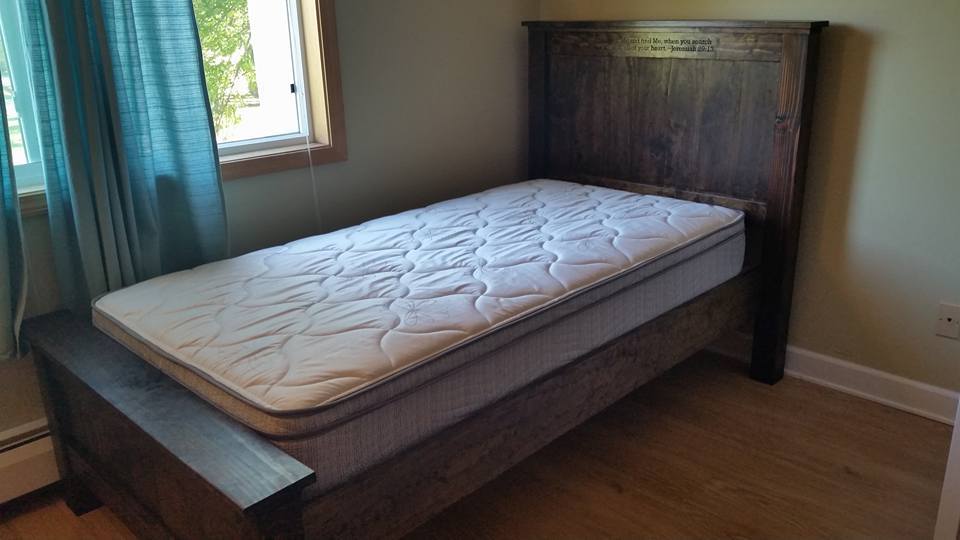
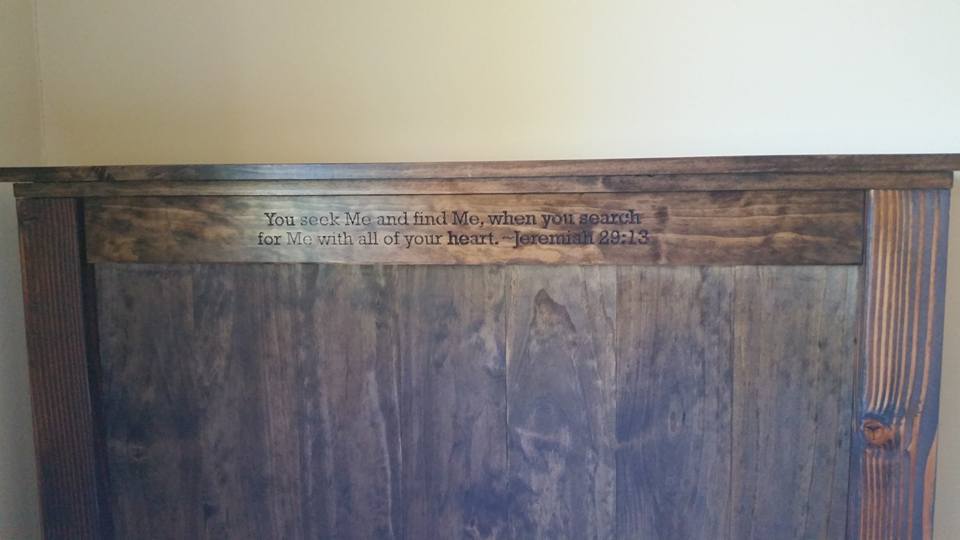
Community Brag Posts

Farmhouse bed, King

Submitted by JennyG on Fri, 07/01/2011 - 13:05

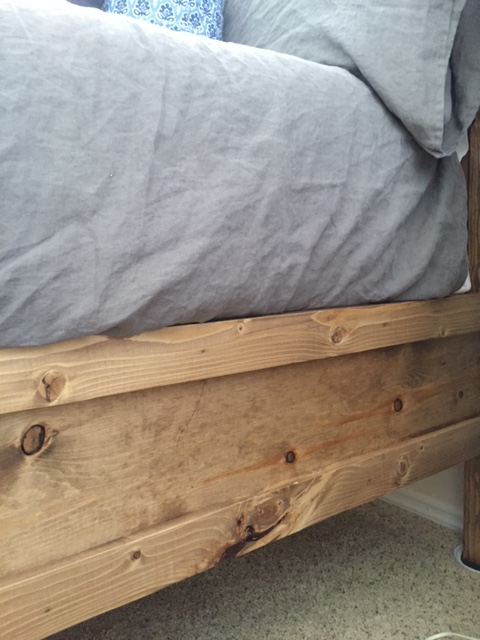
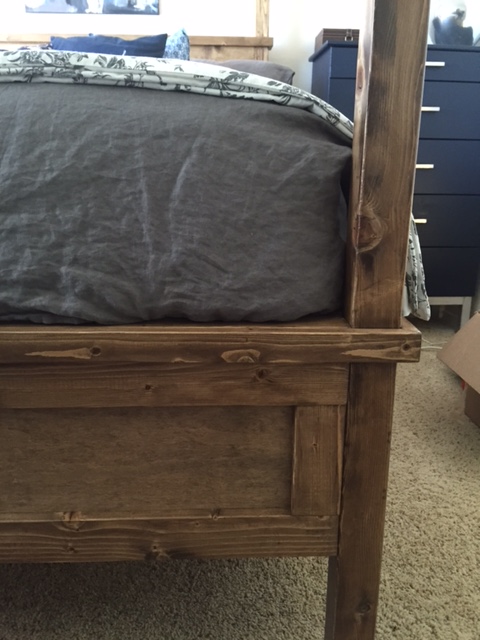
We raised the headboard about 6 inches from the plan and modified the size to king. (sidenote: did you know that California King is actually narrower and longer than a standard king? I always assumed it was the widest bed on the market.)To cover the "seam" of the 2x4s on the posts, we added crown molding. Slats are tongue and groove instead of 2x4s.

Estimated Cost
$250
Estimated Time Investment
Day Project (6-9 Hours)
Finish Used
black paint
Recommended Skill Level
Intermediate

Comments

robert (not verified)

Thu, 11/15/2012 - 22:25

did you put a groove with a router on the edges of your panels on the head and foot board? If so which one.

Fancy X Farm Table and Benches

Submitted by Newfey on Wed, 08/07/2013 - 14:05

I made this table and benches for my daughter

Estimated Cost
$100.00
Estimated Time Investment
Weekend Project (10-20 Hours)
Finish Used
I finished the table and benches with a solution of extra fine Steel wool disolved in Apple Cider Vinegar and dark brown RIT Liquid Dye. Then gave it a number of coats of Polyurethane.
Recommended Skill Level
Intermediate

Alaska Farmhouse Canopy Bed

Submitted by jennyshedd on Sun, 08/30/2015 - 08:59

My dream project...took me a lot longer than anticipated. But a very sturdy bed when finished. I only have the matress and not a box spring, so i raised the support for mattress almost to the top of the sideboards.  The large posts gave me problems at first because i was unsure if ''special 3x3'' meant actual 3x3 or 2.5x2.5 so i ended up having to send them through table saw twice.

Estimated Cost
$400-500
Estimated Time Investment
Week Long Project (20 Hours or More)
Finish Used
Minwax Special Walnut
Recommended Skill Level
Intermediate

Comments

Clara's Table

Submitted by mtallent on Sat, 05/12/2018 - 07:13

Our daughter said she wanted a desk like Daddy. When I found these plans I was so excited! My husband doesn't know it yet but it was his practice for a large farmhouse table that I want for our dining room. The Clara's table plans were easy to follow, I can not remember the exact prices for our materials since we built this back in the fall (over 6 months ago). We will eventually make the chairs. I was pleased with the way it turned out with the stained top and the legs were painted a ballet pink. I believe the stain is Dark Walnut, it was something we had leftover from another project and the paint for the legs was leftover from painting her room. It has held up well the past 6 months, it has a few dings from markers and other toys but I love the character it adds to the table. We plan on making the chairs soon.

Built from Plan(s)
Estimated Cost
$30-$40
Estimated Time Investment
Afternoon Project (3-6 Hours)
Finish Used
Dark Walnut stain and clear coat polyurethane (2 coats stain, 2 clear coats) Ballet pink paint used for the legs. We did not have an old rag to apply the stain, we used a plastic grocery bag and it worked great!
Recommended Skill Level
Beginner

Comments

Banquette Seating with storage

Submitted by Anonymous (not verified) on Mon, 04/25/2022 - 13:58

You didn’t have plans, so I had to “wing it” without you; however, I couldn’t have done it without all the practice I’ve had from all your plans on this website these past several years!

Comments

Modified modular bookcase

Submitted by tiffcampo on Mon, 07/04/2011 - 18:19

I started this build after coming across the plans on this site. My son has a small bedroom and had received a tv for his birthday. It has a small screen and so it needed to be pretty close. So, I adjusted the measurements to be compatible the width of the end of his bed. The only other change to the plans was the addition of the 1x2 trim on the center shelves. I didn't use the greatest quality plywood and it just looked a little unfinished without it.
He wanted black and I wanted white. I primed, then painted flat white. I then sanded out some places and on the 1x10 and trim to stain for an antique look. However, when I rubbed on the ebony stain, I really liked how it looked over the white paint. So, I rubbed the whole thing. Then sealed it. The result is sort of an antiqued gunmetal gray that we both love. Thanks again for the plans!! Next?!

Estimated Cost
$45
Estimated Time Investment
Weekend Project (10-20 Hours)
Finish Used
Olympic Interior Primer, Olympic Interior Flat in Snow Ballet, Minwax Ebony, Spray sealant in semigloss
Recommended Skill Level
Beginner

Comments

songbirdfeeder

Sun, 09/04/2011 - 18:28

You did a terrific job building this! My son is in an apartment while going to college and asked for a bookcase for Christmas. Problem is, he lives 8 hours away and I need to make something that will fit in his car!Haha! This looks like a lot of storage so I'm going to give it a try.

Reclaimed lumber Adirondack chair

Submitted by rkyount on Thu, 08/08/2013 - 13:23

For my brother's 35th birthday, I helped him build a fence and side deck on his house. Using the leftover lumber scraps and screws, I adapted the DIH Adirondack chair plans to build this for him. He wanted a big, sturdy chair with a wide arm rest that looks "rustic". I used 4x4 and 2x4 post scraps, deck boards, and fence pickets. I also widened the seat just a bit for comfort. This is definitely the perfect chair for him!

Estimated Time Investment
Afternoon Project (3-6 Hours)
Finish Used
Since it's all treated lumber, we'll just seal it whenever we do the deck with Thompson's Water Seal.
Recommended Skill Level
Beginner

Comments

rkyount

Fri, 08/09/2013 - 14:38

Thanks! I always enjoy building with your plans, and it was a bonus that I didn't have to buy anything to build this, since I used leftover materials.

Outdoor table in Norway

I found the plans for a farmhouse table here on Ana White`s and decided that this would be a great design an real outdoor table.The table seats 12 people and I also made four benches to go with it. The reason I made four benches is that it is easyer when someone needs to get up and leave the table. Under the feet I mounted small blocks of wood since the table will be standing directly on the ground. This way the rainwater will pass under the feet and if necessary these blocks are easy to change. The feet and the supports are made with 2X4" and the tabletop is made with 1,5X6" all in pressuretreated pine. Pressuretreated pine workes well outdoor in the nordic climate here in Norway and is cheap and widly awailable.

Greatings from Norway

Built from Plan(s)
Estimated Cost
250 usd including the benches.
Estimated Time Investment
Day Project (6-9 Hours)
Finish Used
None
Recommended Skill Level
Beginner

Full outdoor furniture set

Submitted by Bradnag on Fri, 06/22/2018 - 10:15

Built a new outdoor furniture set using the following plans:

Ryobi Outdoor Couch (linked to in the One Arm Outdoor Sectional plans)

Armless 2x4 Sectional

2x4 Outdoor Coffee Table


I also built the Tryde End Table with Shelf & 2 of the Modern Outdoor Chair from 2x4s and 2x6s, but they will be in a seperate brag post since I can only link 3 sets of plans per post.


I built the armless middle sectional piece exactly to plan, to fit 25x25 outdoor cushions. The bench is a little deep for sitting, but great for laying out. The 2 side pieces I shallowed to fit 19" cushions, since they are cheaper and easier to find and are more naturally sized for sitting. I also added a support board under the back rail, which is missing from the Outdoor Couch plans but is present in the Armless sectional plans and I wanted everything to match. I stained everything with Thompson's water sealing stain, since it was going to be exposed to the elements at all times (though this picture was taken before the staining was completely finished, hence the untouched lumber visible under some of the cushions).


Project took a 3-day weekend. Day 1: measuring and cutting. Day 2: assembly. Day 3: sanding and staining. 


Estimated Cost
$250 in materials, $300 in cushions
Estimated Time Investment
Weekend Project (10-20 Hours)
Finish Used
Thompson's Semi-Transparent Stain & Sealer, Honey Gold
Recommended Skill Level
Intermediate

Comments

Behind Closed Doors (Media Center)

Submitted by cbeach1717 on Thu, 07/07/2011 - 20:38

We used Ana's plans for simple bookcases and a larger but equally simple armoire to build a HUGE media center that could somehow manage to take some of the focus off of the television. We added doors everywhere that we could and lots of glass display shelving. The hubby is thrilled because his beloved flat-screen and infinite related electronic gadgets are within easy reach. And I smile every time I walk into our family room and don't have to see everything that is hiding behind closed doors!

Estimated Cost
$150
Estimated Time Investment
Week Long Project (20 Hours or More)
Finish Used
Simple Prime, Painting, Crown Moulding, Pewter Knobs, Glass Shelving, Lights.
Recommended Skill Level
Intermediate

Comments

Cobe

Fri, 07/08/2011 - 22:57

Cbeach1717,

This is exactly what I want!

Can you provide the dimensions for the armoire and the shelves, please? Can you tell me also the paint color and how many coats?

cbeach1717

Mon, 07/11/2011 - 08:52

Ana's "Nursery Armoire" is the best starting point, and here are our dimensions:

Armoire basic box structure:
2- 1x16"@ 8': (Sides)
2- 1x16"@ 42" (Top and bottom)
2- 1x16"@ 40.5" (Two shelves for television and electronics)
1- HUGE 1/4" plywood as the back and for support

*bun feet and crown moulding also add some height

We used a "Country White paint from--GASP- Wal-Mart! And it is the best off-white color I have ever used! We used one coat of primer and two coats of paint.

I hope this helps, but feel free to ask for any further clarifications! Best of luck :o)

Guest (not verified)

Thu, 07/14/2011 - 20:54

I am in love with this! How tall are your ceilings? My only concern is that this might be too big for my teeny condo with 8 foot ceilings!

In reply to by Guest (not verified)

cbeach1717

Sun, 07/17/2011 - 15:48

Thanks! Our ceilings are ten feet high--why not just shorten all height measurements by 2 feet? Good luck!

Sarah Kirchner (not verified)

Sun, 01/15/2012 - 18:17

I am dying to get this built for our house! I see the cost estimate is listed at $150, is that for everything needed for all 3 units? I know it depends on what store is used and the location, just trying to get a better idea of what I need to save up. I was trying to find something similar on Craigslist that I could just refinish, but being able to make a piece that is exactly what I want for around the same price (or less) would be incredible!

I'd love to know where you got the glass shelves from if you don't mind sharing.

cbeach1717

Mon, 01/16/2012 - 13:06

Hi Sarah,

I hope you'll give this plan a try! The $150 estimate definitely includes the wood and supplies for all three pieces and most likely includes the bun feet and knobs as well (I can't be absolutely certain since we built this nearly a year ago). The glass shelves were bought from a local glass cutter who also cut the glass panels for our kitchen cabinets. It really shouldn't be too expensive though!

Oh and the absolute best advice I could give you is to invest in or borrow a Kreg Jig. We did not have one ourselves until well after this project, but it would have been an immense help! I wish you all the best of luck--let us all know how YOUR masterpiece turns out :o)

Guest (not verified)

Tue, 02/28/2012 - 21:39

I absolutely love this, my husband had been designing a unit very similar to this but this just made the job twice as easy not having to do all the hard thinking ourselves haha! Thanks so much for sharing, it looks fabulous!

In reply to by Guest (not verified)

cbeach1717

Mon, 03/05/2012 - 06:23

Thanks so much! I wish you lots of luck with your project, which you'll barely need because it is really simple to make and provides for a stunning result :o)

Classic Storage Wall

Since moving into our house almost 3 years ago, I have wanted a large piece to house the tv. The husband did not want glass, I wanted shelving on both ends and it had to hold a 60 inch tv (not pictured). To avoid paying thousands of dollars to a furniture store, I decided to build my own.

I used 1x2's, 1x3's, 4x8-3/4" plywood (sanded on one side) edge banding (super easy to use), nail gun and wood glue. I spent roughly a week building and staining, interrupted by 2 kids. The staining being the most tedious part. Cost was around $450 for all the pieces. I did attach the bridge piece by drilling holes through the bridge to the side hutches. I then installed nuts and bolts through the hole to attach it all together. Makes it easy to take apart when moved and I am not constantly drilling screws into the unit.

My husband is deployed so this was built solely by myself. My experience level is novice, this is only my 3rd piece of furniture, but I am hooked. The plans are easy to follow and use.

Estimated Time Investment
Week Long Project (20 Hours or More)
Finish Used
Minwax Wood Finish Dark Walnut
Recommended Skill Level
Intermediate

Comments

moonhopping

Mon, 08/12/2013 - 20:29

I have build a lot of small projects but nothing big I wanted to make this when I saw it. You inspired me to get started. You realy did a great job

Back to school 2015

I was just thinking "Where can I put their backpacks and folders this year so we don't lose/forget so many things this year?" Thanks Ana! Modified the plans to make use of my scrap pile. I ordered the vinyls off Etsy from, The Vinyl Things in Life, she custom made them to my dimensions and I love the pop of color! Sorry I can't get better pictures, our entry is tiny.

Estimated Cost
$20, for hooks and vinyl. Wood was from the scrap pile.
Estimated Time Investment
An Hour or Two (0-2 Hours)
Finish Used
Dark walnut stain. Topcoat Polywhey in satin.
Recommended Skill Level
Starter Project

Rustic X console table

Submitted by AUPatrick on Mon, 07/16/2018 - 09:30

My 14 year old son wanted a piece of furniture to put under his TV.  We made it 20 inches less in length but kept the other dimensions the same as the plans.  I made the cuts for him, but he did all of the work putting it together, sanding and staining.  He loves the outcome and it only took us about 6-8 hours over the course of two days.

Thanks for the plans!

Built from Plan(s)
Estimated Cost
$80-$100
Estimated Time Investment
Day Project (6-9 Hours)
Finish Used
Jacoby for the legs and Early American for the remainder
Recommended Skill Level
Beginner

Happy Mother's day

Submitted by Anonymous (not verified) on Sun, 05/08/2022 - 08:21

My sons and I decided to tackle a project for mom this year, and the farmhouse coffee table was a great project. Tweaked the design slightly with offset full length cross pieces and a distressed paint finish on the base. Great plans, fun project with the kids, and mom loved it!

Comments

Cubby Storage for the Playroom!

I used Ana's plans for the open cubby base and hutch with doors to create my storage system for the playroom. I had Lowe's rip my 2 sheets of 3/4" MDF and I made the smaller cuts with my miter saw. I used 1/4" white bead board panel for the doors and cubby backs. I built the pieces in 1 day and painted the next. It was simple and fun! You can see more details at http://www.shanty-2-chic.com/2011/07/storage-for-the-playroom.html!

Estimated Cost
$130
Estimated Time Investment
Weekend Project (10-20 Hours)
Finish Used
I coat of primer and 2 coats of Valspar Antique Homestead Lace in Satin
Recommended Skill Level
Beginner
Seasonal And Holiday

Narrow end table

My kids (11 & 12) made these in about 3 days. We have to work during my 2 yr olds nap time so I would say 6-8 hrs total. We always have a lot of scrap wood lying around so this was a great way to use it up. Unfortunately, sometimes when using scrap wood, it is not always the exact measurements that you need but some plan reworking and measuring as you go can fix that. On this particular plan, the only thing we changed was the thickness of the top and a little fudging on the drawer box. We also used our router to round over some or the edges and we made our own drawer tracks along the bottom w/ scrap furring strips. Honestly, those studs you see in the picture, did most of the work and since their skill set usually involves a reference to the newest video game out, I would say this was defiantly a simple project! ;-)

Built from Plan(s)
Estimated Cost
$20 each If you had to buy all new wood
Estimated Time Investment
Afternoon Project (3-6 Hours)
Finish Used
Valspar paint in emerald and varathane brand stain in early American
Recommended Skill Level
Beginner

Comments

spiceylg

Wed, 08/14/2013 - 04:46

I love that your kids built these, what a sense of accomplishment! Tell them they did a great job!

Coffee Table

Submitted by melehes on Thu, 08/02/2018 - 12:38

Burned wood finish with stain and lots of coats of poly for protection and shine

Built from Plan(s)
Estimated Cost
$100
Estimated Time Investment
Weekend Project (10-20 Hours)
Recommended Skill Level
Beginner

X Book Caddy

Submitted by carongirls on Fri, 08/16/2013 - 06:30

SImple and easy to make. I had leftover wood so all I had to buy was 1x2"s. I'd say the total cost was $15. It's sturdy and holds a lot of books.

Built from Plan(s)
Estimated Time Investment
Day Project (6-9 Hours)
Recommended Skill Level
Beginner

Twin Farmhouse Bed with Jeremiah 29:13 carved into headboard

This is the second farmhouse bed that i've built from these plans.  I made a slight modification to shorten the headboard for this bed. Overall, it was a fun and enjoyable project. 


Built from Plan(s)
Estimated Cost
$160
Estimated Time Investment
Day Project (6-9 Hours)
Finish Used
Walnut, and spray lacquer
Recommended Skill Level
Beginner