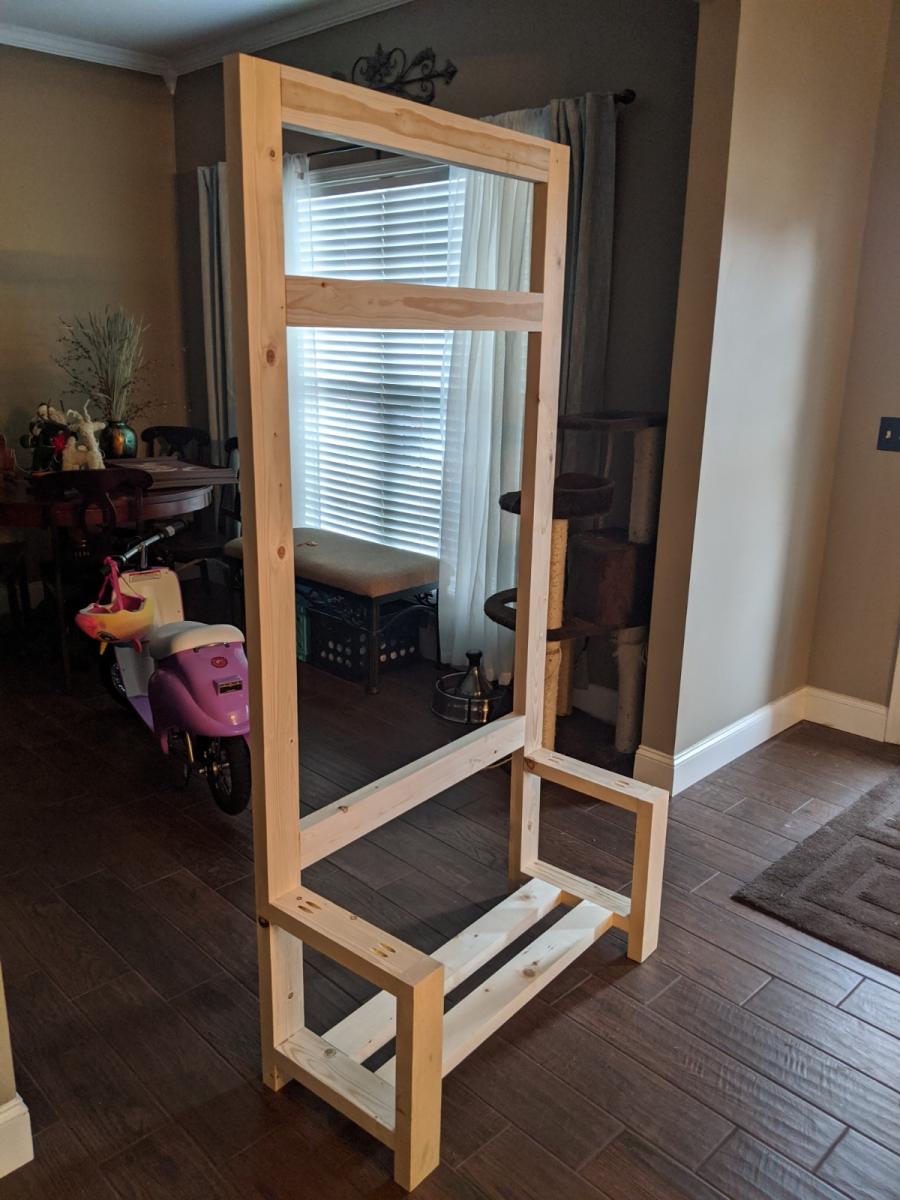
Wood Potting Bench
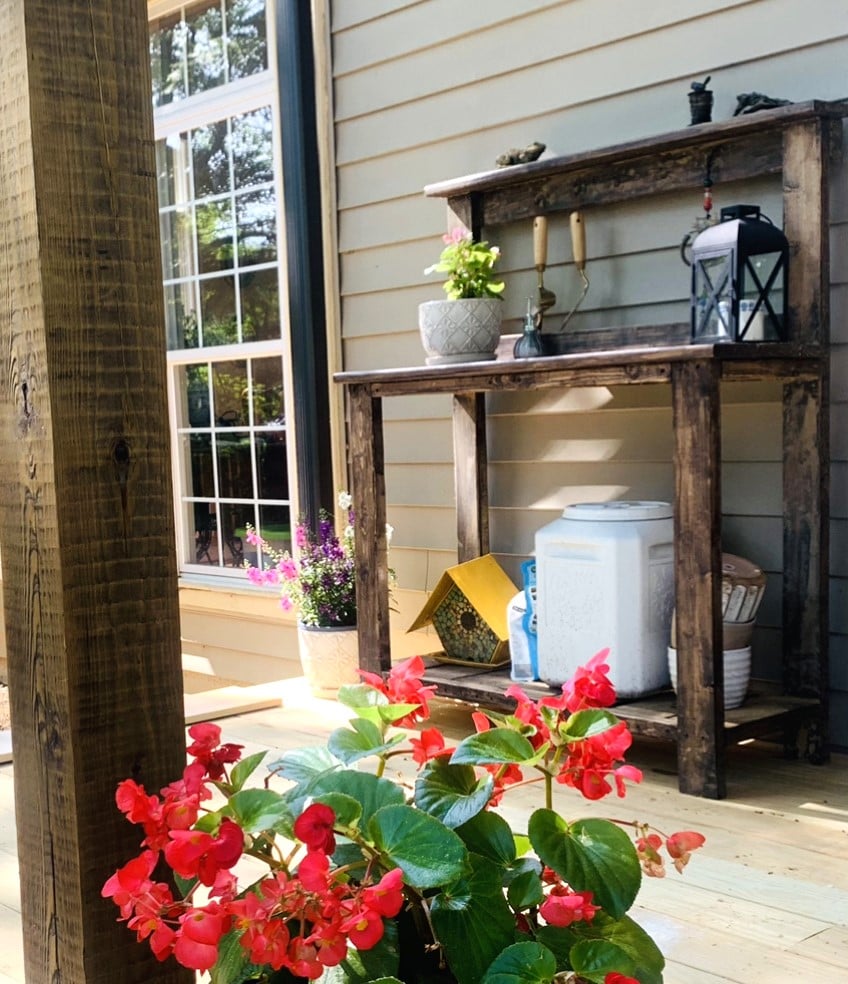
Flower potting bench for the front porch.
Mar
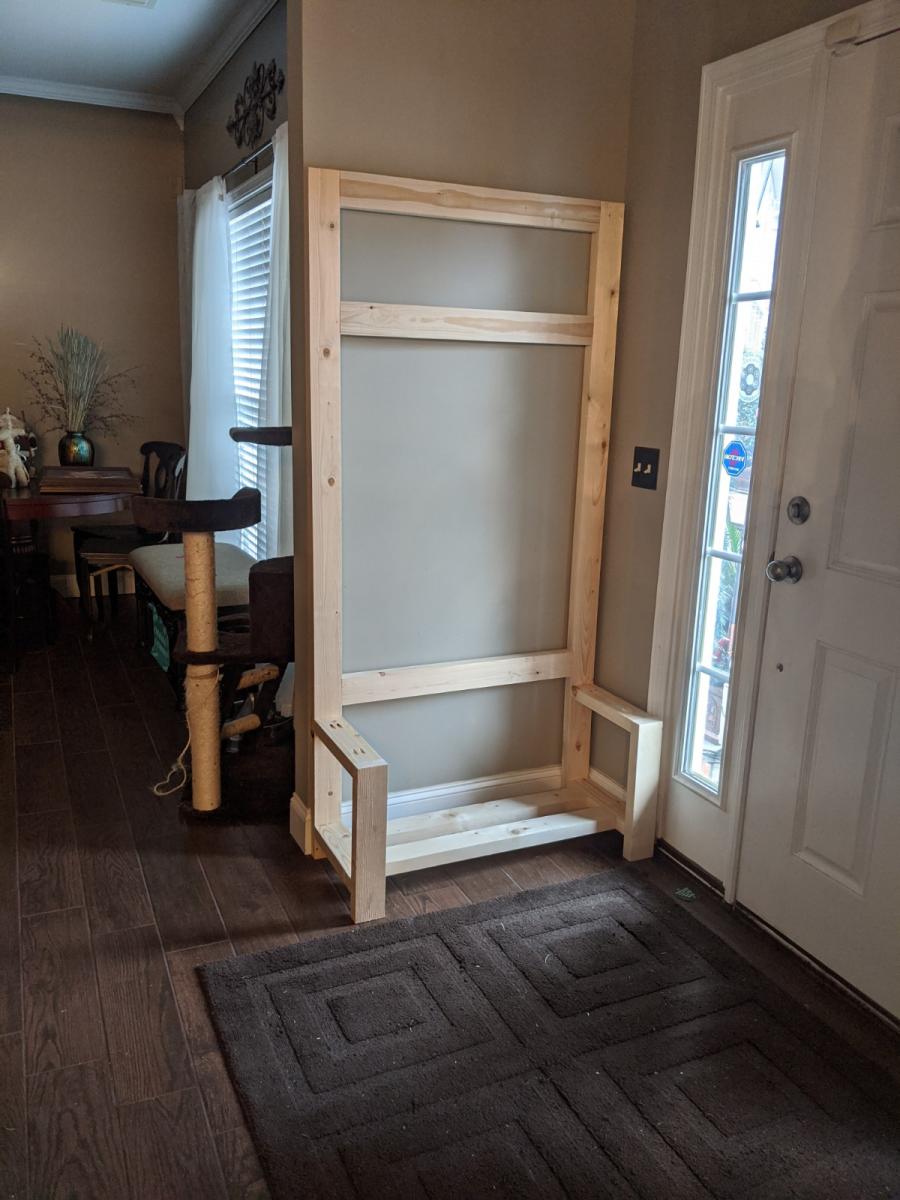
Built from Plan(s)
Flower potting bench for the front porch.
Mar
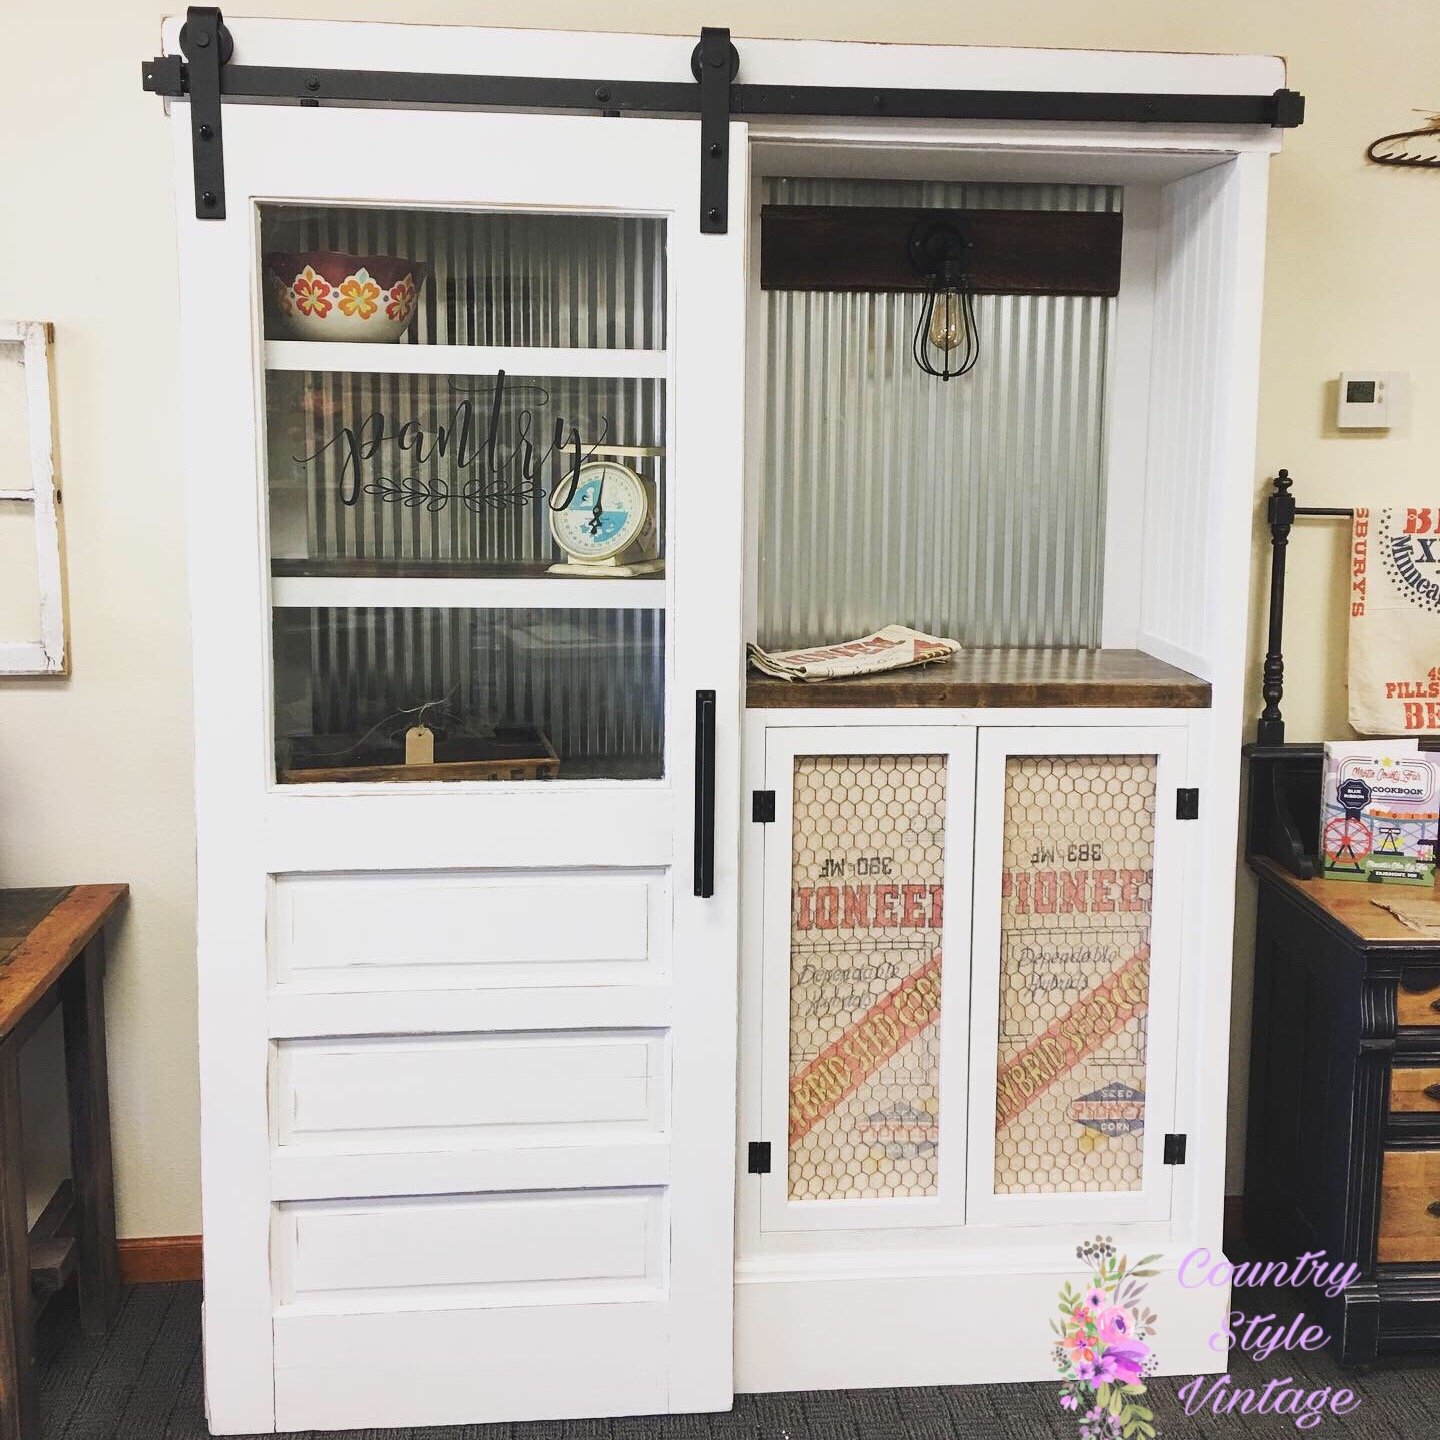
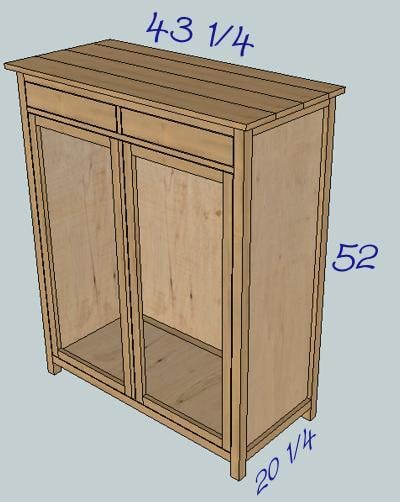
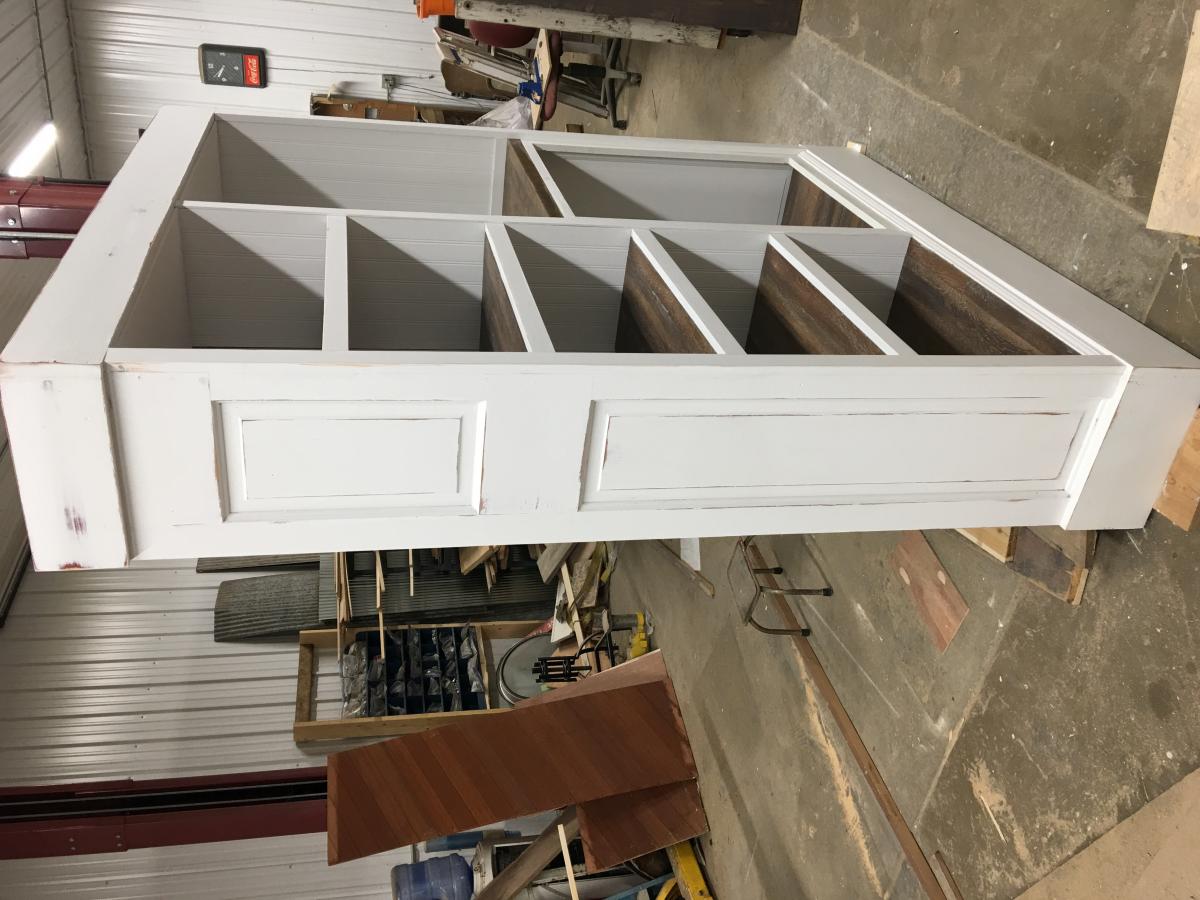
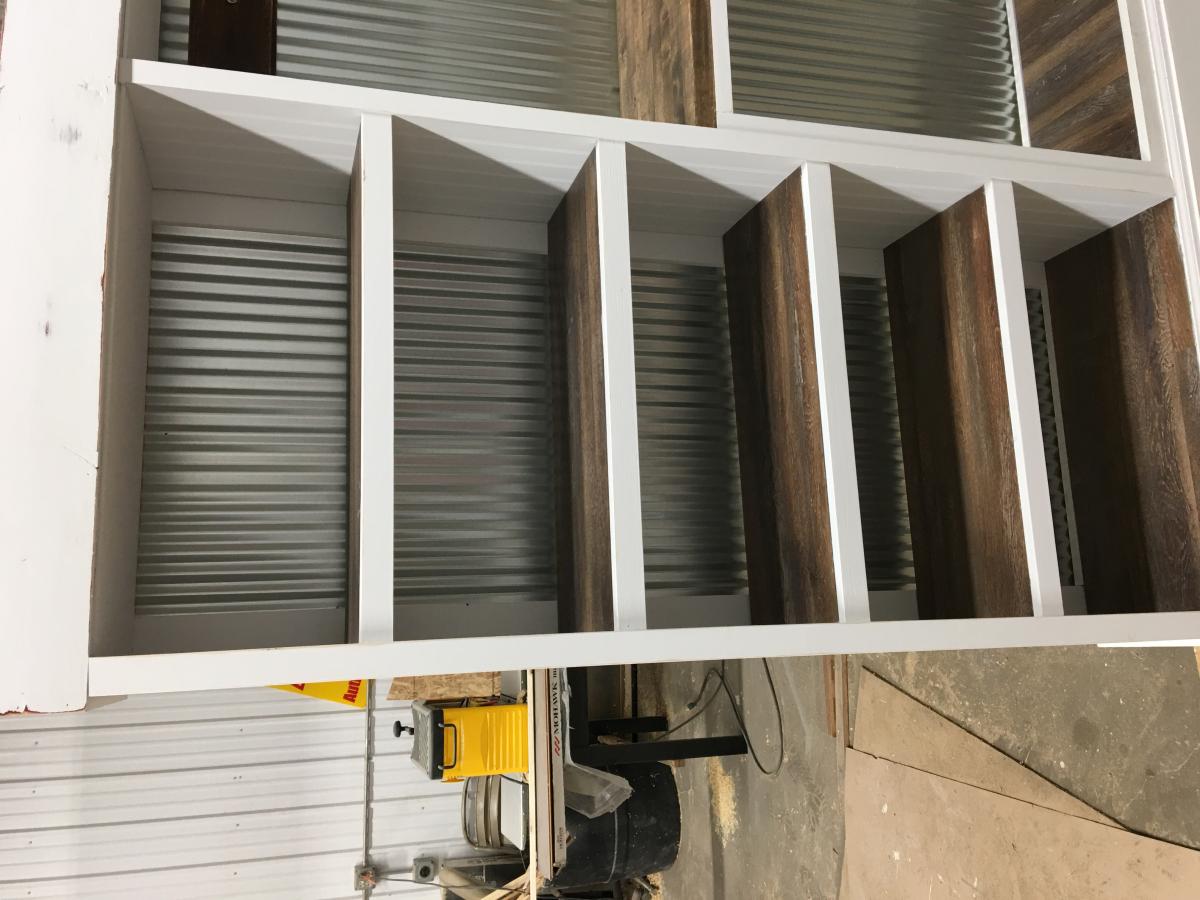
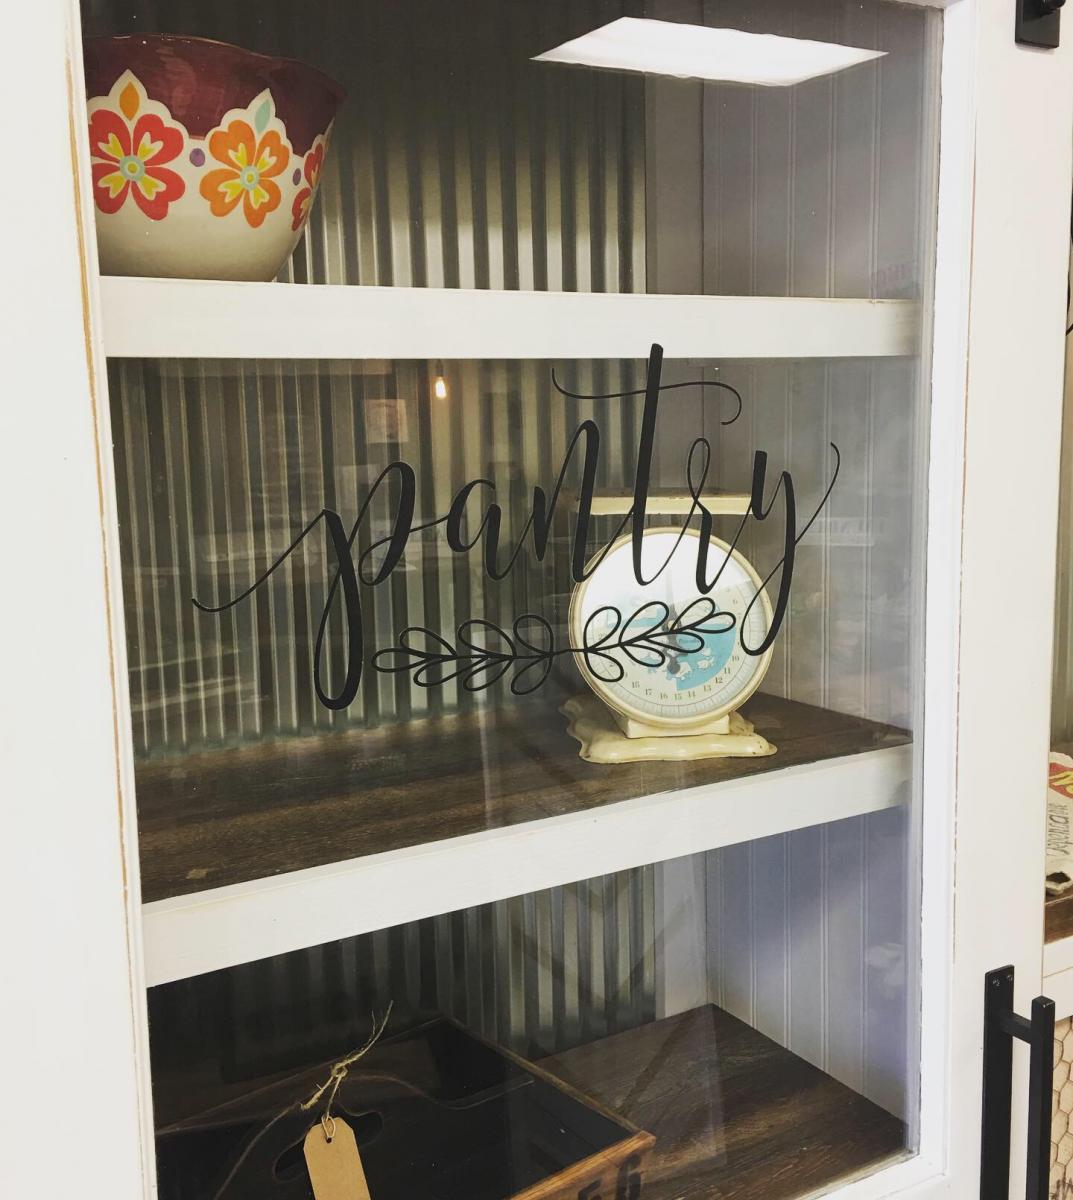
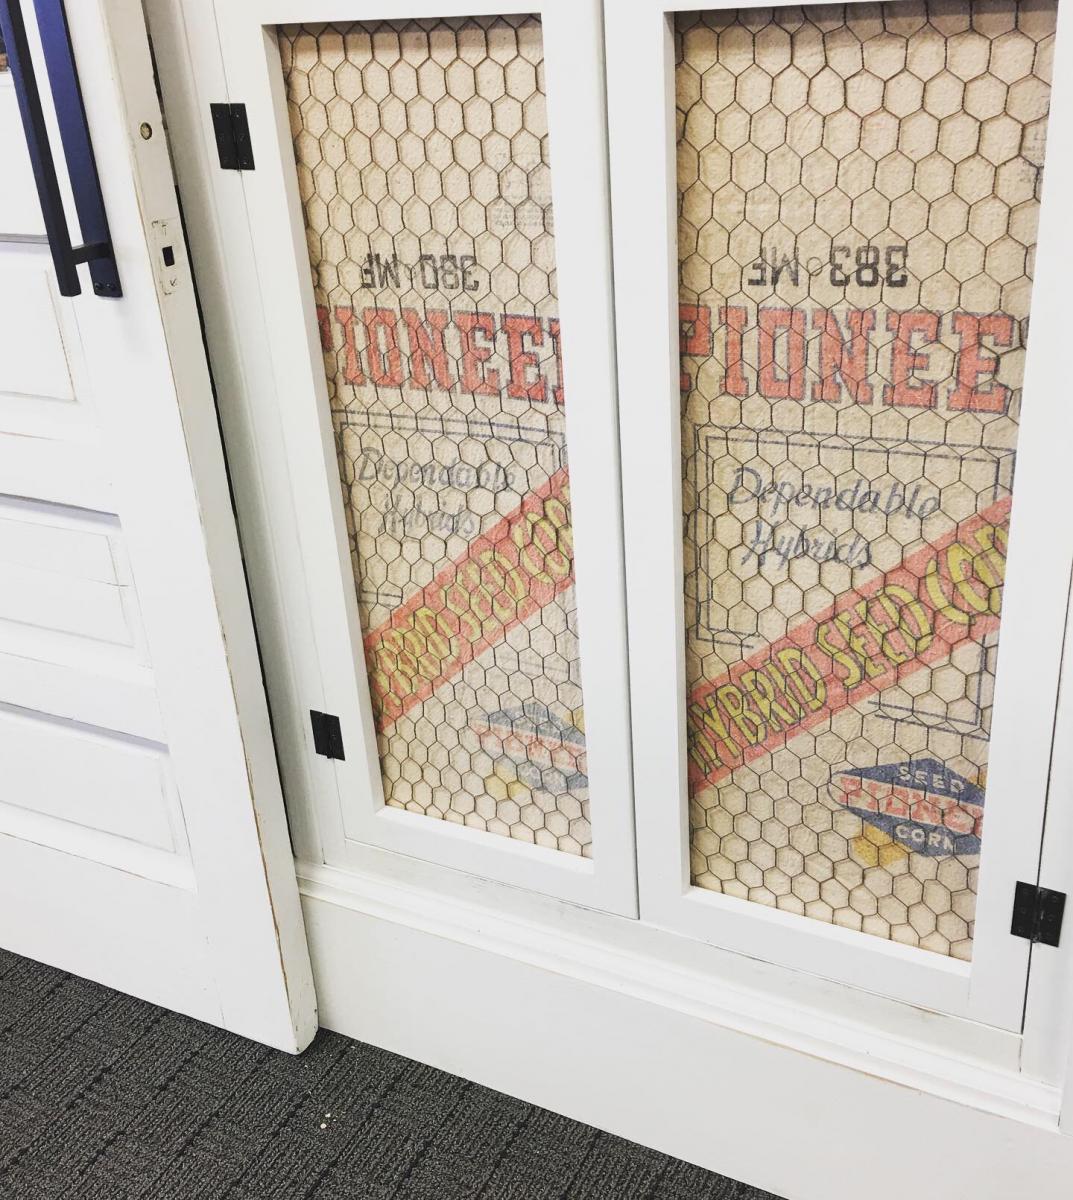
The Barn door cabinet / pantry is one of my favorite Ana White plans. This is the second one I’ve made and this time I challenged myself to use almost all repurposed materials. I wanted to use old doors so I adjusted the plans around them. He sides are an old door I cut in half and the main sliding door is also an old find I cleaned up. The shelves are actually old flat cabinet doors that I covered in laminate flooring (remnant box for $5). I like using laminate flooring to add character and protect high traffic areas from wear and tear. On the right side I added a display counter for your coffee center, tv, or microwave. I added a sconce because everything is cooler with a sconce! I used 2 sheets of galvanized tin on the back. My favorite feature though is the recycling center I added at the bottom. I just made some simple door frames with 1x4s stripped in half and then covered them in chicken wire and old Pioneer seed sacks.
I love Ana Whites Pantry design because it adds soo much storage and is completely customizable!
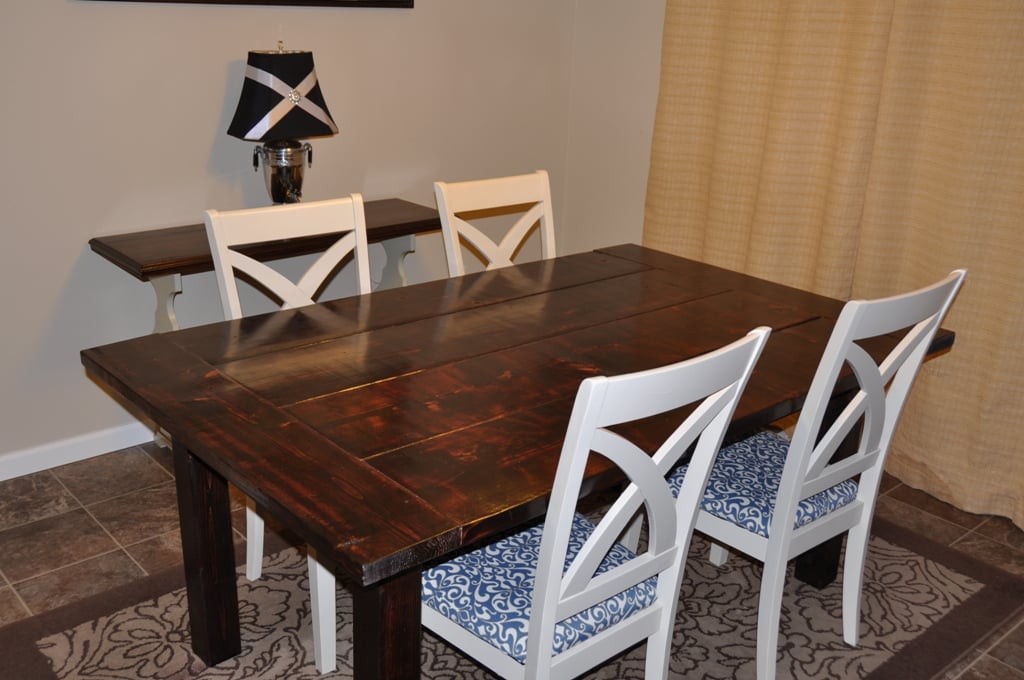
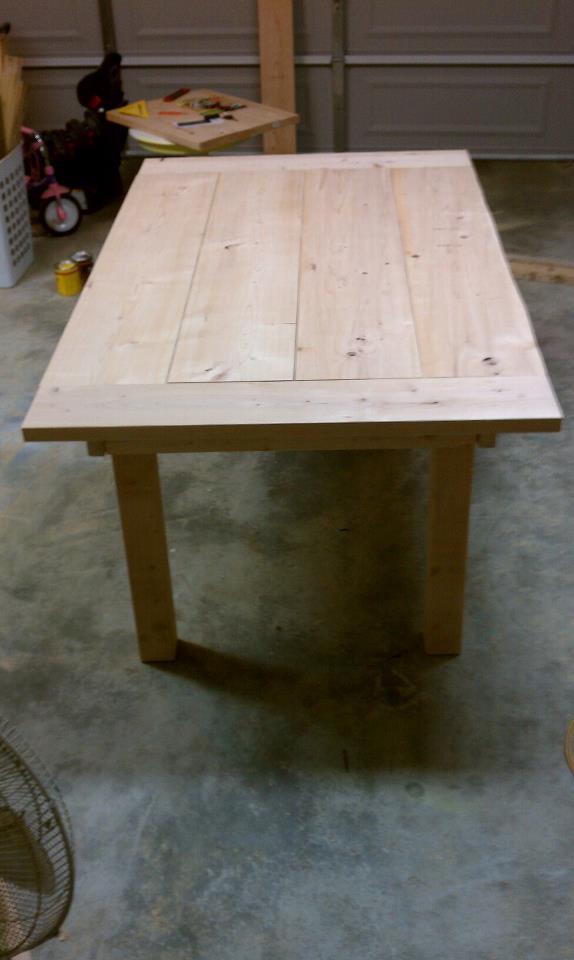
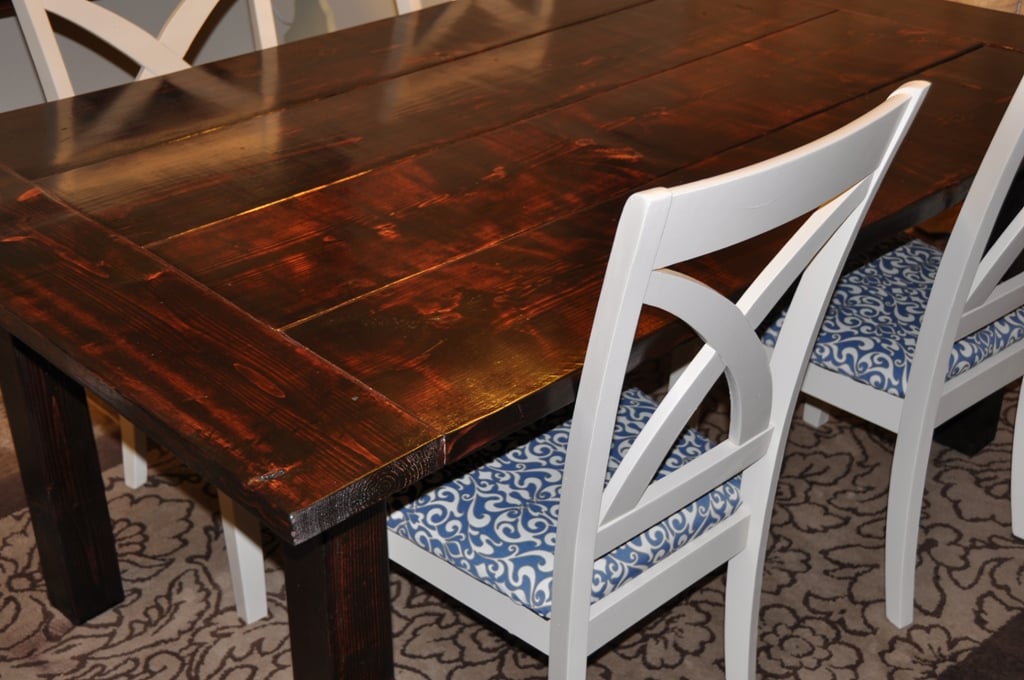
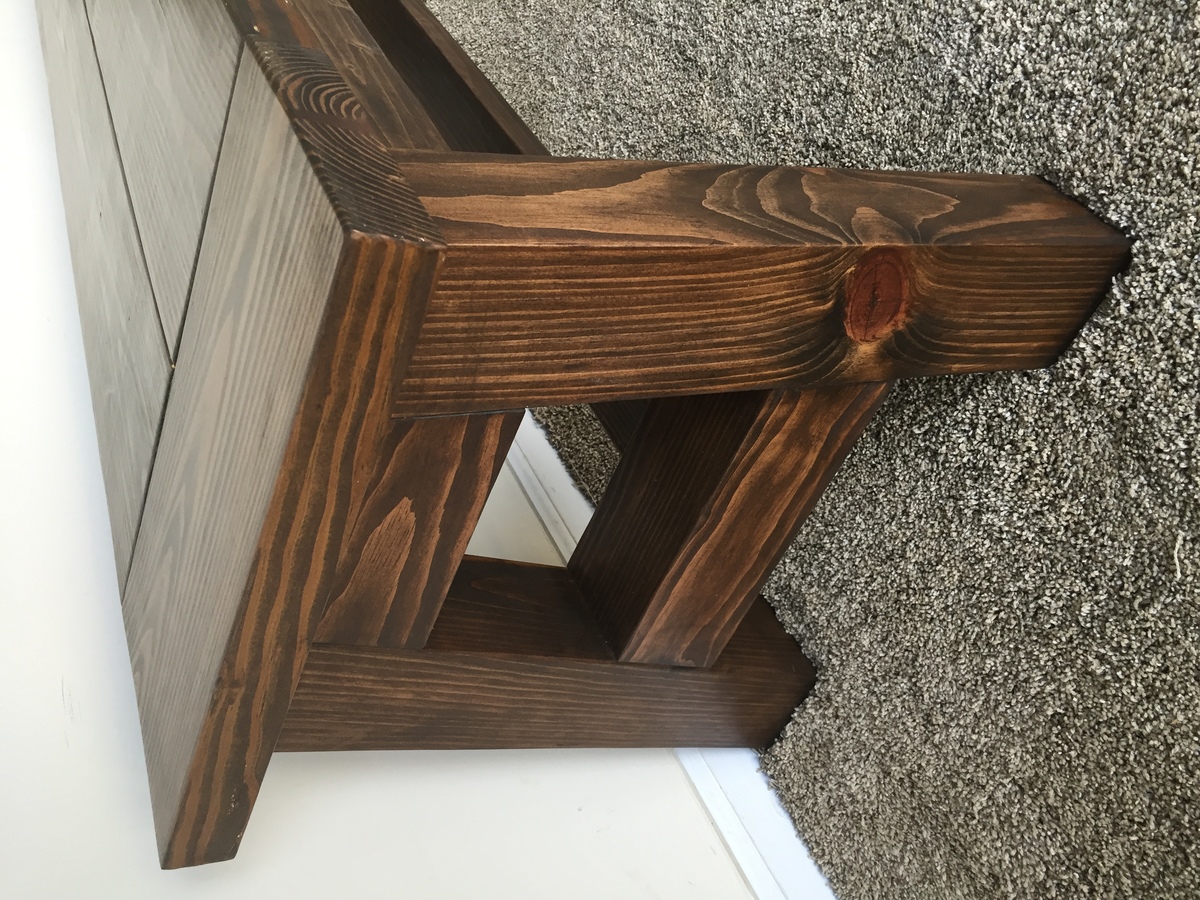
So I went off most of the specs on this table except I didn't want the brace on the bottom. Instead we braced it under the table with extra 2/4s. The longest part of this was the staining and poly due to it being cold as heck in Washington.

Sat, 04/21/2012 - 21:03
Hello,
I love you table! It is beautiful. I too would like to build this table without the brace at the bottom. could you maybe add some photos of how you did the bracing??
thanks!

In reply to details about the bracing under the table by Janelle Kay (not verified)
Fri, 04/27/2012 - 08:45
It's actually pretty easy, I took an extra 2x4 and braced it on the table top right against the table legs. It makes the table really sturdy.
Mon, 05/14/2012 - 12:32
I have been looking for a table that I like and that won't break my pocket. Haven't found one so I want to build this. Can you tell be the measurements of the wood pieces that I need. Thank you I would really appreciate it.
Fri, 05/18/2012 - 08:41
All the measurements I used are on the link below. This is a pretty easy build as long as you have the right tools. The only difference with my table I didn't use the leg braces like the plan states, I braced my legs right under the table so you wouldn't be able see the braces.
http://ana-white.com/2012/02/plans/farmhouse-dining-table
Mike
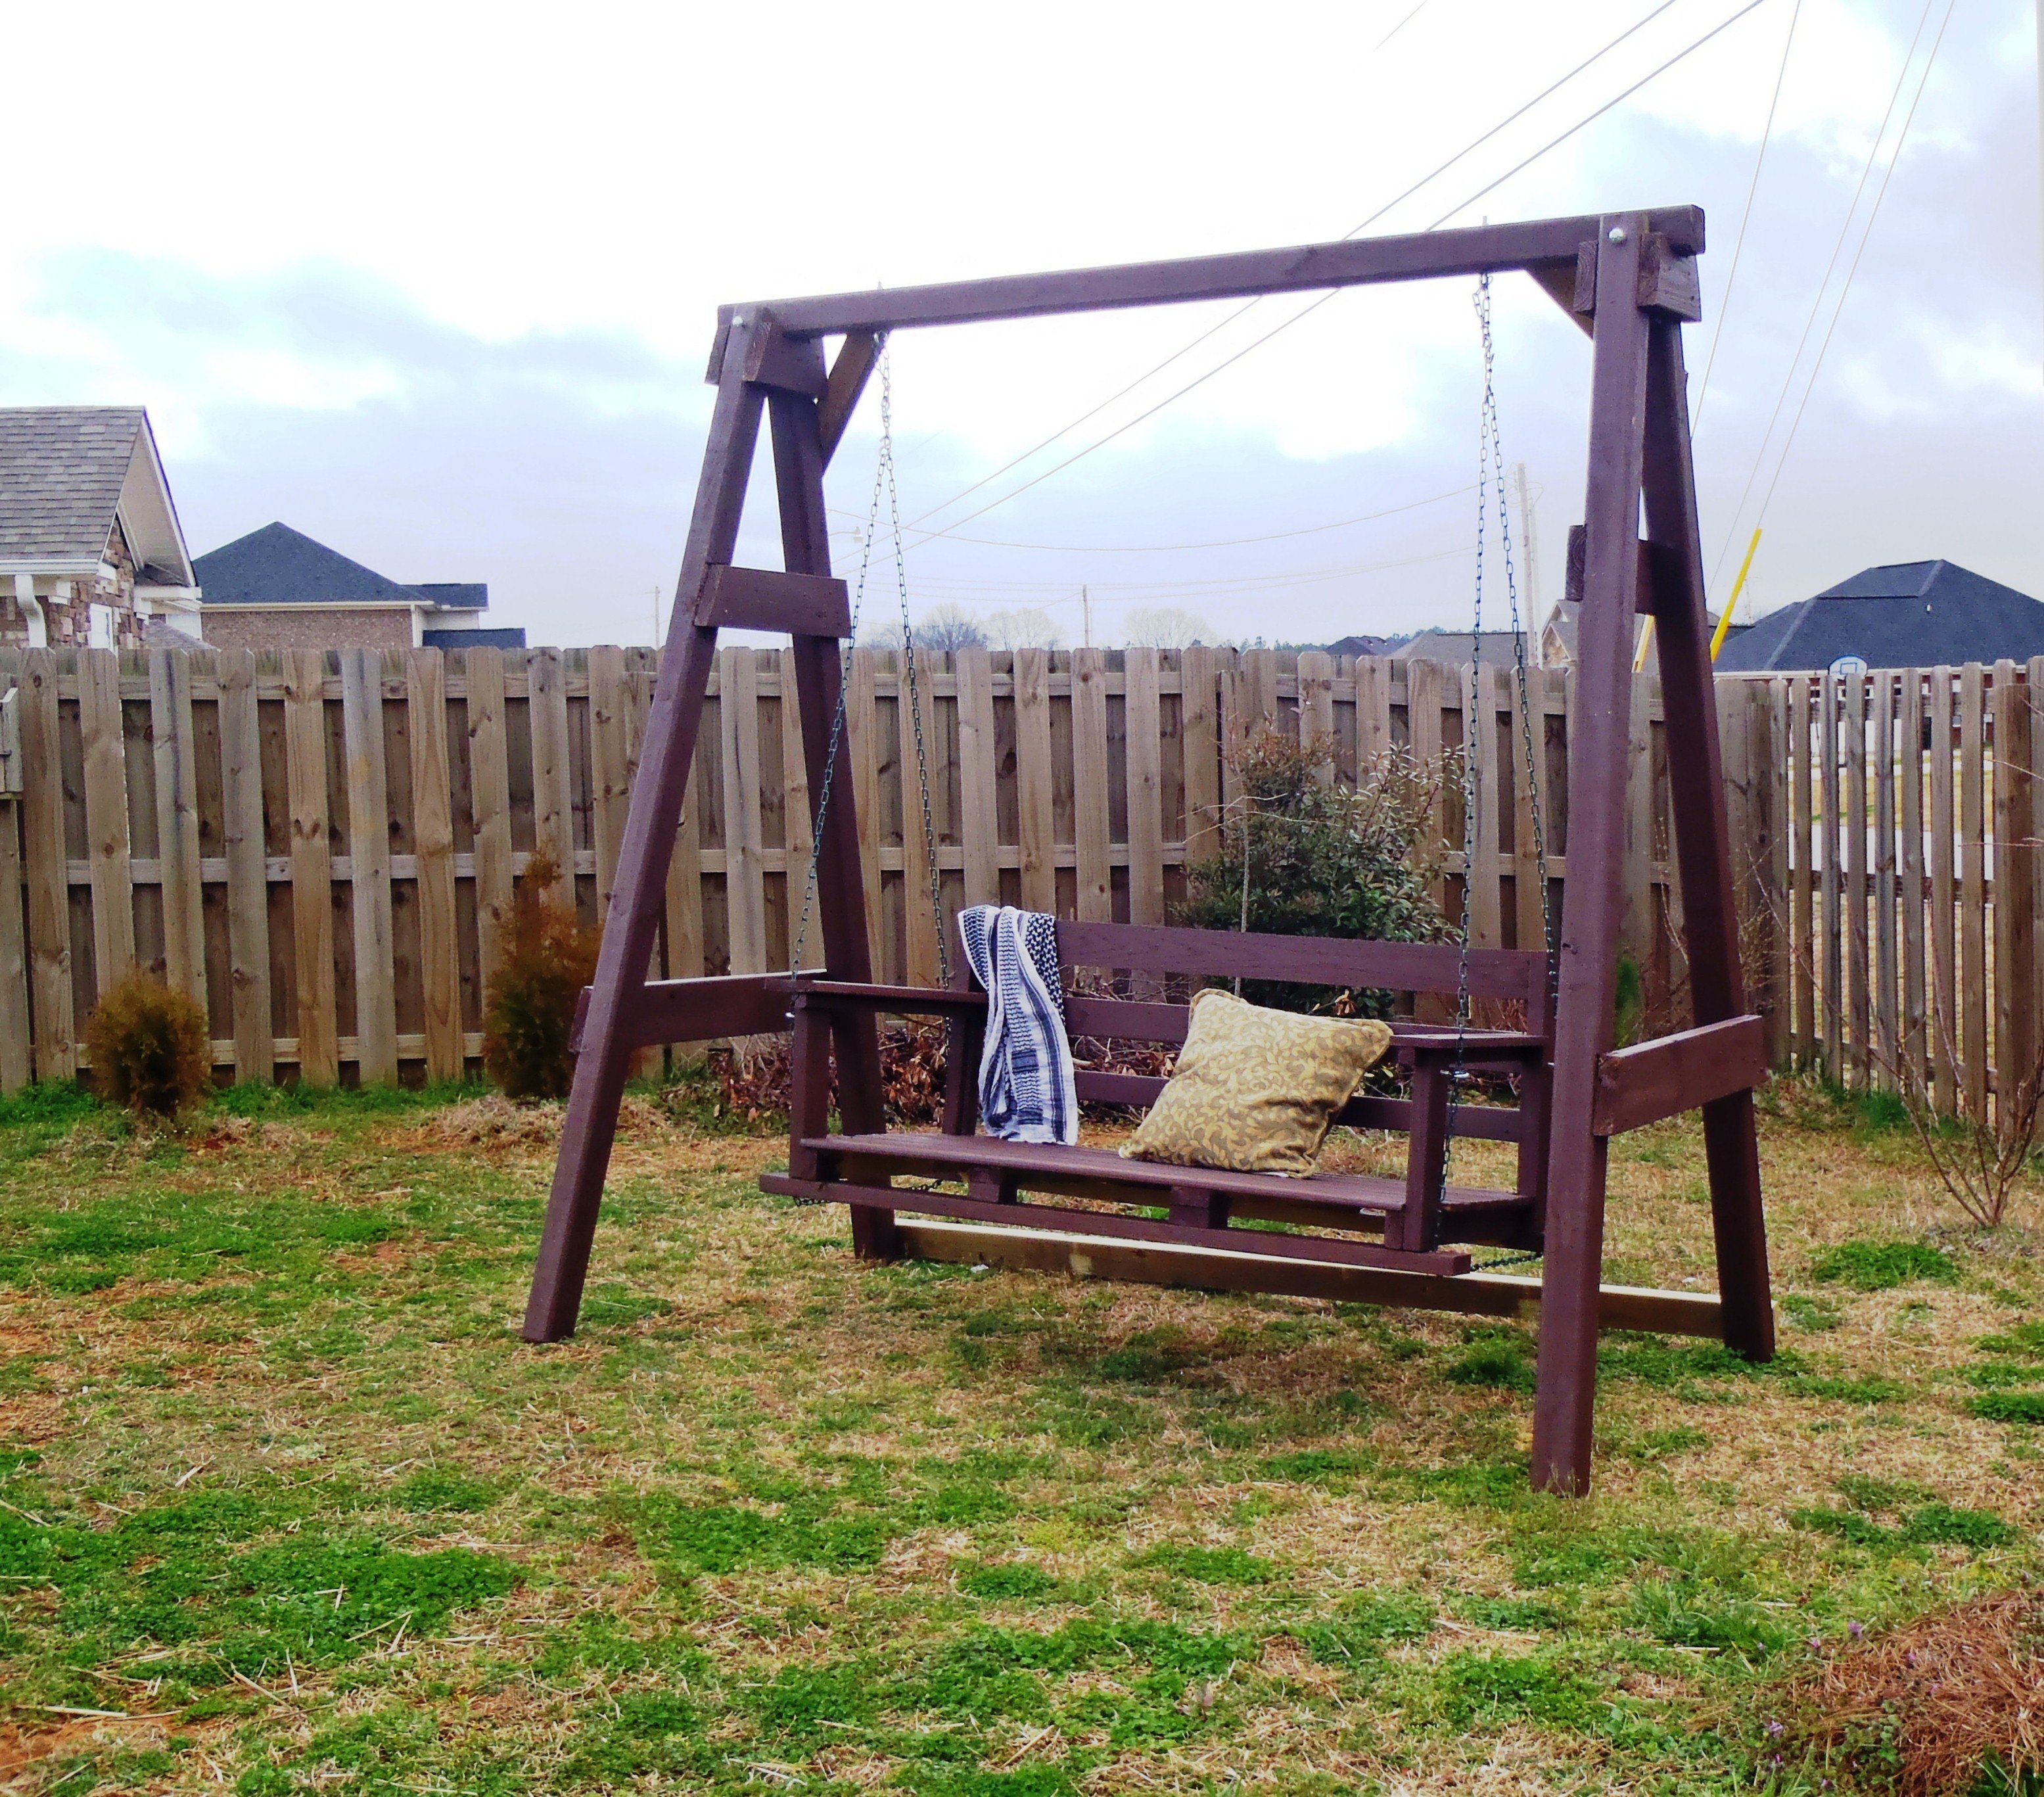
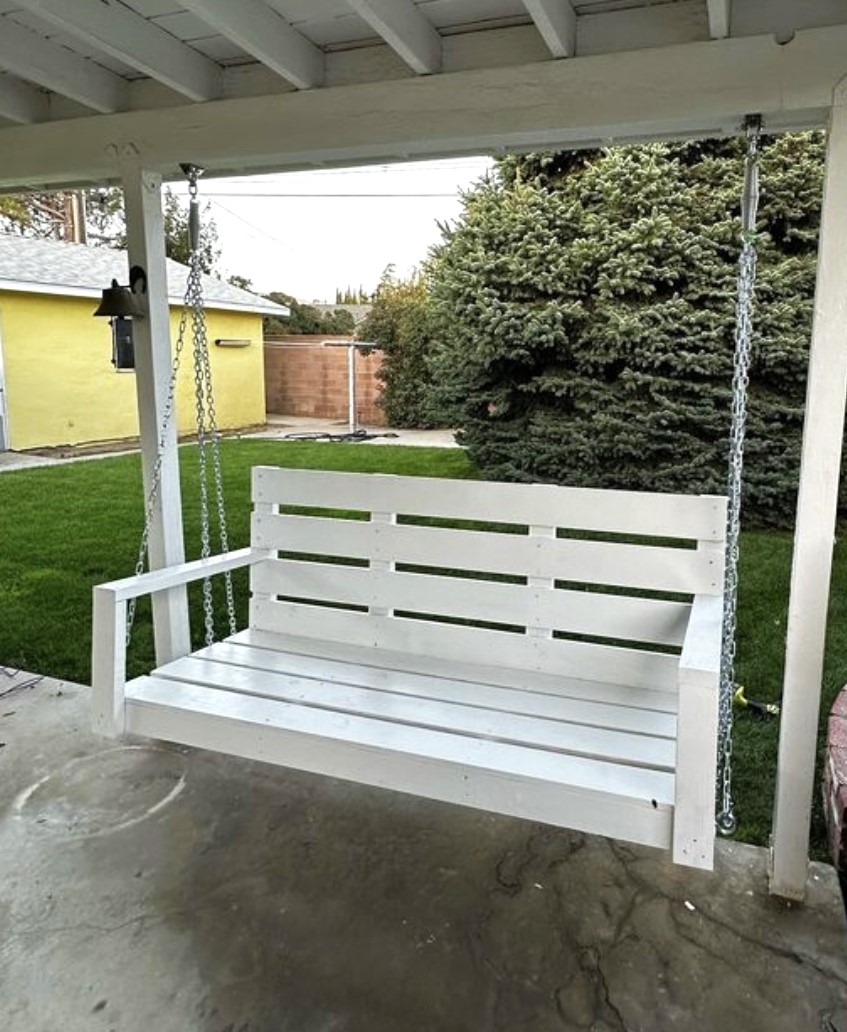
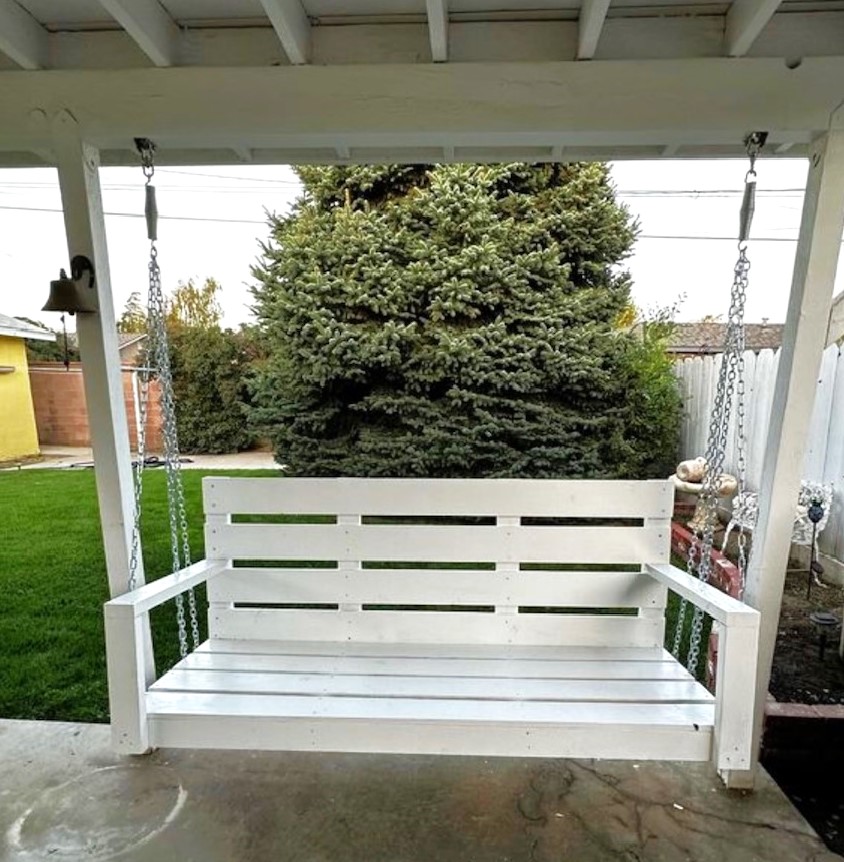
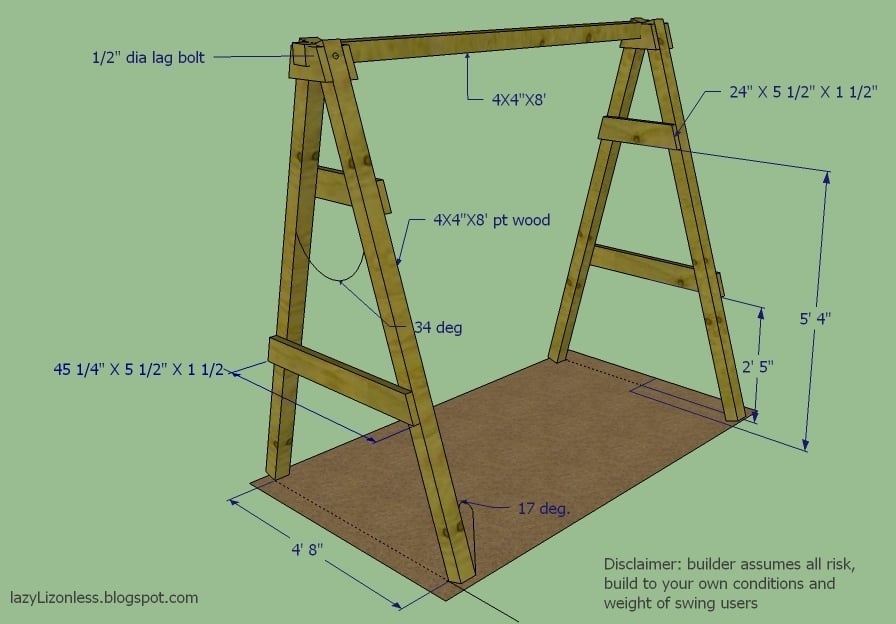
I've finished my swing but my porch don't have enough clearance so I built A frame stand for it.
Fri, 03/02/2012 - 07:09
You did such a great job on your swing! I hope I can build up to making one someday.

In reply to I love this swing! by beachmama79
Thu, 05/10/2012 - 14:02
Thanks and you will. I just added the dimensions in case
Fri, 04/19/2013 - 15:37
I love the idea of adding the A-frame considering that where i live there are no real trees to hang it on and building a porch where one doesn't already exist is a pain in the butt! Lol. How wide do you think we could go before it starts compromising the frames integrity? And how much weight can it hold?
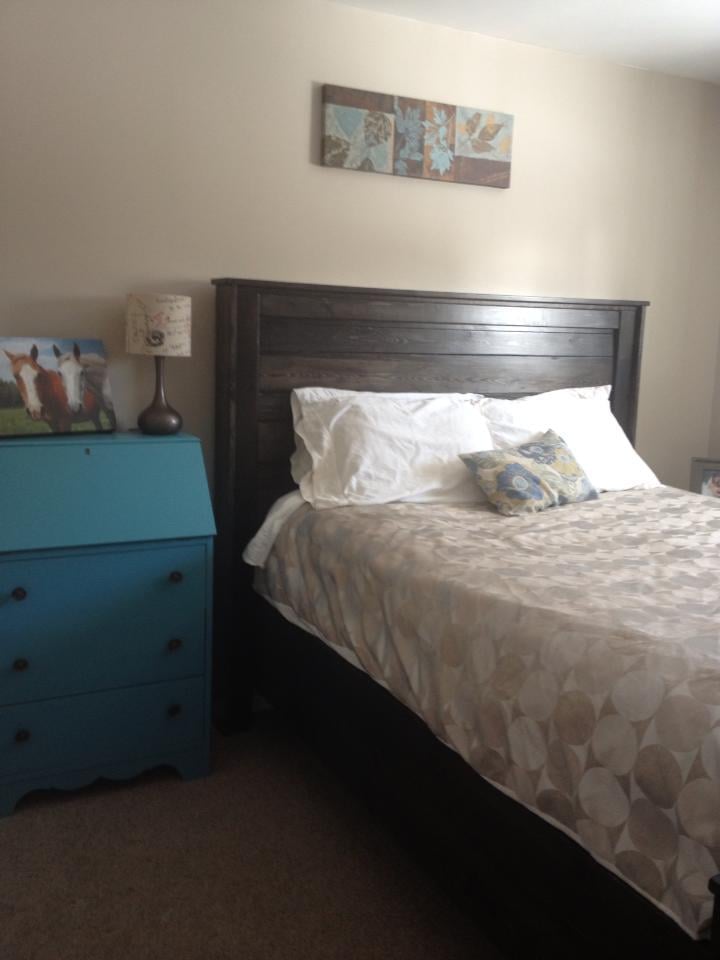
I "doctored" the plans for the reclaimed wood look headboard to using 4x4's for legs and created a footboard of the same style. I then make the siderails for my bedframe by laminating a 2x8 to a 2x6 to completely encase the box frame. I was able to put my boxframe inside by screwing and gluing 2x2's along the inside of the frame. This is a STURDY bed frame!

Mon, 02/06/2017 - 10:07
How did you go about doctoring the plans to use 4x4's instead of 1x3's and 1x2's?
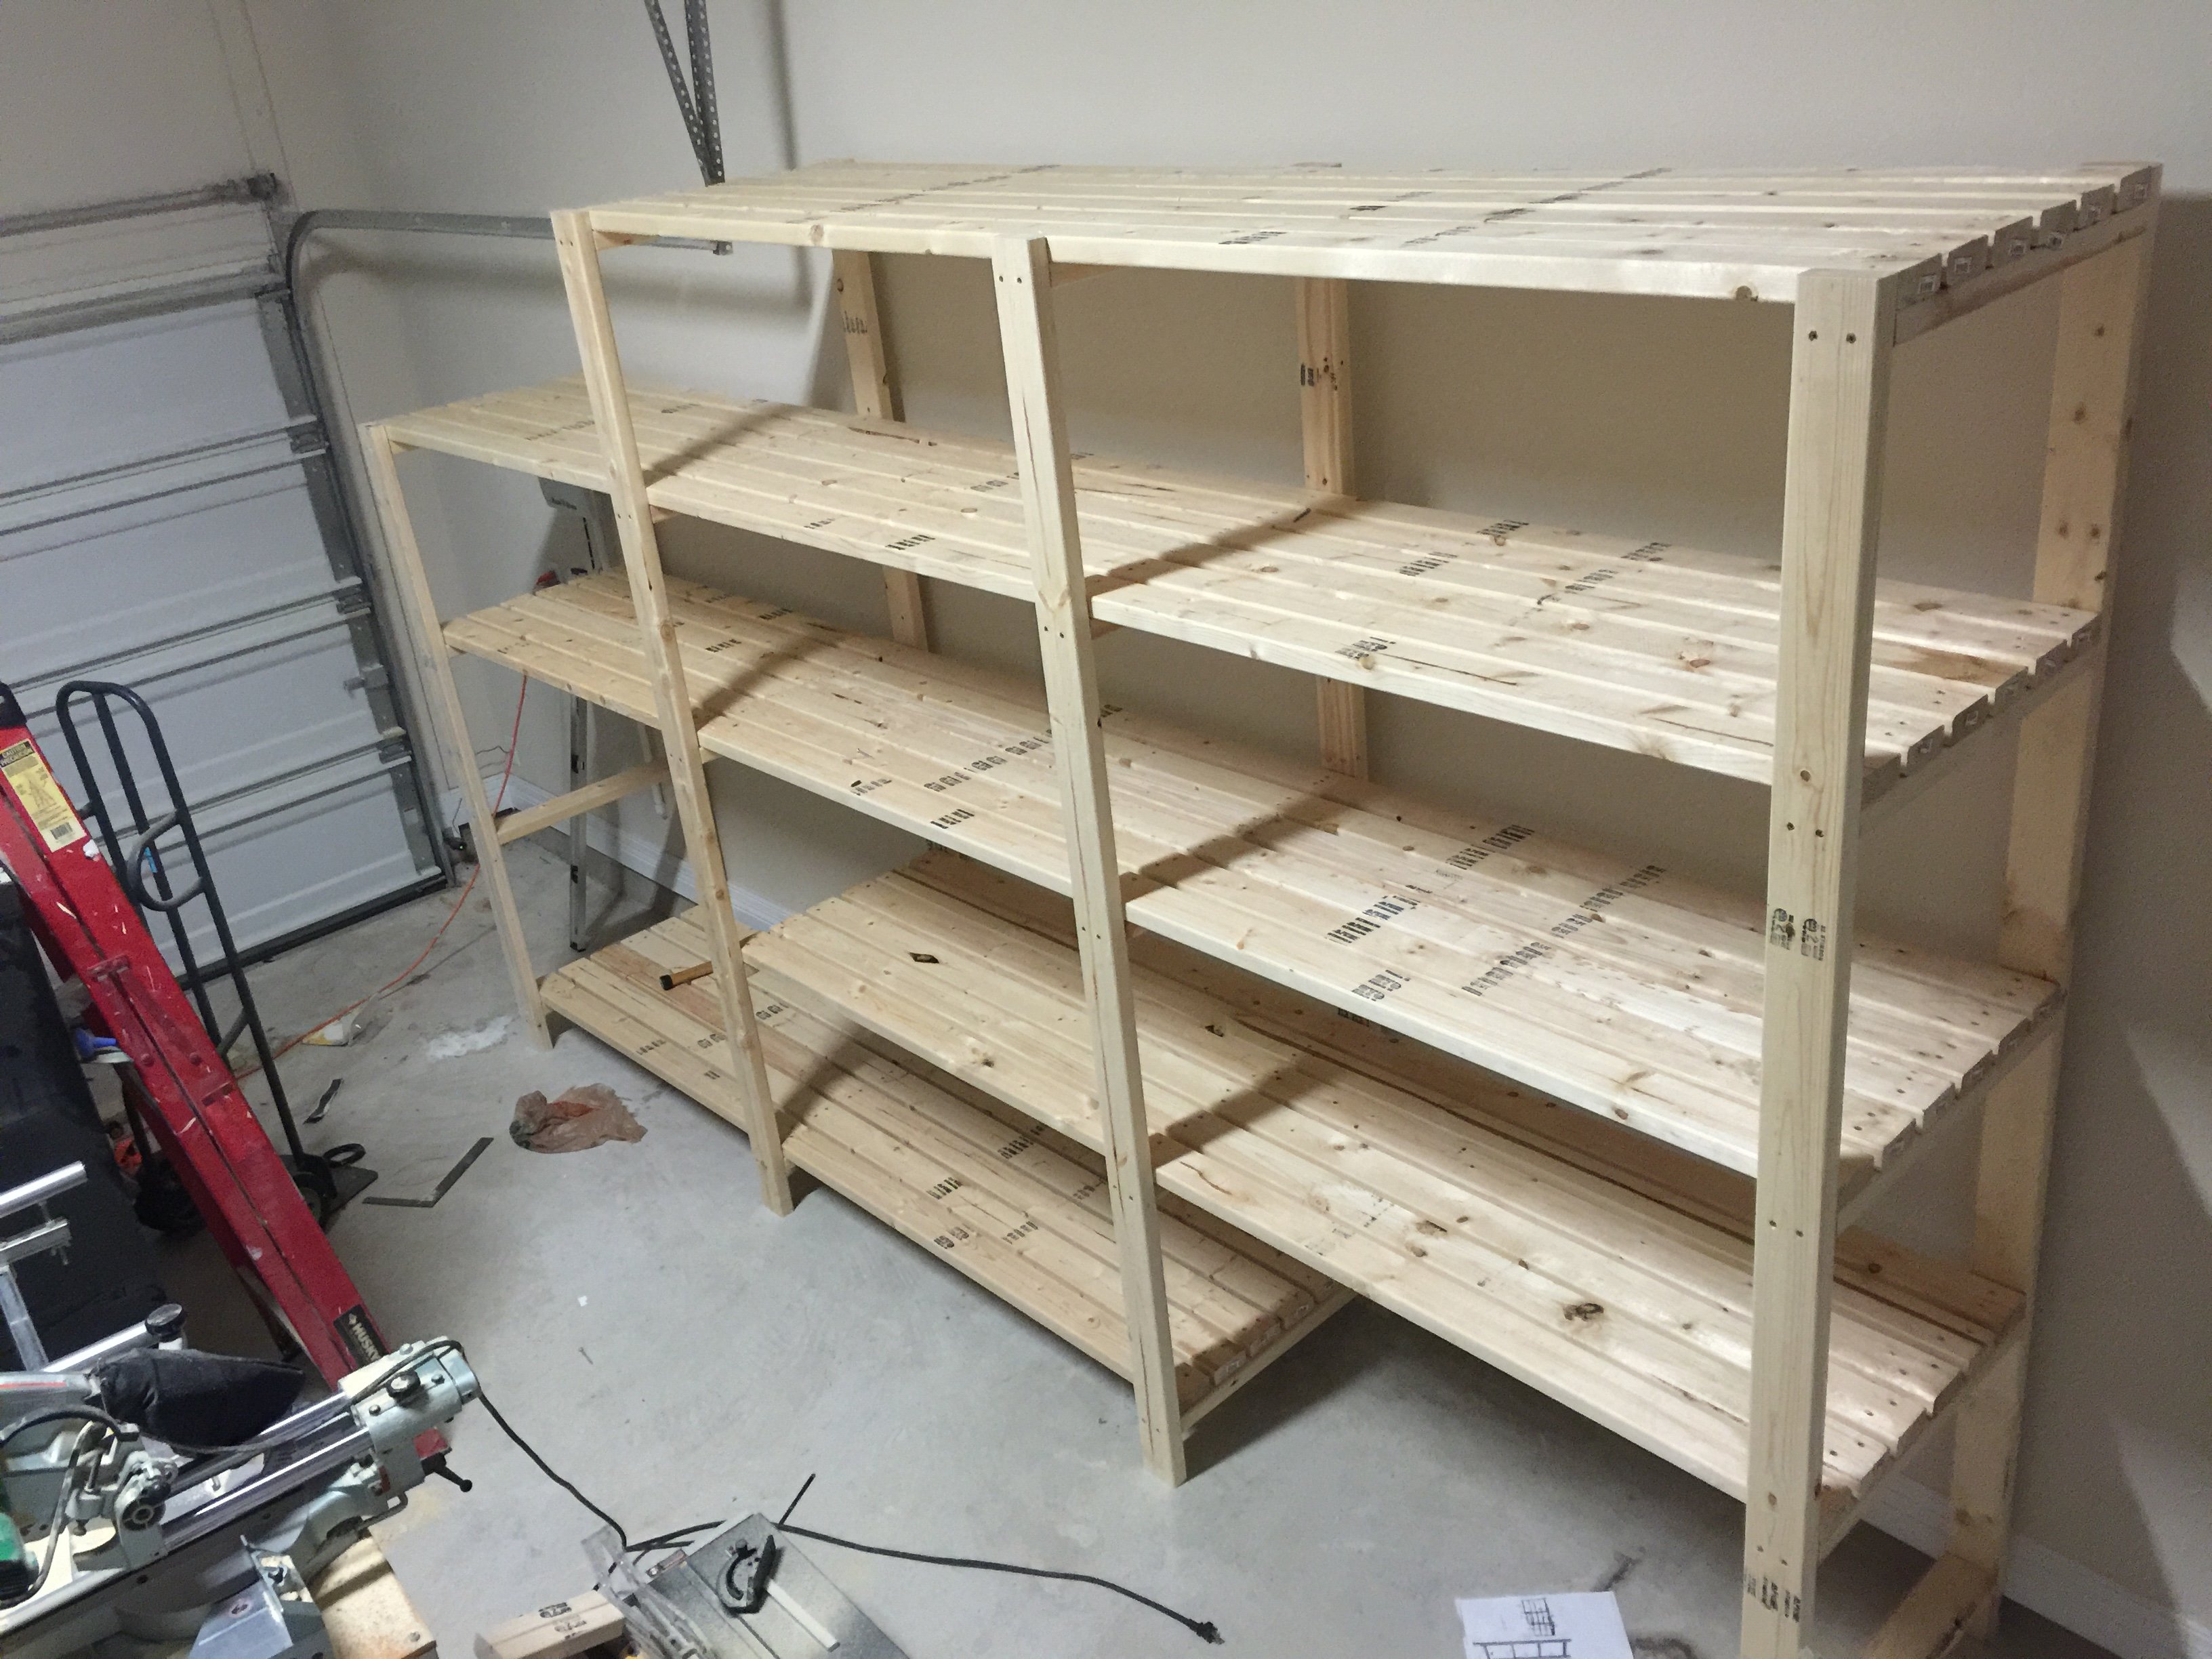
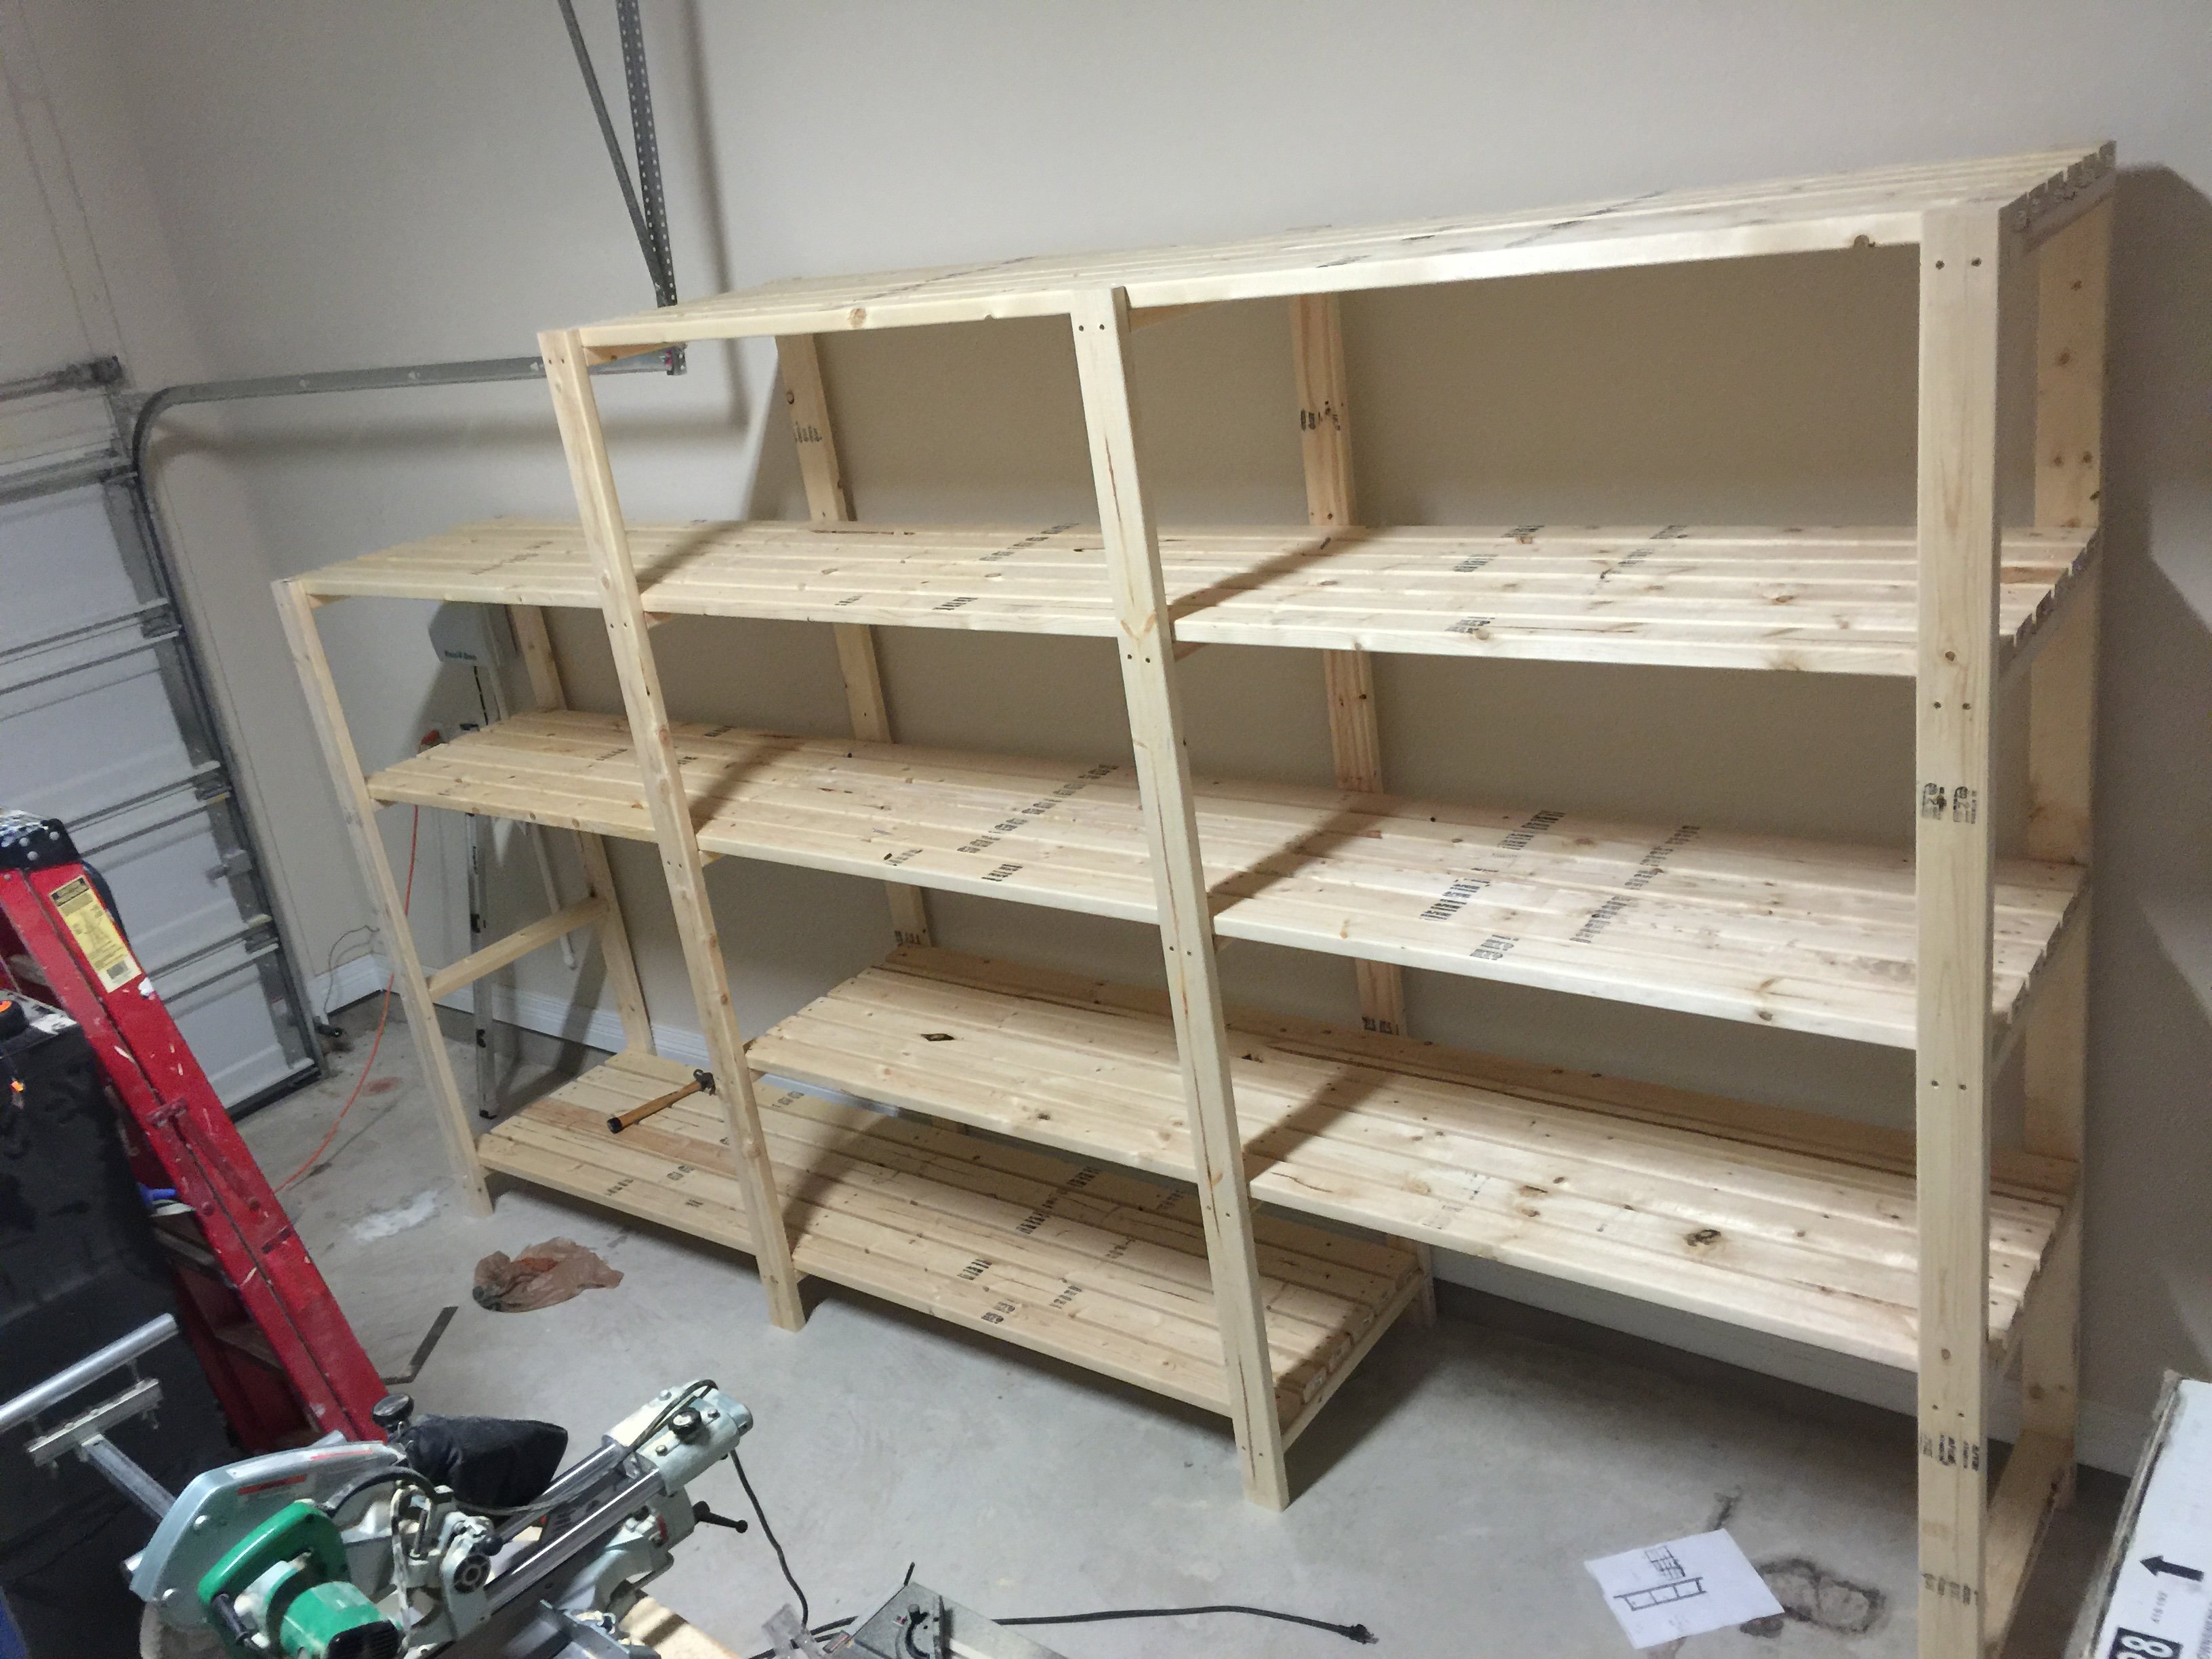
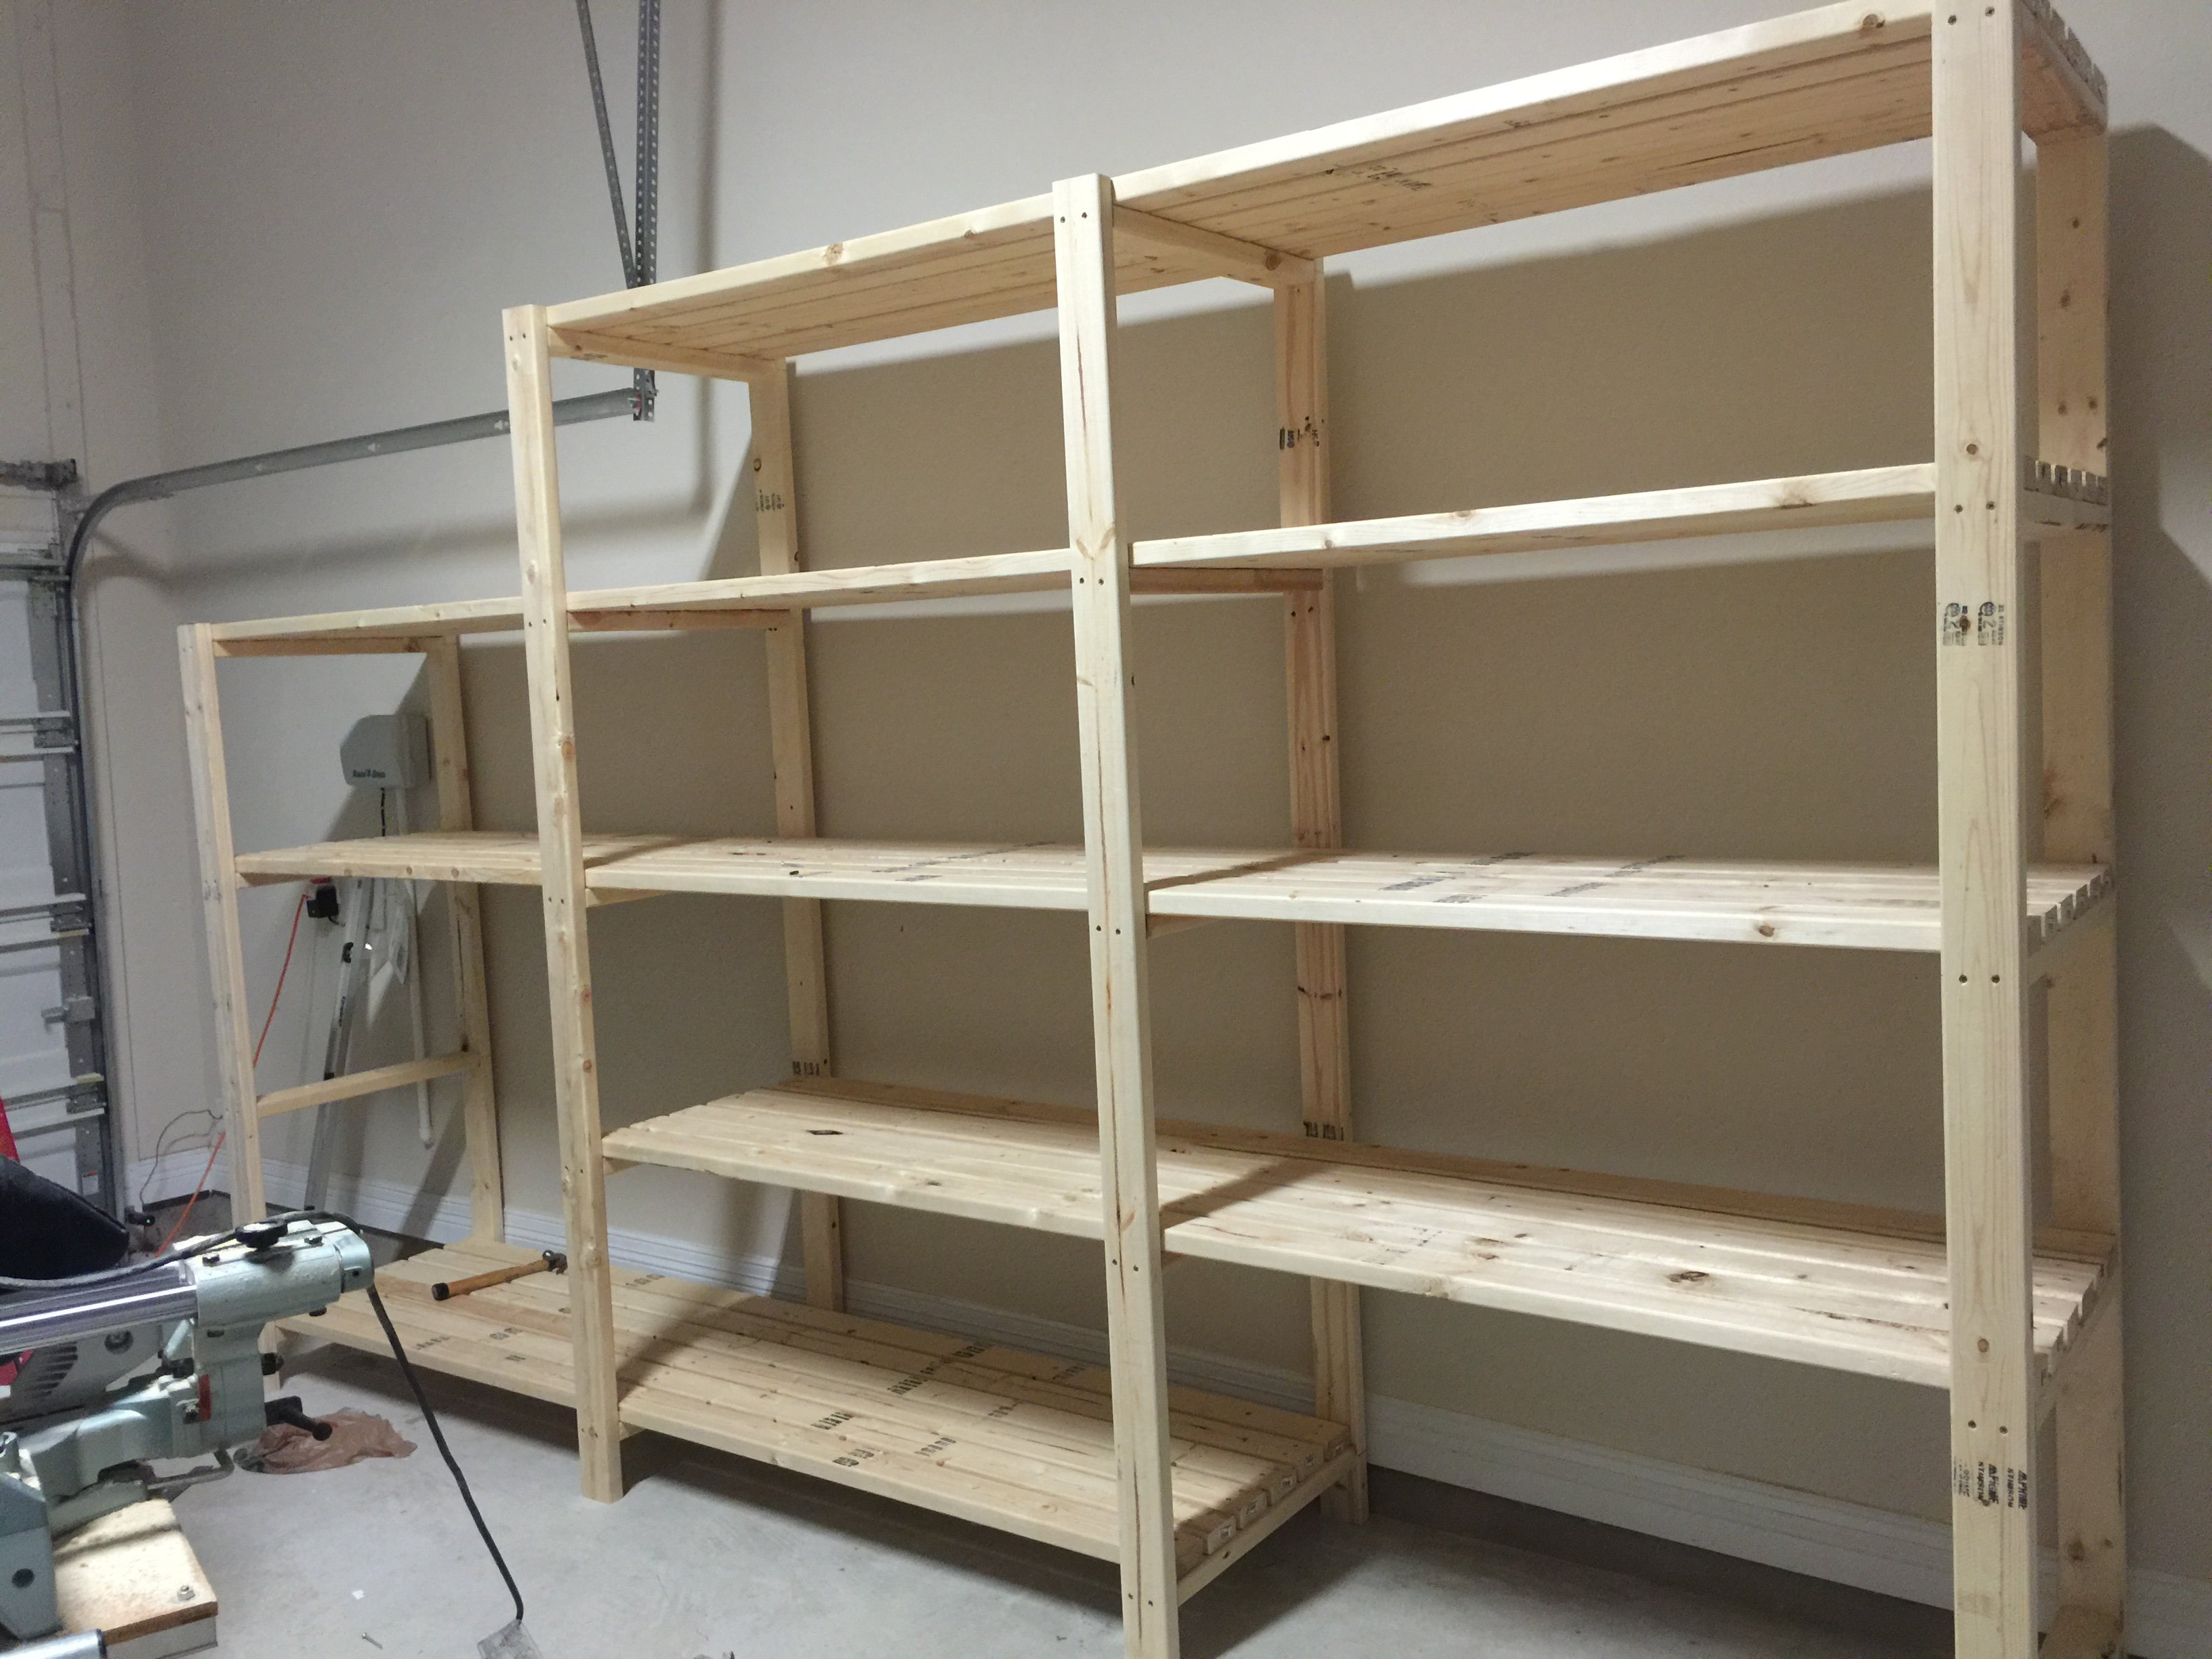
Built up and wider due to my garage size. Left some shelves out for bigger items.
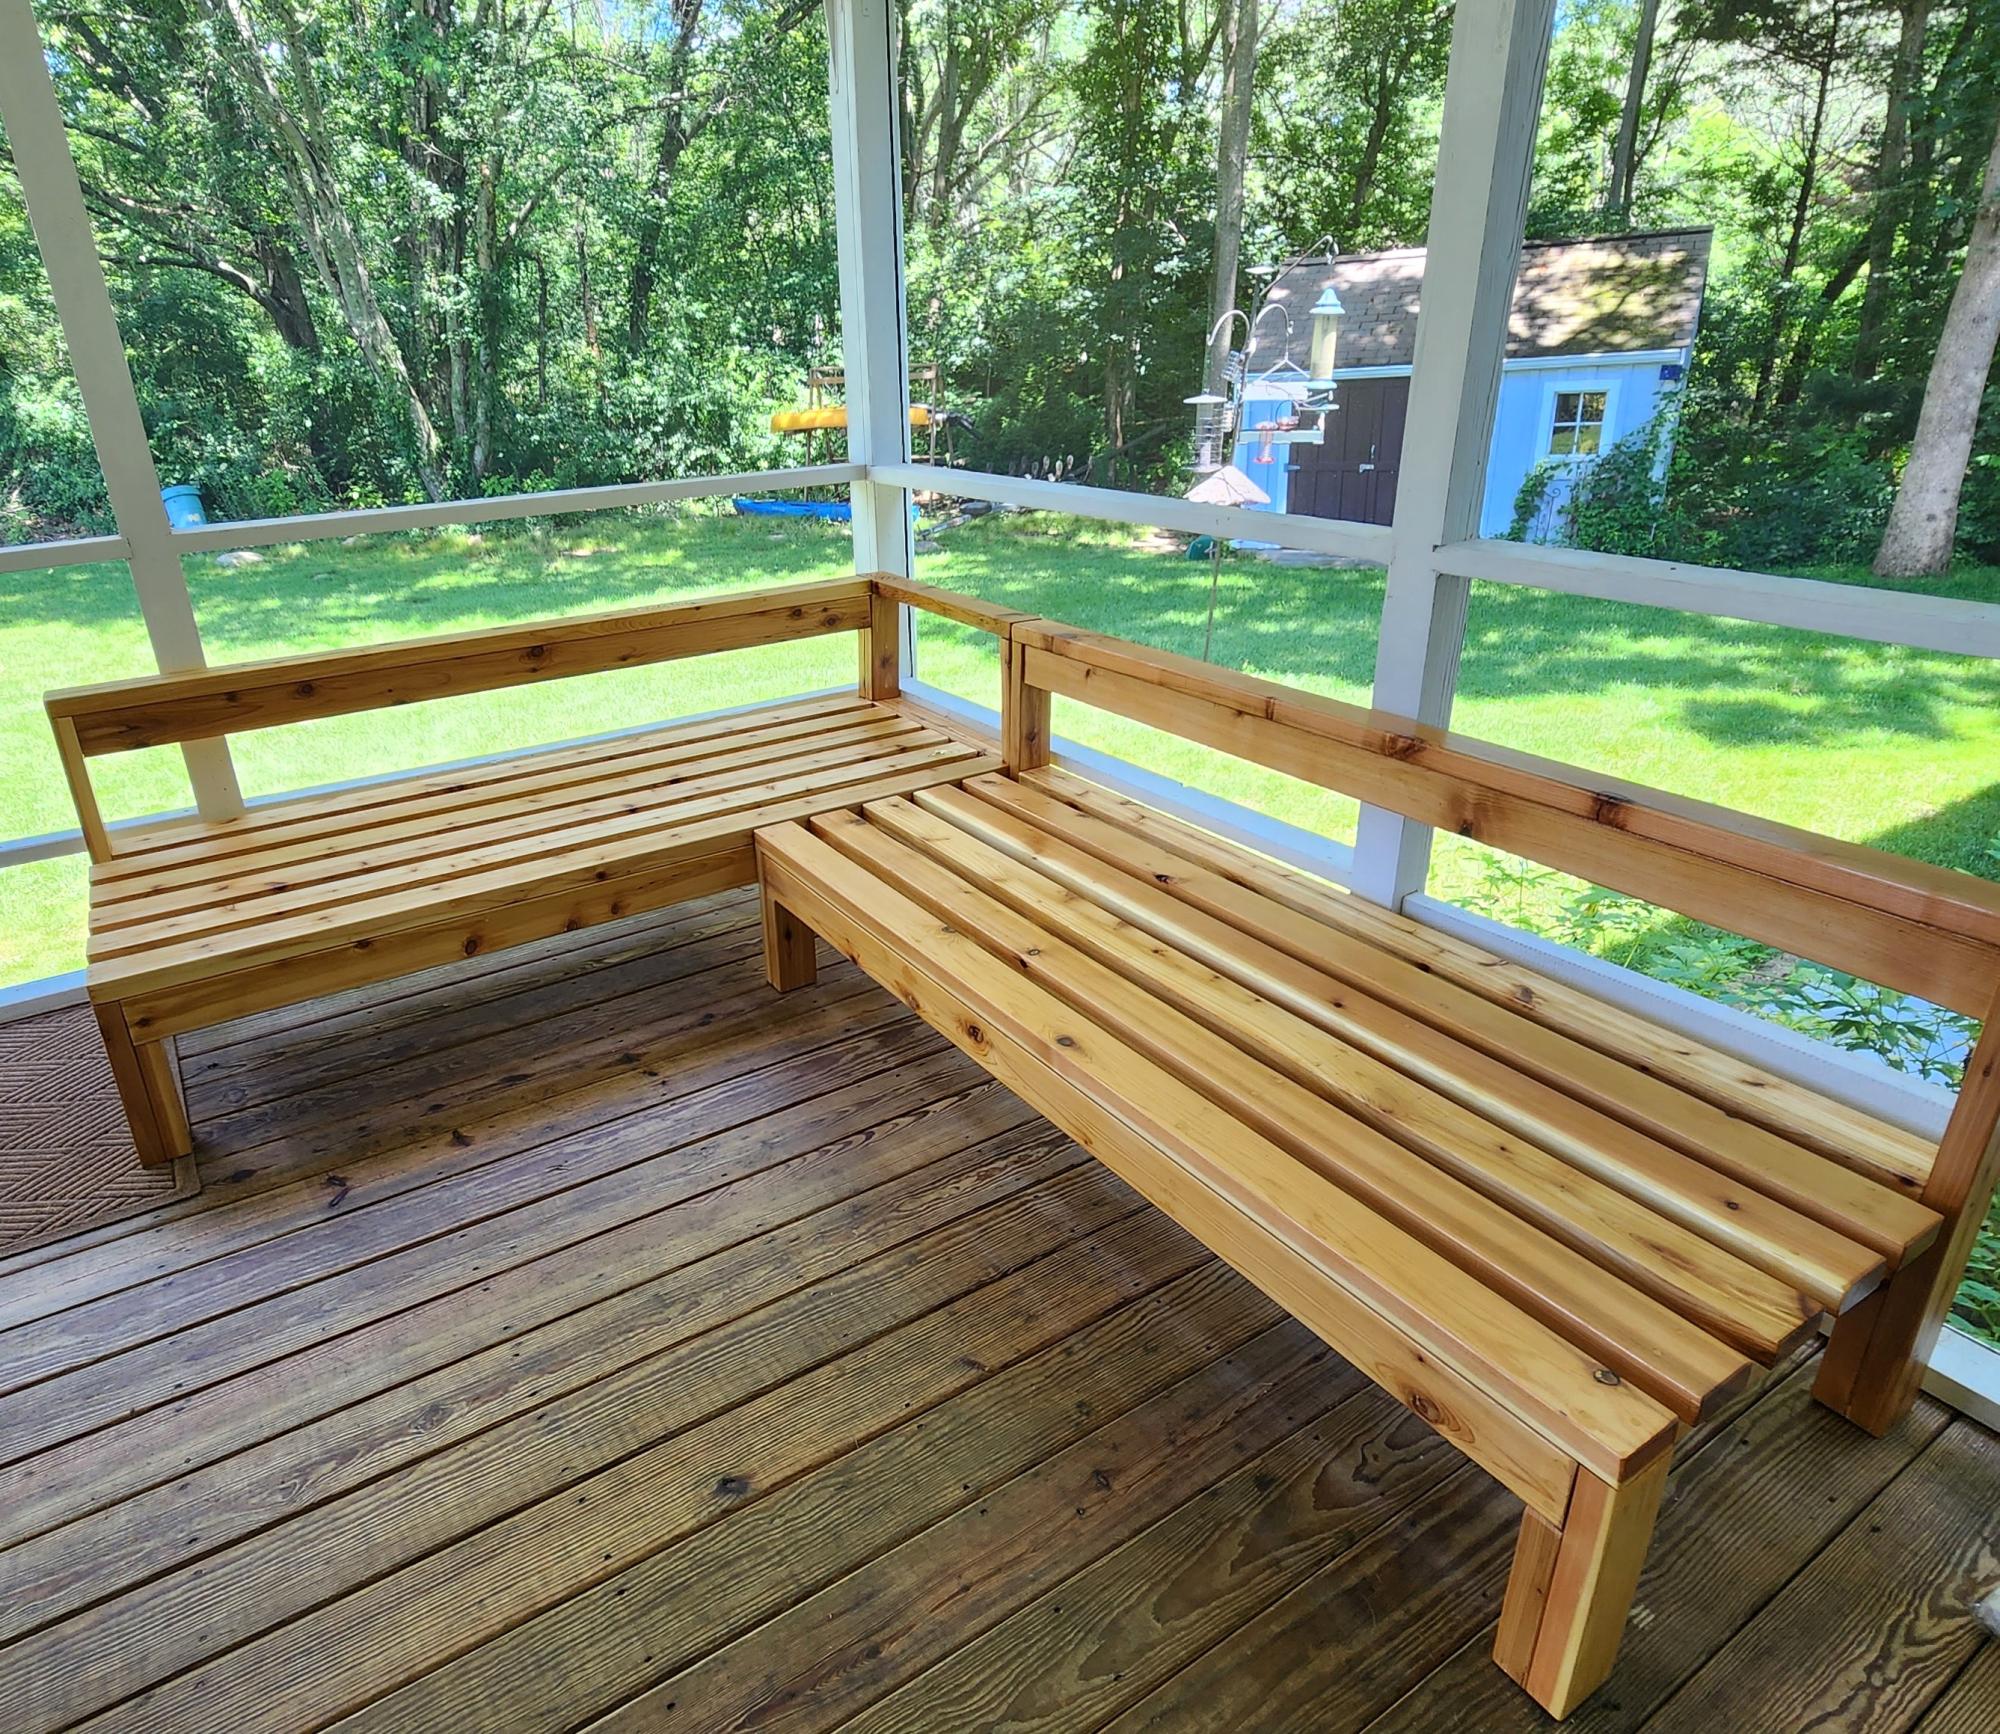
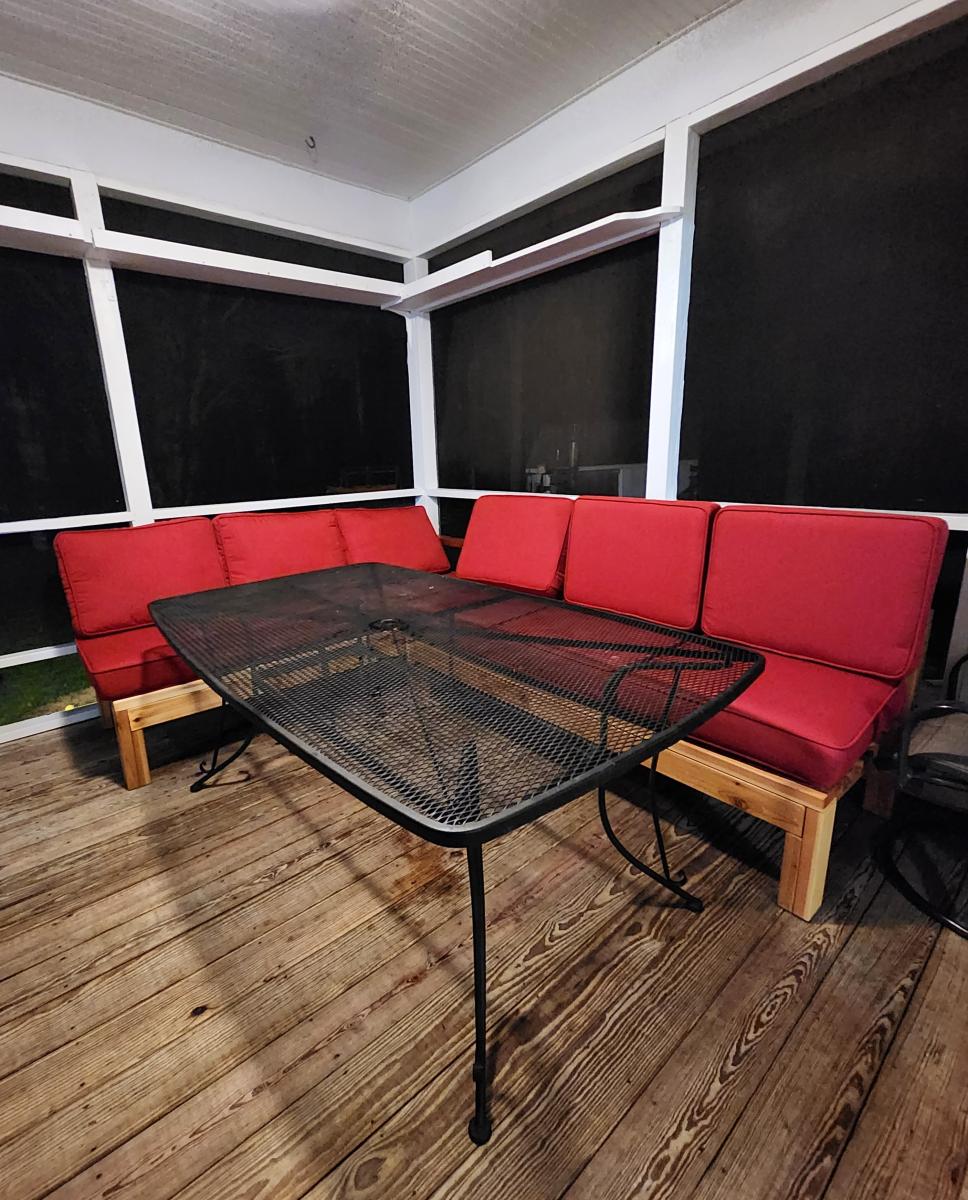
A 6' armless sofa & a 6' one arm sofa made of decking cedar and finished with outdoor urethane. Perfect seating for large group for dinner in a screened in porch! This is my first project using Ana White plans and it came out perfectly!! Thank you.
Michele V.
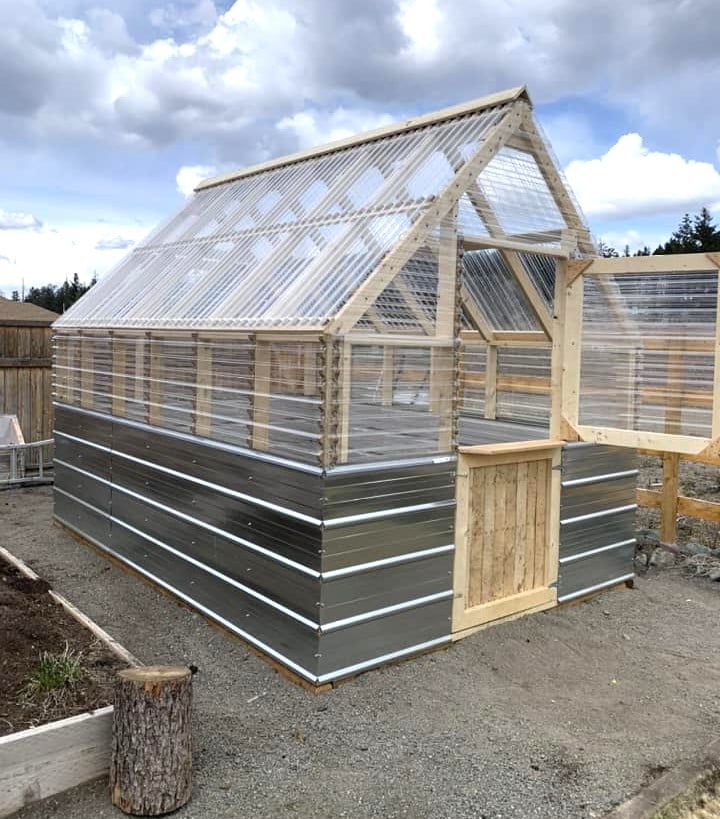
DIY Greenhouse by Trenton Kirby on Facebook!

I built this for a friend of mine - also a client - built it to her needs and come out with a really cool bookshelf/tv console!
Tue, 07/16/2013 - 08:36
I did actually add two supports to the bottom with scrap 2x2's. I knew that this piece would house lots of books, a tv and possibly have a couple of little girls climbing on it. :-)
Thu, 07/18/2013 - 09:27
Sorry it's me again, my husband and I have decided to use your model for our cube shevles and I just want to verify to get the new dimensions you just doubled the legths for the top, the shelves and and the side shelf trim correct? We are new builders and just want to get everything as close to right as we can! Thanks!

Thu, 07/18/2013 - 14:04
Not a problem at all, I don't mind answering questions. Yes, I just doubled the length of the original plan. If you click on my picture, my user info should come up and you can email me and I'd be happy to talk to you in a more direct fashion about this project and if I still have it on my computer in the form of a sketch up file, I will share more details with you. Maybe even a cut list and shopping list. I build everything in sketch up first. :-)
If you have any troubles contacting me, let me know and I will just get you my email on here. :-)
Fri, 07/19/2013 - 07:13
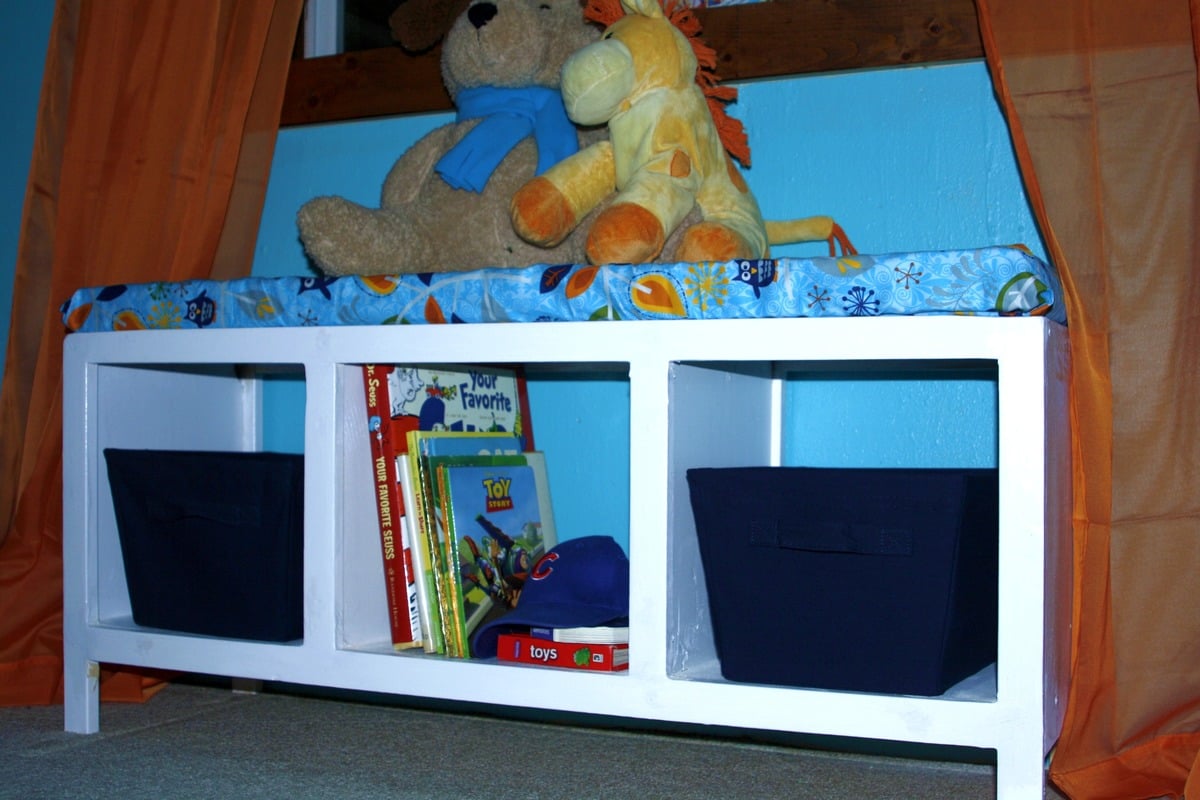
This is exactly what ive been looking for toy storage in my living room! Is it possible to take off the tiny legs, and just keep the entire thing on the floor? I was looking to add some cushions on the top for seating as well. Will it be able to support the weight?
Fri, 07/19/2013 - 07:13
This is exactly what ive been looking for toy storage in my living room! Is it possible to take off the tiny legs, and just keep the entire thing on the floor? I was looking to add some cushions on the top for seating as well. Will it be able to support the weight?
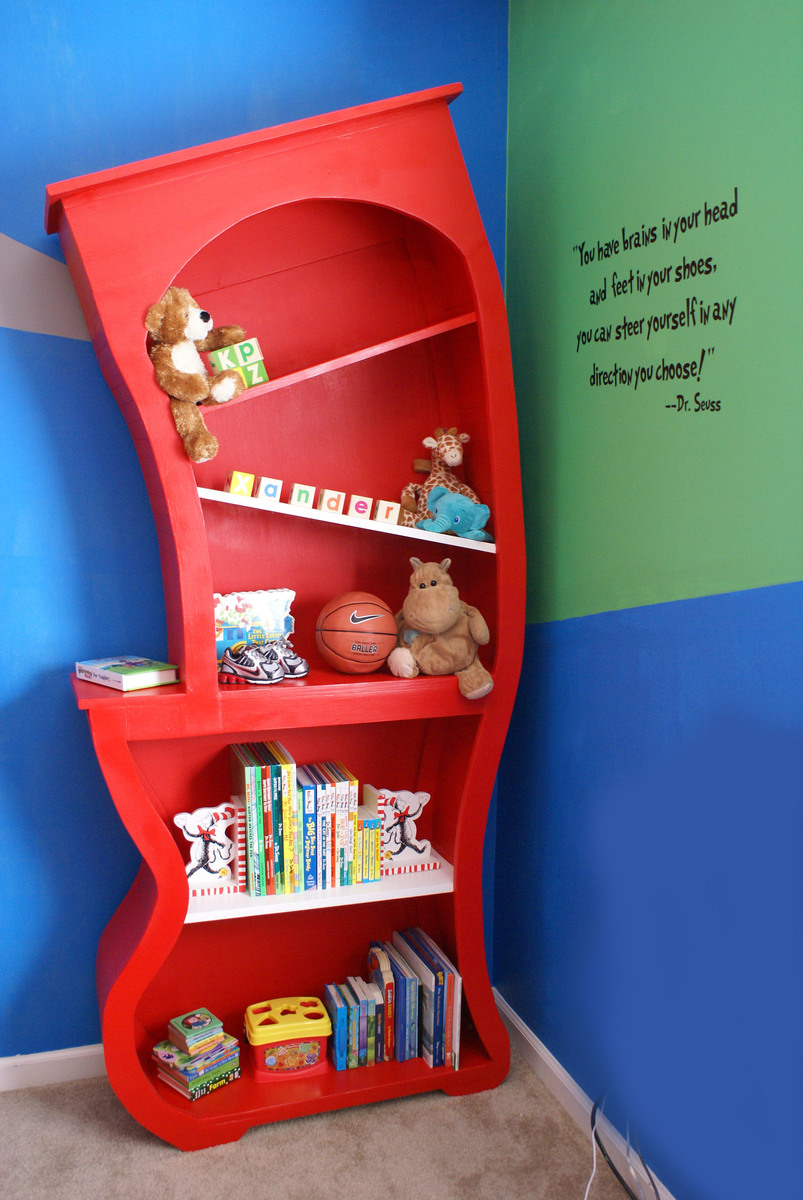
This was a Baby Gift for my sister and her little boy, Xander who was born just a couple weeks ago. I wanted to do something special that would last for my sweet nephew. She found a bookshelf similar to this on cool-rooms.com and we decided to try to make our own version. I've posted about it on my blog if you're interested in the process.
Sun, 03/18/2012 - 16:03
The best 'plans' I could come up for this are described here on my blog post for this... not too specific, but hopefully gives you a good idea of the process: http://alabahamians.blogspot.com/2012/03/dr-seuss-bookshelf-for-sweet-b…
Thanks for the sweet comments!!!
Mon, 01/22/2018 - 17:52
I would love to see the instructions you have in your blog, but it says you must be invited to see the blog. May I have access? Thanks! Brooke
Mon, 01/22/2018 - 17:52
I would love to see the instructions you have in your blog, but it says you must be invited to see the blog. May I have access? Thanks! Brooke
Sun, 03/18/2012 - 19:22
Clever cute creative. Cant stop looking at it. I love it. Thank you so much for posting.
Sun, 03/18/2012 - 19:52
Thank you so much for posting .You did a beautiful job. Your a good sister and a Terrific aunt.
Sun, 03/18/2012 - 22:16
WOW!!!!!! Wow wow wow wow!!! This is just beyond cool.
Sun, 03/18/2012 - 23:30
I love how you have taken a typical shelf and gave it a spark that is SO ONE of a KIND! WOW! This gives me ideas! There is just not enough time in the day thought.
Thank you for sharing your Awesome creativity. Your Family is SO lucky to have someone as talented as you! Keep up the good JOB!!!
Again AMAZING!!!
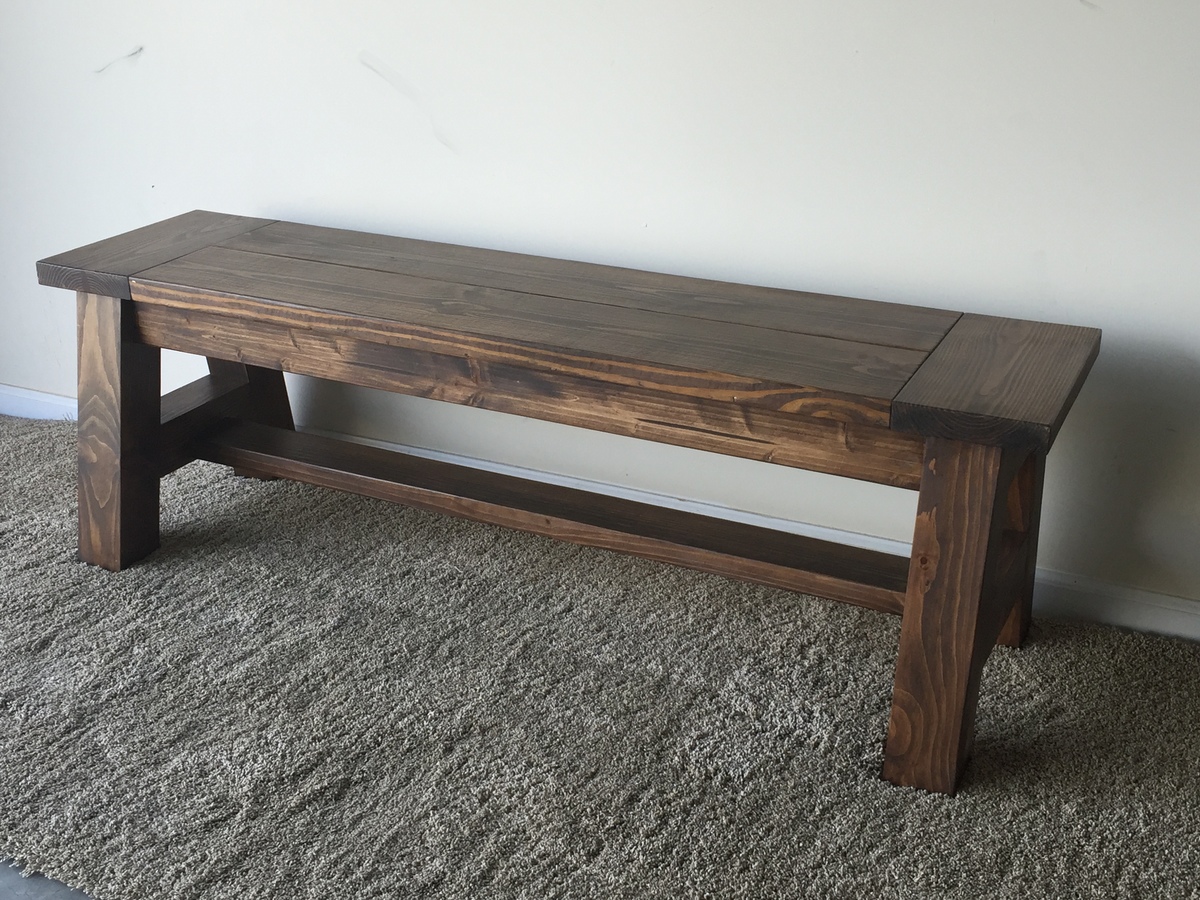
Bench made with A frame ends. 5 feet long, 17 inches high and 14.5 inches wide.

My daughter loves her new couch! This was such an easy project and a great way to reuse an outgrown crib mattress.
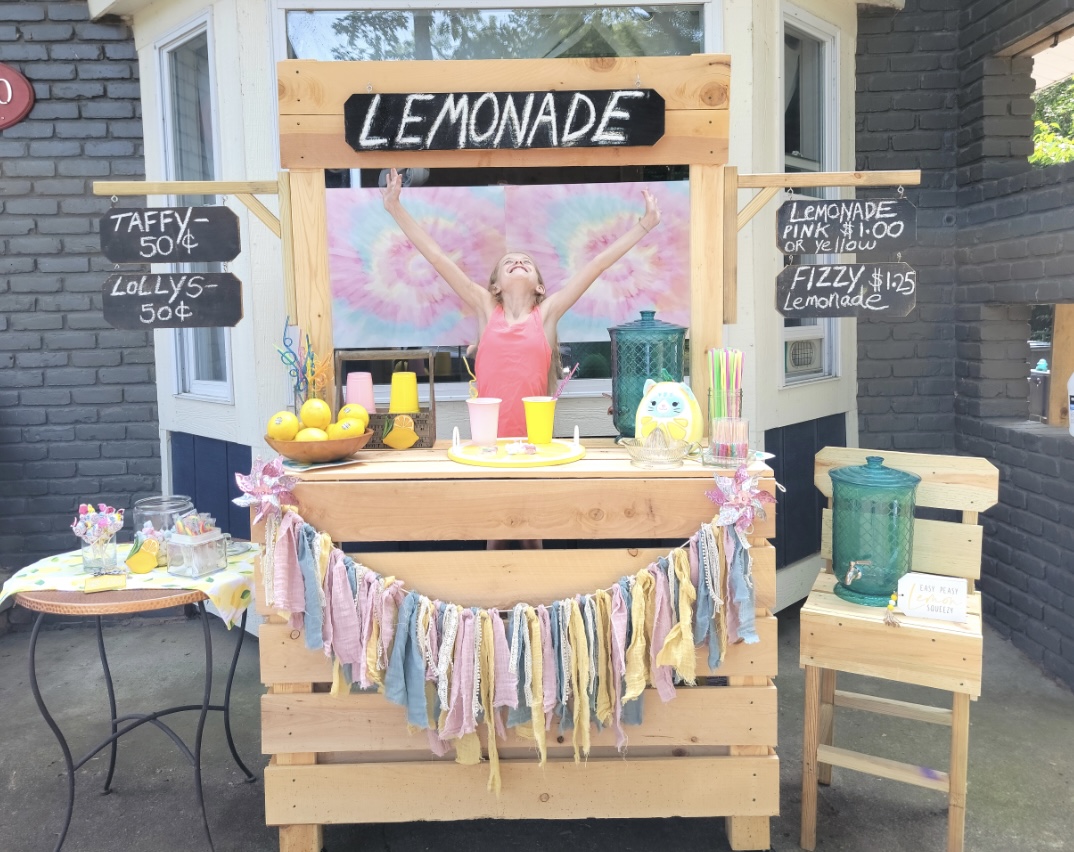
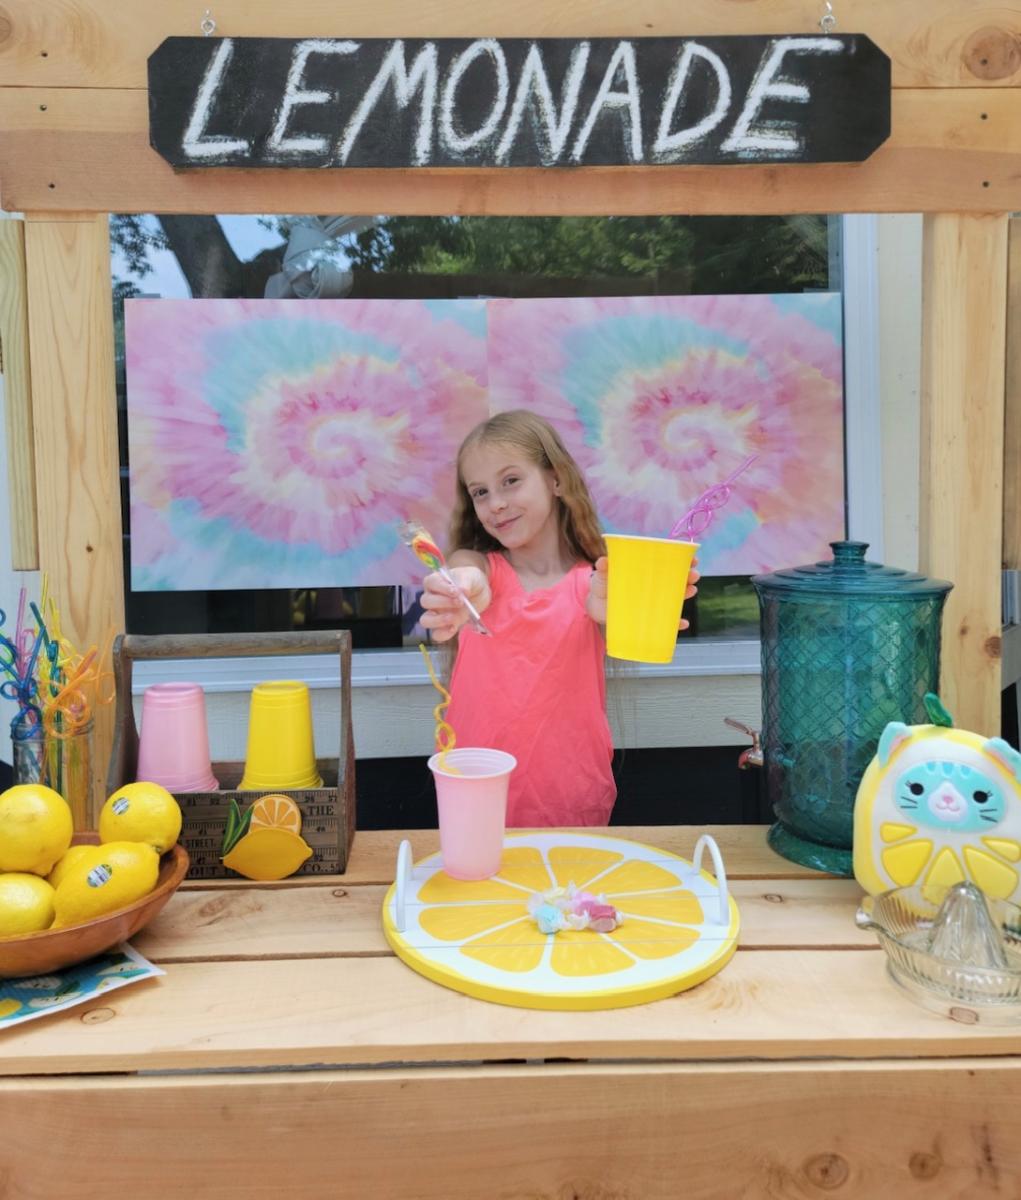
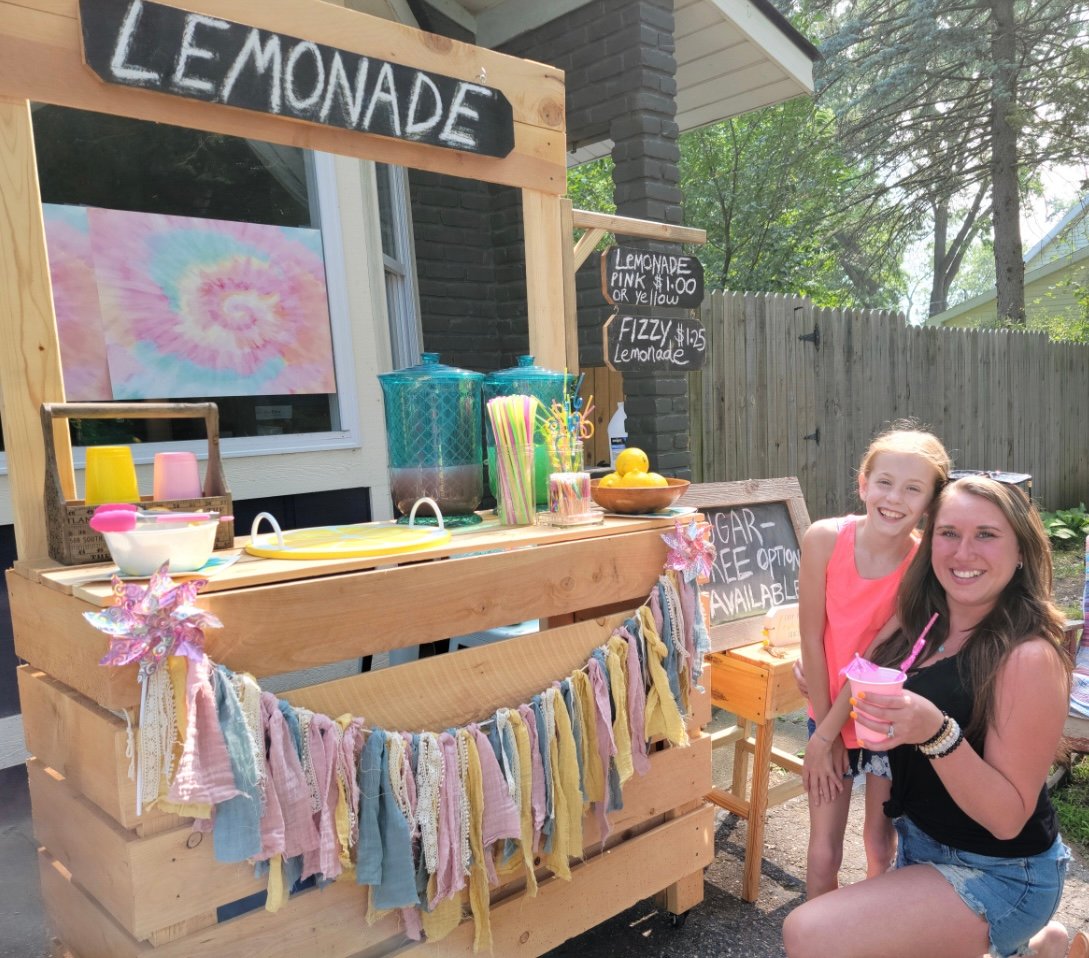
This is based on Ana's Lemonade Stand project- I made it taller and wider, added casters. It was a hit with the birthday girl and the customers!
Amy of The Navy House Goods Co. @thenavyhousegoodsco
Sun, 07/30/2023 - 15:47
Love your mods and the outcome is fantastic, thanks so much for sharing!
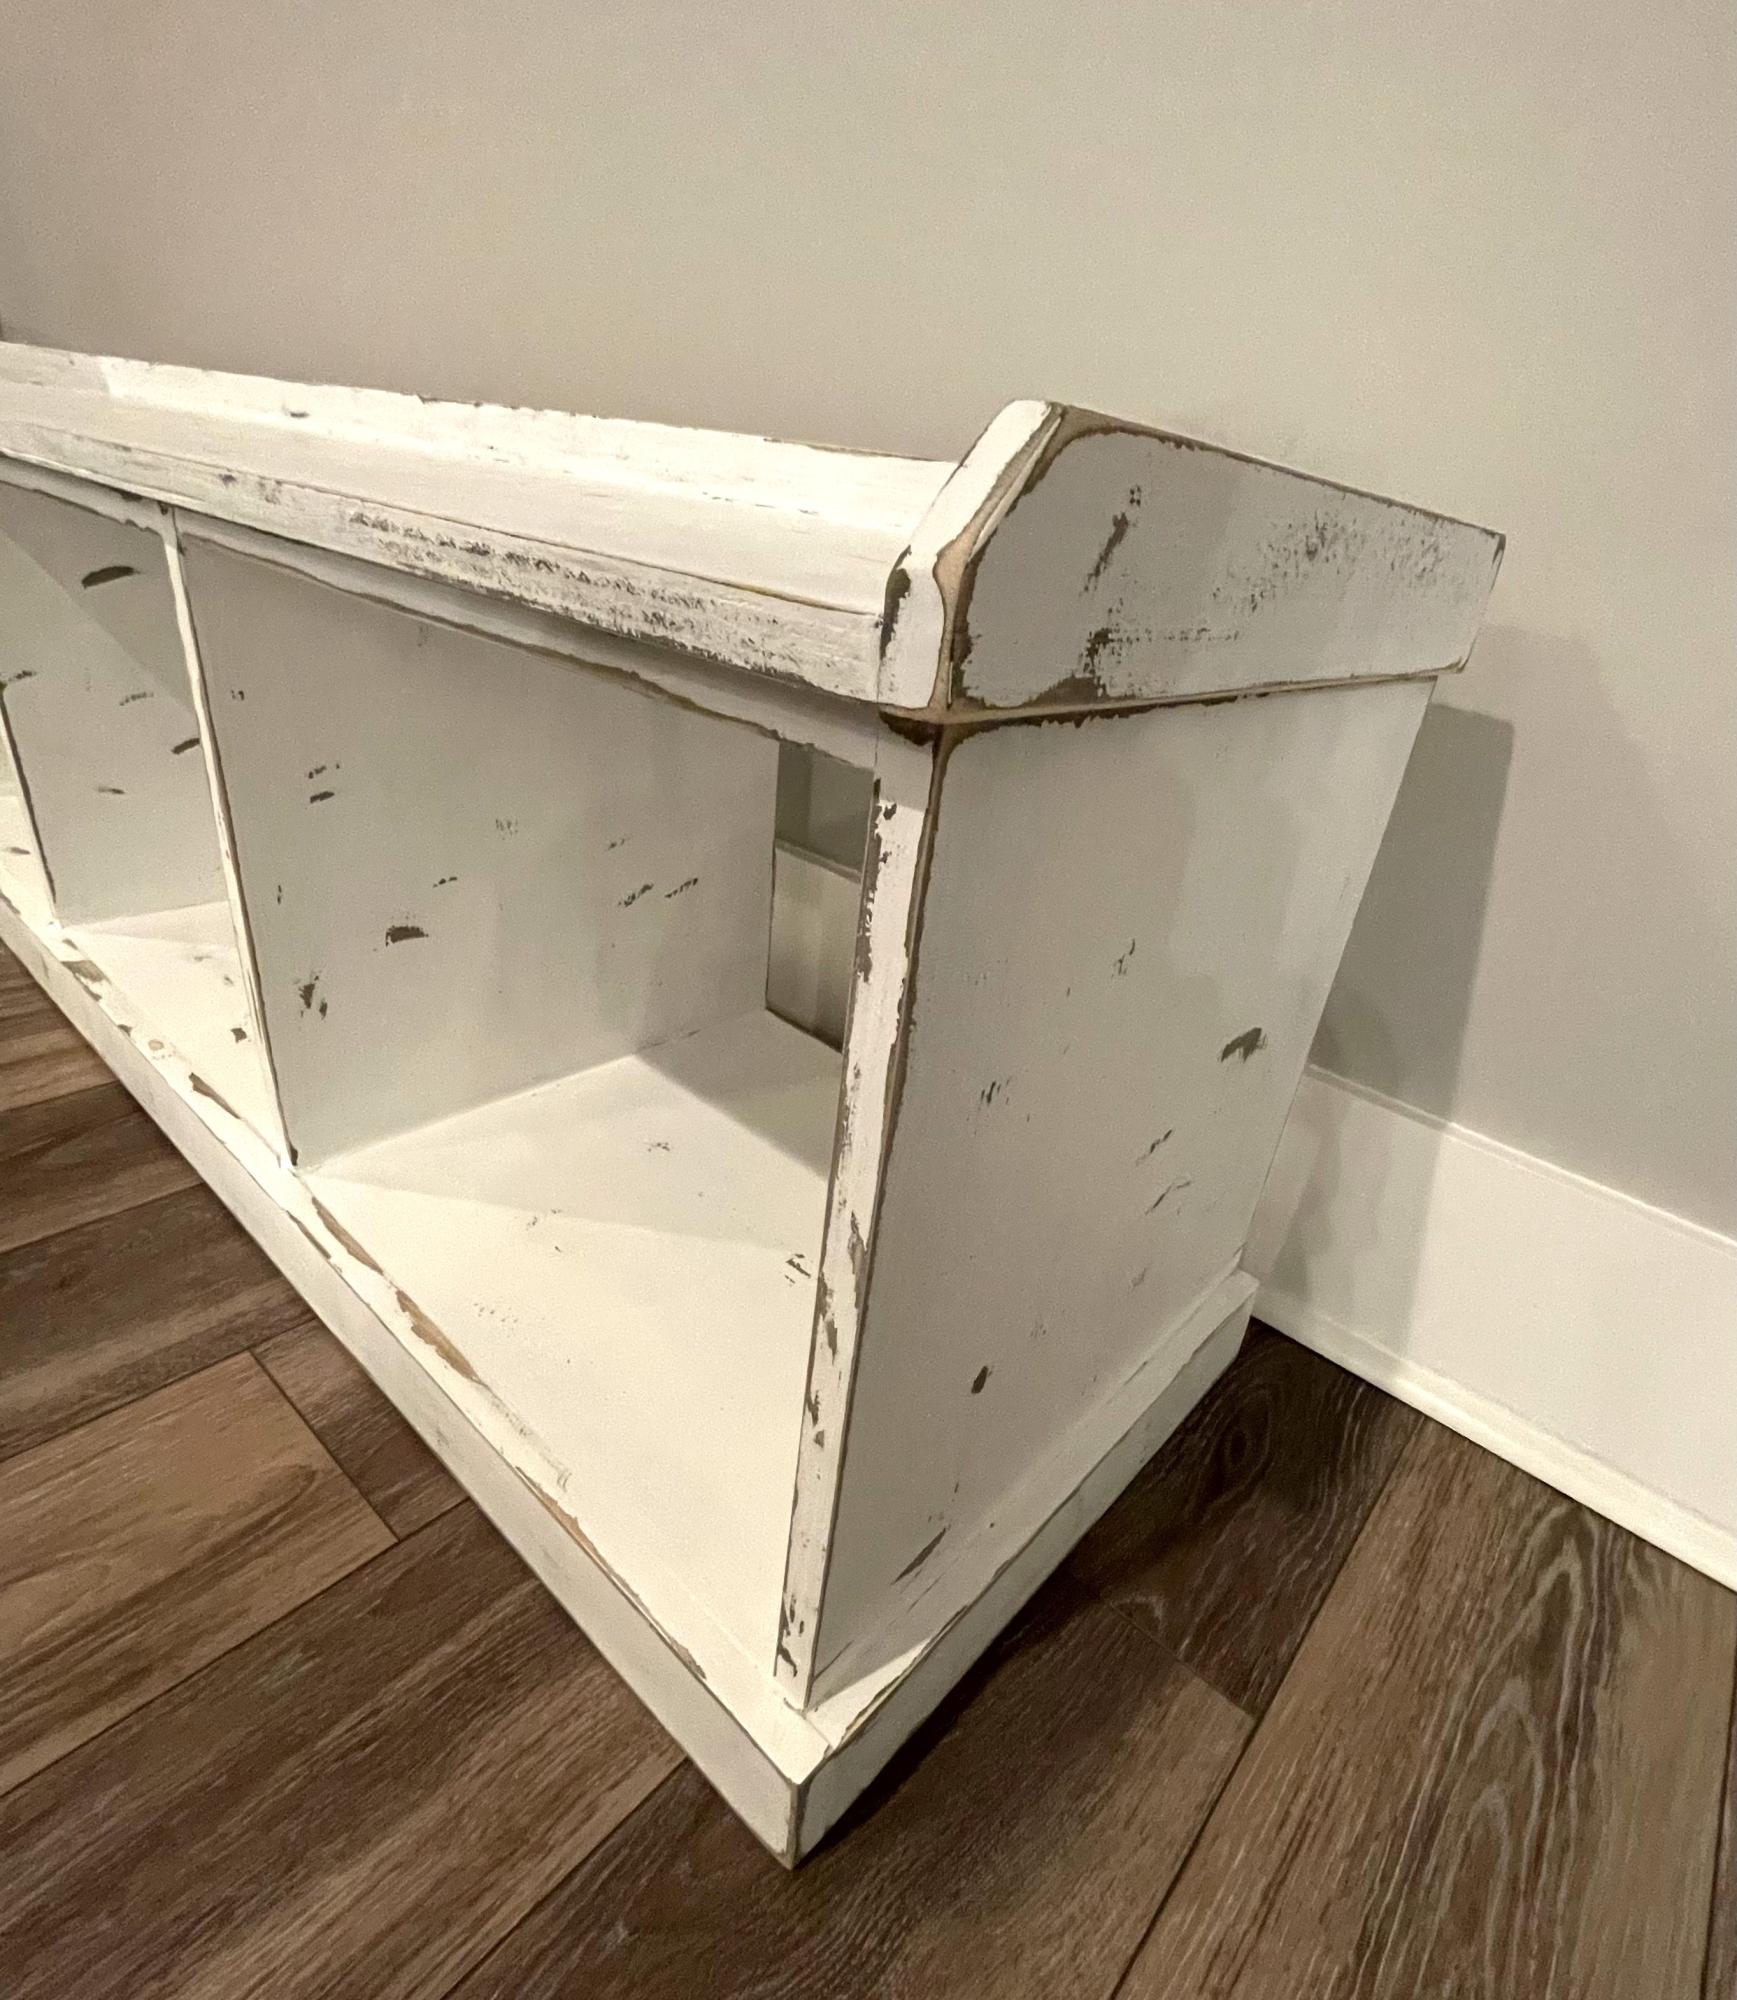
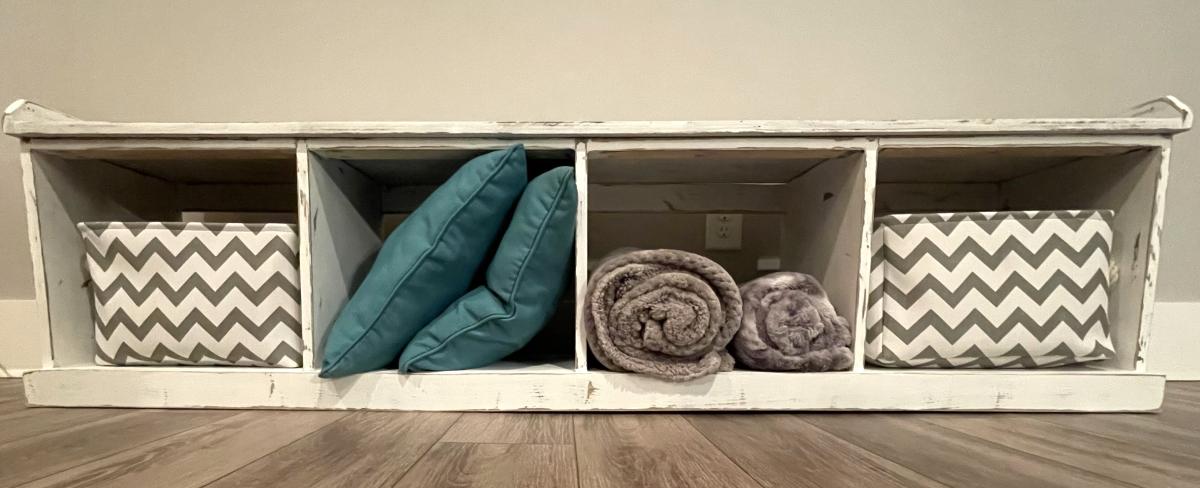
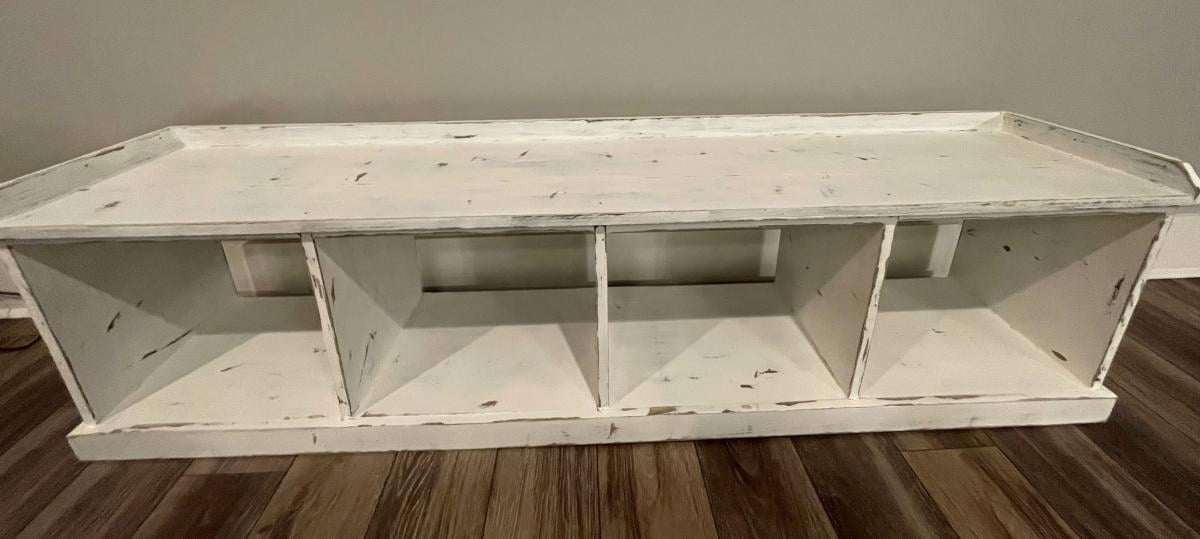
This was our first attempt at making furniture and even though the difficulty rating was ‘intermediate’, the detailed instructions made the process less complicated. Our version of Anna White Essential Entryway Bench turned out better than we expected! Once it was built, I stained it grey, painted it white, then distressed it to make it look antique. I added a custom made foam cushion to the top and, voila!
TammyA
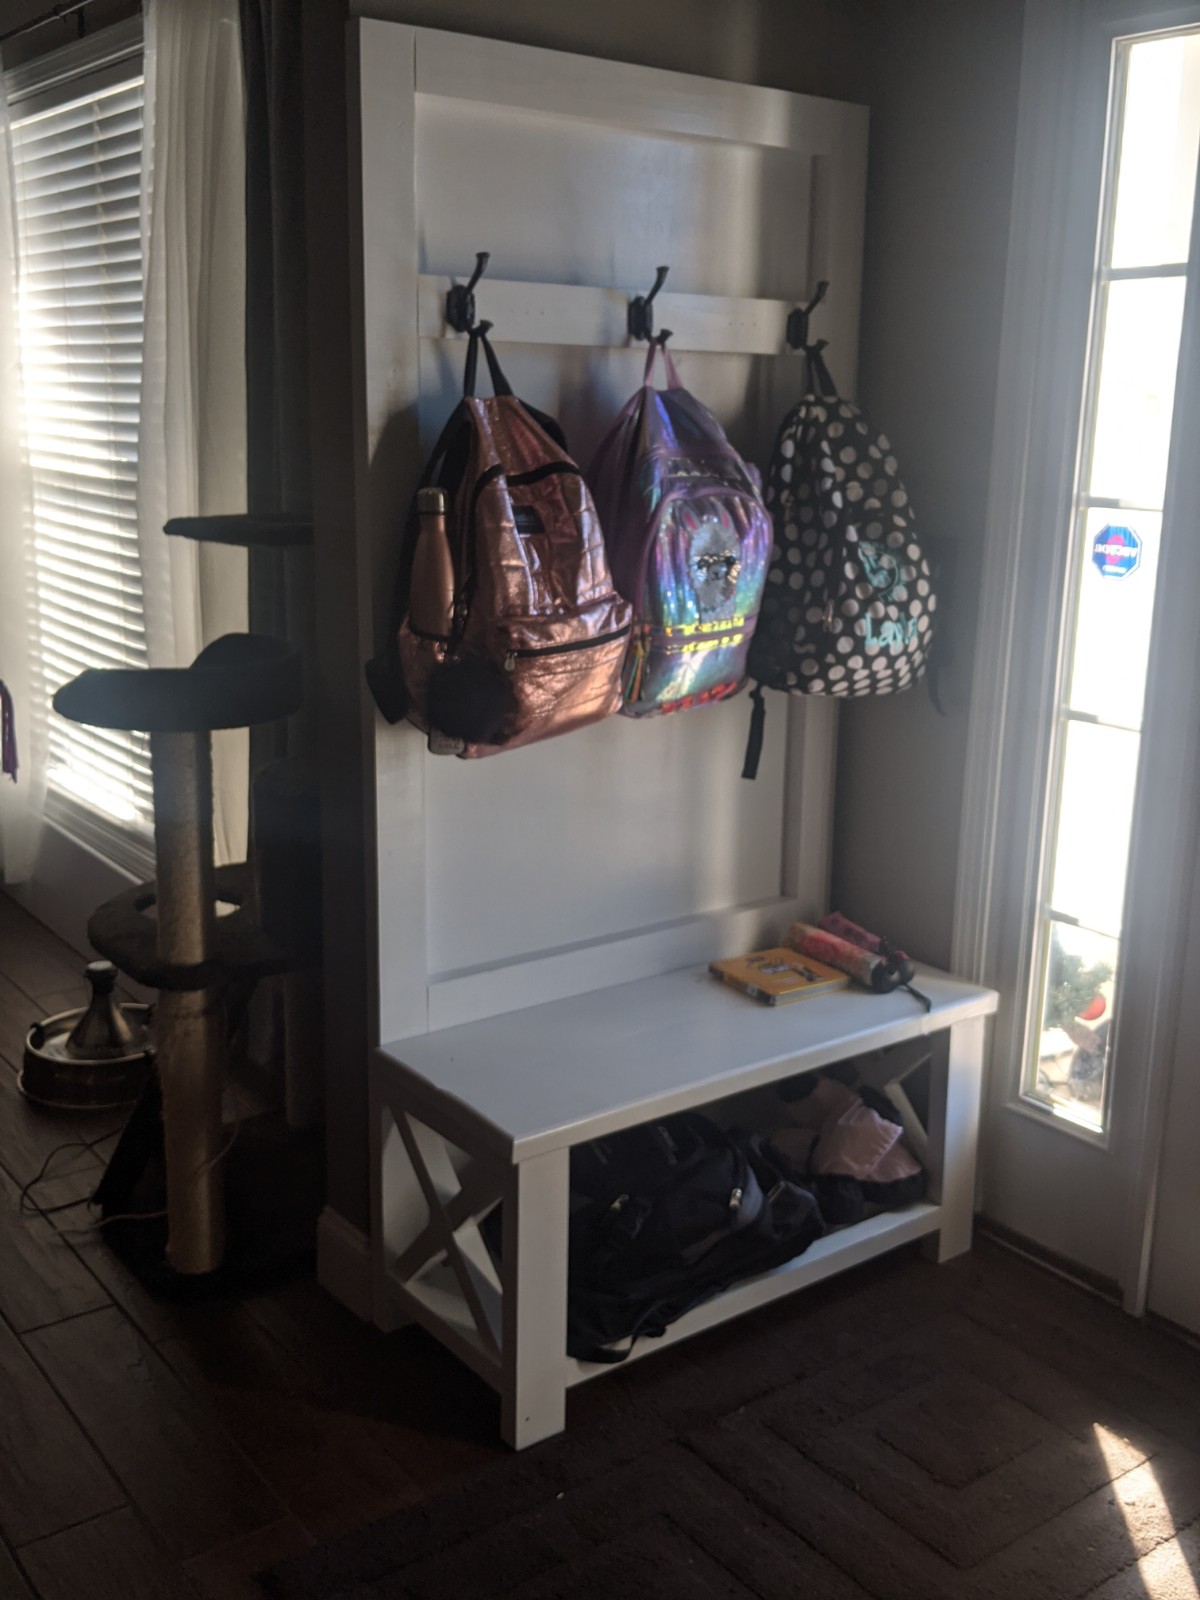
My wife got some gift cards for Christmas. Instead of going and buying stuff for herself, she handed them to me and said that she wanted a Hall Bench/Mudroom bench and she wanted me to build it. We've got several of the Rustic X furniture pieces in our home already and she wanted it to match, so this was the natural fit. This was a great project and addition to some of our home decor. I had to shrink it down to fit our space, but that was easy.

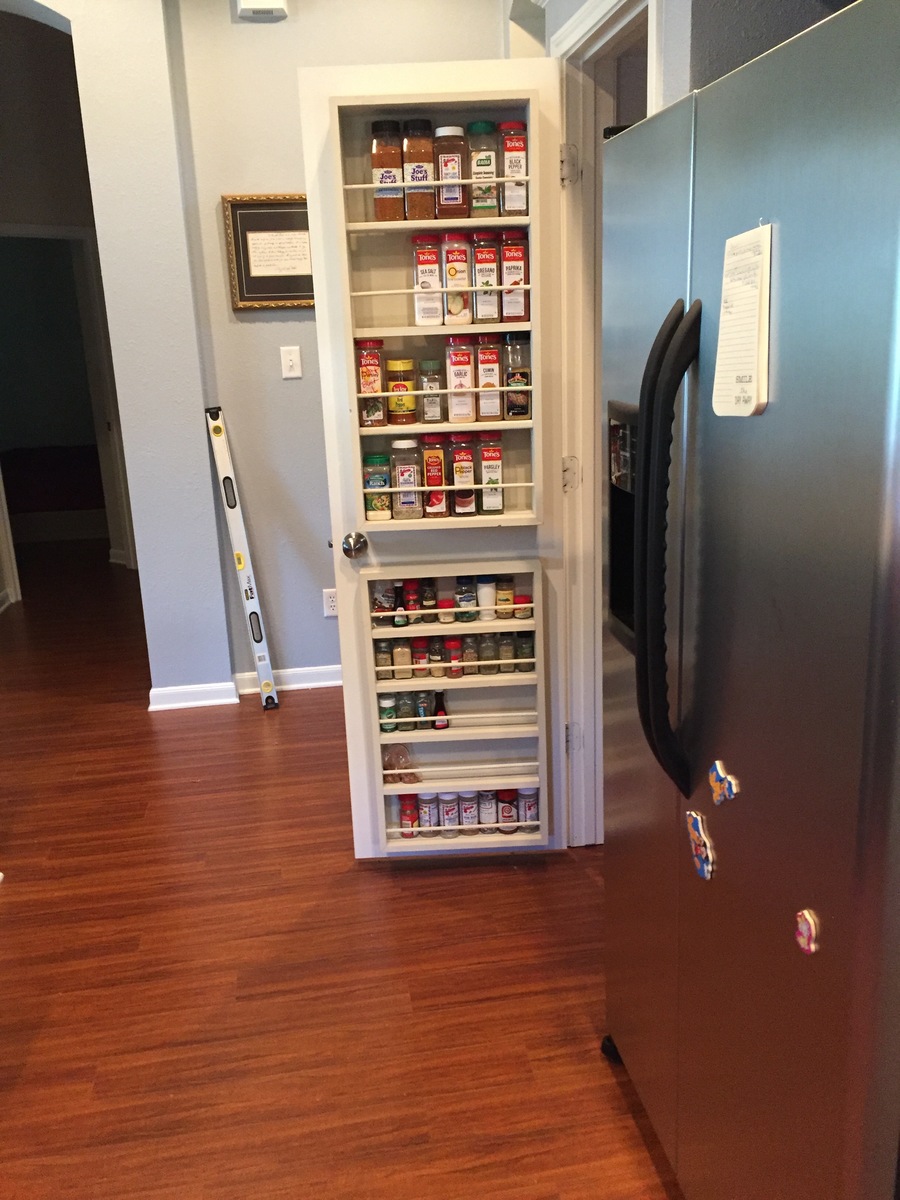
I made some modifications for bigger spice containers. The big ones you get at Sams/Costco are too big for the original design. The top portion was made with 1x6 sides to take care of the bigger containers.
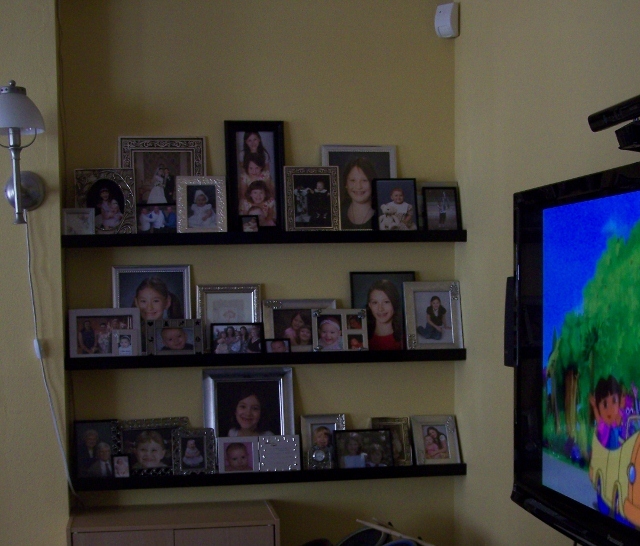
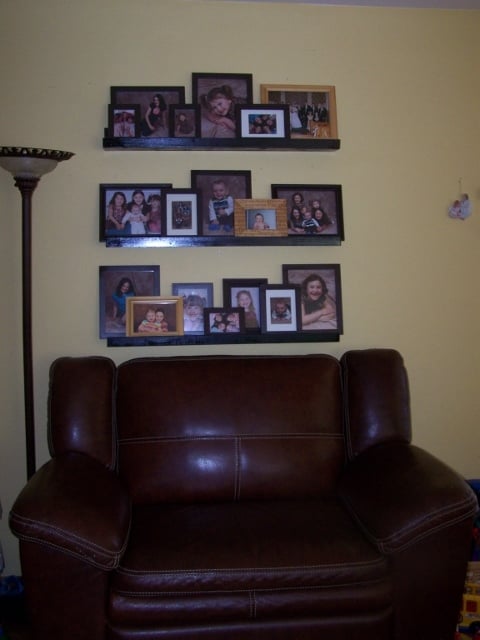
I know there are a hundred brag posts of the $10 ledges, and I have used them before (and posted them) but I am so happy with how these turned out!
Its too bad I don't have a good before picture, because the things I love most about these are the colors and the interchangability and it would be easier to explain with the before picture!
I have had pictures in cute matching frames on the one wall for years, but the frames were too light for the wall color, and the floor and furniture, so I needed to darken them up. Additionally, we got a black tv stand even though the floor and couches are dark brown. (TV is black, so it works) So I made the shelves black to pull that in. Then on the shelves closer to the tv, I used black and silver frames, and on the ones above the brown couch I painted all my light wood frames darker.
As for the interchangability, its a lot easier to pull the frames down and change the picture when you don't have to worry about how they look together - I can just move them around on the shelf. I've always had a hard time getting a "gallery" look just right - something will always hang lower than I want or whatever. So I finally got it perfect with one 10x13 of the kids together in the middle of 4 8x10s (one of each) and a few little ones to mix in. Then we had to go and have #5 and mess my whole system up! :)
So he's 16 months now and his picture is finally on the wall, and was taken last May - so sad..
But my other set of shelves has pictures of everybody - even me, yikes! I decided they look better full so I used all the frames I had, and got some cheap ones and thrift store frames and put them all together. "controlled chaos" just like the rest of the house/life!
Thanks Ana for giving me the confidence to know that I can make it myself, I never would have gone out and spent the money to buy matching frames, but knowing I could just do it myself I was able to get it done for cheap!
My 16-year-old son is home every other day for school with an on-line course he is taking. We started working on projects we both wanted to learn from cooking to woodworking projects. This is the very first project we made. We are both very proud and pleased with the simple directions, minimal tools required, and beautiful results. We used an early American stain and lacquer finish. We have received many compliments on it. Thank you for giving us something to build our relationship and home with.
Elizabeth
Mon, 09/25/2023 - 09:23
Thank you for sharing, I love hearing about the time spent together and the project looks amazing!
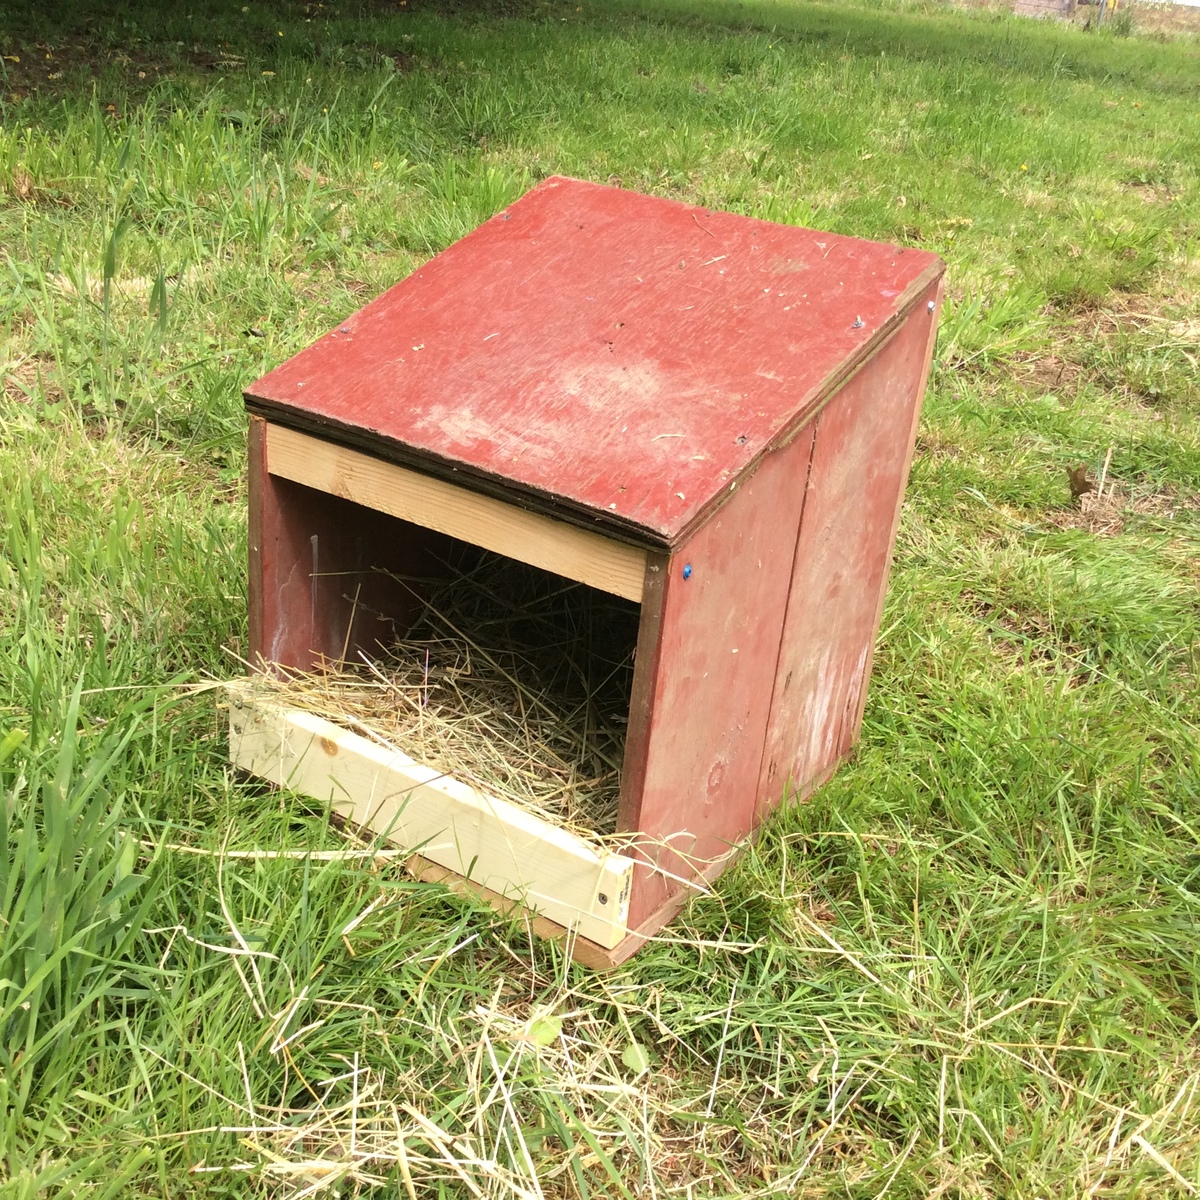
We built our nesting box from scrap wood we had from an old barn we tore down and other scraps from previous projects. The dimensions were modified based on the width of the wood we had on hand. It's not very pretty, but it was free to make and will be inside a chicken coop. Our chicks are scared of it right now, but they are only 8 weeks old and not laying yet. I'm sure they will like it when they get used to it.


Love this project!
Rlynhack