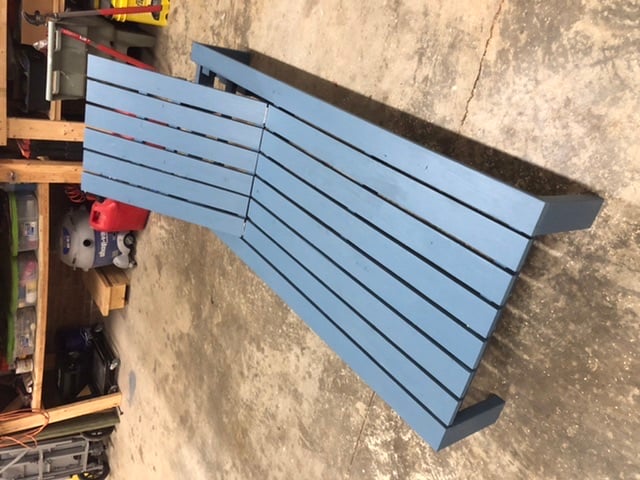
Pottery Barn Inspired Chaise Lounger
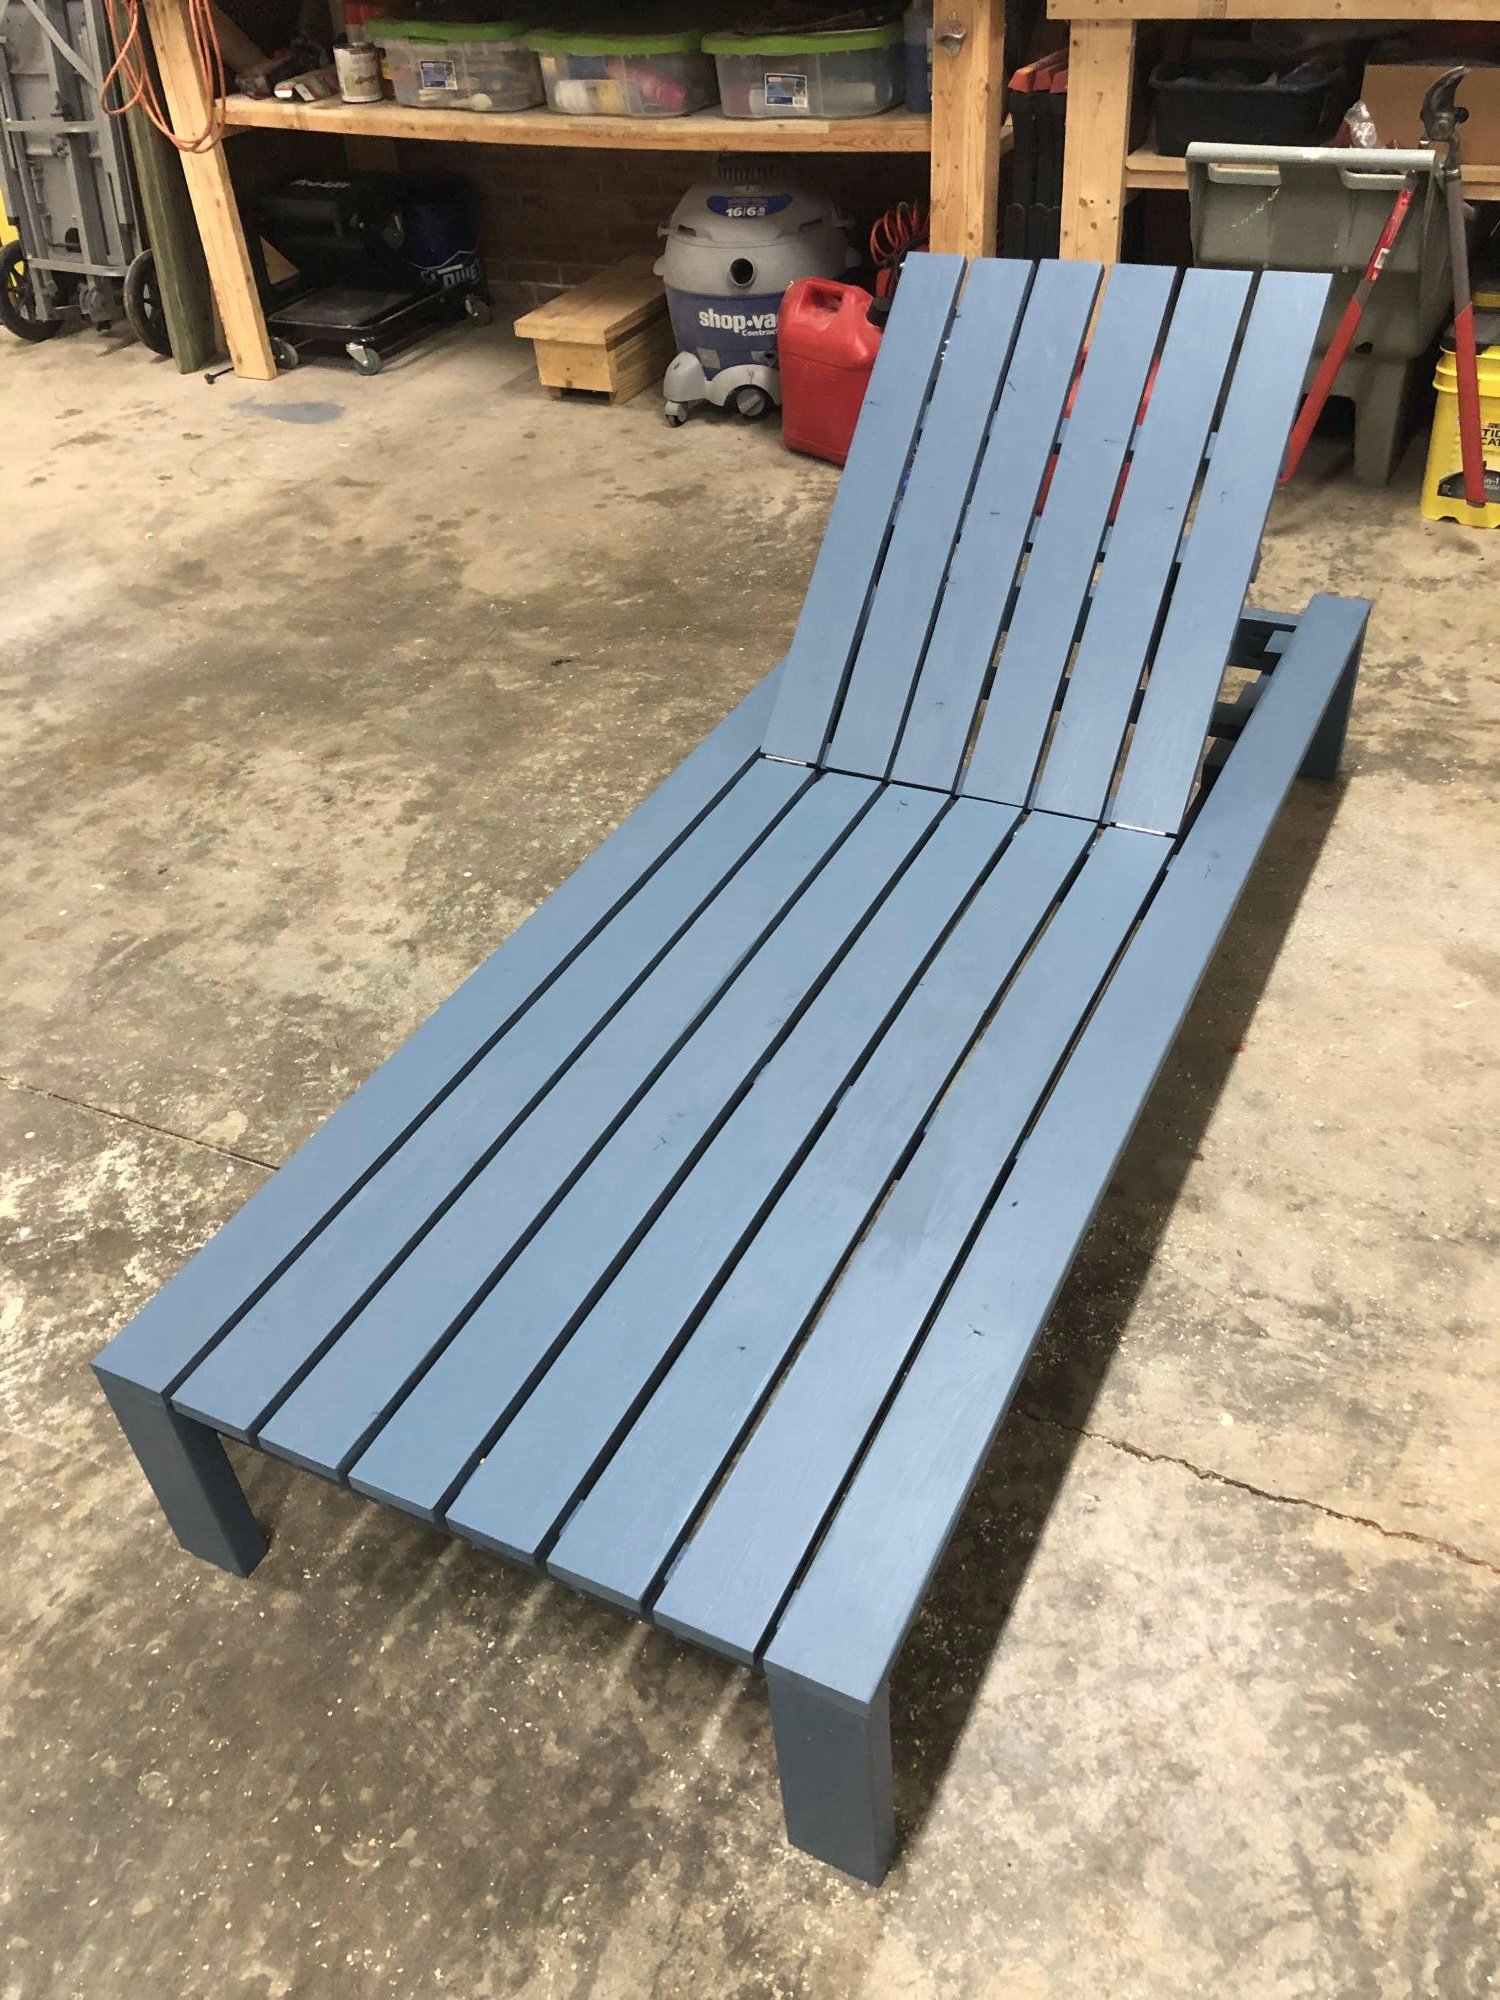
I followed Ana’s Modern Chaise build. The number of 2x4’s specified in the instructions is incorrect. You need 3 not 2. Other than that, a great plan.
Built from Plan(s)
I followed Ana’s Modern Chaise build. The number of 2x4’s specified in the instructions is incorrect. You need 3 not 2. Other than that, a great plan.
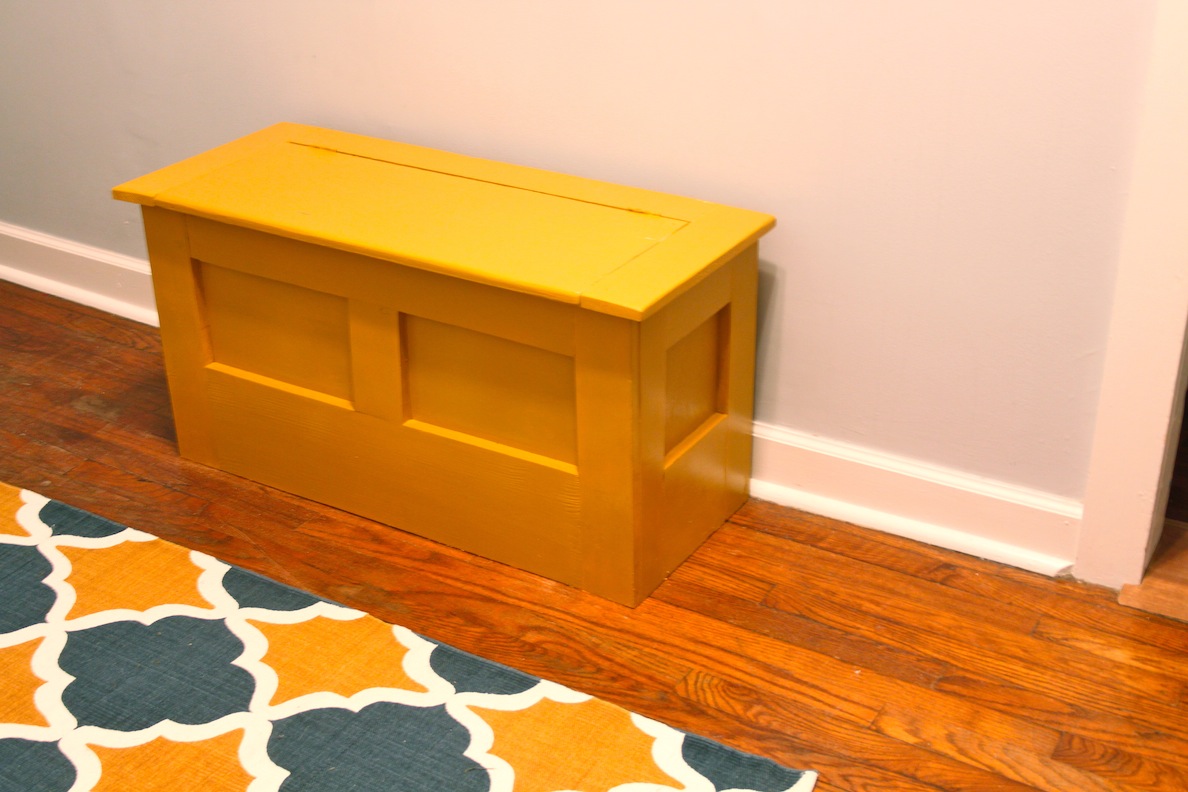
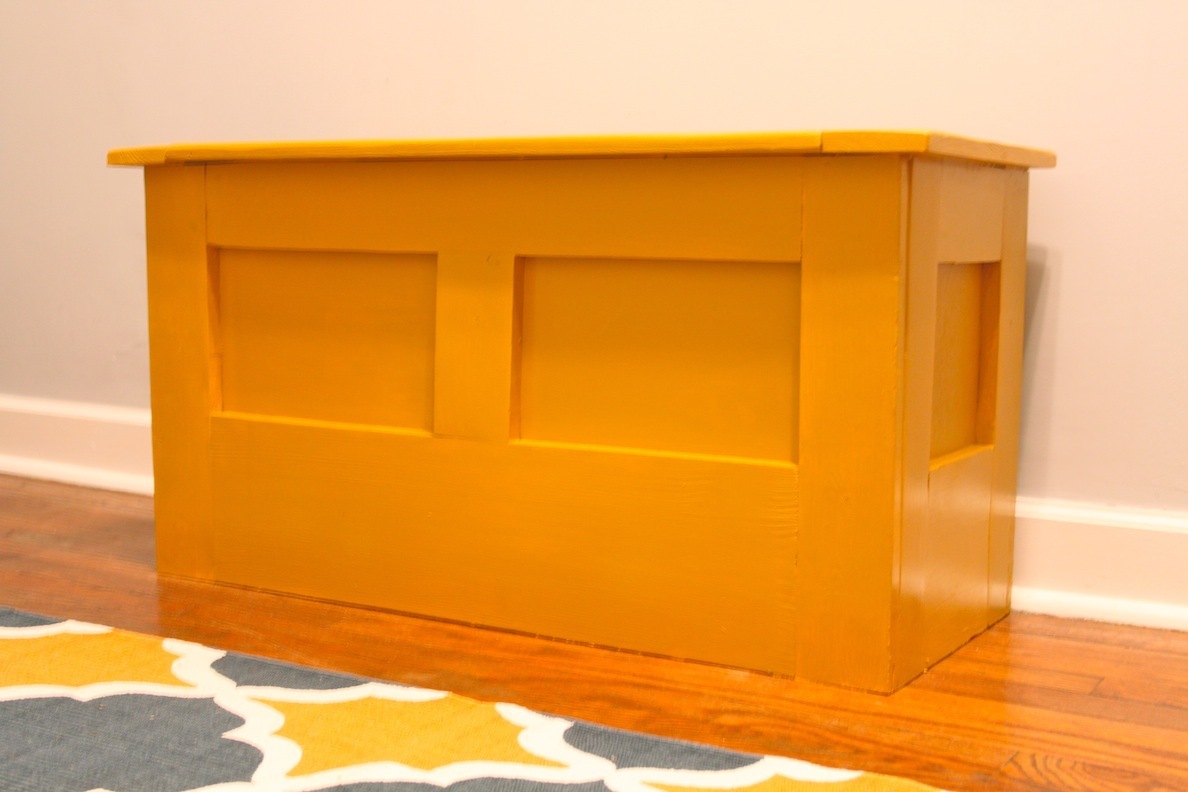
I've been looking for a bench for our hallway for months and have yet to find one I love, but I did fall in love with Mimi's Storage Bench and Hall Tree.
I was determined to make this bench for free. My husband scavenged construction sites for salvage and brought me home quite a bit of scrap. Once I had a nice assortment of boards, I began the job of making them fit the specs. This was much more time consuming than purchasing boards that were the right size to start with. I got quite familiar with the planer (I had to plane down 2x's to 1x's) and even faced the terrifying table saw to rip a few boards down to size.
The lid was made from an old shelf and the inside panels are an old painting from art school--on masonite--that I finally brought myself to part (with). I already had the paint left over from a table I made over, so that was also free!
It didn't take much convincing to get my husband to pick up a pockethole jig. He's been wanting one himself. It was actually a lot more fun and much easier to use than I expected.
Overall, I'm very pleased with the way it turned out. It's made out of some pretty rough wood, so there are a few holes I'll go back and fill in the future--or maybe not. There are also some rough spots and less-than-true boards, but not bad for a free piece of furniture.
This was my first big woodworking project. It was a lot of fun and I gained a lot of knowledge and confidence that I'll use to build more ambitious projects in the future. I think woodworking is actually easier than sewing because boards generally don't stretch, shift, snag, and unravel while you're working.
I plan to scale this plan down, add some safety hinges, and notch the board under the front of the lid to make a bench/toy box for my little girl's room.
A Christmas gift for my G- kid!!!!
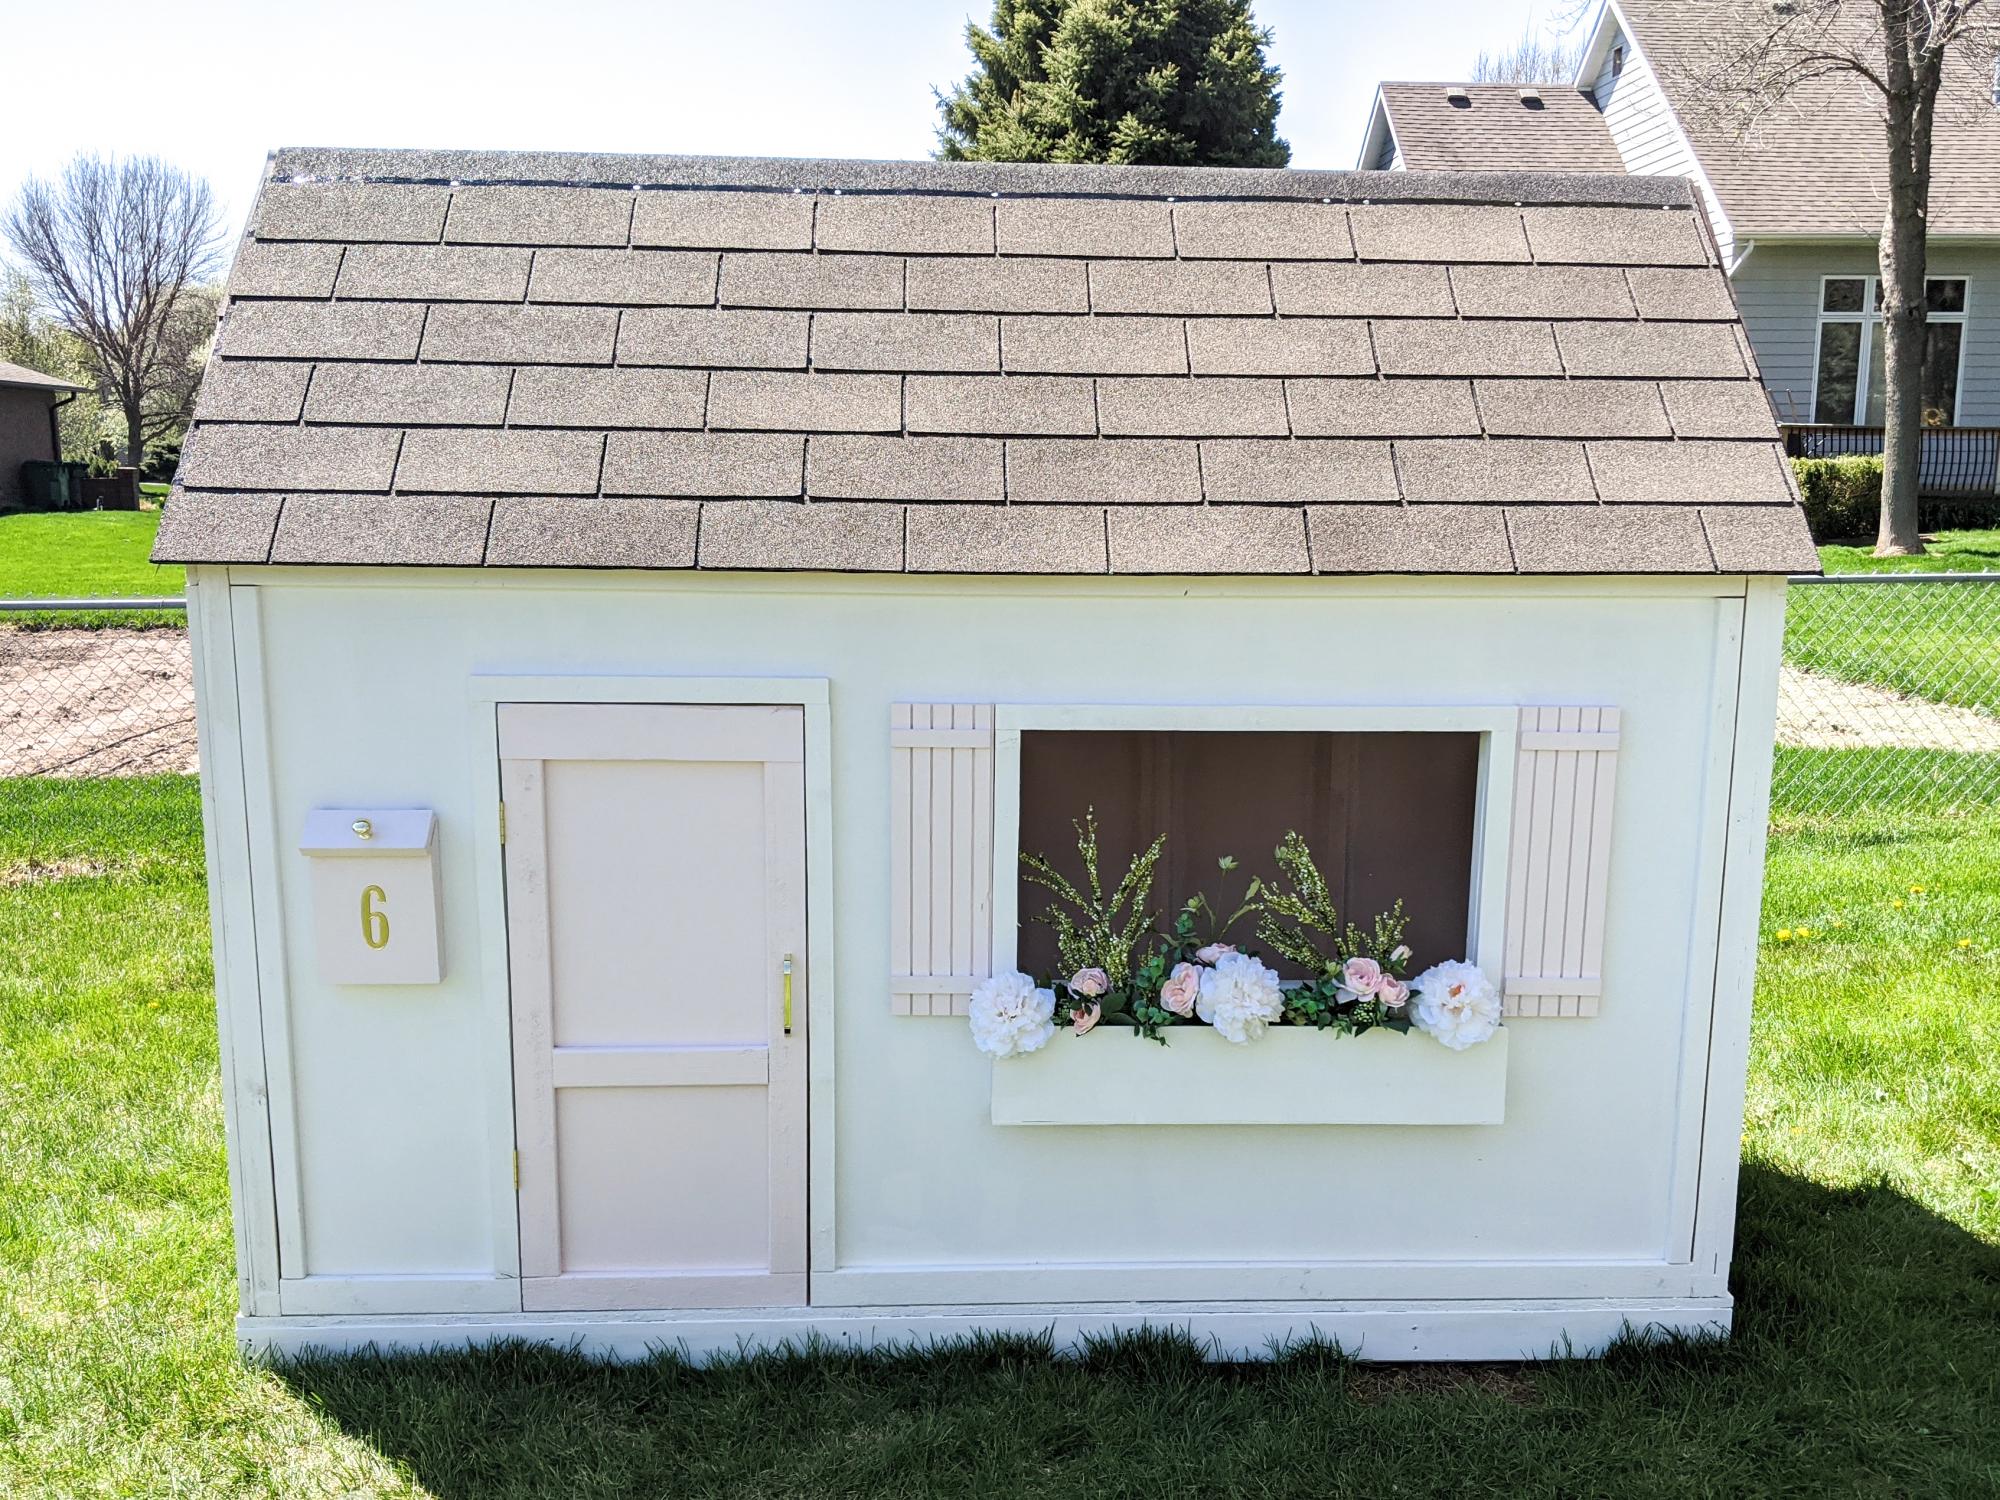
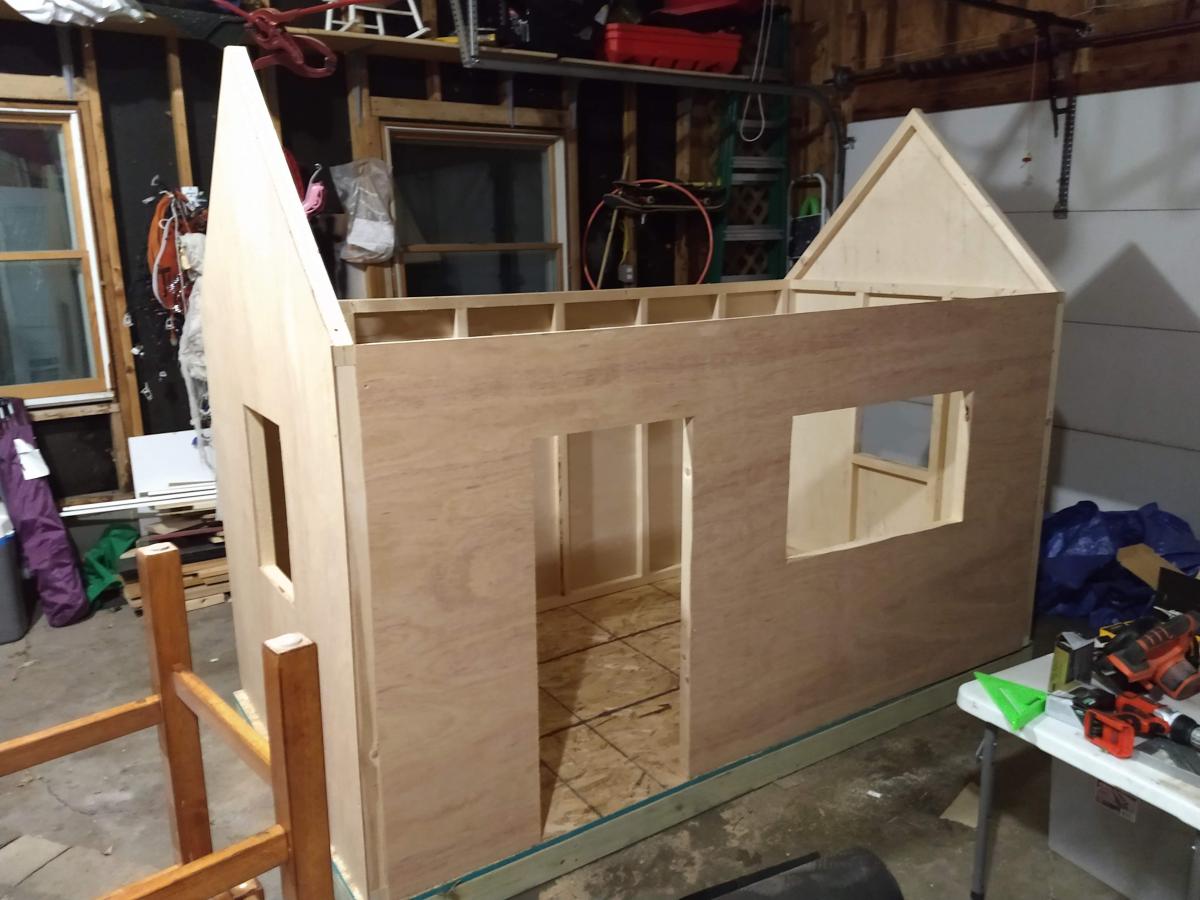
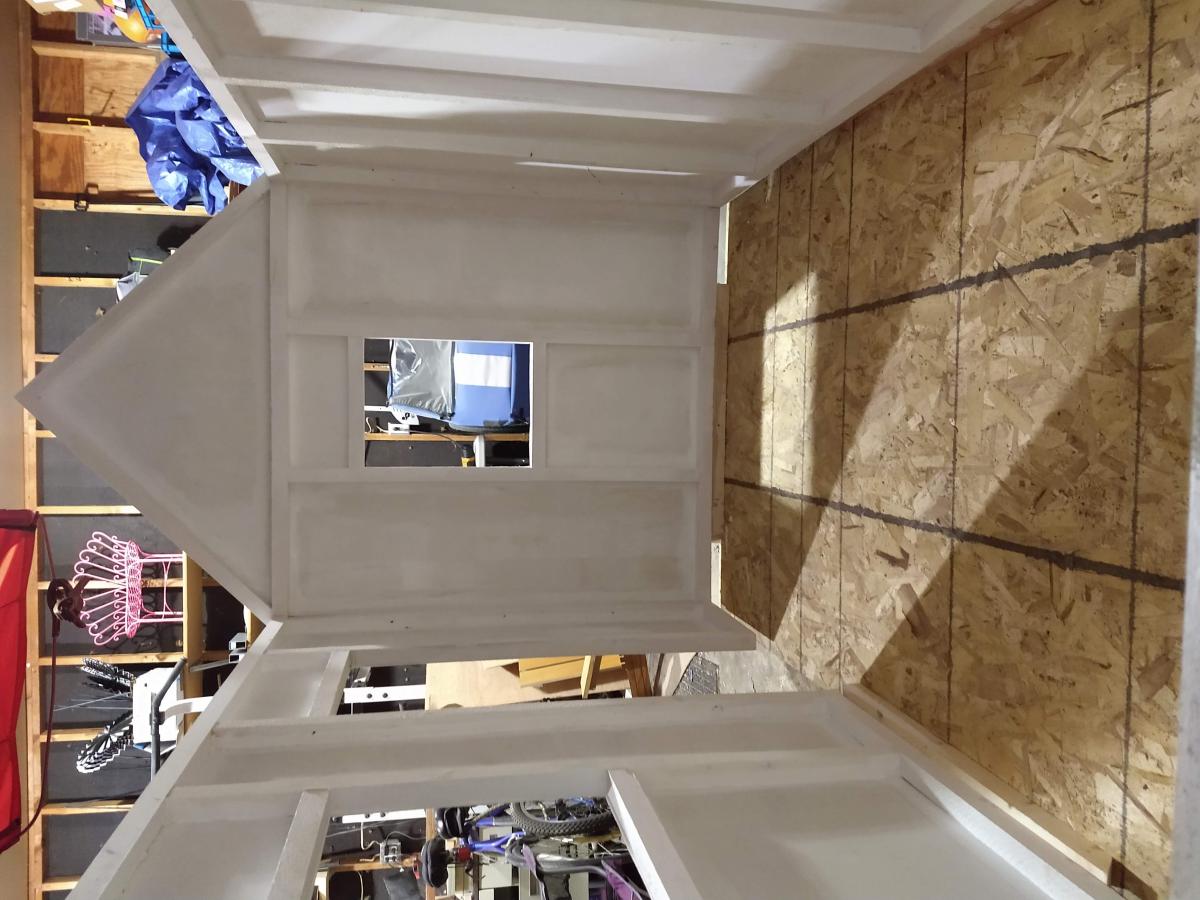
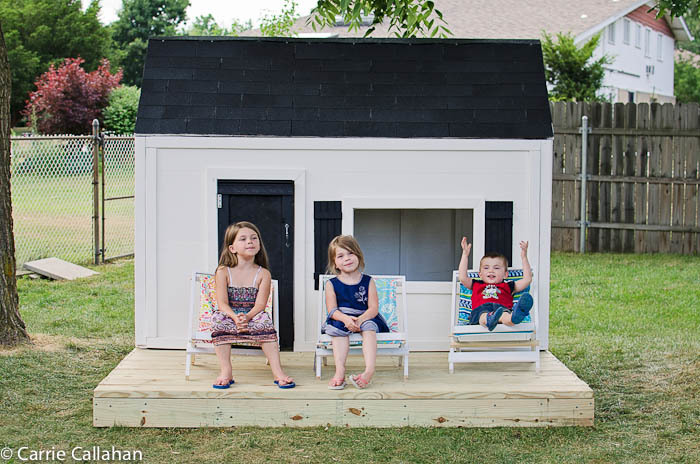
We built this playhouse for our daughter's 6th birthday. She absolutely loves it! We were looking at purchasing one, but they were way out of our budget. Ana saved the day with these plans :).
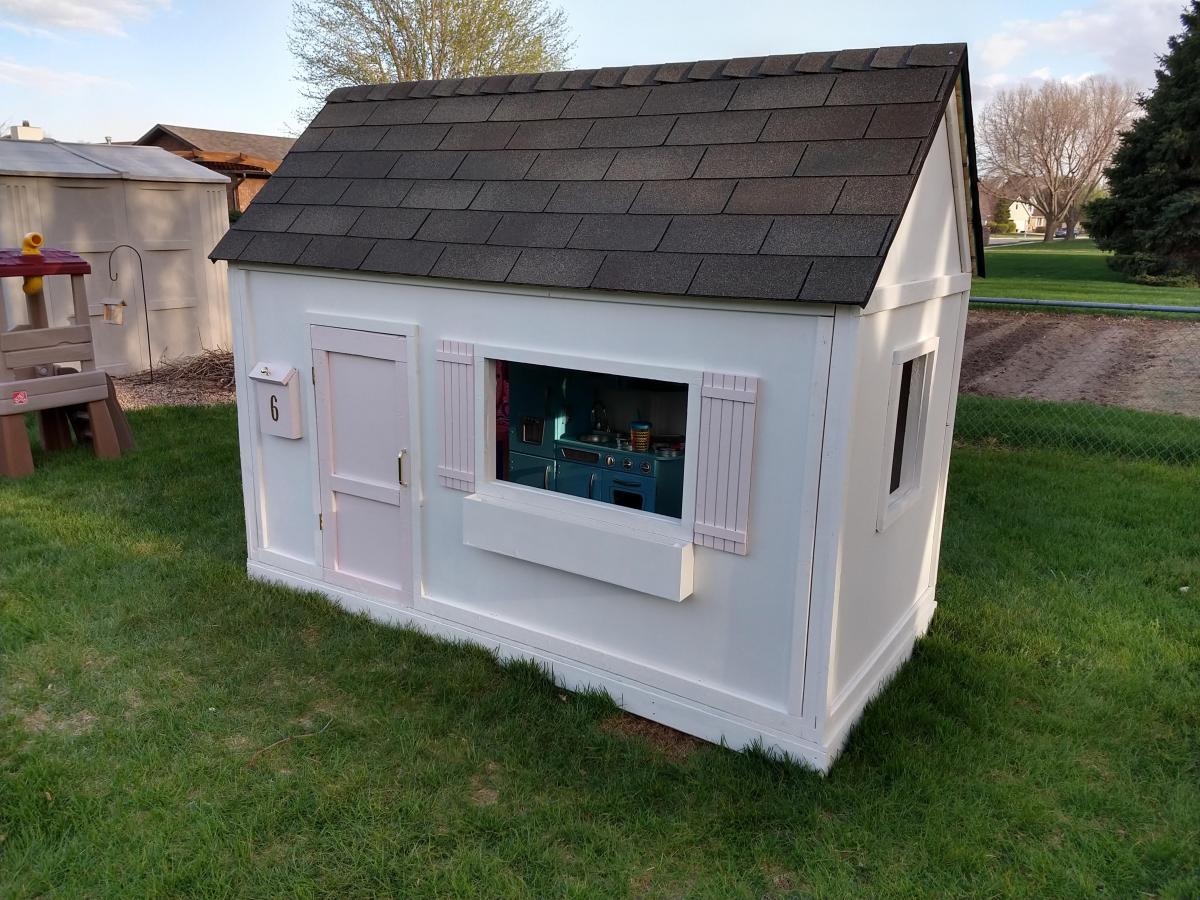
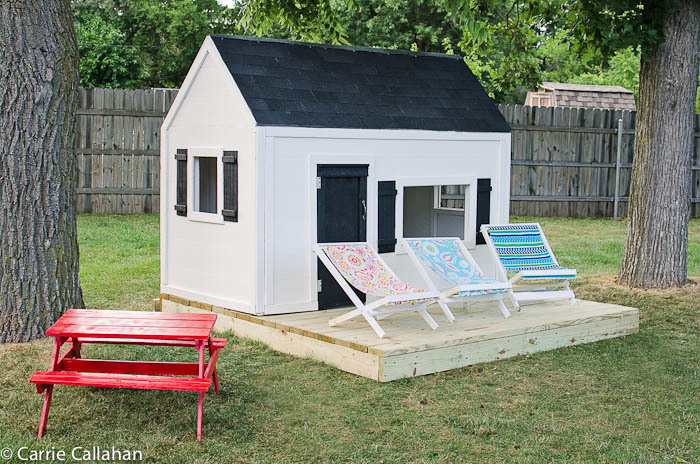
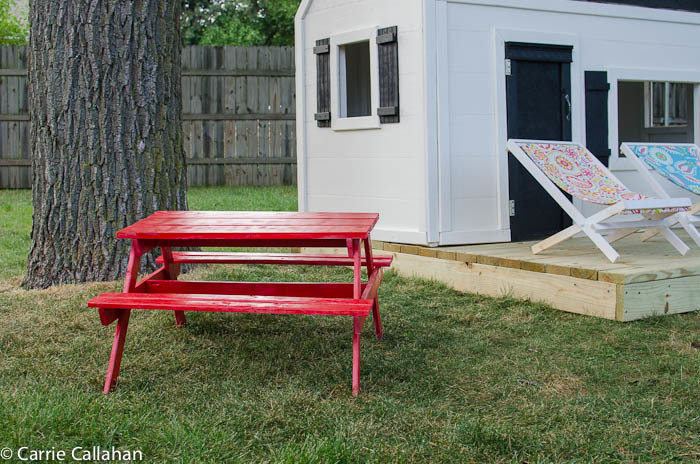
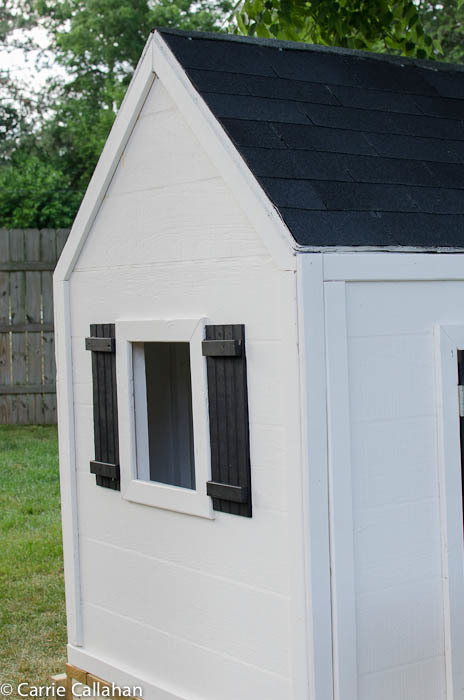
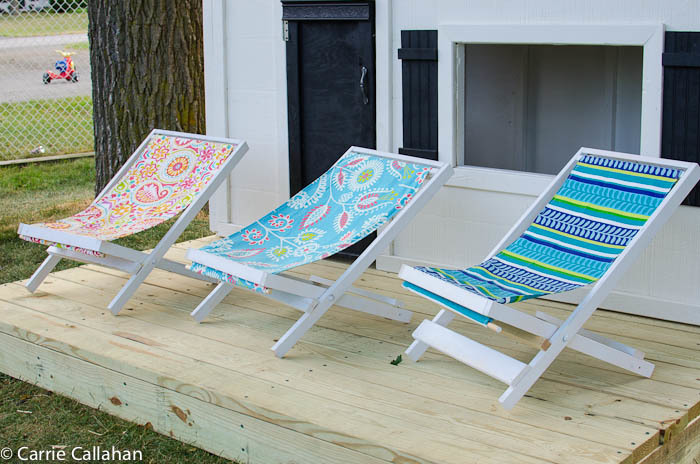
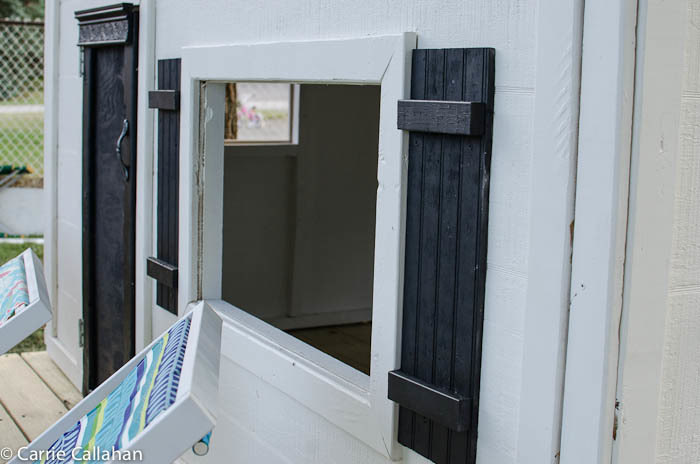
I went a little out of control on the week of the 4th of July - I set out to build a picnic table, 4 sling chairs, a deck and a playhouse - and I did!!!! I owe Ana a great debt of gratitude for these amazing plans and empowering me to do it! I built the picnic table and the sling chairs as I was waiting for primer and paint to dry on the frame, inside and outside of the house. For the shutters - I scrounged around the garage and found some leftover wainscoting, and put a leftover 1x2 on them. The door frame wasn't straight - so I added a piece of leftover trim from my daughters bed I built. My only next step is curtains for the windows. I even moved the full kitchen set I built the kids a few christmas's ago into their. They have only been playing with it for 2 days and I can't drag them out of it!!!
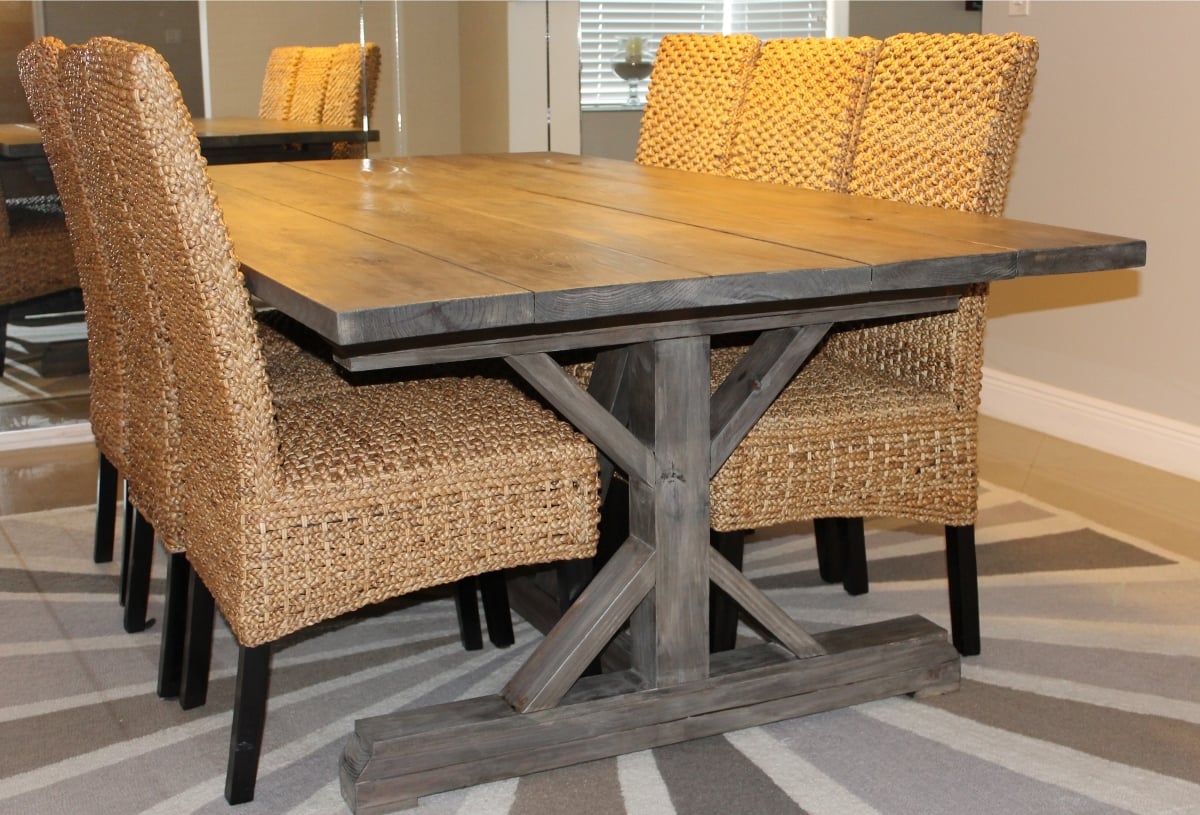
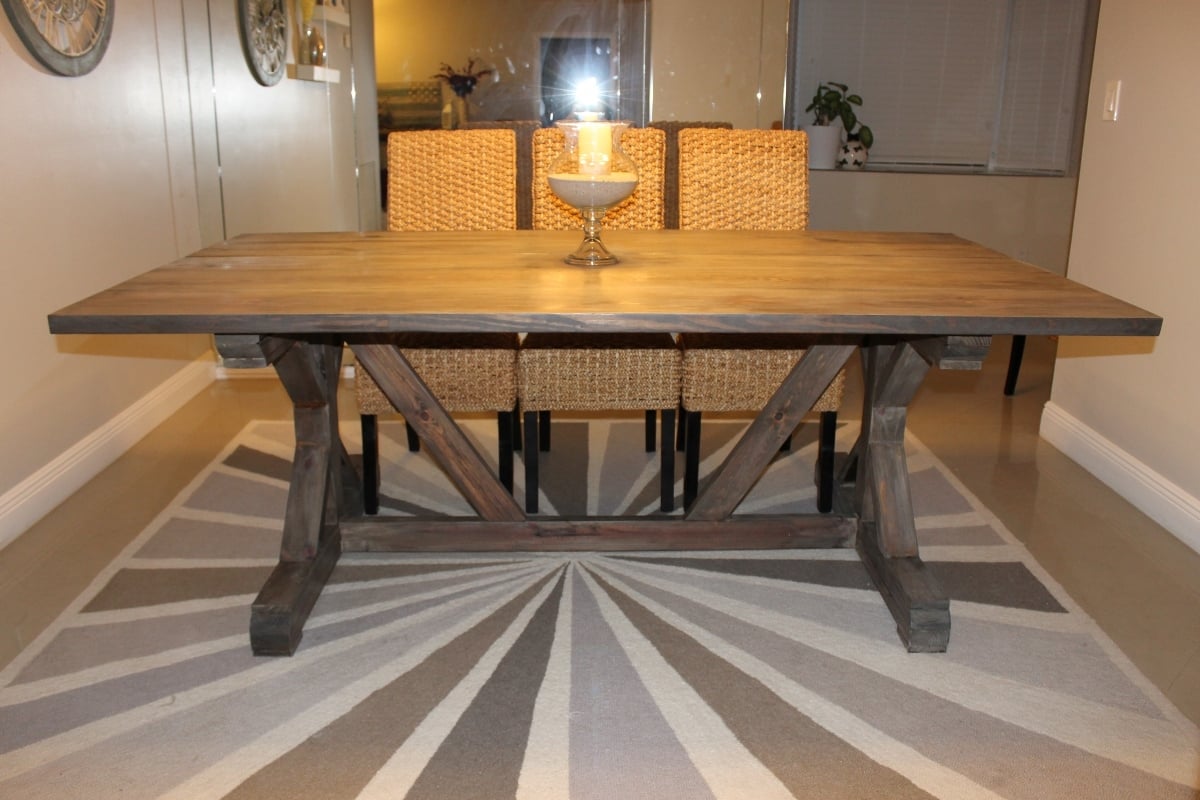
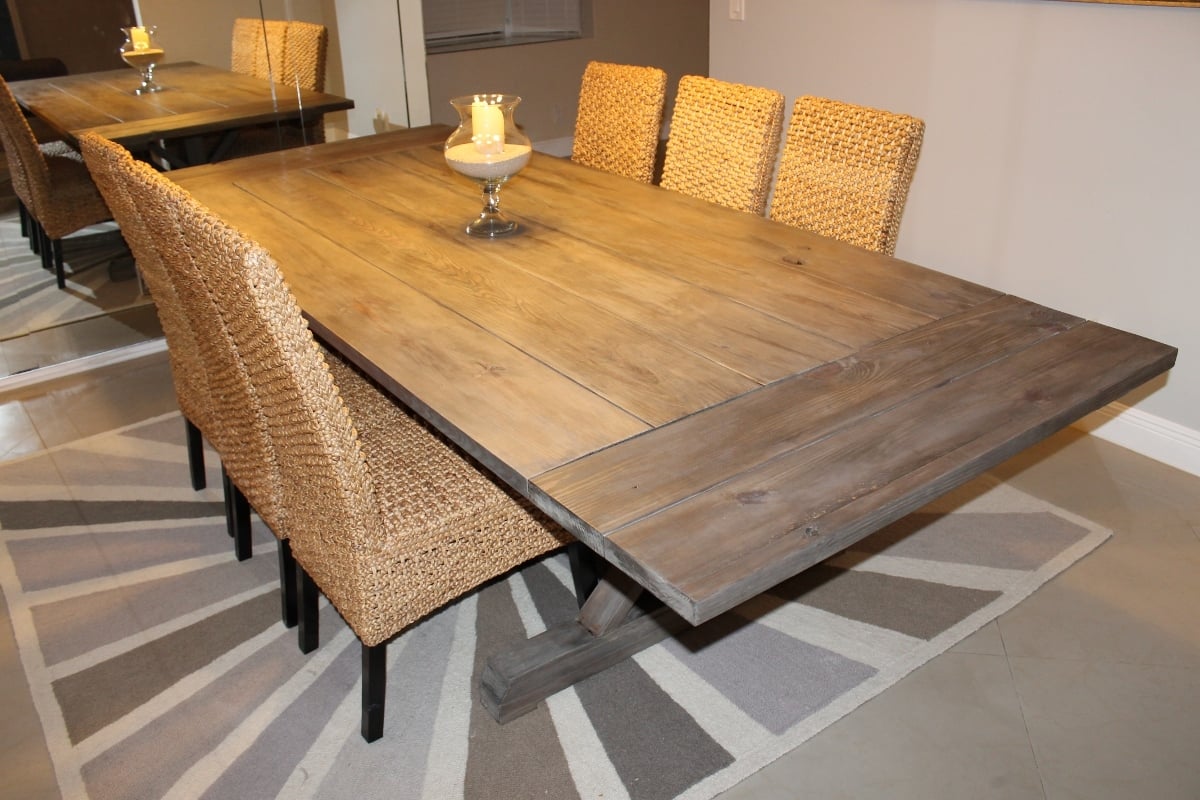
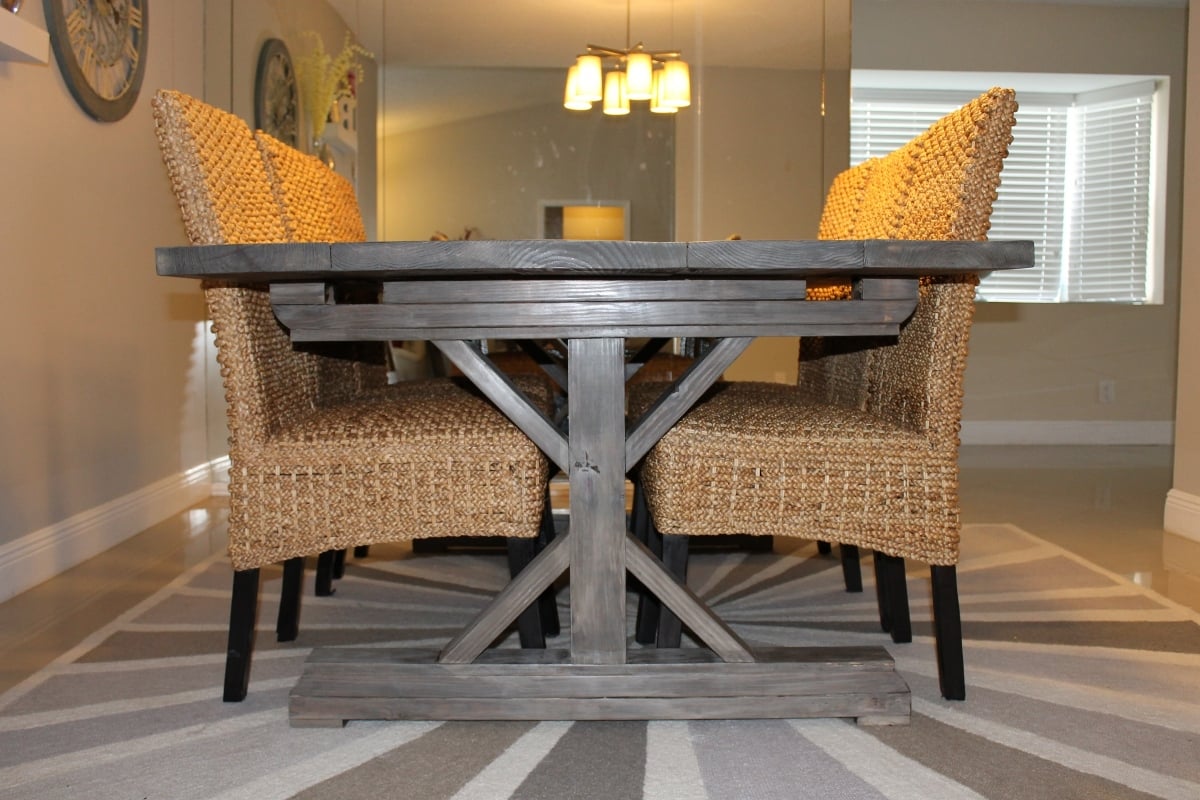
This is our attempt at the Fancy X Farmhouse Table. My husband and I built this over a weekend. We modified our table from the plans, making ours shorter and wider. We also added extensions and changed out a few boards for a bit of a different look from the exact plan. We created a custom finish with a few cheap and easy steps to get the look we wanted. Our table is 84" long by 46" wide. The original plans for the table called for it to be 96" long by 37" wide. We added a fifth board to our table top, thus making our tabletop 9.25" wider (since a 2x10 is actually 9.25" wide.) To account for this, we simply increased the width of the base boards by 9.25". As for the length, since our table was 12" shorter than the plan, we decreased the length of the two support boards running between the bases by 12" to account for that. We had to adjust the length of our decorative pieces somewhat, because of the wider base and shorter length. It was bit of trial and error but we were happy with what came out of it. For the center base post, instead of using 2x4's we used one 4x4 which was clean, square, and straight. We were happy with how things turned out for the base. Perhaps our biggest alteration was the fact that we added extensions to each end. To do this, we cut out 3.5" slots in the top of the base so a 2x4 could slide in. We then took two 2x8's and used pocket holes to bring them nice and tight. With the extensions in place, our table is nearly 10 feet long! As for the finish, we wanted a weathered gray color and were able to come up with it through a three step process. Its really beautiful in person! Thanks again for the plan

Sun, 07/22/2012 - 15:26
Your new table is really very beautiful. The previous one was also very nice, great job!
Thu, 07/26/2012 - 06:37
Wow! Great addition of the extensions. I'm saving this for our build.
Tue, 08/07/2012 - 03:10
Could you possibly give me a detailed explanation of how you finished this table? I love, love, love the color and want to replicate it.
Thanks!
Darcy
Tue, 09/25/2012 - 09:06
Beautiful table, but I really want some information on the 3-step process you used to get the weathered gray look. Can you please provide that information? Thanks!
Tue, 10/23/2012 - 07:46
How did you create that Gray Weatered finish? Also what type of wood did you use?

Sun, 04/07/2013 - 20:40
Thank you for your interest in the finish....we used regular pine from Orange and Blue. We used a mixture of steel wool and vinegar in a glass jar, let it sit for a night or two, then brushed it on evenly over each board. We then let that sit for a night or two and then proceed to whitewash the entire table (two parts water one part paint.) After that, we took Dark Walnut Stain and wiped it over each board, then quickly wiped/scrubbed it off after just a minute or two. That's how we did it!
Id suggest practicing first with some scrap , esp. with the steel wool mixture so you can see how the wood changes. :)
Fri, 09/23/2016 - 15:24
Hi Emily!
I love your table. We are about to make one and love your stain. Would you be so kind to give me details of what you used to achieve the look? I read the above post, but could you give me brands and colors? I don't understand what is steel wash- is that the color?
Thank you so much!
FLKS
Mon, 09/09/2013 - 11:40
but when we brushed on the steel wool/vinegar mixture, the holes on the table top and base that we had filled in with putty didn't really stain...did you run across the problem? I don't see any areas on the top of your table where you can tell where the holes were??
Wed, 04/09/2014 - 09:05
I'm curious if you made the extensions permanent or if they can be removed and added as you need? I love this table!
Thanks,
Wed, 08/13/2014 - 11:50
I am not understanding how you made the extensions from your description and then looking at the end pictures... Would you please explain this a little further and how they are stored and placed for use and how this works? Thank you!

Tue, 10/07/2014 - 17:39
LOVE the finished product! I aim to get the hubby to make this one at some point! But for now, we have just a bench in our kitchen that he made and I'd like to apply the same finish you did. I've looked at a bunch of different tutorials but I like yours the best. Here's the question...how long after I apply the paint/water mixture to I apply the walnut stain? Do I apply the water/paint and wipe off right away? A few seconds later? A minute later? Do I allow the applied/wiped water/paint mixture to dry completely before adding the stain or do I want to apply the stain before it's throughly dry so that it mixes a bit for a softer look? Thanks so much!
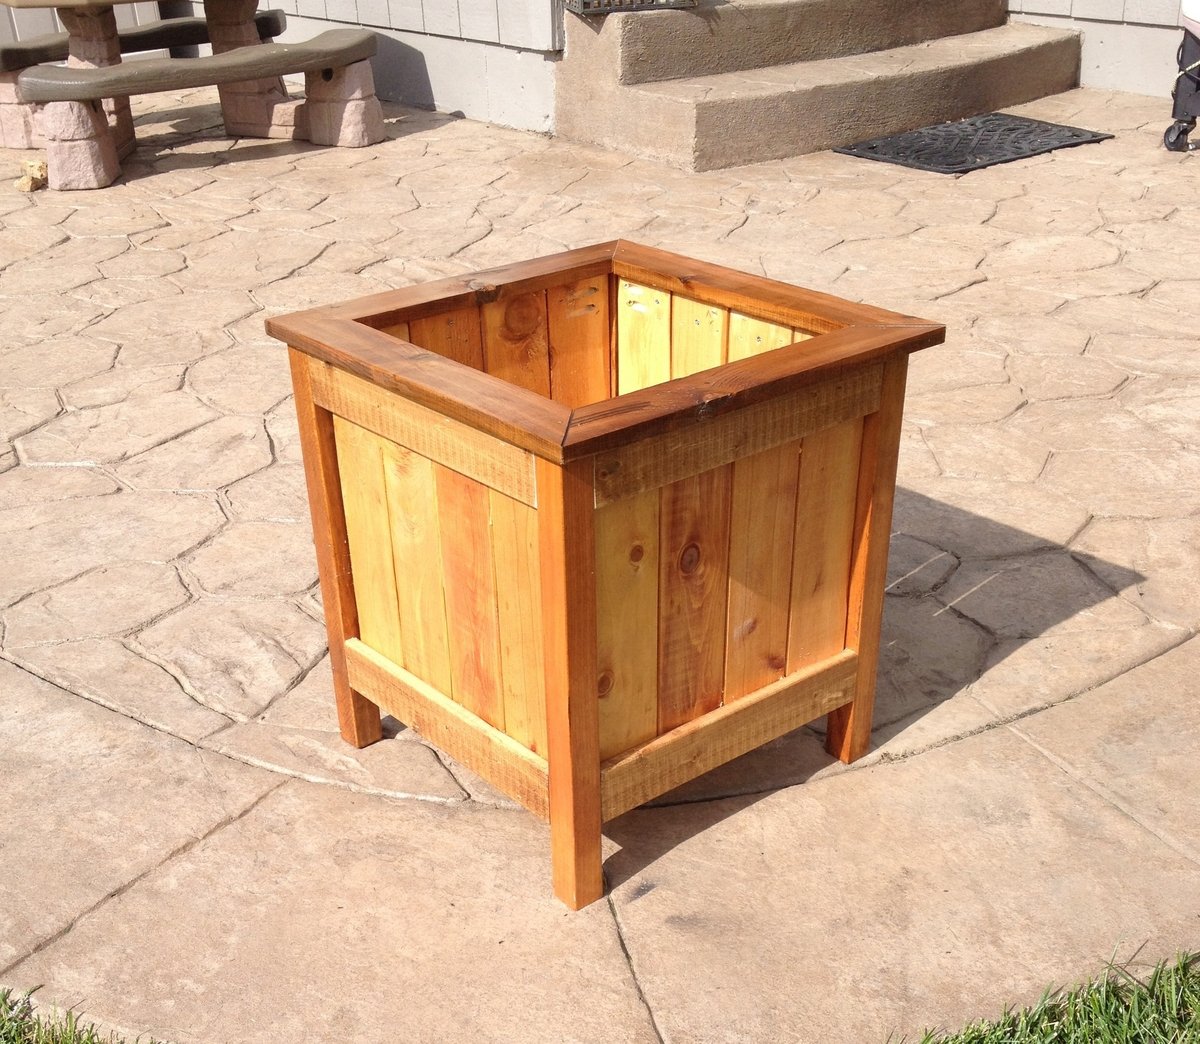
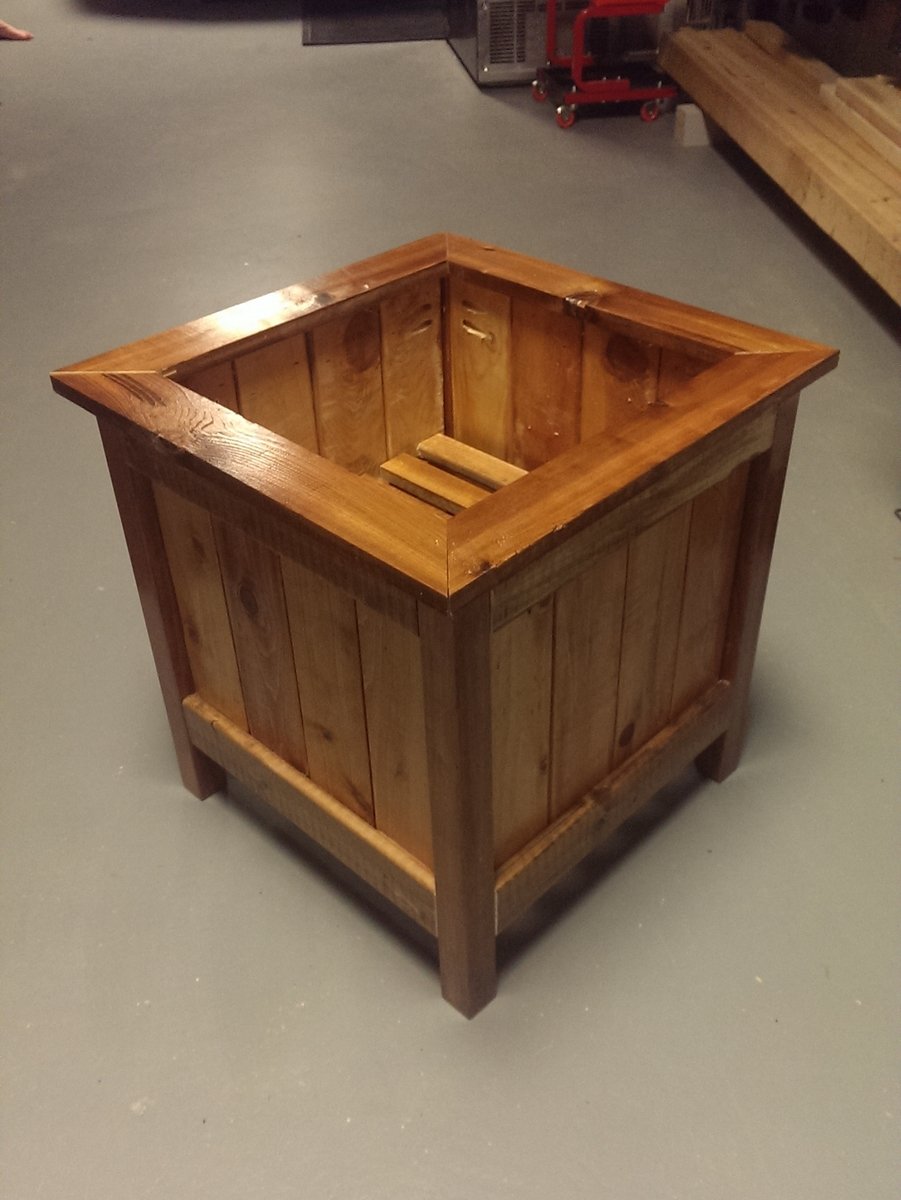
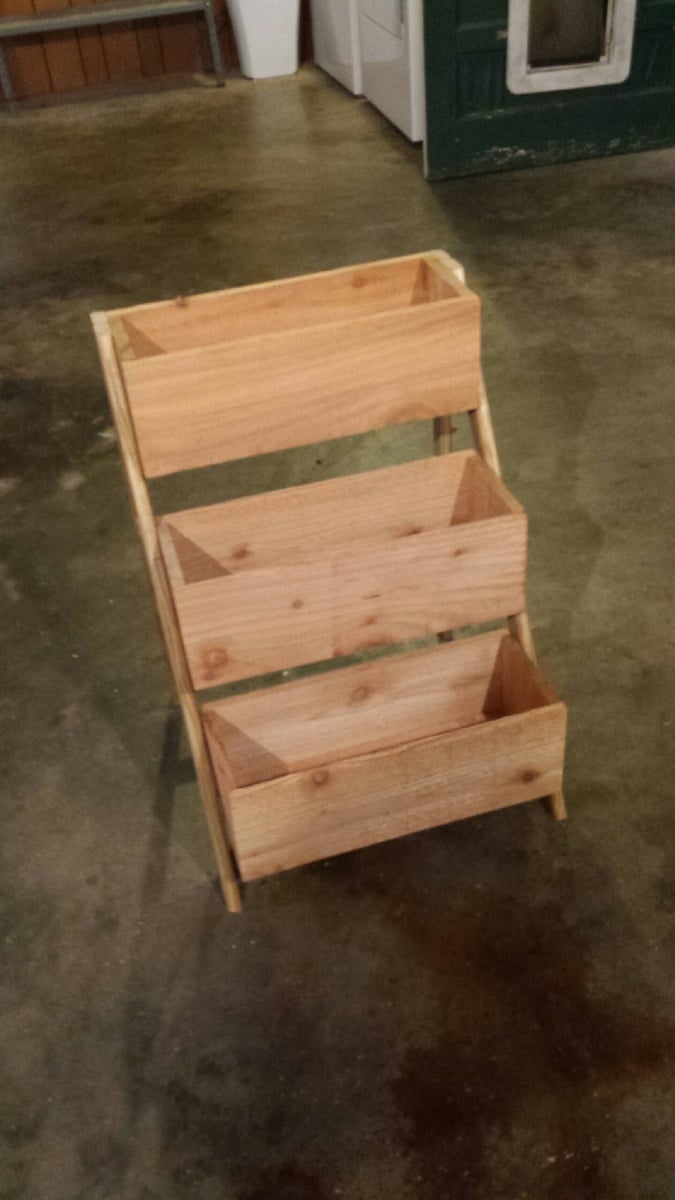
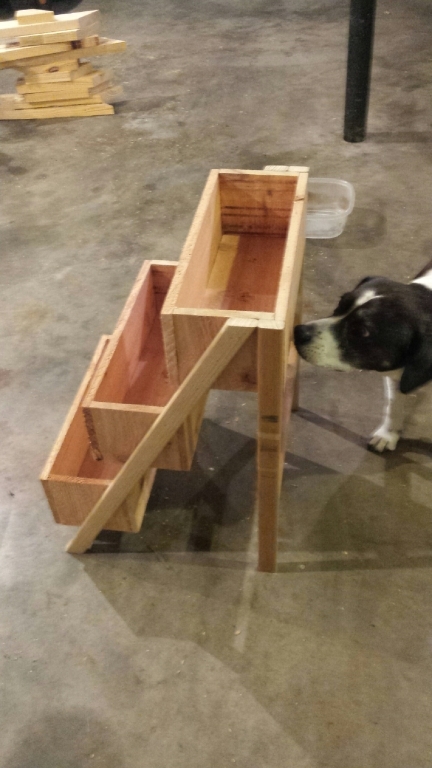
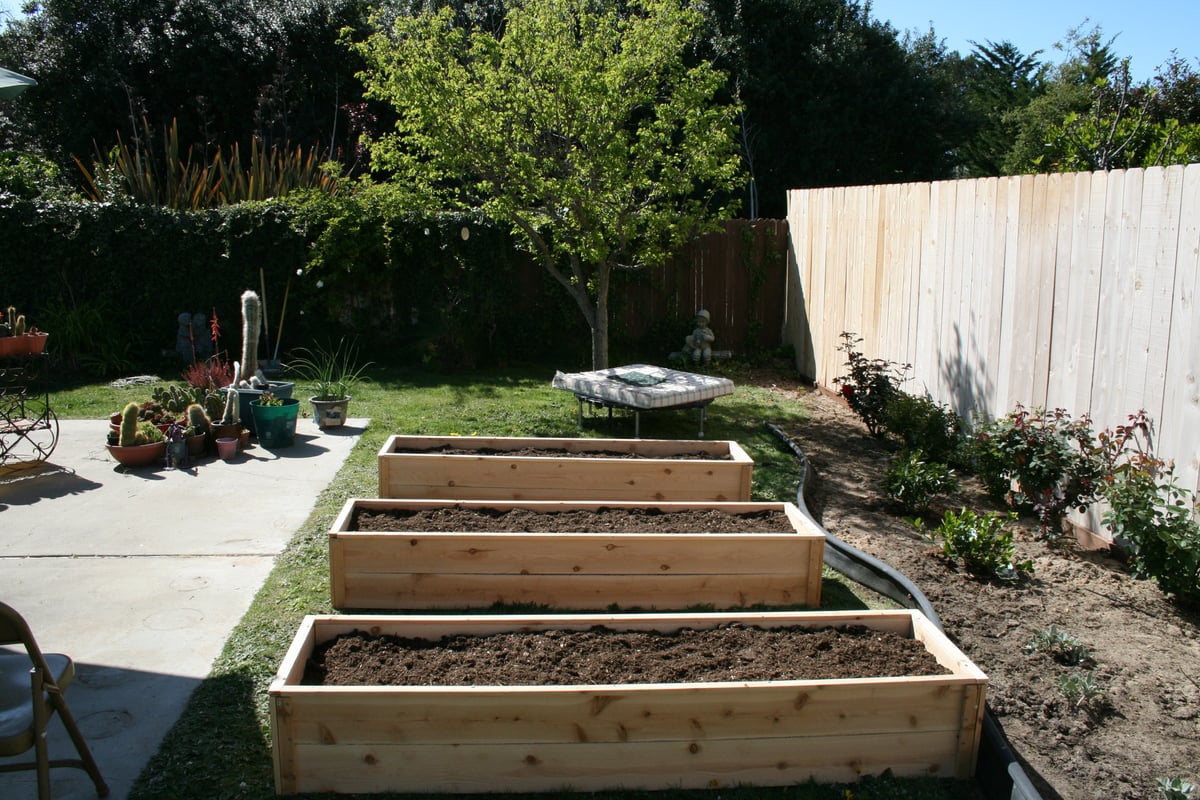
I used the main plan for ideas, but opted to use 3.5 inch pickets instead, which allowed for a smaller planter that wasn't as big. Also chose to miter 1x3s for the top which I think really finishes it off. Sanded everything with a belt sander to 220 grit. Used min wax golden pecan plus three coats of poly inside and out. Finished size was about 17x17. Tile spacers work great to keep the gaps even!
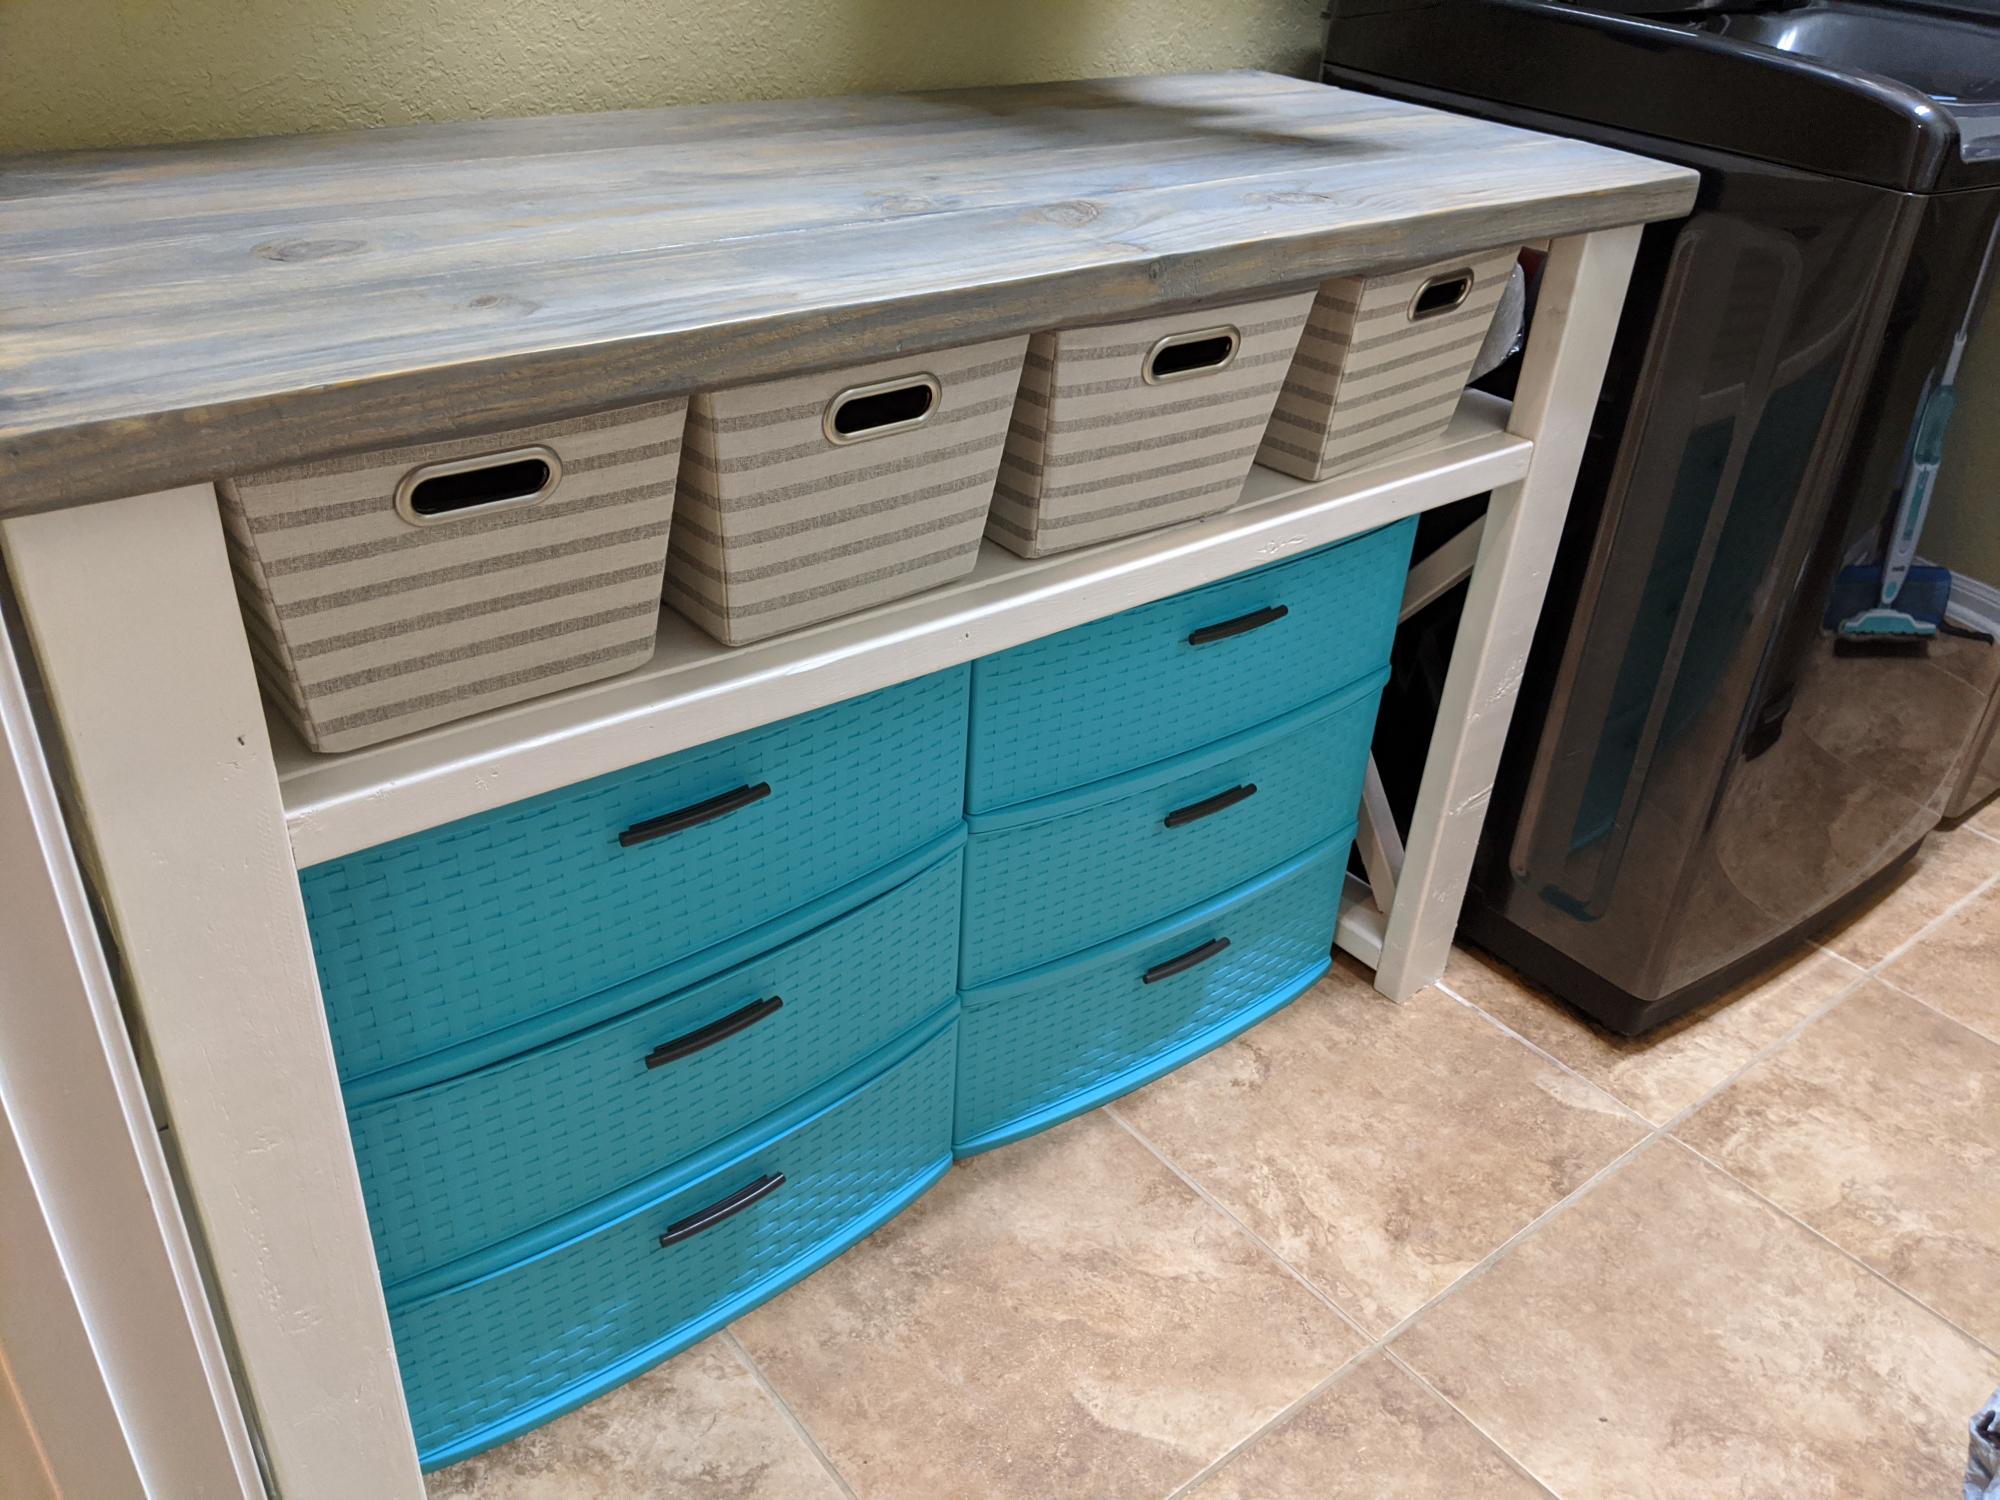
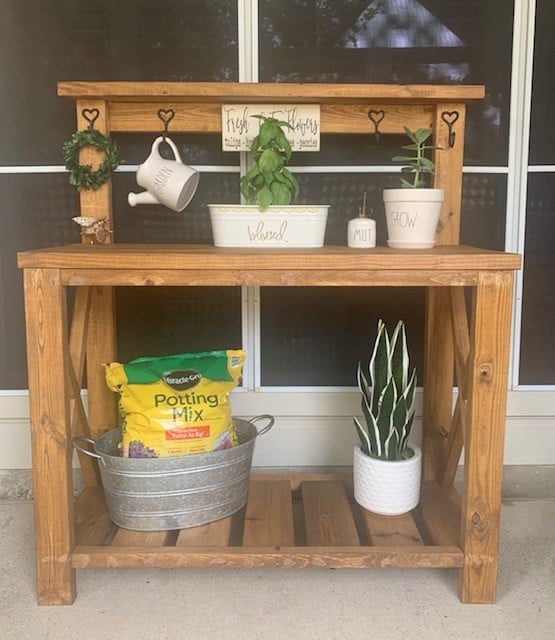
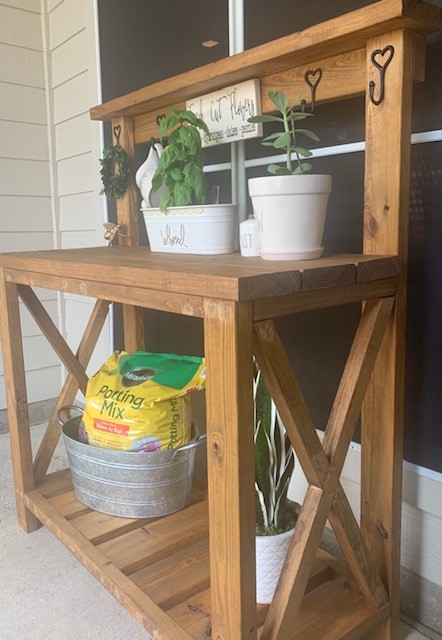
I modified the plans for the farmhouse console table to create a laundry room table. I changed the shelf height and used 2x4s running the entire length for the shelf.

I followed the plans exactly. The only difference is I used my Ryobi Airstrike brad nailer instead of stapler. Lowes was slightly higher in price than the $10.00 on Ana's post but at $11.97 it wasn't too far off!
My hubby made it for me after seeing yours!! I LOVE IT THANK YOU SO MUCH!
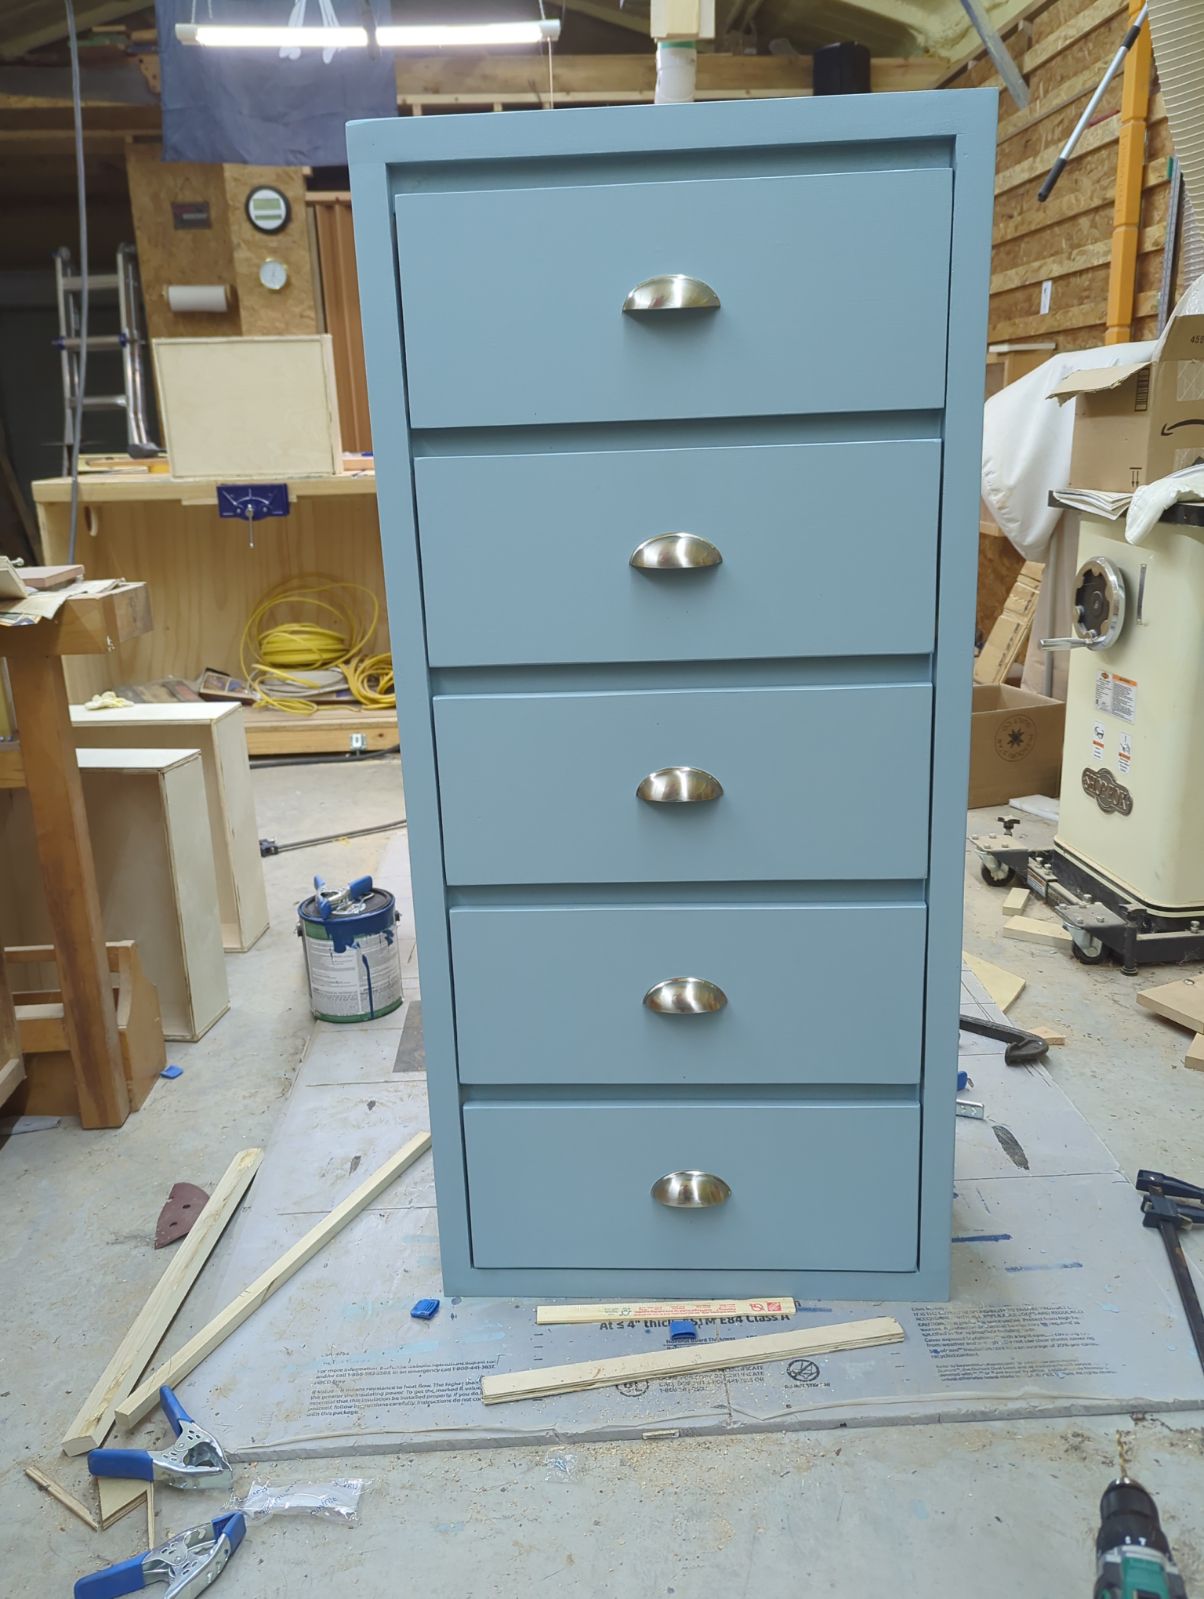
The buy list is correct the cut list is wrong the bottom 2*4's listed should both be 2*6's
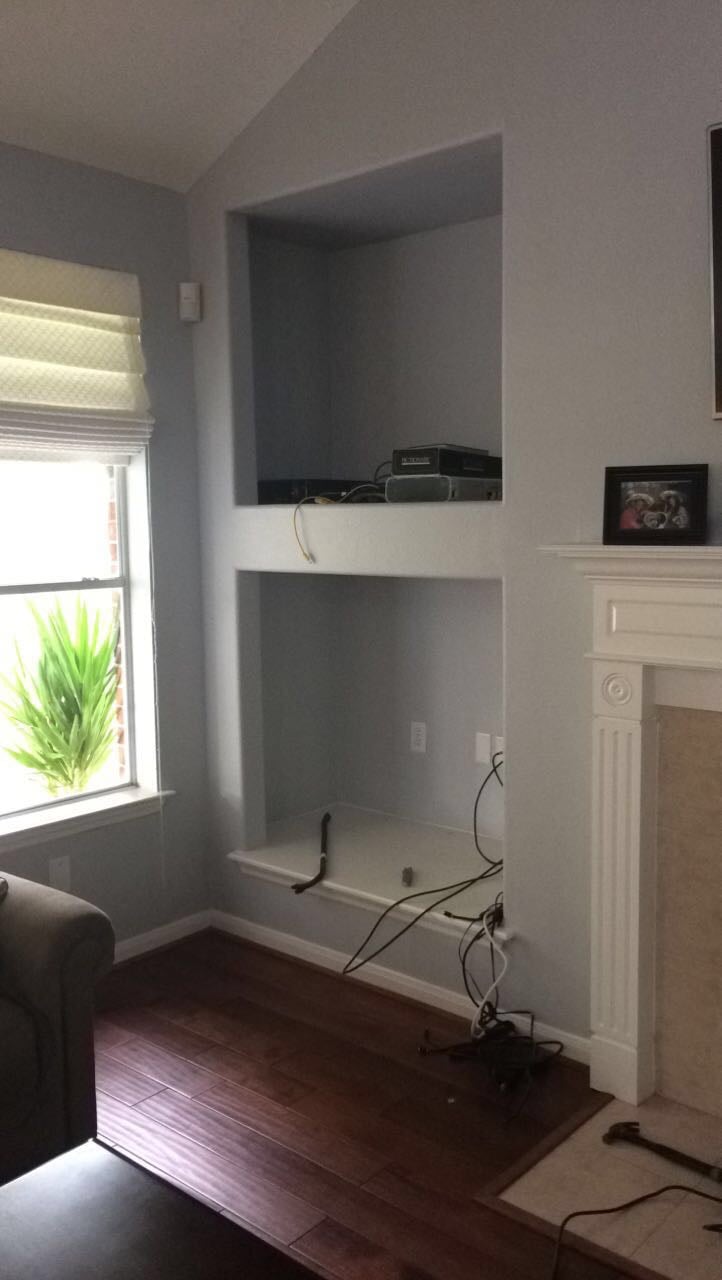
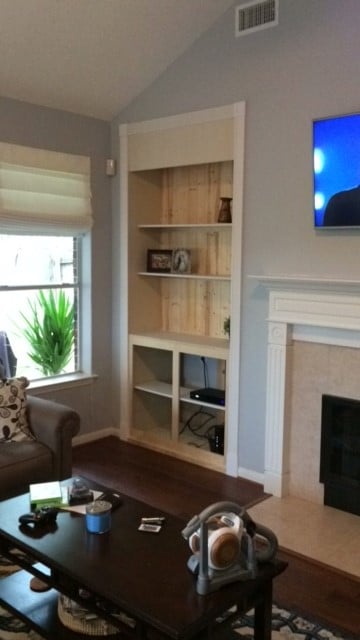
We bought this house about a year ago and we finally got around to removing this pointless niche! The center divider and bottom were removed. The cabinet and hutch were assembled seperately.
This is still a work of progress. I am looking for a nice decorative molding face for the top. If anyone has any suggestions please let me know! We will most likely paint it white to match the fireplace mantle.
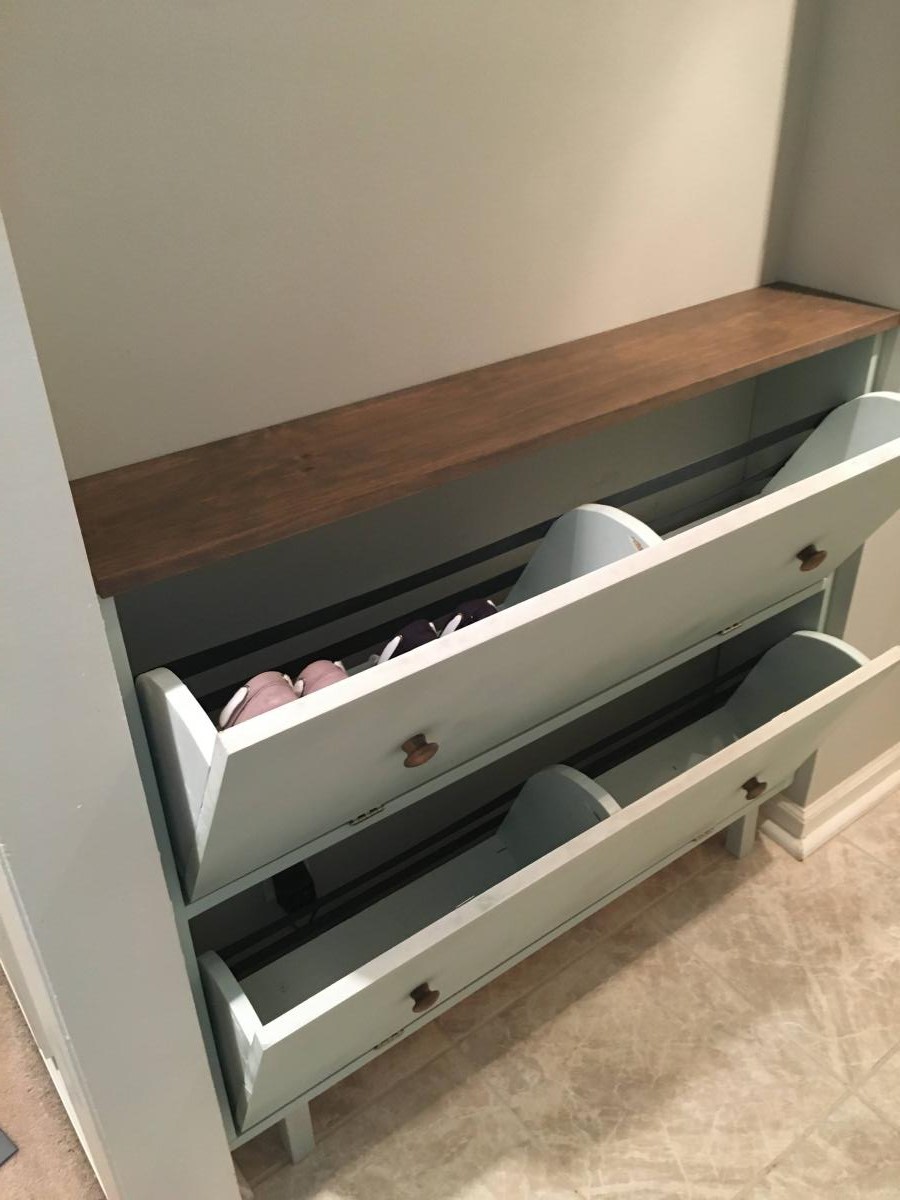
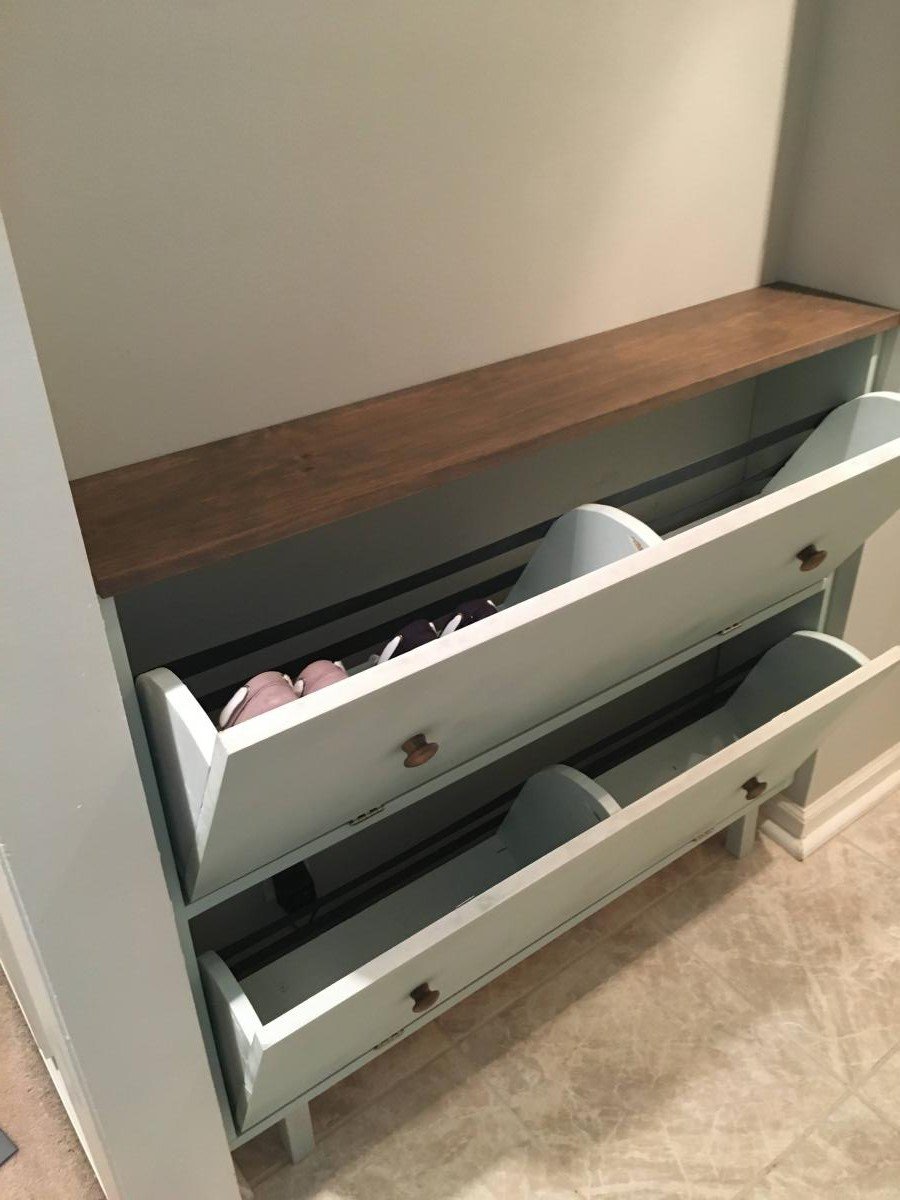
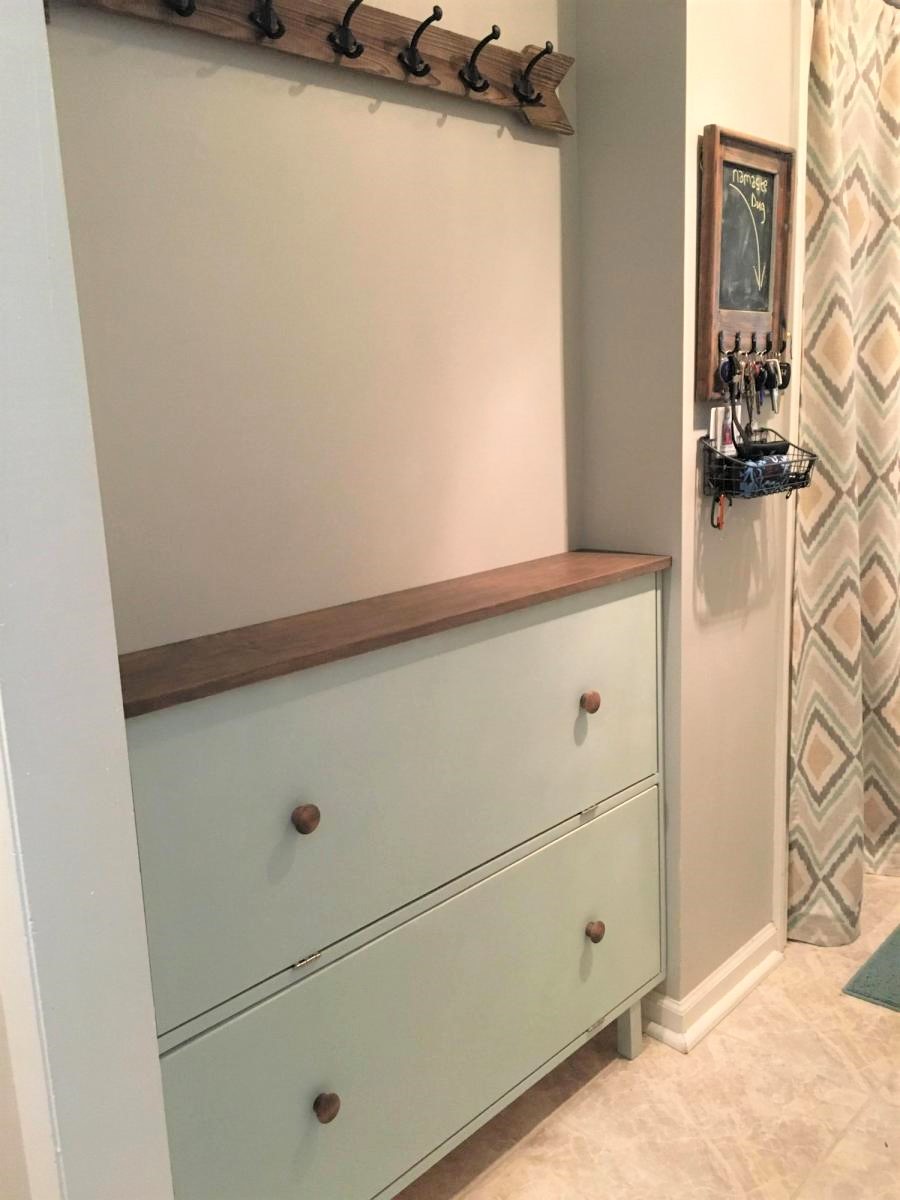
I had this space in my mudroom that was a perfect spot to make a custom shoe dresser. I adjusted the plans I found on this website to custom make storage for shoes. Now this weird little space is functional.
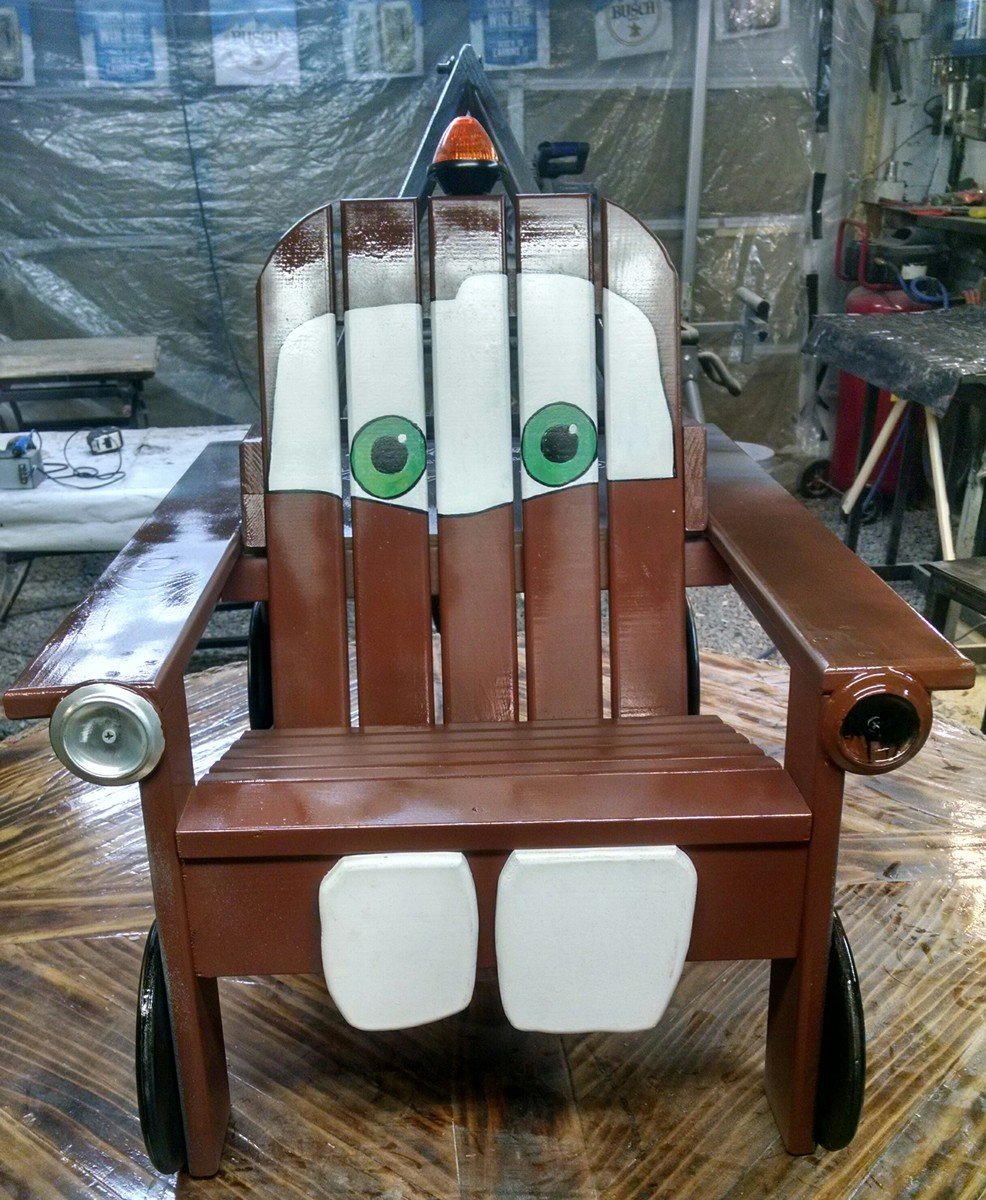
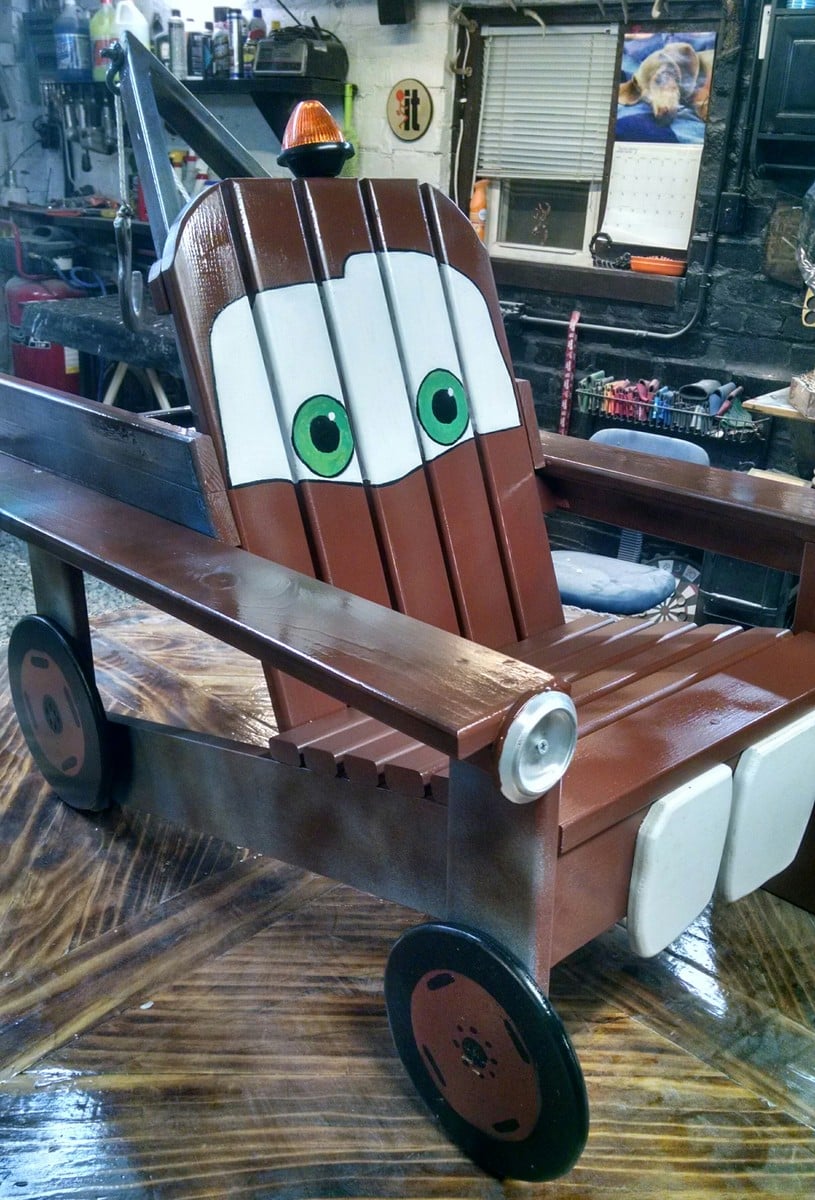
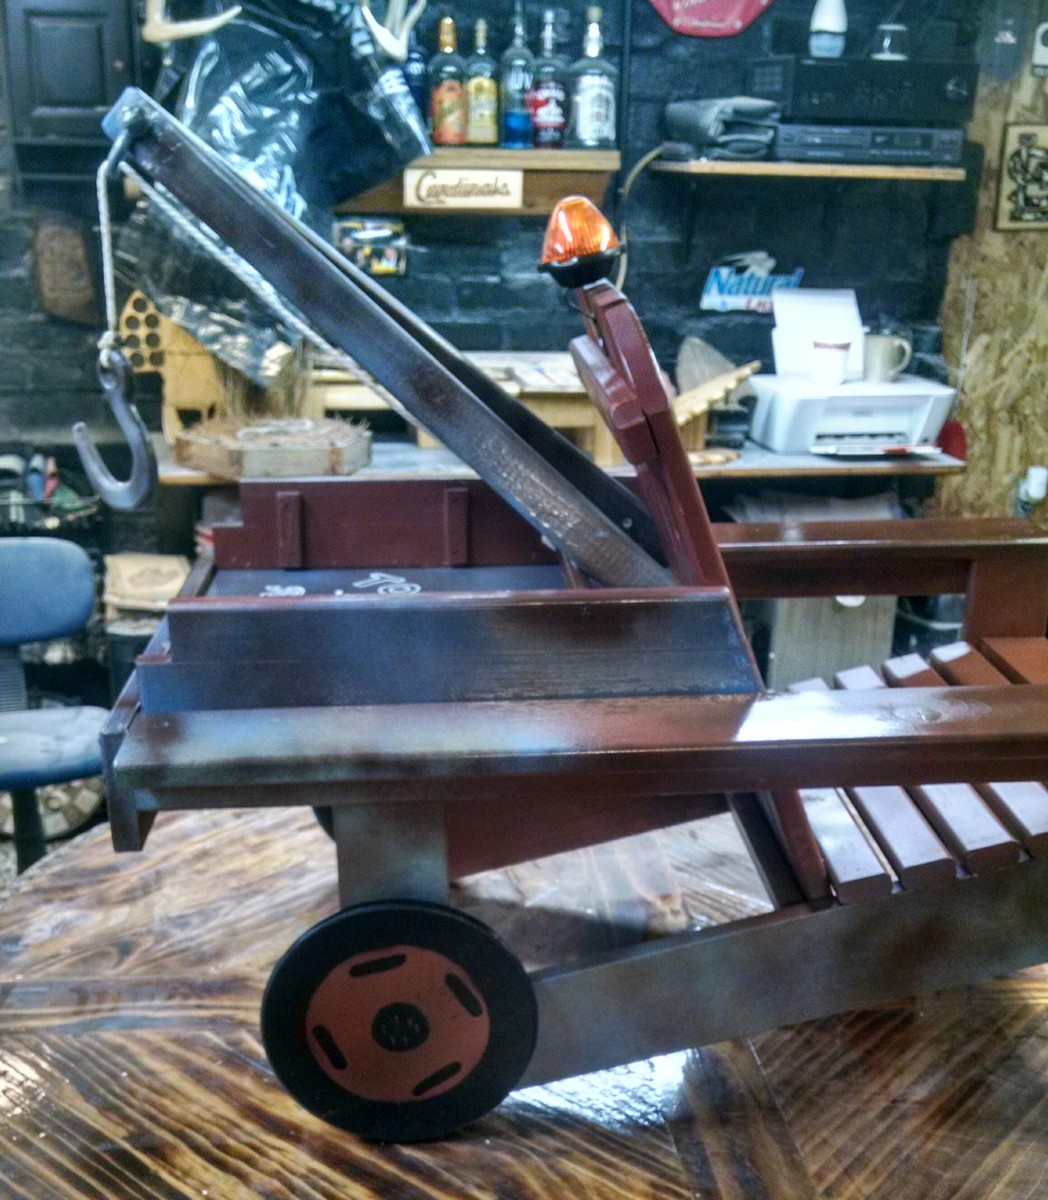
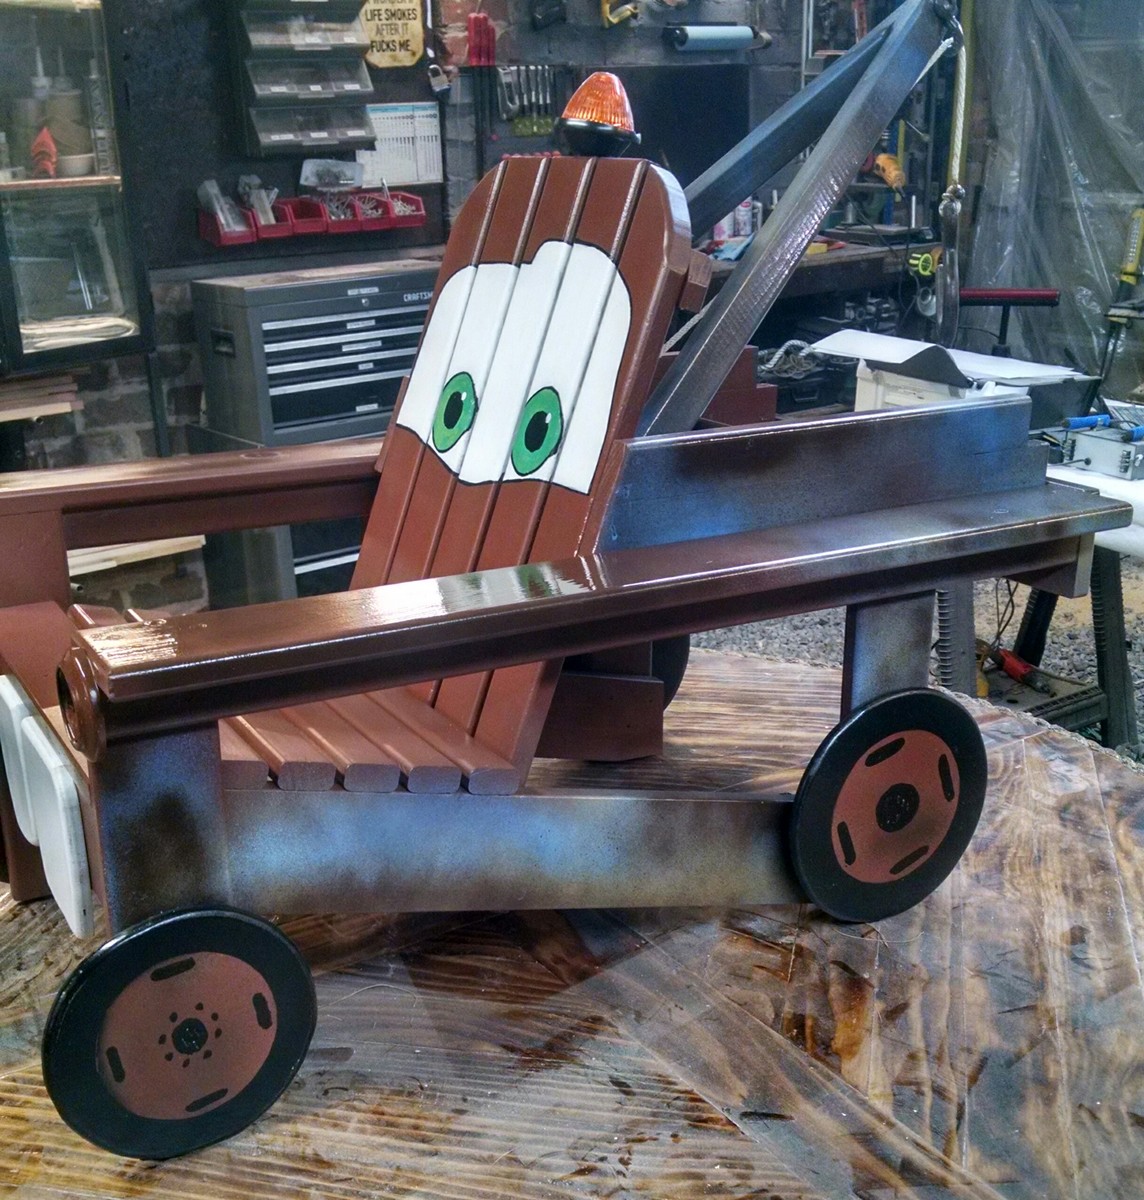
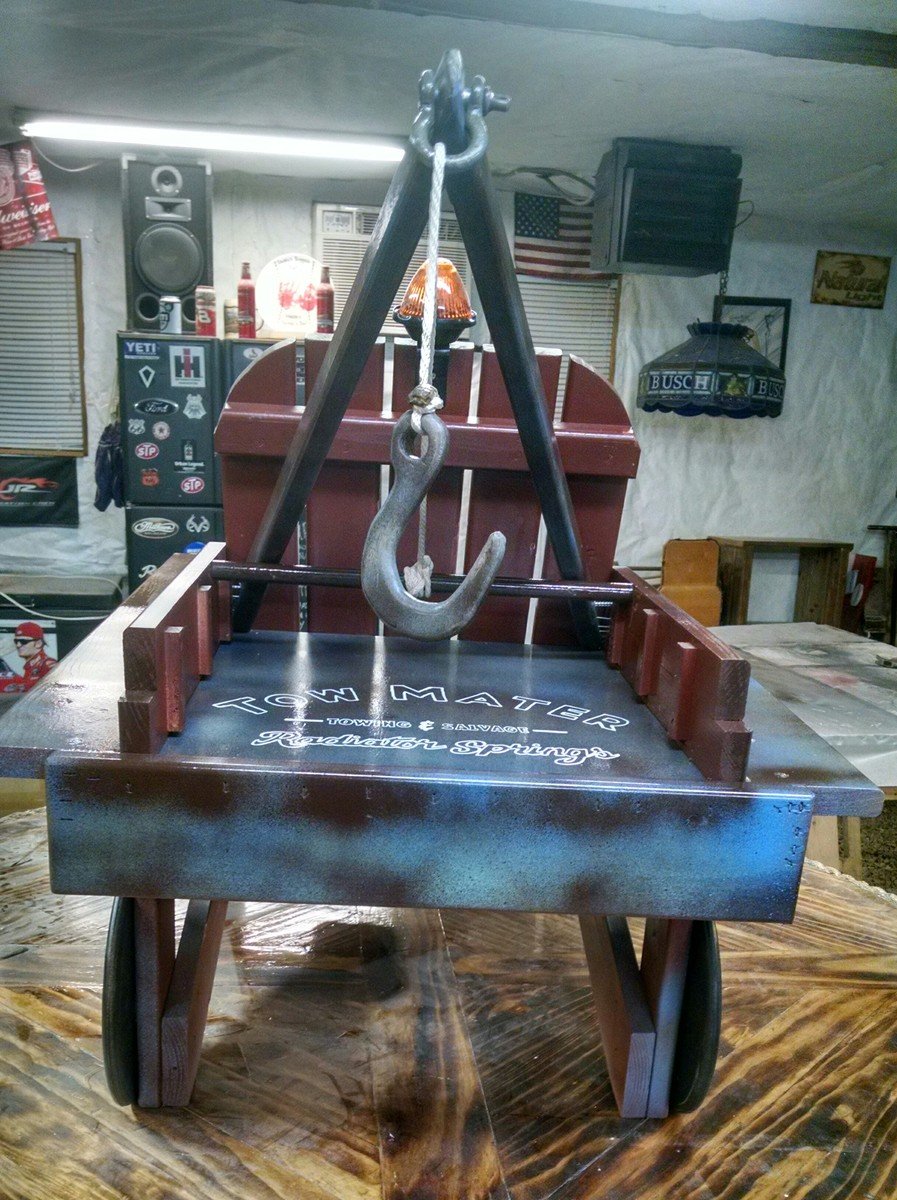
I made this chair for my 3 year old son who is obsessed with Disney Cars based off of Ana's
Super easy little Adirondack chair plans.

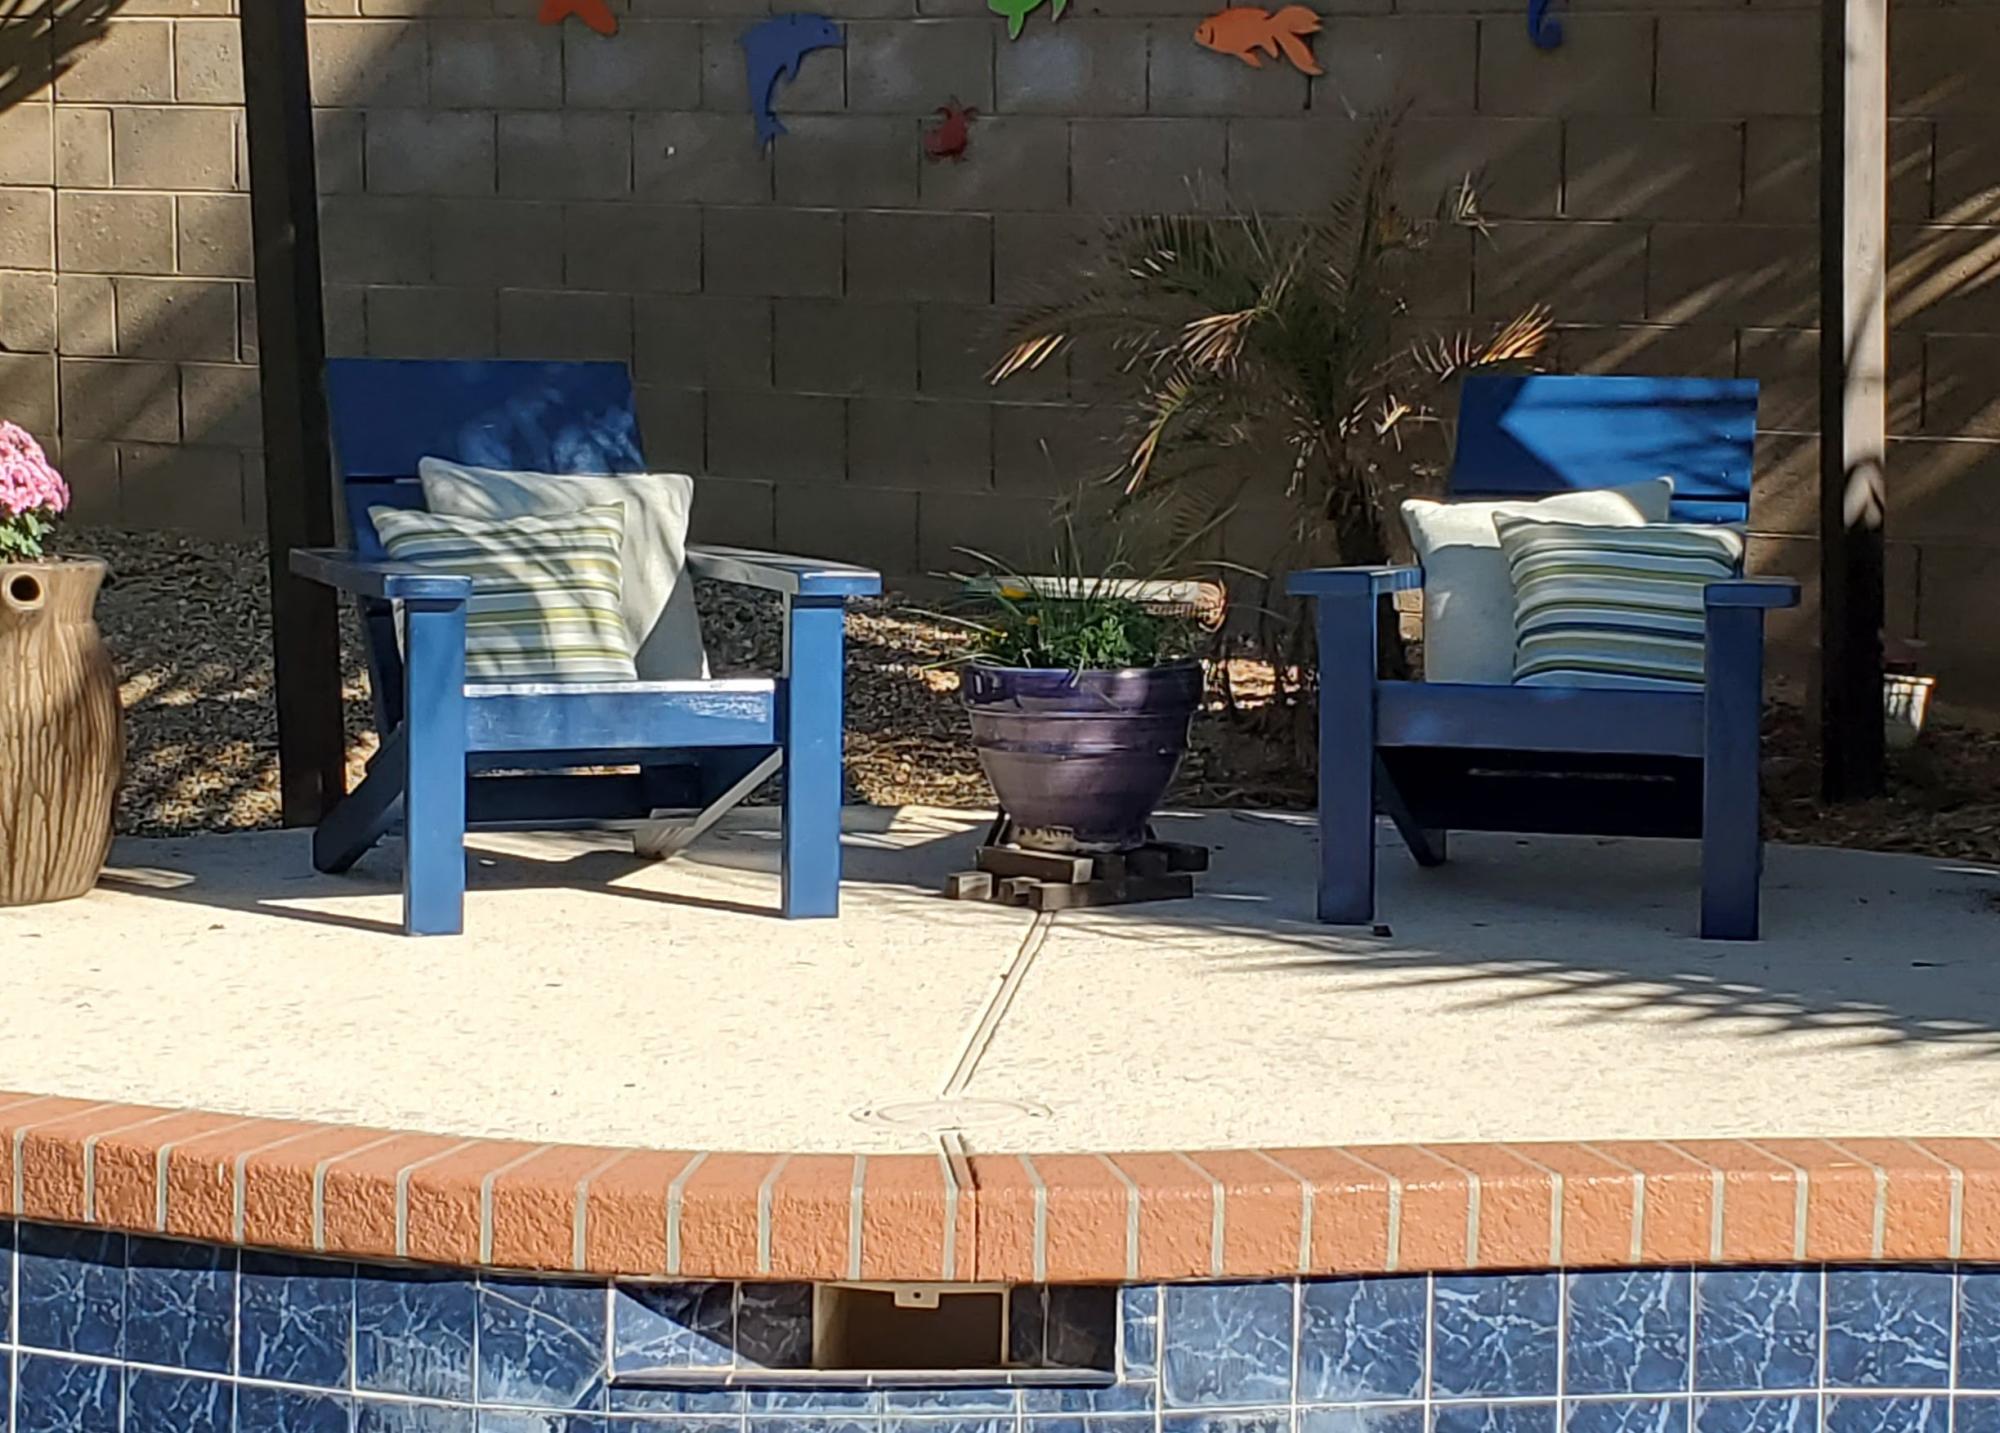
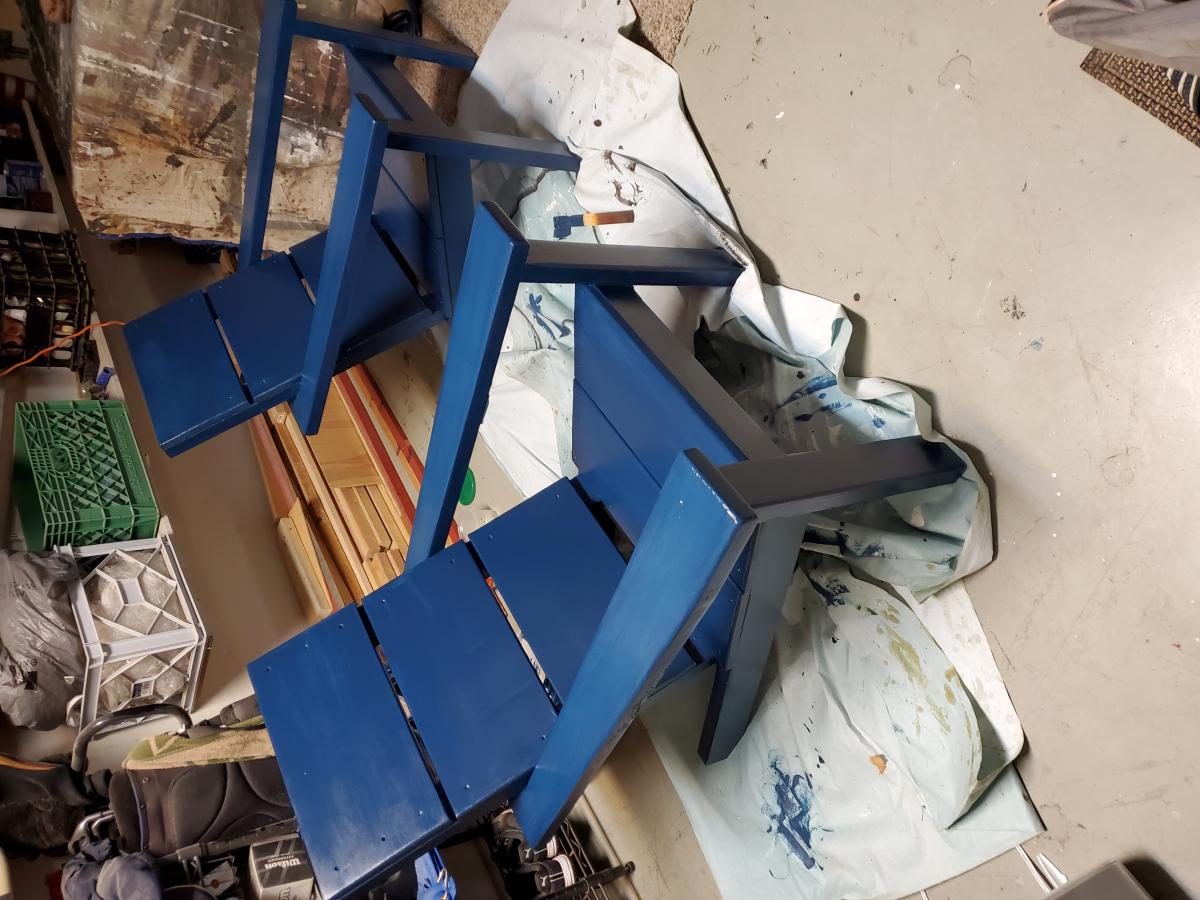
Been wanting to make some Adirondack chairs for years; have about 10 different plans saved that one day I could get to. These 2x4 modern plans made getting them done quickly possible due to simplicity of the cut list and cheap cost of materials. The only real change I made was to use 2x6 for the arms; I cut a taper along outside edge and increased the length of the arms by about an inch and a half to overhang the front legs a bit. Since I just used basic framing lumber, I milled all of the boards first with table saw and planer to make square consistent edges. And, I chose to use pocket screws in as many joints as I could so I wouldn't have screw holes on any visible faces. Add in a lucky find at the big box store paint return; scored this blue exterior paint for $2.00 a quart, and my weekend project turned out pretty good. Now I've got two neighbors that want 'em.
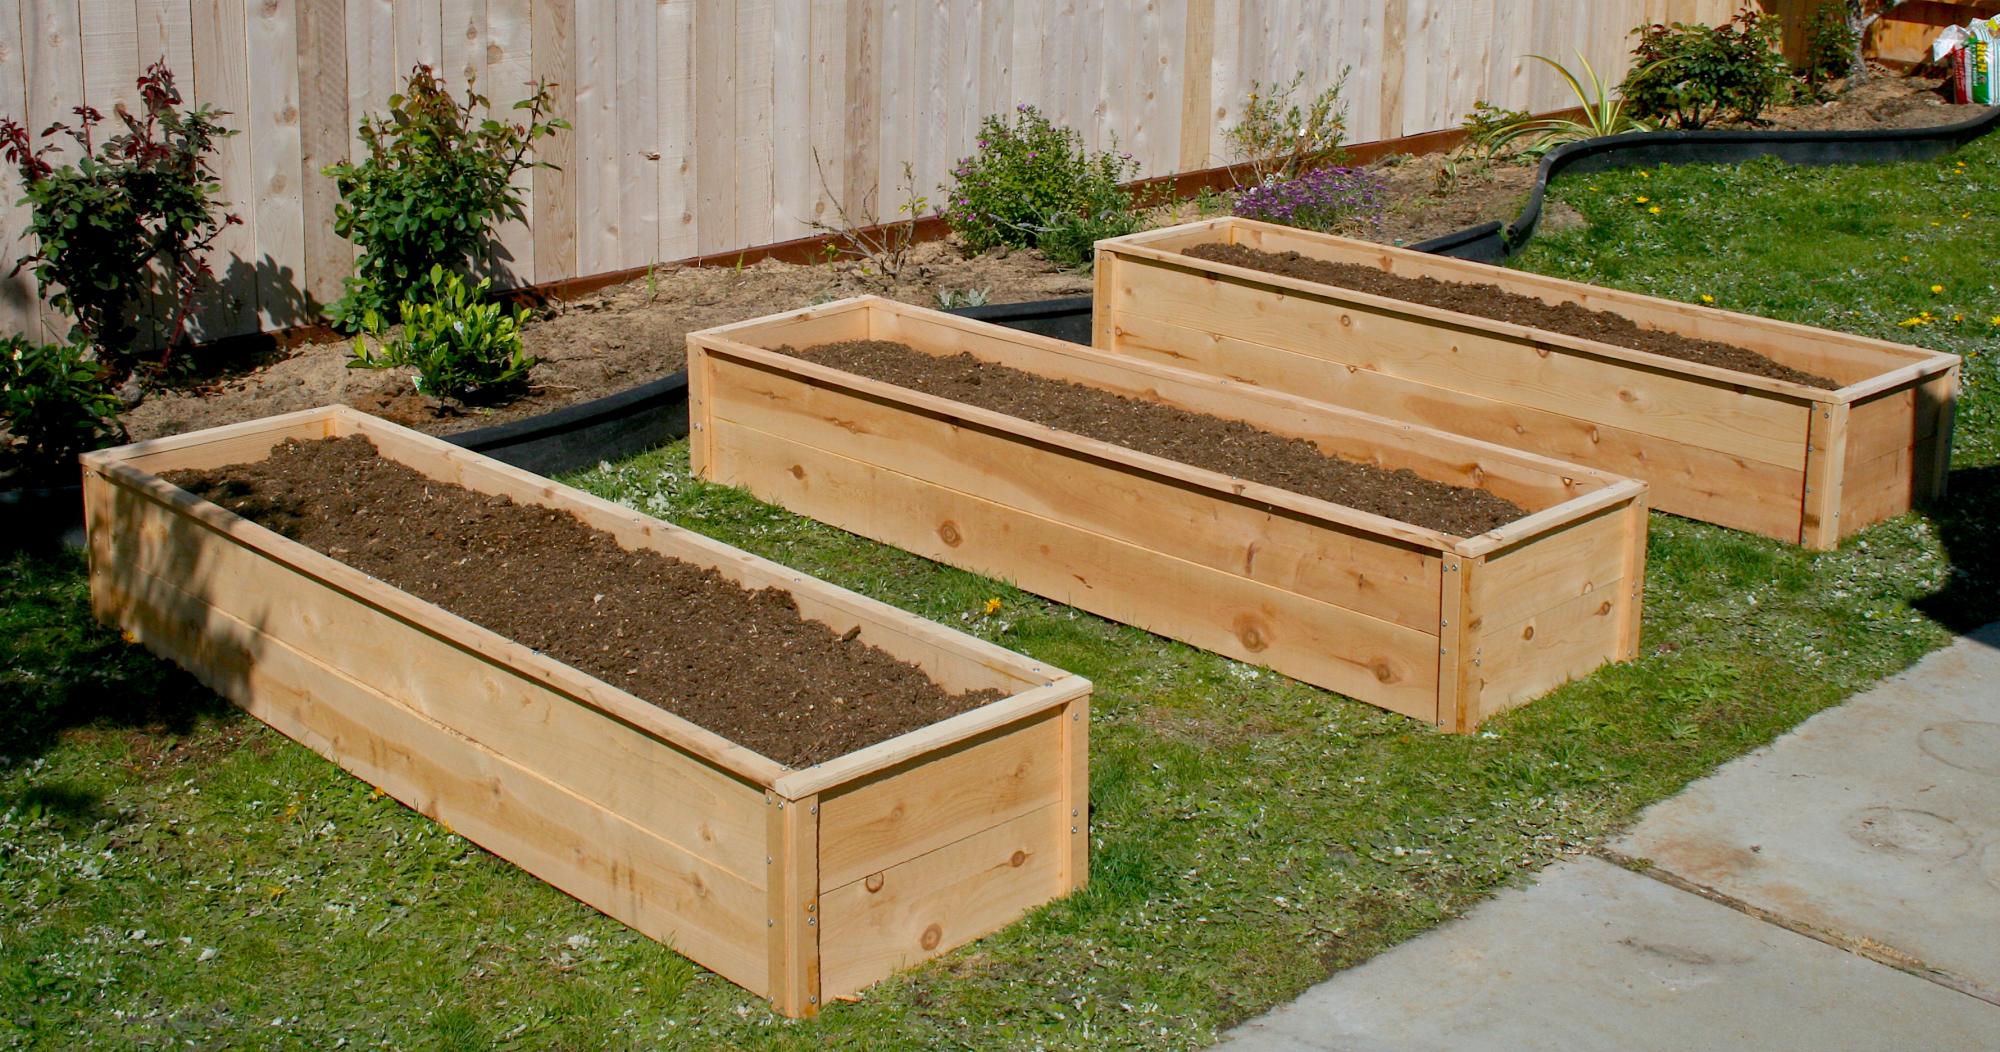
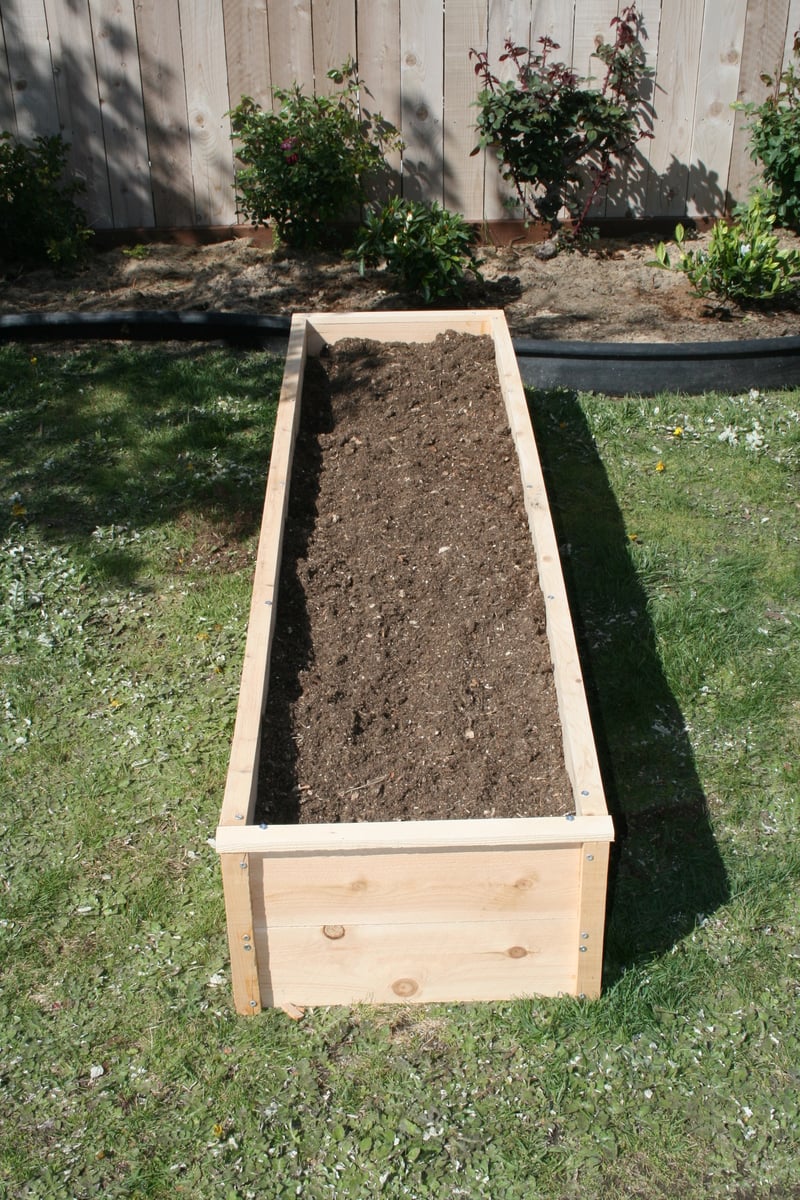
I made these for my 81 year-old Grandma, and I will be making some for my own front yard soon. I followed the plans and ripped the fence boards instead of buying the optional 1x2s. My awesome dad showed me how to use the table saw, but the rest I did all by myself! We decided to leave them unfinished for a natural look. It took me about 7 hours total broken up to make all three, but this is my first project and I was slow. Thanks Ana, for inspiring this working Mom to pick up a hammer and get stuff done!
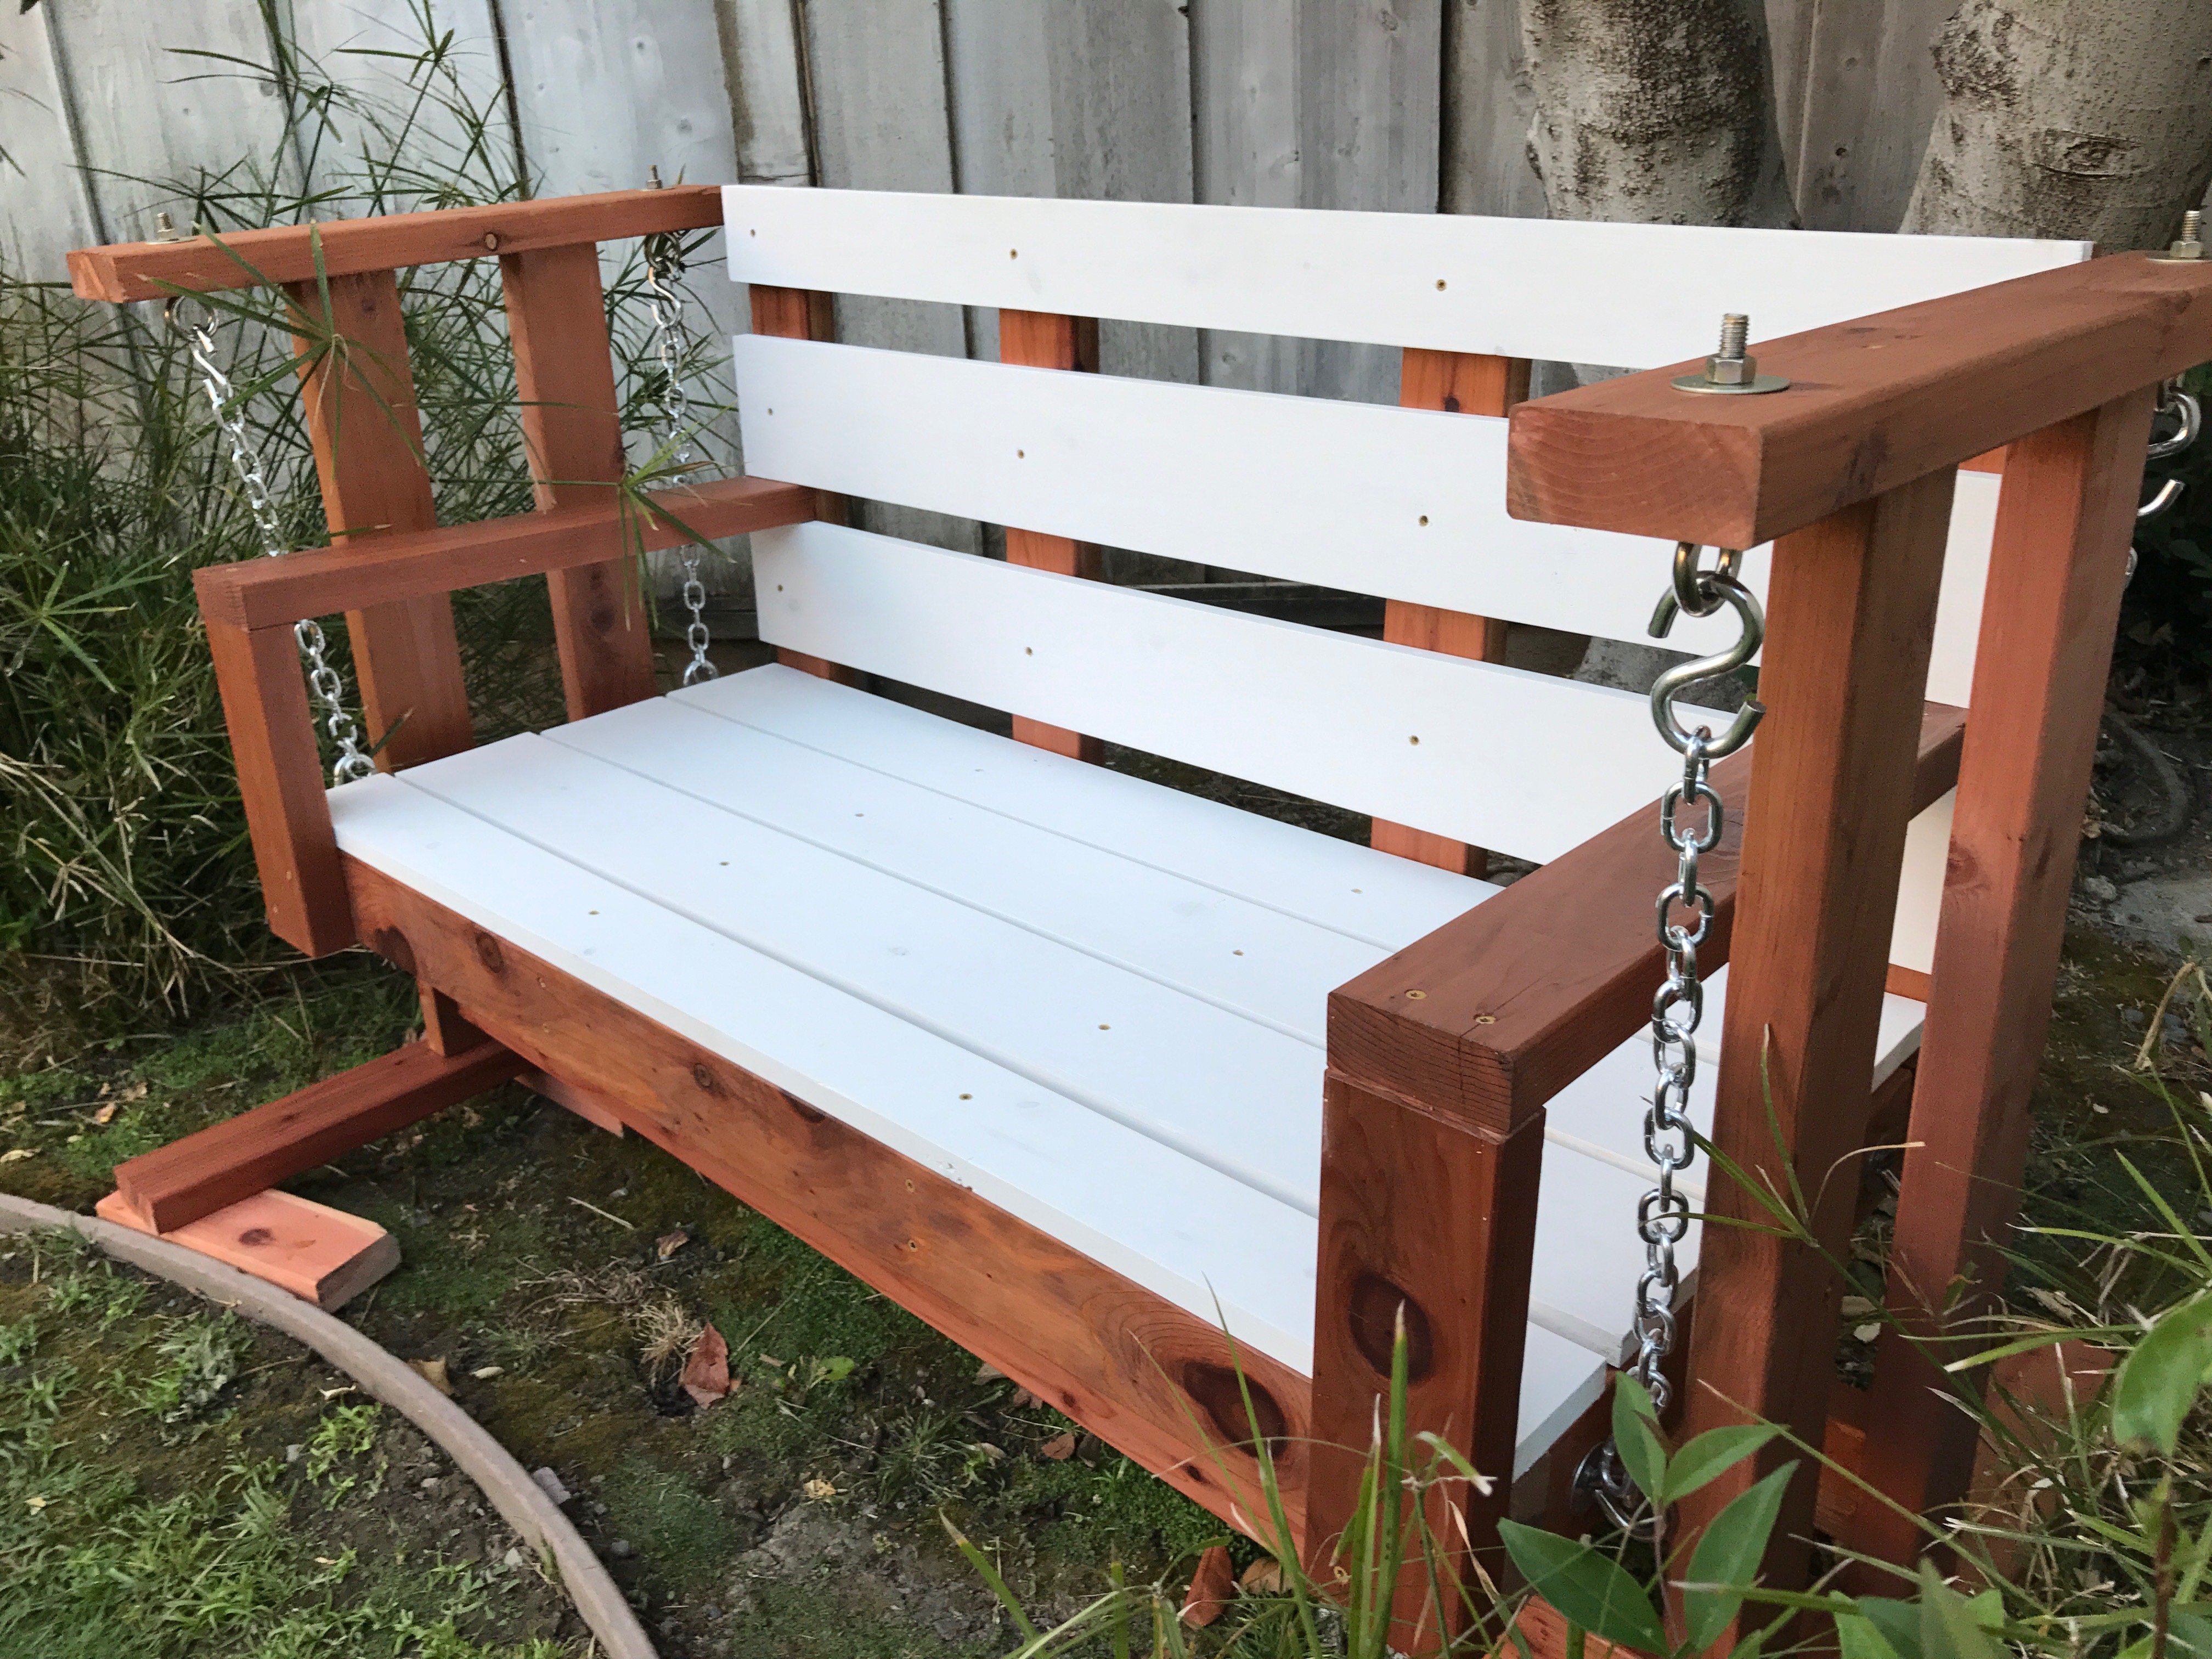
Built the porch swing and was inspired to build the glider frame by another "Brag Post" Looks great and fits perfectly in my back yard!
Fri, 02/18/2022 - 08:20
Are there any dimensions for the glider part? I have first year agriculture students building this, but we are unsure of the cut list for this. I am sure I can figure it out as the teacher, but with 20 students in the class, it would be better to be able to give them instructions to follow on paper. Thank you!!!

Inspired by Finn's Dad's table, we decided to copy it since we wanted to build a table that would seat 8 comfortably. The most difficult part of this project was finding clear cedar for the top. It had to be ordered through our local lumber yard and we were not able to match boards. We built the frame out of treated pine and the 4 x 4 legs from average greade cedar found at Lowe's. We finished it with four coats of polyurethane.
Modified the Cherished Bliss plan a bit to include Carriage bolts instead of pocket holes and I notched the top of the legs to make a shelf for the top.
Legs were cut at 18" and the top is 40". The two center 4x4's are connected with two internal (and smaller diameter) carriage bolts and glued together. The end 4x4's are glued and then a 1/2 x 6" carriage bolt with a pre-drilled "Head" hole (using 1" paddle bit).
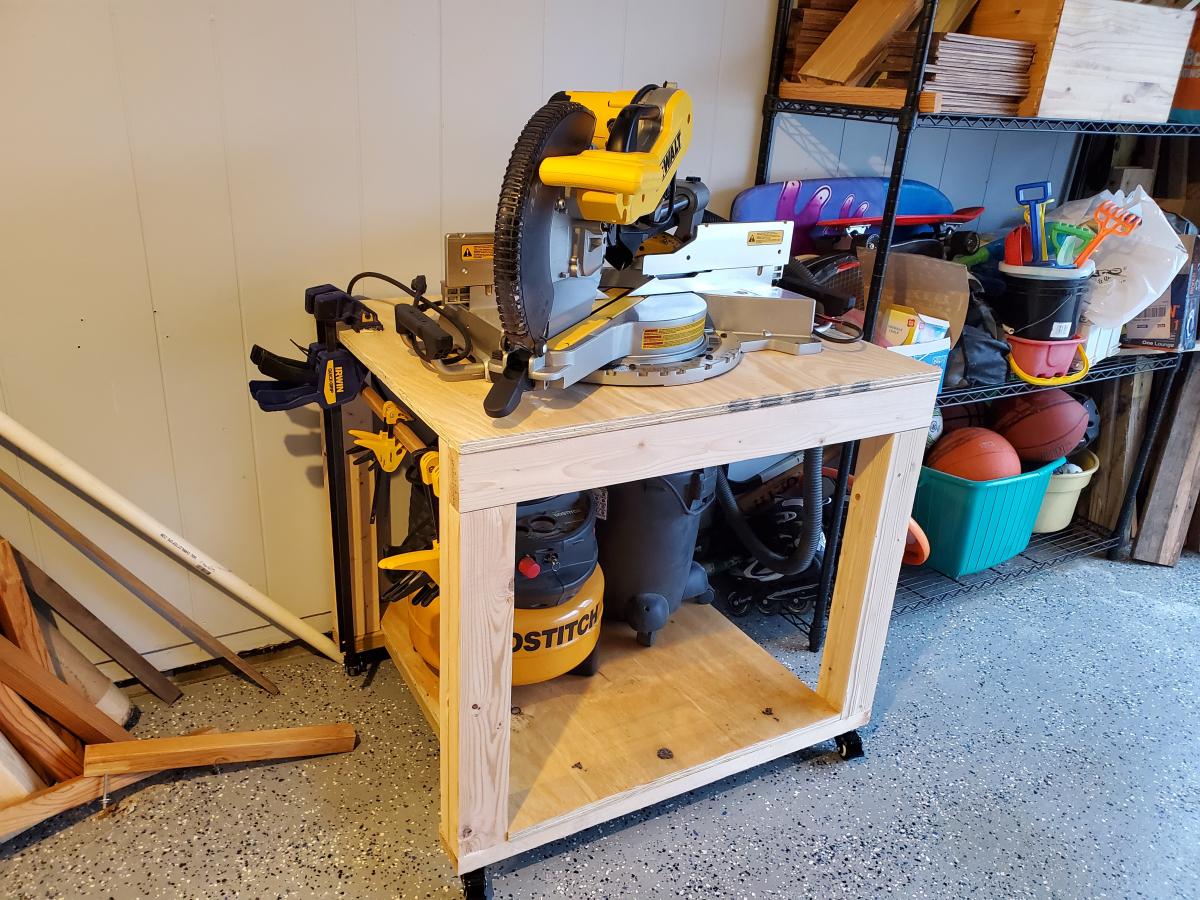
Very easy to make but this baby is heavy!!!

My fabulous husband bought me an awesome new miter saw for Christmas, and it is way too heavy to lug around! So my first project with the new saw was a workbench to mount it on! I added wheels so it can roll anywhere. I'm also very short and wanted to store a very tall shop vac on the lower shelf so I made modifications to accommodate that. I also made it 30" x 36" to make it just the right size for my saw. I will be using this piece as the center of other work tables I will build in the future!
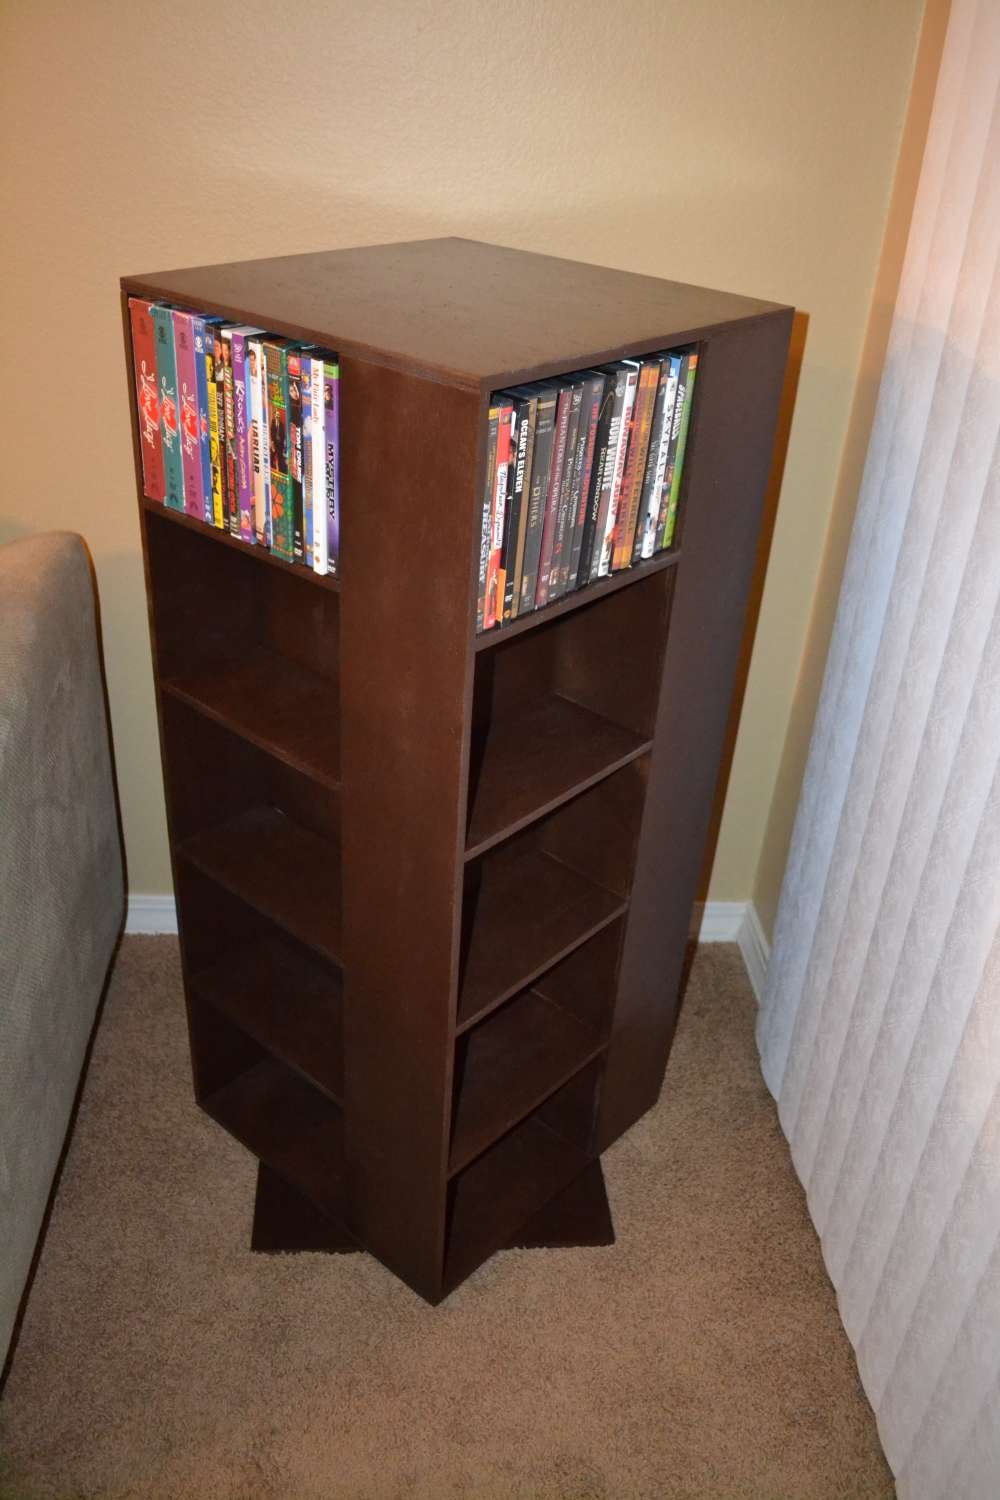
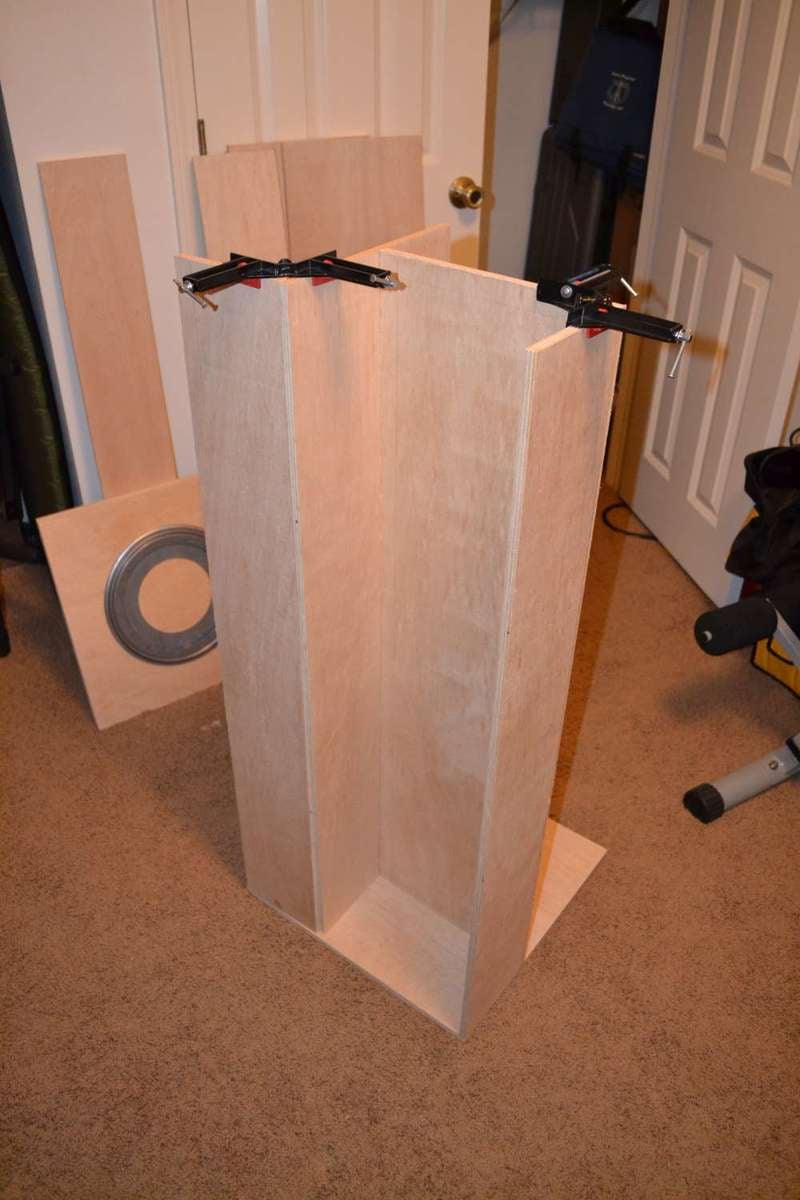
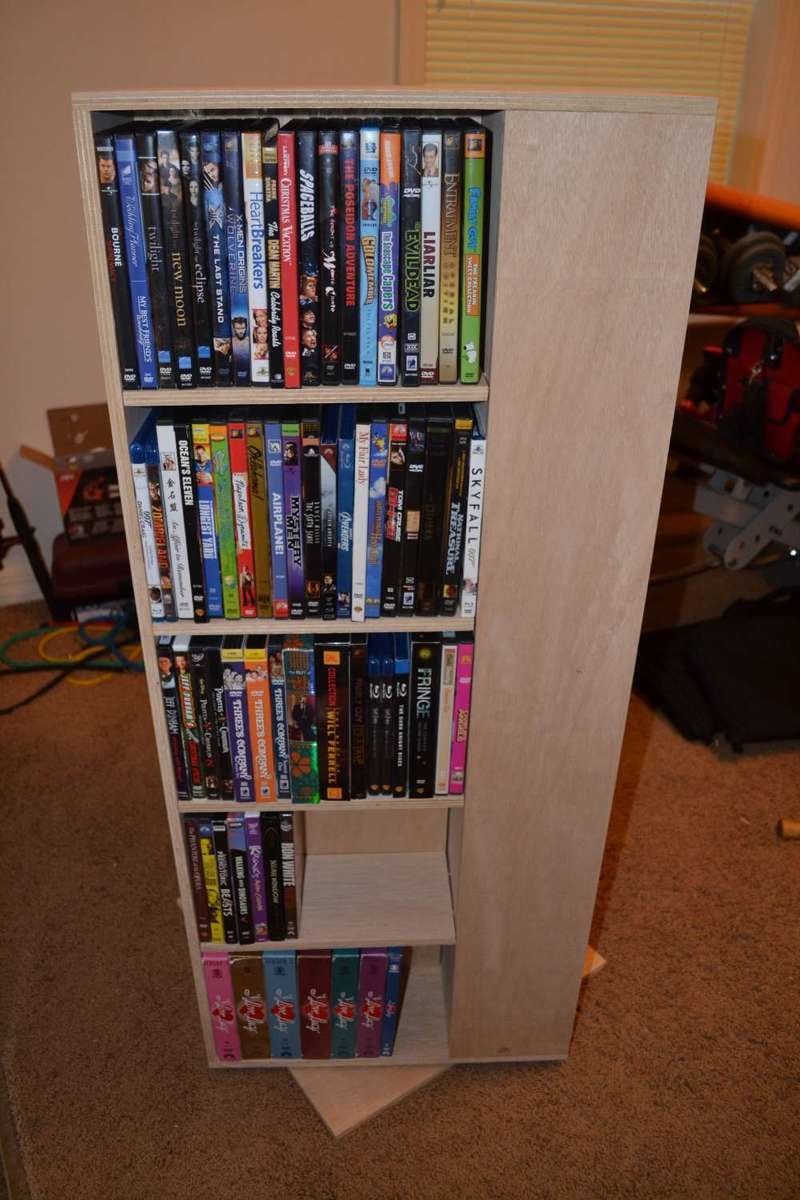
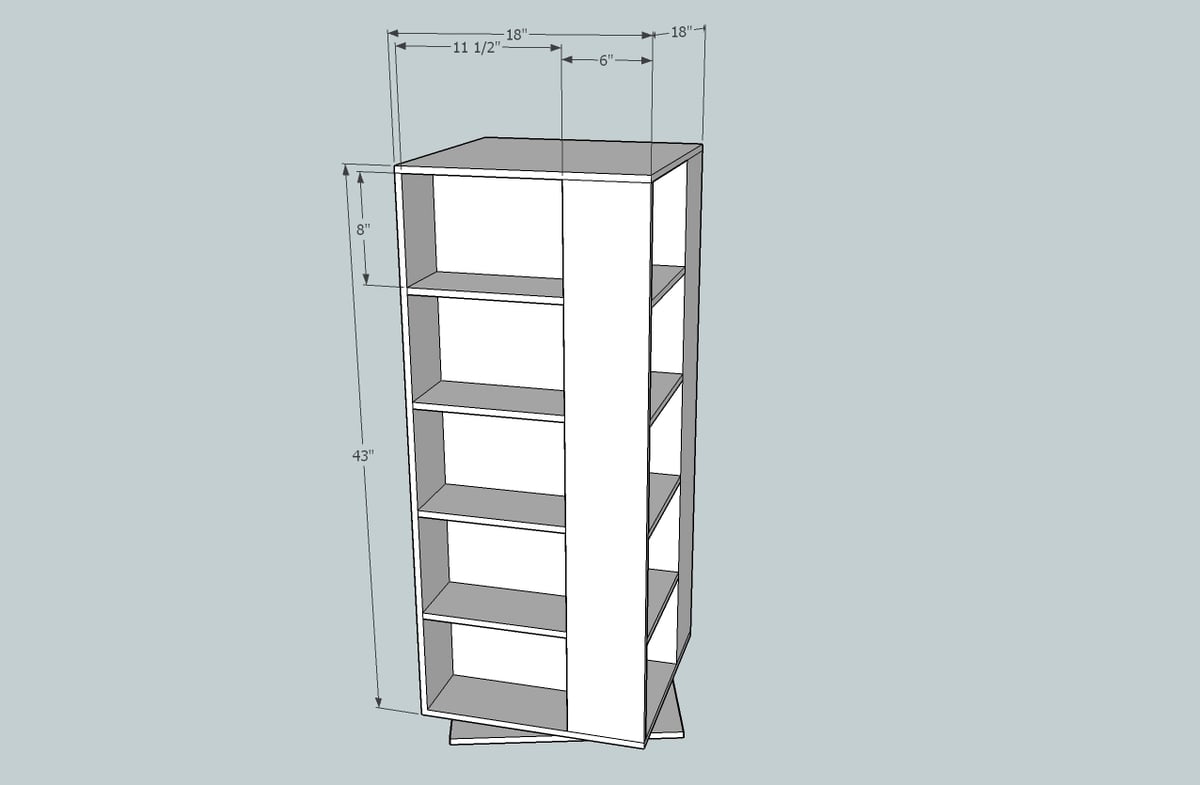
I was looking online for a spinning DVD rack to buy when I stumbled across a picture of a custom built rack. I decided to give it a try and this is the result. This is the first project I've done outside of basic shelves and it was a great learning experience. The overall fit and finish isn't quite where I'd like it to be but overall I think it turned out pretty well. I was able to find a 12" lazy Susan at a hardware store that supports over 300lbs and worked perfectly for this project.
I used pocket holes for the shelves, finishing nails for the top and screws for the bottom and lazy Susan. I also used pocket holes to attach the shelf backs and hid them behind the shelves. One thing I definitely won't use next time is spray paint/enamel. The finish isn't nearly as nice as I wanted and it cost far more than I was expecting.
This is also my first time using SketchUp and I'm really impressed with it. I've uploaded a copy of the plans.
Criticism and suggestions are appreciated.
-Dan

Sun, 07/14/2013 - 11:35
I like this spinning DVD unit! Coincidentally, I just finished using spray enamel to redo some cupboard door handles. It's horrible stuff! I ended up sanding it off, and doing it over in flat black. I roughed up the edges with 180 grit to antique them a bit. Looks much better!
Sun, 02/12/2023 - 01:19
Can I get a design drawing for this piece?
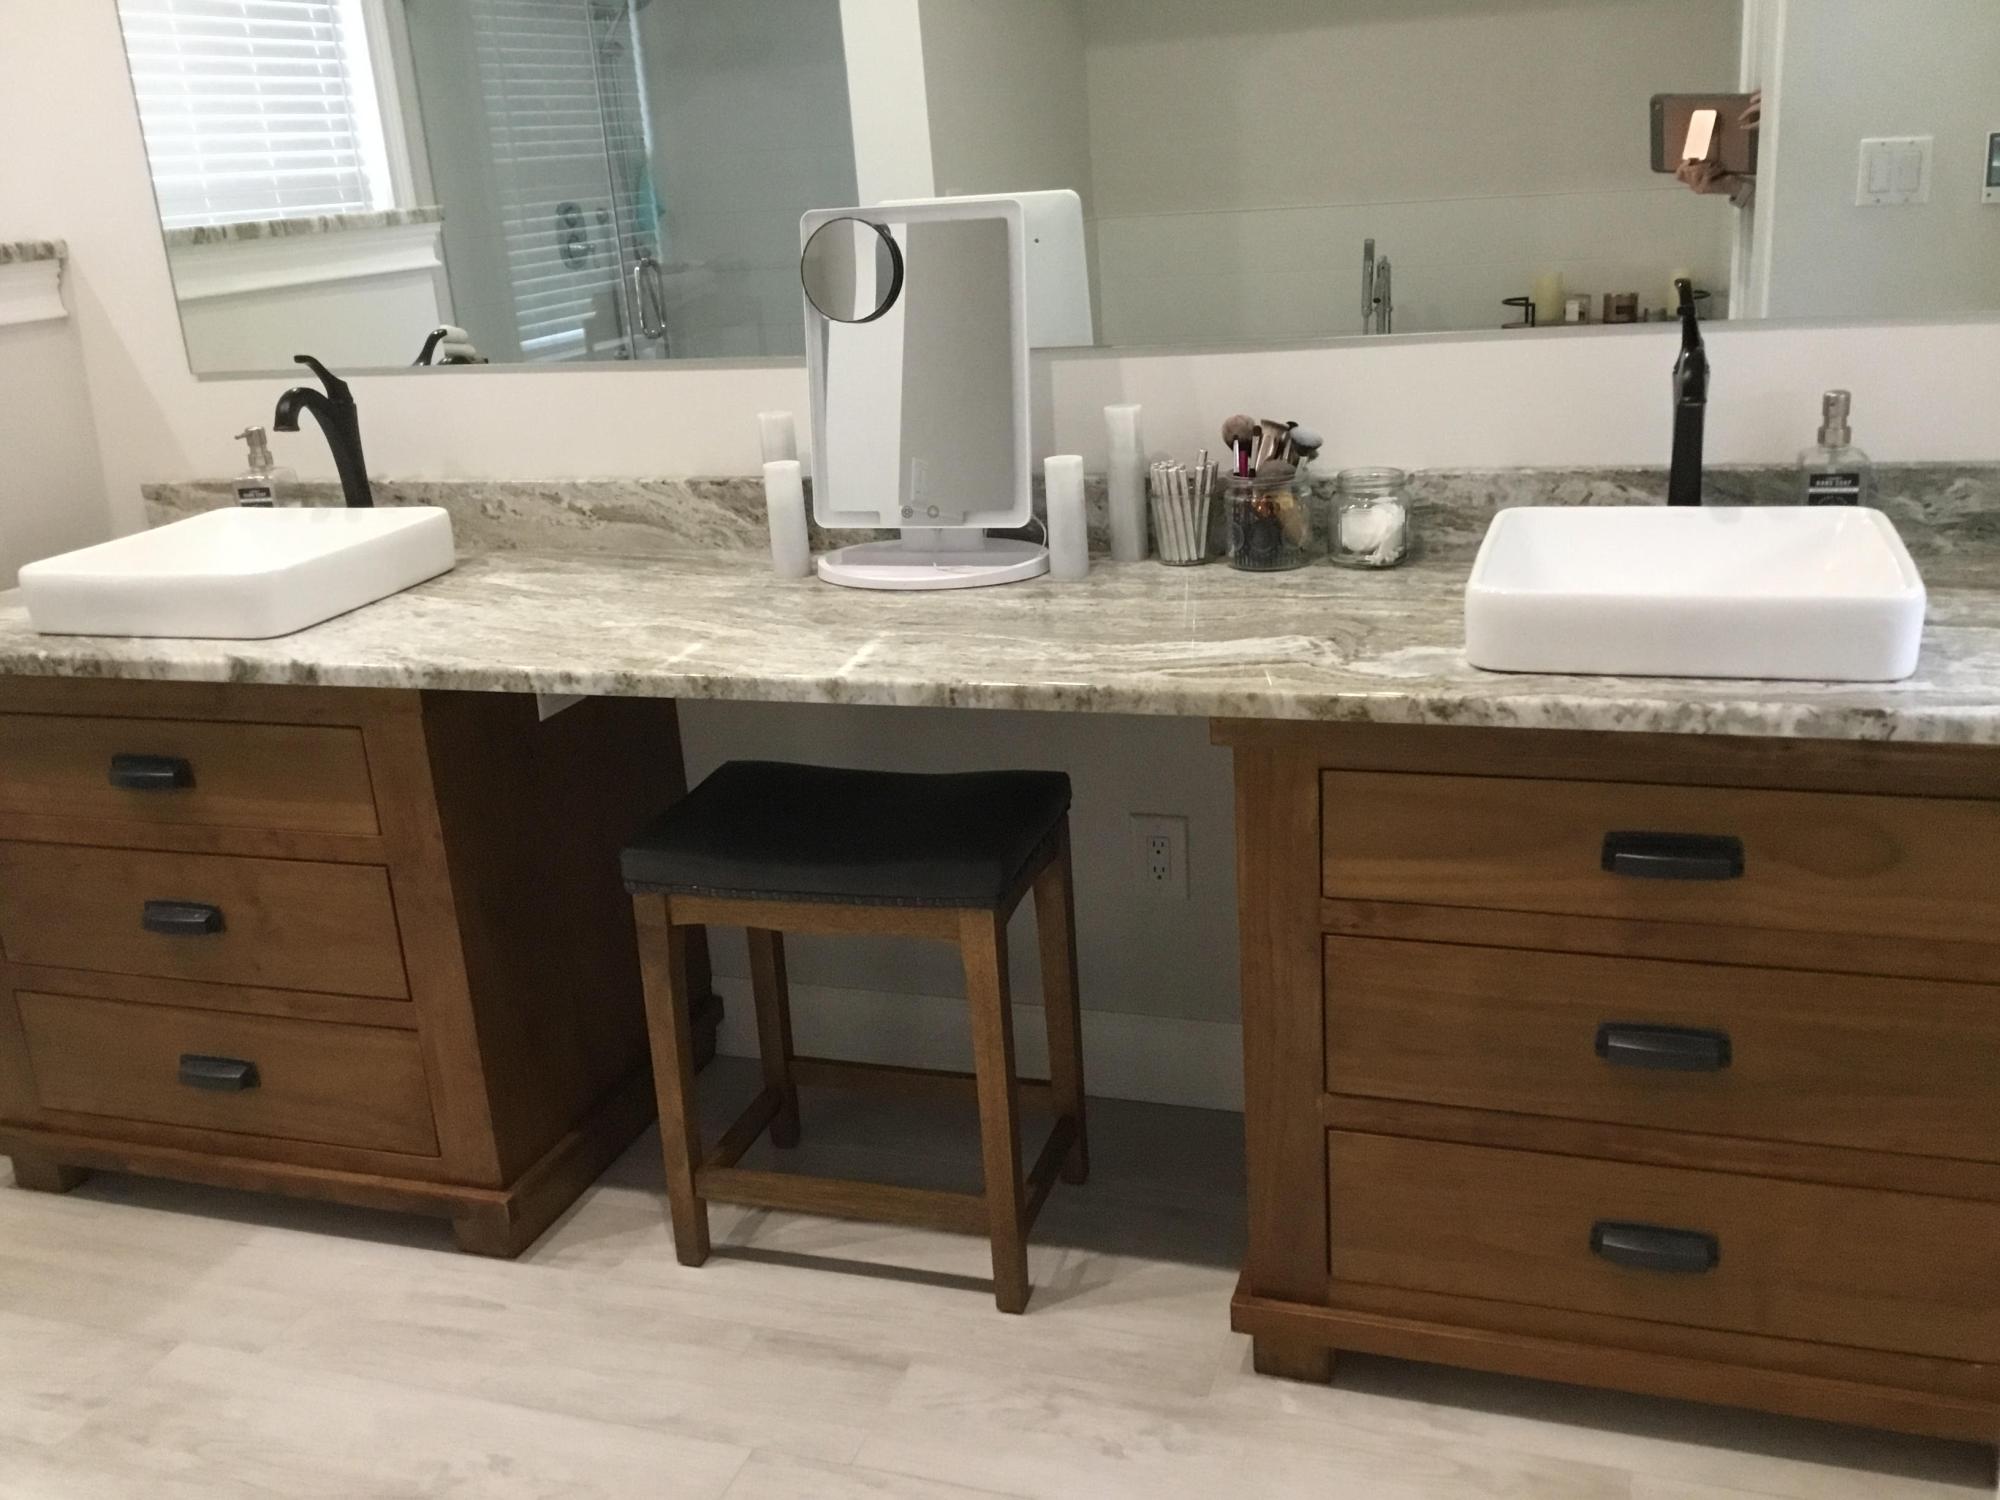
Perfect vanities! When I couldn’t find exactly what I was looking for, I searched online for vanity plans and thankfully your site and these vanities popped up. I love all the storage with these, so much better than ANYTHING pre built we looked at online. We had seen vanities that I was going to settle for but they were around $3,000, and I didn’t love them, so my husband said he could build something and this was the result using your plans. I am so thankful and the whole project was a fraction of the cost! I stained them with a vinegar and steel wool stain with poly over it. I couldn’t be more grateful for you and your generosity of plan sharing. Thank you!
Wed, 01/11/2023 - 05:25
These are very pretty. Any chance he recalls what type of wood used?


Comments
Ana White
Wed, 05/27/2020 - 11:55
This is beautiful!
This is beautiful!