Community Brag Posts
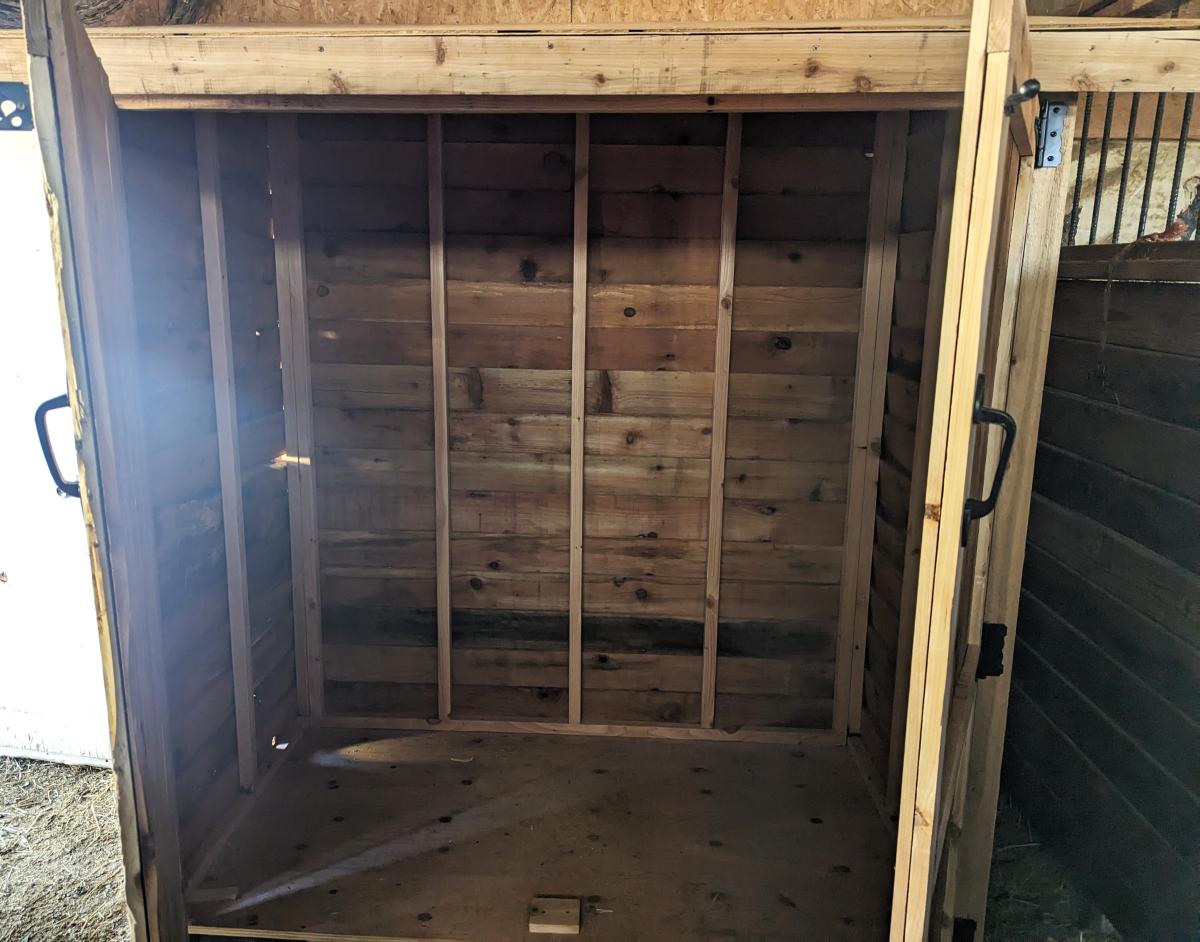
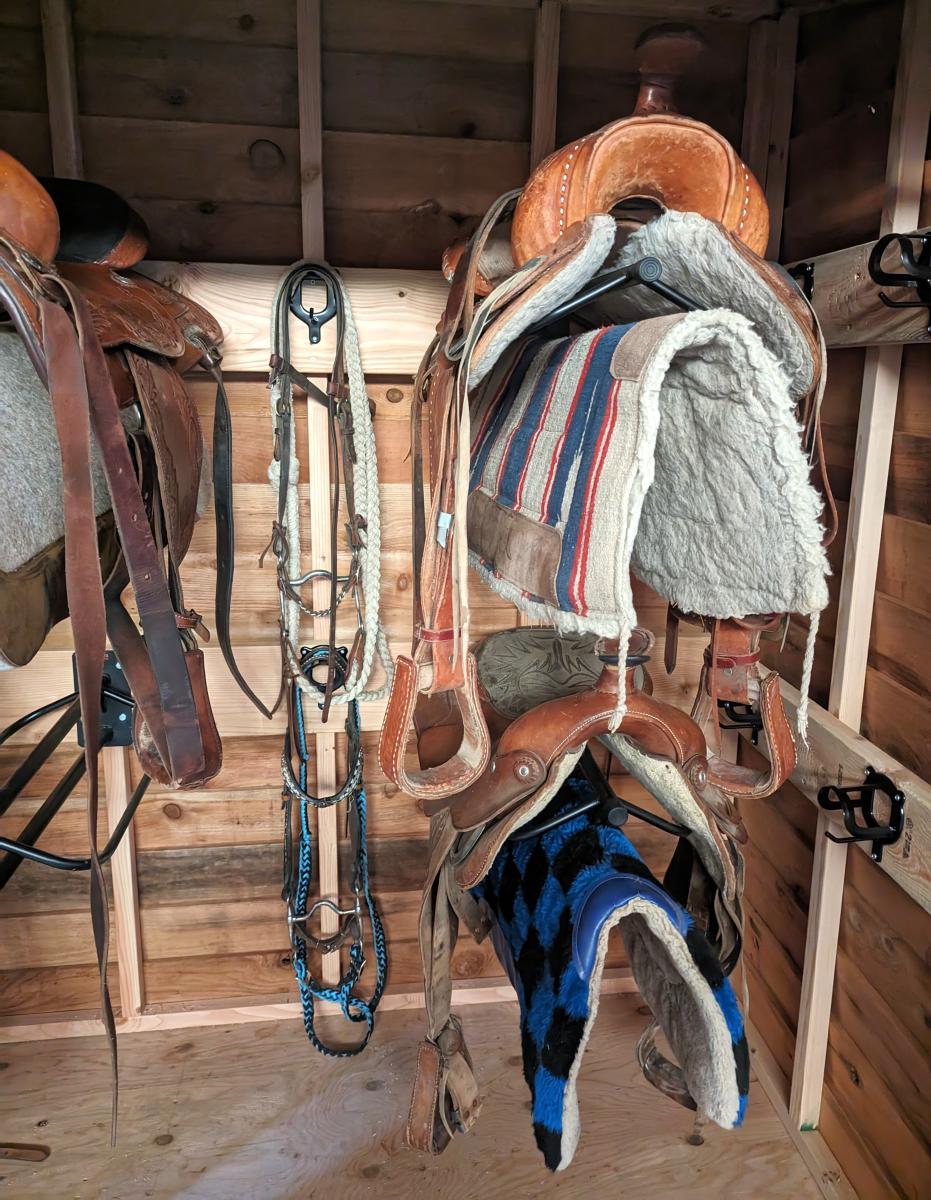
Horse Tack Storage Shed
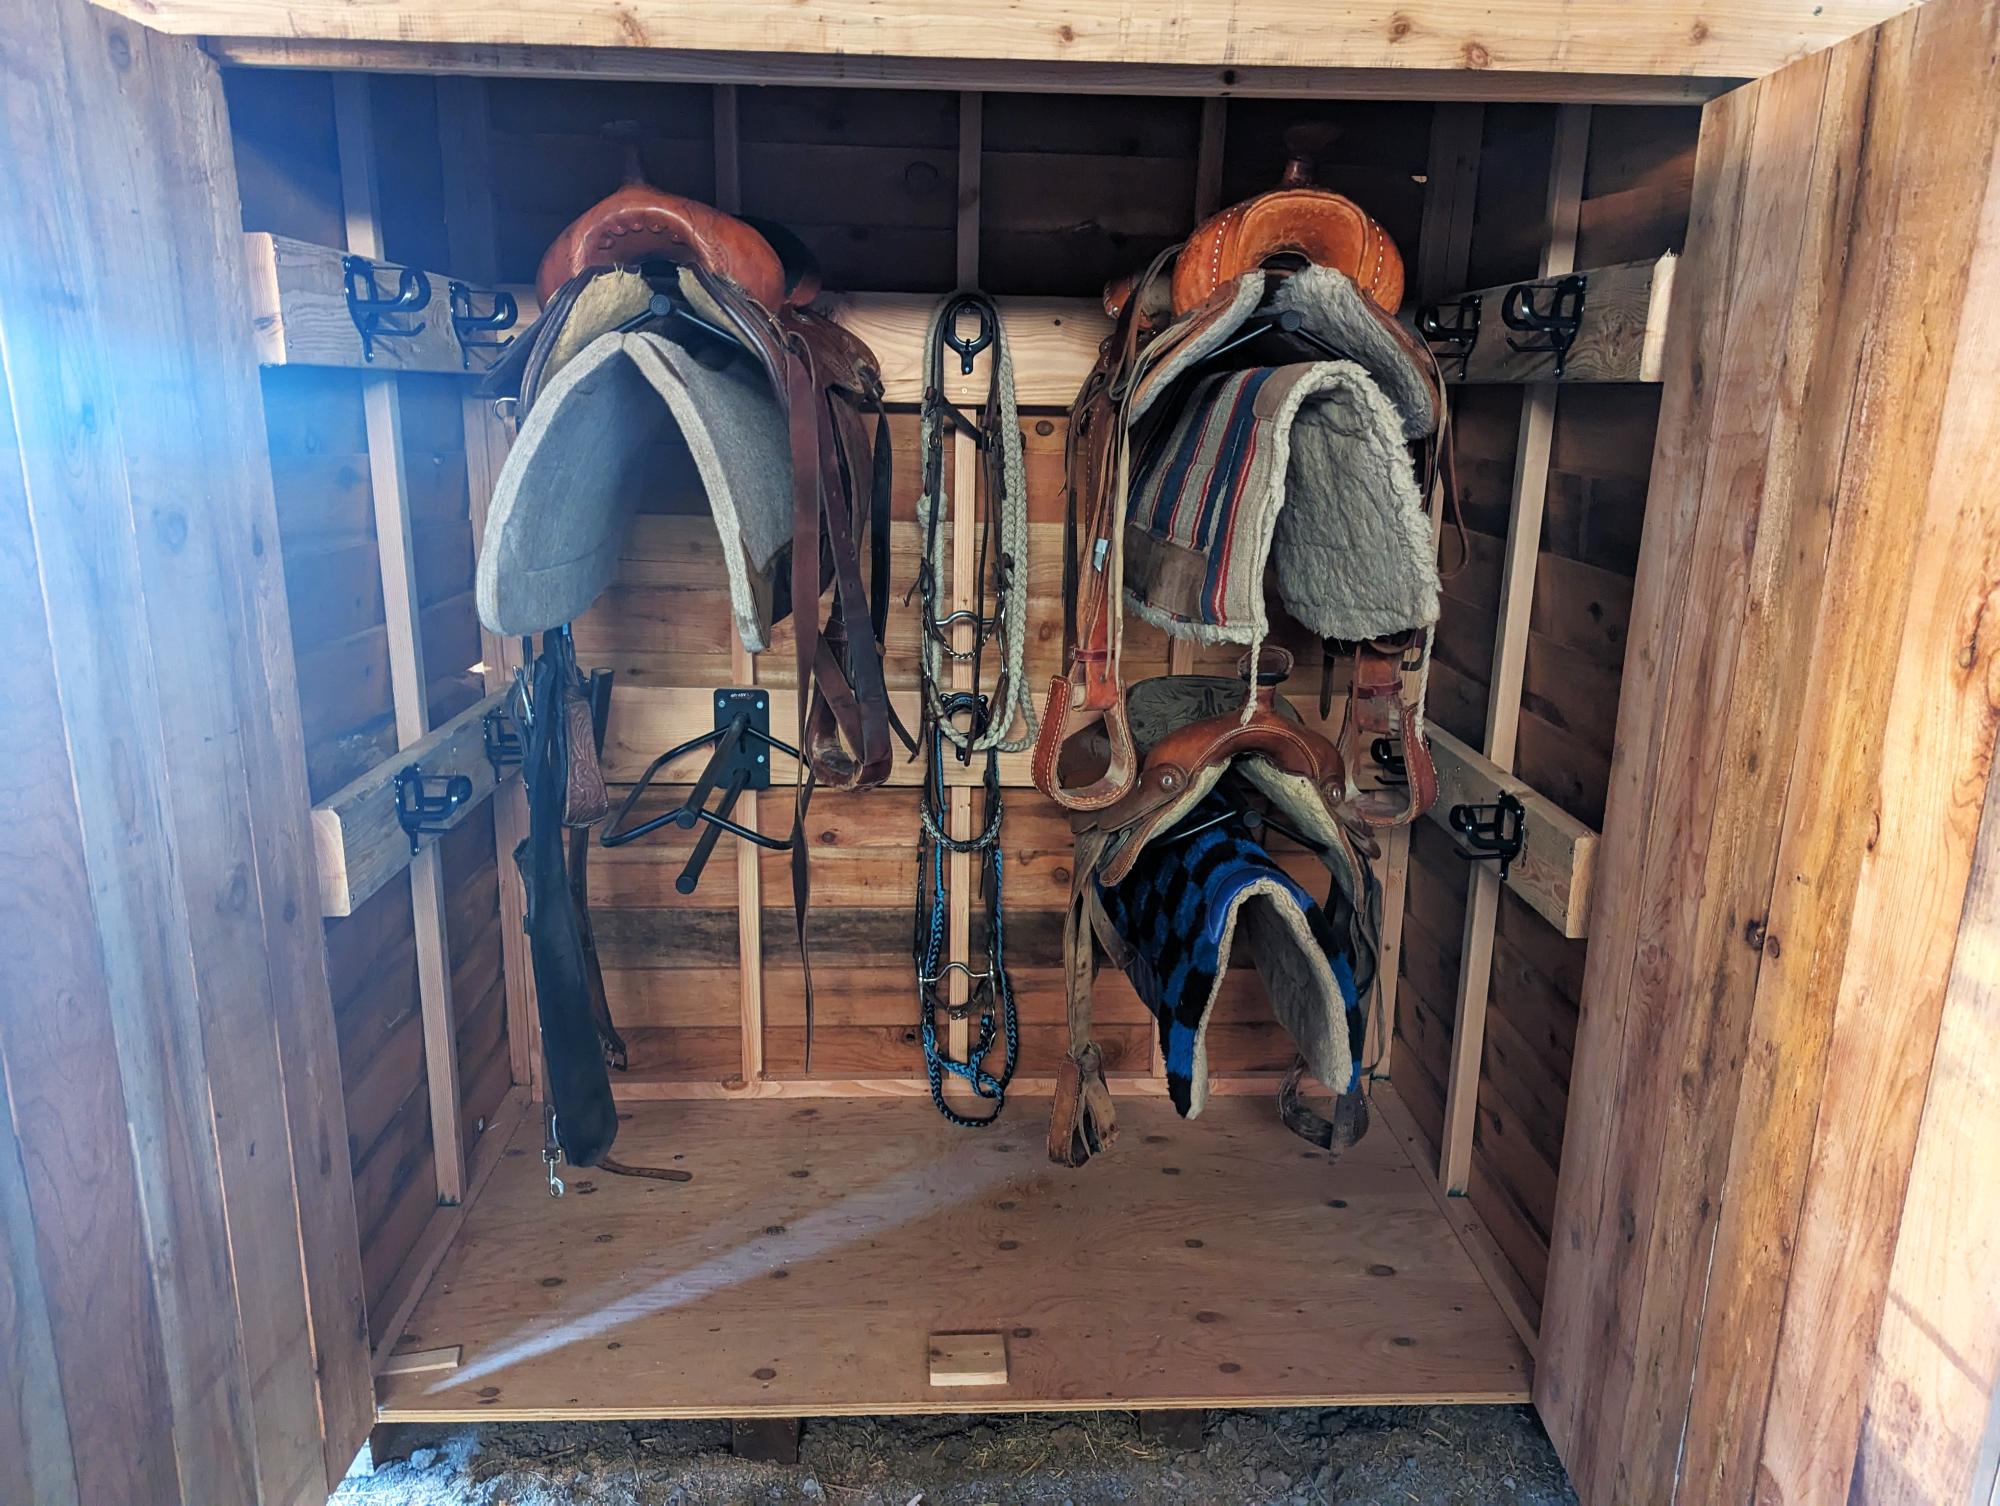
We have been in need of a place to store our horse tack for several years, and finally got around to it. We modified the small cedar shed with a little extra support and added saddle racks and bridle hooks. Super pleased with how it turned out!
Gabi Johnson

Built from Plan(s)
Comments
Wed, 08/30/2023 - 09:13
Great Horse Tack Storage Solution!
Beautiful build and so organized, thanks for sharing!
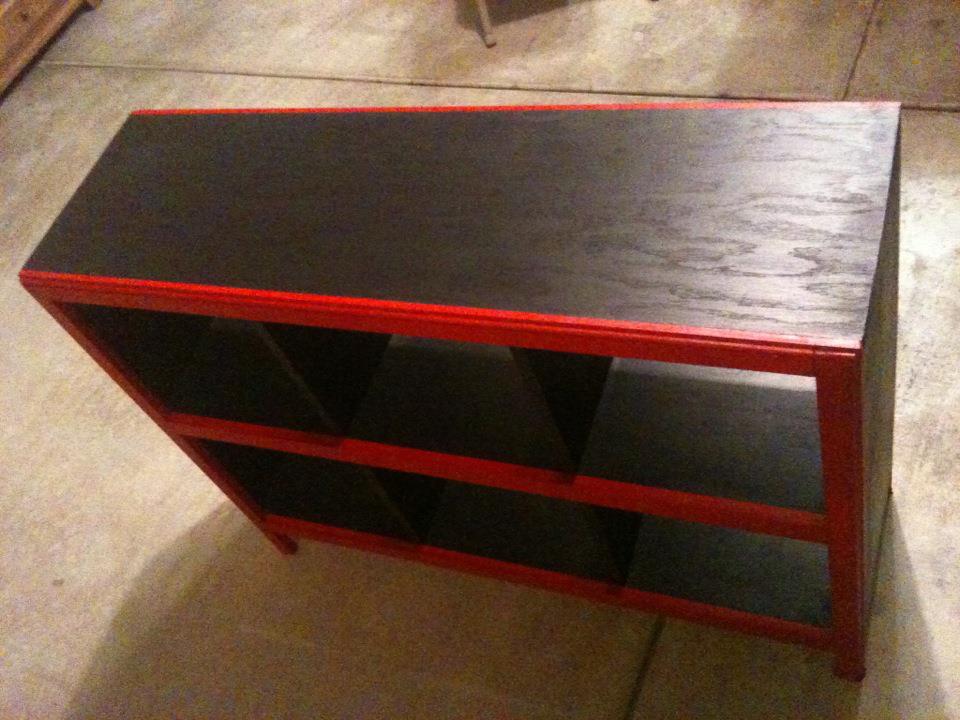
my first project
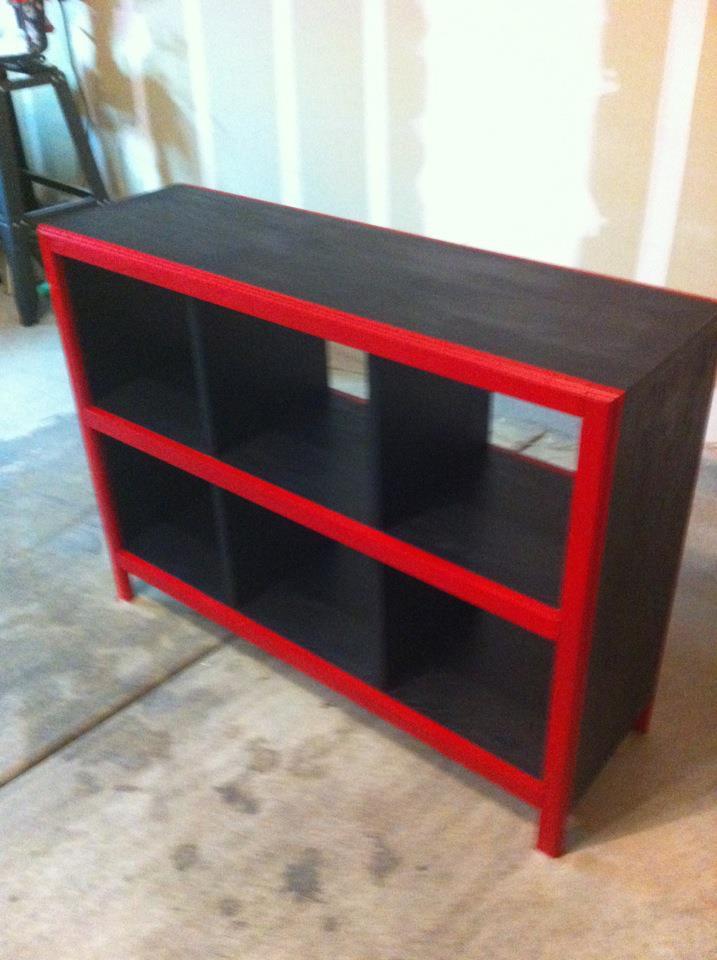
my best friend has built a couple of projects from this site. i enjoyed helping him a bit so when he decided to build one of these for yes baby that is due this summer, i figured i'd double up and build one for myself while we were at it. i haven't built anything since high school (10 years ago). he had all the tools and had made a lot of mistakes along the way so he brought be up to speed and told me a lot of "don't do this...trust me" tips that are helpful.
we used premium ply wood cut to 1x12s and poplar 1x2's for this. total wood cost was about 30 bucks per shelf. I decided to use a trim router for my framing along the outer edge. I think it gives it a professional look at it took 10 minutes to do.
NOTE: if you want to rout around the entire top and you used pocket holes....DONT DO IT. we found that one out the hard way on the other shelf. if your bit does anything but slightly round the edge it's gonna hit the screws. :(
i made a last second change and went with a vibrant red and a dark dark black to make it up. i couldn't be happier. it doesn't match my room at all but i don't care at this point. my friend did a great job taping off the trim and the lines are just awesome.
This thing is stout. i'm not a small man and would not hesitate to stand on top of this thing all day. can't wait to show it off to anyone i can:)
Built from Plan(s)
Estimated Cost
40-50 dollars with paint included.
Estimated Time Investment
Weekend Project (10-20 Hours)
Finish Used
satin black and ruby red satin for the trim. both paint a brand i forgot from lowes.
Recommended Skill Level
Beginner
Comments

Sun, 04/08/2012 - 03:49
Great job on the build and
Great job on the build and paint job and welcome to the community!

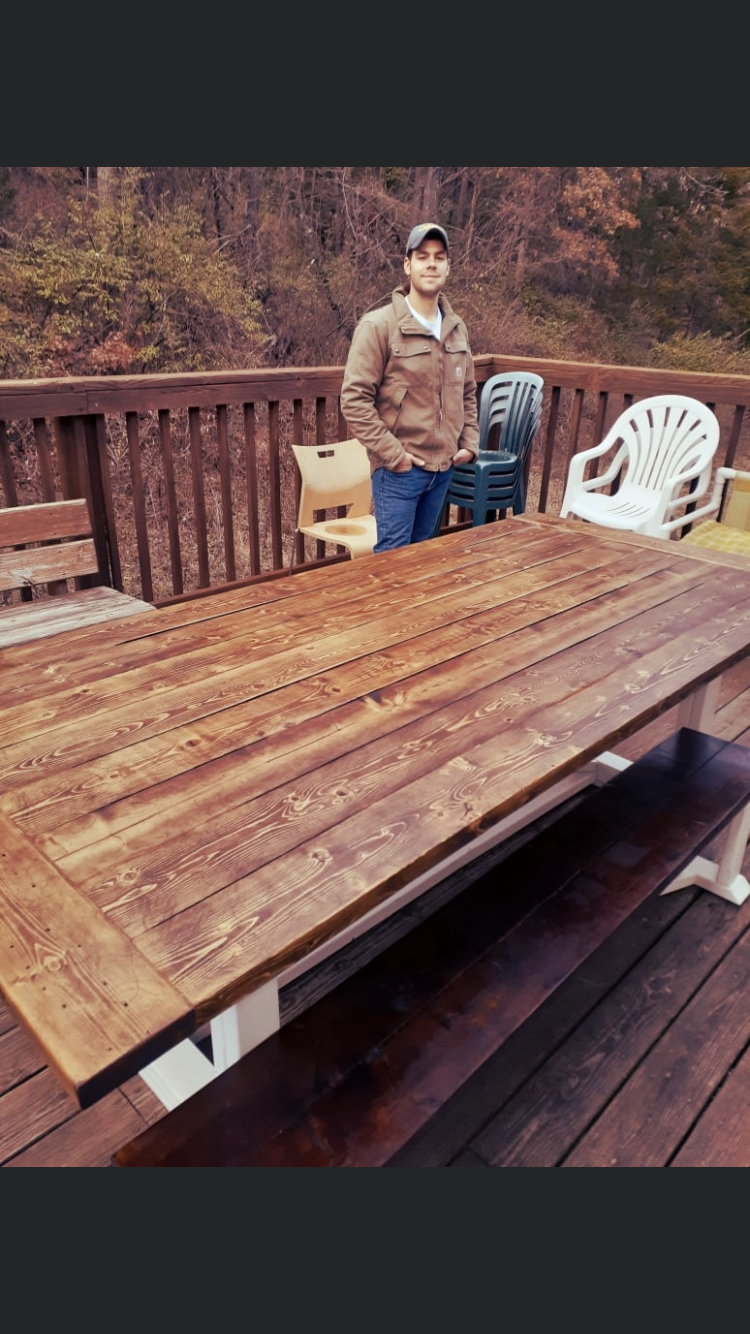
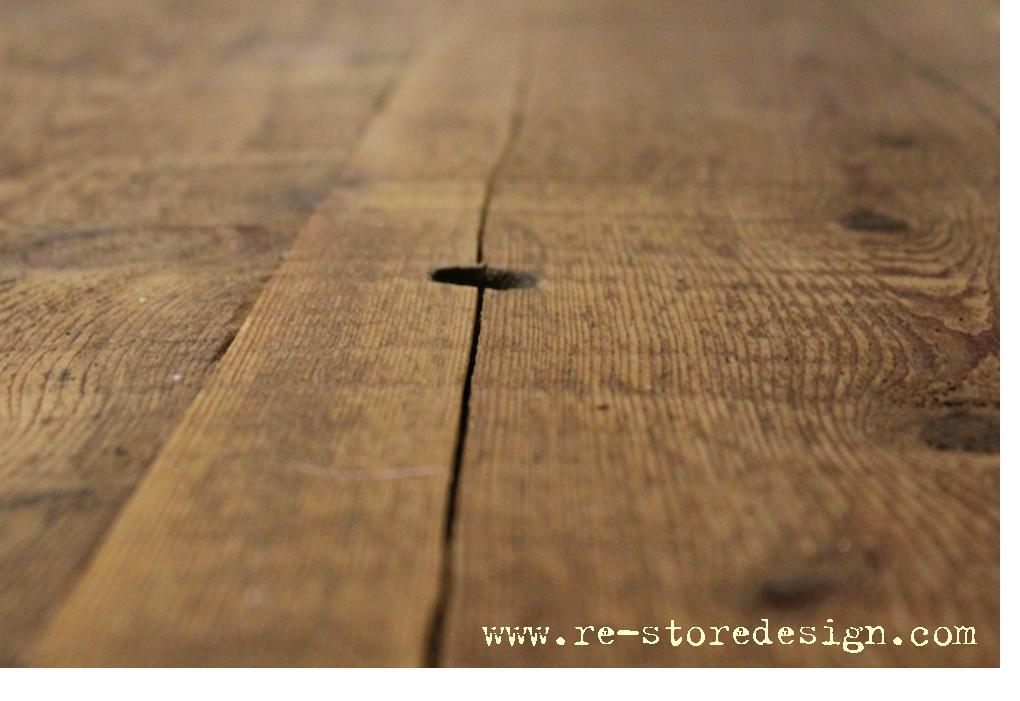
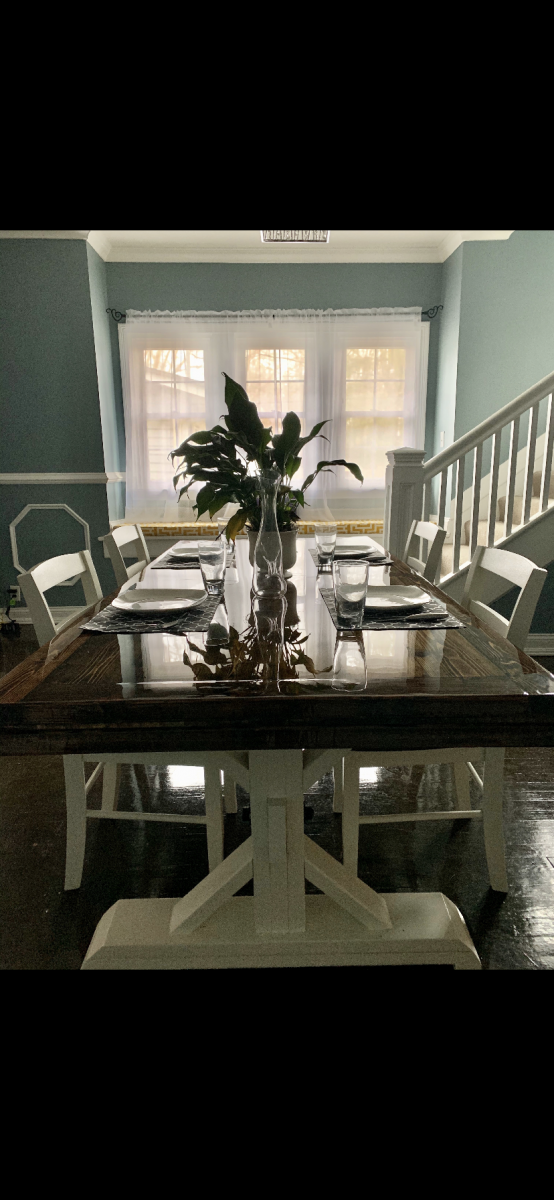
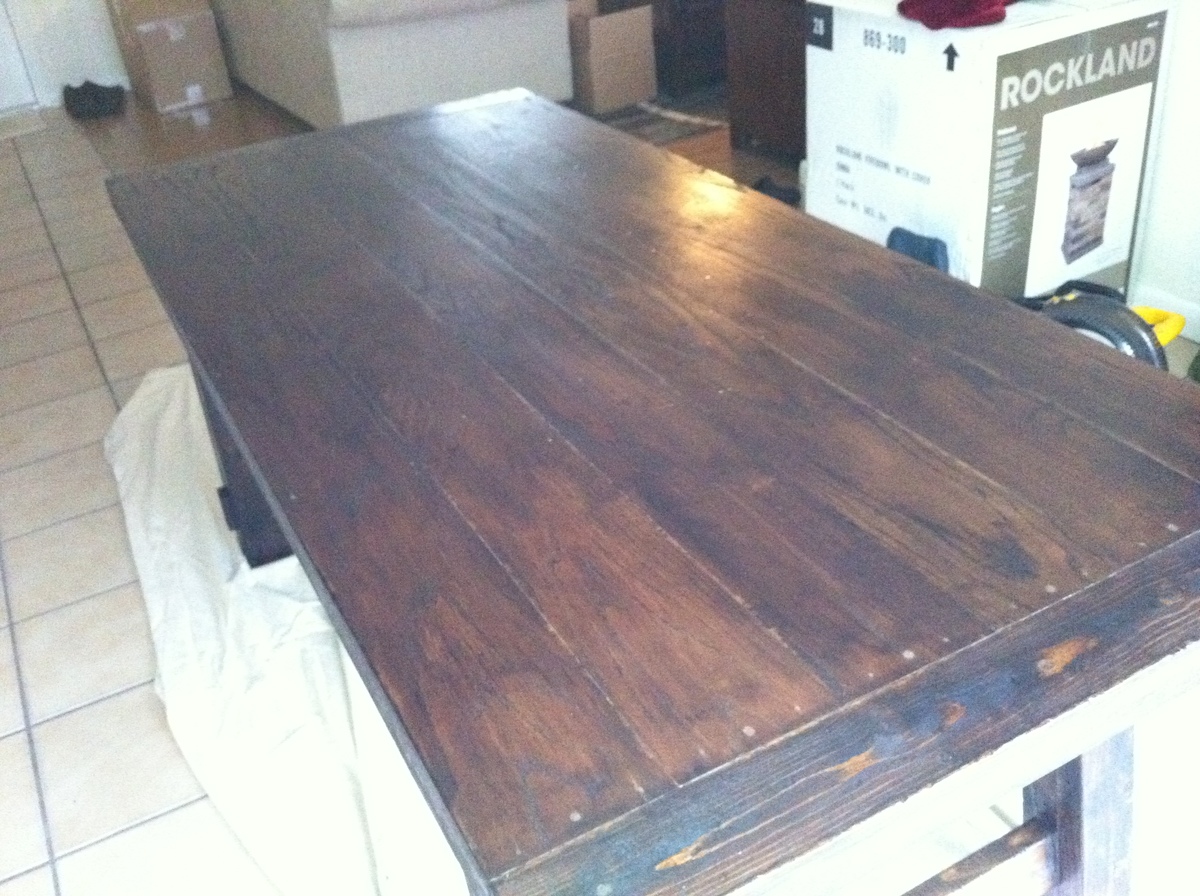
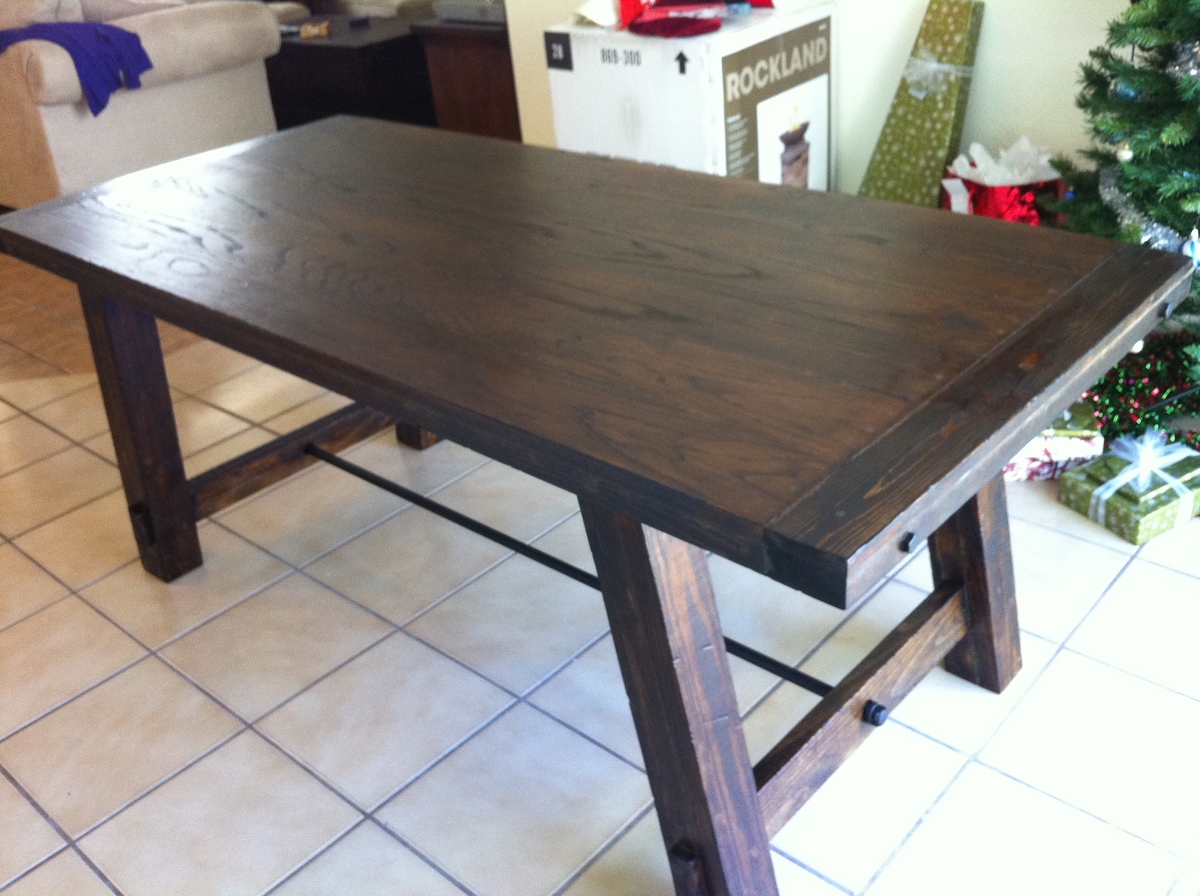
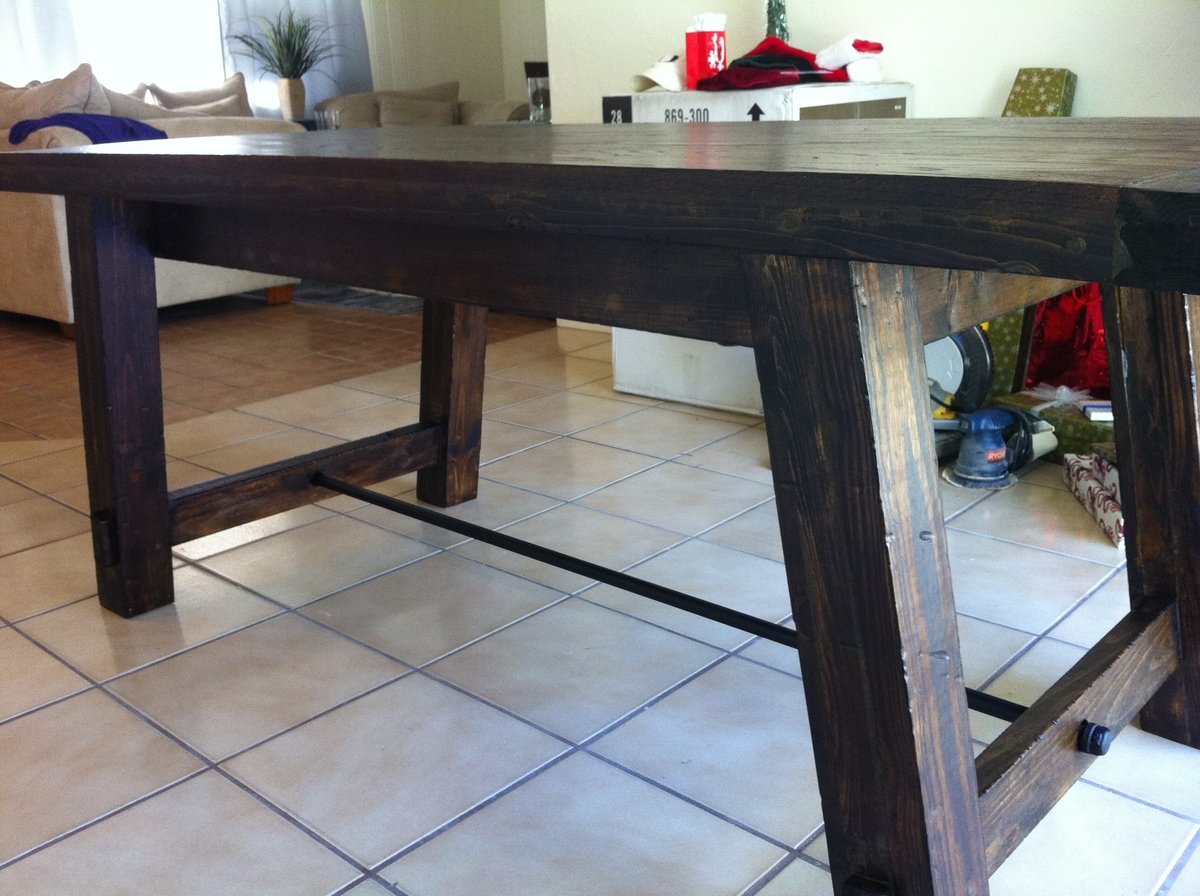
Truss Table
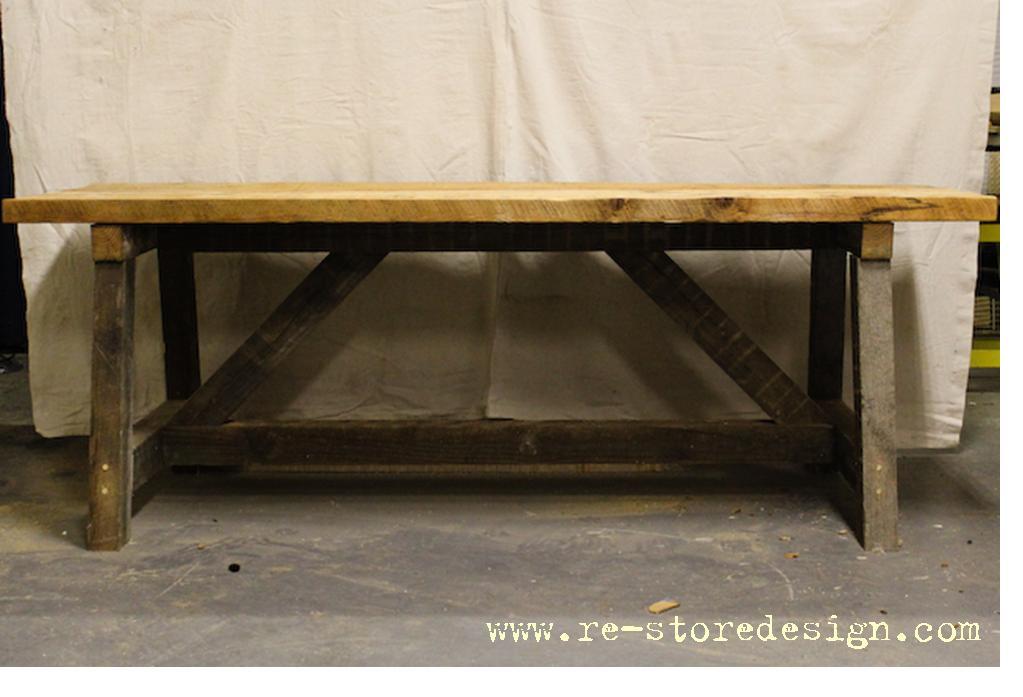
I have been wanted to build this table for over a year and finally had the time for it. The plans made the cuts very simple.
Built from Plan(s)
Estimated Time Investment
Weekend Project (10-20 Hours)
Finish Used
Watco Danish Oil - Natural
Recommended Skill Level
Intermediate
Comments

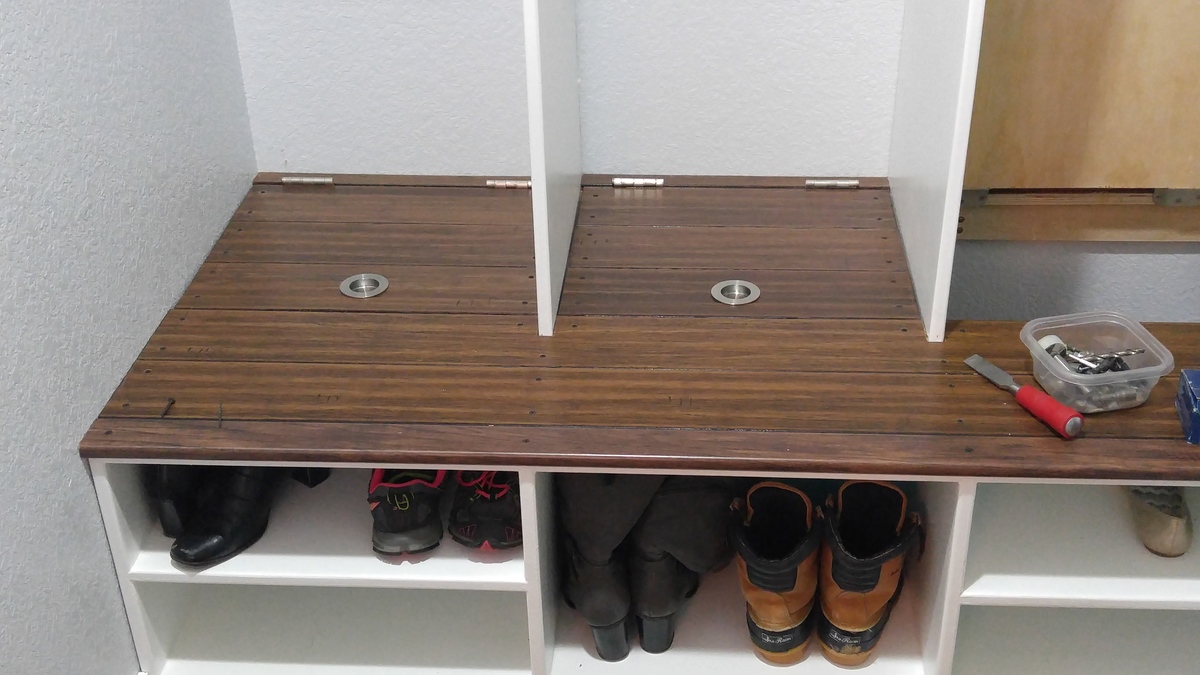
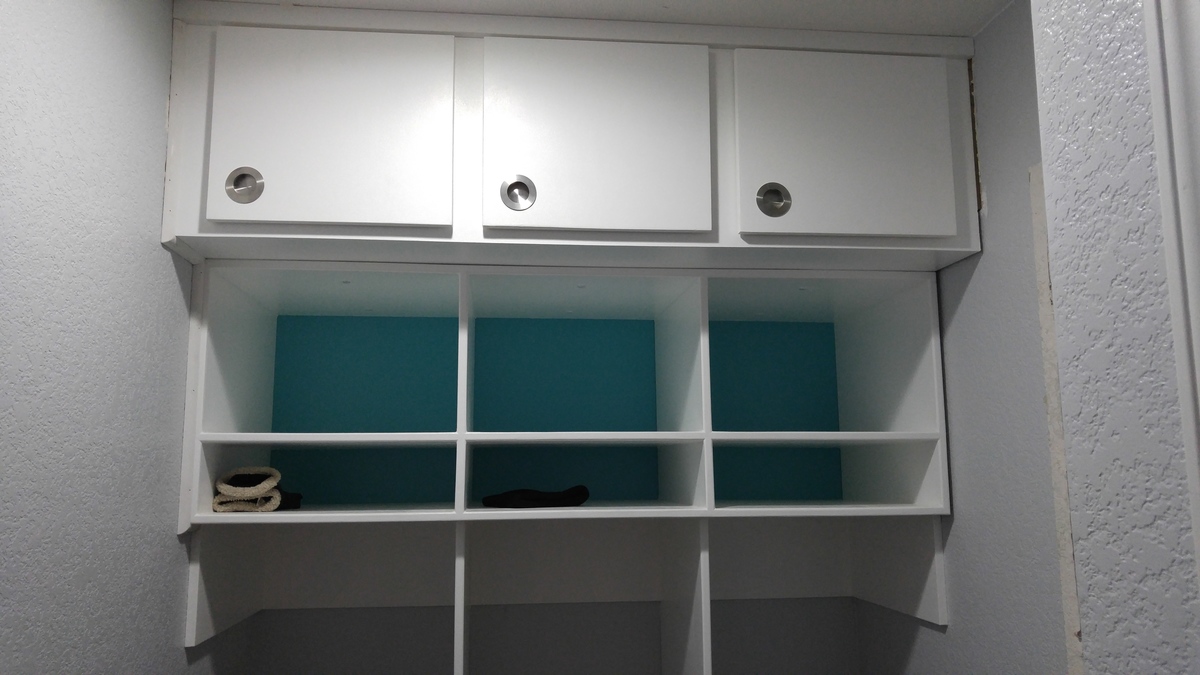
Closet-to-Mudroom Conversion
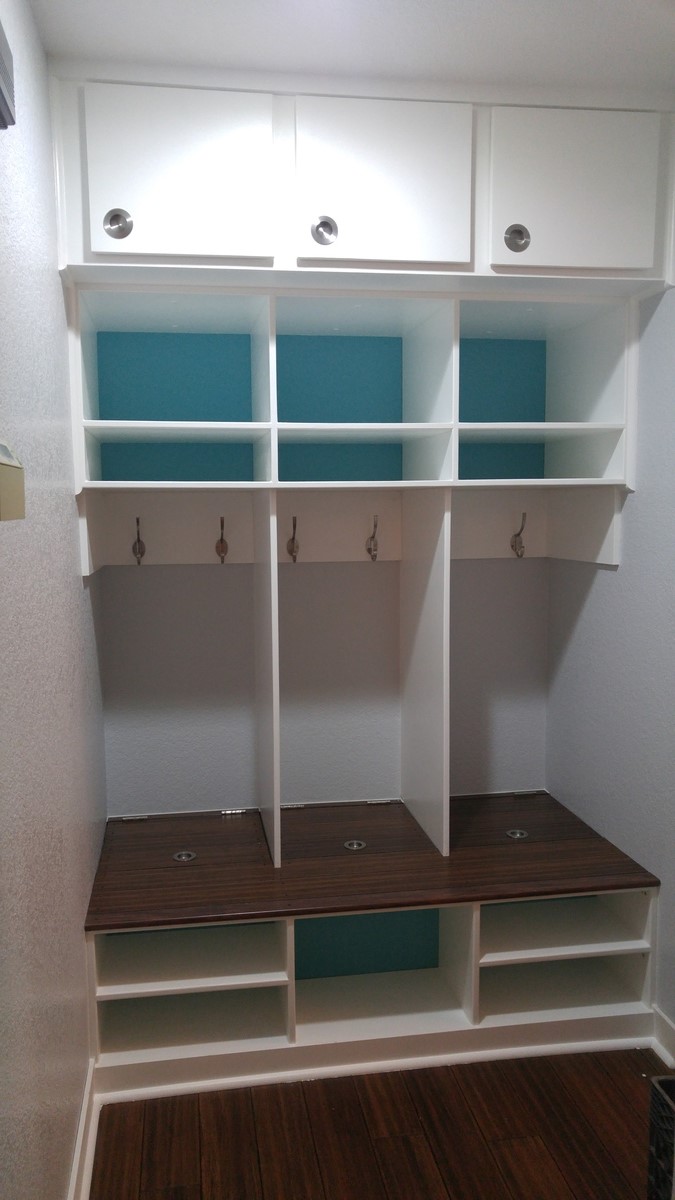
Starting from the Extra Wide Shoe Bench plans, I expanded the upper section considerably. The cabinetry is all cut from hardwood plywood and joined with pocket screws and glue. I don't have a table saw, so a circular saw and straightedge were extensively used.
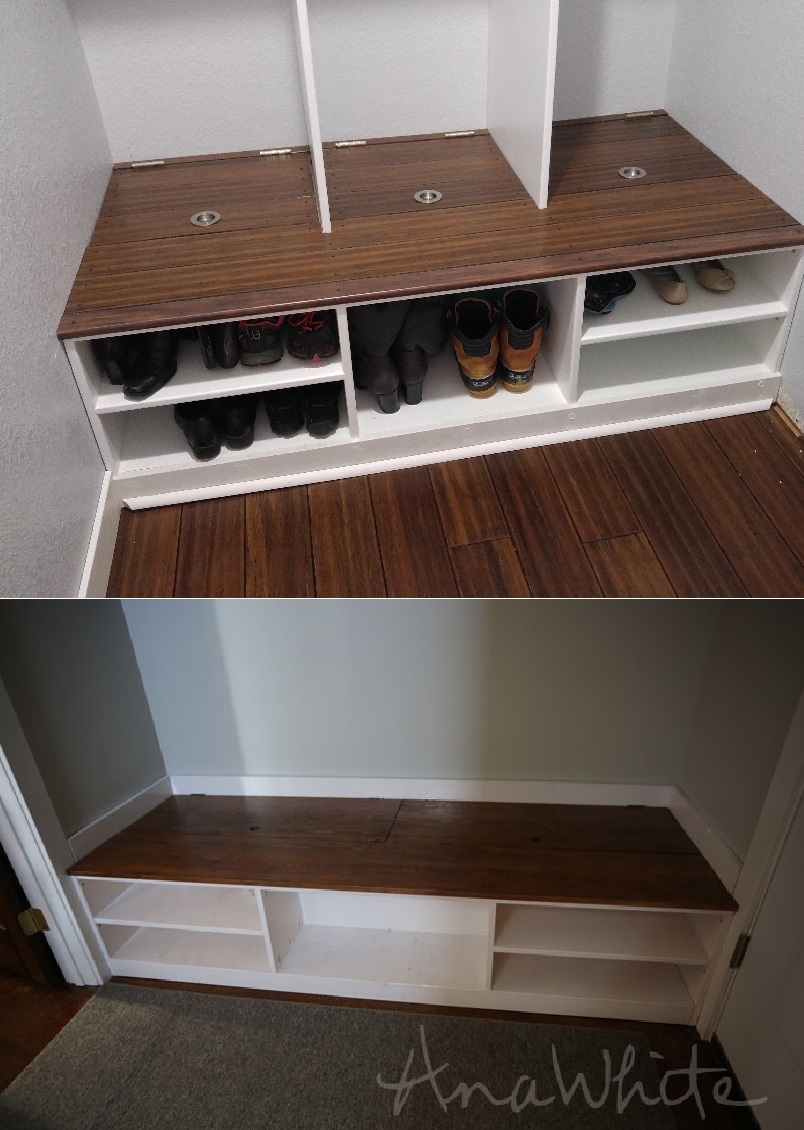
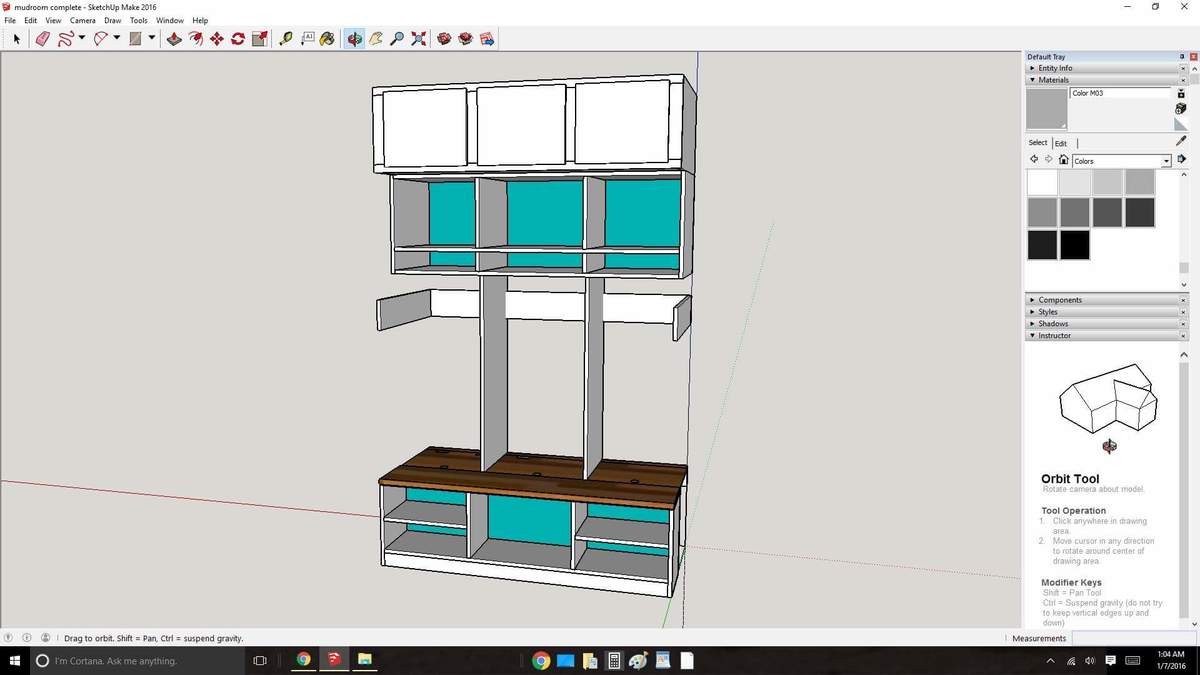
Estimated Cost
$400.00
Estimated Time Investment
Week Long Project (20 Hours or More)
Finish Used
Gloss paint.
Recommended Skill Level
Intermediate
Modified Triple Pedestal Table
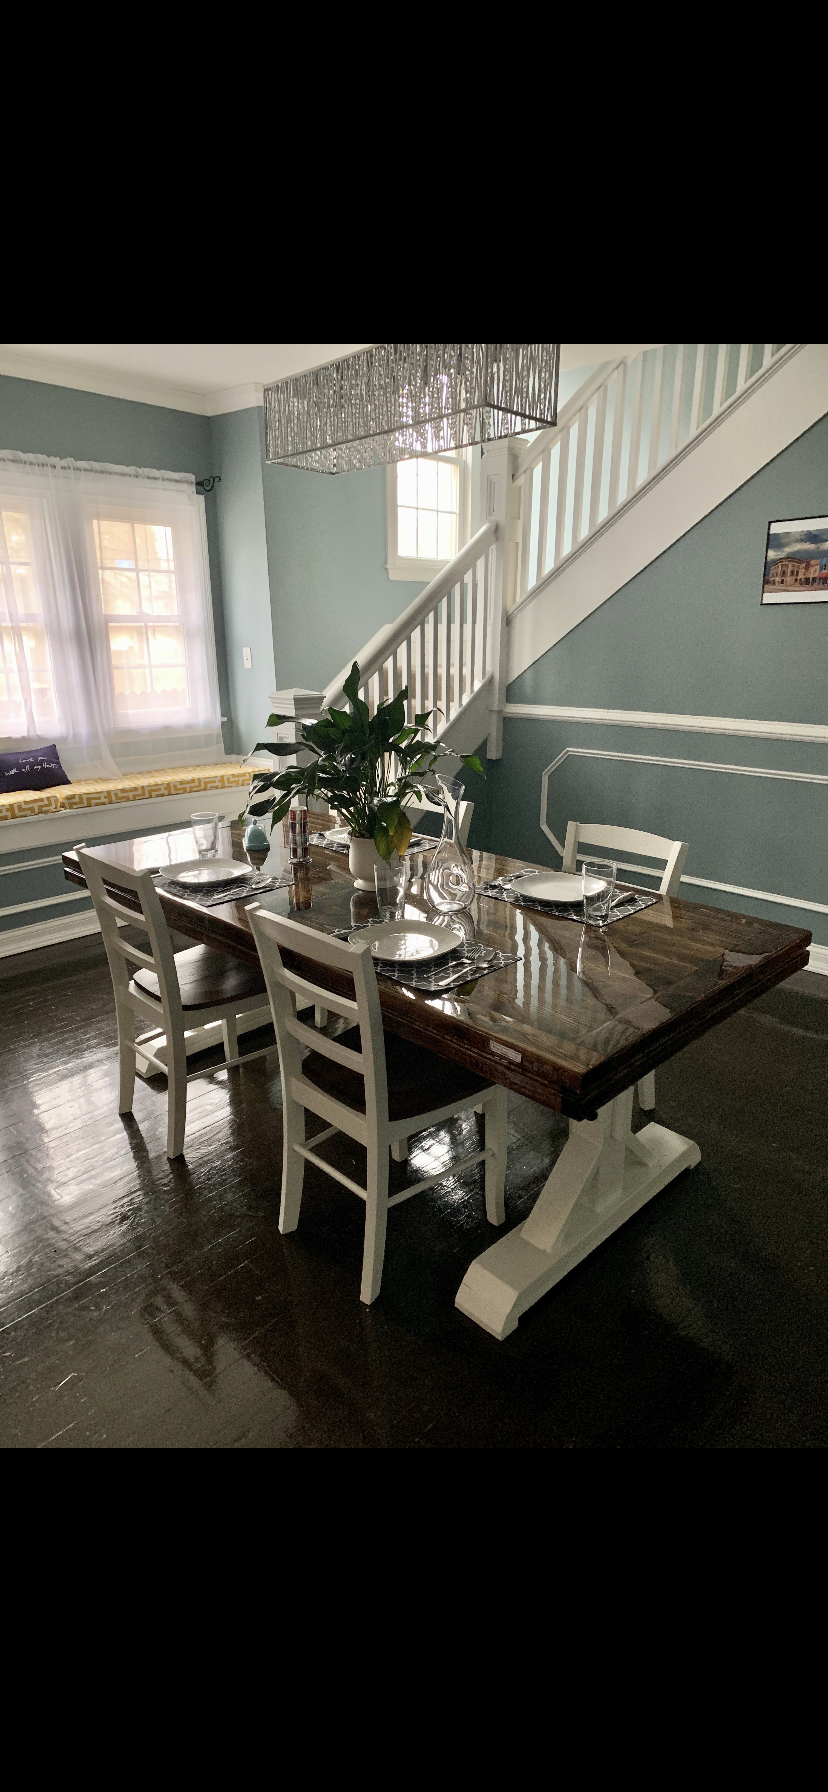
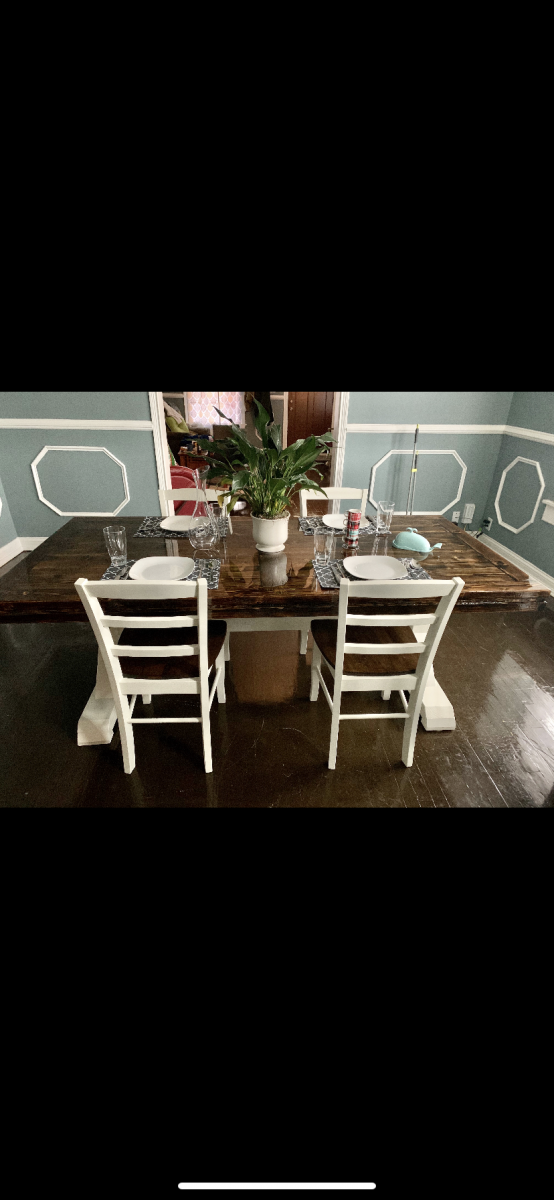
this table and chairs was a joint effort between my lifelong best friend’s son and I, his dad had just recently passed away and it was a good way for us to stay busy and also to help furnish his new house he’d just moved into, we used stock pine 2x and 1x lumber from the big box store and StoneCoat countertops epoxy resin on the table top.This was a lot fun and not too difficult to make and we were super happy with the way this project turned out!
Built from Plan(s)
Estimated Cost
approx $130 in lumber and supplies and about an additional $100 in the epoxy resin
Estimated Time Investment
Weekend Project (10-20 Hours)
Finish Used
Minwax wood conditioner and Minwax dark walnut stain
Recommended Skill Level
Intermediate
Quad Corner Bunks Beds with Storage Drawers
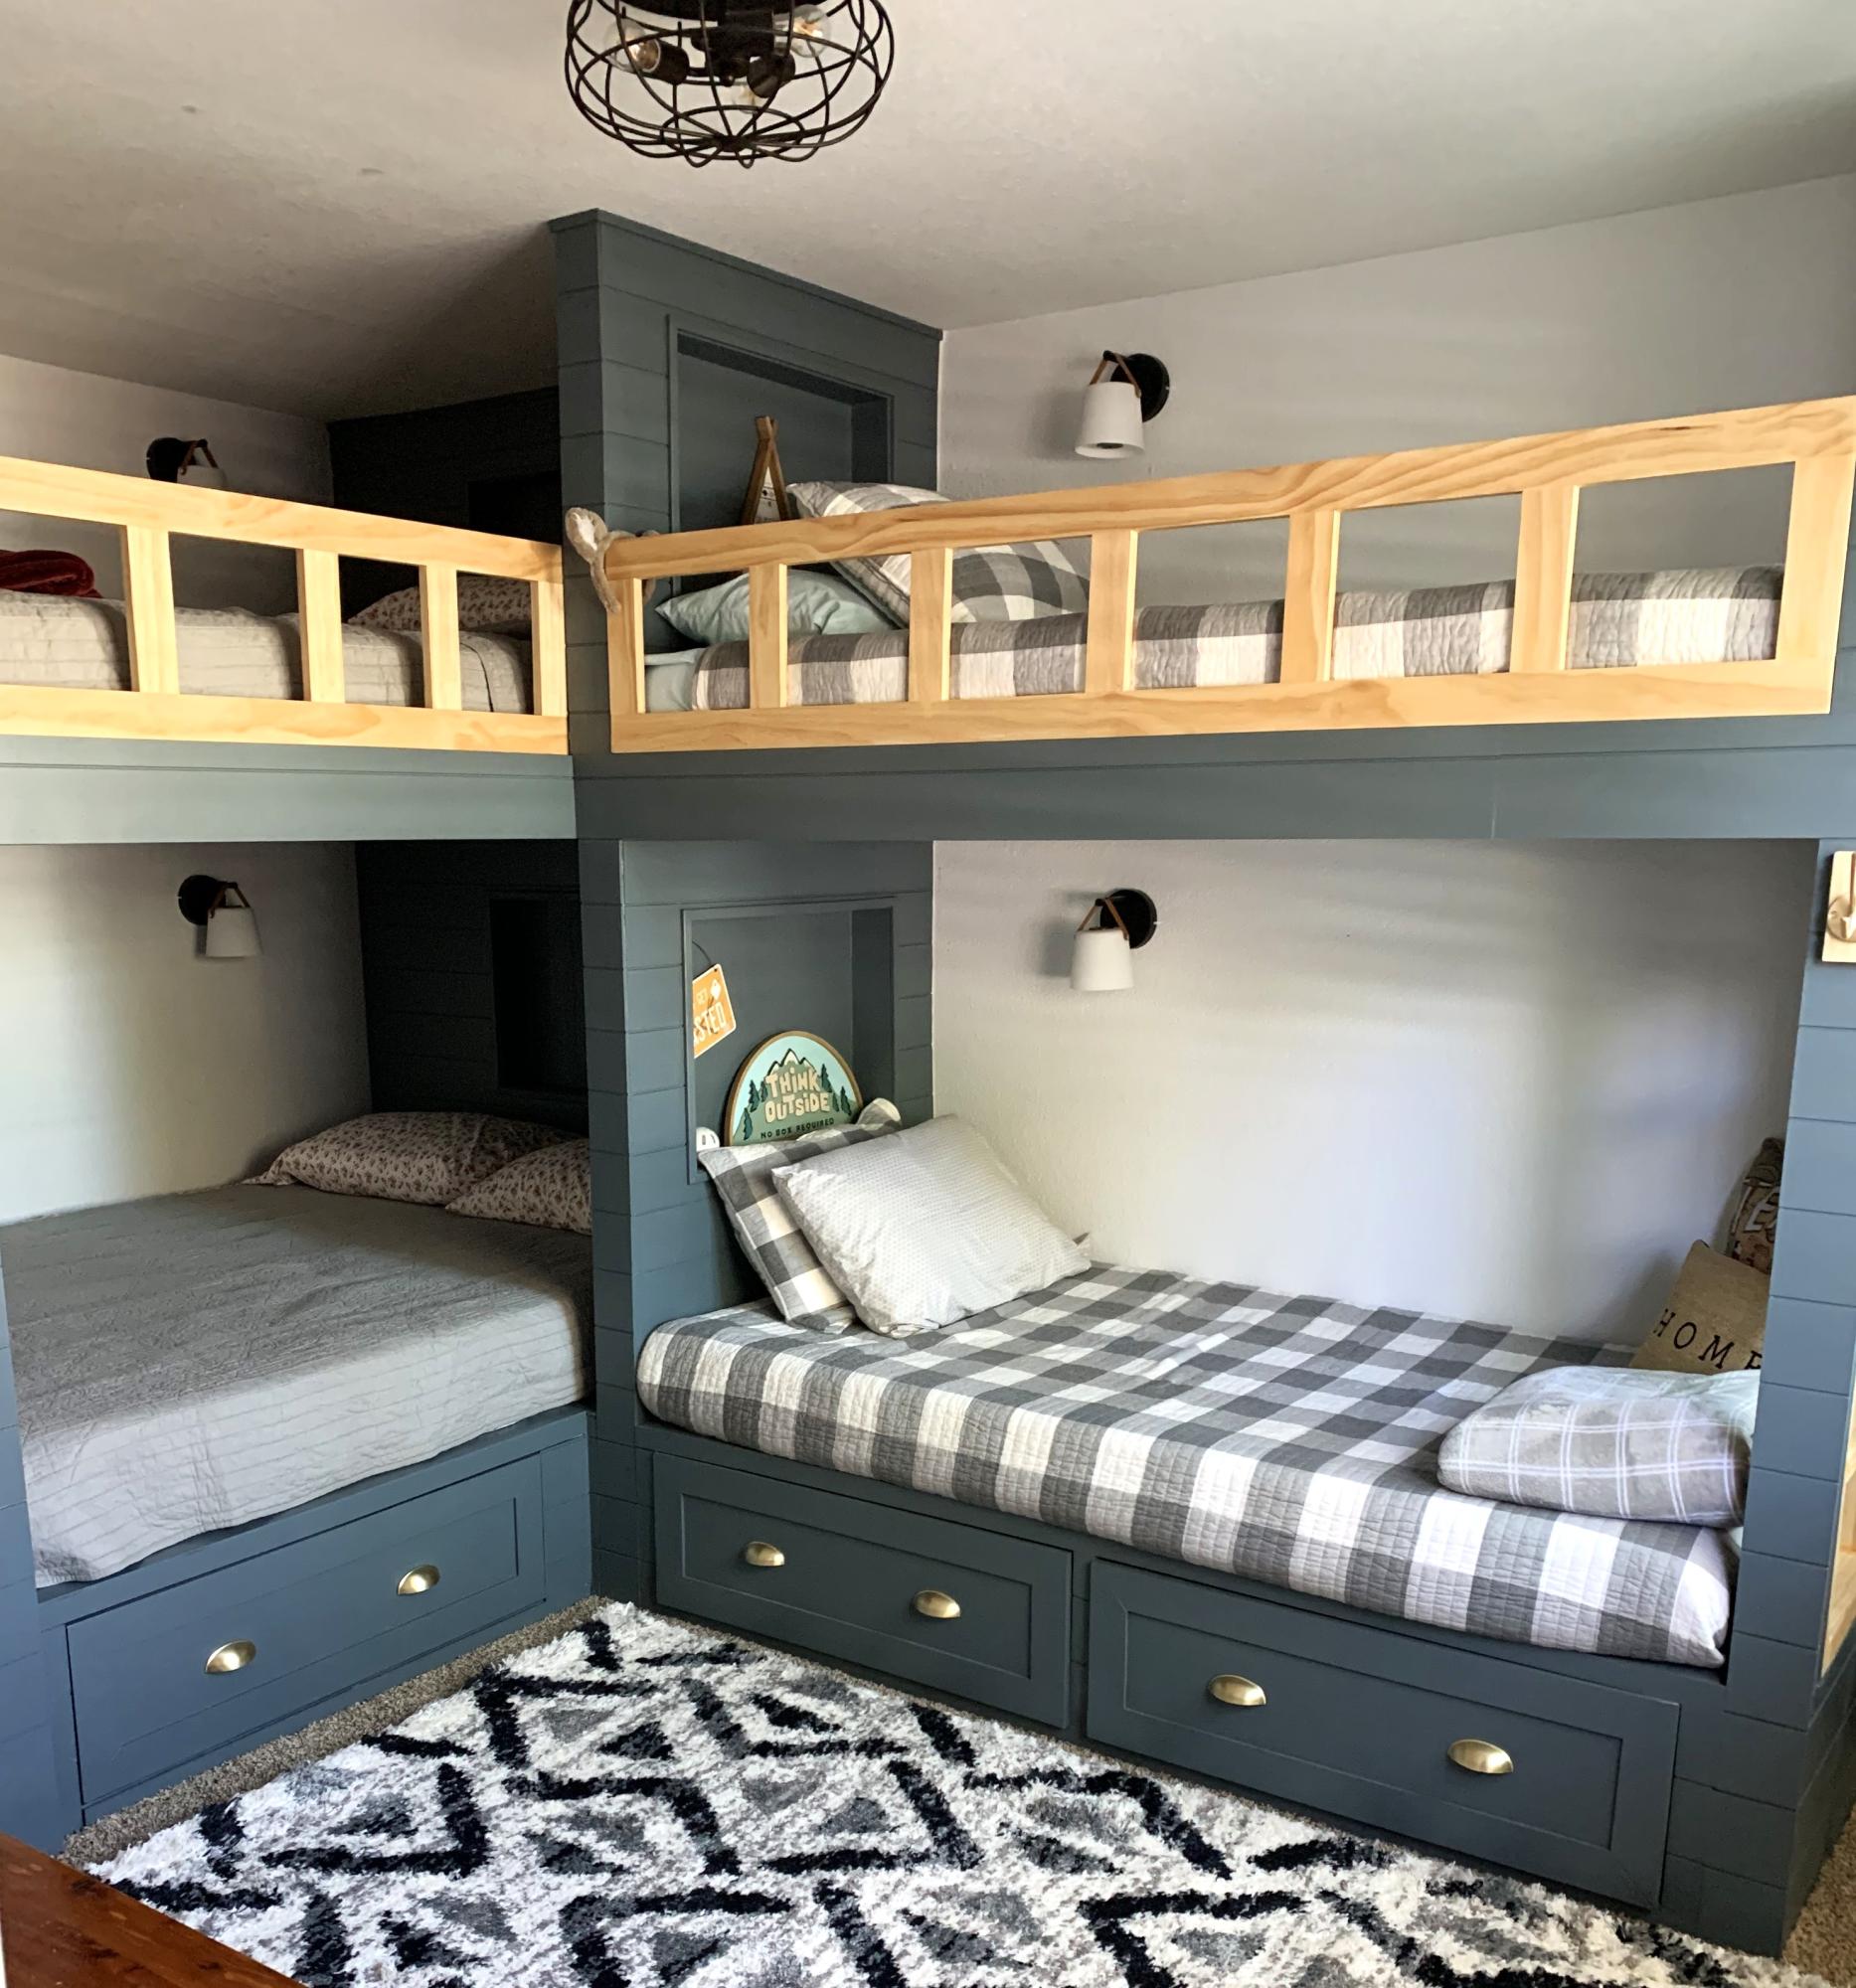
The queen and twin bases were base on your twin bed with storage. Pretty easy to do. This is my first time doing anything this big. I live in a four season resort town and needed beds for heads for ski season.
Debbi H - IG - callintn
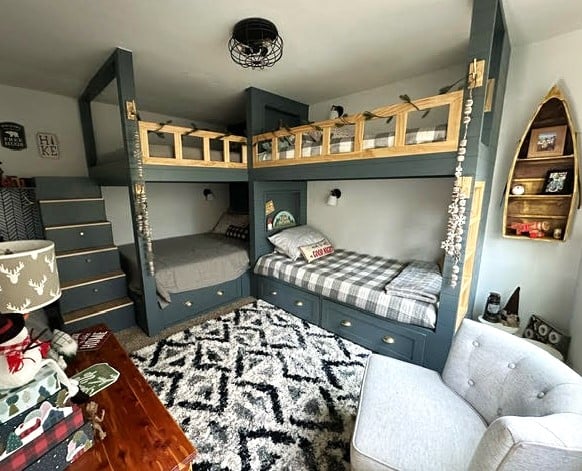
Built from Plan(s)
Sandbox with benches
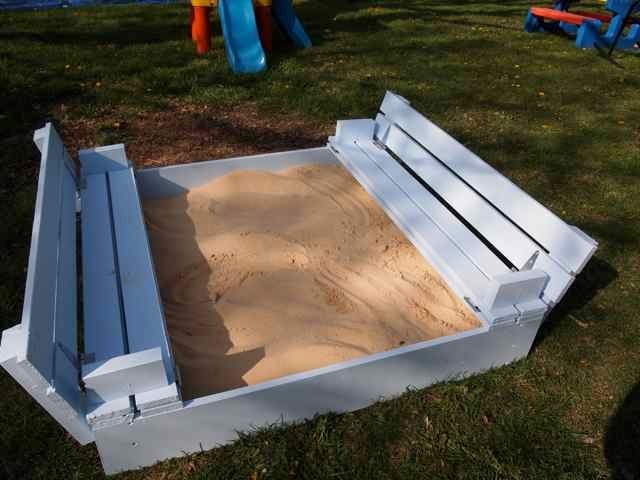
I knew I needed a sandbox for my toddler, and saw the original on pinterest. I was so happy when I came here looking for designs and saw that someone had created a plan for this. I think I'm more excited about it than my little guy is.
The plan was easy to follow, and it went together quickly. Thank you very much for these plans

Built from Plan(s)
Estimated Cost
$50
Estimated Time Investment
Afternoon Project (3-6 Hours)
Finish Used
Exterior paint in light blue.
Recommended Skill Level
Starter Project
Comments

Tue, 04/10/2012 - 10:45
This makes me smile :o)
Your son is adorable, and I totally "get it" when you say that you're more excited than he is! haha. Great job!
Wed, 04/11/2012 - 19:43
Great sandbox, it looks
Great sandbox, it looks awesome! Your son is going to have so much fun in it this summer.
Tue, 10/16/2012 - 19:32
Sandbox with benches
You rock Ana! Your plans are some of the best quick builds with lots of features. I built this sand box in two hours and my son is having the best time. This is a Texas winter replacement for the beach and the backyard pool.
Mon, 05/23/2016 - 19:44
2x8 lumber instead of 1x8
So I just started making this box and it's truly an awesome design but I couldn't get 1x8 lumber instead I got 2x8... For the box base, will this make an difference in the mechanics of the seat and back opening..and the overall size of the box is 1.5" longer at 49" instead of the 47" the plans detail.. I was hoping that it won't but I think it might interfere with the 2x4 support the seat back..
I right in the middle of this project so I need to get on with it as it's nice tomorrow..
THANK YOU
ED
Junior Size Classic Bunk Bed
We built this in our living room start to finish - we live in an NYC apartment. Because of the small room size we chose to modify the plans to a small mattress - hoping that it will last our boys until they are about 5 and 7 (currently 2 and almost here). This blog post outlines our buy and cut list for the modified size: http://wp.me/p3DCu3-Kd
Built from Plan(s)
Estimated Cost
$215 (plus $200 for mattresses and bedding)
Estimated Time Investment
Weekend Project (10-20 Hours)
Finish Used
None
Recommended Skill Level
Beginner
How to make a 2 year old happy (the long way)
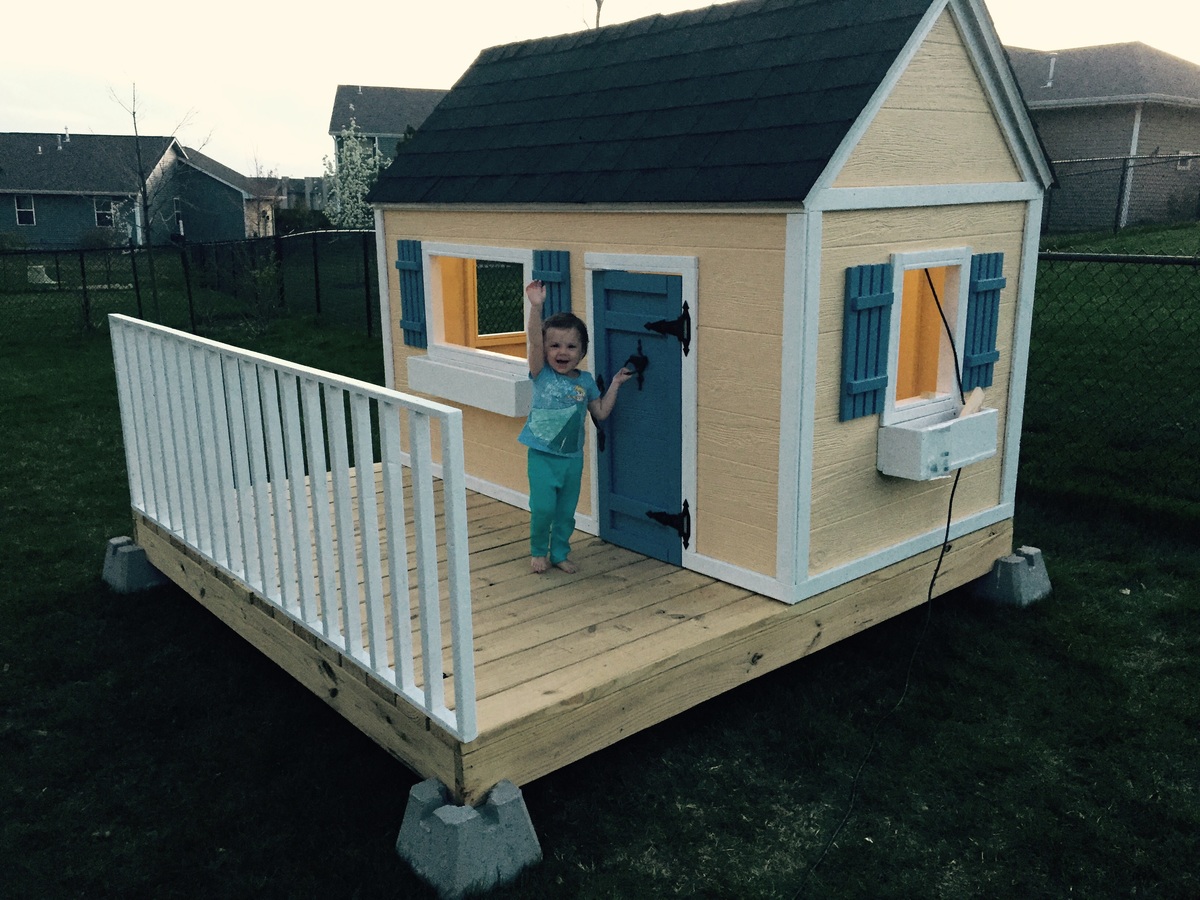
I started this in my garage this winter so that it was ready for spring. Nothing in this is too complicated but it requires some patience. It was all worth it to see how excited my daughter was to finally play with her friends.
Built from Plan(s)
Estimated Cost
$500
Estimated Time Investment
Week Long Project (20 Hours or More)
Finish Used
Exterior paint from SW
Recommended Skill Level
Intermediate
Comments
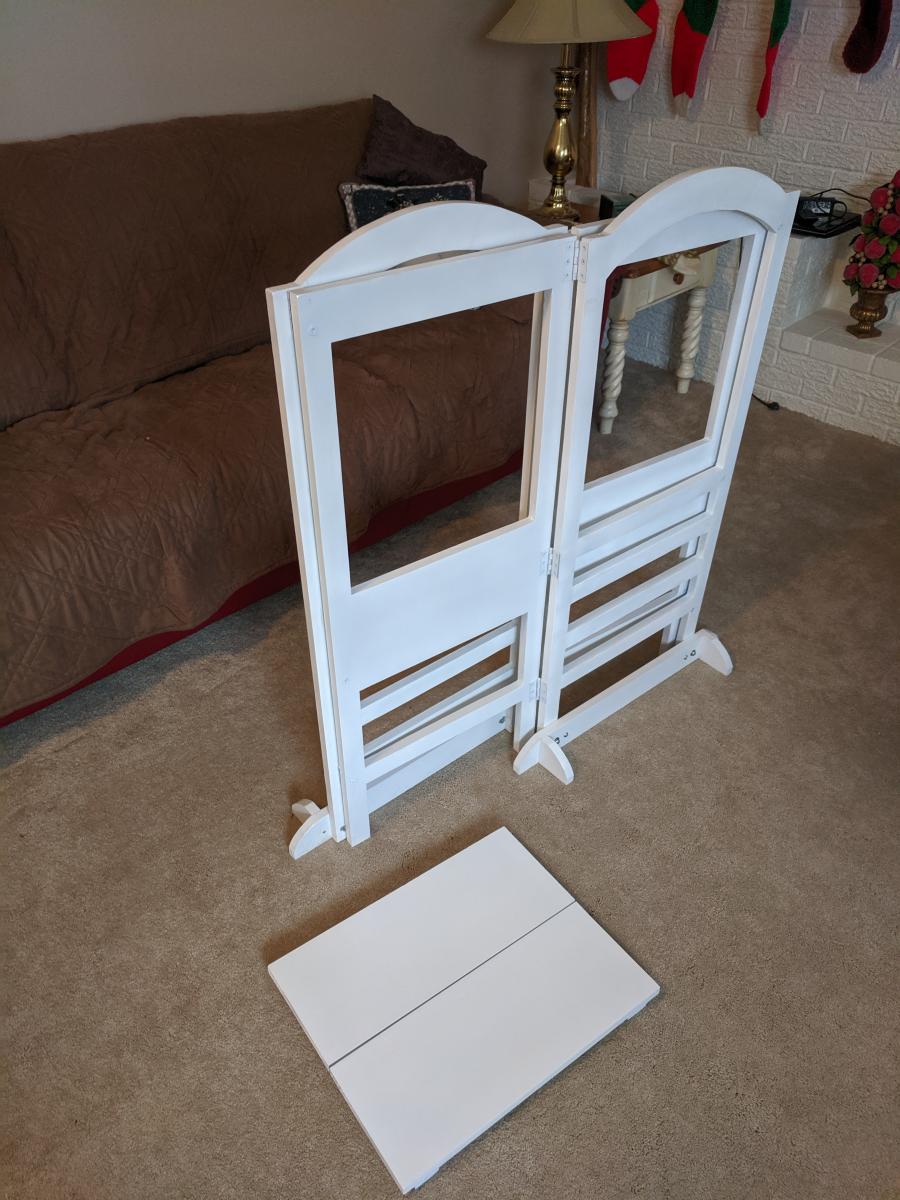
Christmas Helper Towers
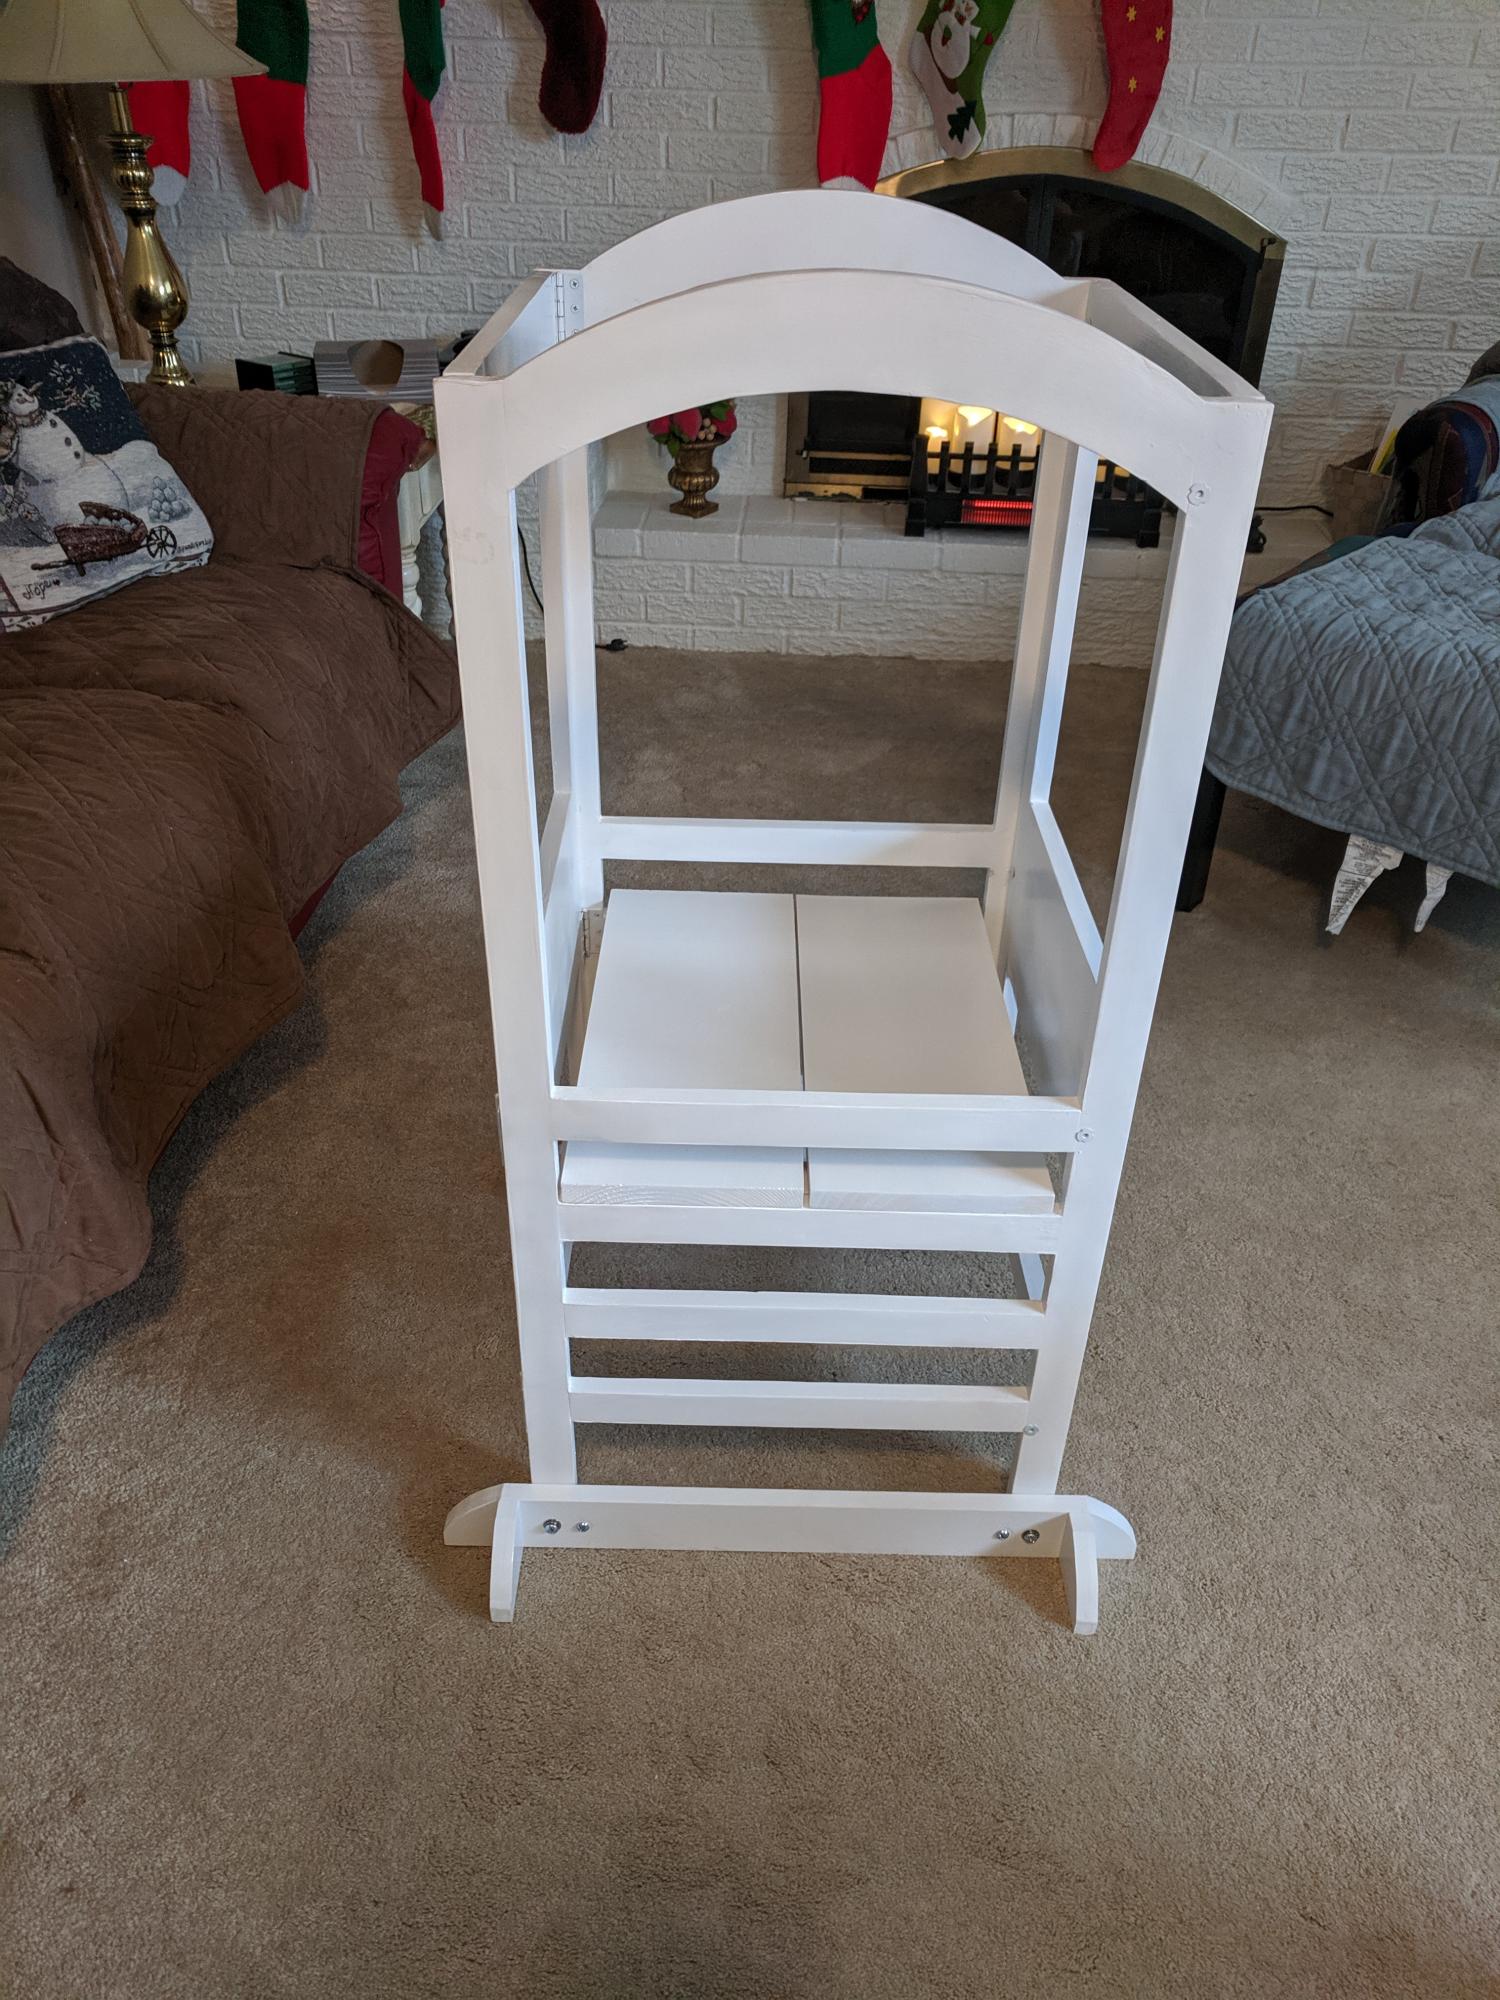
I built two of these for my grandkids for Christmas. One for each of my kid's homes. I used Phillip Moore's folding modification where each side is a separate panel. (Great mod!). I used one T-Nut per hinge on the side where short screws had to be used. I just felt a little safer having that connection that cannot come apart since my grandkids can get pretty active. The kids love them!! Thank you for this plan!
Built from Plan(s)
Estimated Time Investment
Day Project (6-9 Hours)
Finish Used
Paint and semi-gloss clear coat for easy cleanup. I recommend spray paint because no matter how hard I tried to avoid it, the sharp inside corners formed drips with a brush. Finally sanded them off and spray painted with much greater success.
Recommended Skill Level
Intermediate
Privacy Planter Fence
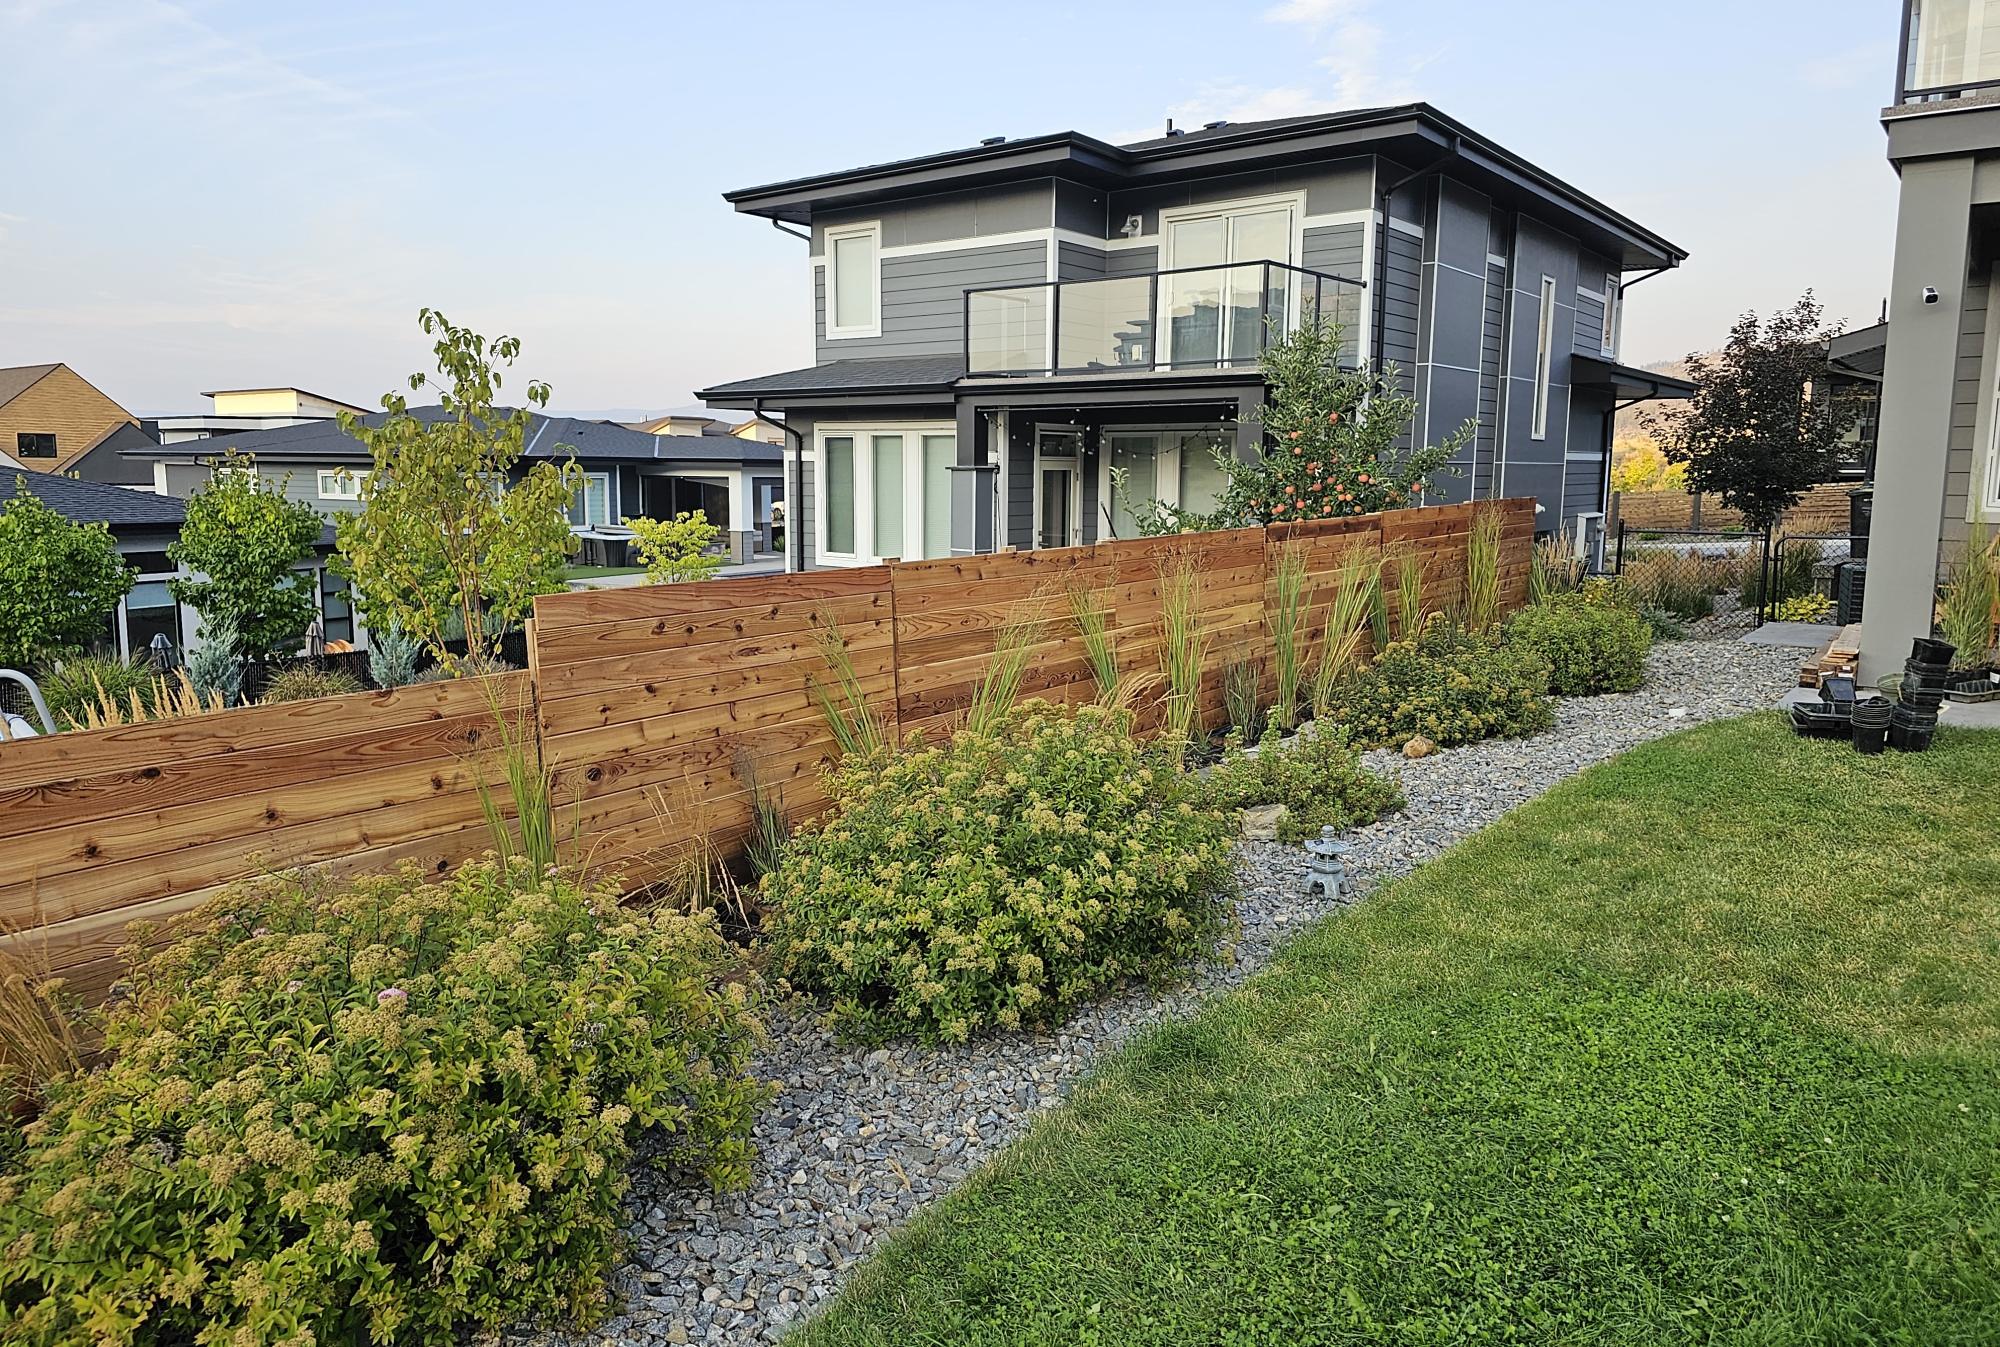
Created a privacy planter fence, using multiple planters. Most of the bases were custom sizes due to the existing rock wall. Tongue and groove cedar utilized and coated with linseed oil. I ensured the frames were square and plumb which the directions omit for some reason. Great week long project!
Kyle
Built from Plan(s)
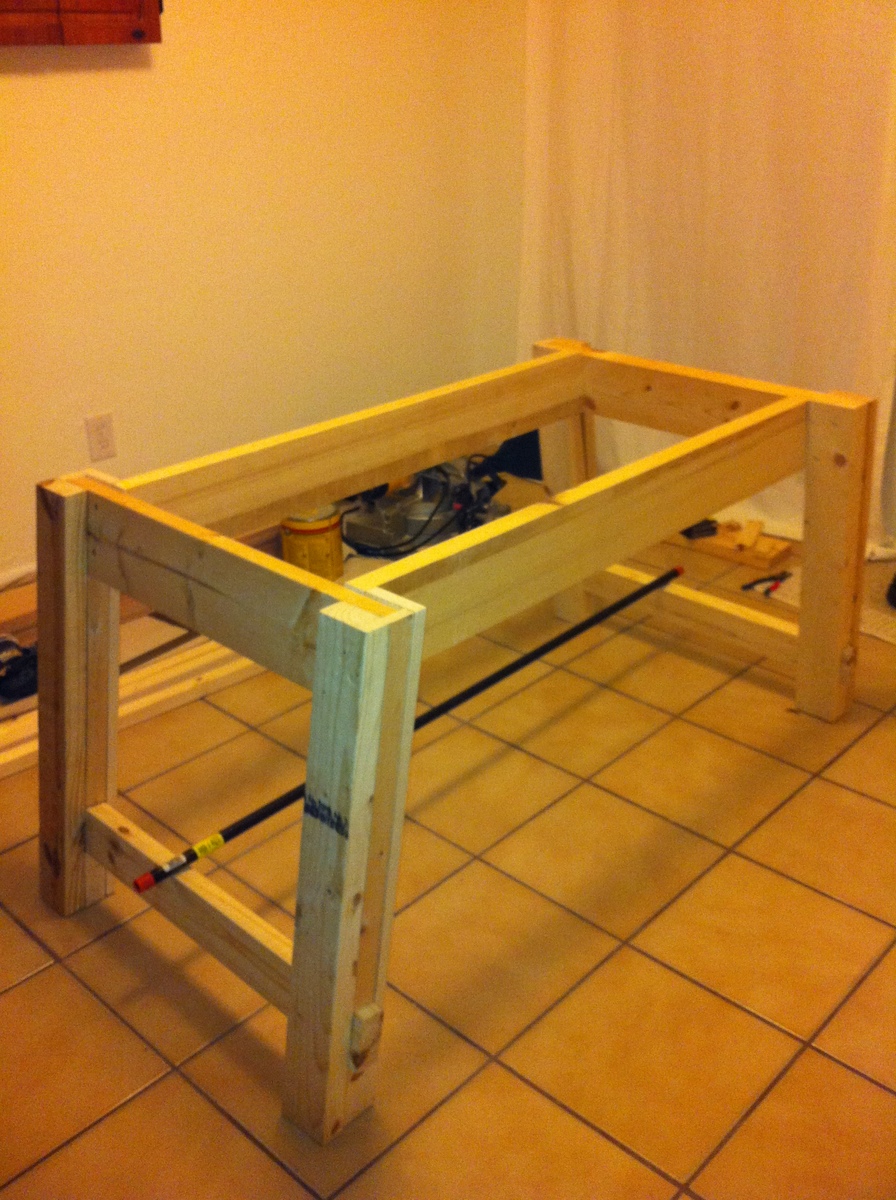
Benchright Farmhouse Table
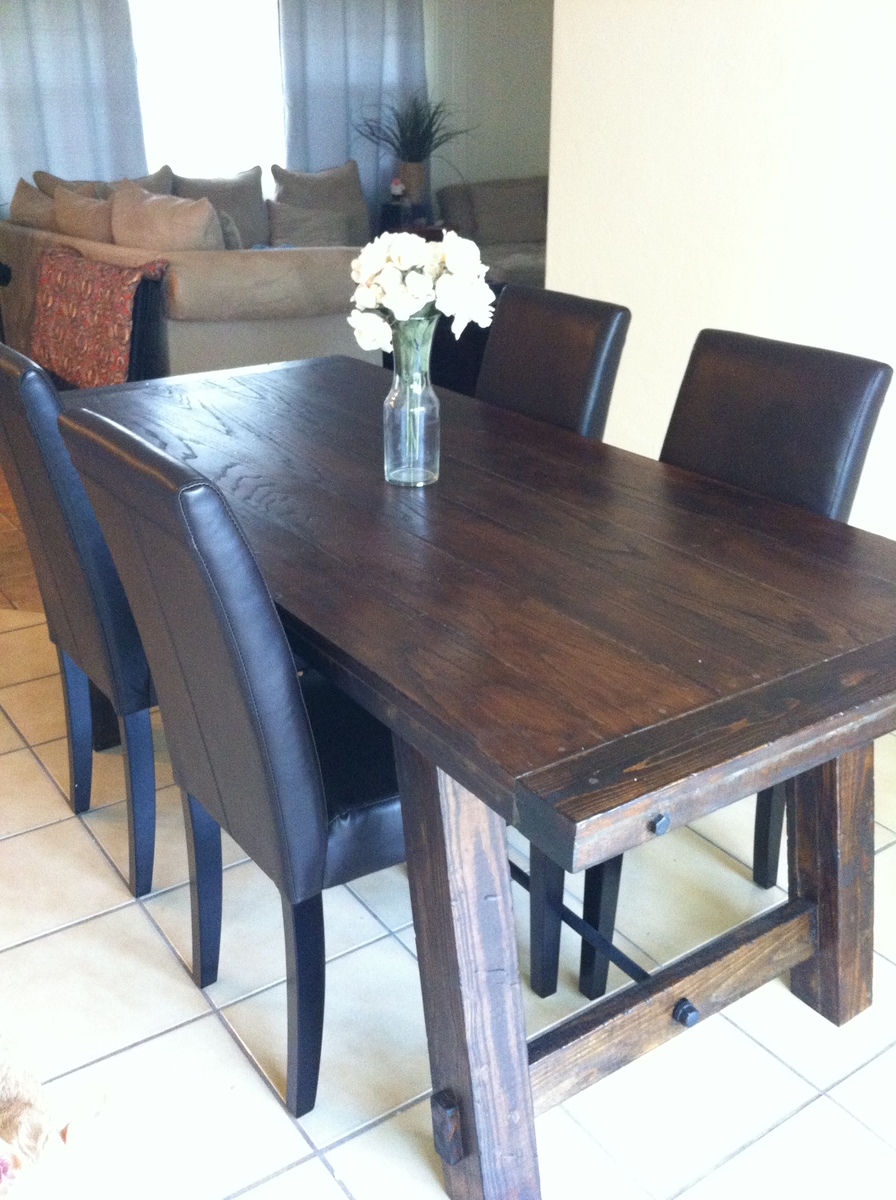
This was our very first project EVER and it came out beautiful! We needed a dinner table and couldn't find anything that came close to the thousand dollar Pottery Barn Benchright table. While searching for used furniture I came across these plans to build my own. After days of begging and convincing, my husband agreed to help me build it. Now he thanks me all the time! It was so fun and easy.
We did have a couple hiccups with the measurements. Ana did say to read through the plans and comments first, but we failed to write down and remember what others suggested. That being said, these plans were very easy. We took our time building this table since it was our first time using a miter saw and our first time building anything. Our table was a little more expensive than other braggers because we didn't use reclaimed wood and since we are beginners, we botched a couple cuts and had to buy a few extra boards :). After sanding, we took some chains and a hammer to the tabletop and legs to make a more distressed and rustic look. We painted the bolts and pipe black with Rustoleum Flat Black. Our pipe was longer than our table, so we had it cut. If you buy your pipe from Lowe's, they will cut and thread it for you. We couldn't find any hardware that look anything similar to the Pottery Barn Benchright. We checked Home Depot and Lowe's, but decided to settle with some plumbing knobs that screwed in the pipe. Once we painted everything and put it all together, we actually loved the pipe knob look more than the Pottery Barn table hardware!
This table is so darn sturdy and will last forever. I can't thank Ana enough, and thank you to everyone that posts these brags, because you helped me convince my husband and myself that we could do this!

Built from Plan(s)
Estimated Cost
$250.00
Estimated Time Investment
Weekend Project (10-20 Hours)
Finish Used
One coat of Minwax Wood Conditioner, Two coats of Minwax Wood Finish in Dark Walnut (the first coat will be ugly, but the second coat is money), One coat of Minwax Polyurethane in Clear Satin (we wanted our table to be protected, but not overly shiny.)
Recommended Skill Level
Beginner
Comments
Buffet Changing Table
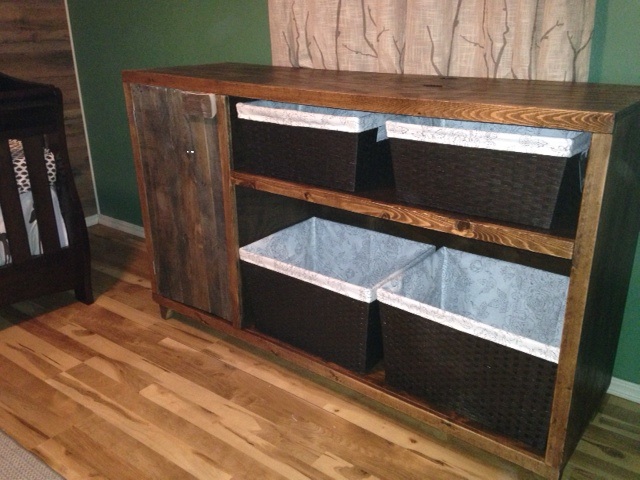
So I altered the Emersen Buffet a little. We needed a changing table and I liked the idea of having the baskets handy for diapers, ect.. I will add the changing pad topper after we get the actual pad.
The door is from a weathered pallet I reclaimed.
I must say this is my first large project of this type. I would have NOT been able to do it without Ana White's site. However, now I feel capable of a lot more.
Thanks so much.
T S
Estimated Cost
Probably less than $80 but even plywood is expensive!
Estimated Time Investment
Weekend Project (10-20 Hours)
Finish Used
Minwax - Special Walnut 2 coats, sand lightly, then coat of polyurethane - satin
Recommended Skill Level
Beginner
Kreg Jig Fun
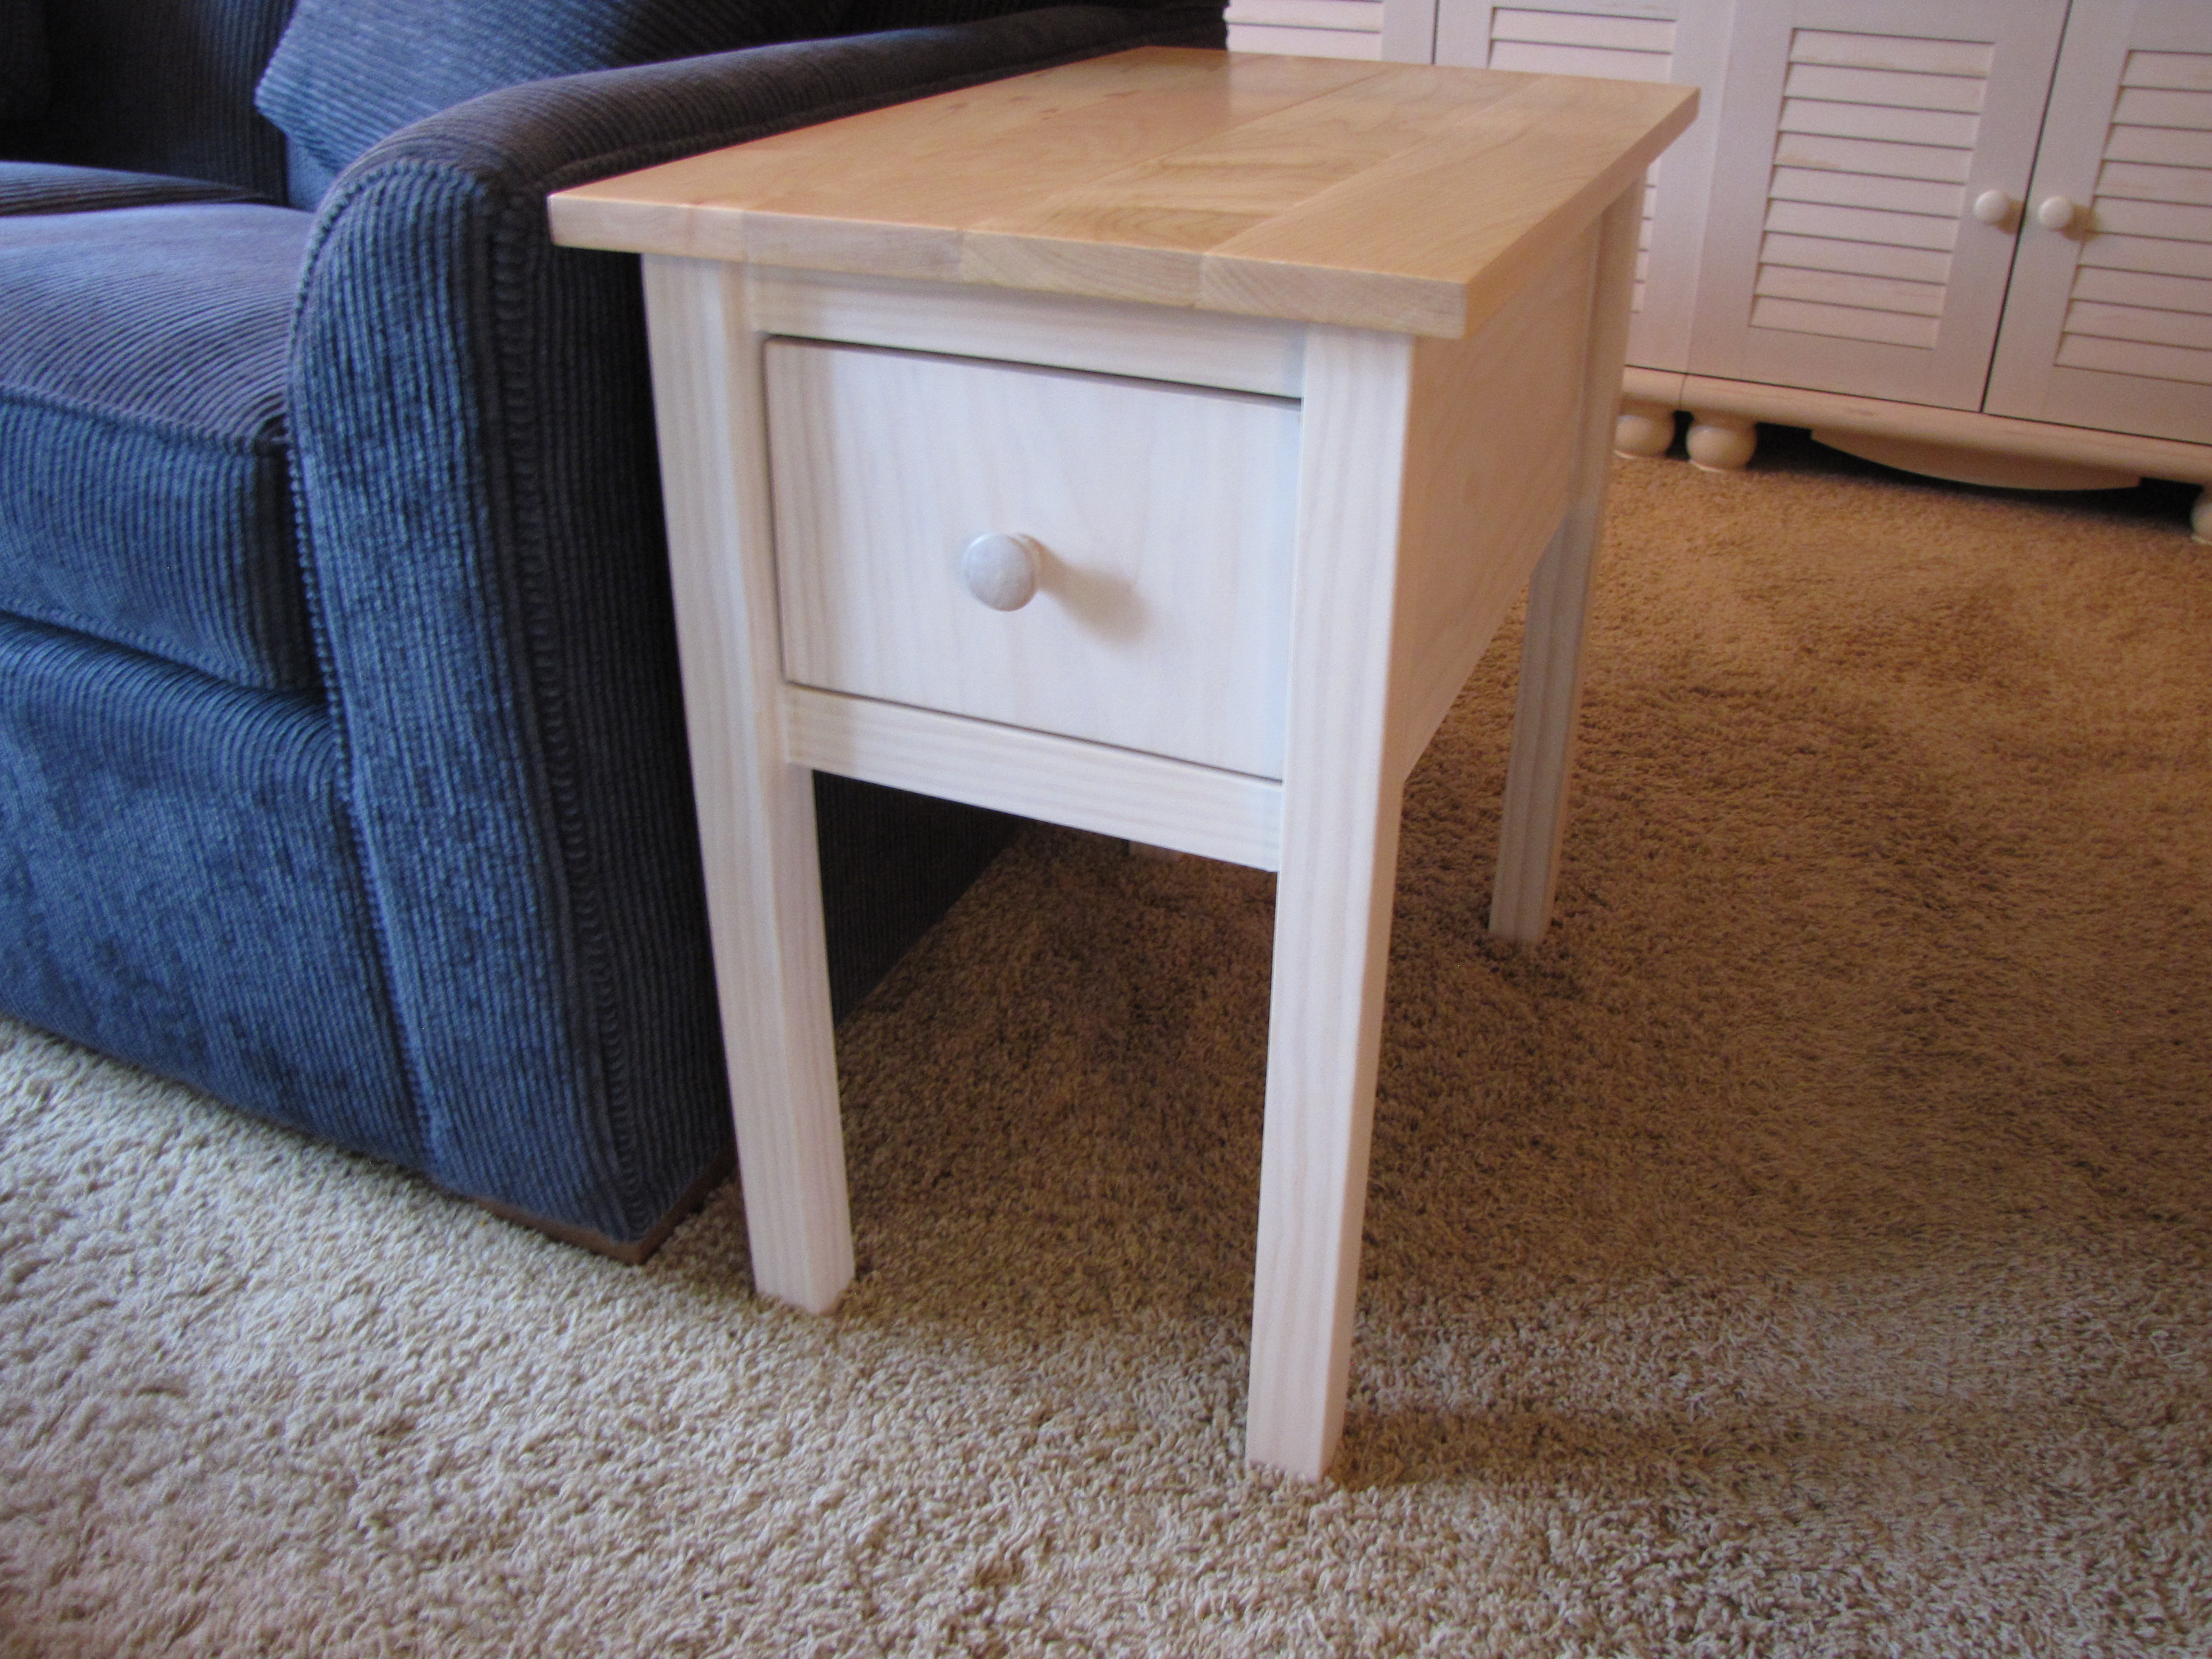
I used whitewashed clear pine for the bases and maple for the tops. I also built a corner table to match. I used a Kreg Jig for the first time for all 3 tables.
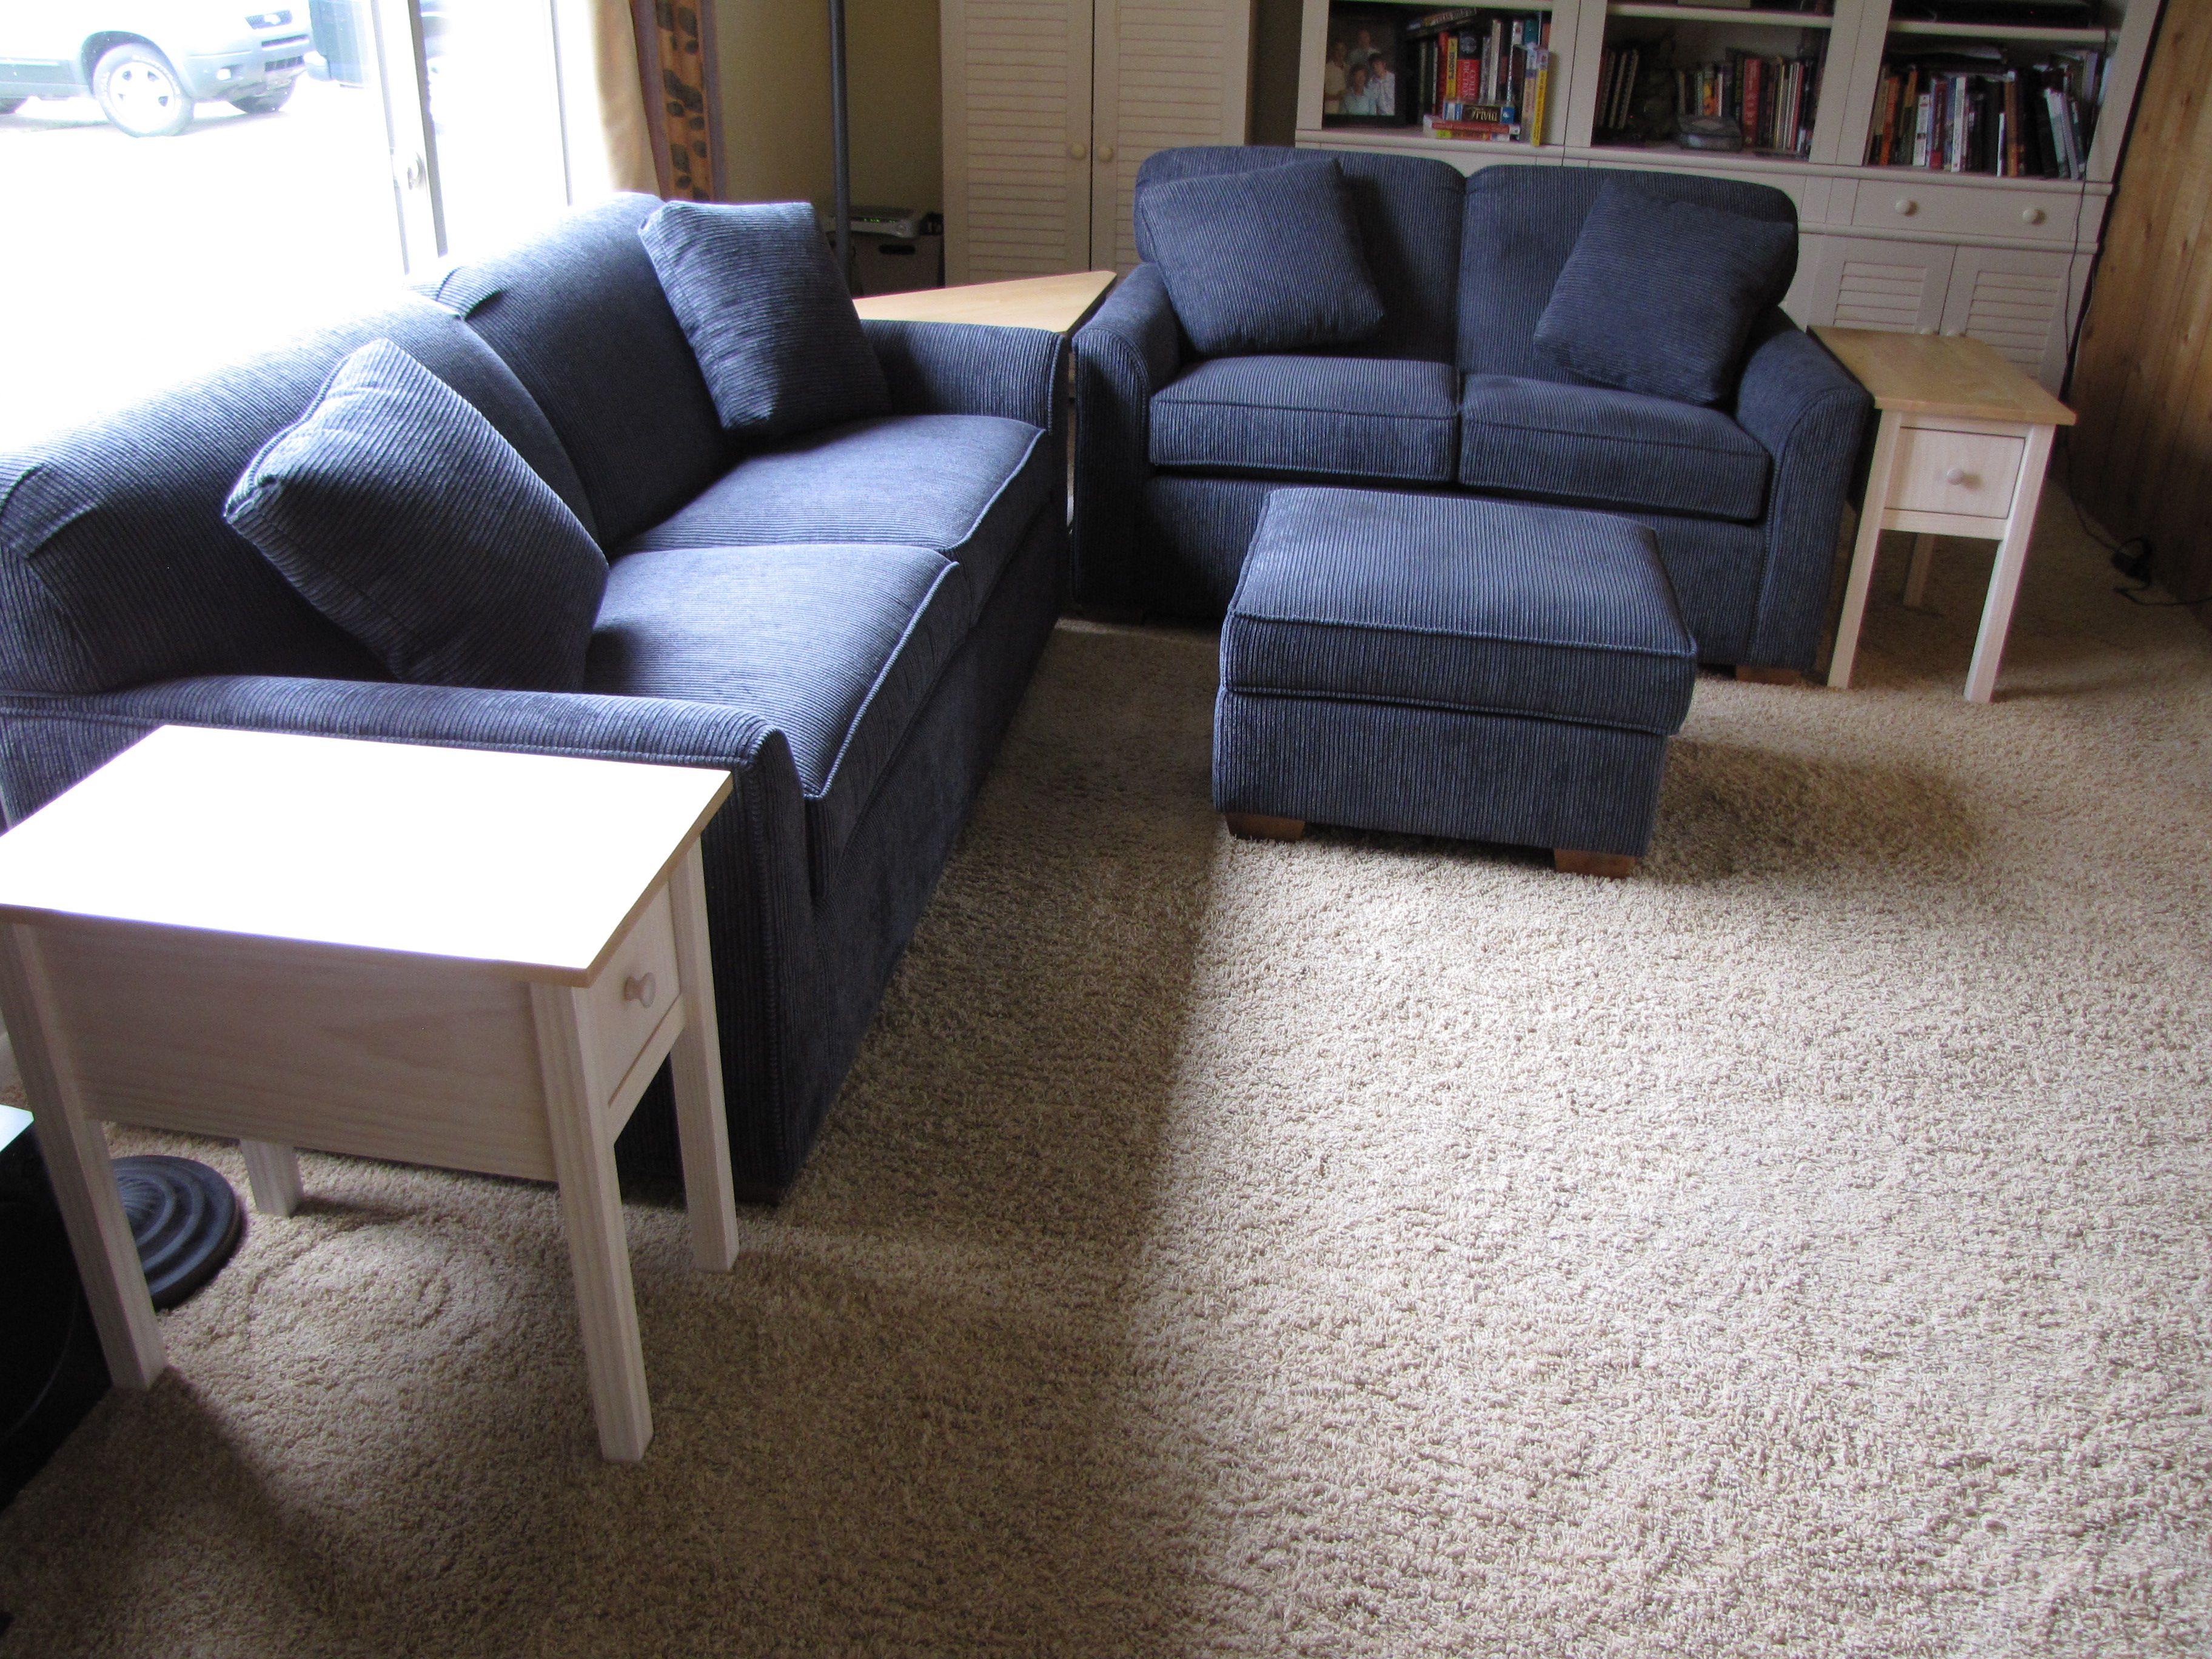
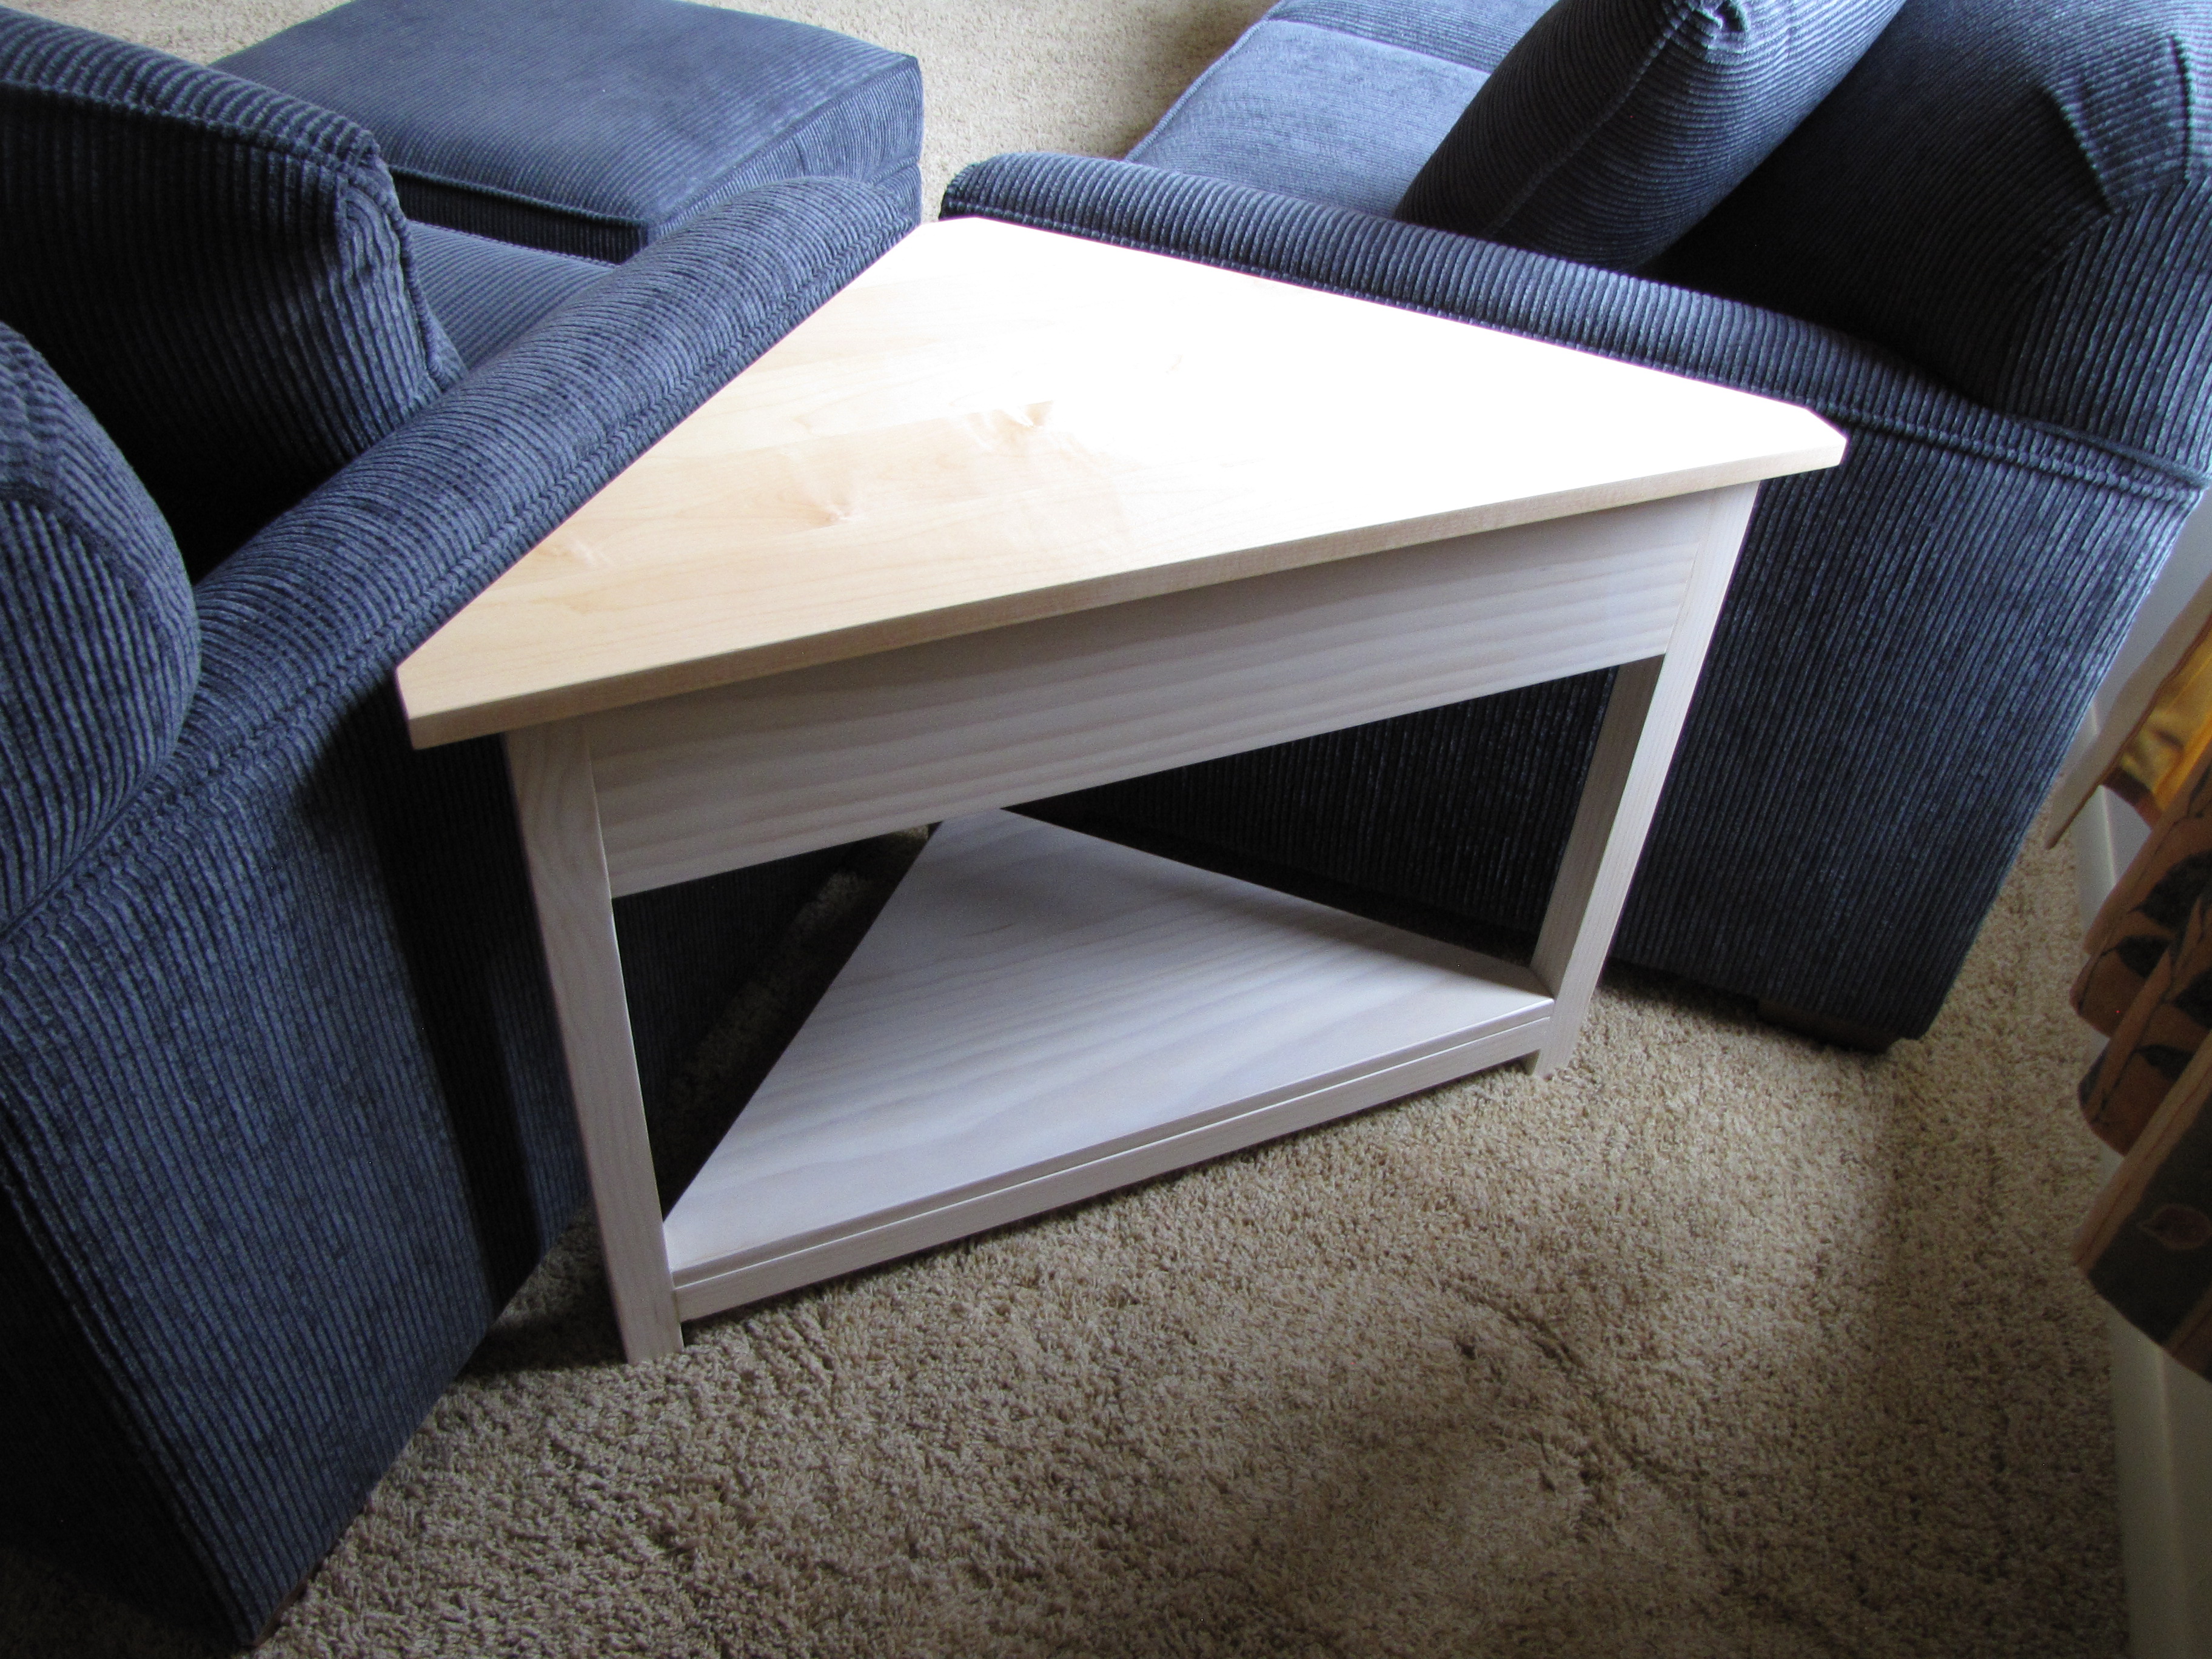
Built from Plan(s)
Estimated Cost
$200
Estimated Time Investment
Week Long Project (20 Hours or More)
Finish Used
Whitewash stain for the bases. Polyurethane for the tops.
Recommended Skill Level
Intermediate
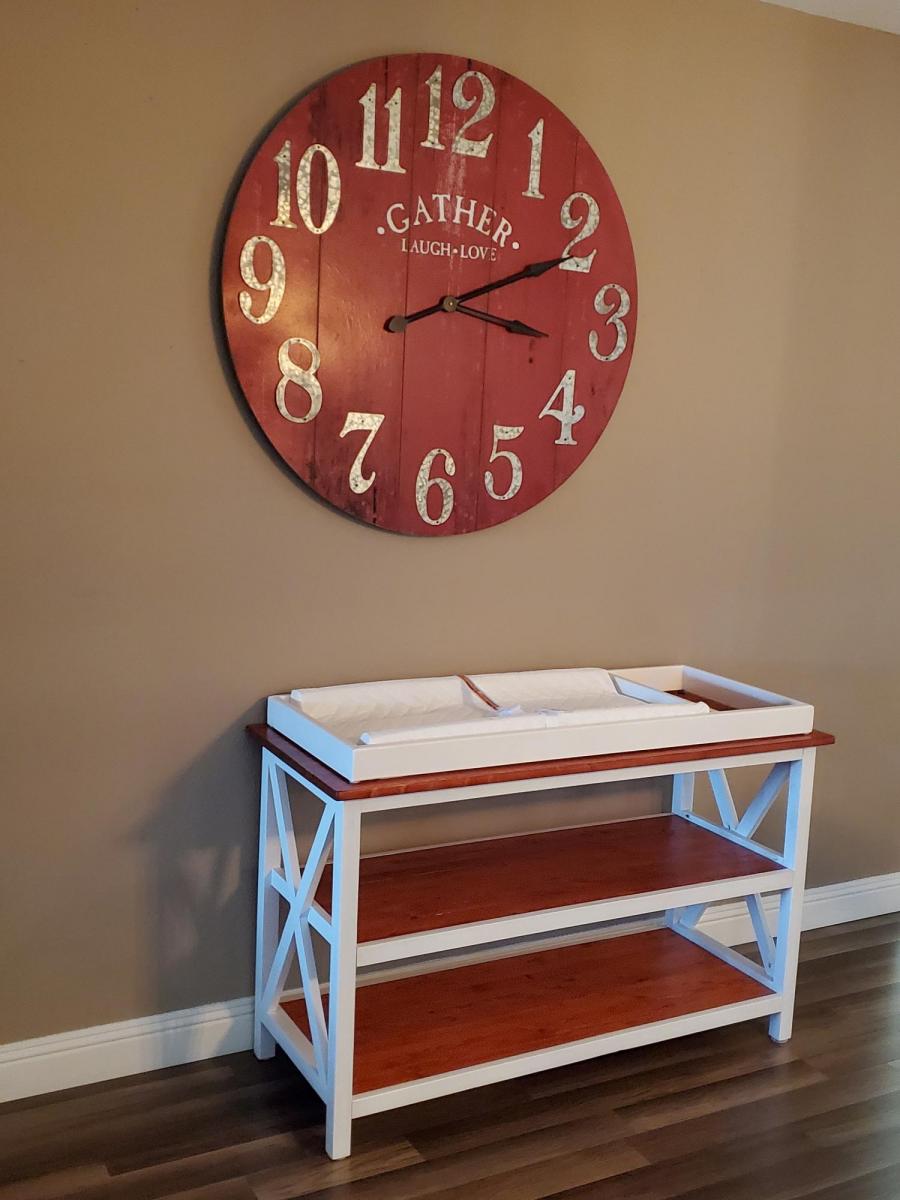
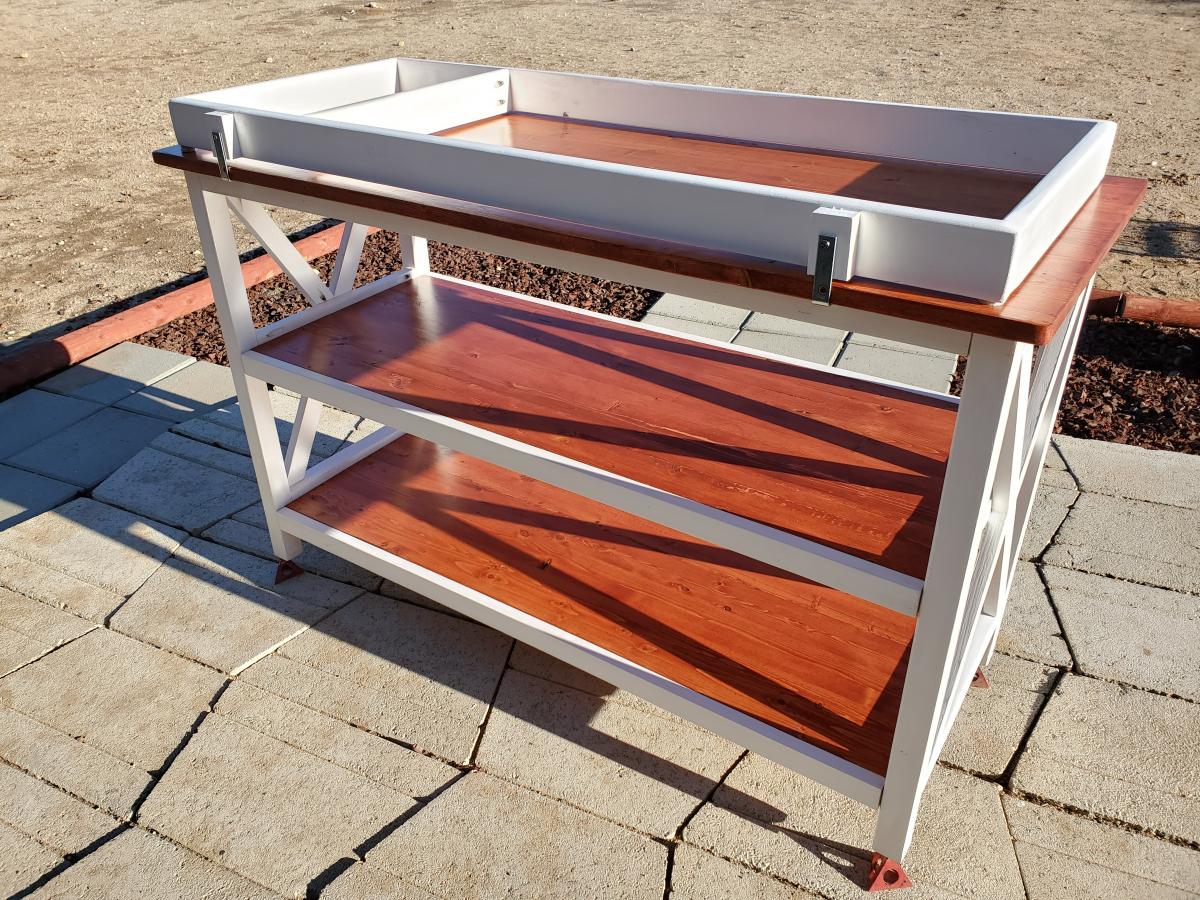
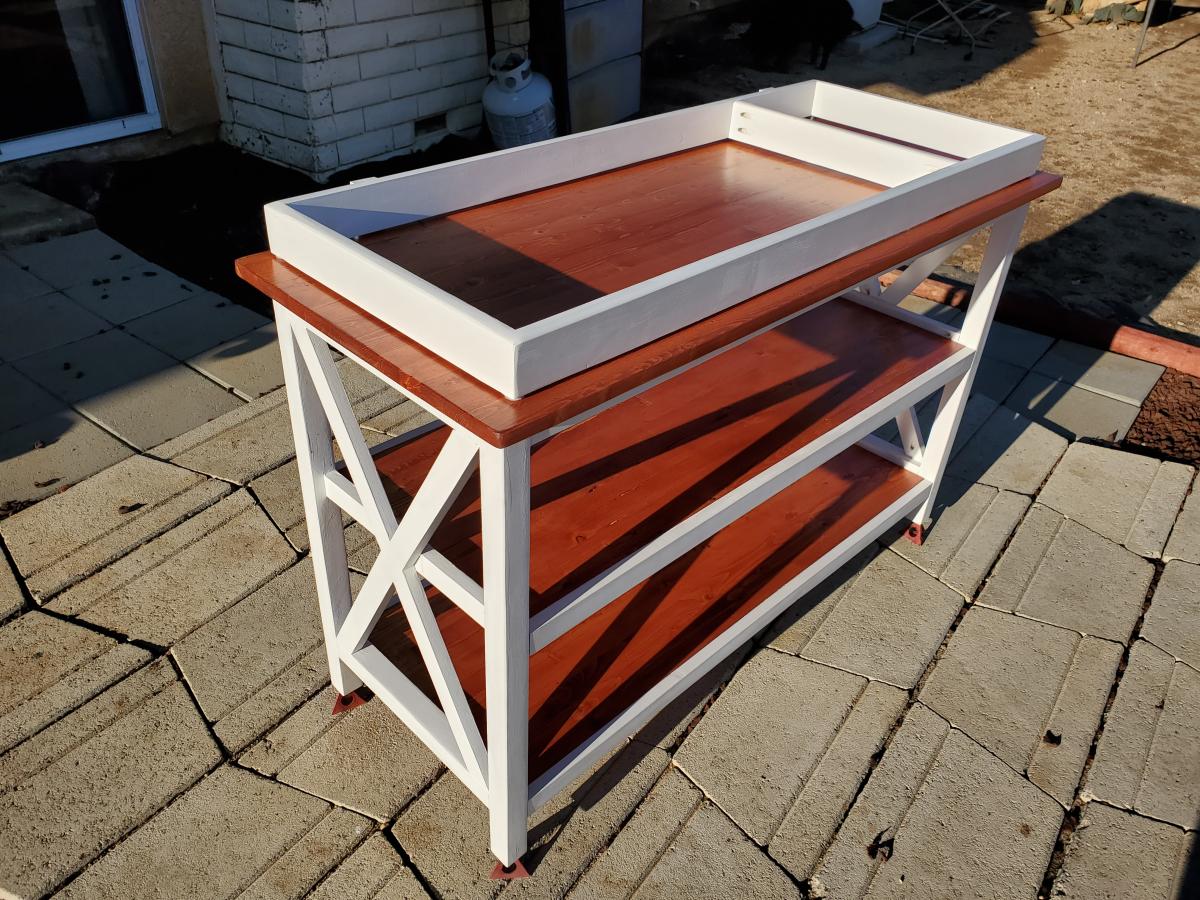
Rustic X DIY changing station w/ removable top

A Christmas gift for a friend who recently had a baby.
I went with one inch (3/4") project panels. The top shelf is 1"x 20". The lower shelves are 1"x 16", but I added 1 1/2" with two 1"x 2" banding. For the "x" brackets, I used 1"x 2" and added a middle piece to connect the legs and double as a side shelf ledge. The baby changing station top is secured by an L-bracket, where I added a block to keep the spacing even around the station top and screwed from underneath. (Note, you might have to trim the L-bracket to fit on the underside of the lip.) Also, I put on furniture felt under the baby changing station top to prevent any marring to the top shelf.
The removable top allows the changing station to become a standard shelving unit once the baby outgrows the changing station top. There are no holes drilled onto the topside of the top shelve as it's being secured by two L-brackets.

Built from Plan(s)
Estimated Cost
The wood cost was about $70.
Estimated Time Investment
Weekend Project (10-20 Hours)
Finish Used
Cherry stain, white paint, and poly.
I stained all three shelves first. I painted the rest of the project white, which needed two coats. Then I assembled the unit together. Afterwards, I applied three coats of poly with a foam brush. After the second coat of poly, i used a gray finishing pad. On the third and final coat of poly, I used a white finishing pad (finer than the gray pad).
I stained all three shelves first. I painted the rest of the project white, which needed two coats. Then I assembled the unit together. Afterwards, I applied three coats of poly with a foam brush. After the second coat of poly, i used a gray finishing pad. On the third and final coat of poly, I used a white finishing pad (finer than the gray pad).
Recommended Skill Level
Intermediate
Chicken Coop with Built-in Planter
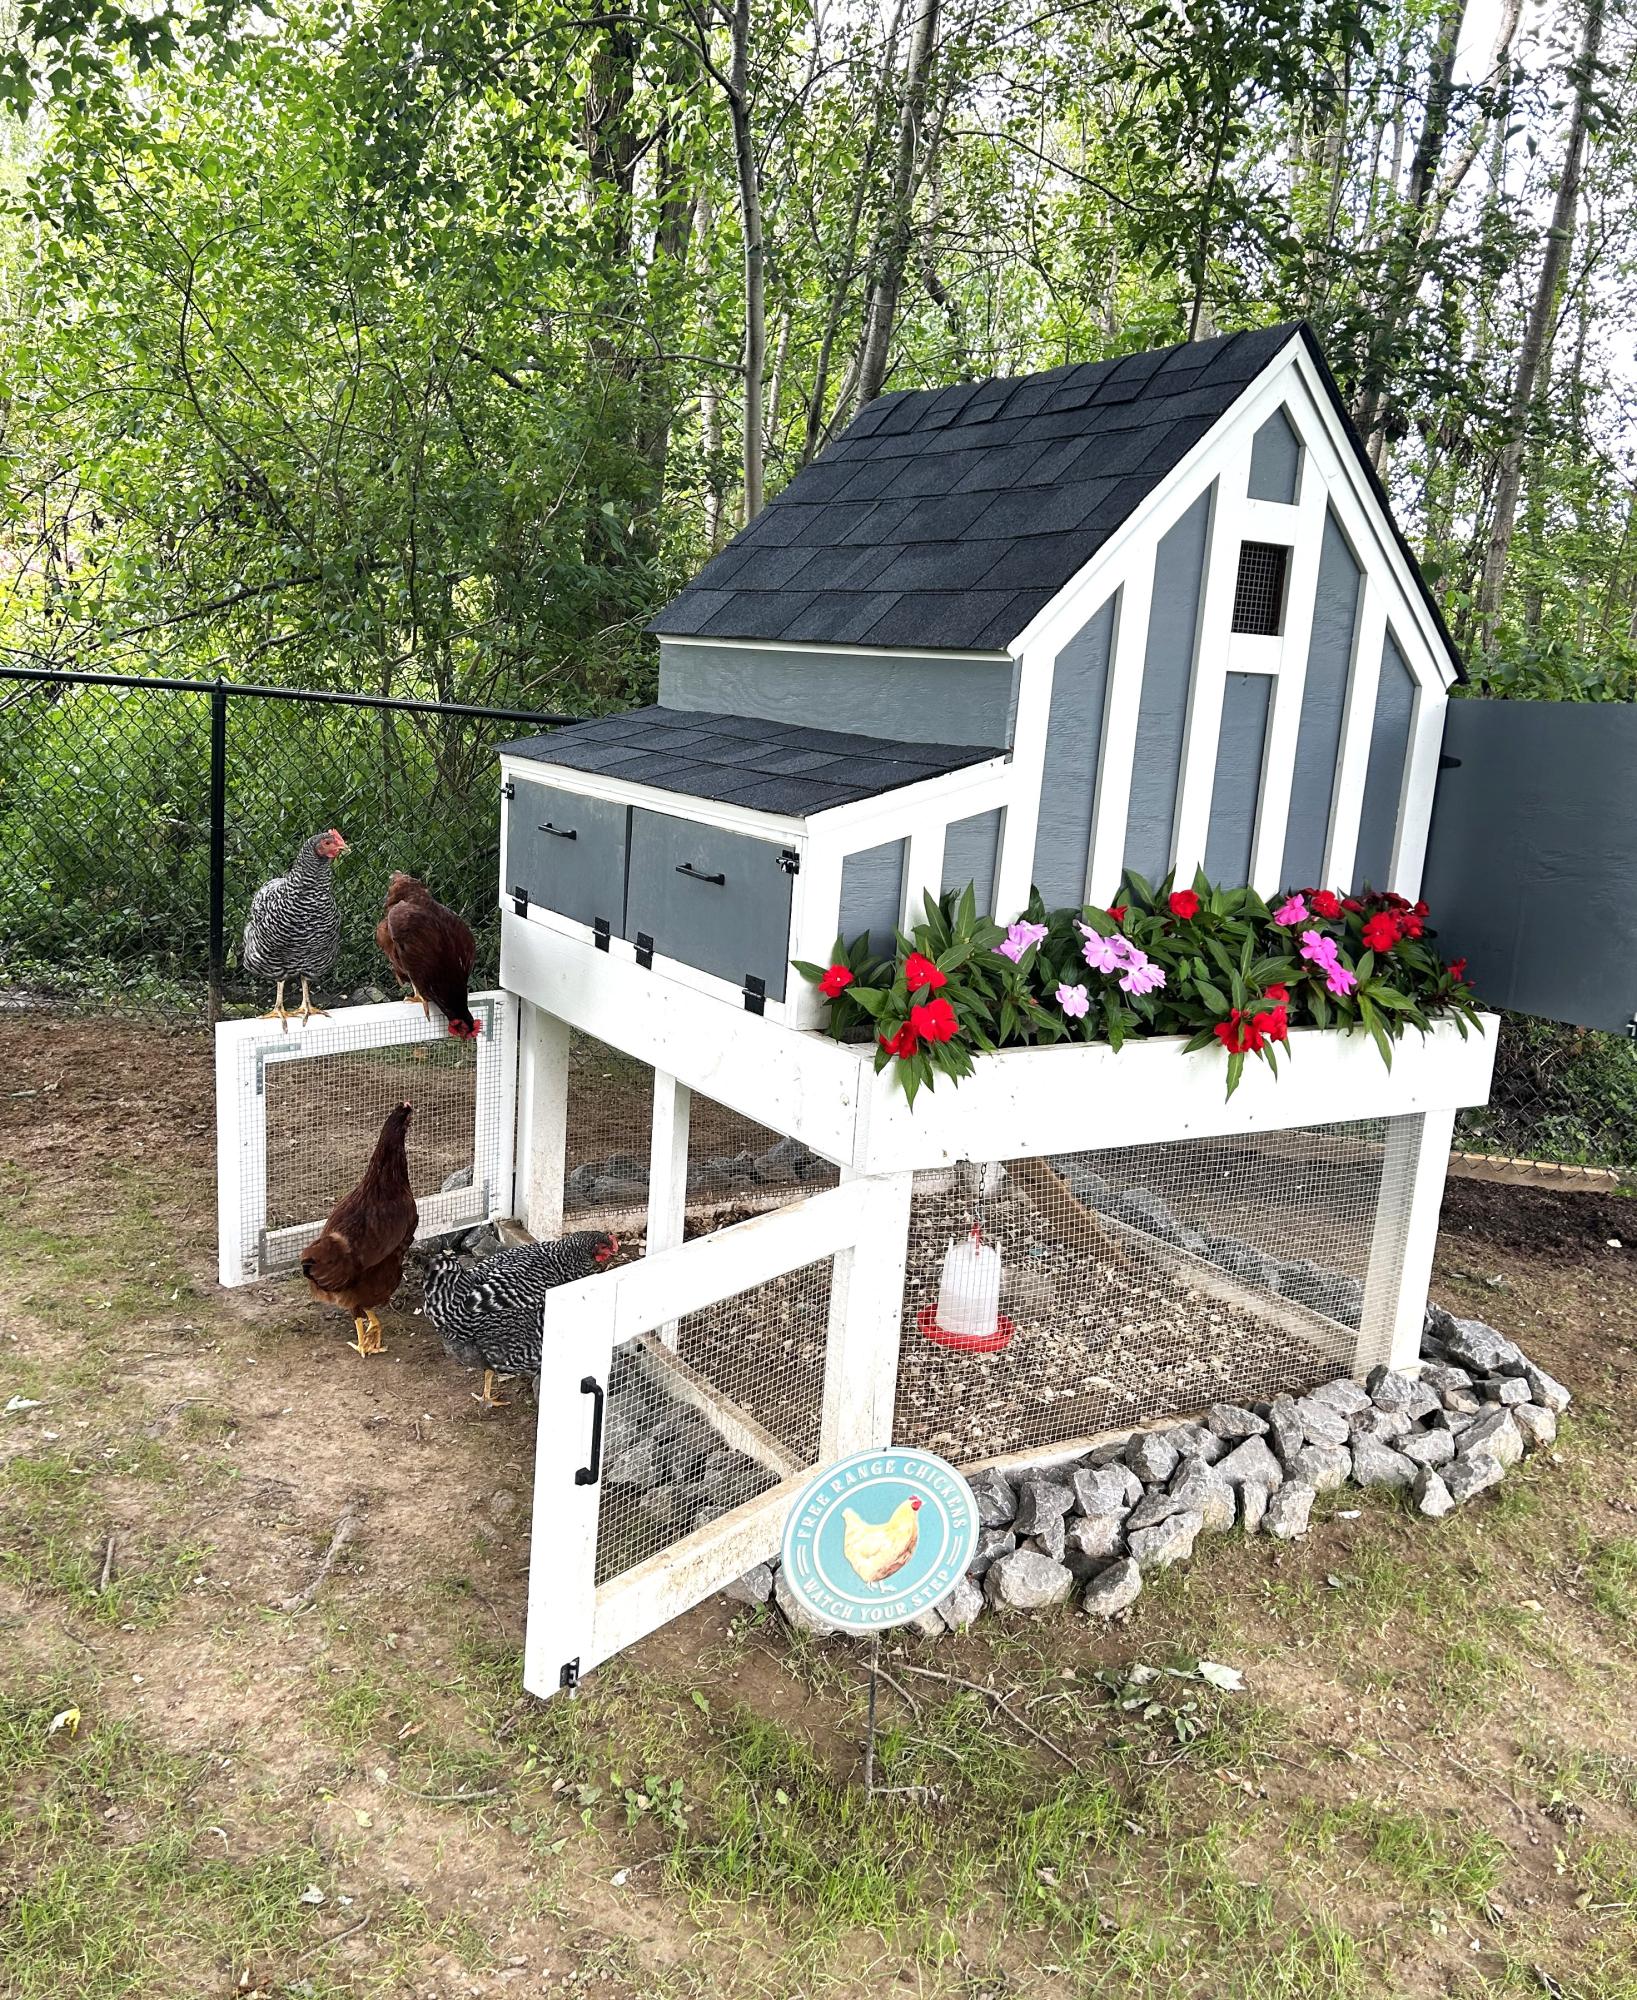
Absolutely loved how this thing turned out. Made a few customizations such as coop extension and drip edge. I have 4 happy hens and a coop that should last a lifetime. Thank you for the help!
Alex
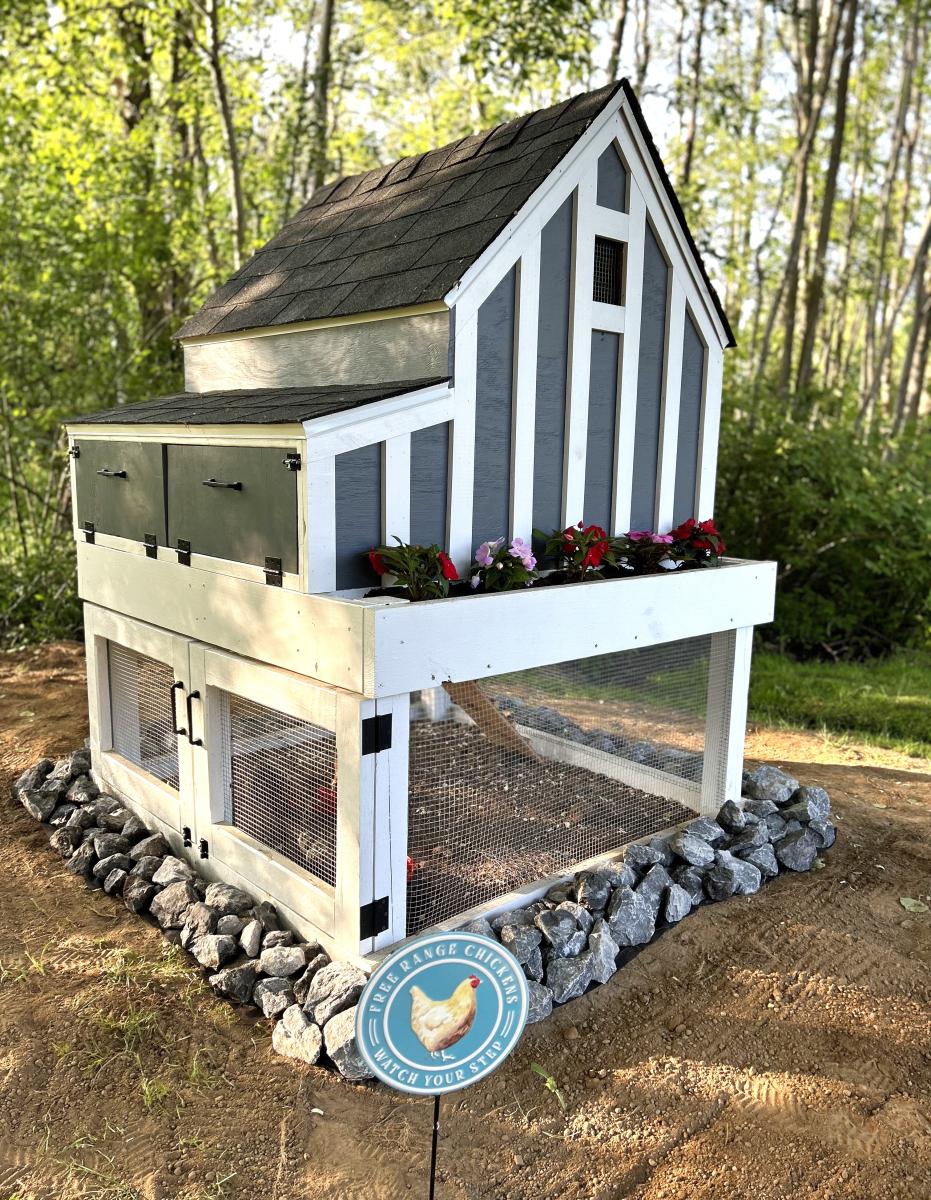
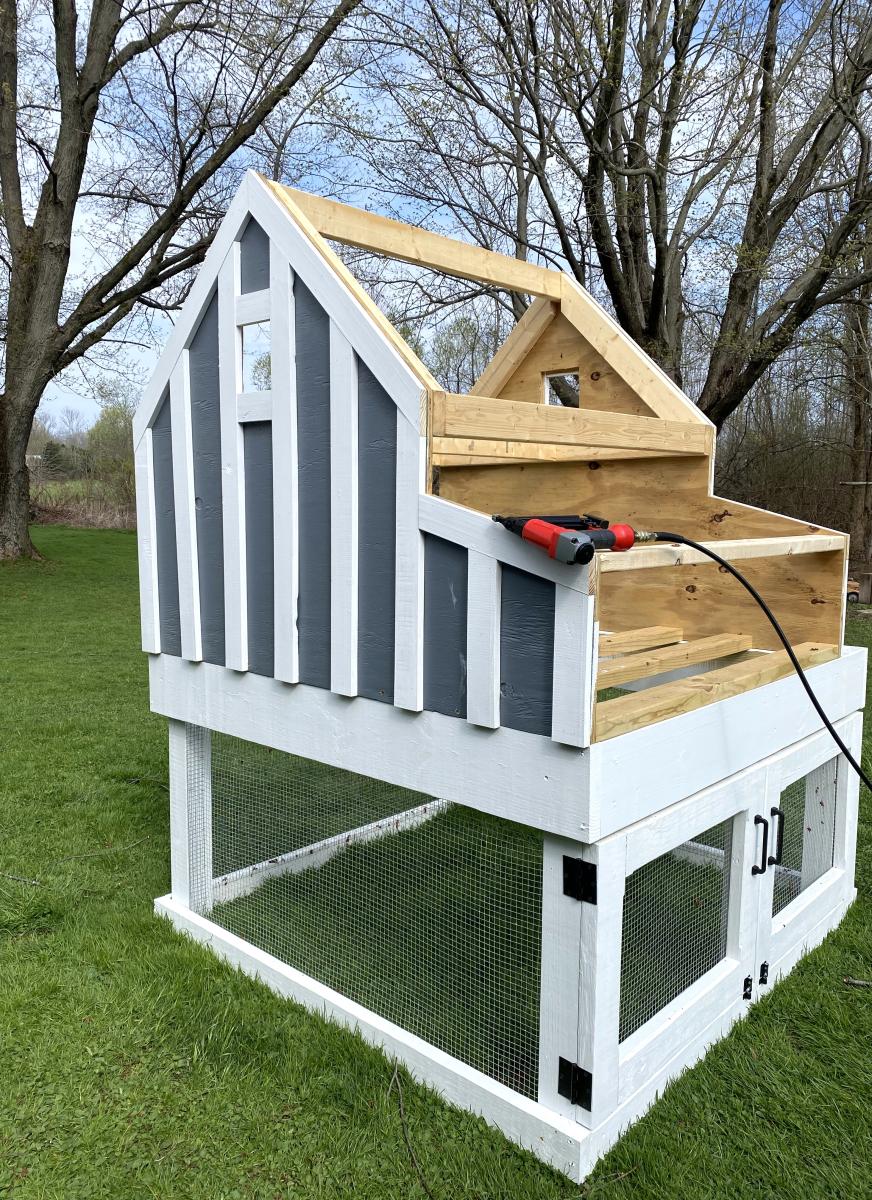
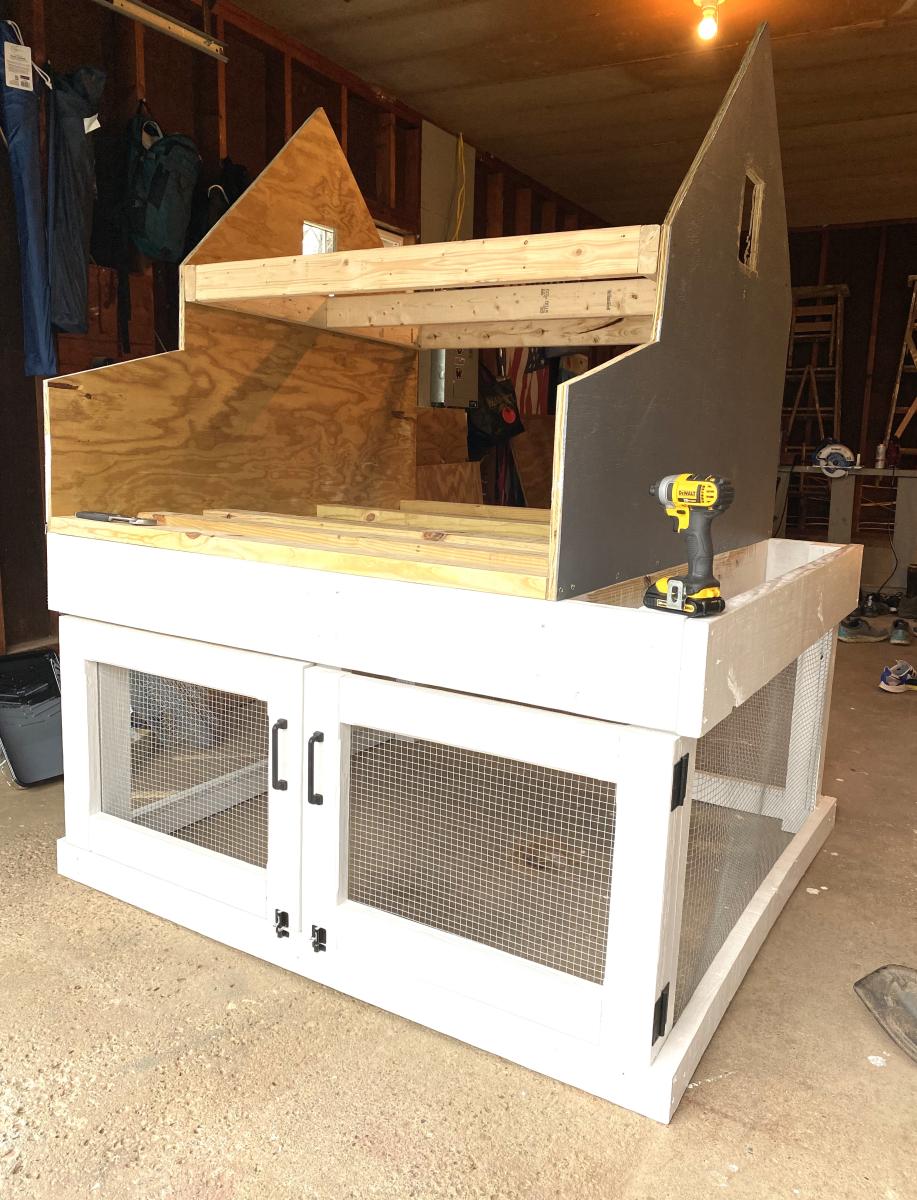
Built from Plan(s)
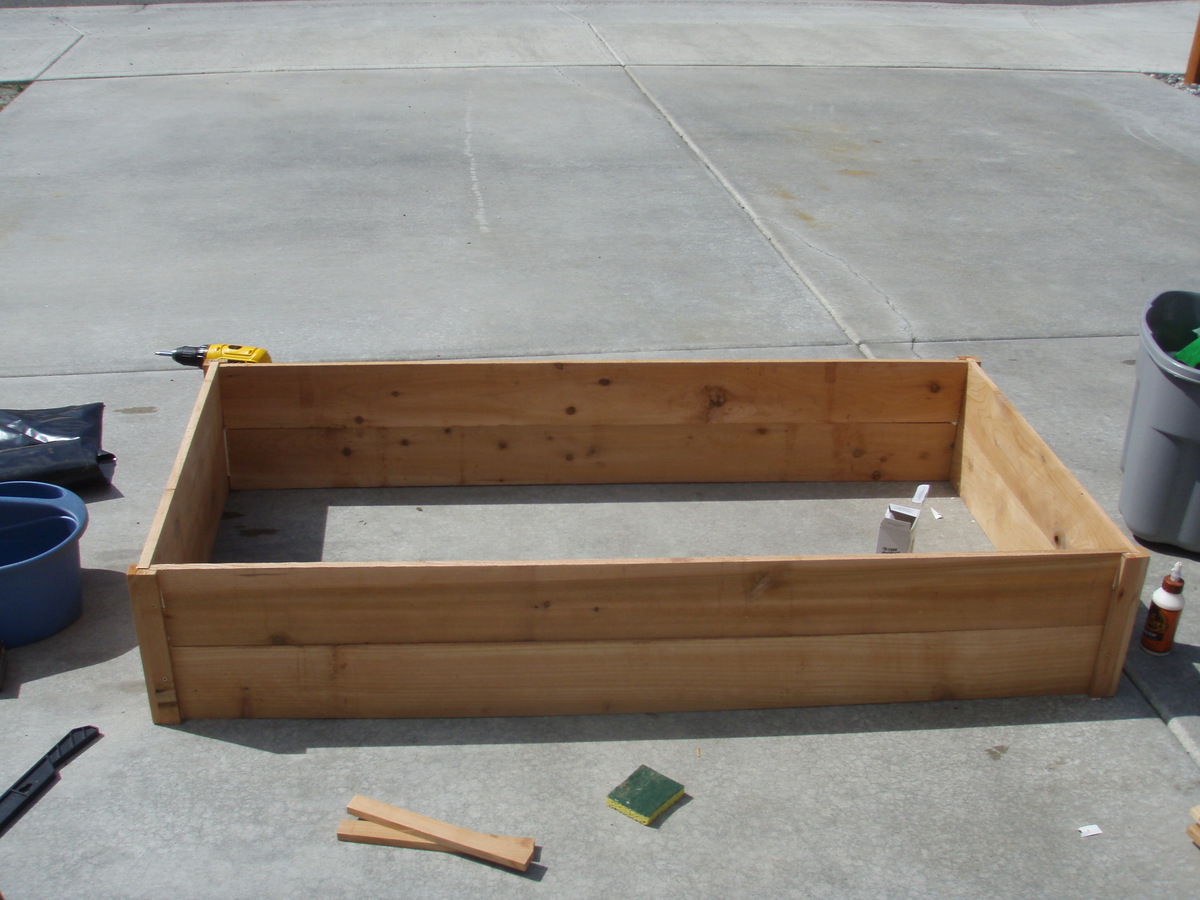
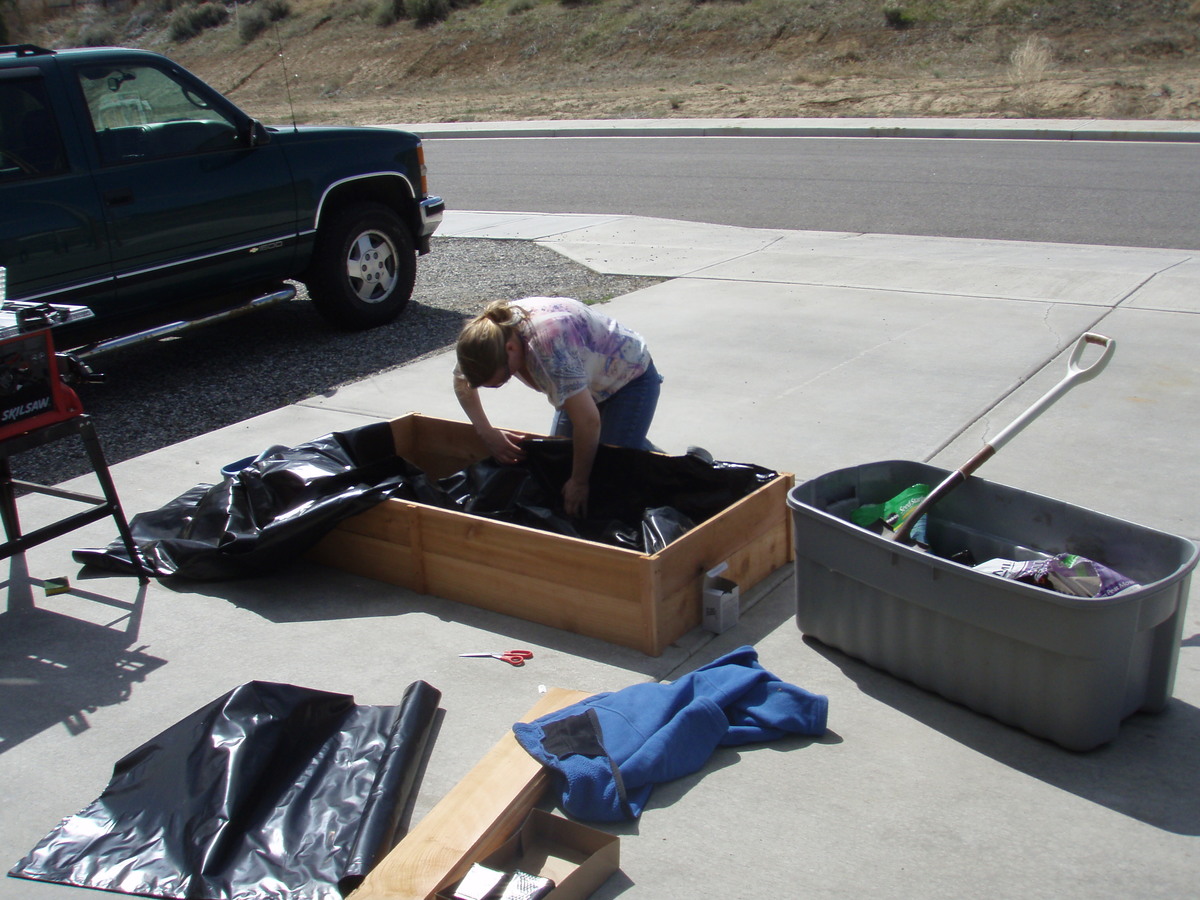
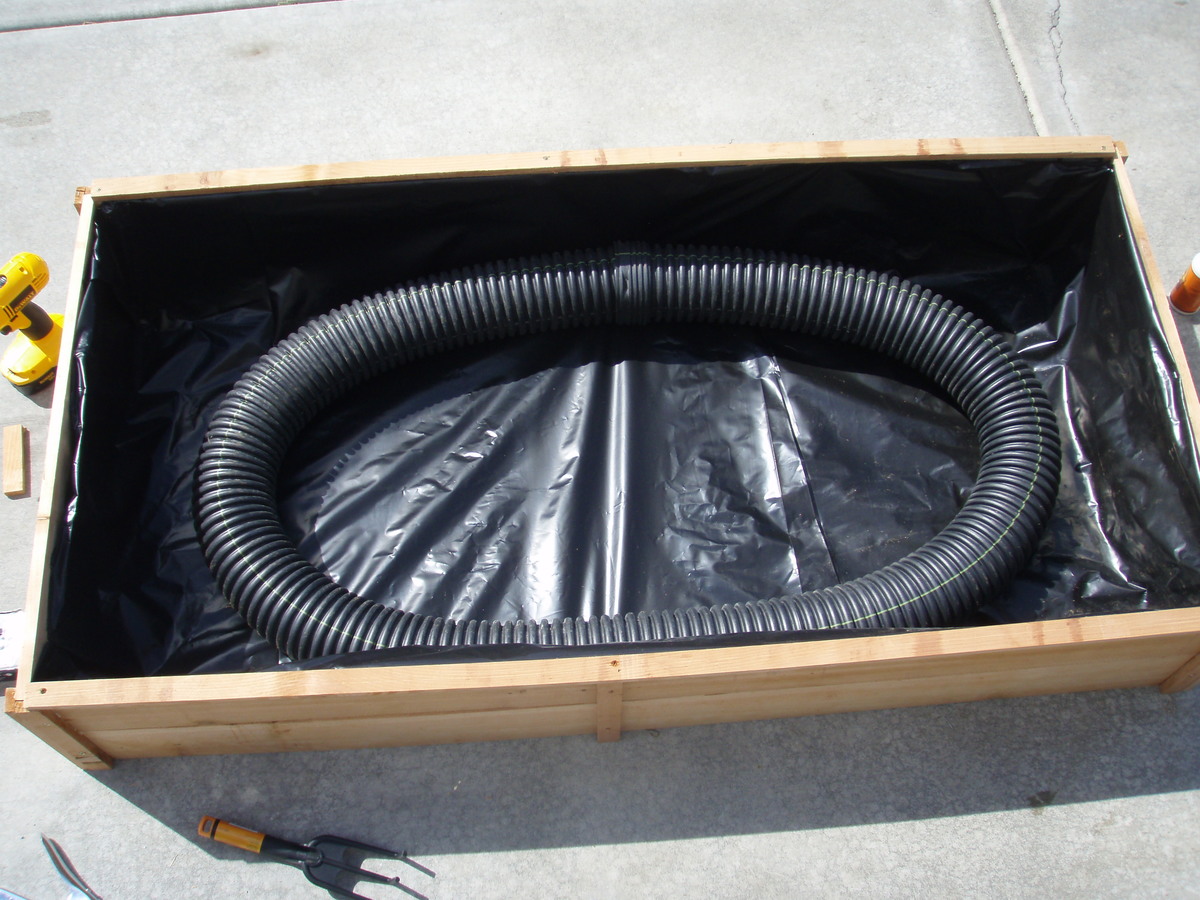
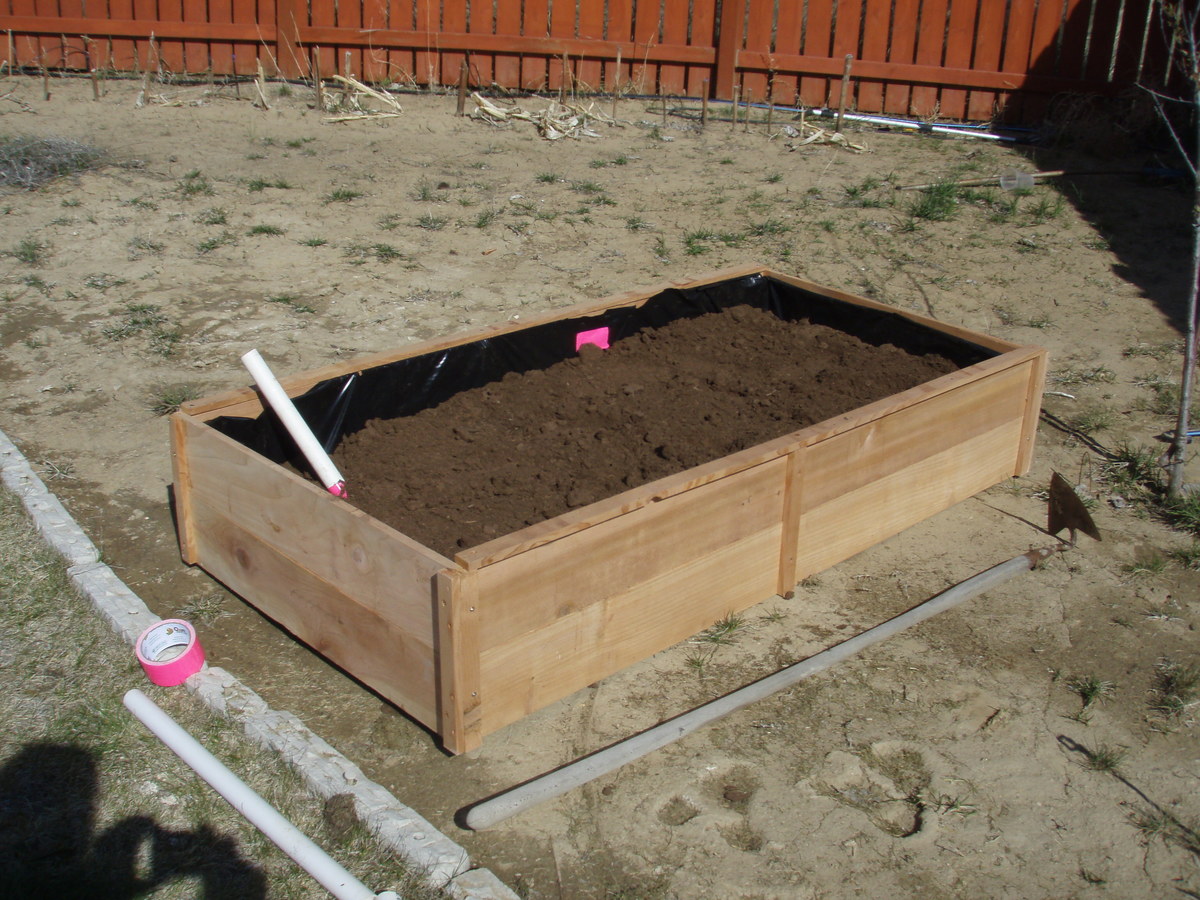
$10 Raise Cedar Garden Palnet, self watering
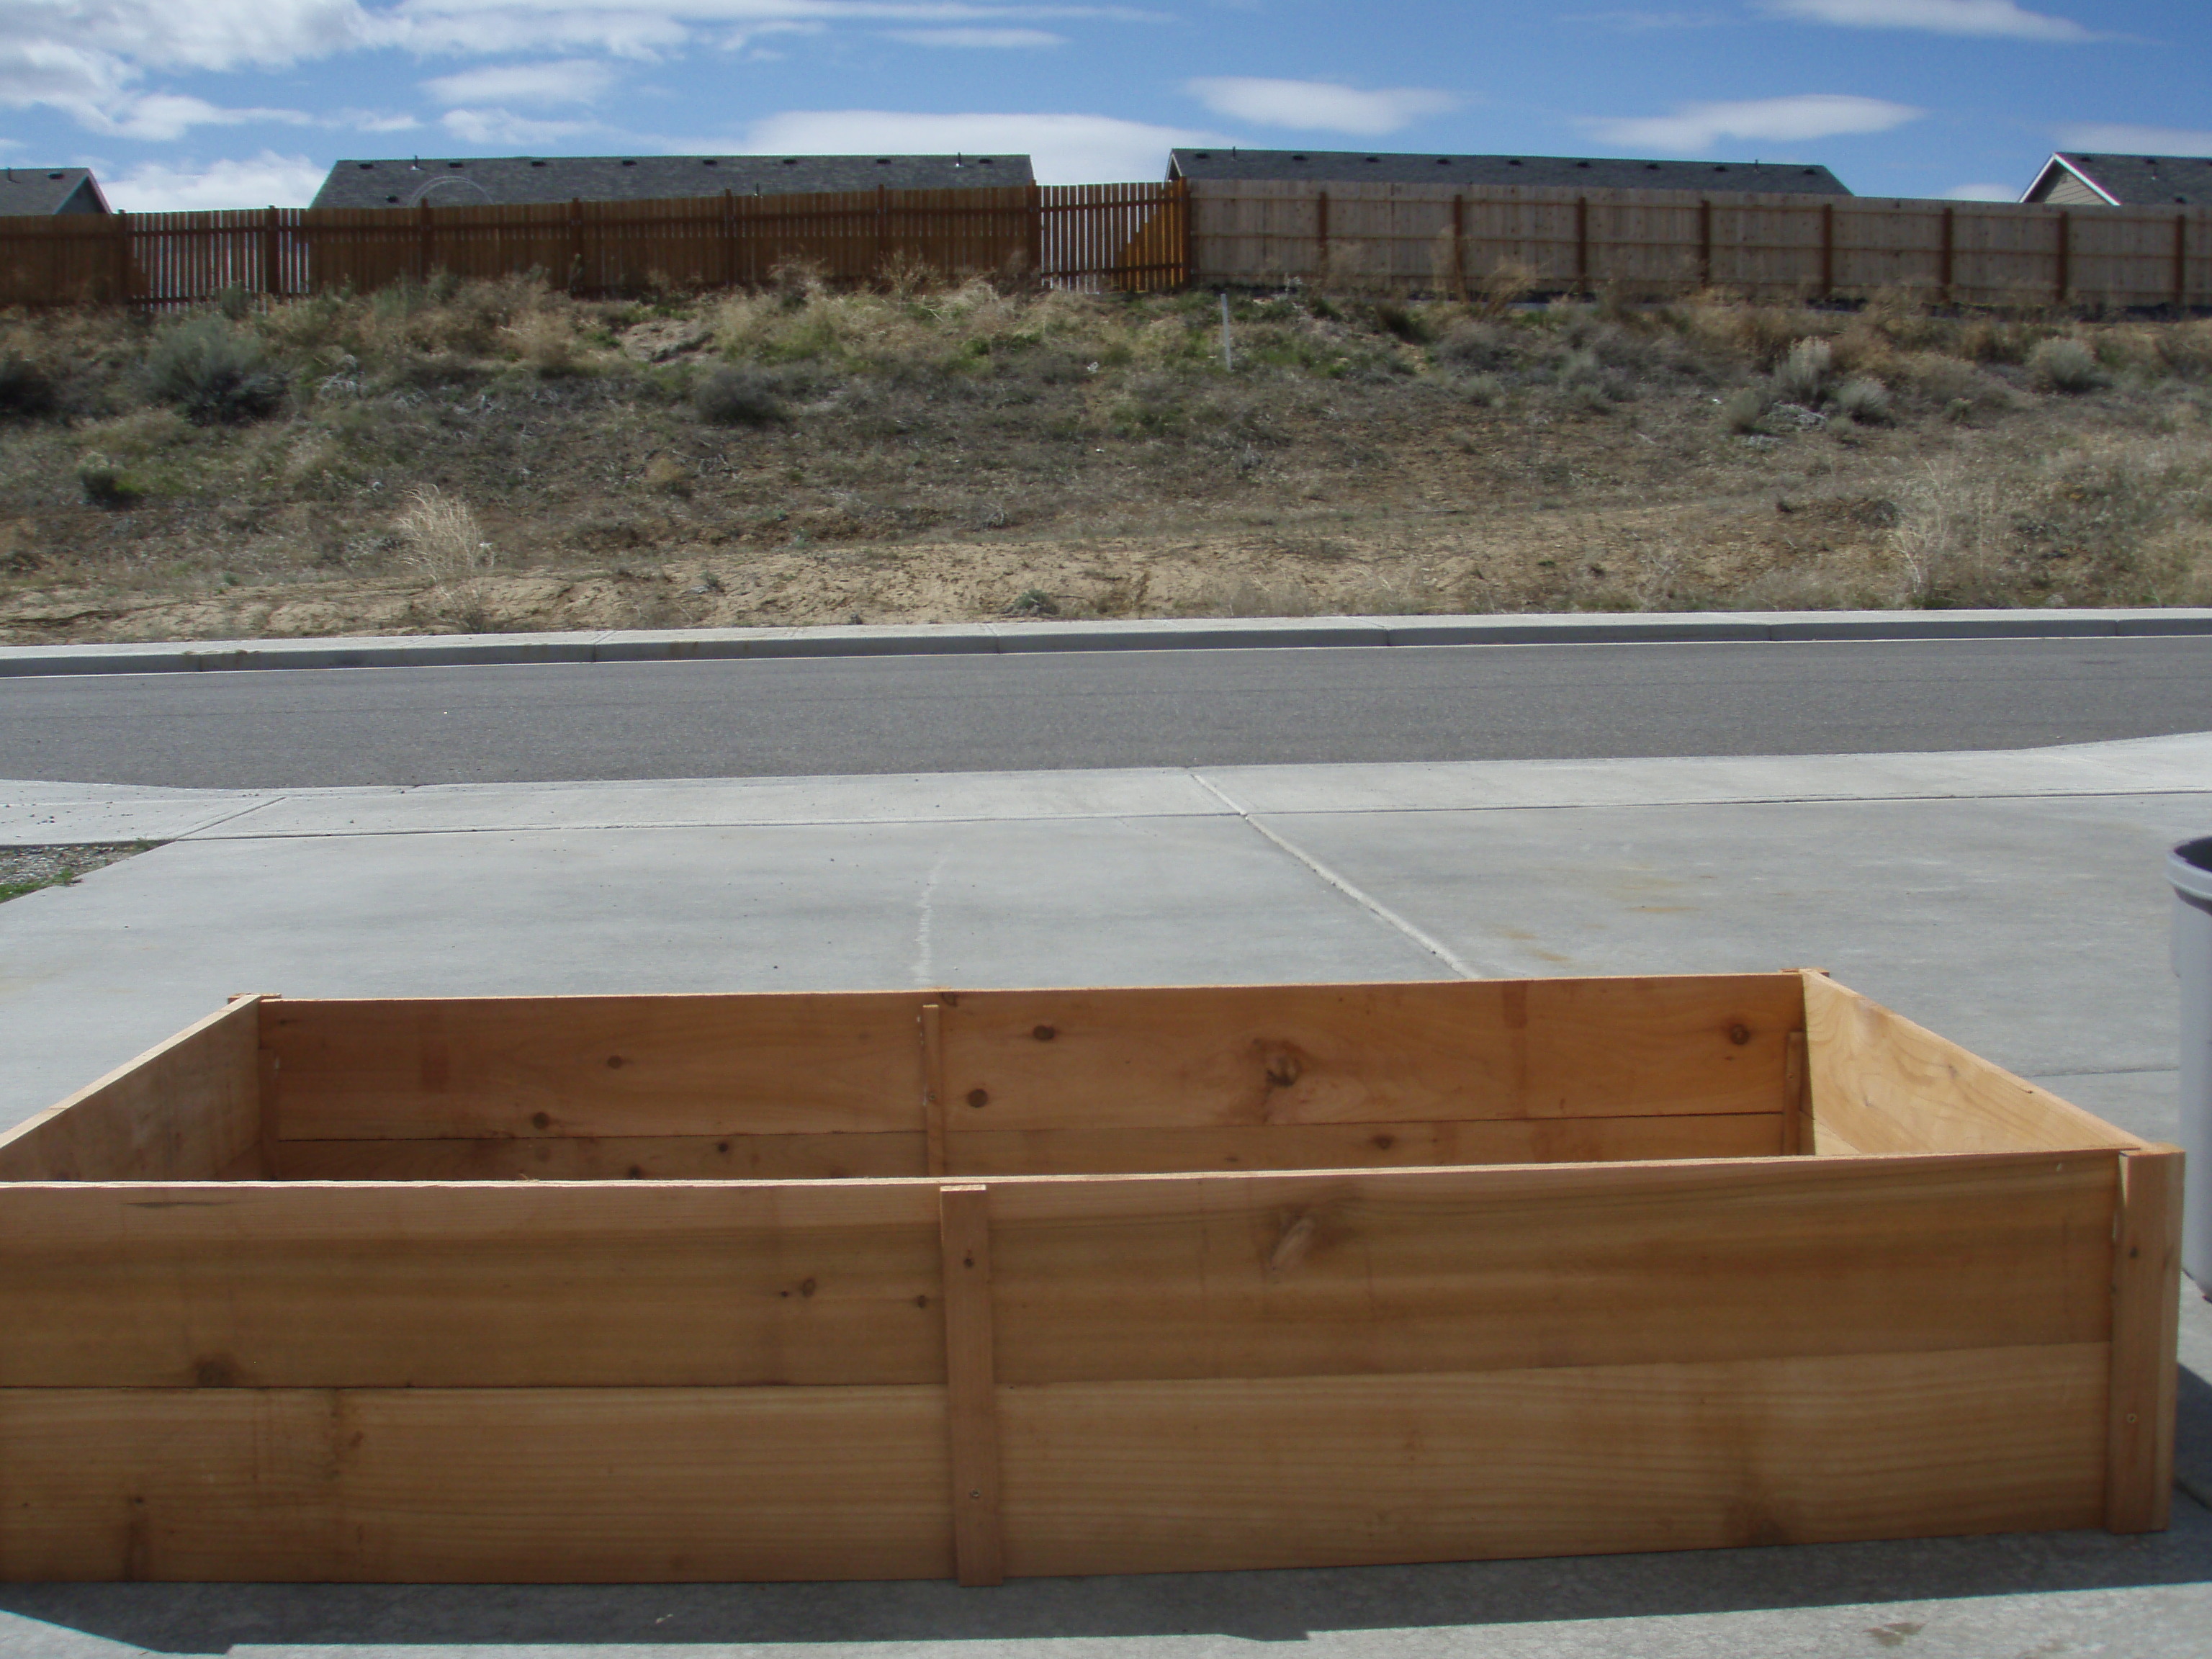
I read about a SIP, or self watering planter in Family Handy Man April 2012. There planse we expensive and compicated. These were easy and fun to make. I like the I dea of using 50% to 90% less water, and only watering once a week.
I added a post down the middle to help with bowing.
I found 5 foot cedar fence posts for $1.28 at orange. Including glue and screws $10. I have the palsit lininn, the withe piping on hand. HTe drain pipe was $6. for a total of $16.
Orange had a 2 x 2 plastic Self watering planter $30, big savings
I say starter only if you are not ripping, but using 1 x2 's
Built from Plan(s)
Estimated Cost
$10
Estimated Time Investment
Afternoon Project (3-6 Hours)
Finish Used
None
Recommended Skill Level
Starter Project
Comments
Wed, 09/05/2012 - 21:12
I am not sure, a roll my dad
I am not sure, a roll my dad had laying around. Most research suggests pond liner.
Reese Media Cabinet
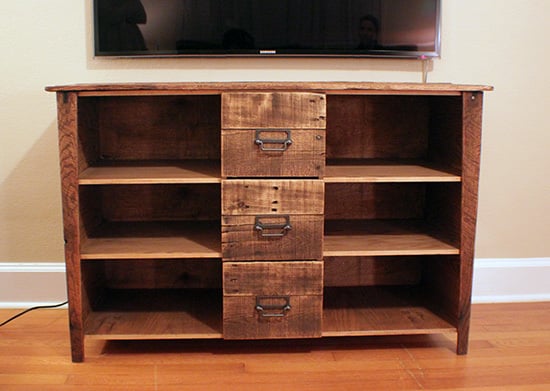
This was a media cabinet that I designed for some friends, and I've got a full how-to and FREE PLANS up on my site at

Estimated Time Investment
Week Long Project (20 Hours or More)
Finish Used
PolyShade Mission Oak - Satin
Recommended Skill Level
Intermediate
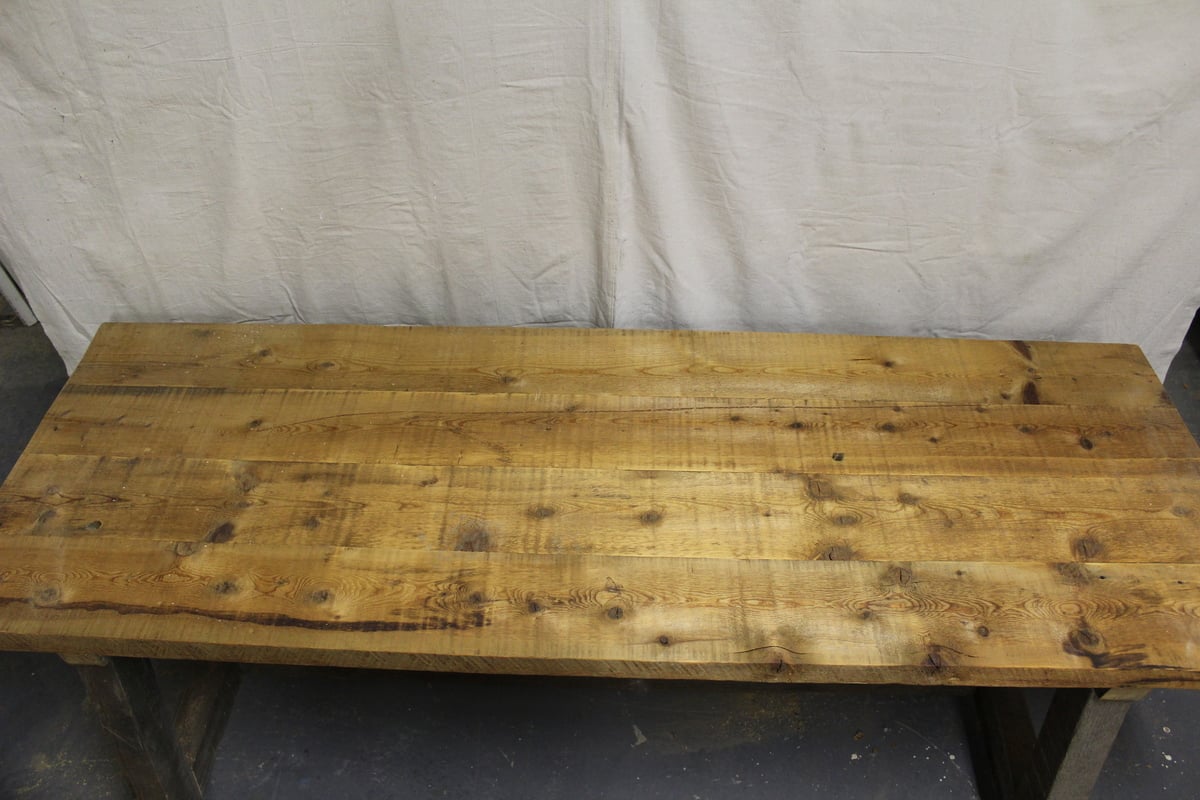
Sturdy workbench with sturdy top
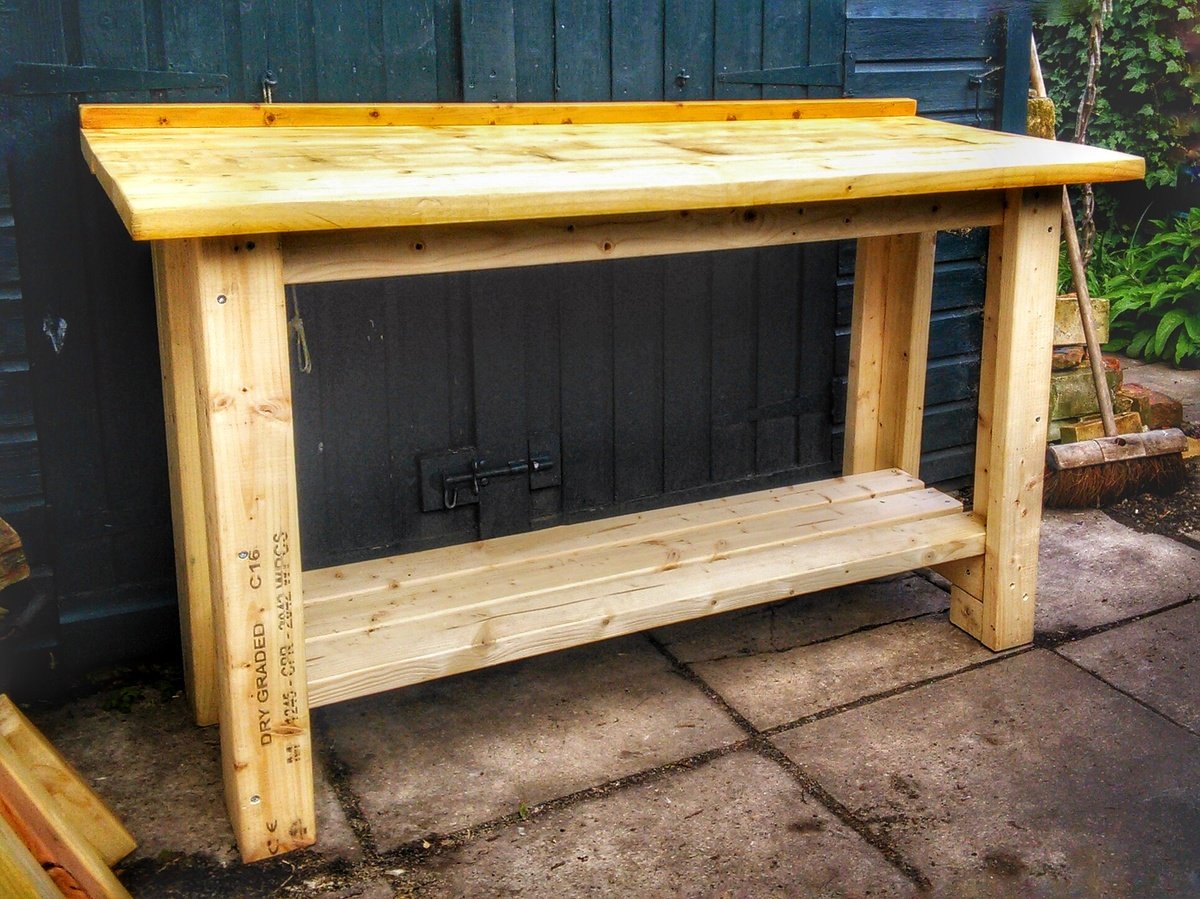
This version is five feet long. The sturdy top was made from scaffold boards. I nailed four stout 3" oval nails into the joining edges of two planks, then cut the projecting heads off at angle. Putting plenty of glue along the nail-free face I sash cramped the whole lot together overnight. Once screwed down I filled holes and cracks with epoxy woodfiller, gave it a though sanding and splashed on a generous amount of Danish Oil just to seal it from spilled coffee etc. Now all I have to do is line the shed...
Built from Plan(s)
Estimated Time Investment
Weekend Project (10-20 Hours)
Finish Used
Danish oil
Recommended Skill Level
Beginner
My try at a step stool
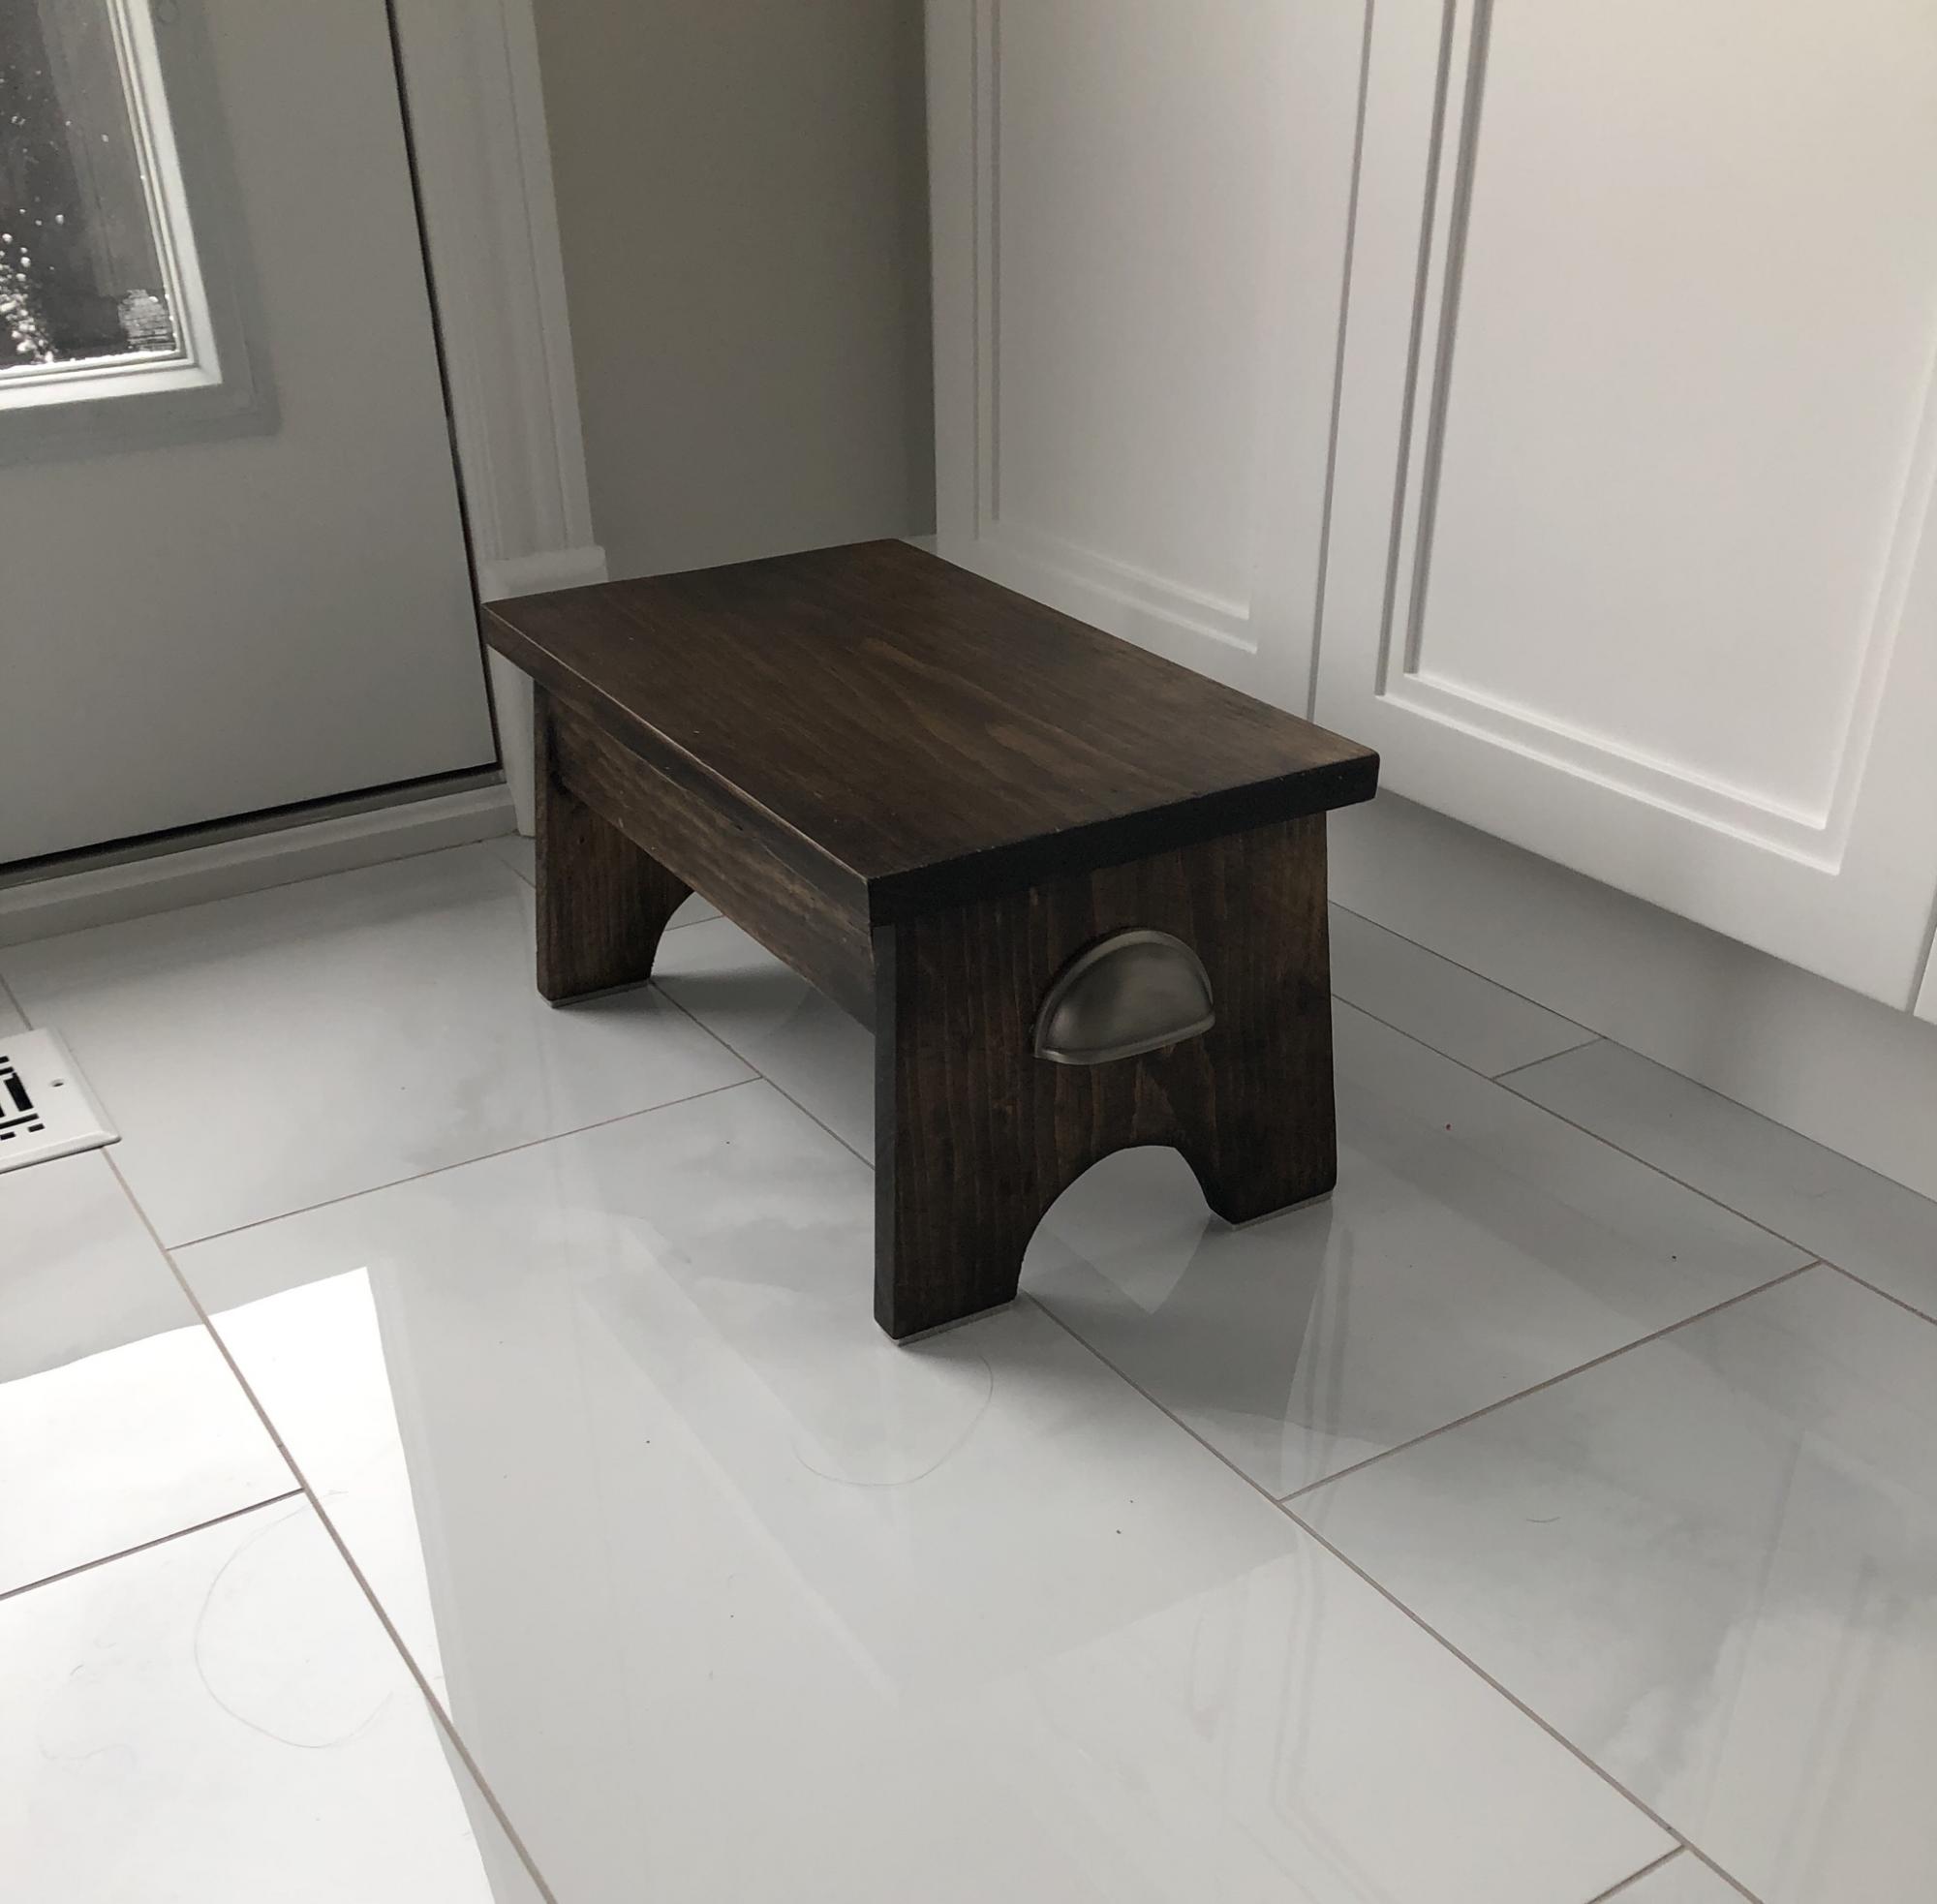
Had fun doing this one. I used a gel stain and about 4 coats of lacquer to finish
Built from Plan(s)