Community Brag Posts
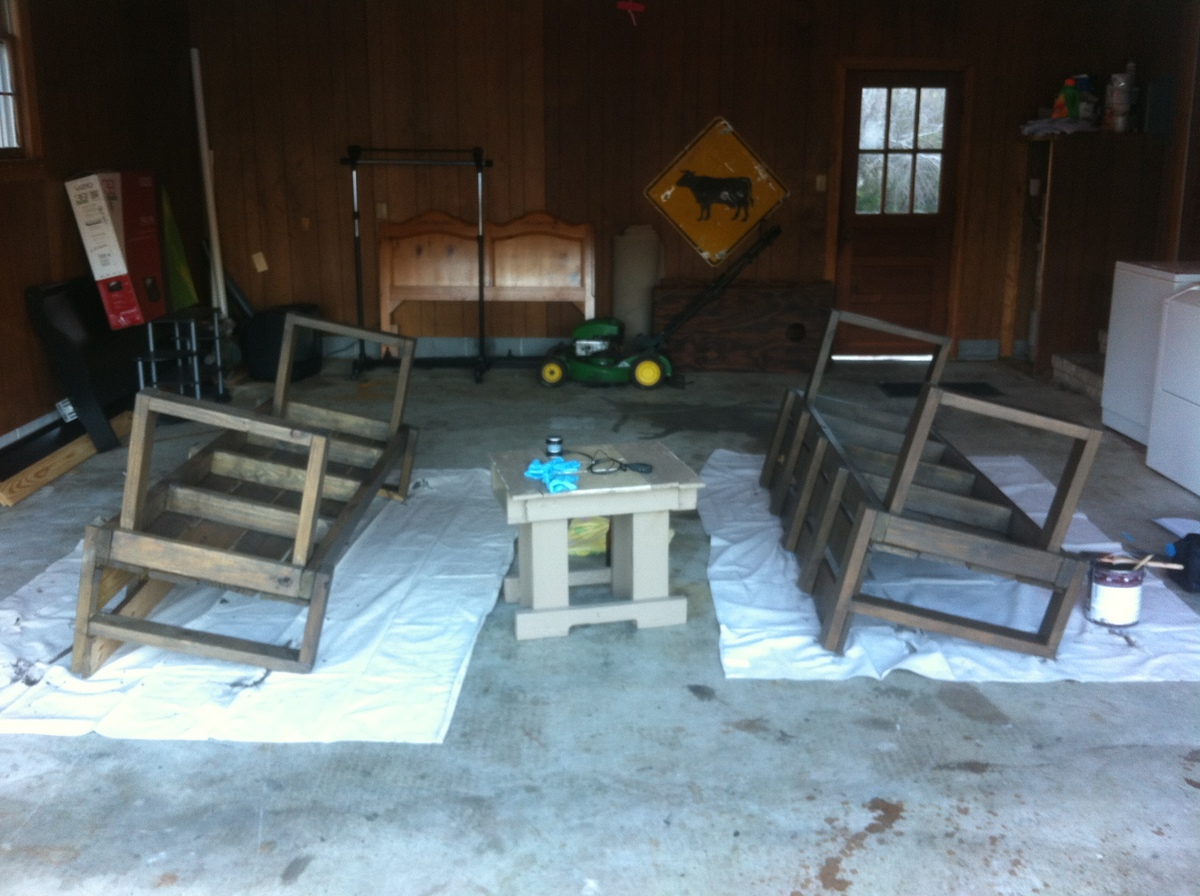
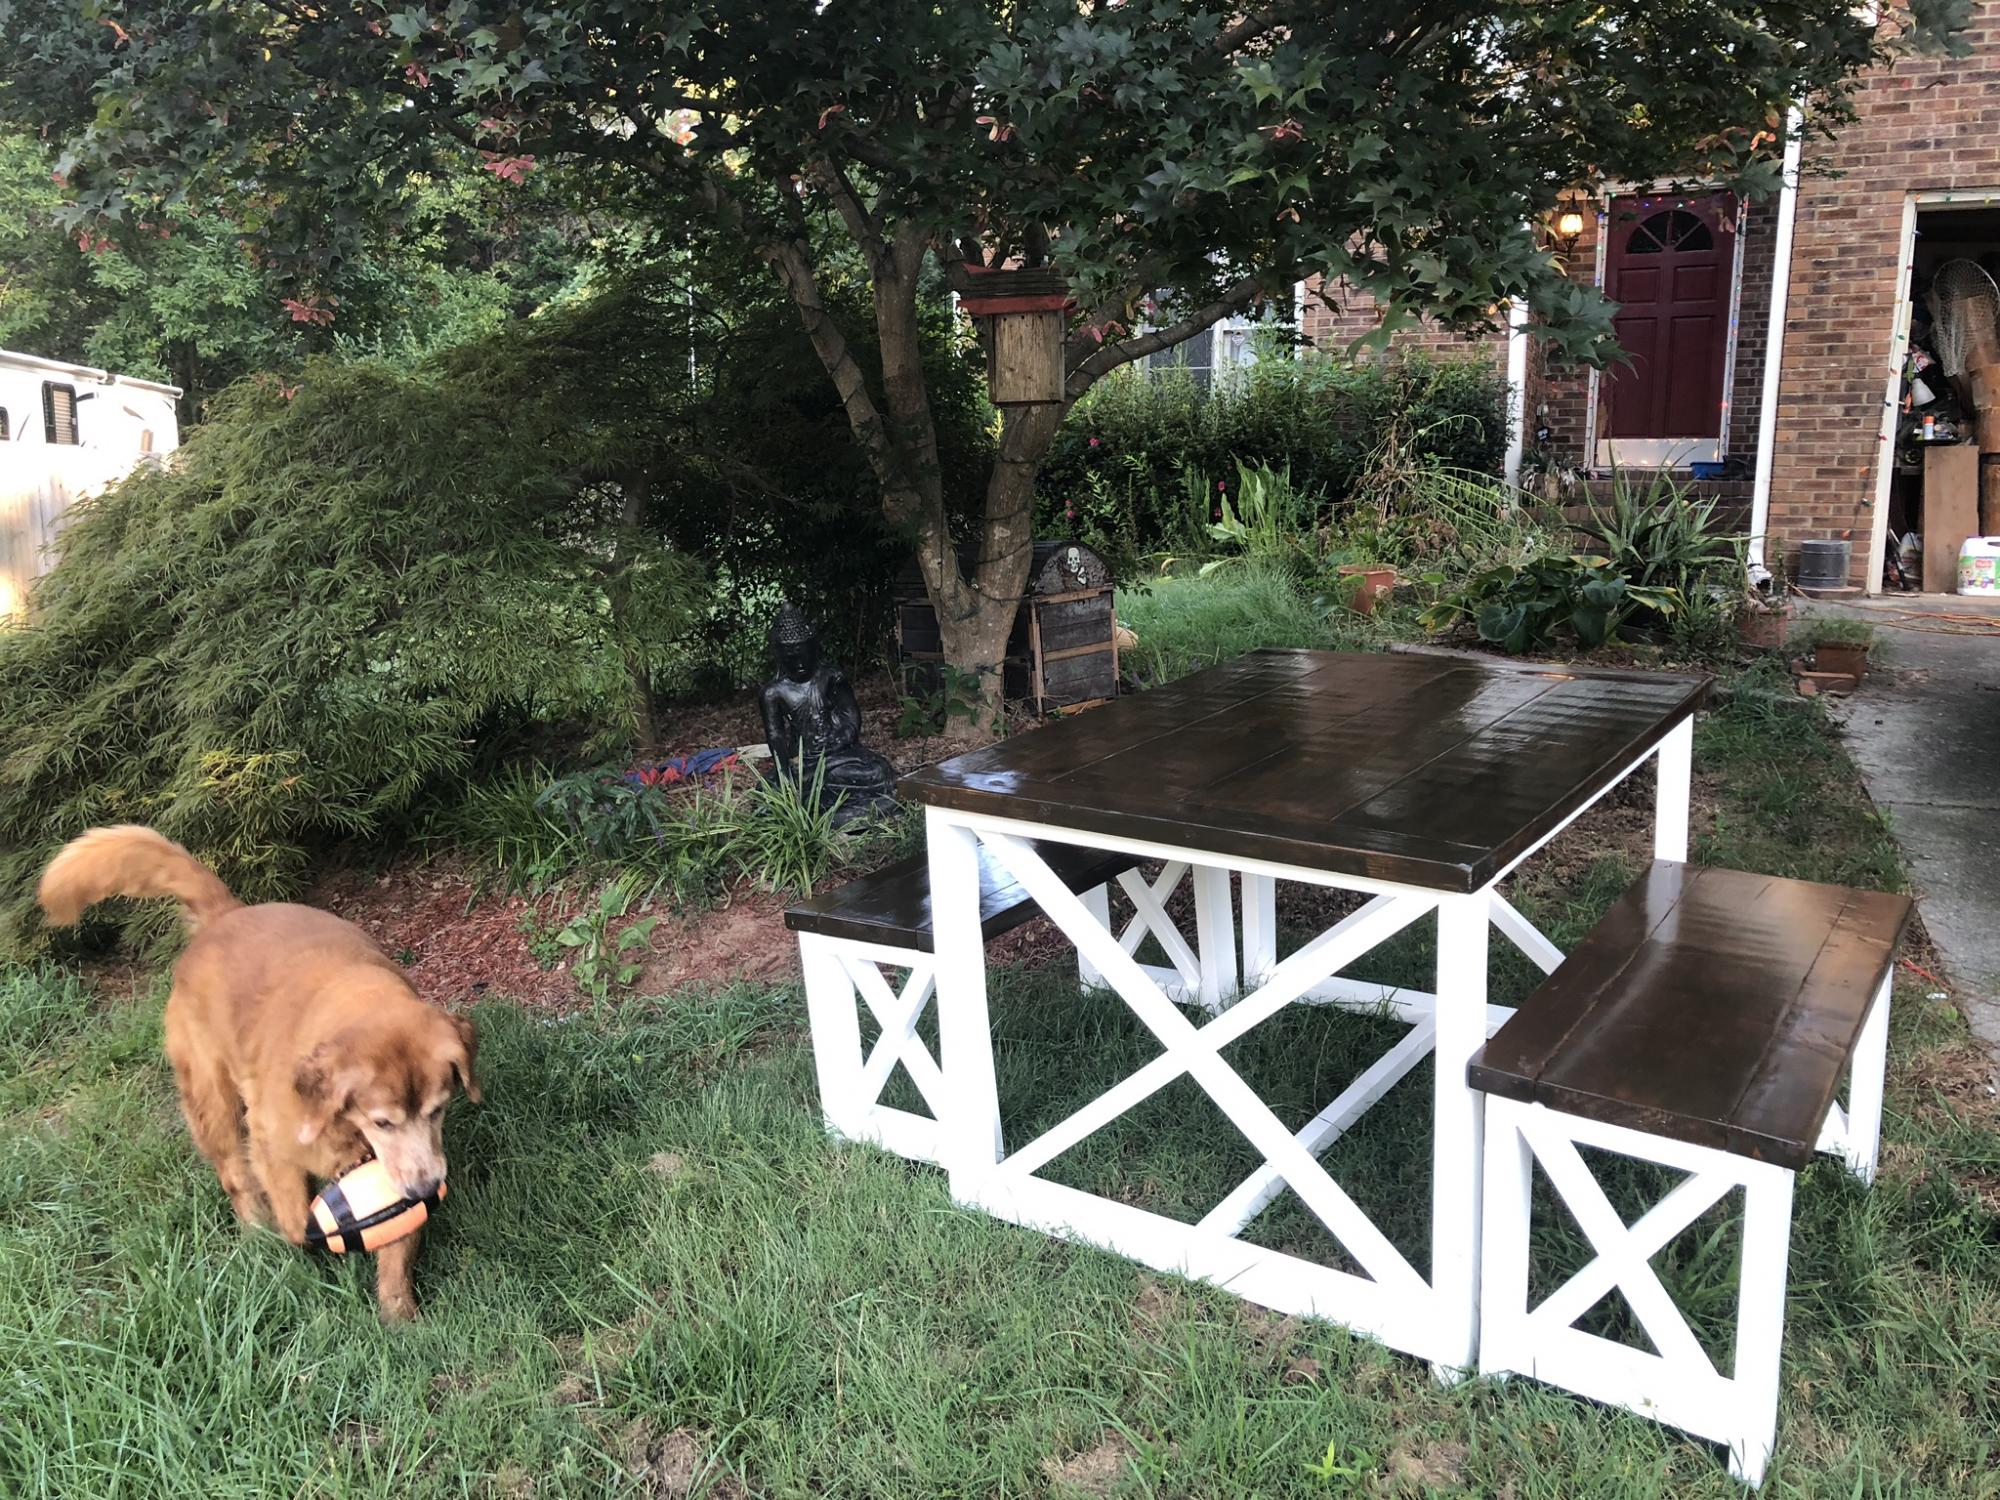
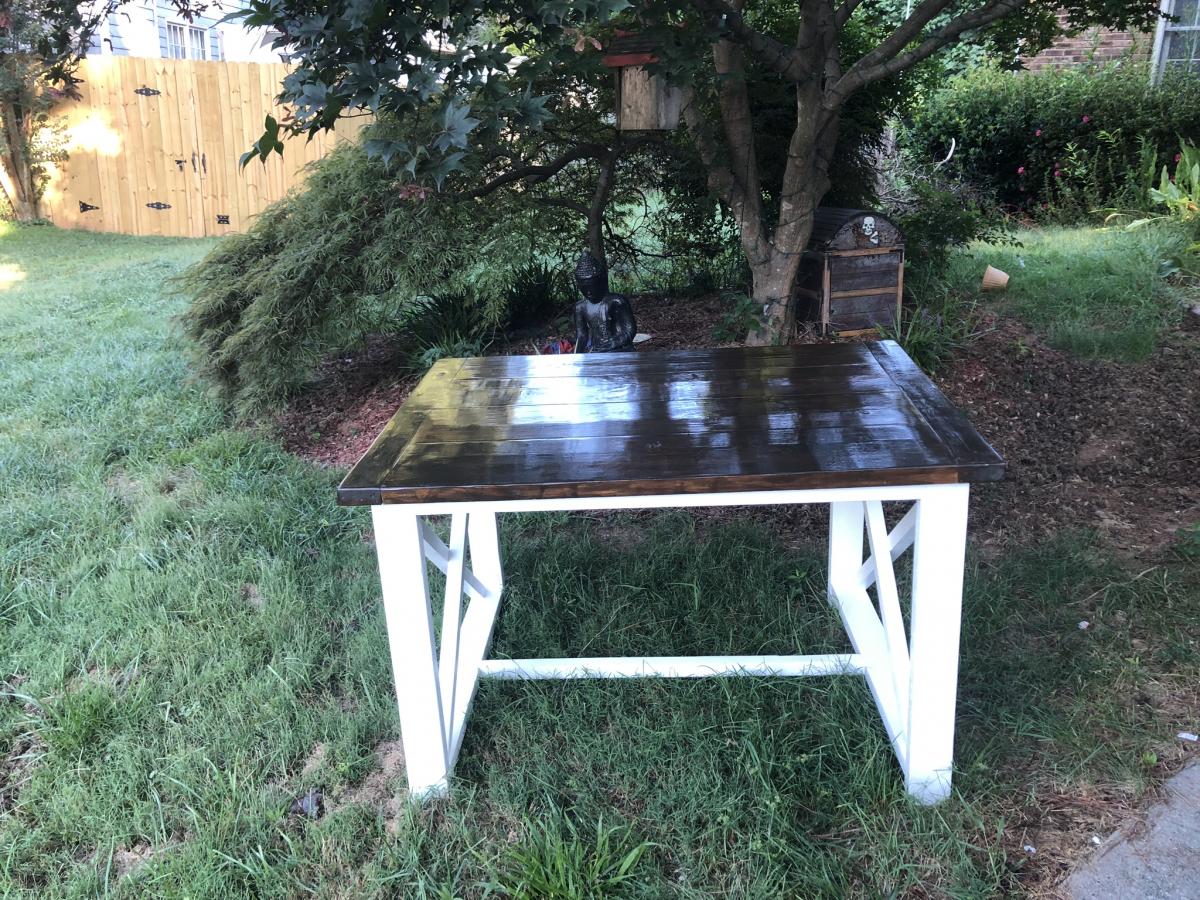
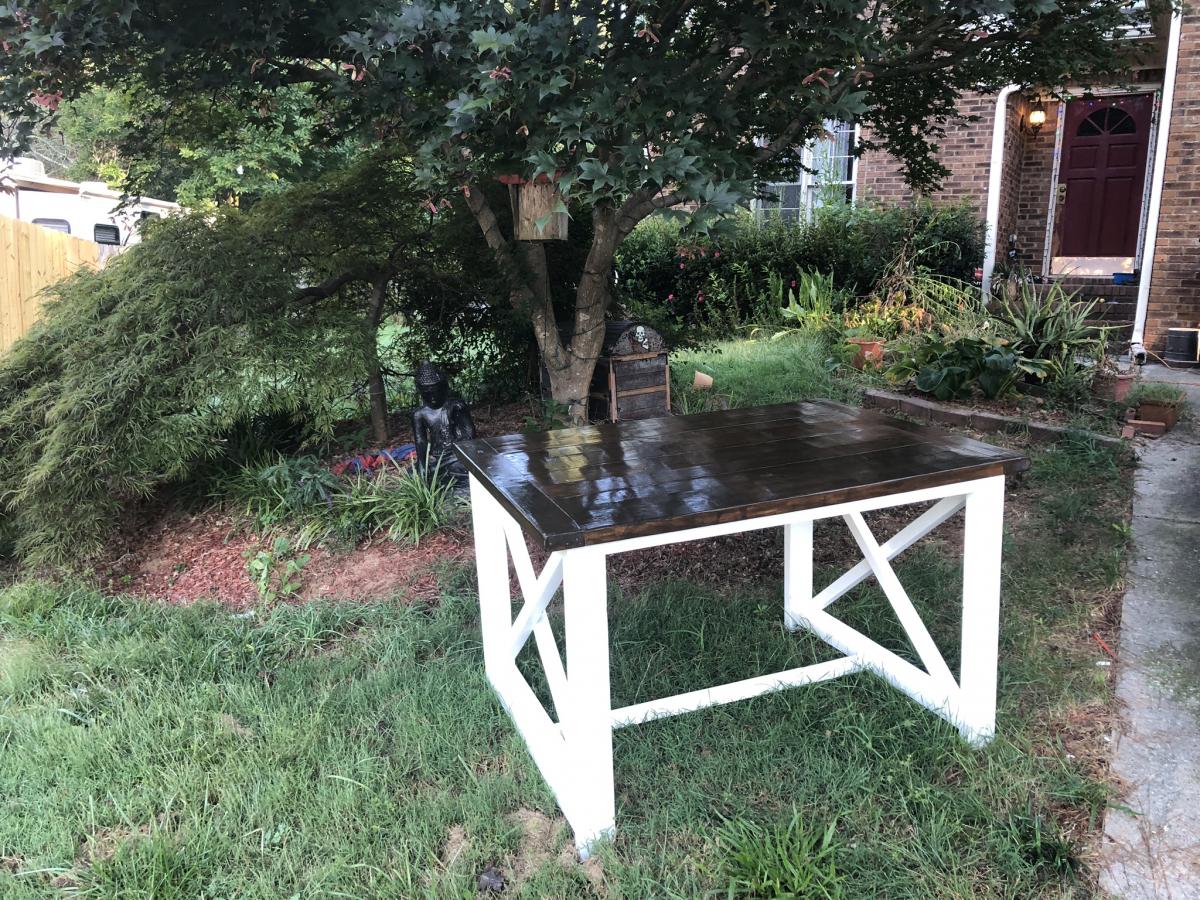
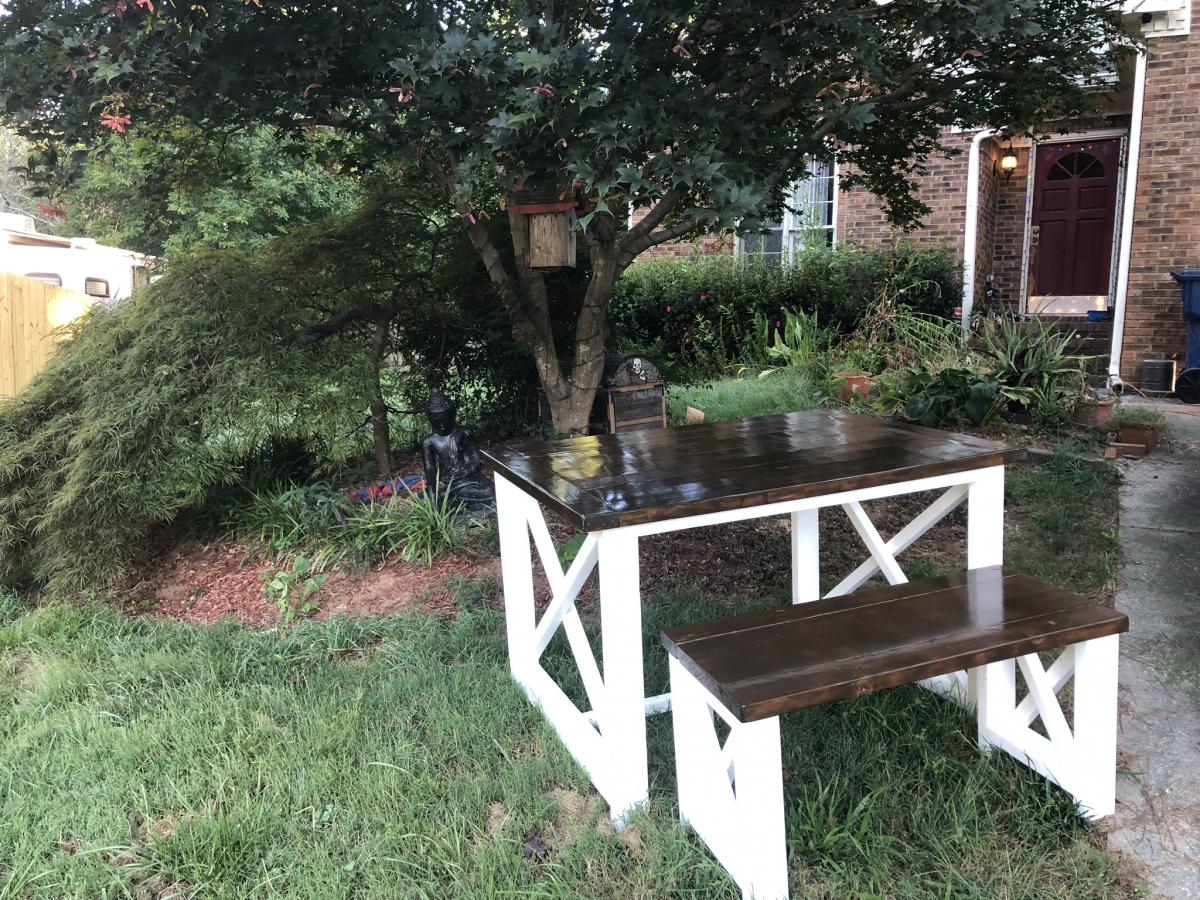
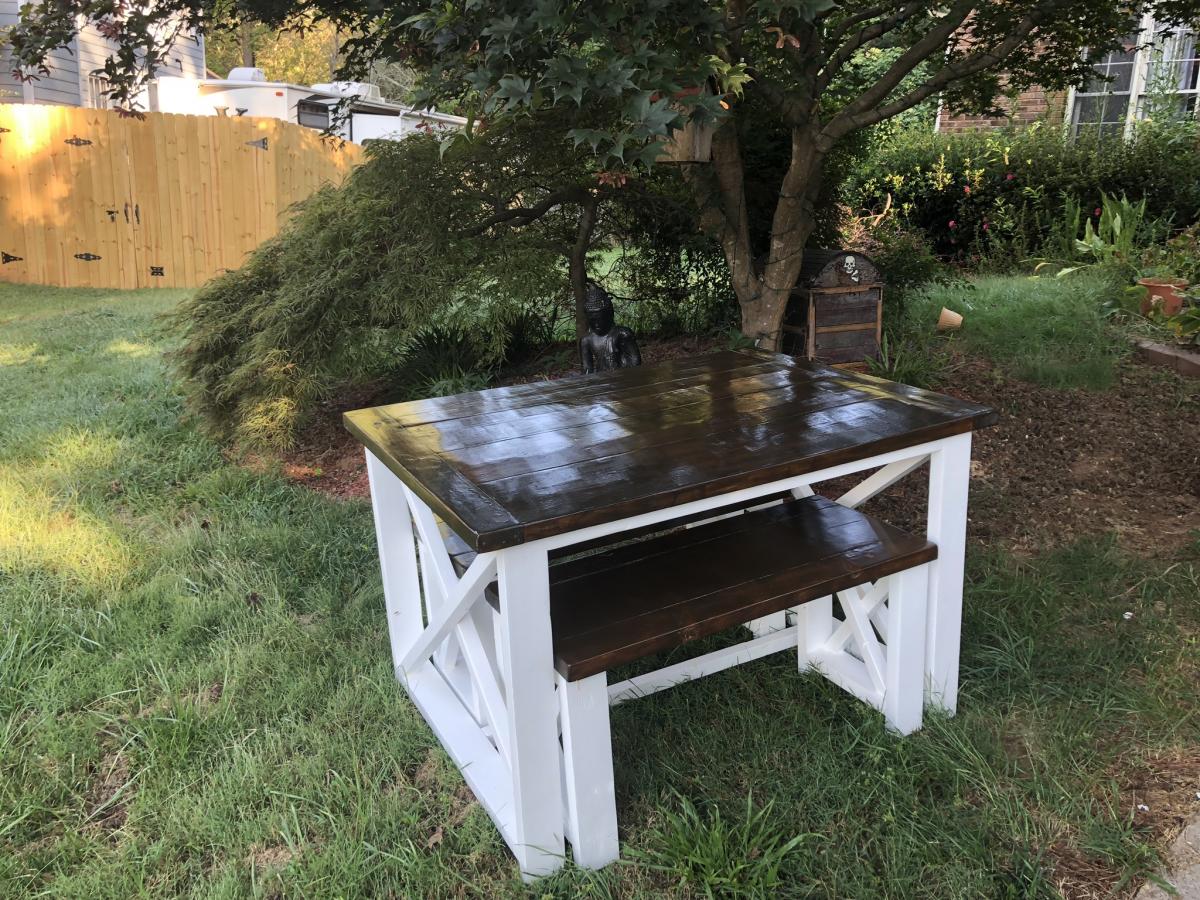
SWING TO BENCH
Really simple edition to make this project portable and efficient for group functions. Add some legs lol. Measure the height you want from your kitchen seat, cut, and screw to the bottom. The pictures should help with how to place them.
Hope you like it
Built from Plan(s)
Estimated Cost
$160 for both benches, screws, glue, brushes, and stain.
Estimated Time Investment
Afternoon Project (3-6 Hours)
Finish Used
Coffee colored stain from home depot
Recommended Skill Level
Beginner
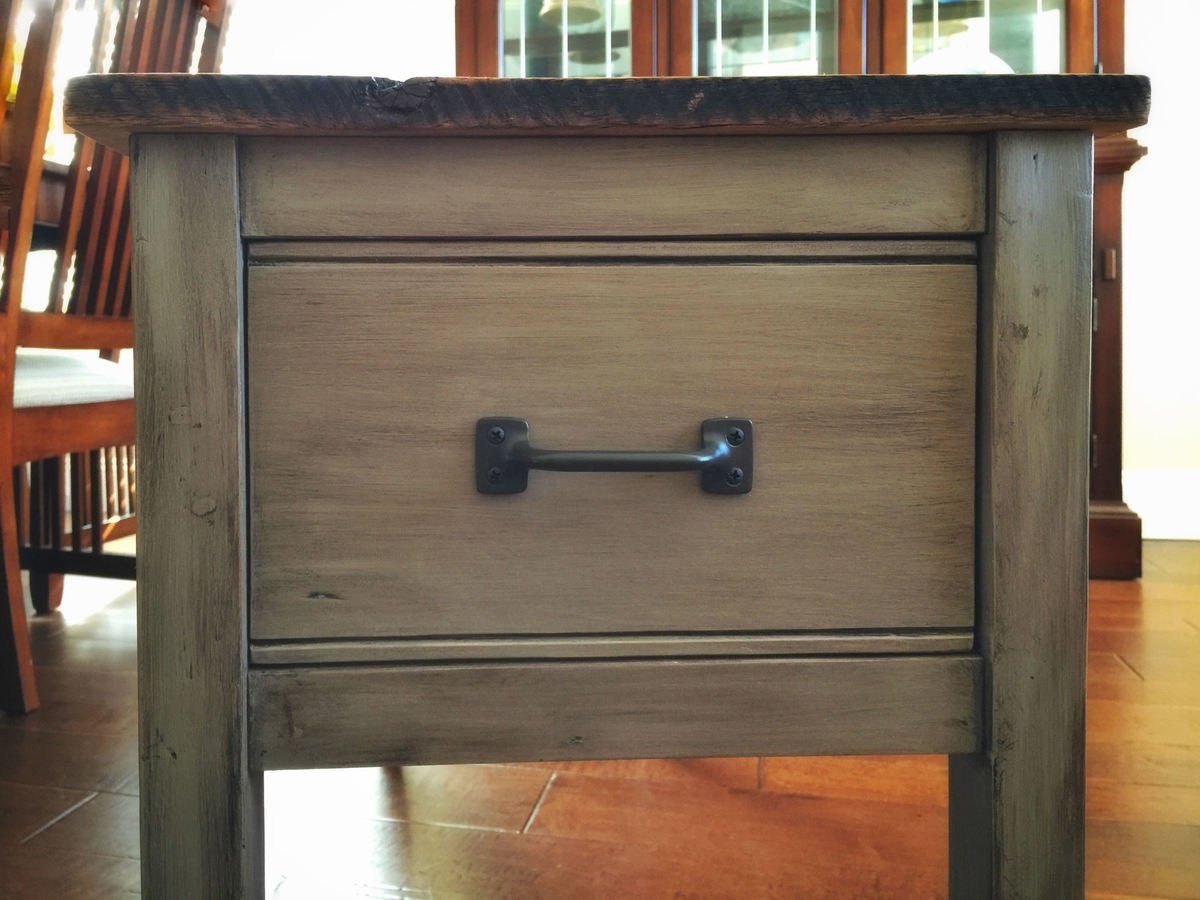
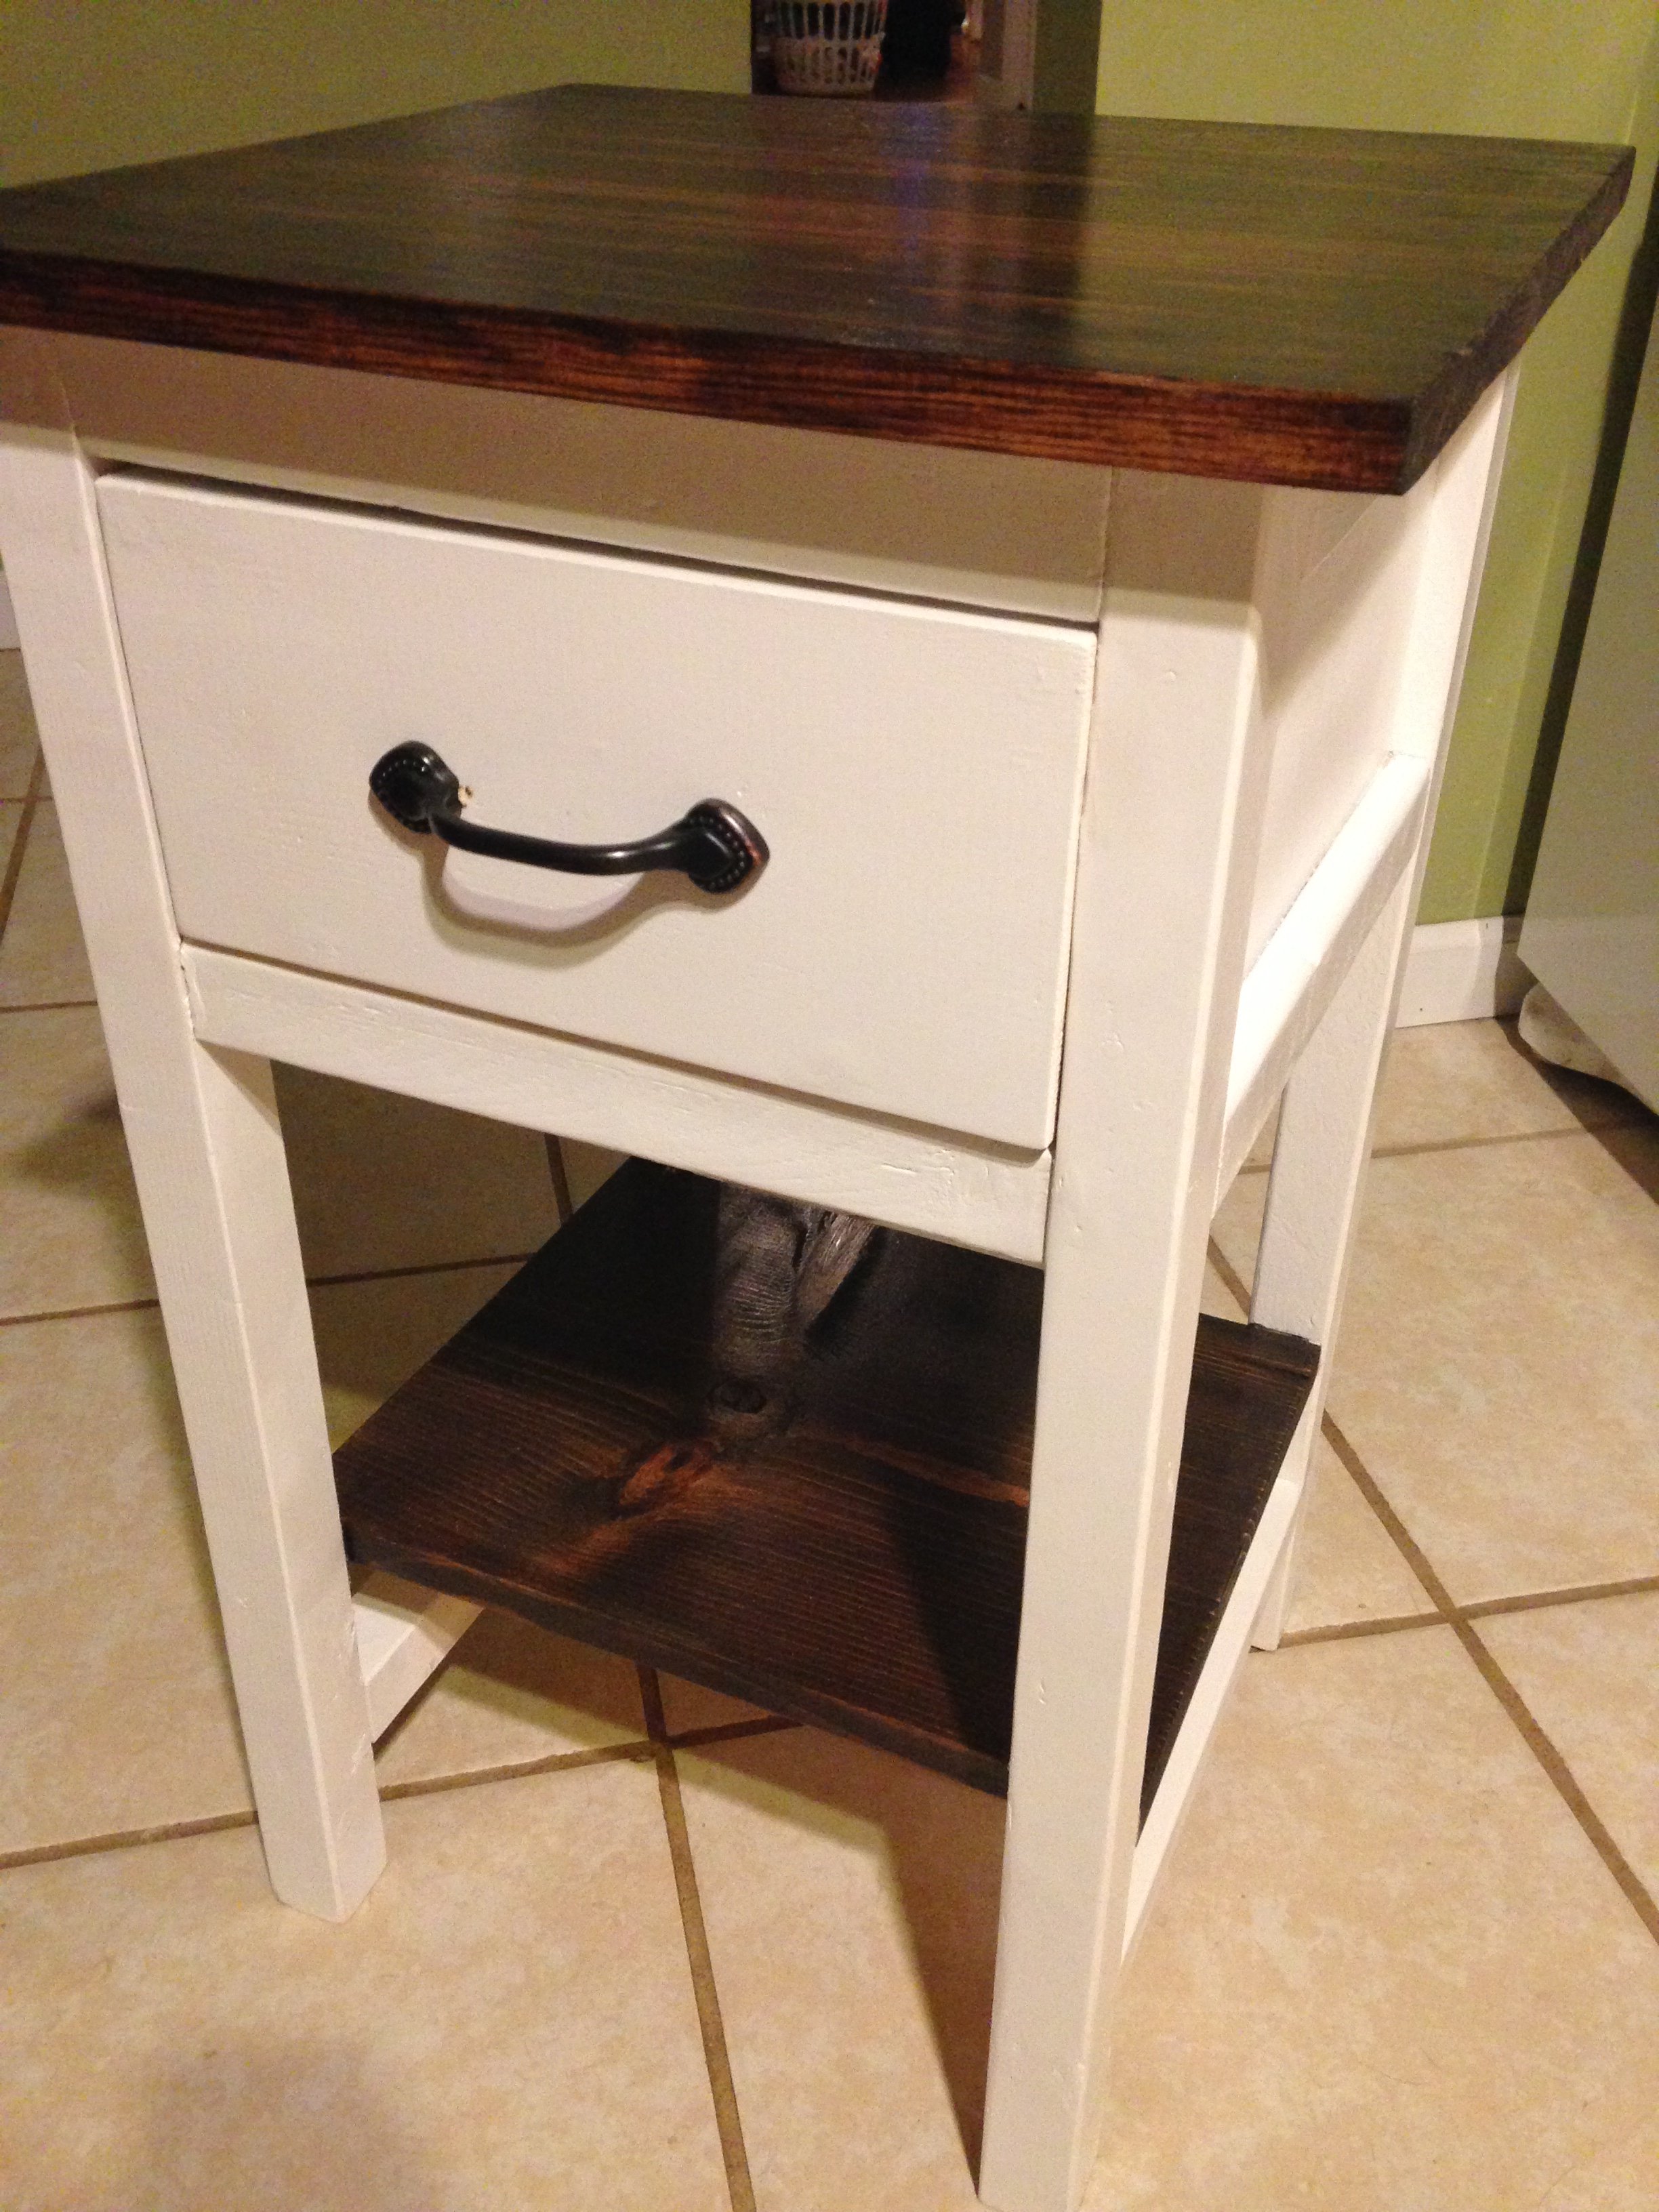
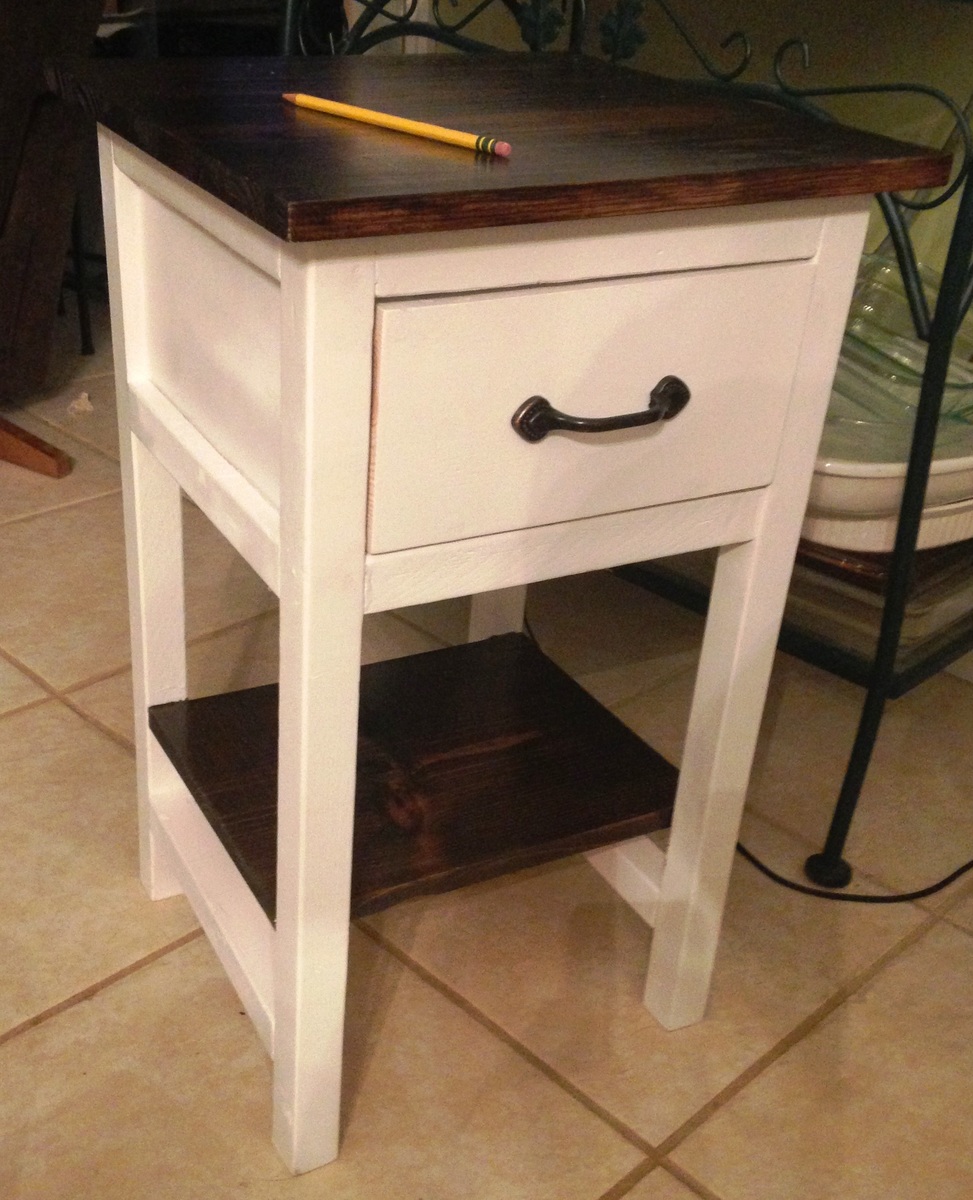
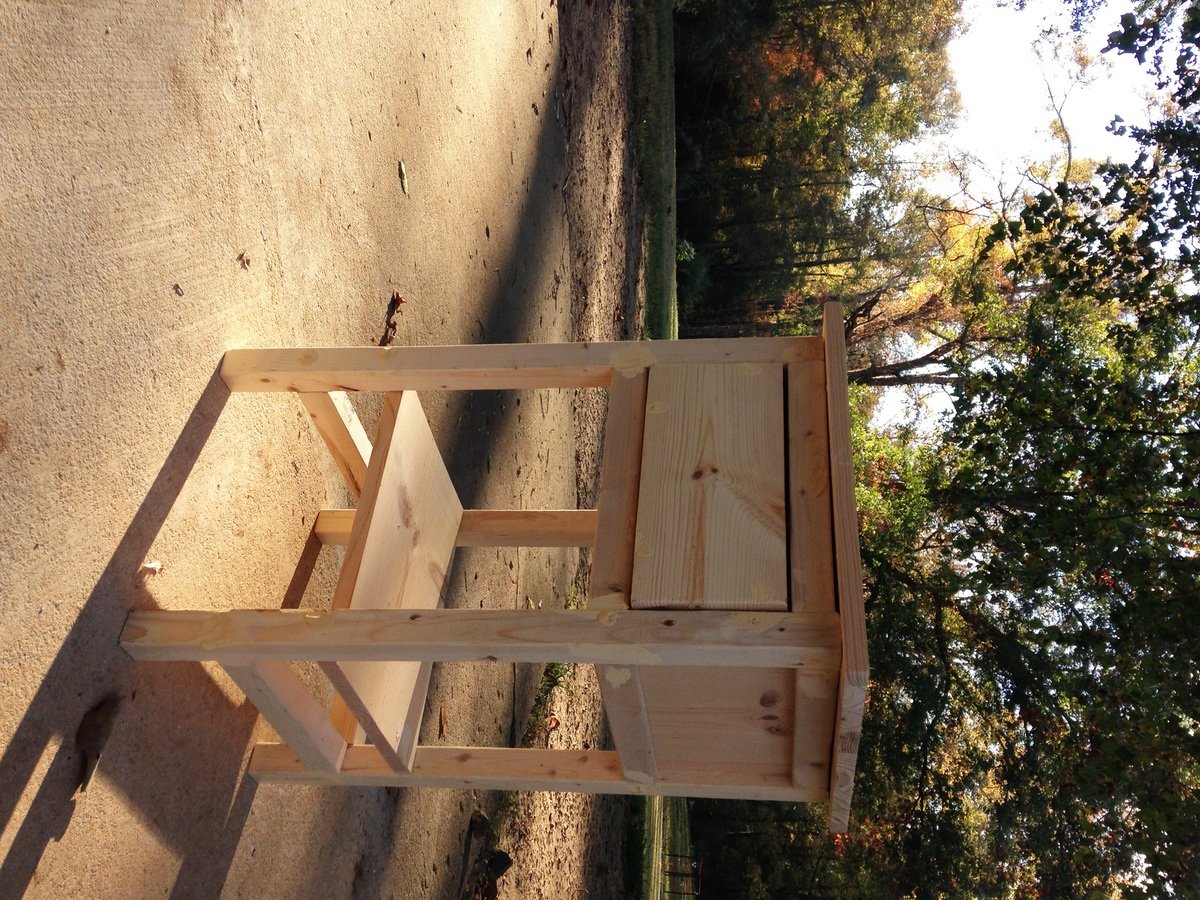
Barnwood Narrow Cottage End Table
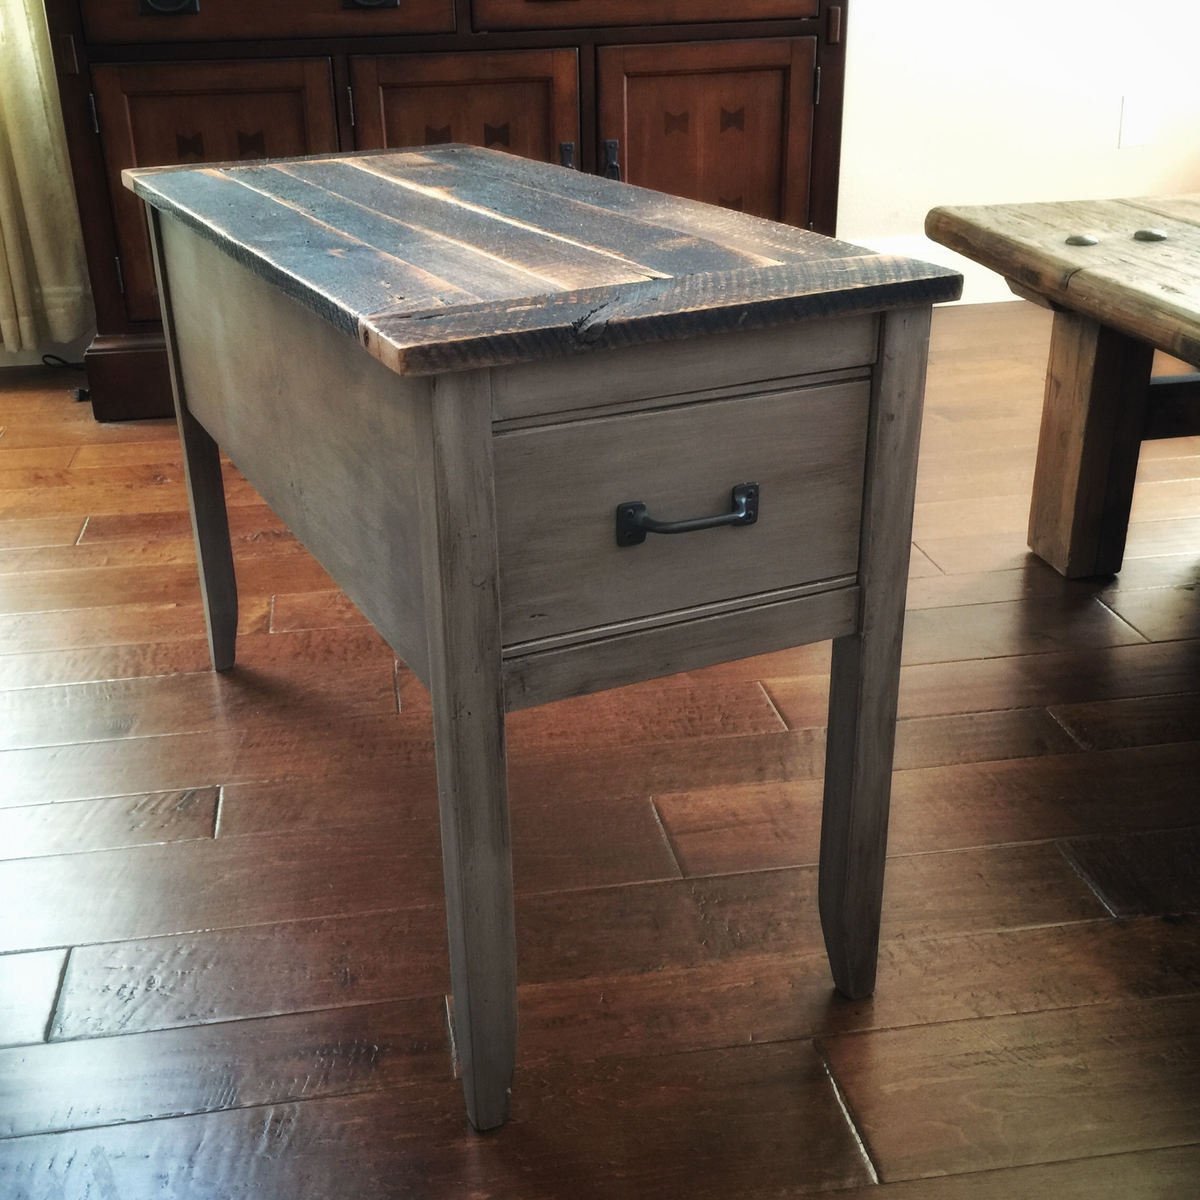
Inspired by the Narrow Cottage End Tables plans. Tapered the legs a bit at the bottoms. Added a bead to the top and bottom of the drawer front. I finally used a 100 year old board salvaged from a barn in Tennessee that suffered a fire - giving the white oak a great dark patina. There is a shop in Orange County, CA called True American Grain that sells reclaimed wood - I bought the board for $40 - it adds a lot of character to the finished project.

Built from Plan(s)
Estimated Cost
$50.00
Estimated Time Investment
Weekend Project (10-20 Hours)
Finish Used
Painted the base using Annie Sloan chalk paint in French Linen. I brushed on and wiped off a glaze from General Finishes in Van Dyke Brown. I used wax as a top coat on the base. For the top, I did a lot of sanding, but kept the old saw marks. I also used Tung Oil on the top, to protect the wood without a high gloss finish.
Recommended Skill Level
Beginner
Comments
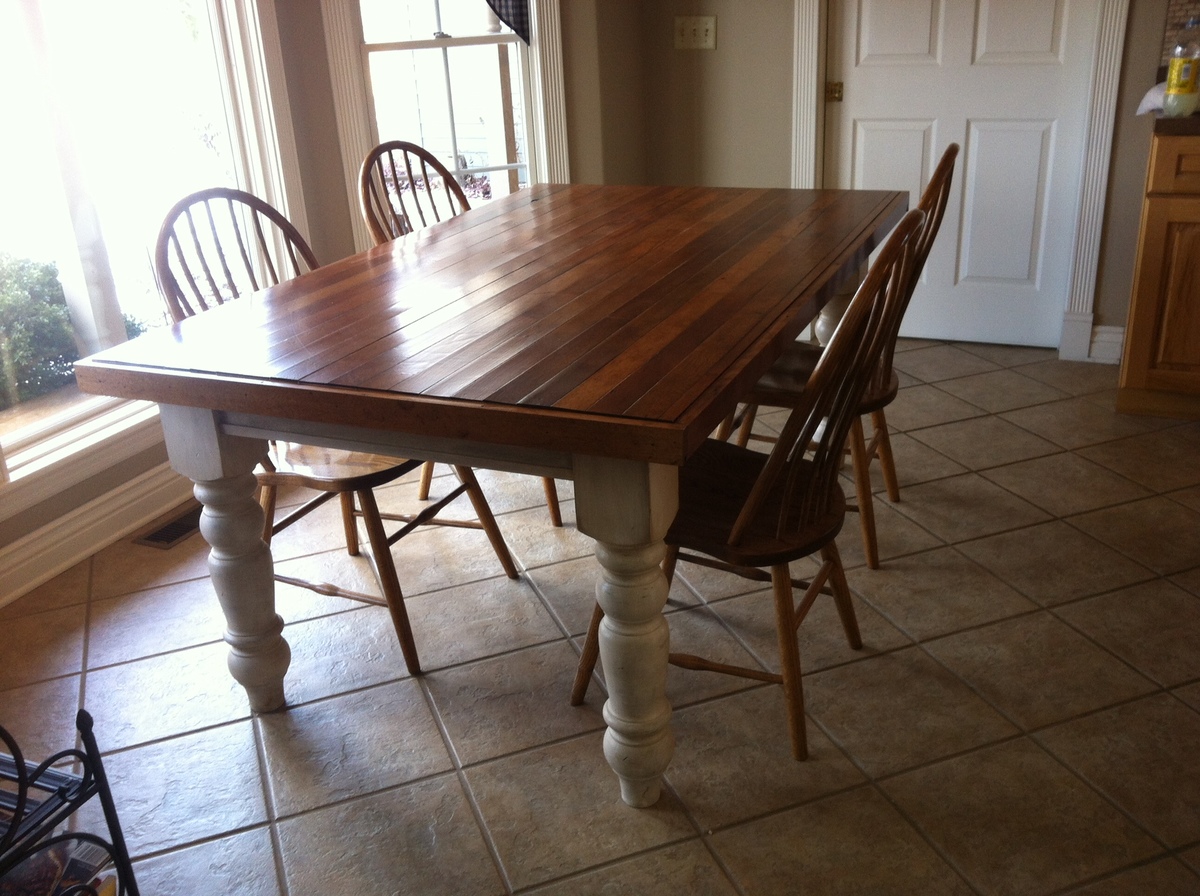
First Woodworking Project - Farmhouse Table
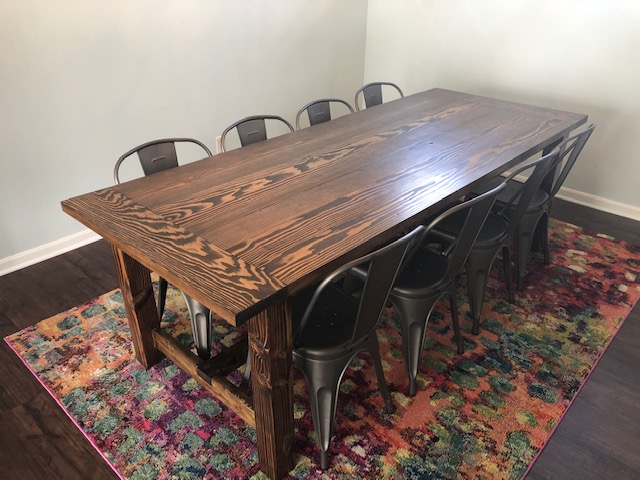
I am embarrassed to admit, but we had been using a 8ft plastic folding table with a table cloth and folding chairs for TWO YEARS prior to this build. I had struggled to find a table that was large enough and that I actually liked. I was so fed up that we decided to build this table. It was a huge learning curve because we had never build anything before. BUT IT IS DOABLE and FUN!
Built from Plan(s)
Estimated Cost
$500
Estimated Time Investment
Week Long Project (20 Hours or More)
Finish Used
Mimi Wax - Walnut & Mini Wax Poly
Recommended Skill Level
Beginner
Comments

Tue, 09/03/2019 - 17:46
What a beautiful table! …
What a beautiful table! Thanks for sharing and encouraging others!
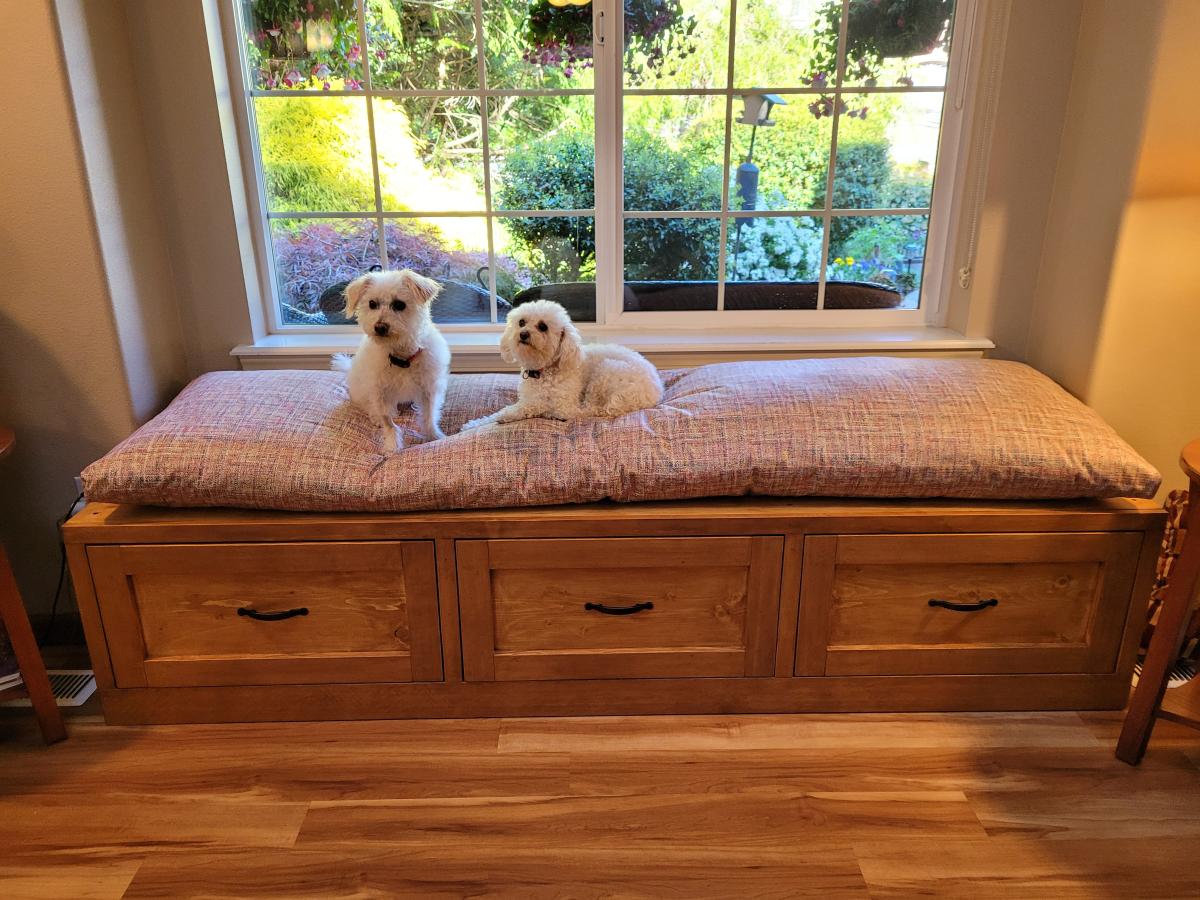
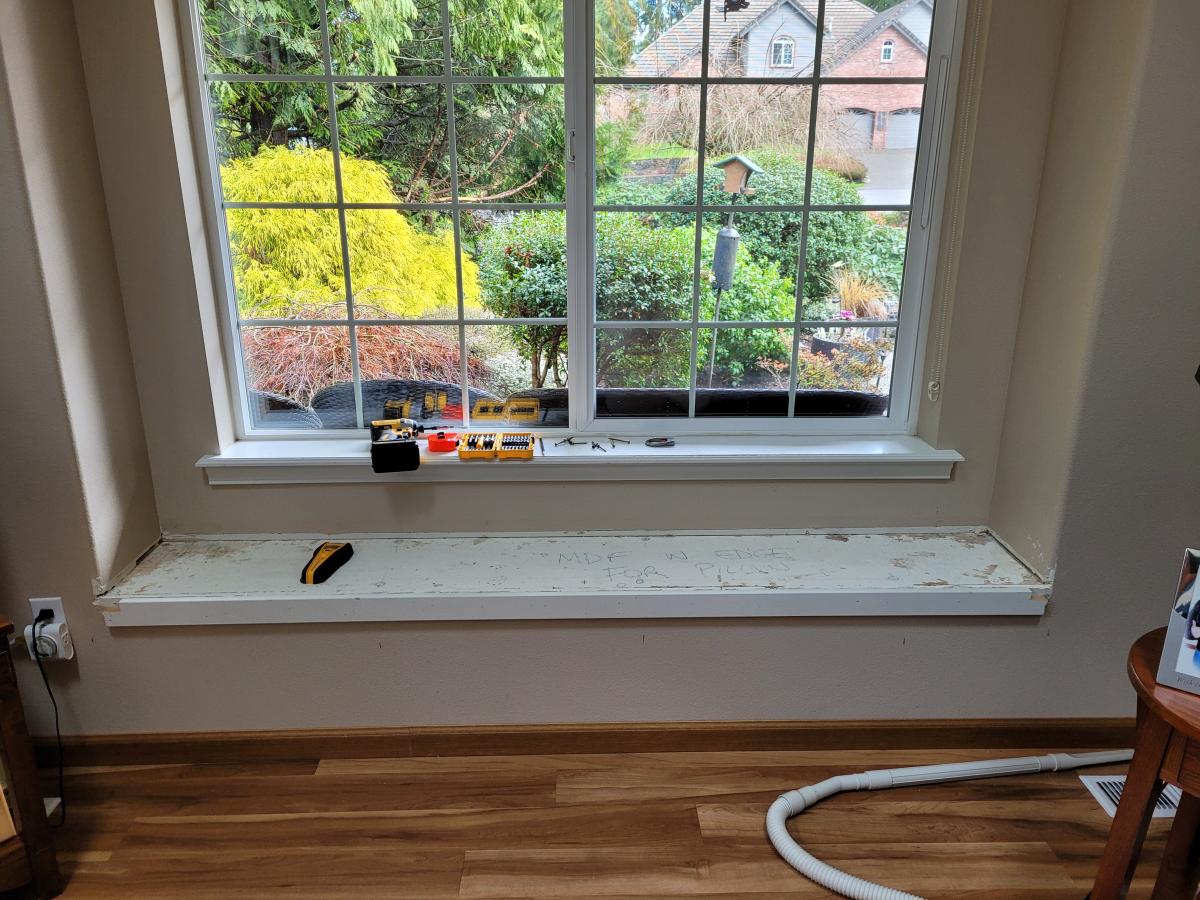
Window seat with drawers using the mudroom bench with easy drawers plan
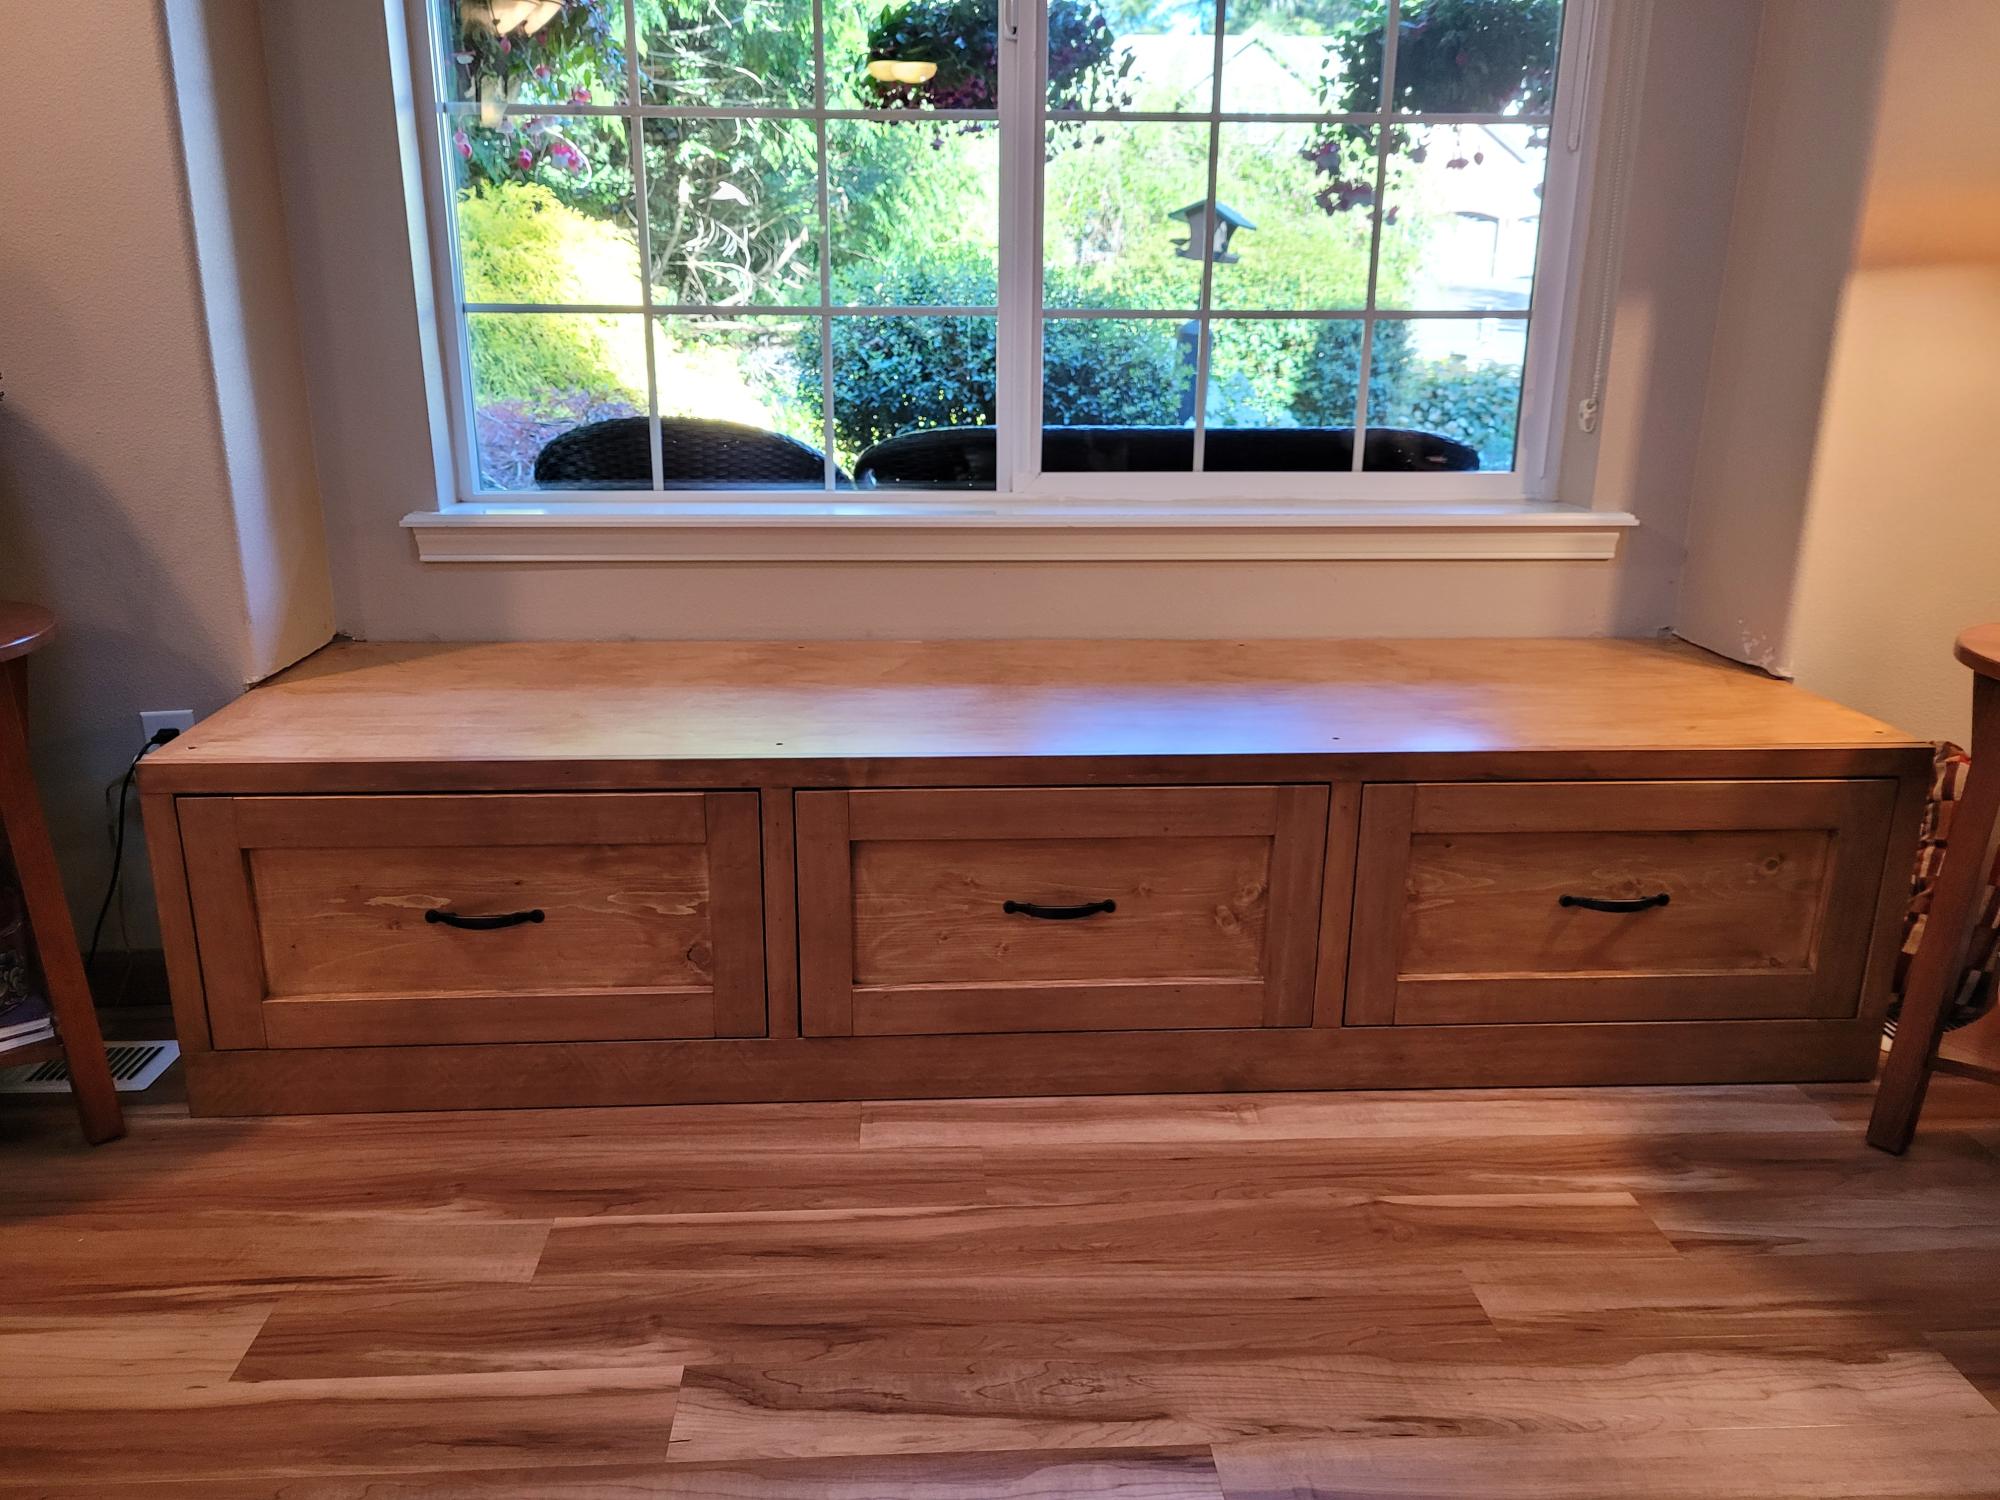
Our home had a window seat that was only 14 inches deep and too small to sit on lengthwise. The before photo shows it just before I started the demolition phase. I had found the mudroom bench with easy drawers plan and decided it would work for our space. This was my first DIY woodworking project. I bought a Dewalt 12-inch compound bevel, sliding miter saw, a Kreg Pocket hole jig, and a Kreg straight-edge guide, and I plan to use them for future projects. I really enjoyed following the plans and building this project.
I got all of my wood at my local Lowe's by sorting through a lot of boards to find the best ones available. I found a nice-looking sheet of hardwood plywood for the top and sides. It was expensive ($84), but I wanted to try staining the project rather than painting it so that it would complement our flooring and other furniture in the room. I decided that if it didn't work out with the stain, I would paint over it.
A local Benjamin Moore paint store did a great job at finding a stain that would match and could be painted over if necessary. It only required one coat of stain to achieve the desired color, and I applied three coats of polyurethane over it.
We ordered a custom cushion with a cover to match the size of our new window seat with drawers. We, and our doggies, are very pleased with how the project turned out! Thank you, Ana White, for the excellent plans and video!
Gene St Germain, Poulsbo, WA
Built from Plan(s)
Comments
Sat, 05/13/2023 - 13:06
Great bench!
Amazing first project and upgrade, it looks so great! Thanks for sharing.
Chippendale Chest of Drawers
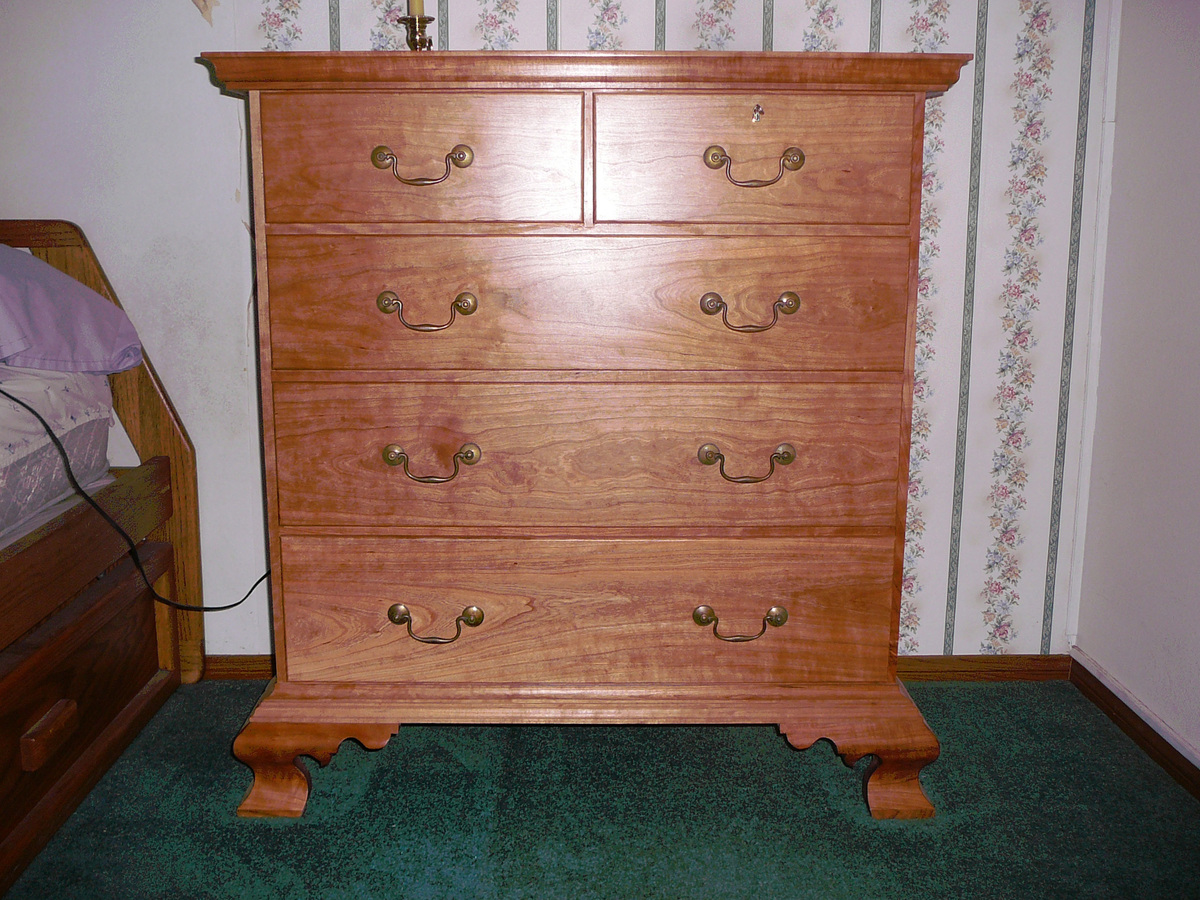
This is a Chippendale Chest of Drawers in Cherry. I did it a couple of years ago and it is still holding up very well. It was my first experience with ogee bracket feet and I was very happy with the way the feet turned out. It is a lot easier than it looks. There is no secondary wood, it is wholly out of American Black Cherry (prunus seritina). It took about four months to build and it has exposed dovetails on the top as the carcass is dovetailed together. Brasses are from bail pull type brasses.
Estimated Cost
$400.00
Estimated Time Investment
Week Long Project (20 Hours or More)
Finish Used
Minwax Antique Oil Finish
Recommended Skill Level
Advanced
Comments

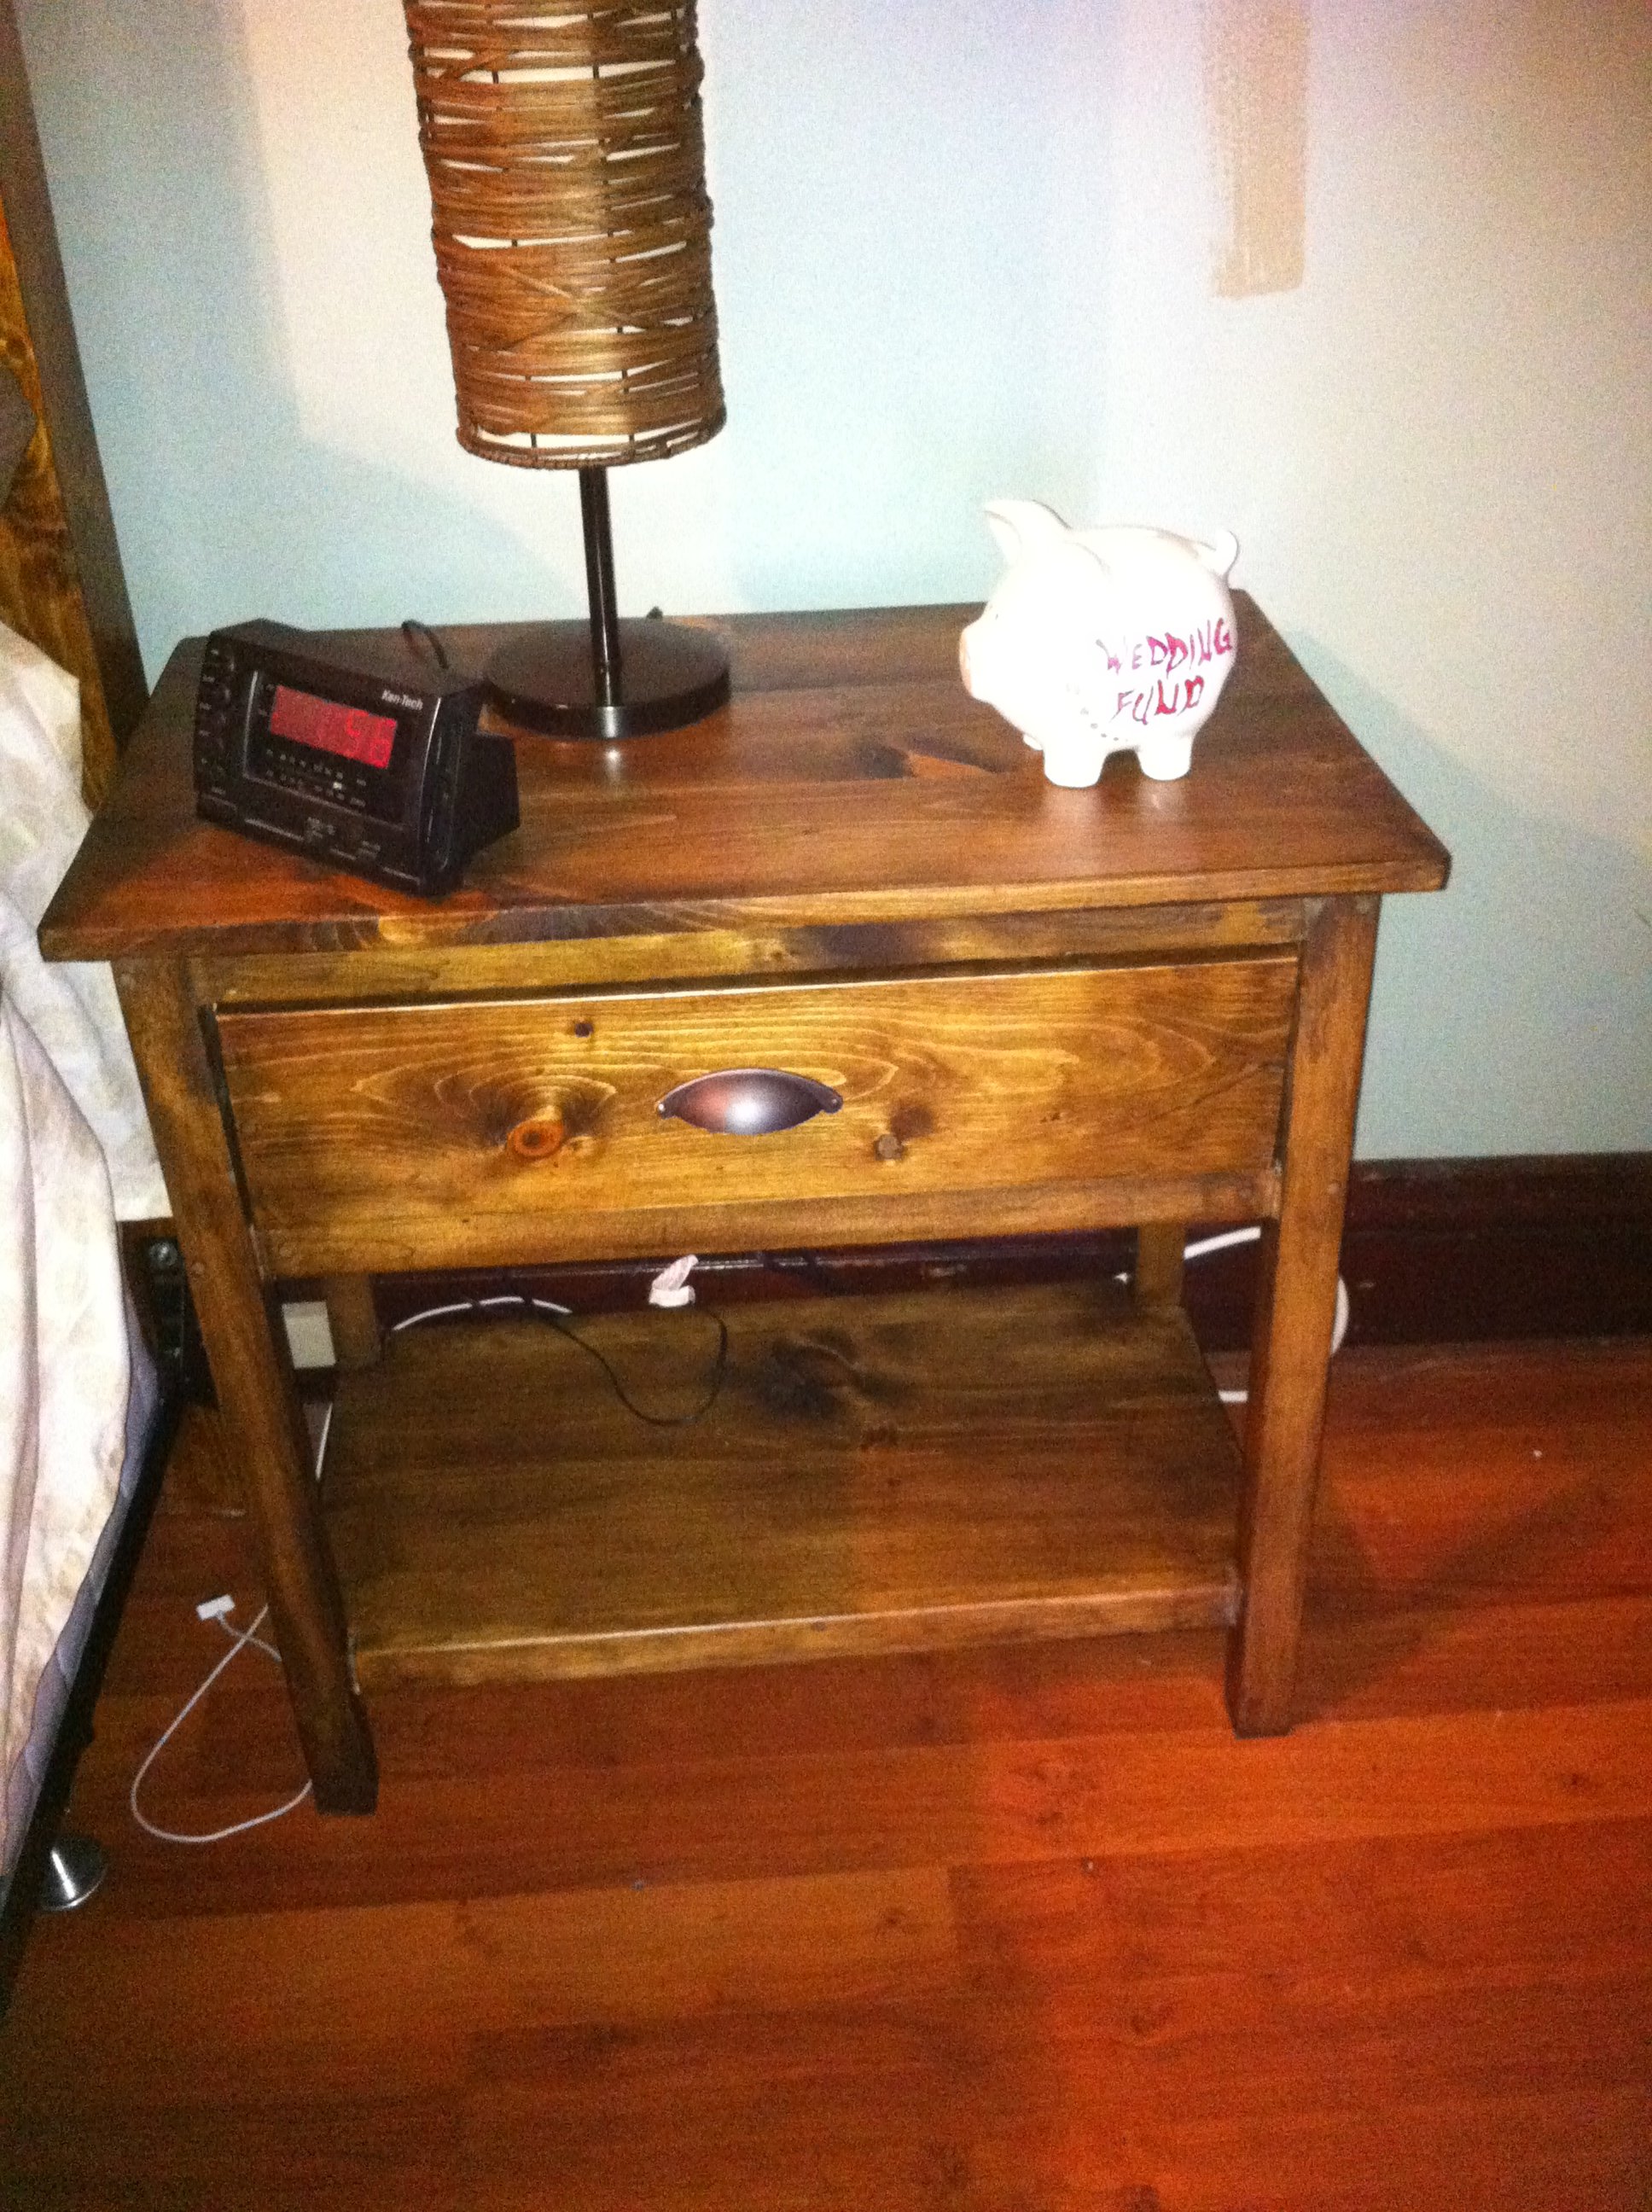
MINI FARMHOUSE BEDSIDE TABLE
I made the mini farmhouse bedside table as my first attempt at wood-working! It was really fun, and turned out pretty good for my first shot. I need to learn how to cut more consistently and get better at making things square. Thanks for the plan!
Built from Plan(s)
Estimated Time Investment
Afternoon Project (3-6 Hours)
Finish Used
White enamel spray paint and Rust-Oleum stain (Kona color) plus polyurethane coat over the stain.
Recommended Skill Level
Starter Project
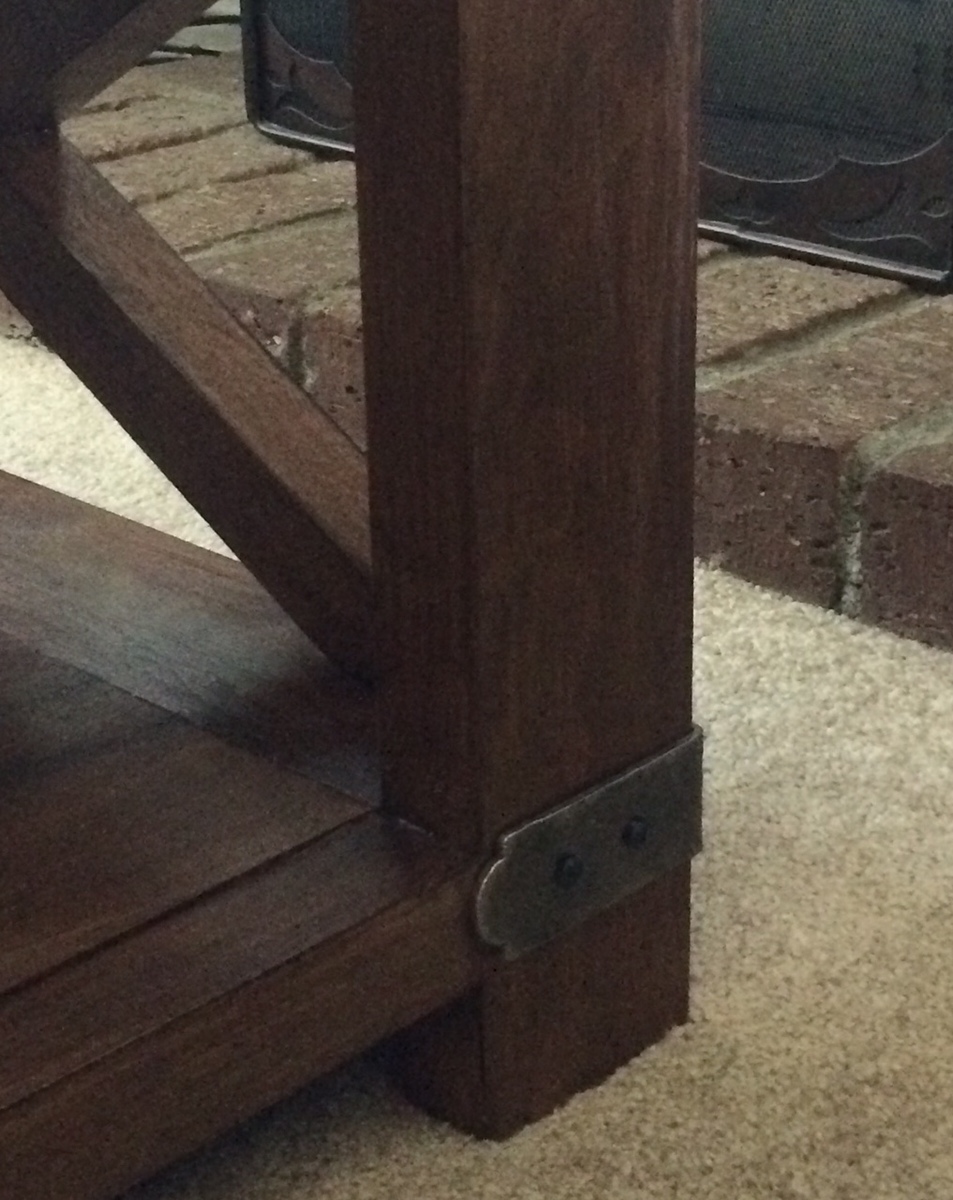
In American Walnut
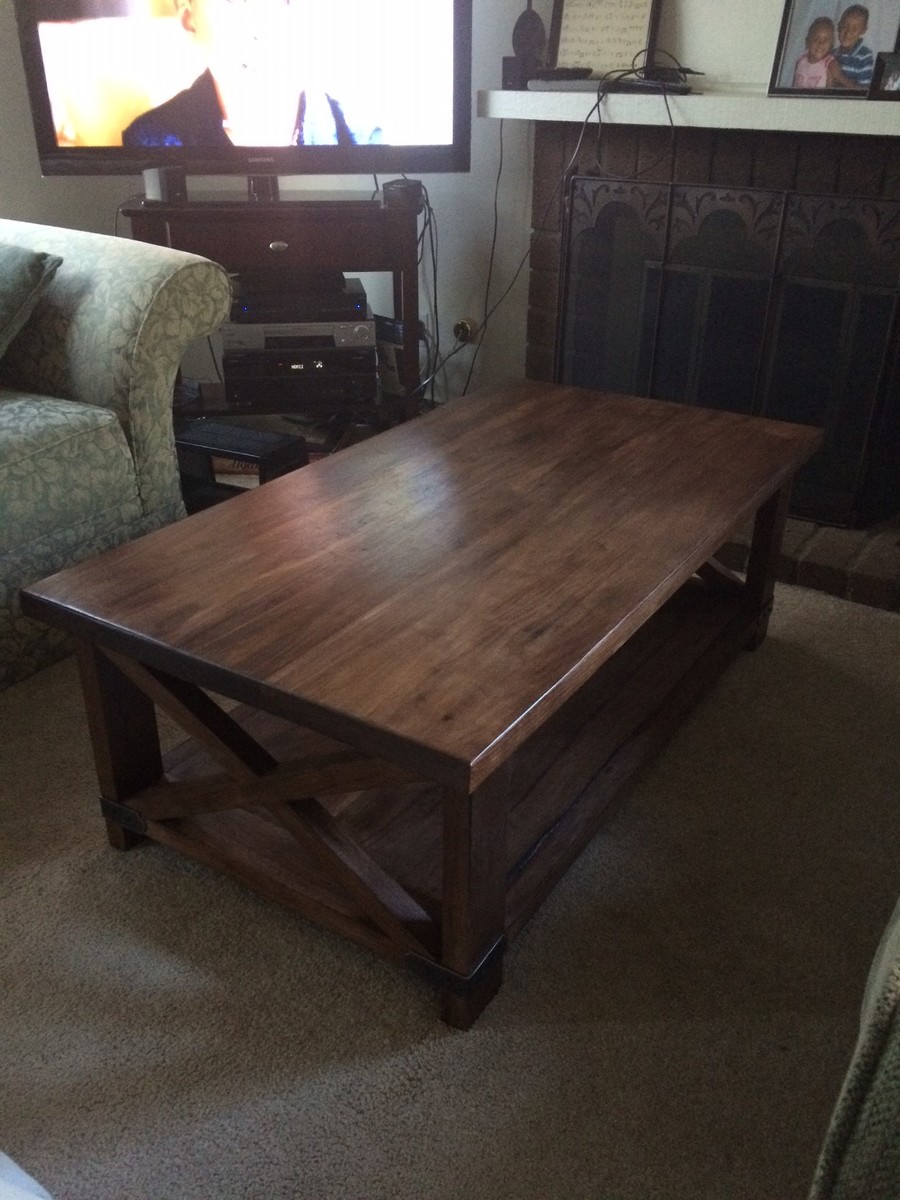
Rustic X Coffee Table done in American Walnut. Top was planed and joined for smother surface.
Built from Plan(s)
Estimated Cost
$600
Estimated Time Investment
Weekend Project (10-20 Hours)
Finish Used
Clear Poly.
Recommended Skill Level
Intermediate
Farmhouse Breakfast Table
Farmhouse Breakfast Table inspired by the x coffee table

Built from Plan(s)
Estimated Cost
$50
Estimated Time Investment
Weekend Project (10-20 Hours)
Finish Used
Mirmax Polyshade Honey
DIY Room Divider Closet


farmhouse night stand
I just Built two of these for my wife and I. the plan was great and easy to follow for the most part i would really suggest spending as much time on the drawers as possible it makes such a big difference getting them to slide easily. now hopefully with anyluck ana will find time in her busy life to post a farmhouse tallboy dresser plan or something close to it!
Built from Plan(s)
Estimated Cost
$50
Estimated Time Investment
Weekend Project (10-20 Hours)
Finish Used
1 coat of mixwax pre stain wood conditioner then two coats of chocolate coloured stain then two coats of semi gloss poly
Recommended Skill Level
Beginner
Comments
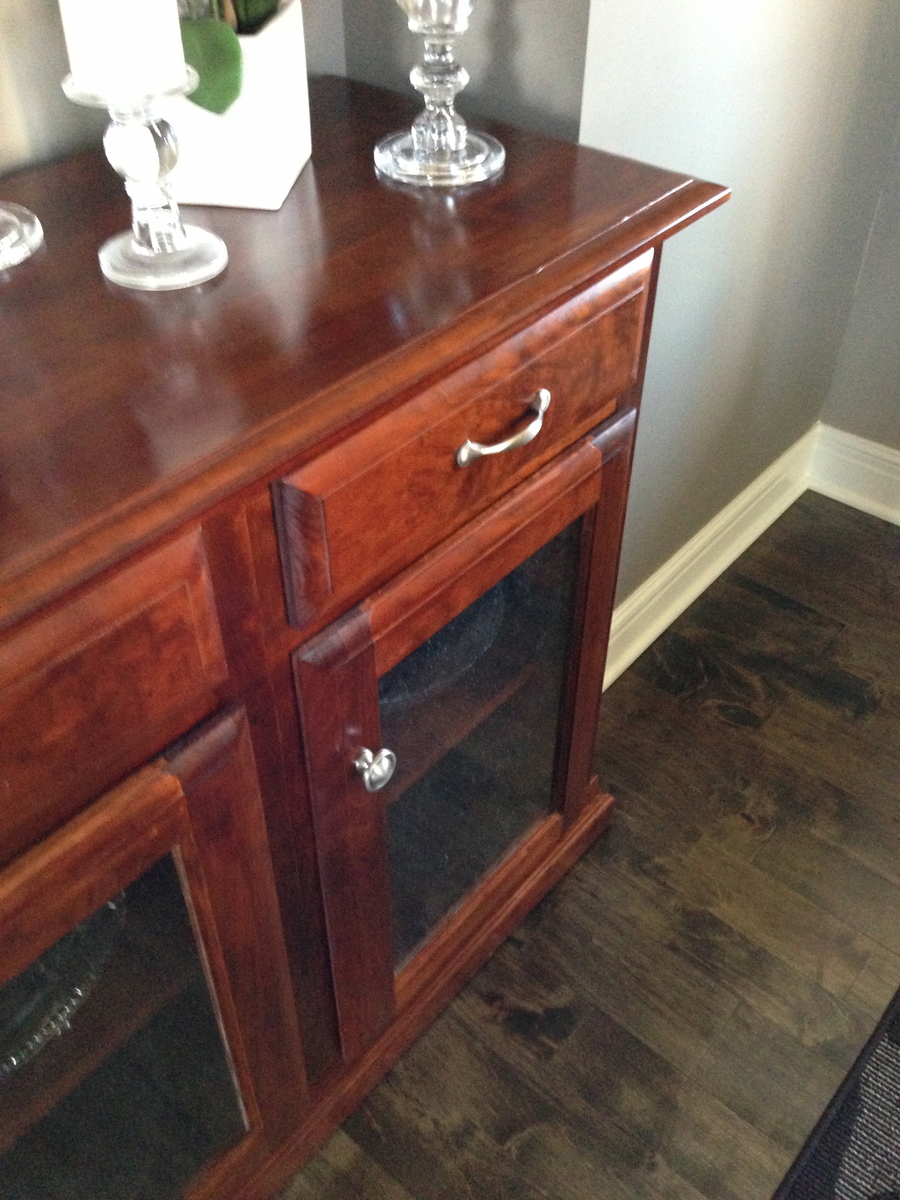
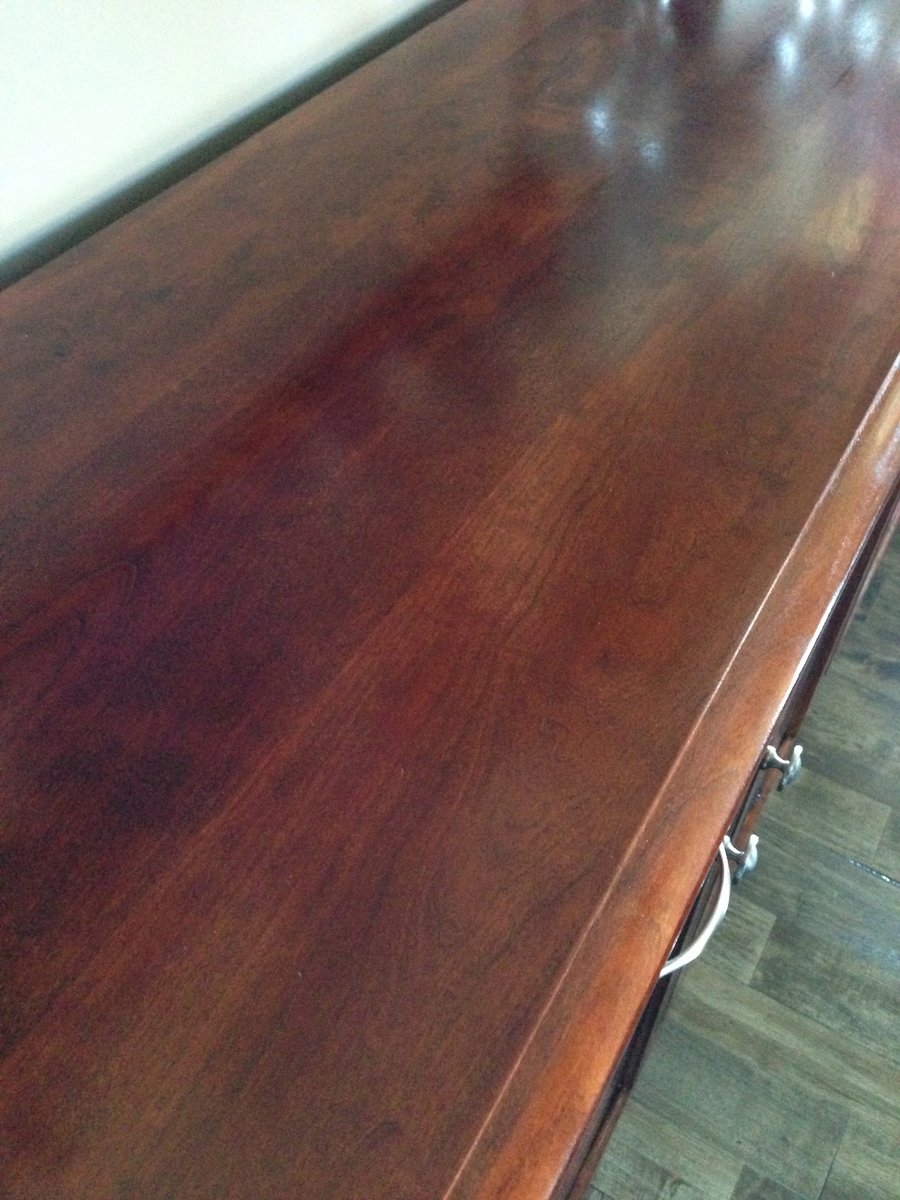
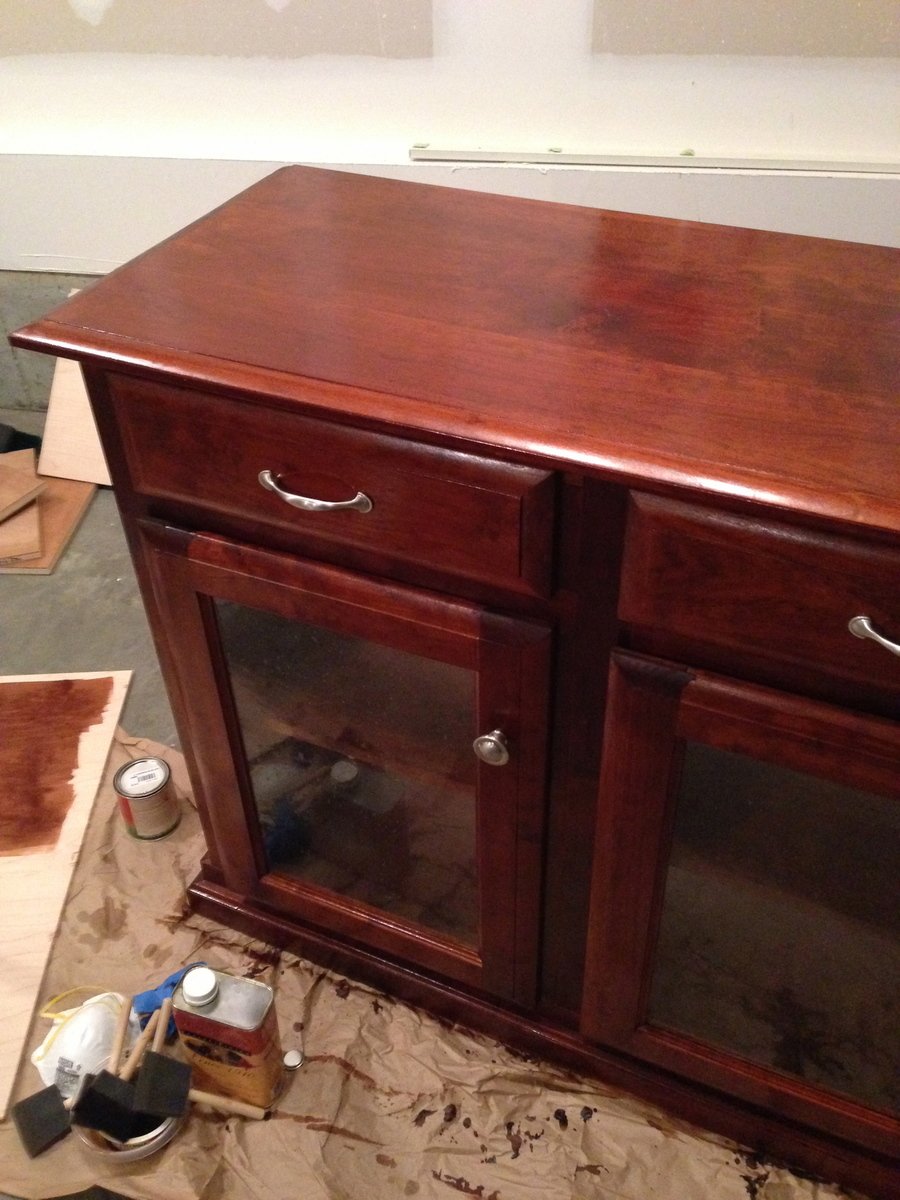
Variation of Planked Sideboard

Worked on this piece on and off for about 4 months! Was hard, but worth every penny. Spent about $300 on materials. Has seeded glass inset cabinet doors with soft close hinges. 80" long x 34" high x ~ 20" deep (I think). Bought black cherry through a specialty lumber supply (I highly recommend cherry!!). Used a cherry dye on it, and Waterlox original to seal it.
Built from Plan(s)
Estimated Time Investment
Week Long Project (20 Hours or More)
Finish Used
Water based cherry dye (1 coat) followed with top coat of waterlox sealer (3 coats)
Recommended Skill Level
Intermediate
Comments
Sat, 11/30/2013 - 12:22
Details
Hey johnhawkfan56,
It looks awesome man. Great job! Got some questions. Would you mind telling me a bit more about the top? I'm assuming you used 3-4 boards glued together? Would you mind sharing some details about making and gluing up the panels? Did you use pocket holes or maybe biscuit joints to keep them even? Did you use a jointer or a thickness planer for the boards? Lastly the finish is incredible. Any pointers or tips on applying the dye or Waterlox?
Thanks
Joey
Sun, 12/01/2013 - 13:08
Joey- Used a biscuit joiner
Joey-
Used a biscuit joiner to put top boards together, it was 3 boards of differing widths. A lot of times with the different woods (cherry, walnut, etc) the boards aren't as uniform. Don't have a planer or jointer, so just got lucky/used some heavy sanding with orbital to smooth things out. The finishing was really easy. Go to a specialty wood shop and ask for cherry dye that penetrates the wood well. Only one coat is needed. Keep in mind, some folks don't recommend dyeing or staining cherry because sunlight naturally darkens the wood to that color. For waterlox, make sure it's in a well ventilated area. I sanded to 240 and did not sand between coats. 3 coats would be enough. Waterlox on cherry alone looks fantastic as well, but it's not that red right away.
Antique hardwood flooring Husky Farmhouse Table
Found 120 year old mahogany hardwood flooring at The Old House Society that provided the table top. Built the subframe and legs per the standard plan. Then attached a 3/4" ODF plywood deck. Strip hardwood was nailed to the top with 1" finishing nails thru the flooring tongues. Cleaned the hardwood, applied 2 coats of shellac and 3 coats of satin polyurethane. The modification to use the strip flooring was the most tedious to get a tight fit. The antique, aged and stressed flooring gives the table a real antique look. Build time was @ 8 hours. Applying the finishes took several days of drying/curing before use. My wife loves it and I am proud of the final project.
Built from Plan(s)
Estimated Cost
Legs from Osburn Wood Products @ $55.00 each plus shipping. Mahogany subframe parts @ $50.00. 4 x8 ODF 3/4" plywood @ $ 65.00. Re-cycled strip flooring @ $250.00. Finishing materials @ $30.00. Total @ $550.00
Estimated Time Investment
Weekend Project (10-20 Hours)
Finish Used
2 coats of shellac. 3 coats of satin polyurethane. Used Golden Mahogany stain to cover cut edges and scars. Amy Howard linen paint on legs and subframe. 1 coat of light antique wax first. 1 coat of dark antique wax final coat on legs and subframe.
Recommended Skill Level
Intermediate
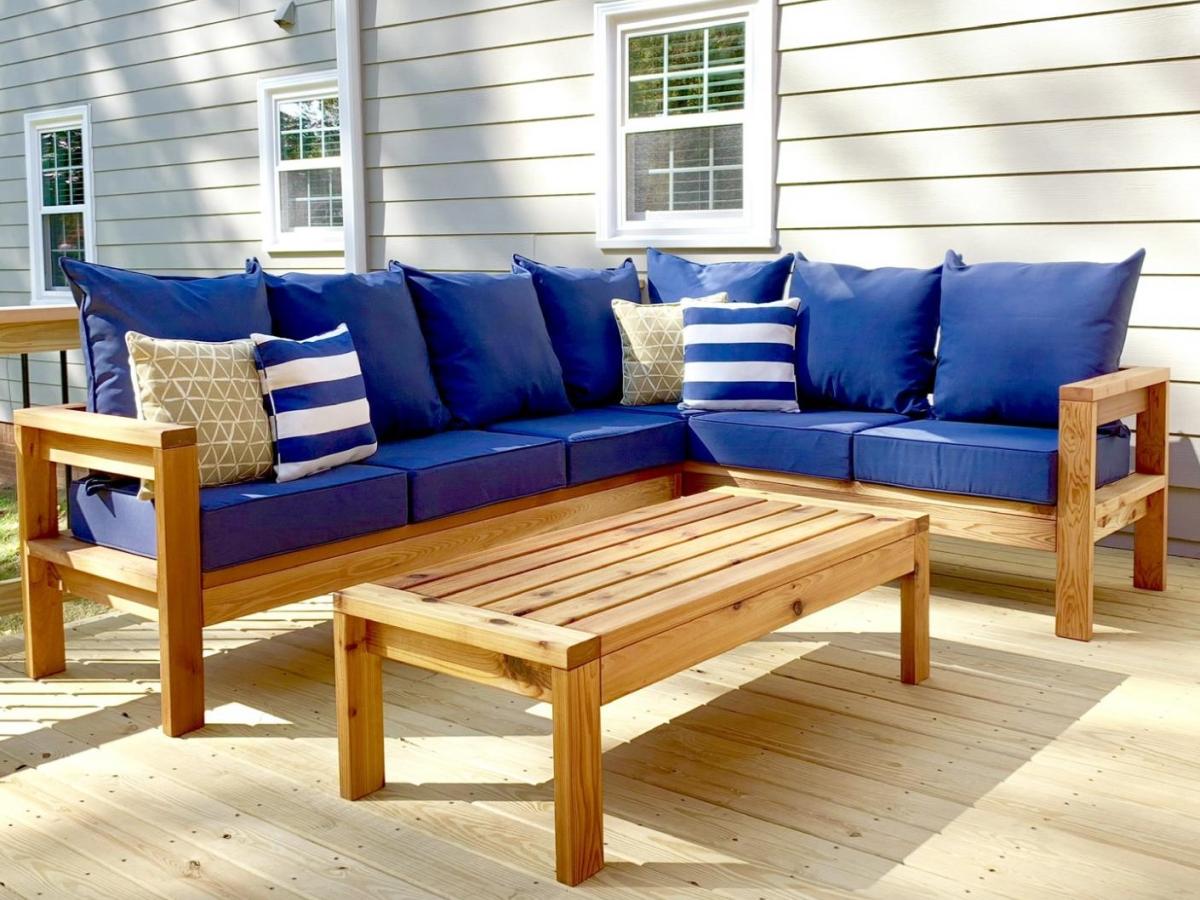
2x4 Outdoor Sectional and Coffee Table

I followed the instructions on the Ana White website, and followed a few of the commenters ideas to reduce the size slightly to minimize the wood costs. I used pocket holes wherever I could to try and reduce the amount of visible screw heads. The cushions were purchased at Big Lots and the cedar was purchased at the big home improvement store. My 5 year old and I worked on this and are so proud of how it turned out.
Built from Plan(s)
Estimated Cost
$250
Estimated Time Investment
Day Project (6-9 Hours)
Finish Used
Teak Oil
Recommended Skill Level
Intermediate
Comments

My Adirondack build

This build was so simple and fun to make. Just like Ana stated in her video, it really only took me an hour to build. I plan to do many more projects that I find on Ana's website. This project still has a little bit more work to do like staining and sealing but will finish that on another day real soon.

Built from Plan(s)
Comments
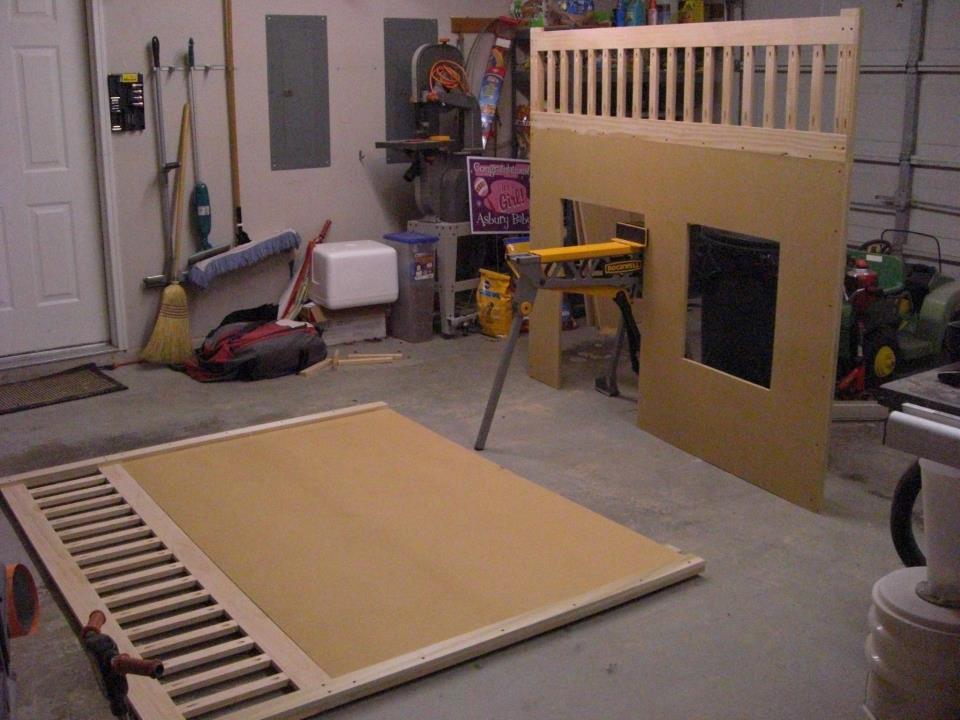
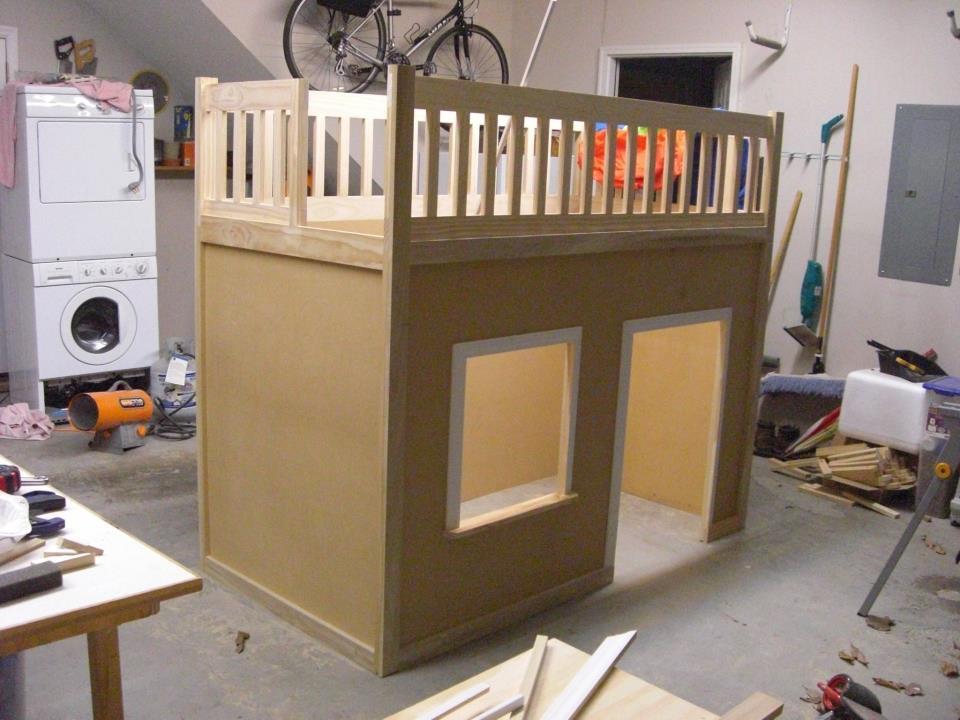
Another great Loft bed
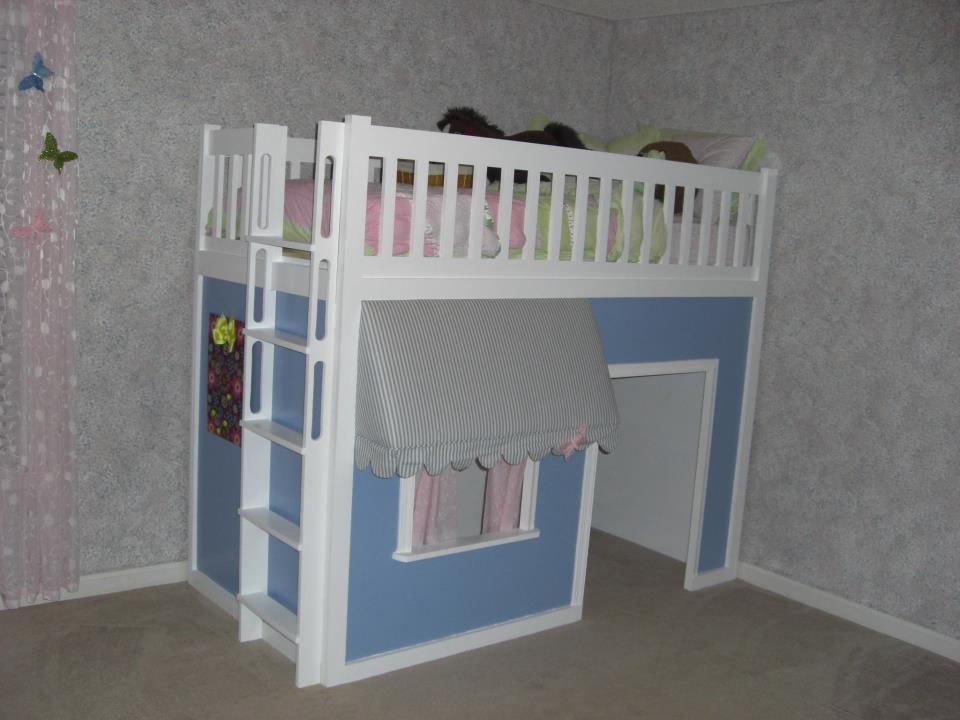
This is another one if your popular loft bed houses. Thanks very much for the plans! I changed a few things, but not as dramatic as others have done. Was a fun project and my daughter actually helped. One spur of the moment idea was to allow her to paint a mural on the backside so that in few years when she out grows it we'll be able to look back and remember how we built it together.


Built from Plan(s)
Estimated Cost
$300
Estimated Time Investment
Week Long Project (20 Hours or More)
Finish Used
White and blue paint.
Recommended Skill Level
Intermediate
Comments

Thu, 01/12/2012 - 19:36
Love the awning! And the
Love the awning! And the painting on the back with the date. Nice touches!
Fri, 01/13/2012 - 18:02
you should be proud!!
Super cute! What a great project for you and your daughter!
Sat, 01/14/2012 - 10:34
Very cute!
You guys did a great job - very cute! I also love the idea of a hidden mural that you get to revisit in the future. So cool!
Worktable +Peg Board and Light

This workbench was really easy to make and is, in fact, very sturdy. I modified it slightly, taking inspiration from (I think) the first brag picture on this and added a pegboard, work light and top shelf, which in my opinion drastically improves the overall functionality. The plans call for 9 2x4s but in order to get the result as-is, you only need six. PS- I'm not sure why the pictures are coming out sideways, but I don't see a rotate button!

Built from Plan(s)
Estimated Cost
64 dollars
Estimated Time Investment
Day Project (6-9 Hours)
Finish Used
None
Recommended Skill Level
Starter Project
Comments
HouseHomemade.us
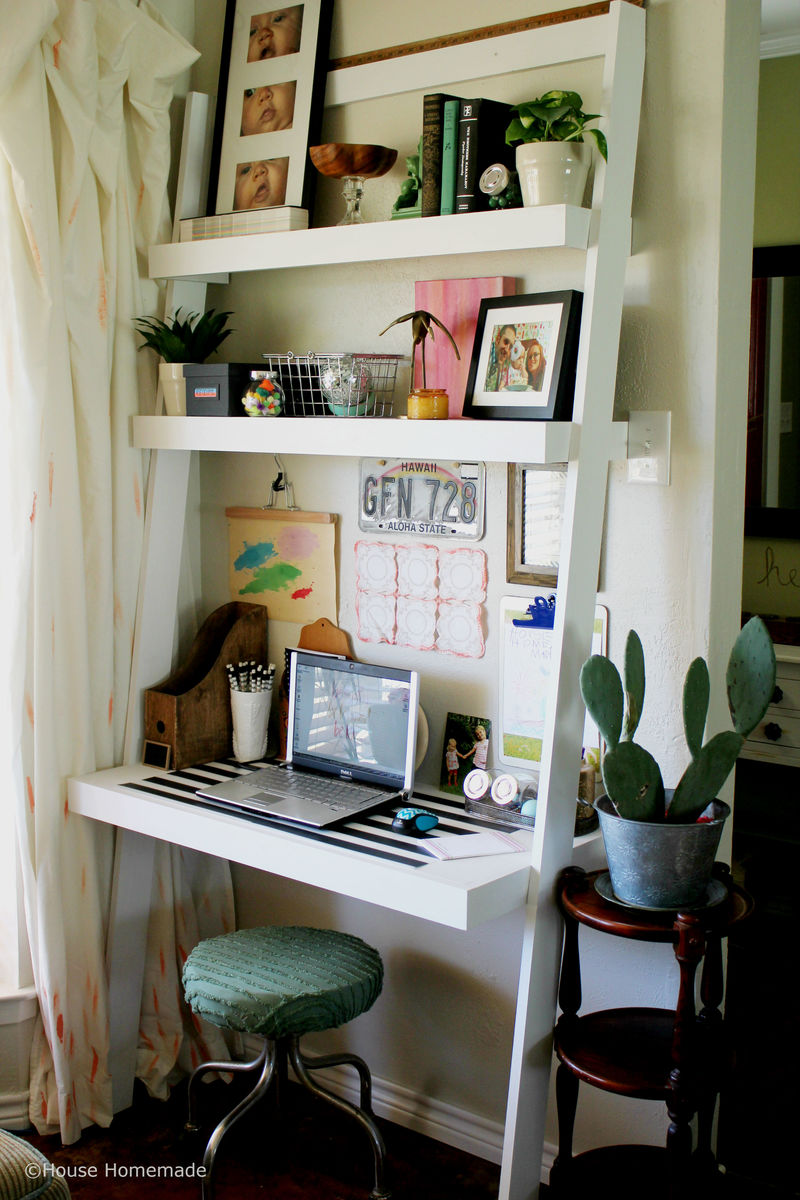
We had a great time making this desk! I was so thankful for the inspiration and now I have a new favorite spot in our home.
Built from Plan(s)
Estimated Time Investment
Day Project (6-9 Hours)
Finish Used
paint
Recommended Skill Level
Intermediate
Comments
Fit for a queen!
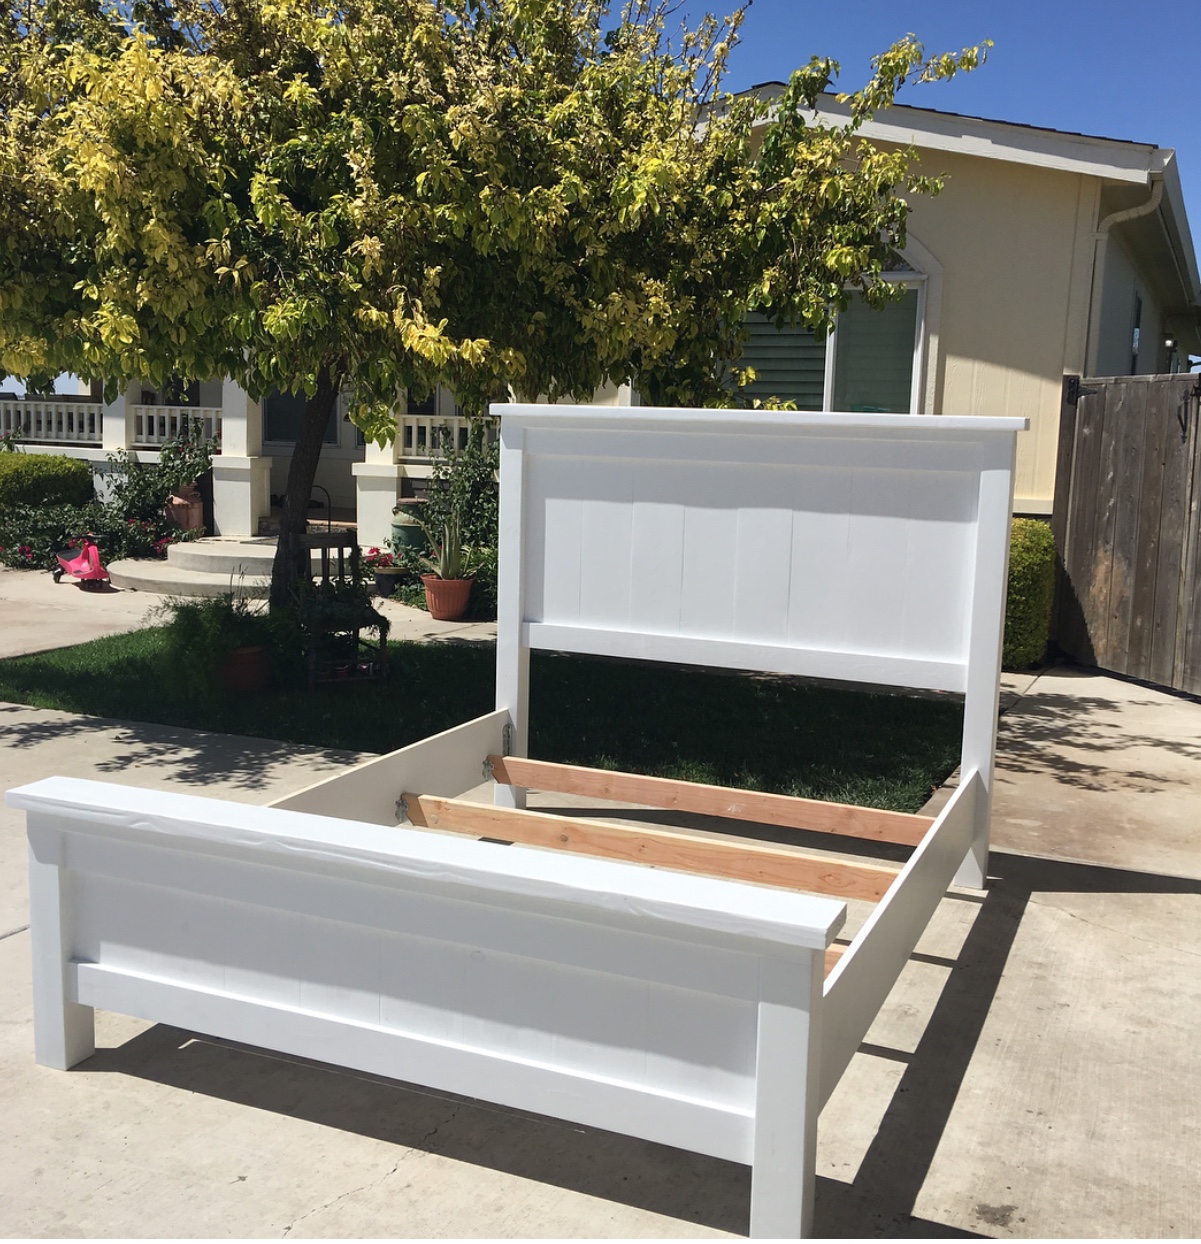
I made this beautiful, queen size, farmhouse style bed for my friend’s daughter. It was her sweet 16 gift. I used Ana’s plans and it turned out even better than I imagined it ever could.
Built from Plan(s)
Estimated Cost
$200
Estimated Time Investment
Weekend Project (10-20 Hours)
Finish Used
Paint
Recommended Skill Level
Intermediate
Comments
Wed, 10/02/2019 - 09:52
Wow! Turned out awesome! …
Wow! Turned out awesome! Thanks for sharing photos.
Tue, 11/05/2019 - 10:40
Thank you so much for…
Thank you so much for entering this project in our October 2019 brag post contest. We are so excited to let you know this entry was randomly selected for a $100 gift card!
Look out for an email from us shortly.
Thanks! Ana
Enclosed Garden Raised Bed
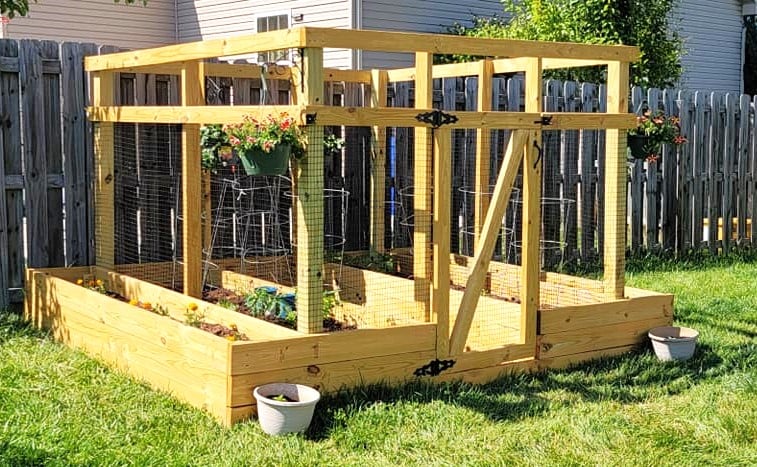
My husband and boys made a beautiful enclosed raised bed using your plans. It was modified to include exterior raised beds for flowers.


Built from Plan(s)
Comments
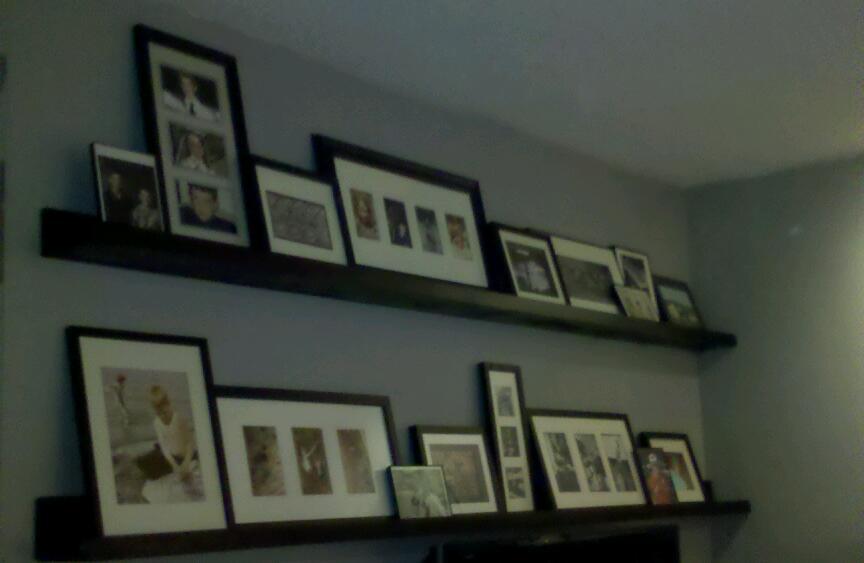
Ten Dollar Ledges (which were free - sort of)
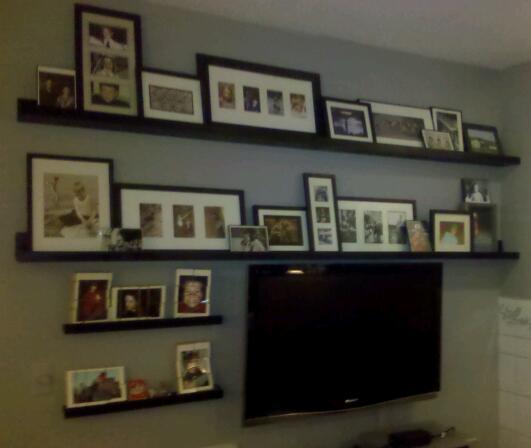
Thanks for a great plan! I've been procrastinating in posting, since I have plans to start blogging and wanted to link. Unfortunately, my blog remains a pipe dream as I still can't come up with a name.
The two long ledges were the ones I made (smaller ones are ancient.) These have helped me a great deal in my efforts to pull together/put my own stamp on the most awkwardly laid out and chopped up house imaginable! The 'in your face effect' created by my piling nearly every photo I own on them should be temporary - wall space will open up as other rooms get done. I do think they soften up the gigantic television (Ok, stop laughing. It was worse before.).
While the Ten Dollar Ledges were the inspiration for these, I didn't follow the instructions, since I have lots of leftover plywood and buying lumber when you live in the country and drive a VW Bug is not much fun. I'm very pleased with both the shelves and the garage space their creation opened up. There was a tradeoff, though, as it took me far longer than the hour or two each would have took had I used dimensional lumber. Four inch rip cuts are a pain! (especially since I was a bit too perfectionistic.) But I'm very happy with the results. Thanks again!
Built from Plan(s)
Estimated Cost
very little (always have screws on hand and used paint I had)
Estimated Time Investment
Weekend Project (10-20 Hours)
Finish Used
Black semigloss spray paint.
Recommended Skill Level
Beginner
Comments
Sat, 01/21/2012 - 16:20
$10 ledge
Hi - I am SO EXCITED - just made a $10 ledge! I have been wanting a photo/art ledge for a long time and actually purchased one from Pottery Barn which I returned. I hated the finish on it an found it very difficult to hang, not to mention that it was expensive! I had some idea how I might make one but wasn't sure, so went on line looking for instructions. So glad I found yours - it was really easy and looks great. The best part is that you can make it whatever size and finish that you want. Now i have to get busy making art to fill it! Thank you so much for your great ideas - i see quite alot of others on your site that I just might try.
Comments
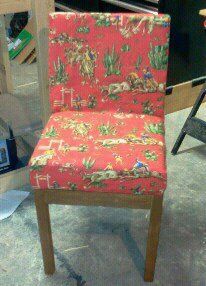
birdsandsoap
Thu, 01/05/2012 - 07:25
I LOVE the fabric! I could
I LOVE the fabric! I could never get tired of cowboys!