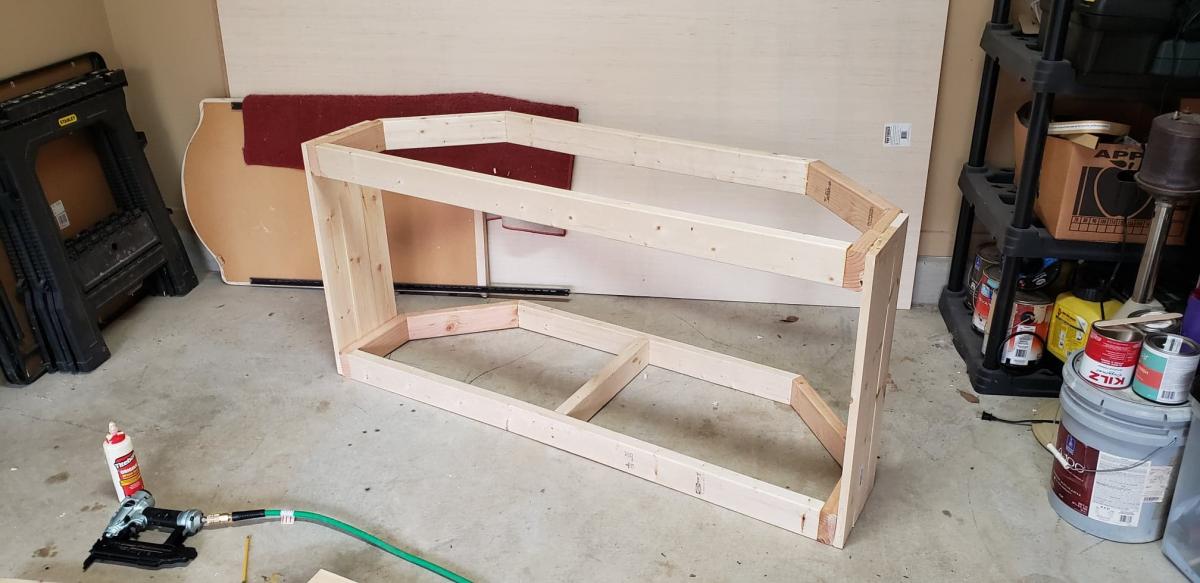
Easy Heavy Duty Sawhorses
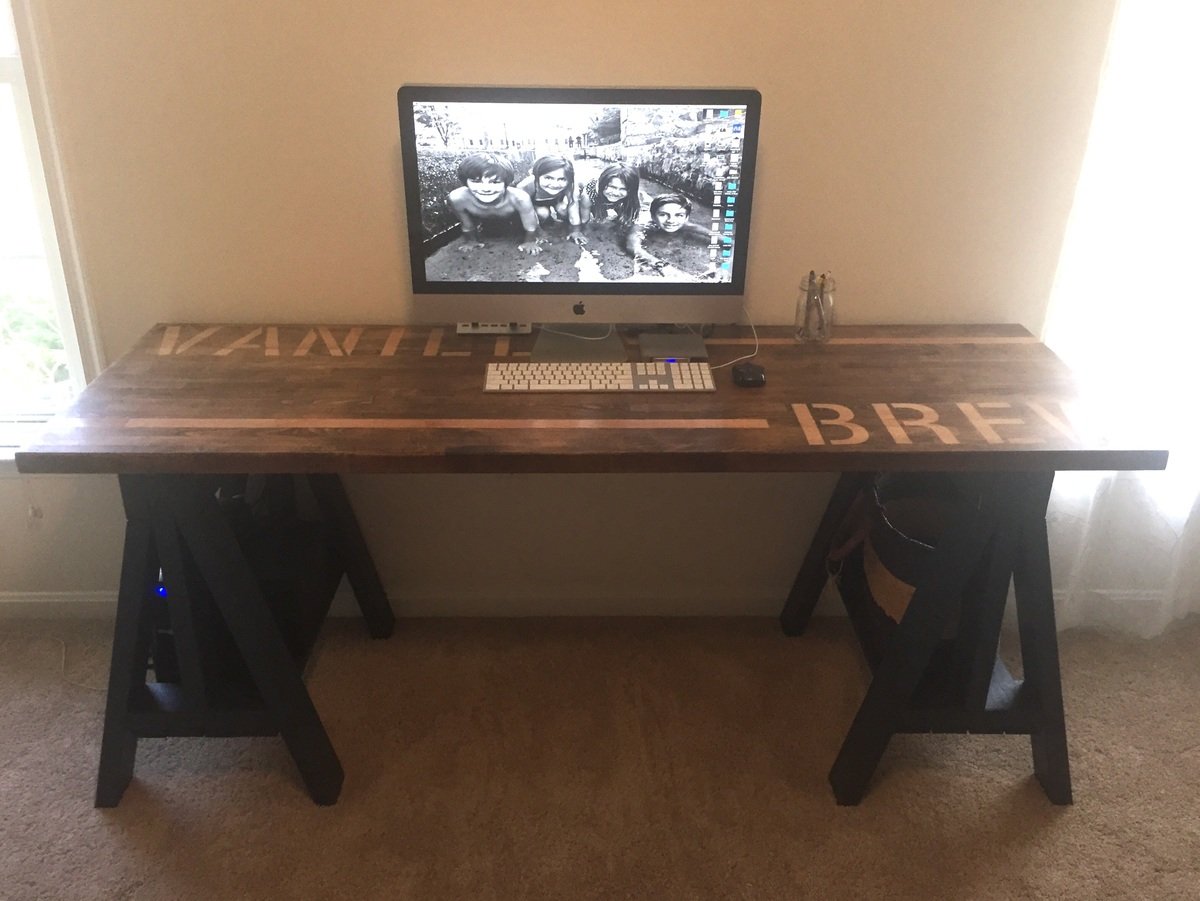
I build these from the plan for Heavy Duty Sawhorses. I preferred these for the thickness to match my butcher block desktop.
We did the Easiest Shiplap Fireplace in a weekend, thanks to Ana’s plans. I convinced my husband to help me build this by upgrading to a 65” tv and adjusting the dimensions. We also built a shelf behind the tv to hold our receiver and Xbox that is hidden when the tv is in place. Ana’s tutorial was amazingly and gave us the confidence to finally build something that’s been on our list for 2 years!
I made two of these as gifts. I modified the plans for a smaller bench length and width. They are 33in long on the top with a 1.5 overhang. I chose to place the 1x4 on top at the end as it was easier to stain and finish. Instead of wood glue since it was finished I used 3 pocket hole screws in the back, 2 corner braces with antique bronze finish on the ends under overhang and 2 on the inside of the storage area and gorilla glue.this made it very solid. It also made positioning it easy as I screwed the corner braces to the bottom side of the 1x4 face. I measured for a 1in overhang and 3/4 of an inch for the thickness of the back board. By doing so I could simply place the board on top of the bench and center it for 1.5 in overhang on ends then simply screw in the remaining screw hole in the inside of the storage compartment.
Made first chair for the firepit area, hope it holds weight!!! Plans were very easy to follow as usual.
I wanted to build a small shower bench. I used the Providence Bench Plans and just made it a bit smaller with a few adjustments. This bench is 35" long and 18" tall. I did not use the cross supports on the bottom because it was so short. Also, you will see that I turned the bottom stretcher and side supports flat/horizontal. I put the screws for the seat boards through the top down just because this was the easiest way for me to do it. The plans did not show in detail how to attach the seat boards from the underside. It just said "finally, the seat boards." I guess they probably used a pocket jig. I bought a pocket jig and used it in the couple of places, but this was my first time using it. I used brown, coated decking screws in the places I did not use the pocket screws. This was my first attempt at building anything and my first time to use a pocket jig. I used a natural wood stain and Behr Weather-Proofing since it will be in a wet area.
When we moved into our new house, I figured it was time to replace my girls's mattresses on the floor with actual beds. so I set about making the twin storage beds with corner unit. I primed all the wood prior to cutting and assembling, and that made things go much faster. Assembling the corner unit was tricky, since i really didn't want to have sanding and much paint in their bedroom. (i loaded in the beds first and the corner unit a week later). I added trim that wasn't on the plan, and also used the magnetic paint on the center area, although it makes a weak magnetic surface. All in all, I LOVE the way it turns out and no one can believe that I built it and didn't buy it... (although it seems obvious to me when you look closely LOL)
Fri, 11/04/2011 - 11:42
It looks great, and I love what you did with the walls! Free hand with paint, or decals? Either way, its darling and clearly gives each girl her own space.
We have the same lamps - quite popular :)
I am trying to figure out a clever way to put three girls in a (huge) room and I think something like this or a bunkbed combo would make it fun and new for them..
Sun, 01/08/2012 - 18:36
Where can I find the plans for the top half of the corner unit.? Your beds are exactly what I want for my girls. Thanks for sharing.
Mon, 10/08/2012 - 17:25
I see the plans for the beds and for the top part of the corner unit but what about the bottom part. please HELP I'm I totally missing it?
Mon, 10/08/2012 - 17:25
I see the plans for the beds and for the top part of the corner unit but what about the bottom part. please HELP I'm I totally missing it?
Mon, 10/08/2012 - 17:25
I see the plans for the beds and for the top part of the corner unit but what about the bottom part. please HELP am I totally missing it?
Mon, 01/18/2016 - 06:30
The links to the top and bottom of the corner unit seem broken; is there still access to these plans? Thanks for your help!
Fri, 11/18/2016 - 17:24
I have been round and round where are the plans for the Hutch?
This project was born out of desperation for some way to organize our garage. It is not difficult to build, and it went pretty quickly with two of us. It probably didn't take more than four hours tops for each section. I've seen the prices for garage storage components and some of them are staggering! We have removed a tall chrome shelf, and moved a ton of stuff onto these shelves, creating a hundred square feet of floor space! And for only $25! Come on over and check it out on my blog! Val
In reply to Awesome! This is just what I by moosmani
Thu, 10/24/2013 - 20:17
Glad you like them! They've been a real sanity-saver!
Not as easy at it seems... but also, this was one of my very first woodworking projects.
Tue, 06/11/2019 - 09:25
This is an amazing first project! I love how it fits perfect in your space and the color. What a beautiful floor too.
Built this from Ana White plans. Love how it looks in our four season room.
Fri, 04/21/2023 - 10:20
Gorgeous build and finish, well done! Thank you so much for sharing.
This project was fun to build with hubby said the shopping list and the cut list was perfect! Love all your designs! King bed is next!
Fri, 04/28/2023 - 09:15
Very well done, thank you for sharing your beautiful space and build!
Our son was moving into his first college apartment. The dining area is small and he thought a breakfast bar would be perfect in this spot. We built the base using Ana’s Counter Height Farmhouse Table for Four plans. We modified the plans to to fit the table top - which was originally the top of a desk. We purchased the desk at our local Habitat Restore. We planed to use the base of the desk for another project- so using the top for this breakfast bar was perfect! The breakfast bar was a perfect fit!
This was my first time doing a big project like this . Thank you for the plan for this.
Thu, 06/15/2023 - 09:19
These look awesome, can't wait to see them all in place and filled up! Thanks for sharing.
For my son's wedding!
Our family decided to raise chickens but needed a place to keep them safe at night. We used your shed plan and adapted it to create necessary venting for the chicks.
Since we had 16 chickens we knew one coop would not be enough space so we built two. We created a vented tunnel between the two coops so the hens could go back and forth between them as they wished while still being protected. The girls are very happy in their new space!
Thank you for your great plans.
Holly
Built this for my garage shop in a day. Added a cutout for my Kreg Pocket Hole Jig, a power strip and casters for ease of movement.
I used these plans and did a little modification!!!!
BP3
I built these planter boxes to hold my raspberry and blueberry plants. Also by connecting them with 2x2s, it keeps my dogs out of the garden
I couldn't find any corner TV stands with the barndoor style that were big enough, so I decided to design and make my own using the Grandy buffet design.
Sun, 05/03/2020 - 17:54
This would be perfect for my house, new look. Also like the idea of the Grandy Barn Door Console, dining room cabinet.
Fri, 03/19/2021 - 10:57
Did you save the measurements/plans? If so, I'd like to get them from you.
Tue, 01/04/2022 - 13:37
I will gladly pay for these plans with the modifications, if someone can send them to me.
Tue, 01/04/2022 - 13:37
I will gladly pay for these plans with the modifications, if someone can send them to me.
Ana's greenhouse plans modified to fit two vintage windows in the front.
Mary Ann Alvarez
This was my second Ana build. I picked the cooler out of someone trash. (the wheels had broke off) Thank you brick house!!! I been wanting to do this plan for a while now, I'm just too cheap to buy the cooler.
The cooler stand plans were nice to have. I had lots of scrap from my hubby but I did have to buy two 1x3x8 to finish the lid. I had trouble with the lid lining up with the cooler. With the hinged attached to the lid, I lined up the cooler, mark it out and re-screwed it to the cooler . Easy. Next time I'll go to Habitat for Humanity or the like for the hardware. I will also remember to finish the wood before assembly. I didn't put the drain in the stand. After inspection of the cooler if won't drain completely if I did, so let it off.
It took me almost a week to finish between mom duties, volunteer work, and church but she's done.
Thanks Ana for the plans. I couldn't have done it without them.