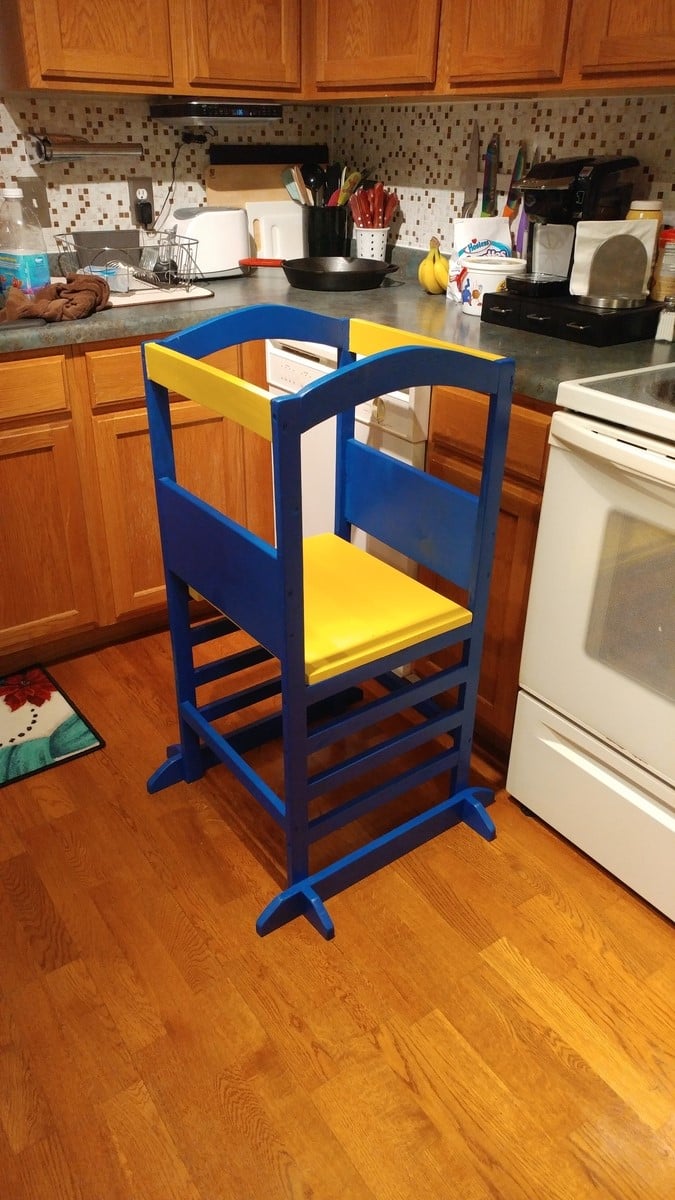
Wall Mounted K Cup Organizer

I used your plan as a base. I do not have space on counter so I chose to hang it on the wall. I placed dots of hot glue on the back to offset from wall and used D hangers.
Pstik
Built from Plan(s)
I used your plan as a base. I do not have space on counter so I chose to hang it on the wall. I placed dots of hot glue on the back to offset from wall and used D hangers.
Pstik
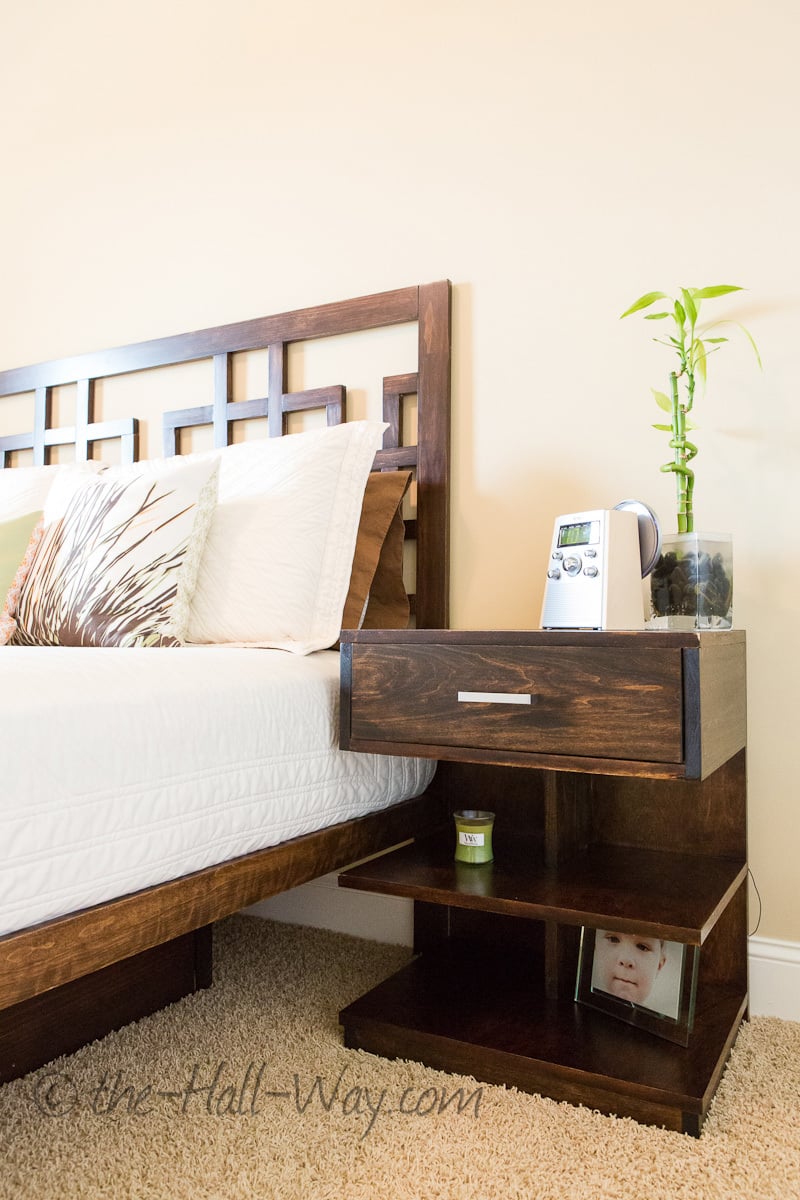
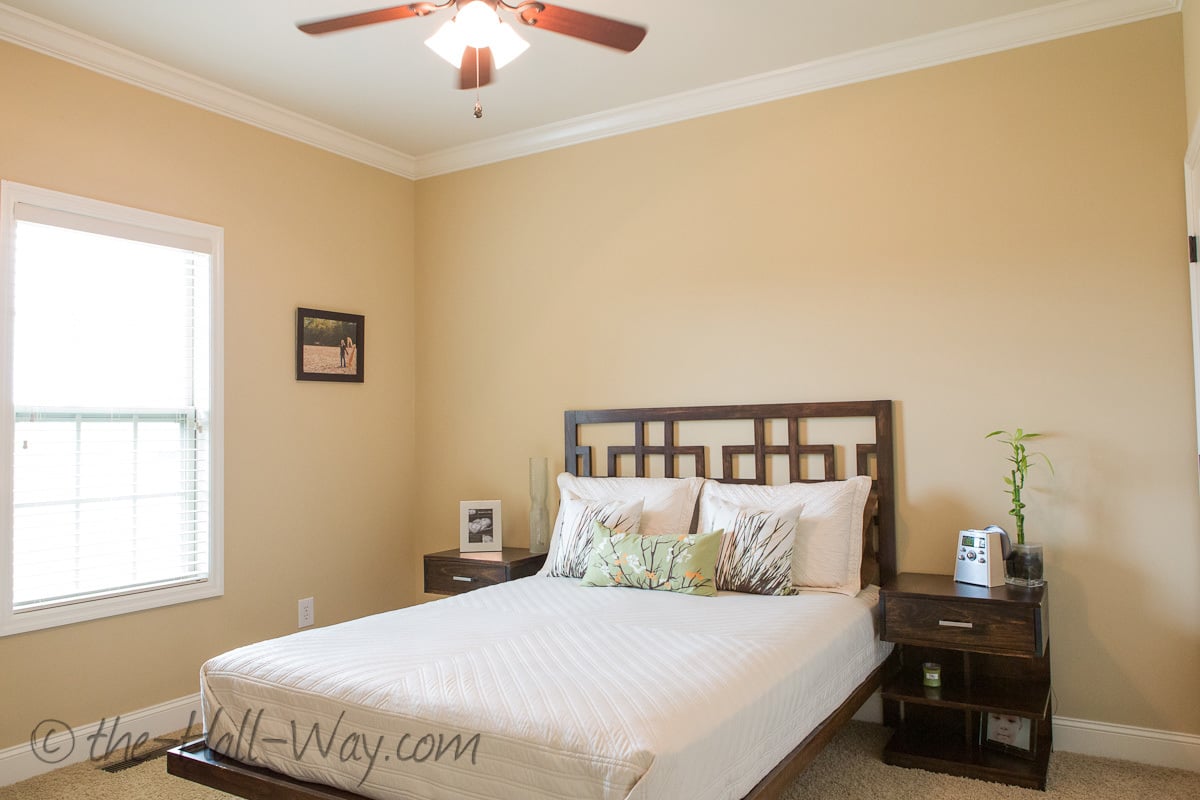
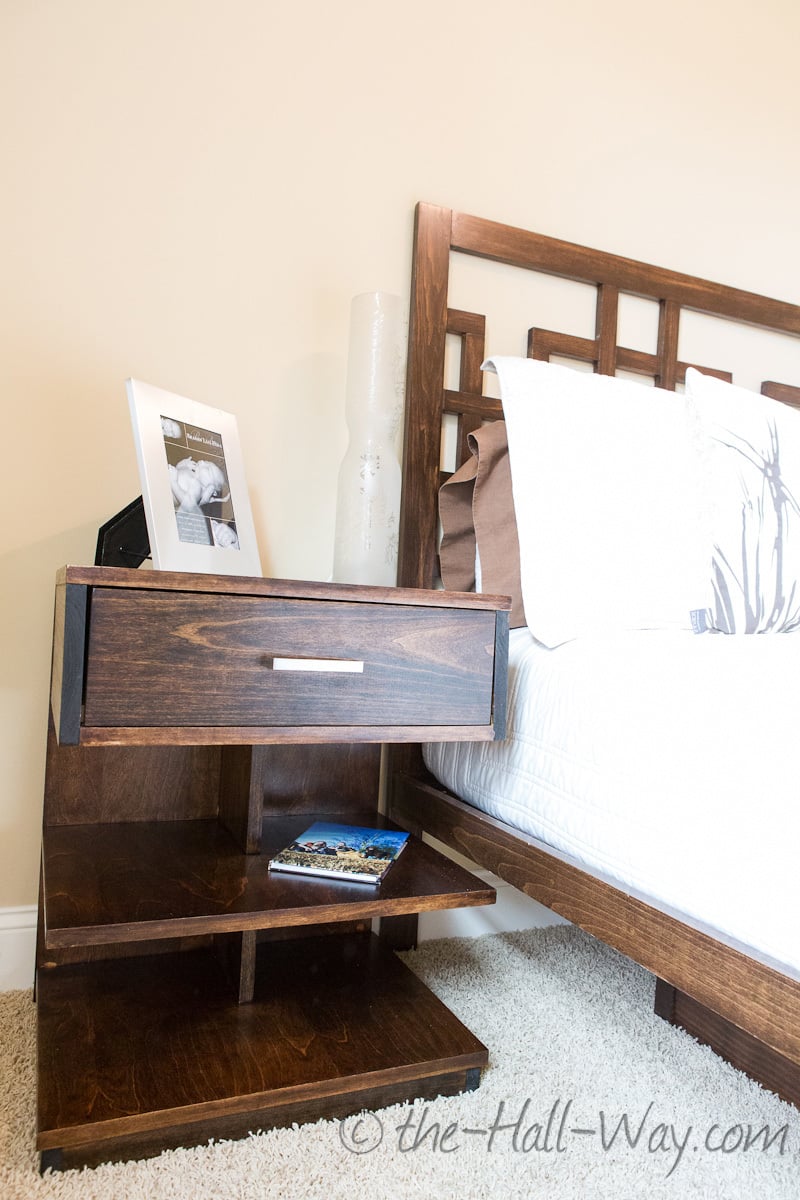
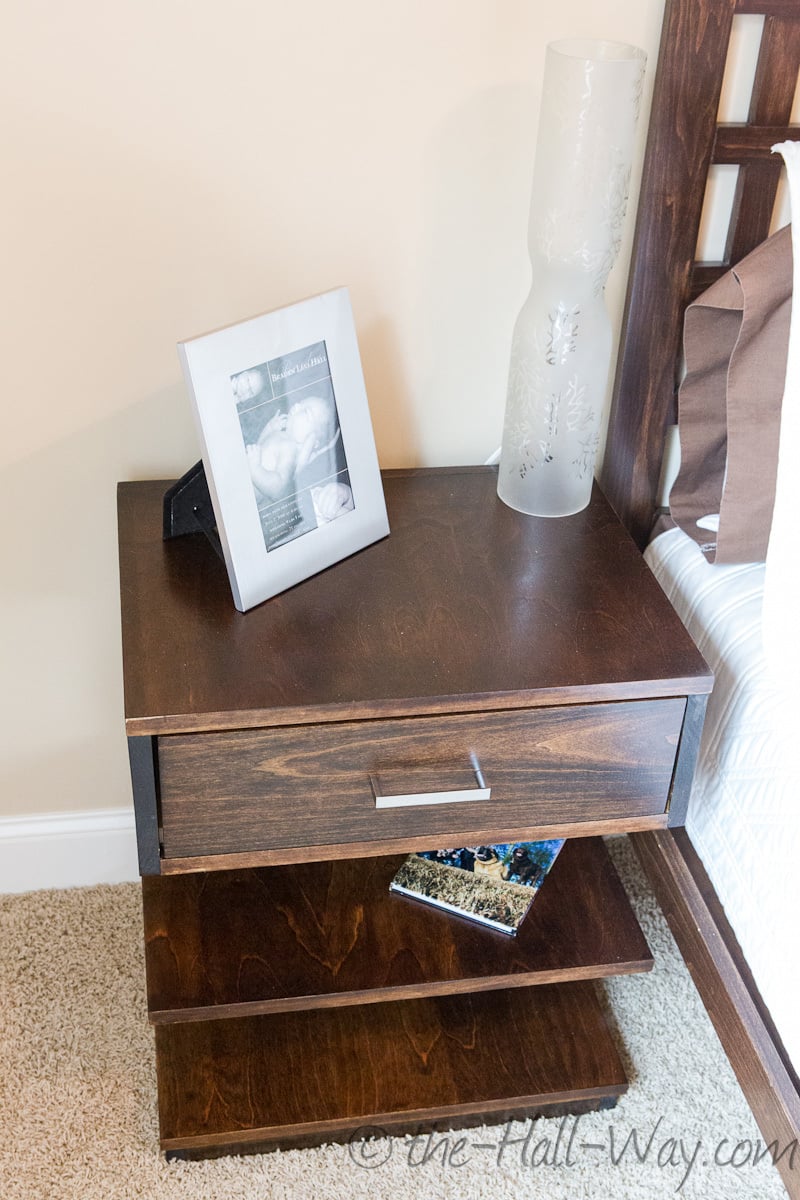
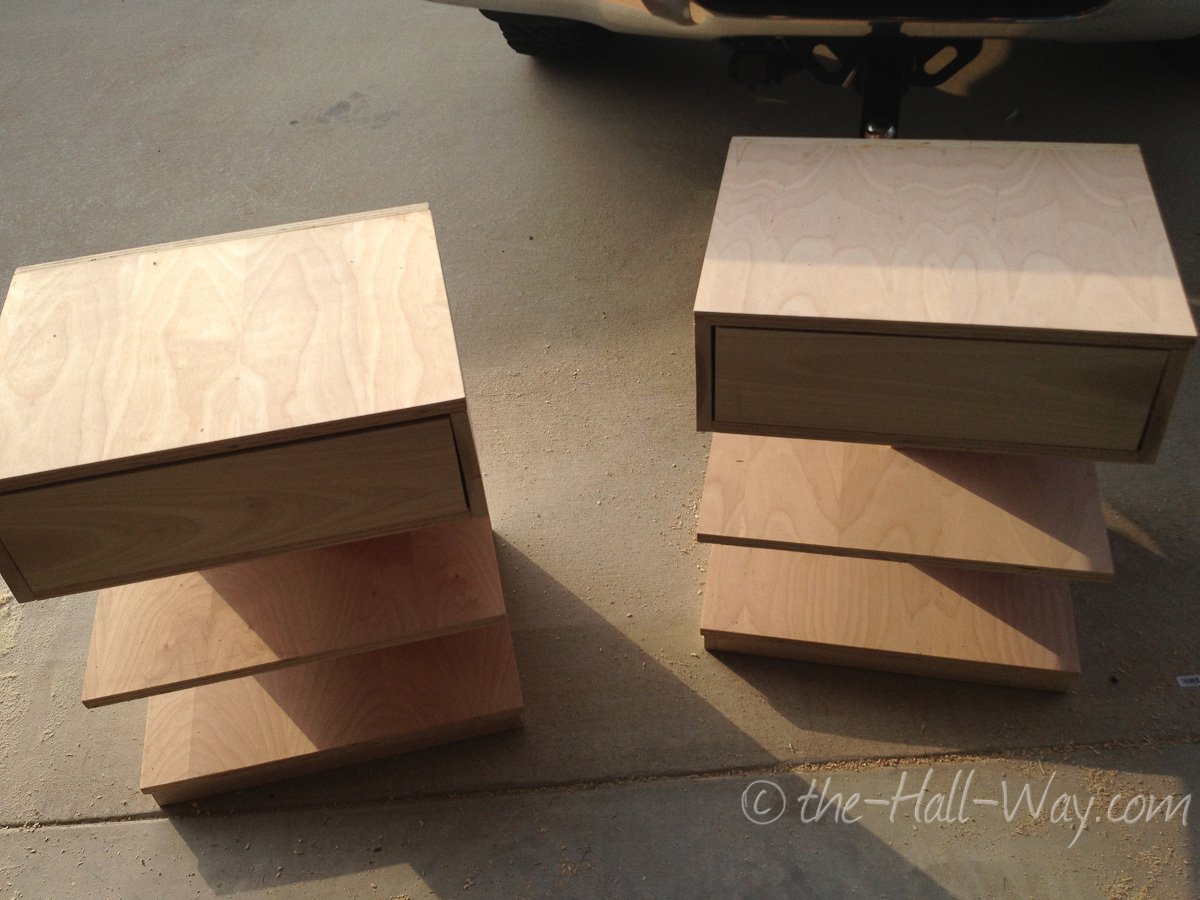
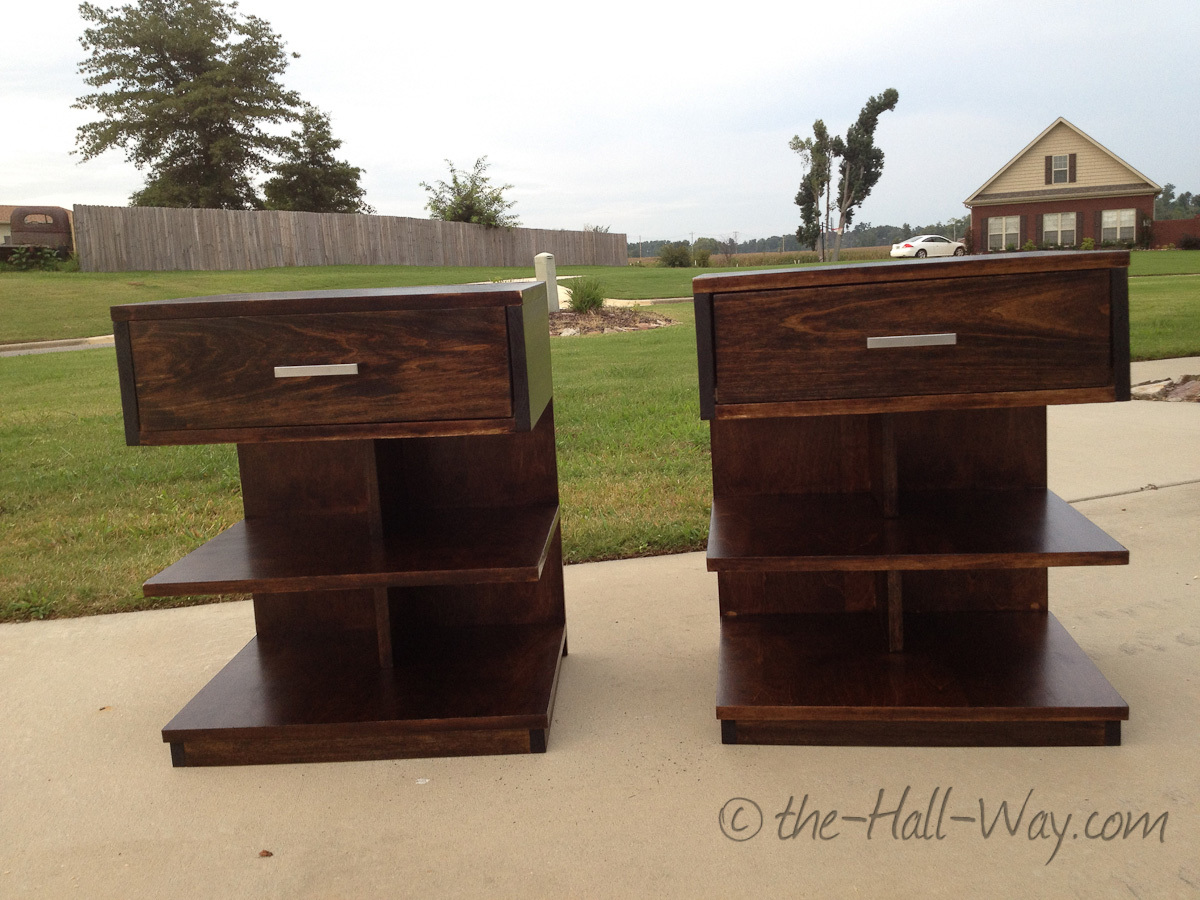
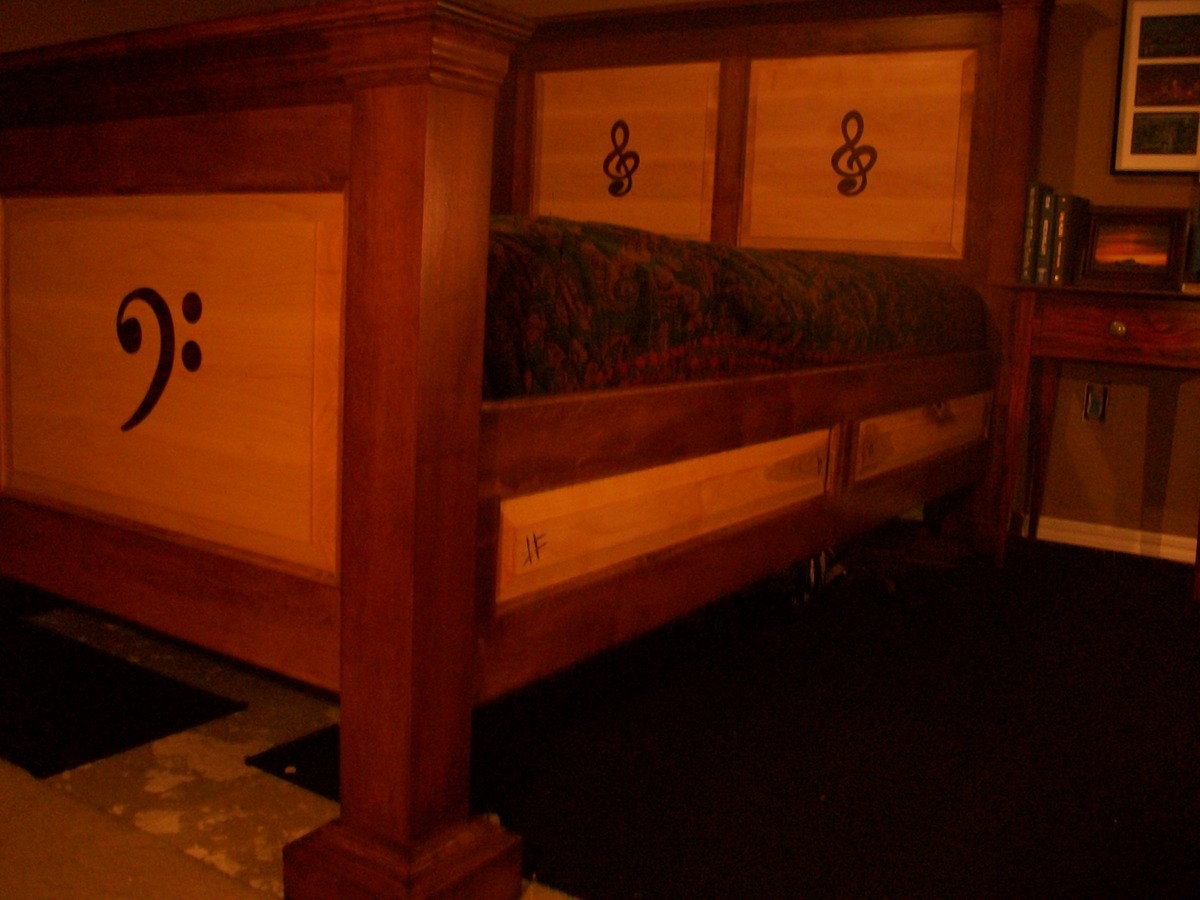
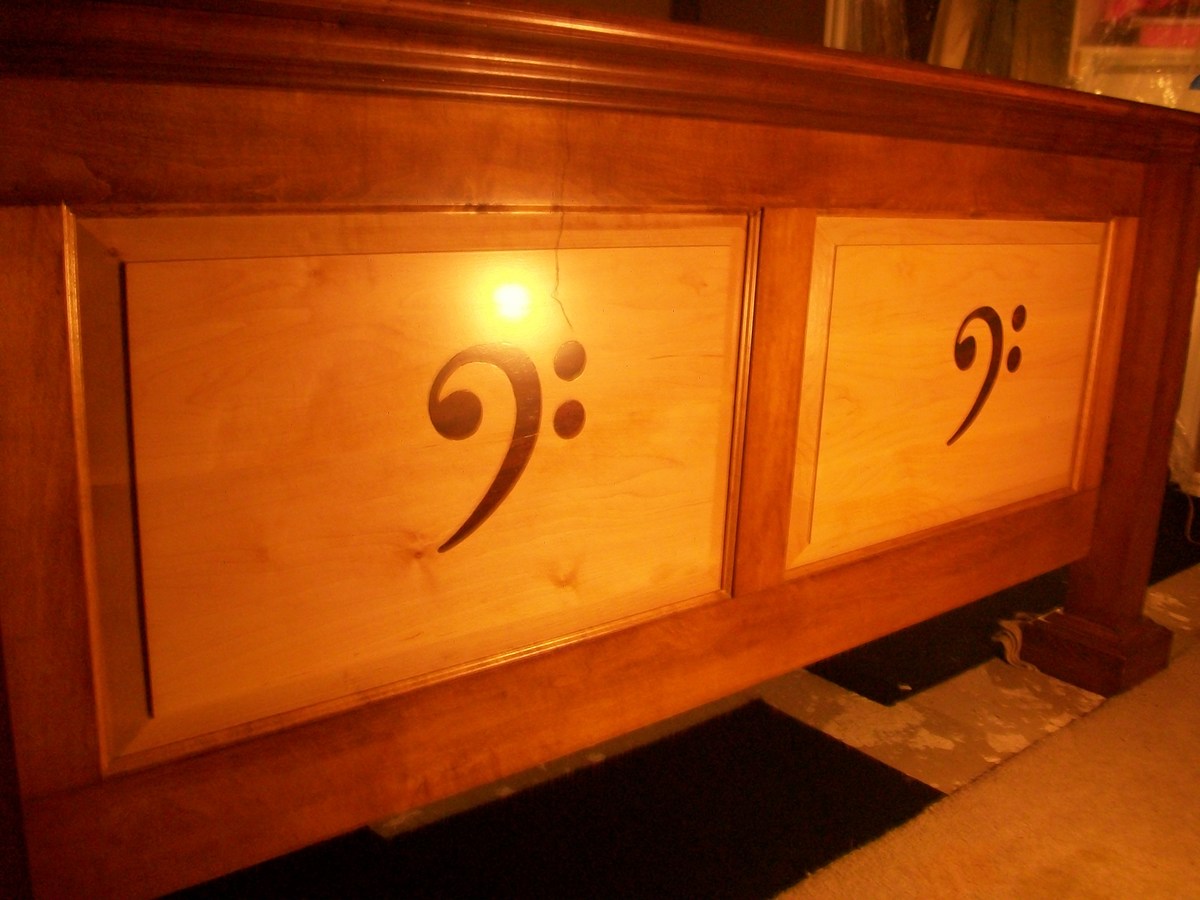
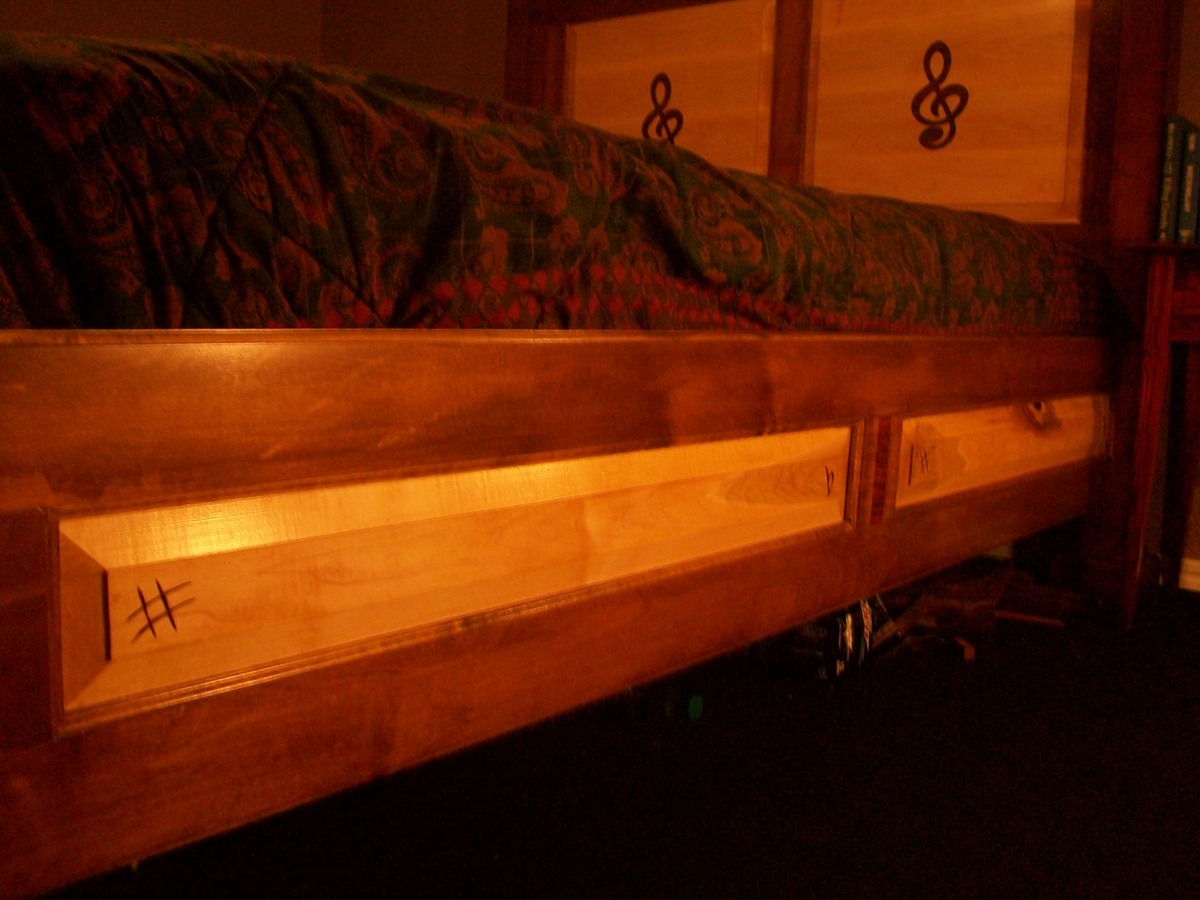
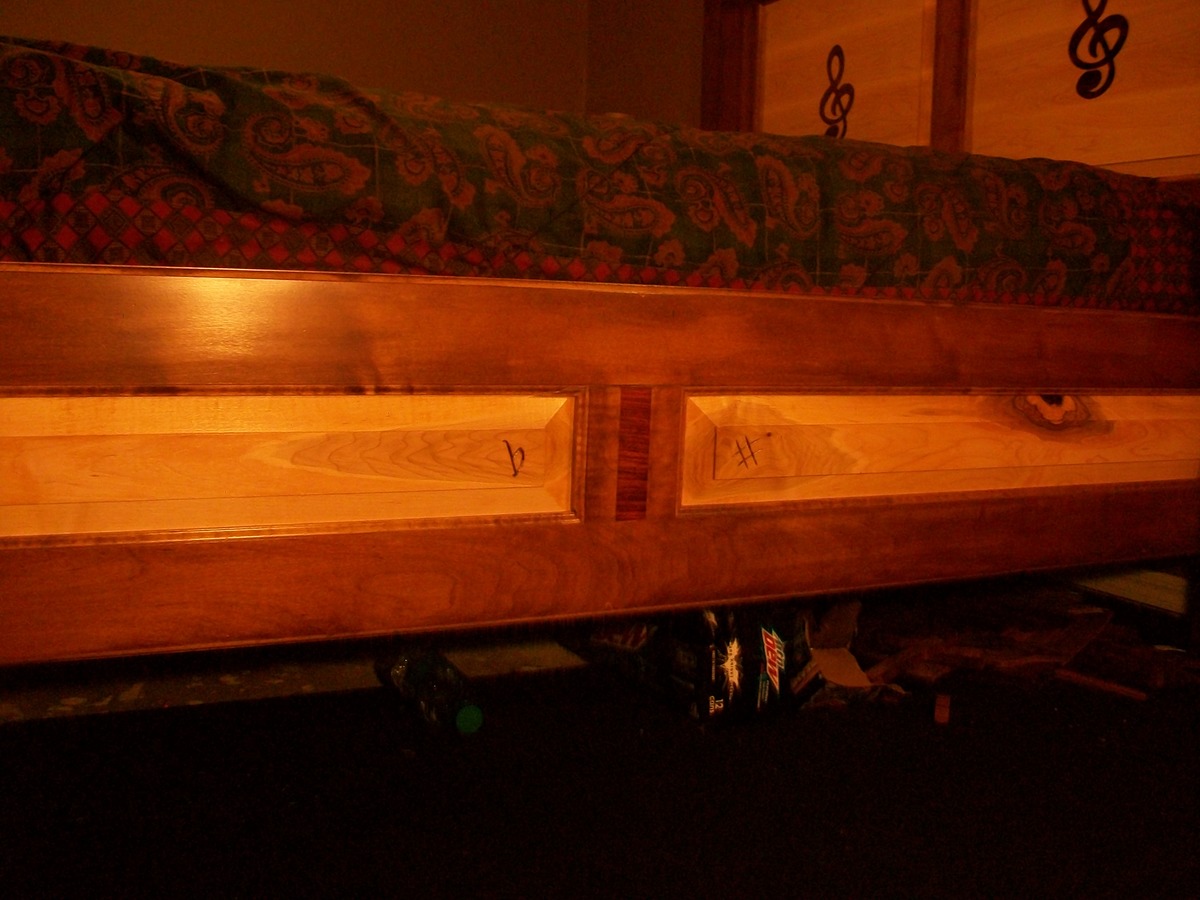
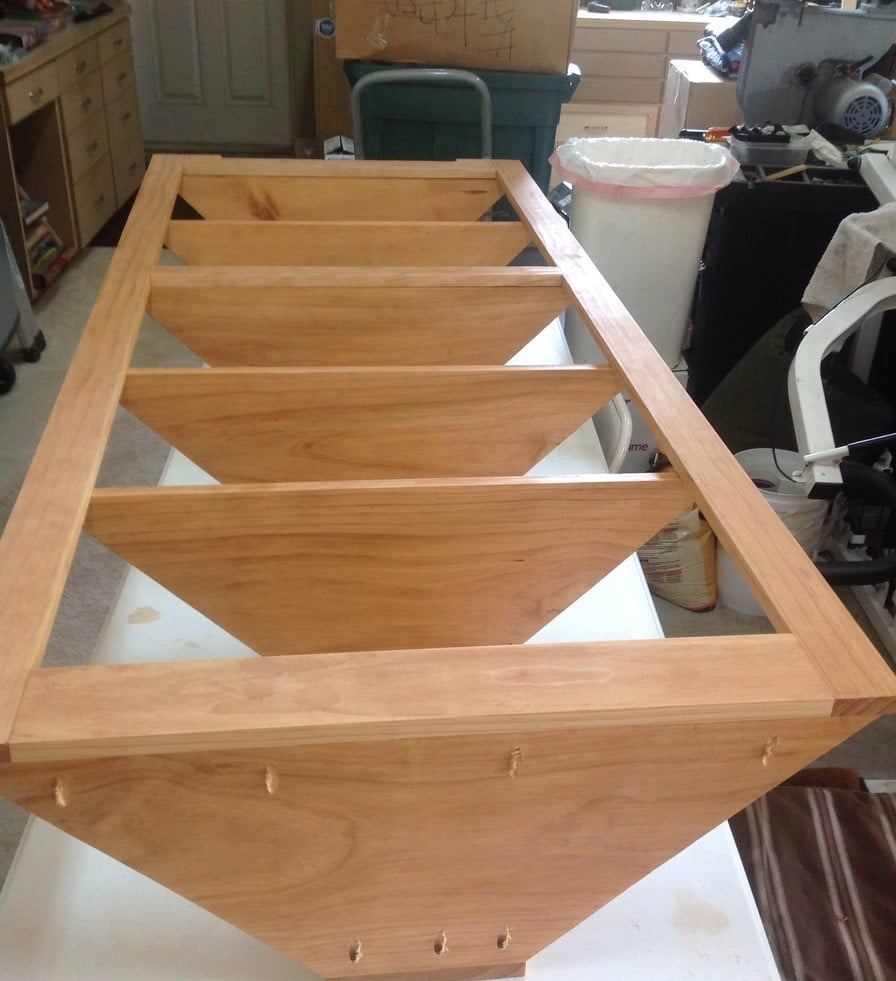
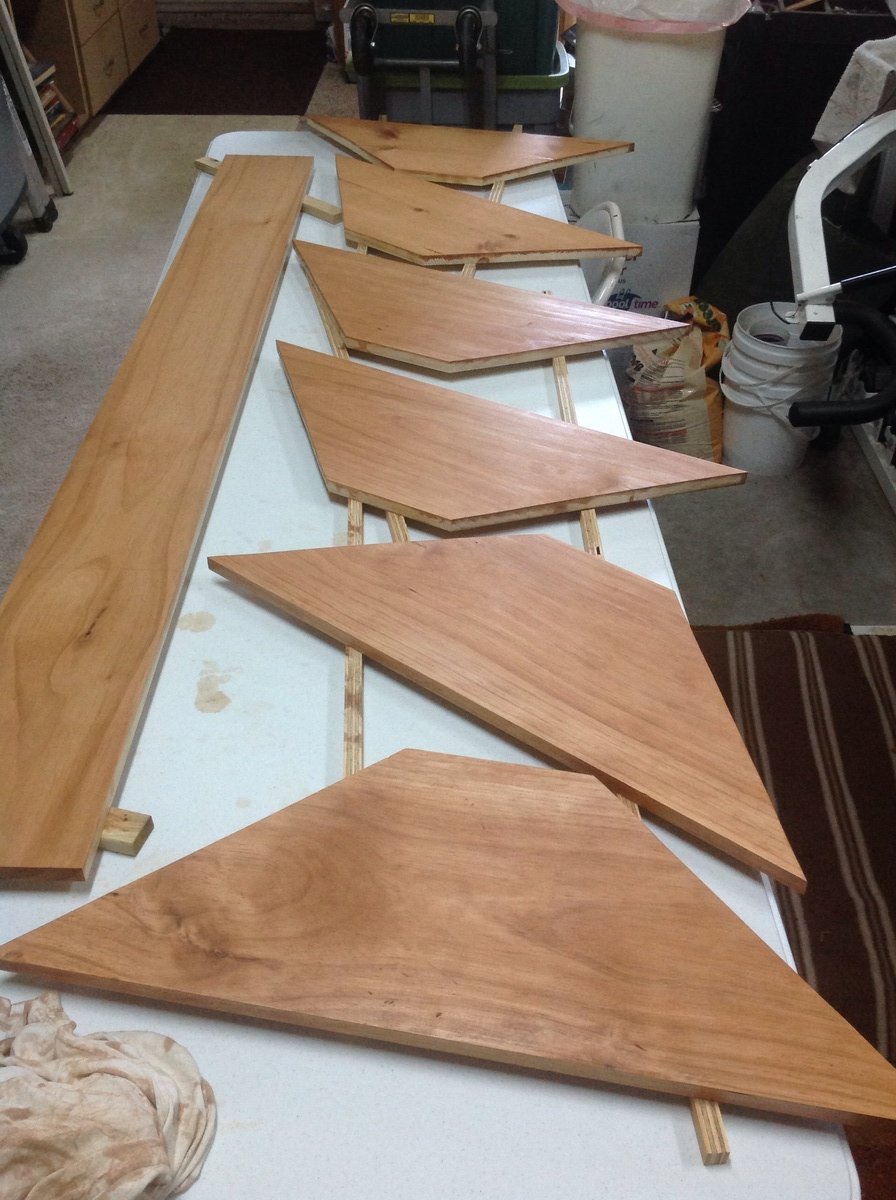
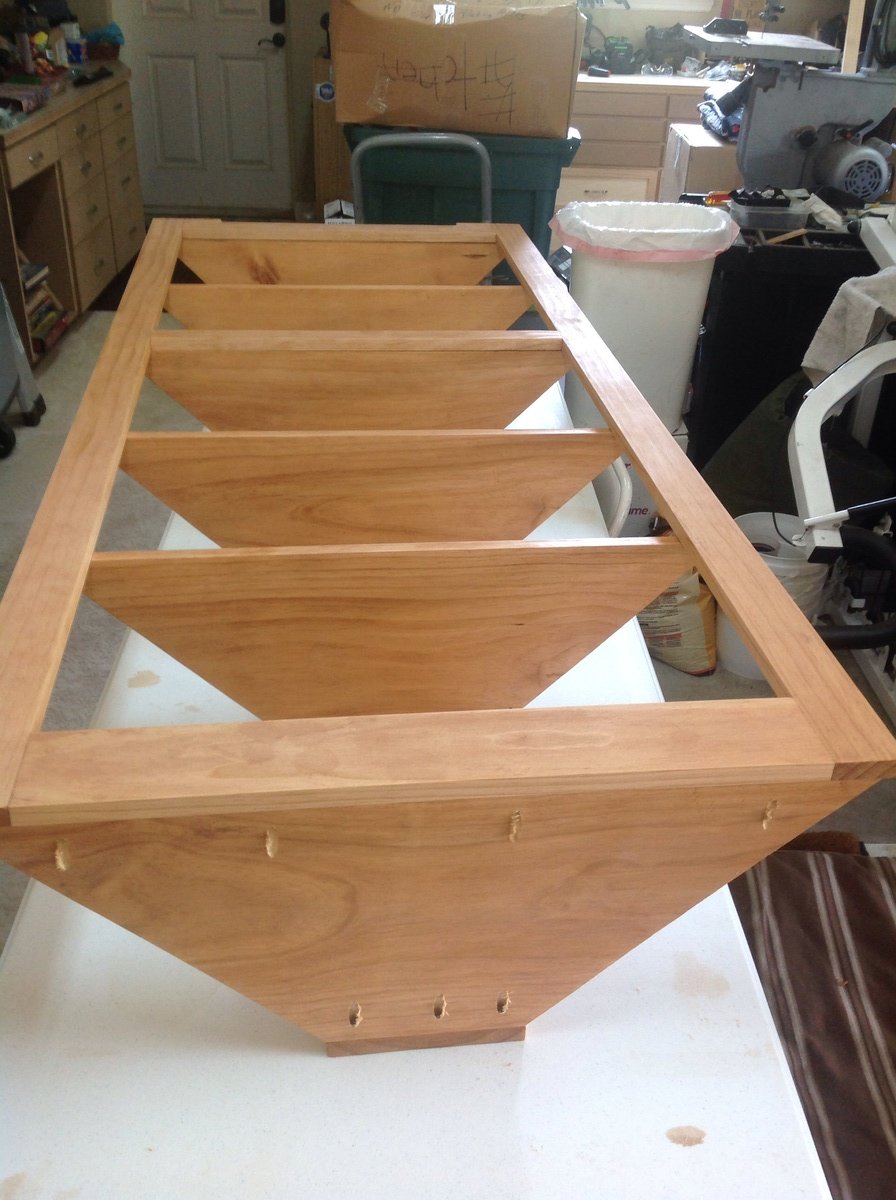
I built this bed for the guest room at our previous house. The room was small, so I made floating shelves for the nightstands to save space. We have since moved and are now renting, so we didn't want to put holes in the walls to hang the shelves. I took the opportunity to build these nightstands instead. The original design was a little too tall and wide, so I reduced those dimensions by 3". This was my first time building drawers, but they went together surprisingly well. I had used a combination of stain on the bed and was worried about matching it, but 2 coats of Minwax Dark Walnut ended up being a pretty close match.
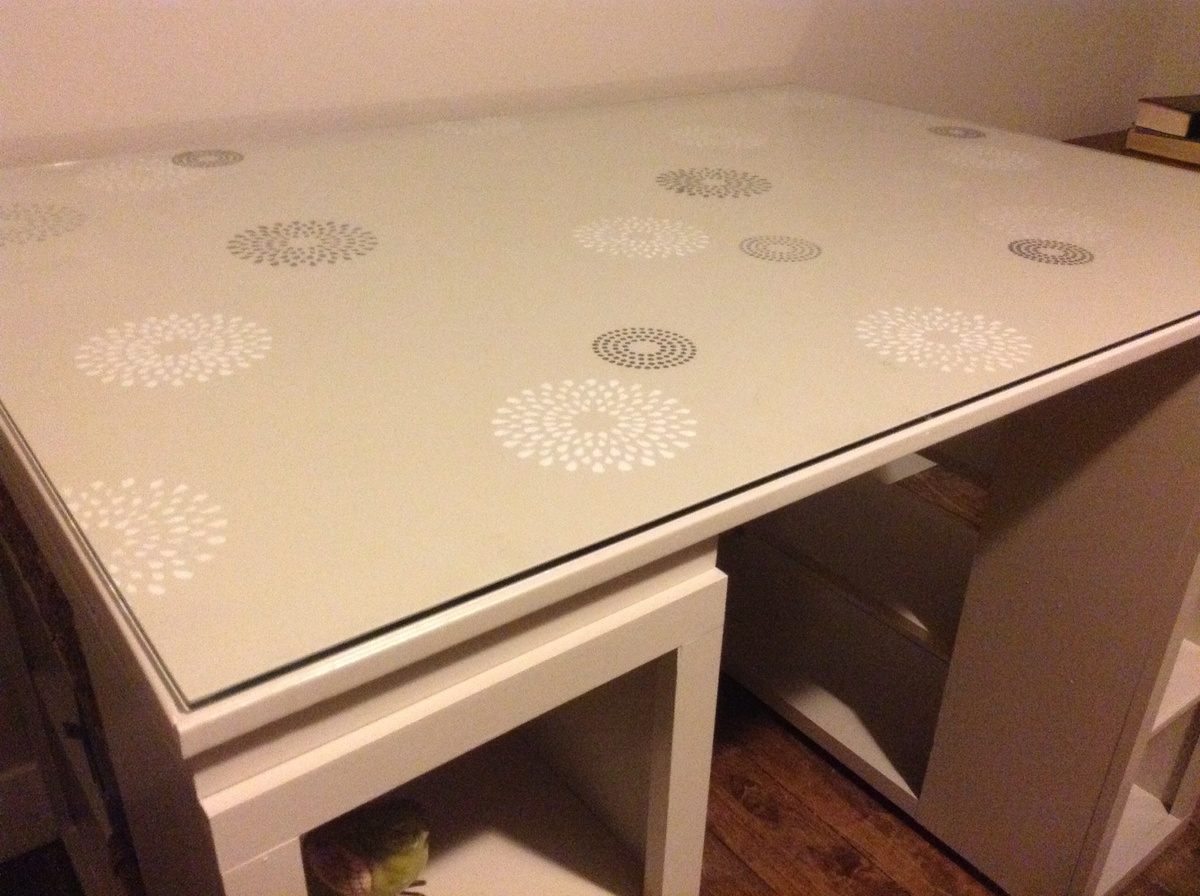
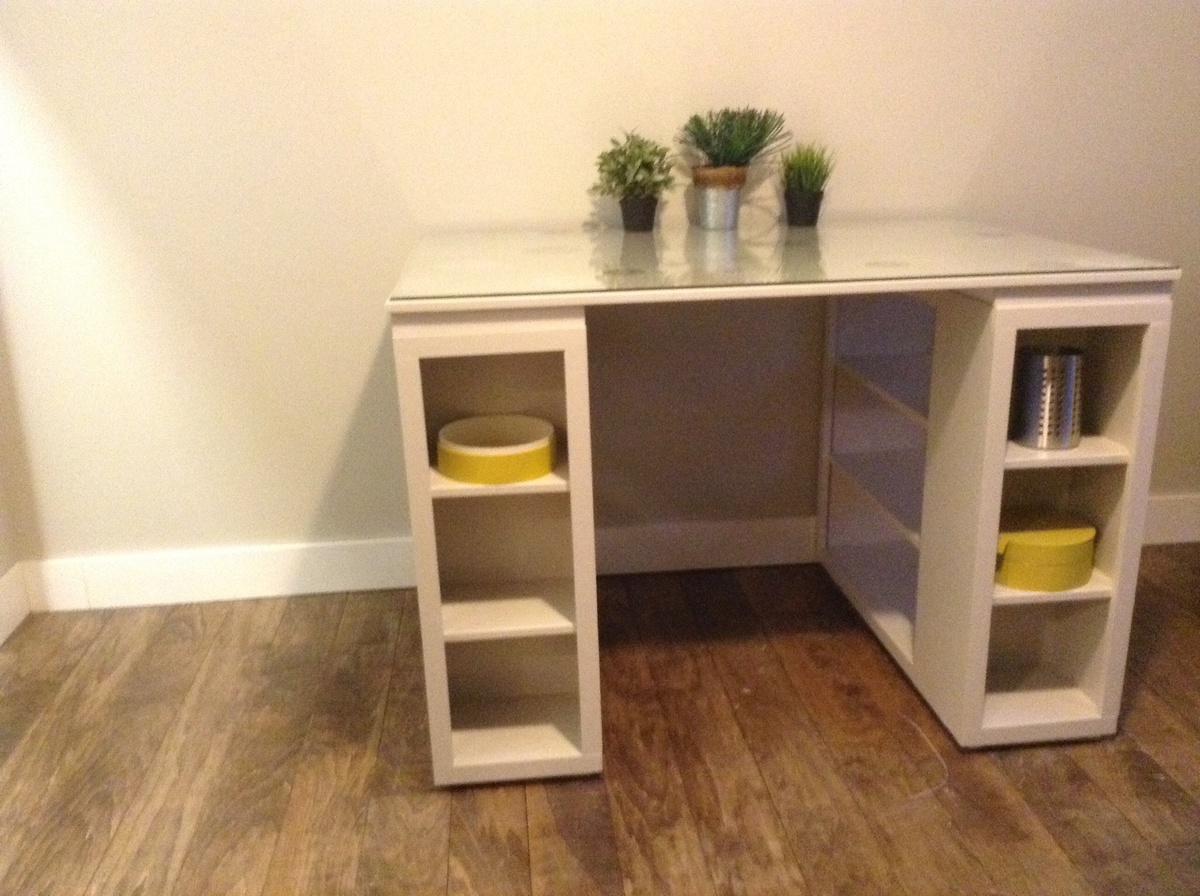
This was my second big DIY project ( I should say DIO for Do it OURSelves) since my husband had to help me with a few things. Anyway, I chose to paint the whole thing the same color as my office/craft room; BM Revere Pewter. Then, I stenciled some flowers in different colors of gray and white on the top. I had a piece of thick glass cut for the top. When I need to do anything heavy duty (like the open shelf console I did next) I simply put a bath rug on the glass. Even so, it's pretty tough as I've dropped lots of stuff on it without a crack!
I made this from the plan in Ana's book. Before we tackled this, I pulled all the carpet out of my office and put in a plywood floor (ripped into 6" widths).
I just finished the console which was made with plans from Ana and Shanty. Looking to move onto the next big project; a bar cart with doors or a dresser. Yikes! This is fun!
P.S. Love my Ryobi One Plus tools!
Thanks Ana, for the inspiration!
First of all I want to Thanks Ana for such a great website and projects and all she do. Its amazing how a person can do all of that for free. If all Americans were the same we would be the greatest Nation by far (anyways we still great!).
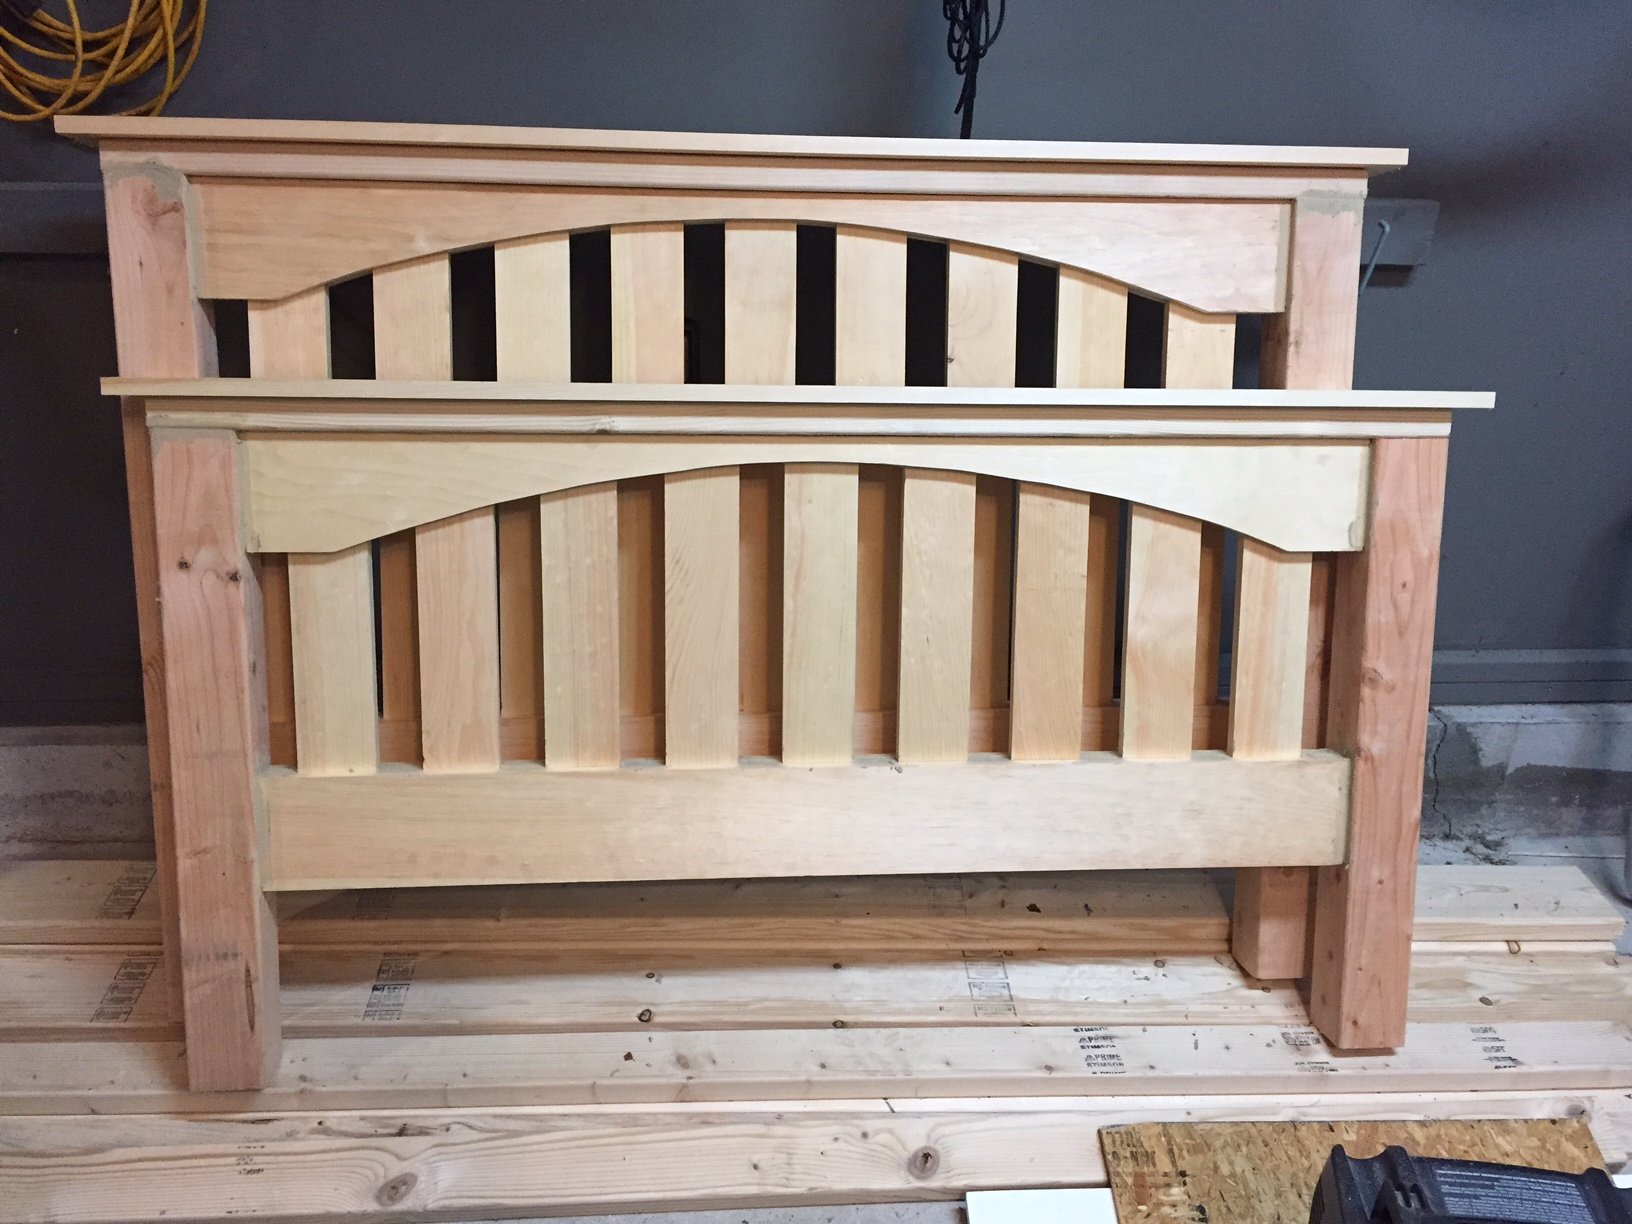
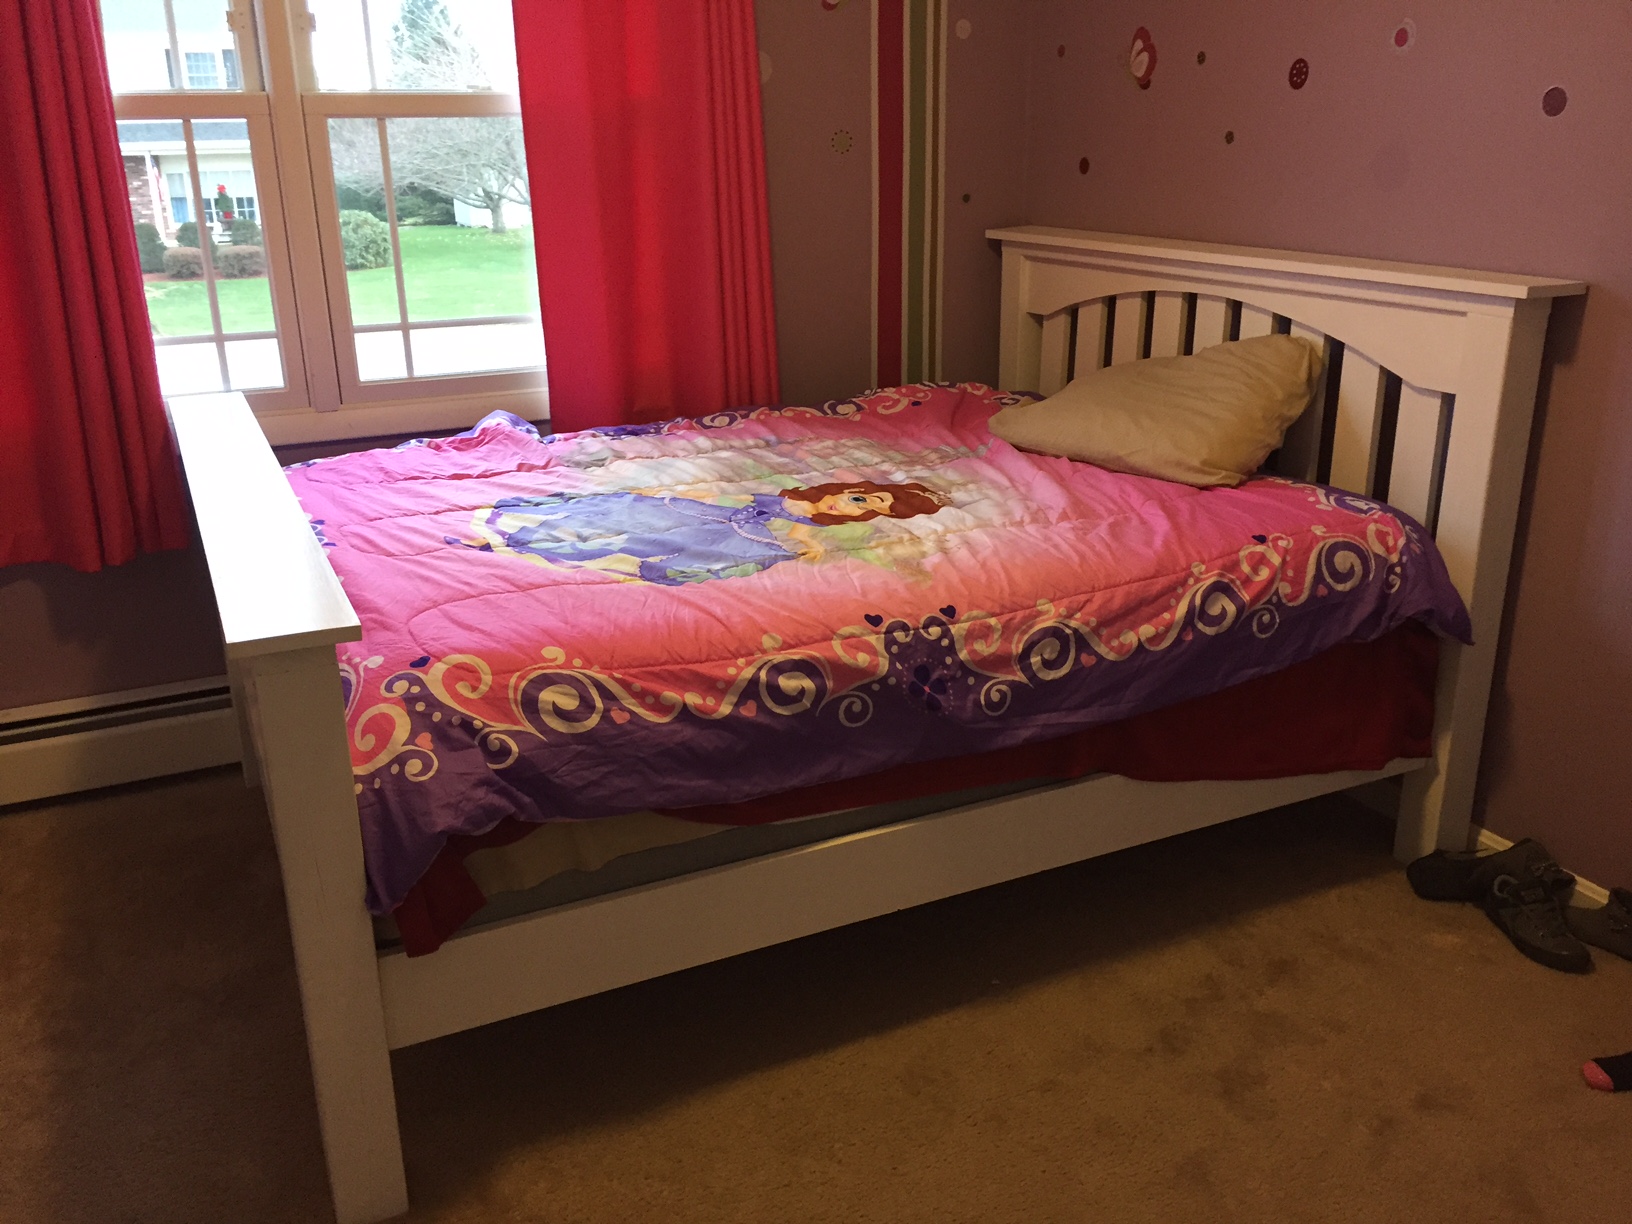
I wanted to make this bed full so I had to re-scale the dimensions and I wanted to share leasons learned.
First: The legth for a full size is the same.
Second the width for a full size will be 52 inches (I would make it 53in); if you are going to follow Anas design and use a 2x6 as a side rail then then the width of the header could be 53in.
I made a design change at the last minute (and paid for it at the end :-s). Instead of follow Ana's design I decided to use railing hardware in this link to be able to take the bed appart without any problem.

Using these mortises I was able to change the side rails for 1x6 which in my opinion look way better. The problem is that now with those mortises the bed frame is going to be wider (56in), so instead of an extra 1in for play with the boxspring I have 3.5in :-(
My wife is nice enough and tried to gave me moral support and she insist that is not a big deal because the gap is toward the wall and my doughter can't care any less; she has her big girl's bed and thats all she wanted; but I know is there and I hate that gap!
Summary:
If you stick to Ana's design 53 inches for headboard is perfect; but if you want to use the mortise then 50.5 should work fine.
To paint the bed I did two coats of primer and two cotas of semi-gloss white paint; in my opinion for furniture I probably would go gloss next time, but this doesn't botter me.
I used prime pine wood so the price went to the $300, if you choose mid-grade pine (it has a lot of knot) you can probably drive the cost down by good 25%.
Time: took me one full day to build the bed and since I had to go to work every day and I was doing one coat of paint every afternoon after work (so "five" days total); maybe you can do the painting it in one day if don't have to go to work and the weather is right!
Made these planters which was my first try at building something from wood! They came out great and can’t wait to try another project!
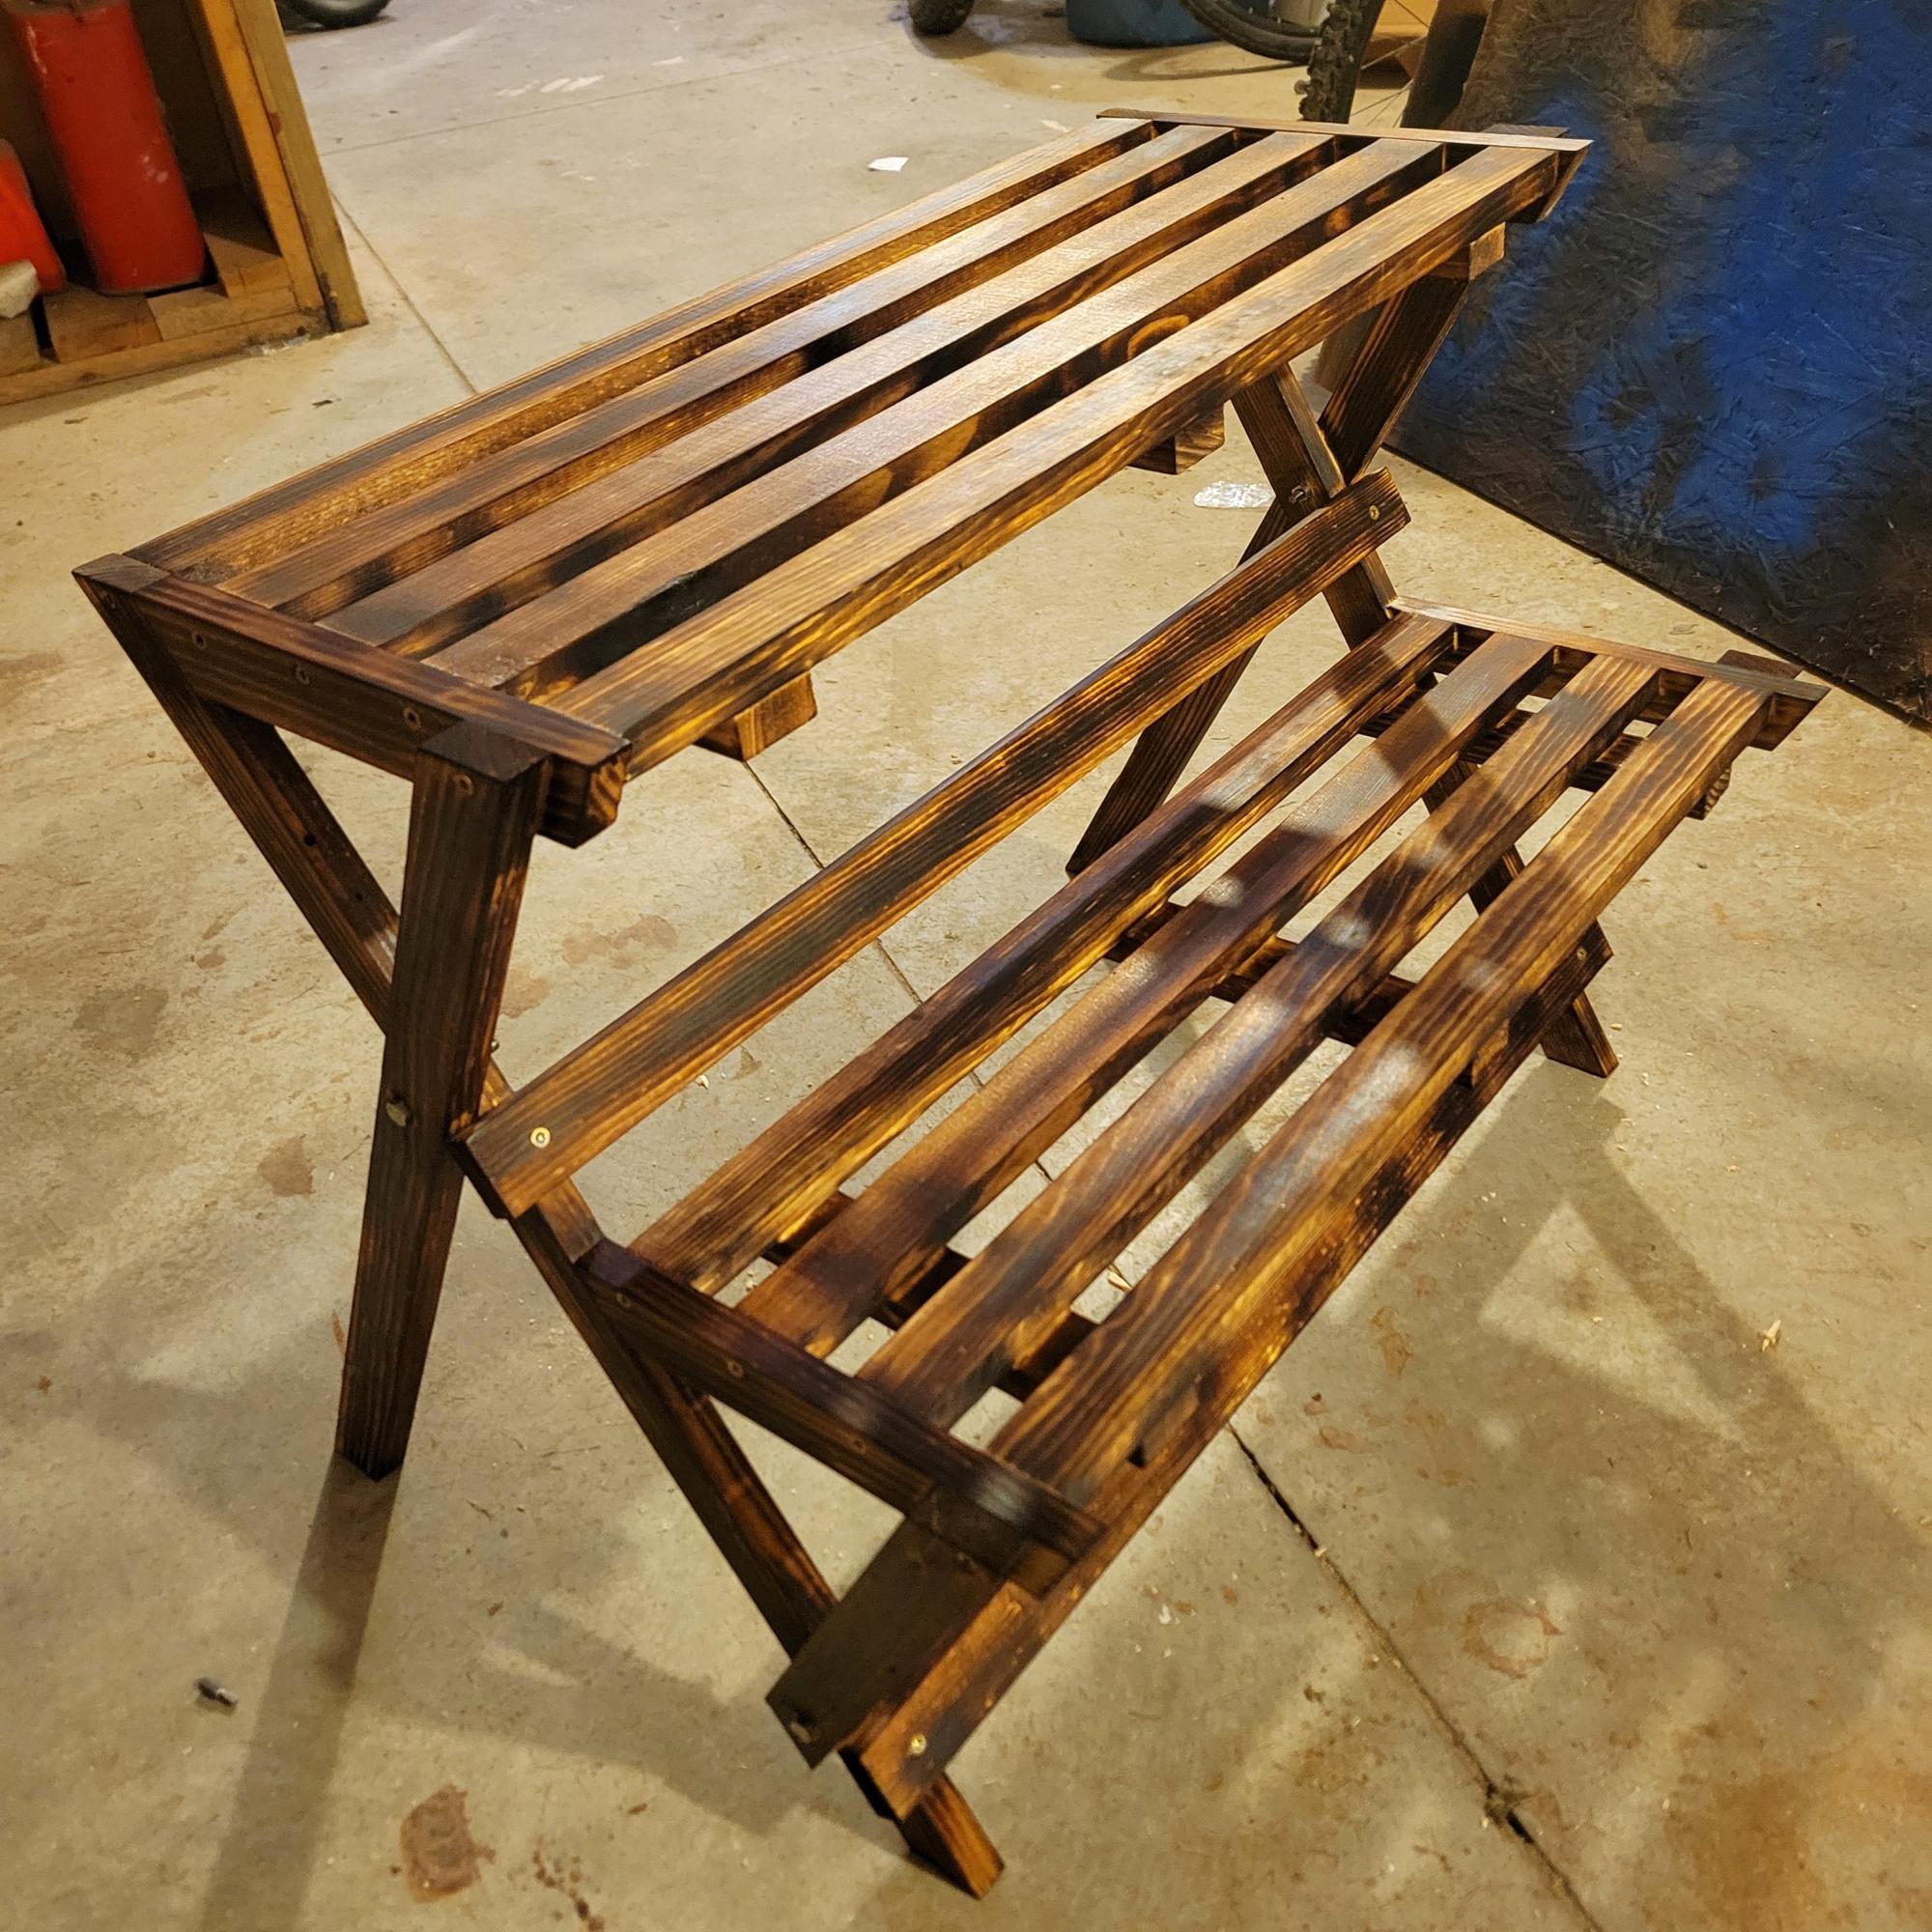
The foldable plant table with some modification to make it stationary instead! Freaking loved this challenge. Gave the 1st one away as a gift. Now selling one!
Samantha Smith

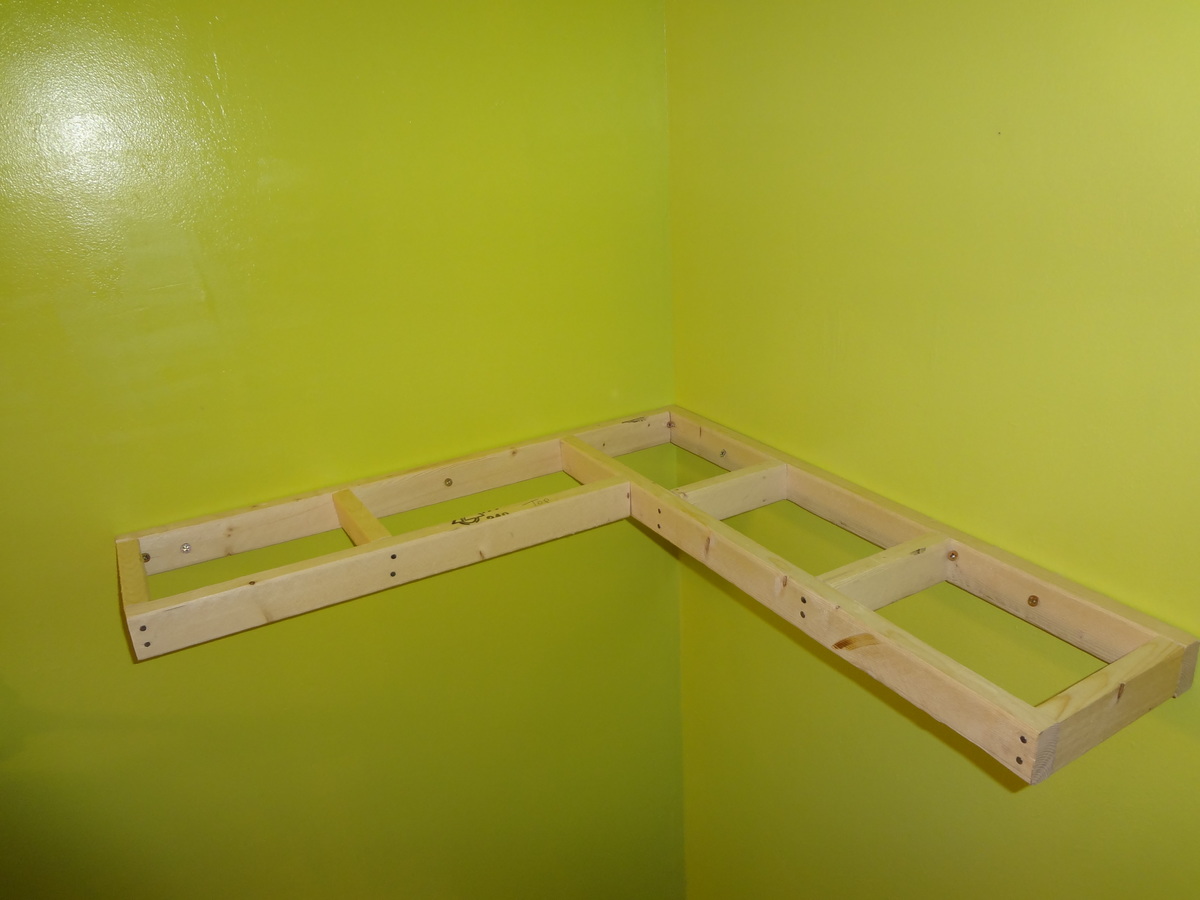
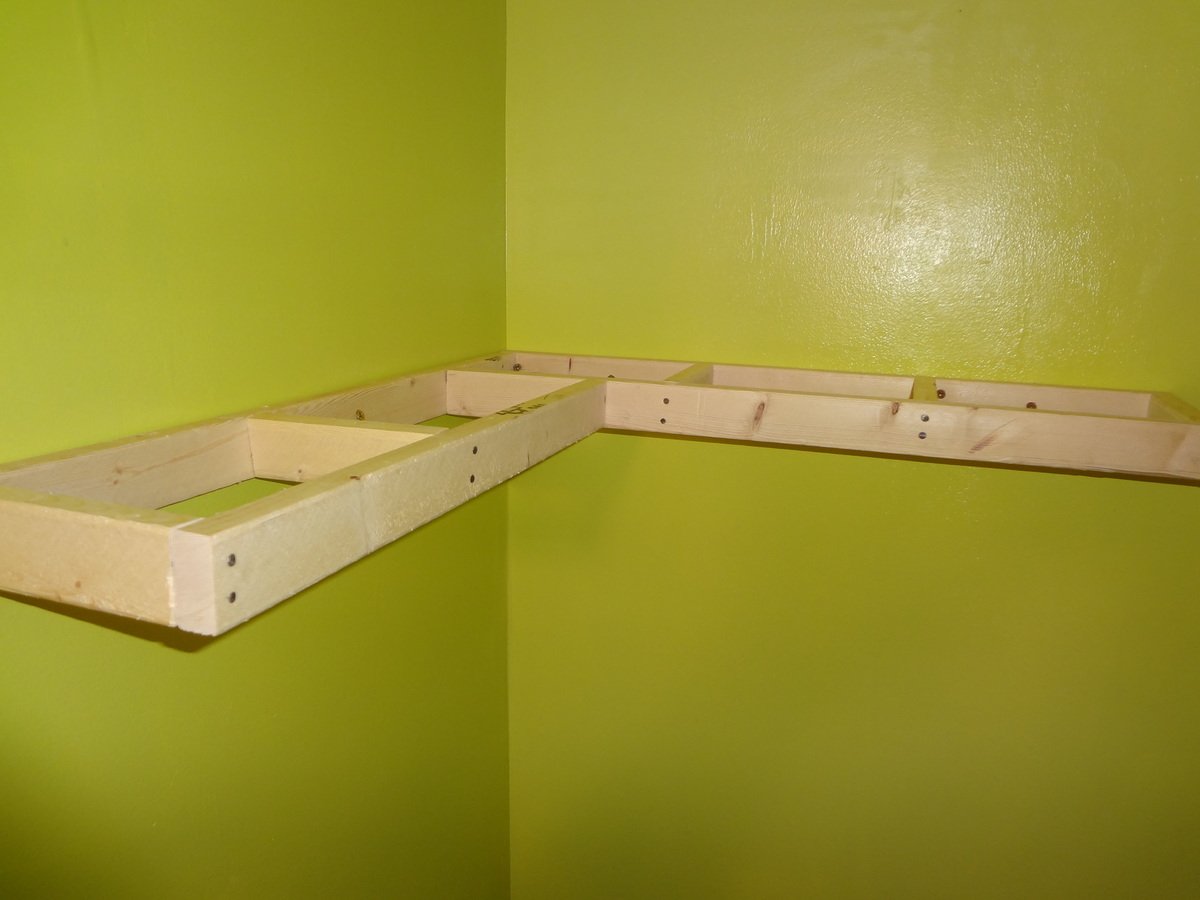
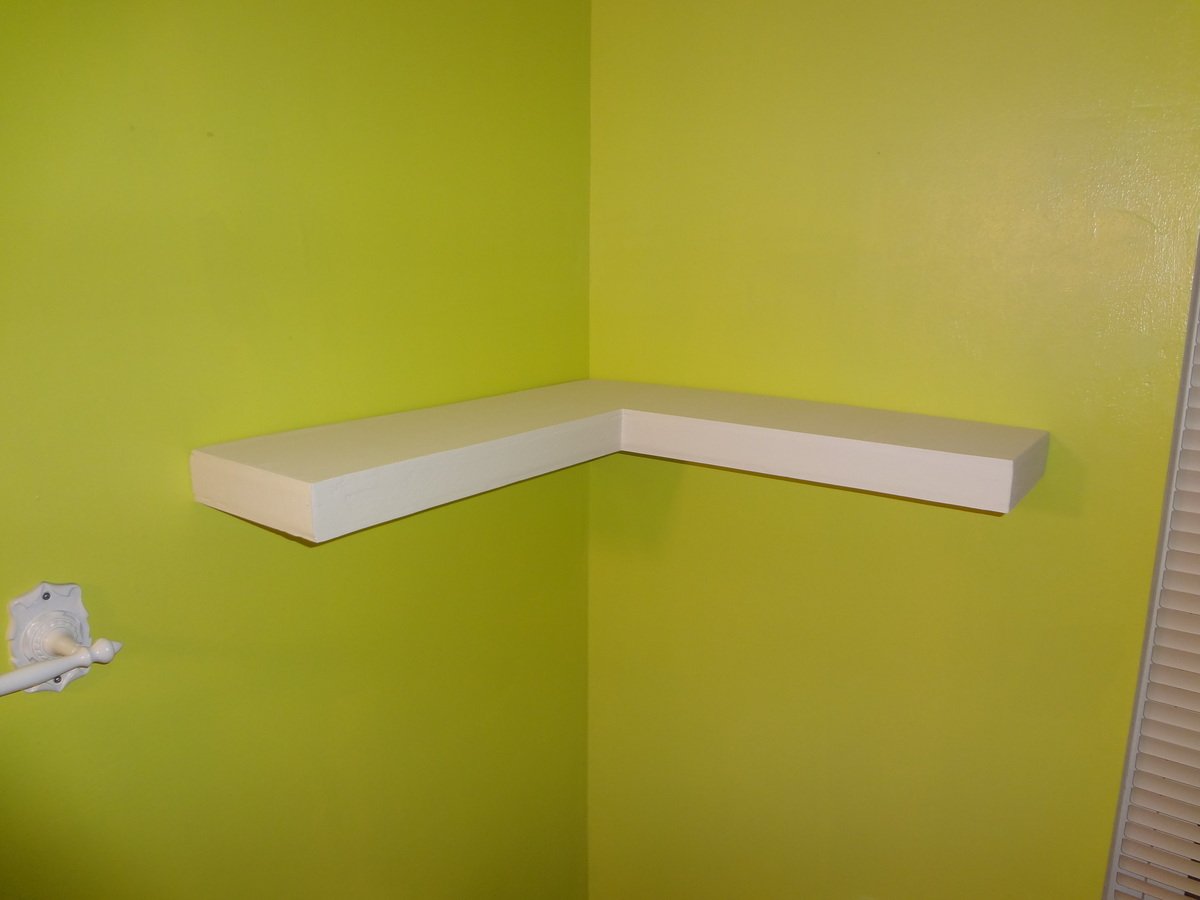
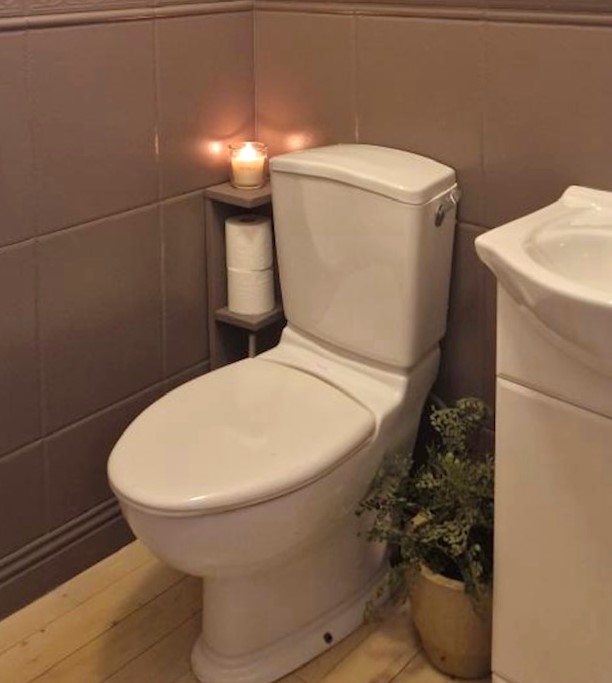
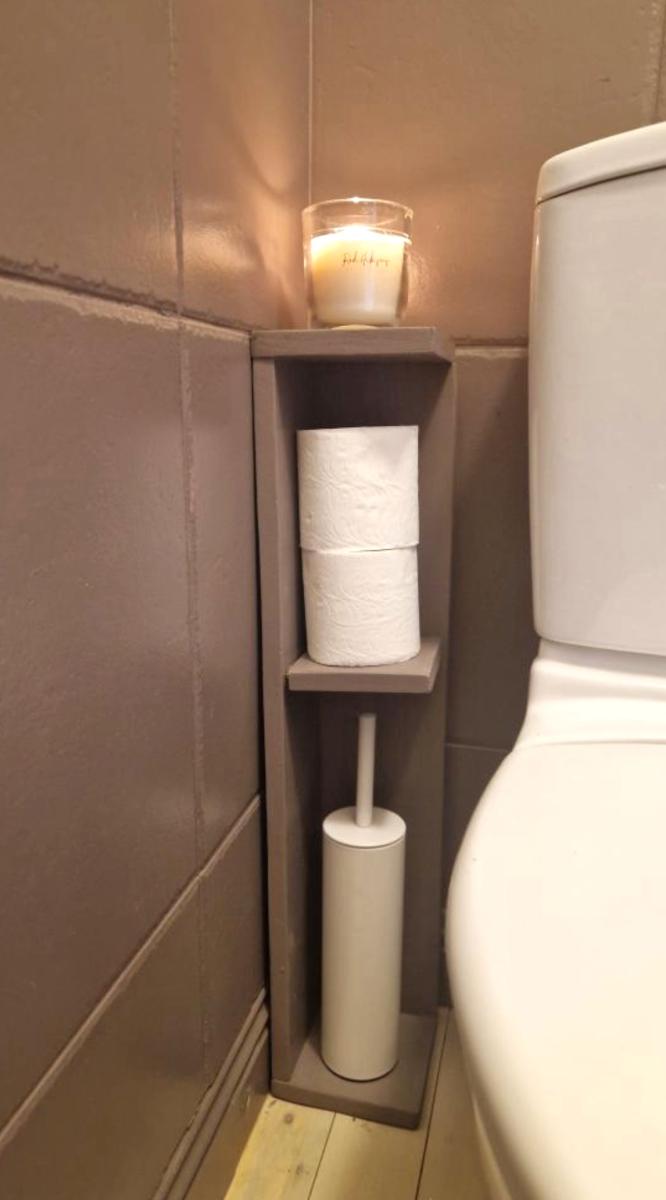
I wanted to do floating shelves in my bathroom but I have very limited space so I decided I was going to do floating shelves in a corner where I did have space. This is not going to be the only shelf, I will make another one to go above it. I was tired of having no storage space for things like toilet paper and towels so now we can use these floating shelves to do that for us :) Tomorrow I'm going to build the second one to go above this one. Making it for a corner is really no different than making it straight. The sleeve fit right over the frame I built and it looks beautiful I think :)
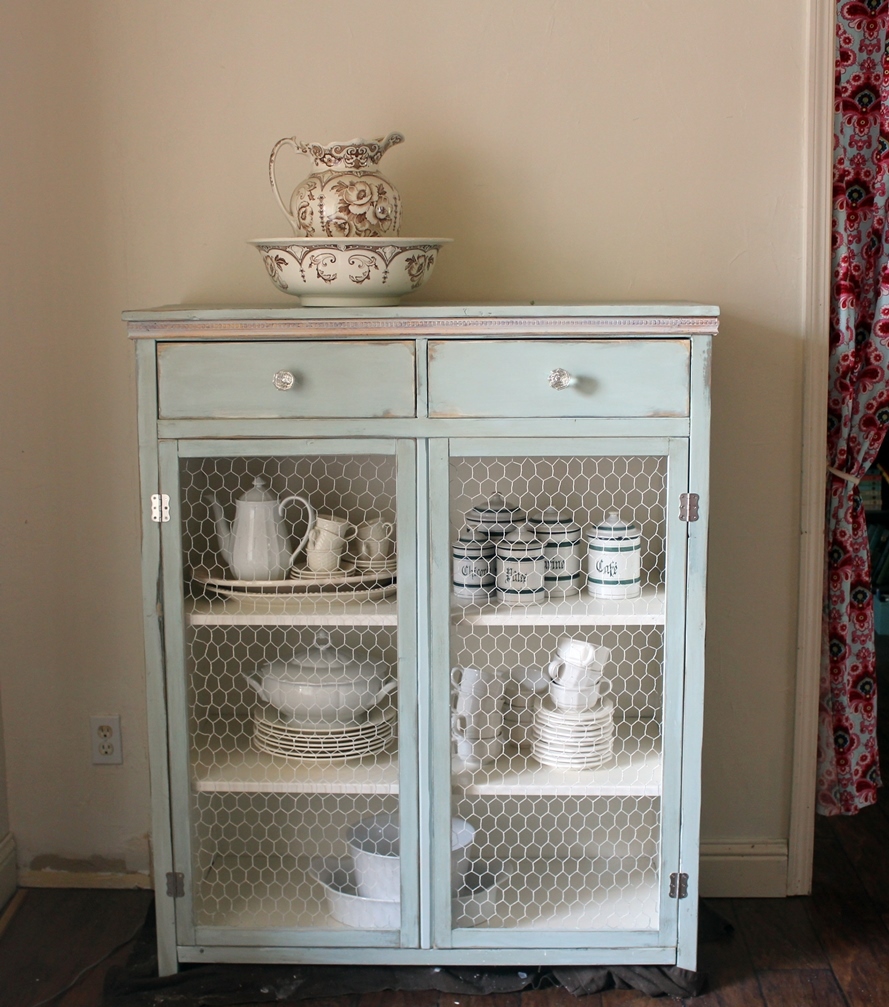
I'm still pretty new to woodworking so this cabinet took a little longer than it probably should have. I made the drawers a little deeper than the plans originally called for, which changed the height of the cabinet doors, but otherwise, all the other dimensions are the same. The laminated glass would have added another $100 to the cost so I used a chicken wire mesh that I dry brushed with the white I used on the interior. The knobs are from Anthropologie and I added a little trim piece around the top. I really love how much this cabinet holds. It is very versatile.

Tue, 08/19/2014 - 13:05
Thank you for the kind comments! I am excited to build another one of these for my mom.
Sun, 10/30/2016 - 13:07
love it! Did you have any issues getting the drawer in when the slides are installed? We installed the slides on the drawer box and then the slides on the case and we had to loosen some to actually get the drawer in, because the little wheels of the slides were basically blocking us from pivoting it in. Thanks!
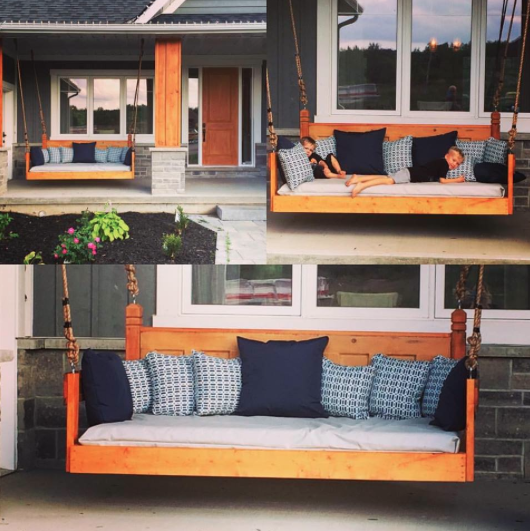
We started this project with Ana's hanging outdoor bed frame, added a vintage door as a back/headboard, and some panels from an old barn shed as arms. Finished it off with some homemade pillows and outdoor mattress cover, and voila! Our family's new favourite spot to relax and read :)
This was the fourth plan we've used from the site, and every single time have been wowed by how easy it is to follow the plans, buy the material, and how well the projects come together. Thank you so much for your generosity in sharing them, Ana. We are so apprecitiative of your creativity, talent, and kindness.
Kindest Regards,
The Culbert Family
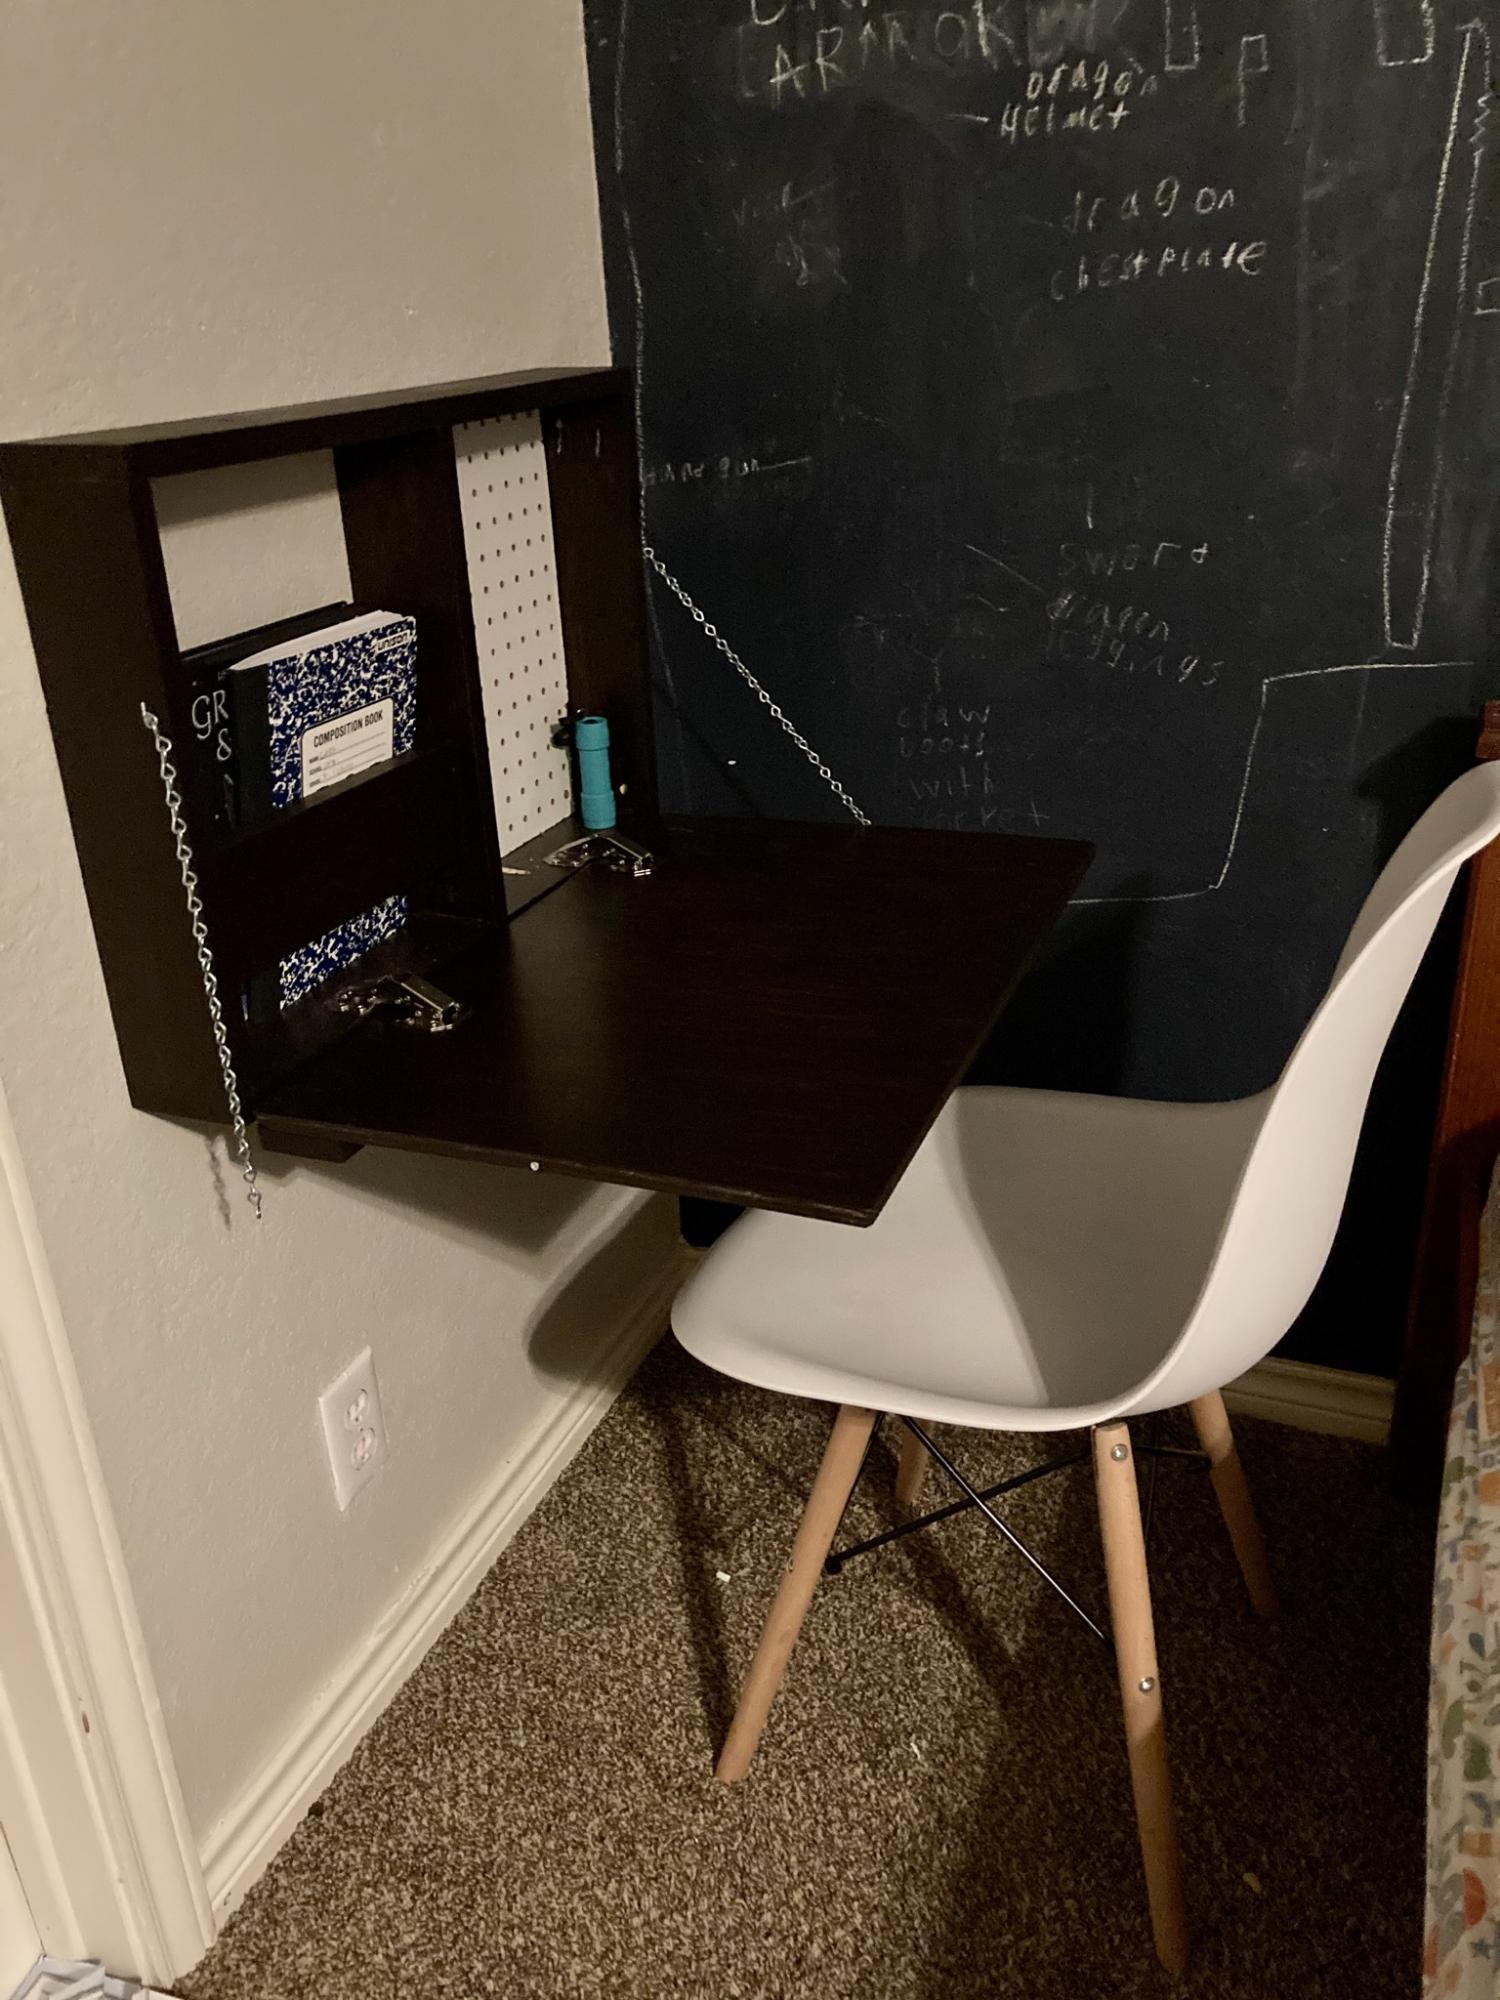
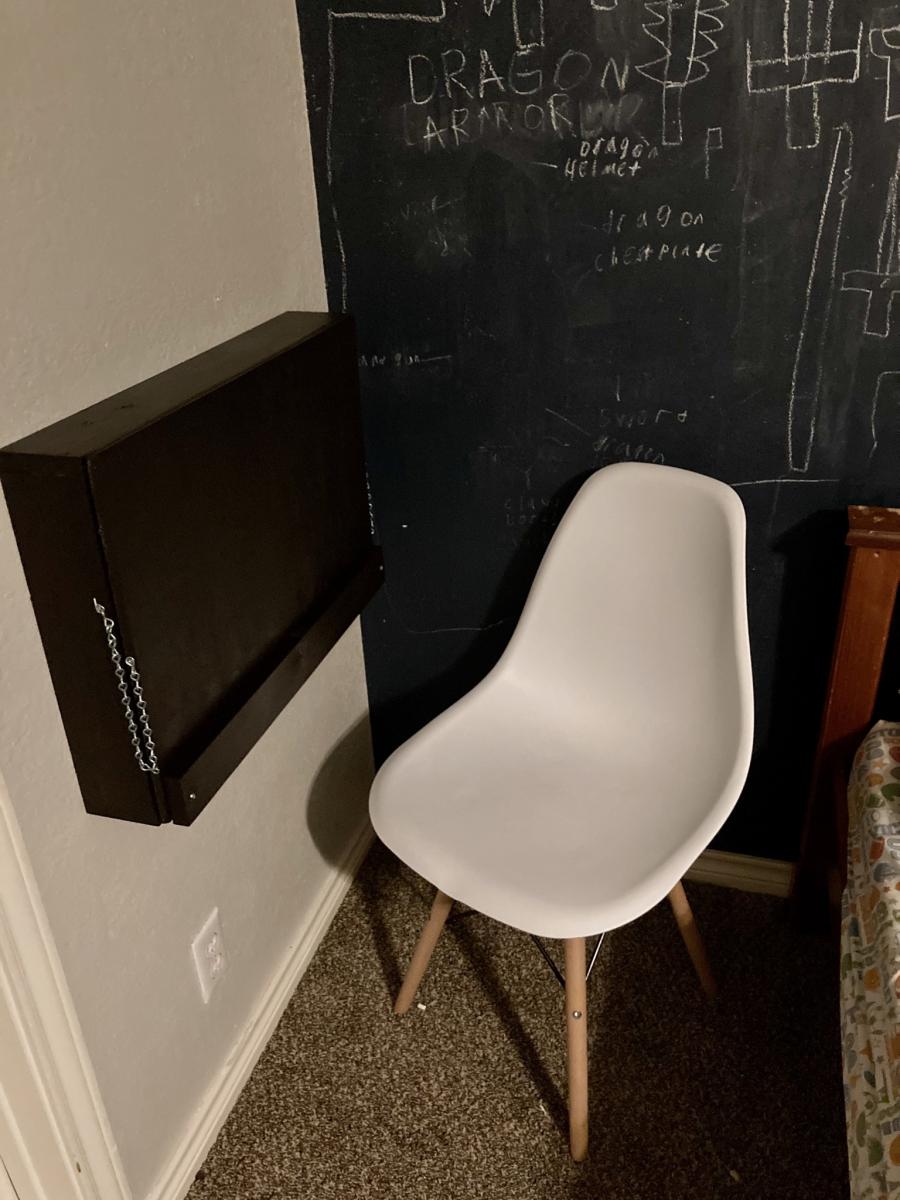
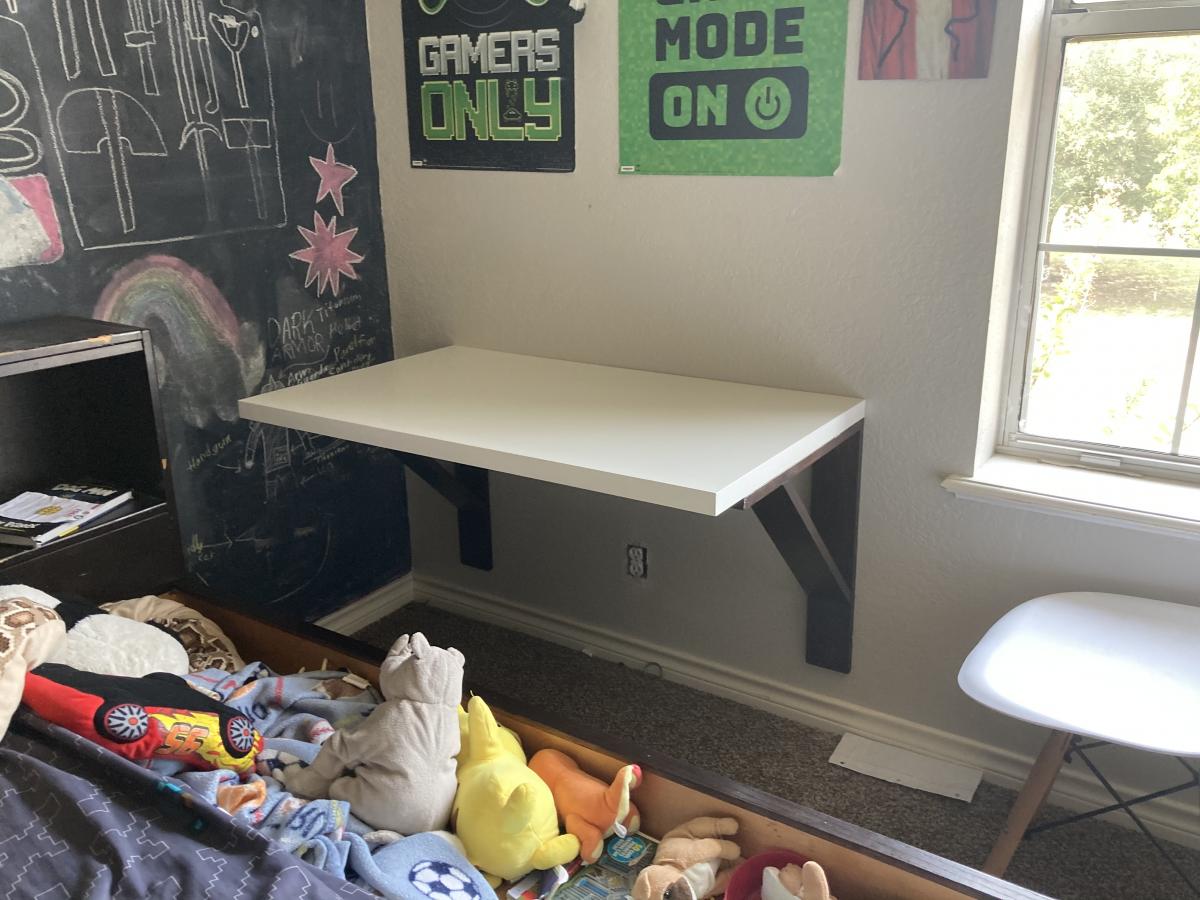
I am brand new at building but my big boys requested desks in their room for distance learning. One fell in love with the flip down wall art desk and this is our take on it. The other wanted a bigger surface, so we used an IKEA desk top and built our own brackets. The boys loved being part of the building. I put all the right angles together with a Kreg jig, and attached everything directly to studs in the wall (I don’t trust my boys not to be rough on them).


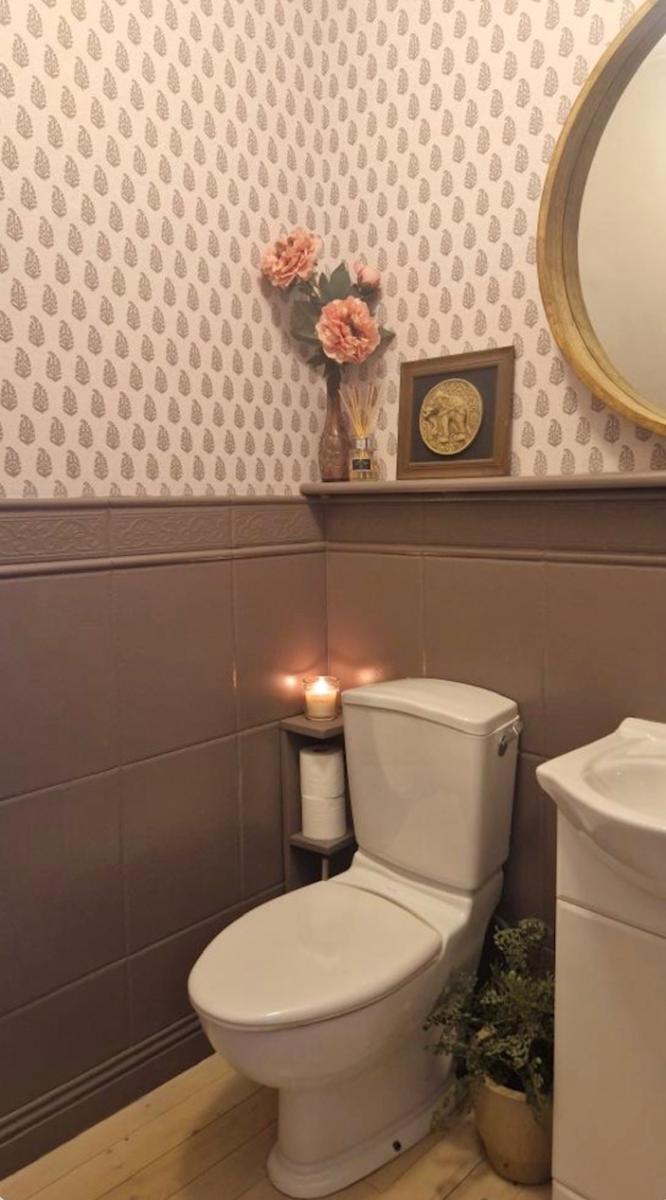
What do you think ? I painted mine to match the tiles as I didn't want it to stand out too much. It's a useful item for sure, but I wanted the mirror and wallpaper from @thepureedit to be the focal points.
But what a great little storage unit from scrap wood. - shabby.ie on Instagram
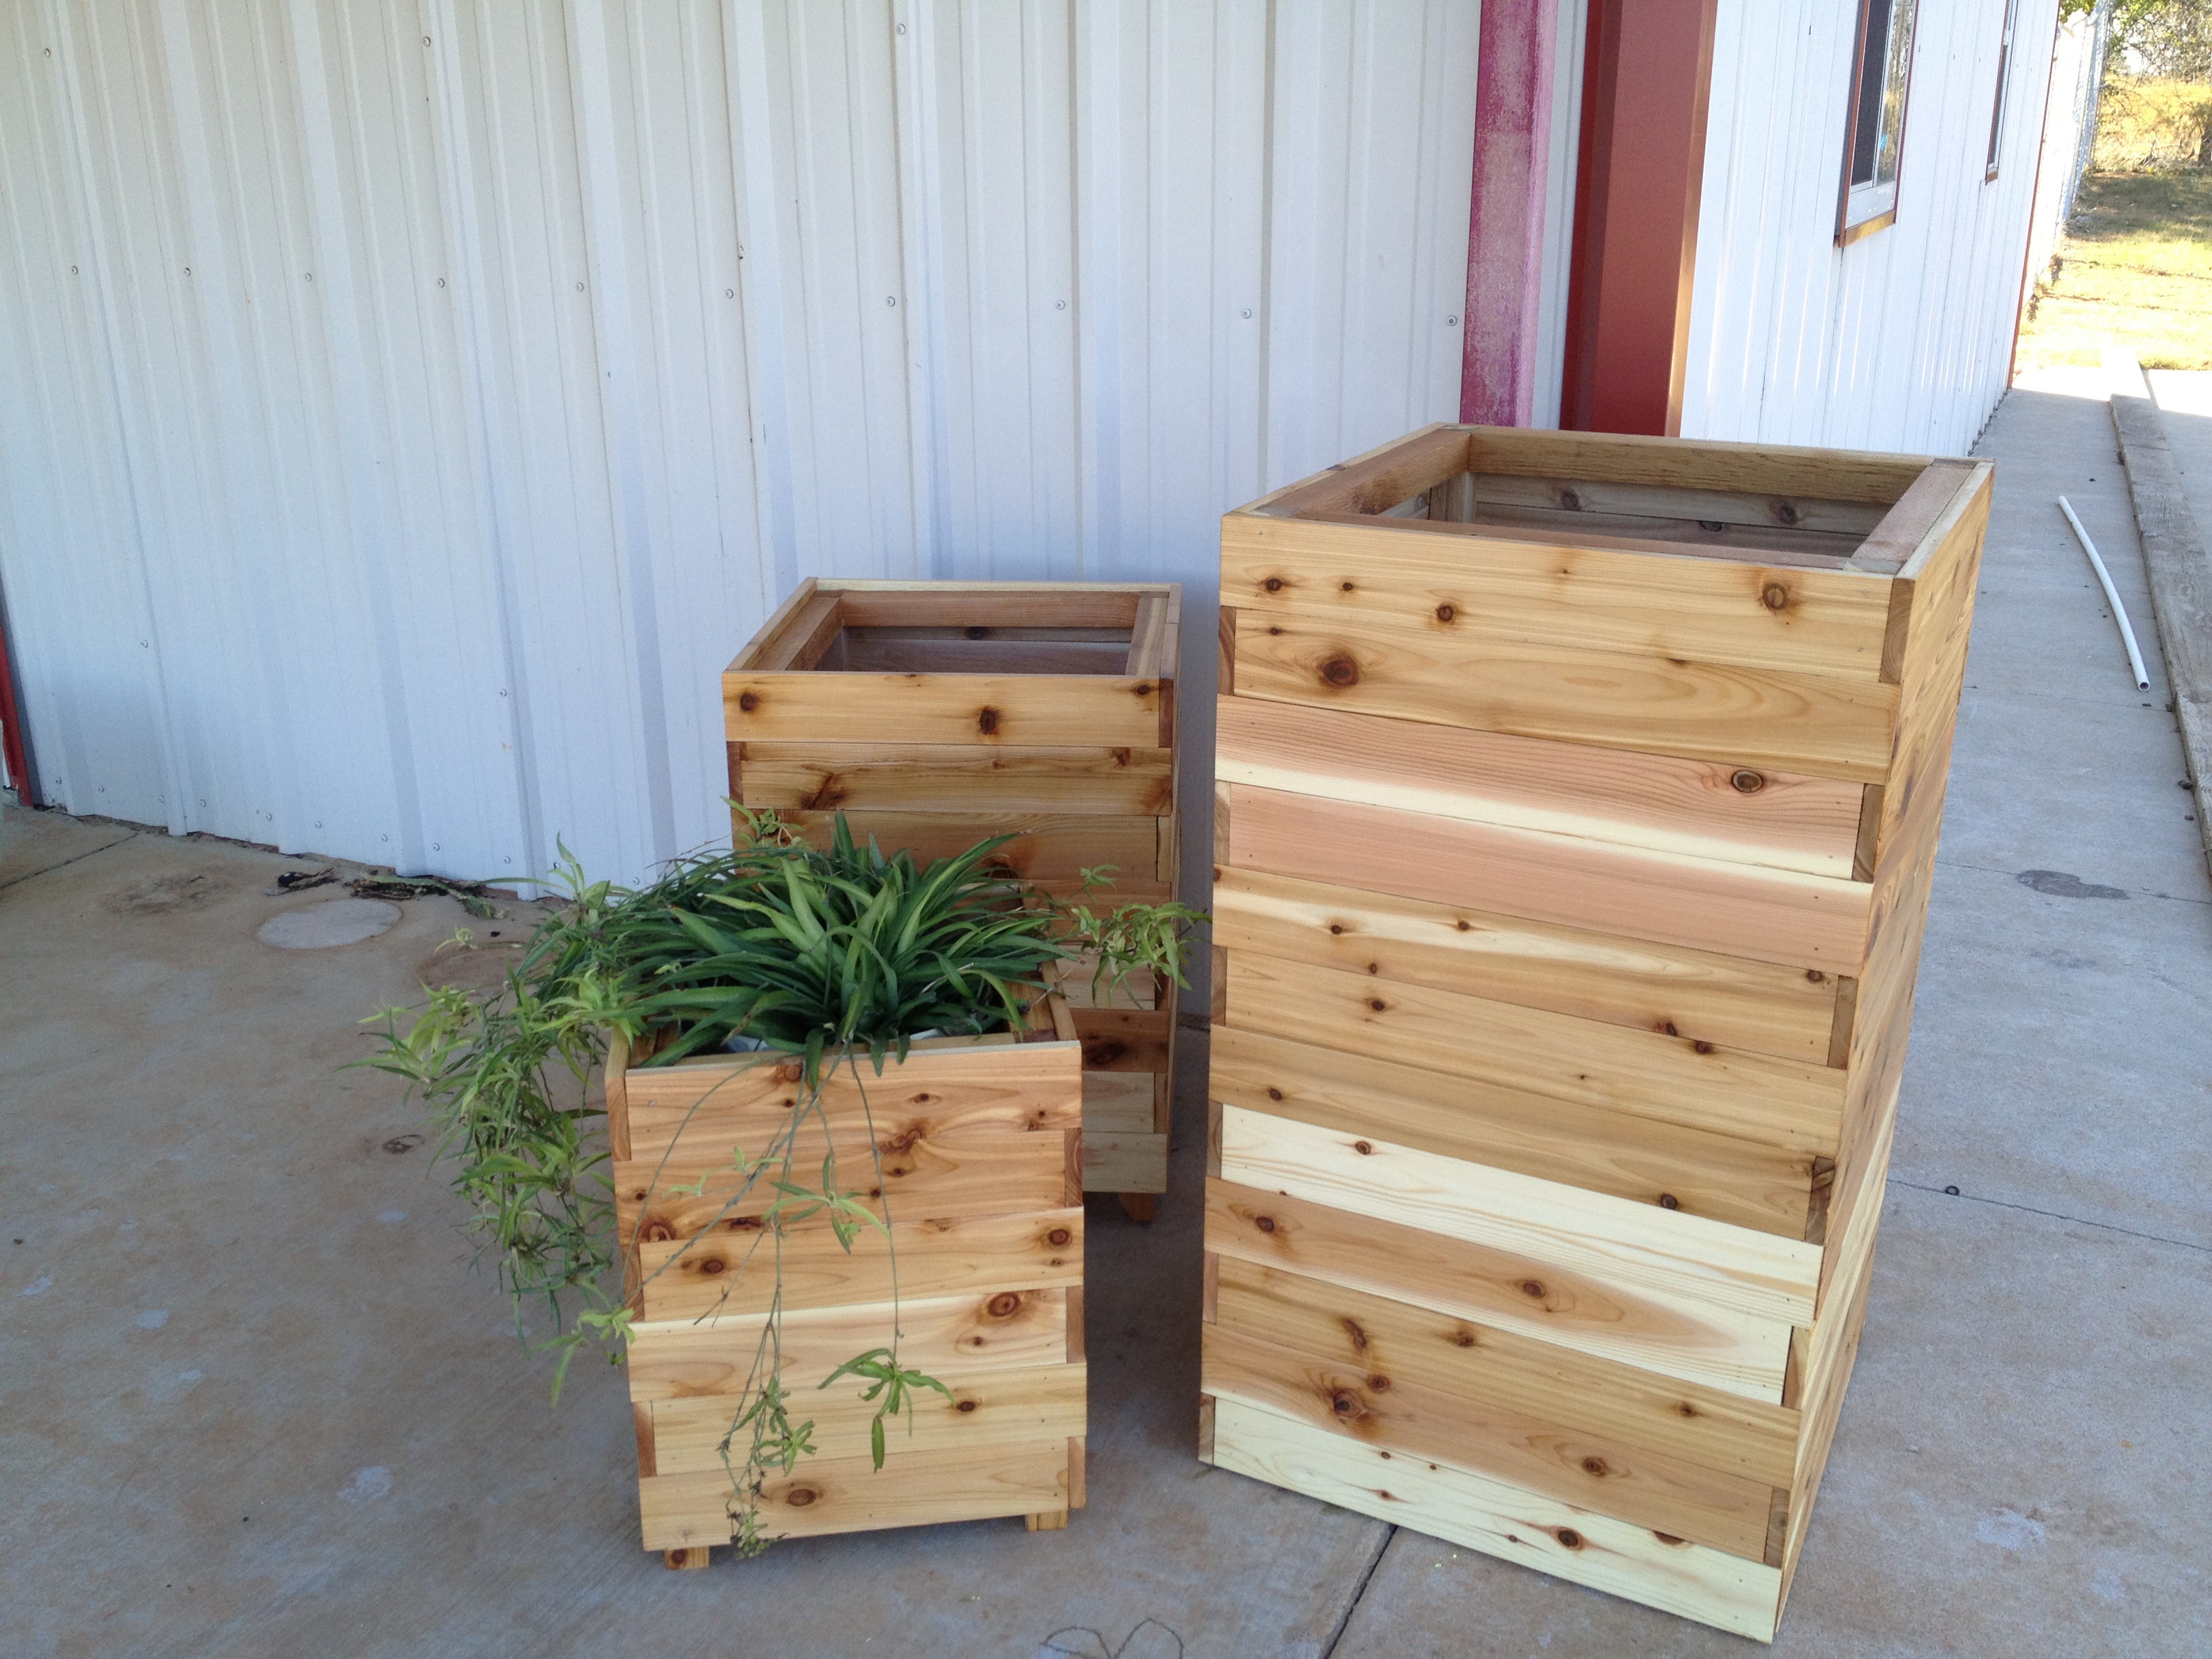
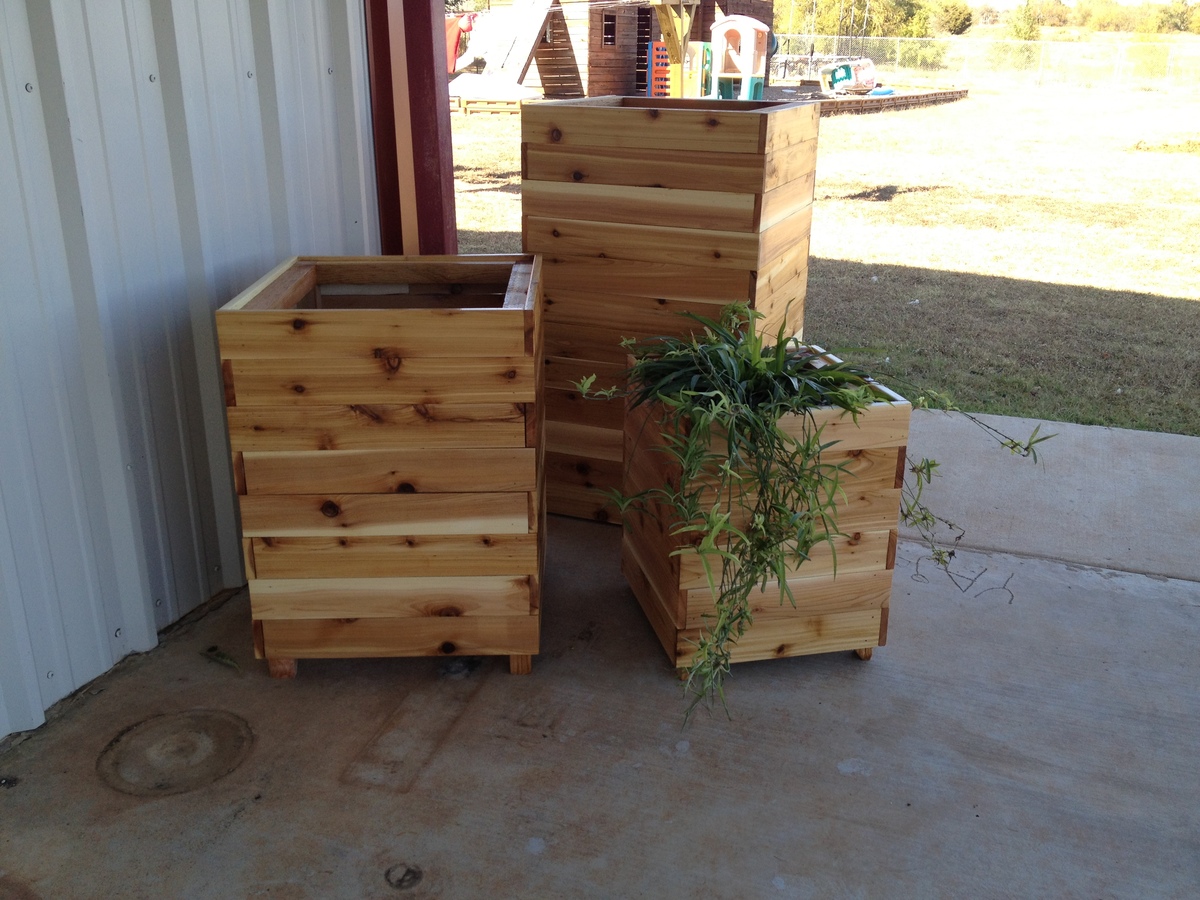
We wanted some tall planters and found some tall teak planters that we love, but one problem $820 on the Casual Country website. The ones online were angled but I couldn't get the angle right so I made mine straight.
The tallest one is 42" x 23" then 29" x 21" and the small one is 20" x 18".
They will look much better when I get something planted in them this spring.
Built the frame with 2"x2" cedar boards and used 4"x1" cedar boards for the planks.

Made mine exactly like the layout except I used an old piece of glass from a different project that didn't work out so well. This 1 turned out really nice. Going to make a couple end tables next with a hidden compartments in them next...
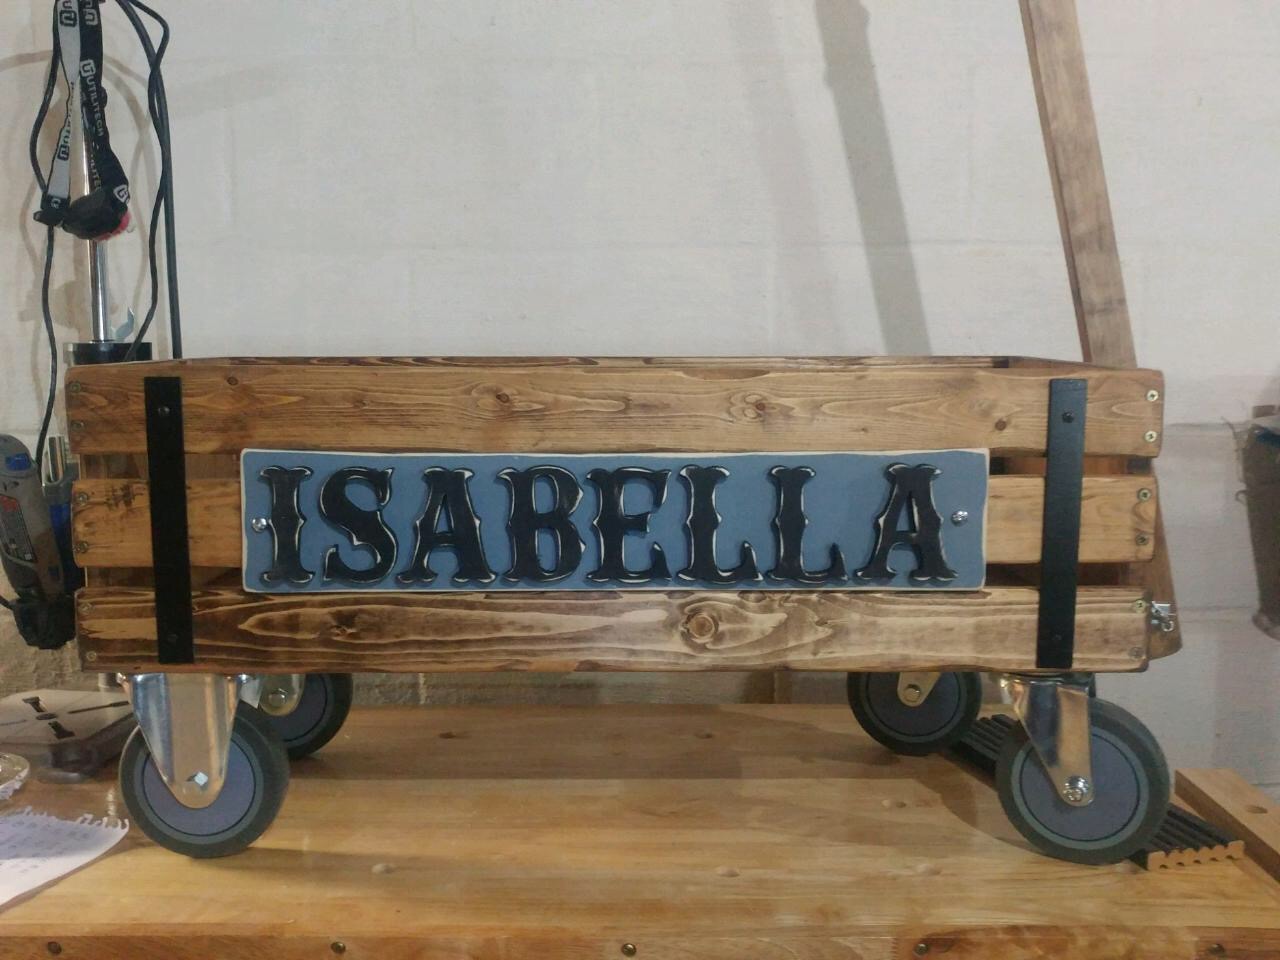
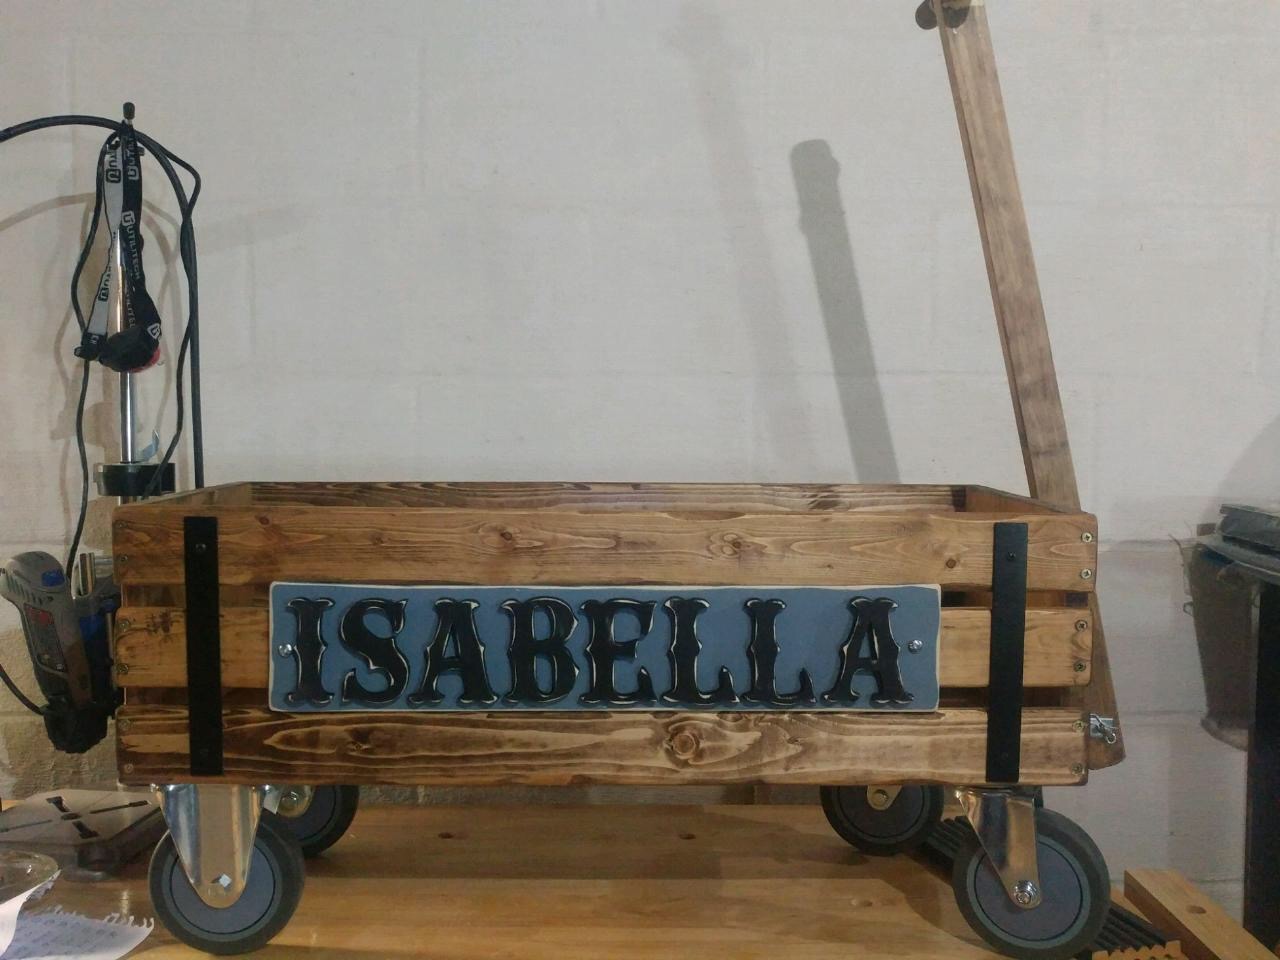
This is the 3rd wagon I've made. It makes an excellent 'heirloom' gift that you can personalize for each recipient that will last for years to come and can be handed down through generations. I decided to go with 5" wheels on my wagons.
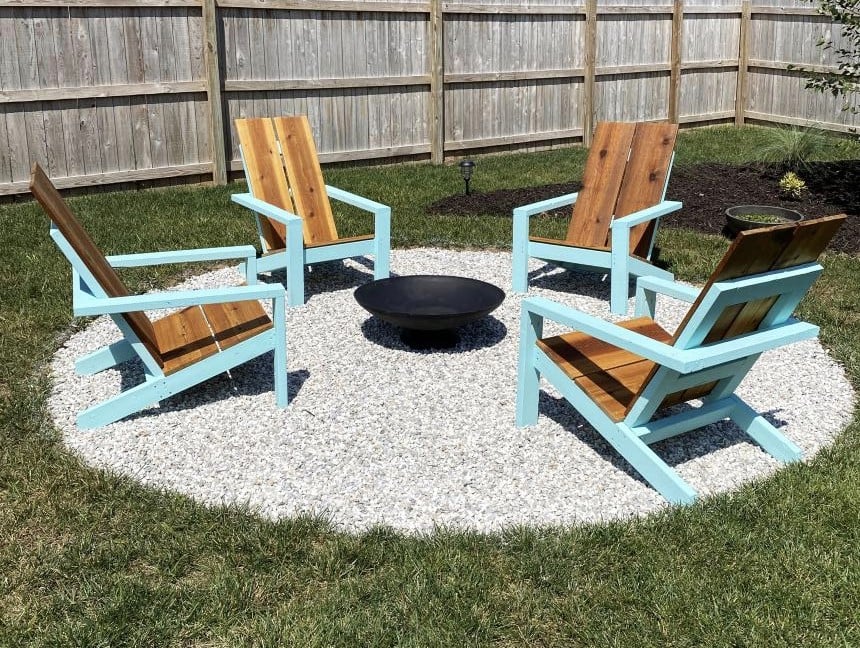
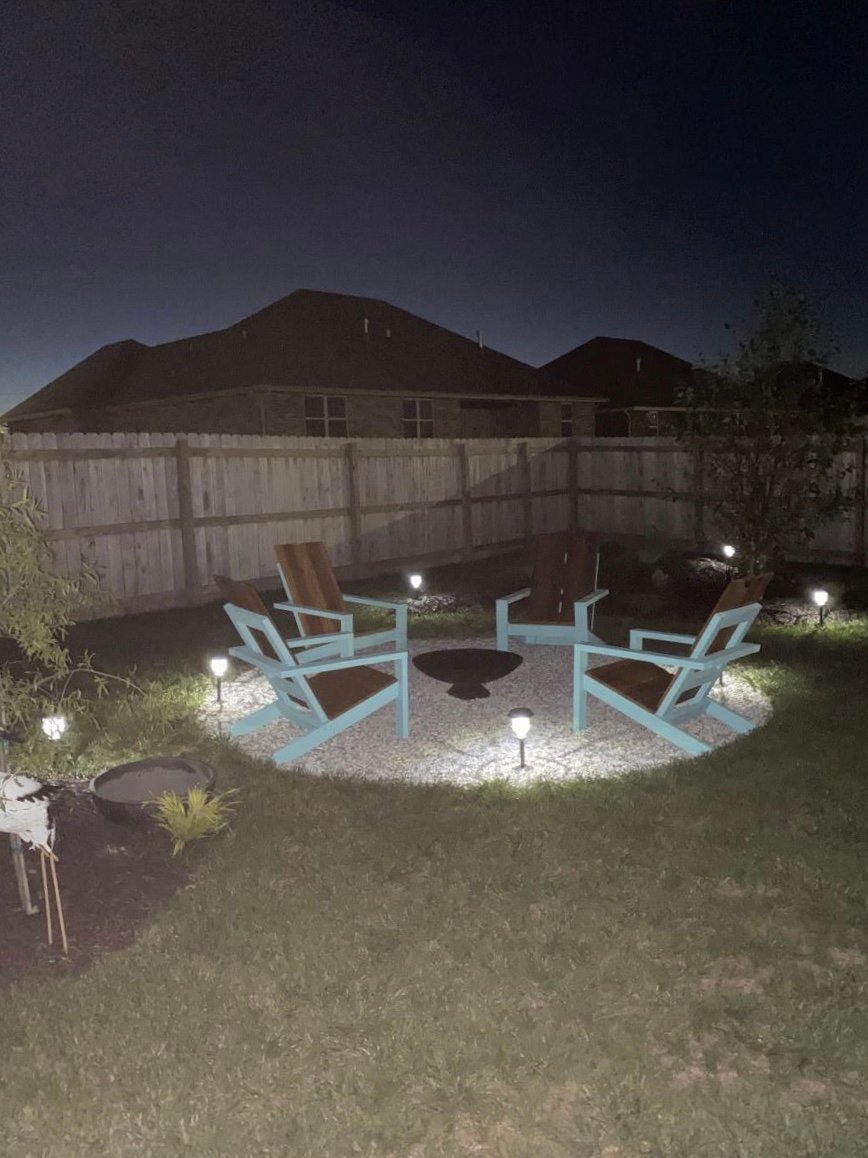
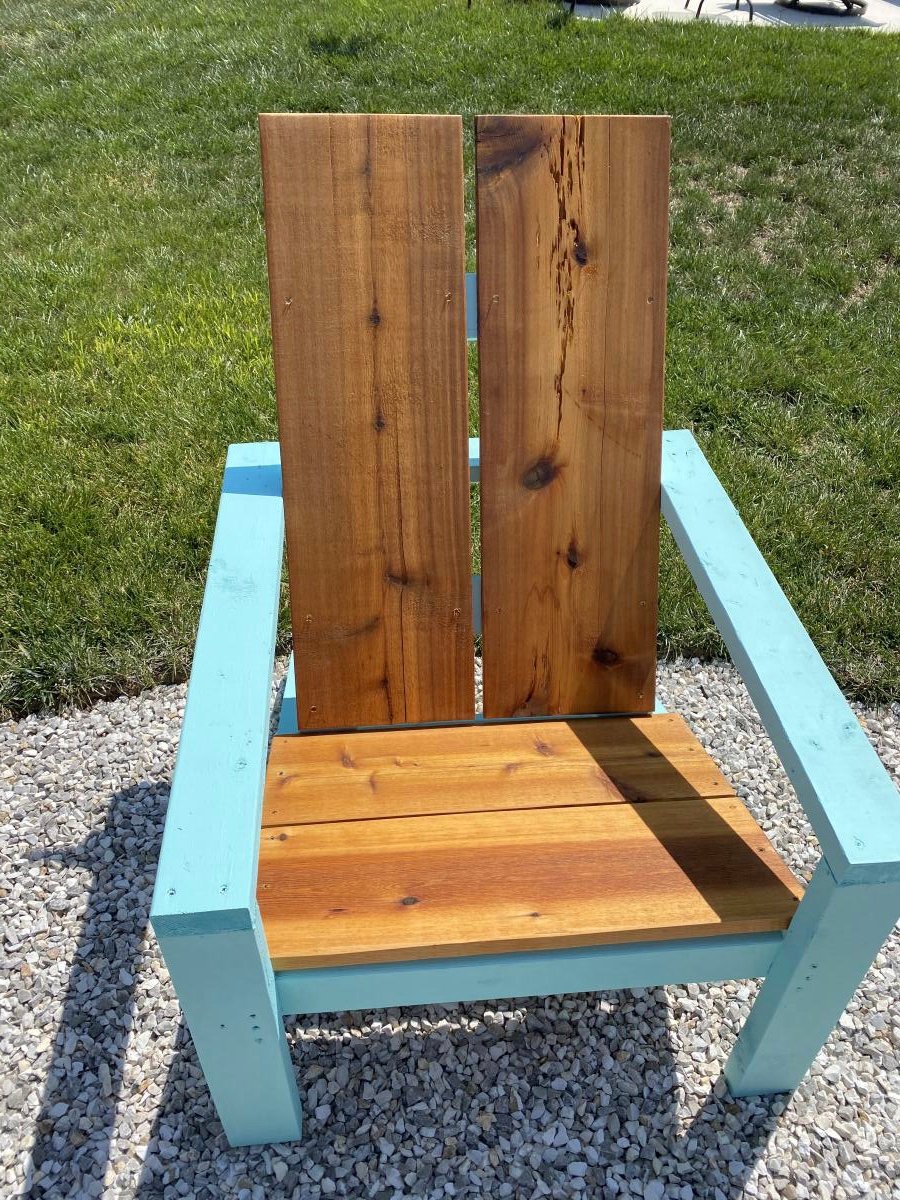
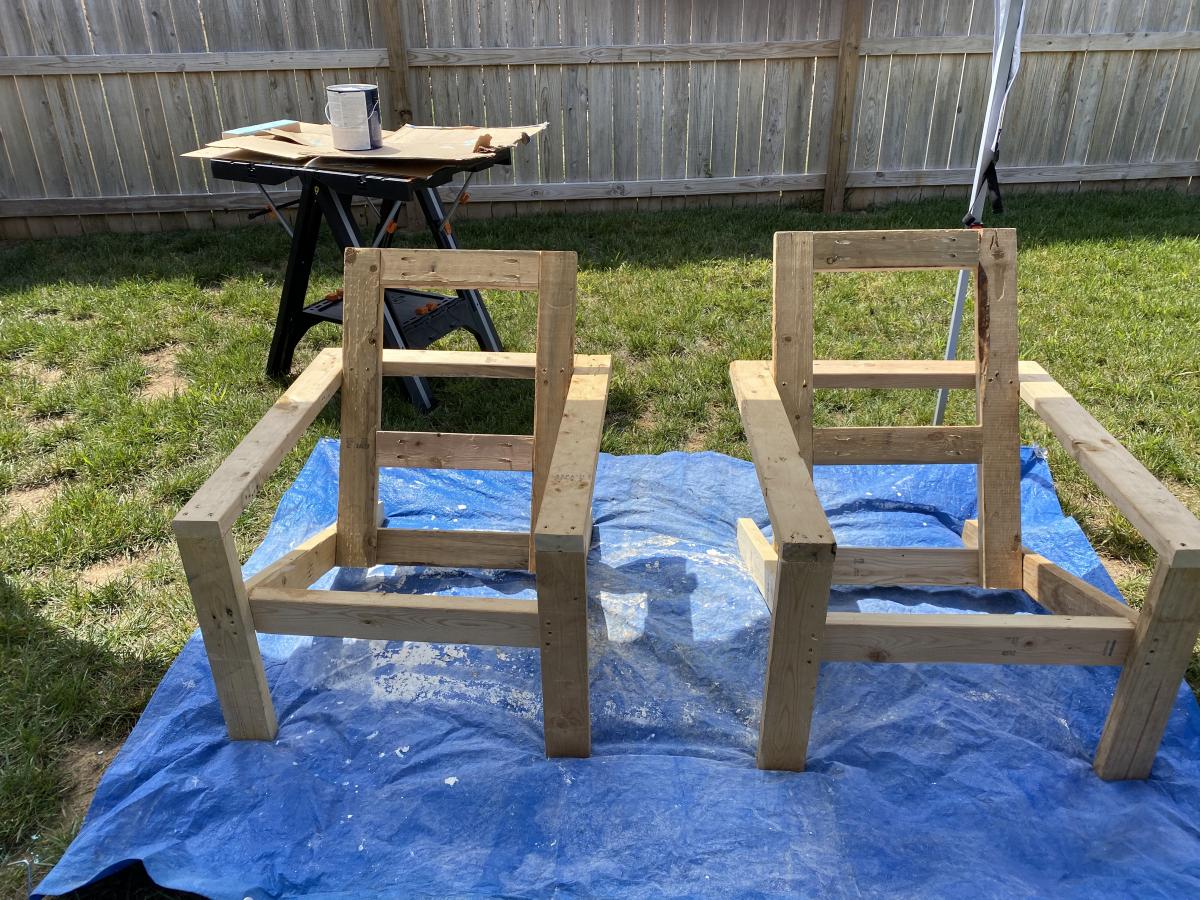
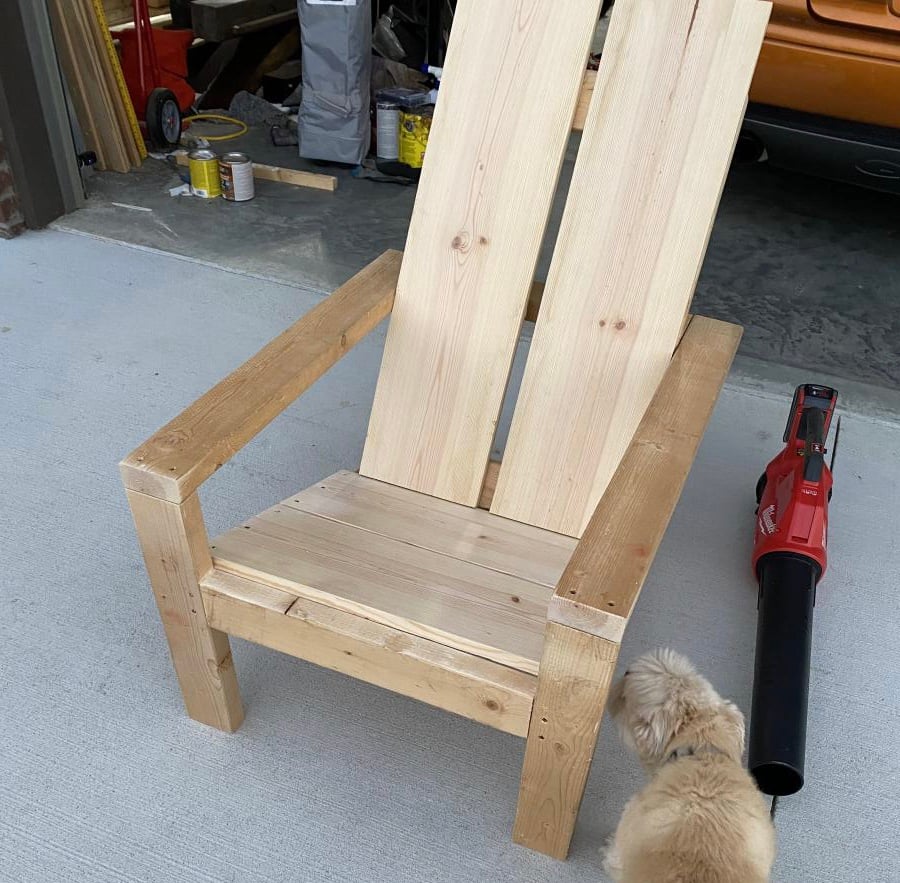
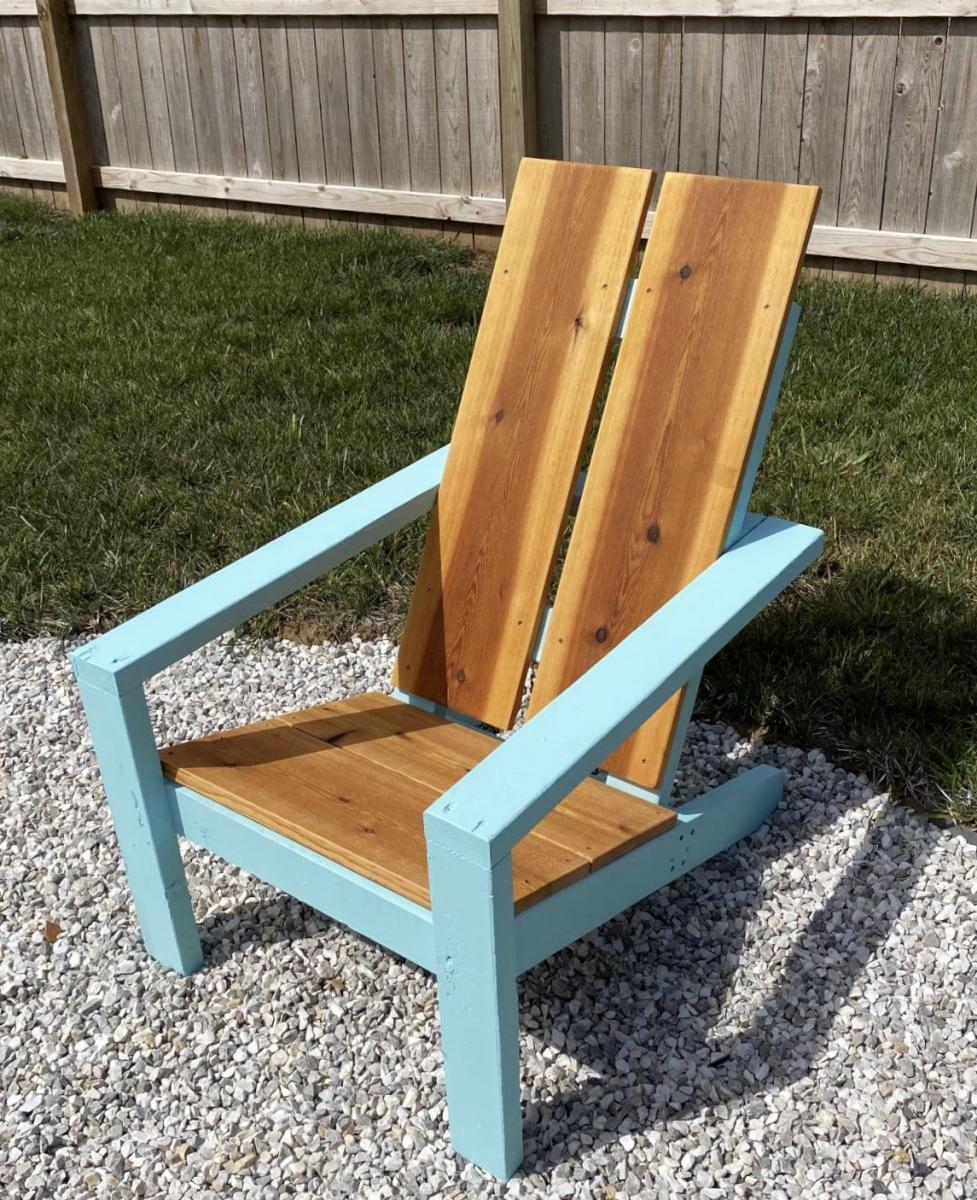
Am a big fan of Ana's work, and have used several of her plans in prior builds including the more traditional Adirondack chairs. Those stayed with my old house, and I wanted something different for my new house. Really liked her Modern Adirondack design with the floating arm rest. However, plans are like recipes to me--a guideline. I wanted the back boards to run up and down, and I am a bit more robust than the lovely and petite Ms. White, so they would need to be wider after I built the first one at 19 1/2" wide per plan. The next three I made 22" wide and that worked well without throwing off the geometry and angles of the other parts. Since I ran the backboards up and down, I needed some cross beams for stability and to give an attachment point for the middle of the boards. Cut some 2x4s at 15" wide, drilled pocket holes in both ends, and attached in between the back supports with the pockets facing up to be hidden by the back boards. All of the 2x4s were leftover cut-offs from the houses being built in my neighborhood. Since the frames were free, I splurged and went with cedar boards for the backs and bottoms. With the wider frames, I had to use 1x12s ripped down to 10 3/4" to get the right look (about a board's width in between). Needed some color, so I painted the frames Teal Seaglass from Menards. Cedar was stained with a natural deck stain from Sherwin Williams. I experimented with salt paint (mixing unsanded grout with the paint) to give a heavily textured and weathered finish but this was unecessary--the wood was distressed enough and I am a terrible painter. It also toned down the color so I skipped that step and just went with 2 coats of plain paint. It looks like outdoor furniture should up close. As always, am pleased with Ana's plans. Thank you for doing all the hard work!

Fri, 08/21/2020 - 16:59
I absolutely love how the back was done!! Thank you so much for sharing!
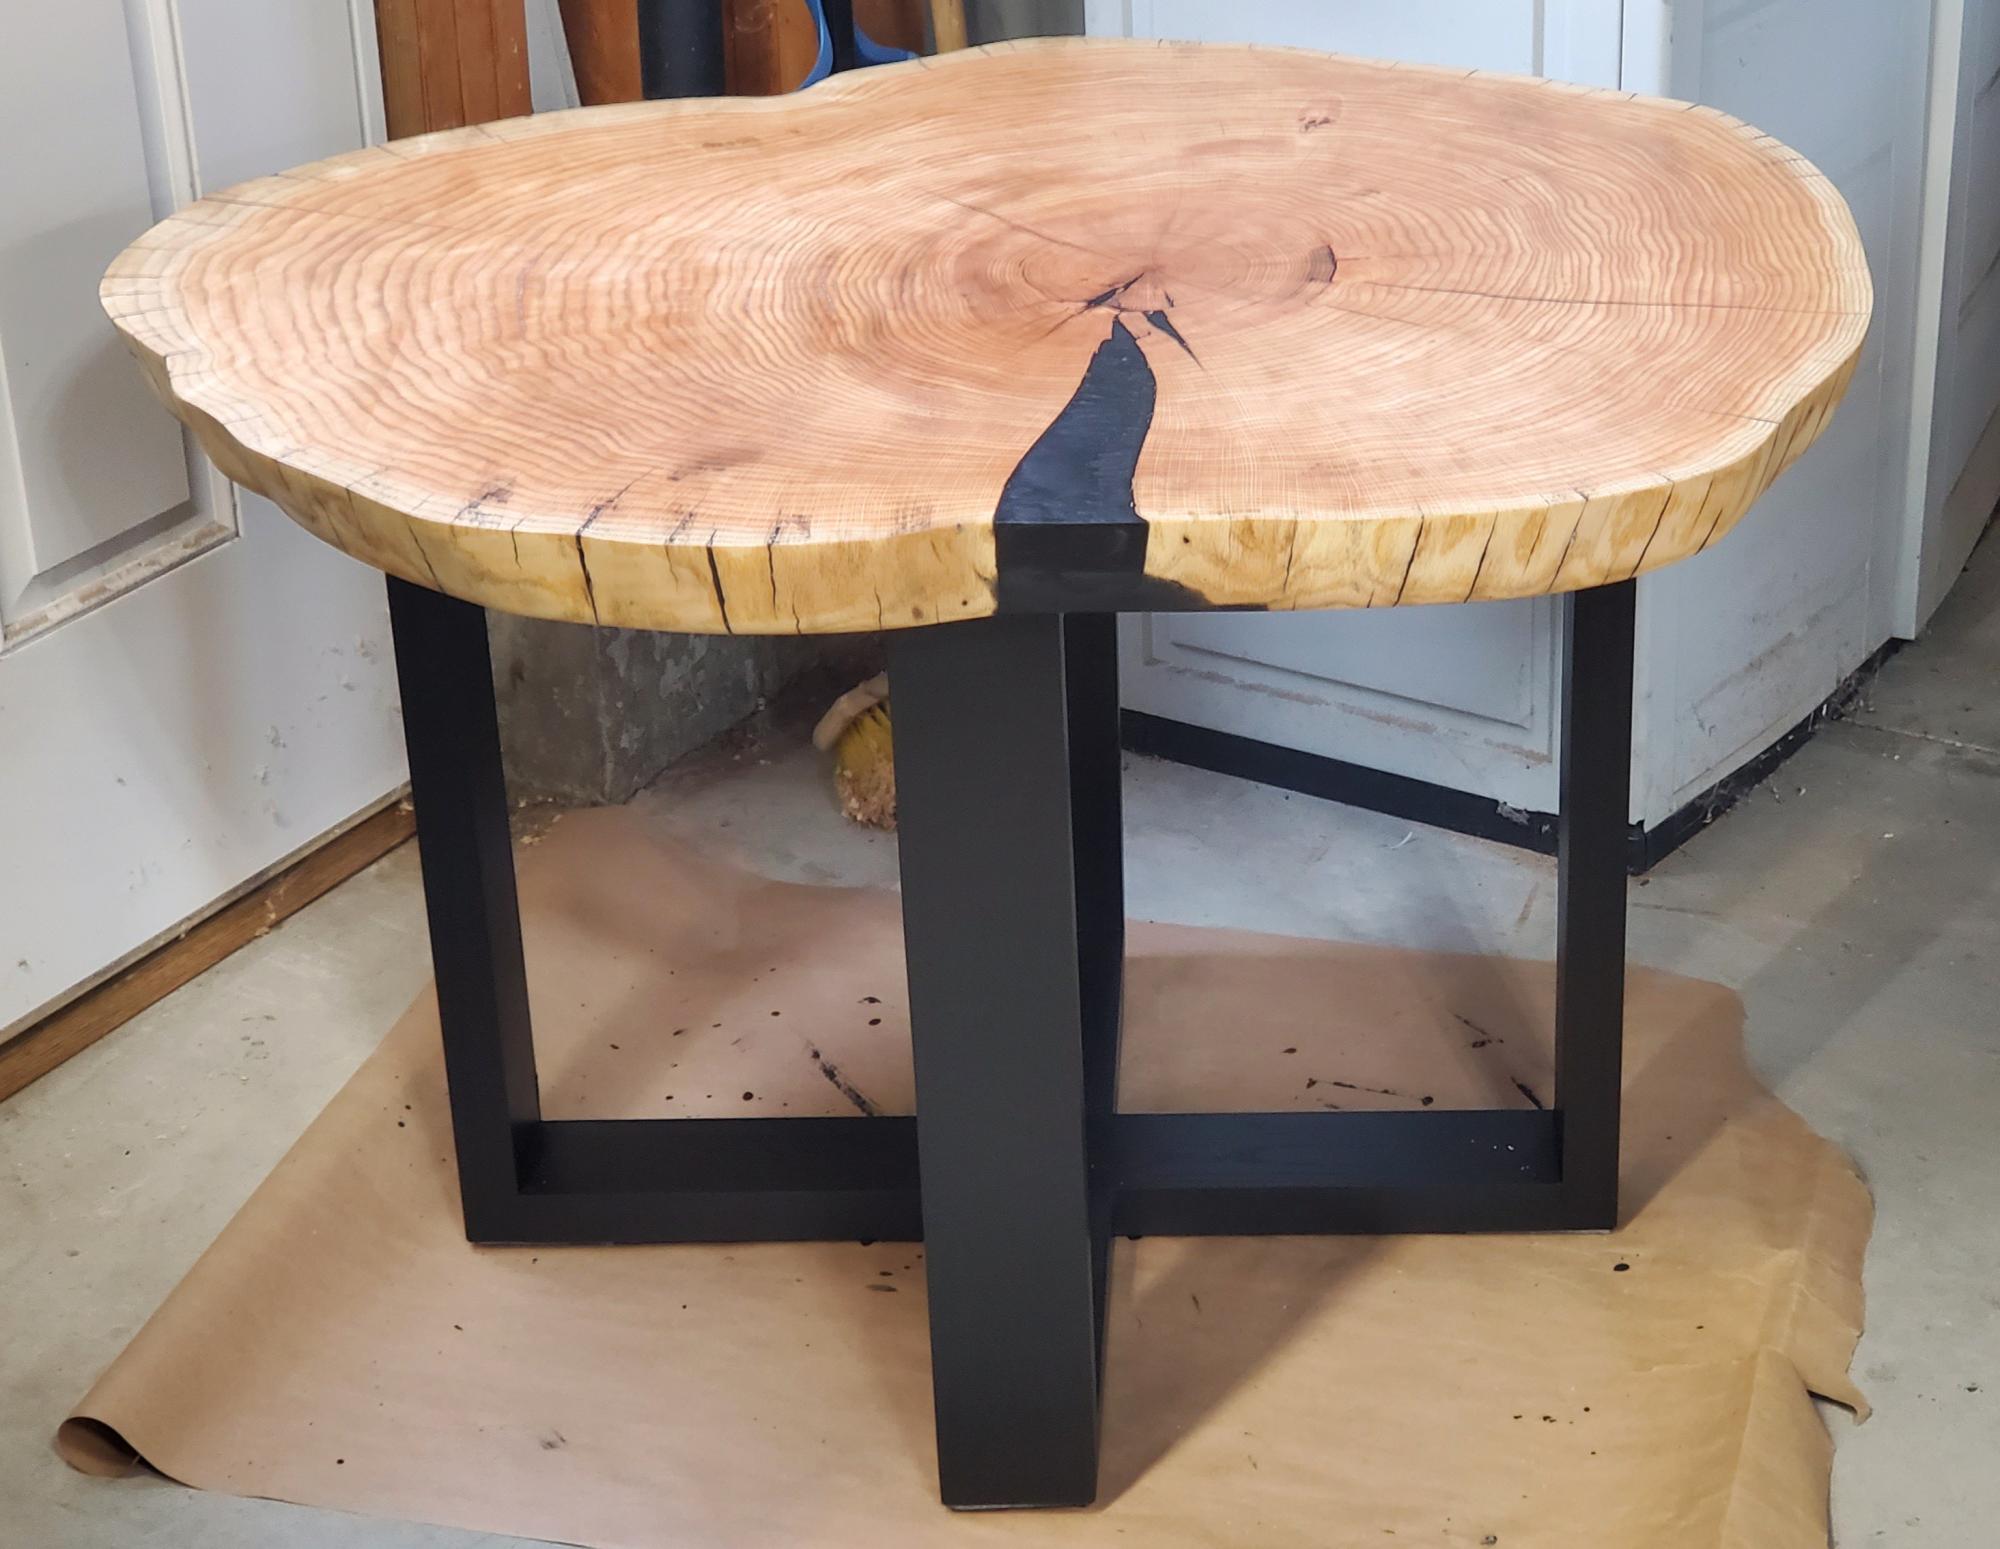
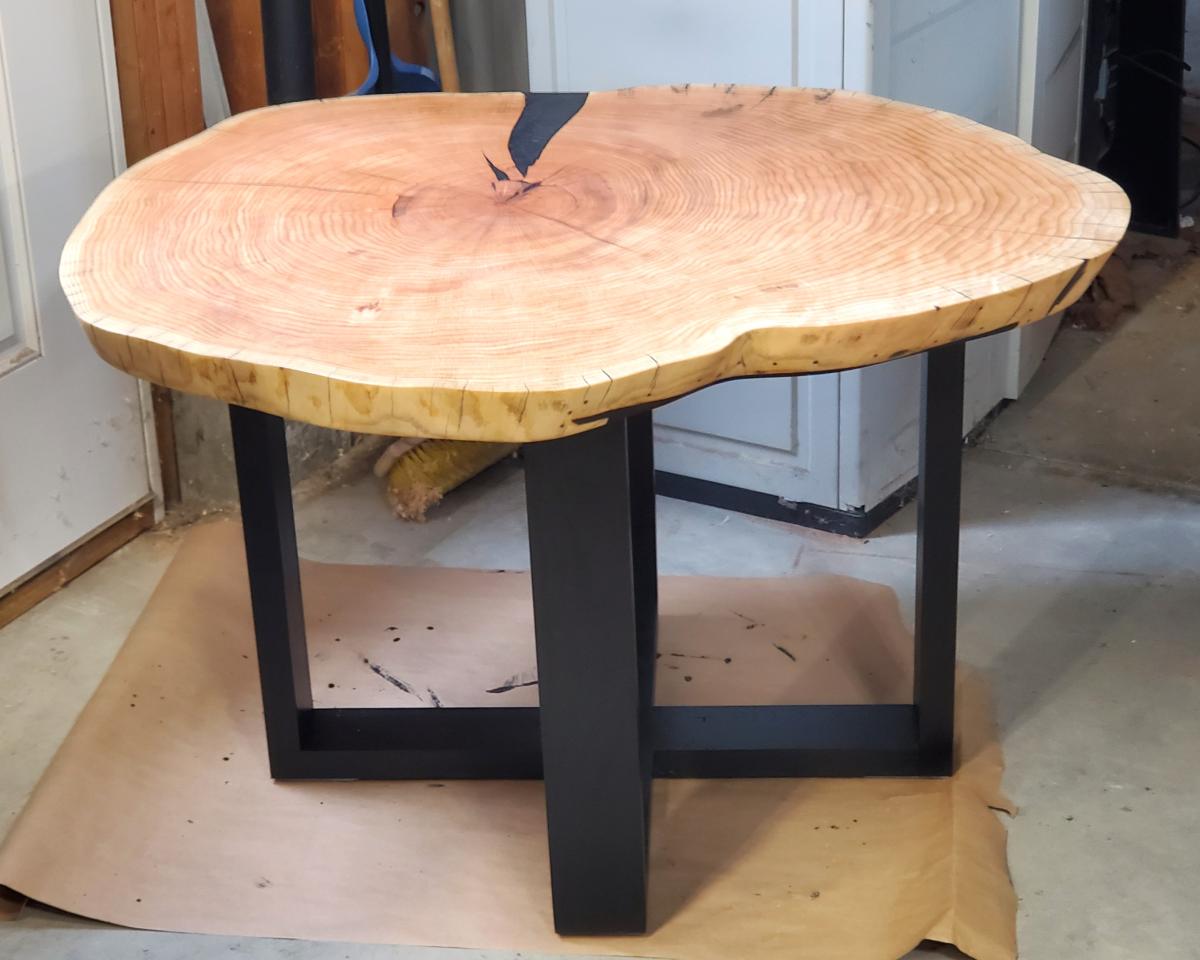
40"x34" oak cookie. I tried some metal legs but couldn't get them wide enough to be stable at the requested 24" height, unless I had some custom made for $$$. I found these plans and changed the dimensions to fit the table and made the legs out of oak. Very pleased with the results.
Dave C

I was looking for my next project for woodshop my junior year of high school. I happened to run into this website while looking for plans and found Ana's farmhouse queen bed and was inspired to make something similar. Now that I have accomplished this task, I want to share it with the community that inspired the build. Let me know what you think! Thanks.

Corner cabinet project based on Ana's plans and adjusted to my own decor and measurements.


These plans make it very simple to make.
Finally decided to do this wall and I’m obsessed 😍 -Kaity
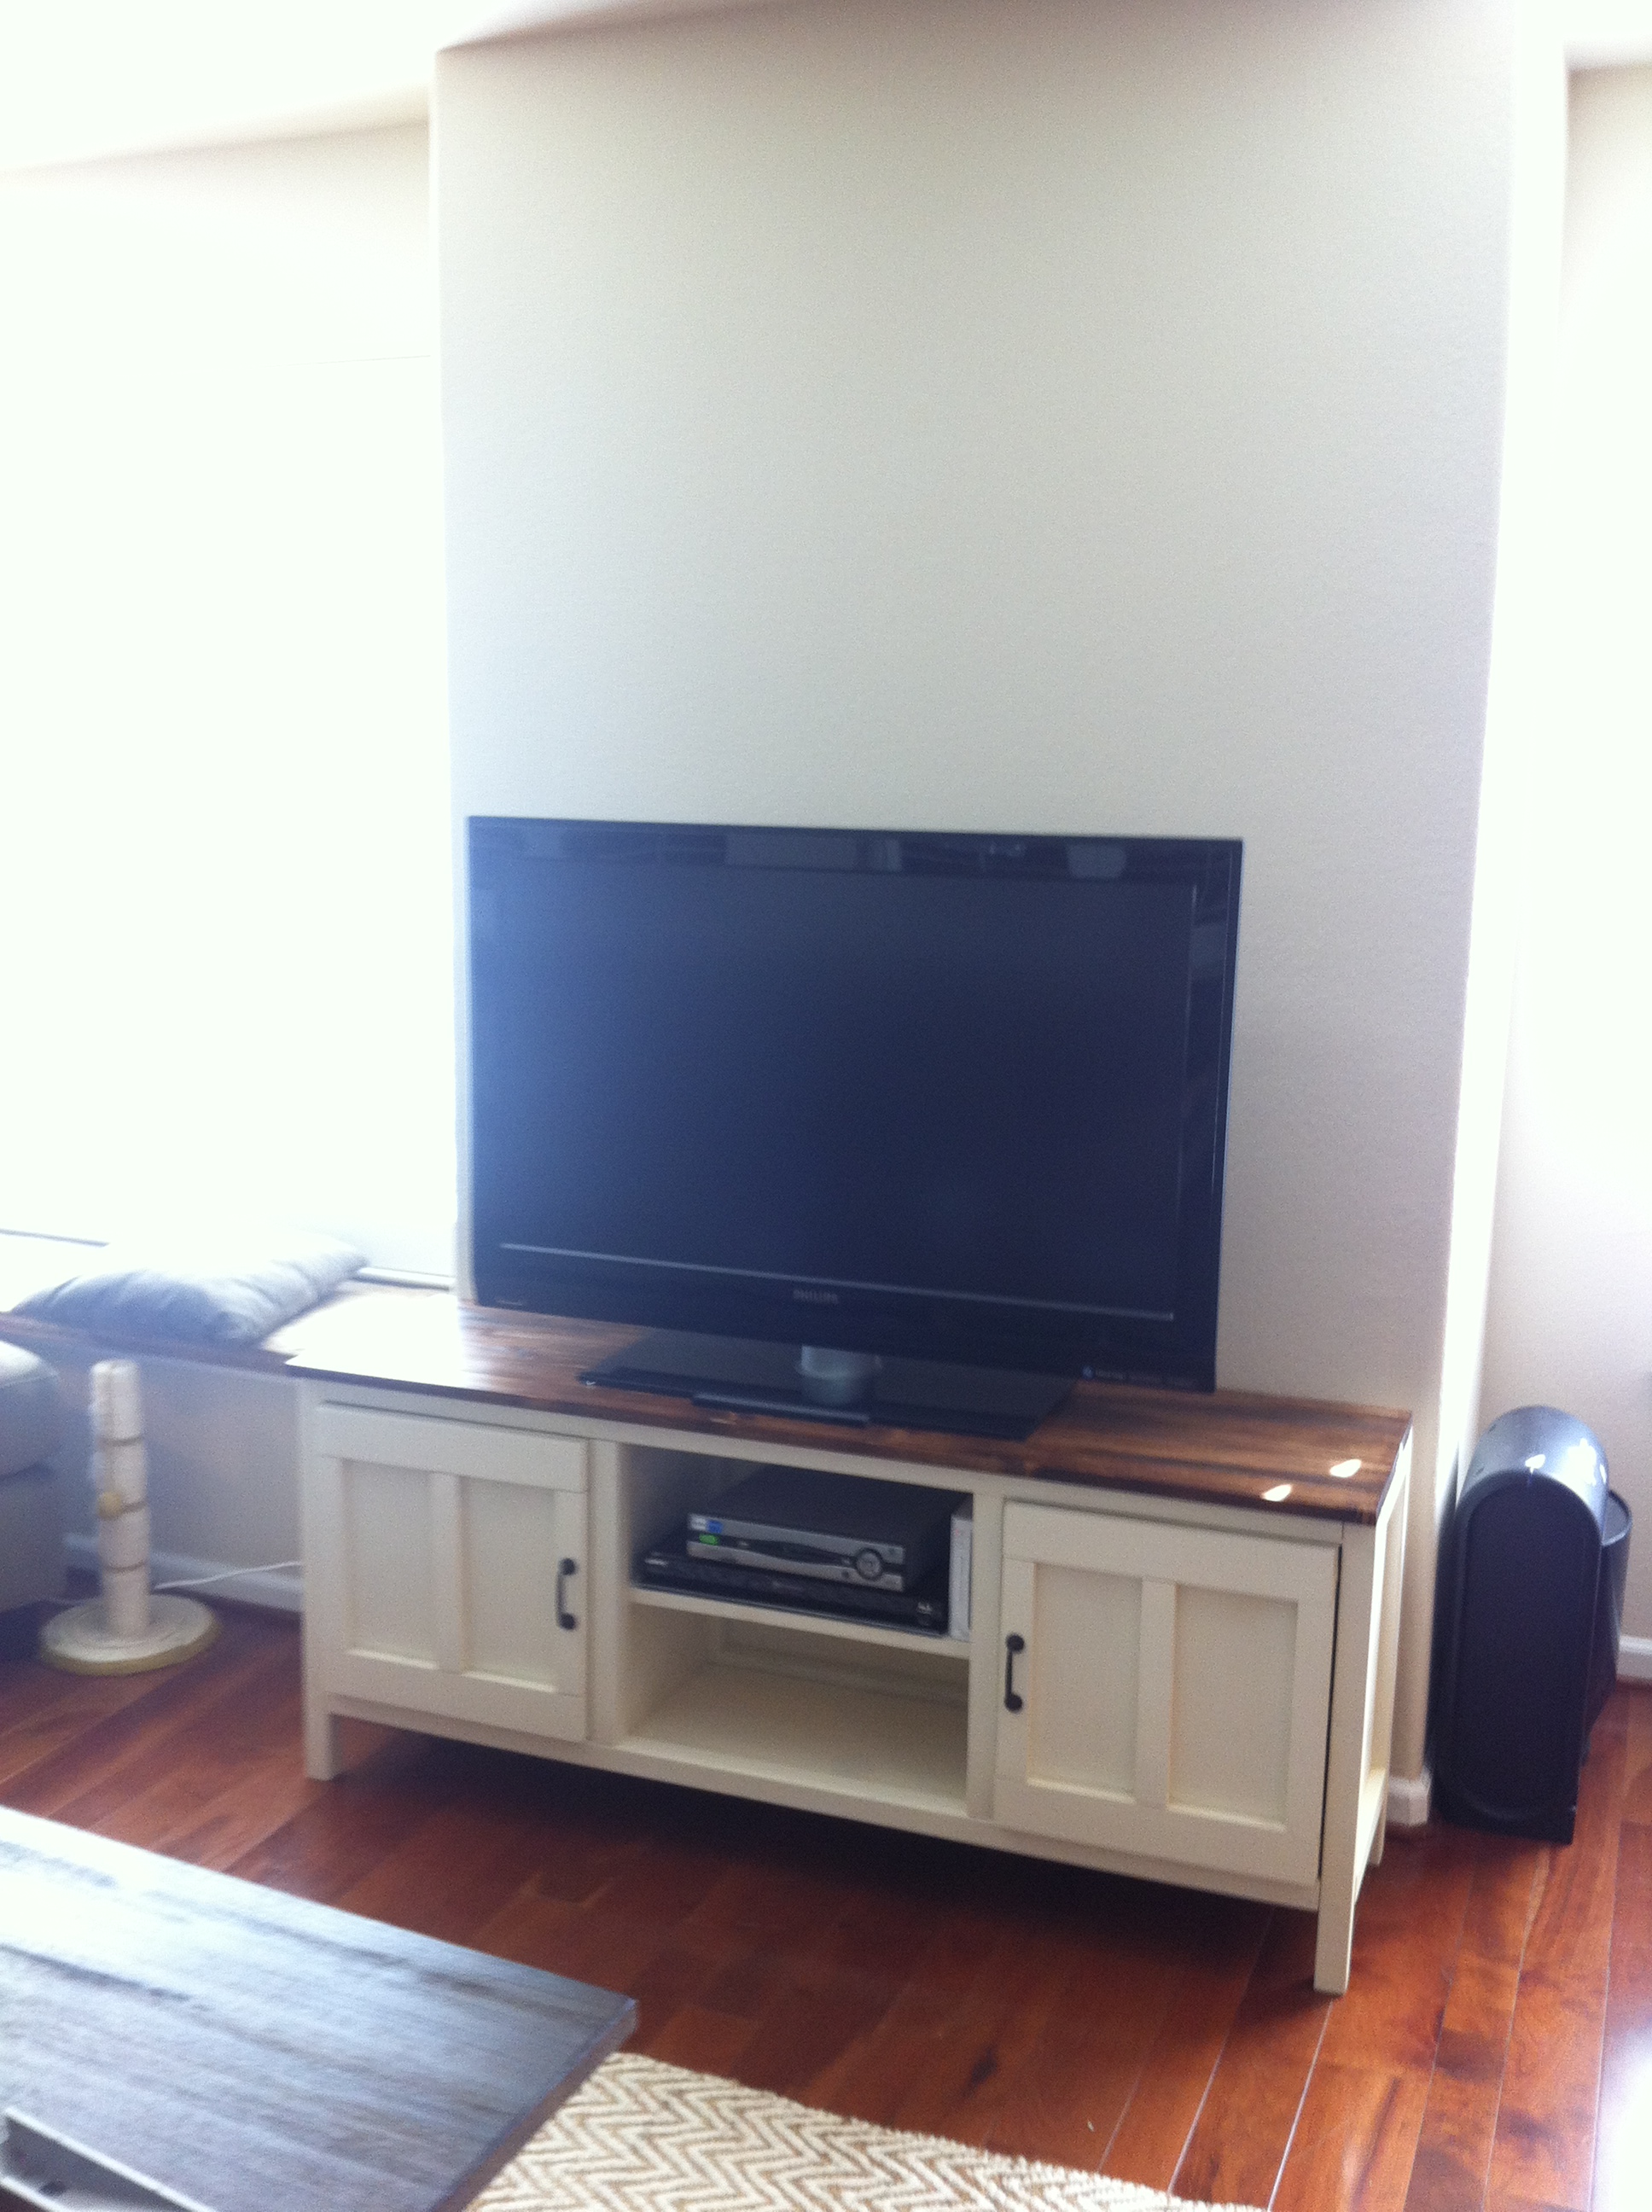
My fiance and I built this media console from Ana's plans to replace the UGLY black plastic/glass tv stand we had previously. It was pretty easy to do. The only thing I recommend is waiting to cut the doors after the box is put together. Our doors did not fit exactly and we had to cut them again to fit. I'm sure that our measurements were off somewhere along the way. We love the way this piece of furniture looks in our family room now, for about $150!!!
Fri, 11/09/2012 - 19:39
Awesome! I've been eyeing this plan for a while but couldn't decide if I wanted to paint or stain it. This is great, thanks for sharing!


