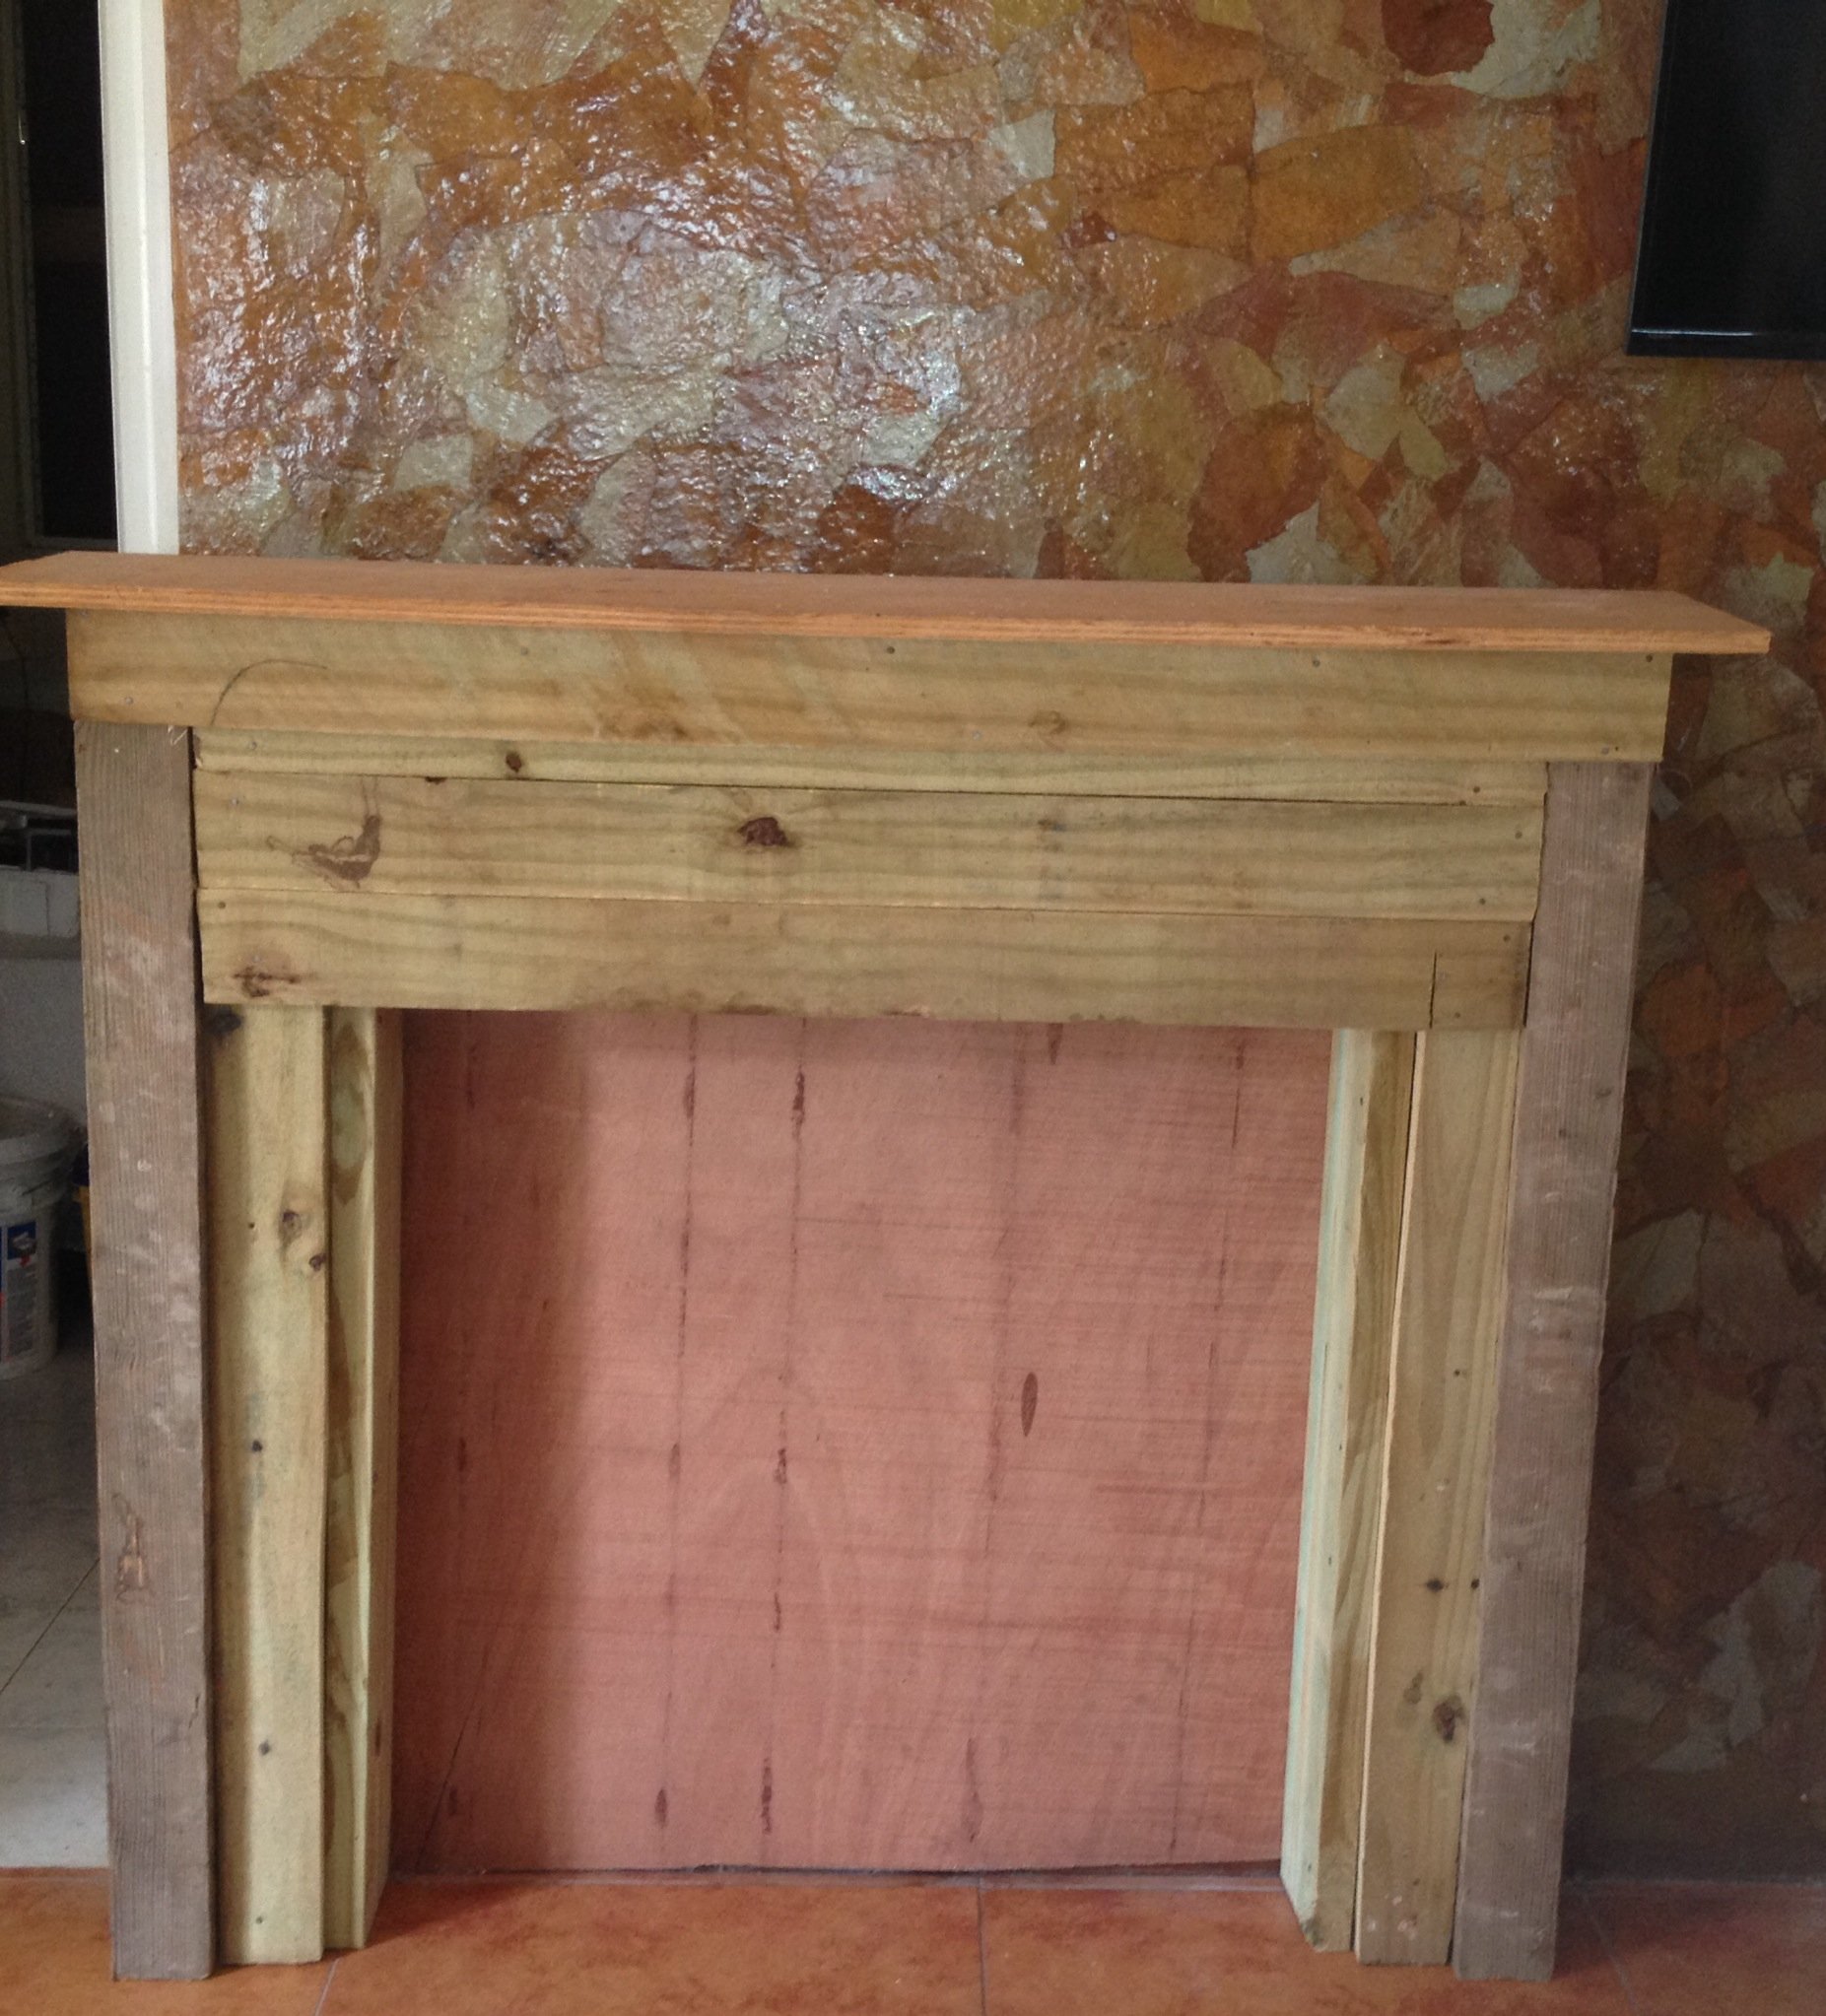
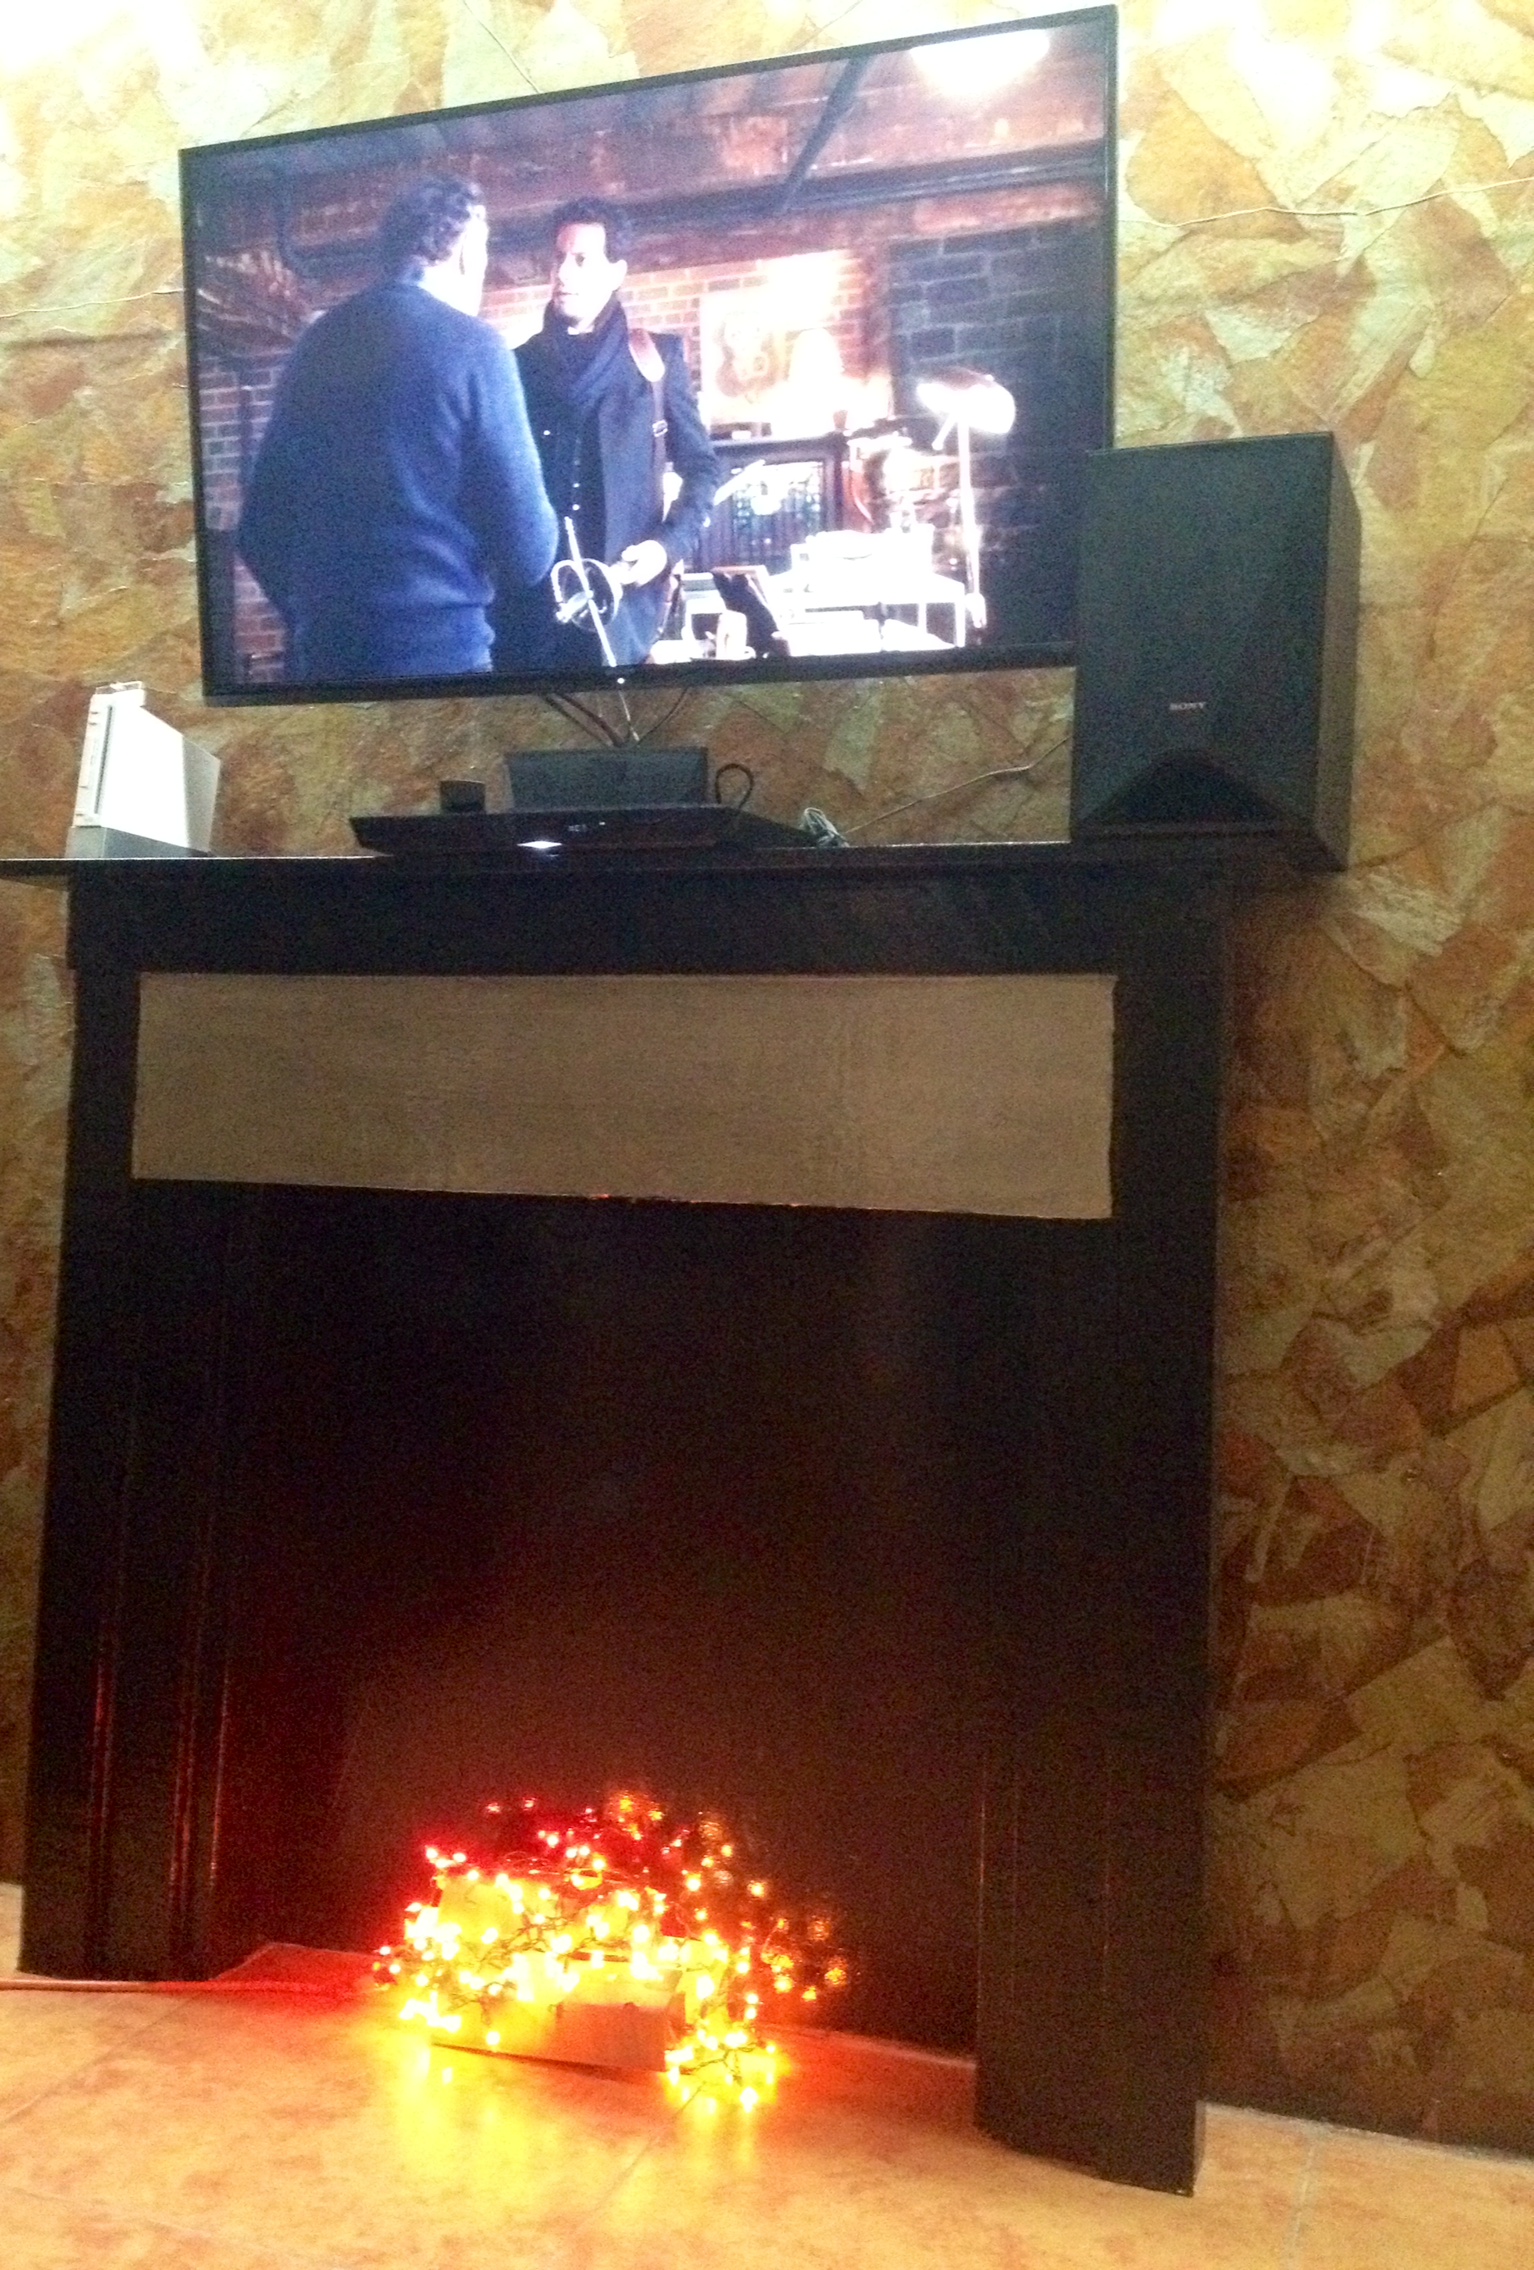
Floating Shelves
I needed some extra space for towels & misc items for my bathroom. So I replaced our over the toilet vanity for these floating shelves, and it was perfect for extra towels and what not. Ana you're the best!!
This bed was built custom for the girl who ordered it. She wanted both a bookcase headboard on the long side and a traditional headboard. The bookcase headboard could not block the window and needed to have access to the outlet behind the bed. The bed was designed to match a dresser that had already been purchased. The drawers below give additional storage.
My wife wanted a piece for our dining room. This was a easy weekend project. I had to modify the size to fit my space. I decided to use red oak for the top. It was more expensive but is a much harder wood with a nicer finish. I made the hardware myself from aluminum flat bar.
Except for adding a bottom support in the center, and modifying the top to compensate for the larger crown molding, (and adding 2 inch wide putty to compensate for poor miter skills), I followed the plans that were given.
The mantle is approximately 15" X 60", and will be covered soon with a Nativity scene.
Thanks for the plans. Made an ideal Christmas gift for my wife and she is very happy!
I love the height of this pedestal. We also wanted a bench for the kids so we just extended the pedestal around. It works great and looks awesome. I put a floating shelf above the hangers and some of my art.
Our two oldest (both boys) had been needing bunk beds for some time. I came across the Side-Street Bunk Beds and LOVED the design; simple, easy, and most importantly, sturdy!
I used standard framing lumber from Home Depot and picked out the cleanest, straightest boards I could find. For safety (because boys will be boys...), I routed all of the edges of any part they could come in contact with using a 3/8" curved router bit. Along with tremendous amounts of sanding, that was the most labor-intensive part of the project. The Kreg Jig made short work of everything else, and eventually sprayed on the paint (I used Kelly-Moore brand paint, but the color is Behr Cinnabar Red).
Although I could have built the beds for cheaper (I spent upwards of $350+), I wanted to make sure the project didn't look like it was built out of framing lumber. A lot of sandpaper, wood-filler, and extra coats of paint could have been reduced, but at close look you can't even tell the main posts are laminated 2x4's.
For some reason, and I still have to find out, the paint still remained tacky long after drying, but that hasn't kept our boys from loving their new beds! Great design and a fantastic first project!!
We built this entryway locker using Hillarys plans. It turned out amazing and it gets more use than any piece of furniture in our house at the moment.
Made the standard full farmhouse bed with storage, but did a couple modifications. 1) Didn’t use drawers, but wanted closed, not open cubbies. I made the drawer fronts and then attached with full overlay hinges and magnetic catches do they open from top down like a horizontal cabinet. 2) built the slats as two, one piece slat frames which sit on the cleat so that they can easily be removed for the extra long term storage between the cubby boxes. Just lift mattress and the two pieces of slats and lots more space.
Made this for my moms caregiver for Christmas ❤
This is the Mom's Lego Table everything went according to plan until, I cut and tried to place the table tops in ... Ooops. Was not square, with the help of my father-in-law we got them to fit. So, as Ana says ..CHECK FOR SQUARE!!! The other part that took awhile was the chess board but was worth it my son loves chess!
I finally finished the bedroom set, this one the last piece (and the biggest dresser).
More info on this 1970's bedroom set here:
http://www.woodworkingfourdummies.com/blog/dresser-set-makeover
Cheers,
Ian
Tue, 05/26/2015 - 08:44
Checked out your blog. I really liked it, but I couldn't find a way to follow though. Nice job on the makeover too!
Wed, 06/03/2015 - 05:30
Glad you liked my blog!
In the top right, there are black buttons for Facebook, Pinterest and twitter where you can follow me.
thanks,
Ian
SUCH a great project for my first ever build! The plans were so simple and fun to follow. I altered them slightly to measure 50" long so it would fit perfectly in my entry way. I used the Varathane wood stain in Dark Walnut. Can't wait for my next project! Ana, thank you for giving first time builders the tools and confidence to build beautiful furniture!
A very quick, easy, and attractive Christmas project! All
Made from scraps. Thanks for another great plan. The hooks are back ordered until after Christmas- so screws will due for now. This stand will double as a swimsuit and life jacket holder in the summer! Love it!
I finally got around to building the first project on my list. I needed more storage in my room so I built the storage bench from the plans. I did tweak it a little to make it a bit wider so that it will neatly match the width of my bed. I may get around to making a cushion for it but right now it serves as a nice tray to hold my wallet and other various sundries.
I designed (in Sketchup) and built some bunk beds for my boys. They're made out of all common sized lumber, SUPER sturdy, and have no exposed nails or screws! The kids LOVE them and I'm really happy with how they turned out!
This portion of the build is just for 2 bunks, but the design allows for a third, lofted bunk to be added (I'll build that next year)
I've got the full step-by-step build at
http://www.iliketomakestuff.com/iltms-project-bunk-beds-part-1/
http://www.iliketomakestuff.com/iltms-project-bunk-beds-part-2/
i built this for my mother when she decided she wanted a new table .i used the plans that i had found on this site Thank you for such an easy plan made my mothers day
This was my third project, and the first one with doors (boy do I have some great opportunity for growth there!). I left off the bottom trim because I wanted a slightly more contemporary look. Thanks for this plan, Ana. It was the perfect size for this space. Things I learned doing this project: next time cut an extra 1x4 to tack in to do the doors, hinges require math, be sure to get the kind of wood filler that dries—not wood putty (sigh), I need a workbench.
Fri, 12/22/2017 - 09:52
Looks great, love the open bottom! Can't wait to see the workbench!
Loved how these plans were so easy to follow and certainly appreciate the accompanying video.
Tue, 12/21/2021 - 10:20
Thank you for sharing, love the raw look and the build is fantastic!
I built this using the Kentwood bookshelf plans as a guide. I made my shelves 3 ft wide and made it aprox. 8 ft tall. I also bought the KREG shelf pin jig and built the shelves to be adjustable. I haven't chosen a finish yet because I am waiting for my son to pick a color since it is going in his room. I am considering fixing a shelf in place and building some doors for the bottom. I worked on this over a week span, however I could only do bits and pieces at a time. The sanding took longer than the build because I plugged the pocket holes and they take longer to sand down.
My daughter asked me to build this for her for Christmas but wanted it to have a gray weathered look to match some of her existing furniture that I had built. Very enjoyable build! Thanks Ana!
Comments
Leslie Is Ready
Sat, 03/21/2015 - 18:39
Love This!
Great job! I saw floating shelves used in a water closet on another site, and thought it was a great idea. I definitely plan to do this in my Master Bath!