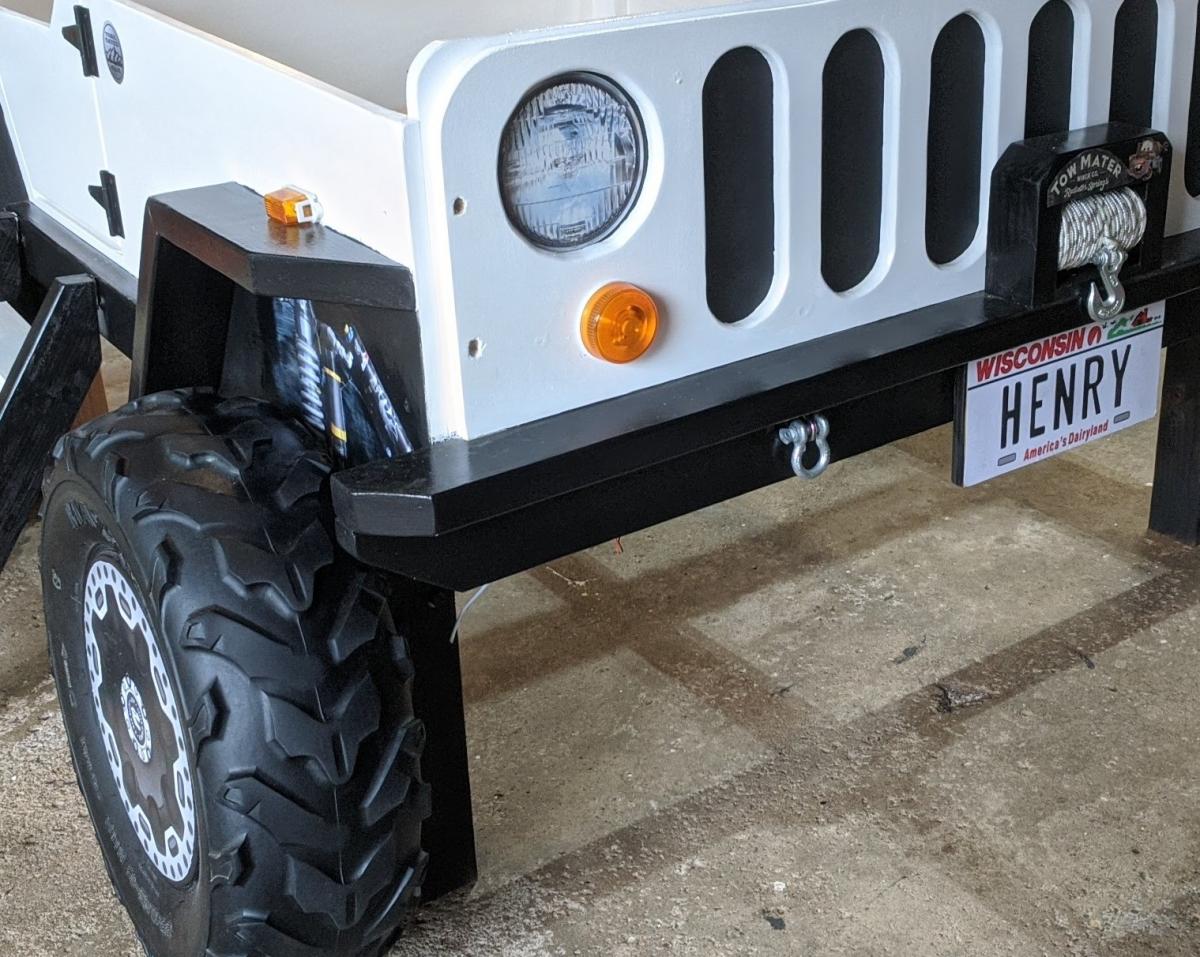
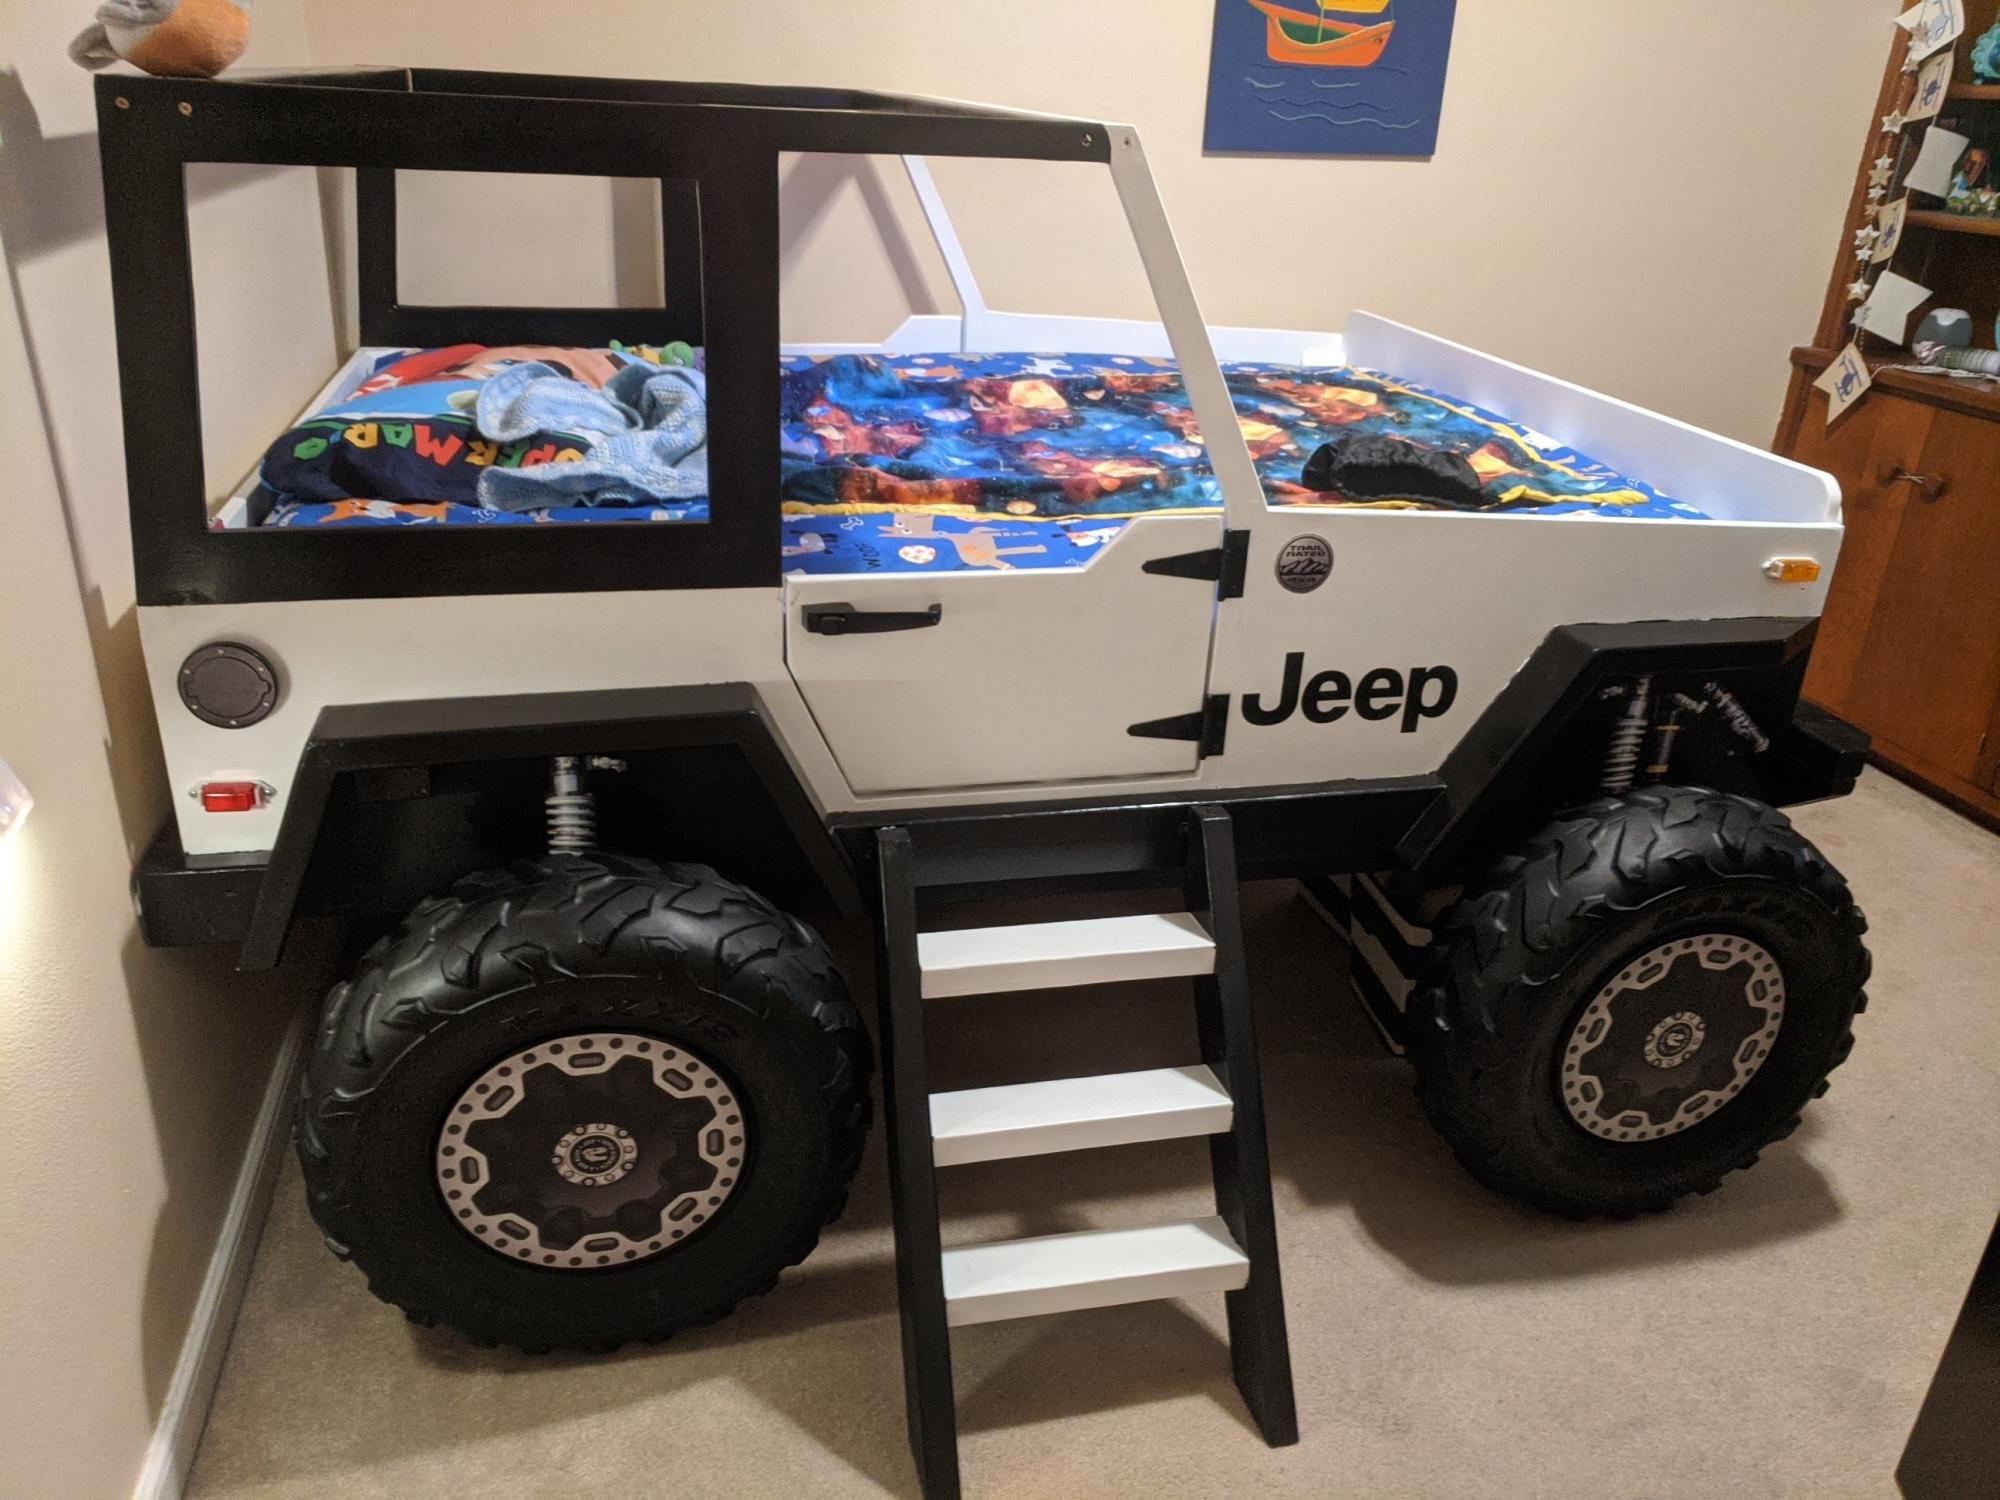
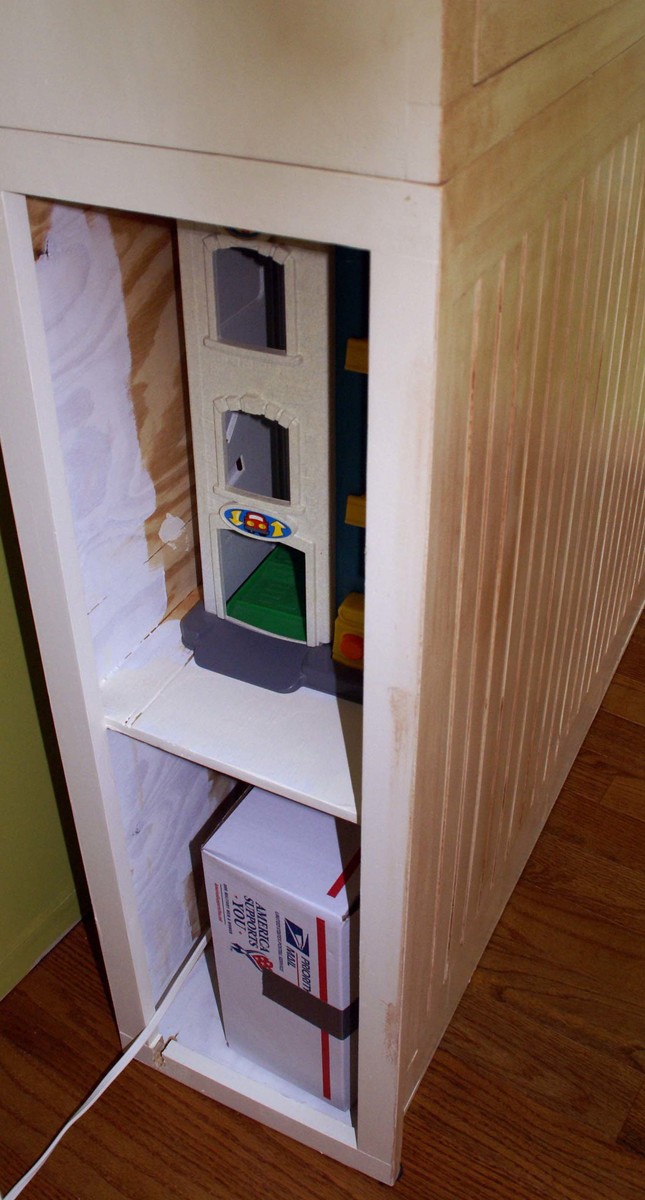
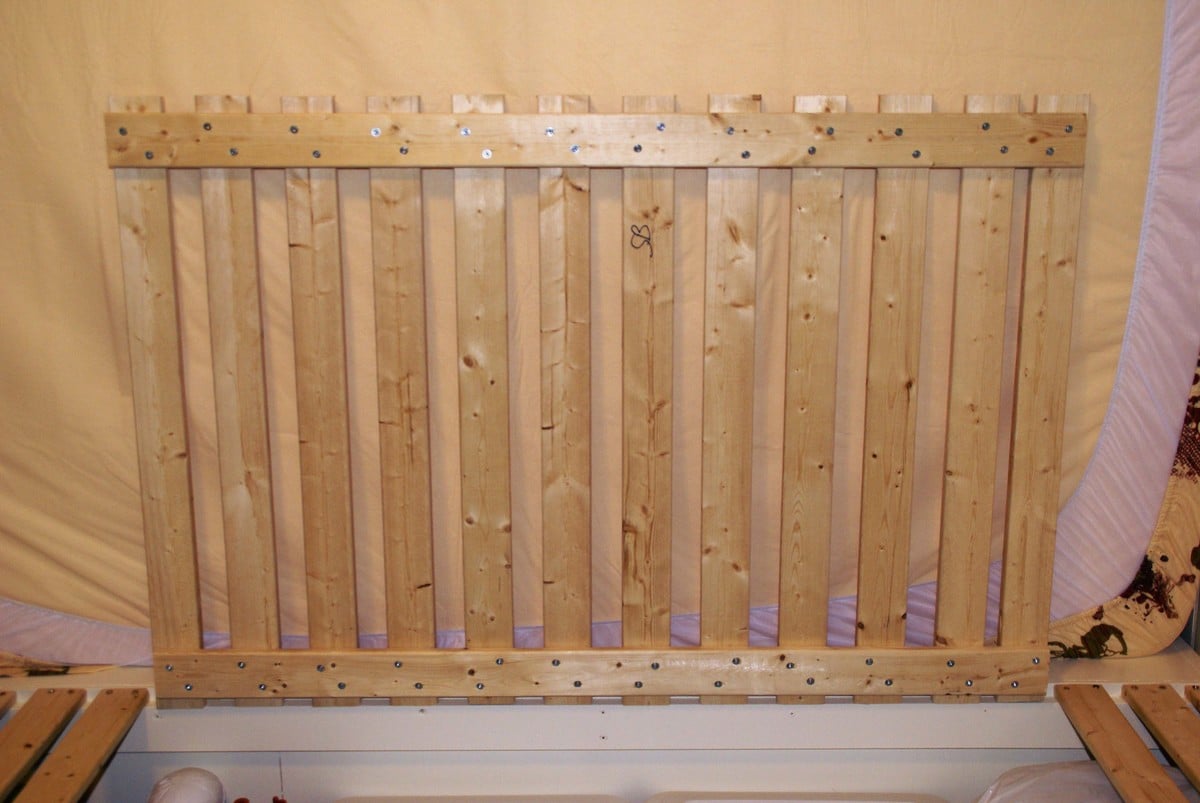
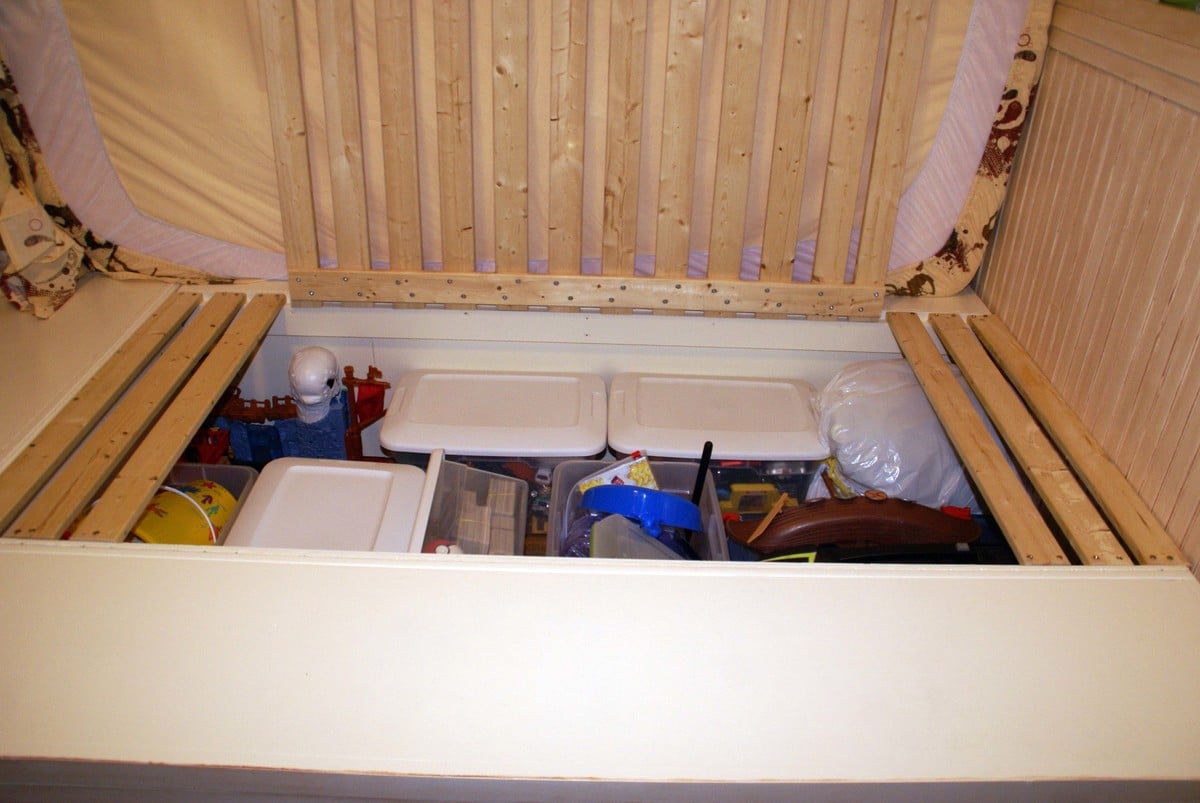
Community Brag Posts

Double Pedestal Table, Benches and Bar

Submitted by Anonymous (not verified) on Mon, 07/24/2023 - 10:37

I was so inspired by Ana's plans I made two tables, that can be put side by side, alongside each other or used as two separate tables with benches. I also made a bar with granite top...... It was lots of sanding as I did not have a planer at the time, but I love the finished project and get compliments by all that see it. Thank you Ana White.


Cathy B

Tryde Media Console

Submitted by LBoz10 on Wed, 03/14/2012 - 08:49

This was our first build, so it was definitely a learning process! We followed the plans pretty closely, with a few minor modifications to suit our needs. The finish was inspired by CreativePineapple's stain/white paint combo - we loved it so much that we had to do our own version!

The center console section was built out of 3/4" MDF - we knew we were going to paint, as opposed to stain, and it was quite a bit cheaper. We primed and painted this section as we went, as we knew that getting our hands/brushes into the cubbies after assembly would be difficult. This added to the time to finish, but it did make for an easier (and probably more even) paint job.

The side panels and back (not shown - we still need to do cutouts for cords before we attach) are 1/4" plywood. The legs are untreated SPF 4x4s, and were definitely where we ran into the most problems. Finidng untreated 4x4's was difficult enough, and when we finally found one that didn't have a ton of chunks and dings in it, we had problems with wood cracking when we got it home. We waited until the wood had acclimatized to our home and stopped cracking, wood-filled the cracks where we could and tried to position the legs so the cracks were facing the console, and hidden. Luckily, this approach was successful, and you can't tell that cracking was an issue. In retrospect, I probably should have just gone with cedar, particularly since we weren't staining it and it wouldn't have mattered that it was different from our other pine boards.

The only placed where we really differed from the plans was adding additional trim to the front section, as opposed to edge binding. The trim was simple 1x2s, similar to the bottom trim.

We primed and painted the entire white bottom section before attaching the top, which was made of stud-grade spruce 2x4's. We used a wood conditioner on the spruce before staining, as it is such a soft wood. The stain was left on for 15-20 minutes before wiping, as we knew we wanted a darker, richer colour. Two coats were required to get the shade we wanted (3 on one board which wasn't soaking up the stain as well). We then finished with 3 coats of Varathane Diamond Wood Finish, to get an especially glossy finish.

Built from Plan(s)
Estimated Cost
$150-200, incl. paint and supplies
Estimated Time Investment
Weekend Project (10-20 Hours)
Finish Used
Paint - Rustoleum Painter's Touch in "Gloss White";
Stain - Minwax Wood Finish in "English Chestnut" (2 coats) plus 3 coats of Varathane Diamond Wood Finish in "Gloss"
Recommended Skill Level
Intermediate

Comments

nancy

Wed, 03/14/2012 - 19:29

You better not stop with this project - absolutely beautiful!! The finish looks amazing...I am wondering if you used a rag or a sponge brush to stain the top? I am very new to staining furniture, so any tips would be appreciated. :)

LBoz10

Sat, 03/17/2012 - 09:22

Thanks! We used a foam brush, as we had a bunch hanging around, and just wiped ta the end with a rag. We also left our wood conditioner overnight, contrary to the package directions, which we heard allows it to sink in and dry more evenly. Other than that...we'd never stained before in our lives, so don't be afraid to just give it a go!

Guest (not verified)

Fri, 03/16/2012 - 16:01

i can't seem to find the detailed plans for the console. do you happen to have them? thanks!

Farmhouse Media Table

Submitted by c-e-fogus on Mon, 01/06/2014 - 13:26

We were blessed with a LARGE TV for Christmas. Totally unexpected. So I needed to build a table for it to sit on. I previously made a narrow farmhouse table and liked the look of it. So I decided to make a smaller version with two shelves underneath. To reduce clutter, I built a couple of "towers" for the x-box, dvd, and wii to sit on (2 half boxes with 1x4 sides with 1x4's nailed across the top.) Dimensions of table are 48 inches long x 22 inches wide x 32 inches tall. (TV is a 60 inch and I think it fits great!) I used pocket holes and 1.25 inch pocket hole screws to attach everything-except I nailed the shelves down to the supports using 1 1/4 inch finishing nails and used 1.25 wood screws to attach legs to apron and supports to legs. I ripped the 1x4's down to 3 inches on the leg front and 2.75 on the sides to make them uniform. Also the aprons I ripped down to 3 inches wide. The shelf supports are about 1.5 inches wide and the shelves themselves are about 18.5 inches wide.

Built from Plan(s)
Estimated Time Investment
Day Project (6-9 Hours)
Finish Used
Minwax Golden Oak stain followed by Minwax Fast drying polyurethane.
Recommended Skill Level
Beginner

Rustic X Console Table as TV Stand

Submitted by Anonymous (not verified) on Sun, 03/27/2016 - 08:19

Hubby followed the plans exactly, using cheap whiteboard from Lowe's. I stained using Minwax dark walnut and a water-based Minwax poly with a matte finish. I would only use this kind of wood again if I were painting the project. It is hard to stain and my options were limited, because the wood doesn't take stain well. Love how "pottery barn" it ended up coming out, though!

Built from Plan(s)
Estimated Cost
$50-100
Estimated Time Investment
Weekend Project (10-20 Hours)
Finish Used
Minwax dark walnut
Recommended Skill Level
Beginner

Modified Farmhouse Standard King Size Headboard

Submitted by LampAtFeet on Fri, 11/15/2019 - 15:56

Thoroughly enjoyed building this Farmhouse headboard. Thank you so much Ana, for the great plans! I couldn't find any 4x4s suitable for indoor furniture, so I ended up following another plan on your site that used 2 2x4s per leg for the Farmhouse headboard. I didn't need the footboard or side rails since our bed already had a frame (it's also a bed that raises up and down at the head and foot sections) Anyway, I just needed a headboard and it works perfectly! We anchored it to the wall to avoid any possible accidents. Keep up the great work! 

Estimated Cost
$50-100 depending on what supplies you have on hand
Estimated Time Investment
Afternoon Project (3-6 Hours)
Finish Used
Painted using Rustoleum black chalkboard paint, then 2 coats of Satin Wipe On Polyeurethane.
Recommended Skill Level
Beginner

Wood Storage Box

Submitted by Joni on Sun, 03/18/2012 - 10:42

My wood scraps were definitely getting out of control, and I needed something to store the wood vertically. I had some spare wood (free from Craigslist), so I put together a wood storage bin. All in all, the project cost me the price of some Kreg screws.

Estimated Cost
Free!
Estimated Time Investment
Afternoon Project (3-6 Hours)
Recommended Skill Level
Beginner

Comments

hoffer5353

Wed, 06/06/2012 - 13:21

I have been struggling to organize my space because my lumber is on one of my work spaces. I have the perfect space for that, thanks for the great post!

Herringbone Wall Coat Rack

Submitted by Huthbert on Wed, 01/08/2014 - 10:20

In an effort to cure our current lack of organization downstairs I decided to build a wall coat rack in hopes that it will help keep our coats, diaper bags, uniforms, purses, baby carriers, bags, and who knows what else off the counter, couch and floor.

Going into this project the only thing I knew I wanted to use in some way was some ripped 2x4's we used as floor spacers during our floor installation. Really happy with the end result :-)

For more pictures and a brief tutorial check out the blog post :http://thehuth.blogspot.com/2014/01/diy-herringbone-wall-coat-rack-usin…

Estimated Time Investment
Day Project (6-9 Hours)
Finish Used
1 coat of dark walnut (wiped down with mineral spirits)
1 coat of Rustoleum wheat stain
1 coat of polycrylic
Recommended Skill Level
Intermediate

Modified Grandy Sliding Door Console

I made my console a little shorter (71 in). I used reclaimed wood for the exterior and sanded/stained wood for the shelving and doors. I used screw eyes and galvanized pipe for the sliding door hardware. A lot of fun!

Built from Plan(s)
Estimated Time Investment
Week Long Project (20 Hours or More)
Recommended Skill Level
Beginner

Comments

paolans12

Fri, 08/12/2016 - 09:15

It looks beautiful, do you have plans ?? would you mind sharing them ?? It'll be my first project ;)

Reclaimed Wood Outdoor Sofa

Submitted by Anonymous (not verified) on Sun, 07/30/2023 - 14:43

We had a small deck with many rotted boards. The contractor who demoed it, knowing my interest in diy projects, sorted out any usable boards. I loved the idea of an outdoor sofa, so altered your beautiful pattern to accommodate decking boards - I literally only had to purchase 2 boards for the entire project! I’m so thrilled with how it turned out! Thank you!!

Camey Brown

Built from Plan(s)

Bed with Storage for the Master Bedroom

I built the same bed as for my son for the master bedroom. A queen size bed with storage with paneled footboard and headboard. I love that style and I made board and batten too.
I am very happy and the bed is very sturdy. I didnt make drawers because it's too difficult for me. I am not ready to build drawers! Maybe next time!

Estimated Time Investment
Week Long Project (20 Hours or More)
Finish Used
white paint
Recommended Skill Level
Beginner

Comments

Stefanye Thurmond (not verified)

Fri, 05/04/2012 - 08:12

I share your fear of drawers! It still looks great with cubbies :)

Anelicia (not verified)

Sun, 11/25/2012 - 21:27

I love this bed but I am wondering since there is no edge if you have any issue with your mattress sliding side to side?

alamanda973

Thu, 12/13/2012 - 17:18

My mattress does not slide because it is heavy and it is a little wider that the bed thus there is no edge which exceeds. I hope to have answered the question.

Sausha's laundry pedestal

Submitted by dconway8 on Thu, 01/09/2014 - 19:53

I needed to raise the height to help my wife who has back problems. The plans were simply and easy to follow, I added some length to fit our space and some molding in te front and bottom to "pretty" it up according to my wife. Really proud, thanks for the plans Ana!

Estimated Cost
80
Estimated Time Investment
Afternoon Project (3-6 Hours)
Finish Used
White paint
Recommended Skill Level
Beginner

Comments

Double Vanity

Submitted by krmoon81 on Thu, 03/31/2016 - 22:30

Well to make a long story short I started out just replacing an old tub in the bathroom which turned into a whole remodel!! I’m talking new toilet, floor, lighting and heck while I was at it lets knock down a wall and make some room for a double vanity. After all in a few years three teenage girls  will be fighting for sink space!!! Honestly I just didn’t want to spend $800 - $1,000 on a double vanity so I decided to take matters into my own hands. This was my first time building any type of functional furniture. I made a ton of mistakes but I also learned many valuable lessons. I really took my time....about 3 weeks...ok, maybe 4. Building this vanity was like cutting 101 for me. #1 lesson I learned, MAKE SURE YOUR CUTS ARE STRAIGHT!!! I also learned the value in test cuts and having a lot of patience and extra wood on hand. Anyone can do this, just be willing to put the time and effort in…and do lots of research.

Estimated Time Investment
Week Long Project (20 Hours or More)
Finish Used
Paint
Recommended Skill Level
Beginner

Comments

Sideboard Companion to 4x4 Truss Table

Submitted by Rasalhague on Fri, 11/29/2019 - 06:17

After the enlarged 4x4 Truss Table, we needed someplace to store the dishes.  The Planked Wood Sideboard was the thing.  Not an easy piece.  This was my first attempt at "Doors & Drawers" and was a steep learning curve, but we are so pleased with the big, sturdy results that match the table.

Estimated Cost
$550 with Kreg hinge and cabinet knob jigs (Will be reused)
Estimated Time Investment
Week Long Project (20 Hours or More)
Finish Used
Minwax Red Mahogany Stain
Recommended Skill Level
Advanced

Oak Simple Changing Table

I took the advice from another user who commented that the depth of the changing table was not suitable for a standard changing pad (16" x 32"). Turns out he was correct, so I modified the design to have a depth of 16 1/4" (as opposed to 15.5" in the original plan). Really not sure how someone could have made this and a standard pad worked as is. If I did it over again, I probably would have made it just a touch deeper for a perfect fit because the pad slightly flares out and is not 100% square. My wife also wanted a larger space beside the changing pad, so I increased the width of the table by 5" and it worked nicely as you can see in the picture with the lamp and other items.

Built from Plan(s)
Estimated Time Investment
Weekend Project (10-20 Hours)
Finish Used
Minwax Red Mahogany and 3 coats of semi-gloss polyurethane
Recommended Skill Level
Intermediate

Comments

Guest (not verified)

Fri, 03/23/2012 - 14:44

The plans for this table (created by another) show 3/4" for the top of the table and shelves as well as the topper. It seems like a little bit of overkill to me. Did you attach the sides of the topper straight to the table or did you have a 3/4" piece for the table and the topper?

I was thinking I would use my Kreg Jig and just attach it straight to the top of the table. I am also thinking that 1/2 plywood would be enough for the shelves with a 1"x2" intermediate support. I am trying to lessen the cost and the weight; oak can get pretty heavy and pricey.

robertsuggs

Mon, 04/16/2012 - 21:35

I did have both 3/4" for the topper and the table. Is it overkill?, probably so, but my thought when making it with Oak was that I want it to last forever. I actually made a small table/night stand to go by the glider. I had some scrap of 1/2" that I used and it looks great, but I can tell that it is not as solid as the other, although still plenty solid for a small table.

brookifer86

Sat, 03/24/2012 - 08:50

I think 1/2" on the shelves would be fine, but definitely at least one 3/4" for the top. You could maybe skip the second layer and just add some 1x2 supports from below? I'm not sure. I went with the overkill method because I'm a worry wart. My baby is now 7 months old and extremely wiggly, so I'm glad for the extra support! Then again I used MDF for the shelving and white wood trim. I also skipped out on the dividers at the top, since wipes have their own boxes and I wasn't sure what else I'd be storing on top.

Guest (not verified)

Mon, 04/09/2012 - 14:37

You did a nice job. Do you think making the shelves 16 1/2 would be perfect? I noticed that to that the size was not correct.

robertsuggs

Mon, 04/16/2012 - 21:31

Thanks for the compliment. I think 16 1/2 would be pretty close. When I used 16 1/4, it wasn't bad by any means, but another 1/4" would likely do it.

bd

Sat, 02/22/2014 - 13:15

What trim did you use and where did you find it? It looks great, but I can't find anything like that. Thanks!

bd

Sat, 02/22/2014 - 13:17

What did you use for trim and where did you find it? It looks great, but I can't find anything in oak like that anywhere!

Rustic X Console Table (The Beginning)

Submitted by aDIYguy on Sat, 01/11/2014 - 18:16

This was my first project and love how it turned out. I have gotten compliments on it, but I unfortunately continue to look at the flaws in it and want to build another one. It was a great project though and I am in the middle of building the coffee table and end table as well. Here it is before we added all the odds and ends on to shelves and top

Built from Plan(s)
Estimated Time Investment
Weekend Project (10-20 Hours)
Finish Used
Used rustoleum american walnut for stain and valspar signature ultra white for the paint. Brushed on stain waited a minute and wiped with a rag.
Recommended Skill Level
Beginner

Comments

sojaco

Tue, 01/14/2014 - 08:37

I love how you finished your console table - I'm now wishing I finished mine like that. I think we all see the flaws in our own work, but this looks fantastic and very professional.

sojaco

Tue, 01/14/2014 - 08:37

I love how you finished your console table - I'm now wishing I finished mine like that. I think we all see the flaws in our own work, but this looks fantastic and very professional.

Study Desks

Submitted by rosiejane on Sun, 04/03/2016 - 21:54

I built a desk each for my son and daughter. They got to choose the type of base. I used old bed slats 90x45mm (4x2) salvaged from verge ripped in half for the bases. I used 12mm plywood for the tops. 7mm ply for the shelves on the sawhorse leg version. Unfortunately, despite getting the straightest and flattest plywood available and subjecting it to all sorts of manipulation, a couple of the flip-top sections are warped to there are slight gaps on one side.

I modified the plan so that the middle section could lift up as well. The back 1x3 of the storage section extended the full width.

Estimated Cost
AUD$60 per desk
Estimated Time Investment
Week Long Project (20 Hours or More)
Finish Used
I experimented with a paint wash finish 50/50 paint/water for the inside of the storage sections. Everything was given a couple of coats of clear satin varnish.
Recommended Skill Level
Intermediate

Wood Star Serving Tray

Submitted by LampAtFeet on Sat, 12/07/2019 - 13:41

I followed the plans for the Wood Star Serving Tray. I thought it was a little tricky cutting all the angles to the correct length. One tip I would suggest is to mark which end has the 24 degree cuts, since you'll be attaching these joints first. Any gaps in the joints can be filled with wood filler, then sanded smooth. I would say this is an Intermediate level project due to the angles and trying to attach them without the nails popping through the other board. Would be fun doing a set of 3 and painting them red, white & blue for the 4th of July. Thanks for the plans, Ana!

Estimated Time Investment
Afternoon Project (3-6 Hours)
Finish Used
Stained with Varathane Briarsmoke, then a light layer of Dark Walnut to help give it an aged look. Sealer on top.
Recommended Skill Level
Intermediate

Comments

DIY Wood Outdoor Chair with Deep Seat Cushion

Submitted by Anonymous (not verified) on Thu, 08/10/2023 - 12:27

Using just basic tools, I was able to build this super comfy outdoor chair for the fraction of the cost. With a couple of modifications, Ana White's design plan made for a perfect fit for the new deep seat cushions I had found on fb marketplace.
 

Seasonal And Holiday
Back