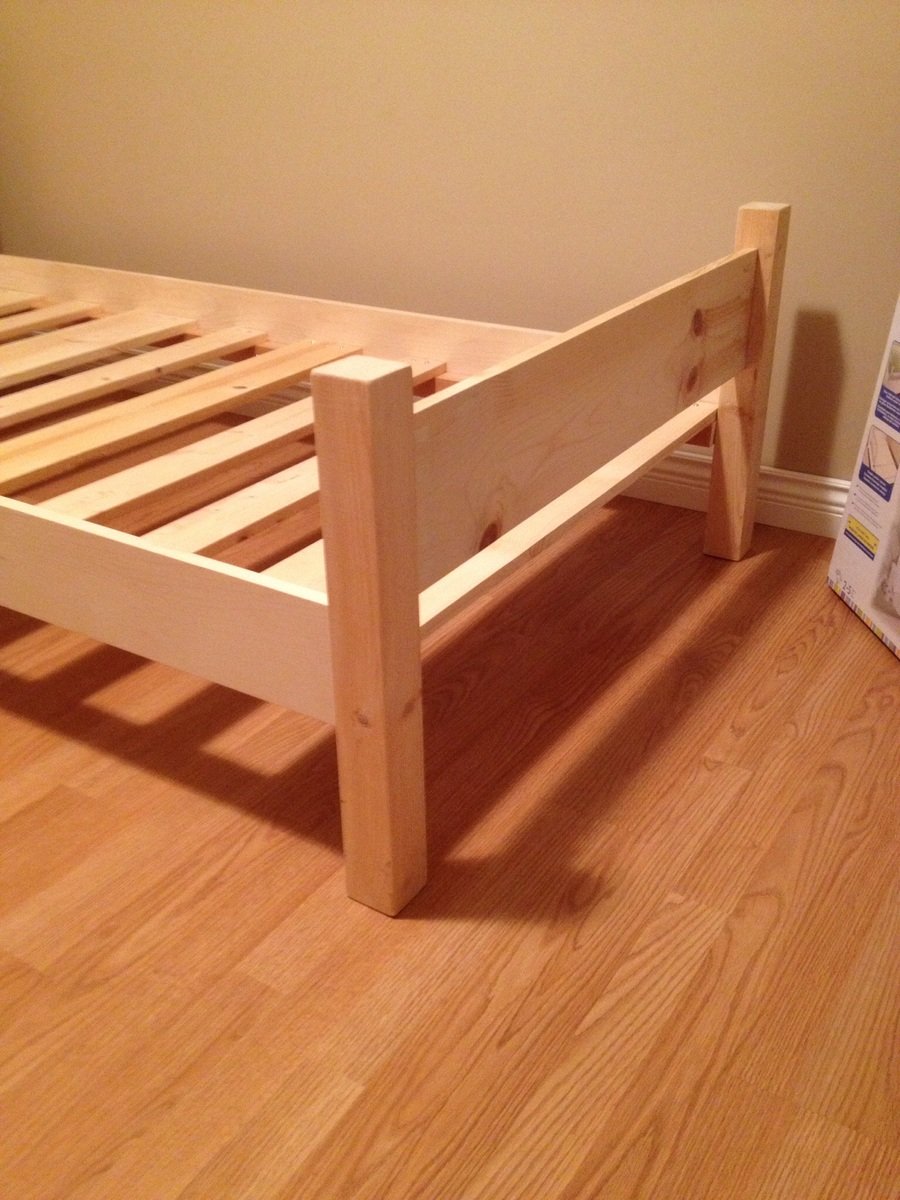
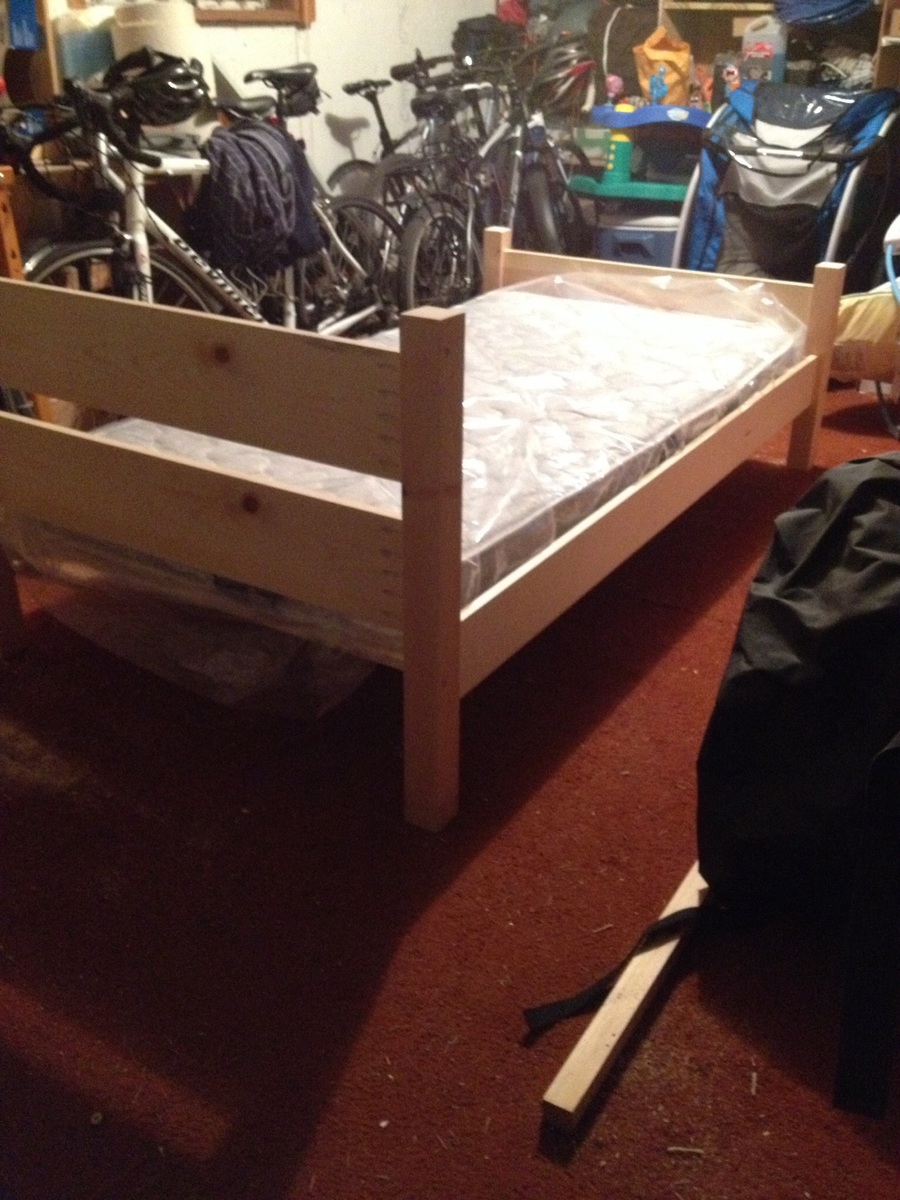
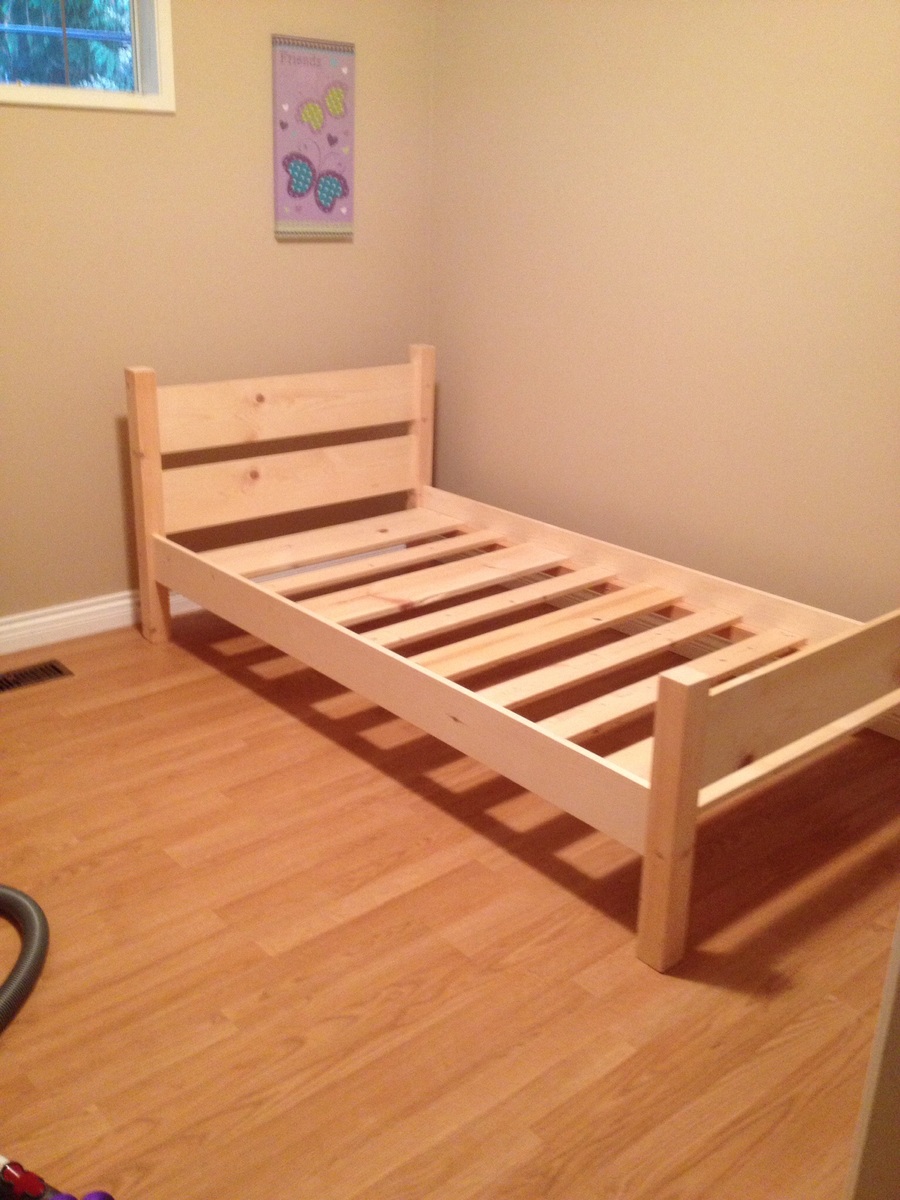
Community Brag Posts

Double Bunk with Dovetail Joinery

Submitted by Anonymous (not verified) on Wed, 07/05/2023 - 08:34

This double bunk bed has been inspired by Your plans for modern bunk bed - Side Street. To facilitate quick assembling - disassembling of beds for relocation dovetails joints with double inclined tails and wedges have been made. Because the beds has been made for orphanage/"kids in difficult life situations" I changed spacing between headboard and footboard rails to let footboard serve as ladder and in this manner reduce costs and time of construction, save place for installation, avoid tripping hasard. Thank You very much for detailed and simple plans.

Andriy Pronin, Ukraine

Built from Plan(s)

Sausha's Washer and Dryer Pedestal

This was one heck of a project LOL! But I am so pleased with the results!!

Estimated Cost
$120
Estimated Time Investment
Day Project (6-9 Hours)
Recommended Skill Level
Intermediate

Comments

pdoughty (not verified)

Sun, 09/23/2012 - 08:03

My washer will shake on the metal pedestals. Will it shake on this one?

Shawna Sommerville (not verified)

Mon, 12/31/2012 - 19:01

My husband just finished one similar to this for me today-total cost about $65.....Thank you for the fabulous & frugal idea!!

Jelly Cupboard(s)

Submitted by bbomer on Fri, 12/27/2013 - 09:48

I have built several of these Jelly Cupboards since the plans came out. Everyone really likes them, and they are super fast and easy to build. The last one had glass doors that turned out pretty well. I like to use plywood beadboard on the back to give it a little more character. I also like to use 'hardware cloth' for the mesh type doors (found at farm stores). It usually has openings about 1/8" or less but not as tight as screen, which looks perfect.

Edit: For hardware part numbers and sources please see: http://grvland.com/wordpress/2012/02/07/jelly-cupboard-project/

Built from Plan(s)
Estimated Cost
$50-$100
Estimated Time Investment
Weekend Project (10-20 Hours)
Finish Used
Black Walnut Danish Oil, Wax Free Shellac, Latex Paint (dark), more latex paint (light), sand back, Water-based Poly
Recommended Skill Level
Beginner

Comments

romanweel

Tue, 12/31/2013 - 00:51

Really lovely work! I scoured a couple of those pretty butterfly hinges by pure luck a while back, and I know where to find more...but those strap hinges! Where did you get them? I can't seem to find them for a decent price (Ohio).

bbomer

Tue, 12/31/2013 - 07:15

The strap hinges are from Acorn Manufacturing. I had to order them because I could not find anything like them locally. For some reason I can not post links in the comments, but the sources are linked on my blog, grvland dot com (no spaces and a . obviously). Just search there for Jelly Cupboard and you will find the source links in the earlier of the two posts. I will also see if I can add a direct link above.

Flip Top Bench

Submitted by Anonymous (not verified) on Wed, 03/09/2016 - 19:54

Hi Ana,


I liked your design, but I've made a few changes to it for my bench:

-The dimensions

-The type of wood used

-All the joinery (Only screws are in the hinges)

-The inlays and a few other aesthetic features.


Thank you!

-

Estimated Cost
$100
Estimated Time Investment
Week Long Project (20 Hours or More)
Finish Used
50% Polyurethane, 50% Mineral Spirits,
Recommended Skill Level
Advanced

Farm table and bench

Submitted by Anonymous (not verified) on Sat, 10/19/2019 - 09:42

The table was my first ever built and I am beyond thrilled!! The 8 ft table is beautiful and sturdy and fits perfectly in my kitchen in front of my picture window. I bench is equally beautiful and sturdy. I can’t wait to start my next project!!

Estimated Cost
$100
Estimated Time Investment
Weekend Project (10-20 Hours)
Recommended Skill Level
Beginner

Square Picnic Table using Deck Boards

Submitted by Anonymous (not verified) on Fri, 07/07/2023 - 11:32

I used deck boards instead of 2x6 for the top and seats; this lightened the table overall while negating the need to sand and finish the boards.

I also used a cedar-tone treated board so staining wasn't necessary.

Kelly S.

Built from Plan(s)
Seasonal And Holiday

Storage Bench

I built just the bottom portion and chose to omit the molding. I lined the inside with contact paper so that items stored inside don't snag on the rough plywood on the other side of bead-board.

Built from Plan(s)
Estimated Cost
$75
Estimated Time Investment
Weekend Project (10-20 Hours)
Finish Used
Minwax stain/poly in one
0000 Steel wool between coats
Recommended Skill Level
Beginner

Hand made vanity mirror/door

Initially I was simply going to replace the old medicine cabinet with a mirror but my husband insisted that he needed a medicine cabinet. So I built the cabinet. Then I built the mirror. I wanted the mirror to stand upright but the width of the hole left behind by the old cabinet was too wide. I then tried to have the right side of the cabinet remain open but then realized that the door would not open because of the height of the faucet. In the end I had no choice but to make the door horizontal.

Though it's not what I wanted and it is not centered like I would I liked it to be I think it still turned out fine. And the mirror looks fantastic! Better than the pics show.

Most of the wood used were scraps from other projects. Including the trim. The one thing I bought for the project was a mirror that turned out to be the wrong size. It was too large and I did not want to cut it so I used the mirror from the old medicine cabinet. It did have hole where the door handle was which I tried to fill. Now I just try not to look at it. lol

Built from Plan(s)
Estimated Cost
$20 for cabinet hardware
Estimated Time Investment
Day Project (6-9 Hours)
Finish Used
Minwax 1-qt. PolyShades Espresso Satin Stain and Polyurethane. I applied it with a sock like I did the vanity but then I did the last coat with a high density sponge (on a stick). A total of 3 or 4 coats. Lost count...
Recommended Skill Level
Beginner

Sofa and Long Couch

Submitted by Anonymous (not verified) on Sat, 03/12/2016 - 12:18

So, we basically took the pans for the 2x4 outdoor sofa and extended it for one of the sofas because we wanted 4-across seating. We also finished up the look by adding vertical beams in the arms and a second 2x4 across the top (see photos). Because of the really long couch, I added extra bracing foot to make sure it won't sag.


Once complete, we determined the pillows across the back were a bit too tall, so we adjusted the plans by adding a couple beams and then lengthening it to attach to the back of the arms rather then between the arms. We pocket drilled the beams together and then braced it with 1x4 slats across the back. I also used a 1/4 router bit to soften all the edges. Anna we took your advice and pocket drilled all attachments except the seat slats for a real finished store-bought look. Cost of wood was under $100 because we went with pine. Pillows and seats from At Home put us at about $600 total for the project.

Estimated Cost
All in with umbrella and stand, wood for stand, two couches, pillows, and sand to add weight for the umbrella was under $700.
Estimated Time Investment
Weekend Project (10-20 Hours)
Finish Used
Thompson Water Sealer
Recommended Skill Level
Beginner

Playhouse/Loft Bed In Small Playroom

Submitted by Espana811 on Wed, 02/29/2012 - 07:15

We had a small 6’x13’ storage room that we wanted to make into a playroom for our daughter. I saw the “Playhouse Loft Bed” project here and wanted to do something similar. With limited space I had to redesign the plans to make it fit. I eliminated the side walls from the plans and made cleats on the three walls to hold everything up. This actually saved a lot of money and time. As this was simply going to be a place for my daughter and friends to play and watch movies I did not worry about the size of the mattress. I simply went and had some foam cut that I am making a cover for. We are building a ladder that will go on the left side as well doors. It is dark inside so I was able to find motion operated puck lights that stay illuminated for 45 minutes at a time. So if she forgets to turn them off then they will go off by themselves to save batteries. This was a fun project. The most time consuming part was the planning. I did everything in Sketchup. This made it simple when it came time to build. The house itself went up fast. I spent the next few days filling holes, sanding, and of course painting. None of which too a long time but I was not in any rush. I also made a Dutch Door to go along with the room.

Built from Plan(s)
Estimated Cost
Around $125
Estimated Time Investment
Weekend Project (10-20 Hours)
Recommended Skill Level
Starter Project

Comments

Bunnie1978

Thu, 03/01/2012 - 06:00

You did a great job! I see lots of fun places in that room for storage too.
I used cleats on my loft bed that's still in process... but mine is queen sized and into the corner. I am doing the measure as you go thing, so it's taking a long time.
It's like a little theater room! Toddler sized!

Espana811

Mon, 03/05/2012 - 07:45

This has definitively been a fun project. There are still a ton of things I want to do for the rest of the room. My little girl goes in every morning to play.

Sister's Table

This was the second table I built - it was much improved on my first and was for my sister as a Christmas present. It has 4x4 legs that I notched out with a circular saw for the legs and a spruce top. I modified the length down to 6' for her house but added extensions on the end that make the table up to 9' long when fully extended.

Estimated Cost
100
Estimated Time Investment
Weekend Project (10-20 Hours)
Finish Used
Minwax Dark Walnut with Polyurethane and a epoxy coating on the top to seal all the cracks, as sister has two little kids.
Recommended Skill Level
Beginner

Comments

Perfect table!

Submitted by Anonymous (not verified) on Tue, 03/15/2016 - 10:58

Dark walnut finish

Built from Plan(s)
Estimated Cost
$150
Estimated Time Investment
Week Long Project (20 Hours or More)
Finish Used
Dark walnut
Recommended Skill Level
Beginner

Sewing Cupboard

Submitted by Anonymous (not verified) on Mon, 10/28/2019 - 15:08

Sewing cabinet for avid quilter. Rolling barn doors on top with barn quilts. Rolling door on bottom. Drawers for thread and cubbies for projects.

Built from Plan(s)
Estimated Cost
$300
Estimated Time Investment
Week Long Project (20 Hours or More)
Finish Used
Latex paint.
Recommended Skill Level
Intermediate

Adirondack Chair with Fun Finish!

Submitted by Anonymous (not verified) on Tue, 07/11/2023 - 07:54

I love this chair. Thanks to Ana-White! I added a little pop to it. The red buttons are screw hole plugs I bought from one of the big box stores. A one inch strip of pine I painted red to coordinate with the blue.

Patrick


Pin For Later!

Adirondack Chair with Fun Finish!

Another Farmhouse Twin

I sometimes really struggle with making this bed, mostly because it's huge and heavy and not a one person assembly. For some reason I still insist on trying to go solo, and it never ever works out. I was in search of some method that would not only make assembly easier and possibly a one gal gig, but also add to the stability factor.

I decided to grab some metal brackets often used in putting together decks or fencing to use as cross braces for my box spring support. This made it much much easier!

Built from Plan(s)
Estimated Cost
$80
Estimated Time Investment
Day Project (6-9 Hours)
Finish Used
light stain, satin poly
Recommended Skill Level
Beginner

Comments

L-Shaped Desk

Submitted by flyboy599 on Wed, 01/01/2014 - 08:16

This desk was made using the "Fancy X Desk" and "Modular Office Base" plans. A CPU enclosure was added with a similar "X" design. The top is 3/4'' plywood with 1x2's and 2x2's providing the framing. A 1x4 runs down the back of the desk with a cord try to hide cables.

Estimated Time Investment
Weekend Project (10-20 Hours)
Finish Used
Black paint and primer in one with 5 coats of polyacrylic on the work surface.
Recommended Skill Level
Beginner

Comments

ksc70x

Thu, 01/07/2016 - 15:16

HI, The desk is awesome and I thought I would make this my first attemt at building something.

But I am unable to find the instructions.

Please help.


Thank you.

ksc70x

Sun, 01/10/2016 - 08:46

Ok after reading the subject matter I realized that this is the merging of two different desks.

Can you post a photo of how you joined them.

The support for such a long desk is my concern, with out it having any middle support or at the the corner?


Thank you.

ksc70x

Sun, 01/10/2016 - 08:47

Ok after reading the subject matter I realized that this is the merging of two different desks.

Can you post a photo of how you joined them.

The support for such a long desk is my concern, with out it having any middle support or at the the corner?


Thank you.

Great Simple Desk!

Submitted by Anonymous (not verified) on Fri, 03/18/2016 - 13:51

I made this sawhorse desk for my 11 year old daughter's room makeover. It's a nice, simple plan that was fast to cut and assemble. I would trim the top of the saw horse legs to be under 24 inches to make sure it completely fits under the desk top. I may add a backsplash type backing.

Built from Plan(s)
Estimated Time Investment
Weekend Project (10-20 Hours)
Finish Used
White semi-gloss paint
Recommended Skill Level
Starter Project

Mini Planked Farmhouse Bedside Tables

By far my favorite project! It was challenging combining two sets of plans, changing dimensions, and learning new skills all at the same time yet so, so, rewarding.

I loved the look of the Mini Farmhouse Bedside Tables but wanted to create a bookshelf as well so, I used the planks idea from the Planked Wood Bedside table plans to create solid sides, and a plywood backing for support and to hide lamp and phone cables.

I have a very low bed, so I shortened the height and made the top proportionate in size.

I used 1x6s for the top, 1x4s for the bottom shelf, 1x3s and a 1x2 for the side panels, 1x4s for the drawer, and 1x2s for the trim and a piece of 1/4" plywood for the backing.

I found that the drawer fell out when you pulled it too far so I added piece of wood between the drawer and the top to keep it from dropping as you pulled it out. 

Estimated Cost
$120 for 2
Estimated Time Investment
Week Long Project (20 Hours or More)
Finish Used
Minwax Penetrating Stain and Minwax Polyurethane
White cabinet paint from Sherwin Williams
Drawer liner :)
Recommended Skill Level
Intermediate

Restoration Hardware- Inspired chalkboard

Submitted by margjack on Wed, 03/07/2012 - 16:32

For my niece's birthday, we used Rayan's plans (over at the Design Confidential) to build an industrial folding chalkboard sign. I used 1/4" MDF for the chalkboards for smoothness and 1x2 pine for the frame, stained one coat of ebony & one coat of rustoleum "sunbleached" stain. I totally forgot to take pictures before we dropped it off, but it was super easy and a real hit!

Estimated Cost
$15 (stain, screws, glue were on-hand)
Estimated Time Investment
An Hour or Two (0-2 Hours)
Finish Used
one coat of ebony & one coat of rustoleum "sunbleached" stain
Recommended Skill Level
Starter Project
Back