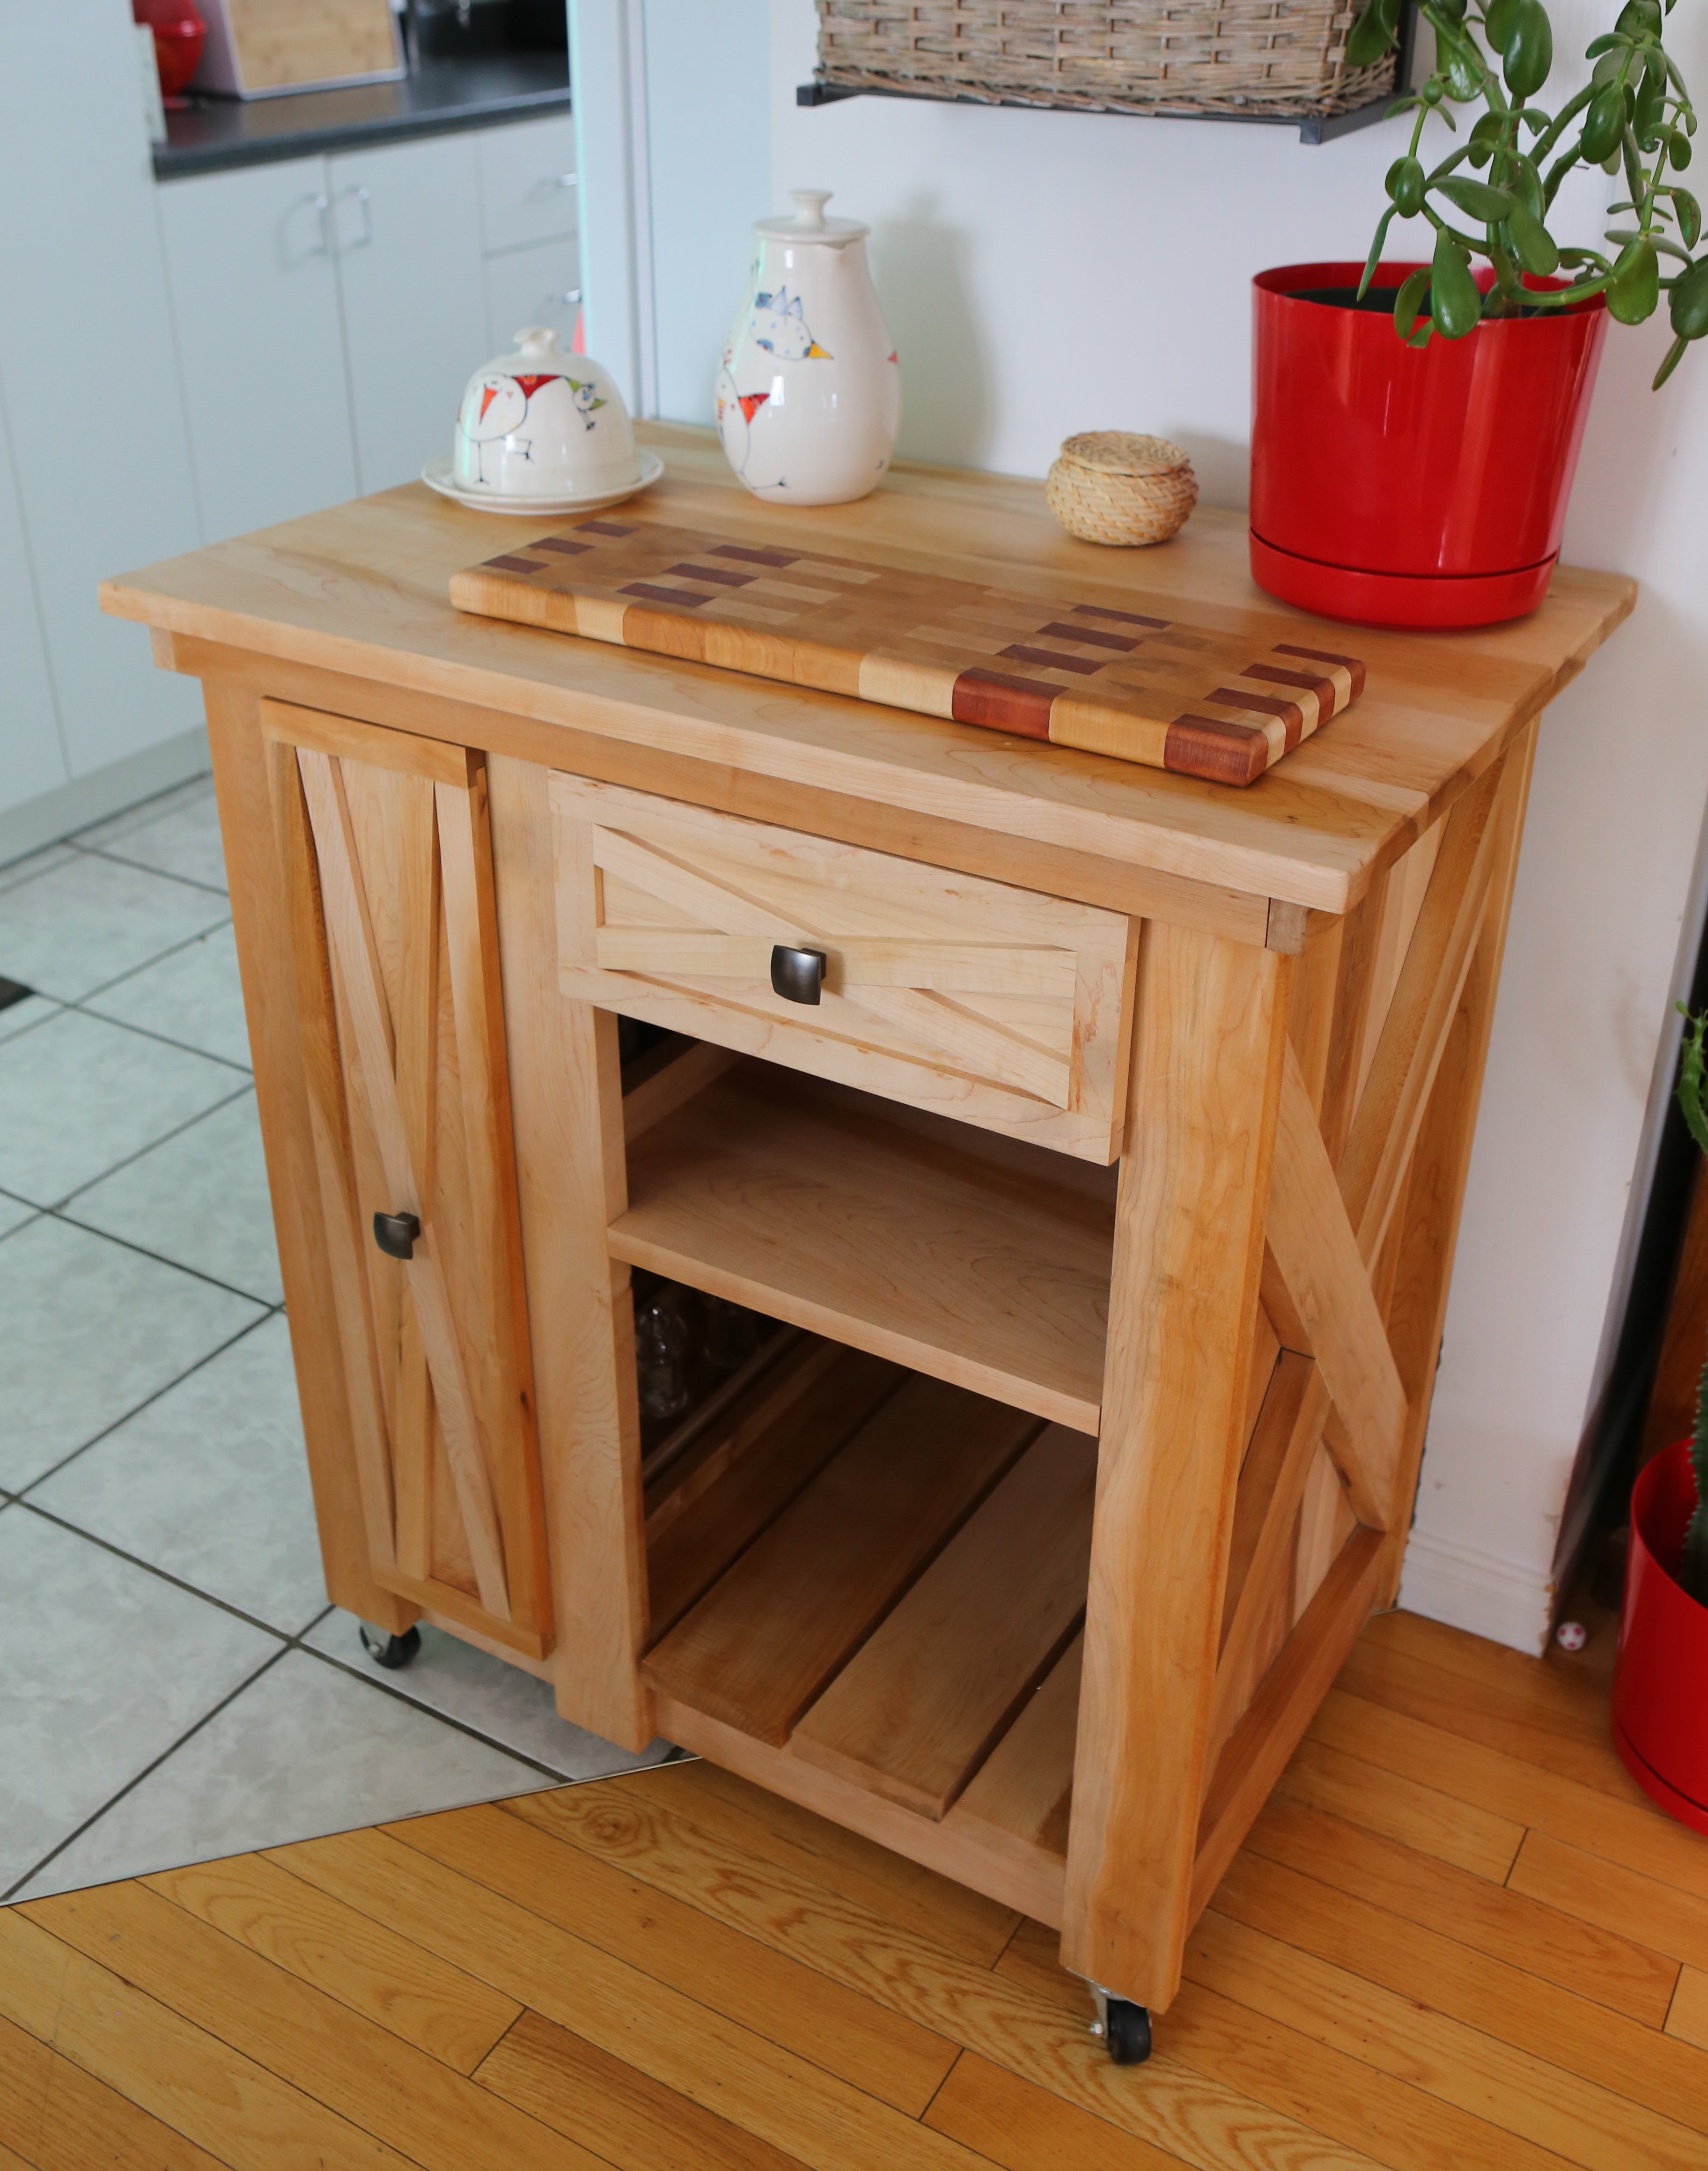
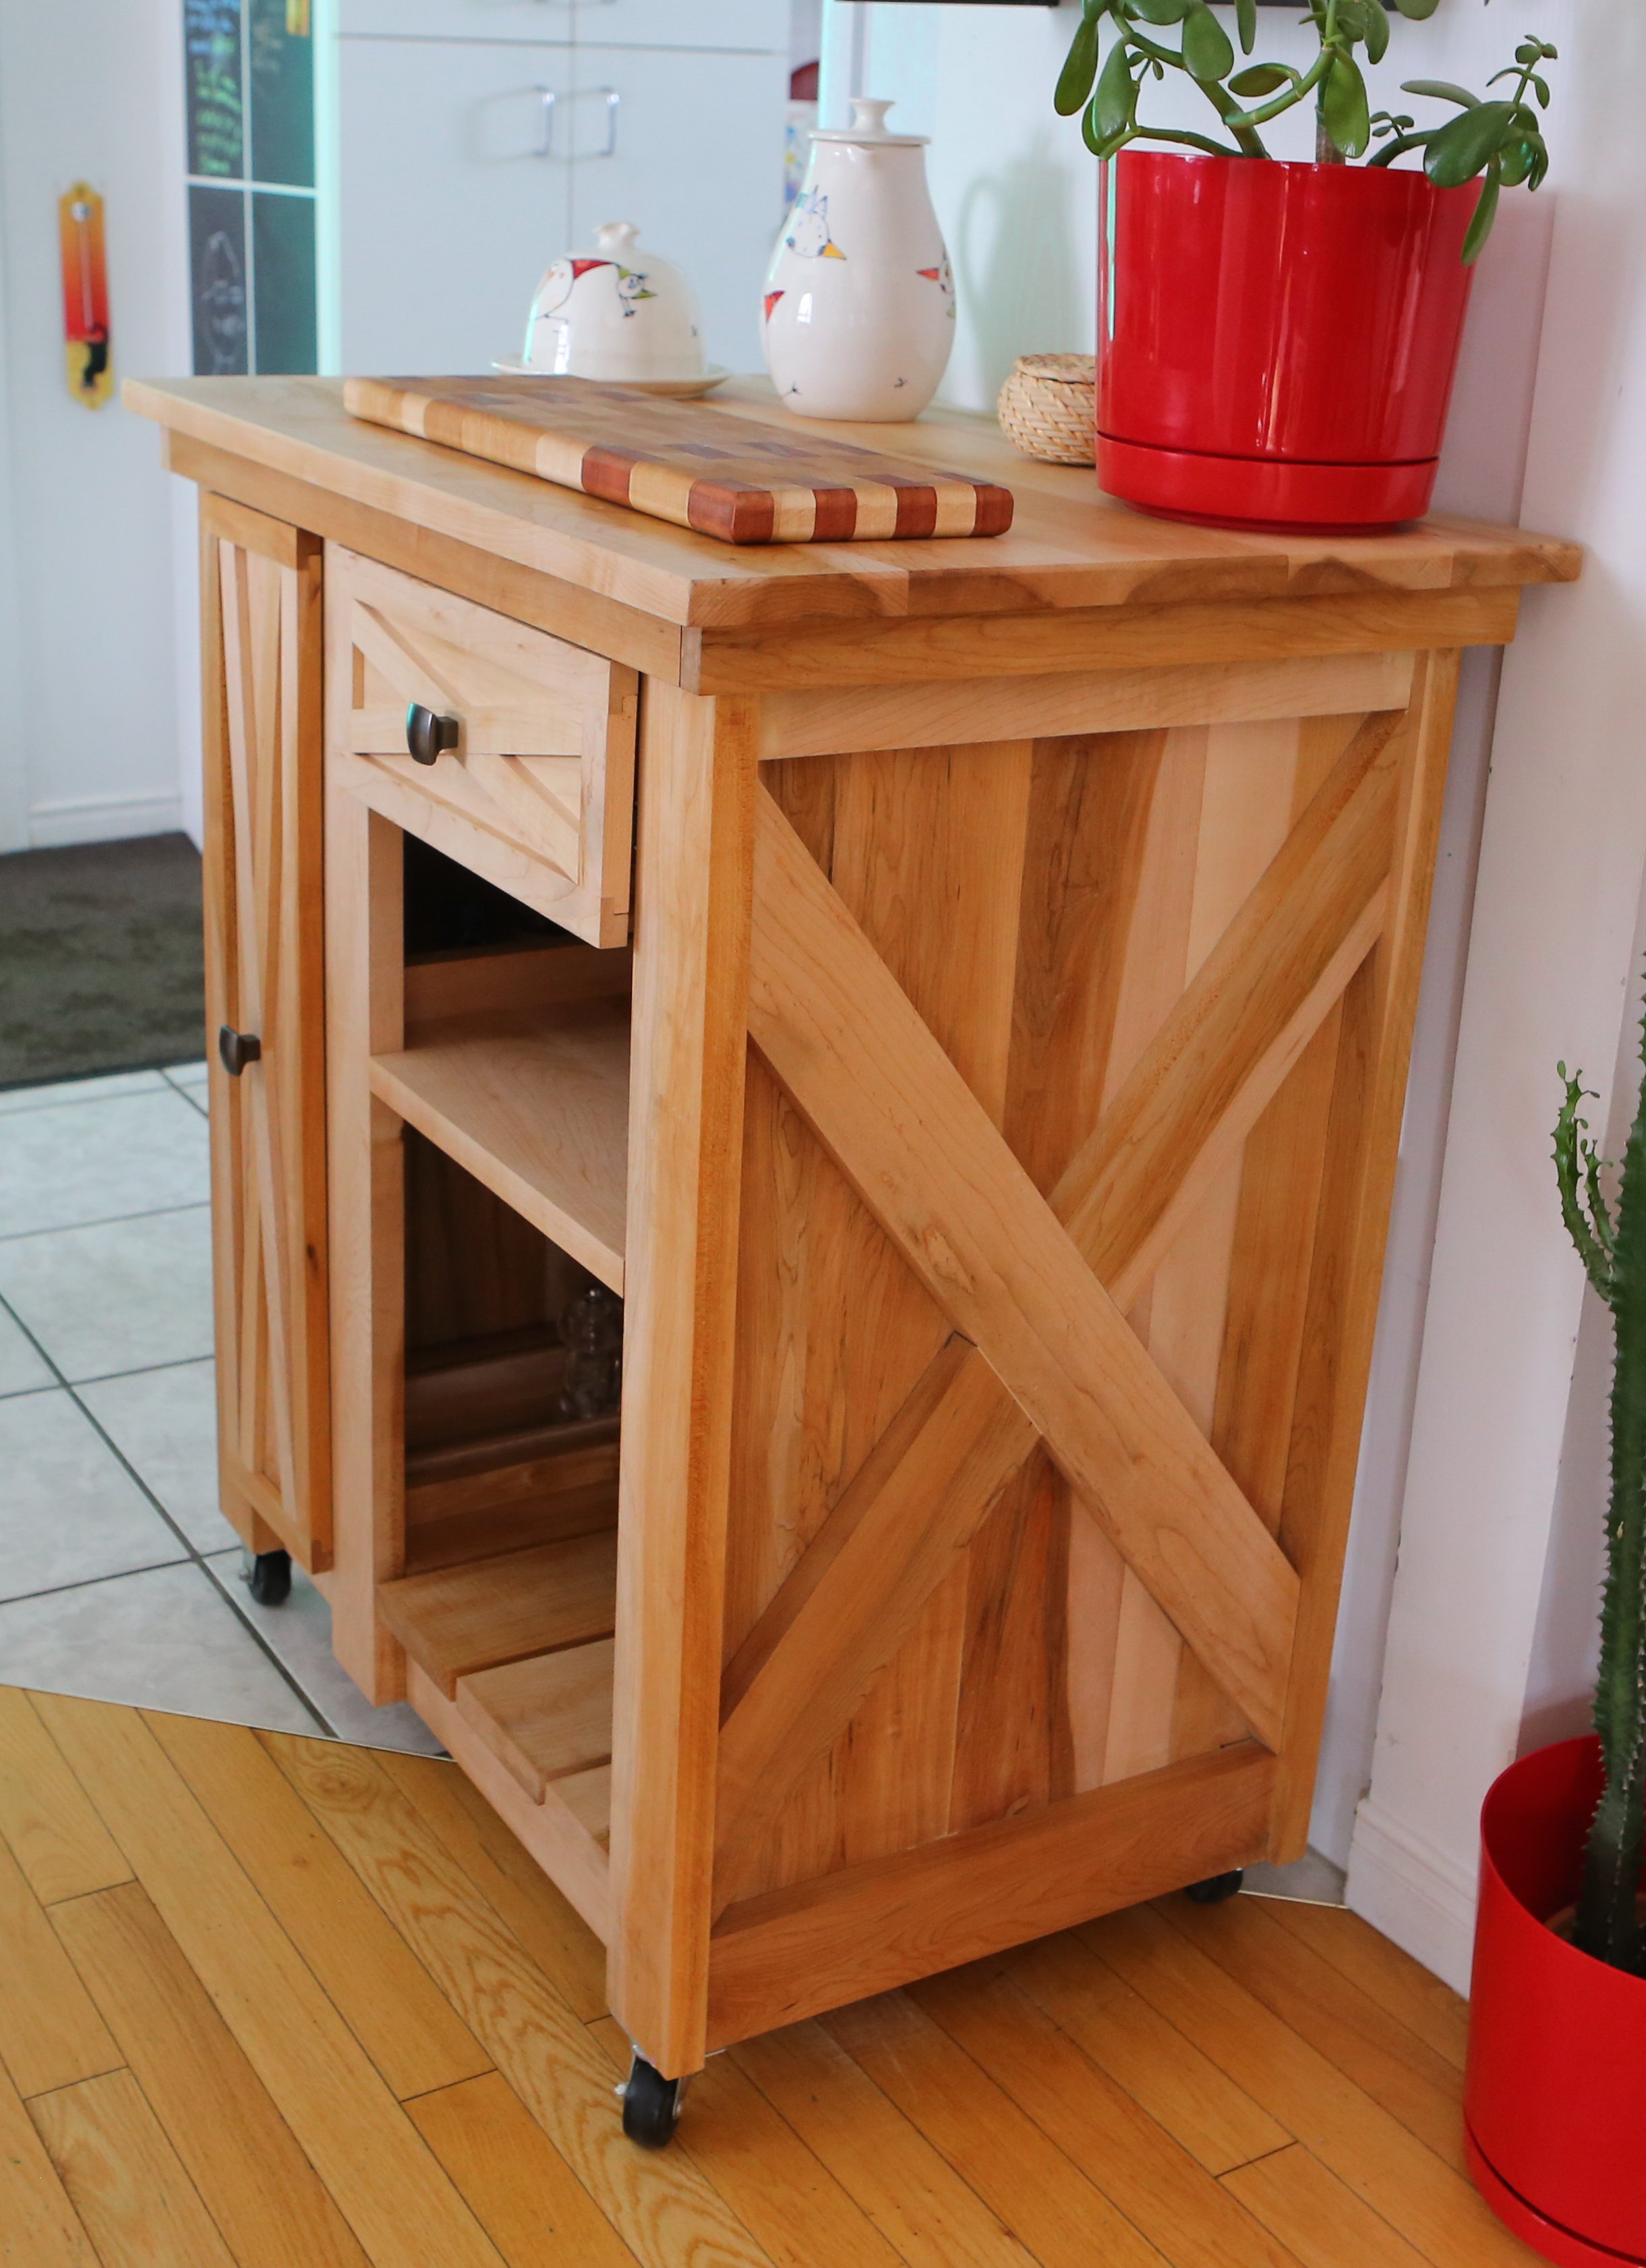
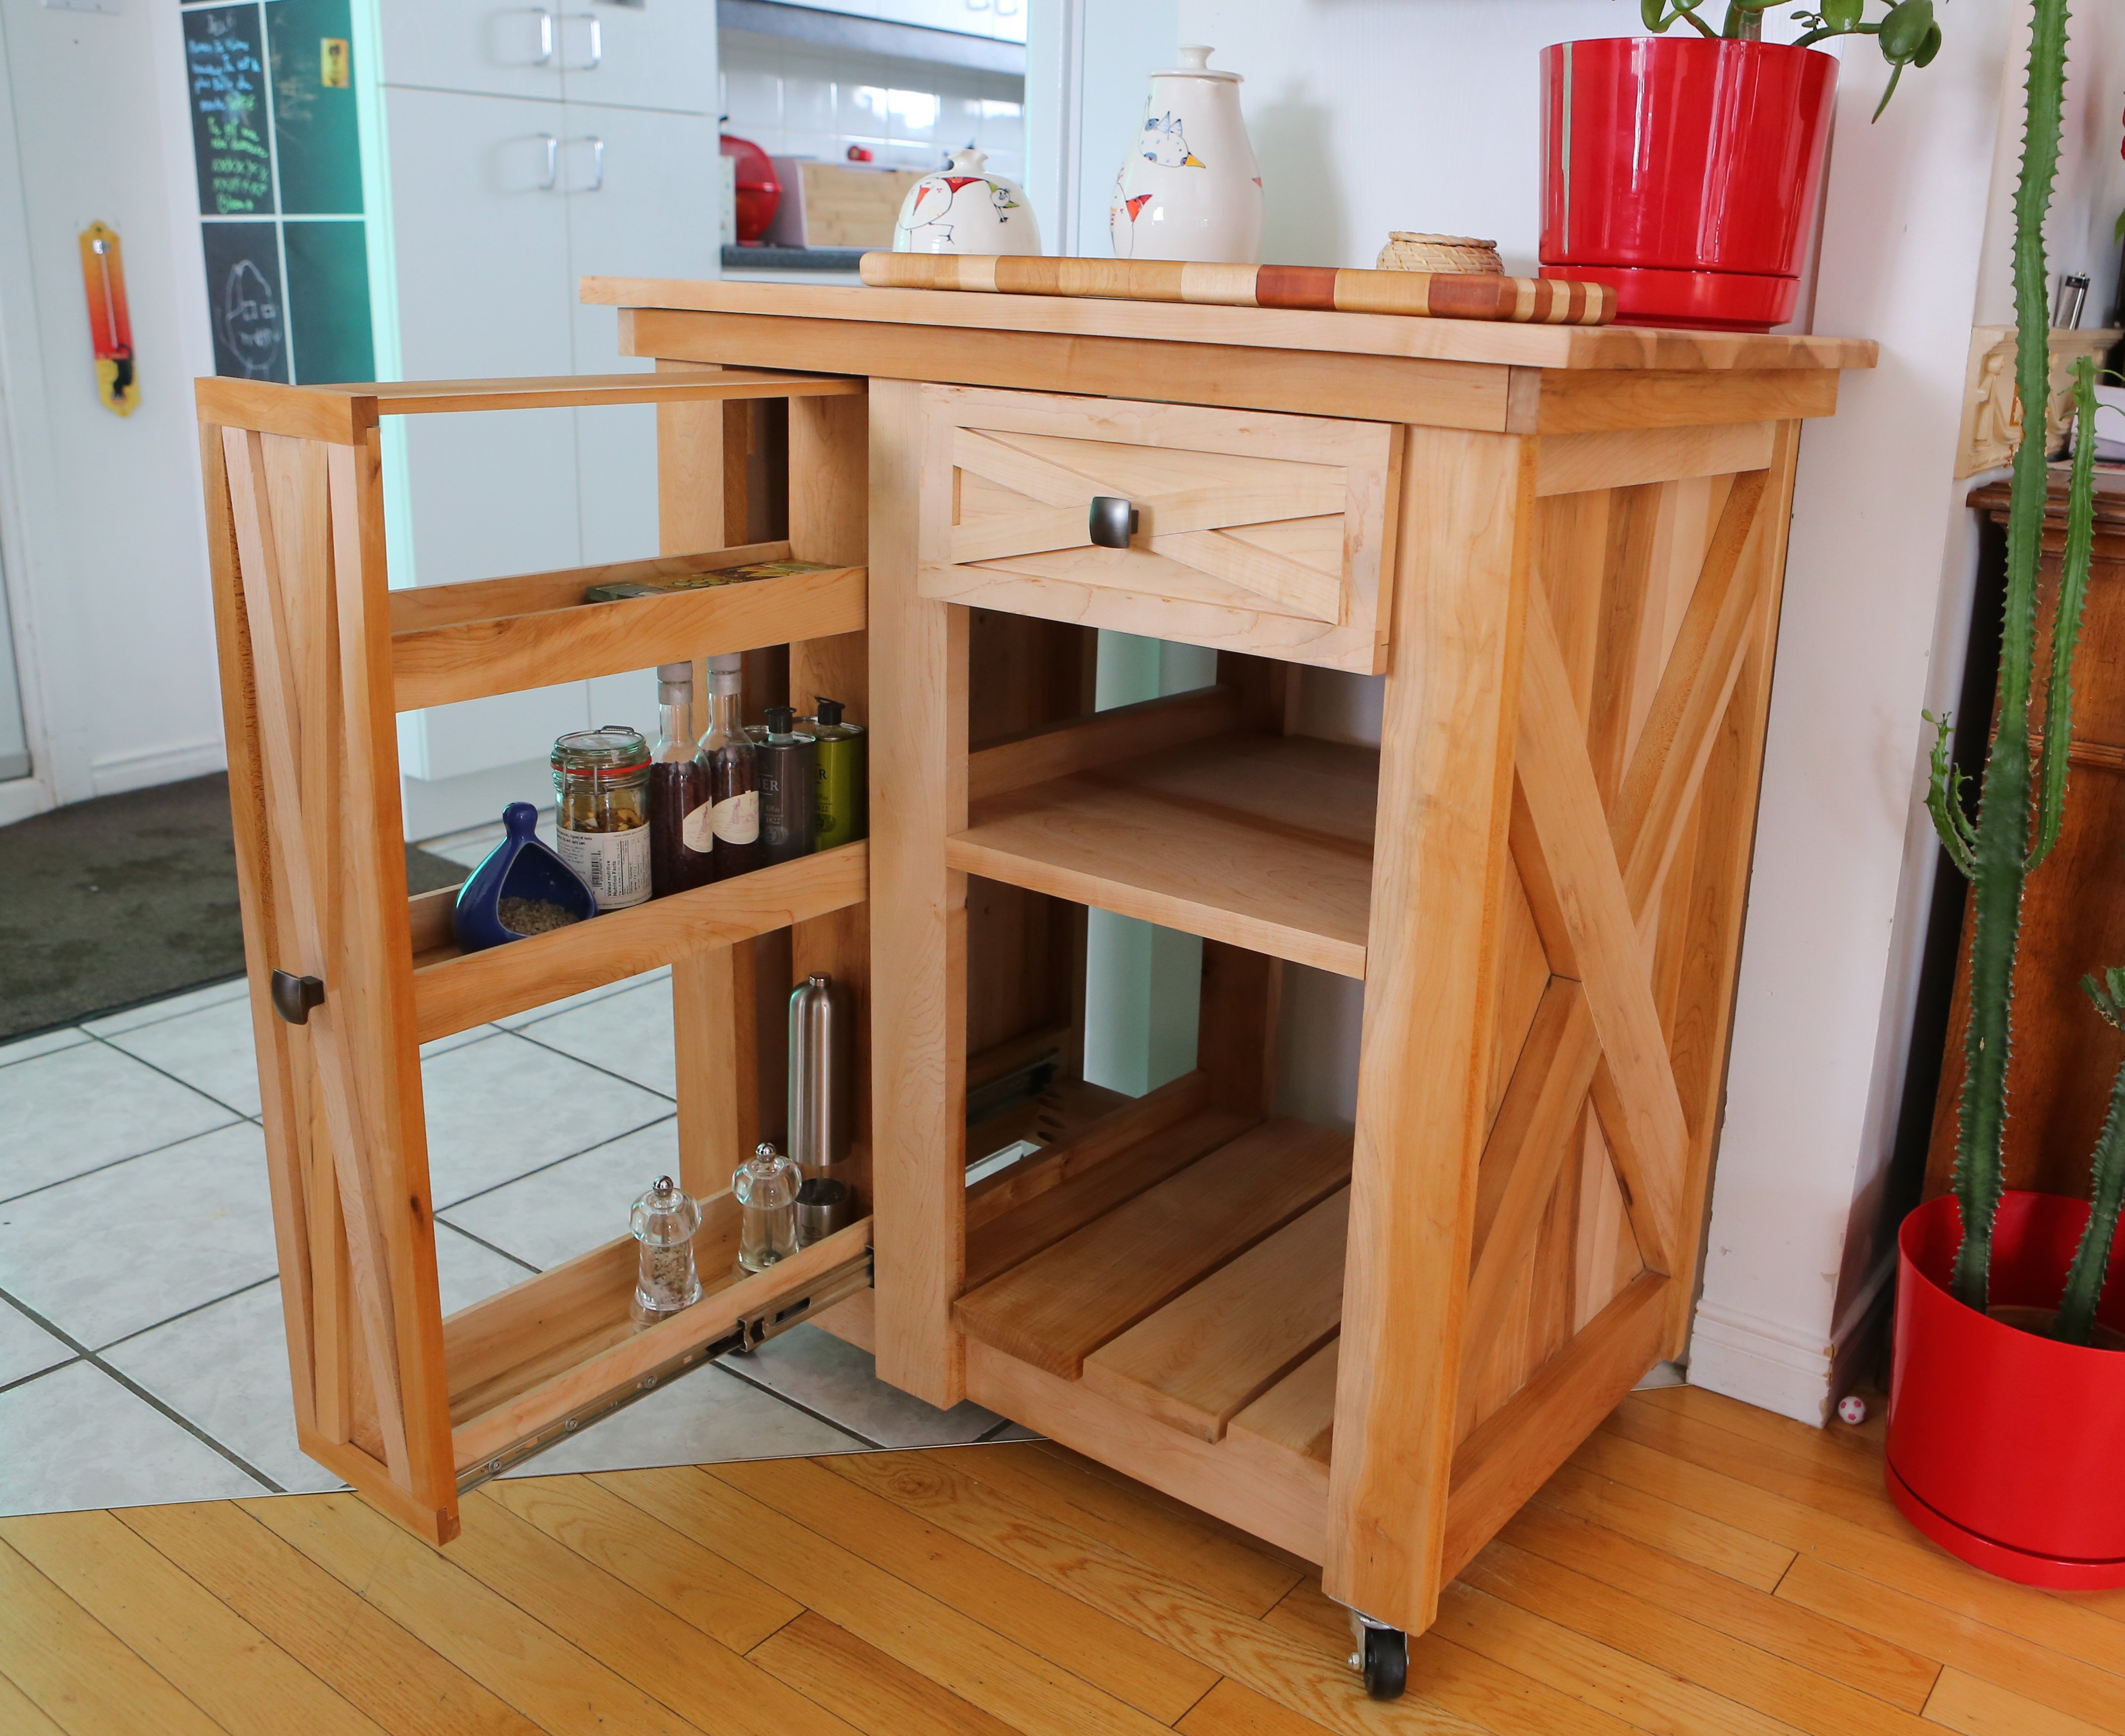
Kids Table
I modified from the Clara table plans.
I loved the look of the Rustic X Bench but wanted to modify to be an entry table. I took the exact plans, but made it longer and taller. The X bracing didn't match up exactly, but I like it with the separation. The stain is a Minwax Espresso finish. I added adjustable glides to the bottom so I could adjust if needed. It was an excellent first project and it fits in our home PERFECT! Thanks Ana for the inspiration to create, build and be a mommy at the same time :)
Fri, 08/30/2013 - 16:18
Beautiful. I love the mix of rustic and modern that your modification exudes (to me). :)
As a beginner at woodwork, this table was pretty easy to make. The instructions were easy to follow. I modified the table by adding 2x6 planks on the bottom and changing up the "X" design. The angles are tricky to get right, but i used scrap wood until i got the perfect angles then used my 2x2's for the final cuts. I also changed the finished dimensions of the table to fit in the room I was making it for, so this table was quite a bit wider than the original. It took me about a day and a half/two days to fully build and then I finished slowly over the rest of the week by staining and using a satin poly finish (I gave the top 4 coats so it took a little longer than normal). I'm so happy with the finished table I've already bought the wood to make another smaller one!
What a great project!! My private outdoor space is amazing. Thanks Ana!!
I love this stool. I used the plan as is, except for creating the angles similar to those shown on the stool photos in the plan. If you follow the plans directly, your stool will be standing completely straight vs the slight angle shown in the photos. If you are not comfortable with cutting angles, I would definitely stick with the plan. I had to play around with mine until I finally got everything right.
The time allotted is more due to waiting for paint to dry versus actual build time. The stool goes together quickly, but sanding & drying time do eat up the hours.
Thank you Ana for the great plans! I have more of these planned for the future, so cute & they'll make great gifts!
Followed Ana's plan w/ minor measurement changes to fit my needs but the Rustic X Console came together pretty good. First we were going with a blue stain but once we got the stain oh the wood it was just to much so we opted for a lighter paint and finished off with a light lacquer.
Adapted plans to suit me
Your and your husband's videos are easy to
follow and well explained for the beginner thanks.
Definite confidence building to Finish
Thanks
My second build from Ana's toy box plan. I had my son use his CNC machine to carve boy's name into the front. Depth of the letters is about 0.25". Looks really good.
I saw Ana's plans for a toolbox and thought that's great! Then I saw another members adaption for a cleaning caddy and I knew I had to build both!
I build on my lanai (porch) in Hawaii, so my work area is fairly small. It was easy to build these at the same time, and I made plenty use of my Kreg jig!
Thu, 08/11/2011 - 15:02
Your work space may be small, but I think I'd take your view any day! Just beautiful. And, the tool box and caddy are really nice, too!
I really fell in love with this crown ledge and had to do it. Of course I did it to fit the length I needed and I also added a decorative piece of trim at the bottom to give it a more finished look.
From the minute I saw this on Ana White's site along with That's My Letter, I knew I had to build it! It is soo adorable and turned out better than I anticipated! Great directions and was easy to build.
I made this for my 5 year old daughter for Christmas. I really like how beautiful and sturdy this play kitchen is. I added 4 inches to the height so it would be the right size for my daughter. I also made all the sections equal in width. This made it simpler for cutting the shelves. The faucet is made from various pvc pipes and spray painted with Rustoleum silver. All the knobs are able to be turned, and the faucet can swivel. For the oven shelf, I used a cooling rack. Thank you so much for this wonderful plan!
Wed, 12/26/2018 - 13:59
I love this! We shared on Instagram, thank you so much for sharing with us!
Mon, 12/31/2018 - 16:04
Thank you! I LOVE your website and all of your plans! I've learned so much from you and you've given me the confidence to take on any diy project!
Tue, 01/01/2019 - 12:43
Thank you! I LOVE your website and all of your plans! You have given me the knowledge and confidence to tackle any diy project!
Just finished this last night! My very first piece of furniture! I'm so proud of myself! Thank you so much for these plans!!
I made this for my Granddaughters 6th Birthday. My husband and I just finished a tree house for the Grand kids and we had lots of scraps left! Very easy to make and the only thing that took time was waiting for the paint to dry.
Fri, 08/12/2011 - 07:44
That bedding is so impressive for a second I thought it was a life size bed!
This was the very first thing I've tackled. It's something I've always wanted to do, but haven't taken the time. A new house that we've moved into has a barn beam mantle above the fireplace (which we love!), so we wanted to incorporate wood that would compliment it. We used knotty pine and tried out the oxidized wood treatment to get the desired color and sealed it with a spray Varathane. Because of that treatment, it took an extra day for all of the drying time from start to finish. I also plan to stencil on the side "Give Thanks", but haven't found a good spot to get a stencil yet.
I am such a fan of these great designs and styles, I will be making many more things. Next on my list, the Oxidized wood X pattern side tables and coffee table! Thank you, Ana!
Very easy to do. Love how it has improved the look in our kitchen since the original garbage can is no longer an eye sore.
http://thefelicianojourney.com/2015/10/30/diy-wood-tilt-out-trash-bin/
I used Ana’s plans to make my queen sized headboard. I used 1x8’s for the verticals and changed the framing a bit to only have one piece of wood on top. I also left out the 2 extra board on the back to save some cost. I glued and nail gunned each vertical piece to the top and bottom 1x4. I attached the assembled center to the 2 posts with pocket screws and small L corner brackets for stability. I also adjusted the height of my project to come to approximately 64 inches tall and the bottom of the inner picture portion, where the mattress reaches the headboard, to just hit the top of that 1x4 so we never have missing objects that have fallen behind the bed. I did use the green pressure treated lumber for the 4x4’s and they stained just fine. I also added a farmhouse style X through the center. I ripped my top 2x6 on both sides to be approximately 5 inches wide, so the rounded edge of the worn lumber is now square. I stained this in minwax dark walnut then went over with a second color coat of minwax classic grey. My apartment isn’t big enough for the sides and foot board but someday if we move, I’ll be able to complete the entire bed set.
Essential outdoor chair, by Al.
I finally completed the last piece to my customized simple two-toned outdoor collection...an outdoor kitchen sink!!! It still needs a couple of touch ups... but more on that later. This is by far my favorite and easiest project to date. We plan on using this as a grill caddie/garden station. This will eventually go onto a 24x12 deck up against our kitchen window (The indoor and outdoor sink will be against each others backs). I decided to go with the Sturdy Workbench plans for the base mainly because of the weight. We wanted something that's going to be difficult to move since it will be hooked up to outdoor plumbing. I used treated 2x4's for the base, cedar 1x4's for the top. I bought the bar sink for about $70. I also used a Kreg Jig to screw in the cedar slats from underneath so the screws won't be visible from the top. FYI - Wait a couple of weeks before you paint soaking wet treated wood. The green chemical from the 2x4 is starting to leak through my white paint. I'll have to go and prime/paint it again when it finally dries. Other than that, it came out 10 times better than I could ever imagine.
I know, I know, yet another Farmhouse Benchright Dining Table! For this one, I wanted 4x4 legs, angled turnbuckles and removable legs since I know I have to move a lot. The legs are made removable with carriage bolts and with the legs fastened this way, the whole project has a more simplified frame. The finish is dark walnut to try and blend vintage/weathered design with a modern finished project. I added dark gray slate to the tabletop, carved in via router, for a little more design and as a built in trivet if so desired.