2 X 4 Adirondack Chairs and Tables with a Twist
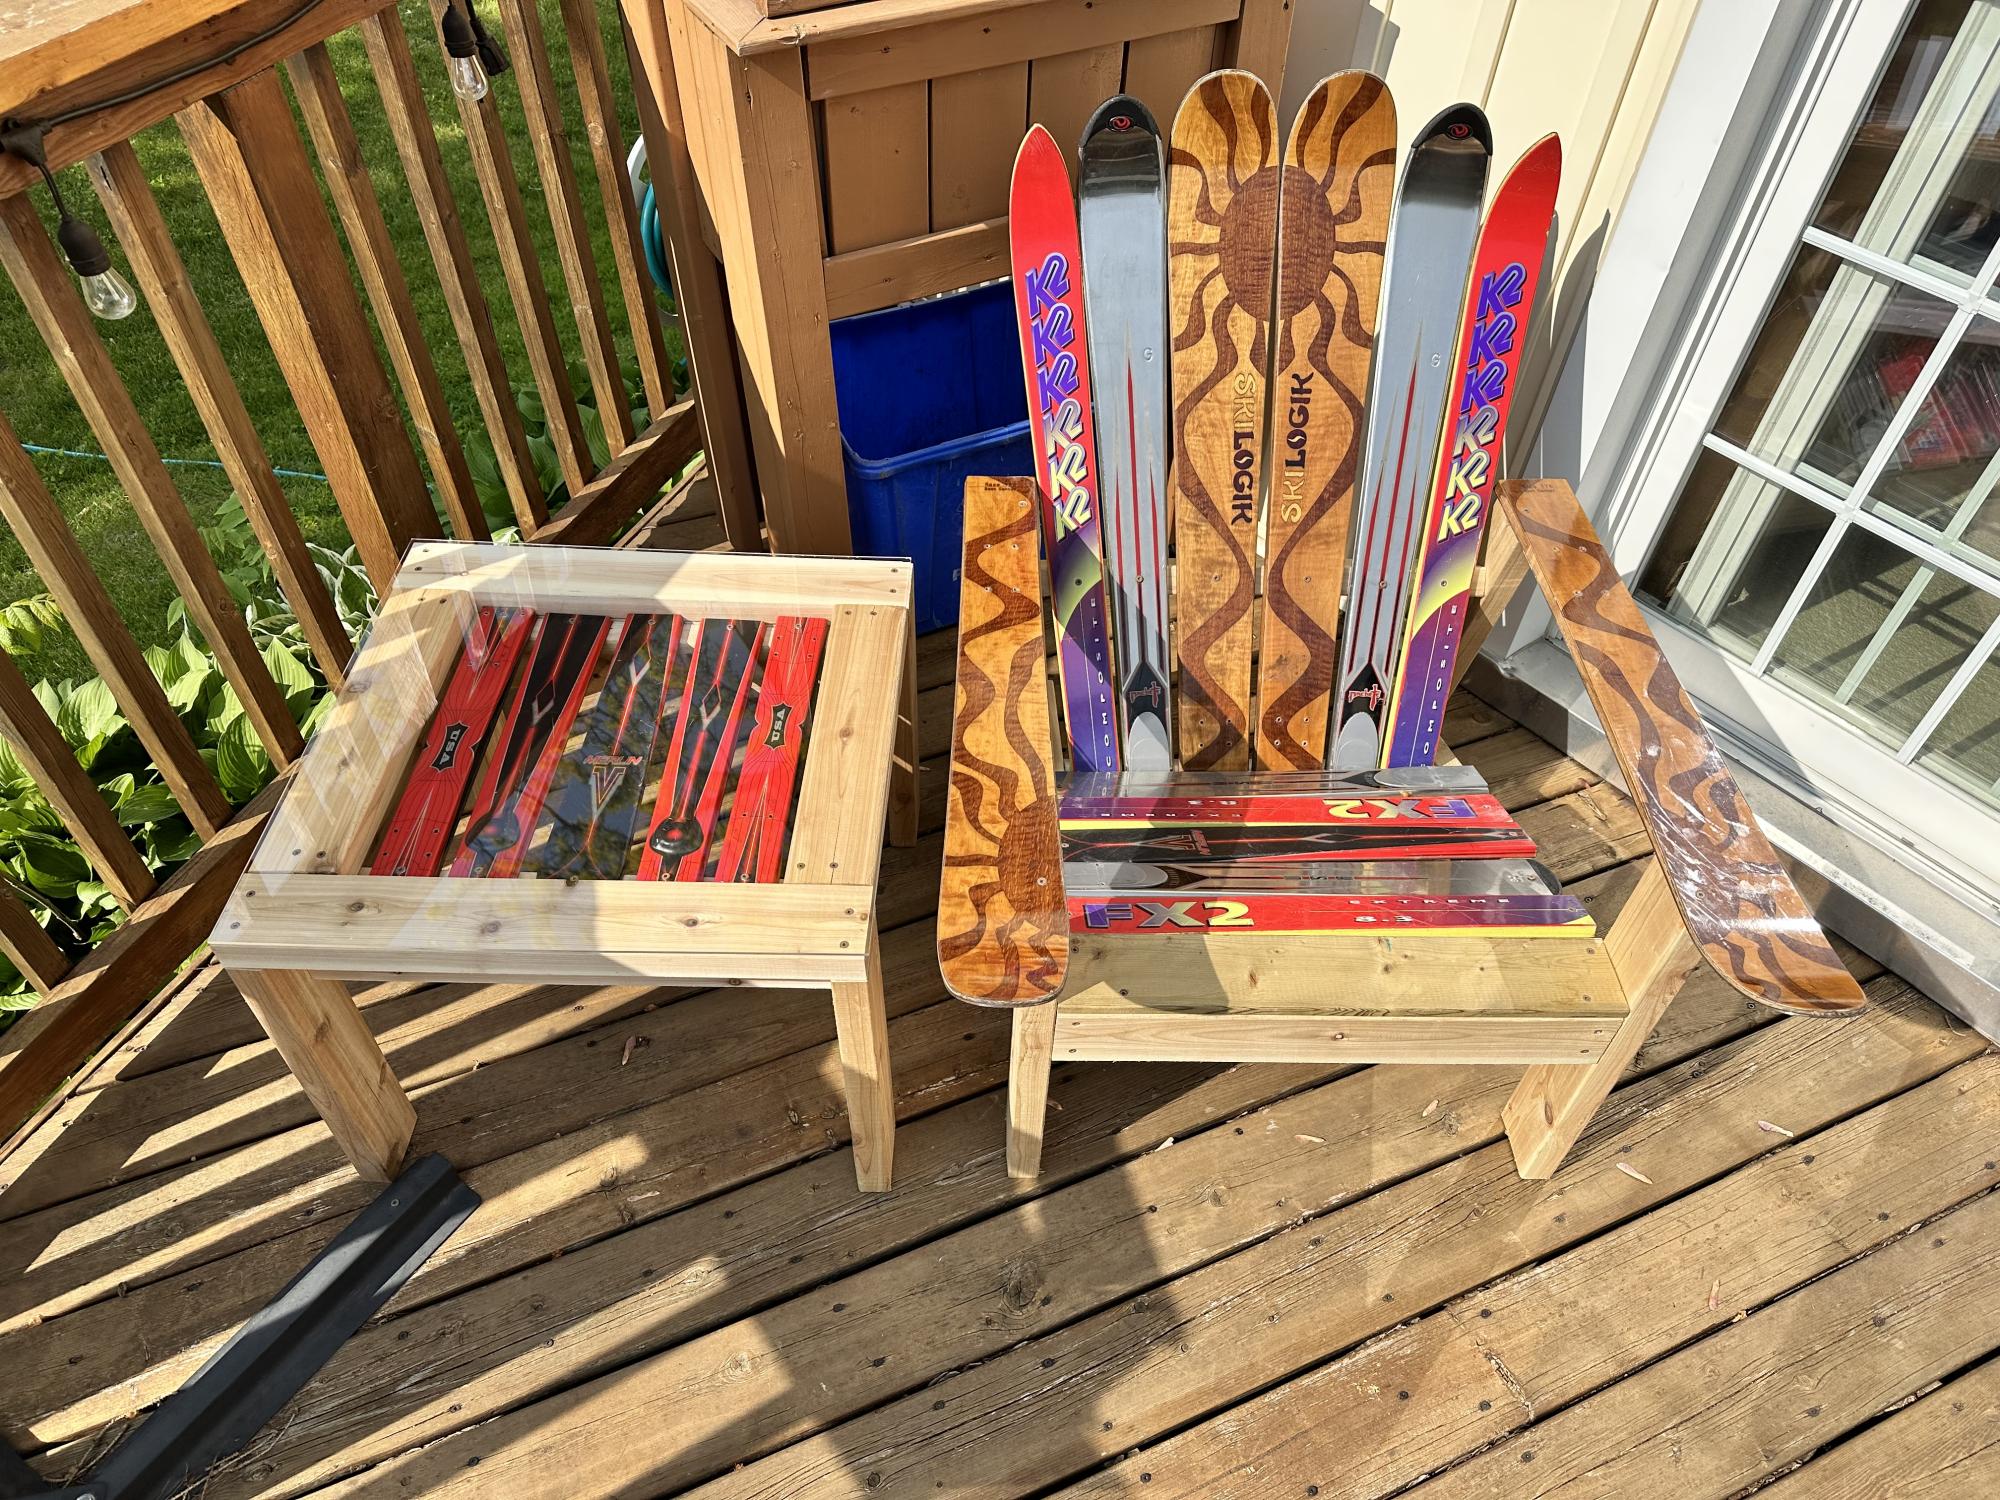
I had a bunch of my old skis that I had used as a display wall in my chalet that I needed to do something with, and this was a perfect solution!
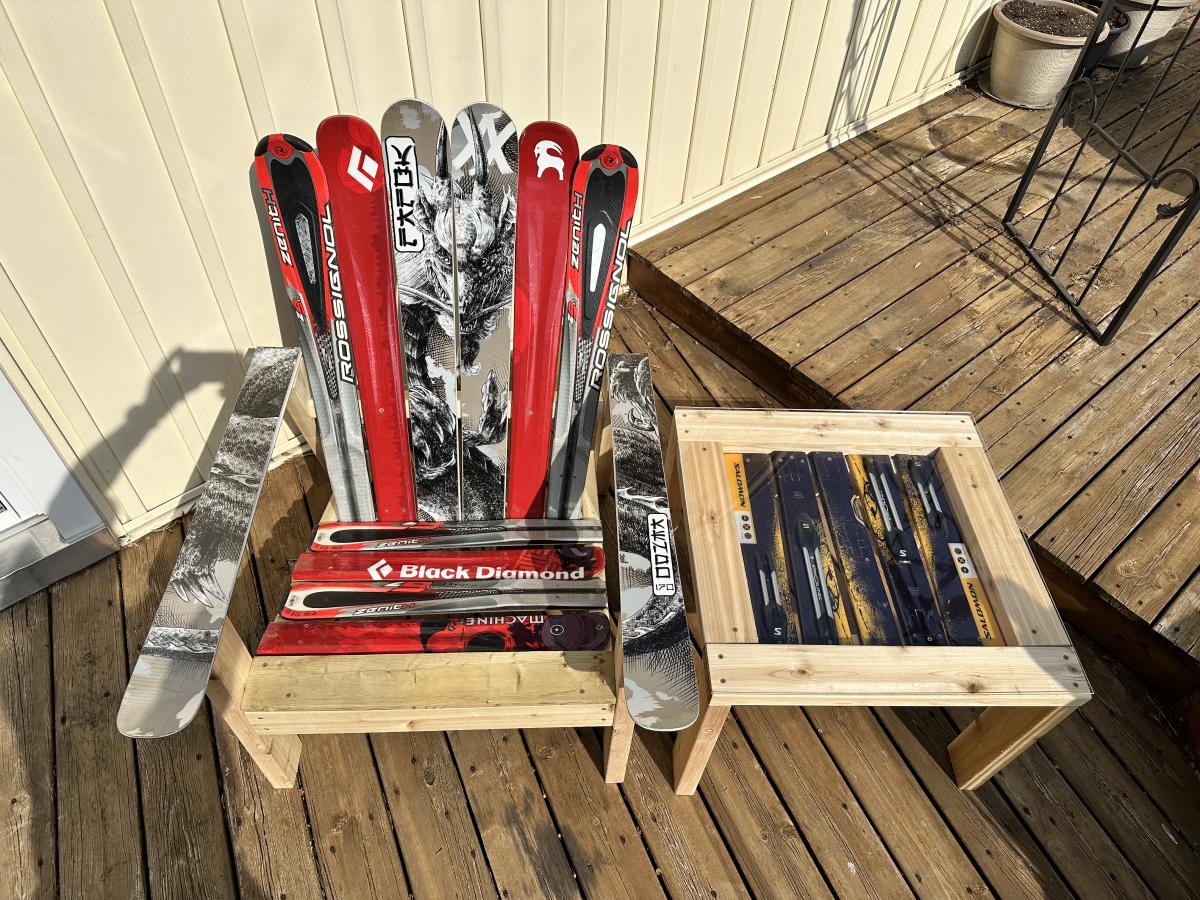
I had a bunch of my old skis that I had used as a display wall in my chalet that I needed to do something with, and this was a perfect solution!
This was our first build. My husband and I really enjoyed working on these! The build went very quickly and the plans were well-detailed. The painting was the most time-consuming part!

We loved the one from Ana's site and had to have it.
Printed off instructions and purchased material.
Didn't take long to build.
I love it
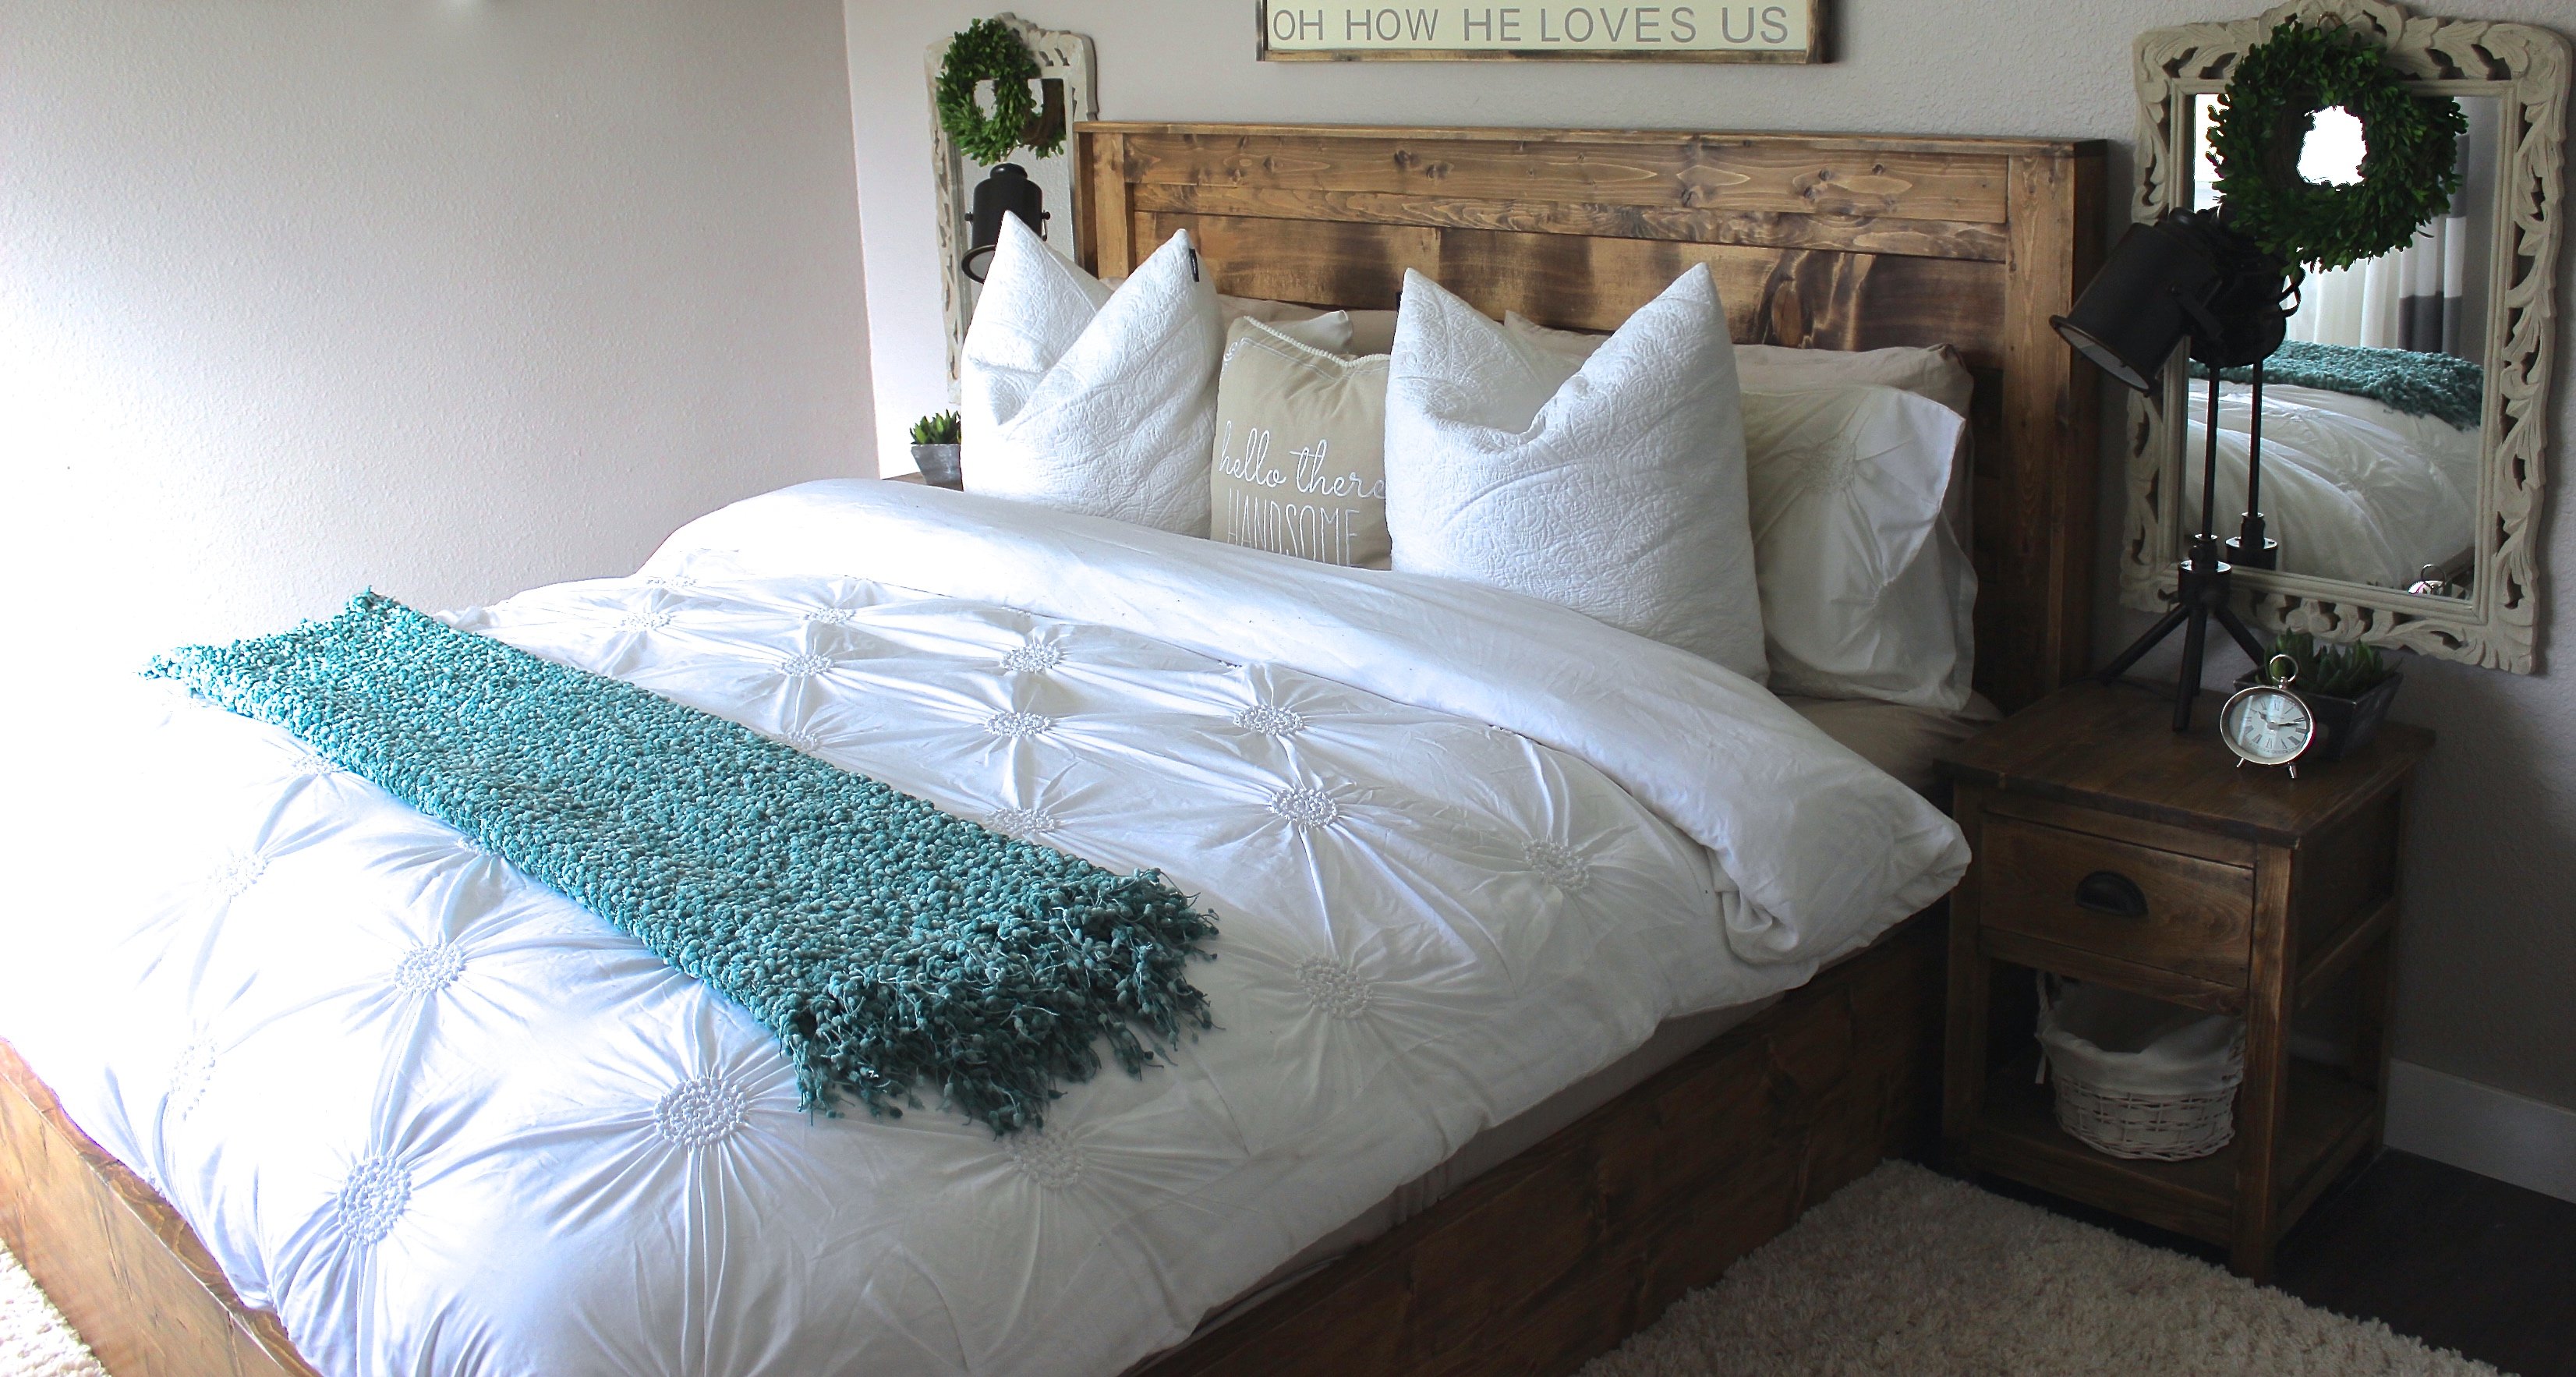
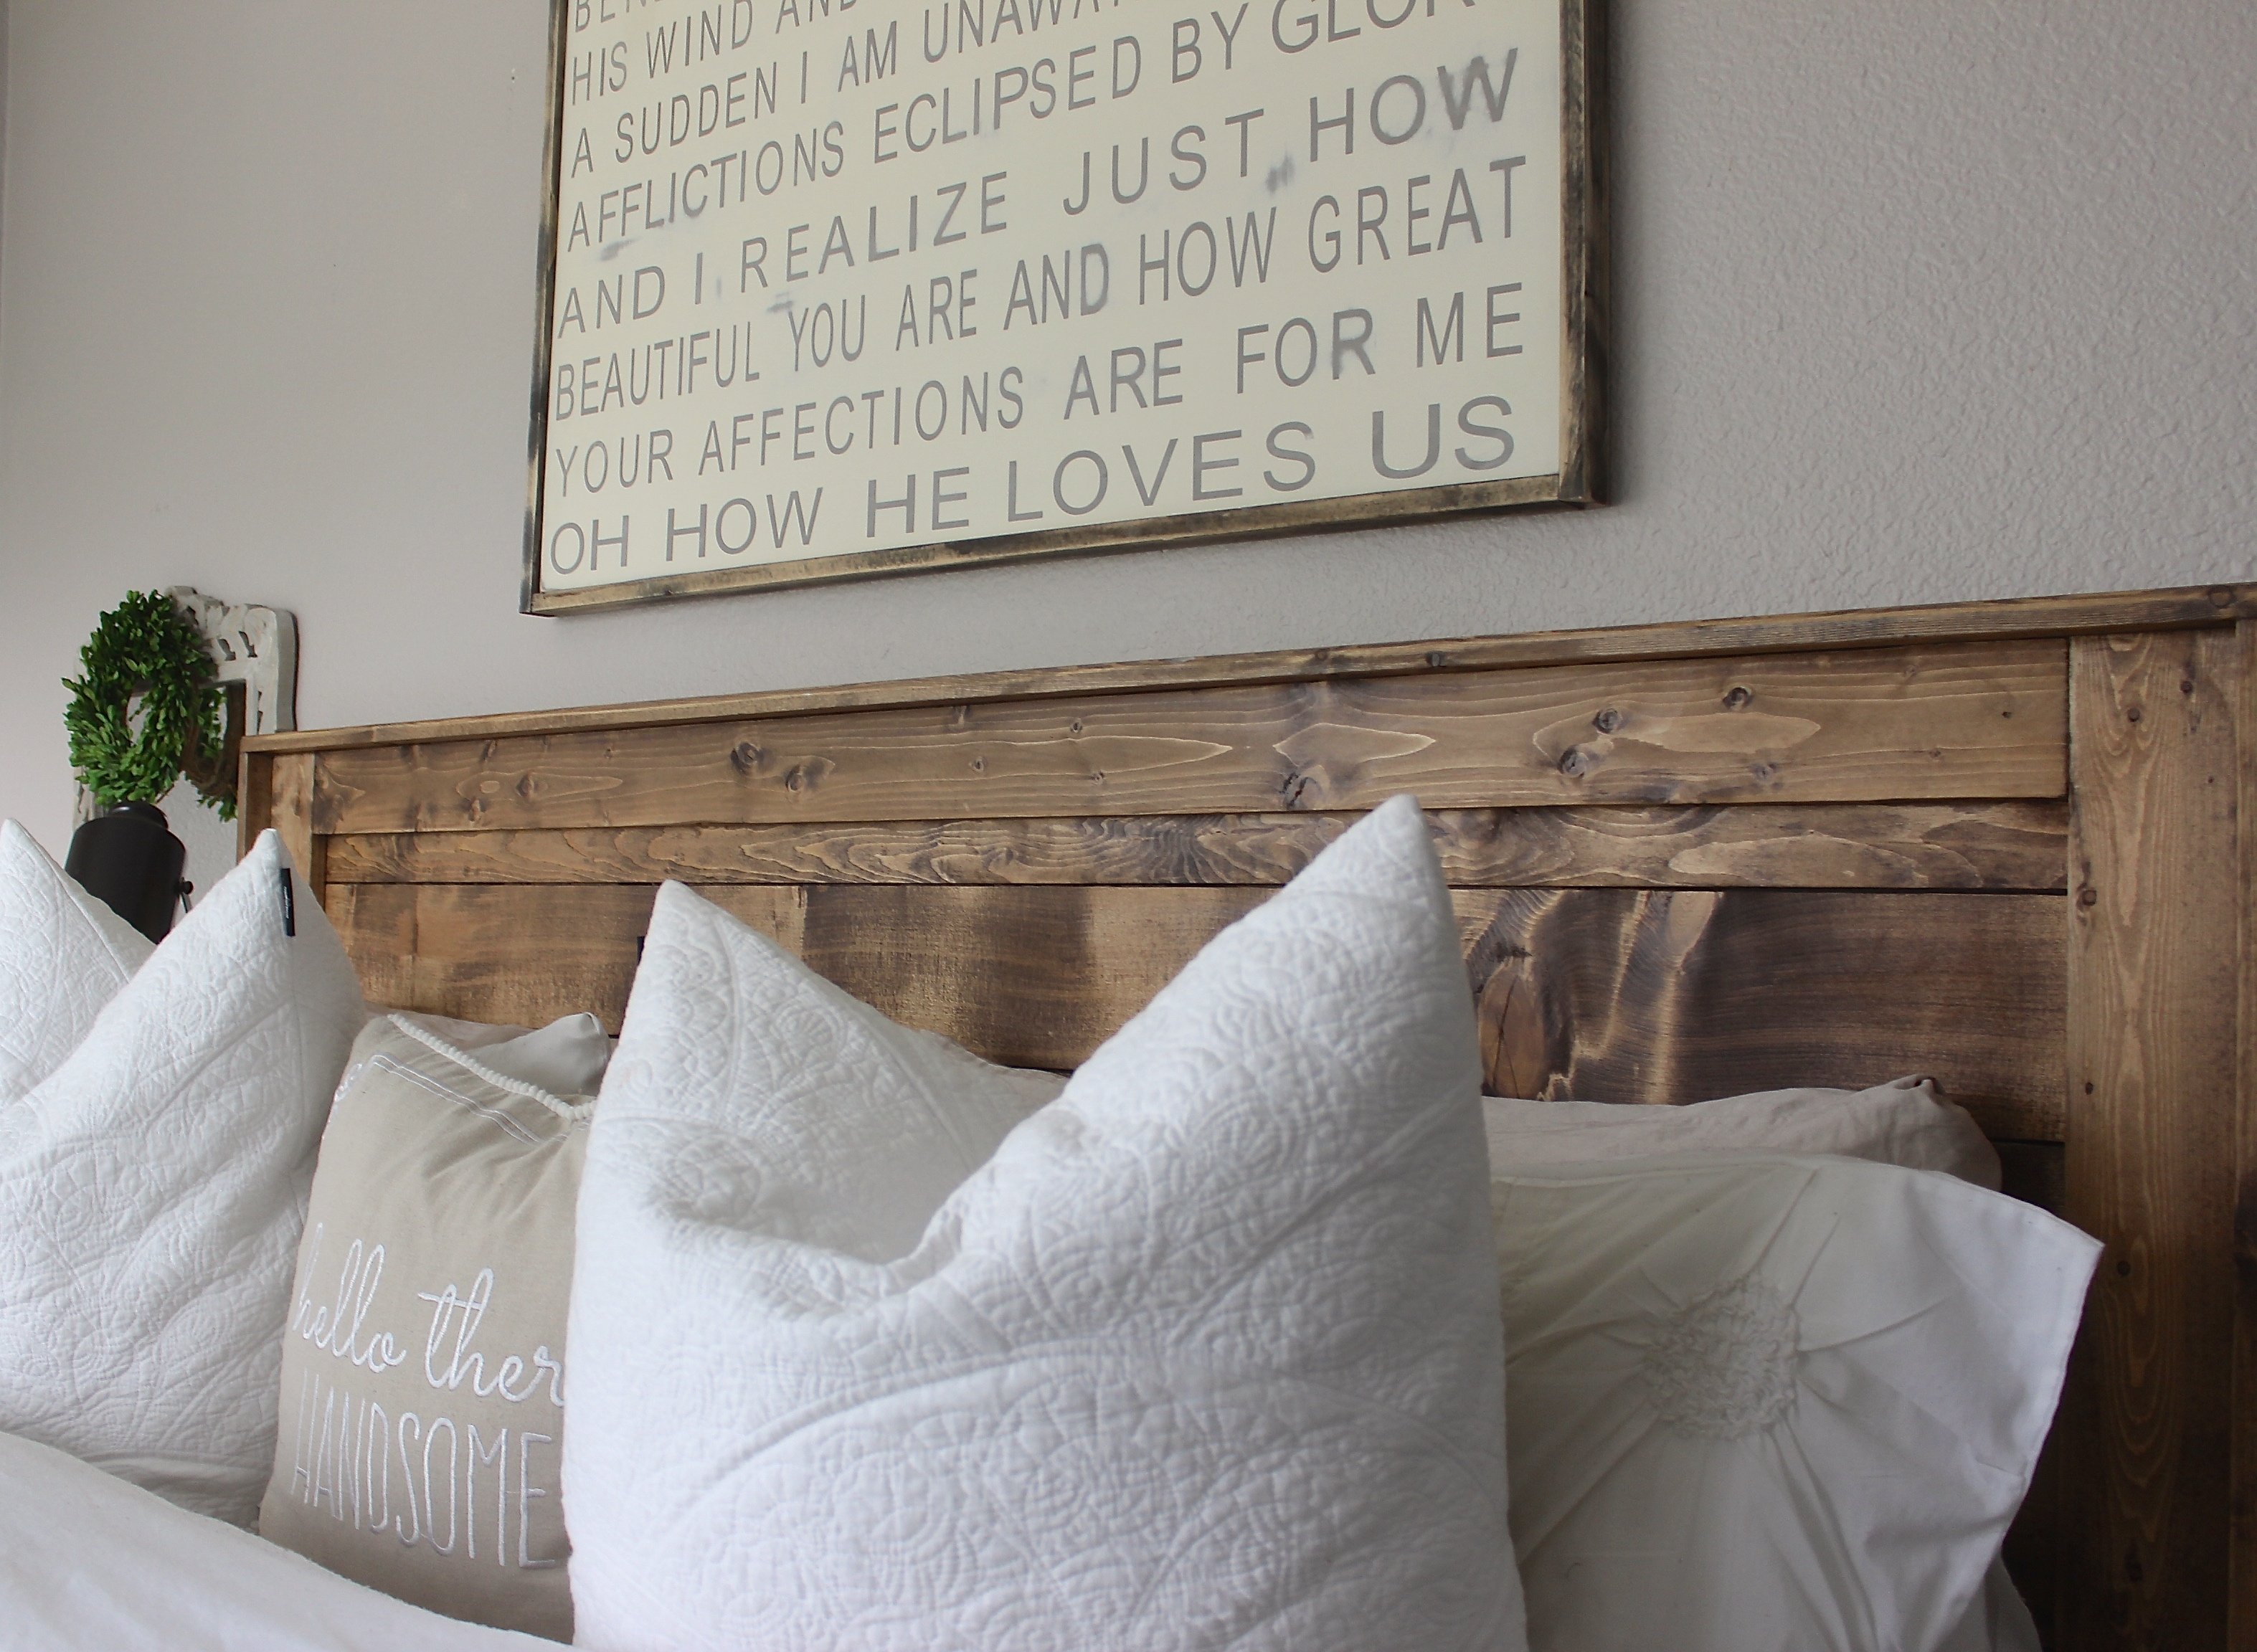
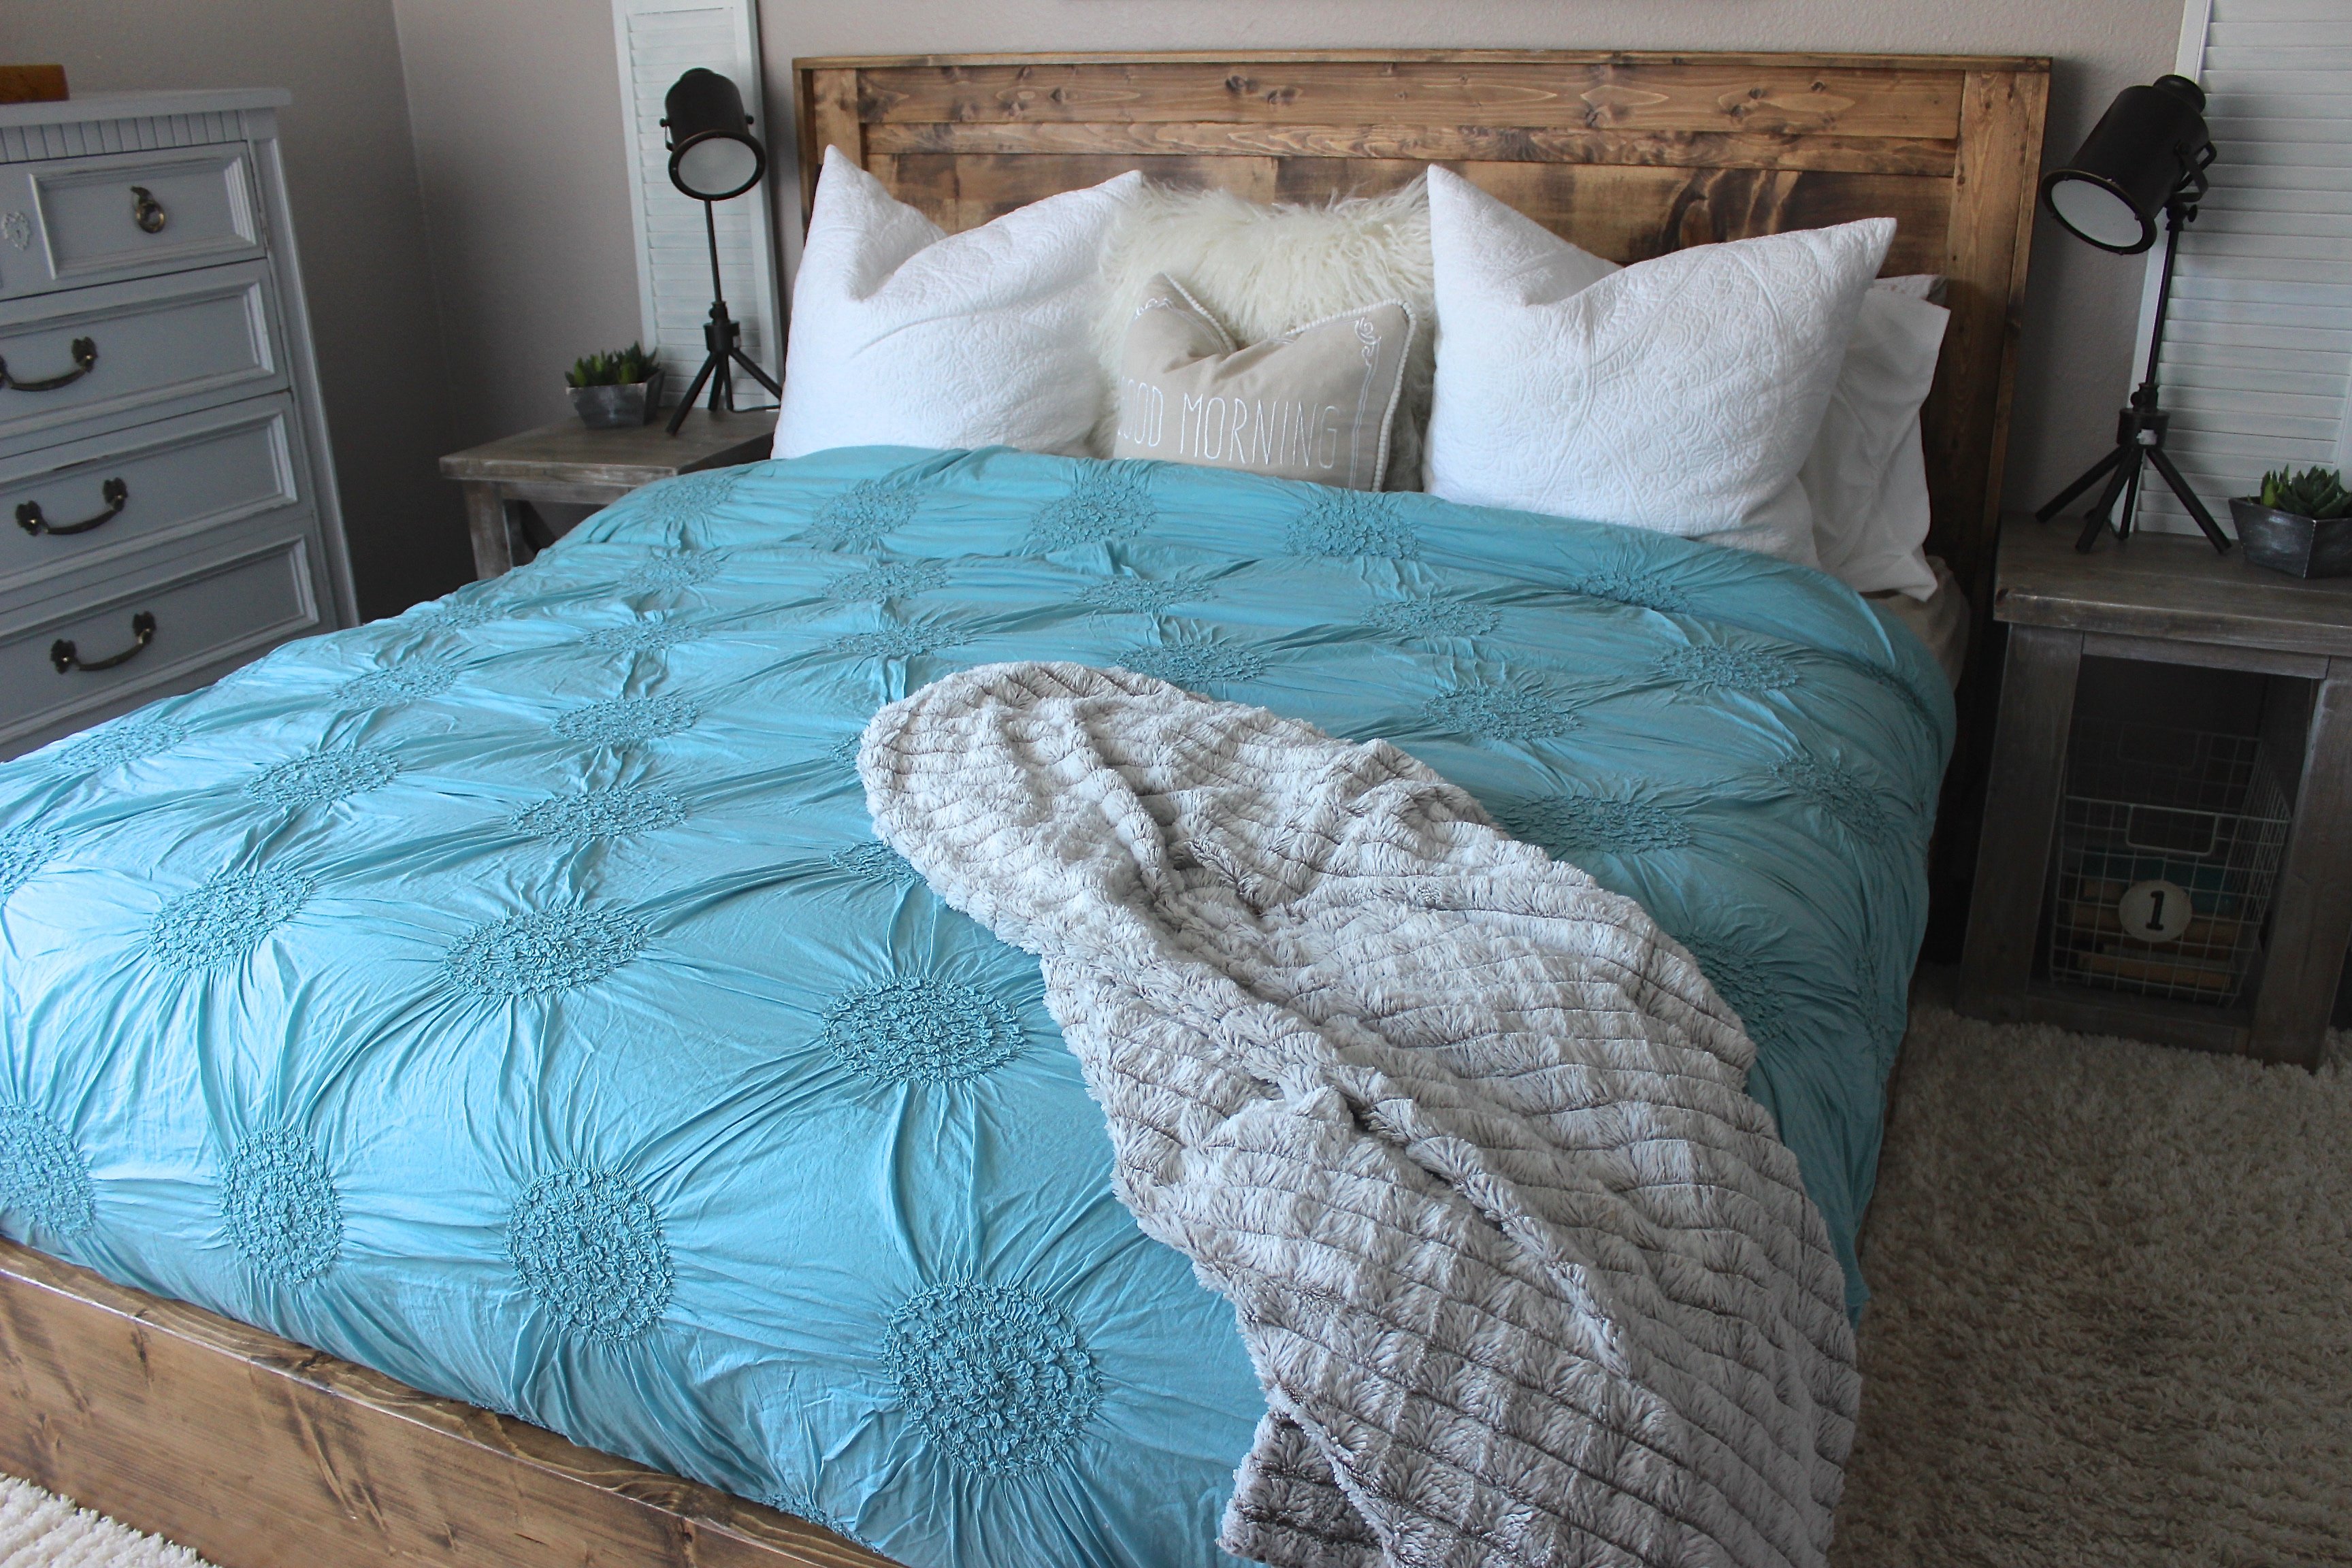
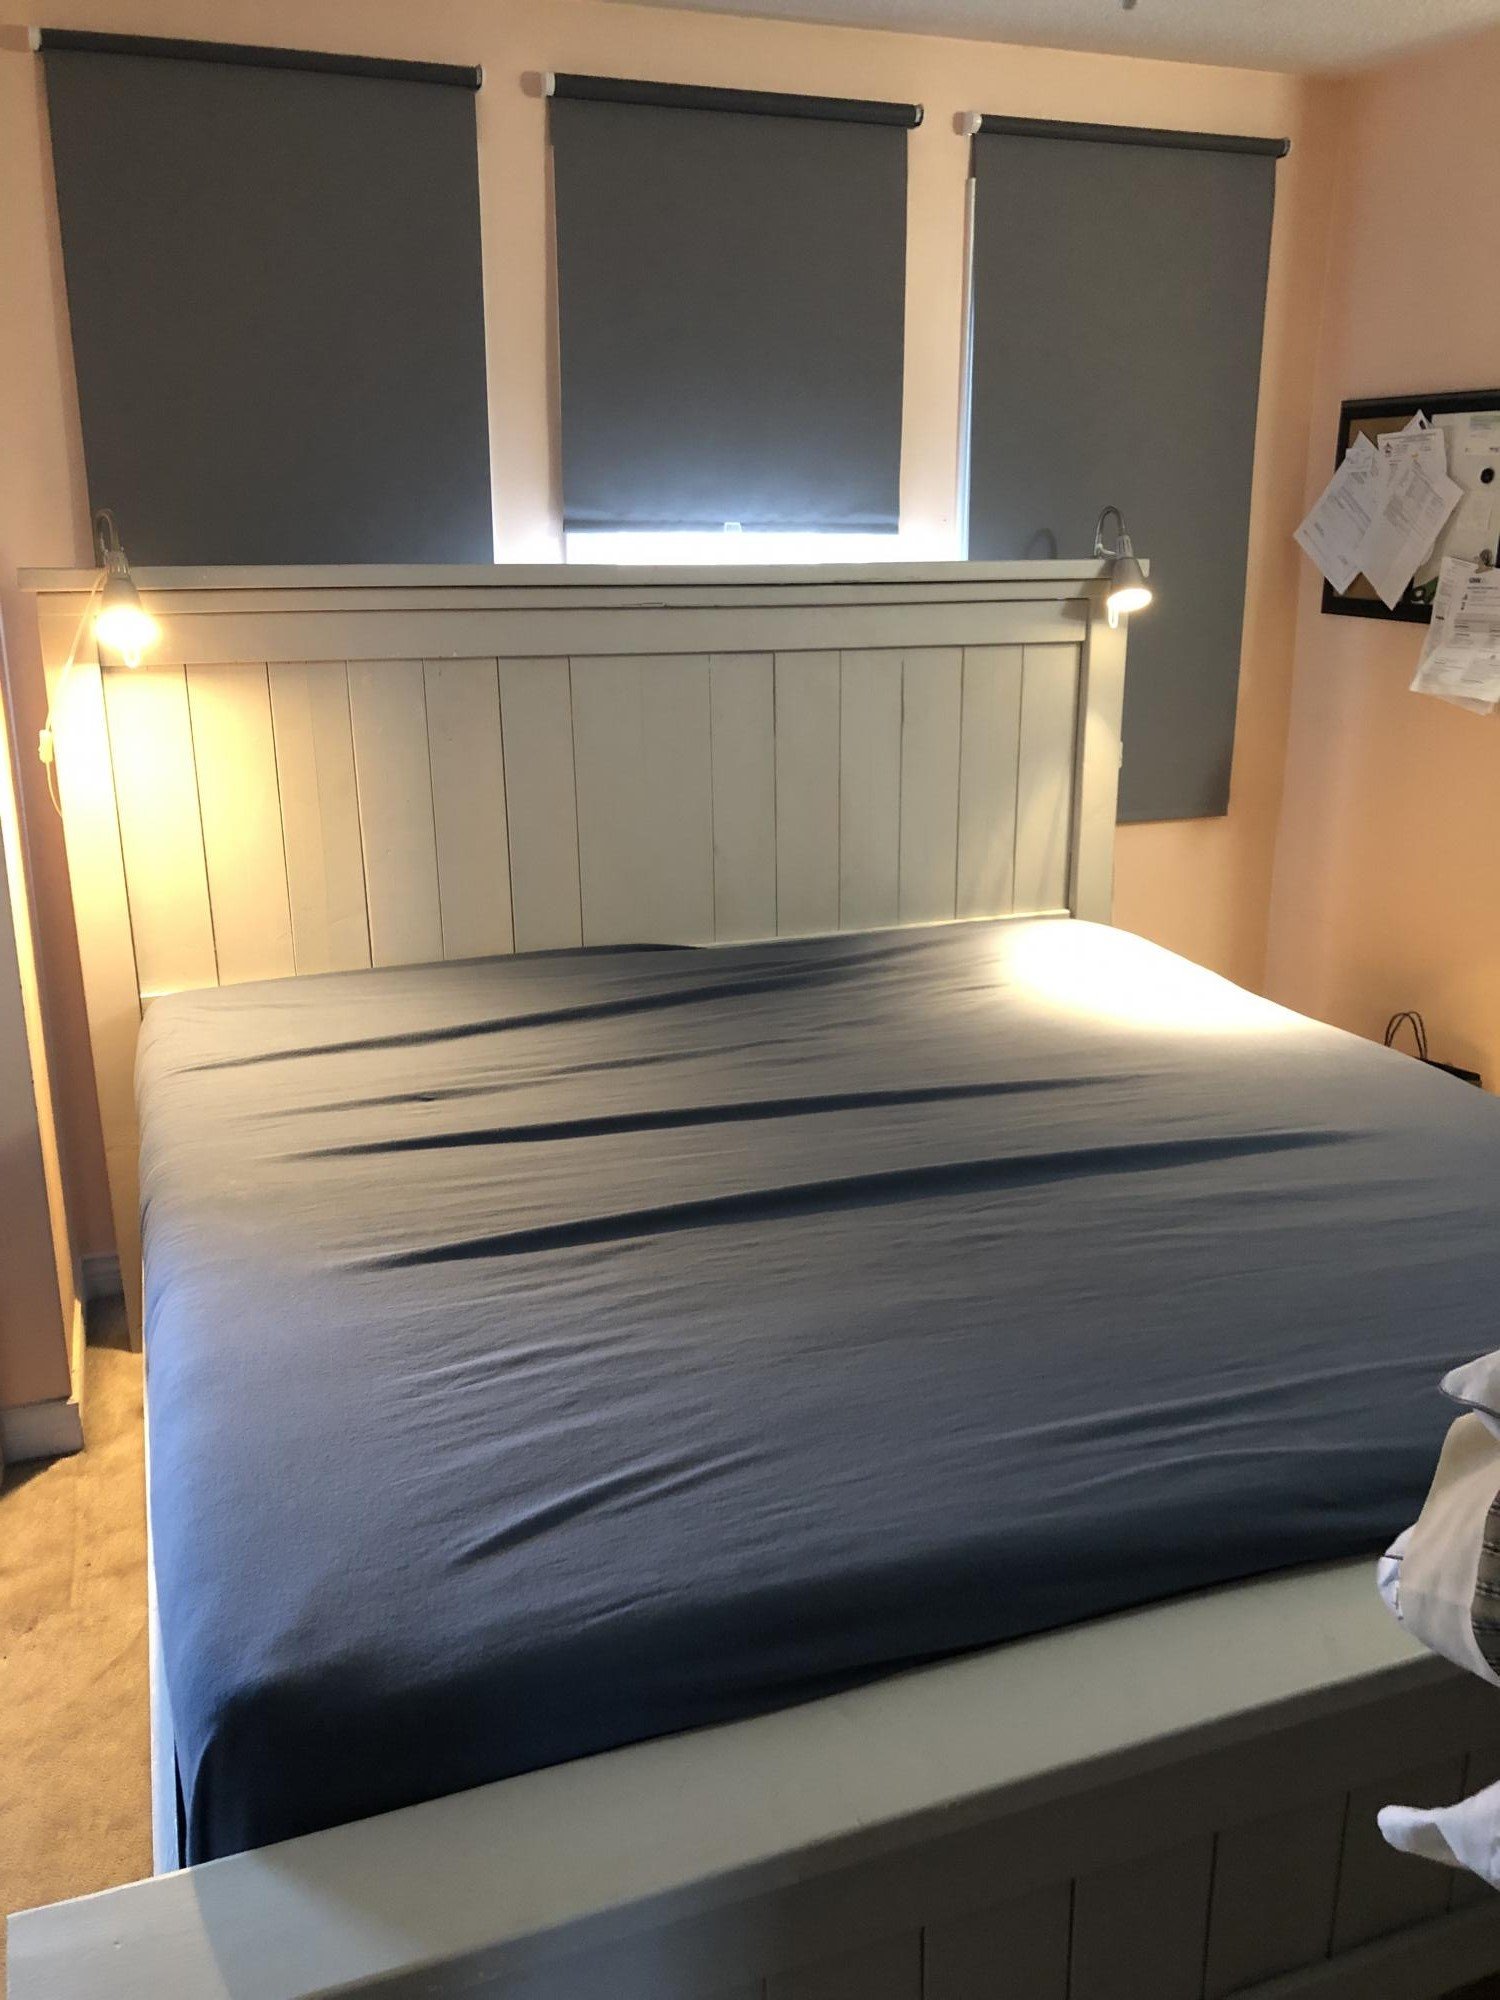
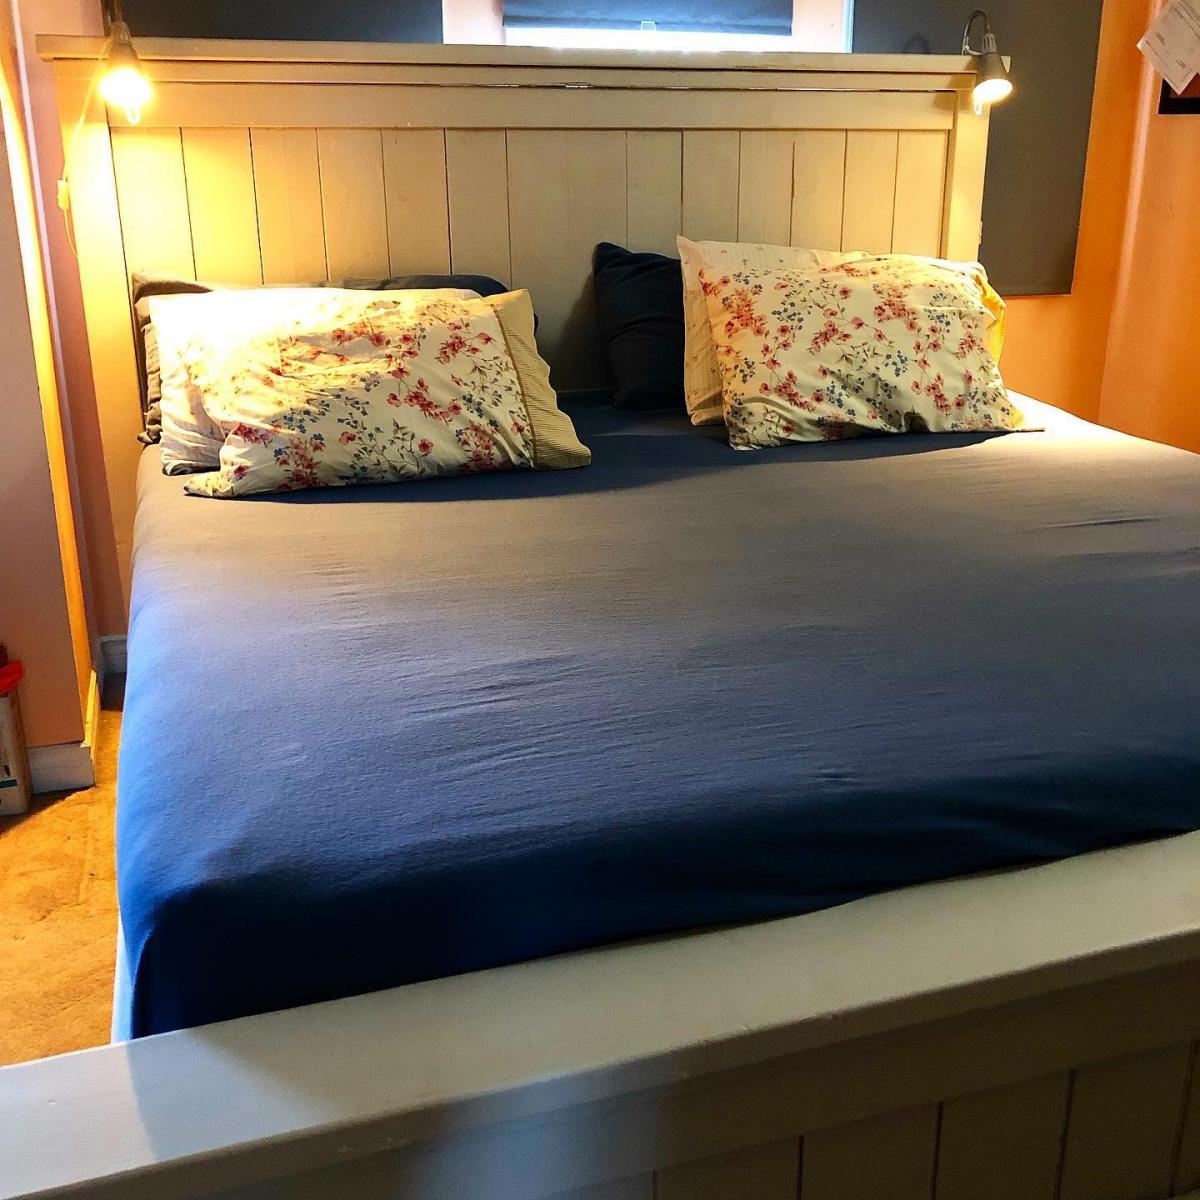
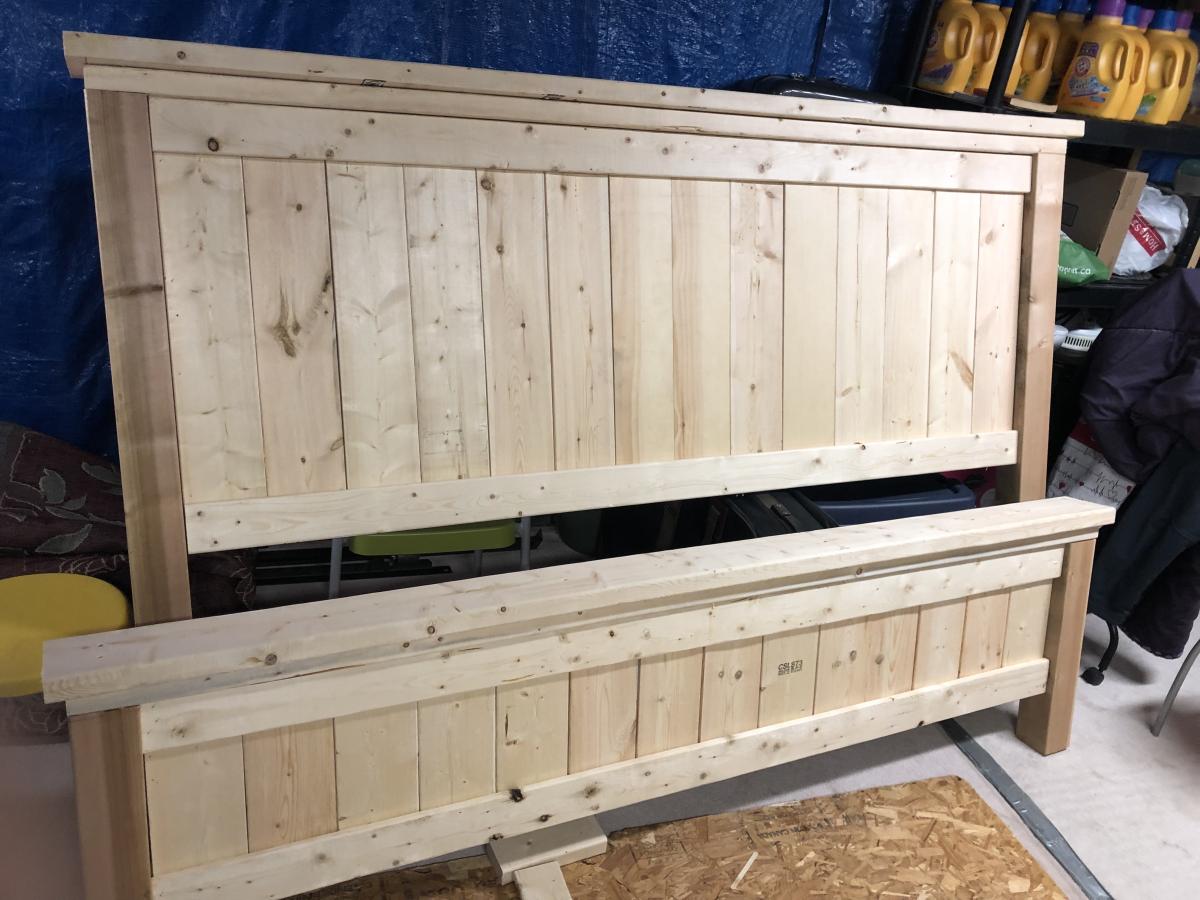
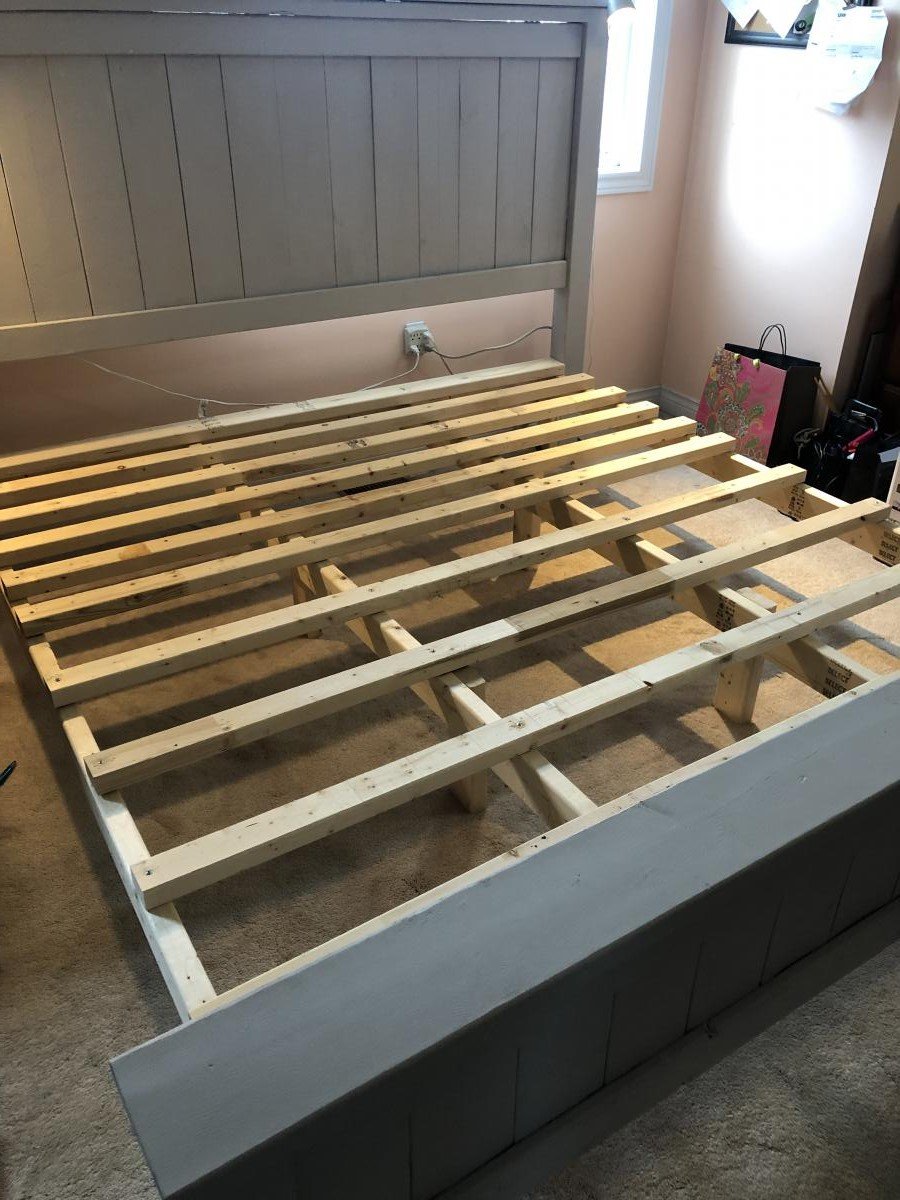
We built this bed actually from a few different styes from this website. We didn't really like the cut out that much - but we loved how low to the ground it was. So we combined the farmhouse bed, with this bed with a west elm bed to come up with this style. I can be happy to say we've sold over 40 of these beds from Double - Kings! We use 2x3" slats for the base. Super strong! Our frame is made out of 2x12's and then the headboard is attached to the base. This is our personal bed & we're so in love with it!
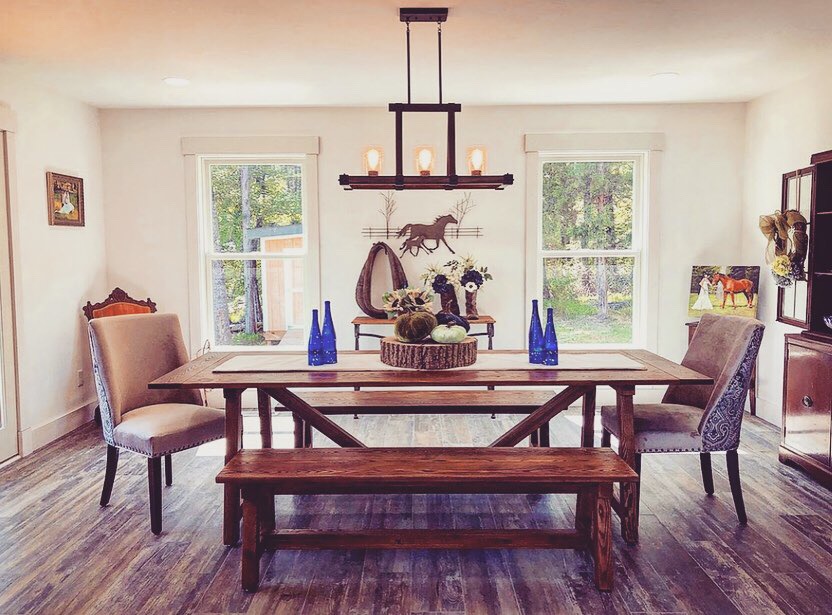
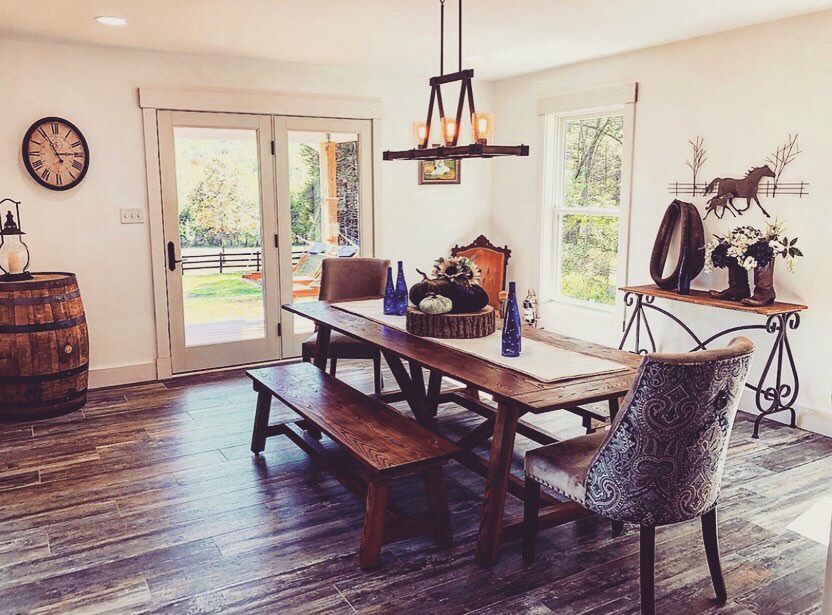
Here is our beautiful truss beam dining table that we built with 100% solid ash hardwood using mortise and tenon joinery and finished in Early American stain! ❤️
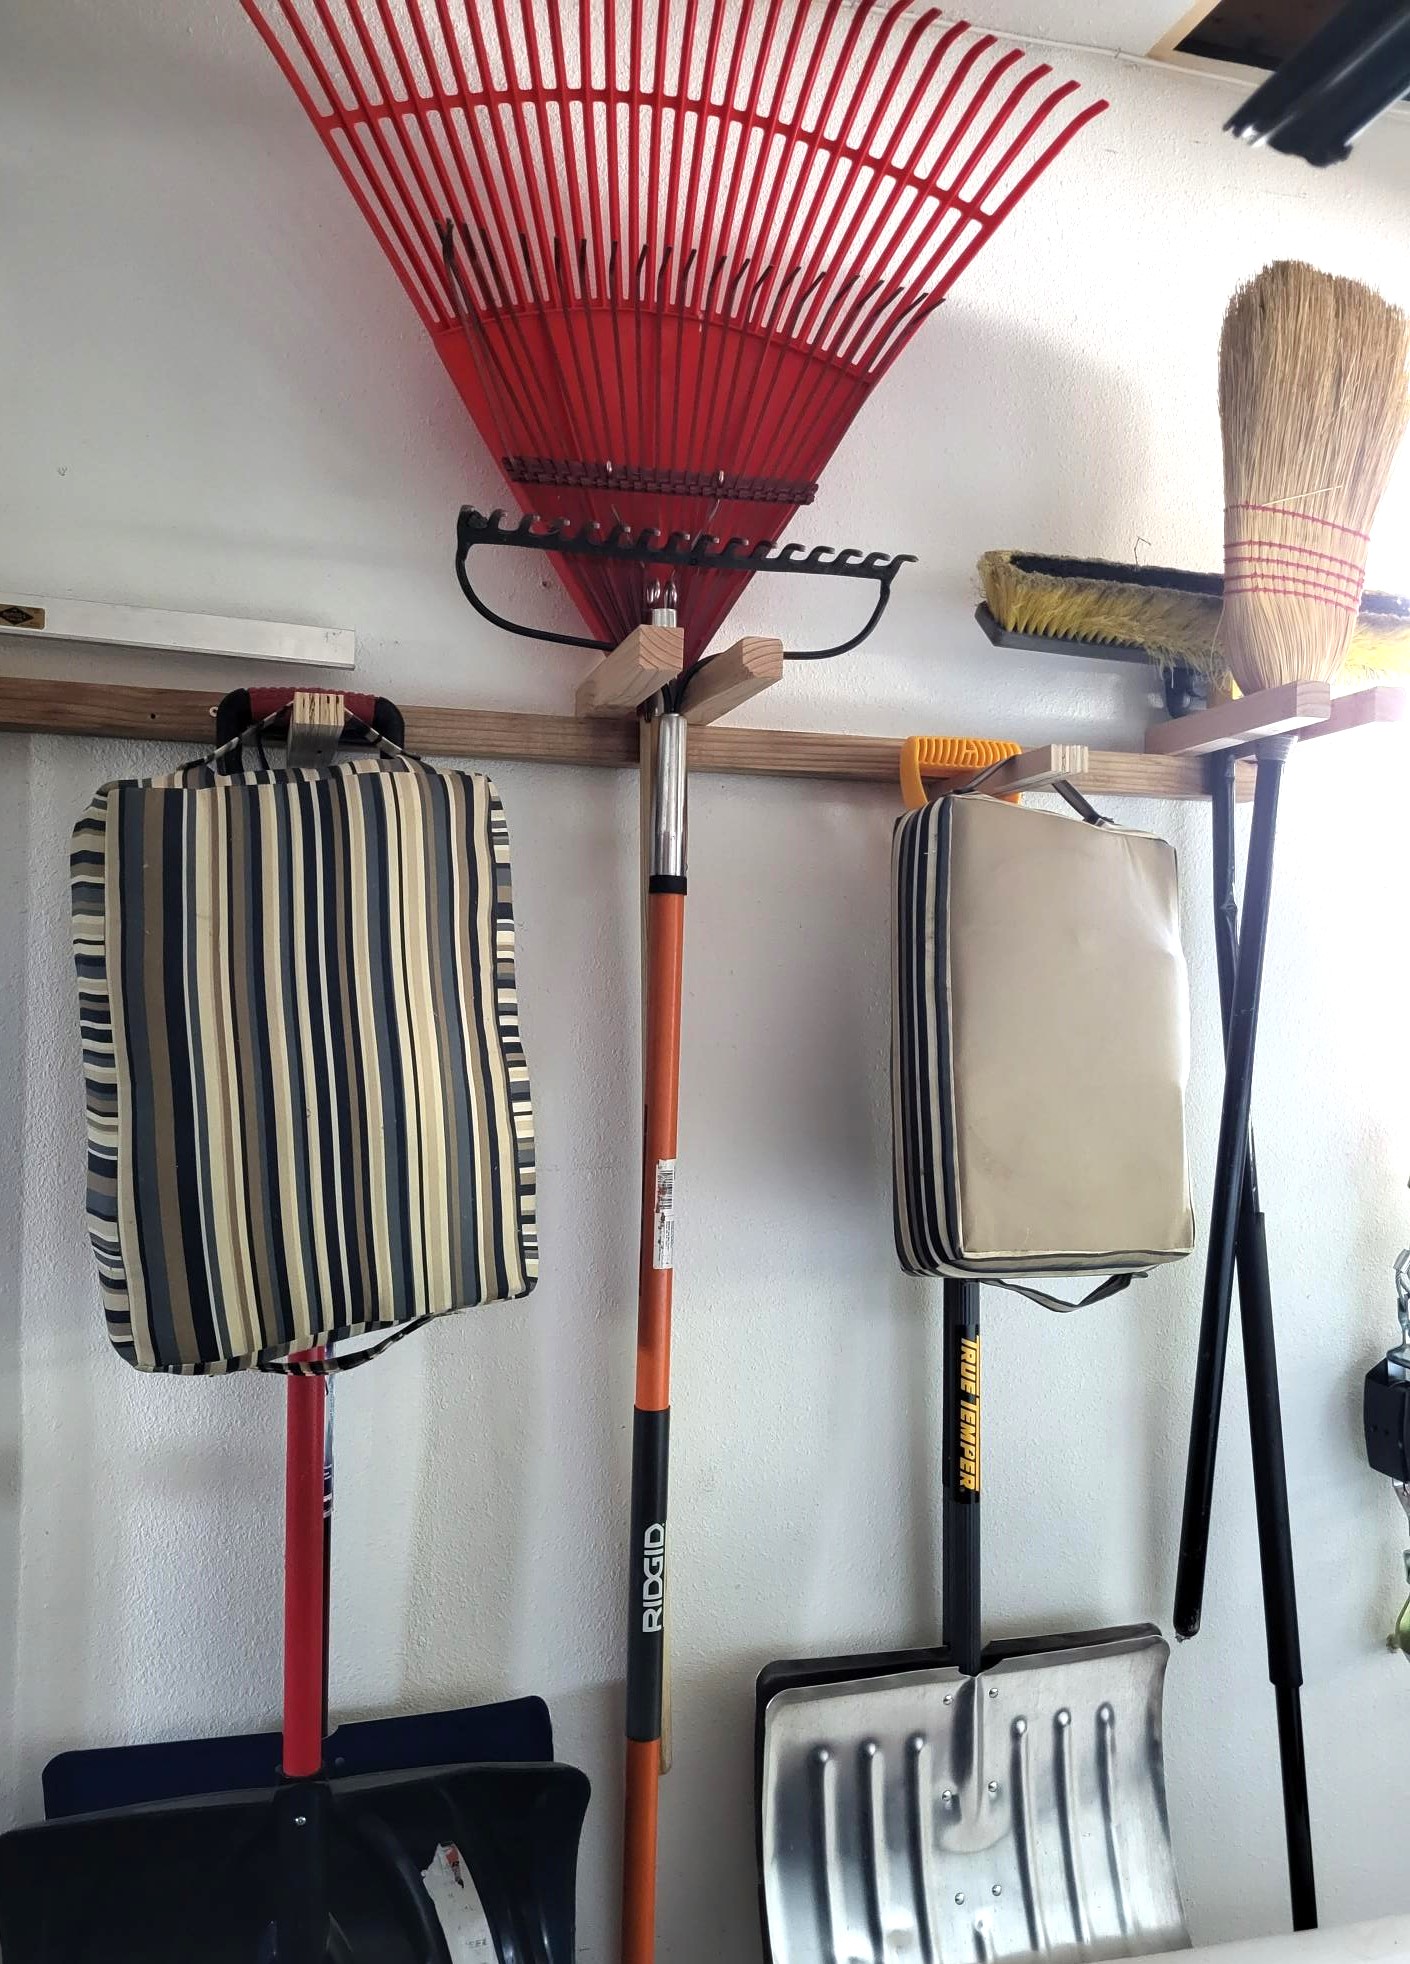
My husband needed a solution for the garage. I showed him your video and he went right to work. We both love it! Thanks for the inspiration and all you do, Ana!
Wed, 06/07/2023 - 11:19
It looks great and functional! Thanks for sharing.
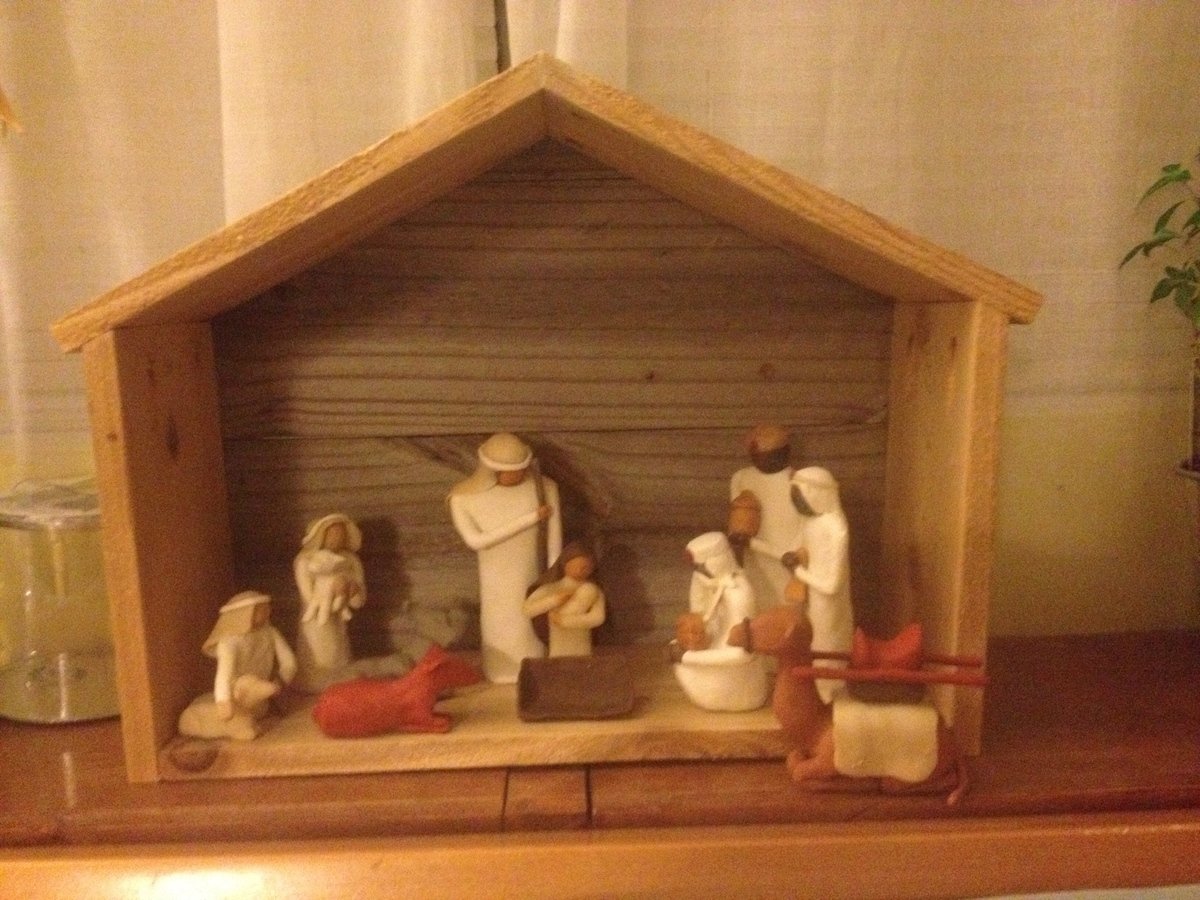
I had been thinking about making something to go with the nativity scene that I made a few years ago, and was so excited to see the plans for this stable this morning. It's less historically accurate, but much easier to build than a cave. =) I had cedar fence picket scraps laying around, so this project didn't cost me anything extra.
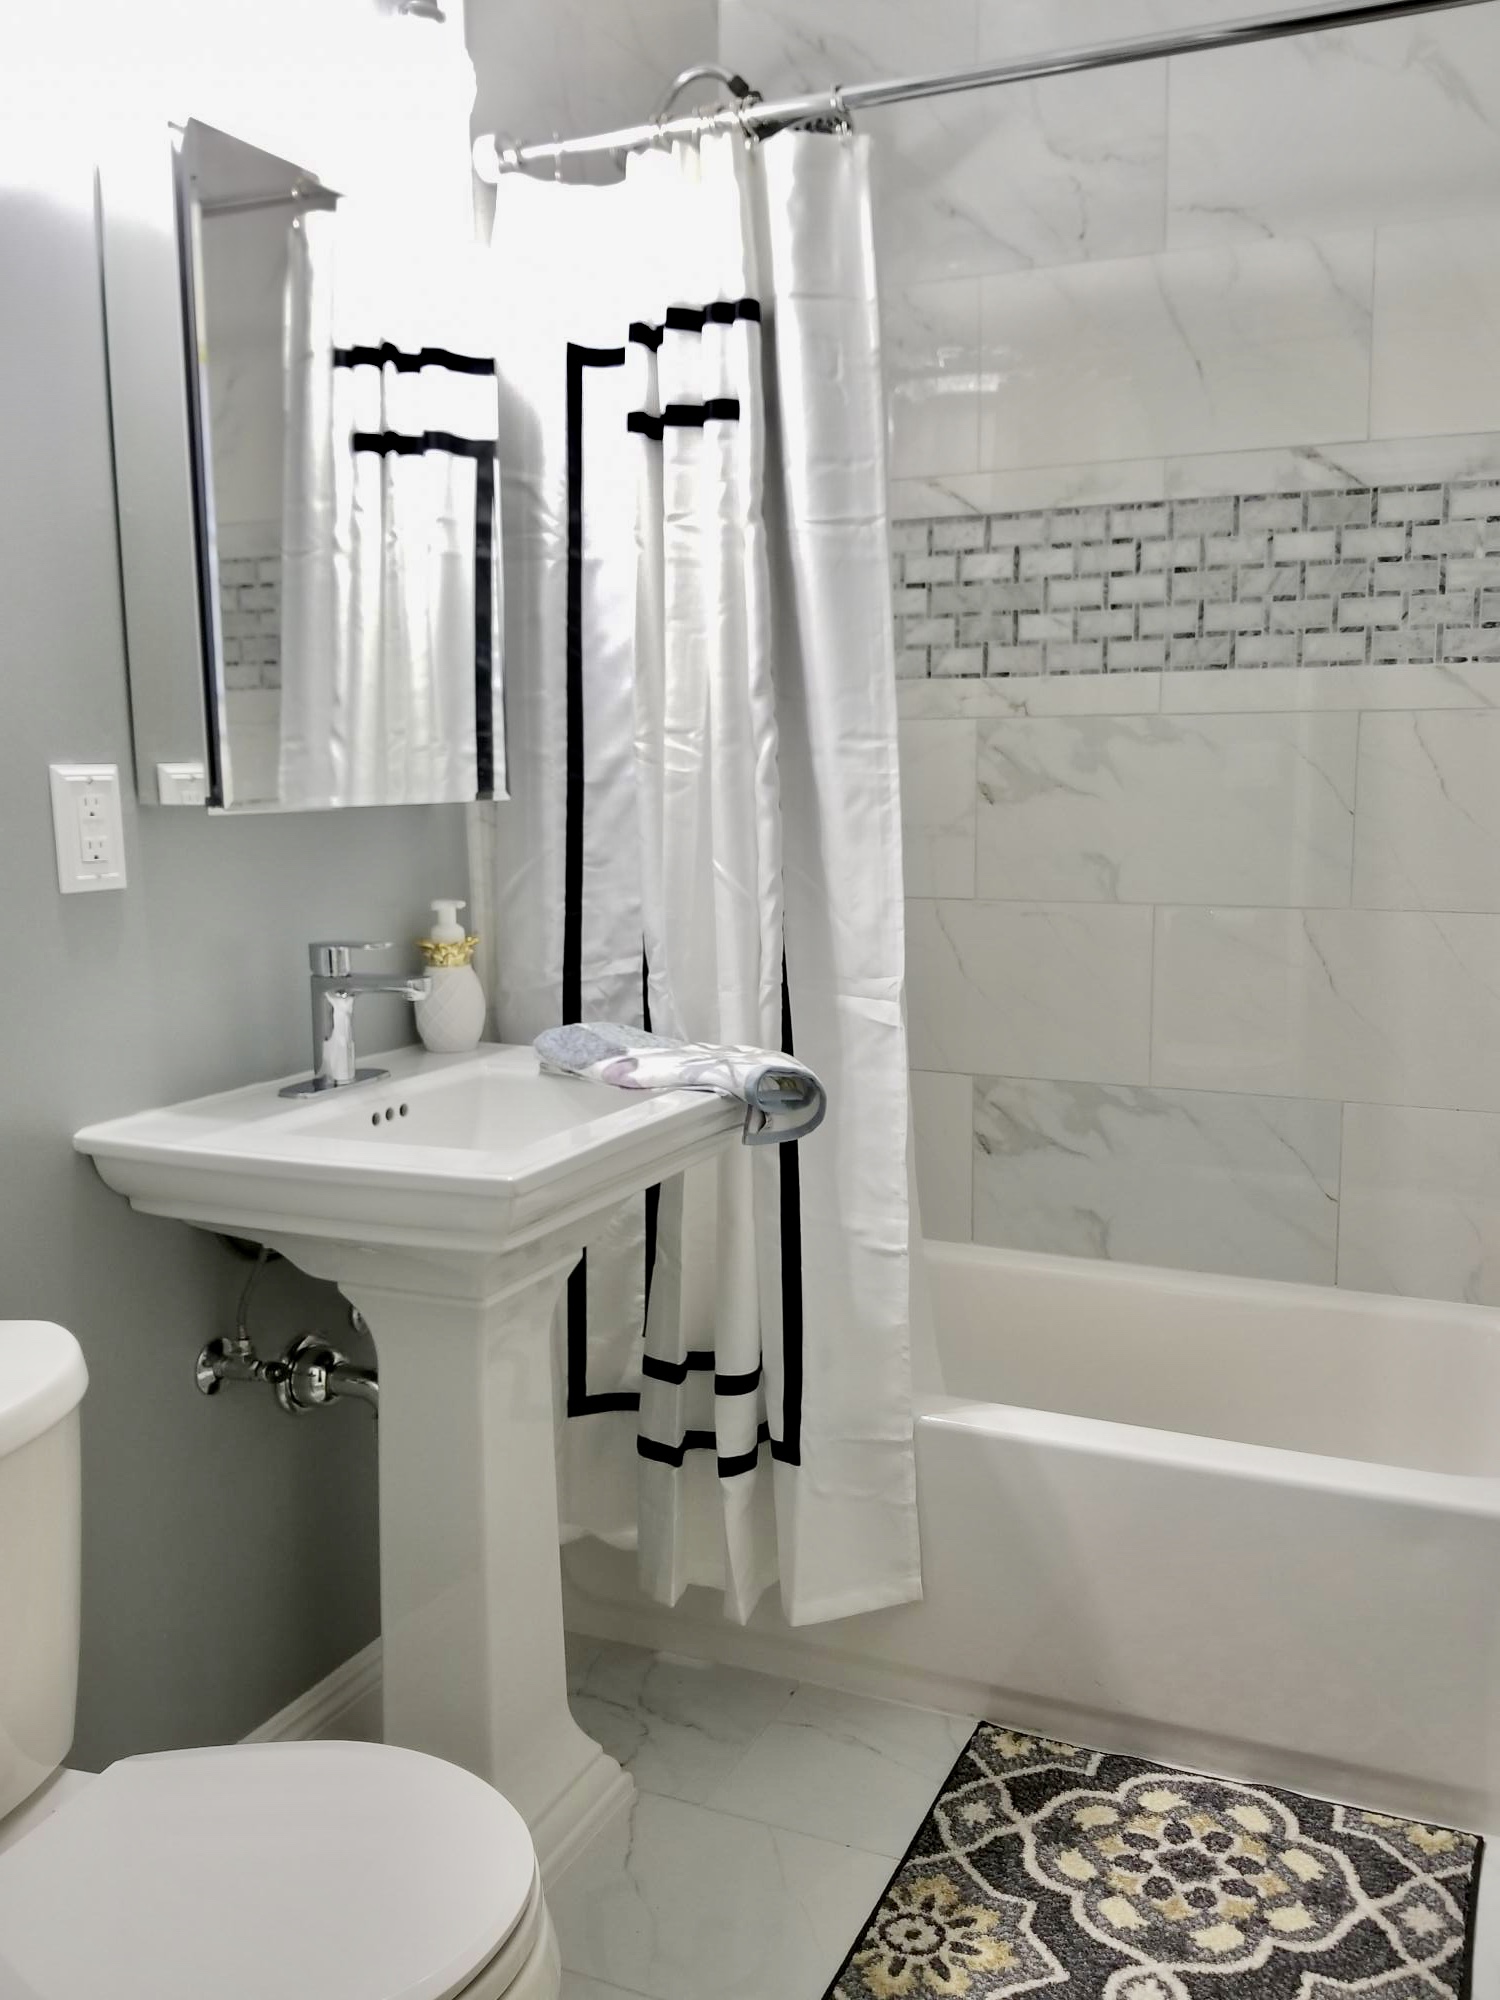
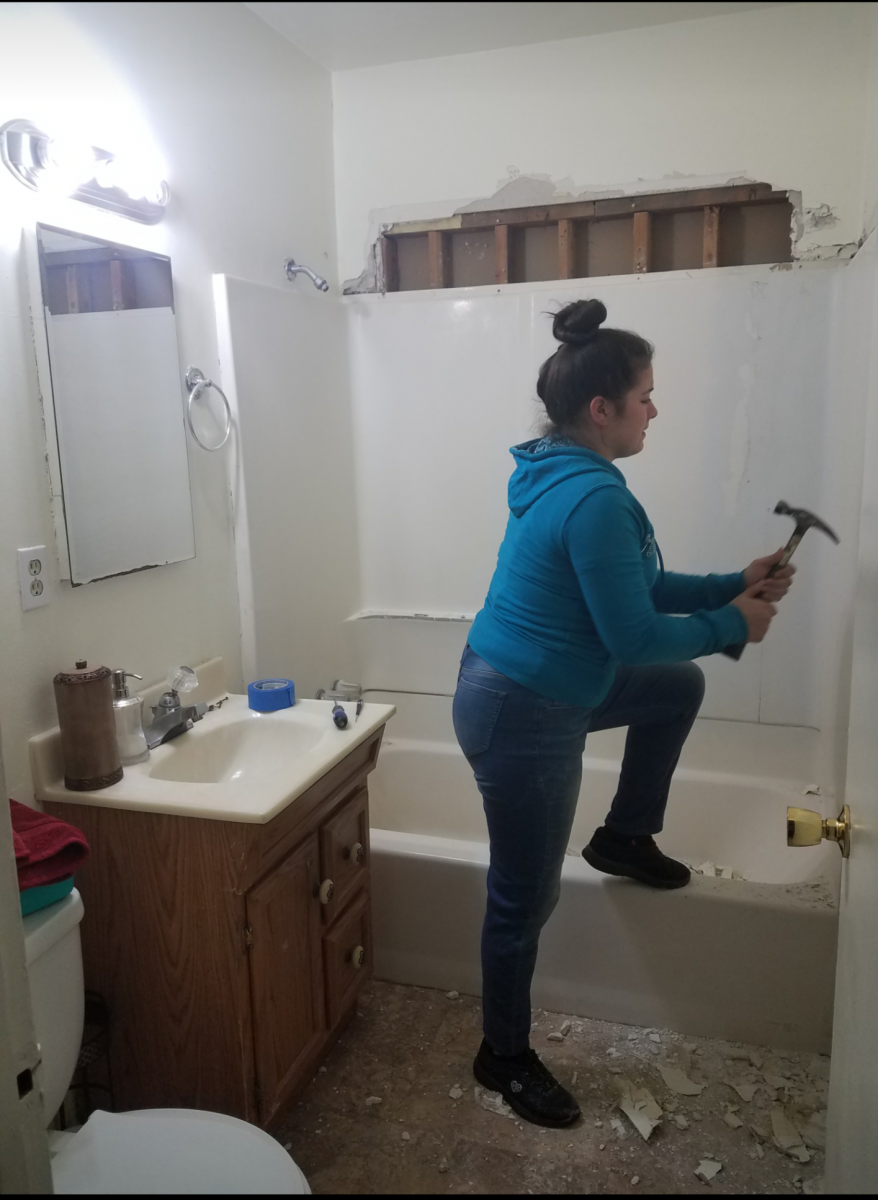
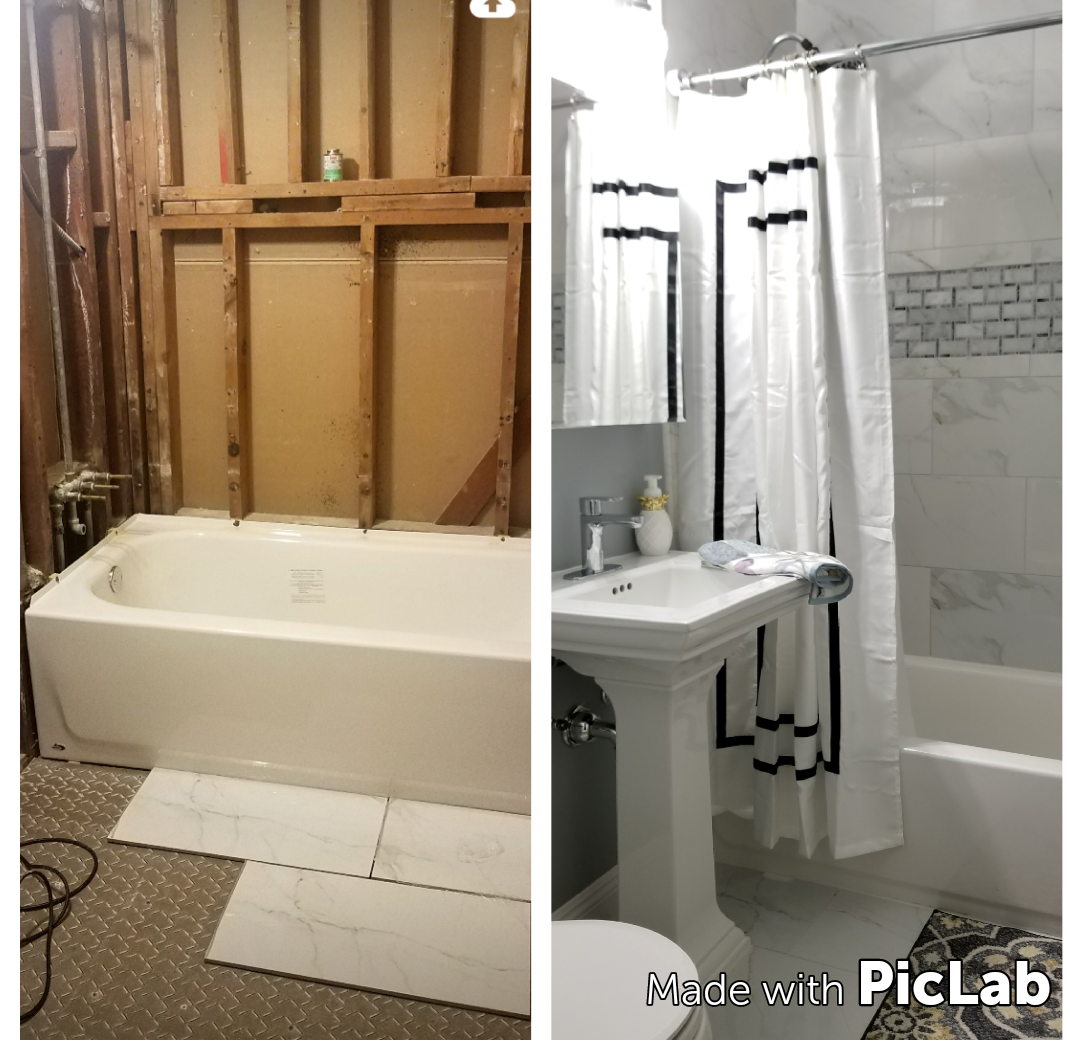
I got a water leak behind the shower walls. And I started calling for Bathroom remodel quotes..but the pricing quote wasn't not even close to what I had I'm in my budget.so I decided to watching YouTube videos..and I got my design inspiration from the Pinterest app ...and I decided to start my own Diy Bathroom remodel. The rest is history.

Wed, 10/02/2019 - 22:55
Amazing, looks like a whole different bathroom!!!
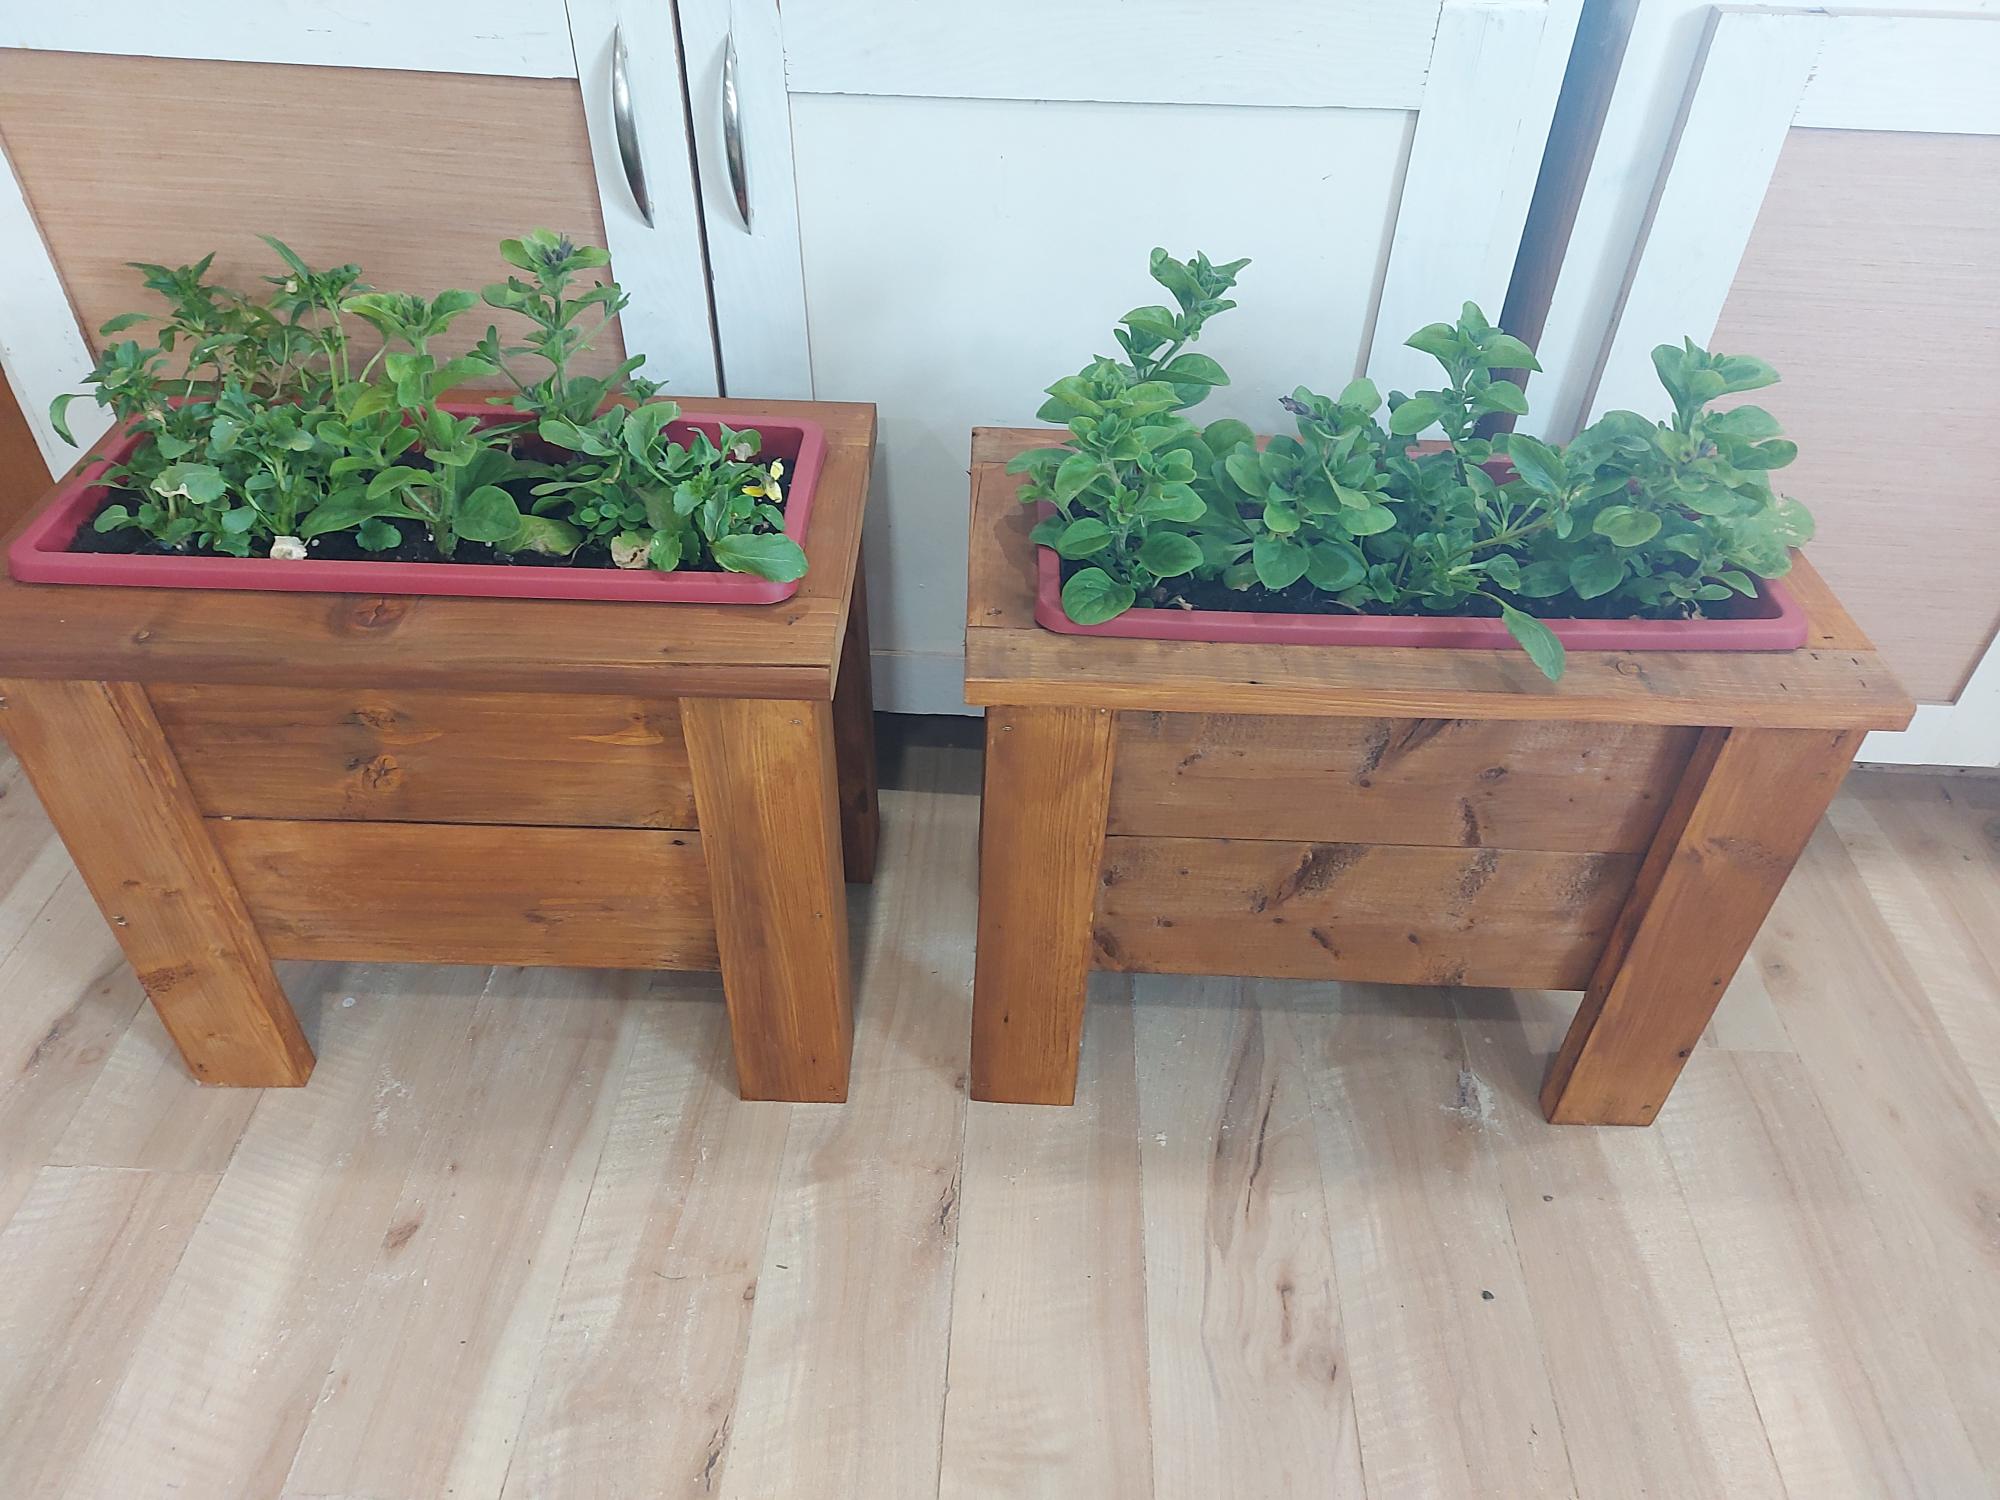
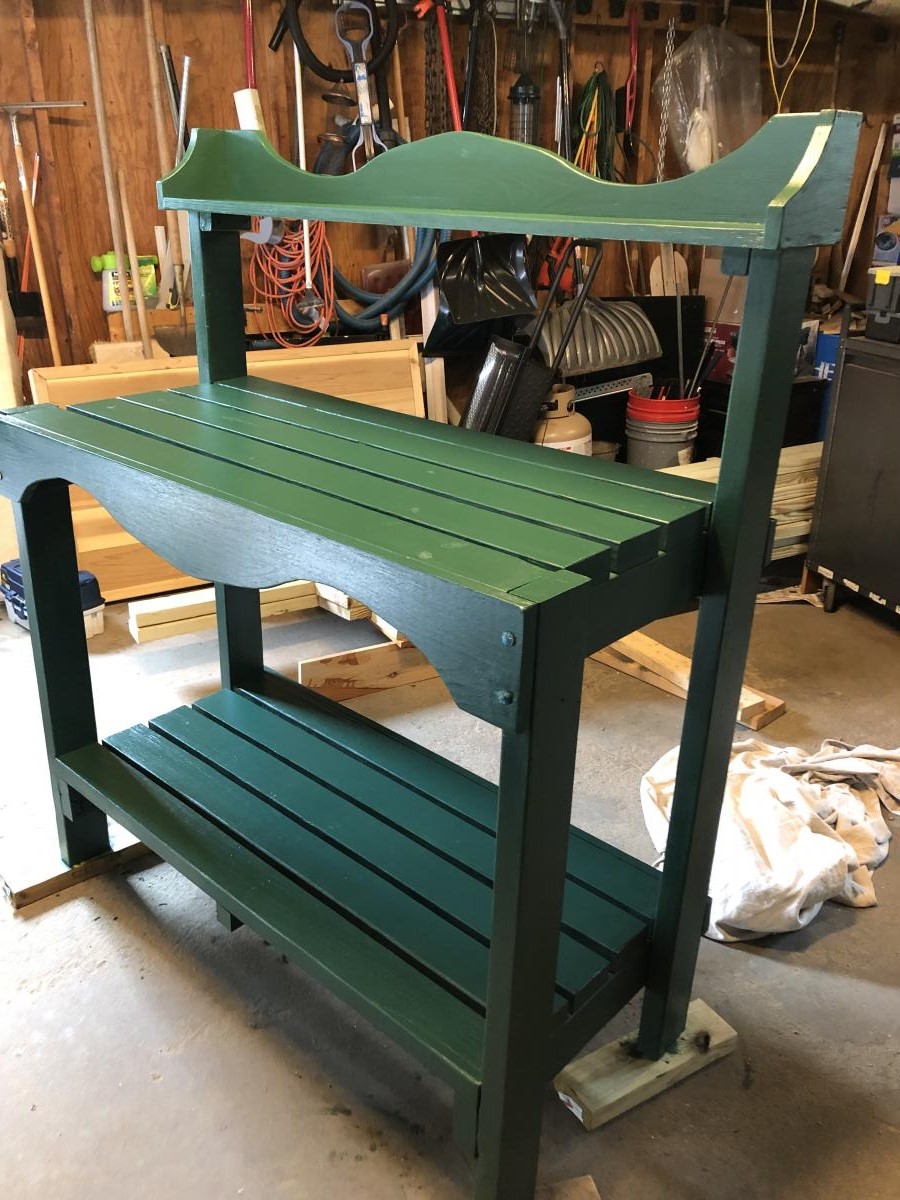
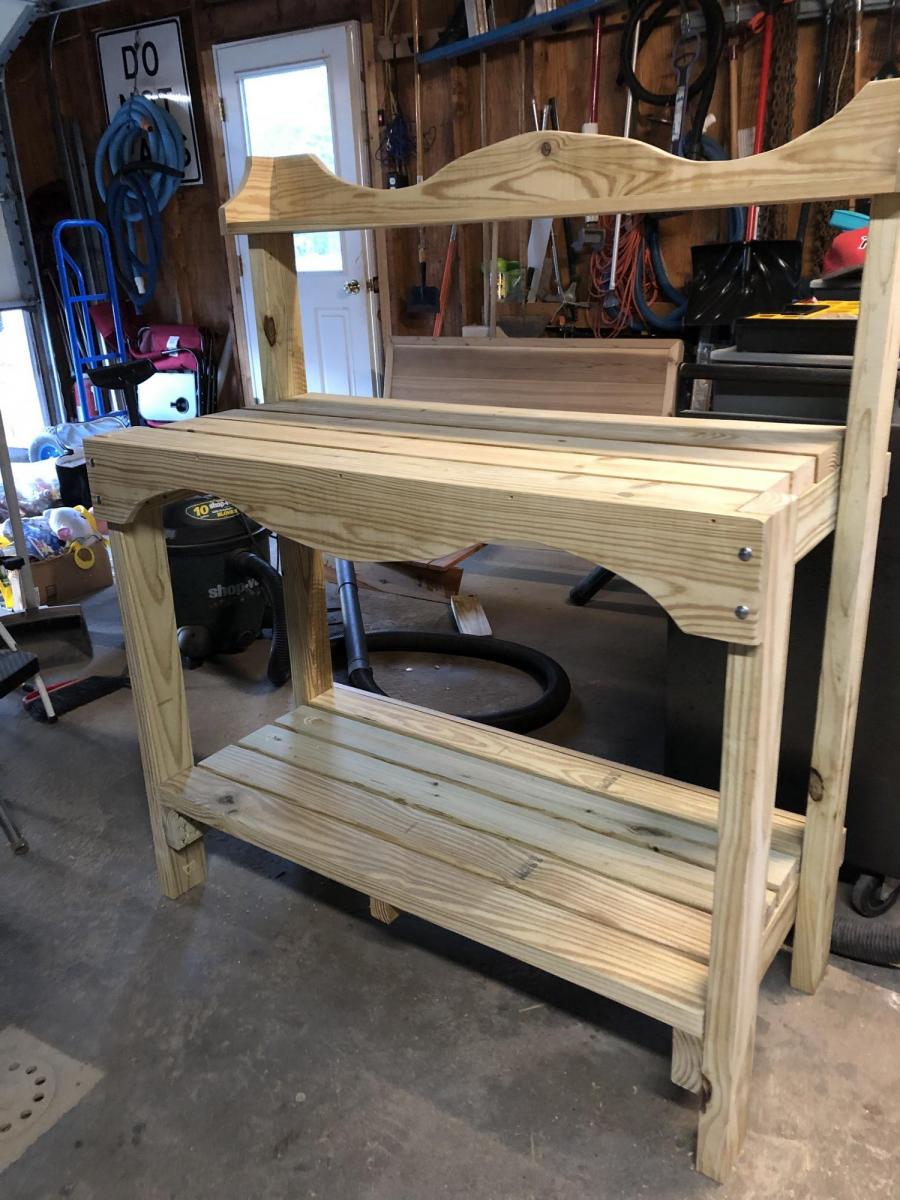
Made these to fit Dollarstore pots. These plans were so easy to follow and adjust for pot size. I used scrap wood and sealed them with a stain sealant. I love your plans!
Denise
New Brunswick, Canada

Tue, 06/13/2023 - 08:51
Brilliant, please send more photos to [email protected] if you get a chance. I'd love to see more angles after you get them in place!
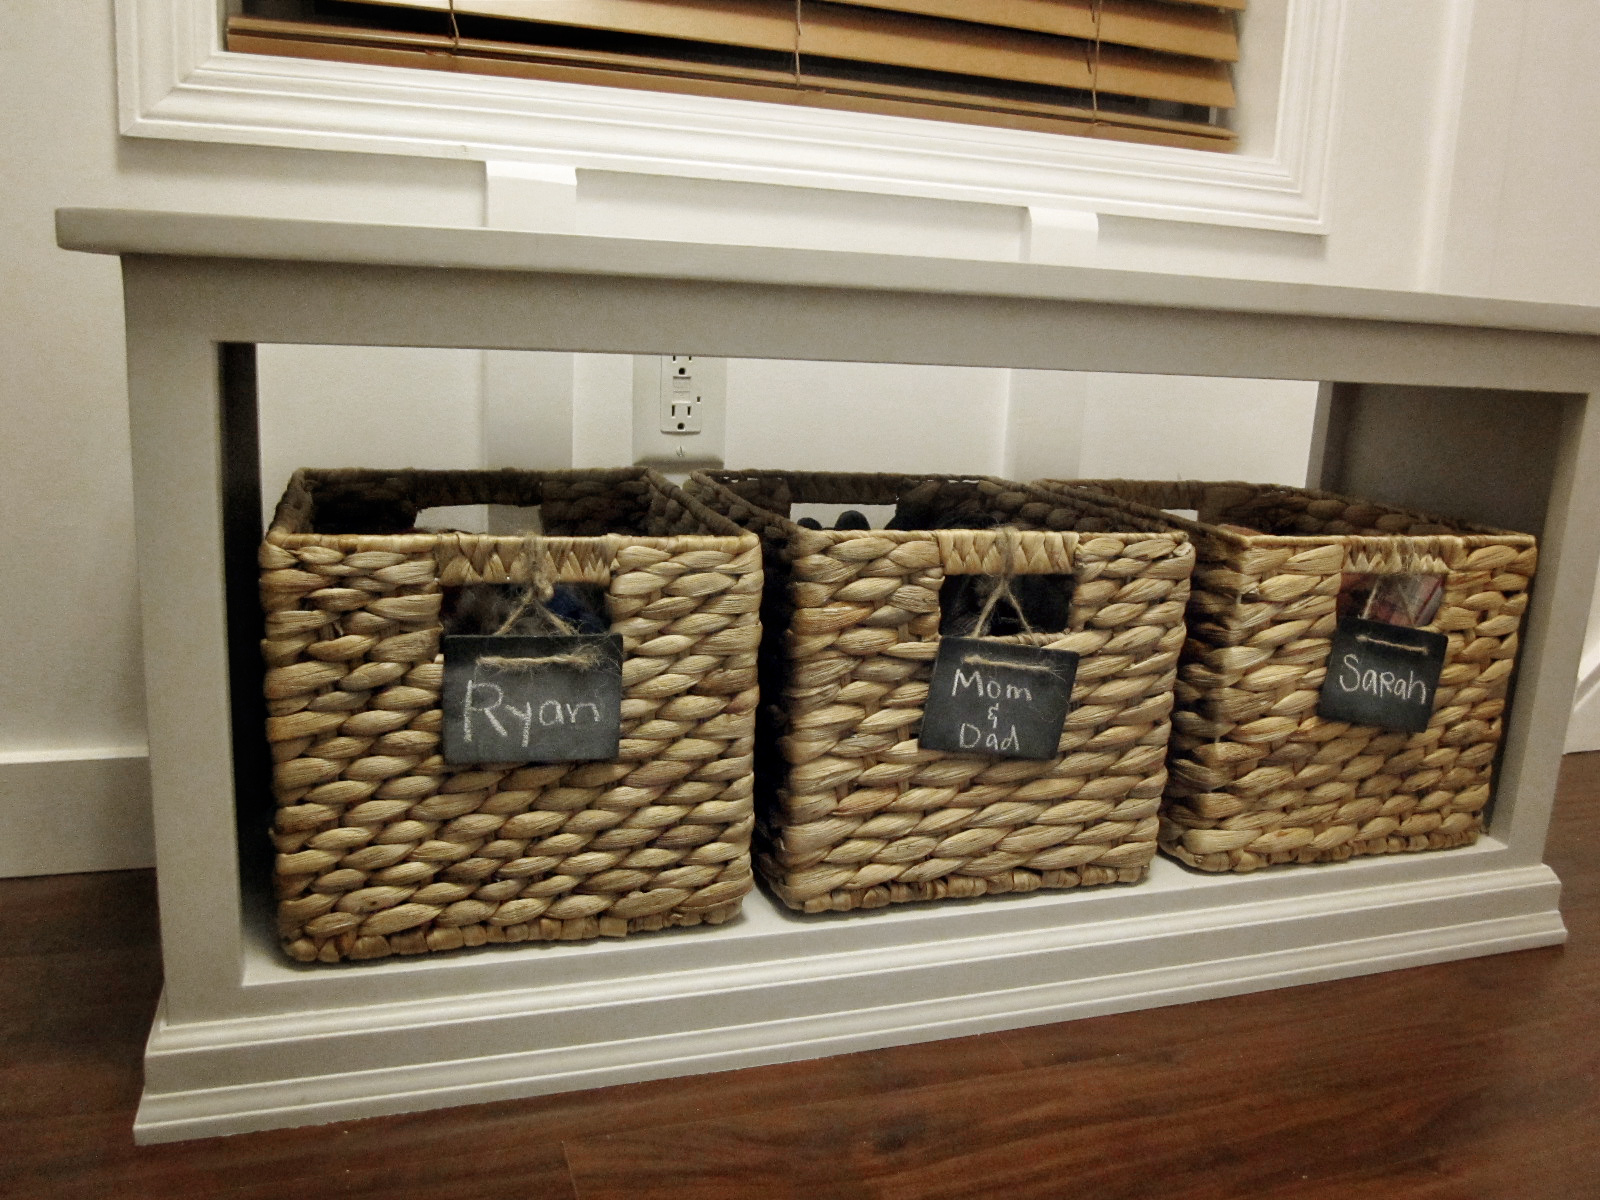
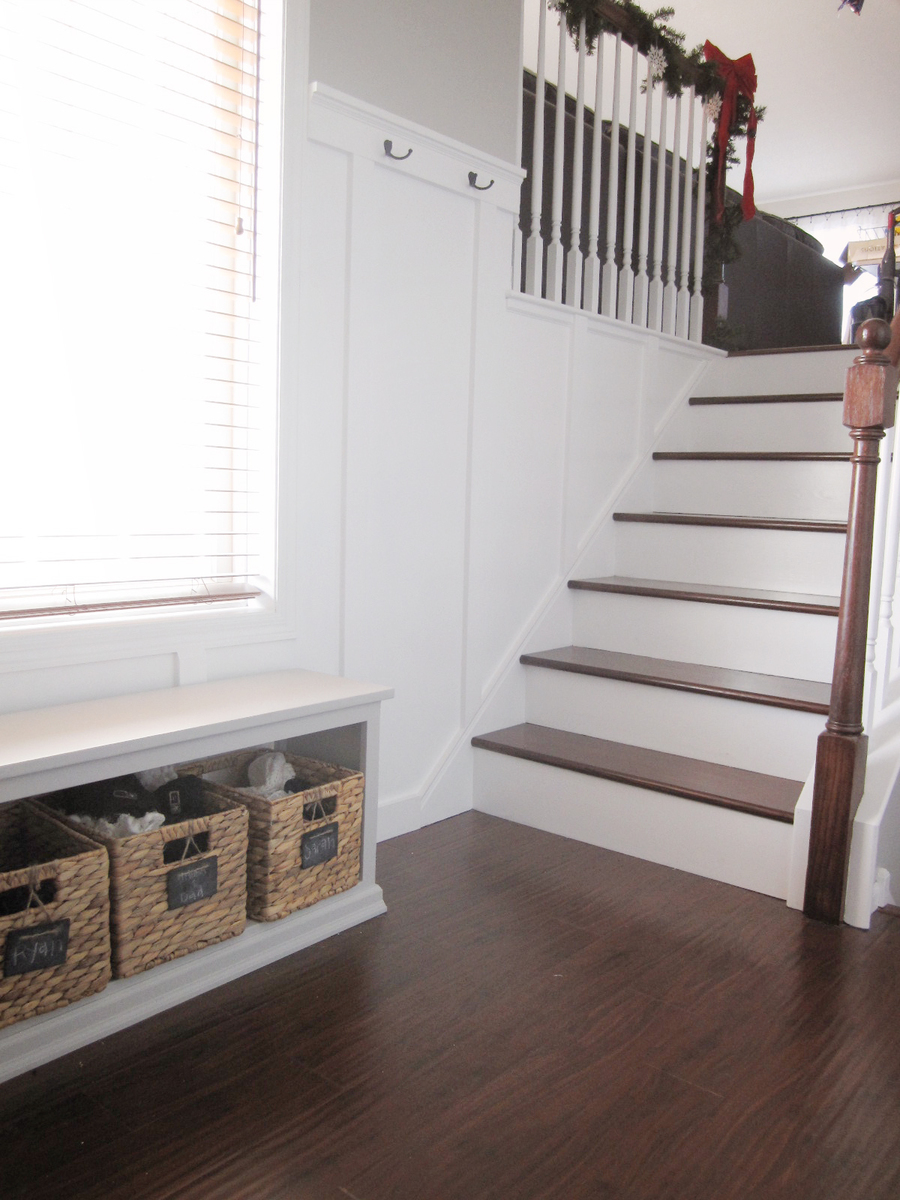
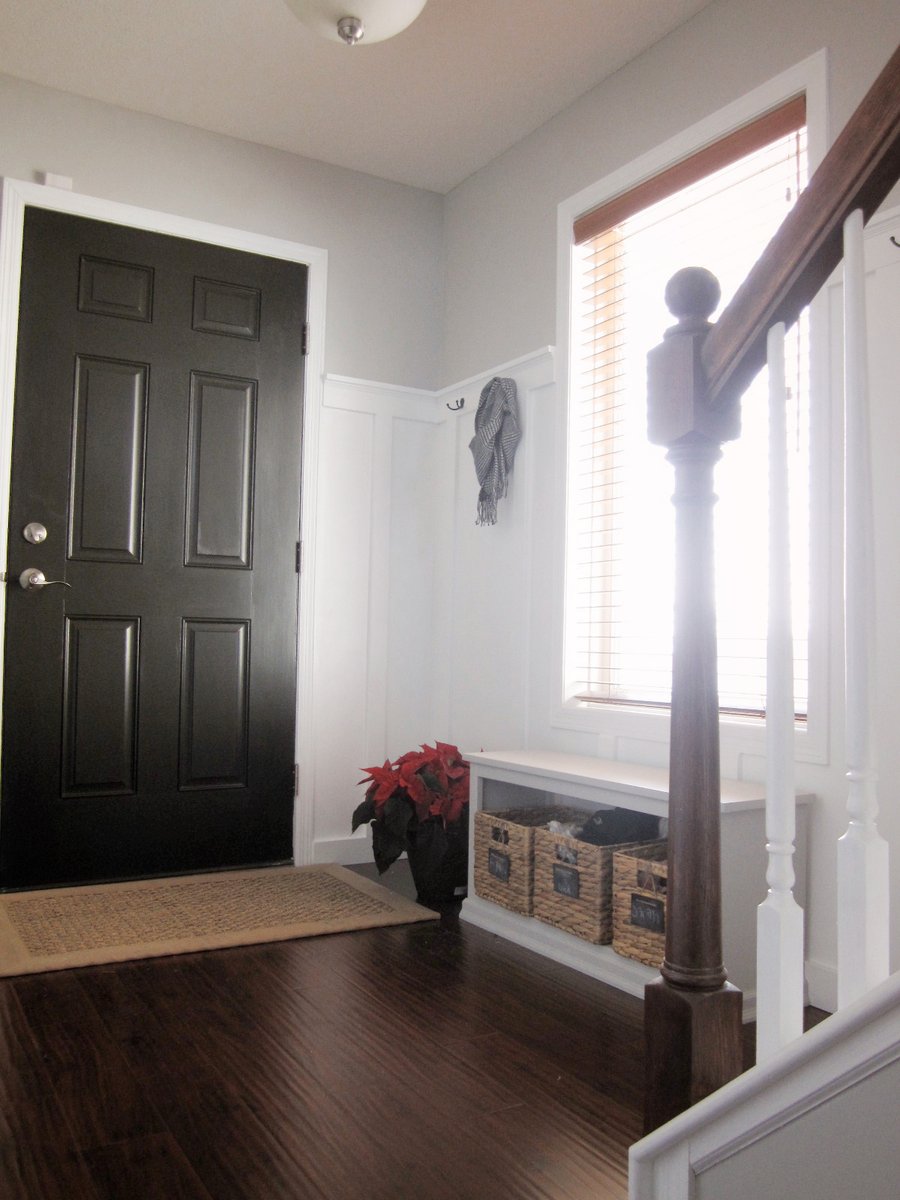
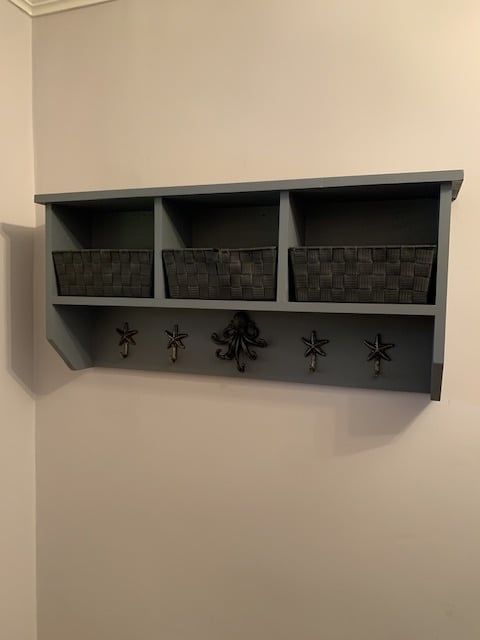
I picked this bench because our entryway isn't very big and this was small enough that I didn't have to make any alterations to the size.

Mon, 01/30/2012 - 14:04
It looks really nice, I like the paint color and the baskets are cute!

Mon, 01/30/2012 - 15:05
That looks great! It looks great on it's own, but it also looks fab in your beautiful house!
Tue, 01/31/2012 - 11:58
What type of floor is that and color, it's beautiful!, as well as the bench,love it
Wed, 02/01/2012 - 09:00
Thanks for the compliment on our floors!! My husband and I just installed them a few months ago. I love them but I'm always a little embarrassed to say this, because I'm a bit of a wood snob, but it's laminate. Kensington Manor 12mm Imperial Teak Handscraped, from Lumber Liquidator. We bought it when it was on sale for $1.99 a square foot. Can't beat that!
Thu, 04/05/2012 - 05:49
these things looks realy nice,i would like to appreciate u
Did this in January 2013.
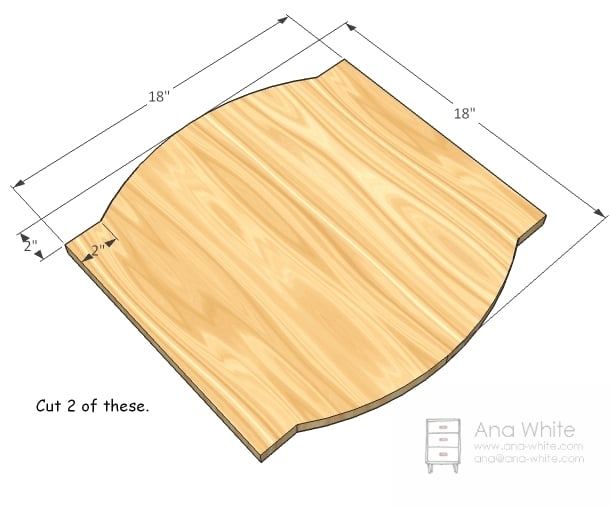
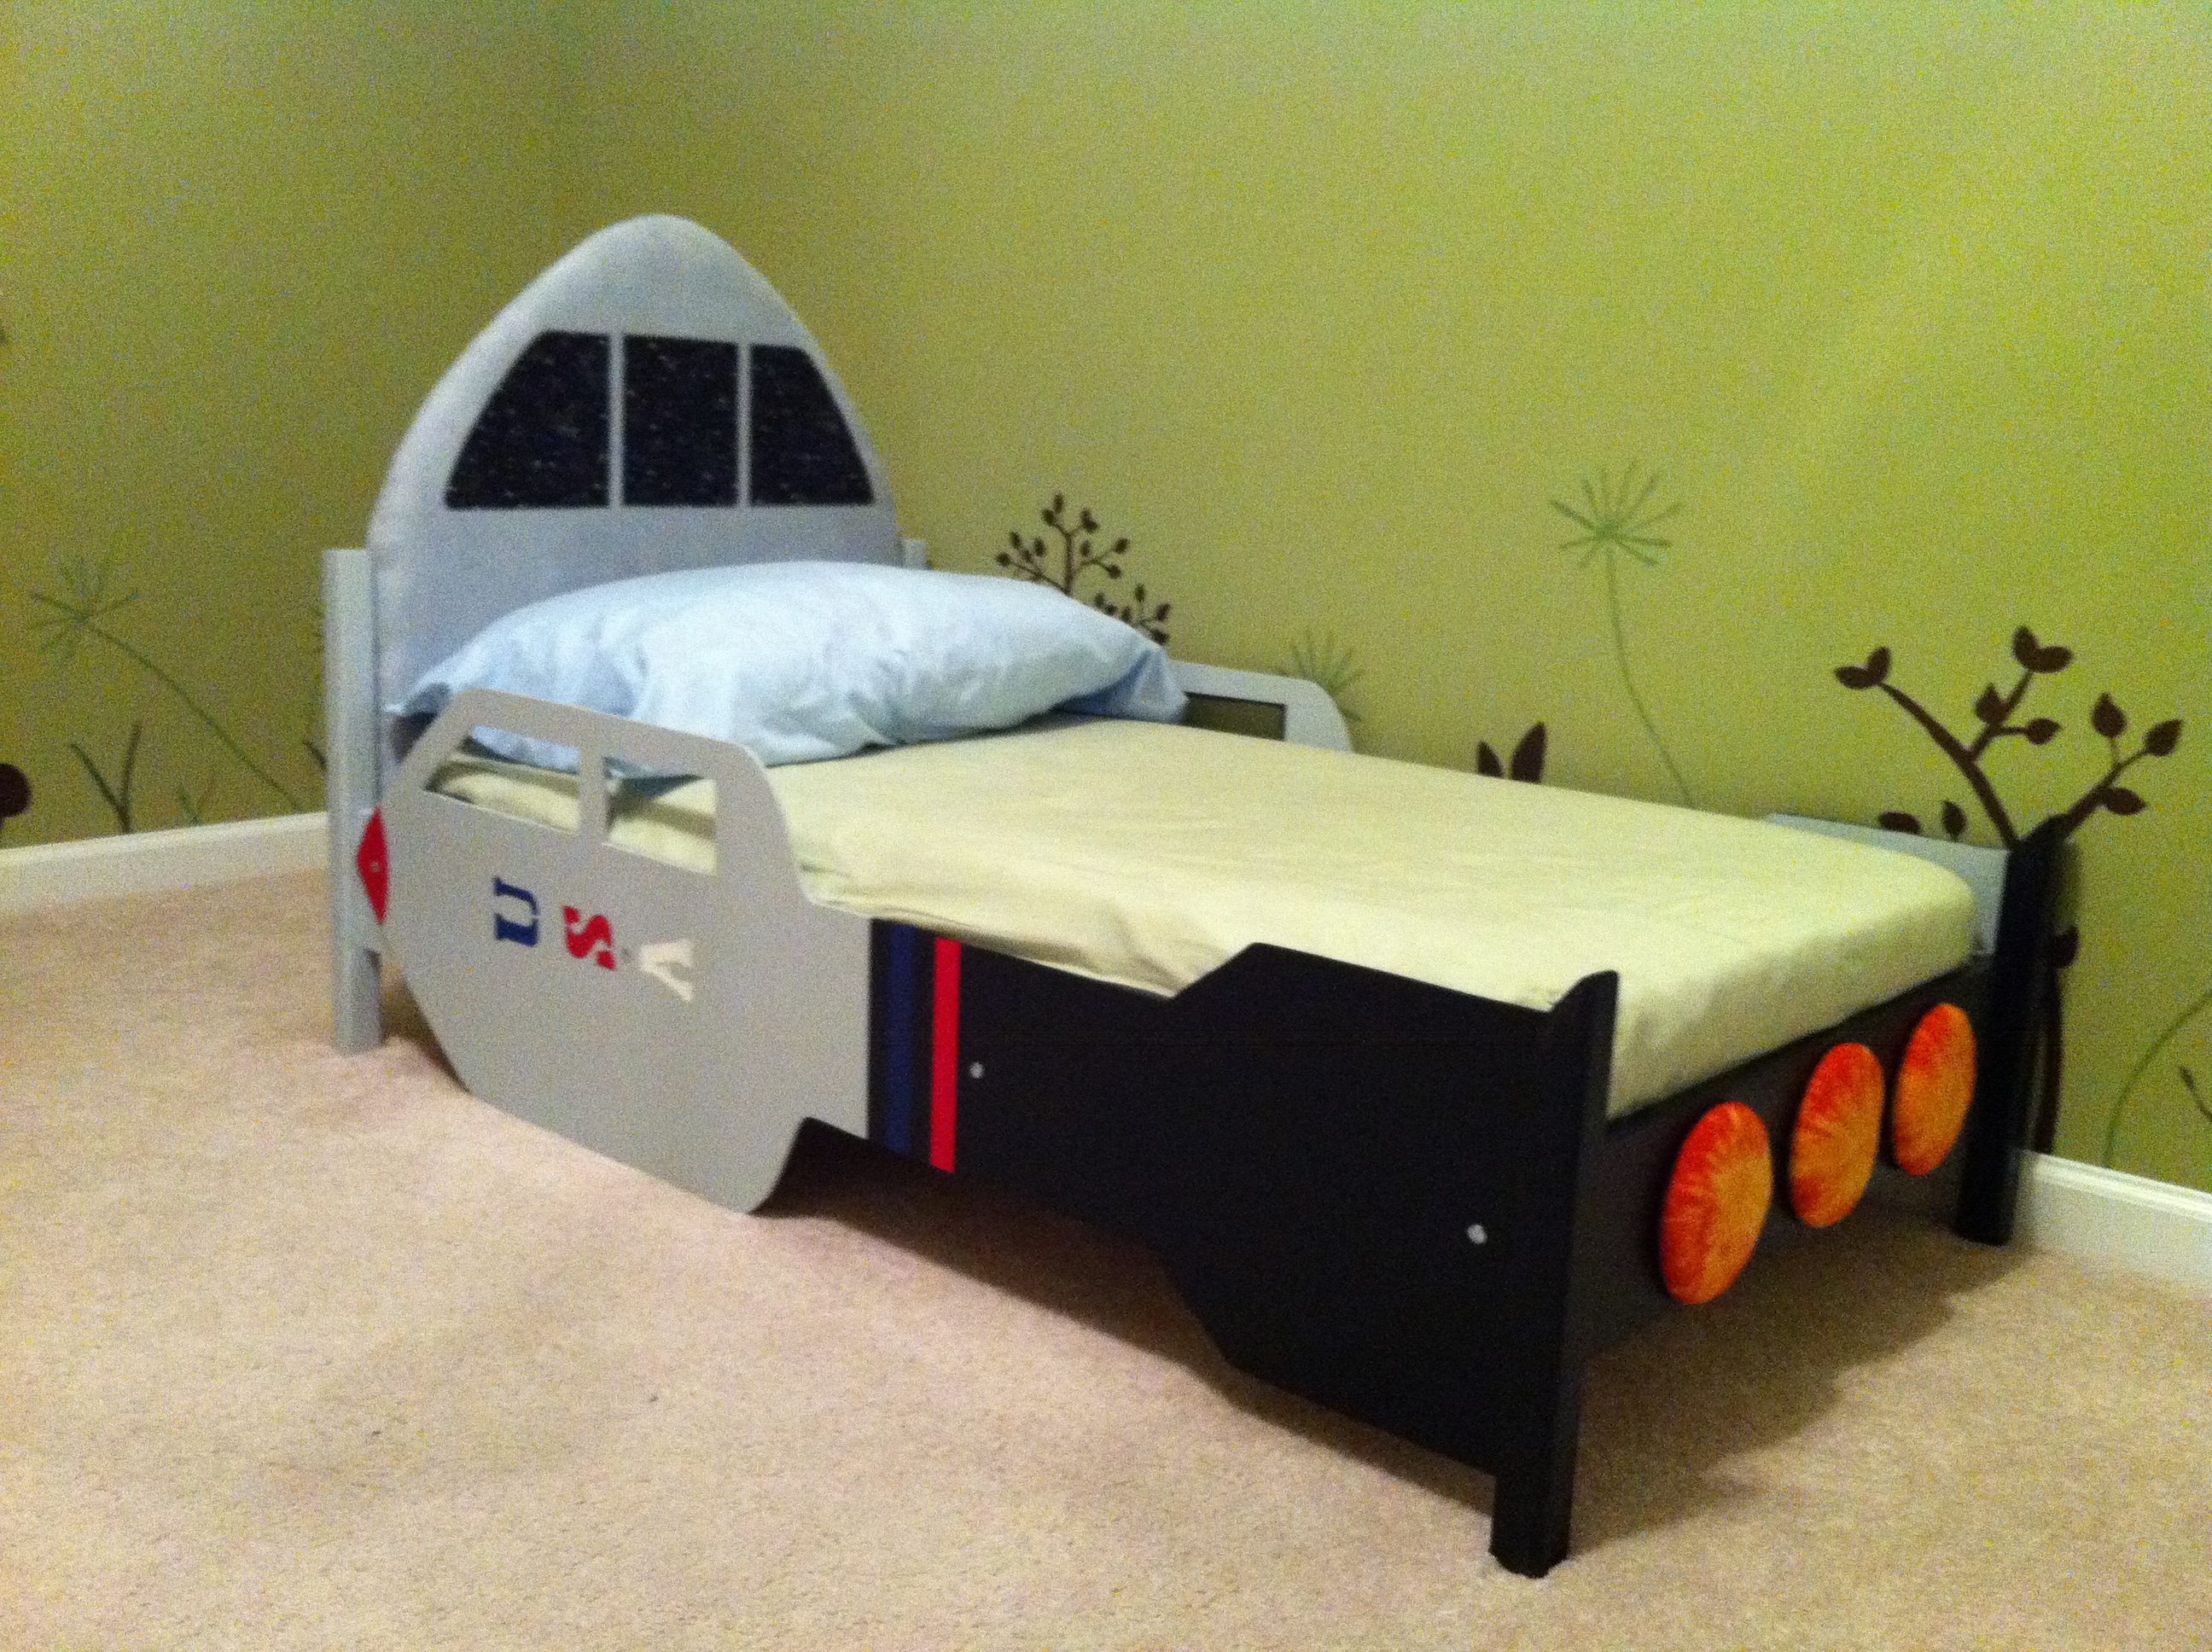
Slight alteration of the Traditional Wood Toddler bed:
http://ana-white.com/2011/10/traditional-wood-toddler-bed
Made the rear posts taller so I could cutoff the triangle shape for the rockets. The front is the same with no real headboard just some support and used a custom upholstered padded headboard there for the view from the cockpit. The sides are cut out of thin plywood and screwed onto the bad (eliminated rails). The rocket engines are upholstered circles I cut.
The main bed is cheap, easy, and quick to build. Designing the rockets, and painting and polying the whole thing are what takes most of the time (along with trying to get everything to dry in my garage in the middle of winter). The fabric, stencils, and paint probably cost as much as the wood.
I thought I had more pics and I probably still have my scribbles for measurements and cuts (if for some reason someone wants them).
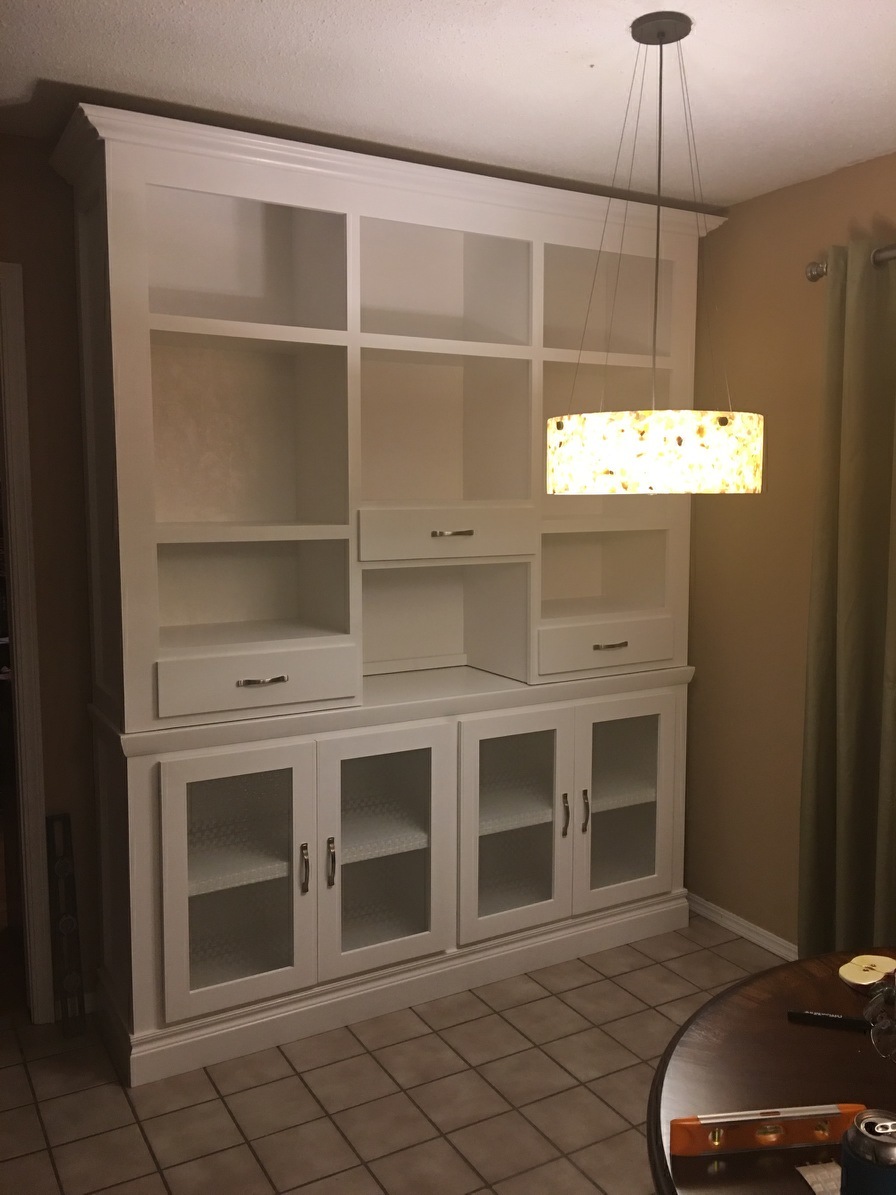
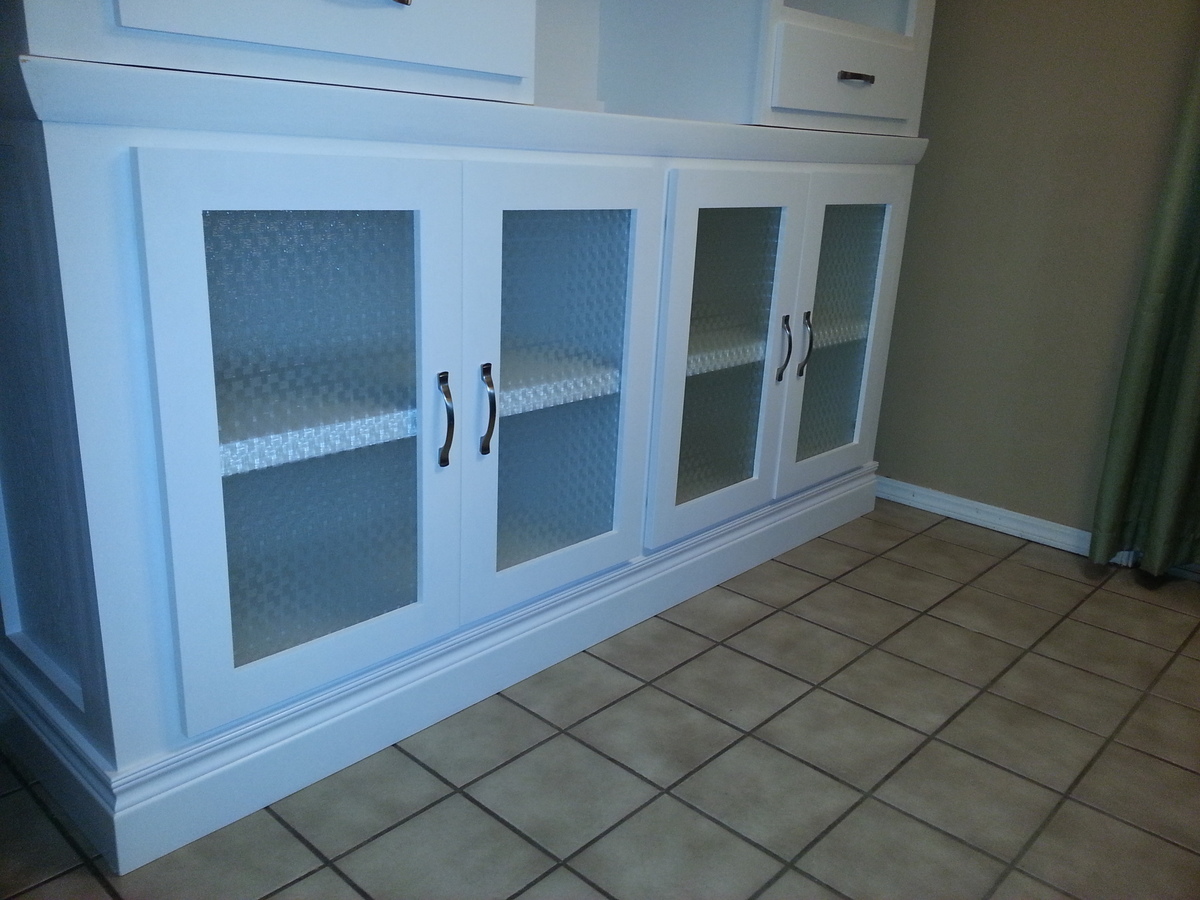
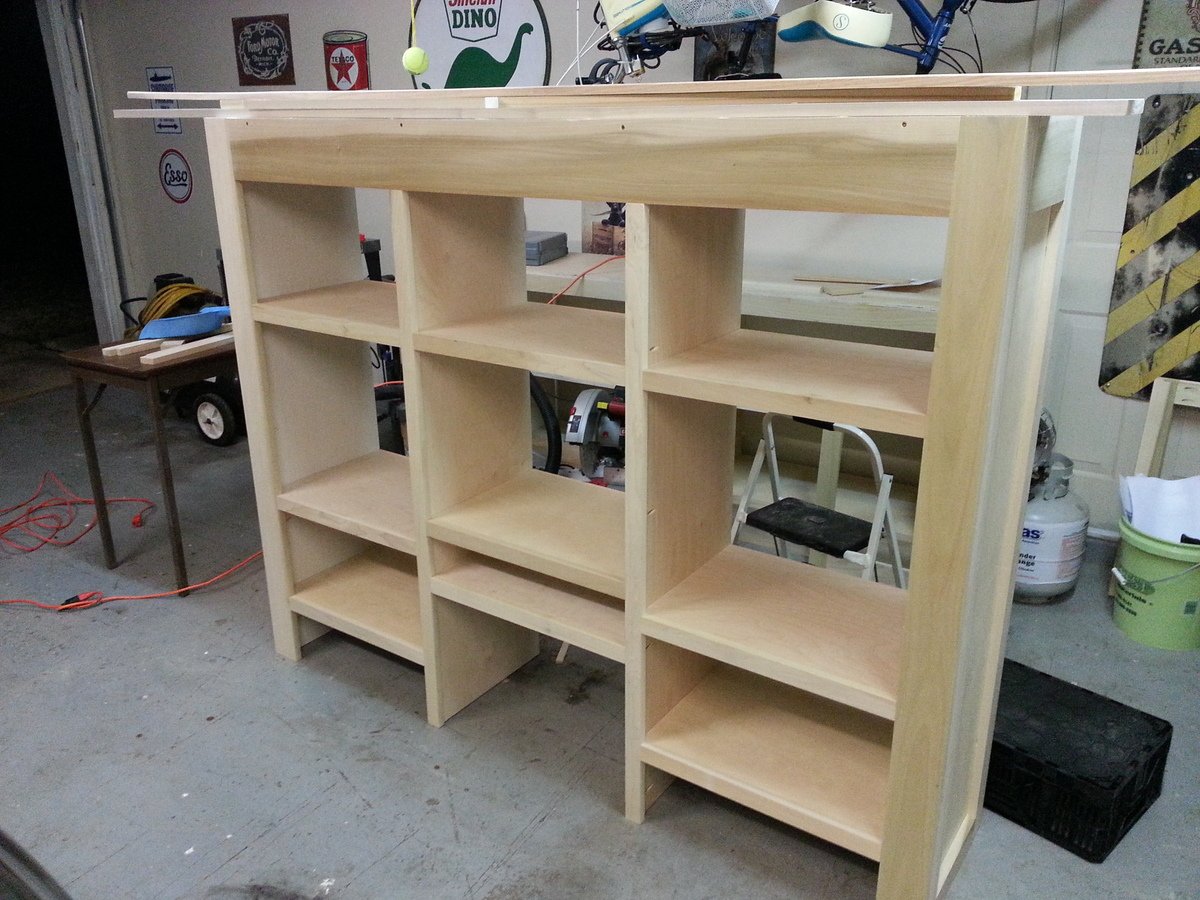
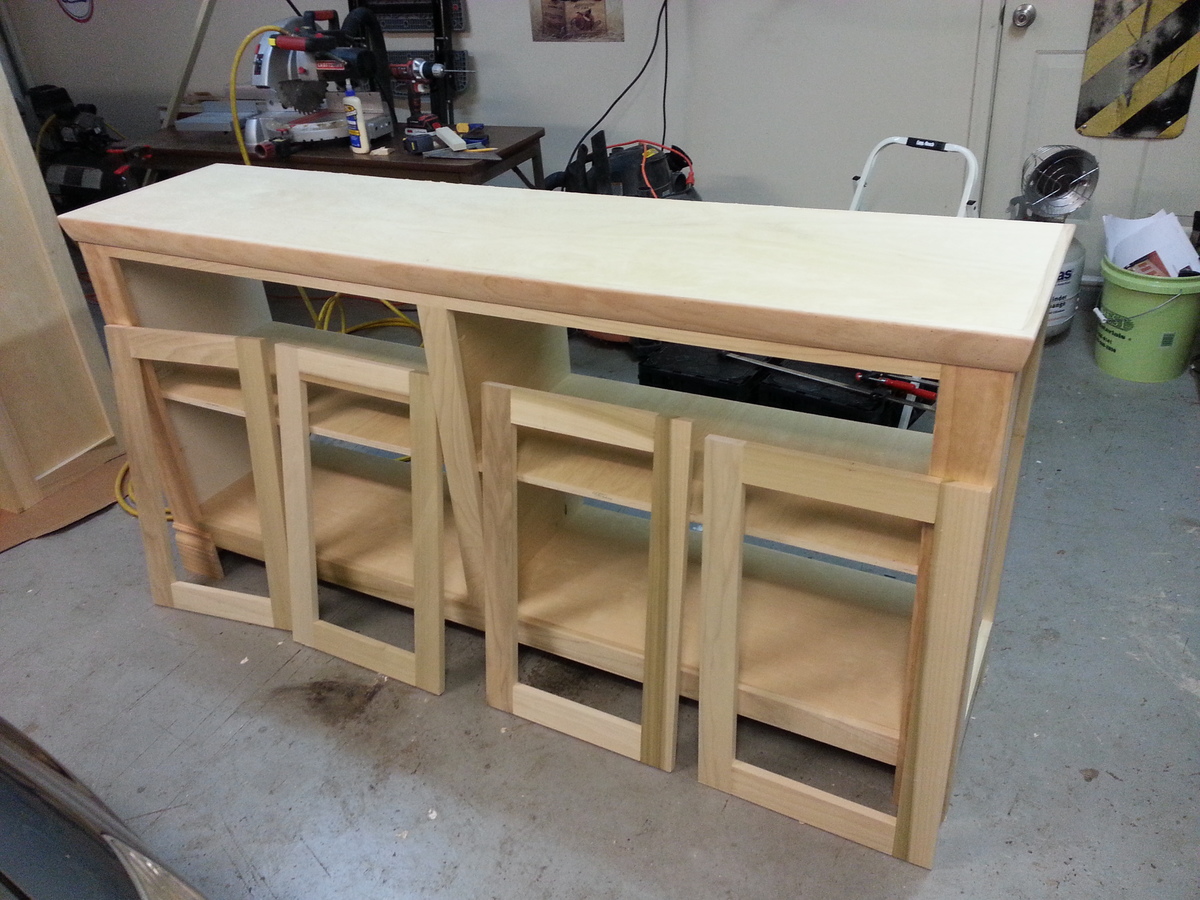
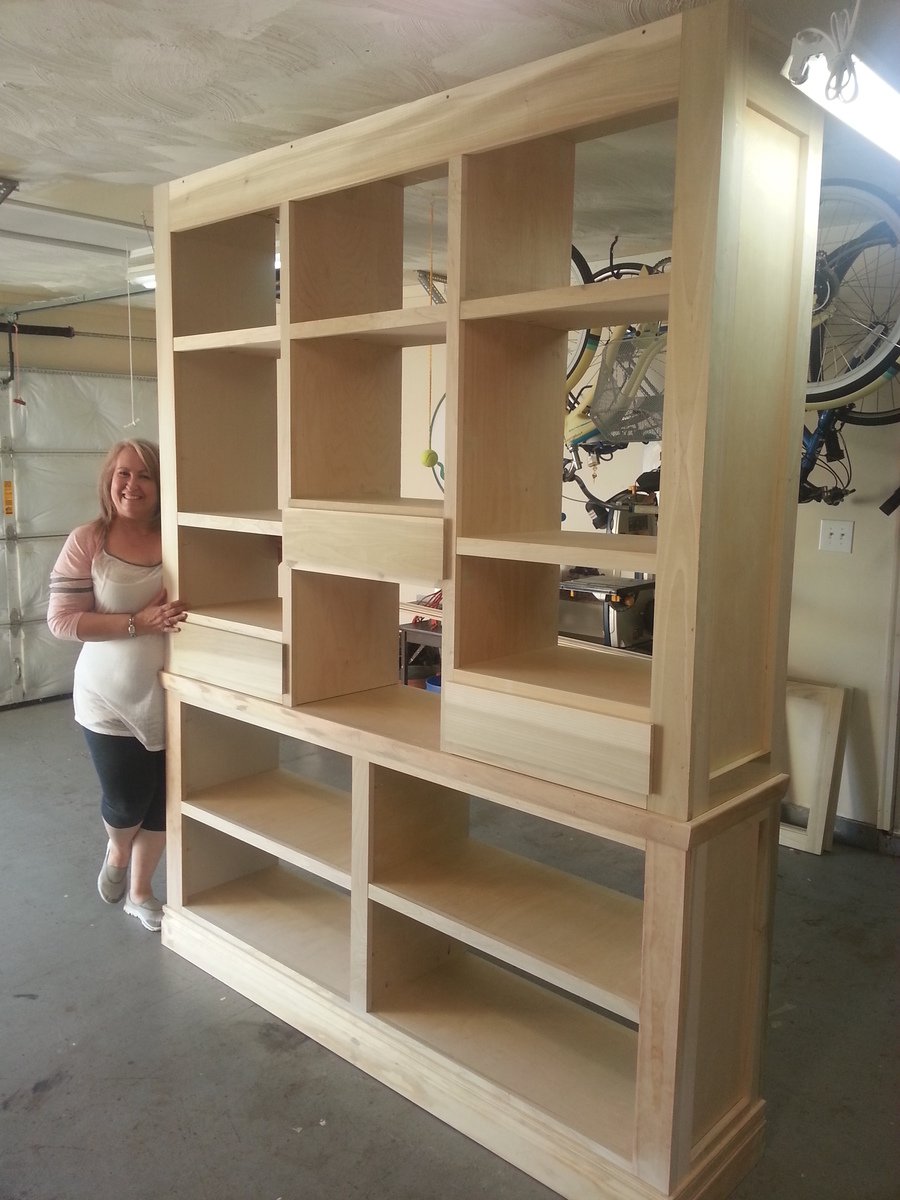
My wife wanted a built in shelving unit for all of her Fiestaware. I couldn't find anything that worked so I looked for large hutches instead. I found a nice design on Ana White and saw some other modifications from other posters - came up with what you see here. Turned out well. I never worked with Blum hinges before so that was a learning experience.
Finally replaced our old queen size bed frame. It took me 2 weekends to finish the project. We bought a Nova Comfort memory foam.
Tue, 11/05/2019 - 10:38
Thank you for entering your bed!
We are so excited to let you know your entry won a random draw $100 gift card. We will email you all the details as well!
Thanks again! Ana
I actually used a partial plan from a previous Ana-white photo and plan. I used some nautical hooks to finish it off.
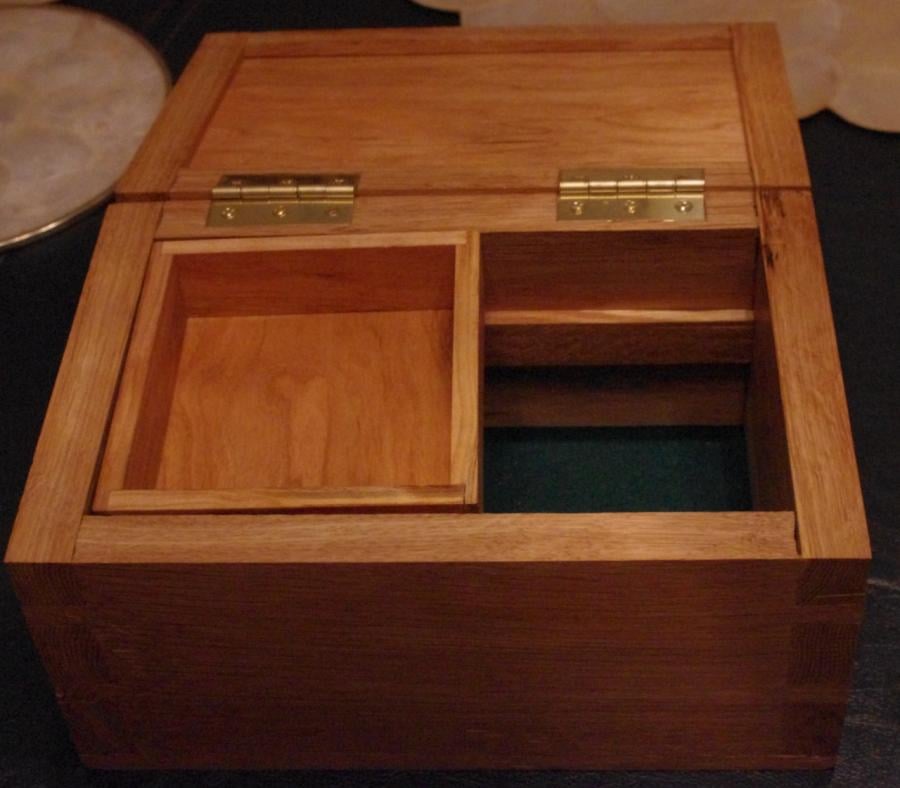
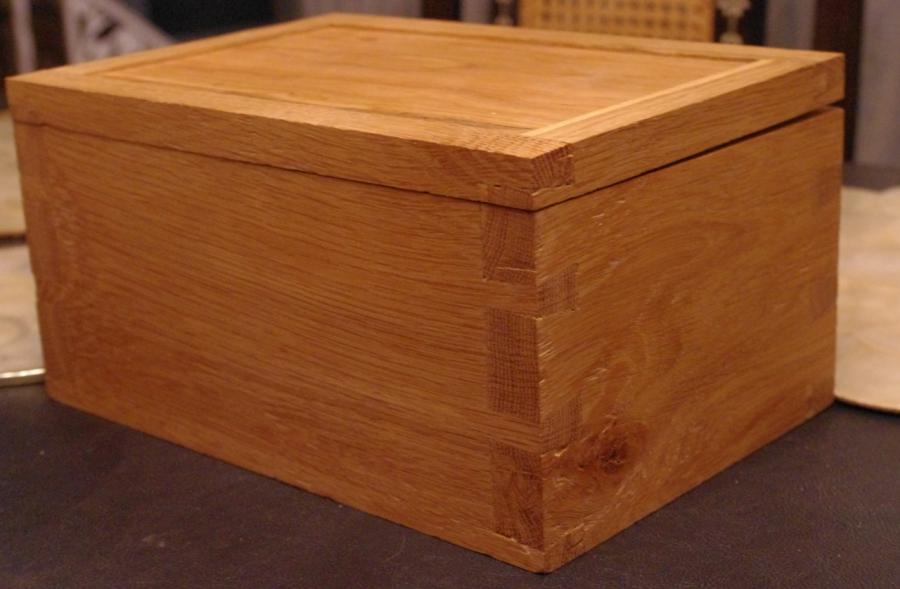
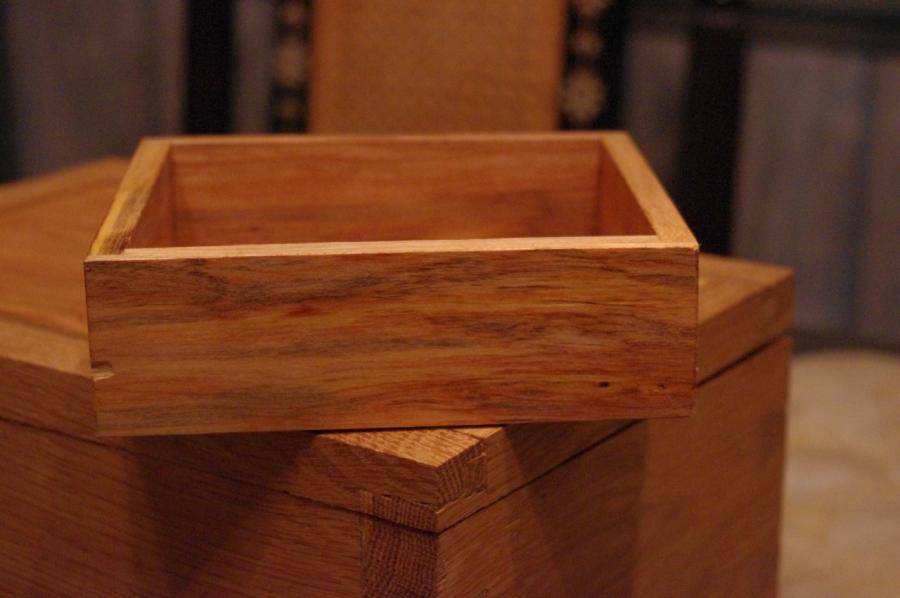
This is a gentleman's valet that I build for my sister in law's boyfriend as a Christmas present. It was also a good opportunity to try out my hand tool skills, since I cut all of the joinery by hand.

Sun, 02/05/2012 - 09:20
Wow, this is gorgeous! Love the rich finish and the dove tail details, and the sliding top tray is so neat. Everyone in the family is going to want one! :) Joanne
Sun, 02/05/2012 - 12:25
This would make a great gift for my husband and all the men in my family...

Sun, 02/05/2012 - 19:12
Kristen you should try it yourself. You'd need to buy a joinery saw, but I just picked up a decent dovetail saw for $13, and a set of good chisels, but for $26 you can get a good set of 4.
My joinery isn't brilliant, but it's functional and doesn't look terrible. I'm pretty sure you could start knocking out some strong joints pretty quickly.
The upside is that it's faster than setting up power tools to make these joints. Hand cut dovetails will always be faster than machine cut, unless you're building a dozen boxes.
In reply to Hand Tool Joinery by claydowling
Mon, 02/06/2012 - 10:48
From here, your dovetail joints look great! I've always just skimmed past instructions for dovetails thinking I'd never put the time into constructing them. Perhaps I will investigate for future projects. The glue and nail option just goes quicker right now, with the list that looks like it just might take forever in this house!
Mon, 02/06/2012 - 07:29
You may not think your joinery is brilliant, but those are some tight joints. Looks beautiful. I love the top!
Mon, 02/06/2012 - 08:35
Those are very tight joints. Slightly too tight in fact. There was a small amount of hairline splitting on the side I didn't show, that I had to fill with glue and sawdust to keep from spreading.
My dovetails aren't bad, just slow for me to cut right now, especially cleaning out the waste. I bought parts for a small bow saw that should make that easier, once I get the thing built.
Tue, 02/07/2012 - 07:49
This Gentlemen's Valet looks amazing! How did you do it? This would be a great Valentine's present for my husband!
Tue, 02/07/2012 - 08:35
The short answer is that I built a box, then built another box to go inside of it. A plan with dimensions wouldn't be a very good idea, because I sized this to match the $7 board I'd found at the hardwood dealer. Your lumber dealer almost certainly carries differently sized boards.
I'll think about a tutorial or video though. Box making is fun, rewarding, and can be profitable. Especially since most cabinets are just different variations on the box.
Tue, 02/07/2012 - 09:21
Alright, I will give it a try this weekend. Will let you know how it went! Thank you so much
Thu, 02/09/2012 - 19:17
Your work is gorgeous! I'm definitely stealing this idea for my husband's birthday as well as all the men in my family, who all have birthdays this spring. :) Only thing is, I'm using tools, my hand tool skills are no where near as good as yours.
Also, I appreciate the tips you've posted on other project plans, they really help clarify some of the smaller details overlooked by the designers for beginners like me.
Hope to see some more projects from you soon!
Thu, 02/09/2012 - 20:06
Hand tool skills actually develop pretty quickly, and one of the reasons it's gaining popularity. You can use scrap wood to learn how to make joints. The first ones will be rough but with even a little bit of practice they'll improve.
The tools are also getting cheaper. I just bought a decent dovetail saw for $13 from Tools For Working Wood, and $26 will buy you a decent set of chisels from Narex.
Christopher Schwarz and Logan Cabinet Shoppe are two good sources for hand tools articles, including videos. There are also good books on the subject. My first text was Hand Tool Essentials, but I'm told there are others worth looking into for first books.
In reply to Hand Tool Skills by claydowling
Fri, 02/10/2012 - 07:30
The Essential Woodworker is the alternate starting text I was thinking of. I haven't read it yet, but heard it recommended by a few sources as a good place to learn about hand tool woodworking. I just ordered a copy for myself. Amazon sells it too, but for considerably more, and I've heard unpleasant things about the binding on the copies available on Amazon.
If the book turns out to be any good I'll post a review on my blog.
Fri, 04/20/2012 - 21:48
Please do!
Thank you for the tips and information, I'll definitely be starting on hand woodworking soon. I love the results of hand vs. machine woodworking, it's just sleeker and has more of a homemade quality.
In reply to The Book I was thinking of by claydowling
Sat, 04/21/2012 - 04:56
I did finally buy the book, and I've reviewed it at http://claydowling.com/articles/02242012-1350/getting-started-woodworki…
There's also a new video coming out (or maybe it is out), that I wrote about: http://claydowling.com/articles/04022012-0947/learning-use-hand-tools I've ordered my copy, but I won't have it in hand until next month. I grabbed is specifically for the information on block planes. I own them, but I've had the least consistent results from them of all my tools.

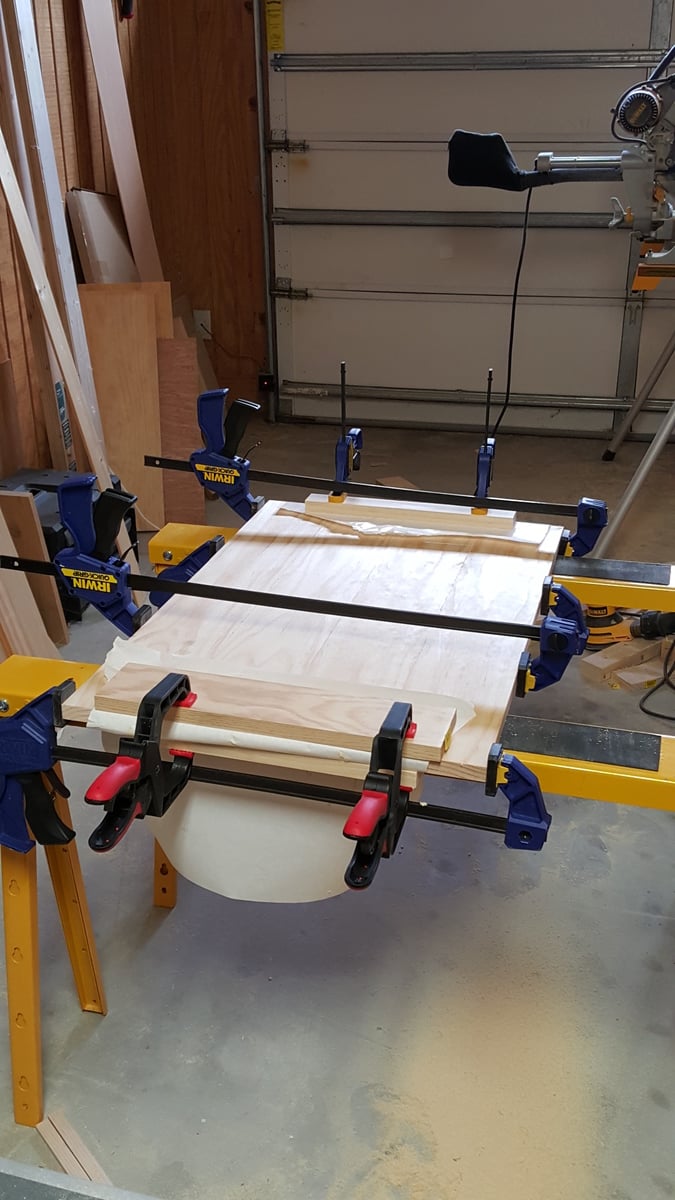
We added a 2x6 to the top and made the table 5.5 " longer and wider. We had to adjust all of our cuts. Read your instructions on the can of stain because on Shanty2Chic's site they mentioned leaving the stain on for 5 minutes and then wiping. However in doing so, you will end up with a very dark finish.
So this project took quite a while for me to finish, but I didn't cut any corners and expanded a bit on the basic plans that were offered. Some notes on changes to the project:
Anyway, enjoy!
Thu, 01/18/2018 - 20:14
What is the yellow tool you have the tabletop clamped to?
Sun, 01/21/2018 - 11:49
That looks lie an sawhorse from Ace: https://tinyurl.com/y949f35q
I built this for a dear friend’s wedding. The showed me a picture of what they wanted and I modified your plans to make it look the way they wanted. I used treated lumber so it would last on their deck. Finished with Cabot solid oil-based stain. I’m not a fan of solid stain as it was very humid and it took sooo long to dry. Also I love see the wood grain.

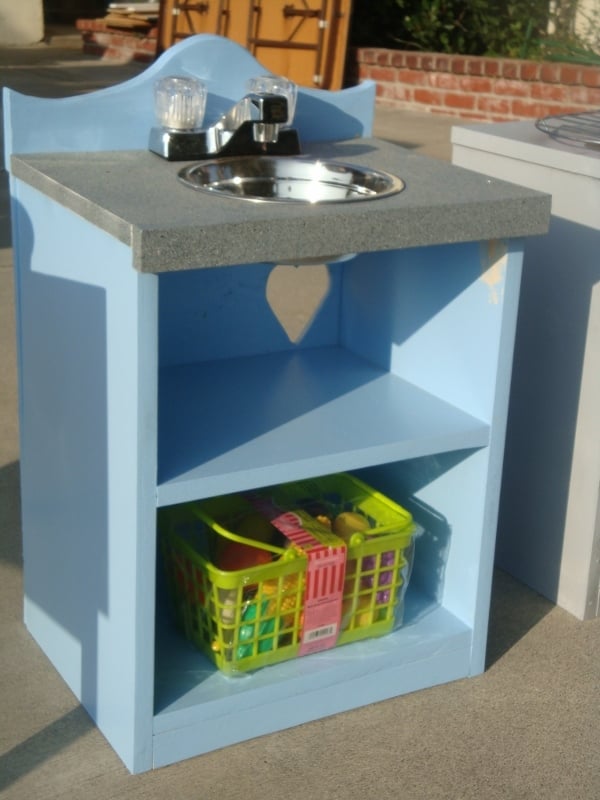
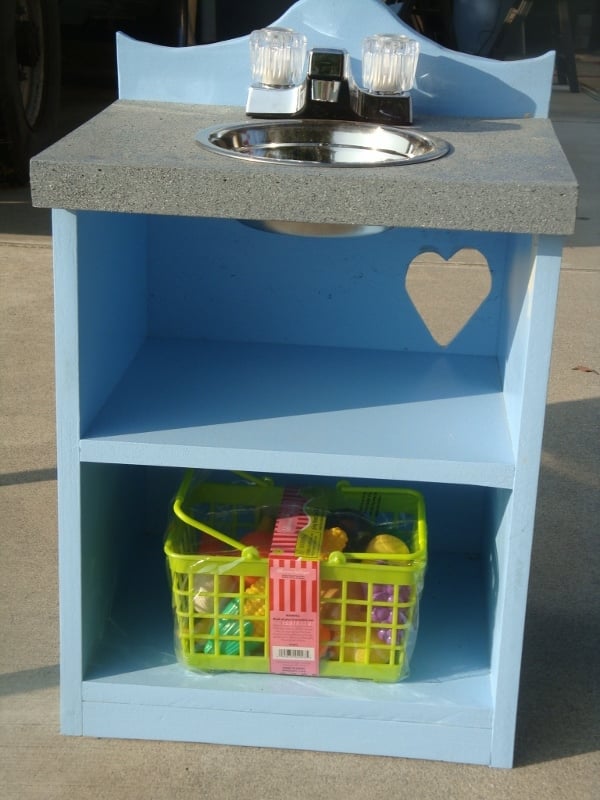
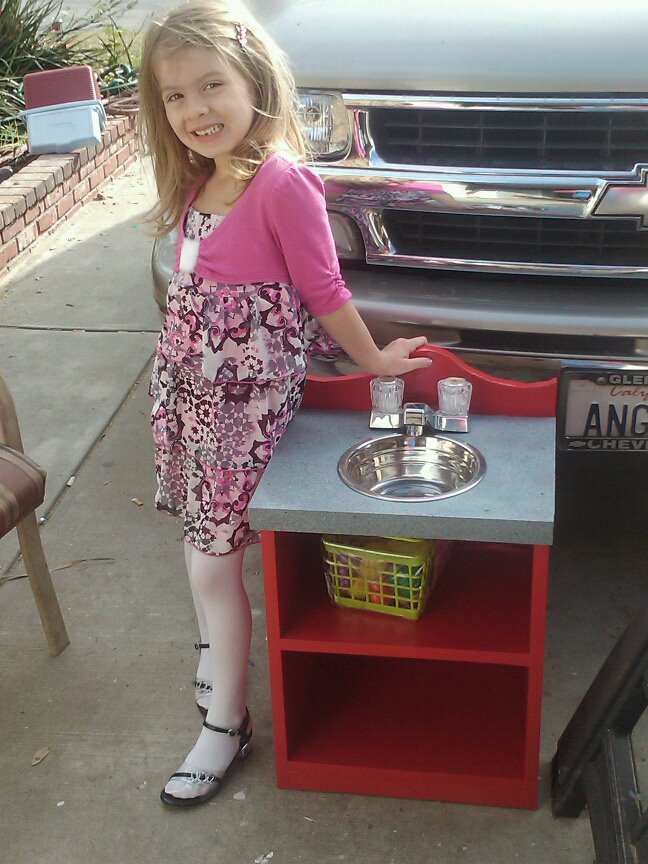
This is the first sink that I made, for one of my nieces of course, and when the other niece saw it, she started campaigning for one of her own. They are extemely easy to build, used my trusty Kreg jig, and on the back, hinged, is a painted, plain top, so when they're tired of using the sink, the top can come off, and instant nightstand! I used the home depot brand sink fixture, 10.00, and a dog dish for the sink. I added a "granite" top, and since this pic, I've sewn the 3 tier curtains. There are 2 different sinks in the below pics.

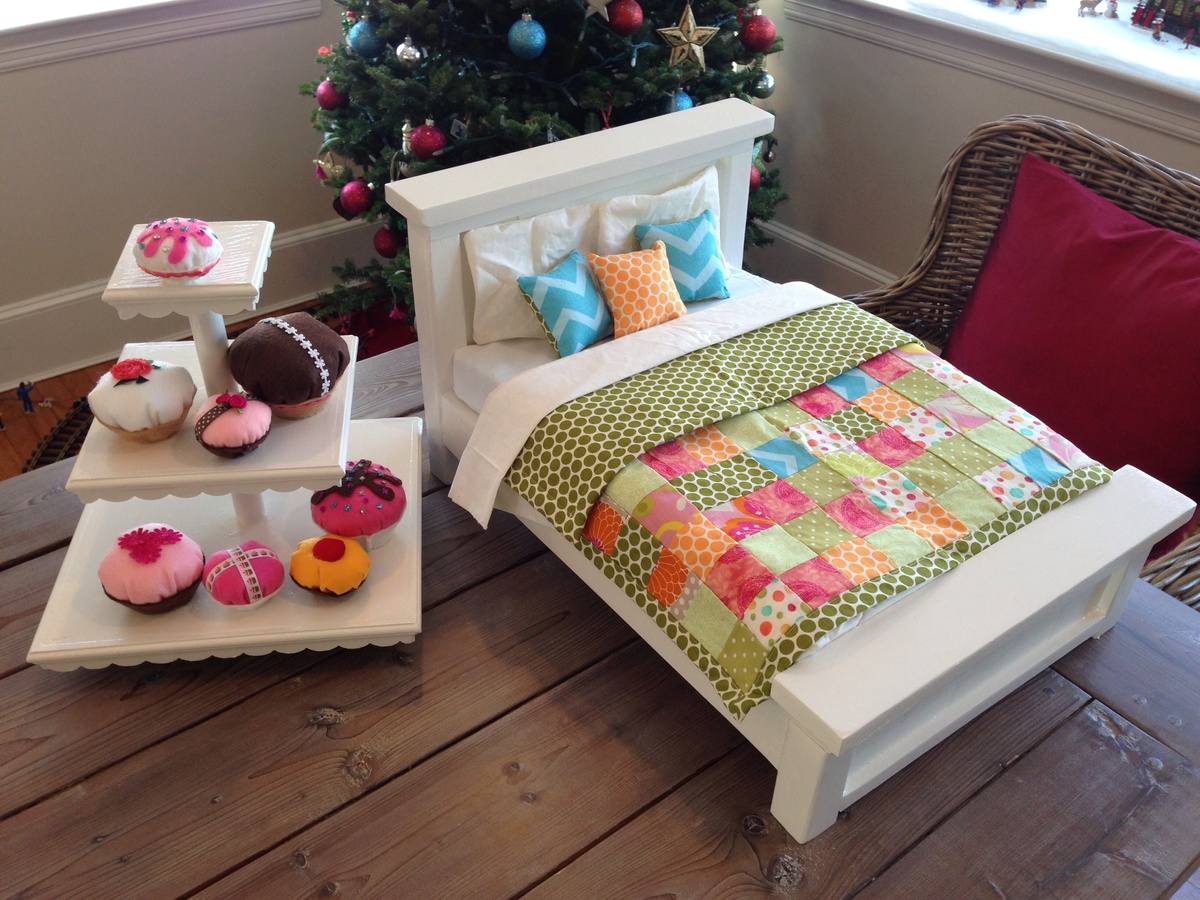
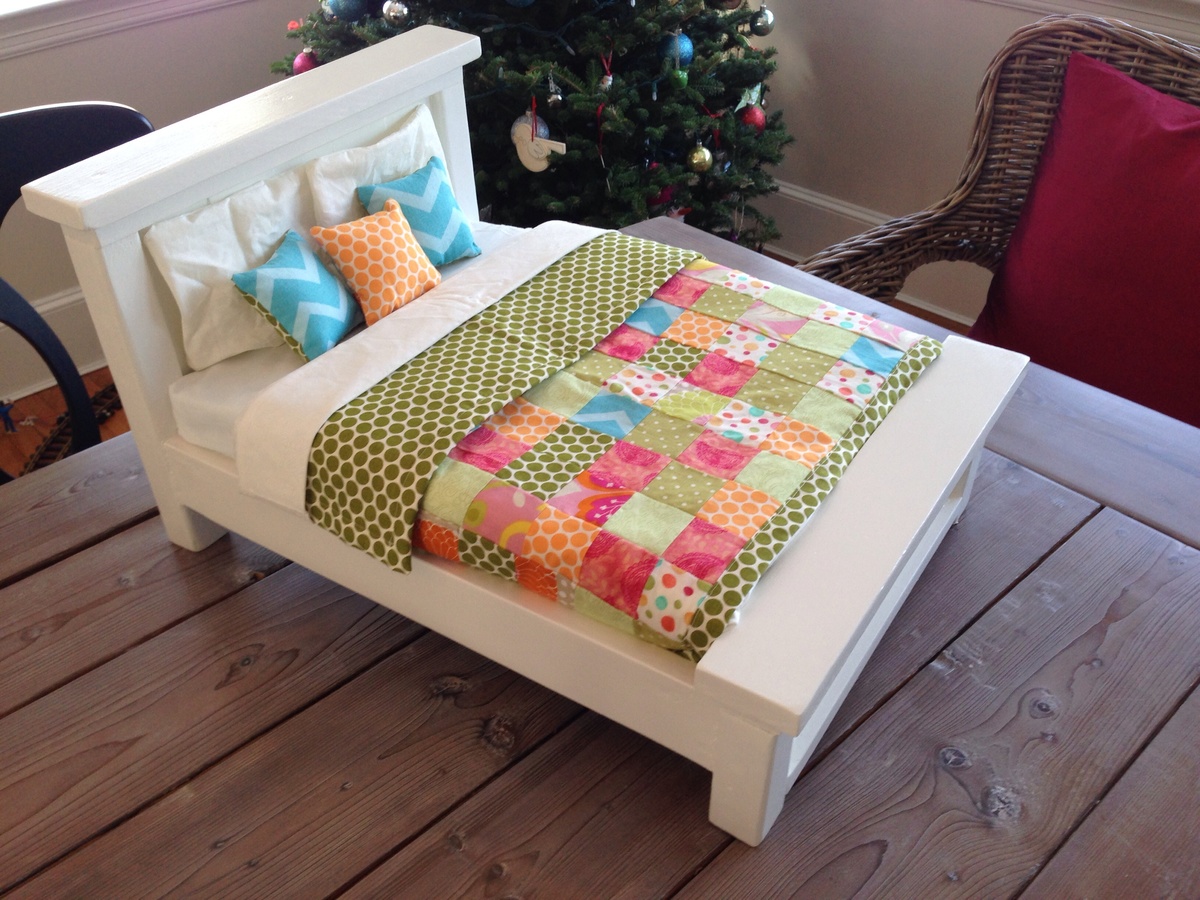
I enjoyed making these projects for my 6 year old for Christmas. Warning: make cuts as you build. Even though I bought standard board sizes, my finished measurements did not all match cut list. Just keep measuring as you assemble and make cuts and small changes as needed. A 1x3 can be anywhere from 2 1/2 to 2 3/4 wide for example. I finished with primer and two coats of Benjamin Moore Advance semigloss Cloud White on both projects. I used 2 inch high density foam for the mattress. The quilt is pieced from 2 1/2 inch squares. The small pillows are 3 inch square finished. The large pillows are 4x7 approximately. The cake stand is cute enough for a child's play room but also large enough to be borrowed for an adult's dessert table.
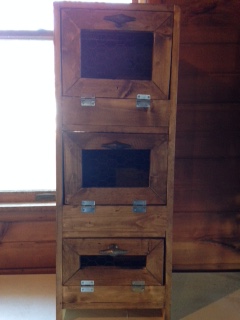
I had a great time with my first project being this vegetable bin. I did have to have some help with the actual construction and I know it's not perfect. It's uneven and has flaws, but I think it gives it a little character.


Comments
Ana White Admin
Thu, 06/01/2023 - 09:32
Fun Design!
Love this, very clever! Thank you for sharing.