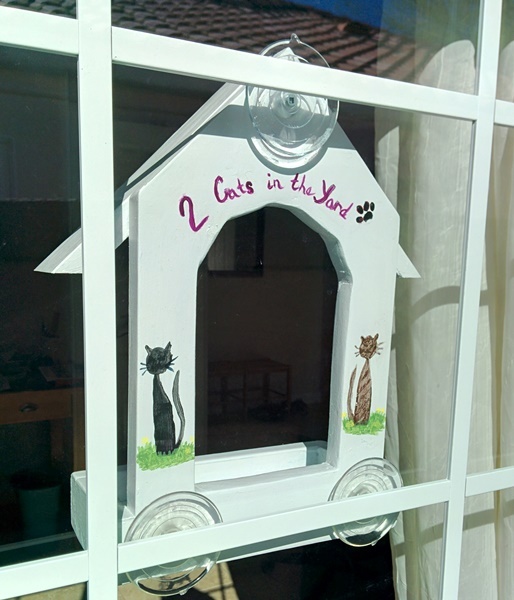
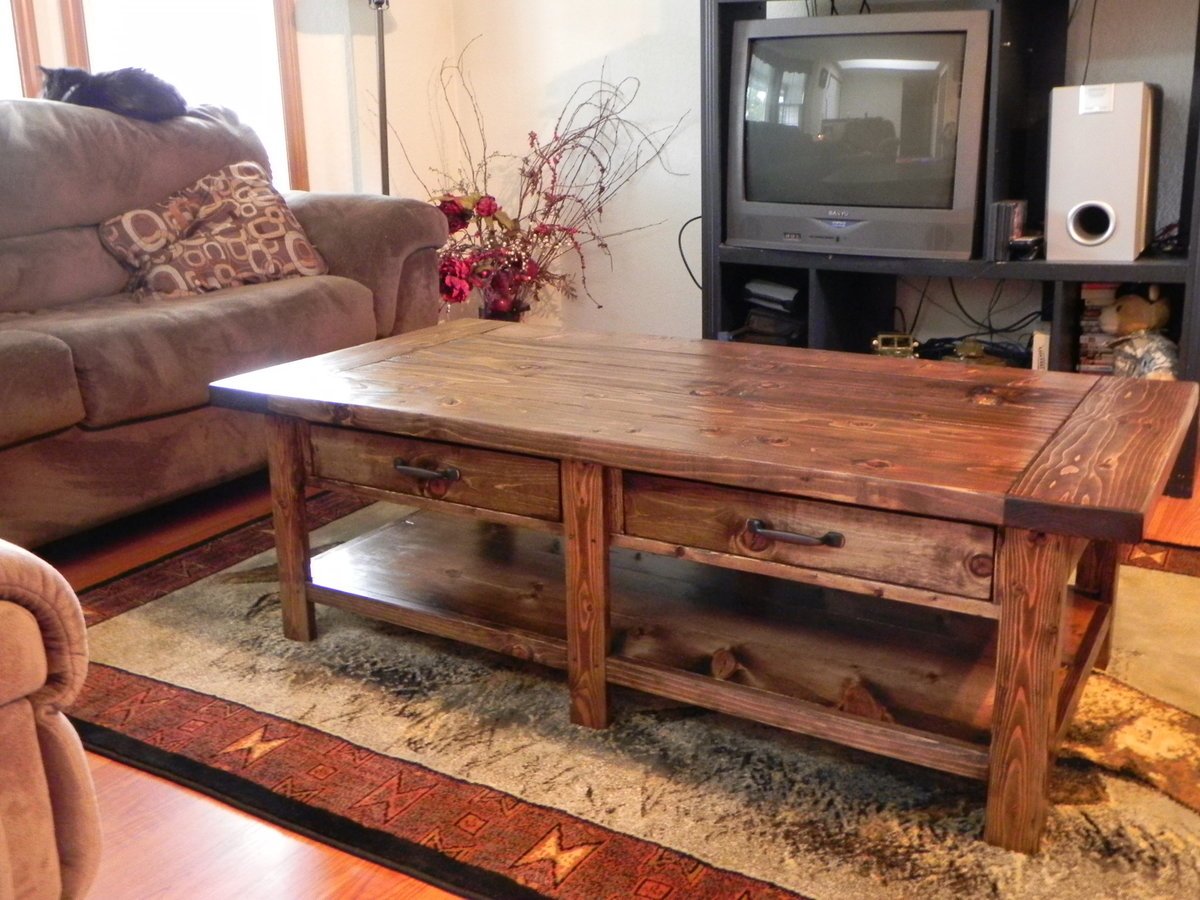
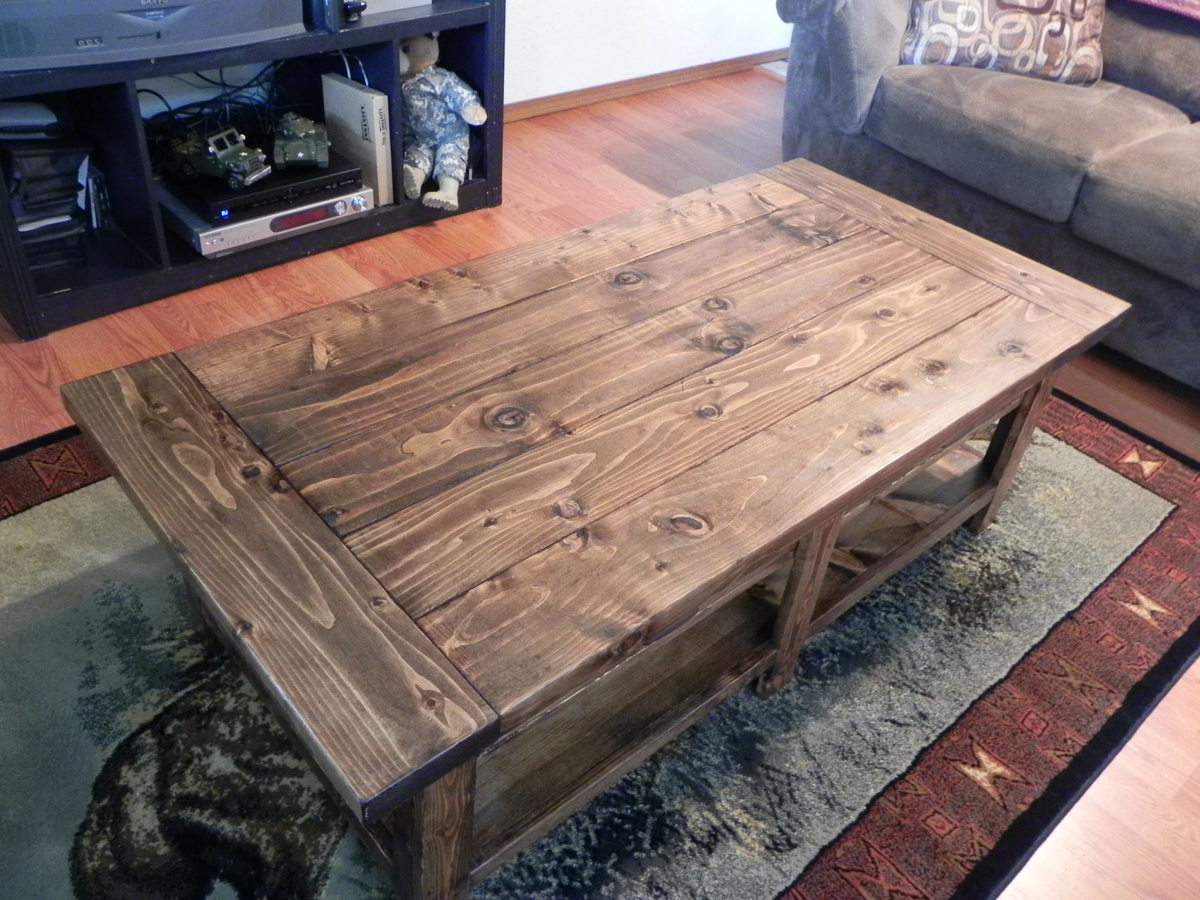
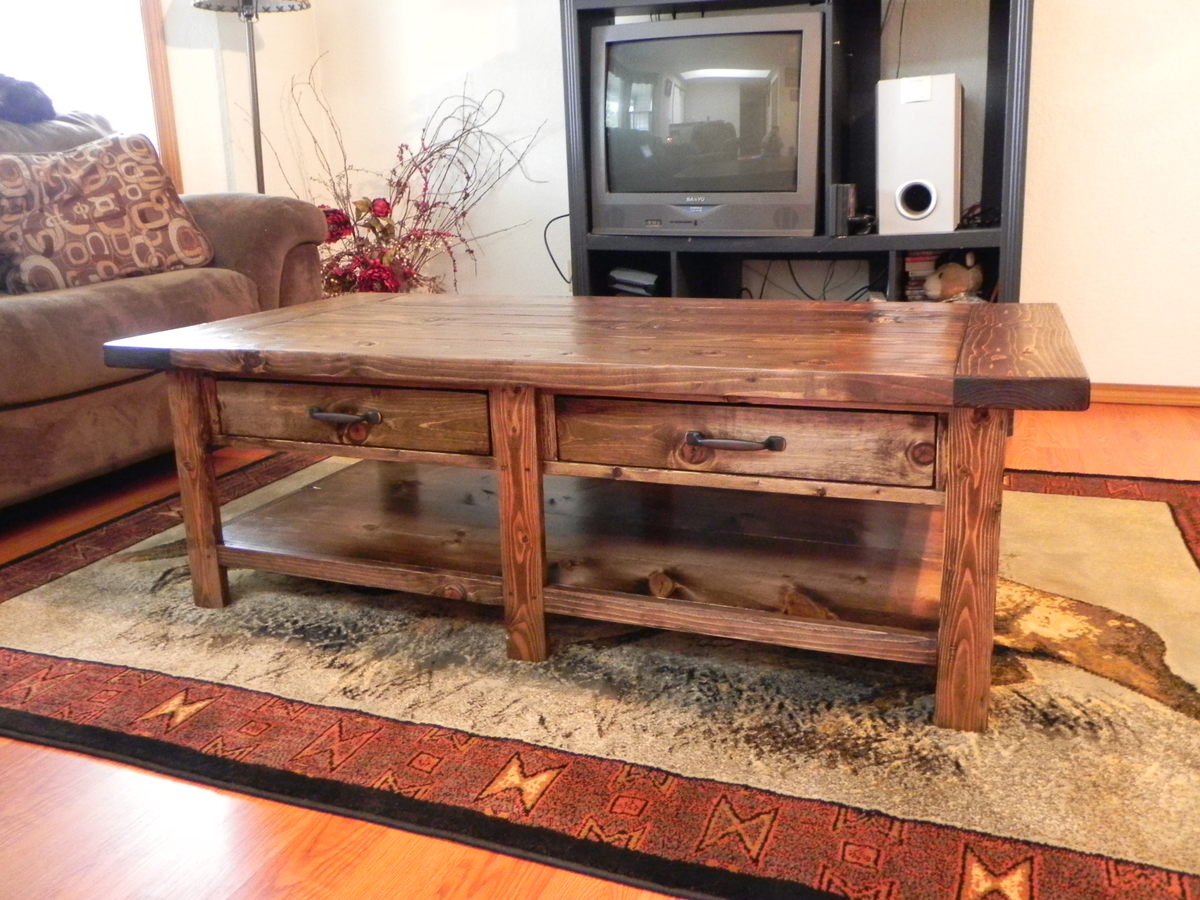
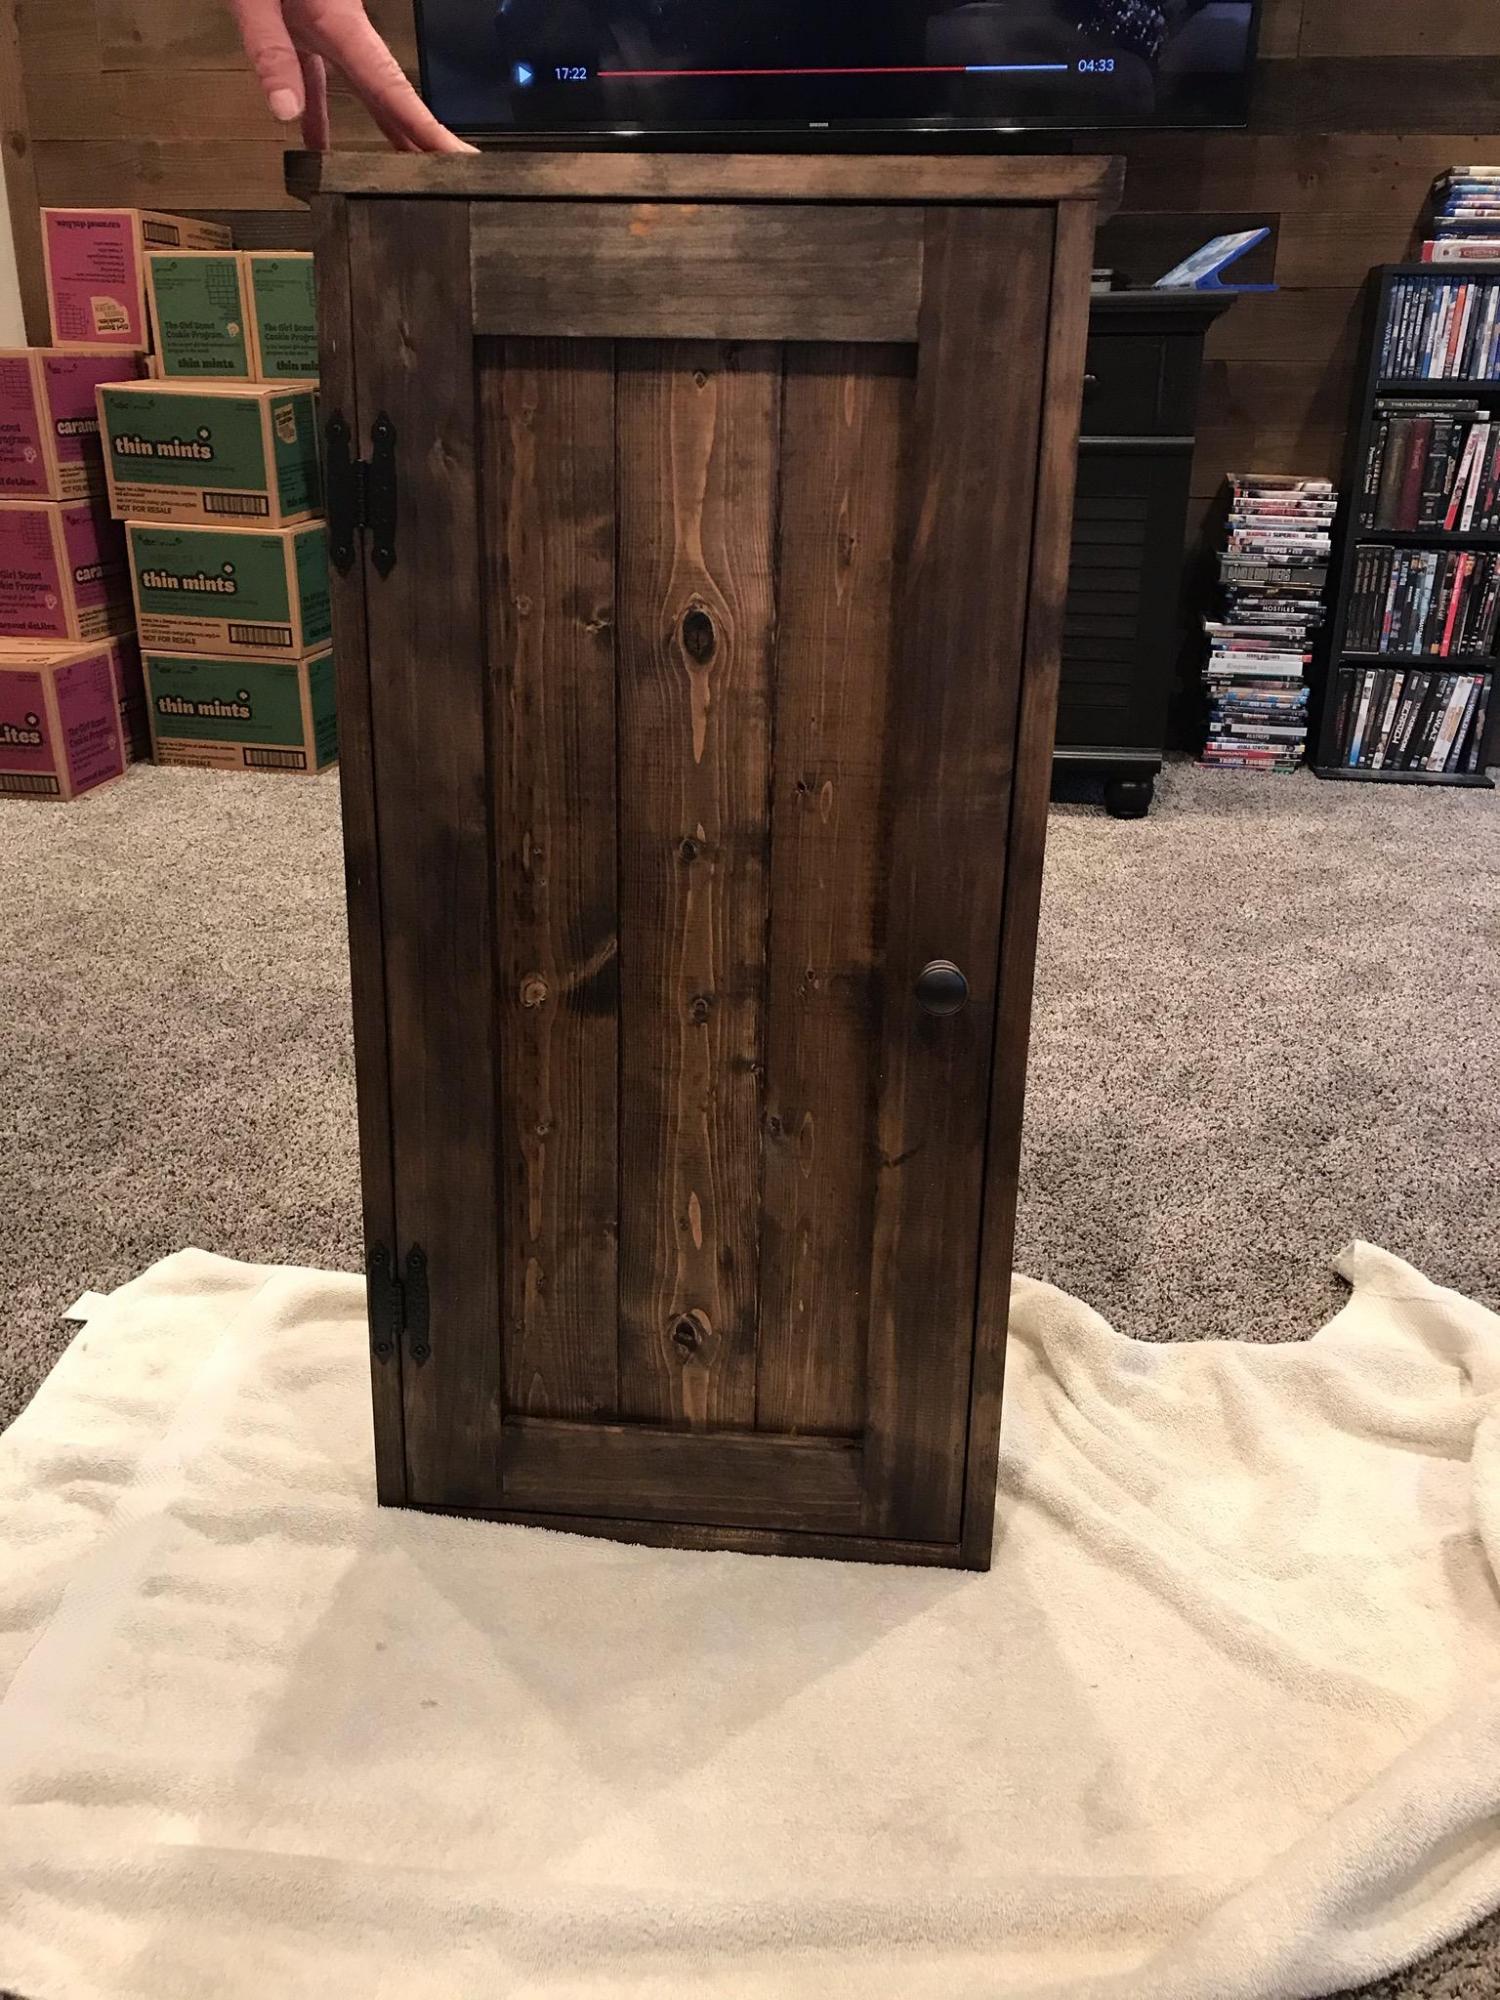
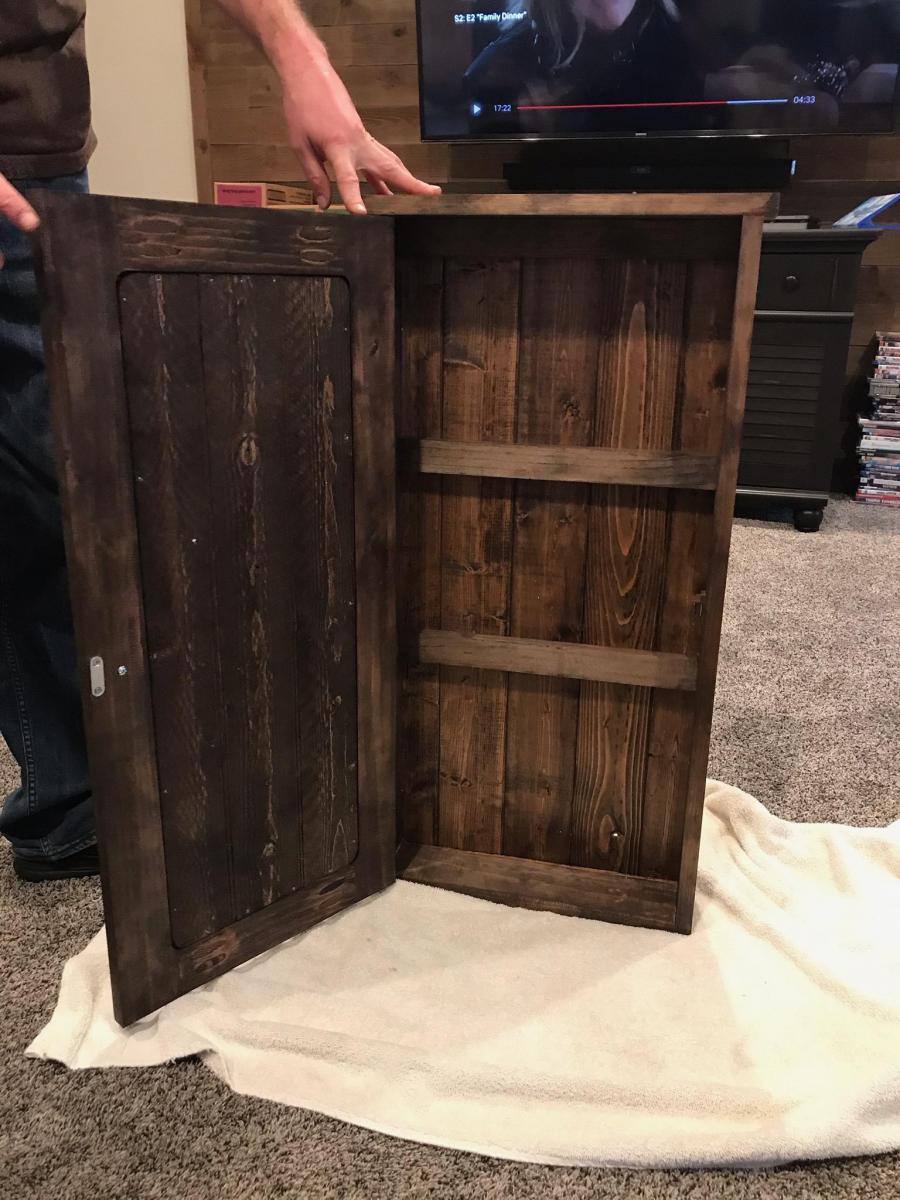
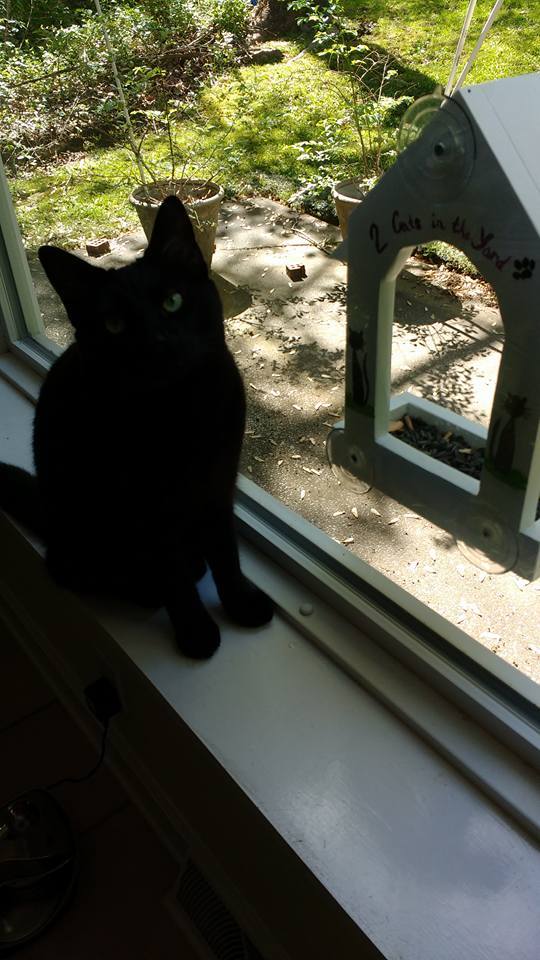
Community Brag Posts

Console Table

Submitted by nikkirumm on Fri, 08/24/2012 - 08:18

This was my first BIG project. I was inspired by a console table from a blog Take the Side Street and the Ikea Hemnes Sofa table. I didn't use any plans, so just winged the whole project. I was a bit afraid taking on this project, so I used 89 cent utility boards (roughly 1'x4') that I found at Menard's. So I wouldn't feel bad if it turned out like crap or fell apart. Little did I know how wonderful it would look. I added parson legs to the bottom that I bought from the Home Depot and finished it off with a coat of Minwax Ployshades in Mission Oak.

I'm really excited about how it turned out and have less than $20 invested in the whole project by using the utility wood. This console table holds it all.

The table measurements are 48"x32 1/2"x11 1/2"

Estimated Cost
$20 (not counting stain and screws)
Estimated Time Investment
Day Project (6-9 Hours)
Finish Used
Minwax Polyshades in Mission Oak
Recommended Skill Level
Beginner

Pallet style outdoor platform sectional (variation) with patio table

Submitted by SeanyMc on Tue, 06/17/2014 - 13:44

Saw the Outdoor sectional on your website and I just had to build it! Made some variations to the original plans, one being making it higher off the ground and the other was a necessity because Home Depot didn't have the right size wood and I wasn't about to go running around from store to store, so I used scraps to make a corner piece that fits perfectly. The most timely aspect was the sanding and removing all the rough edges. Also used Bondo to fill in all the holes that were on the outside to give it an all around smooth finish. The end result is just about the same though and the family and friends are in love with it! Thank you so much for the plans! Really could not even come close to justifying what it would cost to buy a sectional like this. Cushions were a huge concern and rightfully so. After building, I started searching and was mostly getting prices in the plus $800 range. It was breaking my heart knowing I was going to have to pay more than double what the entire sectional cost me. In the end though, was able to land some 25 x 25 x 6 cushions at Lowes for 50% off ($50 a piece).

Estimated Cost
$750 ($300 Wood & supplies. $40 paint. $400 for 50% off cushions)
Estimated Time Investment
Weekend Project (10-20 Hours)
Finish Used
Behr Premium Dark Walnut Paint, All in One.
Recommended Skill Level
Beginner

Comments

drhj84

Mon, 10/06/2014 - 08:18

I was wondering if you could tell us the model of your cushions.  I builth this over the weekend, but I ma having a tough time picking cushions.  thanks


HANLOP01

Mon, 03/16/2015 - 09:06

I love this modification. Did you use 2x8s or 2x10s for your base? It looks like you angles the back. How did you go about doing that? Thank you for posting this?! Great work!

longshot

Mon, 06/29/2015 - 18:00

nice build, when you get some time can you put up your modifications please:) would love to build this! Love the colours you used and how it looks!Me too..you cook like me, i make it my style...thats how i do my salsa ..my way i like it...

longshot

Mon, 06/29/2015 - 18:00

nice build, when you get some time can you put up your modifications please:) would love to build this! Love the colours you used and how it looks!Me too..you cook like me, i make it my style...thats how i do my salsa ..my way i like it...

tsmith@vanausd…

Wed, 07/22/2020 - 11:37

This looks great. This is exactly what I want to make. How is the height of the sectional? That's my only concern. Is there anything you would change if you were to do it all over again?

Seasonal And Holiday

X pedestal table

Submitted by fresh5150 on Fri, 09/16/2016 - 08:14

I love this table!! Simple build using recycled wood from dumpsters. 

Estimated Cost
$14. Just for 4x4 post. All other wood is out of dumpsters :)
Estimated Time Investment
Afternoon Project (3-6 Hours)
Finish Used
Minwax stain
Recommended Skill Level
Beginner

Comments

Donna's reclaimed bed

My Awesome husband made this great bed from one of Ana's plan and I stained it!!

Built from Plan(s)
Recommended Skill Level
Starter Project

Comments

birdsandsoap

Wed, 08/29/2012 - 21:41

I just want to sleep in your bedroom. I love the colors and I L-O-V-E those lamps!

mainelygirl84

Sun, 09/09/2012 - 17:18

Thank you both for the nice comments!!!! I got the lamps at home decorators outlet online for a ridiculously great price some months ago!!! At first they seemed so huge, but grew on me!!! Ha!

Simple White Sofa

This was a great collaboration between a designer and an engineer, me being the designer and my dad the engineer. I recently moved from a small condo to a single family house with a nice wrap around porch. My father is recently retired and believes idle hands are the devil's playthings so I thought this would be a good project to undertake. Full disclosure, we built this in my father's wood shop and needed to purchase no tools.
I took on this project because every couch I looked at was either very expensive or did not meet my tastes. When searching for a design online this one really stood out to me for a couple of reasons, the first being the design looked great, the process was easy to follow, and the construction methods seemed pretty solid. The only drawback I found was that standard lumber at a big box store had to many knots and shied away from it for the slats and arms and went with 'select' grade pine, this change increased the price. It also took some convincing my dad to use big box store lumber as most of it is warped and knotty, he wanted me to purchase cypress from a high end mill so that it could truly weather the elements. His theory is a good one, you are putting a lot of work into building this why not spend a $100-200 more and get a very long lasting wood? My answer, my wife will kill me if I spend $500 on this project!!!! In the end this was much easier than I thought it would be. The chop saw made quick work of the cut list, and the Krieg jig worked great. Painting took the longest, I used a power sander to sand it down. I then used left over wood conditioner and the shellac primer. This took about 4-5 hours. After the primer dried I sanded out a few areas where the primer had pooled. Using a paint sprayer we sprayed at least 3 coats probably more like 5 coats of white exterior semi-gloss. This took about 3 hours. I attached the back to seat after I painted them.

Modifications:
I reduced the overall depth in order to accomodate a 24" cushion instead of the 27.5". I researched online buying foam and fabric as suggested, but this in my opinion made the project too costly. I found outdoor cushions at Ikea which work very well with the style and layout. They are not super cushy but do the trick for a 1/3 of the price.
I also added heavy duty rubber furniture slides to the bottom to prevent any marring to my deck and hopefully reduce moisture wicking up the end grain.

Costs:
Lumber and screws: $190
Cushions: $120
Paint: I used an expensive shellac for the primer $42.00
and exterior grade latex for $25, plus a few paint bushes $10.00
Grand Total: $387

Timing:
1. Acquiring lumber - 1 hour
2. Measuring, cutting and labeling - 1.5 hours
3. Krieg drilling - 3 hours
4. Assembling - 3 hours
5. Sanding - 1 hour
6. Conditioning and Priming - 4 hours
7. Painting with sprayer - 3 hours
Total 16.5 hours

Estimated Cost
$387 total $190 for lumber and screws, $77 for paint, $120 for Ikea Cushions
Estimated Time Investment
Weekend Project (10-20 Hours)
Finish Used
Paint: I used up some left over wood conditioner I had. I used an expensive shellac for the primer $42.00 and white exterior grade latex for $25
Recommended Skill Level
Intermediate

5 foot picnic table with pocket holes

Submitted by milleall on Thu, 07/02/2020 - 08:56

We built from the plan with green treated lumber. We also joined the top and the seat with pocket holes and outdoor blue Kreg screws so there are no screw holes exposed on the tops. Easy build. Great compact picnic table.

Estimated Cost
$90
Estimated Time Investment
Afternoon Project (3-6 Hours)
Finish Used
None
Recommended Skill Level
Beginner

Easy Jewelry Box

Submitted by JoanneS on Tue, 08/28/2012 - 16:12

I built this jewelry box out of scraps as a prototype to test out my Easy Jewelry Box plan, which is inspired by the Willy Bookcase and Master Closet System drawers. When Mom saw it unfinished, she liked it and called dibs on the first one! Well, since this one is now for Mom (and the lumber was free), I went ahead and spent some extra $ for hers – used the self-adhesive felt for the drawer and box bottoms, some embossed felt to line the drawers, added adjustable drawer dividers, and solid antique brass knobs – ‘glammed’ it up a bit. It is painted and stained to match her bedroom furniture. For Mom, I even stained the inside of the drawer box. :)

The build was easy, and took less than 2 hrs. I did both stain and paint for the finish on this one, and it took about 2 hrs to do that. I’m planning to make several more of these in different finishes, and give them as gifts.

Estimated Cost
$30
Estimated Time Investment
Afternoon Project (3-6 Hours)
Finish Used
Paint: Territorial tan by Ace, Stain: Minwax Wood-Sheen in Plantation Walnut, with a few drops of black added in, followed by 2 coats of Minwax polycrylic in satin over the stained parts.
Recommended Skill Level
Beginner

Comments

JoanneS

Tue, 08/28/2012 - 16:15

“Shop” your scrap bin before buying your lumber for this project, you may have enough left overs already on hand. Probably would cost about $20 for whitewood boards, birch ¼” ply, regular felt and unpainted wooden knobs, and you’d still have some left overs. One sample size paint (~4 oz.) was more than enough for one box. The 7/8” unpainted knobs are great, and they only cost $1.49 for 2 (found these at Ace). These solid brass mini knobs ran about $4 each. The 2 sticks of moulding for the optional drawer dividers cost me about $12, but these pieces are more than enough for 4 boxes. For the ¼” plywood – one 2’ x 2’ piece is enough for 3 boxes. I’ll be making several. :)

Long Bookshelf

Submitted by Jon1985 on Mon, 06/23/2014 - 15:59

This is my first Ana White project and was a great learning experience. This project is a modified version of the 6 cube bookshelf plan.

Rips of Pine were used for the top, sides, and facing. 3/4" Plywood was used for the shelf planks and the shelf dividers. The sides were also modified so they worked as the legs. Overall dimensions for this piece is 72"x14.5"x35.5".

Built from Plan(s)
Estimated Cost
$150ish
Estimated Time Investment
Week Long Project (20 Hours or More)
Finish Used
First I applied Minwax Red Chestnut Wood Finish Interior Wood Stain then Dark Walnut Briwax.
Recommended Skill Level
Intermediate

Cornhole Boards

Submitted by SaraLodise on Fri, 09/23/2016 - 13:15

Cornhole boards for friends and family :)       Used 1x4s for framing and legs, 1/2" ply for top.


"R" set:  Birch plywood tops w/ (2) coats of Miniwax Weathered Oak oil stain. Red stripe is Behr 'Cherry Cola.'  (3) coats of Polycrylic finish.


"AW" set:  Regular plywood tops w/ (1) coat of Miniwax Special Walnut oil stain & Glidden 'Clemson Orange' stripe.   (3) coats of Polycrylic finish.

Estimated Cost
$100/set (2 boards)
Estimated Time Investment
Weekend Project (10-20 Hours)
Finish Used
(see description)
Recommended Skill Level
Intermediate

Comments

Seasonal And Holiday

Corner shelves

Submitted by Kate_14 on Sat, 07/04/2020 - 13:33

I built these beautiful corner shelves for a friend. It is a great beginner project. I used a 1x8 board but you could also use a 1x10 board. You could also build 5 shelves instead of 3. I used pocket hole joinery.

Estimated Time Investment
Afternoon Project (3-6 Hours)
Finish Used
Oil I find at my local mill.
Recommended Skill Level
Starter Project

Mudroom Cubbies

Submitted by Jamie_A on Thu, 08/30/2012 - 07:22

We removed the tiny closet in our mudroom (because kids and husbands seem to be unable to open a closet door to put their coats away). I found some pictures of cubbies that I liked, and then used some of Ana's plans to hybrid together what I had envisioned. They came together really easy and quick - the most time consuming part was the finishing. This was my first attempt at drawers and using glides, so that took a bit of tweaking. I bough a square AFTER building this, and I should have done that first! This was also the first time I used my new Kregjig.

Estimated Time Investment
Day Project (6-9 Hours)
Finish Used
I primed the whole piece then painted a bunch of spots with dark brown paint I had left over. I then smeared vasoline around the edges and in a few spots that I thought would have gotten more wear. I then painted the whole thing blue and sanded with 220 grit. I applied 2 coats of poly and sanded in between.
For the seat, I used barn board we had, just sanded and coated with poly twice.
Recommended Skill Level
Beginner

Airplane swing

2 of the planes I've made for gifts for my nieces and nephews. Love making these. Such a fun project. Made modification to the prop giving it angle.

Recommended Skill Level
Intermediate

Den Console

Submitted by Anonymous (not verified) on Mon, 09/26/2016 - 09:16

Cool project!  My wife liked it without the doors!

Built from Plan(s)
Estimated Cost
$55.00
Estimated Time Investment
Afternoon Project (3-6 Hours)
Recommended Skill Level
Starter Project

Cedar sectional

Submitted by rhn0489 on Mon, 07/06/2020 - 11:39

My sister needed new outdoor furniture for her deck and liked the look of the sectional. I used cedar with a clear varnish to creat this piece for her that was perfectly sized for her deck. The challenge to this one was getting it to her house about 3 hours from mine. Fully assembled it would have been tight getting it in my truck. I ended up cutting all of the boards and drilling all of the pocket holes in my shop and then assembling at her house. I have added backs to some of the pieces I have made fro others that want the extr support. I add a 1x4 laying flat across the back of the seat. The slats going up and down then have a slight angle to them which adds comfort and support. I attached the pieces to the 1x4 and the upper back rest piece in the plans.

Estimated Cost
$340 including lumber and hardware
Estimated Time Investment
Weekend Project (10-20 Hours)
Recommended Skill Level
Intermediate
Seasonal And Holiday
Back