Community Brag Posts
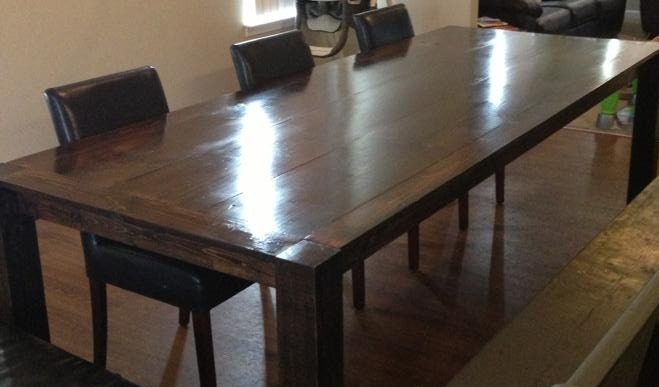
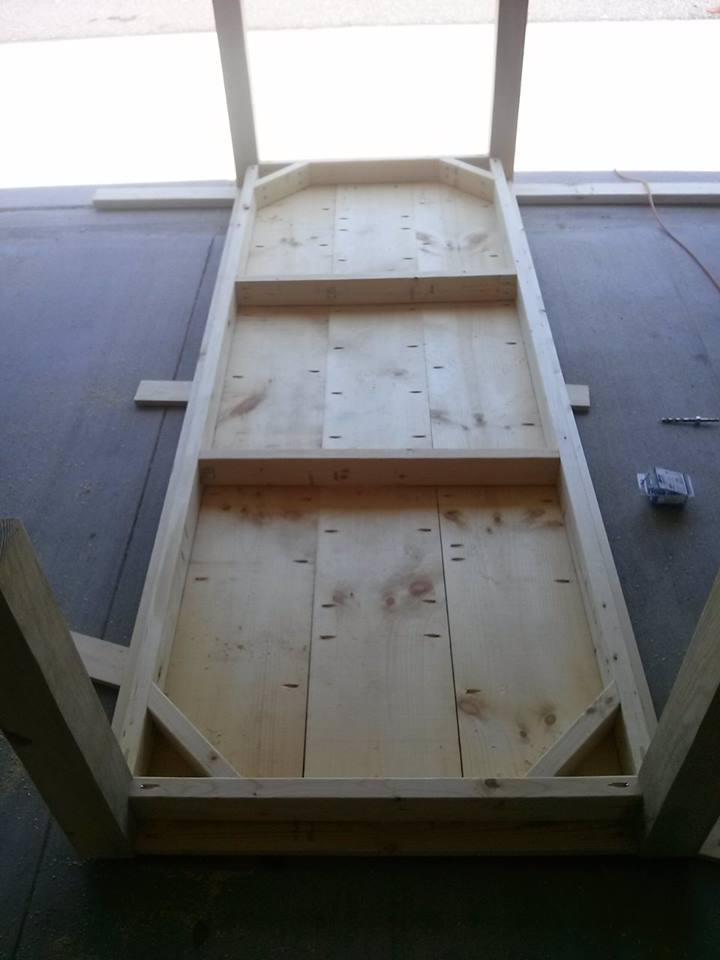
DIY Modern Box Joint Dining Table
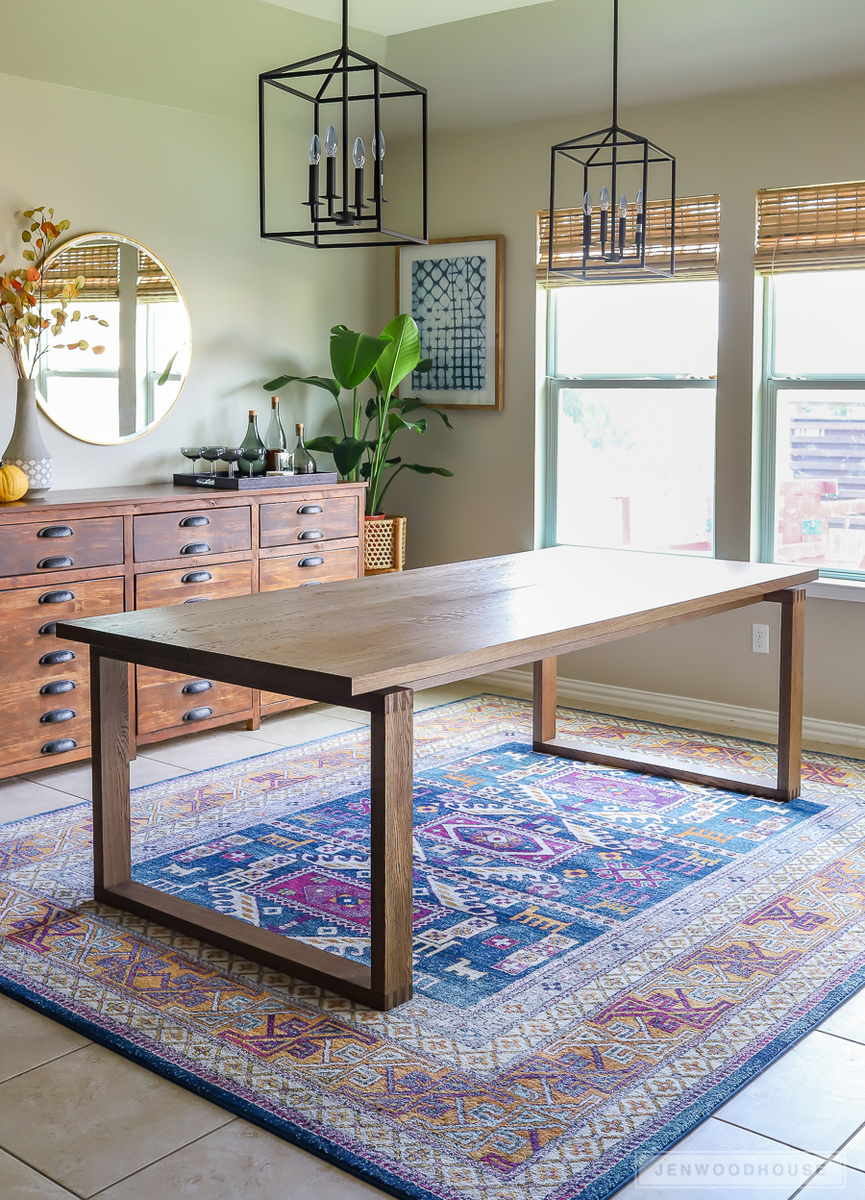
Hi friends!
Jen Woodhouse from The House of Wood here.
After sharing my new dining room, I got a lot of requests for plans for my dining table, so I’m thrilled to finally deliver. The box joints on the legs add just the right amount of detail to this dining table, don’t you think?
Be sure to tag me @jenwoodhouse if you share photos of your build on social media. I'd love to see it!
You can get all the details for this build on my website jenwoodhouse.com
Estimated Time Investment
Afternoon Project (3-6 Hours)
Recommended Skill Level
Intermediate
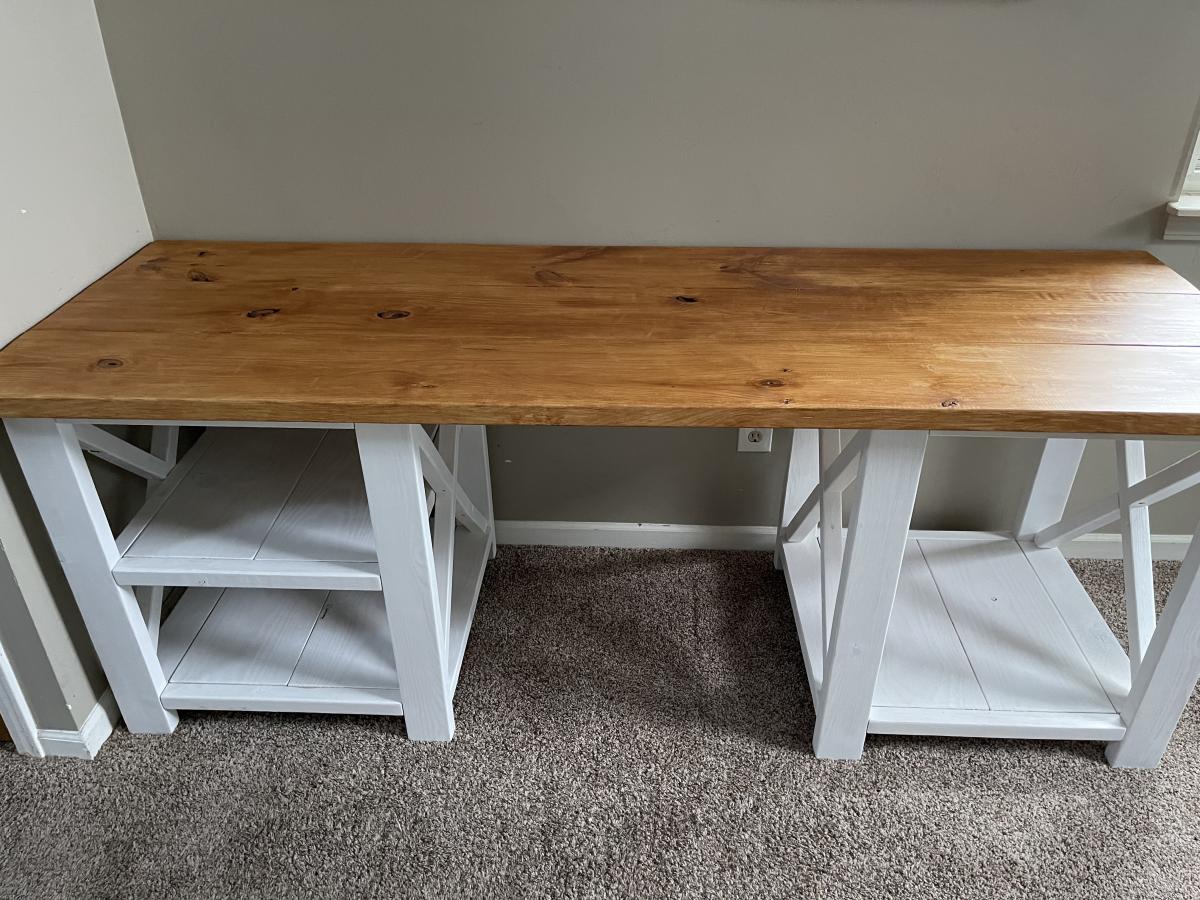
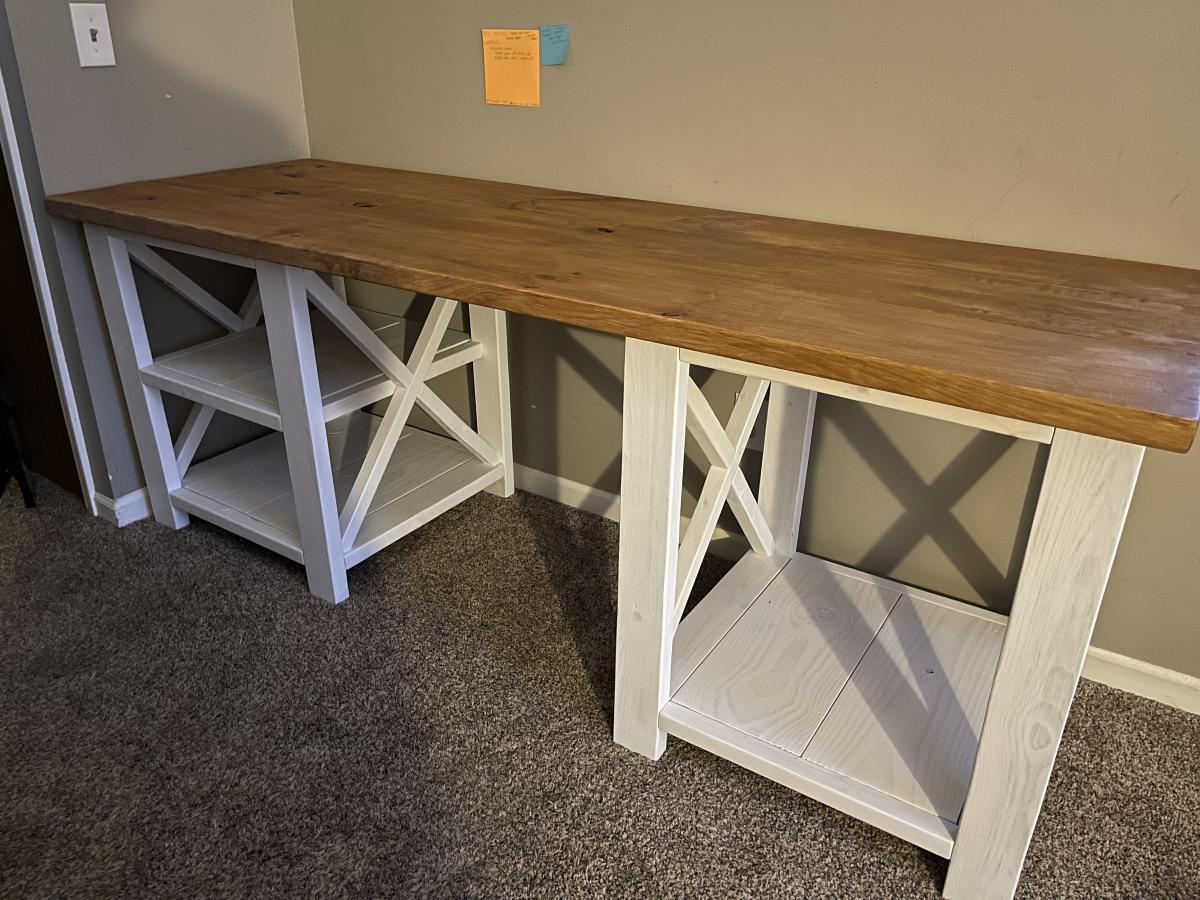
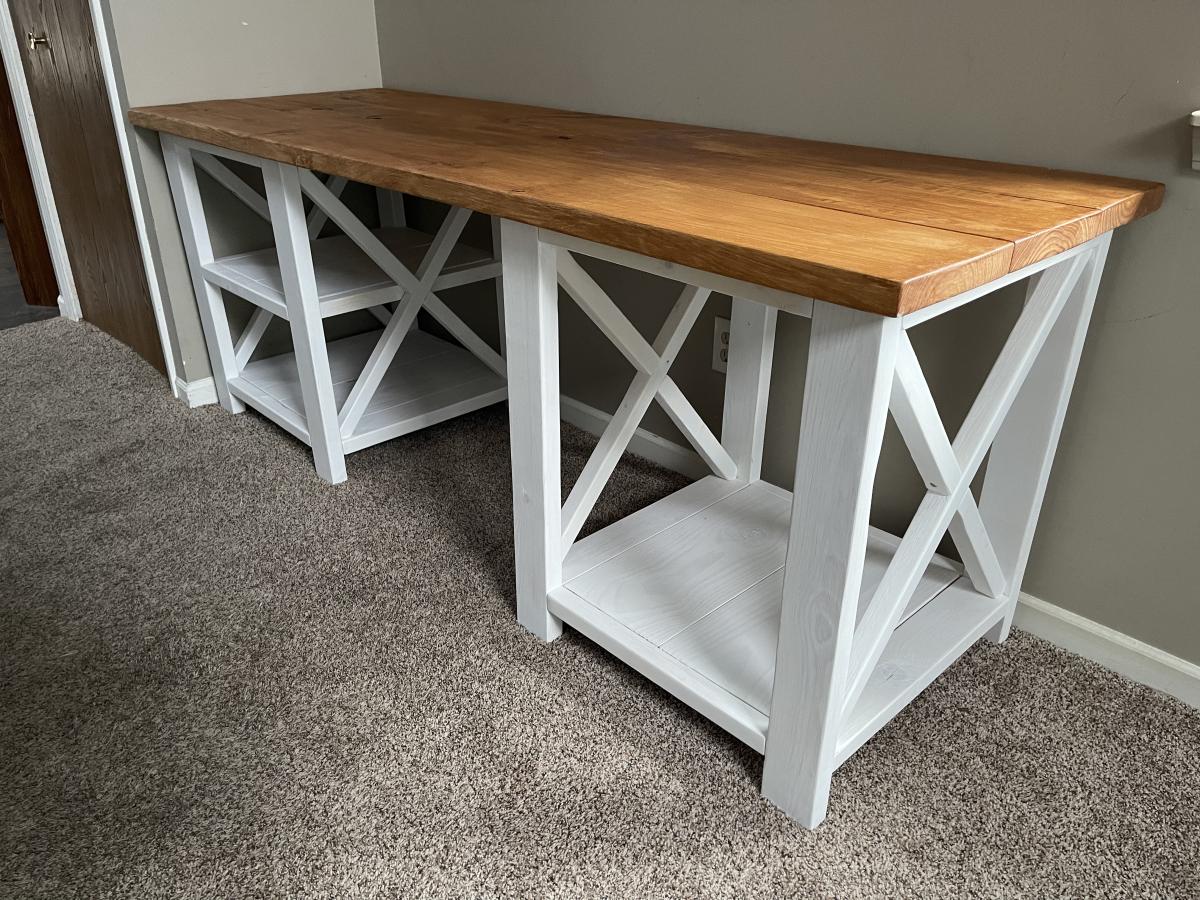
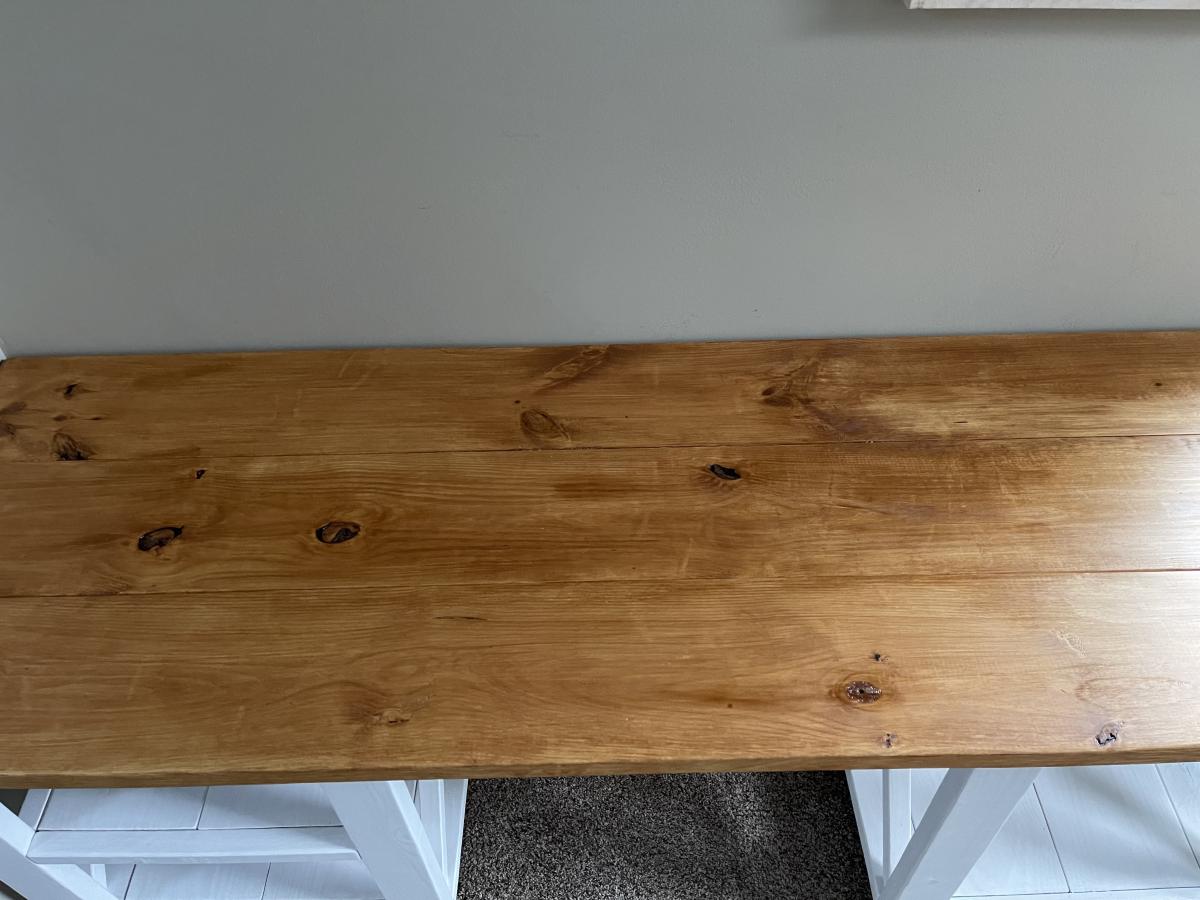
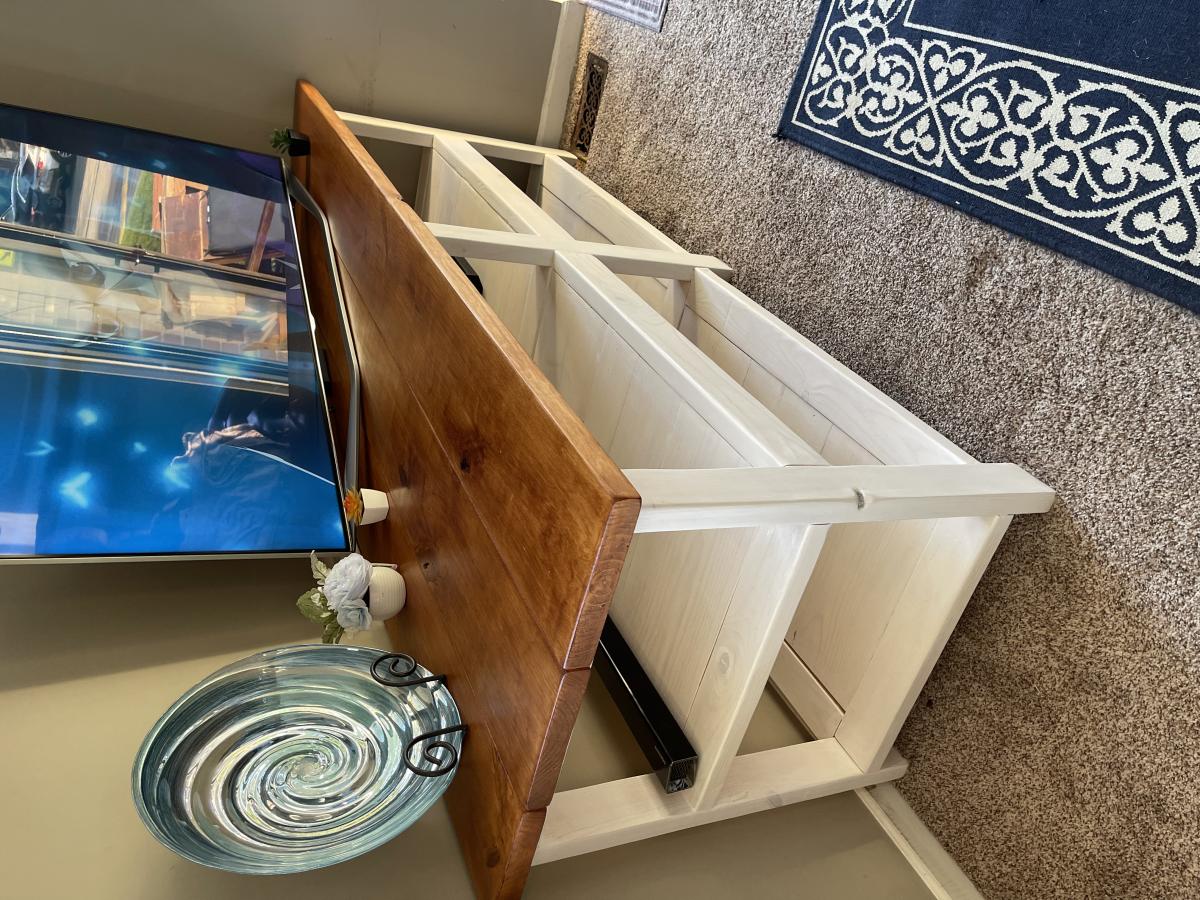
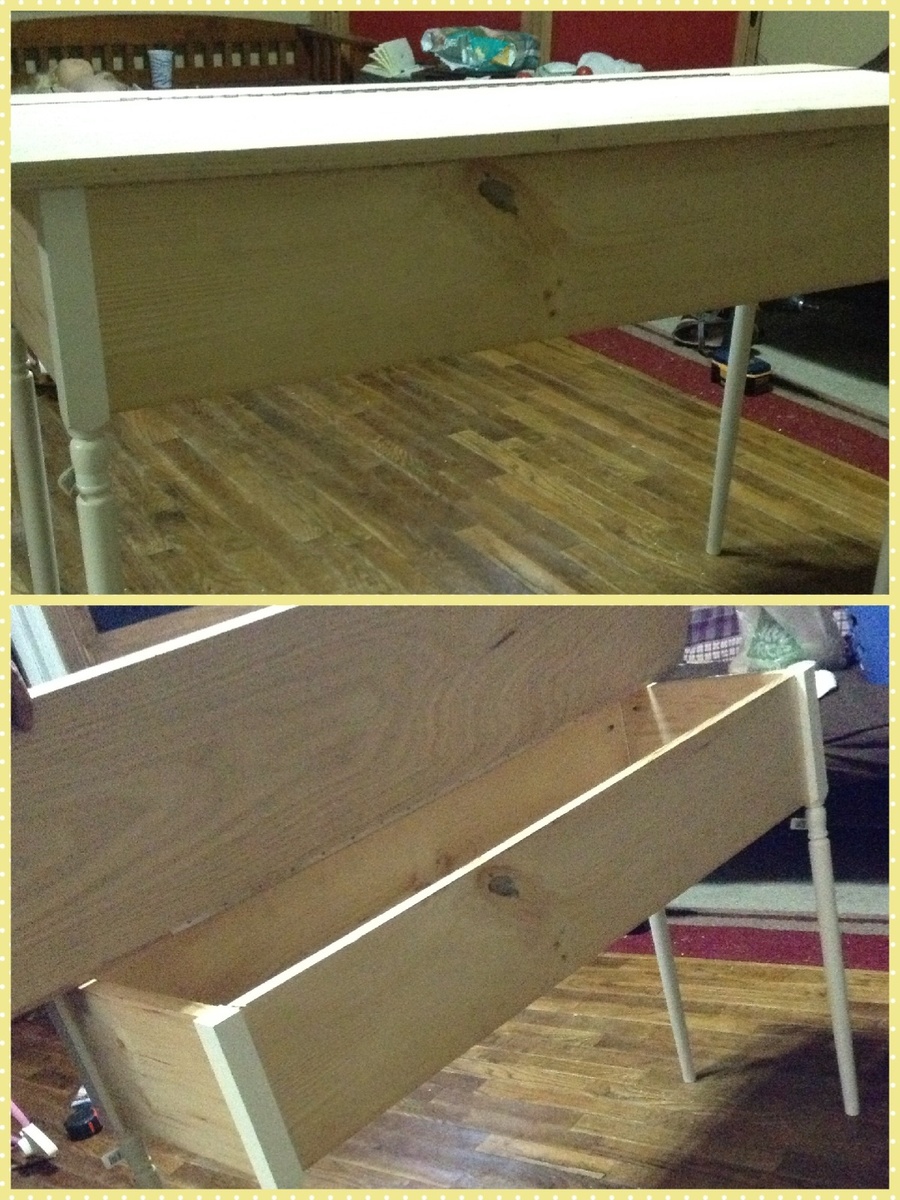
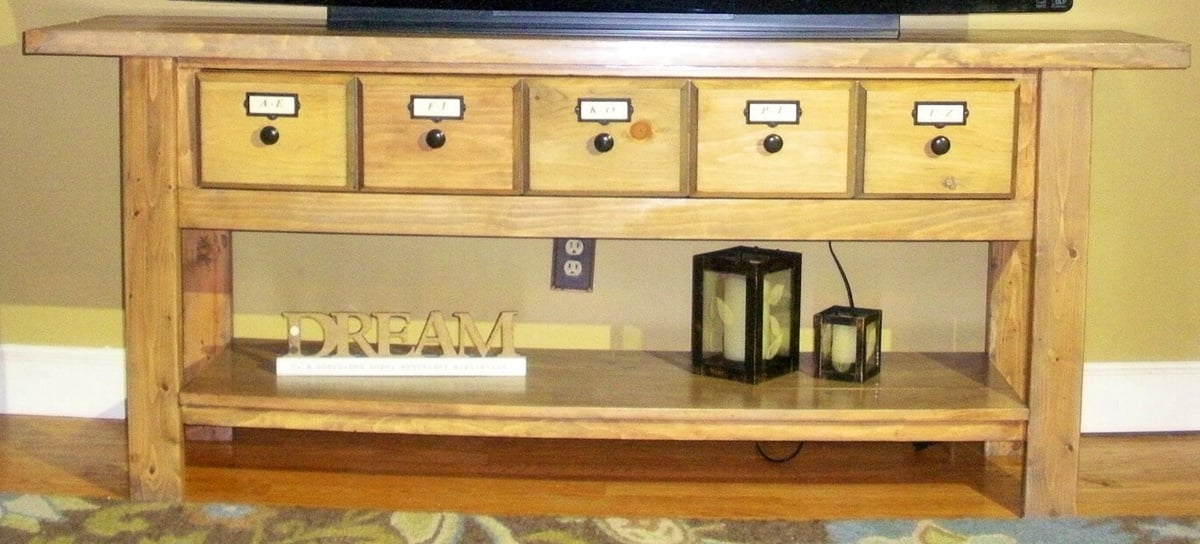
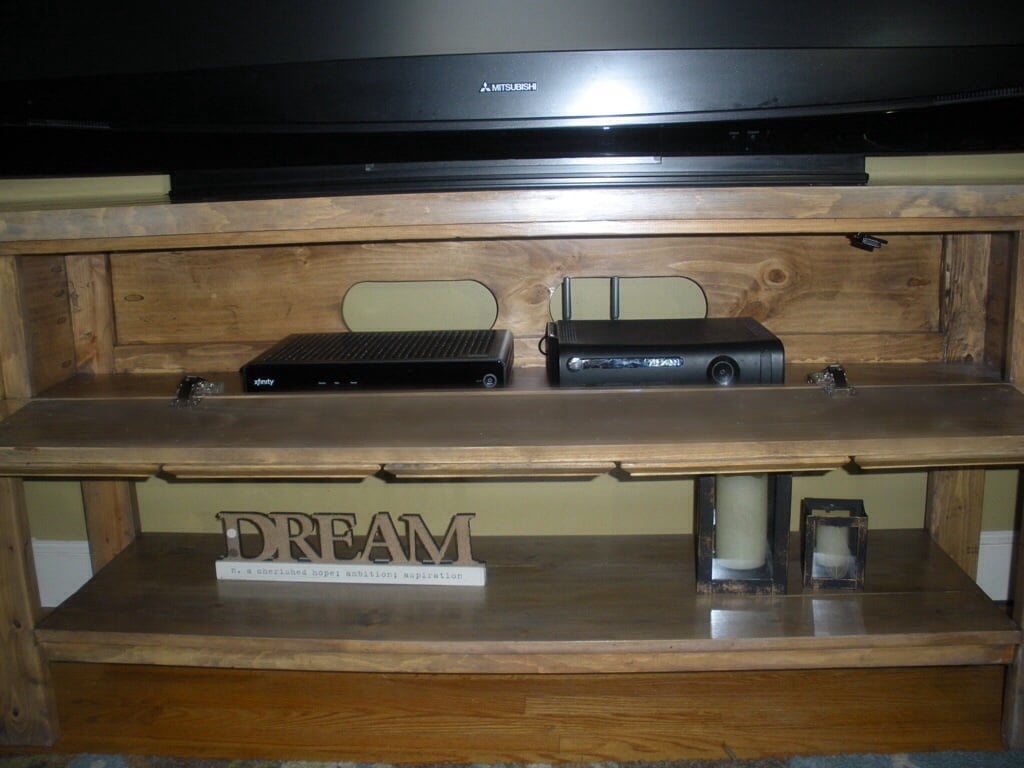
Rustic X Desk and TV stand
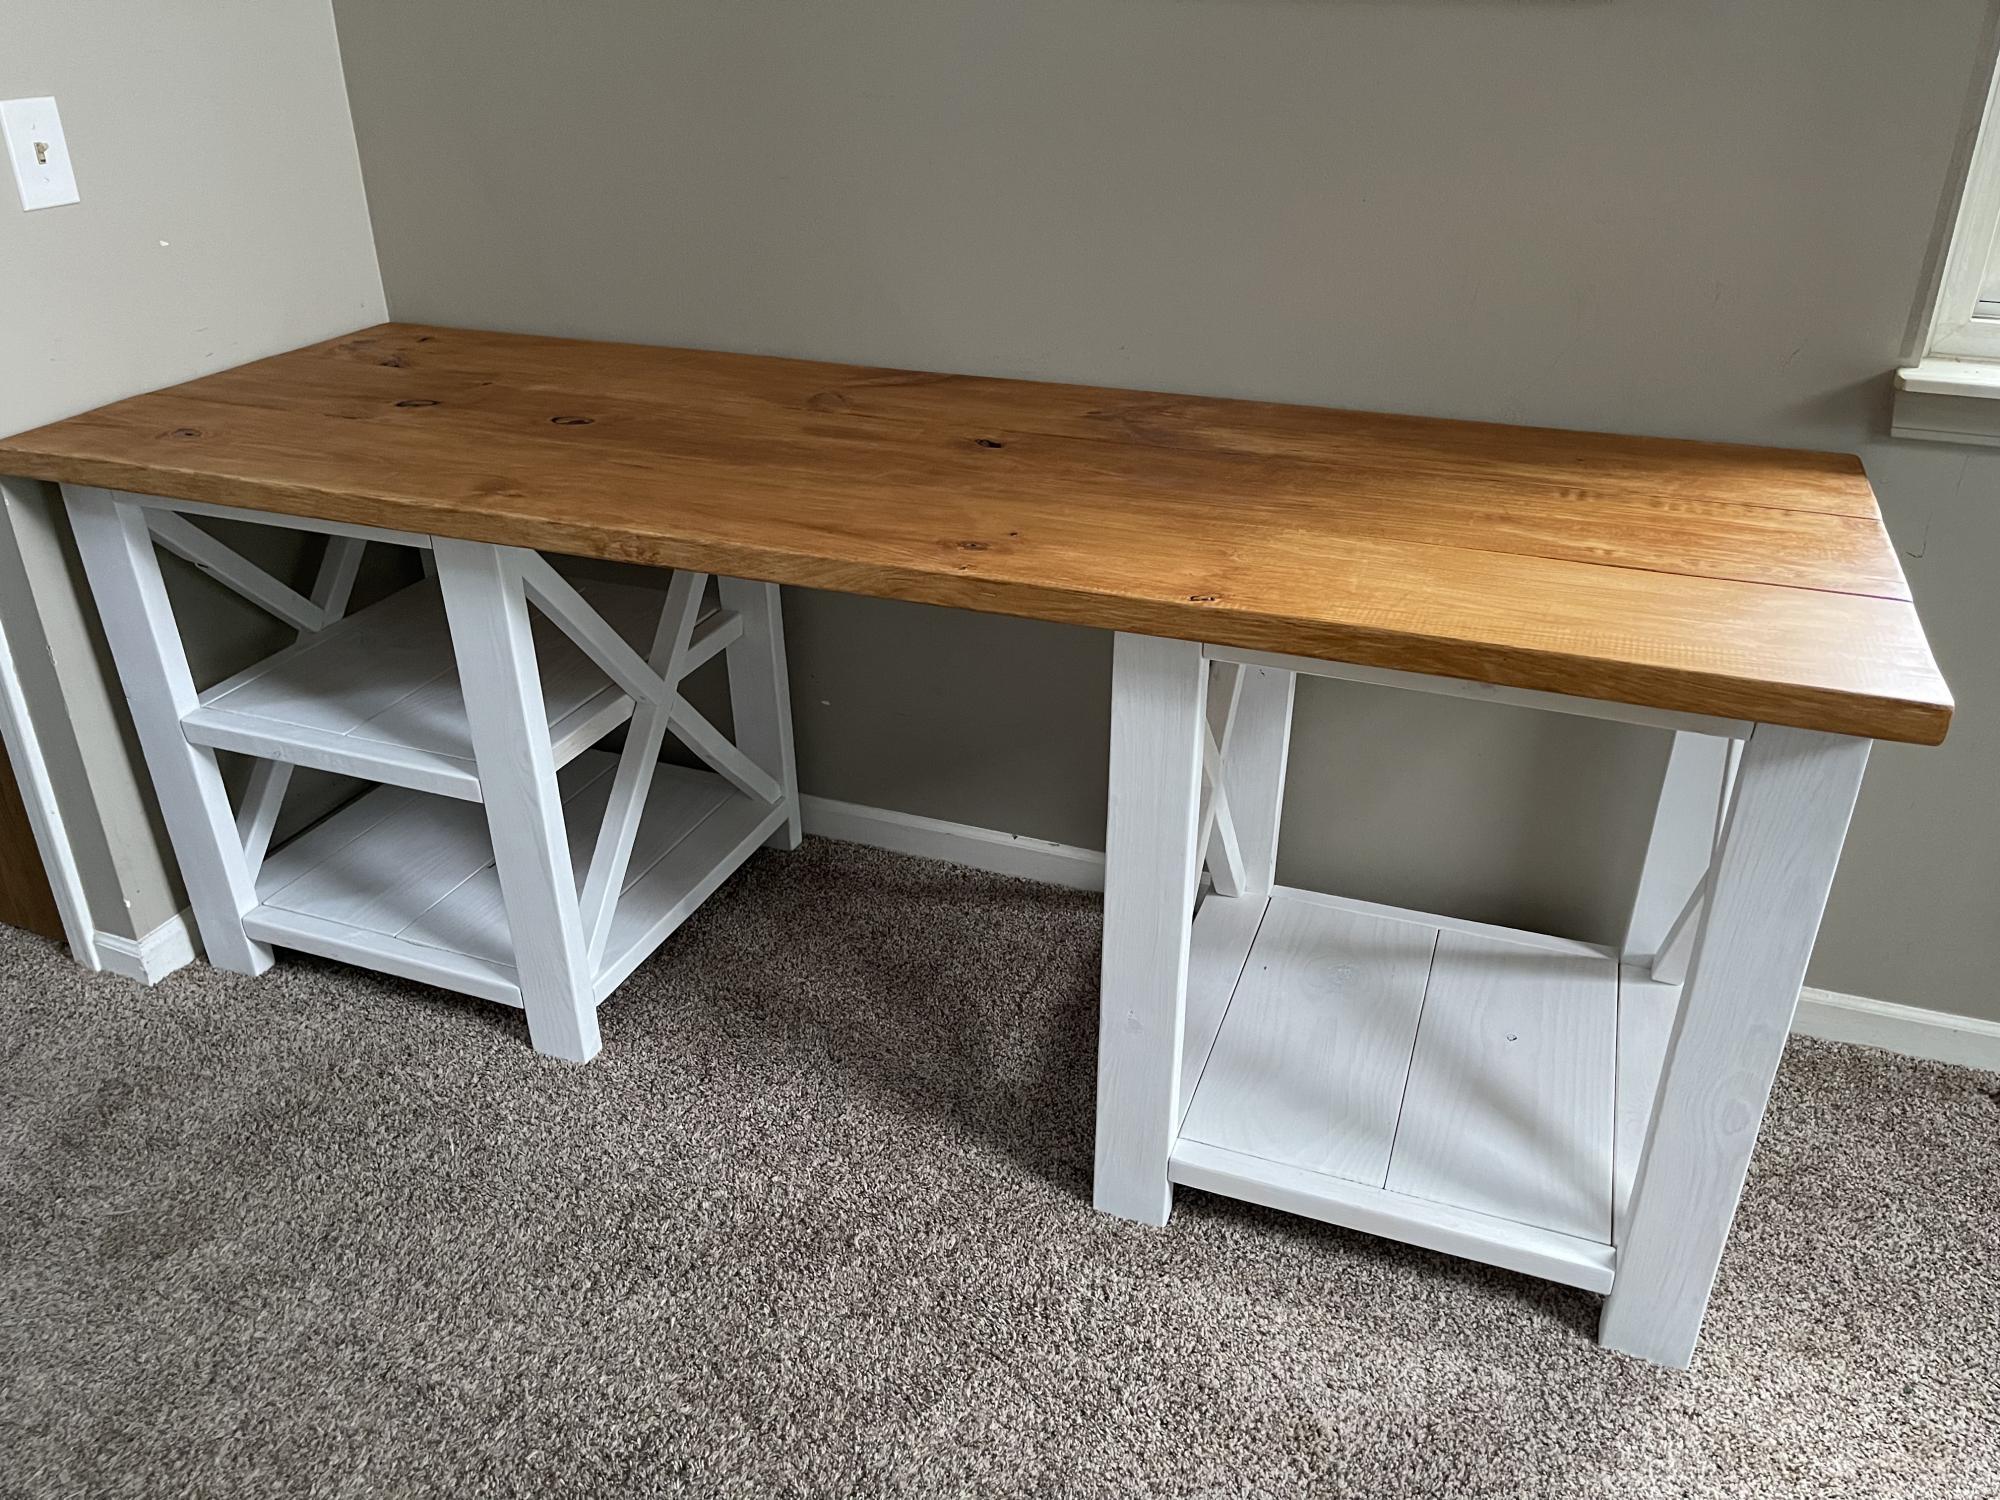
Modified the Rustic X Desk plan to include an additional shelf. Eventually the whole wall where this is now will have a matching tv stand, and dog kennel with barn doors will go in between them
Built from Plan(s)
Comments
Mon, 05/09/2022 - 15:53
Just got the tv stand…
Just got the tv stand finished. I’ll be posting pictures soon… And getting a bigger tv now that it looks so small!!!! 😂
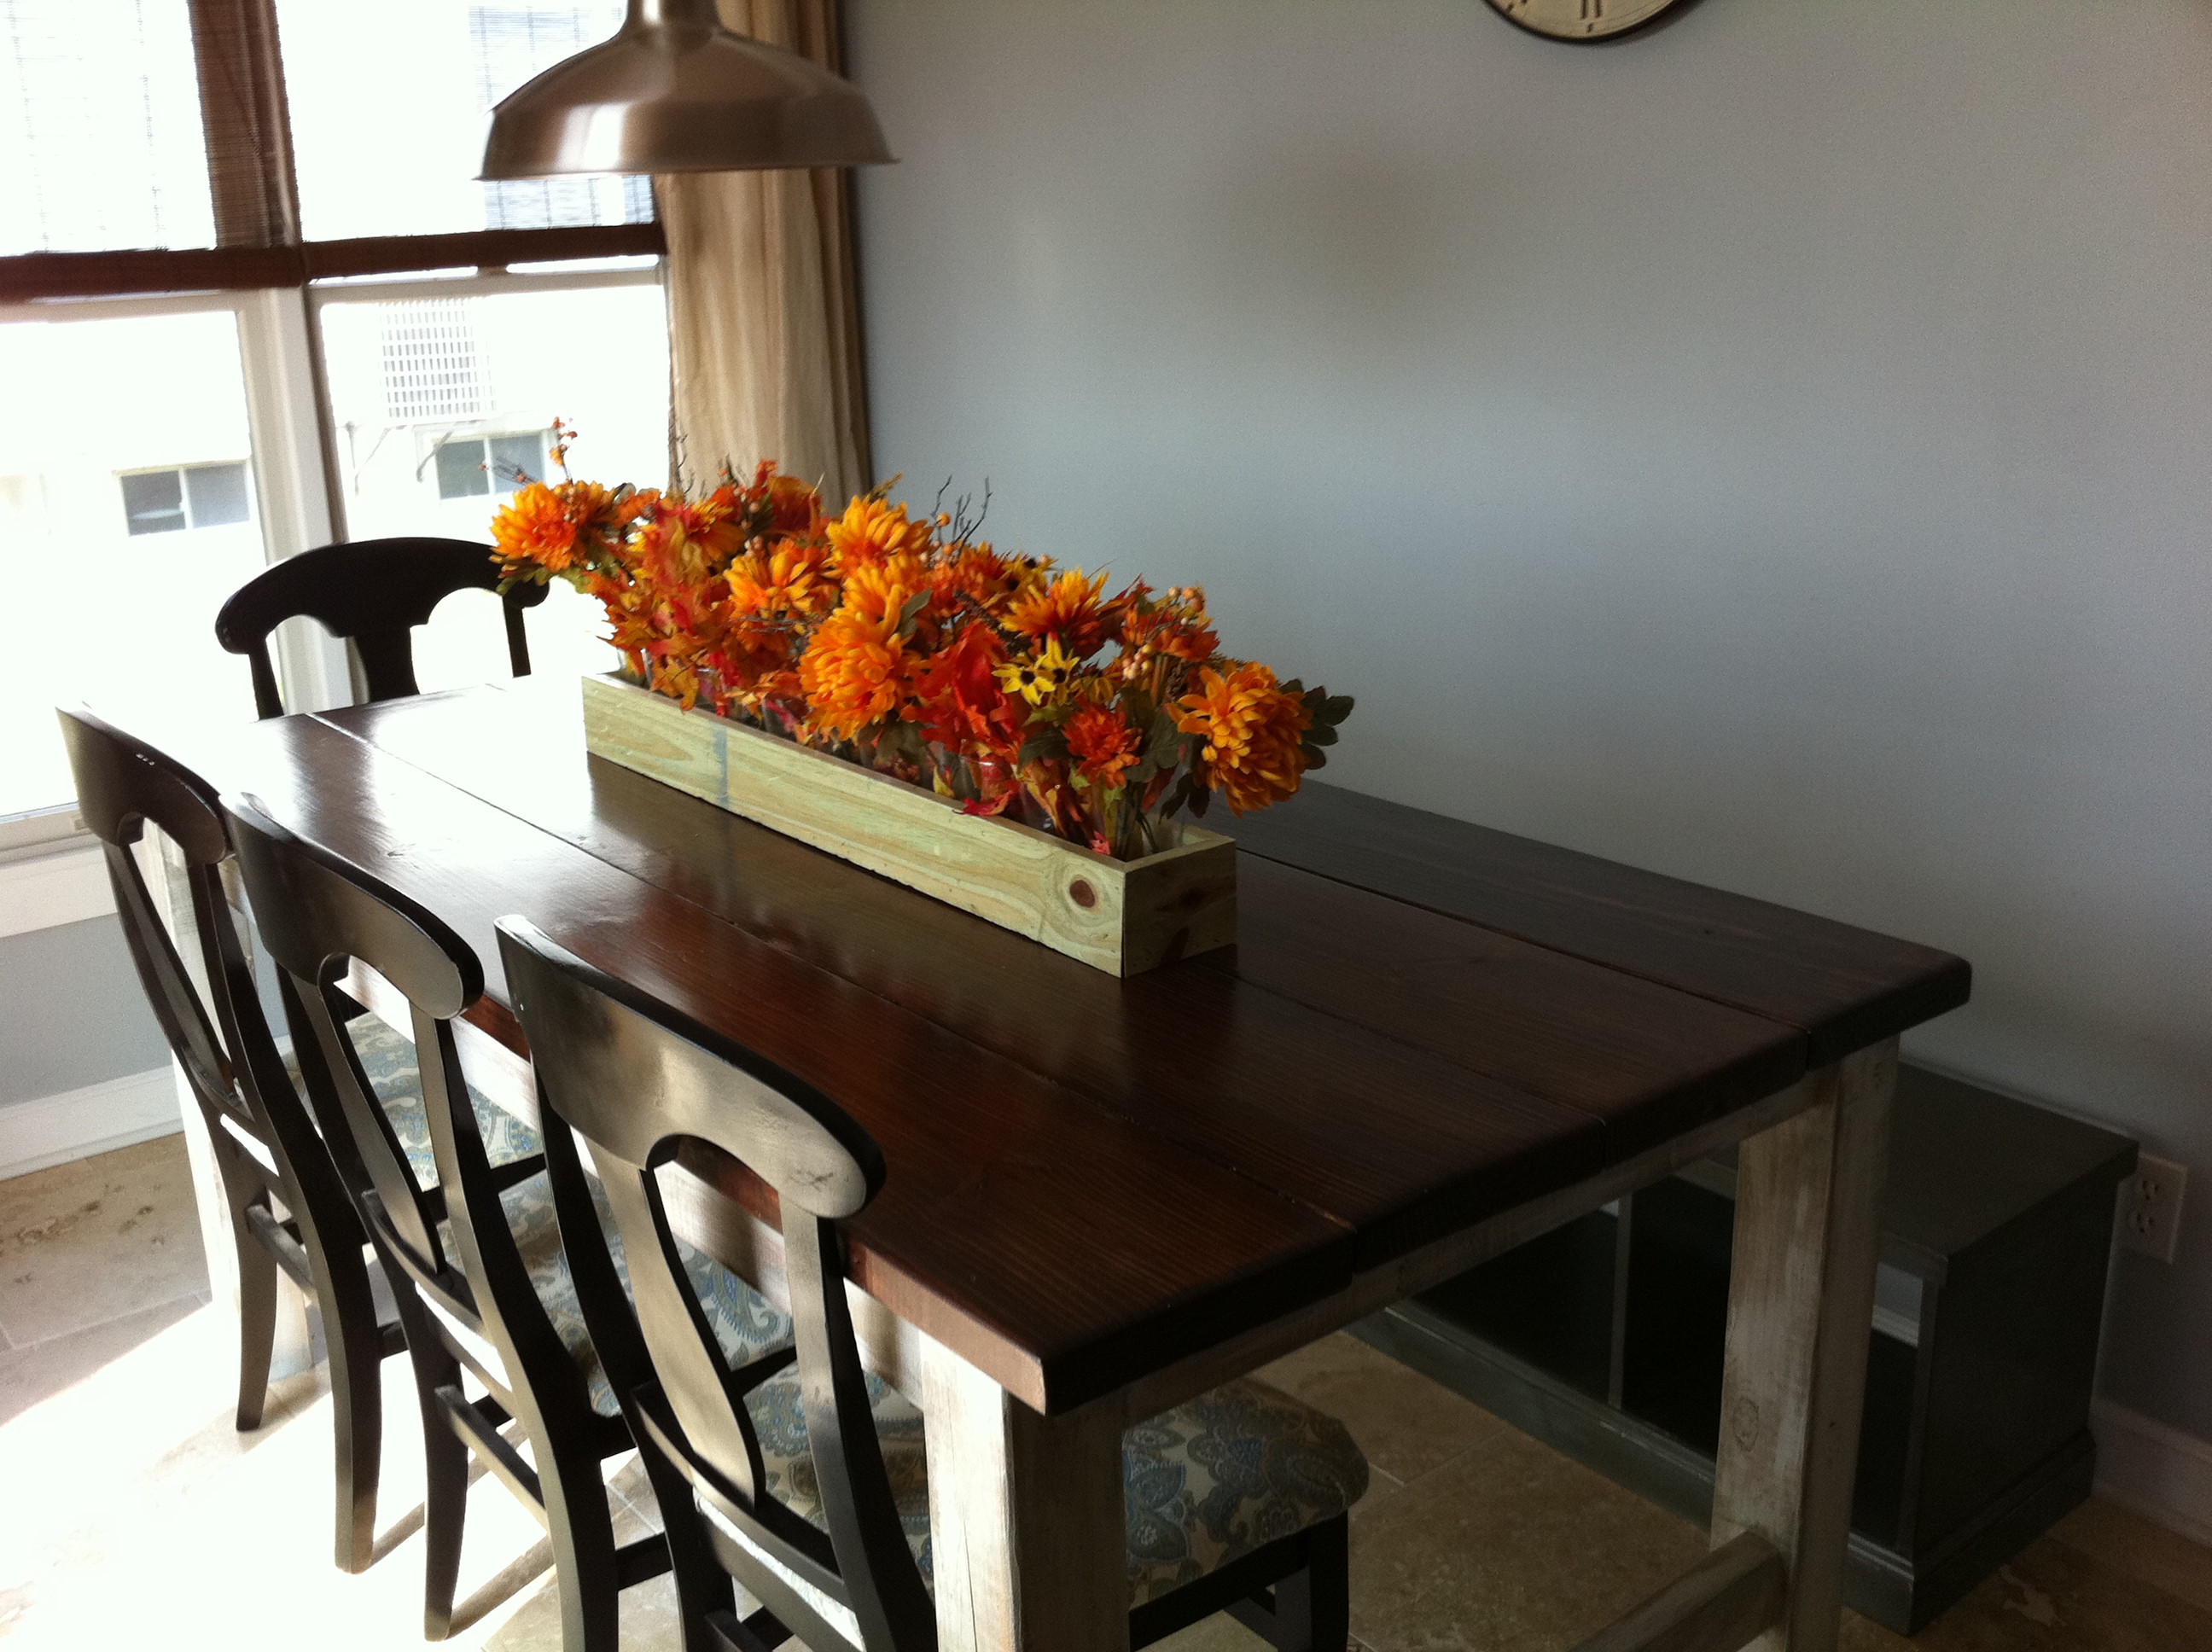
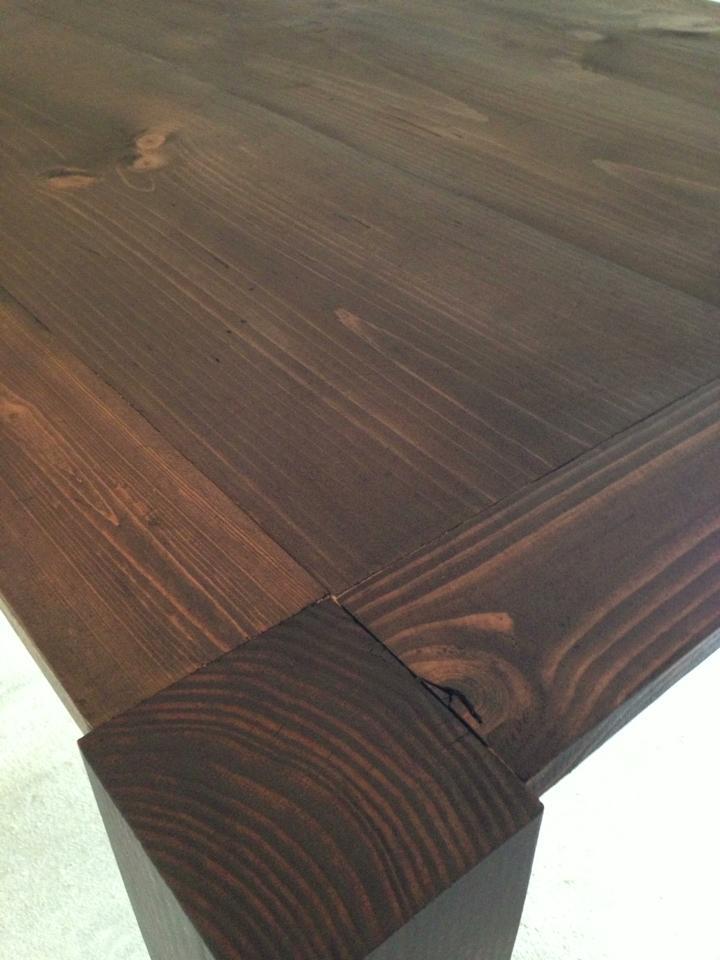
Rustic Farmhouse Table
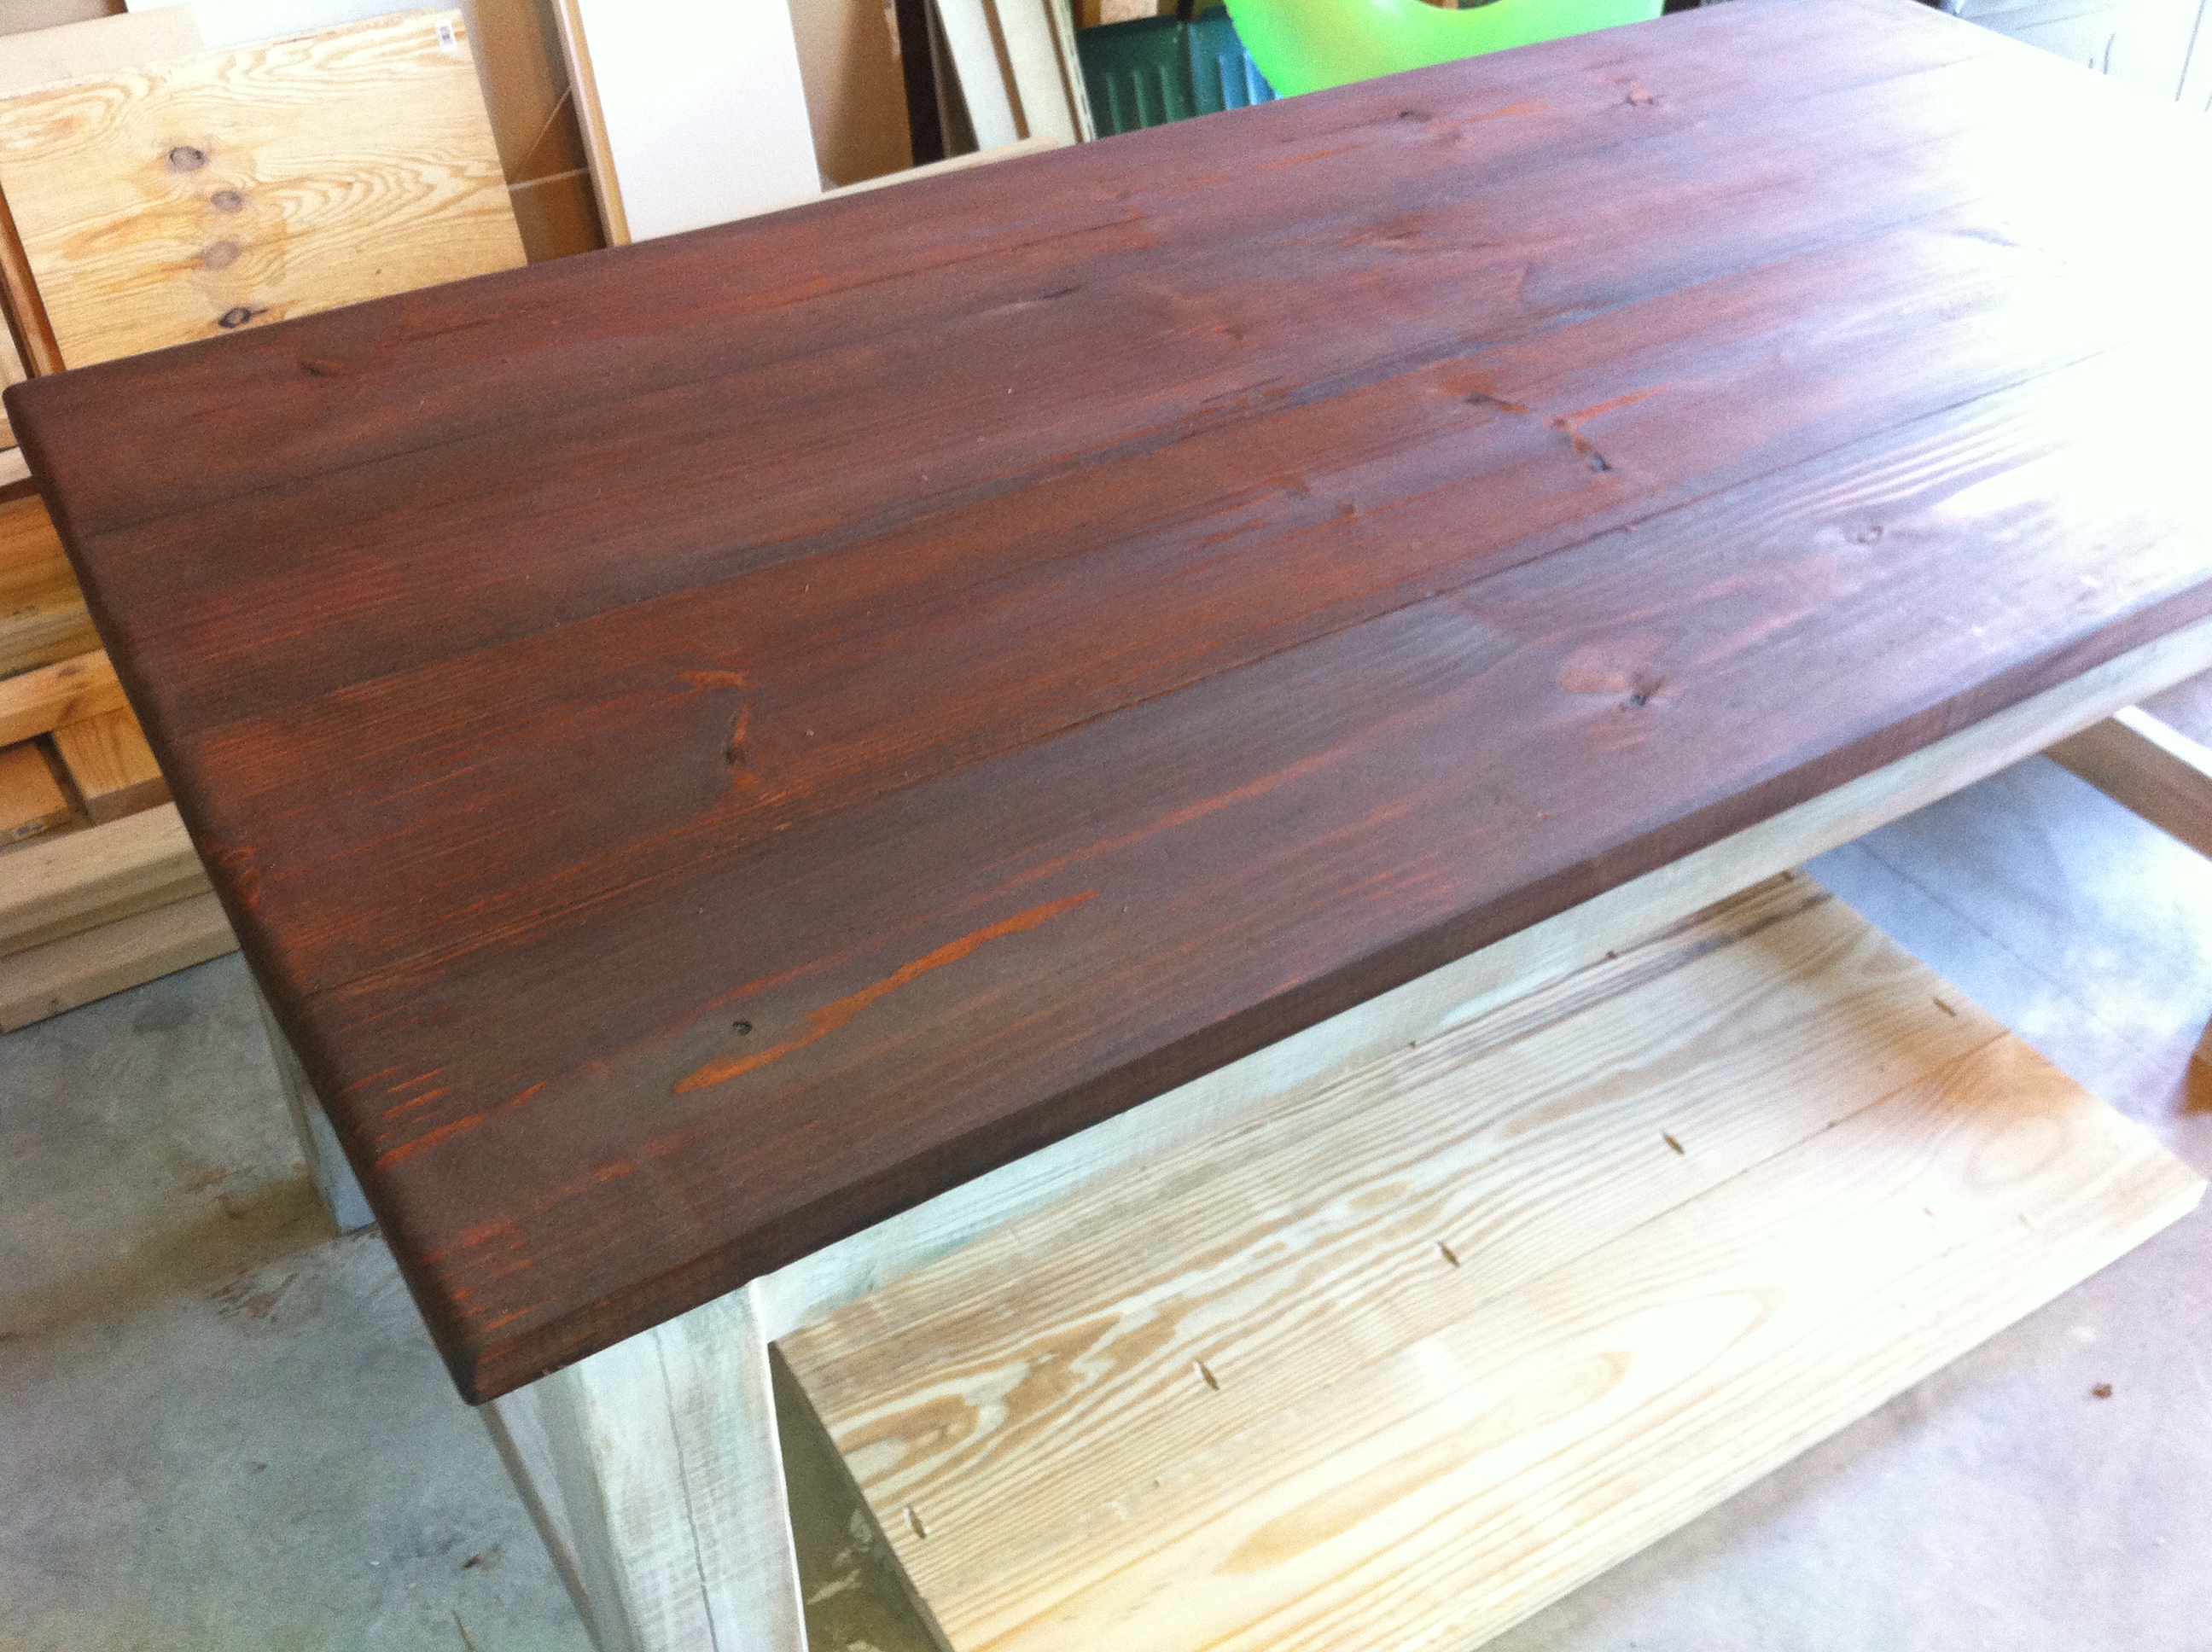
This table was quite simple to build. The hard part was the sanding and the painting/staining. It is sturdy. I also like that I can sand or touch up stain if it is ever damaged. Most store bought tables don't have that ability since the table top is usually a veneer.
Step by Step Summary on my blog - http://thequaintcottage.blogspot.com
Built from Plan(s)
Estimated Cost
I think it cost under $50 with all the lumber, stain and screws. Me likey!
Estimated Time Investment
Day Project (6-9 Hours)
Finish Used
The base has a faux-aged paint finish. Top is Red Oak stain.
Recommended Skill Level
Beginner
Comments
Sat, 07/09/2011 - 18:47
Love the paint job
Your paint job for the legs is awesome. I went to your blog to look at the whole process. Great work. The colors for the legs and top go together beautifully. Wonderfjul job! :) J
Sun, 07/10/2011 - 17:45
Thank you!
Thanks! I really didn't know if all the colors were necessary or if it would turn out how I pictured it in my head, but I just posted a close up pic of the finished leg and hints of the colors show. It is as close to I could get to weathered boards without waiting years to make them.
In reply to plans by grandeb3660
Sat, 09/03/2011 - 18:22
Farmhouse Table Plans Available
I added the plans to my blog, the link is above.
My new Table inspired by Big Ur, Farmhouse and iTable plans
We needed a Dining table to fit our growing family and our friends. Combined ideas from the iTable, Farmhouse and Big Ur table plans. Used 8ft boards so with the breadboards it measures roughly 8ft 7in long. Rustoleum Kona stain. Only took the weekend to build. Thanks Ana!
Built from Plan(s)
Estimated Cost
$250
Estimated Time Investment
Weekend Project (10-20 Hours)
Finish Used
Rustoleum Kona
Recommended Skill Level
Beginner
Sliding Doors to Laundry
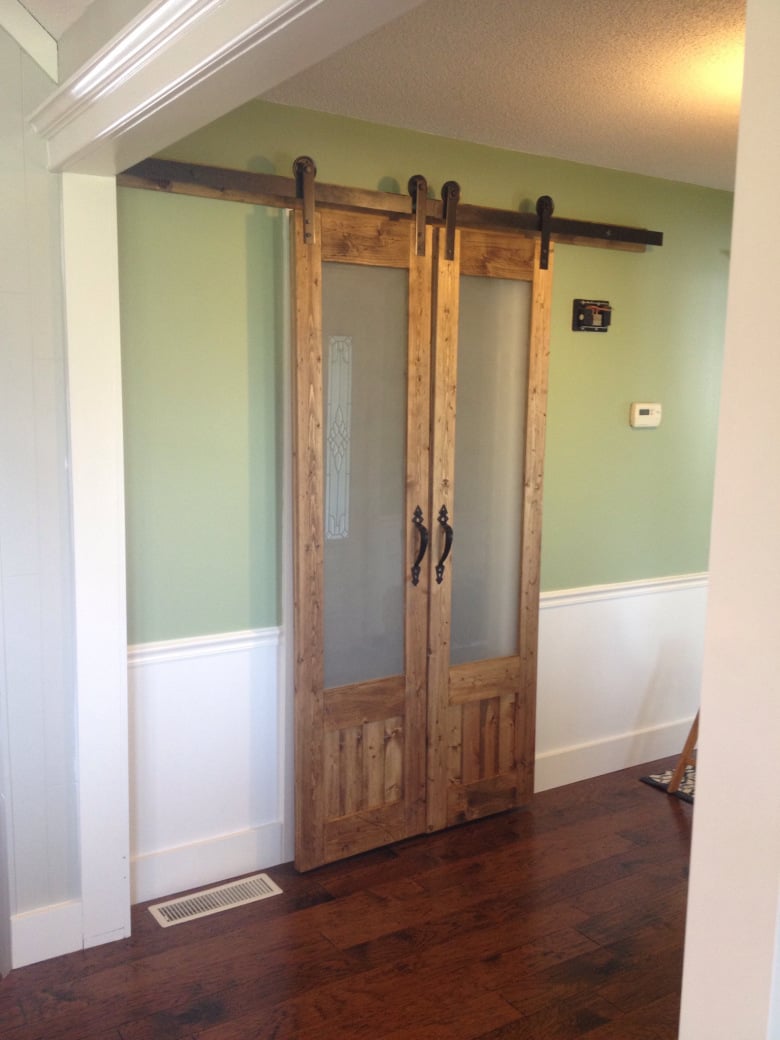
I built these doors to save some space from my old swinging door and to add some visual interest to the hallway since this is the first thing you see when you walk in the front door. You can find full details and tutorial plus alot more pictures on my blog post:
https://chasingadreamblog.wordpress.com/2015/07/20/dress-up-the-mess-sliding-doors-to-laundry-room/
Recommended Skill Level
Beginner
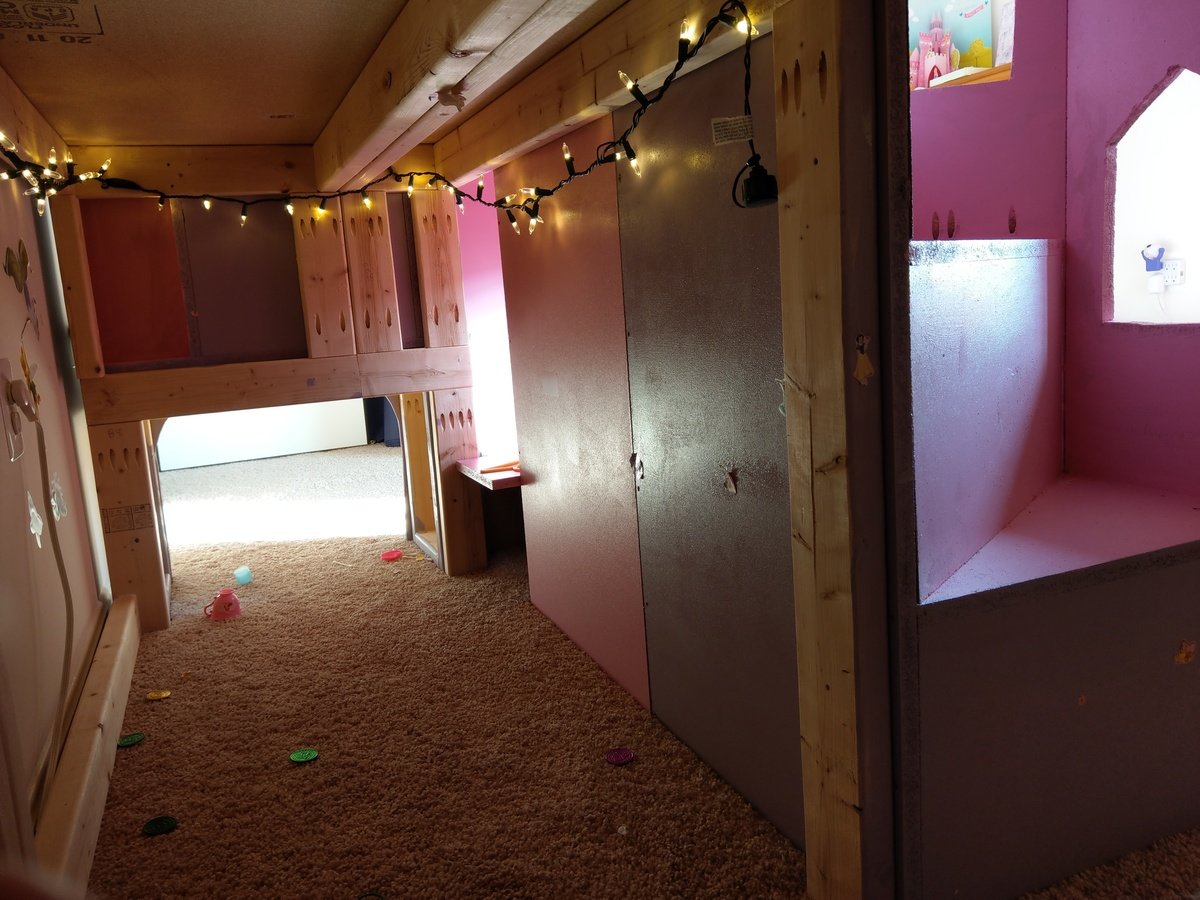
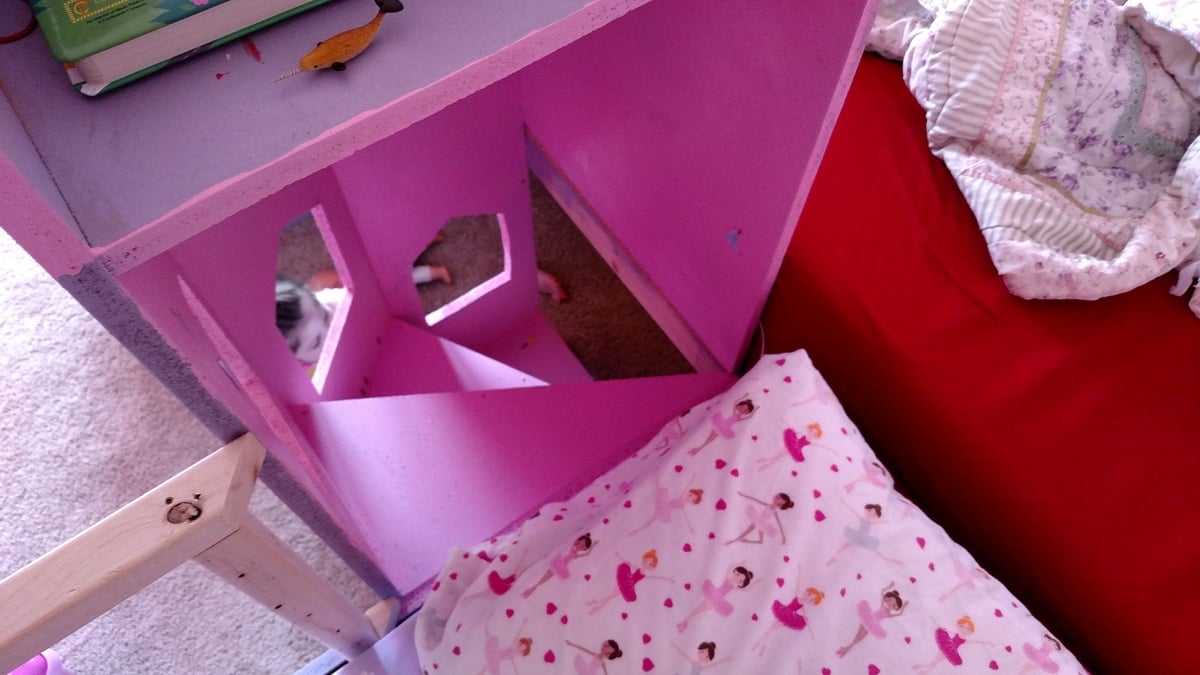
Castle Loft Bed for Two
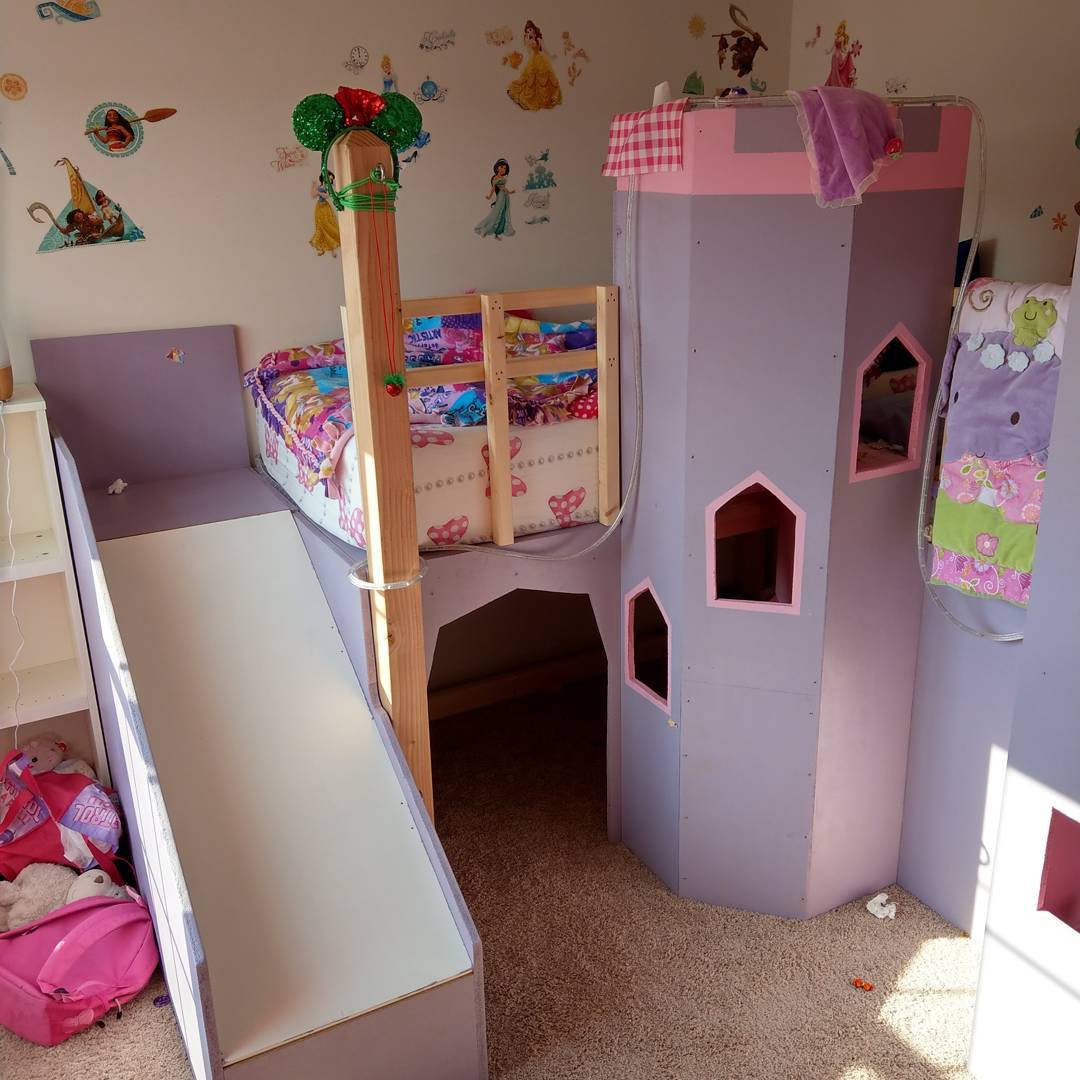
This project started with our older girl wanting sleep in the same room as her younger sister once she was out of a crib. Since it meant no more sneaking into Mom & Dad's bed I was happy to comply. The only problem was all the plans I found were for one bed not two. Both girls love storytime in bed, so I had to make it strong enough for the whole family to be up in bed. To not turn her room into a construction zone, it was made in sections that could fit up the stairs & through the bedroom door.
All together we have a twin bed, a crib-size bed, three removable railings (to let me put them in bed when they fall asleep elsewhere), a slide anyone can use, a secret tunnel to crawl through underneath (and strong enough for adults to use as a step-ladder), a spiral stair for the kids to climb, and enough room for adults to sit up underneath. There is a flag pole next to the slide, but neither my wife nor I have gotten around to making them a flag yet.
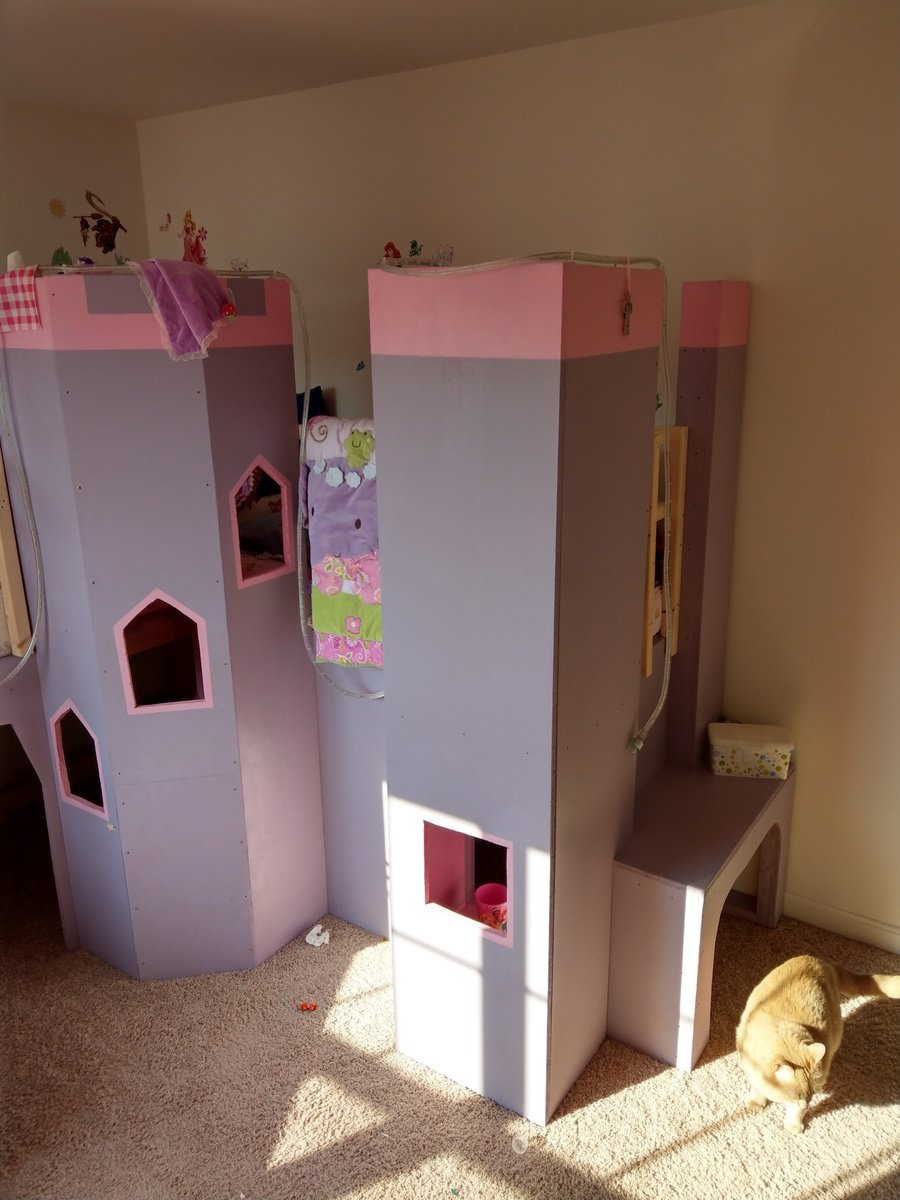
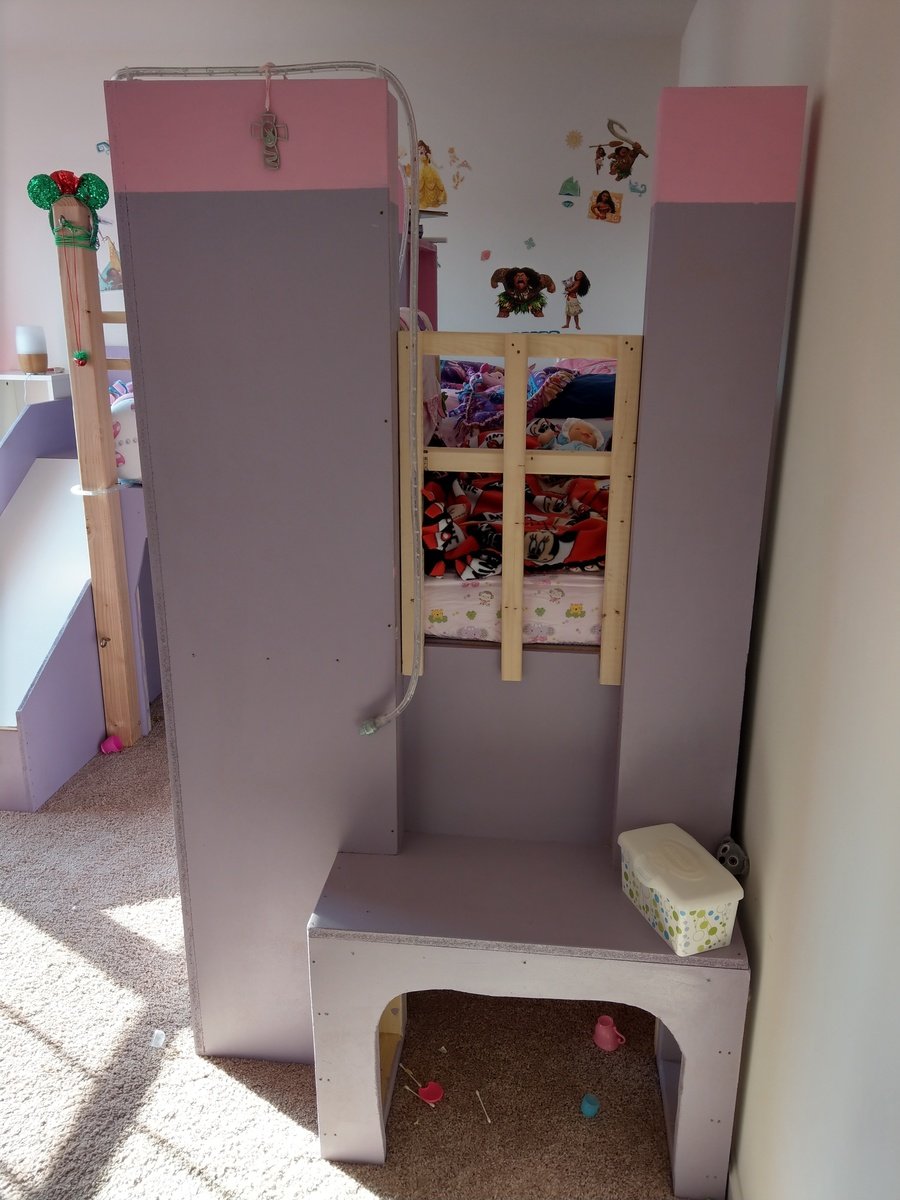
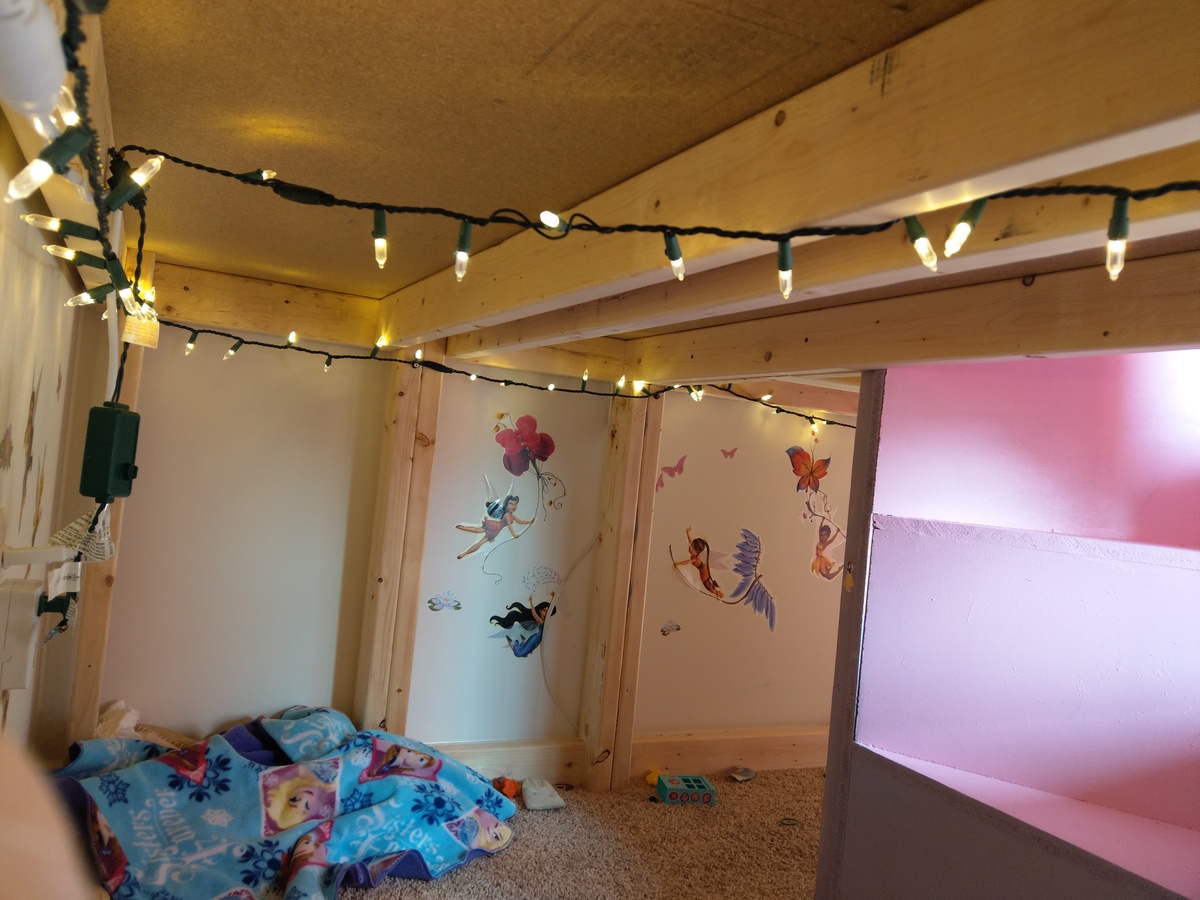
Built from Plan(s)
Estimated Time Investment
Week Long Project (20 Hours or More)
Recommended Skill Level
Advanced
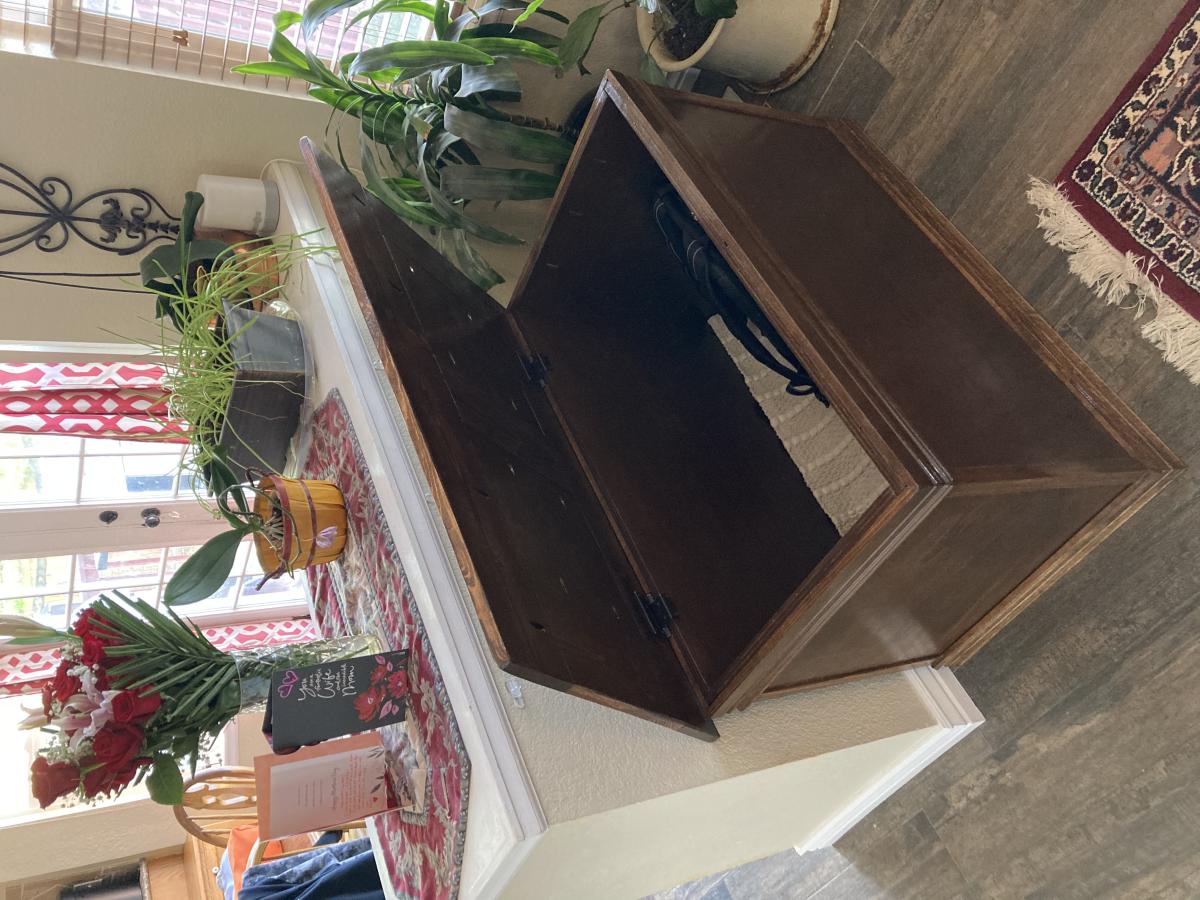
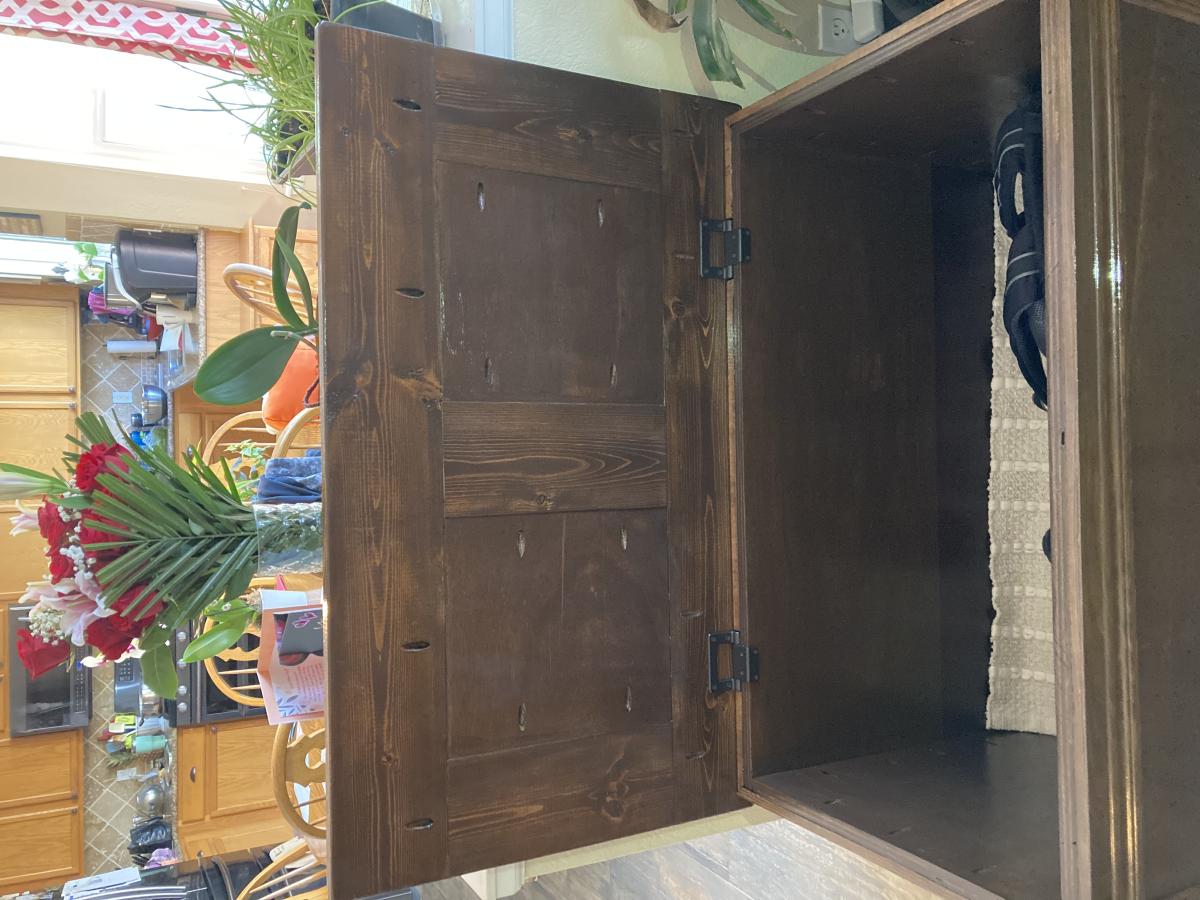
More than a Trunk
This project held two purposes: Father’s Day and my husband’s shoes/backpack. This was the perfect way to get them off of the floor and into something beautiful!
Both of my teenage kids help with different aspects of the build.
I will list what hinges and handles I used after reading all the other posts on this Becca Trunk.
I did make my carcass taller and longer than the plans to hold my husband’s items plus some couch blankets. I have 4 supports on the bottom instead of three. I only used 3/4” hard plywood. I added an inch to each side of the lid, so it was easier to open. There are 2 coats of stain and 2 coats of 3x interior gloss poly made by Varthane on this trunk. I sanded with 320 sandpaper in between each coat of poly.
After reading all the posts about hinges, soft closing and looking at each picture, I came up with Torsion Hinges by Rockler. These hold up the lid at all different angles and give a soft close once lowered to a certain point.
I installed 2 sixty pound bronze torsion hinges with the assistance of their Hinge Jig. That helped me to make my lines and pre drill marks without guessing. Rockler has several videos on them and how to install, plus several on YouTube. I bought them on Amazon for less than the site and sold by Rockler. I did chisel out a small rectangle of the molding and it was easier than I thought. I was so nervous after building it all and now cutting some out of it, but it worked! I did one and my son the other one. The Rockler Jig was very helpful lining all this up. My hinges are 6” in from each side of the trunk. I set the lid in the right spot and drew lines where the hinge jig rest in my chiseled spots. Then flipped it over and lined up the jig again on the lid and knew where my holes were going.
I have just received my 3 set of handles. The others were not chunky enough for the size and the proper look.
Adonai Hardware "Phebe" Antique Iron Drop Pull (Supplied as 2 Pieces per Pack) - Black Powder Coated. I also got these on Amazon.
This trunk took time, but it was well worth it. So beautiful and worth it. My husband was so surprised and also knew it was for his shoes/backpack. He appreciated all the detail that went into it and lived that the three of us built it together for him.
Thank you Ana and Shanty 2 Chic for the plans and pictures. They are always so helpful. I have made many of your builds and I am learning from each one. Thank you again.
Blessings,
Jennifer
Built from Plan(s)
Comments
Mon, 05/16/2022 - 08:26
Gorgeous Trunk!
What a special piece, it is so pretty and sure to be cherished for years! Thank you for sharing:)
Mon, 05/16/2022 - 18:30
Thank you, Ana. I appreciate…
Thank you, Ana. I appreciate your kind words. You have really inspired me and you prepare myself and others for success with your plans and especially the videos. I have learned a lot from you! Thank you!! Blessings, Jennifer
Mon, 05/16/2022 - 08:26
Gorgeous Trunk!
What a special piece, it is so pretty and sure to be cherished for years! Thank you for sharing:)
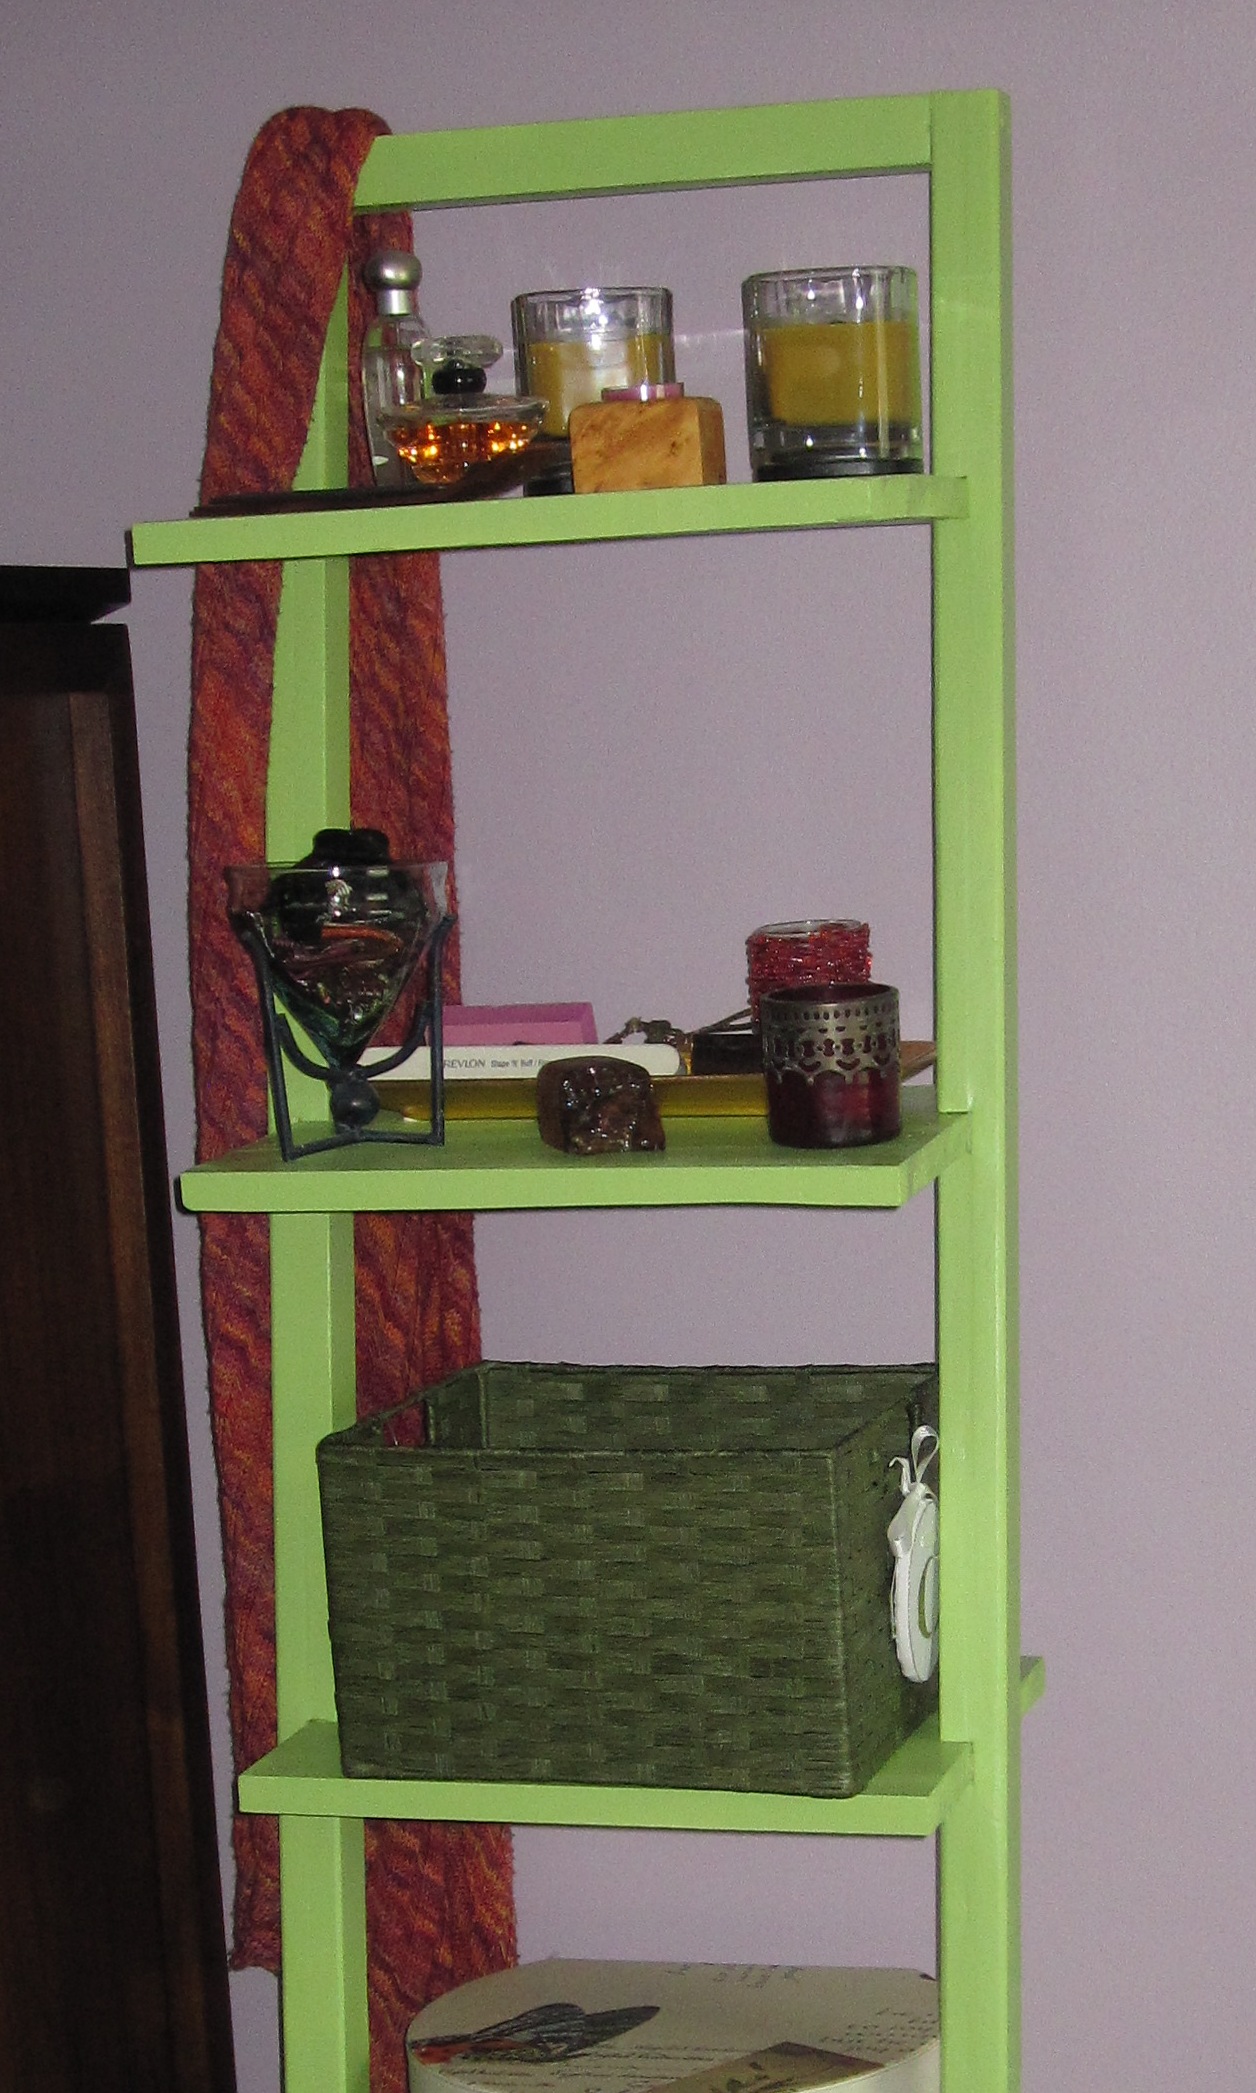
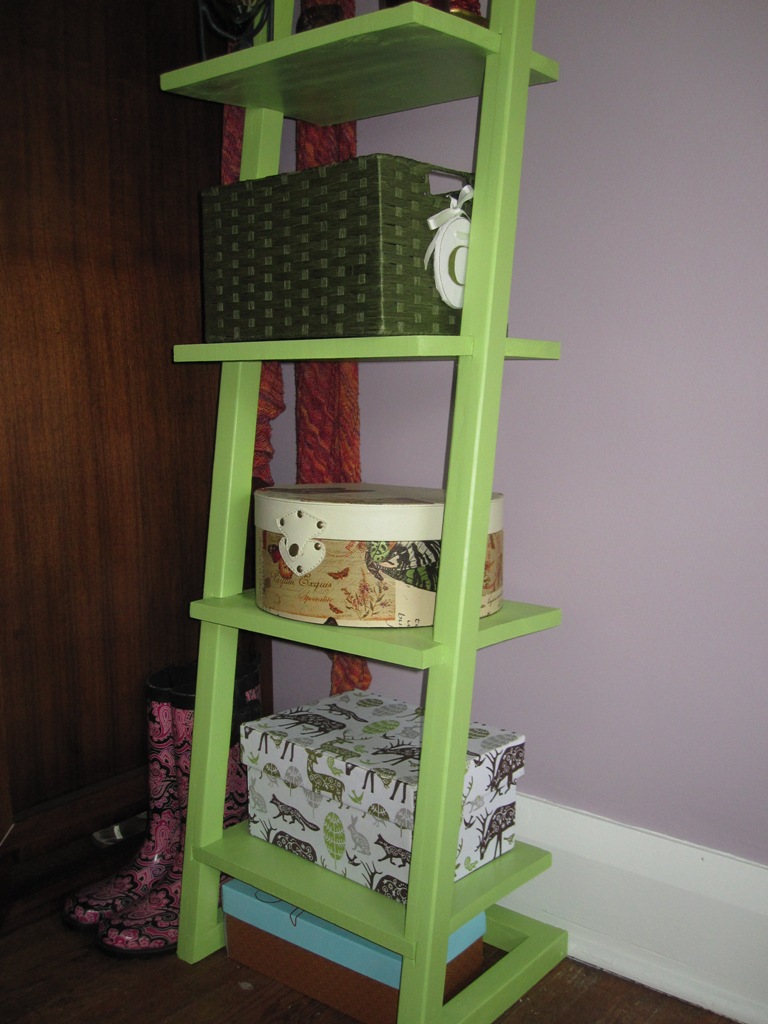
My firZt Ana White build

I moved from a big apartment to a small house and I needed more horizontal space. Shelves look great in use and are very stable. All the newbie mistakes in picking wood, cutting and sanding fade into the background.
What did I learn? - This is one time when getting the nice dressed lumber is worth it since they laminate better. I spent a lot of (useless) time applying wood filler trying to get the gaps invisible. - Get the scraps out of the way ASAP so I don't keep confusing them with the cut pieces. - It's hard to set the miter saw to the "same" 10 degrees more than once since its not a preset on the miter saw, so do all the angled cuts at the same time. -For some reason, one shelf was shorter than the rest.
Built from Plan(s)
Finish Used
Rustoleum Spray Paint, 2 cans
Recommended Skill Level
Starter Project
Flip Top Desk
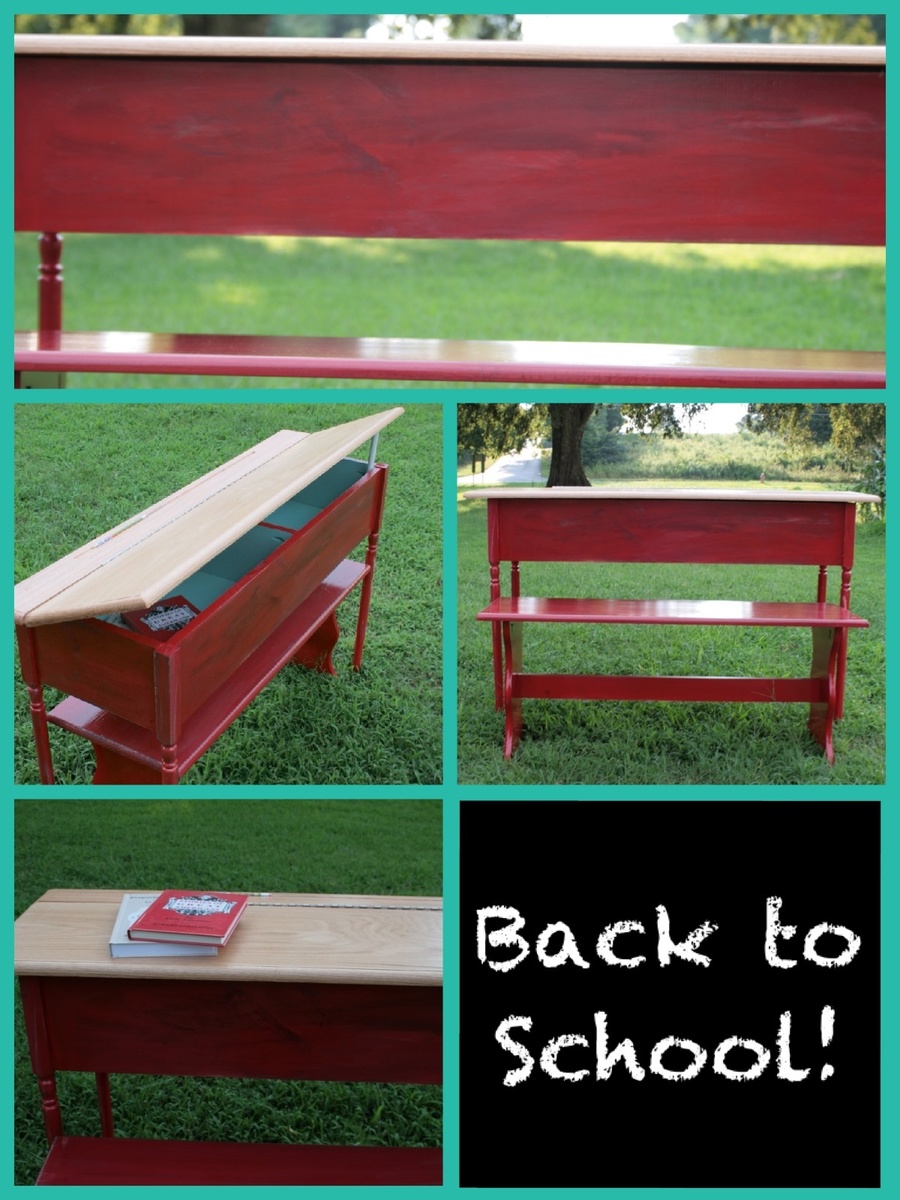
Used the plans to make a desk for my girls!
Built from Plan(s)
Estimated Cost
$150
Recommended Skill Level
Intermediate
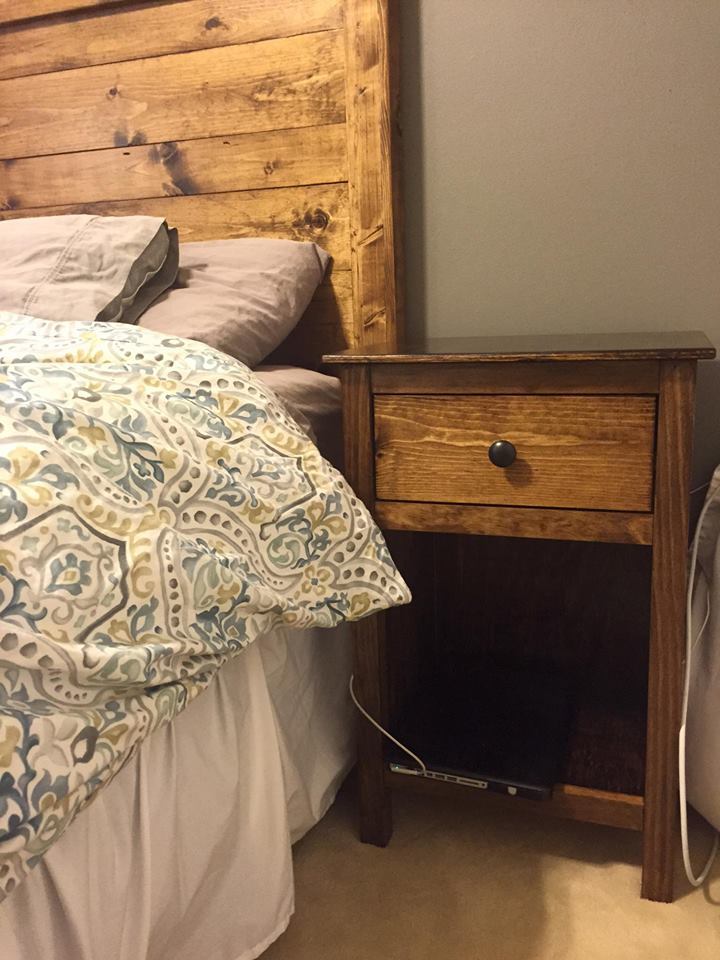
Nightstands
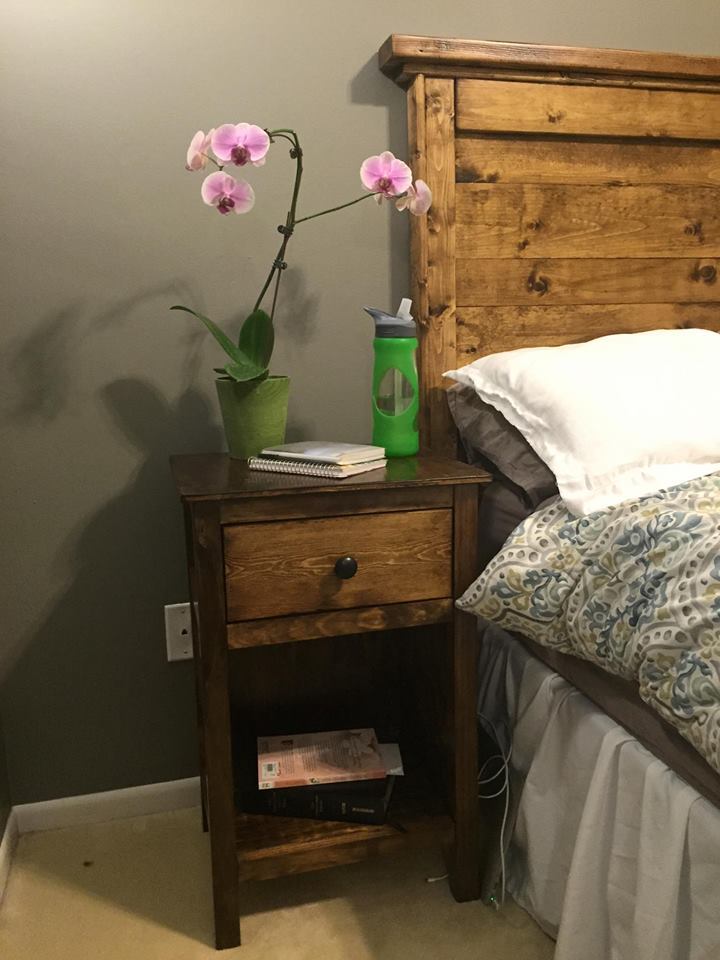
I based these off of the mini farmhouse bedside table plans, but changed a lot of the dimensions, added sides/back and chose to use plywood for the top, sides and shelf. The plywood did not stain very nicely for me- I learned my lesson! The drawers were definitely the hardest part!
Built from Plan(s)
Estimated Cost
$60
Estimated Time Investment
Weekend Project (10-20 Hours)
Finish Used
Minwax provincial stain (two coats) with 2-3 coats of polyurethane.
Recommended Skill Level
Intermediate
Chunky Floating Shelves

I built these floating shelves to put in my kiddo's bathroom. They come together easily and add a ton of charm to his bathroom! These are a great beginner project.


Built from Plan(s)
Estimated Cost
$30 for two 24" shelves
Estimated Time Investment
Afternoon Project (3-6 Hours)
Recommended Skill Level
Beginner
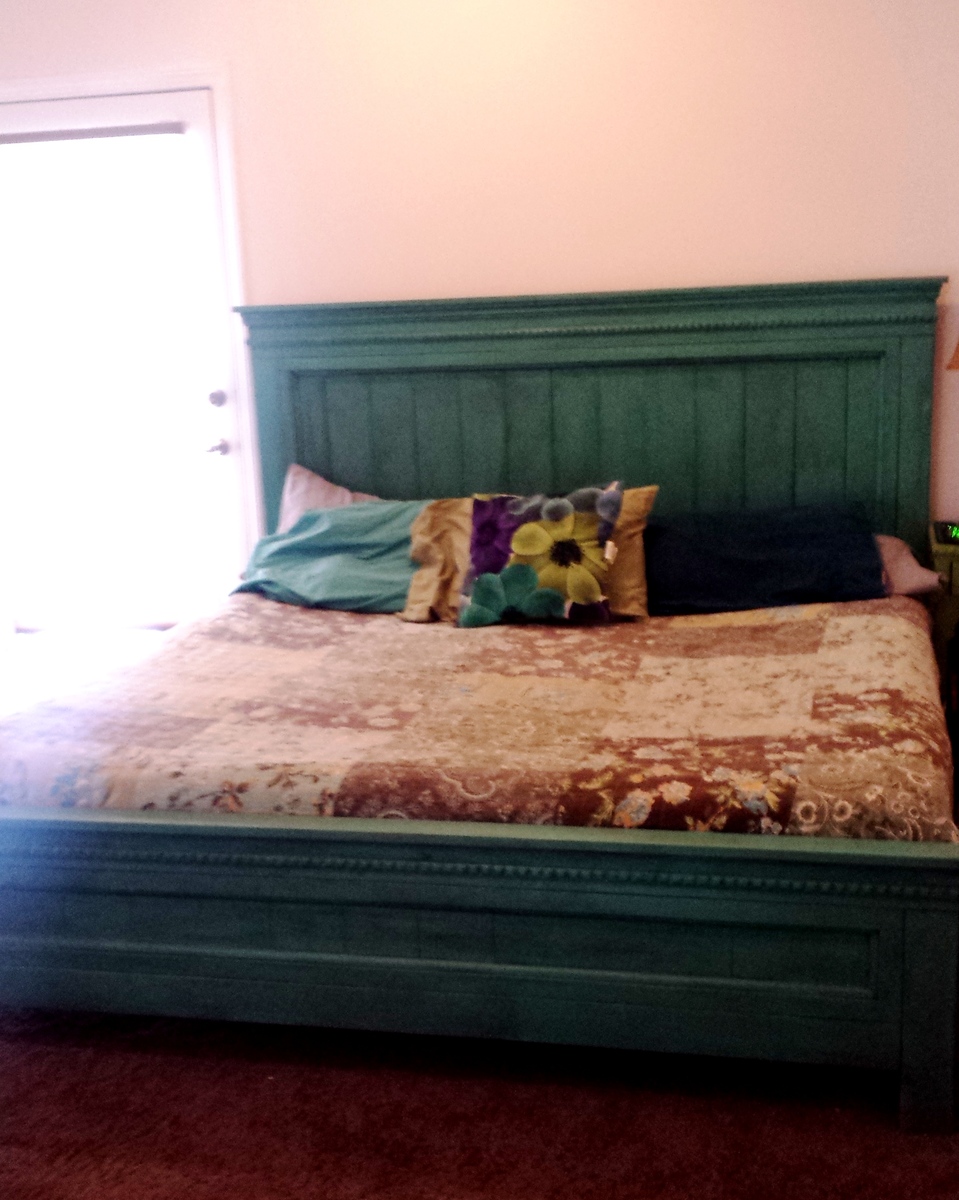
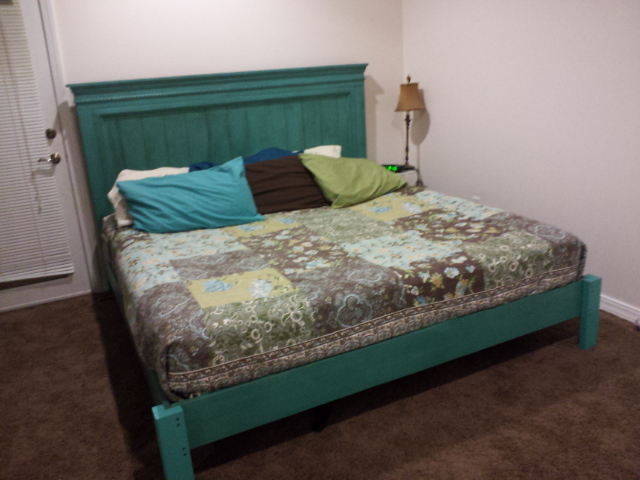
Farmhouse bed
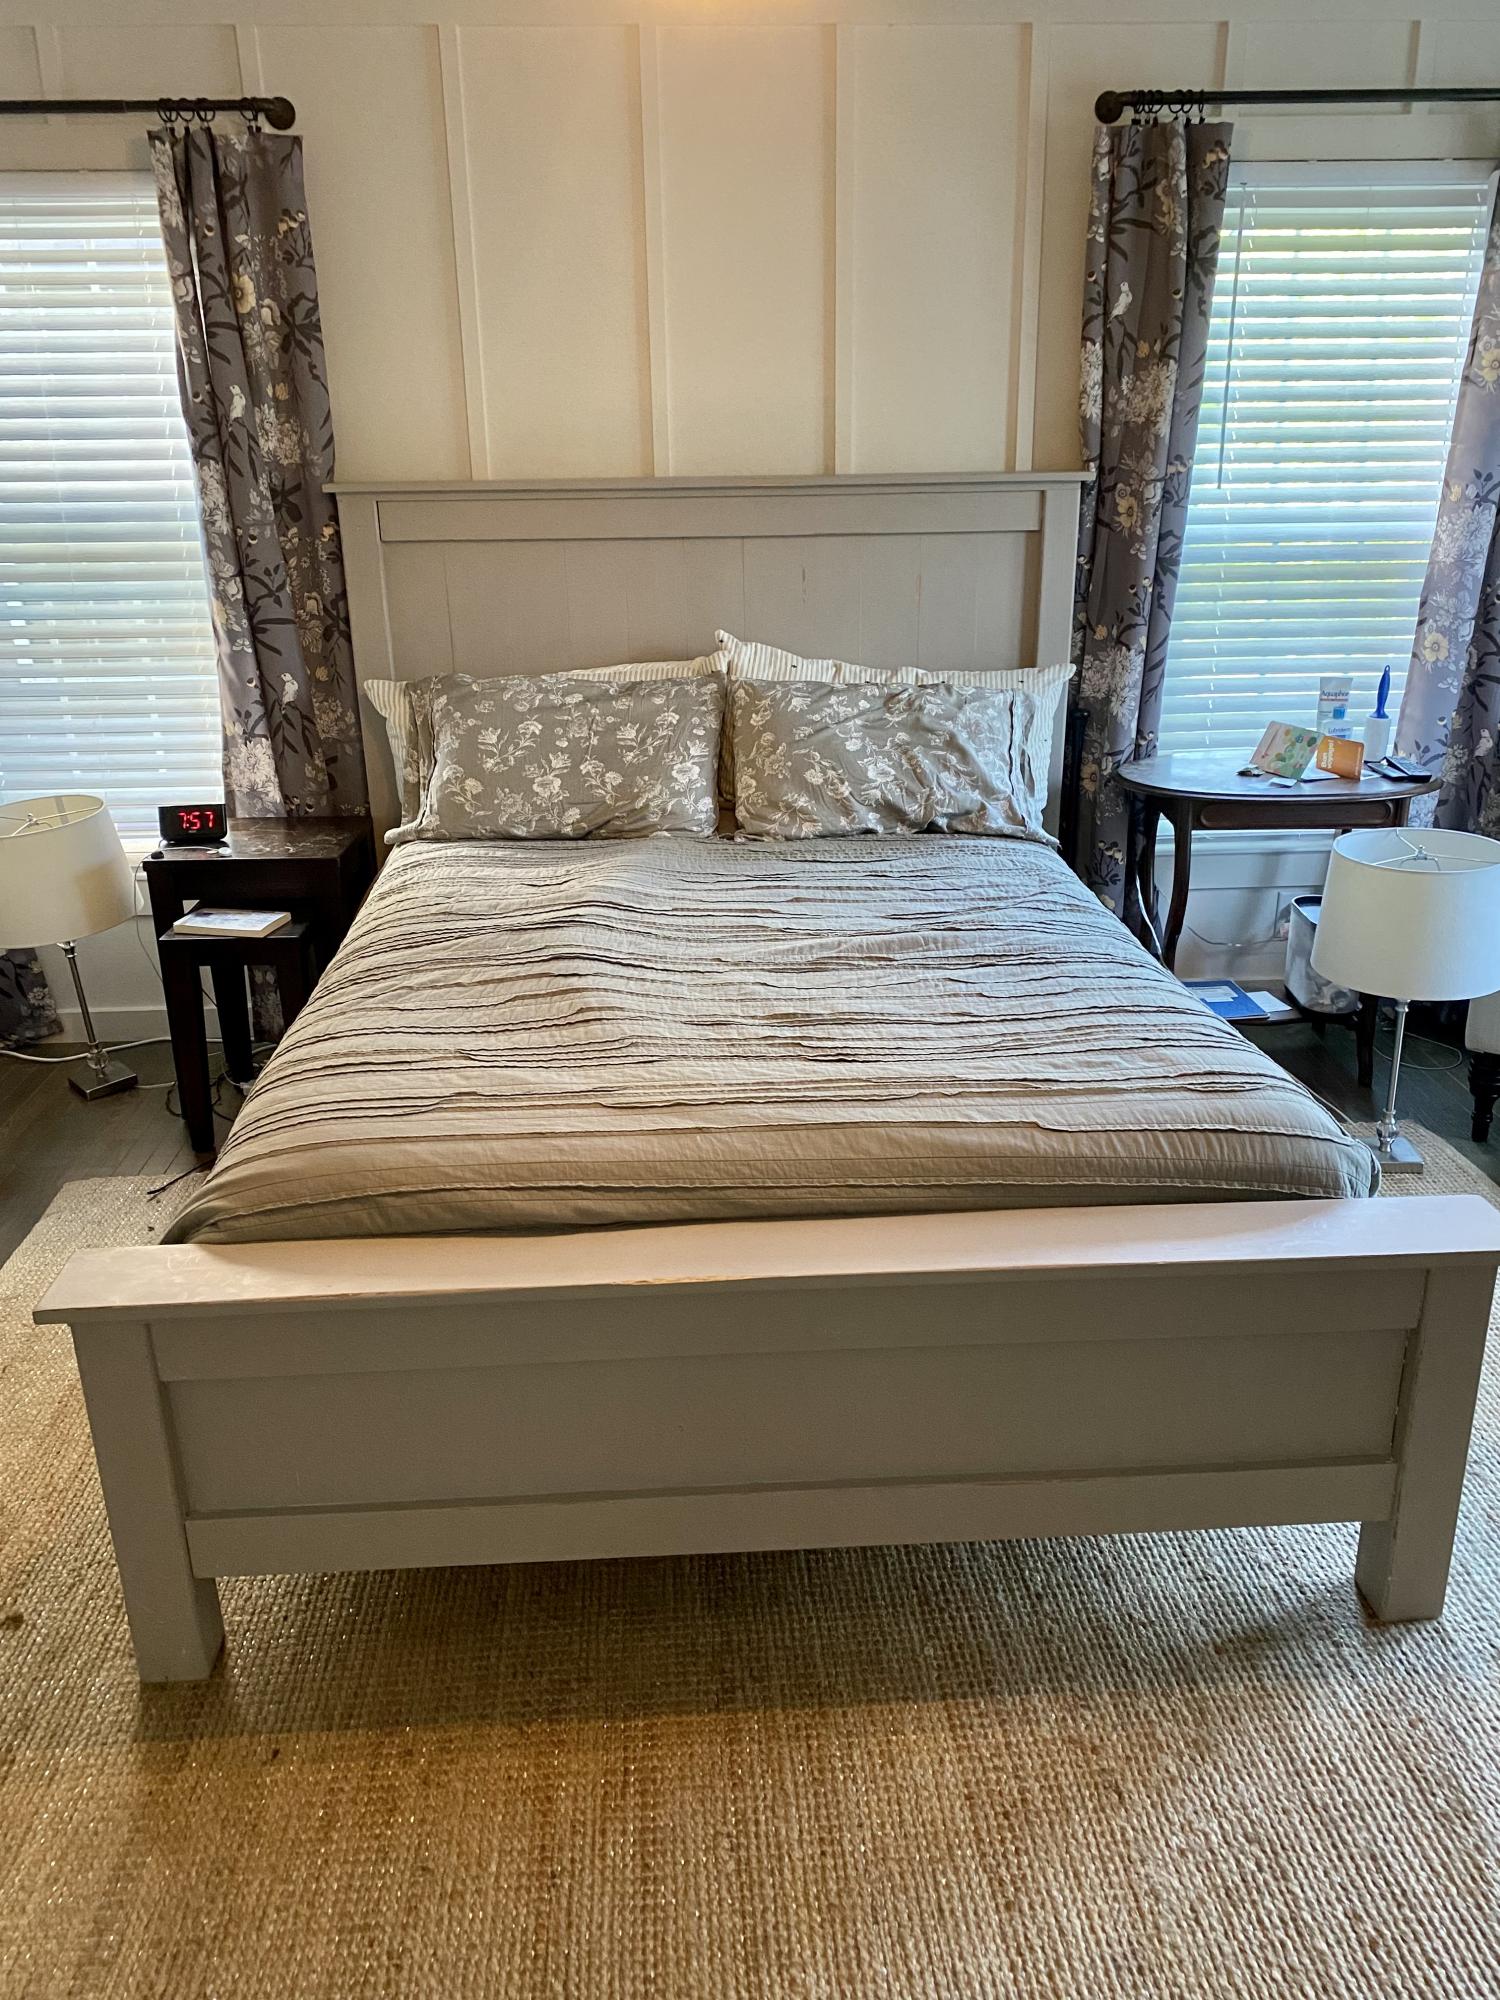
We wanted a new bed - but couldn’t find exactly what we wanted. Then I came across your plans & my husband just ran with it. I’ve gotten tons of compliments too.
Built from Plan(s)
Comments
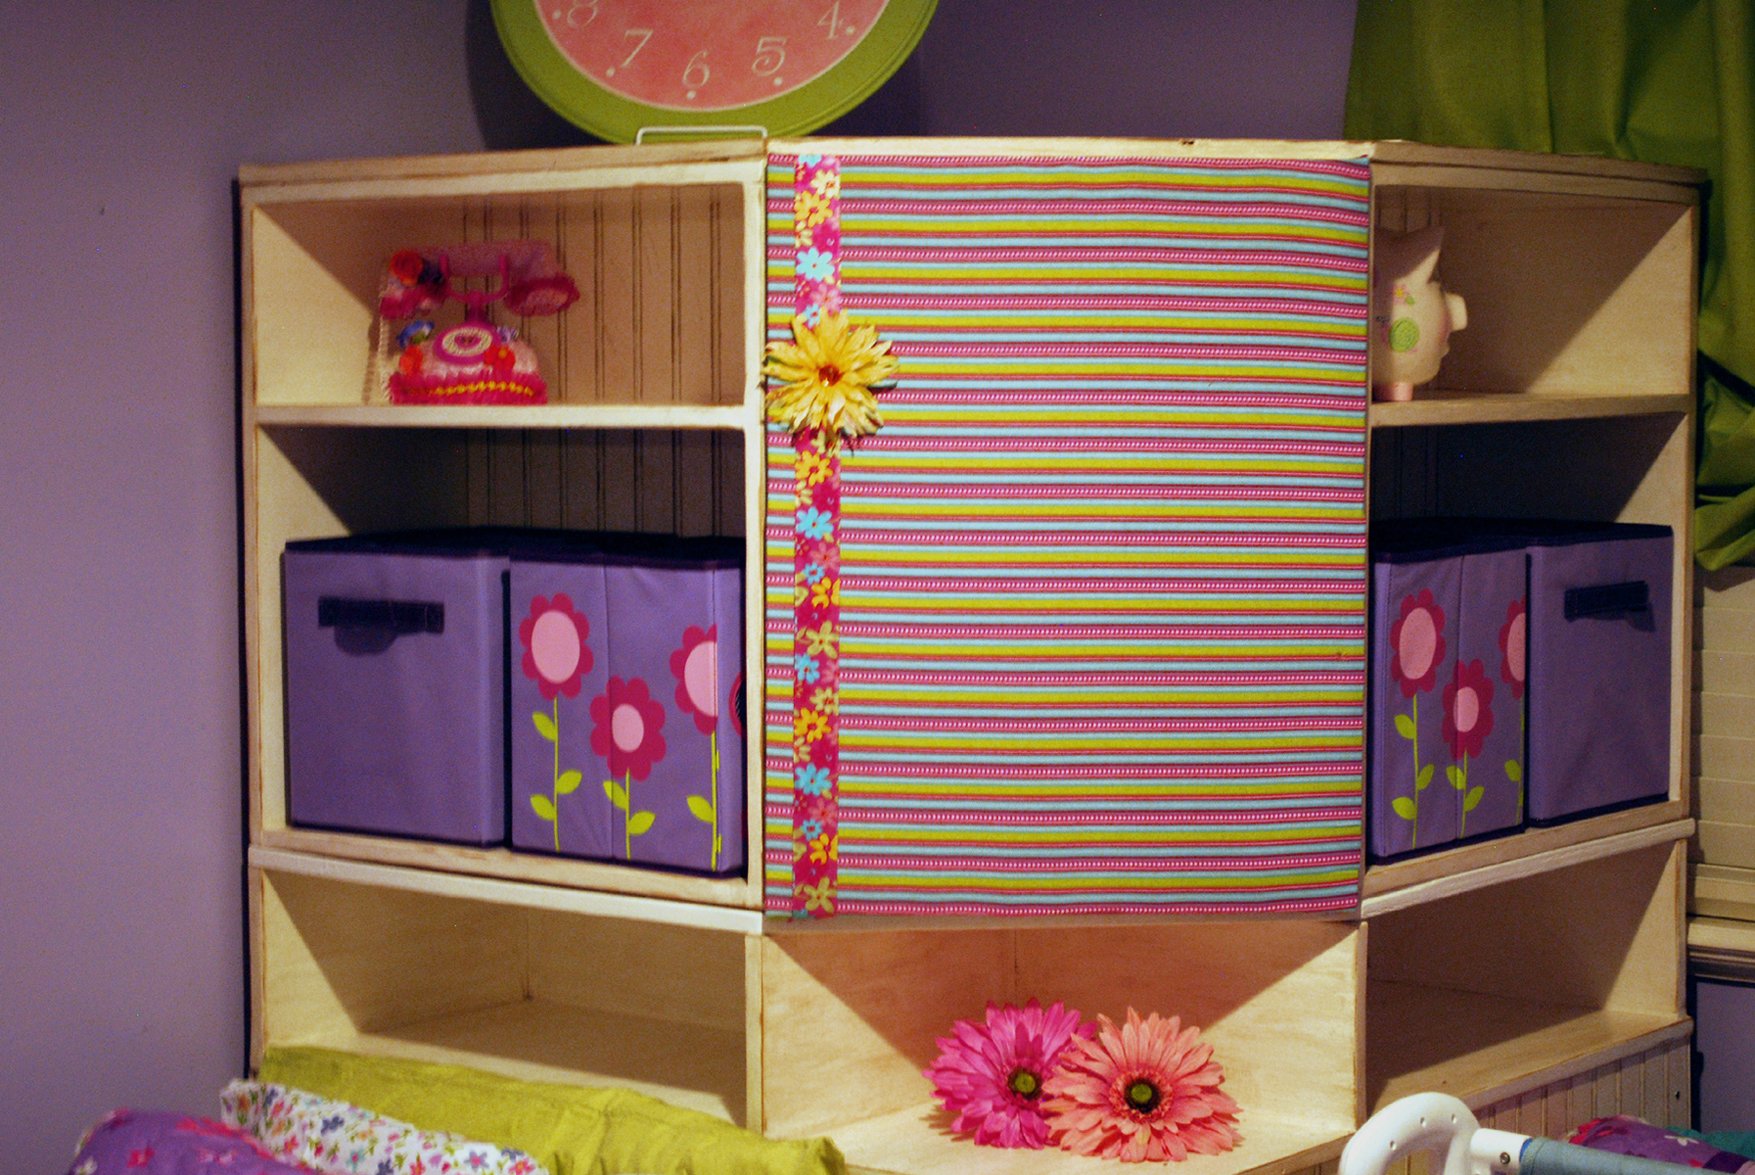
Twin Storage Beds With Corner Hutch
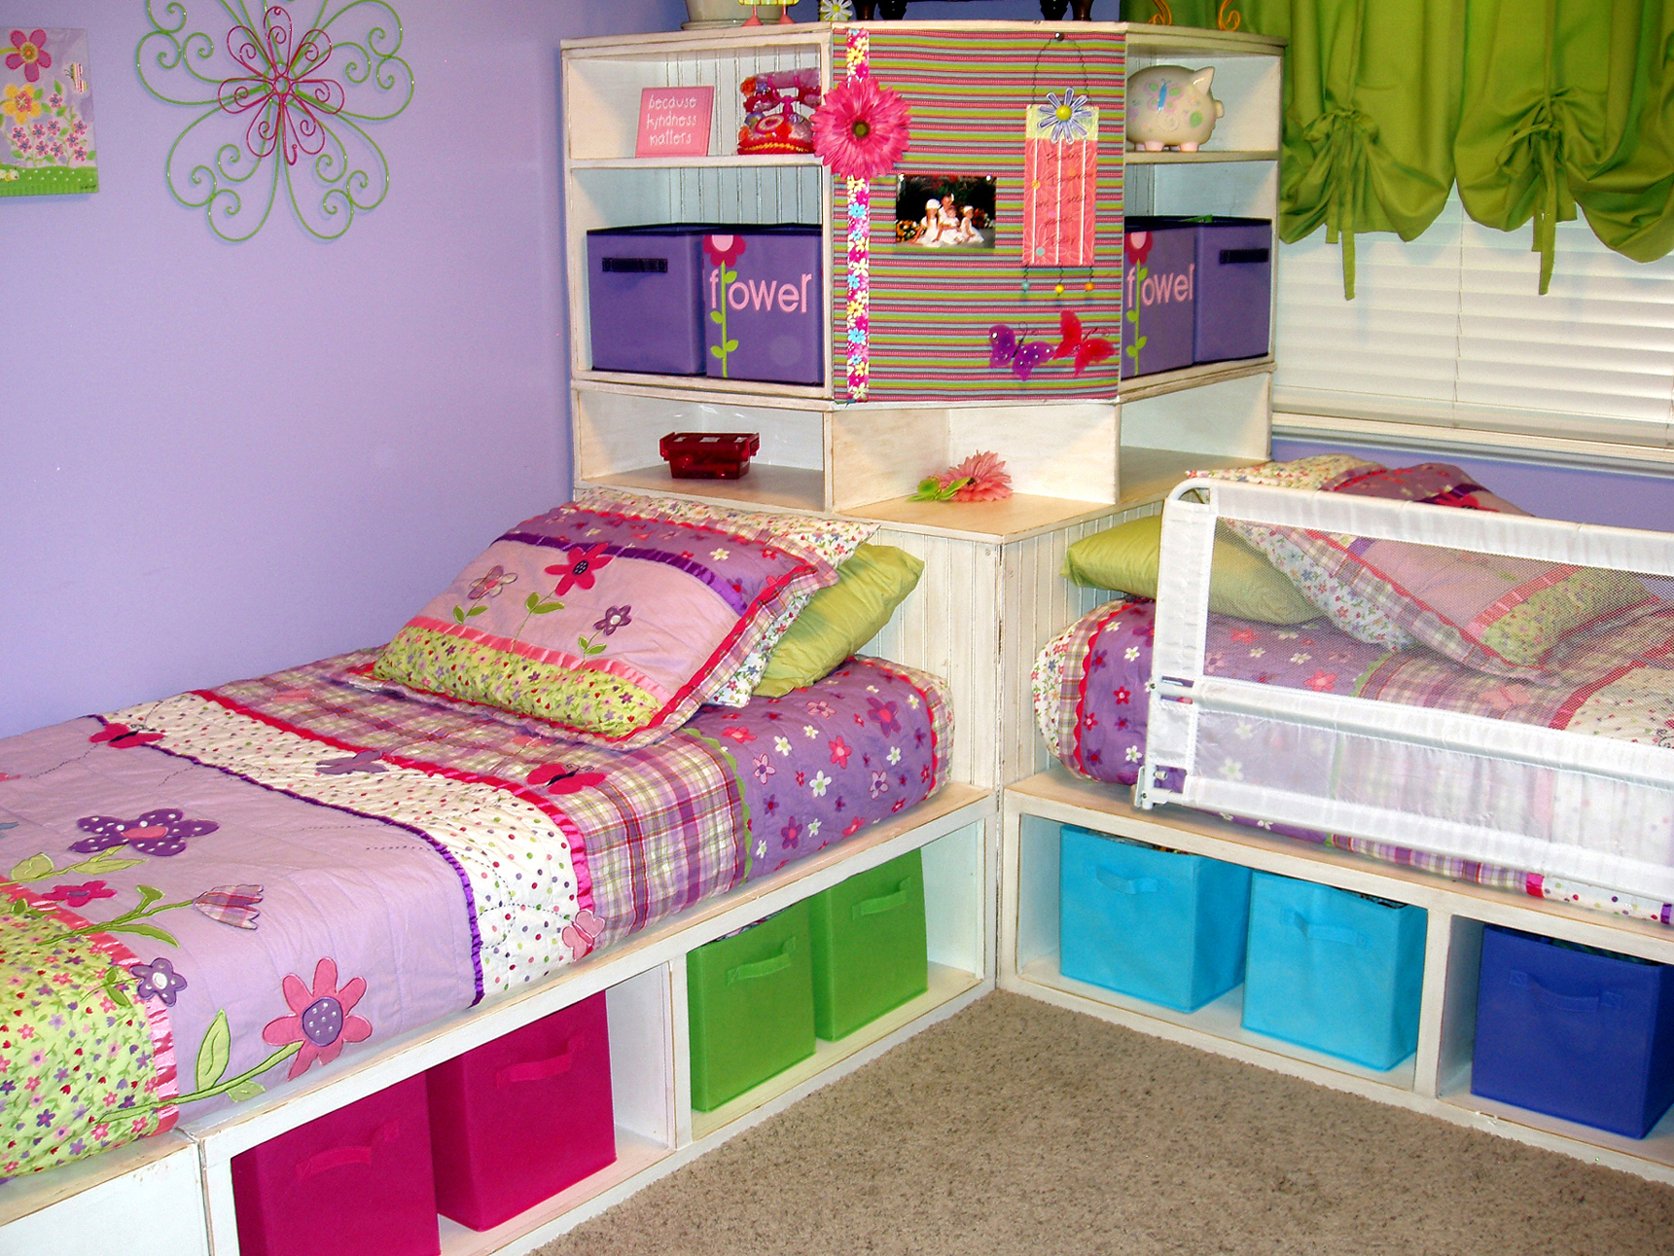
These beds were the very first thing my hubby and I ever built! We had an old hand saw with a dull blade and a hammer and nails! It took us 7 full Saturdays to complete these beds and that includes all of the finish work. We had a great time and a not so great time building these beds but the memories we built together are priceless! We are so proud of the blood, sweat and tears that went into these beds! We love you Ana, well, mostly I love you! You changed my life and I am officially addicted to building! If you have time, check out my very long but very entertaining post about building these beds!
http://isteppedoutofmycomfortzone.blogspot.com/2010/09/and-built-bed.ht…
Estimated Cost
I'm going to guess we spent $300 to $400. We wasted a lot of wood because we had never built anything before and we just didn't know what we were doing! Lots of human error on this bed!
Estimated Time Investment
Week Long Project (20 Hours or More)
Finish Used
My blog has all of the *painful* and funny details!
Recommended Skill Level
Beginner
Comments
Sun, 07/17/2011 - 09:15
storage hutch
I love what you have done! What a great way to use that space! Good work!
Fri, 03/23/2012 - 17:25
Do you have instructions on
Do you have instructions on the corner unit? We like this one better than the others on the site.
Sat, 11/29/2014 - 08:03
Plans for Twin Storage Beds With Corner Hutch
These are so cute! Where is the link for the plans on these beds? They would be perfect for my daughters' room!
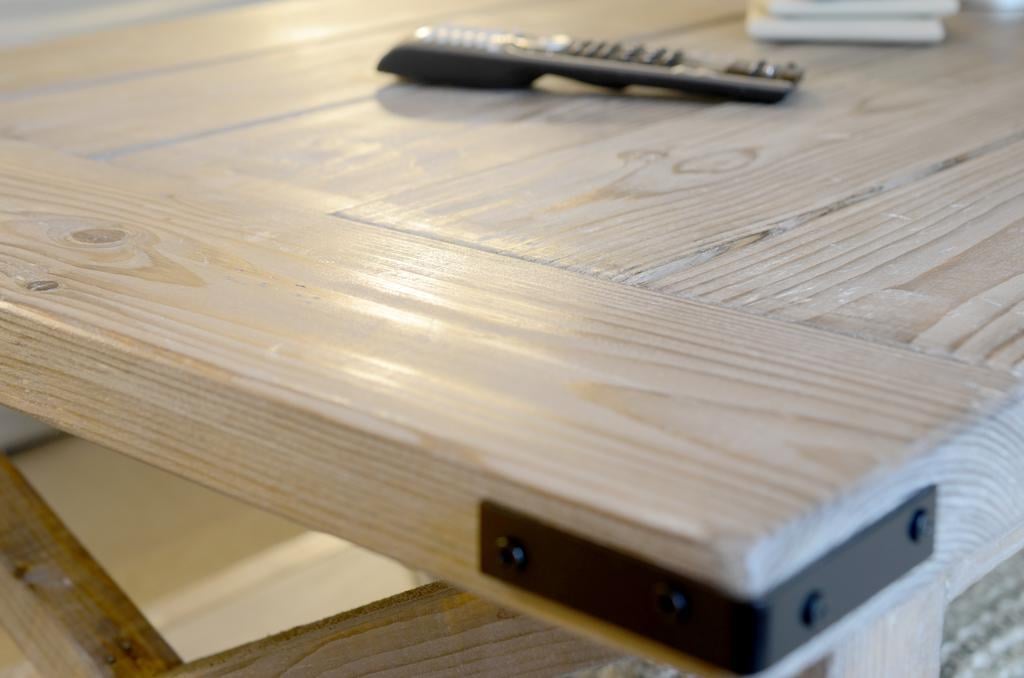
Rustic X Coffee Table with Bread Boards
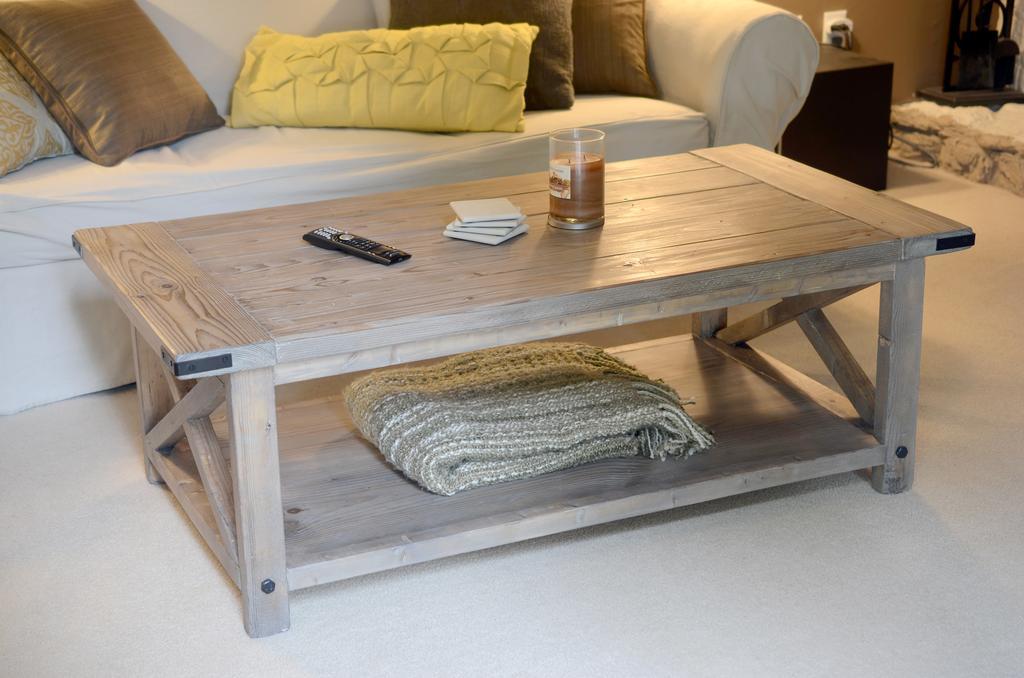
In need of a new coffee table and having a budget lower than what would allow for similar looking store bought tables, I decided to build a variation of the Rustic X coffee table. I used the modified plans by Pete Sveen which included the bread boards on the table top. We used a solution of white vinegar and steel wool to age the wood and used a clear furniture wax to finish it.
Estimated Time Investment
Weekend Project (10-20 Hours)
Finish Used
Vinegar/Steel Wool for Age. Clear furniture wax for finish.
Recommended Skill Level
Beginner
Comments
Vintage Step Stool
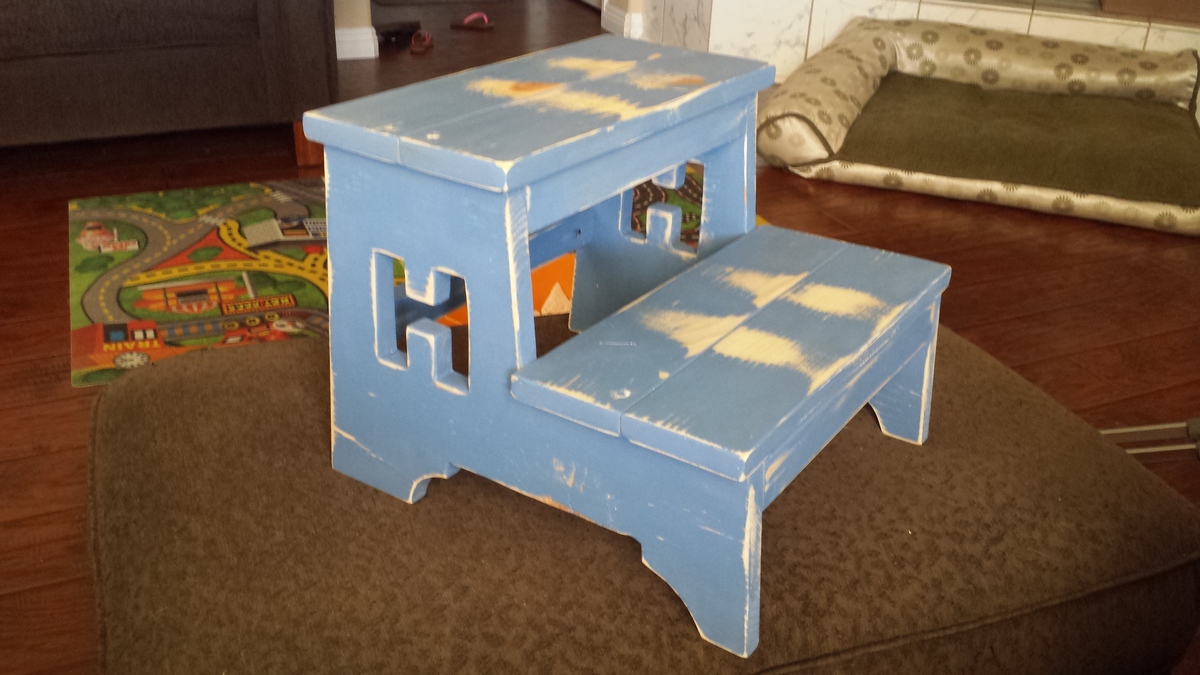
This is the 2nd step stool I built, the first was for my daughter and I just followed the plans. Built this for my friends son Hayden, decided to add the H for his name. It was a tag team build, I built it and painted it and my wife did the sanding, distressing and wax sealer.
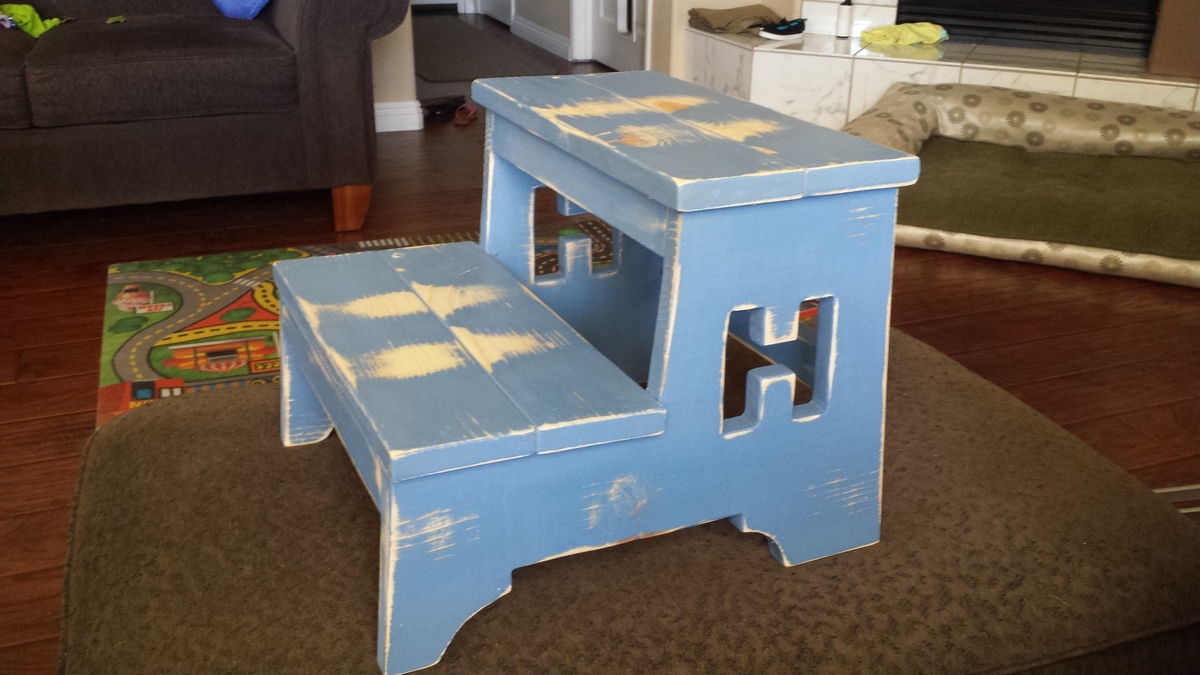
Built from Plan(s)
Estimated Time Investment
Day Project (6-9 Hours)
Finish Used
latex paint and wax sealer
Recommended Skill Level
Beginner
Comments
Little helper tower
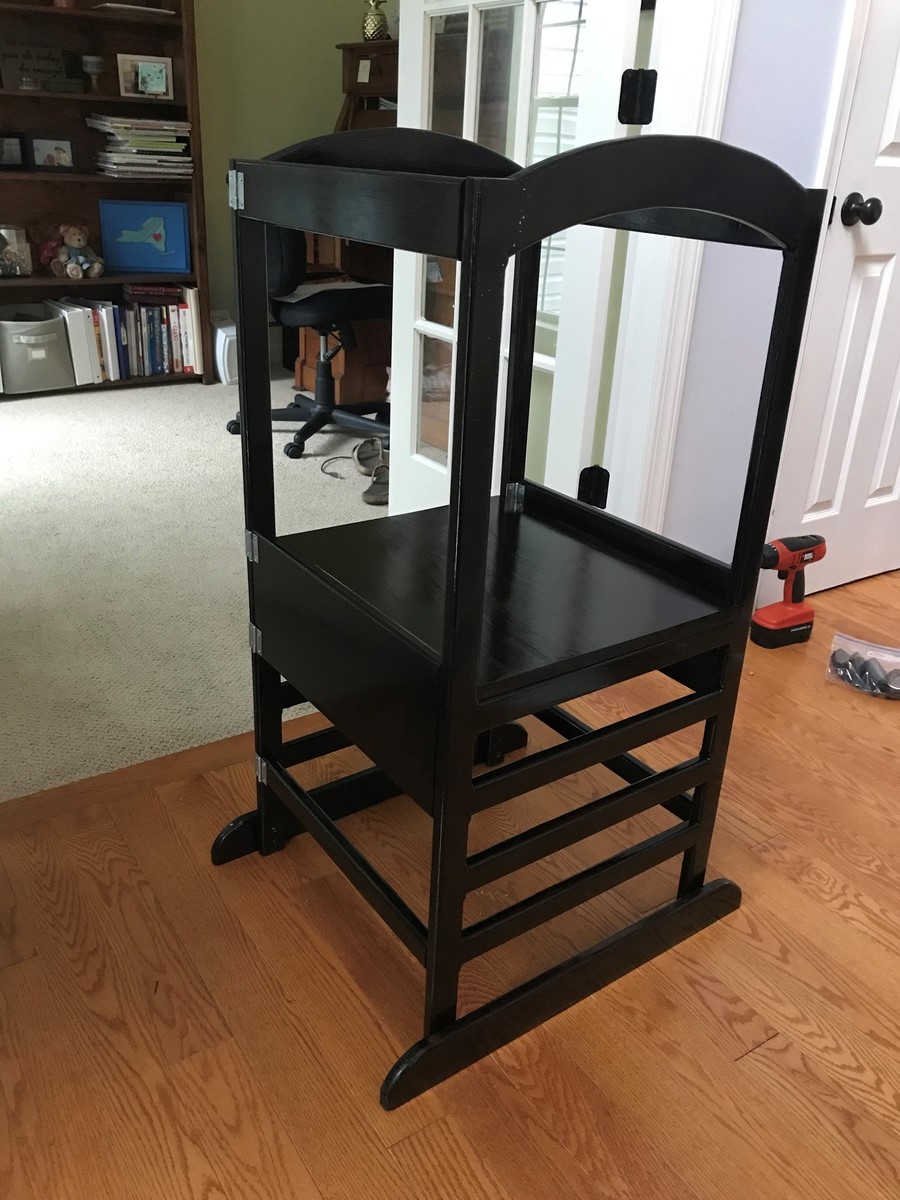
I made this for a friend who has two little ones that are less than two years old. Although I enjoy the ease and convenience of the Kreg jig, I wanted to try something more difficult for this. So for the sides I used mortise and tenon joinery for the ladder rungs and top arches. The only screw I used we to place the hinges and attach the feet. I also didn’t like the gap in the platform that would have been caused by my 1x8 actually only being 7.5 in wide, so I made my own platform by joining the edges of two pieces of wood (one was 11 inches and the other was 6 inches wide). After clamping and lettting the glue dry, I trimmed up the platform to size. Due to the modifications the project took well over 20 hours, but was a fun challenge.
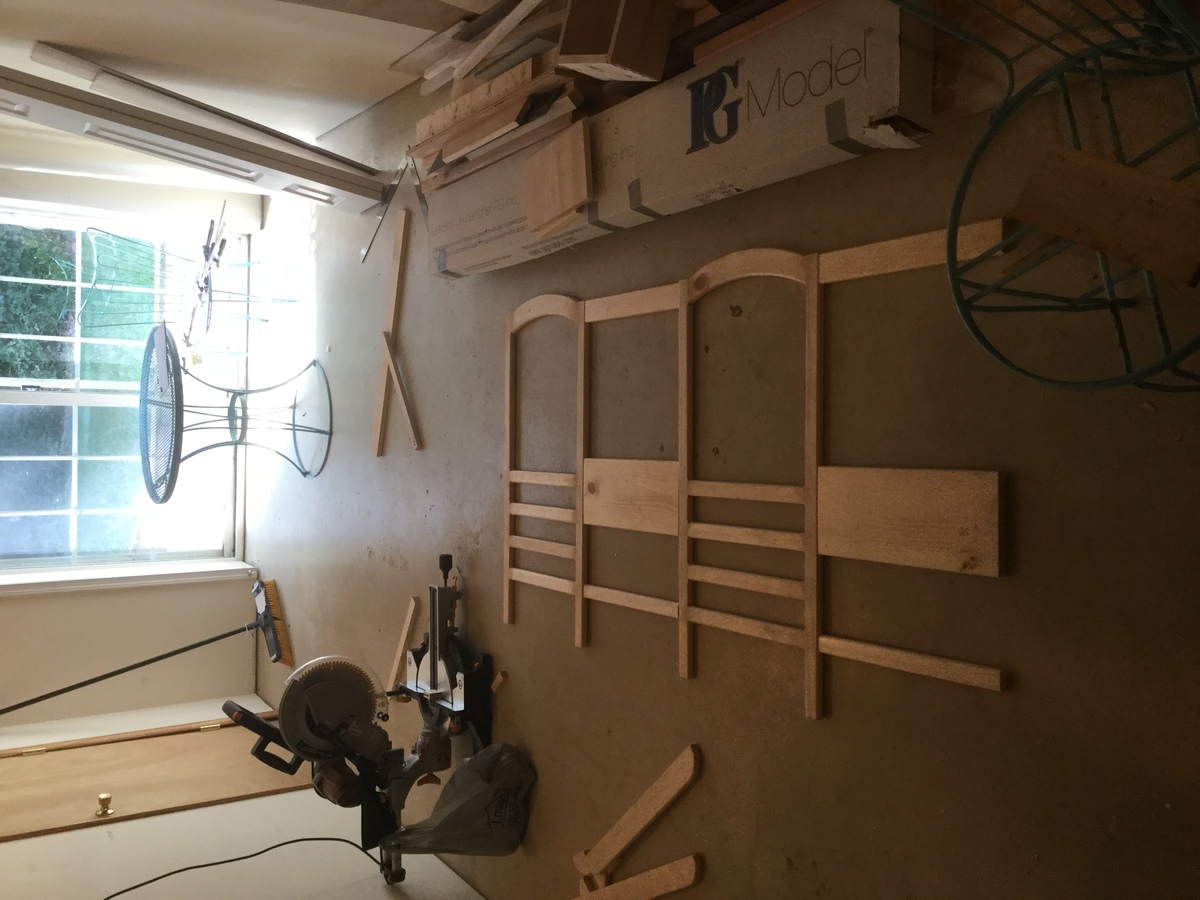
Built from Plan(s)
Estimated Cost
100 dollars
Estimated Time Investment
Week Long Project (20 Hours or More)
Finish Used
Minwax Poly shades espresso gloss
Recommended Skill Level
Advanced
Outdoor Sectional
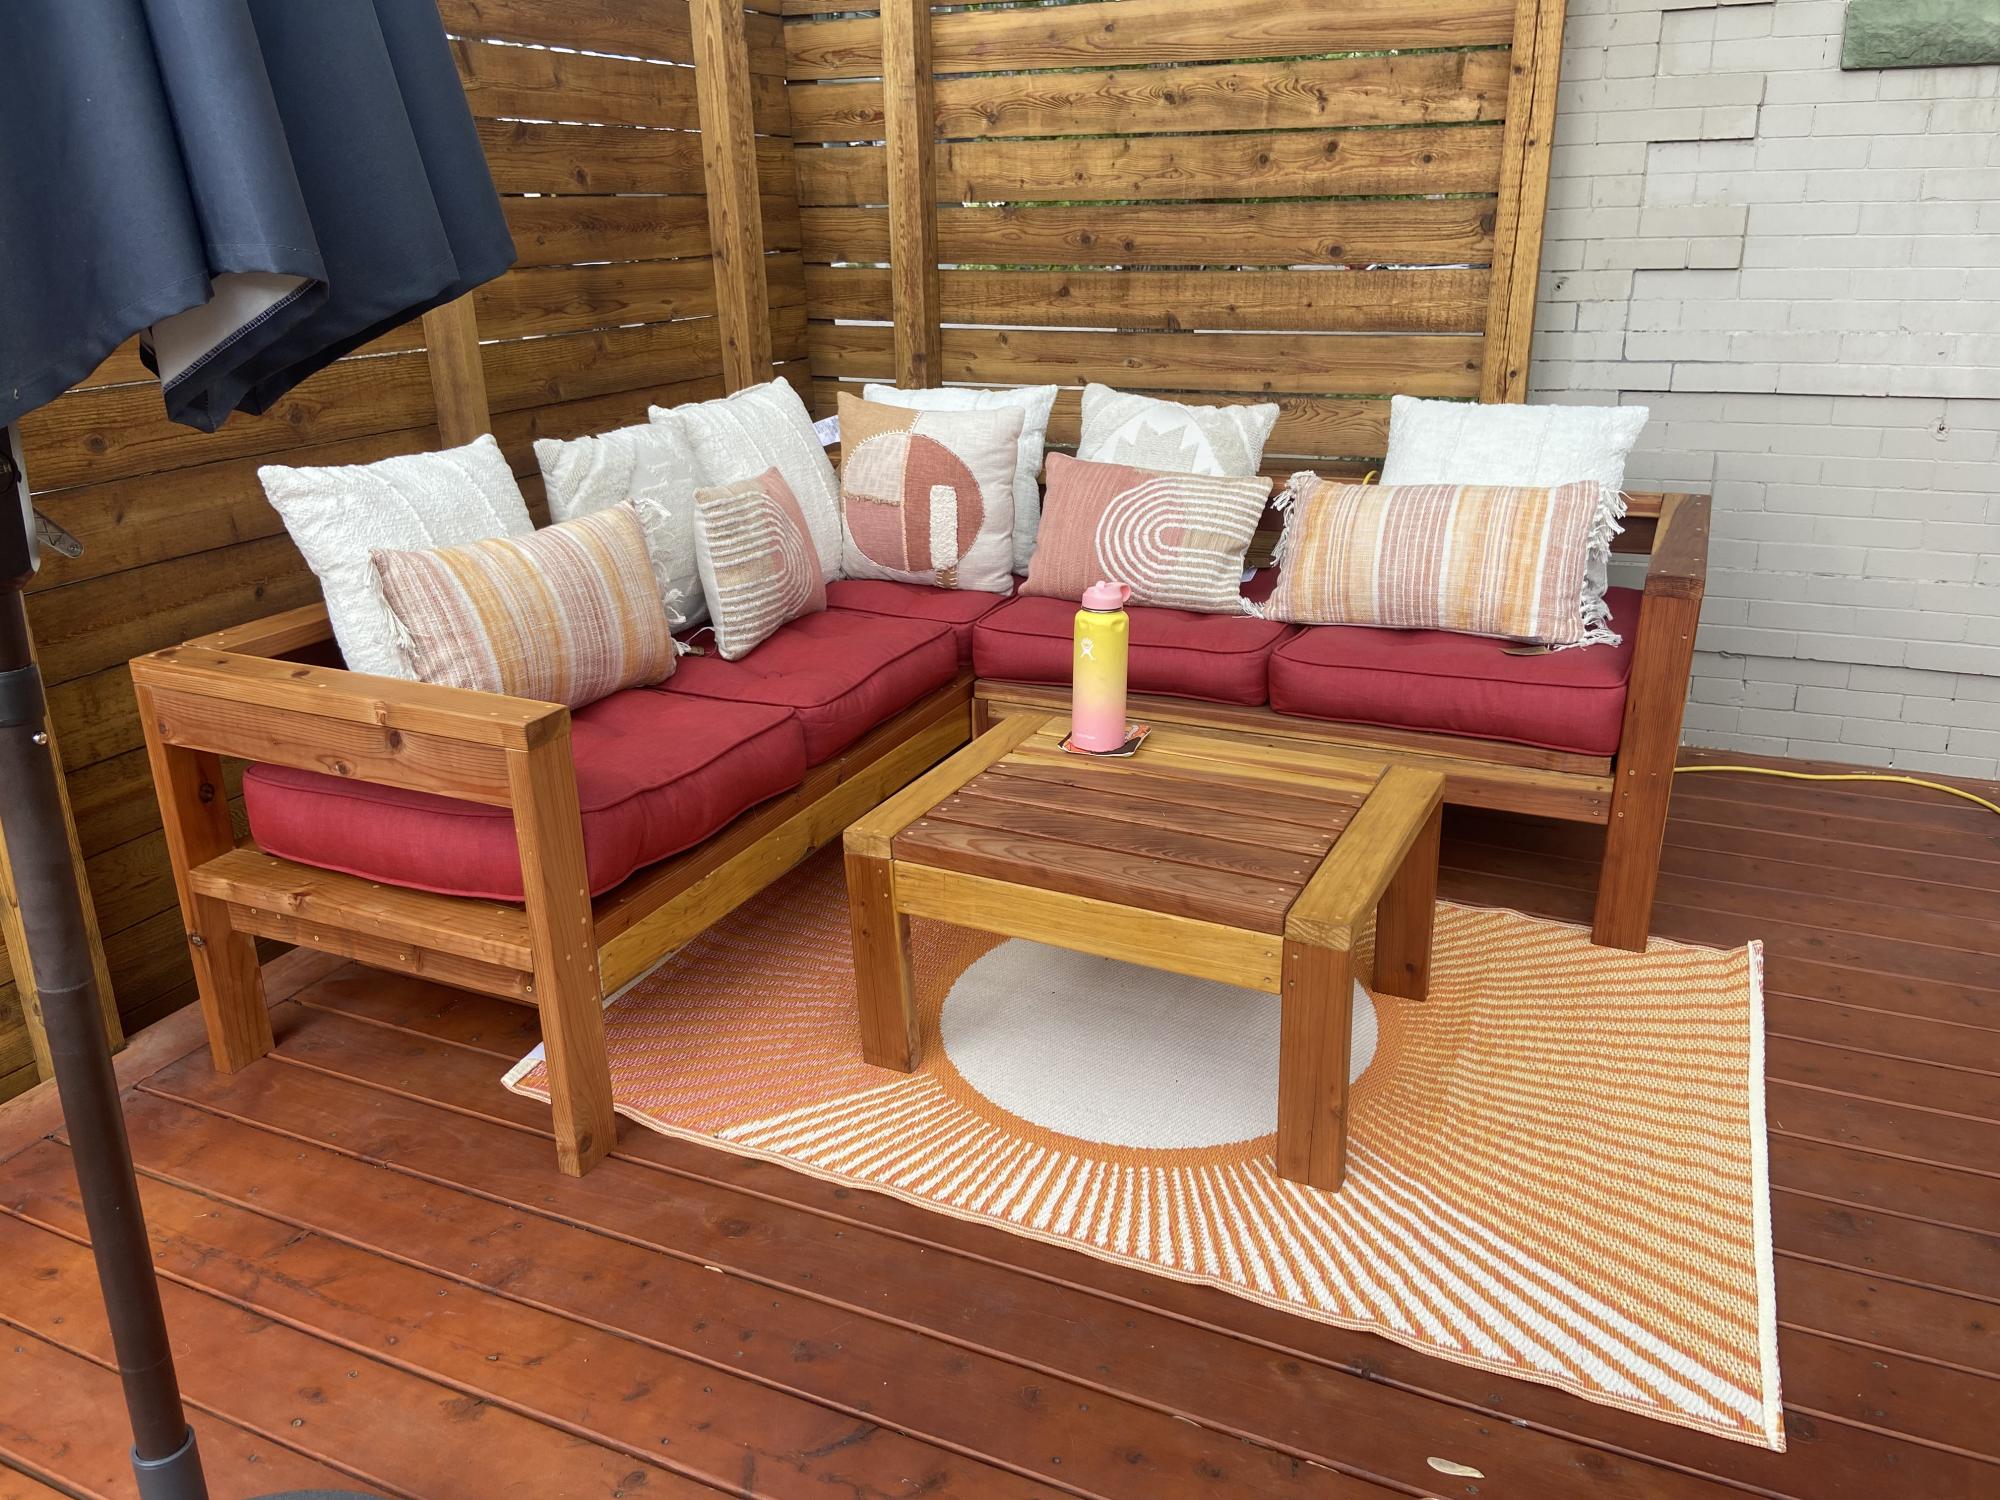
I built the two piece sectional + table and adjusted the sizing so the lengths of the sectionals pieces are the same.
Turned out amazing. So much fun building this and I can’t wait for my next project!
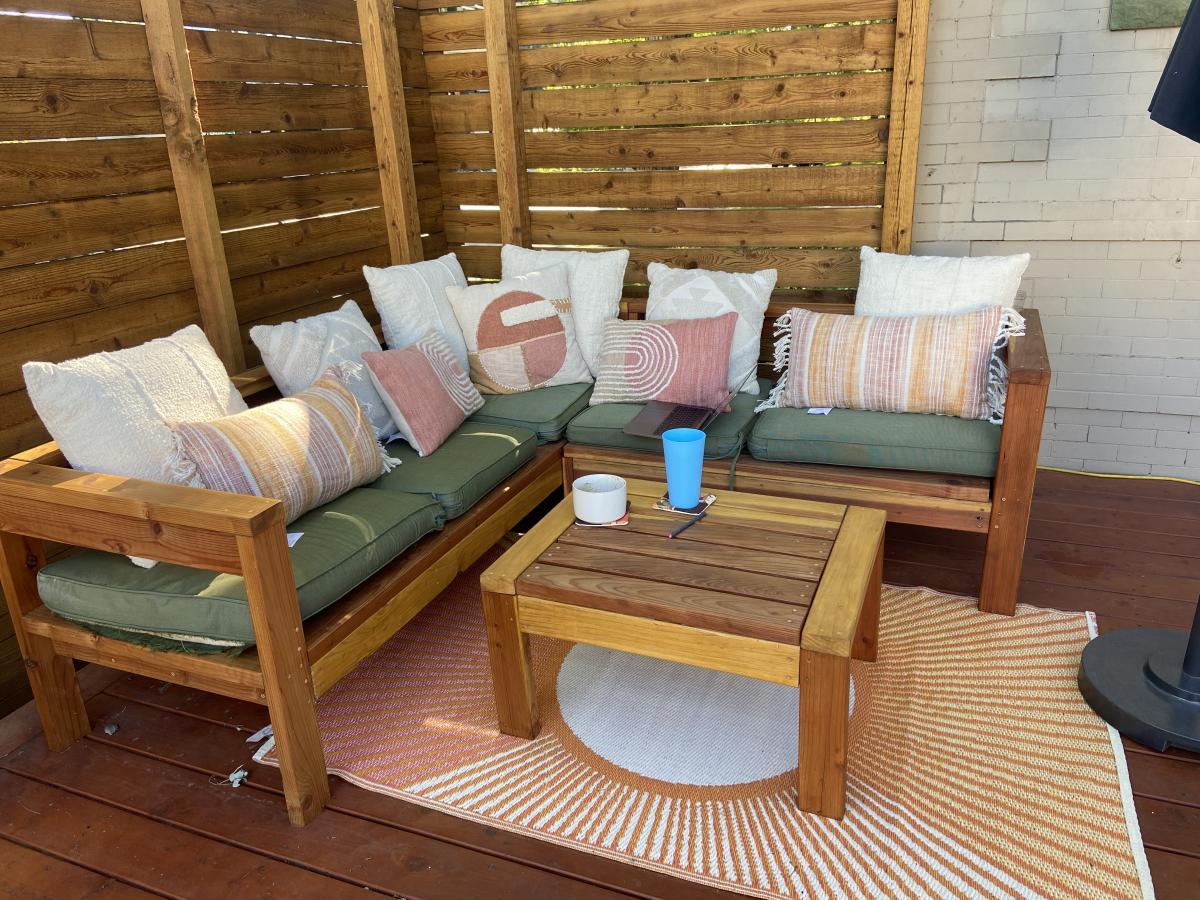
Built from Plan(s)
Comments
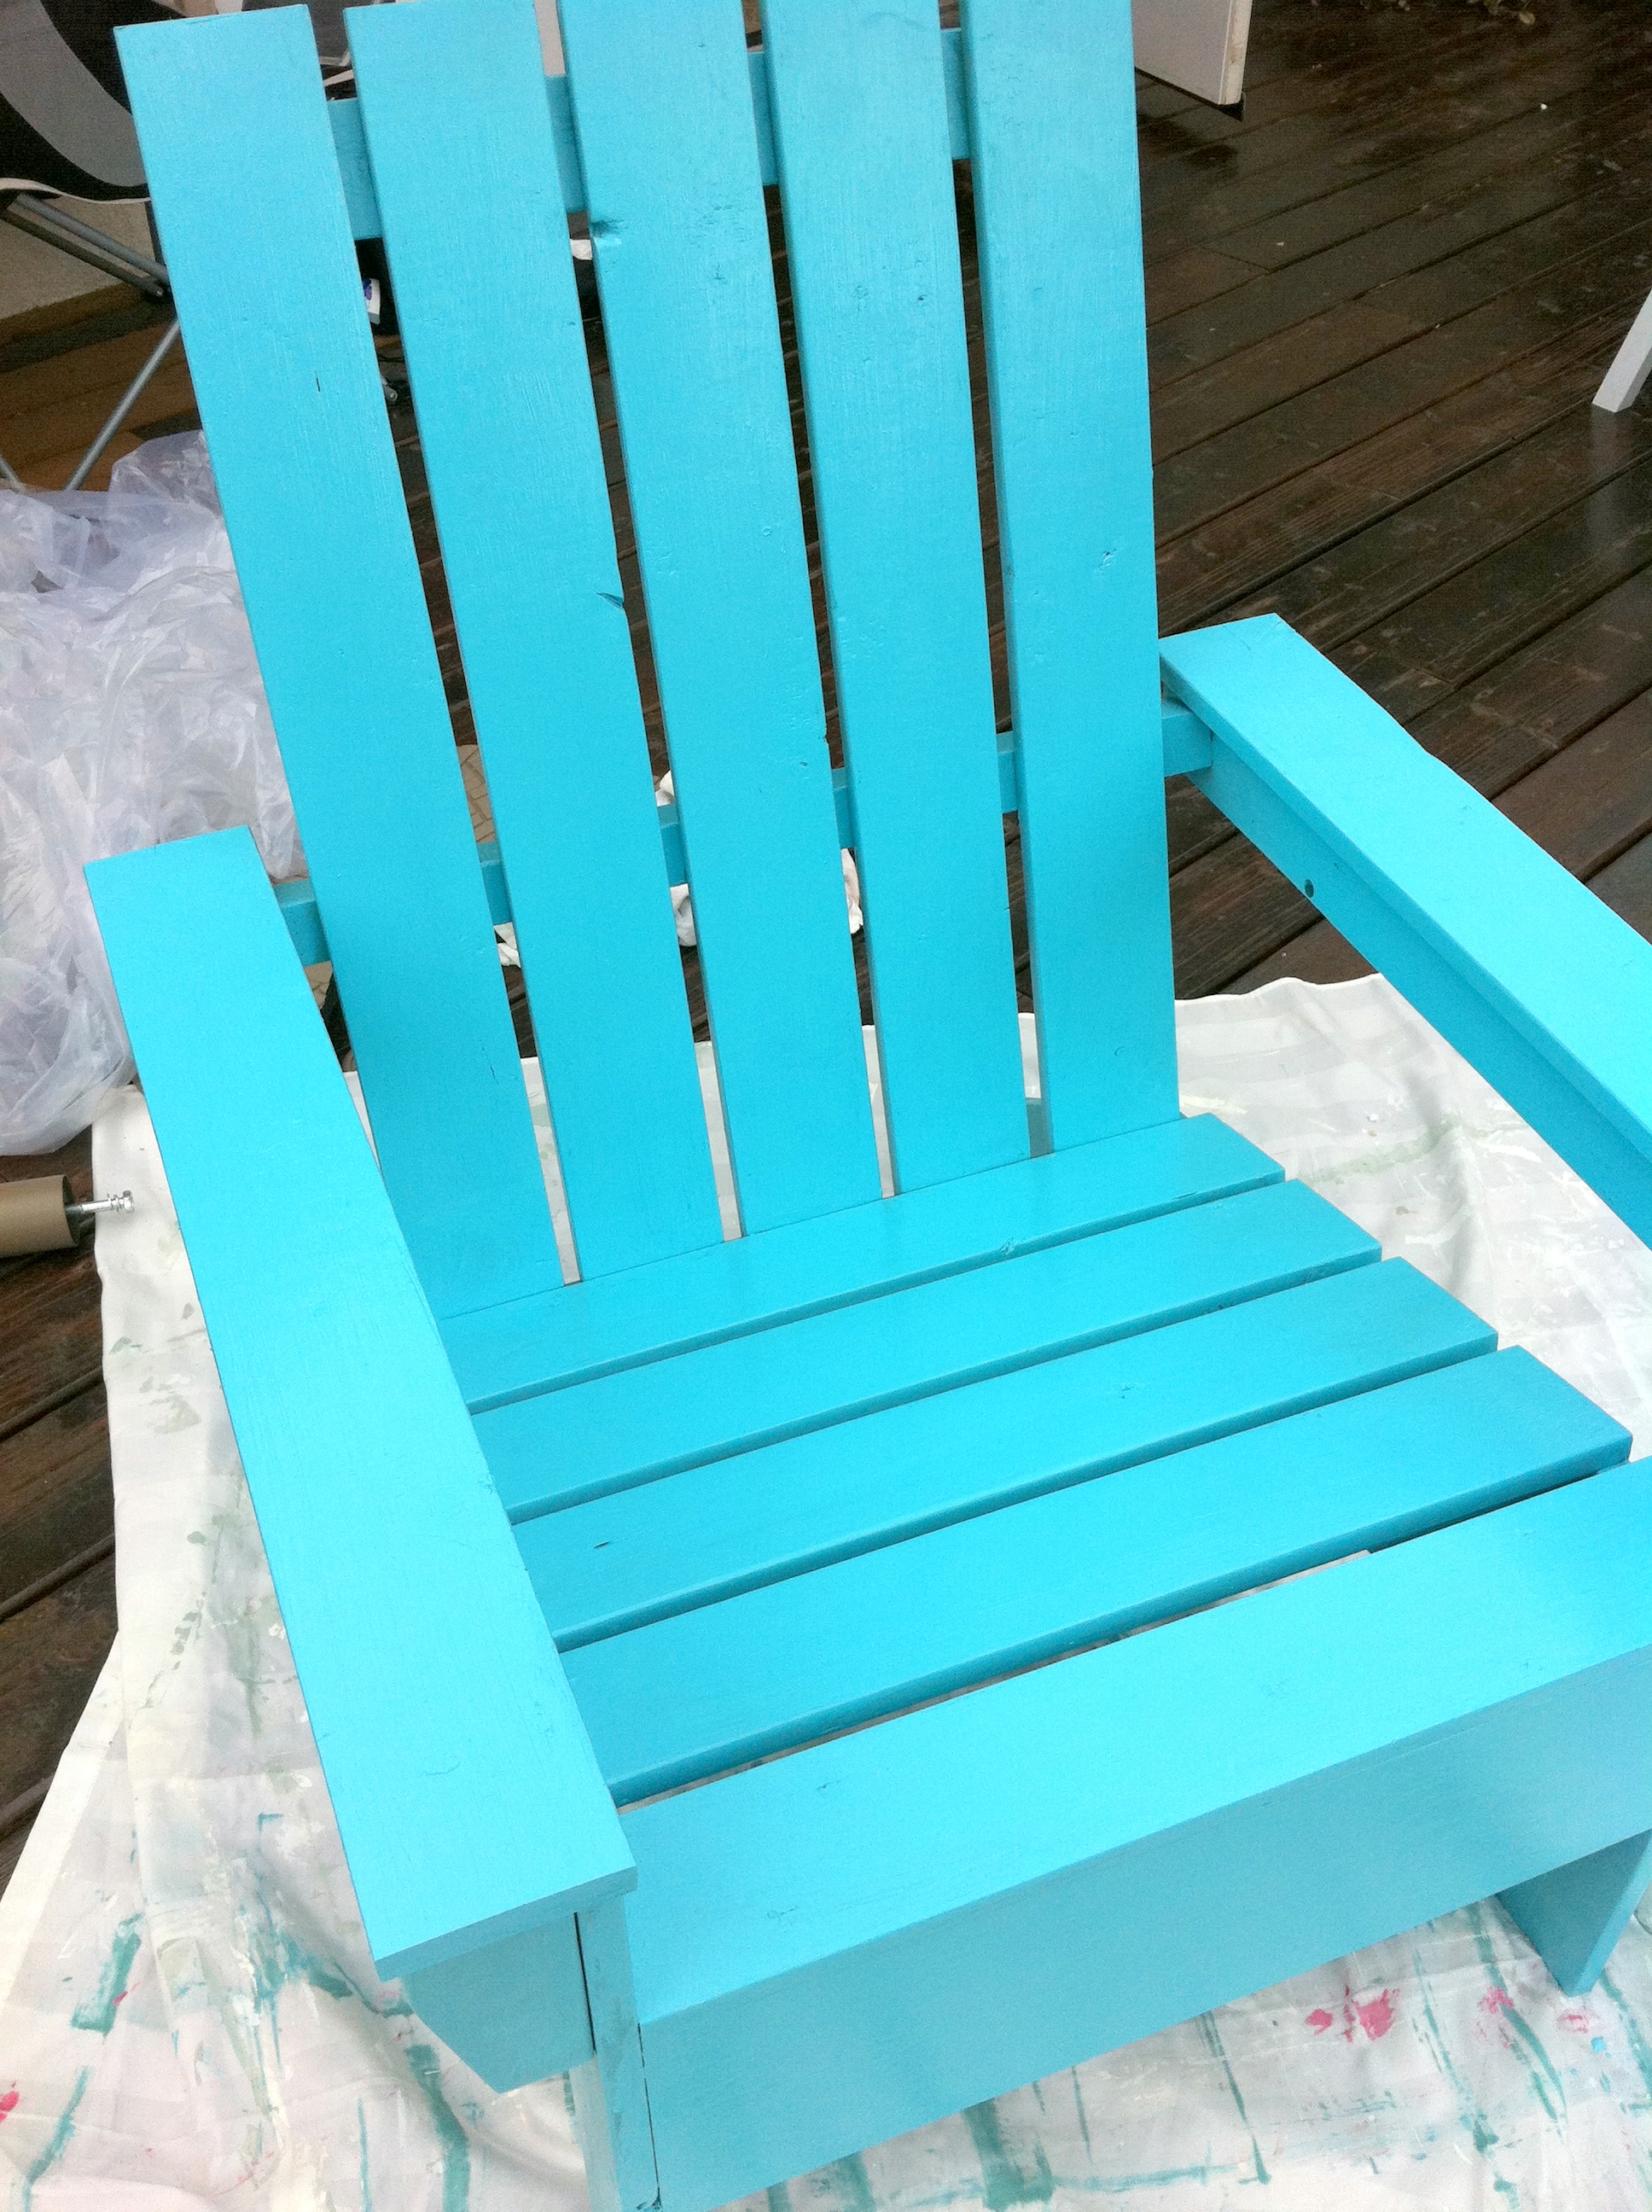
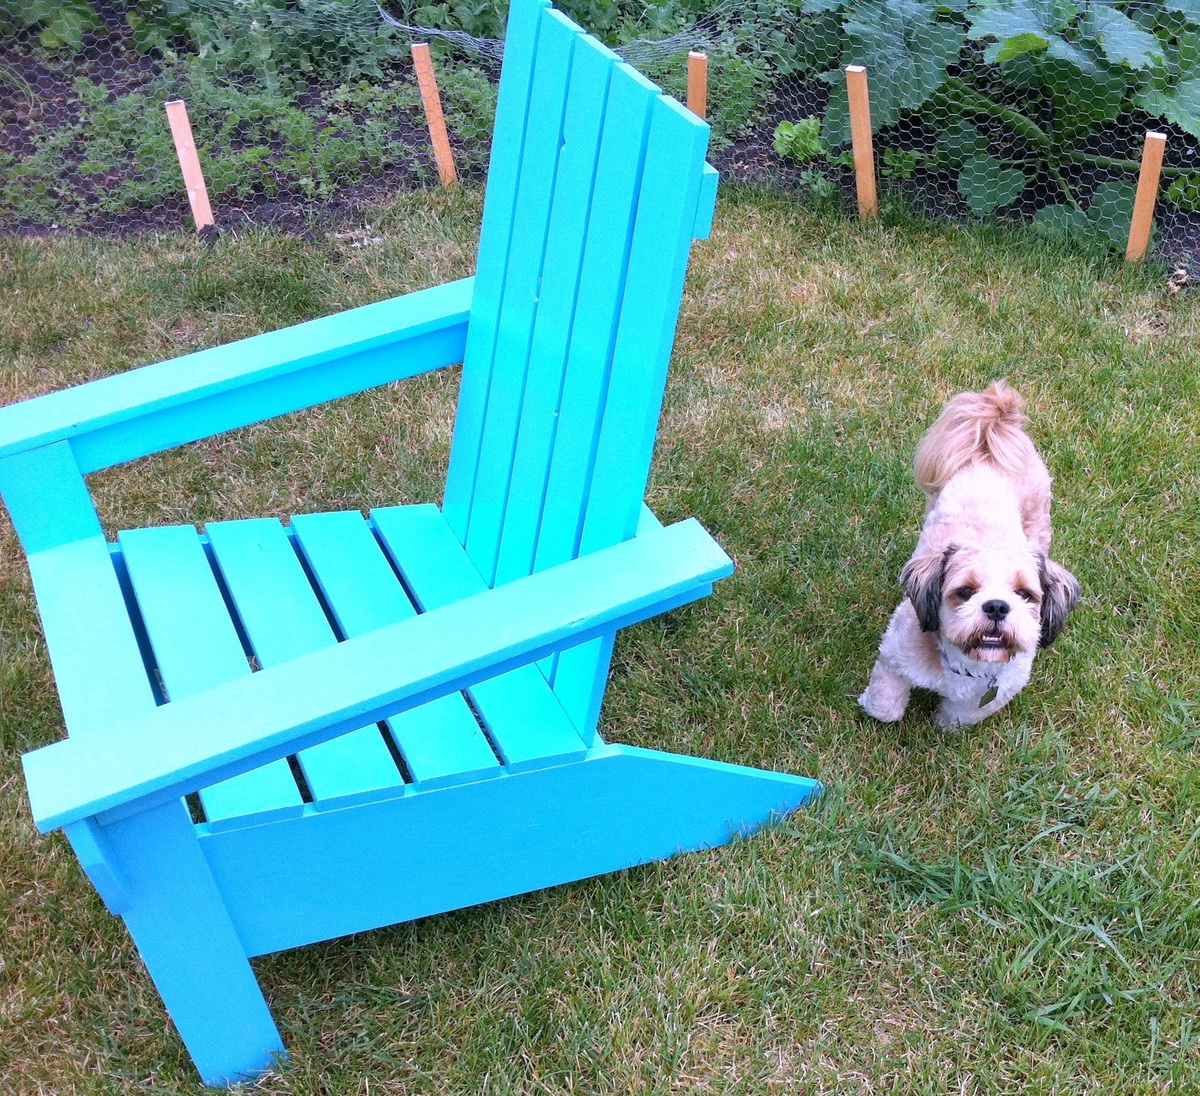
Ana's Adirondack Chair
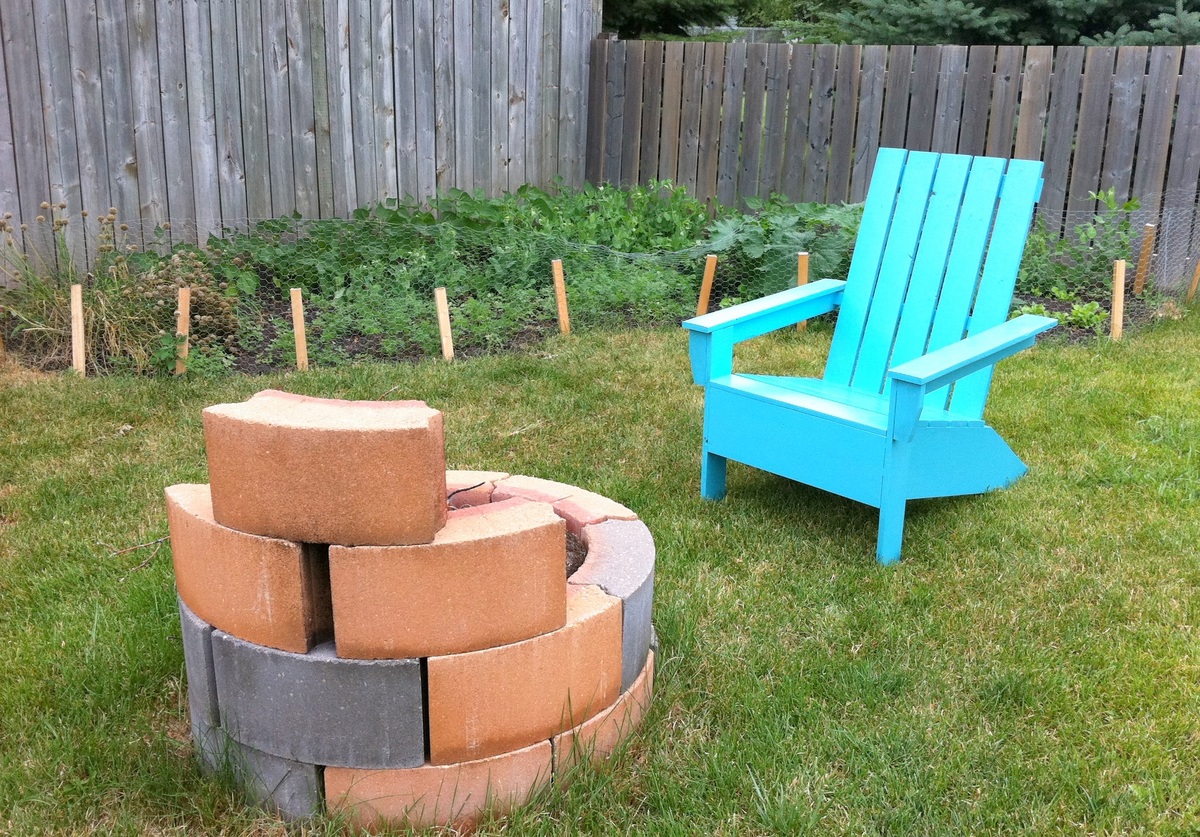
I still need to build a matching chair so we have a pair of adirondack chairs for around the fire pit. More pics of the build at my blog.
Built from Plan(s)
Estimated Cost
$40
Estimated Time Investment
Day Project (6-9 Hours)
Finish Used
Sico Exterior Alkyd Paint - Mis-Tint colour
Recommended Skill Level
Beginner
King Size Farmhouse Bed

This bed was made as a Christmas present for my parents. At the time, there were no plans for a king-sized bed so I modified the queen plans to fit their mattress. I added a 5th leg to support the center of the bed and also added some plywood sheets underneath to better support the mattress.
Estimated Cost
$150
Estimated Time Investment
Weekend Project (10-20 Hours)
Finish Used
"A Day at the Jeweller" by Valspar with a red mahogany stain over (used almost as a glaze)
Recommended Skill Level
Intermediate
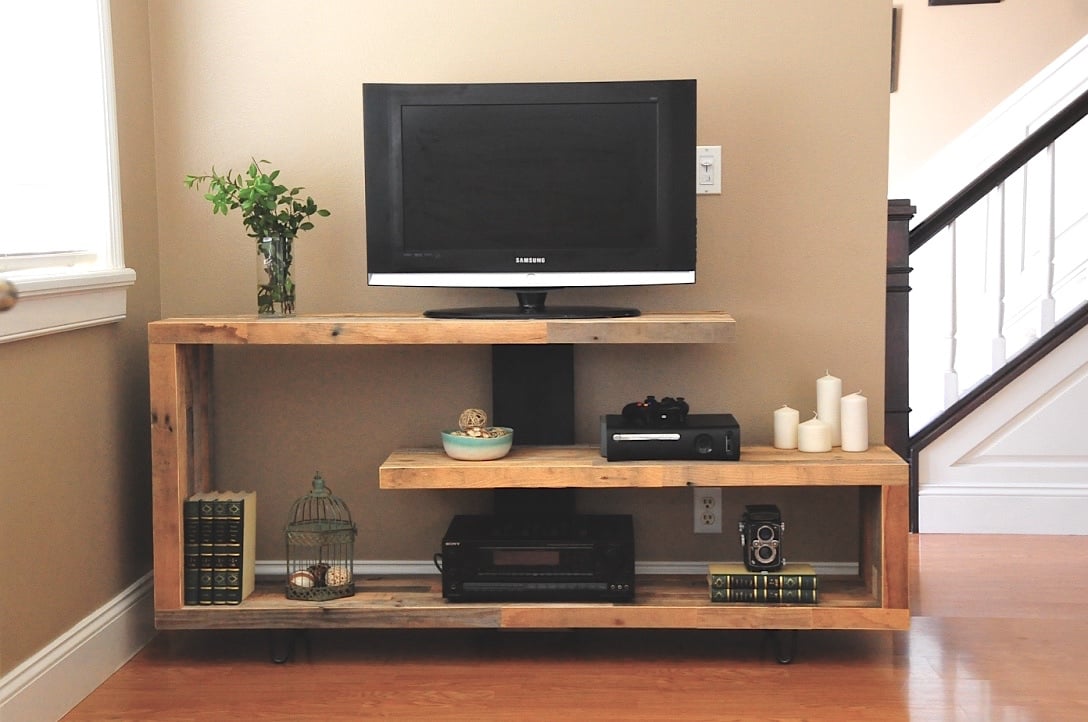
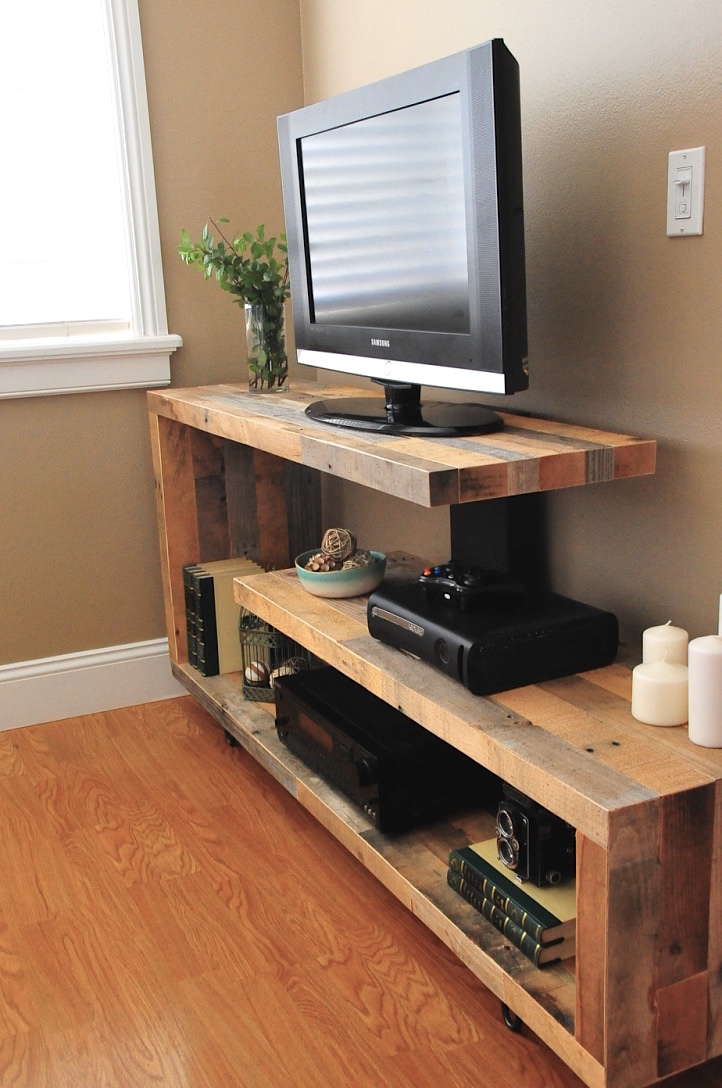
Ridge Media Console
Project was a bit difficult but extremely rewarding when completed!! I followed Ana White's advice......"take a break and always finish your project!!!"
Built from Plan(s)
Estimated Time Investment
Weekend Project (10-20 Hours)
Recommended Skill Level
Intermediate

Comments
Ana White Admin
Sun, 09/06/2015 - 11:40
You did it again!
Knocked it out of the park with this one Brad! Love!!!
roshangautam
Mon, 11/23/2015 - 07:49
Missing Plan
Can't find the DIY plan here ? Am i missing something ?
Templar
Mon, 12/02/2019 - 22:10
Hi there Im new to site and…
Hi there Im new to site and also have the issue of not seeing the plans for this Rustic Modern TV Console. Are they available and Im doing something wrong or??
zoneoneboy
Sat, 06/27/2020 - 05:03
No Plans for "Rustic Modern TV Console"
I am logged in and I do not see the plans for the "Rustic Modern TV Console"