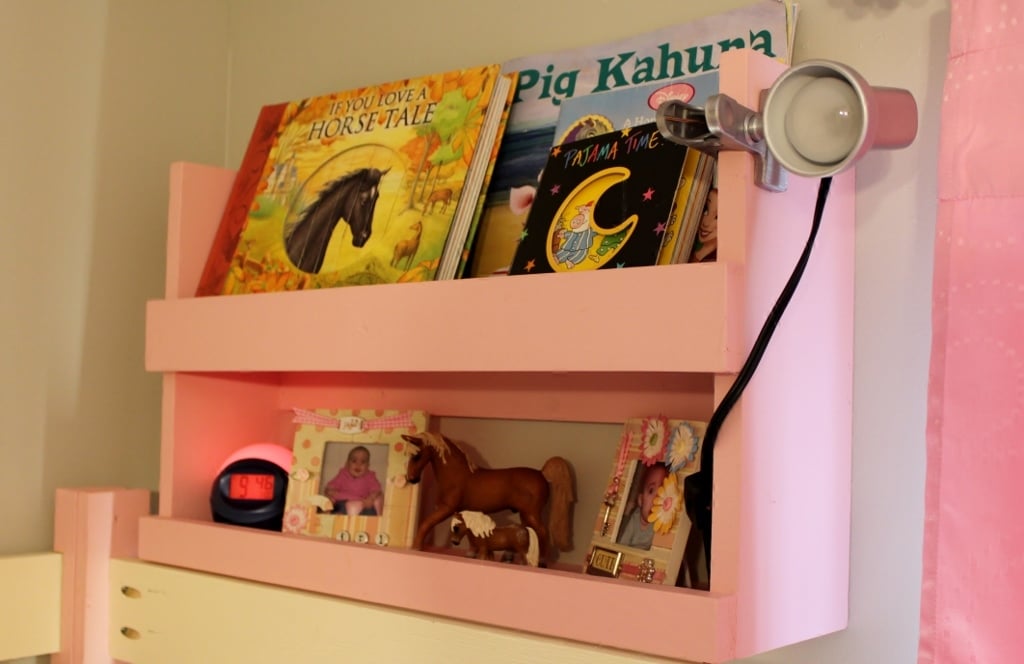
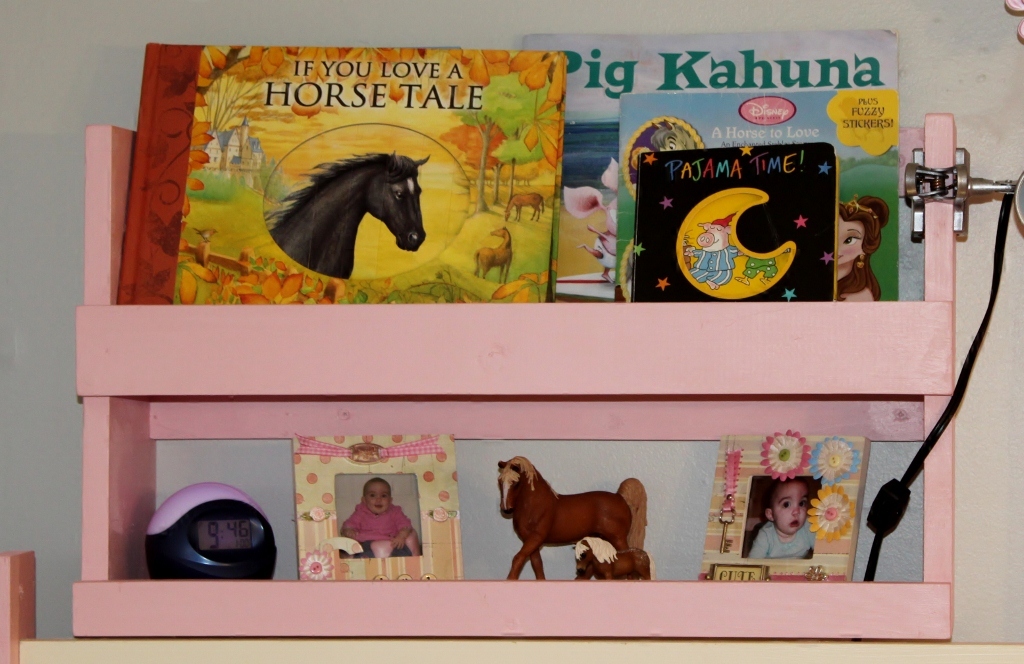
Community Brag Posts

The Boys Create!

Submitted by jablk5 on Fri, 11/02/2012 - 22:16

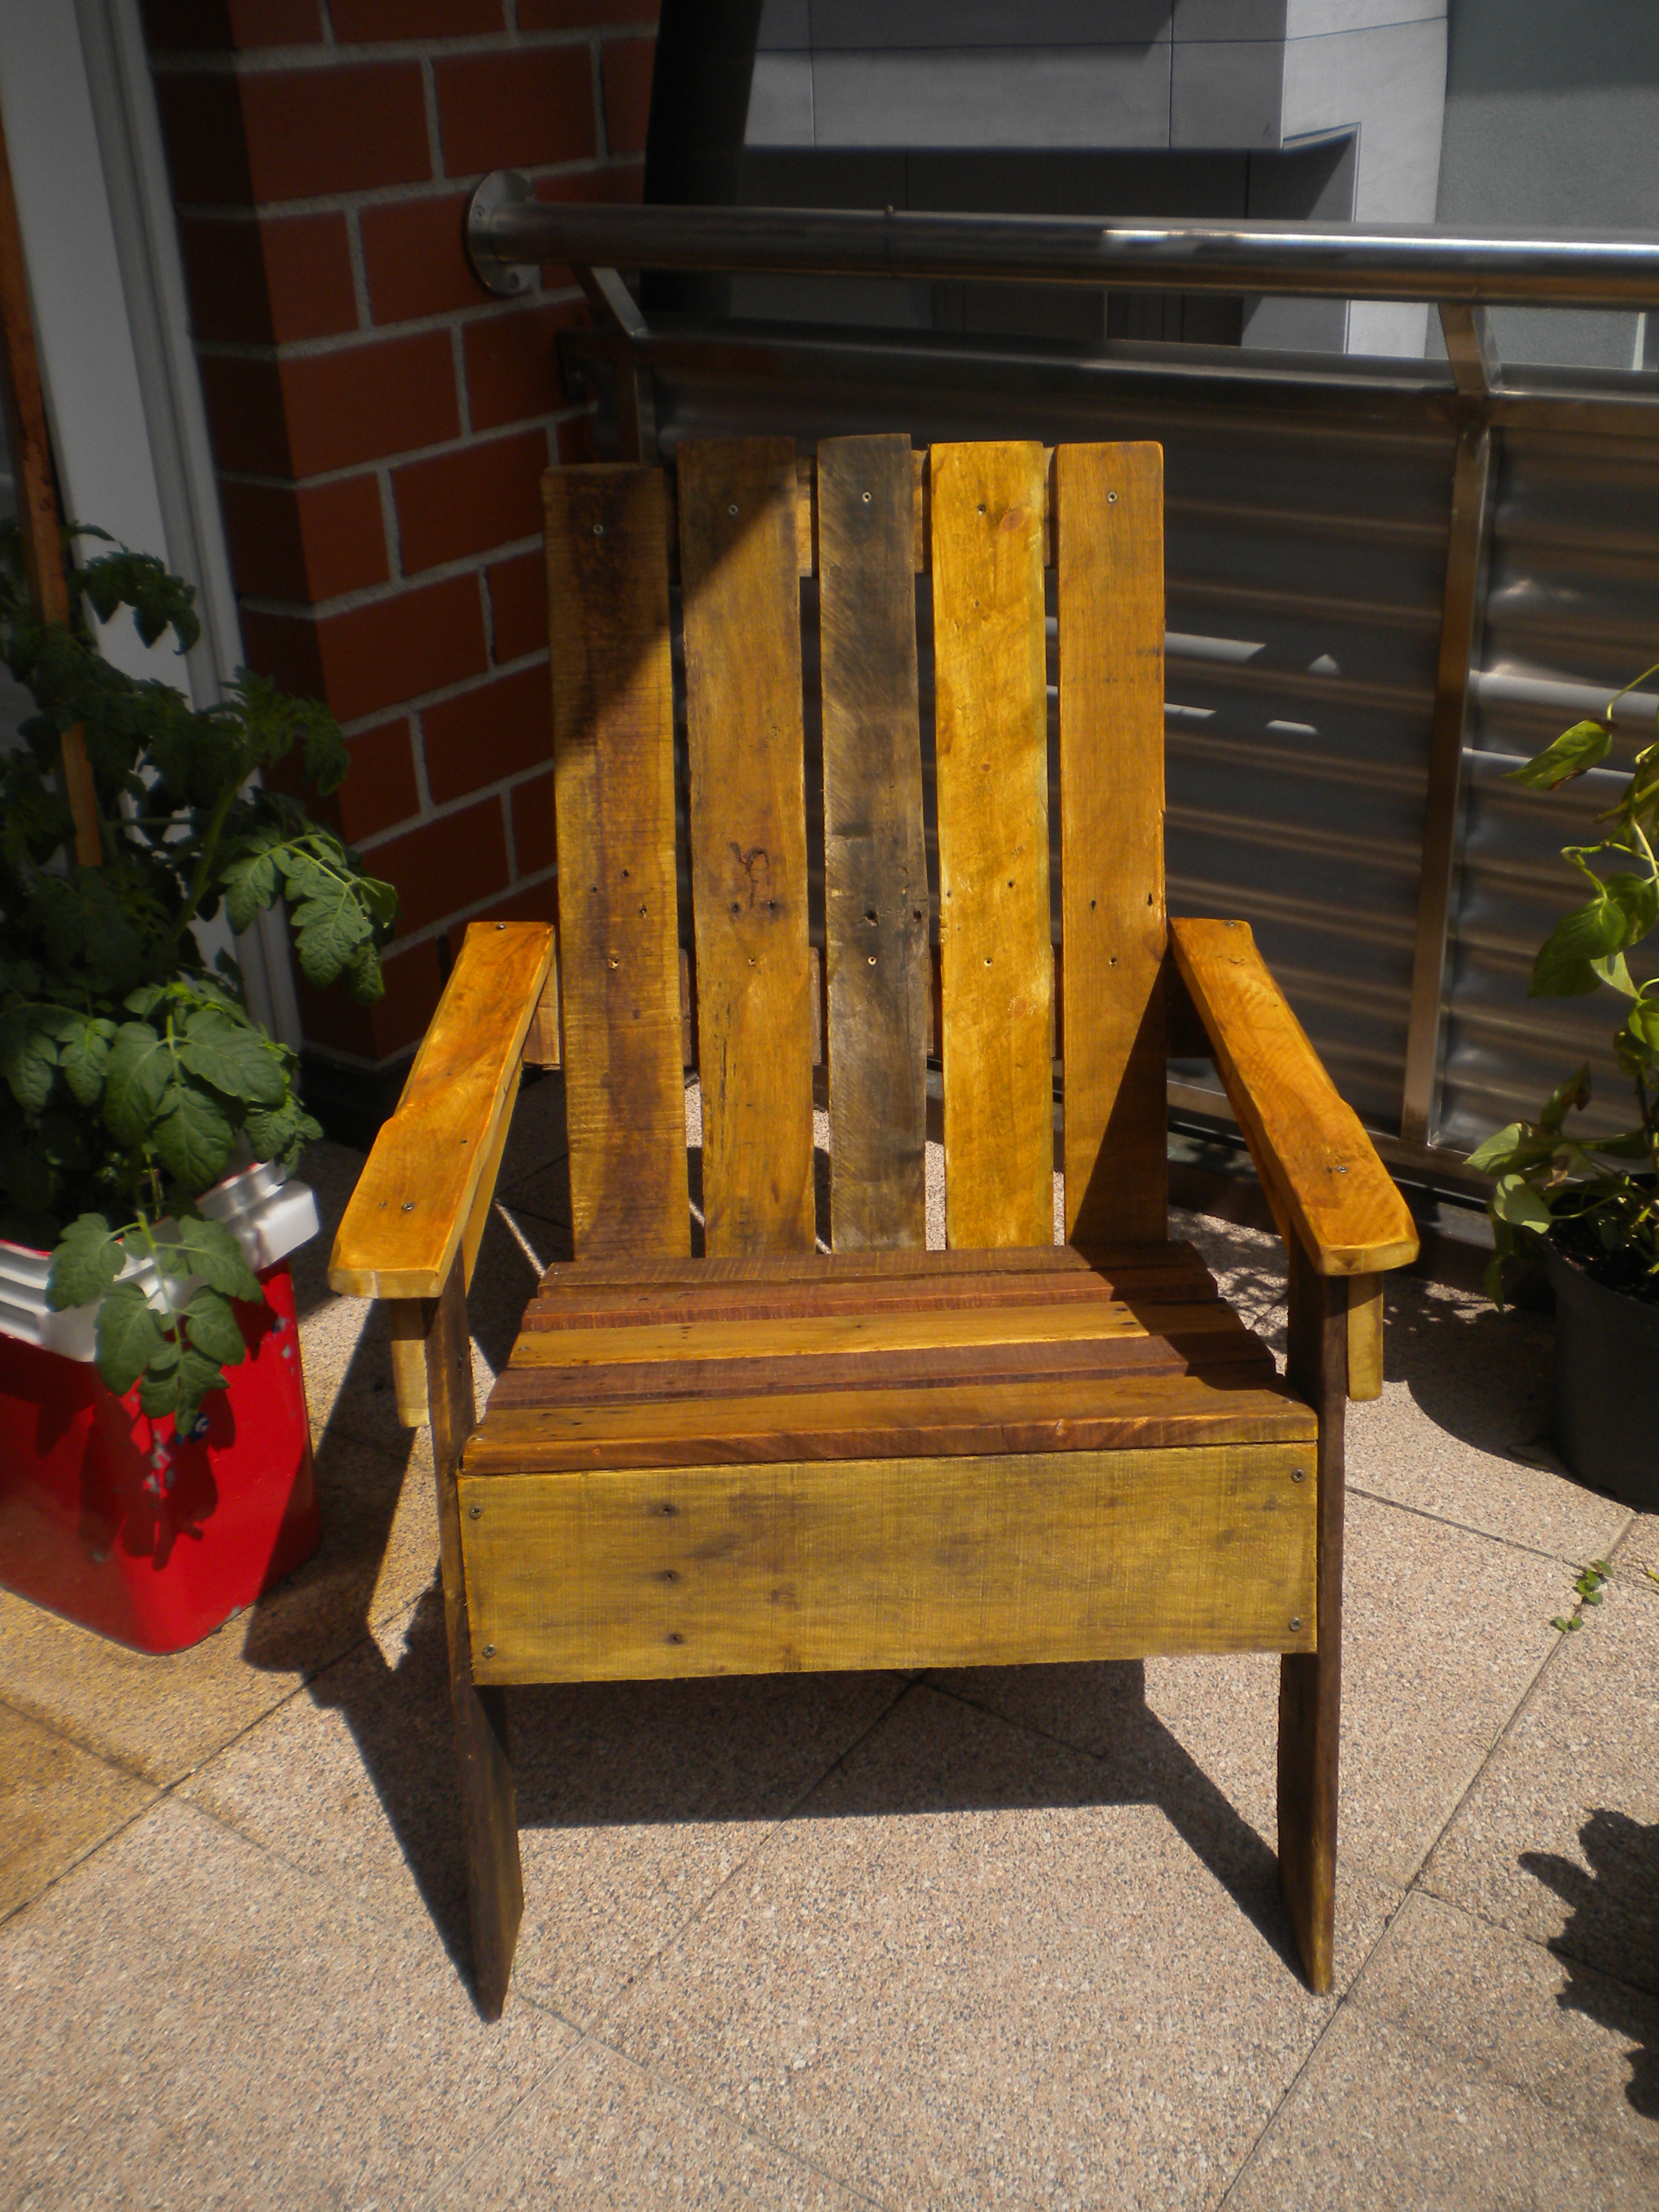
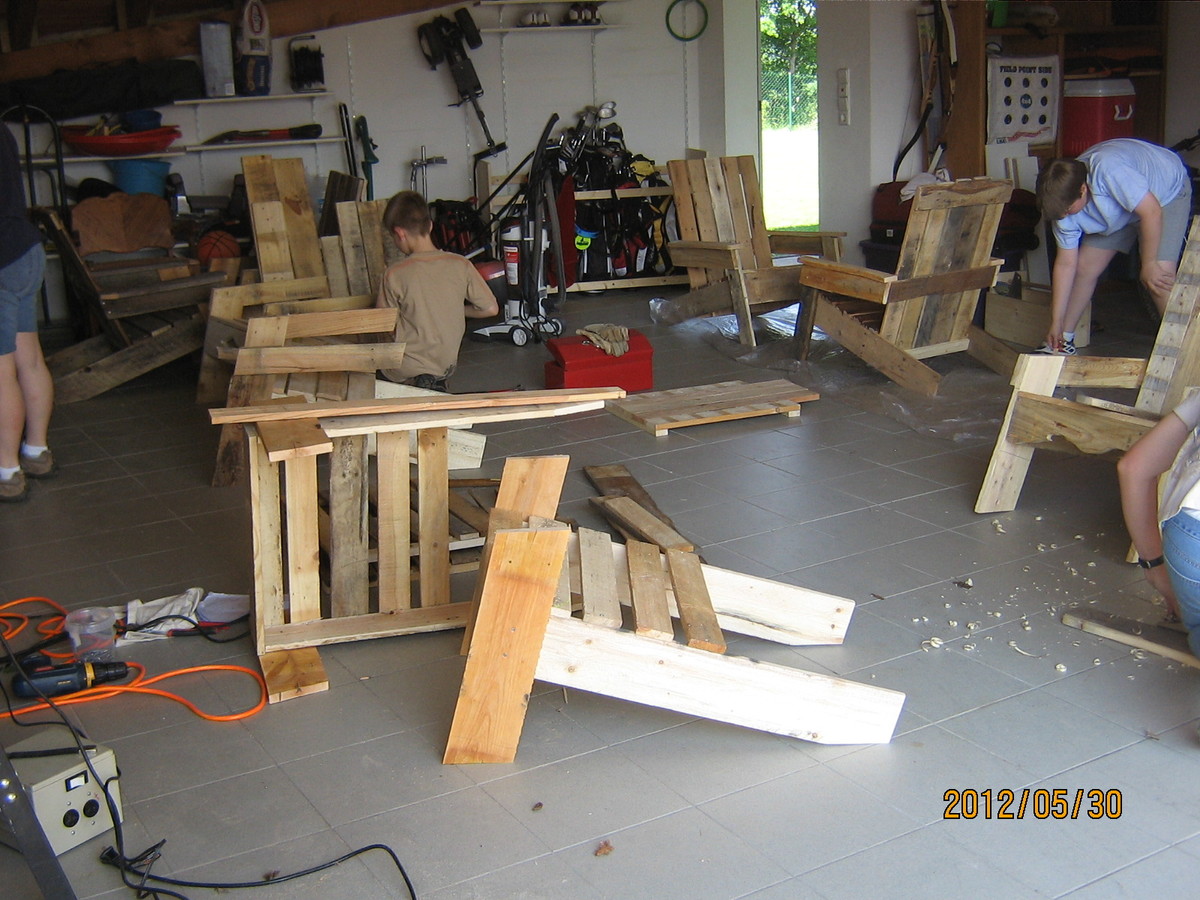
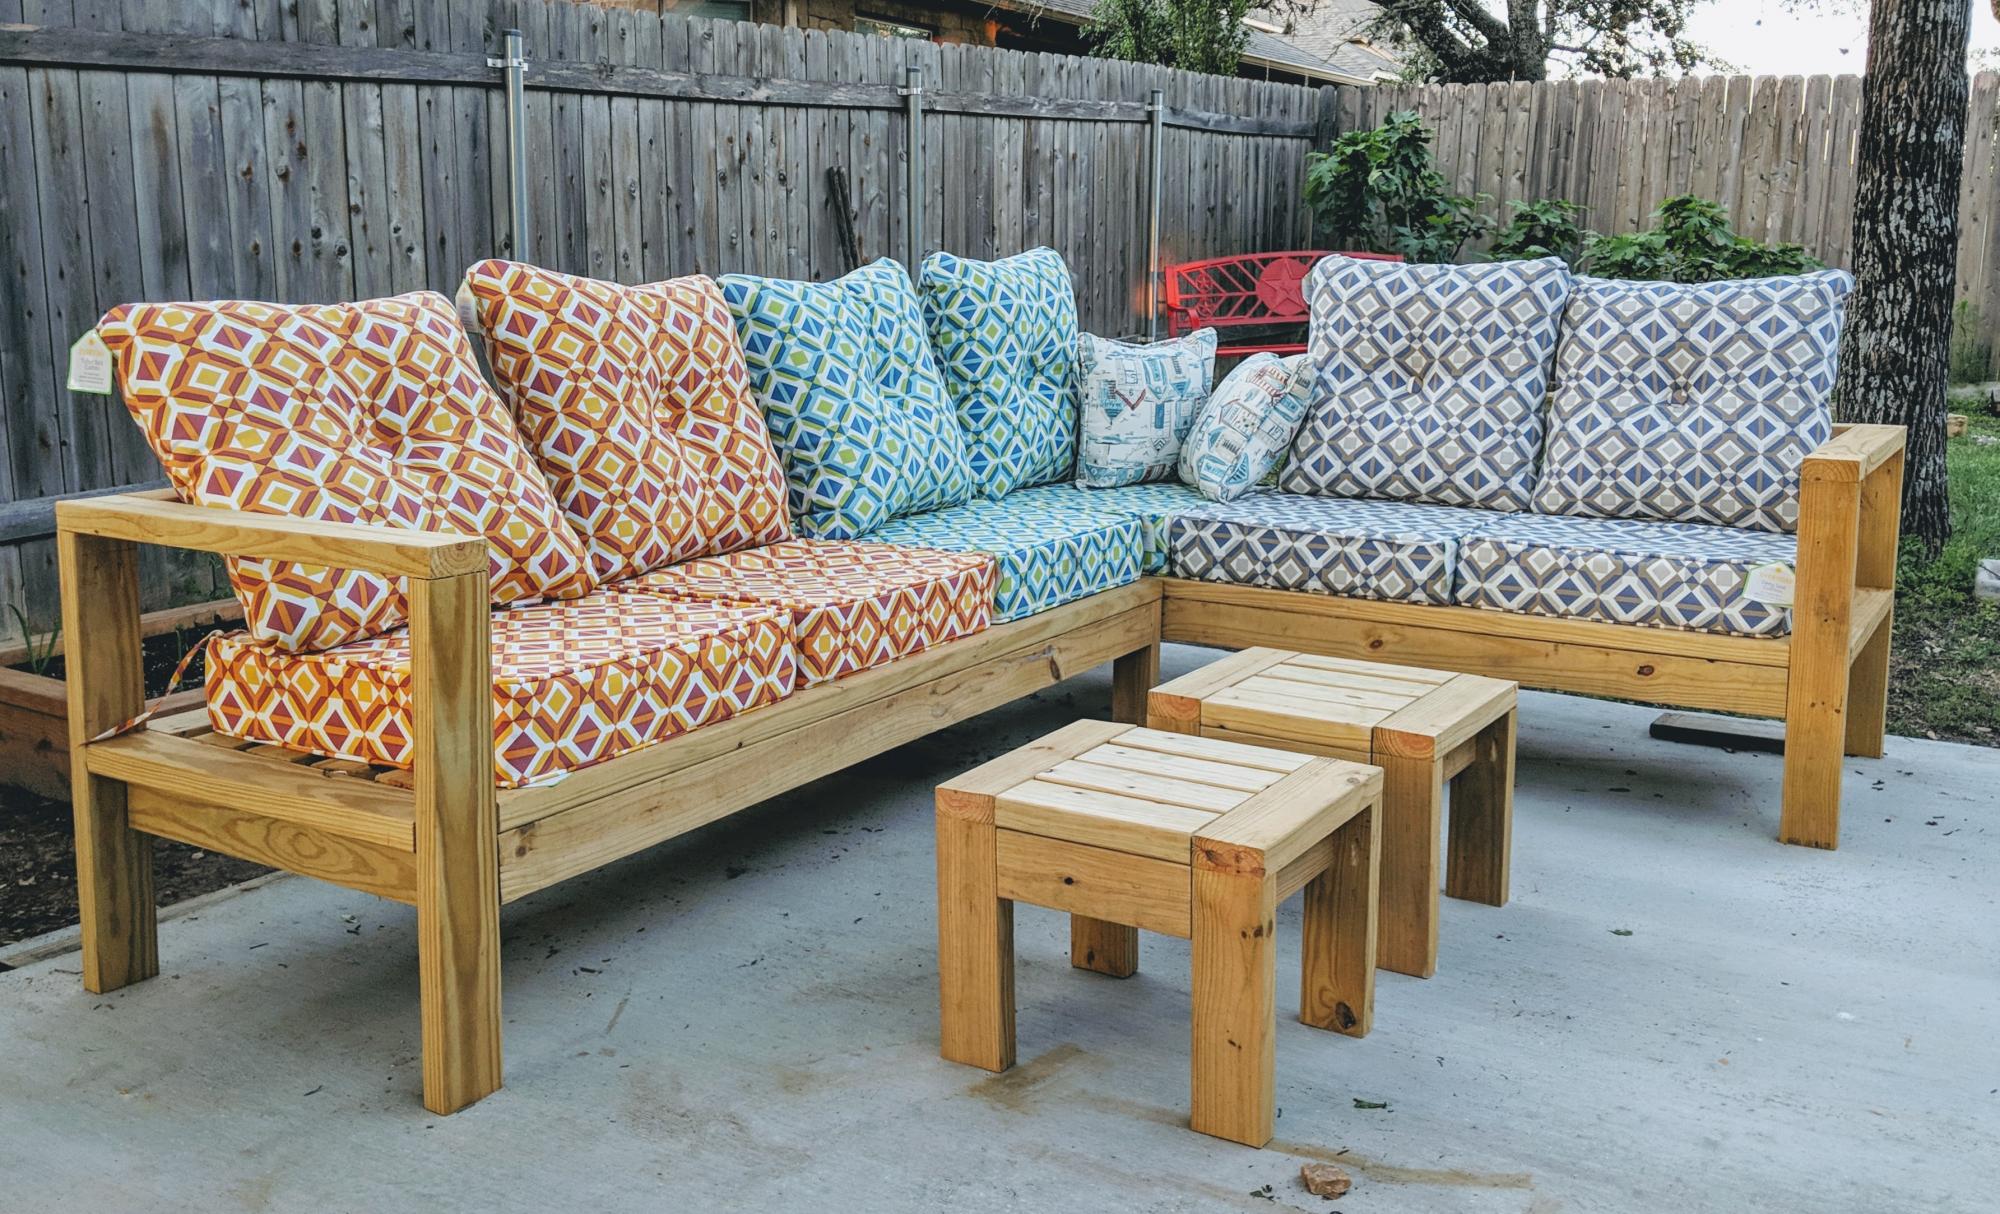
We were able to pick up pallets for free. There were 6 boys aged 10-13 years old. They each took apart 5 pallets. Their pallets with time and patience became two adirondack chairs each. We love the chairs and the boys learned quite a bit. The challenge was that the pallet peices differed in thickness and widths so the boys had to really focus on each piece and the overall look. They look fantastic. The finishes were all different. We are so thankful that Ana has put together such a wonderful website.

Thank you Ana! These boys learned that if they need something, they can make it themselves! They also learned that trash can be a treasure.

Thank you,
Amy

Built from Plan(s)
Estimated Cost
$80 for 12 Chairs
Estimated Time Investment
Week Long Project (20 Hours or More)
Finish Used
The boys chose between outdoor paint, stain, or deck stain finishes.
Recommended Skill Level
Beginner

Comments

Patio furniture

Submitted by Anonymous (not verified) on Mon, 10/04/2021 - 14:43

Followed Ana’s plans, very easy to follow. Chose two different sizes, different woods, and different cushions. Very pleased with outcome.

Comments

Playhouse - Drew Gaffke

Submitted by Anonymous (not verified) on Sun, 12/26/2021 - 14:46

I combined a couple of playhouse plans for this one. The framing is 2x2 treated pine. The front is real stone. I tried to match our home the best that I could. The floor is made out of composite decking.

Comments

Seasonal And Holiday

Large Porch Bench

Submitted by kwildman on Thu, 11/14/2019 - 18:55

I used untreated pine for this project and painted with benjamin moore exterior paint. 

I modified the back a little and I love how it turned out.  I also added an extra brace against the back of each leg that fits under the seat for more support. 

Very easy to build.  I love the plan.

Estimated Cost
75
Estimated Time Investment
Weekend Project (10-20 Hours)
Finish Used
Black exterior paint
Recommended Skill Level
Intermediate

Comments

California King Farmhouse Bed with Arch

Submitted by stephanie on Sun, 06/24/2012 - 16:31

I drove to my dads house to get the wood. He has had rough cut 1X12's sitting in the back yard for several years. They are warped, dirty, cracked..... I think my husband thought I was crazy for wanting to do this. 6 months after getting the wood I finally started. I first took the boards and sanded the caked on red dirt off. Then my 8 year old helped me rip them on the table saw into an 8 inch piece and a 4 inch piece. Then sanded again. The boards turned from red or grey to a yellow color. My husband told me to do it right I needed to use a jointer and he showed me how and I needed to use biscuts to join the planks together, we borrowed one and he showed me how to use the tool. It is so cool, I want to buy one. Then I called my neighbor over to help me, he brought a power planner over and showed me how to use it. It made all the boards the same heighth and REALLY sanded them good (remember these are rough cut boards). Then we used a belt sander to make them really smooth. Then we used a router with a Vgrove bit down the planks where the 1x8's meet. He had two fluted, tapered columns in his garage he has been trying to get rid of so we cut them down and used them as the posts for the headboard and footboard. I cut the arch with a jig saw. Looks pretty darn great! I surprised people with the wood I used! Thank goodness for biscuts, jointers, planners and belt sanders! Best part......cost me a whole $15 to get to this point. I had to buy wood glue, biscuts, and sand paper.

I want to use a laquer finish and try to use a glaze in the grooves. I will try to attach a finished picture when it is done.

Estimated Cost
$15
Estimated Time Investment
Week Long Project (20 Hours or More)
Recommended Skill Level
Intermediate

Comments

Small Cedar Shed

Submitted by Anonymous (not verified) on Wed, 05/20/2020 - 14:42

We needed a small shed to hold shovels and rakes along with a few other garden implements. This cedar shed has worked out perfectly. We made a few tiny modifications including a small shelf and plywood floor. Thanks for the excellent plans, as always.

Built from Plan(s)
Estimated Cost
$250 Canadian
Estimated Time Investment
Weekend Project (10-20 Hours)
Finish Used
We have not yet stained the shed but that will happen during the coming weekend.
Recommended Skill Level
Intermediate

Rabbit Cage

Submitted by blouden on Fri, 07/13/2012 - 23:30

I have a pet ferret that has little room to run around. So I seen this rabbit/ferret cage at the pet store. It was about $150 or so. So I took a pic of it on my phone, and found the Google Sketch app, and watched some videos, and now I have plans for the cage. Some 2x2's, 1x8's, plywood, chicken wire, and some locks and hinges for the ramp an lid.... Still tweaking it, but hopefully it will work out.

Estimated Cost
$50-60
Finish Used
Stain
Recommended Skill Level
Beginner

Comments

Twin Panel Bed

Submitted by Luckysme on Thu, 05/01/2014 - 12:45

Thank you so much for these awesome plans. When I saw the original twin panel bed, I knew this was exactly what I wanted to build for my two daughters. I love super high head boards, and these are exactly that. I am in love. I did make some changes to the plan. I went with taller side rails, and used metal bed rail brackets. The brackets were super important. We move every few years being in the military, and I wanted something that would with-stand time and moves. I am also quite impressed how solid these beds are. I could never find anything this amazing in a store. I would also like to thank my husband for his help. It was our first build, but definitely not our last. Thank you!

Built from Plan(s)
Estimated Cost
200 per bed.
Estimated Time Investment
Week Long Project (20 Hours or More)
Finish Used
I used Annie Sloan Chalk paint. Paris Grey, and Old White. First I Clear waxed it, then finished it with a dark wax. This gave it more dimension.
Recommended Skill Level
Intermediate

Comments

spiceylg

Thu, 05/01/2014 - 18:02

These came out beautiful and especially for a first build! Seriously impressive. Love the whole ensemble. Really pretty.

Danib

Wed, 06/11/2014 - 13:31

This bed is beautiful. You did a wonderful job on it. Could you please tell me where you got the big base molding for the inside of the headboard and footboard? Would love to try this for my granddaughter.

In reply to by Danib

Luckysme

Wed, 06/11/2014 - 17:27

Thank you for your very nice comments:
Here is some info, let me know if I can help further more.

This is what we used for the base molding and the headboard molding at the top. http://www.homedepot.com/p/House-of-Fara-5-8-in-x-4-in-x-8-ft-MDF-Base-…

For the the inner molding we used two pieces of molding: This is the style (link below) we used, but ours was a little bigger, 5 1/4 inches. Couldn't find it on the home depot website, but this is exactly the same style.

The addition molding below is a finishing molding that we had to use since the above molding was not flush to the back board. It finished really nice. Glad we added this addition dimension. You can easily skip using it with different "above" molding.

http://www.homedepot.com/p/American-Wood-Moulding-LWM47-9-16-in-x-4-1-4…

http://www.homedepot.com/p/American-Wood-Moulding-WM100-11-16-in-x-11-1…

For the side rails we also used 10 inch boards. I thought it made the bed look more proportioned. I will add additional pics of the molding, so re-check pictures. Again, let me know if you have further questions.

TV Stand Table

Submitted by Anonymous (not verified) on Tue, 08/02/2016 - 10:00

This was a super fun project and didn't cost much at all.

Estimated Cost
$75
Estimated Time Investment
Weekend Project (10-20 Hours)
Finish Used
Mixture of Grey and Brown stain with a poxy coating
Recommended Skill Level
Intermediate

Comments

Bunk Bed Shelf Organizer

Submitted by BethStew5 on Wed, 07/18/2012 - 21:51

I had just finished my daughter's playhouse loft bed when I saw this plan. It was super easy to build and I used all left over wood from the playhouse. I used 6-inch boards for the sides and shelves since that was what I had left over. Other than that, I followed this plan exactly. Thanks for posting!

Built from Plan(s)
Estimated Time Investment
An Hour or Two (0-2 Hours)
Recommended Skill Level
Beginner

Comments

Potting Bench/Stand

Submitted by MikeO on Tue, 06/16/2020 - 09:58

Built this for my girlfriend's birthday present. Added a 1x4 backsplash and a 2x6 for the top shelf to give a little more shelf room instead of the 2x4 called for in the plan. Stained with Varathane "Vintage Aqua" color and then 3 coats of Helmsman Spar Urethane for outdoor durability. Set the whole thing on caster wheels (not pictured) so she can move around the deck as needed.

Built from Plan(s)
Estimated Time Investment
Afternoon Project (3-6 Hours)
Finish Used
Varathane Vintage Aqua
Helmsman Spar Urethane
Recommended Skill Level
Intermediate
Seasonal And Holiday

Dog crate/bench

We wanted a bench at the foot of the bed to help our squatty dog Kirby get up and down from our elevated bed. When we saw the plans for the dog crate we decided that we could make a crate for our Boston Terrier Petey who needs to be confined overnight AND put a reinforced top on it to provide seating space. We knew it could not be taller than 18" (the same as our living room couches) so Kirby could jump on and off comfortably, and that we didn't need to make it as big as Ana's plan since Petey is half the size of Ana's lab. Our crate/bench is narrower. Every bit of this piece was made with wood either repurposed from an old playhouse or scraps from the cedar pergola we built in May. We had the hinges and the screws on hand already. We drilled holes in the lid to tie a cushion on top eventually. The lid comes off completely for ease of changing out dog bedding. Petey loves sleeping inside and will go in for naps even during the day when he has the run of the house. Kirby and our other dog also like to nap in there. You can just see the white of Petey's blaze in the pic where Kirby is peeking in.

Built from Plan(s)
Estimated Cost
$20
Estimated Time Investment
Weekend Project (10-20 Hours)
Finish Used
One coat primer, two coats of Valspar in Indigo. Lid has 3 coats of Minwax Golden Oak.
Recommended Skill Level
Starter Project

Comments

booksnotbombs

Thu, 07/10/2014 - 07:22

Your pups look so happy with their new crate/bench! It looks nice and sturdy. :) Do Kirby's nails scratch the top at all as he jumps on an off? Just curious what you used as a clear coat, if anything. My little dog gives me the hardest time about cutting her nails so they're probably a little longer than they should be at times until I get her to the groomer.

This is a great, creative solution to all your needs. :)

S_and_S_have_t…

Thu, 07/10/2014 - 19:51

Yes, they are very happy and spoiled! Kirby's nails have not scratched the top yet but since we know they probably will eventually, we plan to put a thin pillow on the top. I won't get around to making it until the fall. We might put a clear protective poly coat but haven't yet.

I started using a Dremel on my 2 Boston Terrier's nails when they were very, very young so they are calm and resigned when it's nail time. That they get Cheerios as a treat afterwards doesn't hurt! However when Kirby was a puppy he was going back and forth between my ex-husband's and my house and my ex didn't start Dremeling early so Kirby won't let us sand his nails down and a groomer has to do them. I hate that we have to spend money on something that could be taken care of a couple times a month at home but if dogs are not conditioned to be held upright, tolerant of having their paws held tightly for the sanding, or terrified of the noise, it's not going to be acceptable to them when full grown. Kirby goes full Tasmanian Devil throwing a fit whenever he sees the Dremel case out so we don't even try anymore.

The bench is great and I am so happy Petey loves it so much. He is congenitally deaf and a real pill sometimes so it is a relief that he has taken to it.

Coffee Bar

Submitted by Anonymous (not verified) on Mon, 10/31/2016 - 07:12

I modified this plan to fit a 27"x 25" chunk of butcher block that my mother-in-law gave me. The finished height is 36 & 1/2". I didn't have any special tools to make the notches for the shelves. I simply lowered the blade-stop on my 7&1/4" miter saw and fastened the screw with hair ties (or in other words, I jimmy-rigged it ;)). I practiced on scrap wood until I reached the depth I needed. There is a 9&1/4" clearance between both shelves, and the shelves have a 1" overhang off the sides. I mainly used pocket holes to connect the pieces. The shelves (3-2x6s each) were fastened together with wood glue and pocket holes, then I slid them into place and screwed them into the side aprons/supports from the top, then filled with wood filler. For the top, I added support from underneathe (2x2s that I had on-hand), then used 2&1/2" screws from underneathe through the 2x2s into the butcher block. At first I used zinc wood screws, but learned quickly that they strip extremely easily, so I switched to sheet rock screws. Fun project!!

Estimated Cost
$35 in lumber, not counting the butcher block top which I got for free from my mother-in-law.
Estimated Time Investment
Weekend Project (10-20 Hours)
Finish Used
For the butcher block, I decided to stain it since it would not be coming into contact with food. I sanded the butcher block with 220 grit sandpaper with my orbital sander. For the rest of my project I first used 80 grit, then 220 grit. Then I applied pre-stain wood conditioners overall, then Minwax provencial stain (I left it on for about 3 minutes then wiped it off). Then I used two coats of polyeurethene, sanding with 400 grit between the coats.
Recommended Skill Level
Intermediate

Comments

Chunky leg farmhouse table

This is a chunky leg farmhouse table I just finished. We wanted to do something a little different with the color scheme, so we did something a little more colonial with a custom stain and paint blended grey top, and painted the legs a deep navy blue.

Estimated Cost
$400
Estimated Time Investment
Weekend Project (10-20 Hours)
Finish Used
Custom stain paint combo on the top.
Sherwin Williams deep navy blue paint on the legs and skirt
Recommended Skill Level
Intermediate

Rustic Crib

Submitted by Pomarola25 on Tue, 04/04/2017 - 11:41

This is my Son's crib that I built about a year ago.  I have the plans for them but I need to get on my desktop to get the plans.  But it's built to be a convertable crib like the expensive cribs you can buy.  If i remember correctly I had less that $150 in material.  With all the sanding and it being the first time I had made one I had about 100 hours into it. 

Estimated Cost
$150
Estimated Time Investment
Week Long Project (20 Hours or More)
Finish Used
Ebony with Satin coat. Rubbed on not brushed.
Recommended Skill Level
Intermediate

Piper's Dining

Submitted by Anonymous (not verified) on Fri, 04/14/2017 - 08:09

This was just the right table design for our history home built in 1880! Love the plans and easy to build!

Estimated Cost
Table- $95 without Kreg Jig cost($20) or screws
Bench- $24- screws
Estimated Time Investment
Week Long Project (20 Hours or More)
Finish Used
Wood primer first on all surfaces,SW Rustic gray, minwax mahogony low lights and satin minwax poly finish(5 coats)
Recommended Skill Level
Intermediate

Potting Bench

Submitted by Anonymous (not verified) on Sun, 04/11/2021 - 13:47

I slightly modified the project to suit my wife's request. One key note: Make sure the main frame pieces mirror each other. I missed that and had two identical pieces outlined in Step 1, versus where the inside aprons actually face each other to allow for the top and bottom rails to be secured to the frame.
Thompson's Clear stain protects the wood; one coat after cutting the pieces and a second one for good measure after assembly.

Estimated Cost
$50.00
Estimated Time Investment
Weekend Project (10-20 Hours)
Recommended Skill Level
Beginner

Comments

Outdoor patio sectional and patio coffee table

Submitted by Anonymous (not verified) on Tue, 05/16/2017 - 13:08

Welcome to our labor of love. This is our first build and while my bf did most of the work, it was a great project for us as a couple. It was definitely work, but well worth it. We love the way it fits perfectly in our courtyard and people keep commenting on how high-end it looks. Thanks for the plan, Ana! The project took a little longer than it probably should, since it was the first project for us. You should account fort he time it will take to cut, sand and stain your pieces before assembly. There are times you will need to allow for the lumber to dry etc.

Finish Used
1-gal. #ST-129 Chocolate Semi-Transparent Waterproofing Stain and Sealer
Recommended Skill Level
Beginner

Comments

Modified Cassidy King Headboard

Submitted by Radcrafter on Mon, 03/02/2015 - 19:41

Love this bed.  I found the Cassidy plan and immediately fell in love with the decorative detail of the headboard.  It wasn't until I was in the process of buying the wood that I decided to go in a different direction and use wood from my giant scrap piles to create the headboard instead of the wood shims.  I followed the plan with a few minor modifications to work with our existing metal frame as opposed to building the one in the plan.

The basic headboard and footboard went together in one day, but creating the design with the scrap wood for the headboard took an entire Saturday.  It was time consuming cutting pieces to fit and then staining each individual piece.

I marked this as a week long project because it does take several days to stain everything and then poly it.  Most of that is wait time not actual building time.


Built from Plan(s)
Estimated Cost
Approx. $70-80 for wood (used scrap for decorative part of headboard, so it would be more if you had to purchase additional wood) + $12 for 4 small cans of stain (already had the large can of Espresso).
Estimated Time Investment
Week Long Project (20 Hours or More)
Finish Used
Minwax Ebony, Special Walnut, Early American & Espresso Stain. Minwax Satin Polyurethane for top coat.
Recommended Skill Level
Intermediate

Comments