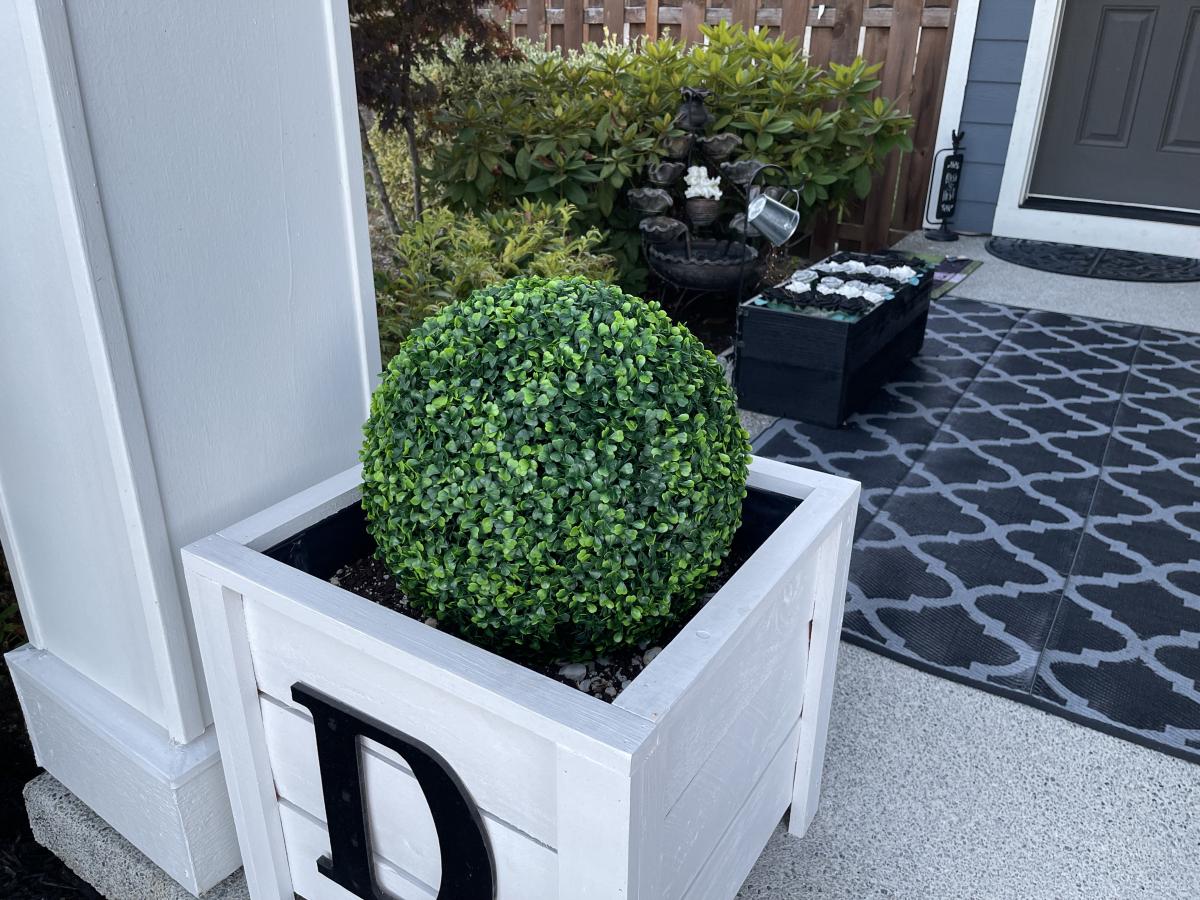
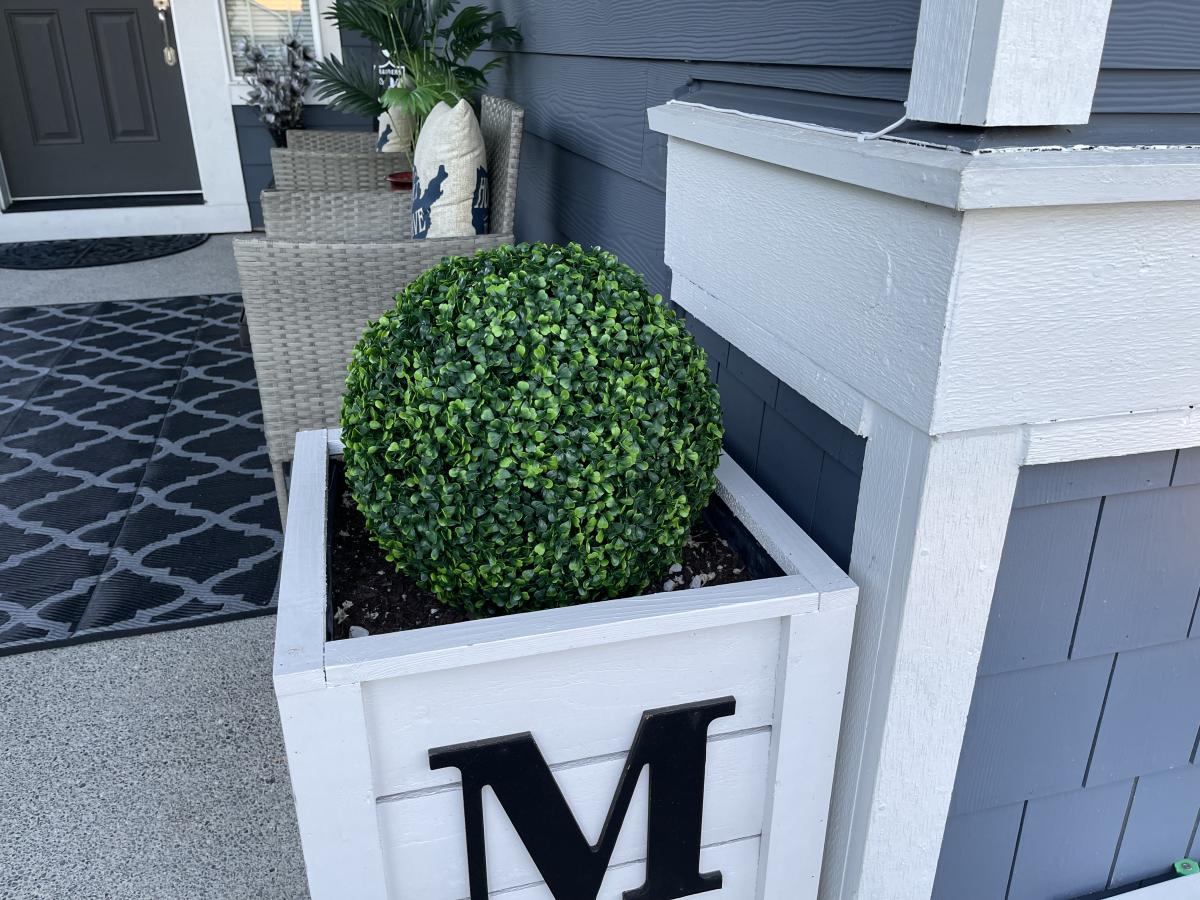
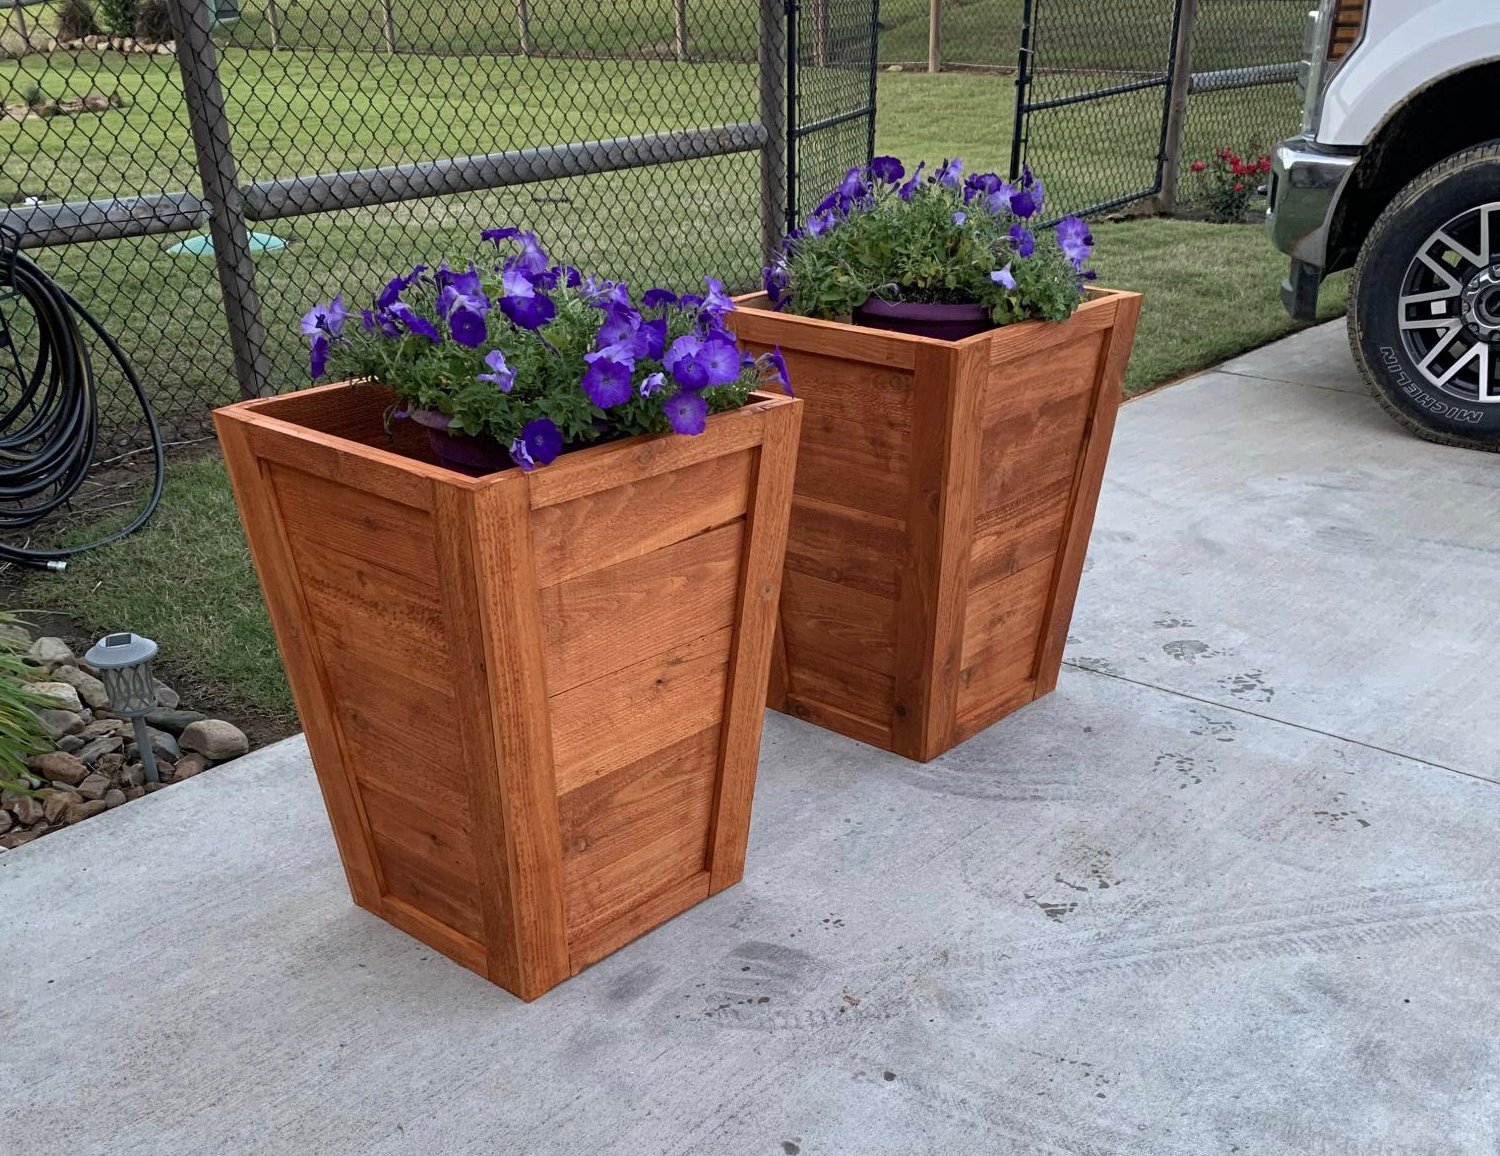
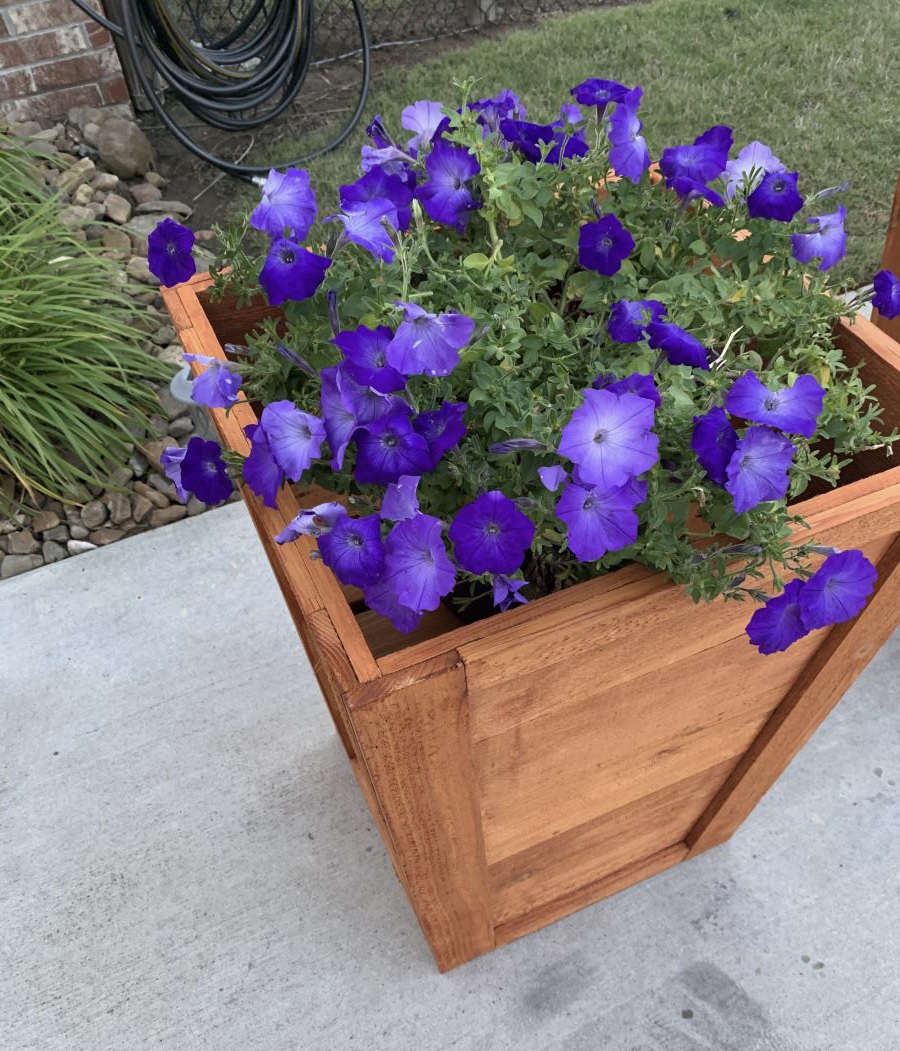
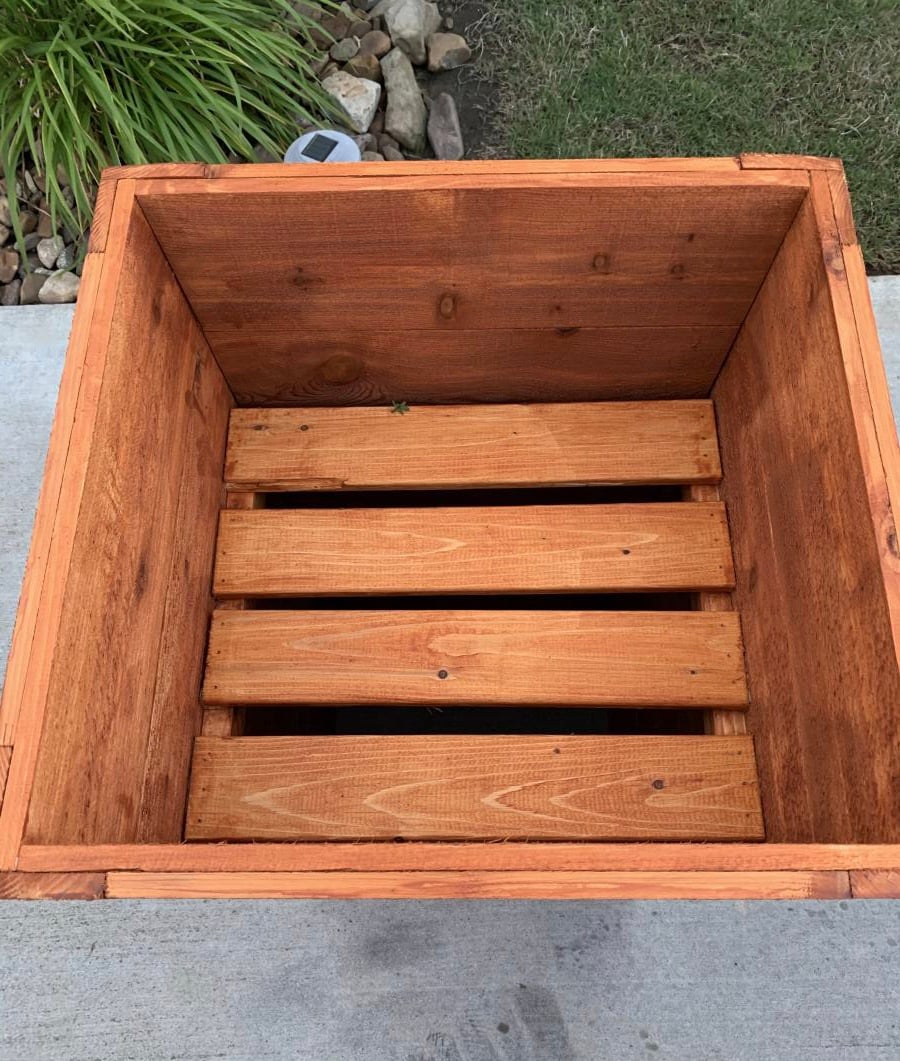
Porch Planters
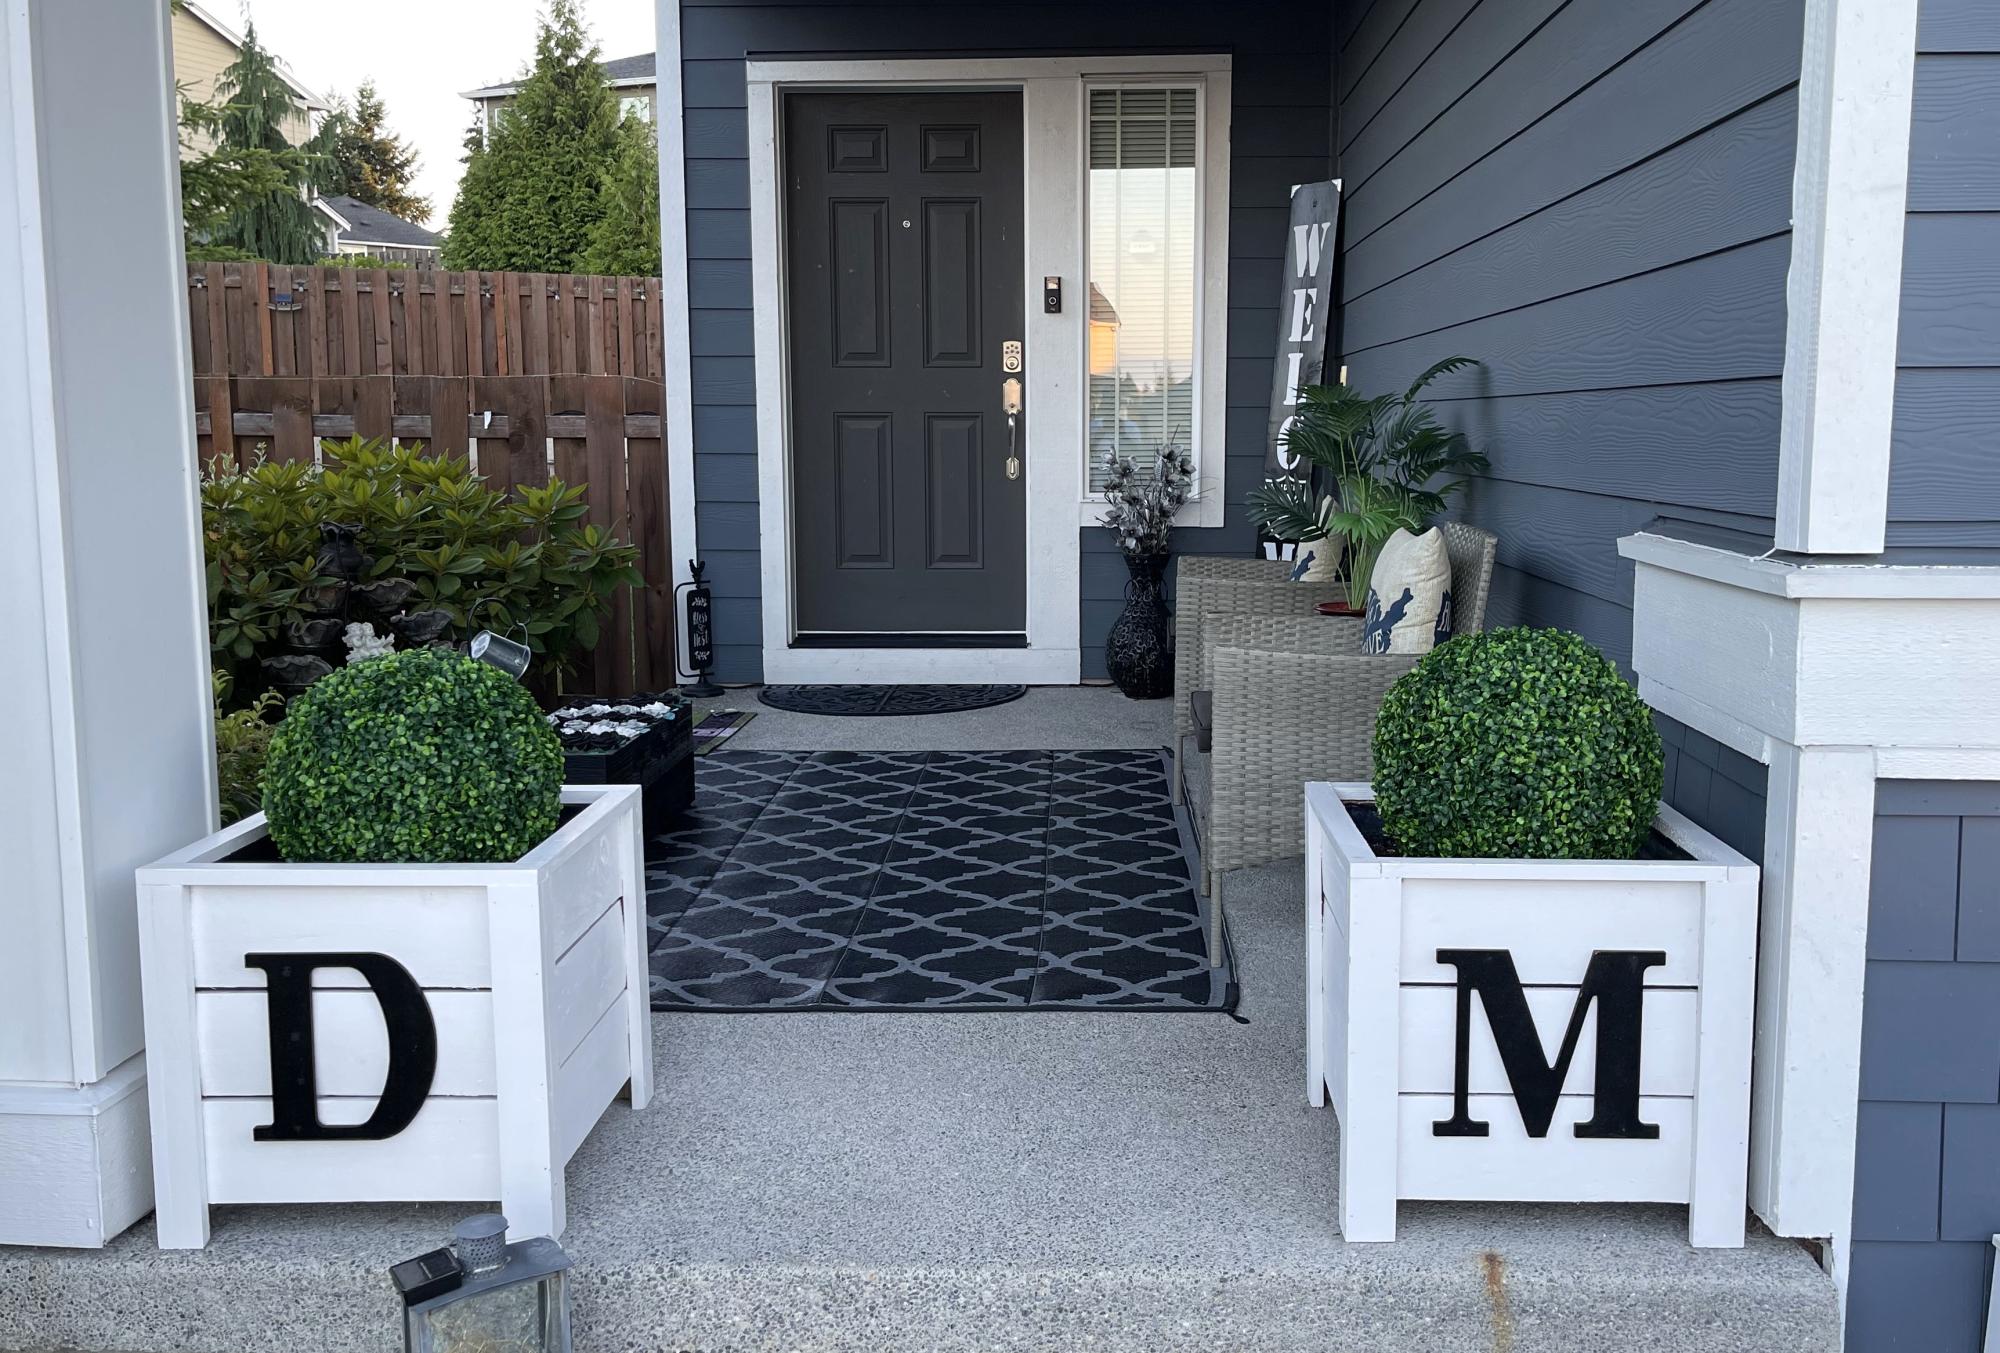
This build was a lot of fun! Thanks ANA!
David Marks
Built from Plan(s)
This build was a lot of fun! Thanks ANA!
David Marks
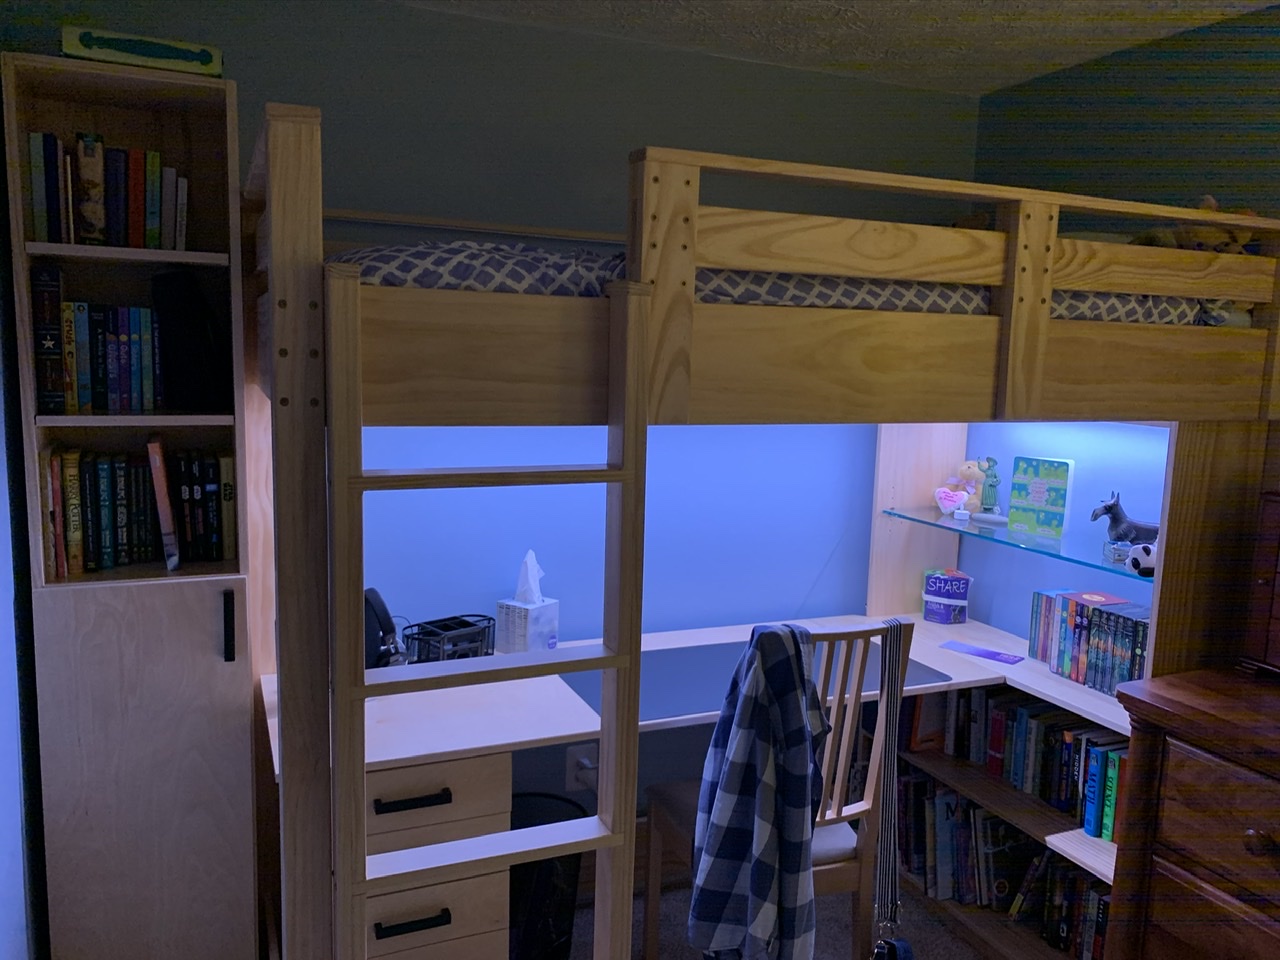
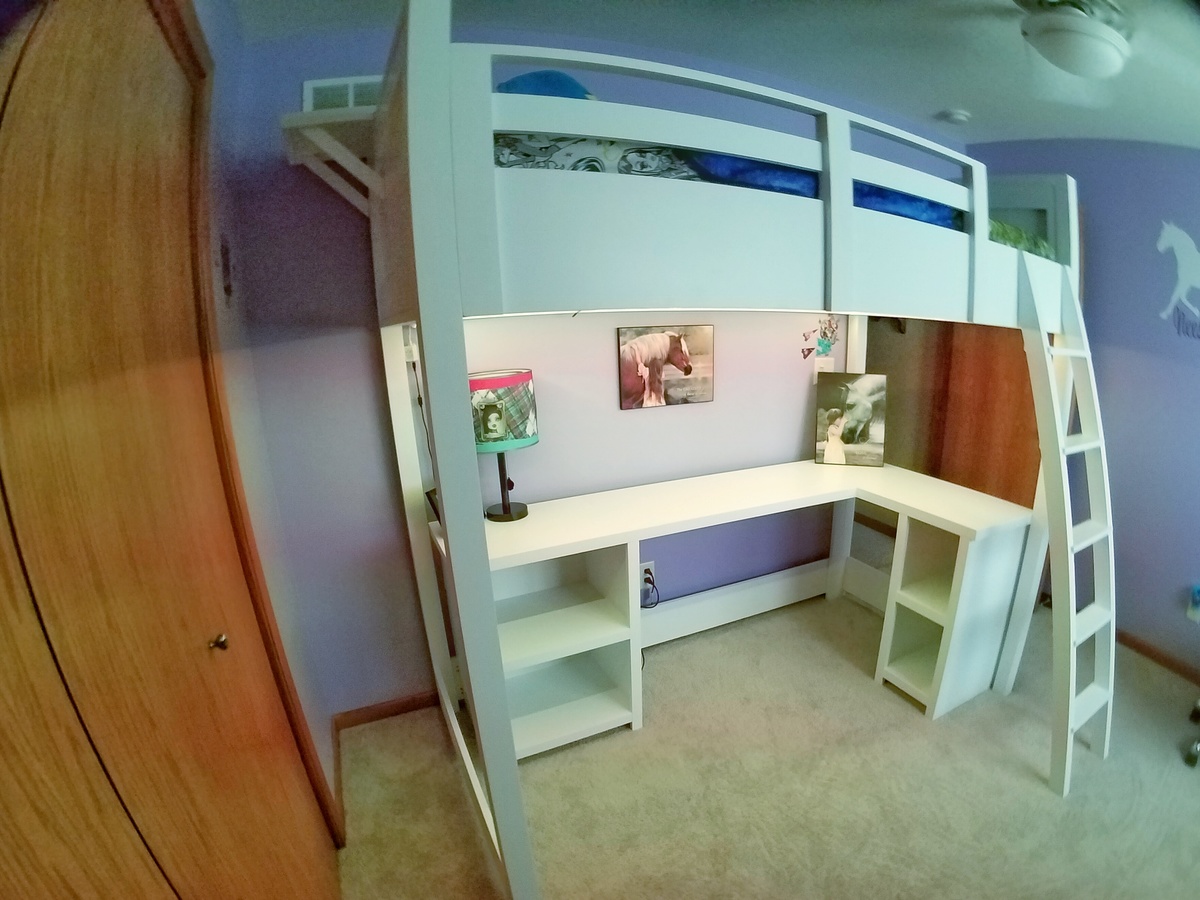
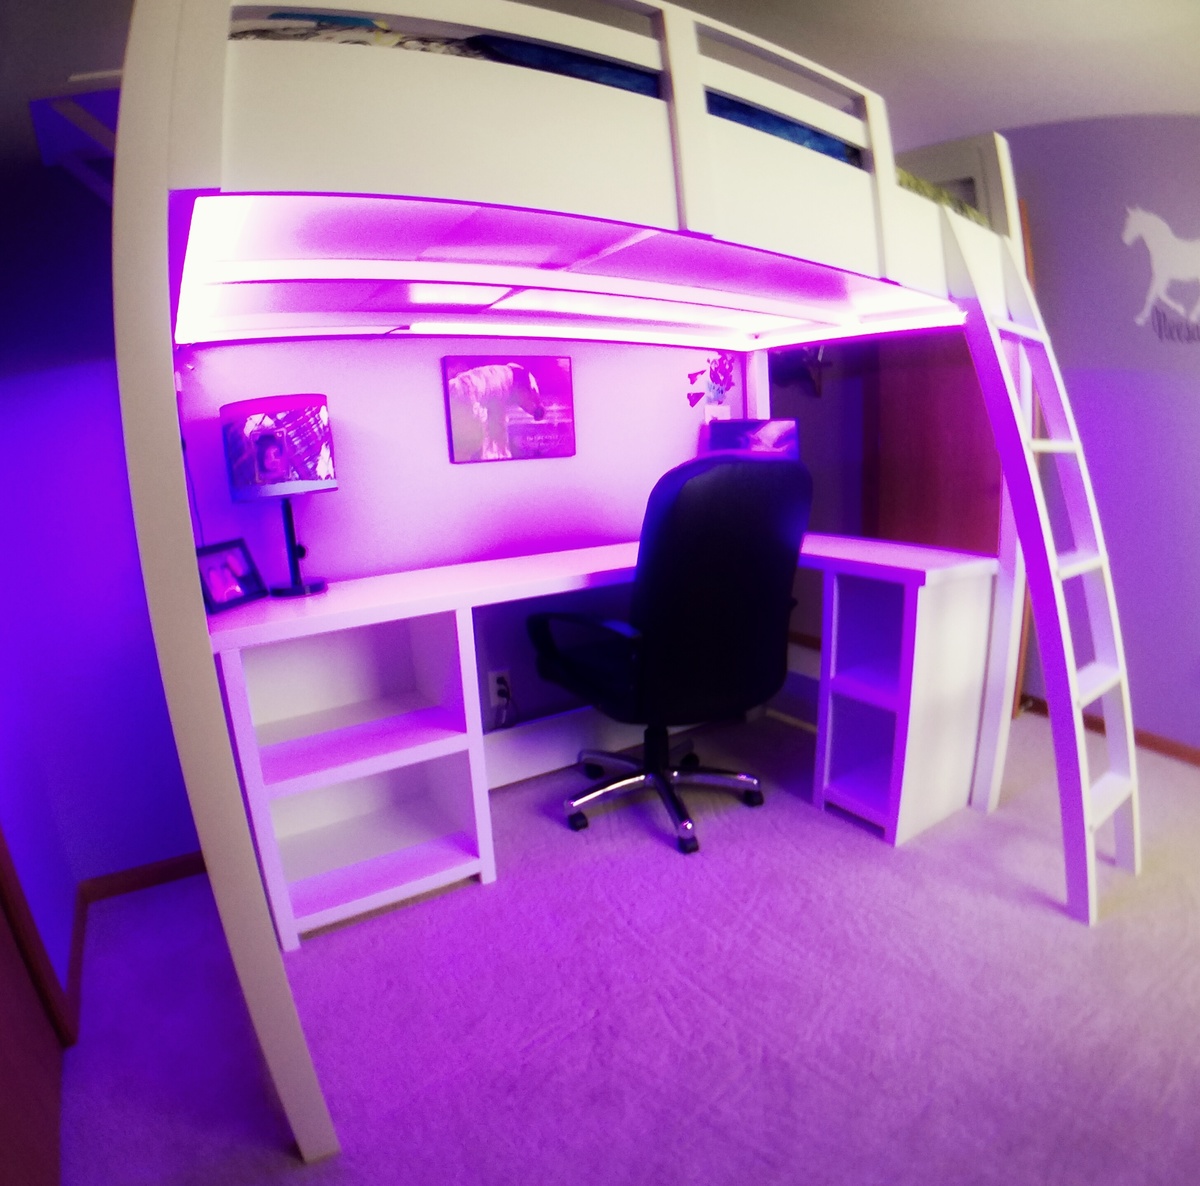
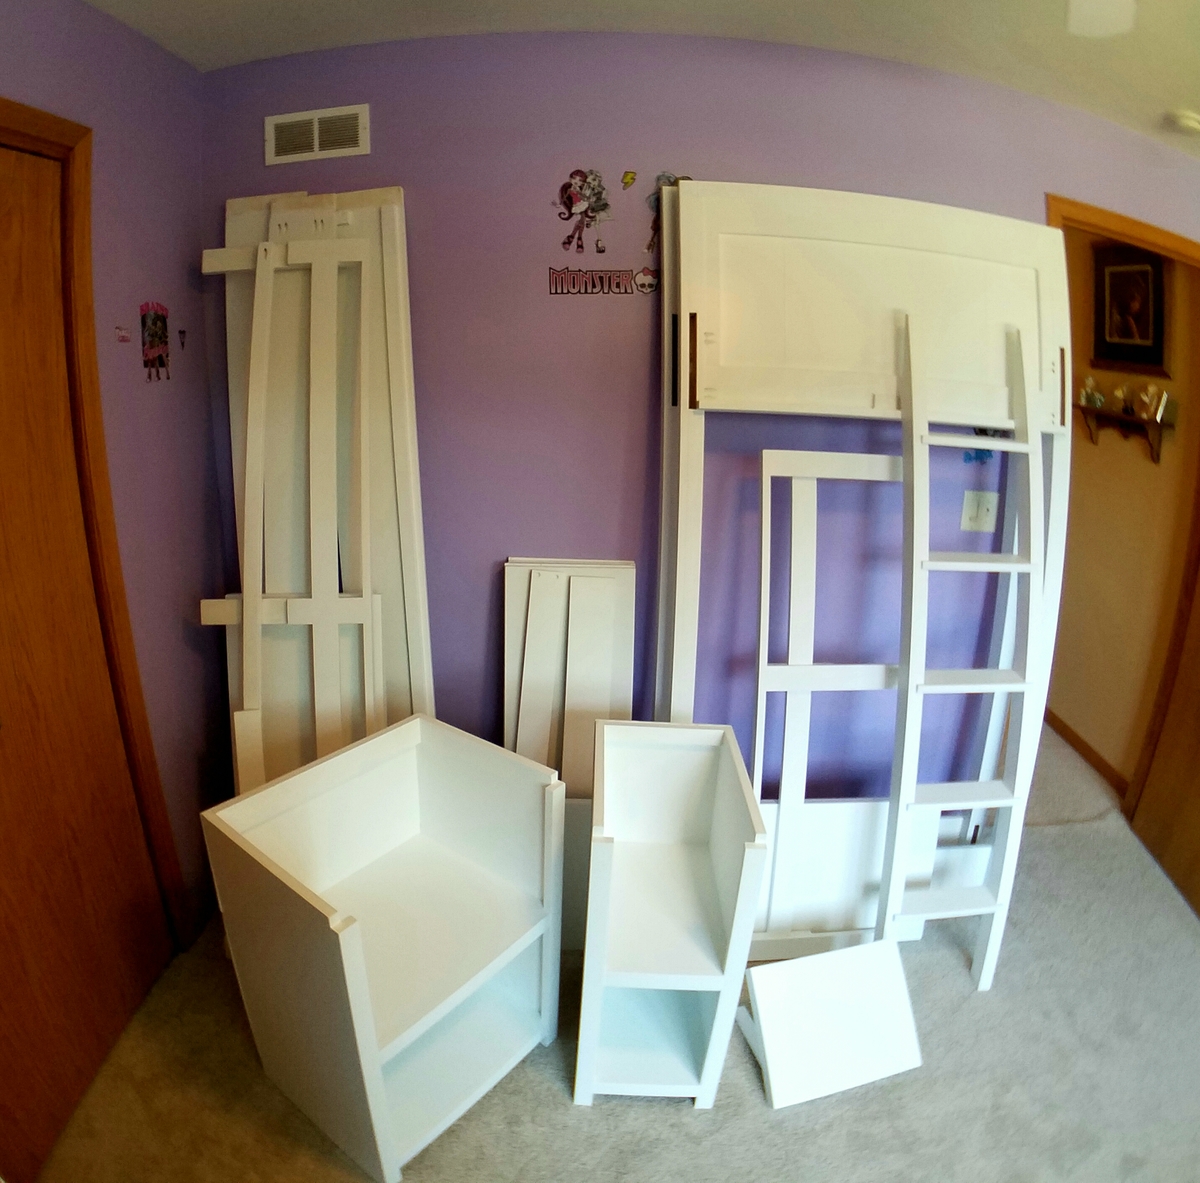
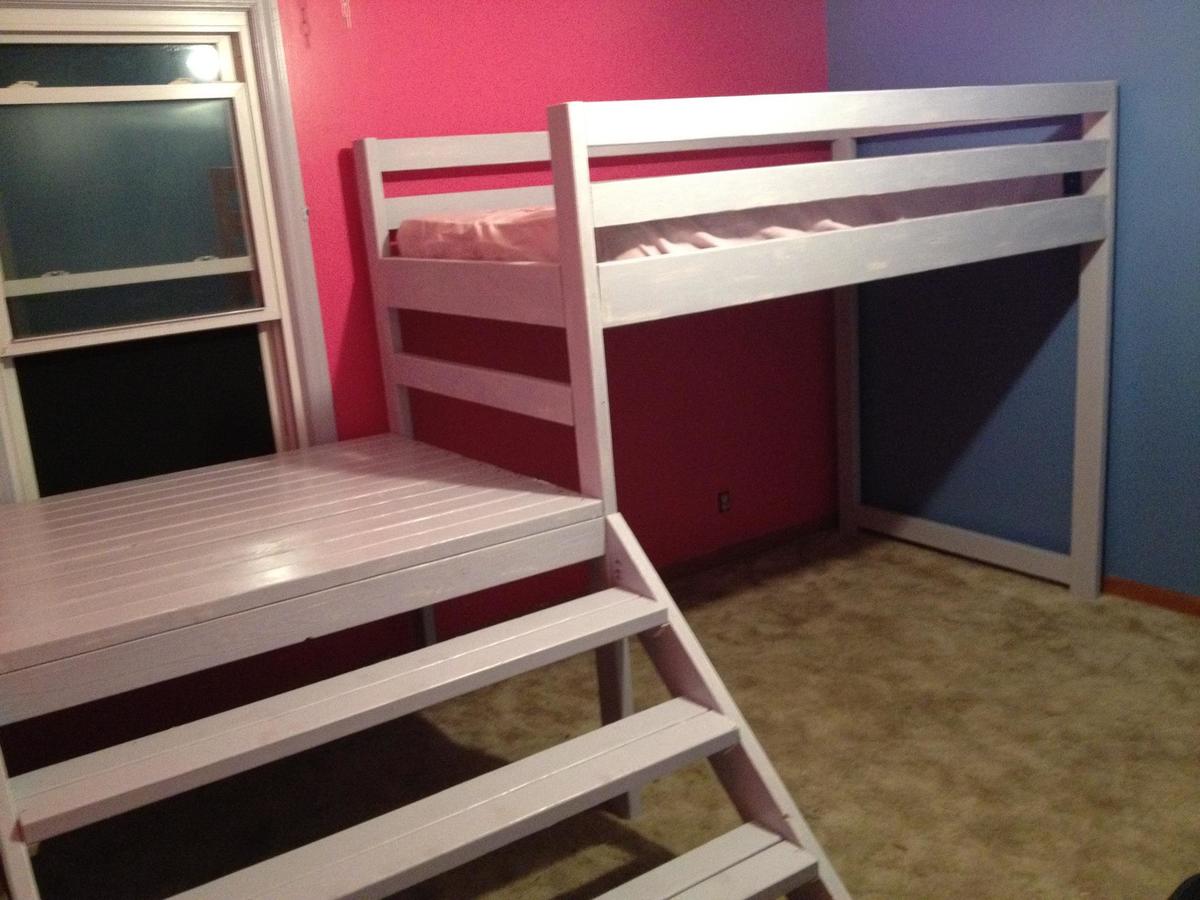
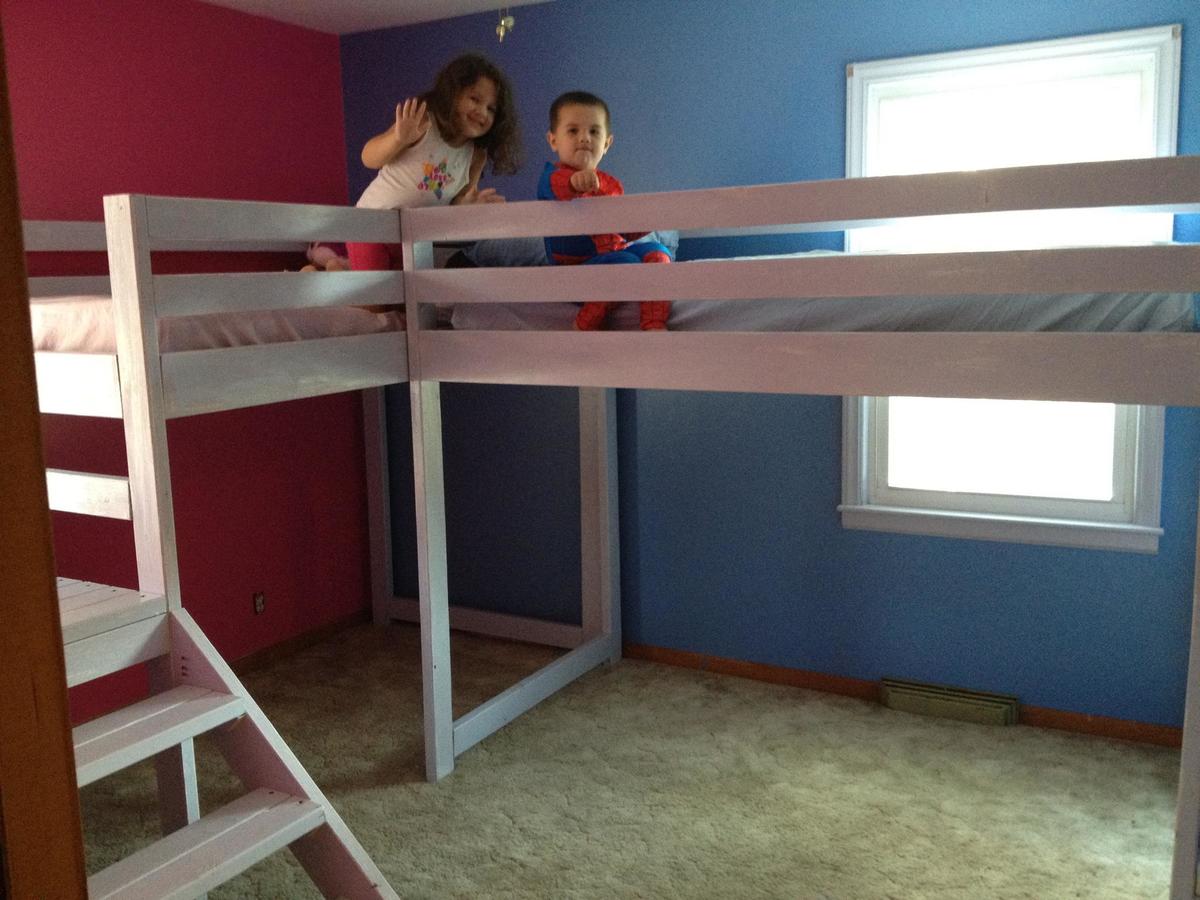
My daughter desperately needed a new loft bed for her small bedroom as she became a teenager. After looking a long time, I finally decided to take the plunge and make something custom after we couldn’t find a bed that met her needs (she’s VERY tall for her age). Thank you for posting the loft bed and bookshelf plans to this site, as they were great to work from and customize! This is my first woodworking project of any kind, and it came out great with these plans.
We followed the Loft Bed and Loft Bed Bookshelf plans pretty closely, but we did make some changes as we went...
First, we tweaked the guard rail design to make it removable by adding back vertical posts. This way, the front and back posts slide over the front rail and it no longer needs to be screwed in place. This is a nice tight grip for safety, but it’s much easier to make the bed by removing the guard rail and dealing with the mattress. If you do this, just make sure the back vertical posts are shorter than the front ones to make room for the cleats and slats on the inside of the rail! This also means the top of the rail is made with a 1x3 instead of the 1x2 in the instructions.
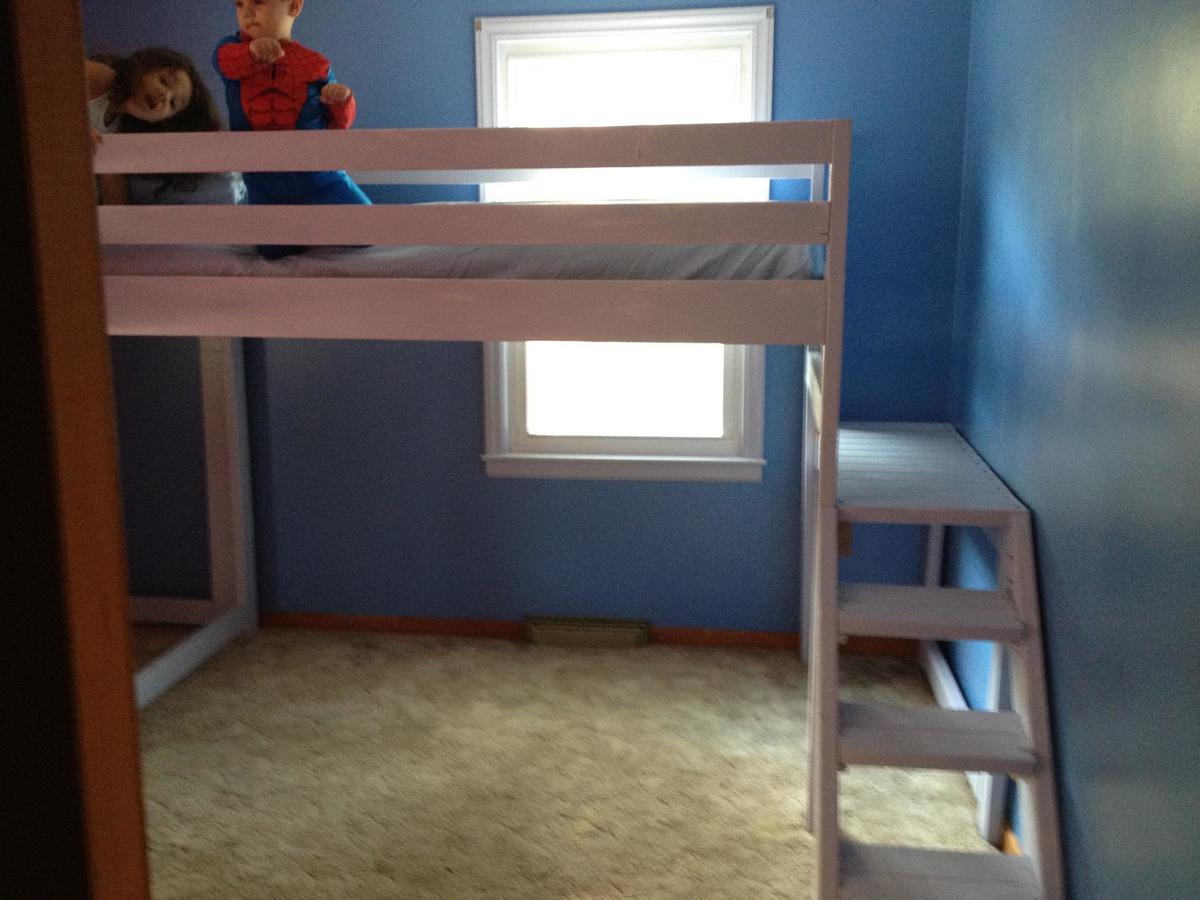
We also decided to use a vertical ladder design rather than an angled ladder. We did this for space considerations in the room; it’s a bit harder to get up the ladder, but not that much. This also helped avoid any weird angle cuts with my basic tools. We also made the ladder about 3” wider than the one called for in the plans.
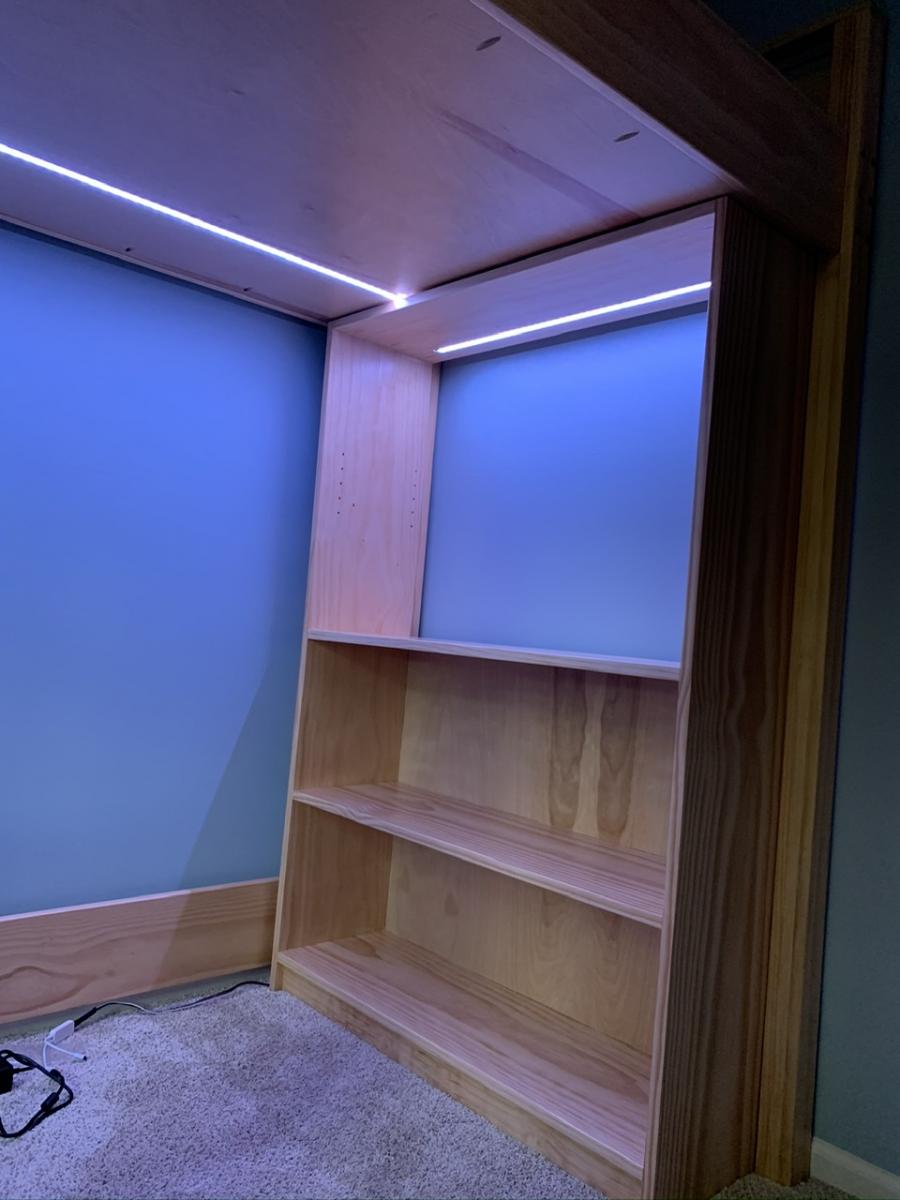
One of my favorite features was adding a 3/4” plywood “ceiling” above the desk. We did this by moving the long side cleats upward by 3/4” of an inch in the plans, and using pocket holes roughly every 10 inches around the perimeter of the plywood. We used this to hide the bottom of the mattress and all the bedding from view when sitting at the desk. It also provides for LED strip lighting above the desk, which is installed by routing out a pathway in the board and installing the lights within an aluminum channel for heat dissipation and to allow installation of a plastic diffuser over the lights. The wiring for the lights lives in the ~1.5” gap between the board and the slats thanks to the 1 x 2 cleats.
In the shelving, we made the upper shelf in the wide bookcase adjustable with the help of a Kreg shelf pin jig. We also ordered a 3/8” tempered glass shelf for this area to let more of the LED light strip we installed in the top of this shelf shine down as well. Again, this was installed in a routed-out pathway that holds an aluminum channel, and the wiring goes up through both the bookcase top and the plywood bed “ceiling” panel to join into the power. We got the strip lights, aluminum channel with diffusers, power supply, and controller from Amazon.
To get power to the LED lights, I routed out a channel for 5-conductor wire in the middle board of a rear leg assembly. Before gluing up the leg, I coated the wire with silicone spray to avoid the glue adhering to it so I could slide the wire around as needed. With a little bit of chiseling, this wire is able to come out of the slide-in joints for the upper and lower wide rails on the back of the bed. On the top, these wires go into a splitter and then to the two sets of LED light strips. On the bottom, the wires to into the LED controller which is mounted to a scrap board along with the power supply that stands on end in the 3/4” gap between the back side wall of the bookshelf and the bottom bed rail.
We created a custom-designed file drawer unit as the pedestal for the desk opposite the wide bookshelf. This was modeled roughly after Ikea Alex drawers with three narrow drawers and one file drawer. The carcass is about 14 1/2” wide by 21 3/4” deep by 29 1/4” tall and made of 3/4” plywood. The drawer boxes are approximately 12” wide by 20” long made of 1/2” plywood with 3/4” plywood fronts. We used full-extension soft-close drawer slides and positioned the cabinet so they have nearly full extension behind the ladder. Four wooden dowels are used on the top corners to align and secure this end of the desk surface.
Speaking of the desk, it is a piece of 3/4” plywood approximately 24” deep by 64” long. One end rests on the file drawer cabinet, and the other end is flush with the middle shelf of the bookcase and attached using two 6” by 5” 14-gauge galvanized T-straps usually used in framing applications. These are screwed upwards into the bottom of the desk and shelf from below, and are holding up quite well. This avoids the need for desk legs by the bookshelf.
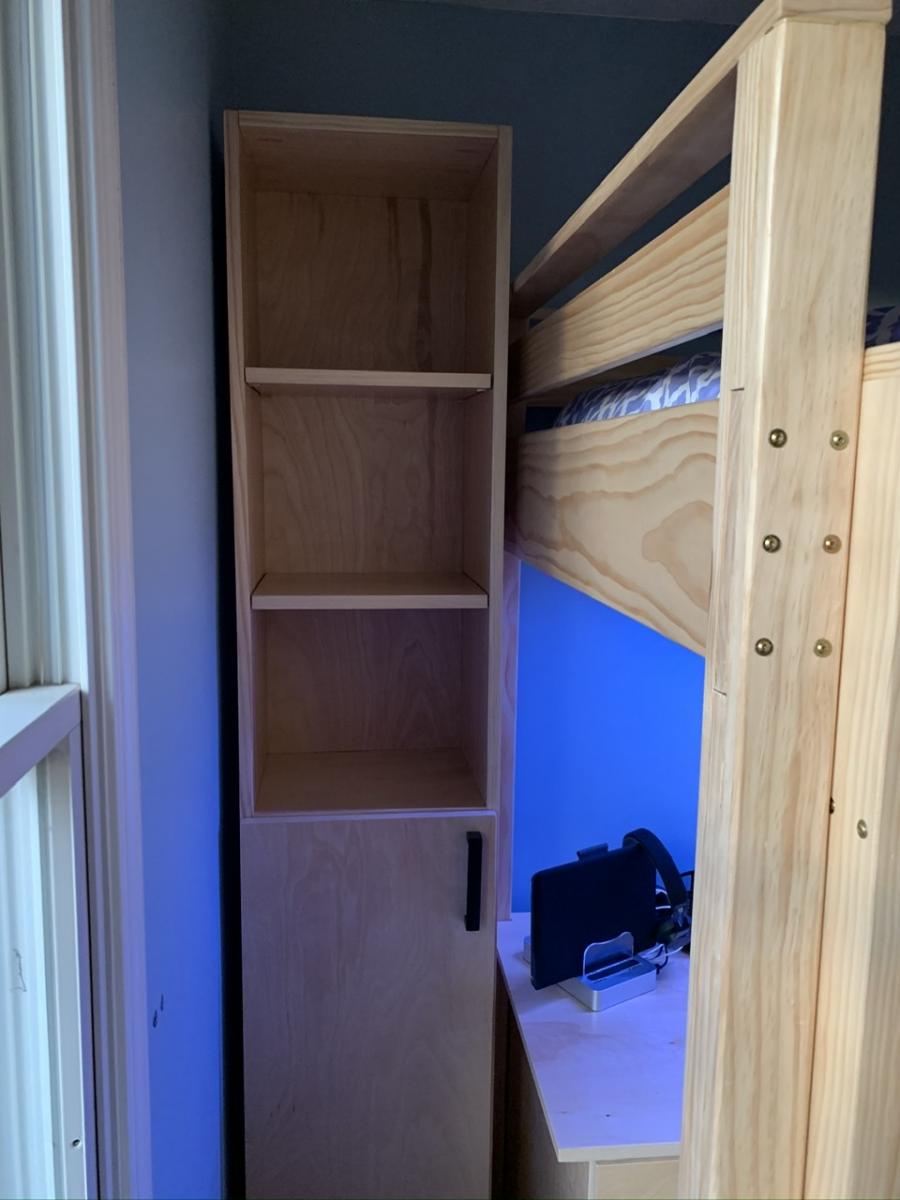
We then adapted the techniques used for the wide bookshelf to build a narrow bookcase (79” tall, 14 1/2” wide) out of two more 10-foot long 1x12 boards. This bookcase sits between the end of the bed and the corner of the room to finish out the look and provide more storage. The top, middle, and bottom shelves are fixed and there are a total of four adjustable shelves (two in the top half, two in the bottom half). We also cut a door and installed it using a pair of full-overlay euro hinges. With these dimensions, the tall bookcase is also capable of working with 11” x 11” x 11” storage cubes just like the wide bookshelf.
The finishing touch was to create a shelf that attaches to the guard rail and provides a place for my daughter’s alarm clock to sit and be within easy reach. This shelf is made around a piece of the scrap 3/4” plywood that is approximately 21” long and 9” deep. I used leftover 1x3 pine that I glued and nailed to the outside perimeter of the plywood flush with the bottom to hide the layers in the plywood while providing walls around the shelf. I also glued and screwed another 1x3 piece to the front of the plywood, this time flush with the top, as the first piece of a U-shaped grip to slide over the top of the guard rail. Another 1x3 scrap was then positioned, glued, and brad nailed to this front piece to finish the grip. I then cut a triangular piece of wood from a 1x6 to provide additional support under the shelf against one of the vertical pieces of the guard rail. This piece is held in place with counter-sunk screws that go through the top of the plywood shelf down into E-Z Lok threaded inserts in the top of the triangular wood support. The whole shelf assembly is only attached to the guard rail so that I can still easily remove the rail to change bedding on the mattress.
The whole project is constructed out of Home Depot select pine boards and birch plywood. Throughout construction, I used a 3/16” round-over bit in a router to eliminate sharp corners pretty much everywhere on the bed itself (legs, rails, ladder, etc.). I didn’t use this on the bookshelves, the file drawers, or the desk. Edge banding was used to hide any exposed plywood edges. I used 200-grit sanding discs and an orbital sander to sand the various pieces during construction and before finishing. The entire thing is finished with two or three coats of Minwax Polycrylic water-based polyurethane, sanding between coats, which gives this a nice smooth finish and lets the richness of the wood grain come through.
Hopefully the pictures I’ve posted can help understand the write-up on modifications to the project. I enjoyed building this a lot, and my daughter really loves what this did to her room to make it much more usable! That was worth all the effort and time right there.
Ana, thanks a million for the plans!!


No more IKEA for me!
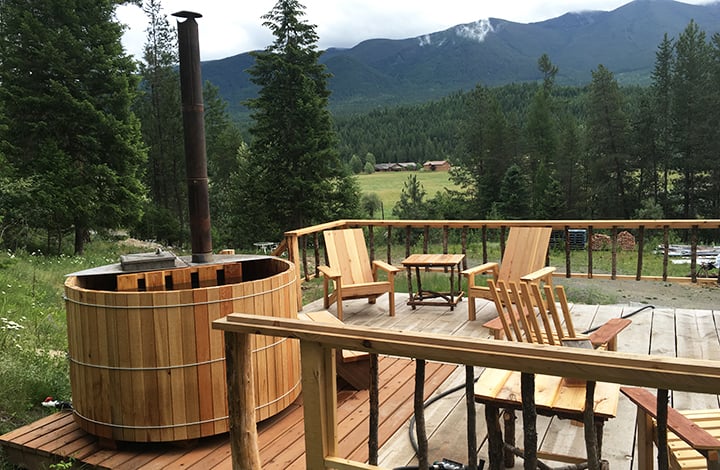
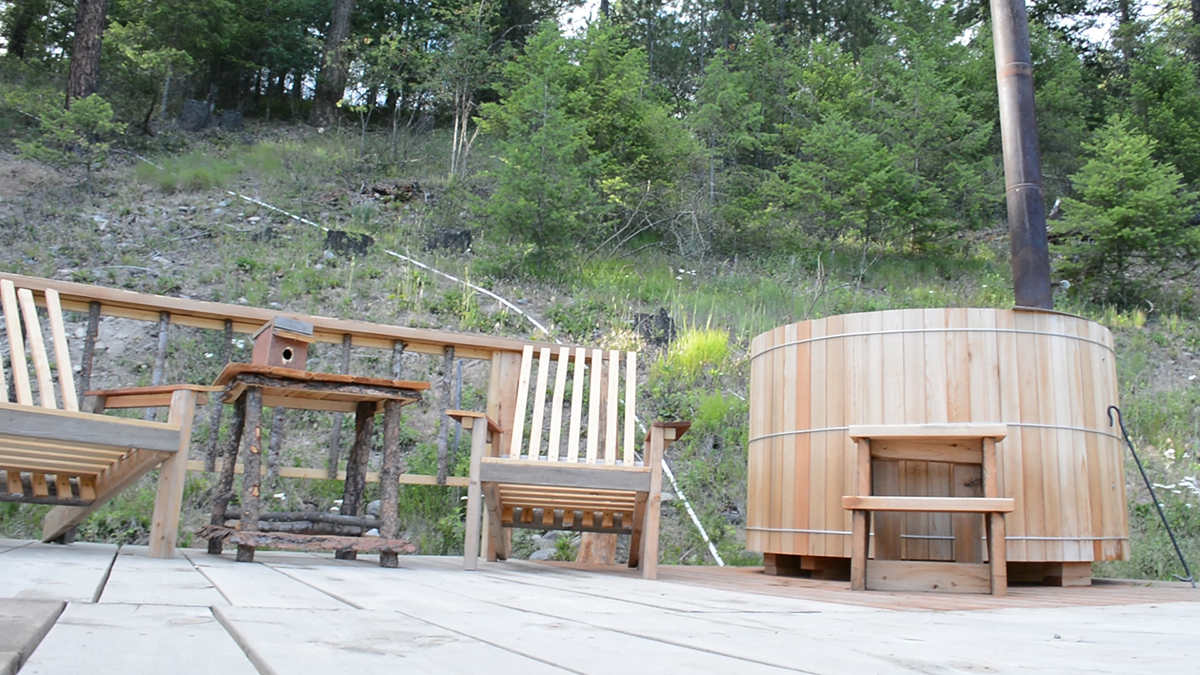
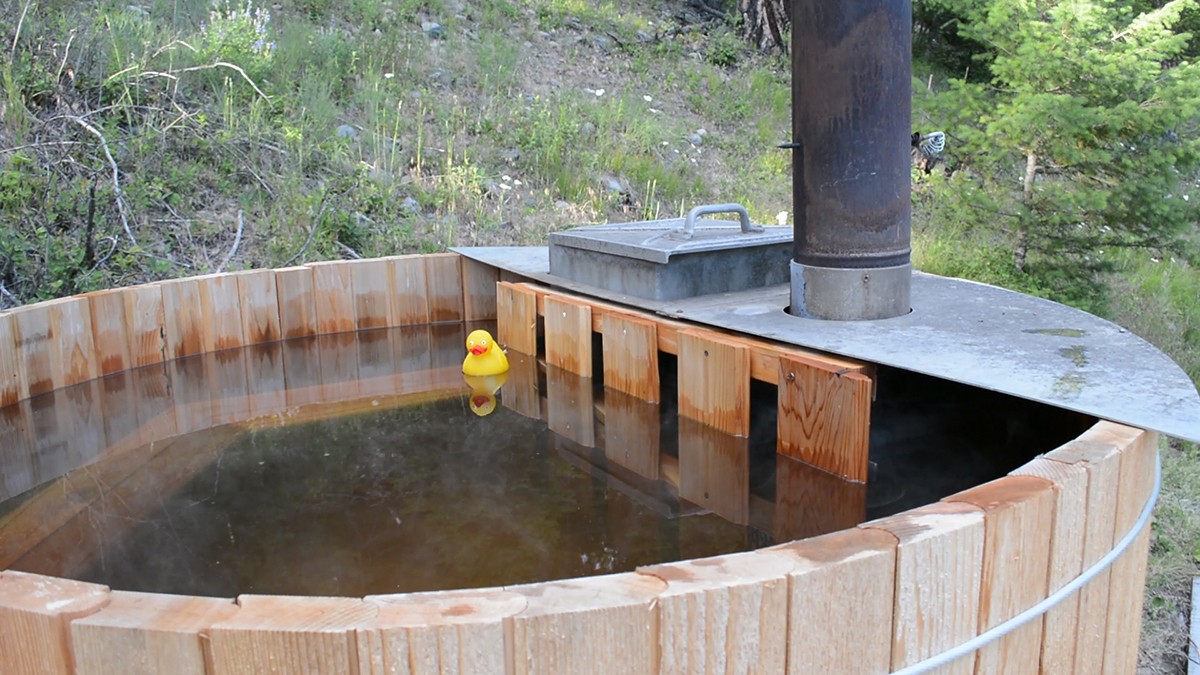
We are developing a completely off-grid property and before starting on construction of the house, we decided to start with a smaller project to get our feet wet (no pun intended!). We also wanted a place to soak our sore muscles while we build a house since we are restricted to taking 60-second hot showers, and so we came up with the idea of a wood-fired cedar hot tub.
Buying a cedar hot tub retail can cost anywhere from $3,000 to $7,000, but we were curious to see what we could build our own for and it turns out, we spent $850. Since there were no existing plans on the internet that we cound find for such a project, we decided to document the entire process and make our own! We struggled a bit with the build, but on our blog we documented what worked to save other people time who want to build something similar. In our post here, you will find a 9-part video series on how we put the hot tub together. Enjoy!
Sat, 06/18/2016 - 11:23
Looks like your hard work paid off and it's beautiful to boot!
The bed is a mixutre of the loft bed plan and the farmhouse loft bed plan with some modifications of my own thrown in. I liked the headboard look of the farmhouse loft bed and incorporated it into the plan. I also made the side rails out of 1x10's to make it more beefy looking and I think it works better. The supports for the mattress are made out of 3/4" bookshelves, cut down to fit as it added more support than 1/2's. The desk is based off the loft bed desk plan, but I made the top piece out of 3/4" MDF. I think it makes a nicer look. I added 1x2's to the face of the bookcases and desk top to finish it off and make everything look more finished.
I also added a programmable, remote controlled, RBG LED lighting system under the bed. My daughter can go from dance party to mood lighting depending on the situation. This bed will deliver.
I also modeled everything in 3D CAD using Solid Edge. This was a very helpful tool to get all the measurements correct as well as incorporating 3 different deisigns blended with my own.

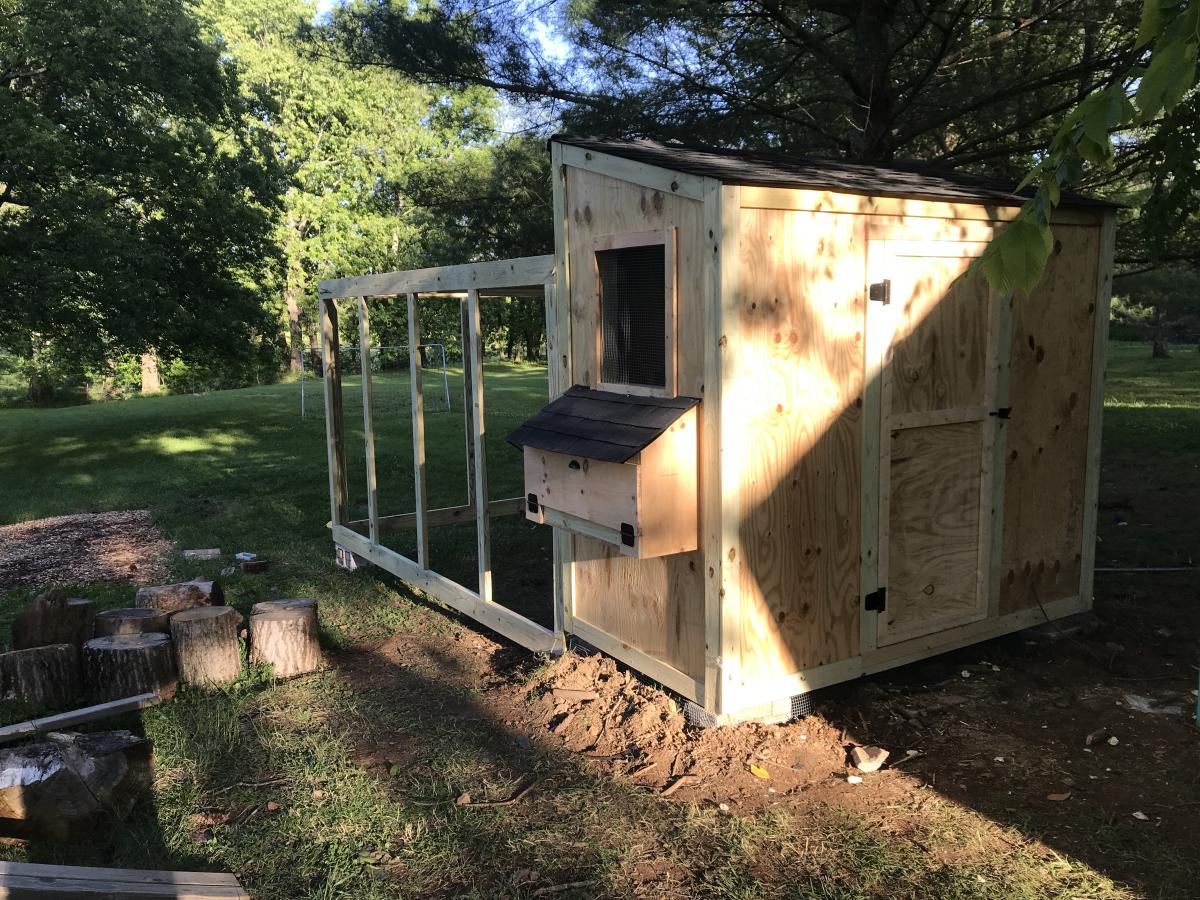
I had such a fun time on this shed coop/run build! My wife and I have 5 children and it was fun involving them in building everything about this coop and run. They have a wonderful sense of accomplishment in looking at what they helped build.
A few notes, while this what a fairly straightforward build, there are a lot of little intricacies to be aware of. Such as:
• Make sure your chicken coop is about a foot off the ground. It's best to do that so critters such as rats and snakes don't make their home under the shed and potentially eat their way through the floor.
• It is highly advisable to dig a trench about a foot to a foot and a half deep around the coop and the run and attach chicken cage fencing from the bottom of the coop/run into the trench, and then taper the cage fencing outward. This will prohibit critters such as raccoons from trying to dig under the coop.
• When you attach the poultry netting to the outside of the chicken run, staple one side really well, then move to the other side and pull the netting fairly hard to make the netting as tight as possible. (Also, be careful when putting the netting across the top of the run to not fall off the ladder as I did and dangle there until one of your kids comes to help you! Ha! :D )
Thank you, Ana, for posting these plans! We are so excited to get our little chickies out into their new home as soon as their feathers come in!
Added some extra trim pieces to finish it out. turned out really nice!!
Mon, 05/18/2020 - 17:25
These look great! Did you use the cedar tone water proofing?
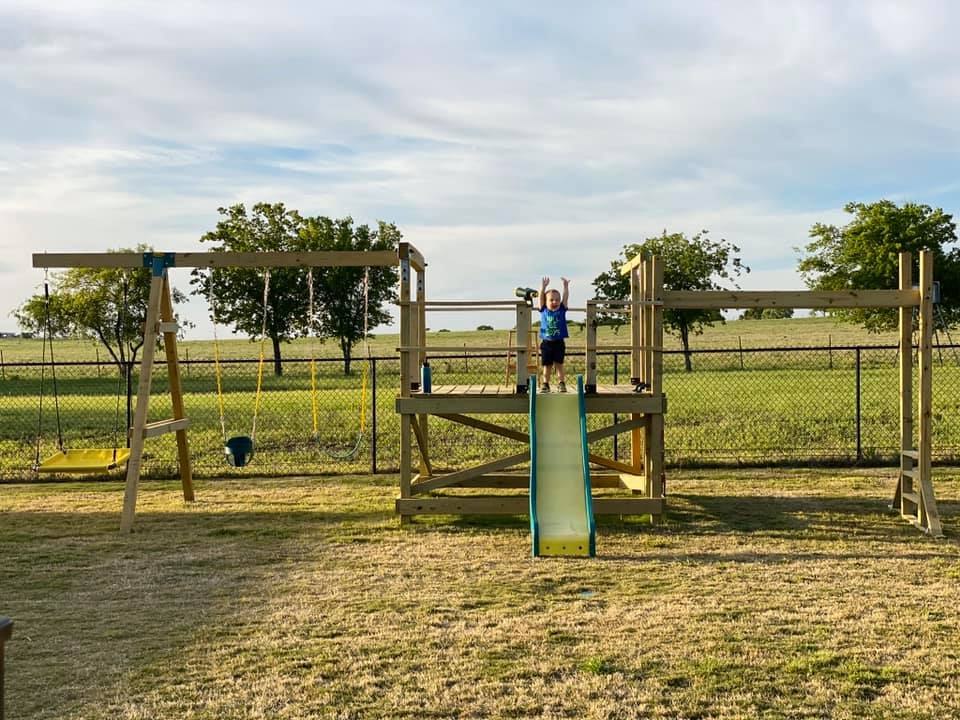
We are used to seeing our grandson every weekend but during the 2020 COVID quarantine we were unable to do so. Instead, we filled our time building him a swing set for our backyard. He loved it!! We are going to add more to the swing side but the hardware I want isn't available right now (apparently there is a lot of swing set building going on during this time). I look forward to many years of playing on this with our grandson and hopefully additional grandkids in the future... Our cost was pretty high mainly because our first round of lumber came from a local lumberyard that was willing to deliver within a few days (big box was going to take several weeks) and they had what is supposed to be higher end lumber (not sure I am convinced of that)....also, i chose some pretty expensive hardware (brackets) just for the added security.....


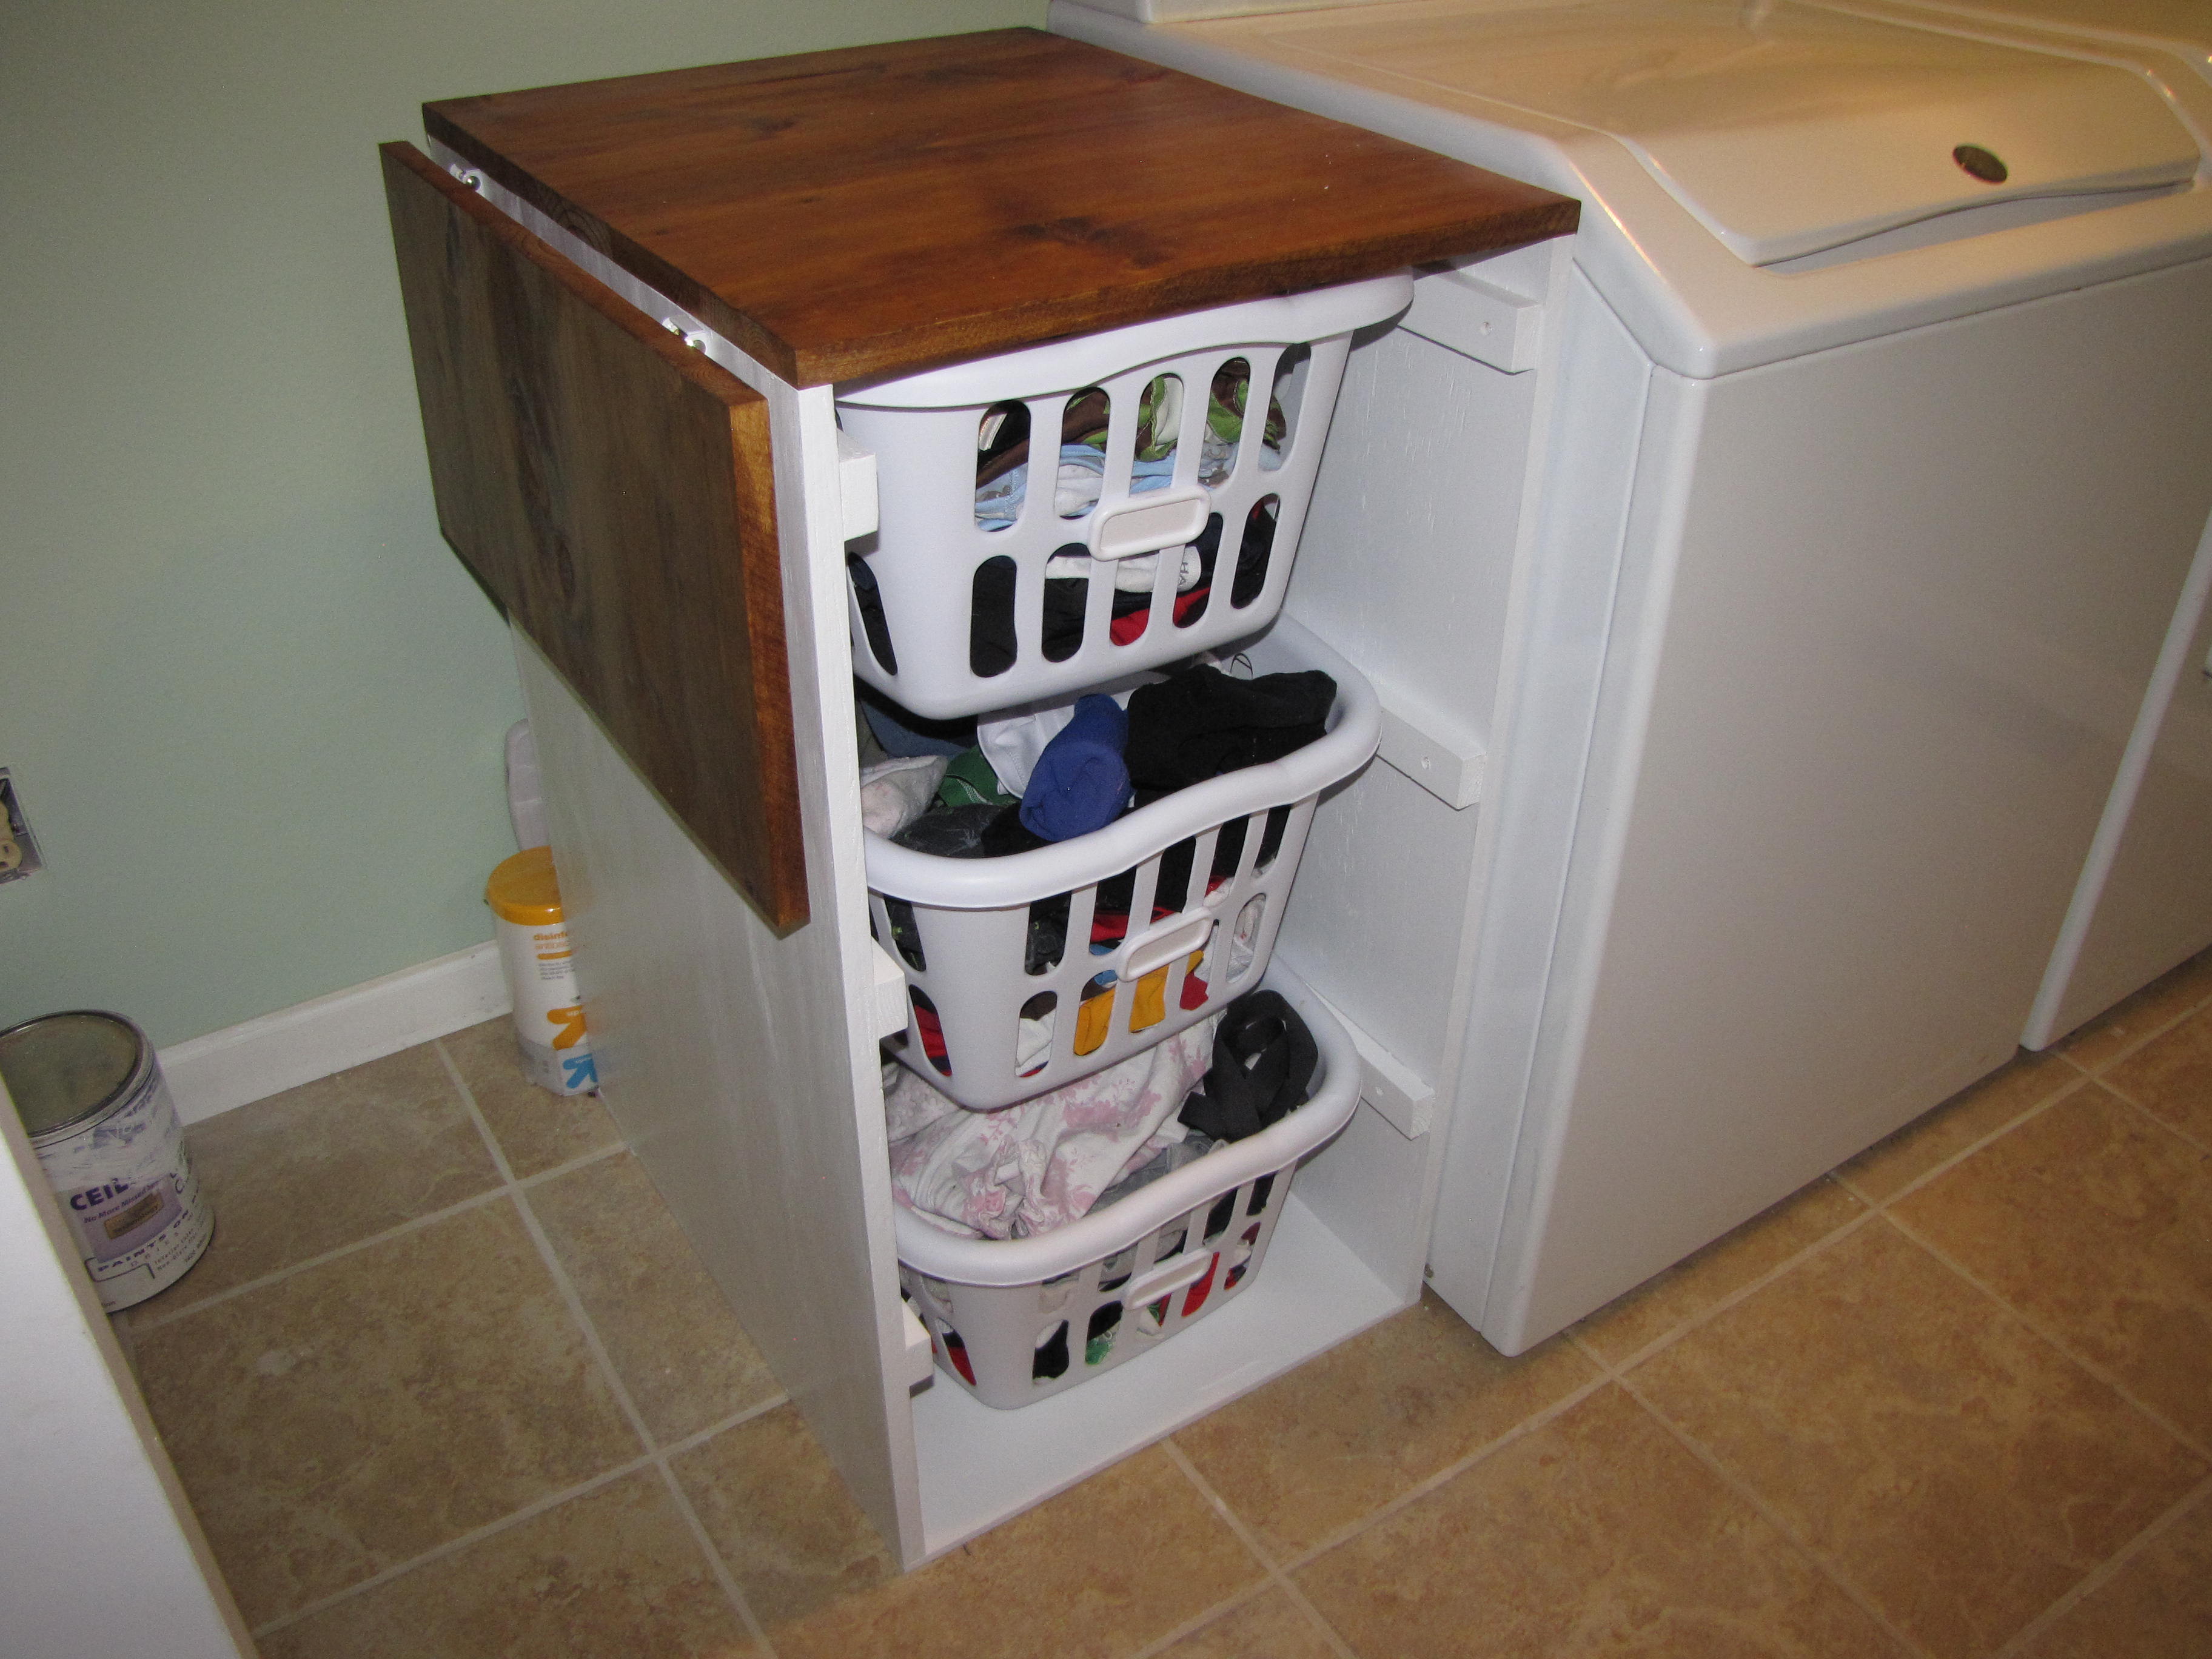
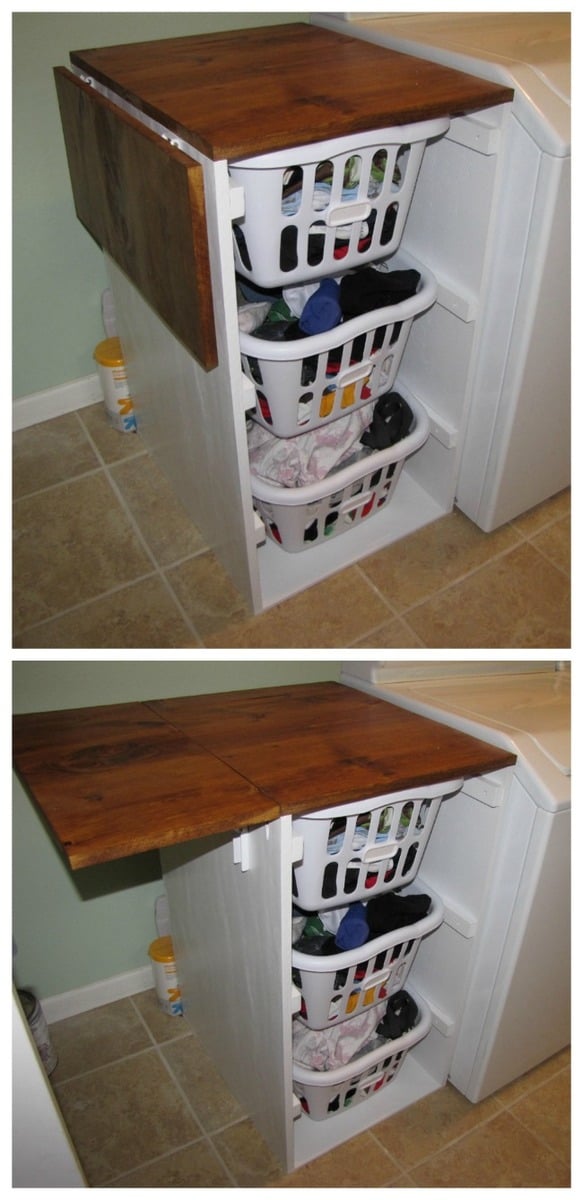
To finish my laundry room off I decided to build laundry cabinets - this laundry basket dresser is perfect! I used 8in. fold down shelf brackets (like the ones in Lady Goats Miter Saw cart). I also cut corners on the back since I was out of plywood after building my laundry cabinets. I used 3 1 X3s to support the back. I used a pine project board for the top which is only 24in deep so I did adjust the plan for that and the baskets still fit!

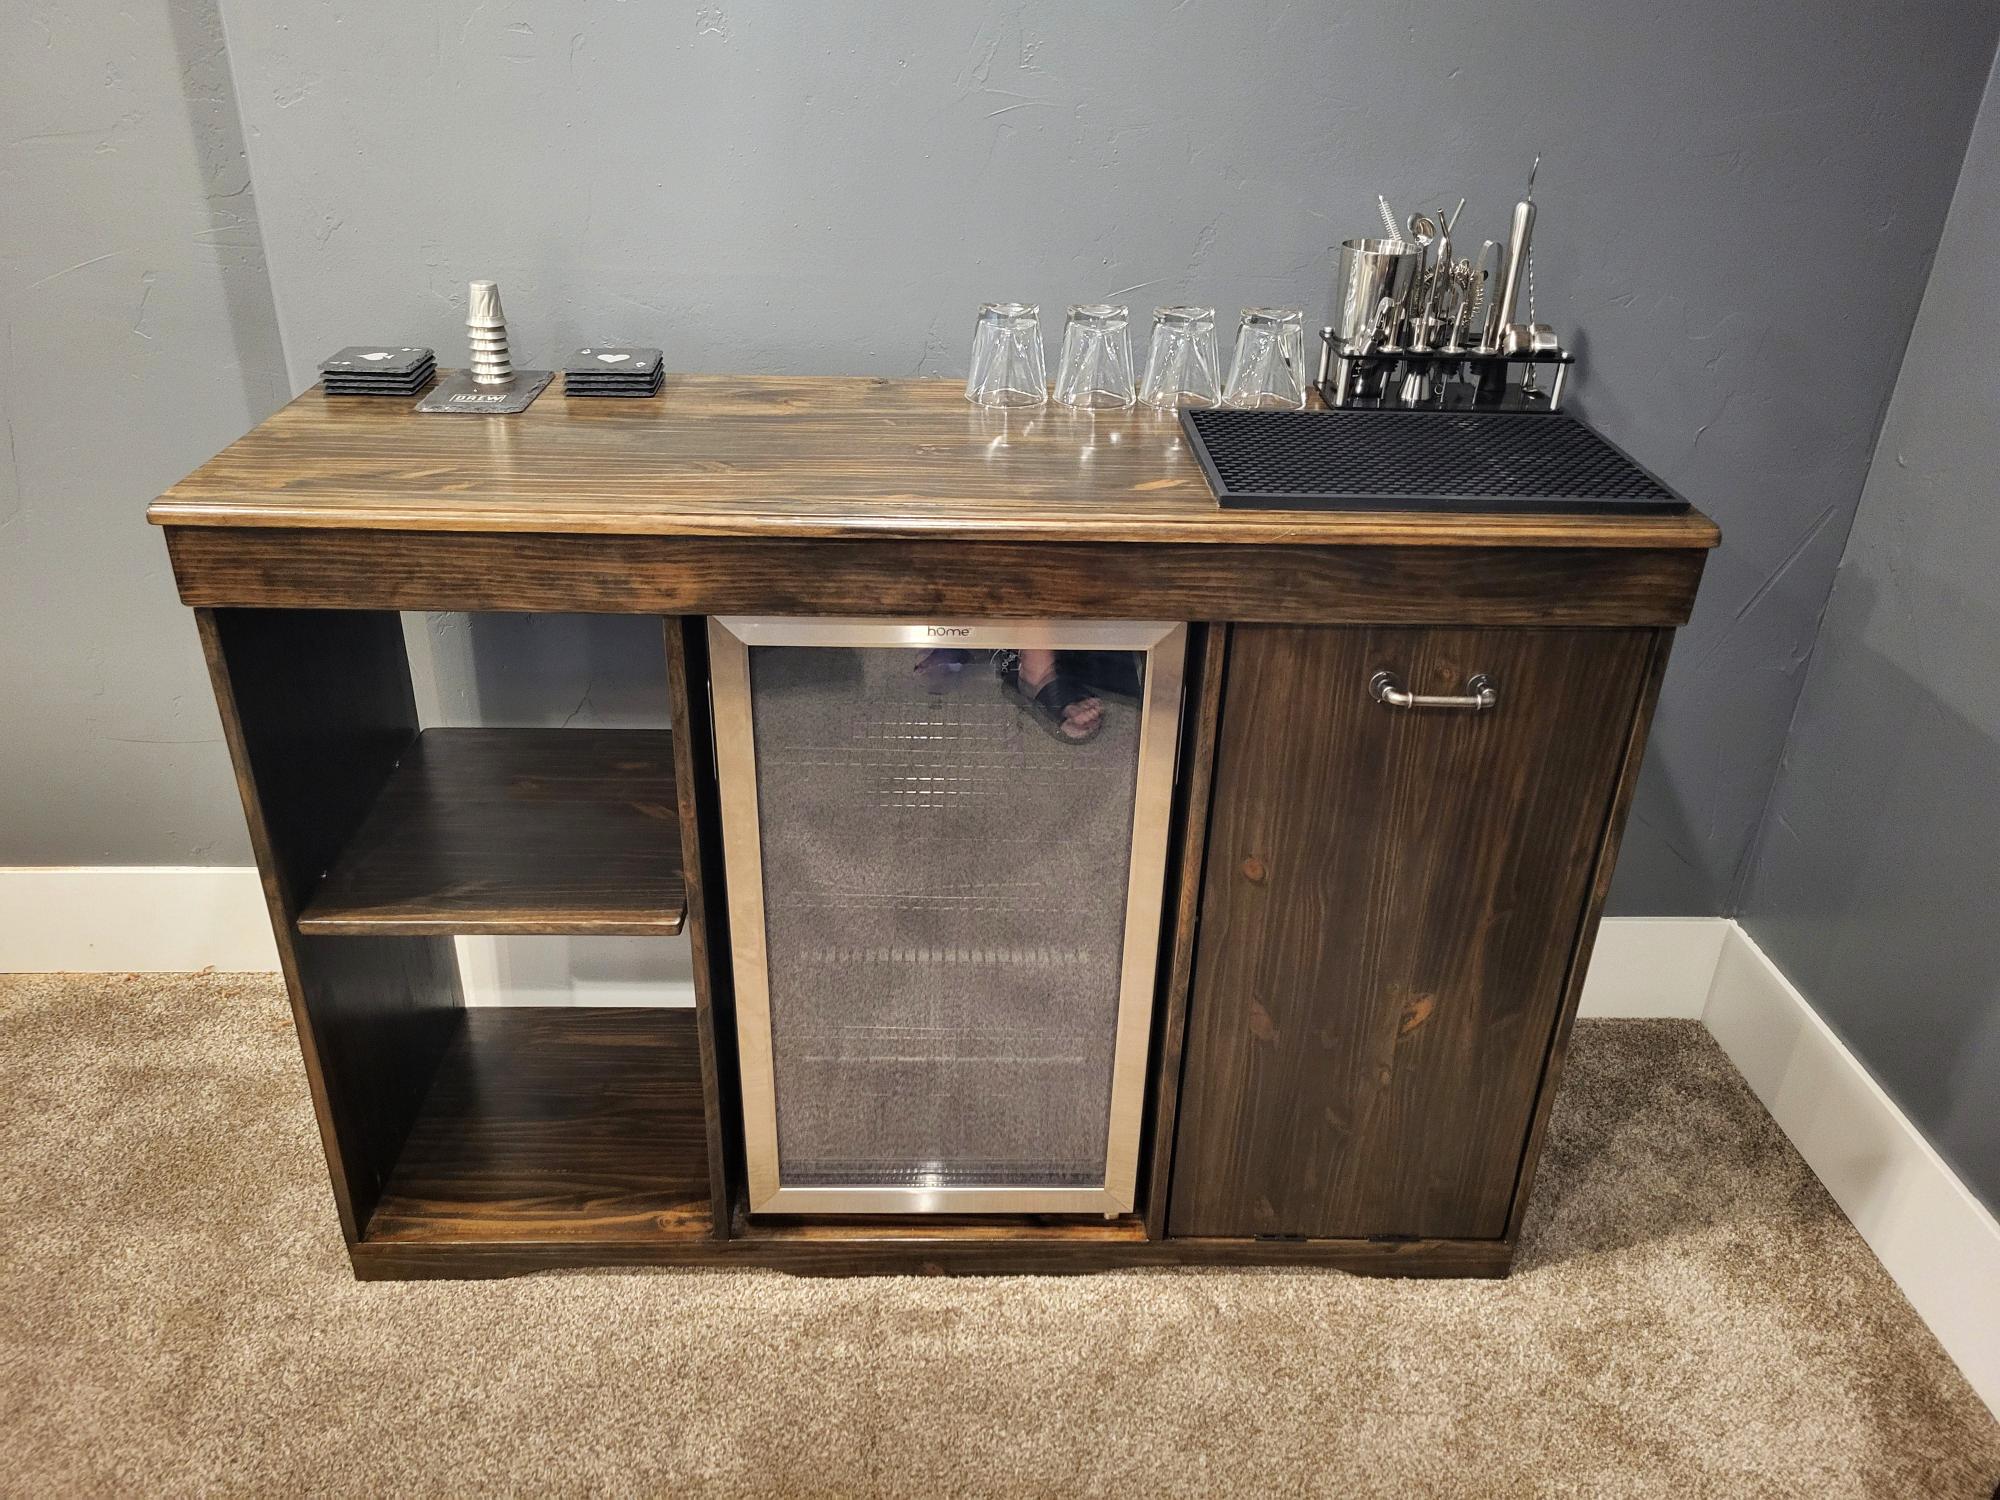
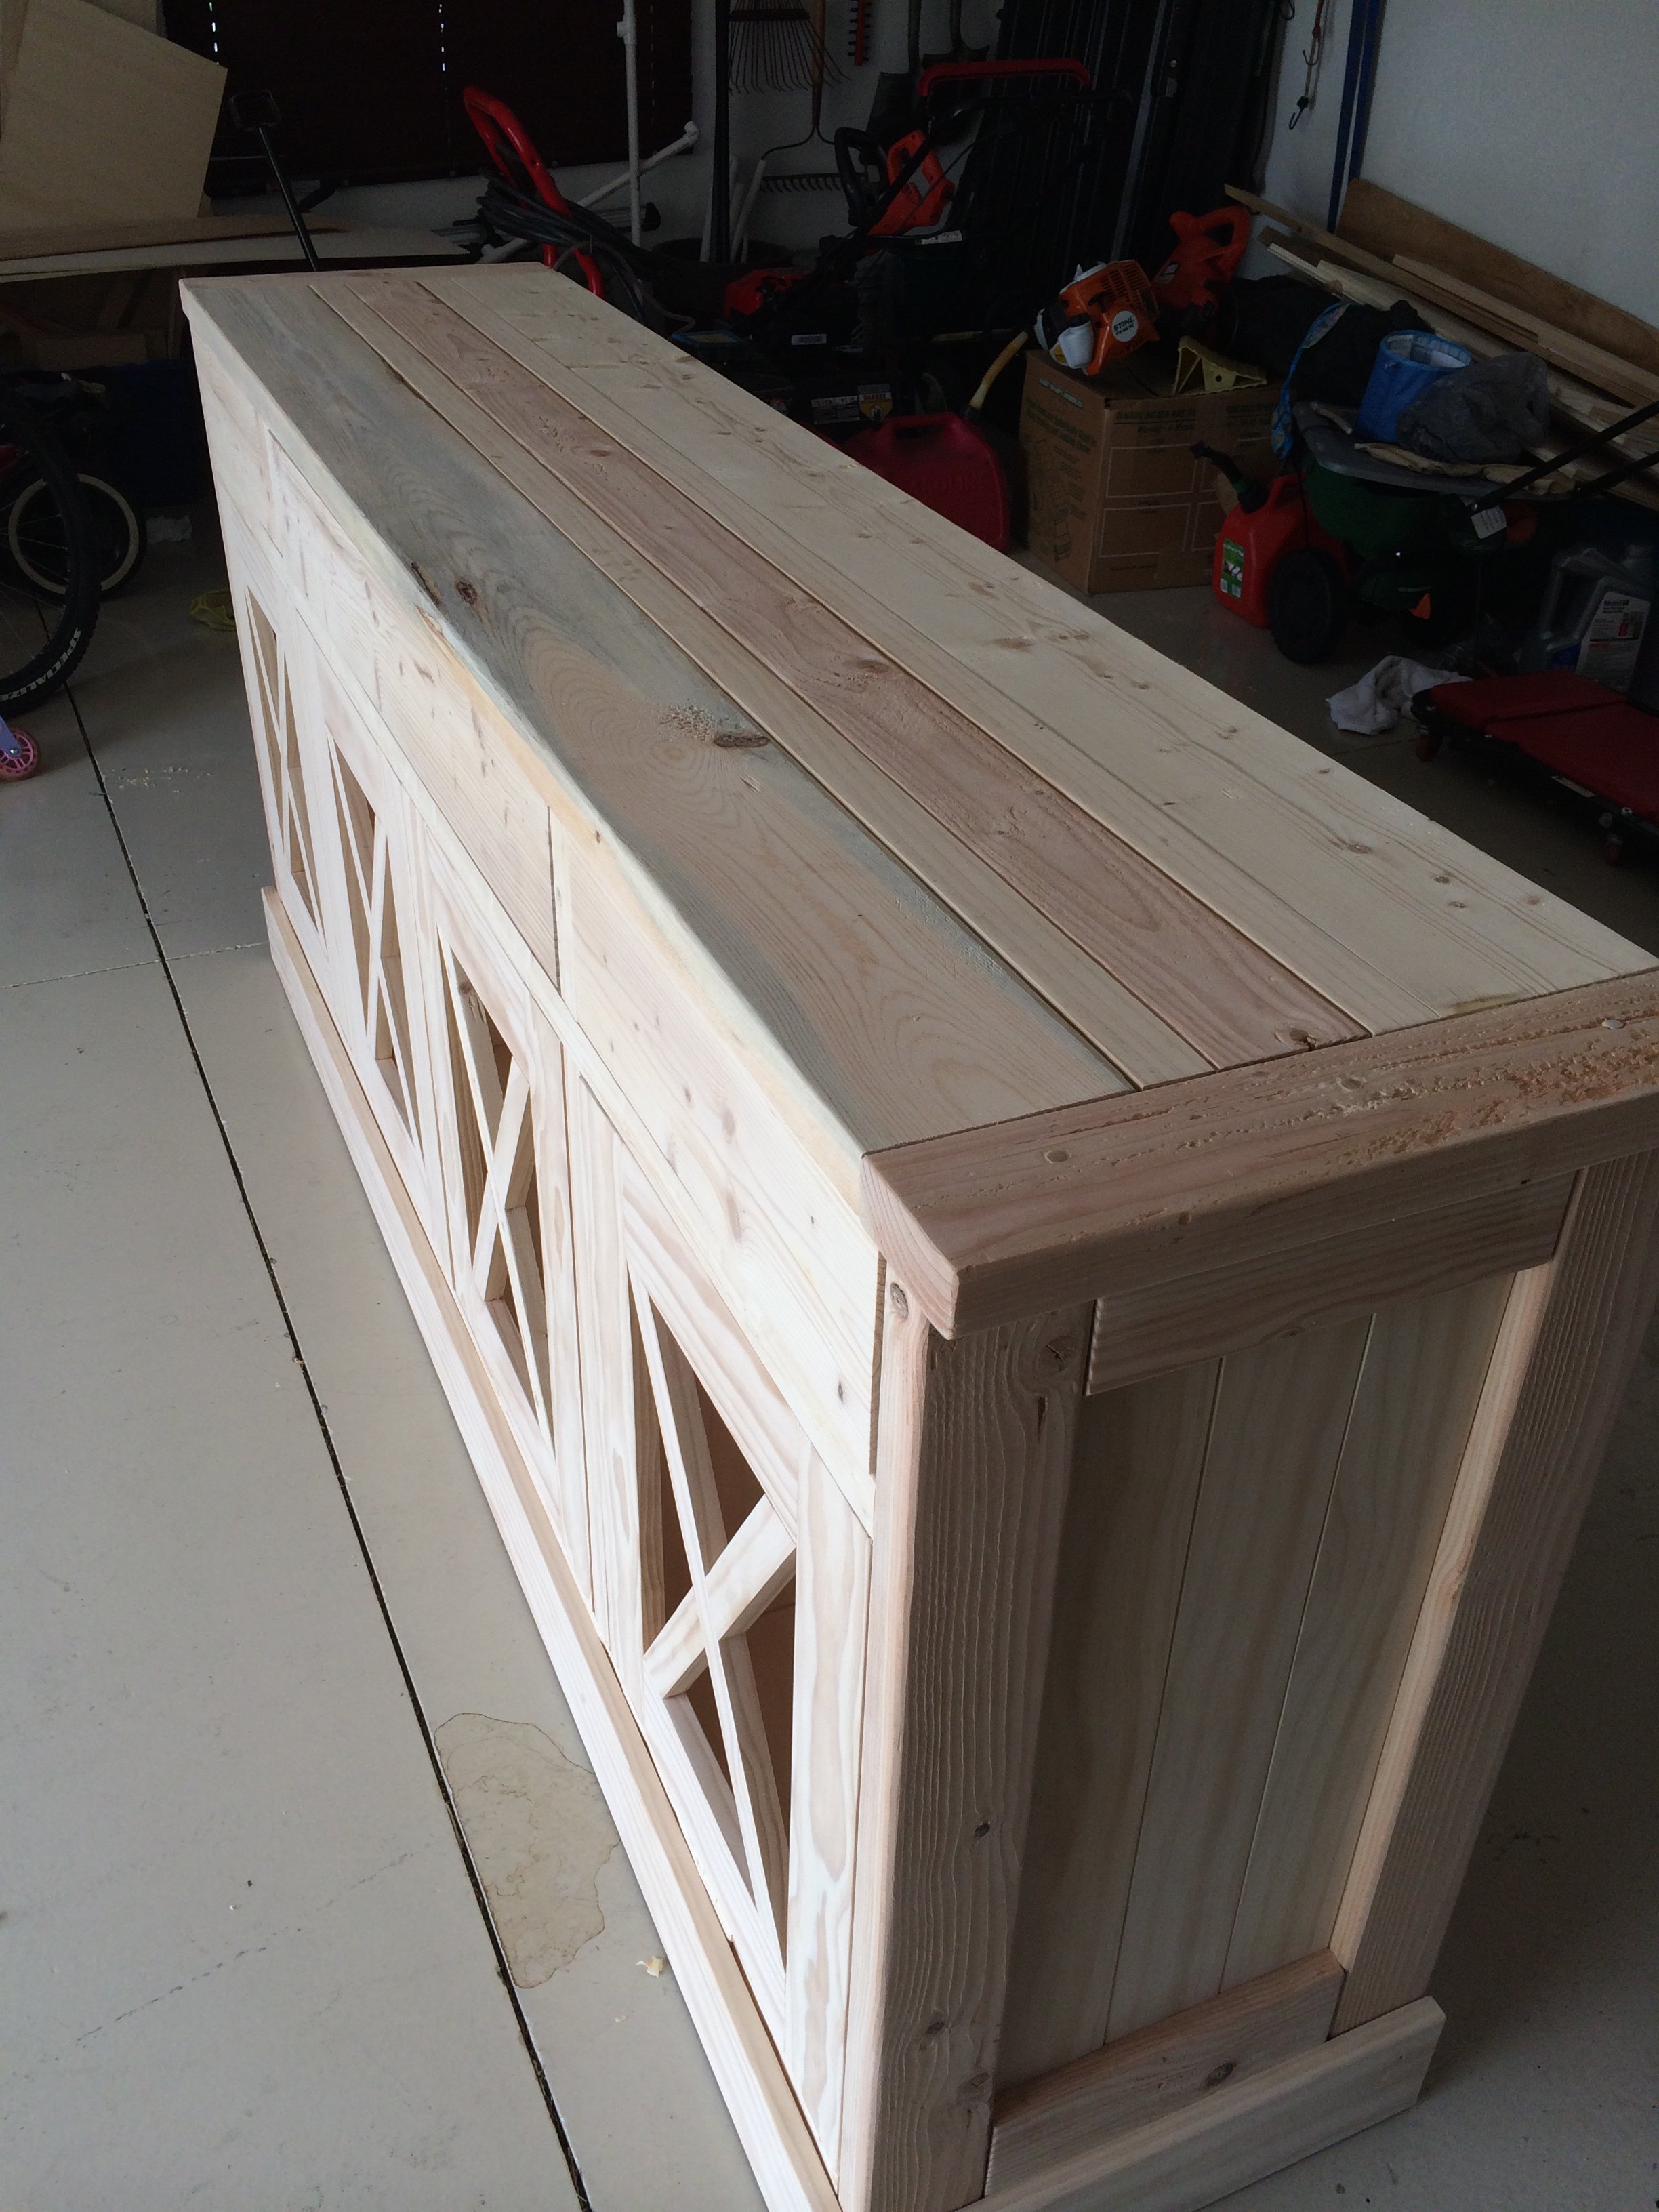
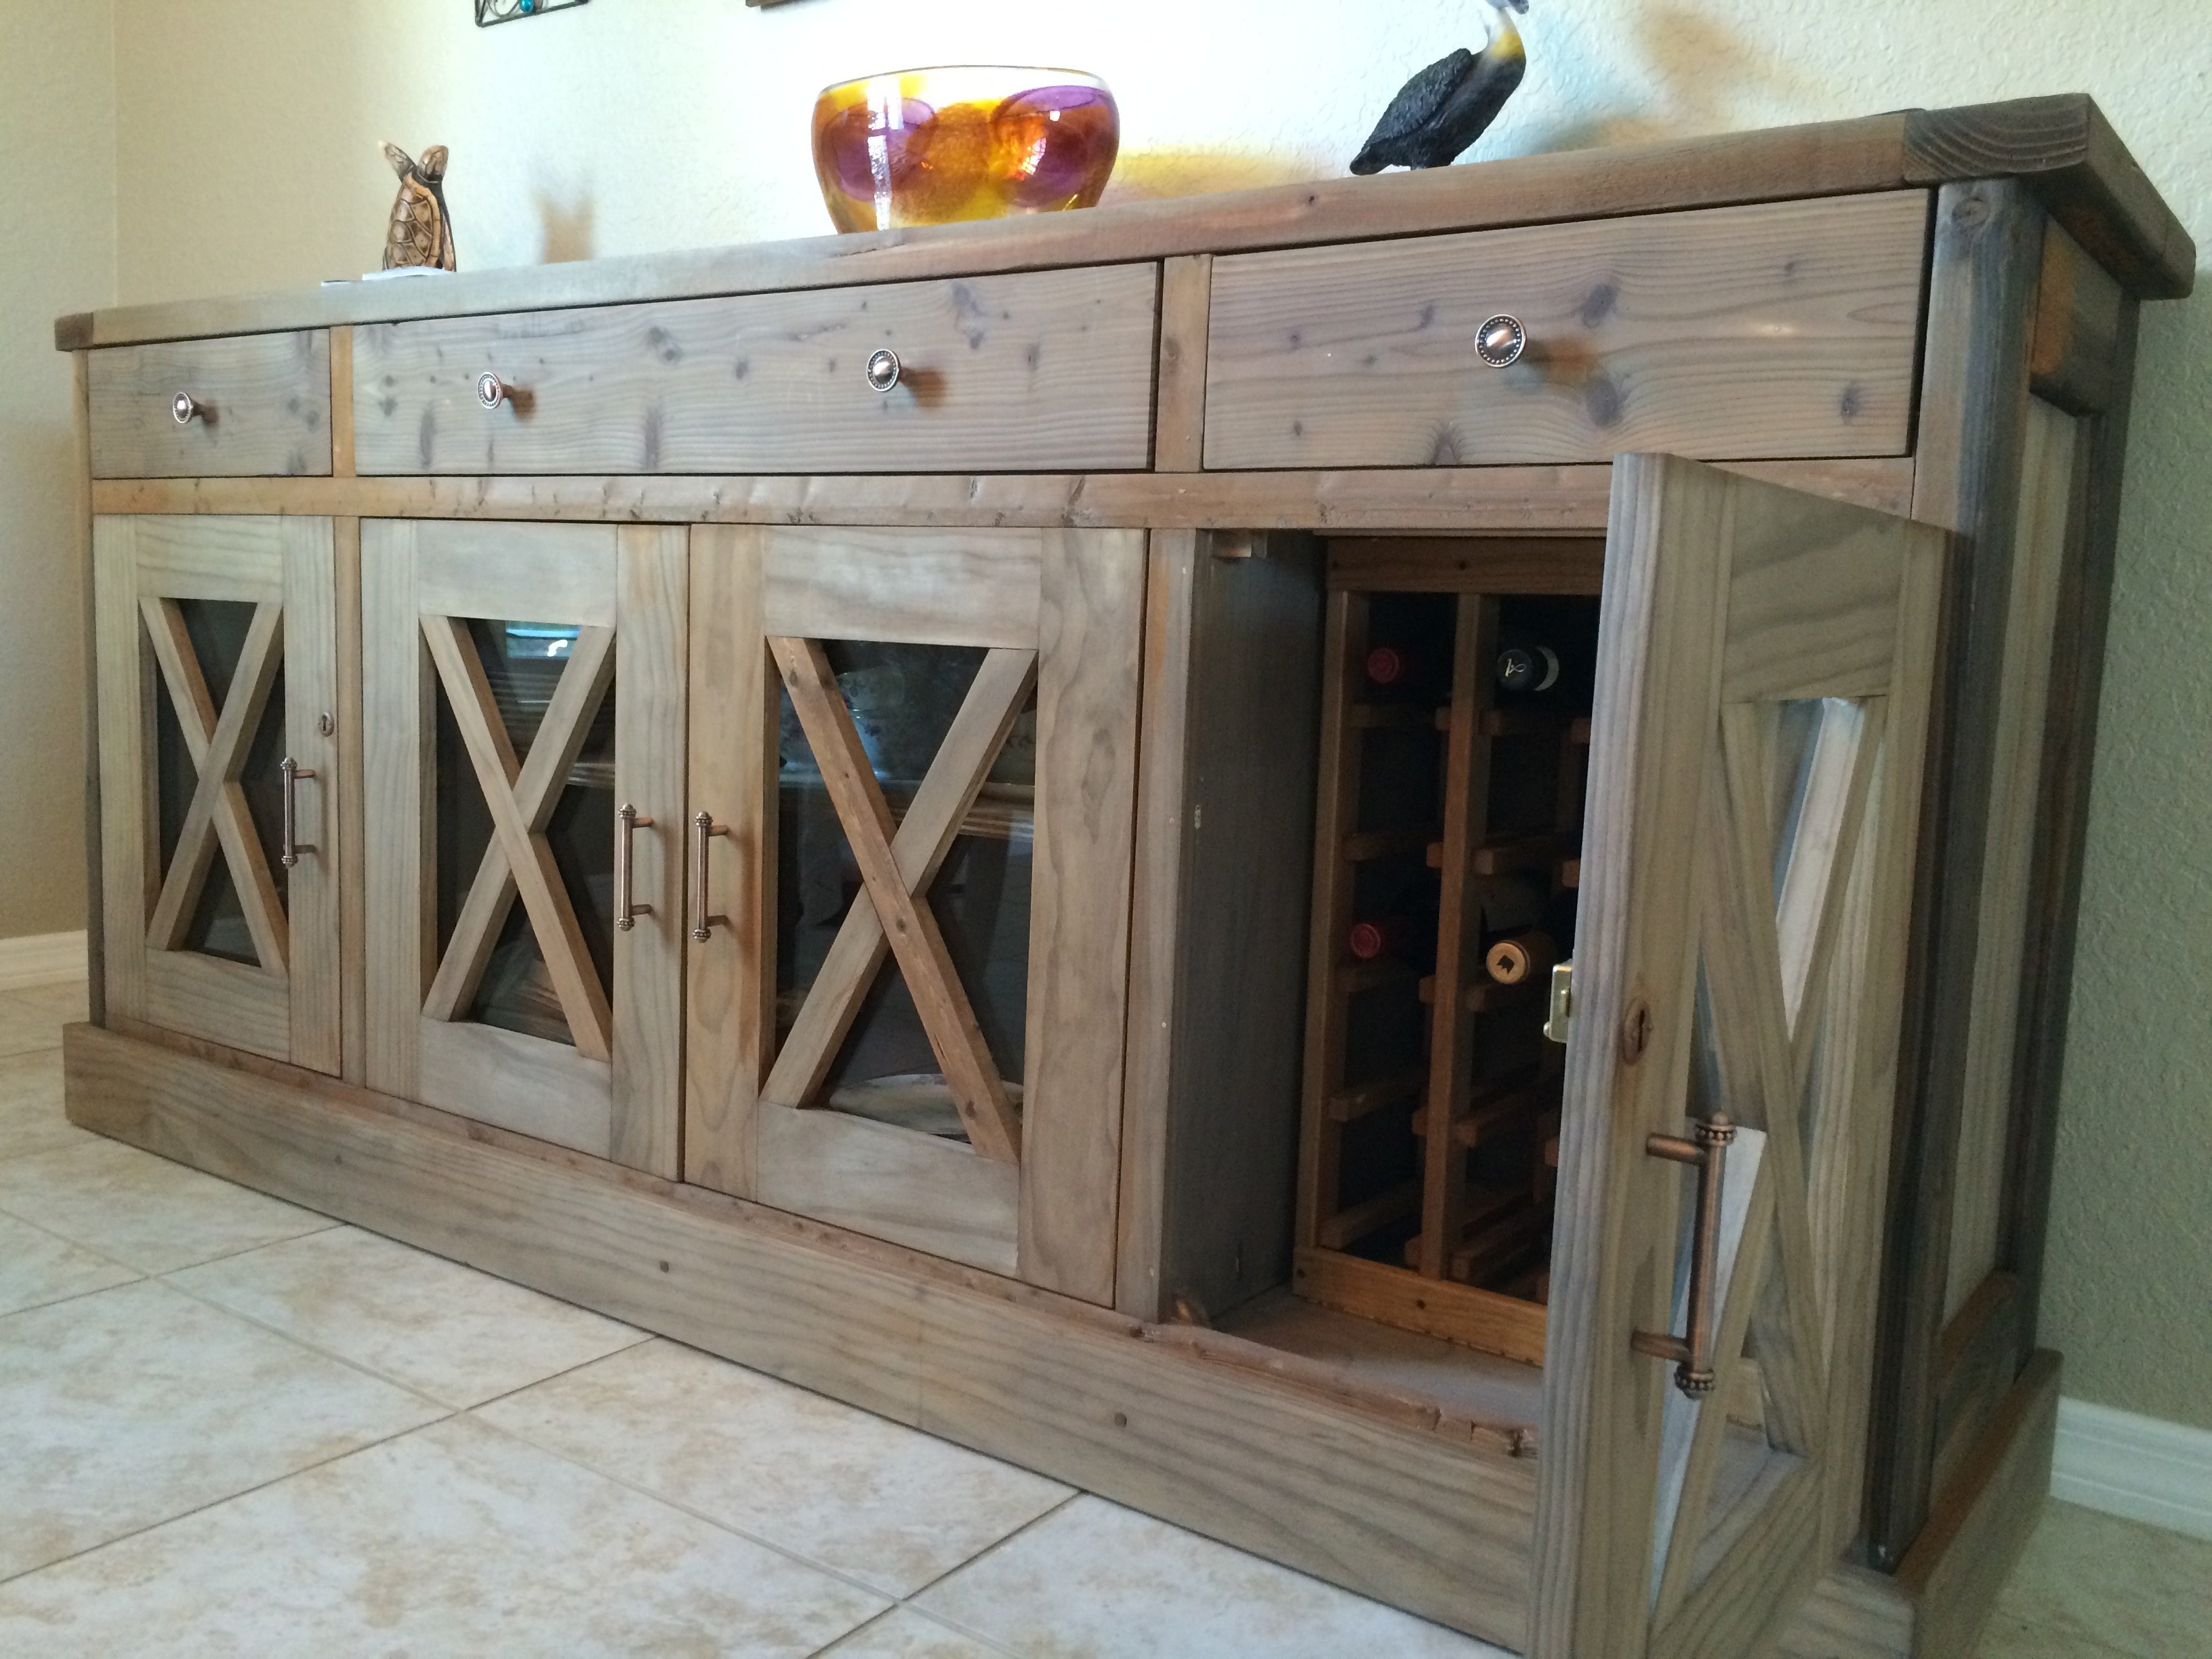
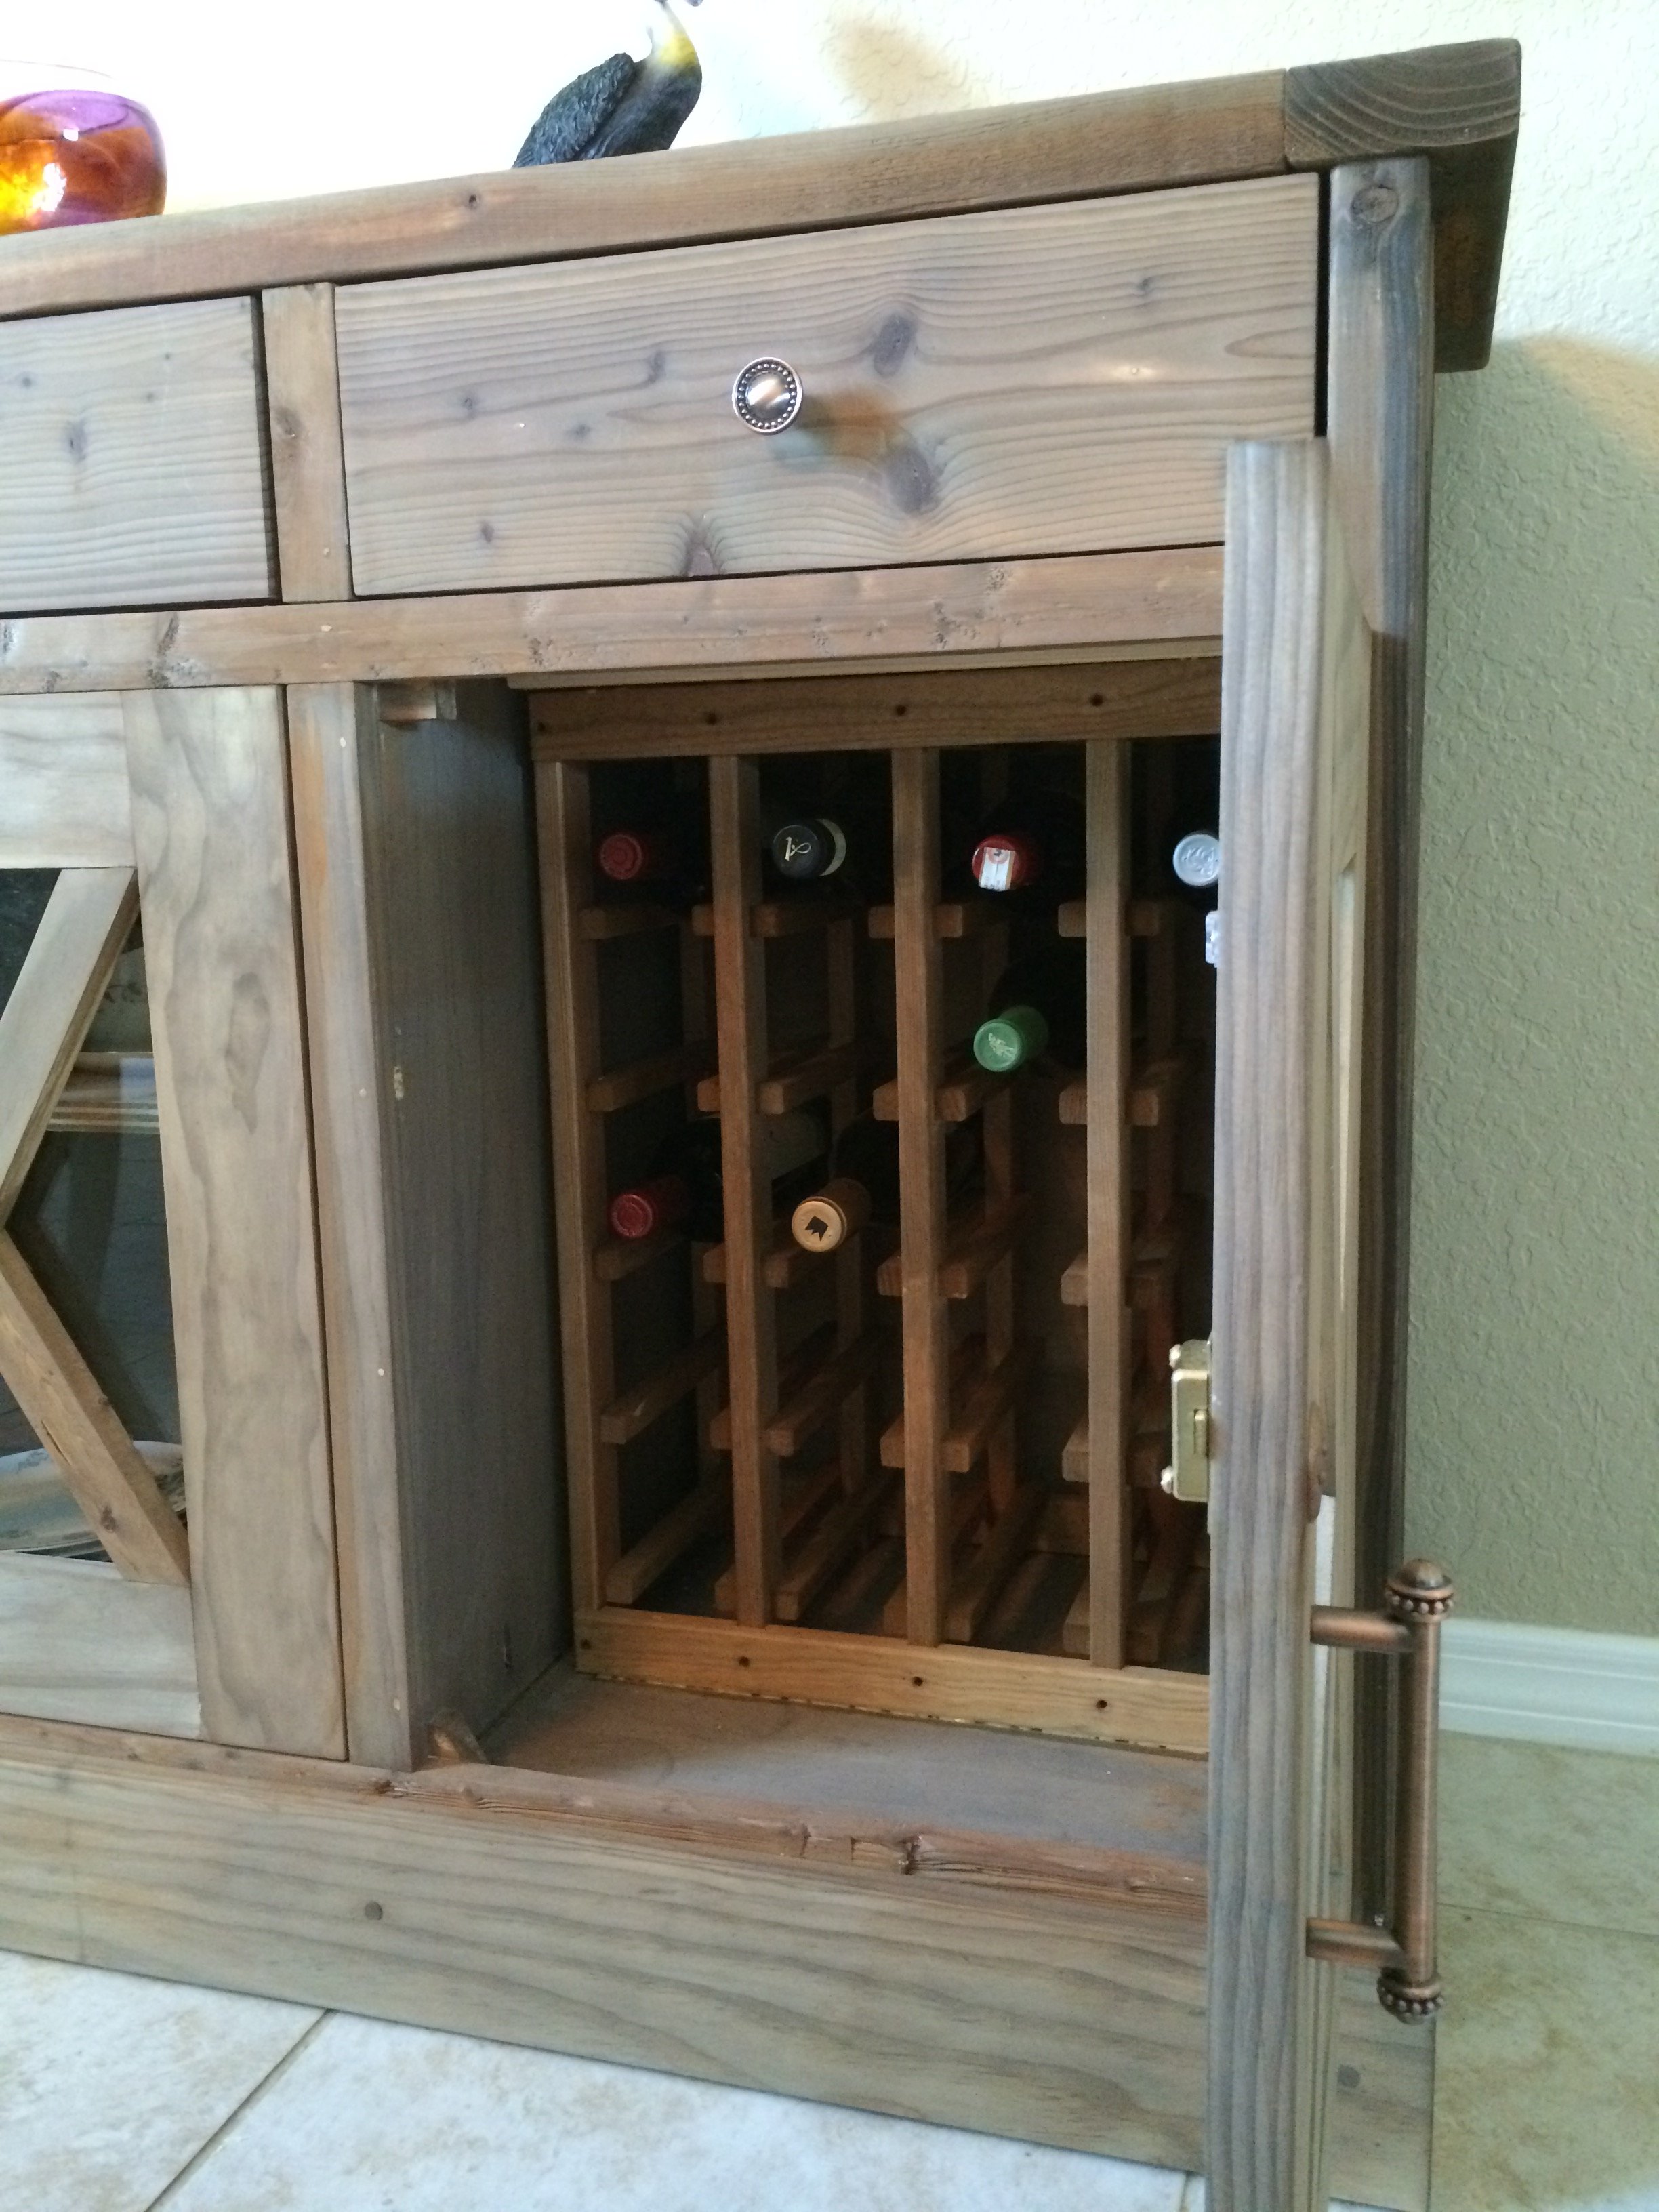
Waste tilt out, wine fridge, and storage shelf.
Drewsmith1549
Found this on Pinterest and FELL IN LOVE! I have 2 kids that are inseperable, ages 3 & 4, a boy & a girl. I had been toying with ideas for them about bunk beds or maybe some PVC forts. But when I found this, it was like everything in one. Let me also start off by saying, although I am artistic I have never used a single tool or built ANYTHING in my life. EVER.
The beds were surprisingly easy to build and are incredibly sturdy & strong. I followed the plan exactly except for the platforms. I made my daughter's huge. (The plan calls for 22", I made hers 50") My son's I made smaller b/c that wall is shorter & there wasn't enough space. So his is only 16" but it's still plenty of room to climb up & get into bed. They use her platform as a stage to perform on or a small play area.
I'm going to glue down padding to cover both platforms and all the stairs b/c my kids are small but rough & tumble and I can already see the hospital bills. But the bed is EXCELLENT! Surprised to see no one else has posted a brag for it!
Make this immediately! The priming, painting & building for each only took one day. ONE DAY! I painted the room, the trim, and made both beds over the holiday weekend (Labor Day, Friday-Monday). My kids are now the envy of every child (and adult) that we know LOL!
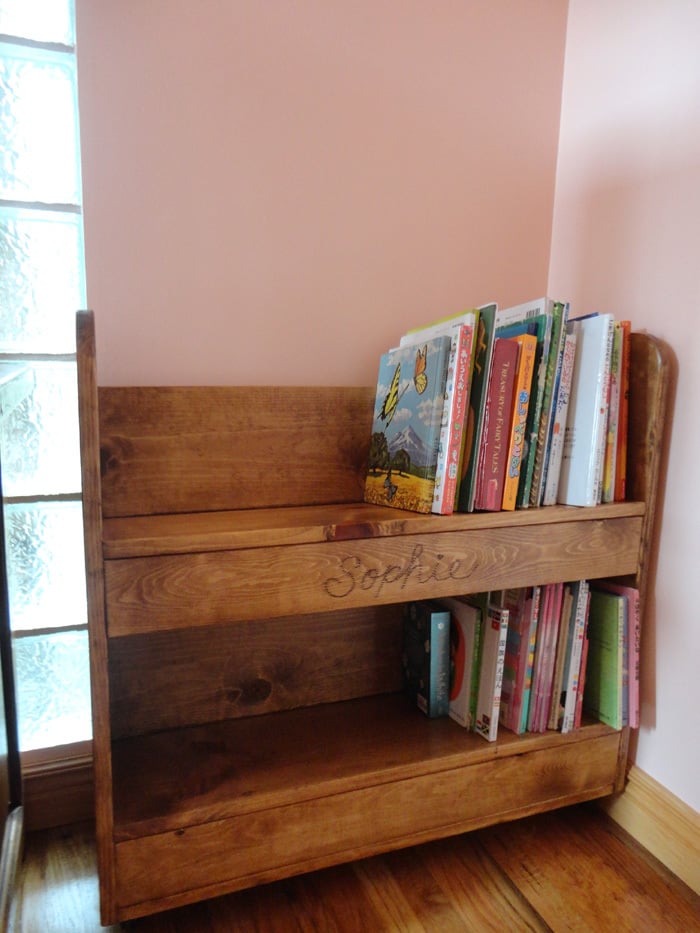
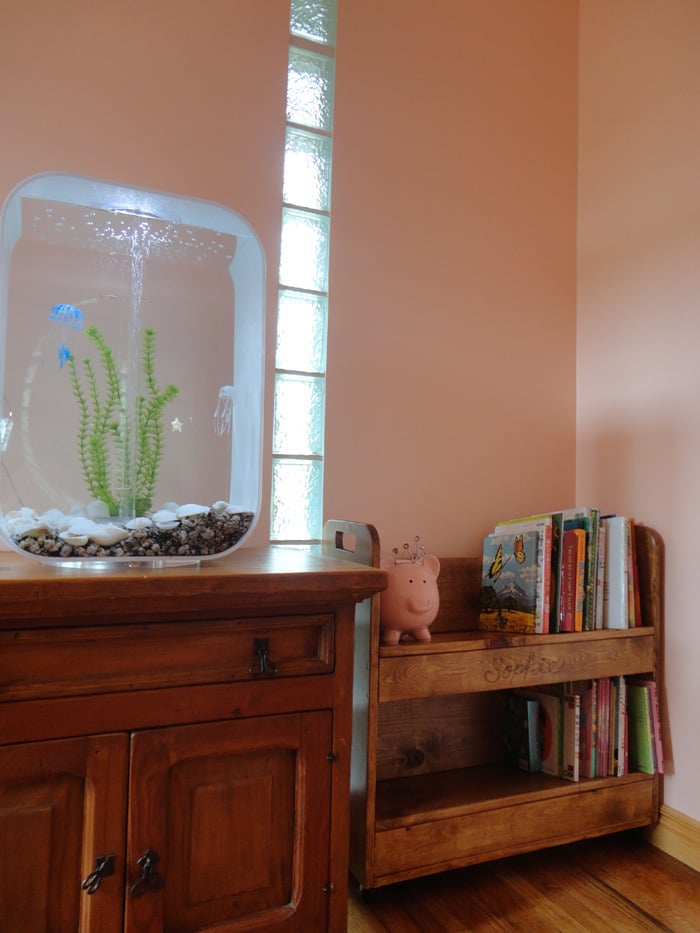
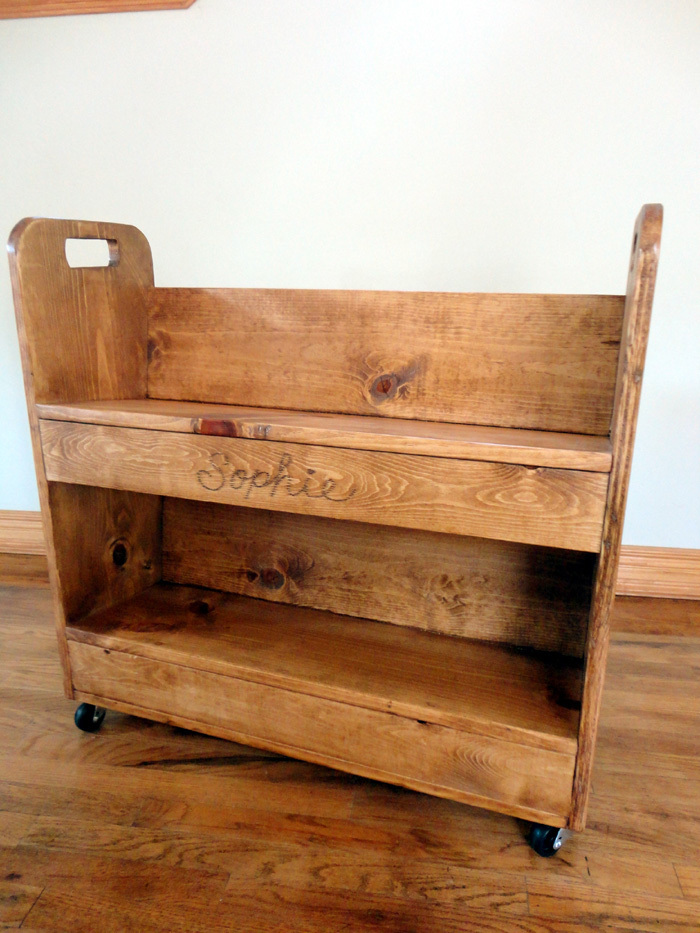
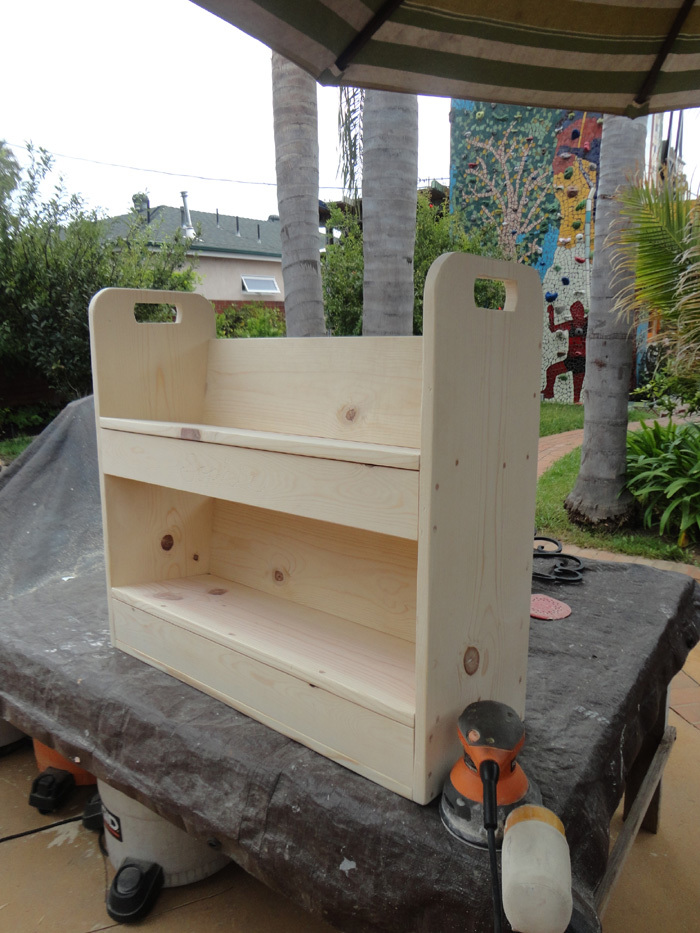
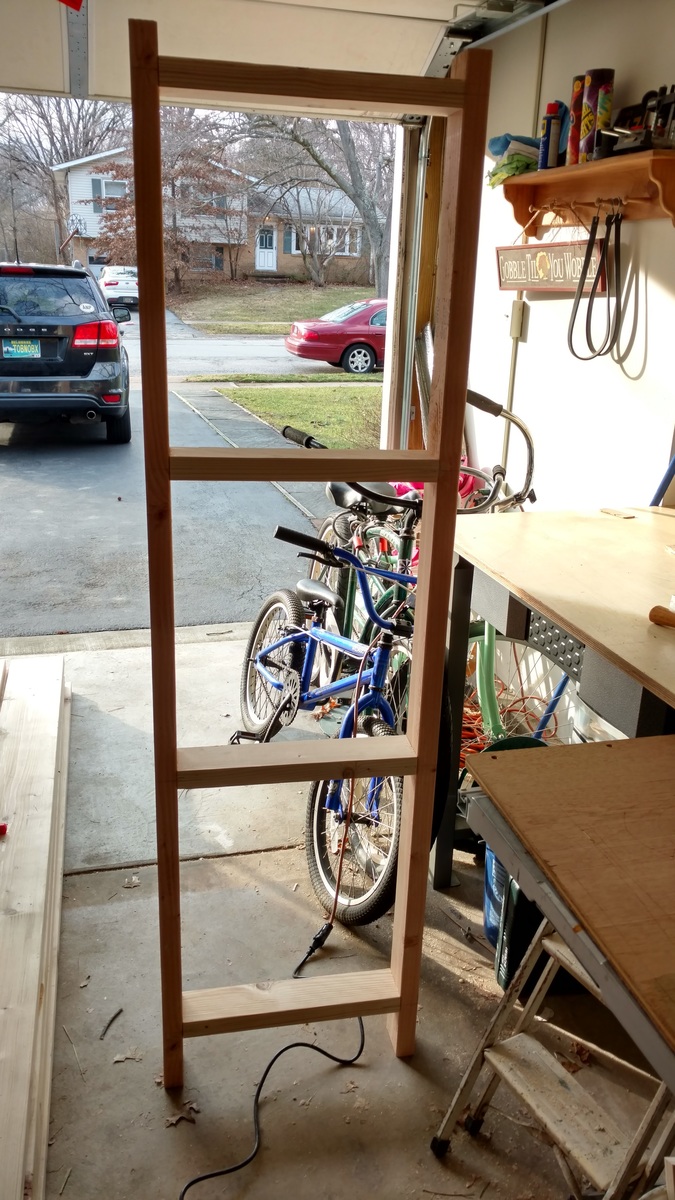
I built this book shelf for my daughter.
I made both the top and the bottom shelves an angled.
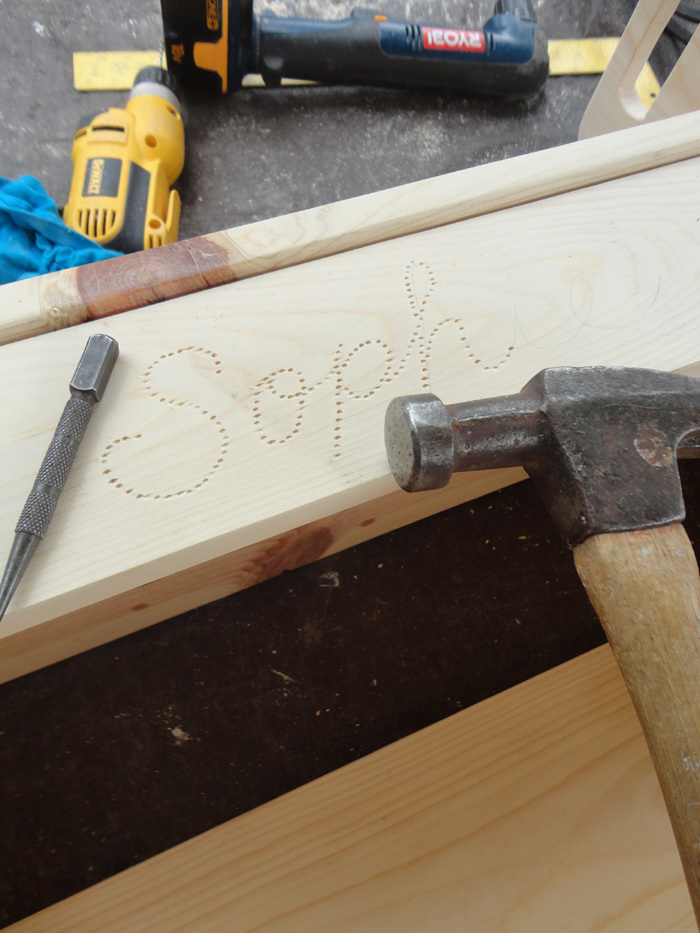
I used a finishing nail punch to emboss the name.
I mixed 3 different color stains to match the other furniture.
Used 2" caster wheels from Home Depot.
Another one bites the dust. Made this out of Ana instructions for a ladder shelf. Like the way this turned out alot. Ana White knows whats up :)
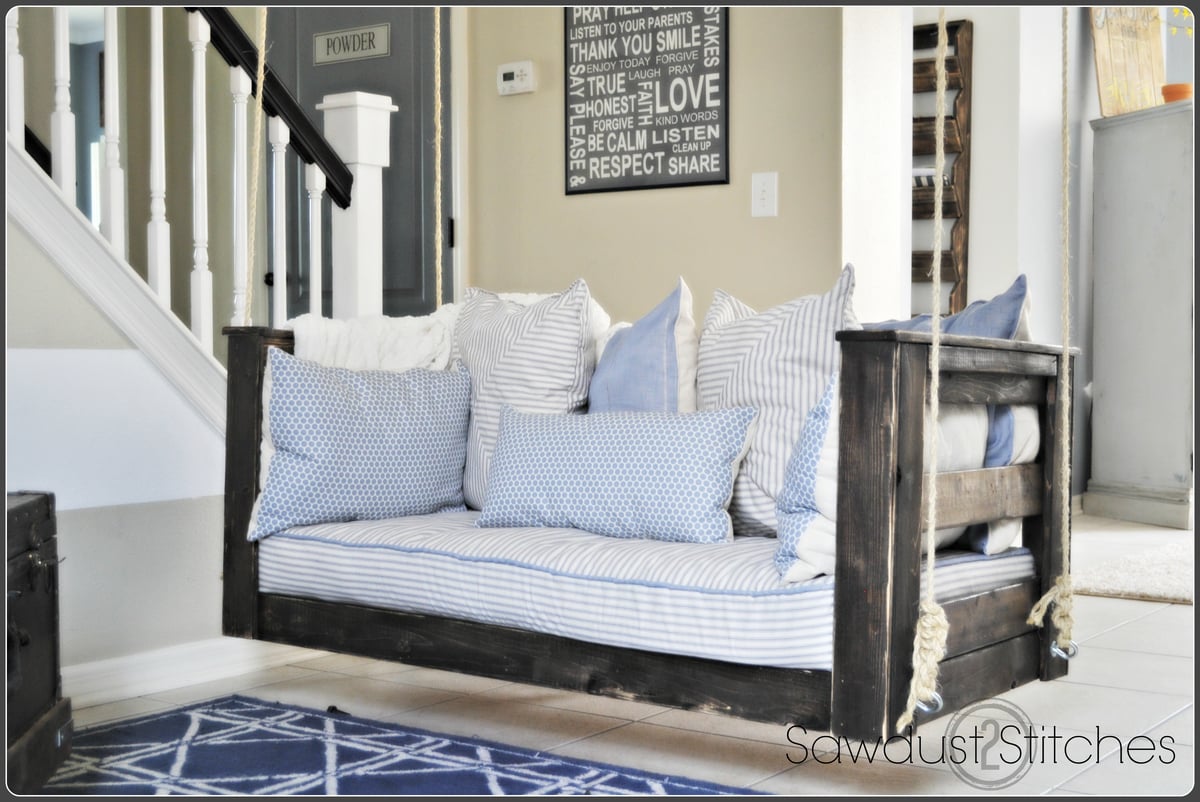
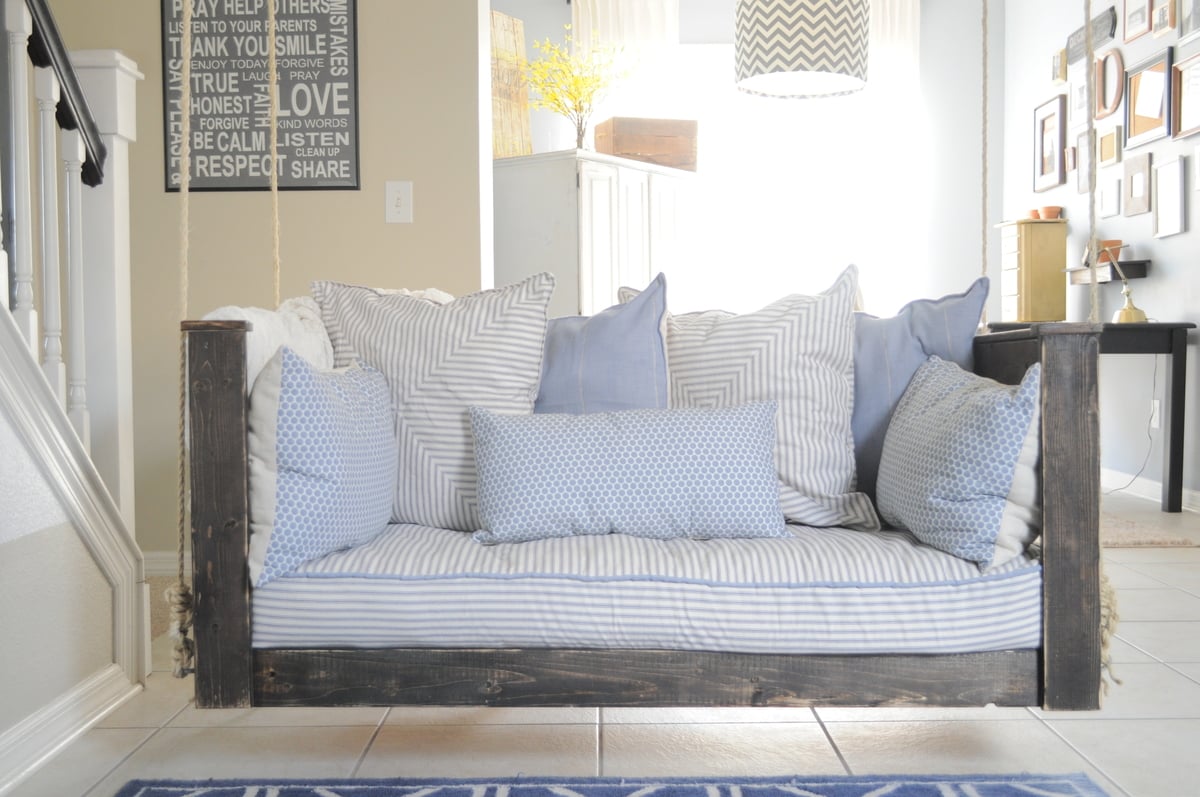
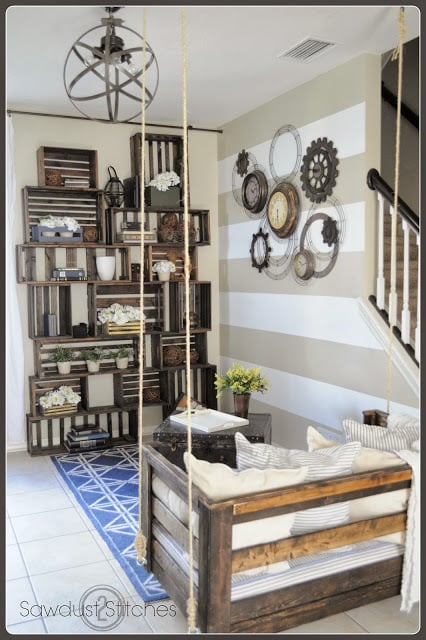
This is s porch swing I made to go in my front sitting room. I re-purposed my sons old crib mattress. It definitely gives the front room the "wow" factor.
Wed, 08/13/2014 - 08:34
You did a fantastic job with the build. You picture could be in a magazine.
Fri, 08/15/2014 - 16:09
I love it! I had never thought of re-using a crib mattress, might have to give this a try :)
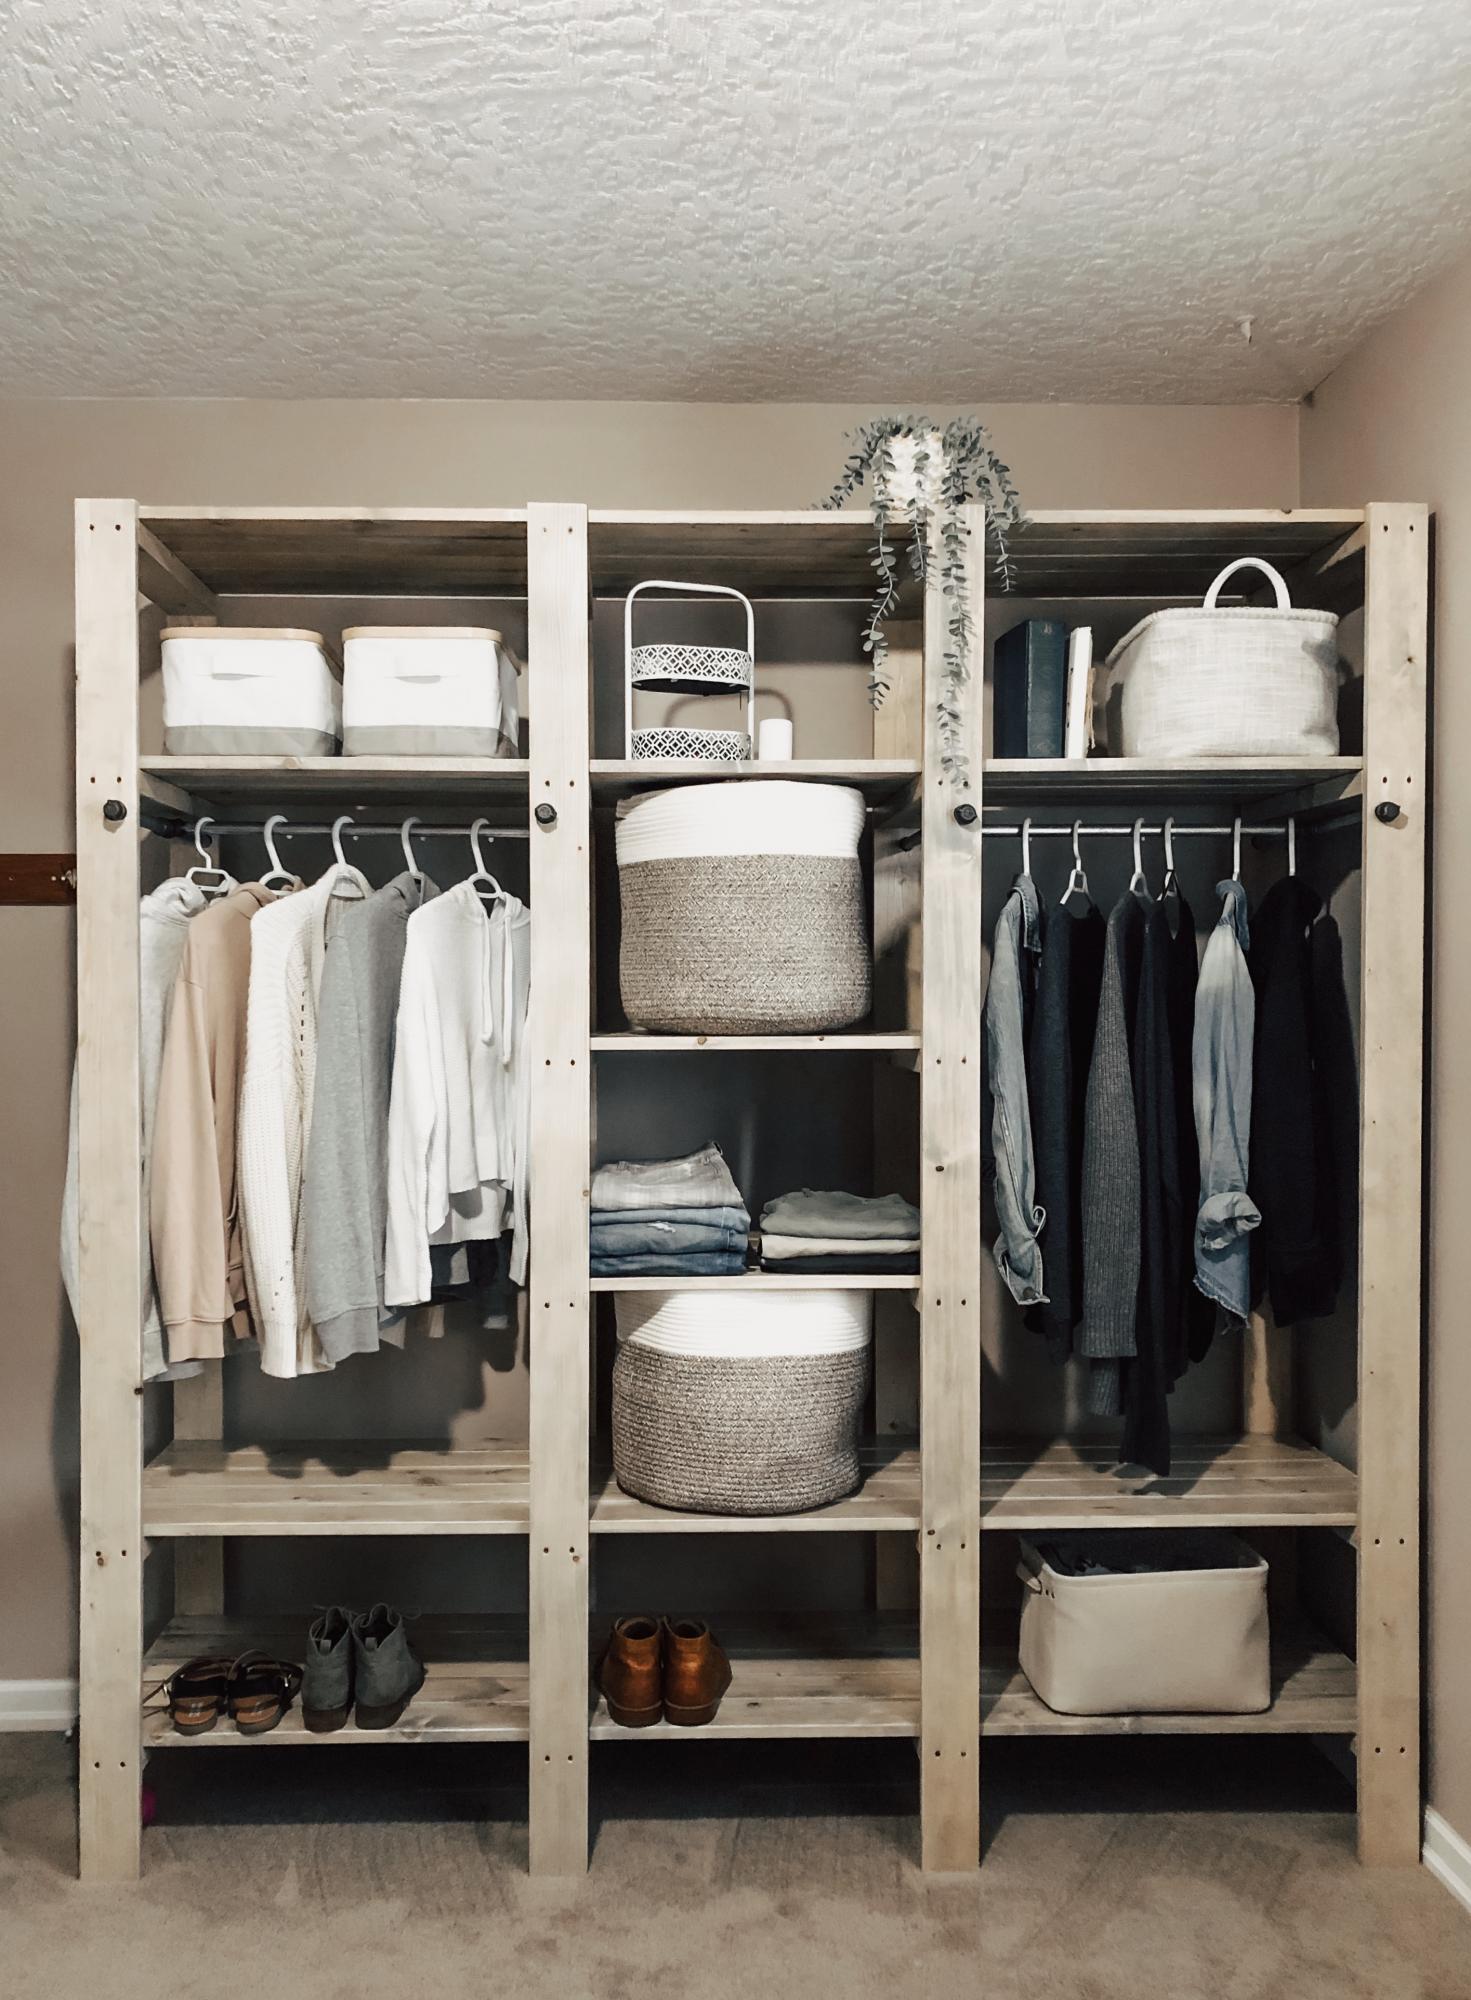
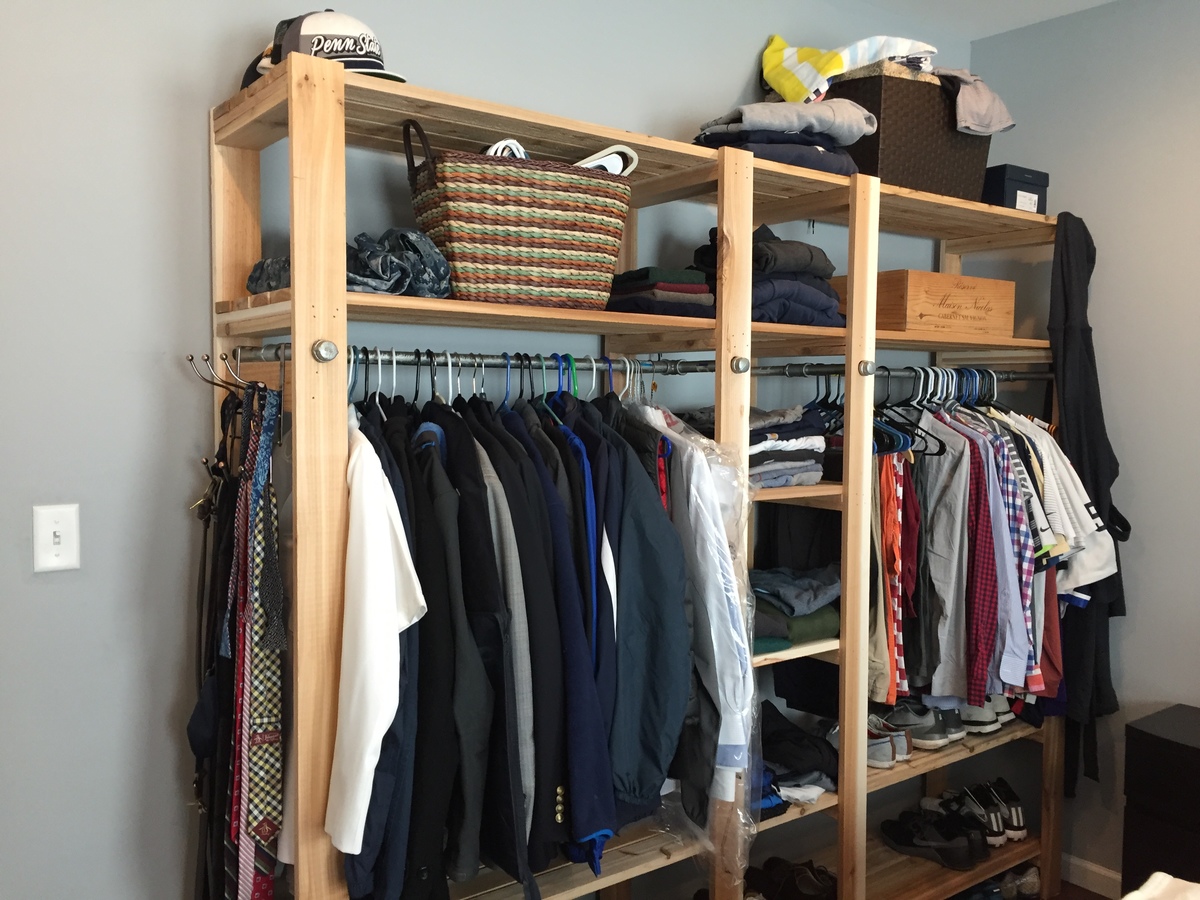
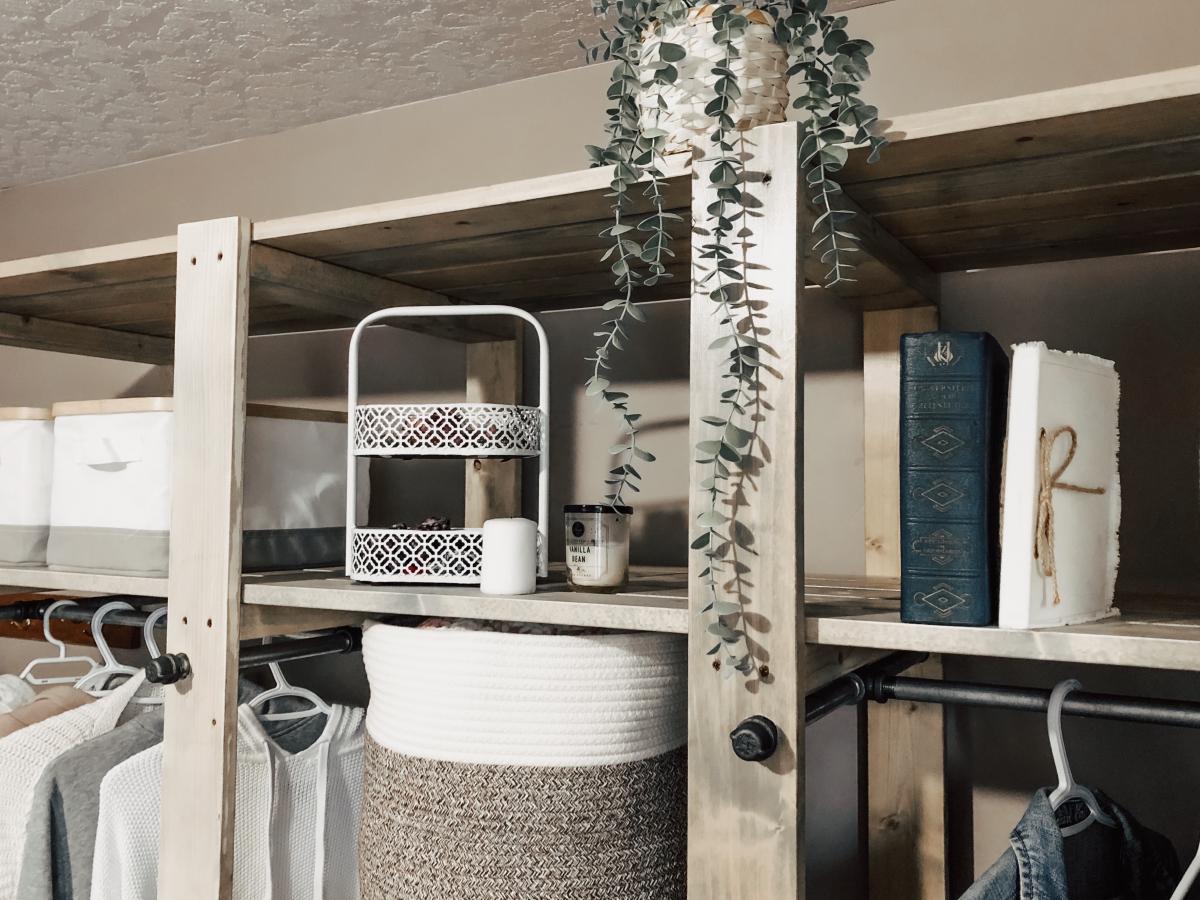
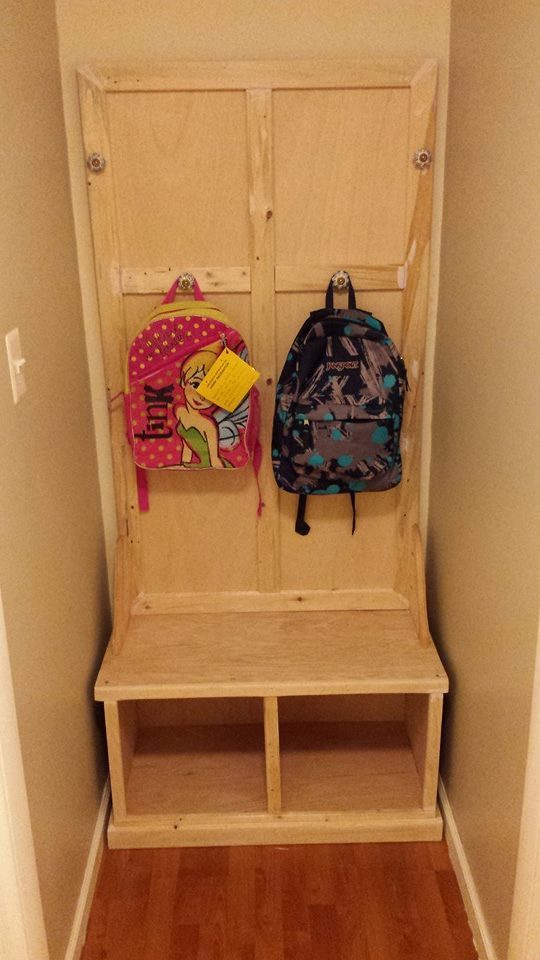
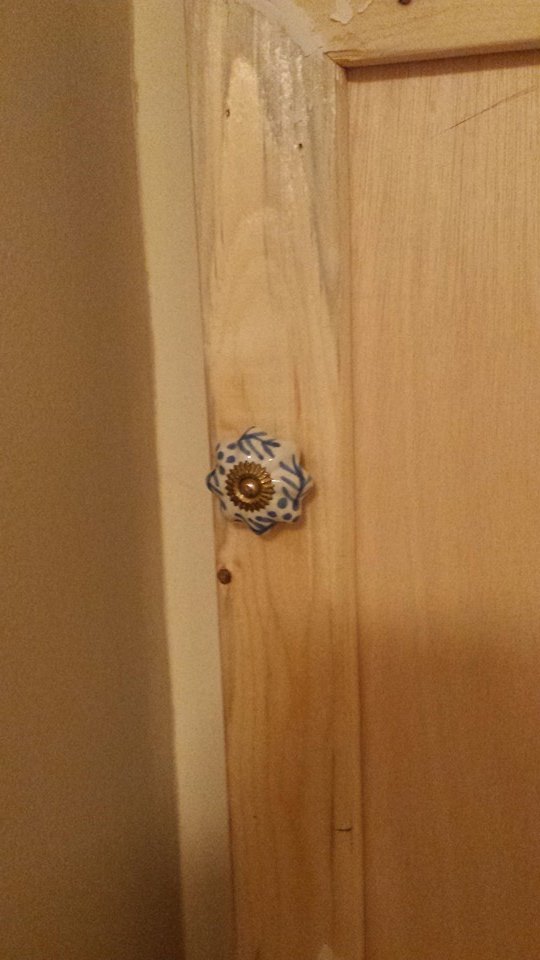
I’ve been searching for a free standing closet for so long!! I stumbled across these plans a few months ago and asked my hubby and brother if they would be up for a little project and boy, did they ever do an amazing job!! I am so happy with this. We ended up making ours a little bit shorter to fit in our room and adjusting some of the other plans. The rods were cut a little short, but everything still worked out beautifully. Thank you for these plans! <3
Sat, 09/12/2020 - 11:14
Thanks for sharing, we chose this as our Brag Post of the Day on Facebook!
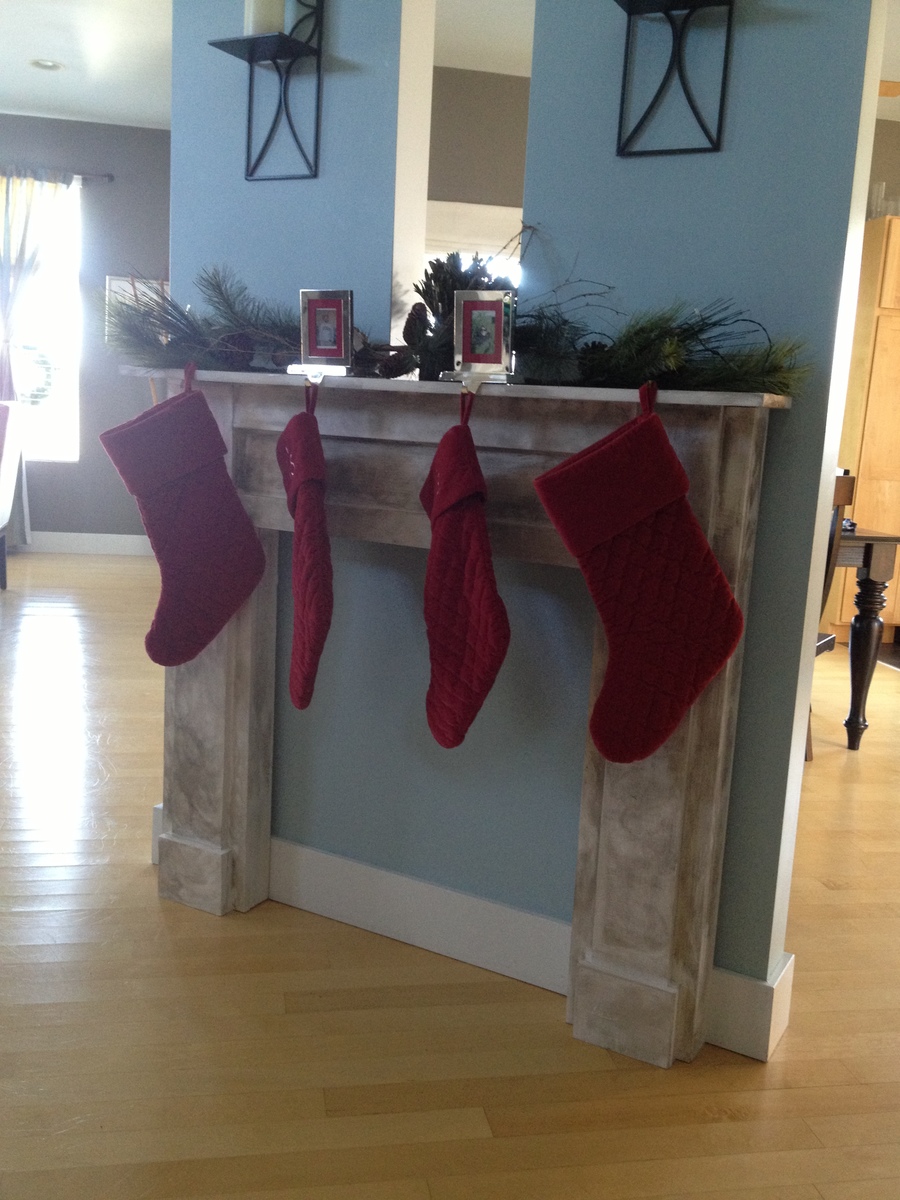
Our home (like many) does not have a fireplace or mantle. So, I decided to build one. Thank goodness for Lowes. They pre-cut all wood for me. I was afraid to use a drill (I'm a rookie), so I nailed all pieces of wood with 1 1/2 inch nails. Wood glue was fabulous prior to using the hammer. I omitted decorative molding too. I think I used too much antique paint, but I can always re-paint it next year. I don't think I'll have the mantle up all year long, but it's great for a Christmas decoration. I hope this gives hope to anyone out there considering this project. If I can do it, YOU can totally do it! Thank you SO much for helping a novice builder like me add something to our home.
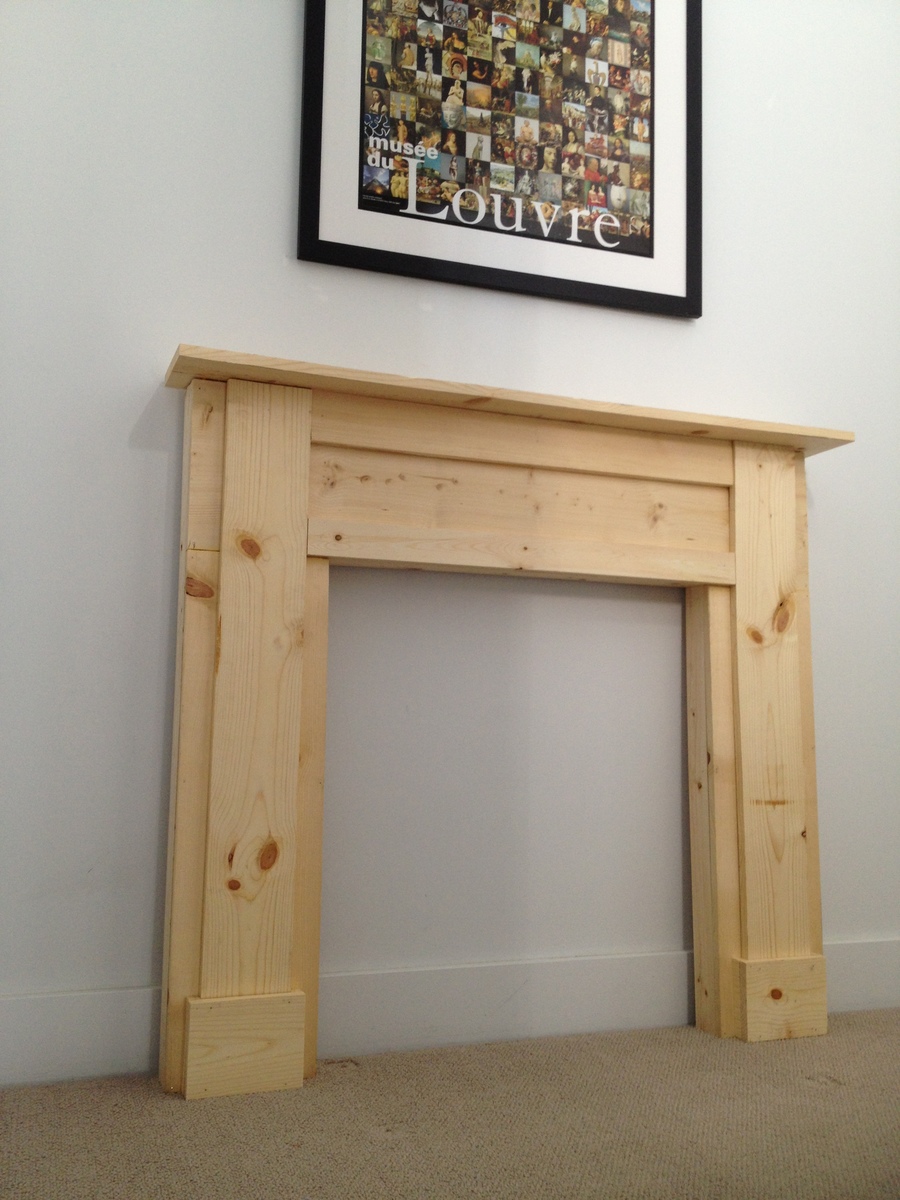

Sat, 12/08/2012 - 11:12
That turned out really nice! The paint looks like marble in the picture.
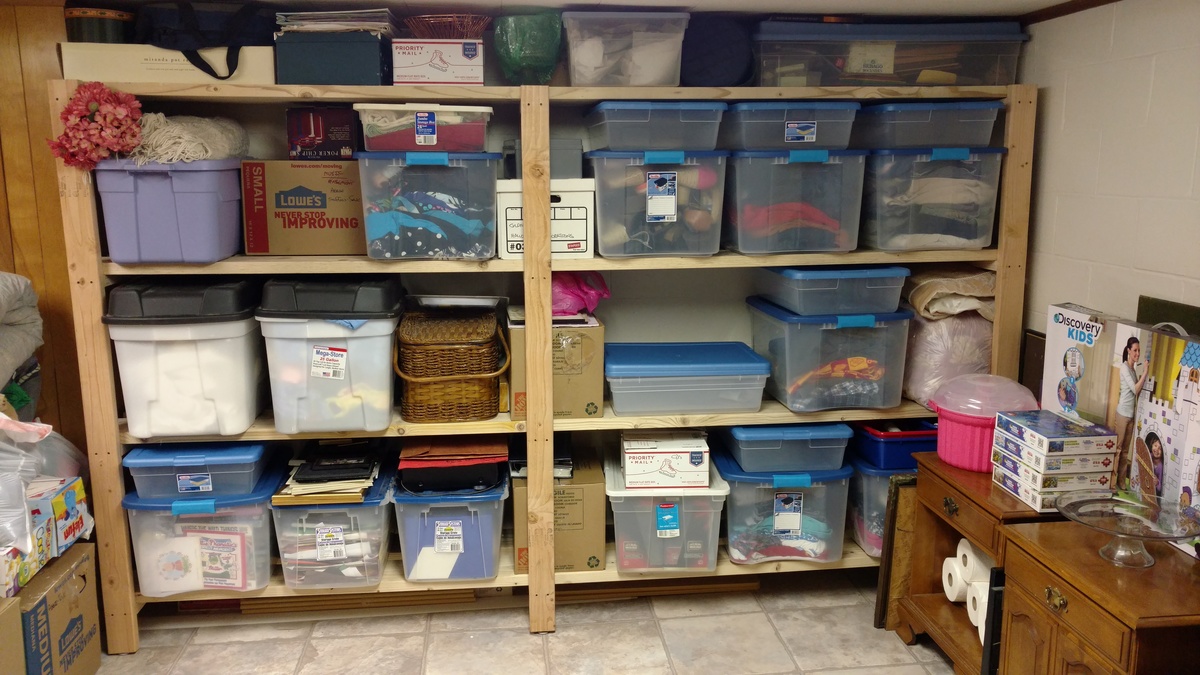
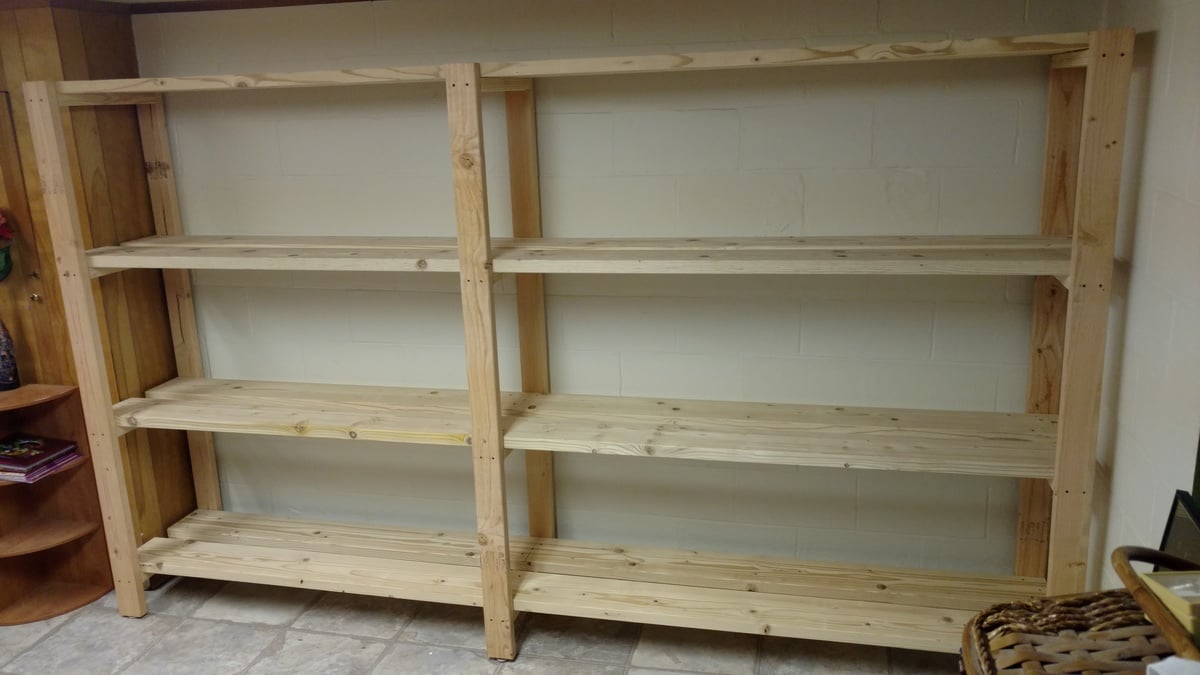
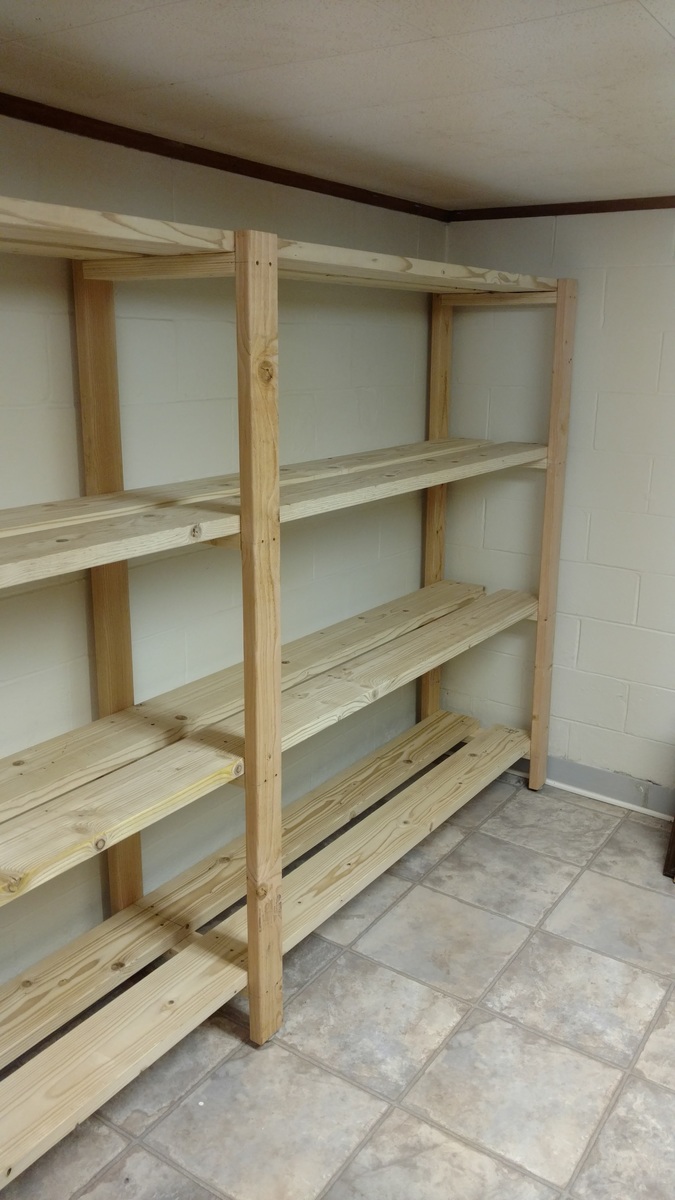
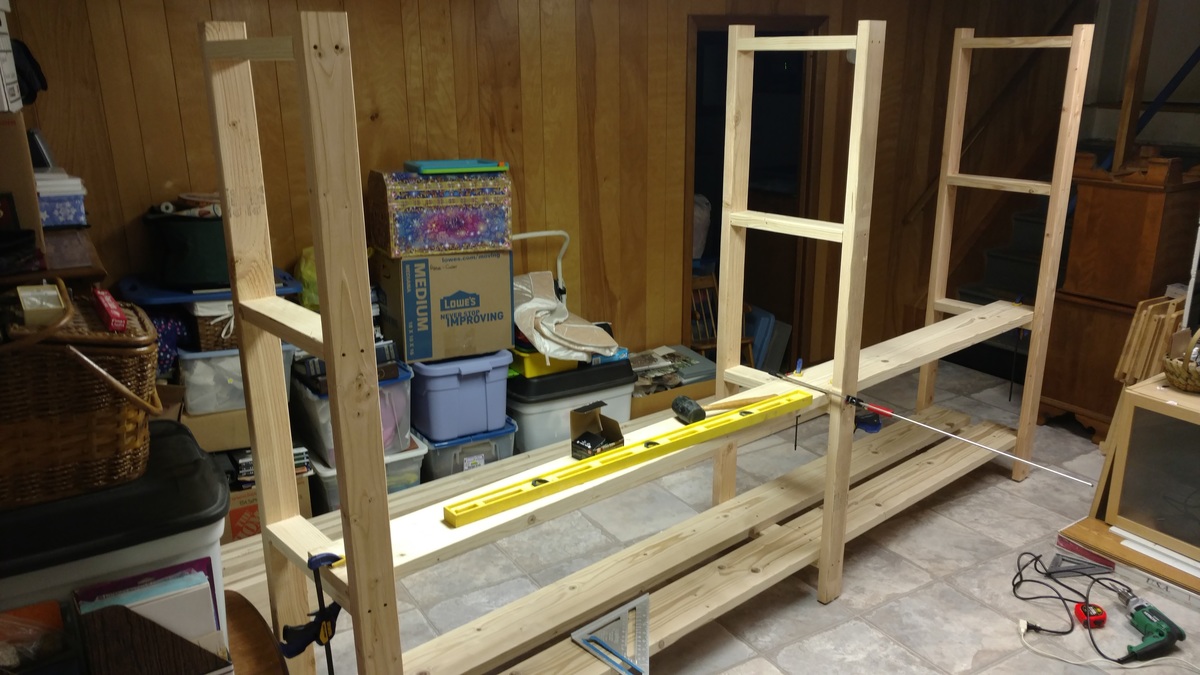
Time to get organized in 2017....and what better way than with some custom shelving. This was not too bad of a project to complete. It only took about 6-8 hours to cut, frame, and assemble everything together (thanks to an interruption or two). 'Twas nice to have a project for once that I didn't have to care about finishing the project with wood filler, sanding, painting. I am sure my wife thanks me more as I would have been another week getting things just right!
A few changes that I made from the original plans:
- used 2x8 for the shelving runs as I only was dealing with a 10ft run and was a few bucks cheaper to buy 8 boards vs 16 boards. Plus less cuts!!!
-installed adjustable furniture feet in the supports to deal with sloping basement floor. Unexpected side effect was it was easier to slide the unit around in the basement as I assembled it.
Outside of those changes I remained faithful to the original design. I didn't bother filling the screw holes as we will be hiding the shelving unit with a curtain once we turn the room into a TV/Office area.
Also as it wasn't 100% clear from the original plans, but the height measurements for the shelf supports are to center... not sure why it didn't register with me right away... but just in case anyone else didn't realize that as well.

This project was something my wife wanted, but I didn't want to spend alot of money. I managed to build this project for less then $25.00 minus the paint. We are not sure what color it's going to be and I think I might add a shelf to it at a later date. We had to cut this down by 19 inches to fit it into our hall way. Hopefully I will get the rest of it finished in the next month or so depending on the weather.
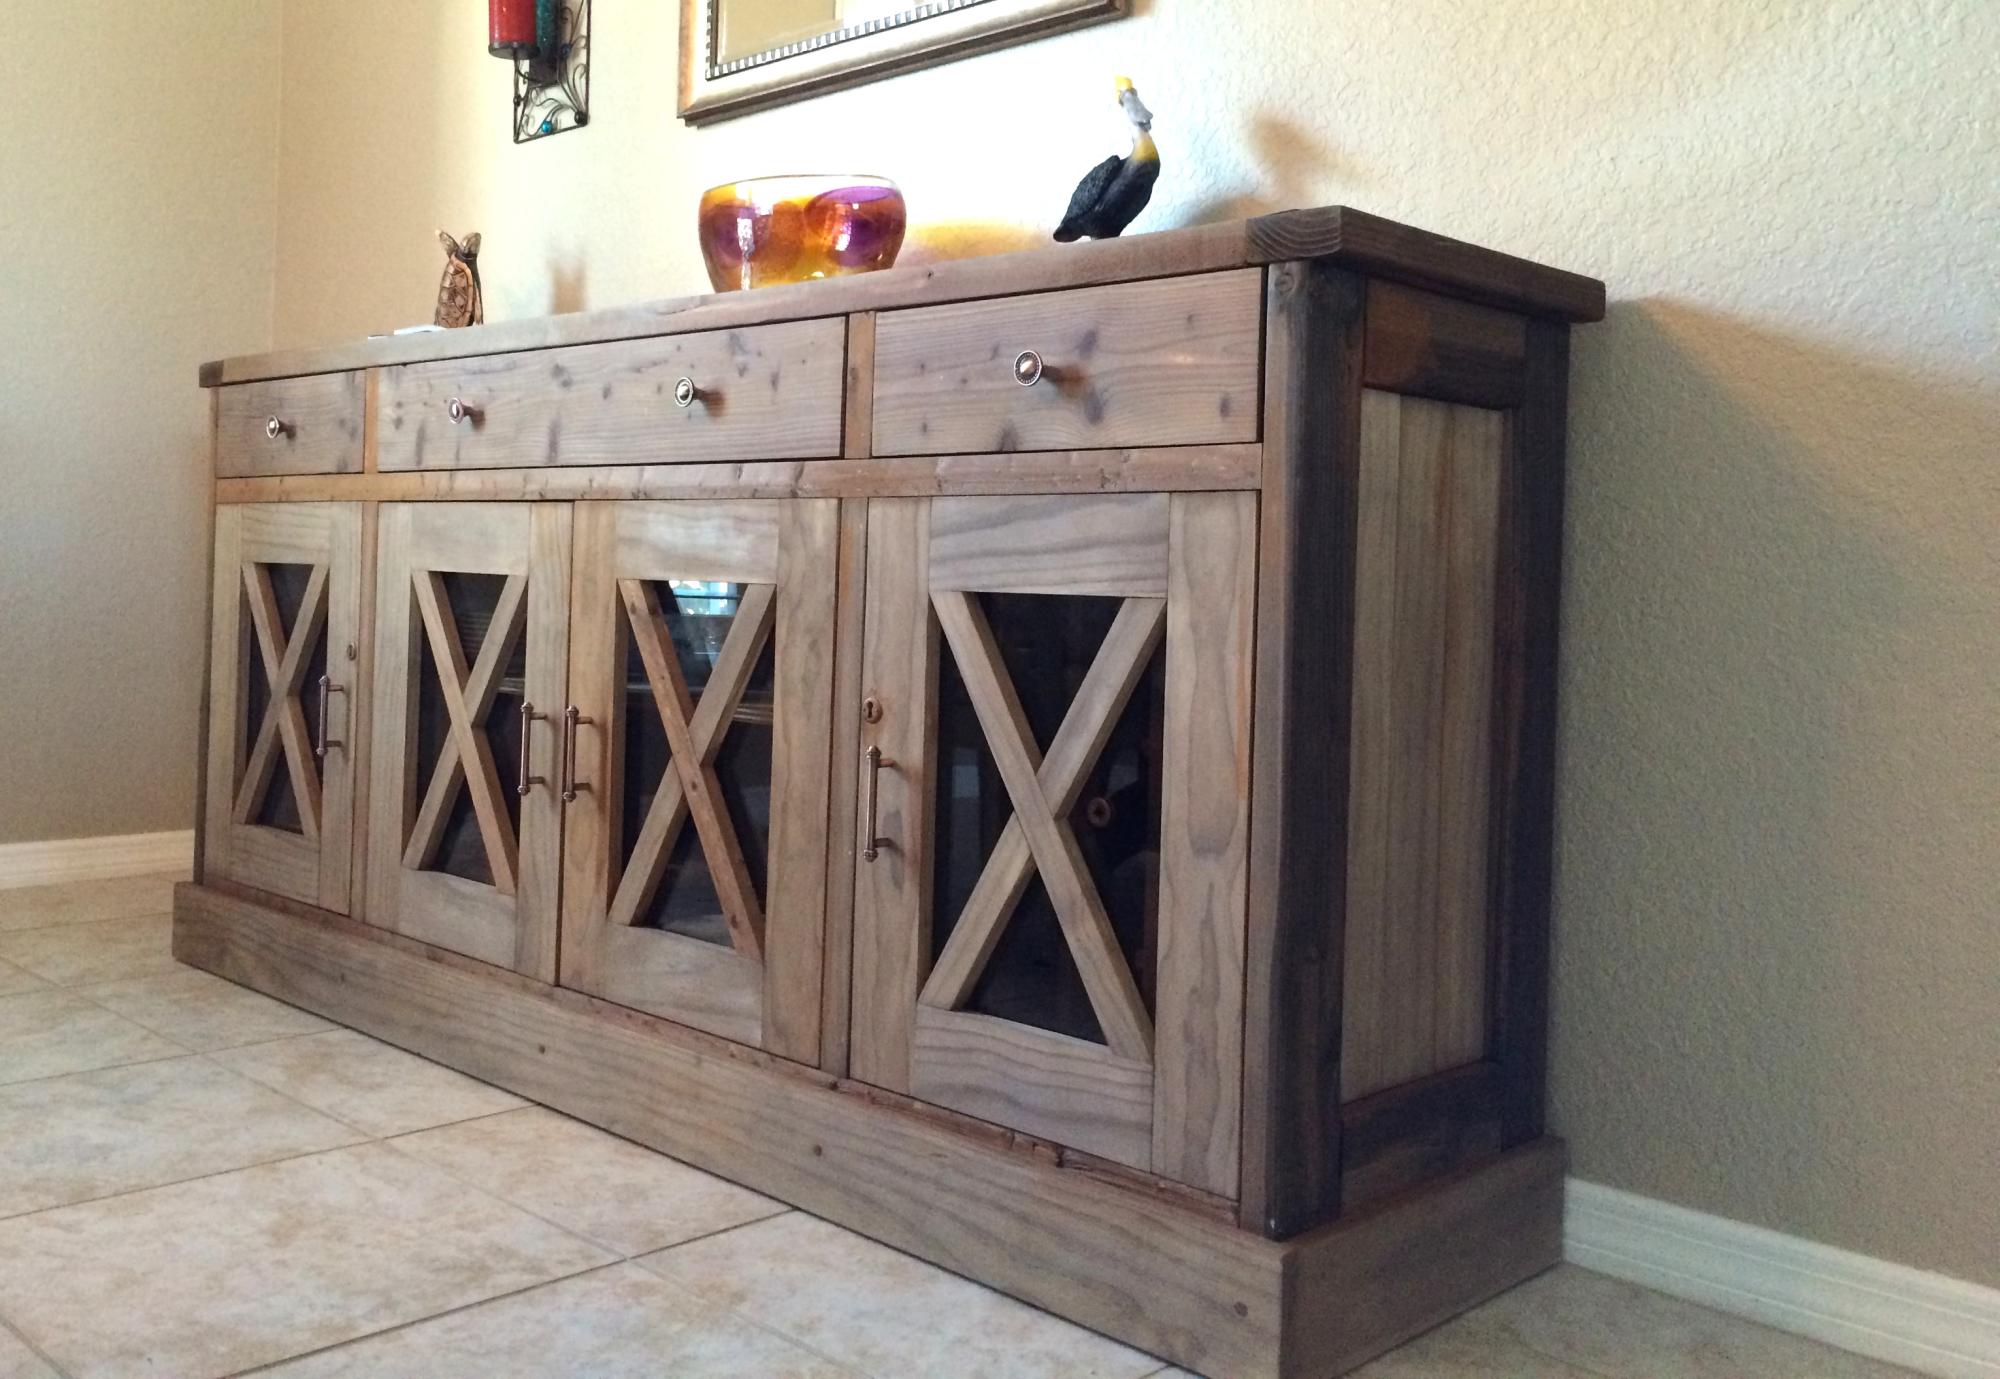
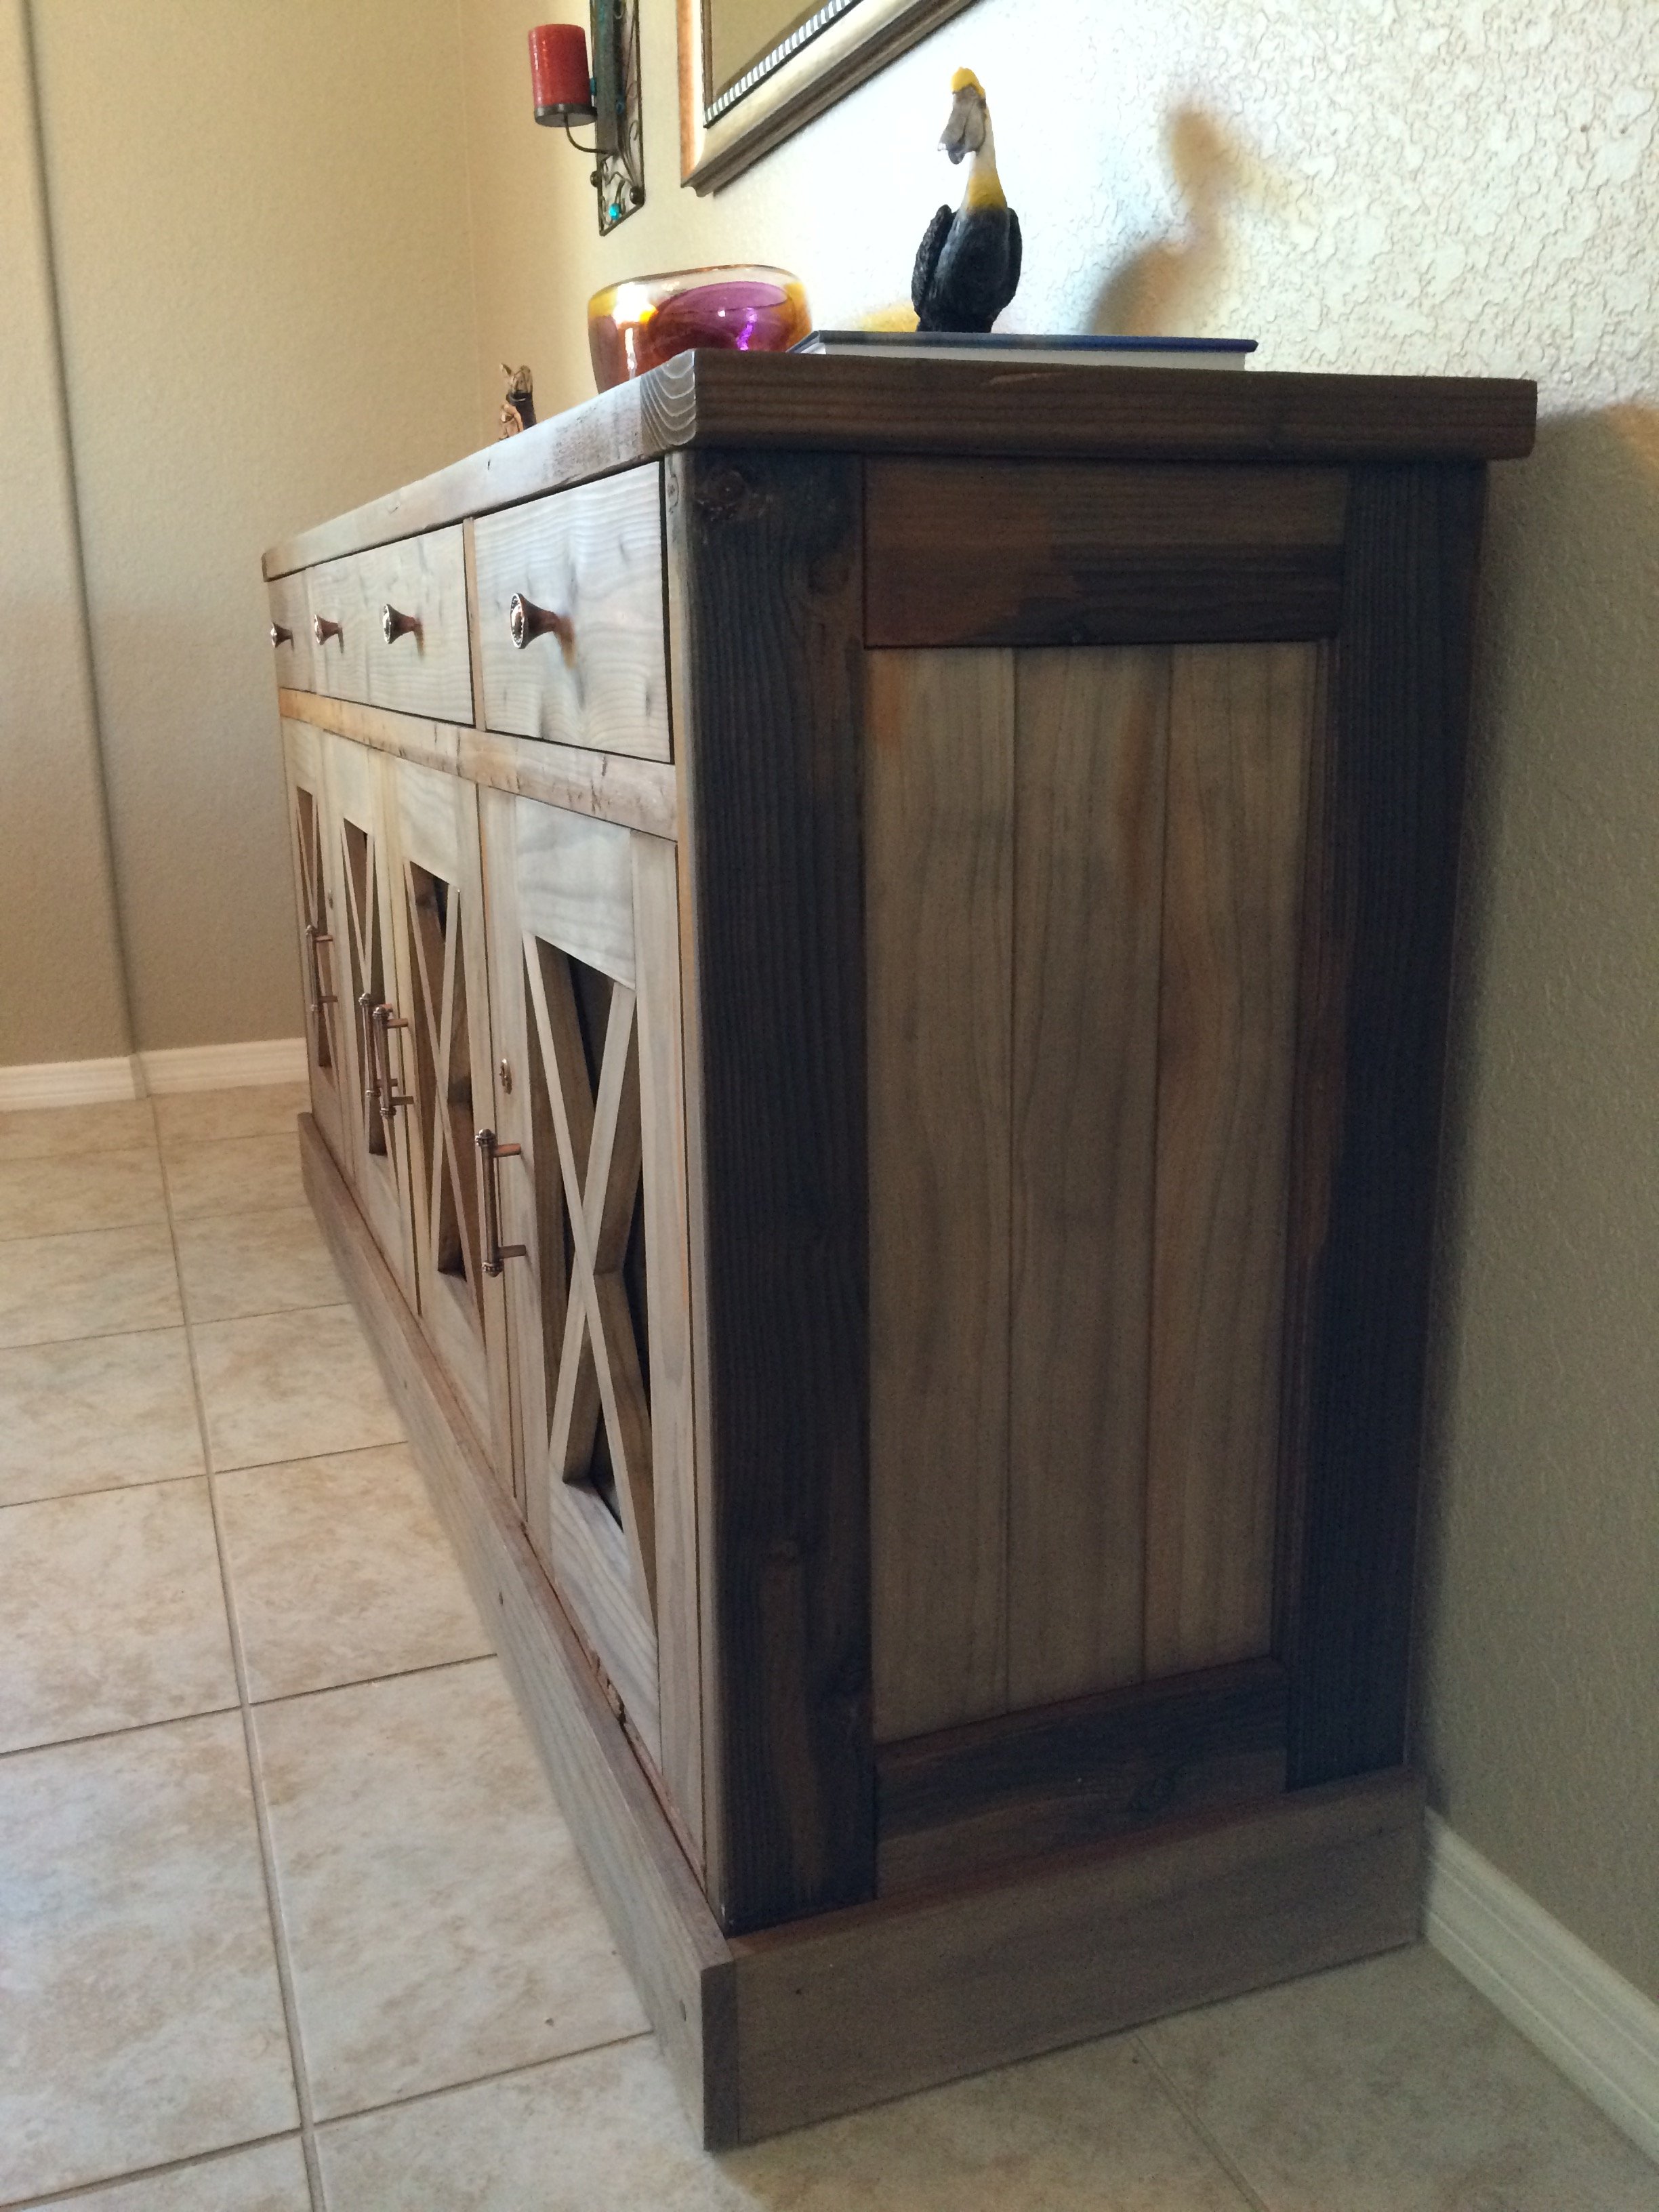
I made a few modifications from the original plans as I wanted to have some visibility into the cabinets. I used natural pine and finished with a tea, vinegar/steel wool solution to give it the reclaimed wood look.
Wed, 08/17/2016 - 23:42
Would you have plans available for the modifications that you made? This is beautiful!!
Mon, 07/22/2019 - 10:52
Do you have plans for the modifications you made on the doors? Thank you

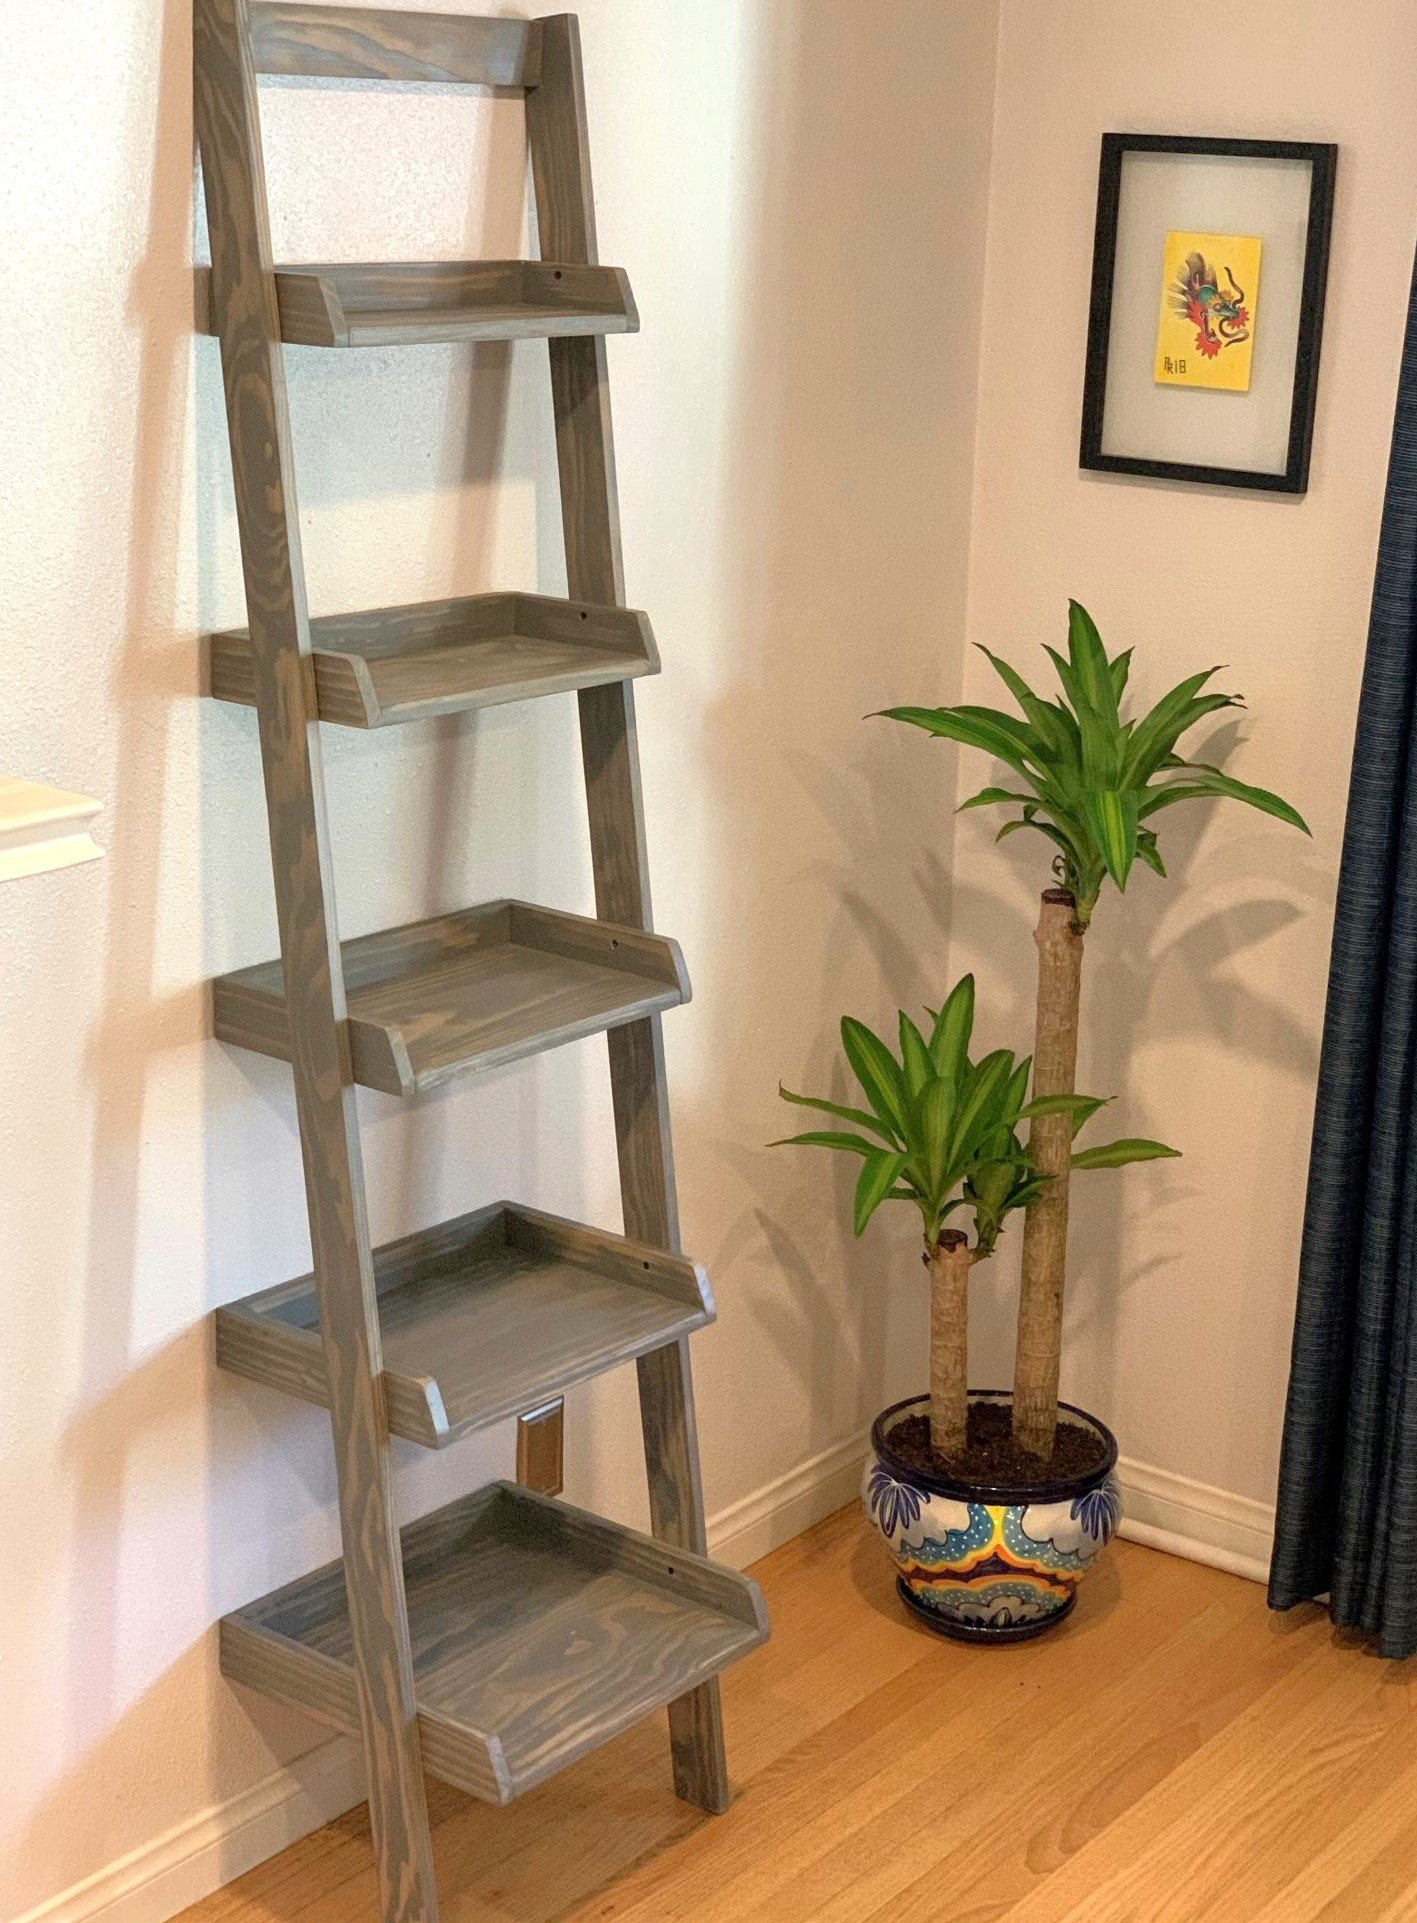
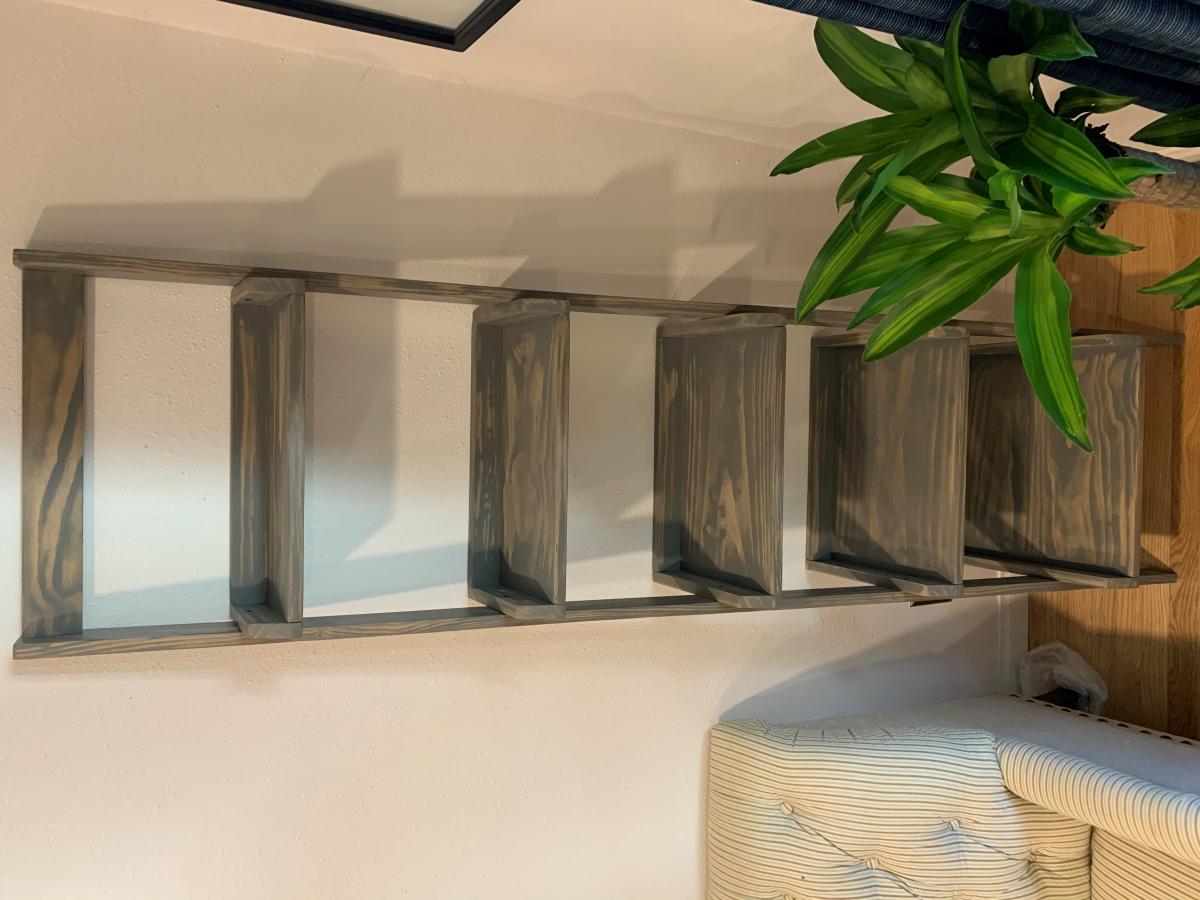
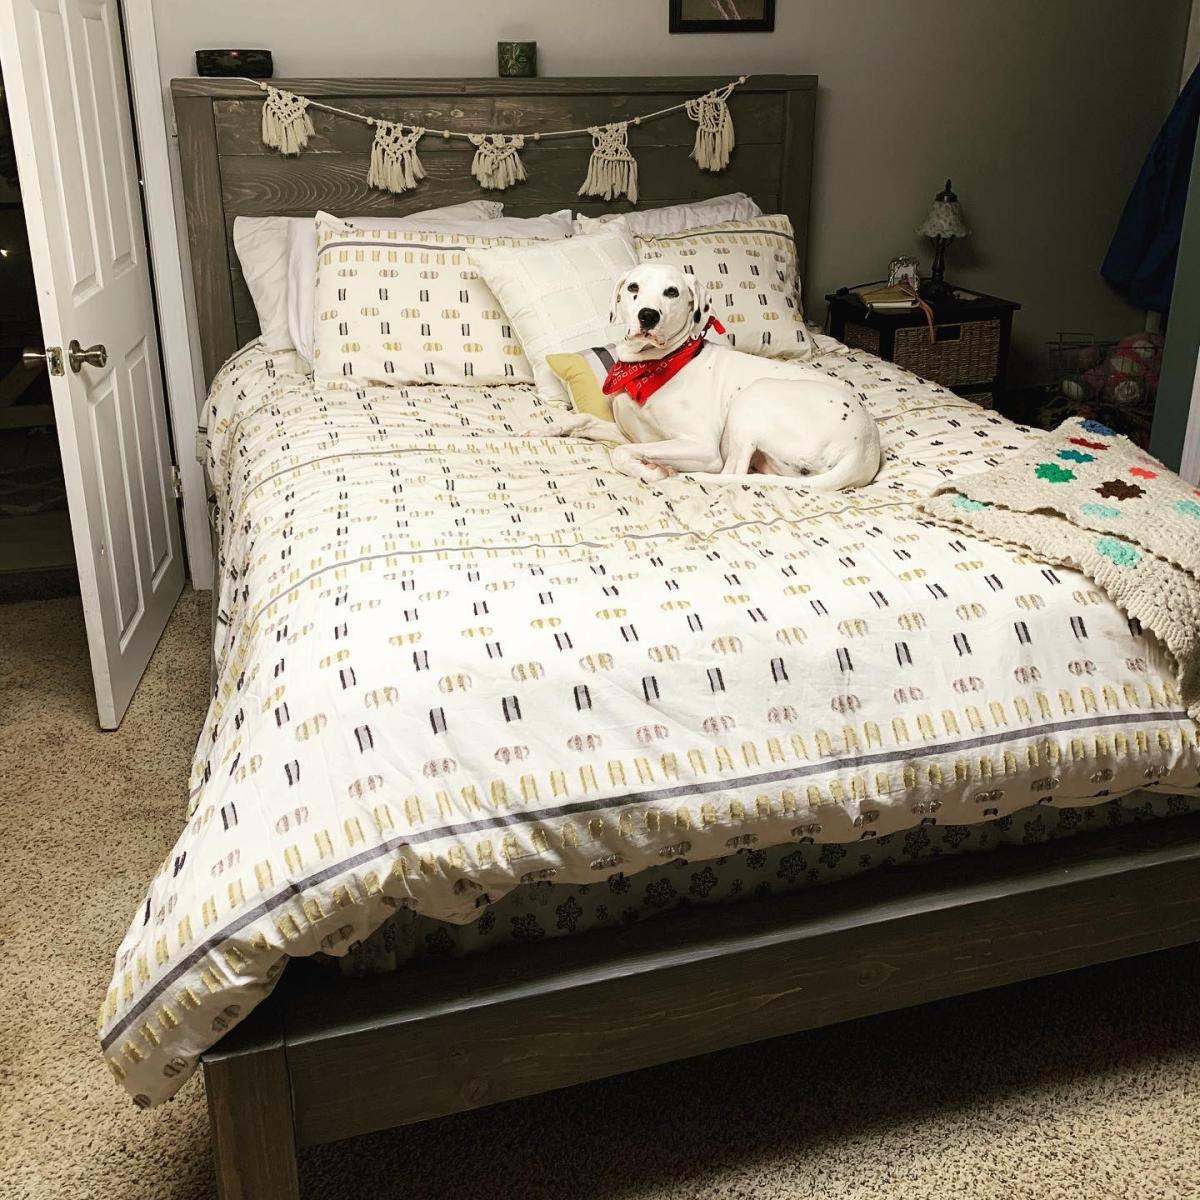
We are mediocre novice in the handy area. I more so than he, but together we wanted to tackle this project.
The directions were great and the pictures helped with some of the minor confusion. Great plan and solid beautiful bed frame.
The total cost was around $175. Wood is a bit expensive in our area...
the stain we chose was a semitransparent gray wash. I thought it was going to be a true stain but it was more a paint quality but in the end the wood grain showed through and we just used one coat! Went on thick
This was my boyfriend and my first major construction project and tackling it together we were a little intimidated ... never used a kreg jig but had purchased one a few years ago and never used it. Haha well you def want to have it. Watched a iTunes video and it Was easy and we faired well.
Only one argument that taught us both a few things and ended up giving us the desire to make more furniture together.
Thank you Ana white


Comments
Rschriner17
Thu, 11/16/2023 - 10:47
Nice work
Looks great!