Community Brag Posts

Porch Swing

Submitted by bbcarey on Tue, 10/23/2012 - 10:12

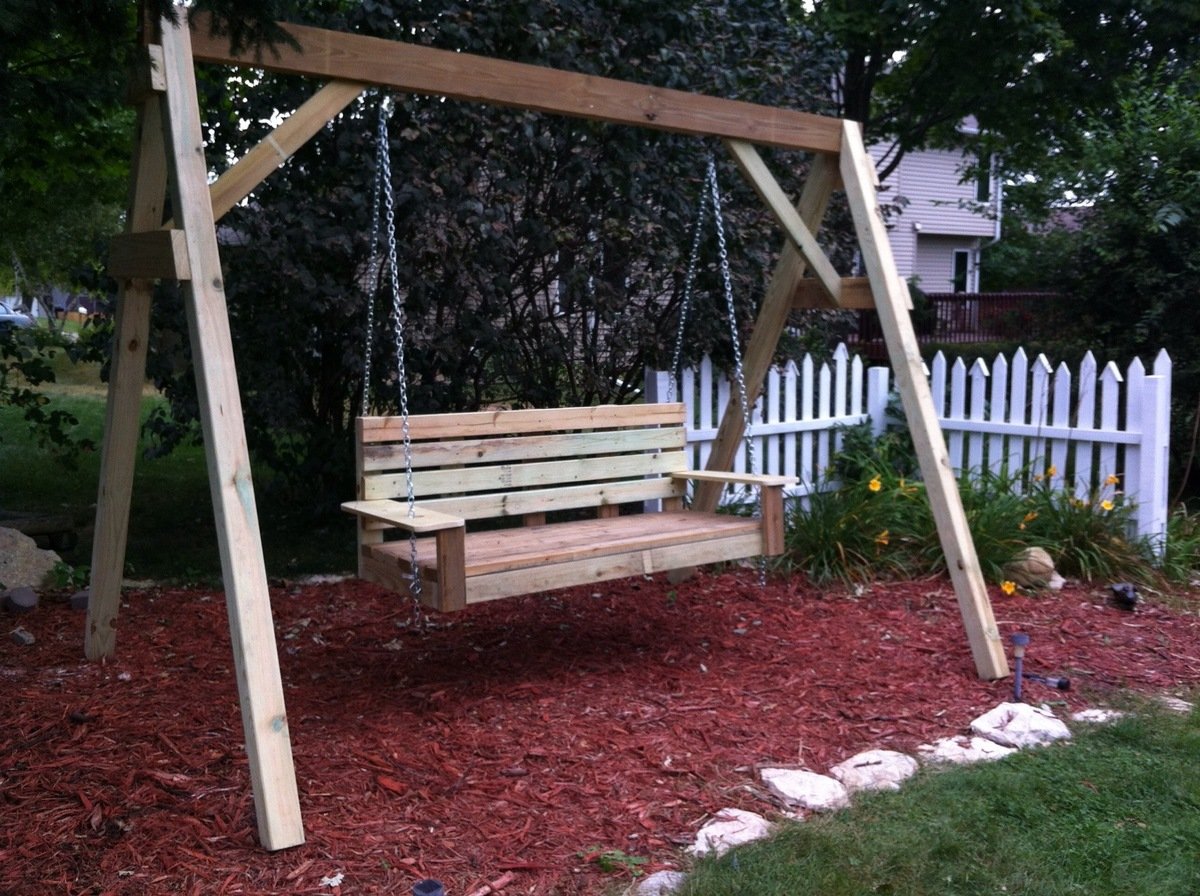
I wanted to make this porch swing ever since seeing it in the plan catalog (Large Modern Porch Swing). Just a matter of setting aside a weekend to get it done and then to find A frame to support it. I made the A-frame from a combination of this post:
http://www.buildeazy.com/newserve/swing_seat_support_dec07_1.html
and this one:
http://www.hgtv.com/home-improvement/custom-a-frame-childrens-swing-set…

I made the back a bit higher on our swing... and not quite as wide.

Reading several other blogs on this- I chose to attach the chains to the top back of the swing to keep it from tipping backwards...

Now just get to enjoy it!!

Built from Plan(s)
Estimated Cost
$50
Estimated Time Investment
Day Project (6-9 Hours)
Finish Used
Exterior Sealer/protector
Recommended Skill Level
Beginner

Comments

Great project!

Submitted by roydub83 on Sun, 08/10/2014 - 20:18

This is an extremely easy project and great for beginners. The step by step guide was spot on. I would only suggest that if you are having your local home goods store do the cutting to make sure they cut according to the guide given or you will end up with only enough "correct cuts" to make one shelf.

I applied a dark brown base coat and then a nice coat of DIY chalk paint (off white). I distressed the edges and a couple of spots on the top shelf and topped it off with clear paste wax. Looks great in the living room.

Thank you for the plans!

Built from Plan(s)
Estimated Cost
$35
Estimated Time Investment
Afternoon Project (3-6 Hours)
Finish Used
DIY Chalk Paint (Distressed) with clear paste wax
Recommended Skill Level
Beginner

Sweet Pea Bed

Submitted by Anonymous (not verified) on Sat, 11/26/2016 - 16:24

This project cost us about $850CAN and took us around a week (5ish hours a day) to complete. My husband and I are definitely not carpenters so it's not perfect but it's pretty amazing :)

we made several alterations to the plans including making the bottom bunk larger to accommodate a double/full size mattress. We also made the "door" to the bottom bed larger with an opening of 30". Another alteration was we dropped the mattress cleats to 9" off the ground so that the mattress dat down in the bed. The bed is for our 2 year old so we thought she would have trouble getting in if it was much higher. This eliminated the storage area underneath but she has a large closets so we didn't think it would be an issue. 

The plans were great and pretty easy to follow. We are over the moon with how it all turned out! 

Estimated Cost
$850
Estimated Time Investment
Week Long Project (20 Hours or More)
Recommended Skill Level
Intermediate

Patio Benches and Table

Followed Ana's plan and built two benches table. Pretty happy with the results.
Cost was about $250 including the paint which was $100.

Estimated Cost
$250
Estimated Time Investment
Weekend Project (10-20 Hours)
Finish Used
BEHR MARQUEE Exterior Semi-Gloss. Two coats with sanding in between coats.
Recommended Skill Level
Beginner

Argie Bedside Table (Nightstand)

Submitted by thehallway on Sat, 10/27/2012 - 07:56

I built this bed for the guest room at our previous house. The room was small, so I made floating shelves for the nightstands to save space. We have since moved and are now renting, so we didn't want to put holes in the walls to hang the shelves. I took the opportunity to build these nightstands instead. The original design was a little too tall and wide, so I reduced those dimensions by 3". This was my first time building drawers, but they went together surprisingly well. I had used a combination of stain on the bed and was worried about matching it, but 2 coats of Minwax Dark Walnut ended up being a pretty close match.

Built from Plan(s)
Estimated Cost
$75
Estimated Time Investment
Day Project (6-9 Hours)
Finish Used
2 coats of Minwax Dark Walnut & Poly
Recommended Skill Level
Intermediate

Comments

Rustic x coffee table

Submitted by Chowells on Wed, 08/13/2014 - 12:13

Rustic x coffee table made from plan. Used 3-4 coats of early american stain and two coats of poly.

Built from Plan(s)
Estimated Cost
$80
Estimated Time Investment
Weekend Project (10-20 Hours)
Finish Used
Early American (several coats) and poly
Recommended Skill Level
Beginner

DIY Wood Christmas Tree

This project was such a fun challenge for me!  I needed a table top version of this great Christmas tree shelf, so I modified the plans just a bit, and created an additional shelf. The little ornament blocks were fun to make too! 

Built from Plan(s)
Estimated Cost
$12
Estimated Time Investment
Day Project (6-9 Hours)
Finish Used
MinWax Dark Walnut
Recommended Skill Level
Intermediate

Floating Corner Shelf

I wanted to do floating shelves in my bathroom but I have very limited space so I decided I was going to do floating shelves in a corner where I did have space. This is not going to be the only shelf, I will make another one to go above it. I was tired of having no storage space for things like toilet paper and towels so now we can use these floating shelves to do that for us :) Tomorrow I'm going to build the second one to go above this one. Making it for a corner is really no different than making it straight. The sleeve fit right over the frame I built and it looks beautiful I think :)

Estimated Time Investment
Afternoon Project (3-6 Hours)
Finish Used
White semi-gloss paint
Recommended Skill Level
Intermediate

Comments

jmr712

Wed, 07/27/2016 - 00:40

Hi, 

Love these shelfs!! what did you use to cover them please?

Olivias doll crib

Submitted by wellys on Mon, 08/18/2014 - 13:29

I had an idea that I wanted to buy my daughter a wooden doll crib and was having a look around on google when I stumbled across Ana's website. I have never made anything from wood in my life and coerced my husband into giving me a hand!

We found that Ana's plans were just so well thought out, we had a little struggle with the metric to imperial thing but carefully plotted ahead and adapted the plans to wood sizes available in the UK.

I also used Ana's plans for a mattress to go in it, I upcycled an old duvet cover.

I am absolutely amazed by the outcome - and, most importantly, our daughter loves it!!

Built from Plan(s)
Estimated Cost
£40.00
Estimated Time Investment
Week Long Project (20 Hours or More)
Finish Used
Undercoat and interior gloss paint (Sage green)
Recommended Skill Level
Starter Project

Comments

Linda7

Tue, 08/19/2014 - 07:06

Nicely done Wellys. Have you seen the doll high chair plans? It is an easy build, too, and can be found in the plans under TOYS.

Faux Fireplace

I made this surround to give me a place to hang my stockings for Christmas and give me a mantel to decorate.  It also moves easily!

Built from Plan(s)
Estimated Time Investment
Day Project (6-9 Hours)
Finish Used
Sherwin Williams Pure White, insert in Minwax Special Walnut
Recommended Skill Level
Beginner

Comments

Gray Farmhouse Console Table

Submitted by boneill on Mon, 08/17/2020 - 18:56

Happy Fall Y’all. Love the Gray / White Farmhouse Colors. I can share the plans I modified for this build if anyone wants to build their own .

Built from Plan(s)
Estimated Cost
$50
Estimated Time Investment
Day Project (6-9 Hours)
Finish Used
Gray Stain, White Paint
Recommended Skill Level
Beginner

Comments

dheald

Sun, 09/06/2020 - 07:05

Hello! This looks great and it’s exactly what I’m looking for in an alternative build. Would you be willing to share the plans with me?

Thanks!

Seasonal And Holiday

Tall Cedar Planters

Submitted by Ji on Sat, 11/03/2012 - 15:51

We wanted some tall planters and found some tall teak planters that we love, but one problem $820 on the Casual Country website. The ones online were angled but I couldn't get the angle right so I made mine straight.
The tallest one is 42" x 23" then 29" x 21" and the small one is 20" x 18".

They will look much better when I get something planted in them this spring.

Built the frame with 2"x2" cedar boards and used 4"x1" cedar boards for the planks.

Estimated Cost
$50 each
Estimated Time Investment
An Hour or Two (0-2 Hours)
Finish Used
Semi-Gloss Poly
Recommended Skill Level
Starter Project

Small Media Console

After clearing some doesn't-belong-here furniture out of my living room, my coffee table became the home to our stereo receiver and HTPC. This project was about getting my coffee table back, in a quick, inexpensive way. The photos *still* don't do justice, but since I've added the equipment, I am SO not hauling this back outside for glamour shots.

Size: Adjusted to fit under a wall-mounted flat TV:17.5"D x 21"H x 42"W. The adjustment was simple: use 5 2x4s instead of 4.

The photos also make the stain appear darker than it is -- it's truly a rich teal. I love the color so much, I'm going to strip my built-like-a-tank, 65-year-old wooden front door and stain it, too.

This is my first "real" project. I've built things before. Badly. Now, I have a Kreg, and I'm learning to be a little more patient with clamping and squaring for better results. :)

It appears that my next project will be the taming of the cable spaghetti.

Built from Plan(s)
Estimated Cost
$21
Estimated Time Investment
Afternoon Project (3-6 Hours)
Finish Used
Cabot Premium Wood Finish in Stormy Teal. I'd planned to pick up a quart of paint, but this was so, so very perfect, and allowed for a rustic/distressed look that I love. http://www.cabotstain.com/colors-and-finishes/families/Premium-Wood-Finish-Colors.html

When I stained the sides, I did them pre-assembly and felt they were a tad dark. I stained the rest (front bib, top) after assembly with two very light coats, and I love-love-love the look. Is it blotchy? Why yes, yes it is. The stain sank into the wood more in knots and rougher areas.

A bonus to this product: not only is it water-based, but it SEALS along with staining. I'm lazy. This is good.
Recommended Skill Level
Starter Project

Finally!!

Submitted by Anonymous (not verified) on Thu, 12/08/2016 - 21:11

This was such a fun project. Had to figure out how to build the sliding door HW. I didn't want the doors flying off when sliding so I did secure in a way that didn't limit the aesthetics or function. I did add a back to the cabinet since the picture was taken. Strips of plywood to give it that barn flavor. The most time consuming part was painting, staining, protecting and waiting for it to dry.

Built from Plan(s)
Estimated Time Investment
Weekend Project (10-20 Hours)
Finish Used
Antique white and walnut stain
Recommended Skill Level
Beginner

Comments

Custom designed Queen Music Bed

Submitted by TannerF. on Mon, 11/05/2012 - 15:31

I was looking for my next project for woodshop my junior year of high school. I happened to run into this website while looking for plans and found Ana's farmhouse queen bed and was inspired to make something similar. Now that I have accomplished this task, I want to share it with the community that inspired the build. Let me know what you think! Thanks.

Estimated Cost
$350
Estimated Time Investment
Week Long Project (20 Hours or More)
Finish Used
Natural-Stained panels, Golden Maple-Stained rails and styles, and Traditional Cherry-Stained legs, caps, moldings and leg-base wraps. All finished with three coats of Lacquer.
Recommended Skill Level
Advanced

Comments

Puzzle Box (Unabox)

Submitted by mtairymd on Sun, 08/24/2014 - 15:03

This is a simplified version of the Unabox from Make Magazine.

Build Instructions:
http://www.instructables.com/id/Puzzle-Box-Unabox/

Video:
http://youtu.be/VTaoUHsGau8

If you like this, please see my other puzzle box.
http://www.instructables.com/id/Puzzle-Box-4/

Estimated Cost
$10
Estimated Time Investment
Afternoon Project (3-6 Hours)
Finish Used
Red oak stain
Recommended Skill Level
Starter Project

Modern outdoor chairs and sofa

Submitted by goose71 on Mon, 08/24/2020 - 23:09

Saw some of the other brags which includes a raised backrest so I incorporated that into my build. There's a 30 degree angle on the backrest (two 2X4's and one 2X6)

Estimated Cost
$500
Estimated Time Investment
Week Long Project (20 Hours or More)
Finish Used
Thompson’s water seal, clear.
Recommended Skill Level
Beginner

Media Console

Submitted by suzshepp on Fri, 11/09/2012 - 17:35

My fiance and I built this media console from Ana's plans to replace the UGLY black plastic/glass tv stand we had previously. It was pretty easy to do. The only thing I recommend is waiting to cut the doors after the box is put together. Our doors did not fit exactly and we had to cut them again to fit. I'm sure that our measurements were off somewhere along the way. We love the way this piece of furniture looks in our family room now, for about $150!!!

Estimated Time Investment
Weekend Project (10-20 Hours)
Finish Used
Rustoleum heirloom white spray paint
Rustoleum stain in dark walnut with a coat of Rustoleum stain in kona because it wasnt as dark as I wanted.
Clear coat of paint on poly
Recommended Skill Level
Beginner

Comments

lphair

Fri, 11/09/2012 - 19:39

Awesome! I've been eyeing this plan for a while but couldn't decide if I wanted to paint or stain it. This is great, thanks for sharing!